A good ceramic birdhouse is that sweet spot where functional garden shelter meets your favorite glaze experiments. Here are my go-to ideas—from classic forms you’ll recognize instantly to a few playful designs that really show off what clay can do.
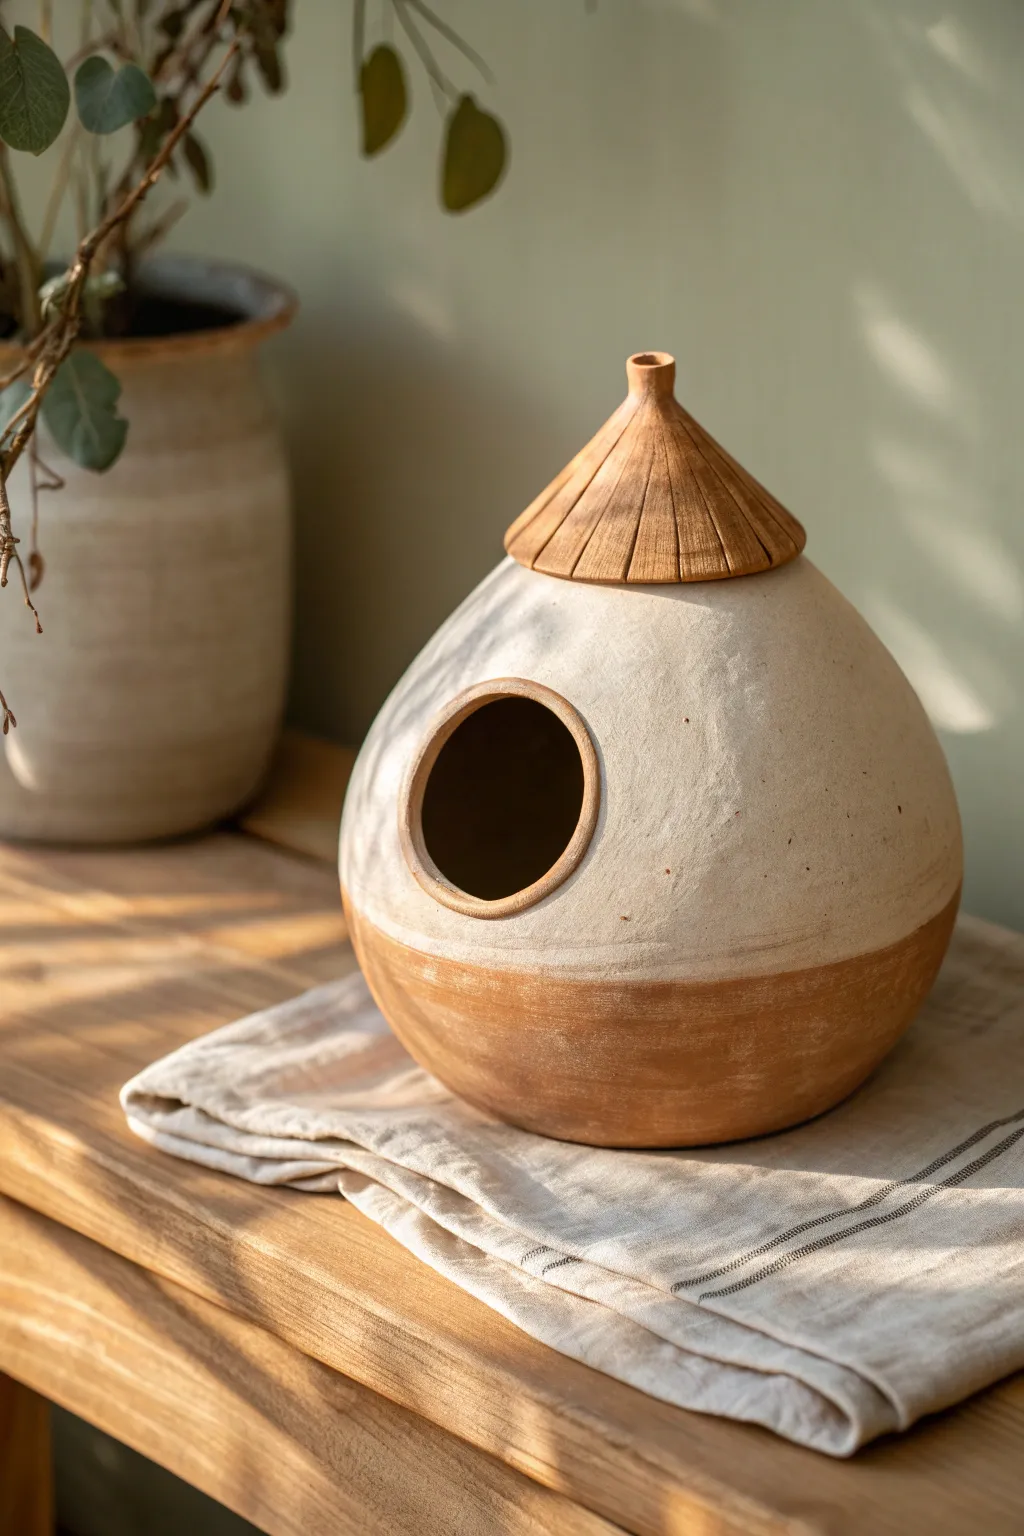
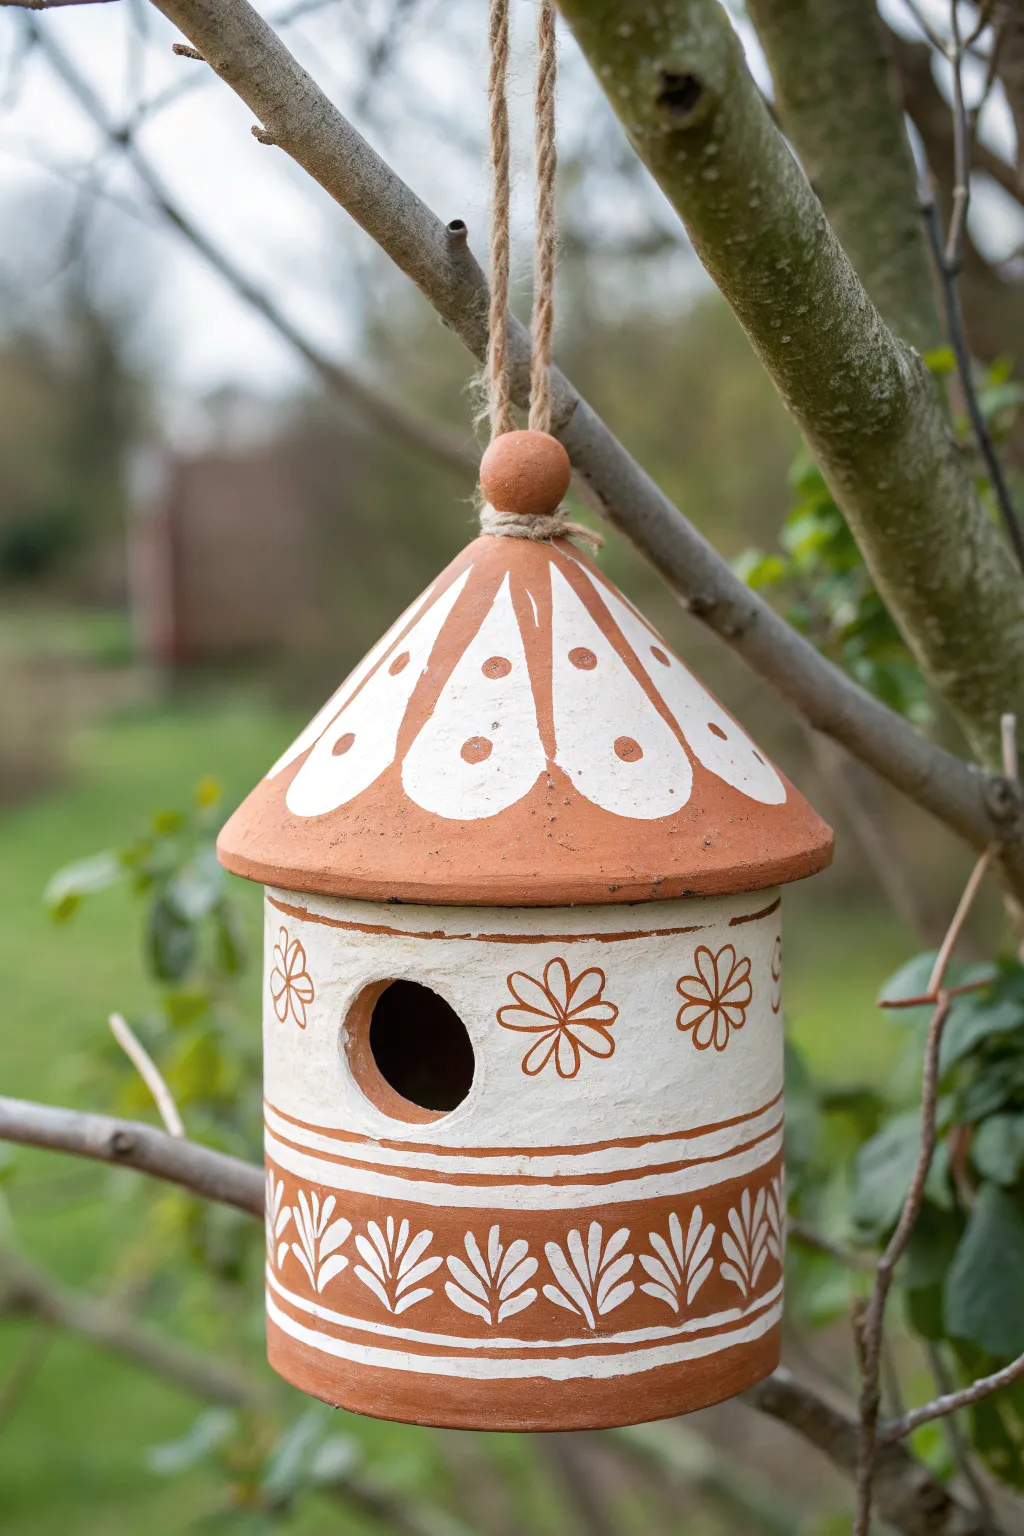
Wheel-Thrown Teardrop Hanging House

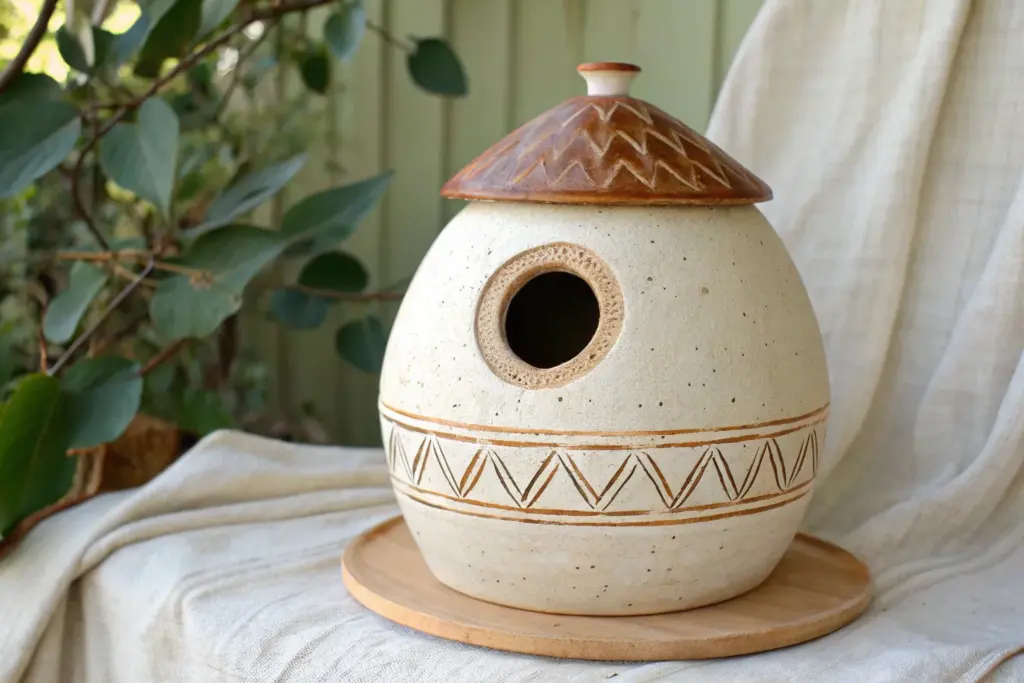
This elegant teardrop birdhouse combines rustic charm with mid-century modern lines, featuring exposed speckled clay contrasting with a glossy seafoam glaze. The rounded form is thrown as a closed vessel on the wheel before being trimmed and finished for hanging outdoors.
Detailed Instructions
Materials
- Stoneware clay (speckled or buff)
- Pottery wheel
- Throwing tools (sponge, wooden rib, needle tool, wire tool)
- Trimming tools
- Circle punch/hole cutter (approx. 1.25 – 1.5 inches)
- Small drill bit or hole punch tool (for hanging)
- Seafoam green/celadon dipping glaze
- Wax resist
- Jute or hemp rope for hanging
- Clear matte glaze (optional for bare sections)
Step 1: Throwing the Form
-
Center and open:
Begin with about 3-4 pounds of well-wedged clay. Center it on the wheel head and open it up, leaving the floor slightly thicker than a standard bowl to support the height. -
Pull the cylinder:
Pull the walls up into a tall cylinder, keeping the top slightly narrower than the base. You are aiming for height here, as the belly will be shaped outward later. -
Shape the belly:
Use a wooden rib or your fingers on the inside to gently push the belly of the pot outward, creating a rounded, bulbous bottom third. Keep the wheel speed moderate to maintain control. -
Collar the neck:
Begin collaring (squeezing) the upper section inward to form the teardrop taper. Use both hands and water to compress the clay inward, moving slowly to prevent the walls from buckling. -
Close the form:
Continue collaring until the top opening becomes very small. Carefully pinch the clay together at the very peak to close the form completely, creating a sealed air pocket inside. This trapped air helps the pot hold its shape during the next steps. -
Refine the profile:
Use a flexible metal rib to smooth the exterior curve, ensuring a seamless transition from the wide belly to the pointed top. I like to do a final pass without water to remove slip before cutting it off the wheel.
Troubleshooting: Torque Twist
If the neck twists while collaring, your wheel is too slow or your hands are dragging. Increase speed slightly and keep hands wet to reduce friction.
Step 2: Trimming and Altering
-
Leather hard drying:
Allow the piece to dry to a leather-hard state. Because it is a closed form, it may take slightly longer than an open bowl. -
Trim the base:
Center the pot upside down on a chuck or foam bat. Trim the bottom into a smooth, rounded curve that mirrors the top, removing the flat base left by the wheel. The goal is a continuous egg-like shape. -
Create the entry hole:
Determine the ‘front’ of your birdhouse. Use a circular hole cutter (about 1 1/4 inch diameter) to punch a clean entry hole near the widest part of the belly. Smooth the edges with a damp sponge. -
Drill hanging holes:
At the very top peak of the teardrop, carefully drill two small holes opposite each other. These will be used to thread the hanging rope later. -
Drainage hole check:
Don’t forget to drill a small hole in the very bottom center to allow rainwater to drain out, keeping the nest dry.
Level Up: Perch Perfect
Add a small clay spur or collect a tiny driftwood stick to insert just below the opening before firing to give the birds a convenient landing spot.
Step 3: Glazing and Finishing
-
Bisque fire:
Fire the piece in a bisque kiln according to your clay body’s specifications (usually Cone 04/06). -
Apply wax resist:
Ideally using a banding wheel, paint a line of wax resist around the bottom third of the pot and another line around the top conical section. This preserves the raw clay look. -
Dip into glaze:
Dip the middle section of the birdhouse into a seafoam green or celadon glaze. The wax will prevent the glaze from sticking to the top and bottom. Wipe away any stray droplets with a sponge. -
Check the interior:
You can leave the interior unglazed for a rougher surface for birds to grip, or pour a small amount of glaze inside and swirl it around if preferred. Unglazed is usually better for traction. -
Glaze fire:
Fire the piece again for the glaze firing (e.g., Cone 5/6). Make sure the bottom is wiped completely clean so it doesn’t fuse to the kiln shelf. -
Add the hanger:
Once cool, feed a sturdy piece of jute or hemp rope through the top holes. Knot it securely on the inside or loop it through to create a strong hanger.
Now you have a stunning, modern home ready to welcome your local wrens or chickadees into the garden


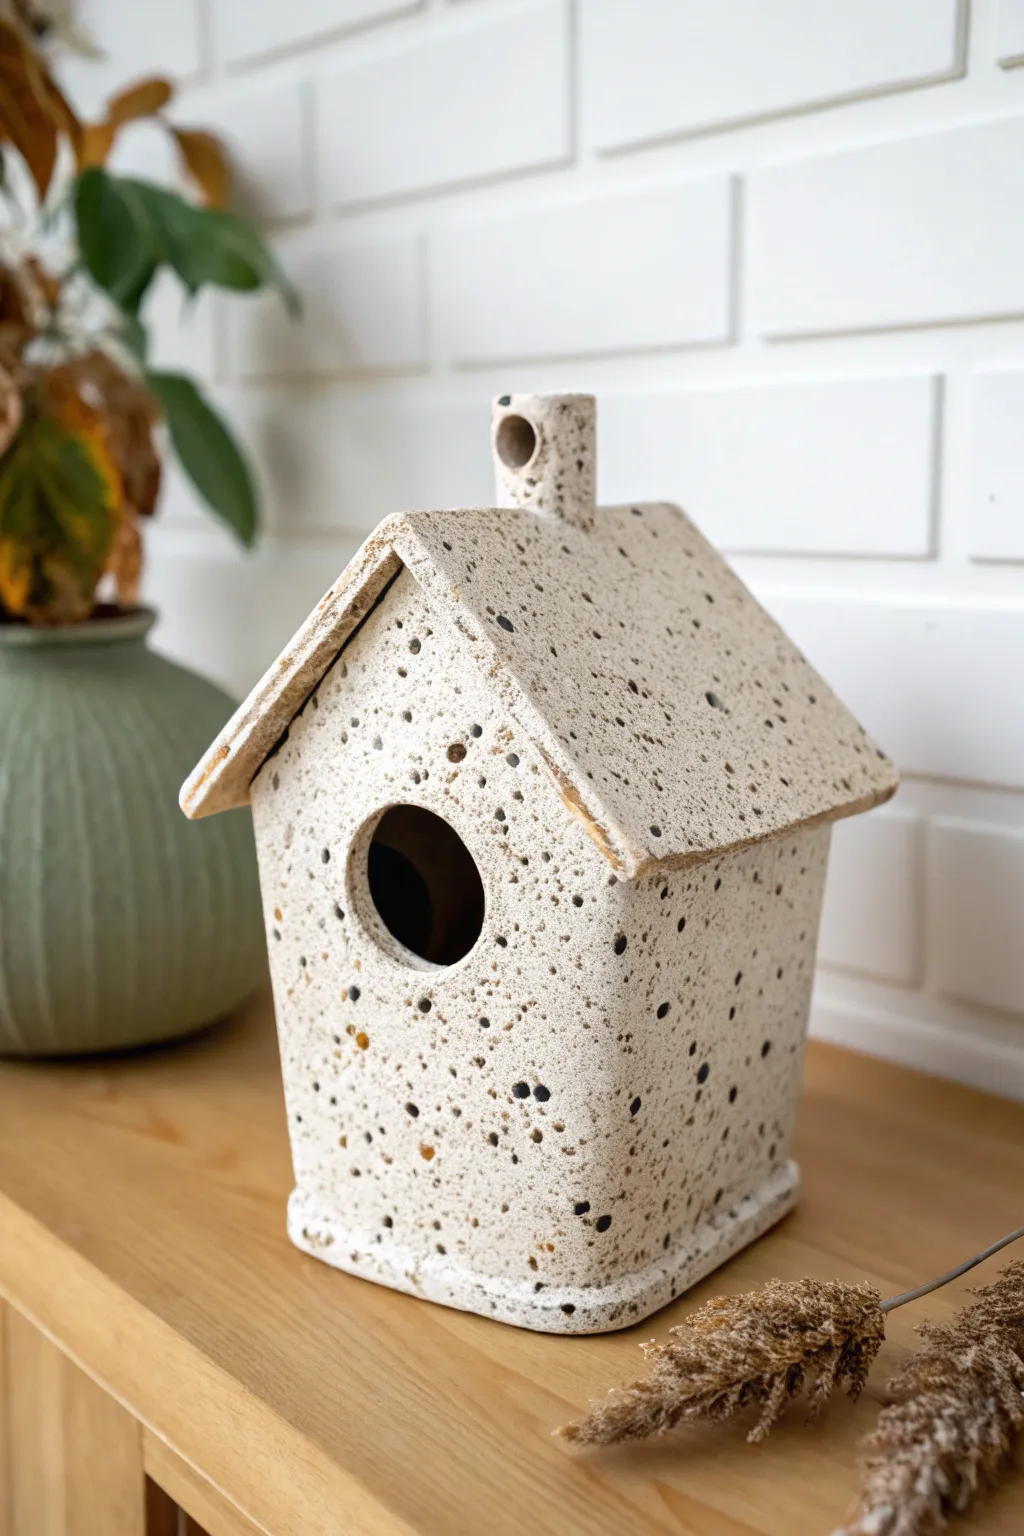
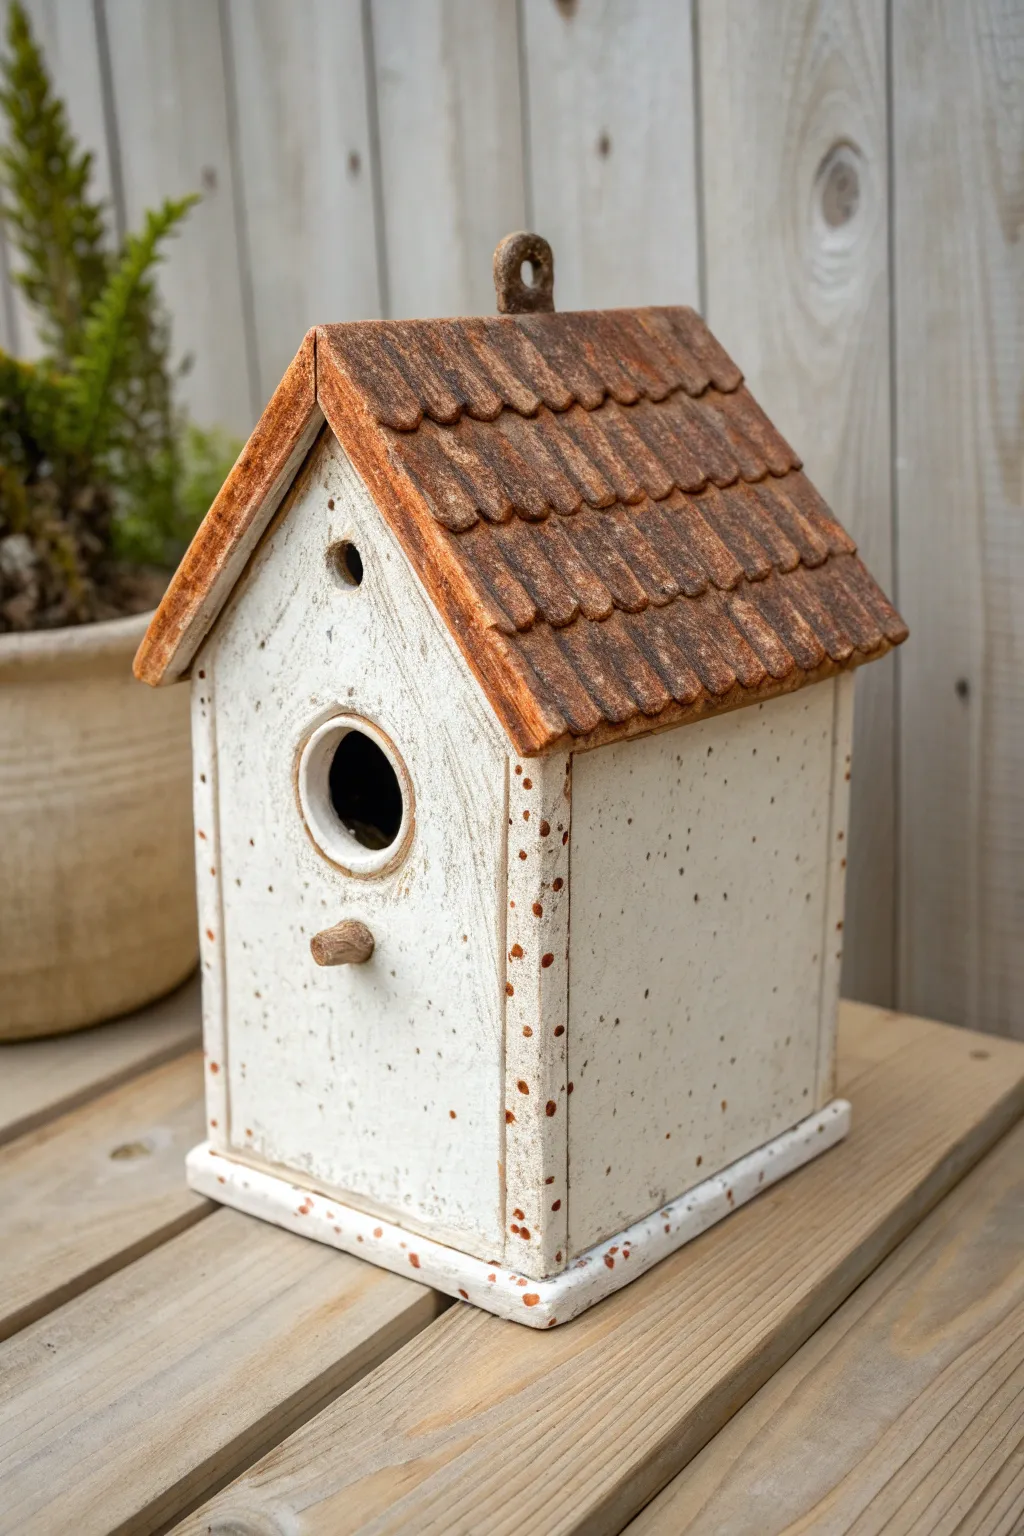
Slab-Built Cottage With Gable Roof
This charming, slab-built birdhouse combines the rustic warmth of unglazed clay with a clean, modern speckled finish. Featuring a distinctively ridged gable roof and a faux-siding front, it brings a cozy, cottage-style aesthetic to your garden or shelf.
Step-by-Step Tutorial
Materials
- Speckled buff stoneware clay (or similar cone 6 clay)
- Red earthenware or terracotta clay (for the roof contrast)
- Rolling pin and guide strips (1/4 inch)
- Fettling knife or needle tool
- Ruler
- Scoring tool (serrated rib)
- Slip (made from the buff clay)
- Circle cutters (various sizes)
- Wooden modeling tool or popsicle stick
- Sponge
- Matte white glaze (optional, or rely on raw clay body)
Step 1: Preparing the Slabs
-
Roll the main body slabs:
Begin by rolling out your speckled buff clay to an even ¼-inch thickness. You will need enough clay for four walls: a front and back (penta-shaped with a gable peak) and two rectangular side walls. -
Cut the wall shapes:
Using paper templates or a ruler, cut two rectangles for the sides (approx. 4×5 inches). Then cut the front and back panels, ensuring the width matches the side panels but rises to a peak about 2-3 inches higher than the sides. -
Add texture to the front:
Before the clay stiffens, use the edge of a ruler or a wooden slat to press horizontal indentations across the front panel. Space them about half an inch apart to mimic clapboard siding. -
Create the entrance:
Use a large circle cutter (about 1.5 inches) to punch the main entry hole in the center of the front panel. Use a much smaller cutter or a drill bit to create a small ventilation hole near the peak. -
Make the decorative rim:
Roll a small coil or cut a ring from a slab of the contrasting red clay (or the same buff clay if you plan to stain it later). Score and slip this ring around the main entrance to create a raised doorframe. -
Let the slabs stiffen:
Leave all your cut pieces on a ware board until they reach a ‘leather hard’ state. They should be firm enough to stand up without bending but still hold moisture.
Clean Lines
When cutting your beveled edges for the roof, use a wire cutter held taut at an angle rather than a knife. Since wire doesn’t drag, it keeps your straight edges much sharper.
Step 2: Construction
-
Score and slip edges:
Take your four wall pieces. Thoroughly score (scratch) the vertical edges where they will meet. Apply a generous amount of slip to these scored areas. -
Assemble the walls:
Press the side walls against the back panel first, ensuring a 90-degree angle. Then attach the front panel. Smooth the interior seams with a modeling tool or a small coil of clay for reinforcement. -
Prepare the roof slabs:
Roll out the red terracotta clay (or stain your buff clay with iron oxide) slightly thicker than the walls. Cut two rectangular panels large enough to overhang the walls by about an inch on all sides. -
Texture the roof:
To achieve the ridged look, press a dowel or the handle of a wooden spoon into the roof slabs at regular intervals. I find pressing firmly creates deep grooves that catch glaze beautifully later. -
Bevel the roof peak:
Cut the top edge of both roof panels at a 45-degree angle. This ensures they fit together snugly at the peak of the house without a large gap.
Step 3: Final Assembly & Finishing
-
Attach the roof:
Score the top edges of your house walls and the underside of the roof panels. slips the connection points and gently place the roof panels on, pressing them together at the peak. -
Secure the peak:
Roll a thin coil of clay and press it into the very top seam where the roof panels meet. Smooth this down to seal the connection and create a finished ridge cap. -
Refine the surface:
Once the house is fully assembled, use a slightly damp sponge to clean up any excess slip that squeezed out during construction. Soften any sharp corners. -
Dry slowly:
Cover the birdhouse loosely with plastic for at least 2-3 days to let the moisture equalize. This prevents the seams from cracking as the clay shrinks. -
Bisque fire:
Fire the piece to cone 04 (or your clay’s specific bisque temperature). This prepares the ceramic for final glazing or finishing. -
Glaze application:
For the look in the photo, apply a matte white glaze only to the walls, carefully avoiding the roof and the door rim to let the raw clay texture and color shine through. Alternatively, apply a clear glaze over the whole piece if using contrasting clays. -
Final firing:
Fire the piece to the maturity temperature of your clay body (likely cone 5 or 6). Once cool, glue the finished house to a wooden base or display as is.
Hanging Option
Before the clay dries, poke holes in the roof peak or add small clay loops on the back. Thread sturdy, weather-resistant wire through them after firing to hang it from a branch.
Place your finished cottage in a spot with partial shade to encourage local birds to move in


Simple A-Frame Birdhouse

This elegant A-frame birdhouse combines architectural simplicity with an organic, speckled finish that mimics natural stone. The clean lines and raw texture make it a stunning modern accent for any shelf or covered patio.
Step-by-Step
Materials
- Speckled buff stoneware clay (or polymer clay with granite finish)
- Rolling pin
- Guide sticks or slats (approx. 1/4 inch thick)
- Fettling knife or X-Acto blade
- Circle cutter (approx. 1.5 – 2 inches)
- Wooden dowel (small diameter for perch)
- Slip and scoring tool (if using ceramic clay)
- Liquid clay or strong adhesive (if using polymer)
- Leather cord or clay tool for loop making
- Ruler
- Paper for template
Step 1: Preparation and Cutting the Slabs
-
Create your template:
Sketch an isosceles triangle on paper for the front and back walls. A good starting size is about 6 inches along the base and 8 inches tall. Create a rectangular strip for the roof panels that matches the length of the triangle’s long sides. -
Roll out the clay:
Wedge your clay to remove air bubbles, then roll it out into a large, even slab. I rely on wooden guide sticks on either side of the clay to ensure a consistent thickness of roughly 1/4 inch. -
Cut the shapes:
Lay your paper templates onto the slab. Using your knife, carefully cut out two triangles (front and back) and two long rectangles (roof panels). Keep the knife vertical for clean edges. -
Add texture (optional):
If your clay isn’t pre-speckled, you can gently press sand or grog into the surface now, or splatter it with a toothbrush and diluted underglaze later for that stony look. -
Cut the entrance:
On the front triangle piece, use your circle cutter to punch a hole centered horizontally and slightly below the midpoint vertically. Clean up the edges with a damp sponge. -
Prepare the base:
Cut a square base piece that matches the width of your triangle’s bottom edge. This will be the floor of the birdhouse.
Sagging Roof?
If the roof panels sag inward while the clay works, support the inside with a rigid cardboard triangle covered in newspaper until the clay is leather-hard.
Step 2: Assembly and Detailing
-
Score and slip:
If using ceramic clay, thoroughly score the edges where pieces will join and apply slip. For polymer clay, apply a thin line of liquid clay or bond. -
Attach walls to base:
Stand the front and back triangles up on the base square. Press firmly to join them at the bottom seams. You might need to support them temporarily with crumpled newspaper inside. -
Install the roof panels:
Place the rectangular roof slabs against the angled sides of the triangles. Let them overhang slightly at the front and back for a classic A-frame silhouette. -
Seal the seams:
Work a small coil of clay into the interior seams for added strength. On the exterior, smooth the joins gently with a modeling tool or your finger so they stick but retain a slight separation line for visual interest. -
Add the hanging loop:
Roll a small coil of clay into a loop shape. Attach this securely to the very peak of the roof ridge. Ensure the attachment point is thick enough to support the weight of the finished house. -
Insert the perch:
Poke a small hole just below the main entrance using a tool slightly smaller than your dowel. Insert a small clay coil or the actual wooden dowel (if firing allows wood, otherwise add the wood after firing) to serve as the perch. -
Refine the surface:
Use a damp sponge to smooth any sharp edges, particularly around the entrance hole and the roof peak. This gives the piece a professional, finished quality.
Step 3: Drying and Finishing
-
Slow drying:
Loosely cover the birdhouse with plastic to let it dry slowly over several days. This prevents warping, especially with slab-built A-frames. -
Bisque fire:
Once bone dry, fire the piece to bisque temperature according to your clay body’s specifications. -
Glazing (Optional):
To maintain the raw, matte look in the reference, simply fire to maturity without glaze, or apply a clear matte glaze only on the inside for waterproofing. -
Final assembly:
If you removed the wooden dowel for firing, use a strong epoxy to glue it into the perch hole now.
Clean & Waterproof
To make it functional outdoors, apply a clear masonry sealer or matte outdoor varnish to the unglazed exterior to repel rain without changing the look.
Place your finished birdhouse on a sunny indoor shelf or hang it in a sheltered spot outdoors to enjoy its simple charm


Wheel-Thrown Round Orb Birdhouse
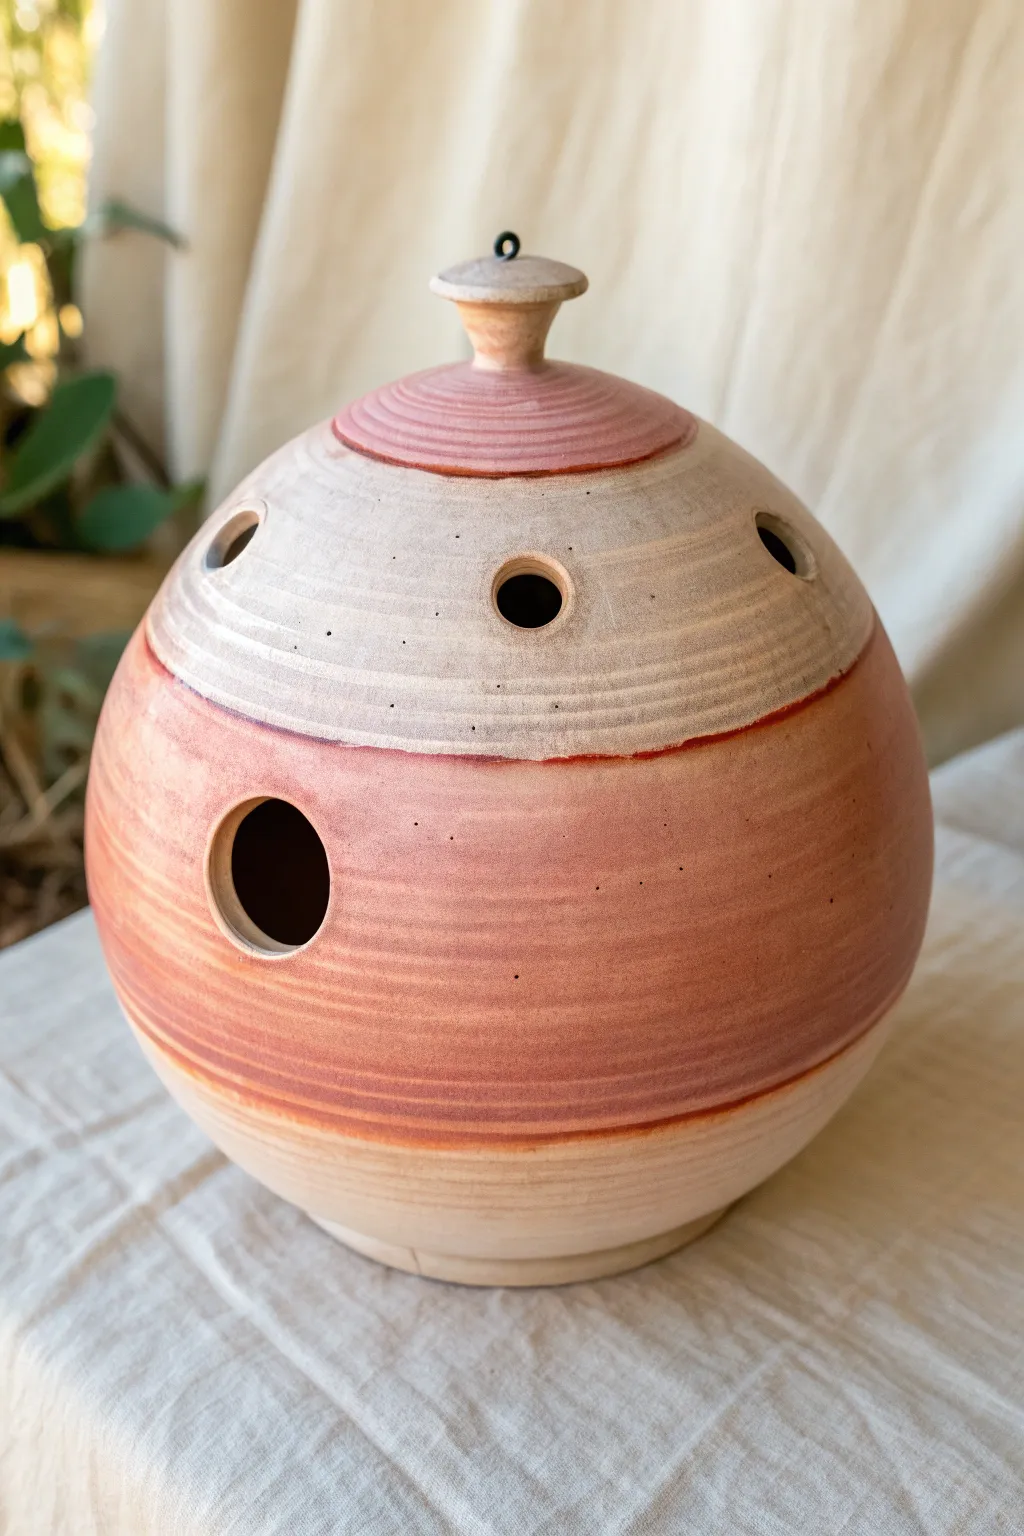
This wheel-thrown spherical birdhouse brings mid-century modern flair to your garden with its striking horizontal bands of raw clay and warm terracotta wash. The multi-hole design provides ventilation while creating a distinct architectural look.
Step-by-Step Tutorial
Materials
- Stoneware clay body (smooth, light-colored)
- Pottery wheel
- Throwing bats
- Rib tools (metal and wood)
- Needle tool
- Hole cutters (various sizes: 1.5 inch for entry, smaller for vents)
- Trimming tools
- Red iron oxide wash or terracotta slip
- Sponge
- Small geometric lid caliper (optional)
- Metal wire for hanging loop
- Soft brush
Step 1: Throwing the Main Form
-
Prepare the clay:
Begin by thoroughly wedging about 3-4 pounds of clay to remove air bubbles. Center the clay on your wheel head, ensuring a wide, stable base. -
Open and pull:
Open the clay and pull the walls up into a cylinder first. Keep the walls even, as you will be stretching them outward significantly. -
Shape the sphere:
Using a rib on the outside against your hand on the inside, gently belly the walls outward to create a globe shape. Collar in the top gradually to close the form. -
Close the form:
Continue collaring until only a small opening remains at the very top. You can choose to close this completely for a seamless sphere or leave a small rim to support a lid. Based on the image, we want a small gallery opening to fit a separate lid. -
Smoothing the surface:
Run a flexible metal rib over the exterior while the wheel is spinning slowly to remove throwing lines and perfect the round curve. Do NOT smooth away the subtle texture lines if you prefer the handmade look visible in the top third.
Smooth Seams
When cutting the entry hole, compress the inner edge with your finger. Sharp ceramic edges can damage bird wings, so smooth everything carefully.
Step 2: Creating the Lid
-
Throw the lid:
Using a small amount of clay (about 0.5 lbs) on a separate bat or hump mold, throw a small, domed lid that fits the measurement of your orb’s opening. -
Form the finial:
While throwing the lid, pull a small amount of clay upward from the center to create a knob. Shape it into a flared, ergonomic finial shape. -
Add the hanging mechanism:
The project image shows a small metal loop. While the clay is soft, pierce a tiny hole through the finial or embed a high-temp wire loop (kanthal wire) securely into the top of the knob.
Drainage Logic
Don’t forget to drill 2-3 small holes in the very bottom floor of the pot during the trimming phase to allow rainwater to drain out.
Step 3: Trimming and Carving
-
Leather hard stage:
Allow both the orb and lid to dry to a leather-hard state. The clay should be firm enough to handle without deforming but soft enough to cut cleanly. -
Trim the base:
Flip the orb upside down (using a chuck or soft foam to support the round shape) and trim a neat foot ring. This lifts the form and adds elegance. -
Cut the main entry:
Select the ‘front’ of your birdhouse. Use a 1.50-inch round hole cutter to create the main entry hole slightly below the equator of the sphere. Clean the edges with a damp sponge. -
Add ventilation holes:
Using a smaller hole cutter/punch tool, create a ring of smaller holes around the upper shoulder of the pot. Space them evenly for visual balance.
Step 4: Decorating and Glazing
-
Bisque fire:
Once bone dry, fire the pieces to bisque temperature (usually cone 04 or 06). -
Masking bands:
To achieve the banded look, you can use wax resist or simply rely on careful brushwork. The goal is three distinct horizontal zones. -
Applying the wash:
Mix a thin wash of red iron oxide or a terracotta-colored underglaze. Place the pot on a banding wheel. -
Painting the center band:
Spin the banding wheel and apply the red wash to the wide middle section (the equator), covering the main entry hole area. Let the brush create a defined but soft edge. -
Painting the lid:
Apply the same wash to the top of the lid, creating a cohesive visual cap. Leave the very top knob and the shoulder section of the main orb unglazed (raw clay color) for contrast. -
Final wipe back:
I like to take a slightly damp sponge and gently wipe the painted areas while spinning the wheel. This pushes the color into the clay texture while revealing some of the grain, enhancing that weathered look. -
Final firing:
Fire the piece to maturity (Cone 5 or 6 for stoneware). Since there is no glossy glaze, you don’t need to worry about the lid sticking, but stilting is always safe practice.
Hang your new ceramic sphere securely and wait for your feathered tenants to inspect the property

The Complete Guide to Pottery Troubleshooting
Uncover the most common ceramic mistakes—from cracking clay to failed glazes—and learn how to fix them fast.
Pinch-Pot Pod Birdhouse
This charming, gourd-shaped birdhouse brings a touch of organic warmth to any garden with its earthy two-tone design. The textured, conical roof adds a delightful storybook quality, making it a cozy retreat for your backyard friends.
Step-by-Step Guide
Materials
- Stoneware clay (buff or speckled)
- Red iron oxide wash or terracotta slip
- Fettling knife
- Rib tool (kidney shaped, wood or rubber)
- Needle tool
- Serrated rib or flexible scoring tool
- Slip (clay mixed with water)
- Small sponge
- Circle cutter or cookie cutter (approx. 1.5 – 2 inches)
- Modeling tool (wood)
- Potter’s wheel (optional, but hand-building instructions are primary here)
Step 1: Forming the Base
-
Prepare the Clump:
Start with two balls of stoneware clay, each roughly the size of a grapefruit. Wedge them thoroughly to remove air bubbles, which is crucial for structural integrity during firing. -
Pinch the Lower Hemisphere:
Take one ball and press your thumb into the center about halfway down. Slowly rotate the clay while pinching walls evenly from the bottom up to create a wide bowl shape. Aim for a wall thickness of about 1/4 inch. -
Pinch the Upper Hemisphere:
Repeat the process with the second ball, but pinch the walls slightly inward near the rim so it will curve towards the top when assembled. You are aiming for a shape that looks like the top half of an egg. -
Join the Halves:
Score the rims of both pinch pots deeply using your serrated rib. Apply a generous amount of slip to the scored areas. Press the two halves together firmly to create a sealed, hollow sphere. -
Shape the Gourd:
Gently paddle the clay with a wooden spoon or smooth it with a rib tool to refine the spherical shape. You want to erase the seam completely so it looks like one continuous form.
Drainage is Key
Before firing, drill 3-4 small holes in the bottom floor of the birdhouse. This essential step prevents rainwater from pooling inside and keeps the nest dry.
Step 2: Refining and Opening
-
Cut the Entrance:
Once the sphere is leather-hard (stiff but still cold to the touch), use your circle cutter or a needle tool to carve a round entrance hole on the side. Place it centrally on the upper half of the curve. -
Smooth the Edges:
With a damp piece of chamois or a wet fingertip, meticulously compress and smooth the edges of the entrance hole. This prevents sharp edges that could harm delicate bird feet. -
Open the Top:
Cut a small, circular opening at the very top of the sphere. This will serve as the connection point for the roof and allow heat to escape.
Step 3: The Thatched Roof
-
Create a Cone:
Roll out a slab of clay or pinch a smaller ball into a wide, shallow cone shape. This needs to be slightly wider than the top opening of your sphere to create an overhang. -
Texture the Roof:
Using a needle tool or a stiff brush, drag lines vertically from the apex of the cone down to the rim edge. I sometimes like to vary the pressure here to mimic the uneven look of straw or thatch. -
Sculpt the Spire:
Pinch a small amount of clay at the very tip of the cone to form a vertical knob or loop. Include a hole through the side of this knob if you plan to hang the birdhouse. -
Attach the Roof:
Score and slip the top opening of the body and the underside of the roof. Press them together firmly. Alternatively, leave the roof removable (lid style) for easier cleaning later.
Go Horizontal
Add small clay loops or lugs on the sides of the body before firing. This lets you string wire through the sides for a stable, sway-free hanging mount.
Step 4: Surface Treatment
-
Apply the Base Colour:
To achieve the two-tone effect seen in the photo, apply a layer of red iron oxide wash or terracotta slip to the bottom third of the birdhouse and the entire roof section. -
Wipe Back Technique:
Once the wash is dry, use a damp sponge to wipe it back slightly. This leaves the colour deep in the textures while revealing the clay body on the high points, creating a weathered look. -
Leave the Middle Bare:
Leave the central band of the sphere as raw stoneware. If you want the white look from the image, you can use a white decorative slip here, or simply use a white clay body. -
Final Surface Prep:
Burnish the bare sections slightly with the back of a spoon if you want a subtle sheen without using glaze. Ensure the bottom is wiped clean of any slip. -
Firing:
Bisque fire the piece first. For a functional birdhouse, fire to vitrification (usually Cone 6 or 10 depending on your clay) so it withstands the elements without absorbing water.
Hang your finished pod in a quiet corner of the garden to invite your first feathered tenants
Coil-Built Silo Birdhouse
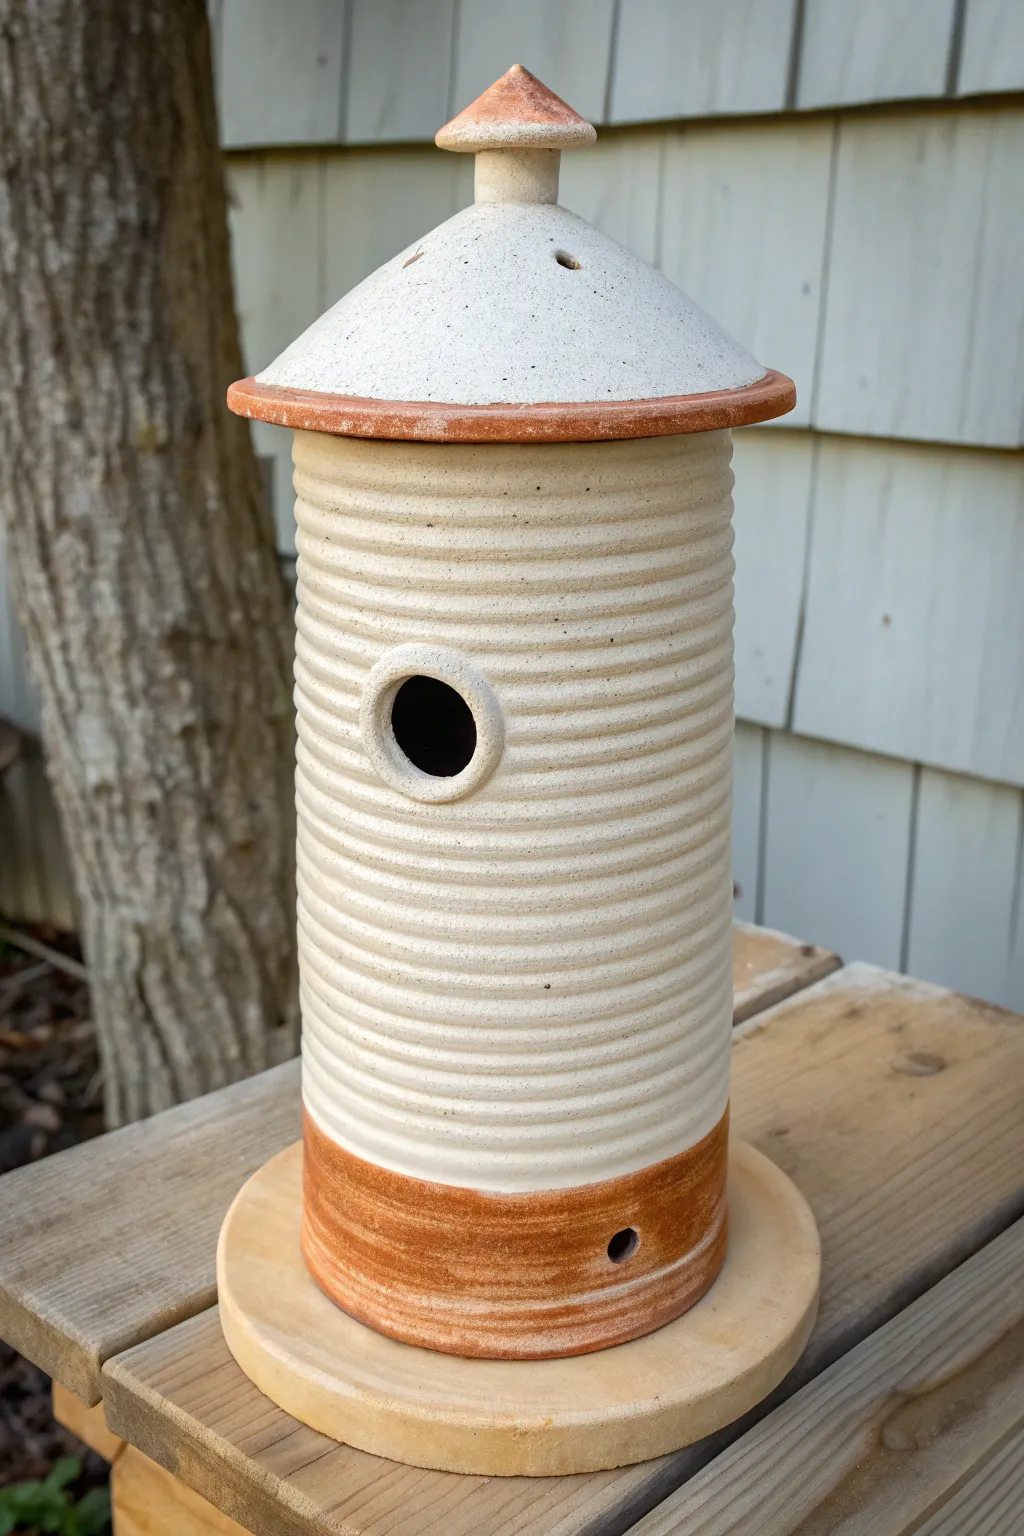
Modeled after classic farm architecture, this charming birdhouse features a ribbed texture that mimics corrugated metal, created through careful coil building. The distinct contrast between the creamy stoneware body and the warm terracotta accents gives it a timeless, rustic appeal perfect for any garden.
Step-by-Step Tutorial
Materials
- White or cream stoneware clay
- Terracotta or red-firing clay
- Pottery wheel or banding wheel
- Needle tool
- Rib tool (serrated and smooth)
- Circle cutter or hole punch set
- Scoring tool
- Slip
- Sponge
- Wire cutter
- Kiln
Step 1: Forming the Base and Body
-
Prepare the Base:
Begin by rolling out a thick slab of terracotta clay, approximately 3/8-inch thick. Cut a perfect circle about 6 inches in diameter to serve as the floor of your silo. -
Start the Wall:
Roll out a consistent coil of terracotta clay. Score and slip the outer edge of your base, then attach the first coil, smoothing the interior seam downward to secure it. -
Build the Accent Band:
Continue adding terracotta coils until the wall is about 1.5 to 2 inches high. This creates the distinct rusty-red bottom band seen in the finished piece. -
Switch Clay Bodies:
Switch to your white stoneware clay. Thoroughly score the top of the terracotta section and apply plenty of slip to ensure a strong bond between the two different clay bodies. This junction is critical. -
Construct the Silo Body:
Build up the rest of the cylinder using the white clay coils. Instead of smoothing the outside completely, leave the coils visible to mimic the corrugated texture of a silo. -
Refine the Ribs:
While supporting the wall from the inside with one hand, gently run a damp sponge or your finger along the exterior coil seams to soften them slightly without losing the ribbed definition. -
Level the Top:
Once you reach a height of about 9 to 10 inches, trim the top rim with a needle tool to ensure it is perfectly level.
Shrinkage Rates Matter
Ensure your terracotta and white stoneware share similar shrinkage rates (check the label!). If they differ too much, the joint will crack during drying or firing.
Step 2: Adding Features and the Roof
-
Cut the Entry:
Determine the front of your birdhouse. Use a circular cutter or a needle tool to carve a smooth, round entry hole about 1.5 inches in diameter (or sized for your target bird species) halfway up the white section. -
Create the Clean-out:
Cut a smaller hole near the base in the terracotta section. This creates a drainage and clean-out port; you can fashion a cork or small clay plug for this later if desired. -
Form the Roof Slab:
Roll a slab of white clay and cut a circle slightly larger than the diameter of your silo rim. Cut a wedge slice out of the circle (like a slice of pie) to allow it to fold into a cone. -
Shape the Cone:
Score and slip the cut edges of the wedge and overlap them to form a low, conical roof shape. Test the fit on your cylinder to ensure there is a slight overhang. -
Add the Finial:
Roll a small ball of terracotta clay and shape it into a miniature cone. Attach this to the very peak of the roof for a decorative knob. -
Add Roof Trim:
Roll a very thin coil of terracotta clay. Score and slip the outer edge of the roof cone and attach this coil as a rim, smoothing it carefully. -
Ventilation Holes:
I always puncture two small ventilation holes near the top of the roof cone to ensure airflow for the nesting birds.
Step 3: Finishing and firing
-
Secure the Roof:
For a permanent house, score and slip the roof onto the body. If you want a removable lid, create a small flange on the underside of the roof so it sits securely inside the silo rim. -
Drying:
Dry the piece slowly, especially because two different clay bodies are joined. Cover it loosely with plastic for several days to equalize moisture. -
Bisque Fire:
Bisque fire the piece according to the requirements of your clay bodies (usually Cone 06 or 04). -
Glazing Strategy:
To maintain the raw clay look shown in the image, apply a clear matte glaze only to the interior for durability, or leave the exterior unglazed to let the natural clay colors shine. If glazing the outside, use a very thin matte clear coat. -
Final Fire:
Fire the birdhouse to the maturity temperature of your stoneware (typically Cone 5 or 6). Ensure the clay bodies chosen mature at the same temperature.
Collapsing Walls?
If the coils start to sag while building, stop adding height. Use a heat gun gently to stiffen the lower walls or let it set up under plastic for an hour before continuing.
Once fired, place this architectural gem in your garden and wait for your first feathered tenants to move in


What Really Happens Inside the Kiln
Learn how time and temperature work together inside the kiln to transform clay into durable ceramic.
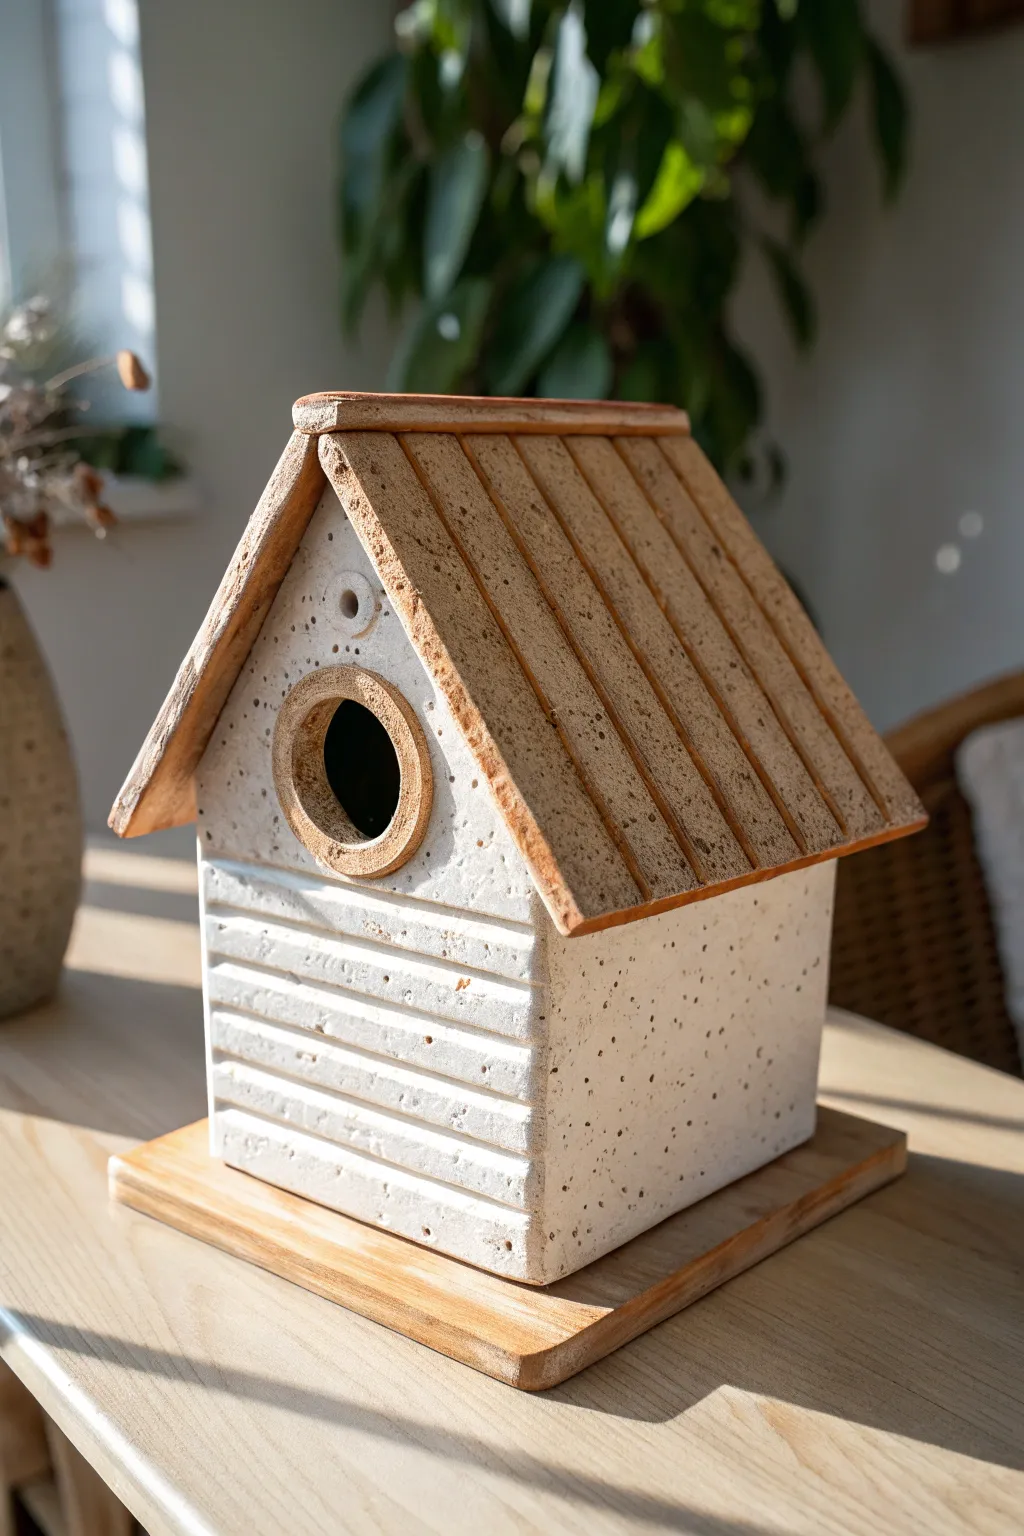
Tree-Bark Textured Birdhouse
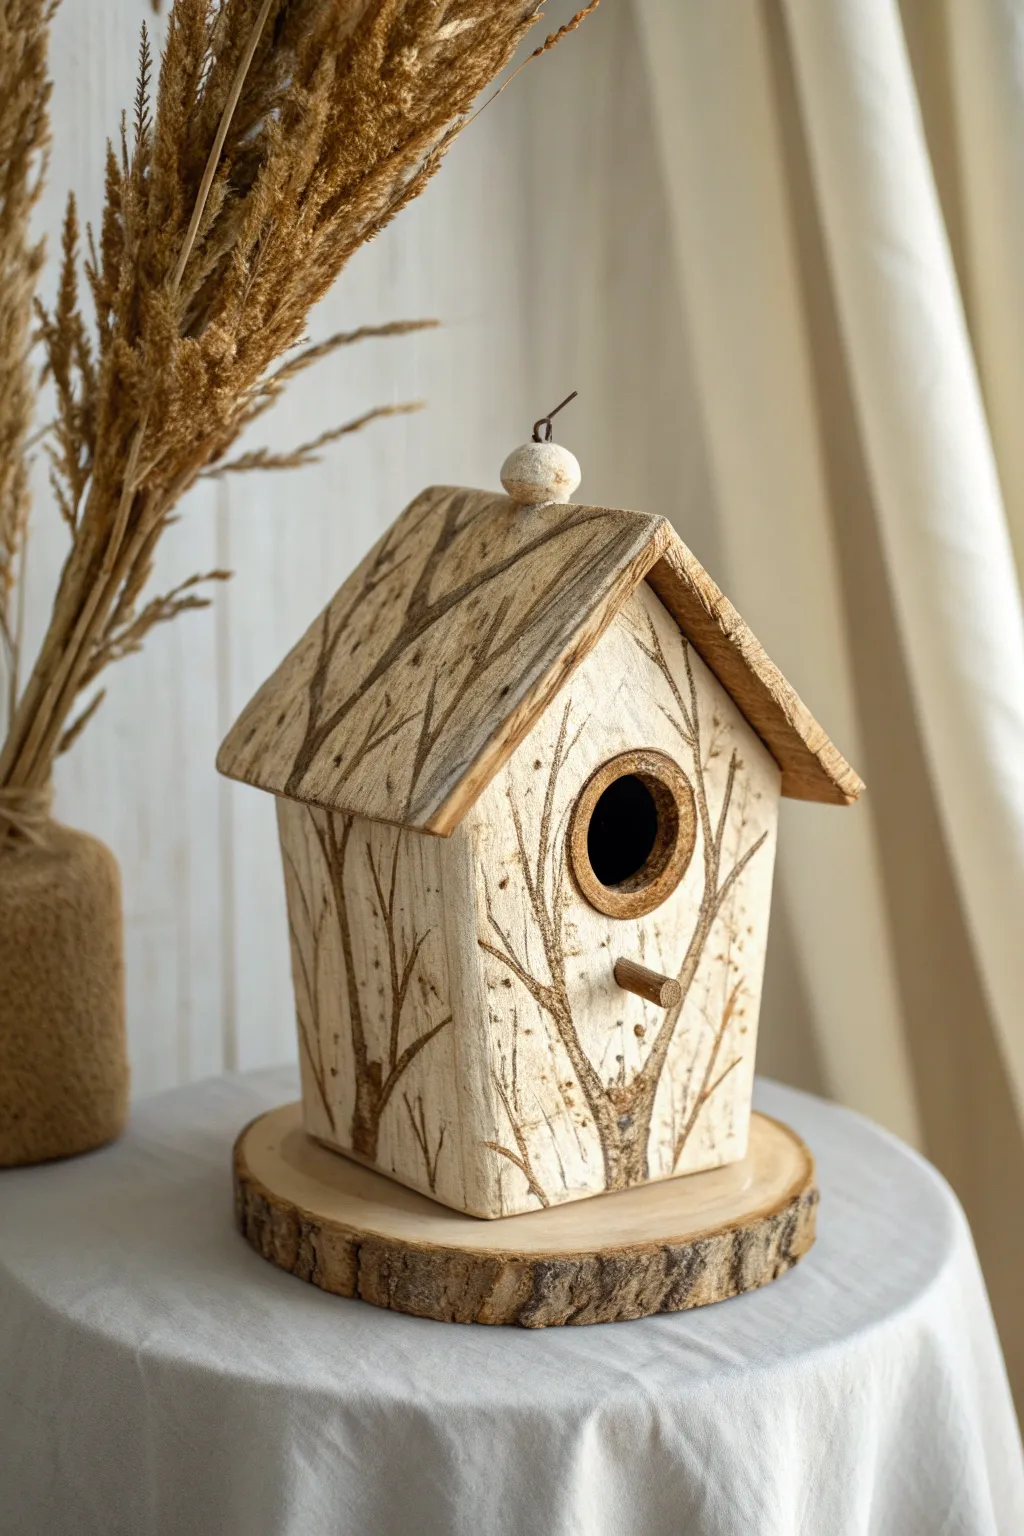
Embrace the quiet beauty of a winter forest with this simple slab-built ceramic birdhouse. The piece features organic, hand-drawn tree branches etched into a creamy white surface, creating a delicate, nature-inspired decorative accent.
How-To Guide
Materials
- Light-colored stoneware clay or porcelain
- Rolling pin and canvas mat
- Fettling knife or clay cutting tool
- Paper templates for house walls and roof
- Serrated rib tool (for scoring)
- Slip (liquid clay)
- Small round clay cutter (for the entrance)
- Wooden dowel or small twig (for the perch)
- Underglaze pencil (dark brown/sepia) or oxide wash
- Clear matte glaze or satin white glaze
- Needle tool
- Sponge
Step 1: Forming the Structure
-
Roll the Slabs:
Begin by rolling out your clay into an even slab, approximately 1/4 inch thick. Compress the slab on both sides with a rib to prevent warping later. -
Cut the Pieces:
Using paper templates, cut out your four walls (two rectangular sides, two peaked front/back panels) and two roof rectangles. Make sure the roof pieces are slightly longer to create an overhang. -
Create the Texture:
Before assembling, you can lightly texture the slab surface with a subtle wood grain mat or just leave it smooth for a cleaner look. I prefer keeping it relatively smooth so the branch drawings pop later. -
Bevel the Edges:
Cut 45-degree angles on the vertical edges of your walls where they will join. This miter joint creates a stronger bond and a cleaner corner. -
Score and Slip:
Rough up the beveled edges with a serrated rib and apply a generous amount of slip. Join the four walls together, pressing firmly to seal the seams. -
Reinforce the Seams:
On the inside of the house, roll a thin coil of clay and press it into the corners to reinforce the structure. -
Add the Entrance:
Use a small round cutter to create the bird entry hole on the front panel. Create a small raised ring of clay to border this hole for extra dimension. -
Attach the Roof:
Score and slip the top edges of the walls and attach the two roof panels. Ensure they meet cleanly at the peak and overhang the sides evenly. -
Insert the Perch:
Poke a small hole below the entrance and insert a small clay coil or leave a hole to glue in a real wooden dowel after firing. Then, add a small bead or loop at the roof peak for a decorative touch.
Step 2: Decorating and Finishing
-
Bisque Fire:
Allow the piece to dry slowly to the bone-dry stage, then bisque fire it according to your clay body’s specifications. -
Apply Base Color:
Once bisque fired, sponge on a thin layer of cream or off-white underglaze if your clay body acts as the canvas. If your clay is already white, you can skip this to match the natural look. -
Sketch the Branches:
Using a dark brown underglaze pencil or a fine brush with oxide wash, lightly sketch tree branches starting from the bottom corners and reaching upward. -
Deepen the Details:
Go back over your branch lines. Press firmly with the pencil or brush to darken the ‘trunks’ and feather out the strokes for the thinner twigs. Add small dots or dashes to mimic falling leaves or bark texture. -
Accent the Roof:
Don’t forget the roof! Continue the branch pattern onto the roof slopes, making it look as though the house is nestled within the trees. -
Highlight the Doorway:
Apply a wash of the brown oxide or underglaze to the raised ring around the entrance hole to define it. -
Glaze Application:
Dip or brush a clear matte or satin transparent glaze over the entire piece. Avoid glossy glazes, as the reflection can distract from the delicate drawing. -
Final Fire:
Glaze fire the piece to the appropriate cone (likely Cone 5 or 6 for stoneware). Once cooled, glue in a small wooden dowel for the perch if you didn’t make one out of clay.
Clean Lines
For sharper corners on a slab house, let the clay firm up to ‘leather hard’ before attempting to assemble the walls. Soft clay will slump.
Smudged Pencil?
Underglaze pencil can smudge easily before firing. If you make a mistake, gently sand it off with a green kitchen scouring pad or fine sandpaper.
Display your new ceramic house on a wooden slice or mantelpiece to bring a touch of woodland charm indoors
Shingle-Impressed Roof Cottage
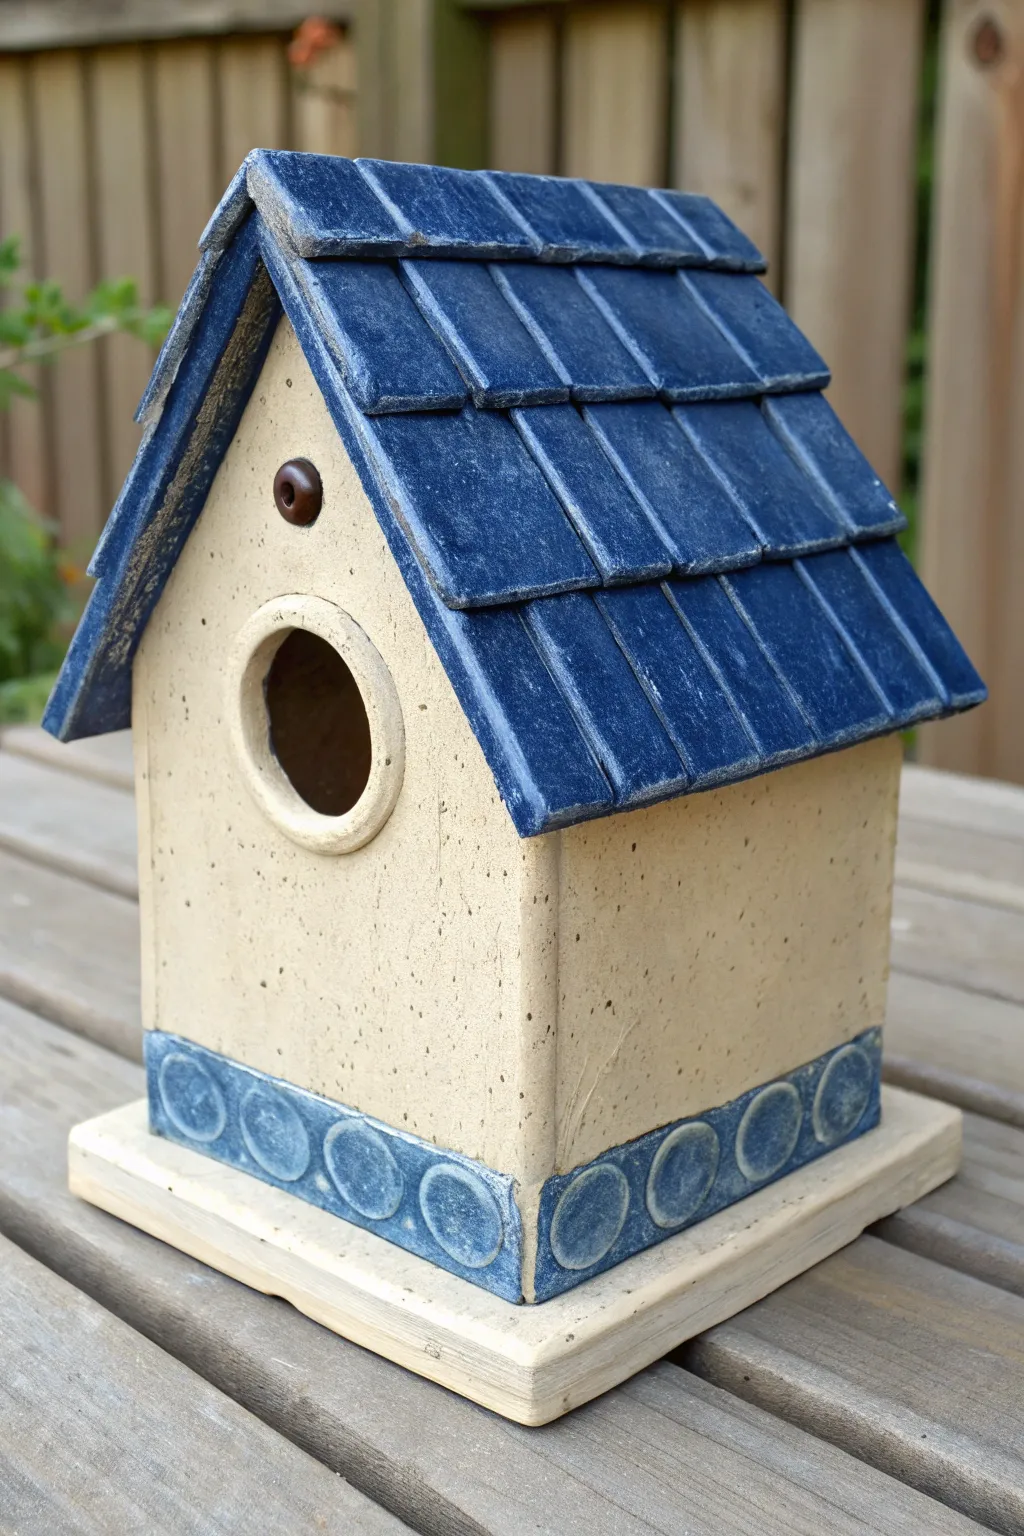
Capture the charm of a country cottage with this slab-built ceramic birdhouse featuring a distinctively tiled roof and decorative base. The textured beige stoneware contrasts beautifully with the deep denim-blue glaze, making it a standout piece for any garden or shelf.
Detailed Instructions
Materials
- Light speckled stoneware clay (approx 3-5 lbs)
- Rolling pin and ½-inch guide strips
- Fettling knife or needle tool
- Ruler or straight edge
- Slip and scoring tool (serrated rib)
- Circle cutters (various sizes: large for entry, small for vent)
- Wooden modeling tool or popsicle stick
- Underglaze (Cobalt or Navy Blue)
- Clear matte or satin glaze
- Small sponge
- Paintbrushes (flat shader and detail brush)
- Plastic wooden base (optional for display, otherwise a clay slab base)
- Small circular texture stamp or cap (for base pattern)
Step 1: Building the Structure
-
Roll the slabs:
Begin by wedging your speckled clay thoroughly to remove air bubbles. Roll out a large, even slab using ½-inch guide strips for consistent thickness, which is crucial for structural integrity during firing. -
Cut the walls:
Using a ruler and fettling knife, cut two rectangular side walls (approx. 5″ x 6″) and two peaked front/back walls. The peaks should be steep like a mountain chalet. Let these pieces stiffen to a ‘leather-hard’ state. -
Cut the openings:
Before assembly, use your large circle cutter to create the main entrance on the front face. Use a very small circle cutter or a straw to punch a ventilation hole near the peak of the roof. -
Assemble the box:
Score the vertical edges of all your wall pieces deeply and apply slip. Press the walls together firmly to form the rectangular base structure. Reinforce the interior seams with thin coils of clay, smoothing them out completely so they disappear. -
Add the entrance rim:
Roll a small coil of clay and attach it around the exterior of the circular entrance hole. Smooth the outer edge into the wall but leave the inner ring distinct to create a rounded, finished ‘doorframe’ look.
Roof Sadness?
If your roof starts to sag inward during construction, crumple up a ball of newspaper and stuff it inside the house to support the roof slabs while they stiffen up.
Step 2: Roofing and Details
-
Create the roof slabs:
Cut two rectangular slabs for the roof. They should be long enough to overhang the walls significantly on the sides and slightly at the front and back. -
Attach the roof:
Score and slip the top edges of your wall structure. carefully place the roof slabs on top, ensuring they meet perfectly at the apex. Join the peak seam securely with a coil and smooth the underside connection points. -
Shingle texture:
Instead of individual tiles, we will create the illusion of shingles. Use a wooden tool or ruler to press horizontal lines across the roof panels. Then, press vertical lines between the horizontal ones, staggering them like bricks to mimic slate tiles. -
Create the base trim:
Cut four narrow strips of clay (about 1.5″ tall) to fit around the bottom of the house. Attach these strips to the base of the walls using the score-and-slip method to create a decorative wainscoting effect. -
Stamp the pattern:
Using a small circular stamp or even a marker cap, press a row of circles into the base trim you just attached. Press firmly enough to leave a good depression for the glaze to pool in later. -
Adding the feet (optional):
If you want the house to have a floor, cut a base slab slightly larger than the house and attach the house to it now. Alternatively, leave it open-bottomed for easy cleaning.
Clean Lines
Use a barely damp sponge to smooth the sharp edges of your cut slabs before assembly. This prevents chipping after firing and gives the house a more refined, professional finish.
Step 3: Glazing and Finishing
-
Bisque fire:
Allow the constructed birdhouse to dry slowly under loose plastic for several days to prevent warping. Once bone dry, bisque fire it to Cone 04 (or your clay’s specific temperature). -
Wax resist:
Apply wax resist to the main body walls of the house. We want the raw, speckled clay body to remain unglazed here to achieve that warm beige tone seen in the example. -
Apply blue underglaze:
Paint a deep navy or cobalt blue underglaze onto the roof shingles and the decorative base trim. I like to apply three coats to ensure a rich, opaque color. -
Wipe back (optional):
For a varied, weathered look on the roof, you can gently wipe a damp sponge over the high points of the shingles, leaving more pigment in the crevices. -
Entrance detail:
Use a small brush to apply a dot of dark brown or metallic glaze to the ventilation hole rim and the very inner edge of the main entrance circle for contrast. -
Clear coat:
Dip or brush a clear matte glaze over the blue areas (roof and base). If you didn’t use wax resist, carefully brush the clear glaze over the bare clay walls too, or leave them raw if the clay is vitrified. -
Final firing:
Glaze fire the piece to the maturity temperature of your clay (typically Cone 5 or 6 for stoneware). Ensure no glaze is on the bottom contact points to save your kiln shelves.
Place your finished cottage in a sheltered garden spot and wait for the first feathered tenants to arrive

TRACK YOUR CERAMIC JOURNEY
Capture glaze tests, firing details, and creative progress—all in one simple printable. Make your projects easier to repeat and improve.
Sgraffito Pattern Birdhouse
Transform a simple terracotta form into a charming garden feature using high-contrast slip decoration. This birdhouse combines rustic earth tones with crisp white floral and geometric motifs for a folk-art aesthetic that pops against green foliage.
Step-by-Step Tutorial
Materials
- Leather-hard terracotta birdhouse form (wheel-thrown or hand-built)
- White clay slip or underglaze
- Soft fan brush
- Small round brush (size 2 or 4)
- Loop tool or sgraffito carving tool
- Needle tool
- Sponge
- Jute twine
- Clear matte exterior glaze (optional)
- Kiln (if firing ceramic)
Step 1: Preparing the Surface
-
Check moisture level:
Ensure your terracotta birdhouse is ‘leather hard’—firm enough to handle without warping, but moist enough to carve into. If you purchased a bisque-fired piece, you will be painting rather than carving, but for true sgraffito, raw clay is best. -
Smooth the exterior:
Run a slightly damp sponge over the entire surface to remove any grog or rough bumps, creating a silky canvas for your decoration. -
Plan the zones:
Lightly scratch guide lines with a needle tool to separate the roof area, the main body, and the bottom banding. This ensures your patterns stay uniform as they wrap around the form.
Step 2: Applying Slip and Roof Design
-
Apply base slip:
Using the soft fan brush, apply three even coats of white slip or underglaze to the areas you want to start white. For this specific look, paint the teardrop shapes on the roof directly, rather than carving them out later. -
Paint the roof teardrops:
Load your brush generously and paint large, inverted teardrop petal shapes radiating from the top knob down to the roof’s edge. Space them evenly so the terracotta shows through in the gaps. -
Add roof details:
Once the white teardrops are touch-dry, dip the handle of your brush or a dowel into terracotta-colored underglaze (or scrape away the white) to create the uniform dots down the center of each white petal.
Clean Lines Tip
Brush a thin layer of wax resist over your white slip designs before carving. This helps the carved lines stay crisp and prevents clean white areas from getting stained by clay dust.
Step 3: Decorating the Main Body
-
Base coat the body:
Paint a wide band of white slip around the middle section where the entry hole is located. You want a solid, opaque white background here. -
Carve the flowers:
When the white slip has lost its sheen but feels cool to the touch, use your sgraffito tool to carve through the white layer. Draw simple six-petaled flowers, removing the white to reveal the red clay beneath. -
Define the borders:
Carve two horizontal parallel lines below the flower zone to create a distinct separation for the bottom pattern. -
Create the lower band:
About an inch from the bottom, apply another solid band of white slip distinct from the central flower area. -
Carve the leaf motif:
Using the loop tool, carve away the negative space in the bottom band to create a repeating stylized leaf pattern. Instead of outlining, think about ‘erasing’ the white between the leaves so the leaves remain white against a clay background.
Add Texture
Instead of smooth white paint, dab the underglaze with a sea sponge for a mottled effect, or use a comb tool to rake texture into the clay before applying the white top layer.
Step 4: Finishing Touches
-
Clean up crumbs:
Use a large, dry, soft brush to gently sweep away all the little clay crumbs generated by carving. Do not use your fingers, or you might smudge the design. -
Slow drying:
Loosely cover the birdhouse with plastic to let it dry very slowly. This prevents the slip from peeling away from the clay body. -
Bisque firing:
Fire the piece to cone 04 (or your clay’s specific bisque temperature). -
Glazing and final fire:
Apply a clear matte glaze to seal the piece for outdoor use, then fire again to maturity. If you prefer the raw texture, you can skip glaze, but the white slip may stain over time outdoors. -
Rigging:
Thread sturdy jute twine through the top loop or holes, tying secure knots to ensure it can support the weight of the ceramic and potential occupants.
Hang your finished masterpiece in a sturdy tree branch and wait for the birds to discover their new home
Speckled Clay With Clear Glaze Finish
Embrace the natural beauty of clay with this charming, rustic birdhouse featuring a distinctive speckled finish. The simple chalet shape allows the lovely texture of the clay body to shine through, enhanced by a crisp clear glaze.
Step-by-Step Guide
Materials
- Speckled stoneware clay (mid-fire, with heavy grog/speckles)
- Rolling pin
- Canvas work surface or slab roller
- Two wooden guide strips (approx. 1/4 inch thick)
- Fettling knife or needle tool
- Ruler
- Paper templates (house front/back, side walls, roof panels)
- Serrated rib or scoring tool
- Slip (made from the same clay body)
- Small circle cutter (approx. 1.5 inches)
- Small wooden dowel or drill bit (for chimney)
- Clear transparent glaze
- Sureform tool (optional for beveling)
Step 1: Prepping and Cutting Slabs
-
Roll out the clay:
Begin by wedging your speckled clay to remove air bubbles. Place it on your canvas between the two wooden guide strips. Roll the clay out into a large, even slab until the rolling pin rests flat on the guides. -
Check for consistency:
Run your hand or a smooth rib over the surface to ensure there are no lumps or dips. The speckled clay can sometimes be gritty, so smooth it down firmly to compress the particles. -
Position templates:
Lay your paper templates onto the leather-hard slab. You will need two pentagons (front and back walls), two squares or rectangles (side walls), two roof panels that overhang slightly, and a bottom base piece. -
Cut the shapes:
Using a fettling knife or needle tool, trace around the templates and cut straight down through the clay. Keep your knife perpendicular to the table for clean, straight edges. -
Create the entry:
On the front panel, position your circle cutter slightly above the center point. Press firmly to remove the circle of clay, creating the bird’s doorway. I like to smooth the inner edge immediately with a damp sponge. -
Dry to leather hard:
Let all your cut pieces sit until they reach a firm leather-hard stage. They should be stiff enough to hold their shape without slumping but still soft enough to score.
Step 2: Assembly and Structure
-
Score the edges:
Take your scoring tool and roughen up the vertical connection points on the side walls and the corresponding edges of the front and back panels. Apply a generous amount of slip to these scored areas. -
Construct the box:
Join the four walls together on top of the base piece. Press the seams firmly, wiggle them slightly to lock the clay particles, and then smooth the excess slip. Use a thin coil of clay on the interior corners to reinforce the joints. -
Bevel the roof joints:
For the roof to sit flush, you may need to slice the top edges of the side walls at an angle. Alternatively, bevel the meeting point of the two roof panels to 45 degrees so they form a sharp peak. -
Attach the roof:
Score and slip the top edges of the house walls. Place the roof panels on, pressing gently. Ensure there is a slight overhang at the front and back for that classic chalet look. -
Craft the chimney:
Roll a small, thick cylinder of clay. Cut its bottom at an angle that matches the slope of your roof. Use a thinner dowel or tool to hollow it out, creating the chimney pipe. -
Mount the chimney:
Score the spot on the roof ridge where the chimney will go. Attach it securely with slip, blending the clay at the base so it looks seamless. Poke a small hole through the chimney wall near the top for detail if desired. -
Create the faux base detail:
For the slightly protruding base seen in the inspiration, roll a thin coil or flat strip of clay and run it around the very bottom perimeter of the house. Blend the top edge upward into the wall, but leave the bottom edge crisp to create a ‘foundation’ look.
Cracked Seams?
If seams split during drying, fill them immediately with ‘paper clay’ (slip mixed with toilet paper pulp). This mixture bonds stronger than regular slip.
Step 3: Finishing and Firing
-
Clean up surfaces:
Once assembled, use a damp sponge to wipe down the entire piece. This is crucial for speckled clay, as it exposes the grog and speckles that might have been smeared over during construction. -
Bisque fire:
Allow the birdhouse to dry completely. This may take several days depending on humidity. Fire the piece to Cone 04 (or your clay’s specified bisque temperature). -
Apply clear glaze:
After the bisque firing, wipe the house with a damp sponge to remove dust. Dip the entire piece into a bucket of clear glaze or brush on 2-3 even coats. The glaze will appear milky now but becomes transparent later. -
Wipe the foot:
Carefully sponge off any glaze from the bottom of the base to prevent it from sticking to the kiln shelf. -
Glaze fire:
Fire the kiln to the temperature required for your specific stoneware clay and glaze body (typically Cone 5 or 6). This high heat activates the darker speckles in the clay, making them pop through the glass-like finish.
Texture Pop
Before glazing, lightly sand the bisque ware to expose more raw speckles. The clear glaze will magnify these spots for high-contrast texture.
Hang your finished house in a safe spot or display it on a shelf to enjoy those beautiful, earthy speckles
Vent Holes as a Design Detail
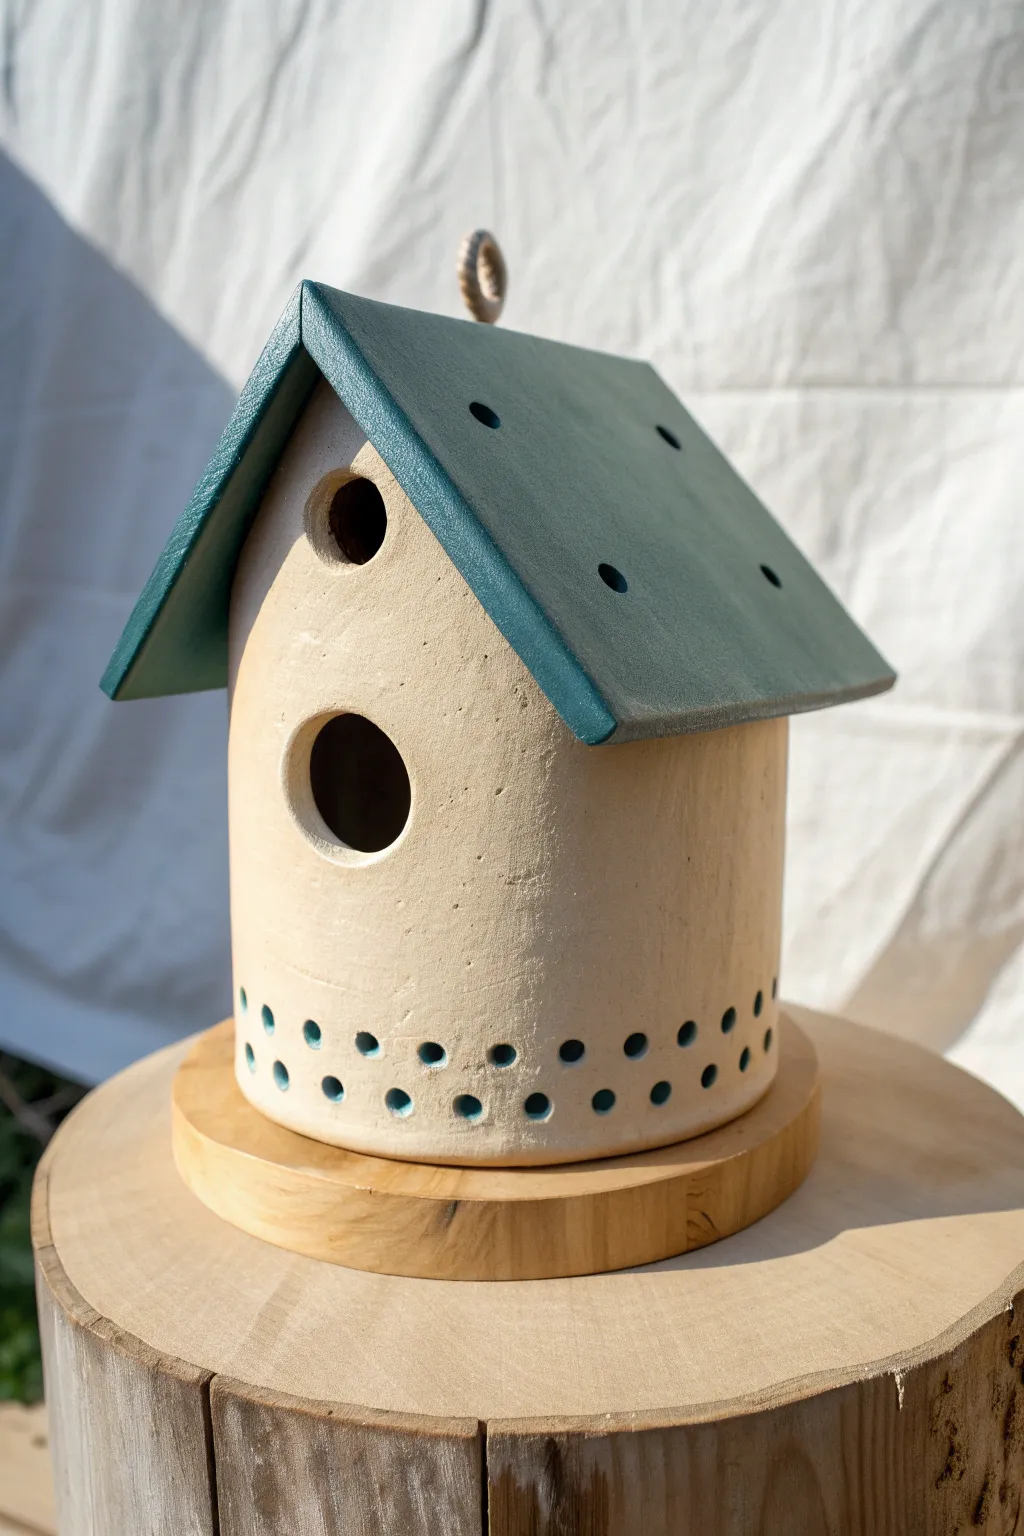
Elevate your garden with this charming ceramic birdhouse that combines classic functionality with a modern, airy design. Featuring a distinct teal-stained roof and a creative double-row of ventilation holes along the base, this project is as fun to build as it is practical for your feathered friends.
Step-by-Step Tutorial
Materials
- Stoneware clay body (buff or terracotta work well)
- Slab roller or rolling pin with guide sticks
- Rolling pin
- Circle cutters (various sizes: 1.5 inch for entry, smaller for vents)
- Fettling knife or needle tool
- Slip and scoring tool (or serrated rib)
- Cardboard or poster board for templates
- Wooden dowel (approx. 1/4 inch) or hole punch tool
- Underglaze (Teal or Hunter Green)
- Clear matte glaze
- Paintbrush (flat shader and detail brush)
- Sponge
- Small loop of rope or heavy twine for the hanger
Step 1: Preparing the Slab Structure
-
Roll Your Clay:
Begin by rolling out a generous slab of clay to a uniform thickness of about 1/4 to 3/8 inch. Consistency is key here to prevent warping later. -
Cut Templates:
While the clay firms up slightly, create your paper templates: you’ll need a long rectangle for the cylinder body (approx. 12×6 inches), two rectangular roof panels, and two triangular gables that match the roof pitch. -
Cut the Main Body:
Lay your long rectangular template onto the slab and cut around it cleanly with a fettling knife. Save the excess clay for the roof and detail pieces. -
Form the Cylinder:
Carefully lift the long rectangle and curve it around a form (like a PVC pipe or large oatmeal canister) or simply overlapping the ends to create a cylinder. Score and slip the seam thoroughly, pressing firmly to join. -
Add the Floor:
Roll a small separate piece of slab for the base. Place your cylinder on top of it, trace around the bottom edge, cut out the circle, and attach it securely using the score-and-slip method.
Slumping Roof?
If your roof panels sag during construction, prop them up with crumpled newspaper or foam blocks. Leave these supports in place until the clay becomes leather-hard and can hold its own weight.
Step 2: Feature Details & Venting
-
Carve the Entry:
Locate the front center of your cylinder. About two-thirds of the way up, use a 1.5-inch circle cutter to create the main entry hole for the birds. -
The Second Opening:
For this specific design, add a smaller, secondary circular opening higher up, near where the roof peak will sit. This adds aesthetic balance and extra airflow. -
Marking the Vents:
Now for the signature detail: use a ruler to lightly mark two parallel horizontal lines near the bottom base of the cylinder. -
Punching the Holes:
Using a small hole punch tool or a wooden dowel, punch a row of evenly spaced holes along the bottom guideline. Repeat this on the top guideline, offsetting the holes slightly to create a staggered, zigzag pattern. -
Clean the Edges:
Once the clay is leather hard, go back with a slightly damp sponge to smooth any sharp burrs created by the hole punching.
Step 3: Roof Construction
-
Cut Roof Panels:
Cut your two rectangular roof slabs. Ensure they are large enough to overhang the cylinder body slightly on all sides for rain protection. -
Texturize the Roof:
Before assembling, I like to gently pat the surface of the roof slabs with a flat board to remove canvas texture and give it a smooth, manufactured slate look. -
Add Roof Vents:
Punch four small holes into each roof panel. These not only mirror the design at the base but ensure hot air can escape during summer months. -
Assemble the Peaks:
Attach two triangular gables to the top rim of your cylinder to support the roof panels. Score and slip them into place. -
Attach the Roof:
Place the roof panels onto the gables, creating a peak. Join the two panels at the top ridge securely with a coil of clay on the underside for reinforcement. -
Install the Hanger:
Fashion a small loop from a coil of clay or insert a high-temp wire loop into the peak of the roof so the house can be hung after firing.
Clean Vent Holes
Don’t smooth the vent holes immediately after punching. Let the clay dry to leather-hard, then simply rub the surface with a scouring pad. The burrs will flake off cleanly without distorting the circles.
Step 4: Finishing and Glazing
-
Apply Roof Color:
Once bisque fired, apply three coats of a teal or deep green underglaze strictly to the roof panels. Keep the application even for that solid, painted wood look. -
Accent the Base Vents:
Load a small detail brush with the same teal underglaze and carefully paint the inside of each ventilation hole at the bottom. This pop of color ties the design together beautifully. -
Clear Glaze Application:
Dip or brush a clear matte glaze over the entire piece. Avoid glossy glaze if possible, as the matte finish resembles natural stone and wood more closely. -
Final Fire:
Fire the piece to the temperature appropriate for your clay body (likely Cone 5 or 6 for stoneware durability outdoors).
Hang your finished house in a quiet spot in the garden and wait for your first tenants to move in.
Drainage-Friendly Base With Foot Ring
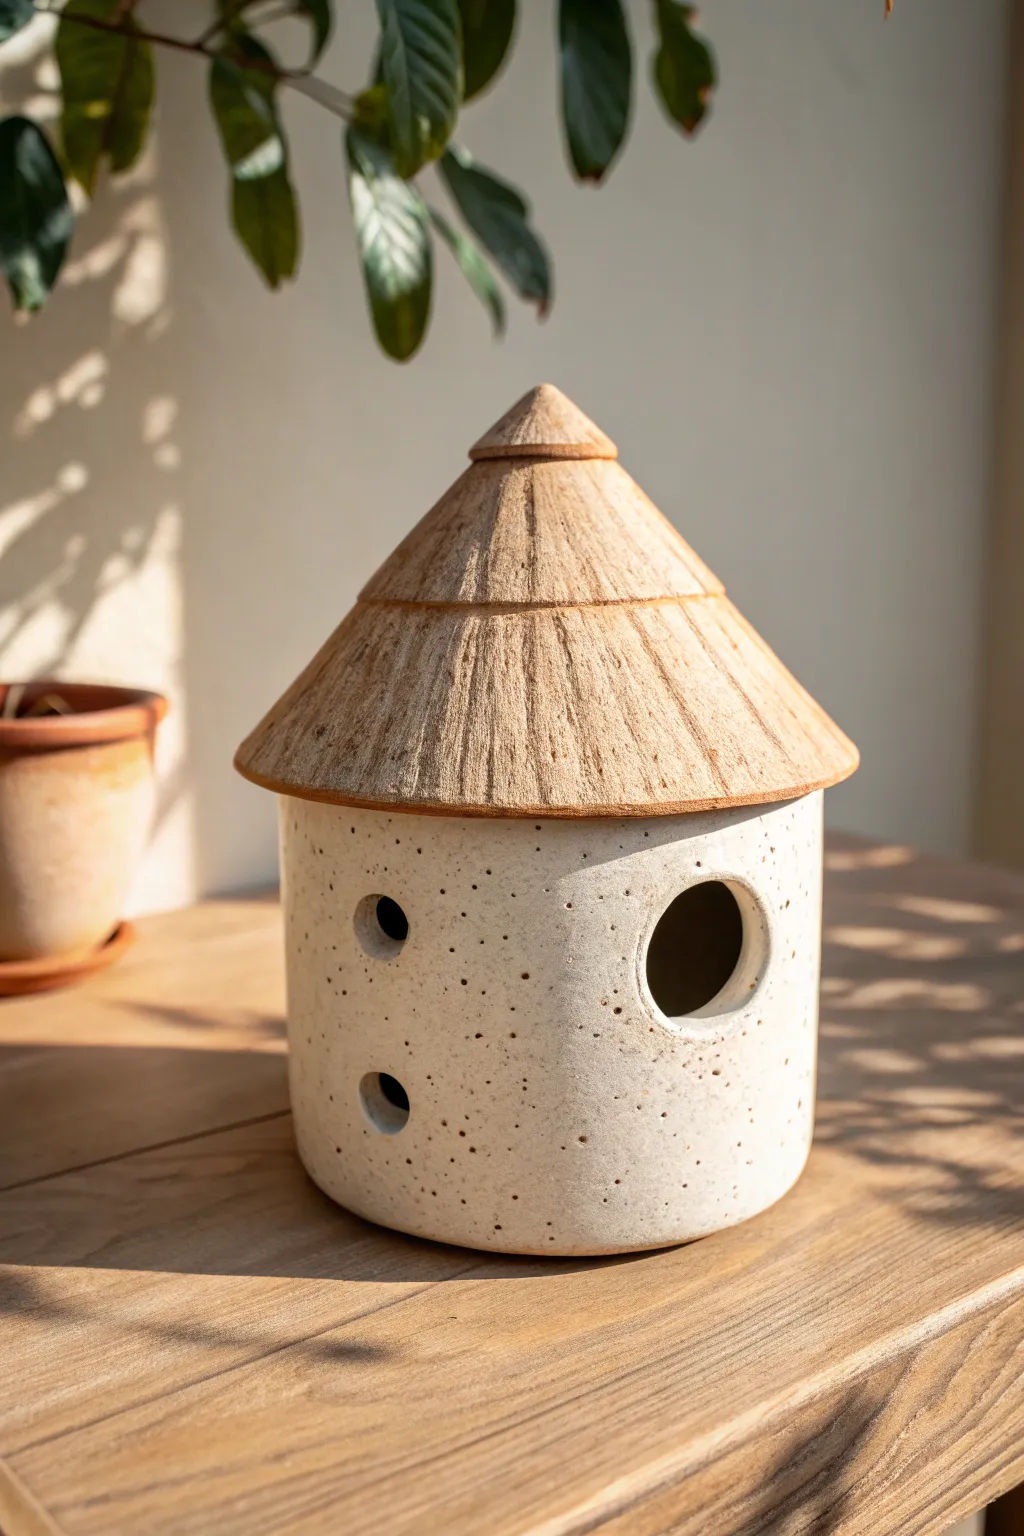
This charming ceramic birdhouse features a clean, cylindrical body speckled with natural clay texture and a contrasting conical roof with a rustic, thatched appearance. Its simple geometry and emphasis on raw material textures make it a timeless addition to any garden space.
Detailed Instructions
Materials
- Speckled buff stoneware clay (or similar clay body with grog/speckles)
- Rolling pin
- Canvas mat or slab roller
- Needle tool
- Pottery knife or fettling tool
- Scoring tool (serrated rib)
- Slip (clay and water slurry)
- Circle cutters (various sizes)
- Wooden modeling tool
- Sponge
- Clear matte or satin glaze
- Iron oxide wash (optional for roof)
Step 1: Forming the Body
-
Roll the slab:
Begin by wedging your speckled stoneware clay thoroughly to remove air bubbles. Roll out a consistent slab of clay approximately 1/4 inch thick on your canvas mat. -
Cut the rectangle:
Measure and cut a rectangular strip from your slab. The length should correspond to your desired circumference (plus a slight overlap for the seam), and the height determines the birdhouse walls. A 12-inch by 6-inch rectangle is a good starting point. -
Create the cylinder:
Carefully lift the rectangle and curve it into a cylinder. Bevel the vertical edges at a 45-degree angle to create a seamless join. -
Join the seam:
Score both beveled edges aggressively and apply a generous amount of slip. Press the edges together firmly. I like to use a wooden rib on the inside while smoothing the outside with a flexible rib to erase the join completely. -
Add the base:
Roll a smaller piece of slab and place your cylinder on top of it. trace around the base, cut the circle out, score and slip both contact surfaces, and attach the floor to the cylinder walls. -
Create drainage (Important):
Flip the cylinder over and carve a small foot ring or add small clay feet. Use a small hole cutter to create a central drainage hole in the floor to prevent water accumulation.
Clean Edges Matter
Always smooth the edges of the entry hole with a damp finger or chamois strip. Sharp fired clay can injure birds as they enter and exit the house.
Step 2: Wall Details
-
Cut the entry hole:
Once the clay is leather-hard, use a large circle cutter (about 1.25 to 1.5 inches depending on the bird species you want to attract) to cut the main entrance near the upper third of the cylinder. -
Add ventilation:
Using a much smaller hole cutter or drill tool, create two or three ventilation holes in a vertical line on the side or back of the house. Clean up any sharp edges with a damp sponge. -
Smooth the surface:
Wipe the entire exterior with a damp sponge to expose the natural speckles in the clay body and ensure a smooth finish before firing.
Roof Fitting Troubles?
If the roof doesn’t sit flat, add a small coil on the underside of the roof to act as a flange. Typically, this flange fits *inside* the cylinder rim.
Step 3: Sculpting the Roof
-
Form the cone:
You can either hand-build a cone from a slab circle with a wedge cut out, or throw a closed conical form on the wheel. For this project, slab building offers great control. Cut a large circle, remove a pie-slice wedge, and join the edges to form a peak. -
Add the rim detail:
Roll a thin coil of clay and attach it horizontally around the cone, about one-third of the way down from the peak. Blend the bottom edge of the coil downward to create a tiered effect. -
Texture the roof:
Using a needle tool or a stiff brush, scratch vertical lines down the surface of the cone to mimic straw or thatch. Vary the pressure to create organic, natural-looking grooves. -
Refine the peak:
Add a small cap or distinct point to the very top of the cone to finish the silhouette neatly. -
Fit the roof:
Ensure the roof’s diameter is slightly wider than the cylinder body to create an overhang. Score the underside of the roof or create a flange so it sits securely on the body without sliding off often leaving it removable for cleaning.
Step 4: Finishing and Firing
-
Initial bisque fire:
Allow both pieces to dry slowly under plastic to prevent warping. Once bone dry, bisque fire them to Cone 04 (or your clay’s specification). -
Glazing the body:
Apply a clear satin or matte glaze to the cylindrical body. This seals the clay while letting the beautiful natural speckles show through. -
Staining the roof:
Apply an iron oxide wash or a toasted tan underglaze to the roof. Wipe it back with a sponge so the color remains in the textured grooves, highlighting the ‘thatch’ effect. -
Final glaze fire:
Fire the pieces separately to maturity (typically Cone 6 for stoneware). If creating a removable roof, ensure no glaze touches the contact points between the lid and body.
Place this ceramic home in a sturdy tree branch and wait for your feathered tenants to arrive
Hidden Clean-Out Door on the Back
Enhance your garden with this hand-built ceramic birdhouse that features a beautifully textured faux-shingle roof and a distressed, speckled white finish. The sturdy slab construction ensures durability while the earthy tones give it a timeless, weathered appeal.
Step-by-Step Guide
Materials
- Mid-fire stoneware clay (with grog for strength)
- Rolling pin and guide strips (approx. 1/4 inch)
- Fettling knife or needle tool
- Slip and scoring tool
- Wooden dowel (small diameter for perch)
- Circle cutter (approx. 1.25 – 1.5 inch)
- White matte glaze
- Iron oxide wash or dark brown underglaze
- Sponge and brushes
- Textured paddle or stamps (optional)
Step 1: Slab Construction
-
Roll your slabs:
Begin by rolling out your clay into an even slab, using guide strips to maintain a consistent 1/4-inch thickness. You will need enough clay for four rectangular walls, a floor, and two roof panels. -
Cut the components:
Using paper templates, cut out two matching side walls, a front and back wall (with peaked tops), and a base. Remember to cut the back wall into two sections if you are incorporating the hidden clean-out door logic referenced in this section. -
Create the texture:
Before assembly, gently paddle the exterior surfaces of your walls with a textured board or rough fabric to create a subtle, weathered wood grain effect. -
Cut the entry and vents:
On the front wall panel, use your circle cutter to remove the main entry hole slightly above the center. Use a smaller tool to drill a tiny ventilation hole near the peak of the gable. -
Assemble the body:
Wait until the slabs are leather-hard. Score and slip the edges of the walls and base deeply, then press them together firmly. Reinforce the interior seams with thin coils of clay for extra stability.
Warping Walls?
If walls warp, your clay was too wet during assembly. Let slabs dry to true leather-hard stage. Use 90-degree supports or cardboard boxes to hold walls square.
Step 2: Roofing and Details
-
Prepping the roof:
Cut two rectangular slabs for the roof, ensuring they are slightly longer and wider than the house body to create overhangs. Bevel the top edges at a 45-degree angle where they will meet at the peak. -
Simulating shingles:
Instead of attaching individual tiles, texturing is easier. Use a modeling tool or the edge of a ruler to impress horizontal lines across the roof slabs. Then, press vertical indentations to simulate separate shingles, staggering them row by row. -
Attach the roof:
Score and slip the top edges of the house walls and the underside of the roof slabs. attach them carefully, sealing the top seam well. -
Add a hanging loop:
Roll a small coil of clay, form it into a sturdy loop, and attach it securely to the very peak of the roof ridge. This needs to be well-adhered to potential separation during firing. -
Insert the perch:
Drill a small hole below the main entry. Insert a small clay dowel or a piece of branch-like clay, securing it with slip. I find it helpful to texture this perch to look like real wood.
Step 3: Glazing and Finishing
-
Bisque fire:
Allow the piece to dry slowly and completely to prevent warping. Fire to cone 04 (or your clay body’s bisque temperature) in the kiln. -
Apply oxide wash to roof:
Mix iron oxide with water and brush it heavily over the entire roof and the perch. Wipe it back with a damp sponge, leaving the dark color in the shingle grooves to accentuate the texture. -
Wax resist application:
Apply wax resist over the roof and the perch to protect the oxide finish. This ensures the white glaze won’t adhere to these specific brownish-red areas. -
Glaze the body:
Dip or brush a matte white glaze onto the body of the house. Don’t worry about perfect coverage; a slightly uneven application adds character. -
Create the speckles:
To achieve the spotted look, dip a stiff-bristled toothbrush into the iron oxide wash. Use your thumb to flick the bristles, spraying a fine mist of brown speckles over the white glazed walls. -
Refine the edges:
With a damp sponge, gently wipe the glaze off the sharp corners and edges of the walls to reveal the raw clay underneath, enhancing the distressed, rustic aesthetic. -
Final firing:
Fire the birdhouse to the maturity temperature of your clay and glaze (typically cone 5 or 6 for stoneware) to finish the piece.
Clean-Out Door
Cut the back wall in half horizontally. Score/slip only the top half to the house. Hinge the bottom half with sturdy wire post-firing for easy cleaning access.
Hang your new ceramic creation in a sheltered spot and wait for your feathered neighbors to move in
Pole-Mounted Birdhouse With Ceramic Collar
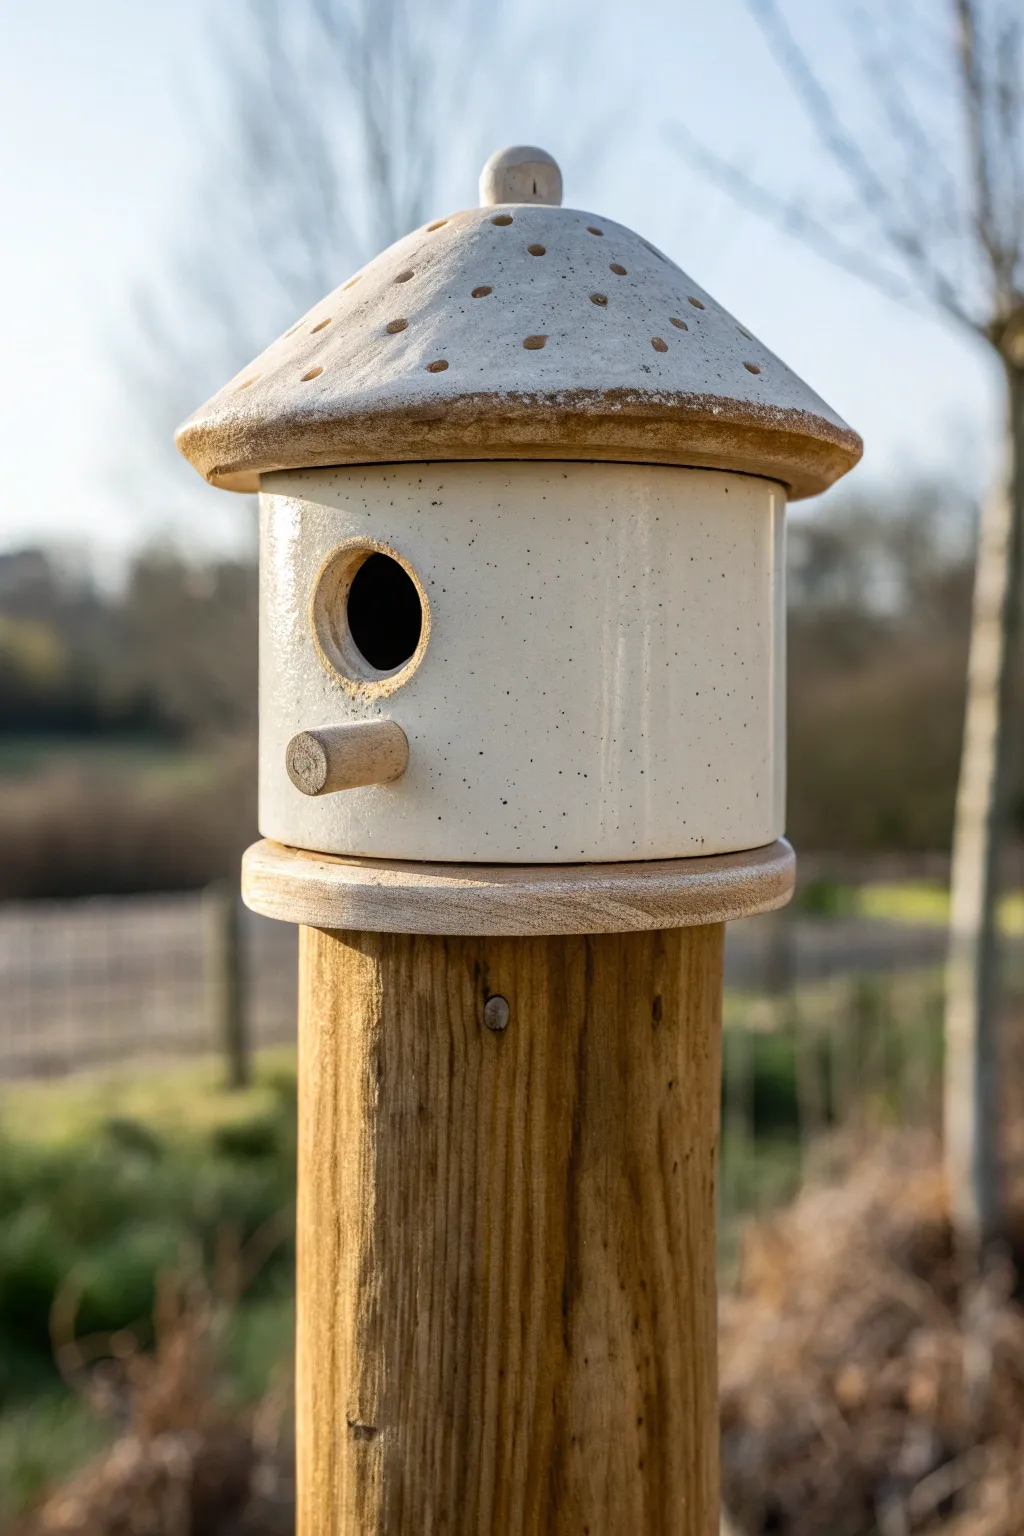
This charming project combines wheel-thrown pottery with rustic woodworking to create a sturdy, weather-resistant home for garden birds. The speckled white glaze and textured roof give it a delightful mushroom-like appearance that blends naturally into outdoor settings.
Detailed Instructions
Materials
- Stoneware clay (cone 5/6)
- Pottery wheel
- Throwing tools (sponge, rib, wire cutter)
- Needle tool
- Wooden dowel (approx. 1/2 inch diameter)
- Speckled white glaze
- Iron oxide wash (optional)
- Kiln
- Wooden fence post
- Circular wooden mounting base (slightly wider than the ceramic cylinder)
- Epoxy or strong outdoor adhesive
- Drill and screws
Step 1: Creating the Cylinder Body
-
Center and open:
Begin with about 2-3 pounds of wedged stoneware clay centered on the wheel. Open the clay to create a floor that is approximately 4-5 inches wide. -
Pull the walls:
Pull the walls up vertically to form a straight cylinder about 6-7 inches tall. Keep the walls even, aiming for a consistent thickness of about 1/4 inch. -
Smooth the surface:
Use a straight metal or wooden rib to smooth the outside of the cylinder, removing throwing lines to create a clean canvas for your glaze later. -
Trim the rim:
Use a needle tool to cut the rim level if it’s uneven, then compress it with a chamois or sponge to ensure it’s strong and smooth. Remove the cylinder from the wheelhead and set aside to reach leather-hard stage.
Cleanout Access Tip
Make the roof removable! Instead of gluing it, form a clay flange on the underside of the roof that fits snugly inside the cylinder rim so you can lift it off for cleaning.
Step 2: Throwing the Roof
-
Form a cone:
Center a slightly smaller ball of clay (about 1.5 pounds). Instead of opening deeply, flatten it into a thick pancake and shape it into a low, conical mound. -
Open and shape:
Open the clay gently, pulling it outwards and slightly downwards to form a flared, conical roof shape. Measure the diameter to ensure it overhangs your cylinder body by at least an inch on all sides. -
Add the finial:
Before removing it from the wheel, pinch a small amount of clay at the very peak to form a rounded knob or finial.
Glaze Crawling?
If the glaze pulls away from the speckled spots, you likely applied it too thickly. Wash the piece, let it dry, and re-apply a thinner coat, or sponge excess off before firing.
Step 3: Assembly and Details
-
Cut the entrance:
Once the cylinder is leather hard, use a circle cutter or a needle tool to cut a round entrance hole about 1.5 inches in diameter (size depends on the bird species you want to attract) near the top third. -
Add the perch hole:
Drill or punch a smaller hole directly below the entrance relative to the size of your wooden dowel perch. Don’t insert the wood yet; this is just for fit. -
Texture the roof:
Use a small tool or the end of a paintbrush to press indentations into the roof surface to mimic mushroom textures or seed pods. -
Bisque fire:
Allow all clay components to dry slowly and completely before loading them into the kiln for a bisque firing.
Step 4: Glazing and Final Mounting
-
Apply glaze:
Dip or brush the main cylinder body with a speckled white glaze. For the roof, you can wipe an iron oxide wash into the textures before glazing, or use a slightly warmer-toned glaze for contrast. -
Glaze fire:
Fire the pieces to the maturity temperature of your clay and glaze (typically cone 5 or 6 for stoneware). -
Prepare the post:
While the ceramics fire, prepare your wooden fence post. Attach a circular wooden base plate to the top using a screw. -
Install the perch:
Cut your wooden dowel to size. Apply a small amount of epoxy to one end and insert it firmly into the small hole on the ceramic body. -
Mount the body:
Use a strong outdoor adhesive to secure the ceramic cylinder onto the wooden base plate. I usually let this cure overnight to be safe. -
Secure the roof:
Finally, apply adhesive to the top rim of the cylinder and place the ceramic roof on top. Since this birdhouse doesn’t open for cleaning, ensure the seal is watertight to protect the interior.
Place your new birdhouse in a quiet spot of the garden and wait for your first feathered tenants to arrive
Perch-Free Modern Birdhouse
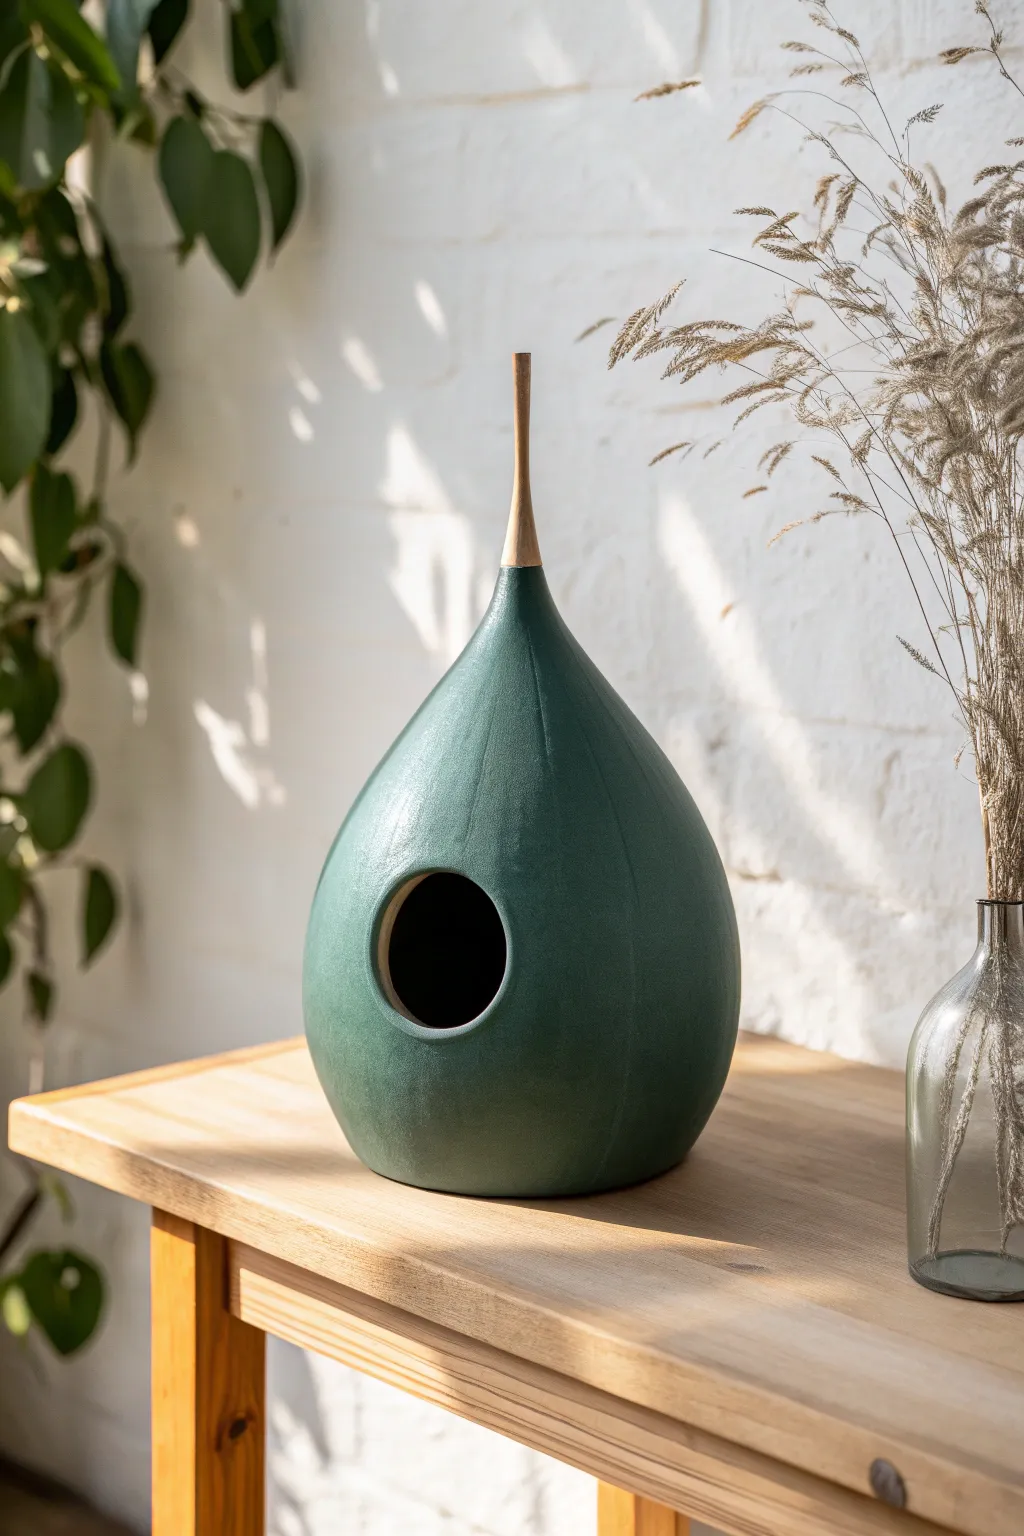
This sleek, perch-free ceramic birdhouse combines organic curves with a striking vertical profile, creating a modern sanctuary for small garden birds. The deep forest green glaze and long wooden finial give it a sophisticated, sculpture-like appearance perfect for contemporary outdoor spaces.
Step-by-Step Guide
Materials
- Stoneware clay (smooth body)
- Pottery wheel
- Throwing tools (rib, sponge, wire)
- Needle tool
- Circle cutter or hole punch (1.25 to 1.5 inch)
- Trimming tools
- Wooden dowel or turned wood spindle (approx. 4 inches)
- Forest green matte or satin glaze
- Epoxy adhesive
- Sandpaper
Step 1: Throwing the Form
-
Center the clay:
Start with about 3-4 lbs of well-wedged clay on the wheel head. Center it into a tall cone shape rather than a low mound, as this will help you achieve the height needed for the teardrop form. -
Open and lift:
Open the clay down to leaving a 1/2 inch floor. Pull the walls up, focusing on maintaining a wide belly at the bottom that gradually tapers inward as you go higher. Aim for a distinct pear or gourd shape. -
Collar the neck:
As you reach the top third of the vessel, gently collar the clay inward to create a narrow neck. Be careful not to make the clay too thin at the very top, as you’ll need wall thickness to support the finial later. -
Close the form:
Continue collaring until the neck is quite narrow, then close the top completely. I like to shape the very peak into a small, flat platform (about the diameter of your wooden dowel) rather than a sharp point. -
Refine the curve:
Use a flexible metal or rubber rib on the exterior while the wheel is spinning slowly to smooth out throw lines and perfect that continuous, weeping-fig silhouette.
Step 2: Adding Texture and Details
-
Create vertical ribs:
While the clay is leather hard, use a modeling tool or the edge of a credit card to press subtle vertical lines running from the top of the neck down to the belly. These shouldn’t be deep cuts, just gentle indentations for texture. -
Cut the entrance:
Select a spot on the widest part of the belly for the entrance. Use a circle cutter or careful needle tool work to cut a 1.25 to 1.5-inch hole. Smooth the edges of the cut with a damp sponge or chamois to protect birds’ feathers. -
Drill the finial mount:
At the very top apex of the birdhouse, carefully drill or carve a small vertical hole. This recess should be sized to accept the base of your wooden finial later. -
Dry slowly:
Cover the piece loosely with plastic to ensure even drying, as the enclosed form can sometimes crack if the bottom dries faster than the top. Once bone dry, bisque fire the piece.
Pro Tip: Drainage Matters
Don’t forget to poke 2-3 small holes in the bottom of the floor during the trimming stage. This allows rainwater to drain, keeping the nest dry and healthy.
Step 3: Glazing and Assembly
-
Glaze application:
Pour a forest green glaze inside the vessel and swirl to coat the interior, pouring out the excess. For the exterior, dip the piece or spray the glaze to get an even, smooth finish that highlights the vertical texture. -
Glaze firing:
Fire the piece according to your clay and glaze specifications (likely Cone 5 or 6 for durability outdoors). -
Prepare the finial:
While the ceramic fires, shape your wooden finial. You can turn this on a lathe or sand down a dowel to a tapered point. The wood should be raw or sealed with a natural oil. -
Attach the top:
Once the ceramic is out of the kiln and cooled, test the fit of the wooden finial in the top recess. Apply a strong two-part epoxy to the base of the wood and insert it into the ceramic hole. -
Clean connection point:
Wipe away any excess epoxy immediately before it cures. Hold the finial straight for a few minutes until the bond sets enough to stand on its own.
Troubleshooting: Slumping Walls
If the belly starts collapsing while throwing, use a heat gun or torch for a minute to stiffen the lower walls before attempting to collar the neck further.
Place this elegant shelter in a quiet corner of your garden and watch for your first feathered residents to move in
Mushroom Roof Fantasy Birdhouse
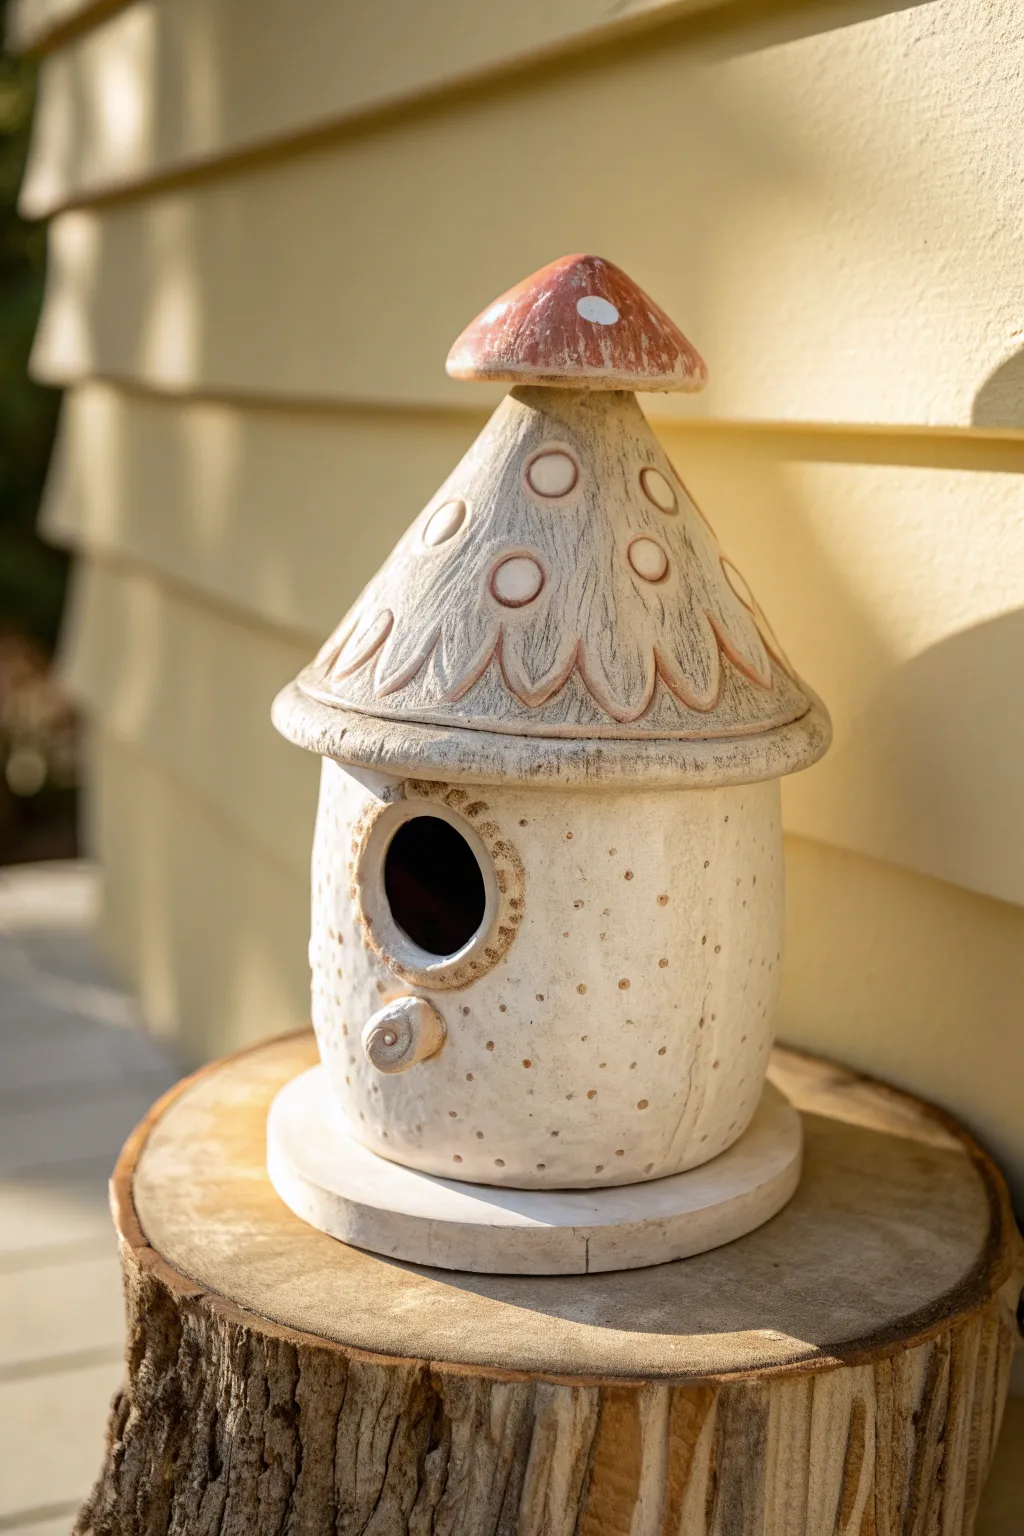
Bring a touch of fairy-tale charm to your garden with this hand-built ceramic birdhouse shaped like a stout, spotted mushroom. Featuring a removable textured roof and a cozy, speckled body, this project is perfect for intermediate potters looking to practice slab and pinch techniques.
How-To Guide
Materials
- Stoneware clay (smooth or fine grog)
- Rolling pin and guide sticks (1/4 inch)
- Large circular template (for the roof)
- Rectangular template (for the body)
- Needle tool
- Scoring tool (serrated rib or fork)
- Slip
- Small loop tool for carving
- Wooden modeling tool
- Sponge
- White or cream matte glaze
- Red-brown underglaze or iron oxide wash
- Clear glaze
Step 1: Forming the Body
-
Prepare the base slab:
Roll out a slab of clay to about a 1/4-inch uniform thickness. Cut a rectangle tall enough for your desired birdhouse height and a circle for the floor base. -
Construct the cylinder:
Wrap the rectangular slab into a cylinder. Bevel the vertical edges at a 45-degree angle, score liberally, apply slip, and press the seam firmly together. -
Attach the floor:
Score and slip the bottom edge of your cylinder and the edge of your circular base. Join them securely, smoothing the clay upward from the base to blend the seam completely. -
Belly out the form:
Gently push the walls outward from the inside using a rib or your fingers to create a slightly rounded, organic ‘mushroom stem’ shape. This softens the rigid cylinder look. -
Cut the entryway:
Decide on the front face and use a circle cutter or needle tool to remove a round hole for the bird entrance, positioning it in the upper third of the body. -
Add the perch and rim:
Roll a small coil to frame the entrance hole, pressing it flat and texturing it. Create a small, curled nub of clay resembling a snail shell or fern fiddlehead and attach it just below the opening as a perch.
Step 2: sculpting the Roof
-
Shape the main cone:
Roll a new slab and cut a large circle with a wedge removed (like a Pac-Man shape). Join the straight edges to form a wide, shallow cone that overhangs the body generously. -
Create the topper:
Pinch a small amount of clay into a rounded mushroom cap shape. Attach this to the very peak of your cone, blending the clay downwards for a seamless transition. -
Carve the scallops:
Use a needle tool to lightly sketch a scalloped pattern around the lower third of the roof. Then, use a small loop tool to carve these lines deeper, creating a relief effect. -
Impress textures:
I like to use the back of a pen or a small circular stamp to press ring indentations into the roof surface above the scalloped line, mimicking mushroom spots. -
Add vertical striations:
Use a sharp modeling tool to incise vertical lines flowing from the peak down to the scallops, giving the roof a fibrous, organic texture. -
Form the flange:
On the underside of the roof, add a small coil ring that fits just inside the rim of the body. This flange prevents the lid from sliding off in the wind.
Clean Wipe Technique
When wiping back the oxide wash, use a firm, slightly damp sponge. Rinse it frequently to avoid muddying the high points of the clay, keeping the contrast crisp.
Step 3: Finishing and Glazing
-
Surface detailing:
Before the clay dries, use a dull pencil point to poke random, small holes all over the main body of the birdhouse to create a speckled texture. -
Bisque fire:
Allow the piece to dry slowly and completely before bisque firing to Cone 04 (or your clay’s specification). -
Apply the oxide wash:
Brush a red-brown iron oxide wash or thinned underglaze into the carved lines of the roof and the textured rim of the entry hole. Wipe away the excess with a damp sponge so the color remains only in the recesses. -
Paint the topper:
Apply a reddish-brown underglaze specifically to the mushroom cap at the peak. Add a single white dot of glaze on top for that classic toadstool look. -
Glaze the body:
Dip or brush the entire exterior with a matte white or cream glaze. The glaze should break over the textures, revealing the clay body underneath the speckles. -
Final firing:
fire the piece to maturity (likely High Fire Cone 6 or 10 depending on your clay). Ensure the lid and body are fired separately or with kiln wash between them to prevent sticking.
Attract Local Birds
Make the entry hole size specific to birds in your area. 1 1/8 inches fits chickpeas, while 1 1/2 inches suits bluebirds. Customize for your feathered neighbors.
Place your finished mushroom house in a shady garden spot and wait for your first tenants to arrive
Floral Appliqué Garden Birdhouse
This charming ceramic birdhouse features raised floral elements and a delicately painted roof that evokes the feeling of a sun-bleached country garden. The combination of textured clay appliqué and soft, dusty botanical painting creates a timeless, handcrafted piece perfect for indoor decor or a sheltered porch.
Step-by-Step Guide
Materials
- Bisque-fired ceramic birdhouse (pre-made) or slab-built clay house
- Air-dry clay or ceramic clay (if firing)
- Clay sculpting tools (needle tool, small ball stylus)
- Slip (clay and water mixture) for joining
- Acrylic paints (White, Sage Green, Terracotta/Dusty Rose, Burnt Umber)
- Matte varnish or sealant
- Gesso (optional, for priming)
- Small synthetic brushes (round size 2 and 4, flat shader)
- Sandpaper (fine grit)
Step 1: Preparation and Appliqué Sculpting
-
Surface Preparation:
Begin with a clean bisque birdhouse. If the surface is too smooth, lightly scuff it with fine-grit sandpaper to help the added clay adhere. Wipe away any dust with a damp cloth. -
Rolling the Coils:
Take small pinching of clay and roll them into tiny, thin coils for the stems and small spheres for the berries and flower centers. Keep these very delicate to match the scale of the house. -
Shaping the Petals:
For the larger terracotta flowers, press small balls of clay into teardrop shapes. Flatten them slightly against your thumb to create a petal-like scoop. -
Attaching the Appliqué:
Score the surface of the birdhouse lightly where you want your vines to climb. Apply a dab of slip, then press your clay stems and leaves onto the surface. Use a sculpting tool to smooth the edges of the clay onto the house for a seamless look. -
Adding Details:
Use a needle tool to press veins into the applied leaves and texture the centers of the flowers. I like to add tiny clay dots around the upper roofline for extra charm. -
Drying Time:
Allow the added clay floral elements to dry completely. If using air-dry clay, wait 24 hours; if using ceramic clay, prepare for firing according to your clay body’s instructions.
Step 2: Painting the Base and Vines
-
Base Coat:
Paint the entire exterior of the birdhouse, including your raised clay details, with a creamy off-white acrylic paint. You may need two coats for opaque coverage. -
Distressing the Base:
Once dry, lightly sand the edges and the raised clay areas to reveal a hint of the underlying texture, giving it a weathered appearance. -
Painting Stems:
Mix a diluted sage green paint. Using a fine liner brush, carefully paint the raised stems and leaves. Keep the paint thin so it settles into the textures of the clay. -
Painting Flat Foliage:
To create depth, paint additional leaves directly onto the flat surface of the house behind the raised clay stems. Use a slightly lighter green to make them look further away. -
Adding Flower Color:
Paint the raised flower petals in a soft terracotta or dusty rose shade. Add a darker dot of burnt umber or dark green to the very center of each bloom.
Seamless Transitions
Use a wet brush to smooth the edges of your clay appliqué into the birdhouse wall. This prevents the additives from looking ‘stuck on’ and makes them look carved.
Step 3: Finishing the Roof
-
Roof Base Wash:
Apply a very watered-down wash of sage green to the entire roof. While it’s still wet, wipe some off with a paper towel to create a mottled, aged effect. -
Scalloped Design:
Using the terracotta paint, draw scalloped half-circles along the roof tiles. Don’t worry about perfection; a shaky hand adds to the rustic charm. -
Roof Florals:
Paint simple flat flowers inside the scallop shapes on the roof using the terracotta color. Add thin brown lines to represent veins or decorative separation between the scallops. -
Rim Detailing:
Paint the front edge of the roof overhang with a solid line of sage green to frame the house. -
Sealing:
Protect your work with a coat of matte varnish. This unifies the sheen of the different paints and protects the raised clay elements.
Go Botanical
Instead of sculpting clay flowers, press real dried flowers or textured leaves into wet clay appliqué to create fossil-like impressions, then paint them with washes.
Place your finished birdhouse on a shelf surrounded by dried flowers to complete the rustic garden vignette
Bird-Shaped Sculptural Birdhouse
This charming project combines sculptural form with functional design, creating a stylized birdhouse that looks like a friendly bird itself. The piece features a soothing two-tone glaze application with speckled clay, bringing an organic, modern touch to your garden decor.
How-To Guide
Materials
- Speckled stoneware clay (approx. 3-4 lbs)
- Pottery wheel (or slab roller for hand-building)
- Needle tool
- Ribs (metal and wooden)
- Circle cutter (approx. 1.5 – 2 inches)
- Hole punch tool (small)
- Scoring tool or serrated rib
- Slip
- Celadon green glossy glaze
- Clear or white glossy glaze (food safe)
- Gold luster (optional for beak)
- Jute twine
- Sponge
Step 1: Forming the Body
-
Prepare the Clay:
Begin by thoroughly wedging your speckled stoneware clay to remove any air bubbles. Center a large ball of clay (about 3 pounds) on your wheel head. -
Throw a Closed Form:
Pull the walls up into a tall cylinder, then gradually collar the neck inward to create a teardrop or pear shape. You are aiming for a wide belly and a narrow, pointed top. -
Close the Top:
Continue collaring until the opening at the very top is completely sealed. Use a rib to smooth the closure and refine the peaked shape that will become the bird’s head. -
Refine the Profile:
Use a metal rib to smooth the exterior, removing throwing ridges and ensuring a continuous, pleasing curve from base to tip. -
Dry to Leather Hard:
Cut the form from the wheel and gently set it aside. Allow it to dry slowly until it reaches a leather-hard state where it is firm enough to carve without collapsing.
Cracks at the Beak?
If the beak cracks off during drying, you didn’t score deep enough. Use vinegar slip for a stronger bond, or wrap the beak area in plastic to slow down drying.
Step 2: Sculpting Details
-
Cut the Entrance:
Choose the ‘front’ of your bird. Using a circle cutter, remove a clean round hole in the center of the belly for the bird entrance. -
Smooth the Edges:
Use a damp sponge or finger to gently round over the sharp cut edges of the entrance hole. -
Create the Beak:
Fashion a small, triangular pyramid from a scrap of clay. Score and slip both the attachment point on the ‘face’ and the back of the beak. -
Attach the Beak:
Press the beak firmly onto the face area above the entrance hole. Smooth the seams with a modeling tool so it looks integrated, not just stuck on. -
Add the Eye:
Using a small hole punch or a drill bit, create a small, clean hole for the eye. Position it slightly back and up from the beak for a cute expression. -
Add the Hanging Loop:
Instead of a clay loop which can be fragile, punch a clean hole horizontally through the very top crest of the head. This will hold the twine later. -
Bisque Fire:
Allow the piece to dry completely (bone dry). Fire it in a electric kiln to Cone 04 (or your clay body’s bisque temperature).
Step 3: Glazing and Finishing
-
Wax Resist:
Apply wax resist to the bottom of the piece to prevent glaze from sticking to the kiln shelf. I also like to wax the inside rim of the eye to keep that detail sharp. -
Base Glaze:
Dip the bottom half of the birdhouse into a clear or white glaze, or leave it unglazed if you prefer the raw speckled clay look shown in the inspiration. -
Top Glaze Dip:
Hold the birdhouse by the base and dip the top half—at an angle—into a celadon green glaze. Let the two glaze lines overlap slightly or leave a gap depending on your preference. -
Glaze Fire:
fire the birdhouse to the maturity temperature of your clay and glaze (usually Cone 5 or 6 for stoneware). -
Gold Accent (Optional):
If you want the metallic beak look, apply a small amount of gold luster to the beak area after the glaze firing and refire at a lower temperature (usually Cone 018). -
Add the Twine:
thread a sturdy piece of natural jute twine through the hole at the top crest. Create a loop and knot it securely.
Style It Up
Try texturing the ‘belly’ area with a chattering tool before the clay dries. The celadon glaze will break beautifully over the texture, adding depth.
Hang your new ceramic friend in a protected spot and wait for the birds to move in