If you’ve got ceramic bowl energy on the brain, I’m right there with you—I could make “just one more bowl” forever. Here are my go-to ceramic bowl ideas for classic shapes, fun surfaces, and glaze moments that make a simple bowl feel totally special.
Classic Round Bowl With a Cozy Satin Glaze
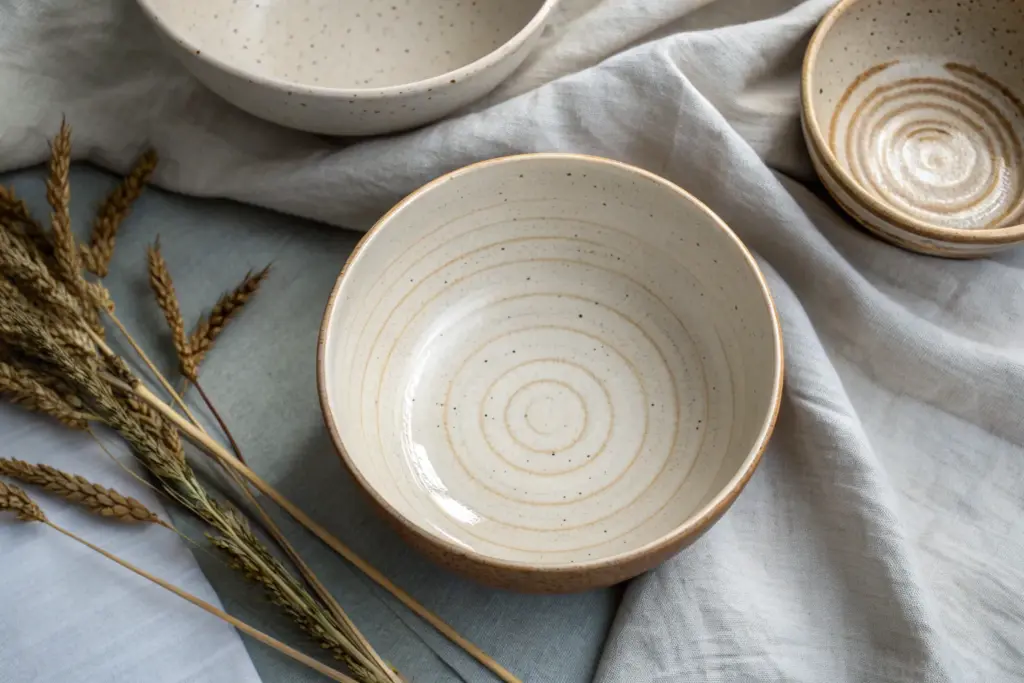
This rustic yet refined wheel-thrown bowl features a comforting, warm creamy glaze punctuated by natural clay speckles. The design highlights the raw beauty of the clay body with an exposed bottom rim, achieving a grounded, organic aesthetic perfect for everyday use.
Detailed Instructions
Materials
- Speckled stoneware clay (mid-fire)
- Pottery wheel
- Throwing sponge
- Wooden throwing rib
- Needle tool
- Wire cutter
- Trimming tools (pear-shaped and loop)
- Satin matte cream or ‘oatmeal’ dipping glaze
- Wax resist
- Sponge for smoothing
- Kiln
Step 1: Throwing the Form
-
Center the Clay:
Begin by wedging about 1.5 to 2 pounds of speckled stoneware clay to remove air bubbles. Secure it to the center of your wheel head and use firm pressure with wet hands to cone it up and down until perfectly centered. -
Open the Bottom:
Drill your thumbs into the center of the clay mound to open it, stopping about a half-inch from the wheel head. Use a needle tool to check the floor thickness if you aren’t certain. -
Establish the Floor:
Pull the clay outward towards your body to create a flat inside floor. Compress the floor thoroughly with a flat sponge or wooden rib to prevent S-cracks during drying. -
Make the First Pull:
Using a pincer grip or your knuckle, perform your first pull to bring the walls up. Focus on height rather than width at this stage, keeping the walls even. -
Shape the Curve:
On your subsequent pulls, apply gentle pressure from the inside hand to belly the wall outward. Aim for a continuous, smooth curve from the floor to the rim. -
Refine the Rim:
As you reach the top, ease off the pressure. Compress the rim with a small piece of chamois or your sponge to make it smooth and rounded, which is crucial for a comfortable drinking or eating edge. -
Smooth the Interior:
Use a flexible metal or wooden rib on the inside of the bowl while support the outside. This removes throwing lines and creates that seamless surface seen in the reference photo. -
Cut and Dry:
Run a wire tool under the base to release the pot, but don’t lift it yet. Leave it on the bat until it is leather-hard—firm enough to hold its shape but soft enough to carve.
Glaze Crawling?
If the glaze pulls back too much, leaving bare patches, your bisque might have been dusty or greasy. Always wipe bisqueware with a damp sponge before dipping.
Step 2: Trimming and Finishing
-
Center for Trimming:
Once leather-hard, invert the bowl onto the wheel. Center it perfectly and secure it with three small coils of clay (lugs). -
Define the Foot:
I prefer to use a sharp pear-shaped loop tool here. Carve away the excess clay from the lower outer wall to mirror the interior curve. -
Carve the Foot Ring:
Carve a distinct foot ring into the bottom. This lifts the bowl slightly and gives it a professional profile. -
Burnish the Texture:
Since the bottom portion will be unglazed, use the back of a spoon or a smooth stone to gently burnish the trimmed area. This presses the grog of the clay down and makes the raw clay grateful to the touch. -
Bisque Fire:
Allow the bowl to dry completely (bone dry). Load it into the kiln for a bisque fire (usually Cone 04 or 06) to prepare it for glazing.
Level_Up: Iron Oxide Wash
Brush a very diluted red iron oxide wash over the external rim before glazing. This enhances the ‘toasted’ brown edge effect seen in the photo.
Step 3: Glazing Process
-
Clean the Bisqueware:
Wipe the fired bowl with a damp sponge to remove any kiln dust, which can cause glaze defects. -
Wax the Base:
Apply wax resist to the foot ring and up the side of the bowl about one inch. This creates the ‘dipped’ look where the raw speckled clay remains visible. -
Prepare the Glaze:
Stir your satin cream glaze thoroughly. It should be the consistency of heavy cream for an even coat. -
Dip the Bowl:
Using dipping tongs, submerge the bowl into the glaze bucket. Hold for 3-5 seconds, then lift it out and shake gently to remove excess drips. -
Check the Rim:
Often, the glaze pulls slightly away from the rim, creating a beautiful toasted edge. If the glaze is too thick there, wipe it back slightly with a sponge. -
Clean Up:
Any glaze beads on the waxed area should be wiped off with a damp sponge. Ensure the foot ring is completely clean so it doesn’t fuse to the kiln shelf. -
Glaze Fire:
Fire the bowl to the maturity temperature of your clay and glaze (typically Cone 5 or 6 for stoneware). Allow the kiln to cool naturally before opening.
Once cooled, your bowl is ready to bring a touch of warm, handmade charm to your table setting


Wide-Rim Shallow Bowl for Pasta and Salads

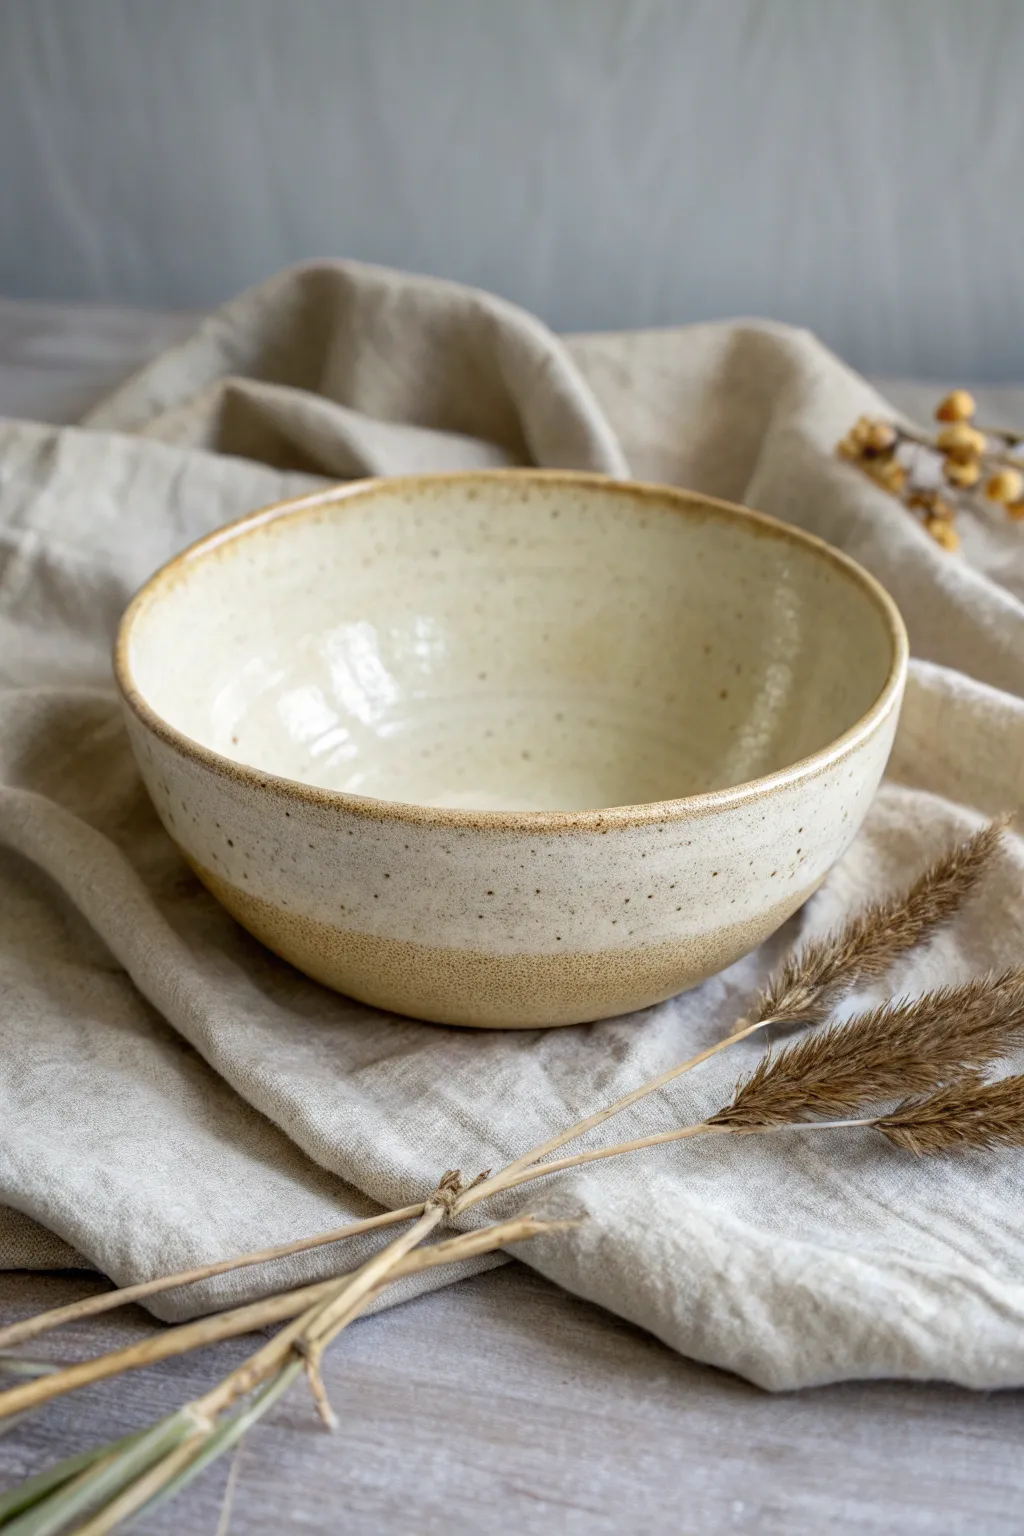
This rustic, wide-rimmed bowl features a speckled, creamy white glaze and a distinctive warm brown oxide rim that frames any meal beautifully. Its shallow, open form is perfect for showcasing fresh salads or hearty pasta dishes while maintaining a handcrafted, organic feel.
Step-by-Step Guide
Materials
- Stoneware clay (smooth or speckled body)
- Pottery wheel
- Throwing sponge
- wooden rib tool
- Metal kidney rib
- Wire cutter
- Trimming tools (loop tool)
- Cream glossy glaze (speckled or plain)
- Iron oxide wash or dark brown underglaze
- Small sponge or brush for rim
Step 1: Throwing the Form
-
Center the clay:
Start with about 2-3 lbs of well-wedged clay. Secure it firmly to the wheel head and center it, ensuring a wide, low puck shape rather than a tall cone since we are making a shallow bowl. -
Open the clay:
Open the centered clay all the way down, leaving about a 1/2 inch for the floor. Instead of pulling straight up, open the clay outwards towards your body to establish the wide floor immediately. -
Compress the floor:
Before pulling the walls, use your sponge or a wooden rib to thoroughly compress the floor. This prevents S-cracks later, which is crucial for wide, flat bottoms like this bowl. -
Pull the walls:
Pull the clay outward and upward in a gradual curve. The goal is a shallow, open shape, so keep your hands at a 45-degree angle. Don’t pull too high; this is more of a deep plate than a tall bowl. -
Shape the curve:
Use a flexible metal kidney rib on the inside of the bowl. Press gently from the center moving outwards while supporting the outside with your other hand to create a smooth, continuous interior curve. -
Define the rim:
As you reach the top edge, leave the rim slightly thicker than the walls. Use a chamois cloth or your sponge to round it off. Don’t worry if it’s not perfectly level; a little undulation adds to the rustic charm seen in the photo. -
Create texture:
For that subtle ridged look on the exterior, simply leave your throwing rings visible or lightly drag a serrated rib up the side during your final slow pull. I find this helps the glaze break beautifully later. -
Cut underneath:
Use a wooden tool to trim away excess skirt clay at the base. Run your wire cutter underneath the bowl to separate it from the wheel head, but leave it on the bat to dry until leather hard.
Step 2: Trimming and Finishing
-
Center for trimming:
Once leather hard, flip the bowl over onto a foam bat or secure it directly to the wheel with lugs of clay. Tap it to center. -
Trim the foot:
Carve away the excess clay from the bottom. Create a distinct foot ring that elevates the bowl slightly. The foot dictates how the bowl sits on the table, so make sure it’s wide enough to support the rim. -
Refine the exterior:
Smooth out any rough tool marks with a damp sponge, but keep the throwing lines you intentionally left. This is the time to sign your work on the bottom. -
Dry slowly:
Flip the bowl back onto its foot. Loosely cover it with plastic to let the rim and the thicker base dry at the same rate. This prevents warping. -
Bisque fire:
Once bone dry, load the bowl into the kiln for a bisque firing to Cone 04 (or your clay’s specific bisque temperature).
Warped Rim?
Wide bowls often warp during firing. To minimize this, ensure your walls are even thickness and dry the bowl upside down for the first day so gravity works with you.
Step 3: Glazing
-
Prep the bisque:
Wipe the bisque-fired bowl with a damp sponge to remove any dust. wax the foot ring or use liquid wax resist to keep the bottom clean. -
Apply the main glaze:
Dip the entire bowl into a bucket of speckled cream glaze. Alternatively, pour the glaze inside, swirl to coat, pour out, and then dip the exterior. Aim for a medium thickness. -
Clean the rim:
While the glaze is still powdery but dry, take a damp sponge and wipe the glaze off just the very top edge of the rim, exposing the clay body underneath. -
Apply the oxide rim:
Dip a small sponge or brush into iron oxide wash or a dark brown underglaze. Gently dab or paint it onto the exposed rim edge. Let it bleed slightly onto the cream glaze for that organic transition. -
Final Fire:
Load the glazed bowl into the kiln and fire to maturity (likely Cone 5 or 6 depending on your clay and glaze). Ensure no glaze is on the foot to prevent it from sticking to the kiln shelf.
Dual-Tone Magic
Instead of just oxide on the rim, try overlapping a second, translucent amber glaze just on the top inch. It will melt with the cream glaze creating beautiful drips.
Once cooled, your handmade ceramic bowl is ready to bring a touch of artisan warmth to your table setting


Deep Soup Bowl With a Bold Foot Ring
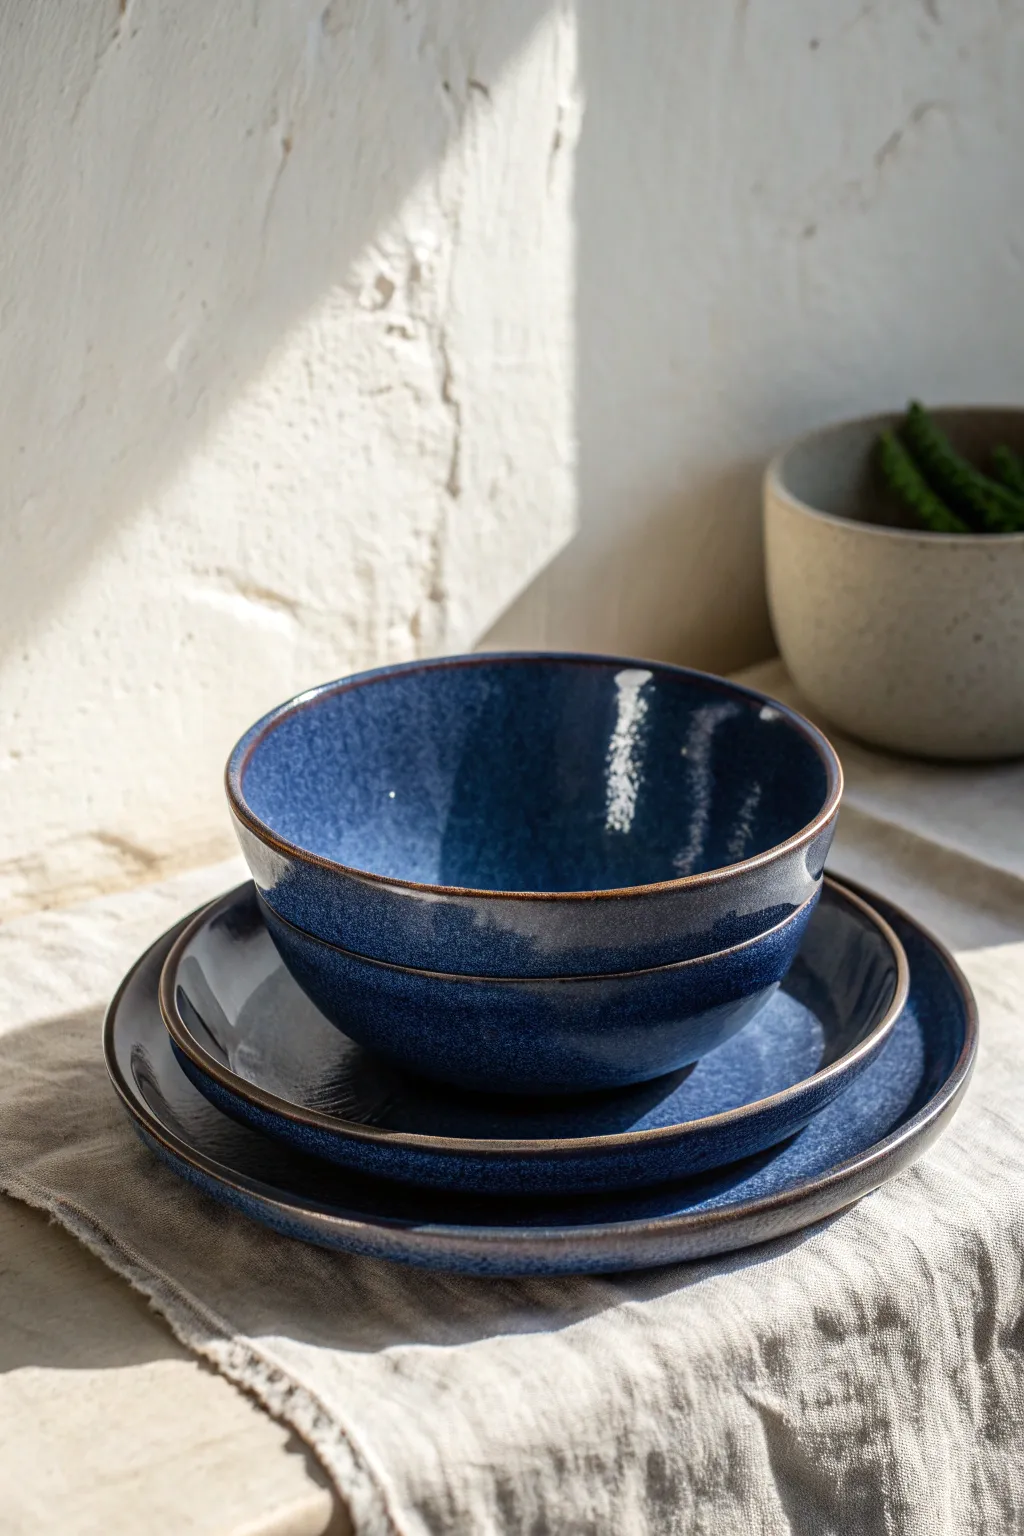
This project guides you through throwing a matching deep soup bowl and plate set, featuring a rich, reactive indigo glaze that breaks beautifully over dark clay. The exposed rim adds a warm, rustic contrast that frames your food perfectly.
How-To Guide
Materials
- Stoneware clay (buff or speckled)
- Pottery wheel
- Ribs (metal and wooden)
- Needle tool
- Wire cutter
- Trimming tools
- Sponge
- Indigo floating blue glaze (commercial or homemade recipe)
- Iron oxide wash (optional, for rims)
- Wax resist
- Kiln
Step 1: Throwing the Deep Bowl
-
Center the Clay:
Start with about 1.5 to 2 lbs of wedged stoneware clay. Slam it onto the wheel head and center it using steady pressure and water. -
Open the Form:
Open the clay down to the bat, leaving about 1/2 inch of thickness for the floor. Since this is a deep bowl with a foot, you don’t want the bottom too thin. -
Pull the Walls:
Pull the clay upward into a cylinder first. Aim for even wall thickness. I find it helpful to collar the rim slightly inward after each pull to maintain structural integrity. -
Shape the Curve:
Using a rib on the inside and a sponge on the outside, gently push the belly of the bowl out to create that generous, deep curve shown in the image. -
Define the Rim:
Compress the lip with a chamois or sponge. Slightly bevel the edge so the glaze will break away from it later, revealing that distinct brown line. -
Undercut and Wire Off:
Use a wooden knife to undercut the base, removing excess clay. Run your wire tool underneath and set the bowl aside to dry to leather hard.
Step 2: Trimming a Bold Foot
-
Secure the Bowl:
Once leather hard, center the bowl upside down on the wheel. Secure it with clay lugs or a Giffin Grip. -
Carve the Exterior:
Trim away excess weight from the lower walls to match the interior curve. The wall thickness should feel consistent from rim to foot. -
Define the Foot Ring:
Carve a distinct, tall foot ring. The image shows a bowl with significant lift, so don’t be afraid to make the foot ring slightly taller than usual. -
Burnish the Unpainted Areas:
Smooth the trimmed area with a damp sponge or a spoon back to remove grog trails, ensuring a clean surface for the glaze.
Rim Wipe Technique
Use a standard kitchen sponge attached to a stick or just your finger for stability. Rotate the piece on a banding wheel while holding the sponge steady for a perfect line.
Step 3: Glazing and Firing
-
Bisque Fire:
Load your bone-dry pieces into the kiln and bisque fire to Cone 04 (or your clay body’s recommendation). -
Clean the Bisqueware:
Wipe the bisque pieces with a damp sponge to remove any dust, which can cause pinholing in the glaze. -
Wax the Foot:
Apply wax resist to the bottom of the foot ring and a few millimeters up the side to prevent glaze from running onto the shelf. -
Apply the Glaze:
Dip the bowl into a bucket of reactive indigo or floating blue glaze. Hold it for about 3 seconds for a thick, rich coat. -
Wipe the Rim:
Immediately after dipping, take a damp sponge and carefully wipe the glaze off the very top edge of the rim. This exposes the clay body. -
Enhance the Rim (Optional):
If your clay isn’t naturally dark, lightly brush a red iron oxide wash onto the exposed rim to achieve that toasted, rusty brown edge. -
Glaze Fire:
Load the kiln again and fire to Cone 6 (or the maturity temperature of your clay and glaze). A slow cool can help develop the micro-crystals in the blue glaze.
Layering Depth
To get more visual texture, try dipping the piece in a dark base glaze first, then dip just the top two-thirds in the floated blue. The overlap creates incredible depth.
Unload your kiln to reveal a stunning set involving deep cosmic blues and earthy rims aimed at cozy soup nights


Oval Serving Bowl With Soft, Modern Curves
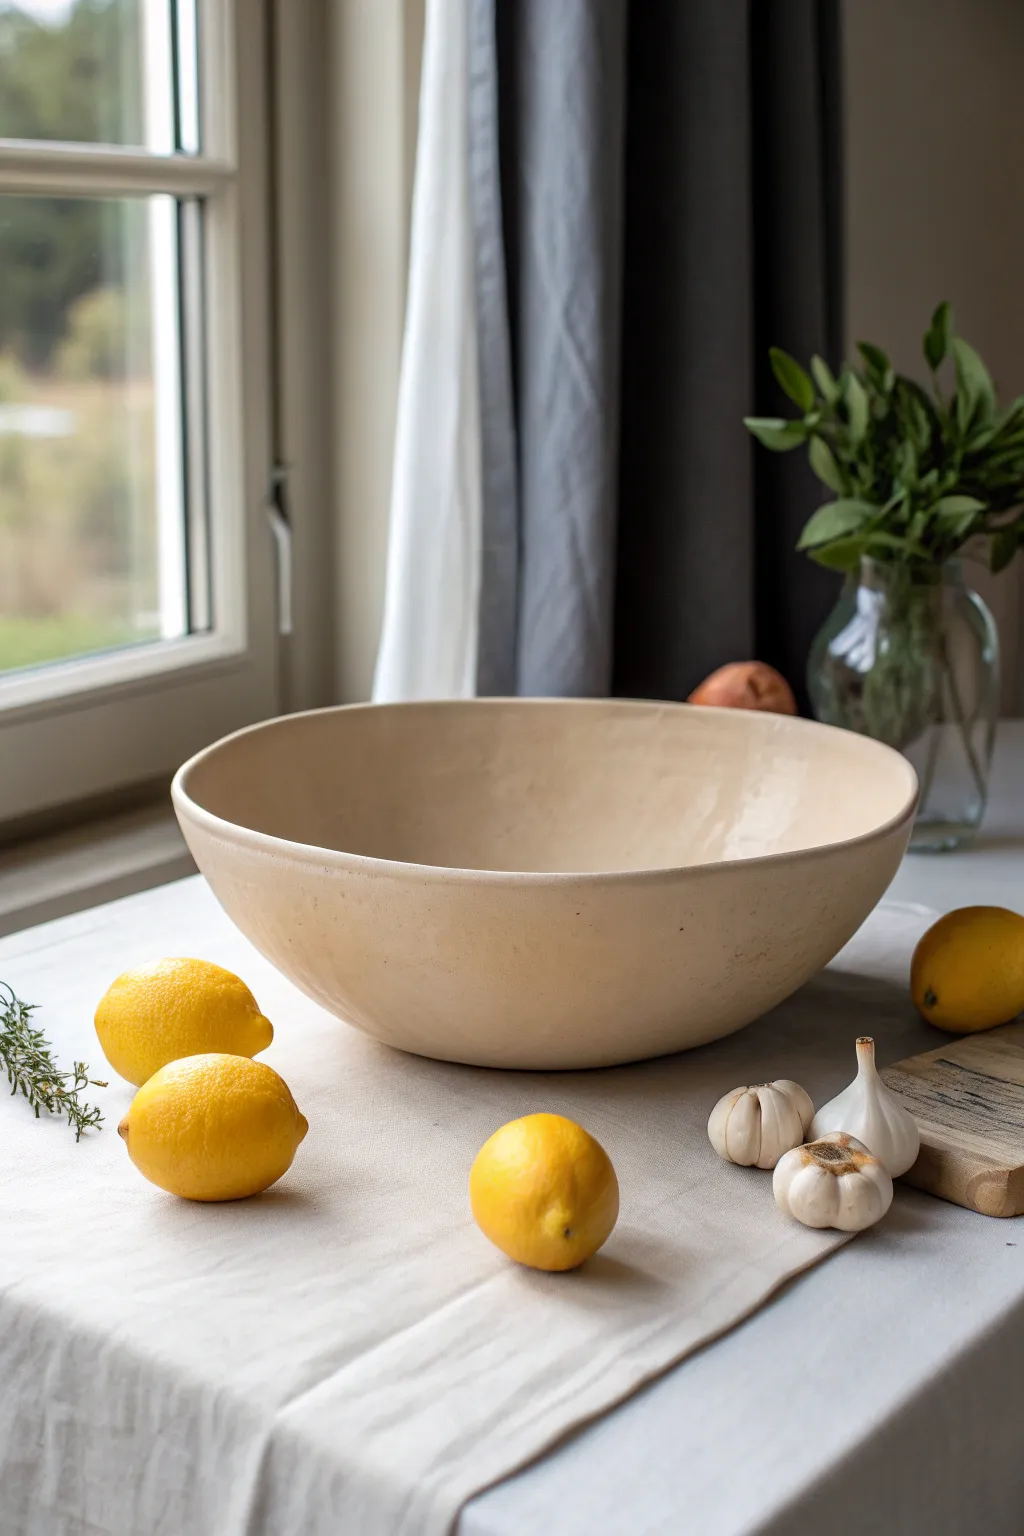
This large, hand-built serving bowl features soft, modern curves and an earthy, cream-colored finish that fits perfectly in a rustic or minimalist kitchen. Its gentle oval shape and subtle textural imperfections give it a truly artisan feel.
Step-by-Step Guide
Materials
- Stoneware clay (smooth, light-firing body)
- Rolling pin
- Canvas guide strips (approx. 3/8 inch thick)
- Canvas cloth or mat
- Large oval slum-mold (plaster or bisque)
- Soft rubber rib
- Metal kidney scraper
- Needle tool
- Sponge
- Cream/sand satin matte glaze
- Kiln
Step 1: Preparing the Slab
-
Wedge the clay:
Begin by thoroughly wedging about 5-7 pounds of stoneware clay to remove any air bubbles. This ensures the large surface area of your bowl won’t crack or warp during firing. -
Flatten the clay:
Pat the wedged ball into a thick, elongated oval pancake shape with your hands. This pre-shaping helps you get the right dimensions when you start rolling. -
Roll out the slab:
Place your canvas guide strips on either side of the clay. Using a heavy rolling pin, roll the clay out into a large, even slab. Rotate the slab occasionally to ensure it doesn’t stick to the canvas underneath. -
Compress the surface:
Once rolled, take your soft rubber rib and firmly compress the surface of the slab on both sides. This aligns the clay particles and creates that smooth, refined texture seen in the final piece.
Step 2: Shaping the Bowl
-
Drape over the mold:
Carefully lift your slab and drape it over your oval hump mold (or into a slump mold, depending on your preference). I find that slumping into a mold often creates a more defined interior curve. -
Ease into shape:
Gently press the clay against the mold, starting from the center and working your way out. Be careful not to stretch the clay too thin in any one spot. -
Trim the excess:
Using a needle tool, cut the excess clay away from the rim of the mold. Hold the tool at a distinct angle to create a beveled edge if desired, or cut straight for a blunt rim. -
Refine the rim:
Run a damp chamois or a tiny piece of plastic wrap over the cut rim to smooth it out. You want a soft, rounded edge that feels pleasant to hold.
Warped Oval?
Large open shapes love to warp. Dry very slowly under plastic for several days. If possible, weigh down the center with a small beanbag during the initial drying phase.
Step 3: Drying and Refining
-
Slow drying:
Cover the bowl loosely with plastic and let it reach leather-hard stage. Because the bowl is wide and shallow, drying it too fast can cause warping. -
Refine the form:
Once leather-hard, remove the bowl from the mold. Use a metal kidney scraper to shave away any uneven spots on the exterior and perfect the oval curve. -
Smooth with a sponge:
Wring out a sponge so it is barely damp and wipe down the entire surface. This subtle smoothing step is key to achieving that soft, modern look shown in the photo. -
Bisque fire:
Allow the bowl to dry completely (bone dry) before loading it into the kiln for a bisque firing to cone 04.
Add Speckles
To get a truly organic look, knead a small amount of granular manganese or iron oxide sand into your clay body before rolling it out.
Step 4: Glazing and Finishing
-
Prepare the glaze:
Mix your cream or sand-colored glaze thoroughly. A satin matte finish works best to replicate the natural, stone-like appearance of the reference image. -
Pour the interior:
Pour a generous amount of glaze into the bowl, swirl it to coat the entire interior surface, and pour the excess back into your bucket. -
Dipper or spray exterior:
For the exterior, you can either dip the bowl into a large tub or use a spray gun for an even application. Aim for a medium thickness to avoid drips. -
Clean the foot:
Wipe the bottom of the bowl clean with a sponge to ensure no glaze touches the kiln shelf. -
Glaze fire:
Fire the bowl to the maturity temperature of your clay and glaze (typically cone 5 or 6 for stoneware). -
Final sand:
After firing, lightly sand the bottom with wet-dry sandpaper to ensure it won’t scratch your table surface.
Now you have a stunning centerpiece ready to hold fresh lemons or serve a family salad

The Complete Guide to Pottery Troubleshooting
Uncover the most common ceramic mistakes—from cracking clay to failed glazes—and learn how to fix them fast.
Soft-Square Bowl for a Clean, Contemporary Look
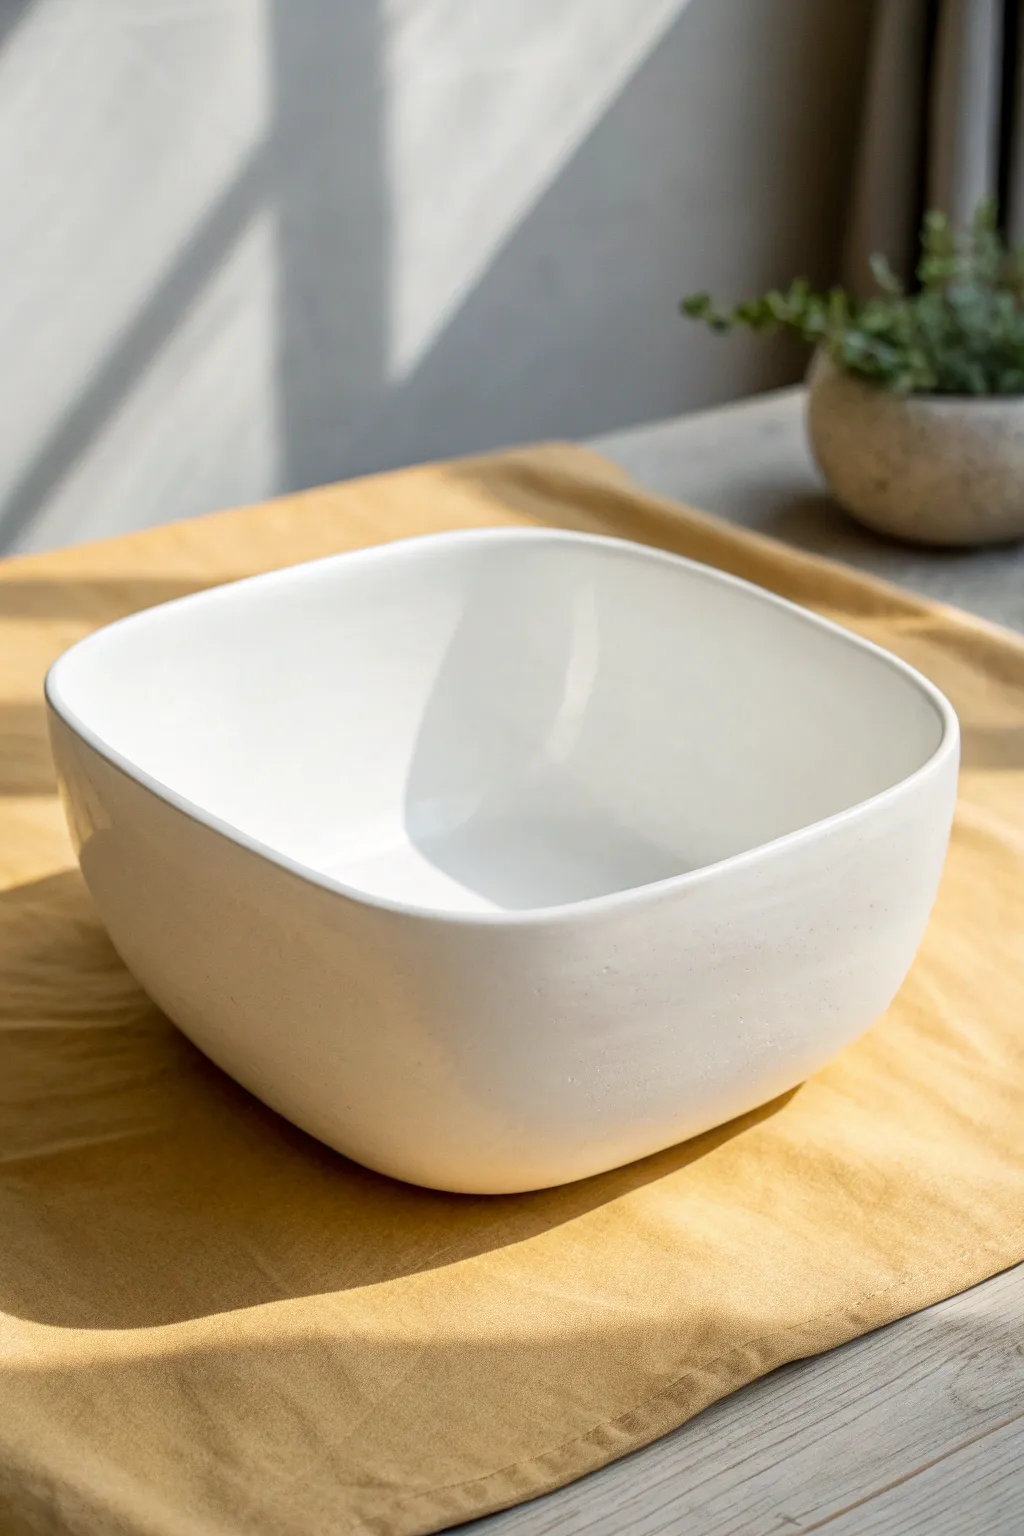
Achieve a clean, contemporary aesthetic with this soft-square ceramic bowl, featuring gently rounded corners and a smooth, minimalist profile. This project is perfect for hand-building enthusiasts looking to move away from perfectly round forms while maintaining symmetry and elegance.
Step-by-Step
Materials
- White stoneware clay body (smooth)
- Rolling pin
- Guide strips or slab roller
- Square slump mold or plaster drape mold (approx. 8-inch)
- Fettling knife or needle tool
- Rib tool (flexible metal and soft rubber)
- Sponge
- Satin or Matte White Glaze
- Scoring tool
- Slip
- Kiln
Step 1: Preparing the Slab
-
Wedge the clay:
Begin by thoroughly wedging about 3-4 pounds of white stoneware clay to remove any air bubbles and ensure the particles are aligned for strength. -
Roll out the slab:
Using a rolling pin and guide strips (or a slab roller if available), roll out a smooth, even slab. Aim for a thickness of about 3/8 of an inch, which provides durability without making the bowl too heavy. -
Compress the slab:
Take a rubber rib tool and gently compress the clay on both sides. This aligns the clay platelets to prevent cracking during drying and creates a beautifully smooth surface for your bowl.
Warping Woes?
Square shapes often want to warp back to round in the kiln. Dry extremely slowly under plastic for 3-5 days to equalize moisture stress before uncovering.
Step 2: Forming the Shape
-
Cut the base shape:
Lay your template or square mold gently on the slab to mark the size. Leave about 2-3 inches of excess clay around the perimeter to form the walls of the bowl. -
Drape the slab:
If using a drape mold, carefully lift your slab and place it over the mold. If using a slump mold, place the slab inside. Let gravity do the initial work of settling the clay into the form. -
Press into corners:
Using a damp sponge or your fingers, gently press the clay into the bottom corners of the mold. Be careful not to stretch the clay too thin in these areas; just guide it firmly into place. -
Trim the rim:
Once the clay has stiffened slightly but is still leather-hard, use a needle tool or fettling knife to trim the excess clay from the rim. Keep your knife perpendicular to the mold edge for a uniform height. -
Soften the corners:
The key to the ‘soft-square’ look is avoiding sharp angles. Use your thumb or a soft rib to push the clay in the corners outward slightly, rounding them off so the transition from side to side is fluid.
Step 3: Refining and Finishing
-
Define the rim:
After trimming, the rim might be sharp. Use a damp chamois or a wet sponge to compress and smooth the rim into a gentle curve. This prevents chipping later and feels better in the hands. -
Smooth the interior:
While the bowl is still in the mold (or just after removing if it’s sturdy enough), use a flexible metal rib to smooth the interior walls. Remove any fingerprints or canvas texture left from rolling. -
Release and dry:
Allow the clay to dry to leather-hard consistency before removing it from the mold. If you rush this steps, the square shape may warp. Once removed, check the bottom and smooth away any marks. -
Creating the foot (optional):
I like to attach a low, subtle foot ring at this stage if desired, or simply compress the bottom slightly concave so it sits flat without rocking. -
Final drying:
Cover the bowl loosely with plastic to let it dry slowly and evenly, especially around the rim and thick corners. Once bone dry, bisque fire the piece according to your clay body’s specifications.
Add Subtle Texture
Before the clay hardens, press a linen cloth gently onto the exterior. The weave adds a tactile, organic softness that complements the matte glaze perfectly.
Step 4: Glazing
-
Clean the bisque:
Wipe the bisque-fired bowl with a damp sponge to remove dust, ensuring the glaze adheres properly. -
Apply glaze:
Pour a satin white glaze into the interior, swirl it to coat evenly, and pour out the excess. For the exterior, dipping is best for a seamless finish, but brushing works if you apply three flowing coats. -
Smooth imperfections:
Check for any drips or pinholes. Gently rub any powdery drips with a clean, dry finger to smooth them out before firing. -
Glaze firing:
Load the kiln, making sure the bowl doesn’t touch other pots. Fire to the maturity temperature of your glaze and clay body.
Now you have a serene, minimalist vessel ready to hold fruit on your table or serve a warm meal
Nesting Bowl Set With a Cohesive Color Palette
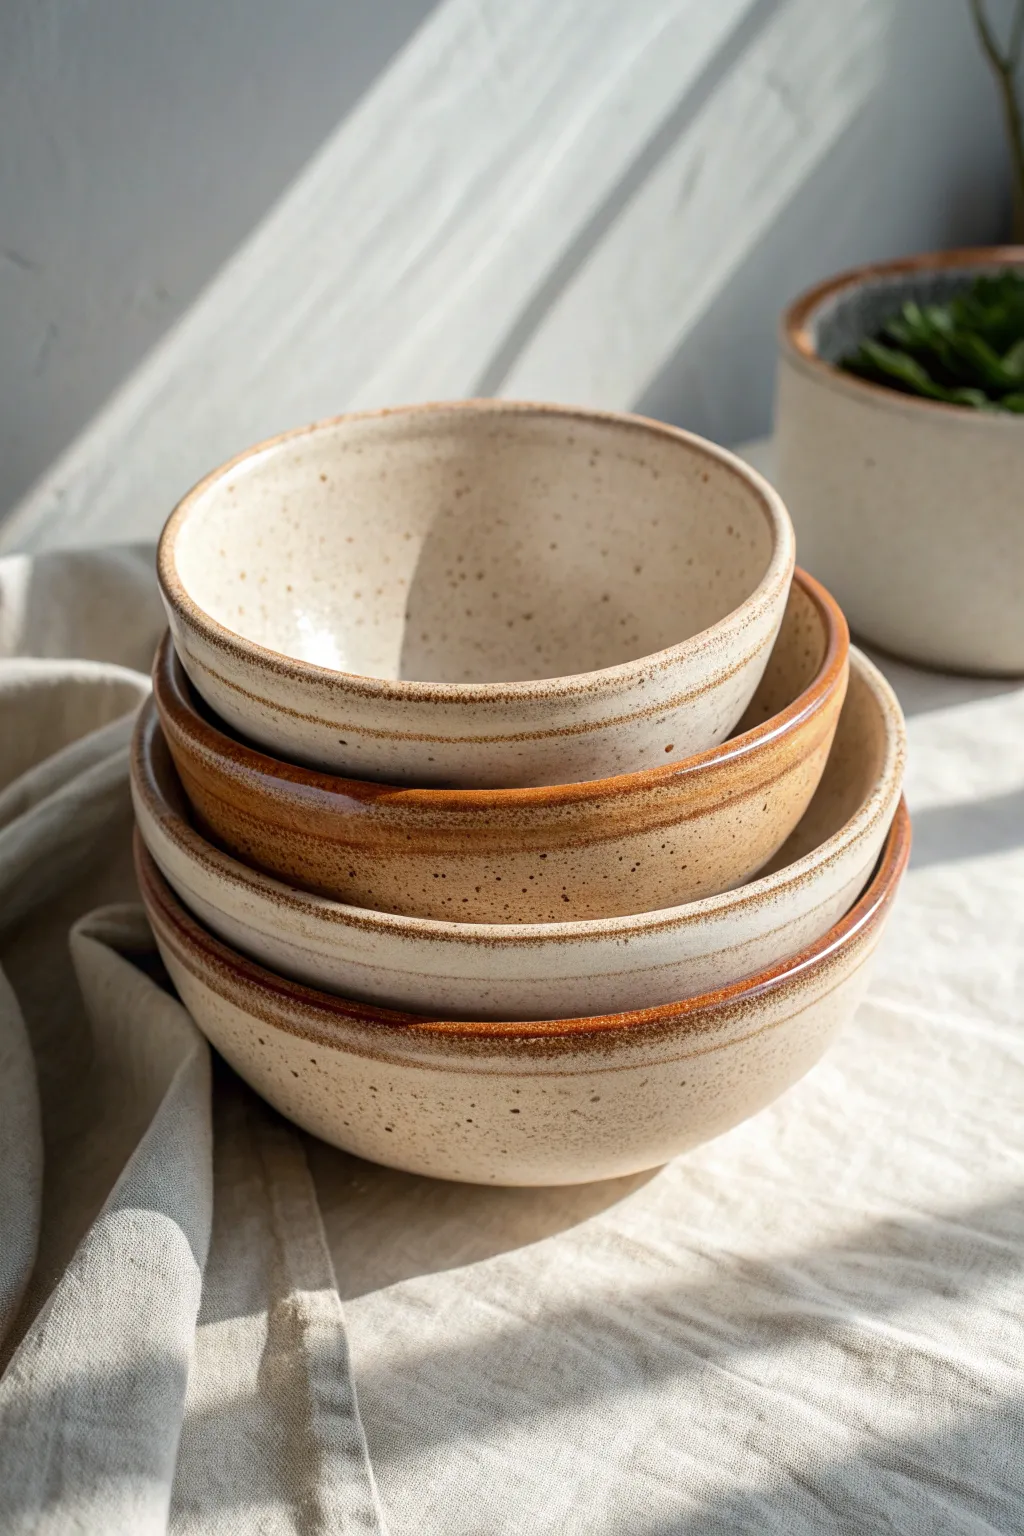
Create a stunning set of functional nesting bowls that balance modern minimalism with earthy warmth. These wheel-thrown vessels feature a classic speckled cream glaze paired with a raw, oxide-stained rim to highlight the natural beauty of the clay body.
Step-by-Step Guide
Materials
- Speckled stoneware clay (approx. 5 lbs)
- Pottery wheel
- Throwing sponge and bucket
- Needle tool
- Wire cutter
- Ribs (wooden and metal)
- Trimming tools (loop tools)
- Calipers or ruler
- Iron oxide wash (Red Iron Oxide mixed with water)
- Speckled cream or matte white glaze
- Wax resist
- Sponge or small brush for oxide application
- Kiln
Step 1: Planning and Throwing
-
Weigh and wedge:
Begin by separating your clay into four graduated measurements. For a standard set, I suggest balls weighing 2 lbs, 1.5 lbs, 1 lb, and 0.5 lbs to ensure significant size differences. -
Center the first ball:
Starting with the largest amount of clay, slam it onto the wheel head and center it using firm pressure and water until it spins perfectly without wobbling. -
Open and widen:
Open the clay down to within a half-inch of the bat. Pull the floor outward to establish a wide, gentle curve rather than a flat bottom, which helps with the nesting shape. -
Pull the walls:
Pull the walls upward, angling them slightly outward. Aim for a 45-degree angle that mimics a classic cereal bowl shape, keeping the rim slightly thicker than the walls for durability. -
Shape with a rib:
Use a flexible metal or rubber rib on the interior while supporting the outside. Compress the curve to remove throwing lines and create that smooth, seamless interior surface seen in the image. -
Measure diameter:
Before cutting the bowl off, measure the rim diameter with calipers. Record this number so you can ensure the next bowl is roughly 1.5 to 2 inches smaller. -
Finish the rim:
Chamois or lightly compress the rim with your sponge to round it off perfectly. This comfortable edge is crucial since the rim will be unglazed. -
Repeat the process:
Throw the remaining three bowls, decreasing the size for each one based on your measurements to ensure they will stack neatly inside one another.
Wobbly stack?
If bowls don’t nest flat, your foot rings may be too narrow or tall. When trimming, hold the smaller bowl inside the foot of the larger one to test the fit before firing.
Step 2: Trimming and Refining
-
Dry to leather hard:
Allow the bowls to dry slowly until they are leather hard—firm enough to handle without deforming but soft enough to carve. -
Center for trimming:
Invert the first bowl on the wheel. Secure it with clay lugs or use a Giffin Grip to keep it perfectly centered. -
Trim the foot:
Using a loop tool, trim away excess weight from the bottom. Carve a distinct foot ring, mimicking the curve of the interior bowl to keep wall thickness consistent. -
Smooth the exterior:
Run a metal rib or the back of a spoon over the trimmed areas to burnish the grog back into the clay, ensuring a smooth surface for the glaze. -
Bisque fire:
Once bone dry, load the bowls into the kiln and bisque fire them to Cone 04 (or your clay’s specific bisque temperature).
Variation: Texture
Before the clay dries, gently press a coarse fabric or rasp against the lower exterior to add tactile contrast to the smooth interior glaze.
Step 3: Glazing and Finishing
-
Wax the foot:
Apply wax resist to the bottom foot ring of each bowl to prevent glaze from sticking to the kiln shelf. -
Apply oxide to rim:
Dip a sponge or small brush into your Iron Oxide wash. Wipe it onto the top 1/4 inch of the rim and the very top edge. Wipe away any excess with a clean damp sponge, leaving just a warm stain. -
Prepare the glaze:
Stir your speckled cream glaze thoroughly. If the glaze is too thick, the speckles might hide; if too thin, it may streak. -
Pour the interior:
Pour glaze inside the bowl, swirl it quickly to coat the entire interior, and pour out the excess. Wipe any drips off the rim immediately. -
Dip the exterior:
Hold the bowl by the foot and dip the exterior into the glaze bucket, stopping just below the oxide-washed rim. You want a distinct line where the glaze meets the raw, stained clay. -
Clean up:
Check the rim again. If glaze splashed onto the oxide band, gently sponge it off so the brown rim remains distinct and matte. -
Final glaze fire:
Load the kiln carefully, ensuring the bowls do not touch. Fire to maturity (usually Cone 5 or 6 for stoneware).
Stack your finished set on the counter to admire the beautiful gradient of sizes and the cohesive color palette


What Really Happens Inside the Kiln
Learn how time and temperature work together inside the kiln to transform clay into durable ceramic.
Inside-Outside Contrast Bowl With a Surprise Interior
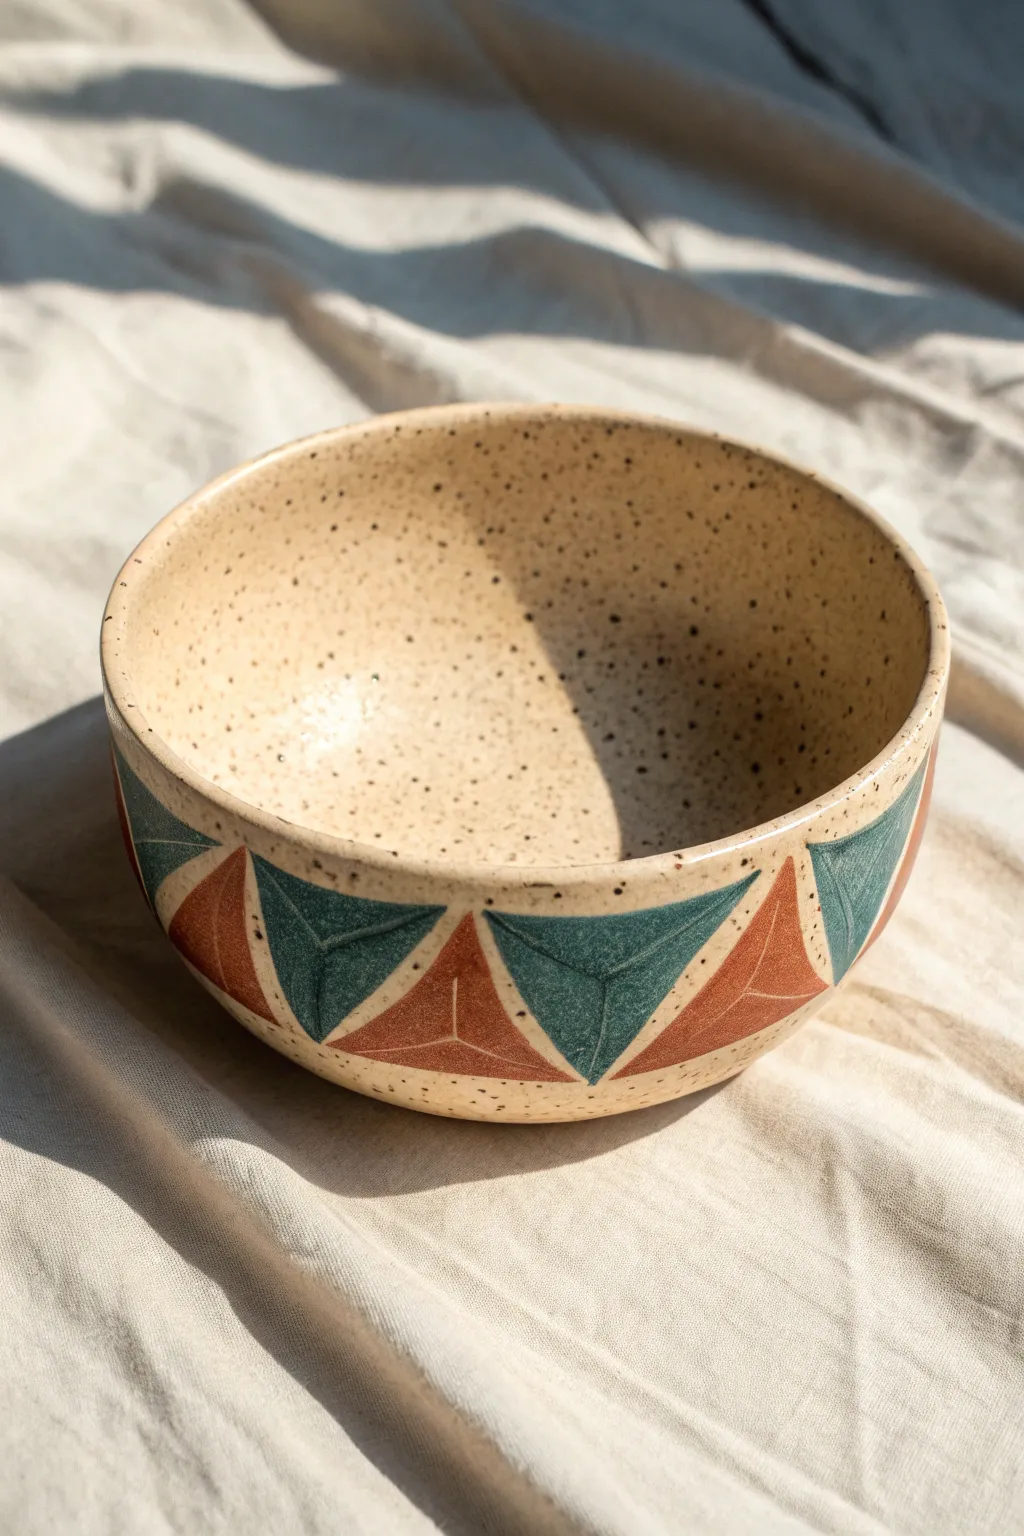
Create a striking piece of functional art that balances a quiet, speckled interior with a bold, retro-inspired geometric exterior. This ceramic project celebrates the natural beauty of spotted clay while introducing a rhythmic pattern of alternating teal and terracotta triangles.
Detailed Instructions
Materials
- Speckled buff stoneware clay
- Potter’s wheel (or slab roller/rolling pin for hand-building)
- Wooden modeling tools
- Sponge
- Cutting wire
- Carving tool or sgraffito tool
- Small flat glazing brush
- Deep teal underglaze
- Terracotta or rust-red underglaze
- Clear or transparent matte glaze
- Ruler or flexible measuring tape
- Pencil
Step 1: Forming the Bowl
-
Preparation:
Begin by wedging about 1.5 to 2 pounds of speckled buff stoneware clay to remove any air bubbles. Having a consistent clay body is crucial for that lovely spotted finish later on. -
Centering:
Throw the clay onto the wheel head and center it effectively. Ensure your hands are wet to reduce friction as you work the clay up and down into a cone and back into a puck. -
Opening:
Open the centered clay to your desired depth, leaving about a half-inch thickness at the bottom for trimming a foot ring later. -
Pulling walls:
Pull the walls up and outward to create a classic curve. Aim for a generous, open shape that allows the interior speckles to catch the light. -
Refining:
Compress the rim with a chamois or sponge to smooth it out. Use a rib tool on the interior to remove throwing lines if you want a perfectly smooth surface, or leave slight spiral marks for texture. -
Drying:
Wire the bowl off the bat and let it dry to a leather-hard state. I find that covering the rim lightly while letting the foot dry helps prevent uneven shrinkage.
Clean Lines?
If your hand is shaky, apply thin auto-detailing tape or masking tape to mark off the triangle boundaries before painting. Peel it off before the underglaze fully hardens.
Step 2: Trimming and Carving
-
Trimming the foot:
Flip the leather-hard bowl onto the wheel. Anchor it with clay lugs and trim a defined foot ring, removing excess weight from the bottom curves. -
Marking the grid:
Using a flexible measuring tape, divide the circumference of the bowl’s exterior into even sections. Lightly mark vertical lines with a pencil to guide your triangle placement. -
Drafting triangles:
Lightly sketch alternating triangles around the band of the bowl. One should point up, the next down. Leave a small gap between them for the unglazed clay line. -
Incising lines:
Use a carving tool to gently score the outlines of your triangles. You can also carve a faint ‘mid-line’ down the center of each triangle to give the illusion of a folded 3D shape.
Step 3: Glazing and Decoration
-
Bisque firing:
Once bone dry, fire the piece to bisque temperature (usually cone 04) to prepare it for glazing. -
Painting teal sections:
Using a small flat brush, carefully apply three coats of deep teal underglaze to the downward-pointing triangles. Let each coat dry slightly before applying the next. -
Painting terracotta sections:
Apply the rust-red underglaze to the upward-pointing triangles. be careful to stay within your incised lines to keep the edges crisp and clean. -
Wax resist (optional):
If you are worried about the clear glaze running, you can apply a thin line of wax resist over the unglazed gaps between the triangles. -
Final glazing:
Dip the entire bowl into a clear or transparent matte glaze. This will seal the underglaze and make the natural clay speckles pop without obscuring your design. -
Glaze firing:
Fire the bowl to the final maturity temperature of your clay body (likely cone 5 or 6). Allow the kiln to cool completely before opening.
Add Depth
For a 3D effect, paint one half of each triangle with a slightly lighter shade of the same color. This mimics light hitting a faceted surface.
Enjoy your customized bowl morning after morning as the perfect vessel for warm oatmeal or fresh fruit
Two-Tone Dip Glaze Bowl With a Crisp Horizon Line
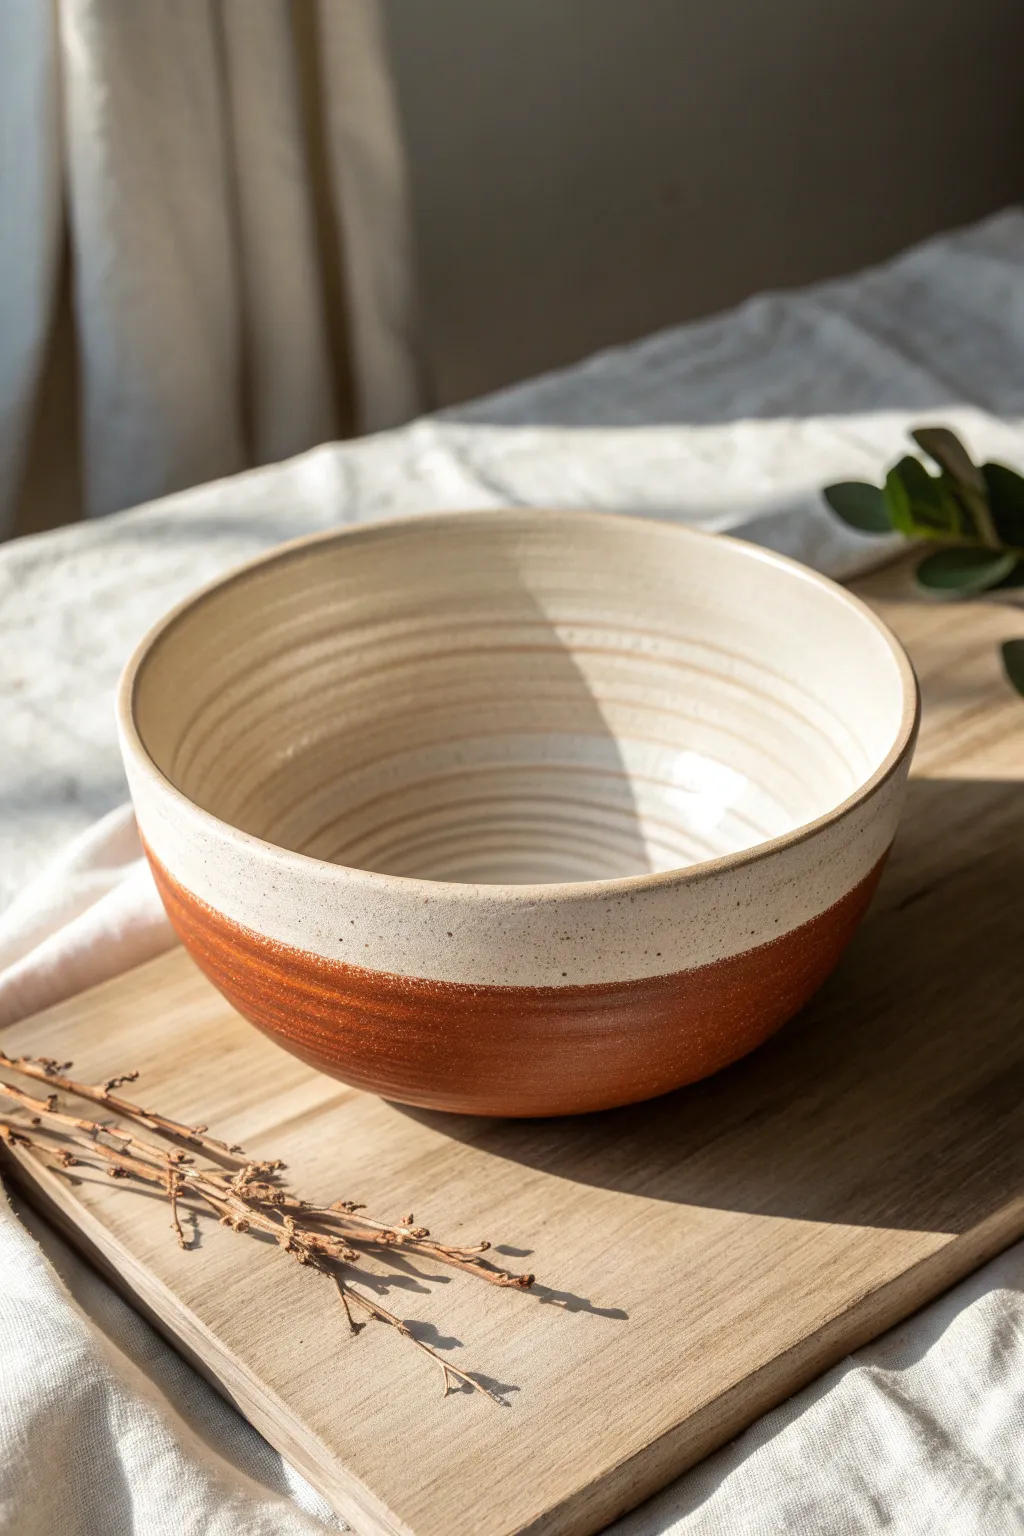
This project celebrates the beauty of raw clay contrasting with a satiny, speckled glaze. By creating a sharp horizon line, you achieve a modern, minimalist aesthetic that highlights the texture of the stoneware while keeping the interior perfectly food-safe.
How-To Guide
Materials
- Stoneware clay body (red or terracotta firing)
- Pottery wheel
- Throwing tools (sponge, needle tool, rib)
- Trimming tools (loop tool)
- White or cream speckled matte glaze
- Wax resist (liquid wax emulsion)
- Glaze tongs (optional)
- Sponge and bucket of water
- Kiln
Step 1: Throwing the Form
-
Select your clay:
Begin with about 1.5 to 2 pounds of iron-rich stoneware clay. The reddish-brown color is crucial for the final look, as the unglazed base provides that beautiful terra cotta contrast. -
Center and open:
Center your clay on the wheel head and open it up, focusing on creating a smooth, curved interior bottom rather than a flat floor. -
Pull the walls:
Pull the walls up and outward to create an open hemispherical shape. Aim for an even thickness of about 1/4 inch throughout the wall. -
Refine the interior texture:
Instead of smoothing the inside perfectly with a rib, use your fingertips or a soft sponge to leave subtle spiral throwing lines as you pull up. These ridges will catch the glaze later and add visual depth. -
Shape the rim:
Compress the rim with a chamois or sponge. Keep the rim simple and slightly rounded—it shouldn’t be too sharp or too thick. -
Wait for leather hard:
Cut the bowl from the bat and let it dry slowly to a leather-hard state. It should be firm enough to handle without deforming but still cool to the touch.
Uneven Glaze Line?
If you struggle to get a straight dip line, wrap masking tape around the bowl before dipping. Peel it off immediately while the glaze is wet to prevent chipping.
Step 2: Trimming and Prep
-
Trim the foot:
Center the bowl upside down on the wheel. Use a loop tool to trim away excess weight from the base, creating a defined foot ring that lifts the bowl slightly. -
Smooth the exterior:
While trimming, use a metal rib to burnish the lower portion of the bowl slightly. This compresses the clay particles and makes the raw section feel nicer to touch. -
Bisque fire:
Once fully bone dry, load the bowl into the kiln for a bisque firing (usually to Cone 04 or 06). This prepares the clay to accept the glaze without dissolving.
Pro Tip: Make the Ridges Pop
For better emphasis on the interior throwing rings, use a glaze that ‘breaks’ over texture. A slightly thinner glaze application helps settle into the grooves.
Step 3: Glazing the Horizon
-
Clean the bisque:
Wipe the bisque-fired bowl with a damp sponge to remove any kiln dust. This ensures the glaze adheres properly. -
Prepare the glaze:
Mix your white speckled matte glaze thoroughly. It should be the consistency of heavy cream. If it’s too thin, the speckles won’t show; too thick, and it might crawl. -
Interior pour:
Pour a generous amount of glaze into the bowl. Roll it around quickly to coat the entire interior surface up to the rim, then pour the excess back into your bucket. -
Clean the rim immediately:
While the glaze is still wet, swipe your finger or a sponge around the rim if any drips occurred, though for this look, we want the rim fully coated. -
The dip technique:
Hold the bowl by the foot (or use glaze tongs for a better grip). Invert it and dip it straight down into the glaze bucket. Stop exactly halfway down the exterior wall. -
Hold and lift:
Hold the bowl in the glaze for about 3 seconds to build up opacity, then lift it straight up. Do not shake it excessively—let the drips fall back into the bucket naturally. -
Check the line:
Turn the bowl upright. Inspect the “horizon line” where the glaze ends. If there is a heavy drip forming that ruins the straight line, gently dab it with a sponge or finger before it dries. -
Clean the base:
Double-check that no stray splashes of glaze have landed on the unglazed bottom section or the foot ring. Wipe them away cleanly with a sponge.
Step 4: Final Firing
-
Load the kiln:
Place the bowl on a kiln shelf. Since the foot is unglazed, you don’t need stilts, but always ensure the foot is completely clean. -
Glaze fire:
Fire the kiln to the maturity temperature of your clay and glaze (typically Cone 5 or 6 for stoneware). Follow a medium speed firing schedule. -
Cool and sanding:
Once the kiln cools, unload your bowl. I usually like to take a piece of 400-grit sandpaper and run it lightly over the unglazed bottom to make the clay feel extra smooth against the table.
Enjoy using your new bowl for everything from morning cereal to serving salads, admiring that perfect handmade contrast daily.

TRACK YOUR CERAMIC JOURNEY
Capture glaze tests, firing details, and creative progress—all in one simple printable. Make your projects easier to repeat and improve.
Speckled Stoneware Bowl for That Earthy Handmade Vibe
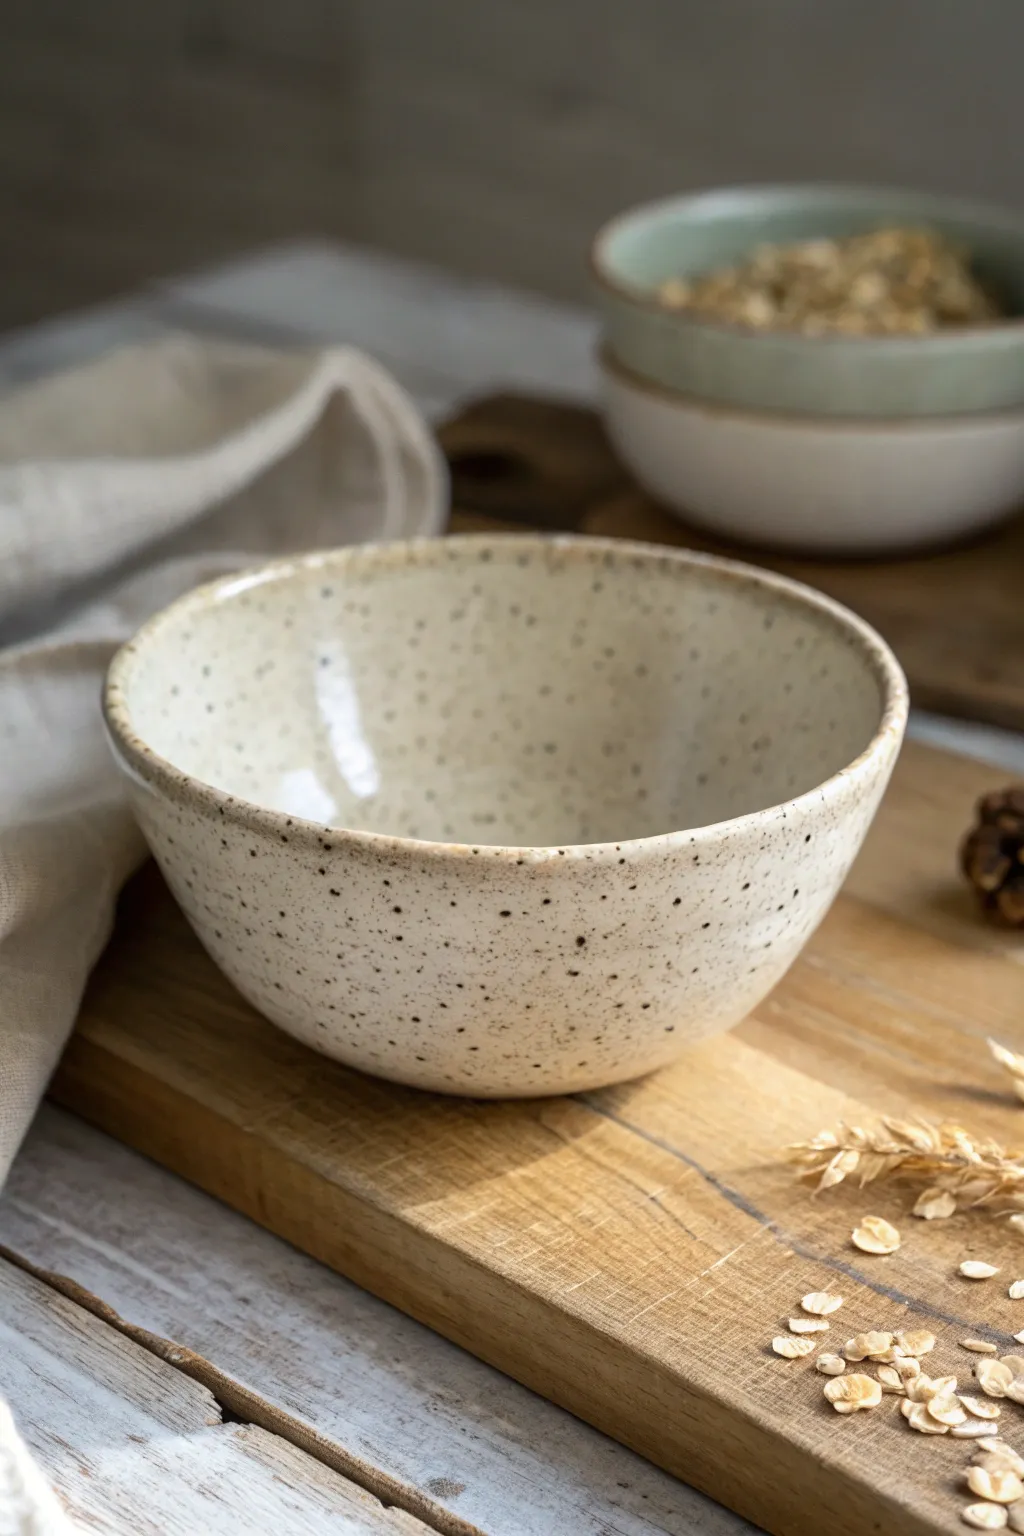
Bring the warmth of a rustic farmhouse kitchen into your home with this charming speckled stoneware bowl. With its creamy glaze, dark mineral flecks, and organic, hand-thrown shape, this piece perfectly captures that coveted earthy, handmade aesthetic.
Step-by-Step
Materials
- Speckled stoneware clay (e.g., buff with manganese specks)
- Pottery wheel
- Throwing sponge
- Wire cutter
- Needle tool
- Wooden rib tool
- Loop trimming tools
- Clear or translucent cream glaze (cone 5/6 compatible)
- Kiln
- Bat for wheel
Step 1: Throwing the Form
-
Prepare the Clay:
Begin by wedging about 1.5 to 2 pounds of speckled stoneware clay. Thorough wedging is crucial to remove air bubbles and evenly distribute the speckling material throughout the body. -
Center on the Wheel:
Slam the ball of clay onto the center of your wheel bat. Using wet hands and steady pressure, cone the clay up and press it down until it feels perfectly centered and smooth. -
Open the Clay:
Press your thumbs into the center of the spinning mound to create the opening, leaving about a half-inch thickness at the bottom for the foot. Pull the floor outward to establish the width of your bowl. -
Compress the Floor:
Use a damp sponge or your fingertips to compress the bottom of the bowl, moving from the center out to the right. This step is vital to prevent S-cracks during the drying process. -
Pull the Walls:
With steady hands, begin pulling the walls upward. Keep your inside and outside fingers directly opposite each other, gently squeezing the clay up to gain height and thin out the walls. -
Shape the Bowl:
On your subsequent pulls, apply slightly more pressure from the inside to push the belly of the bowl outward. Aim for a continuous, gentle curve from the floor to the rim. -
Refine the Rim:
Once you have your desired shape, slow the wheel down. Use a small piece of chamois leather or your sponge to compress and smooth the rim. I like to leave it slightly rounded to enhance the cozy feel. -
Clean Up:
Use the angled edge of a wooden rib to scrape away excess clay or slurry from the base of the pot where it meets the bat. Use your wire tool to cut under the bowl.
Wobbly Rims?
If the rim goes uneven during throwing, don’t slice it off yet. Use a needle tool to trim just the top 1/8th inch while the wheel spins fast to re-level it.
Step 2: Trimming and Finishing
-
Leather Hard Stage:
Allow the bowl to dry slowly until it reaches a leather-hard state. The clay should be firm enough to hold its shape when handled but still soft enough to carve easily. -
Center for Trimming:
Place the bowl upside down on the wheel head. Tap it into the center and secure it in place using three small coils of soft clay pressed against the rim. -
Trim the Profile:
Using a sharp loop tool, shave away excess clay from the lower outer walls to match the curve of the interior. This reduces weight and refines the silhouette. -
Carve the Foot Ring:
Define a foot ring at the base. Carve out the center area inside the ring so the bowl sits solely on the raised circle of clay. Smooth any sharp edges with a damp sponge. -
Bisque Fire:
Let the bowl dry completely to the bone-dry stage. Load it into the kiln and bisque fire it to roughly Cone 04 to prepare it for glazing.
Make it a Set
Weigh your clay balls precisely before throwing. Use a ruler or throwing gauge to measure height and width to ensure every bowl matches perfectly.
Step 3: Glazing
-
Wax the Foot:
Apply wax resist carefully to the bottom of the foot ring. This prevents the glaze from sticking to the kiln shelf during the final firing. -
Mix the Glaze:
Stir your translucent cream or clear glaze thoroughly. If your clay doesn’t have specks, you can add iron filings or granular ilmenite to the liquid glaze now. -
Apply Glaze:
Pour the glaze inside the bowl, swirl it to coat the entire interior, and pour out the excess. Immediately dip the exterior of the bowl into the glaze bucket for an even coat. -
Clean the Foot:
Despite the wax, check the foot ring. Use a damp sponge to wipe away any stray drips of glaze that might have beaded up on the wax. -
Glaze Fire:
Load the bowl into the kiln for the final glaze firing (typically Cone 5 or 6, depending on your clay and glaze). This high heat brings out the toasty color of the clay and melts the specks through the glaze.
Once cooled, fill your new bowl with warm oatmeal or soup and enjoy the cozy feeling of eating from your own creation
Botanical Imprint Bowl With Leaf Texture
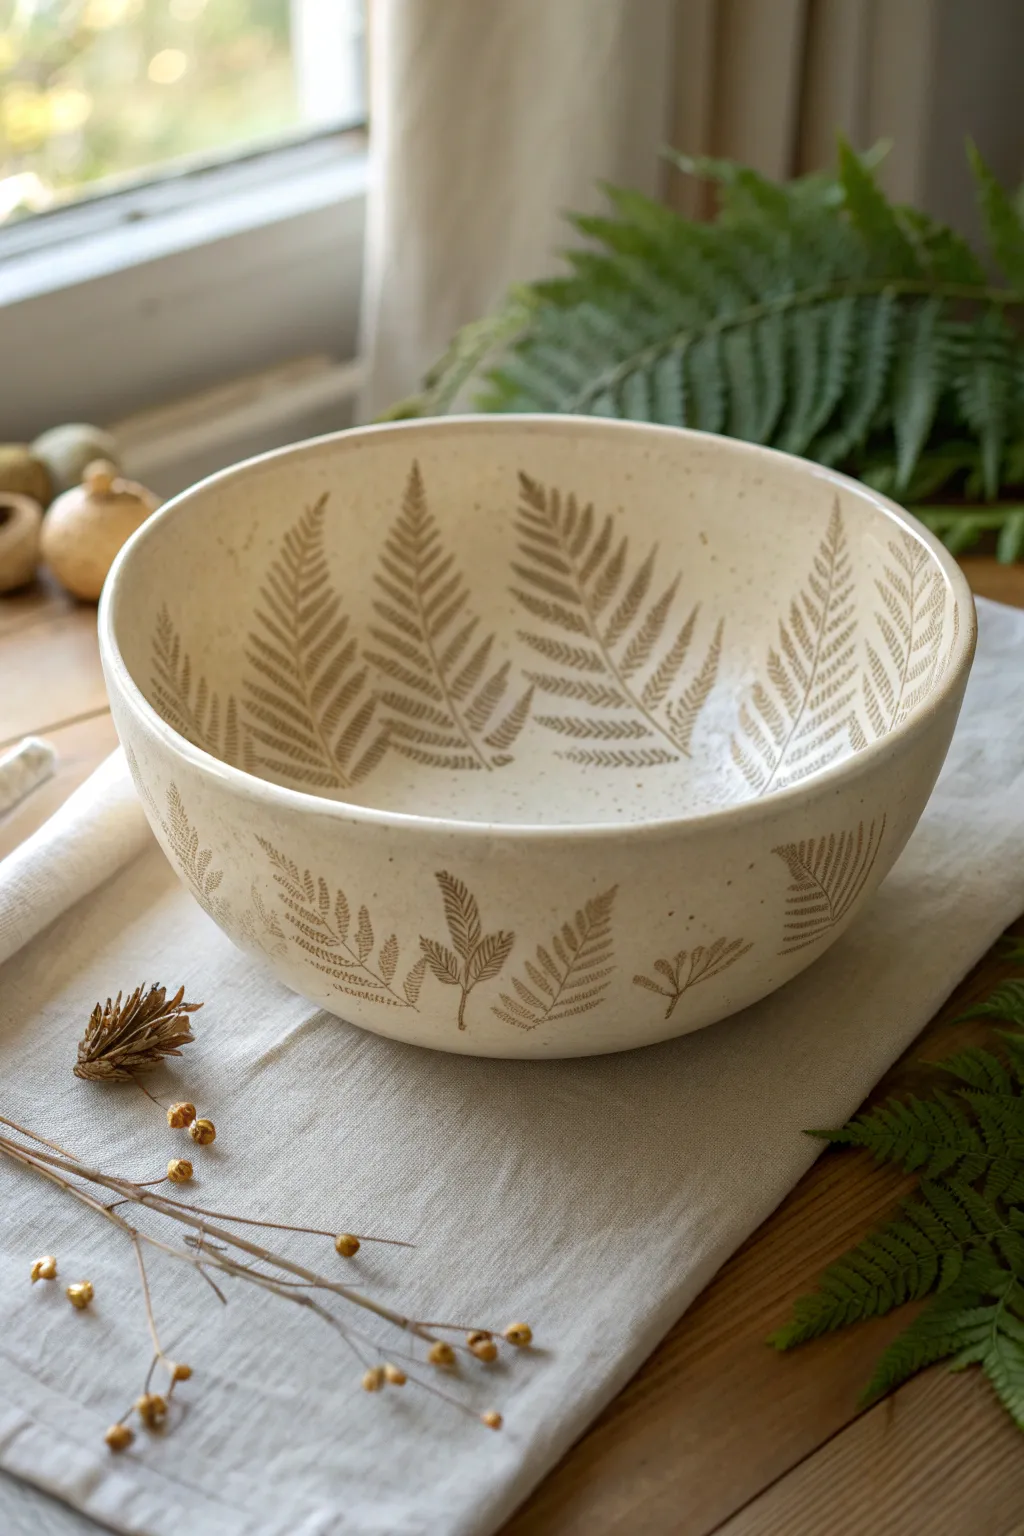
Bring the tranquility of the woods into your home with this speckled stoneware bowl, featuring delicate botanical impressions. By pressing real fern fronds into soft clay and highlighting them with an iron oxide wash, you’ll create a functional piece that feels both rustic and refined.
Detailed Instructions
Materials
- Speckled stoneware clay (approx. 3-4 lbs)
- Pottery wheel (or slab roller/rolling pin for hand-building)
- Fresh fern leaves (sturdy varieties work best)
- Ribs (wooden and metal)
- Sponge
- Cutting wire
- Needle tool
- Rolling pin or pony roller
- Iron oxide wash (or a dark underglaze)
- Clear or transparent matte glaze
- Soft paintbrush
- Clean wiping sponge
Step 1: Forming the Bowl
-
Prepare your clay:
Begin by thoroughly wedging about 3 to 4 pounds of speckled stoneware clay to remove air bubbles and ensure a uniform consistency. -
Center and open:
Secure the clay to your wheel head and center it. Open the mound to create the floor of your bowl, aiming for a gentle, continuous curve rather than a flat bottom. -
Pull the walls:
Pull the walls up and out to form a wide, deep bowl shape. Keep the rim slightly thick to support the width, smoothing the interior curve with a rib tool to ensure a perfect canvas for your leaves. -
Refine the rim:
Use a chamois or a damp sponge to compress and round the rim. This not only looks better but prevents chipping later on. -
Initial dry:
Allow the bowl to dry to a soft leather-hard stage. It needs to be firm enough to handle without warping, but soft enough to accept an impression. -
Trim the foot:
Flip the bowl over and trim a defined foot ring. This gives the bowl visual lift and elegance.
Leaves tearing?
If leaves stick or tear when peeling, the clay might be too wet. Let the clay stiffen slightly, or lightly dust the leaf back with cornstarch before rolling.
Step 2: Applying the Botanicals
-
Select your ferns:
Choose fresh fern leaves with distinct veins. If the leaves are too stiff, I find pressing them flat under a book for an hour helps them conform to the curve of the bowl. -
Placement strategy:
Plan your design. For this look, you want ferns climbing up from the center inside, and wrapping horizontally around the exterior. -
Pressing the exterior:
Lightly mist the exterior clay surface. Lay a fern leaf against the side and use a pony roller or small hand roller to firmly press the leaf into the clay until it is flush with the surface. -
Pressing the interior:
Repeat the process on the inside. Be gentle here; support the outside of the bowl with one hand while rolling the interior leaves to prevent distorting the wall. -
Peel and reveal:
Carefully find the stem edge of each leaf and peel it away to reveal the detailed impression. Clean up any rough clay burrs with a soft brush. -
Bisque fire:
Let the bowl dry completely (bone dry) before loading it into the kiln for a bisque firing (usually cone 04 or 06).
Step 3: Glazing and Finishing
-
Apply oxide wash:
Once bisqued, mix your iron oxide with water to a watercolor consistency. Brush this wash liberally into all the fern impressions. -
Wipe back:
Using a clean, damp sponge, wipe away the excess oxide from the high points of the clay. The dark color should remain only in the deep veins of the leaf texture. -
Glazing:
Dip the entire bowl into a clear or transparent matte glaze. A transparent glaze is crucial here so the speckled clay body and the oxide-filled leaves show through. -
Clean the foot:
Wipe the foot ring completely clean of glaze to prevent it from sticking to the kiln shelf. -
Final firing:
Fire the bowl to the maturity temperature of your clay (typically cone 5/6 for stoneware).
Add depth
Try layering different sized ferns over each other. Press the first one, remove it, then press a smaller one overlapping slightly for a dense forest look.
Now you have a stunning, nature-inspired vessel ready for your table or to display as a centerpiece
Hand-Painted Wildflower Bowl on a Milky White Base
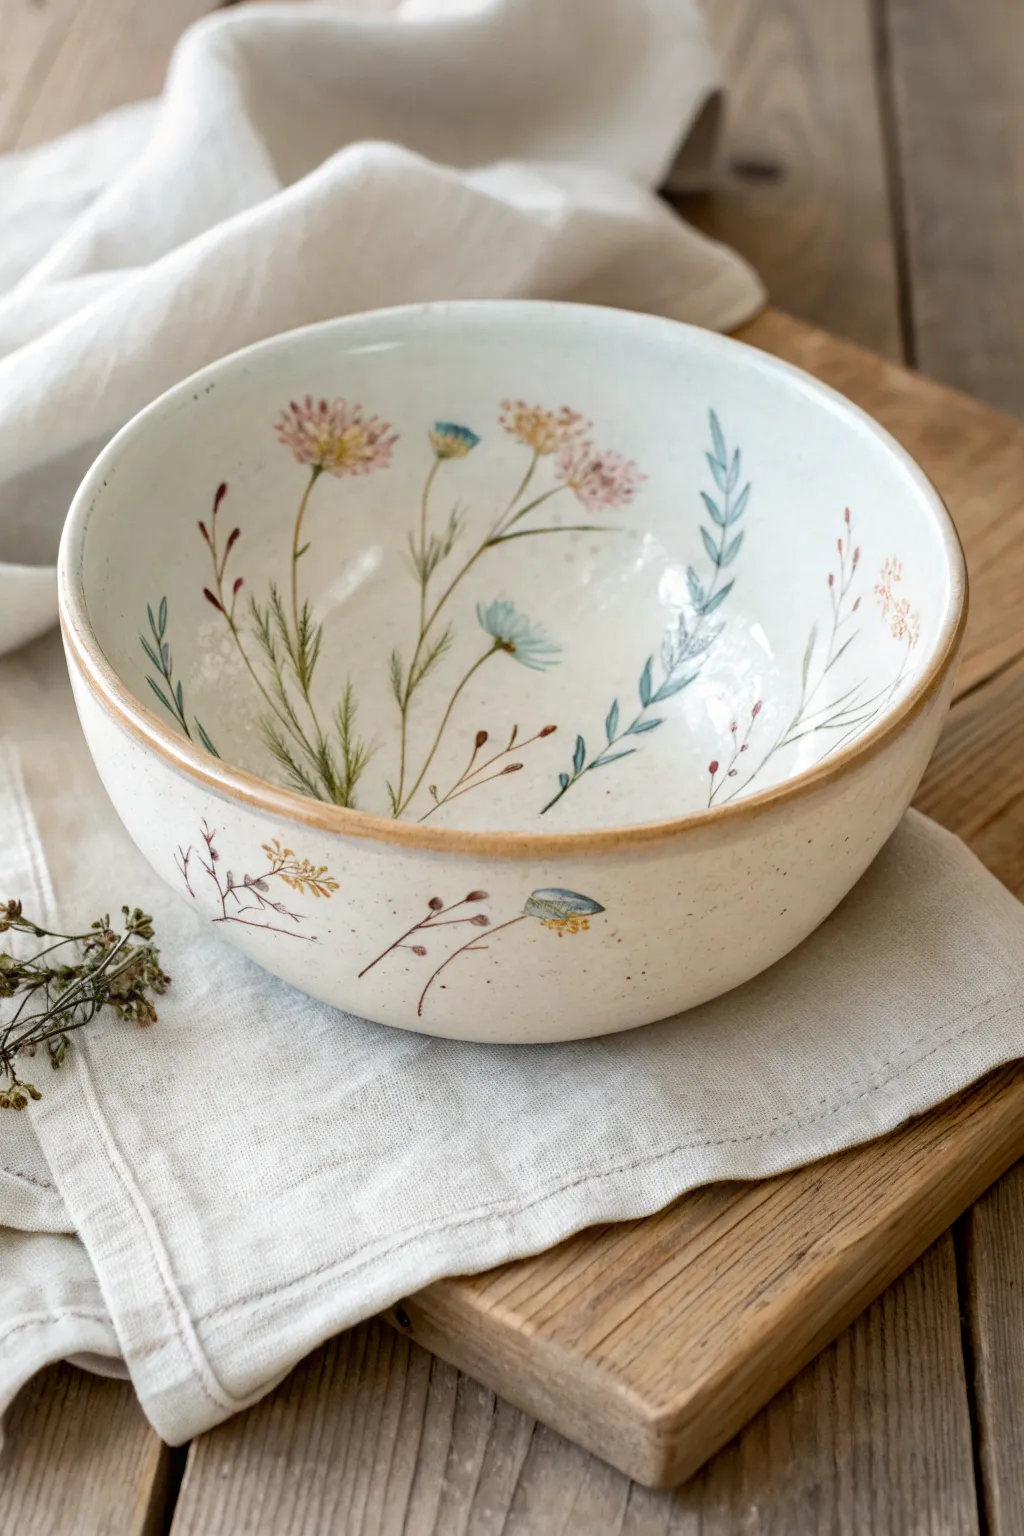
Capture the delicate beauty of a summer field with this charming hand-painted ceramic bowl project. Featuring a soft milky white glaze canvas, this design showcases dainty wildflowers, wispy stems, and gentle herbal motifs for a rustic yet elegant finish.
Step-by-Step
Materials
- Bisque-fired ceramic bowl (medium size)
- Milky white dipping glaze or brush-on glaze
- Underglaze paints (olive green, sage green, dusty pink, pale yellow, sky blue, rust brown)
- Fine liner brushes (size 000 and 00)
- Small round brush (size 1)
- Clear transparent glaze (if using underglaze on top of white glaze, or for the final coat)
- Water container and sponge
- Ceramic pencil (optional)
- Kiln access
Step 1: Base Preparation
-
Clean the Bisque:
Begin by wiping down your bisque-fired bowl with a damp sponge. This removes any kiln dust or oils from your hands that might resist the glaze application. -
Apply the Base Glaze:
If dipping, submerge the bowl into your milky white glaze for about 3 seconds, ensuring even coverage inside and out. If brushing, apply three even coats, allowing each to dry until it loses its sheen before adding the next. -
Initial Drying:
Let the base glaze dry completely. It should be powdery to the touch. Be very careful handling the bowl at this stage, as the unfired glaze is fragile and can smudge easily.
Step 2: Planning the Garden
-
Visualizing the Spacing:
Before painting, visualize where your main flower stems will rise. You want a scattered, organic look, not a perfectly repeating pattern. -
Optional Sketching:
If you are nervous about freehanding, use a ceramic pencil to lightly mark the main vertical lines for the stems inside the bowl. These marks will burn off in the kiln.
Brush Control Pro-Tip
For the thinnest stems, hold your breath slightly as you pull the stroke and lift the brush straight up at the end to create a tapered, needle-sharp point.
Step 3: Painting the Interior Flora
-
Mixing Greens:
Prepare your palette with olive and sage green underglazes. Thin them slightly with water so they flow like ink; this is crucial for getting those whisper-thin stems. -
Establishing Stems:
Using your 000 liner brush, paint long, slender stems rising from the bottom center of the bowl upwards. Vary the heights and curvature so they look like they are swaying in a breeze. -
Adding Leaves:
Switch to the sage green. Add feathery, fern-like leaves to some stems by using quick, short strokes that taper at the end. For other stems, paint simple, small oval leaves in olive green. -
Painting Pink Blooms:
Dip a small round brush into dusty pink. Create the flower heads by dabbing small dots in a cluster or radiating lines to mimic a thistle or clover shape. -
Blue Accents:
Clean your brush and pick up the sky blue. Add small, bell-shaped flowers or simple five-petal blooms on different stems to create color variety. -
Detailing the Centers:
Once the flower heads are dry to the touch, use a tiny dot of rust brown or pale yellow in the centers to add depth and realism. -
Adding Wispy Fillers:
I like to fill empty negative spaces with very faint, rust-colored sprigs or single lines to represent dried grasses, keeping the composition balanced but airy.
Level Up: Texture
Before the initial bisque firing, use a needle tool to gently scratch the clay surface where the flowers will go. The glaze will pool in scratches for depth.
Step 4: Exterior Details & Rim
-
Mirroring the Outside:
Repeat a few smaller versions of the wildflower motifs on the lower exterior of the bowl. Keep these sparse to let the speckled clay or white glaze shine through. -
Painting the Rim:
Load a size 1 round brush with the rust brown underglaze. Gently run the bristles along the rim of the bowl. Don’t worry if the line varies in thickness; a slightly uneven line adds to the hand-thrown aesthetic. -
Speckling (Optional):
To mimic the speckled clay look if your clay body is plain, flick a stiff toothbrush loaded with watered-down brown underglaze over the surface. Do this sparingly.
Step 5: Finishing & Firing
-
Clear Glaze Application:
If your white base glaze is matte and you want a glossy finish, or if you used underglazes on top of a bisque surface instead of a base glaze, carefully dab a clear transparent glaze over your painted designs. Use a fan brush and float the glaze so you don’t smear the artwork. -
Checking the Foot:
Wipe the bottom foot of the bowl completely clean with a wet sponge. Any glaze left here will fuse the bowl to the kiln shelf. -
Final Firing:
Load the bowl into the kiln and fire to the temperature specific to your clay and glaze (usually Cone 5/6 for stoneware or Cone 06/04 for earthenware).
Once cooled, your bowl is ready to bring a touch of eternal spring to your table setting
Blue-and-White Style Geometric Pattern Bowl

Capture the timeless elegance of blue-and-white pottery with this intricately patterned bowl project. By combining distinct geometric bands with delicate pointillism, you will create a piece that feels both modern and traditional.
Step-by-Step Tutorial
Materials
- Bisque-fired ceramic bowl (medium size)
- Cobalt blue underglaze
- Clear dipping glaze or brushing glaze
- Fine liner brush (size 00 or 0)
- Round brush (size 2)
- Pencil (HB or lighter)
- Pottery wheel or banding wheel (for spinning)
- Sponge
- Bowl of water
- Kiln access (for firing)
Step 1: Preparation & Mapping
-
Clean surface:
Begin by wiping down your bisque-fired bowl with a slightly damp sponge to remove any kiln dust or oils from your hands. -
Establish concentric rings:
Place the bowl on a banding wheel. While spinning the wheel slowly, lightly hold your pencil against the interior surface to mark out the main circular zones: the center circle, the mid-band, and the rim section. -
Plan the rim:
Within the top band near the rim, lightly sketch a zigzag pattern that runs the entire circumference, creating triangular spaces.
Steady Hand Pro-Tip
Rest your pinky finger against the bowl’s surface as a stabilizer while painting fine lines. This acts as a pivot point and prevents shakiness.
Step 2: Painting the Rim Zone
-
Outline the zigzags:
Load your liner brush with cobalt blue underglaze. Carefully trace over your pencil zigzag lines, keeping the pressure consistent for an even line width. -
Fill with chevrons:
Inside each triangular section created by the zigzag, paint smaller, nested ‘V’ shapes (chevrons). Alternate the direction so they echo the main zigzag line. -
Detail the triangles:
Continue painting these nested lines until the triangles are filled, giving the rim a dense, woven appearance.
Level Up: Sgraffito
Paint the center circle solid blue, let it dry, then use a carving tool to scratch the dots and patterns out to reveal the white clay beneath.
Step 3: The Dotted Middle Section
-
Create the boundary:
Using the banding wheel again, paint a solid, thin blue ring to separate the rim pattern from the middle section. -
Start the dot grid:
I find it helpful to mark the four cardinal points first to keep spacing even. Dip the handle end of a brush or a specialized dotting tool into the underglaze. -
Apply large dots:
Press the tool gently onto the clay to create the largest row of dots just below the rim line. -
Graduate the size:
As you move down toward the center, create subsequent rows of dots. Slightly decrease the size of the dots or the spacing between rows to create a sense of depth. -
Add tiny fillers:
Use your finest brush to add very small micro-dots between the larger ones if you want extra texture, though leaving negative space works beautifully too.
Step 4: The Central Medallion
-
Frame the center:
Isolate the bottom of the bowl with a painted double-ring border. This defines the ‘medallion’ area. -
Paint the wave border:
Just inside this double ring, paint a series of curved, comma-like strokes (a pattern often called ‘running waves’) that flow in a clockwise direction. -
Create the inner lattice:
Move to the very center. Paint a small central rosette or flower, then surround it with concentric circles of tiny dots. -
Fill the background:
Between the central dot circles, carefully fill the background with solid blue, leaving small reserved circles of white clay to create a negative resist effect. -
Refine the spiral:
Add a final ring of fine hatch marks or a rope pattern around your central medallion to visually tie it to the wave border.
Step 5: Exterior & Finishing
-
Decorate the outside:
Don’t forget the exterior! Paint a loop or scallop pattern around the bottom third of the bowl’s exterior to mirror the curves inside. -
Check consistency:
Inspect your blue lines. If any look transparent or thin, carefully go over them with a second coat of underglaze for a rich, deep blue. -
Glaze application:
Once the underglaze is bone dry, dip the entire bowl into a clear glaze. Shake off excess gently and clean the foot ring with a sponge. -
Final fire:
Load into the kiln for the final glaze firing according to your clay and glaze specifications (usually Cone 5 or 6).
Enjoy the satisfaction of using your beautiful new custom bowl for your morning cereal or as a stunning display piece
Sgraffito Carved Bowl With High-Contrast Lines
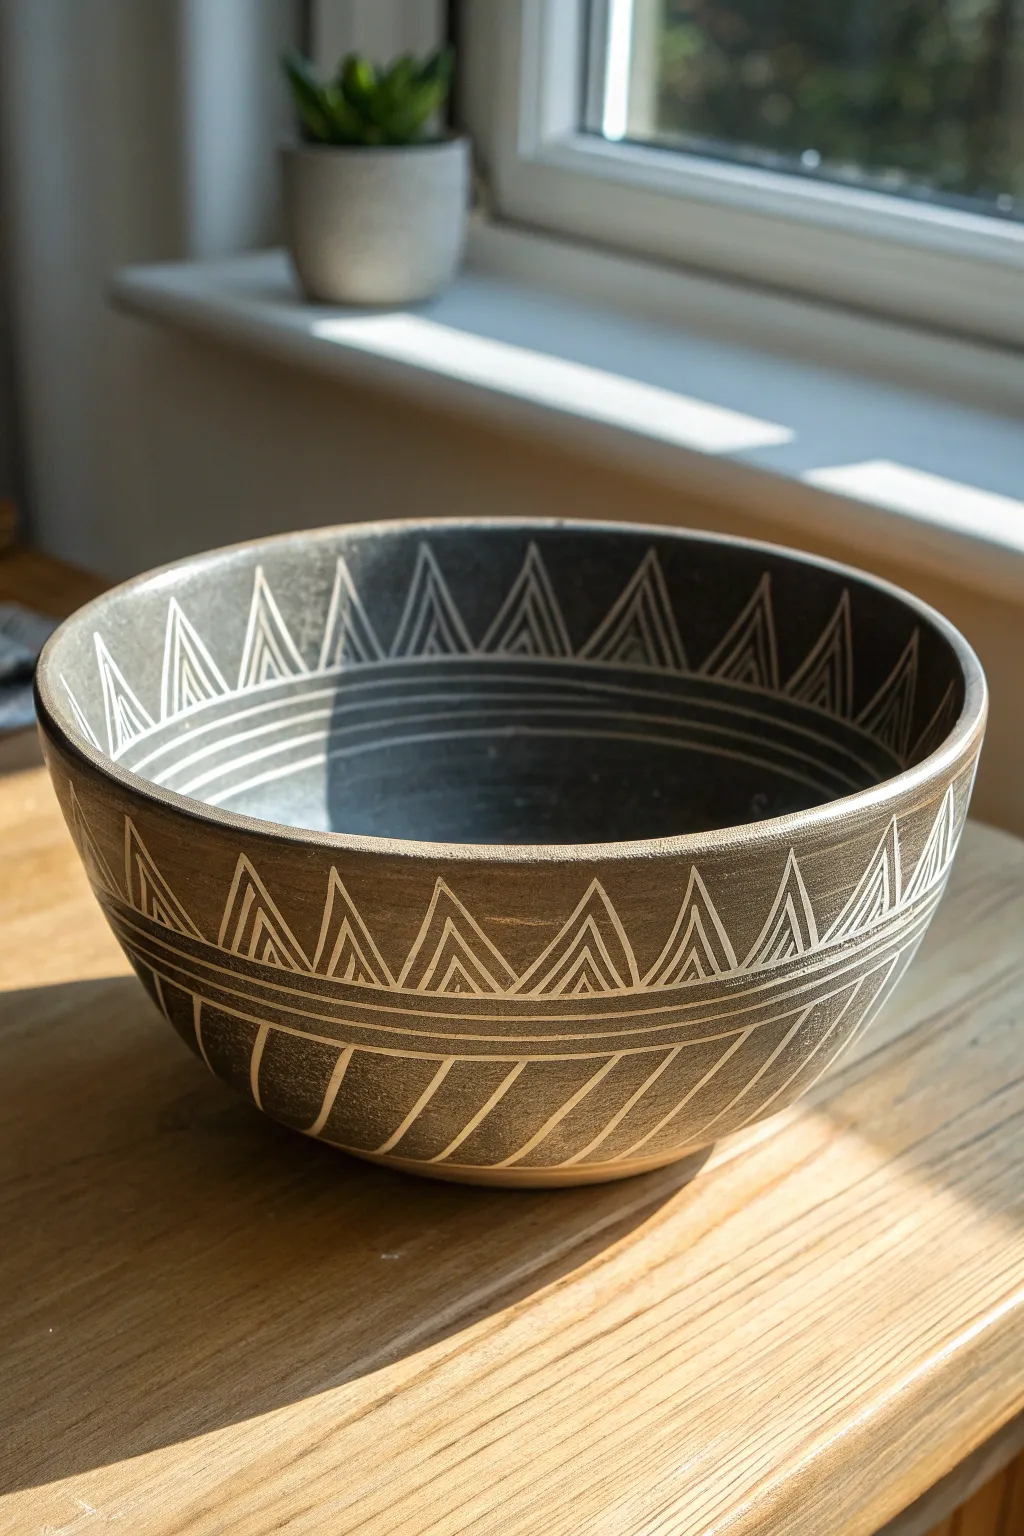
This tutorial guides you through creating a stunning high-contrast bowl using the ancient sgraffito technique. By carving through a layer of dark underglaze to reveal the lighter clay body beneath, you will achieve crisp, architectural lines that make a bold statement.
Step-by-Step Guide
Materials
- Leather-hard stoneware bowl (light colored clay body)
- Black underglaze (or dark brown/charcoal)
- Soft fan brush or hake brush
- Small loop carving tool (sharp)
- Needle tool or fine-point stylus
- Banding wheel
- Clear transparent glaze
- Sponge
Step 1: Preparation and Underglazing
-
Throw or build your form:
Create a medium-sized bowl using a light-colored stoneware or white earthenware clay. The lighter the clay, the better the contrast will be. Ensure the walls are even, roughly 1/4 inch thick. -
Dry to leather-hard:
Allow the bowl to dry until it reaches a sturdy ‘leather-hard’ stage. It should be firm enough to handle without warping but still hold moisture. If it’s bone dry, this technique won’t work. -
Apply the dark layer:
Place your bowl on a banding wheel. Using a soft fan brush, apply 2-3 even coats of black underglaze to the entire interior and exterior surface. Allow the underglaze to lose its sheen between coats so you don’t drag the previous layer. -
Set for carving:
Let the underglazed bowl sit for a short while until the surface is dry to the touch and no longer tacky. I prefer to wait about 20-30 minutes so the underglaze isn’t gummy when I carve.
Step 2: Carving the Design
-
Plan the rim spacing:
Using a needle tool, lightly mark the top edge of the rim to divide the circumference into equal sections for your triangles. This faint guide ensures your pattern meets up perfectly at the end. -
Carve the interior triangles:
Start inside the rim. Use a sharp loop tool to carve a row of triangles, points facing down. Instead of outlining, think of ‘drawing’ the white lines by removing the black surface. Add a smaller triangle inside each larger one for that double-line look. -
Add interior banding:
Spin the banding wheel slowly and hold your tool steady against the interior wall, just below your triangles. Carve 3-4 parallel horizontal bands. Let the wheel’s rotation do the work for straight lines. -
Mirror the exterior rim:
Move to the outside of the bowl. Carve a matching row of triangles just below the lip, pointing upward this time. Ensure the spacing echoes the interior pattern. -
Carve the central band:
Below the exterior triangles, carve three solid horizontal lines around the circumference. This acts as a border between the geometric rim and the lower body design. -
Mark the lower sections:
Beneath your central band, carve vertical dividing lines to create large rectangular segments around the belly of the bowl. -
Fill with diagonal texture:
Inside each rectangular segment, carve angled parallel lines (slashes). Alternate the direction of the slant for adjacent sections if you want variety, or keep them uniform as shown in the inspiration image. -
Clean up the crumbs:
You will have little clay ‘burrs’ or crumbs from carving. Do not brush them off with your hand, or you might smear the black underglaze. Instead, use a soft, dry brush to gently sweep the debris away.
Smudged Lines?
If black dust stains your white lines, wait until the pot is bone dry. Then, lightly rub the white areas with a stiff brush or very fine steel wool to clean them up before firing.
Step 3: Finishing and Firing
-
Complete drying:
Allow the bowl to dry completely to the bone-dry stage. This usually takes a few days. The clay will become lighter in color and room temperature to the touch. -
Bisque fire:
Load the bowl into the kiln for a bisque firing (usually cone 04 or 06). This sets the form and the underglaze permanently. -
Apply clear glaze:
Once cool, wipe the bisque ware with a damp sponge to remove dust. Dip the entire bowl into a clear, transparent glaze. Shake off excess drips. -
Glaze fire:
Fire the bowl a second time to the maturity temperature of your clay body (e.g., cone 5, 6, or 10). The clear glaze will seal the carving and make the black pop against the light clay.
Reverse the Contrast
Try using a dark chocolate clay body with a white underglaze on top. This creates a ‘negative’ of this image, with dark lines on a white field, for a totally different vibe.
Now you have a striking vessel that perfectly balances modern geometry with handmade warmth
Wax Resist Bowl With Dots, Waves, or Brushy Blocks
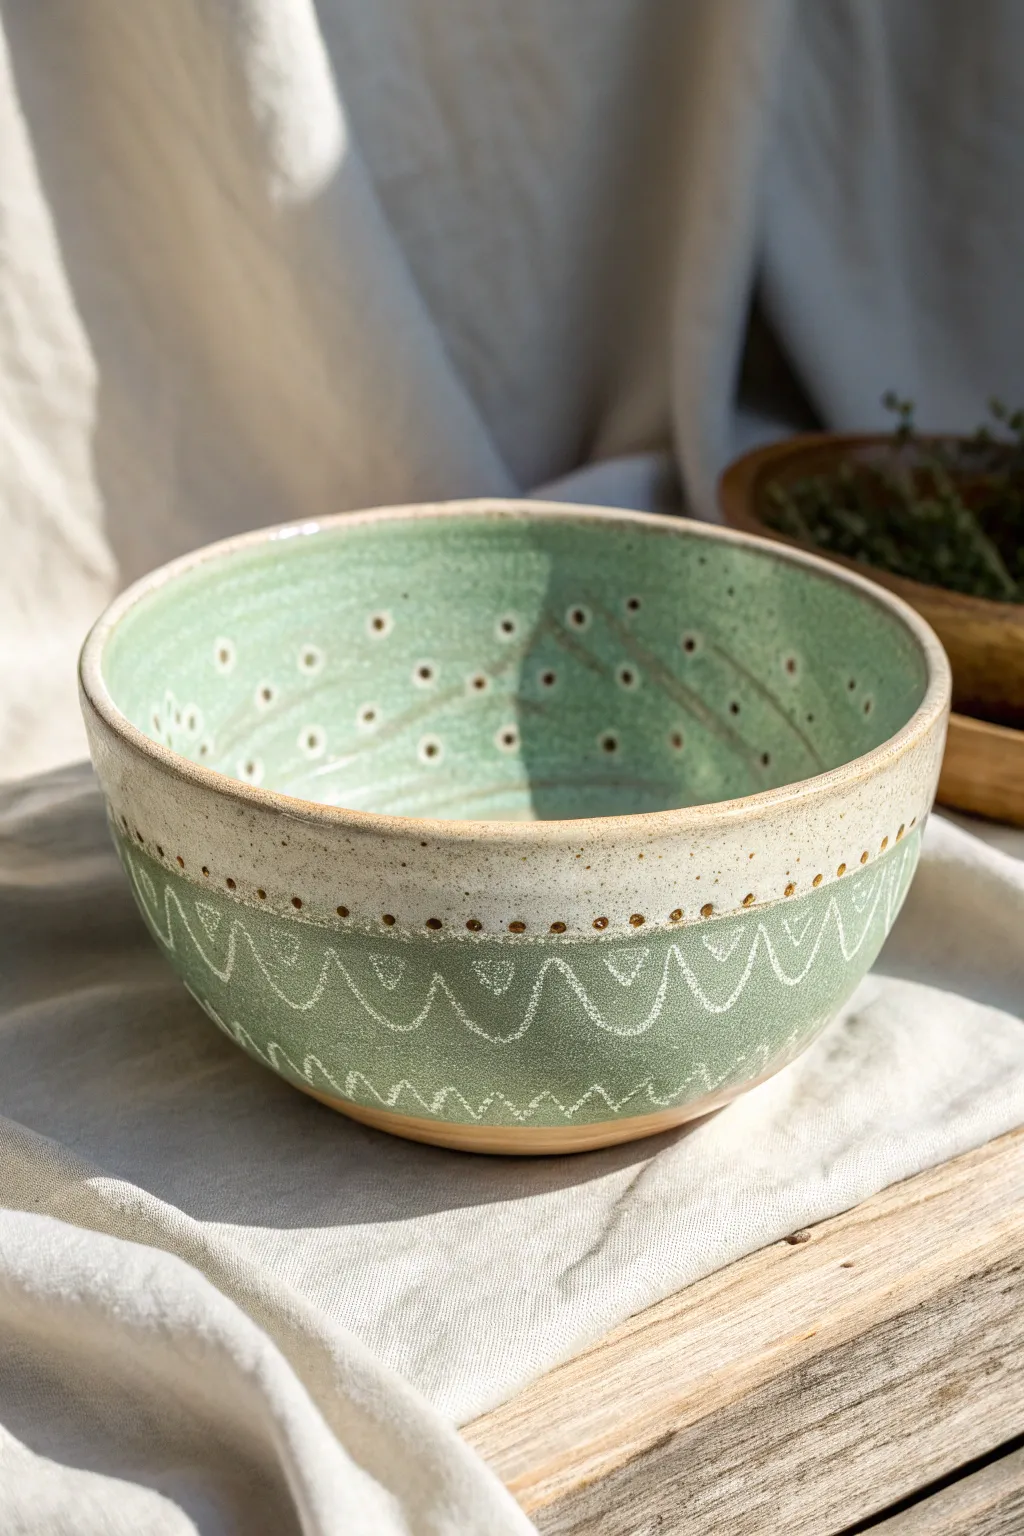
This charming ceramic bowl features a playful interplay of geometric patterns and fluid lines, achieved through the magic of wax resist. The design combines a calm sage green glaze with the natural warmth of speckled clay, creating a piece that feels both rustic and refined.
How-To Guide
Materials
- Bisque-fired ceramic bowl (speckled clay body recommended)
- Liquid wax resist (fine tip applicator or brush)
- Celadon or translucent sage green glaze
- Small paintbrush (for wax application)
- Round paintbrush (medium size, for glazing)
- Damp sponge
- Bowl of water
- Clean towel
Step 1: Preparation & Wax Application
-
Clean the bisque:
Start by wiping down your bisque-fired bowl with a damp sponge. This removes any dust or oils from handling that might interfere with the glaze or wax adhesion. -
Plan the exterior band:
Visualize a band of unglazed clay around the top rim of the exterior. Dip your brush into the liquid wax resist and carefully paint a solid band about 1.5 inches down from the rim on the outside. -
Dot the rim:
Just below the solid wax band on the exterior, use a fine-tip applicator or a very small brush to apply a row of small, evenly spaced wax dots. These will remain unglazed later. -
Create the wave pattern:
Below the row of dots, paint a continuous scalloped or wavy line using the wax resist. I like to keep the curves loose and organic rather than perfectly geometric. -
Add detail to the waves:
Inside each downward loop of your wave pattern, paint a small triangle or drop shape with the wax. Add a secondary, smaller wavy line near the base of the bowl if you have space. -
Interior design:
Moving to the inside of the bowl, apply large, sweeping curved strokes with the wax resist. These should mimic brushstrokes. -
Interior details:
In the negative spaces between your interior wax swipes, add small clusters of wax dots to echo the exterior design. -
Let it dry:
Allow the wax resist to dry completely. It usually turns transparent or slightly darker when dry. Waiting at least 20-30 minutes ensures it won’t smudge during glazing.
Step 2: Glazing & Finishing
-
Prepare the glaze:
Stir your sage green celadon glaze thoroughly. You want a consistency similar to heavy cream for the best coverage. -
Glaze the interior:
Pour a generous amount of glaze into the bowl. Roll the bowl around to coat the entire interior surface, covering your wax designs, and pour out the excess. -
Clean interior drips:
The glaze will bead up on the waxed areas. Use a damp sponge to gently wipe any stubborn glaze droplets off the wax resist designs inside the bowl, revealing the clay body pattern clearly. -
Glaze the exterior:
Holding the bowl by the foot (or using glazing tongs), dip the exterior into the glaze bucket, stopping just below the rim where you want the glaze line to end. Alternatively, brush the glaze onto the lower section. -
Reveal the exterior pattern:
The wax resist on the outside will repel the glaze, but you’ll likely have beads of glaze sitting on top of the wax. Take your damp sponge and carefully wipe the waxed areas. -
Refine the rim:
Wipe the upper rim band thoroughly. The goal is to have clean, unglazed clay at the top, transitioning into the glaze where your dots and waves begin. -
Check the foot:
Ensure the bottom foot of the bowl is completely free of glaze so it doesn’t fuse to the kiln shelf during firing. -
Final inspection:
Look over the entire piece. Use a needle tool to gently scratch off any tiny specks of glaze that might be adhering to the wax lines if the sponge missed them. -
Fire the piece:
Load the bowl into the kiln and fire to the temperature recommended for your specific clay and glaze combination (typically Cone 5 or 6 for stoneware).
Wax Resist Tip
Add a drop of food coloring to your liquid wax. This makes it visible on the pale bisque, so you can see exactly where you’ve painted your design before glazing.
Clean Lines
If your wax lines look ragged, your brush might be too stiff. Use a soft, natural hair brush that holds plenty of fluid to get smooth, continuous strokes.
Once fired, the wax burns away to reveal the warm, raw clay contrasting beautifully with the glossy green glaze
Watercolor-Style Glaze Wash Bowl With Soft Gradients
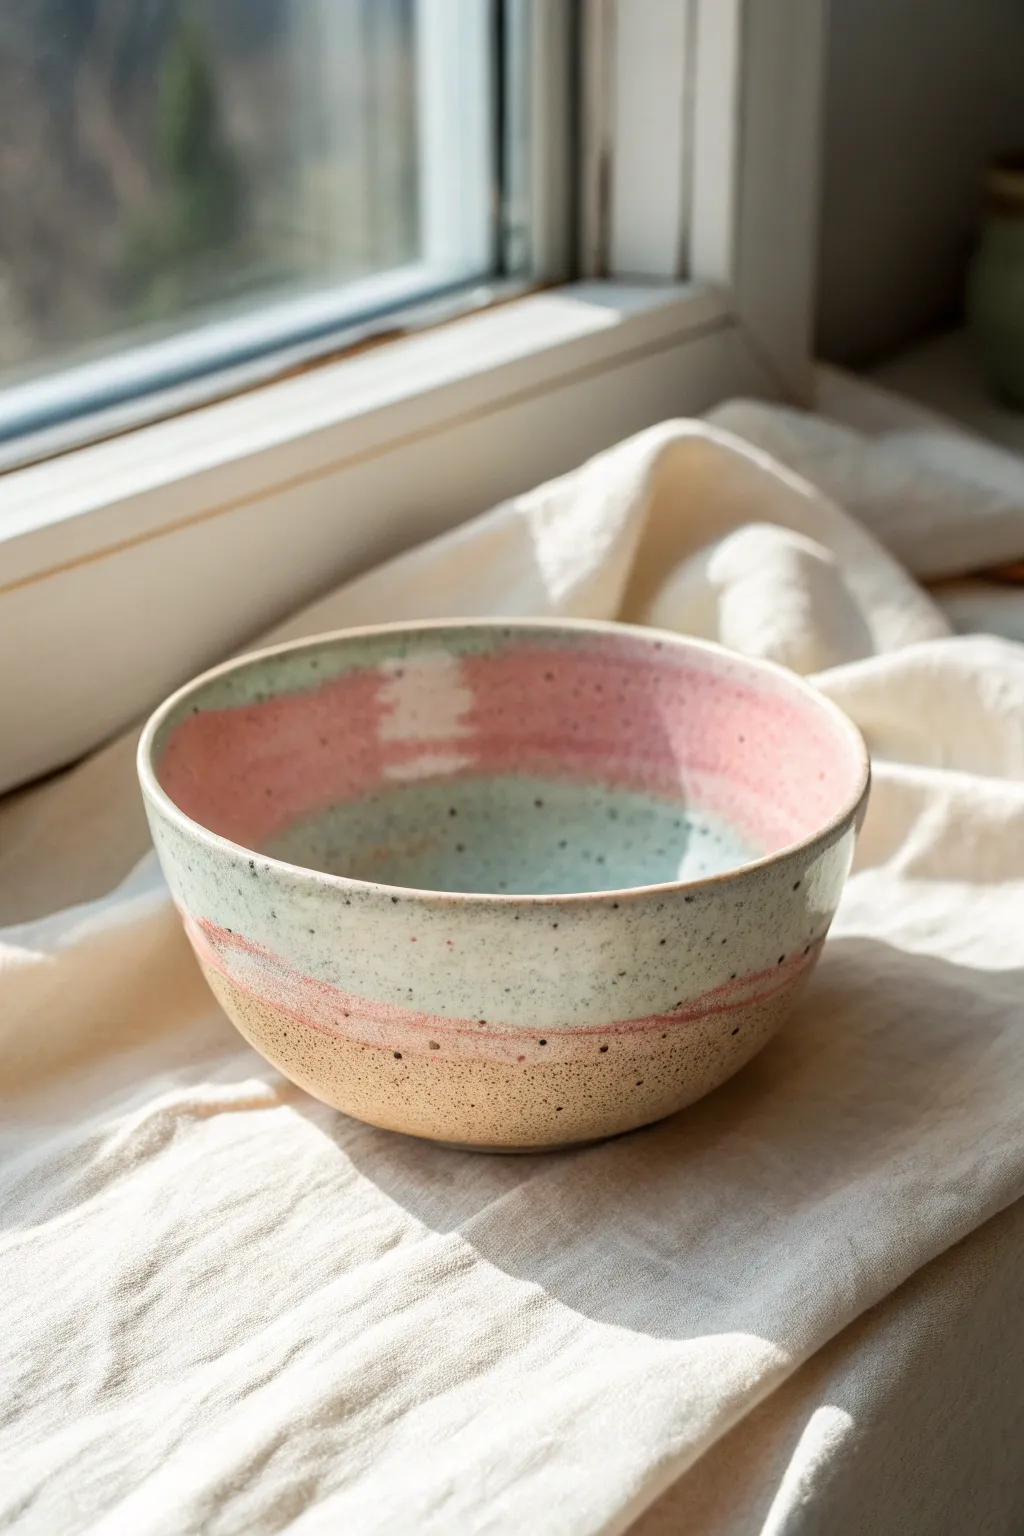
Capture the serenity of a sunrise with this gentle, gradient-glazed bowl that blends raw texture with soft pastels. By layering translucent glazes over speckled clay, you’ll achieve a painterly, watercolor effect that feels both modern and handmade.
Step-by-Step
Materials
- Stoneware clay body with heavy iron speckling (e.g., Speckled Buff)
- Pottery wheel or slab-rolling equipment
- Ribs and trimming tools
- Bisque kiln firing capability
- Wax resist
- Sponge
- Glaze 1: Satin Matte White
- Glaze 2: Translucent Blush Pink or Coral
- Glaze 3: Pale Celadon or Seafoam Green
- Clean bucket of water
- Wide hake brush or soft fan brush
Step 1: Forming the Vessel
-
Prepare the Clay:
Begin by thoroughly wedging your speckled stoneware clay. The speckles are crucial for the final look, as they will bleed through the translucent glazes. Ensure there are no air bubbles. -
Throw the Base Shape:
Center your clay on the wheel and open it up to a wide curve. Aim for a simple, hemispherical bowl shape with distinct, slightly upright walls to showcase the horizontal bands of color. -
Refine the Wall Thickness:
Pull the walls to an even thickness. Since we are going for a delicate look, try to keep the rim slightly tapered but rounded for comfort when drinking or eating. -
Smooth the Surface:
Use a soft rib tool to compress the inside and outside of the bowl. This removes throwing lines and creates a smooth canvas for your gradients, though leaving a tiny bit of texture adds character. -
Trim a Foot Ring:
Once leather hard, flip the bowl and trim a modest foot ring. This elevates the bowl and creates a definitive stopping point for the glaze later. -
Bisque Fire:
Allow the bowl to bone dry completely before loading it into the kiln for a bisque firing (typically Cone 04 or 06, depending on your clay).
Iron Speckle Tip
If you don’t have speckled clay, mix 0.5% granular ilmenite or manganese into a plain buff clay body. Wedge extremely well!
Step 2: Applying the Glaze Gradient
-
Clean the Bisqueware:
Wipe the fired bowl with a damp sponge to remove any kiln dust. This ensures the glaze adheres properly without crawling. -
Wax the Foot:
Apply wax resist to the foot ring and about 1/4 inch up the exterior wall. We want the raw, speckled clay to remain exposed at the very bottom. -
First Dip: The Interior Base:
Pour the Pale Celadon glaze inside the bowl, swirl it quickly to coat just the bottom well, and pour it out. You want a pool of cool blue-green at the very center, fading as it goes up. -
Second Dip: The Exterior Middle:
Hold the bowl by the foot and dip it rim-down into the Satin Matte White glaze. Submerge it about halfway down the exterior wall. This creates the creamy middle band. -
Create the Pink Gradient:
Prepare your Translucent Blush Pink glaze. It should be slightly thinner than usual to act like a wash. I find adding a tiny bit of water helps it flow better for this step. -
Apply the Pink Band:
Dip the rim (about 1.5 to 2 inches deep) into the pink glaze. Hold it there for just a second so it overlaps the white glaze on the outside and the celadon on the inside. -
Overlap Technique:
Notice where the pink meets the white on the exterior. The overlap creates a third tone. If the line is too harsh, lightly dab it with a damp sponge while wet to soften the transition. -
The Interior Wash:
If the pink didn’t run down deeply enough inside, use a wide soft brush to gently pull some of the wet pick glaze further down the interior walls, stopping before you hit the blue center. -
Clean Up:
Check the waxed foot. If any glaze beads have formed on the wax, wipe them off cleanly with a sponge to prevent sticking to the kiln shelf.
Drip Aesthetic
Intentionally thicken the pink glaze slightly. When dipping the rim, hold it at an angle for a few seconds to encourage distinct, artistic drips.
Step 3: Final Firing
-
Load the Kiln:
Place the bowl on a kiln shelf. If your pink glaze is fluid or known to run, you might want to place a cookie (a small slab of clay) underneath just in case. -
Glaze Fire:
Fire to the maturity temperature of your clay and glazes (usually Cone 5 or 6 for stoneware). A slow cooling cycle can help matte glazes develop a nicer satin finish. -
Sand the Bottom:
Once cool and unloaded, briefly sand the unglazed exterior clay with wet-dry sandpaper to ensure the raw section feels smooth in the hand.
Enjoy using your new bowl, where the interaction of melting glazes creates a unique landscape every time you look at it.
Whimsical Fruit-Inspired Bowl That Looks Like a Slice
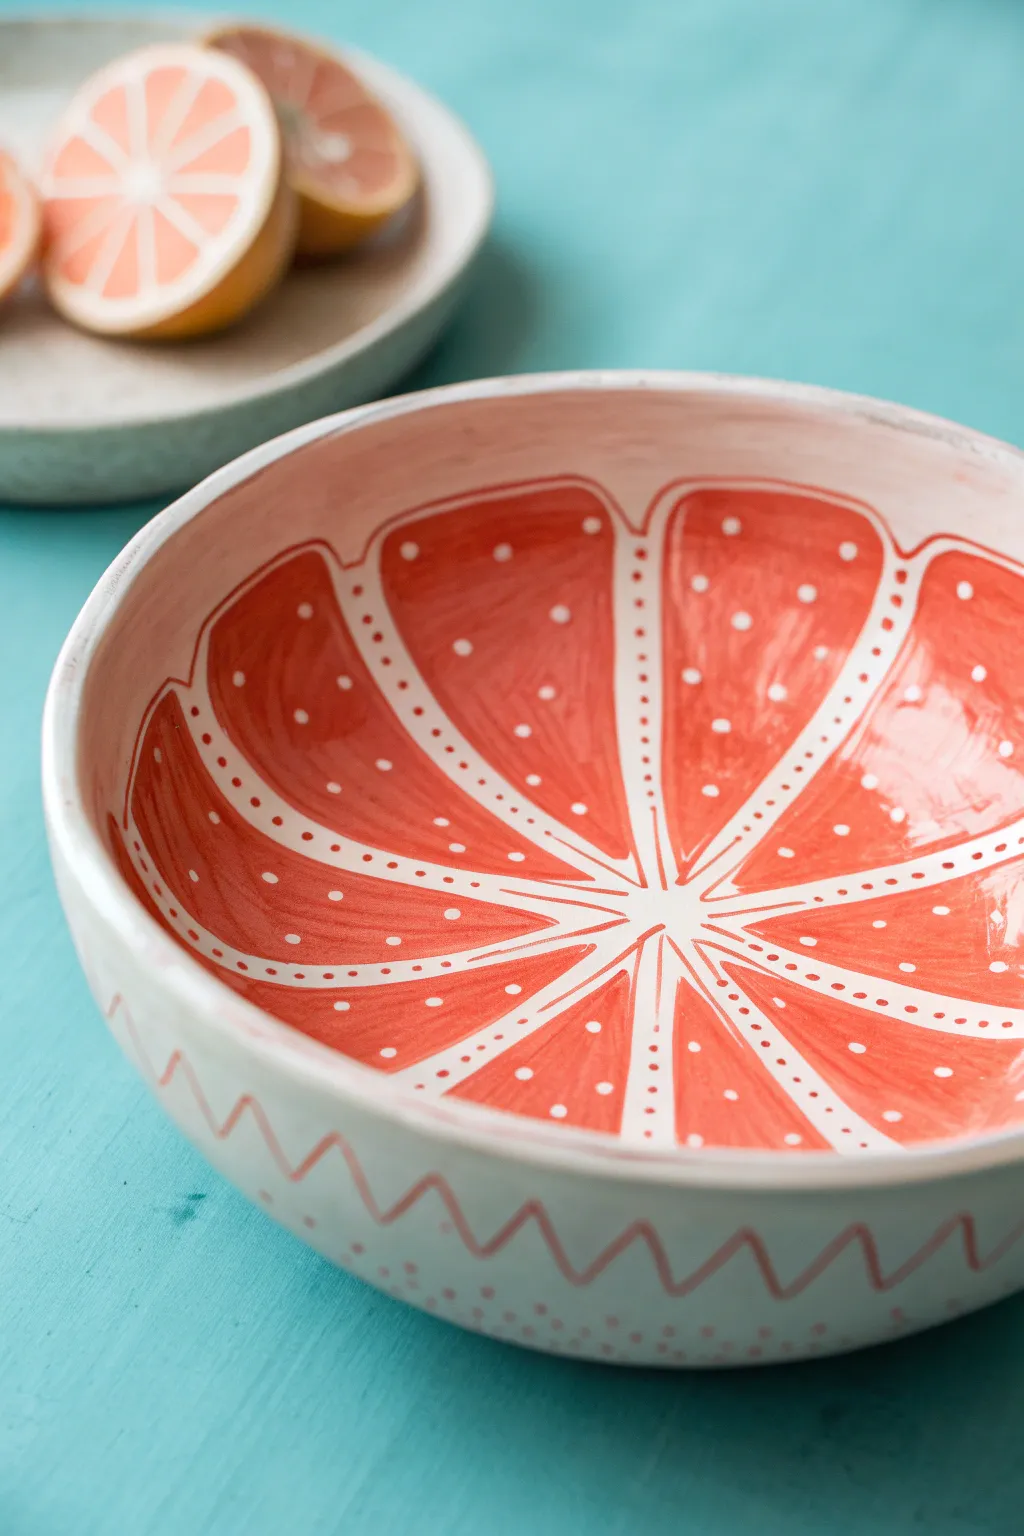
Bring a splash of summer to your table with this delightful hand-painted ceramic bowl designed to mimic a juicy pink grapefruit slice. The playful interior pattern features radiating segments dotted with white seeds, while the exterior sports a charming zigzag motif for a whimsical finish.
Step-by-Step Tutorial
Materials
- Bisque-fired ceramic bowl (wide, shallow shape)
- Underglaze (Coral Pink or Salmon)
- Underglaze (White)
- Underglaze (Pale Pink/Cream for exterior base)
- Pencil for sketching
- Fine liner brush (size 0 or 1)
- Medium round brush (size 4 or 6)
- Clear dipping glaze or brush-on clear glaze
- Sponge and water
- Kiln access
Step 1: Preparation & Exterior
-
Clean the bisque:
Wipe down your bisque bowl with a damp sponge to remove any dust or debris that might repel glaze. -
Base coat the exterior:
Using a medium round brush, apply three even coats of Pale Pink or Cream underglaze to the outside of the bowl. Let each coat dry until it’s chalky before applying the next. -
Sketch the zigzags:
Once the exterior base is dry, lightly use a pencil to draw a simple zigzag line around the lower third of the bowl. Don’t worry about graphite marks; they will burn off in the kiln. -
Paint the exterior pattern:
Load a liner brush with your Coral Pink underglaze and carefully trace over your pencil zigzag lines. -
Add exterior details:
Using the same liner brush, add small dots or dashes beneath the zigzag line near the foot of the bowl to create texture.
Smudged Lines?
If you smudge a white line onto the pink, wait for it to dry completely. Then, gently scratch the mistake away with a pin tool or toothpick before re-applying.
Step 2: Interior Citrus Design
-
Find the center:
Inside the bowl, mark the exact center point with your pencil. -
Mark segment spokes:
Draw faint lines radiating from the center to the rim, dividing the bowl into 10-12 equal pie slices. These will form the gaps between your fruit segments. -
Sketch the pith lines:
Draw the actual fruit segments inside each pie slice. Leave a consistent gap (about 1/4 inch) between each segment to represent the white pith. -
Curve the tops:
When sketching, round off the top corners of each fruit segment near the rim so they look organic and soft, rather than sharp geometric triangles. -
Base coat the segments:
Use your medium brush to fill in the fruit segments with Coral Pink underglaze. Apply three solid coats for opacity, avoiding the pith lines you sketched. -
Refine the edges:
Switch to a liner brush to tidy up the edges of your pink segments, ensuring the creamy bisque color shows through clearly as the ‘pith’ lines.
Step 3: Detailing & Glazing
-
Outline the segments:
With a fine liner brush and White underglaze, paint a thin, delicate outline around each pink segment. I prefer to keep this line slightly loose for a hand-painted feel. -
Add the center star:
Extend thin white lines from the center point outward into the pith gaps, creating a subtle starburst effect in the middle of the bowl. -
Create the seeds:
Dip the handle end of a paintbrush into White underglaze and gently stamp small dots onto the pink segments to create the ‘seeds’. -
Vary seed placement:
Place seeds randomly—some near the center, some near the rim—but try to keep a balanced look across all segments. -
Let dry thoroughly:
Allow the underglaze design to dry completely, preferably overnight, to ensure no smudging occurs during glazing. -
Clear glaze application:
Apply a coat of clear glaze over the entire piece. If brushing, use a wide, soft fan brush and flow the glaze on rather than dragging it to avoid disrupting the design. -
Fire the piece:
Follow your specific clay and glaze firing instructions (usually Cone 06 or Cone 6) to finish the piece in the kiln.
Pro Tip: Pith Effect
Leave the ‘pith’ areas unpainted (raw bisque) if your clay body is white. The clear glaze will seal it, saving you from painting those tricky white lines.
Now you have a refreshing, fruit-inspired centerpiece ready for your next brunch gathering