A good ceramic box is that perfect mix of practical and playful—something you can actually use, but also can’t stop staring at on a shelf. Here are my favorite ceramic box ideas to spark your next handbuilt project, from classic forms to “how is that even a box?” toppers.
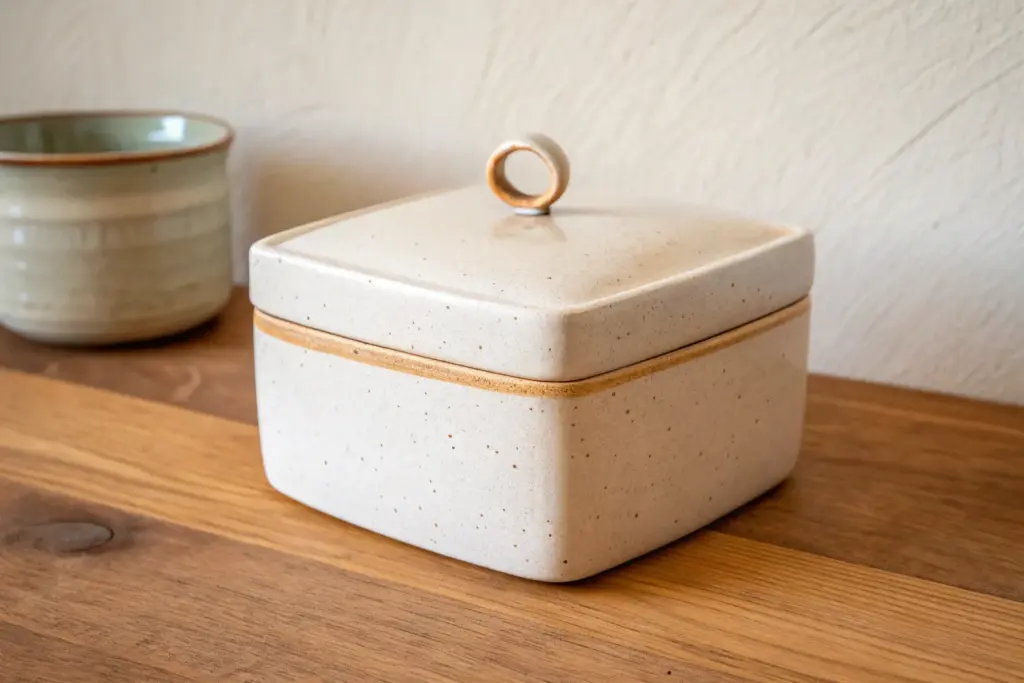
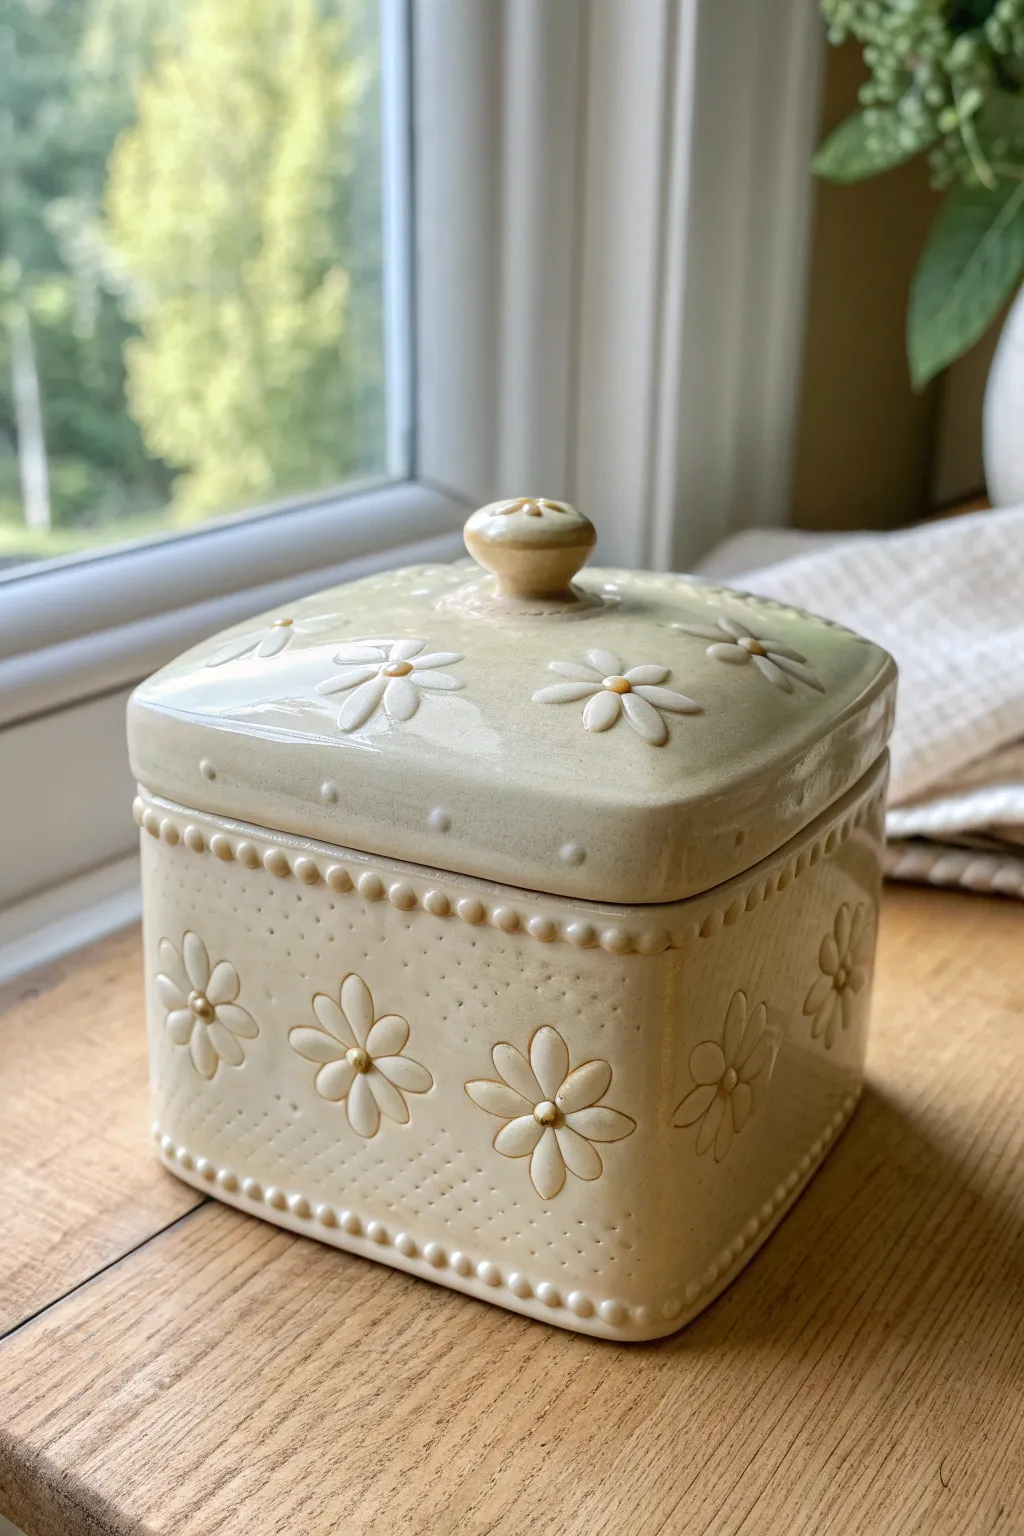
Classic Slab-Built Box With a Gallery Lid
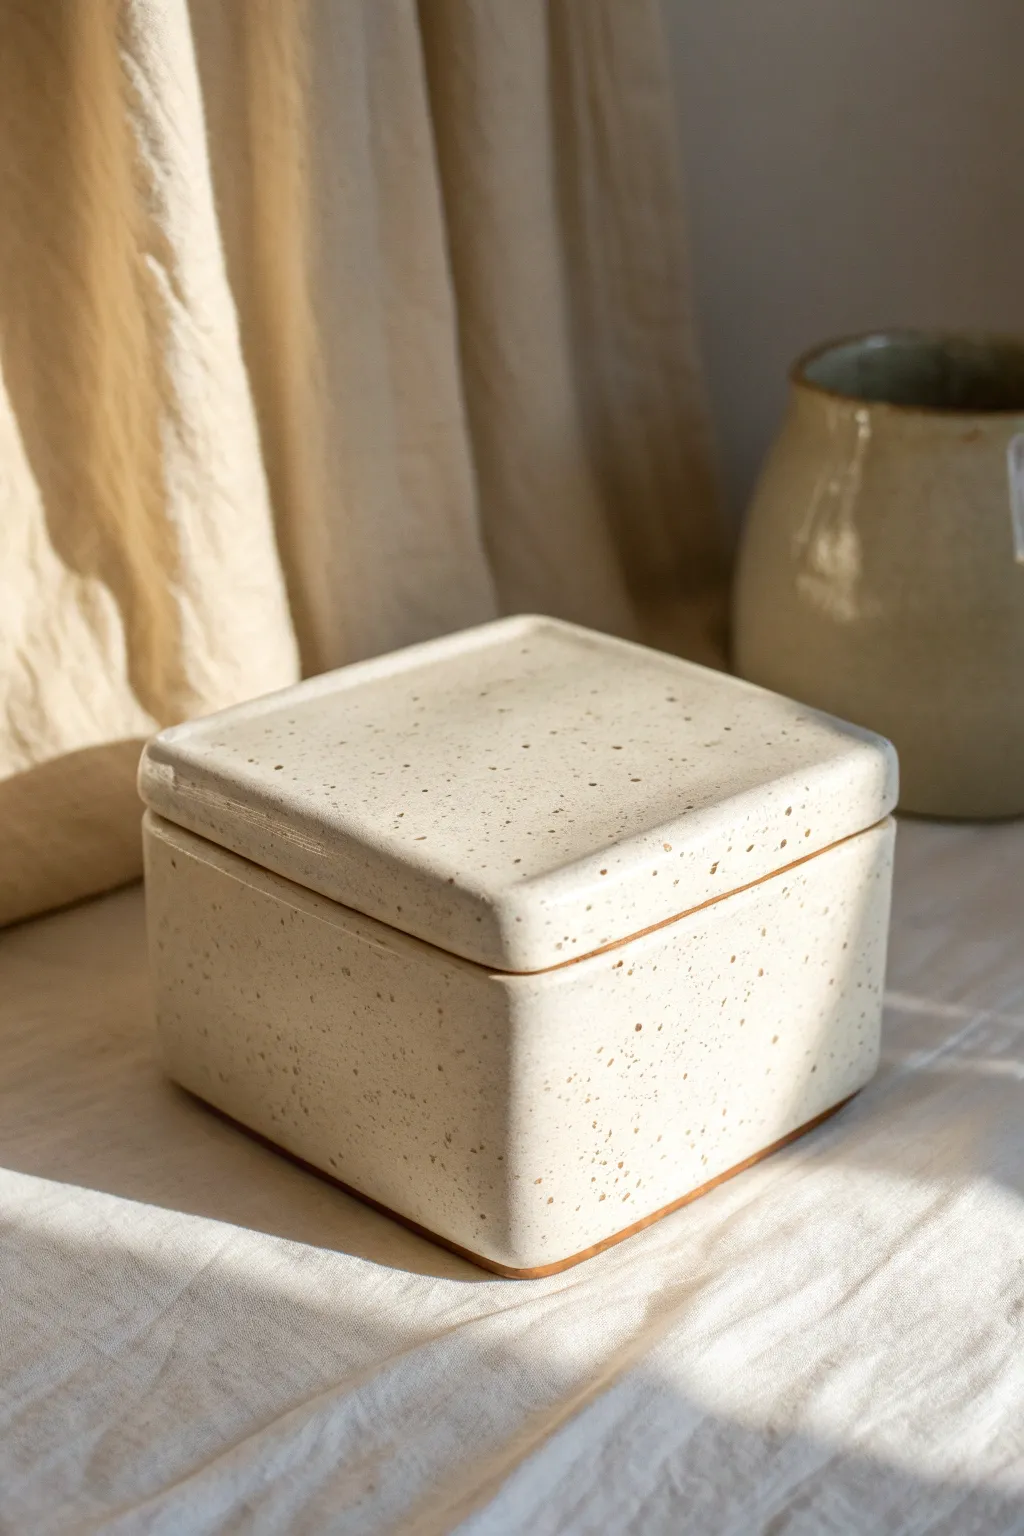
This elegant square box features soft, rounded corners and a creamy, speckled glaze that offers a timeless, earthy aesthetic. The snug-fitting lid with its subtle gallery inner flange makes it perfect for storing everything from tea bags to precious trinkets.
Step-by-Step Tutorial
Materials
- Stoneware clay (speckled or brown body)
- Rolling pin
- Slab sticks or depth guides (approx. 1/4 inch or 6mm)
- Fettling knife
- Ruler and square template
- Scoring tool or serrated rib
- Slip (clay and water mixture)
- Wooden paddle
- Sponge
- Ribs (metal and soft rubber)
- Speckled cream or matte white glaze
- Wax resist (optional)
Step 1: Creating the Slabs
-
Roll the clay:
Begin by wedging your clay thoroughly to remove air bubbles. Using your slab sticks as guides, roll out a large, even slab of clay to about 1/4 inch thickness. -
Compress the slab:
Use a soft rubber rib to compress the clay surface on both sides. This aligns the clay particles, preventing future warping during the drying and firing stages. -
Cut the components:
Using a paper template or ruler, measure and cut five square pieces: one for the base and four for the walls. Cut an additional square slightly larger than the base for the lid top. -
Leather hard stage:
Let the pieces sit until they reach a soft leather-hard stage. They should be firm enough to hold their shape when stood up but still flexible enough to manipulate without cracking.
Warping Woes?
If your lid rocks or doesn’t sit flat, dry it *on* the box. Add a small weight on top during the drying phase to help the clay memory lock into a flat position.
Step 2: Assembling the Box Body
-
Bevel the edges:
For cleaner corners, cut 45-degree bevels on the vertical edges of your wall pieces and the perimeter of the base. This increases surface area for a strong joint. -
Score and slip:
Thoroughly score (scratch) all the beveled edges and apply a generous amount of slip. I always make sure the slip is gooey, not runny, for the best adhesion. -
Construct the walls:
Attach the walls to the base first, pressing firmly. Then, join the walls to each other at the corners. Wipe away excess slip immediately with a damp sponge. -
Reinforce the seams:
Roll a very thin coil of clay and press it into the interior corners of the box. Smooth this coil down with a modeling tool or your finger to reinforce the structure. -
Paddle into shape:
Ideally, you want soft corners like the image. Gently tap the sharp exterior corners with a wooden paddle to round them over and unify the box’s shape.
Step 3: Creating the Gallery Lid
-
Measure the opening:
Measure the *interior* dimensions of your assembled box opening accurately. -
Cut the flange:
From remaining slab scraps, cut four strips about 1/2 inch wide. These will form the inner flange that keeps the lid from sliding off. -
Attach the flange:
Score and slip one side of the flange strips. Attach them to the creamy underside of your lid slab, inset exactly to match your interior box measurements. Leave a tiny bit of wiggle room for shrinkage. -
Round the lid edges:
Just as with the box body, use a sponge or paddle to soften and round the top edges of the lid so it mirrors the pillowy look of the base.
Pro Tip: Seamless Corners
After paddling, run a metal rib lightly over the exterior corners. This erases the paddle marks and gives that professional, seamlessly manufactured look.
Step 4: Finishing and Glazing
-
Dry slowly:
Place the lid on the box with a piece of paper towel in between to prevent sticking. Wrap the whole piece loosely in plastic to dry slowly and evenly. -
Bisque fire:
Once bone dry, fire the piece to bisque temperature (usually Cone 04 or 06). -
Wax dimensions:
Apply wax resist to the bottom of the box and the area where the lid meets the box rim to prevent the lid from fusing shut during the glaze firing. -
Apply glaze:
Dip or brush your speckled cream glaze onto the piece. If brushing, apply 2-3 even coats, alternating direction with each layer. -
Clean the distinct line:
Wipe back the glaze from the bottom edge about 1/4 inch up to create that distinct unglazed ‘foot’ seen in the photo. This reveals the raw clay body. -
Final firing:
Glaze fire the piece to the maturity temperature of your clay and glaze (likely Cone 5 or 6 for stoneware).
Enjoy using your perfectly fitted ceramic box for storage or as a beautiful standalone decor piece


Rectangular Keepsake Box With Beveled Corners
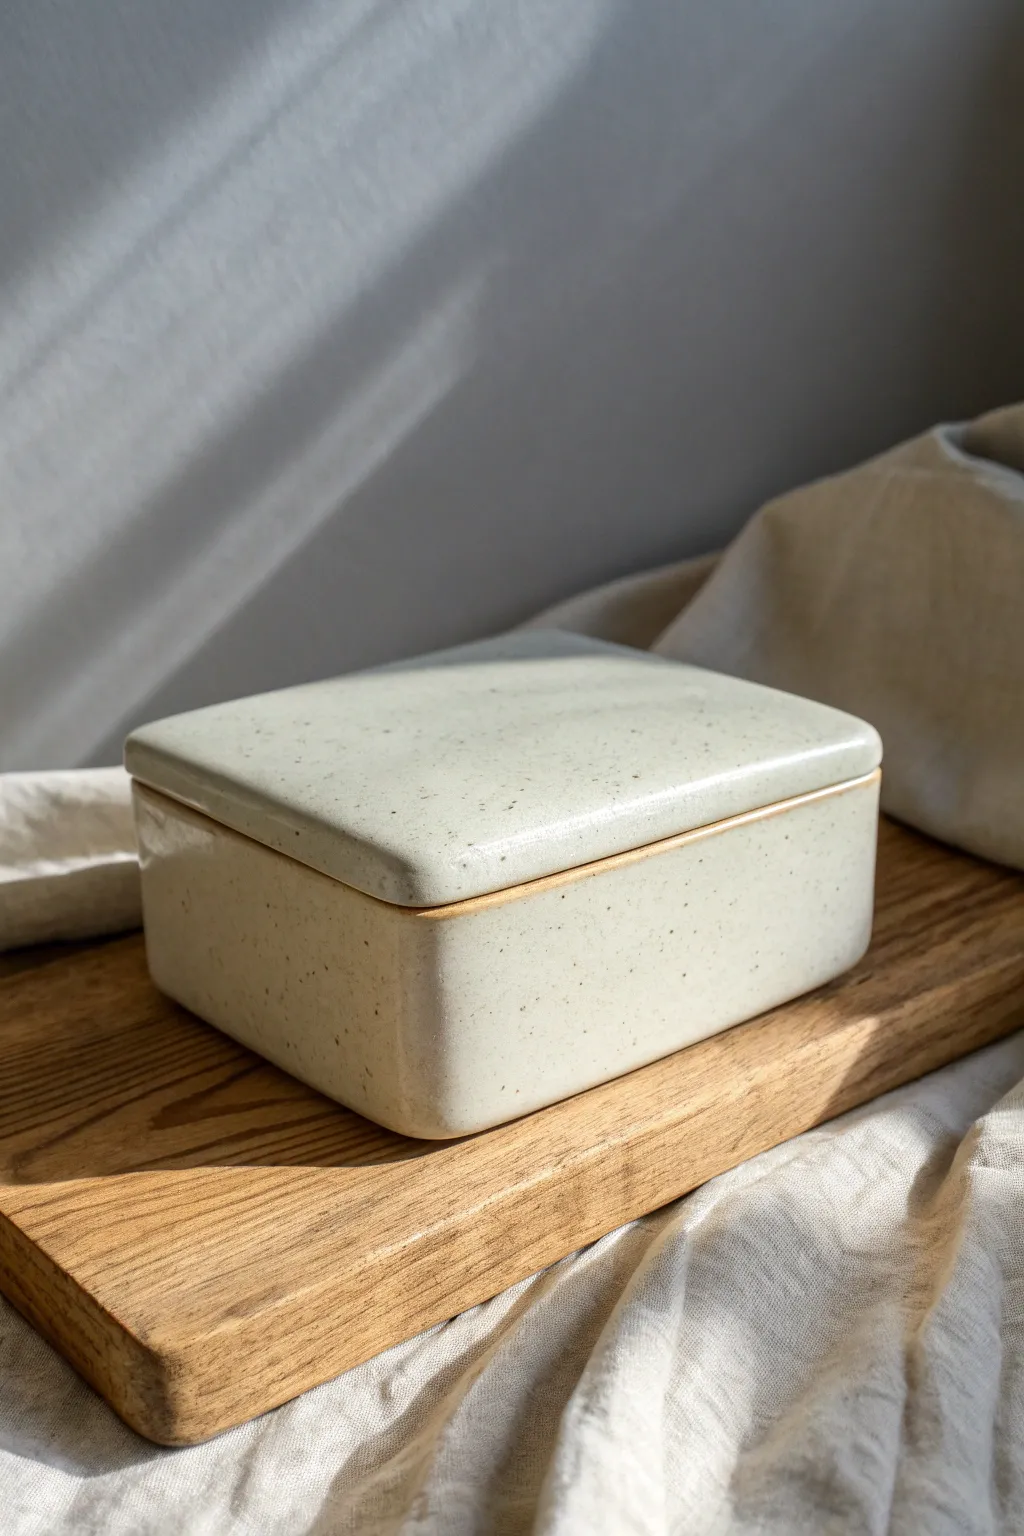
This minimalist rectangular box features softly beveled corners and a gentle cream glaze speckled with natural clay tones. Its simple, elegant form makes it the perfect vessel for storing treasured mementos or jewelry.
Step-by-Step
Materials
- Speckled stoneware clay (white or buff)
- Rolling pin with thickness guides (1/4 inch)
- Clean canvas or work surface
- Fettling knife
- Ruler/straight edge
- Template (cardstock rectangular cutouts)
- Serrated rib and smooth rubber rib
- Slip and scoring tool
- Bevel cutter or trimming tool
- Sponge
- Creamy white glaze (semi-opaque)
Step 1: Preparing the Slabs
-
Roll the clay:
Begin by wedging your speckled stoneware clay to remove any air bubbles. Roll it out into a large, even slab approximately 1/4 inch thick, using guide sticks to ensure uniform thickness. -
Compress the slab:
Take a smooth rubber rib and gently compress the surface of the clay on both sides. This aligns the clay particles to prevent warping during firing and creates a nice canvas for your glaze. -
Leather hard stage:
Transfer your slab to a ware board and let it firm up to a ‘soft leather hard’ consistency. It should hold its shape when lifted but still be flexible enough to manipulate without cracking. -
Cut the components:
Using your ruler and fettling knife, cut out the pieces: a base rectangle, four walls (two long, two short), and a lid slightly larger than the base. I find using cardstock templates helps keep everything square.
Step 2: Assembling the Box
-
Bevel the edges:
Cut 45-degree angles on the vertical edges of your wall pieces where they will join. This miter joint creates a stronger bond and seamless corners for the box. -
Score and slip:
Thoroughly score the edges of the base and the bottom of the walls. Apply a generous amount of slip to the scored areas. -
Join the walls:
Attach the walls to the base, pressing them firmly together at the corners. Wipe away excess slip immediately to keep the interior clean. -
Reinforce the interior:
Roll a very thin coil of clay and press it into the interior seams where the walls meet the floor and each other. Smooth this out completely with a modeling tool. -
Paddle into shape:
Gently paddle the exterior walls with a wooden paddle to ensure they are straight and the corners are tight. This also helps lock the miter joints.
Clean Corner Tip
When smoothing interior corners, use the back of a small paintbrush or a rounded wooden tool. This creates a perfect concave fillet without gouging the clay walls.
Step 3: Constructing the Lid
-
Create the gallery constraint:
Measure the inner dimensions of your box opening. On the underside of your lid slab, score and slip a small rectangle of clay that fits *inside* the box opening. This creates a flange to keep the lid from sliding off. -
Dry fit:
Once the flange is attached, carefully test the fit on the box. It should be snug but have just a tiny bit of wiggle room to account for shrinkage. -
Refine the lid shape:
With the lid on the box, verify that the outer edge overhangs or sits flush as desired. For the look in the photo, trim the lid so it is perfectly flush with the exterior walls.
Textural Variation
Before assembling, roll your slab onto a textured fabric like canvas or linen. The subtle weave pattern will break nicely under the glaze for added depth.
Step 4: Refining and Glazing
-
Round the corners:
Once the box is fully leather hard, use a sponge or a sanding pad to gently round over all sharp corners and edges. This gives the piece that soft, ‘pillowy’ aesthetic seen in the image. -
Dry slowly:
Place the lid on the box and wrap the entire piece loosely in plastic. Allow it to dry very slowly to prevent warping. Once bone dry, bisque fire the piece. -
Apply wax resist:
Apply wax resist to the gallery flange on the lid and the top rim of the box where they touch. This is crucial so the lid doesn’t fuse to the box during firing. -
Glaze application:
Dip or brush your creamy white glaze over the entire piece. Because the clay is speckled, a semi-opaque glaze works best to let those iron spots show through. -
Final wipe:
Check the foot of the box and wipe away any stray glaze. Fire to the maturity temperature of your clay (likely Cone 5 or 6).
Now you have a timeless, durable ceramic box ready to hold your most precious items


Stamped Texture Ceramic Box Using Leaves or Lace
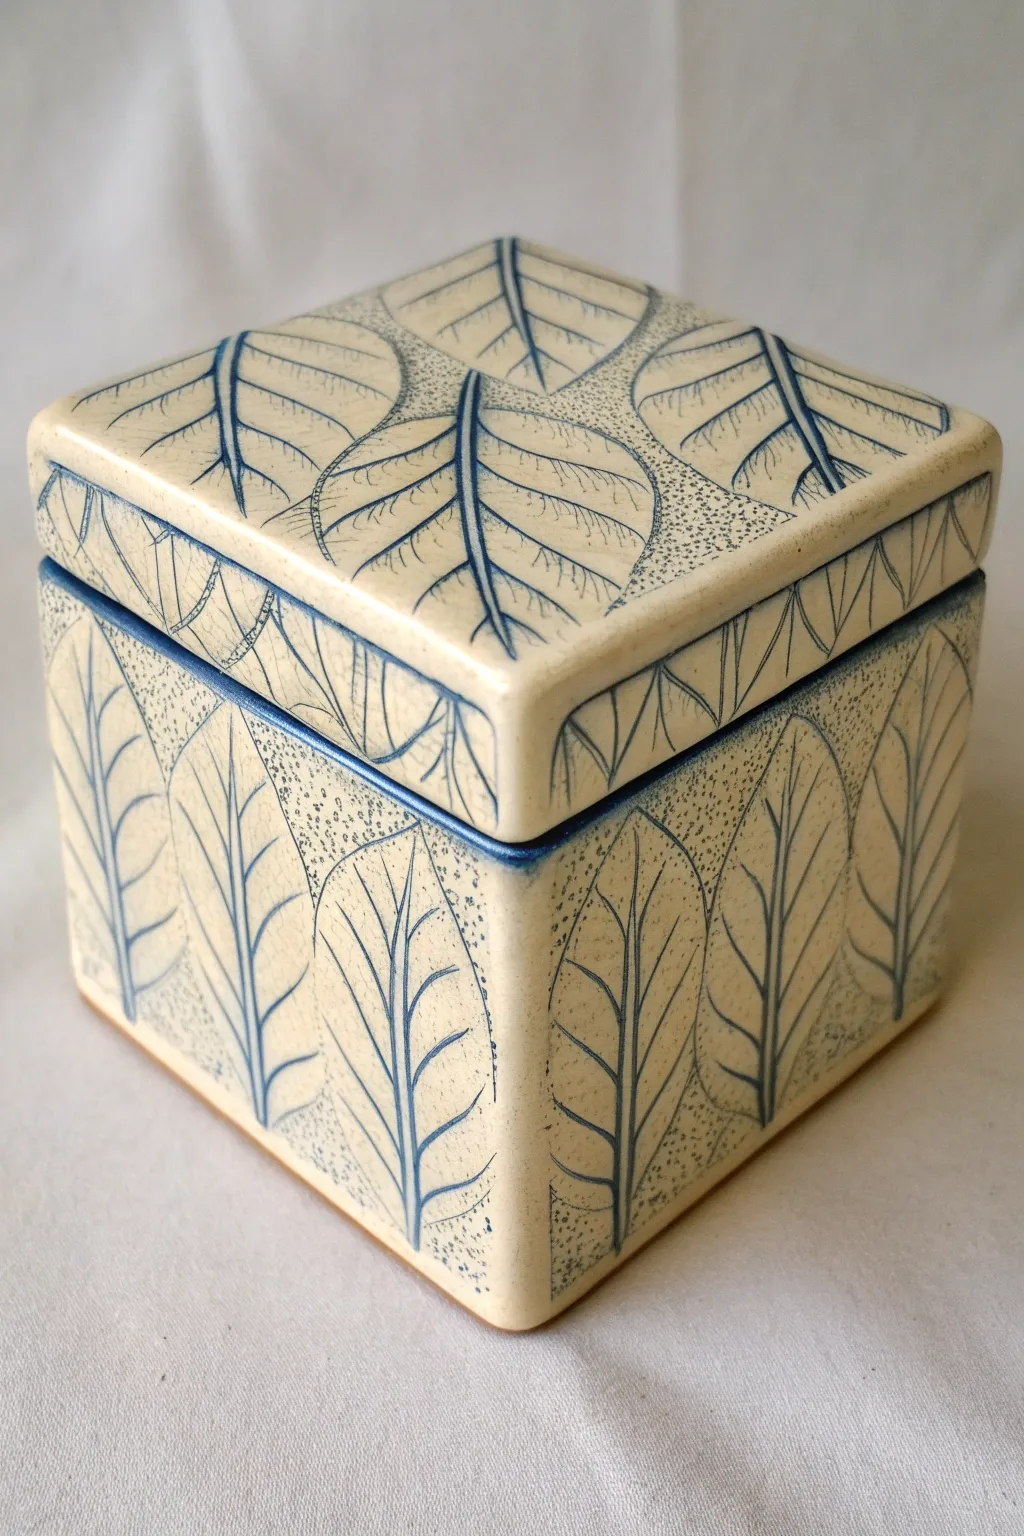
This elegant ceramic box features a delicate sgraffito leaf design carved through blue underglaze, revealing the creamy clay body beneath. The clean lines and meticulous stippling texture create a sophisticated, nature-inspired vessel perfect for storing small treasures.
How-To Guide
Materials
- Light-colored stoneware or porcelain clay slab (approx 1/4 inch thick)
- Square template or ruler
- Fettling knife
- Scoring tool and slip
- Dark blue underglaze
- Soft fan brush
- Sgraffito loop tool (small)
- Needle tool
- Finishing sponge
- Clear transparent glaze
Step 1: Building the Form
-
Cut the slabs:
Roll out your clay slab to an even 1/4 inch thickness. Using your square template, cut out a base piece and four equal wall pieces. For the lid, cut a square slightly larger than your base (to account for the flange) and four narrow strips for the lid’s rim. -
Create the box body:
Wait until the clay is leather hard. Score and slip the edges of the base and the bottom edges of the walls. Assemble the four walls onto the base, ensuring the corners meet at crisp 90-degree angles. Use a small coil on the interior seams to reinforce the joints. -
Assemble the lid:
Attach the four narrow strips to the underside of your lid slab, inset slightly so they will fit inside the box opening—this is your flange system. Check the fit against the box body often; it should be snug but not tight to allow for glaze thickness later. -
Refine the surface:
Once assembled and firmly leather hard, use a metal rib or paddle to ensure all clay walls are perfectly flat and corners are sharp. Smooth away any joining marks with a slightly damp sponge, but keep the edges distinct.
Clean Lines
For crisper sgraffito lines, carve when the clay is ‘chocolate bar hard’—firm but not dry. Too wet and the clay tears; too dry and it chips.
Step 2: Applying the Design
-
Apply underglaze:
Paint 2-3 even coats of dark blue underglaze over the entire exterior surface of the box and the top of the lid. Allow the underglaze to dry until it’s no longer tacky to the touch but the clay is still leather hard. -
Sketch the layout:
Using a dull pencil or very light pressure with a needle tool, sketch the basic leaf outlines. On the box sides, vertically orient large oval leaves side-by-side. On the lid, arrange four leaves pointing inward toward the center. -
Carve the main lines:
Use a small loop tool to carve out the main veins and outlines of the leaves. You want to remove the blue underglaze to reveal the white clay body underneath. Keep your lines confident and flowing. -
Detail the veins:
Switch to a finer tool or the edge of your loop tool to add the secondary veins branching off the center line of each leaf. These should be thinner than the main outline for visual variety. -
Stipple the negative space:
This step requires patience. Using a needle tool, create hundreds of tiny dots (stippling) in the triangular spaces between the leaves. I find this meditative process creates a beautiful shading effect that makes the smooth leaves pop. -
Clean up:
Once the carving is complete, gently brush away any clay burrs or crumbs with a large, soft dry brush. Be careful not to smudge the remaining underglaze.
Color Pop
Try a different underglaze color like forest green or black for the background, or gently watercolor the inside of the carved leaves for subtle tinting.
Step 3: Finishing
-
Bisque fire:
Allow the piece to dry slowly and thoroughly to prevent warping. Fire the box and lid separately in a bisque kiln to cone 04 (or your clay’s specific bisque temperature). -
Glazing:
Wipe the bisqued piece with a damp sponge to remove dust. Apply a clear, transparent glaze over the entire piece, inside and out. Ensure the flange area where the lid meets the box is wiped clean or waxed to prevent sticking. -
Final firing:
Glaze fire the piece to the maturity temperature of your clay body (likely Cone 5/6 or 10).
Once fired, the glossy clear glaze will deepen the blue contrast and protect your intricate carving for years to come


Raised Sprigged Details on a Lidded Box
This charming ceramic project combines slab-building techniques with delicate surface decoration to create a vintage-inspired keepsake box. By utilizing spriggings—appliques of clay added to the surface—you can achieve a raised floral design that feels wonderful to the touch and catches the glaze beautifully.
Step-by-Step
Materials
- White or light buff stoneware clay (smooth)
- Rolling pin and guide sticks (1/4 inch)
- Square template (approx. 4×4 inches)
- Fettling knife or needle tool
- Scoring tool (serrated rib)
- Slip (made from your clay body)
- Small daisy plunger cutter or silicone sprig mold
- Beading tool or small round piping tip
- Texture roller or mat (fine dot pattern)
- Small wooden modeling tool
- Soft sponge
- Honey/Amber translucent celadon glaze
Step 1: Building the Box Form
-
Roll the Slabs:
Begin by rolling out a generous slab of clay to an even 1/4-inch thickness. Compress the clay on both sides with a rubber rib to align the particles and prevent warping later. -
Texture the Walls:
Before cutting your pieces, gently roll a fine dot texture mat or roller over a portion of the slab that will become the side walls. Leave the sections for the lid and base smooth. -
Cut Components:
Using your square template, cut out a base piece and a lid piece. Then, cut four rectangular wall panels. Ensure the wall height is consistent (around 3 to 4 inches) and the lengths match the sides of your base. -
Bevel the Edges:
For crisp corners, miter the vertical edges of your four wall pieces at a 45-degree angle. This creates a stronger joint than a simple butt joint and looks cleaner. -
Score and Slip:
Rough up the beveled edges and the perimeter of the base with your scoring tool. Apply a generous amount of slip to these areas. -
Assemble the Walls:
Attach the walls to the base and to each other. Press the corners firmly together, ensuring the box is square. Reinforce the interior seams with a thin coil of clay, smoothing it out completely.
Clean Beading
Instead of rolling 100 tiny balls, extrude a thin coil and use a ‘pearl maker’ tool or the open end of a small tube to impress the bead shapes directly onto the attached coil.
Step 2: Creating the Lid & Gallery
-
Form the Lid:
Take your smooth square lid slab and gently gently slump it over a small foam pillow or a wad of newspaper to give it a slight, pillowed dome shape. -
Add a Flange:
Flip the lid over (once it’s stiffened slightly to leather hard) and attach a small square of clay coils or strips just inside the perimeter. This ‘flange’ will sit inside the box opening to keep the lid secure. -
Refine the Fit:
Test the fit of the lid on the box body. It should be snug but have a tiny bit of wiggle room to account for glaze thickness later. Smooth the outer edges of the lid with a damp sponge.
Step 3: Decorative Sprigging
-
Make the Flower Sprigs:
Roll a very thin sheet of clay. Use a daisy plunger cutter to punch out several flowers. Alternatively, press clay into a small silicone flower mold and release them carefully. -
Attach Flowers to Lid:
Score the spots on the lid where you want blooms. Apply a dot of slip and press the clay flowers gently onto the surface. Use a modeling tool to deepen the center indent of each flower to ensure a good bond. -
Decorate the Sides:
Repeat the process on the textured side walls, arranging the flowers in a staggered pattern. I find that placing them slightly off-center adds a nice organic feel. -
Create the Beaded Borders:
Roll tiny balls of clay for the borders, or use a specific beading tool on a coil. Attach these tiny beads along the bottom rim of the lid and the bottom edge of the box for a framed look. -
Add the Handle:
Fashion a small knob for the lid. You can throw a tiny form on the wheel or hand-build a mushroom shape. Attach it securely to the center of the domed lid.
Scented Satchel
Before firing, poke small, decorative holes in the lid among the flowers. This turns your container into a potpourri box or garlic keeper that allows air circulation.
Step 4: Glazing and Finishing
-
Bisque Fire:
Allow the piece to dry slowly under plastic to prevent corner cracking. Once bone dry, bisque fire the box and lid according to your clay body’s specifications. -
Wax the Contact Points:
Apply wax resist to the underside of the lid’s flange and the rim of the box where the lid sits. This prevents the two pieces from fusing together in the kiln. -
Glaze Application:
Dip or brush on a translucent amber or honey celadon glaze. This type of glaze is crucial as it will pool in the recesses of the texture and break beautifully over the raised white flowers, highlighting the relief. -
Final Firing:
Glaze fire the piece. Once cool, check the fit of the lid again and sand any rough spots on the foot if necessary.
This delightful box makes a perfect home for jewelry or trinkets, bringing a soft floral touch to any room

The Complete Guide to Pottery Troubleshooting
Uncover the most common ceramic mistakes—from cracking clay to failed glazes—and learn how to fix them fast.
Footed Ceramic Box With Rounded Corner Feet
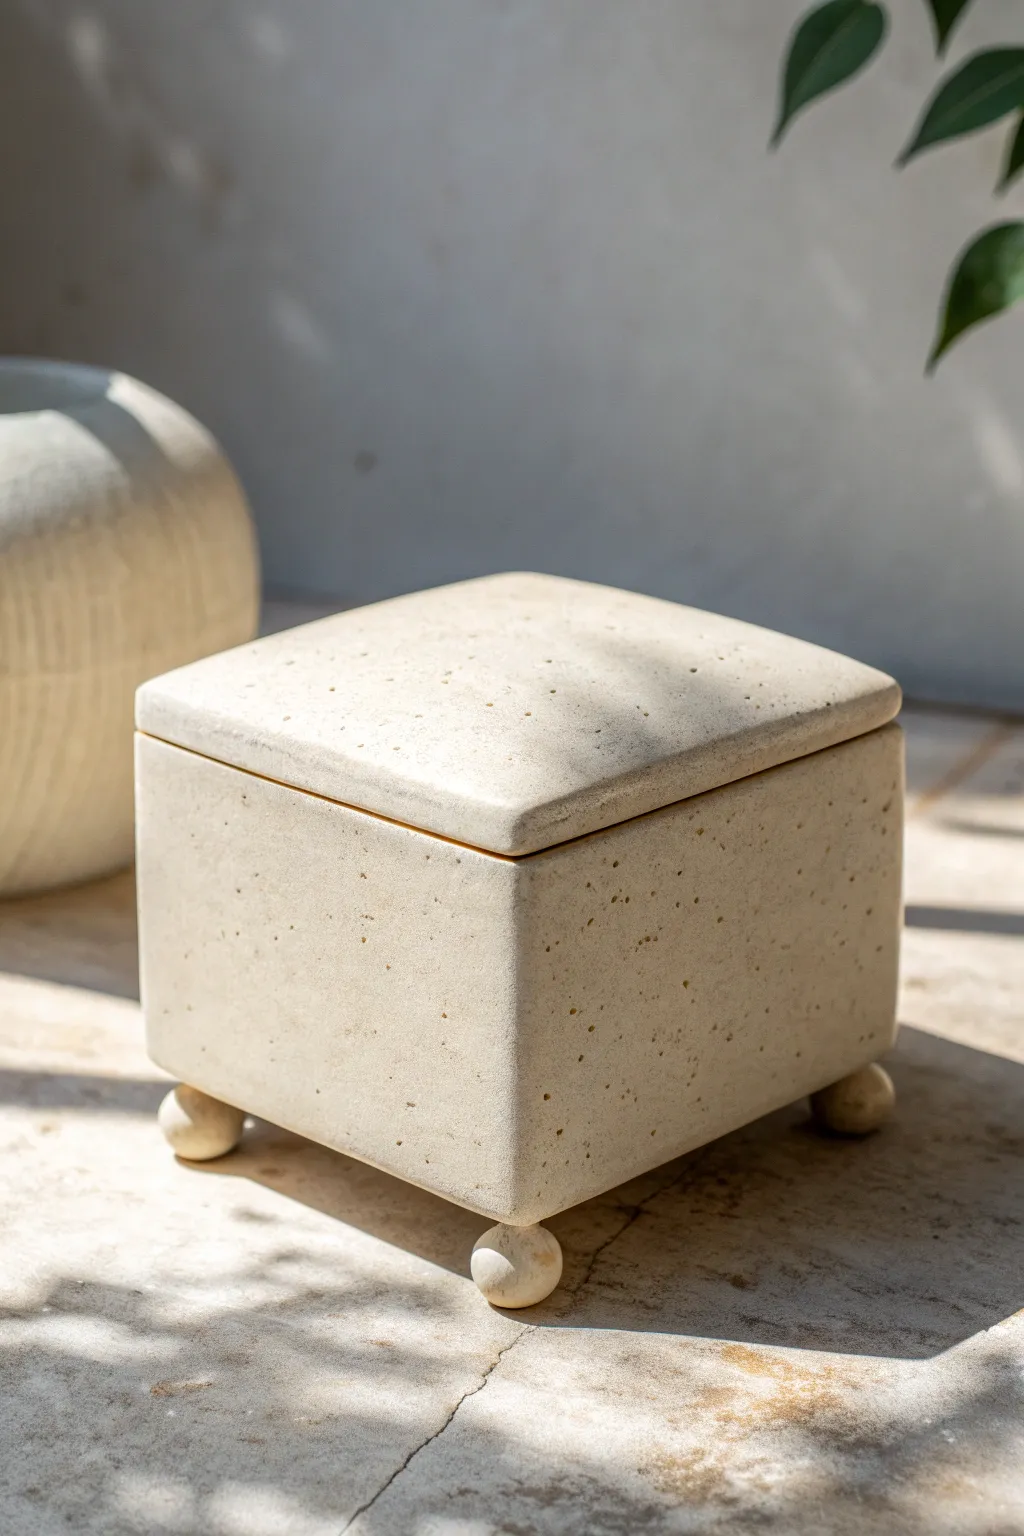
This elegant ceramic box features clean, geometrical lines softened by a speckled stone-like texture and playful rounded feet. Its natural, matte finish pairs perfectly with the subtle shadow play created by the slightly overhanging lid, resulting in a piece that feels both architectural and organic.
Detailed Instructions
Materials
- Stoneware clay (smooth or with fine grog)
- Speckled clay body or speckle additive (e.g., granular ilmenite)
- Wide rolling pin
- Guide sticks or slab roller (approx. 1/4 inch thickness)
- Sharp clay knife or fettling knife
- Ruler and square tool
- Slip and scoring tool (serrated rib)
- Small wooden paddle
- Sponge
- Matte white or transparent glaze (if using speckled clay)
- Cardboard or template paper
Step 1: Preparing the Slabs
-
Prepare the Clay:
Begin by wedging your clay thoroughly to remove air bubbles. If you are creating the speckled look yourself, knead the granular ilmenite into a white stoneware body until it is evenly distributed. -
Roll the Slabs:
Roll out a large slab of clay to a consistent thickness of about 1/4 inch. Using guide sticks on either side of your rolling pin ensures the floor and walls are perfectly even, which is crucial for a geometric box. -
Smooth the Surface:
Compress the slab on both sides using a rib tool. This aligns the clay particles to prevent warping and creates that smooth, stone-like surface we want for the final finish. -
Cut the Components:
Using a ruler and a sharp knife, cut out your pieces: one square for the base, four identical rectangles for the walls, and a slightly larger square for the lid. Let these slabs stiffen to a soft leather-hard state so they can hold their weight.
Warping Walls?
If your box walls start bowing inward while drying, place a piece of soft foam (like upholstery foam) inside the box to support the shape as it stiffens.
Step 2: Assembling the Box Body
-
Bevel the Edges:
For crisp, sharp corners, cut 45-degree bevels on the vertical edges of the wall pieces and the edges of the base slab. This miter joint creates a stronger bond and a cleaner visual line than a butt joint. -
Score and Slip:
Rough up the beveled edges with a scoring tool and apply a generous amount of slip. I usually like to act quickly here so the slip doesn’t dry out before connection. -
Connect the Walls:
Attach the walls to the base and to each other. Press the joints firmly together. -
Reinforce the Interior:
Roll a very thin coil of clay and press it into the interior corners where the walls meet the floor and each other. Smooth this coil out entirely so it disappears. -
Paddle the Shape:
Gently tap the exterior walls with a wooden paddle. This squares up the form, tightens the joints, and helps eliminate any bowing that occurred during handling.
Pro Tip: Sharp Corners
After assembling, use a metal rib or a rasp on the leather-hard clay to ‘shave’ the exterior corners. This creates those ultra-crisp, architectural edges.
Step 3: Creating the Lid and Feet
-
Fit the Lid Flange:
Flip your lid slab over. Create a smaller square slab or coil frame that fits snugly *inside* the box opening. Score and slip this onto the underside of the lid slab to act as a flange that keeps the lid from sliding off. -
Refine the Lid Edge:
Place the lid on the box. The lid should have a very slight overhang or be perfectly flush depending on your preference; trim the edges with a knife or rasp to match the clean geometry of the image. -
Shape the Feet:
Roll four balls of clay approximately 3/4 inch in diameter. Ensure they are all the exact same size by weighing them on a gram scale if you have one. -
Attach the Feet:
Score the bottom corners of the box and the tops of the clay spheres. Attach the balls to the corners, pressing firmly enough to bond them but gently enough to keep the spherical shape. -
Level the Piece:
Flip the box carefully so it stands on its new feet. Gently press down on the rim to ensure all four feet touch the surface evenly and the box sits level.
Step 4: Finishing and firing
-
Refine the Surface:
Once the piece is bone dry, use a slightly damp sponge to wipe away any sharp edges or burrs. To get that sandy stone texture, avoid over-smoothing; let the clay’s natural grain show. -
Bisque Fire:
Fire the piece to bisque temperature (usually Cone 04 or 06) to prepare it for glazing. -
Glazing:
Apply a matte transparent or satin white glaze. If you used speckled clay, the specks will burn through effectively. If using standard white clay, choose a glaze with ‘speckle’ additives. -
Glaze Wiping:
Wipe the bottom of the feet completely clean of glaze to prevent them from fusing to the kiln shelf. -
Final Firing:
Glaze fire to the maturity temperature of your clay body (likely Cone 5 or 6 for stoneware). Allow the kiln to cool slowly to prevent thermal shock.
Place your finished box on a shelf where the light can catch the texture and showcase the unique shadow cast by the rounded feet
Leaf Knob Lidded Box With Vine Details
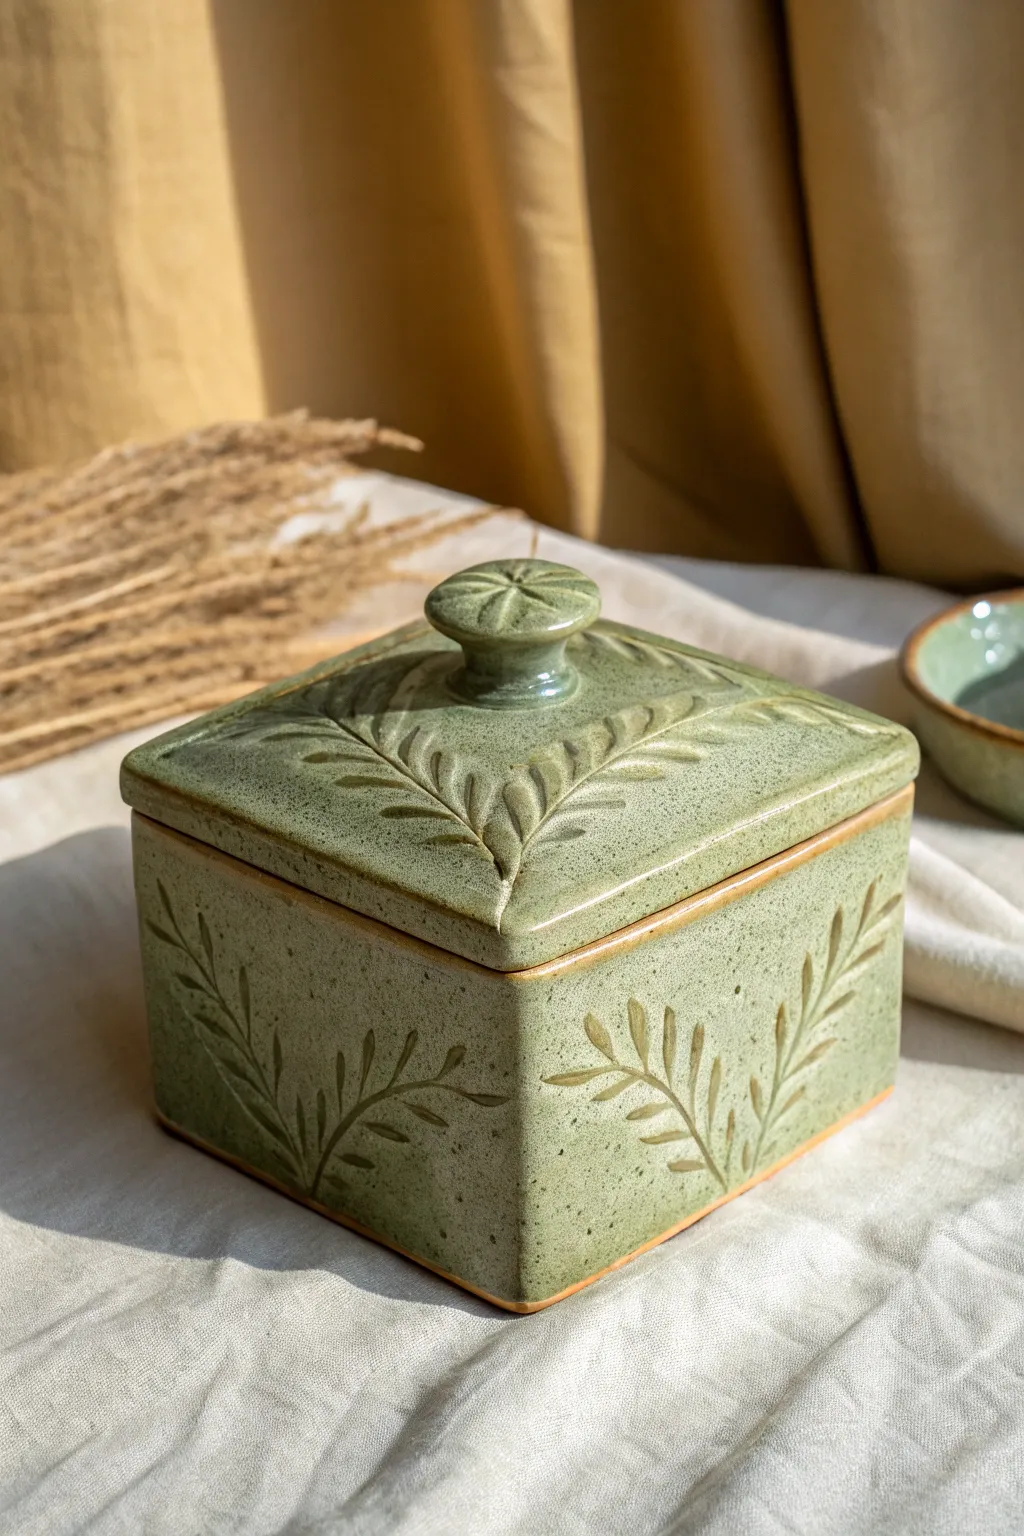
This charming square ceramic box features delicate vine impressions and a matching speckle green glaze that brings the botanical details to life. Perfect for storing trinkets or jewelry, the piece is topped with a decorative radial leaf knob that ties the organic design together.
Step-by-Step Tutorial
Materials
- Stoneware clay (smooth or light grog)
- Rolling pin and guide slats (approx. 1/4 inch thick)
- Slab roller (optional)
- Ruler
- Fettling knife or needle tool
- Slip and scoring tool (serrated rib)
- Carving tools (loop tools or needle tool)
- Small round wooden rib
- Speckled green stoneware glaze
- Kiln
- Sponge
Step 1: Creating the Box Form
-
Roll the Slabs:
Start by rolling out your stoneware clay into a slab of even thickness, about 1/4 inch. If you don’t have a slab roller, use guide slats on either side of your clay to ensure the rolling pin creates a perfectly flat surface. -
Measure and Cut:
Using a ruler and fettling knife, cut out five square pieces of equal size for the box body (e.g., 4×4 inches) and one slightly larger square for the lid to account for overhang. -
Let the Clay Firm Up:
Allow your cut slabs to dry slightly until they reach a ‘leather-hard’ state. They should be stiff enough to hold their shape when stood up, but soft enough to be scored and joined. -
Bevel the Edges:
For tighter seams, cut a 45-degree angle on the edges of the base slab and the bottom and side edges of the wall slabs. This creates a stronger miter joint, though a standard butt joint works too if you reinforce it well. -
Score and Slip:
Vigorously score the edges you intend to join with a serrated rib, apply clay slip, and press the walls onto the base and against each other. Ensure the box is perfectly square. -
Reinforce the Seams:
Roll thin coils of soft clay and press them into the interior corners of the box. Smooth these coils down with a wooden tool or your finger to ensure the walls won’t separate during firing.
Warped Walls?
If your box sides are bowing inward or outward, the clay was likely too soft when assembled. Let slabs dry longer next time, or prop walls with foam blocks until stiff.
Step 2: Designing the Lid and Details
-
Shape the Lid:
Take your lid slab and gently press it into a shallow slump mold or use your thumb to create a very slight domed curve, so it isn’t perfectly flat. Wait until it is leather-hard before proceeding. -
Add the Flange:
To keep the lid secure, attach small strips of clay to the underside of the lid, inset slightly from the edge so they fit snugly inside the box walls. -
Create the Knob:
Roll a small ball of clay for the knob. Flatten it slightly into a mushroom shape and attach it to the center of the lid using the score and slip method. -
Carve the Knob Details:
Use a needle tool to press radiating lines into the top of the knob, resembling a flower or starburst pattern similar to the photo. -
Sketch the Vine Pattern:
Lightly trace your vine design onto the leather-hard box sides and lid surface with a needle tool. I find it helpful to draw corner-to-center diagonal branches on the lid first. -
Carve the Leaves:
Using a small carving tool or V-tip gouge, carefully carve out the leaf shapes along your traced vines. Deepen the central veins and remove a tiny bit of clay for the leaf blades to give them texture.
Step 3: Finishing and Glazing
-
Bisque Fire:
Once the piece is bone dry (no longer cool to the touch), fire it in the kiln to bisque temperature (usually cone 04 or 06, depending on your clay). -
Clean the Bisqueware:
Wipe the fired piece down with a damp sponge to remove any dust, which can prevent glaze from adhering properly. -
Apply the Glaze:
Dip or brush on your speckled green glaze. Make sure the glaze gets into the carved leaf recesses, as the pooling there will darken the green and highlight the design. -
Wipe the Rim:
Using a damp sponge, carefully wipe away the glaze from the rim of the box and the underside where the lid touches the box to prevent them from fusing together in the kiln. -
Final Fire:
Load the pieces into the kiln for the final glaze firing (often cone 5/6 for stoneware). Ensure the lid is fired separately or on a stilt if you haven’t waxed the contact points perfectly.
Level Up: Texture
Before carving, gently sponge the leather-hard clay with a coarse sponge. This creates subtle pitting that the glaze will break over, mirroring the organic stone look.
Enjoy using your beautiful handmade box for storage or as a centerpiece on your table


What Really Happens Inside the Kiln
Learn how time and temperature work together inside the kiln to transform clay into durable ceramic.
Nerikomi Marble Ceramic Box With Swirled Slabs
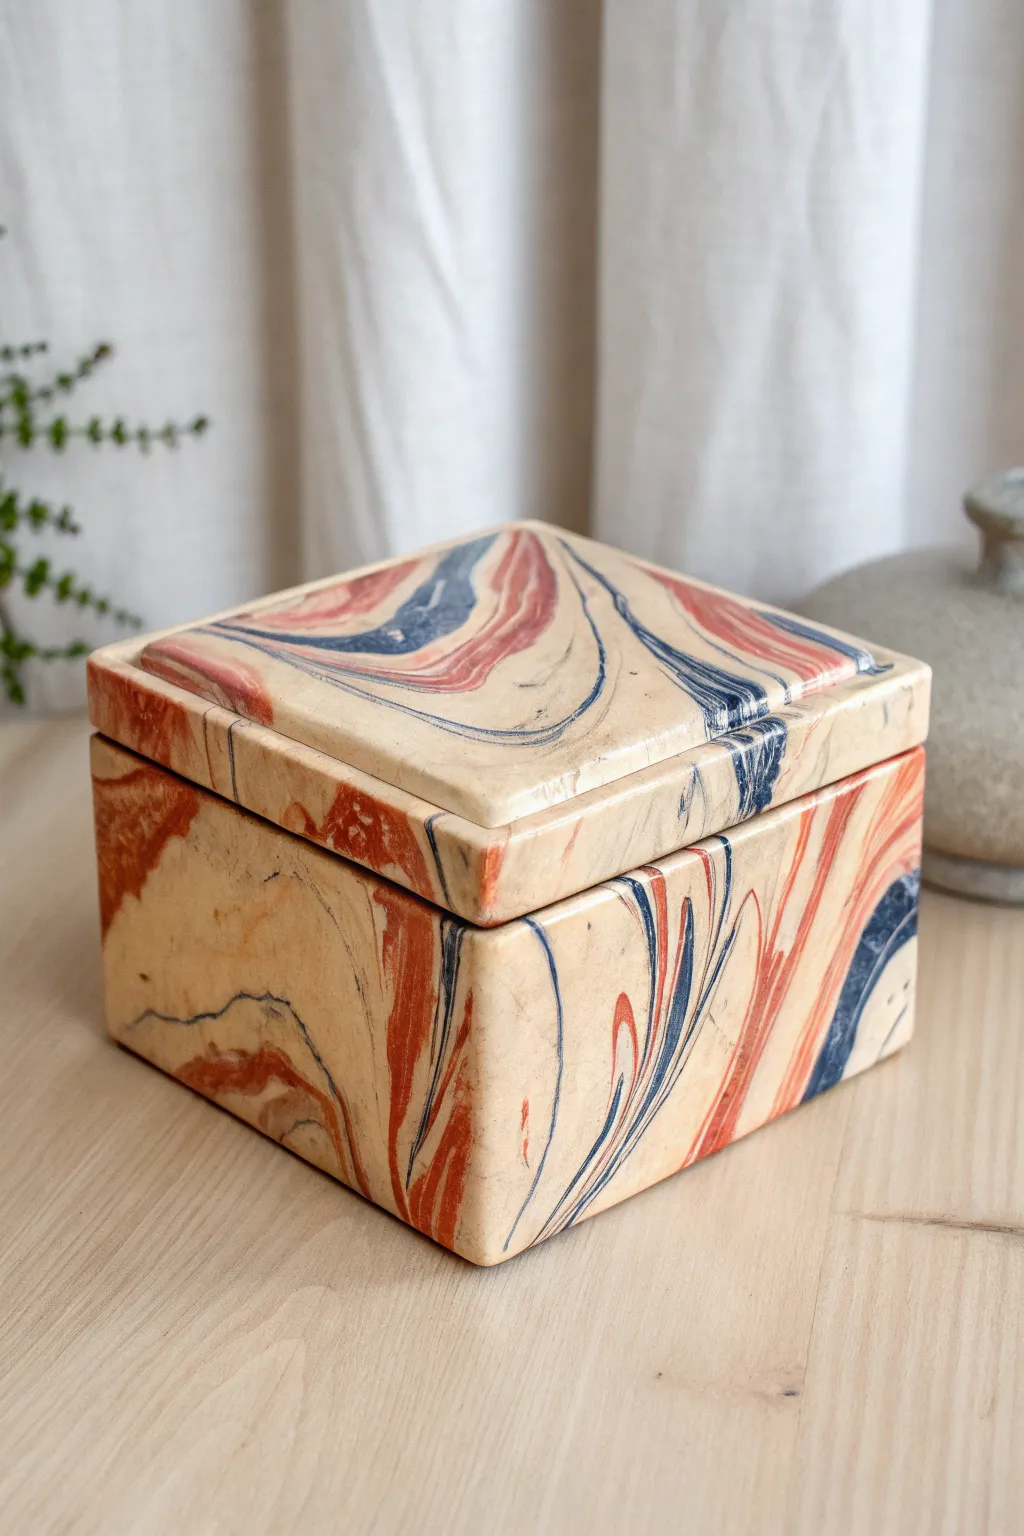
Master the art of Nerikomi with this stunning lidded box that mimics the organic flow of agate stone. By layering colored clays and manipulating the slab, you’ll create a functional piece where the pattern is embedded straight through the ceramic body, not just painted on the surface.
Step-by-Step Guide
Materials
- White stoneware or porcelain clay body (main base)
- Mason stains (Red Iron Oxide/Rust and Cobalt/Navy Blue)
- Rolling pin
- Canvas work surface or slab mat
- Fettling knife or X-Acto blade
- Ruler
- Serrated rib or scoring tool
- Slip (liquid clay)
- Paper template (square)
- Wooden paddle
- Sponge
Step 1: Preparing the Colored Clay
-
Mix your colors:
Start by separating your white clay into three portions: a large portion (about 60%) to keep plain white/beige, and two smaller portions (20% each). Thoroughly wedge rust-colored Mason stain into one small portion and navy blue stain into the other until the color is uniform. -
Create the stack:
Flatten each clay ball into rough, thick patties. Stack them in an alternating pattern—white, rust, white, blue—repeating until you have a thick block. Don’t worry about neatness; irregularity helps the organic look. -
Slice and slam:
Cut the stack in half vertically using a wire tool. Slam one half on top of the other to increase the layer count. Repeat this process once or twice more, but be careful not to over-blend, or the distinct lines will turn muddy. -
Marvelous marbling:
Knead the clay block gently just a few times to disturb the straight lines into swirls. Then, using a rolling pin, roll the block out into a smooth, even slab about 1/4 inch thick. You should see the beautiful striations stretching out throughout the surface.
Step 2: Constructing the Box Base
-
Cut the components:
Using your square paper template and a sharp fettling knife, cut out five squares from your marbled slab: one for the base and four for the walls. For the lid, you will need a slightly larger square later, so preserve a good section of slab. -
Dry to leather hard:
Let the cut squares sit on a ware board until they reach a stiff leather-hard stage. They need to be firm enough to stand up without warping but soft enough to score. -
Miter the edges (optional):
For a seamless corner like the example, cut the vertical edges of your wall pieces at a 45-degree angle. Alternatively, you can use butt joints, but the pattern flow will be interrupted slightly. -
Score and slip:
Aggressively score the edges that will join together using a serrated rib. Apply a generous amount of joining slip to the scored areas. -
Assemble the walls:
Attach two walls to the base first to form a corner, pressing firmly. Continue adding the remaining walls. I like to use a small clay coil on the interior seams for added reinforcement, smoothing it down with a modeling tool. -
Paddle into shape:
Once the box is assembled, gently tap the outside walls with a wooden paddle. This compresses the joints and ensures your box is perfectly square and the walls are straight.
Clean Lines Pro-Tip
To keep the marble pattern crisp, scrape the surface with a metal rib after rolling the slab. This removes the ‘smear’ of clay on top and reveals the sharp definition of the layers underneath.
Step 3: Creating the Lid
-
Measure the opening:
Measure the outer dimensions of your assembled box. Cut a square from your remaining slab that matches these dimensions exactly for a flush lid. -
Add the inner flange:
Flip the lid slab upside down. Measure the *inner* dimensions of your box opening. Cut four small strips of clay and attach them to the underside of the lid to create a square ‘lip’ that fits snugly inside the box rim effectively locking it in place. -
Refining the top edge:
Notice the example has a beveled detail on the lid. Once the lid is leather hard, use a rasp or knife to bevel the top outer edges, creating a raised, pillow-like effect.
Level Up: Feet
Add four small, triangular feet to the corners of the base using leftover marbled scraps. This lifts the box slightly, giving it a lighter, more elegant floating appearance.
Step 4: Finishing Touches
-
Smooth and compress:
Go over the entire piece with a barely damp sponge to smooth sharp edges, but avoid over-sponging which can expose the grog in the clay. Use a flexible metal rib to compress the surface, which makes the marble pattern pop. -
Clear glaze application:
Bisque fire the piece according to your clay body’s specifications. Apply a transparent clear glaze to the entire piece (except the bottom and the contact points where the lid meets the box). This will deepen the contrast of the navy and rust colors. -
Final firing:
Glaze fire the box. If your lid fits very tightly, fire the lid and box separately to prevent them from fusing together with stray glaze.
Enjoy using your sophisticated new box to store jewelry or simply as a striking sculptural object on your shelf.
Story Relief Memory Box With Carved Symbols
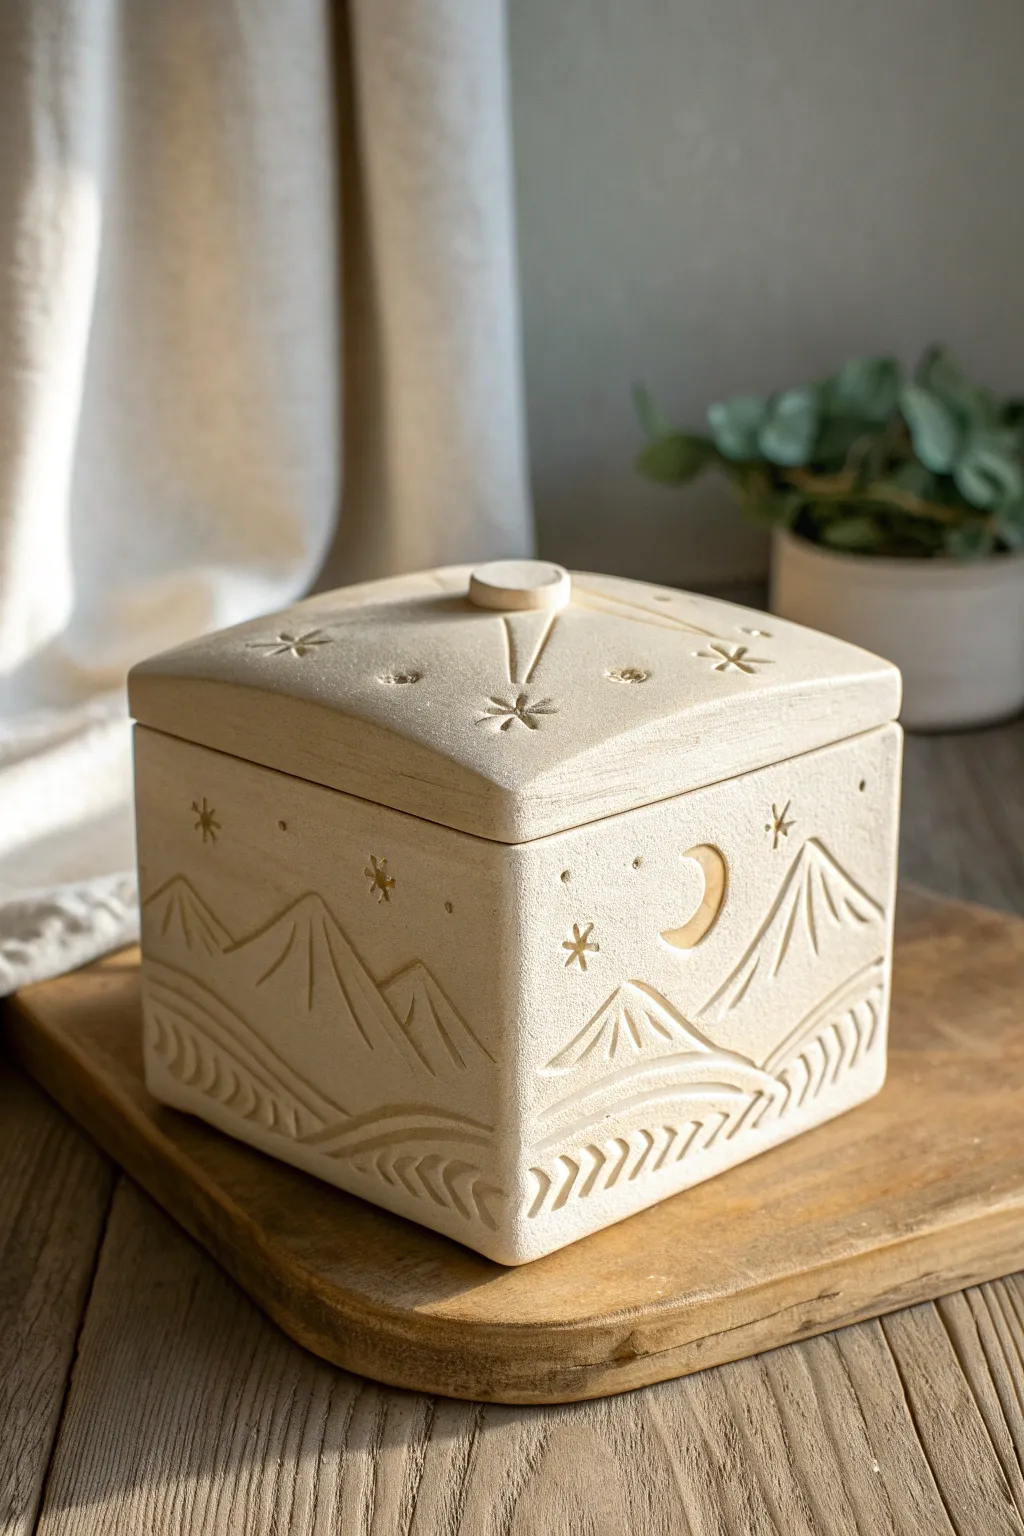
Capture the magic of a starlit night with this hand-built ceramic memory box. Featuring deeply carved mountain ranges, delicate celestial motifs, and a soft matte finish, this piece uses relief techniques to create a tactile storytelling surface.
Step-by-Step
Materials
- Light stoneware clay (speckled or plain buff)
- Square biscuit cutter or paper templates (4×4 inches)
- Canvas rolling mat
- Rolling pin with 1/4 inch thickness strips
- Clay scoring tool or serrated kidney
- Slip (clay mixed with water)
- Loop tools (small and medium sizes)
- Needle tool
- Wood modeling tool
- Small round sponge
- Clear matte glaze or transparent satin glaze
Step 1: Slab Building the Form
-
Roll the slabs:
Begin by wedging your stoneware clay to remove air bubbles. Roll it out on your canvas mat to an even ¼ inch thickness using guide strips to ensure uniformity. -
Cut the components:
Using a sharp fettling knife and templates, cut out five squares for the box (one base, four walls) and one slightly larger square for the lid. Let these slabs stiffen to a ‘leather-hard’ state; they should hold their shape but still be flexible. -
Bevel the edges:
For crisp corners, cut the vertical edges of your wall pieces at a 45-degree angle. This miter joint creates a stronger bond and a cleaner corner aesthetic. -
Score and slip:
Aggressively score the beveled edges and the perimeter of the base. Apply a generous amount of slip, then press the walls onto the base and against each other. -
Reinforce the seams:
Roll a very thin coil of clay and press it into the interior corners. Smooth this out with a wood tool to reinforce the structure. -
Shape the lid:
Take your lid slab and gently press the center from underneath to create a slight dome shape. Add a small coil on the underside, set in about ¼ inch from the edge, to act as a flange that keeps the lid from sliding off. -
Add the handle:
Cut a small circle or form a smooth pebble shape for the knob. Score and slip it onto the center of the domed lid.
Clean Lines Tip
Wait until the clay is ‘bone dry’ before cleaning up tiny carving crumbs. If you try to brush them away while damp, they will smear and ruin the texture.
Step 2: Carving the Narrative
-
Sketch the mountains:
Once the box is firm leather-hard, use a needle tool to lightly sketch your mountain range design. Draw a continuous horizon line that wraps around all four sides. -
Carve the relief:
Using a small loop tool, carve away the negative space just above the mountain peaks. I like to carve slightly deeper near the outline and taper out to create a sense of depth. -
Define the slopes:
Use a needle tool or a sharp sgraffito tool to incise straight lines down the mountain faces, indicating ridges and shadows. -
Create the foreground texture:
Along the bottom, carve rhythmic, curved hash marks to represent rolling hills or rushing water. Keep the pressure consistent for a uniform pattern. -
Add celestial details:
On the lid and upper walls, press small star shapes using a stamp or carve them freehand with a needle tool. Carve a crescent moon on the front face, pressing in slightly to make it concave. -
Smooth the burrs:
Let the piece dry a bit more until the crumbs are chalky. Gently brush away the clay burrs with a soft paintbrush, then smooth sharp edges with a slightly damp sponge—be careful not to wash away your crisp lines.
Golden Hour Glow
After the final firing, apply gold luster or gold leaf to the moon and stars for a luxurious, shimmering contrast against the matte clay.
Step 3: Finishing
-
Bisque fire:
Allow the box to bone dry completely (usually 5-7 days) before bisque firing it in the kiln to approximately cone 04. -
Glaze application:
To maintain the raw, stone-like look, apply a very thin coat of matte clear glaze. Alternatively, leave the outside unglazed and just glaze the interior for functionality. -
Final fire:
Fire the piece to the maturation temperature of your specific clay body (likely cone 5 or 6 for stoneware).
Place your finished box near a window where the light can play across the relief carving throughout the day

TRACK YOUR CERAMIC JOURNEY
Capture glaze tests, firing details, and creative progress—all in one simple printable. Make your projects easier to repeat and improve.
Pierced Luminary Box With a Ventilated Lid
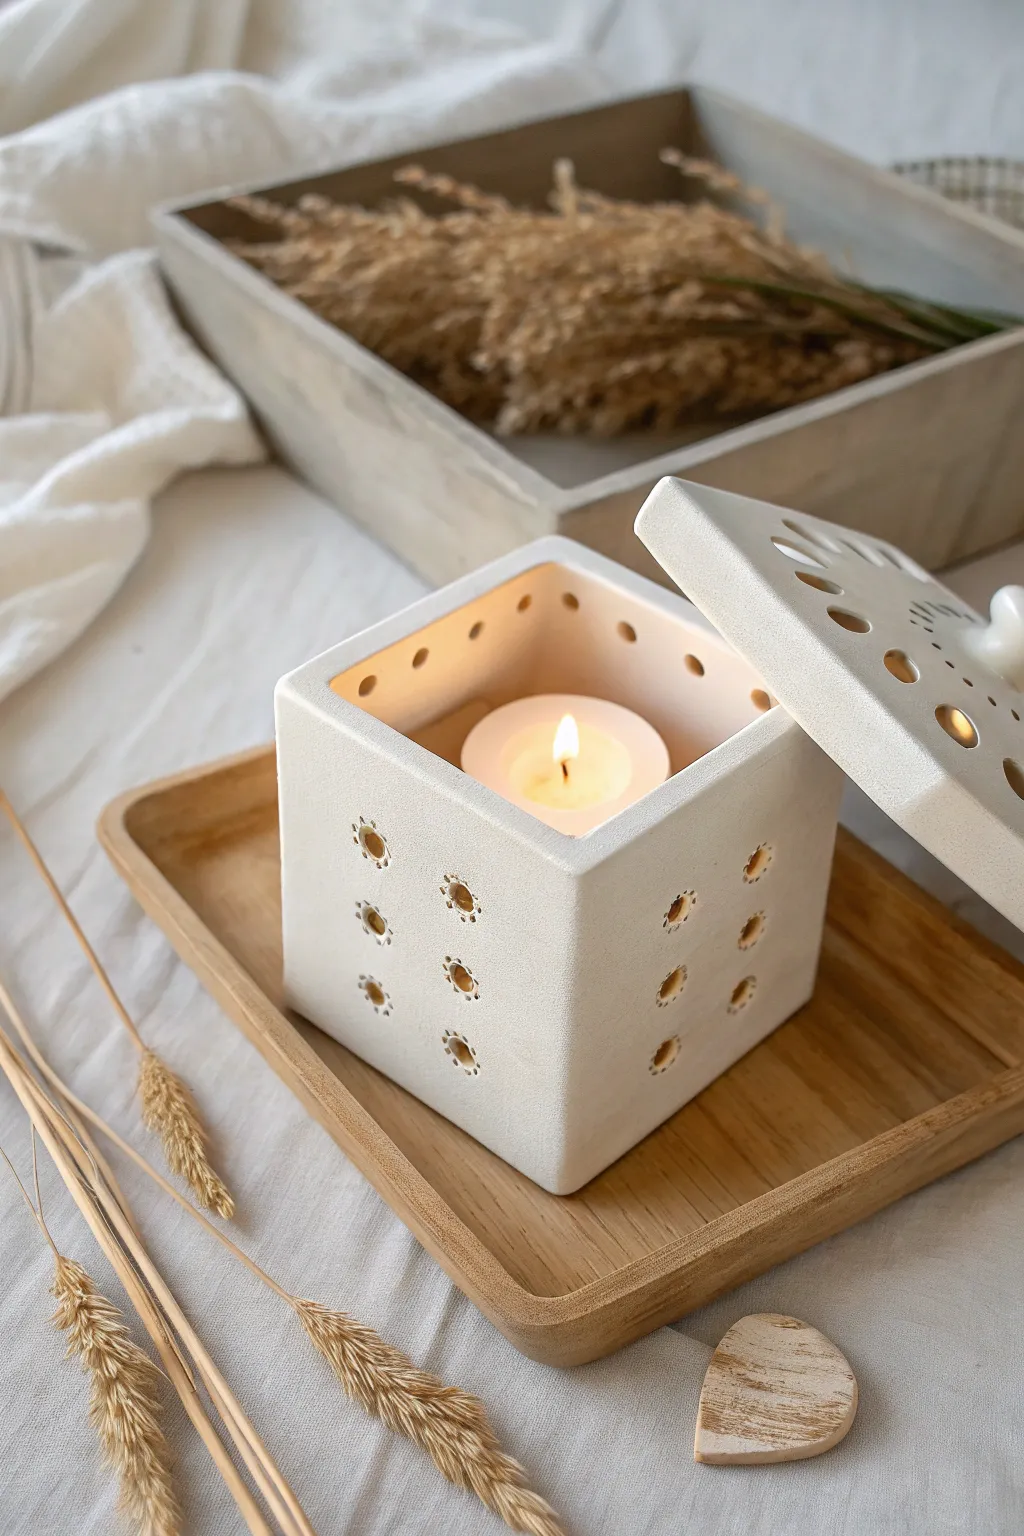
This elegant ceramic luminary box features delicate pierced detailing that casts a warm, speckled glow when lit from within. Its clean, square form and vented lid make it a sophisticated addition to any modern decor setting.
How-To Guide
Materials
- White earthenware or stoneware clay slab (approx. 1/4 inch thick)
- Square template (4×4 inches)
- Fettling knife or needle tool
- Slip and score tool (serrated rib)
- Hole cutters (circular, various sizes)
- Smooth river stone or rib tool (for burnishing)
- Sponge
- Small kiln-safe knob or pulled handle clay
- Ruler
- Clear matte glaze (optional)
- Tealight candle
Step 1: Forming the Box Structure
-
Prepare your slabs:
Roll out your clay into an even slab about 1/4 inch thick. Using your square template, cut out five identical squares for the base and four walls, plus slightly larger square for the lid that overhangs just a bit. -
Bevel the edges:
For clean 90-degree corners, cut the vertical edges of your four wall pieces at a 45-degree angle. Leave the bottom edge flat to attach to the base. -
Score and slip:
Vigorously score the contact points on the base and the beveled edges of your walls. Apply slip generously to these areas. -
Assemble the walls:
Attach the walls to the base one by one, pressing the beveled corners together firmly. I like to use a small wooden reinforcement coil on the inside seams for extra stability. -
Smooth the seams:
Once the box is assembled, use a rib tool to smooth the outside corners, blending the clay until the seams are invisible and the box is perfectly square.
Warping Walls?
If walls bow inward while cutting holes, your clay is too wet. Wait until it’s a firm leather-hard, or place a foam block inside for support while cutting.
Step 2: Creating the Lid and Details
-
Fit the lid:
Take your lid slab and add a small interior flange—a square of clay strips attached to the underside—so the lid sits securely inside the box rim without sliding off. -
Add the knob:
Score the center of the lid and attach a small, smooth knob of clay. Ensure it is securely attached so it can lift the weight of the lid. -
Plan the piercing pattern:
Let the clay dry to leather-hard. This is crucial; if it’s too soft, the box will warp when you cut. Lightly mark a grid on the sides for your hole placement. -
Execute the side piercings:
Using a small circular hole cutter, punch holes in a symmetrical grid pattern (like the face of a die) on each side of the box. Twist the tool gently as you pull it out to keep the hole clean. -
Pierce the lid:
Create a decorative ventilation pattern on the lid. Punch larger holes radiating from the center or along the edges to allow heat to escape. -
Clean up the edges:
Once the clay is bone dry, take a damp sponge or a soft sanding pad and very gently smooth the sharp edges of every hole to ensure a professional finish.
Clean Hole Trick
When punching holes, let the clay stiffen slightly, then use a drill bit by hand to gently ream out the openings for perfectly crisp, sharp circles.
Step 3: Firing and Finishing
-
Bisque fire:
Fire the piece to cone 04 (or your clay’s specific bisque temperature). -
Glazing decision:
For the raw stone look in the image, you can leave the exterior unglazed or apply a very thin matte clear glaze. Glaze the interior if you want easier wax cleanup. -
Final firing:
Fire the piece for a final time according to your glaze and clay specifications. -
Safety check:
Once cool, check the bottom for any rough spots that might scratch furniture and sand them down if necessary. -
Light it up:
Place a tealight inside, secure the lid, and enjoy the beautiful light patterns projected on your table.
Enjoy the peaceful ambiance created by your new handcrafted ceramic lantern