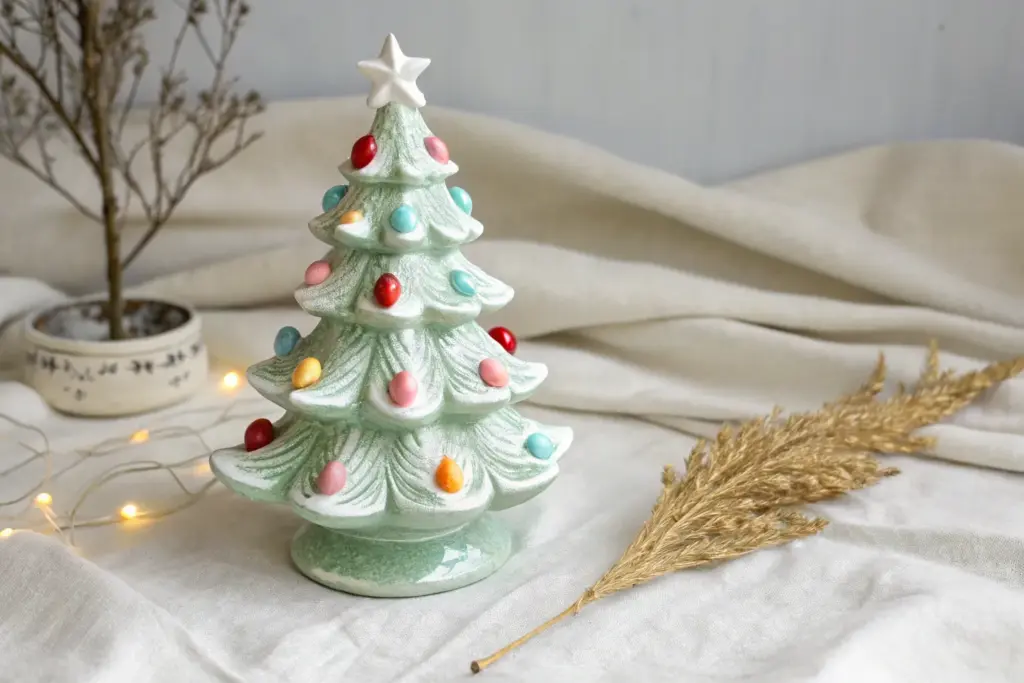
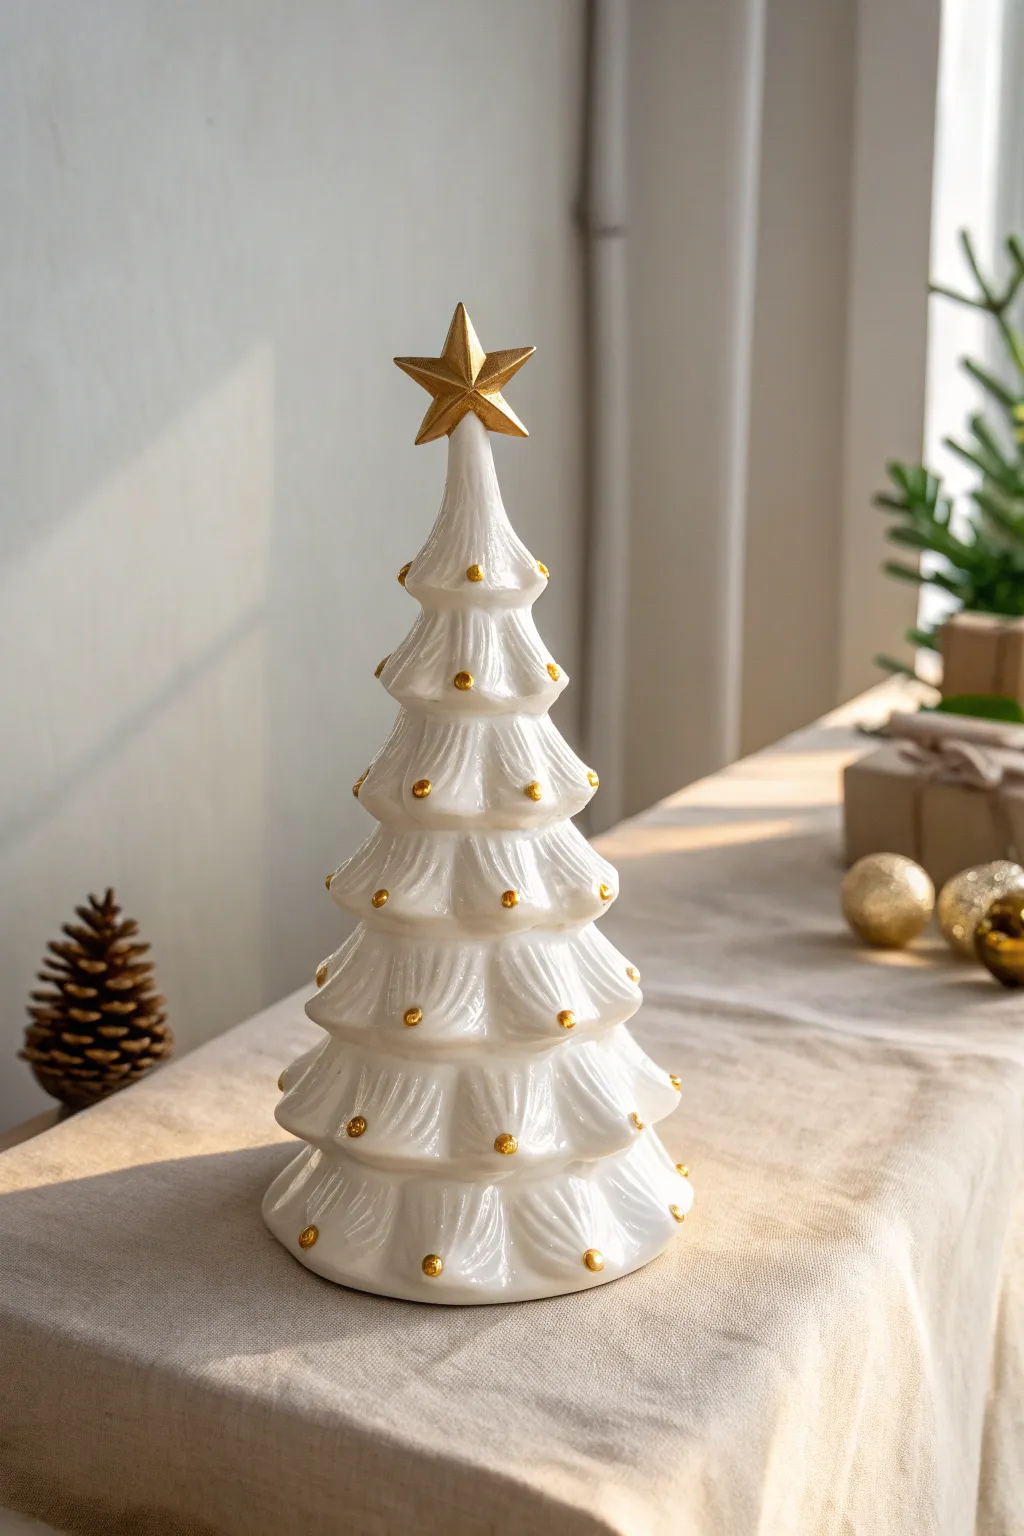
Painting a ceramic Christmas tree is one of my favorite ways to turn nostalgic holiday decor into something that feels totally you. Here are the ideas I lean on in the studio—starting with the classics and ending with a few fun curveballs when you want that extra wow.
Classic Glossy Evergreen With Snowy Tips
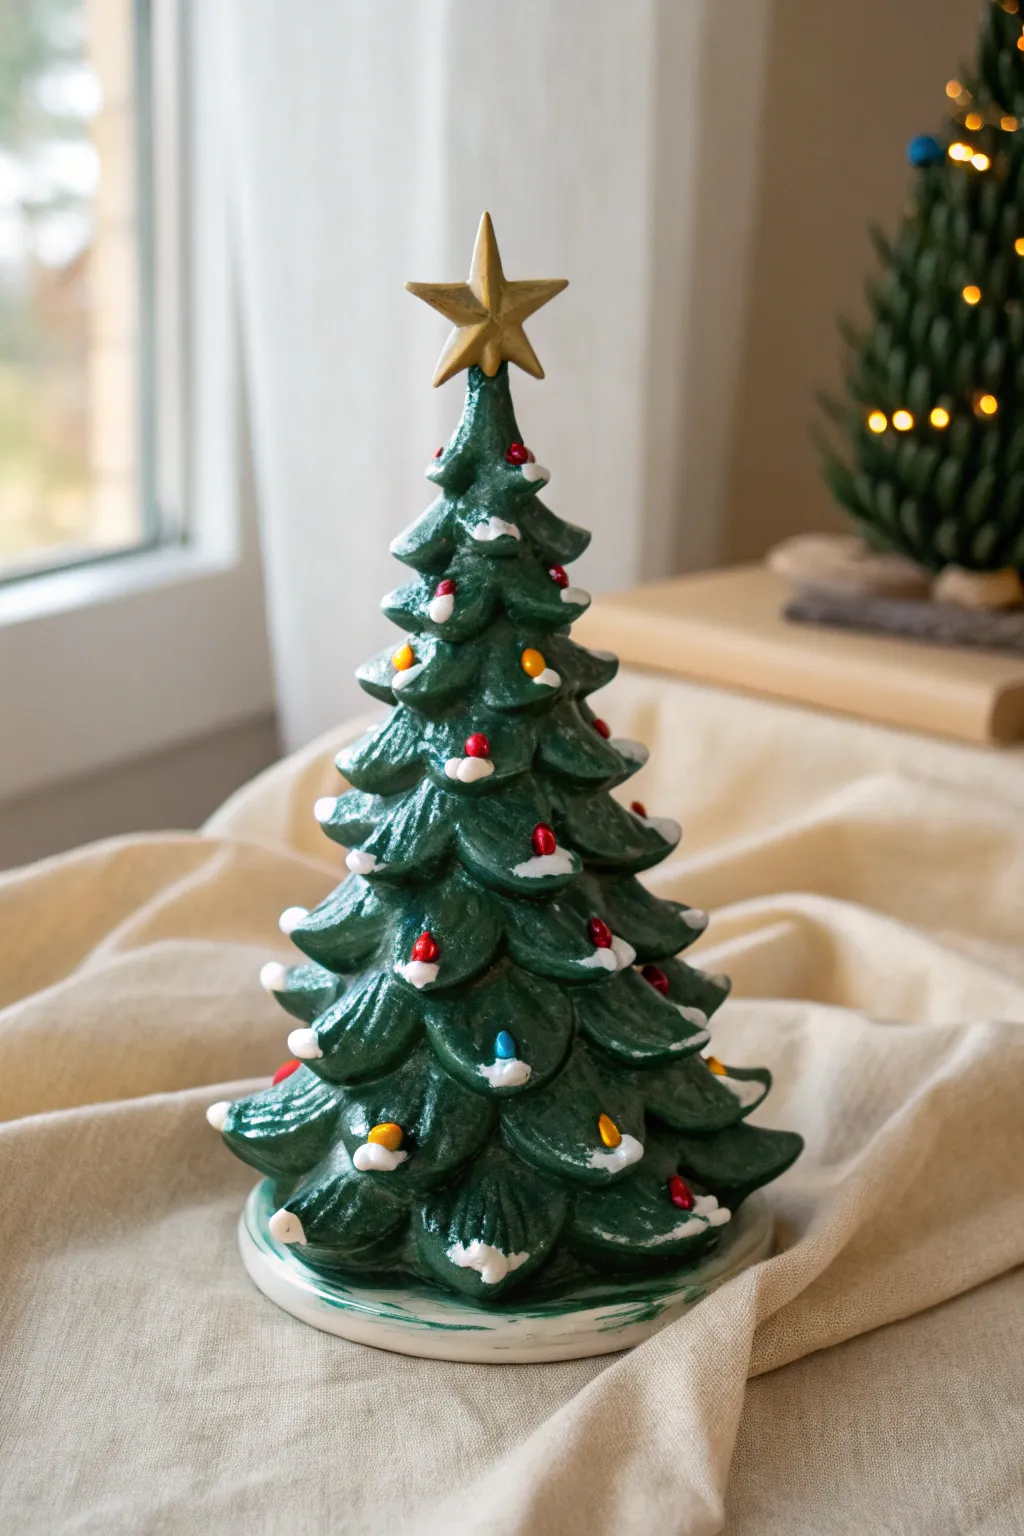
Recreate the charm of vintage holidays with this stunning ceramic tree project. By combining deep, glossy evergreen tones with crisp white snowy accents, you’ll achieve a timeless look that shines beautifully on any mantle.
Step-by-Step Tutorial
Materials
- Unpainted ceramic Christmas tree bisque (with star topper)
- Acrylic paints: Dark Hunter Green, bright White, Metallic Gold, Red, Blue, Yellow
- High-gloss varnish or clear glaze (brush-on)
- Wide flat brush (for base)
- Small round detail brush (size 0 or 1)
- Medium round brush
- Palette or small dishes
- Water cup and paper towels
- Snow texture paint (optional, or mix thick white acrylic)
Step 1: Base Coat & Greenery
-
Prep the bisque:
Begin by wiping down your ceramic bisque with a slightly damp paper towel. This removes any dust or ceramic particles that might interfere with paint adhesion. -
Mix your green:
Squeeze out a generous amount of Dark Hunter Green. If you want a bit of depth, mix in a tiny drop of black or dark blue, but the straight hunter green usually works perfectly for that classic look. -
Apply the first coat:
Using your medium round brush or wide flat brush, apply the green paint to the entire tree section. Work the bristles into the deep crevices between the boughs to ensure no white bisque shows through. -
Check coverage:
Let the first coat dry for about 15-20 minutes. Inspect the tree from different angles to spot any missed patches in the texture. -
Second coat:
Apply a second layer of green for a rich, opaque finish. This deeper color foundation is key to making the snow pop later. -
Paint the base:
While the green dries, paint the circular base of the tree. Use a clean brush to apply a creamy white or off-white color. Some people like to dry-brush a little green near the trunk connection for a natural transition.
Snowy Texture Trick
Don’t have snow paint? Mix regular white acrylic with baking soda (1:1 ratio) to create a fluffy, textured paste that looks just like real accumulated snow.
Step 2: Details & Lights
-
Paint the star topper:
Switch to your metallic gold paint. Carefully coat the star at the top of the tree, ensuring you get the sides and points. Two coats often give the best metallic shine. -
Identify the bulbs:
Locate the small raised bumps on the branches meant to be lights. In this style, we paint them directly rather than inserting plastic bulbs. -
Color the lights:
Using your smallest detail brush, carefully dab paint onto these raised bulbs. Alternate colors randomly between red, yellow, and blue create a festive mix. -
Let the details set:
I prefer to let these small details dry completely—at least 30 minutes—before moving on to messy steps so I don’t accidentally smear a wet ‘light bulb’.
Add Sparkle
While the white snow paint is still wet, sprinkle ultra-fine iridescent glitter over the tips. It mimics the way frost catches the morning light beautifully.
Step 3: Snow & Finish
-
Prepare the snow:
If you have specific snow texture medium, scoop some out. If not, mix white acrylic paint with a little baking soda or use thick-body white paint straight from the tube. -
Apply snow to tips:
Dip a stiff brush or even a small sponge into the white. Gently dab it onto the very tips of the distinct branches, focusing on the outward-facing edges where real snow would land. -
Add snow to bulbs:
For an extra cozy touch, dab a tiny bit of ‘snow’ on top of a few of the colored lights, or just underneath them, as if they are peeking out from a drift. -
Snow on the base:
Add some textured white paint to the base of the tree to simulate a snowy ground. -
Dry thoroughly:
Allow the entire piece to dry overnight. The textured snow areas will take the longest to cure. -
Gloss coat:
Finish by applying a high-gloss varnish over the green sections and the lights. You can leave the snow matte for contrast, or gloss the whole thing for a fully ceramic-glazed appearance.
Now step back and admire your handcrafted evergreen, perfect for bringing holiday cheer to any corner of your home


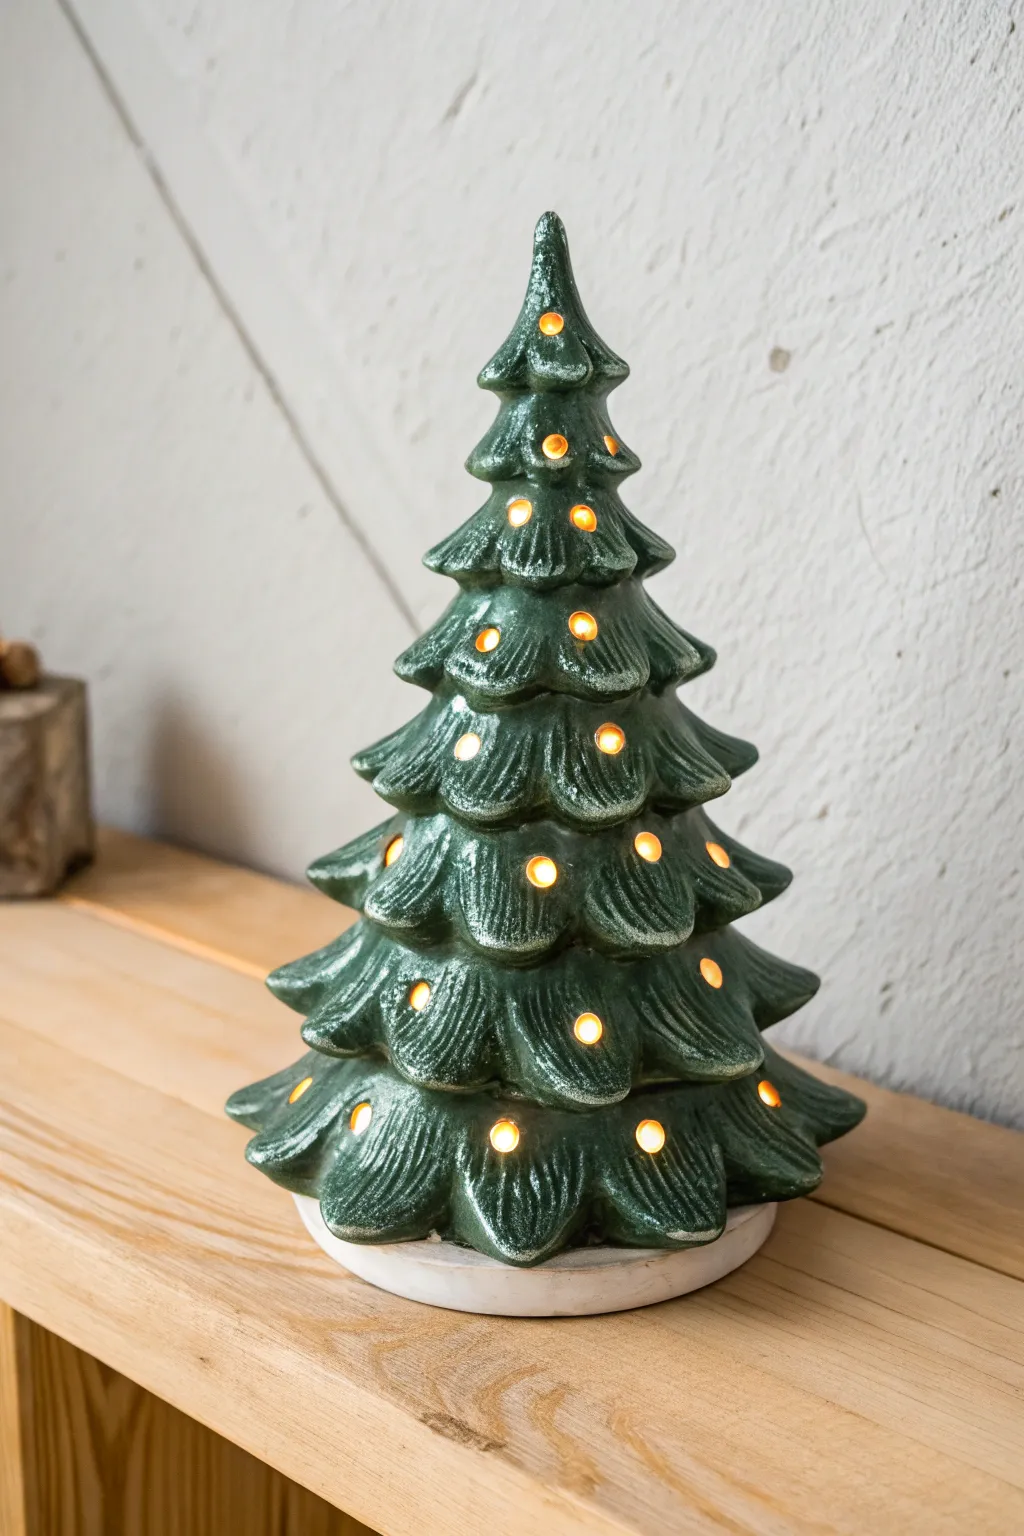
Deep Green Ombre From Base to Top

This elegant ceramic tree captures the deep, moody hues of an evergreen forest using a sophisticated ombre glaze technique. By layering semi-transparent greens from a rich, blackened base to a lighter emerald tip, you’ll create a stunning, glossy finish that feels both modern and timeless.
Step-by-Step
Materials
- Ceramic Christmas tree bisque (smooth tiered style)
- Deep hunter green reactive glaze (e.g., Mayco Dark Green or Duncan varying hues)
- Medium emerald green glaze
- Light moss or celadon green glaze
- Synthetic fan brush
- Soft round artist brush (size 6 or 8)
- Damp sponge
- Clean water for rinsing
- Clear variation glaze (optional for extra speckling)
- Kiln access (for firing)
Step 1: Preparation & Base Coat
-
Clean the Bisque:
Begin by wiping down your entire ceramic bisque tree with a damp sponge. This is crucial for removing any dust from the shelf that could repel the glaze or create pinholes later. -
Map Your Zones:
Mentally divide your tree into three overlapping horizontal sections. The bottom tiers will be the darkest, the middle section medium toned, and the top tiers the lightest. -
Dark Foundation:
Using your fan brush, apply the first coat of the deep hunter green glaze. Start at the very bottom edge and work your way up, covering only the bottom third of the tree. Brush horizontally to follow the tiers. -
Feather the Edge:
While the glaze is still slightly wet, use a clean, slightly damp brush to soften the upper edge of this dark section so there isn’t a harsh line.
Step 2: Building the Ombre
-
Middle Tier Application:
Switch to your medium emerald green glaze. Apply this to the middle section of the tree, overlapping the feathered edge of the dark green below by about half an inch. -
Blending the Transition:
Where the dark and medium greens meet, use a soft, dry brush to lightly gently cross-hatch the wet glazes together. You want them to mingle rather than sit on top of each other. -
Top Tier Light:
Apply the light moss or celadon green glaze to the top third of the tree, including the very tip. -
Final Gradient Blend:
Overlap this light glaze with the emerald middle section. Again, feather the edges downward so the colors flow seamlessly from one to the next.
Glaze Hack
Work quickly when blending. If the first layer dries too much, spritz it lightly with water before adding the second color to help them glide together better.
Step 3: Depth & Detail
-
Second Dark Pass:
Return to the bottom third with your deep hunter green. Apply a second, generous coat, focusing heavily on the underside of the branches to create shadow depth. -
Recess Shading:
Take a smaller round brush loaded with the darkest green. Carefully paint into the deep grooves between the tiers all the way up the tree, even in the lighter sections. This emphasizes the shape. -
Highlighting:
Wipe your brush clean. Dip it into the lightest green shade and dap it onto the protruding edges of the middle tiers. This simulates light hitting the branches. -
Adding Texture:
To achieve that speckled, organic look seen in the photo, you can lightly flick a stiff toothbrush loaded with a tiny amount of the dark green glaze over the lighter top sections. -
Dry Time:
Allow the entire piece to dry completely. The glaze will turn chalky and matte when it is fully dry.
Level Up: Snow Drip
Before the final firing, dab a thick white glaze (like a ‘snow’ specialty glaze) onto the very tips of the branches for a fresh winter snowfall effect.
Step 4: Final Firing
-
Check the Foot:
Before firing, wipe the very bottom rim (the ‘foot’) of the tree with a clean wet sponge. Any glaze left here will fuse the tree to the kiln shelf. -
Stilt and Fire:
Place the tree on stilts inside the kiln to ensure good air circulation. -
Kiln Process:
Fire the piece according to the specific cone rating of your glaze bottles (usually Cone 06 for low fire or Cone 6 for stoneware). The heat will melt the colors together, intensifying the ombre effect. -
Cooling:
Let the kiln cool naturally before removing your tree to prevent thermal shock and cracking.
Once cooled, place your verdant creation near a window or candlelight to let the glossy finish reflect the warm holiday glow


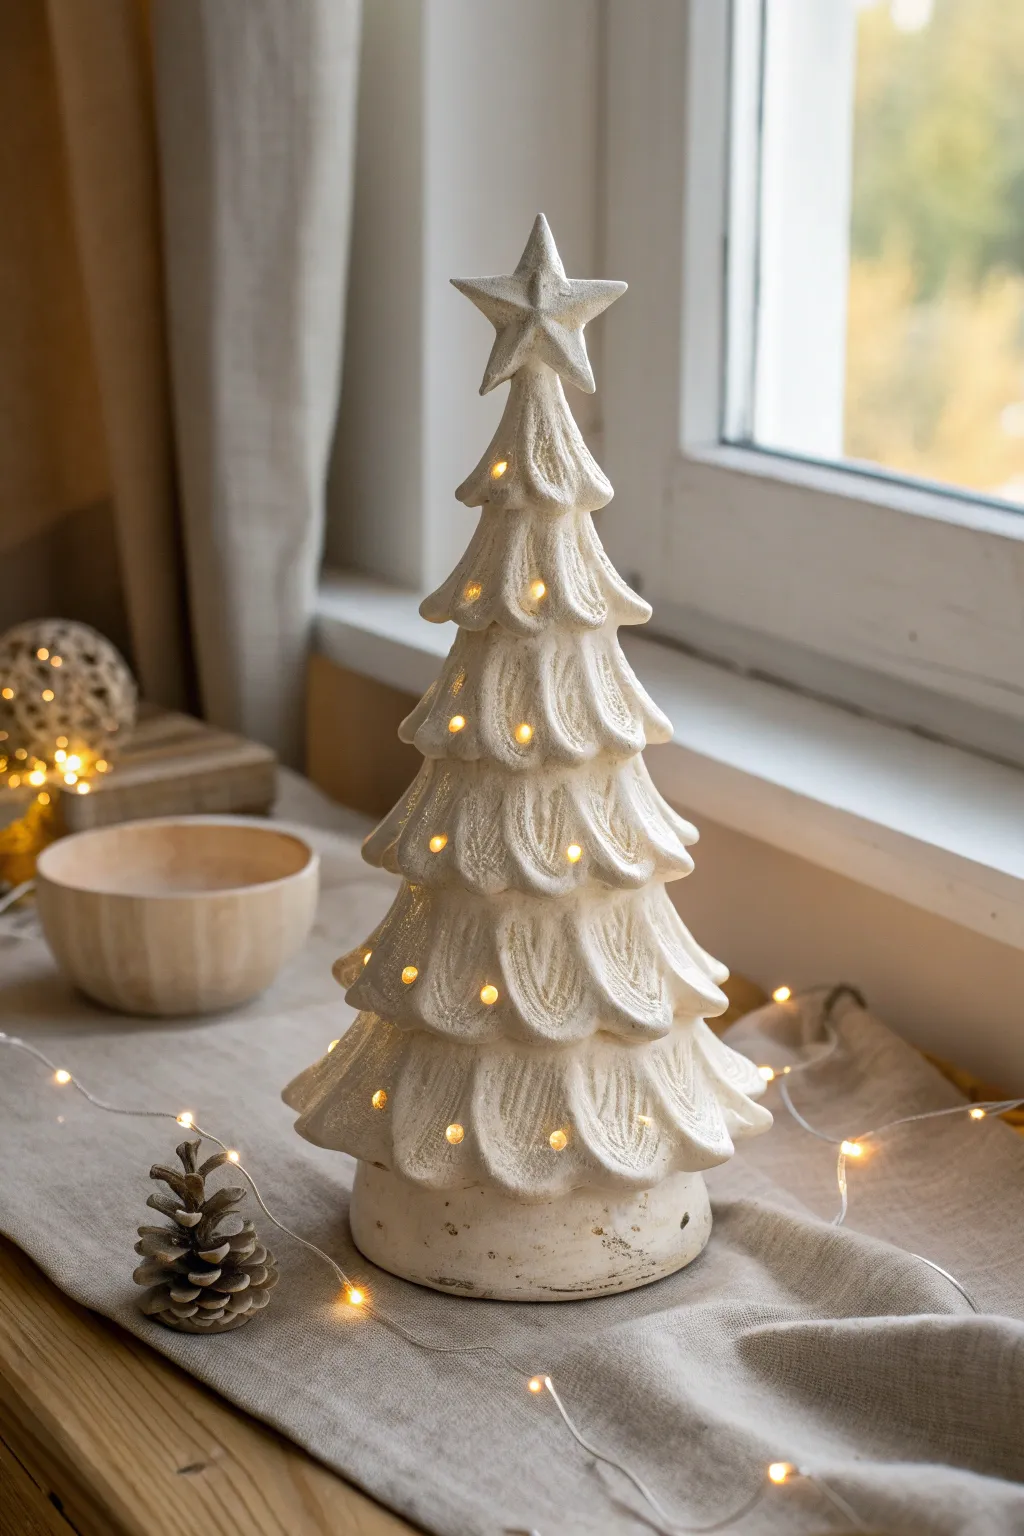
White Tree With Gold-Kissed Branches
Create a sophisticated holiday centerpiece with this project that mimics the look of high-end porcelain. The finished piece features a lustrous, milky-white glossy finish accented by delicate gold bead detailing and a striking metallic star.
Detailed Instructions
Materials
- Ceramic Christmas tree bisque (fired but unpainted)
- High-gloss white glaze or pearlescent white acrylic paint
- Gesso (optional, if using acrylics)
- Metallic gold paint (rich gold or antique gold)
- Wide flat soft bristle brush
- Small round detail brush (size 0 or 1)
- Spray gloss sealant (if using acrylics)
- Clear brush-on glaze (if using ceramic glazes)
- Water cup and paper towels
- Palette or small dish
Step 1: Preparation & Base Coat
-
Clean the bisque:
Before you begin, wipe down your ceramic tree with a slightly damp sponge to remove any dust or kiln firing residue. Let it dry completely for a few minutes. -
Apply base primer (optional):
If you are using acrylic paints instead of ceramic glazes, apply a thin coat of gesso to the entire tree. This helps smooth out the porous surface and creates a better grip for your paint. -
First coat of white:
Using a wide, soft flat brush, apply your first layer of high-gloss white paint or glaze. Use long, vertical strokes starting from the top and working downward to follow the natural flow of the tree’s branches. -
Smooth the crevices:
Be careful not to let paint pool too heavily in the deep grooves between branch layers. Use the tip of your brush to gently pull any excess pools downward to maintain clarity in the texture. -
Dry and repeat:
Allow the first coat to dry fully. If you’re using glaze, follow bottle instructions for drying times. For acrylics, 20-30 minutes is usually sufficient. Apply a second and possibly third coat until the finish is opaque and milky solid. -
Gloss sealing (for acrylics):
If painting with acrylics, the secret to that porcelain look shown in the photo is a high-gloss finish. Once your white base is dry, apply a spray gloss sealer or a brush-on gloss varnish.
Uneven Gold Dots?
If your gold dots look messy or varied in size, try using the flat head of a nail or a toothpick instead of a brush. Dip and stamp for perfect uniformity.
Step 2: Gilding the Details
-
Prepare the gold:
Shake your metallic gold paint well. I like to pour a small amount onto a palette and let it sit for a minute to slightly thicken, which makes controlling the dots easier. -
Paint the tree topper:
Start with the star at the very top. Using a small round brush, carefully paint the entire star gold. You may need two thin coats to get a solid metallic shine without brushstrokes. -
Dotting technique:
Dip the handle end of a paintbrush or a specialized dotting tool into your gold paint. This ensures perfectly round dots compared to using bristles. -
Apply the ornaments:
Gently press the tool onto the raised tips of the tree branches where ‘ornaments’ would naturally hang. Apply firm, even pressure to create uniform gold spheres. -
Check for consistency:
Work your way around the tree in rings, completing one tier before moving to the next. Rotate the tree frequently to ensure you haven’t missed any branch tips. -
Refine the star:
Go back to the star topper. If the edges look uneven, use your smallest detail brush to sharpen the lines where the star meets the white ceramic.
Pearl Finish Upgrade
Mix a drop of iridescent medium into your white base coat. This creates a subtle shimmer that catches the light like true mother-of-pearl.
Step 3: Finishing Touches
-
Inspect the surface:
Look closely at your white surfaces. If any gold accidentally smudged onto the white areas, use a clean, damp brush or Q-tip to wipe it away immediately. -
Final cure or glaze:
If you used ceramic glazes, your piece is now ready for the kiln firing. If you used acrylics, let the gold paint cure for at least 24 hours. -
Final protective coat:
For acrylic projects, give the entire piece—including the gold details—one final very light mist of gloss spray to unify the sheen and protect the gold paint from tarnishing.
Place your gleaming ceramic tree near a window or light source to maximize that beautiful glossy reflection


Pastel Pink Retro Tree With Clear Bulbs

This elegant take on the classic ceramic tree swaps the traditional deep green for a trendy, soft pastel pink that feels both retro and modern. The glossy finish catches the light beautifully, while the clear bulbs provide a warm, incandescent glow perfect for cozy winter evenings.
Step-by-Step
Materials
- Unfinished ceramic Christmas tree bisqueware (clean and dust-free)
- Pastel pink ceramic glaze (low-fire, glossy finish) – look for ‘Baby Pink’ or ‘Shell Pink’
- Wide soft fan brush (for broad coverage)
- Small round detail brush (size 2 or 4)
- Clear plastic twist lights (often called ‘birds’ or ‘flame’ bulbs)
- Light kit (cord, bulb socket, and 7-10 watt bulb)
- Sponge and water bowl
- Ceramic sealant or kiln firing service (depending on paint type used)
- Super glue (optional, to secure loose fittings)
Step 1: Preparation & Base Coat
-
Clean the Bisque:
Before dipping your brush, take a slightly damp sponge and wipe down the entire ceramic tree. This removes any ceramic dust that might prevent the glaze from adhering smoothly. -
Initial Watering Down:
For the very first layer, slightly water down your pastel pink glaze. I find this helps the color seep into all the textured grooves of the branches without clumping up. -
First Coat Application:
Using your wide fan brush, apply the first coat of pink glaze. Start from the bottom branches and work your way up to the tip, using long, following strokes that mimic the downward slope of the boughs. -
Check the Crevices:
Switch to your small round brush to get inside the deep recesses between the layers of branches. Make sure no white bisque is peeking through in those hard-to-reach shadows. -
Let it Dry:
Allow this initial coat to dry until it is no longer shiny and feels chalky to the touch. This usually takes about 20–30 minutes.
Clogged Holes?
If glaze dried inside a light hole, use a small twist drill bit or a crafting file to gently ream out the excess paint until the plastic bulb fits snugly.
Step 2: Building Opacity & Shine
-
Second Coat Application:
Apply a second coat of the pink glaze at full strength (do not water it down this time). Apply it generously but watch for drips pooling at the tips of the branches. -
Smooth the Texture:
As you apply the second coat, use a cross-hatch motion with your brush to ensure even coverage, then finish with downward strokes to smooth out brush marks. -
Clear the Holes:
While the paint is still wet, use the handle end of a paintbrush to poke through the light holes. Glaze tends to clog these small openings, and clearing them now saves a headache later. -
Third Coat for Depth:
For a truly solid, distinct pastel color, a third coat is often necessary. Apply this final layer carefully, ensuring the coverage is totally opaque. -
Dry Completely:
Let the tree dry completely overnight. The surface should be totally matte and dry before proceeding to sealing or firing.
Step 3: Finishing & Assembly
-
Seal or Fire:
If you used kiln-fire glaze, take your piece to a local studio for firing. If you used acrylics (no-fire), apply a high-gloss spray sealer now to achieve that wet, shiny ceramic look shown in the photo. -
Install the Base:
Once the sealant is cured or the piece is fired, insert the light kit into the base of the tree. Secure the cord through the designated notch so the tree sits flat. -
Insert the Bulbs:
Place the clear plastic twists into each hole. Since the glaze adds thickness, you might need to twist them firmly to seat them. -
Secure Loose Lights:
If any holes are too large and the bulbs feel loose, add a tiny dot of super glue to the stem of the plastic bulb before inserting it for a permanent hold. -
Final Polish:
Give the surface a quick wipe with a microfiber cloth to remove fingerprints, plug it in, and enjoy your soft pink holiday glow.
Level Up: Pearl Finish
Mix a small amount of iridescent medium or ‘Mother of Pearl’ luster into your final coat of glaze for a shimmering, magical finish.
The soft pink hue brings a delightful vintage charm to any window sill or mantle display

The Complete Guide to Pottery Troubleshooting
Uncover the most common ceramic mistakes—from cracking clay to failed glazes—and learn how to fix them fast.
Teal-to-Aqua Mermaid Holiday Tree
Capture the magic of the ocean during the holidays with this stunning teal-to-white gradient ceramic tree. The seamless blend of deep turquoise into pearly white creates a sophisticated, modern look perfect for coastal decor themes.
How-To Guide
Materials
- Unpainted ceramic Christmas tree (bisque)
- Acrylic paints: Deep Teal/Turquoise, Aqua/Seafoam, Pearlescent White
- Glazing medium or water for blending
- Fine iridescent white glitter
- Mod Podge or craft glue
- Flat shader brushes (medium and large)
- Small round detail brush
- Spray gloss sealer
- Plastic light kit with clear star topper
Step 1: Base Gradient
-
Clean the Bisque:
Start by wiping down your ceramic tree with a slightly damp sponge to remove any dust or debris from the kiln firing process. Let it dry completely for a few minutes. -
Deepest Teal Layer:
Squeeze out your darkest teal paint. Using a medium flat brush, paint the bottom two tiers of branches completely. Be sure to get into the crevices underneath the boughs. -
Mixing the Mid-Tone:
While the teal is still slightly wet, mix a little of your aqua color into the teal on your palette to create a transition shade. Paint the next two tiers up. -
Blending Upward:
Switch to pure aqua paint for the middle section of the tree. To avoid harsh lines, I like to use a slightly damp brush to feather the moist edge where the dark teal meets the aqua. -
Lightening the Load:
Mix a generous amount of pearlescent white into your aqua paint. Apply this lighter shade to the tiers just above the middle section. -
Pearlescent Peak:
For the top two or three tiers and the very tip, use pure pearlescent white. This creates that frosty, high-contrast look against the dark base. -
Smoothing the Ombre:
Take a clean, dry soft brush and very gently sweep over the transition areas while the paint is tacky. This helps blur the lines between the color bands for a softer gradient. -
Dry Time:
Allow the entire tree to dry completely. Acrylics dry fast, but give it at least 20-30 minutes to ensure the base is solid before adding details.
Step 2: Snowy Accents & Glitter
-
Dry Brushing Tips:
Load a small amount of pearlescent white paint onto a dry brush and wipe most of it off on a paper towel. Lightly flick the brush over the tips of the teal and aqua branches to highlight the texture. -
Applying Adhesive:
Pour a small amount of Mod Podge onto a plate. Using a small round brush, dab the glue onto the very tips of the branches, focusing on the curved ends where snow would naturally settle. -
The Star’s Base:
Don’t forget the very top point where the star sits. Brush a generous layer of adhesive here so the glitter matches the snowy tips below. -
Glitter Application:
While the glue is wet, sprinkle fine iridescent white glitter over the glued areas. You can do this over a paper plate to catch excess sparkles. -
Shake Remove Excess:
Gently tap the base of the tree on the table to knock off loose glitter. Let the adhesive dry clear.
Harsh Lines?
If your color transitions look too stripey, mix a 50/50 blend of the two differing colors and dab it right over the line with a sponge to soften it.
Step 3: Finishing Touches
-
Seal the Deal:
Once the glitter layer is fully dry, take the tree to a well-ventilated area and spray it with a high-gloss sealer. This protects the paint and locks the glitter in place so it doesn’t shed. -
Lighting Assembly:
If your ceramic tree has holes for bulbs, you can insert small clear plastic twists now, or leave them open for a cleaner look like the reference photo. -
Attach the Star:
Insert the clear plastic star into the top hole. If the fit is loose, a tiny dab of hot glue can help secure it upright. -
Final Illumination:
Insert the light kit or LED base into the bottom of the tree. Turn it on to see how the light glows through the star and reflects off the glossy, glittered finish.
Make it Shine
For extra dimension, mix a tiny drop of metallic silver paint into your dark teal base coat. It gives the bottom layers a subtle underwater shimmer.
Now you have a frosty, oceanic centerpiece that brings a cool elegance to your holiday display
Champagne Metallic Tree for a Cozy Glow
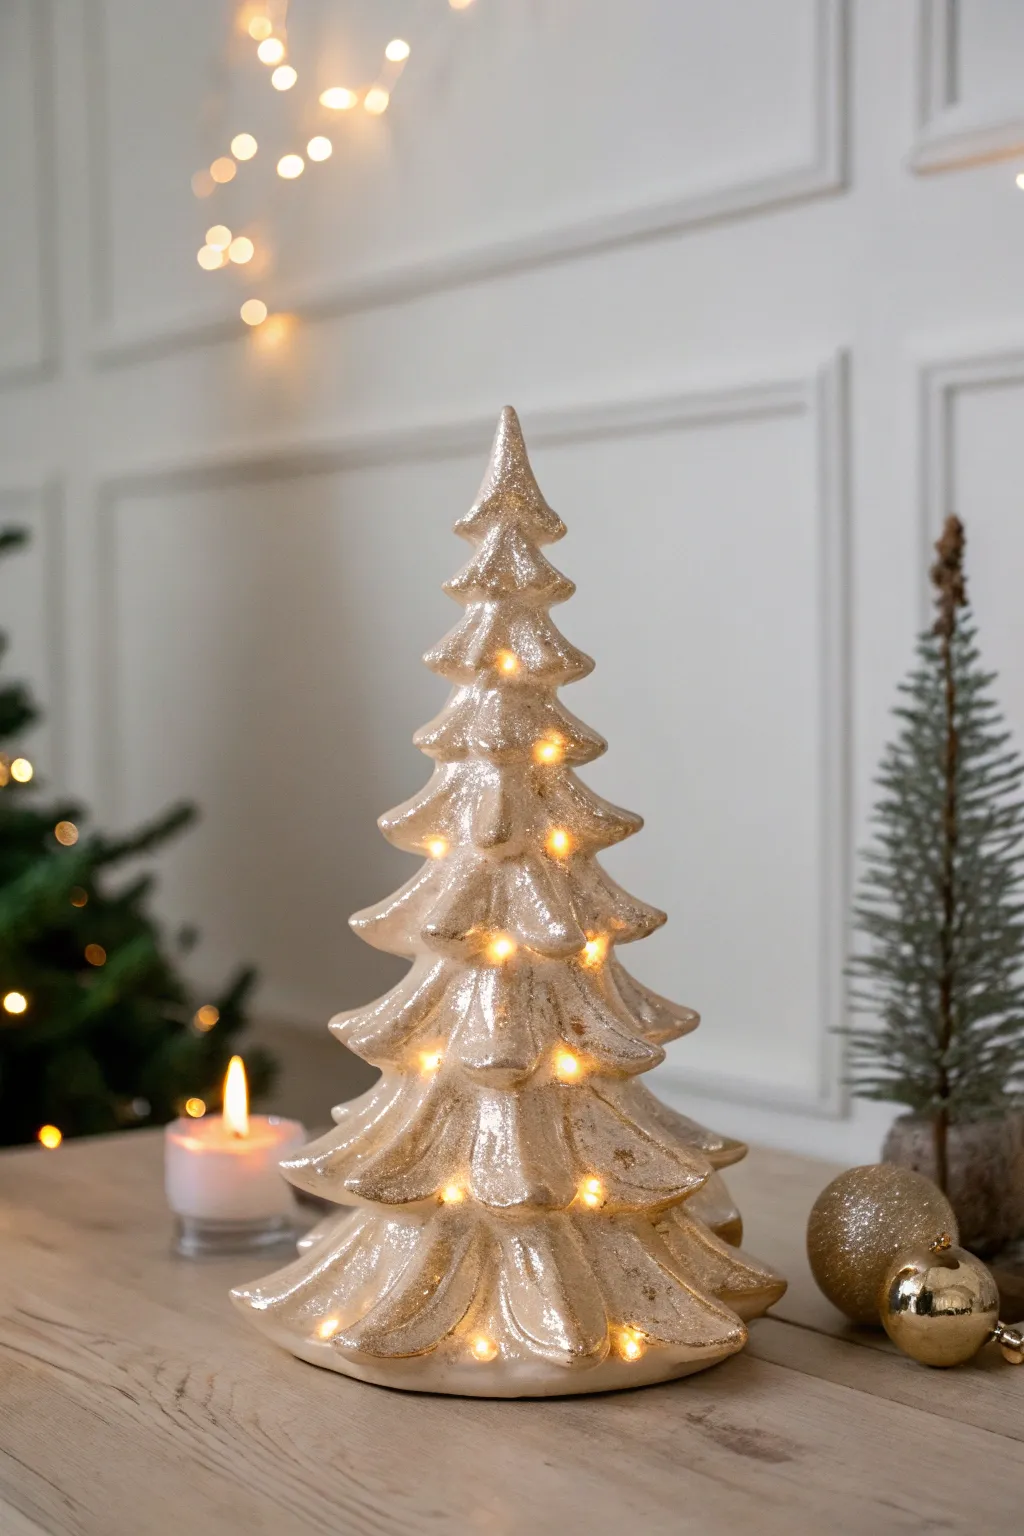
Transform a plain ceramic bisque tree into a glowing centerpiece with this luxurious champagne metallic finish. The soft, shimmering gold tones reflect light beautifully, creating a warm and sophisticated holiday atmosphere.
Detailed Instructions
Materials
- Ceramic bisque Christmas tree (with bulb holes)
- Champagne metallic acrylic paint
- Pearl white acrylic paint
- Gold glitter glaze or fine gold glitter dust
- High-gloss varnish or sealer
- Soft synthetic flat brush (1/2 inch)
- Small round detail brush
- Warm white mini LED bulb kit (for ceramic trees)
- Clean water and paper towels
- Palette or paper plate
Step 1: Base Coat Application
-
Clean the Bisque:
Before you begin, wipe down the entire ceramic tree with a slightly damp sponge to remove any dust or ceramic powder. Let it dry completely. -
Mix the Base Color:
Squeeze out a generous amount of pearl white paint and mix in a small drop of the champagne metallic. You want a very pale, pearlescent base that isn’t too dark yet. -
First Layer:
Using the flat brush, apply this pale mixture all over the tree. Work the bristles into the deep grooves of the branches to ensure no raw ceramic shows through. -
Check Coverage:
Inspect the tree from different angles. Bisque is thirsty and might absorb the first coat unevenly, so apply a second coat of the pearl mix if needed after the first is dry to the touch.
Step 2: Building the Champagne Glow
-
Switch to Metallic:
Pour out pure champagne metallic paint onto your palette. It should be rich and shimmering. -
Main Metallic Coat:
Apply the champagne paint over the entire tree. Use smooth, downward strokes following the direction of the branches to minimize brush marks. -
Drying Time:
Let this metallic layer dry fully. Metallic paints often take a little longer to cure than matte acrylics, so be patient here. -
Highlight the Tips:
I like to take a bit of the pearl white and mix it 50/50 with the champagne. lightly dry-brush this lighter color just on the very tips of the branches to create dimension.
Uneven Coverage?
If the metallic paint looks streaky, don’t overwork it while wet. Let it dry completely, then apply a second thin coat in the crossing direction.
Step 3: Adding Texture and Shine
-
Prepare the Glitter Glaze:
If using a pre-mixed glitter glaze, stir it well. If using dry glitter, mix a pinch of fine gold dust into a clear gloss medium or varnish. -
Apply Glaze:
Brush the glitter mixture over the tree. Focus heavily on the tips and the ridges of the branches where snow would naturally land. -
Texture Check:
If you want the textured look seen in the photo, dab the wet glaze with a crumpled piece of paper towel or a sponge to create a slightly uneven, organic surface. -
Final Varnish:
Once the glitter layer is bone dry, coat the entire piece with a high-gloss varnish. This seals the glitter in and gives that wet, glass-like sheen.
Add Vintage Charm
Before the final varnish, lightly sponge a tiny bit of diluted burnt umber paint into the deep crevices to give it an aged, antique look.
Step 4: Lighting Assembly
-
Prepare the Lights:
Uncoil your warm white LED light strand. Ensure all bulbs are working before installation. -
Insert the Bulbs:
Since this look relies on internal glow rather than plastic pin lights, push the small LED bulbs from the inside of the tree so they sit just behind the holes, or poke through slightly if they fit. -
Secure the Wiring:
If the lights are loose, use a dab of hot glue or masking tape on the inside of the ceramic cone to hold the wires in place. -
Final Display:
Place the tree on a flat surface, plug it in, and adjust the position to ensure the warm light radiates evenly through the openings.
Now you have a stunning, modern heirloom ready to light up your mantel


What Really Happens Inside the Kiln
Learn how time and temperature work together inside the kiln to transform clay into durable ceramic.
Chalky Neutral Tree With Warm Highlights
Capture the serene beauty of a snowy forest with this minimalist ceramic tree project. By combining chalk-finish paints with subtle warm lighting, you will create a sophisticated piece that feels both vintage and refreshingly modern.
Step-by-Step Guide
Materials
- Bisque ceramic Christmas tree (ready-to-paint)
- White or cream chalk-style craft paint
- Light beige or taupe acrylic paint (for antiquing)
- Matte finish spray sealant
- Small round bristle brush
- Medium flat synthetic brush
- Paper towels or lint-free rags
- Warm white mini LED bulb kit (battery or plug-in)
- Plastic or paper paint palette
- Cup of water
Step 1: Base Preparation
-
Clean everything:
Begin by wiping down your ceramic bisque tree with a slightly damp sponge to remove any dust or kiln residue. Let it dry completely for about 15 minutes before painting. -
Inspect the holes:
Check the light holes for any jagged bits of clay. Gently use a small file or sandpaper to smooth these out so your lights fit perfectly later. -
Base coat application:
Using your medium flat brush, apply a generous coat of the white or cream chalk paint to the entire tree. Don’t worry about perfect coverage yet. -
Working the crevices:
Use the small round brush to push paint into the deep grooves under the boughs. Chalk paint is thick, so you may need to dab it in. -
Second coat:
Once the first layer is dry to the touch (usually 20 minutes), apply a second coat of the white chalk paint. Any brush strokes will add to the texture, so don’t smooth them out too much. -
Let it cure:
Allow the base coats to dry fully. Chalk paint dries fast, but give it at least an hour to ensure it is hard enough for the next steps.
Step 2: Adding Texture & Depth
-
Mix the wash:
Create a very watery wash by mixing 1 part beige/taupe paint with 4 parts water. It should look like dirty water. -
Apply the wash:
Working in sections (like just the bottom tier), paint the wash over the dried white paint. It will look messy, but trust the process. -
Wipe back:
Immediately use a clean paper towel to wipe away the beige wash. I generally like to wipe in a downward motion to mimic gravity. -
Check the grooves:
The goal is to leave a tiny bit of that beige color in the deepest cracks of the boughs while keeping the tips bright white. If you wipe too much off, just re-apply the wash. -
Dry brush technique:
Take a dry brush with a very small amount of fresh white chalk paint. Offload most of the paint onto a paper towel until the brush is almost empty. -
Highlight the tips:
Lightly flick the dry brush over the raised edges of the branches and the star. This ‘pops’ the texture back out against the subtle beige shadows.
Chalk Paint Texture
To get that ultra-matte, stone-like texture shown in the photo, mix a teaspoon of baking soda into your white paint before applying the final dry-brush layer.
Step 3: Finishing Touches
-
Seal the piece:
Take the tree outside or to a well-ventilated area. Spray it with a clear matte sealant to protect the chalky finish without making it shiny. -
Prepare the lights:
While the sealer dries, untangle your warm white LED kit. Ensure the bulbs are free of dust. -
Insert bottom lights:
Starting from the bottom inside of the tree, gently push the LED bulbs through the holes. You may need to secure them with a dab of hot glue if the fit is loose. -
Work upwards:
Work your way up somewhat spirally to ensure the wires inside don’t get too tangled or pulled tight. -
Top star:
Usually, the top star is hollow but has a hole at the base. Ensure a light is positioned right at the top hole of the tree body to illuminate the star from within. -
Base assembly:
If your tree has a separate base, place the battery pack or cord through the designated slot and set the tree onto the base. -
Final check:
Turn on the lights in a dim room. If any light creates a glare or looks uneven, adjust the bulb position from the inside.
Rustic Sparkle
Before the sealant dries, sprinkle a tiny pinch of clear ultra-fine glitter over the top of the star and branch tips to mimic fresh, glistening frost.
Now you have a stunning, cozy centerpiece that brings a soft glow to your holiday decor
Black Underpainting for Vintage Depth
Master the art of creating dimension with this classic ceramic technique that uses a dark base to make the bright green glaze pop. The result is a charming, slightly rustic tree that looks like a treasured heirloom straight from the kiln.
Step-by-Step Tutorial
Materials
- Bisque ceramic Christmas tree (tree shape)
- Black antiquing wash or thinned black acrylic paint
- Dark emerald green ceramic glaze or glossy acrylic
- Small round detail brush (size 1 or 2)
- Medium flat shader brush
- Soft cloth or paper towels
- Water container
- Palette
- Clear gloss sealer (if using acrylics)
Step 1: Creating the Shadow Layer
-
Clean the bisque:
Start by wiping down your ceramic bisque with a slightly damp sponge to remove any kiln dust or oils that might repel the paint. -
Mix the wash:
Create a thin, inky wash by mixing black paint with water (about a 50/50 mix) or prepare your antiquing medium; it should flow easily into cracks. -
Apply the dark coat:
Using a larger brush, liberally coat the entire tree with the black mixture. Ensure you get into every single groove, under the boughs, and around the star. -
Wipe back the high points:
Immediately use a damp cloth to wipe the black paint off the raised surfaces. You want the black to remain deep inside the engraved lines and texture, but reveal the white bisque on the tips of the branches. -
Check the crevices:
Inspect the deep grooves beneath the branch layers. If you wiped too much away, dab a little more black back in and gently blot it. -
Dry completely:
Let this underlayer dry fully. If you apply the green too soon, it will mud up and turn gray.
Don’t Over-Wipe
When removing the initial black wash, use a flat, folded cloth rather than a scrunchy one. This prevents the cloth from dipping into the grooves and removing the shadow you need.
Step 2: Layering the Green Glaze
-
Prepare the green:
Load your medium flat brush with the emerald green glaze. We want this to be semi-translucent so the shadow below shows through. -
Start from the bottom:
Begin painting the lowest tier of branches, using sweeping downward strokes that follow the shape of the boughs. -
Feather the edges:
As you paint over the black-filled grooves, use a lighter touch. The green should sit on top of the ‘hills’ of the texture, letting the black ‘valleys’ remain dark. -
Paint the middle sections:
Work your way up the tree. I like to rotate the piece constantly to ensure I don’t miss any side angles of the branches. -
Detail the star:
Using the same green (or a slightly lighter shade if preferred), paint the star on top, being careful not to obscure the dark recessed areas that define its points. -
Check coverage:
Step back and look for any unintended white spots on the high points and touch them up with green.
Step 3: Embellishing and Finishing
-
Add the dots:
Dip the handle end of a small paintbrush or a dotting tool into black paint. -
Place accents:
Gently press dots onto the tips of the branches or randomly scattered as ornaments, just like in the reference image. Keep them relatively uniform in size. -
Second drying phase:
Allow the green coat and black dots to dry completely according to your paint manufacturer’s instructions. -
Apply sealer:
If you used acrylics instead of fired glazes, apply a high-gloss clear varnish to mimic that authentic kiln-fired shine. -
Inspect the gloss:
Check the finish in good light; if the surface looks streaky, apply a second thin coat of gloss for a glass-like appearance.
Fixing Muddy Colors
If your green starts turning gray or muddy, stop immediately. Your black base isn’t dry enough. Let it sit for another hour or use a hair dryer before continuing.
Place your finished tree near a warm light source to let those glossy curves catch the reflection

TRACK YOUR CERAMIC JOURNEY
Capture glaze tests, firing details, and creative progress—all in one simple printable. Make your projects easier to repeat and improve.
Dry-Brushed Tips for Branch Texture
This project transforms a simple ceramic Christmas tree blank into a sophisticated, nature-inspired piece using a classic antiquing technique. The soft sage green base paired with dry-brushed tips highlights the intricate texture of the boughs, giving it a timeless, hand-glazed appearance without requiring a kiln.
Detailed Instructions
Materials
- Unfinished ceramic Christmas tree blank (bisque)
- Acrylic craft paint: Dark Pine Green
- Acrylic craft paint: Sage or Moss Green
- Acrylic craft paint: Cream or Antique White
- Glazing medium or slow-drying medium
- Matte or satin sealant spray
- Soft synthetic flat brush (medium size)
- Stiff-bristled brush (for dry brushing)
- Lint-free paper towels or soft rag
- Water cup and palette
Step 1: Preparation and Base Coat
-
Clean the bisque:
Before painting, wipe down your ceramic blank with a slightly damp sponge to remove any dust or ceramic debris. Let it dry completely. -
Mix the base liquid:
Create a wash by mixing your Dark Pine Green paint with water and a small amount of glazing medium. The consistency should be like heavy cream or melted ice cream—fluid but pigmented. -
Apply the dark undercoat:
Using your medium brush, paint the entire tree with the Dark Pine mixture. Work it deep into all the crevices between the branches. -
Wipe back:
While the paint is still wet, gently wipe the surface with a lint-free rag. You want to remove paint from the high points but leave dark color settled in the deep grooves. -
Dry thoroughly:
Allow this dark shadow layer to dry completely. A hair dryer on a low setting can speed this up if you are eager to proceed.
Oops! Paint too heavy?
If you accidentally apply too much white while dry brushing, immediately wipe it gently with a damp cloth before it sets, or paint over the error with your sage green to reset the area.
Step 2: Applying the Main Color
-
Load the sage green:
Pour out your Sage or Moss Green paint. Do not water this down; you want opaque coverage for the main branches. -
Paint the branches:
Carefully paint the individual boughs with the sage green. Try to cover the raised surfaces while avoiding painting over the dark recesses you created in the previous phase. -
Blend edges:
If your sage green looks too stark against the dark crevice lines, you can lightly feather the paint inward to create a softer transition. -
Check for gaps:
Rotate the tree and look for any unintentional white spots. Touch these up with either the dark green or sage green depending on their location. -
Hard dry:
Let the tree dry completely to the touch. This step is crucial because the dry-brushing phase requires a solid, dry surface.
Step 3: Dry Brushing the Highlights
-
Prepare the dry brush:
Dip a stiff-bristled brush into a very small amount of Cream or Antique White paint. Then, vigorously rub the brush onto a paper towel until almost all the paint is gone. -
Test the stroke:
Test your brush on your hand or a spare piece of paper. It should leave only a faint dusty trace, not wet streaks. -
Target the tips:
Lightly sweep the brush across the very tips and ridges of the tree boughs. Use a horizontal back-and-forth motion. -
Build slowly:
I usually start with a very light touch and add more pressure gradually. It is much easier to add more highlight than to cover up a heavy blotch. -
Highlight the base:
Don’t forget to dry brush the texture on the base of the tree as well, keeping the look consistent from top to bottom. -
Evaluate the contrast:
Step back and look at the tree. If you want more ‘snowy’ tips, repeat the dry brushing process one more time on just the sharpest edges.
Add Sparkle
While the sealer is still wet, sprinkle ultra-fine iridescent glitter over the dry-brushed tips to make the tree look like it is glistening with fresh morning frost.
Step 4: Finishing Touches
-
Seal the piece:
Once fully dry, take the tree to a ventilated area and apply a light coat of matte or satin clear spray sealer. -
Add shine (optional):
If you prefer a ceramic glaze look similar to the reference photo, you can use a high-gloss spray sealer instead of matte. -
Final inspection:
Check for any sticky spots and allow the sealant to cure for at least 24 hours before displaying.
Now you have a beautifully textured ceramic tree that brings a natural, woodland charm to your holiday display
Flocked Snow Drift Branches
Capture the nostalgia of holidays past with this charming ceramic tree, featuring deep evergreen boughs dusted with a delicate, snowy flocking. The warm glow from within highlights the textured branches, creating a cozy and classic centerpiece perfect for any mantle.
How-To Guide
Materials
- Unfinished ceramic Christmas tree casting (with separate base)
- Acrylic paints: Dark Hunter Green, Forest Green, White, and Metallic Pearl
- Clear matte acrylic sealer (spray)
- Ceramic tree light kit (power cord, bulb, and twist-in bulbs if separate)
- Assorted paintbrushes: 1-inch flat brush, medium round brush, and a stiff-bristled dry brush
- Palette or paper plate
- Water cup and paper towels
- Damp sponge
Step 1: Base Coat and Antiquing
-
Clean the ceramic:
Begin by wiping down your unpainted ceramic bisque with a barely damp sponge. This removes any kiln dust or oils from your hands that might repel the paint. -
Apply the dark base:
Load a medium round brush or a 1-inch flat brush with Dark Hunter Green. Coat the entire tree, ensuring you get the paint deep into the crevices between the branches. Don’t worry about being perfectly neat; coverage is key here to create shadows. -
Wipe back for texture:
Before the dark green dries completely, use a slightly damp paper towel or sponge to gently wipe the raised surfaces of the branches. You want to leave the dark paint in the deep grooves but reveal a bit of the ceramic on the high points. -
Allow to cure:
Let this base layer dry completely. The ceramic absorbs moisture quickly, but give it at least 20-30 minutes to ensure a solid foundation for the next layers.
Step 2: Building the Greenery
-
Prepare the Forest Green:
Squeeze a generous amount of Forest Green onto your palette. This lighter, more natural green will serve as the main color for the pine needles. -
Dry brush the branches:
Dip a stiff-bristled brush into the Forest Green, then wipe almost all the paint off onto a paper towel until the brush feels dry. Gently sweep this over the textured branches, catching only the raised details. -
Layering the color:
Repeat the dry brushing process, building up opacity slowly. I find it helpful to change brushing directions—go left, right, and downward—to mimic the organic growth of pine needles. -
Soften the transition:
If the contrast between the dark crevices and the new green is too harsh, use a very lightly loaded brush to stipple color near the edges of the grooves.
Too Heavy-Handed?
If your ‘snow’ looks like stripes rather than dust, use a clean, damp brush to gently blend the white paint backward into the green before it dries fully.
Step 3: The Snow Drift Effect
-
Mix the frosty highlight:
Create a mixture of roughly 70% White acrylic paint and 30% Metallic Pearl. The pearl adds a shimmering, icy quality that flat white misses. -
Load the brush sparingly:
Using a clean, stiff dry brush, pick up a tiny amount of the snow mixture. Dab it onto your palette first to distribute the paint evenly across the bristles. -
Apply the first snow layer:
Starting from the bottom row of branches and working upward, lightly whisk the brush over the very tips and curled edges of the branches. Use a barely-there touch. -
Intensify the tips:
Go back over just the outermost points of the branches with a second pass of the white mixture. This creates a gradient, looking like snow settled naturally on the tips. -
Dab for accumulation:
For a ‘fresh snow’ look, use a small round brush to dab a tiny spot of solid White on the very highest point of each branch curve, creating a distinct highlight.
Pro Tip: Glitter Dust
While the white snow highlight is still wet, sprinkle ultra-fine iridescent glitter over the tree. It clings to the wet paint and adds magical sparkle.
Step 4: Finishing and Assembly
-
Seal the piece:
Once all paint is bone dry, take the tree outside and spray it with a clear matte acrylic sealer. This protects the finish and unifies the sheen of the different paint layers. -
Paint the base:
While the tree dries, paint the separate ceramic base. A solid white or a soft grey works beautifully to create a snowy ground effect. -
Install the light kit:
Insert the light kit into the base, securing the bulb clip. If your tree uses glued-in plastic light pegs for the holes, glue them in now using a clear craft adhesive. -
Final assembly:
Place the tree atop the base, plug it in, and admire how the internal light glows through the holes, reflecting off your snowy highlights.
Plug in your tree and enjoy the warm, vintage glow of your handcrafted holiday heirloom
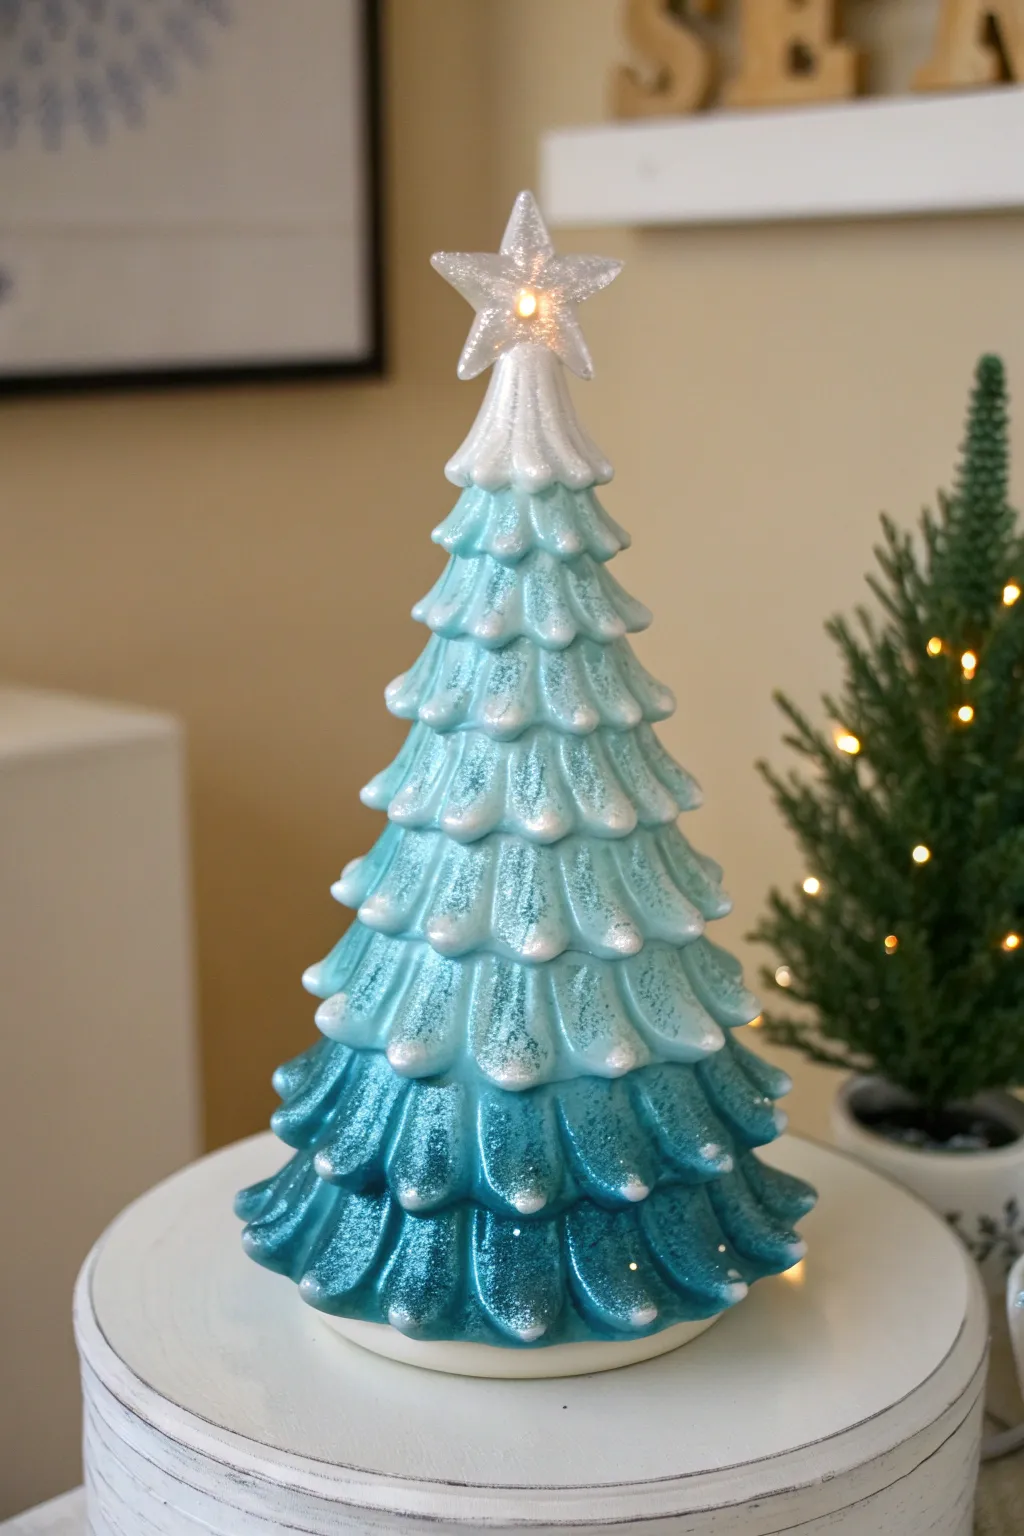
Icy Glitter Topcoat for Frosted Sparkle
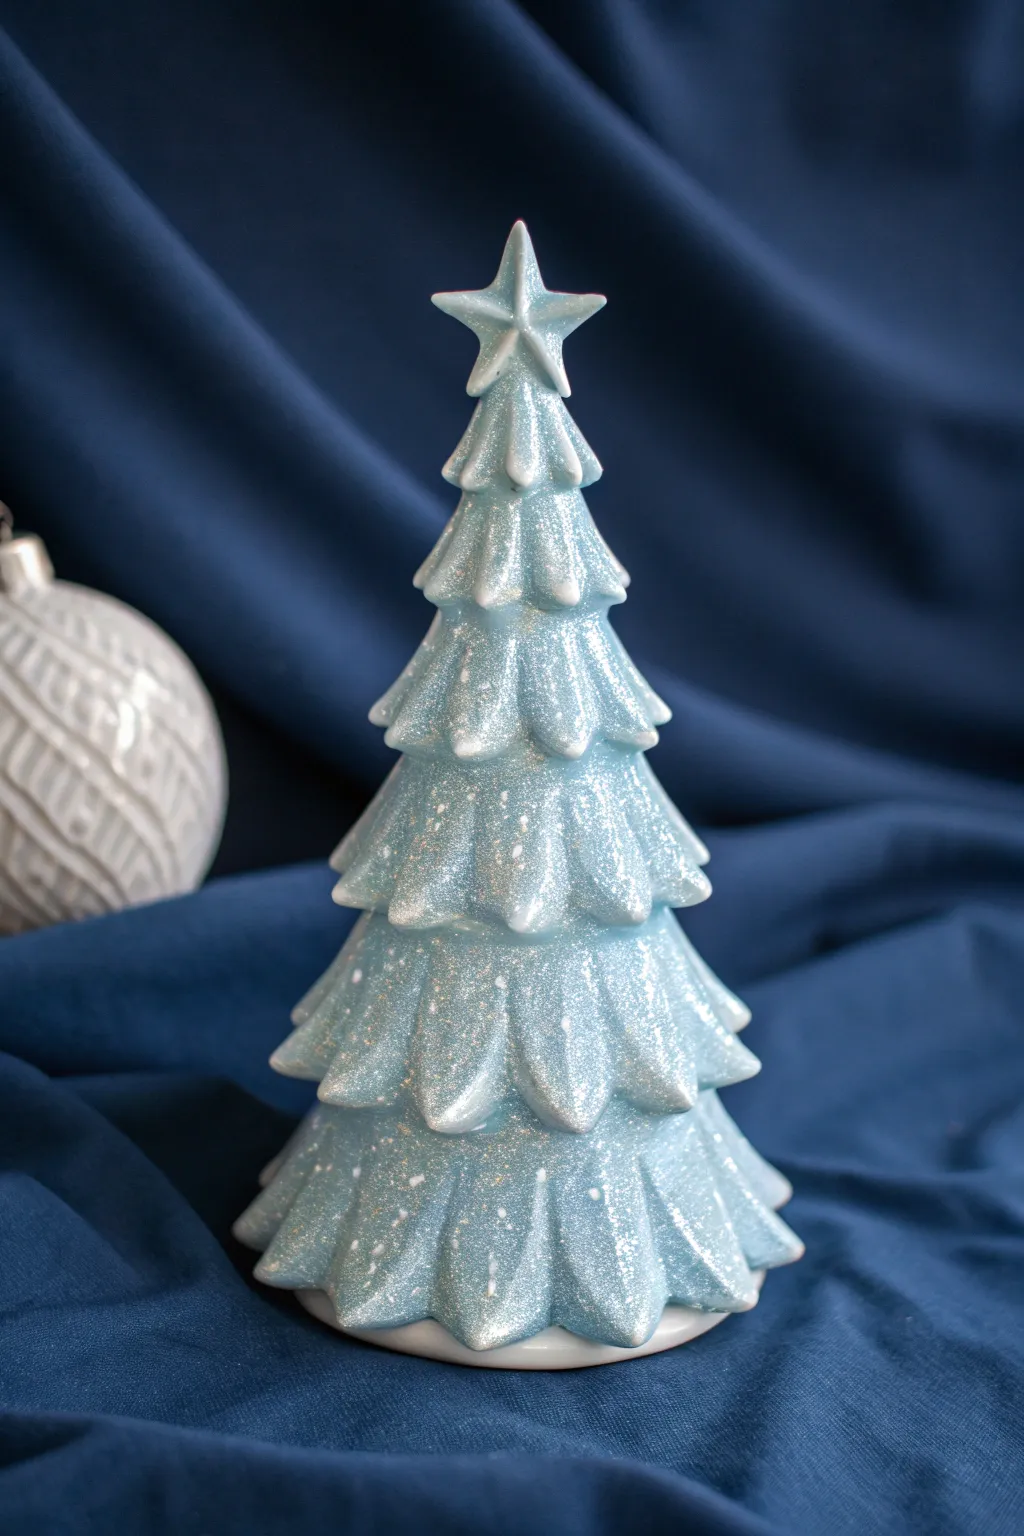
Capture the magic of a winter wonderland with this stunning icy blue ceramic tree. By layering cool tones and a generous coating of iridescent glitter, you’ll create a decoration that shimmers like fresh snow under moonlight.
Step-by-Step Tutorial
Materials
- Bisque ceramic Christmas tree (cone style with star)
- Light icy blue acrylic paint (e.g., Baby Blue or Spa Blue)
- White acrylic paint
- Iridescent fine glitter
- White glitter (optional for extra texture)
- Gloss Mod Podge or decoupage medium
- Soft synthetic flat brush (medium size)
- Small round brush for details
- Palette or paper plate
- Paper to catch excess glitter
- Spray gloss sealer (optional)
Step 1: Base Painting
-
Prepare the surface:
Begin by wiping down your bisque ceramic tree with a slightly damp cloth or sponge. This removes any ceramic dust that might interfere with paint adhesion. -
Mix the base color:
On your palette, mix your light blue paint with a tiny drop of white. You want a very pale, frosty blue tone that serves as the foundation for the icy look. -
Apply the first coat:
Using the medium flat brush, apply an even coat of the pale blue mixture over the entire tree, including the star at the top. Don’t worry if it looks a bit streaky; subsequent layers will cover it. -
Let it dry to the touch:
Allow this base layer to dry completely, typically about 15-20 minutes depending on your paint thickness. -
Add a second coat:
Apply a second layer of the pale blue to ensure solid, opaque coverage. Ensure you get the brush into the deep crevices between the boughs so no bare ceramic shows. -
Highlight the tips:
While the blue is drying, pour out a small amount of pure white paint. Use your small round brush to gently feather white paint onto the very tips and raised ridges of each branch. -
Dry thoroughly:
Let the painted tree dry completely for at least an hour. The paint must be fully set before we introduce the adhesive.
Glitter Mix-Up
Mix 70% iridescent fine glitter with 30% chunky white glitter. This size variation creates a rocky, realistic ice texture compared to uniform glitter.
Step 2: Adding the Frost
-
Prepare the glitter station:
Place a sheet of clean paper underneath your tree. This catches falling glitter so you can funnel it back into the container later. -
Coat with adhesive:
Work in sections, starting from the top. Brush a generous layer of Gloss Mod Podge over the top third of the tree, covering the star and the upper branches. -
Apply the first glitter rain:
Immediately sprinkle iridescent fine glitter over the wet adhesive. I like to let it rain down from above to mimic how snow naturally falls and settles. -
Continue down the tree:
Move to the middle section, applying the adhesive coating and then immediately sprinkling the glitter. Repeat this until you reach the base. -
Dust off excess:
Once you’ve covered the whole tree, gently tap the base on the table to knock off loose glitter particles. -
Spot check:
Look for any blue patches that missed the sparkle. Dab a little adhesive on those spots and add more glitter. -
Enhance the star:
For the star topper, you might want an extra thick layer. Apply a second coat of adhesive just to the star and dip it gently into a small pile of glitter for maximum shine. -
Seal the magic:
To prevent shedding, you can gently dab a very thin layer of Mod Podge over the dry glitter, or spray the entire piece with a clear gloss sealer. -
Final cure:
Allow the tree to dry overnight in a dust-free area to ensure the finish hardens completely.
Ombre Ice Effect
Start with a deeper teal at the bottom and fade to white at the top before glittering. This gradient adds incredible depth beneath the sparkle.
Now your tree looks like it was plucked straight from a frozen forest
Candy Cane Base and Star Accents
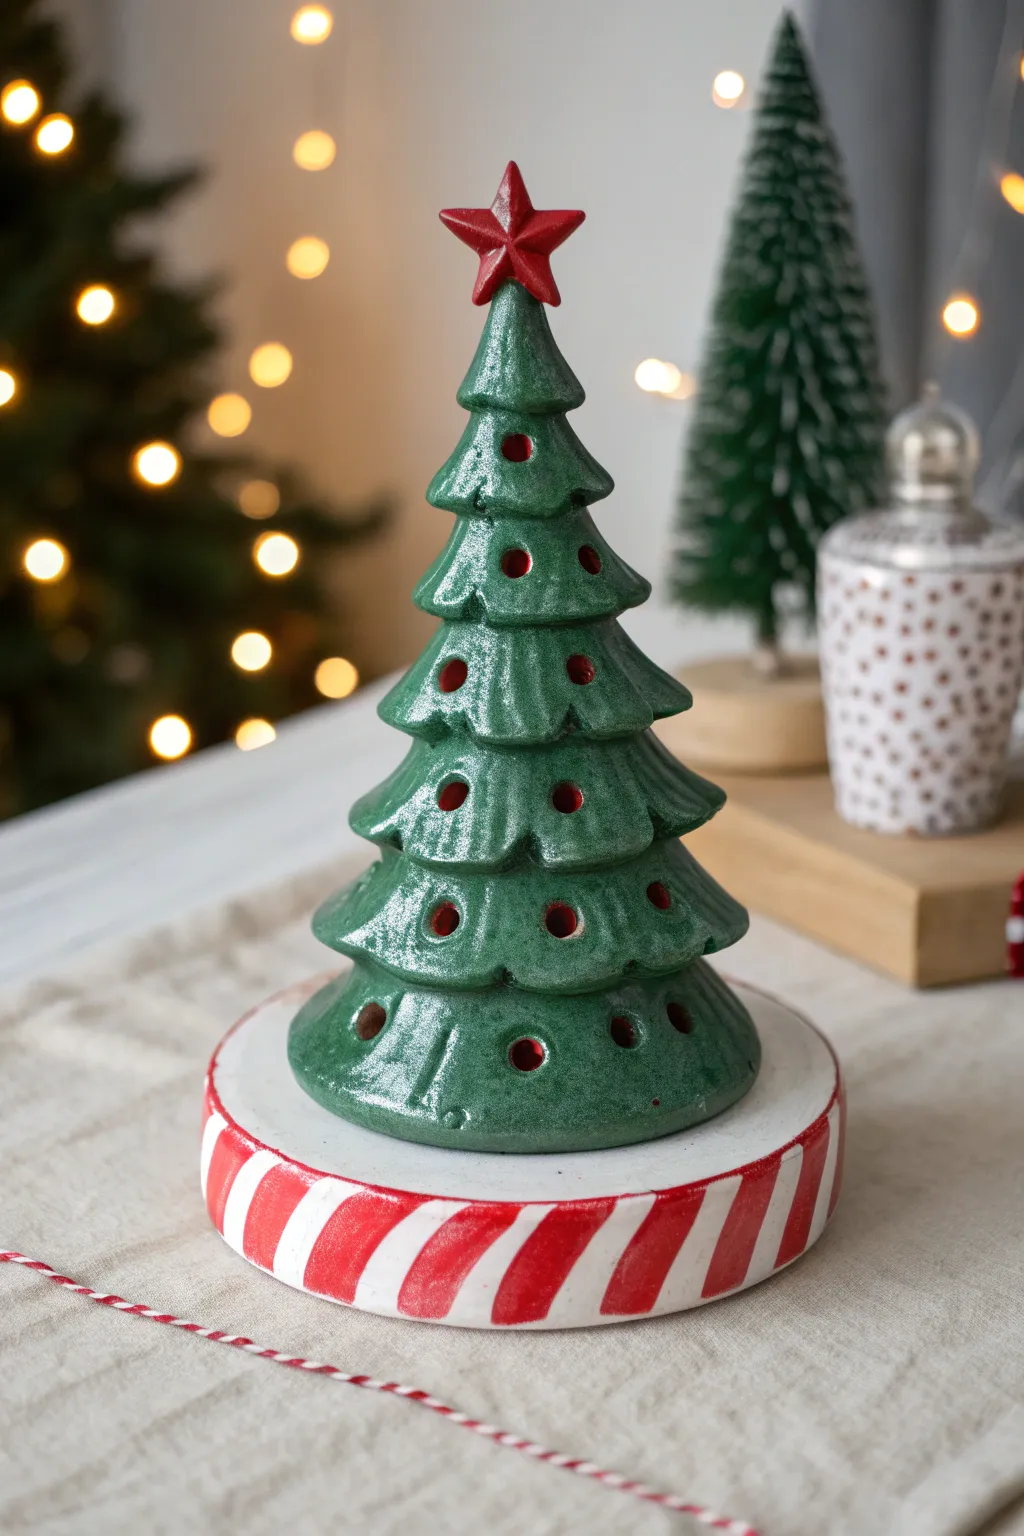
Give your holiday decor a sweet touch with this ceramic tree featuring a nostalgic candy cane striped base. The deep green pine pairs beautifully with the playful red and white stripes, creating a centerpiece that feels both classic and fun.
Detailed Instructions
Materials
- Bisque ceramic Christmas tree (with star topper and separate base)
- Acrylic paints: Deep Forest Green, Bright White, Candy Apple Red
- Glossy clear glaze or sealant (spray or brush-on)
- Fan brush or soft wide brush
- Small round detail brush (size 2 or 4)
- Medium flat shader brush
- Pencil for sketching
- Water cup and paper towels
- Palette
Step 1: Painting the Tree Body
-
Base Green Coat:
Begin by wiping down your bisque piece with a damp sponge to remove any dust. Using your fan brush or wide soft brush, apply a smooth coat of Deep Forest Green to the entire tree body, taking care to get into the crevices of the branches. -
Second Layer:
Once the first coat is dry to the touch, apply a second coat of green. This ensures a rich, opaque color without any streaks showing through the ceramic. -
Branch Detailing:
While I have the green paint out, I double-check the tips of the branches. Use the flat shader brush to touch up any spots that might have been missed, especially underneath the branch tiers. -
The Star Topper:
Switch to your medium flat brush and paint the star topper with Candy Apple Red. Apply two coats for a vibrant finish, letting the paint dry completely between layers. -
Hole Clean-up:
If any green paint clogged the small light holes, use the handle end of a paintbrush to gently clear them out while the paint is still slightly tacky.
Step 2: Creating the Candy Cane Base
-
White Foundation:
Move on to the base piece. Paint the entire circular base, including the top surface where the tree sits, with Bright White. You will likely need 3 coats to get a solid, crisp white coverage. -
Marking the Stripes:
Once the white paint is completely bone dry, use a pencil to lightly sketch diagonal lines around the side edge of the base. Ideally, space them about an inch apart to create wide candy stripes. -
Painting Red Stripes:
Using your flat shader brush, fill in every other marked section with Candy Apple Red. Work slowly to keep the edges crisp against the white. -
Top Rim Detail:
Extend the red stripes slightly over the top lip of the base if desired, or keep them strictly on the vertical edge as shown in the photo. The key is consistent spacing. -
Refining Edges:
If your red paint wobbled onto the white, wait for it to dry perfectly, then use a tiny detail brush with white paint to clean up the lines for a sharp peppermint look.
Tape for Stripes
Struggling with straight lines? Use thin painter’s tape or wash tape to mask off the white areas before painting the red stripes. Peel it off while paint is still wet.
Step 3: Finishing Touches
-
Clear Glazing:
Ensure all paint on both the tree and base is fully cured (usually 24 hours). Apply a coat of glossy clear glaze or sealant over the entire project. -
Drying:
Let the glaze dry according to the manufacturer’s instructions. The gloss will make the green look like glazed ceramic and the candy cane stripes pop. -
Painting the Light Holes (Optional):
If you want the interior glow to reflect red, use a very small brush to paint the inside rim of the light holes red; otherwise, leave them natural bisque color. -
Assembly:
Once everything is dry and sealing is complete, place the green tree onto the candy cane base.
Add Some Snow
For extra winter charm, dab a textured snow paint or white glitter polish onto the tips of the green branches to make it look freshly frosted.
Now you have a festive, custom-painted tree that brings a classic peppermint flair to your mantel
Midnight Galaxy Tree With Starry Speckles
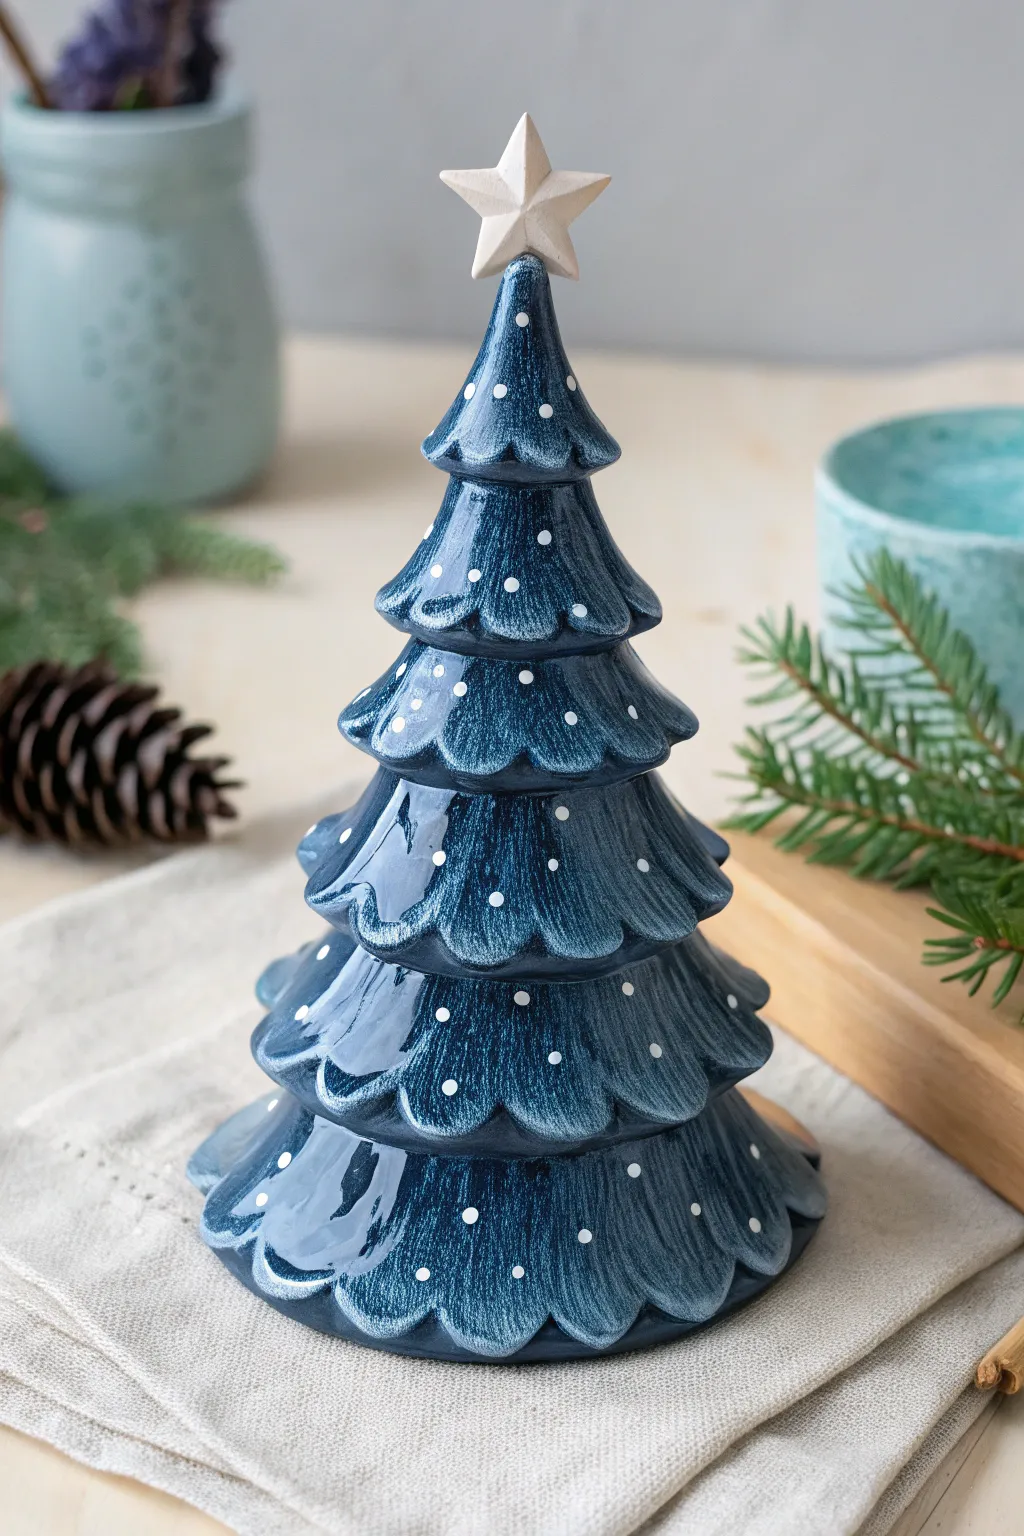
Capture the magic of a winter night sky with this stunning ceramic tree project. By layering deep blues and adding delicate speckles, you’ll transform a simple bisque shape into a cosmic centerpiece that sparkles with starry charm.
Detailed Instructions
Materials
- Bisque ceramic Christmas tree (with textured branches)
- Deep midnight blue acrylic paint or underglaze
- Lighter denim blue acrylic paint (for dry brushing)
- White acrylic paint
- Glossy clear acrylic sealer or glaze spray
- Ceramic star topper (bisque or wood)
- Medium flat shader brush
- Small dry brush or stiff-bristled brush
- Fine-point detail brush or dotting tool
- Palette for mixing
- Water cup and paper towels
Step 1: Base Coat & Texture
-
Clean the surface:
Before painting, wipe down your ceramic tree with a slightly damp sponge to remove any dust from the shelf. Let it dry completely so the paint adheres properly. -
Apply the base coat:
Using your medium flat brush, apply a solid coat of the deep midnight blue paint to the entire tree. Work the paint into all the crevices and grooves of the branches. -
Check for coverage:
Once the first coat is dry to the touch, inspect it for any white spots peeking through. Apply a second coat of midnight blue if necessary to ensure a rich, opaque background. -
Dry brush preparation:
Dip your stiff dry brush into a small amount of the lighter denim blue paint. Offload almost all the paint onto a paper towel until the brush feels dry and barely leaves a mark. -
Highlight the texture:
Gently sweep the dry brush downward over the tips and curves of the branches. This technique catches the raised textures, simulating moonlight hitting the needles and adding dimension. -
Refine the highlights:
If you want more contrast, I like to repeat the dry brushing process on just the very edges of the branches with an even lighter touch, building up the depth gradually.
Step 2: Starry Details & Glazing
-
Prepare the dots:
Pour a small puddle of white acrylic paint onto your palette. We will use this to create the ‘stars’ or ‘snow’ depending on your interpretation. -
Add larger stars:
Using the back end of a paintbrush or a large dotting tool, place a few scattered white dots randomly across the branches. Don’t overdo it; these anchor the pattern. -
Add delicate speckles:
Switch to a fine-point detail brush or a toothpick. Add tiny, darker white micro-dots around the larger ones to create a galaxy effect. -
Paint the topper:
While the tree dries, paint your star topper with a solid coat of white paint. You can apply two thin coats to keep the finish smooth and opaque. -
Clean the edges:
Check the star for any rough edges or brush strokes and smooth them out. Let the star dry completely before handling. -
Seal the tree:
Once the blue paint and white dots are fully cured, take the tree to a well-ventilated area. Spray it with a glossy clear acrylic sealer. This mimics the shine of fired glaze without a kiln. -
Seal the star:
Give the white star a light coat of the same glossy sealer, or keep it matte for a nice textural contrast against the shiny tree. -
Assembly:
Finally, secure the star to the top of the tree. If it’s loose, a drop of clear craft glue will hold it perfectly in place.
Brush Technique Tip
For realistic texture, always pull your brush in the direction the needles or branches would naturally grow—usually downward and outward.
Add Metallic Flair
Mix a tiny bit of silver metallic paint into your white dots or dust the final wet glaze with ultra-fine glitter for a true shimmering galaxy look.
Your midnight galaxy tree is now ready to bring a touch of celestial wonder to your holiday display
Modern Color-Blocked Bands on Branch Rows

Move away from traditional forest greens with this modern, Scandinavian-inspired ceramic tree. By painting distinct color bands on each tier and finishing with a subtle speckle, you’ll create a stylish holiday centerpiece that feels both festive and minimalist.
Step-by-Step Tutorial
Materials
- Unfinished ceramic Christmas tree (smooth, tiered style)
- Acrylic craft paints (Cream/Off-white, Sage Green, Muted Peach/Terracotta)
- Medium flat paintbrush
- Small round paintbrush
- Old toothbrush or stiff bristle brush
- Matte or satin clear sealant spray
- Water cup and palette
- Paper towels
- Cardboard box (for splatter containment)
Step 1: Base Coating
-
Clean the surface:
Before dipping your brush, wipe down the ceramic bisque with a slightly damp paper towel. This removes any ceramic dust that might interfere with paint adhesion. -
Sort your tiers:
Plan your color pattern before you start. Looking at our reference, the pattern alternates: Cream (bottom), Peach, Green, Cream, Green, Peach, Cream (top). Organizing this mentally or sketching it on paper helps prevent mistakes. -
Paint the cream bands:
Start with the cream or off-white paint. Using your flat brush, paint the bottom-most tier, the middle tier (fourth from bottom), and the top cone section just below the star. Apply two thin coats for opaque coverage, letting the first dry for about 15 minutes. -
Apply the peach tones:
Next, mix your peach or terracotta shade. Paint the second tier from the bottom and the second tier from the top. Be careful near the edges where it meets the cream sections; using the edge of your flat brush helps keep the line crisp. -
Fill in the green:
Using the sage green paint, fill in the remaining tiers (third from bottom and the small tier usually third from top). This completes your color blocking. -
Paint the star:
Switch to your small round brush to paint the star topper. A solid coat of the peach/terracotta shade ties it beautifully to the body of the tree. Paint all sides and crevices thoroughly.
Clean Lines Hack
If you have an unsteady hand, use thin strips of washi tape to mask off the edges of the tiers you aren’t currently painting. This guarantees a sharp, professional separation between colors.
Step 2: Detailing & Finishing
-
Prepare the speckle mix:
To get that ceramic glaze effect, water down a small amount of dark brown or black acrylic paint. You want a consistency similar to skim milk—runny enough to fly off bristles, but thick enough to be visible. -
Test the splatter:
I always test this on a scrap piece of paper first. Dip an old toothbrush into the thinned paint, hold it bristles-down, and run your thumb across the bristles to flick paint. Adjust the thickness if you’re getting blobs instead of fine mist. -
Apply the speckles:
Place your tree inside a cardboard box to catch mess. Flick the toothbrush bristles to spray fine speckles over the entire tree. Rotate the tree frequently to ensure even coverage on all sides. -
Let it dry completely:
Allow the speckles to dry fully. This usually takes less time than the base coats, but give it at least 20 minutes to ensure you don’t smear the tiny dots. -
Seal the project:
To mimic the sheen of glazed pottery, take the tree outside and apply a light coat of clear satin spray sealant. This protects the paint and deepens the colors slightly.
Make It Glossy
For a true high-end ceramic look, swap the satin spray for a triple-thick heavy gloss glaze. It mimics fired pottery perfectly and makes the colors pop even more.
Place your finished tree on a wood slice or mantle for an instant touch of modern holiday warmth
Cohesive Painted Tree Forest Display

These sleek, conical ceramic trees bring a sophisticated Scandinavian touch to holiday decor, combining glossy glazes with delicate metallic accents. The contrast between deep forest green and creamy white creates a cohesive forest display that looks stunning on a mantle or centerpiece tray.
How-To Guide
Materials
- Cone-shaped ceramic bisque trees (tiered style)
- Forest green ceramic glaze (gloss finish)
- Creamy white ceramic glaze (gloss finish)
- Liquid gold leaf or ceramic gold luster (overglaze)
- Soft fan brush (for glaze application)
- Fine detail brush (size 0 or 00)
- Damp sponge
- Kiln (or oven, if using bake-on paints)
- Palette for gold paint
- Ceramic tray for display (optional)
Step 1: Preparation and Base Glazing
-
Clean the bisque:
Before you begin painting, take a damp sponge and gently wipe down your ceramic tree forms. This removes any kiln dust or oils from handling, ensuring your glaze adheres perfectly to the surface. -
Select your palette:
Decide which trees will be your deep greens and which will be white. For a balanced forest look like the photo, paint two sizes in green and one in white, or vice versa. -
Apply the first coat:
Using a soft fan brush, apply a smooth, even coat of the forest green glaze to your designated trees. Work from the top down, ensuring the glaze gets into the grooves between the tiers without pooling excessively. -
Glaze the white trees:
Rinse your brush thoroughly or switch to a clean one. Apply the creamy white glaze to the remaining tree, maintaining steady strokes to avoid visible brush marks. -
Let it dry:
Allow the first coat to dry until it is chalky and cool to the touch. This usually takes about 15-20 minutes depending on your room’s humidity. -
Apply second and third coats:
Apply two more coats of glaze to each tree, allowing drying time between each layer. Three coats typically ensure the rich, opaque finish seen in the photo. Be careful not to let the glaze get too thick at the bottom edges. -
Clear the base:
Use a damp sponge to wipe any excess glaze off the very bottom of the trees (the ‘foot’) so they don’t stick to the kiln shelf during firing. -
First firing:
Fire the pieces in the kiln according to the glaze manufacturer’s instructions (usually Cone 06 or 05). If using oven-bake paints, follow those curing instructions.
Glaze Consistency
If your glaze seems too thick, thin it with a few drops of water or glaze thinner. It should flow like heavy cream to avoid clumps in the tier crevices.
Step 2: Adding the Gold Accents
-
Prepare the gold:
Once your trees are fired and cooled, prepare your gold accent material. I prefer using distinct liquid gold luster for that genuine metallic shine, but a high-quality metallic acrylic works for non-fired projects. -
Paint the finials:
Dip a small detail brush into the gold. Carefully paint the very tip (the finial) of each tree. Rotate the tree as you paint to get a clean, consistent cap of gold at the peak. -
Establish the dot pattern:
Plan your dot placement. The dots should sit centrally on the flat part of each tier. Start at the top tier and work your way down to maintain spacing. -
Apply dots:
Using the tip of your fine detail brush or a dotting tool, gently touch the gold to the surface. Apply slight pressure to create round, consistent dots. Space them roughly 1 inch apart around the circumference. -
Rim the tiers (optional):
For the white tree, notice straight gold lines on the edges of the tiers. To achieve this, carefully drag the side of a liner brush along the protruding ridge of each tier. -
Refine the spacing:
As you move down to wider tiers, you may need to add an extra dot to keep the spacing visually consistent with the tiers above. -
Check for drips:
Inspect your gold work immediately. If any paint has dripped or smeared, clean it up instantly with a cotton swab and a tiny bit of solvent or water. -
Final cure or fire:
If using ceramic gold luster, return the pieces to the kiln for a low-fire luster firing (usually Cone 018). If using acrylics, simply let the paint cure fully for 24 hours.
Level Up: Illuminated Trees
Before glazing, drill small holes where the gold dots would go. After firing, insert a small battery-operated tealight underneath for a glowing luminary effect.
Now arrange your elegant ceramic forest on a simple tray to enjoy a handcrafted holiday vignette.