When you’re craving fresh ceramic clay ideas, it helps to have a mix of quick wins and “weekend project” pieces you’ll actually use. Here are my go-to projects I teach all the time—approachable, satisfying, and totally tweakable to your style.
Classic Pinch Pot Snack Bowls
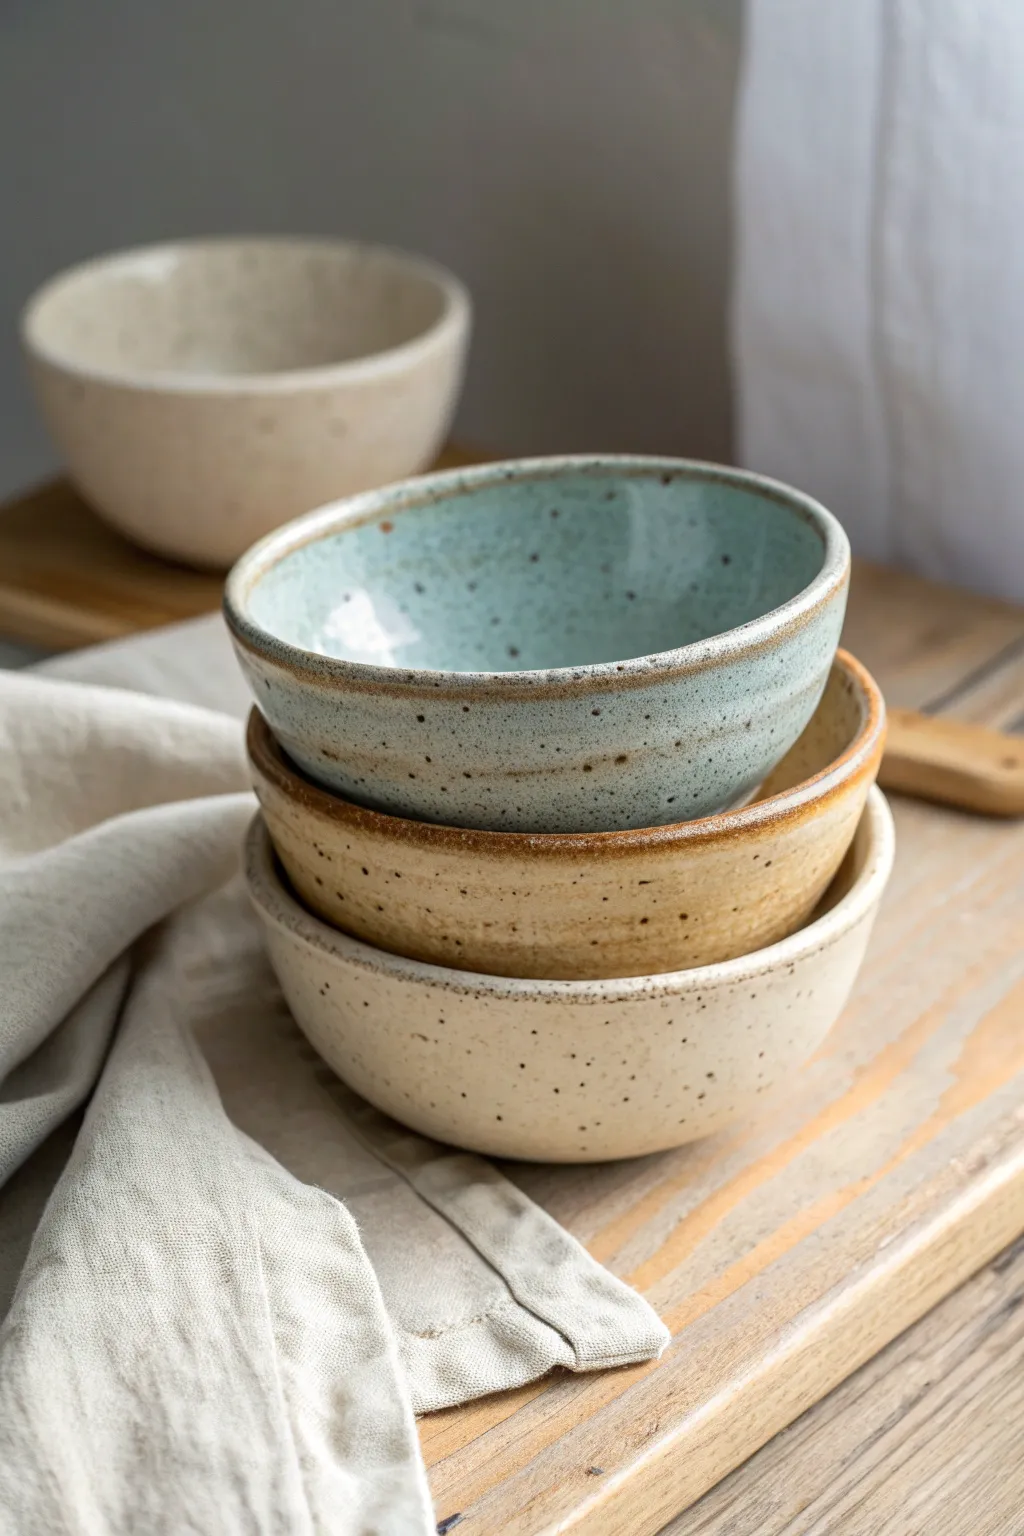
Embrace the imperfect beauty of hand-building with this set of rustic snack bowls. These classic pinch pots feature a cozy nesting shape and a speckled glaze finish that highlights the organic texture of the clay.
Step-by-Step Tutorial
Materials
- Speckled stoneware clay (mid-fire or high-fire)
- Potter’s wire tool
- Small bowl of water
- Potter’s sponge
- Wooden modeling tool or rib
- Metal kidney scraper
- Canvas or wooden work board
- Glaze brushes (soft, fan style)
- Glazes: Light turquoise/celadon, warm honey/ochre, and creamy matte white
- Kiln access
Step 1: Forming the Pinch Pots
-
Prepare Clay Balls:
Begin by wedging your clay to remove air bubbles. Separate the clay into three even sections. Roll each section into a smooth, round ball about the size of a tennis ball or slightly larger, depending on your desired bowl size. -
Open the Form:
Take one clay ball and cup it in your non-dominant hand. Press your thumb directly into the center, pushing down until you are about half an inch from the bottom. -
Pinch the Walls:
With your thumb inside and fingers on the outside, gently pinch and rotate the clay. Work your way from the bottom up to the rim in a spiral motion. Aim for an even thickness of about 1/4 inch throughout the wall. -
Build the Set:
Repeat this pinching process for the other two balls of clay. To ensure they nest well, make the second bowl slightly wider and shallower than the first, and the third slightly wider than the second. Test the fit gently as you work.
Step 2: Refining and Smoothing
-
Level the Rims:
Once the basic shapes are formed, look at the rims. If they are very uneven, you can gently paddle them flat with a wooden spoon or trim the excess with a needle tool. I like to keep a slight wave to maintain that handmade charm. -
Smooth the Interior:
Dampen your potter’s sponge slightly and wipe the interior of the bowls to remove deep finger marks. Use a soft rib tool to compress the bottom and sides, creating a smooth, functional curve. -
Refine the Exterior:
Use a metal kidney scraper to smooth the outside walls. You can leave faint ridges if you prefer texture, but ensure there are no sharp crags that could catch glaze later. -
Create a Foot (Optional):
If you want the bowls to sit slightly elevated, use your thumb to press a small concave indentation into the center of the bottom base, creating a subtle foot ring. -
Slow Drying:
Cover the bowls loosely with plastic and let them dry to a leather-hard state. This allows the moisture to equalize so they don’t warp.
Cracking Up?
If you see cracks on the rim while pinching, your clay might be too dry. Dip your fingers in water (don’t soak the clay) or compress the rim downward to heal the split immediately.
Step 3: Glazing and Firing
-
Bisque Fire:
Once the bowls are bone dry, load them into the kiln for a bisque firing (usually cone 04 or 06). This hardens the clay and prepares it for glazing. -
Wax the Bottoms:
After the bowls cool, apply wax resist to the bottom foot of each bowl. This prevents glaze from sticking them to the kiln shelf. -
Apply the First Glaze:
For the top bowl, dip or brush a light turquoise or celadon glaze over the entire interior and exterior to the foot. The speckled clay body will show through lighter glazes nicely. -
Glaze the Middle Bowl:
Apply a warm honey or ochre glaze to the second bowl. Focus on the rim, allowing the glaze to pool slightly thicker there for a darker accent if the glaze breaks over edges. -
Glaze the Bottom Bowl:
Finish the largest bowl with a creamy matte white glaze. Ensure an even coat so the speckles form a subtle pattern rather than being obscured. -
Glaze Firing:
Load the glazed bowls into the kiln, ensuring they are not touching each other. Fire to the maturity temperature of your clay and glaze combination (typically cone 5 or 6 for stoneware). -
Cooling and Sanding:
Let the kiln cool completely before opening. Remove your bowls and use a sanding block or diamond pad to smooth the unglazed clay on the bottom foot for a professional finish.
Make It a Set
Create a matching dipping platter! Roll a slab of the same clay, cut a large oval, and curl up the edges. It’s the perfect tray to hold your trio of bowls for entertaining.
Stack your finished bowls on the shelf or fill them with nuts and olives for your next gathering


Simple Slab Coasters With Texture
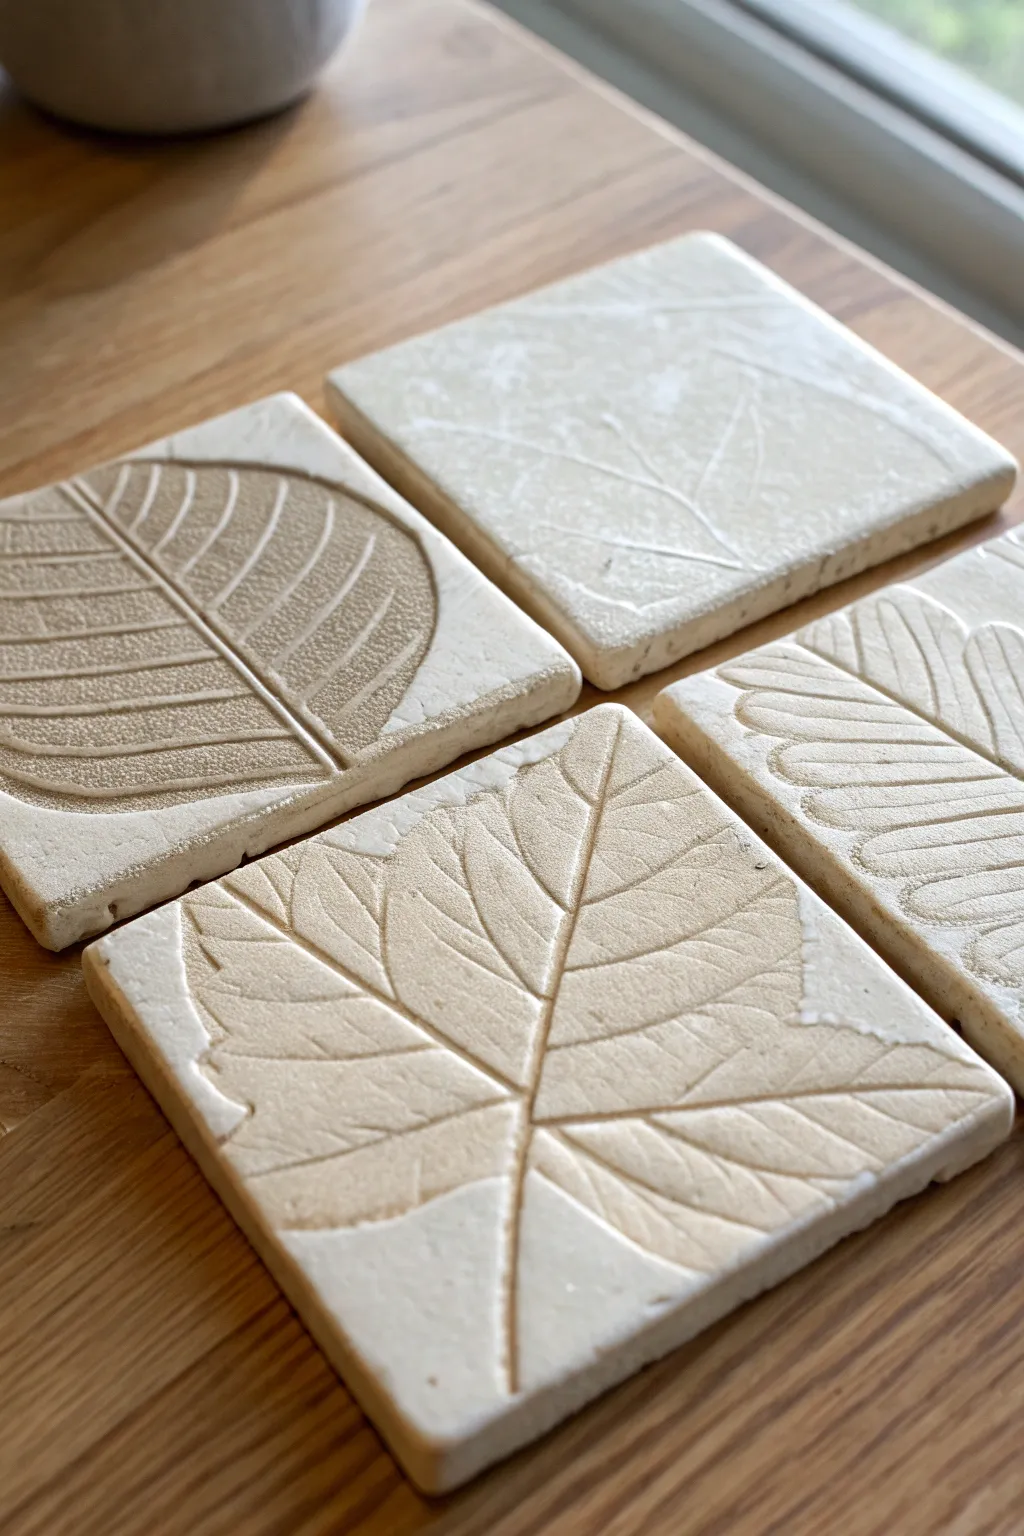
These elegant, minimal coasters bring a touch of nature indoors by capturing the delicate vein structures of real leaves in stoneware clay. The result is a set of functional art pieces with a beautiful, tactile relief surface that highlights organic patterns.
Step-by-Step Guide
Materials
- Light-colored stoneware or earthenware clay (white or cream)
- Four wooden guides or slat strips (approx. 1/4 inch thick)
- Rolling pin
- Canvas or fabric cloth (to work on)
- Square cookie cutter (approx. 4×4 inches) or ruler and needle tool
- Various fresh leaves with prominent veins (maple, hydrangea, etc.)
- Small pony roller or brayer
- Fettling knife or rib tool
- Sponge
- Clear matte or satin glaze
- Iron oxide wash (optional, for antique effect)
- Kiln for firing
Step 1: Preparing the Slab
-
Wedge the clay:
Begin by thoroughly wedging your clay to remove any air bubbles. This is crucial for flat pieces like coasters to prevent warping later. -
Set up the workspace:
Lay down your canvas or heavy cloth on a flat table. Place two wooden thickness strips parallel to each other, slightly wider than the width of your desired coasters. -
Roll the slab:
Place the ball of clay between the strips. Using your rolling pin, roll the clay out until it is perfectly level with the wooden guides, creating an even slab about 1/4 inch thick. -
Compress the surface:
Take a rubber or metal rib tool and gently drag it across the surface of the clay in multiple directions. This compression aligns the clay particles and helps prevent warping during drying.
Vein Definition Tip
Leaf not making a deep enough mark? Place a piece of paper towel over the leaf before rolling. This prevents the roller from slipping and helps press the veins deeper.
Step 2: Creating the Texture
-
Select your leaves:
Choose fresh leaves that are slightly stiff and have raised, thick veins on the back. While dried leaves tend to crumble, fresh ones make the best impressions. -
Position the leaf:
Place a leaf vein-side down onto the clay slab. Consider the composition; you don’t need the whole leaf to fit within the eventual square. An off-center placement often looks more artistic. -
Roll the impression:
Using a small pony roller or brayer, firmly roll over the leaf. I like to press hard enough so the leaf becomes flush with the clay surface, ensuring all those tiny details are captured. -
Remove the leaf:
carefully find the stem or edge of the leaf and peel it away to reveal the detailed impression underneath. -
Repeat for variety:
Continue this process, spacing the leaf impressions out so you have enough room to cut four separate coasters.
Step 3: Cutting and Refining
-
Cut the shapes:
Place your square cookie cutter over the textured area to frame your composition. Press down firmly to cut. Alternatively, measure 4×4 inch squares with a ruler and cut with a needle tool. -
Clean the edges:
Once cut, lift away the excess clay. Gently smooth the sharp cut edges with your finger or a slightly damp sponge to remove any burrs, but be careful not to smudge your leaf texture. -
Weight while drying:
Place the coasters between two pieces of drywall board or sandwich them between sheets of newspaper with a light board on top. This slow, weighted drying is the secret to keeping flat tiles from curling up at the corners. -
Bisque fire:
Once bone dry, load the coasters into the kiln for a bisque firing according to your clay body’s specifications (usually Cone 04 or 06).
Add Color Depth
Instead of plain brown oxide, try using a dark green underglaze wash wiped back. It hints at the original leaf color while maintaining that rustic, fossilized aesthetic.
Step 4: Finishing
-
Apply an oxide wash (optional):
To get the look in the photo where the veins are darker, brush a watered-down iron oxide wash over the texture. Let it sit for a moment, then wipe the high points clean with a damp sponge, leaving the color only in the deep crevices. -
Glaze application:
Dip or brush a clear matte or satin glaze over the entire top surface. A glossy glaze can sometimes obscure the texture causing glare, so a softer finish usually works best for these. -
Wipe the footing:
Ensure the bottom of the coaster is completely free of glaze so it doesn’t stick to the kiln shelf. -
Glaze fire:
Fire the coasters again to the final temperature required for your clay and glaze combination. -
Add protective feet:
Once cooled and out of the kiln, adhere small cork or felt pads to the four corners on the underside to protect your table surfaces.
Now you have a durable, nature-inspired set ready for your coffee table


Everyday Trinket Dish for Rings and Keys
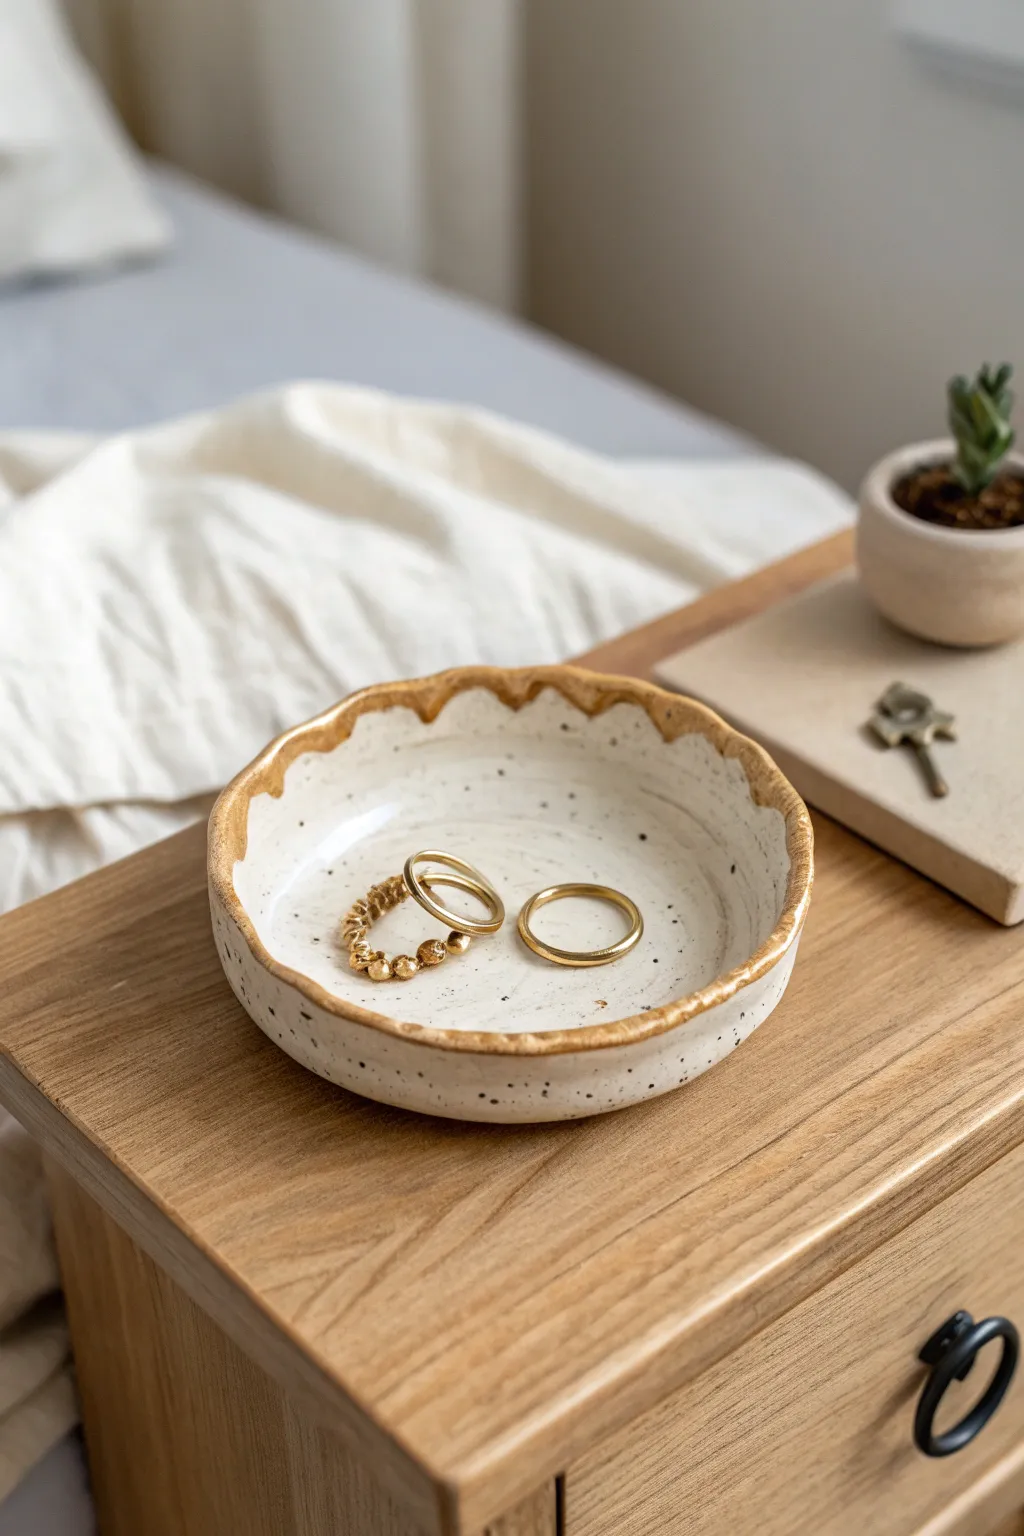
This charming, hand-built dish features a creamy, speckled glaze finish and an organic, wavy rim accented with gold luster. It’s the perfect size for keeping your daily rings and keys safe on a bedside table or entryway console.
Detailed Instructions
Materials
- White stoneware clay (preferably a speckled variety)
- Rolling pin
- Two guide sticks (approx. 1/4 inch thick)
- Circular template or small bowl (about 4-5 inches wide)
- Needle tool or fettling knife
- Smooth yellow sponge
- Small trimming tool
- Creamy white speckled glaze (cone 5/6)
- Gold luster (overglaze)
- Small liner brush dedicated to luster
- Kiln access
Step 1: Shaping the Clay
-
Prepare your slab:
Begin by wedging a baseball-sized amount of speckled clay to remove air bubbles. Flatten it slightly with your palm on a canvas-covered board. -
Roll to thickness:
Place your guide sticks on either side of the clay. Roll the clay out into a smooth slab until the rolling pin rests evenly on the sticks, ensuring a uniform 1/4 inch thickness. -
Cut the circle:
Place your circular template or upturned bowl onto the slab. Using your needle tool, trace around the edge to cut out a perfect circle. -
Form the rim:
Gently lift the edges of the clay circle upwards with your fingers. Pinch the clay lightly as you go around to create a raised wall about 1 inch high. -
Create the wave:
To get that distinct scalloped look, use your thumb and forefinger to gently push down and out at regular intervals along the rim. I like to support the outside with one hand while pushing from the inside to keep the wall sturdy. -
Refine the surface:
Smooth the lip of the rim with a slightly damp sponge to remove any sharp edges or crumbles. Run the sponge over the interior dish floor to erase any canvas textures. -
Dry slowly:
Cover the dish loosely with plastic and let it dry slowly to the leather-hard stage. This prevents warping, especially with the wavy rim.
Use Dedicated Brushes
Gold luster is tricky! Use a brush solely dedicated to luster. Even tiny amounts of water or other potential contaminants can ruin the metallic finish.
Step 2: Firing and Glazing
-
Bisque fire:
Once the piece is bone dry, fire it in the kiln to a bisque temperature (usually Cone 04). This hardens the clay and prepares it for glazing. -
Clean the bisque:
Wipe the bisqued dish down with a damp sponge to remove any kiln dust. This ensures the glaze adheres properly without crawling. -
Apply the base glaze:
Dip the dish into your creamy white speckled glaze, or brush on 3 even coats if using brush-on glaze. Ensure the coverage is opaque but not running. -
Wipe the foot:
Carefully wipe the glaze off the very bottom of the dish with a sponge so it doesn’t stick to the kiln shelf. -
Glaze fire:
Load the kiln again and fire to the maturity temperature of your glaze and clay body, typically Cone 5 or 6 for stoneware.
Try a Wax Resist Pattern
Before dipping in white glaze, paint small dots or a monogram on the interior floor using liquid wax resist. The raw clay will show through after firing.
Step 3: Adding the Gold Accents
-
Prepare for luster:
Once the glaze firing is complete and the piece is cool, wipe the rim with a little rubbing alcohol to remove oils or fingerprints. -
Paint the rim:
Dip your specialized liner brush into the gold luster. Carefully paint the gold along the very top edge of the wavy rim, letting it naturally follow the scallops you created. -
Create the drip effect:
To mimic the image, intentionally widen the gold line in the ‘valleys’ of the waves, pulling the gold slightly down the interior wall to look like a thick glaze drip. -
Luster fire:
Place the piece back in the kiln for a third and final firing. This is a very low-temperature firing, usually around Cone 018, just enough to fuse the gold to the glass surface.
Now you have a stunning, boutique-quality dish ready to hold your treasures


Tiny Bud Vases for Single Stems
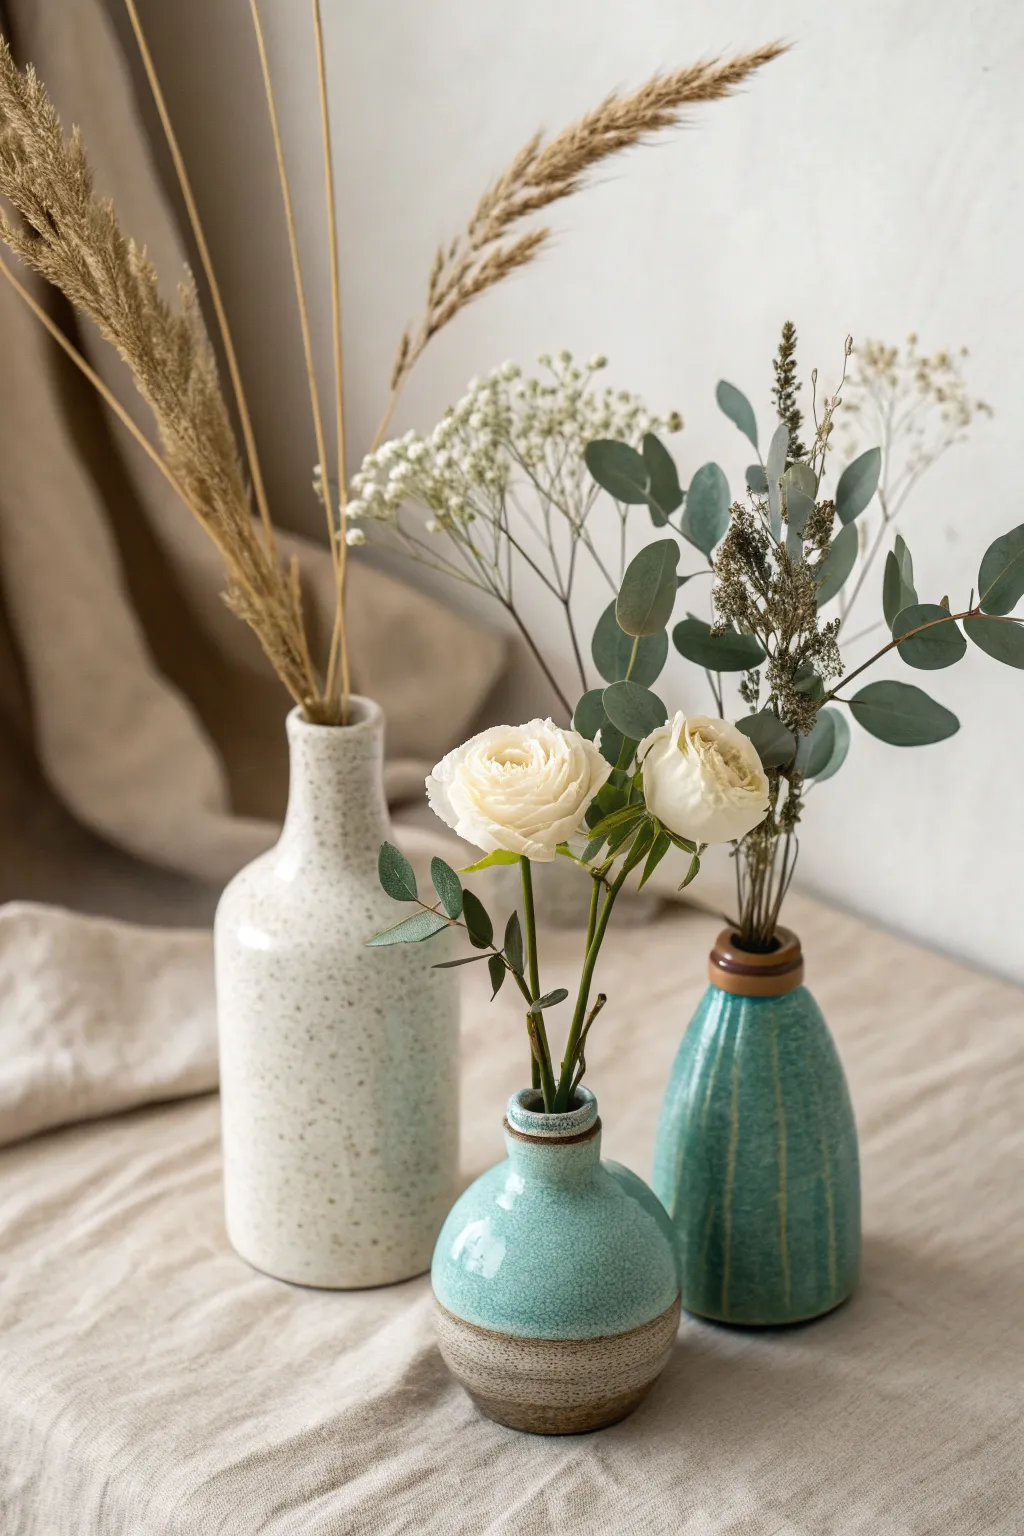
Create a serene vignette with this set of three distinct bud vases, perfect for displaying single stems and dried grasses. The combination of speckled cream stoneware and vibrant turquoise glazes creates a harmonious, earthy aesthetic that brings a touch of nature indoors.
Step-by-Step
Materials
- Speckled stoneware clay (about 2 lbs)
- Pottery wheel
- Throwing sponge
- Needle tool
- Wire cutter
- Rib tool (wooden or metal)
- Trimming tools
- Turquoise reactive glaze
- Glossy white or clear glaze (for the tall bottle)
- Brown iron oxide wash (optional)
- Kiln for bisque and glaze firing
Step 1: Throwing the Forms
-
Wedge the clay:
Begin by thoroughly wedging your speckled stoneware clay to remove air bubbles. Divide the clay into three unequal sections: a small amount (for the roundest vase), a medium amount (for the teardrop vase), and a larger amount (for the tall bottle). -
Center the first ball:
Start with the smallest ball of clay. Secure it firmly to the center of your wheel head and use wet hands to center the clay until it spins smoothly without wobbling. -
Open and pull the round vase:
Open the centered clay, leaving a slightly thicker base for stability. Pull the walls upward, then gently push them outward from the inside to create a bulbous, rounded belly shape. -
Create the narrow neck:
Collar the top of the form inward using both hands to narrow the opening significantly. I like to refine the rim with a chamois piece to ensure it’s smooth for delicate flower stems. -
Throw the tall bottle:
Center your largest ball of clay. Pull this cylinder tall and narrow. Keep the base slightly wider than the neck, gently tapering the form upward to create a sleek, elongated silhouette. -
Throw the teardrop vase:
With the medium ball, throw a form that is wider at the base and tapers steadily to a narrow neck, resembling a teardrop or pear shape. Use a rib to smooth the exterior curve. -
Wire off:
Once satisfied with all three shapes, run a wire cutter under each base to separate them from the wheel head and set them aside to reach leather-hard consistency.
Step 2: Trimming and Texturing
-
Trim the bases:
Once leather-hard, center each vase upside down on the wheel. Use trimming tools to refine the foot rings and remove excess weight from the bottoms. -
Add vertical texture:
For the medium teardrop vase, use a carving tool to gently incise vertical lines down the body. These grooves will help the glaze break beautifully later. -
Add organic texture:
For the smallest round vase, lightly paddle or use a textured rib on the lower third to create a slightly rough, stone-like surface that will remain unglazed. -
Bisque fire:
Allow the vases to dry completely (bone dry). Load them into the kiln and fire to your clay body’s bisque temperature (usually Cone 04 or 06).
Uneven Glaze Drips?
If your glaze runs too much during firing, increase the width of your wax resist near the foot or use a “cookie” (a flat disc of clay) under the pot in the kiln to catch drips.
Step 3: Glazing and Finishing
-
Prepare the bases:
Apply wax resist to the bottom of all vases. For the smallest round vase, wax the bottom third of the exterior as well to leave the raw clay exposed. -
Glaze the tall bottle:
Dip the tallest bottle into a glossy white or clear glaze that allows the natural speckles of the clay body to show through clearly. -
Glaze the turquoise vases:
Dip the top two-thirds of the round vase and the entire exterior of the teardrop vase into the turquoise reactive glaze. This glaze tends to pool in textures, highlighting the vertical lines. -
Accent the rims:
For a rustic touch, carefully paint a thin line of brown iron oxide wash or a darker glaze around the rim of the round vase and the rim collar of the teardrop vase. -
Glaze fire:
Load the glazed pieces into the kiln, ensuring they don’t touch. Fire to the maturity temperature of your clay and glaze (often Cone 5 or 6). Allow the kiln to cool naturally before opening.
Pro Tip: Collaring
When narrowing the necks (collaring), increase your wheel speed slightly and use plenty of water or slip to prevent the clay from twisting or collapsing under friction.
Arrange your finished trio with dried grasses and roses to enjoy the peaceful atmosphere they create in your space

The Complete Guide to Pottery Troubleshooting
Uncover the most common ceramic mistakes—from cracking clay to failed glazes—and learn how to fix them fast.
Drainage-Friendly Succulent Planters
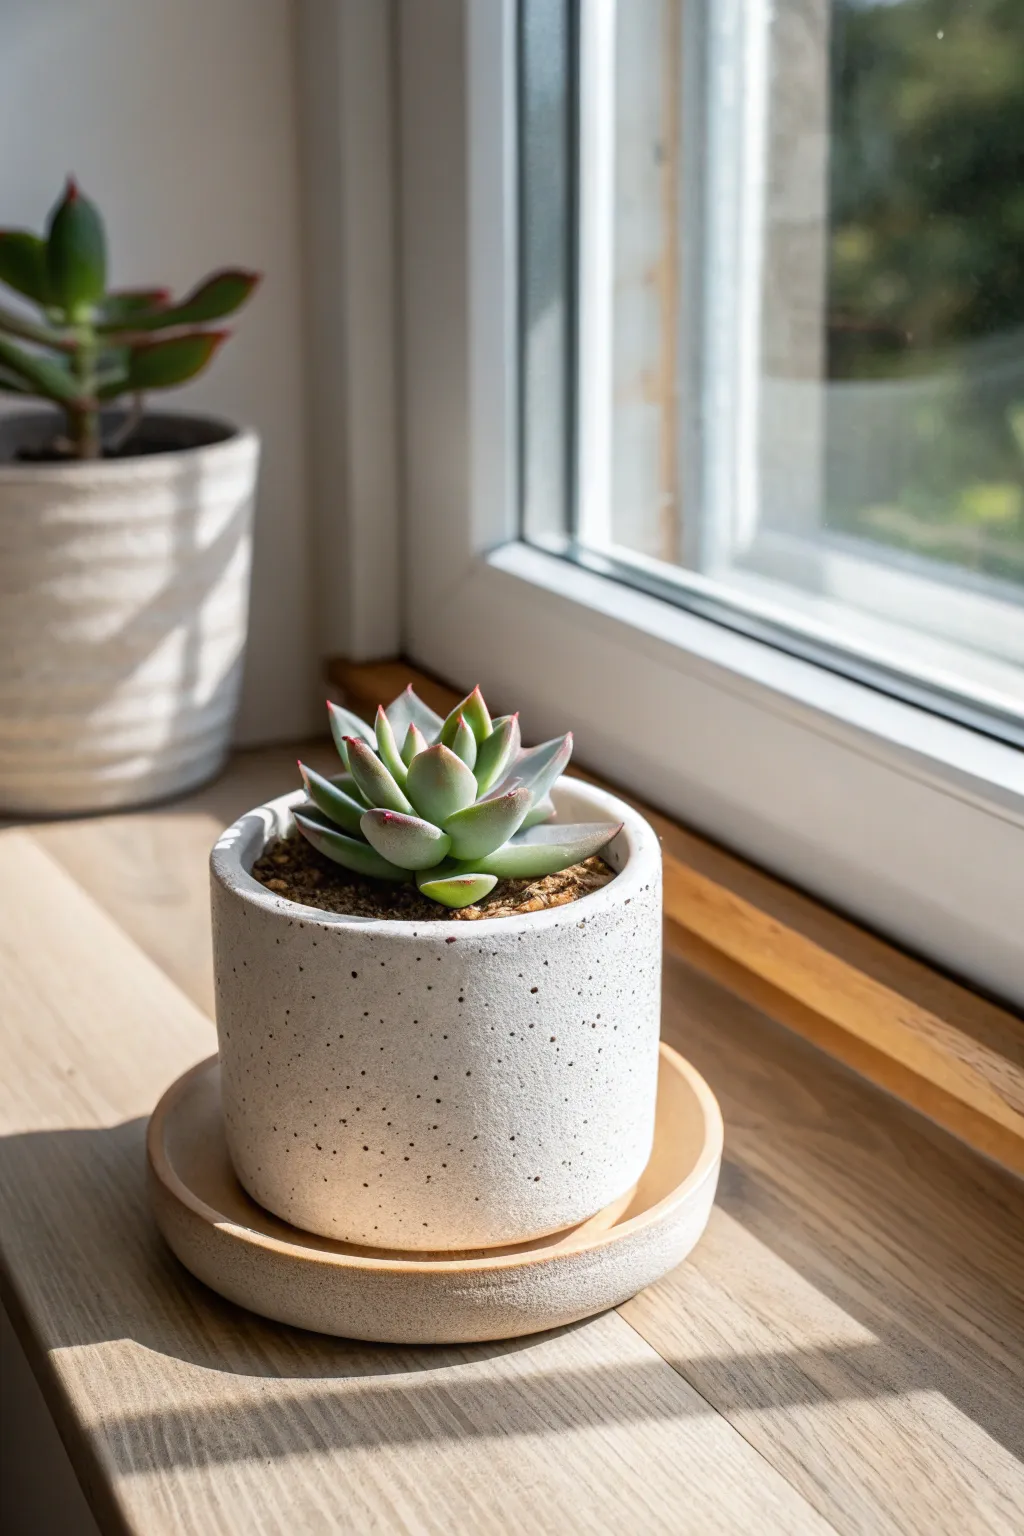
This minimalist ceramic planter features a clean cylindrical form paired with a custom-fitted saucer, perfect for windowsill gardening. The project highlights a beautiful speckled white glaze finish that mimics the texture of stone while providing essential drainage for your succulents.
Step-by-Step Tutorial
Materials
- White stoneware clay (roughly 2-3 lbs)
- Speckled white glaze (cone 5/6)
- Rolling pin
- Canvas work surface or ware board
- Needle tool
- Fettling knife
- Scoring tool or fork
- Slip (clay mixed with water)
- Circular cookie cutters (or a template)
- sponge
- Flexible metal rib
- Plastic wrap
Step 1: Forming the Planter Body
-
Roll the slab:
Begin by wedging your white stoneware clay to remove air bubbles. Roll it out into a consistent slab about 1/4 inch thick. I like to flip the clay halfway through rolling to ensure the texture is even on both sides. -
Cut the base:
Using a circular cookie cutter or a paper template, cut a circle roughly 4 inches in diameter for the floor of the pot. -
Measure the wall:
Calculate the circumference of your base circle (Diameter x 3.14). Add about 1/2 inch for overlap. -
Cut the wall slab:
Cut a long rectangular strip from your slab. The length should match your calculated circumference, and the height should be approximately 3.5 to 4 inches. -
Score and slip the base:
Score the top outer edge of your circular base and brush on a generous amount of slip. -
Attach the wall:
Curve the rectangular wall onto the base. Score and slip the vertical ends where the wall overlaps, pressing them firmly together to create a cylinder. -
Reinforce the seam:
Reach inside and smooth the bottom seam where the wall meets the floor using your finger or a wooded tool. Do the same for the vertical seam. -
Smooth the exterior:
Use a flexible metal rib to smooth the outside of the cylinder, refining the curve and hiding the vertical join mark completely. -
Add drainage:
Once the pot is leather hard, flip it over and use a hole cutter or drill bit to create a central drainage hole in the bottom.
Step 2: Creating the Saucer & Finishing
-
Cut the saucer base:
Roll a new slab slightly thicker than the pot walls. Cut a circle that is about 1 inch wider in diameter than your finished pot. -
Create the rim:
You can either pinch the edges of this circle upward gently to create a lip, or attach a very short coil (about 1/2 inch high) using the score and slip method. -
Refine the saucer:
Smooth the rim of the saucer with a damp sponge so it feels soft to the touch and matches the aesthetic of the main pot. -
Drying:
Loosely cover both pieces with plastic wrap to let them dry slowly. This prevents the flat bottoms from warping. -
Bisque fire:
Once bone dry, fire the pieces to cone 04 (or your clay body’s bisque temperature) in the kiln. -
Glazing:
Dip or brush your speckled white glaze onto the bisque ware. Avoid glazing the bottom of the saucer or the foot of the pot to prevent sticking to the kiln shelf. -
Glaze firing:
Fire the pieces again to maturity (usually cone 5 or 6). The heat will activate the speckles in the glaze, creating that lovely spotting effect. -
Assembly:
Once cooled, pot your favorite Echeveria succulent with gritty soil, place it in the saucer, and find a sunny spot.
Pro Tip: Compression
Compress the rim of your cylinder with a damp chamois or plastic bag strip. This aligns clay particles and prevents tiny cracks from forming during drying.
Level Up: Elevated Feet
Attach three small clay balls or triangle wedges to the underside of the saucer before drying to give the entire piece a floating, elevated appearance.
With your new planter complete, you have a stylish and functional home for your succulents that looks professionally made
Spoon Rest With a Clean Modern Curve
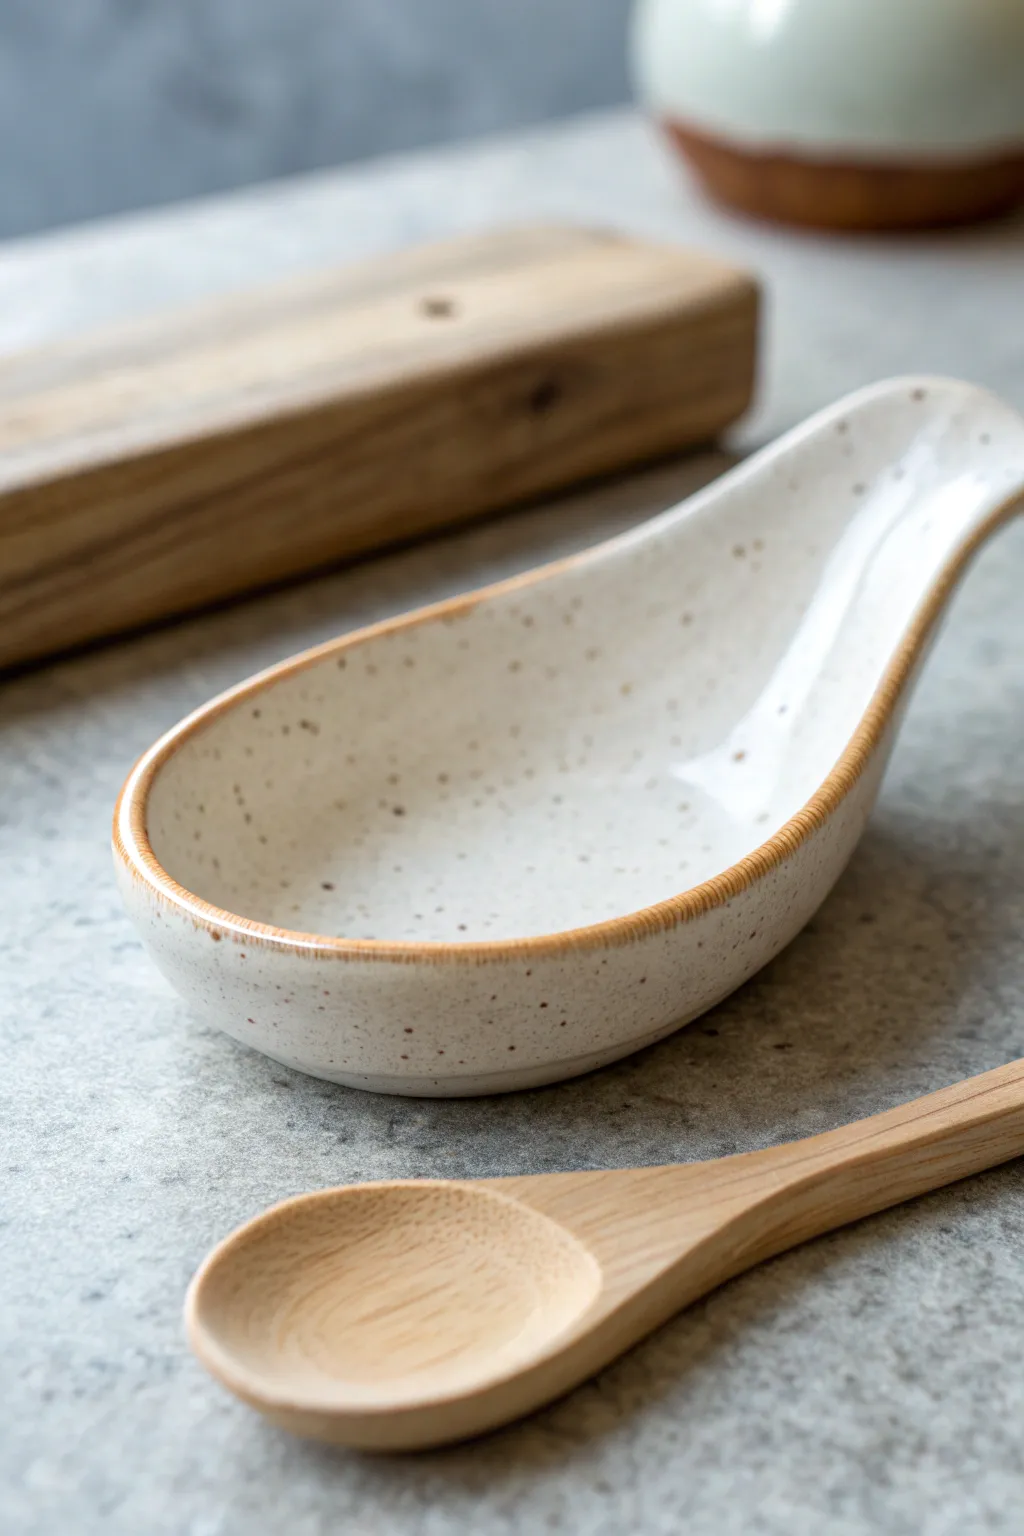
This elegant spoon rest combines modern curves with rustic charm, featuring a creamy white body speckled with iron tones and rimmed in warm brown. Its gentle slope and raised neck are designed to cradle your cooking utensils while keeping your countertops spotless.
How-To Guide
Materials
- White stoneware clay with iron speckles (e.g., Speckled Buff)
- Rolling pin
- Canvas work surface or slab mat
- Ribs (wooden and rubber)
- Needle tool or fettling knife
- Sponge
- Contour tool or spoon for shaping
- Clear glossy glaze
- Iron oxide wash or brown underglaze (for the rim)
- Kiln
- Potter’s wheel (optional, can be hand-built)
Step 1: Forming the Shape
-
Prepare the slab:
Begin by wedging your speckled clay body thoroughly to remove air pockets. Roll it out into a slab that is approximately 1/4 inch thick. I find turning the clay frequently helps maintain an even thickness. -
Smooth the surface:
Before cutting, compress the slab on both sides using a damp sponge or a soft rubber rib. This removes the canvas texture and aligns the clay particles. -
Cut the outline:
Sketch a large teardrop shape lightly onto the clay. It should be wide at the bottom for the spoon bowl and taper into a narrower neck for the handle. Cut this shape out using a needle tool or fettling knife. -
Soften the edges:
Run a damp sponge or your finger along the cut edge to round it over slightly. Sharp edges can become brittle after firing, so softening them now is crucial. -
Create the curve:
Lift the teardrop slab and place it onto a foam forming block or simply cup it in your hand. Gently press the center of the wide end down to create a shallow bowl. -
Raise the neck:
While the bowl is depressed, gently arch the narrow neck upwards. You can prop the handle end up on a small coil of clay or a rolled-up towel to hold its shape while it stiffens. -
Refine the contour:
Use a modeling tool or your thumb to smooth the transition between the bowl and the raised neck. The curve should be continuous and fluid.
Prop it Properly
When drying the curved neck, place a small piece of foam or a rolled newspaper under the arch. This prevents gravity from flattening your elegant curve while the clay is still wet.
Step 2: Drying and Refining
-
Slow drying:
Cover the piece loosely with plastic. Because of the curved shape, you want it to dry slowly so it doesn’t warp. Let it reach a leather-hard state. -
Sponge smooth:
Once leather hard, use a very slightly damp sponge to go over the entire surface one last time. This is your chance to remove any fingerprints or tooling marks. -
Bisque fire:
Allow the spoon rest to dry completely (bone dry) before loading it into the kiln. Fire to cone 04 (or your clay’s specific bisque temperature).
Step 3: Glazing and Finishing
-
Clean the bisque:
Wipe the bisque-fired piece with a damp sponge to remove any dust that settled during the firing process. -
Apply the rim:
Dip a small brush into iron oxide wash or a warm brown underglaze. carefully paint the very edge of the rim. If the brush slips, wipe it away quickly with a clean sponge. -
Glaze interior:
Pour a clear or transparent white glaze into the bowl of the spoon rest and swirl it to coat, pouring the excess back out. This transparency will let the natural clay speckles shine through. -
Glaze exterior:
Alternatively, you can dip the entire piece into the clear glaze using dipping tongs. Just ensure the rim detail is dry before dipping so it doesn’t smudge. -
Clean the foot:
Wipe the bottom of the spoon rest completely clean of glaze using a wax resist or a sponge. This prevents it from sticking to the kiln shelf. -
Glaze fire:
Load the kiln for the final glaze firing, typically to cone 5 or 6 for stoneware. Ensure the piece isn’t touching any others. -
Check the fit:
Once cool, check the bottom. If it rocks slightly, you can sand the bottom flat with wet-dry sandpaper or a diamond sanding pad.
Make it a Set
Use the same speckled clay and rim technique to make a small matching pinch pot for salt or a cylinder utensil holder for a cohesive kitchen collection.
Place this spoon rest near your stove to add a functional piece of art to your daily cooking routine


What Really Happens Inside the Kiln
Learn how time and temperature work together inside the kiln to transform clay into durable ceramic.
Ridged Soap Dish That Actually Drains
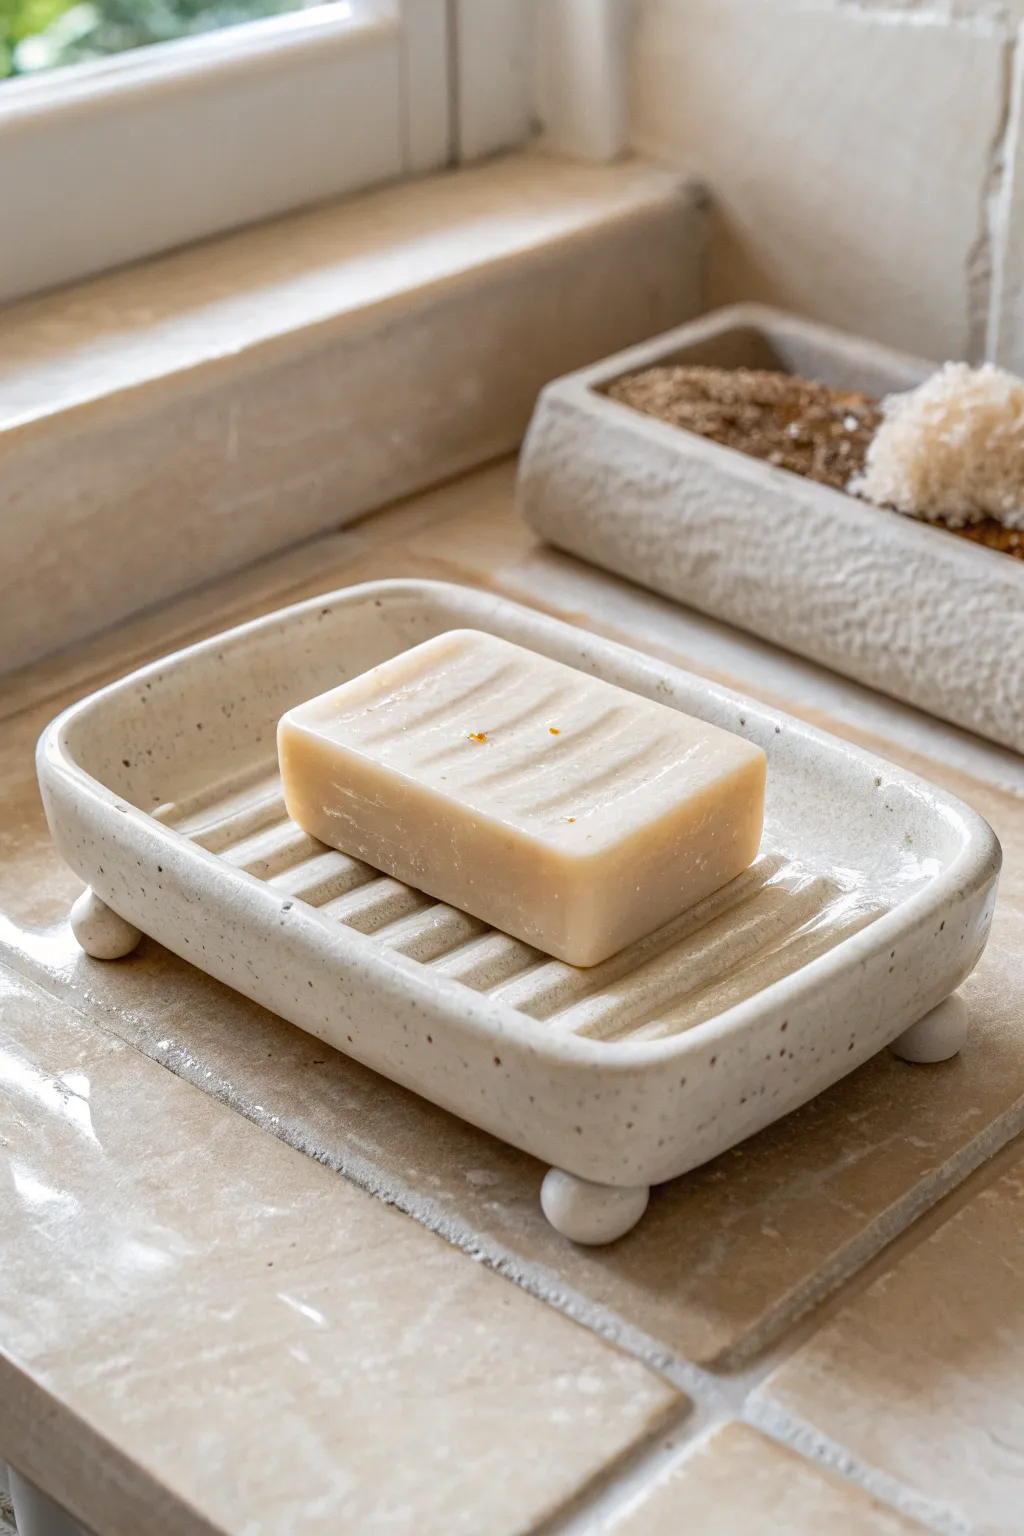
Say goodbye to mushy soap with this elegant and functional ceramic dish featuring deep drainage ridges and sturdy ball feet. The speckled clay body gives it a natural, earthy finish that looks beautiful by any sink.
Step-by-Step Tutorial
Materials
- Speckled stoneware clay
- Rolling pin
- Wooden guide strips (1/4 inch thick)
- Rectangular template (approx. 4×6 inches)
- Needle tool
- Rib tool (wooden or rubber)
- Loop tool or ruler (for making ridges)
- Scoring tool (or fork)
- Slip
- Sponge
- Clear or transparent white glaze
Step 1: Forming the Base
-
Roll the slab:
Start by wedging your speckled clay to remove air bubbles. Roll it out into a smooth slab using 1/4 inch wooden guide strips to ensure an even thickness throughout the piece. -
Smooth the surface:
Before cutting, take a rubber rib and compress the clay slab on both sides. This aligns the clay particles which helps prevent warping later and gives you a nice canvas to work on. -
Cut the rectangle:
Place your rectangular template onto the slab. Using your needle tool held vertically, cut around the template to create the main body of the dish. -
Create the rim:
Roll a long, thin coil of clay about the thickness of a pencil. Score and slip the outer edge of your rectangular base, then attach the coil firmly around the perimeter to create a raised wall. -
Blend the wall:
Using your thumb or a modeling tool, blend the coil down into the base on the inside and outside seams so no connection line is visible. The wall should be about 1/2 to 3/4 inch high.
Drainage Tip
Make the center ridges slightly lower than the outer ones, or slightly slope the interior floor. This gravity-assist ensures water naturally runs off the soap rather than pooling.
Step 2: Adding the Ridges
-
Mark the lines:
Lightly sketch parallel lines across the interior width of the dish using your needle tool. Space them evenly, about 1/2 inch apart. -
Create the channels:
Use a rounded loop tool to carve out the clay between your marked lines. You want to create deep grooves, but be careful not to carve all the way through the bottom slab. -
Alternative ridge method:
If you don’t want to carve, you can roll thin coils of clay and attach them across the bottom instead. Just be sure to score and slip them thoroughly so they don’t pop off during firing. -
Smooth the grooves:
Dip a small sponge or your finger in water and gently run it along the grooves and ridges. This softens any sharp edges left by the carving tool and makes cleaning the finished dish easier.
Step 3: Feet and Finishing
-
Form the feet:
Roll four equal-sized balls of clay, roughly the size of a marble or a large hazelnut. These will elevate the dish to protect your countertop. -
Attach the feet:
Flip the leather-hard dish over. Score and slip the four corners of the base and the clay balls. Press each ball firmly onto a corner. -
Reinforce attachments:
I like to use the back of a small paintbrush to gently wiggle the joint, ensuring a tight bond, then smooth around the connection point so the feet look integrated, not just stuck on. -
Level the dish:
Flip the dish back onto its feet carefully. Gently press down on the center to ensure all four feet are touching the table evenly and the dish doesn’t rock. -
Dry slowly:
Loosely cover the piece with plastic for the first day to let the moisture equalize, then uncover it to dry completely before bisque firing. -
Bisque fire:
Fire the bone-dry piece in the kiln to bisque temperature (usually cone 04 or 06) to prepare it for glazing. -
Glaze application:
Dip or brush a clear or semi-transparent milky glaze over the entire piece. This highlights the natural speckles in the clay while making the surface food-safe and easy to wipe clean. -
Wipe the feet:
Use a damp sponge to meticulously wipe all glaze off the bottom of the four feet. If you leave glaze here, the dish will fuse permanently to your kiln shelf. -
Final firing:
Fire to the maturity temperature of your clay (likely cone 5 or 6). Once cool, sand the bottom of the feet lightly if they feel rough against a surface.
Warping Woes?
If the rectangular base curls up while drying, weight it down gently with a small sandbag or rice bag during the leather-hard stage to keep it perfectly flat.
Enjoy the simple luxury of a handmade soap dish that keeps your favorite bars dry and long-lasting
Tealight Holders With Cutout Patterns
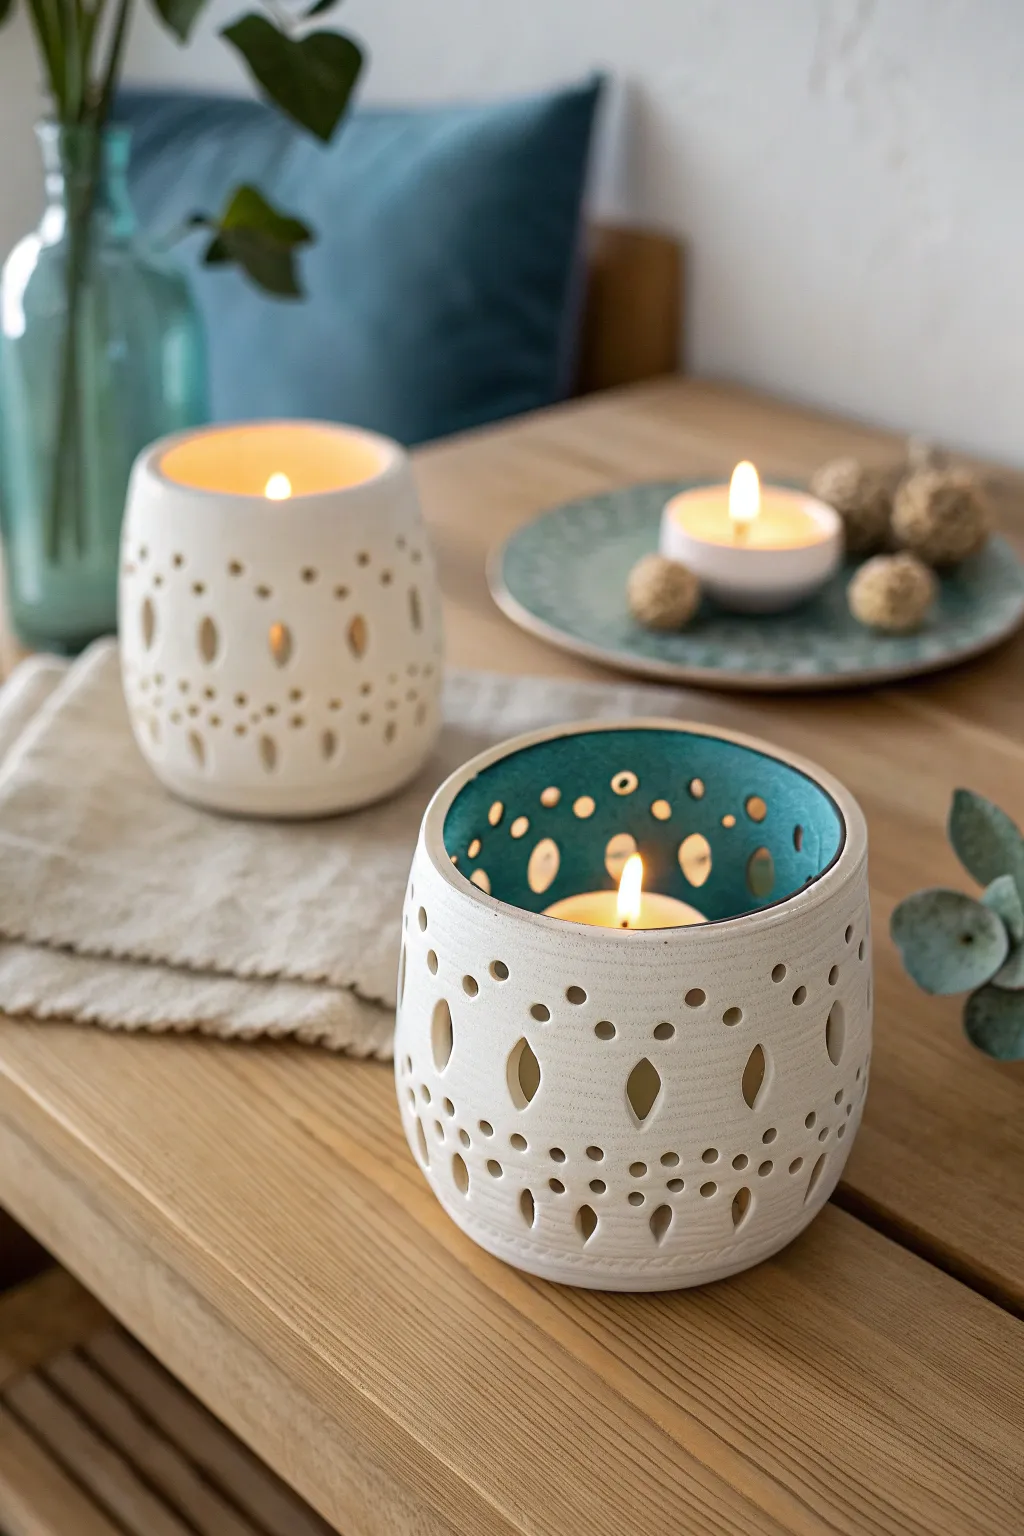
These charming ceramic tealight holders feature delicate cutout patterns that cast beautiful shadows when lit. With a matte white exterior and a surprise pop of teal glaze on the interior, they bring a cozy yet modern touch to any tabletop.
Detailed Instructions
Materials
- White stoneware or porcelain clay body
- Rolling pin with guide strips (approx. 1/4 inch)
- Circular template or cookie cutter (approx. 4-inch diameter for base)
- Rectangular template (based on circumference)
- Needle tool
- Scoring tool or serrated rib
- Slip (clay mixed with water)
- Small hole punch tools (various sizes)
- Teardrop-shaped cutter or small exacto knife
- Sponge
- Teal or turquoise underglaze or glaze
- Matte white glaze (optional for exterior)
- Paintbrush
- Kiln
Step 1: Forming the Cylinder
-
Roll the slab:
Begin by rolling out your clay on a canvas board to a consistent thickness of about 1/4 inch. Using guide strips is crucial here to ensure the walls of your luminary will be even. -
Cut the base:
Use your circular template or cookie cutter to punch out a circle for the base of the holder. Set this aside on a small ware board. -
Measure and cut walls:
Calculate the circumference of your base circle (Diameter x 3.14). Create a rectangular template slightly longer than this length to allow for a slight overlap, and use the needle tool to cut your wall slab. -
Add texture (optional):
Before assembling, you can lightly smooth the surface with a damp sponge or a soft rib to remove any canvas texture, ensuring a clean, modern finish. -
Score and slip:
Score the outer edge of your circular base and the bottom edge of your rectangular slab. Apply a generous amount of slip to the scored areas. -
Attach the wall:
Carefully wrap the rectangular slab around the circular base. Press the wall firmly onto the base to create a seal. -
Join the seam:
Where the two ends of the wall meet, score and slip the vertical edges. Press them together, then smooth the seam inside and out until it is invisible. I find a wooden modeling tool helps blend the clay seamlessly here.
Step 2: Creating the Cutouts
-
Wait for leather hard:
This is the patience step. Let your cylinder dry until it is leather hard—firm enough to handle without warping, but soft enough to cut easily. -
Plan the design:
Lightly sketch your pattern onto the clay surface with a pencil. The design in the photo alternates between rows of small circular holes and larger teardrop shapes. -
Punch the holes:
Using a small circular clay hole punch, remove clay to create the dot patterns. Support the wall from the inside with your hand as you press through. -
Cut the teardrops:
For the larger openings, use a teardrop cutter or carefully slice the shape with an exacto knife. Clean up any ragged edges immediately with a slightly damp brush. -
Smooth the rims:
Check the top rim of the cylinder. If it’s uneven, trim it or smooth it with a damp chamois cloth for a polished look. -
Slow drying:
Cover the piece loosely with plastic to let it dry very slowly. This prevents the cutout areas from cracking as the clay shrinks. -
Bisque fire:
Once fully bone dry, load the piece into the kiln for the initial bisque firing.
Clean Cuts Tip
When punching holes, let the clay firm up slightly more than usual. This prevents the wall from collapsing and results in crisper cutouts that need less cleanup later.
Step 3: Glazing and Finishing
-
Clean the bisque:
Wipe the fired piece with a damp sponge to remove any kiln dust. This ensures the glaze adheres properly. -
Glaze the interior:
Pour a teal or turquoise glaze into the interior of the vessel. Swirl it around to coat the inside walls completely, then pour out the excess. -
Clean the cutouts:
Immediately use a clean, damp sponge to wipe away any teal glaze that leaked onto the exterior face or into the cutout holes. The cutouts need to remain clear. -
Glaze the exterior:
For the exterior, you can leave the clay raw if it’s a nice white stoneware, or dip/brush on a matte white glaze. Be very careful not to let the white glaze drip into the teal interior. -
Wipe the feet:
Ensure the bottom of the holder is completely free of glaze so it doesn’t fuse to the kiln shelf. -
Final firing:
Fire the piece again to the temperature required by your specific glaze and clay body.
Level Up: Texture Pop
Before rolling the slab into a cylinder, press a lace doily into the clay surface. The glaze will break beautifully over the texture, adding depth.
Place a small candle inside and watch the dancing shadows transform your room atmosphere

TRACK YOUR CERAMIC JOURNEY
Capture glaze tests, firing details, and creative progress—all in one simple printable. Make your projects easier to repeat and improve.
Minimal Incense Holder With a Catch Tray
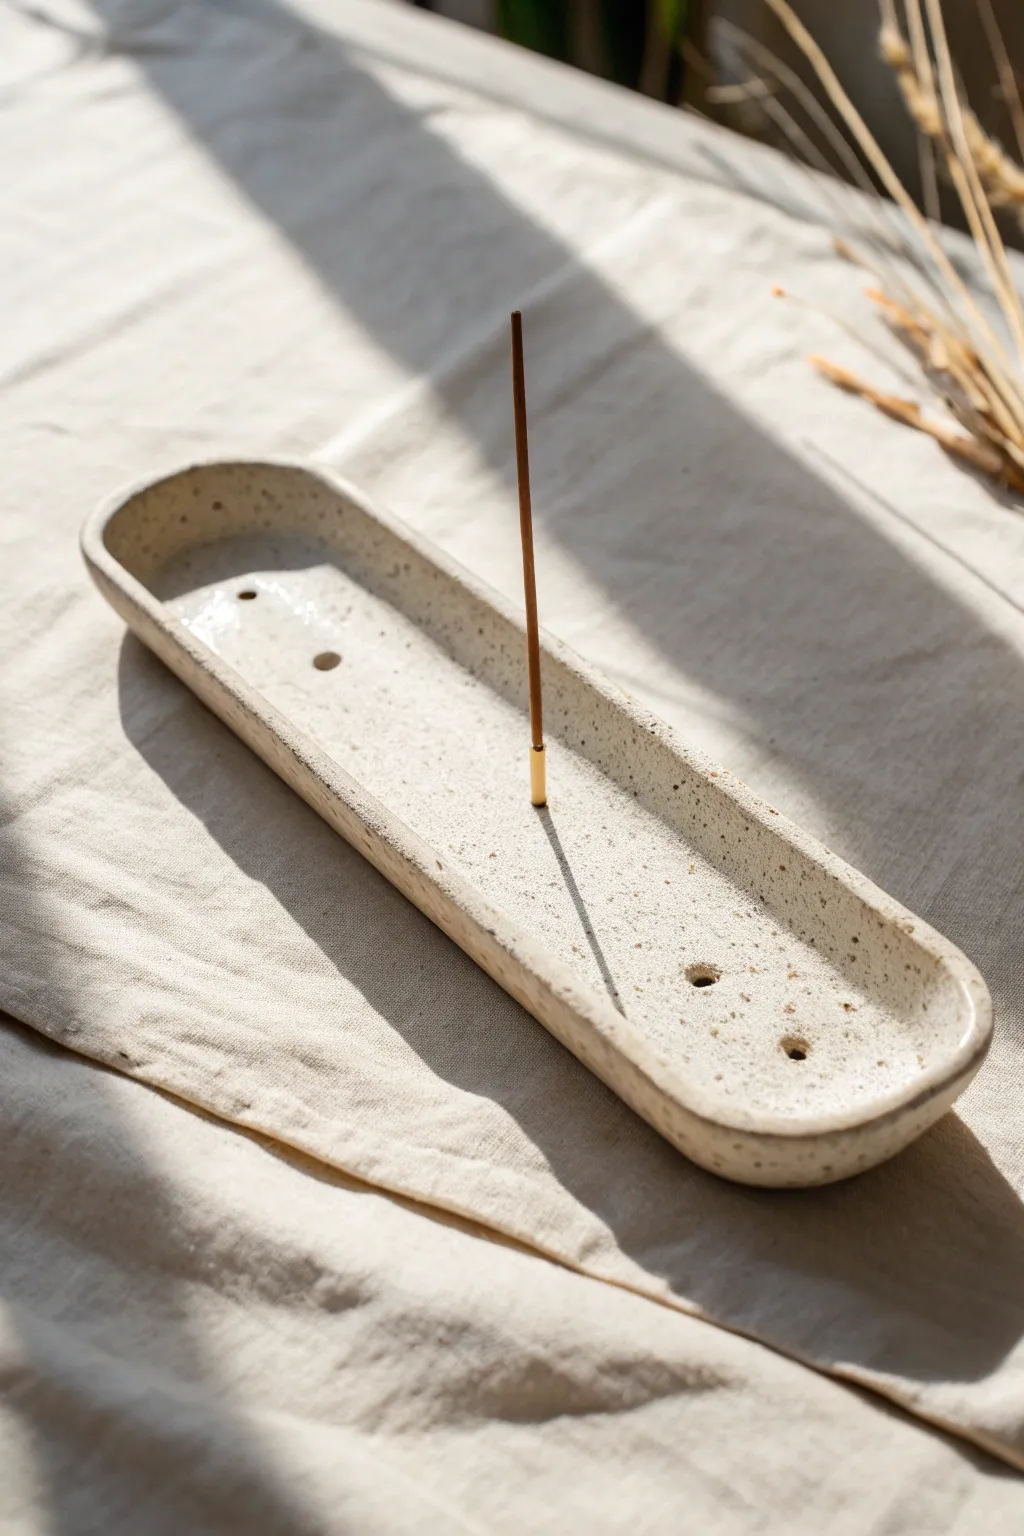
This elongated, canoe-shaped incense holder combines minimalist design with organic warmth. The speckled clay body and soft matte finish evoke the feeling of river stones, making it a serene addition to any meditation space or coffee table.
Step-by-Step Tutorial
Materials
- Speckled clay body (stoneware recommended)
- Rolling pin
- Guide sticks or slats (approx. 1/4 inch thick)
- Needle tool or fettling knife
- Cardboard or stiff paper (for template)
- Kidney scraper (rubber or metal)
- Small sponge
- Straw, drill bit, or wooden skewer (for making holes)
- Matte white or clear glaze (depending on clay body)
- Canvas or wooden board for working
Step 1: Preparation and Forming
-
Template creation:
Begin by sketching an elongated oval shape on a piece of cardboard or stiff paper. Aim for dimensions around 10 inches long by 3 inches wide. Cut this shape out to use as your consistent guide. -
Prepping the clay:
Wedge your speckled clay thoroughly to remove any air bubbles. Pat it into a rough slab shape with your hands before you begin rolling. -
Rolling the slab:
Place the clay between two guide sticks on your canvas. Use your rolling pin to flatten the clay until the roller rests on the sticks, ensuring a perfectly even thickness of about 1/4 inch. -
Smoothing the surface:
Before cutting, take a rubber kidney rib and compress the clay surface. Run it smoothly over the slab in multiple directions to align the clay particles, which helps prevent warping later. -
Cutting the shape:
Lay your paper template onto the smooth slab. Trace around the edge with a needle tool or fettling knife held vertically to get a clean 90-degree cut. -
Initial shaping:
Wait until the clay is soft-leather hard—flexible but not sticky. I like to gently curve the long edges upward with my fingers to create the shallow boat shape. -
Refining the rim:
Use a damp sponge or your fingertips to smooth the cut edges of the rim. Round them over slightly so they aren’t sharp or square, giving the piece a stone-like quality.
Hole Sizing Tip
Incense sitcks vary in thickness. Create holes of slightly different diameters (2mm, 3mm) on the same tray to accommodate different brands.
Step 2: Details and Finishing
-
Creating the catchment area:
To ensure ash stays in the tray, use your thumbs to gently press the center of the slab down while simultaneously supporting the outer walls, effectively deepening the interior slightly. -
Marking placement:
Decide where you want your incense sticks to stand. You can place one central hole or add a few at either end for variety, as seen in the project image. -
Piercing the holes:
Using a tool slightly larger than a standard incense stick (like a bamboo skewer or small drill bit), pierce the clay. Ideally, make the hole perpendicular to the base so the stick stands straight up. -
Cleaning the holes:
Rotate the tool gently as you withdraw it to keep the hole clean. Inspect the underside and smooth away any rough clay burrs that may have pushed through. -
Slow drying:
Place the piece on a board and loosely cover it with plastic. Let it dry slowly over several days to prevent the long shape from curling or warping as moisture leaves the clay. -
Bisque firing:
Once bone dry, fire the piece in the kiln to bisque temperature (usually cone 04 or 06). This prepares it for glazing. -
Glazing application:
Dip, brush, or pour a matte glaze over the piece. If your clay is naturally speckled, a semi-transparent white glaze allows those beautiful spots to show through. -
Checking the holes:
Immediately after glazing, use a clean needle tool to twist inside the holes to ensure they aren’t clogged with glaze. -
Final firing:
Fire the piece again to the maturation temperature of your specific clay and glaze (typically cone 5 or 6 for stoneware). Let the kiln cool naturally before unloading.
Make it a Set
Create a tiny, matching pinch pot to hold unburned incense sticks or a lighter, glazing it in the same finish for a cohesive vanity set.
Now you have a serene, custom-made vessel ready to catch falling ash during your quiet moments
Catch-All Tray With Leaf Impressions
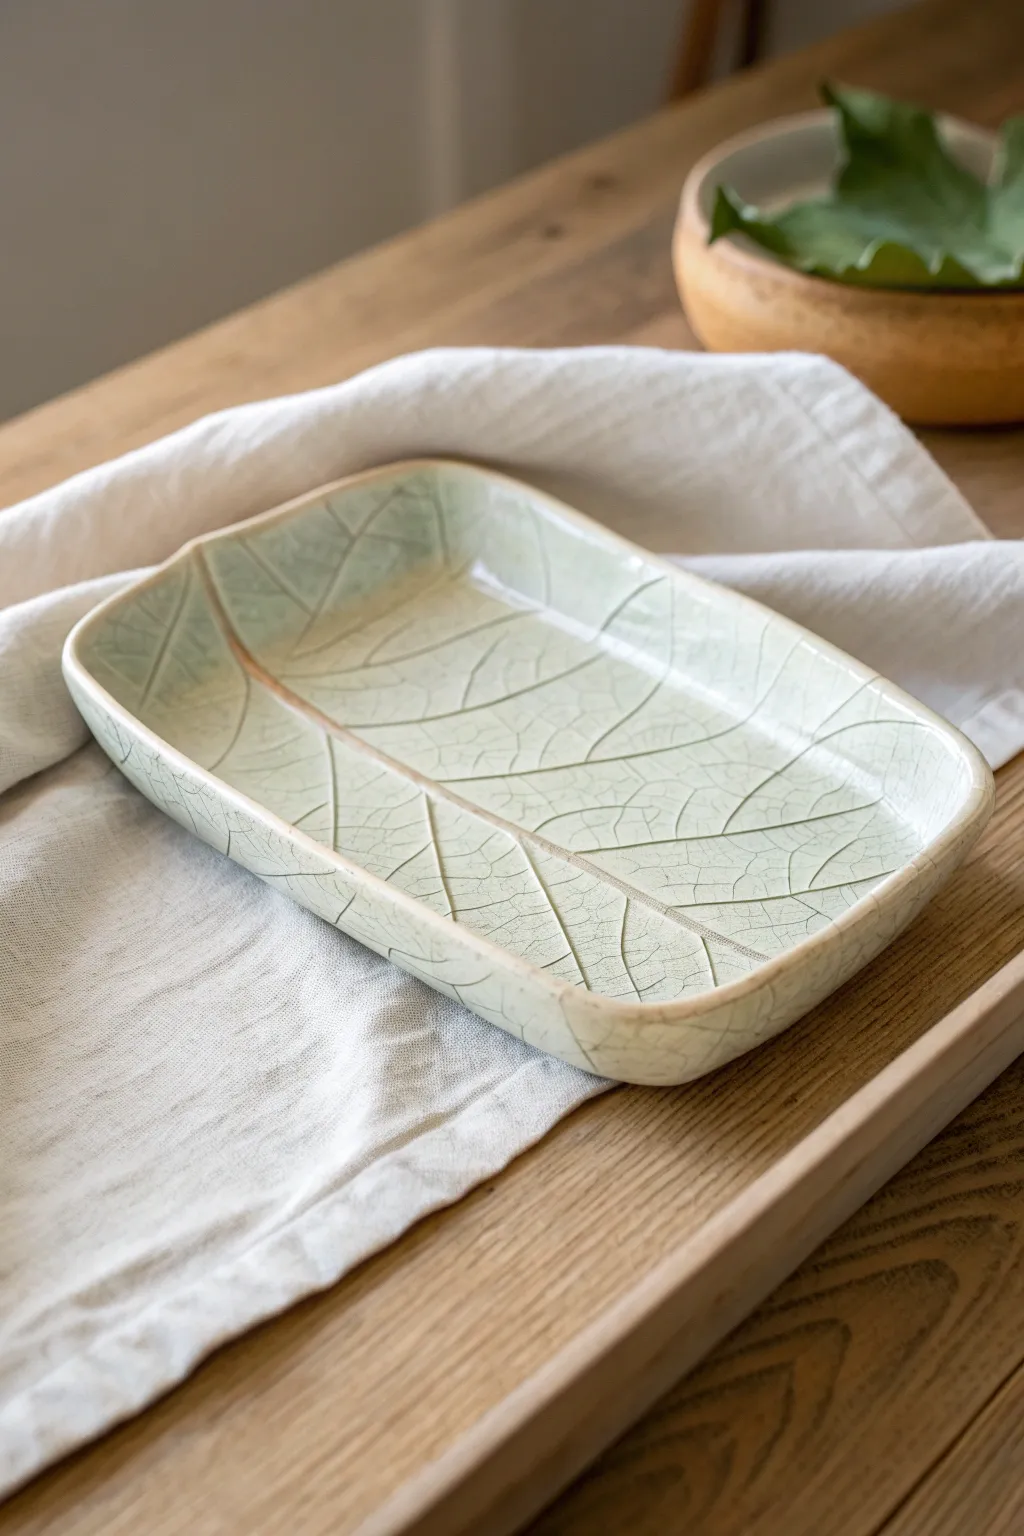
This elegant catch-all tray brings the subtle beauty of nature indoors with a delicate leaf vein pattern impressed directly into the clay. Finished with a pale, crackle-style celadon glaze, it offers a sophisticated resting place for keys or jewelry.
How-To Guide
Materials
- White stoneware or porcelain clay body
- Rolling pin
- Two 1/4 inch wooden guide slats
- Large, fresh leaf with prominent veins (like Hosta or Hydrangea)
- Rectangular slump mold (or a makeshift foam support)
- Rib tool (smooth wooden or rubber)
- Needle tool or fettling knife
- Sponge
- Celadon glaze (crackled finish recommended)
- Clear crackle glaze (optional, for enhancing crazing)
- Kiln
Step 1: Preparation and Impression
-
Prepare the Clay:
Begin by wedging your white stoneware clay thoroughly to remove any air bubbles. Pat it into a rough rectangular shape to prep it for rolling. -
Roll the Slab:
Place the clay between your two wooden guide slats on a canvas-covered surface. Roll the clay out until the rolling pin rests on the slats, ensuring an even thickness across the entire slab. -
Smooth the Surface:
Before adding texture, take your rubber rib and gently compress the clay surface. This aligns the clay particles and creates a pristine canvas for your leaf impression. -
Position the Leaf:
Select a large leaf with thick, raised veins on the underside. Place the leaf vein-side down onto the center of your clay slab. Gently press it down with your hand so it doesn’t shift. -
Impress the Texture:
Use a pony roller or your rolling pin to firmly press the leaf into the clay. I usually roll once firmly in one direction to avoid creating a double image or shifting the leaf. -
Remove the Leaf:
carefully peel back the leaf by the stem to reveal the intricate vein pattern left behind in the clay. If bits of leaf stick, leave them—they will burn off in the kiln.
Fixing Flat Veins
If the veins aren’t showing up well, the clay might be too dry or the leaf too delicate. Mist the clay lightly before rolling, or choose a tougher leaf like cabbage or kale.
Step 2: Shaping and Refining
-
Cut the Shape:
Using a needle tool or fettling knife, cut a rectangle around your leaf impression. You can follow the leaf’s general shape or cut a clean geometric rectangle, leaving about an inch of border around the main veins. -
Soften the Edges:
Run a damp sponge or your finger along the cut edges to smooth out sharpness. This is crucial for a professional finish and prevents chipping later. -
Form the Tray:
Lift the slab and drape it into a shallow rectangular slump mold. Alternatively, place it on a piece of foam and gently lift the edges by propping them up with small pieces of clay or rolled towels. -
Refine the corners:
While the clay is soft, gently pinch the corners to create a slight curve, ensuring the rim is lifted evenly on all sides. Smooth any fingerprints immediately with a damp sponge. -
Dry Slowly:
Cover the tray loosely with plastic to let it dry slowly. Uneven drying can cause warping, especially with flat geometric shapes like trays. Once bone dry, bisque fire the piece according to your clay’s specifications.
Warpping Prevention
To stop corners from lifting while drying, place small weights (like sandbags) on the center of the tray or dry it upside down loosely on foam once it’s leather hard.
Step 3: Glazing and Finishing
-
Clean the Bisque:
Wipe the bisque-fired tray with a damp sponge to remove any dust or debris that might repel the glaze. -
Apply Glaze:
Dip or brush on your chosen pale green celadon glaze. For this specific look, aim for a glaze that tends to “break” over texture, meaning it flows thinner on high points (showing the clay color) and pools darker in the veins. -
Wipe the Foot:
Ensure the bottom of the tray is completely free of glaze. Use a wax resist before glazing or wipe it clean with a sponge afterward to protect your kiln shelves. -
Glaze Firing:
Fire the piece to the temperature recommended for your glaze (likely Cone 5/6 or Cone 10). A proper firing schedule is key to achieving that glass-like finish. -
Enhancing the Crackle (Optional):
If your glaze developed a crackle pattern, you can rub India ink or strong black tea over the surface after it cools, then wipe it off. The dark pigment will settle into the cracks, highlighting the aged aesthetic visible in the photo.
Once fired, you will have a durable and decorative ceramic piece that captures the fleeting structure of a fallen leaf.
Lace-Textured Jewelry Plates
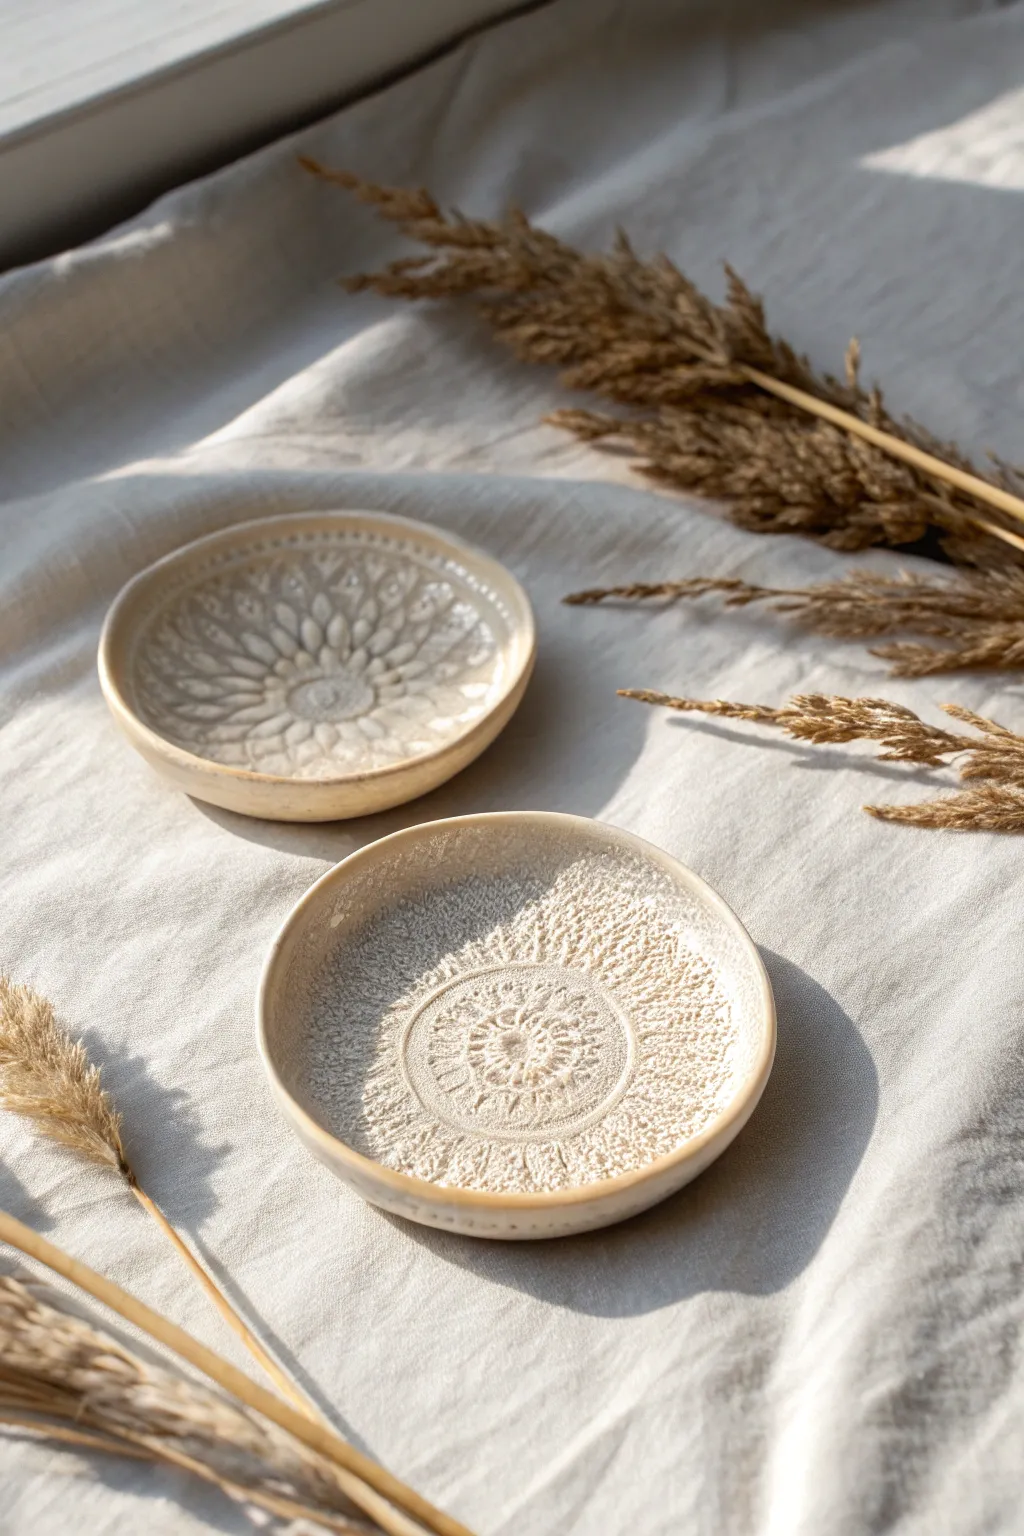
Create these delicate, heirloom-quality jewelry dishes using simple slab-building techniques and textured lace. The finished pieces feature intricate floral patterns highlighted by a creamy, glossy glaze, perfect for holding your favorite rings or earrings.
Step-by-Step Guide
Materials
- Light-colored stoneware clay (smooth or with fine grog)
- Vintage lace doilies or textured silicone texture mat
- Rolling pin
- Two wooden guide strips (approx. 1/4 inch thick)
- Circular cookie cutter (approx. 4-5 inches diameter)
- Small sponge
- Shallow bowl or curved mold (for shaping)
- Pottery knife or needle tool
- Rib tool
- Transparent or semi-opaque cream glaze
- Kiln (or access to a firing service)
Step 1: Prepping the Slab
-
Wedge the clay:
Begin with a ball of clay about the size of a large orange. Wedge it thoroughly to remove air bubbles and ensure an even consistency, which prevents cracking during firing. -
Set up guides:
Place your wooden guide strips on either side of your clay ball on a canvas or cloth-covered surface. These guides ensure your slab will be a uniform thickness. -
Roll the slab:
Using the rolling pin, roll the clay out until the rolling pin rests on the wooden guides. Roll from the center outwards to keep the clay compression even. -
Smooth the surface:
Before adding texture, take a slightly damp rib tool and run it gently over the surface of the slab. This removes canvas marks and creates a pristine canvas for your lace.
Sticking Lace?
If the lace sticks to the wet clay, lightly dust the clay surface with cornstarch before laying the lace down. It acts as a release agent and burns off in the kiln.
Step 2: Texturing and Cutting
-
Position the lace:
Lay your chosen lace doily or texture mat carefully onto the smoothed clay slab. I gently pat it down first to make sure it doesn’t shift. -
Roll the texture:
Roll over the lace with your rolling pin firmly. You want enough pressure to embed the pattern deep into the clay, but not so much that you thin the slab significantly. -
Reveal the pattern:
Carefully peel back the lace to reveal the intricate impression left behind. This is the most satisfying part of the process. -
Cut the shape:
Place your circular cutter over the most interesting part of the pattern. Press down firmly to cut out your dish shape. If you don’t have a cutter, trace a circle and cut it with a needle tool. -
Soften the rim:
Lift the circle and gently run a damp sponge or your finger around the cut edge. Sharp edges can become very jagged after firing, so rounding them now is essential.
Make it Golden
Apply a gold luster overglaze to the rim of the fired piece and fire a third time at a lower temperature (cone 018) for a luxurious, gilded finish.
Step 3: Shaping and Drying
-
Form the curve:
Place your clay circle into a shallow bowl or a slump mold lined with a piece of paper or plastic (to prevent sticking). Gently press the center down so the edges curve upward. -
Refine the shape:
If you want a more distinct rim, you can gently pinch the edge slightly while it sits in the mold, though gravity often does a great job on its own. -
Slow drying:
Let the dishes dry slowly in the mold until they are leather hard. Rushing this stage can cause warping, especially with flat ware like plates. -
Bisque fire:
Once fully bone dry, fire the pieces in a kiln to bisque temperature (usually cone 04 or 06). This prepares them for glazing.
Step 4: Glazing and Finishing
-
Clean the bisque:
Wipe the bisque-fired piece with a damp sponge to remove any dust, which can prevent glaze from adhering properly. -
Apply the glaze:
Brush or dip the piece in a semi-opaque cream or white glaze. A semi-opaque glaze works best because it pools in the deeper texture lines while staying thin on the high points, accentuating the lace design. -
Wipe the foot:
Ensure the bottom of the plate is completely free of glaze. Use a sponge to wipe away any drips near the base to prevent it from sticking to the kiln shelf. -
Glaze fire:
Fire the piece again to the maturation temperature of your specific clay and glaze (often cone 5 or 6 for stoneware).
Once cooled, your delicate dishes are ready to be displayed or gifted to someone special
Wavy Bowls Made With Simple Draped Forms
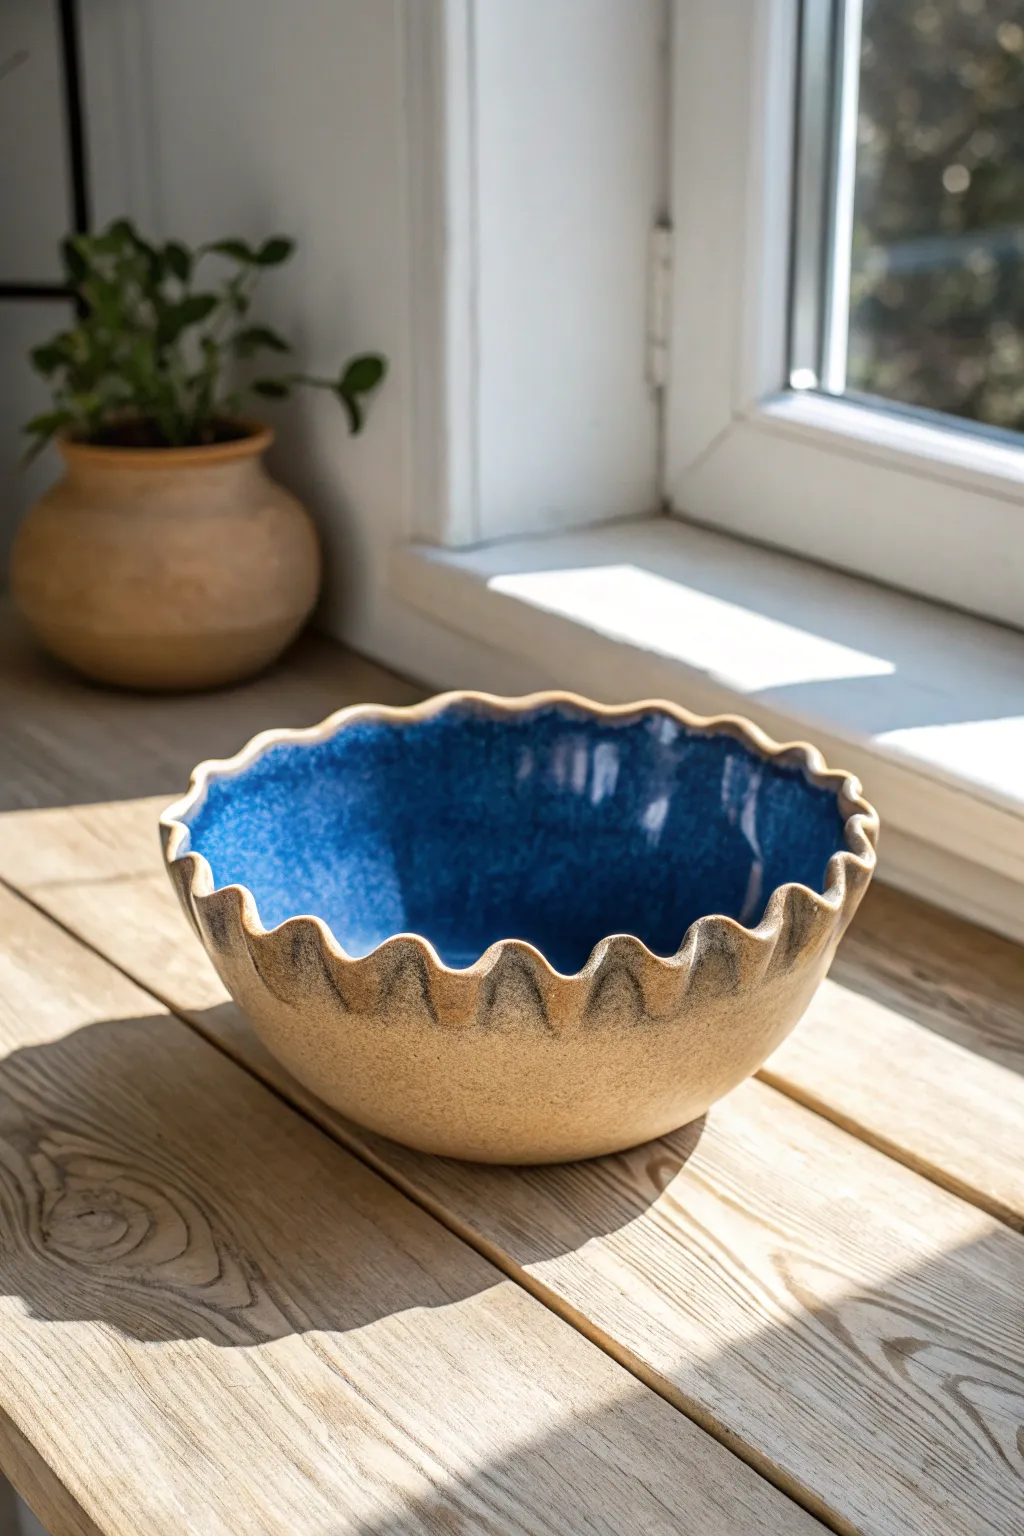
Capture the contrast of sand and sea with this beautiful draped bowl, featuring a deeply scalloped rim and a stunning dual-glaze finish. The organic wavy edge flows naturally from a simple draped slab, creating a piece that feels both rustic and refined.
How-To Guide
Materials
- Speckled stoneware clay (buff or light brown)
- Rolling pin
- Canvas mat or slab roller
- Circular template or large plate (approx. 10-12 inches)
- Needle tool
- Hump mold (a plaster mold or a simple thrift store bowl turned upside down)
- Flexible rib (rubber or metal)
- Sponge
- Deep glossy blue glaze (cone 5/6 or per your clay type)
- Matte beige or clear glaze (for exterior, optional depending on clay body)
- Wax resist
- Banding wheel (optional but helpful)
Step 1: Forming the Slab
-
Prepare the Clay:
Wedge your speckled stoneware clay thoroughly to remove air pockets and ensure an even consistency. You’ll need about 2-3 pounds of clay for a medium-sized bowl. -
Roll the Slab:
Roll out a slab of clay on your canvas mat to a thickness of approximately 1/4 inch. Try to keep the thickness consistent from edge to center, turning the slab occasionally as you roll to prevent sticking. -
Compress the Surface:
Use a flexible rib to compress the clay on both sides of the slab. This strengthens the clay structure and removes the canvas texture, giving you a smooth surface for glazing later. -
Cut the Circle:
Place your circular template over the slab and cut around it using a needle tool. Remove the excess clay and smooth the cut edge gently with a damp sponge or your finger.
Step 2: Shaping the Waves
-
Position on Mold:
Carefully lift your clay circle and center it over your hump mold. Gently drape the clay down over the form, ensuring it doesn’t trap a pocket of air at the very top. -
Establish the Rim:
Let the gravity do the initial work, but help the clay settle against the mold. As the excess clay gathers at the bottom (which will become the rim), you will see natural folds beginning to form. -
Create the Scallops:
To create the distinct wavy pattern seen in the image, use your fingers to exaggerate the natural folds. Push the ‘valleys’ of the waves gently inward against the mold and pull the ‘peaks’ slightly outward. -
Refine the Curves:
Work your way around the bowl, spacing the waves evenly. I like to use the side of my thumb to press the indentations to ensure they are uniform and rounded, rather than sharp V-shapes. -
Level the Rim:
If the waves have become uneven in height, use a needle tool to trim the very edge while the bowl is still on the mold, or wait until leather hard to level it with a surform tool. -
Add a Foot (Optional):
If you want the bowl to sit higher, score and slip a small ring of clay onto the center of the base (currently facing up). Otherwise, simply flatten the bottom slightly so it sits stable. -
Dry Slowly:
Allow the bowl to dry on the mold until it is leather hard. This is crucial so the waves hold their shape when you flip it over.
Uneven Waves?
If your scallops aren’t spacing out evenly, mark the rim lightly with a needle tool at 12, 3, 6, and 9 o’clock. Create a wave at each mark first, then subdivide the spaces between.
Step 3: Glazing and Finishing
-
Bisque Fire:
Once bone dry, fire the piece to bisque temperature (usually Cone 04) according to your clay manufacturer’s instructions. -
Clean the Bisque:
Wipe the fired bowl with a damp sponge to remove any kiln dust, which can prevent the glaze from adhering properly. -
Wax the Exterior:
We want clarity between the clay body and the blue interior. Apply wax resist carefully along the top edge of the wavy rim and coat the entire exterior if you plan to leave it raw, or just the foot ring if you are glazing the outside. -
Glaze the Interior:
Pour a glossy deep blue glaze into the bowl. Swirl it around to coat the entire interior surface up to the rim, then pour the excess back into your bucket. -
Check the Rim:
Immediately use a damp sponge to wipe away any blue glaze that dripped onto the exterior or the very top edge of the scallops. The crisp line is key to this look. -
Exterior Treatment:
If your clay isn’t naturally beige/speckled, you can dip the exterior in a matte clear or matte beige glaze. Alternatively, leave the raw speckled clay exposed as shown in the photo for a tactile contrast. -
Final Fire:
Load the bowl into the kiln for the glaze firing (typically Cone 5 or 6). Ensure the wavy rim isn’t touching any other pots or posts.
Ocean Froth Effect
Layer a flux-heavy white glaze just over the rim of the blue interior. During firing, it will melt and run slightly into the blue, mimicking sea foam on the waves.
This bowl brings a calming, seaside aesthetic to your table and serves as a perfect centerpiece for fruits or salads
Footed Dessert Bowls With a Tiny Pedestal
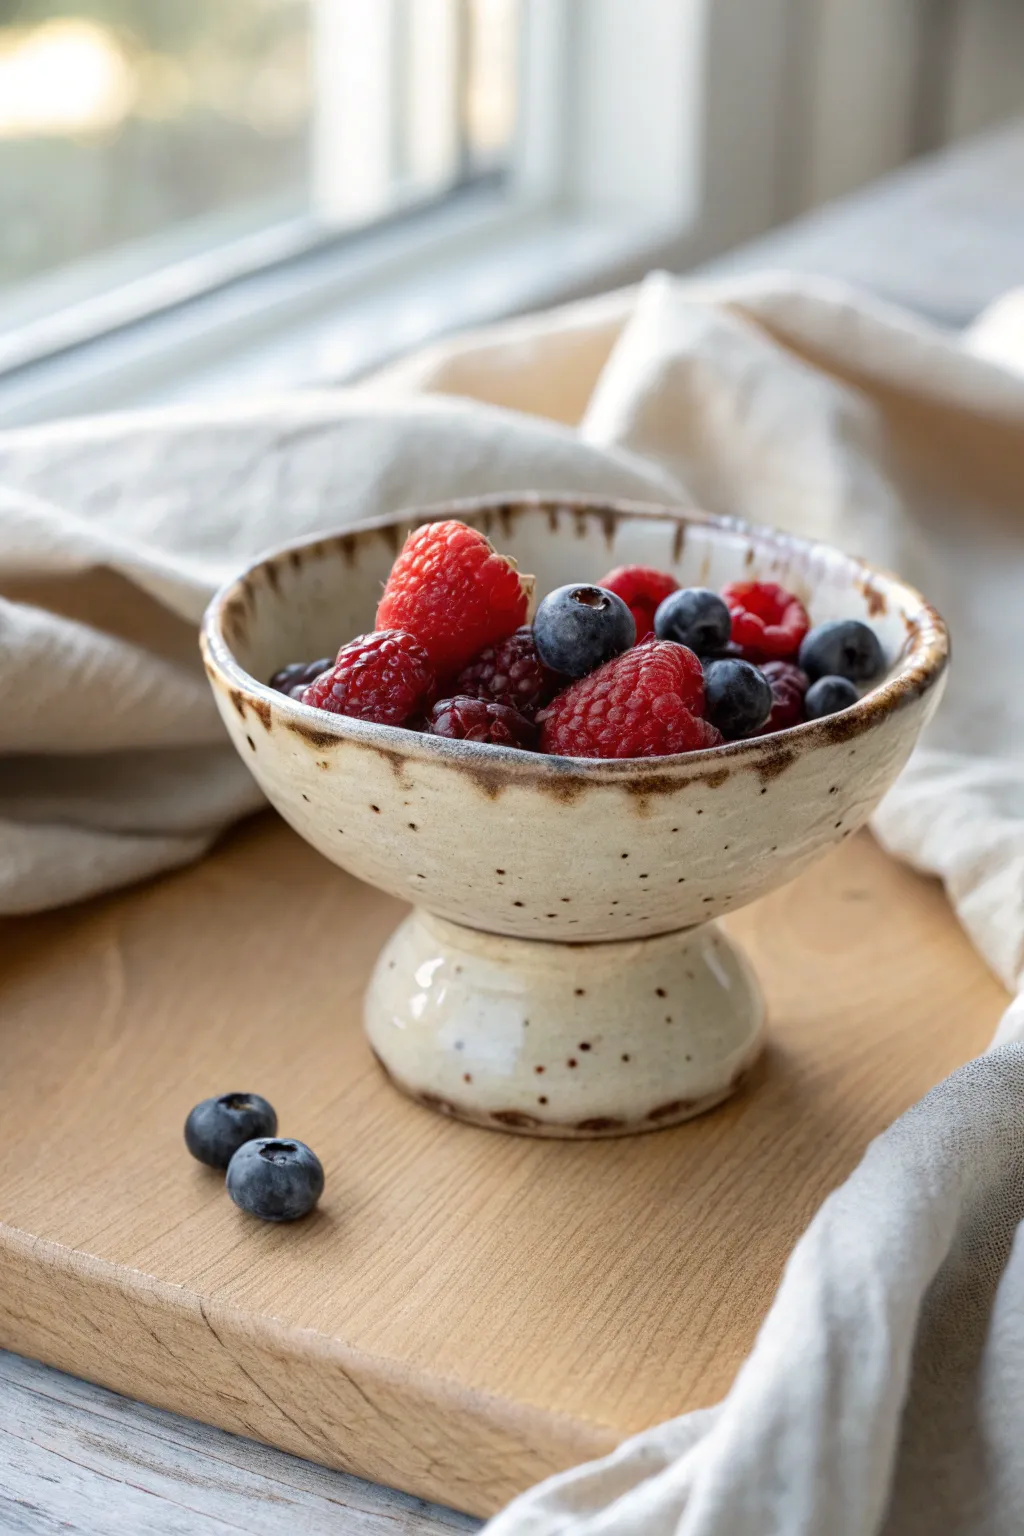
Elevate your morning berries or evening sweets with this charming footed dessert bowl. Featuring a creamy, speckled oatmeal glaze and a distinctive dark iron-stained rim, this wheel-thrown vessel sits atop a sturdy, hollow pedestal for a classic silhouette.
Step-by-Step Guide
Materials
- Speckled stoneware clay (approx. 1.5 lbs)
- Pottery wheel
- Throwing sponges
- Wooden throwing ribs
- Needle tool
- Wire cutter
- Trimming tools (loop tools)
- Loop tool for carving
- Kiln
- Oatmeal or cream speckled glaze
- Iron oxide wash or dark brown underglaze
- Small paintbrush or sponge
Step 1: Throwing the Bowl
-
Center the clay:
Start with a well-wedged ball of speckled stoneware clay on the wheel head. Use water and firm pressure to center the clay, ensuring it spins smoothly without wobbling. -
Open the form:
Drill your thumbs into the center to open the clay, but leave about a 1/2-inch thickness at the bottom—this extra clay is crucial for trimming the pedestal foot later. -
Pull the walls:
Gently pull the walls upward and outward to create a classic bowl curve. The rim should be slightly wider than the base, flaring open comfortably. -
Shape the profile:
Use a wooden rib on the interior to smooth the curve and compress the clay particles. Aim for a distinct, semi-hemispherical shape that mimics the bowl in the image. -
Refine the rim:
Compress the rim with a chamois or your finger to make it sturdy and rounded. This will be the focal point for the dark oxide later. -
Cut off slightly high:
When cutting the bowl from the bat with your wire tool, be careful not to distort the shape. I find it helpful to leave a bit of extra clay at the base to support the foot during the leather-hard stage.
Wobbly Pedestal?
If the foot collapses during trimming, the clay was likely too soft. Let the bottom dry longer than the rim by loosely covering the rim with plastic while the base is exposed to air.
Step 2: Trimming the Pedestal
-
Dry to leather hard:
Allow the bowl to dry slowly until it reaches a leather-hard state. It should be firm enough to handle without deforming but soft enough to carve easily. -
Center for trimming:
Invert the bowl on the wheel head and secure it with small wads of soft clay. Tap it to ensure it is perfectly centered. -
Define the foot diameter:
Mark a circle on the bottom where the pedestal will begin. The pedestal in this design is substantial, roughly one-third the width of the bowl’s opening. -
Carve the pedestal shape:
Using a sharp loop tool, remove the excess clay from the outside of the foot ring. Carve inwards to create a ‘waist’ where the bowl meets the foot, forming that elegant pedestal silhouette. -
Hollow the foot:
Trim out the interior of the foot ring to reduce weight. Mirror the curve of the interior bowl for an even wall thickness. -
Smooth the surface:
Before removing it from the wheel, use a smooth rib or a damp sponge to erase any sharp trimming lines, giving the piece a softer, handmade quality.
Step 3: Glazing and Finishing
-
Bisque fire:
Fire the piece in the kiln to bisque temperature (usually cone 04 or 06) to prepare it for glazing. -
Apply the base glaze:
Dip the entire bowl into a creamy, oatmeal-colored glaze. If your clay doesn’t have natural speckles, choose a glaze that includes iron speckles to mimic the spotted texture. -
Wipe the foot:
Clean the bottom of the foot ring with a damp sponge to prevent the piece from sticking to the kiln shelf. -
Apply the iron rim:
Mix a small amount of iron oxide wash or dark brown underglaze. Using a small sponge or brush, dab this onto the very edge of the rim. Let it drip slightly or apply unevenly for that rustic look. -
Accent the foot:
Optionally, apply a very thin wash of the iron oxide to the bottom edge of the pedestal foot to tie the design together. -
Glaze fire:
Fire the bowl to the maturation temperature of your clay and glaze (typically cone 5 or 6 for stoneware). Allow the kiln to cool completely before unloading.
Pro Tip: Oxide Magic
Apply the iron oxide roughly. The uneven application breaks during firing, creating the beautiful variations seen on the rim rather than a solid, artificial brown line.
Now you have a stunning, bakery-worthy vessel ready to make any snack feel like a special occasion.
Cylinder Utensil Crock With Carved Lines
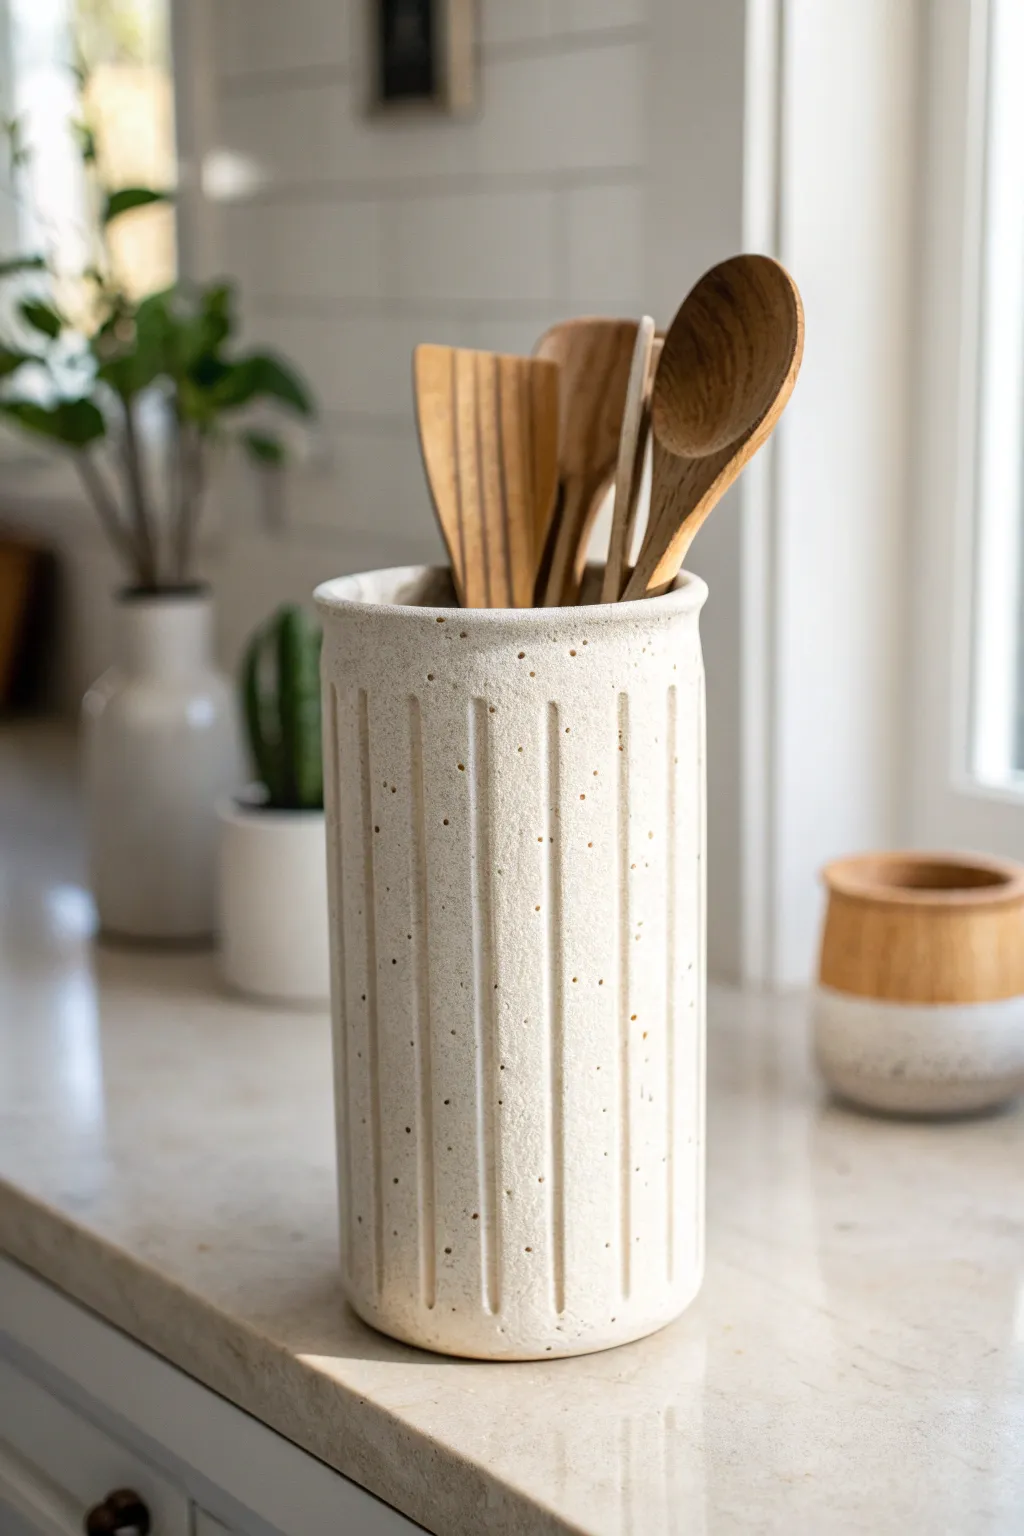
This elegant utensil crock combines a minimalist cylindrical form with striking texture created by deep vertical carving. The natural speckled clay body shines through a matte white glaze, offering a modern rustic aesthetic perfect for any kitchen countertop.
Detailed Instructions
Materials
- Speckled stoneware clay (white or buff base with manganese speckles)
- Pottery wheel (or slab roller/rolling pin for hand-building)
- Needle tool
- Wire cutter
- Metal or wooden rib tools
- Trimming tools (loop tools)
- Carving tool (U-shaped fluting tool or wire loop)
- Sponge
- Matte white or transparent matte gaze
- Ruler or measuring tape
Step 1: Throwing the Cylinder
-
Center the Clay:
Begin with about 3-4 pounds of well-wedged speckled clay. Center it firmly on the wheel head, ensuring it feels stable and doesn’t wobble. -
Open the Form:
Open the centered clay, leaving a floor thickness of about 1/2 inch. Compress the floor thoroughly with a rib to prevent S-cracks during drying. -
Pull the Walls:
Pull the clay upwards into a tall, straight cylinder. Aim for a height of roughly 7-8 inches and a width of 5-6 inches. Ensure the walls are even from bottom to top, perhaps leaving them slightly thicker than a standard mug to withstand the carving later. -
Refine the Shape:
Use a metal rib on the exterior and your hand on the interior to ensure the walls are perfectly vertical. Remove any throwing lines if you want a smooth surface between the carved grooves. -
Finish the Rim:
Compress and round the rim with a chamois or a damp sponge. A slightly thickened, rounded rim adds durability for daily use. -
Wire Off:
Run a wire tool under the base to separate it from the wheel head, but leave it on the bat or wheel to stiffen up to a leather-hard state.
Clean Lines Hack
Use a flexible ruler or a straight edge gently pressed against the leather-hard clay as a guide for your carving tool to ensure your vertical lines stay perfectly straight.
Step 2: Carving the Texture
-
Check Moisture Level:
Wait until the cylinder is a distinct leather-hard—firm enough to hold its shape when handled, but soft enough to carve without chipping. I find carving is smoothest when the clay ribbons off cleanly rather than crumbles. -
Mark the Grid:
Technically you can freehand this, but for precision, lightly mark the top rim with even intervals using a needle tool to guide your vertical lines. -
Execute the Carving:
Using a U-shaped loop tool or fluting tool, start about half an inch from the bottom and carve straight up toward the rim. Maintain consistent pressure to keep the groove depth uniform. -
The Stop Point:
Lift the tool gently as you near the rim, stopping about half an inch below the top edge to create a clean, uncarved band at the lip. -
Clean Up Burrs:
Once all lines are carved, let the piece dry slightly more, then gently rub the surface with a soft rib or a barely damp sponge to soften any sharp edges created by the carving tool.
Two-Tone Effect
Wipe away the glaze on the raised surfaces with a damp sponge before firing, leaving glaze only in the carved grooves. This highlights the texture dramatically.
Step 3: Glazing and Finishing
-
Bisque Fire:
Once bone dry, fire the piece in the kiln to bisque temperature (usually cone 04 or 06). -
Wax the Base:
Apply wax resist to the bottom of the crock and up the side about 1/4 inch to ensure a clean foot. -
Glaze Application:
Dip the crock into a matte white glaze. If you want the speckles to pop more, consider a semi-transparent matte glaze instead. Hold it upside down for a few seconds to let excess glaze drip off. -
Wipe the Rim (Optional):
Check the rim and the grooves; if glaze has pooled too thickly in the carved lines, gently dab it with a sponge so the texture remains distinct after firing. -
Final Fire:
Glaze fire the piece to the maturity temperature of your clay body (typically cone 5/6 or cone 10).
Fill your new handmade crock with favorite wooden spoons and enjoy the organized beauty it brings to your kitchen space
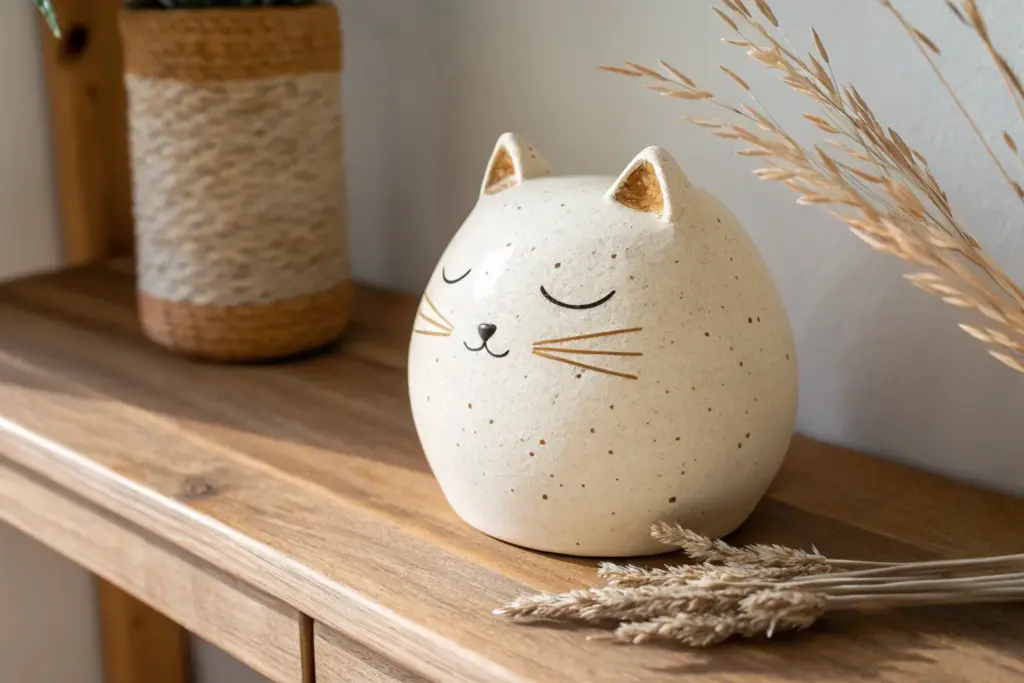
Animal-Themed Planters With Sweet Faces
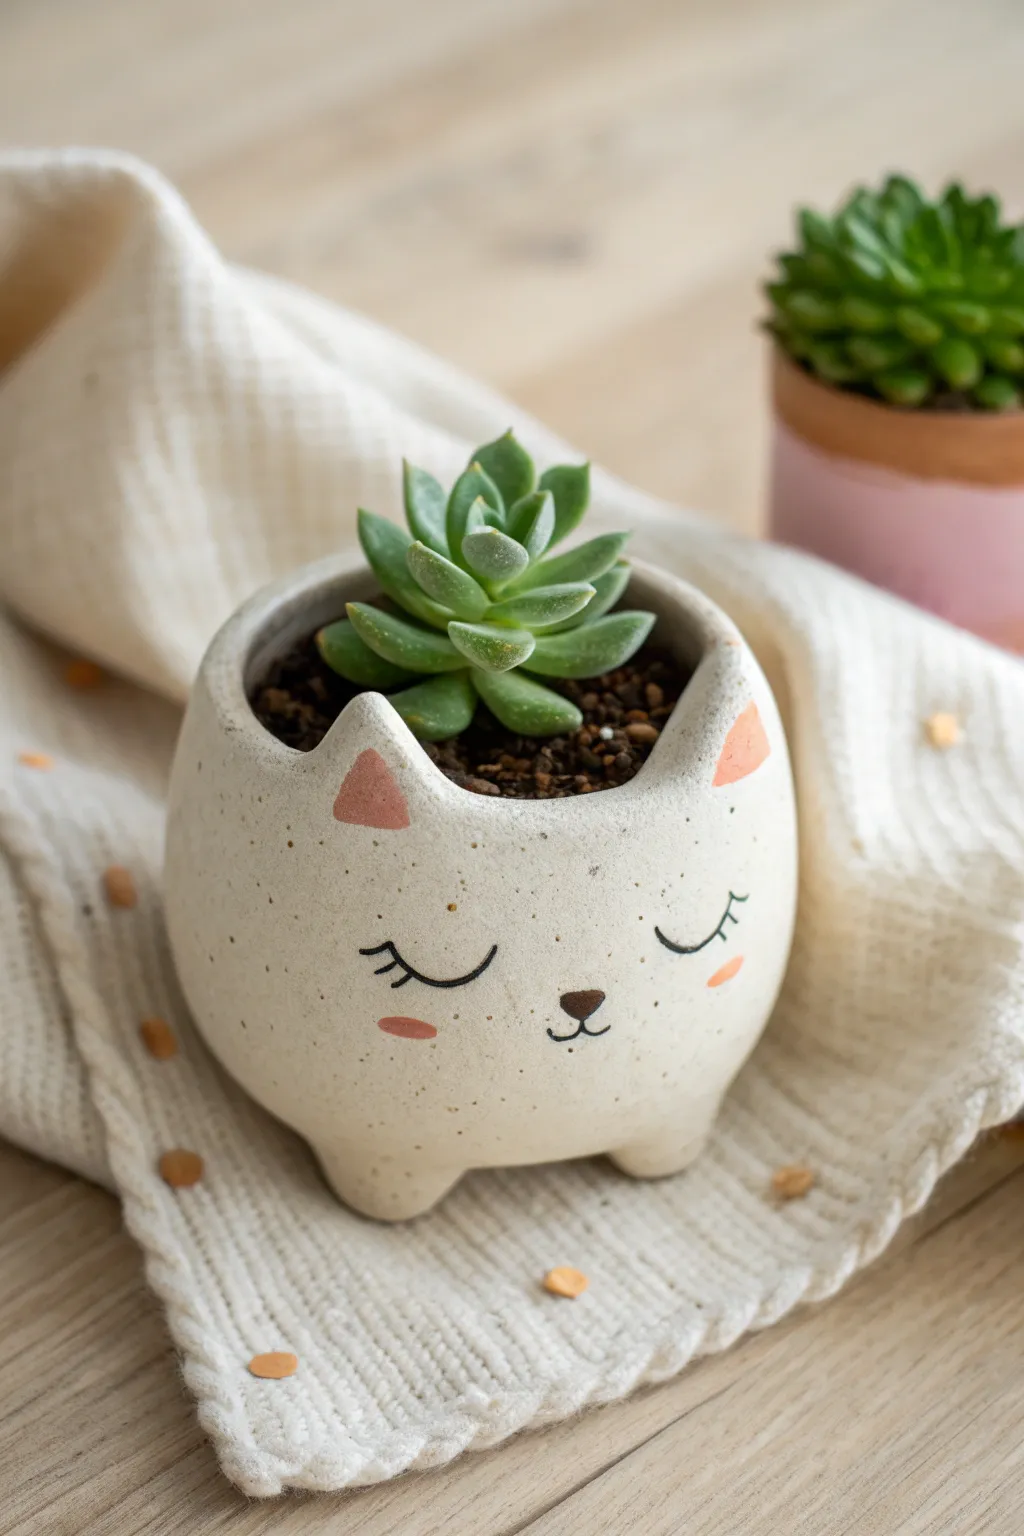
Bring a touch of sweetness to your windowsill with this adorable ceramic cat planter, featuring a speckled cream finish and a peaceful, sleeping face. This hand-built project combines simple pinch pot techniques with delicate painting to create a cozy home for your favorite small succulent.
Step-by-Step Tutorial
Materials
- White stoneware clay (preferably speckled)
- Pottery wheel or banding wheel (optional but helpful)
- Clay carving tools or needle tool
- Small sponge
- Water slip or vinegar
- Serrated rib or kidney tool
- Matte cream/off-white glaze (speckled if clay isn’t)
- Underglazes: Black, soft pink, terracotta/dusty rose
- Fine detail paintbrush (size 0 or 00)
- Kiln access
Step 1: Forming the Body
-
Prepare the Clay:
Start by wedging a ball of white stoneware clay roughly the size of a large orange to remove air bubbles. If you want that lovely speckled look shown in the photo, choose a clay body that already contains manganese speckles. -
Pinch the Base Shape:
Hold the clay ball in one palm and push your thumb into the center, stopping about a half-inch from the bottom. Gently pinch and rotate the clay to open up a bowl shape, aiming for relatively thick, sturdy walls. -
Round the Form:
Continue pinching while gently curving the walls inward slightly at the top. You want a rounded, almost spherical shape rather than a straight-sided bowl, as this creates the chubby cat body. -
Smooth the Surface:
Use a damp sponge or a flexible rib tool to smooth out your finger marks on the exterior. The surface should be clean and rounded, though a little handmade texture adds charm.
Wobbly Kitty?
If the planter rocks or feels unstable on its feet, gently rub the dry clay feet on a piece of sandpaper while the pot is level on a table. This flattens the bottom of the feet evenly.
Step 2: Adding Features
-
Shape the Ears:
Take two small chickpea-sized balls of clay and shape them into triangles. Score the top rim of your pot where the ears will go, add a dab of slip, and press the triangles firmly into place. -
Blend the Seams:
Using a modeling tool or your finger, drag the clay from the base of the ears down into the main pot body to secure them. Smooth the transition so the ears look like extensions of the pot. -
Add the Feet:
Roll three or four small balls of clay for the feet (a tripod base is often more stable). Flip the pot over, score the bottom, slipping and attaching the feet. Gently tap the pot on a flat surface to level them. -
Create Drainage:
Don’t forget the plant’s health! Use a hole cutter or a wide straw to punch a drainage hole in the very center of the bottom. -
Refine the Rim:
Check the rim between the ears. It should dip slightly to frame the plant. Smooth this edge carefully with a damp sponge so it isn’t sharp after firing. -
Dry Slowly:
Cover the piece loosely with plastic and let it dry slowly to the leather-hard stage. This prevents cracking, especially where the ears join the body.
Step 3: Decorating and Glazing
-
Bisque Fire:
Once bone dry, fire the piece in a kiln to cone 04 (or your clay’s specific bisque temperature). The piece is now ready for glazing. -
Apply Base Glaze:
Dip or brush the entire pot with a matte cream or off-white glaze. If your clay wasn’t speckled, choose a glaze that includes speckles to mimic the stone-like texture. -
Paint the Ears:
Using a soft pink underglaze or overglaze (depending on your materials), carefully paint triangular patches inside the ears. Keep the edges soft specifically to match the gentle style. -
Detail the Face:
With your finest brush and black underglaze, paint two downward-curving crescents for sleeping eyes. Add three small lashes to the outer corner of each eye. -
Add Nose and Mouth:
Paint a small, inverted triangle for the nose using a dark brown or black. Connect a tiny ‘w’ shape directly beneath it for the mouth. -
Rosy Cheeks:
Mix a diluted terracotta or dusty rose color. Dab two small horizontal ovals under the eyes for blushes. I like to keep this paint very thin so the speckles show through. -
Final Fire:
Fire the piece again to the maturation temperature of your glaze (usually cone 5 or 6 for stoneware). Ensure the feet are wiped clean of glaze before firing.
Purr-fect Tail
Before drying, roll a thin coil of clay and attach it to the back of the pot, curling it around the side. It adds 3D interest without changing the simple front profile.
Pop in a rosette-shaped succulent like an Echeveria to complete your new ceramic friend’s hairstyle
Face Vases With Playful Expressions
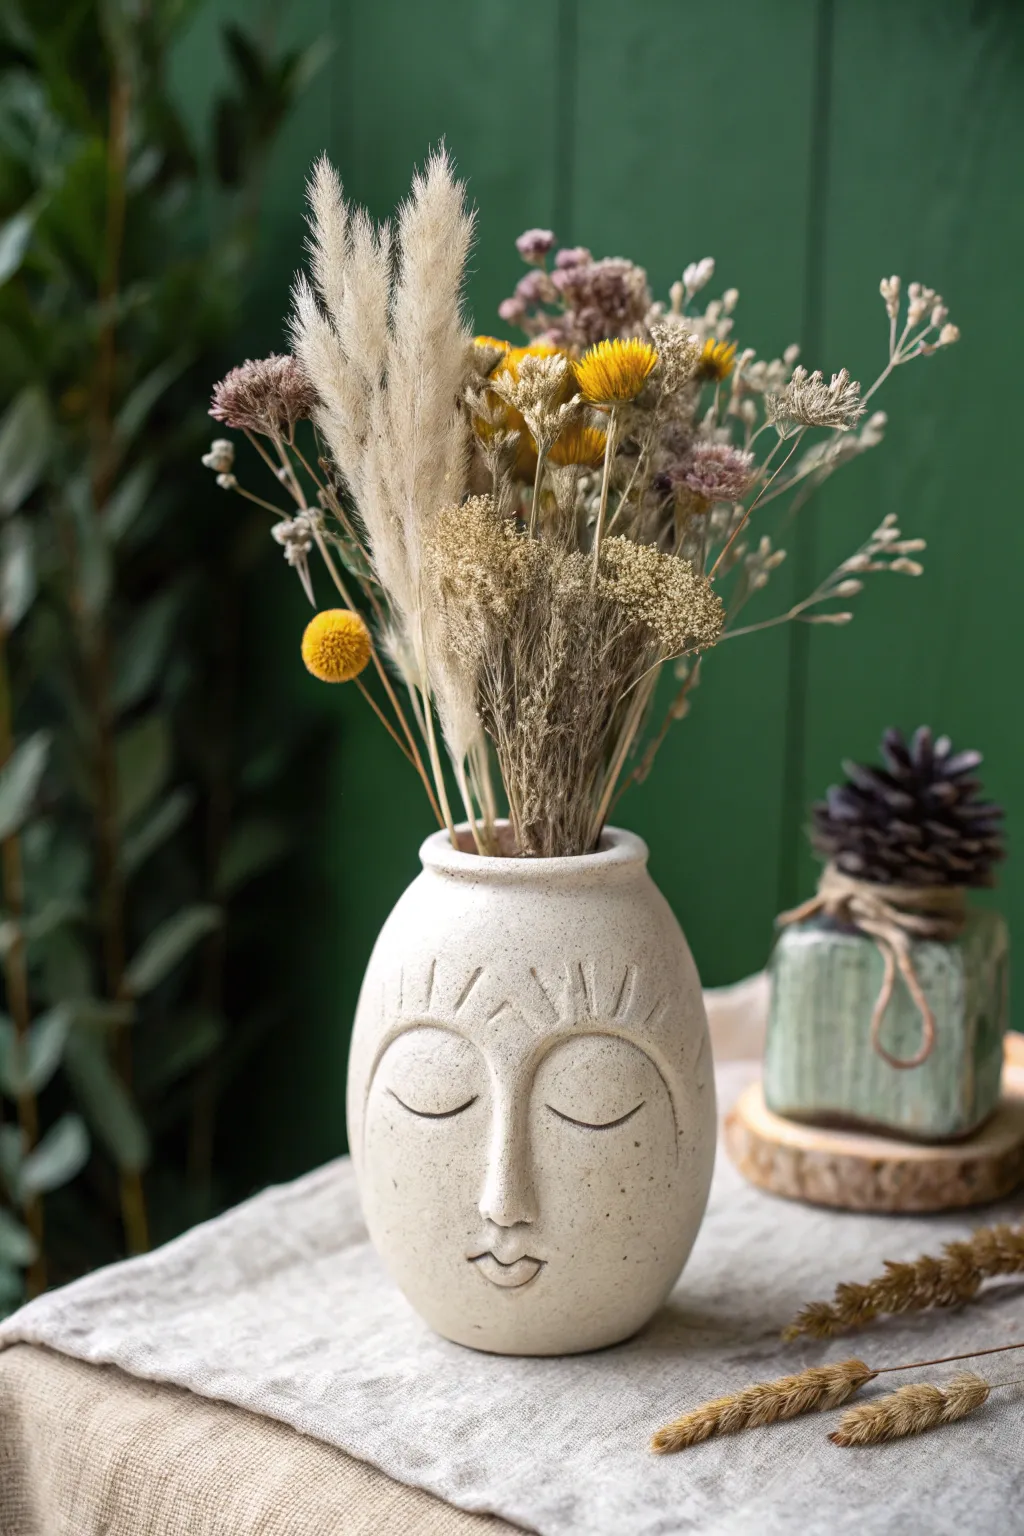
Sculpt a moment of calm with this charming ceramic vase, featuring gentle sleeping eyes and a serene expression. Its rounded form and textured creamy glaze make it the perfect vessel for dried florals and wild grasses.
Step-by-Step
Materials
- White stoneware or earthenware clay body
- Pottery wheel (optional, can be hand-built)
- Wooden modeling tools
- Needle tool
- Metal kidney rib
- Sponge
- Speckled cream or matte white glaze
- Kiln
- Wire cutter
- Slip and scoring tool
Step 1: Forming the Vessel
-
Prepare the Clay:
Begin by wedging about 2-3 pounds of white stoneware clay. Ensure there are no air bubbles, as these can disturb the smooth surface of the face later. -
Center and Open:
Secure the clay on the wheel head and center it. Open the mound, pulling the floor flat but keeping enough thickness at the base for stability. -
Pull the Cylinder:
Pull the walls upwards into a cylinder slightly taller than your desired finished height. Aim for an even thickness of about ¼ inch throughout the walls. -
Shape the Belly:
Using a rib on the inside and your hand on the outside, gently push the clay outward to create a rounded, bulbous belly shape. This curve will form the ‘head’ of your character. -
Collar the Neck:
Slowly collar the top inward to create a narrower opening. Use a sponge to keep the rim smooth and compressed like a donut, which adds strength. -
Refine the Surface:
Before taking it off the wheel, use a metal kidney rib to smooth the exterior, removing throwing ridges to create a blank canvas for the facial features. Wire it off and let it stiffen to leather-hard.
Step 2: Sculpting the Expression
-
Map the Features:
Once leather-hard, lightly trace the placement of the nose, eyes, and mouth with a needle tool. Keep the features centered on the belly of the vase. -
Build the Nose:
Form a small, elongated triangle of clay. Score and slip the area on the vase, then attach the nose. Blend the edges seamlessly into the face using a wooden tool so it looks like it emerges naturally from the pot. -
Carve the Eye Arches:
Using a modeling tool, carve two shallow, curved arches for the eyebrows. These should sit proudly above the eyes. -
Incise the Lashes:
Carefully incise short, radiating lines above the eyebrow arches to suggest eyelashes or decorative markings. I find a sharp needle tool works best for crisp lines here. -
Create the Eyelids:
Carve two downward-curving crescents for the closed eyes. Press slightly deeper on the bottom line to create a shadow that defines the sleeping expression. -
Sculpt the Mouth:
Add a tiny coil for the lips or carve directly into the clay. Create a subtle ‘M’ shape for the upper lip and a small curve for the bottom, giving the face a gentle, sealed kiss expression. -
Smooth and Refine:
Take a slightly damp sponge and go over all your added features to soften any sharp burrs or rough edges from the carving tools.
Uneven Features?
If facial symmetry is difficult, draw your design on paper first, cut it out as a stencil, and gently press it against the leather-hard clay to trace.
Step 3: Firing and Glazing
-
Bisque Fire:
Allow the vase to dry completely, which may take several days depending on humidity. Load it into the kiln for a bisque firing to cone 04. -
Apply Glaze:
Dip or brush on a speckled cream glaze. A matte finish works beautifully here to mimic the texture of skin or stone without being too shiny. -
Wipe the Base:
Clean the glaze off the foot of the vase with a wet sponge to prevent it from sticking to the kiln shelf. -
Final Fire:
Fire the piece for a second time according to your clay and glaze specifications (typically cone 5 or 6 for stoneware).
Add Personality
Before the clay dries, consider adding small clay lugs on the sides as ‘ears’ or attaching textural coils on the head to simulate hair.
Fill your new vase with dried pampas grass or billy buttons to complete the tranquil look
Sgraffito Pattern Mugs With Bold Contrast
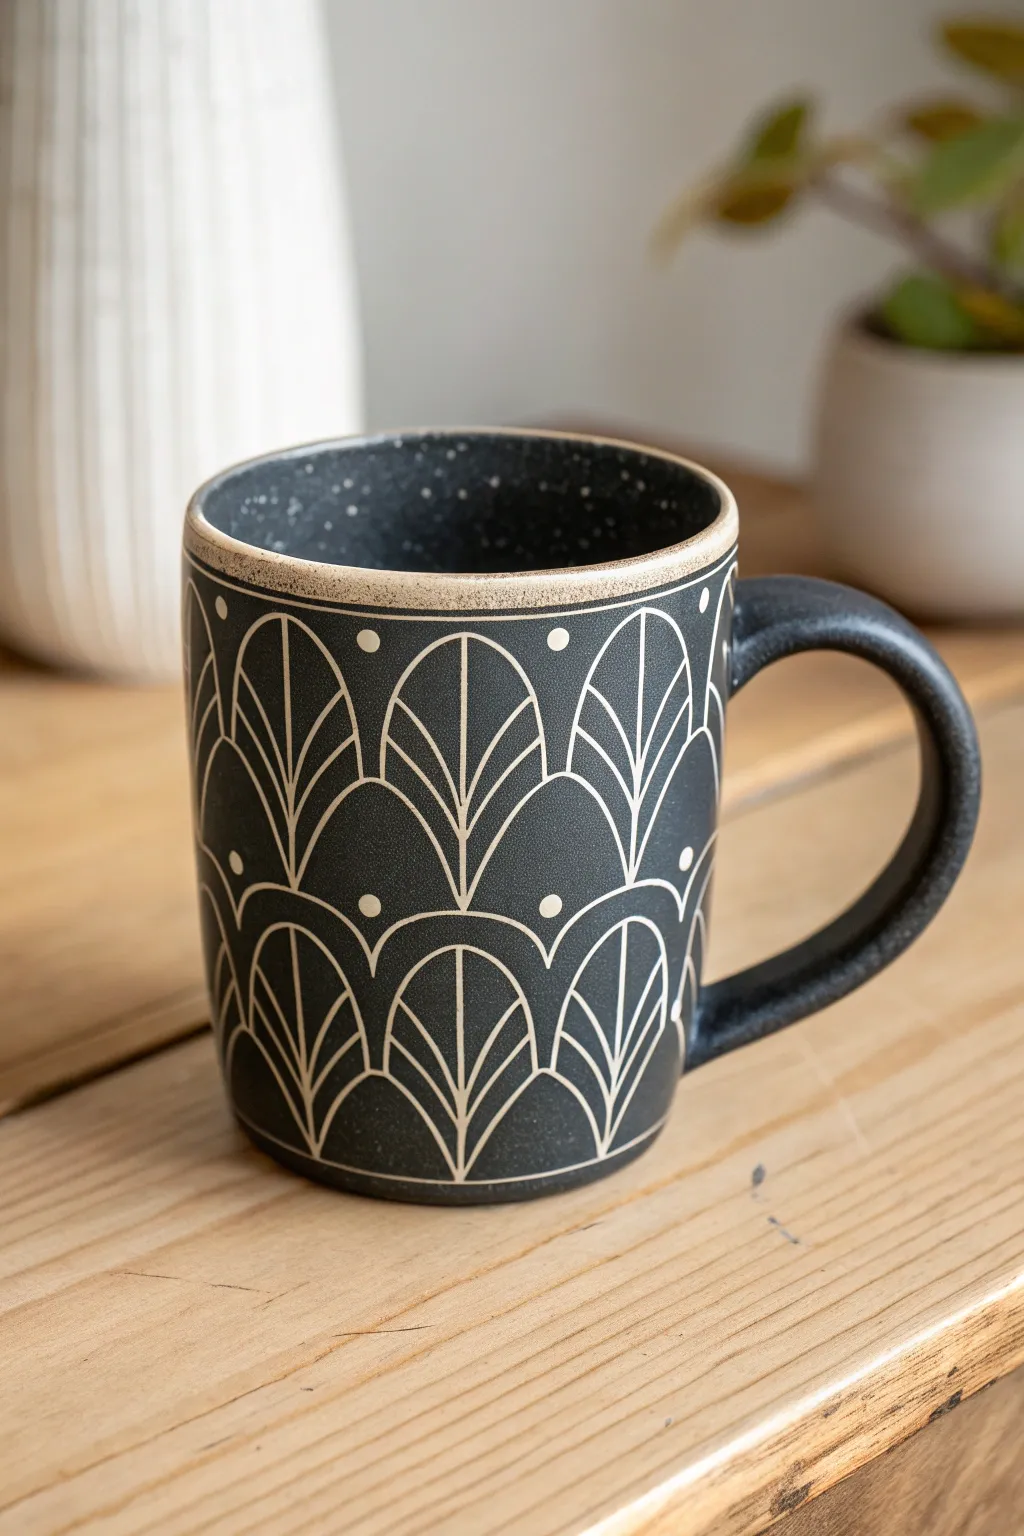
Achieve a stunning, high-contrast look by carving through layers of dark slip to reveal the warm clay body underneath. This sgraffito project features a repeating scallop pattern reminiscent of classic Art Deco design, finished with a speckled interior.
How-To Guide
Materials
- Stoneware clay body (buff or light speckled)
- Black underglaze or slip (matte finish)
- Clear glaze (optional for exterior, needed for interior)
- Speckled white glaze (for interior)
- Sgraffito loop tool (small)
- Needle tool
- Soft fan brush
- Sponge
- Pottery wheel (or slab building tools)
- Rib tool
- Wire cutter
- Measuring tape or paper template
Step 1: Forming the Mug
-
Throw the cylinder:
Center roughly 1 pound of light-colored stoneware clay on your wheel. Pull the walls to create a straight-sided cylinder about 4-5 inches tall, ensuring the walls are even but thick enough to withstand light carving later. Smooth the surface with a metal or rubber rib to remove throwing lines. -
Trim and refine:
Once the piece is leather hard, trim the bottom to create a slight foot. This is the perfect time to burnish the exterior gently with a soft rib, creating a super-smooth canvas for your sgraffito work. -
Pull and attach the handle:
Pull a strap handle that is roughly the same thickness as your rim. Score and slip the attachment points on the side of the mug, pressing the handle firmly into place. Smooth the seams with a modeling tool or your finger so the transition is seamless.
Clean Lines Pro-Tip
Carve your sgraffito lines when the clay is on the stiffer side of leather-hard. If the clay is too wet, the lines will be jagged and messy; too dry, and the clay will chip.
Step 2: Designing the Surface
-
Apply the dark background:
Using a soft fan brush, apply 2-3 even coats of black underglaze or slip to the entire exterior of the mug, stopping just below the rim. I prefer to let each coat dry until it loses its sheen before applying the next to avoid dragging the brush marks. -
Wait for leather hard:
Allow the mug to dry back to a stiff leather-hard state. The underglaze should be dry to the touch and not tacky, but the clay underneath must still contain moisture for smooth carving. -
Create a spacing guide:
Lightly scratch a vertical line to mark your starting point. You can use a paper template wrapped around the mug to prick pinholes at equal intervals, ensuring your scalloped arches will be evenly spaced around the circumference. -
Lightly sketch the pattern:
With a very light touch using a dull pencil or stylus, draw your repeating arch pattern. Start with the bottom row of arches, then stagger the top row so the points of the upper arches land in the valleys of the lower ones.
Level Up: Color Pop
Instead of leaving the carved lines as raw clay, inlay a bright colored underglaze (like teal or mustard yellow) into the grooves before the first firing for a vibrant twist.
Step 3: The Sgraffito Process
-
Carve the main outlines:
Using a small wire loop tool, carve firmly along your sketched arch lines. Apply consistent pressure to cut through the black layer and reveal the contrasting cream clay beneath. Keep a brush handy to sweep away the clay ‘crumbs’ immediately so they don’t get stuck in your design. -
Add the central leaf veins:
Inside each arch, carve a vertical line straight up the center, stopping just before the peak. This acts as the spine for your leaf motif. -
Carve the interior details:
Carve curved lines radiating from the base of the arch toward the central spine on both sides. These lines mimic leaf veins and add movement to the rigid geometric shape. -
Add the decorative dots:
Use a small drill tool or the loop tip to gently scoop out circular dots in the negative spaces between the arches. Place one distinct dot between the peaks of the top row for visual balance. -
Define the rim:
Carve a horizontal line about a quarter-inch below the rim, creating a dedicated border. Gently scrape away any black underglaze above this line to leave the actual lip of the mug as exposed raw clay. -
Detailed cleanup:
Once dry, use a slightly damp sponge to very gently wipe the surface. This removes any tiny burrs or sharp edges from the carving without smudging the black underglaze into the white lines.
Step 4: Glazing & Firing
-
Bisque fire:
Load the bone-dry mug into the kiln for a bisque firing (usually cone 04). This sets the design permanently. -
Glaze the interior:
Pour a speckled white glaze into the interior of the mug, swirl it to coat entirely, and pour out the excess. Wipe any drips off the rim immediately. -
Protect the exterior:
Depending on your underglaze, you can leave the exterior matte (unglazed) for a tactile stone feel. If you want durability, brush on a thin layer of matte transparent glaze over the carving. Avoid thick globs, which can obscure the sgraffito texture. -
Final firing:
Fire the piece to cone 6 (or your clay body’s maturation temperature). Ensure the handle doesn’t touch other pots in the kiln.
Enjoy your morning coffee with the satisfaction of holding a piece of handmade geometric art
Mishima-Inspired Inlay Tiles for Wall Decor
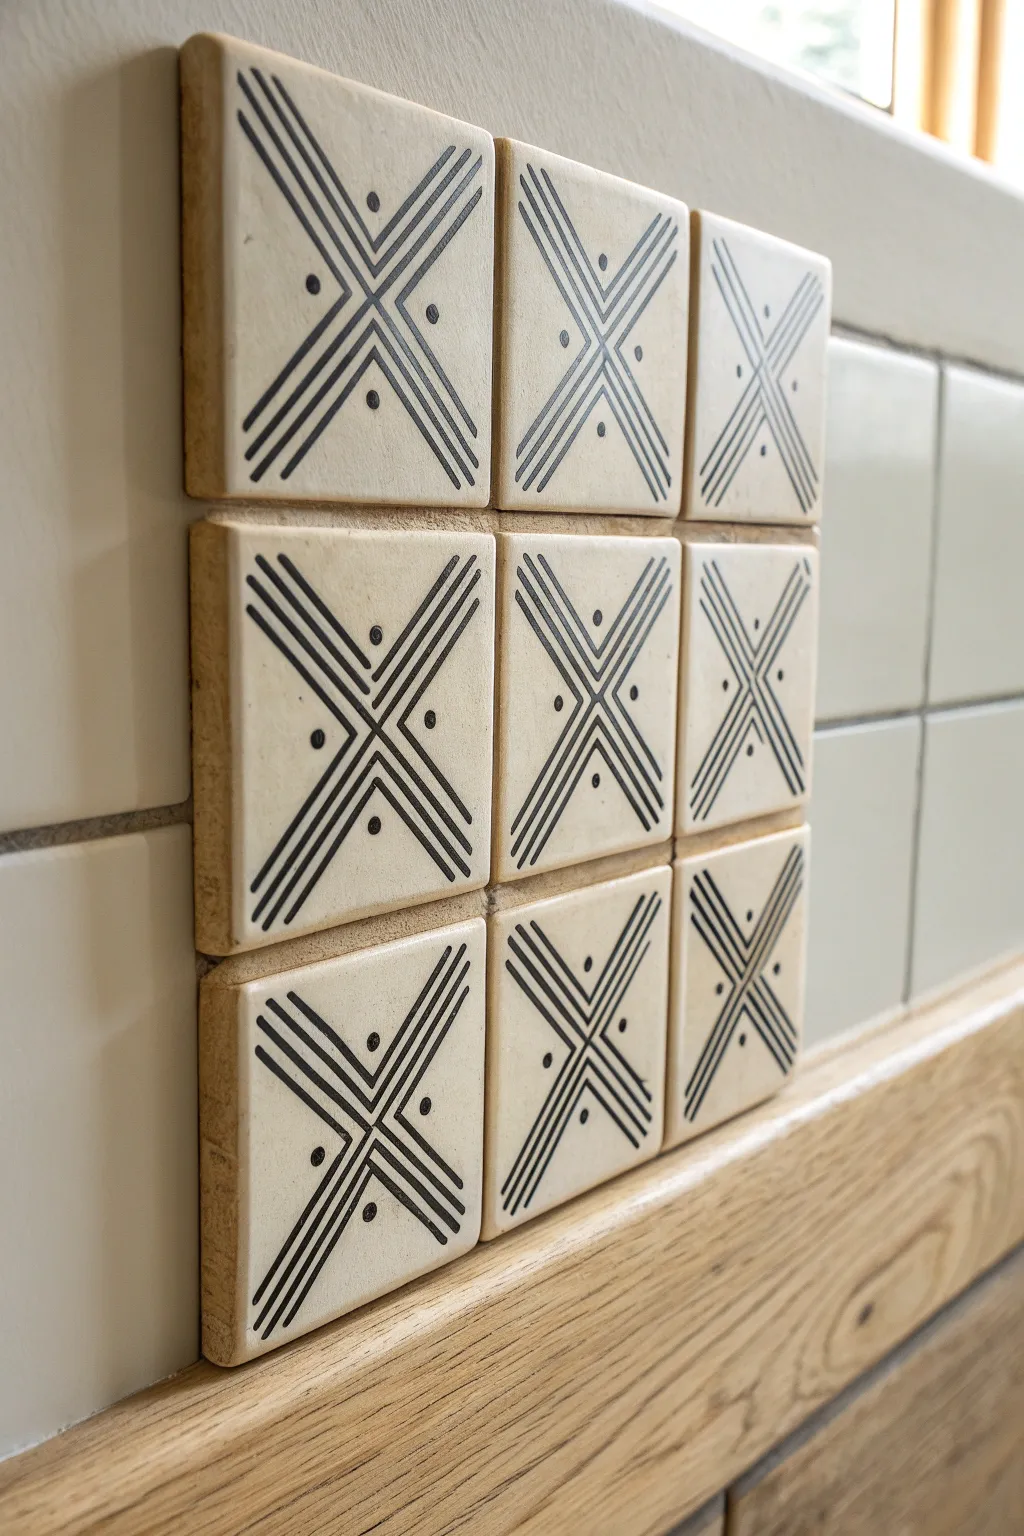
These striking ceramic tiles blend contemporary geometric design with the ancient Korean technique of Mishima inlay. The contrast between the creamy clay body and the sharp black underglaze lines creates a sophisticated focal point perfect for distinct wall accents or backsplashes.
Detailed Instructions
Materials
- White or speckled buff stoneware clay (rolled into a slab)
- Black underglaze
- Clear or matte transparent glaze
- Needle tool or X-Acto knife
- Ruler
- Wax resist (emulsion)
- Small metal rib or scraper
- Sponge
- Small paintbrush
- Tile cutter (square cookie cutter works well)
- Wooden board or drywall slab for drying
Step 1: Slab Preparation & Cutting
-
Roll the slab:
Begin by rolling out your clay slab to an even thickness, ideally around 1/4 inch to 3/8 inch. Use guide sticks or a slab roller to ensure uniformity, as uneven tiles can warp during firing. -
Smooth the surface:
Compress the clay on both sides using a rib. This is a crucial step to align the clay particles, which helps prevent warping and creates a smooth canvas for your intricate carving work later. -
Cut the squares:
Using your square cutter or a ruler and knife, cut out nine identical squares. For the look in the photo, 4-inch by 4-inch squares work beautifully. I like to cut a few extras just in case of mishaps. -
Dry to leather hard:
Place the tiles on a wooden board or drywall piece. Cover them loosely with plastic and let them dry slowly until they reach a leather-hard state. They should be firm enough to handle without bending but still contain moisture.
Smudgy Lines?
If the black underglaze is smearing across the tile face, your sponge is too wet or dirty. Rinse it frequently and squeeze it out until it’s barely damp.
Step 2: Carving the Design
-
Mark the center:
Lightly mark the center point of a tile. This will serve as the anchor for your X-shaped design. -
Draft the lines:
Using a ruler, lightly scratch the guide lines for the main X shape. You want four parallel lines intersecting with four other parallel lines. -
Carve the channels:
With your needle tool or a specialized carving tool, firmly incise the lines. You want clean, deep channels for the underglaze to sit in, but avoid cutting all the way through the tile. -
Add the details:
Press the round end of a tool or a small drill bit into the clay between the lines to create the four distinct dot accents in the quadrants created by the X. -
Clean the burrs:
Once carved, run a stiff brush or your finger lightly over the lines to remove the little clay crumbs (burrs). Don’t use a wet sponge yet, as it will just smudge the clay back into the lines.
Step 3: The Mishima Inlay
-
Apply wax resist:
Brush a coat of wax resist over the entire surface of the tile, focusing on the flat areas between the carved lines. This protects the main surface from staining. -
Fill with underglaze:
Generously paint black underglaze into the carved lines and dots. Don’t worry about being neat; make sure the recessed areas are completely filled. -
Wipe back:
Once the underglaze has stiffened slightly, use a damp sponge to wipe away the excess from the surface. The wax resist will help the black wipe off the top easily, leaving crisp black lines trapped inside the carvings. -
Final cleanup:
If any black shading remains on the white surface, give it one more thorough wipe with a clean area of the sponge to ensure high contrast.
Wax Resist Method
Applying wax resist *before* carving creates the crispest lines. The wax protects the surface immediately, so cleanup takes significantly less scrubbing.
Step 4: Firing & Finishing
-
Bisque fire:
Allow the tiles to dry completely (bone dry) before loading them into the kiln for a bisque firing. -
Glaze application:
Dip or brush a clear or matte transparent glaze over the bisque-fired tiles. This seals the work and deepens the black inlay without obscuring it. -
Glaze fire:
Fire the tiles again to your clay body’s recommended temperature (usually cone 5 or 6 for stoneware). -
Mounting:
Once fired and cooled, arrange your tiles in a 3×3 grid. Using tile adhesive or a strong construction adhesive, mount them directly to your wall or a backing board for hanging.
Enjoy the rhythmic process of carving and the stunning graphic impact of your finished ceramic grid
Marbled Clay Bowls With Swirled Stoneware

Create a mesmerizing, organic centerpiece with this marbled stoneware bowl tutorial that blends natural cream, tan, and dark grey clays. The result is a unique vessel featuring distinct whirlpool patterns and speckles that look effortlessly elegant on any tabletop.
Step-by-Step Guide
Materials
- White stoneware clay (mid-fire)
- Tan/buff stoneware clay
- Dark grey or black stoneware clay
- Pottery wheel (or slab roller/rolling pin for hand-building)
- Wire clay cutter
- Rib tools (metal and rubber)
- Sponge
- Trimming tools
- Clear transparent glaze (cone 5/6 or match clay body)
- Kiln
Step 1: Preparing the Marbled Clay
-
Portion the clay:
Start by slicing off chunks of your three clay bodies. You want the white stoneware to be the dominant color (about 60%), followed by the tan (30%) and a smaller amount of the dark grey (10%) to create fine contrast lines. -
Stack and slice:
Layer the chunks on top of each other like a sandwich. Slice the stack in half with your wire cutter, stack the halves, and slam them down onto your wedging table to adhere the layers. -
Minimal wedging:
Perform a very light wedge—just enough to remove air pockets but not enough to blend the colors into a muddy grey. I find that about 5 to 8 turns is usually the sweet spot where the distinct veins remain intact. -
Form the ball:
Shape your wedged clay into a round ball, being careful to keep the marbled layers oriented vertically if you want stripes up the side, or horizontally for a more spiraled effect.
Step 2: Throwing the Form
-
Center specifically:
Slam the ball onto the wheel head. When centering, be gentle and avoid excessive coning up and down, as overworking the clay at this stage can blur those crisp color definitions. -
Open the floor:
Open the clay to create a wide, flat floor. This will become the canvas for the spiral pattern you see at the bottom of the bowl. -
Pull the walls:
Pull the walls up and out to create a wide, open bowl shape. As you pull, clear slurry off your hands often so you can see the pattern engaging beneath your fingers. -
Refine the curve:
Use a flexible metal rib to compress the inside curve and smooth out throwing lines. This step is crucial for revealing the underlying marble pattern by scraping away the surface ‘sludgy’ layer where the colors might have smeared together. -
Check the rim:
Use a chamois or a damp sponge to round off the rim gently. A slightly thicker rim helps prevent warping during the firing process. -
Wire off:
Run a wire tool under the base to separate the bowl from the bat, then set it aside to dry to leather-hard consistency.
Rib for the Reveal
The muddy slurry from throwing hides the pattern. Use a sharp metal rib on the final pull to scrape off the top millimeter of slime and reveal the crisp lines inside.
Step 3: Trimming and Finishing
-
Secure for trimming:
Once the bowl is leather hard, center it upside down on the wheel. Secure it with clay lugs or a Giffin Grip. -
Trim the exterior:
Using a trimming tool, shave away the excess clay from the exterior walls and foot. This is the most satisfying part, as the sharp tool cuts through the dull exterior to reveal the crisp, vibrant swirls hidden underneath. -
Create the foot ring:
Carve a clean foot ring to give the bowl lift and elegance. Ensure the bottom is smooth and burnish it lightly with the back of a spoon or a smooth stone if desired. -
Bisque fire:
Allow the bowl to dry slowly and completely before loading it into the kiln for a bisque firing (usually cone 04).
Muddy Colors?
If your colors turn into a solid grey blur, you over-wedged. Next time, try ‘stack and slam’ wedging only, or reduce your kneading turns by half.
Step 4: Glazing
-
Clean the bisque:
Wipe the bisqued bowl with a damp sponge to remove any dust that might resist the glaze. -
Apply clear glaze:
Dip or pour a clear, transparent glaze over the entire piece. A clear glaze is essential here; anything opaque will hide your beautiful marbling work. -
Clean the foot:
Review the foot ring and wipe away any glaze that might fuse the bowl to the kiln shelf. -
Glaze fire:
Fire the bowl to the maturity temperature of your stoneware (typically cone 5 or 6). Let the kiln cool naturally before unloading.
Enjoy using your new stunning marbled bowl as a daily reminder of the beauty of mixing natural elements
Sculptural Totem Stacks as Shelf Art
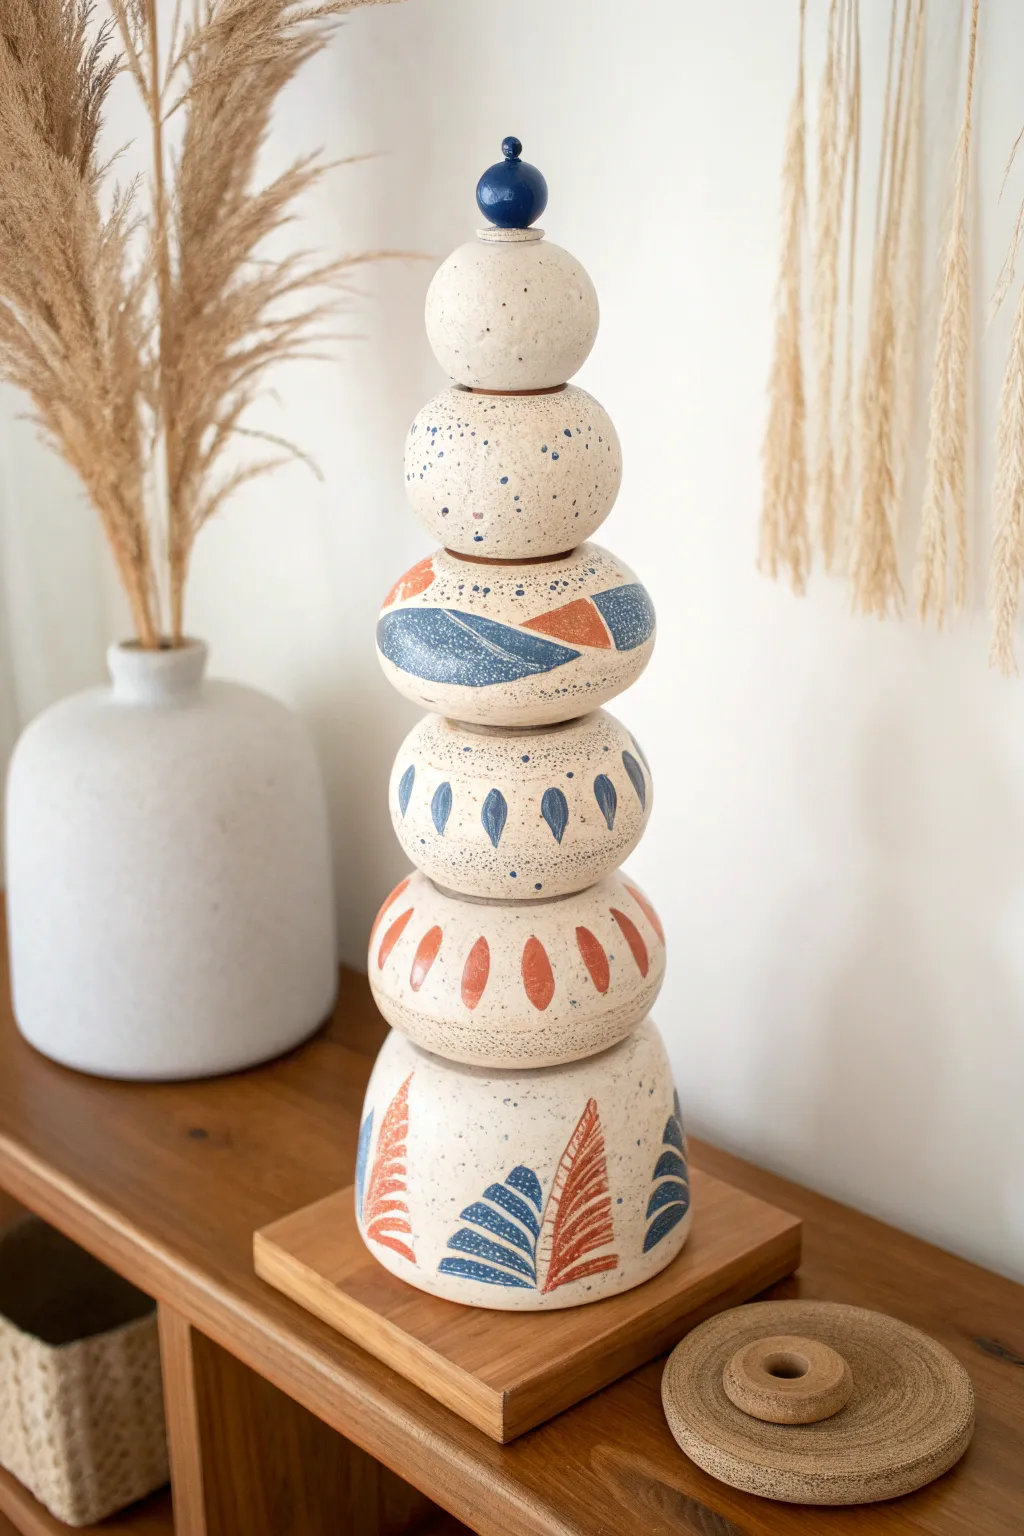
Embrace the balance of organic forms with this stacked ceramic totem, featuring a playful mix of geometric patterns and botanical motifs. The speckled clay body provides a rustic canvas for vibrant terra cotta and denim blue accents, creating a striking vertical centerpiece for any shelf.
Detailed Instructions
Materials
- Speckled stoneware clay (mid-fire)
- Pottery wheel (or hand-building tools for coil/pinch method)
- Wooden throwing ribs
- Pin tool
- Wire cutter
- Trimming tools
- Underglazes: Navy Blue, Burnt Orange
- Small round paintbrushes
- Clear transparent glaze
- Kiln
- Metal rod or dowel (optional for internal support)
Step 1: Forming the Segments
-
Plan your stack:
Sketch out the profile of your totem first. This piece involves six distinct levels: a wide base, a flattened round tier, a donut-like ring, a quirky asymmetric rock shape, a smaller round sphere, and a tiny finial on top. -
Throw the base:
Center a 2-pound ball of speckled clay on the wheel. Throw a hollow, closed form with a wide, flat bottom and tapering sides, resembling a gumdrop. Compress the walls well to prevent cracking. -
Create the middle tiers:
Throw four subsequent closed forms of graduating sizes. The second tier should be a flattened sphere; the third a slightly taller, bulbous shape; the fourth a quirky, uneven rock shape; and the fifth a perfect small sphere. -
Sculpt the finial:
Hand-build or throw a tiny, solid knob shape for the very top. Give it a small rounded body and a delicate point. -
Constructing the joinery:
Although these can simply stack, I prefer to create stability. Once leather hard, trim the bottom of each piece to nest slightly into the top of the piece below it, or cut a small hole through the vertical center of all pieces to thread them onto a rod later. -
Refining the surface:
Once leather-hard, trim away excess weight. Use a smooth metal rib to compress the surface, revealing the beautiful texture of the speckled clay.
Wobbly Towers?
If stacking loose pieces feels unstable, use a small amount of museum wax or hidden epoxy putty between tiers to secure them without permanent glue.
Step 2: Surface Decoration
-
Bisque fire:
Fire all components to cone 04 (or your clay’s bisque temperature). Wipe them down with a damp sponge to remove dust before glazing. -
Paint the base layer:
On the bottom-most segment, use a thin brush to paint stylized fern leaves in burnt orange and navy blue underglaze. Keep the strokes loose and painterly. -
Pattern the middle tiers:
Move up the stack. On the second tier, paint simple oval dashes in alternating orange and blue. For the third tier, paint widely spaced blue teardrops pointing downward. -
Detail the upper sections:
For the fourth (asymmetric) tier, paint bold, landscape-style shapes involving curves and triangles. Leave the fifth sphere mostly bare but flick a stiff toothbrush loaded with blue underglaze to create a splatter effect. -
Glaze the finial:
Coat the tiny top finial entirely in solid navy blue underglaze or a varied blue gloss glaze to make it pop against the natural clay.
Clean Lines
When painting underglaze patterns on raw clay, use a pencil first. Graphite burns off in the kiln, leaving your painted design perfectly placed.
Step 3: Finishing
-
Apply clear coat:
Dip or brush a coat of clear transparent glaze over every piece except the very bottom of the base. This seals the underglaze and highlights the clay’s speckles. -
Check the footing:
Wipe the bottom of every single segment clean of glaze with a wax resist or sponge. If glaze fuses the pieces together in the kiln, your stack will be permanent (and possibly messy). -
Glaze fire:
Load the kiln, ensuring pieces aren’t touching unless you intend to fuse them. Fire to cone 5/6. -
Final assembly:
Once cool, stack your pieces. If you made center holes, thread them onto a metal rod or secure them with a strong epoxy if permanent stability is desired.
Place your finished totem on a wooden pedestal or mantelpiece to enjoy the interplay of shapes and shadows