If you’ve got a fresh square slab of clay in front of you, you’re already halfway to a tile you’ll want to touch every time you walk by. Here are my favorite ceramic clay tile ideas—starting with the classics and moving into the fun, “how did you make that?” textures.
Classic Leaf Imprint Tiles
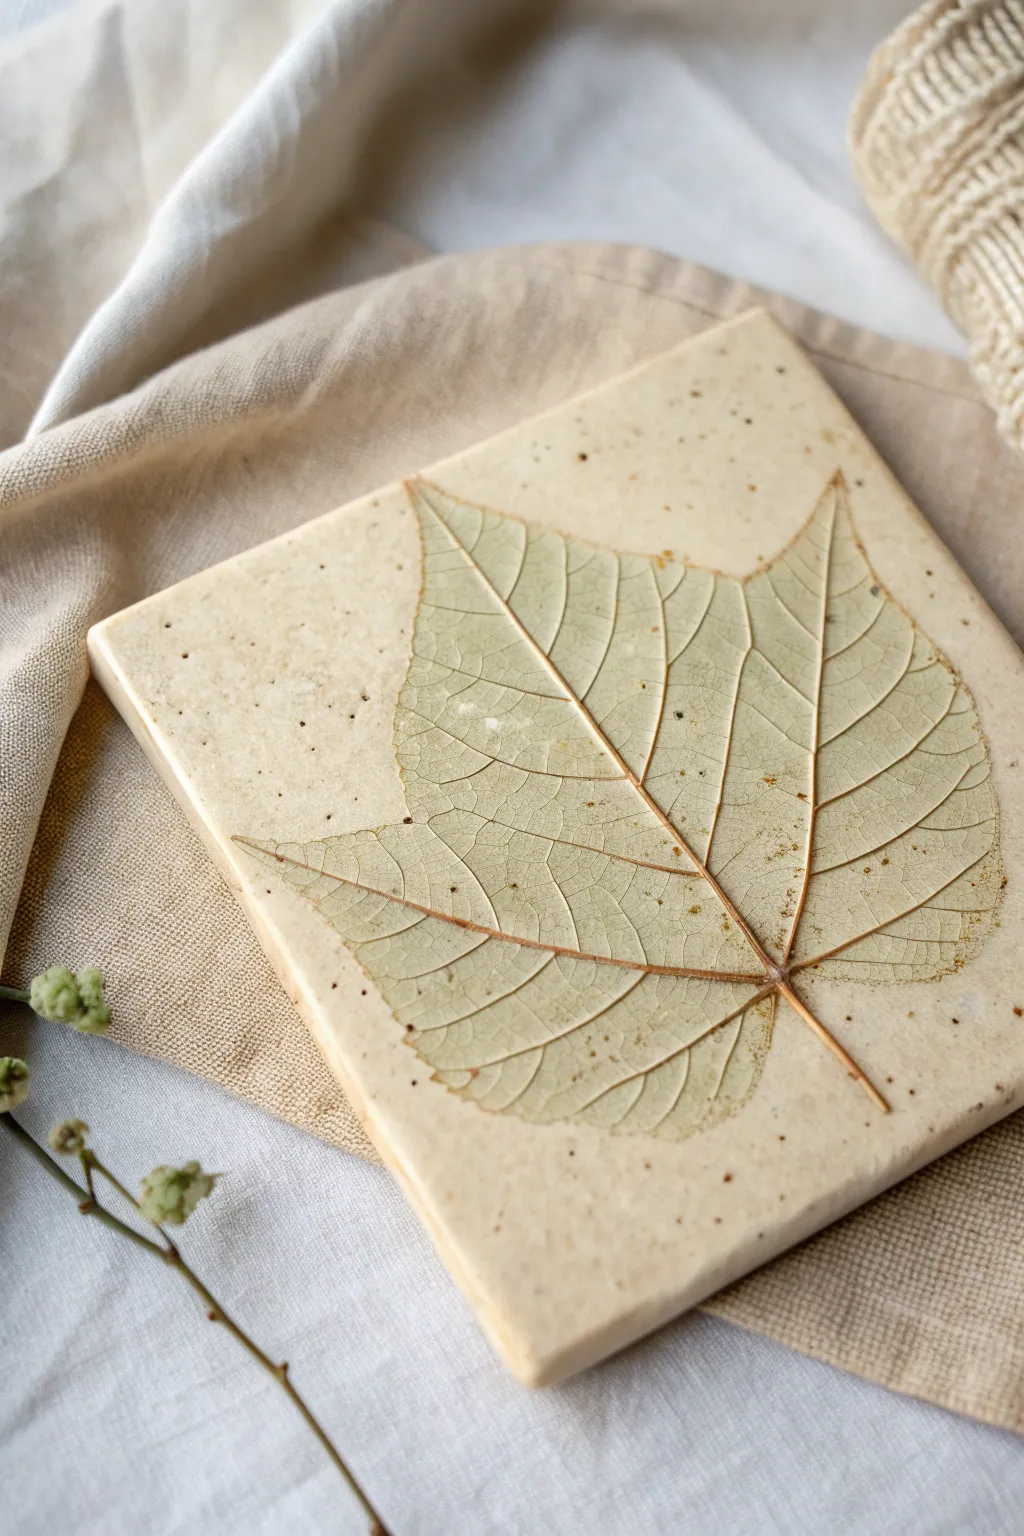
Capture the delicate beauty of a fallen leaf forever in this timeless ceramic project. This tutorial guides you through creating a perfectly square, cream-colored tile with a subtle speckled finish and a stunningly detailed leaf relief that feels both rustic and refined.
Detailed Instructions
Materials
- White stoneware clay with fine grog or speckles
- Rolling pin
- Two wooden guide strips (approx. 1/4 inch thick) or dowels
- Canvas or heavy cotton cloth working surface
- Fresh leaf with prominent veins (like maple or sycamore)
- Needle tool or fettling knife
- Square template or ruler
- Soft sponge
- Small bowl of water
- Clear matte or satin glaze
- Iron oxide wash (optional, for vein emphasis)
- Kiln access
Step 1: Preparation and Rolling
-
Wedge the Clay:
Begin by wedging a ball of white stoneware clay thoroughly to remove any air bubbles. This ensures a uniform consistency and prevents explosions in the kiln later. -
Set Up Workspace:
Lay down your canvas or cotton cloth on a flat table. This fabric texture prevents sticking and adds a subtle woven texture to the back of your tile. -
Place Guides:
Position your two wooden guide strips on either side of the clay ball. These are crucial for keeping the slab thickness perfectly even across the entire tile. -
Roll the Slab:
Using your rolling pin, roll the clay out until the roller rests firmly on the guide strips. Roll in multiple directions to compress the clay platelets, which helps prevent warping. -
Smooth the Surface:
Take a slightly damp sponge or a rubber kidney tool and smooth out the surface of the clay slab, erasing any distracting canvas textures from the top side.
Vein Definition Tip
If your leaf is thin, place a piece of paper over it before rolling. This distributes pressure and presses the delicate veins deeper without tearing the leaf material.
Step 2: Creating the Impression
-
Leaf Selection:
Select a fresh leaf that isn’t too brittle. Ensure the veins on the back are raised and distinct, as this creates the deep impression we want. -
Positioning:
Place the leaf vein-side down onto the center of your smoothed clay slab. Arrange it so the stem creates a pleasing line, slightly off-center if you prefer asymmetry. -
First Press:
Gently press the leaf down with your fingers first to tack it into place so it doesn’t shift during the rolling step. -
Roll the Impression:
Using a pony roller or your main rolling pin, roll firmly over the leaf once. Do not roll back and forth; one committed pass ensures a crisp, ghost-free image. -
Remove the Organic Matter:
Find the stem of the leaf and carefully lift it. Peel the leaf away slowly to reveal the intricate network of veins stamped into the clay.
Step 3: Cutting and Refining
-
Position Template:
Place your square template over the impression. Frame the leaf so the negative space around it feels balanced. -
Cut the Shape:
Hold the needle tool or fettling knife vertically and cut around the template. Keep the blade straight to ensure crisp 90-degree edges on your tile. -
Smooth Edges:
Once cut, run a finger or a slightly damp sponge along the sharp cut edges to soften them just a tiny bit. I usually verify the corners aren’t too sharp now to avoid chipping later. -
Dry Slowly:
Place the tile on a piece of drywall or wooden board. Cover it lightly with plastic for the first day to slow down drying, which is the secret to preventing curled corners.
Go Botanical
Try tinting your clear glaze with a tiny amount of celadon or translucent green mason stain. It pools in the veins, giving a glassy, watercolor effect.
Step 4: Firing and Glazing
-
Bisque Fire:
Once bone dry (the clay will feel room temperature, not cool), bisque fire the tile in a kiln to approximately Cone 04 to harden it. -
Enhance Veins (Optional):
To get the look in the photo, brush a very diluted iron oxide wash into the veins and wipe away the excess with a damp sponge, leaving color only in the deep crevices. -
Apply Glaze:
Dip the tile or brush on a clear matte or satin glaze. This seals the clay while allowing the natural speckles and the leaf detail to shine through. -
Final Fire:
Fire the tile again to the maturation temperature of your specific clay body (likely Cone 5 or 6 for stoneware).
Once cooled, your ceramic tile is ready to be used as a coaster or framed as a permanent piece of nature-inspired art


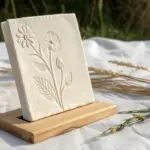
Sunflower Bas-Relief Tiles
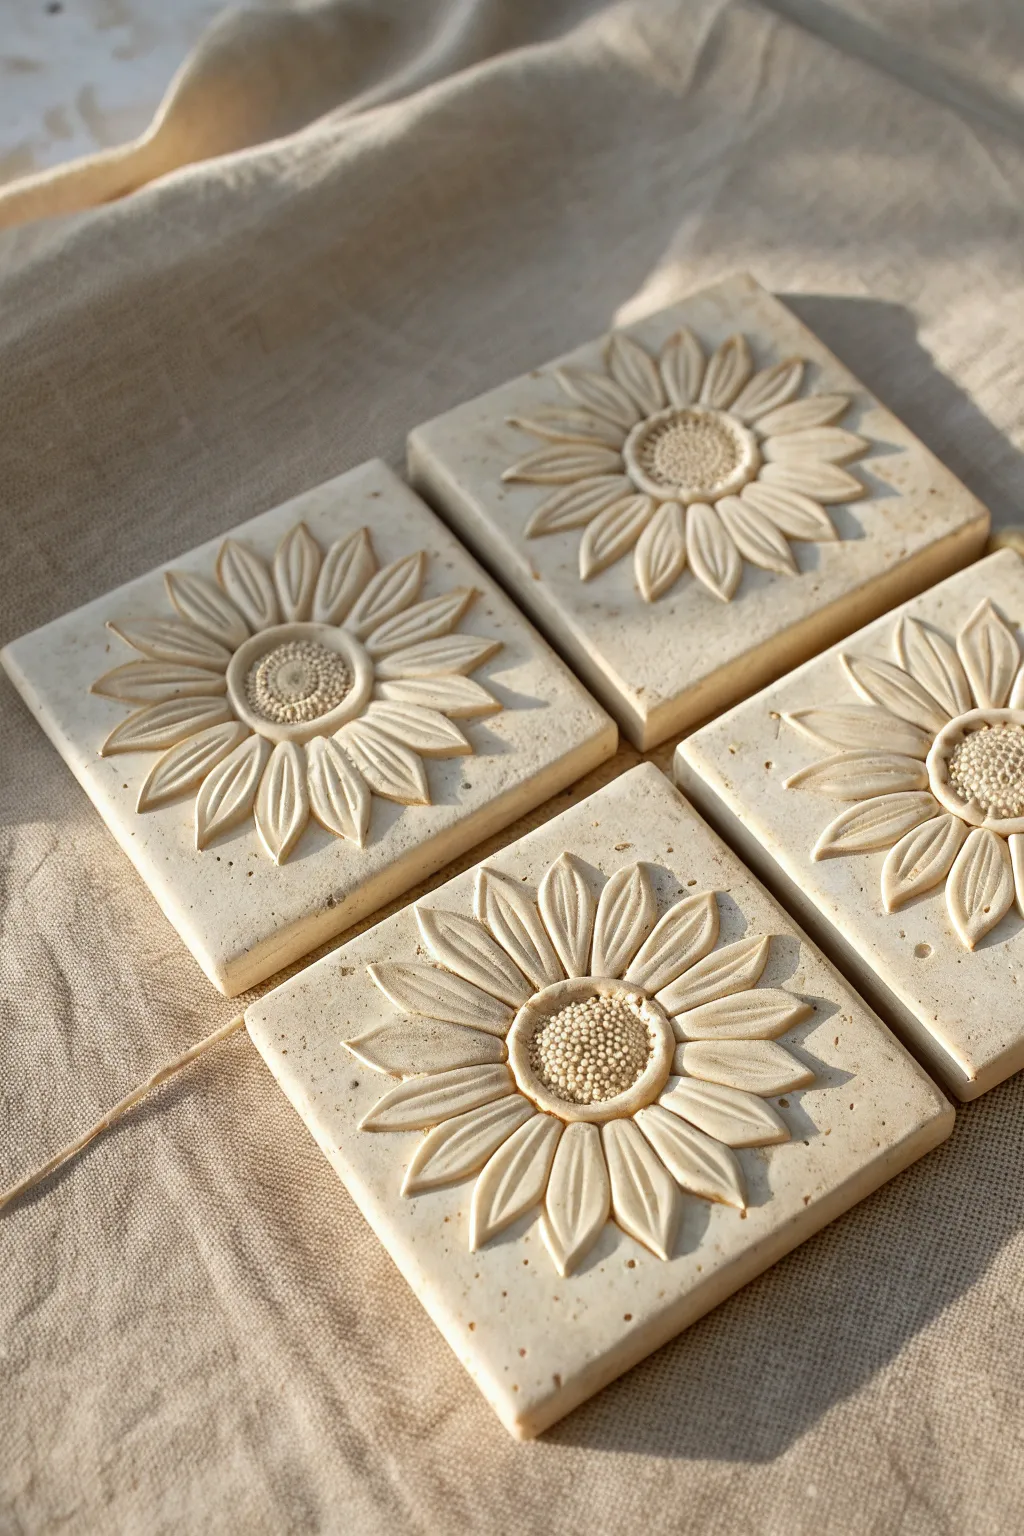
Capture the warmth of summer with these elegant bas-relief sunflower tiles crafted from creamy speckled clay. Their dimensional petals and textured centers create a beautiful interplay of light and shadow, perfect for garden accents or a rustic backsplash.
Step-by-Step Guide
Materials
- Light-colored stoneware clay (with fine grog or speckles)
- Square tile cutter or ruler and needle tool
- Rolling pin
- Guide sticks or slats (approx. 0.75 cm thick)
- Sunflower plaster mold or sprig mold (approx. 3-4 inches wide)
- Cornstarch or clay release powder
- Scoring tool or serrated rib
- Slip (liquid clay)
- Modeling tools (wooden or rubber tipped)
- Sponge
- Canvas or ware board
Step 1: Base Preparation
-
Roll the Slab:
Begin by wedging your clay to remove air bubbles, then roll it out into a smooth slab. Use wooden guide sticks on either side of your clay to ensure an even thickness of about 0.75 cm. -
Cut Squares:
Using your square cutter or a ruler and needle tool, cut four identical squares. Aim for dimensions slightly larger than your final desired size to account for shrinkage, perhaps 4×4 or 5×5 inches. -
Smooth Edges:
Gently run a damp sponge or your finger along the cut edges of each square to soften sharp corners and remove any burrs left by the cutting tool. -
Dry to Leather Hard:
Place your squares on a ware board covered with canvas. Let them dry slowly until they reach a leather-hard state—firm enough to handle without bending, but still moist enough to accept attachments.
Warping Woes
If tiles curl up at the corners while drying, flip them over daily and sandbag the edges with small weights to keep them flat.
Step 2: Creating the Sunflower Relief
-
Prepare the Mold:
While your tiles firm up, take a small ball of fresh clay and your sunflower plaster mold. Dust the mold lightly with cornstarch to prevent sticking. -
Press the Clay:
Press the ball of clay firmly into the mold, ensuring it fills every crevice of the petals and the seeded center. Use your thumb to pack it tight. -
Level the Back:
Scrape the back of the clay flush with the mold surface using a straight edge or wire tool so the sunflower appliqué will be flat on the reverse side. -
Release the Sprig:
Gently tap the mold or use a small ball of sticky clay to pull the molded sunflower out. You now have a ‘sprig’ ready for attachment.
Step 3: Assembly and Refining
-
Score the Surfaces:
Identify the center of your leather-hard tile. Use a scoring tool to scratch up the surface area where the sunflower will sit. Do the same to the flat back of your sunflower sprig. -
Apply Slip:
Dab a generous amount of slip onto the scored area of the tile. This acts as the glue that bonds the two pieces of clay together. -
Attach the Sunflower:
Place the sunflower sprig onto the center of the tile. Press down firmly but gently, starting from the center and working out to the petals, being careful not to squash the detailed relief. -
Clean Up Excess:
I like to use a small brushes or a rubber-tipped tool to wipe away any slip that oozes out from underneath the petals, keeping the transition between the flower and the background crisp. -
Refine Details:
If any petal definition was lost during pressing, use a modeling tool to re-carve the lines. gently stipple the center seeds again if they need more texture. -
Final Surface Check:
Inspect the plain background of the tile. Smooth out any accidental fingerprints or tool marks with a barely damp sponge for a pristine finish. -
Slow Drying:
Cover the finished tiles with plastic loosely. Allow them to dry very slowly over several days to prevent the tiles from warping or the relief from pulling away. -
Bisque Fire:
Once bone dry, fire the tiles in a kiln to a bisque temperature (usually Cone 04). This hardens the clay and prepares it for glazing or finishing. -
Finishing Touch:
Depending on your preference, leave them bare for a natural stone look as shown in the photo, or apply a clear matte glaze to seal them before a final glaze firing.
Pro Tip: Custom Texture
Press a piece of coarse linen onto the background clay before attaching the flower to give the tile a subtle fabric-like texture.
Finish by arranging your set of tiles to admire the subtle variations in each handcrafted blossom

Sea Turtle Shell Relief Tiles
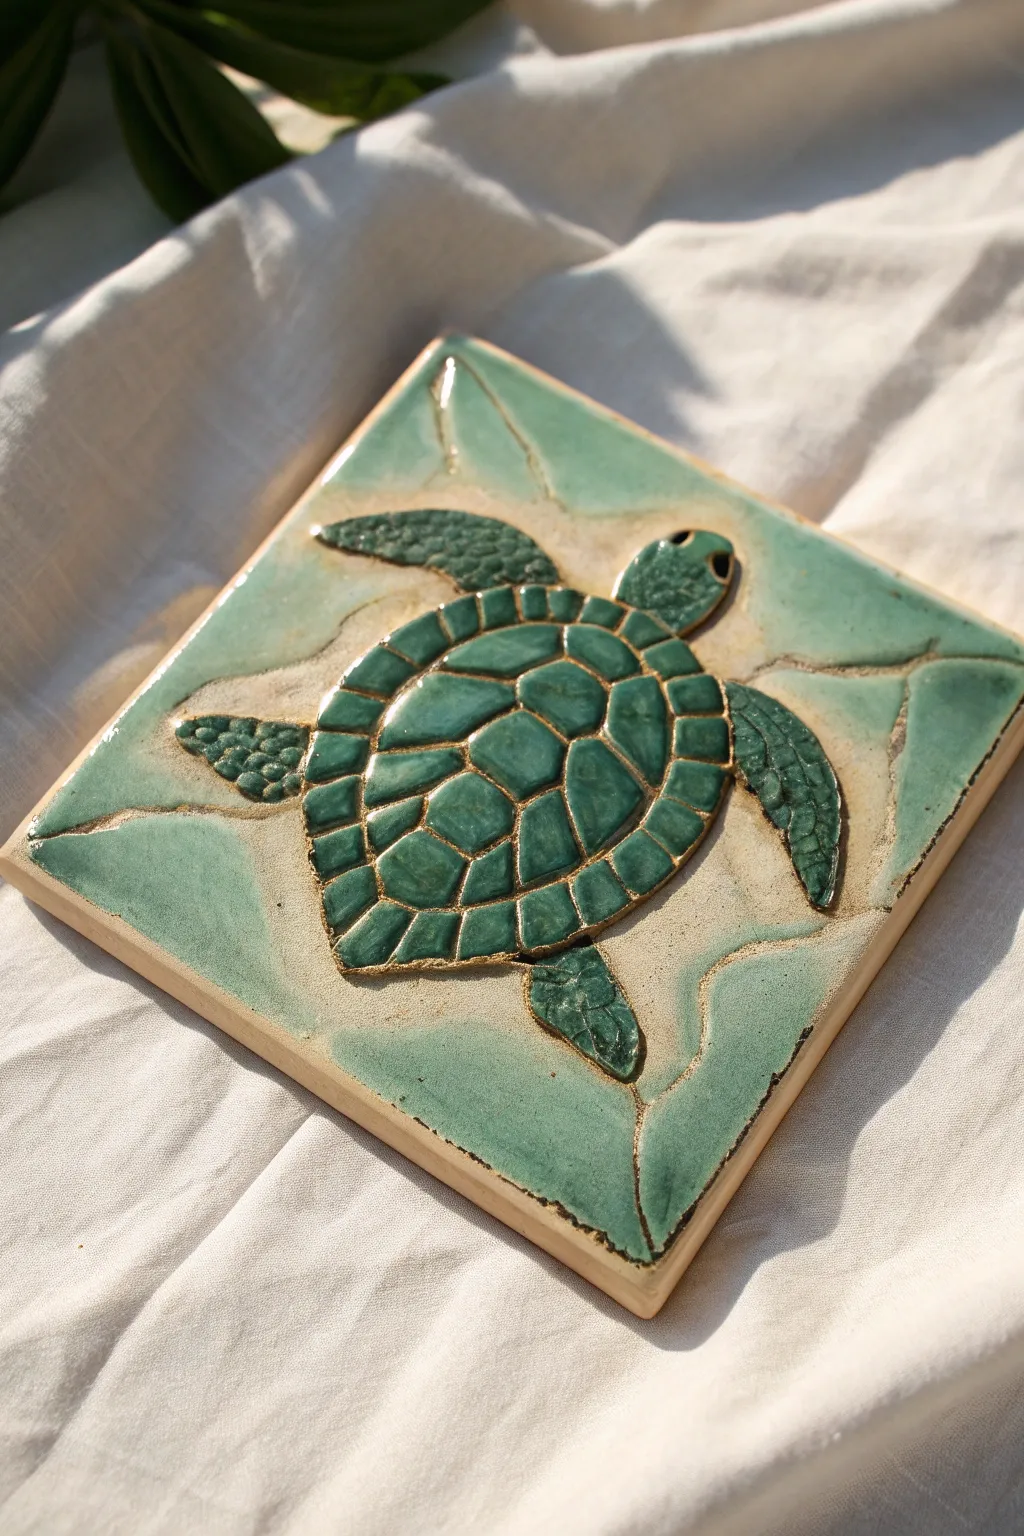
Capture the serenity of the ocean with this beautiful ceramic relief tile featuring a swimming sea turtle. The project uses a unique crackle-glazing technique to create the illusion of shallow water ripples over a sandy seabed.
Step-by-Step
Materials
- Stoneware clay slab (approx. 1/2 inch thick)
- Needle tool
- Loop carving tools (small and medium)
- Sponge
- Rolling pin and guide sticks
- Turtle template (paper printout)
- Seafoam green crackle glaze
- Dark teal or forest green glossy glaze
- Wax resist
- Soft glaze brushes
- Clean canvas or workspace
Step 1: Shaping the Foundation
-
Prepare the slab:
Begin by rolling out your stoneware clay to a uniform thickness, using guide sticks to ensure it is level. A thickness of about 1/2 inch is ideal to prevent warping during firing. -
Cut the tile:
Measure and cut a perfect square from your slab. Smooth the edges with a damp sponge to remove any sharp burrs or clay crumbs. -
Transfer the design:
Place your paper turtle template gently onto the center of the damp clay. Lightly trace the outline of the turtle with a dull pencil or stylus so the impression transfers to the clay surface.
Glaze Crawling?
If the glaze pulls away too much, your wax lines might be too wide. Use a thinner brush for wax next time, or scrape excess wax off with a blade before glazing.
Step 2: Sculpting the Relief
-
Carve the background:
Using a medium loop tool, carefully carve away the clay around the turtle outline. You want to lower the background by about 1/8 to 1/4 inch, leaving the turtle raised. -
Define the shell:
Use a needle tool to lightly draw the geometric scutes (the shell pattern) onto the turtle’s back. Pressing gently creates grooves that will catch the glaze later. -
Add texture to flippers:
Stipple or lightly scratch texture onto the flippers and head to mimic the wrinkly, scaled skin of a sea turtle. I like to use a small ball tool for this to keep it organic. -
Smooth the background:
Go back over the recessed background area with a damp sponge or your finger to smooth out tool marks, creating a gentle, flat surface for the water effect. -
Create water lines:
Carve uneven, wandering lines into the background clay extending from the turtle. These deep grooves will separate the glaze later to create the cracked earth or ripple effect.
Ocean Sparkle
Add a pinch of crushed clear glass into the deepest parts of the background cracks before the final firing for a wet, glistening pool effect.
Step 3: Bisque & Glazing
-
Bisque fire:
Allow your tile to dry slowly and completely to avoid warping. Once bone dry, fire it in the kiln to a bisque temperature (usually barely cone 04). -
Wax the outlines:
Apply a thin line of wax resist along the very edges of the turtle and inside the deep background grooves you carved. This reveals the raw clay body in the final piece. -
Glaze the turtle:
Paint two to three coats of the dark teal/forest green glaze onto the turtle. Ensure the glaze pools slightly in the shell grooves to emphasize the pattern. -
Glaze the water:
Apply the seafoam green crackle glaze to the background areas. Be careful not to let it cross the wax resist lines; wipe away any drips immediately. -
Final fire:
Fire the tile again to the maturation temperature of your specific glazes (often cone 5 or 6 for stoneware).
Now you have a stunning piece of ceramic art that brings a touch of the sea to your home


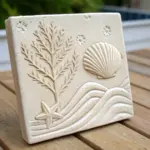
Starfish and Sandy Texture Tiles
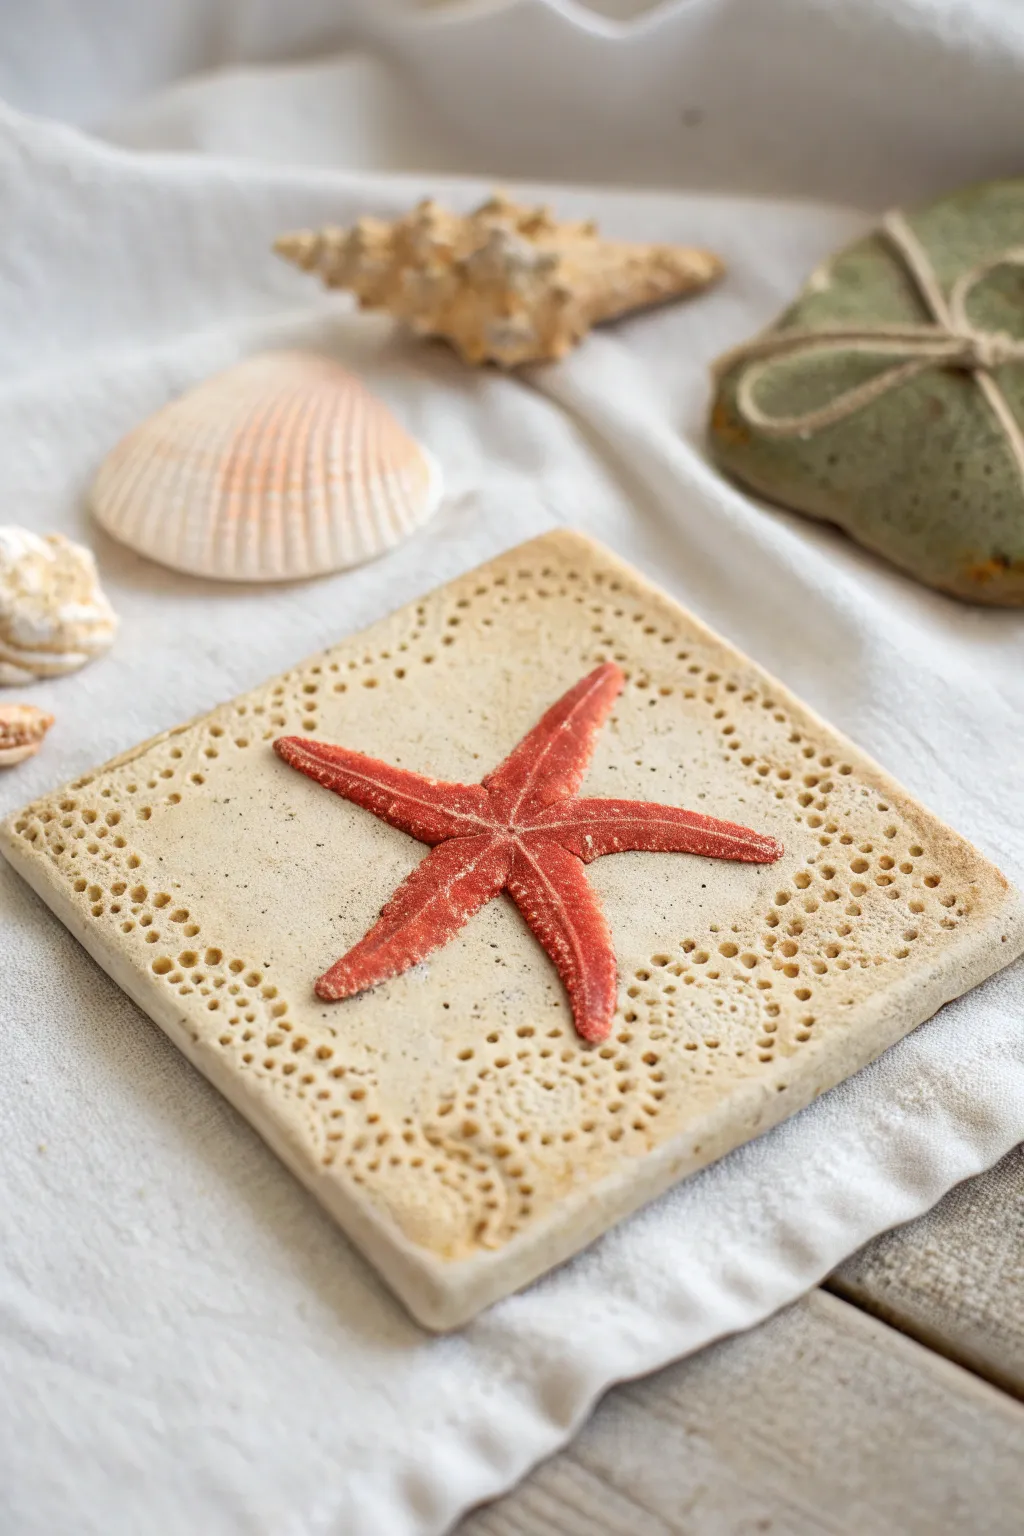
Capture the essence of a beach walk with this textured ceramic tile featuring delicate lace impressions and a vibrant red starfish. This mixed-media approach combines slab building with surface decoration to create a stunning piece of dimensional wall art or a unique trivet.
Detailed Instructions
Materials
- White earthenware clay (low-fire)
- Rolling pin
- Two wooden guide strips (approx. 1/4 inch thick)
- Square tile cutter or fettling knife and ruler
- Cotton lace doily (crocheted style works best)
- Real dried starfish (small size)
- Sponge
- Clear glaze (low-fire)
- Red underglaze (or acrylic paint if not firing)
- Small liner brush
- Sandpaper (fine grit)
- Kiln (optional, see note on air-dry clay)
Step 1: Creating the Base Tile
-
Prepare the Clay:
Begin by wedging a ball of white earthenware clay to remove air bubbles and ensure a uniform consistency. -
Roll the Slab:
Place the clay between two wooden guide strips on a canvas surface. Roll the clay out until it is perfectly flat and matches the thickness of the guides. -
Add Texture:
Place a cotton lace doily over the surface of the wet clay. I prefer to position it so the intricate border pattern aligns nicely with the edges of where I plan to cut the tile. -
Impress the Pattern:
Gently roll over the doily with the rolling pin once. Use firm, even pressure to push the fabric texture deep into the clay surface without distorting the slab’s thickness too much. -
Reveal the Design:
Carefully peel back the doily to reveal the imprinted lace pattern. Smooth any rough bits with a fingertip if necessary. -
Cut the Shape:
Using a square tile cutter or a ruler and fettling knife, cut a clean square from the textured slab, aiming for about 4×4 or 6×6 inches.
Clean Impressions
Dust the lace doily lightly with cornstarch before rolling it into the clay. This acts as a release agent and prevents the fabric from sticking or pulling up bits of clay.
Step 2: Adding the Starfish Element
-
Create the Starfish Form:
There are two ways to do this. For a fully ceramic piece, press a real dried starfish into a scrap of clay to make a mold, then press fresh clay into that mold to create a replica. -
Attach the Starfish:
Score the center of the tile and the back of your clay starfish. Apply slip (liquid clay) to both scored areas. -
Refine the Connection:
Press the starfish firmly onto the center of the tile. Use a small modeling tool to gently blend the underside of the starfish arms onto the tile surface for a secure bond. -
Detailing:
Use a needle tool or stiff brush to re-texture the starfish surface, mimicking its natural porous look if it got smoothed out during attachment. -
Drying:
Allow the tile to dry slowly between two pieces of drywall or under loose plastic to prevent the corners from curling up. Wait until it is bone dry. -
Bisque Fire:
Fire the piece in a kiln to cone 04 (or according to your clay body’s instructions) to create bisque ware.
Add Sparkle
Sprinkle a tiny pinch of coarse sand or granular frit into the wet glaze on the background before firing to give the tile a genuine gritty, beach-like texture.
Step 3: Glazing and Finishing
-
Highlight the Texture:
To enhance the ‘sandy’ look of the background, dab a very watered-down iron oxide wash or tan underglaze over the lace texture, then wipe most of it away with a damp sponge. -
Paint the Starfish:
Apply three coats of bright red underglaze specifically to the starfish. Use a small liner brush to respect the edges where the starfish meets the textured background. -
Seal the piece:
Apply a coat of clear, matte, or satin glaze over the entire tile. A matte finish looks more like natural stone and sand. -
Final Fire:
Fire the tile again to the temperature required by your glaze (usually cone 05 or 06). -
Alternative Finish:
If you used air-dry clay instead of ceramic, paint the starfish with red acrylic paint and use a diluted brown acrylic wash for the lace texture, sealing afterward with a matte varnish.
Display your finished tile on a stand or use it as a coaster to bring a permanent touch of summer to your home

The Complete Guide to Pottery Troubleshooting
Uncover the most common ceramic mistakes—from cracking clay to failed glazes—and learn how to fix them fast.
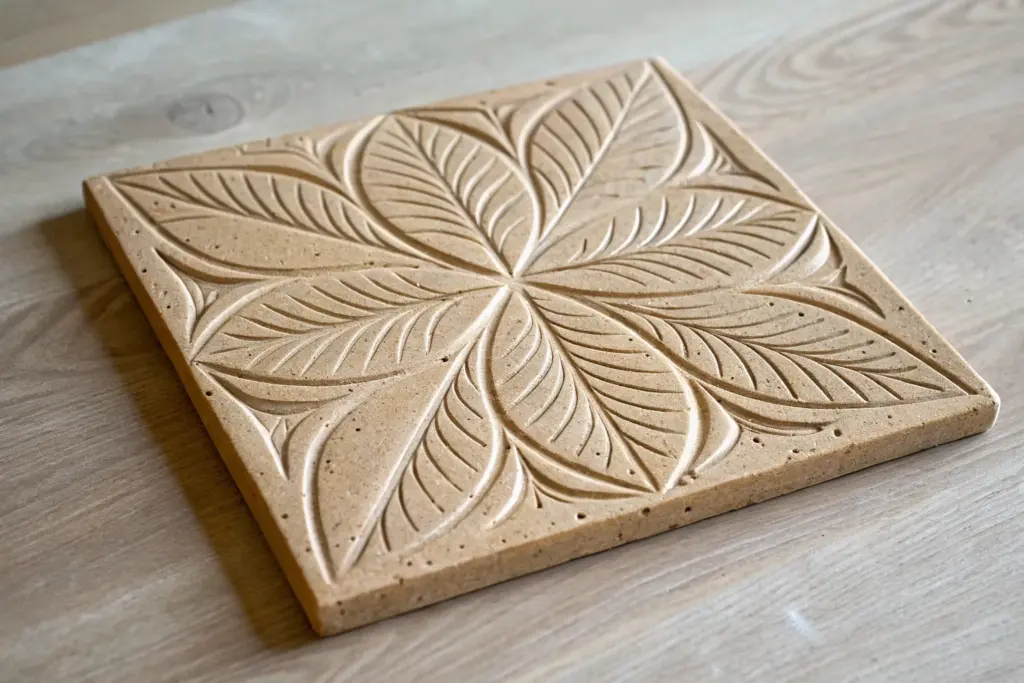
Simple Geometric Carved Line Tiles
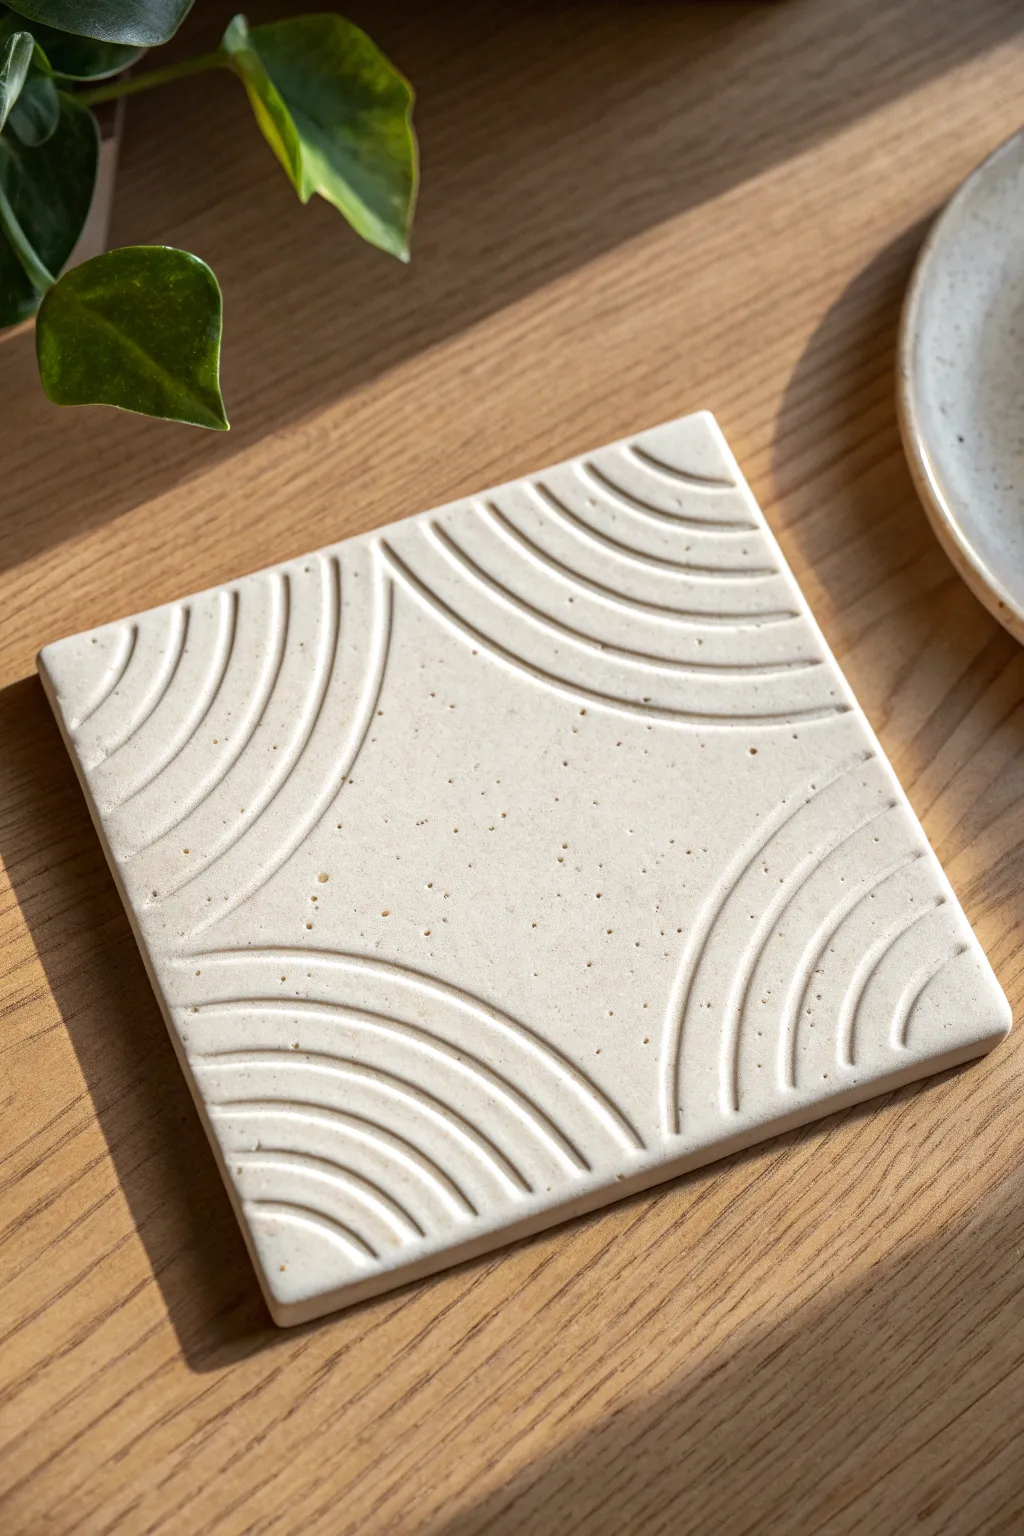
This elegant ceramic project features a minimalist design created by simply carving repetitive geometric arcs into leather-hard clay. The result is a beautifully textured limestone-colored tile that works perfectly as a sophisticated coaster or architectural accent.
Step-by-Step Tutorial
Materials
- White or speckled stoneware clay
- Rolling pin
- Two 1/4-inch wooden guide strips (for even thickness)
- Square tile cutter or ruler and needle tool
- A round object or template (about 3-4 inches diameter) for guiding curves
- Wire loop tool or U-shaped carving tool
- Sponge
- Sandpaper (fine grit)
- Clear matte glaze (optional)
- Small kiln (or access to a firing service)
Step 1: Preparation & Shaping
-
Wedge the clay:
Begin by thoroughly wedging your stoneware clay to remove any air bubbles and ensure a uniform consistency. -
Set up guides:
Place your 1/4-inch wooden guide strips on a canvas or cloth-covered work surface, spacing them wide enough to accommodate your tile size. -
Roll the slab:
Roll your clay between the guide strips until the rolling pin rests on the wood, ensuring a perfectly even thickness across the entire slab. -
Compress the surface:
Take a rubber rib or a damp sponge and gently smooth over the surface of the clay slab to compress the particles, which helps prevent warping later. -
Cut the square:
Using a square tile cutter or a ruler with a needle tool, cut a precise 4×4 inch (or your desired size) square from the slab. -
Dry to leather hard:
Let the tile sit uncovered for a few hours or loosely covered overnight until it reaches a ‘leather-hard’ state—firm enough to hold its shape but soft enough to carve easily.
Warping Worries?
Tiles love to warp. Dry them very slowly. Flip them over every few hours during the drying phase, or weigh down the corners gently.
Step 2: Carving the Design
-
Mark the corners:
Visualize the four corners of your square as the center points for your concentric circles. -
Plan the first arc:
I like to lightly sketch the first arc with a needle tool near one corner to ensure spacing is correct before committing to the deep carve. -
Carve the outer arcs:
Using your loop tool, carve the largest arc connecting two adjacent sides near a corner. Keep your hand steady and apply even pressure. -
Create the concentric pattern:
Move inward toward the corner, carving parallel arcs with approximately 1/4-inch spacing between each line. -
Repeat for all corners:
Rotate the tile and repeat the concentric arc pattern on the remaining three corners, leaving a diamond-shaped negative space in the center. -
Clean the burrs:
Allow the clay to dry slightly more, then use a stiff brush or finger to gently flick away the little crumbs of clay (burrs) creating during carving. -
Soften edges:
Run a damp sponge along the sharp outer edges of the square to slightly round them off, making the finished piece more durable.
Add Dimension
Before the final firing, rub an iron oxide wash into the carved grooves and wipe the surface clean to make the lines pop with dark contrast.
Step 3: Firing & Finishing
-
Bone dry drying:
Sandwich the tile between two pieces of drywall board or place a weight on top while it dries completely to bone dry; this is crucial for keeping it perfectly flat. -
Bisque fire:
Load the bone-dry tile into the kiln for a bisque firing (usually Cone 04) to harden the clay. -
Sanding (optional):
Once fired, use fine-grit sandpaper to smooth out any rough spots or sharp ridges left from the carving tool. -
Glazing:
For the look in the image, leave the raw clay unglazed or apply a very thin coat of clear matte glaze to protect the surface while maintaining the stone texture. -
Final firing:
Fire the tile a second time to the maturity temperature of your specific clay body (often Cone 5 or 6 for stoneware).
Now you have a stunning, geometrically carved ceramic piece ready to display or use
Tessellating Triangle Pattern Tiles
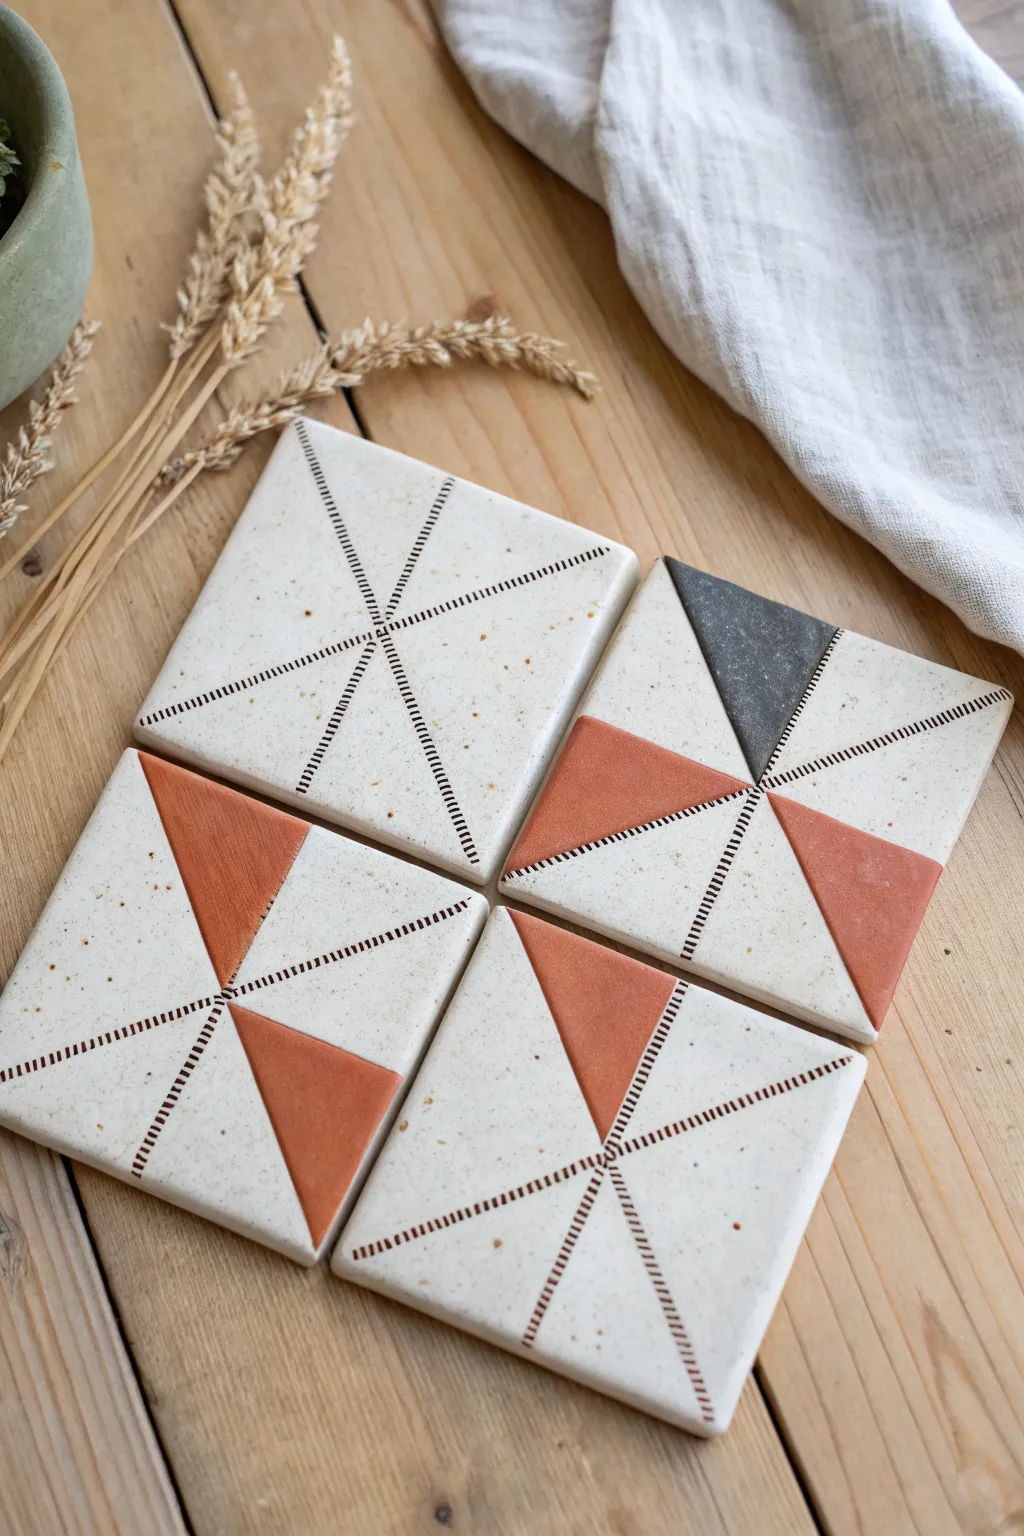
These contemporary square tiles combine minimalist carving with bold geometric glazing for a striking finish. The speckled clay body adds warmth and texture, making them perfect for stylish coasters or a custom backsplash feature.
Step-by-Step
Materials
- Speckled stoneware clay (white or cream)
- Square tile cutter or ruler and knife
- Rolling pin with depth guides (approx. 1/4 inch)
- Needle tool or scoring tool
- Underglaze (Terracotta/Rust Orange and Dark Grey/Black)
- Small flat brush for glazing
- Clear matte or satin glaze
- Clean sponge and water
- Canvas board or ware board
Step 1: Shaping the Tiles
-
Roll out the clay:
Begin by wedging your speckled clay to remove air bubbles. Roll it out into an even slab about 1/4 inch thick. Using depth guides will ensure uniform thickness, which is crucial for tiles so they dry evenly without warping. -
Cut the squares:
Using a square tile cutter or a ruler and a sharp fettling knife, cut out four identical 4-inch squares. Clean up the edges with a slightly damp sponge to smooth any roughness. -
Dry partially:
Allow the tiles to dry to a ‘leather-hard’ state. This means the clay is firm enough to hold its shape and be carved into without deforming, but still contains moisture. I usually check them after about 2-4 hours depending on humidity.
Warping Prevention
Dry tiles extremely slowly. I place a weighted board on top of them while they dry between sheets of drywall or newspaper to keep them perfectly flat.
Step 2: Carving the Design
-
Mark the center:
Lightly mark the exact center of each square tile with a pin tool. This doesn’t need to be deep, just a visual guide. -
Score the lines:
Using a ruler, lightly scratch four lines radiating from the center point to the edges, creating an irregular ‘X’ shape. Vary the angles slightly so the triangles created aren’t perfectly symmetrical. -
Create the texture:
Instead of carving solid lines, press a small, flat-edged tool or a specialized texture rib along your guide lines to create a ‘stitched’ or dashed effect. Press firmly enough to create a texture that glaze will pool into later. -
Clean up burrs:
Once the carving is complete, gently brush away any clay crumbs. If there are sharp burrs, smooth them very lightly with your finger or a soft brush, careful not to erase the texture.
Make it a Set
Create a mural effect by ensuring the lines on the edge of one tile match up perfectly with the lines on the next tile.
Step 3: Glazing & Firing
-
Bisque fire:
Allow the tiles to dry completely to bone dry. Fire them to bisque temperature (usually Cone 04) based on your clay’s specifications. -
Apply masking tape:
Once bisque fired, use masking tape or painter’s tape to block off sections of the tile. Tape along the dashed lines to create crisp triangular areas for glazing. -
Paint the triangles:
Apply your terracotta or rust-colored underglaze to specific triangular sections. For one tile, you might choose a single triangle; for another, two opposite triangles. Use a dark grey underglaze for a single accent triangle on one tile. -
Highlight the stitching:
Mix a small amount of dark underglaze with water to create a wash. Paint this into the dashed lines and then wipe the surface back with a damp sponge. This leaves the dark color in the recesses, highlighting the stitched effect. -
Remove tape:
Carefully peel away the masking tape while the underglaze is still slightly damp to ensure clean, sharp lines. -
Apply clear glaze:
Once the underglaze is dry, dip or brush a clear matte or satin glaze over the entire tile. This seals the clay and brings out the speckles. -
Final fire:
Fire the tiles a second time to the maturation temperature of your glaze and clay body (often Cone 5 or 6). Ensure the tiles are flat on the kiln shelf to prevent warping.
Once cool, add cork backing to your new tiles to protect your surfaces and enjoy your modern handmade creation


What Really Happens Inside the Kiln
Learn how time and temperature work together inside the kiln to transform clay into durable ceramic.
Lace-Pressed Pattern Tiles
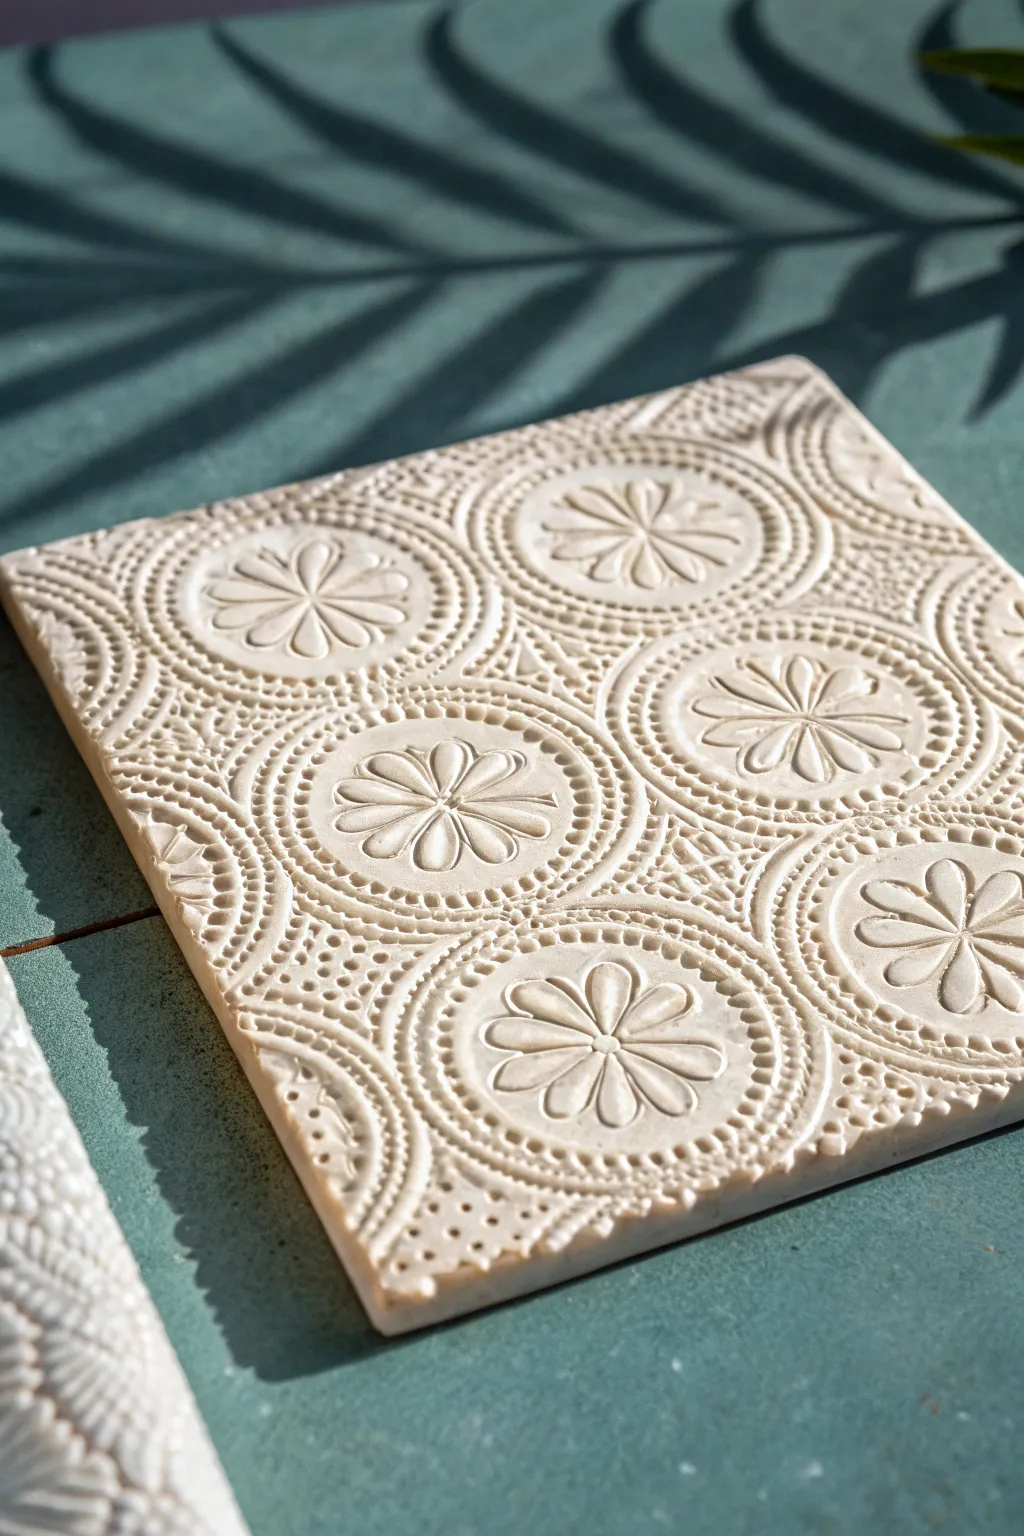
This elegant project transforms a slab of plain clay into a sophisticated design piece using nothing more than a scrap of textured fabric or a stamp. The finished tile features raised floral motifs and intricate dotted borders, resulting in a tactile surface with a classic, artisanal feel.
Detailed Instructions
Materials
- White stoneware or porcelain clay
- Rolling pin
- Wooden guide strips (1/4 inch thick)
- Canvas work surface or cloth
- Lace doily or textured rubber stamp with mandala pattern
- Cornstarch (for release)
- Square tile cutter or fettling knife
- Ruler
- Sponge
- Rib tool (smooth metal or rubber)
Step 1: Preparing the Slab
-
Setup:
Set up your workspace by laying down a piece of canvas. This prevents the clay from sticking to your table as you roll it out. -
Wedging:
Take a manageable chunk of your white stoneware clay and wedge it thoroughly to remove any air bubbles, which ensures a smooth surface for the pattern. -
Initial rolling:
Place the clay between your two wooden guide strips. These strips are crucial for maintaining a perfectly even thickness across the entire tile. -
Flattening:
Roll the clay out with your rolling pin until the pin rides along the guide strips. I like to flip the slab once during this process to ensure even compression on both sides. -
Smoothing:
Take your rib tool and gently compress the surface of the clay slab. Smooth out any canvas texture or small imperfections to create a pristine ‘blank canvas’ for your texture.
Step 2: Impressing the Design
-
Dusting:
Lightly dust the surface of your clay with a small amount of cornstarch. This acts as a release agent so your texture tool won’t stick and tear the clay. -
Placement:
Position your lace doily or rubber texture mat carefully on top of the smooth slab. If you are using a smaller stamp to create a repeating pattern, plan your spacing before the first press. -
Rolling the texture:
Using the rolling pin, roll firmly over the texture material one time. Do not roll back and forth, as this can cause ghost images; just use one confident pass with consistent pressure. -
Revealing the pattern:
Gently lift the lace or mat straight up and off the clay. You should see a deep, crisp impression of the floral and dotted details.
Fixing Sticking Lace
If the lace pulls up chunks of clay, your clay is too wet. Let the slab sit for 15 minutes to firm up, and use more cornstarch before trying again.
Step 3: Cutting and Finishing
-
Measuring:
Place your ruler or square template over the impressed clay to frame the design exactly how you want it centered. -
Cutting:
Use a fettling knife or a square tile cutter to cut the tile shape. Keep the blade perpendicular to the table for straight, clean edges. -
Releasing:
Carefully lift the excess clay away from the square tile, leaving the finished piece on the canvas. -
Edge cleanup:
Once the clay has stiffened slightly to a ‘leather hard’ state, gently run a damp sponge or your finger along the cut edges to soften any sharpness without disturbing the surface texture. -
Drying:
Place the tile on a piece of drywall or between two pieces of drywall to dry slowly. This helps prevent the corners from warping upwards. -
Bisque firing:
Fire the bone-dry tile in a kiln to the appropriate cone for your specific clay body (usually Cone 04 or 06 for bisque). -
Glazing (Optional):
For the look in the photo, leave the tile unglazed or apply a clear matte glaze to protect the surface while keeping the raw texture visible.
Highlighting Texture
After bisque firing, wipe a dark oxide wash (like iron oxide) over the tile and sponge it off the high points to make the floral pattern pop.
Now you have a beautifully textured tile ready for display or installation in your home
Pebble and Bubble Add-On Tiles
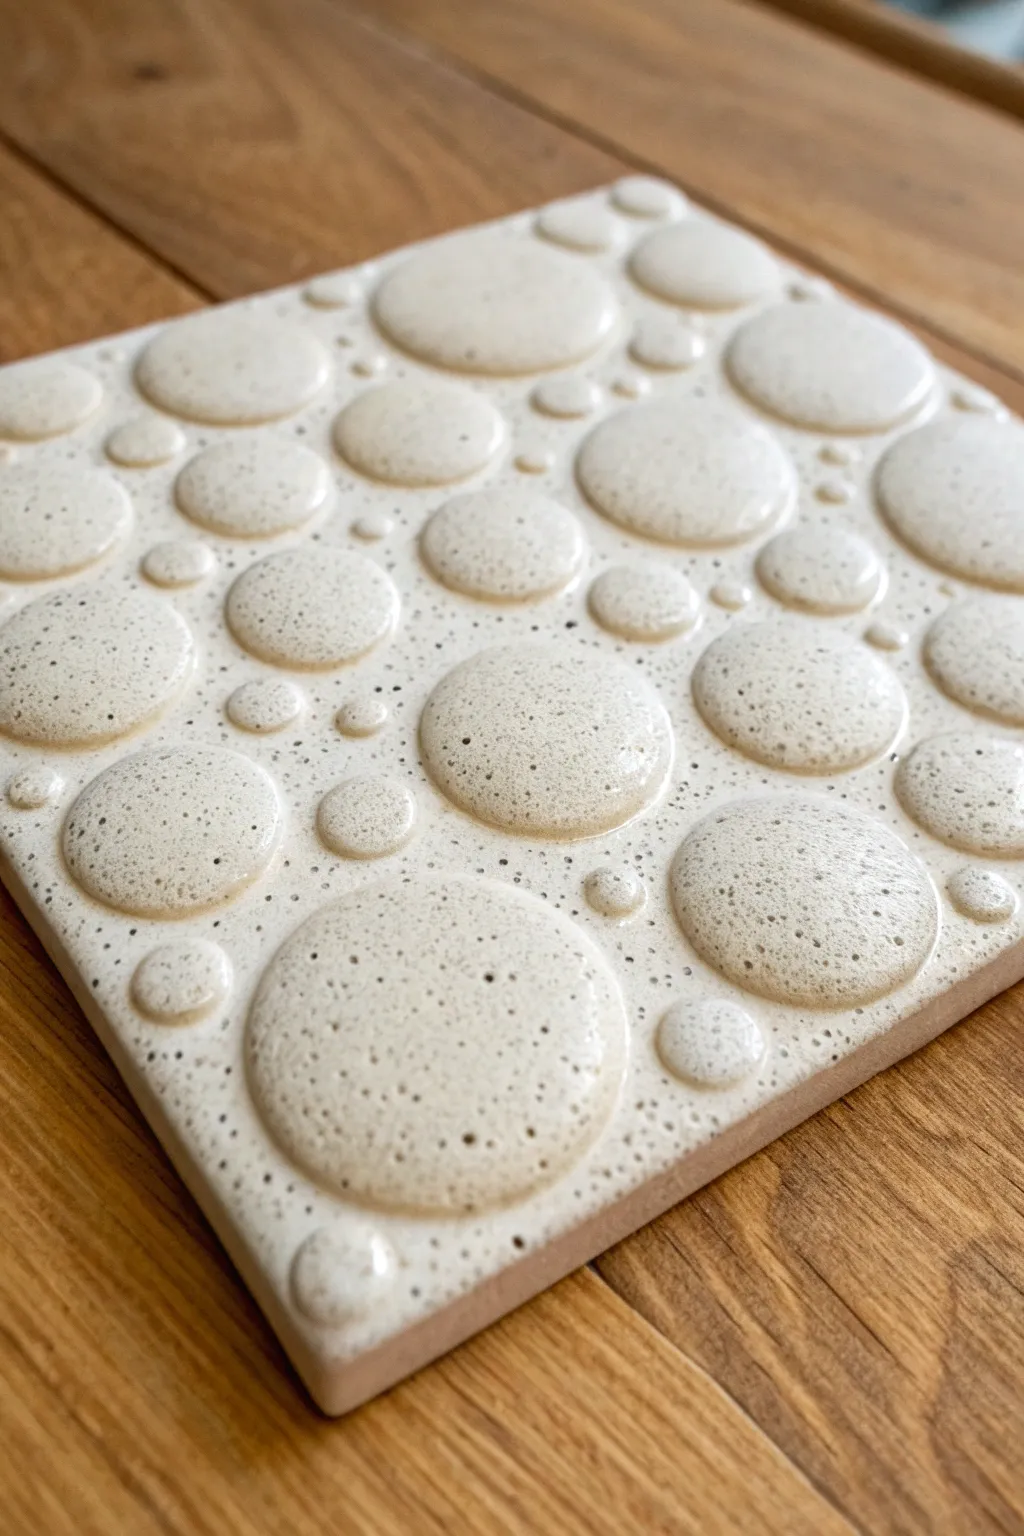
This project transforms a simple slab of clay into a tactile, bubbly surface that feels wonderful to the touch and adds modern dimension to any wall. By using a creamy, speckled glaze on various sized relief circles, you achieve a sophisticated organic look reminiscent of sea foam or river stones.
Step-by-Step
Materials
- Light buff or white stoneware clay (smooth body)
- Rolling pin
- Two wooden guide slats (approx. 1/4 inch thick)
- Tile cutter or square template (4×4 or 6×6 inch)
- Various circle cutters (cookie cutters, piping tips, bottle caps)
- Scoring tool and slip
- Soft rib tool (rubber or silicone)
- Sponge
- Creamy speckled glaze (gloss or semi-gloss)
- Clear glaze (optional)
Step 1: Creating the Base
-
Roll the slab:
Begin by rolling out a smooth slab of clay. Use your wooden guide slats on either side of the clay perfectly even thickness, which is crucial for tiles to prevent warping. -
Compress the clay:
Take your soft rubber rib tool and drag it firmly across the surface of the clay in multiple directions. This compression aligns the clay particles and creates a smooth, professional canvas for your bubbles. -
Cut the tile shape:
Using your square template or tile cutter, press down to cut your desired square shape. Don’t move the tile yet; handling it too much now can distort the straight edges.
Clean Connection Tip
Use a soft paintbrush dipped in water to run around the base of each attached ‘bubble.’ This smooths the seam instantly and looks cleaner than using a tool.
Step 2: Forming the Bubbles
-
Cut the circles:
Roll out a second, slightly thinner slab of clay. Use your assortment of circle cutters to punch out varied sizes of circles—large, medium, and tiny dots. -
Clean the edges:
Once cut, gently run your finger around the edge of each clay circle to smooth out any sharp cutting burrs. I find a slightly damp finger works best for this. -
Dome the circles:
cup each clay circle gently in your palm and press the center lightly with your thumb from the back, or press them against a smooth stone to give them a slight dome shape so they look like 3D bubbles rather than flat stickers. -
Plan your layout:
Ideally, arrange the dry-fitted clay circles on top of your square base without attaching them yet. Play with the composition, mixing sizes to create a random, organic scattering.
Go Geometric
Instead of random placement, arrange the bubbles in a grid or concentric circles. You can also square-off the bubbles for a pixelated 8-bit relief texture.
Step 3: Assembly and Refining
-
Score the surfaces:
Lift one bubble at a time. Use your scoring tool or a serrated kidney to rough up the spot on the base tile and the back of the bubble. -
Apply slip:
Dab a small amount of clay slip onto the scored area of the bubble. -
Attach firmly:
Press the bubble firmly onto the tile. Wiggle it very slightly to ensure a strong bond and to release any trapped air pockets, which could cause explosions in the kiln. -
Clean up connections:
Use a small, damp brush to wipe away any excess slip that oozed out from under the bubbles. This keeps the transition between the background and the relief crisp. -
Dry slowly:
Place another board or a sheet of plastic loosely over the tile to let it dry very slowly. Tiles are prone to warping, and slow drying helps keep the corners flat.
Step 4: Glazing and Firing
-
Bisque fire:
Once bone dry, fire the tile to a bisque temperature according to your clay body’s specifications (usually Cone 04 or 06). -
Wipe down:
After the kiln cools, use a damp sponge to wipe any dust off the bisque tile to ensure the glaze adheres properly. -
Apply glaze:
Brush or dip your creamy speckled glaze onto the tile. Ensure the glaze pools slightly around the base of the bubbles, as this emphasizes the dimension. -
Check the thickness:
If your glaze breaks (becomes transparent) on high points, apply a second coat just to the very tops of the bubbles to ensure that solid, glossy white finish. -
Final fire:
Glaze fire the tile to maturity (e.g., Cone 5 or 6). Make sure the bottom of the tile is completely free of glaze, or use stilts, to prevent it from sticking to the kiln shelf.
Once fired, you can mount this piece individually or grout several together for a stunning feature wall

TRACK YOUR CERAMIC JOURNEY
Capture glaze tests, firing details, and creative progress—all in one simple printable. Make your projects easier to repeat and improve.
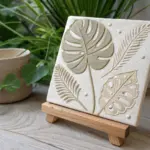
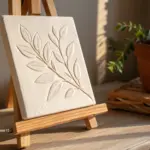
Botanical Vein Carving Study Tiles
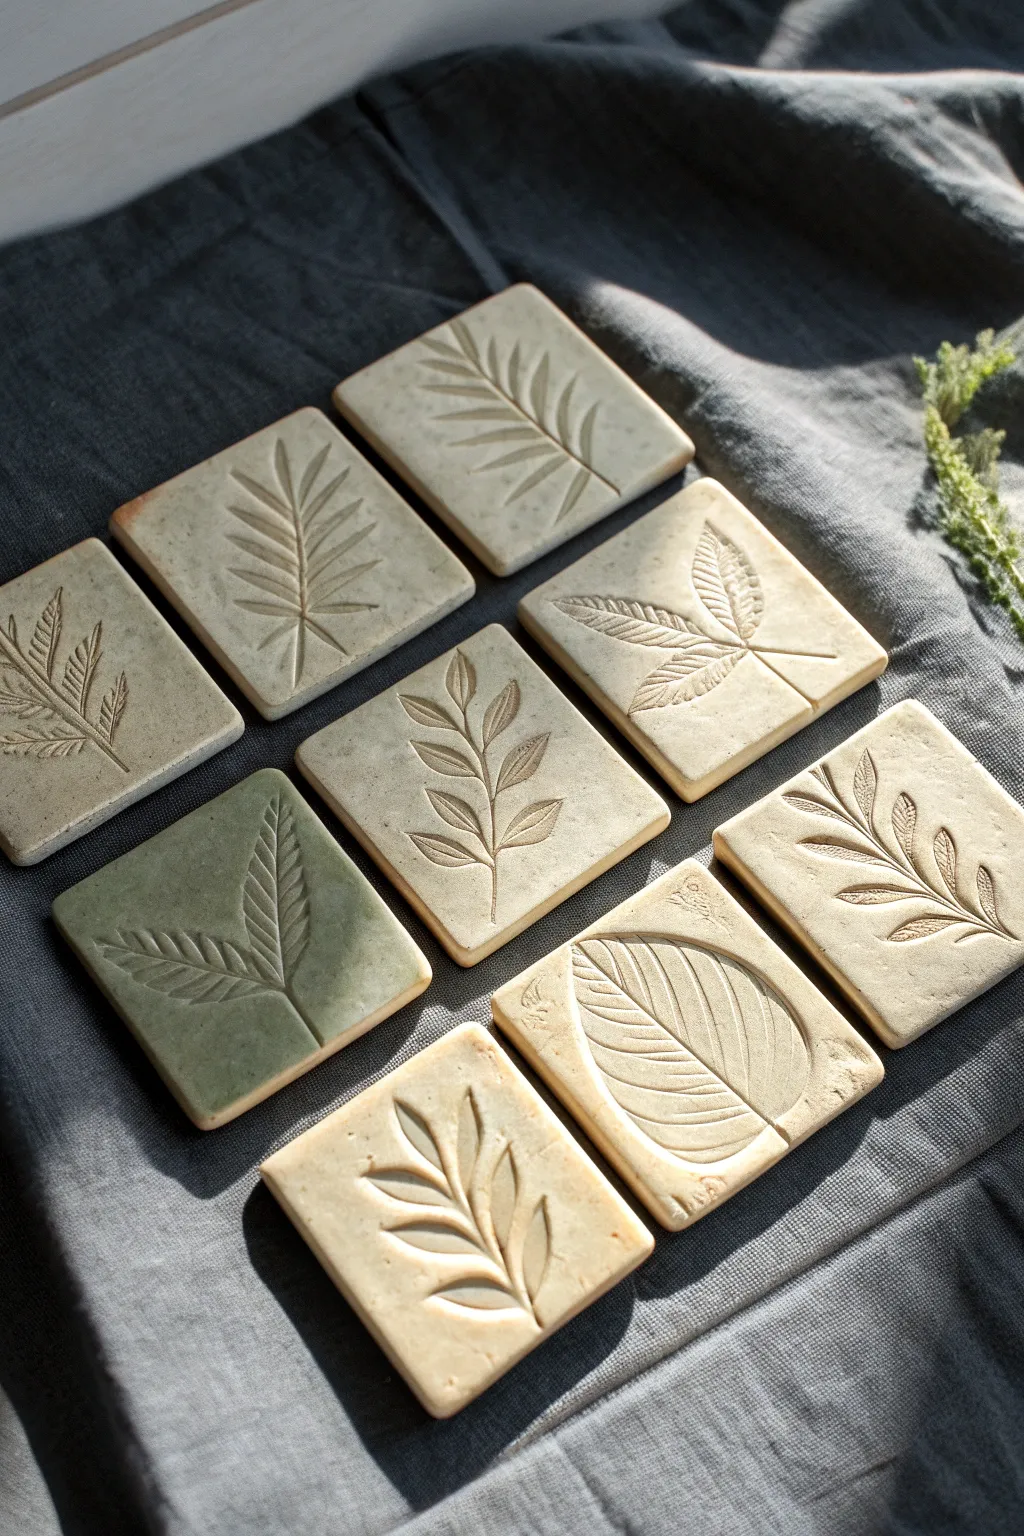
Create a stunning collection of botanical study tiles that capture the delicate veins and textures of nature in permanent stoneware. This project uses fresh foliage impressions to create raised relief designs on simple geometric clay slabs, finished with a natural, earthy aesthetic.
Step-by-Step Tutorial
Materials
- Light-colored stoneware clay or porcelain (something with fine grit)
- Rolling pin
- Two wooden guide strips (approx. 1/4 inch thick) or canvas cloth
- Square cookie cutter or metal template (approx. 4×4 inches)
- Fresh leaves with prominent veins (fern, sage, or similar)
- Small rolling tool or brayer (optional)
- Needle tool or fettling knife
- Sponge
- Mason stain or dark underglaze wash (optional for antiquing)
- Clear matte glaze (optional)
Step 1: Preparing the Canvas
-
Wedge the clay:
Begin by thoroughly wedging your clay body to remove air bubbles and ensure a uniform consistency. A smooth, grit-free clay works best for capturing fine leaf details. -
Set up guides:
Place your wooden guide strips on either side of your workspace on a piece of canvas cloth. This ensures every tile is rolled to the exact same thickness. -
Roll the slab:
Roll your clay out between the guides until the rolling pin rests flat on the wood strips. Smooth the surface with a rubber rib to compress the particles and erase canvas texture. -
Cut the shapes:
Using a square metal cutter or a template with a needle tool, cut out your tile shapes. Cut a few more than you need, as I always like to have spares in case of warping. -
Smooth the edges:
Gently run a damp sponge or your finger along the cut edges of each square to soften sharp corners and remove crumbs.
Step 2: Capturing Nature
-
Select your specimens:
Choose leaves that are sturdy but fresh. Leaves with distinct, raised vein structures on the back side will give the crispest impression. -
Position the leaf:
Place a leaf vein-side down onto the center of a damp clay tile. Arrange it thoughtfully; slightly off-center or diagonal placements often look more artistic. -
Initial press:
Gently press the leaf into the clay with your fingertips to tack it in place, starting from the stem and working outward. -
Roll the impression:
Use a small pony roller or your rolling pin to firmly press the leaf into the clay. Roll once with consistent pressure—back and forth motions can cause the leaf to shift and double the image. -
Reveal the design:
Carefully find the stem or a tip of the leaf. Use a needle tool to hook it if necessary, and slowly peel the leaf away to reveal the raised impression. -
Refine the details:
Inspect the impression. If any small bits of organic matter remain stuck, gently pick them out with a needle tool.
Placement Pro Tip
Place a sheet of thin newspaper over the leaf before rolling. This prevents the roller from sticking to the sap and tearing the leaf during the impression step.
Step 3: Drying and Finishing
-
Slow drying:
Place the tiles on a piece of drywall or sandwiched between drywall boards to ensure they dry flat. Flat tiles are crucial, especially if you plan to frame or mount them. -
Bisque fire:
Once bone dry, fire the tiles to bisque temperature (usually cone 04) according to your clay body’s specifications. -
Apply a wash:
To highlight the veins like the example images, apply a watered-down oxide wash (like iron oxide) or a dark mason stain over the textured area. -
Wipe back:
Immediately wipe the surface with a clean, damp sponge. The dark color will remain in the deep veins while the raised surface returns to the clay color. -
Final glaze:
Leave the tiles raw for a matte stone look, or apply a very thin coat of clear matte glaze if they will be used as coasters, then fire to maturity.
Tile Warping?
If tiles curl while drying, flip them over daily. Weighting them down with a board during the leather-hard stage also forces them to remain perfectly flat.
Now you have a permanent botanical record that brings a quiet, organic touch to your space
Raised Frame With Inset Center Tiles
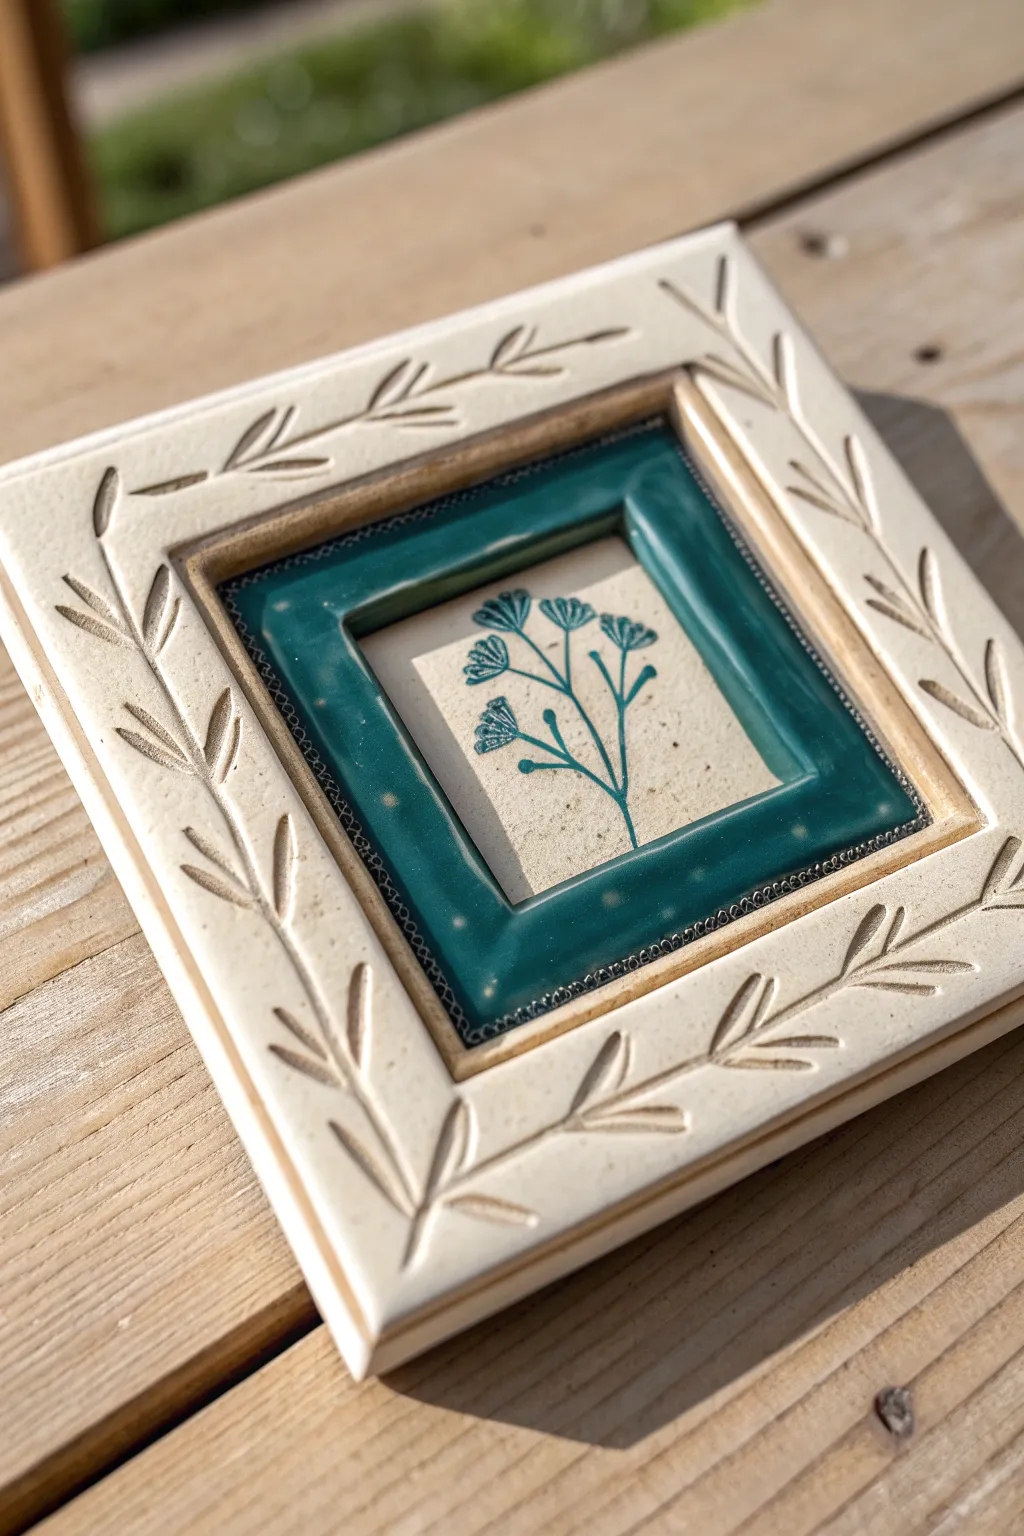
This elegant ceramic tile combines distinct, layered elements and natural textures to create a sophisticated piece of art. The unique inset design features a glossy teal centerpiece surrounded by a hand-carved, matte cream border.
Step-by-Step Guide
Materials
- White or cream stoneware clay
- Rolling pin and guide strips (canvas cloth optional)
- Square tile cutter or template (approx. 6 inches)
- Small square cutter (approx. 3 inches)
- Carving tools (loop tool and needle tool)
- Teal blue glossy glaze
- Matte white or clear glaze
- Underglaze pencil or fine liner brush (teal)
- Slip and scoring tool
- Kiln
- Sponge
Step 1: Shaping the Base and Frames
-
Roll the Slab:
Begin by rolling out your stoneware clay to a uniform thickness of about 1/4 to 3/8 inch. Using guide strips helps maintain a consistent surface, which is crucial for preventing warping later. -
Cut the Main Square:
Cut a large square (about 6×6 inches) from the slab. This will serve as the substantial outer frame and backing foundation. -
Create the Inner Frame:
Roll a slightly thicker slab or use the existing surplus to cut a smaller square frame. This frame should be sized to fit perfectly in the center of your larger square but with a hollow center, much like a picture frame. -
Assemble the Layers:
Score the back of the smaller square frame and the center of the large base square heavily. Apply slip generously to both scored areas. -
Attach and Compress:
Press the inner frame firmly onto the base. Use your fingers or a modeling tool to compress the seam where the inner frame meets the base to ensure a permanent bond.
Step 2: Carving Details
-
Leather Hard Stage:
Allow the assembled tile to dry slowly until it reaches the leather-hard stage. The clay should be firm enough to carve without burring but soft enough to cut easily. -
Outline the Leaves:
Using a needle tool, lightly sketch a flowing vine pattern on the outer border. The leaves should gently curve in opposite directions for a rhythmic look. -
Carve the Relief:
Take a small loop tool and carefully carve out the leaf shapes. I like to carve slightly deeper at the base of the leaf and taper up toward the tip to create dynamic shadow lines. -
Smooth the Edges:
Use a slightly damp sponge or your finger to soften any sharp burrs left by the carving, but be careful not to wash away the crisp definitions of your leaves.
Warping Worries?
If your tile lifts at the corners while drying, place a weighted board on top of it, sandwiched between pieces of drywall or wood, to force it flat.
Step 3: Decoration and Glazing
-
Bisque Fire:
Once bone dry, fire the piece in the kiln to bisque temperature (usually Cone 04) to prepare it for glazing. -
Paint the Center Flower:
Using a teal underglaze pencil or a very fine liner brush dipped in teal underglaze, draw the delicate floral sprig in the central recessed area. Keep the lines thin and botanical. -
Glaze the Inner Frame:
Carefully apply three coats of glossy teal glaze to the raised inner frame. Use a flat brush to ensure you get clean, straight edges where the frame meets the outer border and the inner recess. -
Glaze the Outer Border:
Apply a matte white or clear satin glaze to the outer carved border. Wipe back the glaze slightly with a sponge if you want the raw clay texture to show through the carving more prominently. -
Wax Resist (Optional):
If you are worried about the teal glaze running, apply a thin line of wax resist between the teal frame and the cream sections. -
Final Firing:
Fire the tile again to the maturation temperature of your specific glaze and clay body (typically Cone 5 or 6 for stoneware).
Clean Lines Tip
Use masking tape around the inner frame before glazing the teal section. Peel it off while the glaze is still slightly damp for a razor-sharp edge.
Display your finished tile on a plate stand or mount it in a shadow box to show off its lovely depth
Sgraffito Sketch Tiles
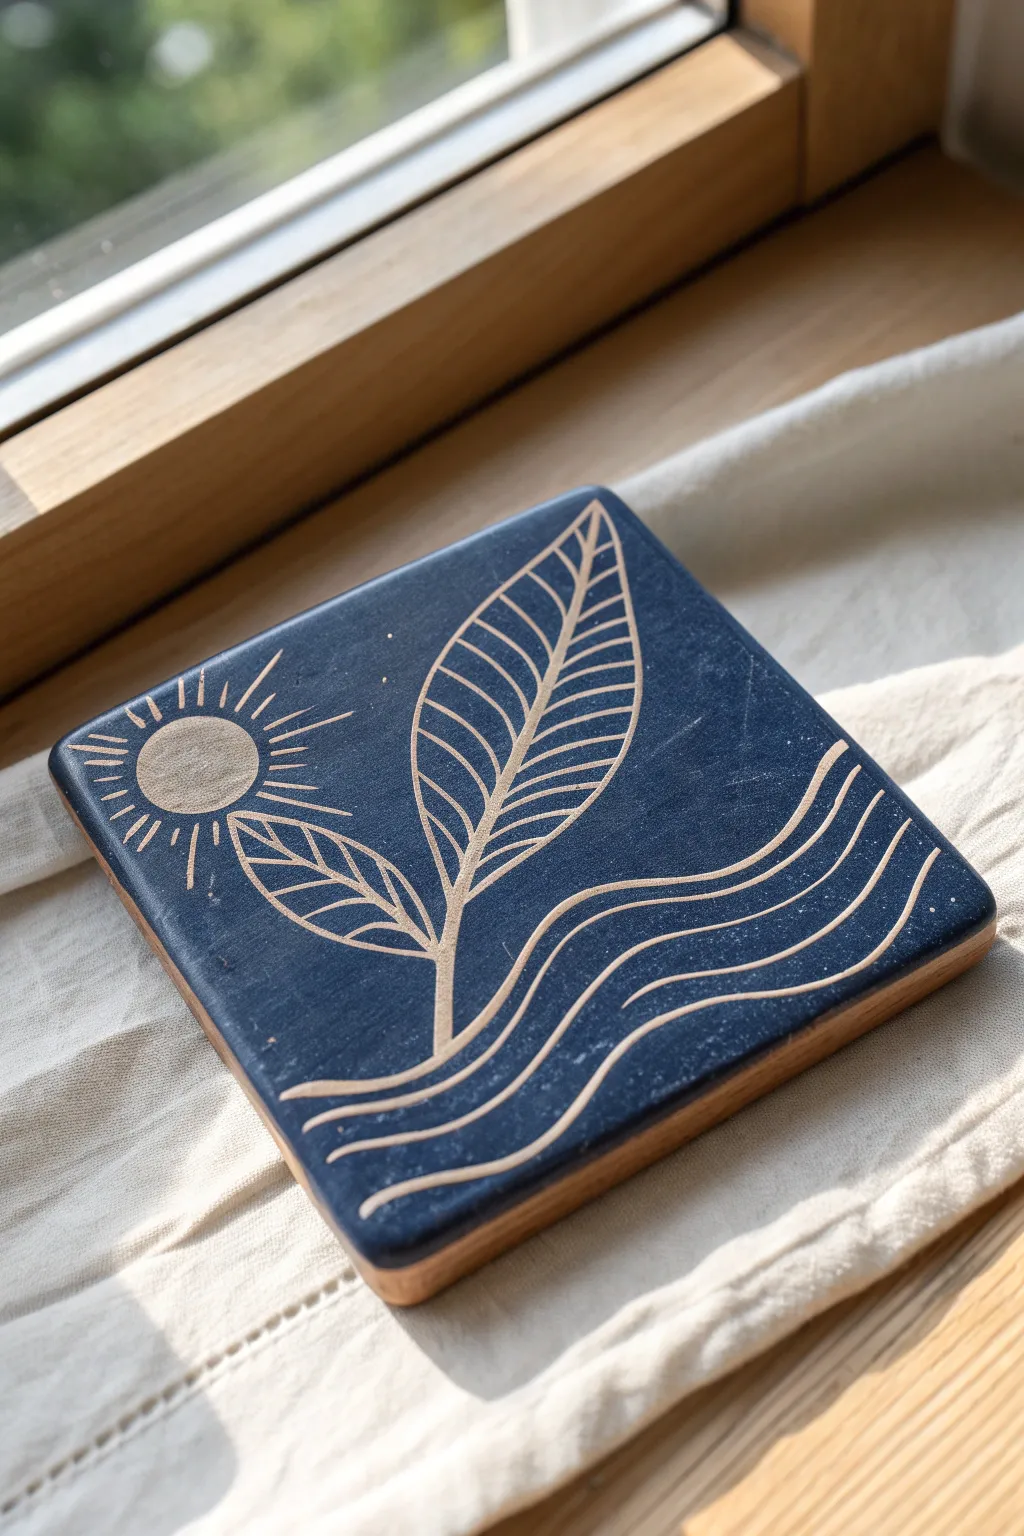
This elegant sgraffito project transforms a simple clay tile into a striking piece of art featuring a stylized sun, botanical leaves, and flowing wave motifs. By carving through a layer of dark blue underglaze, you’ll reveal the warm, natural clay body beneath for a beautiful high-contrast design.
Detailed Instructions
Materials
- Leather-hard clay slab (approx. 4×4 inches, ½ inch thick)
- Dark blue underglaze (Navy or Midnight Blue)
- Wide soft fan brush or hake brush
- Pencil or needle tool (for light sketching)
- Sgraffito loop tool (small wire tip)
- Carving tool (V-tip or fine point)
- Clean sponge and water
- Clear transparent glaze (for final firing)
- Kiln access
Step 1: Preparation & Underglazing
-
Prepare the slab:
Roll out your clay slab to a uniform thickness of about half an inch. Cut it into a precise 4×4 inch square. Smooth the edges with a slightly damp sponge to remove any sharpness or burrs. -
Dry to leather-hard:
Allow the clay to dry slowly until it reaches the leather-hard stage. It should be firm enough to handle without bending but still contain moisture—think of the consistency of cheddar cheese. -
Apply the first coat:
Using a wide, soft fan brush, apply a smooth, even coat of dark blue underglaze across the entire top surface. Brush in one direction for this layer. -
Wait for the shine to leave:
Let this first coat dry until the sheen disappears. It doesn’t need to be bone dry, just touch-dry so you don’t drag the previous layer. -
Apply subsequent coats:
Apply two or three more coats of underglaze, alternating the direction of your brush strokes (horizontal, then vertical) to ensure solid, opaque coverage without streaks. Let the final coat dry completely until the surface is matte.
Smudged Lines?
If blue dust settles into your carved white lines, don’t rub it. Wait for the piece to be bone dry, then use a stiff brush to flick the dust out carefully.
Step 2: Design Transfer & Carving
-
Sketch the layout:
Using a soft pencil, very lightly sketch your design directly onto the underglaze. Don’t press hard; you just want a faint graphite guide. Position the stem in the center, the sun in the top left, and waves at the bottom. -
Carve the sun:
Start with the sun in the upper left corner. Use a loop tool to carve out the solid circle of the sun face, removing the blue to show the clay. Then, switch to a fine point tool to etch the radiating rays. -
Define the stem:
Carve the main vertical stem line rising from the waves. Keep the line weight consistent and make it sturdy enough to support the leaves visually. -
Outline the leaves:
Draw the teardrop shapes of the two large leaves attached to the stem. Use a confident, fluid motion to carve the outer perimeter of each leaf. -
Add leaf veins:
With a finer carving tool, add the central vein to each leaf, followed by the smaller angled veins. I find it easiest to carve these from the center outward to keep them symmetrical. -
Create the waves:
At the bottom of the tile, carve three to four flowing, wavy lines that run the full width of the tile. Vary the spacing slightly to give the water movement and rhythm. -
Add texture details:
Look at the negative space. If you want a bit of texture, you can create tiny dots or small scratches in the blue areas to evoke stars or spray, though keeping it solid blue creates a cleaner modern look. -
Clean up crumbs:
Your carving will produce little clay burrs or crumbs. Do not wipe them with your hand, or you’ll smear blue into your white lines. Instead, turn the tile upside down and gently tap it, or blow the crumbs away.
Step 3: Finishing
-
Dry slowly:
Place the tile between two pieces of drywall or loosely cover with plastic to let it dry very slowly to the bone-dry stage. This prevents warping. -
Bisque fire:
Fire the piece in a kiln to cone 04 (or your clay’s specific bisque temperature). -
Clear glaze application:
Once bisqued, sponge off any dust, then apply a coat of clear transparent glaze over the entire face of the tile to seal the sgraffito design. -
Final firing:
Fire the tile a second time to the maturation temperature of your clay and transparent glaze (typically cone 05, 06, or 6 depending on your materials).
Make it a Set
Carve a different botanical element on three other tiles—like a fern, a flower, and a branch—to create a cohesive 4-piece coaster set.
Once that final firing feels complete, you will have a durable, distinctively handcrafted tile ready for display or use
Inlaid Linework (Mishima-Style) Tiles
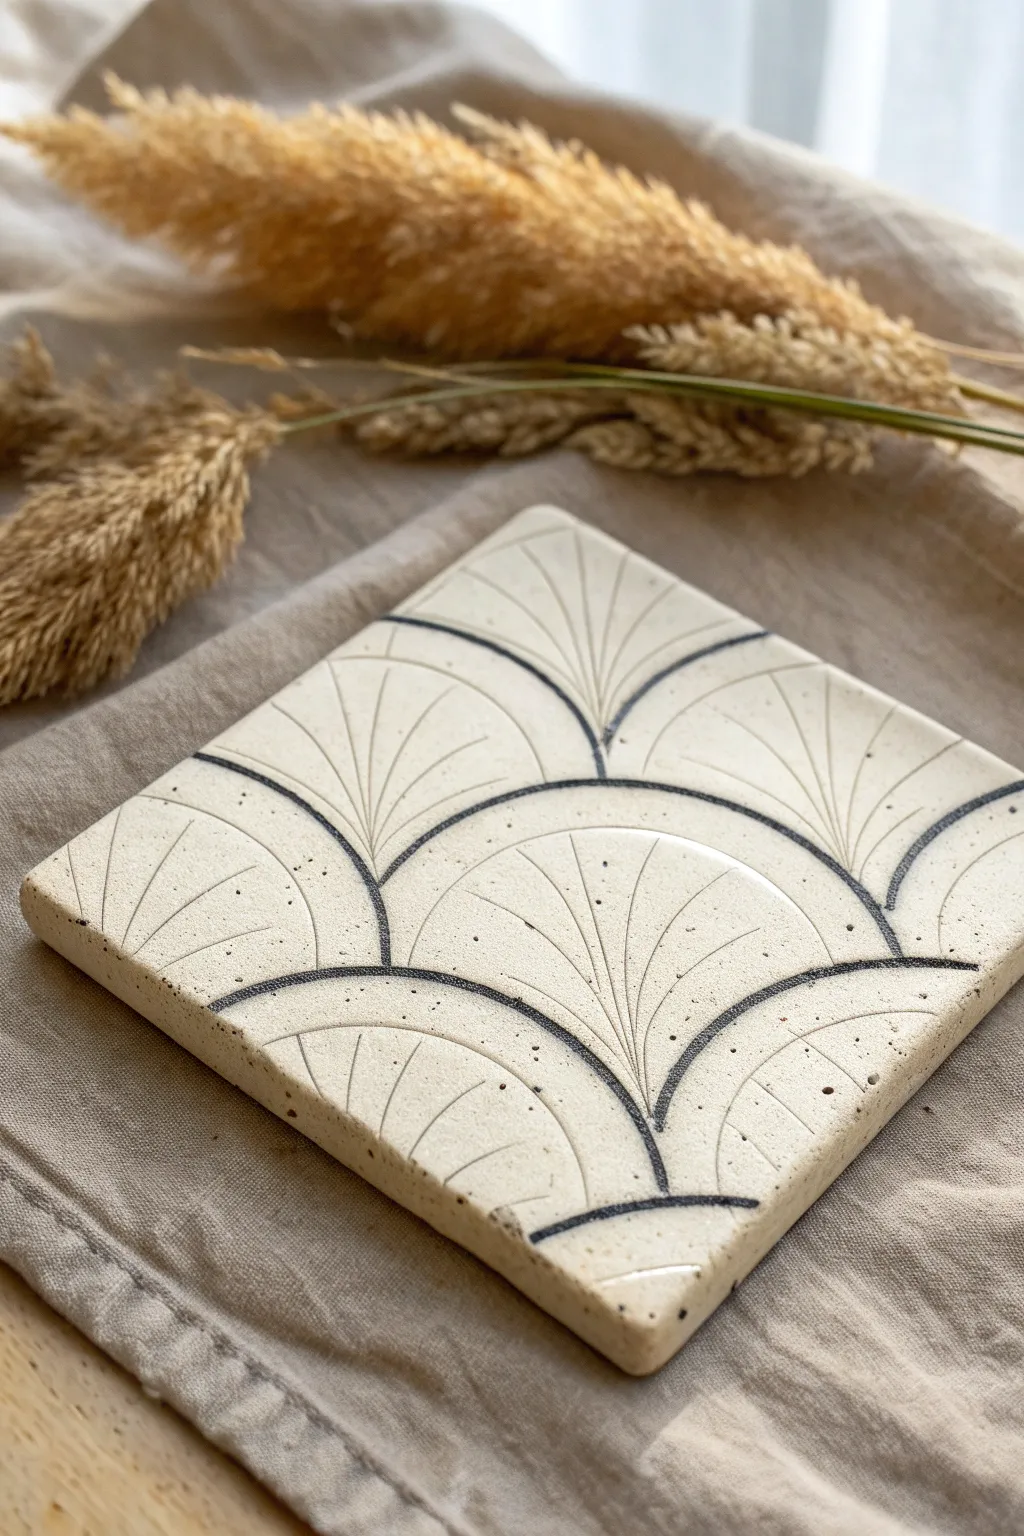
This elegant ceramic coaster showcases the timeless beauty of the Mishima inlay technique, featuring a repeating Art Deco fan pattern. The crisp black lines contrast beautifully against the speckled, creamy stoneware, creating a piece that feels both modern and vintage.
Step-by-Step Guide
Materials
- Light-colored speckled stoneware clay
- Rolling pin
- Two wooden guide strips (approx. 1/4 inch thick)
- Needle tool or X-Acto knife
- Square template or cookie cutter (4×4 inches)
- Black underglaze (or black slip)
- Small stiff paintbrush
- Metal kidney rib tool
- Clean sponge
- Clear matte or satin glaze
- Loop tool (optional, for carving deeper lines)
- Ruler
Step 1: Preparation & Shaping
-
Prepare the clay slab:
Begin by wedging your speckled stoneware clay thoroughly to remove air pockets. Place the clay between two wooden guide strips on a canvas surface and roll it out. The strips ensure an even thickness, which is crucial for a flat tile that won’t warp. -
Cut the square:
Once rolled smooth, lay your square template over the clay. Using a needle tool or knife, cut vertically around the template to create a perfect square. Smooth the edges with a slightly damp finger to remove sharp burrs. -
Establish the leather-hard stage:
This is the most critical timing step. Let the tile dry slowly until it reaches a ‘leather-hard’ state. It should be firm enough to handle without bending, but soft enough to carve into. If it’s too wet, your lines will be messy; too dry, and it will chip.
Step 2: Carving the Design
-
Draft the grid:
Lightly sketch your design directly onto the leather-hard clay with a very soft pencil (the graphite will burn off in the kiln). For this fan pattern, mark the center points along the bottom edge where the fans will originate. -
Carve the main arches:
Using a sharp needle tool or a very fine loop tool, carve the primary semi-circles. Apply consistent pressure to create a channel that is deep enough to hold underglaze but not so deep it weakens the tile. -
Add the radiating lines:
Carve the straight lines fanning out from the center base of each arch. I find it helpful to rotate the tile as I work to keep my hand angle consistent for straighter lines. -
Detail the intersections:
Pay close attention to where the fans overlap or meet the edge of the tile. Keep your carving tool sharp and clean out any ‘crumbs’ of clay from the grooves immediately so they don’t get stuck. -
Clean the surface:
Once the carving is complete, run a barely damp sponge over the surface very lightly to smooth any rough ridges created by the carving tool, ensuring the surface is flat.
Keep it Clean
Wax resist can be your best friend. Paint liquid wax over the flat surface BEFORE carving. The underglaze will wipe off the waxed areas effortlessly.
Step 3: The Mishima Inlay
-
Apply the underglaze:
Using a stiff paintbrush, generously apply black underglaze or slip over all the carved lines. Don’t worry about being neat here—you want to make sure the grooves are completely filled. It will look like a messy black blob, and that is okay. -
Let it firm up:
Allow the underglaze to dry until it is no longer shiny. It needs to be dry enough that it won’t smear when you scrape it, but not bone dry. -
Scrape away excess:
Take your metal kidney rib tool and hold it at a sharp angle to the clay. Scrape across the surface firmly to remove the excess underglaze. The black should remain only in the carved recessed lines, revealing the clean clay body underneath. -
Final wipe:
If a slight haze of black remains, use a clean, damp sponge to wipe the surface. Rinse the sponge frequently. Be gentle so you don’t pull the black underglaze out of the grooves.
Smudged Lines?
If scraping creates smears, the underglaze/slip is too wet. Wait 15 minutes. If it’s still messy, use a prolonged scraping motion rather than wiping.
Step 4: Finishing
-
Bisque fire:
Allow the tile to dry completely to the bone-dry stage. This usually takes a few days. Once dry, fire it in the kiln to bisque temperature (usually Cone 04). -
Glazing:
Dip or brush a clear matte or satin glaze over the entire face of the tile. A glossy glaze can sometimes distort the fine lines, which is why a matte finish often complements the graphic Mishima style better. -
Final firing:
Fire the tile again to the maturity temperature of your clay and glaze (typically Cone 5 or 6 for stoneware). Once cooled, add small felt or cork pads to the bottom if using as a coaster.
Now you have a stunning, graphic art piece that is functional and durable enough for everyday use
Topographic Map Contour Tiles
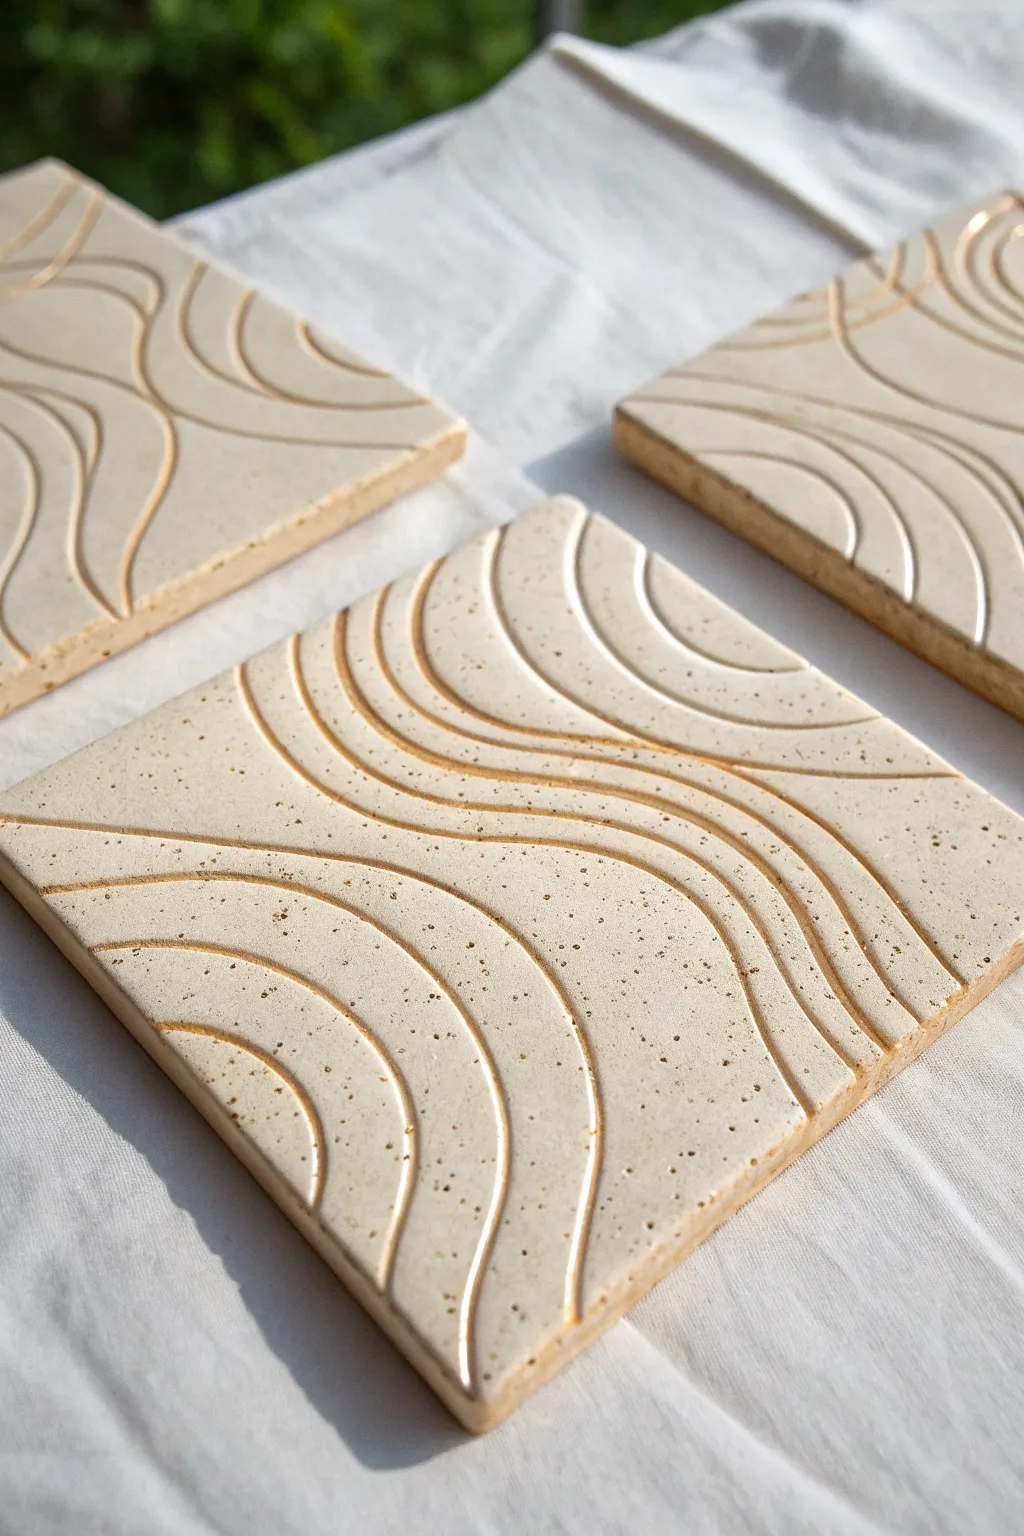
Capture the organic beauty of topographic maps with these deeply carved ceramic tiles. The rhythmic, flowing lines create a tactile surface that feels as good as it looks, highlighting the natural speckling of the stoneware clay.
How-To Guide
Materials
- Speckled buff stoneware clay
- Rolling pin
- Guide sticks (1/4 inch or 6mm depth)
- Square cookie cutter or template (4×4 inches)
- Rib tool (metal or wood)
- Needle tool
- Wire loop tool (small rounded edge)
- Sponge
- Canvas work surface
- Soft brush
- Clear matte glaze
Step 1: Forming the Blank Tiles
-
Prepare the Clay:
Wedge your speckled stoneware clay thoroughly to remove air bubbles and align the particles. Wedging ensures your tiles won’t warp during firing. -
Roll the Slab:
Place the clay on a canvas surface between two 1/4 inch guide sticks. Roll the clay out into a long, even slab, ensuring the rolling pin rests on the guide sticks for uniform thickness. -
Compress the Surface:
Use a rib tool to firmly compress the clay surface on both sides. This aligns the clay platelets, which is crucial for preventing warping in flat tile projects. -
Cut the Shapes:
Using a square cookie cutter or a paper template with a needle tool, cut out your 4×4 inch squares. If you’re making a set, try to cut them close together to minimize waste. -
Dry to Leather Hard:
Allow the squares to dry slowly until they reach a leather-hard state. They should be firm enough to handle without bending but still contain enough moisture to carve smoothly.
Step 2: Carving the Topography
-
Sketch the Flow:
Lightly trace your design onto the leather-hard surface using a needle tool. Draw organic, flowing waves that mimic sand dunes or topographic maps. I prefer to let the lines run off the edges to create a feeling of continuity. -
Carving the Grooves:
Select a small wire loop tool with a U-shaped profile. Gently drag the tool along your traced lines, removing a ribbon of clay to create a clean, uniform channel. -
Deepen the varying lines:
Go over select lines a second time if you want variation in depth, but be careful not to carve more than halfway through the tile’s thickness. -
Smooth the Edges:
After carving, small burrs of clay will remain on the edges of the grooves. Wait about 20 minutes for these to firm up, then gently brush them away with a soft, dry paintbrush. -
Refine with Sponge:
Wipe the surface very lightly with a barely damp sponge. This softens the sharp edges of your carving just enough to make the tile pleasant to touch, without erasing the definition.
Clean Grooves Tip
Don’t try to pick out clay crumbs immediately after carving. Let the tile dry slightly more; the crumbs will become brittle and brush off cleanly without smearing your design.
Step 3: Finishing and Firing
-
Slow Drying:
Sandwich your finished greenware tiles between two pieces of drywall board or place them under lightweight plastic to dry very slowly. Even drying is the secret to perfectly flat tiles. -
Bisque Fire:
Once bone dry, load the tiles into the kiln for a bisque firing (usually Cone 04). Ensure they are flat against the kiln shelf. -
Sponge Clean:
After the kiln cools, wipe the bisqued tiles with a damp sponge to remove any kiln dust before glazing. -
Apply Glaze:
Dip or brush a thin layer of clear matte glaze over the front. A clear glaze is essential here to let the beautiful iron speckles of the clay body shine through. -
Glaze Firing:
Fire the tiles to the maturity temperature of your clay body (typically Cone 5 or 6 for stoneware). Place them directly on the kiln shelf if the bottoms are unglazed, or use stilts if you glazed the back.
Color Inlay
Before the clear glaze, brush a dark underglaze into the carved grooves and wipe the surface clean with a sponge. This ‘mishima’ effect makes the contour lines pop dramatically.
Once fired, these modern tiles make excellent trivets or coasters that bring a touch of earthy elegance to your table
Mixed Texture Patchwork Tiles
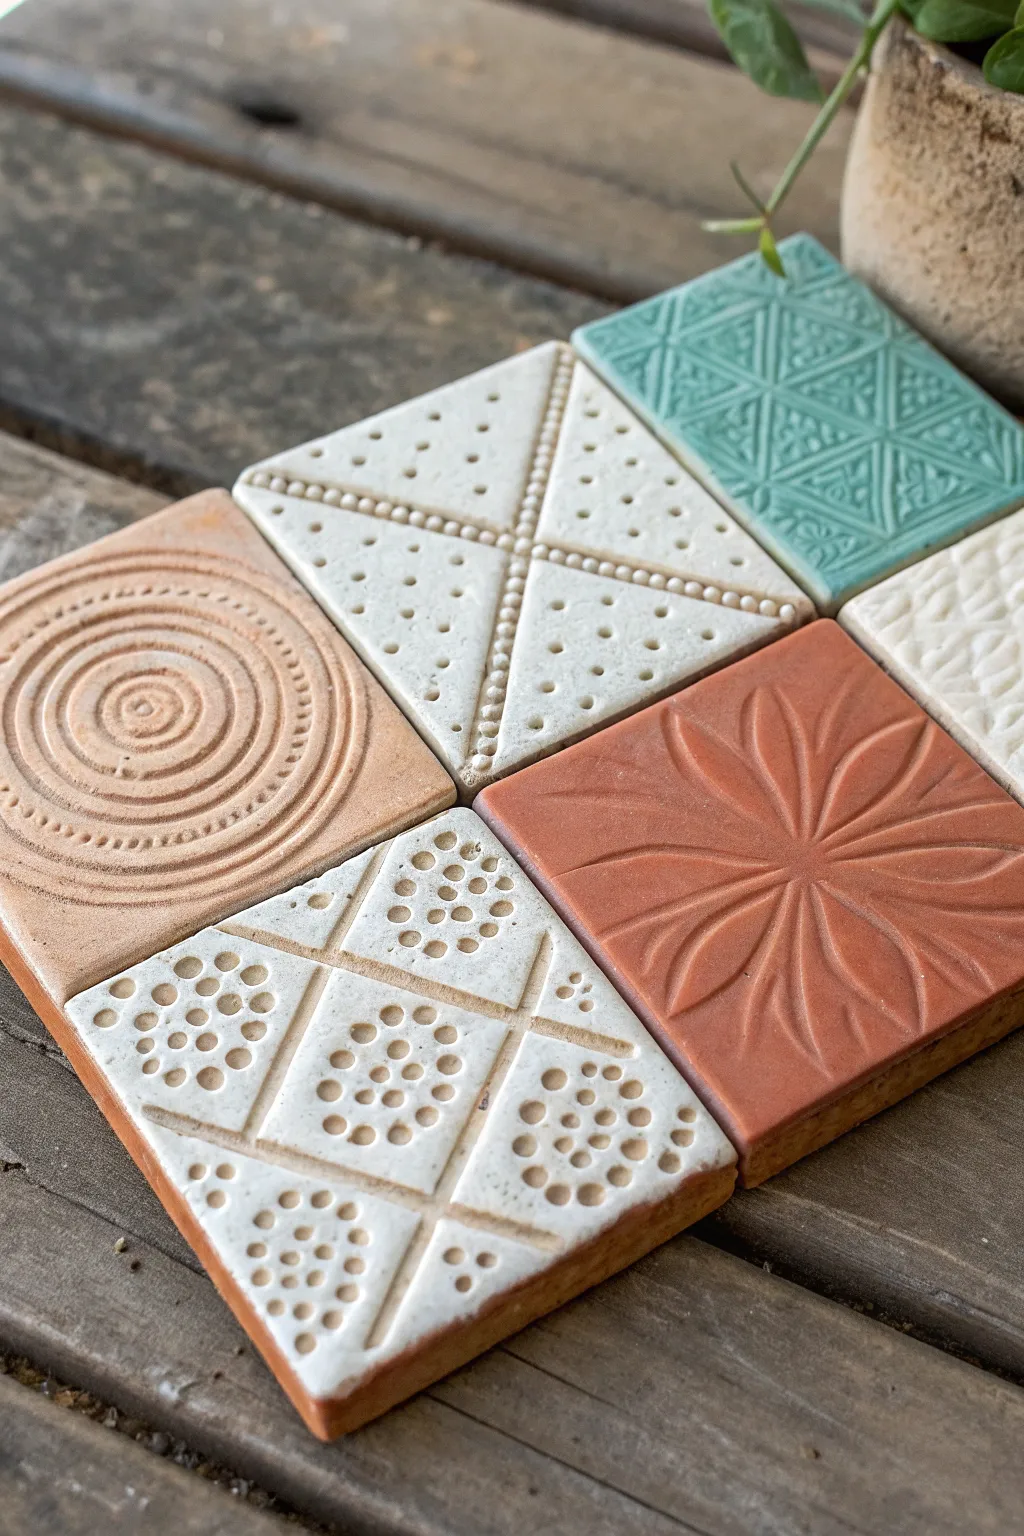
Create a stunning set of textured ceramic tiles that blend raw earthenware warmth with crisp white and turquoise glazes. This mixed-texture patchwork project combines impressed geometric patterns with hand-carved details for a modern bohemian look perfect for coasters or trivets.
Detailed Instructions
Materials
- Low-fire earthenware clay (terracotta)
- Rolling pin with guide rings (approx 1/4 inch)
- Square tile cutter or ruler and needle tool
- Assorted texture tools (stamps, lace, or 3D printed rollers)
- Wooden modeling tools
- Small stylus or dotting tool
- Loop tool for carving
- Sponge and water bowl
- Low-fire glazes (White gloss, Turquoise/Teal)
- Soft fan brush
- Kiln (or access to a firing service)
Step 1: Slab Preparation & Cutting
-
Wedges the clay:
Begin by thoroughly wedging your terracotta clay to remove any air bubbles and ensure an even consistency. This is crucial for preventing warping later. -
Roll the slab:
Roll out a smooth slab of clay. Use guide rings on your rolling pin or place two long wooden slats of equal thickness (about 1/4 to 3/8 inch) on either side of the clay to ensure the entire slab is perfectly uniform. -
Compress the surface:
Take a rubber rib or a damp sponge and firmly compress the surface of the clay in sweeping motions. This aligns the clay particles and creates a smooth canvas for your textures. -
Cut the rough shapes:
Using a square tile cutter or a ruler and needle tool, cut out your six square tiles. I suggest cutting them slightly larger than your desired final size to account for shrinkage during drying and firing.
Warping Woes?
If corners curl up during drying, flip the tiles over daily. Drying slowly under plastic is the secret to perfectly flat tiles. Avoid direct drafts or sunlight.
Step 2: Adding Texture & Pattern
-
Create the concentric circles:
For the first tile, use a loop tool or a rounded stylus to carve freehand concentric circles. Vary the depth slightly—pressing deeper for the outer rings and lighter for the center spiral—and add small dot impressions between the outer rings for detail. -
Imprint the diamond dot pattern:
On the second tile, use a ruler to lightly scribe a large ‘X’ corner to corner. Press small beads of clay or use a large stylus to create the dotted cross. Then, fill the four triangular sections with smaller, randomly spaced dots. -
Stamp the triangle texture:
For the turquoise tile design, use a triangular geometric stamp or a texture roller. Press firmly and evenly across the surface to get a crisp, deep impression of the repeating triangles. -
Carve the flower burst:
Sketch a central point on a fresh tile. Using a small carving tool, carve petal shapes radiating outward. Keep the petals wider at the outer edge and tapering to a point at the center, leaving the terracotta smooth between the carved areas. -
Design the checkerboard accents:
For the final patterned styles, create a grid using straight lines. Fill alternating squares with patterns—one tile featuring clusters of small dots, and another using textured fabric or lace pressed into specific quadrants for variety.
Pattern Popping
For the glazed tiles, wipe a damp sponge gently over the dry glaze surface before firing. This thins the glaze on high points, letting the clay color peek through for depth.
Step 3: Refining & Drying
-
Smooth the edges:
Once the clay has stiffened to a ‘leather hard’ state, run a damp sponge or finger along the sharp edges of every tile to round them off slightly. This prevents chipping later. -
Check for flatness:
Place the tiles on a piece of drywall or a wooden board. Place a lightweight board on top of them for the first day of drying to ensure they stay perfectly flat. -
Slow drying:
Allow the tiles to dry slowly over several days, loosely covered with plastic, until they are bone dry and room temperature to the touch. -
Bisque fire:
Load the bone-dry tiles into the kiln for a bisque firing (usually Cone 04). Ensure they are not touching each other.
Step 4: Glazing & Final Firing
-
Clean the bisque:
Wipe the fired bisque tiles with a damp sponge to remove any dust, which can prevent glaze from adhering properly. -
Apply white glaze:
On the dotted diamond and checkerboard tiles, brush on 2-3 coats of white gloss glaze. Be careful not to let the glaze pool too thickly in the deep dot impressions, or it may bubble. -
Apply turquoise glaze:
Coat the triangle-textured tile with a turquoise or teal glaze. This color looks especially good when it breaks over texture, so a semi-transparent glaze works wonders here. -
Leave some raw:
Leave the concentric circle tile and the flower burst tile unglazed to show off the beautiful natural terracotta color. You can apply a clear matte glaze if you want protection without changing the color. -
Glaze fire:
Fire the tiles again to the temperature specified by your glaze manufacturer (typically Cone 05 or 06). Let the kiln cool completely before opening to avoid thermal shock.
Arrange your finished tiles on a table or mount them together for a striking wall display that celebrates texture