When you’ve got a plain piece of clay (or bisque) in front of you, the design choices can feel endless in the best way. These ceramic design ideas are the kind I reach for in my studio when I want something satisfying, doable, and seriously cute on the shelf.
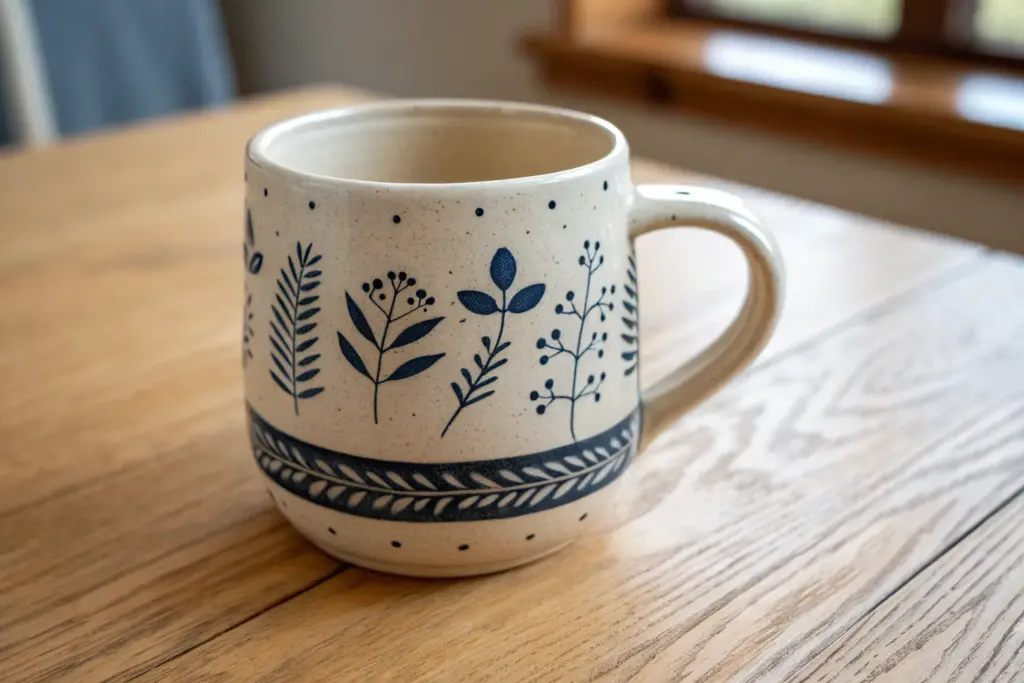
Classic Blue-and-White Brushwork
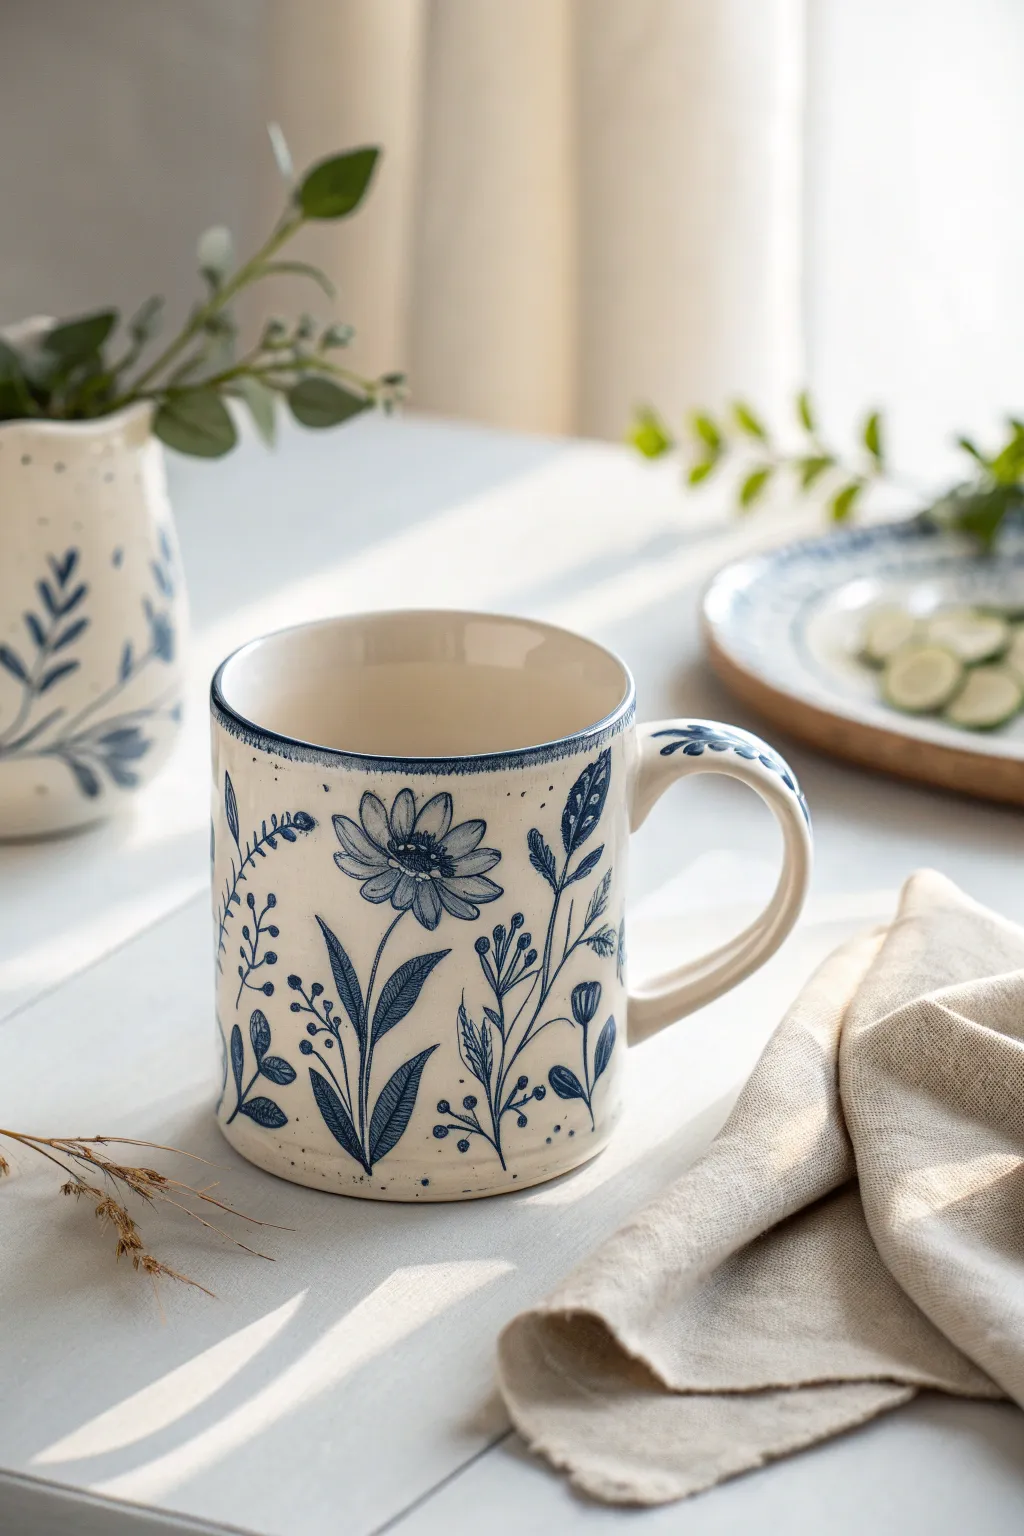
This project captures the timeless elegance of classic blue-and-white pottery with a delightful botanical twist. You’ll create a charming, hand-painted mug featuring intricate indigo wildflowers dancing across a creamy, speckled ceramic surface. It’s a perfect blend of rustic warmth and delicate artistry.
Step-by-Step Guide
Materials
- Bisque-fired ceramic mug (straight-sided cylinder shape preferred)
- Cobalt blue underglaze
- Clear transparent dipping glaze (food safe)
- Small round brushes (sizes 0, 2, and 4)
- Fine liner brush
- Pencil (for sketching)
- Clean water and sponge
- Wax resist (optional)
- Kiln (or access to local firing service)
Step 1: Preparation & Planning
-
Surface Prep:
Begin by wiping down your bisque-fired mug with a slightly damp sponge. This removes any kiln dust or oils from your hands that might resist the glaze later on. -
Sketching the Layout:
Using a regular pencil, lightly sketch the main stems of your floral design directly onto the bisque. Don’t worry about mistakes; the graphite will burn off completely in the kiln. -
Spacing the Key Elements:
Place the large focal flowers first. I suggest positioning a large daisy-like bloom on the front-facing side and perhaps another on the reverse to balance the composition. -
Adding Foliage:
Sketch in the supporting leaves and smaller bud stems around your main flowers. Aim for a flowing, organic look where stems curve gently rather than standing stiffly straight.
Smudged Lines?
If you smudge raw underglaze, don’t wipe it while wet—it will smear into the pores. Let it dry completely, then gently scrape it off with a craft knife or sandpaper.
Step 2: Painting the Design
-
Mixing the Blue:
Pour a small amount of cobalt blue underglaze onto a palette. If it feels too thick, add a drop of water to achieve an ink-like consistency that flows smoothly from your brush. -
Main Flowers First:
Using a size 4 round brush, paint the petals of the large focal flowers. Use a ‘press and lift’ stroke: press down near the center of the flower and lift as you pull outward to create a petal shape that tapers naturally. -
Defining Centers:
Once the petals dry slightly, use a smaller brush to dab a dark, dense circle in the center. Add tiny dots around this center to create the look of stamens. -
Painting Stems:
Switch to your size 2 brush for the stems. Paint them with a steady, continuous stroke, varying the pressure slightly to create thick and thin sections for a natural appearance. -
Leaf details:
Fill in the leaves with solid blue. For the larger leaves at the base, you can leave tiny slivers of white unpainted in the center to suggest veins, or paint them solid and scratch details later (sgraffito). -
Fine Liner Work:
Take your fine liner brush to add the delicate sprigs, tiny berries, and wispy details that fill the empty spaces. These small marks give the design its intricate ‘folklore’ feel. -
Adding Texture:
To mimic the speckled look in the image, load a stiff toothbrush with a very watered-down blue underglaze. Run your thumb over the bristles to flick tiny, subtle speckles across the surface. Go lightly here.
Create Depth
Dilute your blue underglaze with water to create a lighter ‘wash’ for some petals, then go back over other areas with full-strength pigment for contrast.
Step 3: Borders & Finishing
-
Rim Detail:
Paint a thin, consistent band of blue along the very top rim of the mug. This frames the artwork beautifully. -
Bottom Border:
Add a slightly thicker, grounded line near the base of the mug. It doesn’t need to be mechanically perfect; a little hand-painted wobble adds charm. -
Handle Accents:
Don’t forget the handle! Paint a simple leaf motif or a few dashes along the spine of the handle to integrate it with the rest of the piece. -
Clean Up:
Check the foot ring (the bottom where the mug sits). Wipe away any stray underglaze with a sponge so it doesn’t stick to the kiln shelf. -
Glazing:
Once the underglaze is bone dry, dip the entire mug into a clear, food-safe transparent glaze. Shake off excess gently and let it dry. -
Final Fire:
Fire the mug in the kiln according to the clay and glaze manufacturer’s instructions (usually Cone 5 or 6 for stoneware).
Enjoy sipping your morning coffee from a vessel that carries your own artistic touch


Simple Polka Dots With a Modern Layout
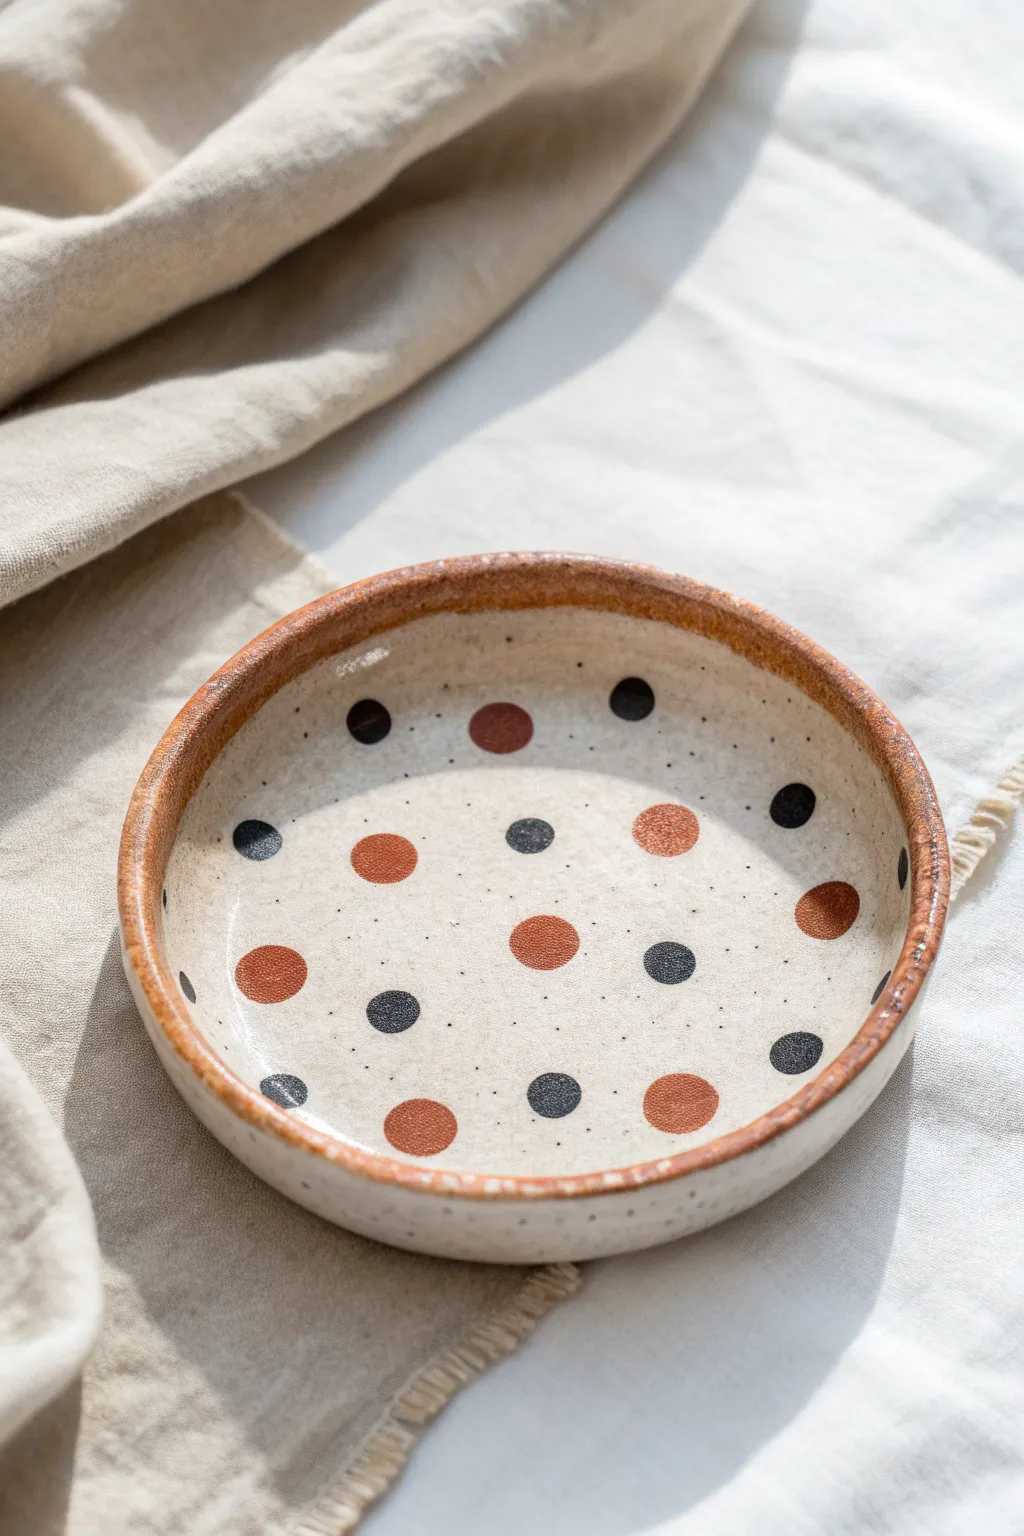
This shallow dish combines the rustic warmth of exposed stoneware with a playful, modern polka dot pattern. By leaving the base clay speckled and natural, the burnt orange and charcoal dots pop against the surface for a design that feels both earthy and geometric.
Step-by-Step
Materials
- White or light buff speckled stoneware clay
- Rolling pin with guide strips (approx. 1/4 inch)
- Small round slump mold or shallow bowl for shaping
- Pottery sponge
- Loop tool for trimming
- Rib tool (flexible metal or rubber)
- Underglaze in Rust/Terracotta
- Underglaze in Black/Dark Grey
- Round sponge dabbers (small size) or circular stencils
- Clear matte or satin transparent glaze
- Kiln (or access to a firing service)
Step 1: Forming the Dish
-
Preparing the clay:
Begin by wedging your speckled stoneware clay thoroughly to remove any air bubbles. This step is crucial for ensuring the finished piece is durable and free of voids. -
Rolling the slab:
Roll out a slab of clay using guide strips to maintain an even thickness of about 1/4 inch. If you want that wonderful speckled texture shown in the image, try not to over-smooth the surface too much at this stage. -
Cutting the circle:
Use a needle tool or a circular template to cut a round shape slightly larger than your slump mold, accounting for the depth of the bowl. -
Shaping the curve:
Gently drape your clay slab into your slump mold or bowl. Press very lightly with a damp sponge to make sure it conforms to the curve without stretching the clay too thin. -
Defining the rim:
While the clay is leather hard, you can trim the rim to be even. For the rustic look in the photo, a slightly uneven, handmade rim actually adds character, so don’t stress about perfection here. -
Drying to leather hard:
Allow the piece to dry slowly until it reaches a sturdy leather-hard state. It should be firm enough to handle but still cool to the touch.
Step 2: Applying the Design
-
Cleaning the surface:
Wipe the interior surface with a slightly damp sponge to remove any dust or stray clay crumbs that might interfere with the underglaze application. -
Planning the layout:
Lightly mark where your dots will go. The image shows a ‘random but balanced’ spacing rather than a strict grid. Leave plenty of negative space to let the speckled clay shine through. -
Applying rust dots:
Dip a round sponge dabber into the Rust/Terracotta underglaze. Press firmly onto your planned spots. I find a slight twisting motion helps deposit the color evenly without leaving sponge marks. -
Applying black dots:
Switch to a clean dabber and apply the Black/Dark Grey dots in the remaining spaces. The contrast between warm earth tones and dark neutrals is key to this look. -
Adding micro-speckles:
The image features tiny, subtle speckles between the large dots. Dip a stiff toothbrush in watered-down black underglaze and gently flick the bristles to spatter tiny droplets across the interior. -
Painting the rim:
Using a brush, apply the Rust/Terracotta underglaze to the rim of the bowl. Allow the brush to drag slightly naturally; this creates that beautiful, varied edge that frames the piece. -
Bisque firing:
Once the underglaze is fully dry and the piece is bone dry, fire it to cone 04 (or your clay’s bisque temperature).
Consistent Circles
If sponge dabbers are leaving uneven textures, use adhesive circle stickers as stencils. Apply the sticker, paint over it, and peel it off once the underglaze is touch-dry.
Step 3: Glazing and Finishing
-
Washing the bisque:
Briefly rinse the bisqued piece under water to remove dust and let it dry for a moment. This prevents the glaze from crawling. -
Applying clear glaze:
Dip the entire piece into a clear matte or satin glaze. A glossy glaze works too, but a satin finish feels more modern and tactile for this specific design. -
Cleaning the foot:
Wipe the bottom (foot) of the bowl clean with a sponge so it doesn’t fuse to the kiln shelf. -
Final firing:
Fire the piece to the maturity temperature of your clay body and glaze (typically Cone 5 or 6 for stoneware).
Go Geometric
Instead of round dots, try cutting triangles or squares from newsprint, wetting them to adhere to the clay, and painting around them for a negative-space pattern.
This simple yet striking dish is now ready to hold trinkets or serve snacks with effortless style


Clean Stripes for Instant Style
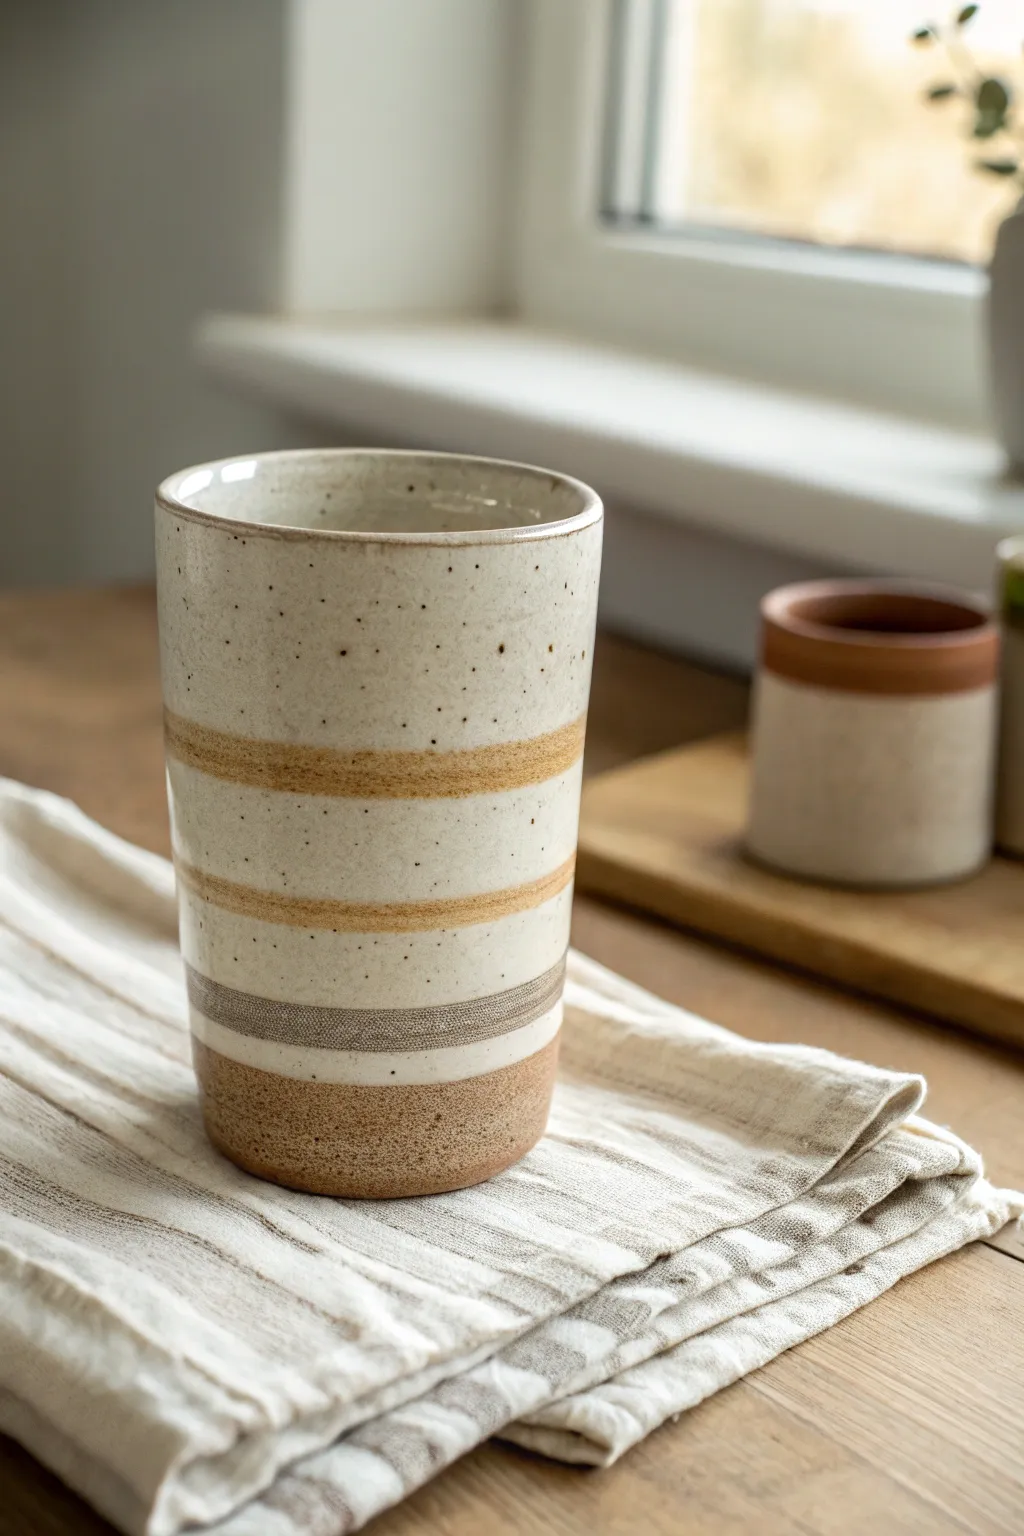
Achieve a timeless, grounded aesthetic with this simple yet sophisticated ceramic tumbler featuring clean horizontal bands. The natural clay body peeks through warm cream and ochre stripes, creating a cozy and modern piece perfect for your morning coffee.
How-To Guide
Materials
- Stoneware clay (speckled or buff)
- Pottery wheel
- Throwing tools (sponge, wire cutter, ribs)
- Trimming tools
- Underglazes (Warm Ochre, Cream/White, Taupe/Grey)
- Soft fan brush or hake brush
- Banding wheel
- Clear matte or satin glaze
- Kiln
- Wax resist (optional)
Step 1: Throwing the Form
-
Prepare the clay:
Begin by thoroughly wedging about 1 to 1.5 pounds of speckled stoneware clay to remove any air bubbles and ensure a consistent texture. -
Center specifically:
Secure the clay on the wheel head and center it. Since this is a tall cylinder, ensure your base is centered perfectly to avoid wobbling later. -
Open and lift:
Open the clay to create the floor, compressing it well to prevent cracks. Begin pulling the walls upward, aiming for a tall, vertical cylinder shape rather than a bowl. -
Refine the walls:
Use a metal or wooden rib on the outside while supporting the inside with your hand to straighten the walls and remove throwing lines for a smooth canvas. -
Shape the rim:
Use a chamois or a small sponge to gently round and compress the rim, making it comfortable for drinking. -
Cut and dry:
Wire the pot off the wheel and set it aside to dry until it reaches the leather-hard stage.
Wobbly Stripes?
Rest your painting arm on a steady stack of books or a jar while the wheel spins. This anchors your hand, ensuring the brush stays perfectly level for crisp bands.
Step 2: Trimming and Decorating
-
Standard trimming:
Once leather hard, center the pot upside down on the wheel. Trim the bottom to create a clean, flat foot or a slight curve, refining the overall weight of the piece. -
Prepare for glazing:
Wipe the surface with a barely damp sponge to remove dust, which helps the underglaze adhere smoothly. -
Set up the banding wheel:
Place your tumbler right-side up on a banding wheel. If you don’t have one, you can use your pottery wheel rotating at a very slow speed. -
Apply the base cream:
Using a soft fan brush, apply a broad band of cream or off-white underglaze. I like to cover the middle section thoroughly, leaving the raw clay exposed at the very bottom. -
Paint the accent stripes:
While the wheel spins slowly, hold a brush loaded with warm ochre underglaze steady against the pot to create the yellow-orange bands. -
Add the grey line:
Rinse your brush and switch to a taupe or grey underglaze. Apply a thinner band just below the main cream section for contrast. -
Clean up lines:
If any lines look messy, you can use a fine carving tool or a stiff brush with water to gently scratch back or clean up the edges once the underglaze is dry to the touch. -
Bisque fire:
Let the piece dry completely, covering it loosely if necessary to prevent uneven drying. Fire it to your clay body’s bisque temperature (usually cone 04 or 06).
Pro Tip: Texture
Leave the bottom inch of the tumbler unglazed and free of slip. This raw ‘clay boot’ provides a lovely tactile contrast against the smooth glazed upper section.
Step 3: Glazing and Final Firing
-
Apply wax resist:
Apply wax resist to the bottom of the foot and slightly up the side if you want the raw clay base to remain unglazed. -
Clear coat:
Dip the entire tumbler into a clear matte or satin glaze. A glossy glaze works too, but a matte finish emphasizes the earthy texture of the speckled clay. -
Final check:
Wipe away any glaze drips from the waxed bottom with a sponge. -
Glaze fire:
Load the kiln and fire to the final maturity temperature of your stoneware clay (typically cone 5 or 6 for mid-fire).
Now you have a stunning, calm addition to your kitchen cupboard that highlights the natural beauty of the material


Easy Botanical Vines Around the Rim
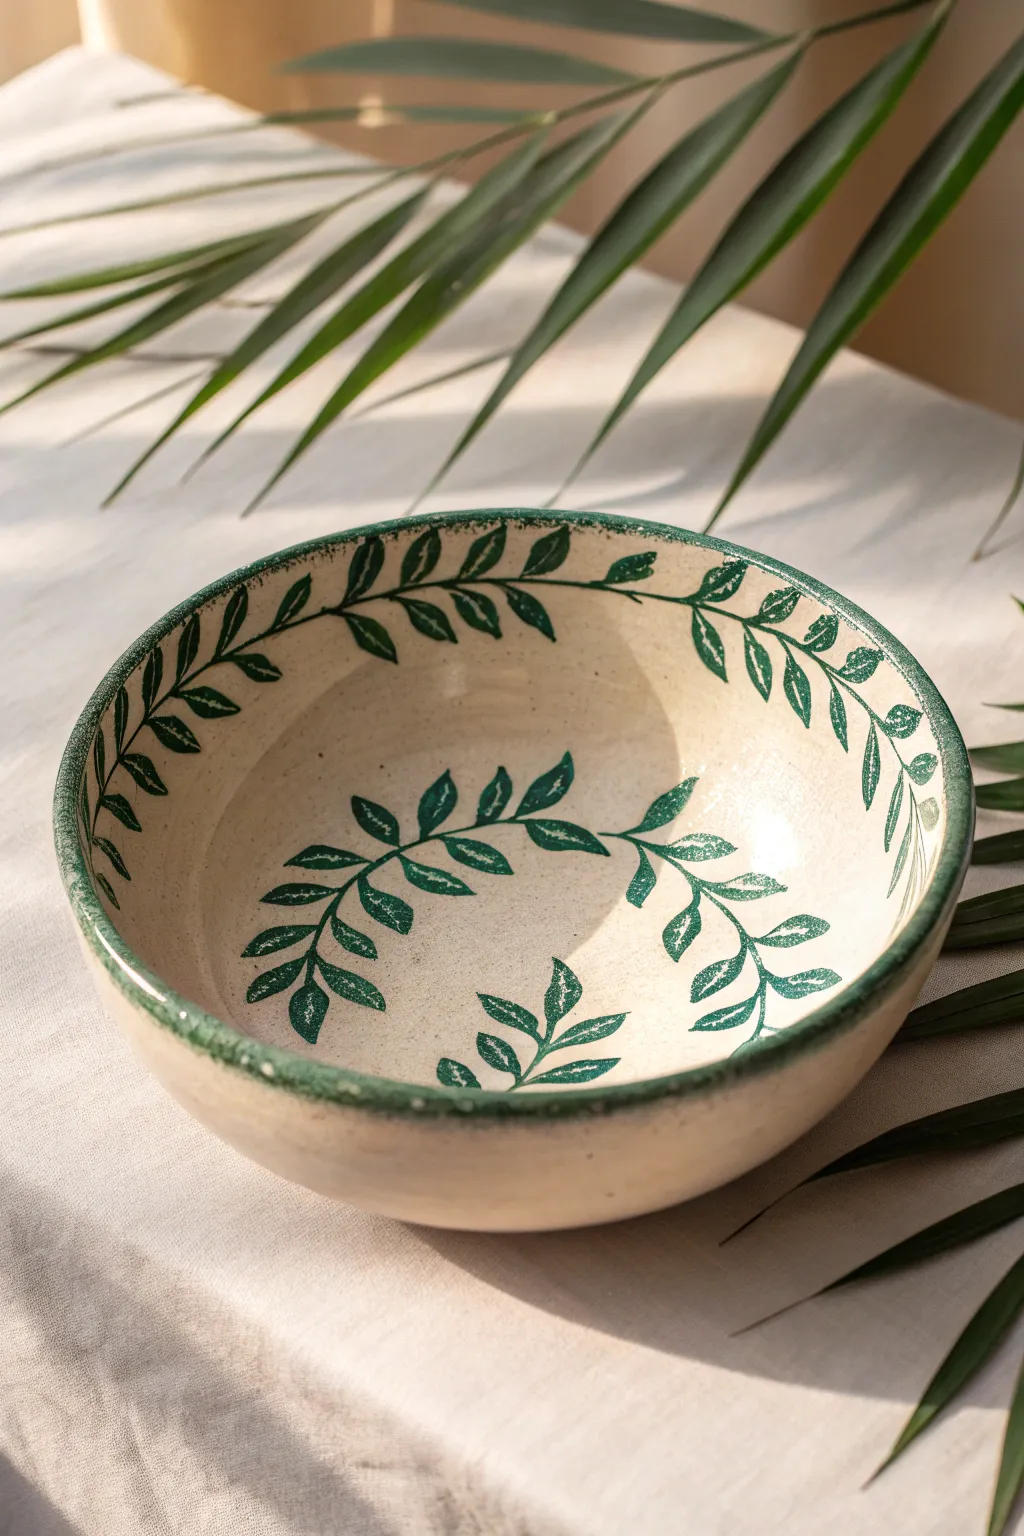
This project combines the rustic charm of hand-built pottery with elegant, flowing botanical motifs. By painting wandering green vines along both the rim and the interior basin, you achieve a beautifully cohesive design that feels organic and timeless.
Step-by-Step
Materials
- Bisque-fired ceramic bowl (creamy white or speckled clay body recommended)
- Dark green underglaze (forest green or hunter green)
- Small round detail brush (size 0 or 1)
- Liner brush (size 00 or 0)
- Sponge
- Water container
- Clear transparent glaze
- Pencil (optional)
Step 1: Preparation & Planning
-
Clean the Bisque:
Begin by wiping down your bisque-fired bowl with a damp sponge. This removes any dust or oils from handling that might repel the underglaze. -
Map the Rim Design:
Visualize a continuous wavy line traveling around the upper inside rim. If you are nervous about freehanding, use a pencil to lightly sketch this central vine stem. Don’t worry about erasing; pencil marks will burn off in the kiln. -
Map the Center Design:
Sketch a similar circular wreath pattern in the very bottom of the bowl. Keep it loose and spaced out so the leaves don’t become too cluttered.
Pro Tip: Variance is Vital
Don’t make every leaf identical. Varied sizes and slight angle changes make the vine look organic rather than stamped.
Step 2: Painting the Rim
-
Paint the Main Stem:
Load your liner brush with dark green underglaze. Paint a continuous, slightly undulating line roughly 1 inch below the rim’s edge. This serves as the anchor for your leaves. -
Add Leaf Outlines:
Switch to your small round brush. Starting from the stem, paint small, almond-shaped outlines for the leaves. Create them in pairs or alternating patterns, extending upwards towards the rim edge. -
Fill the Leaves:
Gently fill in the leaf outlines. For that slightly rustic, stamped look seen in the photo, don’t worry about solid, perfect coverage—a little texture or brushstroke visibility adds character. -
Define the Rim Edge:
Use the side of your round brush to sponge or dab a thin border of the same green underglaze directly onto the very lip of the bowl. This frames the design perfectly.
Step 3: Painting the Interior
-
Paint the Inner Stems:
Move to the bottom basin of the bowl. Using the liner brush again, paint two or three long, curved stems that meet to form a loose wreath shape. -
Add Inner Leaves:
Paint leaves branching off these inner stems, using the same almond shape as the rim. Aim for the leaves to point in the direction of the stem’s growth for a natural flow. -
Detail Work:
Go back over your leaves with the very tip of your detail brush. You can add tiny points to the tips or slight veins if you want more realism, though the simple silhouette is very effective. -
Check for Smudges:
Carefully inspect the white space for any accidental green specks. Gently scrape them away with a clean craft knife or wipe with a barely damp Q-tip.
Troubleshooting: Blurry Lines?
If your clear glaze makes the design run, you likely applied it too wet or scrubbed too hard. Bisque fire the underglaze first to lock it in.
Step 4: Glazing & Firing
-
Dry the Underglaze:
Let the green underglaze dry completely. It should look chalky and matte to the touch before you proceed. -
Apply Clear Glaze:
Dip the entire bowl into a clear, transparent glaze. If brushing, apply 2-3 even coats, ensuring you don’t smear the design (dabbing the first coat helps preventing smearing). -
Wipe the Foot:
Use a sponge to wipe all glaze off the bottom foot of the bowl so it doesn’t fuse to the kiln shelf. -
Final Fire:
Fire the bowl in the kiln according to your clay and glaze specifications (usually Cone 5 or 6 for stoneware).
Now you have a stunning, nature-inspired vessel ready for your next meal or display

The Complete Guide to Pottery Troubleshooting
Uncover the most common ceramic mistakes—from cracking clay to failed glazes—and learn how to fix them fast.
Press-and-Reveal Leaf Impressions
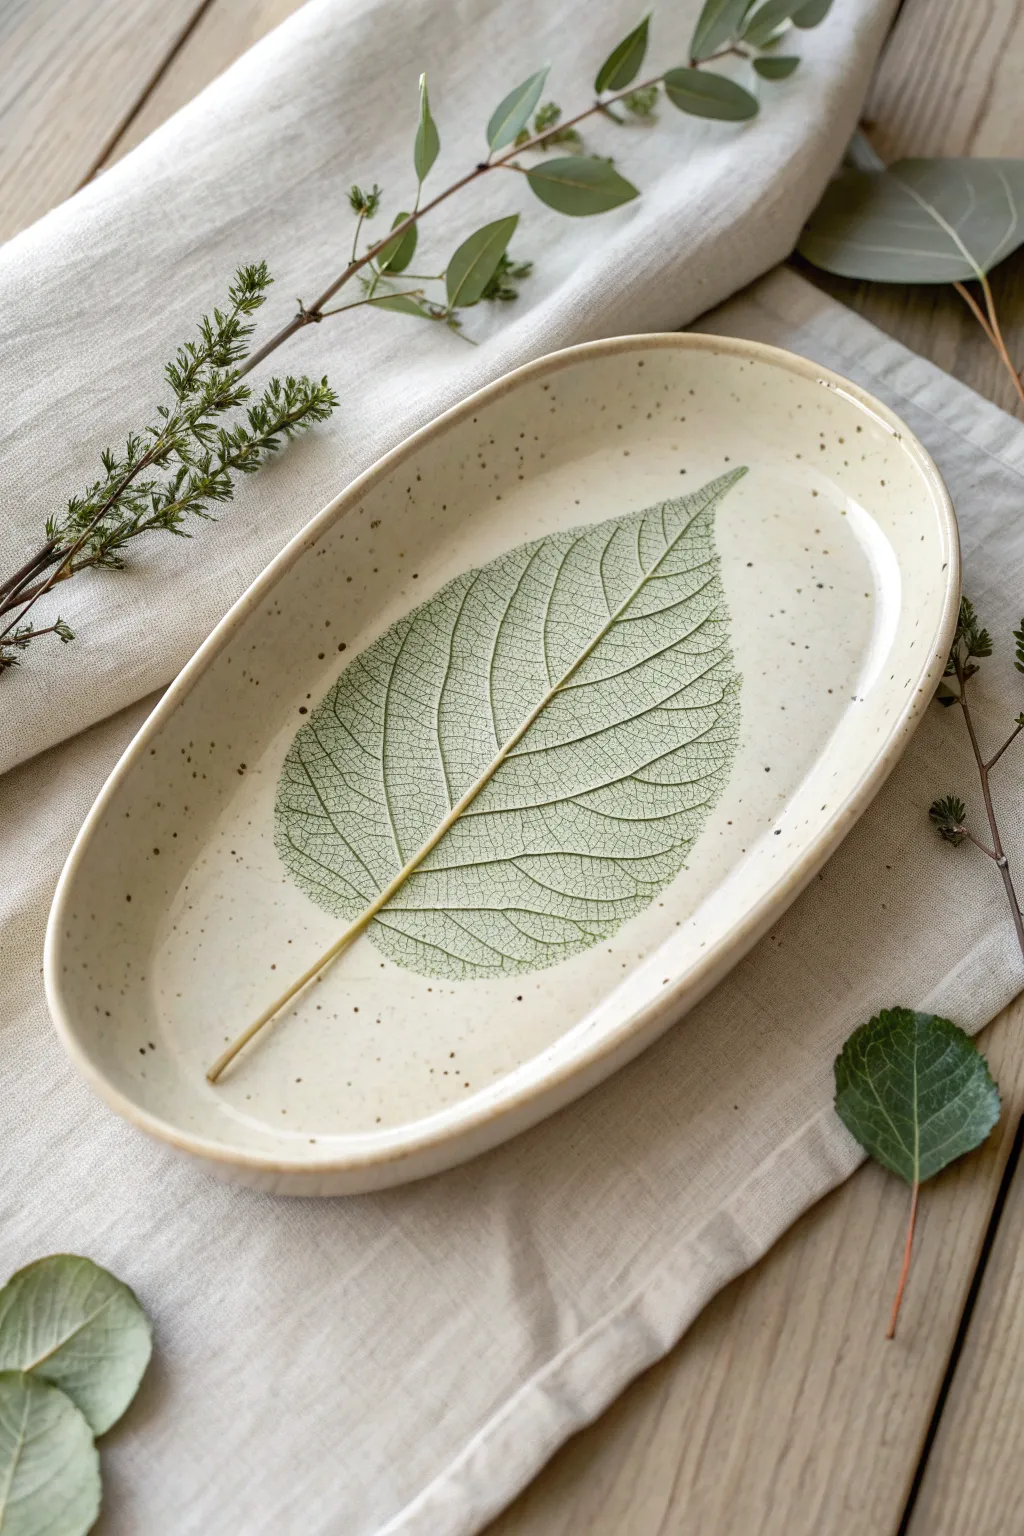
Capture the intricate beauty of nature with this elegant oval ceramic dish, featuring a permanent fossil-like impression of a skeleton leaf. The result is a stunning, functional piece with a speckled cream glaze that highlights the delicate green veining of the botanical print.
Step-by-Step Guide
Materials
- Light-colored stoneware clay (smooth, low grog)
- Large skeleton leaf (store-bought or DIY)
- Oval drape mold or slumber mold
- Rolling pin and guide sticks (approx. 1/4 inch thickness)
- Rib tool (flexible rubber)
- Needle tool or fettling knife
- Underglaze (forest green or moss green)
- Clear or transparent speckled glaze like ‘oatmeal’
- Sponge
- Soft fan brush
- Plastic wrap or thin canvas
Step 1: Slab Preparation & Shaping
-
Roll the slab:
Begin by wedging your clay thoroughly to remove air pockets. Roll it out into a smooth, even slab using guide sticks to maintain a consistent thickness of about 1/4 inch. -
Compress the surface:
Take your flexible rubber rib and run it firmly over the slab in multiple directions. This compression is crucial to prevent warping later and provides a pristine canvas for your leaf. -
Position the leaf:
Place your skeleton leaf centrally on the slab. If the leaf is dry and brittle, lightly mist it with water first so it becomes pliable and doesn’t crack under pressure. -
Roll the impression:
Gently roll over the leaf with your rolling pin to embed it flush with the clay surface. You want it integrated, not just resting on top, but be careful not to thin the clay too much in that spot. -
Cut the shape:
Using your needle tool or fettling knife, cut a large oval shape around the leaf, leaving a generous border. You can use a paper template for symmetry or go freehand for an organic look. -
Smooth the edges:
Run a damp sponge or your finger along the cut rim to soften the sharp angle. A rounded rim holds glaze better and feels nicer to the touch. -
Form the dish:
Lift the slab carefully and drape it over your oval slump mold. Press gently to conform the clay to the curve without distorting your beautiful leaf impression. -
Slow drying:
Cover the piece loosely with plastic to ensure slow drying. Let it dry to the bone-dry stage, which usually takes several days depending on humidity.
Troubleshooting: Blurry Lines
If the leaf detail looks messy, you likely didn’t wipe the sponge enough. Rinse it frequently and make broad, clean swipes to clear the surface clay.
Step 2: Coloring & Glazing
-
Bisque fire:
Once bone dry, bisque fire the piece to Cone 04 (or your clay’s specific bisque temperature). -
Apply the wash:
Mix your green underglaze with a little water to create a thin wash. Paint this liberally over the impressed leaf area, ensuring it gets into all the tiny vein crevices. -
Wipe back:
Using a clean, slightly damp sponge, wipe away the excess underglaze from the surface. The color should remain trapped in the indented lines of the leaf skeleton, revealing the design. -
Apply main glaze:
Stir your speckled oatmeal or transparent cream glaze well. I like to apply 2-3 even coats with a soft fan brush, ensuring full coverage. -
Check transparency:
Make sure your chosen glaze is translucent enough that it won’t obscure the underglaze detail underneath once fired. -
Clean the foot:
Wipe any glaze off the bottom foot of the platter to prevent it from sticking to the kiln shelf. -
Final smooth:
Check the rim one last time for any sharp drips or rough glaze patches and smooth them with a finger. -
Glaze fire:
Fire the piece to the maturation temperature of your glaze and clay body (typically Cone 5 or 6 for stoneware).
Level Up: Double Texture
Before rolling in the leaf, press a textured fabric (like burlap) into the clay. This adds a background weave texture behind the botanical print.
Once cooled, your platter is ready to bring a touch of woodland serenity to your table setting
Geometric Line Patterns That Never Fail
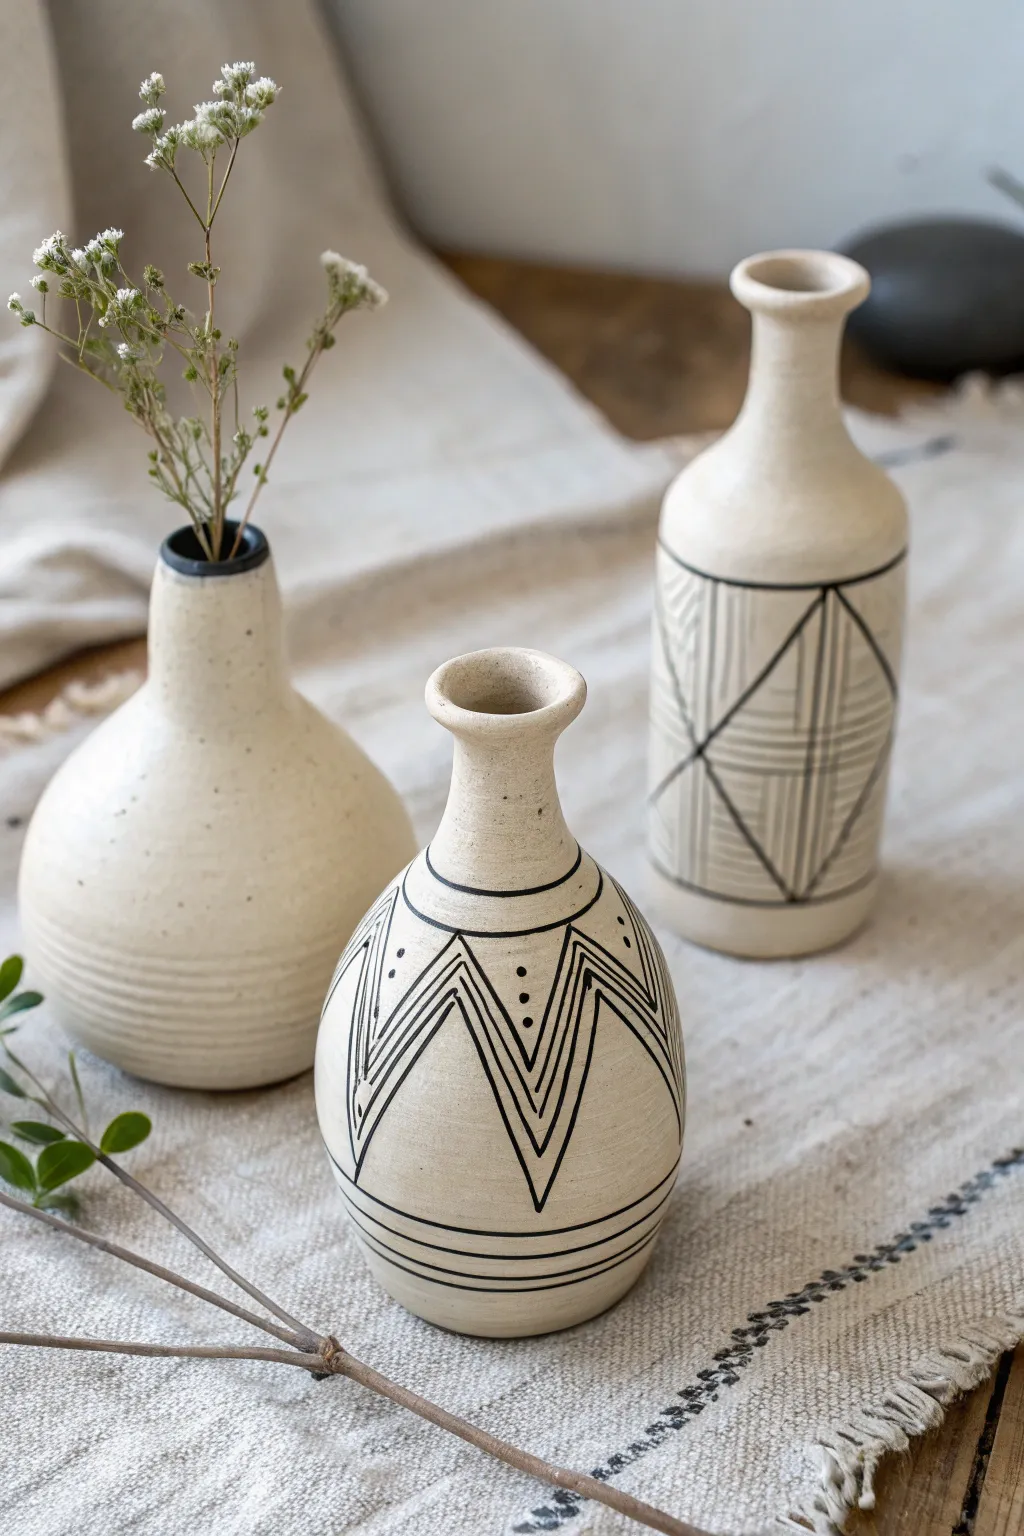
Transform plain bisque or ceramic forms into striking modern decor pieces with nothing more than a steady hand and high-contrast lines. This project embraces the beauty of imperfection, using repeating geometric motifs like chevrons, diamonds, and linear hatching to create a cohesive set that looks freshly pulled from a potter’s kiln.
Step-by-Step
Materials
- Three bisque or matte-glazed ceramic vases (varying shapes: bulbous, bottle-necked, and cylindrical)
- Black underglaze (if firing) or black acrylic paint/paint marker (if no-fire)
- Fine liner brush (size 00 or 0)
- Pencil for sketching
- Clear matte glaze or spray varnish
- Damp sponge
- Lazy Susan or banding wheel (optional but helpful)
Step 1: Preparation & Planning
-
Clean surface:
Begin by wiping down your ceramic vessels with a barely damp sponge. This removes any dust or oils from your hands that might resist the paint or underglaze. -
Sketch the zones:
Using a pencil, lightly mark horizontal bands around the vases to define where your patterns will sit. On the central vase, mark a band around the shoulder and the base. For the tall bottle vase, section off a large rectangle in the center. -
Draft the patterns:
Lightly sketch the main geometric shapes within your zones. For the middle vase, draw a zigzag or chevron line. For the tall vase, draw a large diamond shape intersected by a cross.
Step 2: Painting the Central Vase (Chevrons)
-
Define the neck:
Load your liner brush with black underglaze or paint. Carefully paint a solid ring around the very base of the neck where it meets the body. -
Create the main zigzag:
Trace over your pencil sketch of the large chevron pattern. I find it helpful to pull the brush toward me rather than pushing it away for cleaner lines. -
Add inner details:
Inside the main chevron, paint smaller, nested V-shapes. Create three nested lines for a bold graphic look, keeping the spacing somewhat organic. -
Dot accents:
Place three vertical dots in the negative space between the upper peaks of your chevrons to add visual interest. -
Base branding:
Finish this vessel by painting two or three horizontal rings near the bottom of the vase, varying their thickness slightly.
Keep it fluid
Mix your black paint or underglaze to the consistency of heavy cream. If it drags or skips, add a drop of water for smoother geometric lines.
Step 3: Painting the Tall Vase (Diamonds)
-
Frame the grid:
Paint the horizontal lines that define the top and bottom of your patterned section on the cylindrical body. -
Draw the diamond:
Paint the large central diamond shape, ensuring the points touch the top and bottom boundary lines. -
Bisect the form:
Draw a vertical line straight through the center of the diamond and a horizontal line across the middle, creating four smaller diamond quadrants. -
Fill with hatching:
In the left and right quadrants, fill the space with horizontal hatch marks. In the top and bottom quadrants, switch to vertical hatch marks to create contrasting texture. -
Outer hatching:
Replicate this hatching pattern in the negative spaces outside the main diamond to fill the rectangular frame.
Mix & match textures
Try leaving the raw clay exposed on the outside and only glazing the inside for functionality. The contrast between rough clay and sleek paint is stunning.
Step 4: Painting the Round Vase (Minimalist)
-
Rim detail:
For the third, rounder vase, keep it simple to balance the set. Paint the rim of the opening solid black. -
Texture rings:
Instead of bold shapes, create texture at the bottom. Paint very thin, subtle horizontal rings around the lower third of the vase. -
Splatter effect:
Loading your brush with a little extra water and paint, flick the bristles with your thumb to create a fine, speckled spray across the body of this vase.
Step 5: Finishing Touches
-
Clean up:
If you are using underglaze, you can carefully scratch away mistakes with a needle tool once dry. If using acrylic, wipe wet mistakes immediately with a damp Q-tip. -
Dry thoroughly:
Allow all pieces to dry completely. Underglaze usually looks chalky and lighter when dry. -
Seal or fire:
If using ceramic glazes, dip in clear matte glaze and fire according to clay type. If using acrylics, spray with a matte sealant to protect your design from dust and handling.
Arrange your trio together with some dried baby’s breath or wildflowers to complete the organic, artisan aesthetic


What Really Happens Inside the Kiln
Learn how time and temperature work together inside the kiln to transform clay into durable ceramic.
Doodle Lines and Squiggles for a Playful Look
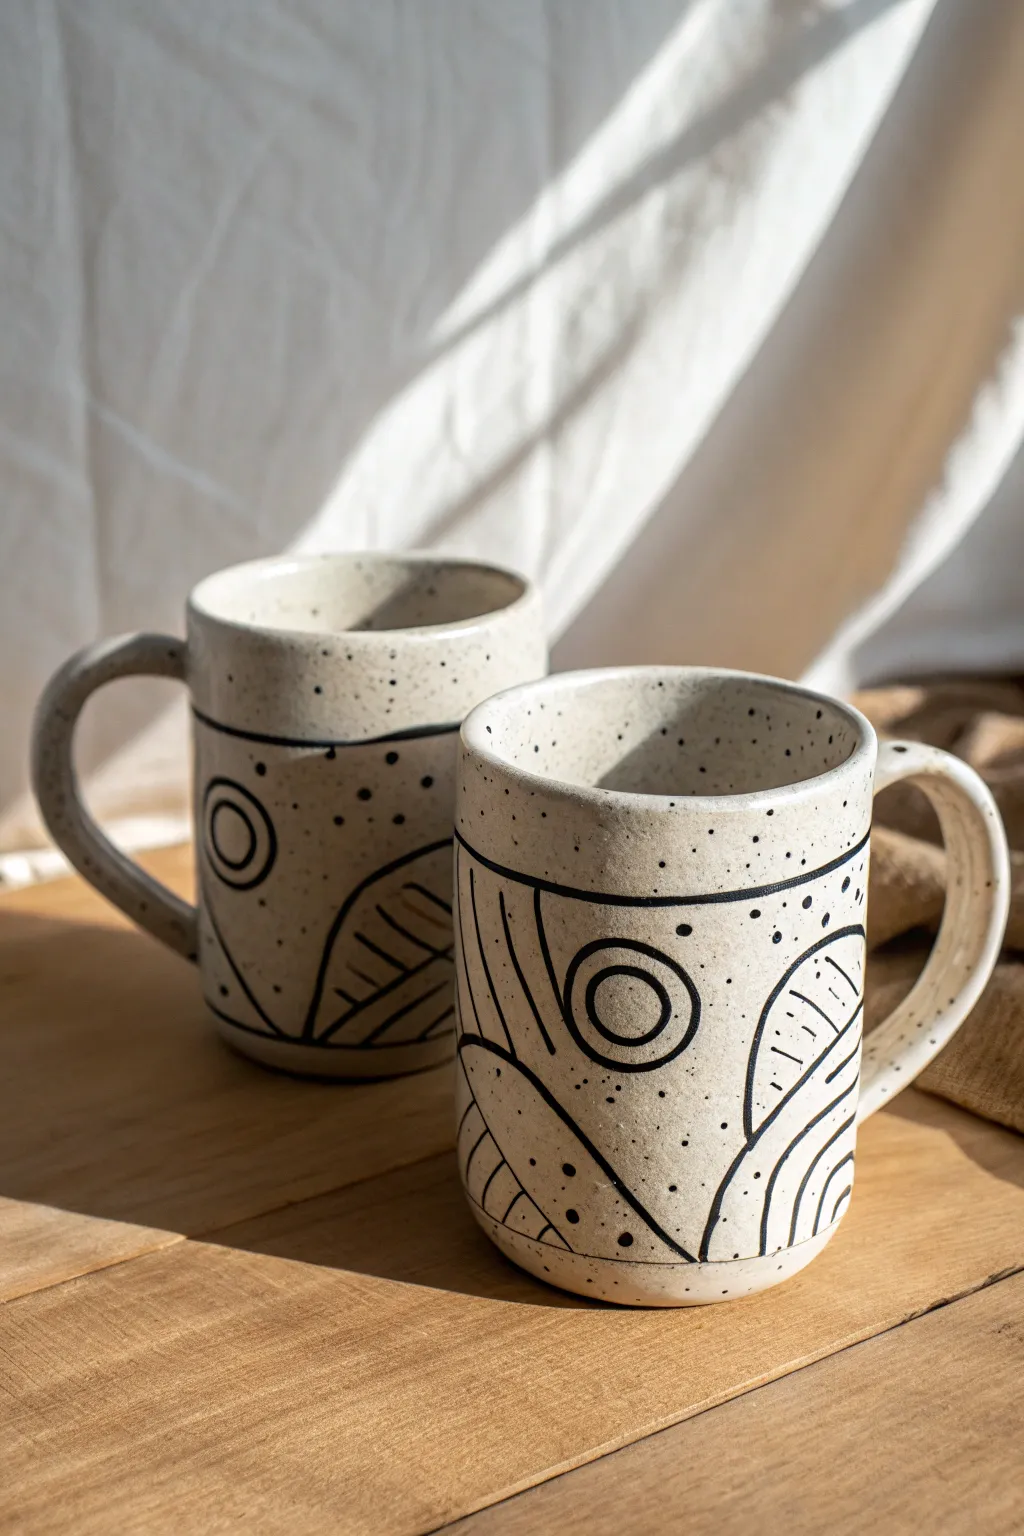
Embrace the imperfect beauty of hand-drawn art with these speckled ceramic mugs featuring bold, abstract doodles. The combination of gritty, speckled clay and crisp black underglaze creates a modern yet earthy aesthetic perfect for your morning coffee ritual.
Step-by-Step Tutorial
Materials
- Bisque-fired ceramic mugs (stoneware clay body)
- Black underglaze (or underglaze pencil)
- Fine liner brush (size 0 or 00)
- Speckled transparent glaze (or clear glaze over speckled clay)
- Sponge and water bucket
- Wax resist
- Kiln access
Step 1: Preparation & Planning
-
Surface Prep:
Begin with your bisque-fired mugs. Use a slightly damp sponge to wipe down the entire surface, removing any kiln dust or oils from your hands that might resist the glaze. -
Sketching the Design:
Before committing with underglaze, lightly sketch your doodle pattern directly onto the bisque using a regular graphite pencil. Don’t worry about mistakes; the graphite will burn off completely in the kiln. -
Mapping the grid (Optional):
If you struggle with spacing, lightly mark vertical lines to divide the mug into thirds or quarters. This helps ensure your abstract shapes wrap evenly around the form.
Smudged Lines?
If you accidentally smear wet underglaze, don’t wipe it while wet! It will stain the pores. Let it dry completely, then gently scrape it off with a sharp blade or needle tool.
Step 2: Applying the Design
-
Loading the Brush:
Thoroughly mix your black underglaze. Dip your fine liner brush in, ensuring the bristles are saturated but not dripping. I find it helpful to twist the brush tip on a palette to keep a sharp point. -
Drawing the Base Lines:
Start by painting the prominent lines that define the major shapes—the large curves at the bottom and the horizontal line separating the upper rim area. -
Adding Focal Points:
Paint the concentric circles (the ‘eyes’ or targets). Keep your hand steady, but allow for slight wobbles; this organic quality is key to the playful doodle look. -
Detailing the Shapes:
Fill in the secondary patterns, such as the curved hatch lines inside the leaf-like shapes or the vertical stripes within the defined sections. -
Adding the Dots:
Using the very tip of your brush or the back end of a paintbrush handle, add scattered black dots of varying sizes. Concentrate some clusters inside shapes and leave others floating in negative space. -
Building Opacity:
If your black lines look streaky or thin, carefully go over them a second time once the first layer is dry to ensure a deep, opaque black after firing. -
Clean Up:
If you smudge a line, wait for it to dry completely, then gently scratch the mistake off with a needle tool or a stiff bristled brush.
Add Dimension
Make the black lines slightly raised for tactile texture. Use a slip trailer bottle with a fine metal tip to apply the black underglaze instead of a brush.
Step 3: Glazing & Finishing
-
Waxing the Foot:
Apply wax resist to the bottom of the mug and about 1/4 inch up the side. This prevents glaze from sticking to the kiln shelf. -
Preparing the Overglaze:
Mix your speckled transparent glaze well. If you used a speckled clay body initially, a standard clear glaze is sufficient to let the clay’s natural grit show through. -
Dipping the Mugs:
Hold the mug by the handle or use glazing tongs. In one smooth motion, dip the mug into the clear glaze, hold for a brief count of three, and lift it out. -
Shaking off Excess:
Give the mug a gentle shake as you pull it out to remove excess drips. Be careful not to smudge the underglaze if it isn’t fully set. -
Checking the Rim:
Inspect the rim for any thick drips. Smooth them gently with a fingertip while the glaze is still powdery but damp. -
Final Clean:
Use a sponge to wipe any glaze droplets off the waxed foot ringing the bottom. -
Firing:
Load the mugs into the kiln and fire to the temperature recommended for your specific clay and glaze combination (usually Cone 5 or 6 for stoneware).
Once cooled, your mugs are ready to bring a touch of artistic flair to your beverage routine
Ombre Color Fade on Vases and Tumblers
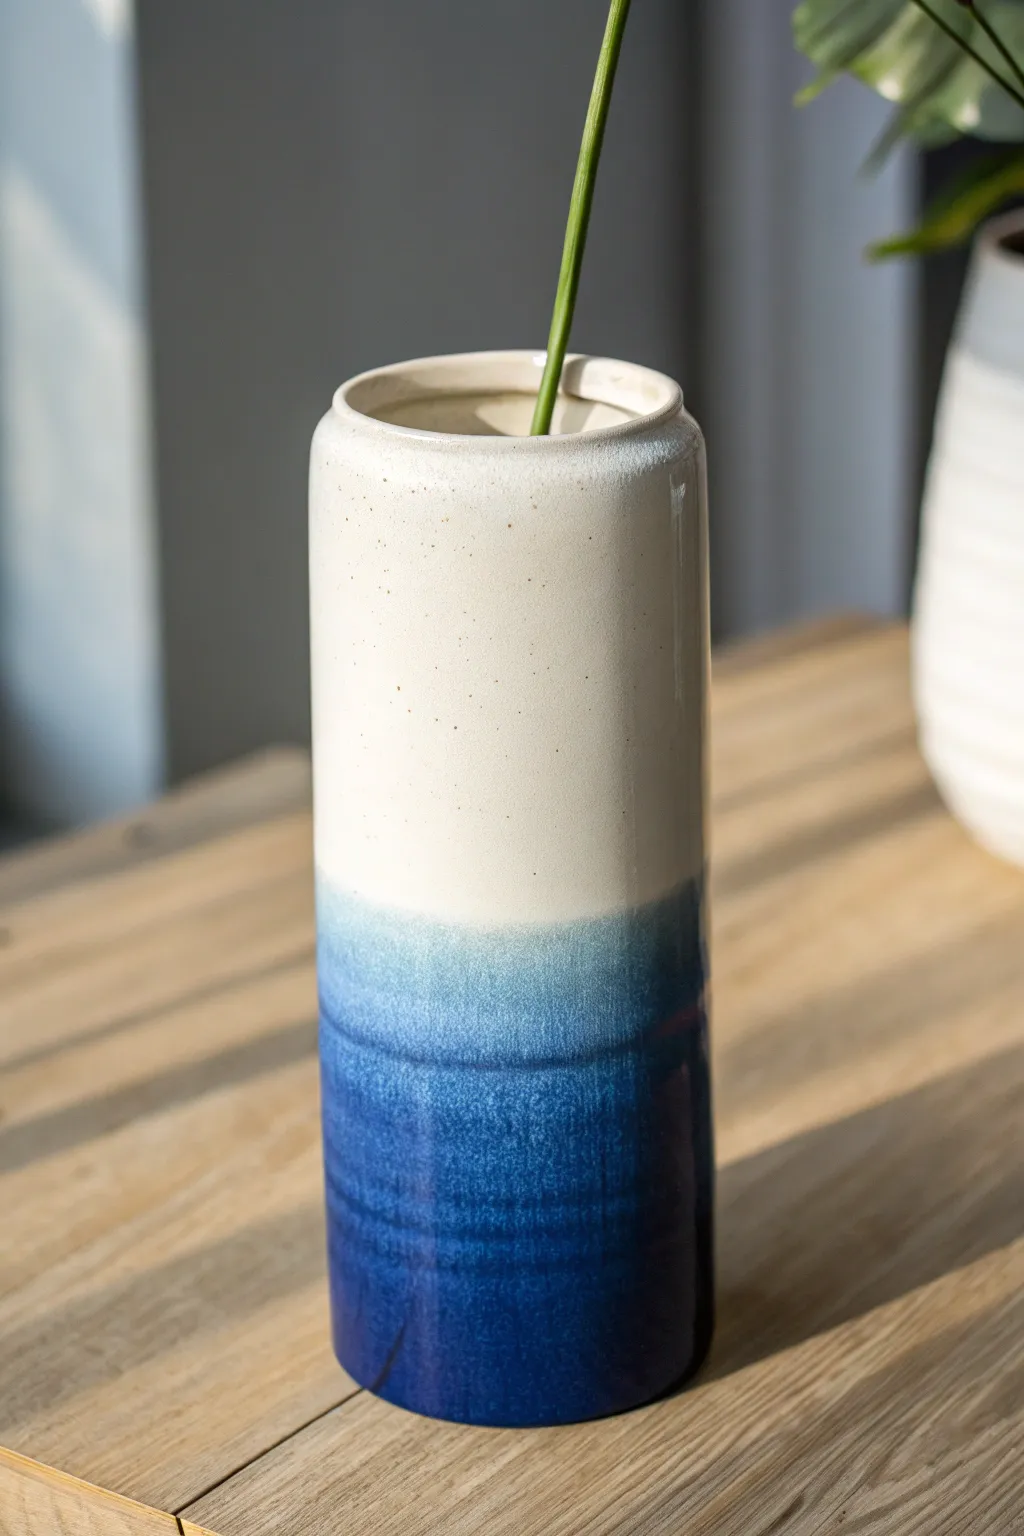
Achieve a stunning gradient effect that mimics the meeting of sand and deep ocean water with this simple yet sophisticated glazing technique. The smooth transition from speckled cream to rich indigo creates a modern, serene focal point perfect for any minimalist arrangement.
How-To Guide
Materials
- Bisque-fired cylindrical stoneware vase (tall)
- Speckled Cream glaze (stoneware cone 6)
- Reactive Blue or Indigo glaze (stoneware cone 6)
- Wide glazing brush or fan brush
- Large bucket deep enough for dipping (for the base coat)
- Smaller container for the blue glaze
- Sponge
- Wax resist (optional)
- Damp clean cloth
- Kiln (or access to a firing service)
Step 1: Preparation and Base Glazing
-
Clean the bisque:
Begin by wiping down your bisque-fired vase with a damp sponge. This removes any kiln dust or oils from your hands that might prevent the glaze from adhering properly. -
Wax the foot:
Apply a coat of wax resist to the very bottom of the vase and about 1/4 inch up the side. This saves you from having to wipe glaze off the bottom later and protects your kiln shelves. -
Prepare the cream glaze:
Thoroughly mix your Speckled Cream glaze in a large bucket. Ensure there are no lumps and the consistency is similar to heavy cream. -
Dip the interior:
Pour the cream glaze inside the vase, swirl it around quickly to coat the entire interior surface, and pour the excess back into the bucket. -
Coat the exterior:
Using dipping tongs or by holding the vase carefully by the rim (if your hand fits inside), dip the entire vase into the cream glaze. Hold it for about 3 seconds to get an even coat. -
Initial dry:
Allow this base coat to dry until it is powdery to the touch. I usually wait about 20-30 minutes here to ensure the surface is stable enough for the next layer.
Step 2: Creating the Ombre Effect
-
Prepare the blue glaze:
Pour your Indigo or Reactive Blue glaze into a container wide enough to accommodate the width of the vase. -
First dip (Darkest Blue):
Hold the vase upside down. Dip the bottom third of the vase into the blue glaze. Hold it there for 3-4 seconds to build up a thick, dark layer. -
Second dip (Mid-tone):
Once the first dip has lost its sheen (about a minute), dip the vase again, but go slightly deeper—covering about half of the vase. Pull it out *immediately*. -
Feathering the edge:
Quickly flip the vase upright. While the second layer is still wet, use a damp sponge or a soft fan brush to gently pat or feather the top edge of the blue glaze where it meets the cream. -
Create the transition:
This feathering action blends the blue particles downward into the cream base, preventing a harsh horizontal line and creating that misty transition. -
Check the thickness:
Inspect the layers. If the blue looks too thin at the very bottom, you can do one final quick dip of just the bottom inch to intensify the deep indigo color.
Uneven Fade?
If the line looks too harsh, dampen a sponge slightly and dab the transition line while the glaze is powdery but not bone dry. This physically moves the particles.
Step 3: Finishing Touches
-
Clean the foot ring:
Even with the wax resist, check the bottom of the vase. Use a damp sponge to wipe away any droplets of glaze that may be beadling on the wax. -
Rim check:
Smooth the glaze on the rim with your finger. Since you held the vase upside down, gravity might have pulled glaze away from the rim; ensure it’s well-covered. -
Final drying:
Let the vase dry completely overnight. The moisture from the multiple dips needs to evaporate to prevent steam explosions in the kiln. -
Fire the piece:
Load the vase into the kiln and fire to Cone 6 (or whatever temperature your clay and glaze combination requires). -
Cooling:
Allow the kiln to cool naturally before opening. The thermal shock of opening too early could cause crazing in the glaze.
Airbrush Option
For the smoothest gradient without dipping lines, use a mouth atomizer or airbrush to spray the blue glaze onto only the bottom half while spinning the vase on a banding wheel.
Place a single tall stem in your new vase and enjoy the calm, oceanic vibe it brings to your space

TRACK YOUR CERAMIC JOURNEY
Capture glaze tests, firing details, and creative progress—all in one simple printable. Make your projects easier to repeat and improve.
Marbled Swirls for a Soft, Stone-Like Finish
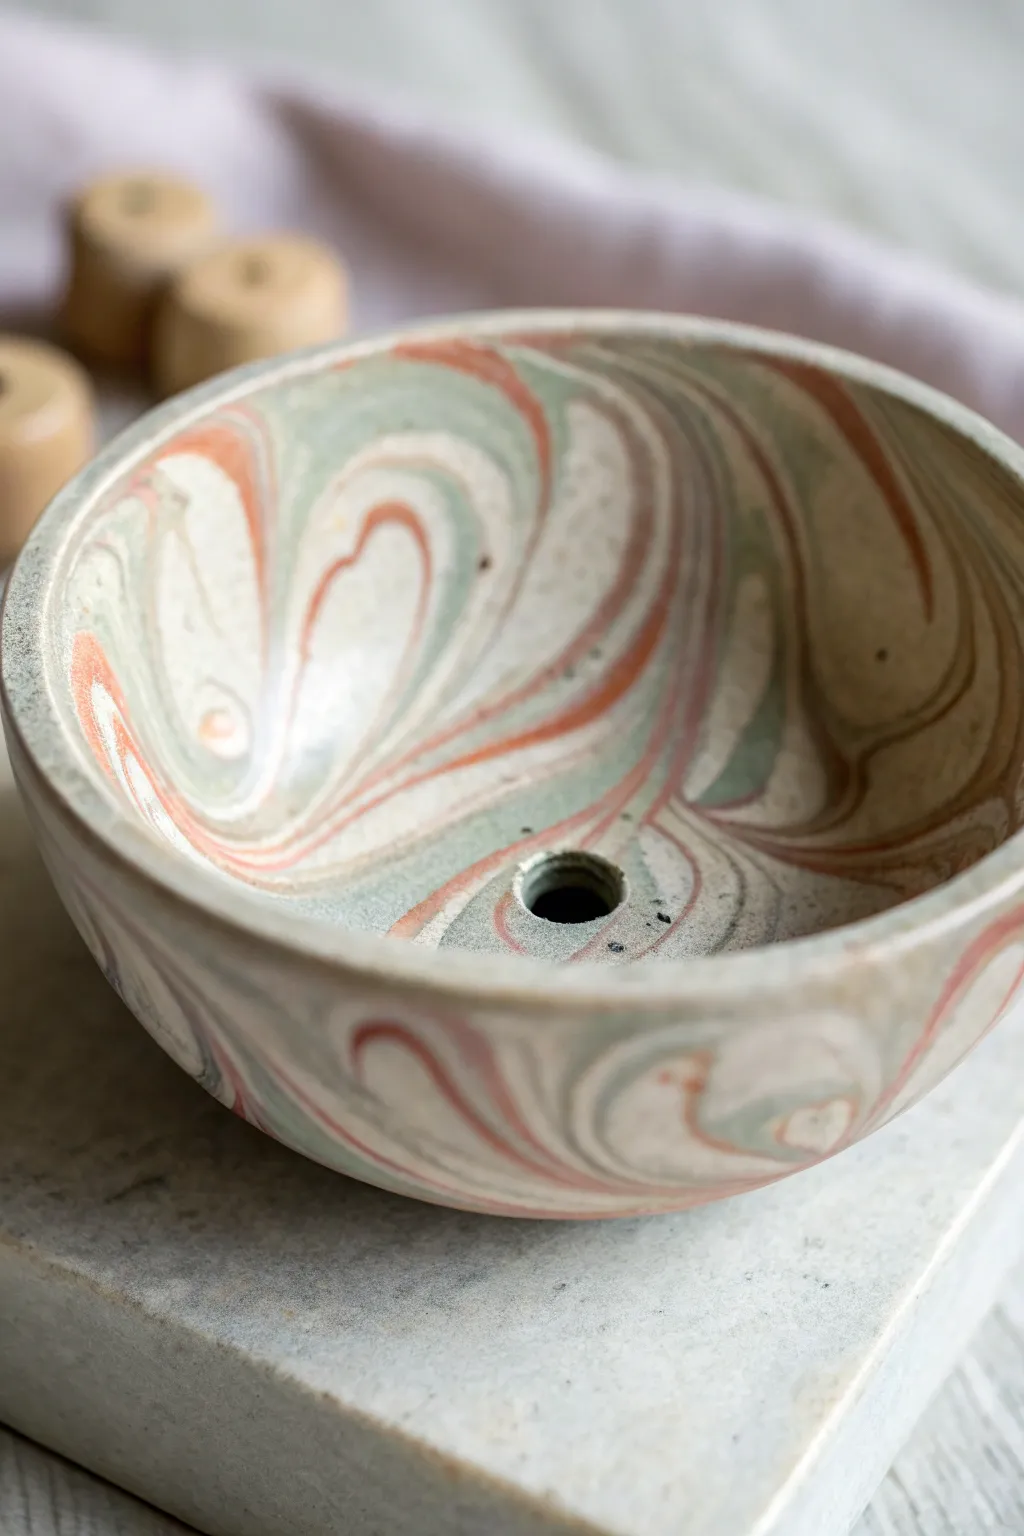
Capture the organic beauty of natural stone with this marbled ceramic bowl, featuring swirling layers of sage green, terracotta, and soft cream. The smooth, matte finish gives it a sophisticated, contemporary feel perfect for holding small succulents or precious trinkets.
Step-by-Step
Materials
- White stoneware clay
- Mason stains (Sage Green, Coral/Terracotta)
- Pottery wheel (or rolling pin for hand-building)
- Wire cutter
- Rib tool (metal and rubber)
- Sponge
- Pin tool
- Trim tool
- Clear matte glaze (optional, for inside only)
Step 1: Preparing the Colored Clay
-
Divide the clay:
Start with a block of white stoneware clay. Slice off two smaller chunks, leaving the largest portion as plain white. You want about 50% white, 25% for green, and 25% for terracotta. -
Wedging in color:
Take one of the smaller chunks and create a well in the center. Add a teaspoon of hydrated Sage Green Mason stain. Fold the clay over the stain and wedge it thoroughly until the color is uniform. Wear gloves to avoid staining your hands. -
Repeat for the second color:
Repeat the previous step with the second chunk of clay, using the Coral or Terracotta stain. Wedge until you have a smooth, consistent reddish-orange hue. -
Stacking the slab:
Form each of your three colored clays (white, green, terracotta) into thick logs or slabs. Stack them on top of each other, alternating the order if you wish. -
Twisting the log:
Roll the stacked clay into a single thick cylinder. Grip the ends and twist the clay in opposite directions like a candy wrapper. This twisting action creates the initial swirl separation. -
Knead lightly:
Gently wedge the twisted log just a few times—maybe 4 to 6 turns. I usually stop earlier than I think is necessary; over-wedging will muddy the colors and destroy the distinct marble definition.
Step 2: Throwing and Shaping
-
Center specifically:
Slam your marbled ball onto the wheel head. When centering, try to move the clay up and down (coning) minimally to preserve the pattern, but ensure it is perfectly centered. -
Open the form:
Open the clay to create the floor of your bowl. Compress the bottom well with your fingers to prevent S-cracks later. -
Pull the walls:
Slowly pull up the walls. As you pull, the hidden strata of colored clay will begin to stretch and reveal the marble pattern. Keep your pulls consistent to maintain even wall thickness. -
Create the curve:
Use a rib tool on the inside to gently push the belly of the bowl out, creating a full, rounded curve. This rounding motion stretches the clay surface and often reveals the best swirls. -
Smooth the surface:
Run a metal rib gently up the outside specifically to remove the slurry (liquid clay). Removing this slip layer makes the pattern sharp and clean rather than hazy. -
Refine the rim:
Use a chamois or a piece of plastic to smooth the rim. A rounded, slightly inward-turned rim gives the piece a solid, stone-like appearance.
Muddy colors?
If your colors look grey or blended rather than distinct, you likely wedged too much after combining the clays. Next time, slap them together, twist once, and throw immediately.
Step 3: Finishing Touches
-
Wire off:
Run a wire cutter underneath the pot to separate it from the wheel head and let it dry to leather-hard. -
Trim the foot:
Once leather-hard, flip the bowl and trim the base. Trimming cuts through the outer layer, often revealing the most dramatic swirls that were hidden during throwing. -
Drill the drainage:
If using this as a planter, use a hole cutter or drill tool to create a clean drainage hole in the absolute center of the base while the clay is still leather-hard. -
Bisque fire:
Fire the piece in the kiln to bisque temperature (usually Cone 06/04). Wipe it down with a damp sponge afterwards to remove dust. -
Sanding for texture:
To achieve that specific matte, stone feel shown in the image, sand the exterior with wet-dry sandpaper (400 grit) under running water after the firing creates a silky smooth, unglazed surface. -
Final fire:
If you want the inside functional, add a clear matte glaze to the interior only. Leave the outside raw clay. Fire to maturity (Cone 5/6 or 10).
Carve it out
For a steeper contrast, try ‘fluting’ or carving vertical facets into the leather-hard exterior. This cuts through the layers and exposes stripes of color hidden within the wall.
Now you have a stunning, one-of-a-kind vessel that looks as though it was carved directly from a canyon wall
Fruit Motifs on Tiny Trinket Dishes
This charming project combines the rustic appeal of speckled stoneware with the fresh vibrancy of summer fruits. You will learn to hand-paint simple motifs onto a small, low-profile dish to create a perfect catch-all for rings or coins.
Detailed Instructions
Materials
- Speckled buff stoneware clay (or white clay with speckle additive)
- Small rolling pin
- Circle template or cutter (approx. 4 inches)
- Small sponge
- Underglazes: Bright Red, Yellow, Leaf Green, Dark Green
- Detail brushes (liner brush and small round brush)
- Clear transparent glaze (food-safe if creating functional ware)
- Needle tool
- Modeling tool or ribs for smoothing
- Kiln access
Step 1: Forming the Dish
-
Roll the slab:
Begin by rolling out your speckled clay on a canvas board to an even thickness of about 1/4 inch. If you want that natural stone look seen in the photo, ensure your clay body has grog or manganese speckles. -
Cut the circle:
Using a circle cutter or a needle tool guided by a template, cut out a clean circle approximately 4 to 5 inches in diameter. -
Lift the edges:
Gently lift the outer edges of the clay circle with your fingertips. I like to pinch a very small wall, turning the flat circle into a shallow bowl shape. Aim for a wall height of about 0.75 inches. -
Smooth the rim:
Run a damp sponge or a chamois cloth over the rim to round it off. The rim should be soft and smooth, not sharp or jagged. -
Refine the surface:
Before painting, ensure the interior surface is smooth. Use a rubber rib to compress the clay gently, removing any canvas texture while keeping the speckles visible. -
Initial drying:
Allow the dish to dry to a leather-hard state. It should be firm enough to hold its shape but still cool to the touch and receptive to underglaze.
Fix Smudged Lines
If you smear underglaze while painting, don’t wipe it wet! Let it dry completely, then gently scratch the mistake off with a needle tool.
Step 2: Painting the Motifs
-
Paint the lemon slice:
Using a small round brush and yellow underglaze, paint a circle for the lemon slice. Leave the very center slightly lighter or unpainted if you want a pith effect, add thin radiating lines for segments. -
Add the lemon rind:
Outline the yellow circle with a very fine line of brown or dark beige underglaze to represent the rind, mimicking the illustration style in the image. -
Paint the strawberry body:
load your brush with bright red underglaze. Paint a rounded heart shape next to the lemon. Apply 2-3 coats for opacity, letting each coat dry briefly in between. -
Add strawberry details:
Once the red is dry, use your finest liner brush to dip into a creamy white or light yellow underglaze. Dot tiny seeds across the surface of the strawberry. -
Paint the leaves:
With dark green underglaze, paint the leafy cap on top of the strawberry. Use a swift, lifting motion to create pointy leaf tips. -
Paint the herb sprig:
On the opposite side, use a dark green or forest green underglaze to paint a sprig of rosemary or thyme. Draw a single stem line first, then use quick, short strokes to add needles branching off it. -
Add decorative filler:
Fill the empty space between the main fruits with a small, stylized flower or starburst shape using green and yellow underglaze to balance the composition. -
Decorate the outer rim:
Don’t forget the outside! Paint alternating small ovals of red and yellow/green along the exterior wall to echo the interior theme.
Add Gold Accents
For a luxe finish, apply a low-fire gold luster overglaze to the strawberry seeds or the dish rim after the final glaze firing and fire a third time.
Step 3: Glazing and Firing
-
Bisque fire:
Once the piece is bone dry, load it into the kiln for a bisque firing (usually cone 04). This sets the shape and makes the underglaze permanent. -
Apply clear glaze:
Wipe the bisqued piece with a damp sponge to remove dust. Dip the entire dish into a clear transparent glaze. This will make the colors pop and seal the clay. -
Glaze fire:
Fire the piece again to the maturation temperature of your specific clay and glaze (often cone 5 or 6 for stoneware). The clear glaze will become glossy and reveal the clay’s natural speckles.
Now you have a delightful, fruit-themed trinket dish ready to brighten up any dresser or side table.
Checkerboard Blocks for Bold Contrast
Bring bold contrast to your table setting with this shallow bowl, featuring a classic checkerboard pattern re-imagined with a speckled, organic finish. The interplay between the raw cream clay and the dark underglaze creates a modern yet rustic aesthetic.
Step-by-Step Guide
Materials
- Stoneware clay (speckled or buff)
- Black underglaze
- Clear matte or satin glaze
- Rolling pin and guide sticks (approx. 1/4 inch)
- Slump mold or large bowl for shaping
- Rib tool (kidney)
- Needle tool or fettling knife
- Sponge
- Pencil
- Flat shader brush (synthetic works well for crisp lines)
- Painter’s tape (optional)
- Loop tool or trimming tools
Step 1: Forming the Base
-
Wedging:
Start by wedging your speckled stoneware clay thoroughly to remove air pockets and ensure an even consistency. -
Rolling the Slab:
Roll out a slab of clay using your guide sticks to maintain a consistent thickness of about 1/4 inch. If you want more noticeable speckling later, smooth the surface with a rib tool to compress the clay particles. -
Cutting the Circle:
Place a round template or a large dinner plate over your slab and trace around it with a needle tool to cut out your perfect circle. -
Shaping the Form:
Gently lift the slab and drape it into your slump mold. Carefully press the clay against the mold’s interior, working from the center outward to avoid trapping air. -
Refining the Rim:
Smooth the rim with a damp sponge or chamois leather to ensure it’s rounded and comfortable to the touch. Let the bowl dry to a leather-hard state.
Crisp Lines
For sharper edges without tape, slightly dampen your brush before loading the underglaze. It helps the pigment flow smoothly along the pencil guidelines.
Step 2: Drafting the Design
-
Marking the Center:
Once leather-hard, remove the bowl from the mold. Using a pencil, lightly mark the exact center of the bowl’s interior. -
Drawing Concentric Rings:
Sketch a smaller circle in the center where the checkerboard pattern will warp and stretch, and another ring about halfway up the wall. -
Dividing Sections:
Lightly draw lines radiating from the center to the rim, dividing the bowl into equal pie slices. I usually aim for 8 or 12 sections depending on the size of the bowl. -
Creating the Grid:
Connect your ring marks within the pie slices to form the varying sizes of ‘squares’ that make up the warped checkerboard effect.
Design Twist
Instead of black, use a dark navy or deep forest green underglaze. The speckles will still pop through but with a softer, cooler tone.
Step 3: Painting and Glazing
-
Selecting Squares:
Identify which squares will be black. Mark them lightly with a small ‘x’ so you don’t lose track of the alternating pattern while painting. -
First Coat:
Using your flat shader brush, apply the black underglaze to the selected squares. Use confident strokes to keep the edges relatively crisp. -
Building Opacity:
Let the first coat dry until it’s no longer shiny, then apply a second and third coat of black underglaze to ensure a solid, deep color without brushstrokes showing through. -
Cleaning Edges:
If any underglaze strayed outside the lines, gently scrape specific spots away with a clean, sharp tool or a stiff, dampened brush. -
Bisque Firing:
Allow the piece to dry completely before firing it to a bisque temperature (usually cone 04). -
Waxing (Optional):
Wipe the bisque ware with a damp sponge to remove dust. If you want the raw clay texture on the bottom, apply wax resist to the foot ring. -
Clear Glazing:
Dip the entire bowl into a clear matte or satin glaze. This will seal the piece and enhance the natural speckles in the clay body while protecting the black design. -
Final Fire:
Fire the piece to the maturation temperature of your specific clay and glaze combination (typically cone 5 or 6).
The result is a stunning, functional piece of art that balances geometric precision with handmade warmth, ready for your next meal
Speckled Surfaces That Feel Handmade

Embrace the rustic charm of handmade pottery with this trio of nesting bowls. Featuring a creamy, iron-speckled glaze and subtle throwing lines, these vessels offer a warm, tactile quality that feels both modern and timeless.
How-To Guide
Materials
- Speckled Stoneware Clay (or white stoneware with iron filings added)
- Pottery Wheel
- Throwing tools: sponge, wire cutter, needle tool, wooden rib
- Trimming tools: loop tool, metal kidney
- Satin Matte Cream/Oatmeal Glaze
- Oxide wash (Iron Oxide or Manganese)
- Small sponge or brush for rim application
- Kiln
Step 1: Throwing the Forms
-
Wedging the Clay:
Begin by thoroughly wedging your speckled stoneware clay. You will need three balls of clay in graduating sizes—approximately 1 lb, 1.5 lbs, and 2 lbs—to create the nesting effect. -
Centering:
Start with the smallest ball. secure it to the wheel head and center it using even pressure and medium-high speed. A well-centered lump is crucial for even walls. -
Opening the Floor:
Drill your thumbs into the center and open the clay outward. For these bowls, aim for a gentle curve at the transition from floor to wall rather than a sharp corner. -
Pulling the Walls:
Slow the wheel down slightly. Compress the clay between your fingers and pull upward. As you pull, flare the walls outward into a wide ‘V’ or ‘U’ shape, characteristic of cereal or soup bowls. -
Creating Texture:
Unlike many polished pieces, we want to leave the subtle ‘throwing lines’ visible on the exterior. Instead of smoothing the outside with a rib, use your fingertips or the soft edge of a wooden tool to gently accentuate these spiral ridges as the wheel spins. -
Refining the Rim:
Compress the rim with a chamois or a piece of plastic to round it off. A slightly thickened rim adds visual weight and durability. -
Repeat for Larger Bowls:
Remove the first bowl with a wire cutter. Repeat the process with the medium and large clay balls, ensuring the shapes mimic the curve of the first bowl but on a larger scale.
Rim Too Dark?
If the rim contrast is too harsh, wipe most of the oxide wash off with a clean, damp sponge before firing. The clay works as a stain, leaving just a subtle shadow.
Step 2: Trimming and Bisque
-
Leather Hard Stage:
Allow the bowls to dry to a leather-hard state. The rim should hold its shape, but the bottom should still be carvable. -
Trimming the Foot:
Center a bowl upside down on the wheel. Use a loop tool to trim away excess weight from the bottom, carving a distinct foot ring. This lifts the bowl and gives it a professional profile. -
Smooth the Transition:
Use a damp sponge or a soft rib to smooth any sharp trimming marks, blending the trimmed area into the textured upper body. -
Bisque Firing:
Once fully bone dry, load the bowls into the kiln for a bisque fire (typically Cone 04 or 06). This prepares the clay for glazing.
Step 3: Glazing and Finishing
-
Waxing the Foot:
Apply wax resist to the bottom foot ring of each bowl to prevent glaze from fusing the bowl to the kiln shelf. -
Applying the Base Glaze:
Dip each bowl into a satin matte cream or oatmeal glaze. If dipping isn’t an option, pour the glaze inside, swirl to coat, pour out, and then spray or brush the exterior. -
Revealing Texture:
If surface texture was lost during glazing, gently wipe the exterior with a damp sponge. This thins the glaze on the high points of theridges, allowing the speckled clay body to show through more clearly after firing. -
Accentuate the Rim:
To achieve the specific look in the photo, dip a small sponge into an iron oxide wash (or a darker brown glaze). While holding the bowl steady, lightly run the sponge along the very edge of the rim. -
Checking for Drips:
Inspect the foot ring and wipe away any glaze drips. I always double-check this step to save my kiln shelves. -
Glaze Firing:
Load the kiln ensuring the bowls do not touch each other. Fire to the maturity temperature of your clay and glaze (often Cone 5 or 6). Allow the kiln to cool completely before opening.
Add More Speckles
If your clay isn’t speckled enough, mix granular ilmenite or coarse iron oxide into your liquid glaze for that peppered look.
Now you have a stunning, functional set of nesting bowls ready for your next cozy meal
Scalloped Borders and Wavy Edges
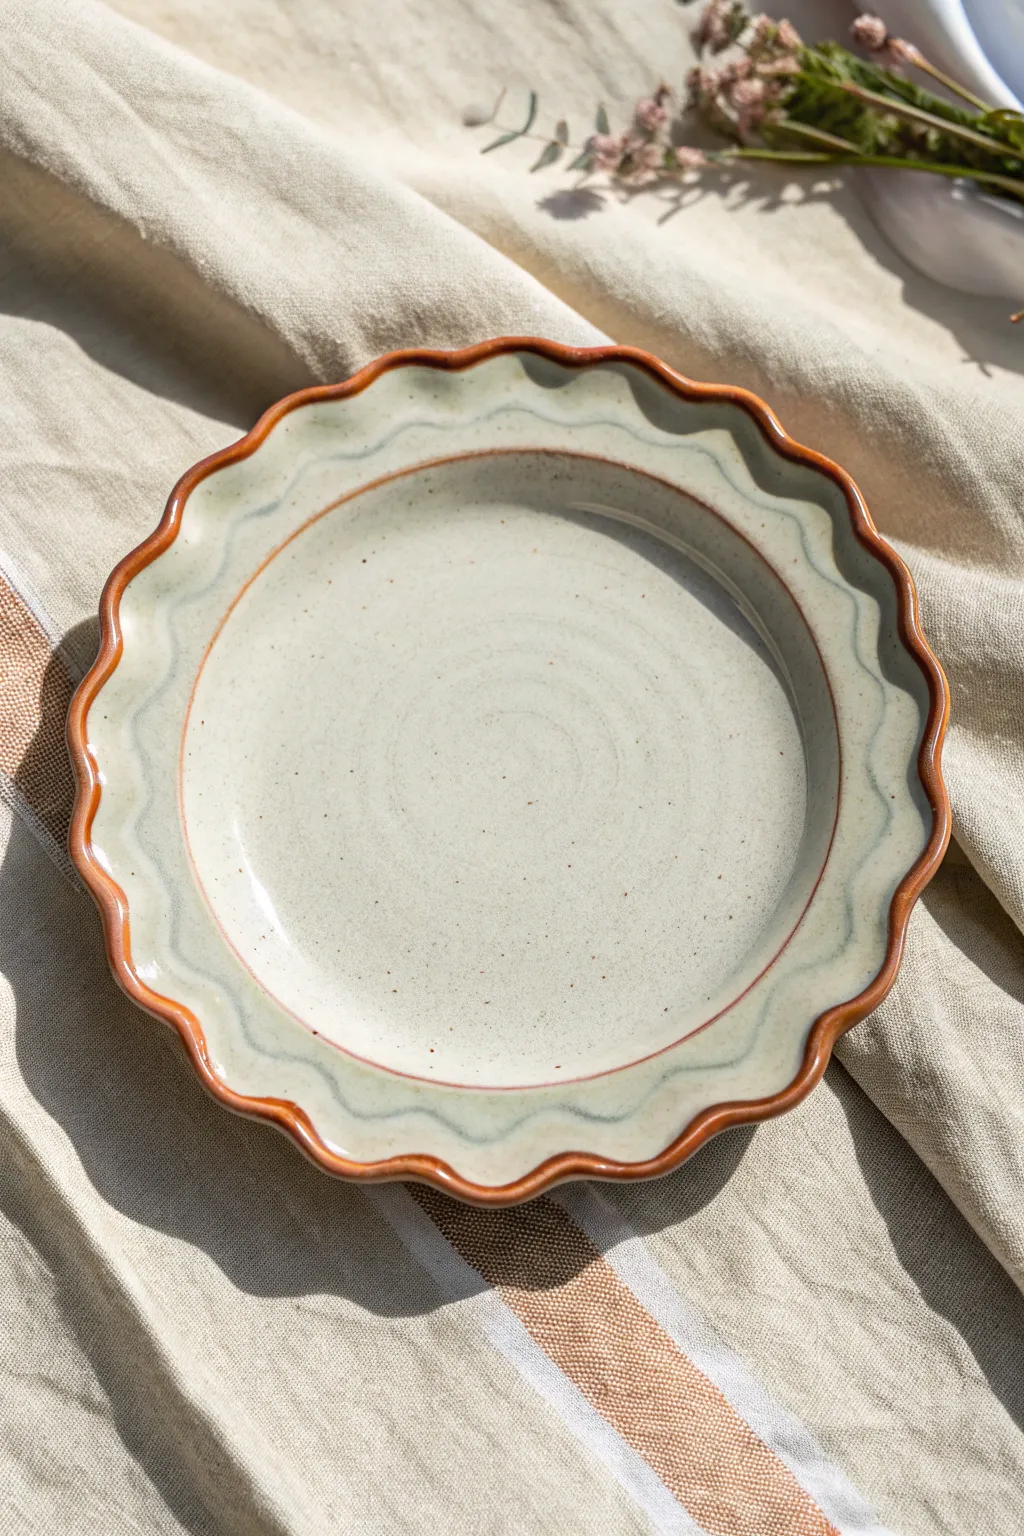
This charming ceramic plate features a gentle, rhythmic scalloped edge that mimics the organic curves found in nature. The piece combines a speckled cream glaze with a warm terracotta-toned rim, creating a delightful interplay of texture and form perfect for showcasing your culinary creations.
Detailed Instructions
Materials
- Speckled stoneware clay (mid-fire)
- Rolling pin
- Canvas mat or slab roller
- 9-inch round template (paper or bisqueware)
- Fettling knife or needle tool
- Potter’s wheel (optional, for centering, though hand-building works too)
- Sponge
- Rib tool (flexible rubber)
- Terracotta colored underglaze or slip
- Clear or translucent cream glaze
- Soft fan brush
- Loop tool or trimming tool
- Kiln
Step 1: Forming the Base
-
Roll the slab:
Begin by wedging your speckled stoneware clay thoroughly to remove air bubbles. Roll it out into a uniform slab about 1/4 inch thick. I like to rotate the clay periodically as I roll to ensure an even thickness throughout. -
Compress the clay:
Take a flexible rubber rib and drag it smoothly across the surface of the slab on both sides. This compression step aligns the clay particles, preventing warping later, and creates a pristine canvas for your plate. -
Cut the circle:
Place your 9-inch round template gently onto the slab. Using a needle tool or fettling knife, cut straight down around the perimeter to create a perfect circle. Remove the excess clay. -
Lift the rim:
To give the plate its depth, gently lift the outer inch of the circle upward. You can do this by placing the slab over a shallow hump mold or by pinching the edge up while the slab rests on a banding wheel.
Step 2: Sculpting the Scallops
-
Mark the intervals:
Lightly mark the rim of your plate at even intervals to guide your scallops. Aim for about 16-20 marks around the circumference to replicate the density seen in the photo. -
Flute the edge:
Using your thumb and forefinger, gently push the clay rim outward at each mark while supporting the clay between the marks with your other hand. This push-pull motion creates the signature wavy ‘pie crust’ edge. -
Refine the waves:
Go around the rim a second time with a damp sponge. Smooth out any sharp fingerprints and ensure the peaks and valleys of the scallops are uniform and soft flowing. -
Smooth the transition:
Use your rib tool to smooth the interior bottom of the plate where it meets the rising wall. You want a seamless curve rather than a sharp angle. -
Dry slowly:
Let the plate dry very slowly under loose plastic to the leather-hard stage. Scalloped edges dry faster than the center, so slow drying is crucial to prevent cracking.
Wobbly Waves?
If your scallops look uneven, create a paper template with the waves pre-cut. Lay it on the clay and trace the wave pattern before shaping the rim.
Step 3: Decorating the Rim
-
Bisque fire:
Once the piece is bone dry, fire it in the kiln to bisque temperature (usually roughly cone 04) to prepare it for glazing. -
Wipe down:
After the kiln cools, wipe the bisque ware with a damp sponge to remove any dust that might interfere with glaze adhesion. -
Apply rim color:
Dip a small brush into your terracotta-colored underglaze or slip. Carefully paint the very edge of the scalloped rim. You want the color to highlight the wave, so keep this line steady. -
Add inner ring:
Using a banding wheel for stability, paint a thin, concentric circle of the terracotta color on the interior of the plate, mirroring the outer rim. It creates a nice visual echo of the form. -
Clean up details:
If your brush slipped, gently scrape away any unwanted underglaze with an X-Acto knife or a stiff brush once the color is dry.
Go Geometric
Try alternating the painted rim color. Instead of a solid line, paint dashes or dots along the scallop peaks for a playful, folk-art inspired variation.
Step 4: Glazing and Finishing
-
Apply main glaze:
Stir your translucent cream glaze thoroughly. Pour a generous amount into the center of the plate, swirl it to coat the entire interior up to the rim, and pour out the excess. -
Brush the exterior:
Use a soft fan brush to apply two coats of the same cream glaze to the exterior/bottom of the plate, avoiding the foot ring. -
Clean the foot:
Use a damp sponge to meticulously wipe any glaze off the bottom foot ring where the plate will touch the kiln shelf. -
Final fire:
Load the plate into the glaze kiln and fire to the maturity temperature of your clay body (likely cone 5 or 6). Allow the kiln to cool completely before unloading.
Enjoy using your beautifully rippled plate for serving favorite desserts or displaying as a centerpiece
Sgraffito Scratch Designs for Crisp Contrast
This project combines the raw warmth of exposed clay with sleek, dark slip design for a striking finish. The white sgraffito lines pop beautifully against the matte charcoal background, creating an organic yet modern piece perfect for your table.
Step-by-Step Tutorial
Materials
- Stoneware clay body (terracotta or buff color)
- Black underglaze or slip
- Pottery wheel (or coil/slab building tools)
- Loop trimming tools
- Sgraffito tool (sharp needle tool or fine loop)
- Soft fan brush
- Clear matte glaze (optional for interior)
- Sponge and water bucket
Step 1: Forming the Vessel
-
Throwing the Form:
Begin by centering your clay on the pottery wheel. Open the center and pull up the walls to create a deep, rounded bowl shape, keeping the rim slightly tapered inward for a cozy feel. -
Refining the Curve:
Use a rib tool to smooth the interior and exterior curves, ensuring there are no finger ridges left behind. Aim for a wall thickness of about a quarter-inch. -
Drying to Leather Hard:
Cut the bowl from the bat and let it dry slowly until it reaches a leather-hard state. It should be firm enough to handle without deforming but still hold moisture. -
Trimming the Foot:
Place the bowl back on the wheel head upside down and center it. Use a loop tool to trim away excess weight from the bottom and define a clean foot ring.
Step 2: Applying the Background
-
Define the Glaze Line:
Decide where you want the dark color to stop on the exterior. For this look, leave the bottom third of the bowl as raw clay. You can lightly mark this line with a needle tool while the wheel spins slowly. -
Applying Underglaze (Exterior):
Using a soft fan brush, apply 2-3 even coats of black underglaze or slip to the exterior, stopping neatly at your marked line. Allow each coat to lose its sheen before applying the next. -
Coating the Interior:
Apply the same black underglaze to the entire interior of the bowl. Ensure full coverage here so the inside matches the dark exterior aesthetic. -
Proper Consistency:
Let the underglaze dry until it is no longer tacky to the touch. It shouldn’t be bone dry, or it will chip when you carve.
Chipping Lines?
If the black slip chips off in chunks rather than clean lines, your underglaze layer is too dry or too thick. Mist it lightly with water and wait 5 minutes.
Step 3: Carving the Design
-
Planning the Leaves:
Visualize where your main leaf shapes will go. I usually start with four large vertical leaves spaced evenly around the exterior to anchor the pattern. -
Sgraffito Outline:
Use a sharp sgraffito tool or needle tool to gently scratch through the black layer on the exterior, revealing the light clay body underneath. Draw the simple outline of a pointed oval leaf. -
Adding Veins:
Draw a central vein down the middle of the leaf, then add diagonal veins branching off. Keep your lines confident and clean for that crisp contrast. -
Interior Vines:
Move to the inside of the bowl. Instead of individual leaves, carve a flowing vine that starts near the bottom and reaches up toward the rim. -
Branching Out:
Add smaller leaves branching off the main interior vine. Let these lines be looser and more organic than the exterior pattern. -
Cleaning Up Crumbs:
As you carve, little burrs of clay will accumulate. Don’t brush them away with your hand, or you might smear the black slip. Instead, tap the bowl upside down or use a soft, dry brush to flick them away.
Go Geometric
Swap the organic leaf motif for sharp triangles or stacked horizontal lines. The sgraffito technique works perfectly for modern geometric patterns too.
Step 4: Firing and Finishing
-
Bisque Firing:
Allow the bowl to dry completely to the bone-dry stage. Fire it in the kiln to cone 04 (or your clay’s bisque temperature). -
Glazing:
For the interior food safety, apply a clear glaze over the black underglaze. For the exterior, you can leave it unglazed for a matte texture or apply a thin clear matte glaze to seal it without added shine. -
Final Firing:
Fire the piece again to the maturation temperature of your specific clay body and glaze (typically cone 5 or 6 for stoneware).
Now you have a stunning contrast bowl ready to be displayed or filled with fruit
Stamped Texture Bands on Mugs and Planters
Embrace the rustic charm of speckled stoneware with this textured mug design that features dual sensory experiences. By combining a deep indigo-glazed upper band with a raw, tactile lower relief, you create a piece that feels as good in the hand as it looks on the shelf.
How-To Guide
Materials
- Speckled Stoneware Clay (e.g., Laguna B-Mix Speckled)
- Pottery Wheel
- Throwing tools with ribs and wire cutter
- Geometric texture roller or bisque stamp (triangle/starburst pattern)
- Trimming tools
- Sponge
- Deep Indigo/Cobalt Blue glaze (transparent enough to show texture)
- Clear matte or satin glaze (optional for bottom)
- Wax resist
- Kiln
Step 1: Throwing the Cylinder
-
Wedge and Center:
Begin with about 1 to 1.5 lbs of speckled stoneware clay. Wedge it thoroughly to remove air pockets, then center it on your wheel head. -
Open and Pull:
Open the clay and pull up a cylinder. Aim for straight walls with a consistent thickness of about 1/4 inch. Leave the walls slightly thicker than usual to accommodate the stamping pressure later. -
Review Dimensions:
For a standard mug, aim for a height of roughly 4-5 inches before trimming. Smooth the lip with a chamois or sponge. -
Cut and Dry:
Wire the pot off the bat but leave it in place or move it delicately to a ware board. Let it dry until it reaches soft leather-hard—the clay should be firm enough to handle without warping but soft enough to accept an impression.
Step 2: Texture and Trimming
-
Support the Wall:
Hold the mug in one hand, placing your fingers inside the cylinder to support the wall directly behind where you will be stamping. This prevents the wall from collapsing inward. -
Apply the Texture:
Using a geometric roller or stamp, press firmly into the exterior clay. Create two distinct bands: one around the upper third and one around the lower third, leaving a smooth negative space in the middle if desired, or covering the majority of the surface as shown in the inspiration. -
Refine the Shape:
If the stamping process distorted the cylinder’s roundness, gently gently reshape it by hand or use a throwing stick from the inside while spinning slowly on a banding wheel. -
Trimming the Foot:
Once the mug is fully leather-hard, center it upside down on the wheel. Trim a clean foot ring, defining the bottom edge where the glaze will stop.
Stamp Distortion
If stamping makes your cylinder oval, don’t squeeze it back! Instead, place a throwing stick inside and gently push out against the flat spots while rotating.
Step 3: Handle and Bisque
-
Pull a Handle:
Pull a strap of clay for the handle. I prefer to let this stiffen slightly on a table edge for 20 minutes before attaching so it holds its curve better. -
Attach Handle:
Score and slip the attachment points on the mug and handle. Press them firmly together, smooth the seams with a modeling tool, and wipe away excess slip. -
Slow Dry:
Cover the mug loosely with plastic to equalize the moisture content between the handle and body. Let it dry slowly to bone dry. -
Bisque Fire:
Fire the piece to Cone 04 (or your clay’s specific bisque temperature).
Glaze Breakage
Choose a ‘breaking’ glaze for the blue band. These glazes become thinner on high points (showing clay color) and pool darker in the stamped recesses.
Step 4: Glazing
-
Wax Resist:
Apply wax resist to the foot ring and the bottom of the mug to prevent glaze adhesion. -
Inlay Prep (Optional):
If you want the texture on the bottom half to remain white/raw but highlighted, wipe a very thin wash of white underglaze into the crevices and sponge off the surface completely. -
Glaze the Interior:
Pour your clear or white liner glaze inside the mug, swirl to coat, and pour out. Wipe the rim clean. -
Dip the Top Band:
Hold the mug by the foot and dip the top half upside down into the Deep Indigo glaze. Aim to cover the top textured band completely, stopping just below it. Hold for 3 seconds. -
Create the Sharp Line:
As you pull the mug out, give it a quick shake to remove drips. Check the glaze line; if it’s uneven, you can carefully clean it up with a damp sponge. -
Glaze the Bottom (Optional):
You can leave the bottom texture raw clay (as shown) or brush a thin coat of clear matte glaze over it to seal it without hiding the speckles. -
Final Fire:
Fire the mug to maturity (typically Cone 5 or 6 for stoneware). Ensure the kiln is well-vented for bright colors.
Enjoy your morning coffee in a vessel that highlights the beautiful tactile nature of handmade ceramics
Clay Appliqué Shapes for a 3D Pop
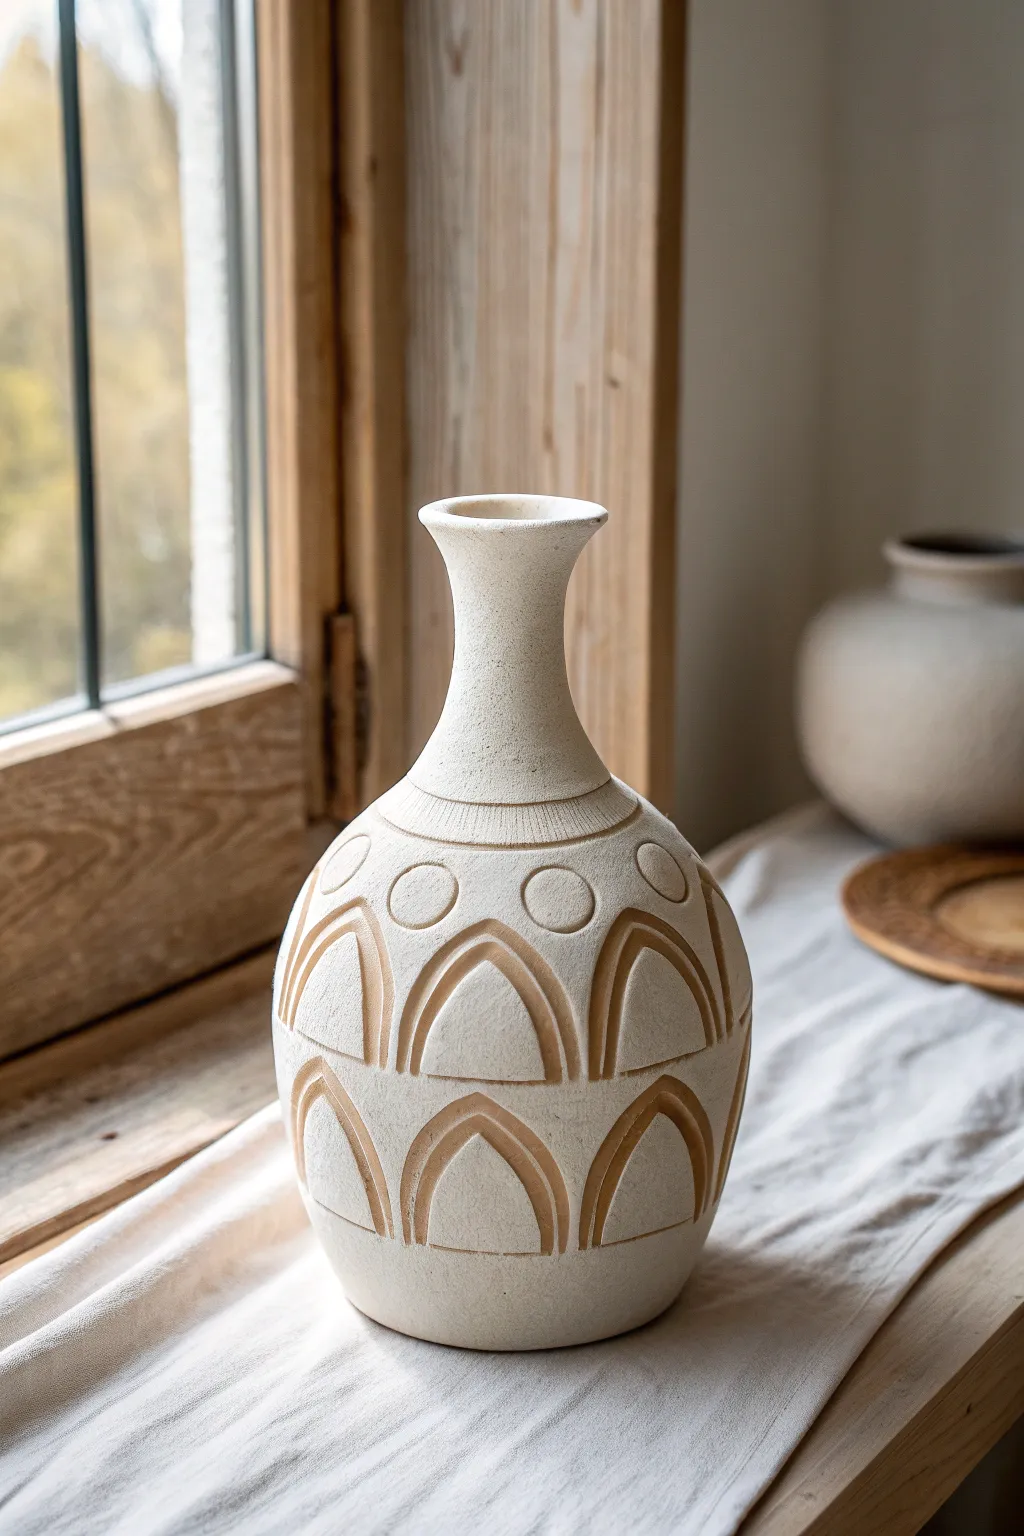
This project transforms a simple clay vessel into an architectural statement piece featuring deep arches and rhythmic circular motifs. The textured, matte finish mimics the look of ancient sandstone, bringing an organic yet structured warmth to any windowsill.
How-To Guide
Materials
- Stoneware clay body (white or light buff with grog)
- Pottery wheel (or coil building supplies)
- Ribs (metal and wooden)
- Needle tool
- Loop carving tools (small and medium)
- Sponge
- Wire texturing brush or stiff bristle brush
- Banding wheel (optional but helpful)
- Ruler or flexible measuring tape
- Clear matte glaze or transparent satin glaze
Step 1: Throwing and Shaping
-
Center and open:
Begin with about 3-4 lbs of clay. Center it firmly on the wheel and open the clay to create a flat bottom, leaving enough thickness to trim a foot later. -
Pull the cylinder:
Pull the walls up into a tall cylinder. Focus on keeping the walls consistent in thickness, slightly thicker than a standard mug to allow depth for carving later. -
Belly the form:
Gently push from the inside to create a bulbous belly at the bottom third of the vessel. Use a rib on the outside to refine the curve. -
Collar the neck:
Slowly collar in the top two-thirds of the clay to form a long, elegant bottleneck. Keep your hands wet to prevent twisting the clay. -
Refine the rim:
Flare the very top rim slightly outward for a classic trumpet shape. Compress the lip with a chamois or sponge. -
Dry to leather hard:
Allow the vase to dry slowly until it reaches a solid leather-hard state. It needs to be firm enough to withstand carving pressure without warping.
Uneven Carving Depths?
If you carve too deep and hit air, don’t panic. Score and slip a small patch of clay into the hole, smooth it over, let it stiffen, and re-carve that section gently.
Step 2: Mapping and Carving
-
Create guidelines:
Place the pot on a banding wheel. Use a needle tool to lightly scribe horizontal focus lines where your pattern rows will sit—one at the neck base and two rows across the belly. -
Mark the vertical spacing:
Using a flexible ruler, measure the circumference and divide it evenly for your arch motifs. Mark these intervals lightly with the needle tool. -
Sketch the arches:
Freehand sketch the repeating arch shapes (resembling cathedral windows) and the circles above them directly onto the leather-hard surface. Don’t worry about perfection; faint lines can satisfy spacing needs. -
Carve the arch outlines:
Use a small loop tool to carve deep V-shaped or U-shaped channels outlining the arches. I find pulling the tool down vertically gives the cleanest line. -
Define the negative space:
Carve away the clay *inside* the arch outlines slightly deeper than the surrounding surface to create a recessed effect, or carve the outline deep enough to create bold shadow lines. -
Add circular details:
Using a small circular cutter or loop tool, carve or stamp the circle motifs above the first row of arches. Ensure they align with the peaks of the arches below. -
detail the neck:
At the base of the neck, carve fine, repeating vertical tick marks around the circumference to create a textured collar band. -
Refine edges:
Once the major carving is done, use a slightly damp sponge or finger to smooth any sharp burrs left by the tools.
Step 3: Texturing and Finishing
-
Apply sandstone texture:
Take a stiff bristle brush or wire texture tool and gently stipple or tap the entire uncarved surface of the pot. This creates that gritty, stone-like appearance. -
Bisque fire:
Allow the piece to dry completely (bone dry) before loading it into the kiln for a bisque firing. -
Glazing strategy:
To maintain the raw texture, apply a very thin coat of matte clear or satin white glaze. Alternatively, wipe back the glaze just on the high points to accentuate the carving. -
Final firing:
Fire the piece to the appropriate temperature for your clay body (likely Cone 5 or 6). Once cool, sand the bottom foot if necessary to protect your furniture.
Natural Stone Look
Mix a small amount of heavy grog or sand directly into your throwing clay. When you sponge the surface later, the grit reveals itself and looks incredible under matte glaze.
Place your finished vase near a window where natural light can play across the carved shadows
Mishmash Patchwork: Mix Motifs on One Piece

This project transforms a simple ceramic plate into a cohesive sampler of botanical patterns and geometric lines. By sectioning off different areas, you can experiment with multiple design techniques—from delicate line work to bold glazing—all on a single harmonious surface.
Step-by-Step Guide
Materials
- Bisque-fired ceramic plate (oval or round)
- Pencil (for sketching lines)
- Masking tape, artist tape, or thin washi tape
- Underglaze (warm brown, terracotta, forest green, black)
- Fine liner brushes (sizes 00 and 0)
- Underglaze pencil or distinct underglaze liner bottle (optional)
- Clear transparent glaze
- Sponge and water
- Kiln access
Step 1: Preparation & Layout
-
Clean the bisque:
Begin by wiping down your bisque-fired plate with a damp sponge. This removes any dust or residue that might prevent the glaze from adhering properly. -
Sketch the grid:
Using a regular pencil, lightly sketch a patchwork grid onto the plate. The graphite will burn off in the kiln. Aim for an asymmetrical layout with intersecting lines that create triangular and quadrilateral shapes of varying sizes. -
Apply the dividers:
Once you are happy with the layout, use a thin liner brush loaded with a warm brown or terracotta underglaze to paint over your pencil lines. These will serve as the ‘sash’ or borders between your different pattern zones. -
Clean the intersections:
If your lines cross messily, wait for them to dry for a moment, then gently scrape away excess with a toothpick or clean up patches with a barely damp brush for crisp intersections.
Smudge Control
If underglaze smudges into a white area, don’t wipe it while wet—it will stain. Let it dry completely, then gently scratch the mistake off with a needle tool.
Step 2: Patterning the Zones
-
Create the striped texture:
Choose one triangular section for the bold stripes. Using the warm brown underglaze inconsistent with your border lines, paint parallel diagonal lines. Keep your hand steady and maintain even spacing to mimic a textile weave. -
Paint the central leaf:
In a central, larger quadrilateral, paint a single, bold fern or leaf motif. Use the terracotta color here. Start with the central stem, then add leaves curving outward. Fill the leaves entirely for a solid, stamped look. -
Detail the speckle section:
Select a side section for a mixed-media look. Paint thin, black or dark brown stems rising from the edge. Once dry, add small dots and stars scattered around them to create a whimsical, pollen-like atmosphere. -
Draw the outline leaf:
In that same speckled section, paint a stylized leaf using only outlines (no fill). This creates a lovely contrast against the solid leaf in the center section. Use a very fine brush or an underglaze applicator bottle for precision here. -
The green monochromatic zone:
Dedicate one section to a sophisticated, all-over pattern. Using a diluted forest green underglaze, paint a repeating botanical background. Think of wallpaper—small, intersecting leafy branches that fill the entire designated shape. -
Add floating elements:
If you have a large remaining white section, place a single, small sprig of greenery near the edge. Leaving negative space here is crucial; it lets the eye rest and prevents the design from feeling cluttered. -
Enhance with dots:
Return to the speckled section or a small corner triangle. Dip the non-brush end of your paintbrush into terracotta underglaze and stamp small distinct dots to balance the color distribution across the plate.
Texture Play
For the striped section, try carving the lines into the clay (sgraffito) before adding color. This adds a tactile element that feels great when holding the plate.
Step 3: Finishing Touches
-
Review and refine:
Check all your border lines again. If any pattern spilled over into a neighboring ‘patch,’ I usually carefully scrape it back with a craft knife to keep the borders distinct. -
Top glazing:
Once the underglaze designs are completely dry to the touch, dip the entire plate into a bucket of clear transparent glaze. Alternatively, brush on three even coats of clear brushing glaze. -
Clean the foot:
Wipe the bottom foot of the plate completely clean with a sponge to ensure it doesn’t stick to the kiln shelf. -
Final fire:
Fire the piece in the kiln according to the temperature requirements of your clay and glaze (typically Cone 5 or 6 for stoneware).
Now you have a stunning botanical sampler plate that looks complex but is built one simple section at a time
Negative Space Designs Using Masked Shapes
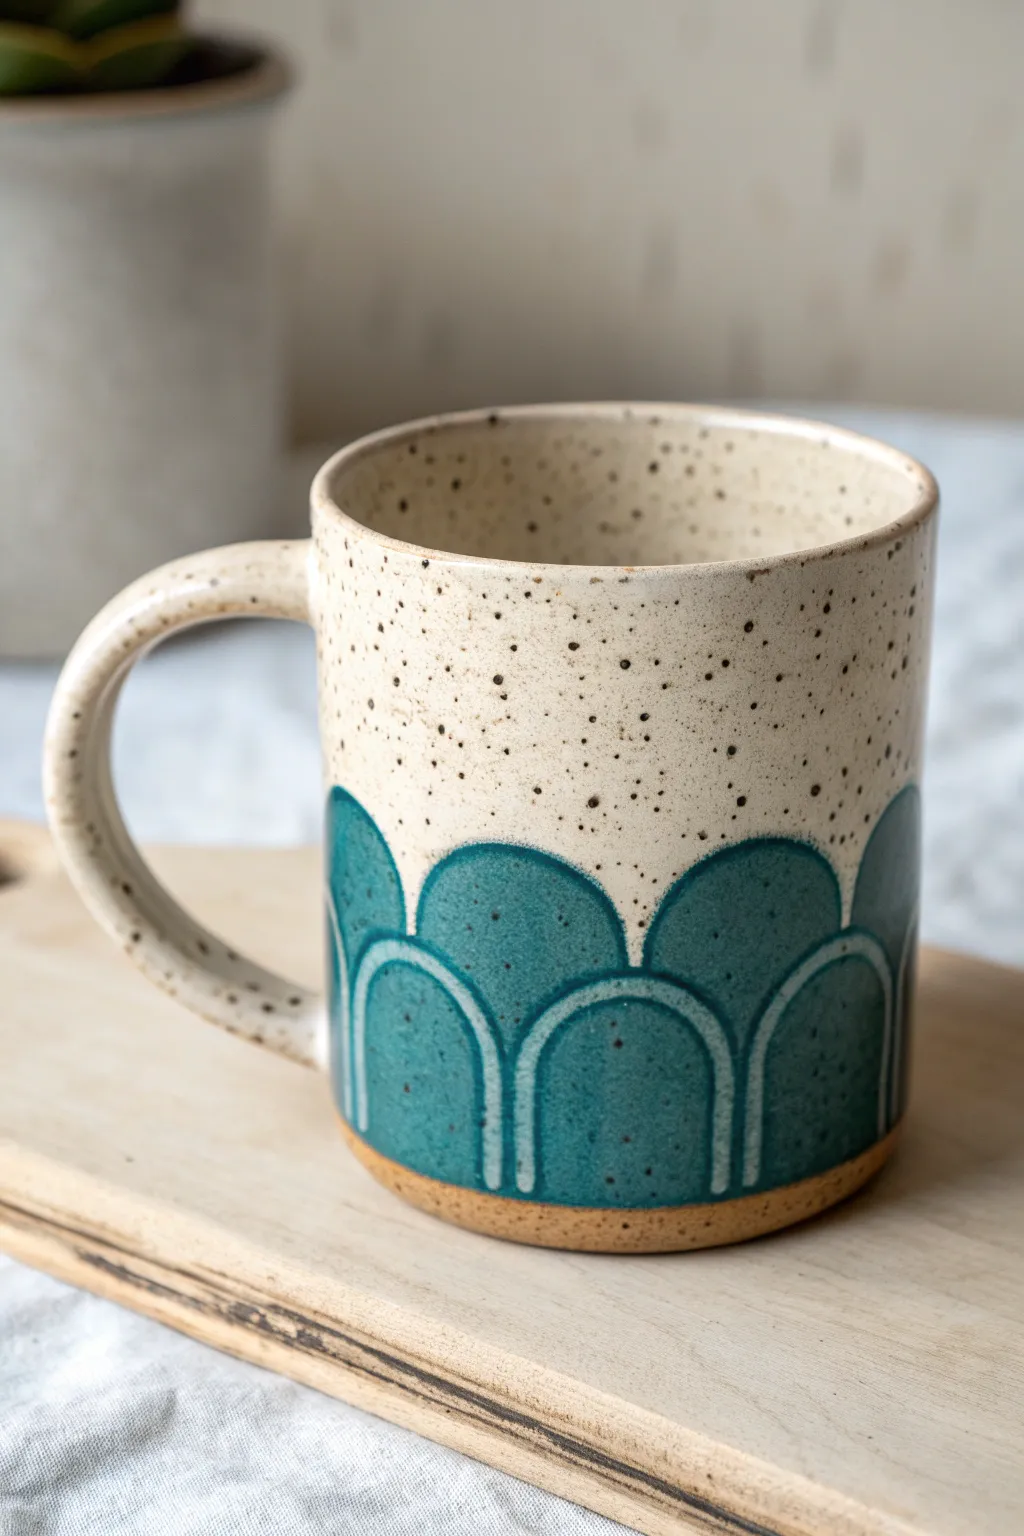
This charming ceramic mug combines the raw beauty of speckled clay with sharp, modern geometry through resist application. By using simple masking techniques, you can create crisp negative space lines that define playful teal arches, revealing the gorgeous clay body underneath.
Step-by-Step
Materials
- Bisque-fired ceramic mug (speckled clay body)
- Wax resist emulsion or latex resist
- Fine liner brush
- Pencil
- Teal or deep turquoise dipping glaze
- White or clear matte glaze (speckled if using plain clay)
- Sponge
- Clean water
- Glaze tongs
Step 1: Preparation & Mapping
-
Surface Cleaning:
Before starting any glazing, wipe your bisque-fired mug down thoroughly with a damp sponge. This removes invisible dust that can cause glaze crawling or pinholes. -
Establish the Horizon:
Place your mug on a banding wheel. Hold a pencil steady against the side at a mid-point height and rotate the wheel to create a perfect, level guide line around the circumference. -
Drafting Arches:
Lightly sketch your scallop design below the horizon line using the pencil. Aim for two overlapping rows: a bottom row of tall arches and a top row of smaller semi-circles nestled between them.
Step 2: Applying the Resist
-
Loading the Brush:
Dip a fine liner brush into your wax resist or latex. You want enough fluid to create a solid line but not so much that it drips. -
Tracing the Lines:
Carefully trace over your pencil lines. These wax lines will repel the colored glaze later, exposing the raw, speckled clay as ‘negative space’ stripes. -
The Bottom Reveal:
Paint a band of wax resist around the very bottom edge of the mug, about a quarter-inch high. This leaves a raw clay foot that provides a nice visual anchor. -
Drying Time:
Allow the resist to dry completely. Wax usually takes about 15-20 minutes to harden; latex will turn transparent and rubbery when ready.
Use A Banding Wheel
Rotating the mug on a wheel while holding your brush steady makes painting consistent, smooth arches much easier than freehanding.
Step 3: Glazing Process
-
The Interior Pour:
Pour your interior glaze (I prefer a simple white or clear to let the outside shine) inside the mug, roll it around to coat, and pour out the excess. -
Cleaning the Rim:
Wipe the rim with a damp sponge to keep a clean transition between the inside and outside glazes. -
Dipping the Top Half:
Hold the mug by the foot and dip the top half straight down into a creamy white or oatmeal glaze, stopping just above your pencil horizon line. -
Cleaning the Overlap:
If the white glaze dripped into your scallop area, gently wipe it away. Let this upper section dry until chalky to the touch. -
Dipping the Bottom Pattern:
Now, carefuly dip the bottom half into your teal glaze. Submerge it up to the edge of the white glaze so they meet perfectly without heavy overlapping.
Add Texture
Before the first bisque fire, try carving the outlines of the arches slightly into the clay. The glaze will break beautifully over the edges.
Step 4: Final Touches & Firing
-
Wiping the Resist:
Once the glaze is dry to the touch, use a damp sponge or fingertip to gently wipe any glaze droplets off the waxed lines. The wax should repel it, but thicker beads might need a nudge to pop off. -
Foot Check:
Double-check the bottom of the mug. Ensure absolutely no glaze is on the underside that sits on the kiln shelf. -
Firing:
Load the mug into the kiln and fire to the maturity temperature of your clay and glaze (typically Cone 6 or 10). -
Cooling:
Allow the kiln to cool naturally before opening. This patience prevents thermal shock and keeps your glaze colors vibrant.
Once cooled, your mug is ready to hold your morning coffee, showcasing the lovely contrast between glazed color and raw clay