If you’ve ever stared at a blank pot and thought, “What do I even draw on this?”, I’ve got you. These ceramic drawing ideas are the kind of designs you can actually pull off on curved mugs, bowls, and plates without needing fancy illustration skills.
Classic Polka Dot Scatter
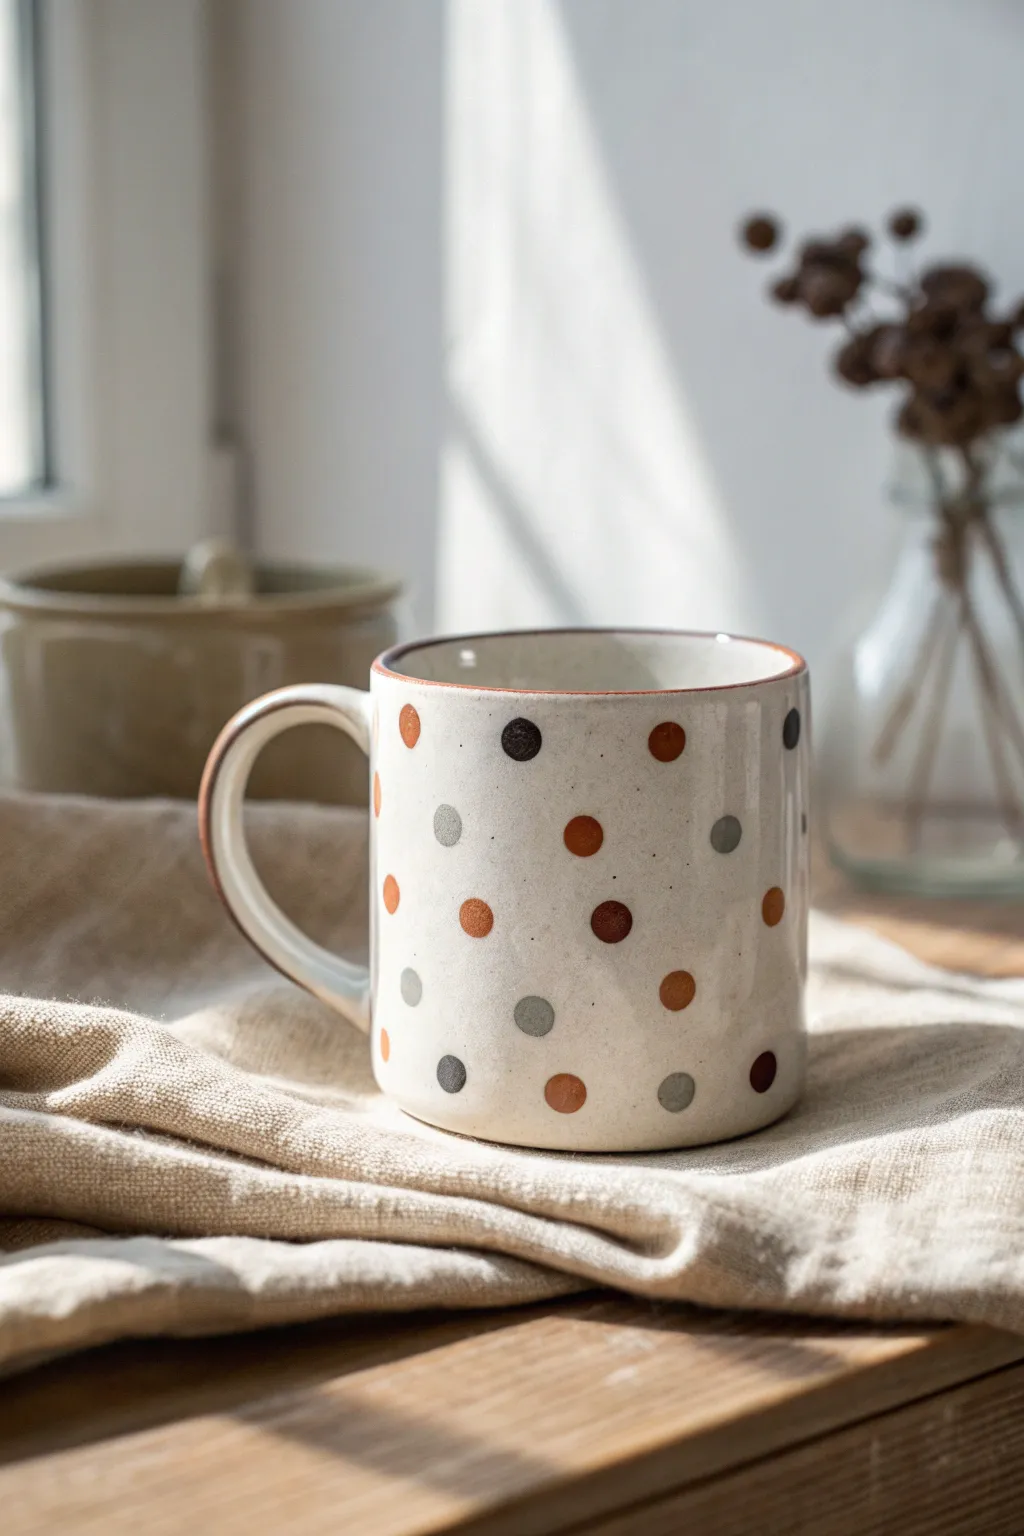
Bring a touch of organic charm to your morning routine with this speckled polka dot mug design. Using a palette of warm rusts, deep browns, and soft greys against a creamy base, you can transform plain bisque ware into a cozy, artisan-style piece.
How-To Guide
Materials
- Cone 04 bisque mug (smooth surface)
- Underglaze in four colors: Rust red, chocolate brown, warm tan, and slate grey
- Speckled cream or ‘oatmeal’ brush-on glaze (translucent/semi-opaque)
- Small round synthetic brush (size 2 or 4)
- Detail brush (size 0)
- Clean sponge and water bowl
- Pencil (optional)
- Clear dipping glaze (optional, if your speckled glaze isn’t self-sealing)
Step 1: Preparation
-
Clean the bisque:
Start by wiping down your bisque mug with a damp sponge. This removes any dust that might resist the glaze and ensures a smooth application surface.
Smudged dots?
If you smudge a dot while it’s wet, don’t wipe it! Let it dry completely, then gently scrape the mistake off with a crafting knife or needle tool before re-painting.
Step 2: Painting the Pattern
-
Plan the scatter:
Visualize a random scatter pattern. You want the dots to look organic, not perfectly gridded. If you’re nervous, lightly sketch circle placement with a pencil; the graphite will burn off in the kiln. -
Mix your palette:
Pour a small amount of your four underglaze colors onto a palette. This ‘harvest’ color scheme relies on the balance between the warm reds and the cool greys. -
Apply the first color:
Dip your round brush into the rust red underglaze. Press the tip gently onto the mug and swirl slightly to create a dot about the size of a pea. Repeat this sporadically around the mug. -
Add deep browns:
Clean your brush thoroughly. Switch to the chocolate brown underglaze and place these dots in the larger gaps between your red dots. Vary the spacing so some are close together and some are far apart. -
Incorporate neutrals:
Using the warm tan shade, fill in more of the negative space. I find that keeping these dots slightly smaller than the darker ones adds a nice visual depth to the pattern. -
Finish with grey accents:
Finally, use the slate grey underglaze to fill remaining gaps. These cool-toned dots provide a necessary contrast to the warm autumnal tones. -
Check density:
Step back and look at the mug. If there are any large empty voids, add a dot of whichever color is least represented in that area. -
Rim detail:
Using the fine detail brush (size 0), carefully paint a thin line of the rust red underglaze along the very top rim of the mug. This frames the design beautifully. -
Let it dry:
Allow the underglaze dots to dry completely. They should look chalky and matte before you proceed to glazing.
Make it texture-rich
For a tactile experience, apply the underglaze dots slightly thicker or use a slip trailer. This creates raised bumps you can feel under the glaze.
Step 3: Glazing and Firing
-
Apply the base glaze:
Stir your speckled cream glaze very well to suspend the speckles. Using a soft fan brush or large flat brush, apply a coat over the entire mug, going right over your dry polka dots. -
Layering:
Apply two to three coats of the speckled glaze in total, letting each coat dry until it’s touch-dry between applications. Ensure the glaze isn’t too thick on the colored dots to keep them distinct. -
Wipe the foot:
Use a damp sponge to meticulously wipe any glaze off the bottom foot of the mug. This prevents it from fusing to the kiln shelf during firing. -
Final inspection:
Check for any pinholes or thick drips in the glaze and smooth them out gently with a dry finger if necessary. -
Fire:
Load the mug into the kiln. Fire to the cone temperature recommended for your specific glaze manufacturer (usually Cone 5 or 6 for stoneware durability).
Once cooled, your handmade mug is ready to be filled with your favorite hot beverage for a cozy moment


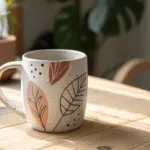
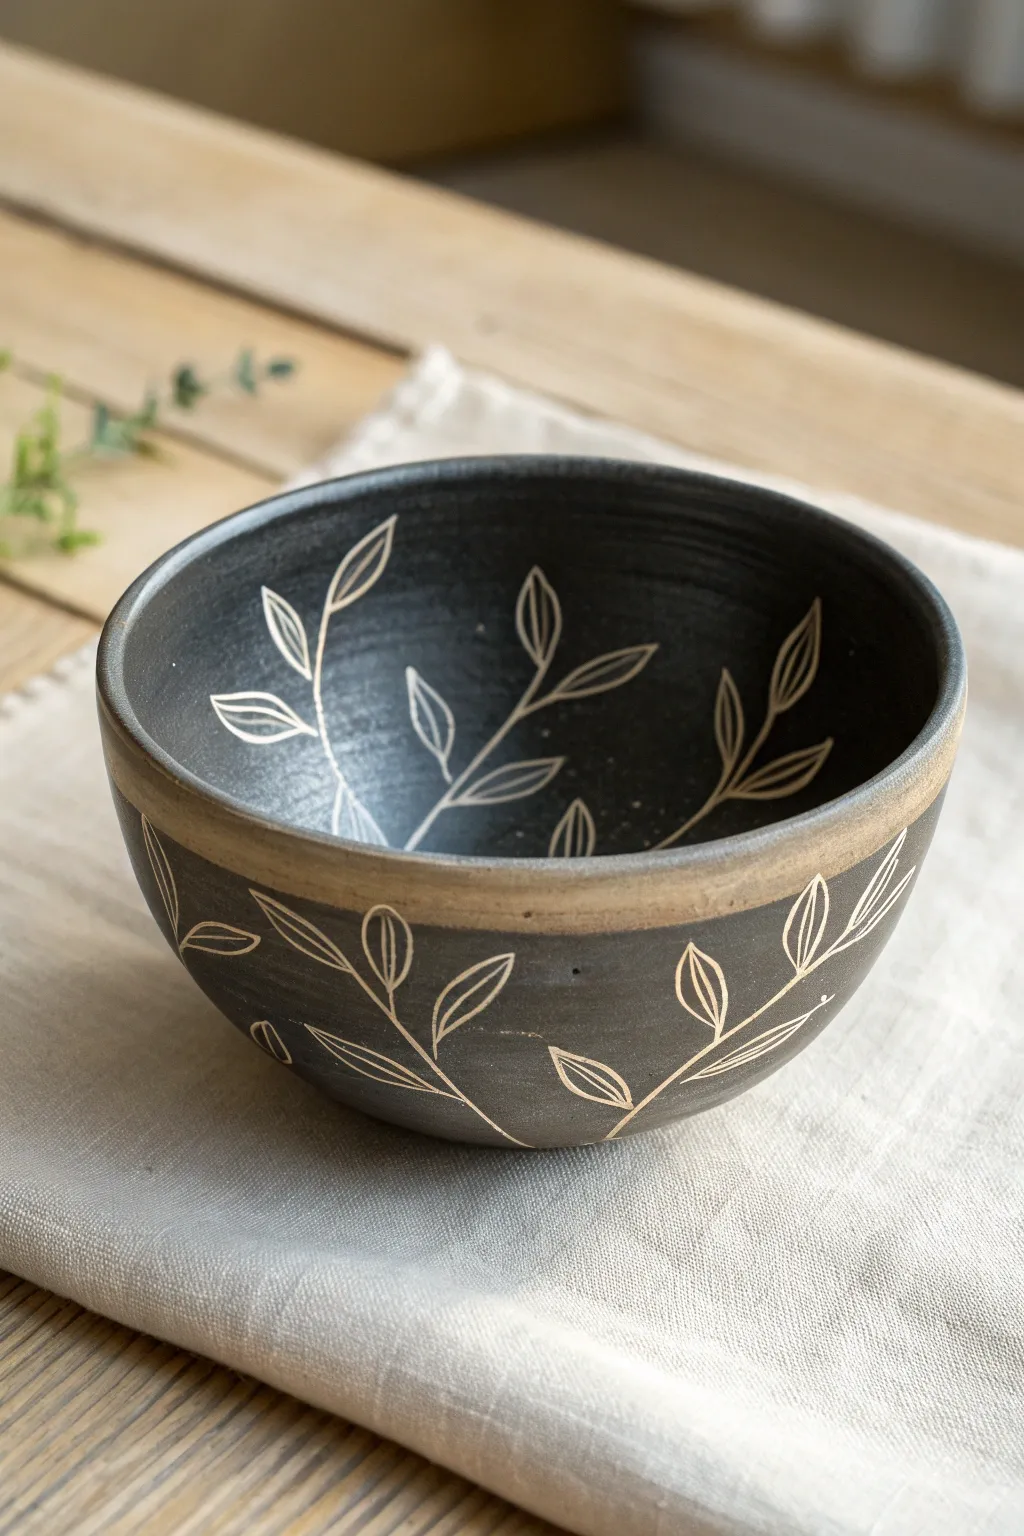
Easy Botanical Line Sprigs
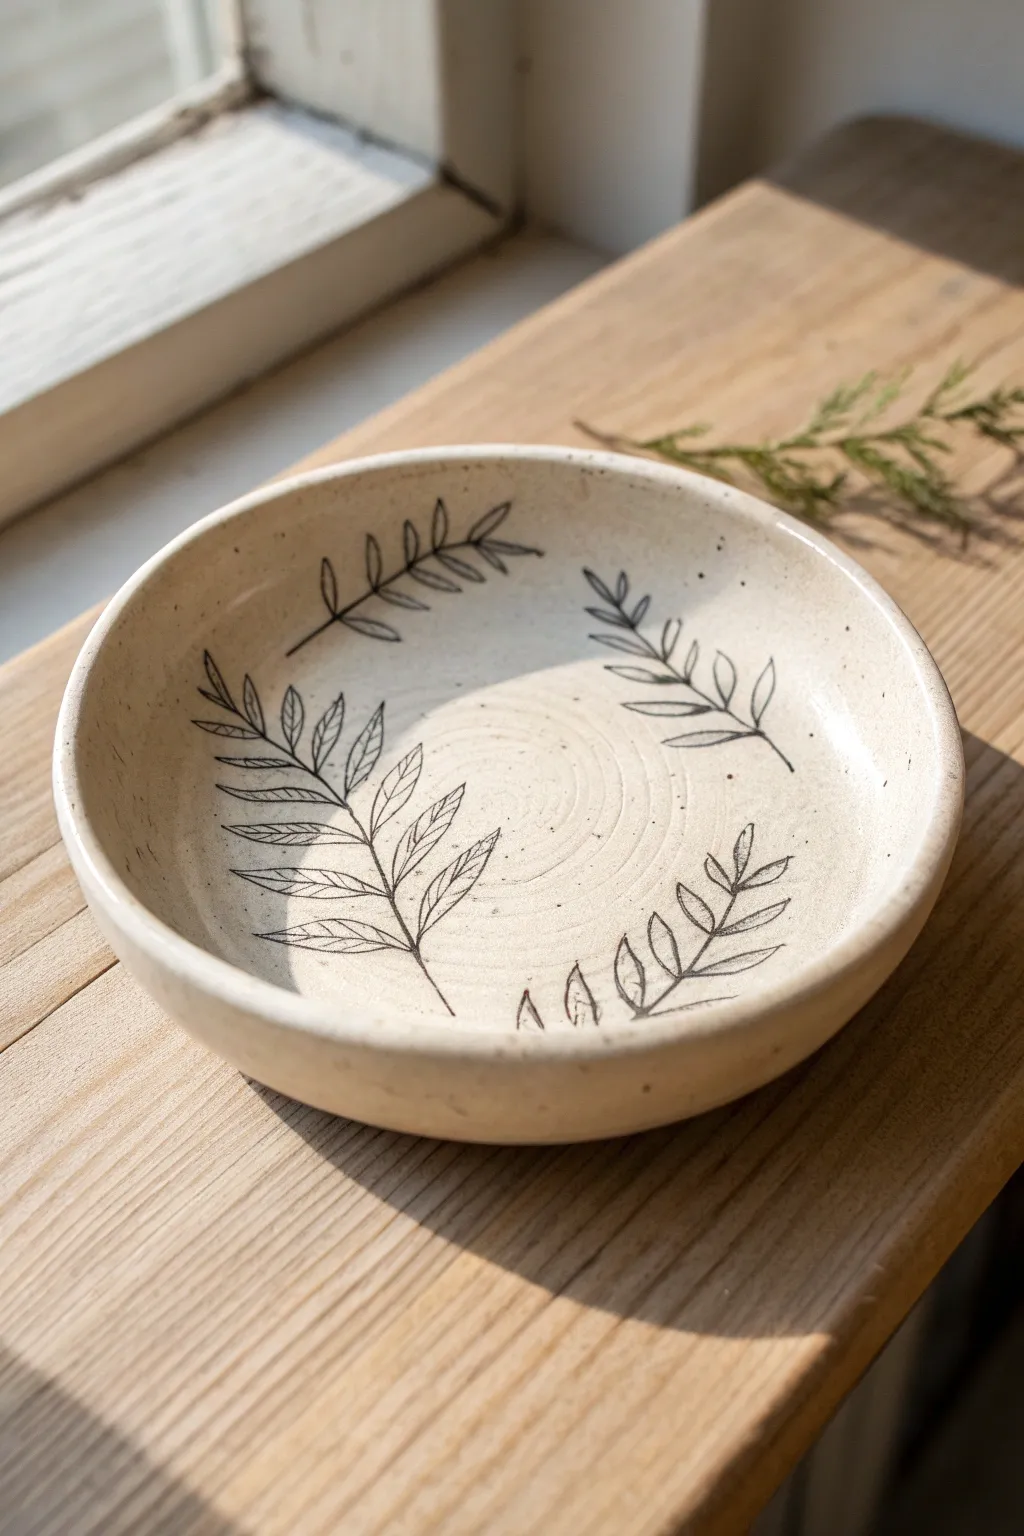
Capture the delicate beauty of nature on your pottery with these airy, hand-drawn botanical sprigs. This project uses a simple line-art technique on a speckled clay body to create a rustic, organic bowl perfect for holding trinkets or serving snacks.
Step-by-Step Guide
Materials
- Speckled buff stoneware clay
- Pottery wheel (or rolling pin and slump mold for hand-building)
- Rib tool (metal and rubber)
- Sponge
- Black underglaze pencil or fine liner brush with black underglaze
- Clear glossy glaze (food safe)
- Kiln
- Wire cutter
- Trimming tools
Step 1: Forming the Bowl
-
Prepare the clay:
Begin by wedging about 1 to 1.5 pounds of speckled buff stoneware clay. Thorough wedging ensures the speckles are distributed evenly and removes air bubbles. -
Center and open:
Throw the clay onto the wheel head and center it. Open the clay to create a wide, shallow floor, keeping the base slightly thicker to allow for trimming later. -
Pull the walls:
Pull the walls up and out to form a classic low bowl shape. Aim for a gentle curve rather than straight vertical sides, which provides a nicer canvas for the drawing inside. -
Refine the interior:
Use a smooth rubber rib to compress the interior floor and walls. This is crucial for removing throwing lines so your drawing surface is relatively smooth, though keeping a faint spiral in the center adds charm. -
Finish the rim:
Chamois or sponge the rim to make it soft and rounded. Cut the bowl from the wheel using a wire tool and set it aside to dry until it reaches leather-hard consistency.
Pencil vs. Brush
Underglaze pencils create a textured, charcoal-like look perfect for rustic styles. For crisp, solid black lines, use a liner brush and fluid underglaze instead.
Step 2: Trimming and Drawing
-
Trim the foot:
Once leather hard, flip the bowl over and center it on the wheel. Trim a clean foot ring, removing excess weight from the bottom while defining the bowl’s profile. -
Smooth the surface:
Flip the bowl right-side up. If the interior has dried unevenly, lightly sponge it to ensure a consistent surface texture for drawing, but don’t make it wet. -
Plan the composition:
Visualize three to four sprigs floating around the interior curve. You want them to follow the curve of the bowl, bending slightly as if blown by the wind. -
Draw the main stems:
Using a black underglaze pencil or a very fine liner brush dipped in black underglaze, sketch the central spine of each botanical sprig first. Keep the lines thin and confident. -
Add the leaves:
Starting from the base of the stem, draw small, elongated oval leaves in pairs. Angle them upward towards the tip of the sprig. -
Vary the sizes:
Make alternating sprigs slightly different sizes—one large fern-like branch, followed by a smaller, simpler twig. This asymmetry feels more organic. -
Detailing:
Add a center vein line to some of the larger leaves for extra detail. I find that leaving some leaves as simple outlines keeps the design from looking too heavy. -
Clean up smudges:
If you smudge the underglaze pencil, gently scrap it away with a sharp needle tool or very lightly sand it off once bone dry. Avoid adding water, which can smear the pigment.
Step 3: Glazing and Firing
-
Bisque fire:
Allow the bowl to dry completely to the bone-dry stage. Load it into the kiln for a bisque firing (usually cone 04 or 06, depending on your clay). -
Wipe down:
After the bisque fire, wipe the bowl with a damp sponge to remove any kiln dust. This ensures the clear glaze will adhere properly without crawling. -
Apply clear glaze:
Pour a transparent, glossy food-safe glaze into the interior of the bowl. Swirl it around to coat the entire drawing, then pour the excess out quickly. -
Dip the exterior:
Hold the bowl by the foot (or use glazing tongs) and dip the exterior into the clear glaze, meeting up with the rim line. -
Clean the foot:
Use a sponge to wipe the foot ring completely clean of glaze to prevent it from sticking to the kiln shelf. -
Glaze fire:
Fire the bowl to the maturity temperature of your clay and glaze (typically cone 5 or 6 for stoneware). The clear glaze will melt, deepening the black lines and revealing the clay’s speckles.
Smudged Lines?
If you mess up a line with underglaze pencil, don’t use a wet sponge! Wait until the pot is bone dry, then gently scratch the error away with an X-Acto knife.
Once fired, fill your new bowl with fruit or simply display it to enjoy the permanent greenery


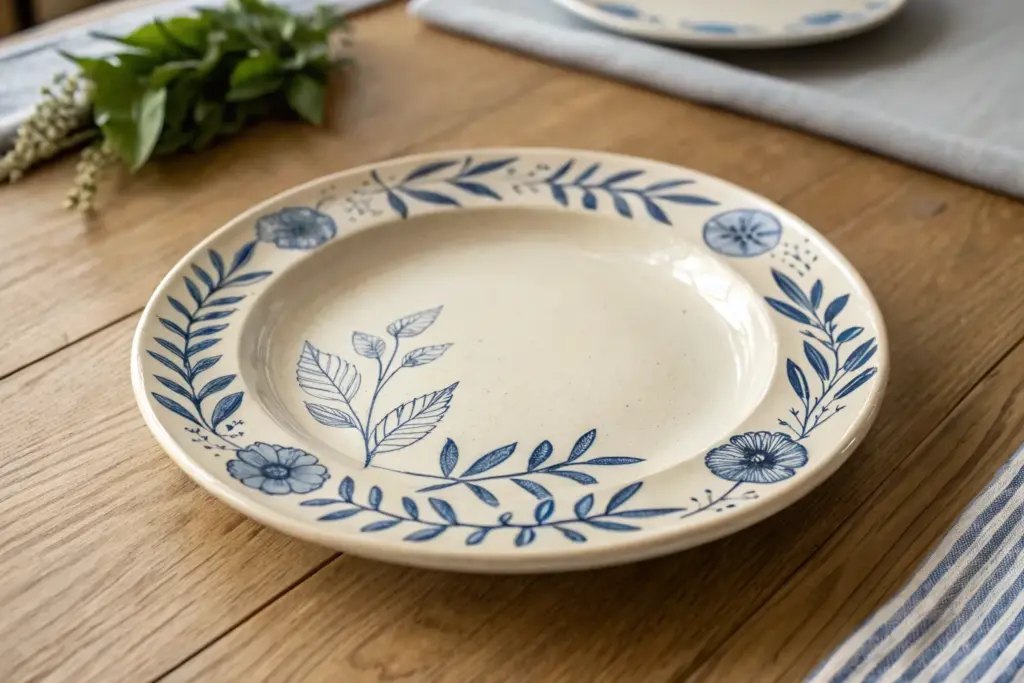
Loose Wildflower Doodles
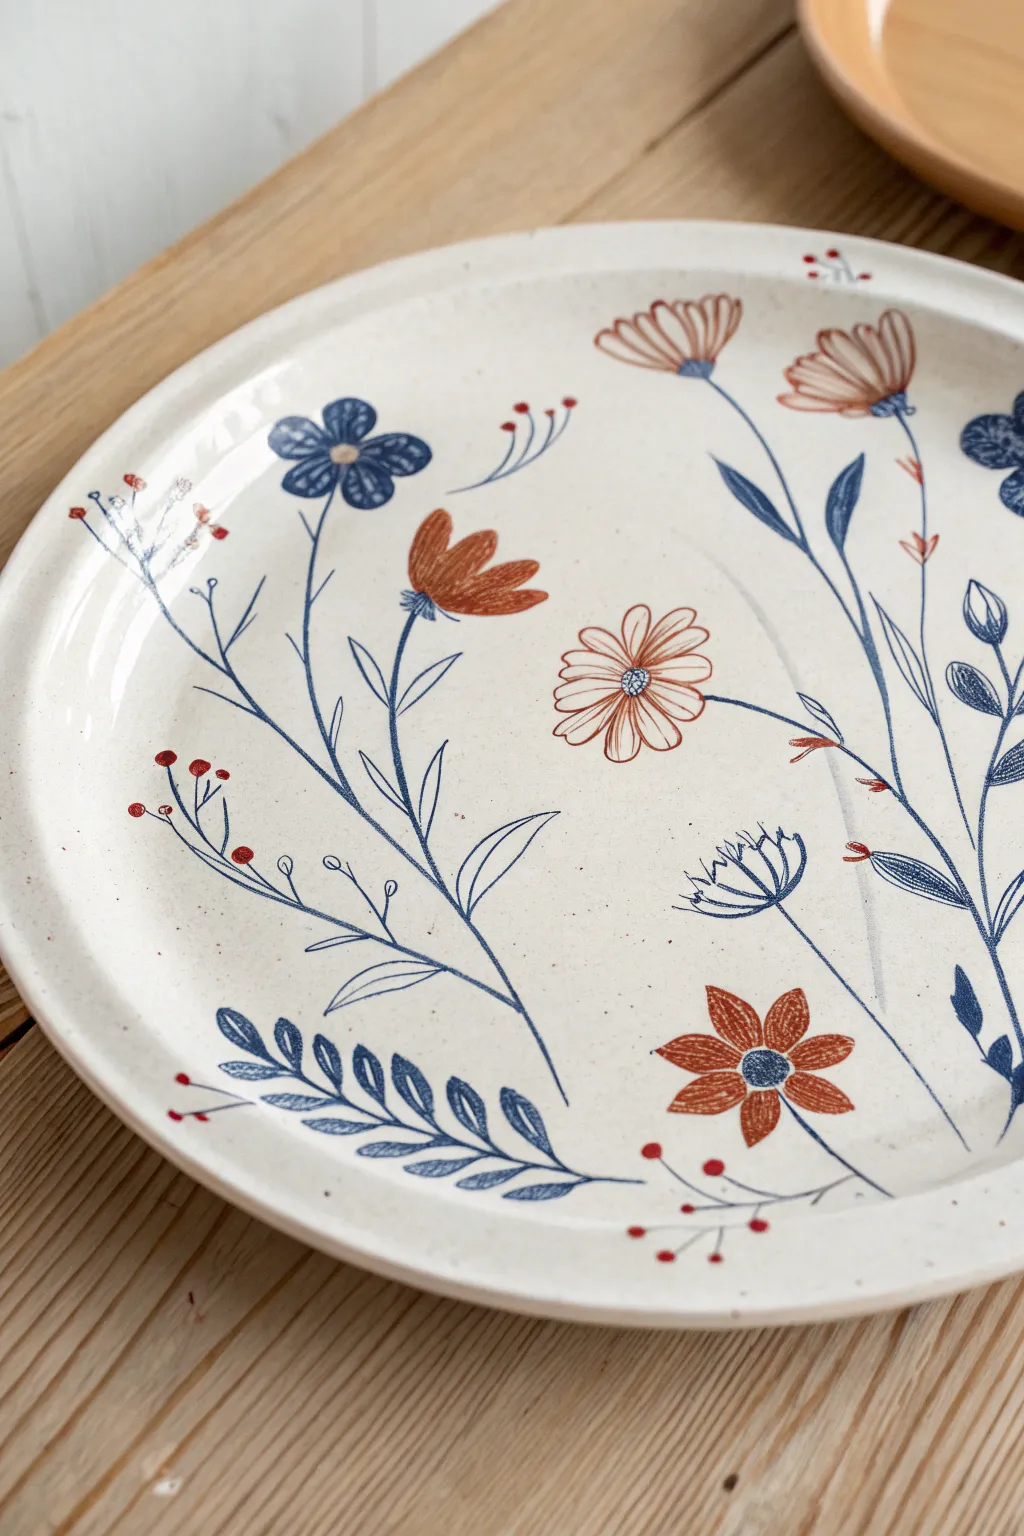
Capture the effortless charm of a meadow with this hand-painted ceramic plate featuring loose wildflower doodles. Using a limited palette of deep cobalt blue and warm terracotta, you’ll create a breezy composition that feels both refreshing and timeless.
Step-by-Step
Materials
- Bisque-fired ceramic plate (white stoneware preferred)
- Underglaze pencil or fine liner brush
- Underglaze paints (Navy Blue, Rust/Terracotta)
- Clear dipping or brushing glaze (gloss or satin)
- Small round paintbrush (size 0 or 2)
- Detail paintbrush (size 000)
- Damp sponge
- Water cup
- Clean cloth
Step 1: Planning and Layout
-
Prep the surface:
Wipe down your bisque plate with a damp sponge to remove any dust or oils from handling. This ensures the underglaze adheres properly to the clay body. -
Map the stems:
Visualize a loose, flowing arrangement where stems originate from different edges of the plate, growing inward. You don’t need to sketch everything, but sketching large main curves helps establish flow.
Brush Control Secret
For those long, elegant stems, hold your brush higher up on the handle and breathe out slowly as you pull the line. This steadies your hand.
Step 2: Painting the Blue Elements
-
Mix the blue consistency:
Dilute your navy underglaze slightly with a drop of water. You want an ink-like consistency that allows your fine brush to glide smoothly without stuttering. -
Draw primary stems:
Using your fine liner or detail brush, paint thin, meandering blue lines for the main plant stems. Let them curve naturally rather than stick-straight, mimicking the movement of wildflowers. -
Add delicate leaves:
Along these stems, paint elongated, almond-shaped leaves. Keep them outlined and unfilled for an airy look, or gently fill some in with thin lines for texture. -
Create the heavy fern leaf:
Near the bottom left, paint a curved central vein. Add small, solid blue tear-drop shapes along both sides of this vein to create a fern-like frond. I like to vary the pressure here to make the leaves taper. -
Detail the blue flower:
Find a spot on the upper left for the blue daisy. Paint five rounded petals, leaving a small negative space circle in the center. Add small dots or lines inside the petals for depth. -
Add wispy accents:
Scatter faint, thread-like sprigs with tiny loops or dots at the ends to fill empty spaces without overcrowding.
Smudge Fix
If you accidentally smudge wet underglaze, don’t wipe it immediately! Let it dry completely, then gently scratch the mistake off with a needle tool.
Step 3: Adding Warm Accents
-
Form the rust flowers:
Switch to your terracotta or rust-colored underglaze. Paint a large, multi-petaled daisy shape towards the lower right, and a few tulip-like shapes facing upwards on other stems. -
Layering the daisy:
For the main rust-colored daisy, outline the petals first. Then, use quick, loose strokes to hatch inside the petals, leaving some white clay showing through for a sketched effect. -
Create the two-tone blooms:
For the large open flower in the center, outline the petals in rust. Once dry, add a tiny dot of blue in the center to tie the color palette together. -
Add berry details:
Look for the thin, empty branch lines you painted earlier. Dip the tip of your smallest brush or a toothpick into the rust underglaze and dot tiny berries at the tips.
Step 4: Glazing and Firing
-
Let it bone dry:
Allow your underglaze design to dry completely. It should look chalky and matte to the touch before you proceed. -
Apply clear glaze:
Dip the plate into a clear glaze bucket for an even coat, or carefully brush on three coats of clear brushing glaze, letting each layer dry in between. -
Wipe the foot:
Use a damp sponge to meticulously clean any glaze off the bottom foot ring of the plate so it doesn’t fuse to the kiln shelf. -
Fire the piece:
Load the plate into the kiln and fire to the temperature appropriate for your clay and glaze (typically Cone 5 or 6 for stoneware).
Once fired, you’ll have a durable piece of art perfect for serving treats or displayed on a wall


Tiny Fruit Icons Around the Edge
Bring a fresh, summery feel to your table settings with this charming fruit-themed design. Using simple geometric shapes and fine linework, you will create a rustic pattern of strawberries and lemon slices that perfectly frames any meal.
How-To Guide
Materials
- Bisque-fired ceramic plate (speckled clay body recommended)
- Underglazes: Red, Leaf Green, Sunshine Yellow, Dark Brown or Black
- Fine liner brush (size 0 or 00)
- Small round brush (size 2)
- Pencil (standard graphite)
- Clear transparent glaze
- Damp sponge
- Kiln access
Step 1: Preparation & Sketching
-
Clean the bisque:
Start by wiping down your bisque-fired plate with a damp sponge. This removes any dust that might repel the underglaze and ensures a clean surface for your drawing. -
Map the spacing:
Using a standard pencil, lightly mark small ticks around the rim to plan where your fruits will go. Aim for an alternating pattern: strawberry, lemon slice, lemon slice, strawberry, repeat. Don’t worry about pencil marks; they burn off in the kiln. -
Sketch the lemons:
Draw simple circles for your lemon slices. They don’t need to be perfect compass circles—a little wobble adds to the hand-drawn charm. -
Sketch the strawberries:
In the alternating spaces, sketch the strawberry shapes. Draw them hanging from a central point, imagining a vine connecting them, though we will paint the leaves later. -
Add leaf guidelines:
Lightly sketch the stems and leaves connected to the strawberries. Extend the stems outward so they flow nicely along the curve of the plate rim.
Use an Underglaze Pencil
For the dark outlines, try a black underglaze pencil instead of a brush. It gives a sketchier, charcoal-like texture that looks amazing on rustic pottery.
Step 2: Painting the Fruit
-
Base coat for lemons:
Load your size 2 round brush with yellow underglaze. carefully fill in the lemon circles. You may want to leave very thin gaps for the segment lines, or paint solid and add lines later. -
Lemon details:
Once the yellow is touch-dry, paint the wheel spokes. If you painted a solid circle, use a darker yellow or thin brown line on top. If you left gaps, simply tidy them up. -
Base coat for strawberries:
Switch to your red underglaze. Paint the body of the strawberries, ensuring good coverage. I usually apply two coats here to make the red pop against the speckled clay. -
Strawberry seeds:
Wait for the red to dry completely. Using your finest liner brush and a creamy white or very light yellow underglaze, dot tiny seeds across the surface of the berries. -
Painting the leaves:
Use a muted or olive green underglaze for the greenery. Paint the sepals (the leafy cap) directly on top of the strawberries and fill in the floating leaves on the stems.
Step 3: Outlining & Glazing
-
Mix the outline color:
For the illustrative look, use a dark brown or black underglaze. Thin it down slightly with water so it flows like ink. -
Outline the stems:
Using the liner brush, trace the main vine stems connecting your leaves. Keep the pressure light to maintain a thin, delicate line. -
Outline the leaves:
Outline the green leaves. Add a central vein down the middle of each leaf and tiny diagonal veins branching off for a realistic botanical touch. -
Outline the fruit:
Loosely outline the lemon slices and strawberries. The key is not to be too rigid—let the line break occasionally for a more organic feel. -
Rim detail:
Clean your brush and wipe any stray smudges from the plate’s center. For a finished look, you can paint a thin band of reddish-brown along the very edge of the plate rim. -
Apply clear glaze:
Once all underglaze is bone dry, dip or brush on a coat of clear transparent glaze. This will seal your design and make the plate food-safe. -
Final fire:
Load the plate into the kiln for the final glaze firing according to your clay and glaze temperature specifications.
Add a Speckle Effect
If you don’t have speckled clay, flickering a stiff toothbrush loaded with iron oxide over the wet glaze creates faux speckles.
Enjoy using your new plate for a bright and cheerful breakfast setup

The Complete Guide to Pottery Troubleshooting
Uncover the most common ceramic mistakes—from cracking clay to failed glazes—and learn how to fix them fast.
Bold Geometric Shape Blocks
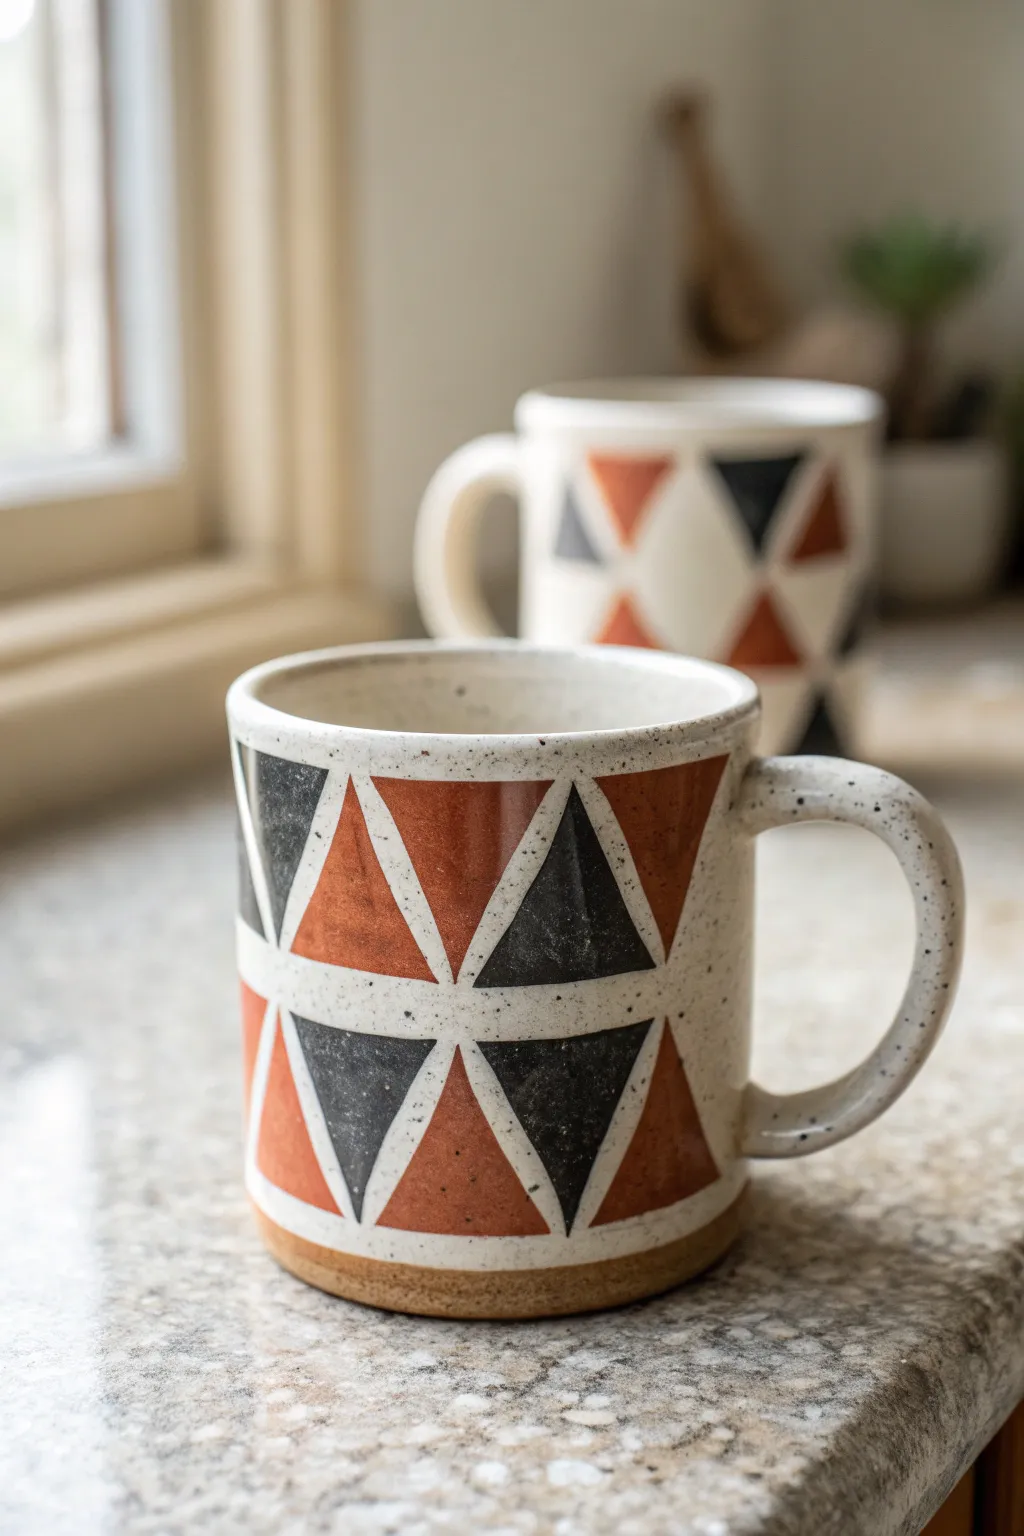
Embrace the timeless appeal of mid-century aesthetics with this geometric mug design, featuring bold triangles in earthy charcoal and burnt sienna. The contrast between the matte raw clay base and the glossy, speckled glaze creates a tactile experience that makes every sip feel grounded.
Step-by-Step
Materials
- Bisque-fired ceramic mug (wheel-thrown or hand-built)
- Wax resist emulsion
- Pencil
- Ruler or measuring tape
- Underglazes: Charcoal Grey and Burnt Sienna/Red Iron Oxide
- Glossy speckle glaze (e.g., ‘Vanilla Speckle’ or ‘Oatmeal’)
- Small flat brush (1/4 inch)
- Medium round brush
- Sponge
- Potter’s needle tool (optional)
Step 1: Planning and Mapping
-
Clean the bisque:
Start by wiping down your bisque-fired mug with a damp sponge to remove any kiln dust or oils from your hands, ensuring the glaze will adhere properly. -
Determine the bottom line:
Decide where you want the glaze to stop near the foot. Measure about half an inch up from the bottom and draw a light pencil line all the way around the circumference. -
Wax the foot:
Apply wax resist to the bottom of the mug and up the side to the pencil line you just drew. This exposes the beautiful raw clay and creates that distinct unglazed base. -
Grid the surface:
Using a flexible ruler, lightly divide the mug’s height into two equal bands for your triangle rows. Draw a horizontal line around the middle of the mug with your pencil. -
Mark triangle points:
Along the top rim, the middle line, and the bottom wax line, make small tick marks at even intervals (e.g., every 1.5 inches). Stagger the marks on the middle line so they sit exactly between the top and bottom marks. -
Connect the dots:
Use your pencil to connect these marks, forming a continuous zigzag pattern that creates tessellating triangles. The graphite will burn off in the kiln, so don’t worry about being too messy.
Wax Resist Wisdom
Add a tiny drop of food coloring to your wax resist so you can easily see exactly where you’ve painted it on the creamy bisque.
Step 2: Painting the Geometry
-
Prep your underglaze:
Pour a small amount of your charcoal and burnt sienna underglazes onto a palette. Isolate which triangles will be which color—alternating them creates the best rhythm. -
Paint the grey triangles:
Using the small flat brush, fill in the darker triangles first. I find it easiest to outline the shape carefully and then flood the center with color. -
Apply second coat:
Let the first layer dry until matte, then apply a second coat of the charcoal underglaze for solid, opaque coverage. -
Paint the red triangles:
Rinse your brush thoroughly and repeat the process for the burnt sienna triangles. Be careful not to let the wet colors touch the grey ones to keep edges crisp. -
Clean up edges:
If you accidentally went outside the lines, use a damp brush or the tip of a needle tool to gently scrape away the excess underglaze once it’s dry. -
Wax the pattern:
This is crucial: Once the underglaze is bone dry, carefully paint wax resist exactly over each colored triangle. This will prevent the dipping glaze from obscuring your design.
Step 3: Glazing and Finishing
-
Prepare the dipping glaze:
Stir your white speckle glaze thoroughly. It should be the consistency of heavy cream. -
Dip the interior:
Pour the glaze inside the mug, roll it around to coat the entire inner surface, and pour it out quickly. -
Dip the exterior:
Holding the mug by the foot (which is already waxed), dip the entire mug into the glaze bucket for about 3 seconds, stopping just before you hit the unglazed foot line. -
Wipe the resist:
As the glaze dries, you’ll see it beading up on the waxed triangles. Use a damp sponge to gently wipe any glaze beads off the waxed areas, revealing the colored triangles clearly. -
Final check:
Ensure the foot is completely clean of glaze before setting it on the kiln shelf. -
Fire:
Fire the mug to the temperature appropriate for your clay and glaze (typically Cone 6 for stoneware).
Mishimima Twist
Instead of painting shapes, carve the triangle outlines into leather-hard clay and inlay the underglaze for a textured, inlaid pottery look.
Once cooled, your mug is ready to add a stylish, distinctly modern touch to your morning coffee routine
Checkerboard and Grid Patterns
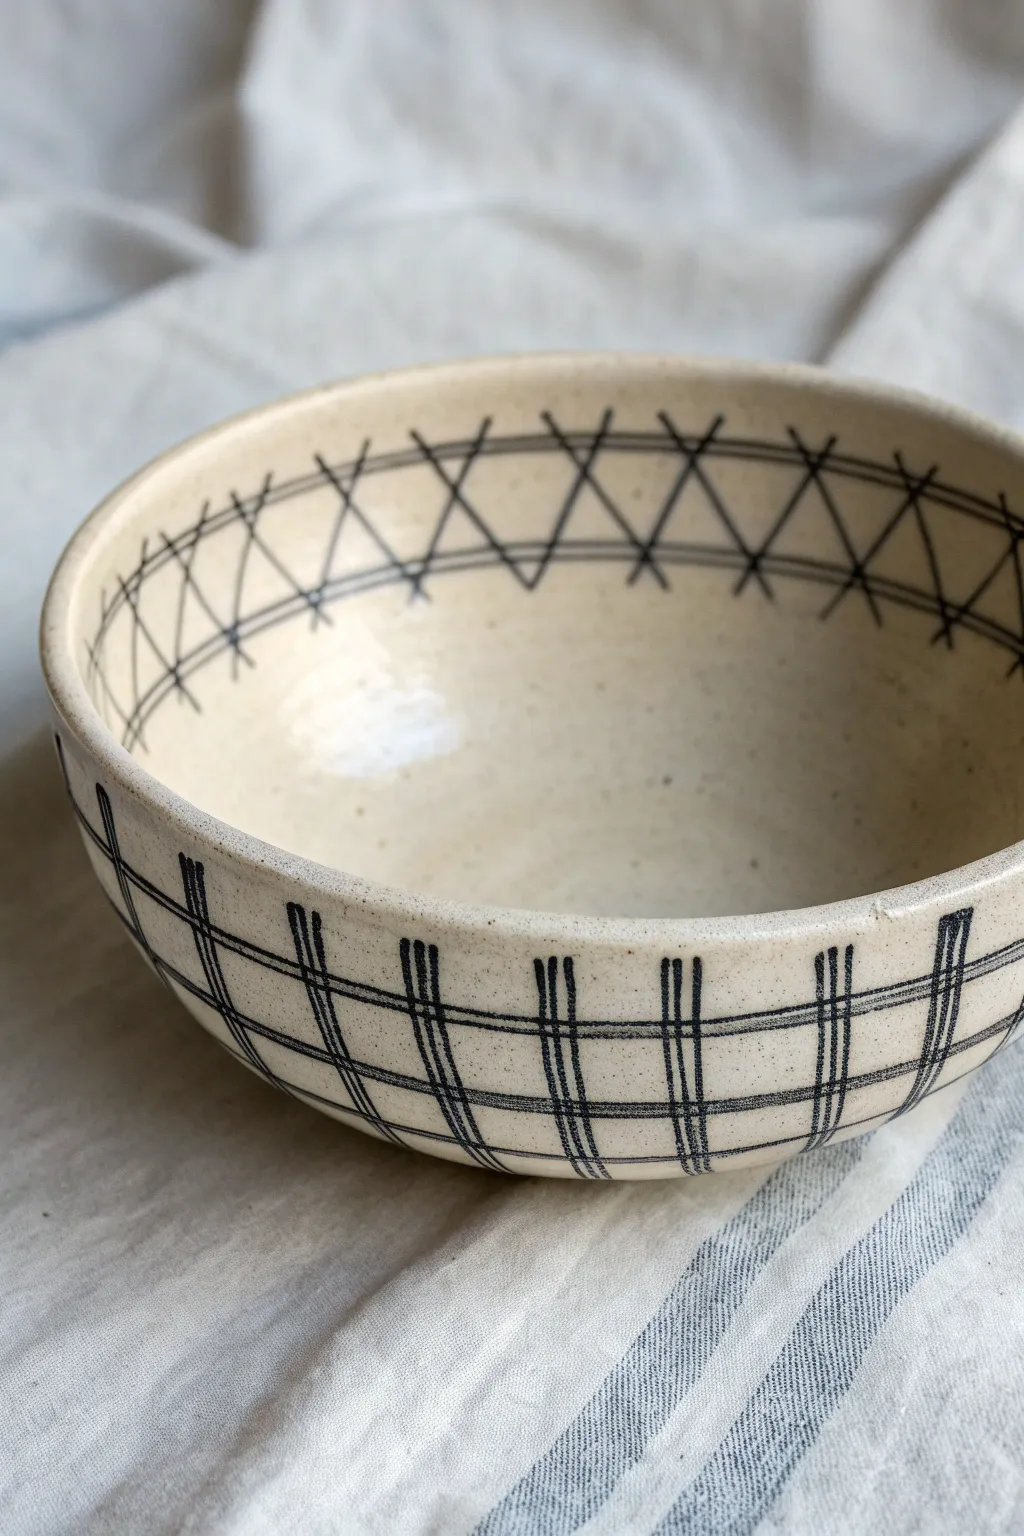
This project combines two classic geometric designs on a simple ceramic form for a modern, sketchy aesthetic. By contrasting an exterior grid with an interior lattice band, you create visual rhythm that perfectly complements the natural speckle of the clay.
Detailed Instructions
Materials
- Bisque-fired ceramic bowl (creamy or speckled clay body recommended)
- Black underglaze pencil or fine liner bottle
- Clear dipping or brushing glaze
- Soft fan brush (for glaze)
- Damp sponge
- Pencil (standard graphite, optional)
- Banding wheel (for turning pieces easily)
Step 1: Planning the Exterior Grid
-
Clean surface:
Wipe your bisque-fired bowl with a damp sponge to remove any dust or oils that might resist the underglaze. -
Mark vertical guides:
Place your bowl on a banding wheel. Using a very light pencil touch, mark vertical tick marks around the rim to space out your double stripes evenly. -
Draw the main horizontals:
Using your black underglaze pencil or liner, draw two parallel horizontal lines that wrap around the circumference of the bowl’s belly. -
Add lower horizontals:
Draw another set of parallel lines closer to the foot of the bowl. Don’t worry if the lines are slightly wobbly; that hand-drawn quality adds character. -
Draw vertical pairs:
Starting from the rim and extending down to the foot, draw pairs of vertical lines that intersect your horizontal bands. -
Complete the grid:
Continue these vertical pairs around the entire exterior, maintaining rough spacing but embracing organic variations.
Step 2: Creating the Interior Lattice
-
Set the boundary:
Moving to the inside of the bowl, draw a single horizontal line that circles the interior wall, about an inch or so down from the rim. -
Add the top border:
Draw a second horizontal line closer to the top rim to frame the area where the pattern will go. -
Start the zigzag:
Draw a continuous zigzag line between your two borders, creating a row of triangles pointing up and down. -
Create the X shapes:
Draw a second zigzag line that mirrors the first one, crossing over it to create a series of diamond or ‘X’ shapes within the band. -
Extend the tips:
Allow the tips of your X-shapes to extend slightly past the horizontal border lines, just like in the photo, to give it a sketched, architectural feel. -
Clean up smudges:
If you smudge any underglaze lines, carefully gently scrape the mistake away with an X-acto knife or a stiff clean brush rather than wiping, which can smear it further.
Fixing Smudged Lines
Don’t wipe wet underglaze! Let it dry completely, then gently scratch the error off with a needle tool or dry paintbrush.
Step 3: Glazing and Firing
-
Bisque touch-up:
If you used a liquid underglaze, let it dry completely. If you used an underglaze pencil, blow away any loose graphite dust. -
Apply clear glaze:
Using a soft fan brush, apply a coat of clear glaze over the entire piece. I find dipping is faster, but brushing gives you more control over not smudging the lines. -
Second coat:
Apply a second slightly cross-hatched coat of clear glaze to ensure full coverage without streaks. -
Wipe the foot:
Use a damp sponge to completely wipe any glaze off the bottom foot ring to prevent the bowl from sticking to the kiln shelf. -
Final fire:
Fire the piece to the temperature recommended for your specific clay and clear glaze combination (usually Cone 5 or 6).
Pro Tip: Line Quality
Vary your pressure. Pressing harder at intersections creates darker ‘nodes’ that make the grid look more structural and confident.
Your finished bowl will have a charming, sketchbook-style appearance that makes even simple meals feel artistic


What Really Happens Inside the Kiln
Learn how time and temperature work together inside the kiln to transform clay into durable ceramic.
Meditative Mandala Centerpiece
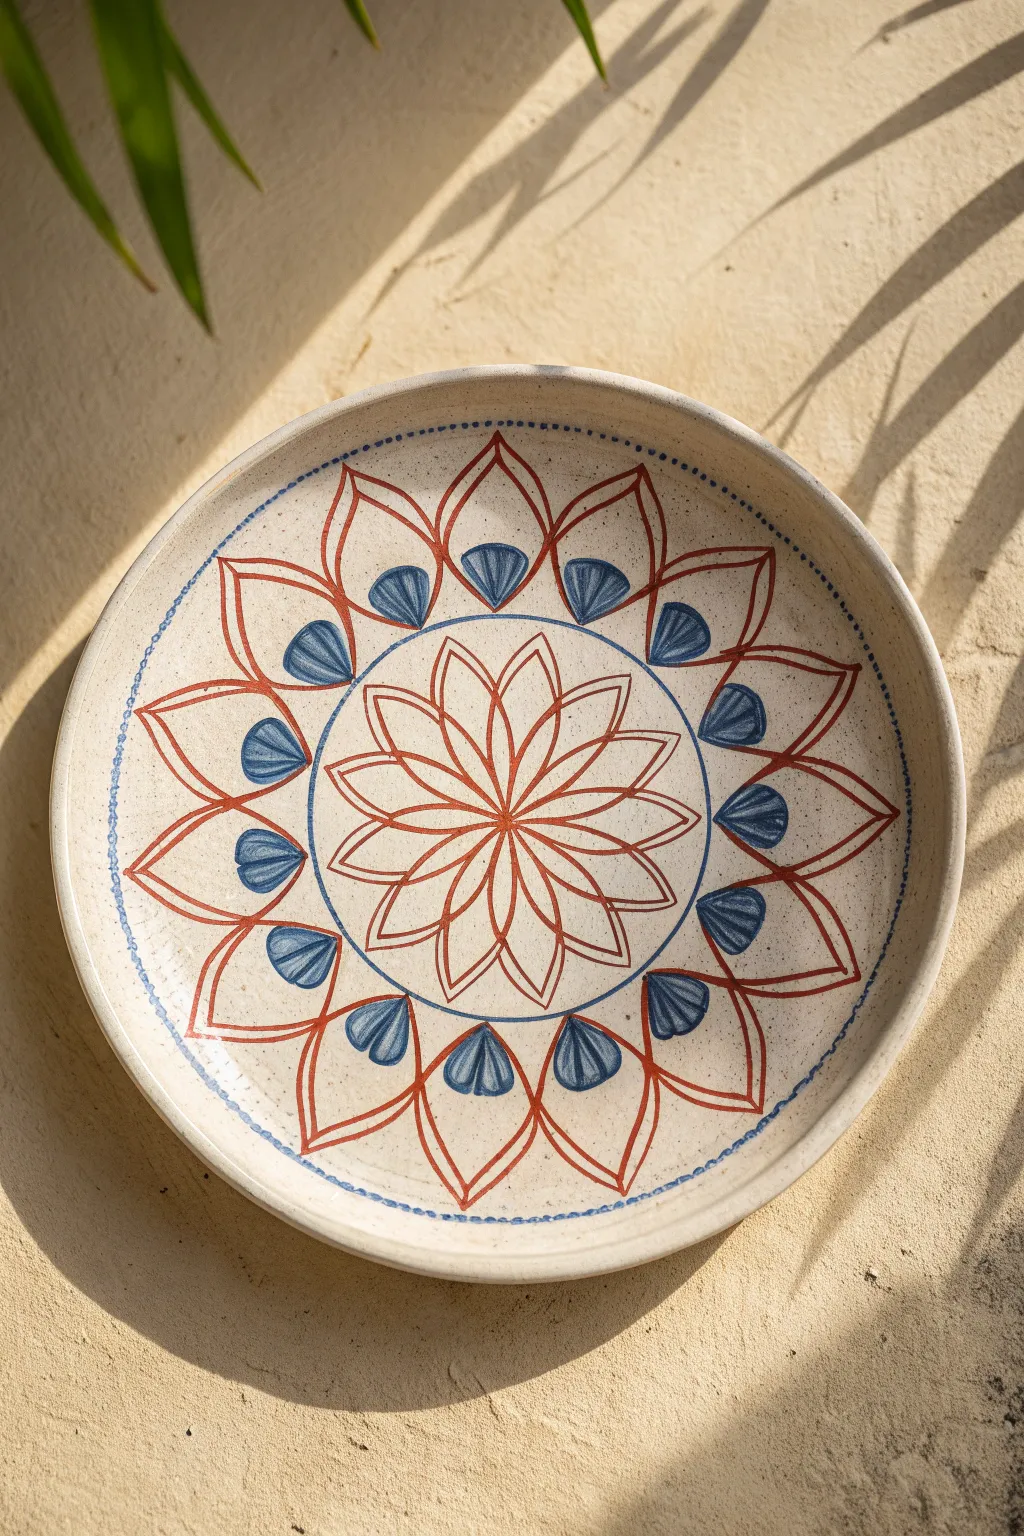
This project transforms a simple speckled ceramic plate into a radiating piece of art using earthy terracotta reds and deep blues. The mandala-inspired design features a central floral burst surrounded by elegant lotus petals, creating a calming, centered composition perfect for display or dining.
Step-by-Step Tutorial
Materials
- Bisque-fired ceramic plate (cream or speckled clay)
- Underglaze pencil (soft lead) or graphite
- Reddish-brown underglaze (terracotta or rust shade)
- Deep indigo/navy blue underglaze
- Fine liner brush (size 00 or 0)
- Small round brush (size 2)
- Banding wheel (optional but highly recommended)
- Clear transparent glaze
- Sponge and water
- Kiln access
Step 1: Preparation & Mapping
-
Clean the surface:
Begin by wiping your bisque plate with a slightly damp sponge. This removes any dust that might resist the glaze and prepares the porous surface for painting. -
Find the center:
Place your plate on a banding wheel if you have one. Gently spin the wheel and hold a pencil steady to mark the absolute center point. This tiny dot will anchor your entire mandala. -
Mark the rings:
While spinning the banding wheel, lightly sketch three concentric circles using a pencil. The first should be small (defining the central flower), the second slightly larger, and the third near the rim (defining the outer petals).
Wobbly Lines?
If your hand shakes, rest your pinky finger on the dry center of the plate while outlining the rim. This acts as a stabilizer pivot point.
Step 2: The Central Motif
-
Draft the inner flower:
Sketch a 12-petaled flower in the center circle. Start with four cardinal points to ensure symmetry, then fill in two petals between each main point. The petals should be pointed, like a starburst. -
Outline in red:
Dip your fine liner brush into the reddish-brown underglaze. With a steady hand, trace over your pencil lines for the central flower. Keep the consistency ink-like for smooth flow. -
Add inner details:
Inside this central flower, paint a second, smaller set of petals nestled between the larger ones. This layering creates depth without needing shading.
Step 3: The Outer Lotus Ring
-
Define the blue boundary:
Using your banding wheel and the blue underglaze, paint a thin, continuous circle enclosing your central flower. This separates the core from the outer design. -
Sketch outer petals:
Pencil in large, wide lotus petals radiating from the blue circle toward the rim. Aim for roughly 12-14 large petals. Their tips should point outward, almost touching the rim guide you drew earlier. -
Outline larger petals:
Use the liner brush and reddish-brown underglaze to outline these large lotus shapes. I find it helpful to pull the brush stroke toward me for better control on these longer curves. -
Paint secondary peaks:
Between the tips of each large petal, paint a simple inverted ‘V’ shape connecting them. This creates a negative space petal that fills the gaps.
Embossed Texture
Use a slip trailer instead of a brush for the red outlines. This leaves a raised, tactile line that feels wonderful under the clear glaze.
Step 4: Fills & Final Accents
-
Add the blue drops:
Inside each large outer petal, near the base, paint a solid tear-drop shape using the blue underglaze and your size 2 round brush. Orient the point of the tear-drop toward the center. -
Detail the blue drops:
Once the blue drops are dry to the touch, take your liner brush with a tiny amount of water (or white underglaze, if preferred) to scratch or paint thin lines through the blue, mimicking veins. -
Create the dotted rim:
Dip the back end of your paintbrush (the handle) into the blue underglaze. Gently dot a border just inside the very edge of the plate rim. Space them evenly for a beaded look. -
Clean up imperfections:
If you smudged any lines, use a stiff, damp brush or an X-Acto knife to gently scrape away the mistake before glazing. -
Apply clear glaze:
Once the underglaze is completely dry, dip or brush apply a clear transparent glaze over the entire piece. Ensure the coat is even to avoid clouding the design. -
Fire the piece:
Load the plate into the kiln and fire it according to your clay and glaze specifications (typically Cone 5 or 6 for stoneware).
Now you have a stunning, symmetrical centerpiece that balances rustic warmth with precise geometry
Minimal Stars and Tiny Dots
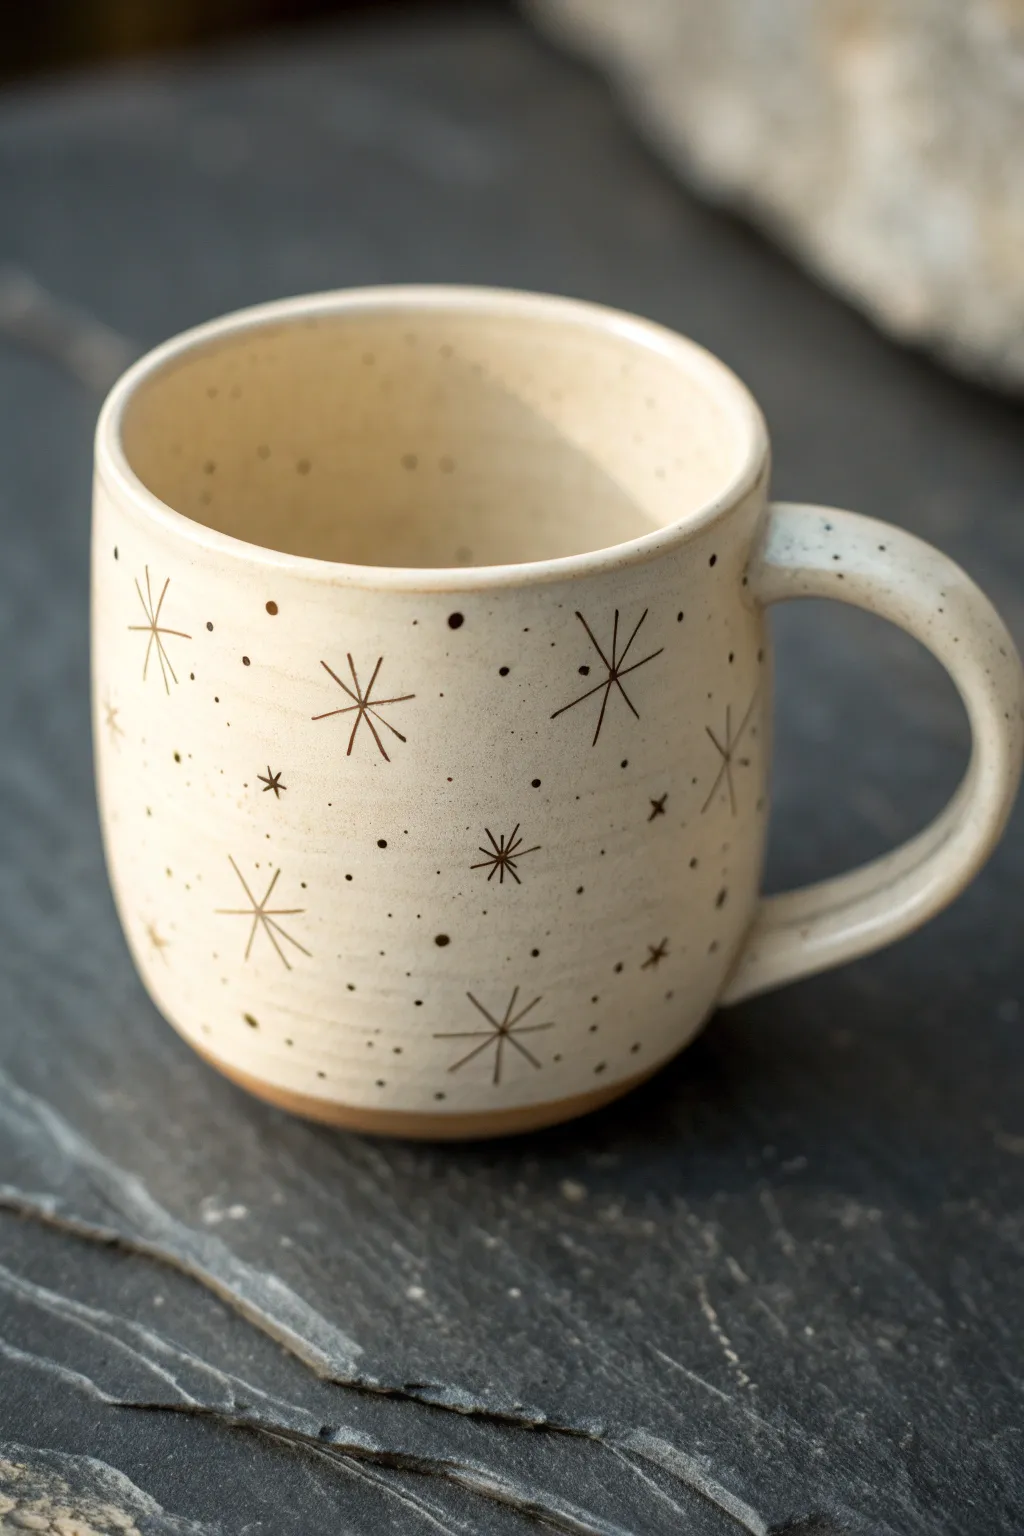
Embrace the magic of a clear night sky with this minimalist ceramic design featuring delicate starbursts and scattered speckles. The result is a cozy, modern mug that feels both sophisticated and handmade.
Step-by-Step Tutorial
Materials
- Bisque-fired ceramic mug (stoneware preferred)
- Cream or off-white dipping glaze (gloss or satin)
- Underglaze pencil or fine-tip underglaze applicator (dark brown or black)
- Small round brush (size 0 or 1)
- Wax resist
- Sponge
- Clear glaze (optional, strictly if using underglaze pencil on top of bisque)
- Kiln access
Step 1: Preparation & Glazing Base
-
Clean the bisque:
Start by wiping down your bisque-fired mug with a slightly damp sponge. This removes any kiln dust or oils from your hands that might interfere with glaze adhesion. -
Apply wax resist:
Flip the mug over and carefully brush wax resist onto the bottom foot ring. Extend the wax just slightly up the side (about 1-2mm) to create that clean, unglazed clay line visible at the base. -
Let the wax dry:
Wait 10-15 minutes for the wax to fully harden. It will likely turn transparent or slightly darker when dry. -
Dip the mug:
Using glazing tongs or a swift hand-dip motion, submerge the mug into your cream-colored base glaze. Hold it for about 3 seconds to ensure an even coat. -
Clean the drips:
Once the glaze is dry to the touch, use a damp sponge to wipe any glaze beads off the waxed bottom foot. The wax makes this easy, but you want to ensure no rogue droplets remain.
Smudged Lines?
If you smear a line while drawing on raw glaze, don’t wipe it! Let it dry, then gently scratch the mistake off with a needle tool before redrawing.
Step 2: Drawing the Stars
-
Prepare the applicator:
For the sharpest lines, I prefer using a fine-tip underglaze slip trailer or an underglaze pencil. If using a slip trailer, shake it well and test the flow on a scrap piece of paper first. -
Draw the central cross:
Start your first starburst by drawing a simple vertical line, about half an inch long. Cross it with a horizontal line of the same length to make a plus sign. -
Add diagonal rays:
Draw diagonal lines intersecting the center point. Make these slightly longer than the initial cross to give the star an elongated, radiant look. -
Vary the sizes:
Continue creating these 8-point stars around the mug. Don’t make them all identical; mix large stars with smaller, 6-point twinkling stars. -
Create simplified stars:
In the spaces between the large starbursts, draw simple 4-point stars (just a cross) and tiny 5-point asterisks to fill the gaps without overcrowding. -
Keep spacing random:
Resist the urge to place them in a grid. Allow some stars to sit lower near the base and others to float high near the rim for a natural, scattered effect.
Step 3: Adding the Speckles
-
Dot the empty spaces:
Using the tip of your applicator or a minimal amount of underglaze on a size 0 brush, gently touch the surface to leave small, round dots between the stars. -
Vary dot density:
Make clusters of 2-3 dots in some areas and leave single isolated dots in others. This mimics the irregularity of a real starry sky. -
Check the handle:
Don’t forget the handle! Add a few trailing dots and perhaps one small star on the curve of the handle to integrate it with the rest of the design. -
Inspect the rim:
Ensure your design stops just shy of the very top lip where your mouth will touch, keeping the drinking surface smooth. -
Final drying:
Let the underglaze decoration dry completely. If you applied the design over the creamy raw glaze (maiolica style), be careful not to smudge it while handling. -
Fire the piece:
Load the mug into the kiln for the final glaze firing according to your clay and glaze temperature specifications.
Pro Tip: Line Weight
Vary your pressure when drawing the star rays. Start with firm pressure at the center intersection and flick outward for tapered, elegant points.
Once fired, pour yourself a hot drink and enjoy the celestial charm of your handmade creation

TRACK YOUR CERAMIC JOURNEY
Capture glaze tests, firing details, and creative progress—all in one simple printable. Make your projects easier to repeat and improve.
Single Animal Mascot in the Center
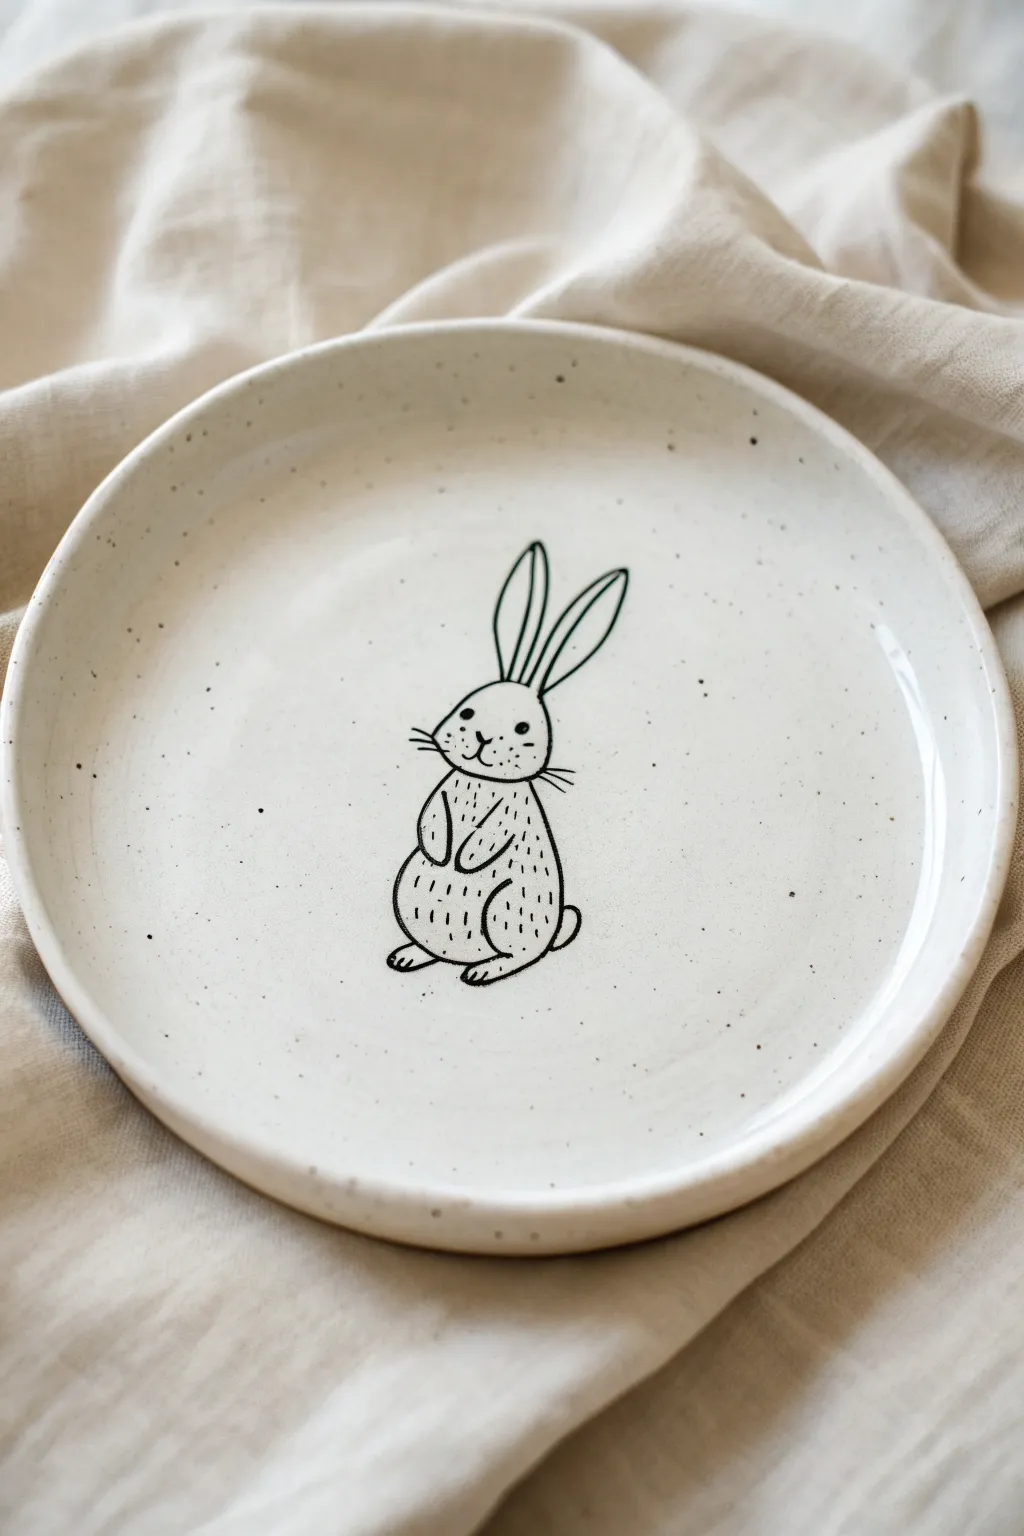
Capture a touch of woodland charm with this minimalist speckled plate featuring an endearing bunny mascot. The simple black line work against a creamy, speckled glaze creates a timeless piece perfect for serving treats or hanging as wall art.
Step-by-Step Tutorial
Materials
- Bisque-fired ceramic plate (flat rim, approximately 8-10 inches)
- Underglaze pencil (black) or fine-tip underglaze applicator bottle
- Liquid wax resist
- Cream or off-white dipping glaze (glossy or satin)
- Speckled clay body (or a speckle additive for your glaze)
- Soft fan brush
- Clean sponge
- Tracing paper (optional)
- Pencil (optional)
- Kiln accessible for firing
Step 1: Preparation & Sketching
-
Clean the surface:
Begin by wiping down your bisque-fired plate with a damp sponge. This removes any kiln dust or oils from your hands that might repel the underglaze. -
Draft your design:
Sketch your rabbit on a piece of paper first to get the proportions right. The rabbit should be centered and tall, with long ears reaching upward. -
Transfer or freehand:
If you’re confident, you can sketch lightly directly onto the bisque with a regular graphite pencil. The graphite will burn off in the kiln, leaving only your underglaze lines. -
Identify key shapes:
Focus on the main oval for the body and a rounded shape for the head. Keep the ears long and slightly tapered.
Smudged Lines?
If you smear the black underglaze while drawing, wait for it to dry, then gently scratch the mistake away with an X-Acto knife before reglazing.
Step 2: Line Work Application
-
Outline the head:
Using a fine-tip underglaze applicator with black underglaze, start by drawing the curve of the head. Keep the line weight consistent but not too heavy. -
Draw the ears:
Extend two long loops up from the head for the ears. Add a singular line inside the right ear to denote the inner fold. -
Form the body:
Create the pear-shaped body below the head. Instead of a solid line, use slightly broken or sketched lines near the bottom to suggest fur texture. -
Add the paws:
Draw two small, curved arms resting against the chest. Then, add the feet at the base, ensuring they look grounded. -
Detail the face:
Place two small dots for eyes, widely spaced. Add a small ‘Y’ shape for the nose and mouth, and don’t forget the whiskers—three on each side. -
Add texture:
Use short, dashed strokes on the belly and chest area to mimic soft fur. This adds dimension without cluttering the design.
Step 3: Glazing & Firing
-
Let it dry:
Allow the black underglaze lines to dry completely. If they are wet, the subsequent glazing step might smear them. -
Wax the foot:
Apply liquid wax resist to the bottom foot ring of the plate. This prevents glaze from sticking to the kiln shelf later. -
Prepare the glaze:
Stir your cream-colored dipping glaze thoroughly. If you are using a clear glaze over a speckled clay body, ensure it’s mixed well to distribute the particles. -
Dip the plate:
Using glazing tongs, dip the entire plate into the bucket of glaze for about three seconds. Lift it out and let the excess drip off smoothly. -
Check the thickness:
I like to gently scratch a tiny hidden area to check thickness; the glaze should be about the thickness of a postcard. -
Clean the foot:
Once the glaze is dry to the touch, use a damp sponge to wipe any stray glaze off the waxed foot ring. -
Smooth imperfections:
Gently rub any drips or pinholes on the surface with a clean finger to smooth the powdery glaze layer. -
Fire the piece:
Load the plate into the kiln and fire it to the recommended temperature for your specific glaze and clay body (typically Cone 5 or 6 for stoneware).
Add Subtle Color
Use a watered-down pink underglaze to add a very faint blush to the cheeks or inner ears before dipping in the final clear or cream glaze.
Now you have a charming, custom piece of pottery ready to be used or gifted
Ocean Doodles: Waves and Shells
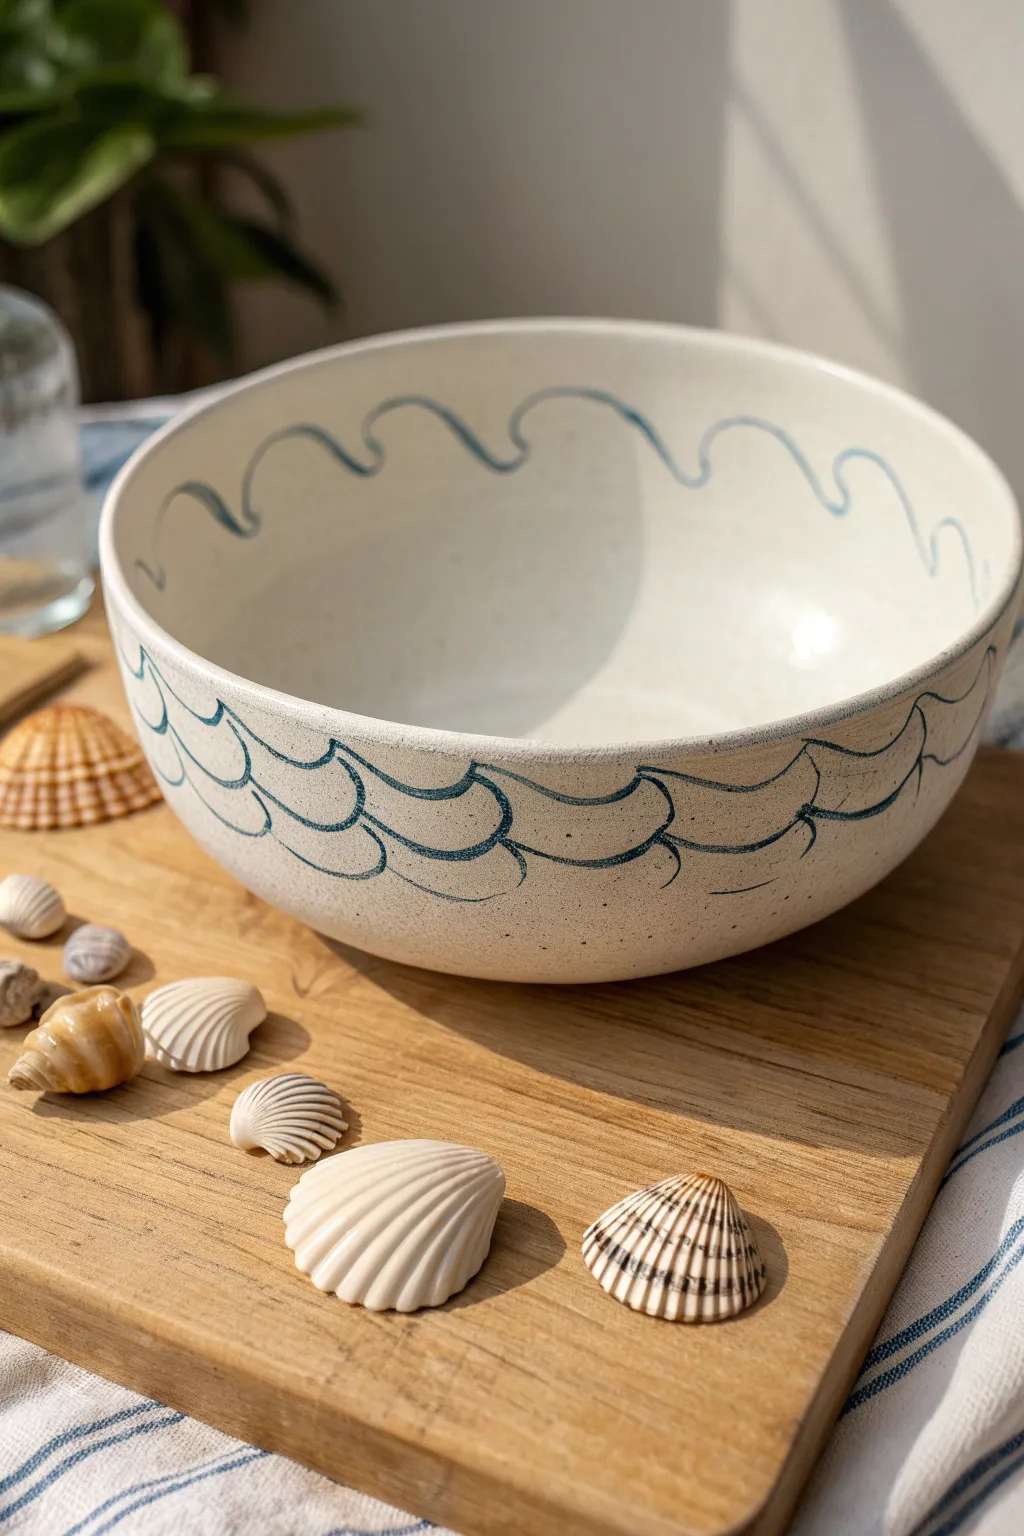
Bring the calming rhythm of the ocean to your kitchen with this charming, handcrafted ceramic bowl. The design features simple, looping wave patterns painted in a classic ocean blue against a speckled, creamy white glaze, perfect for a relaxed coastal vibe.
Step-by-Step Guide
Materials
- Large stoneware bowl (bisque fired)
- Underglaze pencil or fine liner brush (Navy or Cobalt Blue)
- Wax resist (liquid)
- Matte or satin white speckled glaze
- Clear dipping glaze (optional, depending on finish desired)
- Soft sponge
- Clean water
- Kiln
Step 1: Preparation and Planning
-
Clean surface:
Begin with your bisque-fired stoneware bowl. Wipe the entire surface gently with a slightly damp sponge to remove any kiln dust or oils from your hands, ensuring a clean canvas for your design. -
Map the spacing:
Lightly sketch a few guide marks using a regular graphite pencil to divide the exterior circumference. This helps ensure your waves meet up evenly at the end, though a slightly organic, uneven look adds character.
Clean Lines Pro Tip
If using a brush for lines, dilute your underglaze slightly with water. It should feel like ink flowing from a fountain pen for smoother, uninterrupted strokes.
Step 2: Drawing the Exterior Waves
-
Create the bottom wave tier:
Using your blue underglaze pencil or a liner brush loaded with underglaze, start near the bottom third of the bowl. Draw a continuous, scalloped line that mimics the trough of a wave. -
Overlap the second tier:
Draw a second row of scallops directly above the first. Start each new curve from the midpoint of the curve below it, creating a scale-like effect. -
Add the third tier:
Repeat the process for a third row of waves. Keep your hand loose; shakiness or variation in line thickness actually enhances the hand-drawn aesthetic. -
Detail the crests:
Go back over your lines to darken them if needed. You can add a tiny ‘hook’ or extra weight to the top of some curves to suggest a breaking wave.
Step 3: Interior Detailing
-
Rim placement:
Move to the inside of the bowl. Plan your interior wave line to sit about an inch or two below the rim. -
Draw the interior wave:
Create a single, continuous undulating line that circles the entire inner wall. Unlike the exterior scales, this should look like a long, rolling surface wave. -
Refine the line work:
Inspect your blue lines. If you smudge any underglaze, gently sand it away or wipe with a damp sponge before proceeding.
Level Up: Hidden Gems
Before glazing, hide small ceramic shell decals or tiny drawings inside the bottom of the bowl for a surprise reveal once the soup is finished.
Step 4: Glazing and Firing
-
Apply wax resist:
Carefully paint liquid wax resist directly over your blue lines. This technique, called wax resist inlay, will prevent the main glaze from obscuring your drawing. -
Wax the foot:
Don’t forget to apply wax to the bottom foot of the bowl to prevent it from sticking to the kiln shelf. -
Mix the glaze:
Prepare your matte white speckled glaze. Ensure it is mixed thoroughly so the speckles are suspended evenly throughout the bucket. -
Dip the bowl:
Using glazing tongs or a steady hand, dip the entire bowl into the white glaze. Hold it for about 3 seconds to achieve an even coat. -
Clean the lines:
Once the glaze is dry to the touch, use a damp sponge to gently wipe any glaze beads off the waxed blue lines. The blue design should reveal itself clearly through the white coating. -
Final inspection:
Check for any pinholes or drips in the glaze and smooth them out with your finger. -
Fire the piece:
Load the bowl into the kiln and fire to the temperature appropriate for your specific clay body and glaze (typically Cone 5 or 6 for stoneware).
Now you have a serene, ocean-inspired vessel ready to hold your favorite fruits or warm stews
Constellations and Night Sky Maps
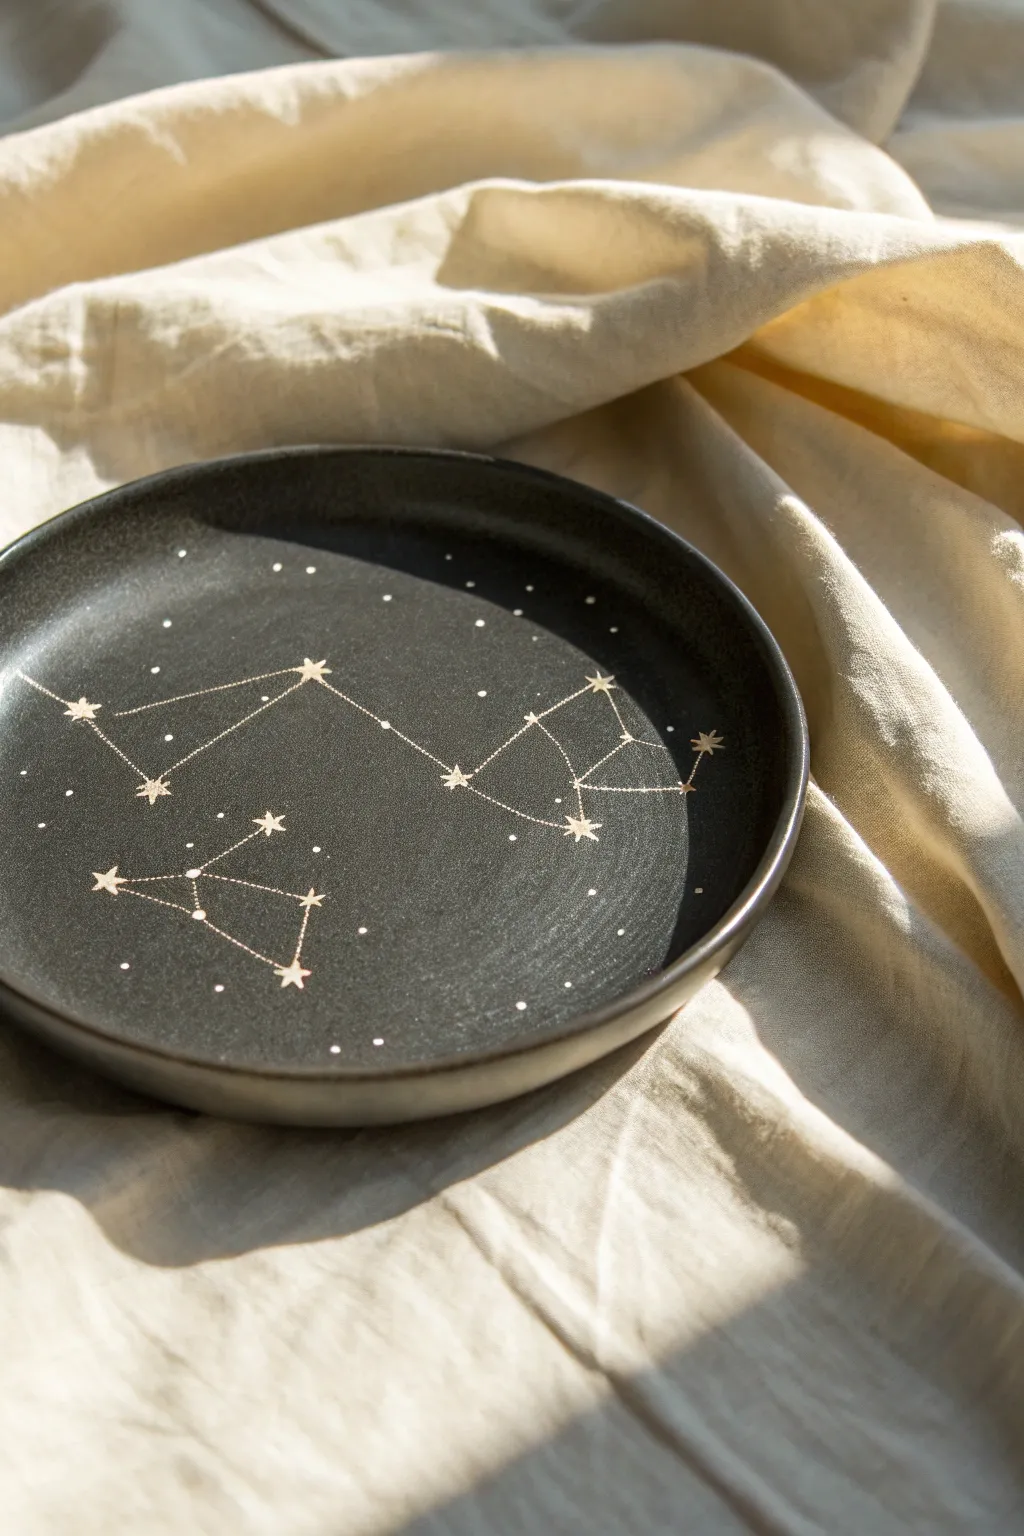
Transform a simple dark ceramic plate into a starry night sky with delicate white constellation lines. This project captures the mystique of the cosmos and makes for a stunning personalized gift or a striking jewelry catch-all.
How-To Guide
Materials
- Dark grey or black ceramic plate (matte or satin finish preferred)
- White ceramic paint pen (fine tip)
- White ceramic paint pen (extra fine tip)
- Pencil (white charcoal or standard)
- Ruler
- Printed constellation reference images
- Cotton swabs
- Rubbing alcohol
- Oven (for curing)
Step 1: Preparation & Planning
-
Clean the surface:
Before we begin, wipe down the entire surface of the plate with rubbing alcohol and a paper towel. This removes any oils or fingerprints that might prevent the paint from adhering properly. -
Gather your references:
Choose the constellations you want to feature. You might pick your sun sign, the Big Dipper, or a random assortment that looks pleasing. Having printed images or phone screenshots nearby is essential. -
Map the layout:
Using a white charcoal pencil or a standard pencil (which shines graphite on dark matte surfaces), lightly mark the main anchor points for your largest constellations. Don’t draw the connecting lines yet, just the positions for the main stars.
Uneven Lines?
If your hand is shaky, try resting your wrist on a clean sponge or folded towel while drawing. This elevates your hand and provides stability without smudging the surface.
Step 2: Drawing the Constellations
-
Draw the star anchors:
With your fine tip white ceramic pen, draw small five-pointed or six-pointed stars over your pencil marks. I like to vary the sizes slightly to mimic the different magnitudes of real stars. -
Connect the stars:
Switch to the extra fine tip pen for the connecting lines. Use a small ruler to gently guide your hand, drawing thin straight lines between your star anchors to form the constellation shape. -
Create dotted connectors:
For a varied look, as seen in the reference, draw some of the connecting lines as a series of tiny dots rather than solid lines. This adds visual texture and elegance. -
Let the main features dry:
Pause for about 15 minutes to let the constellations dry completely. This prevents accidental smudging as you fill in the rest of the ‘sky’.
Step 3: Adding the Milky Way
-
Scatter background stars:
Using the extra fine tip pen, gently tap the tip against the plate to create tiny, randomly placed dots around your main constellations. -
Vary dot density:
Cluster some dots closer together in certain areas to suggest the density of the Milky Way, leaving other areas sparser for balance. -
Add larger distant stars:
Occasionally press slightly harder or wiggle the pen tip to create slightly larger dots, representing medium-brightness stars that aren’t part of a constellation. -
Check balance:
Step back and look at the plate from a distance. If any area looks too empty, add a few more speckles to even out the composition. -
Correct mistakes:
If a line went crooked or a star looks blobbish, dampen a cotton swab with a little water or alcohol and carefully wipe it away while the paint is still semi-wet.
Add Some Sparkle
For a magical touch, add tiny accents of metallic gold ceramic paint to the center of the largest stars once the white base layer is dry but before baking.
Step 4: Finishing Up
-
Dry completely:
Allow the plate to dry for at least 24 hours. The paint needs to be fully set before heat curing. -
Prepare for baking:
Place your cold plate into a cold oven. Do not preheat the oven, as the sudden temperature change could crack the ceramic. -
Bake to cure:
Set the oven to 300°F (150°C) or the temperature specified on your specific paint pen brand. Bake for 30-35 minutes. -
Cool down:
Turn the oven off and leave the plate inside until the oven has cooled down completely to room temperature.
Now you have a piece of user-friendly art that brings the beauty of the galaxy right to your table
Abstract Doodle Patchwork Panels
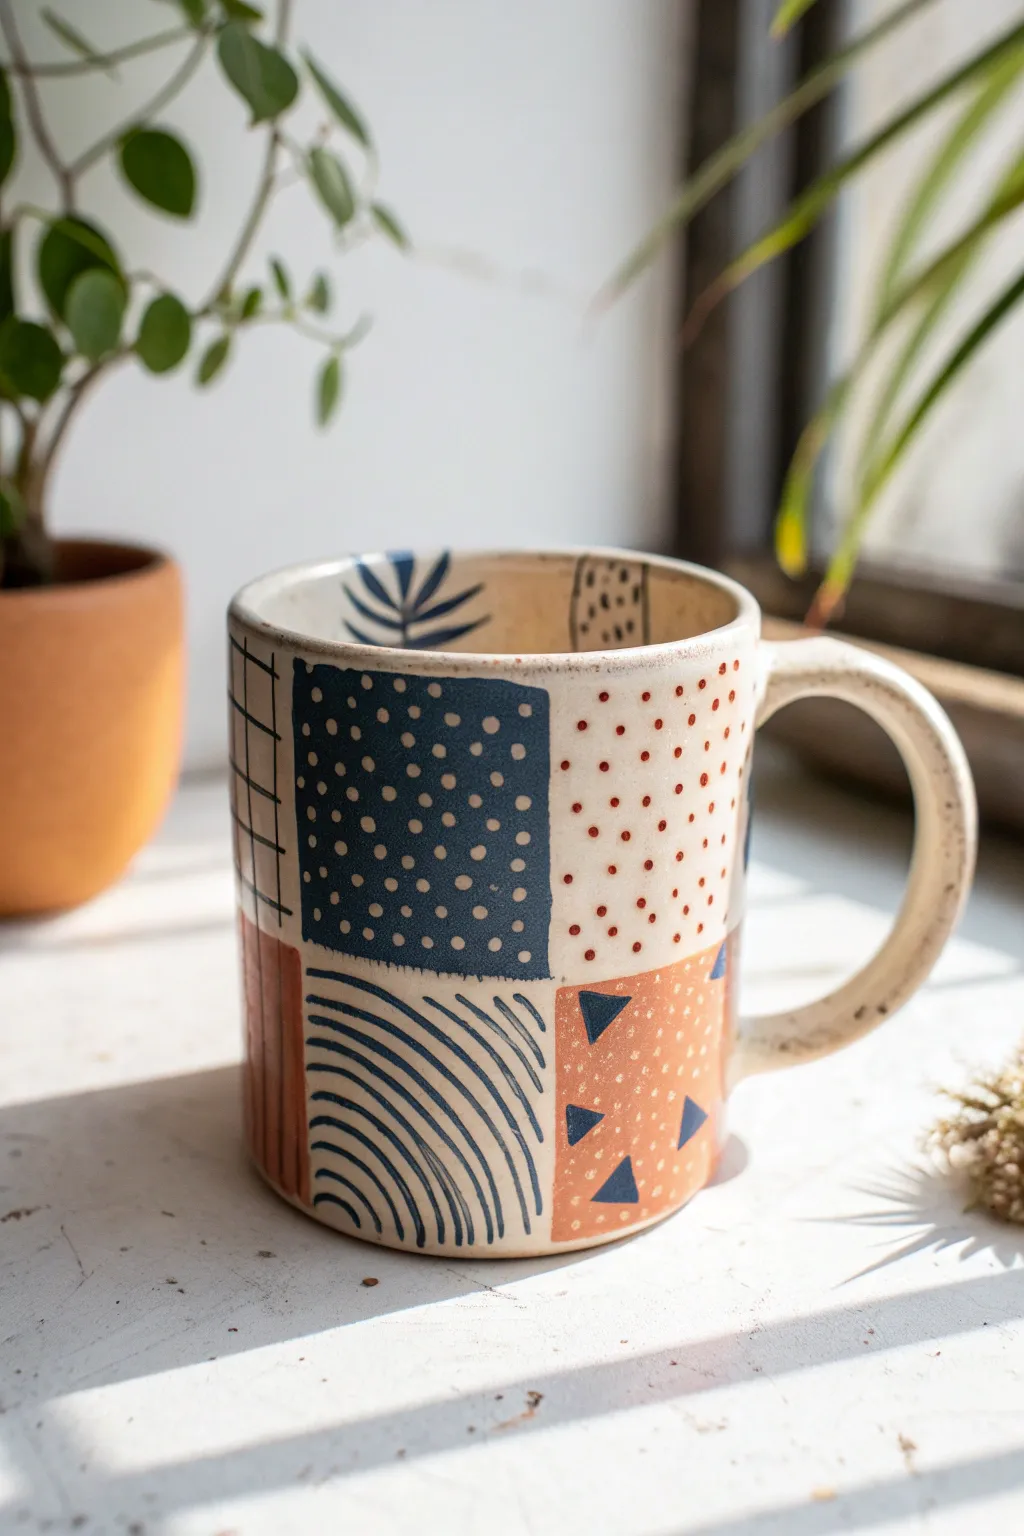
Transform a simple ceramic mug into a piece of modern art with this playful patchwork design. Using underglazes to create distinct panels of abstract patterns, you’ll combine geometric precision with organic, hand-drawn doodles for a cozy, eclectic look.
Step-by-Step Guide
Materials
- Bisque-fired stoneware mug (light or speckled clay body created on wheel or by hand)
- Pencil (for sketching guidelines)
- Underglaze (Dark Navy Blue)
- Underglaze (Terracotta or Rust Orange)
- Fine detail brush (size 0 or 00)
- Small flat shader brush (size 2 or 4)
- SGraffito tool (needle tool or loop tool)
- Clear transparent glaze
- Damp sponge
Step 1: Planning and Base Work
-
Prep the surface:
Begin with a clean, bisque-fired mug. Wipe it down gentle with a damp sponge to remove any kiln dust or oils from your hands, ensuring the underglaze will adhere properly. -
Map the grid:
Lightly sketch a grid layout onto the mug using a pencil. You don’t need a ruler; hand-drawn lines add character. Aim for roughly four main panels around the top half and four corresponding ones on the bottom half to create a checkerboard effect. -
Sketch interior motifs:
Don’t forget the inside rim! Pencil in a few small organic shapes, like the botanical leaf motif shown near the lip of the mug, to connect the interior design to the exterior.
Step 2: Painting the Panels
-
Block in solid color:
Identify which square panels will have a solid background color. For this design, choose a top-left panel and use your flat shader brush to apply 2-3 coats of Dark Navy Blue underglaze. -
Apply the rust tone:
Select a diagonal counterpart panel on the bottom row and fill it with your Terracotta or Rust underglaze. Apply smooth, even strokes, letting each coat dry slightly before adding the next. -
Create the dotted panel:
Moving to a blank panel intended for the blue dots, leave the raw clay as the background. Dip the handle end of a paintbrush or a specialized dotting tool into the Navy Blue underglaze and stamp a repeating grid of small, uniform dots. -
Paint the confetti panel:
For the panel next to it, create a ‘confetti’ look. Dip a fine brush into the Rust underglaze and tap it gently to create varied sizes of small speckles. I like to vary the pressure here to keep it looking random rather than uniform.
Clean Lines
For sharper grids without intricate brushwork, try using thin strips of masking tape or specialized ceramic pinstriping tape to mask off lines before applying the solid color blocks.
Step 3: Adding Linear Details
-
Draw the grid lines:
Using your fine detail brush and Dark Navy Blue, carefully paint the dividing lines between all your panels. These lines frame the artwork and give it that ‘patchwork quilt’ structure. -
Create the heavy grid doodle:
On a side panel, use the fine liner brush to paint a simple, wide windowpane grid using thin black or dark blue lines. Allow the lines to be slightly wavering for a hand-drawn feel. -
Paint the curved arches:
In one of the bottom squares (left as raw clay), paint concentric curved lines—like rainbows or arches—starting from the bottom corner and radiating outward using the Navy Blue. Keep the spacing consistent but freehand. -
Add geometric triangles:
Find a panel you previously painted solid Rust/Terracotta. Once it is completely dry to the touch, paint small triangles over the top using the Dark Navy Blue. The dark color will sit nicely on top of the lighter earth tone.
Wax Resist Method
Apply wax resist over your first layer of patterns (like the dots). Then, wash a contrasting translucent glaze over the whole panel. The wax will repel the top coat, revealing the design beneath.
Step 4: Finishing Touches
-
Lighten the solid block:
Return to your solid Navy Blue square. Take your fine detail brush and dip it into the raw clay color (or a white underglaze) and carefully dab small dots over the dark blue to create a reverse polka-dot effect. -
Internal details:
Using the Navy Blue, paint the simple leaf frond you sketched earlier on the interior rim. Keep the strokes fluid, pressing down at the base of the leaf and lifting up for the tip. -
Clean up:
Check the bottom of the mug and the handle connections. If any underglaze has smudged where it shouldn’t be, scratch it off gently with a tool or wipe with a damp sponge. -
Glazing:
Once all underglaze design work is bone dry, dip the entire mug into a clear transparent glaze. This will seal the clay and make the colors pop vibrantly after firing. -
Final Fire:
Load the kiln and fire to the temperature appropriate for your specific clay and glaze (usually Cone 5 or 6 for stoneware). Allow the kiln to cool completely before opening.
Now you have a charming, hand-painted mug perfect for your morning coffee routine
Continuous One-Line Face Drawing
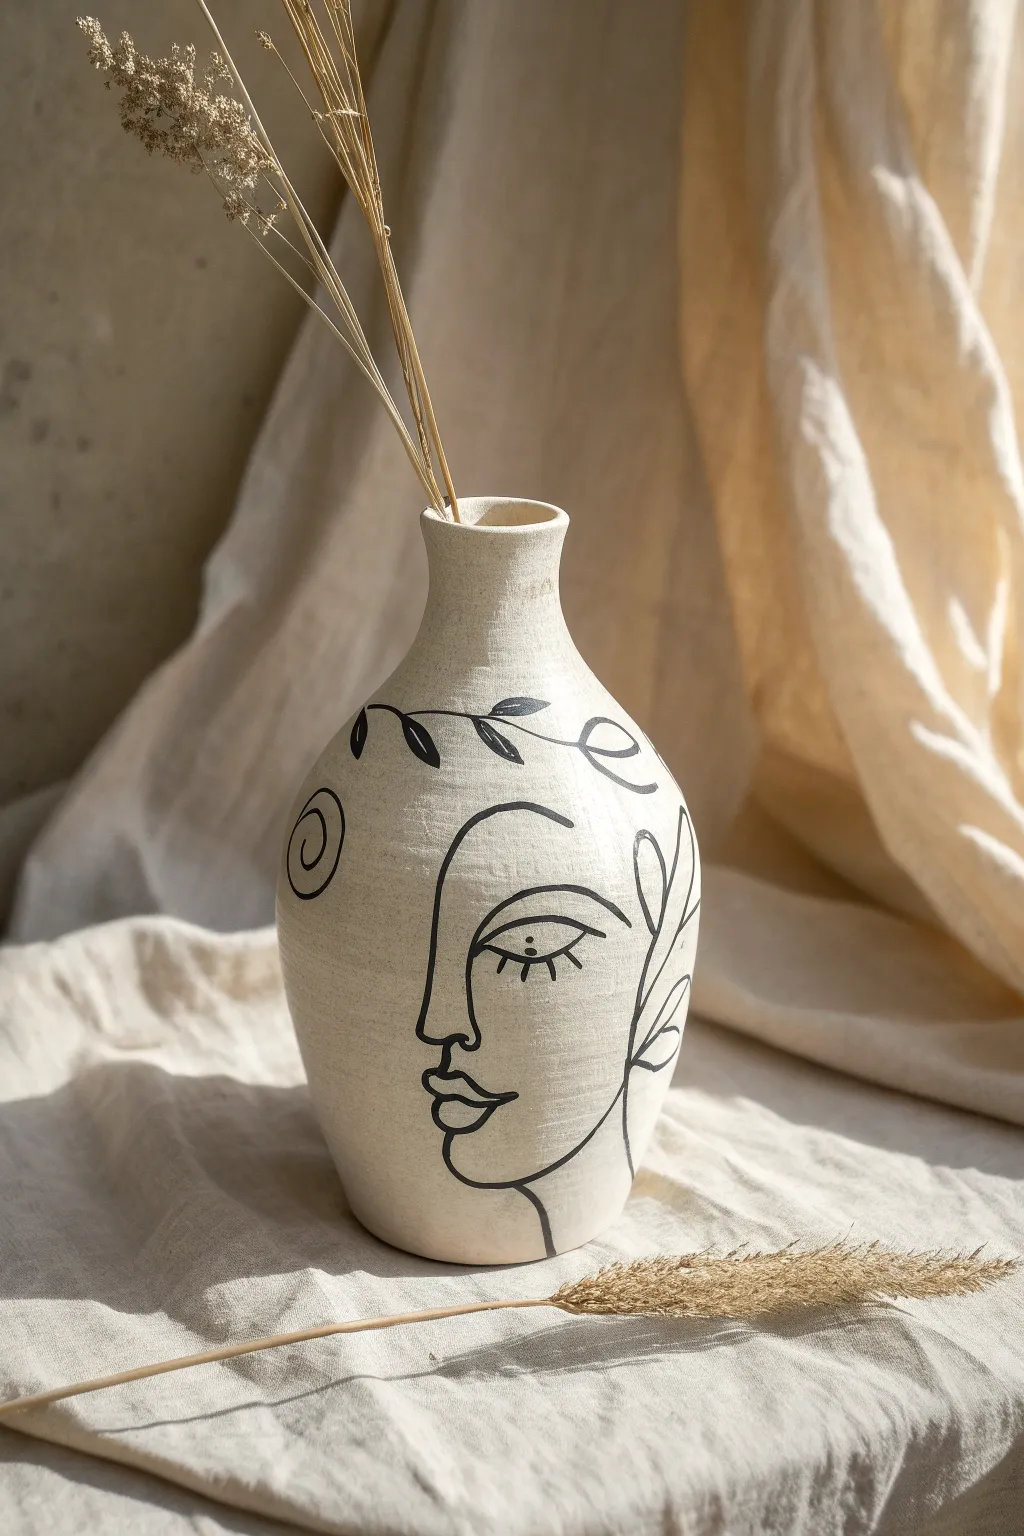
Transform a plain ceramic vessel into a piece of modern art with this elegant continuous-line face study. The stark contrast of black ink against textured beige clay creates a sophisticated, bohemian focal point for any room.
Detailed Instructions
Materials
- Bisque-fired ceramic vase (smooth, beige/cream tone)
- Black underglaze or ceramic marker
- Fine-point liner brush (size 0 or 00)
- Pencil (HB or lighter)
- Eraser
- Clear matte glaze (optional, for sealing)
- Damp sponge
- Palette or small dish
- Paper towels
Step 1: Preparation & Planning
-
Clean the Surface:
Begin by gently wiping down your bisque-fired vase with a damp sponge. This removes any ceramic dust that could interfere with your drawing materials. -
Analyze the Form:
Study the curves of your vase. For this design, identify the largest, flattest vertical section of the body—this will correspond to the cheek and jawline area where the drawing needs the most space. -
Light Sketching:
Using a very light touch with your pencil, sketch the main anchor points of the face. Mark where the nose bridge starts, where the chin curves, and the general placement of the eye. Don’t worry about perfection; these graphite marks will burn off in the kiln or can be wiped away. -
Visualize the Line Path:
Before committing to ink, trace the intended path of the ‘one line’ in the air with your finger. Notice how the nose connects to the eyebrow, and how the jawline sweeps up into the hair line.
Step 2: Drawing the Features
-
Load the Brush:
Pour a small amount of black underglaze onto your palette. Dip your liner brush, ensuring it’s saturated but not dripping. If the underglaze feels too thick, thin it slightly with a drop of water for smoother flow. -
Start at the Nose:
Begin your actual drawing at the bridge of the nose. Apply steady pressure to create a line of consistent thickness, moving downward to form the tip of the nose. -
Create the Lips:
Without lifting your brush if possible (or joining carefully if you must), loop down from the nose to create the philtrum and the upper lip. Form the mouth with simple, organic curves. -
Define the Jawline:
Swoop downward from the lip to form the chin, then pull the line upward and outward in a long, smooth curve to define the jaw and cheek. -
The Eye Detail:
The eye is a separate element in this design. Draw an almond shape near the nose bridge. Add a bold circle for the iris. -
Add Lashes and Brow:
Paint three distinct, vertical lashes extending down from the lower eyelid. Then, paint a high, arched eyebrow that creates an expression of calm observation.
Fixing Wobbly Lines
Shaky hand? Don’t stress. Use a slightly damp, stiff brush to gently ‘push’ the wet underglaze edges back into place, or scratch away excess dried glaze with a needle tool.
Step 3: Adding Decorative Elements
-
Draw the Headband Vine:
Near the top shoulder of the vase, draw a horizontal wavy line that acts as a decorative wreath or hairline. -
Leaf Details:
Along this top vine, add small, filled-in leaf shapes on alternating sides of the vine. Keep them solid black for contrast. -
Ear and Side Ornament:
On the right side of the face (near the ear area), draw a vertical flowing stem with larger, open-outline leaves. This frames the face beautifully. -
Abstract Accents:
Add a simple spiral swirl on the left side of the vase, behind the head, to balance the composition. -
Check Line Weight:
Step back and look at the vase from a distance. If any lines look too thin or shaky, carefully go over them one more time to thicken and smooth them out.
Brush Control Secret
Rest your pinky finger on the dry surface of the vase while painting. This creates an anchor point, giving you significantly more stability for those long, sweeping curves.
Step 4: Finishing Touches
-
Clean Up:
Once the black design is barely dry to the touch, use a dry brush or a very slightly damp Q-tip to tidy up any smudges or jagged edges. -
Remove Pencil Marks:
If you aren’t firing the piece in a kiln (using air-dry markers instead), gently erase visible pencil lines. If firing, leave them; the heat will make the graphite disappear. -
Drying Time:
Allow the underglaze or paint to dry completely—usually at least an hour—before handling further. -
Sealing:
Apply a clear matte glaze over the entire piece if firing, or a clear matte spray sealant if using non-fired materials, to protect your artwork.
Place your finished vase near a window where the natural light can highlight the elegant curves of your new face design
Comic-Style Icons and Speech Bubbles
Transform a plain white ceramic bowl into a playful piece of art using comic-inspired icons and bold lines. This project features high-contrast black motifs like lightning bolts, smiley hearts, and rainy clouds for a trendy, hand-drawn look.
How-To Guide
Materials
- Plain white ceramic bowl or deep plate (glazed or unglazed bisque)
- Black ceramic paint marker (fine and medium tip)
- Or: Black underglaze with a fine liner brush (if firing in a kiln)
- Pencil (optional, for sketching)
- Isopropyl alcohol and paper towel (for cleaning)
- Cotton swabs (for cleanup)
- Q-tips and water
Step 1: Preparation & Planning
-
Clean surface:
Begin by wiping down your ceramic bowl thoroughly with isopropyl alcohol and a paper towel. This removes any oils or fingerprints that could prevent the paint or ink from adhering properly. -
Visual mapping:
Mentally divide the bowl into sections to ensure your icons are spread out evenly. You don’t want all the heavy shapes on one side. -
Optional sketching:
If you are nervous about freehand drawing, lightly sketch your main shapes using a soft pencil. The pencil lead will burn off in the kiln or can be wiped away later depending on your chosen paint method.
Ink Flow Secret
Store ceramic markers tip-down for 30 minutes before starting. This ensures solid, opaque black lines without streaking during your first few strokes.
Step 2: The Central Character
-
Draw the heart outline:
Start primarily in the center to anchor the design. Draw a large, slightly asymmetrical heart shape using your medium-tip marker or brush. The lines should be bold and confident. -
Add the face:
Inside the heart, draw two small arched lines for closed ‘sleeping’ eyes and a tiny curved smile right centered between them to give it a peaceful expression.
Step 3: Weather Elements
-
Create the rain cloud:
Positioned slightly above the heart, draw a fluffy cloud outline. Use connected semi-circles for the top and a flatter, wavy line for the bottom. -
Show the rain:
Beneath the cloud, add vertical dashed lines of varying lengths to represent falling rain. -
Draw the sunburst:
On the left side of the bowl, draw a five-pointed star shape. Don’t worry about perfection; a wonky star adds charm. -
Add sun rays:
Surround the star with radiating lines. Alternate between short and long strokes to create a dynamic ‘burst’ effect. -
Strike the lightning:
On the right side, draw a large jagged lightning bolt. Outline the shape first, keeping the angles sharp. -
Fill the bolt:
If using a brush, leave the interior hollow or fill it in solid black depending on your preference; the reference image keeps the interior open for a lighter look.
Pop of Color
After the black outlines dry, fill the lightning bolts with bright yellow or the heart cheeks with pink for a vibrant comic book aesthetic.
Step 4: Filling the Space
-
Draw secondary stars:
Scatter 3-4 smaller five-pointed stars around the remaining empty spaces to balance the composition. -
Add swirls:
Near the rim or in larger gaps, draw tight spiral circles or target shapes (concentric circles) to add visual interest. -
Insert mini icons:
Look for small gaps and fill them with tiny doodles like small solid hearts, simple lightning symbols, or single diamond shapes. -
Detailing with dots:
I like to finish by adding tiny dots or small circles with a dot in the center to fill any awkward negative spaces without overcrowding the design.
Step 5: Finishing Touches
-
Check line weight:
Review your work. Go over any primary outlines (like the main heart or cloud) to make them slightly thicker than the background stars, creating depth. -
Clean up errors:
If you made a mistake with underglaze, scratch it off gently with a toothpick once dry. If using markers, wipe quickly with a damp cotton swab before it sets. -
Curing or Firing:
Follow the instructions for your specific materials. If using a porcelain marker, you typically bake it in a home oven. If using underglaze, the piece will need to be clear-glazed and fired in a kiln.
Now you have a whimsical, custom bowl perfect for serving snacks or displaying your jewelry
Carved Sgraffito Line Illustrations
This elegant tutorial guides you through creating a striking ceramic bowl featuring delicate white vine illustrations against a matte black background using the sgraffito technique. The result is a sophisticated interplay of light lines and dark clay that feels organic and modern.
Step-by-Step Tutorial
Materials
- Leather-hard clay bowl (wheel thrown or pinch pot)
- Black underglaze (velvet or matte finish)
- Soft fan brush or hake brush for glazing
- Sgraffito tool (wire loop or needle tool)
- Pencil (optional)
- Clear matte glaze (for final firing)
- Sponge
Step 1: Preparation & Application
-
Assess clay state:
Ensure your bowl is at the perfect leather-hard stage. It should be firm enough to hold its shape but soft enough that you can scratch into the surface without chipping. -
Wipe the surface:
Gently wipe the interior and exterior of the bowl with a slightly damp sponge to remove any dust or stray clay burrs that could interfere with your underglaze application. -
Apply first coat:
Using a soft fan brush, apply a smooth, even coat of black underglaze to the entire interior and the exterior up to the rim line. -
Mind the rim:
Leave the top rim and a small band just below it on the outside unglazed to reveal the natural sandy clay body, just like in the reference image. This creates a beautiful framing effect. -
Layer up:
Once the first coat has lost its sheen and is dry to the touch, apply a second and third coat. You want a solid, opaque black surface so the carving really pops. -
Final drying:
Allow the underglaze to dry until it feels slightly chalky but the clay beneath is still leather hard. If it gets bone dry, carving becomes brittle and difficult.
Step 2: Design & Carving
-
Plan the flow:
Visualize where your vines will grow. In this design, the vines sweep upwards from the bottom curve, creating a sense of movement. -
Sketch lightly:
If you’re nervous about freehanding, use a dull pencil to very lightly map out the main stems. The pencil marks will burn off in the kiln. -
Carve the main stems:
Using a sharp sgraffito tool or fine wire loop, carve long, sweeping lines for the stems. Use confident, smooth strokes rather than short, sketchy ones. -
Pressure control:
Apply just enough pressure to scrape away the black underglaze and reveal the light clay body underneath. You don’t need to dig deep into the clay itself. -
Add the leaves:
Branching off the stems, carve simple almond shapes for the leaves. Vary the angles so they look natural and organic. -
Interior details:
Inside each leaf shape, draw a delicate center vein line. This small detail adds dimension and resembles the reference piece. -
Connect the design:
I like to ensure some vines wrap visually from the outside to the inside, creating a continuous narrative around the form. -
Clean up burrs:
As you carve, little crumbs of clay (burrs) will accumulate. Don’t brush them away with your hand, or you might smear the black. Instead, use a soft, dry brush to gently sweep them off.
Chipped Lines?
If your lines look chipped or jagged, the clay is too dry. Mist the pot slightly, wrap it in plastic for an hour to rehydrate surface, then try again.
Step 3: Finishing Touches
-
Check the rim:
Verify that your unglazed rim line is clean. You can use a damp sponge to tidy up the edge where the black glaze stops. -
Bisque fire:
Once bone dry, bisque fire the piece to the appropriate cone (usually Cone 04 or 06) to set the design permanently. -
Final glaze:
Apply a clear matte glaze over the entire piece to protect the carving while maintaining that lovely non-reflective finish seen in the photo.
Vary Line Weight
Use different tool tips for variety. Try a slightly wider loop tool for the main stems and a needle tool for the delicate leaf veins.
Once fired, you’ll have a stunning vessel that balances rustic texture with refined botanical art