Painting a ceramic owl is one of my favorite ways to play with color because the eyes, beak, and feather texture basically beg for personality. Here are my go-to painting ideas—from classic looks you can nail in one sitting to bolder styles with color blocking, dot mandala details, and a few shiny metallic accents.
Classic Barn Owl Neutrals
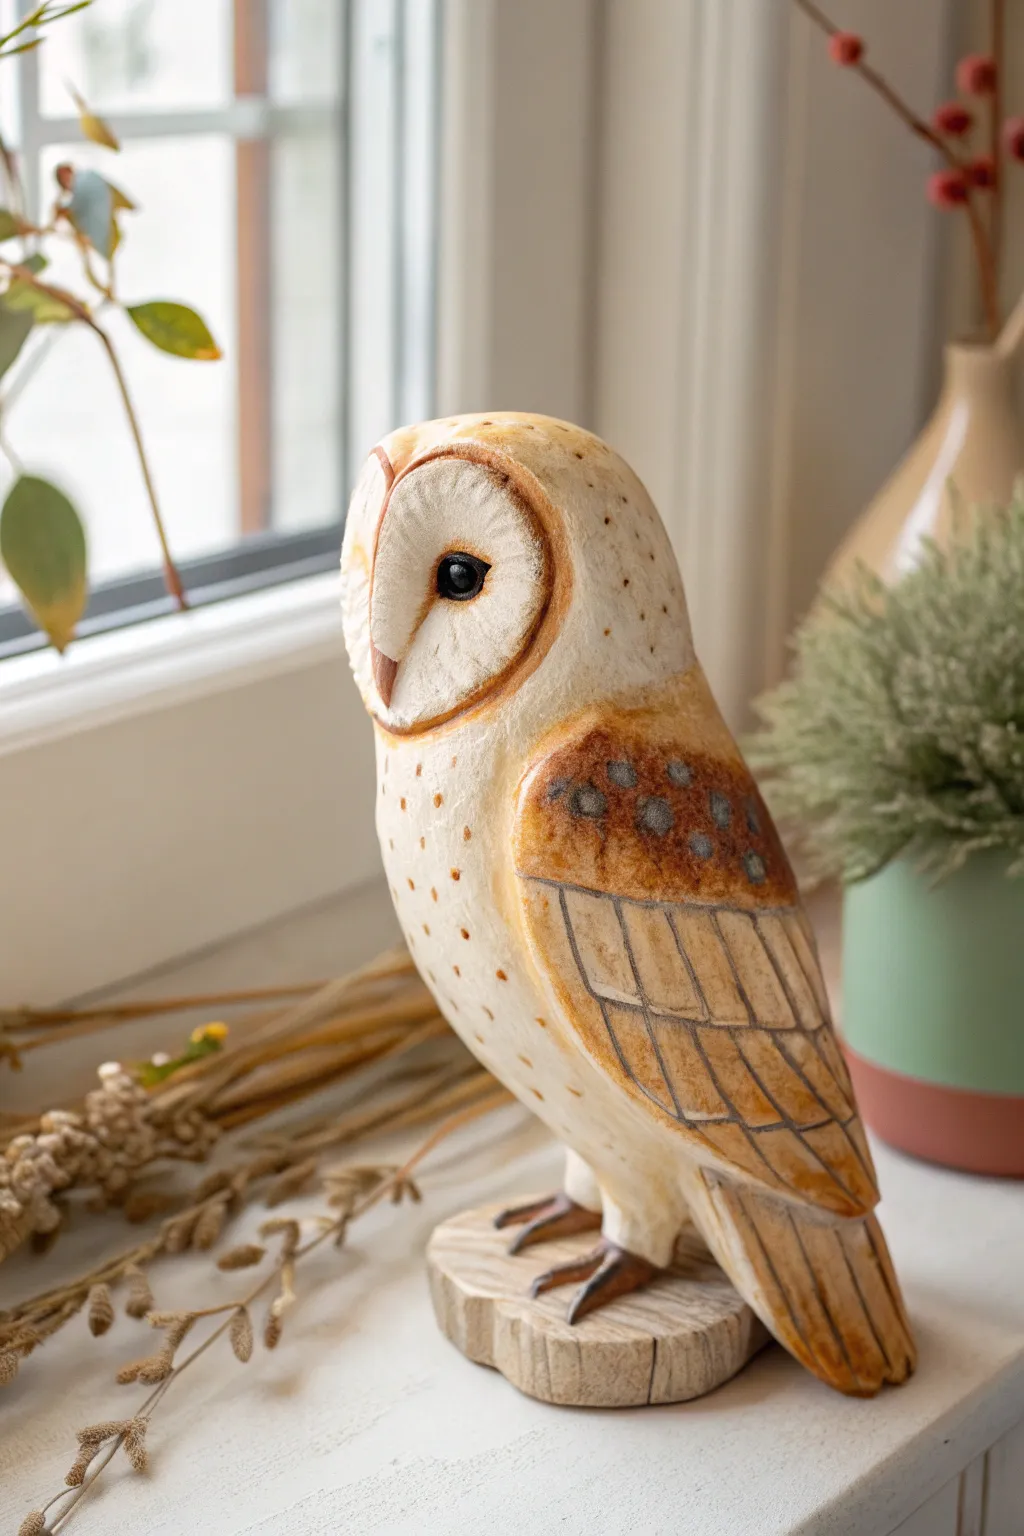
Capture the timeless elegance of a barn owl with this folk art-inspired ceramic painting project. Using a palette of soft creams, warm ochres, and charcoal accents, you will create a piece that feels both organic and delightfully handcrafted.
Step-by-Step
Materials
- Unpainted ceramic owl bisque (roughly 6-8 inches tall)
- Acrylic paints: Titanium White, Unbleached Titanium (cream), Yellow Ochre, Burnt Sienna, Raw Umber, Carbon Black
- Matte acrylic medium or sealer
- Paintbrushes: Large flat brush, medium shader, small round detail brush (size 1 or 2)
- Pencil for sketching guidelines
- Palette for mixing
- Cup of water and paper towels
- Sponge or paper towel for texturing
Step 1: Base Coating and Planning
-
Clean surface:
Begin by wiping down your ceramic bisque with a slightly damp cloth to remove any ceramic dust. This ensures the paint adheres properly and prevents grainy textures. -
Apply the creamy base:
Mix a large amount of Titanium White with a touch of Unbleached Titanium to create a soft, warm cream color. Apply this to the entire owl, including the base. You may need two coats for full opacity, letting the first dry completely before adding the second. -
Sketch guidelines:
Once the base is bone dry, lightly use a pencil to map out the heart-shaped face facial disc and the wing boundaries. Keep your lines very faint so they don’t show through later translucent layers.
Natural Texture
For a more organic look on the white feathers, dab the wet paint with a crumpled paper towel. This lifts pigment to create a fluffy, feathery surface.
Step 2: Face and Chest Details
-
Define the face disc:
Mix a wash of Burnt Sienna with plenty of water or glazing medium. Using a small round brush, carefully outline the heart-shaped facial disc. Gently feather the inner edge of this heart inwards to create a soft, recessed look. -
Chest stippling:
For the speckled chest, dip the tip of your smallest brush into watered-down Burnt Sienna. Create tiny, random dots starting from the neck and fading out as you move down the belly. Keep the dots irregular for a natural appearance. -
Paint the beak:
Fill in the beak area with a solid coat of Burnt Sienna mixed with a tiny drop of Black for depth. -
Eyes that see:
Paint the eyes solid Carbon Black. Once dry, add a tiny, singular dot of Titanium White to the upper right corner of each pupil to bring the owl to life.
Shaky Lines?
If your hand shakes while outlining feathers, support your wrist on a sturdy book or block of wood to keep the brush steady and controlled.
Step 3: Wings and Texture
-
Base the wings:
Mix Yellow Ochre with a striking amount of Burnt Sienna. Paint the upper shoulder area of the wing with this warm, rusty tone. -
Create wing spots:
While the shoulder area is dry, mix a dark grey using Black and White. Paint varying sizes of oval spots onto the rusty shoulder patch. -
Outline the feathers:
Using a thin liner brush and watered-down Raw Umber (almost ink-like consistency), draw the long vertical lines of the flight feathers on the lower wing. Add horizontal cross-hatching lines to suggest the feather overlapping structure. -
Wash the wings:
To age the wings, take a very diluted wash of Yellow Ochre and glaze it over the flight feathers you just outlined. This tints the cream base without hiding your line work. -
Tail feathers:
Repeat the lining process on the tail feathers, using longer vertical strokes of Raw Umber to define the shape.
Step 4: Finishing Touches
-
Paint the feet:
Color the talons using a mixture of Raw Umber and Black. I find that dragging the brush slightly onto the ‘wood’ base helps ground the figure. -
Wood base texture:
Paint the log base with a light grey-brown mix. While wet, streak in darker brown lines to mimic wood grain and bark texture. -
Dry brushing highlight:
Take a dry brush with a tiny amount of pure Titanium White. Very lightly scuff it over the chest and the top of the head to catch the raised texture of the ceramic. -
Seal the work:
Allow the entire piece to cure for at least 24 hours. Finish with a matte spray sealer to protect the paint and maintain that chalky, folk-art finish.
Place your finished owl on a sunny sill or mantle to add a wise, woodland touch to your decor


Bold Eye Rings for Instant Character
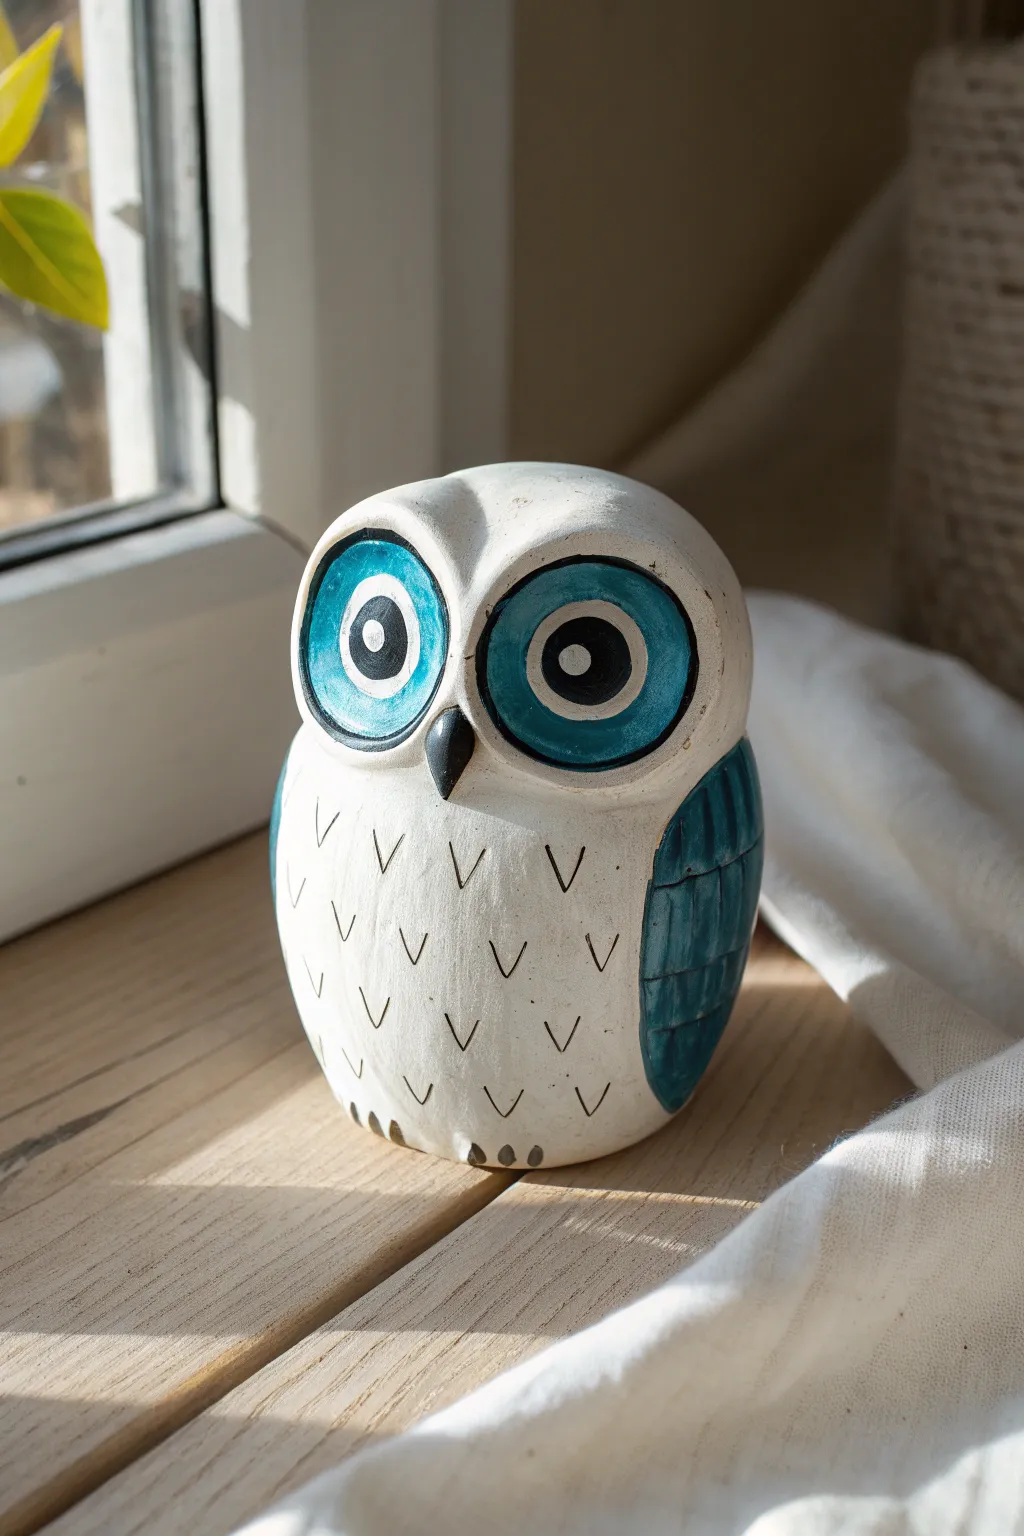
This charming ceramic owl proves that minimal color palettes can pack the biggest punch. By pairing a rustic off-white body with striking teal accents, you create a piece that feels both handcrafted and modern.
Step-by-Step Guide
Materials
- Unpainted ceramic owl figurine
- Acrylic paints: Off-white (or Cream), Teal (or Turquoise), Black, White
- Matte spray sealant or brush-on varnish
- Medium flat brush
- Small round detail brush
- Very fine liner brush or black permanent fine-point marker
- Water cup and paper towels
Step 1: Base Coating
-
Clean the surface:
Begin by wiping down your ceramic owl with a slightly damp cloth to remove any dust or oils. Let it dry completely before starting. -
Mix the base color:
On your palette, mix a generous amount of off-white paint. You want a warm, creamy tone rather than a stark bright white to achieve that rustic pottery look. -
Apply the first coat:
Using your medium flat brush, cover the entire owl with the off-white mixture, except for the large concave eye areas if you can avoid them easily. Don’t worry about perfection here; the first coat is just for coverage. -
Apply the second coat:
Once the first layer is dry to the touch, apply a second coat of off-white. Use slightly dabbing motions to create a subtle texture that mimics aged stone or plaster. -
Dry thoroughly:
Allow the base coats to dry fully. This is crucial so your detail colors don’t muddy the crisp white background.
Steady Hand Trick
Rest your pinky finger on a dry part of the owl while painting the fine circular lines around the eyes. It acts as an anchor for smoother curves.
Step 2: Painting the Features
-
Fill the eye sockets:
Load your medium brush with teal paint. Carefully fill in the large circular identations around the eyes. The paint should be opaque and bold. -
Paint the wings:
Using the same teal shade, paint the wing sections on the sides of the owl’s body. Follow the sculpted lines if your ceramic has them, creating a distinct block of color. -
Detail the wings:
While the teal on the wings is drying, mix a tiny drop of black into your teal to create a darker shadow color. Use a small round brush to paint thin lines indicating feather separation on the wings. -
Create the white sclera:
Switch to a clean small round brush and pure white paint. Paint a large circle inside the teal eye ring, leaving a thick, even band of teal showing around the edge. -
Add the pupils:
With black paint and your small round brush, paint a solid black circle in the center of the white area. Make these fairly large to give the owl a wide-eyed, attentive expression. -
Highlight the eyes:
Dip the handle end of a brush into white paint and dot a small reflection highlight onto the black pupil. I usually place this near the top right of the pupil to bring it to life.
Antique It
For a truly aged look, heavily dilute some brown paint with water and wash it over the white body, wiping it off immediately with a paper towel.
Step 3: Graphic Details
-
Outline the eyes:
Using a very fine liner brush and black paint (thinned slightly with water for flow), carefully outline the outer edge of the teal eye rings and the inner edge where the teal meets the white. -
Paint the beak:
Fill in the small triangular beak with solid black paint. Keep the edges sharp and distinct against the white face. -
Add feather V’s:
Using your liner brush or a fine-point permanent marker, draw small ‘V’ shapes scattered across the white chest and belly. Keep them loose and slightly irregular for a hand-drawn feel. -
Detail the feet:
At the very bottom front edge of the owl, paint small vertical dashes or small semicircles in grey or black to suggest tiny talons peeking out. -
Clean up edges:
Look over your work. If any black lines wobbled, you can touch them up with a dab of your off-white base color once the black is dry. -
Seal the piece:
Finish by applying a matte spray sealant over the entire owl. This protects the paint from chipping and unifies the finish, locking in that charming rustic look.
Place your finished owl on a windowsill where natural light can catch those brilliant teal eyes


Metallic Beak and Talon Accents
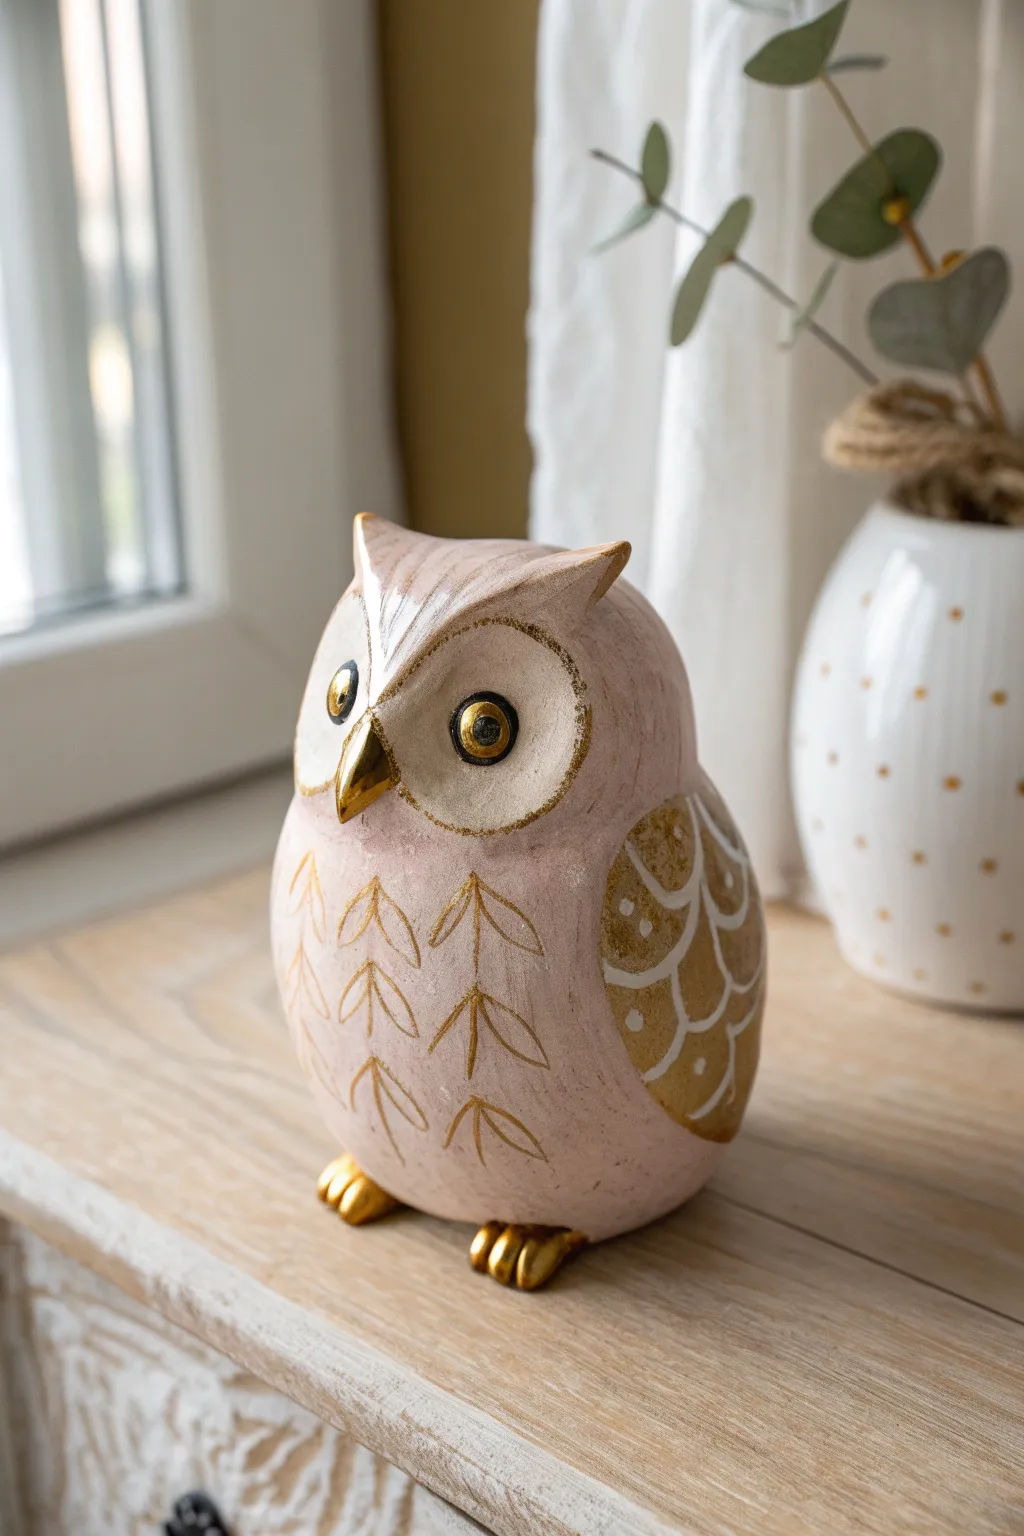
This charming ceramic owl combines soft, dusty rose hues with elegant metallic gold accents for a sophisticated woodland look. The gentle wash technique creates a stone-like texture, while precision gold detailing brings the character to life.
How-To Guide
Materials
- Bisque ceramic owl figurine
- Acrylic paints: Dusty Rose/Light Pink, Titanium White, Metallic Gold
- Glazing medium or water (for thinning)
- Small flat brush (size 4 or 6)
- Fine liner brush (size 0 or 00)
- Paper towels or soft rag
- Gloss varnish or clear sealer
- Palette for mixing
Step 1: Base Coat & Washing
-
Prepare the wash:
Begin by creating a light wash of your dusty rose acrylic paint. Mix one part paint to roughly two parts water (or glazing medium) on your palette until it reaches a milky consistency. -
Apply the first layer:
Using the flat brush, cover the entire owl body with the pink wash. Don’t worry about perfect opacity; the goal is to stain the ceramic bisque rather than coat it thickly. -
Wipe back for texture:
While the paint is still damp, take a paper towel or soft rag and gently dab or wipe the surface. This lifts some pigment from the raised areas while leaving darker color in the crevices of the textured feathers. -
Paint the face mask:
Once the pink base is touch-dry, switch to Titanium White. Carefully paint the heart-shaped ‘mask’ area around the eyes. You may need two thin coats to get a solid, crisp white against the pink background. -
Refine the edges:
Use a slightly damp clean brush to feather the edges where the white meets the pink if you want a softer transition, or keep it crisp for a stylized look.
Brush Control Tip
For the finest gold lines on the chest, thin your metallic paint with just a drop of water. It helps the paint flow smoothly off the liner brush.
Step 2: Golden Accents
-
Paint the eye rims:
Load your fine liner brush with Metallic Gold paint. Carefully trace the raised rim around each eye. Stabilize your hand by resting your pinky finger on the owl’s head. -
Detail the eyes:
Fill in the center pupil area with black, leaving a tiny dot of white for a highlight. Once the black is dry, you can add a small ring of gold inside the iris for extra sparkle. -
Gild the beak:
Using a fully loaded brush of Metallic Gold, paint the beak. This smooth, triangular shape benefits from a slightly thicker application so the metallic finish looks like solid metal. -
Add forehead definition:
Dip your fine brush in gold again and gently outline the top edge of the white face mask, creating a brow line that separates the face from the pink head feathers. -
Paint the talons:
Move down to the feet. Carefully paint each talon with gold. I find that two coats here ensure the feet look sturdy and bright against the surface the owl sits on.
Level Up: Antique It
Mix a tiny amount of raw umber into a glazing medium and wash it over the dried gold areas. Wipe it back immediately to age the metal.
Step 3: Feather Detailing
-
Outline chest feathers:
This step requires a steady hand. Using the fine liner brush and gold paint, trace the raised leaf-like patterns on the owl’s chest. Use very light pressure to keep the lines thin and delicate. -
Define the wing patch:
Identify the oval wing patch on the side. Paint the background of this specific patch with a slightly darker gold or bronze if you have it, or simply use a heavy coat of your standard gold. -
Add white wing scallops:
Once the gold wing patch is dry, take your white paint and a fine brush to paint the scalloped feather lines over the gold. This inversion of colors adds lovely visual interest. -
Dotting details:
using the handle end of a paintbrush, dip it in white paint and add tiny dots inside the gold wing scallops for a whimsical texture. -
Final inspection:
Look over the piece for any smudges. You can easily touch up the main body with your pink wash or clean up lines with a damp brush before sealing. -
Seal the piece:
Finish by applying a clear gloss varnish over the gold areas (beak, eyes, talons) to make them shine, while using a matte sealer on the pink body to maintain that soft, bisqueware feel.
Place your finished owl on a shelf near natural light to watch those metallic details catch the sun

Dry-Brush Feather Highlights
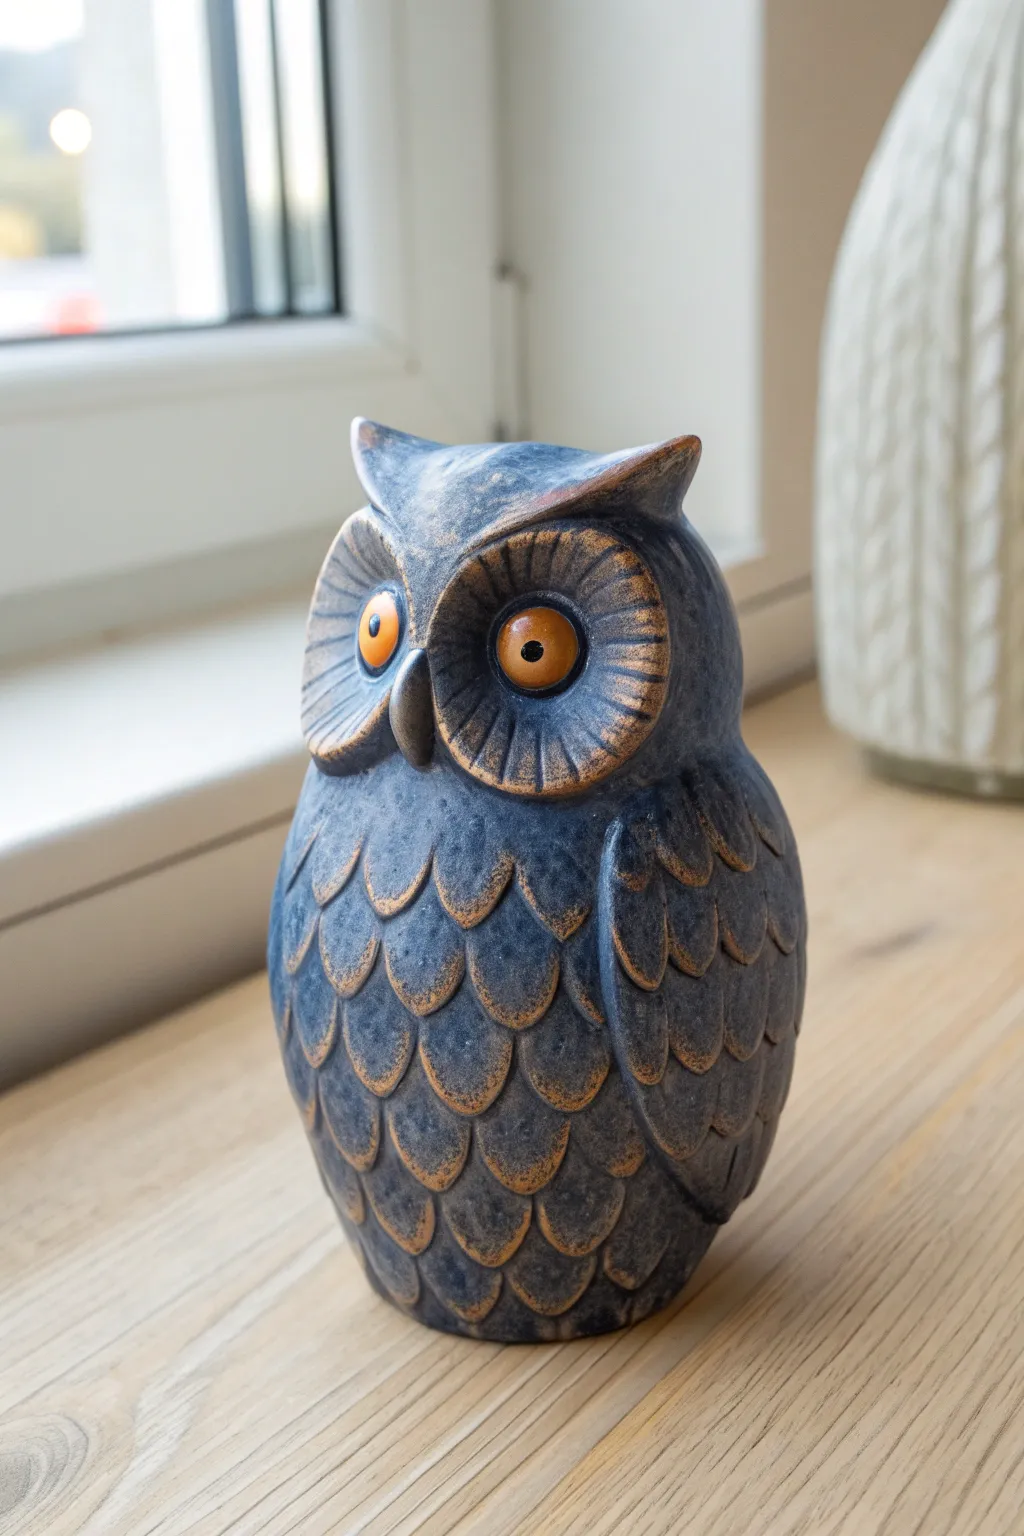
Transform a plain ceramic owl into a sophisticated decor piece using a classic dry-brushing technique. The result combines a moody, dark slate base with warm, metallic copper highlights that make the textural feathers pop.
Step-by-Step Tutorial
Materials
- Unfinished ceramic owl figurine
- Acrylic paint: Dark slate grey or Payne’s grey
- Acrylic paint: Metallic copper or bronze
- Acrylic paint: Bright orange (for eyes)
- Acrylic paint: Black (for pupils)
- Medium soft flat brush (base coat)
- Stiff-bristled flat brush (dry brushing)
- Small round detail brush
- Paper plate or palette
- Paper towels
- Matte spray sealer (optional)
Step 1: Base Coat Application
-
Clean the surface:
Before painting, wipe down your ceramic owl with a slightly damp cloth to remove any dust or oils. This ensures your paint adheres perfectly to the surface. -
Mix your base color:
Squeeze out a generous amount of dark slate grey paint. If you don’t have a pre-mixed slate color, you can create a custom shade by mixing dark grey with a tiny drop of blue to get that cool, stony undertone. -
Apply the first layer:
Using your medium soft flat brush, coat the entire owl in the dark grey paint. Don’t worry if it looks streaky at first; the goal is just to get coverage. -
Scrub into crevices:
Make sure to push the bristles into the deep grooves of the feathers and around the eyes. These recessed areas need to be the darkest part of the finished piece to create depth. -
Apply a second coat:
Once the first layer is dry to the touch, apply a second coat to ensure a solid, opaque finish. No white ceramic should be peeking through. -
Let it cure:
Allow the base coat to dry completely. I like to let this sit for at least an hour because dry brushing over wet paint will muddy the colors and ruin the effect.
Step 2: Dry Brushing Highlights
-
Prepare the dry brush:
Take your stiff-bristled flat brush and dip just the very tip into the metallic copper or bronze paint. You need very little pigment for this step. -
Offload the paint:
Rub the brush vigorously on a paper towel until almost no paint comes off on the paper. The brush should feel dry and look like it has barely any color left on it. -
Test on the back:
Start brushing lightly on the back of the owl to test the intensity. Use quick, feather-light strokes that skim across the raised surface without dipping into the crevices. -
Highlight the body feathers:
Work your way around the body, brushing against the grain of the feathers (upwards or sideways) to catch the raised edges. The copper should just kiss the tops of the texture. -
Define the face:
Gently dry brush the circular ridges around the eyes and the ‘eyebrows’. Be extra careful here to keep the dark recesses around the eyes intense for contrast. -
Build intensity slowly:
If the highlights are too faint, do a second pass. It is much easier to add more layers of dry brushing than to cover up a heavy-handed mistake.
Texture Master Tip
Always brush ‘against the grain’ of the sculpted feathers. If the feathers point down, brush upward. This catches the most texture.
Step 3: Final Details
-
Paint the beak:
Using a small round brush, paint the beak. You can leave it dark grey or add a tiny touch of black to make it stand out from the feathers. -
Fill in the iris:
Clean your small brush and pick up the bright orange paint. Carefully fill in the round iris of the eyes, keeping the paint smooth and avoiding the textured ridges you just highlighted. -
Add pupils:
Once the orange is dry, use the very tip of your detail brush or the handle end of a paintbrush to dot a black pupil in the center of each eye. -
Add a catchlight (optional):
For a bit of life, add a tiny white dot in the black pupil at the 10 o’clock or 2 o’clock position to simulate a reflection. -
Seal the work:
Protect your handiwork with a light mist of matte spray sealer to prevent chipping and unify the finish without adding too much shine.
Oops, too much paint?
If you apply too much copper and lose detail, let it dry, repaint that spot with your dark base color, and try dry-brushing again.
Place your finished owl on a windowsill or shelf where the light can catch those metallic accents

The Complete Guide to Pottery Troubleshooting
Uncover the most common ceramic mistakes—from cracking clay to failed glazes—and learn how to fix them fast.
Translucent Wash Over a Deep Base
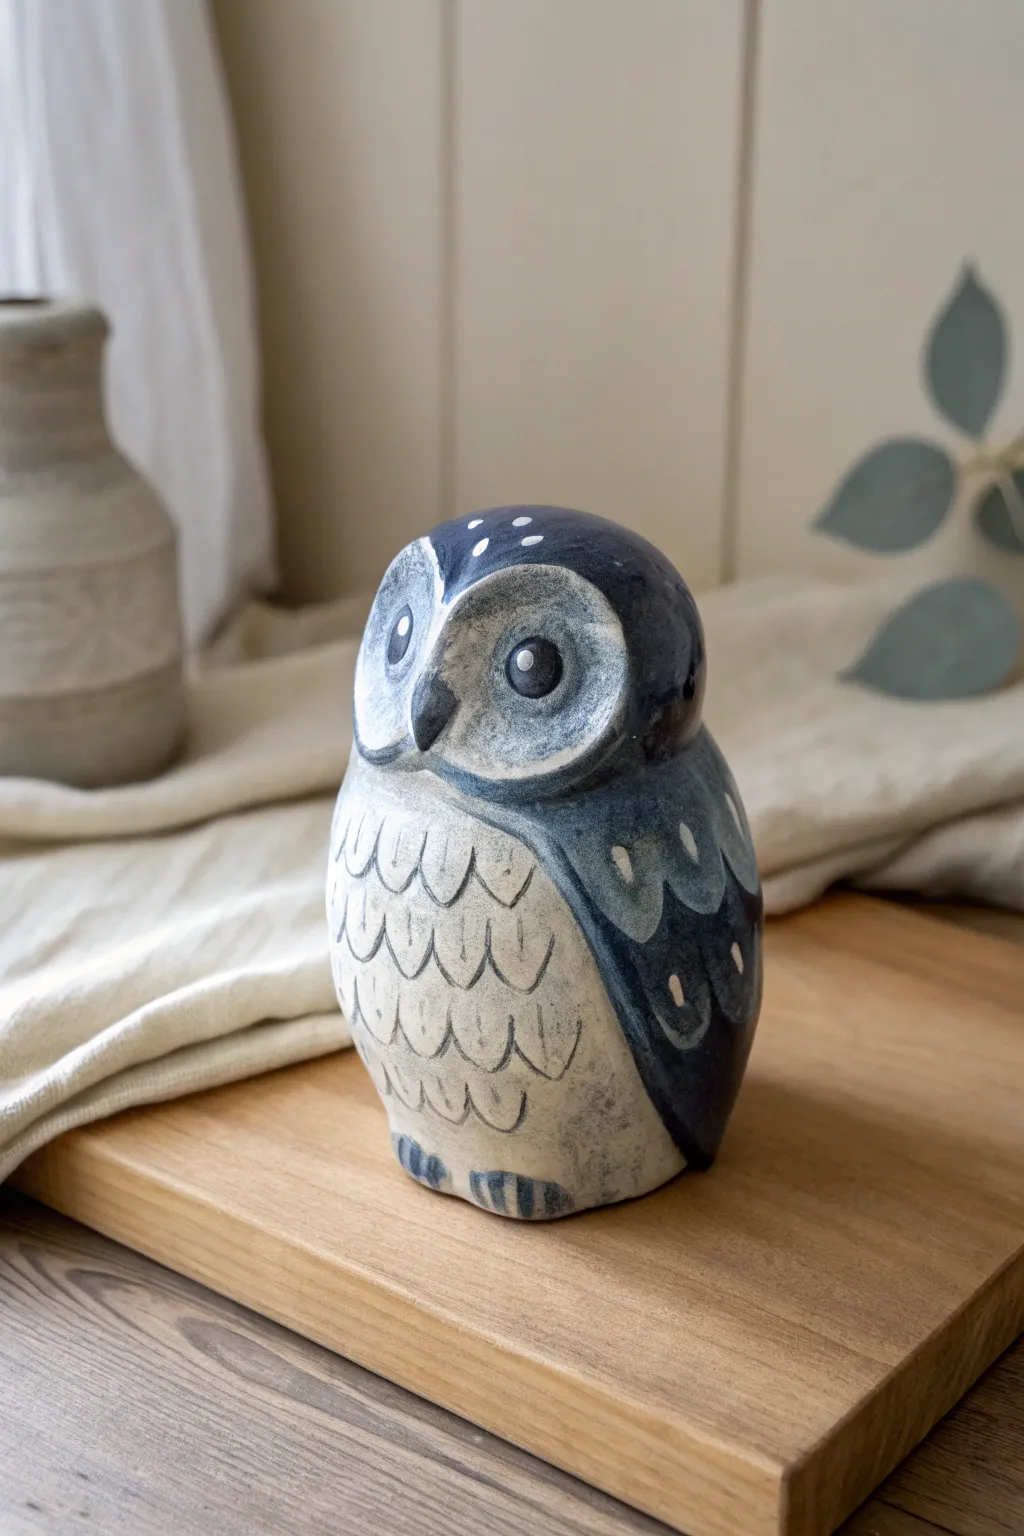
This project captures the charm of Nordic folk art with a muted palette and clever layering techniques. By combining a creamy base with a translucent grey-blue wash, you’ll create depth that makes the feathers pop without needing complex shading skills.
Step-by-Step Tutorial
Materials
- Unpainted ceramic owl bisque
- Cream or off-white acrylic paint (matte finish)
- Deep slate blue or indigo acrylic paint
- Black acrylic paint
- White acrylic paint (for highlights)
- Glazing medium or water (for thinning)
- Medium flat brush
- Small round detail brush (size 1 or 2)
- Paper towels or soft rag
- Matte spray sealant
Step 1: Base Coat Application
-
Clean the bisque:
Start by wiping down your ceramic owl with a slightly damp cloth to remove any dust or ceramic powder. This ensures the paint adheres smoothly. -
Apply the cream base:
Using a medium flat brush, paint the entire owl with your cream or off-white acrylic paint. You want solid, opaque coverage here. -
Inspect and re-coat:
If the ceramic creates streaks or transparent spots, let the first coat dry for about 15 minutes and apply a second coat. The goal is a clean, uniform canvas. -
Dry thoroughly:
Allow the base coat to dry completely. It must be bone dry before the next step, or the wash will lift the paint.
Glaze Control
Work in sections when applying the wash. Acrylic dries fast, and if the glaze sets before you wipe it back, you’ll be stuck with a solid blotch instead of a texture.
Step 2: Creating the Translucent Wash
-
Mix the wash color:
In a palette, mix your slate blue paint with a significant amount of glazing medium. If you don’t have medium, water works, but use it sparingly to avoid breaking the paint binder. The consistency should be like skim milk. -
Map out dark areas:
Identify the areas that need to be dark: the head cap, the wings, and the back. Leave the chest, face discs, and feet primarily cream. -
Apply the wash:
Brush the translucent blue wash over the head and wings. Apply it loosely; it’s okay if it looks a bit uneven at first. -
Wipe back texturing:
Immediately after applying the wash, take a crumpled paper towel or rag and gently dab (don’t scrub) the painted areas. This removes some pigment from the high points while leaving color in the nooks and crannies, creating an instant weathered look. -
Layering depth:
If I feel the color is too faint, I like to repeat the wash and wipe process a second time once the first layer is touch-dry to build richness.
Level Up: Metallic Touch
Mix a tiny drop of metallic bronze or silver into your slate blue wash. It will give the dark feathers a subtle, magical shimmer that only catches the light at certain angles.
Step 3: Defining the Features
-
Outline the face:
Using the small round brush and unthinned slate blue paint, carefully outline the heart-shaped facial disc to separate the creamy face from the dark head. -
Paint the eyes:
Paint the round eyes solid black. Keep your hand steady and brace your pinky on the table for stability. -
Add eye highlights:
Once the black is dry, dip the very tip of your brush handle (or a toothpick) into white paint. Dot a tiny highlight near the top of each eye to bring the owl to life. -
Define the beak:
Paint the small beak using a dark graphite or black mix, ensuring it has a sharp point. -
Detail the head spots:
With the small brush and the cream paint, add tiny dab marks on the top of the head for pattern.
Step 4: Featherwork & Finishing
-
Draw chest feathers:
Using a very thin brush or even a grey paint marker, draw ‘U’ shapes on the cream chest to simulate feathers. Keep the lines thin and delicate. -
Wing details:
Add cream-colored teardrop shapes or dashes to the dark wings to mimic the pattern of folded feathers. -
Paint the feet:
Add dark grey stripes to the feet area to suggest talons. -
Final wipe down (optional):
If the chest looks too stark white, you can do a very watery wash of grey over the feather lines and wipe it off instantly to mute the contrast. -
Seal the piece:
Once absolutely everything is dry (give it a few hours), spray the entire piece with a matte sealant to protect the finish and unify the sheen.
Now your charming ceramic owl is ready to perch quietly on your shelf
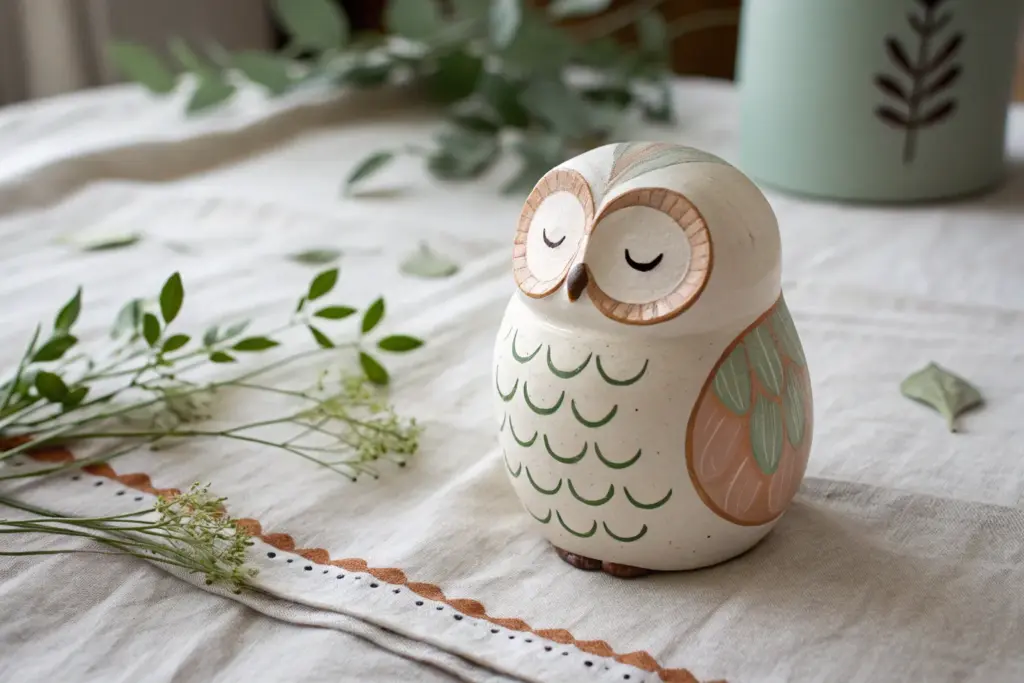
Dot Mandala Belly Pattern

Transform a plain ceramic owl figurine into a charming piece of folk art with this detailed painting tutorial. You will create a soothing design featuring earthy tones of rust orange, sage green, and charcoal against a matte cream background.
Detailed Instructions
Materials
- Unpainted ceramic owl figurine (smooth finish)
- Acrylic craft paints: Cream/Off-white, Rust Orange, Sage Green, Charcoal Grey/Black
- Matte acrylic sealer or varnish
- Fine detail brushes (sizes 0, 00, 1)
- Small flat brush
- Stylus or toothpick for dots
- Palette for mixing paint
- Paper towels
- Cup of water
Step 1: Preparation & Base Coat
-
Clean surface:
Begin by wiping down your ceramic owl with a damp cloth to remove any dust or oils. Let it dry completely. -
Apply base color:
Using the flat brush, cover the entire owl with the Cream/Off-white paint. Apply thin, even coats to avoid brush strokes. -
Layering the base:
You will likely need 2-3 coats for full opacity. Allow the paint to dry fully between each layer to ensure a smooth, matte finish.
Steady Hand Tip
Rest your painting hand on a heavy book or block while working. This stabilizes your wrist for painting precise circles on a 3D curved surface.
Step 2: Painting the Face
-
Outline the eyes:
With a fine brush and Rust Orange paint mixed with a tiny bit of cream for a muted tone, carefully outline two large circular areas for the eyes. -
Add inner eye rings:
Inside the orange outline, paint a second, slightly thicker ring using the Sage Green paint. Keep your hand steady and anchor your pinky on the table for support. -
Paint pupils:
In the center of each eye circle, paint a small, solid circle using the Charcoal Grey or Black paint. Place them slightly towards the center for a cute expression. -
Detail the eye rims:
Use a stylus or toothpick dipped in Charcoal Grey to add tiny, evenly spaced dots along the Sage Green ring. -
Paint the beak:
Fill in the small triangular beak area with solid Rust Orange paint. Two coats may be needed for vibrancy.
Step 3: Creating the Belly Mandala
-
Center circle:
Locate the center of the belly. Paint a small Sage Green dot as your anchor point. -
First ring – sunburst:
Around the center dot, paint a small ring. Then, paint radiating spokelike lines outward using Rust Orange, creating a sunburst effect. -
Green patterned band:
Outline a larger circle around the sunburst. Fill this band with Sage Green paint. While wet or after drying, carefully paint thin vertical hatch marks or leave negative space lines to create the texture seen in the photo. -
Outer scalloped border:
Using Rust Orange, paint a series of connected semi-circles or scallops around the green band. Fill them in solidly. -
Decorative dots:
Dip your stylus or the handle end of a brush into Charcoal Grey. Place a dot at the peak of each orange scallop. -
Secondary dot ring:
Add a final ring of smaller grey dots further out, floating in the negative space around the main mandala design.
Make It Antique
Before sealing, lightly dry-brush a very small amount of diluted brown paint over the textured areas to give it an aged, vintage pottery look.
Step 4: Side Details & Finishing
-
Paint side flowers:
On the wings or sides of the owl, paint a simple flower motif. Start with a center dot and paint long petal shapes radiating outward. -
Alternate colors:
For the petals, alternate between Rust Orange and Sage Green to maintain the cohesive color palette. -
Check for cleanup:
Look over your work. Use a clean, damp brush or a bit of the base Cream paint to tidy up any stray marks or wobbly lines. -
Seal the artwork:
Once the paint is completely bone dry (I usually give it a few hours just to be safe), apply a coat of matte acrylic sealer to protect your design without making it shiny.
Place your finished owl on a sunny shelf or wrap it up as a thoughtful handmade gift


What Really Happens Inside the Kiln
Learn how time and temperature work together inside the kiln to transform clay into durable ceramic.
Folk Florals on the Body
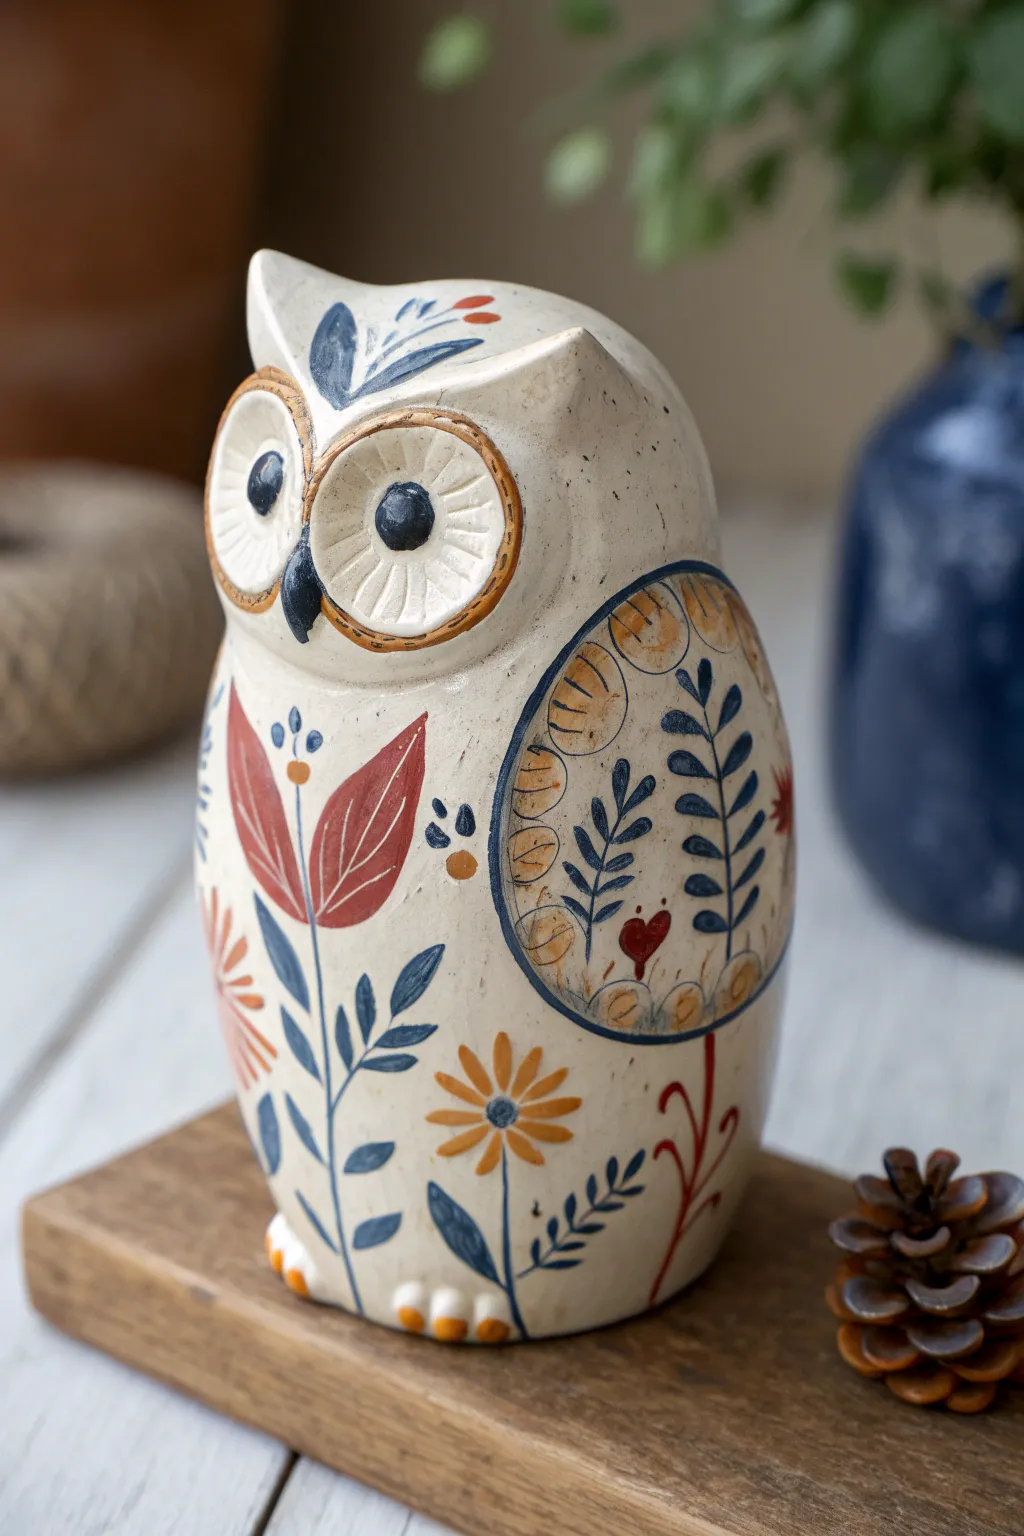
Capture the charm of traditional Scandinavian pottery with this hand-painted ceramic owl tutorial. By combining warm cream tones with rustic blues and burnt orange, you’ll transform a plain bisque figure into a cozy piece of home decor rich with nature-inspired motifs.
Step-by-Step Tutorial
Materials
- Unpainted ceramic bisque owl figurine (smooth finish preferred)
- Acrylic paints: Cream/Off-white, Navy Blue, Burnt Orange/Rust, Ochre Yellow, Black
- Matte acrylic varnish or sealer
- Paintbrushes: Large flat brush (base coat), Medium round brush (leaves/shapes), Fine liner brush (details)
- Pencil for sketching
- Palette for mixing
- Water cup and paper towels
Step 1: Base Preparation
-
Clean the surface:
Begin by wiping down your ceramic owl with a slightly damp cloth to remove any dust or oils from the surface. This ensures the paint adheres smoothly. -
Apply the creamy base:
Mix a warm cream or off-white color. Using your large flat brush, apply an even coat over the entire figurine. Don’t worry if it looks streaky at first; thin layers are better than thick ones. -
Add a second coat:
Allow the first layer to dry completely (about 15-20 minutes). paint a second coat of the cream color to get a solid, opaque finish. I like to check for any missed spots around the feet or under the wings at this stage. -
Sketch the design:
Once the base is bone-dry, lightly sketch your floral patterns with a pencil. Mark out the wing ovals, the large leaves on the chest, and the eye circles. Keep the lines faint so they are easy to cover later.
Pro Tip: Antique It
To get that aged, rustic look seen in pottery, mix a tiny drop of brown paint with water (a wash) and lightly brush it over the dried texture, then wipe it back immediately with a paper towel.
Step 2: Painting the Face and Wings
-
Define the eyes:
Using a thin brush and burnt orange paint, carefully outline the large circular rims around the eyes. Keep the line steady but don’t stress about perfection; folk art embraces a hand-drawn look. -
Fill the pupils:
Paint the pupils solid black. While you have the black paint out, fill in the beak as well. Once the pupils dry, add a tiny white dot in each for a lifelike sparkle. -
Detail the eye rims:
Mix a very diluted grey or use a tiny amount of black to paint thin, radiating lines inside the white eye circles, mimicking subtle feathers or an iris pattern. -
Outline the wings:
Use navy blue to paint the large oval outline that defines the wing on the side of the body. -
Paint wing scallops:
Inside the wing oval, use ochre yellow to paint semi-circle ‘scallop’ shapes along the inner edge. Add a small burnt orange line or dot inside each scallop for texture.
Step 3: Floral Body Details
-
Create the main leaves:
On the owl’s chest, paint two large, curving leaf shapes using the burnt orange/rust color. Make them symmetrical, curving upwards like a tulip. -
Add blue foliage:
Switch to your navy blue and a medium round brush. Paint stemmed leaves rising from the bottom, weaving between the orange shapes. Use a ‘press and lift’ motion to create the leaf shape naturally with the brush tip. -
Paint the decorative daisy:
Near the bottom center, between the blue stems, paint a simple daisy shape using ochre yellow for the petals and a blue dot for the center. -
Embellish the forehead:
Don’t forget the head area. Paint a small blue sprig of leaves right in the center of the forehead, above the eyes, flanked by tiny orange accents. -
Vine details on the wing:
Inside the wing area, paint vertical blue vines with small leaves creating a pattern that fills the empty cream space. -
Add final flourishes:
Look for empty spaces on the body. Add tiny dots of blue or small orange accents to balance the composition. Paint the claws at the bottom with ochre yellow.
Trouble: Shaky Lines?
If your fine lines for the stems or eye rims are looking shaky, dilute your paint slightly with water. Thinner paint flows off the liner brush much smoother than thick acrylics.
Step 4: Finishing Touches
-
White detailing:
Using your finest brush and white paint, add delicate vein lines on top of the large orange chest leaves. This layering adds depth to the flat color. -
Clean up sketch lines:
Check if any pencil marks are still visible. If the paint is fully dry, you can gently erase them or touch them up with a bit of your cream base color. -
Apply varnish:
Finish the piece by applying a clear matte varnish. This will protect your paint job and give the ceramic a unified, professional finish.
Place your charming new owl on a bookshelf or mantel to bring a touch of woodland folk art into your home
Scalloped Feather Swoops
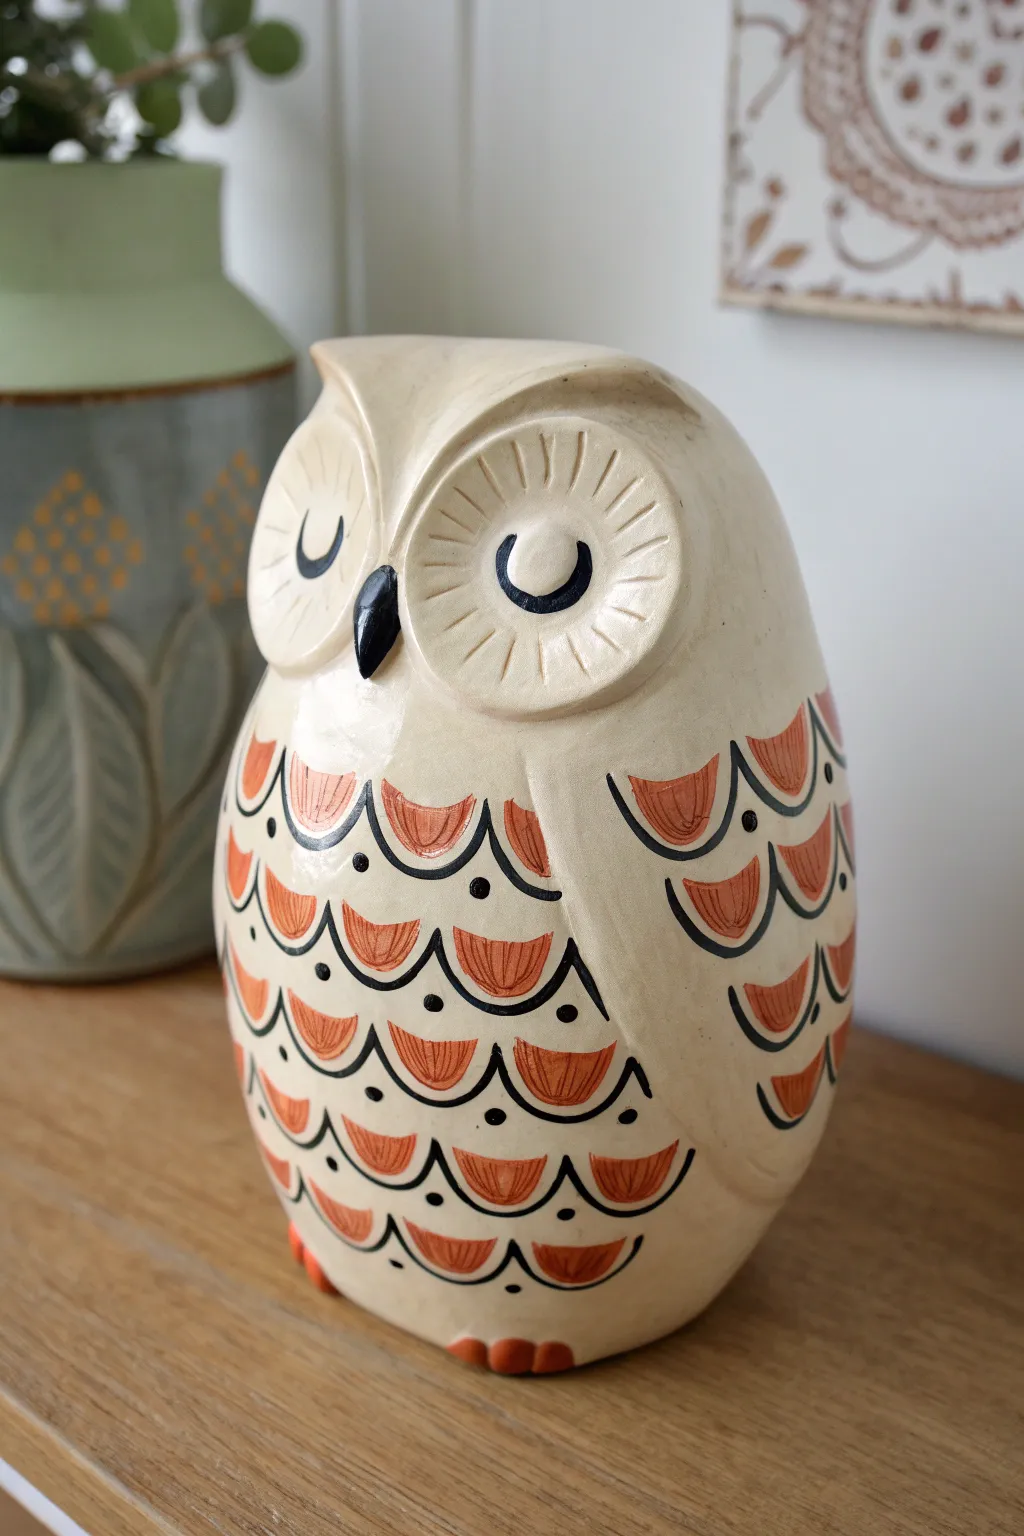
This charming project transforms a simple ceramic owl blank into a piece of folksy decor using repetitive scalloped patterns. The warm terracotta tones against a creamy base create a cozy, vintage-inspired look perfect for autumn shelving.
Detailed Instructions
Materials
- Ceramic owl bisque or figurine blank
- Cream or off-white acrylic paint (matte finish)
- Terracotta or rust-orange acrylic paint
- Carbon black acrylic paint
- Medium flat brush (approx. 1/2 inch)
- Small round detail brush (size 1 or 2)
- Fine liner brush (size 0 or 00)
- Dotting tool or toothpick end
- Matte spray varnish
Step 1: Base Coating
-
Clean surface:
Before you begin painting, wipe down your ceramic blank with a slightly damp cloth to remove any manufacturing dust or oils that might repel the paint. -
First base layer:
Using your medium flat brush, apply an even coat of cream or off-white acrylic paint over the entire owl. Don’t worry if it looks streaky at first; thin layers are key. -
Full coverage:
Allow the first coat to dry for about 15 minutes, then apply a second coat. Ensure you get into the crevices around the eyes and wings, but keep the paint smooth so you don’t lose the texture details. -
Check for opacity:
Inspect the owl under good light. If the ceramic color is still showing through, apply a third thin coat. Let the base cure completely for at least an hour before adding details.
Steady Hand Trick
For steadier lines when outlining feathers, rest your pinky finger against the dry part of the owl to anchor your hand while you paint.
Step 2: Painting the Features
-
Define the beak:
Switch to your small round brush. Pick up carbon black paint and carefully fill in the beak area. Keep your hand steady to maintain a sharp edge against the cream base. -
Paint the closed eyes:
Using the same brush, paint the crescent shapes for the closed eyelids. If your ceramic has molded ridges for the eyes, simply follow them. If not, paint two downward-curving crescents centered in the eye sockets. -
Clean up edges:
I like to keep a tiny damp brush nearby to quickly wipe away any black paint that accidentally strays outside the lines while it’s still wet.
Make It Glossy
Swap the matte varnish for a high-gloss glaze on just the beak and the terracotta feather shapes to make them look like raised enamel.
Step 3: The Scalloped Feathers
-
Start the chest pattern:
Load a small round brush with terracotta paint. Starting just below the neck area, paint a horizontal row of small semi-circles (scallops) facing upward. Think of these as little ‘U’ shapes filled in with color. -
Second row placement:
Paint the second row of terracotta scallops below the first. Offset them slightly, so the center of a new scallop sits between two scallops from the row above, like laying bricks. -
Continue down the body:
Work your way down the owl’s belly with these alternating rows. Leave a small gap of cream space between the rows—this is where your black outlines will eventually go. -
Wing feathers:
On the wings, the feather pattern changes slightly. Instead of horizontal rows, paint longer, tiered scallops that follow the curve of the wing shape. Use the terracotta paint here as well. -
Bottom feet detail:
If your owl has visible feet at the base, paint the toes in the same terracotta shade to tie the color scheme together.
Step 4: Outlining and Accents
-
Outline the scallops:
Once the orange paint is completely dry, take your fine liner brush and black paint. Carefully paint a thin, curved line underneath each terracotta scallop. Extend the line slightly upward at the corners to create a sharp point. -
Connect the pattern:
Ensure your black lines are fluid. The black outline basically cups the orange shape. Don’t outline the top straight edge of the scallop; just the curved bottom. -
Add detail dots:
Using a dotting tool or the back end of a paintbrush dipped in black, place a single dot between the peaks of the scallops in the cream space. This adds a lovely visual rhythm to the pattern. -
Wing definition:
Outline the larger scallops on the wings with black. These lines might naturally be longer and more sweeping to emphasize the wing structure. -
Final drying:
Let all paint dry overnight to ensure the black lines don’t smudge during sealing. -
Seal the piece:
Take the owl to a well-ventilated area and apply a light coat of matte spray varnish. This protects the paint from dust and gives the owl a unified, professional finish.
Place your finished owl on a mantel or bookshelf to add a touch of handmade warmth to your room

TRACK YOUR CERAMIC JOURNEY
Capture glaze tests, firing details, and creative progress—all in one simple printable. Make your projects easier to repeat and improve.
Geometric Triangle Feather Blocks
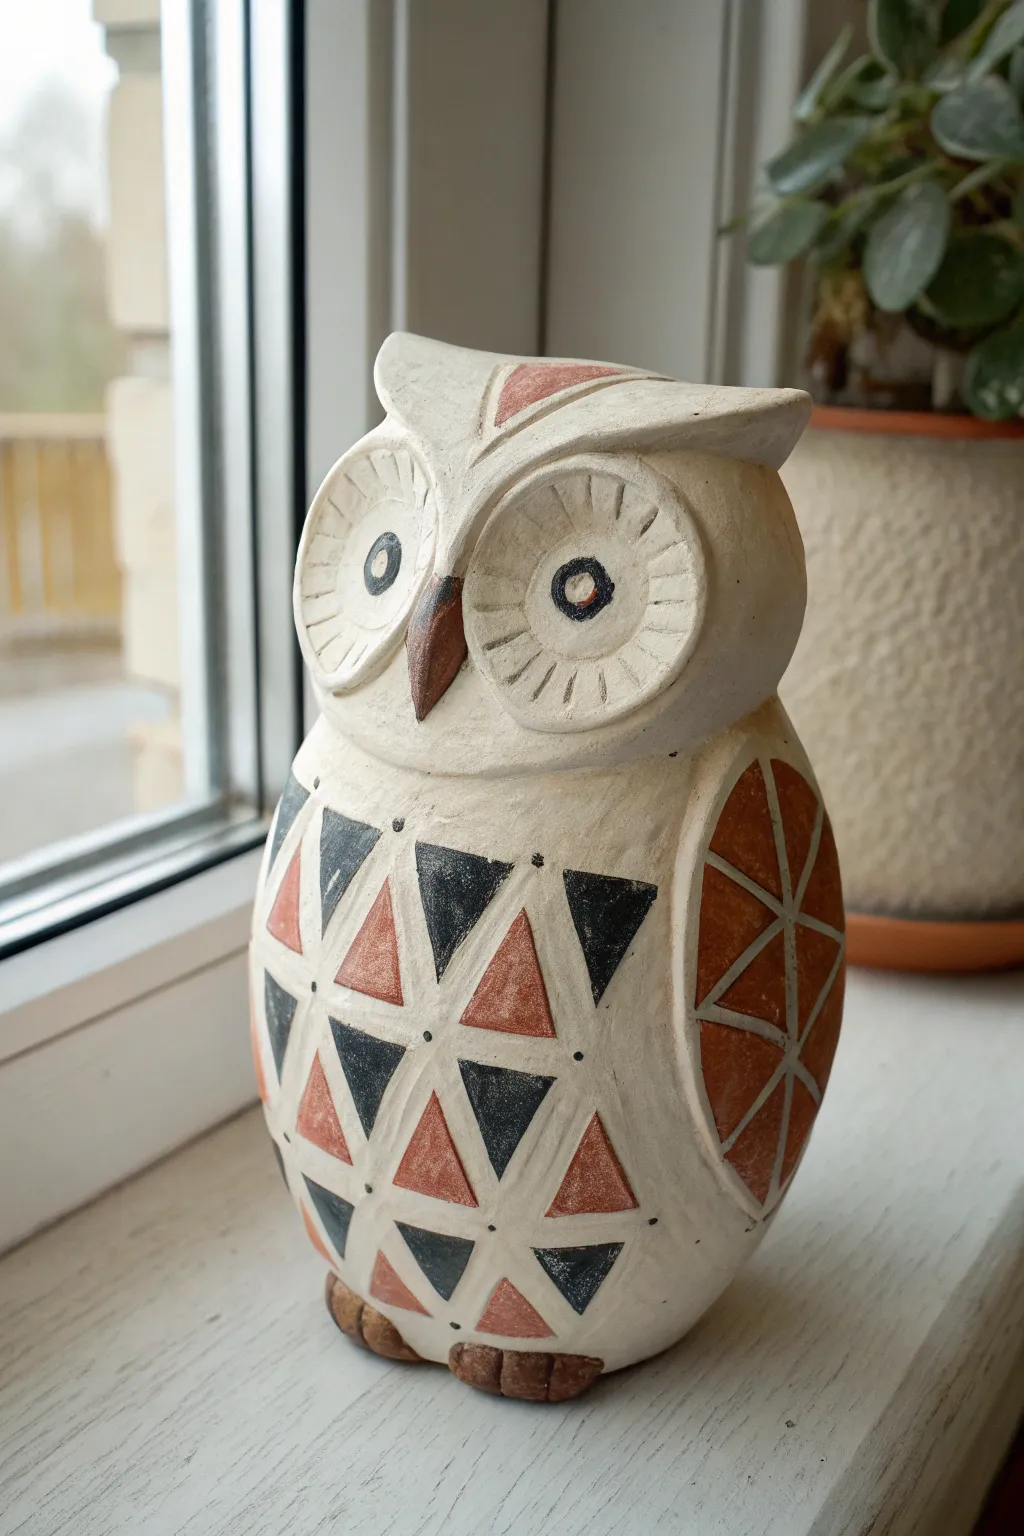
This charming ceramic owl showcases a modern folk-art aesthetic, using repeating geometric shapes to suggest feathers without the need for intricate detailing. The clean lines of the black and terracotta triangles against a creamy white base create a striking, high-contrast look that feels both rustic and contemporary.
Step-by-Step Guide
Materials
- Bisque ceramic owl figurine (smooth surface)
- Acrylic paints: Cream/Off-White, Black, Terracotta/Burnt Orange, Dark Brown
- Flat shader brushes (small and medium)
- Fine liner brush (size 0 or 00)
- Pencil for sketching
- Eraser
- Matte finish sealant spray
- Palette
- Water cup and paper towels
Step 1: Base Coat and Preparation
-
Clean the surface:
Begin by wiping down your bisque owl with a slightly damp cloth to remove any ceramic dust. This ensures your paint adheres smoothly and prevents bumpy textures later on. -
Apply the base color:
Load a medium flat brush with your cream or off-white acrylic paint. Apply an even coat over the entire owl, including the base and ears. -
Apply a second coat:
Ceramic bisque is thirsty and absorbs paint quickly. Once the first layer is touch-dry, apply a second coat of cream to get a solid, opaque finish that hides the raw ceramic color completely. -
Sketch the grid:
Lightly sketch a grid of triangles on the owl’s belly using a pencil. Start by drawing horizontal rows, then add diagonal lines to create alternating upward and downward-pointing triangles. Keep the pressure light so graphite doesn’t smudge into your cream base.
Tape for Perfection
For ultra-crisp triangle lines, cut small pieces of masking tape or painter’s tape to block off areas. This creates sharper edges than freehand painting.
Step 2: Painting the Geometric Patterns
-
Outline the triangles:
Using your fine liner brush and black paint, carefully trace over your pencil lines on the belly section. Creating a crisp outline first helps contain the color you’ll fill in next. -
Fill the black triangles:
Select specific downward-pointing triangles to be black. Use a small flat brush to fill these in solid. I find it helpful to look at the pattern as a checkerboard to ensure I don’t paint two adjacent triangles the same color. -
Fill the terracotta triangles:
Switch to your terracotta or burnt orange paint. Fill in the upward-pointing triangles. Leave the spaces between these colored triangles (the background triangles) as the original cream base color to create breathing room in the pattern. -
Add corner details:
Once the triangles are dry, take a very fine liner brush or a dotting tool dipped in black paint. Add a tiny dot at the vertices (corners) where the triangles meet. This small detail sharpens the geometric look.
Metallic Accent
Swap the black dots at the triangle corners for gold leaf or metallic gold paint. It adds a subtle shimmer that elevates the rustic look to something chic.
Step 3: Wings and Facial Features
-
Map out the wings:
On the side wing panels, sketch a ‘spiderweb’ or segmented wheel pattern. Draw a central point, radiating lines outward, and connecting arcs. -
Paint the wing segments:
Paint alternating segments of the wing pattern with your terracotta paint, leaving the raised ridges or divider lines in the cream base color. This emphasizes the sculpted texture of the wings. -
Detail the eyes:
Paint the pupil of the eye solid black. Add a ring of terracotta around the pupil if your mold has a defined iris, or create one with a steady hand. -
Highlight the eyes:
Dip the handle end of a brush into white paint and place a small ‘catchlight’ dot in the upper right quadrant of the black pupil to make the owl look alive. -
Paint the beak:
Use a dark brown paint for the beak. Apply it carefully, ensuring the edges are sharp against the cream face feathers. -
Add facial lines:
If your owl has sculpted ridges around the eyes (the facial disk), lightly dry-brush a tiny amount of grey or diluted black over these ridges to accentuate the texture without making it too dark. -
Detail the head crest:
Paint the triangular inset on the forehead using the terracotta color to balance the orange tones from the belly and wings.
Step 4: Finishing Touches
-
Shoulder the feet:
Paint the small claws or feet at the bottom with the same dark brown used for the beak. You can add a little bit of terracotta to the brown to warm it up so it harmonizes with the rest of the palette. -
Check and retouch:
Look over the entire piece for any smudges or uneven lines. Use your cream base paint as a ‘white-out’ to clean up any triangle edges that went astray. -
Seal the project:
Take the owl to a well-ventilated area and spray it with a clear matte sealant. This protects the acrylic paint from chipping and gives the ceramic a professional, finished sheen.
Place your geometric owl near a window or plant to let natural light highlight the delightful contrast of your hand-painted patterns
Warm Sunset Ombre Owl

Capture the fleeting beauty of dusk with this ceramic owl project, featuring a seamless ombre fade from twilight purple to warm peach. The glossy finish highlights the gentle scalloped texture of the feathers, making it a perfect accent piece for any windowsill.
Step-by-Step Tutorial
Materials
- Bisque ceramic owl figurine
- Acrylic paints: Plum purple, magenta, coral pink, peach/creamsicle orange, warm brown, cream/off-white, black, white
- Glazing medium or clear gloss varnish
- Soft synthetic brushes (flat shader, round detail, liner)
- Small sponges or daubers for blending
- Palette or plate
- Water cup and paper towels
Step 1: Base Face Features
-
Eye Discs:
Start by painting the large, circular areas around the eyes with a cream or off-white color. Use a flat brush to get smooth coverage, avoiding the actual eyeballs in the center. -
Adding Texture:
Take a very dry brush with a tiny amount of diluted brown paint. Gently stipple or dab small speckles onto the cream eye discs to mimic the feathery texture seen in the reference. Keep these subtle and concentrated near the outer edges. -
Beak and Brows:
Paint the beak and the protruding ‘eyebrows’ (the tufts above the eye discs) with a warm medium brown. If you want more depth, add a tiny bit of white to the brown for the top edge of the brows to act as a highlight.
Seamless Blending
Use a retarder medium to slow down the drying time of your acrylics. This gives you longer to work the purple-to-peach gradient before the paint sets.
Step 2: The Sunset Gradient
-
Top Section:
Mix your plum purple with a little glazing medium to improve flow. Paint the top third of the owl’s body, starting just under the neck and covering the head and shoulders. -
Middle Transition:
While the purple is still slightly tacky, begin painting the middle section with magenta or deep pink. Where the purple meets the pink, use a clean, slightly damp sponge to dab the boundary gently, blurring the line. -
Lower Section:
Move down to the belly area using a coral pink. I find that blending this directly into the magenta above while wet creates the smoothest transition. Use horizontal strokes that follow the curve of the feather scallops. -
Base Glow:
Finish the bottom third of the owl with your lightest peach or creamsicle orange color. Blend this upward into the coral pink so there are no harsh stripes. -
Feather Definition:
Once the gradient is dry, use a very thin liner brush dipped in a slightly darker version of each section’s color (purple, pink, or orange). Carefully outline the bottom curve of individual scalloped feathers to make the texture pop.
Step 3: Wings and Details
-
Painting the Wings:
For the wings, create a wash of heavy cream or light beige. Paint the entire wing surface. -
Wing Shadows:
In the crevices of the wing feathers, apply a thin wash of the purple used on the head. This ties the color scheme together and adds shadow without looking muddy. -
Eyes:
Paint the round eyeballs a deep, rich brown. Let them dry completely. -
Pupils:
Paint a large black circle in the center of the brown eye, leaving a thin rim of brown visible. -
Sparkle:
Using the handle end of a paintbrush or a dotting tool, place a single, crisp white dot in the upper right corner of each pupil to bring the owl to life. -
Feet:
Paint the small visible talons at the base with the same warm brown used for the beak.
Metallic Magic
Mix a tiny drop of pearl medium or iridescent gold into the peach paint at the bottom for a literal ‘golden hour’ glow on the owl’s belly.
Step 4: Finishing Touches
-
Highlighting:
Dry brush a tiny amount of white paint on the very center of the forehead and the highest points of the chest to simulate the glossy reflection. -
Sealing:
Apply two coats of high-gloss varnish over the entire piece. This is crucial for achieving that ceramic-glaze look shown in the photo, and it helps the colors appear more vibrant.
Place your shiny new friend near a window to catch the real sunset light on its glossy feathers
Starry Night Galaxy Owl
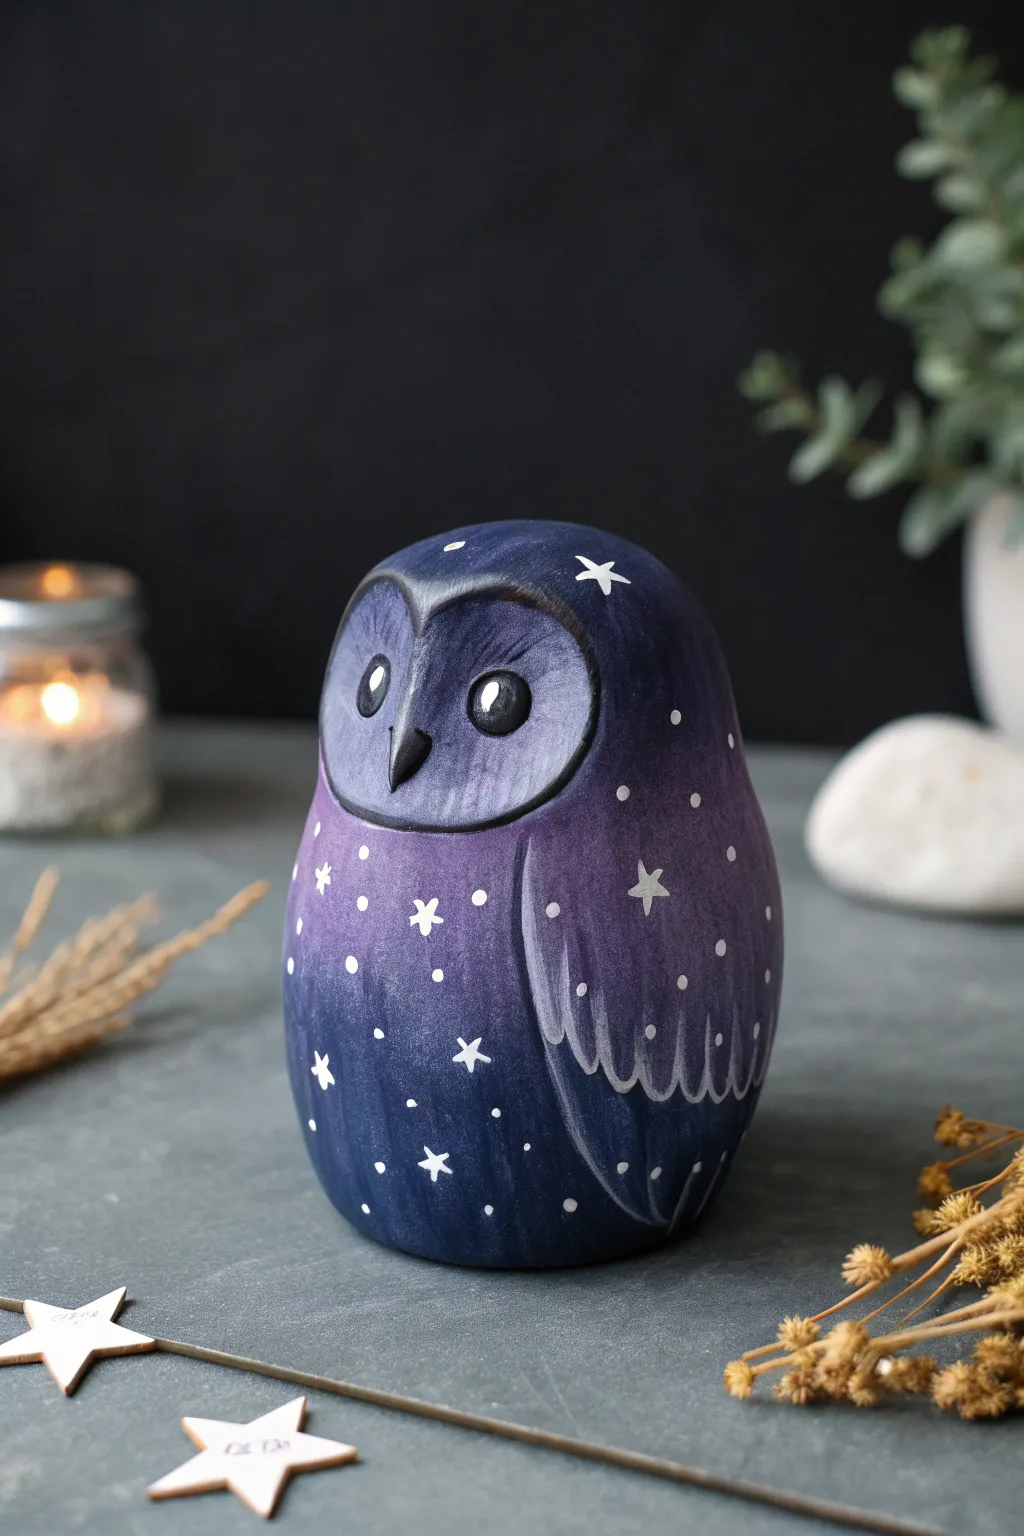
Transform a simple ceramic blank into a mystical cosmic creature with this stunning gradient technique. The deep purples and blues blend seamlessly to create a night sky effect, finished with delicate white constellations.
Detailed Instructions
Materials
- Unpainted ceramic owl figurine (smooth finish)
- Acrylic paints: Carbon Black, Deep Violet, Navy Blue, Lavender, Titanium White
- Matte finish sealant spray
- Sponge applicators or cosmetic sponges
- Detail brushes (sizes 0 and 00)
- Flat shader brush (size 4 or 6)
- Palette for mixing paint
- Paper towels
- Water cup
Step 1: Base Gradient
-
Prepare the surface:
Wipe down your ceramic owl with a slightly damp paper towel to remove any dust or oils. Let it dry completely before starting to ensure the paint adheres properly. -
Start with the darkest tones:
Squeeze out Carbon Black and Navy Blue onto your palette. Using a sponge applicator, dab the black paint primarily at the very bottom of the owl and along the outer back edges. -
Blend in the blue:
While the black is still slightly tacky, sponge the Navy Blue above the black areas, working your way up the owl’s body. Overlap the edges slightly to create a soft, blurred transition between the two colors. -
Introduce the violet:
Mix Deep Violet with the tiniest touch of Navy Blue. Sponge this color in the middle section of the body and the wing area, blending it downward into the navy base. -
Highlight the upper body:
For the chest and upper head area, use a pure Deep Violet or mix it with a little Lavender to lighten it. Sponge this onto the chest and forehead, creating a lighter ‘glow’ that fades into the darker surroundings. -
Create the wing definition:
Mix a light shade using Lavender and White. Using your flat shader brush, carefully paint the curved shape of the wing on the side. Don’t worry about the feathers yet; just block in the solid shape over the gradient background. -
Define the facial disk:
Paint the circular face area using a mix of Lavender and Deep Violet. It should be lighter than the body but not stark white. Use a brush for this to get a clean, sharp edge around the face.
Step 2: Finer Details
-
Outline the features:
Using your size 0 liner brush and slightly watered-down black paint, carefully outline the heart-shaped facial disk and the beak area to separate them from the body. -
Paint the eyes:
Fill the large eye circles with solid black paint. Once dry, add a small white reflection dot in the upper corner of each eye to give the owl a lively expression. -
Add the beak:
Paint the small triangular beak in solid black. I like to add a tiny streak of dark grey on one side of the beak for a subtle highlight. -
Detail the feathers:
Switch to your smallest 00 brush. Using thinned white or pale lavender paint, draw ‘U’ shapes along the bottom edge of the wing area to simulate feathers. Add subtle vertical strokes inside the wing for texture. -
Wood grain texture:
On the facial disk, mix a very diluted black wash. Paint thin, curved lines radiating from the beak outward to mimic feathers or wood grain texture.
Cosmic Blending Tip
Keep your sponges slightly damp (not wet!) for the smoothest gradient. Patting repeatedly in the same spot helps mash the paint layers together seamlessly.
Step 3: Starlight Finish
-
Paint the larger stars:
Using a fine-point brush and titanium white, paint several five-pointed stars across the darker areas of the body. Place them randomly, with a few on the head and lower wings. -
Add distant stars:
Dip the tip of a toothpick or the back of a paintbrush into white paint. Dot small ‘distant’ stars around the larger ones. Group some dots closer together to suggest varying galaxy depths. -
Create sparkling accents:
For the largest stars, use a very dry brush to drag a tiny bit of white paint outward from the center, creating a glowing cross effect. -
Seal the artwork:
Allow the owl to dry overnight. Once cured, spray the entire piece with a matte sealant in a well-ventilated area to protect the paint and unifiy the finish.
Fixing Wobbly Lines
If your white star lines get too thick, don’t wipe them off. Wait for it to dry, then use the purple background color to ‘cut back’ into the star shape and sharpen it.
Place your starry guardian on a shelf near a candle to let the painted constellations shimmer softly
Black-and-White Linework Owl
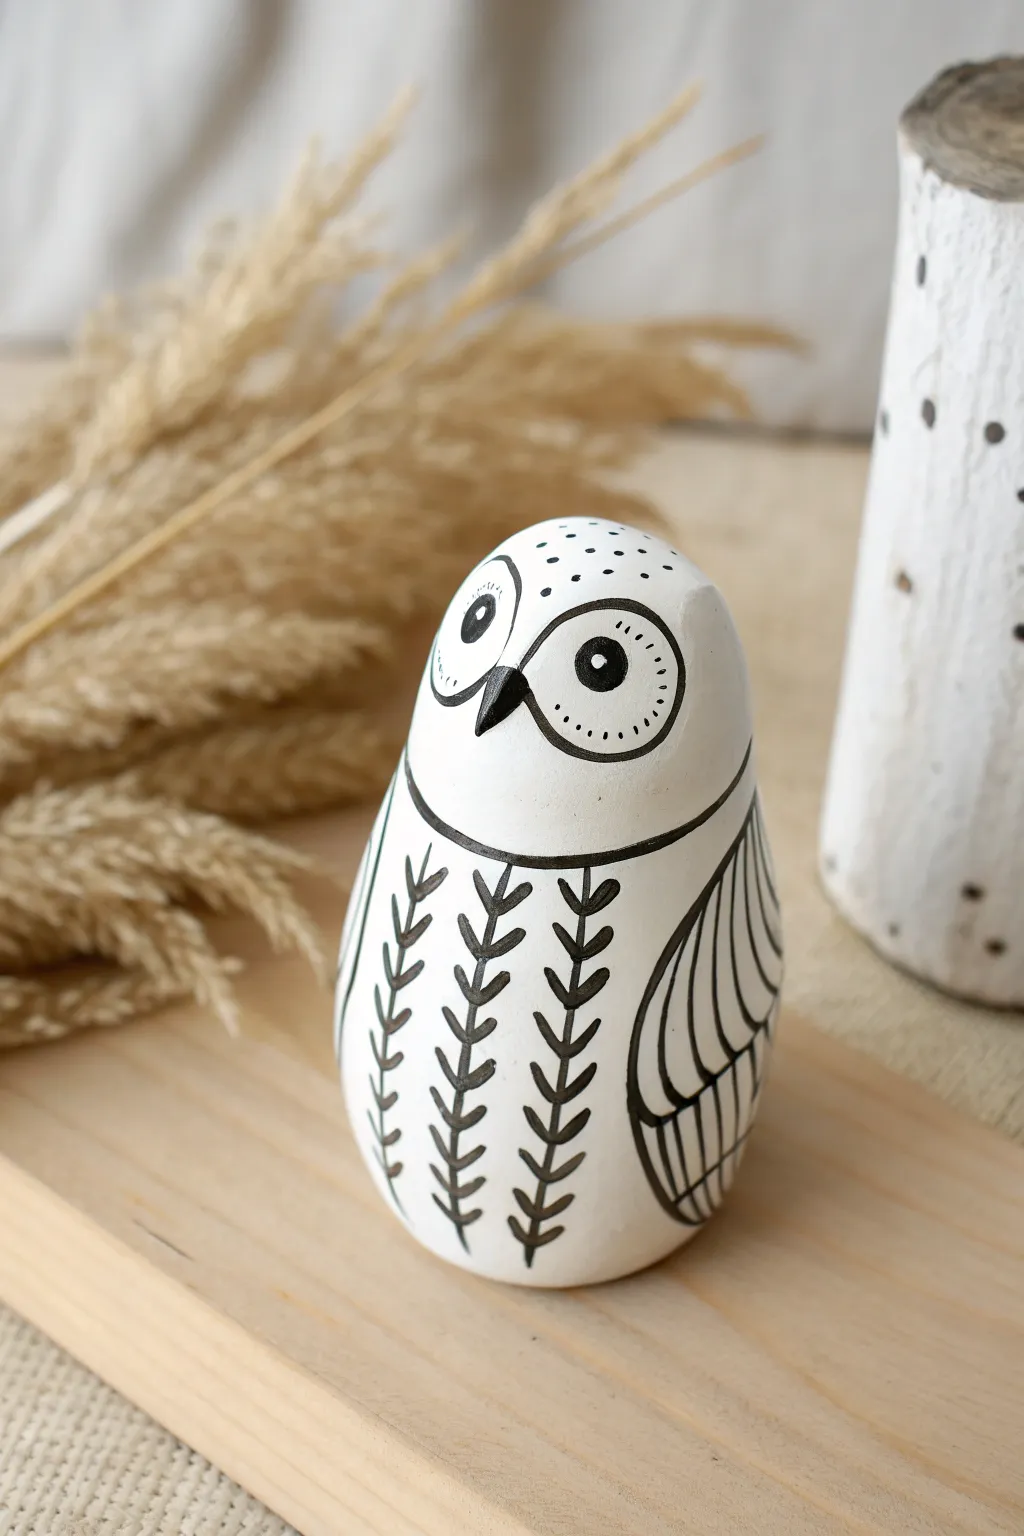
Embrace the minimalism of Scandinavian folk art with this striking black-and-white owl design. Using simple linework on a clean white base, you can transform a plain ceramic blank into a sophisticated modern decor piece that looks great on any shelf.
Step-by-Step Guide
Materials
- Unpainted ceramic owl figurine (smooth, rounded shape)
- White acrylic paint (matte or satin finish)
- Black acrylic paint or black paint pen (fine tip)
- Wide flat paintbrush
- Fine liner paintbrush (size 0 or 00)
- Pencil with a good eraser
- Matte finish spray sealant
- Palette or small dish
- Water cup and paper towels
Step 1: Base Preparation
-
Clean the surface:
Before you begin painting, wipe down your ceramic owl with a slightly damp cloth to remove any dust or oils. Let it dry completely. -
Apply the base coat:
Using the wide flat brush, apply a smooth coat of white acrylic paint over the entire figurine. Ensure you get into any crevices. -
Layer for opacity:
Allow the first coat to dry for about 15-20 minutes. Apply a second or even third coat until the finish is solid, opaque, and streak-free. Let this base cure fully for at least an hour.
Step 2: Sketching the Design
-
Map the face:
Using a pencil very lightly, draw a curved horizontal line across the upper third of the owl to define the head area. This doesn’t need to be perfectly straight; a slight curve adds character. -
Outline the eyes:
Sketch two large oval shapes for the eyes within the head area. They should touch in the middle where the beak will be. -
Define the wings:
Draw curved lines on the sides of the body to mark where the wings begin. They should start just below the neck line you drew earlier.
Master the Flow
Thin your black acrylic paint with a tiny drop of water. Ink-like consistency flows smoother for fine lines than thick paint straight from the tube.
Step 3: Painting the Details
-
Outline the main features:
Switch to your fine liner brush or a black paint pen. Carefully trace over your pencil lines for the neck curve and the eye outlines. Keep your hand steady and slow. -
Fill the pupils:
Inside the eye ovals, paint solid black circles for the pupils. Add a tiny dot of white paint inside the black pupil later for a ‘gleam’ effect. -
Paint the beak:
Paint a small, sharp triangle pointing downward right between the eyes. Fill it in with solid black. -
Add facial texture:
Using the very tip of your brush or pen, add tiny dashes around the inner edge of the eye ovals to create an iris effect. Add small dots on the forehead area for extra texture. -
Create the chest feathers:
For the chest pattern, paint vertical lines descending from the neck line. Along these vertical lines, add small ‘V’ shapes or leaves, creating a vine-like or wheat-stalk pattern. I find starting from the top and working down works best. -
Detail the wings:
Outline the wing shape on the sides. Fill the wing area with curved, scalloped lines to represent layered feathers. Add a few straight vertical lines at the bottom of the wing for the tips. -
Clean up errors:
If you make a mistake, let the black paint dry completely, then carefully touch it up with a bit of white paint.
Add a Color Pop
Keep the monochrome look but paint just the beak in gold leaf or bright orange for a tiny, sophisticated splash of color that draws the eye.
Step 4: Finishing Touches
-
Erase pencil marks:
Once you are absolutely certain the black paint is bone dry, gently erase any visible pencil sketch lines. -
Seal the artwork:
Take the figurine to a well-ventilated area and apply a light coat of matte spray sealant. This protects the paint from chipping and gives it a professional, unified finish.
Place your finished owl on a mantle or bookshelf to enjoy its modern, handcrafted charm
Antique Wash for a Weathered Look
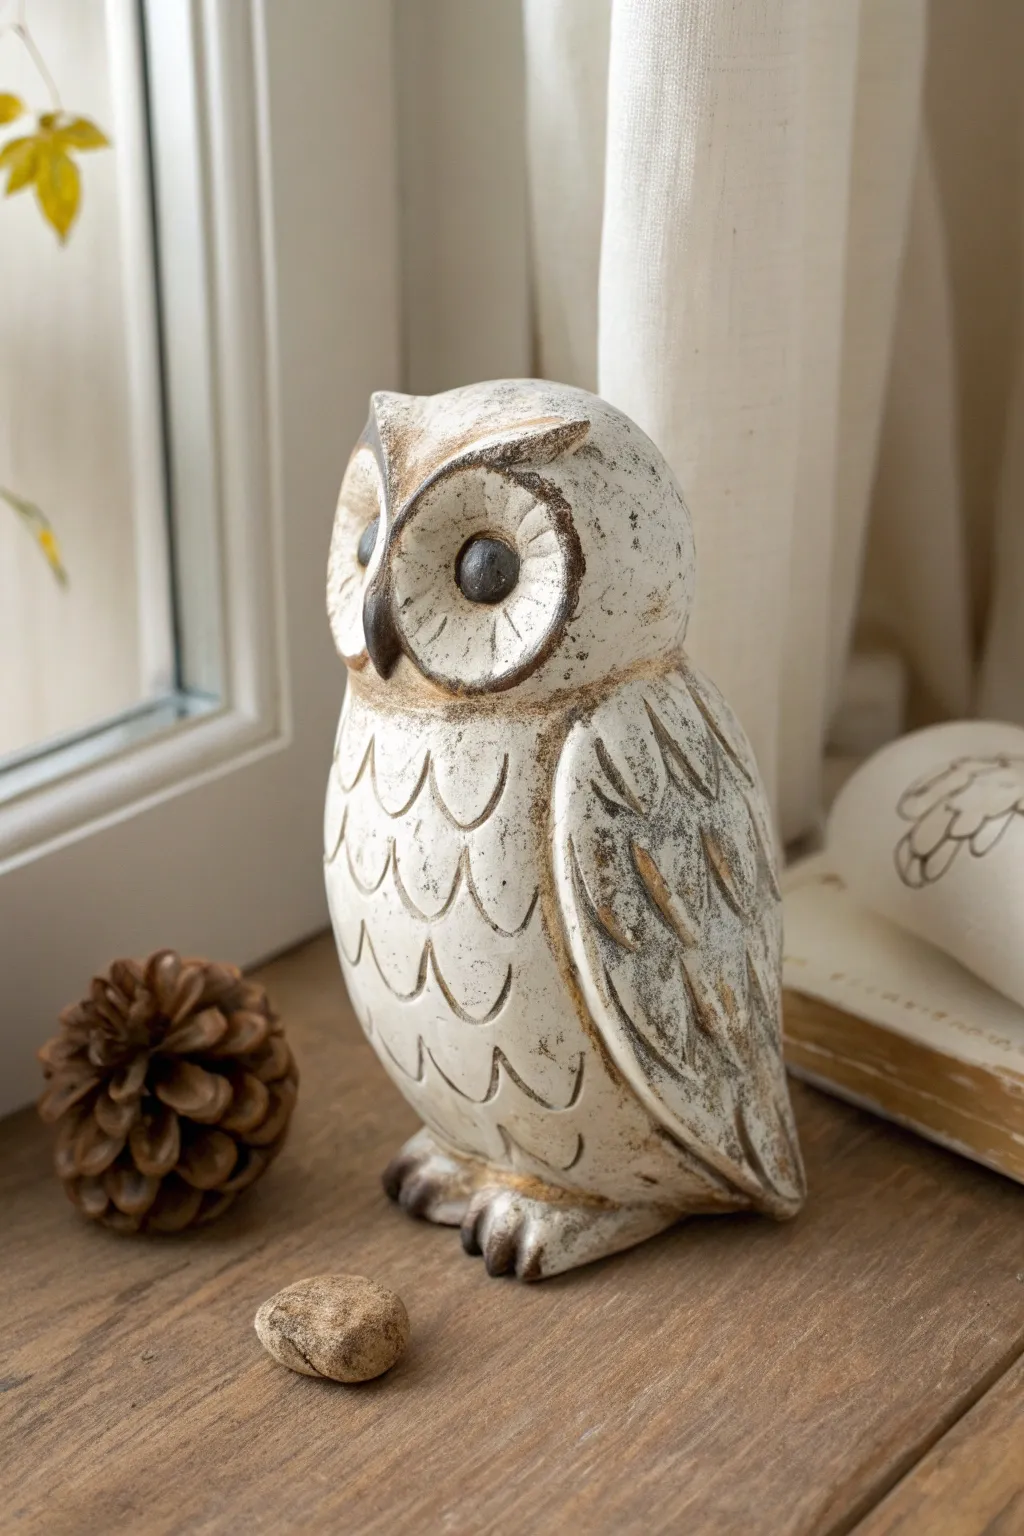
Transform a plain ceramic owl into a charming, vintage-style accent piece using this antiquing technique. The result is a beautifully distressed finish where deep brownish-bronze tones peek through creamy white layers, mimicking years of gentle weathering.
How-To Guide
Materials
- Bisque or smooth ceramic owl figurine
- Acrylic paint: Dark Umber or Chocolate Brown
- Acrylic paint: Warm White or Antique White
- Acrylic paint: Metallic Bronze (optional, for depth)
- Black acrylic paint (small amount for eyes)
- Glazing medium or water
- Wide flat brush (synthetic)
- Stiff bristle brush or old toothbrush
- Soft cloth or paper towels
- Matte spray sealer
Step 1: Base Coating
-
Prepare the surface:
Begin by wiping down your ceramic owl with a slightly damp cloth to remove any dust or oils. Let it dry completely. -
Apply the dark undercoat:
Mix your Dark Umber paint with a tiny drop of Metallic Bronze if you want a subtle sheen. Paint the entire owl with this dark mixture, ensuring you work the paint deep into every groove, feather detail, and crevice. -
Check for coverage:
Don’t worry about brush strokes here; the goal is total opaque coverage. Double-check difficult areas like under the wings and around the toes. -
Let it cure:
Allow this base coat to dry thoroughly. This is crucial because if it’s wet, the next steps will turn muddy. I usually give it at least an hour or use a hairdryer to speed things up.
Too Much Brown?
If your wash turned the owl too dark, wait for it to dry completely. Then, perform another round of dry brushing with pure white to bring back the brightness.
Step 2: Creating the Distressed Effect
-
Prepare the white wash:
Pour out a generous amount of Warm White paint. You want this paint slightly thick, so don’t water it down yet. -
The dry brush technique:
Dip a stiff-bristled brush into the white paint, then wipe almost all of it off onto a paper towel. The brush should feel nearly dry to the touch. -
Highlight the texture:
Lightly drag the brush across the raised surfaces of the owl—the feather tips, the eyebrows, and the chest curves. Do not press hard; the dark paint should remain visible in the lower recessed areas. -
Build up layers:
Repeat the dry brushing process. It’s better to do three light layers than one heavy one. Focus more white paint on the high points (chest, top of head) to create dimension. -
Define the face:
Use a smaller brush to carefully apply the off-white color around the facial disc, leaving a dark rim around the eyes to emphasize the owl’s gaze.
Texture Matters
For the best dry-brushing results, use a cheap ‘chip brush’ or an old, stiff paintbrush. Soft watercolor brushes won’t catch the raised textures properly.
Step 3: Antiquing and Detailing
-
Paint the eyes:
Using a small detail brush, paint the pupils jet black. Leave a tiny white dot or ‘catchlight’ in the upper corner of the pupil to give the owl life. -
Mix an antique wash:
Mix a small amount of the Dark Umber with water or glazing medium (approx. 1 part paint to 4 parts water). It should be very runny. -
Apply the wash:
Brush this watery mixture over a small section of the white painted areas. It will settle into the textures instantly. -
Wipe back:
Immediately wipe the wet wash away with a soft cloth. This stains the white paint slightly, giving it that aged, dirty-in-a-good-way look. -
Focus on the feet:
On the feet and claws, apply lighter pressure when wiping back the wash, or leave them slightly darker to simulate contact with the ground/branch. -
Softening transitions:
If any area looks too starkly white, lightly dab it with a damp cloth gathered around your finger to smudge the surrounding antique tones into it. -
Final inspection:
Look at the owl from a distance. If you lost too much contrast, you can do one final, very light dry brush of white on the absolute highest points. -
Seal the piece:
Once fully dry (give it overnight to be safe), spray the figurine with a matte sealer to protect the finish without adding an unnatural gloss.
Now you have a timeless piece of decor that looks like an expensive antique store find
Patchwork Quilt Pattern Owl
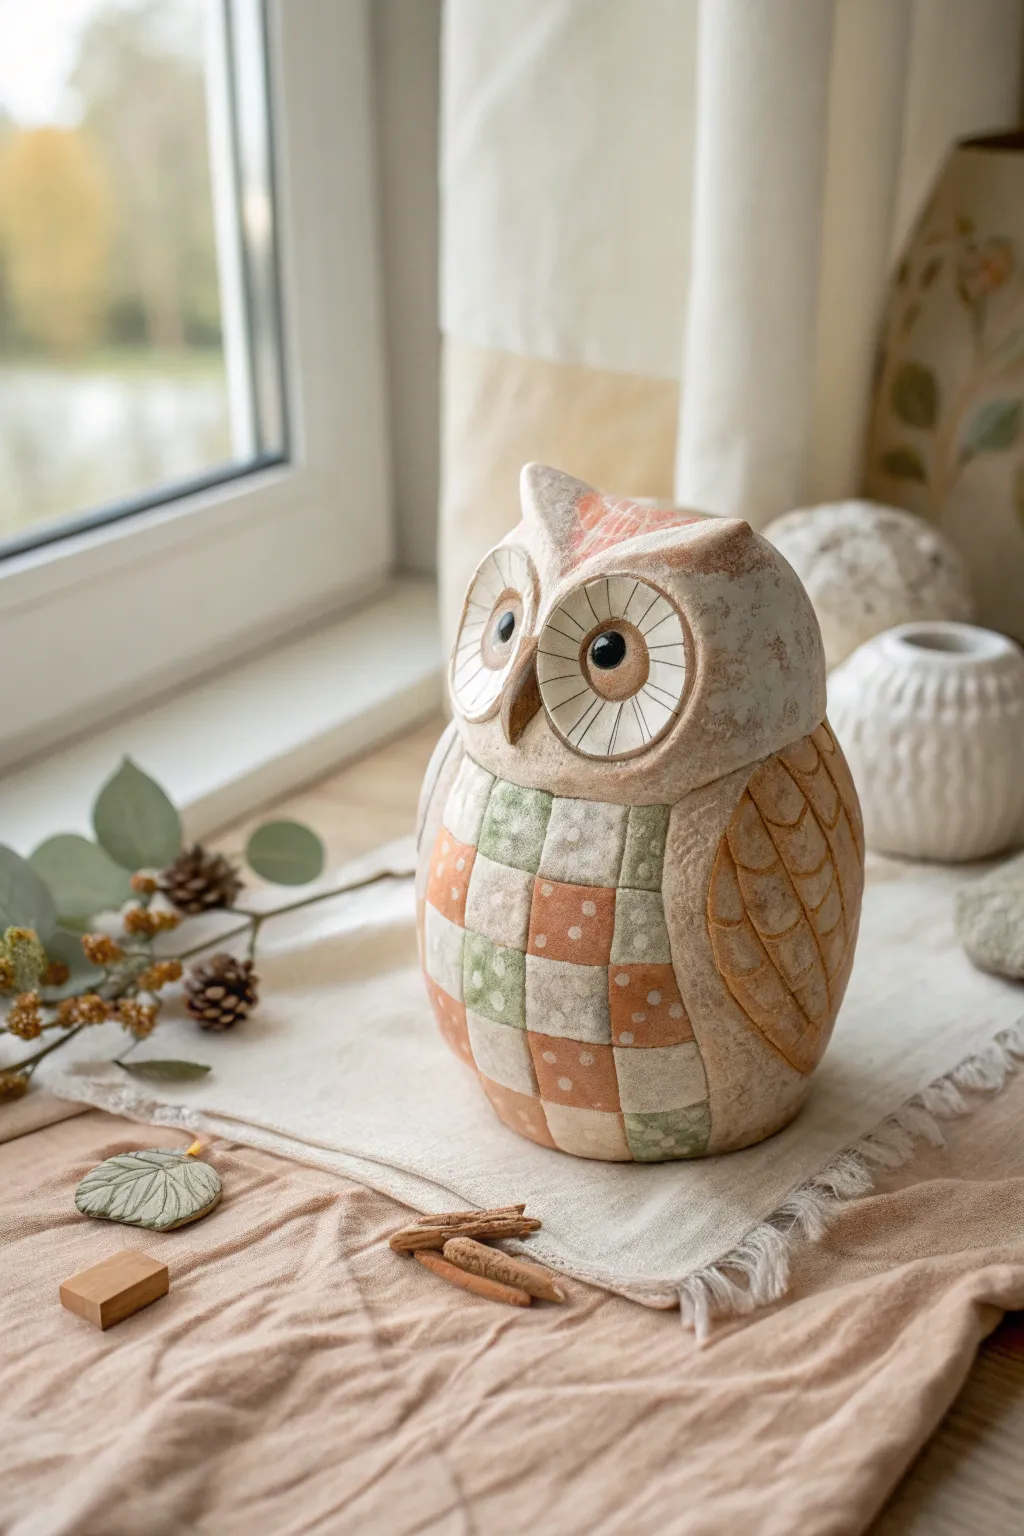
Transform a plain ceramic owl bisque into a cozy, cottage-core masterpiece with this patchwork design. The sage green and terracotta checkered pattern evokes the warmth of a vintage quilt, making it a perfect accent for a window sill.
Detailed Instructions
Materials
- Ceramic owl bisque (smooth body area preferred)
- Acrylic paints: Sage Green, Terracotta/Burnt Orange, Antique White, Cream, Soft Brown
- Flat shader brushes (small and medium)
- Fine liner brush (0 or 00 size)
- Pencil (HB or lighter)
- Ruler or flexible measuring tape
- Dotting tool or toothpick
- Water cup and palette
- Matte finish spray sealant
- Antiquing medium or diluted brown paint (optional)
Step 1: Preparation & Base Coat
-
Clean the bisque:
Start by wiping down your ceramic owl with a slightly damp sponge to remove any dust or kiln residue. Let it dry completely for about 10 minutes. -
Base coat the head and wings:
Mix a Cream or Off-White color with a tiny drop of Brown to create a warm stone color. Paint the head, face (excluding eyes), and wings with this mixture. -
Paint the chest area:
For the main body where the patchwork will go, apply a solid coat of Antique White. This ensures your colors will pop later. Let this base layer dry for at least 30 minutes.
Step 2: Drafting the Design
-
Mark the grid:
Using a flexible tape measure and a pencil, lightly mark vertical lines down the owl’s belly, spacing them about 1/2 inch to 3/4 inch apart depending on the size of your owl. -
Create the squares:
Draw horizontal curved lines across the belly to intersect with your vertical lines. Try to follow the curvature of the owl’s form rather than drawing straight ruler lines; this makes the ‘fabric’ look like it’s wrapping around the bird. -
Define the face:
Lightly sketch the circles for the large eye discs and the triangular beak area if your mold doesn’t already have deep grooves for them.
Uneven Lines are Okay!
Don’t stress about perfect grids. Slightly wavy lines actually enhance the ‘soft fabric’ illusion, making the painted ceramic look like a stuffed toy.
Step 3: Painting the Patchwork
-
Paint the Green squares:
Select your Sage Green paint. Using a small flat brush, fill in alternating squares in a checkerboard pattern. Don’t worry about razor-sharp edges just yet; a rustic look fits this style. -
Paint the Terracotta squares:
Fill in the remaining empty squares with your Terracotta/Burnt Orange paint. I find that applying two thin coats gives a smoother, more fabric-like finish than one thick globs layer. -
Paint the eye discs:
While the body dries, paint the large circular discs around the eyes with bright Antique White. Use a liner brush to paint thin, radiating lines in Soft Brown to mimic iris patterns or feathers. -
Detail the eyes and beak:
Paint the beak a dark brown. For the eyes, use solid black, adding a tiny white reflection dot at the 2 o’clock position once the black is dry.
Add Fabric Texture
Before the paint dries on the colored squares, gently press a piece of rough denim or linen onto the wet paint to imprint a real fabric weave texture.
Step 4: Texture & Details
-
Add the polka dots:
Dip a dotting tool or the back of a paintbrush into Cream paint. Gently stamp clusters of small dots onto the Sage Green and Terracotta squares. Vary the placement—some in corners, some centered—to keep it whimsical. -
Outline the patch grid:
Mix a watery wash of Soft Brown. With your finest liner brush, carefully trace the grid lines between the colored squares to simulate stitching gaps. -
Dry brush the texture:
To give the head and wings a stony, weathered look, load a dry, stiff brush with a simplified White paint. Wipe most of it off on a paper towel, then lightly whisk it over the raised textures on the head and wing feathers. -
Define wing feathers:
Use a diluted Brown paint to paint thin, U-shaped outlines on the wings to emphasize the feather layers. -
Antique the crevices:
If you want a more vintage look, brush a very diluted brown wash over the entire piece and immediately wipe it back with a clean rag. The dark pigment will stay in the deep grooves of the ceramic. -
Seal the piece:
Once everything is bone dry (wait overnight if possible), take the owl outside and spray it with a matte clear coat to protect the paint and unify the sheen.
Now your charming patchwork owl represents the perfect blend of ceramic art and cozy quilting traditions, ready to watch over your home
Neon Splatter on a Solid Base
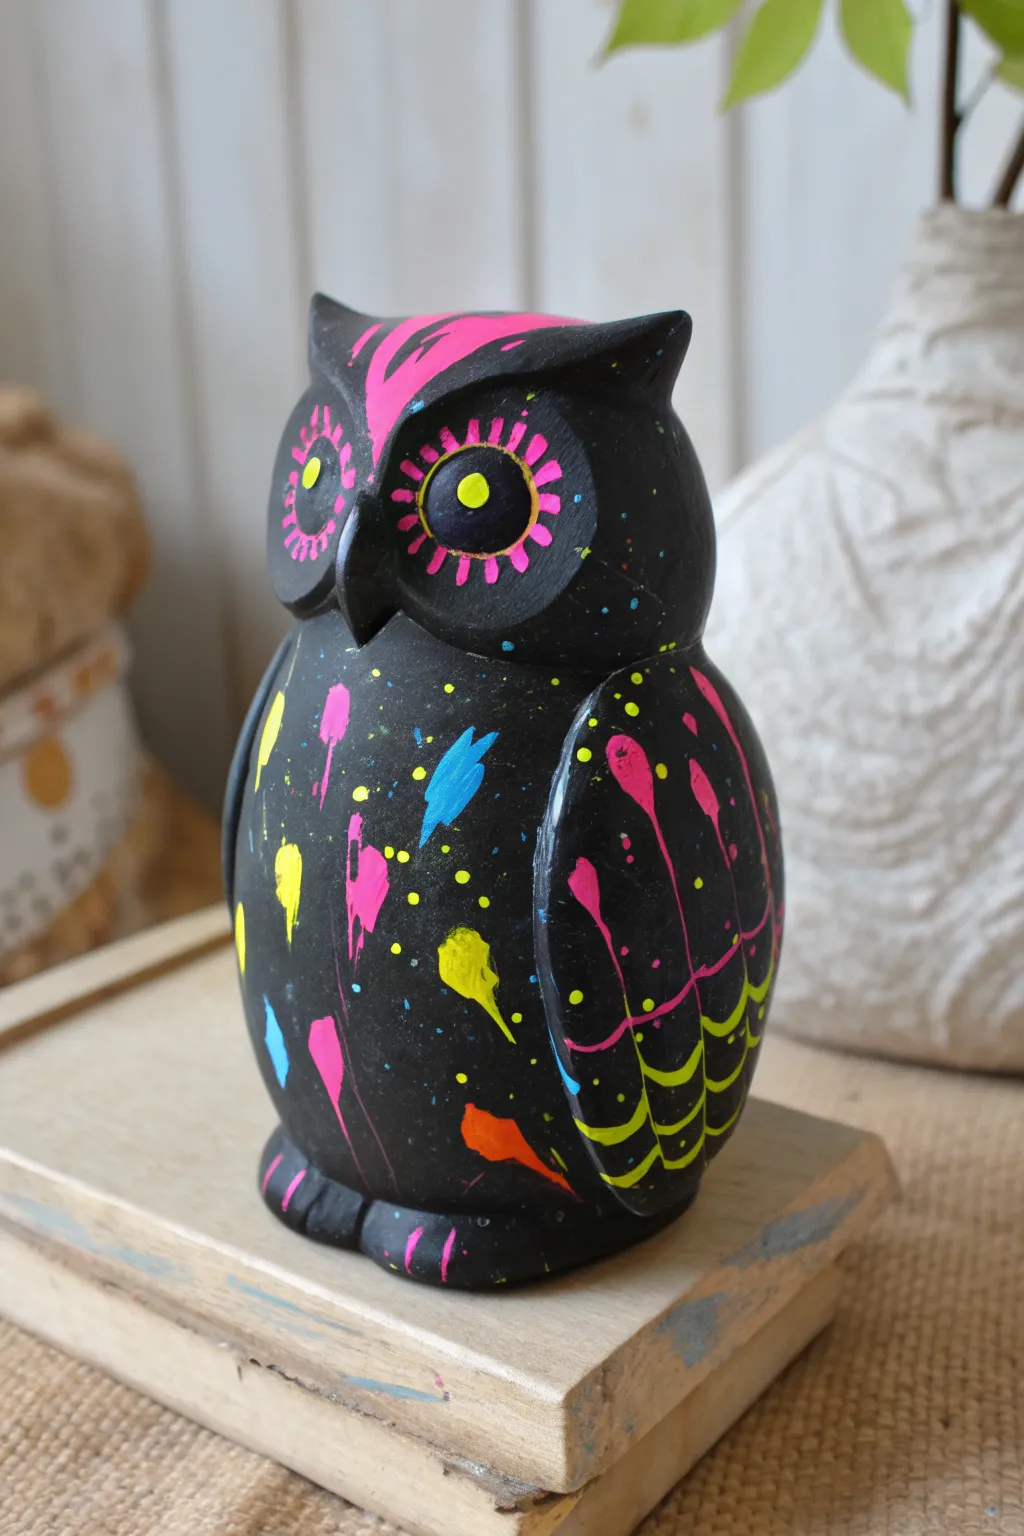
Transform a plain ceramic owl into a vibrant, modern art piece using a striking high-contrast technique. This project combines a matte black base with electric neon accents to create a playful glow-in-the-dark vibe that really pops.
Step-by-Step
Materials
- Unfinished ceramic owl figurine
- Matte black acrylic paint or gesso
- Neon acrylic craft paints (pink, yellow, blue, orange)
- Medium flat brush (for base coat)
- Small round detail brush (size 0 or 1)
- Old toothbrush or stiff bristle brush
- Palette or paper plate
- Water cup and paper towels
- Matte spray varnish (optional)
Step 1: Setting the Stage
-
Clean the surface:
Before you begin, wipe down your ceramic figurine with a slightly damp cloth to remove any dust or oils. Let it dry completely to ensure the paint adheres smoothly. -
Apply the first base coat:
Using your medium flat brush, apply a smooth, even layer of matte black acrylic paint over the entire owl. Don’t worry if it looks a bit streaky at first; thin layers are better than thick ones. -
Add a second coat:
Once the first layer is dry to the touch (usually 15-20 minutes), apply a second coat of black. Make sure to get into all the crevices around the feathers and eyes for a solid, opaque finish. -
Check for missed spots:
Inspect the owl from different angles, particularly under the beak and wings. Touch up any white ceramic still peeking through.
Paint opacity issues?
Neon paints can be transparent. If they look dull on black, paint the detail in white first, let it dry, then layer the neon on top.
Step 2: Creating the Face
-
Blocking out the eyes:
Using a small round brush, carefully paint the large circles around the eyes with neon pink. You might need two layers of neon paint to make it truly bright against the black background. -
Adding eye details:
Paint the inner rings of the eyes. Use a bright yellow for the center pupil area to create a piercing gaze. -
Eyelash accents:
With the very tip of your detail brush, paint small pink lines radiating outward from the eyes to mimic eyelashes or feather details. -
Painting the forehead:
Add a few bold strokes of neon pink on the forehead area, sweeping upward to highlight the brow feathers.
Step 3: Splatter and Patterns
-
Painting wing feathers:
On the wings, use your neon pink to paint long, teardrop shapes representing the larger feathers. I find it easiest to start at the top and pull the brush downward. -
Adding scallops:
Switch to neon yellow or green. Paint scalloped lines near the bottom of the wings to simulate layers of feathers. -
Preparing the splatter:
Dilute a small amount of neon blue paint with a drop of water on your palette. It should be fluid but not runny. -
Creating the splash effect:
Load a small brush with the thinned blue paint. Carefully tap the handle of the brush against your finger over the owl’s body to create random splatter spots. -
Adding larger splashes:
For the bigger, more intentional-looking ‘splats’ shown on the chest (blue, yellow, pink, and orange), use your round brush to paint rough, organic shapes that look like dripped paint. -
Micro-dots technique:
Dip the handle end of your paintbrush into neon yellow or green paint. Dot it randomly over the black areas to create tiny, perfect circles of color. -
Highlighting the feet:
Don’t forget the talons! Add a few small swipes of neon pink or orange to the toes to tie the whole look together.
Better Splatters
Practice your splatter technique on a piece of cardboard first to gauge how much water creates the perfect droplet size.
Step 4: Finishing Touches
-
Review and refine:
Look over your work. If any neon colors look dull against the black, carefully add another layer of paint on top of the dry color to boost the opacity. -
Seal the piece:
Once absolutely dry (give it a few hours), spray the entire owl with a matte varnish. This unifies the sheen and protects your artwork from dust.
Now you have a striking, electric owl that adds a modern pop of color to any shelf