A ceramic piggy bank is basically the perfect little canvas—curvy, cute, and just begging for color and texture. Here are my favorite ideas to help you paint, carve, and glaze a pig bank that feels totally you (and actually makes saving money more fun).
Classic Blush Pig With Glossy Glaze
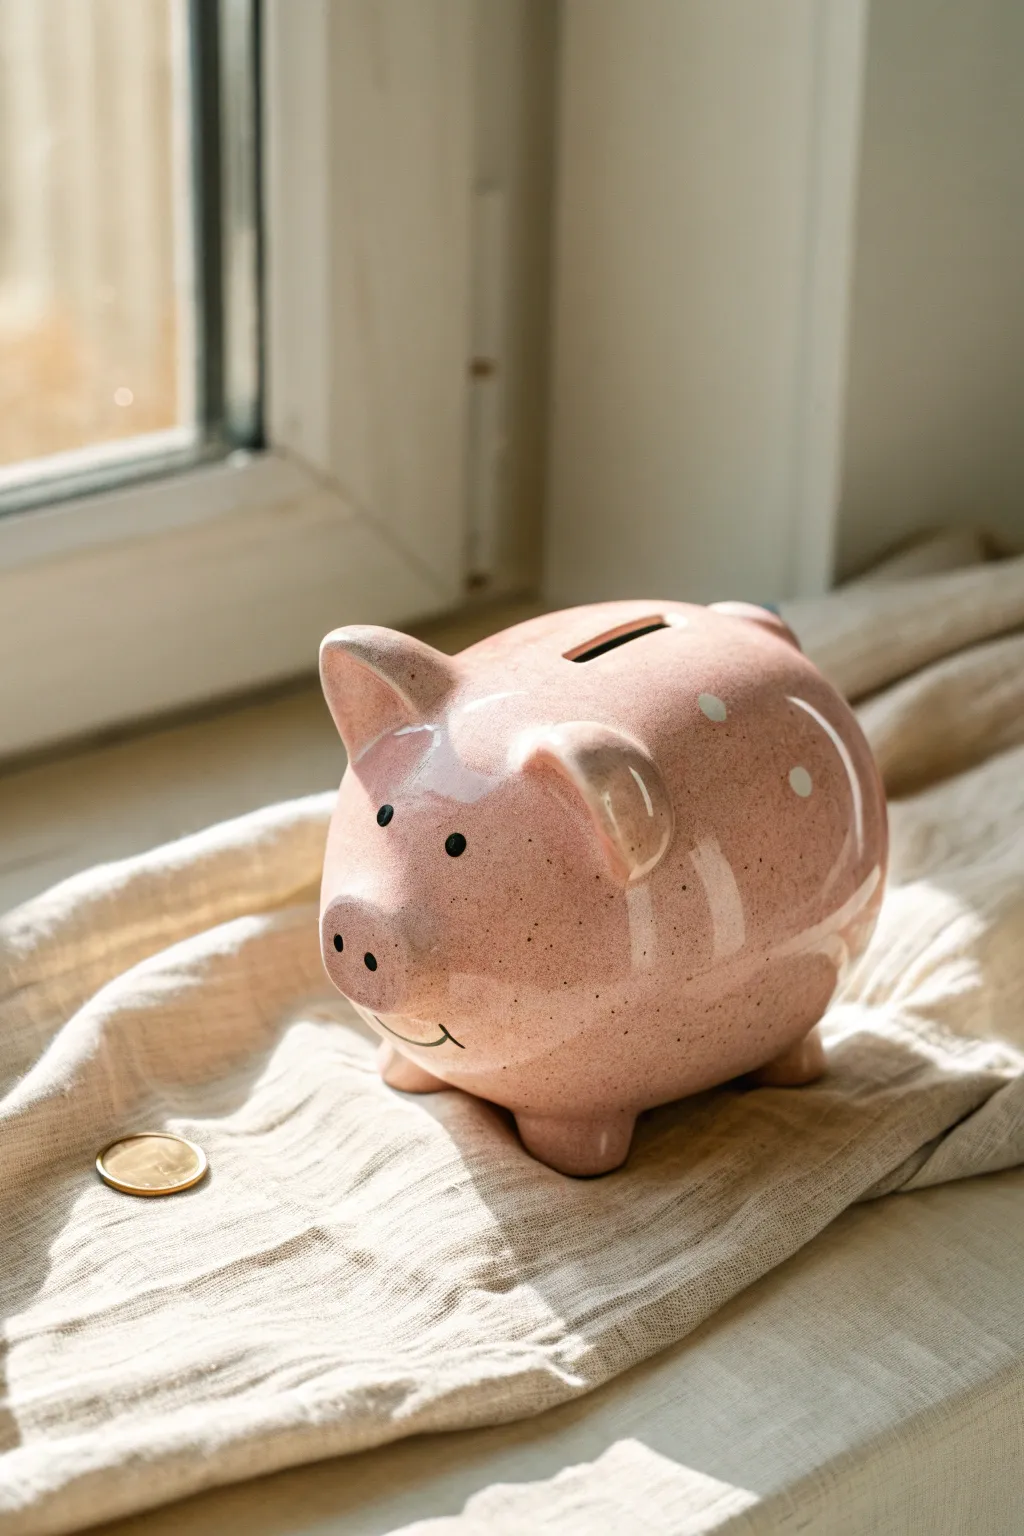
Capture the charm of traditional pottery with this delightful blushing pig project. The finish features a soft pink glossy glaze enhanced by subtle speckling and simple, playful details that give the piece distinct character.
Step-by-Step Tutorial
Materials
- Bisque-fired ceramic piggy bank
- Light pink underglaze
- Clear glossy glaze
- Speckled clay body (or speckle additive)
- Black underglaze
- White underglaze
- Small round sponge
- Fine detail brush
- Fan brush or wide soft glaze brush
- Sponge for wiping
- Kiln access
Step 1: Preparation and Base Coat
-
Clean the bisque:
Begin by wiping down your bisque-fired piggy bank with a damp sponge. This removes any dust that could prevent the glaze from adhering properly. -
Mix the base color:
Prepare your light pink underglaze. If you are using a standard white clay body but want that speckled look shown in the photo, mix a small amount of ceramic speckle additive into your pink underglaze now. -
Apply the first coat:
Using a soft fan brush, apply a smooth, even layer of the pink underglaze over the entire exterior of the pig. Watch out for drips around the legs and ears. -
Let it dry:
Allow the first coat to dry until it is chalky and cool to the touch. This usually takes about 10 to 15 minutes depending on humidity. -
Apply second and third coats:
Apply two more coats of pink, allowing drying time between each. To get that rich, opaque finish, three coats are essential.
Smear Prevention
If the black eyes smear when applying clear glaze, dab the clear glaze gently over those spots first rather than brushing across them.
Step 2: Adding Character Details
-
Paint the eyes:
With your fine detail brush and black underglaze, carefully paint two small, solid black circles for the eyes. Position them wide apart to create a cute, innocent expression. -
Add the snout details:
Using the same fine brush, paint two smaller black dots on the flat part of the nose for the nostrils. -
Create the smile:
Paint a thin, sweeping black line for the mouth. Adding a tiny upward curve at the end gives him a happy smirk. -
Add white accents:
To mimic the faint polka-dot effect seen on the flank, verify your pink layer is totally dry. Dip a small round sponge or the handle end of a brush into watered-down white underglaze. -
Stipple the spots:
Gently dot a few faint white circles onto the back and sides. You want these to look subtle, almost like a natural variation in the pottery rather than a harsh pattern. -
Clean the foot:
Use a damp sponge to wipe any underglaze off the very bottom of the feet so the pig doesn’t stick to the kiln shelf.
Level Up: Tail Detail
For a fun 3D effect, shape a small coil of clay into a curly tail and attach it before the first bisque firing.
Step 3: Glazing and Firing
-
Check dryness:
Ensure all your underglaze decoration is bone dry before proceeding to the clear overglaze. -
Apply clear glaze:
Using a clean fan brush, float a layer of clear glossy glaze over the entire piece. Be gentle so you don’t smear the black details. -
Second coat of clear:
I usually apply a second coat of clear glaze in a cross-hatch direction to ensure no bare patches remain. -
Final wipe:
Check the feet one last time to ensure no clear glaze has dripped onto the contact points. -
Fire the piece:
Load the piggy bank into the kiln and fire to cone 06 (or the temperature specified by your specific glaze manufacturer).
Once cooled, your glossy pink friend is ready to start saving coins


Minimal White Pig With Tiny Heart Sprinkles
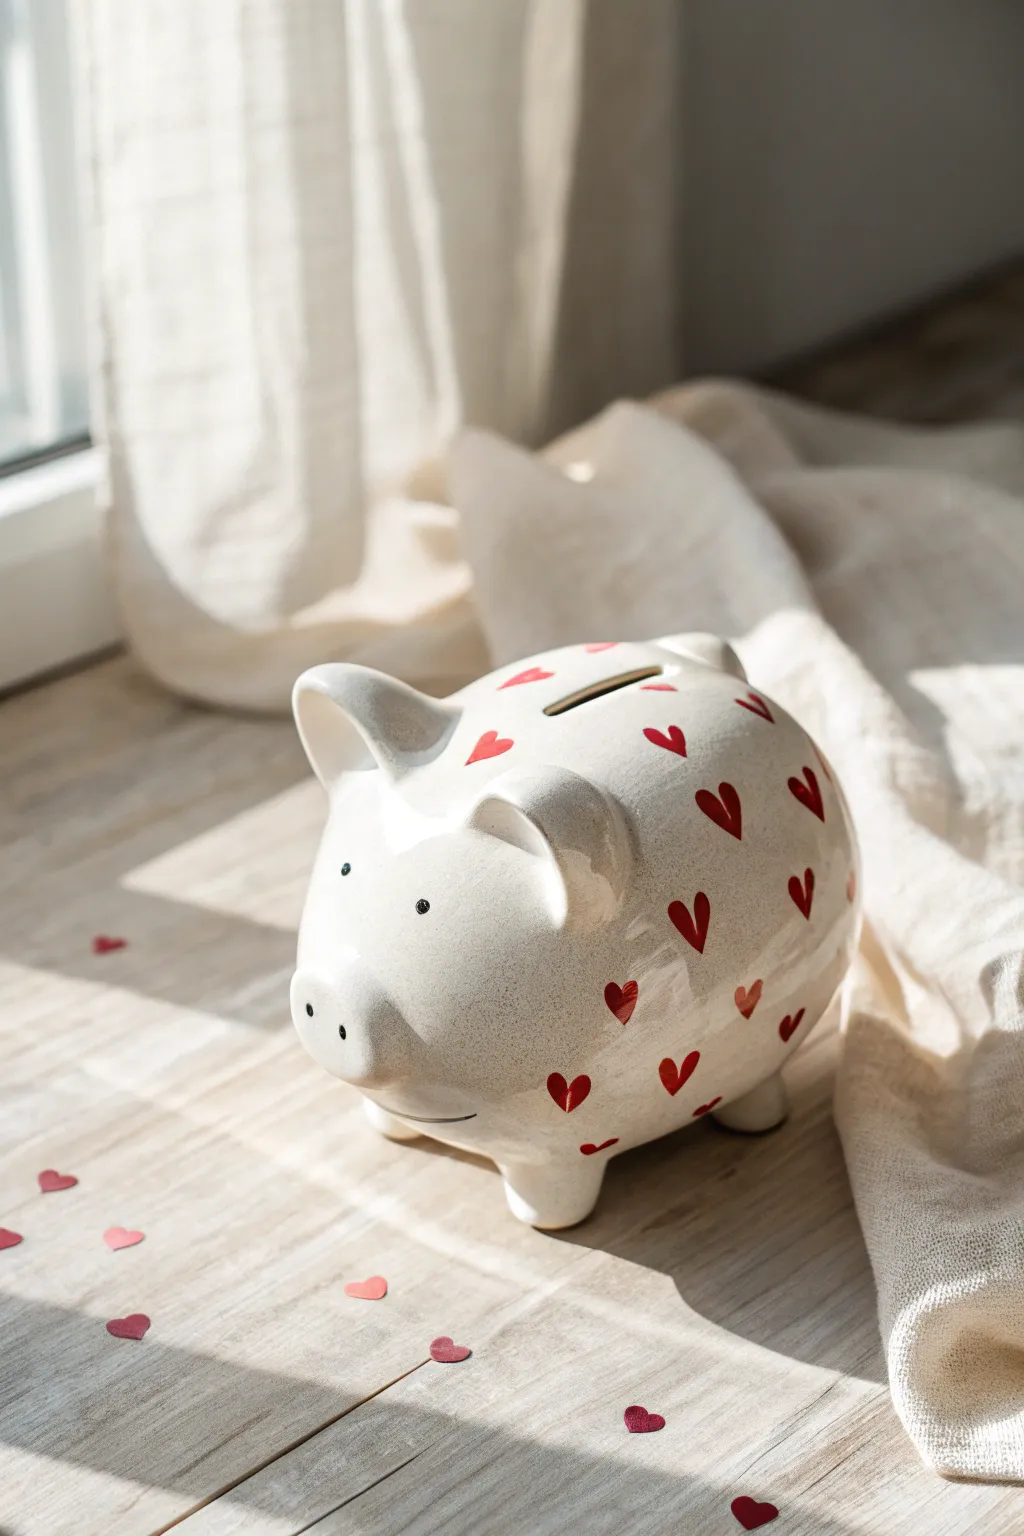
This charming project transforms a plain ceramic base into a whimsical keepsake using a sparse, deliberate pattern of tiny red hearts. The clean white background makes the red pop, creating a modern yet sweet aesthetic perfect for saving up for something special.
Step-by-Step
Materials
- Plain white ceramic piggy bank (unglazed bisque or glazed)
- Red permanent vinyl or red acrylic paint
- Small heart-shaped paper punch (if using vinyl)
- Fine-point paintbrush (if painting)
- Rubbing alcohol and cotton pads
- Tweezers
- Clear sealant spray (gloss finish)
- Pencil (optional for spacing)
Step 1: Preparation
-
Clean the Surface:
Before adding any designs, wipe down the entire surface of the piggy bank with rubbing alcohol on a cotton pad. This removes oils and dust that could prevent the hearts from adhering properly. -
Dry Completely:
Allow the ceramic to air dry completely for a few minutes to ensure a clean slate. -
Plan placement:
Take a moment to visualize where you want your hearts. The goal is a random, floating ‘sprinkle’ look rather than rigid rows. You can lightly mark spots with a pencil if you’re nervous about freehanding.
Placement Strategy
Work in triangles when placing items randomly. Place three hearts to form a loose triangle, then move to the next area. This prevents accidental straight lines.
Step 2: Creating the Hearts (Vinyl Method)
-
Punch Shapes:
Use your small heart-shaped punch on a sheet of red permanent vinyl. Punch out 30-40 hearts to ensure you have plenty to work with. -
Weed the Vinyl:
Carefully separate the heart shapes from the backing sheet. I find it helpful to just slightly lift the edge of each heart before trying to grab them. -
Pick and Place:
Using your tweezers, pick up a single vinyl heart. Using tweezers prevents the oils from your fingers from weakening the adhesive. -
Apply to Surface:
Place the heart onto the ceramic pig. Press down firmly in the center first, then smoothing outward to the edges to eliminate bubbles.
Curved Surface Fix
If a vinyl heart wrinkles on a curved spot like the snout, snip a tiny slit in the heart’s crease. Overlap the cut edges slightly to make it lie flat.
Step 3: Creating the Hearts (Paint Method)
-
Select Brush:
If painting instead of using vinyl, choose a very fine-point detail brush to keep the edges crisp. -
Paint Outline:
Dip just the tip into red acrylic paint. Carefully paint the outline of a tiny heart shape first. -
Fill the Shape:
Gently fill in the center of the heart with a small amount of paint, being careful not to let it gloop or drip. -
Rotate and Repeat:
Turn the pig slightly and paint the next heart. Vary the angles slightly so they don’t all look uniform.
Step 4: Pattern and Distribution
-
Start Sparsely:
Begin by placing hearts widely apart across the main body of the pig. It is easier to add more later than to remove them. -
Mind the Curves:
Pay special attention to the ears and legs. Wrapping a vinyl heart around a tight curve (like the ear edge) might cause peeling, so try to place them on flatter sections of the curves. -
Check Density:
Step back and look at the pig from a distance. Fill in any large empty gaps with an additional heart. -
Vary Orientation:
Ensure the hearts are slightly tilted in different directions. This ‘tumbled’ look mimics falling confetti.
Step 5: Finishing Touches
-
Burnish Vinyl:
If you used vinyl, go over every single heart firmly with your thumb or a soft cloth to ensure the edges are sealed tight against the ceramic. -
Clean Residue:
If you used pencil marks for planning, gently erase them now, being careful not to disturb your work. -
Prepare for Sealing:
Move the piggy bank to a well-ventilated area and set it on a piece of cardboard. -
Apply Sealant:
Spray a light, even coat of clear glossy sealant over the entire pig. This protects the paint from chipping or the vinyl from peeling over time. -
Final Cure:
Let the sealant dry according to the manufacturer’s instructions, usually 24 hours, before handling or using the bank.
Now you have a sweet, custom vessel ready to hold your savings or decorate your shelf with love


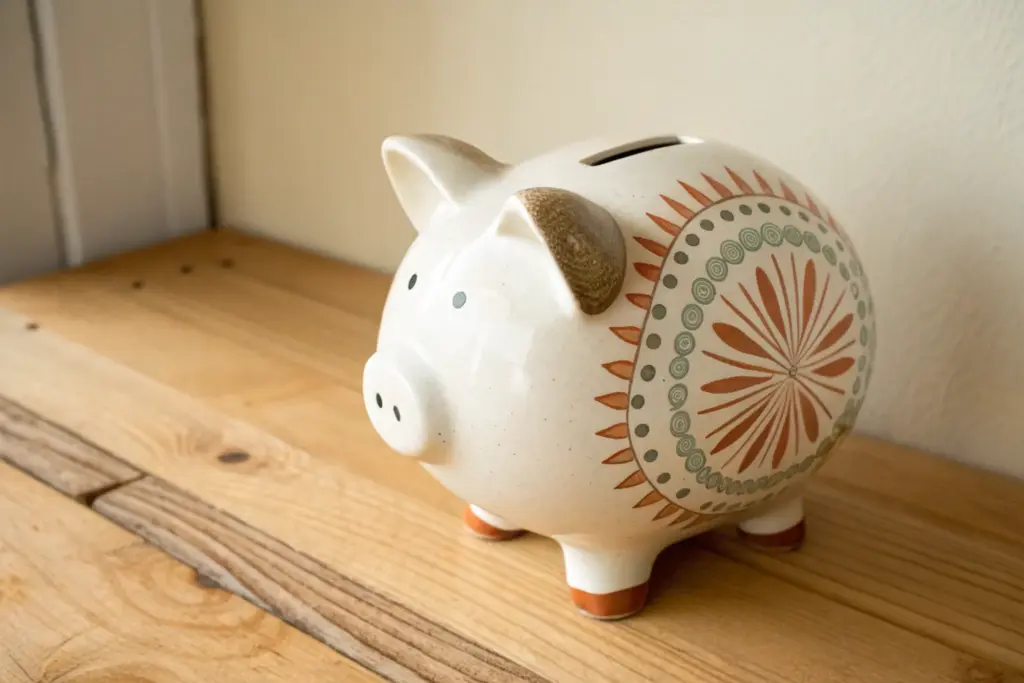
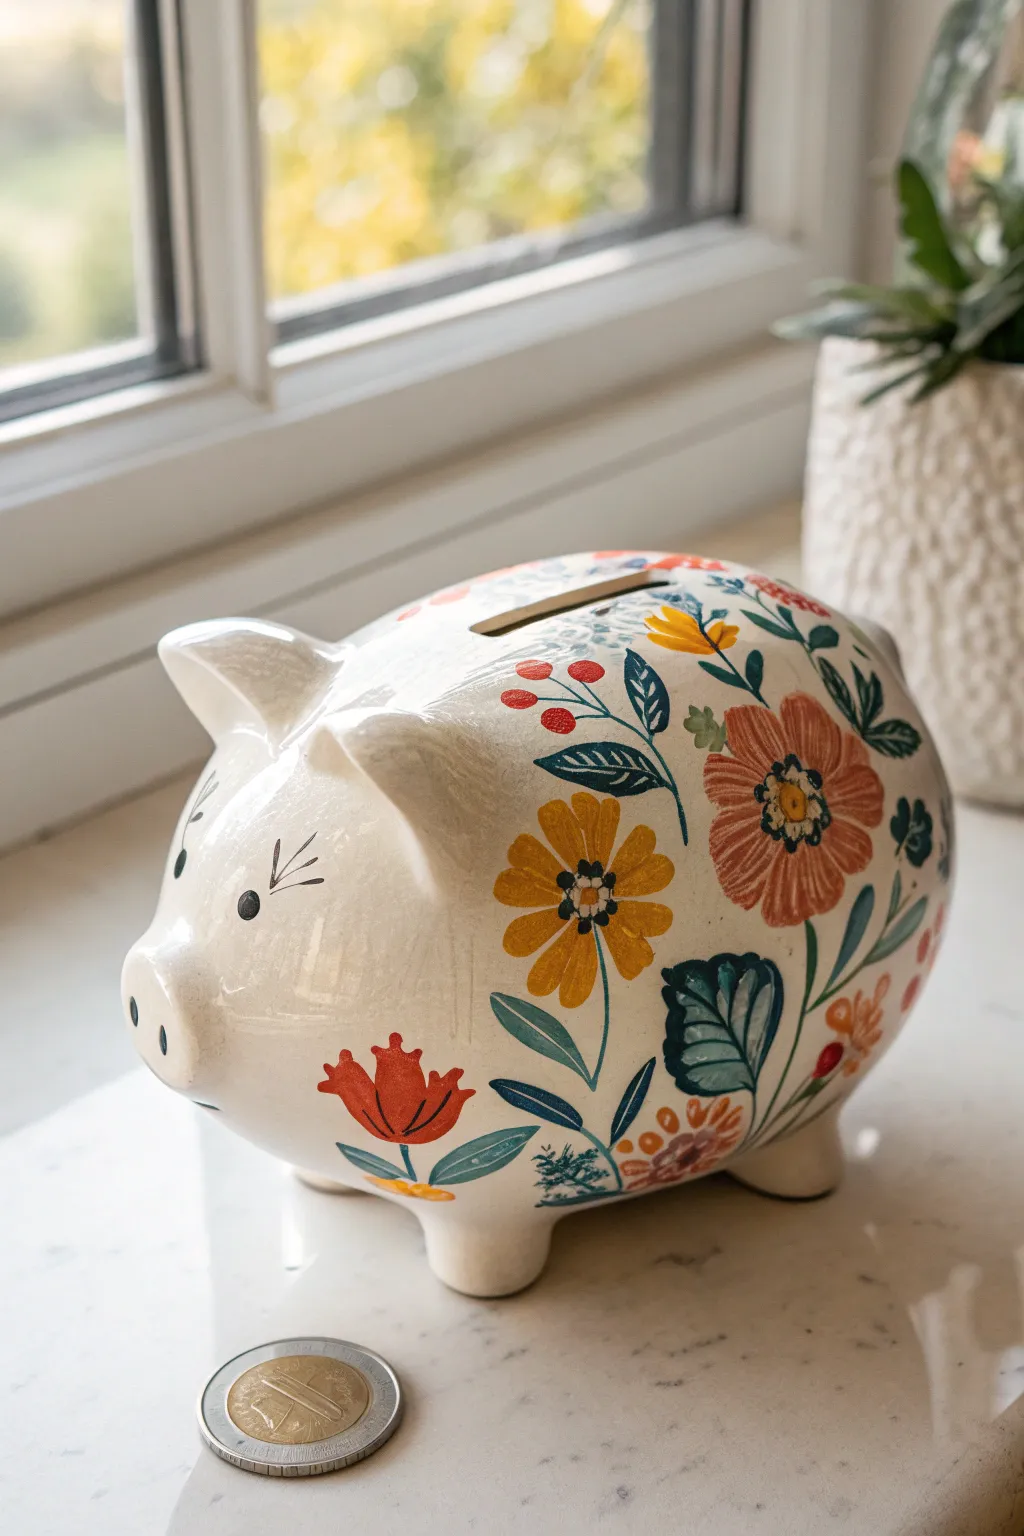
Cottagecore Strawberry-and-Daisy Pig

Transform a plain ceramic piggy bank into a whimsical piece of cottagecore decor with this sweet strawberry and daisy design. The gentle speckled pink background and charming hand-painted motifs give it a cozy, rustic feel perfect for a nursery or sunny shelf.
Step-by-Step Tutorial
Materials
- Unfinished ceramic piggy bank (bisque)
- Acrylic paints: warm pink, titanium white, ruby red, forest green, pollen yellow, black
- Medium soft flat brush (size 6 or 8)
- Small round detail brush (size 1)
- Old toothbrush (for speckling)
- Palette or paper plate
- Water cup and paper towels
- Glossy spray sealant or Mod Podge
Step 1: Base Coating
-
Clean the surface:
Wipe down your ceramic pig with a slightly damp cloth to remove any dust or oils from the store shelves. Let it dry completely. -
Mix the pink:
Create a warm, dusty pink shade by mixing your primary pink with a touch of white and a tiny dot of yellow to warm it up. You want a soft, milky strawberry milk color. -
Apply the first coat:
Using the flat brush, paint the entire pig with the pink mixture. Don’t worry if it looks streaky; acrylics usually need layers. -
Apply the second coat:
Once dry to the touch, apply a second coat of pink for full, opaque coverage. Ensure you get into the crevices behind the ears and under the snout. -
Create the speckled effect:
Dilute a small amount of white paint with water until it’s fluid. Dip an old toothbrush into it, then run your thumb across the bristles to flick tiny white speckles over the pink base. This mimics the texture of stoneware pottery.
Uneven Daisies?
If your petals look uneven, imagine a clock face. Paint petals at 12, 3, 6, and 9 first, then fill in the gaps. This helps keep spacing consistent.
Step 2: Painting the Fruit
-
Outline the strawberries:
Using your small round brush and ruby red paint, gently sketch teardrop shapes scattered randomly across the pig’s body. keep them relatively small to leave room for flowers. -
Fill the berries:
Fill in your red teardrops. You might need two thin coats of red to make the strawberries look juicy and bright against the pink background. -
Add the leaves:
With forest green paint and the tip of your round brush, paint three small leaves crowning the top of each berry. A single quick dab per leaf usually creates a nice shape. -
Add strawberry seeds:
Dip the very tip of your smallest brush (or a toothpick) into yellow or creamy white paint. Add tiny dots in offset rows on each red berry to create seeds.
Paint Stripping?
If the second coat of paint pulls up the first layer, you are painting too soon. Acrylics dry fast on the surface but need time to bond underneath.
Step 3: Adding Florals & Details
-
Paint daisy centers:
Place scattered dots of pollen yellow in the empty spaces between your strawberries. These will be the centers of your daisies. -
Paint the petals:
Using clean white paint and the round brush, press and drag outward from the yellow centers to create tear-shaped petals. I usually paint 5 to 7 petals per flower. -
Outline the petals:
For a distinctive illustrative look, mix a very dark grey or simply use black with a tiny bit of water to thin it. Carefully outline the white petals with extremely thin lines to make them pop. -
Define the snout:
Paint a thin, curved black line to define the snout shape, and add two vertical ovals for the nostrils. This gives the pig its character. -
Add the eyes:
Paint two small black circles for eyes on either side of the head. Add a tiny white reflection dot in each eye to bring the piggy to life. -
Seal the project:
Allow the paint to cure for at least 24 hours. Finish by applying a glossy spray sealant or a coat of Mod Podge to protect the finish and give it a ceramic shine.
Start saving your coins in style with this adorable handmade bank that looks straight out of a storybook


Wraparound Wildflower Meadow Pig
Transform a plain white ceramic piggy bank into a vibrant piece of home decor with this folk-art inspired floral design. Using a warm, muted palette of mustard, rust, and teal, you’ll create a charming garden scene that wraps seamlessly around the pig’s form.
How-To Guide
Materials
- Plain white ceramic piggy bank (glazed or bisque)
- Acrylic craft paints (mustard yellow, rust red/terracotta, deep teal, olive green, cream)
- High-gloss or satin polyurethane varnish
- Round synthetic brushes (sizes 2, 4, and 6)
- Fine liner brush (size 0 or 00)
- Rubbing alcohol
- Cotton pads
- Palette or small plate
- Water cup and paper towels
- Pencil (optional)
Step 1: Preparation and Base Layout
-
Clean surface:
Before painting, wipe the entire ceramic surface with rubbing alcohol on a cotton pad. This removes invisible oils or dust that could prevent the paint from adhering properly. -
Draft main flowers:
Lightly sketch the position of the three largest flowers using a pencil. Place one large bloom on the flank (like the pinkish-rust flower shown), one near the shoulder, and one towards the rear. Don’t worry about perfection; acrylic will cover the pencil marks. -
Mix your palette:
Squeeze out your rust red, mustard yellow, and deep teal paints. If the colors feel too bright, tone them down by mixing in a tiny dot of brown or complementary color to achieve that vintage, earthy look.
Slippery Surface?
If paint slides off the glaze, lightly sand the pig with fine-grit sandpaper (400 grit) first, or mix a medium/glass medium into your acrylics for better grip.
Step 2: Painting the Blooms
-
Paint large petals:
Using a size 6 round brush, load it with the rust-red paint. Create the large side flower by pressing the brush down and sweeping outward to form teardrop-shaped petals. Leave a small open circle in the center. -
Add yellow blooms:
Switch to clean mustard yellow paint. Create the second prominent flower (like the daisy shape) using the same press-and-sweep technique, but make the petals slightly flatter and wider. -
Create variation:
For visual interest, paint smaller accent buds. Use the rust color to paint a tulip-shaped bud near the bottom front leg, pointing upwards. -
Second coat:
Ceramic often makes paint streak. Once the first layer is dry to the touch—usually about 10 minutes—apply a second coat to the petals to ensure opaque, solid color.
Level Up: 3D Texture
Use ‘puff paint’ or dimensional fabric paint for the flower centers and leaf veins. Once painted over, it creates a tactile, embossed ceramic effect.
Step 3: Leaves and Stem Details
-
Draw main stems:
Mix olive green with a touch of teal for a rich foliage color. Using a size 2 brush, paint thin, curving lines connecting your flowers to an imaginary ground or flowing around the pig’s body. -
Paint broad leaves:
Add large leaves near the rust flower. Use the teal color to paint broad, leaf shapes. Notice how some leaves in the reference have two tones—you can paint half the leaf teal and the other half olive green while wet for a soft blend. -
Add filler sprigs:
Using the tip of your size 2 brush, add wispy sprigs with small dots (berries) in red or yellow to fill empty white spaces between the main floral elements. -
Layering details:
Once the base green leaves are dry, use a lighter cream or pale green shade to paint the veins on the teal leaves. This pop of contrast brings the foliage to life.
Step 4: Fine Details and Finishing
-
Flower centers:
Paint the centers of your main flowers. I like to use a contrasting color here—painting a white or cream circle in the center of the rust flower, and a dark center for the yellow daisy. -
Center detailing:
Using your finest liner brush (size 0), add tiny dots or star shapes inside the flower centers. This mimics the pollen and adds texture to the flat painting. -
The Face:
For the pig’s face, keep it minimal to let the flowers shine. Use black paint and the liner brush to paint a small vertical oval for the eye, adding three quick lashes pointing backward. -
Snout definition:
Paint two small vertical ovals on the snout for nostrils. Keep them symmetrical. -
Dry completely:
Let the pig sit undisturbed for at least 24 hours to allow the acrylics to cure fully. -
Seal:
Apply a coat of high-gloss or satin varnish over the entire pig. This protects the paint from chipping when coins are dropped in and gives it that finished clear-glazed pottery look.
Enjoy saving your coins in this lovely, hand-painted garden keepsake

The Complete Guide to Pottery Troubleshooting
Uncover the most common ceramic mistakes—from cracking clay to failed glazes—and learn how to fix them fast.
Farm Life Scene Painted Around the Belly

Transform a plain ceramic piggy bank into a charming piece of rustic decor with this detailed farm scene tutorial. Featuring a classic red barn and leafy trees painted around the belly, this project turns a simple coin keeper into a work of art.
Step-by-Step Tutorial
Materials
- White or cream glazed ceramic piggy bank
- Acrylic enamel paints (multi-surface or ceramic specific)
- Small flat brush (size 4 or 6)
- Fine liner brush (size 0 or 00)
- Rubbing alcohol and cotton pads
- Palette or paper plate
- Water cup and paper towels
- Pencil (optional for sketching)
- Clear acrylic sealer spray (gloss or satin)
Step 1: Preparation & Base Sketching
-
Clean the surface:
Before painting, wipe the entire surface of the piggy bank with rubbing alcohol and a cotton pad. This removes oils or dust that might prevent the paint from adhering properly to the glaze. -
Establish the horizon:
Visualize a horizon line running horizontally across the lower third of the pig’s belly. You can lightly sketch this with a pencil if you wish, but keep it faint as pencil can sometimes smear into light paint colors. -
Outline the barn:
Using a very dilute mix of red paint and your fine liner brush, sketch the outline of the barn. Position it slightly off-center on the pig’s side. Draw a simple pentagon shape for the front face and extend the roofline diagonally backward for perspective.
Paint Slipping?
If the paint beads up on the slick glaze, your coat is too thick or the surface is oily. Wipe it back, clean with alcohol again, and try stippling the first layer on rather than brushing.
Step 2: Painting the Landscape
-
Block in the ground:
Mix a light tan or sandy beige color. Using the flat brush, paint a distinct horizontal strip below your horizon line to represent the dirt path or field base. Don’t cover the very bottom of the feet; keep it centered on the belly curve. -
Add first grass layer:
Switch to a medium olive green. Using the tip of your flat brush or a round brush, paint loose, vertical strokes along the bottom edge of the beige strip to start forming the grassy foreground. -
Detail the grass texture:
While the olive green is still slightly tacky, mix in a darker forest green. Use quick, upward flicking motions with your liner brush to create individual blades of grass that overlap the beige ground slightly.
Step 3: Creating the Barn & Trees
-
Paint the barn siding:
Fill in the barn outline with a deep barn red. You may need two thin coats for full opacity. I usually let the first coat dry for about 10 minutes before applying the second to avoid lifting the paint. -
Add siding details:
Once the red base is dry, mix a lighter orange-red or use a thin white line to paint vertical stripes down the side of the barn to mimic wooden planks. -
Paint the roof:
Use a dark grey or slate blue for the roof. Pain the triangular roof section above the siding, ensuring the edges are crisp. -
Add barn door and window:
Use white paint and the liner brush to create the ‘X’ cross-brace door on the front. Add a small black rectangle higher up for the hayloft window. -
Paint the tree trunk:
To the left of the barn, paint a tree trunk using brown paint. Start thicker at the base and branch out into thinner limbs as you move upward, keeping the structure somewhat symmetrical. -
Stipple the leaves:
Load a small old brush or a stiff stencil brush with medium green paint. Dab—don’t drag—the brush around the branches to create the leafy canopy. -
Add leaf highlights:
Without cleaning your brush fully, pick up a tiny bit of yellow-green or light olive. Stipple these lighter highlights onto the tops of the leaf clusters to give the tree dimension. -
Create the tree on the right:
Repeat the tree painting process on the far right side of the pig’s flank, making this tree slightly taller and thinner to balance the composition.
Seasonal Details
Make it a harvest scene by painting tiny orange pumpkins near the barn door or adding red dots to the trees for an apple orchard vibe.
Step 4: Finishing Touches
-
Refine the sky:
The original ceramic color serves as the sky, but you can add a very faint wash of watered-down cream paint around the barn roof to soften the transition if the glaze is too stark white. -
Add final details:
Use your finest liner brush and black paint to add the weathervane or antenna detail to the peak of the barn roof. Add two small black dots for eyes on the pig’s face if they aren’t already painted. -
Surface curing:
Allow the paint to cure for at least 24 hours. If using ceramic paint, follow the manufacturer’s instruction for baking the piece in an oven to set the design permanently. -
Seal the artwork:
If you aren’t baking the piece, spray it with a light coat of clear acrylic sealer to protect the painting from scratches and handling.
Start saving your coins in style with your beautiful new barnyard creation
Ocean Wave Pig With Flowing Blue Underglaze
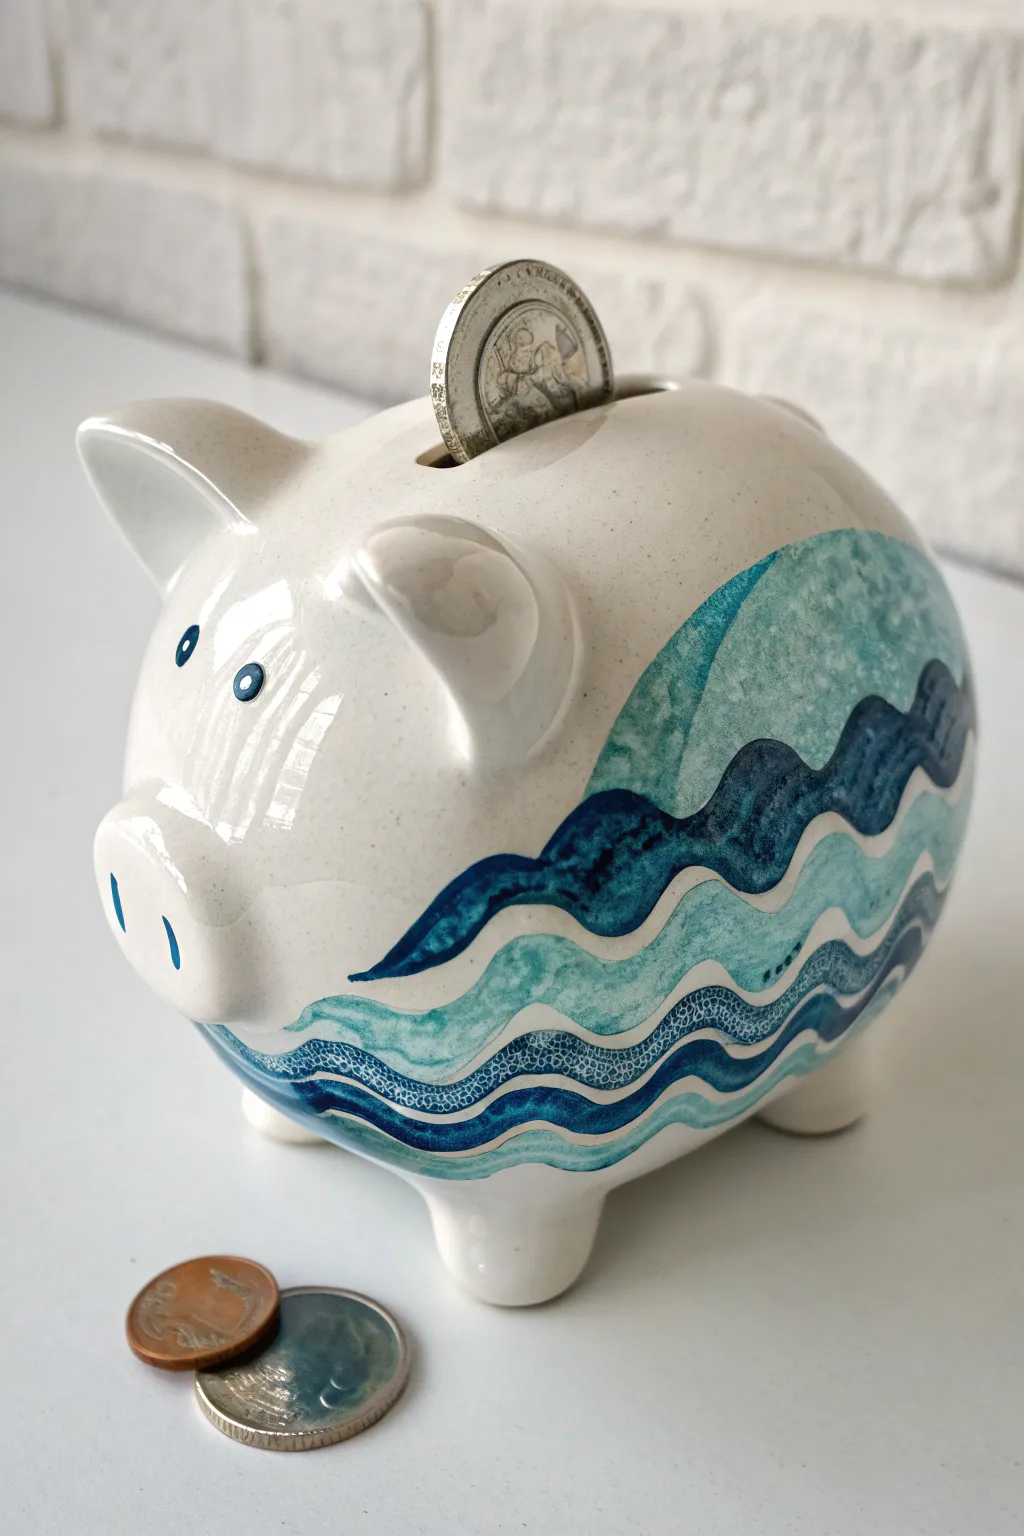
Transform a plain bisque piggy bank into a seascape treasure with this flowing wave design. Using layers of translucent blue underglaze, you’ll create a sense of movement and depth that mimics the rhythm of the ocean.
How-To Guide
Materials
- Bisque piggy bank (cone 04 white earthenware)
- Pencil
- Underglazes: Dark navy blue, teal/turquoise, light sky blue
- Fan brush or soft mop brush
- Round brushes (sizes 4 and 8)
- Detail liner brush (size 0 or 1)
- Clear dipping or brushing glaze
- Sponge and water bowl
- Kiln access
Step 1: Preparation and Sketching
-
Clean the Bisque:
Begin by wiping down your entire bisqueware pig with a damp sponge. This is crucial for removing any dust from the shelf display that could prevent the glaze from adhering properly. -
Map the Horizon:
Lightly sketch your wave pattern directly onto the bisque using a pencil. Start the highest wave crest near the back haunches, curving down towards the belly. -
Draw Flowing Layers:
Continue sketching wavy parallel lines beneath your first line. Vary the width slightly to create a natural, organic water look rather than perfect stripes. Aim for 3-5 distinct bands of waves. -
Mark the Face:
Sketch two simple oval eyes and two small vertical dashes on the snout for nostrils. Keep the face minimal to let the body design shine.
Step 2: Painting the Ocean
-
Paint the Lightest Wash:
Dilute your teal or turquoise underglaze with a little water to create a semi-transparent wash. Using the size 8 round brush, fill in the large, wide sections of the wave pattern. -
Add Texture:
While the teal layer is still damp, dab it gently with a dry sponge or crumpled paper towel to create a mottled, foamy texture within the paint. -
Apply the Mid-Tones:
Switch to your size 4 brush and apply the sky blue underglaze to alternating bands. I prefer to use quick, sweeping strokes here to emphasize the feeling of movement. -
Create the Dark Currents:
Using the dark navy blue underglaze, paint the boldest, thickest wave bands. This deep color anchors the design and provides necessary contrast against the white bisque. -
Layering Colors:
For extra depth, go back over the teal sections with a very watery wash of navy. Let it settle into the texture spots you created earlier. -
Define the Waves:
With your detail liner brush and full-strength navy underglaze, carefully outline the top edge of each wave band. This crisp line separates the colors and sharpens the design.
Fixing Smudges
If you drip dark blue on the white bisque, don’t just wipe it—it will stain. Let it dry, then scrape it off gently with a crafting knife or sandpaper before glazing.
Step 3: Patterning and Details
-
Add Dot Details:
Dip the handle end of a paintbrush into the white or light blue underglaze to stamp small dots into the darker blue waves, mimicking sea foam or bubbles. -
Create Texture Lines:
Using the liner brush, add very fine, wavy hatch marks inside the lighter blue bands. These tiny lines suggest the rippling surface of water. -
Paint the Face:
Fill in the eye ovals with the dark navy blue. Carefully paint the two nostril dashes with the same color. -
Add Eye Highlights:
Once the navy eyes are dry to the touch, add a tiny dot of white underglaze to the center of each pupil to bring the pig to life.
Add Gold Accents
After the initial firing, apply a low-fire gold luster over the wave outlines and fire again at cone 018 for a shimmering, luxurious finish.
Step 4: Finishing and Firing
-
Final Inspection:
Check for any smudges on the white areas of the pig. The graphite pencil lines will burn off in the kiln, but stray paint needs to be scraped off gently with a knife or wiped with a clean sponge. -
Apply Clear Glaze:
Once the underglaze is bone dry, apply 2-3 coats of clear brushing glaze over the entire pig, or dip it if you have a dipping container. Ensure even coverage to avoid cloudy spots. -
Stilt and Fire:
Wipe the bottom of the pig’s feet completely clean of glaze. Place on stilts in the kiln to prevent sticking and fire to the recommended temperature for your clay and glaze combination (usually cone 06 or 05).
Once cooled, your piggy bank is ready to start saving coins for your next beach vacation


What Really Happens Inside the Kiln
Learn how time and temperature work together inside the kiln to transform clay into durable ceramic.
Geometric Color-Block Pig in Modern Tones
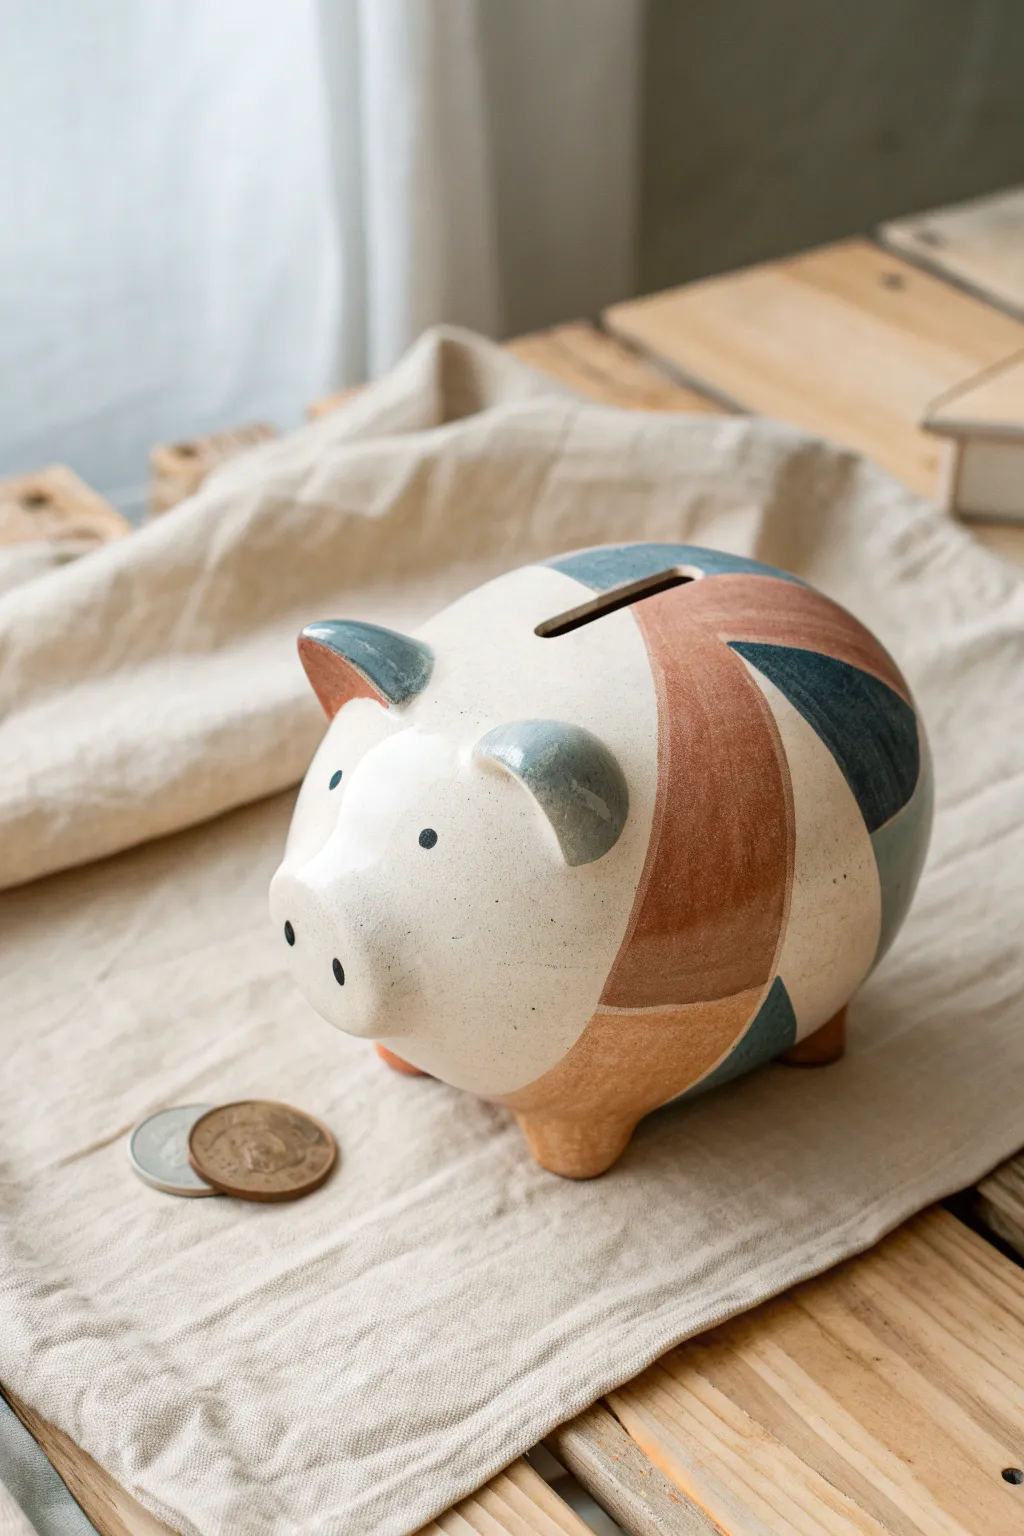
Transform a plain ceramic piggy bank into a modern decor piece with this geometric design. Featuring a sophisticated palette of terracotta, slate blue, and creamy white, this project uses bold angles to create a playful yet mature look.
Detailed Instructions
Materials
- Bisque or plain white ceramic piggy bank
- Acrylic paints (matte finish): Cream/Off-White, Terracotta/Rust, Slate Blue
- Painter’s tape (low-tack or washi tape)
- Flat synthetic paintbrushes (medium and small)
- Small round detail brush
- Pencil and eraser
- Palette or paper plate
- Matte clear sealant spray
Step 1: Preparation and Base Coat
-
Clean surface:
Wipe down your ceramic pig with a damp cloth to remove any dust or oils. Let it dry completely before starting. -
Mix the base color:
Mix a small amount of warm brown into your white paint to create a soft, creamy off-white shade that mimics natural pottery. -
Apply base coat:
Paint the entire pig with the cream mixture. Use smooth, long strokes to minimize texture. I find two thin coats work better than one thick one. -
Dry thoroughly:
Let the base coat dry for at least an hour. The paint must be fully cured so the tape doesn’t peel it up later.
Clean Lines Only
If paint bleeds under the tape, wait for it to dry. Then, gently scratch the excess away with a toothpick or paint over the error with the base color.
Step 2: Designing the Geometry
-
Map out sections:
Using a pencil, very lightly sketch large, angular shapes across the pig’s body. Think in triangles and trapezoids that wrap around the curves. -
Tape the lines:
Apply painter’s tape along your pencil lines. Press the edges of the tape down firmly with your fingernail to prevent paint bleed. -
Section strategy:
You won’t be able to paint every section at once since they touch. Tape off non-adjacent shapes first (e.g., one blue triangle on the back and one rust section on the leg).
Step 3: Painting the Color Blocks
-
Apply Terracotta:
Load a flat brush with your terracotta paint. Fill in the designated shapes, brushing away from the tape edge initially to seal the line. -
Apply Slate Blue:
Switch to a clean brush and paint your slate blue sections. The contrast between the cool blue and warm rust is key to this look. -
Paint the ears:
Paint the inner ear detail. As seen in the reference, use the slate blue for the interior of the ears to add depth. -
Remove tape (Round 1):
While the paint is still slightly tacky (not fully wet, not bone dry), carefully peel back the tape at a 45-degree angle. -
Let dry and re-tape:
Allow the first set of shapes to dry completely. Then, apply new tape over the dried paint to mask off the remaining negative spaces. -
Fill remaining gaps:
Paint the remaining geometric sections, ensuring the colors touch cleanly without overlapping messily. -
Final tape removal:
Remove the second round of tape to reveal the full interlocking pattern.
Go Textured
Mix baking soda into your acrylic paint before applying. This creates a grainy, ceramic-like texture that makes the piece look like high-end pottery.
Step 4: Details and Finish
-
Touch up edges:
Use a small detail brush and your cream base color to tidy up any lines that might have bled or look uneven. -
Add the eyes:
Dip the back end of a paintbrush handle into black or dark grey paint. Dot it onto the face to create perfectly round eyes. -
Paint the snout:
Using the same dotting technique, add two smaller dots on the nose for the nostrils. -
Check the feet:
If you want the feet to look ‘dipped,’ carefully paint the bottom inch of each leg in the terracotta tone. -
Seal the project:
Once fully cured (wait 24 hours), spray the entire pig with a matte clear coat to protect the finish without adding unwanted shine.
Place your stylish new bank on a shelf and start saving up for your next craft project
Speckled Terrazzo Pig With Confetti Chips
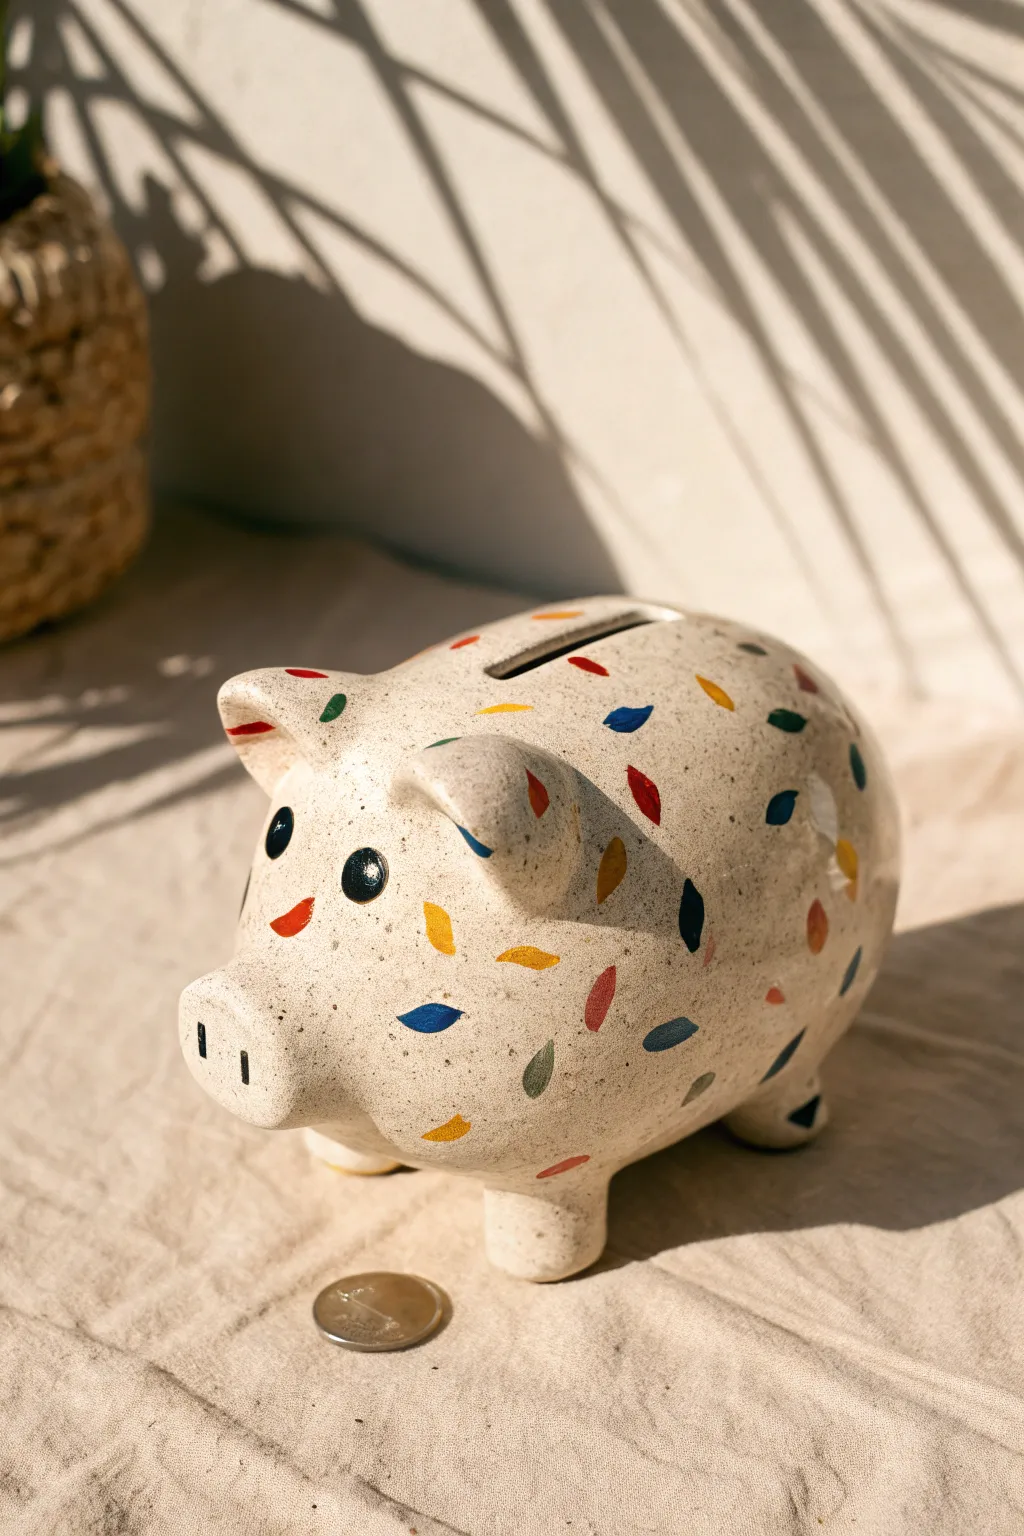
Transform a plain ceramic pig into a trendy, modern decor piece with this fun terrazzo-inspired finish. The speckled stone effect background paired with bright, playful confetti chips creates a high-end pottery look without the kiln.
How-To Guide
Materials
- Unfinished ceramic piggy bank
- Stone-effect spray paint (e.g., Krylon ‘Make It Stone’ in Granite or Beige)
- Acrylic paints (primary blue, red, yellow, green, orange, mustard)
- Small flat paintbrush (size 2 or 4)
- Matte or satin clear sealant spray
- Painter’s tape
- Scrap paper or plastic drop cloth
- Small paper plate or palette
- Coin for sizing reference (optional)
Step 1: Preparation & Base Coat
-
Prepare the surface:
Wipe down your ceramic piggy bank with a damp cloth to remove any dust or oils. Let it dry completely. If the original surface is very glossy, you might want to give it a light sanding with fine-grit sandpaper to help the paint adhere better. -
Protect the coin slot:
Take a small piece of painter’s tape and carefully mask off the coin slot at the top. This prevents the textured spray paint from clogging the opening or creating rough edges where coins need to pass. -
Mask the bottom stopper:
Don’t forget the bottom! Flip the pig over and tape over the rubber or plastic stopper to keep it clean and functional. -
Set up your spray zone:
Move to a well-ventilated area, preferably outdoors. Lay down your scrap paper or plastic drop cloth to catch overspray. -
Apply the stone texture:
Shake your stone-effect spray paint vigorously for at least one minute. Hold the can about 10-12 inches away and apply a light, even coat over the entire pig. The goal is a uniform speckled beige texture. -
Let it cure:
Allow this first coat to dry for roughly 15-20 minutes. If the coverage looks patchy, apply a second light coat. I prefer to do two thin coats rather than one heavy one to avoid drips. Let the final base coat dry for at least 3-4 hours, or overnight for best results.
Brush control secret
Use a flat, square-tipped brush rather than a round one. Dabbing the flat edge creates instant geometric ‘chip’ shapes with sharp corners, mimicking real terrazzo tiles perfectly.
Step 2: Painting the Confetti
-
Plan your palette:
Squeeze dime-sized amounts of your acrylic paints onto your palette. You want a mix of bold primaries (blue, red) and earthy tones (mustard, olive green) to achieve that authentic terrazzo look. -
Practice your shapes:
Before painting on the pig, practice making small, irregular polygon shapes on a piece of paper. Think of them as shards of tile or broken glass—some triangular, some trapezoidal, some like grain rice. -
Start with the first color:
Dip your small flat brush into your first color (e.g., deep blue). Paint random shapes scattered across the pig’s body. Keep them spaced out generously to leave room for other colors. -
Rotate and evaluate:
Turn the pig frequently as you paint. It’s easy to accidentally leave a large bald spot on one side. Make sure the distribution feels random but balanced. -
Add secondary colors:
Clean your brush and switch to your next color, perhaps a bright red or orange. Paint these shapes in the gaps between the blue ones. Vary the size slightly—some tiny specks and some larger chips create visual interest. -
Layer in earthy tones:
Now introduce your mustard yellow and olive green paints. These softer tones help bridge the gap between the neutral stone background and the bright primary colors. -
Addressing the face:
For the eyes, paint simple black circles. Add a small white highlight dot if you want a cuter expression, or keep them solid black for a modern graphic look. Paint two small vertical lines on the snout for nostrils. -
Detail check:
Look closely at the confetti chips. If the stone texture is making the paint look rough or thin, go back and add a second layer of acrylic paint to the chips to make the colors pop.
Metallic flair
For a luxe twist, swap one of the paint colors for metallic gold or copper leaf. Apply a few shiny flecks sparingly among the matte colors to catch the light.
Step 3: Sealing & Finishing
-
Dry time:
Let your painted confetti chips dry completely. Acrylics dry fast, but give it an hour just to be safe so you don’t smudge your hard work during the sealing process. -
Remove the tape:
Carefully peel off the painter’s tape from the coin slot and the bottom stopper. Inspect the edges and tidy up with a tiny bit of paint if any spray crept under. -
Seal the project:
To protect the finish from chipping when handling coins, spray the entire pig with a clear matte or satin sealant. A glossy finish might look too plastic, so matte works best to preserve the stone effect. -
Final cure:
Let the sealant cure for 24 hours before dropping in your first coin. This ensures the surface is fully hardened and non-tacky.
Start saving your spare change in style with your new speckled masterpiece

TRACK YOUR CERAMIC JOURNEY
Capture glaze tests, firing details, and creative progress—all in one simple printable. Make your projects easier to repeat and improve.
Scalloped Mermaid-Scale Pig for Extra Texture
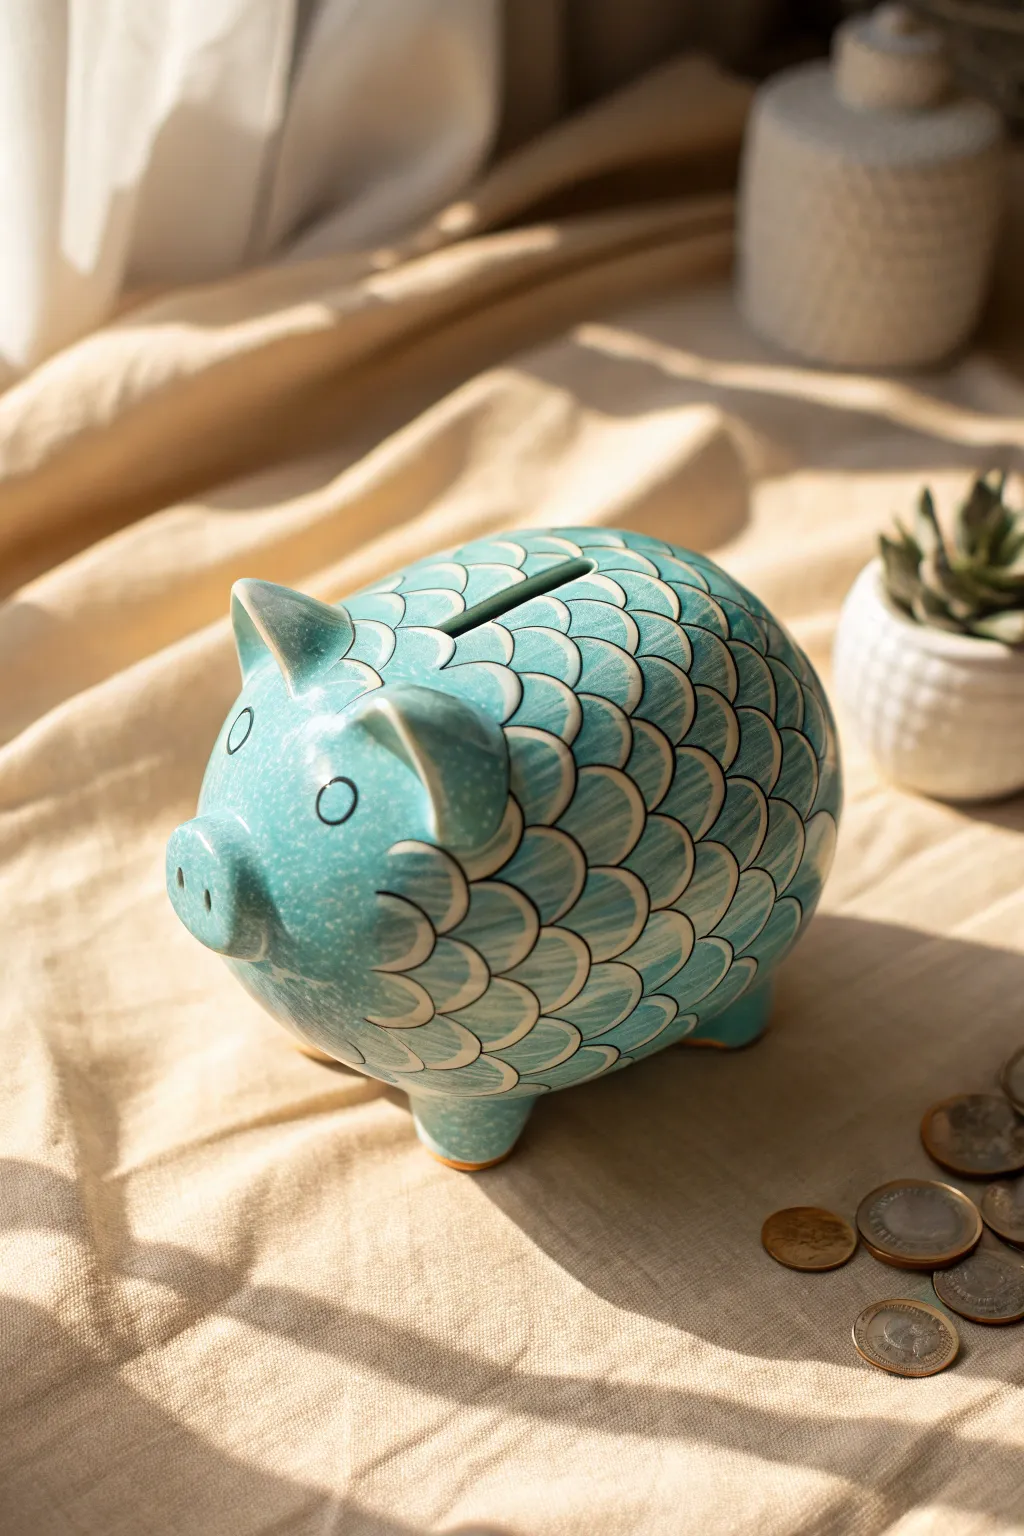
Transform a plain ceramic piggy bank into a treasure from the deep with this scalloped scale technique. The semi-translucent turquoise glaze highlights the texture beautifully, creating a whimsical piece that feels both organic and magical.
Step-by-Step
Materials
- Plain bisque ceramic piggy bank
- Pencil
- Carving tool (U-gouge or ceramic loop tool)
- Damp sponge
- Turquoise celadon glaze (translucent)
- Clear glaze (optional, for extra shine)
- Fan brush and detail brush
- Soft cloth or towel
- Ceramic kiln (or access to firing services)
Step 1: Preparation and Patterning
-
Clean surface:
Begin by wiping down your bisque piggy bank with a slightly damp sponge to remove any dust or grease that might interfere with your work. -
Map the scales:
Starting near the tail, use a regular pencil to lightly sketch your first row of U-shaped scallops. Stagger the next row like bricks so the bottom point of the new scale sits between the arches of the previous row. -
Refine the face:
When you reach the head, carefully sketch around the ears and eyes, leaving the snout area smooth and unscaled to create a cute facial definition.
Celadon Secret
Use a glaze specifically labeled ‘breaking’ or ‘celadon.’ These form the two-tone effect naturally by pooling in the textures.
Step 2: Carving the Texture
-
Select your tool:
Choose a U-shaped gouge or a small wire loop tool. The size of the loop determines the depth and width of your scale outline. -
Carve the outlines:
Gently press the tool into the clay following your pencil lines. You don’t need to go deep; just enough to create a distinct groove that will catch the glaze later. -
Create layering:
Where the scales overlap, ensure the lines connect cleanly so it looks like physical layers rather than just a drawing. -
Clean the burrs:
After carving the entire body, use a soft, dry brush or your finger to gently rub away the little clay crumbs (burrs). I find a quick wipe with a very slightly damp sponge smoothes sharp edges perfectly.
Golden Touch
After the main firing, apply metallic gold luster to the rims of the scales and fire again at a lower temperature for luxe detailing.
Step 3: Glazing and Finishing
-
Initial wash:
Dip a sponge in clean water and wipe the pig one last time. This helps the glaze flow into the crevices without drying instantly. -
Apply the glaze:
Using a fan brush, apply a generous coat of translucent turquoise celadon glaze over the entire pig. The magic of celadon is that it pools in the carved grooves, appearing darker, while staying light on the high points. -
Wipe back (optional):
For a more rustic look like the photo, wait for the glaze to dry slightly, then use a damp sponge to gently wipe the high points of the scales. This reveals a bit more of the clay body underneath. -
Detail the face:
Use a smaller detail brush to ensure glaze gets into the carved outlines of the eyes and snout without flooding them completely. -
Check the bottom:
Ensure the feet bottoms are wiped completely clean of glaze; otherwise, your pig will fuse to the kiln shelf during firing. -
Dry thoroughly:
Let the piece dry completely for at least 24 hours. Any trapped moisture can cause cracking during the firing process. -
Final Fire:
Fire the piece in a kiln according to your clay and glaze specifications (usually Cone 5 or 6 for stoneware). This melts the glaze into that durable, glass-like finish shown in the photo.
Once cooled, your mermaid pig is ready to keep your coins safe in sparkly, aquatic style
Galaxy Night-Sky Pig With Star Splatter
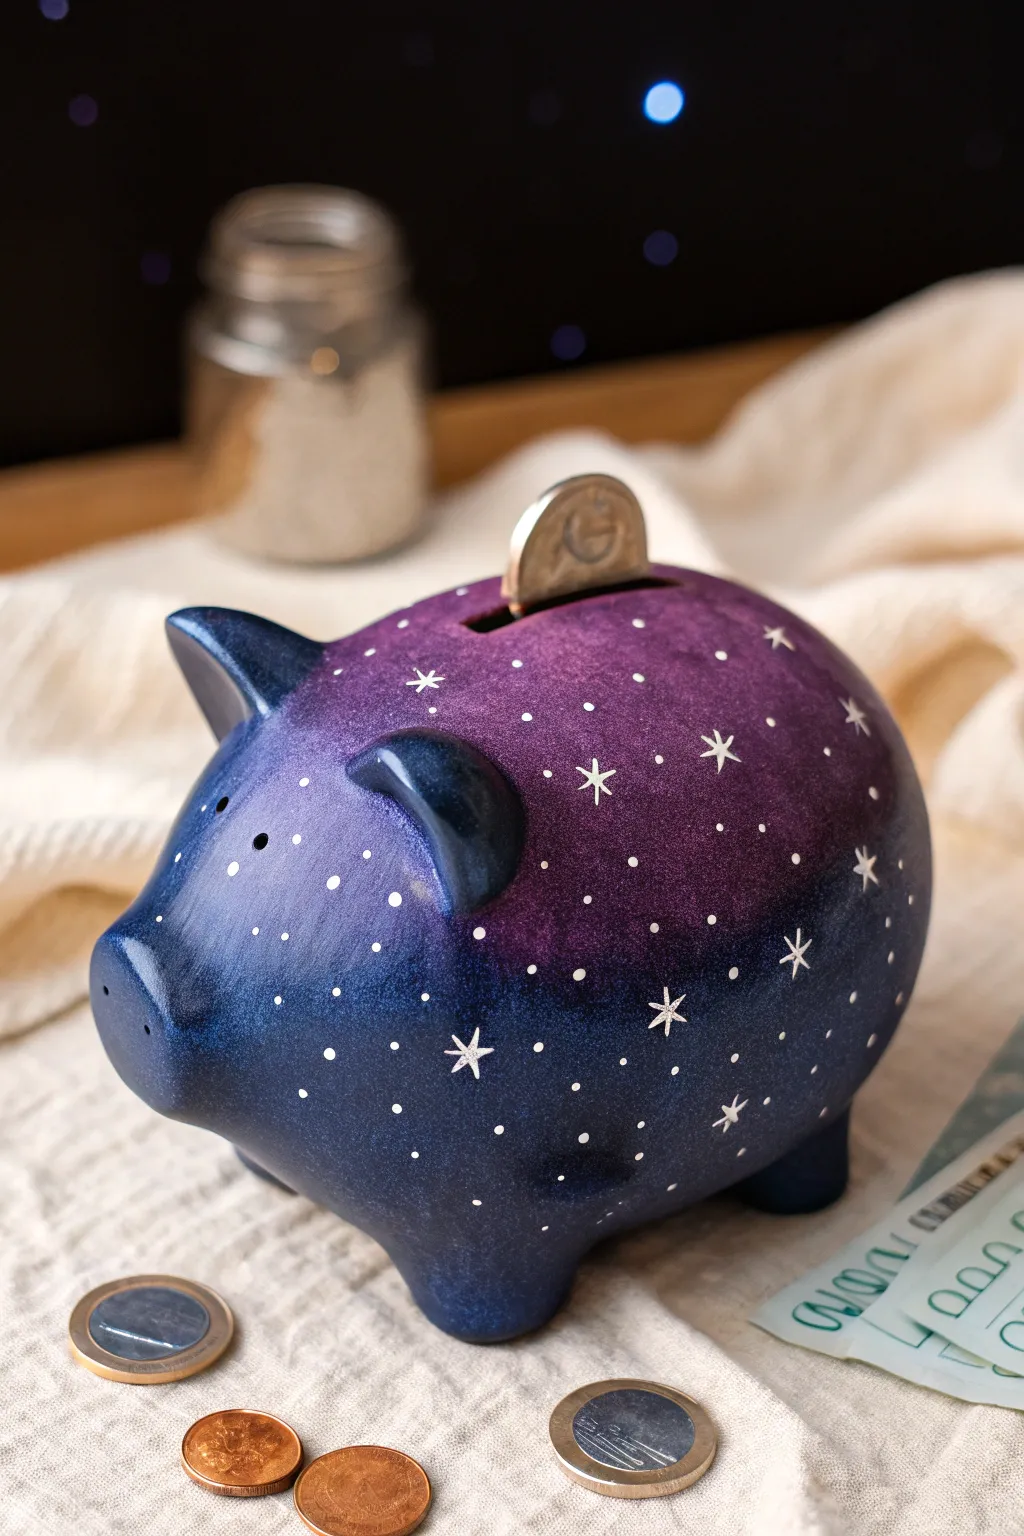
Transform a plain ceramic bank into a dreamy celestial body with this galaxy-themed project. Using a blend of rich purples and deep blues with hand-painted stars, this piggy bank brings the beauty of deep space right to your savings goal.
Step-by-Step Tutorial
Materials
- Unpainted ceramic piggy bank
- Acrylic paints (Titanium White, Phthalo Blue, Dioxazine Purple, Black)
- Medium flat brush
- Small round brush (size 2-4)
- Fine liner brush (size 0 or 00)
- Makeup sponge or craft sponge
- Gloss varnish or clear sealant spray
- Palette or paper plate
- Water cup and paper towels
- Old toothbrush (optional for spatter)
Step 1: Base Coat & Gradient
-
Prep the surface:
Wipe down your ceramic pig with a damp cloth to remove any dust or oils. Let it dry completely before starting to ensure the paint adheres smoothly. -
Apply the first base color:
Using your medium flat brush, paint the front half of the pig—specifically the snout, face, and front legs—with a solid coat of Phthalo Blue. I like to bring this blue about halfway down the body. -
Apply the second base color:
Clean your brush and paint the rear half of the pig, including the back legs and curly tail, with Dioxazine Purple. Don’t worry about the blend just yet; simply get the color on the ceramic. -
Blend the transition:
Where the blue and purple meet in the middle, use a slightly damp makeup sponge. Gently dab along the seam to blur the line, creating a soft transition between the two cosmic colors. -
Add depth with black:
To make the colors richer, mix a tiny dot of black into your blue and purple separately. Use the sponge to dab this darker shade near the very bottom of the feet and under the belly for a shadow effect. -
Layer for opacity:
Ceramic often soaks up acrylics. Once the first layer is touch-dry, sponge on a second coat of your blue gradient and purple gradient to make the colors vivid and opaque. -
Let it cure:
Allow the base gradient to dry completely for at least 30 minutes. The surface must be bone dry before you start the delicate star work.
Sponge Technique Tip
When blending the purple and blue, keep your sponge relatively dry. Too much water will lift the previous layer of paint rather than blending the new one.
Step 2: Stars & Constellations
-
Create the star splatter:
Dilute a small amount of Titanium White paint with a few drops of water until it has an inky consistency. -
Flick the stars:
Dip an old toothbrush or a stiff bristled brush into the thinned white paint. Using your thumb, flick the bristles to spray tiny white specks across the entire body of the pig. Practice on paper first to control the spray. -
Paint prominent stars:
Load your fine liner brush with undiluted white paint. Choose random spots on the body to paint larger, specific stars. Paint a small cross shape for a twinkling effect. -
Add detail to stars:
For the largest stars, carefully pull the paint outward from the center to create longer, sharper points, mimicking the classic four-point star shape seen in the reference. -
Dot in distant planets:
Using the handle end of your small paintbrush, dip it in white paint and dot random circles onto value-empty spaces to represent larger, distant planets or stars. -
Refine the eyes:
If paint covered the eye indentations too much, use a small amount of black on a fine brush to redefine the pupil, or simply ensure the blue/purple coat is smooth inside the indentation.
Glow in the Dark
Mix glow-in-the-dark medium with your white paint for the stars. During the day it looks normal, but at night your piggy bank will turn into a glowing constellation.
Step 3: Finishing Touches
-
Inspect and touch up:
Look over the pig for any bald spots in the base coat or smudged stars. Touch up small areas with your liner brush as needed. -
Seal the galaxy:
Once all paint is fully cured (give it a few hours), apply a coat of gloss varnish. This not only protects the paint from chipping but gives the galaxy a wet, shiny look that mimics the brilliance of space.
Now your savings can grow safely within this beautiful piece of the universe
Patchwork Quilt Pig With Stitched Line Details
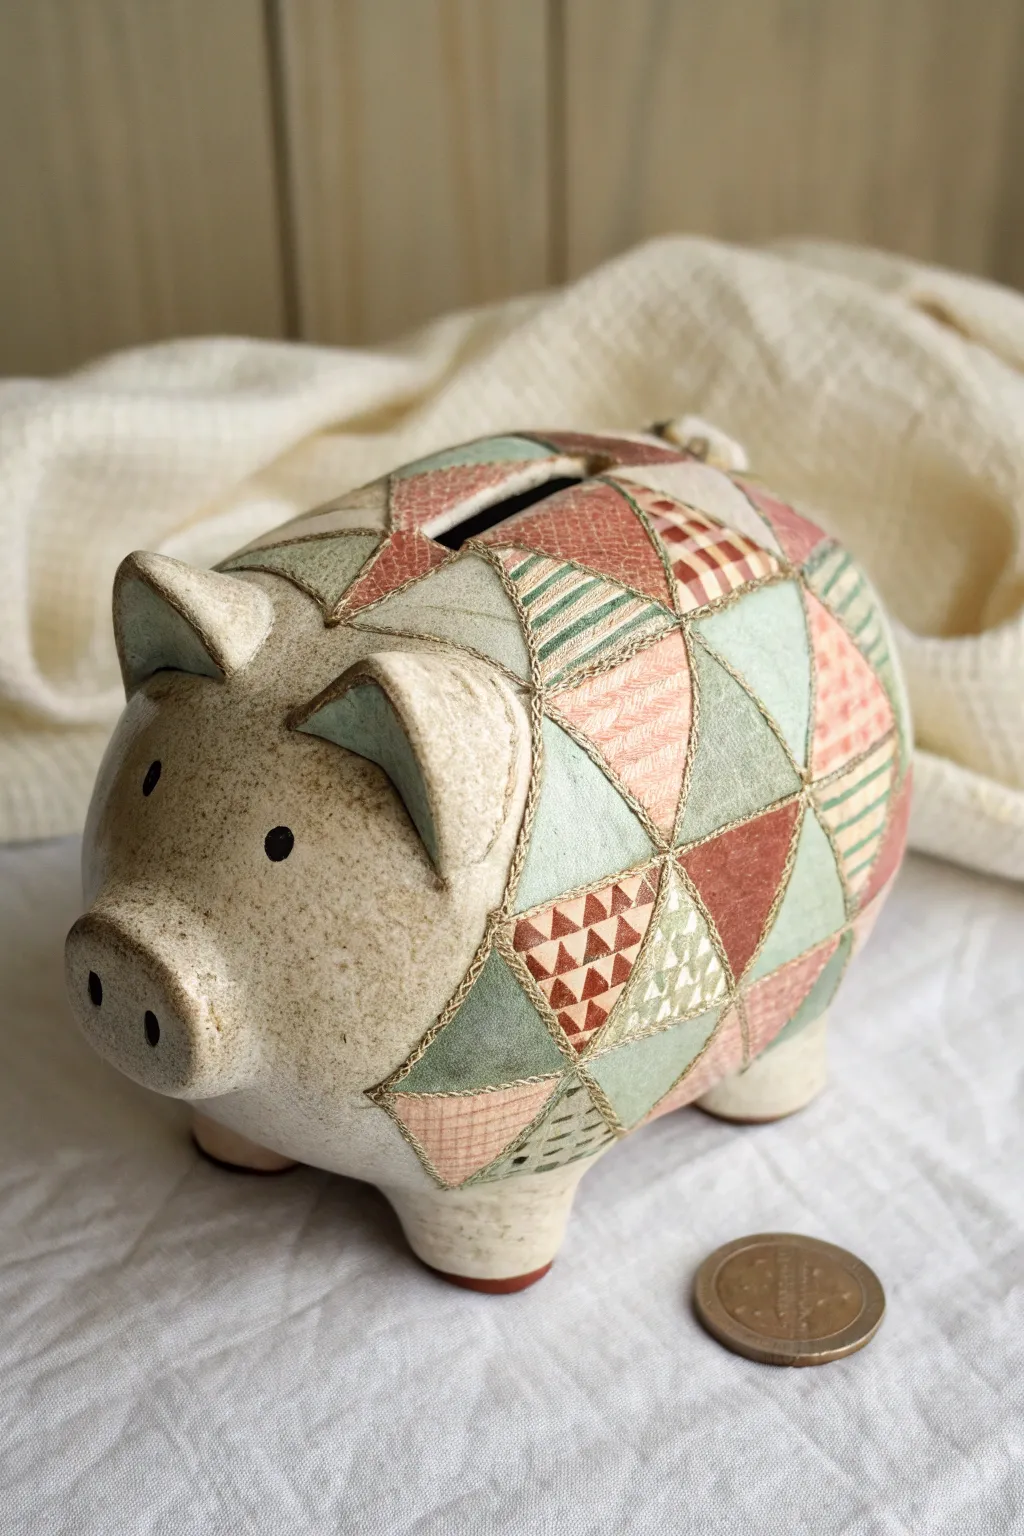
Transform a plain ceramic pig into a cozy work of art with this faux-patchwork quilt design. Using underglazes and sgraffito-like detailing, you’ll create the illusion of stitched fabric triangles for a charming, rustic finish.
Step-by-Step
Materials
- Bisque-fired ceramic piggy bank
- Pencil
- Underglazes (muted teal, terracotta, cream/off-white, rust red)
- Fine detail brushes
- Needle tool or fine sgraffito tool
- Dark brown or black underglaze wash (for stitching)
- Clear matte or satin glaze
- Ruler (flexible if possible)
- Damp sponge
Step 1: Planning the Pattern
-
Surface Preparation:
Wipe down your bisque-fired pig with a damp sponge to remove any dust or oils from handling. Let it dry for a few minutes until the surface is no longer cool to the touch. -
Map the Grid:
Using a pencil, lightly sketch a geometric grid across the body of the pig. Start with a series of intersecting diagonal lines to create diamond shapes, then bisect those diamonds to form triangles. -
Adjusting for Curves:
The pig’s body is round, so your lines won’t be perfectly straight. Allow the pencil lines to curve naturally with the form of the belly and back, just like fabric would drape over a round object. -
Face and Legs:
Leave the face (snout to just behind the eyes) and the lower legs unpatterned. Mark a soft, curved boundary line where the ‘quilt’ pattern stops and the plain ceramic skin begins.
Use Wax Resist
Apply wax resist over finished triangles before painting adjacent ones. This prevents colors from bleeding into each other.
Step 2: Painting the Patchwork
-
Base Colors:
Select 3-4 distinct colors for your palette. I prefer muted earth tones like sage green, dusty rose, and cream to mimic vintage fabrics. Paint individual triangles in alternating colors so no two touching triangles are the same shade. -
Apply Layers:
Apply 2-3 coats of underglaze to each triangle to ensure opacity. Let each coat dry until it’s chalky before applying the next to avoid dragging the previous layer. -
Spotted Texture:
Once the base coats are dry, choose a few random triangles to pattern. Use a fine brush to add small dots or distinct speckles in a contrasting color (like rust over cream). -
Striped Texture:
On other triangles, paint fine parallel lines to create a striped fabric look. Vary the direction of the stripes—horizontal, vertical, and diagonal—to enhance the patchwork effect. -
Checkered and Triangle Patterns:
For variety, paint tiny grid patterns or miniature triangles inside larger ones. This mimics different fabric swatches being sewn together.
Step 3: Stitching and Distressing
-
Simulating Seams:
Mix a small amount of dark brown underglaze with a little water to create a thin liner consistency. Using your finest liner brush, paint thin lines over the pencil grid marks between the colored triangles. -
Adding the Threads:
Make small, dashed hatch marks across the seam lines you just painted. These hatch marks should look like thread binding the ‘fabric’ pieces together. -
Sgraffito Detailing:
Alternatively, if you prefer texture over painted lines, use a needle tool to gently scratch through the underglaze layers down to the clay body to define the seams. This creates a physical groove. -
Face Details:
Paint two solid black circles for the eyes. Add a touch of the pink or terracotta color inside the ears and lightly dab the snout for a rosy look. -
Antiquing Wash:
Dilute a brown underglaze heavily with water. Brush this wash over the unpainted face and legs, then immediately wipe most of it back with a sponge. This settles into the clay pores, giving the ‘skin’ a speckled, aged appearance.
Texture Imprint
Before the clay is fired (greenware stage), press real fabric into the damp clay triangles for authentic texture.
Step 4: Glazing and Firing
-
Drying Time:
Allow the underglaze work to dry completely, preferably overnight, to ensure the detailed stitching doesn’t smear during glazing. -
Glaze Application:
Apply a clear glaze over the entire piece. A matte or satin finish is best here, as a high-gloss finish can make the ‘fabric’ look too plastic and obscures the subtle texture. -
Final Fire:
Fire the piece in the kiln according to the clay and glaze manufacturer’s instructions (typically cone 5 or 6 for stoneware).
Once fired, you’ll have a charming keepsake that looks just like a soft, hand-stitched toy but with the durability of ceramic
Polka Dot Pig With a Two-Tone Belly Dip
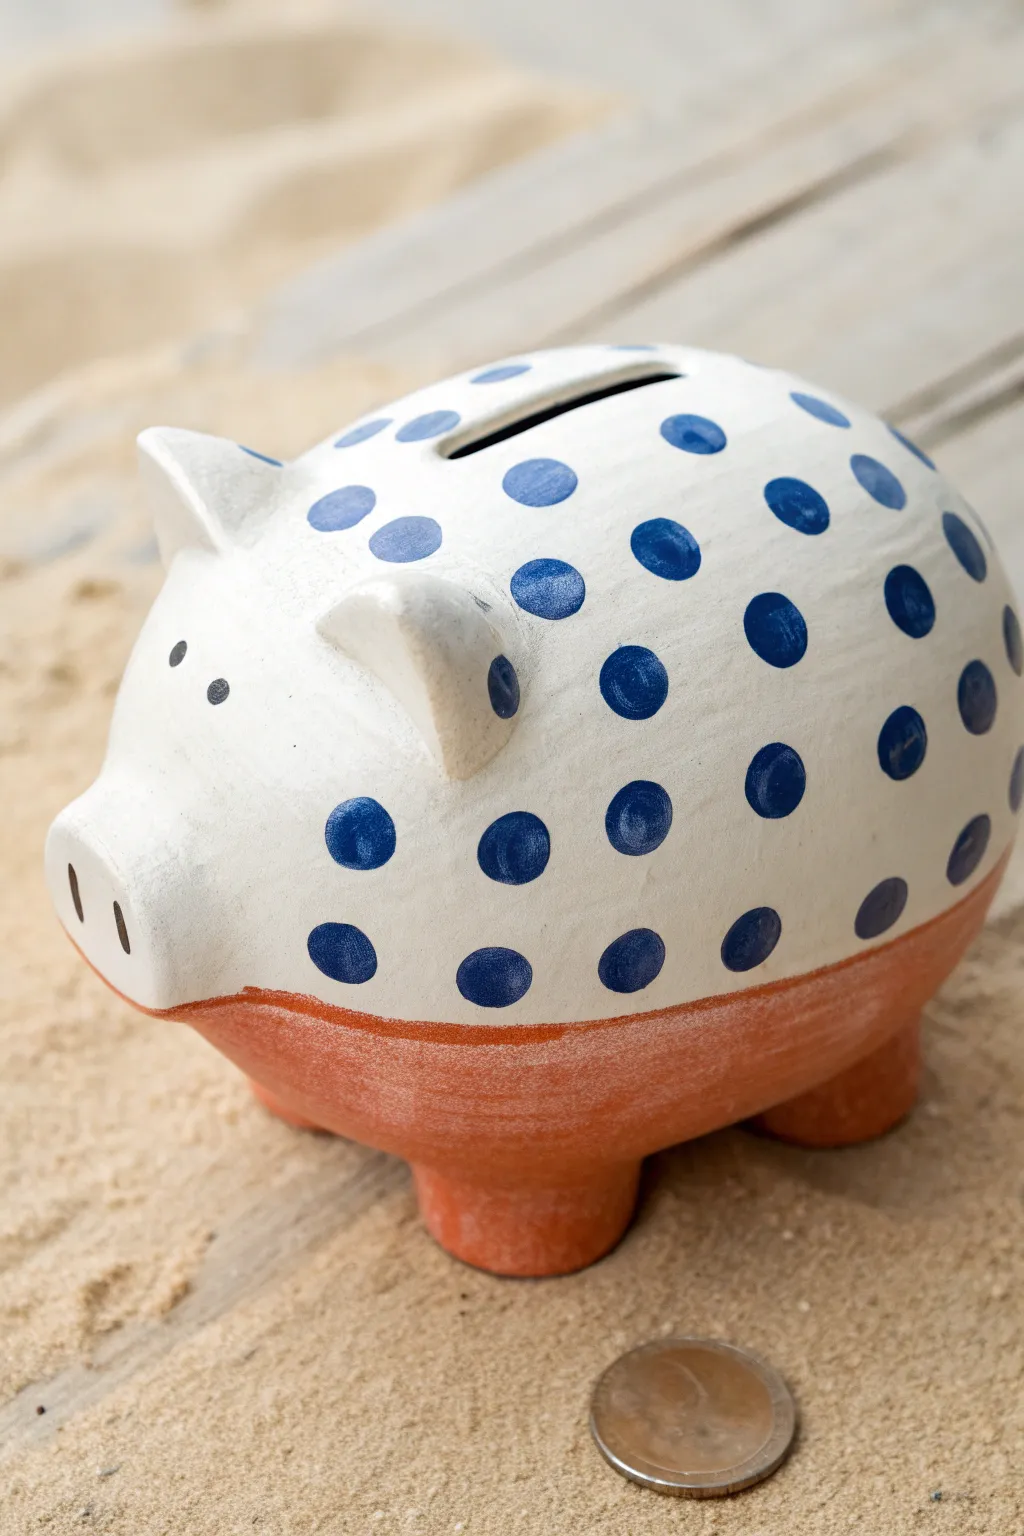
Give a classic white piggy bank a playful makeover with this charming dip-dye effect. Combining a crisp white base with hand-painted polka dots and a warm terracotta belly creates a modern yet rustic piece perfect for saving pennies.
Detailed Instructions
Materials
- Unfinished ceramic bisque piggy bank
- White acrylic paint (matte finish)
- Terracotta or rust-orange acrylic paint
- Royal blue or navy blue acrylic paint
- Wide flat paintbrush
- Small round paintbrush or foam pouncer (approx. 1/2 inch)
- Painter’s tape or masking tape
- Palette or paper plate
- Water cup and paper towels
- Clear matte varnish spray (optional)
Step 1: Preparing the Base
-
Clean the surface:
Begin by wiping down your ceramic pig with a slightly damp cloth to remove any dust or debris from the shelf. Let it dry completely before starting. -
Apply the base coat:
Using the wide flat brush, paint the entire piggy bank with the white acrylic paint. Smooth out your brushstrokes as you go to avoid ridges. -
Layer for opacity:
Ceramics can be thirsty, so you will likely need a second or even third coat of white paint to get a solid, opaque finish. Allow the paint to dry fully between layers. -
Define the dip line:
Once the white base is bone dry, decide where you want the ‘belly dip’ line to start. On our model, this is low on the body just above the legs. Apply a strip of painter’s tape horizontally around the entire pig at this level. Press the edges firmly to seal.
Step 2: Creating the Belly Dip
-
Paint the bottom section:
Use your terracotta or rust-orange paint to fill in the area below the tape line. This includes the belly and all four legs. -
Get full coverage:
Paint the underside of the belly and the bottom of the feet as well. You might need to flip the pig gently upside down—just be sure the white top half is dry so you don’t smudge it. -
Clean removal:
While the terracotta paint is still slightly tacky but mostly dry, carefully peel away the painter’s tape. Pulling it off at a 45-degree angle usually gives the crispest line. -
Touch up edges:
If any orange paint bled under the tape, use a tiny brush with white paint to clean up the line once everything is dry.
Bleeding Lines?
If paint seeps under your tape, don’t panic. Wait for it to dry completely, then scrape the excess gently with a craft knife or paint over it with the base color.
Step 3: Adding the Polka Dots
-
Plan your pattern:
Before painting, visualize where your dots will go. A random scatter looks organic and fun, but spacing them somewhat evenly prevents overcrowding. -
Load the brush:
Dip your small round brush or foam pouncer into the royal blue paint. If using a brush, load it generously so the dot stays round. -
Paint the first dots:
Start applying dots purely on the white section of the pig. Press the brush down gently and tackle the top half first. -
Refine the circle shape:
I usually swirl the brush tip gently in a circular motion to widen the dot and ensure the edges are smooth and round. -
Work around features:
Add dots around the ears and near the coin slot, being careful not to get blue paint inside the opening. -
Finish the pattern:
Continue adding blue dots down the sides until you reach the terracotta line. Leave a little negative space or ‘breathing room’ between the lowest dots and the orange color block.
Pro Tip: Perfect Circles
Instead of freehanding loops with a brush, use a round foam pouncer or the eraser end of a pencil dipped in paint to stamp perfectly uniform and round dots.
Step 4: Finishing Touches
-
Paint the eyes:
Using the handle end of a paintbrush dipped in black paint (or a very fine liner brush), add two small dots for the eyes. -
Define the snout:
Paint two vertical dashed lines on the flat part of the nose to create the nostrils. -
Let it cure:
Allow the entire piggy bank to dry for at least 24 hours to ensure the paint fully adheres to the ceramic surface. -
Seal for protection:
If this bank will be handled often, apply a light coat of clear matte varnish spray. This protects the finish from chipping and makes dusting easier.
Your customized piggy bank is now ready to brightly guard your savings on a sunny shelf
Sgraffito Pig With Carved Botanical Line Art
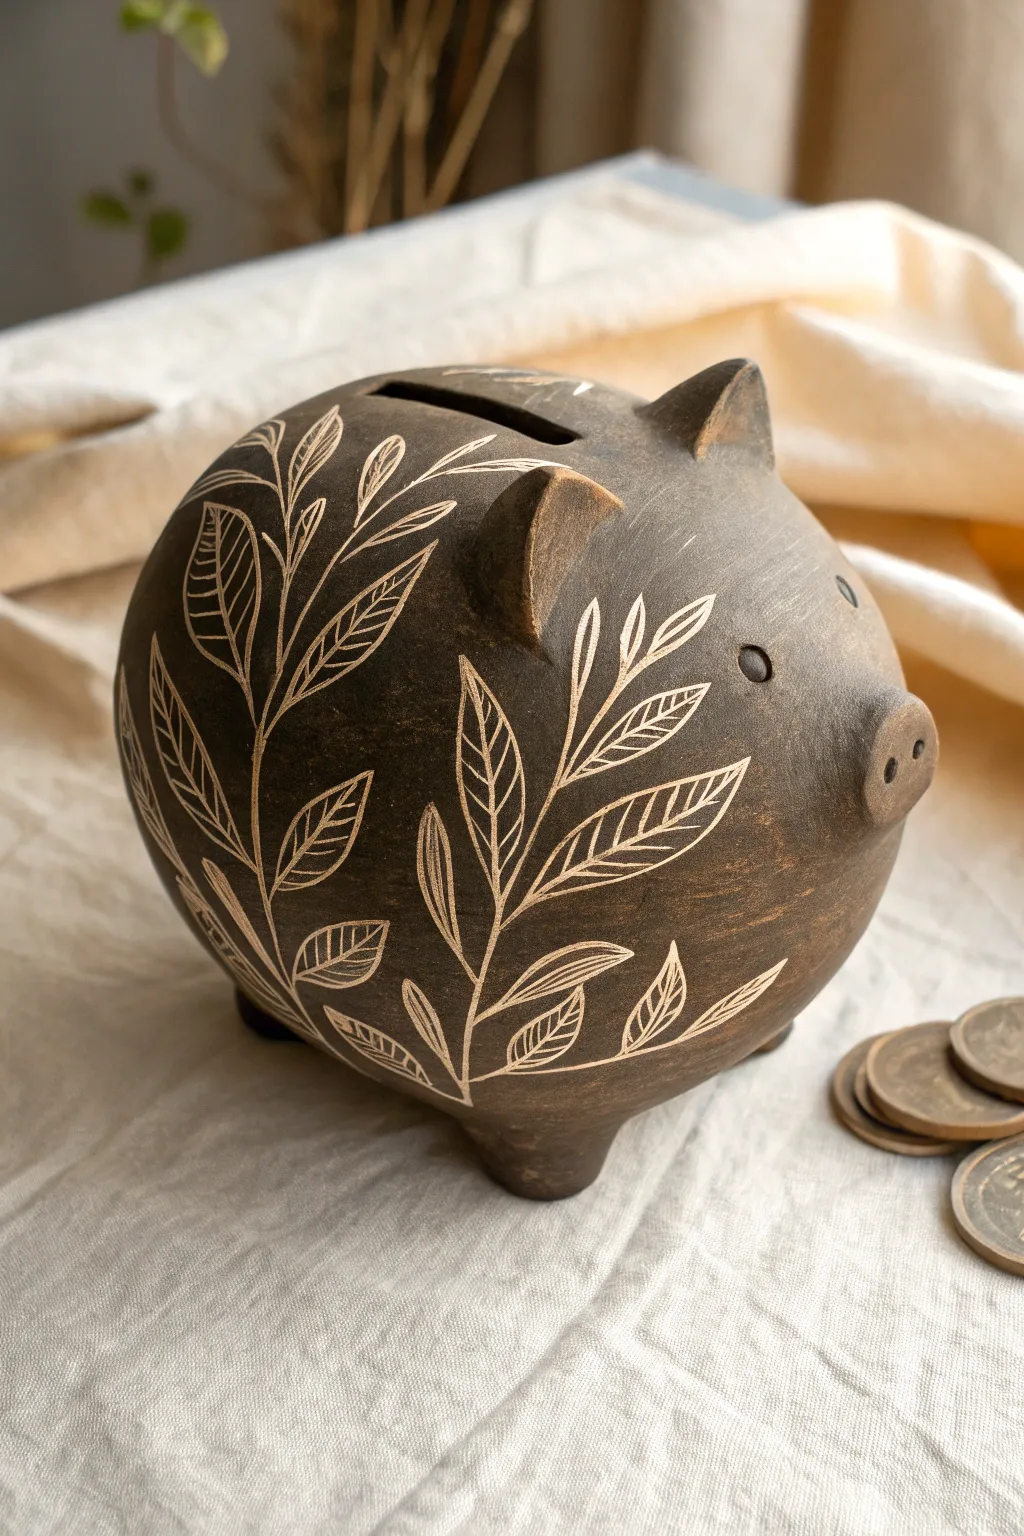
Transform a simple clay form into a sophisticated savings vessel using the ancient technique of sgraffito. This project features a deep, earthy black underglaze contrasting beautifully with crisp white clay revealed through delicate botanical carvings.
Step-by-Step
Materials
- Bisque-fired ceramic piggy bank (or leather-hard clay form)
- Black underglaze (velvet finish recommended)
- Wide soft brush (hake or fan brush)
- Sgraffito tool set (or a sharp loop tool and needle tool)
- Pencil
- Tracing paper (optional)
- Clear matte or satin glaze
- Sponge
- Soft bristle brush for dust
Step 1: Preparation and Underglazing
-
Clean the surface:
Before applying any color, take a slightly damp sponge and wipe down the entire surface of your ceramic pig. This removes any dust or oils that might resist the underglaze. -
Apply the first coat:
Using a wide, soft brush, apply a smooth, even coat of black underglaze over the entire exterior. Brush in one direction, ensuring full coverage without dripping. -
Layer up accuracy:
Allow the first coat to dry until it’s no longer shiny. Apply a second coat, brushing in a perpendicular direction to the first layer to eliminate streakiness. Repeat for a third coat if you want a truly opaque, deep black. -
Dry to leather hard:
Let the underglaze dry completely. If you are working on greenware (unfired clay), wait until the piece is ‘leather hard’—firm but still cold to the touch—before carving. If using bisque, it simply needs to be touch-dry.
Fixing Smudges
If you accidentally carve a mistake or smear black dust into a white line, don’t panic. Let it dry, then carefully patch the black underglaze with a tiny brush. Re-carve the line once dry.
Step 2: Designing the Botanicals
-
Plan the layout:
Visualize where your main stems will flow. The design works best if the branches curve upward from the belly of the pig toward the coin slot, mimicking growth. -
Rough sketch:
Very lightly sketch your design directly onto the black underglaze using a regular pencil. The graphite will shine slightly against the matte black, giving you a guide, and it will burn off in the kiln. Don’t press hard, or you’ll scratch the surface prematurely.
Level Up: Colored Clay
Swap the white clay body for a terracotta or speckled clay. The sgraffito lines will reveal the warm red or speckled earth tone beneath the black for a totally different vibe.
Step 3: Carving the Sgraffito
-
Carve the main stems:
Using a medium-sized sgraffito loop tool, carve the central spine of your main branch first. Apply steady pressure to slice through the black layer and reveal the white clay beneath. I try to make this line slightly thicker than the leaves. -
Outline the leaves:
Switch to a finer point tool. Draw the outline of each leaf shape attached to the stem. Keep your hand relaxed to allow for organic, natural curves rather than rigid geometric shapes. -
Add leaf veins:
Inside each leaf outline, carve a central vein. Then, add delicate diagonal lines branching from the center vein to the leaf edge. These strokes should be quick and confident for the cleanest look. -
Vary the line weight:
To create visual interest, go back and thicken the base of some leaves or the main stem connections. This variation in line thickness gives the botanical illustration depth and a hand-drawn feel. -
Detail the face:
Don’t forget the pig’s features. Carve small circles for the eyes, adding a tiny highlight inside if desired, and outline the snout and nostrils to define the character. -
Clean as you go:
As you carve, ‘burrs’ or crumbs of clay will accumulate. Do not brush them away with your hand, as this can smear the black underglaze into your white lines. Instead, gently blow them away or tap the piece upside down.
Step 4: Finishing Touches
-
Final cleanup:
Once all carving is complete, take a very soft, dry brush and gently sweep away any remaining clay dust from the crevices. -
Bisque fire:
If you carved on greenware, the piece must now be bisque fired in a kiln to cone 04 (or your clay body’s specification) to harden it. -
Glaze application:
Apply a clear glaze over the entire piece. A matte or satin clear glaze looks particularly sophisticated on this design, preserving the earthy feel of the black underglaze. -
Final firing:
Fire the piece again to the maturation temperature of your glaze and clay (typically cone 5 or 6 for stoneware).
Now you have a stunning, handcrafted vessel ready to hold your savings in style
Mishima-Inlay Pig With Repeating Folk Patterns
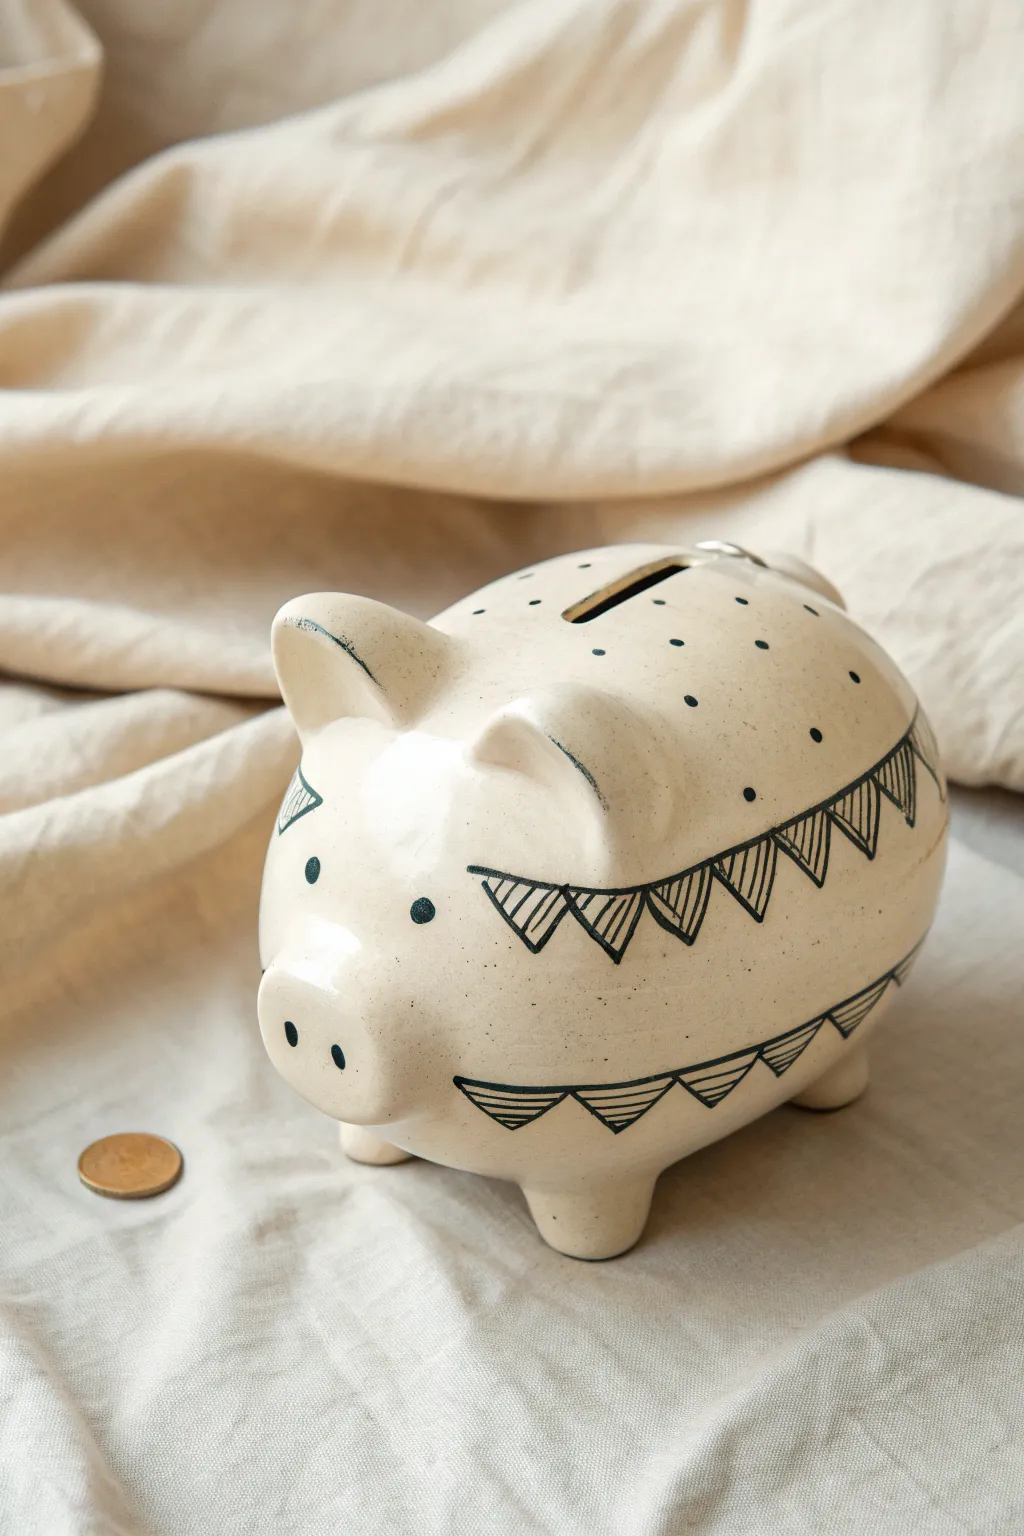
This charming ceramic piggy bank features delicate geometric patterns created using the Mishima inlay technique. The simple black triangles and dots contrast beautifully against the creamy, speckled clay body, giving it a timeless, handmade folk art aesthetic.
Detailed Instructions
Materials
- Light-colored stoneware clay (speckled or plain)
- Pottery wheel (optional, for body) or slab rolling equipment
- Pointed carving tool or needle tool
- Black underglaze or slip
- Metal kidney rib
- Sponge
- Clear glaze (glossy or satin)
- Paintbrush (soft bristle)
- Cutting wire
- Scoring tool or fork
- Slip (clay glue)
Step 1: Forming the Pig Body
-
Create the main form:
Start by forming the main body of the pig. You can throw a closed form on the wheel that resembles a large egg, or pinch two bowl shapes and join them together to create a hollow oval. Aim for a smooth, rounded surface. -
Refine the shape:
Once the clay is leather-hard, smooth out the exterior using a metal rib. Gently tap the bottom on a flat surface to create a stable base so the pig doesn’t roll. -
Add the snout:
Roll a small coil or disk of clay for the snout. Score and slip the front of the body, then attach the snout firmly. Blend the edges seamlessly into the face, leaving the front flat. -
Attach the legs:
Form four small, sturdy cones for legs. Score and slip the connection points on the belly of the pig, attach the legs, and smooth the joints. Ensure the pig stands level. -
Sculpt and attach ears:
Cut two triangle shapes from a clay slab. Curve them slightly to give them dimension and attach them near the top of the head using the score and slip method. -
Cut the coin slot:
Using a sharp knife or needle tool, carefully cut a rectangular slot in the center of the pig’s back. Ensure it’s wide enough for the largest coin you intend to save.
Clean Lines Tip
Use a layer of wax resist over the clay before carving. The wax stops underglaze from staining the surface, making the cleanup step much faster and cleaner.
Step 2: Applying the Mishima Inlay
-
Plan the design:
Before carving, lightly sketch your pattern directly onto the leather-hard clay with a pencil. Draw two horizontal bands around the belly spaced widely apart for the triangle banners. -
Carve the triangles:
Using a sharp carving tool, incise the pennant banners along your guide lines. Cut triangular shapes hanging from the top line and resting on the bottom line. Carve vertical lines inside each triangle for texture. -
Add detail dots:
Poke or drill small, shallow holes above the top banner to create a polka-dot effect. Add eyes and snout nostrils using the same carving technique ensuring the depth is even. -
Apply the underglaze:
Take your black underglaze or slip and paint it generously over all the carved areas. Don’t worry about staying inside the lines; the goal is to fill every groove completely. -
Let it set:
Allow the underglaze to dry until it is no longer shiny. This is crucial because wiping it away too soon will pull the color out of the grooves. -
Scrape the surface:
I prefer using a metal kidney rib for this step. Gently scrape the surface of the pig to remove the excess underglaze. The black color will remain only inside the carved lines, revealing the sharp design. -
Clean up:
Wipe the surface with a slightly damp sponge to remove any lingering cloudy residue, being careful not to wash out the inlay.
Step 3: Firing and Glazing
-
Bisque fire:
Once the pig is bone dry, load it into the kiln for a bisque firing (usually to cone 04 or 06). This hardens the clay and prepares it for glazing. -
Apply clear glaze:
Dip the entire pig into a clear gloss or satin glaze. Alternatively, you can brush on three even coats. This seals the clay and makes the black inlay pop. -
Check the foot:
Wipe any glaze off the bottom of the feet with a wet sponge to prevent the pig from sticking to the kiln shelf. -
Final firing:
Fire the piece again to your clay body’s maturity temperature (e.g., cone 5 or 6). Once cool, your custom savings bank is ready for use.
Make it rattle
Before sealing the body, form tiny clay balls, wrap them in newspaper, and place them inside. The paper burns away, leaving a joyful rattle inside.
Now you have a wonderful handcrafted vessel to store your coins and brighten up your shelf
Rustic Handbuilt Pig With Tool-Marked Texture
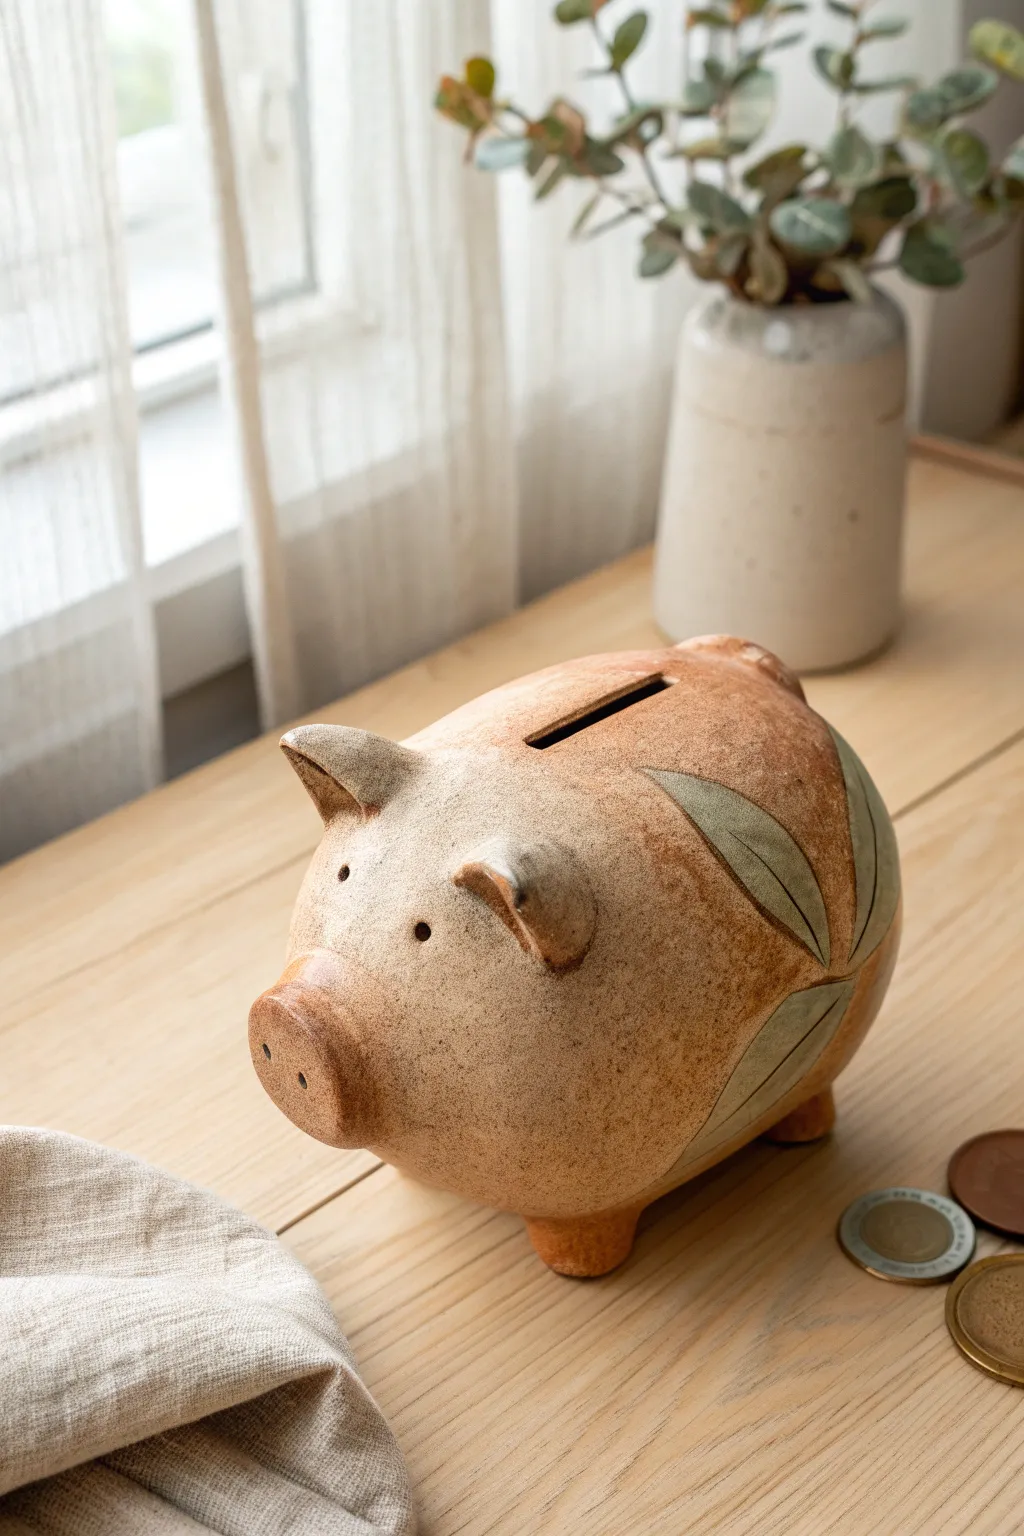
Embrace the charm of handbuilt pottery with this rustic ceramic piggy bank, featuring a warm, speckled finish and organic leaf motifs. This project combines simple pinch pot construction with subtle carving techniques to create a timeless keepsake that looks beautiful on any shelf.
Step-by-Step Tutorial
Materials
- Speckled stoneware clay (approx. 2-3 lbs)
- Scoring tool or serrated rib
- Slip (clay mixed with water)
- Wooden modeling tool
- Needle tool
- Fettling knife
- Rubber kidney rib
- Sponge
- Clear matte glaze (cone 5/6 recommended)
- Green underglaze or oxide wash (optional for leaves)
Step 1: Forming the Body
-
Shape two pinch pots:
Start by dividing your clay into two equal balls, roughly the size of large oranges. Press your thumb into the center of each ball and pinch the walls evenly as you rotate the clay, creating two matching bowl shapes. -
Join the pots:
Score the rims of both pinch pots thoroughly using your scoring tool or a fork. Apply a generous amount of slip to the scored areas. -
Seal the seam:
Press the two rims together firmly to form a hollow egg shape. Use your thumb or a wooden tool to drag clay across the seam, melding the two halves together so the join line disappears completely. -
Trap the air:
Ensure the form is fully sealed. The trapped air inside will act like a balloon, providing resistance that helps you shape the pig without collapsing the walls. -
Refine the shape:
Roll the egg shape gently on your work surface to smooth it out. Use a rubber kidney rib to compress the clay and remove any finger marks, aiming for a smooth, organic oval.
Air Escape Hole
Don’t forget to poke a tiny, hidden pinhole in the belly before firing! This lets expanding hot air escape and prevents your piggy bank from exploding in the kiln.
Step 2: Adding Features
-
Create the legs:
Roll four small, equal-sized coils of clay for the legs. They should be short and sturdy. Tap them on the table to flatten the bottom and the top attachment point. -
Attach the legs:
Score and slip the bottom of your pig body and the tops of the legs. Press them on firmly. I find it helpful to wiggle them slightly to ensure a strong bond. Smooth the seams with a modeling tool. -
Form the snout:
Make a small, flat disk of clay, slightly thicker than the body. Score and slip the front of the pig and attach this disk. Blend the edges back onto the face for a seamless transition. -
Make the ears:
Fashion two triangular pieces of clay. Curve them slightly to give them a natural, perky look. Score, slip, and attach them near the top front of the body, blending the clay downwards securely. -
Pierce the details:
Using a the back of a drill bit or a specialized hole cutter, press two nostrils into the snout and two eyes spaced widely apart. Don’t worry about perfection; slight asymmetry adds character.
Step 3: Construction & Decoration
-
Cut the coin slot:
Let the pig stiffen slightly to leather-hard. Use a fettling knife to carefully cut a rectangular coin slot along the spine. Smooth the sharp edges with a damp sponge or finger. -
Carve leaf motifs:
Lightly sketch a large leaf shape on the hindquarter using a needle tool. Once you are happy with the placement, carve shallow lines to define the leaf outline and the central vein. -
Apply leaf color:
Paint a thin layer of green underglaze or an oxide wash inside the leaf outlines. Wipe away any excess with a sponge if you want a more weathered, inlaid look. -
Dry slowly:
Cover the pig loosely with plastic to let it dry very slowly. This is crucial for hollow forms to prevent cracking. Once bone dry, bisque fire the piece. -
Glaze and final fire:
Dip or brush the entire piece with a clear matte glaze to highlight the speckles in the stoneware clay. Fire to maturity (likely cone 5 or 6 depending on your clay).
Make it a Corker
Cut a circular hole in the belly instead of a pinhole. After firing, fit it with a rubber or cork stopper so you can retrieve your savings without breaking the bank.
Place your finished pig in a spot with good light to show off the natural clay texture and start saving your coins
Kintsugi-Inspired Crackle Lines With Metallic Accents
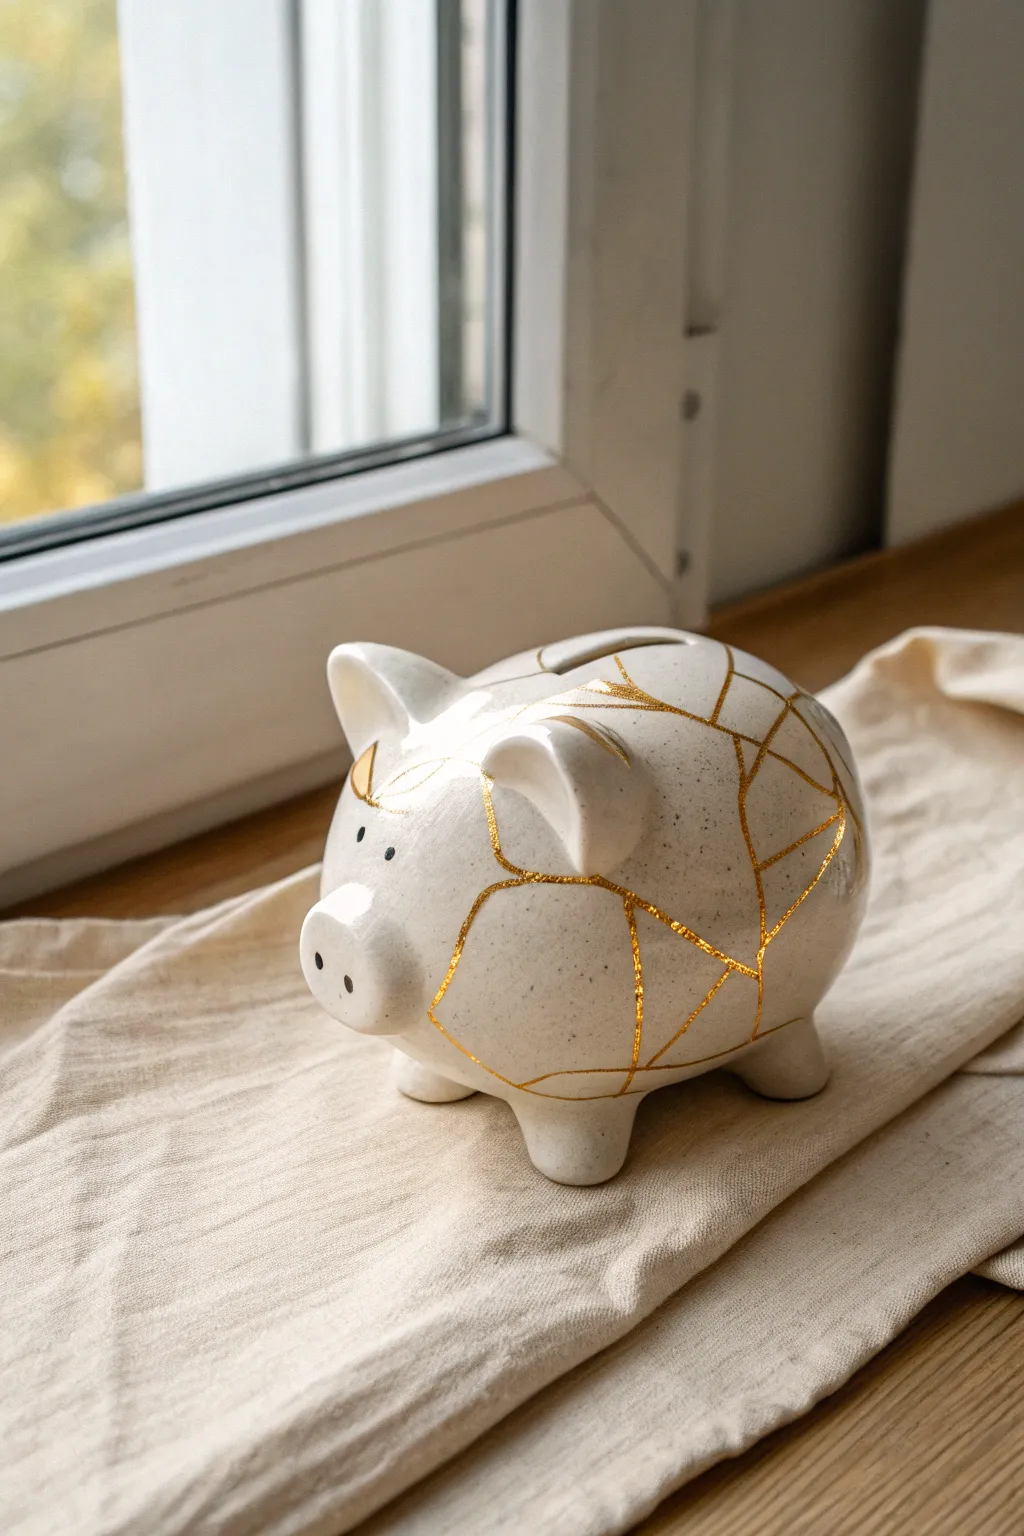
Embrace the Japanese art of repairing broken pottery with gold, but without actually breaking anything. This project transforms a simple ceramic piggy bank into a stunning piece of modern decor featuring elegant, metallic geometric lines.
How-To Guide
Materials
- White ceramic piggy bank (unglazed bisque or matte glazed)
- Gold leaf adhesive size (or tacky glue)
- Gold leaf sheets or metallic gold pigment powder
- Fine-tip paintbrush (size 0 or 00)
- Soft, fluffy paintbrush (for brushing away excess leaf)
- Black acrylic paint (optional, for eyes/nostrils)
- Pencil
- Clear spray sealant (gloss or matte)
- Damp cloth or sponge
Step 1: Preparation & Planning
-
Clean the surface:
Begin by wiping down your ceramic piggy bank with a damp cloth to remove any dust, oils, or fingerprints. Let it dry completely. -
Sketch the fractures:
Using a pencil, lightly draw your ‘crack’ lines directly onto the ceramic. Instead of random squiggles, think about how glass or ceramic naturally shatters—create straight, intersecting lines that form geometric shapes. -
Connect the lines:
Ensure your lines wrap around the curves of the pig’s body, connecting the ears to the back and moving down the legs. Varied spacing creates a more organic look. -
Refine the design:
Step back and look at the pattern. If a section looks too empty, add a smaller intersecting branch line. Lightly erase and redraw until you are happy with the balance.
Step 2: Applying the Adhesive
-
Load the fine brush:
Dip your fine-tip paintbrush into the gold leaf adhesive size. You don’t need a heavy blob; a steady, moderate amount works best. -
Trace the pencil lines:
Carefully paint over your pencil sketches with the adhesive. Try to keep the line thickness relatively consistent, but slight variations can mimic real cracks well. -
Work in sections:
I prefer to work on one side of the pig at a time so the glue doesn’t dry out before I can apply the gold. Start with the main body area. -
Observe the tackiness:
Allow the adhesive size to sit until it becomes tacky. Refer to your specific bottle’s instructions, but this usually takes 10 to 15 minutes. It should feel sticky but not wet.
Messy Edges?
If your glue lines spread too wide, wait for the gold to dry completely. Then, gently scratch away the uneven edges with a toothpick for a sharper look.
Step 3: Gilding the Cracks
-
Apply the gold leaf:
Gently press a sheet of gold leaf over the tacky adhesive lines. You don’t need to be precise here; the gold will only stick where the glue is. -
Press into place:
Use a dry, soft finger or a clean brush to gently pat the gold leaf down, ensuring it makes full contact with the adhesive lines. -
Brush away excess:
Take your soft, fluffy paintbrush and briskly brush over the area. The excess gold leaf that isn’t stuck to the glue will flake away, leaving behind crisp gold lines. -
Repeat the process:
Continue applying adhesive and gold leaf to the remaining sections—the head, ears, and legs—until all your pencil lines are gilded. -
Touch up gaps:
Inspect your lines for any breaks where the gold didn’t take. Dab a tiny bit of adhesive in those spots, wait for tackiness, and re-apply a scrap of gold leaf.
Level Up: Texture
Mix baking soda into white paint and sponge it onto the pig before starting. This creates a stone-like texture that makes the smooth gold lines pop even more.
Step 4: Finishing Touches
-
Clean up debris:
Use a soft cloth to wipe away any stubborn gold flakes clinging to the non-glued ceramic surface due to static. -
Paint the face:
If your piggy bank needs eyes or nostrils defined, use a small dotting tool or the back of a paintbrush dipped in black acrylic paint to add two small dots for eyes and two for the snout. -
Seal the work:
To prevent the gold leaf from tarnishing or scratching off over time, apply a layer of clear spray sealant. Use light, misting coats rather than one heavy wet coat. -
Final dry:
Let the sealant cure for at least 24 hours before handling or using the bank.
Now you have a sophisticated art piece that turns saving money into a stylish endeavor