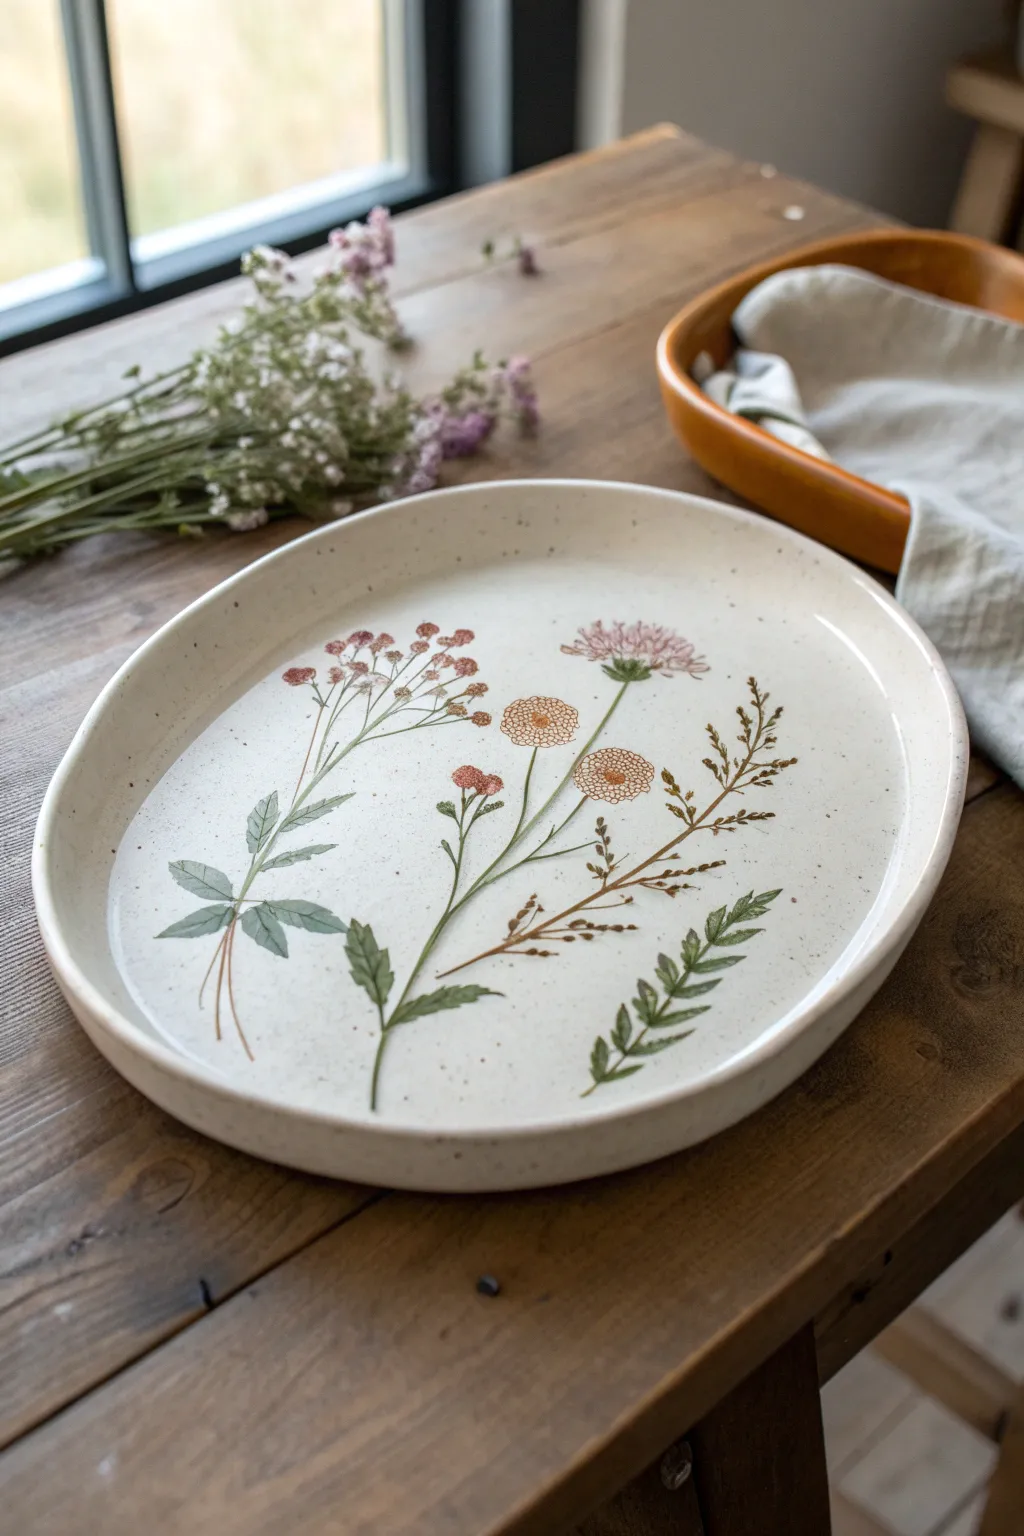
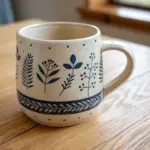
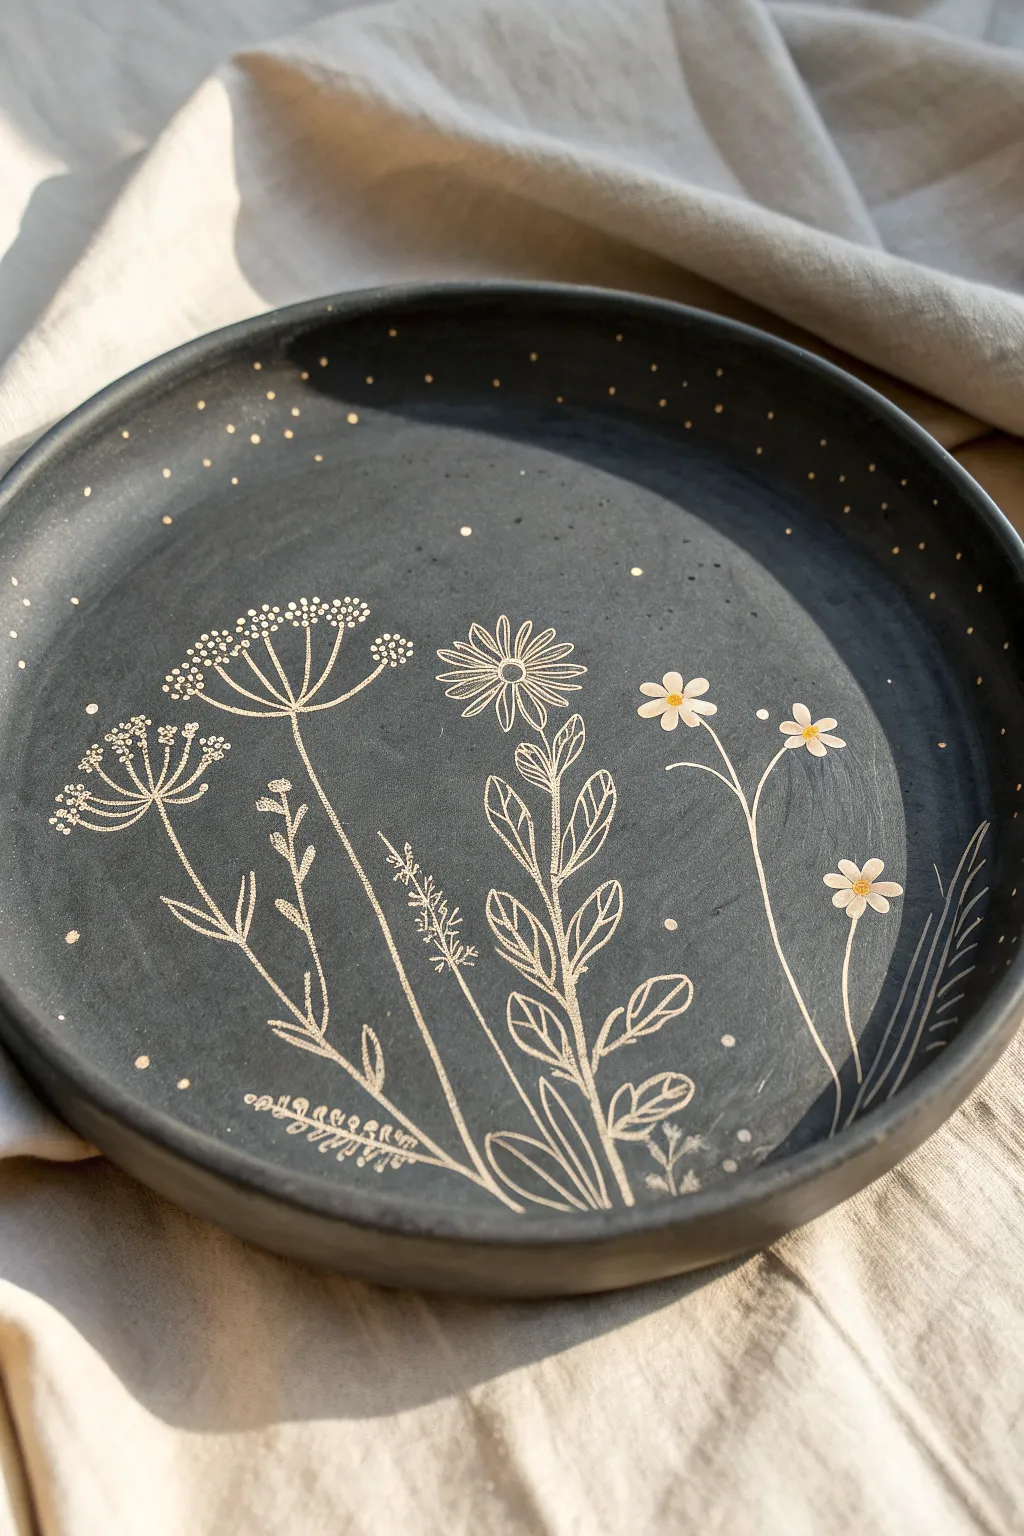
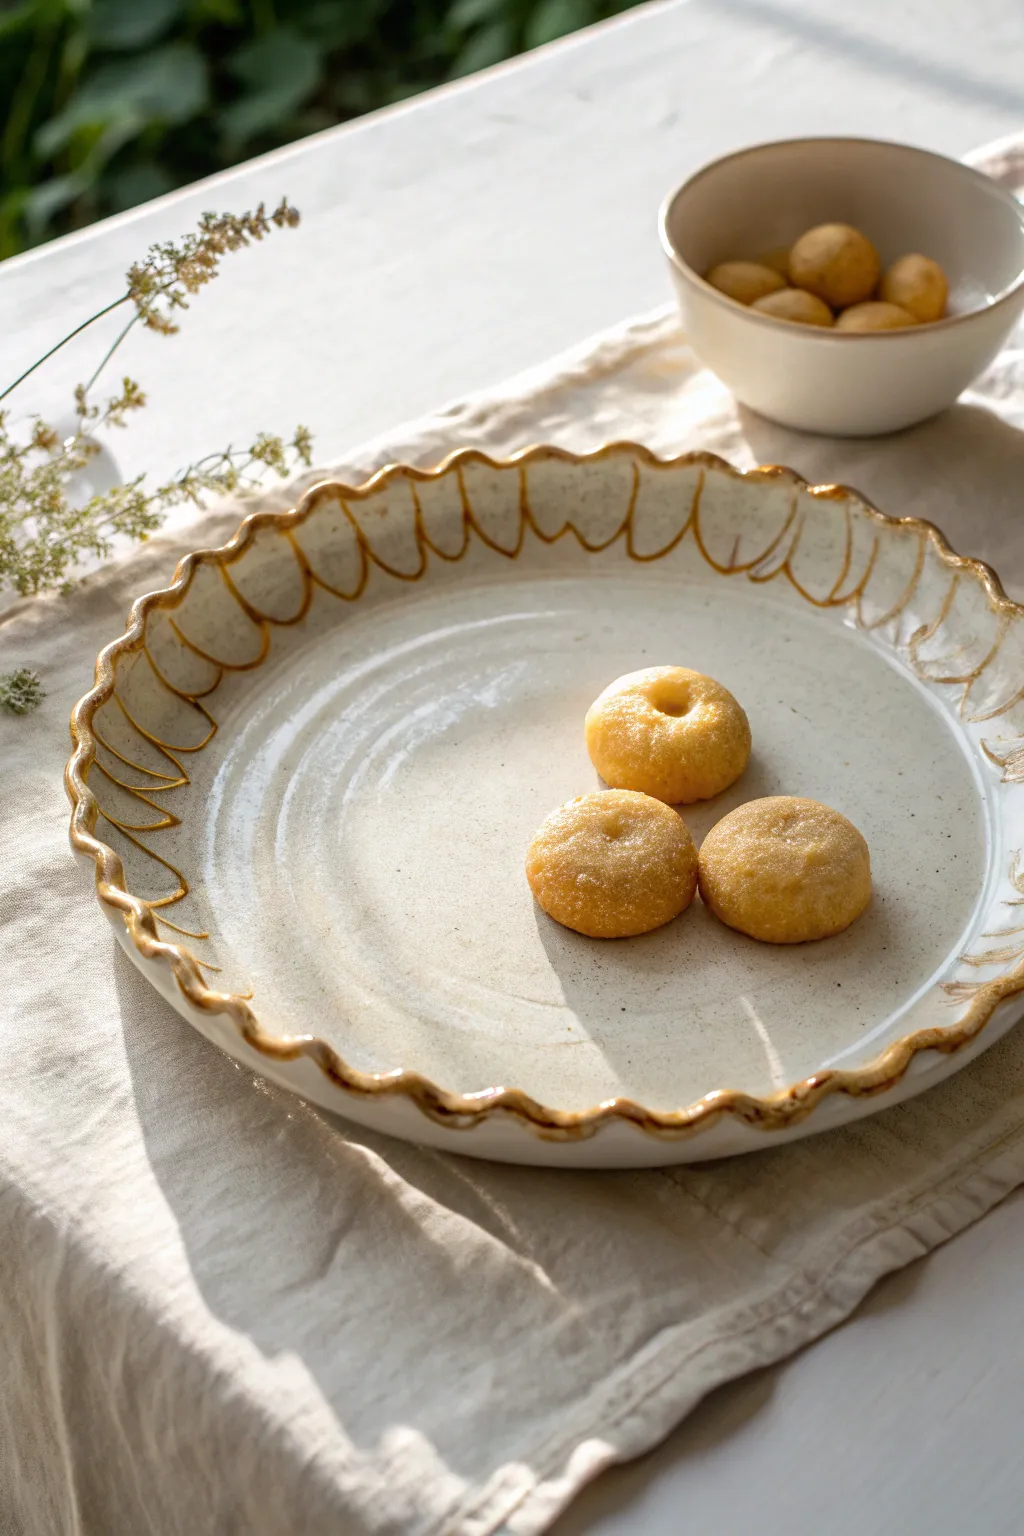
If you’ve ever pulled a platter from the kiln and thought, “Okay… now what do I put on this big beautiful surface?” you’re in the right place. These ceramic platter design ideas are the kinds of finishes I keep coming back to in my studio—easy to personalize, fun to repeat, and totally dinner-table worthy.
Classic Botanical Centerpiece
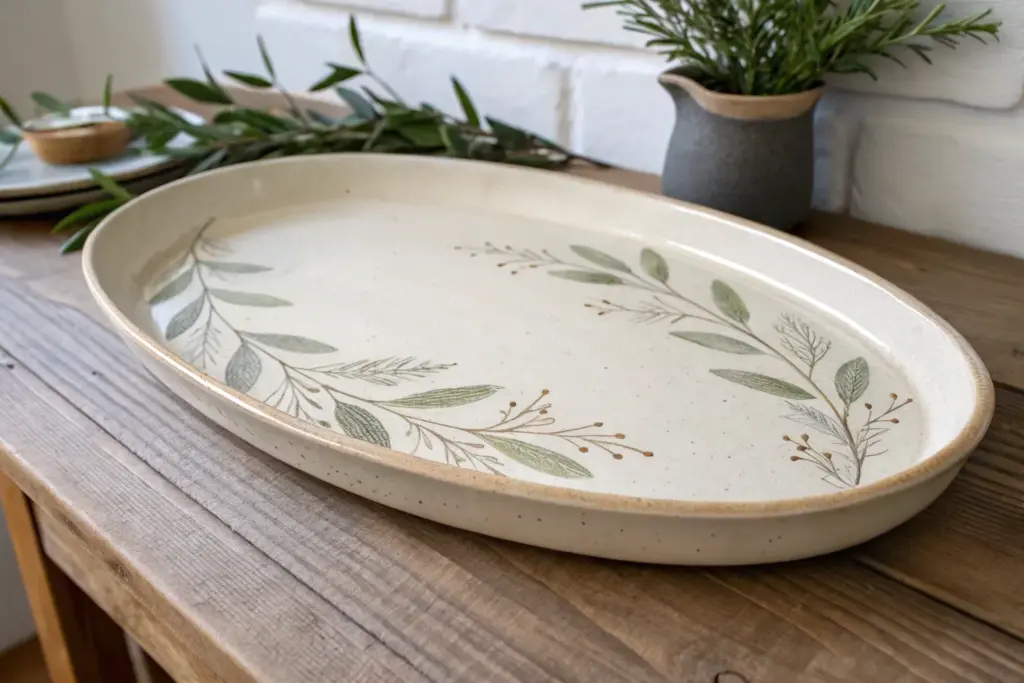
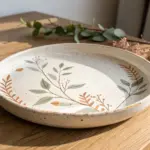
Capture the fleeting beauty of a meadow with this delicate ceramic project, featuring hand-painted botanical silhouettes on a speckled cream backdrop. This oval platter combines rustic charm with fine detail, resulting in a timeless centerpiece that looks as though actual flowers were pressed directly into the clay.
Step-by-Step
Materials
- Oval bisque-ware ceramic platter (approx. 12-14 inches)
- Speckled cream or ‘oatmeal’ matte glaze (cone 5/6)
- Underglazes: Sage Green, Deep Forest Green, Terracotta, Dusty Rose, Muted Mustard
- Fine detail brushes (size 0 and 00 liner)
- Small round brush (size 2)
- Pencil for sketching
- Clear dipping glaze (optional, if underglazes need sealing)
- Kiln access
Step 1: Preparation & Base Glaze
-
Clean the bisque:
Begin by wiping down your bisque-ware platter with a damp sponge. This is crucial to remove any dust that might repel the glaze later. -
Apply the base coat:
Using a wide fan brush or by dipping, apply three even coats of your speckled cream glaze. This glaze needs to be opaque enough to hide the clay body but translucent enough to show the speckles. -
Let it dry completely:
Allow the base glaze to dry until it is powdery to the touch. It shouldn’t feel cool or clammy. This provides a stable surface for our painting.
Smudged Lines?
If you smudge raw glaze while painting, don’t wipe it! Let it dry, then scrape the mistake off gently with an X-Acto knife before retouching with cream glaze.
Step 2: Drafting the Design
-
Light sketching:
Using a soft pencil, very lightly sketch the main stems of your wildflowers directly onto the powdery glaze. Don’t worry about erasing mistakes; the graphite will burn off in the kiln. -
Composition planning:
Plan for three distinct botanical elements: a tall umbel (like dill or Queen Anne’s Lace) on the left, a central cluster of round blooms, and a fern-like frond on the right.
Step 3: Painting the Botanicals
-
Stem work:
Load your size 0 liner brush with Sage Green underglaze mixed with a tiny drop of water for flow. Paint thin, confident lines following your pencil sketches for the main stems. -
Adding the leaves:
Switch to Deep Forest Green. For the left plant, paint small, lance-shaped leaves near the base. I like to use a ‘press and lift’ motion here to create the leaf shape naturally. -
Creating the blooms:
For the pinkish flowers on the left, dip a small round brush into Dusty Rose. Stipple tiny dots in umbrella shapes at the top of the stems to mimic small florets. -
Detailing the center flowers:
For the central flowers, paint small circles using Terracotta or Muted Mustard. Once dry, use your finest liner brush to add a cross-hatch or grid pattern inside the circles for texture. -
Painting the fern:
On the right side, paint the fern frond. Use the Deep Forest Green again, painting a central vein first, then adding symmetrical leaflets that start wide and taper to a point. -
Adding delicate grasses:
Using a brownish-green mix, add very fine, whisker-thin grasses or seed heads leaning between the main flowers to fill negative space. -
Reviewing the balance:
Step back and look at the platter. If an area feels too empty, add a few fallen petals or small dots of color to balance the composition.
Real Flower Impressions
Instead of painting freehand, gently press real wildflowers into the damp clay before the bisque firing to create a physical texture guide for your glazing.
Step 4: Finishing & Firing
-
Final drying:
Let the underglaze design dry completely on top of the raw glaze. This usually takes about 2-4 hours to be safe. -
Firing:
Fire the platter to the temperature specified by your clay and glaze manufacturer (typically Cone 5 or 6 for this type of stoneware). -
Inspection:
Once the kiln has cooled, remove the platter. Check that the glaze has fluxed smoothly and the speckles have emerged through the cream background.
Your finished platter is now ready to serve beautifully as both a functional dish and a piece of art on your table

Minimal Leaf Line Art
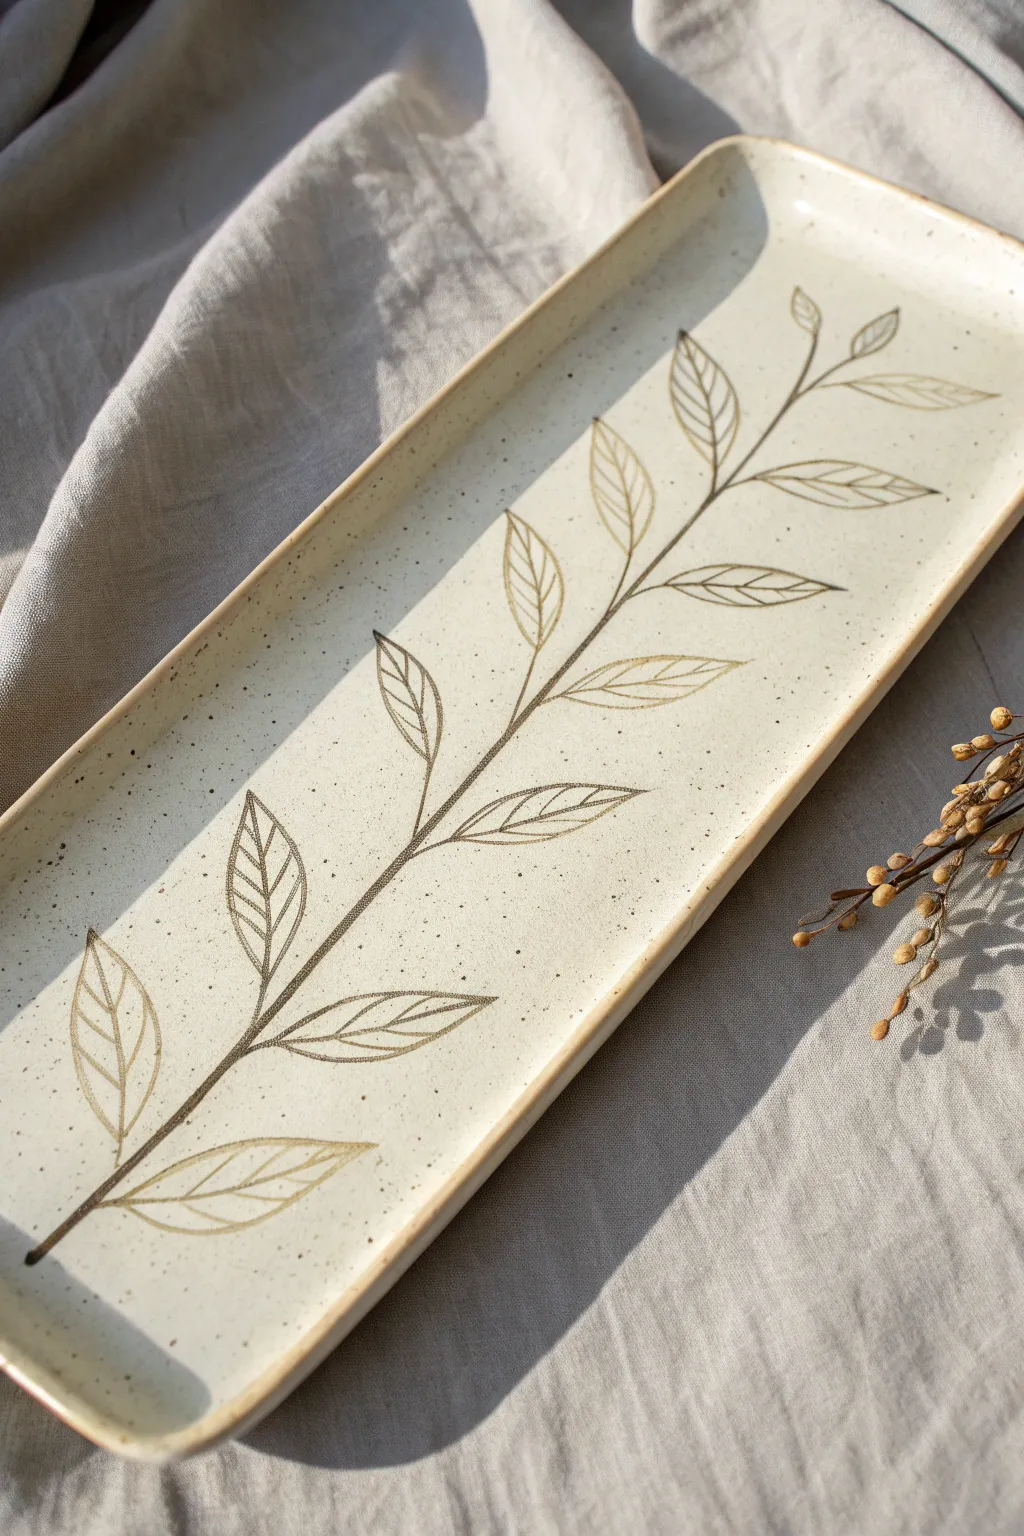
Embrace the elegance of simplicity with this long ceramic serving platter, featuring a crisp, hand-drawn botanical branch that stretches across its surface. The speckled clay body provides a warm, rustic canvas for the delicate dark underglaze lines, creating a functional piece of art perfect for serving appetizers or styling a table.
Detailed Instructions
Materials
- Speckled clay body (stoneware recommended)
- Slab roller or rolling pin
- Rolling slats (1/4 inch thick)
- Rectangular slump mold specific to long platters
- Fettling knife or needle tool
- Rib tool (soft kidney)
- Damp sponge
- Black or dark brown underglaze pencil or distinct underglaze liner pen
- Small fine-liner brush (size 0 or 00)
- Clear glossy or satin glaze (food safe)
- Kiln access
Step 1: Forming the Platter
-
Roll the Slab:
Begin by rolling out your speckled clay into a long, even slab. Ensure it is approximately 1/4 inch thick using your rolling slats as guides to maintain consistency throughout. -
Compress the Clay:
Using a soft kidney rib, compress the clay on both sides. This aligns the clay particles to prevent warping later and creates a smooth, canvas-like surface for your drawing. -
Cut to Size:
Measure your slump mold and cut a rectangle slightly larger than the mold shape using a needle tool or fettling knife. You want clean, straight lines for this modern silhouette. -
Shape the Form:
Gently drape the clay slab into your slump mold. Press lightly with a damp sponge to ensure the clay takes the shape of the mold’s curve without leaving finger impressions. -
Refine the Rim:
Smooth the cut edges of the rim with a damp sponge or a chamois cloth. A slightly rounded edge is more durable and pleasant to touch than a sharp angle. -
Slow Dry to Leather Hard:
Cover the mold loosely with plastic and allow it to dry slowly until it reaches a leather-hard state. This stage is crucial—it needs to be firm enough to hold its shape but soft enough to accept the underglaze.
Fixing Smudges
Mess up a line? Wait for the underglaze to dry completely, then gently scrape the mistake away with an X-Acto knife or needle tool before re-drawing.
Step 2: Decorating and Glazing
-
Sketch the Stem:
Once leather hard, remove the tray from the mold. Using a very light touch or a pencil (the graphite will burn off), mark the central axis for your branch. I find sketching a faint guide helps keeps the composition balanced. -
Draw the Main Line:
Dip your fine-liner brush into dark brown or black underglaze. Paint a continuous, thin line from one end of the platter to the other, tapering slightly at the top to mimic a natural branch. -
Outline the Leaves:
Branching off from the stem, paint the outline of the leaves. Keep the shapes simple—elongated ovals with pointed tips. Arrange them in alternating pairs as you move up the stem. -
Add Vein Details:
Inside each leaf outline, paint a central vein and delicate lines radiating outward. Use the very tip of your brush and lift pressure at the end of each stroke for a feathery, illustrative look. -
Bisque Fire:
Allow the platter to dry completely. Fire the piece to a bisque temperature (usually Cone 04 or 06) to set the shape and the underglaze design. -
Prepare for Glazing:
Wipe the bisqued platter with a damp sponge to remove any dust. This ensures the clear glaze will adhere properly without crawling. -
Apply Clear Glaze:
Pour or brush a clear, food-safe glaze over the entire interior surface. A satin or glossy finish works well to highlight the speckles in the clay without obscuring the line art. -
Clean the Rim (Optional):
For the look in the photo, wipe the clear glaze off the very top edge of the rim with a sponge. This leaves a raw ceramic contour that frames the design beautifully. -
Glaze Fire:
Fire the platter a second time to your clay body’s maturity temperature (typically Cone 5/6 for stoneware). Ensure the platter is well-supported in the kiln to prevent warping.
Pro Tip: Pencil It In
Use an underglaze pencil for the drawing instead of a brush for a sketchier, more textured charcoal-like aesthetic that feels more organic.
Once fired, you will have a stunning, food-safe serving piece that beautifully balances modern minimalism with organic warmth


Geometric Border Bands
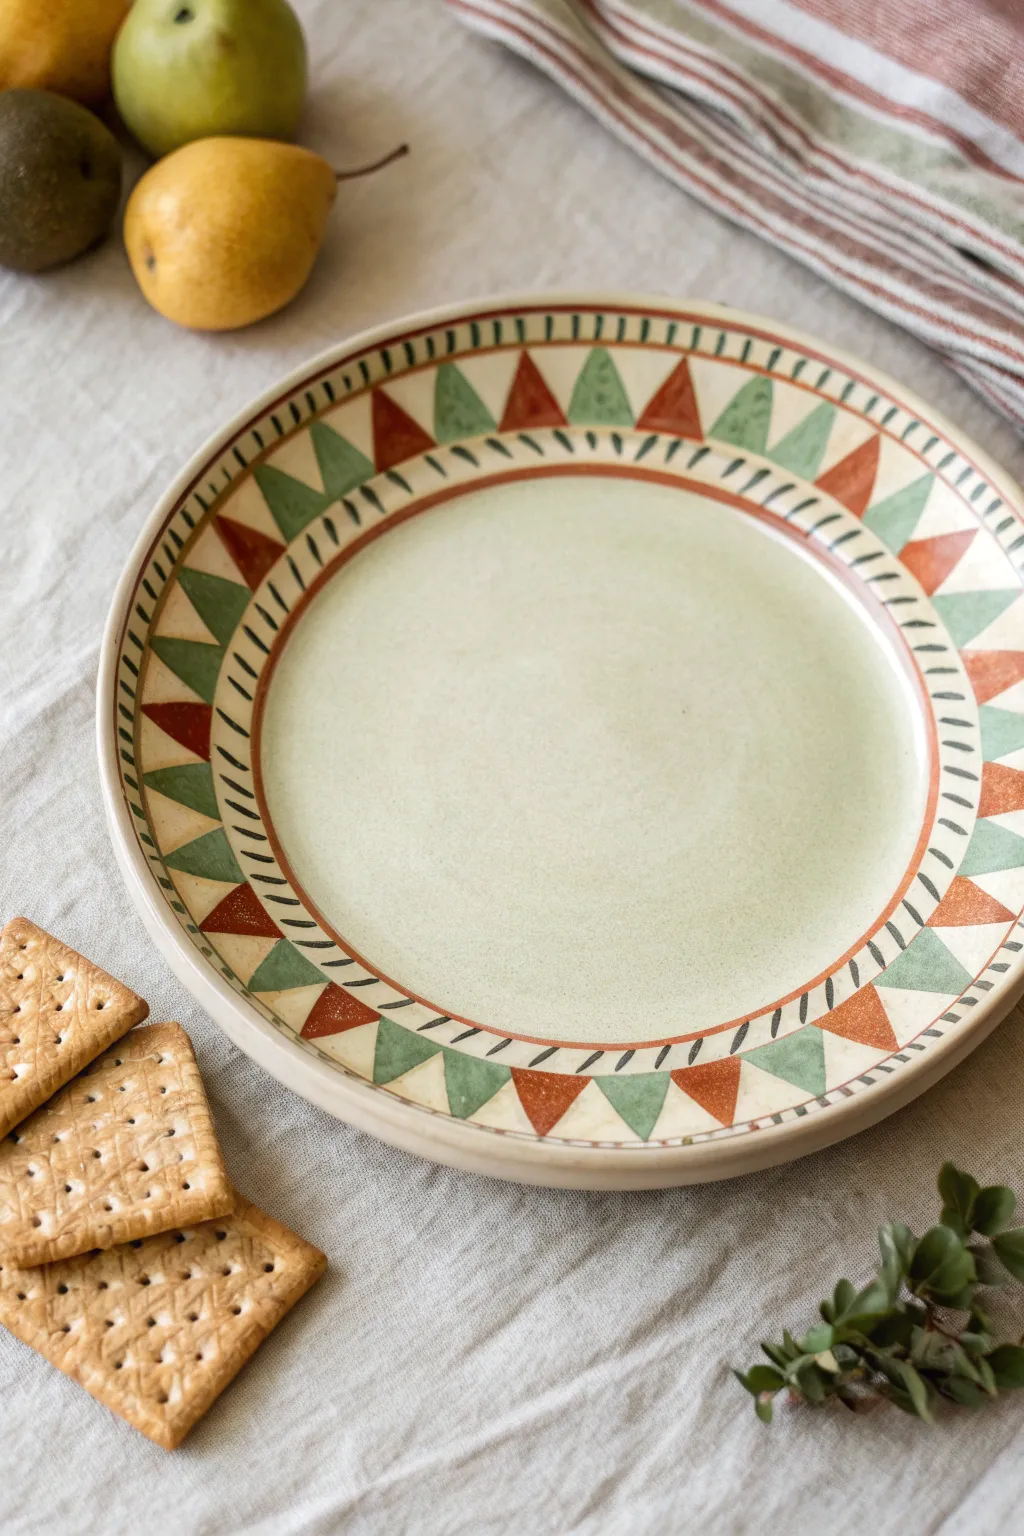
This project transforms a plain ceramic bisque plate into a rustic masterpiece featuring a repeating triangle motif in warm terra cotta and sage green tones. The design relies on precise banding and hand-painted geometric details to create a look that feels both ancient and refreshingly modern.
How-To Guide
Materials
- Bisque-fired ceramic plate (flatter rim preferred)
- Underglazes (Terra Cotta/Rust, Sage Green, Dark Brown/Black)
- Potter’s wheel or banding wheel
- Pencil for sketching
- Fine liner brush (size 0 or 00)
- Medium round brush (size 4 or 6)
- Ruler or measuring tape
- Clear transparent glaze
- Sponge and water
- Kiln access
Step 1: Preparation and Mapping
-
Clean the Bisque:
Start by wiping down your bisque-fired plate with a damp sponge. This removes any dust that might resist the glaze and prevents pinholing later on. -
Center on the Wheel:
Place your plate on a banding wheel or potter’s wheel. Centering is crucial here because the circular bands need to follow the form perfectly. -
Mark the Bands:
While spinning the wheel slowly, hold a pencil steady to mark three distinct concentric circles: one at the very edge of the rim, one where the rim meets the well, and one inner circle for the center design boundary. -
Divide the Rim:
Using a ruler, lightly mark even intervals around the rim for your triangles. Aim for about 1.5 to 2 inches of width per triangle base to ensure they aren’t too crowded.
Step 2: Painting the Bands
-
Mix the Dark Liner Color:
Prepare your dark brown or black underglaze. It should be the consistency of heavy cream so it flows well but stays opaque. -
Paint the Inner Band:
Spin the wheel slowly. Load your liner brush and gently touch it to the pencil line separating the rim from the center well. Create a solid, continuous dark line. -
Paint the Outer Band:
Repeat the previous step on the pencil line near the outer edge of the plate, creating the border that will contain your geometric pattern. -
Add Decorative Hatching:
Just inside the inner band and just outside the outer band, paint small, angled dashes. I find a rhythmic ‘touch-lift-touch’ motion works best to keep these consistent as you rotate the plate.
Steady Hand Trick
Rest your pinky finger on the plate’s unpainted surface or use a maulstick (a stick resting on the table) to stabilize your painting hand while doing fine lines.
Step 3: Creating the Geometric Pattern
-
Outline the Triangles:
Using your pencil marks as a guide, outline the alternating triangles with your liner brush and the dark underglaze. You want a zig-zag pattern essentially filling the space between the two bands. -
Fill the Rust Triangles:
Switch to your medium round brush. Fill every other triangle pointing outward with the terra cotta or rust-colored underglaze. Apply two to three coats for solid opacity. -
Fill the Sage Triangles:
Clean your brush thoroughly, then fill the remaining downward-pointing triangles with the sage green underglaze. Be careful to stay within the dark outlines. -
Paint the Center Well:
Dilute the sage green underglaze slightly with water to create a wash. Apply this to the center circle of the plate, brushing in a spiral from the center out for a textured, painterly look. -
Paint the Rim Edge:
Use the diluted sage wash again on the very outer edge of the rim to tie the color palette together.
Uneven Triangles?
If your spacing is off at the end, don’t panic. Gently wipe away the last few pencil marks and slightly adjust the width of the final three triangles to hide the gap.
Step 4: Finishing and Firing
-
Clean Up Smudges:
If any underglaze strayed, use a clean, stiff brush dipped in water or a scratching tool to gently remove the error from the bisque. -
Initial Drying:
Let the underglaze dry completely. The surface should feel chalky and room temperature, not cool to the touch. -
Dip in Clear Glaze:
Using glaze tongs, dip the entire plate into a bucket of clear transparent glaze. Hold it for about 3 seconds to get an even coat. -
Wipe the Foot:
Immediately wipe the bottom foot ring of the plate with a sponge. Any glaze left here will fuse the plate to the kiln shelf. -
Final Fire:
Load the plate into the kiln and fire to the temperature recommended for your specific clay body and clear glaze (usually Cone 5 or 6 for stoneware).
Once fired, you’ll have a stunning, food-safe platter ready for your next gathering


Two-Tone Dip Glaze Look
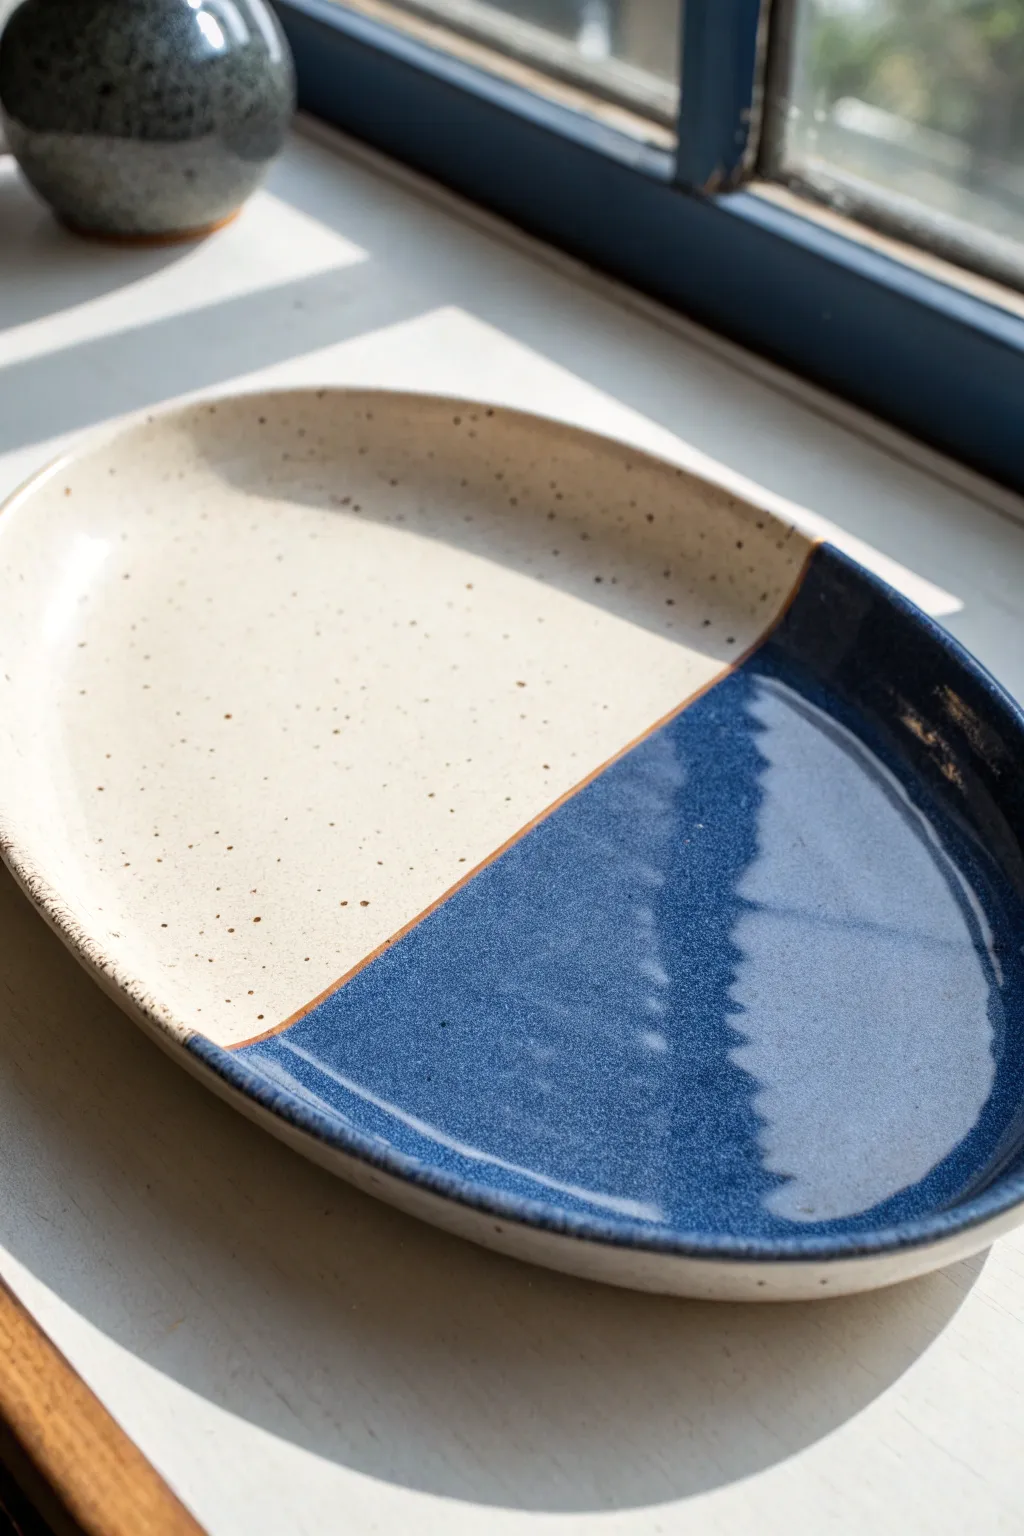
This elegant oval platter embraces the beauty of contrast by pairing raw, speckled clay with a deep, glossy cobalt glaze. The diagonal dip creates a modern geometric line that feels both crisp and organic.
Step-by-Step Guide
Materials
- Speckled Stoneware Clay (e.g., Laguna Speckled Buff)
- Pottery Wheel (or slab roller/rolling pin for hand-building)
- Rib tool
- Wire cutter
- Sponge
- Trimming tools
- Oval drape mold (if hand-building)
- Wax resist
- Wide hake brush or glazing tongs
- Glossy Cobalt Blue Glaze
- Clear Glaze (optional, for the white side)
- Kiln
Step 1: Forming the Platter
-
Prepare the clay:
Begin by thoroughly wedging about 3-4 pounds of speckled stoneware clay to remove air bubbles and ensure particle alignment. -
Throwing the slab:
Center your clay on the wheel and open it wide and low. Instead of pulling up walls immediately, focus on compressing the base into a wide, flat disc about 1/4 inch thick. -
Shaping the oval:
Once you have a flat round slab, use a wire cutter to detach it from the bat. Gently lift opposite sides and carefully stretch the clay while transferring it to a ware board, naturally forming an oval shape. -
Refining the curve:
Alternatively, if hand-building, roll a slab and drape it over an oval bisque mold. Use a soft rib to smooth the clay against the mold, compressing the surface to reveal the speckles. -
Defining the rim:
Whether thrown or hand-built, pull the rim up slightly to create a shallow curve. Use a damp sponge to soften the edge, giving it that handmade, slightly organic feel seen in the photo. -
Slow drying:
Cover the platter loosely with plastic. Large flat forms are prone to warping, so allow it to dry very slowly over several days until it reaches leather hard.
Step 2: Trimming and Bisque
-
Trimming the foot:
Flip the leather-hard platter onto a foam bat or chuck. Trim a defined foot ring to give the piece lift and elegance, mirroring the curve of the rim. -
Final smoothing:
Run a smooth metal rib over the entire surface to burnish slightly; this helps the bare clay section feel pleasant to the touch after firing. -
Bisque fire:
Load the bone-dry platter into the kiln for a bisque fire (usually Cone 04), ensuring it is well-supported to prevent warping.
Clean Lines
For a softer transition line instead of a hard edge, skip the wax resist and simply free-hand the dip. The glaze will naturally overlap slightly, creating a beautiful organic boundary.
Step 3: Glazing the Diagonal
-
Cleaning the bisque:
Wipe the bisque-fired platter with a damp sponge to remove any dust, which could cause pinholing in the glaze. -
Planning the line:
visualize the diagonal line. It should cut across the oval dynamically. You can lightly mark this with a pencil if you need a guide, as the graphite will burn off. -
Waxing the resist area:
If you want a razor-sharp line, apply liquid wax resist to the half of the platter that will remain white/raw. Paint strictly up to your diagonal line and let it dry completely. -
Mixing the glaze:
Stir your glossy cobalt blue glaze thoroughly. It needs to be the consistency of heavy cream to achieve that deep, opaque color without running. -
The dip:
Hold the platter firmly by the wax-resist side (or use tongs). In one smooth motion, dip the unwaxed side into the glaze bucket at an angle to match your diagonal line. -
Drip management:
Hold the platter over the bucket for a few seconds to let excess glaze drain. I usually give it a tiny, gentle shake to break the surface tension of the drips. -
Cleaning the line:
Once the glaze is dry on the surface, use a damp sponge to wipe away any stray droplets on the waxed side or the foot ring. -
A matte option:
If you prefer the light side to be glazed rather than raw clay, you can brush a clear matte glaze over the ‘raw’ side now, or simply leave it bare as shown in the inspiration image. -
Final Fire:
Load the kiln for the final glaze firing (e.g., Cone 5 or 6). Verify that the foot is perfectly clean so the platter doesn’t fuse to the kiln shelf.
Warping Woes
If your platters warp, dry them slower! Place a small weighted bag of sand in the center of the platter while it dries under plastic to keep the bottom flat.
Once cooled, your platter is ready to serve as a stunning centerpiece for your next gathering

The Complete Guide to Pottery Troubleshooting
Uncover the most common ceramic mistakes—from cracking clay to failed glazes—and learn how to fix them fast.
Speckled Glaze With Bare Clay Rim

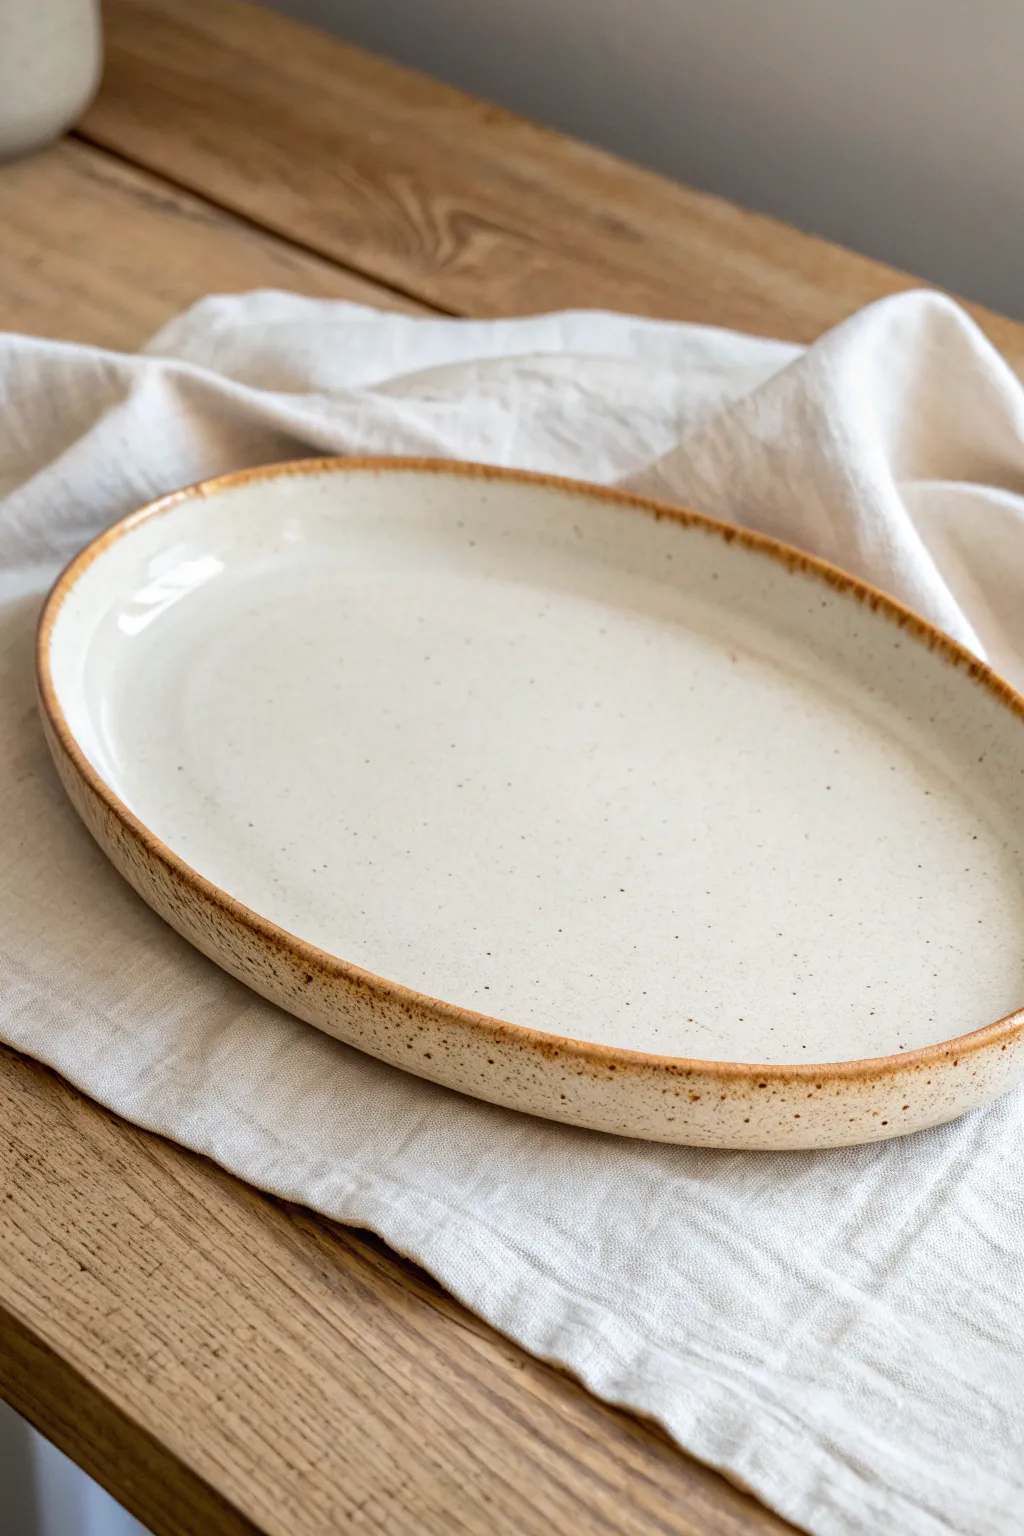
This project captures the essence of organic pottery with its creamy, speckled glaze and warm, exposed clay rim. The gentle oval shape and earthy tones make it a versatile serving piece that feels both modern and timeless.
Step-by-Step Tutorial
Materials
- Light-colored stoneware clay (smooth or with fine grog)
- Rolling pin
- Canvas ware board or cloth
- Oval template (paper or craft foam)
- Fettling knife or needle tool
- Soft rib (yellow mud tool or similar)
- Sponge
- Slump mold (plaster or bisque) or foam cushion
- Speckled cream/white glaze (cone 5/6 compatible)
- Iron oxide wash (optional, for rim enhancement)
- Sureform tool (cheese grater tool)
- Wax resist
Step 1: Forming the Slab
-
Wedge the clay:
Begin by thoroughly wedging about 3-4 pounds of clay to remove any air bubbles. This ensures your platter won’t crack during firing. -
Roll out the slab:
On your canvas board, use the rolling pin to flatten the clay into a slab. Aim for a consistent thickness of about 1/4 inch to 3/8 inch. Remember to flip the slab occasionally while rolling to prevent it from warping later. -
Compress the slab:
Take your soft rib and drag it across the surface of the clay in multiple directions. This compression step is crucial for plate flatware to prevent S-cracks and creates a smooth canvas for your glaze.
Uneven Glaze Line?
If the glaze beads up messily on the wax, wait for it to dry slightly, then use a wooden toothpick or sharpening tool to gently scrape the glaze back to a perfect line.
Step 2: Shaping the Platter
-
Cut the oval shape:
Place your oval template onto the smooth slab. Using a needle tool or fettling knife, trace around the template, holding the tool perpendicular to the table for a clean, vertical edge. -
Transfer to mold:
Carefully lift your clay slab and drape it over your slump mold or press it into a foam cushion to establish the shallow curve. If using a slump mold, drop the slab firmly but gently to ensure it takes the shape. -
Define the rim:
While the clay is in the mold, run a damp sponge or a chamois cloth along the cut edge. Round it over slightly so the finished rim is pleasant to the touch. -
Dry to leather hard:
Allow the piece to dry slowly until it reaches a leather-hard state. It should be stiff enough to hold its shape without support but still cool to the touch.
Enhance the Speckle
If your glaze lacks dimension, try buying ‘Speckles’ additive (ilmenite or granular manganese) and mixing a small amount into a plain white semi-matte glaze.
Step 3: Refining and Bisque
-
Clean the foot:
Once leather hard, flip the platter over. If you want a defined foot ring, you can attach coils now, or simply smooth the bottom flat with a rib for a modern look. -
Refine the rim texture:
To achieve that specific brownish rim texture seen in the photo, you can lightly tap the rim with a sureform tool or scratching tool to open up the clay pores slightly. -
Bisque fire:
Let the platter dry completely (bone dry). Fire it in your kiln to a bisque temperature (usually Cone 04) to prepare it for glazing.
Step 4: Glazing Technique
-
Clean and wax:
Wipe the bisque ware with a damp sponge to remove dust. Apply wax resist to the very bottom to prevent sticking to the kiln shelf. -
Highlight the rim:
Dip a sponge into a diluted iron oxide wash or a dark warm stain. Lightly dab it along the very edge of the rim. Wipe away any excess with a clean sponge so it stains the clay body rather than sitting on top. -
Apply wax to the rim:
Here is the critical step for this look: Carefully paint a thin line of wax resist over the iron-stained rim. I suggest using a steady hand or a banding wheel to get a consistent line. -
Prepare the glaze:
Mix your speckled cream glaze well. The specks are heavy and tend to settle at the bottom, so keep it agitated. -
Dip or pour glaze:
Pour the glaze into the center of the platter, swirl it to coat the interior, and pour out the excess. Because you waxed the rim, the glaze will naturally bead away from the edge, leaving that beautiful exposed clay line. -
Clean up:
Use a sponge to wipe away any stray droplets of glaze that may have stuck to the waxed rim despite the resist. -
Glaze fire:
Load the kiln and fire to the maturity temperature of your clay and glaze (typically Cone 5 or 6). Allow the kiln to cool naturally.
Once cooled, your platter offers a beautiful contrast between the smooth, speckled interior and the raw, earthy rim, ready for service
Raised Slip-Trailed Florals
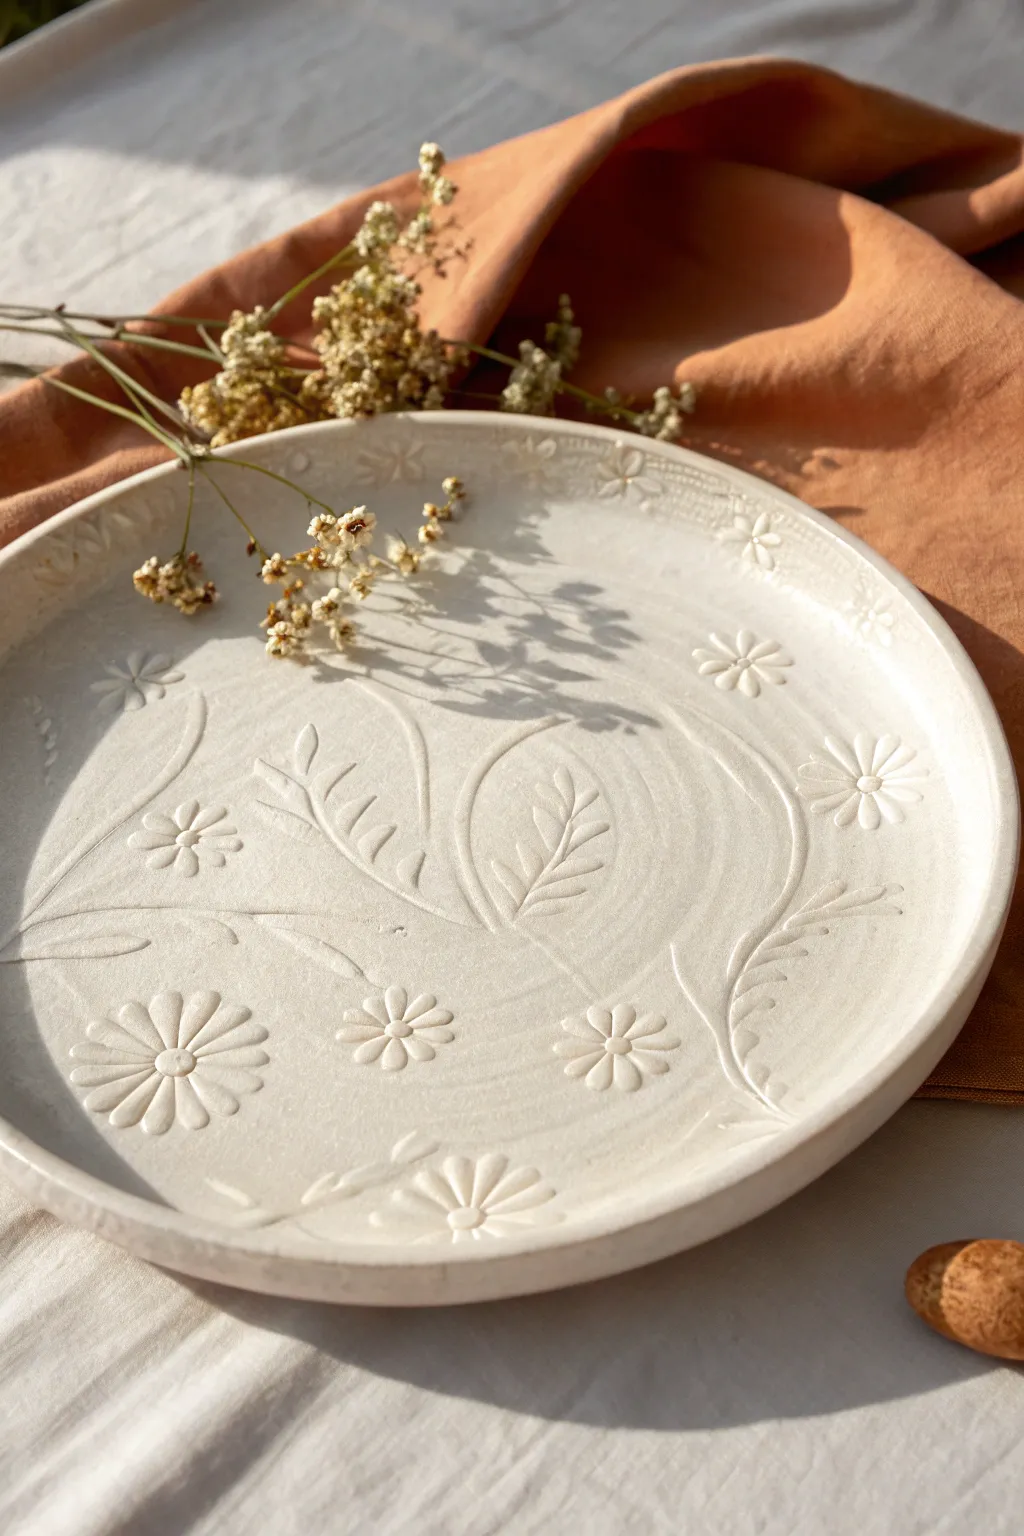
Capture the delicate beauty of a summer meadow with this elegant ceramic platter, featuring raised floral motifs that invite touch. Using slip-trailing techniques on a creamy clay body, you’ll create a subtle, tone-on-tone relief that feels both organic and refined.
Step-by-Step
Materials
- White stoneware or porcelain clay body (smooth)
- Slip trailer bottle with fine tip nozzle
- Thickened slip (made from the same clay body or deflocculated slip)
- Small sponge
- Rolling pin
- Platter mold or slump mold
- Guide rails or smooth canvas
- Rib tool (flexible metal or rubber)
- Needle tool
- Soft paintbrush
- Clear or satin white glaze
Step 1: Preparing the Canvas
-
Prepare the clay:
Begin by thoroughly wedging your white stoneware clay to remove any air bubbles. This ensures a smooth surface, essential for the delicate slip work later. -
Roll out the slab:
Using a rolling pin and guide rails set to about 1/4 inch thickness, roll out a large, uniform slab. Compress the clay on both sides with a rib tool to align particles and prevent warping. -
Form the platter:
Drape your slab over your chosen slump mold or press it into a platter mold. Gently smooth it into place with a damp sponge, ensuring the rim is even and defined. -
Set up the surface:
Allow the platter to stiffen slightly to a soft leather-hard stage. It needs to be firm enough to hold its shape but receptive to the wet slip you will be adding.
Slip Too Runny?
If your slip spreads flat, let it sit uncovered to evaporate water. If it tears while piping, add a drop of vinegar to flocculate it.
Step 2: Designing the Relief
-
Mix your slip:
Prepare your slip trailer. The slip should be the consistency of heavy cream or soft peaks—thick enough to hold a raised line without spreading, but fluid enough to pipe smoothly. I like to screen the slip first to prevent clogs. -
Plan the composition:
Lightly sketch your main stems using a needle tool or pencil directly on the leather-hard clay. Keep the lines very faint; these are just guides for spacing your florals. -
Pipe the stems:
Starting with the main vines, gently squeeze the slip trailer while moving your arm in a fluid motion. Let the slip lay on top of the clay rather than dragging the nozzle through it. -
Add leaves:
Create leaves by piping a teardrop outline, then carefully filling it in with more slip. Alternatively, pipe a thick line and use a damp brush to pull the slip outward, creating a tapered leaf shape. -
Create daisy centers:
For the flowers, start by dotting small mounds of slip to form the centers. Let these firm up for a few minutes before adding petals so they don’t bleed together. -
Pipe the petals:
Squeeze distinct, elongated oval shapes radiating from the centers to form daisy petals. Vary the pressure to make the petals thicker in the middle and tapered at the ends. -
Layer details:
Once the initial layer of petals has set slightly, you can add tiny dots or secondary lines on top of the leaves for extra dimension and texture. -
Refine the edges:
Check the rim of your platter. You can pipe a decorative border of small dots or continuous lines to frame the floral design.
Color Contrast
Mix a mason stain (like sage green or soft pink) into your white slip before piping for a gentle, pastel raised design.
Step 3: Refining and Finishing
-
Clean up imperfections:
Wait until the slip is leather hard. Use a clean, slightly damp brush to gently smooth any sharp peaks or jagged start/stop points in your piping. -
Slow drying:
Cover the platter loosely with plastic. Because you have added wet slip to drier clay, drying must happen very slowly to prevent the relief decoration from cracking or peeling off. -
Bisque fire:
Once bone dry, fire the piece to bisque temperature (usually cone 04 or 06). This prepares the ceramic for glazing. -
Glaze application:
Apply a coat of clear or translucent satin white glaze. Avoid thick, opaque glazes that might fill in the texture and obscure your beautiful piping work. -
Final firing:
Glaze fire the platter to the maturity temperature of your clay body perfectly fuse the slip decoration into a durable surface.
Once fired, seeing how the light catches the raised petals makes the careful piping worthwhile


What Really Happens Inside the Kiln
Learn how time and temperature work together inside the kiln to transform clay into durable ceramic.
Sgraffito Sketchbook Platter
Capture the quiet beauty of a starlit field on this striking ceramic platter. Using the sgraffito technique, you’ll scratch delicate wildflowers and scattered stars through contrasting black underglaze to reveal the bright clay body beneath.
Detailed Instructions
Materials
- Bisque-fired ceramic platter (or leather-hard clay slab/plate)
- Black underglaze (velvet finish recommended)
- Pencil or light-colored charcoal pencil
- Sgraffito loop tool (small/fine point)
- Pin tool or needle tool
- Soft brush (for sweeping away debris)
- Clear transparent glaze
- Large soft brush (for underglaze application)
Step 1: Preparation & Application
-
Surface Preparation:
Start with a leather-hard clay platter. If you are working on bisque ware, wipe it down with a damp sponge to remove any dust. The surface needs to be smooth and free of imperfections before you begin glazing. -
Apply the Base Coat:
Stir your black underglaze thoroughly. Using a large soft brush, apply a smooth, even coat of black underglaze across the entire interior surface of the platter. Use long, sweeping strokes to minimize texture. -
Layering Up:
Allow the first coat to dry until it’s no longer shiny. Apply a second coat in a cross-hatching direction (perpendicular to the first layer) to ensure solid, opaque coverage without streaks. I usually do three coats total for a really deep, velvety black. -
Drying Time:
Let the underglaze dry until it is firm to the touch but still possesses a slight coolness (leather hard). If it gets bone dry, the carving will be chippy; if it’s too wet, the gouges will be messy.
Clean Lines Pro-Tip
Keep your hands clean! Oils from your skin can resist the clear glaze later. Rest your hand on a clean scrap of paper or a bridge while carving to protect the black surface.
Step 2: Sketching the Design
-
Rough Layout:
Use a light-colored pencil or a charcoal pencil to lightly sketch the main stems of your floral arrangement directly onto the black surface. Don’t worry about erasing mistakes; the pencil lines will burn off in the kiln. -
Spacing the Flowers:
Mark the approximate locations of the flower heads. Place the large daisy shapes and the taller umbel (dandelion-like) structures first to anchor your composition, leaving negative space near the top.
Fixing Mistakes
Accidentally scratched where you didn’t mean to? Don’t panic. Dab a tiny bit of fresh black underglaze over the mistake, let it dry, and it will be like it never happened.
Step 3: Carving the Details
-
Carving Stems:
Using your fine-point sgraffito loop tool, gently carve the main stem lines. Apply consistent pressure to cut through the black layer just enough to reveal the white clay, but try not to dig deep into the clay body itself. -
The Umbel Flowers:
For the tall, umbrella-shaped flowers on the left, start by carving the radiating spokes from a central point. At the end of each spoke, use a pin tool or the very tip of your loop tool to create small clusters of dots. -
The Dandelion Puff:
Create the rounded flower head next to the umbels by making short, radiating dashes. This mimics the fluffy texture of a seed head. -
Carving the Daisy:
Move to the central daisy. Outline the petals with smooth curves, then carve fine lines inside each petal for texture. Clear out the center circle completely to create a solid white core. -
Adding Leaves:
Along the main stems, carve leaf shapes. For the central plant, use oval shapes with a central vein line. For the grassy fillers on the right, use long, sweeping strokes. -
Small Wildflowers:
On the right side, carve the delicate smaller flowers. These have five simple petals. You can leave the centers black and add a small dot of yellow underglaze later if desired, or carve them out completely white as shown here. -
Refining Lines:
Go back over your main lines to ensure they are crisp. Use a pin tool to add tiny serrated edges to leaves or extra texture on the stems. -
Adding the Stars:
Using the point of a needle tool, stipple tiny dots randomly across the upper empty space and around the flowers. These represent pollen or distant stars, tying the composition together. -
Cleanup:
As you carve, little crumbs of clay and glaze will accumulate. Do not brush them with your hand, or you might smear the black. Instead, use a very soft, dry brush to gently sweep the debris off the platter.
Step 4: Finishing
-
Bisque Fire (If needed):
If you carved into greenware (unfired clay), you must now bisque fire the piece to set the shape and the underglaze. -
Glazing:
Once bisque fired, apply a coat of clear transparent glaze over the entire platter. This will seal the clay and make the black underglaze pop with intense contrast. -
Final Fire:
Fire the platter one last time according to the temperature requirements of your clear glaze and clay body.
Display your finished platter as a stunning centerpiece or mount it on the wall to enjoy your permanent garden scene
Scalloped Or Ruffled Rim
This elegant yet homey ceramic platter balances a large, smooth serving surface with a rhythmic, scalloped rim that mimics petals. The design features a warm, speckled cream glaze accented by a rich honey-brown oxide that pools beautifully in the fluted edges.
Step-by-Step Guide
Materials
- 5 lbs Speckled stoneware clay
- Rolling pin
- Canvas/slab mat
- Ribs (metal and soft rubber)
- Needle tool
- Large circular template (paper or bat)
- Sponge
- Trimming tools
- Clear or Oatmeal speckled glaze
- Iron oxide wash or Rutile wash
- Paintbrush (small, synthetic)
Step 1: Slab Construction
-
Roll the slab:
Begin by wedging your speckled stoneware clay thoroughly to remove air bubbles. Roll it out into a large, consistent slab approximately 3/8-inch thick. I usually flip the slab over halfway through rolling to ensure intense compression on both sides. -
Cut the circle:
Place your large circular template—around 14-16 inches diameter makes a nice sized platter—onto the clay. Use a needle tool to trace and cut out your perfect circle, keeping the knife perpendicular to the table for a clean edge. -
Compress the rim:
Take a moment to compress the cut edge with a damp sponge or your finger. This heals the cutting marks and prevents future hairline cracks. -
Create the lift:
Place your clay ciircle onto a large slump mold or a shallow, convex form to give it a gentle curve. Alternatively, you can plate it on a bat and use foam wedges underneath the rim to prop it up about 1-2 inches.
Warping Woes?
Platters love to warp. To fix this, weigh down the center with a sandbag during the leather-hard drying stage to keep the bottom perfectly flat.
Step 2: Scalloping the Rim
-
Mark your spacing:
Lightly mark intervals around the rim where you want your scallops to be. Aim for about 1.5 to 2 inches apart to replicate the pattern in the photo. -
Form the scallops:
Using your thumb and forefinger, gently pinch the clay rim at each mark to create a raised peak. Push the clay between the peaks slightly downward and outward to exaggerate the curve. -
Refine the fluting:
With a damp sponge, smooth the transition between the raised scallop and the flat interior. You want a distinct ‘flute’ shape that runs from the rim about 2 inches inward toward the center. -
Final smoothing:
Go over the entire rim one last time with a soft rubber rib to erase fingerprints, ensuring the scallops look organic and flowing rather than pinched.
Clean Lines
For a sharper scallop, cut a ‘U’ shape out of an old credit card and use it to press indentations into the rim instead of using your fingers.
Step 3: Finishing and Glazing
-
Dry slowly:
Cover the platter loosely with plastic. Because the rim is thinner and more exposed than the center, it needs to dry very slowly to prevent warping. Check it daily until bone dry. -
Bisque fire:
Load the bone-dry platter into the kiln for a bisque firing to Cone 04. Make sure the rim is fully supported. -
Apply the wash:
Once bisqued, mix your iron oxide or rutile wash. Using a small brush, carefully paint a line along the very edge of the rim and highlight the interior ‘valleys’ of each scallop. -
Wipe back:
Take a damp sponge and gently wipe away the excess oxide. You want the color to remain only in the textures and on the very edge to create that toasted, defined look. -
Glaze application:
Dip or pour a clear or oatmeal glaze over the entire piece. The glaze will interact with the oxide wash underneath, pulling that golden-brown color through. -
Final firing:
Fire the platter to the temperature required by your clay body and glaze (typically Cone 5 or 6 for stoneware). Allow the kiln to cool completely before removing to prevent thermal shock.
Now you have a stunning centerpiece ready for your next gathering

TRACK YOUR CERAMIC JOURNEY
Capture glaze tests, firing details, and creative progress—all in one simple printable. Make your projects easier to repeat and improve.
Template-Built Oval With A Seam Detail
Embrace the beauty of handmade ceramics with this shallow oval platter, featuring soft, organic curves and a distinct speckled clay body. The exposed rim creates a lovely contrast against the creamy white interior glaze, highlighting the natural texture of the stoneware.
Step-by-Step
Materials
- Speckled stoneware clay (mid-fire)
- Oval paper or tar paper template (approx. 14×8 inches)
- Rolling pin and canvas or slab roller
- Potter’s knife or needle tool
- Soft rib (yellow mudtool or similar)
- Serrated rib
- Sponge
- Shallow foam slab or thick foam cushion
- Plastic sheet
- Creamy white dipping or brushing glaze
Step 1: Preparing the Slab
-
Roll out the clay:
Begin with a well-wedged ball of speckled stoneware clay. Roll it out into a slab that is approximately 1/4 to 3/8 inch thick. If you are using a rolling pin, rotate the clay frequently to ensure an even thickness and prevent warping later. -
Compress the slab:
Using a soft rib, compress the clay surface on both sides. Run the rib swiftly over the slab in multiple directions to align the clay particles, which significantly reduces the chance of cracking during drying. -
Cut the shape:
Place your oval template onto the smoothed slab. Using a potter’s knife or needle tool, trace around the template to cut out your oval shape. Hold the knife perpendicular to the table for a clean, straight edge. -
Initial smoothing:
Once cut, run your finger or a slightly damp sponge along the cut edge to soften the sharp corner left by the knife. This small detail makes the rim feel more finished and professional.
Weighted Drying Trick
To prevent warping as it dries, place a small sandbag or a bag of rice in the center of the platter once it’s leather hard. This weight holds the floor down while the rim dries.
Step 2: Forming the Platter
-
Lift and drop technique:
Pick up the oval slab and gently drop it onto a piece of foam. Gravity will naturally cause the center to sink slightly, starting the curve. I find doing this a few times helps ease the clay into a relaxed shape. -
Define the rim:
While the slab is resting on the foam, gently press the edges upward with your fingertips to create a shallow wall. You want a subtle lift, not a sharp angle. -
Smooth the interior:
Use your soft rib again on the interior of the platter while it is curved. This not only smoothes the surface but also compresses the floor further, which is crucial for preventing S-cracks in flatware. -
Refine the lip:
With a slightly damp sponge, go over the rim one more time. The goal is to expose the grog/speckles slightly and ensure there are no sharp burrs that glazed edges might snag on. -
Slow drying:
Cover the platter loosely with plastic to let it dry very slowly to the leather-hard stage. Because flat platters are prone to warping, slow and even drying is your best defense.
Warped Rim?
If the rim curls up unevenly during drying, flip the leather-hard platter upside down on a flat board and place a weighted board on top for a few hours to flatten it.
Step 3: Finishing and Glazing
-
Bisque fire:
Once the piece is bone dry, bisque fire it according to your clay body’s specifications (usually Cone 04 or 06). -
Wax the rim (Optional):
If you want a very crisp line between the glaze and the raw clay rim, carefully apply wax resist to the very edge of the rim. Alternatively, you can just wipe the glaze back later. -
Apply glaze:
Pour a creamy white glaze into the interior of the platter, swirl it to coat the bottom evenly, and pour the excess out. If brushing, apply 2-3 even coats to the interior only. -
Clean the edges:
Using a damp sponge, meticulously wipe away any glaze that dripped onto the rim or the exterior wall. The design relies on that contrast between the white center and the speckled, raw clay border. -
Glaze fire:
Load the kiln and fire to the maturity temperature of your clay and glaze (typically Cone 5 or 6 for mid-fire stoneware). -
Sand the bottom:
After firing, check the foot of the platter. If the raw clay feels minimal rough, use a diamond sanding pad or wet-dry sandpaper to polish the bottom so it sits smoothly on a table.
This simple yet elegant platter is perfect for serving and highlights the organic warmth of handbuilding
Carved Rim Pattern For Extra Shadow
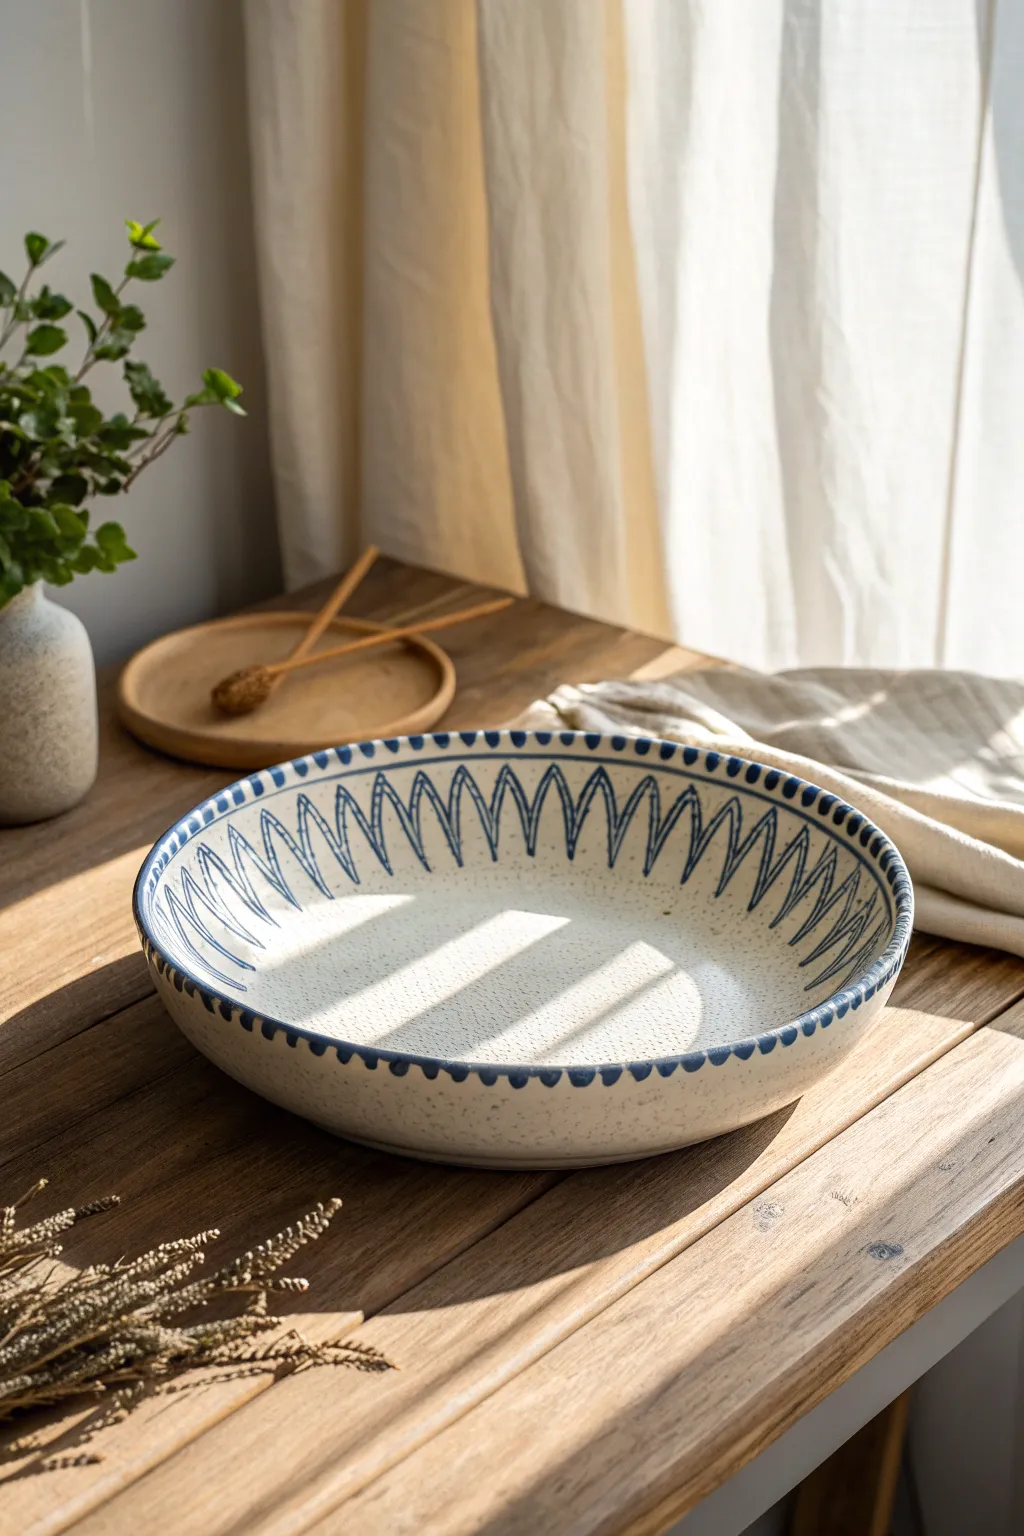
Capture the warmth of a Mediterranean afternoon with this beautifully textured shallow bowl. Featuring a creamy, speckled glaze and a hand-painted indigo rim pattern, this project balances rustic charm with geometric precision.
Step-by-Step Tutorial
Materials
- White stoneware clay with grog (for speckling)
- Pottery wheel
- Trimming tools (loop tools)
- Rib tool (wooden or silicone)
- Indigo or cobalt blue underglaze
- Fine liner brush (size 0 or 1)
- Clear matte or satin glaze
- Sponge
- Needle tool
- Wire cutter
- Bat for wheel throwing
Step 1: Shaping the Form
-
Center the clay:
Begin by wedging roughly 3-4 lbs of speckled stoneware clay to remove air bubbles. Center it firmly on the wheel head or bat. -
Open the form:
Open the centered clay wide and low. Unlike a cup, you want a broad, flat floor. Compressing the floor is crucial here to prevent S-cracks during firing. -
Pull the walls:
Pull the walls outward rather than just upward to create a shallow, open bowl shape. Aim for a gentle curve that transitions smoothly from the floor to the rim. -
Refine the rim:
Use a chamois or a wet sponge to round off the rim. A slightly thickened rim adds visual weight and durability. -
Dry to leather hard:
Wire the pot off the bat and let it dry slowly until it reaches a leather-hard state. It should be firm enough to handle without deforming but cooler to the touch than room temperature. -
Trim the foot:
Flip the bowl over, center it, and trim a neat foot ring. This elevates the piece and gives it a professional finish.
Step 2: Applying the Decoration
-
Plan the pattern:
Before painting, visualize the pattern placement. The design sits on the inner slope of the wall. Lightly marking cardinal points (North, South, East, West) with a needle tool can help space the pattern evenly. -
Paint the rim dots:
Load your brush with indigo underglaze. Paint small, evenly spaced dots along the very top edge of the rim. I like to rotate the banding wheel slowly while tapping the brush for a consistent rhythm. -
Create the base line:
Determine where the bottom of your pattern will sit on the inside of the bowl. Paint a thin, solid line around the circumference at this level to act as a guide. -
Paint the first zig-zags:
Using the liner brush, draw a continuous zig-zag line between the rim dots and your bottom guide line. The peaks should meet the rim, and the valleys should touch the guide line. -
Double the lines:
To create the ‘petal’ look shown in the image, paint a second, slightly curved line inside each zig-zag triangle. This creates a double-lined effect that adds depth. -
Clean up:
If you smudge any underglaze, let it dry completely, then gently scratch it off with an X-acto knife or a stiff clean brush. -
Bisque fire:
Once the underglaze is dry, fire the piece to bisque temperature (usually Cone 04 or 06, depending on your clay body).
Uneven Spacing?
If your pattern doesn’t meet up perfectly at the end, gently sponge off the last few inches of wet underglaze and re-paint, slightly adjusting the width of the zig-zags to close the gap.
Step 3: Glazing and Finishing
-
Wax resist the foot:
Apply wax resist to the bottom foot ring to prevent glaze from sticking to the kiln shelf. -
Apply clear glaze:
Dip the entire bowl into a clear mix. A matte or satin finish works best here to mimic the stony texture in the photo. -
Wipe back (optional):
If your clear glaze is thick, you might want to wipe it back slightly over the blue design with a damp sponge so the underglaze doesn’t run or blur. -
Glaze fire:
Fire the piece to maturity (Cone 5, 6, or 10, based on your clay specifications). Ensure good ventilation in the kiln. -
Sand the bottom:
After firing, use wet-dry sandpaper or a grinding stone to smooth the unglazed foot ring, ensuring it won’t scratch your table.
Level Up: Carved Texture
Use a carving tool to physically incise the blue lines into the clay before bisque firing. This creates a tactile, inlaid effect where the glaze will pool darker in the grooves.
Serve your favorite salad or fruit in this stunning handmade vessel and enjoy the play of light across the rim.
Fruit Motif That Feels Like Summer
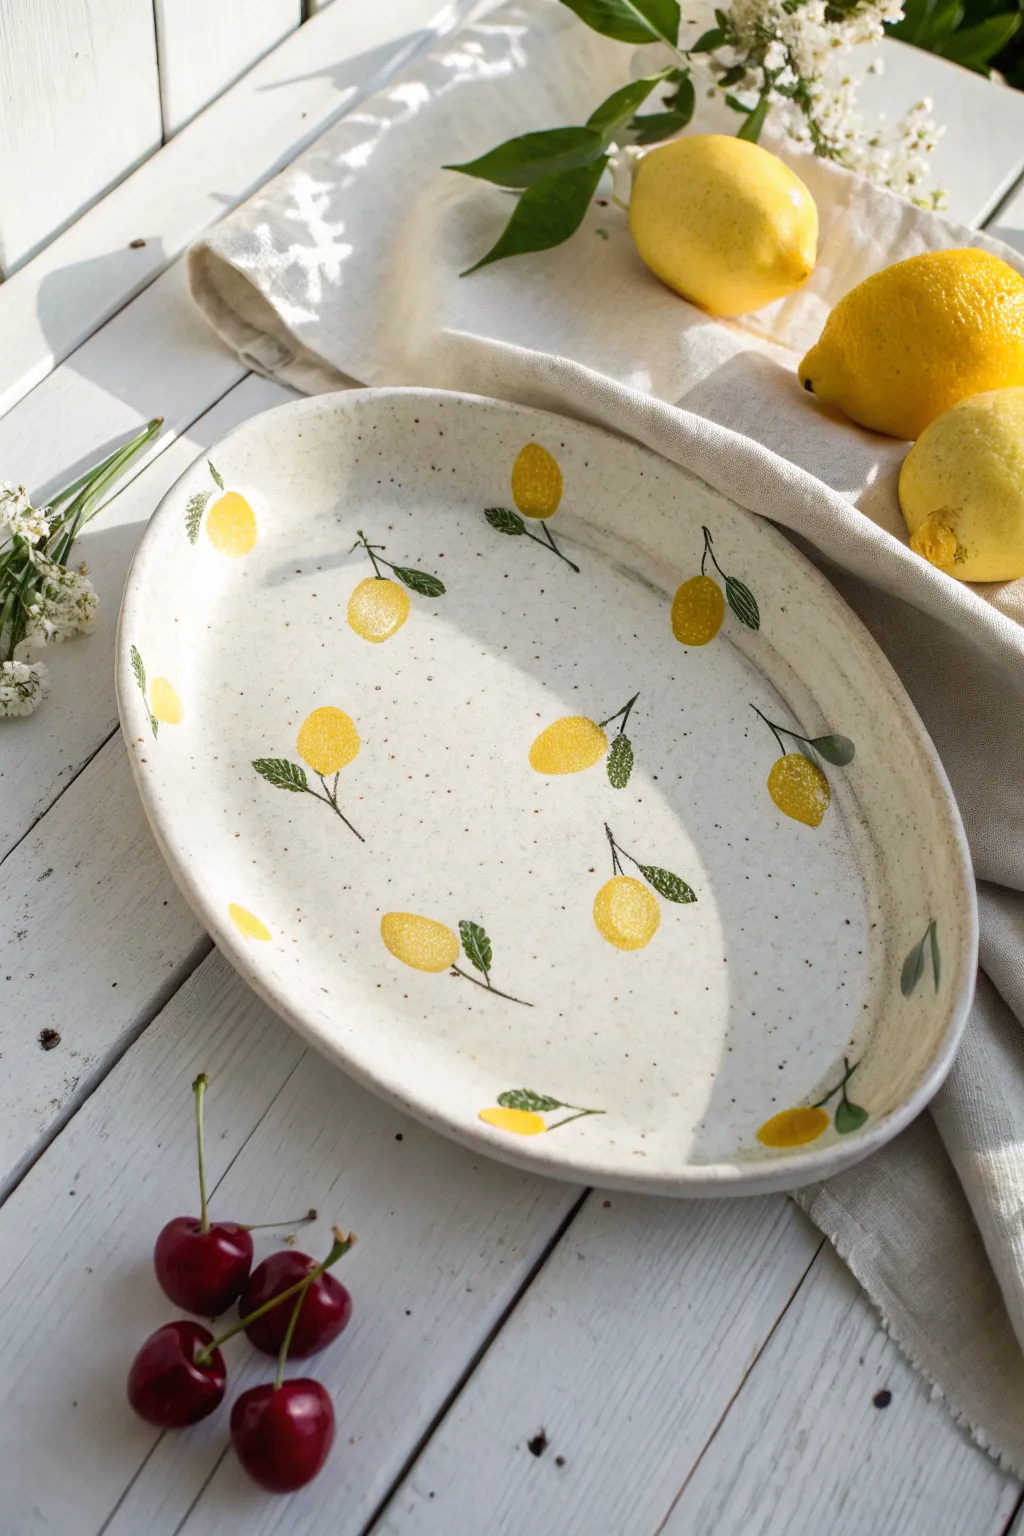
Capture the essence of a Mediterranean summer with this cheerful, hand-painted ceramic platter featuring a scattered lemon motif. The speckled clay body and loose, painterly style give it a charming rustic appeal perfect for serving seasonal fruits.
Detailed Instructions
Materials
- Speckled stoneware clay (approx. 3-4 lbs)
- Oval drape mold or slab template
- Rolling pin and guide strips (1/4 inch)
- Rib tool (flexible metal or rubber)
- Yellow underglaze (sunshine or bright yellow)
- Green underglaze (forest or olive tone)
- Dark brown or black underglaze (for stems)
- Small round paintbrush (size 2 or 4)
- Fine liner brush
- Sponge
- Clear transparent glaze
- Kiln access
Step 1: Forming the Platter
-
Roll the slab:
Begin by wedging your speckled stoneware clay thoroughly to remove air bubbles. Roll it out into a large, even slab using 1/4 inch guide strips to ensure consistent thickness. -
Smooth the surface:
Take a flexible rib tool and compress the clay slab on both sides. This aligns the clay particles to prevent warping and creates a smooth canvas for your future painting. -
Shape the oval:
Place your slab over an oval drape mold or onto a slump mold. Gently press the clay to conform to the shape, starting from the center and working outward to avoid wrinkles. -
Refine the rim:
Trim any excess clay from the edges using a needle tool or fettling knife. Take a damp sponge and run it along the rim to soften the sharp edges into a rounded, comfortable lip. -
Dry to leather hard:
Allow the platter to dry slowly until it reaches the leather-hard stage. It should be firm enough to hold its shape perfectly but still cool to the touch.
Uneven Underglaze?
If your yellow lemons look streaky after the first coat, let them dry fully and apply a second thin layer. Cross-hatching the brushstrokes helps create solid opacity.
Step 2: Painting the Lemons
-
Plan placement:
Visualize a scattered pattern where lemons face different directions. I like to lightly sketch the oval positions with a pencil first; the graphite will burn off in the kiln. -
apply yellow base:
Load your round brush with bright yellow underglaze. Paint simple oval shapes for the lemons. Use a singular, confident stroke if possible to keep the look organic rather than overworked. -
Add dimension:
While the yellow is still slightly damp, you can dab a tiny bit of water or a lighter yellow on the upper curve of each fruit to suggest a highlight, though a flat application works well for this folk-art style. -
Paint the leaves:
Using the green underglaze and a smaller round brush, add one or two leaves to most lemons. Press the brush down at the base of the leaf and lift as you pull away to create a tapered point. -
Add texture to leaves:
For a rustic touch, you can lightly scratch through the green paint with a needle tool to reveal the clay underneath, mimicking leaf veins, or simply leave them solid as shown in the original design. -
Connect with stems:
Switch to your fine liner brush and the dark brown underglaze. Paint thin, delicate lines connecting the fruit to the leaves. Vary the angles so they don’t look like soldiers in a row. -
Bisque fire:
Once the underglaze is completely dry, allow the platter to dry to the bone-dry stage. Load it into the kiln for a bisque firing (usually Cone 04 or 06).
Step 3: Glazing and Finishing
-
Clean the bisque:
After the kiln cools, wipe the bisque-fired platter with a damp sponge to remove any dust that might interfere with the glaze application. -
Apply clear glaze:
Dip the entire platter into a clear, transparent glaze, or brush on three even coats if you are using a brushing glaze. Ensure the coat is even so it doesn’t cloud the design. -
Wipe the foot:
Carefully wipe the glaze off the bottom ‘foot’ or contact points of the platter with a wet sponge to prevent it from fusing to the kiln shelf. -
Glaze fire:
Fire the piece again to the maturation temperature of your specific clay and glaze (likely Cone 5 or 6 for stoneware). This will melt the glaze into a glossy, food-safe surface.
Stamp for Speed
Carve a simple lemon shape out of a dense household sponge. Dip it in underglaze and stamp your fruit pattern for a uniform, rhythmic look.
Once cooled, your platter is ready to bring a citrusy splash of cheer to your next dinner party
Mishima Inlay For Crisp Lines
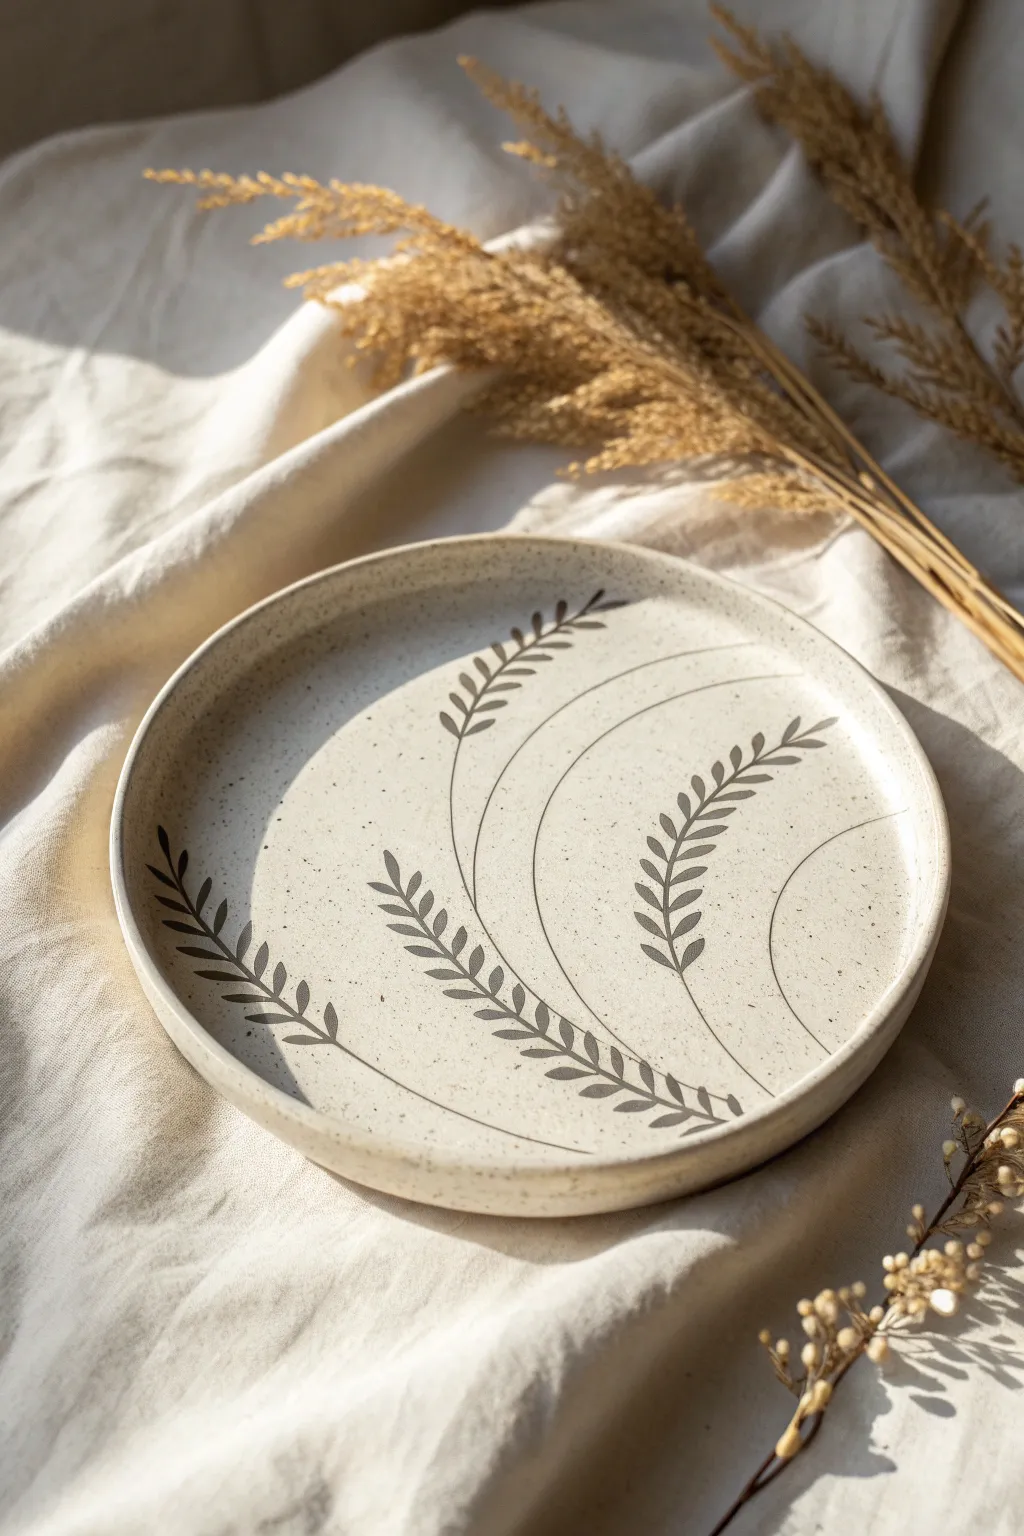
Capture the delicate sway of summer grasses with this elegant Mishima inlay project. Using a speckled clay body and precise carving, you’ll create a minimalist wheat motif that feels both modern and timeless.
How-To Guide
Materials
- Speckled buff stoneware clay
- Rolling pin and guide strips (approx. 1/4 inch)
- Round plaster mold or slump mold
- Metal kidney rib
- Soft rubber rib
- Fine needle tool or X-Acto knife
- Loop tool (small)
- Dark grey or black underglaze
- Fine paint brush
- Wax resist
- Clear transparent glaze
- Sponge
- Clean water
Step 1: Forming the Platter
-
Roll out the slab:
Begin by rolling out your speckled buff stoneware clay on a canvas surface. Use guide strips to ensure an even thickness of about 1/4 inch across the entire slab to prevent warping later. -
Compress the clay:
Taking a soft rubber rib, firmly compress the slab in multiple directions. This aligns the clay particles, providing a smoother surface for carving and reducing the chance of cracks during firing. -
Cut the circle:
Place your round template or mold over the slab and cut a clean circle, leaving about an inch of excess if you plan to trim later, or cut to exact size if pressing into a mold. -
Shape the form:
Gently drape your clay circle over a hump mold or press it into a slump mold to create the shallow platter shape with a slight rim. Use a damp sponge to smooth the rim edges. -
Dry to leather hard:
Allow the platter to dry slowly until it reaches a sturdy leather-hard stage. The clay should be firm enough to handle without deforming but soft enough to carve into easily.
Step 2: Carving the Inlay Design
-
Plan the composition:
Lightly sketch your wheat stalk design onto the surface with a very soft pencil. The graphite will burn off in the kiln, so don’t worry about mistakes. Aim for flowing, curved lines that follow the circular form of the plate. -
Carve the main stems:
Using a needle tool or a very fine sharp loop tool, carve the long, sweeping lines for the stems. You want a shallow channel, about 1-2mm deep—deep enough to hold color but not so deep it weakens the plate. -
Carve the leaves:
Add the leaf details branching off the stems. Use short, decisive strokes that taper at the ends to mimic the natural shape of grain or grass leaves. -
Add secondary curves:
Carve thin, singular arcing lines near the edges to balance the composition, echoing the curve of the rim. -
Clean the burrs:
Once carved, you might see tiny crumbs of clay or ‘burrs’ along the edges. Let the piece dry just slightly more, then gently brush them away with a soft dry brush, or carefully smooth them with a rubber rib without closing the channels.
Clean Lines Secret
Apply wax resist over the entire surface BEFORE carving. This prevents the underglaze from staining the surrounding clay when you wipe it back later.
Step 3: Inlaying and Finishing
-
Apply the wax resist:
At this stage, I like to coat the entire surface surrounding the carved lines with wax resist. This step is optional but makes the cleanup process significantly faster and keeps your background clay cleaner. -
Fill with underglaze:
Generously paint the dark grey or black underglaze into the carved channels. Ensure the liquid gets all the way to the bottom of the grooves. It will look messy, and that is perfectly fine. -
Let it set:
Allow the underglaze to dry until it is no longer shiny. It needs to be firm so you don’t smear it out of the lines in the next step. -
Scrape the excess:
Using a sharp metal kidney rib, carefully scrape across the surface of the plate to remove the excess underglaze. Hold the rib at a high angle and drag it cleanly. The design will emerge crisp and sharp against the speckled clay. -
Final sponge wipe:
If a slight haze of color remains, wipe the surface very lightly with a clean, barely damp sponge. Avoid scrubbing, or you risk pulling color out of the inlaid lines. -
Bisque fire:
Place the finished platter on a shelf to dry completely before bisque firing it to cone 04 (or your clay’s specific bisque temperature). -
Glaze and final fire:
Dip or brush a clear transparent glaze over the entire piece. Fire to cone 6 (or your clay body’s maturation temperature) to seal the clay and make the dark inlay pop.
Texture Twist
Try inlaying colored slips made from the same clay body instead of underglaze for a more subtle, textural effect that feels organic.
Once fired, the contrast between the dark inlay and the warm, speckled clay creates a stunning piece suitable for serving or display
Tile-Inspired Patchwork Panels
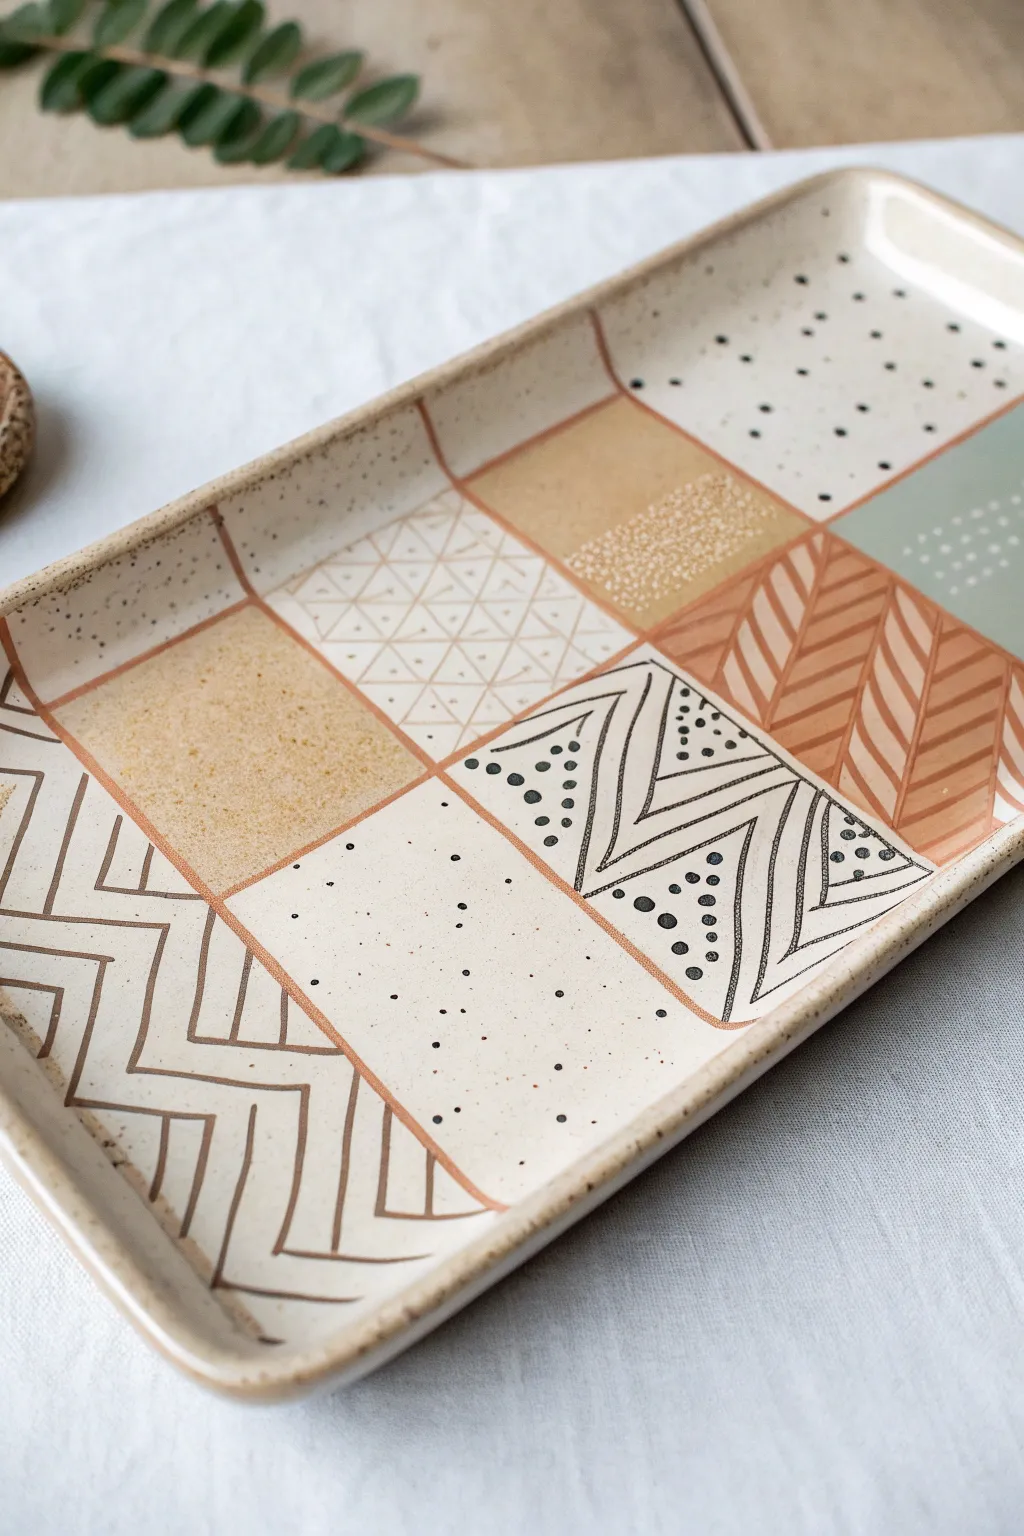
This rectangular ceramic platter transforms a simple slab of clay into a harmonious display of mixed patterns and textures. By dividing the surface into geometric ’tiles,’ you can experiment with varied glazing techniques, sgraffito, and wax resist to create a warm, earthy centerpiece.
Step-by-Step Tutorial
Materials
- Light stoneware or speckled clay body
- Rolling pin and guide strips (approx. 1/4 inch)
- Rectangular slump mold or wooden board for hand-building
- Fettling knife
- Ruler or straight edge
- Underglazes (Warm Rust, Sage Green, Wheat/Mustard, Black)
- Fine-tipped liner brush
- Wax resist (liquid)
- Carving tool (sgraffito tool or needle tool)
- Clear transparent glaze (glossy or satin)
- Sponge and water
- Kiln
Step 1: Slab Construction & Forming
-
Roll the slab:
Begin by rolling out your clay on a canvas surface using guide strips to ensure an even thickness of about 1/4 inch. If you are using speckled clay, smooth it with a rib afterwards to ensure the grog is pushed down slightly. -
Cut the rectangle:
Using a ruler and a fettling knife, cut a clean rectangle. Aim for dimensions around 6×12 inches, or size it to fit your specific slump mold. -
Shape the rim:
Transfer the slab to your slump mold to give it a shallow curve. Alternatively, place it on a board and gently lift the edges, propping them up with foam or coils of clay to create a raised rim. -
Smooth the edges:
Use a damp sponge or your finger to round over the sharp cut edges of the rim. This prevents chipping later and gives the piece a professional finish. -
Dry to leather hard:
Allow the platter to dry slowly until it reaches a leather-hard state. It needs to be firm enough to handle carving and painting without warping, but still possess enough moisture to accept underglaze.
Clean Lines Tip
Use automotive pinstriping tape to mark out your grid before applying underglaze. It creates incredibly sharp, straight lines and peels off cleanly without disturbing the raw clay surface.
Step 2: Mapping the Design
-
Sketch the grid:
With a needle tool or a very soft pencil, lightly map out your grid. Create a 3×4 or 2×4 layout of squares and rectangles. Don’t worry if the lines aren’t perfectly mathematically equal; a little variation adds charm. -
Define the borders:
Using a rust-colored underglaze and a liner brush, paint thin lines over your grid marks. This creates the ‘grout’ look that separates the different pattern zones. -
Identify solid color zones:
Select a few random squares to be filled with solid colors. Paint one block in a sage green and another in a wheat or mustard yellow. Apply 2-3 coats for opacity.
Go Geometric
Instead of a simple square grid, try dividing your platter into varied geometric shapes like hexagons or irregular trapezoids for a modern, abstract patchwork look.
Step 3: Adding Patterns & Texture
-
Create the herringbone pattern:
In the large right-hand section, paint diagonal stripes using the rust underglaze. I like to alternate the direction of the diagonals in vertical columns to create a classic herringbone weave effect. -
Layering the triangle grid:
For the upper-left section, leave the background as raw clay. Paint a delicate grid of triangles using thin rust lines. Keep your hand steady and your brush loaded with enough pigment to make crisp lines. -
Detailing the solid blocks:
Once the wheat-colored block is dry, use white underglaze or slip to stipple a textured pattern over the bottom half, creating a visual gradient. -
Wax and overlay:
On the sage green block, you can apply small dots using wax resist (if you plan to glaze over it) or simply create a pattern of white dots using underglaze for a soft, matte contrast.
Step 4: Sgraffito & Strong Graphics
-
Paint the chevron block:
In the lower-left corner, paint thick, bold chevron lines using a dark brown or black underglaze. Let the lines be slightly organic rather than perfectly rigid. -
The central focal point:
For the central panel with the striking geometric triangles, paint the black triangular outlines first. Fill the interior triangles with rows of tiny black dots. -
Sgraffito detailing:
Locate a panel you want to detail with carving. Paint a square entirely with black or rust underglaze. Once it’s firm but not bone dry, carve through the layer to reveal the clay body beneath, creating stripes or dots. -
Speckled minimalism:
Dedicate one or two panels to simple minimalism. Paint a white background and add tiny, random black specks to mimic a granite or terrazzo texture. -
Clean up lines:
Go back over your main separating grid lines with the rust underglaze if they got messy during the pattern painting. Crisp borders really make the patchwork pop.
Step 5: Finishing
-
Bisque fire:
Let the platter dry completely to bone dry state. Load it into the kiln for a bisque firing (usually Cone 04) to set the shape and underglazes. -
Apply clear glaze:
Once fired, wipe the bisqueware with a damp sponge to remove dust. A dip into a clear glossy glaze works best to brighten the underglaze colors, though a satin matte is lovely for a more rustic feel. -
Wipe the foot:
Ensure the bottom of the platter is completely free of glaze so it doesn’t stick to the kiln shelf. -
Final glaze fire:
Fire the piece to the maturation temperature of your clay and glaze (typically Cone 5 or 6 for stoneware).
Once cooled, your platter offers a beautiful sampler of patterns ready to serve appetizers or hold trinkets.
Whimsical Animal Story Platter
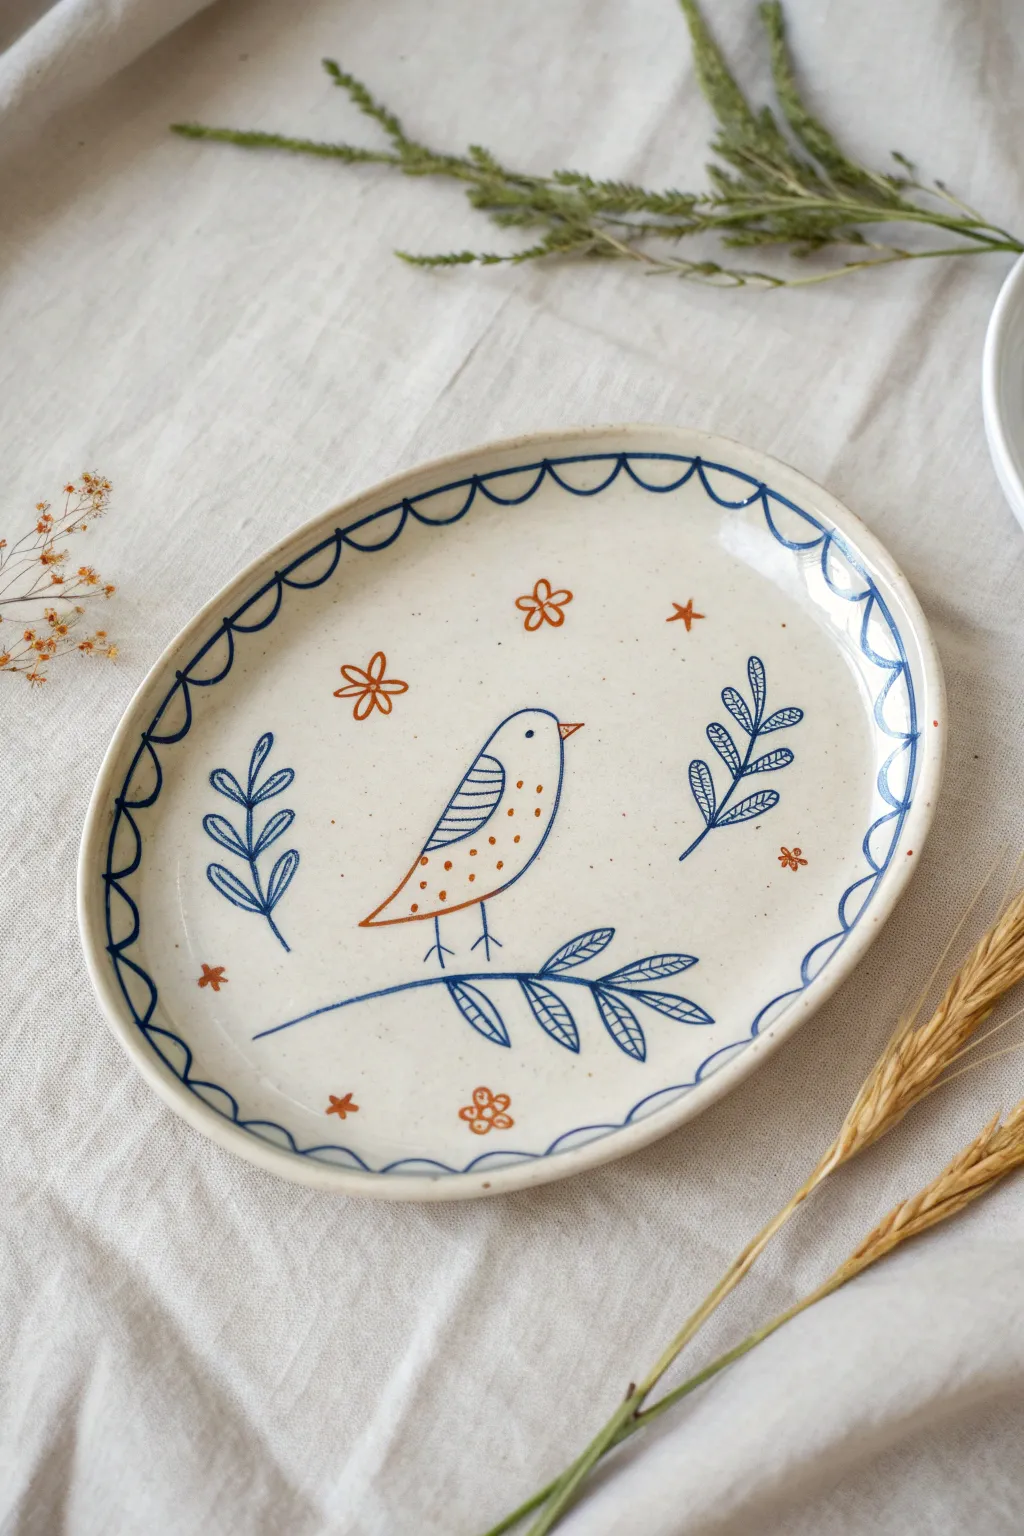
Capture the charm of simple storytelling with this delightful folk-art inspired ceramic platter. Featuring a sweet bird perched among botanical sprigs and scattered stars, the design uses a minimal palette of navy blue and burnt orange to create a timeless, handcrafted look.
How-To Guide
Materials
- Oval stoneware platter (bisque-fired)
- Underglaze pencil or fine liner bottle (Navy Blue)
- Underglaze pencil or fine liner bottle (Burnt Orange)
- Clear transparent glaze
- Soft fan brush for glazing
- Fine detail brush (size 0 or 00)
- Pencil for sketching
- Damp sponge
- Kiln access
Step 1: Preparation & Sketching
-
Clean surface:
Start by wiping down your bisque-fired platter with a slightly damp sponge. This removes any dust or oils that might repel the glaze later. -
Transfer the basic shape:
Using a regular graphite pencil, lightly sketch the oval outline of the bird in the center. Don’t worry about being perfect; the pencil marks will burn away in the kiln. -
Map out elements:
Lightly mark the positions for the three botanical sprigs—one beneath the bird’s feet and two flanking the sides. Add small circles where the flowers and stars will go to ensure balanced spacing.
Steady Hand Helper
Rest your pinky finger on a dry part of the plate while painting lines. This anchors your hand and gives you much better control for fine details like the leaves.
Step 2: Line Work Painting
-
Outline the bird:
Using a fine liner applicator or a very fine brush with navy blue underglaze, engage a steady hand to trace the bird’s body. Leave a small gap for the beak. -
Add wing details:
Draw the wing shape inside the body using the blue underglaze. Fill the upper part of the wing with simple horizontal stripes for texture. -
Draw the main branch:
Sweep a long, curved blue line beneath the bird to serve as the main perch. Add leaf outlines stemming from this branch, keeping them open and airy. -
Create side botanicals:
Paint the two vertical plant sprigs on the left and right sides. Use the same navy blue to draw a central stem with paired leaves climbing upwards, adding cross-hatching inside the leaves for distinct folk-art texture. -
Add the scalloped border:
Around the inner rim of the platter, carefully paint a continuous scalloped line in blue. The loops should face inward, creating a lace-like frame for your scene. -
Paint the feet:
Add two simple stick legs extending from the bird to the branch below, giving it a grounded posture.
Step 3: Color Accents
-
Paint the beak:
Switch to your burnt orange underglaze. Using your finest brush, paint a small, sharp triangular beak on the bird’s face. -
Add body details:
Still using orange, dot the lower half of the bird’s body and the lower section of the wing to add warmth and pattern. -
Draw the eye:
Dip the very tip of a brush handle or a dotting tool into the navy blue and place a single, small dot for the eye. -
Create flowers:
Using the burnt orange, draw simple five-petal outline flowers scattered around the open white space. I like to vary their sizes slightly for visual interest. -
Add stars:
Paint small, simple five-point stars or asterisks in orange to fill the remaining gaps, completing the whimsical sky effect.
Smear Prevention
If you smudge a line, don’t wipe it wet! Let it dry completely, then gently scrape the mistake off with a craft knife or a stiff clean brush.
Step 4: Glazing & Firing
-
Drying:
Allow the underglaze design to dry completely. It should look chalky and matte when ready. -
Sponge lightly:
Very gently dab the design with a slightly damp sponge to set the underglaze powder, ensuring it doesn’t smear when you apply the clear overglaze. -
Apply clear glaze:
Using a soft fan brush, apply 2-3 coats of clear transparent glaze over the entire front of the platter. Let each coat dry until it loses its sheen before applying the next. -
Clean the foot:
Wipe away any glaze from the bottom foot ring of the platter to prevent it from sticking to the kiln shelf. -
Final fire:
Fire the piece in the kiln according to your clay and glaze specifications (typically Cone 5 or 6 for stoneware).
Once fired, you’ll have a beautifully durable serving piece that brings a touch of storybook magic to your table setting