If you’ve got a flat slab and a little curiosity, ceramic platters are one of my favorite ways to turn clay into something instantly useful and beautiful. These ceramic platter ideas focus on shape, surface, and those little functional details that make a handmade serving piece feel extra special.
Classic Oval Slab Platter

Embrace the beauty of simplicity with this elegant, hand-built ceramic platter. Its soft, creamy glaze and subtle speckling, paired with gently rising sides, make it a timeless centerpiece for any table setting.
Step-by-Step
Materials
- Speckled Stoneware Clay (Cream or Buff)
- Canvas Workspace or Slab Mat
- Rolling Pin (or Slab Roller)
- Guide Sticks or Slat Boards (approx. 1/4 inch thick)
- Paper Template (Oval shape)
- Needle Tool or Fettling Knife
- Ribs (Soft Rubber and Metal Kidney)
- GR Pottery Form (Oval) or a Bisque Hump Mold
- Weight Bag or Small Sandbag
- Sponge
- Potter’s Knife
- Creamy White Drip Glaze (Gloss or Satin-Matte)
- Kiln
Step 1: Preparing the Slab
-
Wedge the Clay:
Begin by thoroughly wedging about 3-4 lbs of speckled stoneware clay to remove any air pockets and ensure an even consistency. -
Set Up Guides:
Place your canvas on a sturdy table. -
Thickness Guides:
Arrange your wooden guide sticks on either side of the clay. For a platter of this size, a thickness of about 1/4 inch to 3/8 inch creates a substantial yet elegant feel. -
Roll the Slab:
Roll the clay out using a rolling pin, ensuring you maintain even pressure. Flip the slab securely onto a fresh section of canvas halfway through to prevent sticking and to align the clay partilces. -
Compress the Clay:
Take a soft rubber rib and firmly compress the surface of the slab. I like to do this in multiple directions—this not only smooths the texture but is crucial for preventing warping later on.
Step 2: Shaping and Refining
-
Cut the Shape:
Lay your oval paper template lightly onto the slab. Using a needle tool, trace and cut around the perimeter. Hold the needle vertical to get a nice, straight edge. -
Soften the Rim:
Before moving the clay, run a damp sponge or a piece of plastic wrap over the freshly cut edge to round it off slightly. Sharp edges can chip easily after firing. -
Transfer to Form:
Wait until the clay is ‘soft leather hard’—firm enough to handle but still flexible. Carefully lift the slab and drape it over your oval hump mold or press it into a slump mold. -
Establish the Curve:
If using a hump mold, gently press the slab down to conform to the shape. Use a sandbag or weight bag in the center to keep it seated flat while the sides drape naturally. -
Smooth the Profile:
Use a flexible rib to smooth the clay against the mold, ensuring the curve is continuous and free of finger marks. -
Dry Slowly:
Cover the piece loosely with plastic. Allow it to dry slowly on the mold for a day so it retains the shape without cracking. -
Refine the Foot:
Once firm, remove from the mold. If you want a perfectly flat bottom, you can gently paddle the base or attach a small coil foot ring now, though the example image suggests a simple flat-bottomed slab style. -
Final Sponging:
Go over the rim one last time with a slightly damp sponge to ensure it is perfectly smooth.
Warping Woes?
If your platter lifts at the edges during drying, weight the center with a sandbag and dry very slowly under plastic for several days.
Step 3: Firing and Glazing
-
Bisque Fire:
Once bone dry, fire the platter to bisque temperature (usually Cone 06 or 04 depending on your clay body). -
Clean the Bisque:
Wipe the bisque-fired piece with a damp sponge to remove any dust that might resist the glaze. -
Glaze Application:
Pour a creamy off-white glaze into a wide shallow pan. Dip the platter face down, or brush on 2-3 even coats if dipping isn’t possible. The glaze should be fluid enough to level out but opaque enough to show the clay’s speckles subtly. -
Wipe the Base:
Clean the bottom of the platter thoroughly with a wax resist or a sponge to prevent it from sticking to the kiln shelf. -
Glaze Fire:
Fire the piece to maturity (Cone 5 or 6 is common for stoneware). Let the kiln cool completely before opening to avoid thermal shock to the wide, flat shape.
Pro Tip: Compression
Compressing the slab on BOTH sides with a rib is the secret to avoiding s-cracks. Taking 5 extra minutes here saves the pot later.
Once cooled, your platter offers a beautifully serene canvas for serving everything from roasted vegetables to fresh fruit.


Round Platter With Foot Ring
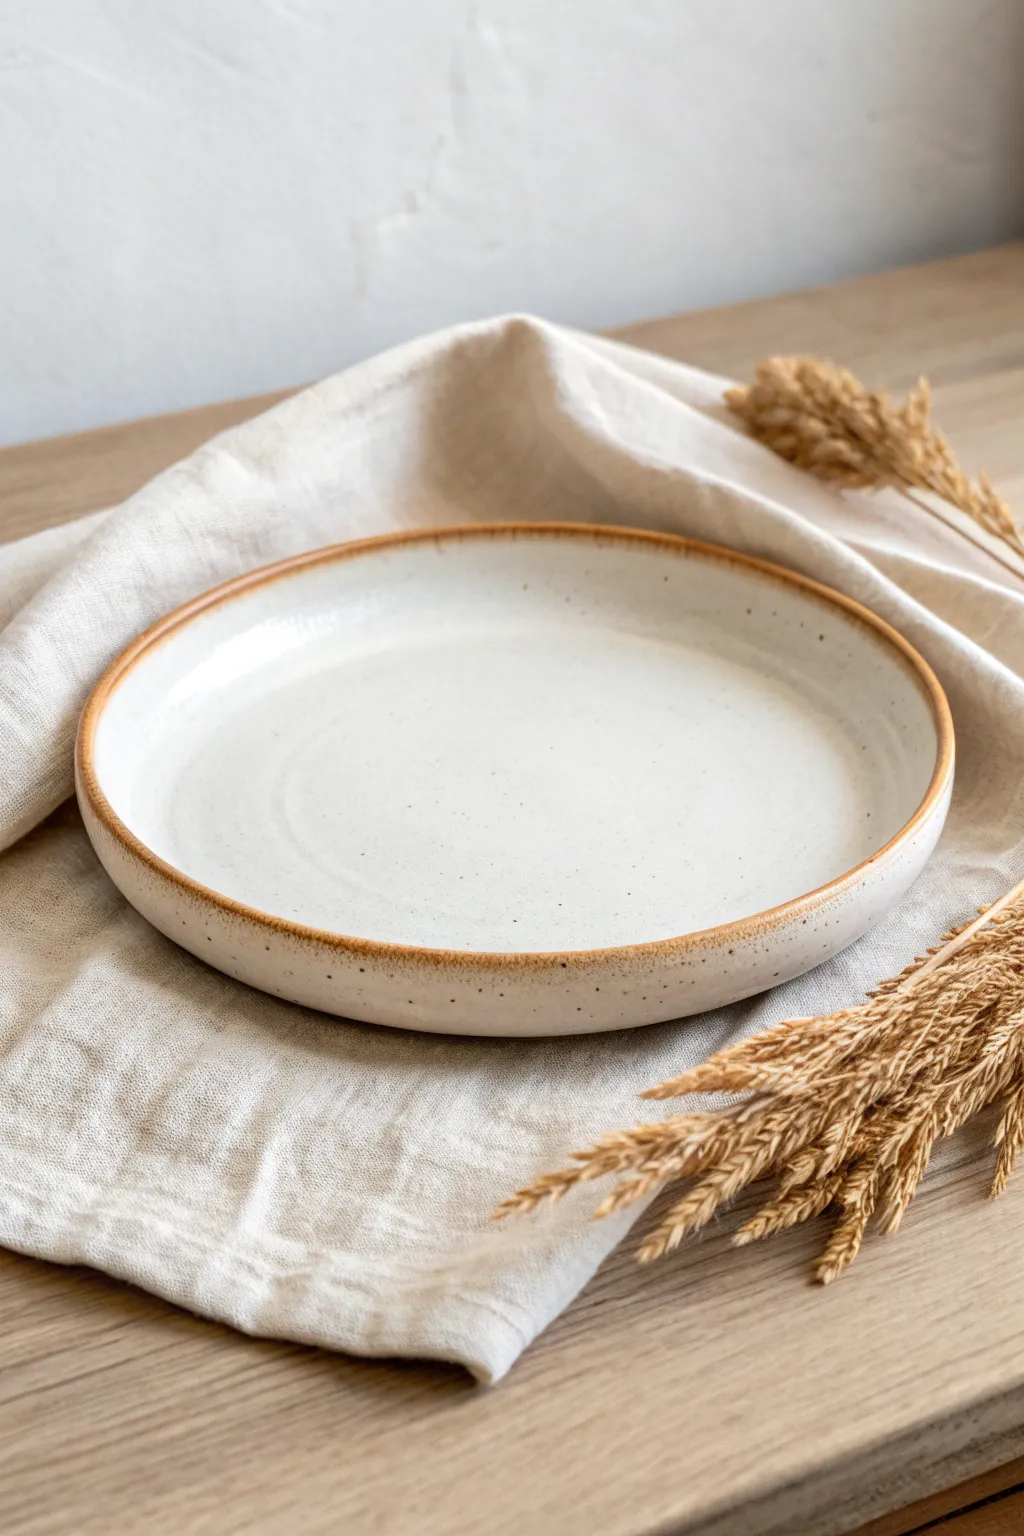
This elegant yet grounded platter features a creamy, speckled glaze that lets the warmth of the clay peek through at the rim. Its simple, shallow form and sturdy foot ring make it perfect for serving artisanal breads or acting as a centerpiece.
Step-by-Step Guide
Materials
- Speckled stoneware clay (approx. 3-4 lbs)
- Pottery wheel
- Throwing sponge
- Ribs (wooden and metal)
- Wire cutter
- Trimming tools
- Creamy white matte glaze
- Iron oxide wash (optional, for rim)
- Bat for wheel
- Kiln
Step 1: Throwing the Form
-
Center and open:
Begin by centering your 3-4 lb ball of speckled stoneware clay on the wheel head. Open the clay wide, keeping the floor flat and about 1/2 inch thick to accommodate trimming later. -
Establish the floor:
Compress the base thoroughly using a wooden rib or a damp sponge. This is crucial for preventing S-cracks during firing, especially with wider platters. -
Pull the wall:
Pull a short wall, keeping it relatively vertical at first. You don’t need much height—about 1.5 to 2 inches is sufficient for this shallow profile. -
Shape the rim:
Use a rib to gently curve the wall outward, creating a smooth transition from the floor to the rim. Compress the rim with a chamois or your thumb to ensure it is rounded and durable. -
Refine the surface:
Run a metal rib over the interior surface while the wheel spins slowly to remove slurry and reveal the clay’s grog structure. -
Undercut and wire off:
Use a wooden tool to clean up the base of the wall, creating a small undercut. Run your wire tool under the bat to release the platter, but leave it on the bat to dry slowly to leather-hard.
Step 2: Trimming and Finishing
-
Center specifically for trimming:
Once leather-hard, flip the platter onto a foam bat or use fresh clay lugs to secure it upside down on the wheel head. Ensure it is perfectly centered. -
Define the foot ring:
Determine the width of your foot ring—aiming for roughly two-thirds of the platter’s diameter for stability. Mark the inner and outer circles of the ring. -
Trim the excess:
Using a sharp trimming tool, remove the excess clay outside the foot ring first, mirroring the interior curve of the platter. -
Hollow the interior:
Trim out the center inside the foot ring. I like to keep the foot ring itself fairly wide and flat to match the rustic aesthetic. -
Smooth the transition:
Use a damp sponge or a rubber rib to smooth out any trimming chatter marks and soften the sharp edges of the foot ring. -
Bisque fire:
Let the piece dry completely, covering the rim loosely with plastic if it’s drying too unevenly. Fire to Cone 04 (or your clay’s bisque temperature).
Don’t Rush Drying
Platters warp easily. Dry them very slowly by keeping the rim covered with light plastic while the center catches up to leather hard.
Step 3: Glazing
-
Wax the foot:
Apply wax resist to the bottom of the foot ring to prevent glaze from adhering to the kiln shelf. -
Dip or pour:
Using a creamy, semi-opaque white glaze, either dip the entire platter (if your container is large enough) or pour the glaze over the interior and exterior to ensure an even coat. -
Accentuate the rim:
Wipe the glaze off the very edge of the rim with a damp sponge. This exposes the raw clay body, which will toast to a lovely brown during firing. -
Optional oxide boost:
For a darker rim contrast like in the image, you can lightly brush a very diluted iron oxide wash onto the exposed clay rim. -
Final fire:
Fire the platter to the final temperature required by your clay and glaze combination (typically Cone 5 or 6). Allow the kiln to cool naturally.
Fixing a Wobbly Rim
If the rim warps during firing, it’s often due to handling when soft. Use a bat system so you never have to lift the wet clay manualy.
Once cooled, your platter will be ready to bring a touch of handcrafted warmth to your dining table


Organic Wavy-Edge Platter
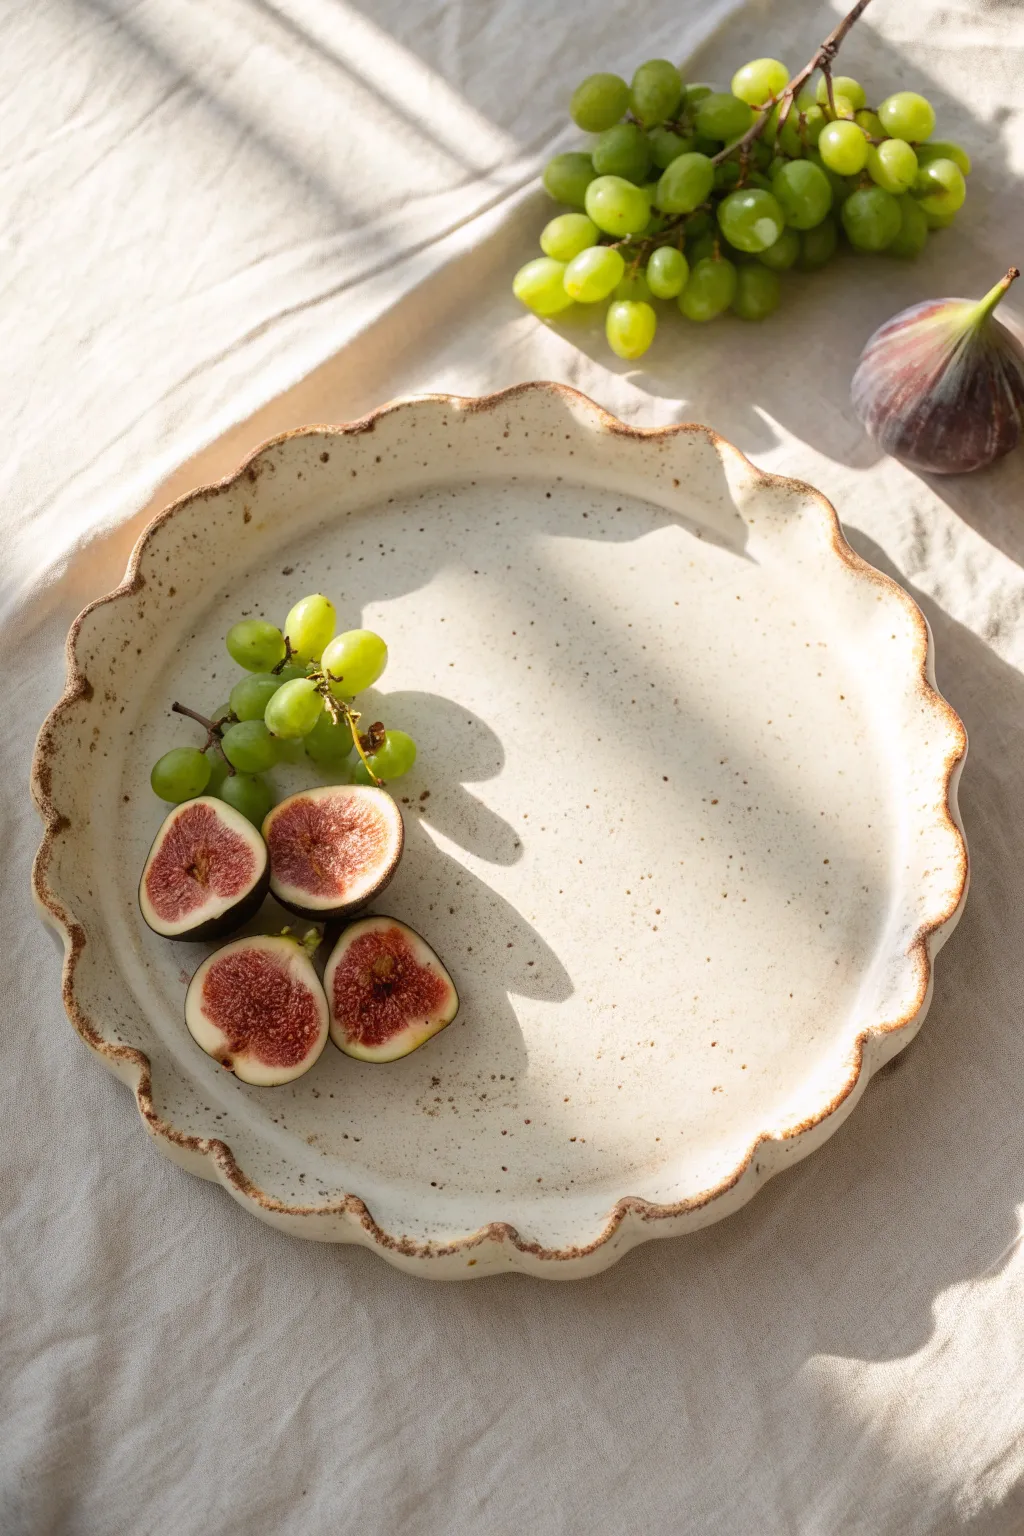
This project embraces the beauty of imperfection with its gently undulating rim and speckled, earthy finish. It’s a versatile serving piece that balances rustic charm with modern elegance, perfect for showcasing fresh fruits or charcuterie.
How-To Guide
Materials
- Speckled stoneware clay (mid-fire)
- Rolling pin
- Guide sticks (1/4 inch thick)
- Large round plaster or hump mold (or a large bowl covered in canvas)
- Needle tool
- Fettling knife
- Rib tool (soft kidney)
- Sponge
- Surform tool (cheese grater style)
- Matte cream or white glaze
- Iron oxide wash (or a darker brown underglaze)
- Wax resist
- Kiln access
Step 1: Forming the Base
-
Prepare the Clay:
Begin by wedging your speckled stoneware clay thoroughly to remove air bubbles. You’ll want a generous amount, about 3-4 pounds, to ensure you have enough surface area for a large platter. -
Roll the Slab:
Set up your guide sticks on either side of the clay. Using a rolling pin, roll the clay out into a large, consistent slab. Rotate the clay periodically so it stretches evenly in all directions without sticking. -
Compress the Surface:
Once rolled, take your soft rib tool and drag it firmly across the surface in overlapping strokes. This compression is crucial for preventing warping during the firing process. -
Cut the Circle:
Place your mold or a large circular template over the slab. Using a needle tool, trace and cut a large circle, leaving about an inch of extra margin beyond your intended final size to account for the depth of the rim.
Warping Woes?
Flat platters love to warp. To prevent this, dry the piece very slowly under plastic for several days, and weigh down the center with a sandbag while it dries on the mold.
Step 2: Defining the Shape
-
Drape the Clay:
Carefully lift your clay slab and center it over your hump mold. If you don’t have a professional mold, a large upturned bowl covered in a piece of fabric works perfectly. -
Slump and Smooth:
Gently press the clay down to conform to the mold’s curve. Use a damp sponge to smooth out any finger marks, ensuring the slab hugs the form tightly without stretching it too thin. -
Creating the Flutes:
Now for the signature wavy edge. Using your thumb and forefinger, gently pinch the rim upwards at regular intervals. I find it helpful to think of a clock face, pinching at 12, 6, 3, and 9 first, then filling in between to keep the waves even. -
Refining the Edge:
Go back around the rim with a damp sponge. Soften the peaks and valleys you just created so they look organic and blunted rather than sharp. The edge should feel pleasant to touch. -
Slow Drying:
Loosely cover the piece with plastic and let it dry slowly on the mold until it is leather hard. Rushing this stage often leads to warping.
Step 3: Finishing and Firing
-
Trim the Foot:
Once leather hard, flip the piece over. If the bottom is heavy, you can trim a shallow foot ring using loop tools, or simply smooth and compress the flat bottom for a more modern look. -
Bisque Fire:
Allow the platter to dry completely until bone dry. Fire it in a bisque cycle (usually Cone 04 or 06) to prepare it for glazing. -
Apply Oxide to Rim:
Mix a small amount of iron oxide wash. Using a small sponge or brush, dab this along the very edge of the fluted rim. Wipe away any excess with a clean sponge so the color stains the clay texture without being opaque. -
Glazing:
Dip the entire platter into a matte cream or white glaze. If your dipping container is too small, pour the glaze over the platter over a catch bucket. -
Wipe the Rim:
While the glaze is powdery but not fired, take a damp sponge and gently wipe the glaze off the very edge of the rim where you applied the oxide. This reveals that darker, toasted color underneath. -
Clean the Foot:
Wipe the bottom of the platter completely clean of glaze to prevent it from sticking to the kiln shelf. -
Glaze Fire:
Fire the piece to the maturity temperature of your clay body (likely Cone 5 or 6). Allow the kiln to cool naturally before removing your finished platter.
Level Up: Texture
Before cutting your circle, roll the slab onto a piece of coarse linen or lace. The glaze will break beautifully over the subtle fabric texture during firing.
Once cooled, your platter is ready to bring a touch of earthy sophistication to your next gathering


Long Rectangular Serving Platter
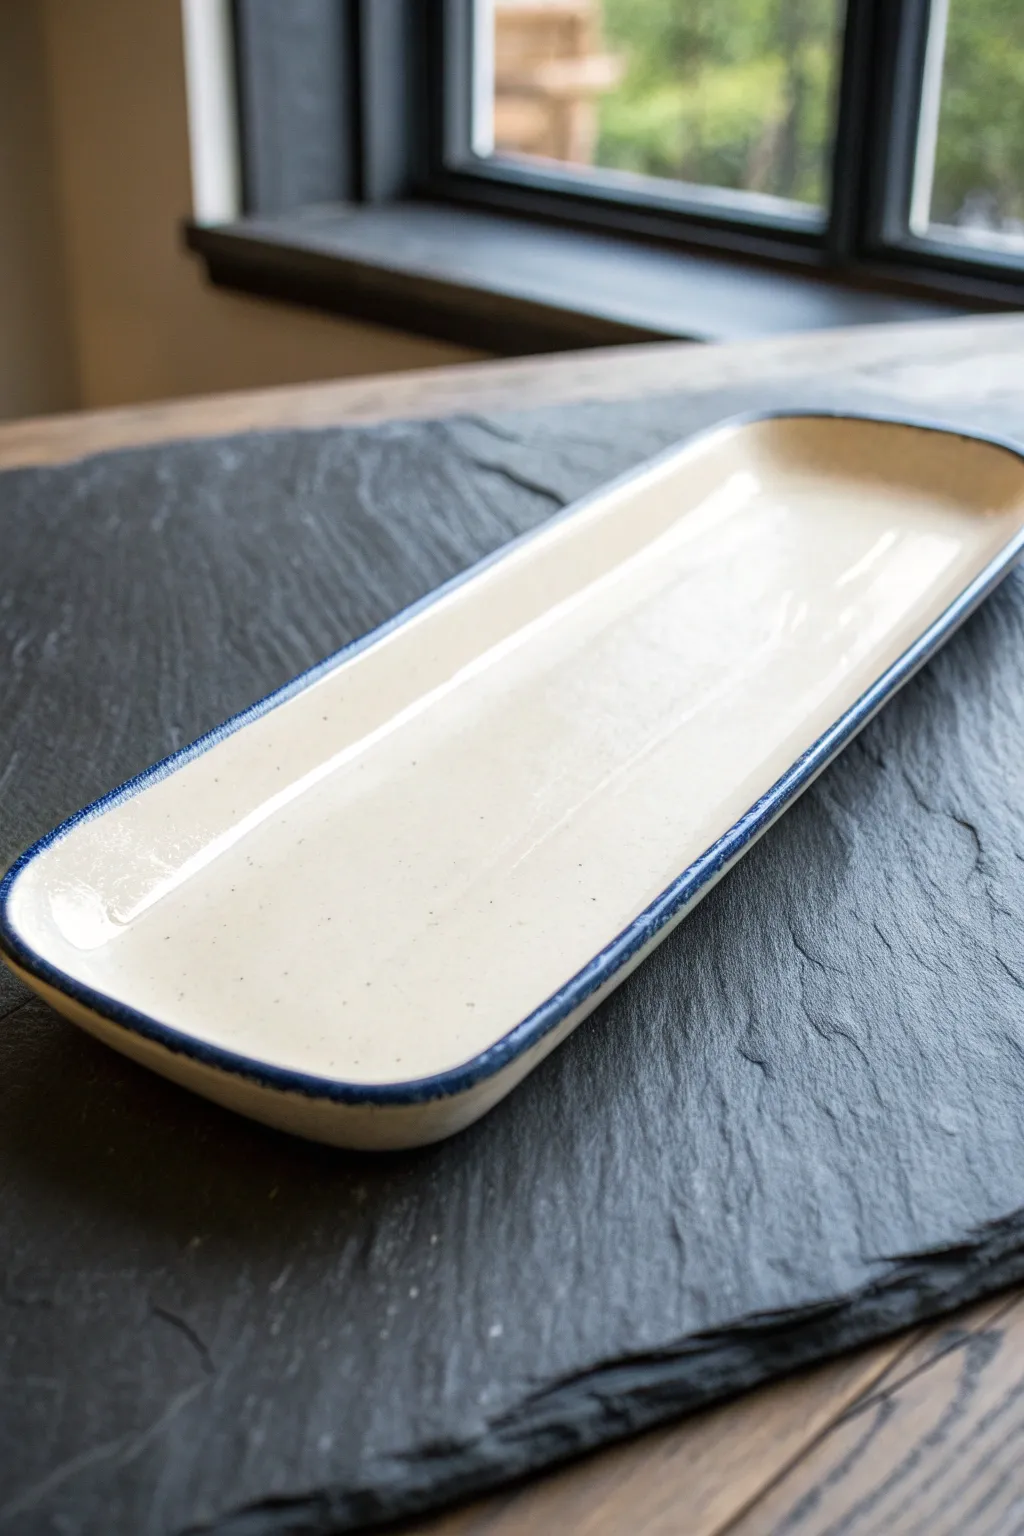
This elegant long rectangular platter features a warm, creamy glaze speckled with subtle hints of iron and framed by a distinct cobalt blue rim. Its hand-built charm and simple profile make it the perfect vessel for serving appetizers or baguettes.
Step-by-Step
Materials
- White stoneware clay (speckled variety preferred)
- Rolling pin
- Two wooden guide slats (approx. 1/4 inch thick)
- Rectangular paper template (approx. 14 x 5 inches)
- Fettling knife or needle tool
- Soft rib tool (rubber or silicone)
- GR Pottery Form (rectangular) or loose canvas for draping
- Pottery sponge
- Creamy white dipping glaze
- Cobalt blue underglaze
- Fine detail brush
- Wax resist (optional)
Step 1: Forming the Slab
-
Prepare the Clay:
Begin by wedging about 2-3 pounds of stoneware clay to remove air bubbles. If your clay doesn’t already have speckles, you can wedge in a very small amount of granular ilmenite or iron oxide to achieve that rustic look. -
Roll out the Slab:
Place your clay between two wooden guide slats on a canvas surface. Roll the clay out until the rolling pin rests flat on the slats, ensuring an even thickness of roughly 1/4 inch across the entire surface. -
Compress the Surface:
Take a soft rib tool and firmly drag it across the surface of the slab in multiple directions. This compression is crucial for preventing warping during the firing process and creates a smooth canvas for your glaze. -
Cut the Shape:
Lay your rectangular paper template gently onto the clay slab. Using a fettling knife or needle tool, trace around the template to cut out your rectangle, keeping the knife perpendicular to the table for a clean edge. -
Soften the Edges:
Once cut, run a slightly damp sponge along the sharp cut edges to round them off. You don’t want sharp corners that glaze will run away from later.
Warping Woes?
To prevent curling corners, weigh down the center of the platter with a small sandbag during the leather-hard drying stage.
Step 2: Shaping and Refining
-
Lift the rim:
If you are using a drape mold, carefully transfer the slab onto it now. If working freehand, place the slab on a board and gently lift the edges upward with your fingers to create a shallow curve, propping them up with small coils of spare clay if needed. -
Refine the Form:
Smooth out any finger marks using your soft rib. Pay special attention to the interior curve where the base meets the wall, ensuring a seamless transition that will be easy to clean after use. -
Dry Slowly:
Loosely cover the piece with plastic sheeting. Because long flat shapes are prone to warping, I allow this to dry very slowly over several days until bone dry. -
Bisque Fire:
Once fully bone dry, fire the piece to bisque temperature (usually cone 04) based on your specific clay body’s instructions.
Texture Twist
Before cutting the rectangle, press a linen cloth into the wet clay slab to leave a subtle textile texture under the glaze.
Step 3: Glazing and Finishing
-
Clean the Bisqueware:
Wipe the fired platter with a damp sponge to remove any kiln dust. This helps the glaze adhere properly without crawling. -
Apply the Base Glaze:
Dip the entire platter into a bucket of creamy white glaze. Use tongs or dip half and then the other half, overlapping slightly in the middle if your bucket is small. Shake gently to remove excess drips. -
Smooth the Surface:
Once the glaze is dry to the touch, gently rub any drips or pinholes with a clean, dry finger to smooth the powdery surface. -
Wipe the Foot:
Using a wet sponge, meticulously wipe the glaze off the bottom of the platter where it will touch the kiln shelf. Alternatively, you could have applied wax resist here before dipping. -
Paint the Rim:
Load a fine detail brush with cobalt blue underglaze or a stable blue overglaze. Steady your hand and carefully paint a thin line along the very top edge of the rim. -
Refine the Line:
If the line creates a bead or drip, gently dab it with the brush. The goal is a consistent, organic line that highlights the form’s contour. -
Final Fire:
Load the platter into the kiln for the final glaze firing, typically to Cone 5 or 6 depending on your clay and glaze specifications. -
Sand the Bottom:
After unloading the cooled kiln, use wet-dry sandpaper or a grinding stone to smooth the unglazed foot ring, ensuring it won’t scratch your table surface.
Now you have a stunning handmade centerpiece ready for your next dinner party

The Complete Guide to Pottery Troubleshooting
Uncover the most common ceramic mistakes—from cracking clay to failed glazes—and learn how to fix them fast.
Chip-and-Dip Platter With Attached Bowl
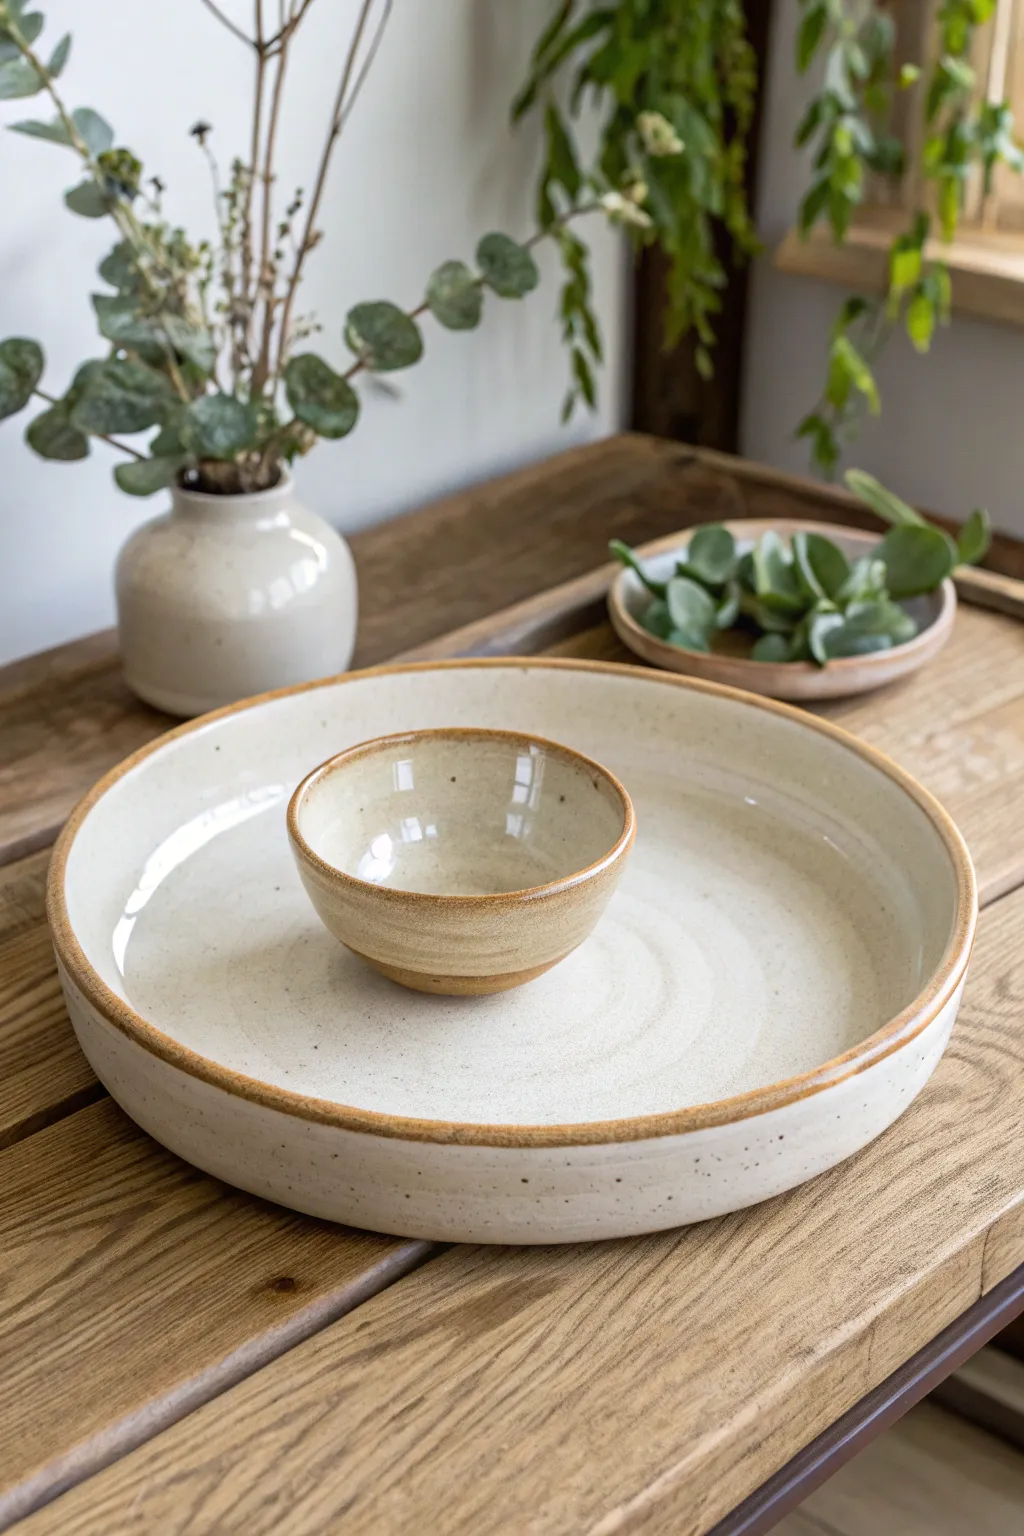
Elevate your snack table with this seamless integration of form and function. This project combines a low-profile serving platter with a perfectly centered dip bowl, united by a speckled cream glaze and exposed clay rims for a rustic-modern finish.
Step-by-Step Tutorial
Materials
- Stoneware clay (speckled or buff)
- Pottery wheel
- Throwing bats
- Wire cutter
- Ribs (metal and wooden)
- Needle tool
- Trimming tools
- Scoring tool
- Slip
- Glaze brushes
- Speckled vanilla or oatmeal glaze
- Wax resist
Step 1: Throwing the Platter Base
-
Center and open:
Begin with about 3-4 lbs of clay. Center it low and wide on the wheel head. Open the clay all the way down, leaving about 1/4 inch thickness for the floor to prevent warping. -
Establish the floor:
Compress the floor thoroughly with a rib. This is crucial for a flat platter; work from the center outward to align the clay particles and prevent S-cracks later. -
Pull the walls:
Pull up a short, vertical wall—aim for about 1.5 to 2 inches in height. Keep the wall thickness even and substantial enough to support rim adjustments. -
Refine the rim:
Use a chamois or sponge to round off the rim. This project features a distinct, rounded edge, so don’t make it too sharp. -
Cut off and dry:
Wire the platter off the bat but leave it in place to firm up to leather-hard. Platters need to dry slowly to stay flat.
Compression is Key
For platters, compress the floor 3x more than you think is necessary. This prevents ‘S-cracks’ in the drying phase, especially under the weight of the attached bowl.
Step 2: Creating the Dip Bowl
-
Throw the bowl:
Using a smaller amount of clay (about 1 lb), throw a small bowl. Aim for a shape that mirrors the platter’s walls—slightly rounded bottom but generally upright. -
Match the proportions:
Ensure the bowl is wide enough for scooping but small enough to leave ample chip space on the platter. A width of 4-5 inches is usually ideal. -
Trim the foot:
Once leather hard, trim away the excess clay from the bottom of the bowl. You want a flat bottom, not a foot ring, to maximize the contact area with the platter.
Step 3: Assembly & Trimming
-
Trim the platter:
Flip the leather-hard platter onto a foam bat or chuck. Trim the bottom flat and smooth, mirroring the interior profile. -
Mark the center:
Place the platter right-side up. Use your needle tool to lightly scratch a circle in the exact center where the bowl will sit. -
Score and slip:
Aggressively score inside your marked circle on the platter and the bottom of the bowl. Apply a generous amount of slip to both surfaces. -
Attach the bowl:
Press the bowl firmly into the center of the platter. Give it a small wiggle to seat it, then clean up any excess slip squeezing out from the seam with a damp brush. -
Slow drying:
Cover the assembled piece loosely with plastic. I like to let this dry very slowly over several days to ensure the connection point doesn’t crack as the clay shrinks.
Dual-Tone Design
Try glazing the interior of the dip bowl in a contrasting color, like a deep moss green or navy, while keeping the platter neutral for a pop of visual interest.
Step 4: Glazing
-
Bisque fire:
Fire the piece to cone 04 (or your clay’s specific bisque temperature). -
Wax the accents:
Apply wax resist to the very top rim of both the platter and the bowl. This creates the signature exposed clay line seen in the photo. -
Pour the interior:
Pour your speckled vanilla glaze inside the small bowl first, rolling it around to coat, then pour it out. Clean any drips. -
Dip or brush the rest:
Dip the entire platter into a wide glaze bucket if available. If brushing, apply 3 even coats to the platter surface and exterior bowl, stopping just below your waxed rims. -
Final clean up:
Use a damp sponge to wipe any glaze off the waxed rims to ensure a crisp, clean line where the clay meets the glaze. -
Glaze fire:
Fire to cone 6 (or your glaze’s maturity temperature). The heat will melt the glaze into that smooth, glossy finish while the clay rims toast to a warm brown.
Once cooled, your durable new serving piece is ready to host your favorite salsa and chips at the next gathering
Platter With Built-In Handles
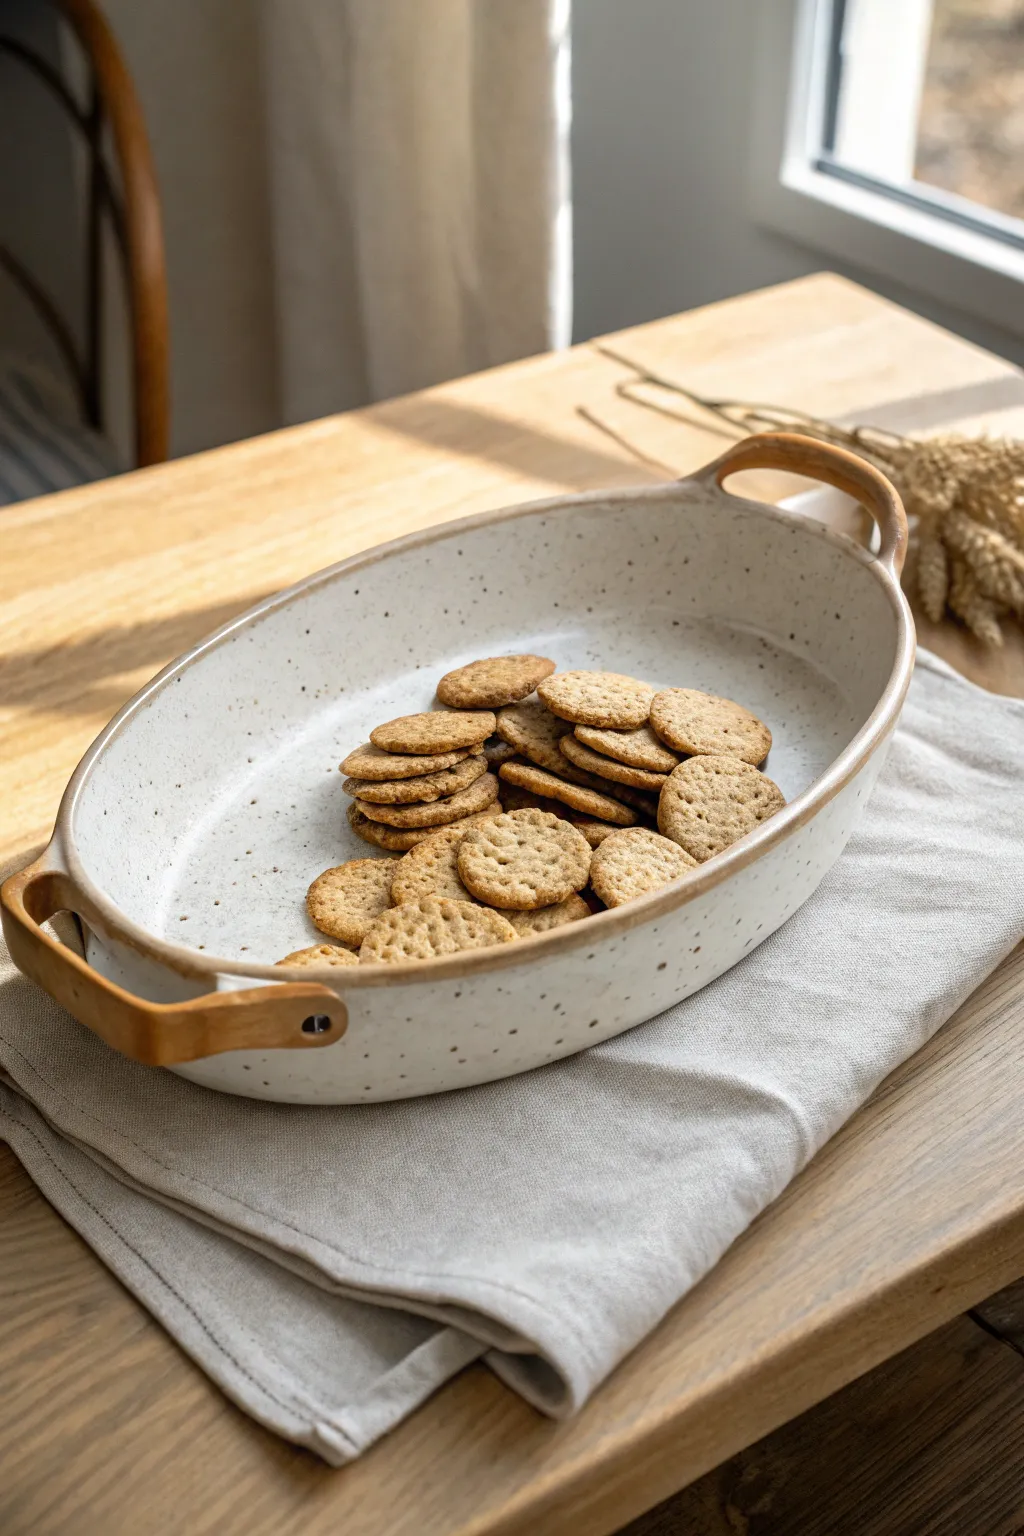
This rustic, speckled ceramic platter features gracefully incorporated loop handles that fold seamlessly out from the rim. The clean oval form combined with the organic texture creates a timeless serving piece perfect for crackers or bread.
Detailed Instructions
Materials
- Speckled stoneware clay (approx. 2-3 lbs)
- Slab roller or rolling pin with guide sticks
- Oval template (paper or tarpaper)
- Pottery knife or needle tool
- Rib tool (wooden and flexible metal)
- Sponge
- Slip (made from your clay body)
- Scoring tool or serrated rib
- Soft plastic sheet
- Matt white or clear glaze (food safe)
Step 1: Forming the Base
-
Roll the slab:
Begin by rolling out a consistent slab of speckled stoneware clay. Aim for a thickness of about 1/4 to 3/8 of an inch. If you are using a rolling pin, use guide sticks to ensure the thickness is even across the entire surface. -
Compress the clay:
Use a flexible rib tool to compress the clay on both sides. This aligns the clay particles, reducing the chance of warping during firing and creating a smooth canvas for your speckles to shine through. -
Cut the oval:
Place your oval template onto the slab. Using a needle tool or fettling knife, cut vertically around the template. Remove the excess clay but keep the scraps nearby for later use. -
Soften the rim:
Run a damp sponge or your finger along the freshly cut edge to round it off slightly. This prevents sharp edges that can be uncomfortable to hold later. -
Lift the walls:
Place the slab onto a piece of foam or a shallow hump mold if you have one. Gently press the center down or lift the edges up to create a shallow curvature. The walls shouldn’t be steep; aim for a gentle, sloping rise.
Cracking at the Connections?
If hairline cracks appear at the handle joints while drying, compress the seam with a damp rib immediately. Cover tightly with plastic for 24 hours to re-hydrate and equalize moisture.
Step 2: Creating the Handles
-
Prepare handle strips:
From your leftover slab scraps, cut two rectangular strips approximately 4 inches long and 1 inch wide. These will become the loop handles. -
Shape the loops:
Bend each strip into a gentle ‘U’ shape. The curve should be wide enough to comfortably fit a finger or two, mimicking the functional loops seen in the photo. -
Refine handle edges:
Smooth the edges of your strips with a slightly damp sponge. You want them to look polished before attachment, as the inside curve is hard to smooth later. -
Test fitting:
Hold the handles against the short ends of your oval platter. Adjust the curve or trim the length of the strips until they look balanced against the platter’s size.
Step 3: Assembly and Refining
-
Score the attachment points:
Mark where the handle ends meet the platter rim. Thoroughly score (scratch) both the handle ends and the corresponding spots on the rim using a serrated tool. -
Apply slip:
Dab a generous amount of slip onto the scored areas. This acts as the glue for your clay components. -
Attach the handles:
Press the handles firmly onto the rim. I like to blend the clay from the handle down onto the underside of the rim for extra strength, ensuring there is a seamless transition. -
Clean connections:
Use a small modeling tool or a wooden skewer to clean up any excess slip that squeezed out. Smooth the seam so it looks like the handle grows naturally out of the rim. -
Adding the faux wood detail:
To recreate the specific look in the image, apply a contrasting iron-oxide wash or a darker underglaze specifically to the handles before bisque firing to mimic a wooden or leather wrap effect. -
Rim definition:
Use a brush to apply a thin line of that same oxide wash or dark underglaze along the very edge of the platter rim to frame the piece. -
Slow drying:
Cover the platter loosely with plastic. Because the rim is thinner than the center, slow drying is crucial to prevent warping. Let it dry for several days until bone dry.
Handle Alignment
To ensure your handles are perfectly symmetrical, look straight down at the platter from above, rather than from the side, while attaching them.
Step 4: Firing and Glazing
-
Bisque fire:
Fire the bone-dry piece to Bisque temperature (usually Cone 04-06 depending on your clay). -
Glaze application:
Dip or brush a satin white or clear glaze over the main body of the platter. Try to avoid glazing the darker ‘handle’ areas if you want a textural contrast, or use a translucent glaze over them. -
Wipe the foot:
Ensure the bottom of the platter is completely free of glaze before firing to prevent it from fusing to the kiln shelf. -
Final firing:
Fire to the maturity temperature of your clay (likely Cone 5 or 6 for stoneware). Allow the kiln to cool naturally before removing your finished serving platter.
Enjoy using your custom platter to serve warm bread or appetizers at your next gathering


What Really Happens Inside the Kiln
Learn how time and temperature work together inside the kiln to transform clay into durable ceramic.
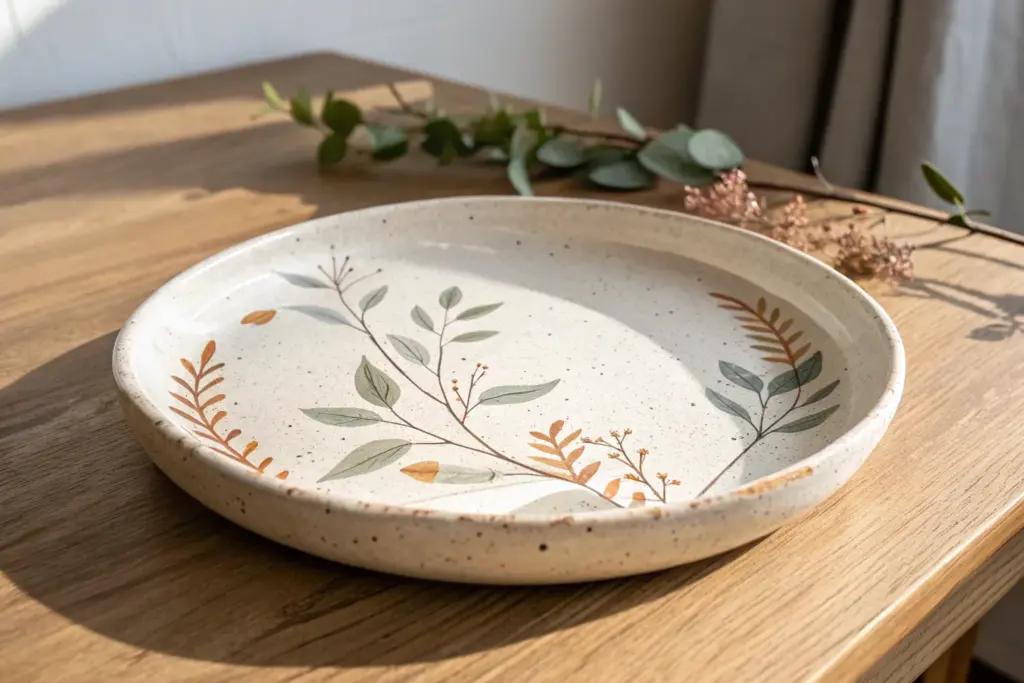
Minimal Botanical Line Art Platter
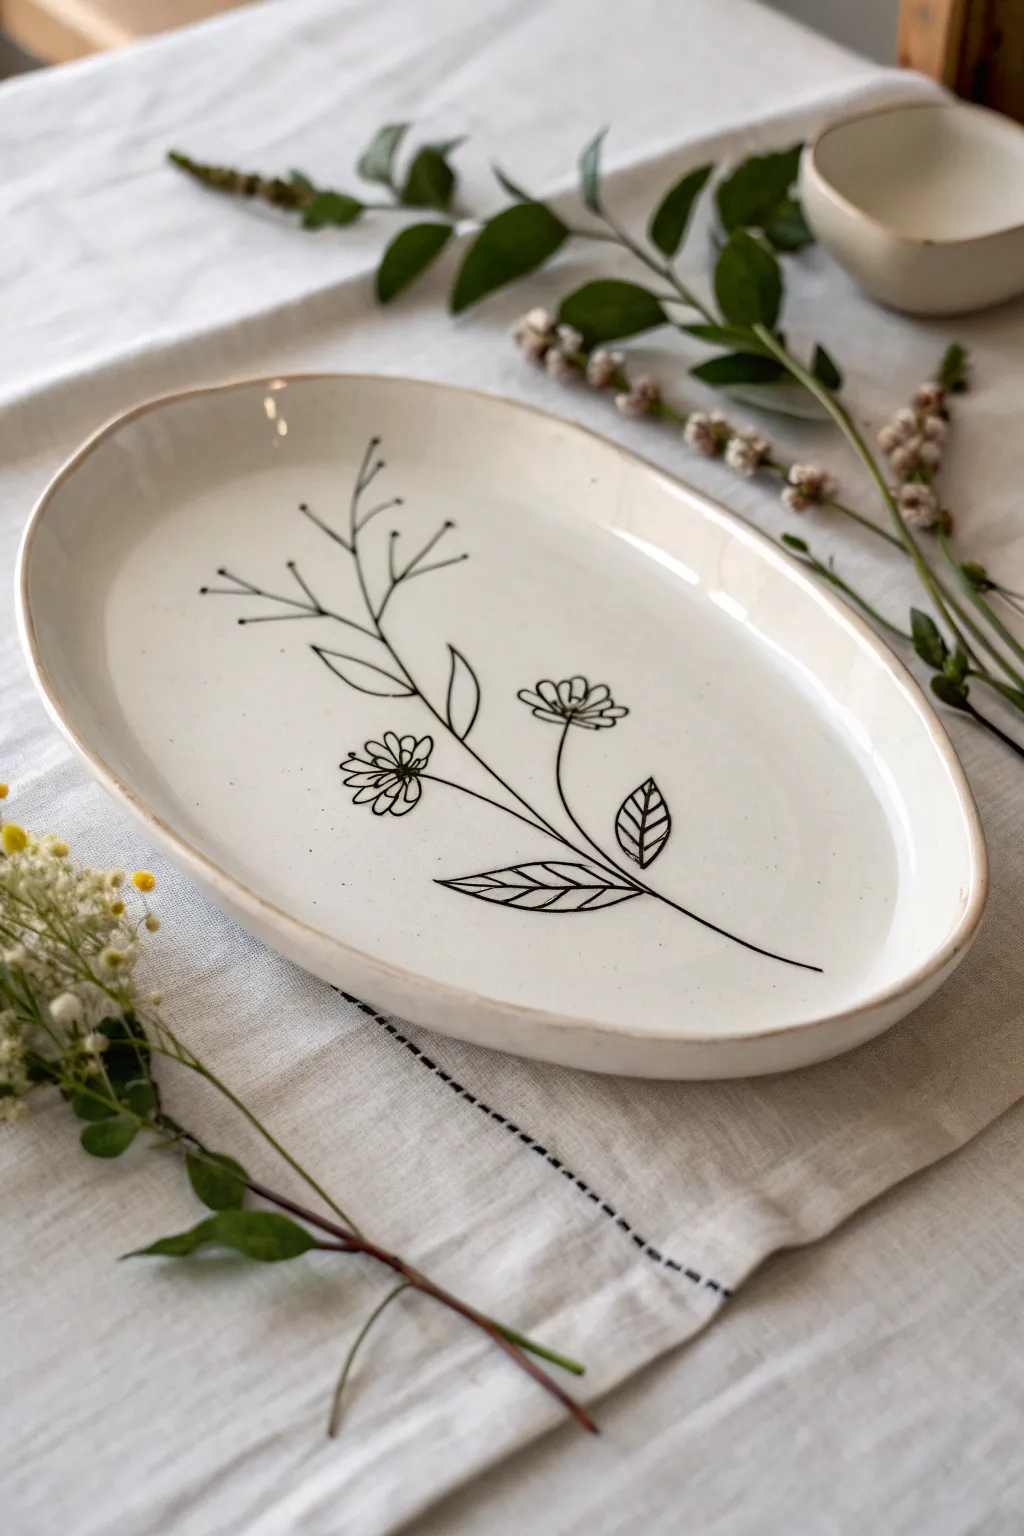
Capture the elegance of nature with this serene, cream-colored oval platter featuring a delicate black line drawing. This project uses underglaze techniques to create a permanent, food-safe serving piece that feels both modern and handmade.
Step-by-Step Guide
Materials
- B-mix or porcelain clay body
- Rolling pin
- Oval platter slump mold (approx. 12-14 inches)
- Rib tool (flexible metal or rubber)
- Sponge
- Needle tool
- Fettling knife
- Black underglaze (pencil or fine-tip applicator bottle)
- Clear dipping glaze (food safe)
- Kiln access
Step 1: Forming the Platter
-
Roll out the Slab:
Begin by wedging your clay to remove any air bubbles. Roll it out into a consistent slab about 1/4 inch thick, ensuring you have enough surface area to cover your mold. -
Smooth the Surface:
Before cutting, run a flexible rib tool gently over the clay slab in multiple directions. This compresses the clay particles and creates that perfectly smooth canvas we need for the drawing later. -
Drape the Clay:
Carefully lift your slab and drape it over your oval slump mold. Press gently from the center moving outward to ensure the clay conforms to the shape without trapping air underneath. -
Trim the Excess:
Using a fettling knife or needle tool, trim the excess clay around the bottom edge of the mold to define your oval shape. I like to leave just a tiny bit of extra margin to refine later. -
Refine the Rim:
Once the clay is leather-hard (stiff but still cool to the touch), remove it from the mold. Use a damp sponge to smooth the rim, rounding over any sharp edges created by your knife cut.
Steady Hands
Rest your pinky finger on the clay surface to stabilize your hand while drawing fine lines with the applicator bottle.
Step 2: Applying the Design
-
Plan Your Composition:
Lightly sketch your design onto the leather-hard clay using a regular graphite pencil. Don’t worry about mistakes; graphite burns off in the kiln. -
Establish the Main Stem:
Using a black underglaze applicator bottle with a fine tip or a stabilized underglaze pencil, draw the central curved stem line running diagonally across the platter. -
Add Main Branches:
Extend two or three main dividing lines from the central stem. Keep the lines confident and fluid to mimic organic growth. -
Draw the Flower Heads:
Sketch two small daisy-like flowers. Draw a small central circle for the pollen center, then loop simple, rounded petals around it. Keep them stylized rather than hyper-realistic. -
Detail the Leaves:
Add large, pointed leaves near the base of the stem. Draw the outline first, then add a central vein and angled side veins to give them a graphic look. I find pressing slightly harder here gives a nice line variation. -
Create Delicate buds:
At the top of the stem, switch to very light pressure to draw thin, branching twig-like structures ending in small dots or tiny clusters. -
Clean Up Smudges:
If you smudge any underglaze, gently scrape it away with a sharp cleanup tool rather than wiping, which can smear the pigment into the clay pores.
Step 3: Finishing and Firing
-
Bisque Fire:
Allow the platter to dry completely until bone dry. Fire it to cone 04 (or your clay’s specific bisque temperature) to harden the ware. -
Clean the Bisque:
Wipe the fired piece with a damp sponge to remove any kiln dust. This ensures the glaze will adhere properly without crawling. -
Apply Clear Glaze:
Dip the entire platter into a clear, food-safe glaze. If you don’t have a dipping container large enough, you can pour the glaze over it or brush on three even coats. -
Wipe the Foot:
Use a sponge to meticulously wipe all glaze off the bottom foot or base where the platter will touch the kiln shelf. -
Glaze Fire:
Fire the piece a final time to the temperature recommended for your specific clay and glaze (typically cone 5 or 6 for stoneware).
Sgraffito Twist
Paint a solid black oval in the center, then carve through the black to white clay to create a ‘negative’ white-line version.
Once fired, your platter is ready to serve as a stunning minimalist centerpiece for your next gathering
High-Contrast Fruit Motif Platter
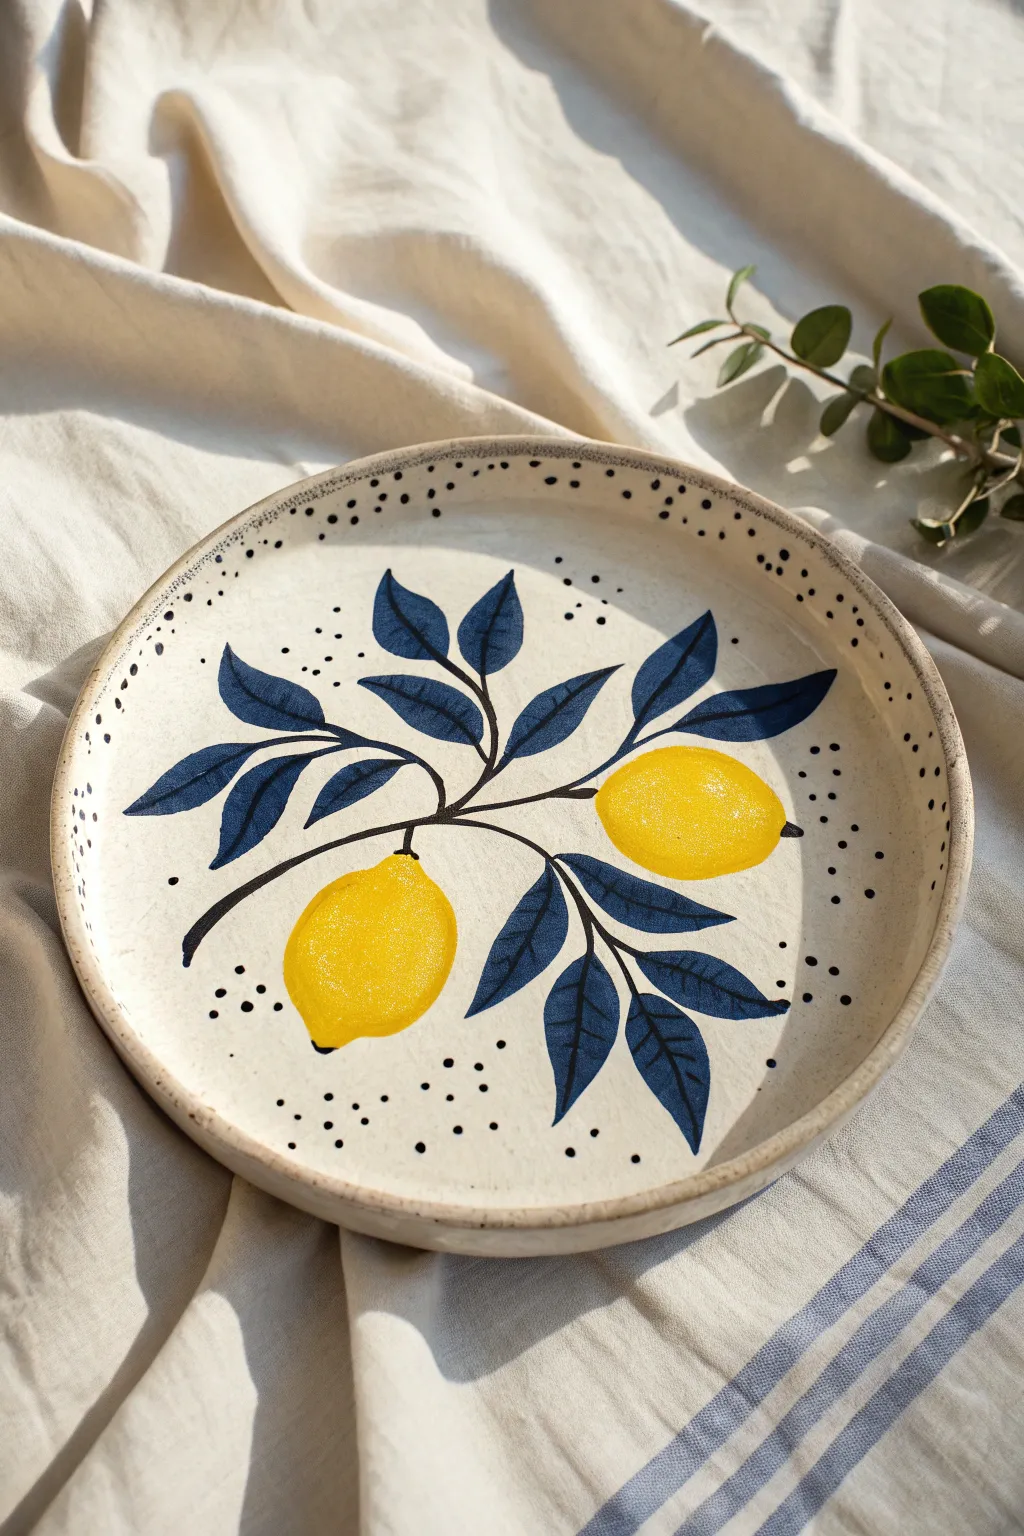
Bring a touch of Mediterranean summer to your table with this cheerful ceramic project featuring vibrant yellow lemons against deep indigo leaves. The design relies on bold contrasts and playful speckled details to create a piece that feels both rustic and modern.
Step-by-Step
Materials
- Bisque-fired ceramic platter (shallow rim)
- Underglaze in Bright Yellow
- Underglaze in Deep Indigo or Navy Blue
- Underglaze in Black
- Clear dipping glaze or brush-on clear glaze
- Pencil for sketching
- Round watercolor style brushes (sizes 4 and 8)
- Fine liner or detail brush (size 0 or 00)
- Sponge
- Water container
- Palette or tile for mixing
Step 1: Preparation & Sketching
-
Clean the Bisque:
Start by wiping down your bisque-fired platter with a slightly damp sponge. This removes any dust that could prevent the underglaze from adhering properly. -
Map Out the Composition:
Visualize the center point of your platter. The design features a central branch that splits, so identify where the main stem will originate. -
Sketch the Lemons:
Using a regular pencil, lightly sketch the outlines of two lemon shapes. Place one lemon slightly higher on the right side and the other hanging lower on the left to create balance. -
Connect the Stems:
Draw the central branch and stems connecting your lemons. Keep the lines curved and fluid rather than straight to mimic natural growth. -
Draft the Foliage:
Sketch pointed, oval-shaped leaves branching off the main stems. Don’t worry about perfect symmetry; some leaves can overlap or point in different directions for a more organic look.
Keep it Clean
The pencil marks you made during sketching will burn off completely in the kiln. Don’t worry if they show through the paint or look messy during the process.
Step 2: Painting the Design
-
Base Coat the Lemons:
Load your size 8 round brush with Bright Yellow underglaze. Fill in the lemon shapes with a smooth, even coat. I like to let this dry briefly until the shine disappears before adding the next layer. -
Intensify the Yellow:
Apply a second and third coat of yellow to the lemons to ensure the color will be opaque and vibrant after firing. -
Outline the Stems:
Switch to the Deep Indigo underglaze. Using the size 4 brush, carefully trace over your pencil lines for the main branch and stems. -
Fill the Leaves:
Paint the leaves with the Deep Indigo. Start at the stem end of the leaf and press down to widen the stroke, then lift as you reach the tip to create a natural tapered point. -
Add Leaf Veins:
Once the blue leaves are touch-dry, use your fine liner brush with Black underglaze to paint a central vein down the middle of each leaf. -
Detail the Lemons:
Add small black nubs to the ends of the lemons using the fine liner brush to give them realistic definition. -
Second Coat for Leaves:
If your blue looks streaky, carefully apply a second coat, being mindful not to obscure the black vein detail you just added.
Step 3: Finishing Details
-
Create the Speckled Effect:
Dilute a small amount of Black underglaze with water until it has an inky consistency. -
Flick the Texture:
Load a toothbrush or stiff brush with the diluted black. Run your thumb across the bristles to flick tiny specks across the entire surface of the platter, concentrating slightly more near the rim. -
Dotted Border:
Dip the back end of your paintbrush (the wooden handle) into the undiluted Black underglaze. Dot it gently around the inner rim of the platter to create a loose, framing border. -
Clean the Rim:
If any stray marks landed on the very edge or underside of the rim, wipe them away with a damp sponge for a professional finish. -
Glazing:
Allow all underglaze to dry completely (usually overnight is safest). Apply a clear glaze over the entire piece, either by dipping or brushing 2-3 even coats. -
Final Fire:
Fire the piece in the kiln according to the clay and glaze manufacturer’s instructions (typically Cone 5 or 6 for stoneware).
Create Depth
Mix a tiny drop of white underglaze into your yellow for the top of the lemon to create a subtle highlight, making the fruit look rounder and more dimensional.
Once fired, fill your beautiful new platter with fresh fruit or serve appetizers to showcase your handiwork

TRACK YOUR CERAMIC JOURNEY
Capture glaze tests, firing details, and creative progress—all in one simple printable. Make your projects easier to repeat and improve.
Sgraffito Rim Border Platter
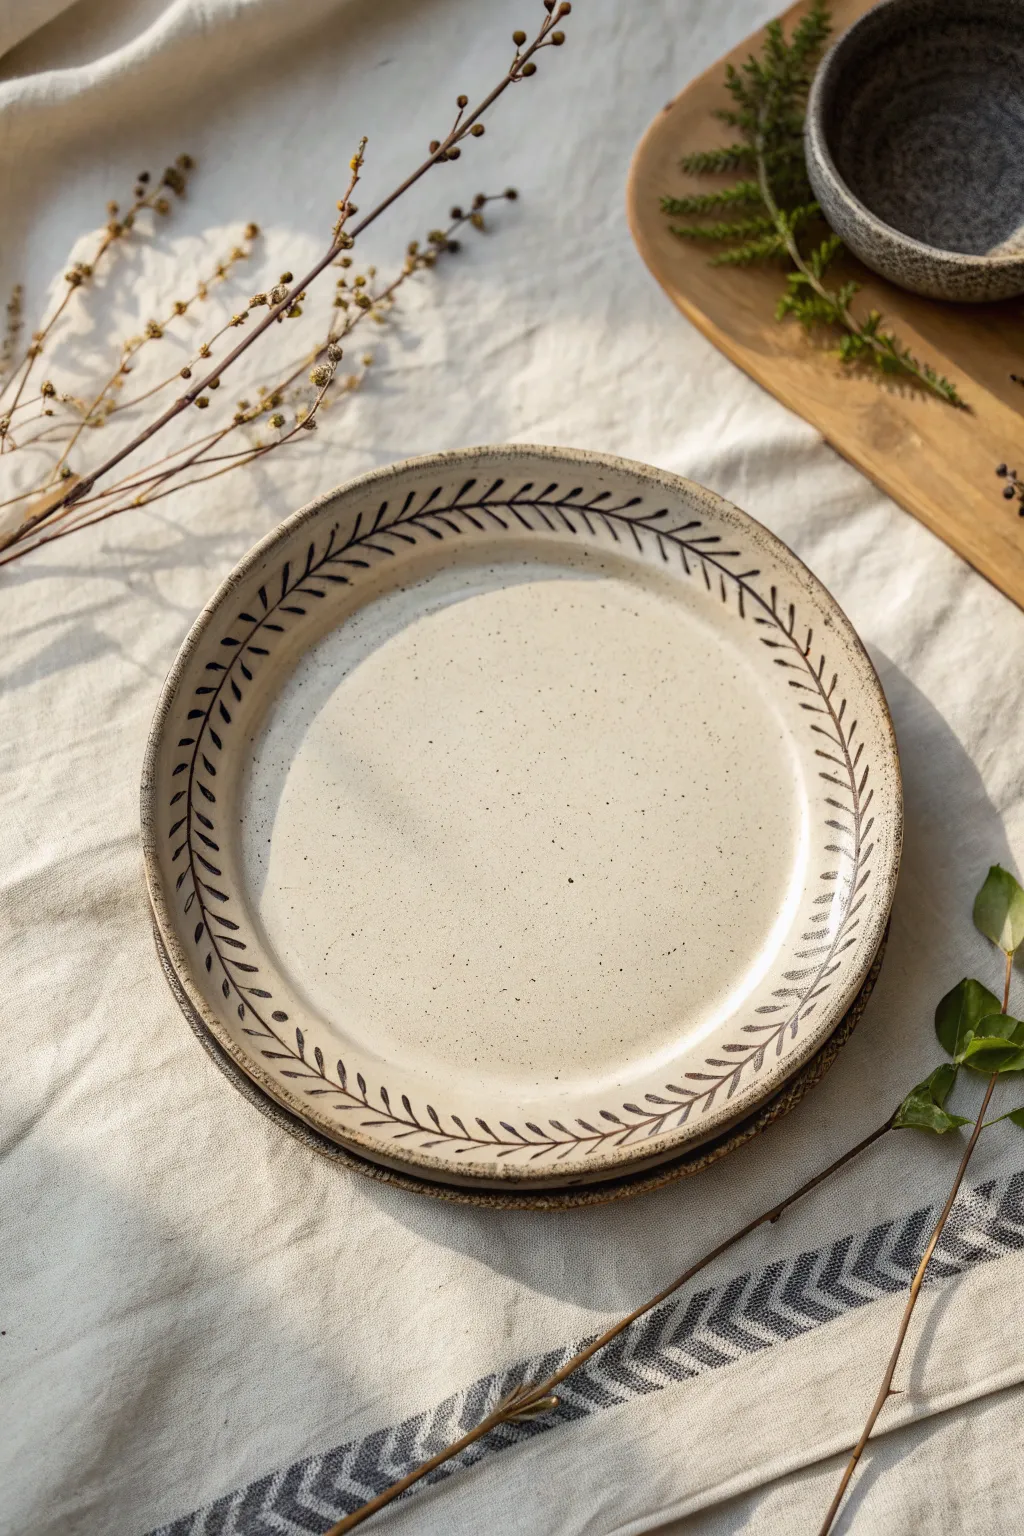
Capture the essence of rustic elegance with this creamy, speckled ceramic platter featuring a delicate vine motif around the rim. This project specifically highlights the sgraffito technique to carve a high-contrast natural design into leather-hard clay, resulting in a timeless piece perfect for serving or display.
Step-by-Step Tutorial
Materials
- Stoneware clay body (preferably speckled buff or similar)
- Black underglaze
- Sgraffito loop tool (small)
- Small needle tool
- Synthetic fan brush
- Clear or transparent satin glaze
- Pottery wheel or rolling pin/slab roller
- Platter mold or bat
- Sponge
- Rib tool (wood and rubber)
Step 1: Forming the Platter
-
Prepare the Clay:
Begin by wedging about 3-4 pounds of speckled stoneware clay. Ensure it is free of air bubbles for a smooth throwing or rolling experience. -
Form the Base:
If throwing on the wheel, center your clay and open it wide to form a flat, thick base about 1/4 to 3/8 inch thick. Compress the bottom thoroughly with a rib to prevent cracking. -
Shape the Rim:
Pull up a shallow wall, approximately 1.5 inches high. Use a rib to flare the rim out gently, creating a wide, flat border area that will serve as the canvas for your vine design. If hand-building, roll a large slab and slump it over a platter mold to achieve the shape. -
Refine the Surface:
Smooth the entire surface with a damp sponge or a soft rubber rib to remove finger marks. Pay special attention to the rim, ensuring it is even and flat. -
Dry to Leather Hard:
Allow the piece to dry slowly until it reaches a sturdy leather-hard state. The clay should be firm enough to handle without warping but still cool to the touch.
Step 2: Designing the Rim
-
Apply Underglaze:
Rotate the platter on a banding wheel and use a fan brush to apply three even coats of black underglaze solely to the rim area. Let each coat dry until it loses its sheen before applying the next. -
Center the Vine:
Once the underglaze is dry to the touch, visualize a central line running through the middle of the painted rim. Lightly scratch this guide line with a needle tool if you need help keeping it centered, or freehand it for a more organic feel. -
Carve the Central Stem:
Using a small sgraffito loop tool, carve a continuous wavering line around the entire circumference of the rim. I like to vary the pressure slightly to give the vine a natural, hand-drawn thickness. -
Add Leaf Structure:
Starting at one point, carve small, leaf-like ovals branching off the central stem. Alternate the leaves—one on the inside, then one on the outside—spacing them evenly. -
Detail the Leaves:
For each leaf shape, carve the outline first, then gently scrape away the black interior of the leaf shape to reveal the light clay body underneath, leaving a thin black vein in the center if desired, or simply carve the shape as a single bold stroke. -
Refining the Edges:
Go back over your carved lines with a stiff brush to sweep away the clay crumbs (burrs). Do not wipe with a wet sponge, as this will smear the black underglaze into the raw clay.
Smudged Lines?
If black dust smears onto the white clay while carving, wait until the piece is bone dry. Then, gently flick the dust away with a stiff brush rather than wiping.
Step 3: Finishing and firing
-
Bisque Fire:
Slow dry the platter completely to the bone-dry stage. Load it into the kiln for a bisque firing (typically Cone 04) to set the shape and underglaze. -
Clean the Ware:
After the bisque firing, wipe the entire piece down with a damp sponge to remove any kiln dust. This ensures the glaze adheres properly. -
Apply Clear Glaze:
Dip the platter into a clear or transparent satin glaze, or brush it on evenly. The transparency is crucial so your sgraffito work and the clay’s speckles show through clearly. -
Wipe the Foot:
Clean the bottom foot ring of the platter thoroughly with a sponge to prevent it from sticking to the kiln shelf. -
Final Fire:
Fire the piece to the maturity temperature of your clay body (likely Cone 5 or 6 for stoneware). Allow the kiln to cool naturally before unloading.
Pro Tip: Butter Soft
Carve when clay is ‘chocolate bar hard’—stiff but yields to a fingernail. Too wet and lines will be ragged; too dry and the tool will chip the surface.
Enjoy using your new platter for serving rustic meals and watch how the vine border frames your food beautifully
Slip-Trailed Dot-and-Loop Platter

This elegant stoneware platter achieves a timeless, artisanal look by combining simple slab-building techniques with delicate surface decoration. The creamy, speckled glaze highlights the rhythmic beadwork along the rim, creating a piece that feels both earthy and sophisticated.
Step-by-Step Guide
Materials
- Speckled stoneware clay (approx. 3-4 lbs)
- Rolling pin
- Canvas ware board or slab mat
- Round slump mold or a large plaster form
- Needle tool
- Flexible metal kidney rib
- Sponge
- Slip trailer bottle (with medium nozzle)
- Thick joining slip (made from your clay body)
- Modeling tool or smooth wooden stick
- Pattern roller or stamp tool (for the inner texture band)
- Wide soft brush
- Transparent or creamy matte glaze
Step 1: Forming the Base
-
Roll the slab:
Begin by wedging your speckled stoneware clay thoroughly to remove air pockets. Flatten it onto your canvas board and roll out a consistent slab about 1/4-inch thick. Rolling in multiple directions helps compress the clay particles and prevent warping later. -
Smooth the surface:
Before cutting, take your flexible metal rib and compress the surface of the slab. Drag it gently across the clay to align the particles and create that silky smooth canvas for your future glaze. -
Cut the circle:
Place your slump mold or a large paper template onto the slab to determine the size. Using a needle tool, cut a clean circle roughly 12-14 inches in diameter, depending on your desired platter size. -
Shape the form:
carefully lift the slab and drape it into your slump mold. Press gently from the center outwards to ensure it conforms to the curve without trapping air. I like to use a damp sponge here to smooth the rim edge while the clay is supported by the mold. -
Let it firm up:
Allow the clay to reach a soft leather-hard state inside the mold. This is crucial—if it’s too soft, your rim decorations will deform the plate; too hard, and the slip won’t adhere properly.
Slip Consistency Tip
Deflocculate your trailing slip with a drop of sodium silicate. This allows a lower water content for less shrinkage, meaning your beads won’t crack off as they dry.
Step 2: Adding the Texture & Beads
-
Define the rim area:
With the platter still in the mold (or resting on a banding wheel if it’s sturdy enough), lightly visualize where your rim decoration will go. You want a distinct border about 1.5 to 2 inches wide. -
Apply the inner texture:
Use a pattern roller or a small textured stamp to create the band of fine detail just inside the rim area. Press firmly enough to leave an impression but support the underside of the rim with your hand so you don’t distort the curve. -
Prepare the slip:
Fill your slip trailer with thick slip made from the same clay body. The consistency should be like stiff cake icing—peaks should hold their shape without slumping. -
Trail the beads:
Starting at the outer edge of your textured band, carefully squeeze out large, consistent dots of slip. Ideally, spacing them about a half-inch apart creates a pleasing rhythm. Keep the pressure steady to ensure each ‘bead’ is the same volume. -
Flatten the beads:
Once the slip dots have lost their wet sheen (about 20-30 minutes), gently press each one with a damp finger or a smooth wooden tool. You want to flatten them slightly into ‘buttons’ rather than high spikes, fusing them securely to the base. -
Refine the edges:
Check the very outer edge of the platter. If the cutting process left a sharp angle, use a damp chamois or sponge to round it over, mirroring the softness of the beaded design.
Level Up: Oxide Wash
Before glazing, brush a diluted iron oxide wash over the beads and texture, then wipe it back with a sponge. This deepens the shadows and makes the relief pop.
Step 3: Finishing & Glazing
-
Slow drying:
Cover the platter loosely with plastic to dry very slowly. Rims tend to dry faster than centers, which causes warping. Slow drying over several days ensures the plate stays flat. -
Bisque fire:
Once bone dry, fire the piece to bisque temperatures (usually Cone 04 or 06). Stack carefully in the kiln to support the wide rim. -
Clean the bisque:
Wipe the bisque ware down with a damp sponge to remove any dust. This prevents pinholes in your final glaze. -
Apply the glaze:
Dip or brush a creamy, semi-matte glaze over the entire piece. A glaze that breaks over textures is perfect here—it will pool slightly around the beads and highlight the stamped texture band. -
Wipe the foot:
Ensure the bottom foot ring is completely free of glaze. Since this is a wide platter, double-check that no glaze is too thick near the bottom edge where it could run. -
Final firing:
Fire to the maturity temperature of your clay and glaze (typically Cone 5/6 for stoneware). Allow the kiln to cool naturally to reduce thermal shock on the large flat form.
Your finished platter will be a stunning centerpiece ready to hold fruit or serve eager guests at your next gathering
Stamped Texture Floral Platter
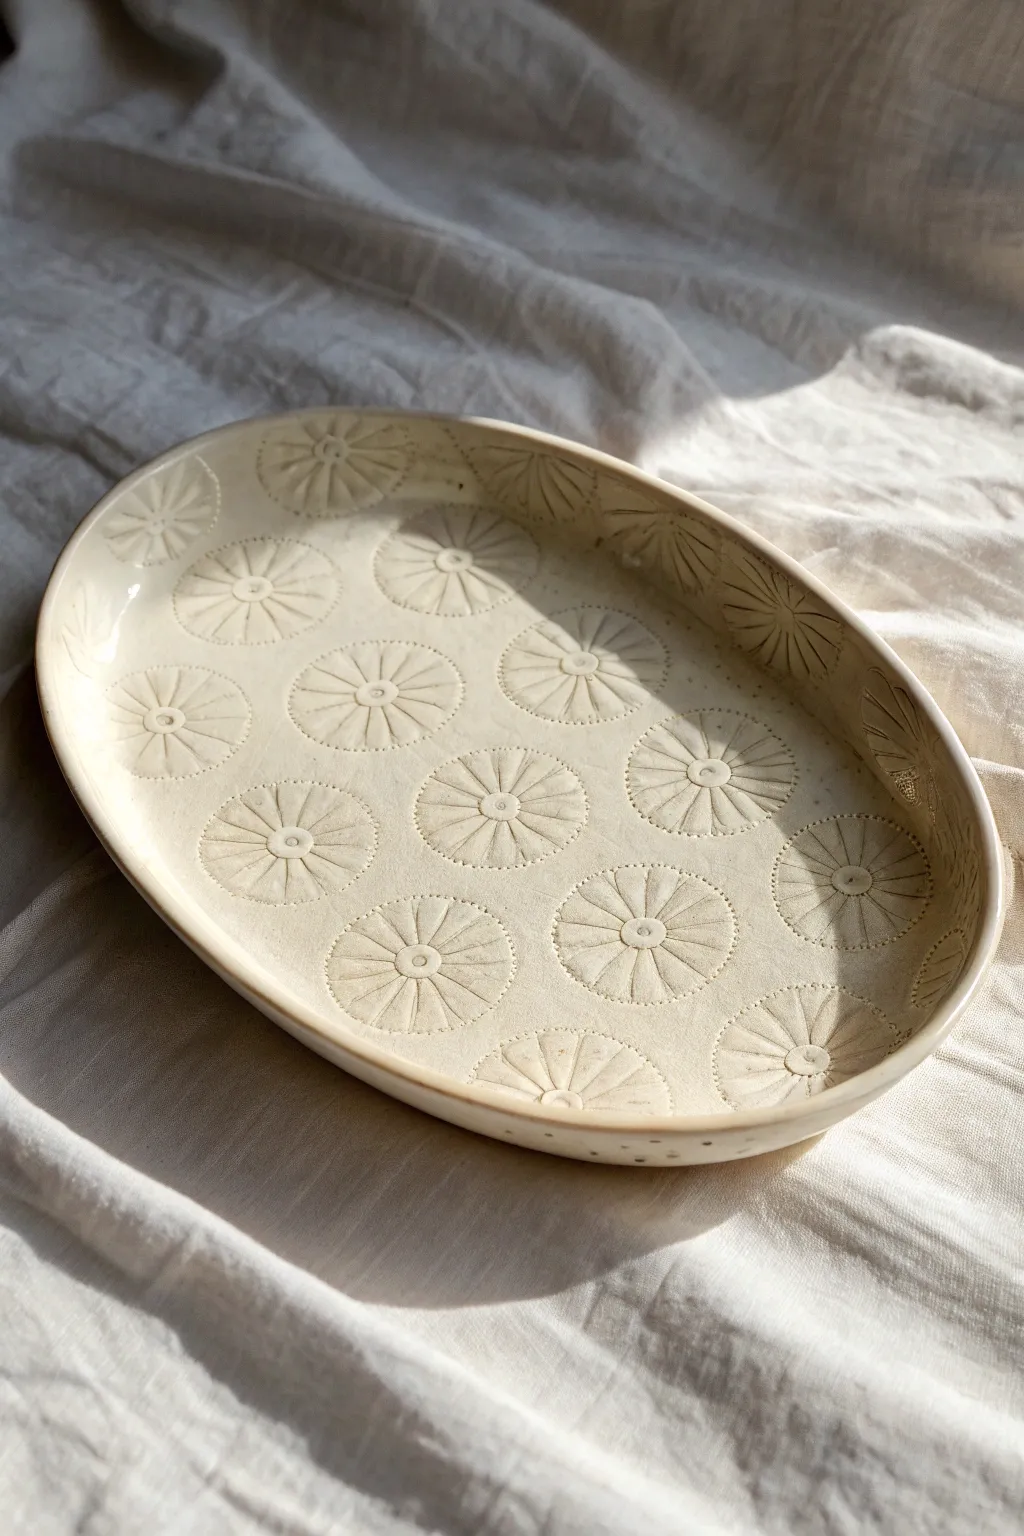
This elegant ceramic platter features a repetitive floral sunburst motif that adds tactile depth and visual rhythm to a simple form. The creamy, natural glaze highlights the texture beautifully, making it a perfect functional centerpiece for your table.
Step-by-Step Tutorial
Materials
- Stoneware clay (smooth, light-colored body recommended)
- Slab roller or rolling pin with thickness strips
- Oval slump mold or large oval plaster form
- Deep-texture floral or sunburst stamp (ceramic, wood, or bisqued clay)
- Rib tool (flexible rubber)
- Needle tool or fettling knife
- Sponge
- Chamois leather strip
- Kiln
- Cream or off-white glossy glaze
Step 1: Slab Preparation
-
Roll the clay:
Begin by rolling out a generous slab of clay to a consistent thickness, roughly 1/4 to 3/8 of an inch. If you are using a rolling pin, using guide strips on either side will ensure an even surface. -
Check for bubbles:
Inspect the surface for any air bubbles. If you spot one, pierce it gently with a needle tool and smooth the area over with your thumb. -
Smooth firmly:
Use a flexible rubber rib to compress the clay on both sides. This is crucial for preventing warping later and creates a pristine canvas for your stamping.
Fixing Warp
If the rim starts lifting unevenly while drying, place small weighted bags (filled with sand or rice) gently on the warped areas while it’s still leather hard to encourage it back down
Step 2: Stamping the Design
-
Plan your layout:
Before committing to the clay, I like to lightly hover my stamp over the slab to visualize the spacing. You want a consistent grid, but organic placement works too. -
Start from the center:
Press your floral stamp firmly into the center of the slab. Rock it slightly in a circular motion to ensure all the petal details transfer deeply. -
Expand the pattern:
Work outward from that central flower, stamping adjacent motifs. Aim for about half an inch of negative space between each circle. -
Detailing the stamp:
Ensure the center dot of the flower and the radiating lines are distinct. If the clay sticks to your stamp, dust the tool lightly with cornstarch. -
Stamp the perimeter:
Continue stamping until your patterned area is larger than the final oval shape you intend to cut. Don’t worry about partial stamps at the edges yet.
Step 3: Shaping and Refining
-
Cut the oval:
Place your oval template or straight onto the slab. Using a needle tool or fettling knife, cut a clean oval shape, slicing through some of the outer stamped designs for a cropped, artistic look. -
Transfer to mold:
Carefully lift your slab and drape it over your slump mold (hump mold) or into a press mold. Allow gravity to help it settle. -
Secure the shape:
Gently press the slab against the mold surface. Be careful not to press so hard that you flatten the texture you just created on the other side. -
Smooth the rim:
While on the mold, run a damp sponge or a strip of chamois leather around the cut edge to round it off and remove any sharp burrs.
Level Up: Oxide Wash
Apply an iron oxide wash into the stamped grooves and wipe it back before glazing. This emphasizes the texture dramatically, giving it an antique, rustic finish
Step 4: Drying and Glazing
-
Slow drying:
Cover the piece loosely with plastic to let it dry slowly to leather hard. This prevents the rim from drying too fast and warping the oval shape. -
Refine the foot:
Once leather hard, flip the piece gently. Smooth the bottom surface with a rib. You can add a small coil foot if desired, or leave it flat for a modern look. -
Bisque fire:
Once bone dry, load the platter into the kiln for the bisque firing. -
Glaze application:
Dip or brush on a semi-opaque cream glaze. A slightly fluid glaze is excellent here, as it will pool slightly in the stamped depressions, darkening the deeper lines while breaking lighter over the raised areas. -
Wipe the foot:
Clean the bottom of the platter thoroughly with a sponge to ensure no glaze touches the kiln shelf. -
Final fire:
Fire to the maturation temperature of your clay and glaze (typically Cone 5 or 6 for stoneware).
Once cooled, your platter represents a beautiful marriage of precise texture and organic form, ready for serving
Terrazzo Speckle Clay Platter
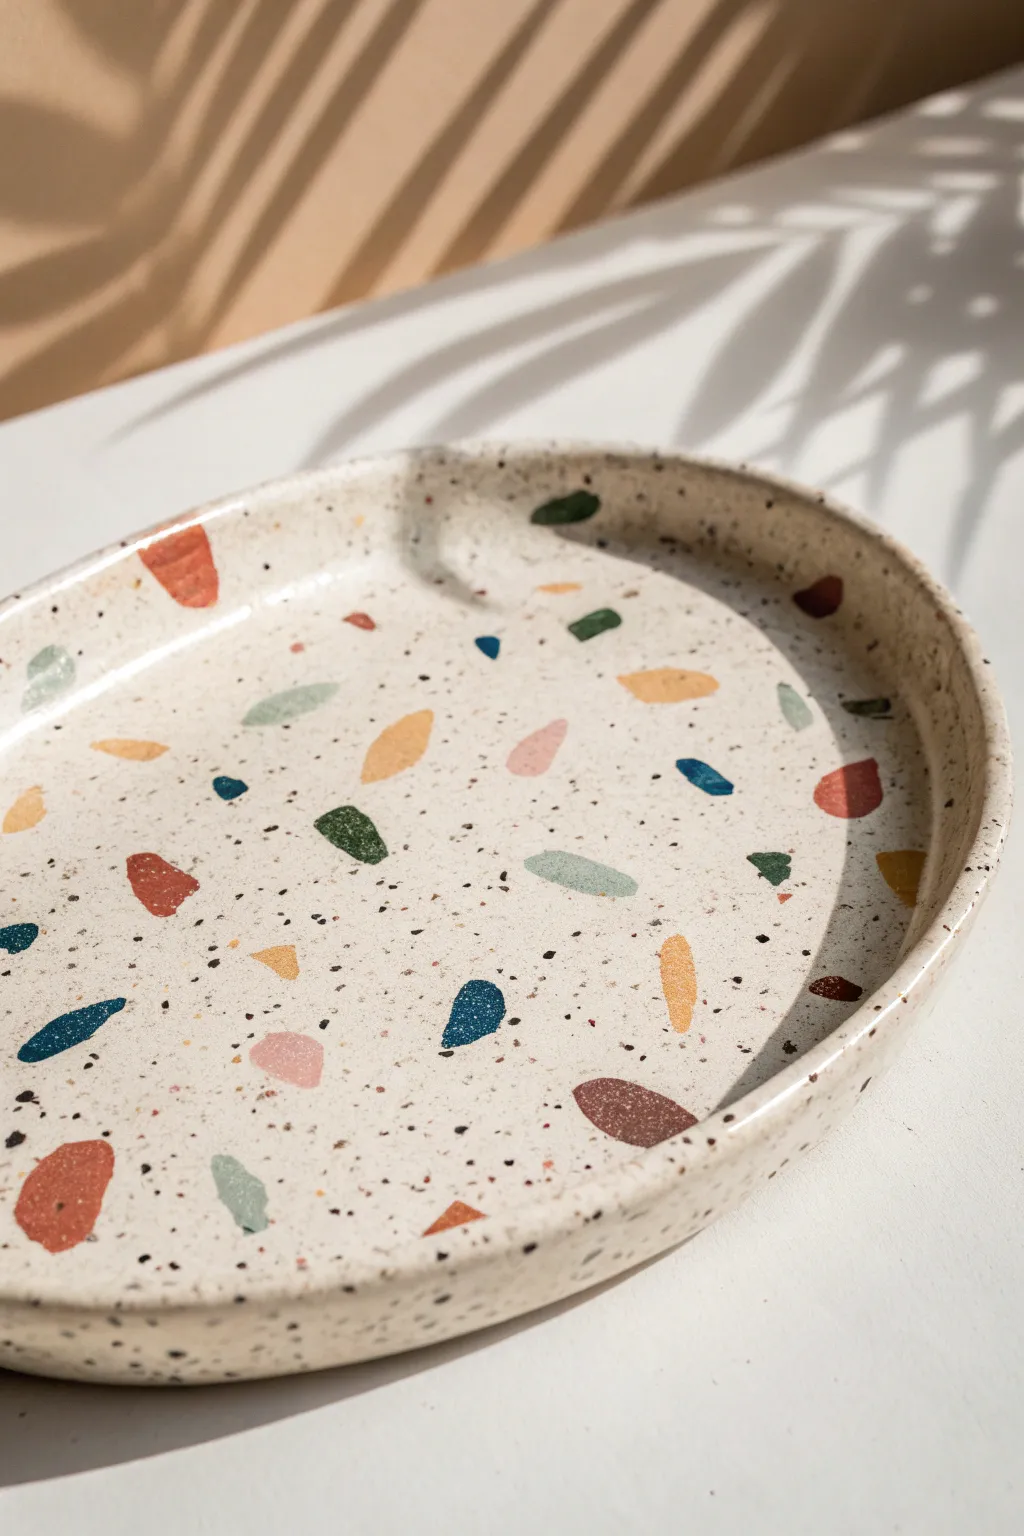
Bring the timeless elegance of Italian flooring to your table with this handmade ceramic-style platter. This project uses polymer or air-dry clay techniques to create a stunning terrazzo effect, featuring scattered chips of ochre, rust, sage, and deep blue suspended in a speckled cream base.
How-To Guide
Materials
- White or cream polymer clay (approx. 8 oz)
- Small amounts of colored polymer clay (rust red, ochre yellow, sage green, navy blue, soft pink)
- Black pepper or dried coffee grounds (for speckling)
- Rolling pin or acrylic roller
- Craft knife or scalpel blade
- Oval template (paper or cardboard)
- Sandpaper (various grits: 400, 600, 1000)
- Sponge or soft cloth
- Food-safe sealant or glossy varnish (optional, depending on use)
- Oven (if using polymer clay) or drying rack
- Small bowl for shaping lips (optional)
Step 1: Preparing the Terrazzo Chips
-
Condition the colored clay:
Start by conditioning your small blocks of colored clay—rust, ochre, sage, navy, and pink. Knead each color individually until soft and pliable to prevent cracking later. -
Roll out thin sheets:
Roll each color into a thin, uneven sheet, roughly 1-2mm thick. The edges don’t need to be perfect since we are going to chop these up. -
Create the chips:
Using your craft knife, randomly chop the colored sheets into irregular geometric shapes. Aim for a mix of triangles, jagged quadrilaterals, and shards ranging from tiny specks to 1cm pieces. -
Set aside:
Keep your piles of colored chips separate or loosely mixed depending on your preference, and set them aside on a piece of parchment paper.
Smudged Colors?
To prevent colors from bleeding or smudging during the rolling phase, wash your hands and roller frequently, or place a sheet of parchment paper between the roller and clay.
Step 2: Creating the Speckled Base
-
Condition the white clay:
Take your large block of white or cream clay and knead it thoroughly until warm and smooth. -
Add the texture:
To achieve that realistic stony grit look, sprinkle a pinch of ground black pepper or dried coffee grounds onto the clay. I find this creates a much more organic texture than using black clay specks. -
incorporate the speckles:
Fold the clay over the pepper and knead repeatedly until the dark specks are evenly distributed throughout the white block. -
Roll the base slab:
Roll the speckled white clay out into a thick slab, approximately 5-6mm thick. Make sure it’s large enough to fit your oval template.
Go For Gold
For a luxe touch, mix small flakes of gold leaf in with your colored chips before rolling. The gold will embed alongside the colors for a chic, metallic shimmer.
Step 3: Assembling the Terrazzo Pattern
-
Scatter the chips:
Take your chopped colored chips and scatter them randomly over the surface of your white slab. Don’t overthink the placement; let them fall naturally. -
Press the chips in:
Gently press the colored pieces into the white base with your fingers so they stick. Ensure you have a good balance of large focal chips and smaller shards. -
Roll flush:
Use your rolling pin to roll over the entire slab again. This will force the colored chips down into the white clay until the surface is completely flat and smooth. -
Check density:
If there are large empty gaps, add a few more chips and roll again until you are happy with the density of the pattern.
Step 4: Shaping and Finishing
-
Cut the shape:
Place your oval template onto the clay slab. Use your craft knife to trace around the template, cutting cleanly through the clay. Remove the excess. -
Form the rim:
Gently lift the edges of the oval slab to create a slight lip or rim. You can use your fingers to smooth the edge upwards, creating a shallow dish shape. -
Smooth the edges:
Dip your finger in a little water (or baby oil for polymer clay) and run it along the cut edge to smooth out any harshness from the knife. -
Cure or dry:
If using polymer clay, bake according to the package instructions (usually 275°F/130°C for 15-30 minutes). If using air-dry clay, let it sit in a dry, draft-free spot for 24-48 hours. -
Sand for reveal:
Once fully cured and cooled, wet-sand the surface starting with 400 grit and moving to 1000 grit. This is critical—it removes the thin film of white clay over the chips and makes the colors pop vividly. -
Seal:
Apply a thin coat of glaze or sealant to protect the surface and give it a finished ceramic sheen.
Now you have a chic, modern catch-all dish that looks exactly like expensive ceramic artwork.
Marbled Clay Swirl Platter
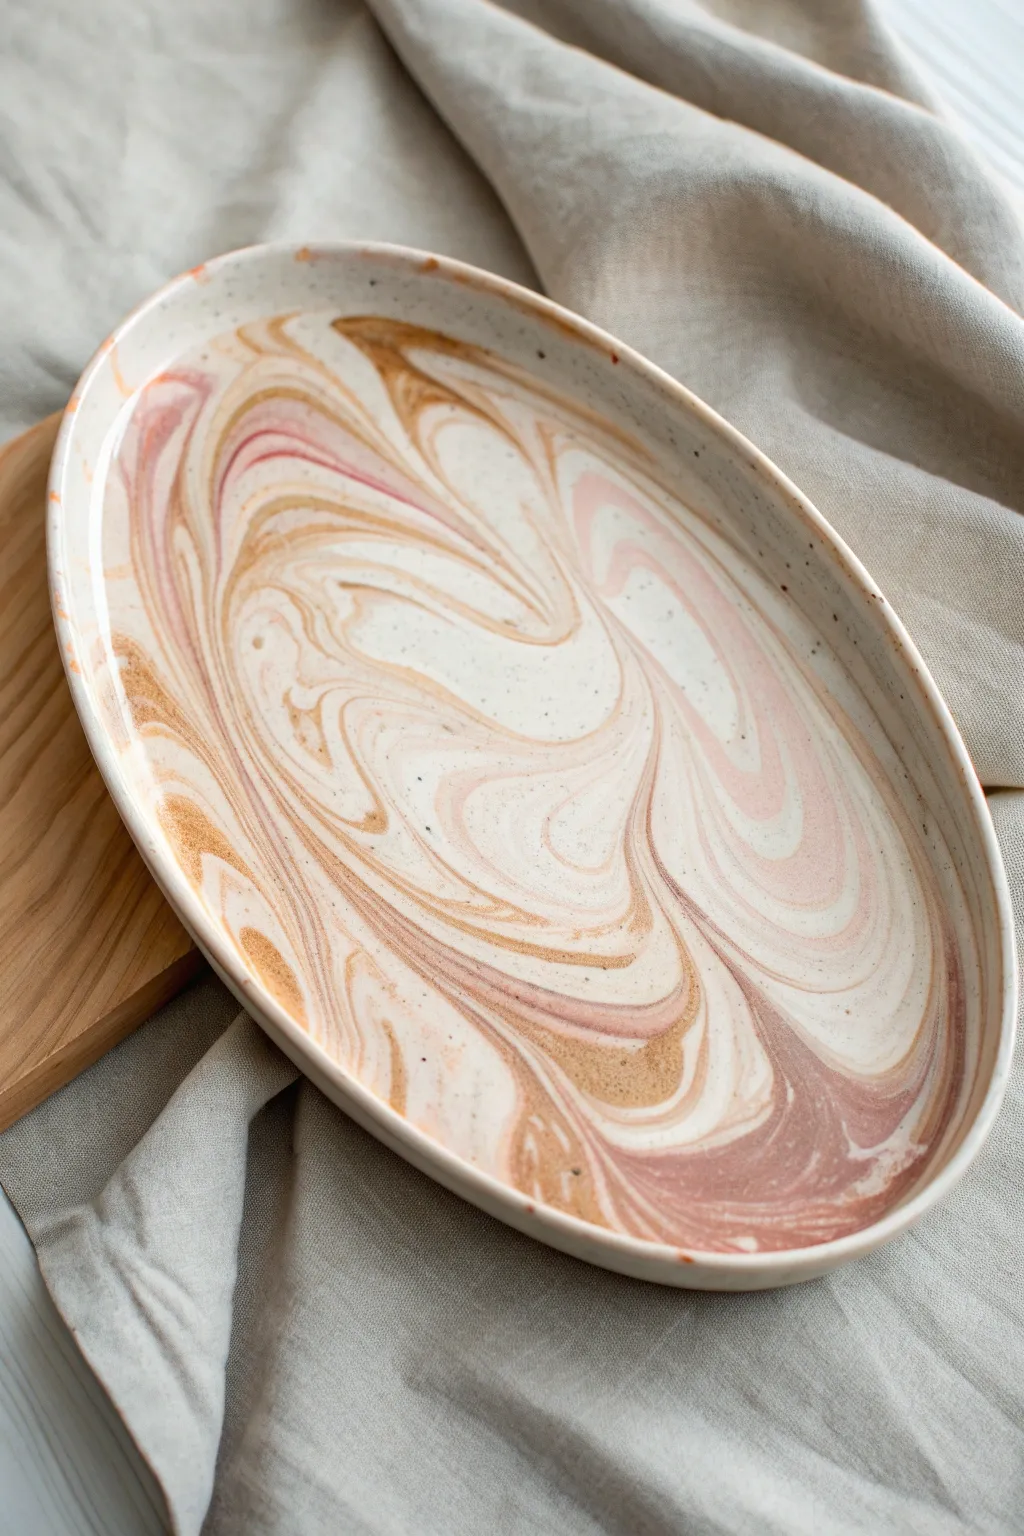
Capture the fluid beauty of geology with this stunning marbled clay platter, where currents of russet, tan, and creamy white dance across an oval canvas. This hand-building project uses the Nerikomi technique to create a smooth, sophisticated serving piece that looks far more complex than it actually is.
Step-by-Step Guide
Materials
- White stoneware clay (low grog)
- Mason stain (Dusty Rose or Light Red)
- Mason stain (Golden or Yellow Ochre)
- Canvas work surface
- Rolling pin
- Wire cutter
- Needle tool
- Metal kidney rib
- Rubber kidney rib
- Sponge
- Slump mold or oval cardboard template
- Foam sheet or pillow (for drying)
- Clear matte or satin glaze
Step 1: Preparing the Clay Colors
-
Divide the clay:
Start with about 2-3 pounds of your white base clay. Divide this into three unequal portions: keep about 50% as plain white, 25% for the pink tone, and 25% for the tan/gold tone. -
Mix the pink clay:
Create a well in the center of one of the smaller portions. Add a teaspoon of the Dusty Rose Mason stain. Carefully fold the clay over the pigment and knead thoroughly until the color is uniform. Wear gloves to avoid staining your hands. -
Mix the tan clay:
Repeat the mixing process with the second small portion, using the Golden Mason stain. Knead until the color is completely integrated and streak-free. -
Rest and wedge:
Let the colored clays sit for about 30 minutes if they feel sticky from mixing. Wedge each ball (white, pink, and tan) separately to remove air bubbles and align particles.
Step 2: Marbling the Slab
-
Form clay ropes:
Roll each color of clay into thick coils or ‘snakes’ of varying thicknesses. Make the white coils the thickest and most numerous to maintain it as the dominant background color. -
Twist and bundle:
Gather the coils together into a single large log, alternating colors. Twist the entire log like a candy cane to begin swirling the colors internally. -
Fold and compress:
Fold the twisted log in half and slam it down onto your wedging table. Reshape it into a block. I find that repeating this twist-and-fold motion just 2-3 times is ideal; over-mixing will mud the colors. -
Slice the slab:
Using a wire tool, slice thin veneers off your marbled block. This reveals the intricate internal pattern. Lay these slices side-by-side on your canvas, slightly overlapping them. -
Roll the slab:
Roll over the overlapping slices with a rolling pin. Roll in multiple directions to seal the seams and stretch the pattern until the slab is about 1/4 inch thick. The pattern will elongate and flow.
Smudged Colors?
If the pattern looks blurry after rolling, scrape the surface firmly with a metal rib. This removes the ‘smear’ layer on top and reveals the crisp lines underneath.
Step 3: Shaping and Finishing
-
Cut the oval shape:
Place your oval template over the most attractive part of your marbled slab. Trace around it with a needle tool held vertically, then remove the excess clay. -
Smooth the surface:
Firmly compress the surface with a metal kidney rib. This is crucial for marbled clay to prevent cracks at the seams between colors. Drag the rib across the surface to reveal the pattern more clearly. -
Form the rim:
Transfer the slab to a piece of foam or a shallow slump mold. Gently press the center down and lift the edges to create a soft, upturned rim. -
Refine the edges:
Run a damp sponge or a soft rubber rib along the rim to round it off. Ensure there are no sharp cuts or burrs left from the needle tool. -
Slow drying:
Cover the platter loosely with plastic. Because different clay bodies (caused by adding stains) can maintain moisture differently, slow drying helps prevent warping. Check daily. -
Bisque fire:
Once bone dry, bisque fire the piece to Cone 04 (or according to your clay specifications). -
Glaze application:
Check your bisque ware for any rough spots and sand lightly if needed. Dip or brush on a clear matte or satin glaze. A clear glaze ensures the colored clay pattern remains the star of the show. -
Final firing:
Glaze fire the platter to the maturity temperature of your clay body (typically Cone 5 or 6 for stoneware).
Pro Tip: Thickness
Make your slab slightly thicker than usual. Colored clays create weak points at the seams, so a thicker slab provides necessary structural integrity.
Now you have a timeless serving vessel that beautifully mimics the random perfection of natural stone.
Geometric Color-Block Platter
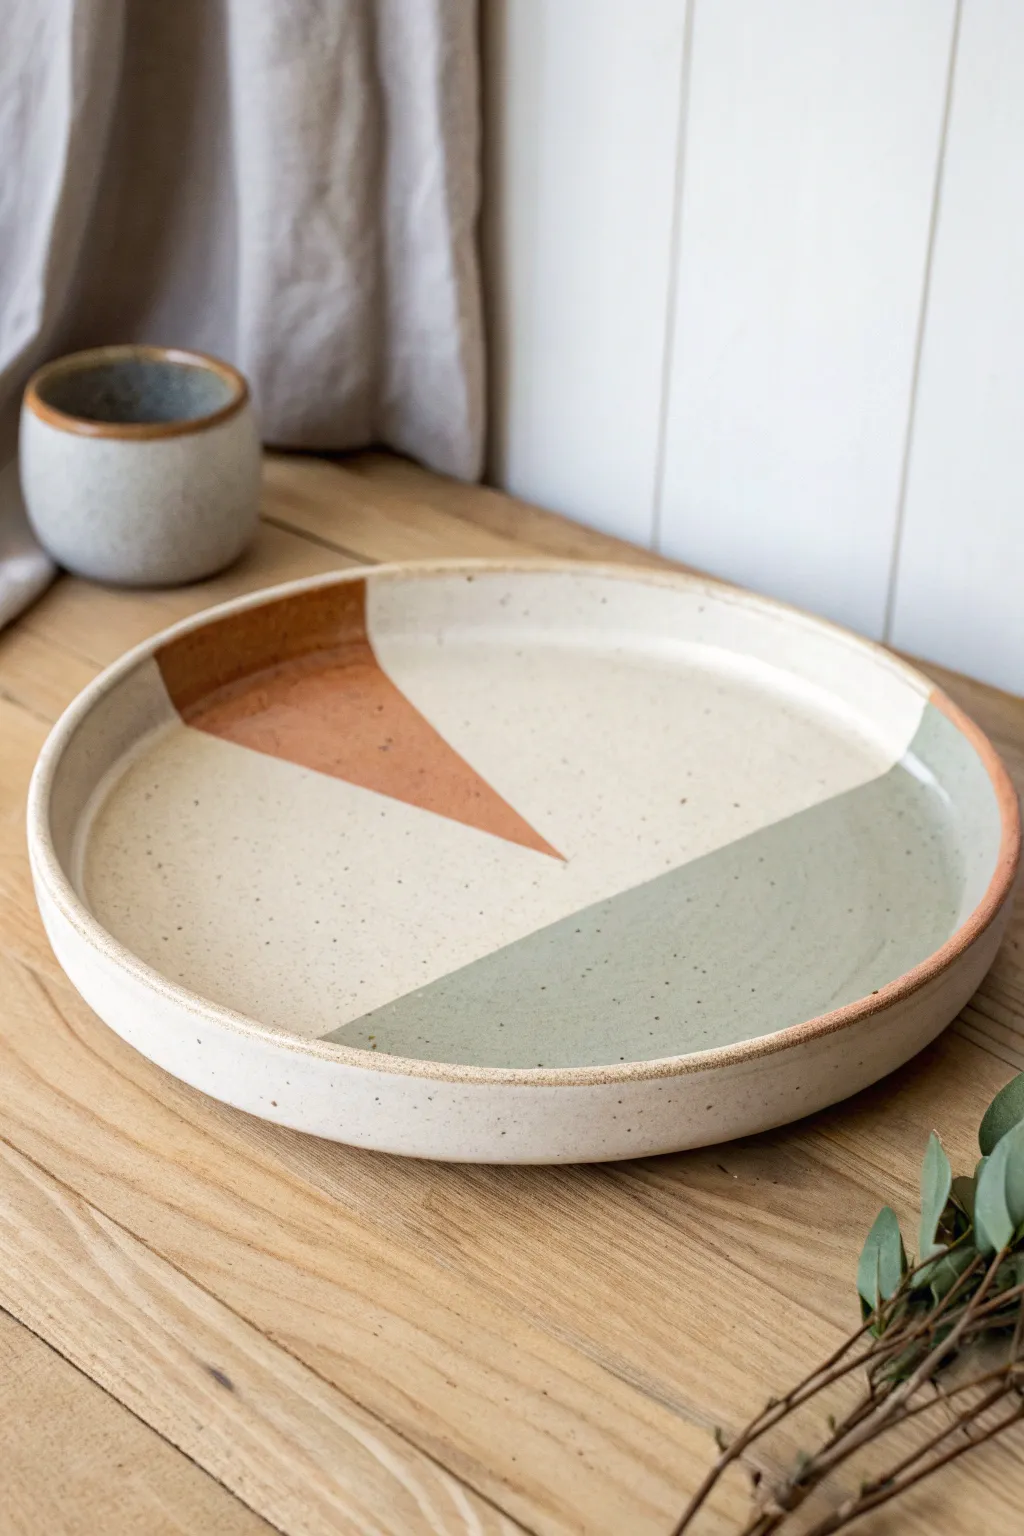
Bring modern, minimalist design to your table with this striking geometric platter. Using simple masking techniques, you will create crisp intersections between warm terracotta, cool sage, and creamy speckled glaze on a clean clay canvas.
How-To Guide
Materials
- Light-colored stoneware clay (speckled or plain)
- Rolling pin
- Wooden guide strips (approx. 1/4 inch thick)
- Platter mold or large dinner plate (for use as a slump mold)
- Fettling knife or needle tool
- Sponge
- Wax resist or masking tape/glaze tape
- Glaze 1: Glossy Cream or White (speckled optional)
- Glaze 2: Rust/Terracotta
- Glaze 3: Sage Green/Grey
- Soft fan brushes
- Fine liner brush
Step 1: Forming the Platter
-
Roll the slab:
Begin by wedging your stoneware clay thoroughly to remove air bubbles. Set up your wooden guide strips on a canvas-covered surface and roll out a smooth, even slab that is slightly larger than your intended mold. -
Cut the circle:
Place your mold upside down on the slab to trace the circle, or use a paper template. Use a needle tool to cut a clean circle, leaving about an inch of extra clearance if you want a deeper rim. -
Shape the rim:
Lift the slab carefully and drape it into your slump mold or onto your hump mold. Gently press the clay to conform to the shape, focusing on creating that distinct, vertical lip shown in the photo. -
Smooth the edges:
Using a slightly damp sponge, compress the rim of the platter. This makes the edge smooth to the touch and prevents future chipping. I like to run a soft rib over the interior surface now to remove any canvas texture. -
Dry to bisque:
Allow the piece to dry slowly under plastic for the first day to prevent warping, especially with a wide flat shape. Once bone dry, fire it to bisque temperature (usually cone 04).
Crisp Line Pro-Tip
For the sharpest geometric lines, use automotive detailing tape (1/8 inch). It sticks better to bisque than painters tape and creates a tighter seal against glaze bleeding.
Step 2: Applying the Design
-
Clean the bisque:
Wipe the bisque-fired platter with a damp sponge to remove any kiln dust. This ensures the glaze adheres properly to the surface. -
Map the geometry:
Using a pencil, lightly sketch your geometric sections directly onto the bisque. Draw a line dividing the bottom third for the green section, and a triangular wedge for the rust section. -
Mask the base layer:
To keep lines crisp, apply wax resist or thin glazing tape along your pencil lines, masking off the areas that will become rust and sage green. We will glaze the main cream color first. -
Apply the cream glaze:
Brush 2-3 coats of your cream/white glaze over the main unmasked section. Ensure you cover the interior and the rim, maintaining an even thickness. -
Clean the resist:
If any cream glaze beaded up on your wax resist lines, gently wipe it away with a damp sponge or fingertip before the next step. -
Glaze the rust triangle:
Once the cream glaze is dry to the touch, carefully brush the rust/terracotta glaze into the triangular section. Use a steady hand or re-apply wax resist over the edge of the cream glaze to protect it. -
Glaze the sage section:
Apply the sage green glaze to the final segment. Be mindful of where the green meets the cream; the glaze thickness should be consistent so one color doesn’t bulge higher than the other. -
Touch up the rim:
Look closely at the rim of the platter. You can choose to wrap one color over the edge or leave the very rim unglazed for a raw clay look, often called a ‘halo’ effect. -
Clean the foot:
Flip the platter over securely. Use a sponge to wipe any stray glaze off the bottom foot ring to prevent it from fusing to the kiln shelf.
Glaze Crawling?
If the glaze pulls away from the lines, you likely applied it too thick over a wax resist boundary. Sponge off the excess immediately or the glaze will crawl during firing.
Step 3: Final Firing
-
Glaze fire:
Load the kiln and fire to the maturity temperature of your glaze and clay body (typically cone 5 or 6 for stoneware). -
Cool and inspect:
Allow the kiln to cool completely before opening. Check your geometric lines for clarity and sand down any sharp bits on the foot if necessary.
Now you have a stunning, modern serving piece ready to be the centerpiece of your dining table
Carved Topographic Lines Platter
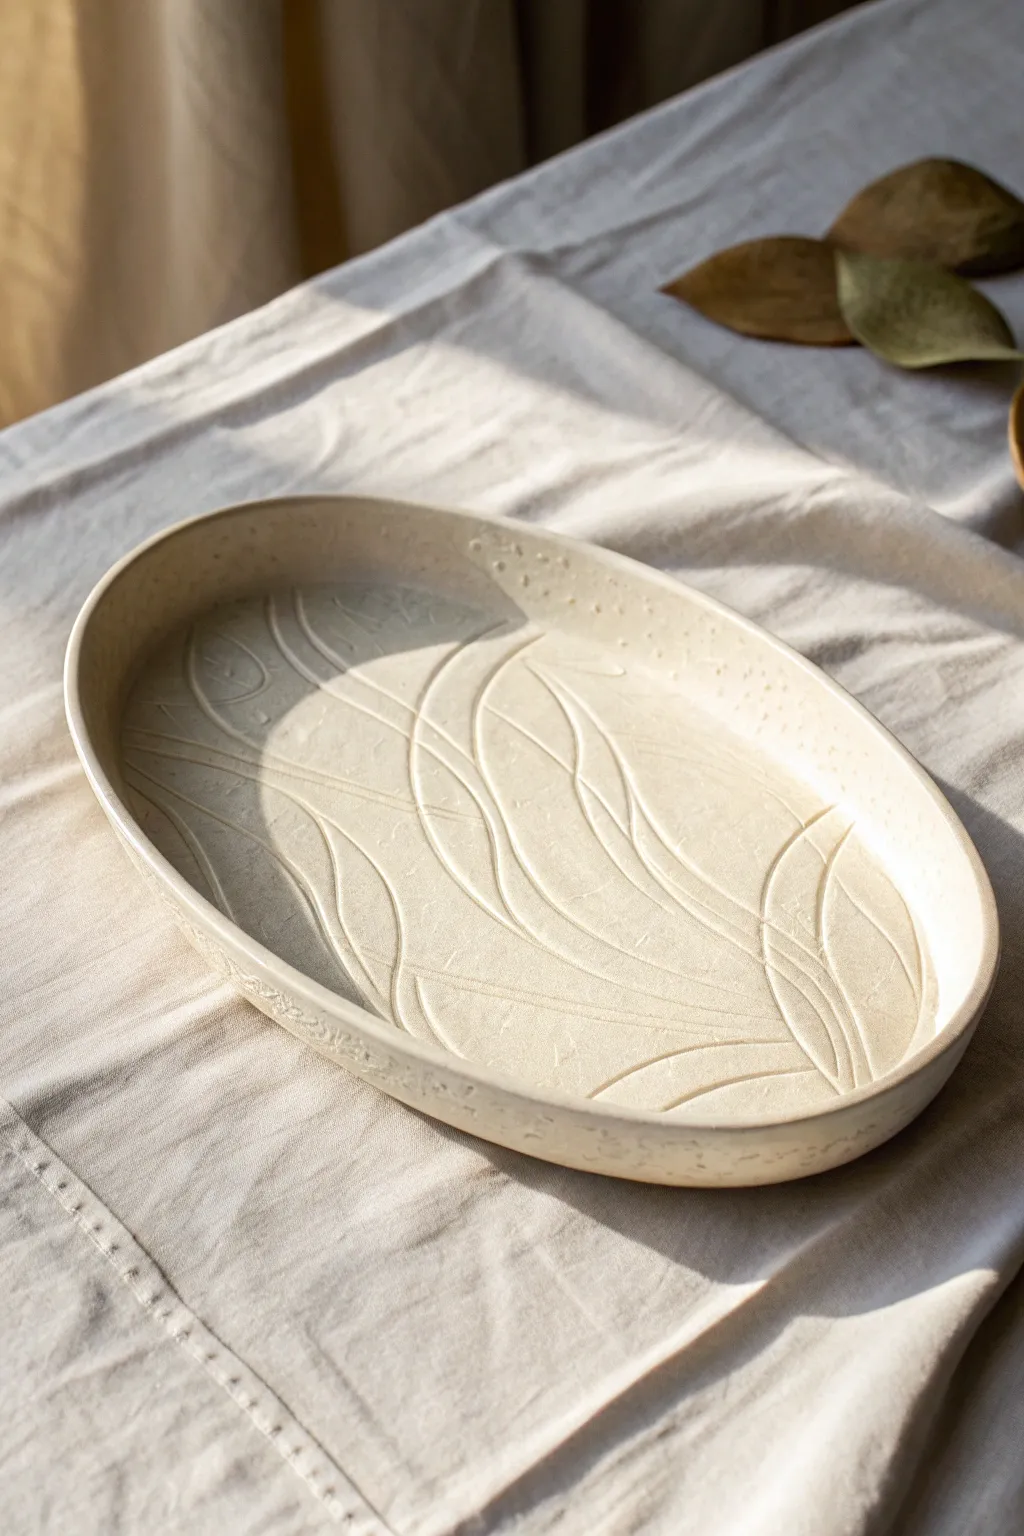
Capture the organic rhythm of flowing water or wind-swept sand with this elegant oval platter. Featuring delicate, carved topographic lines on a matte, speckled cream surface, this piece balances functional serving space with low-relief artistic texture.
Step-by-Step
Materials
- Stoneware clay (speckled or buff)
- Rolling pin
- Canvas work surface or slab mat
- Oval slump mold or large oval serving dish
- Needle tool
- Rib tool (flexible rubber or metal)
- Wire loop carving tool (small/medium)
- Sponge
- Matte white or cream glaze
- Spray bottle with water
- Plastic wrap
Step 1: Forming the Base
-
Wedge the clay:
Begin by thoroughly wedging about 3-4 pounds of stoneware clay to remove air bubbles and ensure a consistent texture, which is crucial for smooth carving later. -
Roll the slab:
Using your rolling pin on a canvas surface, roll out a slab to an even thickness of approximately 3/8 inch. Rotate the clay periodically to ensure it doesn’t stick and to keep the shape relatively circular or oval. -
Compress the slab:
Take a flexible rib tool and firmly drag it across the surface of the clay in multiple directions. This compression aligns the clay particles, preventing warping and cracking during drying. -
Cut the shape:
Place your oval template or mold lightly on top of the slab as a guide. Cut around it with a needle tool, leaving about an inch of extra margin if you plan to drape it into a deep mold. -
Mold the platter:
Lift the slab carefully and place it into your slump mold (or over a hump mold). Gently press the clay into the form, starting from the center and smoothing outward to avoid trapping air pockets.
Clean Lines Pro-Tip
Don’t wipe the surface with a wet sponge immediately after carving. This washes out the crisp edges. Wait for the burrs to dry completely, then brush them off.
Step 2: Refining and Carving
-
Define the rim:
Once the clay is in the mold, trim the excess from the rim using a needle tool or fettling knife to get a clean, even edge. Smooth this edge with a damp sponge. -
Let it stiffen:
Allow the clay to dry to a ‘leather-hard’ state. It should be firm enough to hold its shape without warping but soft enough to carve into easily without chipping. -
Plan the design:
Before carving, lightly trace your flowing ‘topographic’ lines onto the surface with a needle tool. Keep the lines organic and varying in proximity, like ripples in water. -
Carve the main lines:
Using a U-shaped wire loop tool, gently carve along your traced lines. Maintain a shallow, consistent depth. I generally pull the tool towards me for better control over the curve. -
Intersecting paths:
Create visual interest by allowing some lines to converge or branch off. Vary the pressure slightly to create tapering ends where the lines fade out. -
Texture the rim:
For subtle detail, use the side of your loop tool or a textured stamp to add small impressions along the vertical interior wall of the rim, mimicking scattered pebbles or sand. -
Clean up burrs:
Carving often leaves little clay crumbs or sharp edges (burrs). Wait until the clay is bone dry, then gently brush these away with a soft brush rather than risk smearing them while damp. -
Smooth the surface:
Go over the uncarved areas with a slightly damp sponge to ensure the ‘land’ between your river lines is perfectly smooth and pleasant to touch.
Fixing Warped Rims
If the rim starts to warp while drying, place small weighted bags of sand or rice on the distorted areas to gently press them back down while the clay is still leather hard.
Step 3: Finishing
-
Slow drying:
Cover the platter loosely with plastic wrap to let it dry slowly over several days. Uneven drying in flat pieces can lead to warping. -
Bisque fire:
Fire the piece to cone 04 (or your clay body’s bisque temperature) to prepare it for glazing. -
Apply glaze:
Pour or dip a matte white or cream glaze over the piece. If the glaze is thick, it might fill the carvings too much, so consider thinning it slightly or wiping back high points. -
Create depth:
For the look in the photo, ensure the glaze pools slightly in the carved recesses but breaks (thins) over the edges of the cuts, highlighting the topography. -
Final firing:
Glaze fire the platter to maturity (e.g., cone 5/6). Once cool, sand the bottom if necessary to protect your table.
The subtle relief of this platter creates a stunning shadow play on your dining table
Wall-Hanging Statement Platter
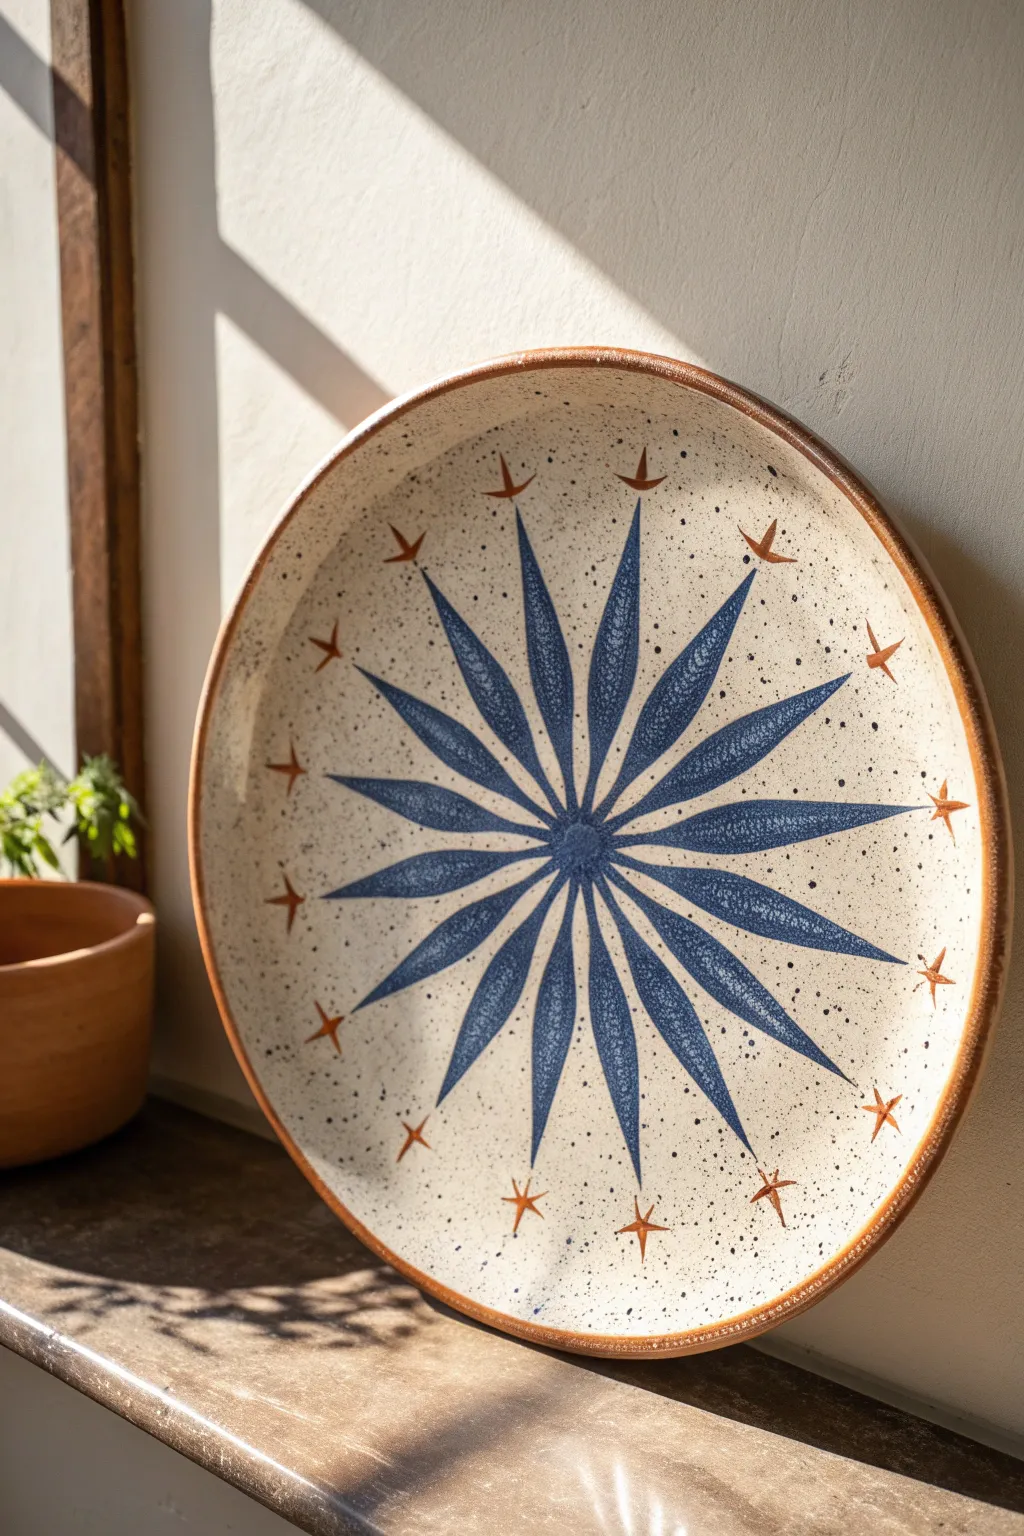
This striking wall-hanging platter combines rustic stoneware charm with a precise, mid-century modern starburst design. By layering cobalt blue petals with delicate copper-toned star accents on a speckled background, you’ll create a piece of art that feels both vintage and timeless.
Step-by-Step Tutorial
Materials
- Speckled stoneware clay (approx. 3-4 lbs)
- Pottery wheel or slab roller
- Large round bat
- Trim tools
- Needle tool
- Ruler or measuring tape
- Paper template (optional)
- Underglaze pencil (light color)
- Cobalt blue underglaze
- Iron oxide wash or rust-colored underglaze
- Small fine-point paintbrush
- Medium liner brush
- Clear matte or satin glaze
- Wire wall-hanging mechanism
Step 1: Forming the Base
-
Prepare the Clay:
Wedge your speckled stoneware clay thoroughly to remove air pockets and ensure even particle distribution, which is crucial for a large, flat surface. -
Roll or Throw the Platter:
If throwing, center the clay on a large bat and broaden it into a wide, shallow plate form with a distinct, slightly raised rim. Alternatively, roll out a slab to 1/4-inch thickness and slump it over a large plaster mold. -
Refine the Rim:
Using a rib tool or a damp sponge, compress the rim to smooth it out. Aim for a slightly rounded, organic edge rather than a sharp manufactured look. -
Dry to Leather Hard:
Allow the platter to dry slowly to the leather-hard stage. Cover the rim with plastic if the center is drying too slowly to prevent warping. -
Trim the Foot:
Flip the platter and trim a clean, supportive foot ring. At this stage, you must also create holes in the foot ring for the hanging wire if you aren’t using an adhesive hanger later.
Clean Lines Tip
To get ultra-sharp petal tips without shaky hands, use thin automotive detailing tape or flexible masking tape to stencil the petal shapes before painting.
Step 2: Designing the Starburst
-
Mark the Center:
Once the piece is flipped back over and still leather hard, find the exact center of the platter using a ruler and mark it very lightly with a needle tool. -
Establish Guidelines:
Divide the platter rim into 16 equal sections. I find it easiest to mark North, South, East, and West first, then subdivide the remaining quarters. -
Sketch the Petals:
Using a light-colored underglaze pencil or very light scratch marks, draw long, slender petal shapes radiating from the center point toward 16 markers, stopping about an inch or two from the rim. -
Check Symmetry:
Step back and view the platter from a distance to ensure your petals are relatively symmetrical in length and width before committing to paint.
Step 3: Painting and Glazing
-
Paint the Blue Rays:
Using your medium liner brush and cobalt blue underglaze, carefully fill in the petal shapes. Apply three thin, even coats to ensure solid, opaque color. -
Detail the Petals:
For added texture, you can gently scratch through the blue underglaze with a needle tool to create vein-like details or simply stipple the underglaze slightly for depth. -
Create the Center Hub:
Paint a small, solid circle at the very center where all petals meet, blending the connection points for a clean finish. -
Add Star Accents:
Using the iron oxide wash or rust underglaze and a fine-point brush, paint small four-point stars or crosses just beyond the tip of each blue petal. -
Define the Rim:
Apply the same iron oxide/rust color to the very edge of the rim. Use a sponge for a softer, slightly irregular border that frames the design. -
Bisque Fire:
Slowly dry the piece completely, then load it into the kiln for a bisque firing to cone 04 (or according to your clay body instructions). -
Apply Clear Glaze:
Once cooled, apply a clear matte or satin glaze over the entire face of the platter. This will seal the piece and allow the natural speckles of the clay to shine through. -
Final Firing:
Fire the platter to the final maturity temperature of your clay and glaze (typically cone 5 or 6 for stoneware).
Level Up: Texture
Before the clay dries, use a carving tool to gently recess the areas where the blue petals will go. This inlay effect adds tactile depth to the wall hanging.
Hang your finished platter in a spot with good natural light to catch the subtle sheen of the glaze