I love how a ceramic pumpkin gives you all the cozy fall vibes without the mess, the mush, or the one-week lifespan. Here are my favorite ways to paint, glaze, and style ceramic pumpkins so they feel totally “you,” whether you’re into classic harvest or something a little unexpected.
Classic Orange With Realistic Shading
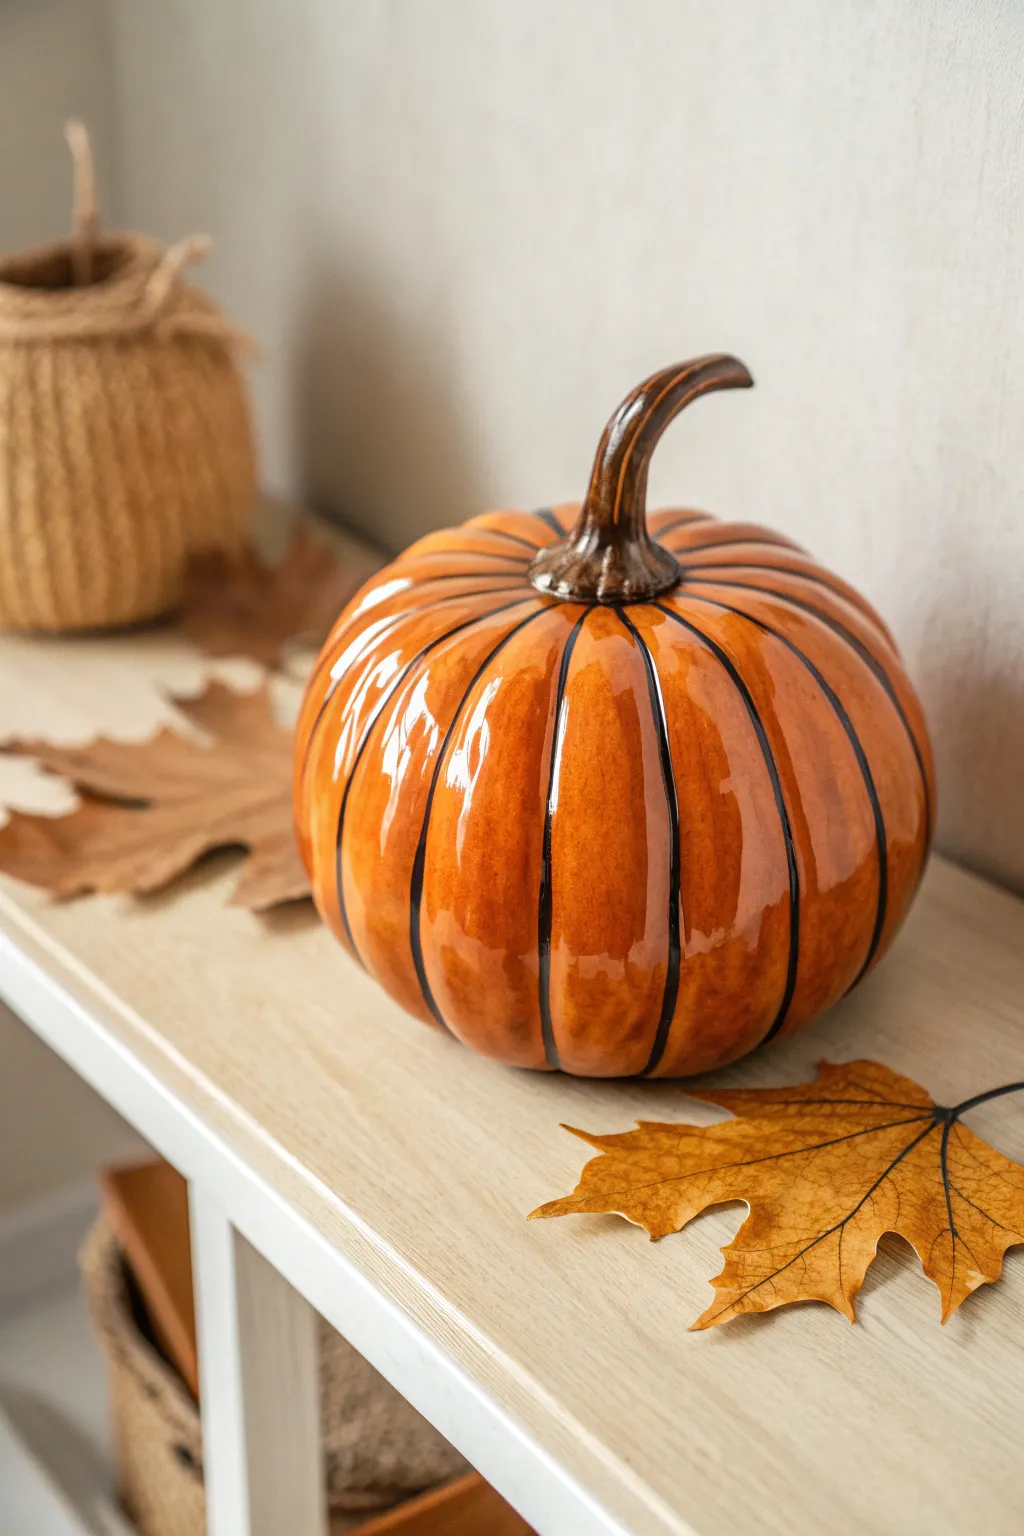
Capture the timeless essence of autumn with this stunning glazed ceramic pumpkin, featuring deep orange hues and realistic ribbed shading. This project focuses on achieving a mirror-like finish and enhancing the natural contours with dark washes for a lifelike appearance.
Step-by-Step Tutorial
Materials
- Bisque ceramic pumpkin (pre-fired)
- Underglazes: Deep Orange, Burnt Sienna, Dark Brown/Black
- Clear dipping glaze or brush-on clear gloss glaze
- Soft synthetic fan brush (for large areas)
- Fine liner brush (size 0 or 00)
- Medium round brush (size 4 or 6)
- Damp sponge
- Clean water
- Kiln (or access to a firing service)
Step 1: Base Application
-
Prepare the Bisque:
Begin by wiping down your bisque pumpkin with a slightly damp sponge. This removes any dust that might resist the glaze and ensures a smooth application surface. -
First Orange Coat:
Using your fan brush, apply a generous coat of Deep Orange underglaze to the entire body of the pumpkin. Avoid the stem for now. Brush in long strokes following the vertical curve of the pumpkin ribs to minimize brush marks. -
Layering for Opacity:
Let the first coat dry until it loses its sheen. Apply a second and third coat of Deep Orange, alternating brush direction slightly or continuing the vertical strokes. Three coats usually provide the solid, vibrant coverage seen in the final piece. -
Stem Base:
Switch to a medium round brush and paint the stem with a coat of Dark Brown underglaze. Ensure you get into the little crevices where the stem meets the fruit.
Fixing Smudges
If you accidentally smudge dark liner paint onto the bright orange, don’t wipe it! Let it dry, then scratch it off gently with a toothpick before glazing.
Step 2: Shading and Definition
-
Mixing a Wash:
Create a wash by mixing a small amount of Burnt Sienna underglaze with water (about a 50/50 mix). You want a consistency similar to skim milk. -
Applying Shadows:
Apply this wash loosely over the orange body. While the wash is still wet, use a damp sponge to gently wipe away the excess from the high points (the roundest parts of the ribs), leaving the darker color in the recesses and natural imperfections. -
Defining the Grooves:
This step is crucial for that realistic look. Take your fine liner brush and load it with undiluted Dark Brown or Black underglaze. I like to carefully steady my hand and paint thin, decisive lines deep inside the vertical grooves of the pumpkin. -
Softening Lines:
If the dark lines look too harsh, use a very slightly damp, clean brush to feather the edges outward just a tiny bit, blending them into the orange. -
Stem Detailing:
Go back to the stem. Add streaks of Black over the Dark Brown base to simulate wood grain twist. Allow the underglaze design to dry completely, ideally overnight.
Metallic Touch
For a luxe twist, apply a luster overglaze (like gold or mother-of-pearl) to the stem after the main firing and re-fire at a lower temperature.
Step 3: Glazing and Firing
-
Clear Glaze Application:
Once the underglaze is bone dry, apply your clear gloss glaze. If brushing, apply two generous coats, letting each dry in between. If dipping, dip once quickly and evenly. -
Checking for Drips:
Inspect the bottom edge of the pumpkin carefully. Wipe away any glaze that has dripped near the base to prevent it from fusing to the kiln shelf. -
Drying Time:
Allow the clear glaze to dry completely. It will turn powdery and opaque, obscuring your design temporarily—don’t panic, this is normal. -
Firing:
Load the pumpkin into the kiln. Fire to cone 06 (or the specific temperature required by your clear glaze manufacturer). Ensure proper spacing so it doesn’t touch other pieces. -
Cooling:
Let the kiln cool down naturally before opening. Removing the piece too early can cause ‘crazing’ (cracks) in that beautiful glossy finish.
Place your shiny new heirloom on a mantel with some dry leaves and enjoy the harvest vibes


Modern Matte White Pumpkin
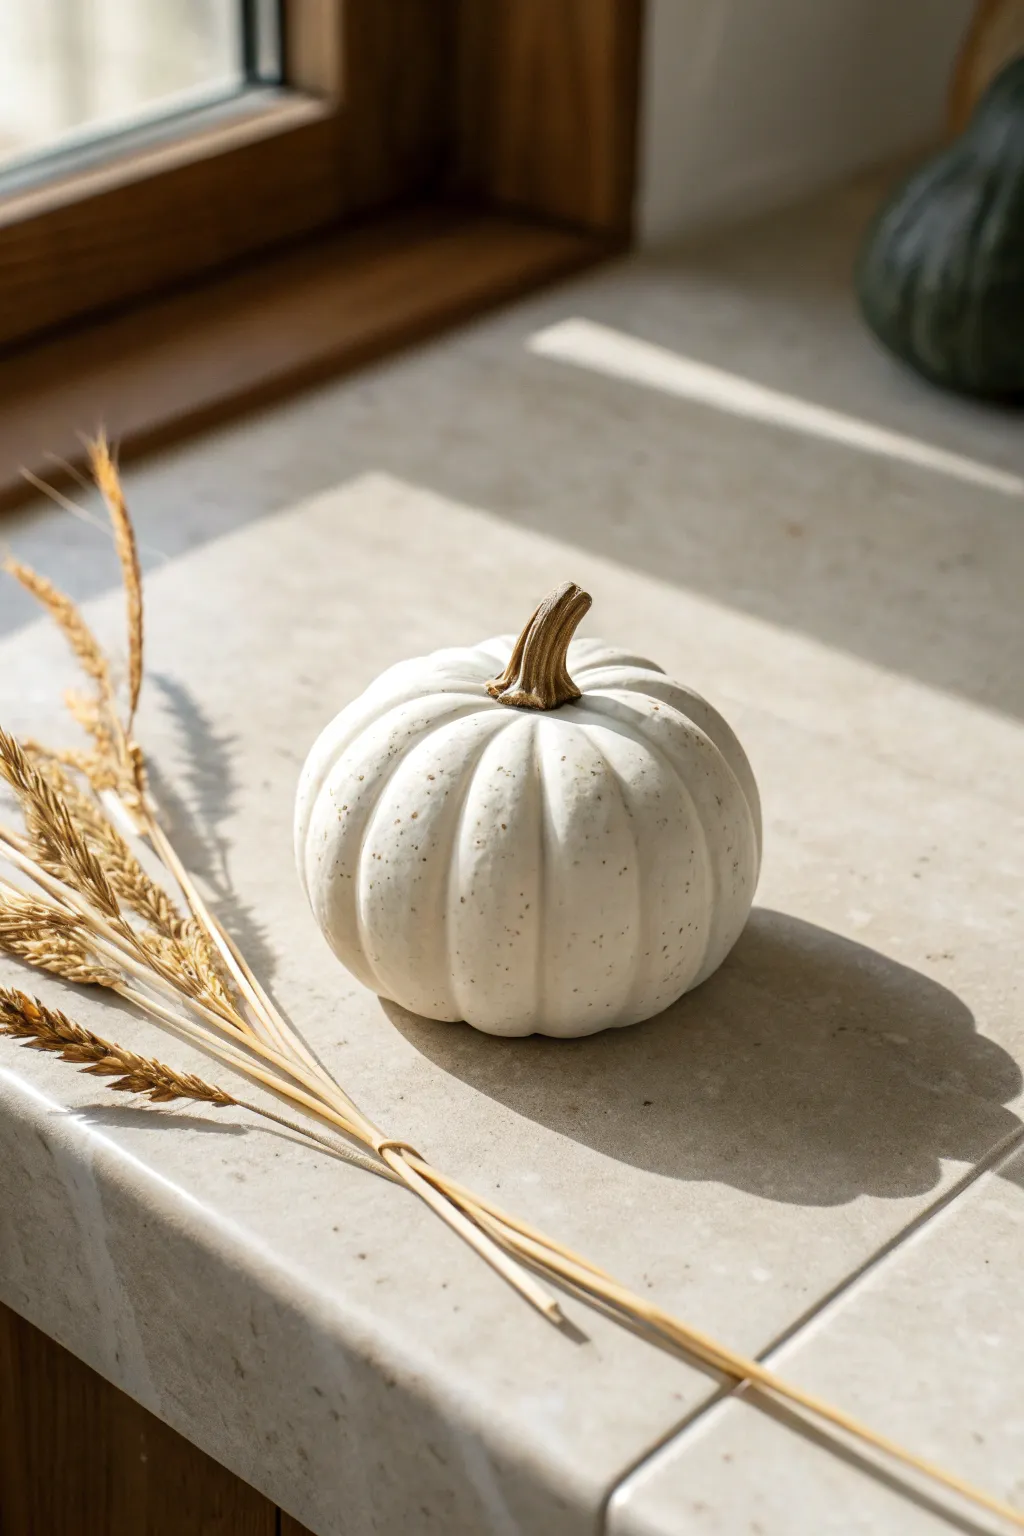
Embrace minimalist autumn decor with this sleek, modern take on the traditional pumpkin. This project transforms a basic ceramic bisque pumpkin into a high-end, speckled matte white piece that looks beautiful on any mantle or tablescape.
Detailed Instructions
Materials
- Ceramic bisque pumpkin (ready-to-paint)
- Matte white acrylic paint
- Soft synthetic flat brush (medium size)
- Detail round brush (small)
- Light brown acrylic paint
- Dark chocolate brown acrylic paint
- Old toothbrush
- Matte spray sealant
- Paper plate or palette
- Water cup and paper towels
Step 1: Base Coating
-
Prepare the Surface:
Wipe down your ceramic bisque pumpkin with a slightly damp paper towel to remove any dust or ceramic powder. This ensures a smooth paint application. -
First Coat of White:
Squeeze a generous amount of matte white acrylic paint onto your palette. Using the soft flat brush, apply an even coat over the entire pumpkin body, carefully working the paint into the deep crevices between the ridges. -
Avoid the Stem:
Paint right up to the base of the stem but try to keep the stem itself clean for now. Don’t worry if a little white gets on it; we will paint over it later. -
Dry and Repeat:
Let the first coat dry completely, which usually takes about 15-20 minutes. Bisque is porous and absorbs paint quickly, so you will likely need a second or even third coat to get a solid, opaque white finish. -
Check for Coverage:
Inspect the pumpkin in good light. Ensure no raw ceramic color is showing through, especially in the grooves. Apply touch-ups where needed.
Step 2: Stem Detailing
-
Base Color for Stem:
Switch to your small detail brush. Mix a drop of water into your light brown paint to improve flow, and paint the entire stem. Cover any accidental white marks from the previous step. -
Adding Dimension:
While the light brown is still slightly tacky, dip the tip of your brush into the dark chocolate brown paint. Wick off most of the paint on a paper towel so the brush is almost dry. -
Dry Brushing:
Lightly drag the dry brush along the raised ridges of the stem. This highlights the texture and mimics the look of a real dried pumpkin stem. -
Deepening Shadows:
Use a tiny amount of the dark brown paint to darken the very base of the stem where it meets the pumpkin body. This creates a realistic shadow and separation.
Control Your Speckles
Does your toothbrush spray too much? Run your finger across the bristles aimed *away* from the project first to clear excess paint, then turn it toward the pumpkin for a finer mist.
Step 3: Creating the Speckled Finish
-
Prepare the Speckle Mix:
On your palette, mix a small amount of light brown paint with a tiny dot of black or dark grey. Dilute this mixture with water until it is very thin and inky. -
Load the Toothbrush:
Dip the bristles of unwanted old toothbrush into the thinned paint mixture. Test the spray on a piece of paper first to control the droplet size. -
Flicking Technique:
Hold the toothbrush about 6-8 inches away from the white pumpkin. Use your thumb to firmly flick the bristles, sending a fine mist of speckles onto the surface. -
Control the Density:
Move around the pumpkin to ensure even coverage. I prefer to keep the speckling very light and subtle for a modern look, rather than heavy splatters. -
Clean Up Mistakes:
If a large glob lands on the white surface, quickly dab it gently with a clean, damp paper towel to lift it or blend it out.
Go for Gold
For a glamorous twist, paint the stem in metallic gold leaf liquid instead of brown. The contrast between raw matte ceramic and shiny metal is stunning.
Step 4: Final Touches
-
Let it Cure:
Allow the speckles and stem paint to dry completely. This is crucial before sealing to prevent smearing your delicate speckle work. -
Seal the Project:
Take the pumpkin to a well-ventilated area. Apply a light coat of matte spray sealant. The matte finish is essential to maintain that modern, non-glossy ceramic aesthetic. -
Final Inspection:
Once the sealer is dry, check for any missed spots. Your modern ceramic pumpkin is now ready for display.
Now you have a chic, modern pumpkin that fits perfectly with contemporary decor styles


Neutral Stoneware Look in Beige and Speckle
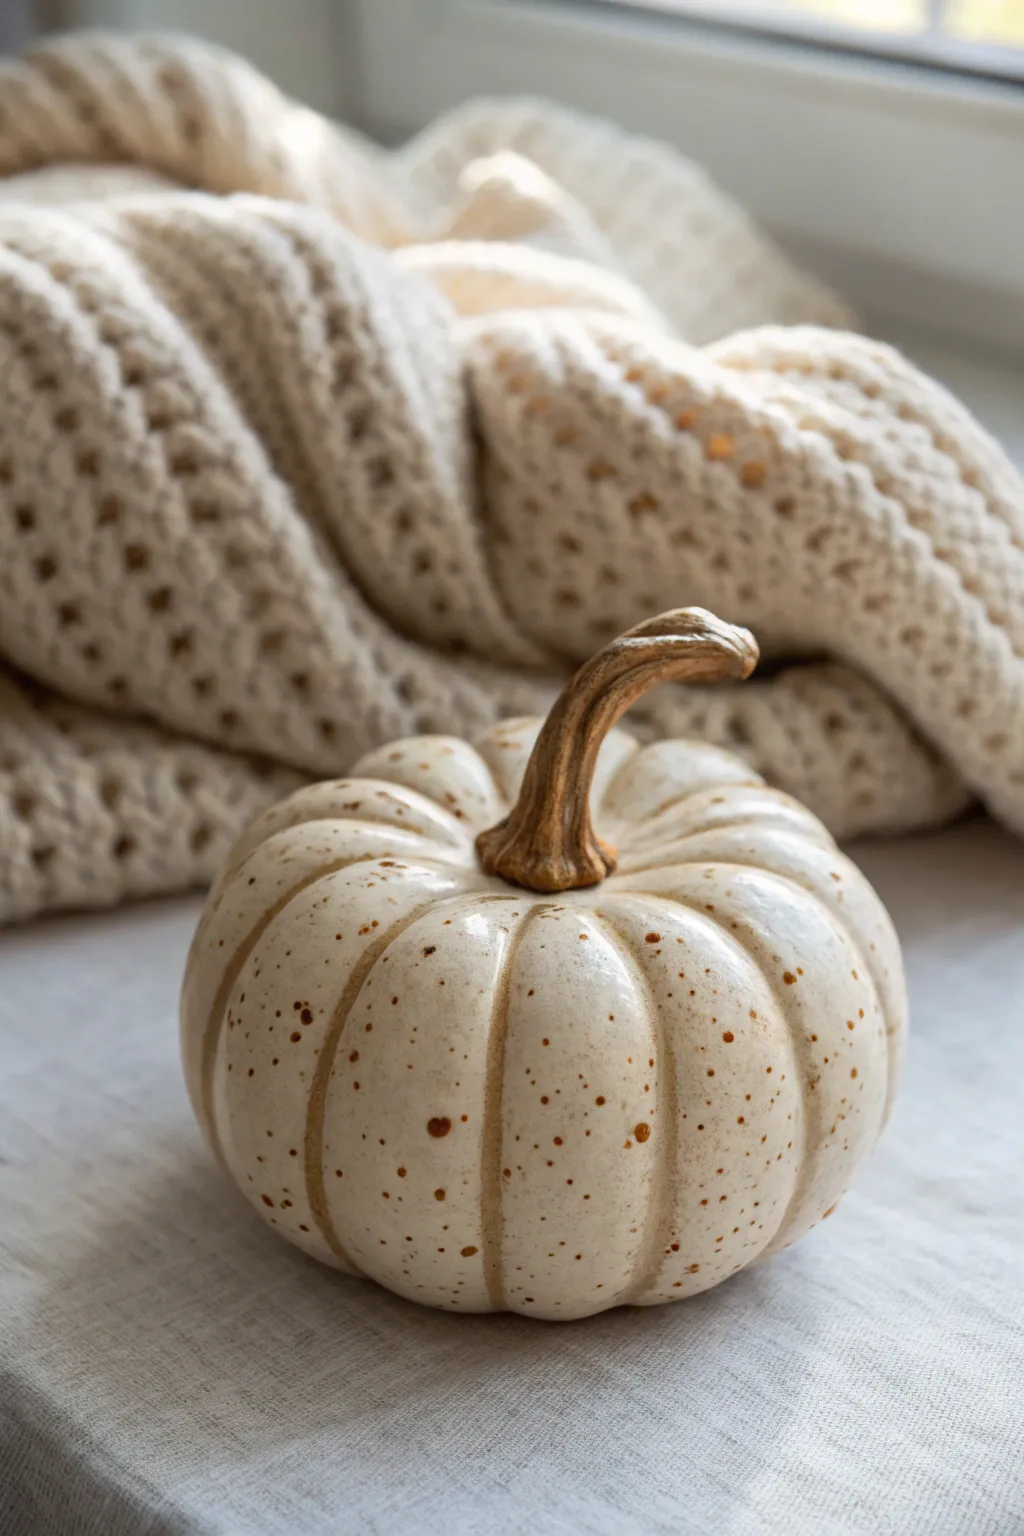
Transform an inexpensive craft pumpkin into a chic, high-end decor piece with this surprisingly simple painting technique. The result creates a convincing stoneware illusion complete with organic speckling and a warm, creamy finish.
How-To Guide
Materials
- Small faux craft pumpkin (plastic/foam)
- Cream or beige acrylic paint (matte finish)
- Dark brown acrylic paint
- Burnt sienna or metallic bronze acrylic paint
- Baking soda
- Paintbrush (medium flat)
- Old toothbrush or stiff bristle brush
- Clear matte sealer spray
- Small cup for mixing
- Paper towels
- Cardboard box or drop cloth
Step 1: Preparation & Base Coat
-
Clean surface:
Begin by wiping down your faux pumpkin with a damp cloth to remove any dust or manufacturing residue, ensuring a clean surface for the paint to adhere to. -
Remove stem:
If possible, carefully pull out or mask off the stem. Painting the pumpkin body is much easier if you don’t have to navigate around the stem detail. -
Create texture mix:
In your mixing cup, combine the cream acrylic paint with a tablespoon of baking soda. Start with a 1:1 ratio, aiming for a thick, mousse-like consistency. -
Adjust thickness:
If the mixture feels too stiff to spread, add a drop of water. The baking soda is crucial for mimicking the gritty texture of real stoneware clay. -
Apply first coat:
Using the medium flat brush, apply a thick layer of the baking soda paint to the pumpkin. Use vertical strokes that follow the pumpkin’s natural ridges. -
Dry thoroughly:
Let this first coat dry completely. Depending on humidity, this could take about an hour. It should feel chalky and hard to the touch. -
Apply second coat:
Brush on a second layer of your textured paint mixture to ensure full coverage, hiding the original plastic color entirely. Let this dry fully.
Uneven Splatters?
If you get a large, unwanted blob of paint, quickly blot it gently with a damp paper towel before it dries, then respray that area lightly.
Step 2: Creating the Stoneware Effect
-
Prepare splatter paint:
Dilute a small amount of dark brown acrylic paint with water until it reaches an ink-like consistency. It needs to be runny enough to flick easily. -
Test the splatter:
Dip an old toothbrush into the thinned paint. Before hitting the pumpkin, practice running your thumb over the bristles inside your cardboard box. -
Apply speckles:
Hold the brush near the pumpkin and flick the bristles to create the speckle effect. Rotate the pumpkin to ensure even coverage across all sides. -
Vary aperture:
I prefer to vary the distance slightly as I flick; holding the brush closer creates larger spots, while moving it back creates a fine mist.
Step 3: Detailing the Stem
-
Base coat stem:
While the speckles dry, paint the detached stem with a base coat of burnt sienna or dark brown acrylic. -
Add dimension:
Once dry, dry-brush a lighter bronze or tan color over the raised ridges of the stem to highlight the texture and make it look like twisted wood. -
Reattach stem:
Glue the stem back onto the pumpkin body or carefully peel away your masking tape if you left it on.
Pro Tip by Design
Mix a tiny drop of grey into your cream base paint. Pure white can look too stark; a slightly ‘muddy’ tone looks more like authentic ceramic clay.
Step 4: Finishing Touches
-
Seal the project:
Take the pumpkin to a well-ventilated area and spray it lightly with a clear matte sealer. This protects the baking soda finish from chipping. -
Cure:
Allow the sealer to cure according to the can’s instructions, ensuring the finish is durable enough for seasonal handling.
Now you have a stunning, artisanal-style pumpkin ready for your autumn display


Metallic-Dipped Pumpkin Base
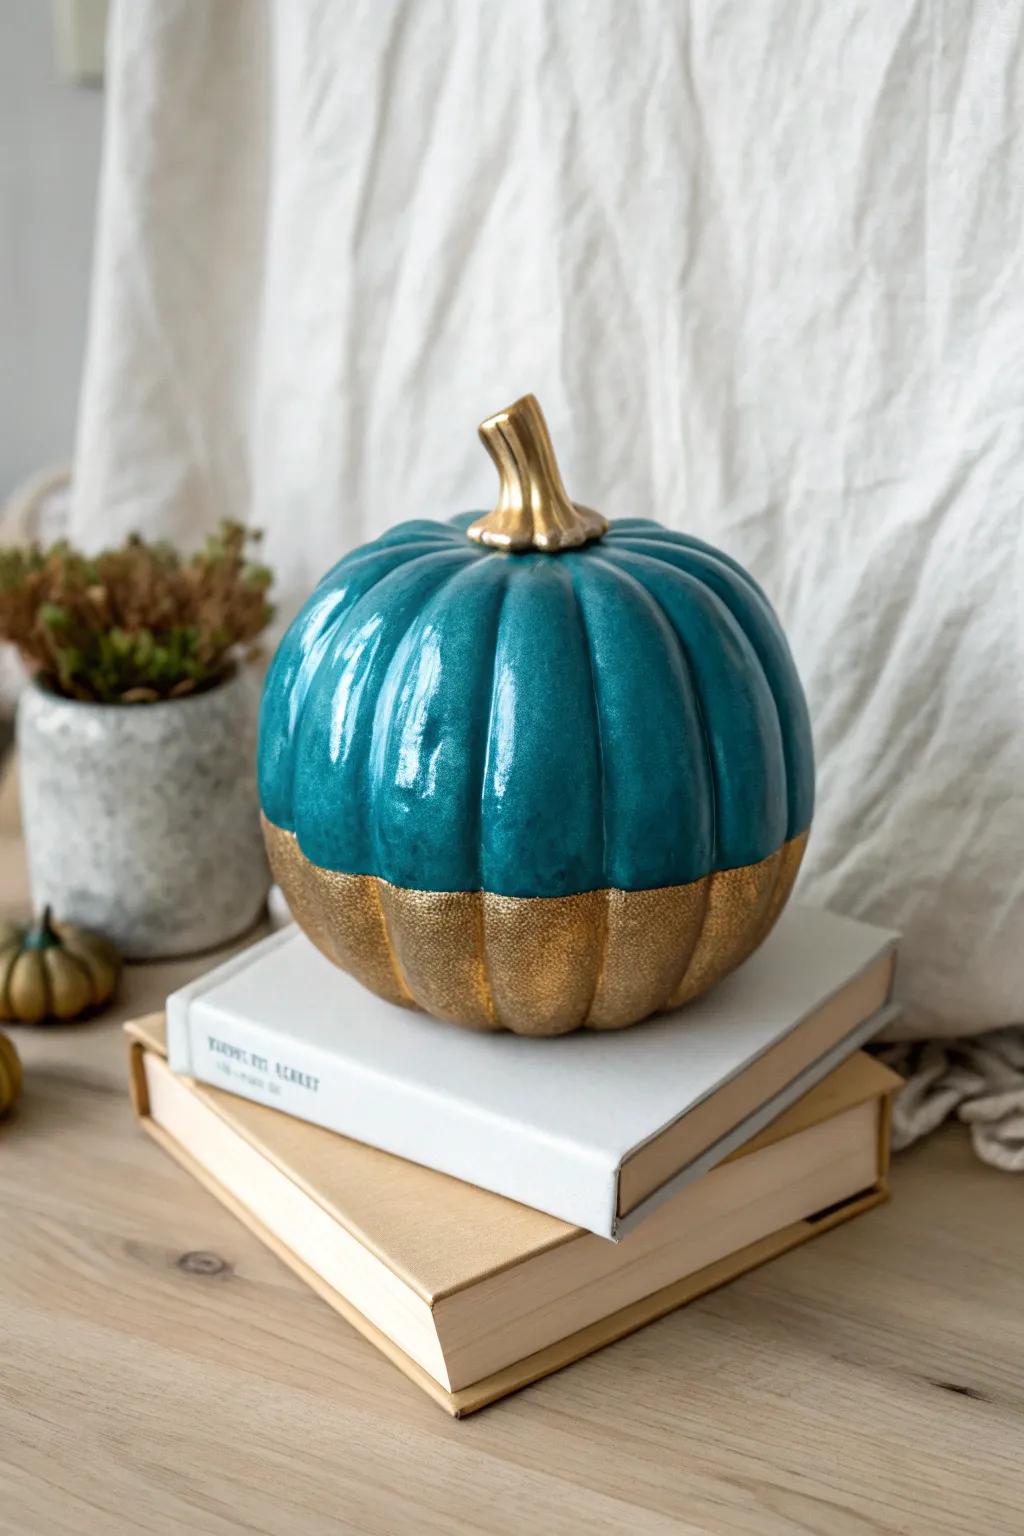
Elevate your autumn decor with this stunning pumpkin that combines a rich, glossy teal with a glamorous metallic gold base. This chic, two-toned design creates a sophisticated look that moves away from traditional orange and into modern elegance.
Step-by-Step
Materials
- Bisque or plain ceramic pumpkin
- High-gloss teal spray paint (or acrylic paint and gloss sealer)
- Liquid gold leaf or high-quality metallic gold acrylic paint
- Wide, soft bristle brush
- Small detail brush
- Painter’s tape or washit tape
- Plastic drop cloth or newspaper
- Glossy clear sealant spray (optional)
- Sandpaper (fine grit)
Step 1: Base Preparation
-
Clean the surface:
Begin by wiping the ceramic pumpkin down with a damp cloth to remove any dust or oils that interfere with paint adhesion. Let it dry completely. -
Sand imperfections:
If your ceramic piece has any rough spots or seams from the mold, gently sand them down with fine-grit sandpaper until smooth. -
Protect your workspace:
Lay down your plastic drop cloth or newspaper in a well-ventilated area, especially if you are opting for spray paint.
Step 2: Adding the Color
-
Apply the teal base:
Spray or paint the entire pumpkin with your chosen teal color. If spraying, use short, even bursts to prevent drips. -
Layer for opacity:
Allow the first coat to dry according to the manufacturer’s instructions. I usually find that two or three thin coats provide a much deeper, richer color than one thick coat. -
Inspect coverage:
Check the crevices and deep grooves of the pumpkin to ensure the teal paint has covered every angle. -
Let it cure:
Allow the teal paint to fully cure for at least 24 hours. This is crucial because you will be applying tape over it next.
Bleeding Lines?
If paint bled onto the teal appearing messy, dip a q-tip in a tiny amount of rubbing alcohol or paint remover to gently erase the gold bleed before touching up with teal.
Step 3: Creating the Dipped Effect
-
Define the dip line:
Decide how high you want the gold base to go—usually about one-third of the way up looks best. Apply painter’s tape horizontally around the pumpkin circumference. -
Secure the tape edges:
Press the tape firmly into the grooves of the pumpkin ribs. Use your fingernail or a credit card edge to ensure a tight seal so paint doesn’t bleed underneath. -
Apply the gold:
Using your wide, soft brush, apply the liquid gold leaf or metallic paint to the bottom section below the tape line. -
Add a second coat:
Metallic paints often require a second coat for true brilliance. Apply a second layer once the first is dry to the touch to hide any brush strokes. -
Remove the tape:
Carefully peel back the painter’s tape while the gold paint is still slightly tacky. This helps create a crisp, sharp line without chipping dry paint. -
Touch up edges:
If any gold paint bled under the tape, use a very small brush with teal paint to carefully correct the line once the gold is fully dry.
Try Texture
Mix a small amount of baking soda into your teal paint before applying it. This creates a matte, ceramic-pottery texture that contrasts beautifully with the shiny gold.
Step 4: Finishing Details
-
Paint the stem:
Using a small detail brush, carefully paint the stem with the same gold metallic paint used for the base. -
Define the stem base:
Be precise where the stem meets the pumpkin body. A steady hand here makes the finished piece look professional. -
Seal the project:
If you want extra protection and shine, apply a clear gloss sealant over the entire pumpkin. This also helps unify the texture of the two different paints. -
Final drying time:
Set the pumpkin in a dust-free area to dry completely before handling or styling it on your shelves.
Place your striking new centerpiece on a stack of books or a mantle and enjoy the luxurious vibe it brings to your space

The Complete Guide to Pottery Troubleshooting
Uncover the most common ceramic mistakes—from cracking clay to failed glazes—and learn how to fix them fast.
Glazed Stem in Gold or Bronze
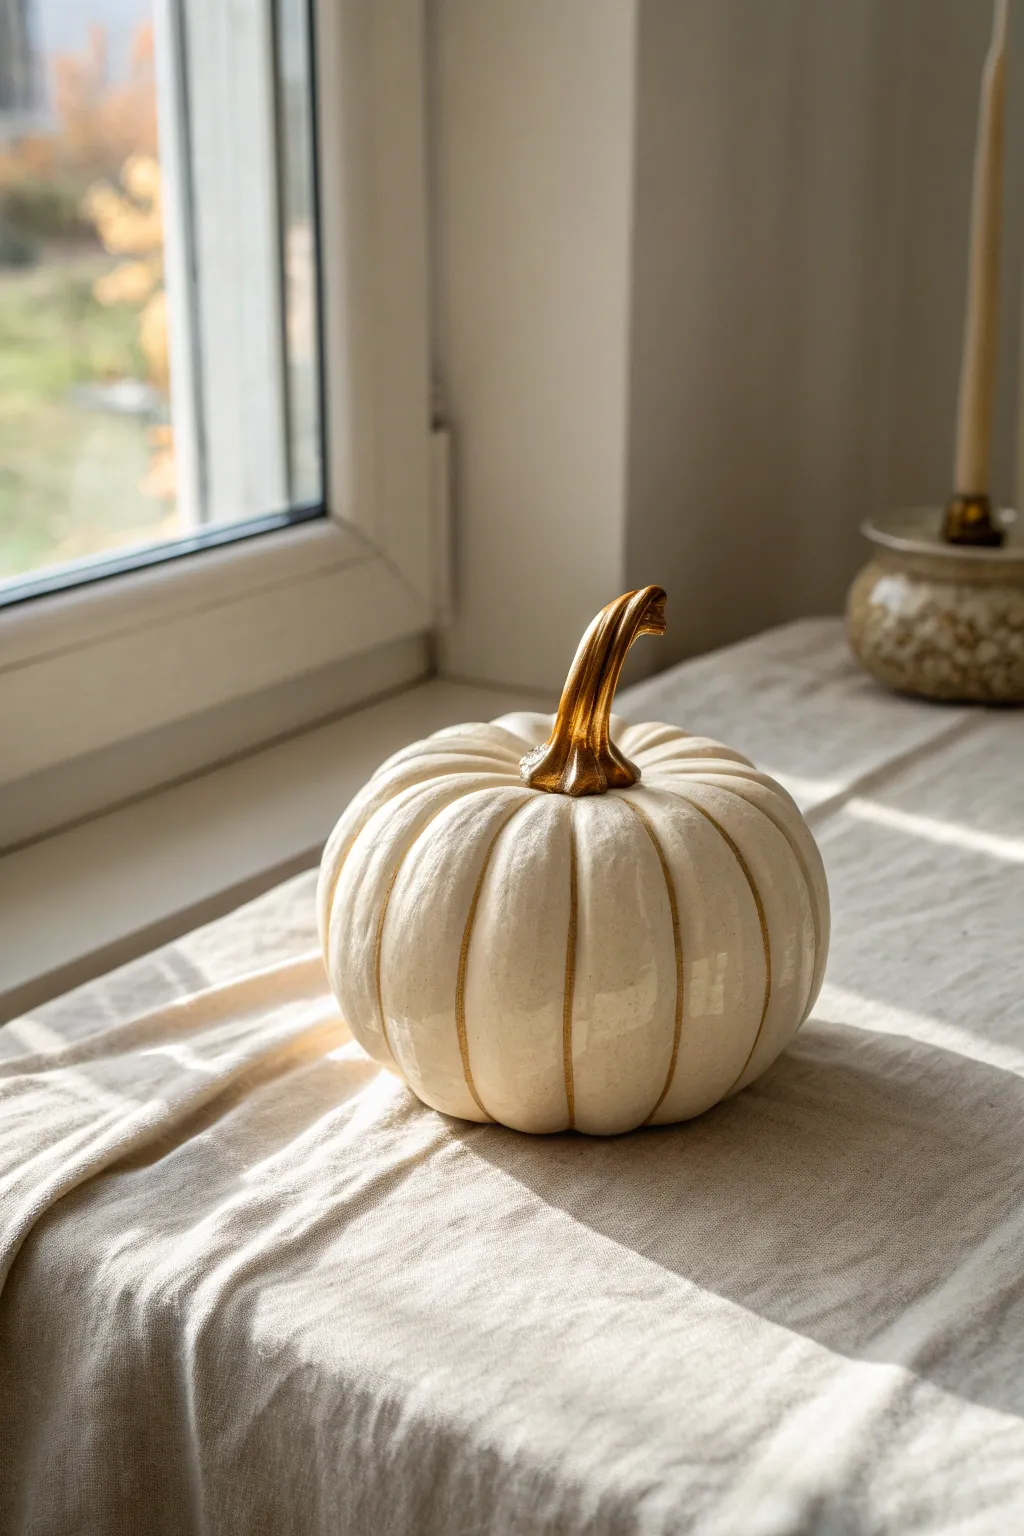
Elevate a simple cream-colored ceramic pumpkin into a piece of sophisticated autumn decor by focusing on a luxurious detail: a metallic glazed stem. This project combines smooth, high-gloom porcelain aesthetics with the striking contrast of gold or bronze liquid leafing.
Step-by-Step Tutorial
Materials
- Bisque ceramic pumpkin (ready-to-glaze)
- Cream or off-white ceramic glossy glaze
- Gold or bronze liquid leaf paint (or overglaze luster if firing)
- Fine grit sandpaper (220 grit)
- Soft fan brush for glazing
- Small fine-point detail brush
- Damp sponge
- Clean cloth
- Kiln (if using stoneware glazes) or Sealant (if using acrylics)
Step 1: Preparation and Base Coat
-
Clean the bisque:
Begin by wiping down your bisque pumpkin with a damp sponge. This removes any ceramic dust that might interfere with glaze adhesion and ensures a smooth surface. -
Sand imperfections:
Check the surface for any rough spots or seams from the mold. Gently sand these away with fine-grit sandpaper until the pumpkin feels perfectly smooth to the touch. -
Dust off:
After sanding, give the pumpkin another thorough wipe with a clean, slightly damp cloth to remove all sanding residue. -
Mix the glaze:
Stir your cream or off-white glossy glaze thoroughly. If it feels too thick, I find adding a tiny drop of water helps it flow better into the deep ridges of the pumpkin. -
Apply the first coat:
Using a soft fan brush, apply the first coat of glaze to the entire body of the pumpkin. Avoid the stem for now if you plan to use a different material there, or glaze it if you are painting over it later. -
Let it dry:
Allow the first coat to dry completely. The sheen will disappear, turning matte and chalky when it’s ready for the next layer. -
Apply second and third coats:
Apply two more coats of glaze, allowing full drying time between each. Three coats usually ensure a solid, opaque finish without streakiness.
Don’t Rush the Gold
Liquid leaf is beautiful but unforgiving. Use a single, confident stroke for the smoothest finish. Going back over semi-dry paint will cause dragging and clumps.
Step 2: Refining the Shape
-
Wipe the bottom:
Use a sponge to wipe any glaze off the very bottom foot of the pumpkin. This prevents it from fusing to the kiln shelf during firing. -
Clean the grooves:
Take a look at the deep vertical crevices. If glaze has pooled too thickly there, use a damp brush to gently lift some out so you don’t lose the definition of the ribs. -
Fire the pumpkin:
Load the pumpkin into the kiln and fire it according to the glaze manufacturer’s instructions (typically cone 06 or cone 6 depending on your clay body).
Step 3: Gilding the Stem
-
Prepare the surface:
Once the pumpkin has been fired and cooled, ensure the stem area is clean and dry. The glossy surface serves as an excellent base for metallic accents. -
Select your gold:
Shake your liquid gold leaf or metallic paint vigorously. The metallic pigments settle quickly, and you want extreme opacity. -
Outline the base:
Using a very fine detail brush, carefully paint a line around the base of the stem where it meets the pumpkin body. Create a clean, sharp edge here. -
Fill in the stem:
Switch to a slightly larger brush if needed and fill in the rest of the stem. Use vertical strokes that follow the natural texture and twist of the stem. -
Add dimension:
For a richer look, I like to dap a tiny bit of bronze into the deeper crevices of the stem while the gold is wet, creating subtle shadows. -
Extend the color:
For the specific look in the photo, bring the gold paint just barely down into the top of the crevices between the pumpkin ribs, creating a rooted appearance. -
Dry and seal:
Let the liquid leaf cure for at least 24 hours. Because liquid leaf is solvent-based, it usually doesn’t need a sealer, but handle it gently to preserve the shine.
Glaze Crawling?
If your glaze pulls away leaving bare spots after firing, it likely means dust or oil was on the bisque. Wash thoroughly and reglaze the bare spots, then re-fire.
Now you have a stunning, high-contrast decoration that looks like it came straight from a high-end boutique
Soft Pastel Pumpkins in a Cluster
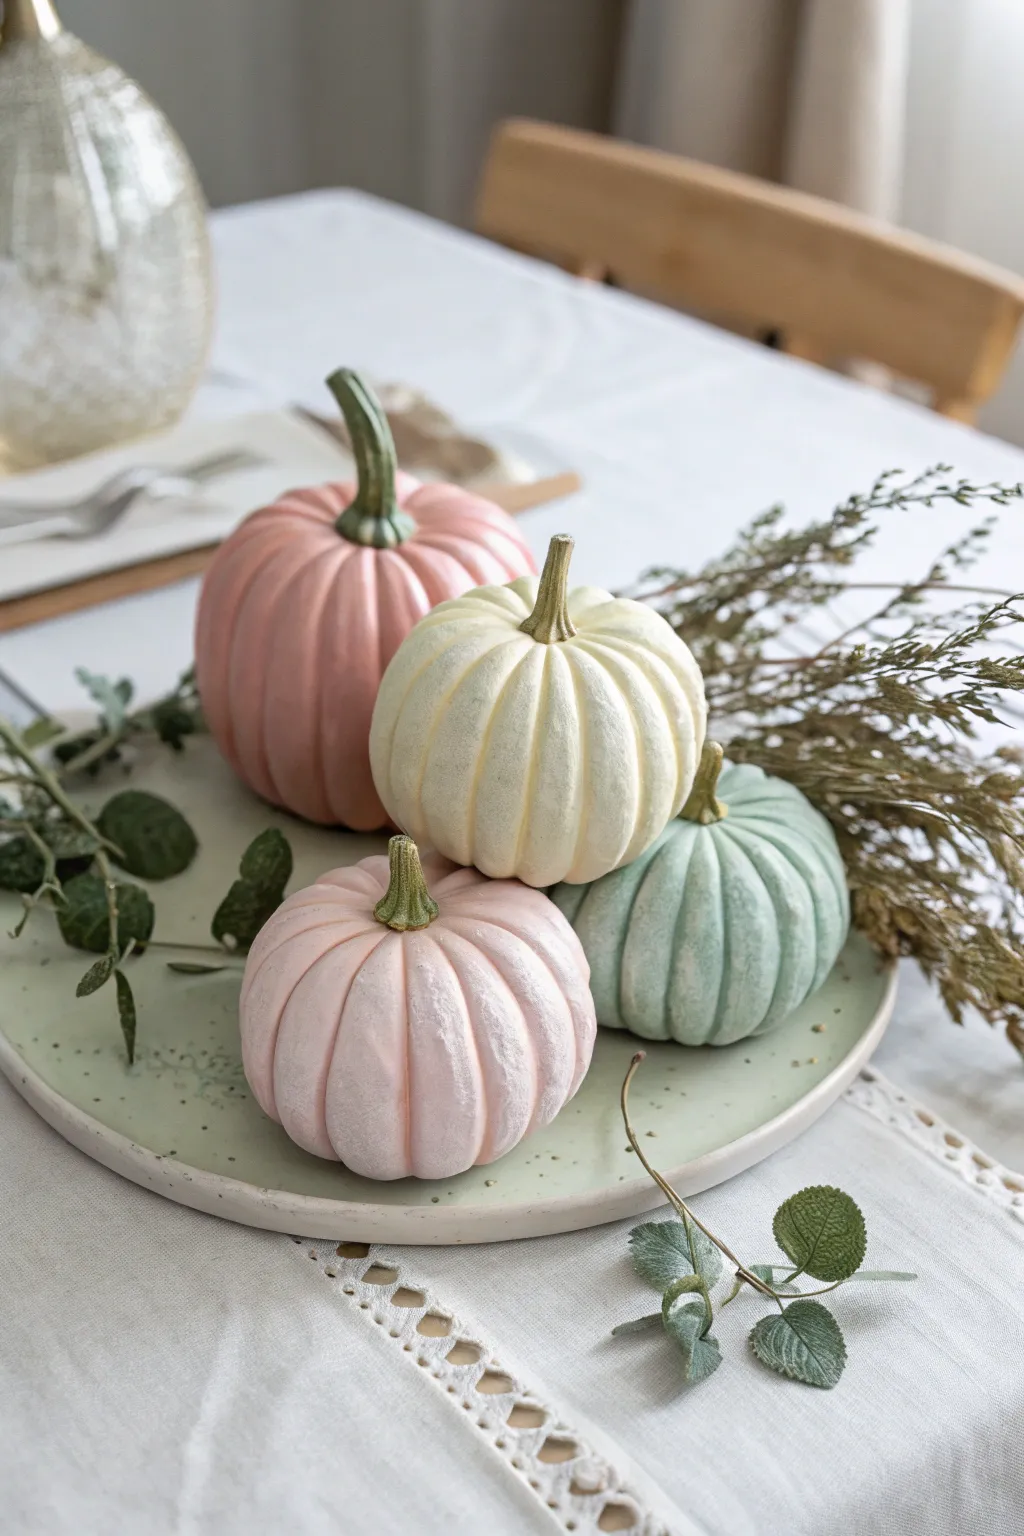
Create a sophisticated autumnal display with these hand-painted ceramic pumpkins featuring a velvety matte finish. The soft blush, cream, and sage tones offer a modern, delicate twist on traditional fall decor.
Step-by-Step
Materials
- Bisque ceramic pumpkins (various sizes)
- Acrylic craft paints (pastel pink, cream/white, sage green, raw umber)
- Matte finish spray sealant or varnish
- Baking soda or plaster of paris powder
- Medium flat synthetic brush
- Small round detail brush
- Paper towels
- Palette or paper plate
- Fine-grit sandpaper (optional)
Step 1: Preparation and Base Mixing
-
Clean surface:
Begin by wiping down your ceramic bisque pumpkins with a slightly damp cloth to remove any dust or debris. Let them dry completely. -
Smooth imperfections:
Inspect the pumpkins for any sharp seams or rough spots from the casting process. Gently sand these down with fine-grit sandpaper if needed. -
Create texture medium:
To achieve that velvety, non-glossy ceramic look, mix your acrylic paints with a texture agent. Add a teaspoon of baking soda or plaster of paris to your pink, cream, and sage paint puddles. -
Check consistency:
Stir the powder into the paint until it creates a thick, creamy consistency similar to chalk paint. I find this helps hide brush strokes beautifully.
Step 2: Painting the Pumpkins
-
First coat application:
Using your medium flat brush, apply the first coat of the textured paint mixture. Paint two pumpkins pink, one cream, and one sage green based on the reference. -
Stroke direction:
Follow the vertical curves of the pumpkin ridges with your brushstrokes to emphasize their natural shape. -
Dry and assess:
Allow the first coat to dry for about 15-20 minutes. It will look chalky and matte as it dries. -
Second coat:
Apply a second coat to ensure full coverage, making sure no raw ceramic is showing through, especially in the deep crevices.
Textured Grip
If the baking soda paint feels too gritty, lightly sand the dried surface with a brown paper bag before sealing for a finish that feels like unglazed porcelain.
Step 3: Detailing the Stems
-
Base stem color:
Mix a small amount of sage green with a tiny drop of raw umber to create a muted, earthy olive tone. -
Paint stems:
Use the small round detail brush to carefully paint the stems of all pumpkins with this olive mixture. -
Add dimension:
While the stem paint is still slightly wet, add a tiny touch of lighter green or cream to the raised ridges of the stem for a natural highlight. -
Clean up edges:
If any stem paint traveled onto the pumpkin body, touch it up immediately with the appropriate body color.
Paint Clumping?
If your paint and baking soda mix gets too thick or clumpy, thin it out with a few drops of water until it flows smoothly again.
Step 4: Finishing Touches
-
Dry brushing:
To enhance the matte texture, take a dry, clean brush with the teeniest amount of white paint. Lightly whisk it over the very tops of the pumpkin ridges. -
Create depth:
Conversely, you can use a very diluted wash of darker paint in the deepest crevices, wiping it back quickly with a paper towel so it only remains as a subtle shadow. -
Seal the work:
Once fully dry (give it at least an hour), take the pumpkins to a well-ventilated area. -
Apply varnish:
Spray them with a dead-flat matte sealer. Avoid glossy sprays, as they will ruin the soft, chalky aesthetic.
Arranging these soft-hued pumpkins on a platter creates an instant feeling of calm elegance for your table


What Really Happens Inside the Kiln
Learn how time and temperature work together inside the kiln to transform clay into durable ceramic.
Moody Black Pumpkin With Matte Finish
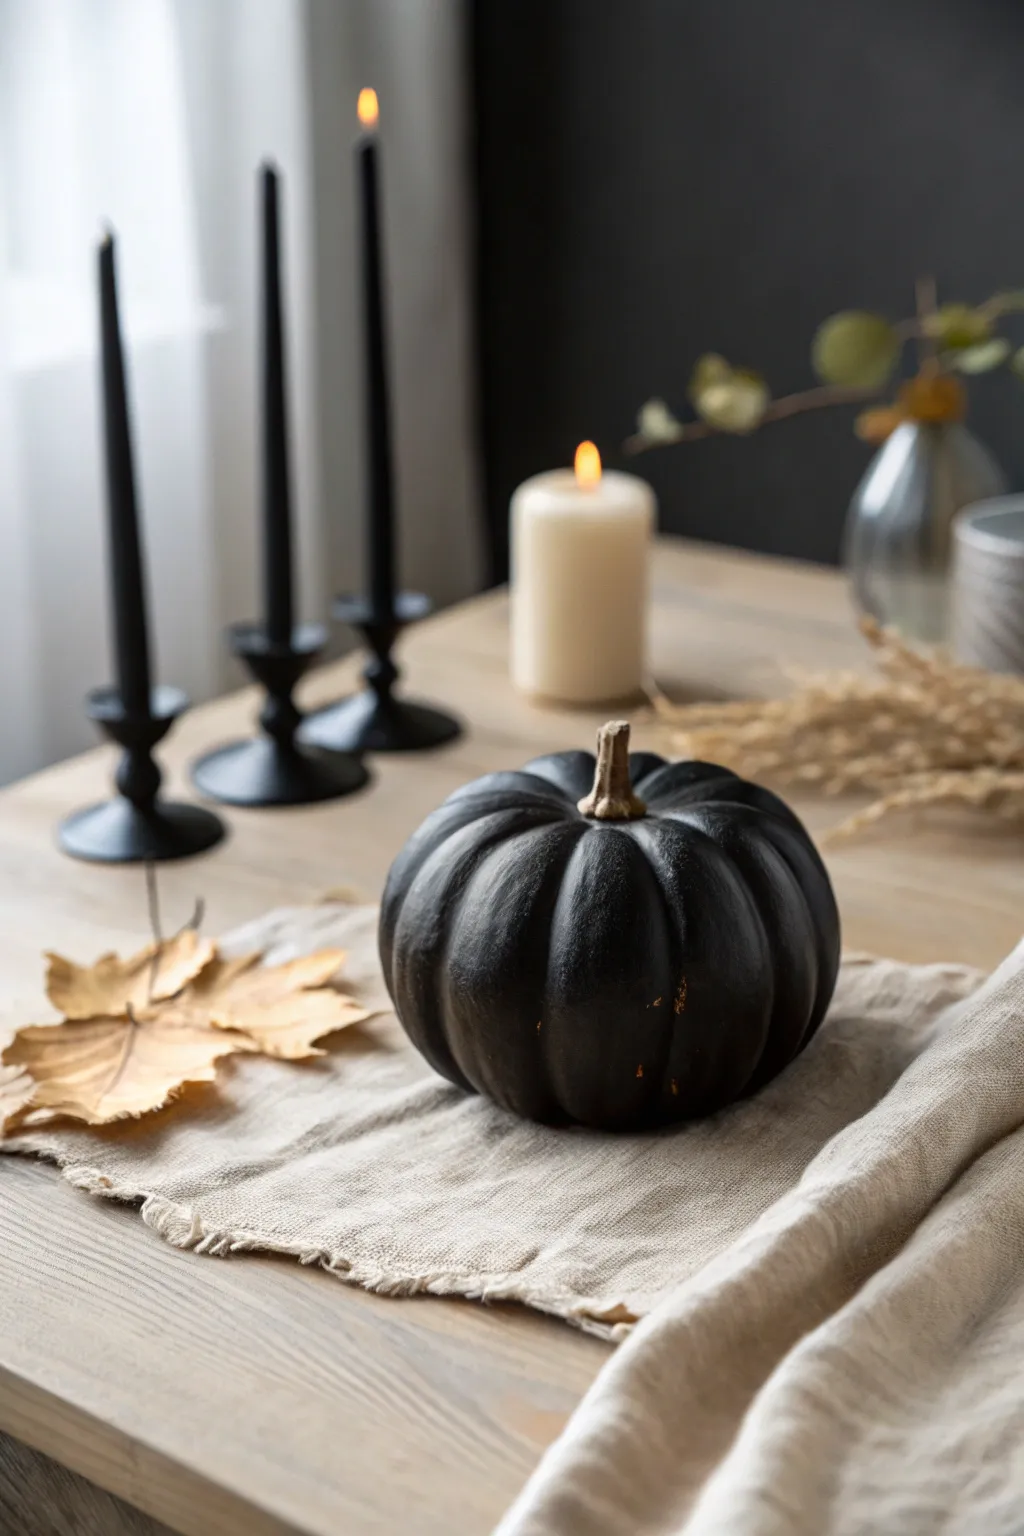
Transform a simple craft pumpkin or an old ceramic piece into a sophisticated decor element with this moody makeover. The velvety matte black finish creates a striking modern silhouette, while the distinct stem detailing adds a touch of organic realism.
Step-by-Step Tutorial
Materials
- Faux pumpkin (ceramic bisque or smooth foam)
- Matte black spray paint or chalk paint
- Soft charcoal acrylic paint
- Burnt umber acrylic paint
- Cream or beige acrylic paint
- Matte sealant spray
- Baking soda (optional for texture)
- Small flat brush
- Detail brush
- Sanding block (fine grit)
- Clean cloth
Step 1: Preparing the Base
-
Select your pumpkin:
Choose a pumpkin with deep ribs and a good shape. If you are recycling an old glossy ceramic pumpkin, this process works perfectly to modernize it. -
Clean the surface:
Wipe down the entire pumpkin with a damp cloth to remove dust or oils. If the original surface is very glossy, scuff it lightly with fine-grit sandpaper to help the new paint adhere better. -
Tape the stem:
If your pumpkin has a removable stem, take it off now. If it’s attached, carefully wrap the entire stem in painter’s tape to protect it from the black base coat.
Step 2: Creating the Matte Finish
-
Apply the base coat:
Spray the pumpkin with matte black paint. Hold the can about 8-10 inches away and use sweeping motions to avoid drips. Alternatively, brush on two coats of black chalk paint. -
Check for coverage:
Once the first coat is dry, inspect the deep crevices between the ribs. These areas often get missed, so apply a focused second coat to ensure total coverage. -
Create ceramic texture (optional):
I like to mix a teaspoon of baking soda into black acrylic paint for the final coat if the surface looks too plastic. Brush this on to give it a slightly gritty, stoneware feel. -
Let it cure:
Allow the black paint to dry completely. For chalk paint or baking soda mixtures, wait at least 2-3 hours before handling. -
Softening the black:
Using a very dry brush and a tiny amount of charcoal or dark grey paint, lightly whisk over the highest points of the ribs. This shouldn’t look grey, but rather like light catching the matte surface.
Pro Tip: Stem Realism
If your plastic stem looks fake, coat it in a layer of hot glue or modeling paste before painting. Use a toothpick to drag grooves into it wet for better texture.
Step 3: Realistic Stem Detailing
-
Base the stem:
Remove the tape from the stem. Paint the entire stem with a solid coat of burnt umber acrylic paint and let it dry. -
Add highlights:
Mix a little cream paint with the burnt umber to create a light tan shade. Dry brush this color onto the raised ridges of the stem texture. -
Detail the tip:
Use the pure cream paint on a detail brush to highlight just the very top uneven edge of the stem, mimicking where a vine would have been snapped off. -
Add depth:
Water down a tiny drop of black paint to create a wash. Paint this into the crevices where the stem meets the pumpkin body to create a natural shadow. -
Blend the transition:
If the transition from stem to black pumpkin looks too sharp, dry brush a tiny bit of the brown slightly onto the very top of the black curve to marry the two sections.
Troubleshooting: Blotchy Paint
If the black paint looks streaky, you likely brushed over half-dry paint. Let it dry fully, sand lightly, and apply a final coat with a sponge roller.
Step 4: Finishing Touches
-
Distress lightly:
For a worn, vintage look, very gently rub a sanding block over a few random spots on the pumpkin’s ribs to expose a hint of the underlying texture. -
Seal the work:
Spray the entire piece with a Dead Flat or Ultra Matte clear sealer. This is crucial for maintaining that velvety, light-absorbing look that makes the project successful. -
Final inspection:
Check for any shiny spots. If the sealer left a sheen, give it a very light buff with #0000 steel wool once fully cured to knock back the gloss.
Place your new sophisticated pumpkin on a linen runner and enjoy the modern autumn atmosphere
Paint-Pen Doodles and Little Icons
Transform a plain ceramic or faux pumpkin into a chic autumnal centerpiece using simple black line art. This project features delicate botanical motifs like ferns, twigs, and stars scattered across a cream-colored surface for a modern, minimalistic look.
Step-by-Step
Materials
- Medium-sized ceramic or faux pumpkin (smooth surface, cream or white)
- Black posca paint pens (fine point and extra-fine point)
- Pencil (HB or lighter)
- Kneaded eraser
- Paper towel or rag
- Clear matte sealant spray (optional)
Step 1: Preparation and Planning
-
Clean the surface:
Before you begin, ensure your pumpkin is completely clean. Wipe it down with a slightly damp paper towel to remove any dust or oils that might prevent the paint pen from adhering properly, then let it dry fully. -
Draft the layout:
Visualize the pumpkin’s segments as natural dividers. You don’t need to fill every inch; negative space is key to this look. Plan to place one larger motif in the center of a few alternating segments. -
Sketch lightly:
Using a very light hand and your pencil, sketch the main shapes of your larger botanical elements. Focus on the spine of the leaves and the general direction of the branches. Keep these lines faint so they are easy to remove later.
Step 2: Drawing Main Motifs
-
Start with large leaves:
Using the fine point black paint pen, trace your first large leaf shape. Outline an elongated teardrop or almond shape. Add a central vein line running 3/4 of the way up the leaf. -
Fill in leaf details:
Inside the leaf outline, draw hatched lines or small chevrons to create texture. Don’t worry about perfect symmetry here; a hand-drawn look adds character. -
Create fern branches:
Identify a tall vertical space and draw a long, slightly curved central stem. From this stem, draw short, upward-curving lines on both sides to mimic fern fronds or pine needles. -
Draw dandelion-style flowers:
For a bit of variety, draw a small circle or dot. Radiate straight lines outward from this center point like a starburst. Add tiny dots at the end of each line to create the seed heads. -
Add vertical twig sprigs:
Draw vertical lines that branch out into smaller sprigs. On the tips of these branches, add small clusters of three dashes to look like buds or tiny leaves. -
Incorporate a geometric flower:
Draw a multi-pointed star or simple flower shape with thin petals. For an interesting contrast, outline the petals but leave the insides uncolored, or add a simple line down the center of each petal.
Oops, I Smudged It!
If you smear wet ink, act fast! Use a slightly damp cotton swab to wipe away the mistake immediately. If it has dried, you can gently scrape it off ceramic with a craft knife.
Step 3: Adding Filler details
-
Sprinkle in stars:
Look for larger gaps between your main botanical drawings. Fill a few of these spots with simple five-point stars. Color them in solid black for visual weight. -
Add stippling and dots:
I like to take the extra-fine pen for this part. Add clusters of tiny dots around the stems of your plants or near the stars. This ‘confetti’ effect ties the separate drawings together. -
Check for balance:
Rotate the pumpkin slowly. Step back and look for areas that feel too empty or too crowded. Add a small floating leaf or a few extra dots to balance out the composition. -
Drying time:
Let the ink dry completely for at least 30 minutes. Paint pens can smear easily on smooth ceramic surfaces if you touch them while wet.
Go For Gold
For a luxe touch, trace over just one or two leaves with a gold metallic paint pen, or add gold dots mixed in with the black ones to catch the candlelight.
Step 4: Finishing Touches
-
Erase guidelines:
Once you are absolutely certain the ink is dry, gently dab the surface with a kneaded eraser to lift up any visible pencil lines. Avoid rubbing hard. -
Seal the artwork:
If you plan to use this pumpkin outdoors or store it for years, take it to a well-ventilated area and apply a light coat of clear matte sealant spray to protect your drawings from scratching.
Now you have a stylish, custom piece of fall decor that looks great on any mantel or table setting

TRACK YOUR CERAMIC JOURNEY
Capture glaze tests, firing details, and creative progress—all in one simple printable. Make your projects easier to repeat and improve.
Gingham or Plaid Painted Panels
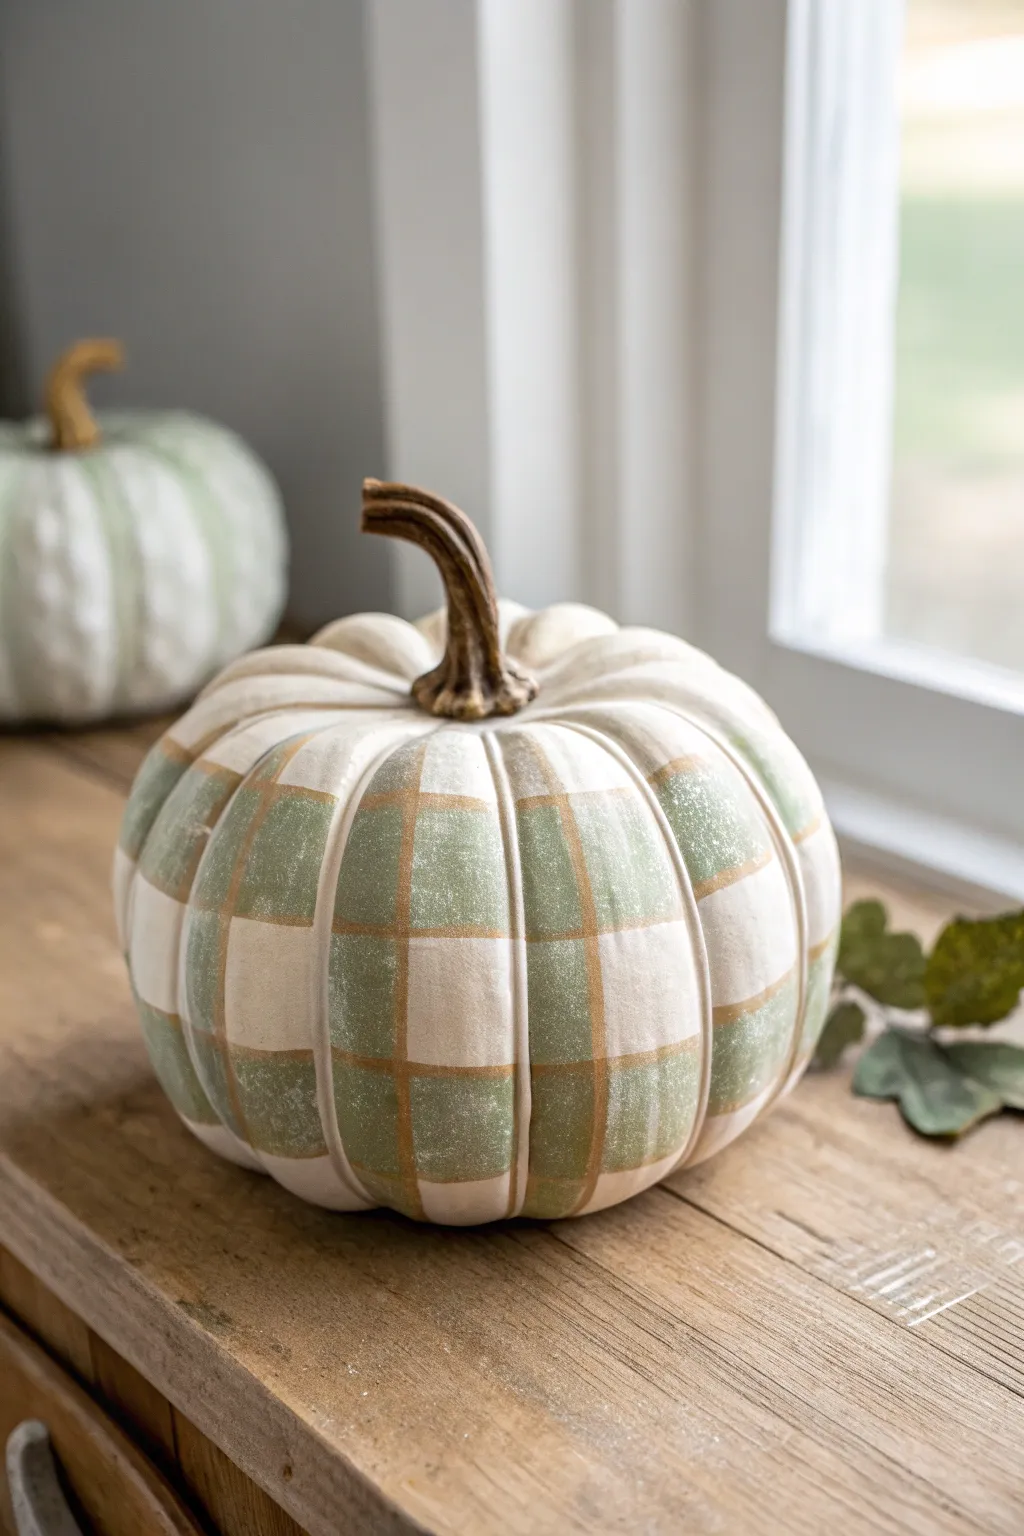
Transform a plain ceramic pumpkin into a cozy autumnal centerpiece with this charming gingham design. Using muted sage greens and subtle tan accents, you’ll create a sophisticated plaid pattern that perfectly highlights the pumpkin’s natural ridges.
How-To Guide
Materials
- Bisque or smooth ceramic pumpkin (white or cream base)
- White chalk or acrylic paint (matte finish)
- Sage green acrylic paint
- Tan or light gold acrylic paint
- Flat shader brush (medium width)
- Fine liner brush
- Pencil
- Painter’s tape (optional)
- Matte clear sealant spray
Step 1: Base Preparation
-
Clean surface:
Begin by wiping down your ceramic pumpkin with a damp cloth to remove any dust or oils. Let it dry completely. -
Apply base coat:
Paint the entire pumpkin with a matte white or cream paint. This ensures your pattern has a clean, uniform background. You may need two coats for full opacity. -
Dry thoroughly:
Allow the base coat to dry fully before moving on. I usually give it at least an hour to ensure the subsequent layers don’t lift the base.
Step 2: Mapping the Grid
-
Identify vertical sections:
Observe the pumpkin’s natural vertical ridges. These deep grooves will act as the natural vertical dividers for your pattern. -
Mark horizontal rings:
Using a pencil, lightly sketch horizontal rings around the pumpkin. Space them evenly, about 1.5 to 2 inches apart, to create squares within the vertical sections. -
Define the checks:
Decide which squares will be painted. In a traditional checkerboard style, mark every other square lightly with an ‘X’ so you know where to paint the green blocks.
Clean Lines
Work one vertical section (created by the pumpkin’s ridges) at a time. This prevents your hand from smudging wet paint on the opposite side.
Step 3: Painting the Gingham
-
Mix your sage green:
Prepare your sage green paint. If it’s too dark, mix in a little white to soften it. You want a muted, farmhouse-style green. -
Paint green squares:
Using a flat shader brush, fill in the squares you marked with an ‘X’. Keep your brush strokes vertical to mimic the weave of fabric. -
Create smooth edges:
Carefully paint up to the pencil lines. Don’t worry if the edges aren’t laser-straight; a little organic wobble adds to the hand-painted charm. -
Paint the adjacent squares:
For a true gingham look, the ‘white’ squares adjacent to the green ones shouldn’t be stark white. Mix a very dilute wash of the sage green (mostly water) and lightly tint the vertical columns between the solid green blocks, leaving the horizontal white rows purely white. -
Dry the green layer:
Let all the green sections dry completely to the touch.
Rustic Wash
For a more vintage look, apply an antiquing wax or a diluted brown paint wash over the finished dried pumpkin, then wipe it back with a cloth.
Step 4: Detailing and Finishing
-
Prepare the stripe color:
Load a fine liner brush with tan or light gold paint. This color will separate the checks and add warmth. -
Paint horizontal dividers:
Paint thin horizontal lines over your original pencil marks, separating the rows of checks. Keep the hand steady but relaxed. -
Paint vertical dividers:
Paint thin vertical lines following the pumpkin’s natural deep grooves. This emphasizes the pumpkin’s shape and tidies up the edges of your painted squares. -
Adding texture (optional):
To give it a worn, vintage fabric look, use a dry brush with a tiny amount of white paint and lightly scuff over the center of the solid green squares. -
Paint the stem:
Paint the stem in a realistic brown, adding darker brown lowlights in the crevices and lighter tan highlights on the ridges for dimension. -
Final seal:
Once all paint is perfectly dry, spray the entire pumpkin with a matte clear sealant to protect your work and unify the finish.
Place your finished pumpkin near a window to let natural light highlight the subtle texture of your handiwork
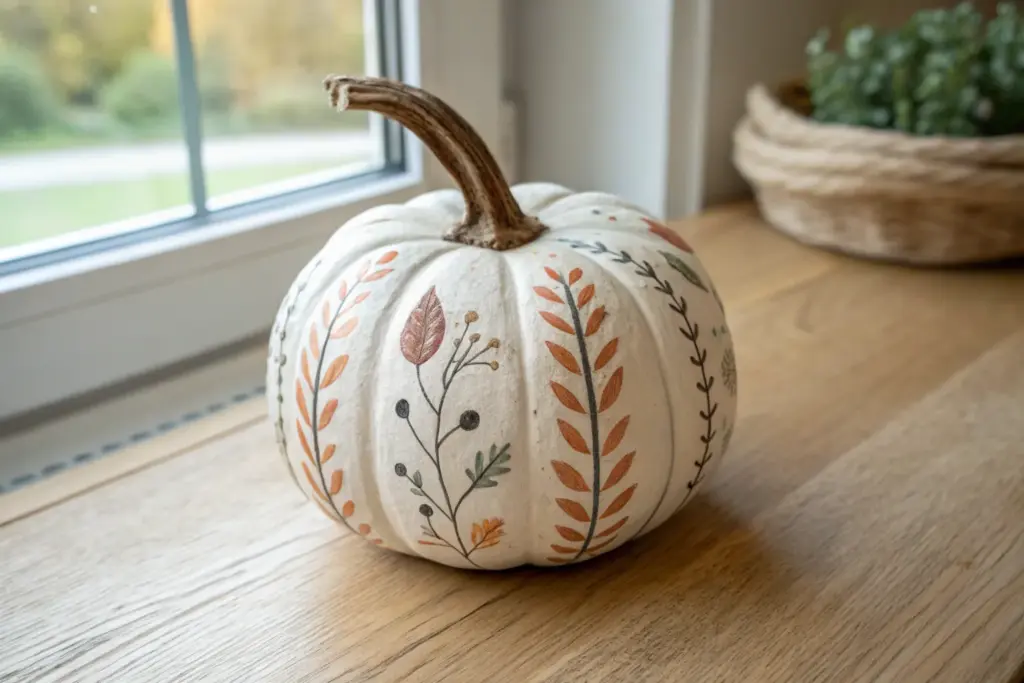
Hand-Painted Floral Vines Around the Ribs
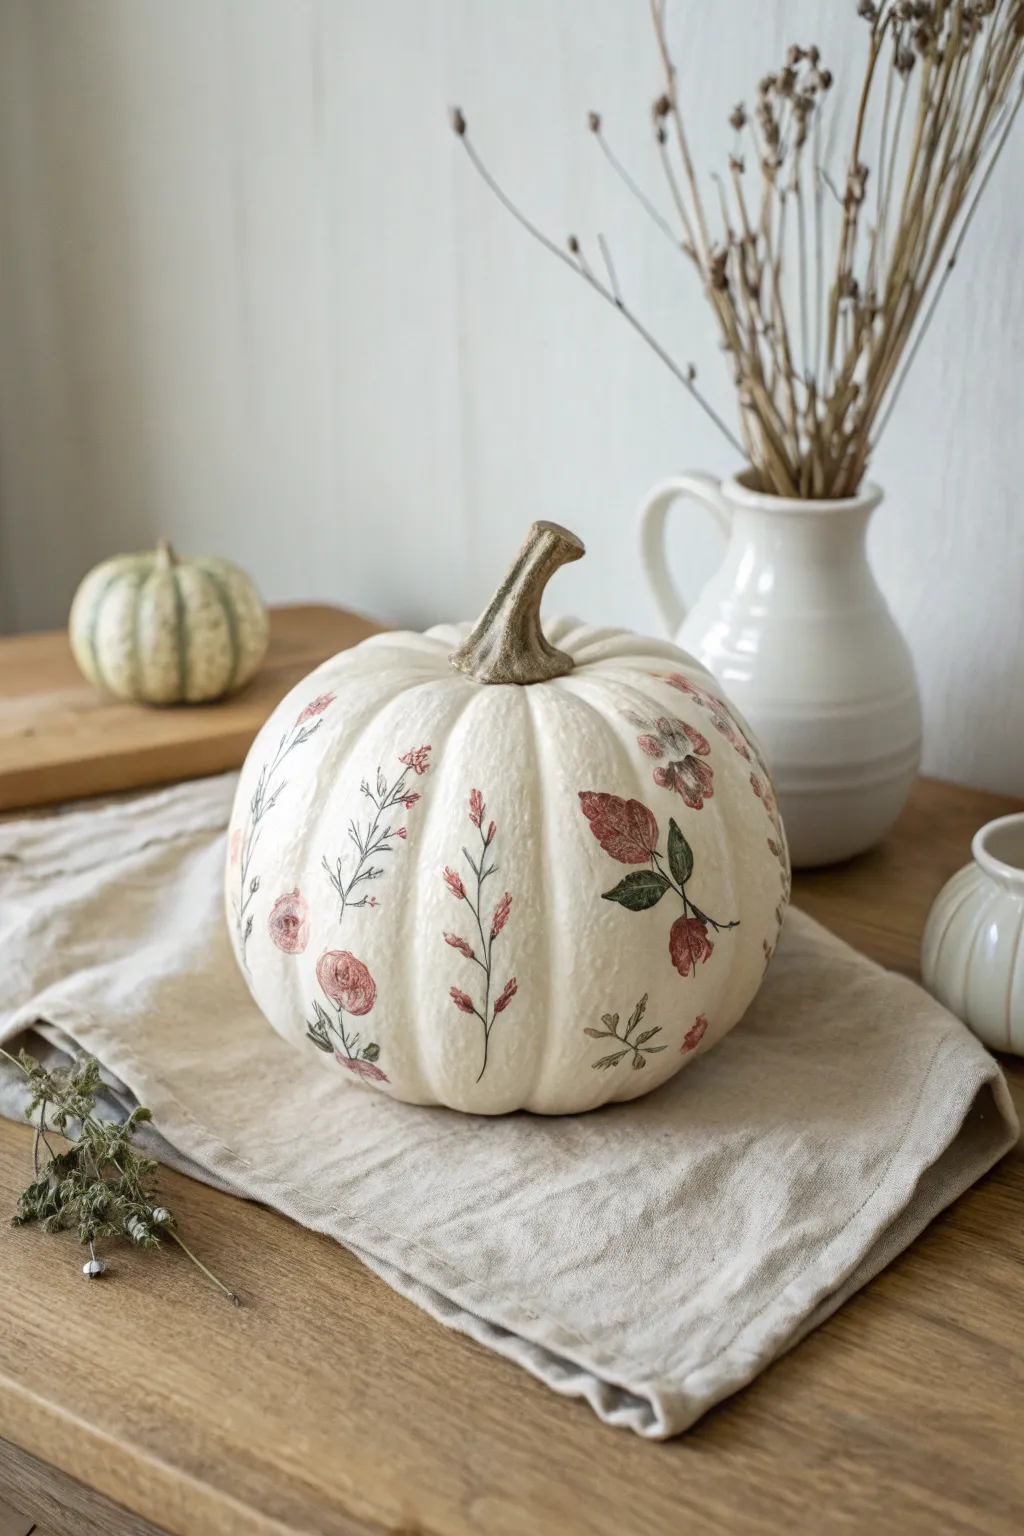
Transform a plain white ceramic pumpkin into an elegant autumn centerpiece with delicate floral illustrations. This project combines the clean look of cream-colored pottery with the fine detail of botanical drawings for a sophisticated cottage-core aesthetic.
Detailed Instructions
Materials
- Large white ceramic pumpkin (bisque or glazed)
- Fine grit sandpaper (if surface is too glossy)
- Rubbing alcohol and cotton pads
- Pencil (H or HB hardness)
- Fine-point permanent markers (black, sepia, or dark brown)
- Acrylic paints (muted red, sage green, light pink)
- Fine detail brushes (size 0 and 00)
- Small palette or mixing plate
- Paper towels
- Matte clear sealant spray
Step 1: Surface Preparation
-
Clean the surface:
Begin by wiping down your ceramic pumpkin with rubbing alcohol on a cotton pad. This removes any oils or dust that might interfere with the ink and paint adhesion. -
Check the finish:
Run your fingers over the pumpkin’s ribs. If the ceramic is extremely glossy, lightly scuff the surface with fine-grit sandpaper to give your paints a better ‘tooth’ to grip onto. -
Wipe away dust:
If you sanded, ensure all ceramic dust is completely removed with a damp cloth or another alcohol wipe before proceeding.
Smudge Alert
If your fine-point pen smears when painting, switch to applying the paint first, letting it dry completely, and then doing the line work on top for a crisp finish.
Step 2: Planning the Layout
-
Visualize the spacing:
Look at the natural ribs of the pumpkin. You want to place your floral sprigs in the valleys between the ribs or trailing gently across the rounded peaks, rather than fighting the pumpkin’s natural geometry. -
Sketch the primary stems:
Using a light hand with an H-pencil, sketch the main skeletal structure of your vines. Let them curve naturally from the bottom upward, stopping about two-thirds of the way up the pumpkin. -
Mark flower placement:
Add small circles or ovals where your main blooms will sit. Keep the spacing irregular to mimic a wild meadow look rather than a rigid pattern.
Step 3: Drawing deeply
-
Outline the stems:
Take your fine-point marker (I prefer a dark sepia for a vintage look) and carefully trace over your pencil stem lines. Use broken or slightly wavy lines to make the stems look organic and woody. -
Add leave structures:
Draw small, slender leaves branching off the stems. For the fern-like sprigs, use quick, upward flicks of the pen to create feathery textures. -
Sketch the blooms:
Outline your flowers. Use loose, sketchy circular motions for the rose-like blooms, keeping the lines thin and delicate. Don’t close every shape; leave gaps for a lighter feel. -
Erase pencil marks:
Once the ink is completely dry—wait at least 15 minutes to be safe—gently erase any visible pencil guidelines.
Antique It
Mix a tiny drop of brown paint with glaze medium and brush it over the entire finished pumpkin, wiping it back immediately, to give the white ceramic an aged, vintage patina.
Step 4: Painting the Botanicals
-
Prepare your palette:
Squeeze out tiny amounts of muted red, sage green, and light pink acrylic paint. Mix a drop of water into each to create a semi-translucent, watercolor-like consistency. -
Wash in the leaves:
Dip your size 00 brush into the watered-down sage green. Fill in the fern leaves and larger rose leaves, letting the color be uneven. It’s okay if the paint goes slightly outside the lines. -
Paint the red sprigs:
For the taller, wheat-like stalks, use the muted red paint. Dab the color on gently, focusing on the tips of the plant. -
Color the blooms:
Using the muted red and pink, fill in the flower heads. I like to keep the center of the flowers slightly darker and fade out toward the edges for depth. -
Add detail shading:
Once the base wash is dry, go back with slightly thicker (less watered-down) paint to add tiny accents of darker color to the base of the leaves and the shadows of the petals. -
Paint the stem:
Don’t forget the pumpkin’s main stem. Paint it a realistic brownish-green, using vertical brush strokes to emphasize the fiber texture.
Step 5: Finishing Touches
-
Assess and refine:
Step back and look at the pumpkin from a distance. If any area looks too empty, add a small floating leaf or a tiny sprig with your pen. -
Ink over paint:
If the paint obscured any of your lovely pen lines, gently re-trace them to bring the definition back. -
Seal the work:
Take the pumpkin to a well-ventilated area and spray it with a clear matte sealant. This protects your delicate illustration from scratches and moisture.
This delicate botanical pumpkin brings a timeless elegance to your seasonal decor that feels both artistic and wonderfully homemade
Marbled Glaze Swirls in Fall Colors
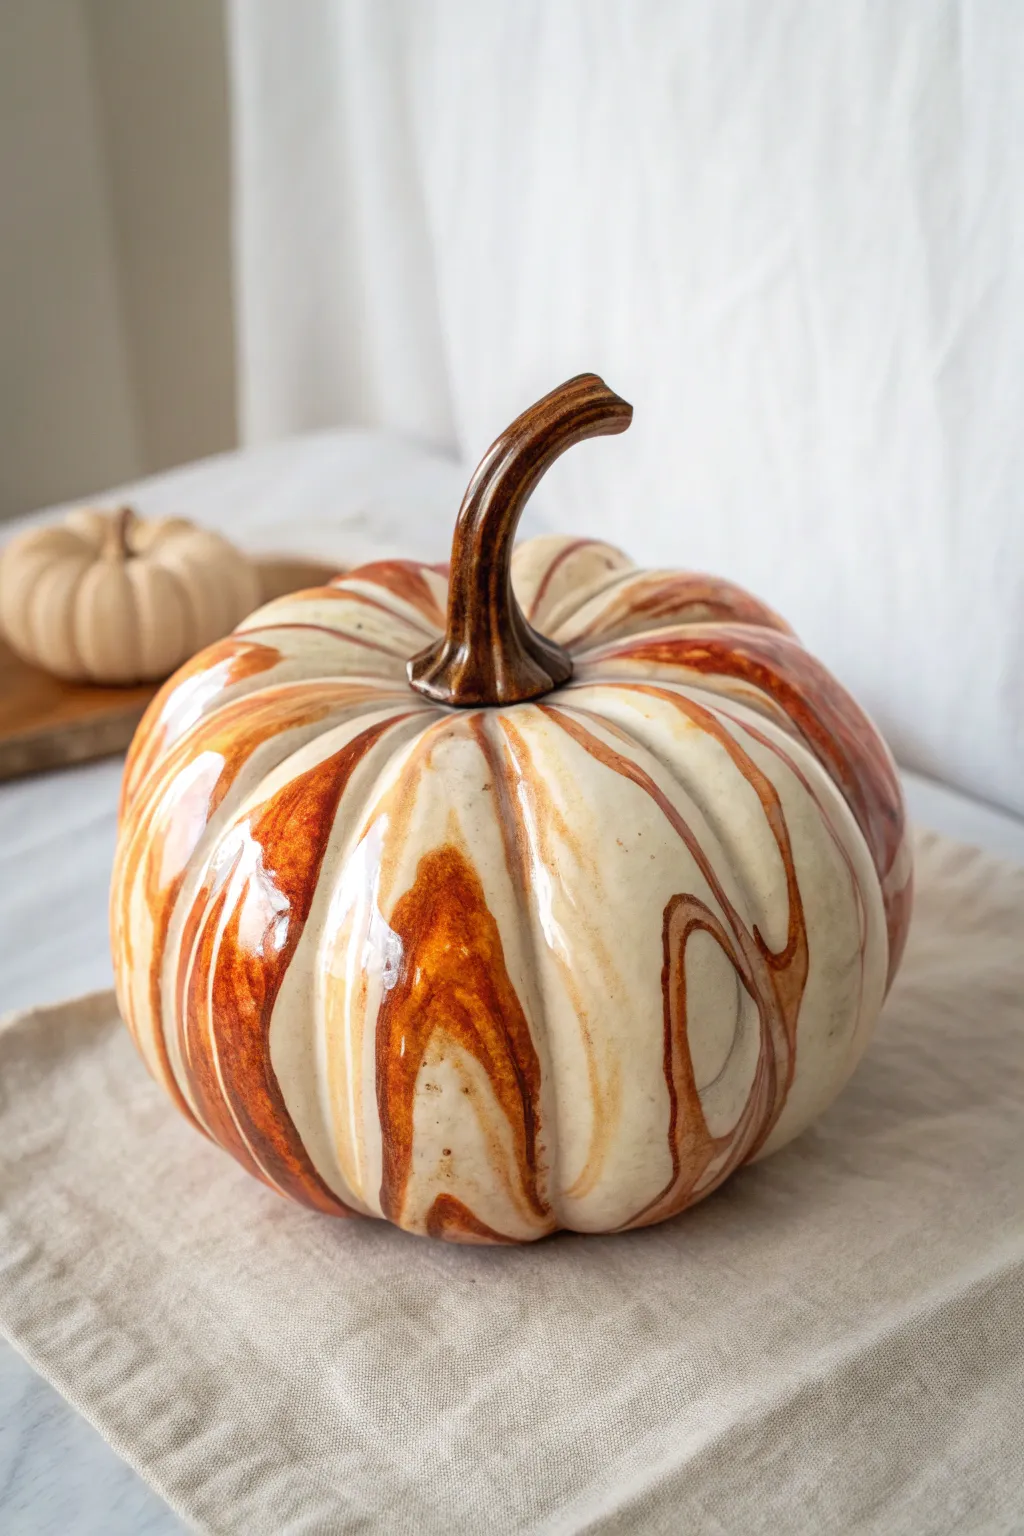
Transform plain bisque into a glossy autumn masterpiece using a stunning liquid pour technique. This marble-effect pumpkin features swirls of creamy white, caramel, and rust that look sophisticated and high-end, perfect for a modern Thanksgiving centerpiece.
Step-by-Step
Materials
- Bisque-fired ceramic pumpkin (cleaned and dust-free)
- Cone 06 ceramic glazes: Cream/White (base), Caramel/Amber, Rust/Burnt Orange, Dark Brown
- Pouring medium or water (for thinning glaze)
- Small plastic cups for mixing
- Wooden stir sticks
- Large plastic bin or deep tray (to catch drips)
- Wire cooling rack or banding wheel
- Wide soft brush (fan brush recommended)
- Detail brush (size 2 or 4)
- Sponge and bucket of water
- Clear gloss glaze (optional, if colors aren’t naturally glossy)
Step 1: Preparation & Base Coat
-
Surface Prep:
Begin by wiping down your bisque pumpkin with a damp sponge. This removes any kiln dust and slightly hydrates the clay, which prevents the glaze from drying too instantly upon contact. -
Setup the Pour Station:
Place your wire rack inside the large plastic bin. Position the pumpkin securely on the rack. The excess glaze needs a place to go, and this setup keeps your workspace clean. -
Mix Pouring Glazes:
Pour your Cream, Caramel, and Rust glazes into separate cups. I prefer to thin them slightly with water or a specialized ceramic pouring medium until they reach the consistency of heavy cream. They need to flow, but not be watery. -
Apply the Base:
Using a ladle or a wide brush, coat the entire pumpkin (except the stem) in the Cream glaze. You want a thick, wet layer that serves as a slippery canvas for the other colors to move on.
Glaze Crawling?
If glaze pulls away leaving bare spots, it was likely too thick or the surface had dust/oil. Clean bisque well and thin your glaze slightly.
Step 2: Creating the Marble Effect
-
The Drizzle Technique:
While the base coat is still very wet, take your cup of Caramel glaze and slowly drizzle it over the top ridges of the pumpkin. Let gravity pull the glaze down the natural grooves. -
Adding Contrast:
Immediately follow with smaller drizzles of the Rust/Burnt Orange glaze. Focus these darker colors near the top and in the deeper creases of the pumpkin’s shape for dimension. -
Tilt and Turn:
Carefully lift the pumpkin (holding it from the bottom opening or inside) and gently tilt it side to side. This encourages the varied glaze colors to run together and create organic swirls rather than straight stripes. -
Refine the Pattern:
If there are areas that look too plain, use a soft fan brush to lightly sweep across the wet glazes. Don’t over-mix; just nudge the colors to blend the edges. -
Check the Bottom:
As the glaze creates drips at the bottom, wipe them away with a sponge before they harden. You want a clean edge where the pumpkin creates contact with the shelf.
Step 3: Stem & Finishing
-
Painting the Stem:
Once the main body is tacky but not fully dry, use your detail brush to paint the stem. Use the Dark Brown glaze here. -
Adding texture to the Stem:
While the brown stem glaze is wet, drag through it slightly with a dry brush to reveal tiny streaks of clay or lighter pigment, mimicking the wood grain texture shown in the photo. -
Dry Footing:
Flip the pumpkin over carefully and ensure the entire foot (the bottom ring) is completely free of glaze. Any glaze left here will fuse the pumpkin to the kiln shelf. -
Final Drying:
Let the pumpkin dry for at least 24 hours. The thick layers of poured glaze take much longer to dry than a standard brushed application. -
Firing:
Fire the piece in the kiln according to your glaze manufacturer’s instructions (typically Cone 06 for low fire or Cone 6 for mid-fire). This melts the swirls into that smooth, glass-like finish.
Avoid Muddy Colors
Don’t overwork the glaze once poured. Let gravity do the mixing. Too much brushing blends the distinct colors into a single muddy brown tone.
Now you have a stunning, high-gloss ceramic pumpkin that captures the rich warmth of the season
Terrazzo Speckle Pumpkin Surface
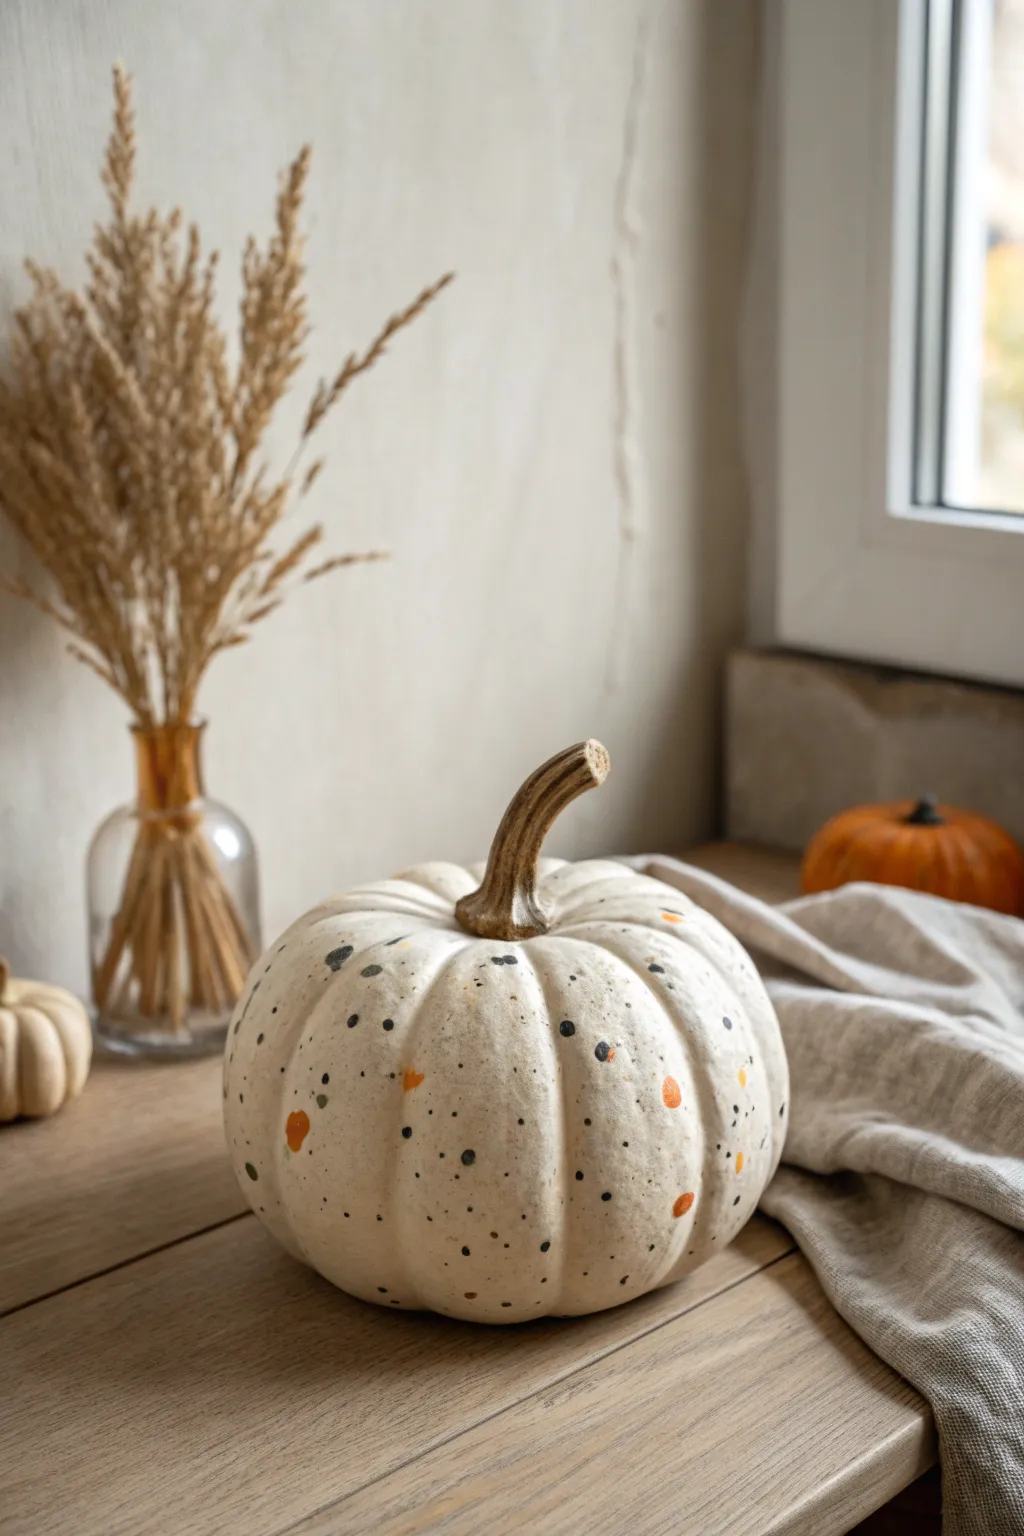
Reimagine basic autumn decor with this sophisticated, modern take on a ceramic pumpkin. Using a simple splatter technique, you’ll create a chic, high-end terrazzo effect featuring organic spots of black, grey, and ochre against a creamy white base.
Detailed Instructions
Materials
- Ceramic or craft pumpkin (smooth surface preferred)
- White or cream matte spray paint (for the base)
- Acrylic paints: Black, Slate Grey, and Ochre/Mustard Yellow
- Old toothbrush or stiff-bristled splatter brush
- Small round paintbrush (size 1 or 2)
- Water cups
- Paper towels
- Protective drop cloth or large cardboard box
- Clear matte sealant spray
Step 1: Preparation & Base Coat
-
Clean the surface:
Begin by thoroughly wiping down your ceramic or faux pumpkin with a damp cloth to remove any dust, stickers, or oils. Let it dry completely. -
Protect the stem:
Use painter’s tape to carefully wrap the entire stem. This keeps the realistic brown stem color intact while we paint the body of the pumpkin. -
Prepare your workspace:
Set up a well-ventilated area for painting. I like to use a large cardboard box turned on its side as a spray booth to catch overspray and later, splatter. -
Apply the base color:
Spray the entire pumpkin with two solid coats of matte cream or off-white paint. Allow the first coat to dry for about 15-20 minutes before applying the second to ensure opacity. -
Dry thoroughly:
Let the base coat cure completely, ideally for at least an hour or two, so the surface is hard and non-tacky before you start the detail work.
Splatter Control
For finer mist, hold the brush closer to the pumpkin. For larger, distinct drops, load the brush with more paint and flick from further away.
Step 2: Creating the Speckle Effect
-
Prepare the splatter mix:
In a small cup, mix a pea-sized amount of black acrylic paint with a few drops of water. You want a consistency that is fluid like ink but not a watery wash. -
Test the splatter:
Dip your old toothbrush into the black mixture. Before hitting the pumpkin, practice by running your thumb over the bristles to flick paint onto a piece of scrap paper. -
Apply tiny black specks:
Flick the toothbrush bristles to spray a fine mist of black specks evenly around the pumpkin. Rotate the pumpkin frequently for uniform coverage. -
Add variance with a brush:
To create the larger, distinct irregular dots seen in the reference, switch to your small round paintbrush. Dip it in un-thinned black paint. -
Hand-paint larger dots:
Randomly dab small, imperfect circles onto the surface. Don’t make them perfectly round; organic shapes look more like natural stone. -
Layer in grey tones:
Repeat the splatter process using your slate grey paint. Keep this layer lighter than the black to add depth without overpowering the design. -
Introduce color:
Mix your ochre/mustard yellow paint. Because this color is an accent, we will only hand-paint this layer rather than splattering it. -
Place color accents:
Paint small, organic splotches of the ochre color sporadically around the pumpkin. Aim for one colored spot for every ten black/grey spots. -
Check density:
Step back and assess your pumpkin. Fill in any large empty gaps with a hand-painted black or grey dot to balance the composition.
Step 3: Finishing Touches
-
Dry the details:
Allow the acrylic speckles to dry completely. Since some dots might be thicker, give this at least 30 to 45 minutes. -
Remove tape:
Carefully peel away the painter’s tape from the stem. If any cream paint seeped through, use a damp Q-tip to wipe it away immediately. -
Seal the work:
Spray a light, even coat of clear matte sealant over the entire pumpkin. This protects the acrylic dots from chipping and unifies the sheen. -
Dry final coat:
Let the sealant cure according to the manufacturer’s instructions, usually overnight, before placing it in your display.
Uneven Coverage?
If you accidentally create a large blotch or run, quickly dab it gently with a dry paper towel to lift the excess, leaving a faint, textured mark behind.
Place your finished pumpkin near natural light to show off the subtle, organic texture of your handiwork
Crackle Texture for an Aged Harvest Look
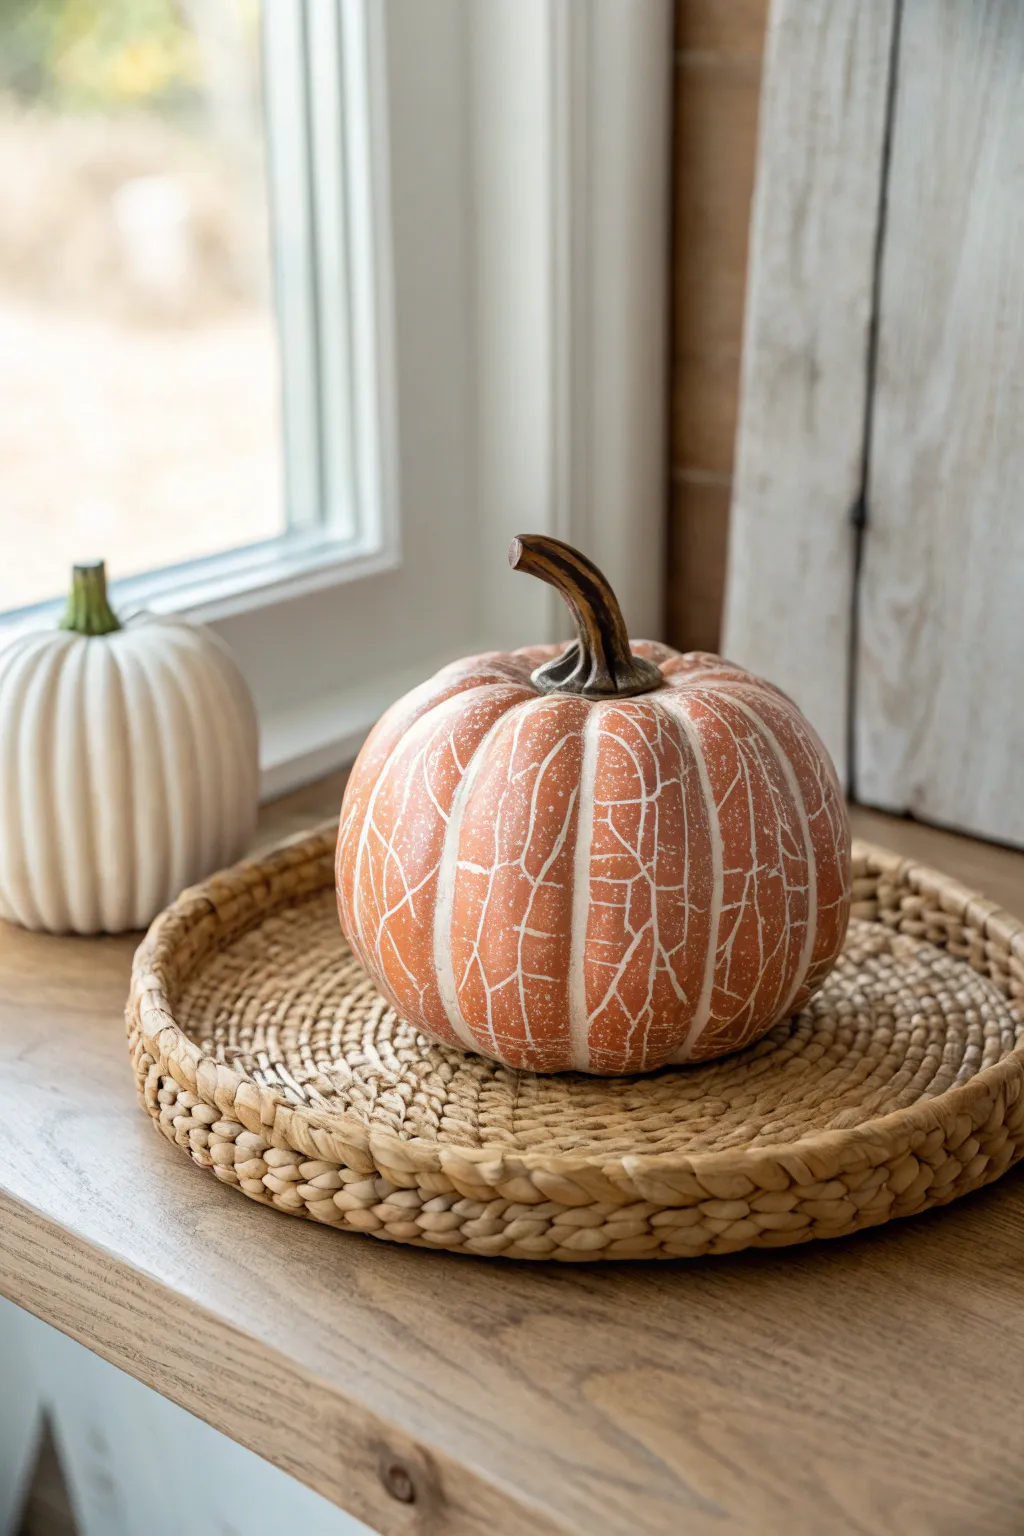
Achieve a beautifully aged, weather-worn look for your ceramic pumpkins with a technique that mimics antique pottery. This terracotta and white crackle finish brings instant character and rustic warmth to your seasonal display.
Step-by-Step Tutorial
Materials
- Bisque ceramic pumpkin or a smooth craft pumpkin (plastic/foam)
- White acrylic paint or white chalk paint
- Crackle medium (clear application)
- Terracotta or warm burnt orange acrylic paint
- Dark brown acrylic paint (for the stem)
- Matte sealer spray
- Soft synthetic brushes (flat and round)
- Sponge brush
- Paper towels
- Fine grit sandpaper (optional)
Step 1: Base Coat Application
-
Clean surface:
Begin by wiping down your pumpkin with a slightly damp cloth to remove any dust or oils. If you are using a plastic craft pumpkin, a quick light sanding will help the paint adhere better. -
Apply white base:
Paint the entire body of the pumpkin with the white acrylic or chalk paint. This color will eventually be the ‘cracks’ that show through your top coat. -
Check coverage:
Ensure the coverage is solid and opaque; you may need two coats. Let this layer dry completely before moving on.
Step 2: Crackle Medium
-
Apply medium:
Using a clean brush or sponge, apply a generous layer of crackle medium over the dried white paint. The thickness of this layer dictates the size of your cracks. -
Direction matters:
Brush the medium on in one consistent direction, ideally following the vertical ribs of the pumpkin. Avoid over-brushing, as this can disturb the chemical reaction. -
Let it set:
Allow the crackle medium to dry until it is tacky but not wet. Depending on the brand, this usually takes about 30 to 60 minutes, but check the bottle instructions.
Thick vs. Thin
A thick layer of crackle medium creates large, wide cracks, while a thin layer results in fine, subtle spiderweb cracks.
Step 3: Top Coat & Effect
-
Prepare top color:
Load a soft flat brush with your terracotta orange paint. You want a decent amount of paint on the brush so you don’t have to drag it too hard. -
Apply orange layer:
Paint over the tacky crackle medium using long, confident strokes. Try to do this in a single pass for each section; going back over wet paint can ruin the crackle effect. -
Watch it work:
As the paint begins to dry, you will start to see the orange layer separate, revealing the white base coat underneath. I love watching this part happen—it feels like magic. -
Full dry time:
Let the pumpkin sit undisturbed for several hours. The crackling process continues as it dries, so be patient.
Paint Dragging?
If the top paint drags or lifts, you are brushing too hard or going over the same spot twice. Apply paint in one decisive stroke.
Step 4: Stem & Finishing
-
Detail the stem:
Paint the stem with dark brown acrylic paint. You can add a tiny bit of the orange or a lighter tan to highlight the ridges and give it a woody texture. -
Clean up edges:
If any orange paint accidentally got on the stem during the body painting, touch up those areas now for a crisp finish. -
Seal the work:
Once everything is bone dry, take the pumpkin outside or to a well-ventilated area. -
Apply sealer:
Spray a light, even coat of matte sealer over the entire pumpkin. This protects the finish and prevents the crackled paint from flaking off over time.
Place your newly refreshed pumpkin on a woven tray or mantel to enjoy its rustic charm all season long
Sgraffito Pumpkin With Carved Leaf Patterns
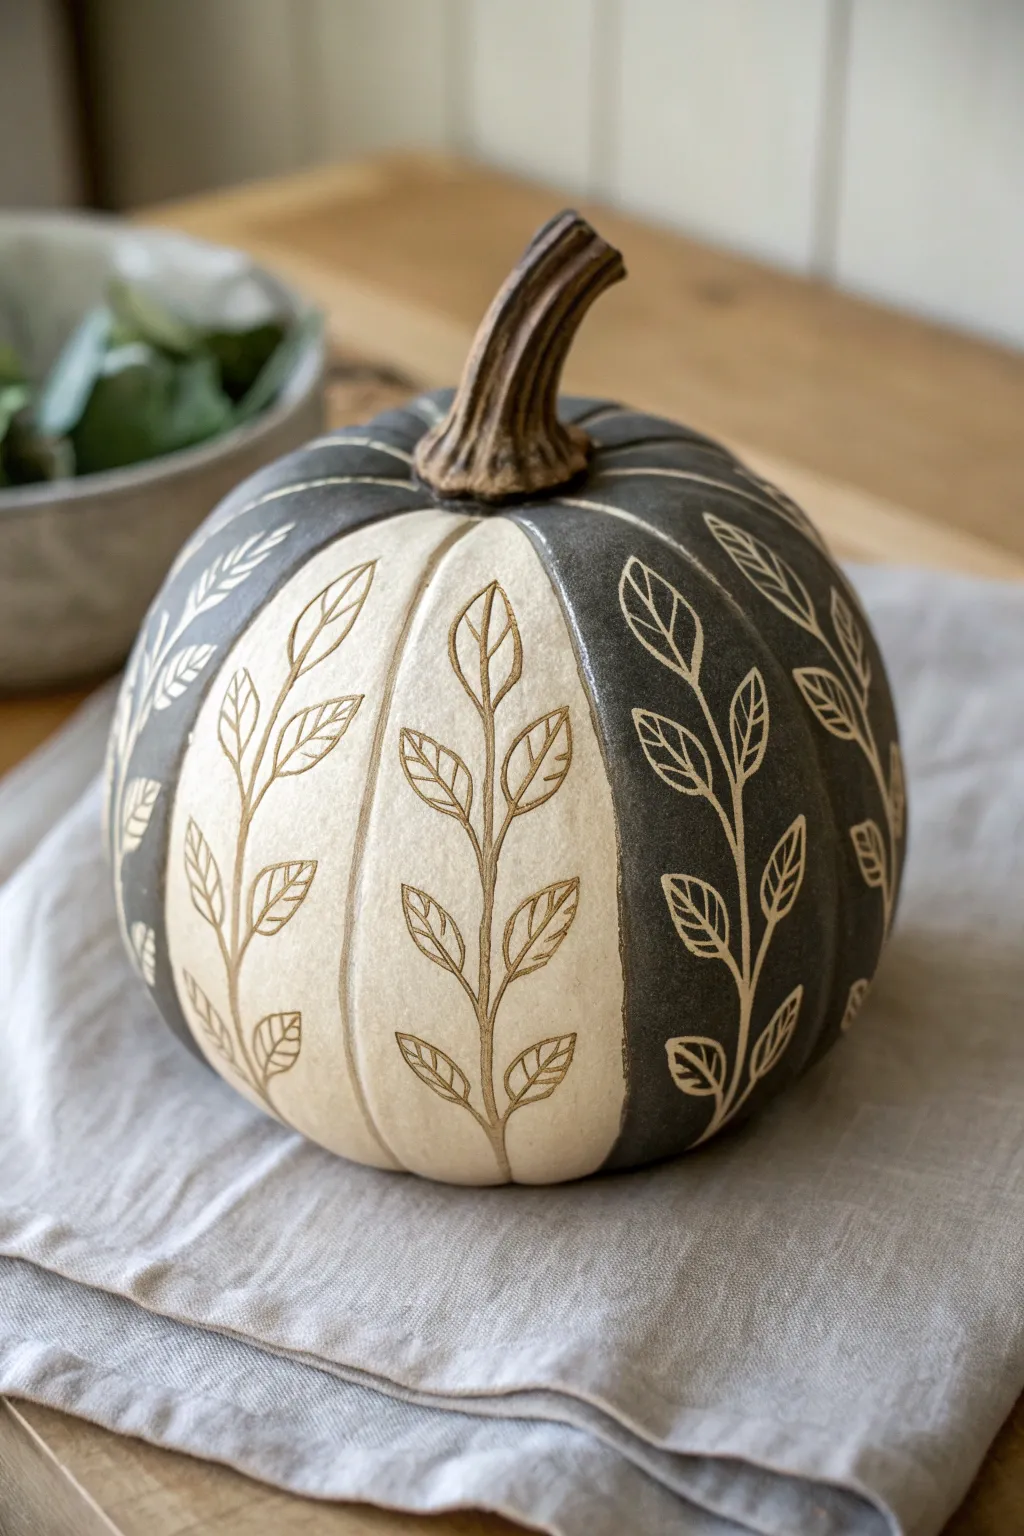
This sophisticated ceramic project uses the sgraffito technique to create striking contrast between deep charcoal slip and natural clay. The result is a modern, botanical-inspired pumpkin with beautifully carved vine details that feels both rustic and refined.
Step-by-Step
Materials
- Leather-hard clay pumpkin (wheel-thrown or hand-built)
- Black or charcoal underglaze (or colored clay slip)
- Wide hake brush or soft fan brush
- Sgraffito tool (loop tool or needle tool)
- Carving tool with a V-tip gauge
- Pencil (optional for sketching)
- Clear matte glaze (optional)
- Soft sponge
- Damp cloth
Step 1: Preparation & Application
-
Assess clay state:
Ensure your clay pumpkin is in a firm leather-hard stage. It should be sturdy enough to handle without warping, but soft enough to carve into easily. -
Clean the surface:
Gently wipe the exterior with a barely damp sponge to remove any dust or grog that might interfere with the slip application. -
Plan the segments:
Visualize the vertical segments of the pumpkin. You will be applying dark slip to alternating sections, leaving every other segment natural. You can mark these lightly with a fingernail if needed. -
Apply the first coat:
Using a soft fan brush, apply a smooth, even layer of black or charcoal underglaze to the selected alternating segments. Be careful to paint intricate edges neatly. -
Layer up:
Let the first coat dry until the sheen disappears, then apply a second and potentially third coat. I prefer three thin coats to ensure solid opacity without cracking. -
Dry to leather-hard:
Allow the underglaze to dry until it is no longer tacky to the touch. The clay underneath must remain leather-hard for the carving step.
Chipped Lines?
If the underglaze chips while carving, the clay was too dry. Mist it lightly and wrap in plastic for an hour to rehydrate before trying again.
Step 2: Carving the Design
-
Sketch the vines:
Lightly sketch a central vertical stem line up the middle of each segment—both the painted and unpainted ones—using a dull pencil. The pencil marks will burn off in the kiln. -
Carve the stems:
Using a V-tip carving tool, carve along your sketched stem lines. Apply consistent pressure to create a clean groove without digging too deep. -
Outline the leaves:
Starting from the bottom and working upward, carve leaf shapes branching off the main stem. Aim for symmetry, placing leaves in pairs or alternating patterns. -
Sgraffito the dark sections:
For the black segments, this process is true sgraffito. As you carve, you are revealing the light clay body beneath the black slip. Keep your tool clean to avoid smudging black slip into the white grooves. -
Carving the light sections:
For the natural clay segments, apply the same carving pressure. While you won’t get color contrast immediately, the texture will catch glaze or oxides later to define the pattern. -
Detail the veins:
Switch to a finer needle tool or a smaller gauge to carve delicate veins inside each leaf shape for added realism. -
Clean up burrs:
Wait for the pumpkin to dry slightly more (to the bone-dry stage). Then, gently brush away the little clay crumbs (burrs) created by carving using a stiff, dry brush. Do not use water here or you’ll blur the crisp lines.
Pro Tip: Crisp Contrast
Make sure your carving tool is sharp. A dull tool compresses the clay rather than cutting it, which leads to ragged edges and less distinct color separation.
Step 3: Finishing Touches
-
Refine the stem:
Add texture to the pumpkin’s stem by carving deep vertical grooves that twist slightly, mimicking a natural dried vine. -
Bisque fire:
Fire the piece to cone 04 (or your clay’s bisque temperature). This sets the shape and makes the underglaze permanent. -
Rinse and dry:
After firing, quickly rinse the pumpkin under water to remove dust and let it dry completely for 24 hours. -
Glaze application:
For the look in the photo, apply a clear matte glaze over the entire piece. This protects the surface while maintaining a natural, non-glossy stone feel. -
Final fire:
Fire the pumpkin a second time to the maturation temperature of your specific clay and glaze combination.
Now you have a stunning, hand-carved centerpiece ready for your autumn display