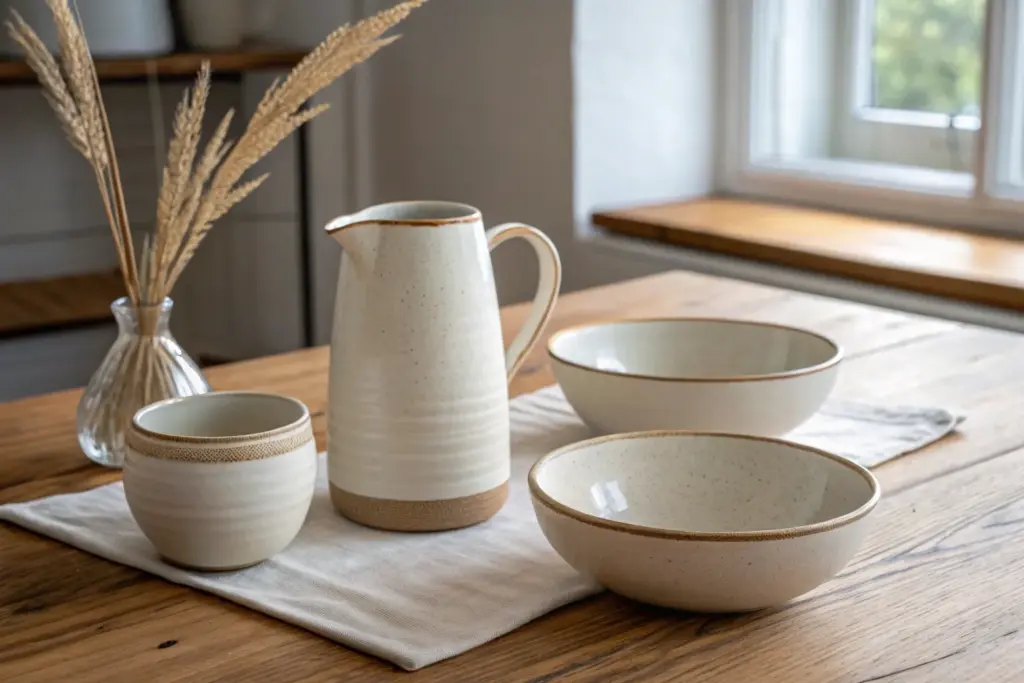
If you’ve ever made one cute mug and then immediately wanted the whole matching vibe, you’re my kind of person. A ceramic set turns your favorite glaze, shape, or motif into a little collection that feels intentional, cozy, and totally handmade.
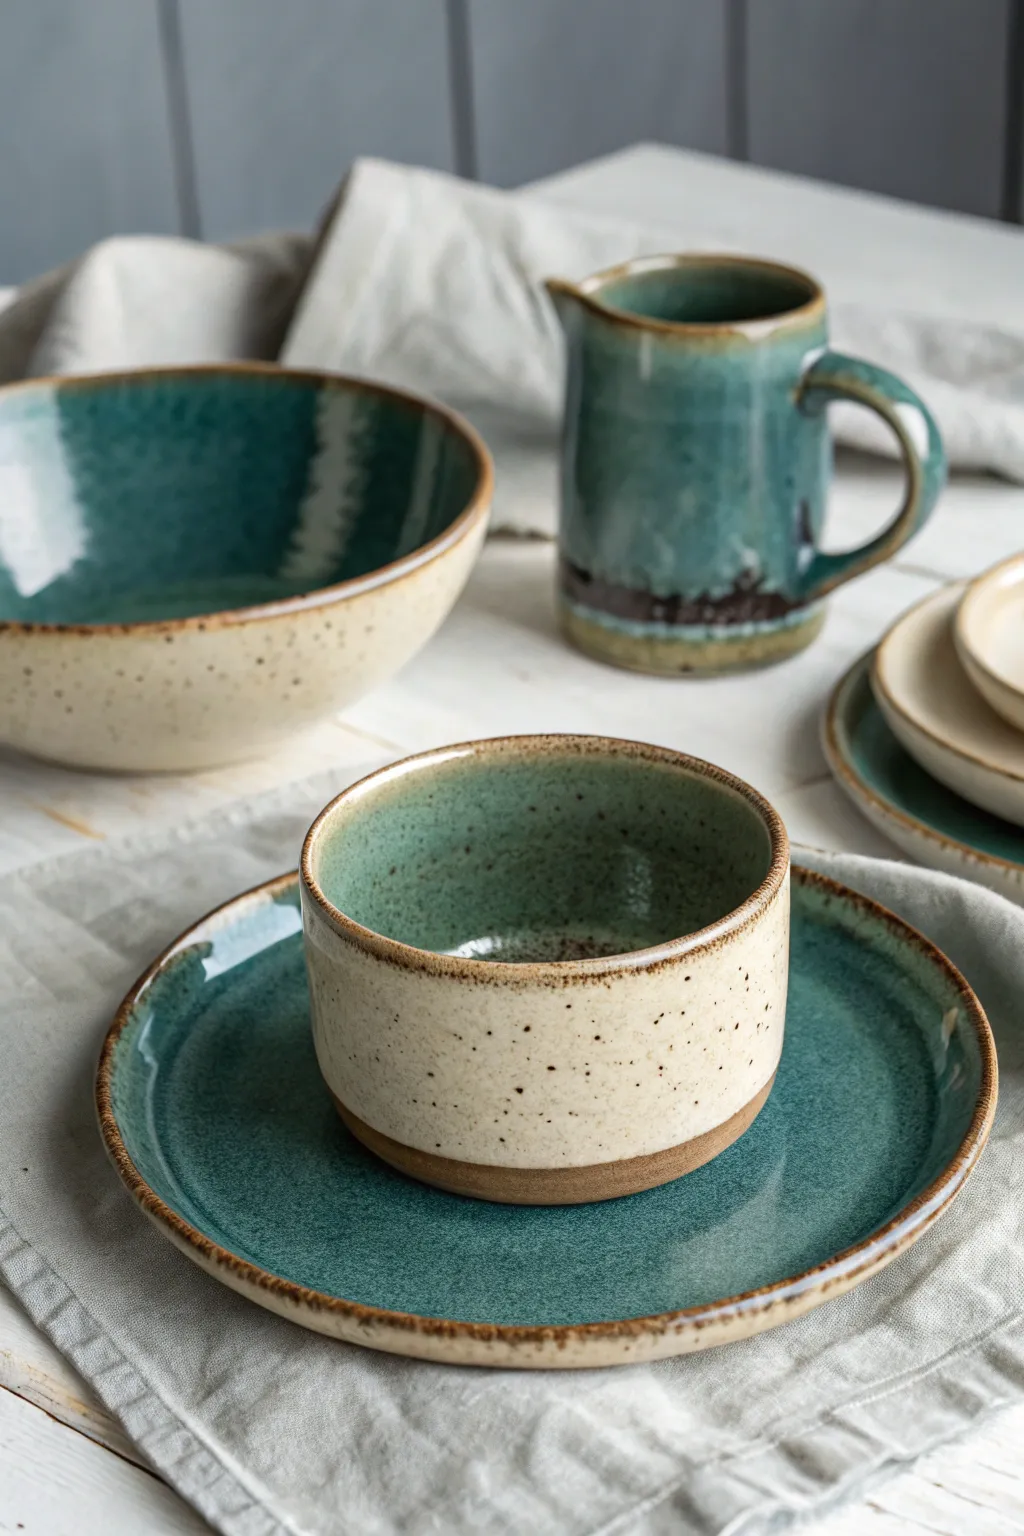
Everyday Dinnerware Starter Set
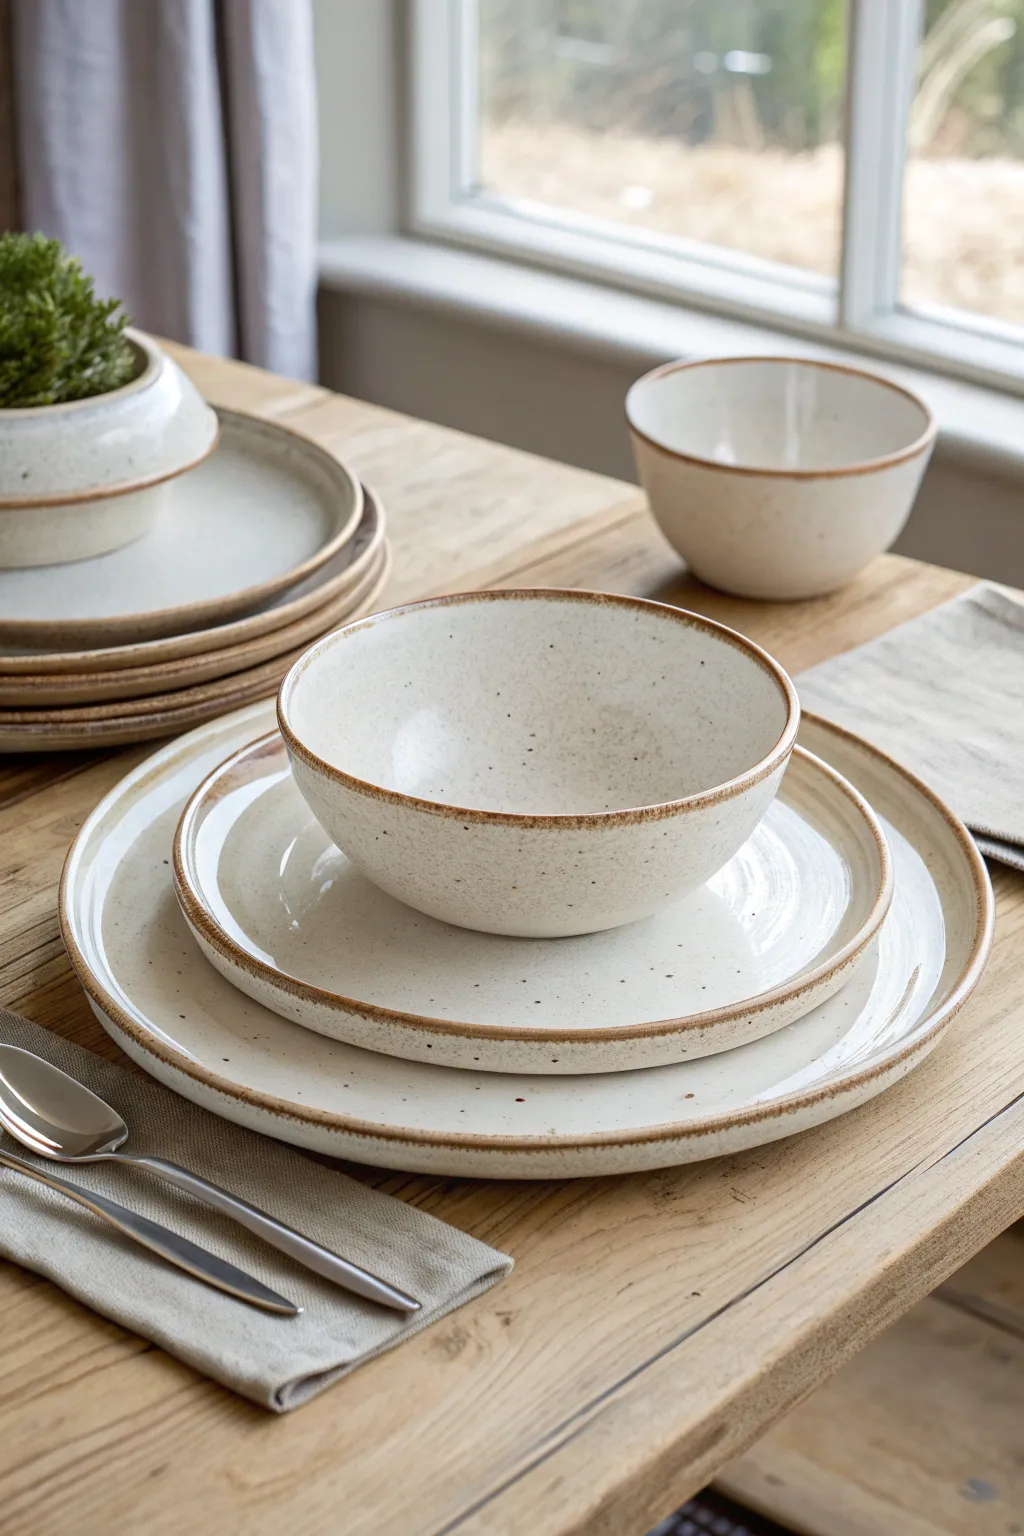
This project creates a beautiful, durable set of everyday dishes characterized by a creamy, speckled glaze and a distinctive warm brown rim. The organic shape and earthy tones make this set perfect for daily meals or special gatherings, blending seamlessly with any table decor.
How-To Guide
Materials
- Stoneware clay body (white or light buff)
- Potter’s wheel
- Throwing sponges and ribs
- Wire cutter
- Trimming tools
- Soft fan brush
- Cream/Off-white speckle glaze (cone H6 or appropriate for your clay)
- Iron oxide wash or dark brown underglaze
- Wax resist
- Kiln
Step 1: Throwing the Forms
-
Wedge the clay:
Begin by thoroughly wedging your stoneware clay to remove air bubbles and ensure consistency. For a starter set, prepare balls of clay in varying weights: 2 lbs for dinner plates, 1.5 lbs for salad plates, and 1 lb for bowls. -
Center specifically for plates:
Focus on centering your clay wide and low for the plates. Compress the base thoroughly with a rib to prevent S-cracks later; this is crucial for flatware. -
Open and pull the floor:
Open the clay and pull the floor out towards 10-11 inches for the dinner plate. Create a gentle, continuous curve from the center out to the rim rather than a sharp angle. -
Define the rim:
Pull up a short wall for the plate rim, keeping it relatively thick to discourage warping. Use a wooden or rubber rib to smooth the surface and define the transition from the eating surface to the rim. -
Throw the bowls:
Center your 1 lb clay balls for the bowls. Open deep and pull walls into a classic hemisphere shape, ensuring the rim is slightly thickened and rounded to match the sturdy aesthetic of the plates. -
Detach and dry:
Wire cut the pieces from the wheel head but leave them on bats if possible to maintain their shape. Allow them to dry to a leather-hard state.
Step 2: Trimming and Refining
-
Trim the foot rings:
Once leather hard, center the pieces upside down on the wheel. Trim a defined foot ring on each piece. A distinct foot elevates the form and makes glazing easier. -
Smooth the edges:
After trimming, run a damp sponge or a soft rib over the trimmed areas and the rim to soften any sharp lines created by the tools. -
Bisque fire:
Slowly dry your greenware completely to avoid explosions. Load them into the kiln and bisque fire to approximately Cone 04 to prepare them for glazing.
Rim Drips?
If the brown rim glaze runs during firing, thin your oxide wash with more water next time, or apply it slightly drier so it absorbs instantly without pooling.
Step 3: Glazing and Finishing
-
Clean the bisque:
Wipe down all bisque-fired pieces with a damp sponge to remove dust, which can cause finish defects like crawling. -
Apply wax resist:
Brush liquid wax resist onto the foot ring and the very bottom center of each piece. I like to be generous here to save time on cleanup later. -
Dip the base glaze:
Using dipping tongs, submerge each piece into the cream speckled glaze. Hold for 3-5 seconds to ensure an even coat. Shake gently to remove excess drips before turning right-side up. -
Clean the foot:
Even with wax resist, use a damp sponge to wipe any stray glaze beads off the foot ring to protect your kiln shelves. -
Paint the rim:
Dip a soft brush into iron oxide wash or a dark brown underglaze. While holding the brush steady against the rim, rotate the banding wheel (or use your pottery wheel) to create that consistent, thin brown line. -
Check for pinholes:
Inspect the dry glaze surface. If you see pinholes, gently rub them with a clean finger to smooth the powder over the gap. -
Glaze fire:
Load the kiln carefully, ensuring no pieces touch. Fire to the maturity temperature of your clay and glaze combination (typically Cone 5 or 6 for stoneware).
Get Stackable
Use calipers when throwing to ensure rim diameters match exactly. This ensures your finished plates and bowls will stack perfectly in the cupboard.
Once cooled, your durable new dinner set is ready for its first family meal


Breakfast Bowl Trio That Nests
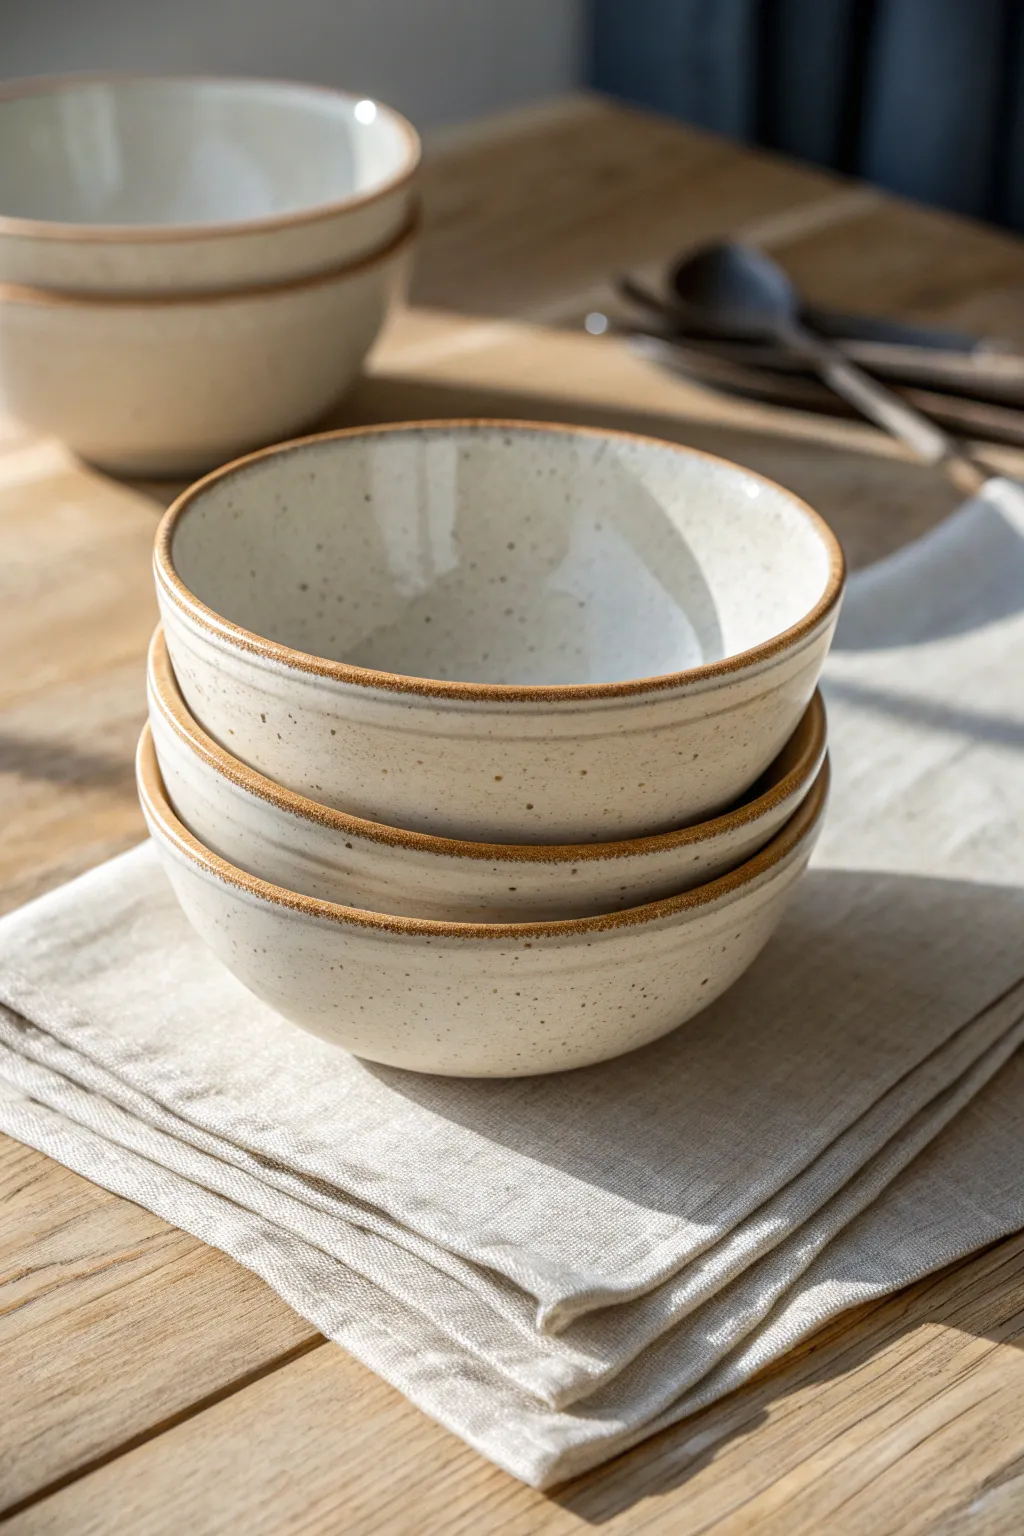
Create a cozy morning ritual with this trio of nesting breakfast bowls, featuring a warm, speckled clay body and a distinct toasted rim. The simple, open form highlights the natural beauty of the stoneware, while the milky white glaze adds a clean, modern finish perfect for oatmeal or yogurt.
Step-by-Step Tutorial
Materials
- Speckled stoneware clay (mid-fire, cone 5-6)
- Pottery wheel
- Throwing sponge
- Wire cutter
- Ribs (wooden and metal)
- Trimming tools (loop tools)
- Calipers (for measuring nesting sizes)
- Damp sponge for smoothing
- Wax resist
- Glossy white or clear glaze
- Kiln
Step 1: Throwing the Trio
-
Prepare your clay:
Wedge three balls of speckled stoneware clay. Since these are nesting bowls, graduate the weights. I recommend starting with approximately 1.5 lbs, 1.25 lbs, and 1 lb balls of clay. -
Center the first ball:
Secure the largest ball on the wheel head. Use steady pressure and water to cone the clay up and down until it is perfectly centered and running smooth. -
Open the form:
Drill your thumb into the center, leaving about a half-inch of clay at the bottom for the foot. Pull the floor outward to establish a gentle, rounded inner curve rather than a flat bottom. -
Pull the walls:
Make your pulls, bringing the clay up and slightly outward. Aim for a 45-degree angle that opens up wide at the top. Keep the walls consistent in thickness, about a quarter-inch. -
Refine the rim:
Compress the rim with a chamois or your sponge. For this specific look, create a slight bevel or rounded edge, but keep it substantial enough to show off the unglazed clay detail later. -
Measure and cut:
Use a wooden rib to smooth the inside curve and remove throwing lines. Measure the diameter with calipers to guide the size of your next bowl. Wire under the bowl and set it aside on a ware board. -
Throw the smaller bowls:
Repeat the throwing process with the medium and small clay balls. Use your caliper measurement to ensure the medium bowl is roughly 1 inch narrower than the large one, and the small bowl 1 inch narrower than the medium.
Crisp Rim Tip
For the sharpest line between the glaze and the raw clay rim, use liquid wax resist and apply it while the bowl is spinning slowly on a banding wheel.
Step 2: Trimming and Refining
-
Dry to leather hard:
Allow the bowls to dry slowly until they are leather hard. They should be firm enough to handle without deforming but still cool to the touch and carveable. -
Center for trimming:
Place the largest bowl upside down on the wheel head. Secure it with small coils of clay or a Giffin Grip. Tap it to ensure it is perfectly centered. -
Trim the foot ring:
Use a sharp loop tool to carve away excess clay from the base. Define a clean foot ring that lifts the bowl slightly. Remove weight from the lower walls to match the thickness of the upper walls. -
Smooth the exterior:
Run a metal kidney rib over the trimmed area to smooth out tool marks and compress the clay particles. Repeat the trimming process for the other two bowls. -
Bisque fire:
Let the bowls dry completely to bone dry. Load them into the kiln and bisque fire to Cone 04. This prepares the clay for glazing.
Step 3: Glazing the Design
-
Clean the bisque:
Wipe the bisque-fired bowls with a damp sponge to remove any dust, which can prevent glaze from adhering properly. -
Wax the rim and foot:
Apply a band of wax resist to the very top rim of each bowl. This is crucial for achieving that toasted clay detail. Also wax the bottom foot ring to prevent sticking in the kiln. -
Glaze the interior:
Pour your glossy white glaze into the bowl, swirl it quickly to coat the entire interior, and pour out the excess. Wipe any drips off the rim immediately. -
Glaze the exterior:
Holding the bowl by the foot, dip the exterior into the glaze bucket. Stop just short of the rim if you didn’t wax, or dip fully if waxed—the wax will resist the glaze. I usually wipe the rim with a damp sponge just to be sure the line is crisp. -
Clean up:
Check the rim and foot one last time. Any stray glaze spots on the waxed rim should be wiped away cleanly to ensure that sharp contrast. -
Glaze fire:
Load the glazed bowls into the kiln. Fire to mid-range temperature (Cone 5 or 6) depending on your clay and glaze specifications. This final firing will melt the glaze and toast the exposed clay rim.
Make it a Full Set
Create a matching pitcher or small creamer using the same speckled clay and rim technique to turn your bowl trio into a complete breakfast service set.
Once cooled, these durable bowls are ready to be stacked on your shelf or filled with your favorite morning treat


Mug Set With Coordinated Handles
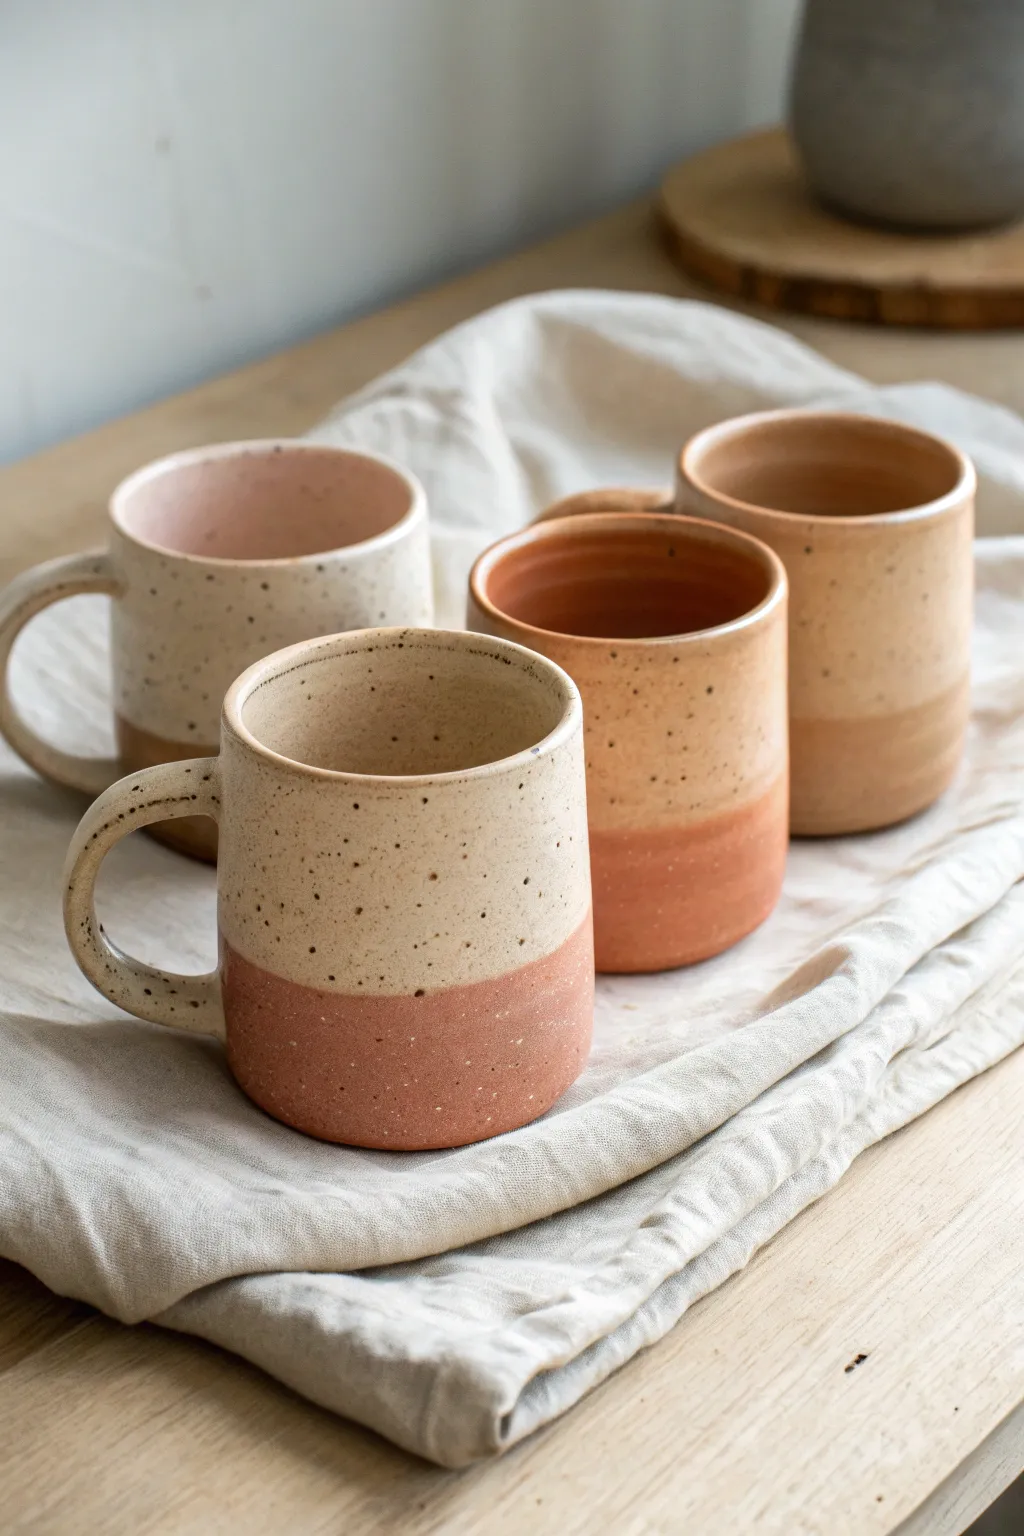
These charming, rustic mugs feature a warm, unglazed clay base contrasted with a smooth, speckled creamy glaze on top. The simple cylinder shape and pulled handles create a cohesive, handmade set perfect for cozy mornings.
Detailed Instructions
Materials
- Speckled stoneware clay (approx. 1-1.5 lbs per mug)
- Pottery wheel
- Throwing tools (sponge, needle tool, rib, wire cutter)
- Trimming tools
- Bucket of water
- Scoring tool or serrated rib
- Slip (clay mixed with water)
- Cream or oatmeal matte glaze
- Wax resist (optional)
- Kiln
Step 1: Throwing the Form
-
Prepare Clay Balls:
Weigh out four equal balls of speckled stoneware clay, roughly 1 to 1.5 pounds each, and wedge them thoroughly to remove air bubbles. -
Center the Clay:
Secure a ball of clay to the center of your wheel head, coning it up and down until it spins perfectly smooth and true. -
Open the Cylinder:
Press your thumbs into the center to open the floor, leaving about a half-inch thickness for the base, then compress the floor well to prevent cracking. -
Pull the Walls:
Slowly pull up the walls of the cylinder, keeping them even and straight. Aim for a simple, vertical shape without too much curve. -
Refine the Rim:
Use a chamois or your sponge to gently smooth the rim, ensuring it’s rounded and comfortable for drinking. -
Repeat Process:
Repeat the throwing steps for the remaining three balls of clay, measuring the height and width with calipers to keep the set consistent.
Wobbly Handles?
If handles slump while drying, prop them up with a small piece of foam or a wad of paper towel underneath the curve until the clay stiffens.
Step 2: Trimming and Handling
-
Dry to Leather Hard:
Allow the cylinders to dry until they are leather hard—firm enough to handle without deforming but still damp enough to carve. -
Trim the Base:
Flip the mugs over on the wheel and trim the bottoms, creating a clean foot ring if desired, or a simple flat bottom for a modern look. -
Pull Handles:
Pull four handles from a separate lump of clay. I find it easiest to pull a slightly longer strip than needed and cut it to size. -
Shape Handles:
Curve the clay strips into a ‘C’ or ear shape, holding them for a moment to set the curve before attaching. -
Attach Handles:
Score and slip the attachment points on both the mug and the handle, then press firmly to join. Smooth the connection points with your thumb or a wooden tool. -
Dry Slowly:
Cover the mugs loosely with plastic to let them dry slowly and evenly, which prevents the handles from cracking away from the body.
Make it a Set
Use the same two-tone technique on a matching pitcher or creamer. Keep the glaze dip line at the same relative height for visual flow.
Step 3: Bisque and Glaze
-
Bisque Fire:
Once bone dry, load the mugs into the kiln for a bisque firing (usually cone 04 or 06). -
Prepare for Dipping:
Wipe the bisque-ware with a damp sponge to remove dust. If you want a precise line, apply wax resist to the bottom third of the mug. -
Dip Glaze:
Holding the mug by the foot, dip it upside down into your cream glaze, submerging it about two-thirds of the way down. -
Glaze the Handle:
Carefully pour glaze over the handle or dip sideways to ensure the handle is fully coated, matching the top section of the mug. -
Clean the Line:
If you didn’t use wax, use a damp sponge to wipe away any drips and neaten the line where the glaze meets the raw clay. -
Final Fire:
Fire the mugs to the maturity temperature of your clay and glaze (typically cone 5 or 6 for stoneware).
Enjoy using your beautiful new custom mug set for your next coffee break


Matching Tumbler Set With Simple Bands
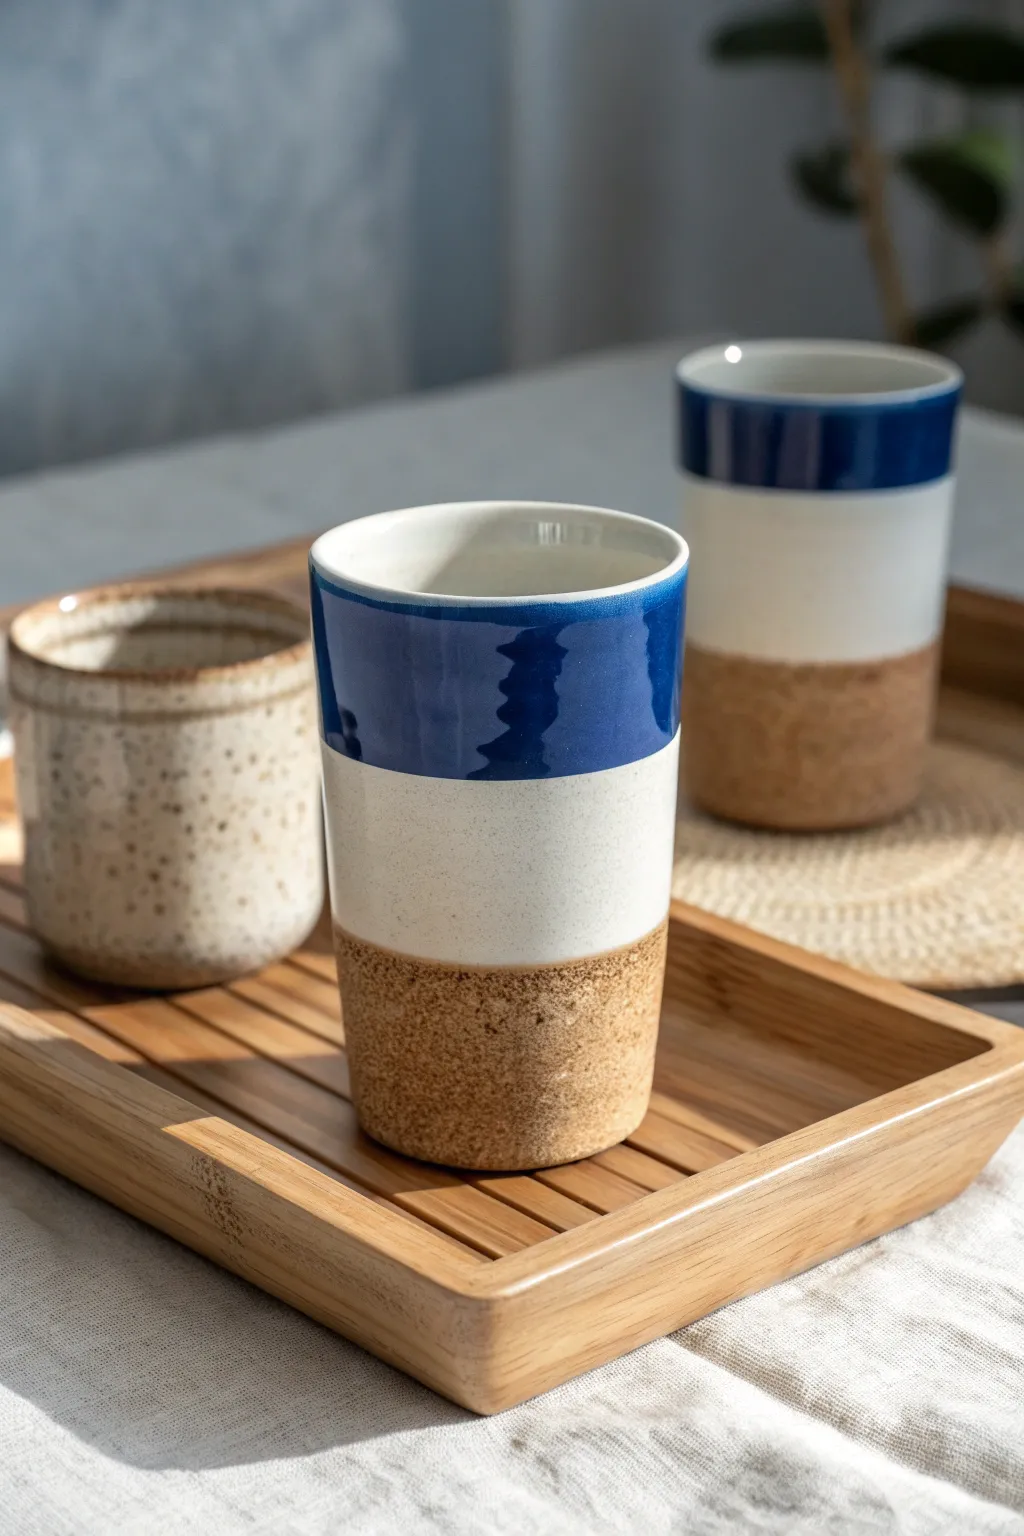
These elegant tall tumblers combine glossy glazes with raw, textured clay to create a stunning tri-banded design. The deep cobalt blue rim contrasts beautifully with the speckled sandy base, mimicking the look of cork or natural stone.
Step-by-Step
Materials
- Stoneware clay body (groggy or speckled)
- Pottery wheel
- Throwing tools (sponge, needle tool, rib, wire cutter)
- Trimming tools
- Wax resist
- Cobalt blue glossy glaze
- White or clear glossy glaze
- Large glaze brushes
- Kiln
Step 1: Throwing and Shaping
-
Prepare the Clay:
Begin by wedging about 1 to 1.5 lbs of stoneware clay for each tumbler. Ensure different balls of clay are equal in weight so your set matches in size. -
Center on the Wheel:
Throw the clay onto the wheel head and center it firmly. Since we are making tall tumblers, ensure your centered mound is slightly taller and narrower than usual before opening. -
Open and Pull:
Open the clay and begin pulling the walls. Aim for a distinct vertical cylinder shape. Pull the walls straight up, keeping a consistent thickness from bottom to top. -
Establish the Rim:
Once you have reached your desired height (about 5-6 inches), compress the rim with your chamois or sponge to ensure it is smooth and pleasant for drinking. -
Refine the Profile:
Use a metal or wooden rib on the exterior while supporting the inside with your hand. Run it up the side to remove throwing lines and create that sleek, modern straight-walled profile seen in the photo. -
Wire Off:
Cut the tumbler from the bat using your wire tool and set it aside to dry until leather-hard.
Uneven Glaze Lines?
If your dipped lines are wavy, use electrical tape or automotive detailing tape to mask off perfect straight lines before dipping or brushing glazes.
Step 2: Trimming and Texture
-
Trim the Foot:
Once leather-hard, center the tumbler upside down on the wheel. Trim the bottom to create a clean, flat foot or a slight recess. -
Refine the Surface:
While trimming, you can use a serrated rib or trimming tool to gently roughen the bottom third of the exterior if your clay isn’t naturally textured; this enhances the ‘cork’ look later. -
Bisque Fire:
Allow the greenware to dry completely (bone dry) before loading it into the kiln for a bisque firing.
Step 3: Glazing the Bands
-
Clean the Bisque:
Wipe the fired bisque ware with a damp sponge to remove any dust, which can cause pinholes in your glaze. -
Apply Wax Resist:
Paint a clear band of wax resist over the bottom third of the tumbler. This reserves the raw clay texture for that earthy base. -
Dip the Interior:
Pour white glossy glaze into the inside of the tumbler, swirl it quickly to coat, and pour it out. Wipe any drips off the exterior rim immediately. -
Glaze the Middle Band:
Dip the tumbler (excluding the waxed bottom) into a white or clear glaze to create the middle section. Alternatively, you can brush this on if you don’t have enough glaze for dipping. -
Create the Blue Rim:
Hold the tumbler upside down and carefully dip just the top third into the cobalt blue glaze. Hold it steady for 3-5 seconds to get an opaque coat. -
Overlap Check:
Check the line where the blue meets the white. The overlap creates that slight variation in color seen in the photo. If needed, I like to tidy up any uneven drips with a sponge. -
Clean the Foot:
Even with wax resist, double-check the bottom of the tumbler. Wipe away any stray glaze beads from the raw clay section to ensure a clean kiln shelf. -
Glaze Fire:
Load the tumblers into the kiln for the final glaze firing according to your clay and glaze temperature guidelines (usually Cone 5/6 or Cone 10).
Enhance the Texture
Use a clay body with heavy grog or sand. After trimming, wipe the raw base with a damp sponge to expose the grit for a true cork-like feel.
Once cooled, your tumblers are ready to bring a touch of coastal elegance to your morning routine

The Complete Guide to Pottery Troubleshooting
Uncover the most common ceramic mistakes—from cracking clay to failed glazes—and learn how to fix them fast.
Tea Service Set for Slow Afternoons
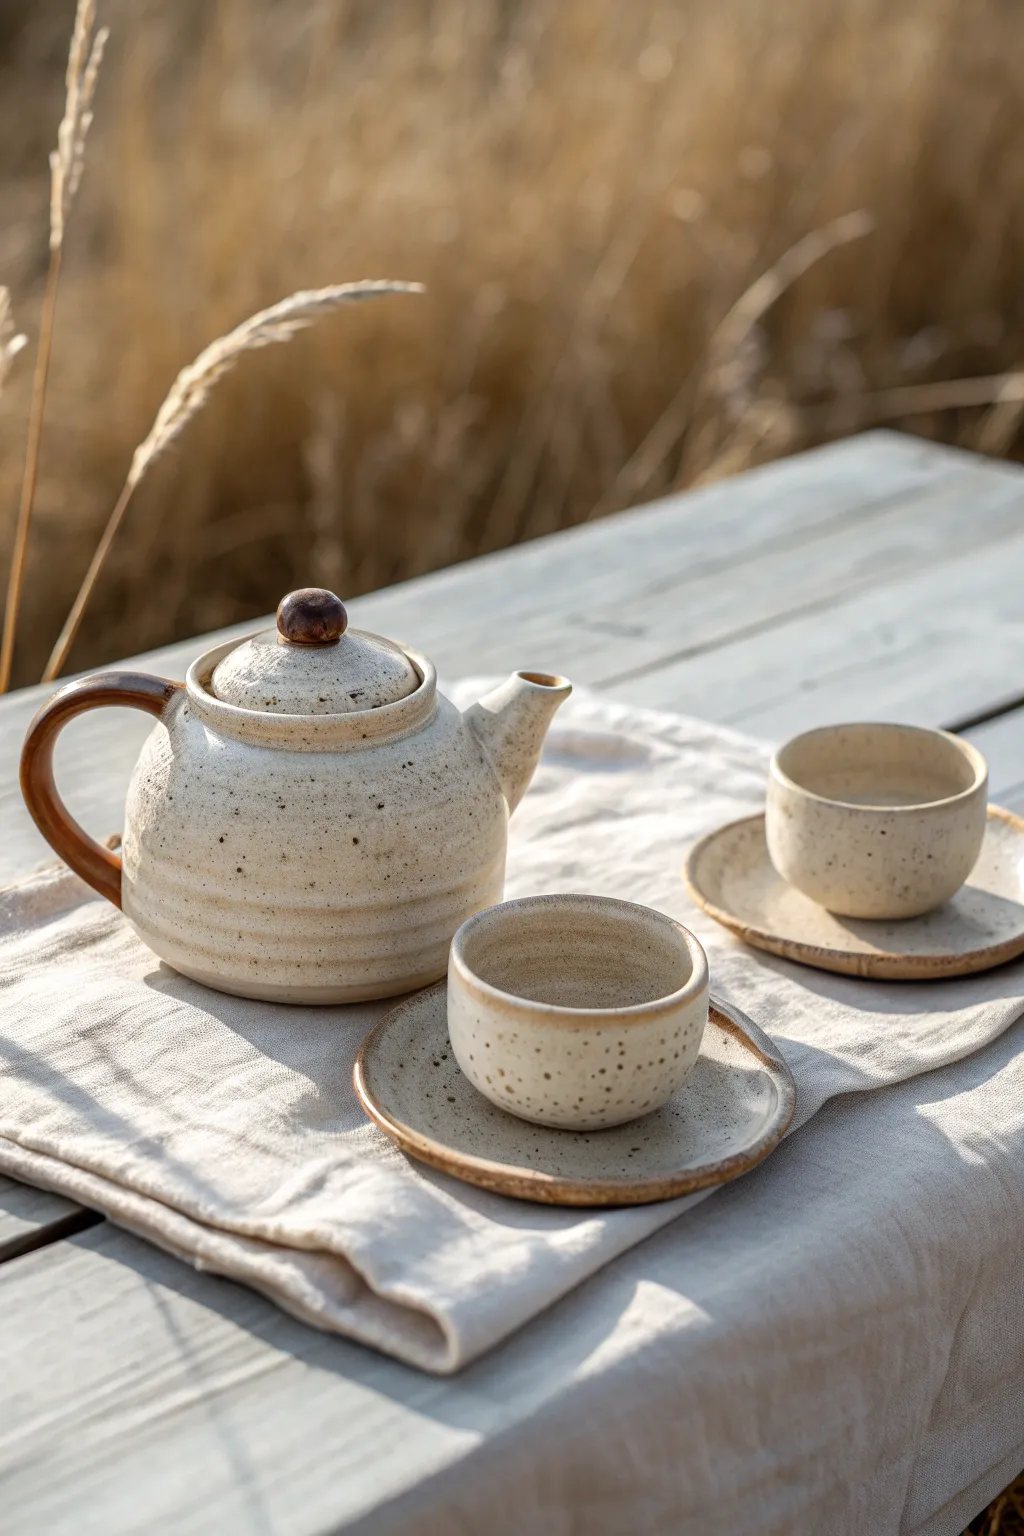
This charming, rustic tea set features a cozy speckled cream finish with warm brown accents, perfect for slow afternoons outdoors. The set includes a rotund teapot with a distinct lid and comfortable handle, paired with two matching cups and saucers.
How-To Guide
Materials
- Speckled stoneware clay (approx. 3-4 lbs)
- Pottery wheel
- Throwing tools (sponge, needle tool, rib, wire cutter)
- Trimming tools
- Serrated rib or scoring tool
- Slip
- Cream/White matte glaze
- Iron oxide wash or dark brown underglaze
- Kiln
- Wax resist
Step 1: Creating the Teapot Body
-
Throw the body:
Begin by centering about 1.5 to 2 lbs of speckled clay on the wheel. Open the clay and pull the walls up, creating a bulbous, rounded belly shape while keeping the neck slightly narrower. -
Create the gallery:
At the rim of the pot, use a wooden tool or your finger to split the rim, pressing down the inner half to create a ‘gallery’ or ledge where the lid will eventually sit. -
Detailing the surface:
While the wheel is spinning slowly, gently press a rounded rib into the lower half of the belly to create subtle horizontal ridges for texture. -
Throw the spout:
Use a small ball of clay to throw a conical spout. Ensure the base is wide enough to attach to the pot and the tip is tapered for a clean pour. -
Throw the lid:
Throw a small, low-profile lid that fits the measurements of your gallery. You can throw a small knob directly on top, or attach a separate knob later for contrast.
Step 2: Forming the Cups and Saucers
-
Throw the cups:
Center small balls of clay (approx. 0.5 lb each) and throw simple cylinder shapes with slightly rounded bottoms. Keep the walls even and fairly thin for a delicate drinking experience. -
Throw the saucers:
Throw two flat discs with slightly raised edges to serve as saucers. Check that the foot of your cups fits comfortably in the center depression. -
Drying to leather hard:
Allow all pieces—teapot body, spout, lid, cups, and saucers—to dry slowly until they reach a leather-hard state.
Clean Pour Pro-Tip
When shaping your spout, sharpen the very edge of the lip so it’s thin and crisp. This breaks the surface tension of the liquid and prevents annoying drips after pouring.
Step 3: Trimming and Assembly
-
Trim the teapot:
Invert the teapot body on the wheel and trim the bottom to create a clean, defined foot ring. Do the same for the cups and saucers. -
Attach the spout:
Cut the base of the spout at an angle to fit the curve of the pot. Hold it up to check the placement; the tip should be level with the rim. Score both surfaces, apply slip, and press firmly to attach. -
Pull and attach handles:
Pull a strap of clay for the teapot handle. Curve it into a comfortable ‘ear’ shape. Score and slip to attach it opposite the spout. I like to smooth the connection points with a damp sponge for a seamless look. -
Drill the strainer:
Before the clay gets too dry, used a small hole punch or drill tool to create strainer holes in the body of the pot behind where the spout is attached. -
Bisque fire:
Once fully bone dry, load the greenware into the kiln and bisque fire to cone 04.
Lid Fit Troubleshooting
If your lid wobbles after firing, apply a tiny amount of grinding paste to the gallery and twist the lid back and forth. This grinds the surfaces to match perfectly.
Step 4: Glazing and Finishing
-
Wax the feet:
Apply wax resist to the bottom foot rings of all pieces and the gallery where the lid touches the pot to prevent sticking. -
Glaze application:
Dip the pieces into a cream matte glaze. The speckles in the clay body should show through; if your clay isn’t speckled, use a speckled glaze instead. -
Add oxide accents:
Paint an iron oxide wash or dark brown underglaze onto the teapot handle, the spout tip, the lid knob, and the rims of the saucers and cups. This creates that rustic, toasted edge look. -
Wipe back:
Gently sponge the oxide areas so the brown transitions softly into the cream glaze rather than having a harsh line. -
Final firing:
Fire the glazed pieces to the maturity temperature of your clay body (likely cone 5 or 6) to vitrify the clay and melt the glaze.
Once cooled, brew your favorite blend and enjoy the quiet satisfaction of using your own handmade service.
Coffee Station Set With Creamer and Sugar Jar
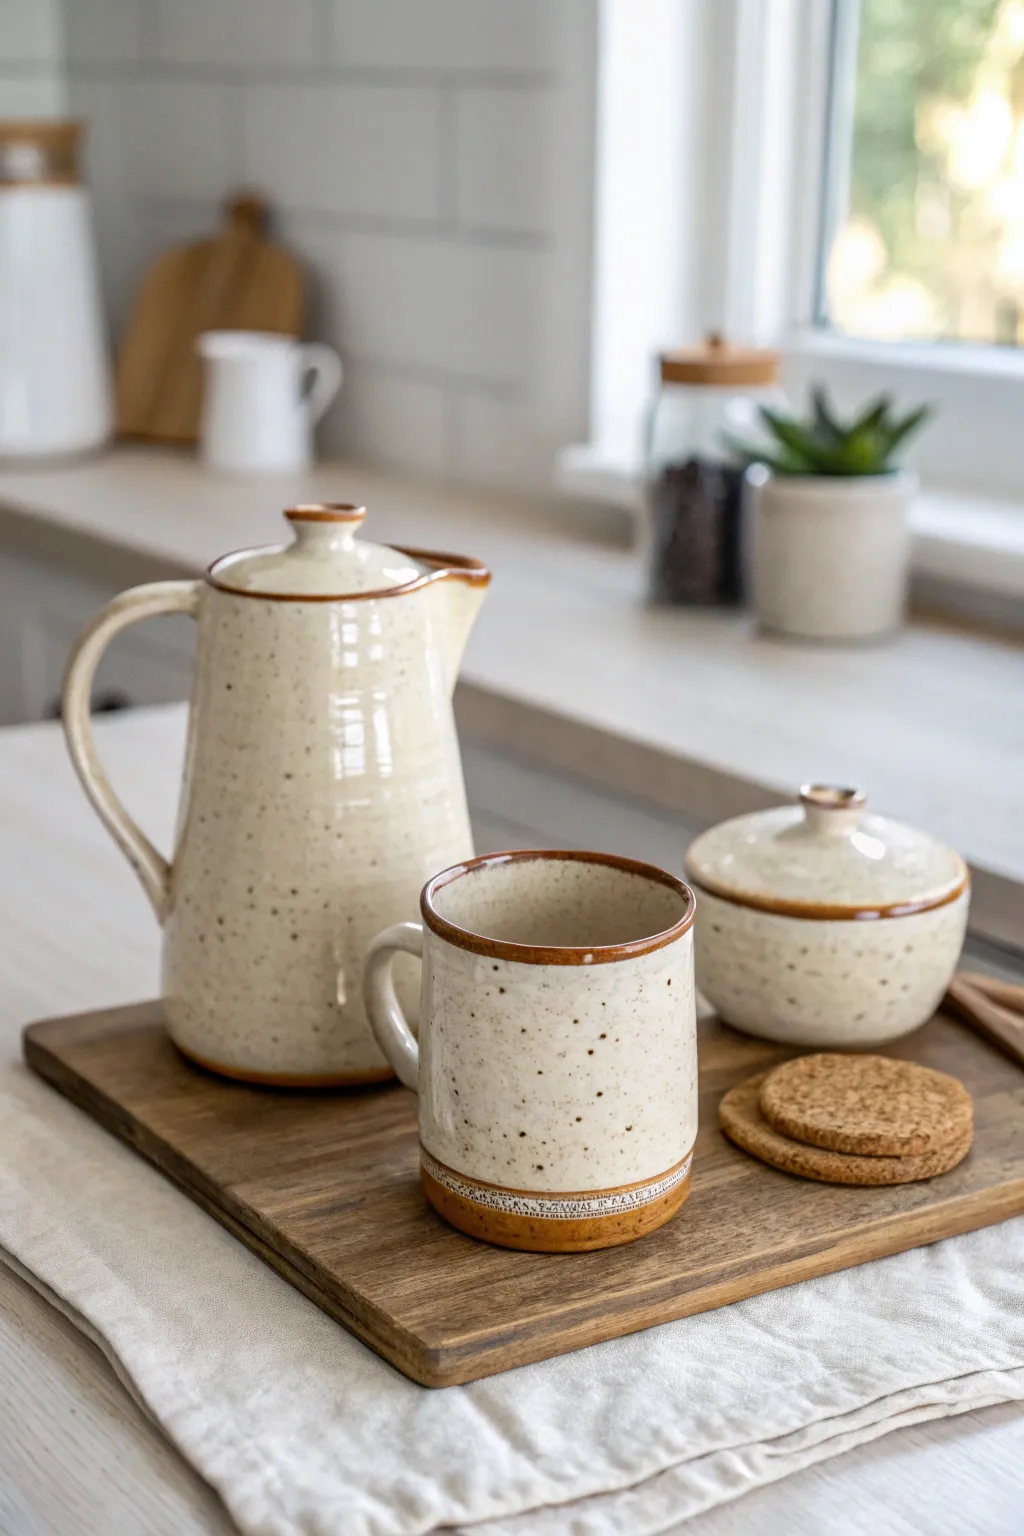
This rustic yet refined ceramic set features a creamy speckled glaze accented by warm brown rims and textured details. The combination of a tall coffee pourer, a cozy mug, and a lidded sugar jar creates a cohesive coffee station aesthetic perfect for slow mornings.
Step-by-Step Guide
Materials
- Stoneware clay body (speckled buff recommended)
- Pottery wheel
- Throwing tools (sponge, rib, wire cutter)
- Trimming tools
- Needle tool
- Cream/White speckled glaze
- Iron oxide wash or dark brown underglaze
- Sponge or small brush for rim details
- Kiln
- Wooden texture roller or carving tool
- Calipers
Step 1: Throwing the Forms
-
Throw the coffee pot body:
Begin with about 2-3 lbs of clay. Center it on the wheel and open it up, pulling the walls tall and slightly tapered inward towards the top. Leave the rim slightly thickened to support a lid later. -
Shape the spout:
While the clay is still wet, gently pull a spout on the rim of the tall pot using your forefinger and thumb. Ensure it has a sharp cutoff edge to prevent dripping. -
Throw the sugar bowl:
Using a smaller amount of clay (approx. 1 lb), throw a rounded bowl shape. constrict the neck slightly and create a gallery (an internal ledge) inside the rim where the lid will sit. -
Throw the mug body:
Throw a simple cylinder for the mug. I like to keep the walls relatively straight but round out the bottom interior for easier cleaning. Use a flat rib to smooth the sides. -
Create the lids:
Using calipers to measure your galleries, throw two small lids off the hump or individually. Add a small, pinched knob to the center of each lid for a handle.
Uneven Rims?
If your oxide rim looks shaky, place the piece on a banding wheel. Hold your brush steady in one spot while slowly rotating the wheel for a perfect line.
Step 2: Trimming and Assembly
-
Leather hard stage:
Allow all pieces to dry to a leather-hard state. They should be firm enough to handle without deforming but still cool to the touch. -
Trim the bases:
Center each piece upside down on the wheel. Trim away excess weight from the bottom, carving a neat foot ring for the pot and the sugar jar. -
Detail the mug base:
For the mug, trim a distinct band at the bottom, about an inch high. This area will remain unglazed or have a different texture. -
Add texture to the mug:
On that bottom trimmed band of the mug, use a texture roller or a carving tool to impress a subtle pattern. This adds tactile interest where your hand holds the cup. -
Pull and attach handles:
Pull two handles from fresh clay—one large, elegant ear-shape for the coffee pot and a smaller c-shape for the mug. Score and slip the attachment points, then firmly press the handles onto the bodies.Smooth the seams. -
Test the fit:
Check that your lids still fit the pot and sugar jar. If they are tight, sand them slightly; if loose, they will be fine after glazing. -
Bisque fire:
Load all fully dry bone-dry pieces into the kiln and fire to Cone 04 (or your clay’s specific bisque temperature).
Step 3: Glazing and Finishing
-
Wax resist:
Apply wax resist to the foot rings and the textured bottom band of the mug if you want the raw clay to show through. Also wax the gallery ledges and the underside of the lids. -
Dip in base glaze:
Dip each piece into a bucket of cream or white speckled glaze. Hold them submerged for about 3 seconds to get an even coat. Shake off excess drips as you pull them out. -
Clean the edges:
Use a damp sponge to wipe any glaze off the waxed areas or foot rings to prevent the pieces from fusing to the kiln shelf. -
Apply the rim detail:
Dip a small sponge or brush into iron oxide wash or dark brown underglaze. Gently run this along the very top rim of the pot, mug, jar, and lid knobs to create that definitive brown line. -
Apply wash to mug base:
For the textured band at the bottom of the mug, brush a light coat of the iron oxide wash over the texture to highlight the pattern, then wipe back the high points with a sponge. -
Glaze fire:
Load the kiln carefully, ensuring no glazed surfaces touch. Fire to Cone 6 (or your glaze’s maturity temperature). -
Sand the bottoms:
Once cooled and unloaded, use high-grit wet/dry sandpaper to smooth any rough patches on the unglazed foot rings so they don’t scratch your table.
Drip Prevention
Sharp edges break surface tension. When shaping the pitcher’s spout, make sure the final edge is sharp and undercut, not rounded, to stop drips running down the front.
Now you have a stunning, handcrafted set ready to elevate your morning coffee ritual


What Really Happens Inside the Kiln
Learn how time and temperature work together inside the kiln to transform clay into durable ceramic.
Snack and Dip Serving Set
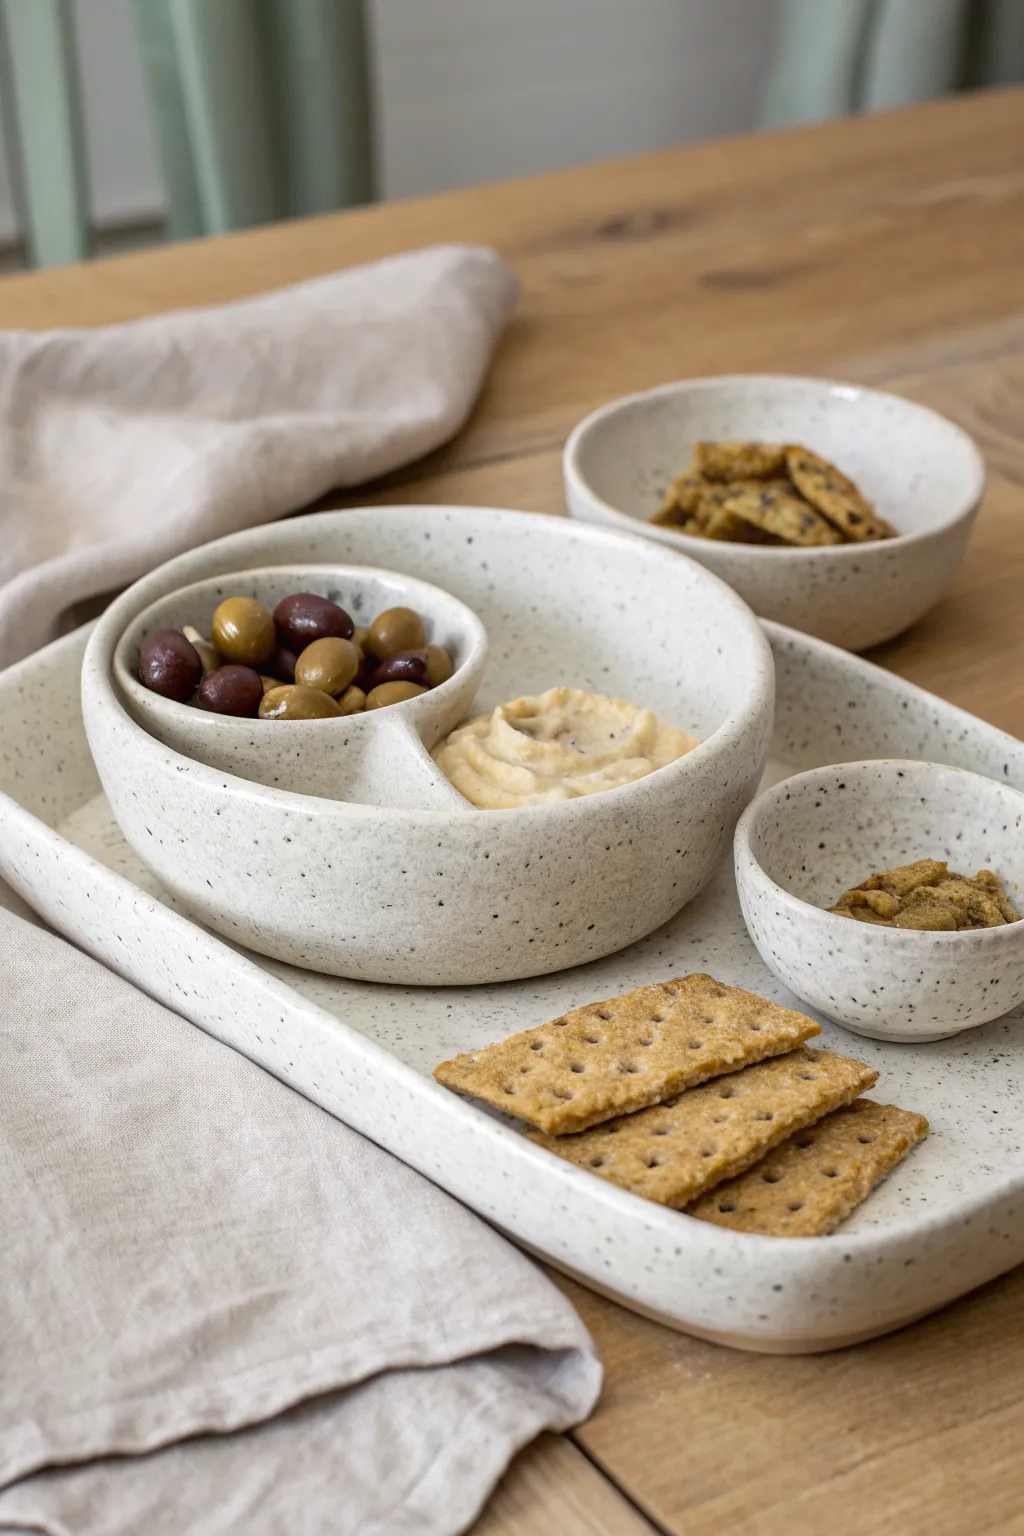
Craft a cohesive, modern snack set featuring a soft white glaze with delicate speckling. This project includes a large serving tray, a clever divided bowl for dips and olives, and matching side bowls, perfect for elevating your appetizer spread.
How-To Guide
Materials
- Stoneware clay (white or buff)
- Rolling pin
- Guide sticks or slab roller
- Fettling knife
- Kidney scraper (smooth rib)
- Sponge
- Large rectangular press mold (or wood form)
- Plaster hump molds (various bowl sizes)
- Scoring tool
- Slip
- Speckled white glaze (food safe)
- Kiln
Step 1: Forming the Tray
-
Roll the slab:
Begin by wedging your clay thoroughly to remove air bubbles. Roll out a large, even slab approximately 1/4 inch thick using guide sticks to ensure uniform thickness across the entire piece. -
Smooth the surface:
Before cutting, take a soft rib or kidney scraper and compress the clay slab on both sides. This aligns the clay particles, preventing future warping, and creates a nice canvas for your glaze. -
Cut to size:
Using a template or ruler, cut a large rectangle for the tray base. Ensure the corners are slightly rounded rather than sharp 90-degree angles for a softer, organic look. -
Shape the rim:
Gently lift the edges of your slab. If using a slump mold, press the clay into the form. If building by hand, pinch up a low wall (about 1 inch high) all around the perimeter, smoothing the transition from floor to wall with your finger or a sponge. -
Refine the lip:
Run a damp chamois or sponge along the top rim of the tray to round it off perfectly. Sharp edges can chip easily after firing, so a smooth lip is functional as well as aesthetic.
Seamless Divider
When attaching the divider wall, use a tiny ‘snake’ of soft clay along the seam line to reinforce the join before smoothing it out.
Step 2: Creating the Divided Bowl
-
Mold the main bowl:
Roll a new slab and drape it over a medium-sized bowl hump mold to create the main vessel shape. Trim the excess clay at the base and let it firm up slightly to leather-hard. -
Form the inner divider:
Once the bowl holds its shape but is still workable, roll a small coil or cut a strip of slab to act as the divider. Curve it into an ‘S’ shape or a simple arc depending on how you want to section the bowl. -
Attach the divider:
Score the interior of the bowl where the divider will sit, and score the bottom edge of your divider strip. Apply slip to both surfaces and press the divider firmly into place. -
The nesting cup:
The image shows a smaller cup appearing to nestle inside. To replicate this integral look, create a small pinch pot or wheel-thrown cup. Attach it permanently into one section of the main bowl using the score-and-slip method, blending the seams seamlessly at the bottom. -
Blend seams:
Use a modeling tool to smooth the connection points of the divider and the nested cup. It should look like one continuous piece of clay rather than separate attachments.
Step 3: Making the Side Bowls
-
Pinch or detailed molding:
For the two smaller separate bowls, pinch pots work excellently for an organic feel. Ball up clay in your hand, press your thumb in, and gently pinch outwards while rotating to thin the walls. -
Match the profiles:
Ensure the rim thickness of these small bowls matches the rim thickness of your large tray and divided bowl. Consistency in wall thickness ties the whole set together visually.
Warping Tray?
To prevent the large flat tray from curling up at the edges, dry it very slowly. Place weights (like bags of sand) on the center while it dries to leather hard.
Step 4: Finishing and Glazing
-
Bisque fire:
Allow all pieces to dry slowly and completely under loose plastic to prevent warping. Once bone dry, bisque fire them in the kiln to prepare them for glazing. -
Prepare the glaze:
Select a matte or satin white glaze that contains specks (often iron or manganese additives). Mix the glaze thoroughly to ensure the speckles are evenly distributed in the hidden suspension. -
Dip or pour:
Dip each piece into the glaze for a consistent coat. For the divided bowl, ensure the glaze doesn’t pool too thickly in the corners where the divider meets the walls. -
Clean the distinct foot:
Wipe the bottom of each piece clean with a wet sponge. Leaving the raw clay exposed on the bottom creates a nice textural contrast and prevents the pots from sticking to the kiln shelf. -
Glaze fire:
Fire the pieces to the temperature appropriate for your specific clay body and glaze (typically Cone 5 or 6 for stoneware). Let the kiln cool completely before opening to avoid thermal shock.
Once cooled, arrange your set and fill the compartments with colorful olives and dips for a stunning presentation
Appetizer Plate Set With Tiny Pinch Bowls
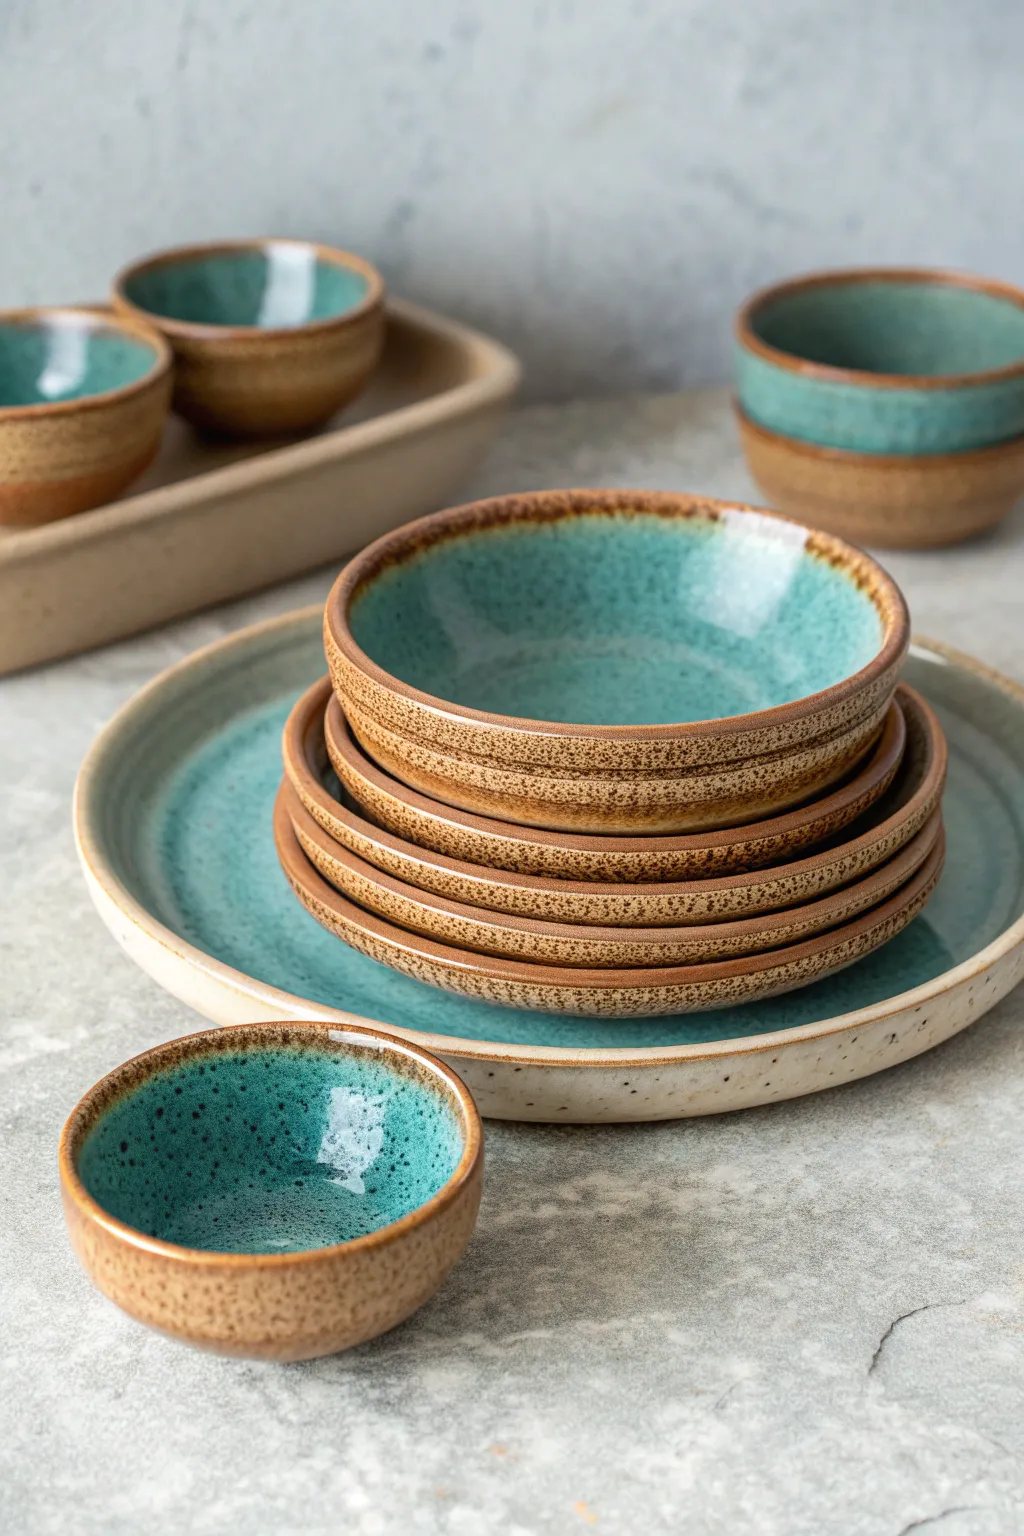
This project guides you through creating a charming appetizer set featuring a large platter, stackable plates, and tiny pinch bowls. The contrast between raw, speckled stoneware and a glossy, lagoon-blue glaze creates an earthy yet refined aesthetic perfect for modern tables.
Step-by-Step
Materials
- Speckled buff stoneware clay
- Pottery wheel
- Sponge and bucket of water
- Wire cutter
- Rib tool (wooden and metal)
- Trimming tools
- Calipers (optional for sizing)
- Wax resist
- Turquoise or teal cone 6 glaze
- Kiln
Step 1: Throwing the Pinch Bowls
-
Prepare the Clay:
Begin by wedging small balls of speckled clay, about 1/2 pound each. Ensure they are free of air bubbles for a smooth throwing process. -
Center and Open:
Center a small ball on the wheel head. Open the clay gently with your thumbs, creating a wide curve rather than a flat bottom, as these bowls need a rounded interior. -
Pull the Walls:
Pull the walls up to about 2 inches in height. Keep the rim slightly thick to prevent chipping later. Use a rib to smooth the interior curve. -
Refine the Rim:
Use a chamois or a wet sponge to compress and round the rim. This step is crucial for comfortable use. -
Cut and Repeat:
Wire the bowl off the wheel and set it aside on a ware board. Repeat this process for as many pinch bowls as you desire.
Clay Choice Matters
Use a clay body with Manganese speckles (like ‘Speckled Buff’). The glaze will interact with the specks, pulling them through into the turquoise color.
Step 2: Creating the Plate Stack
-
Weigh Consistent Batches:
For stacking appetizer plates, weigh out identical amounts of clay (approx. 1-1.5 lbs each) to ensure uniformity. -
Throw the Large Platter:
Use a larger amount of clay (3-4 lbs) for the base platter. Open wide and pull the clay outward to form a flat floor, leaving a distinct, slightly raised rim about 1 inch high. -
Throw the Small Plates:
Center your 1.5 lb balls. Flatten them into discs and pull up a short, steep wall to create a shallow dish shape. I like to use a wooden rib here to define a sharp angle at the interior base. -
Refining the Profile:
Smooth the surfaces with a metal rib to bring out the grog and speckles in the clay body. Ensure the bottoms are flat enough to stack well.
Step 3: Trimming and Drying
-
Leather Hard Stage:
Allow all pieces to dry to a leather-hard state. They should be firm enough to handle without deforming but soft enough to carve. -
Trim the Foot Rings:
Place pieces inverted on the wheel. Trim a clean, defined foot ring on each piece. This lifts the form and adds elegance. -
Bisque Fire:
Once bone dry, load the pieces into the kiln for a bisque firing (usually Cone 04). This prepares the clay for glazing.
Rim Variation
Mix equal parts glaze and water for a wash. Dip just the rim for a darker, deeper color break where the glaze meets the raw clay edge.
Step 4: Glazing and Final Fire
-
Clean the Bisqueware:
Wipe all pieces with a damp sponge to remove any dust that might prevent the glaze from adhering properly. -
Wax Resist Application:
Apply wax resist to the foot ring and the bottom exterior of each bowl and plate. For this specific look, extend the wax slightly up the exterior wall so the raw clay remains visible. -
Pour the Interior:
Pour a glossy turquoise glaze inside the bowls and plates. Swirl it to coat the interior evenly, then pour out the excess quickly. -
Clean the Rims:
Immediately wipe the very top edge of the rim with a damp sponge. This exposes the speckled clay lip, creating a nice frame for the blue glaze. -
Glaze Fire:
Fire the pieces to Cone 6 (check your specific clay and glaze instructions). Allow the kiln to cool completely before unloading.
Once cooled, your set is ready for stacking and serving your favorite small bites

TRACK YOUR CERAMIC JOURNEY
Capture glaze tests, firing details, and creative progress—all in one simple printable. Make your projects easier to repeat and improve.
Sushi Night Set With Long Trays and Sauce Dishes
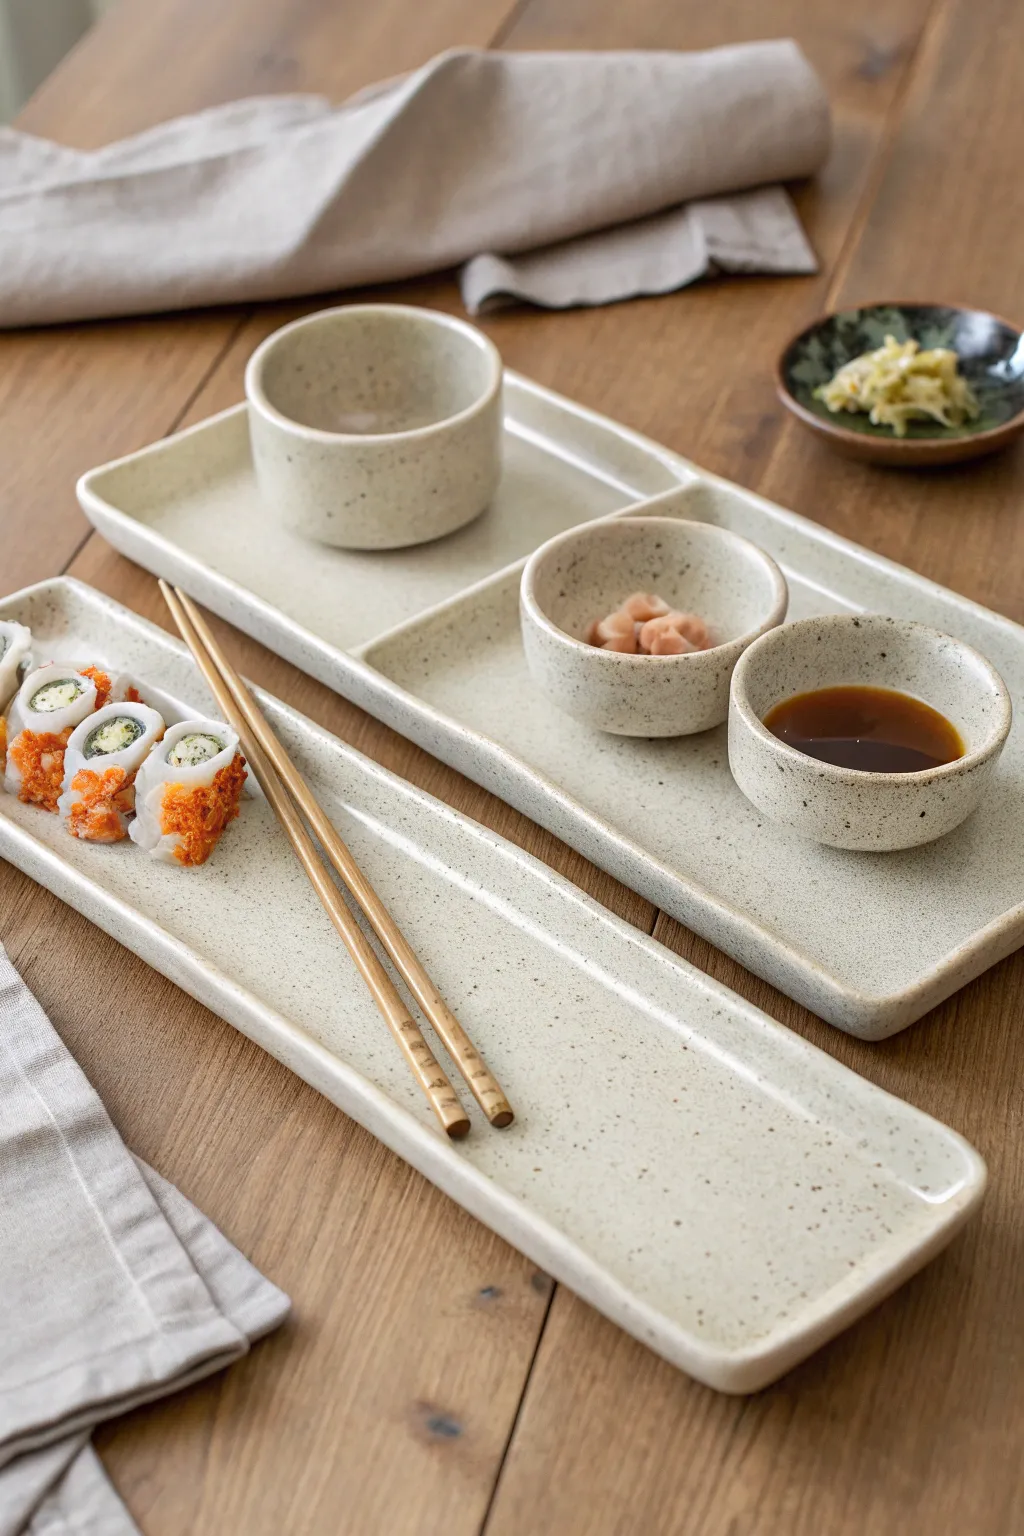
Elevate your homemade sushi nights with this stunning, minimalist ceramic set featuring a long serving platter and a coordinating segmented tray. The speckled cream matte glaze gives it an organic, modern feel that perfectly complements colorful rolls and vibrant sashimi.
How-To Guide
Materials
- Speckled stoneware clay (mid-fire)
- Canvas work surface
- Rolling pin with guide strips (approx. 1/4 inch or 6mm)
- Rectangular drape molds or wooden forms
- Pottery knife or fettling knife
- Flexible rib tool
- Sponge
- Slip (liquid clay)
- Scoring tool or serrated rib
- Small round cookie cutters or circle templates
- Matte cream/white glaze
- Kiln
Step 1: Forming the Long Platter
-
Roll the Slab:
Begin by wedging your speckled clay to remove air bubbles. Roll it out on your canvas into a long, even slab using the guide strips to ensure a uniform thickness of about 1/4 inch. -
Cut the Shape:
Using a ruler and your pottery knife, cut a long, narrow rectangle. A good dimension for sushi is roughly 12 inches by 5 inches, but size it according to your table needs. -
Smooth the Surface:
Run a flexible rib gently over the surface to compress the clay particles and remove the canvas texture. This is crucial for preventing warping later. -
Lift the Rims:
Or gently lift the edges of the slab by hand or place the slab over a shallow rectangular hump mold. If forming by hand, prop the edges up with small coils of clay or foam supports until leather hard to create a gentle, tray-like curve. -
Refine Edges:
Once the clay has stiffened slightly to leather-hard, use a damp sponge to round over the sharp cut edges for a polished look.
Step 2: Creating the Segmented Tray
-
Cut the Base:
Roll out a second slab of identical thickness. Cut a wider rectangle this time, perhaps 10 inches by 6 inches, to serve as the base for your dipping bowls and accompaniments. -
Build the Wall:
Cut long strips of clay from your remaining slab, about 3/4 inch tall. These will become the vertical walls of the tray. -
Score and Slip:
Score the perimeter of the rectangular base and the bottom of your wall strips. Apply slip generously. -
Attach the Walls:
Press the strips onto the base to form the outer rim. I prefer to reinforce the inside seam with a very thin coil of clay, blending it smooth for a seamless transition. -
Add the Divider:
Cut a strip to fit the width of the tray. Score/slip and attach it roughly one-third of the way down the tray to create a separate zone for the larger cup or accessories.
Warp-Proofing
To prevent long trays from bowing up in the middle during firing, weigh down the center with a small bag of sand or rice during the drying phase.
Step 3: Making the Sauce Dishes and Cups
-
Hand-build or Pinch:
For the small sauce dishes and the sake cup, you can pinch them from a ball of clay for an organic look, or slab-build them for precision. -
Slab Method Option:
If slab building to match the trays perfectly: cut a circular base and a strip for the wall. Wrap the wall around the base, score, slip, and blend the seams thoroughly. -
Shape and Refine:
Ensure the rims are rounded and comfortable to the lip. The sauce dishes should be shallow and wide, while the drinking vessel (if making one) should have taller, straight sides. -
Checking the Fit:
While everything is still greenware, place the small bowls onto the segmented tray to ensure they fit comfortably within the sections you created.
Chopstick Upgrade
With excess clay, make matching chopstick rests. Roll a tiny coil, flatten slightly, and create a gentle U-shaped indentation in the center.
Step 4: Finishing and Glazing
-
Bisque Fire:
Allow all pieces to dry slowly under plastic to prevent warping, then bisque fire them according to your clay body’s specifications (usually Cone 04 or 06). -
Glaze Application:
Dip or brush your matte cream glaze onto the pieces. A matte glaze looks particularly good here because it allows the dark speckles of the clay body to bleed through subtly. -
Wipe the Feet:
Carefully wipe the glaze off the bottom of every piece with a wet sponge so they don’t fuse to the kiln shelves. -
Final Firing:
Glaze fire to the maturity temperature of your clay (likely Cone 5 or 6). Once cool, sand the bottoms lightly if there are any rough spots.
Set your table with your new handmade ceramics and enjoy the professional touch they bring to your dining experience
Charcuterie Board Companion Set
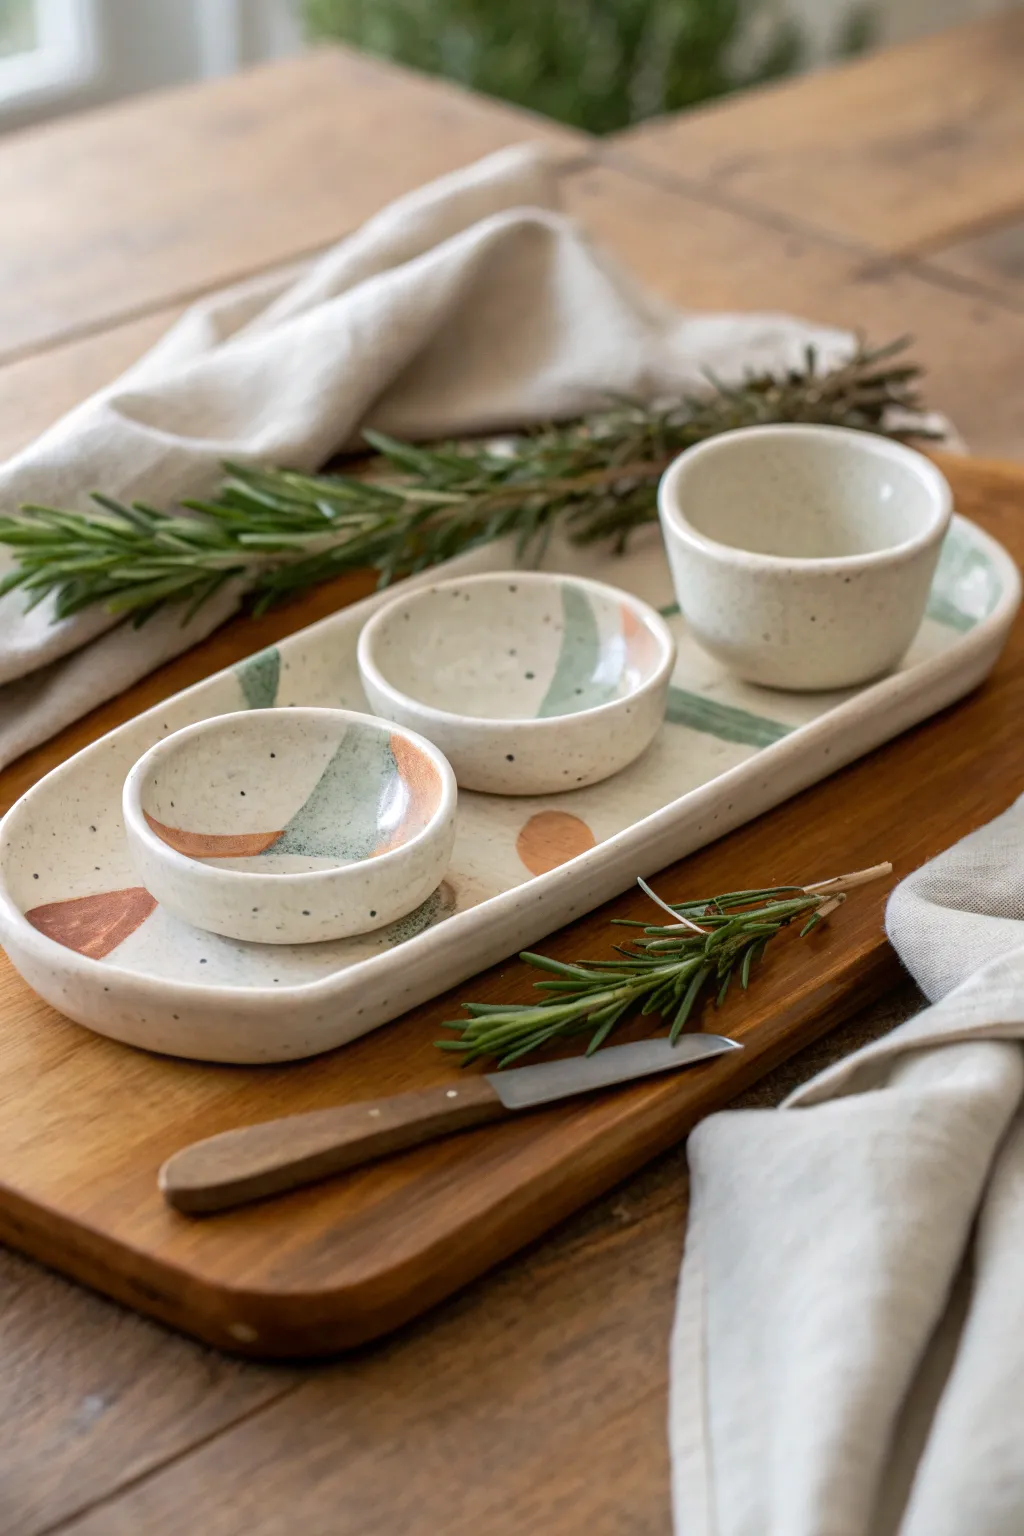
Elevate your next cheese board with this charming handmade ceramic set featuring a long serving tray and three nesting pinch pots. The design relies on a creamy, speckled clay body accented with abstract, minimalist brushstrokes in sage green and terracotta.
Step-by-Step
Materials
- Speckled stoneware clay (approx. 2-3 lbs)
- Rolling pin
- Canvas or slab mat
- Rectangular template (paper or craft foam, approx. 10×4 inches)
- Circle cutters or bowls for templates (approx. 3-inch diameter)
- Needle tool
- Smooth kidney rib (rubber or metal)
- Sponge
- Underglazes (muted sage green, terracotta/rust orange)
- Soft fan brush
- Clear transparent glaze (cone 5/6 or match your clay)
- Kiln access
Step 1: Forming the Tray
-
Roll the slab:
Begin by wedging your speckled clay thoroughly to remove air bubbles. Roll it out on your canvas into a distinct slab about 1/4-inch thick. Keep the thickness consistent for even drying. -
Cut the rectangle:
Place your rectangular template onto the slab. Using your needle tool, cut vertically around the template to create the base of your tray. -
Smooth the surface:
Before manipulating the clay further, run a damp sponge or a soft rib over the surface to compress the clay particles and remove any canvas texture. -
Create the rim:
Gently lift the edges of the rectangle with your fingertips. Pinch upward to create a small vertical wall, roughly half an inch high. I like to keep this organic rather than perfectly straight. -
Refine the shape:
Smooth the transition between the floor and the wall of the tray using a modeling tool or your fingertip. Round off the top lip of the rim with a damp sponge so it isn’t sharp.
Warping Woes?
If your long tray warps during drying, execute ‘slow drying.’ loosely cover it with plastic for several days and place a small weighted bag of sand in the center to hold it flat.
Step 2: creating the Pinch Pots
-
Portion the clay:
Divide the remaining clay into three equal balls, roughly the size of a tangerine. -
Open the form:
Hold a clay ball in one hand and press your thumb into the center, stopping about a quarter-inch from the bottom. -
Pinch the walls:
Rotate the ball while gently pinching the clay between your thumb and fingers. vary the height slightly if you want variety; the image shows one taller cup and two shallower bowls. -
Shape the taller cup:
For the taller vessel shown on the right, pinch the walls upward rather than outward, keeping them vertical to hold toothpicks or taller dips. -
Shape the shallow bowls:
For the two smaller bowls, pinch the walls slightly outward to create a wider, open shape perfect for oils or salts. -
Flatten bottoms:
Tap each pot gently on the table to create a flat, stable foot. Ensure they sit level without wobbling. -
Test the fit:
Place the three greenware pots onto the damp tray to ensure they fit comfortably with a little negative space between them. Adjust sizes now while the clay is plastic.
Make It a Gift Set
Create a matching cheese knife handle! Make a thick coil of clay, hollow it out slightly to accept a utensil kit insert, and decorate it with the same green and rust abstract pattern.
Step 3: Decorating & Glazing
-
Bisque fire:
Allow all pieces to dry slowly under plastic to prevent warping, then bisque fire them according to your clay body’s specifications (usually Cone 04). -
Plan the pattern:
Wipe the bisque ware with a damp sponge to remove dust. visualize where your abstract shapes will go; keeping the design spare creates that modern look. -
Apply sage accents:
Using a soft brush, paint sweeping, curved geometric shapes with the sage green underglaze. These should look like loose quarter-circles or soft triangles. -
Apply terracotta accents:
Add smaller accents of terracotta underglaze. Let these shapes touch or slightly overlap the green areas for visual interest. -
Wax the bottoms:
Apply wax resist to the bottom of the tray and the foot of each pinch pot to prevent them from sticking to the kiln shelf. -
Clear glaze application:
Dip the entire piece (or brush generously) with a clear transparent glaze. The clear coat will seal the underglaze decoration and let the natural clay speckles shine through. -
Final firing:
Fire the set to the maturation temperature of your clay and glaze (typically Cone 5 or 6). Allow the kiln to cool completely before unloading.
Once cooled, arrange your new custom serving set with fresh herbs and your favorite artisan snacks for a beautiful display.
Baking Prep Set With Ramekins and Spoon Rest
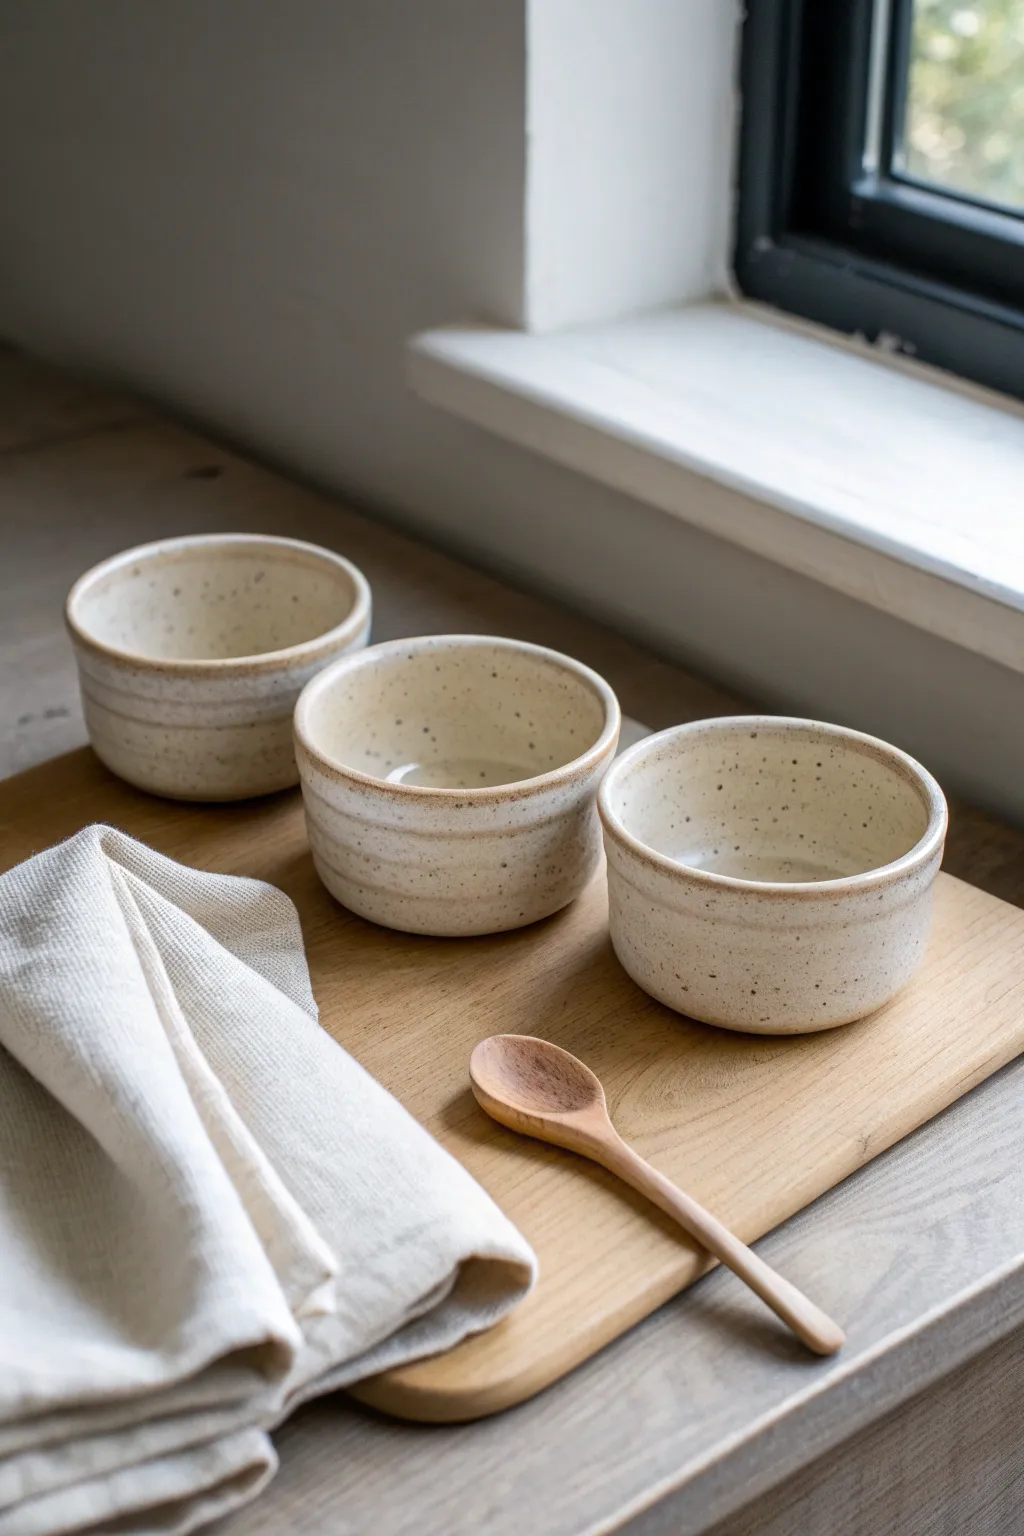
This project guides you through creating a charming set of wheel-thrown ramekins featuring a rustic, speckled cream glaze and subtle throwing rings. These durable little bowls are perfect for staging ingredients during baking prep or serving individual portions at the table.
Detailed Instructions
Materials
- Speckled stoneware clay (approx. 1 lb per ramekin)
- Potter’s wheel
- Medium sponge
- Wire cutter
- Wooden throwing rib
- Metal kidney scraper
- Needle tool
- Trimming tools (loop tool)
- Satin matte cream glaze
- Kiln
Step 1: Throwing the Forms
-
Prepare Clay Balls:
Weigh out three equal balls of speckled stoneware clay, roughly 1 pound each. Wedge them thoroughly to remove air pockets and ensure even consistency. -
Center the Clay:
Secure the first ball onto the wheel head. With the wheel spinning at a medium-fast speed, use water and firm hand pressure to center the clay into a low, wide puck shape. -
Open the Interior:
Press your thumbs into the center to open the clay, leaving about a 1/4 inch thickness for the floor. Pull the floor out horizontally to establish a flat, wide base for the ramekin. -
Pull the Walls:
Slow the wheel down slightly. Pinch the clay at the base and pull the walls straight up. Aim for a cylindrical shape with vertical sides, keeping the walls relatively thick and sturdy for durability. -
Refine the Rim:
Compress the rim with a piece of chamois or your sponge to round it off. A smooth, rounded rim is essential for durability and feels better when handling. -
Create Texture:
I like to leave the subtle throwing rings visible near the bottom third of the pot. Using your finger or a wooden rib, gently press horizontal grooves into the exterior as the wheel spins to accentuate these lines. -
Cut:
Run a wire tool under the base of the ramekin to separate it from the wheel head. -
Repeat:
Repeat the throwing process for the remaining two clay balls, aiming to match the height and width of the first one as closely as possible.
Warped Walls?
If your ramekins warp during firing, the walls might be too thin or uneven. Keep the walls slightly thicker than a drinking cup to ensure they hold their round shape.
Step 2: Trimming and Finishing
-
Leather Hard Stage:
Allow the pieces to dry slowly until they reach a leather-hard state. They should be firm enough to handle without deforming but still cool to the touch. -
Center specific piece:
Place a ramekin upside down on the wheel head and tap it into center. Secure it with small wads of clay. -
Trim the Foot:
Using a sharp loop tool, trim away excess weight from the bottom edge. Carve a distinct foot ring so the ramekin sits slightly elevated, mirroring the straight profile shown in the image. -
Smooth the Surface:
Use a smooth metal kidney or the back of a spoon to burnish any rough spots on the trimmed area, blending the texture so it feels cohesive. -
Bisque Fire:
Once fully bone dry, load the ramekins into the kiln for a bisque firing (usually to Cone 04 or 06, depending on your clay body).
Step 3: Glazing
-
Clean and Wax:
Wipe the bisque-fired pieces with a damp sponge to remove dust. Apply wax resist to the bottom foot ring to prevent glaze from adhering to the kiln shelf. -
Mix Glaze:
Stir your satin matte cream glaze thoroughly. If your clay body doesn’t have speckles, you can add granular ilmenite or manganese to the glaze itself to achieve that spotted look. -
Dip:
Holding the ramekin by the foot, dip it swiftly into the glaze bucket for about 3 seconds. Pull it out and shake gently to remove excess drips. -
Rim Detail:
The glaze will naturally break over the rim and the throwing rings, allowing the darker clay body to show through slightly, creating that warm, toasted edge. -
Final Fire:
Load the glazed pieces into the kiln and fire to maturity (likely Cone 5 or 6 for stoneware). Allow the kiln to cool completely before unloading.
Pro Tip: Consistency
Use a set of calipers or a simple chopstick marked with tape to measure the height and width of your first bowl, ensuring the next two match perfectly.
Once cooled, these sturdy vessels are ready to hold your spices, mise en place, or dips.
Bathroom Vanity Set With Tray and Tumbler
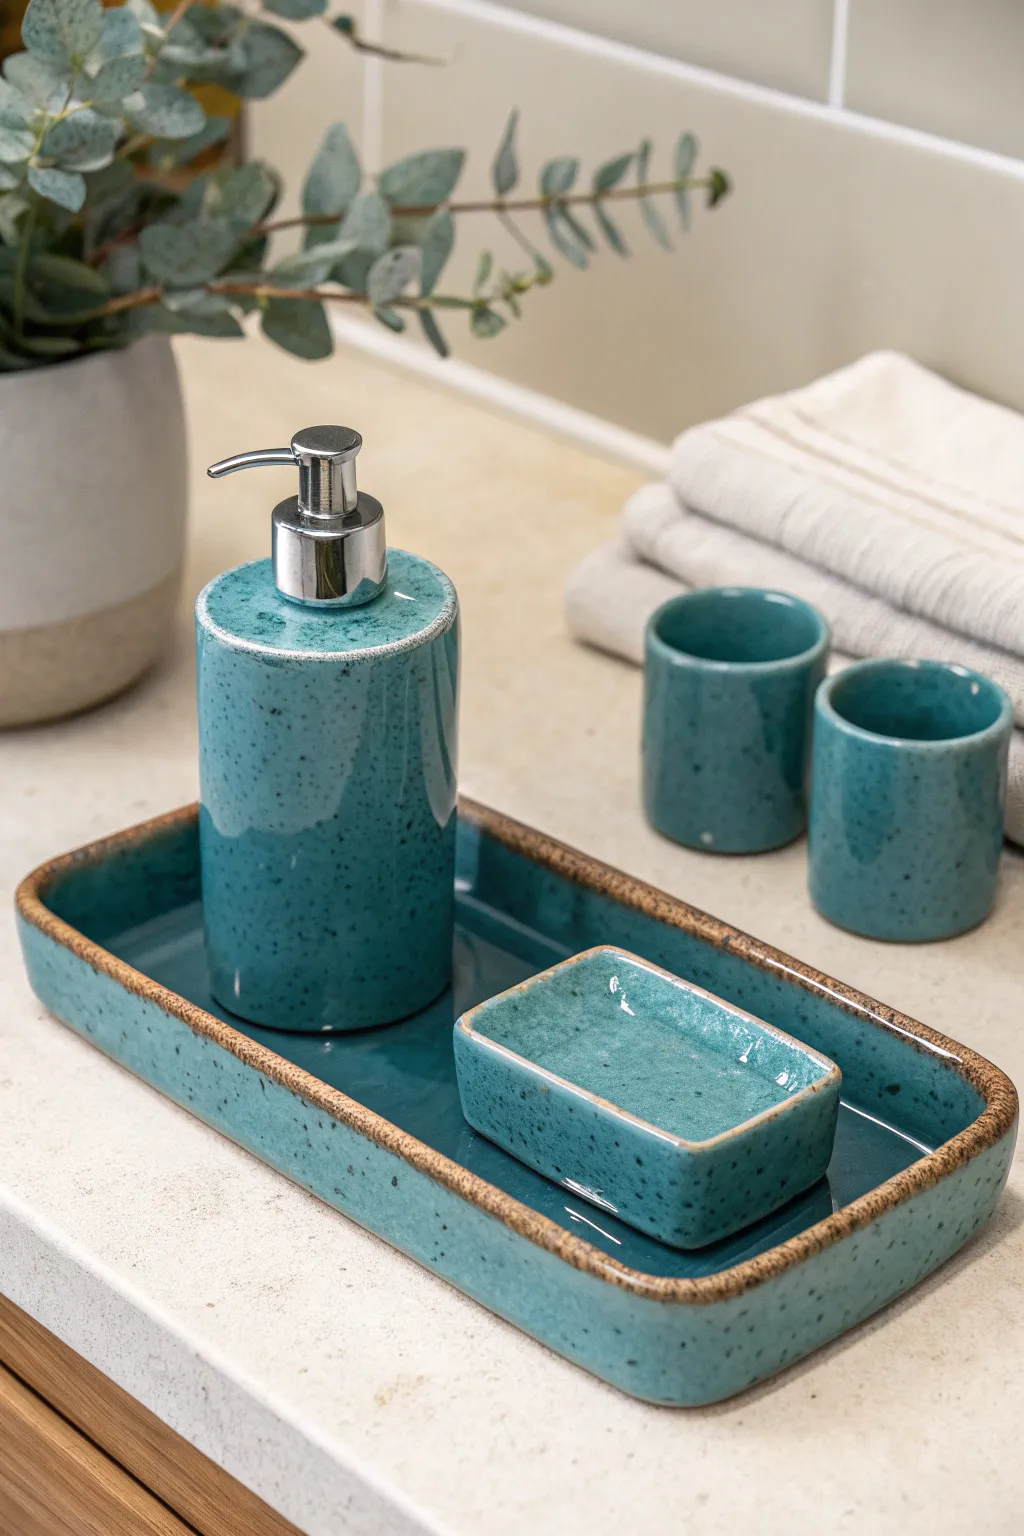
Transform raw clay into this sleek, spa-worthy bathroom accessory set featuring a glossy teal glaze with charming speckles. The combination of a rectangular tray, geometric soap dish, and cylindrical dispenser creates a functional statement piece for any modern vanity.
Step-by-Step Guide
Materials
- Stoneware clay (grogless for smoother finish)
- Pottery wheel (for dispenser and tumblers)
- Slab roller or rolling pin
- Canvas work surface
- Wooden guide strips (1/4 inch thickness)
- Pottery knife or needle tool
- Rib tool (metal and rubber)
- High-gloss teal glaze (cone 5 or 6 appropriate)
- Speckled clay body or speckle-additive glaze
- Soap pump mechanism (chrome finish)
- Scoring tool
- Slip
- Sponge
Step 1: Forming the Tray and Soap Dish
-
Roll the slab:
Begin by wedging your stoneware clay thoroughly to remove air bubbles. Roll out a large, even slab approximately 1/4 inch thick using your slab roller or a rolling pin with guide strips on either side to ensure uniform thickness. -
Cut the bases:
Using a needle tool and a straight edge, cut out a large rectangle for the main tray base (approx. 10×5 inches) and a smaller rectangle for the soap dish base (approx. 4×3 inches). -
Prepare the walls:
From the remaining slab, cut long strips for the walls of both the tray and the soap dish. These should be about 1 inch tall. I find it helpful to cut them slightly longer than the perimeter of the bases to allow for trimming. -
Score and slip:
Score the edges of your bases and the bottom edge of your wall strips. Apply a generous amount of slip to the scored areas to act as glue. -
Attach the walls:
carefully attach the wall strips to the bases. Wrap the strip around the perimeter, pressing firmly. Where the ends of the walls meet, cut them at a 45-degree angle (beveled) for a seamless join, score, slip, and press together. -
Curve the corners:
While the clay is still plastic, gently push from the inside of the corners outward to create the soft, rounded rectangular shape seen in the image. Use a damp sponge to smooth the top rim of the walls, rounding them slightly.
Uneven Glaze Coat?
If you notice pinholes or thin spots after dipping, lightly sand those areas with a finger once dry (wear a mask!) and dab a tiny bit more glaze on with a brush before firing.
Step 2: Throwing the Dispenser and Tumblers
-
Center the clay:
Place a ball of clay on the wheel head and center it. For the soap dispenser, you’ll need slightly more clay than for the tumblers. -
Open and pull the cylinder:
Open the clay and pull up the walls to create a tall, straight cylinder. Aim for a height of about 6-7 inches for the dispenser. Keep the walls even and straight, avoiding any tapering inward or outward. -
Refine the shape:
Use a metal rib on the outside while supporting the wall from the inside to scrape away slip and creating a perfectly smooth vertical profile. The top rim should be flat to accommodate the pump mechanism later. -
Form the tumblers:
Repeat the process with smaller amounts of clay to create the two small cups or tumblers shown in the background. These should be shorter and slightly wider, perfect for holding toothbrushes. -
Dry and bisque fire:
Allow all pieces to dry slowly under plastic to prevent warping, especially the slab-built trays. Once bone dry, bisque fire them in the kiln to cone 04 or your clay’s specification.
Step 3: Glazing and Finishing
-
Prepare the glaze:
Mix your high-gloss teal glaze well. If your clay body isn’t naturally speckled, mix in a speckling agent or choose a glaze that includes iron speckles. -
Wax the bottoms:
Apply wax resist to the bottom of the tray, soap dish, tumblers, and dispenser to prevent them from sticking to the kiln shelf. -
Dip the pieces:
Dip each piece into the glaze bucket. For the dispenser, pour glaze inside, swirl to coat, pour out, and then dip the exterior. Hold them upside down for a few seconds to let excess drips fall off. -
Clean the rims:
The image shows a distinctive reveal of the raw clay body at the very edges. Use a damp sponge to carefully wipe the glaze off the very top rim of the dispenser, tray, and soap dish. This creates that lovely toasted contrast line. -
Glaze fire:
Fire the pieces again to the glaze’s maturity temperature (likely cone 5 or 6). I always ensure the pieces aren’t touching on the kiln shelf. -
Assemble dispenser:
Once the pieces are cool, test the fit of your soap pump. If the opening is slightly too large, you can wrap a little plumber’s tape around the pump base for a snug fit, or simply screw it on if you sized the neck for a specific thread.
Luxury Texture
Before glazing, gently sand the bare clay rim you plan to leave exposed. A smooth, unglazed rim feels much more professional and finished to the touch than a rough one.
Now you have a stunning, custom-made ceramic set that brings a touch of handmade elegance to your daily routine
Desk Set for Calm Creative Chaos
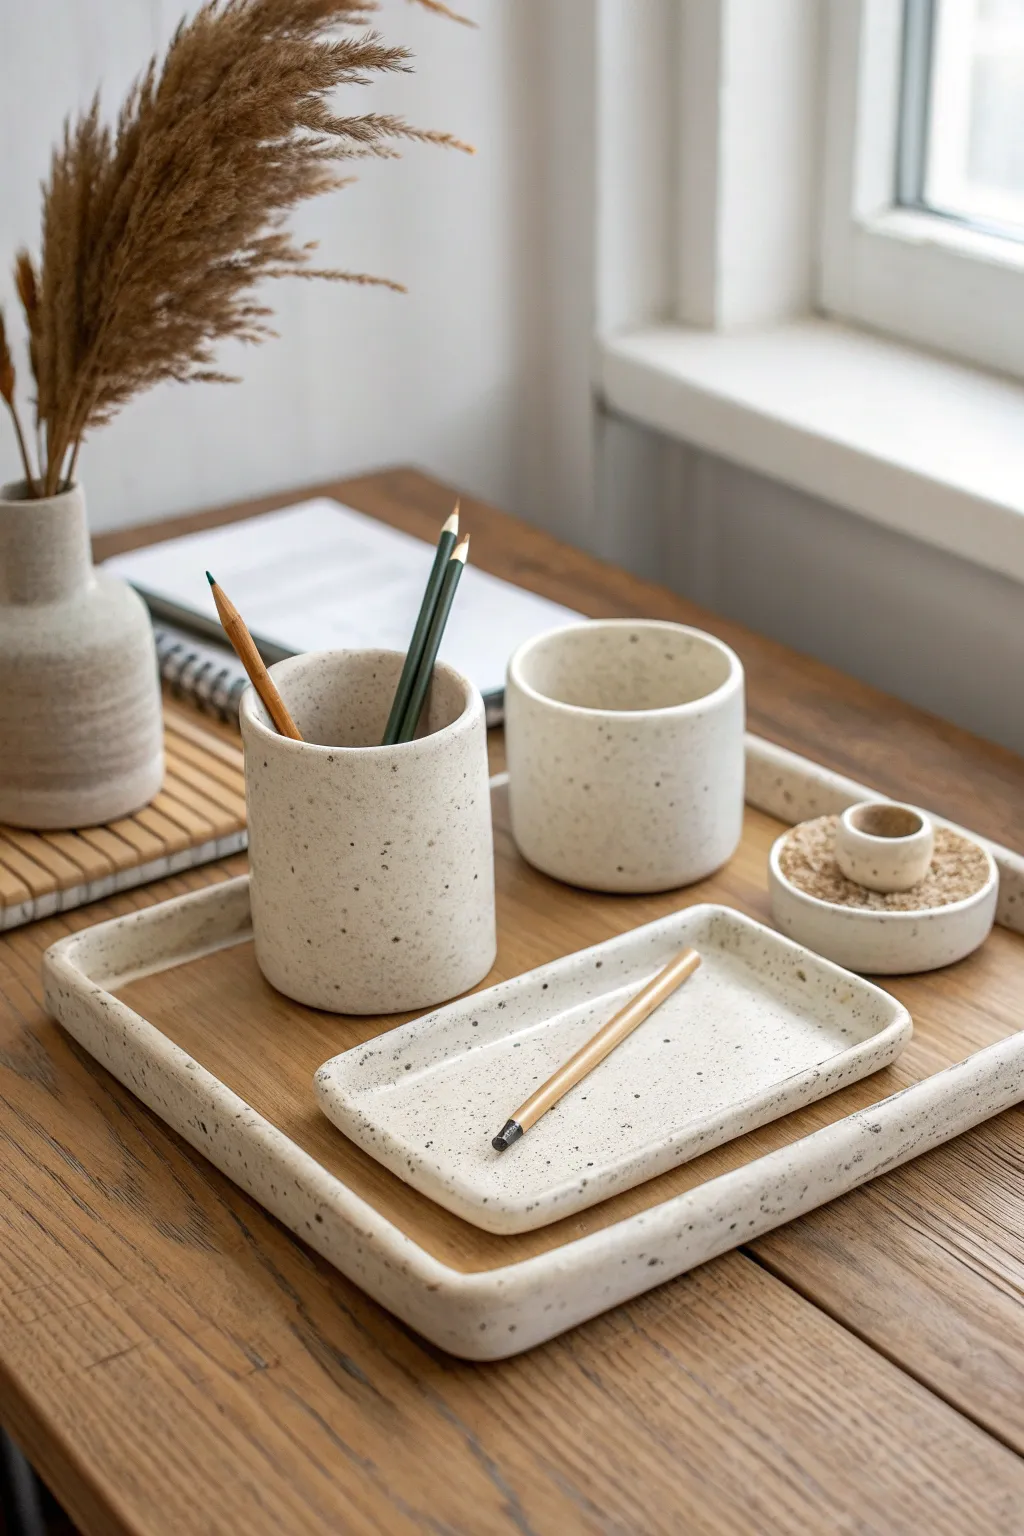
Bring a sense of serenity to your workspace with this cohesive ceramic desk set featuring a natural speckled finish. This slab-building project creates a functional rectangular tray, a pen cup, and smaller nesting dishes perfect for organizing your creative chaos.
Step-by-Step
Materials
- Speckled stoneware clay (white or buff with grog)
- Rolling pin
- Canvas mat or slab roller
- Guide sticks (1/4 inch thickness)
- Fettling knife or needle tool
- Ruler and square
- Scoring tool or serrated rib
- Slip (clay mixed with water)
- Various diameter biscuit cutters or templates
- Soft rib tool (rubber or silicone)
- Sponge
- Kiln
- Matte white or transparent glaze (if clay is already white)
Step 1: Preparation and Slab Rolling
-
Wedge the clay:
Begin by thoroughly wedging your speckled stoneware clay to remove any air bubbles. You will need about 3-5 lbs of clay depending on the size of your tray. -
Roll out the slab:
Place the clay on your canvas mat between two guide sticks. Roll the clay out into a large, consistent slab approximately 1/4 inch thick. Compress the slab on both sides with a rubber rib to align the clay particles and prevent warping. -
Measure the components:
Using your ruler, mark out the base for the large tray (approx. 8×12 inches), the smaller tray (4×6 inches), and the bases for the cylindrical cups. You will also need long rectangular strips for the walls of the cups.
Clean Seams
When joining the vertical seam of the pencil cup, bevel the edges at 45-degree angles before scoring. This creates a stronger overlap and a cleaner invisible join.
Step 2: Building the Trays
-
Cut the bases:
Use your fettling knife to cut out the rectangular bases for the large and small trays. Smooth the cut edges with a damp finger. -
Create the heavy rim:
Roll coils of clay slightly thicker than a pencil. These will form the raised borders of your trays. -
Attach the tray walls:
Score the outer edge of your rectangular bases and the underside of your coils. Apply slip generously. -
Blend the coils:
Press the coil onto the base. Using your thumb or a modeling tool, blend the inside of the coil down onto the base floor until the seam disappears. I like to smooth this transition seamlessly so it looks like one solid piece. -
Refine the edges:
Use a damp sponge to smooth the coil walls, creating a soft, rounded rectangular lip. Ensure the corners are gently curved rather than sharp.
Texture Twist
Before cutting your slabs, gently press a piece of linen or canvas into the clay surface to leave a subtle woven texture that the glaze will break over beautifully.
Step 3: Building the Pencil Cup and Bowls
-
Cut cylinder components:
Cut a circular base for the pencil holder. Measure the circumference of this base and cut a rectangular strip of slab to match that length for the wall. -
Form the cylinder:
Score and slip the short ends of the rectangular strip. Stand it up and curl it around to join the ends, creating a tube. Compress the seam from both inside and outside using a wooden tool. -
Attach base to wall:
Score and slip the bottom of the tube and the edge of the circular base. Join them together, smoothing the clay downward from the wall to the base on the outside, and using a long tool to smooth the inside seam. -
Repeat for smaller vessels:
Repeat this process for the shorter cup and the tiny incense holder, adjusting the height of your slab strips accordingly. -
Smoothing and drying:
Run a damp sponge over all rims to soften them. Let all pieces dry slowly under plastic to the leather-hard stage to prevent warping.
Step 4: Finishing and Firing
-
Bisque fire:
Once the pieces are bone dry, load them into the kiln for a bisque firing (usually to Cone 04). -
Glazing:
Wipe the bisque-ware with a damp sponge to remove dust. Pour a matte white or satin clear glaze into the cups and trays, swirling to coat the inside, then pour out excess. -
Exterior glazing:
Dip the exterior of the pieces or brush the glaze on. For the speckled look shown, ensure your glaze is translucent enough to let the clay’s natural iron spots show through. -
Glaze fire:
Fire the pieces a final time to the temperature required by your clay and glaze combination (typically Cone 5 or 6 for stoneware).
Arranging your freshly fired set on your desk will give you a beautifully organized space to spark new ideas
Plant Parent Set With Planter and Drip Tray
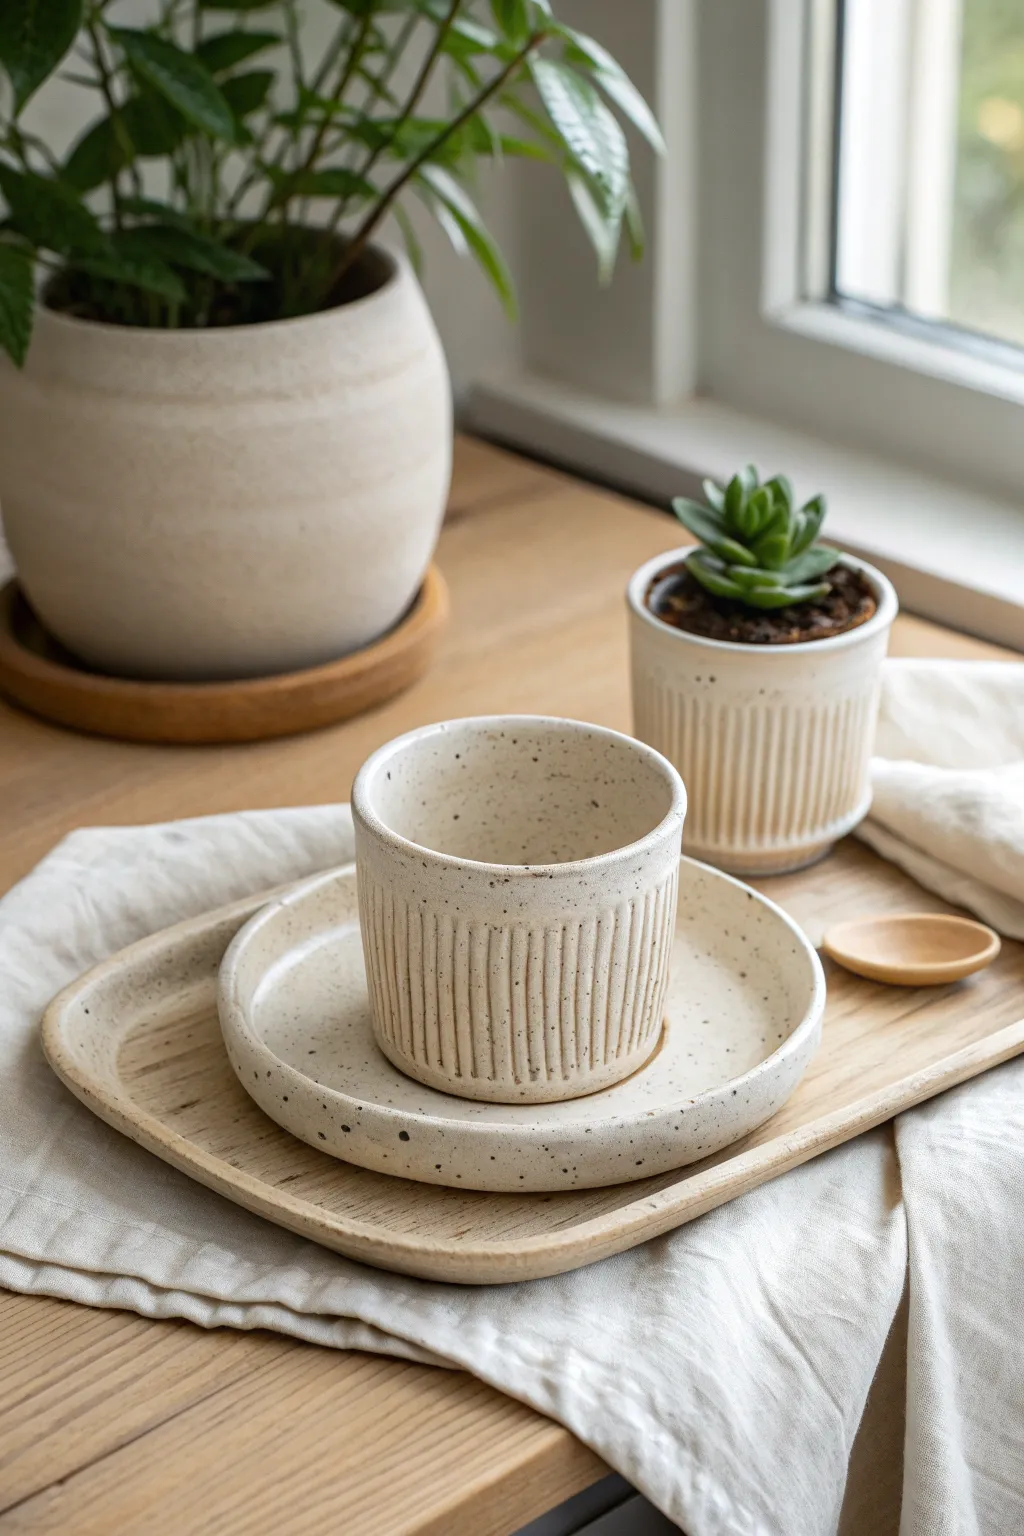
This comprehensive tutorial guides you through crafting a cohesive desk collection featuring a ribbed cup, matching saucer, serving tray, and two coordinating planters. The finished pieces boast a warm, speckled cream glaze and tactile vertical fluting that adds a modern, handcrafted touch to your plant-filled workspace.
Step-by-Step Guide
Materials
- Speckled stoneware clay (white or buff base with grog)
- Pottery wheel (for the cup and small planter)
- Rolling pin and guide sticks (for slab building)
- Canvas work surface
- Carving tools (specifically a small loop tool or fluting tool)
- Ribs (wooden and rubber)
- Needle tool
- Wire cutter
- Sponge
- Trimming tools
- Matte white or satin cream glaze (translucent enough to show speckles)
- Kiln
Step 1: Throwing the Cup & Small Planter
-
Center and open:
Start with about 1 lb of clay for the cup. Center it on the wheel and open the form, pulling the walls up to create a simple cylinder with straight sides. -
Shape the rim:
Compress the rim with a chamois or your finger to ensure it is smooth and pleasant to drink from. Leave the walls slightly thicker than usual to accommodate the carving later. -
Create the planter:
Use a similar amount of clay for the small succulent planter. Throw a similar cylinder shape but include a drainage hole in the bottom if desired, or plan to trim one later. -
Leather hard stage:
Wire the pieces off the bat and let them dry to a leather-hard state. This is crucial for clean carving.
Cracks in the slab trays?
Slabs often warp or crack if they dry unevenly. Dry your trays slowly under a loose sheet of plastic, or sandwich them between drywall boards to keep them flat.
Step 2: Carving the Texture
-
Mark your guidelines:
Place the cup upside down on a banding wheel. You can lightly mark vertical lines to guide spacing, but freehand carving often yields a charming organic look. -
Execute the fluting:
Using a small U-shaped loop tool, carve vertical channels from just below the rim to just above the foot. I like to maintain a steady, downward stroke for consistency. -
Repeat on the planter:
Apply the same fluting technique to the small planter. Ensure the depth of the cuts is consistent so the glaze breaks beautifully over the ridges. -
Smooth the ridges:
Once carved, run a damp finger or soft sponge over the sharp edges of the flutes to soften them slightly before firing.
Step 3: Slab Building the Trays
-
Roll the slabs:
Roll out a slab of clay to approximately 1/4 inch thickness. Use guide sticks to ensure an even surface. -
Cut the shapes:
Cut a circle for the cup saucer and a rounded rectangle for the serving tray. Use a paper template if you want precise symmetry. -
Form the rims:
Gently lift the edges of your slab shapes. Pinch and smooth the rim upward to create a shallow lip that will contain spills. -
Refine the edges:
Compress the rims with a sponge. For the organic look shown, allow slight irregularities in the rim height rather than making it mechanically perfect.
Add a wooden accent
To match the reference image perfectly, skip glazing the very bottom coaster area or create a separate wooden coaster insert for the drip tray.
Step 4: Large Coiled Planter
-
Create the base:
Roll a thick circular slab for the base of the large planter. -
Build with coils:
Roll thick coils of clay and stack them onto the base, scoring and slipping between each layer. Build the walls up to create a rounded belly shape. -
Smooth the exterior:
Blend the coils together thoroughly using a rib tool. The goal is a smooth, rounded surface that matches the minimalist aesthetic of the set.
Step 5: Finishing and Firing
-
Bisque fire:
Allow all pieces to dry completely (bone dry) before loading them into the kiln for a bisque fire (typically cone 04). -
Glazing:
Dip or pour your satin cream glaze over the pieces. Wipe the foot of each piece clean with a damp sponge. -
Glaze thinness check:
Ensure the glaze isn’t applied too thickly over the fluted areas; a thinner application here allows the clay’s natural speckles and texture to highlight the ridges. -
Final firing:
Fire the pieces to maturity (typically cone 5 or 6 depending on your clay body). Let the kiln cool completely before unloading.
Once cooled, pot your favorite succulents and enjoy a coffee break with your handcrafted set
Entryway Catchall Set for Keys and Coins
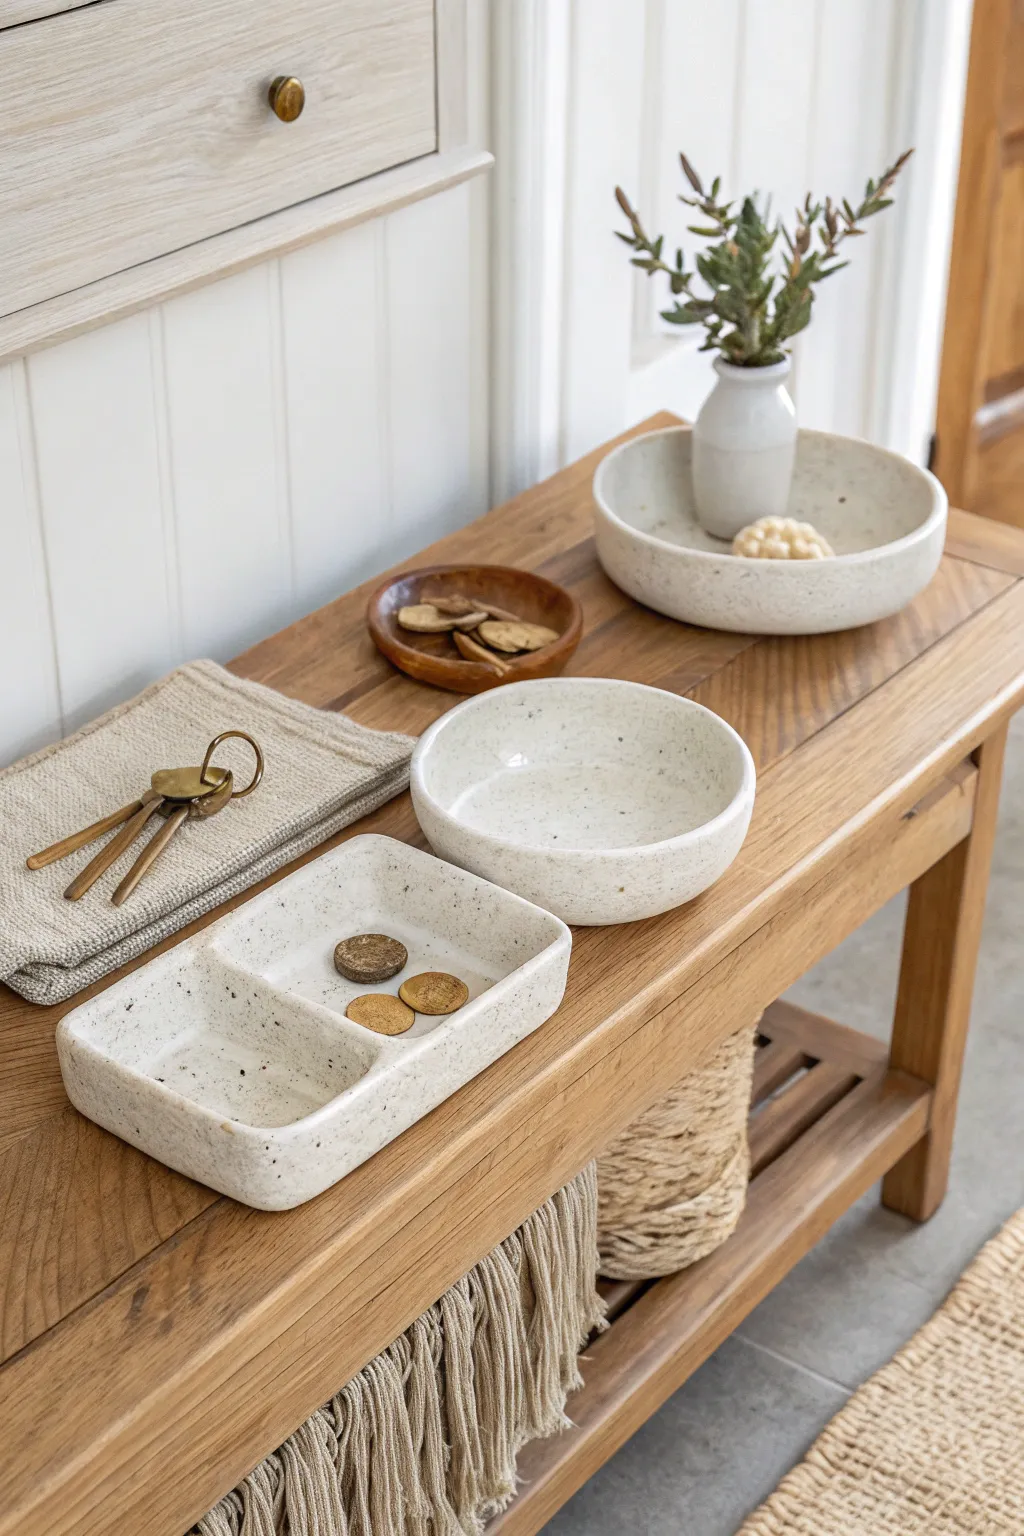
Create a unified artisanal look for your hallway with this handcrafted three-piece ceramic set. Using speckled stoneware clay and a transparent satin glaze creates a wonderfully natural, modern finish that neatly organizes everyday clutter.
Detailed Instructions
Materials
- Speckled mid-fire stoneware clay
- Rolling pin and guide strips (approx. 1/4 inch thick)
- Circular slump molds (or bowls for making molds)
- Rectangular slump mold (or DIY cardboard mold)
- Needle tool
- Potter’s knife or fettling tool
- Rib tool (flexible rubber or metal)
- Scoring tool (or fork)
- Slip (liquid clay)
- Sponge
- Clear or Satin White Stoneware Glaze
- Kiln (access required)
Step 1: Shaping the Divided Tray
-
Roll the slab:
Begin by rolling out a generous slab of speckled stoneware clay to a uniform 1/4-inch thickness. Ensure the slab is large enough to drape over your rectangular mold with excess for trimming. -
Form the base shape:
Drape the slab gently over your rectangular hump mold (or press it into a slump mold). Gently pat the clay to conform to the corners, being careful not to stretch it too thin. -
Establish the divider:
Measure the internal width of your rectangular tray. Cut a strip of clay from your leftover slab that matches this width and determines the height of your inner wall. -
Secure the divider:
Mark the center line inside the tray where the divider will go. Score this line and the bottom edge of your clay strip. Apply slip generously. -
Blend the seams:
Press the divider firmly into place. I like to use a small coil of soft clay along the seams to reinforce the join, blending it smooth with a modeling tool or your finger so the transition is invisible. -
Smooth the edges:
Using a damp sponge or chamois, round over all the top edges of the tray walls and the divider. Sharp edges can become brittle after firing.
Warping Woes
If your rectangular tray warps during drying, place a small, weighted bag of sand or rice inside it while it dries to gently hold the flat bottom shape.
Step 2: Creating the Bowls
-
Prepare bowl slabs:
Roll out two more slabs of clay for the round bowls. Use circular templates or cookie cutters to cut perfect circles—one slightly larger for the bigger bowl in the background. -
Slump the clay:
Place your clay circles into your chosen bowl molds. Gently press from the center outward to remove air pockets and ensure the clay takes the shape of the mold. -
Refine the rims:
While the clay is still in the mold, use a needle tool to trim any uneven excess from the rim to create a level height all the way around. -
Compress the interior:
Use a flexible rubber rib to compress the inside surface of the bowls. This not only smooths the texture but aligns the clay particles to prevent cracking during drying. -
Dry slowly:
Leave the pieces in their molds until they reach a leather-hard state. Removing them too early can cause warping, especially with wider bowls.
Make it Match
Create a cohesive look by using the same clay to create a small vase. Roll a slab into a cylinder, attach a base, and glaze it identically for a full set.
Step 3: Finishing and Glazing
-
Bisque fire:
Once all pieces are bone dry, load them into the kiln for a bisque firing (usually to Cone 04). This prepares the clay to accept glaze. -
Wipe down:
After the kiln cools, remove your pieces and wipe them with a damp sponge to remove any dust, which can cause glaze defects like crawling. -
Apply the glaze:
Dip, brush, or pour a clear or semi-opaque white satin glaze over the bisqueware. If you used speckled clay, a transparent glaze is crucial to let those beautiful natural flecks show through. -
Wipe the feet:
Use a wax resist on the bottom of each piece before glazing, or meticulously sponge off any glaze from the foot of the bowls and tray to prevent them from sticking to the kiln shelf. -
Glaze fire:
Fire the pieces a second time to the temperature required by your specific clay and glaze body (typically Cone 5 or 6 for stoneware). -
Sand the bottoms:
Once fired and cooled, check the unglazed bottoms for roughness. A quick rub with sandpaper or a diamond grit pad will protect your wooden furniture from scratches.
Arrange your fresh ceramics on your entryway table and enjoy the modern, organic order they bring to your space.
Candle Moment Set With Taper Holders
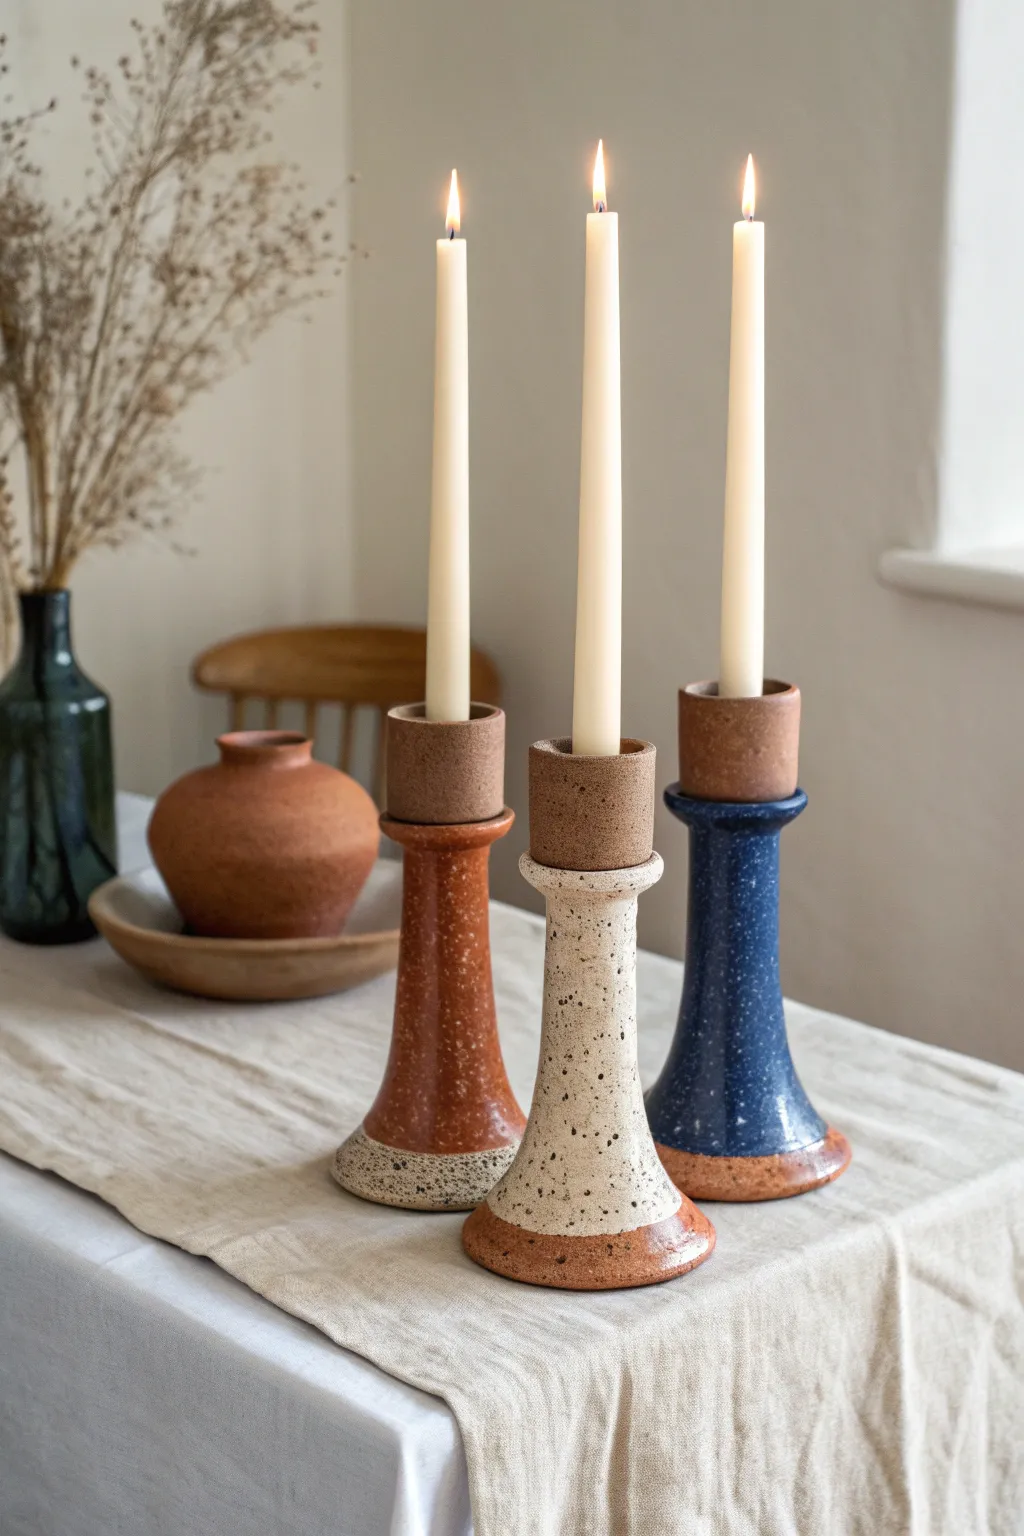
Elevate your table setting with this trio of ceramic taper holders, featuring a modern silhouette and a playful mix of raw clay and speckled glazes. The design uses contrasting textures and colors to create a cohesive yet distinct set that feels both rustic and refined.
Step-by-Step Tutorial
Materials
- Stoneware clay (speckled or buff)
- Pottery wheel
- Throwing tools (sponge, rib, needle tool, wire)
- Calipers or ruler
- Trimming tools
- Standard taper candle (for sizing)
- Wax resist
- Speckled cream glaze
- Deep cobalt blue glaze
- Rust/terracotta orange glaze
- Small paintbrush
- Kiln
Step 1: Throwing the Forms
-
Prep your clay:
Wedge three balls of clay, roughly 1.5 to 2 pounds each. Having slightly different amounts can help achieve the staggered heights naturally, though you can also control this during throwing. -
Center the first ball:
Secure the clay to the wheel head and center it into a tall cone before pressing it down into a puck. This helps align the clay particles for a taller form. -
Open the clay:
Create an opening in the center, but leave the floor quite thick—at least 1 inch. You need this mass to trim a solid foot later, and the top needs to remain solid for the candle cup. -
Pull the cylinder:
Pull the walls up into a tall, narrow cylinder. As you pull, choke the neck in slightly to create a tapered shape that is wider at the bottom and narrower near the top. -
Form the candle cup:
At the very top rim, leave a thick band of clay. Use your finger or a tool to open up a small well in this top section specifically sized for a taper candle. I like to use an actual candle to gently check the diameter, ensuring a snug fit. -
Define the sections:
Use a rib to smooth the sides. Create a distinct visual break line or slight indentation where the ‘cup’ meets the main body of the holder to mimic the assembled look in the photo. -
Repeat for the set:
Throw the remaining two balls of clay. Aim to vary the heights slightly for visual interest, but keep the base widths and cup sizes consistent.
Fit Check Pro Tip
Make the candle cup slightly deeper than you think you need. Glaze thickness can shrink the opening, and it’s easier to add a little melted wax to secure a loose candle than to fix a hole that’s too small.
Step 2: Trimming and Bisque
-
Leather hard stage:
Allow the pieces to dry to a leather-hard state. They should be firm enough to handle without deforming but soft enough to carve. -
Trim the base:
Center a holder upside down on the wheel. Trim the bottom to create a distinct, angled foot ring. This wide base is crucial for stability. -
Refine the surface:
Use a metal rib to burnish or smooth the raw clay texture on the top ‘cup’ section if you plan to leave it unglazed. The exposed clay provides a beautiful contrast. -
First firing:
Once bone dry, load the pieces into the kiln for a bisque fire (usually Cone 04 or 06). This prepares them for glazing.
Step 3: Glazing and Finishing
-
Apply wax resist:
Wax the bottom of the foot and the top ‘cup’ section of each holder. This will keep these areas raw and unglazed, highlighting the clay body texture. -
Glaze the first holder:
Dip the main body of the tallest holder into the speckled cream glaze. Wipe away any drips that may have run onto the waxed sections. -
Glaze the middle holder:
Dip the body of the middle holder into the deep cobalt blue glaze using tongs or by holding the waxed areas. -
Glaze the shortest holder:
Dip the shortest holder into the rust orange glaze. Ensure the glaze coat is even. -
Create the two-tone effect:
For the specific look in the photo, you can modify the glazing. For the cream holder, dip the very bottom inch into the rust glaze to create a dipped foot effect. For the blue holder, do the same with the rust glaze. -
Clean up:
Use a damp sponge to clean any stray glaze spots off the waxed rims and feet. The lines between glaze and raw clay should be crisp. -
Final firing:
Load the kiln carefully, ensuring pieces aren’t touching. Fire to the maturity temperature of your clay and glaze (typically Cone 5 or 6 for stoneware).
Level Up: Texture Play
Before the first firing, gently press coarse sand or grog into the wet clay of the rim and base. This enhances the tactile raw texture against the smooth, shiny glaze.
Once cooled, place your tapers inside and enjoy the warm, handmade glow they bring to your space
Reactive Glaze Showcase Set Across Forms
Embrace the beauty of contrast with this stunning stoneware set, featuring a speckled creamy-beige exterior paired with a deep, moody teal interior. The defining touch is the reactive rusty-brown rim that naturally occurs where the glazes interact, creating a rustic yet modern aesthetic.
Step-by-Step
Materials
- Speckled buff stoneware clay (mid-fire, cone 5/6)
- Potter’s wheel and throwing tools (sponge, ribs, wire cutter)
- Trimming tools
- Bisque kiln
- Glaze kiln (Cone 6)
- Liquid wax resist
- Creamy matte or satin white glaze (cone 6)
- Deep teal or sea-green reactive glaze (cone 6)
- Small glaze brushes
- Sponge for wiping feet
Step 1: Forming the Vessels
-
Prepare the Clay:
Begin by thoroughly wedging your speckled buff clay to remove air bubbles. This specific clay body is crucial because the iron speckles will burn through the cream glaze later, adding that signature texture. -
Throw the Bowl:
Center about 1.5 lbs of clay on the wheel. Open wide and pull the walls outward into a gentle curve. Aim for a distinct, rounded bottom rather than a flat cylinder. -
Throw the Cup:
Using about 1 lb of clay, throw a straight-sided cylinder. Gently belly out the bottom half for a comfortable hand-feel, keeping the rim slightly tapered in to hold heat. -
Shape the Pitcher:
For the pitcher, center 2-3 lbs of clay. Pull a tall cylinder, then collar the neck in significantly. While the wheel is slow or stopped, use your index finger and thumb to pull a sharp, functional spout. -
Throw the Plates:
Using 1.5-2 lbs of clay, throw flat discs. Compress the bottoms thoroughly to prevent cracking. Lift the edges slightly to create a rim that will contain sauces or juices. -
Attach Handles:
Once the pitcher and cup are leather hard, pull handles from a separate lug of clay. Score and slip the attachment points, then firmly press the handles on, smoothing the seams with a damp sponge.
Rim Reaction Tip
If your glazes don’t naturally break brown at the rim, brush a very thin line of iron oxide wash on the raw rim before the final dip.
Step 2: Trimming and Bisque
-
Trim Foot Rings:
When leather hard, trim a defined foot ring on the bowl, cup, and plates. This creates a shadow line that makes the pieces look like they are floating slightly. -
Smooth and Dry:
Burnish the rims lightly with a soft rib or chamois to ensure they are pleasant to touch. Allow all pieces to dry slowly under plastic to even out moisture content. -
Bisque Fire:
Load the bone-dry greenware into the kiln and bisque fire to Cone 04. This strengthens the ware for glazing while leaving it porous enough to absorb water.
Change the Clay
Try a dark chocolate clay body instead of buff. The cream exterior will look brighter, and the teal interior will become much moodier and deeper.
Step 3: The Dual-Glaze Application
-
Wax the Feet:
Apply liquid wax resist to the foot rings and the bottom 1/4 inch of the exterior walls. This ensures a clean line and prevents glaze from adhering to the kiln shelf. -
Glaze the Interiors:
Pour the deep teal glaze inside the bowl, cup, and pitcher. Roll the glaze around to coat the entire interior surface, then pour the excess out quickly. For plates, dip the face or brush heavily. -
Clean the Rims:
Use a damp sponge to meticulously wipe any teal glaze off the very top rim and any drips on the exterior. The rim needs to be bare for the final effect. -
Dip the Exterior:
Holding the piece by the foot (or using tongs), dip the exterior into the creamy matte white glaze. I find dipping straight down and up quickly gives the most even coat without runs. -
Overlap the Rim:
This is the secret step: Dip just the rim (about 1/4 inch) back into the teal glaze. The interaction between the cream base and the teal overlap creates that rusty brown break. -
Fettling:
Check the waxed bottoms one last time and use a sponge to wipe away any stray droplets of glaze that might have beaded up on the wax. -
Final Firing:
Fire the kiln to Cone 6 (oxidation). Ensure a slow cool down if possible, which allows the crystals in the matte glaze to develop fully.
Unload your kiln to discover a set of modern ceramics ready for your next dinner party
Two-Tone Color-Blocked Set
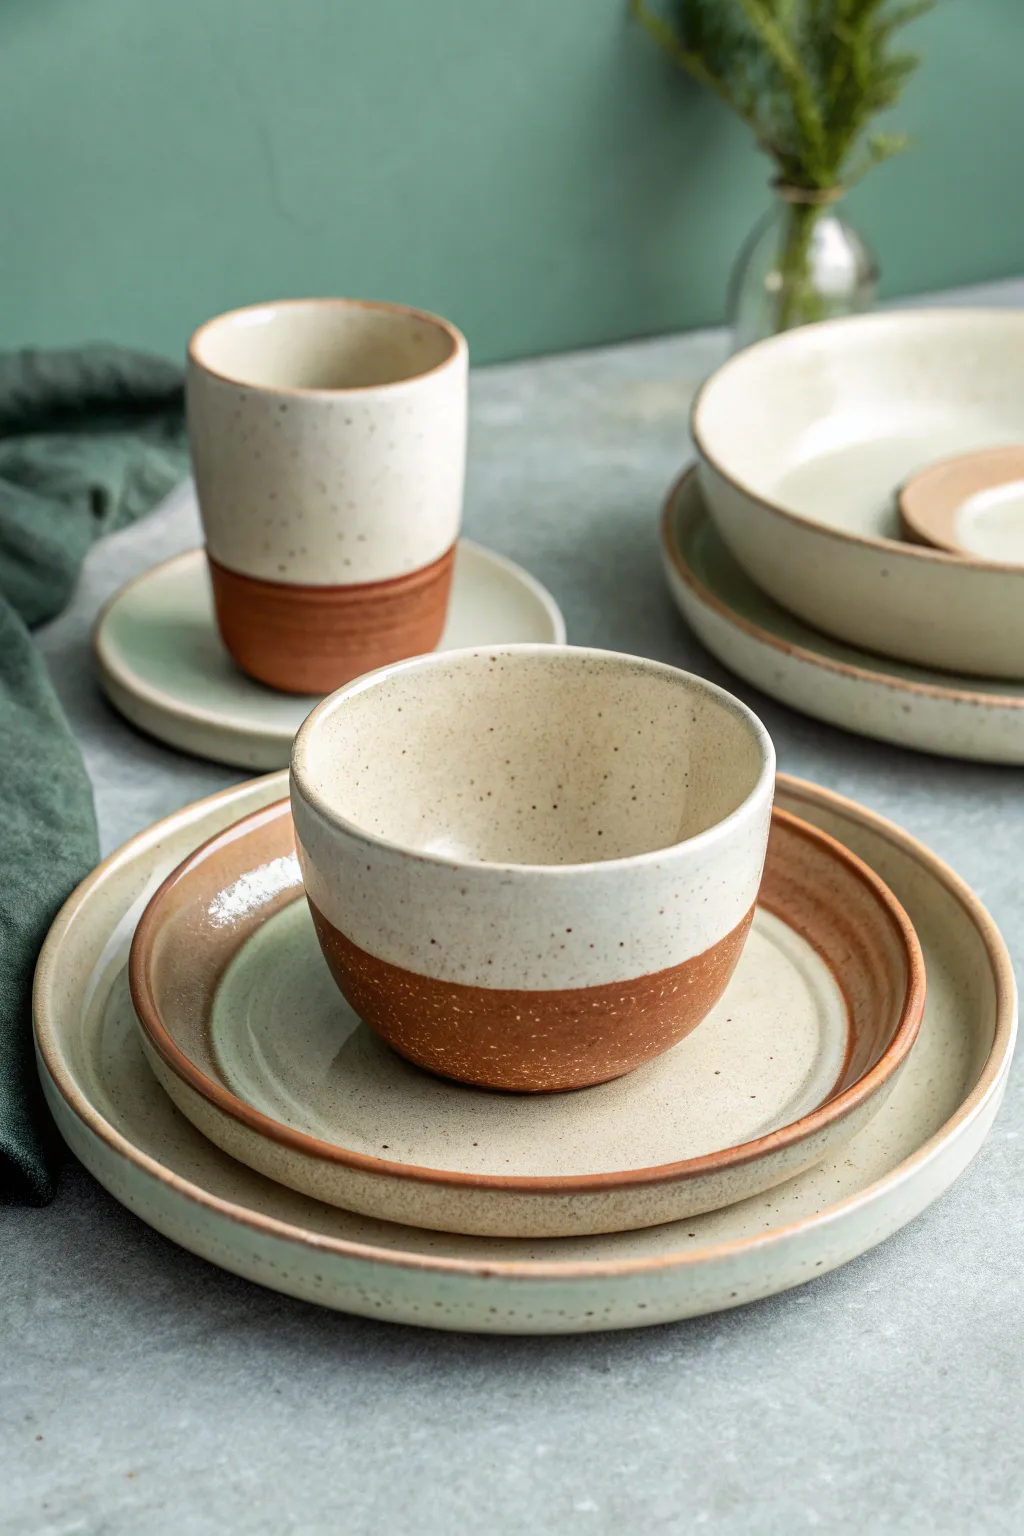
This project embraces the natural beauty of red clay by leaving the base unglazed, creating a striking contrast with a creamy, speckled white glaze. The result is a modern, tactile set that feels as grounded as it looks.
Step-by-Step Tutorial
Materials
- Red stoneware or terracotta clay body
- Pottery wheel
- Throwing tools (sponge, needle tool, wire cutter)
- Trimming tools
- Rib tool (wooden or silicone)
- Speckled cream or ‘oatmeal’ cone 5/6 glaze
- Wax resist emulsion
- Sponge or brush for wax
- Kiln
Step 1: Throwing and Shaping
-
Wedge the clay:
Begin by thoroughly wedging your red stoneware clay to remove air bubbles and align the particles, ensuring a smooth throwing experience. -
Center the clay:
Place a ball of clay on the wheel head and center it. For the bowl shown, start with about 1.5 lbs of clay; for the tumbler, use slightly less. -
Open and pull the walls:
Open the centered clay and pull up the walls. Aim for a cylindrical shape for the tumbler and a gentle curve for the bowl. Keep the walls consistent in thickness. -
Refine the rim:
Compress the rim of your vessel with a chamois or sponge. A rounded, smooth rim is crucial for comfort when drinking or eating. -
Smooth the surface:
Use a rib tool on the exterior while the wheel is spinning to remove throwing lines. Smooth surfaces work best for this clean, dipped aesthetic. -
Create the plate:
For the plate, flatten a larger ball of clay, leaving a slightly thicker rim. Pull the rim up gently to create a shallow lip. -
Wire off:
Run a wire cutter under the base of your pieces and slide them onto a ware board to dry to a leather-hard state.
Uneven Glaze Line?
If your dip wasn’t straight, don’t panic. Use a damp sponge to carefully wipe the glaze line straight before firing. A steady hand and a banding wheel help fix wobbly horizons.
Step 2: Trimming and Bisque Firing
-
Center specifically for trimming:
Once leather-hard, place your piece upside down on the wheel. Secure it with clay lugs or a chuck. -
Define the foot:
Trim away excess clay from the bottom. Create a distinct foot ring for the bowl and plates. For the tumbler, a flat bottom with a slight bevel works well. -
Smooth the transition:
I like to burnish the lower exterior (where the raw clay will show) with a smooth stone or the back of a spoon to make it pleasant to touch. -
Dry slowly:
Allow all pieces to dry completely. Cover them loosely with plastic if the air is dry to prevent warping. -
Bisque fire:
Load the bone-dry greenware into the kiln and fire to cone 04 (or your clay’s specific bisque temperature).
Add Texture
Before the bisque firing, use a carving tool to add subtle vertical fluting to the lower unglazed section. The glaze will break beautifully over the texture change.
Step 3: Glazing the Two-Tone Look
-
Clean the bisque:
Wipe the fired pieces with a damp sponge to remove any dust, which can prevent glaze from adhering properly. -
Apply wax resist:
Paint extensive wax resist on the bottom third of the exterior and the entire foot. Be precise with your line; this determines the sharp two-tone boundary. -
Prepare the glaze:
Stir your speckled cream glaze thoroughly. If the speckles have settled, ensure they are evenly distributed. -
Dip the interior:
For the cups and bowls, pour glaze inside, swirl to coat, and pour out. Wipe the rim immediately if any drops remain. -
Dip the exterior:
Hold the piece by the foot (or use tongs) and dip it straight down into the glaze bucket, submersion stopping just past your wax line. The wax will repel the glaze. -
Clean up drips:
Once the glaze is dry to the touch, use a damp sponge to wipe any stray beads of glaze off the waxed area. The line should be crisp and clean. -
Glaze fire:
Load the kiln, ensuring no glazed surfaces touch the kiln shelf or other pots. Fire to the maturity temperature of your glaze and clay (typically cone 5 or 6). -
Sand the bottom:
After firing, sand the unglazed clay bottom with fine-grit sandpaper to ensure it won’t scratch your table.
Enjoy using your beautifully minimalist set for your morning coffee or evening meal
Modular Serving Set That Forms One Big Shape

This project explores the satisfying world of modular pottery, creating a series of individual triangular plates that come together to form perfectly circular serving platter. The rich, deep teal glaze contrasts beautifully with the unglazed toasted clay rims, giving the set a rustic yet thoroughly modern aesthetic.
Step-by-Step Guide
Materials
- Stoneware clay (speckled or buff)
- Circle bat or template (approx. 12-14 inches diameter)
- Slab roller or rolling pin with guide strips
- Potter’s knife or needle tool
- Rib tool (wooden and rubber)
- Sponge
- Ruler
- Paper template (60-degree triangle)
- Circular bat system or hump mold (optional)
- Deep teal reactive glaze
- Wax resist
- Kiln
Step 1: Preparing the Slabs
-
Roll the clay:
Begin by rolling out a substantial slab of stoneware clay. Aim for a consistent thickness of about 1/4 to 3/8 of an inch. If you are using a rolling pin, use guide strips to ensure the slab is perfectly even across the entire surface. -
Compress the surface:
Using a rubber rib, firmly compress the clay on both sides. This aligns the clay particles, preventing warping later on—a crucial step for flat serving ware. -
Make your master template:
Cut a paper circle the exact size you want your final platter to be. Fold it in half, then into thirds to create six equal wedges. Cut one wedge out to use as your master template for all the triangular plates.
Step 2: Forming the Triangles
-
Cut the shapes:
Place your wedge template onto the prepared slab. Using a needle tool held vertically, trace and cut out six identical triangle shapes. Cut a few extras if you have room, just in case one warps during firing. -
Define the rims:
Since these are plates, not just flat tiles, you need to lift the edges. I find it helpful to place each triangle on a foam sheet and gently press the center down with a damp sponge while pulling the edges slightly upward. -
Refine the walls:
Once the general curve is established, use your fingers to pinch a vertical rim around the perimeter of each triangle. Keep this rim fairly low and subtle, about half an inch high. -
Smooth the edges:
Run a damp chamois or a soft sponge over the rim of each plate. This softens the angle and makes the finished piece comfortable to touch. -
Create the matching bowls:
For the accompanying bowls, throw small mounds of clay on the wheel or pinch pots by hand. Focus on creating a consistent rounded bottom that echoes the curves of the triangular plates. -
Assemble the test fit:
Before the clay dries completely to leather hard, arrange the six triangles into a circle. Make minor adjustments to the sides now so they nestle together perfectly without large gaps.
Warping Woes?
If plates curl during drying, weight them down. Place a board over the leather-hard pieces with a light weight (like a bag of rice) to keep them flat.
Step 3: Drying and Bisque
-
Slow drying:
Place the pieces on a ware board and cover them loosely with plastic. Modular sets are prone to warping, so slow, even drying is essential. Flip them over gently once a day. -
Bisque fire:
Once the pieces are bone dry, load them into the kiln for a bisque fire to Cone 04. Ensure they are fully supported on the kiln shelf.
Make it a Puzzle
Instead of identical wedges, cut the circle into organic, unequal puzzle-piece shapes for a more freeform, contemporary serving board.
Step 4: Glazing and Finishing
-
Wax application:
Apply a band of wax resist to the bottom of each piece and, crucially, along the exposed rim edge. The exposed raw clay is a key design element of this set. -
Clean the lines:
Check your wax lines carefully. Any stray wax will repel glaze, so use a knife to clean up the edges of the wax for a crisp transition between clay and color. -
Pour the glaze:
Pour your deep teal glaze into the interior of the bowls and the triangular plates. Swirl it quickly to coat the surface evenly, then pour out the excess. Avoid dipping, as you want to keep the outside walls unglazed. -
Wipe back:
Use a damp sponge to wipe away any glaze drips that might have splashed onto the waxed rims or exterior walls. -
Glaze fire:
Fire the pieces to the temperature appropriate for your specific clay and glaze (usually Cone 5 or 6 for stoneware). Make sure the plates are flat on the shelf. -
Sand the bottoms:
Once fired and cooled, lightly sand the unglazed bottoms with wet-dry sandpaper to ensure they won’t scratch your table surface.
Arrange your finished modular set on a tablecloth to admire how the individual pieces create a unified, stunning centerpiece