A good ceramic teapot is basically a little sculpture you get to use every day. Here are my favorite ceramic teapot ideas to spark your next build—some classic, some quirky, all totally makeable.
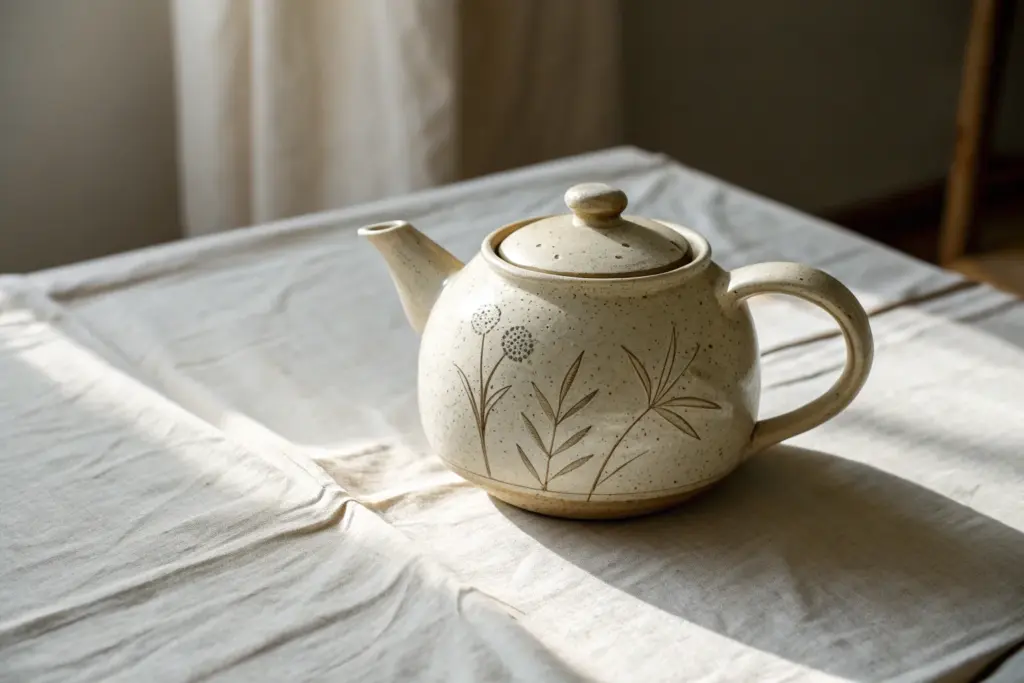
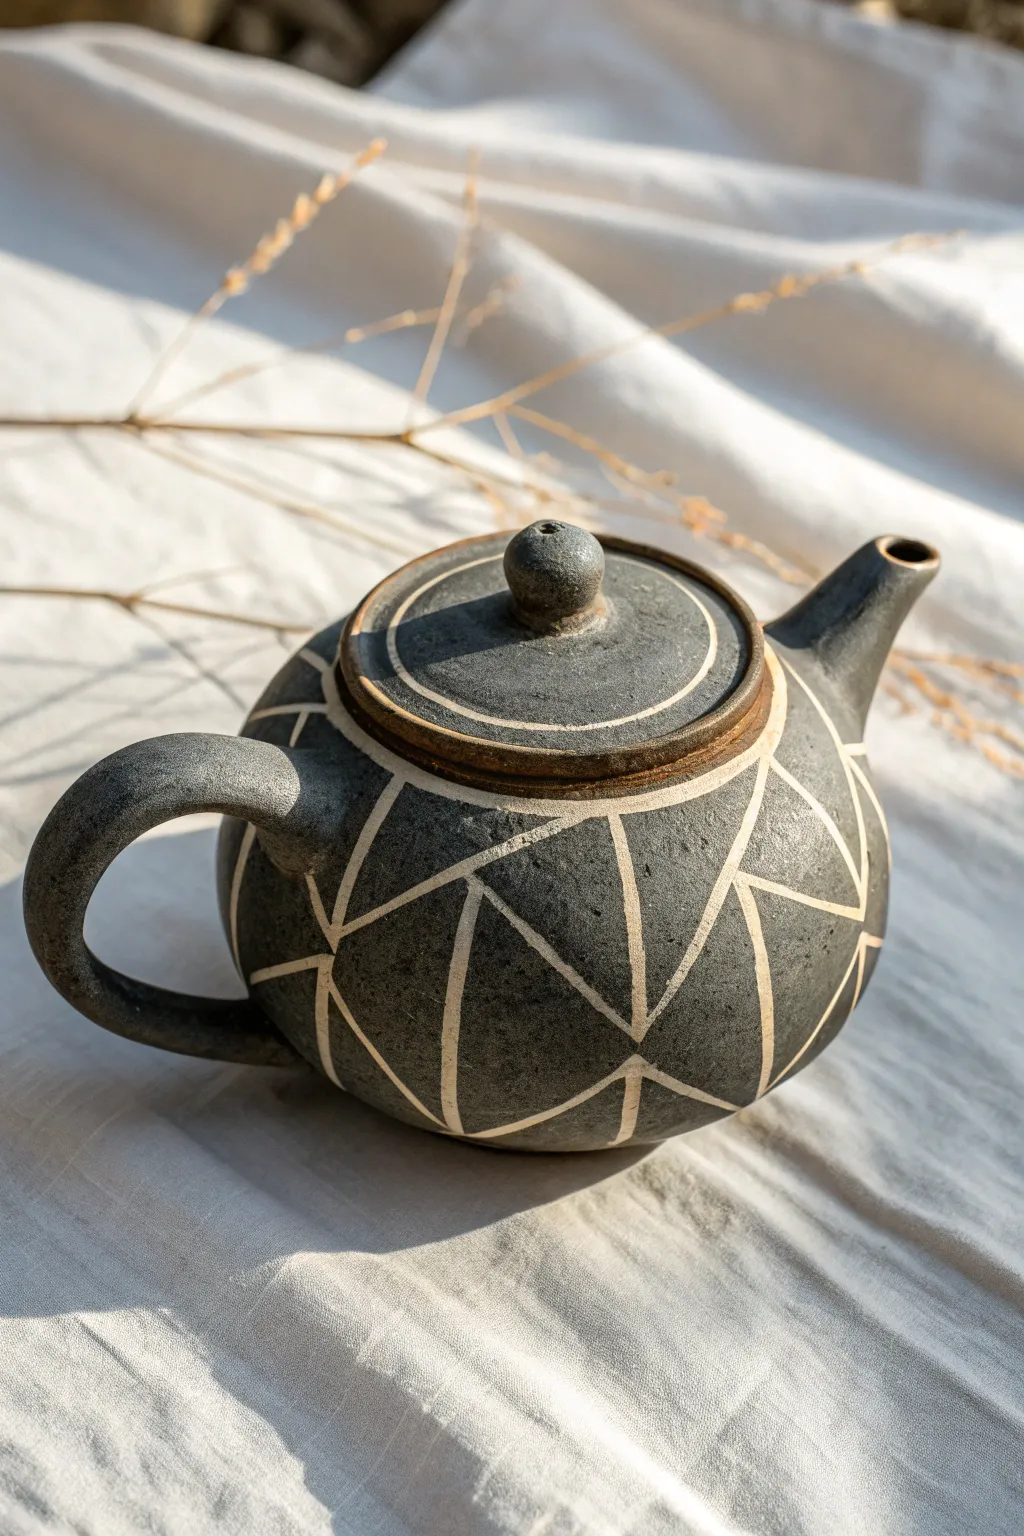
Classic Round Belly Teapot
Embrace simplicity with this classic round-bellied teapot, featuring a warm, speckled oatmeal glaze that feels instantly cozy. Its generous curves and sturdy handle make it a comforting vessel for your daily brew, while the subtle ridges add tactile interest to the smooth form.
Step-by-Step Tutorial
Materials
- Stoneware clay (smooth or with grog)
- Pottery wheel
- Throwing tools (sponge, wooden rib, needle tool, wire cutter)
- Loop tools for trimming
- Heat gun (optional)
- Serrated rib or scoring tool
- Slip (clay and water mixture)
- Speckled oatmeal or cream glaze (food safe)
- Kiln
Step 1: Throwing the Body
-
Centering:
Start with about 2-3 pounds of well-wedged clay. Secure it to the wheel head and center it firmly, ensuring the mound is stable and symmetrical before opening. -
Opening the floor:
Open the clay to create the interior floor. For a teapot, keep the floor slightly thicker than a mug to allow for trimming a foot ring later; aim for about 3/8 of an inch. -
Pulling the walls:
Begin pulling the walls up into a cylinder. Keep the top rim slightly gathered in to maintain structural integrity. I like to leave a little extra thickness near the belly area to stretch outward later. -
Shaping the belly:
Using a rib on the outside and your hand on the inside, gently push the clay outward from the belly to create that classic round volume. Refine the profile until you have a smooth, globe-like curve. -
Forming the gallery:
At the rim, use a wooden tool or your thumb to split the clay slightly, creating a seated ‘gallery’ where the lid will rest inside the neck. Ensure this ledge is distinct and level. -
Finishing the surface:
Before removing it from the wheel, run a soft rib or a sponge up the sides to create subtle, organic throwing lines or smooth it completely depending on your preference.
Spout Alignment Trick
Use a ruler or chopstick across the rim of the pot when attaching the spout. The spout’s tip must be at or slightly above this line, or the tea will spill out before the pot is even tipped.
Step 2: Creating Components
-
Throwing the lid:
Using a smaller ball of clay (about 1/2 pound), throw the lid inverted (upside down) or right-side up using calipers to measure the gallery you created on the body. This one features a gentle dome shape. -
Adding the knob:
If throwing right-side up, shape a small, round knob directly from the excess clay at the top. If inverted, trim the lid later and attach a hand-rolled ball of clay for the knob. -
Throwing the spout:
Throw a small, tapering cylinder for the spout. It should be wider at the base where it attaches and slightly flared at the lip to prevent dripping. Cut it off the wheel and let it leather hard. -
Pulling the handle:
Pull a strap of clay for the handle. For this design, you want a sturdy, C-curve shape. Let it stiffen slightly into a curve on a board so it holds its shape during attachment.
Lid Fit Issues
If your lid rocks after firing, use a circular motion with grinding paste (or lapping compound) between the lid and seat. This manual grinding creates a perfectly airtight, custom fit.
Step 3: Assembly and Glazing
-
Trimming the body:
Once the body is leather hard, flip it over and trim away excess weight from the bottom. Carve a distinct foot ring that mirrors the roundness of the belly. -
Attaching the spout:
Cut the spout at an angle using a fettling knife so it fits flush against the pot’s belly. Hold it up to check alignment; the tip of the spout should be level with the rim of the pot. -
Drilling holes:
Mark the attachment area on the body. Drill a cluster of strainer holes inside this marked area to allow tea to pour through while catching leaves. -
Securing attachments:
Score the attachment points on the body, spout, and handle vigorously. Apply slip and press the pieces firmly into place. Smooth the seams with a small tool or brush. -
Make the steam hole:
Don’t forget to poke a small steam hole in the lid using a needle tool. This prevents a vacuum from forming when you pour. -
Bisque firing:
Allow the entire teapot to dry completely—this is crucial for complex forms. Fire to bisque temperature (usually cone 04). -
Glaze application:
Dip the teapot into a speckled oatmeal or cream glaze. Ensure the inside is fully coated. Wipe the foot ring and the gallery rim clean so the lid implies doesn’t stick during firing. -
Final firing:
Fire the glazed piece to the clay body’s maturity temperature (e.g., cone 6 or 10). Let the kiln cool naturally to avoid thermal shock to the complex form.
Now you have a beautifully handmade vessel ready to serve warmth and comfort on any slow afternoon


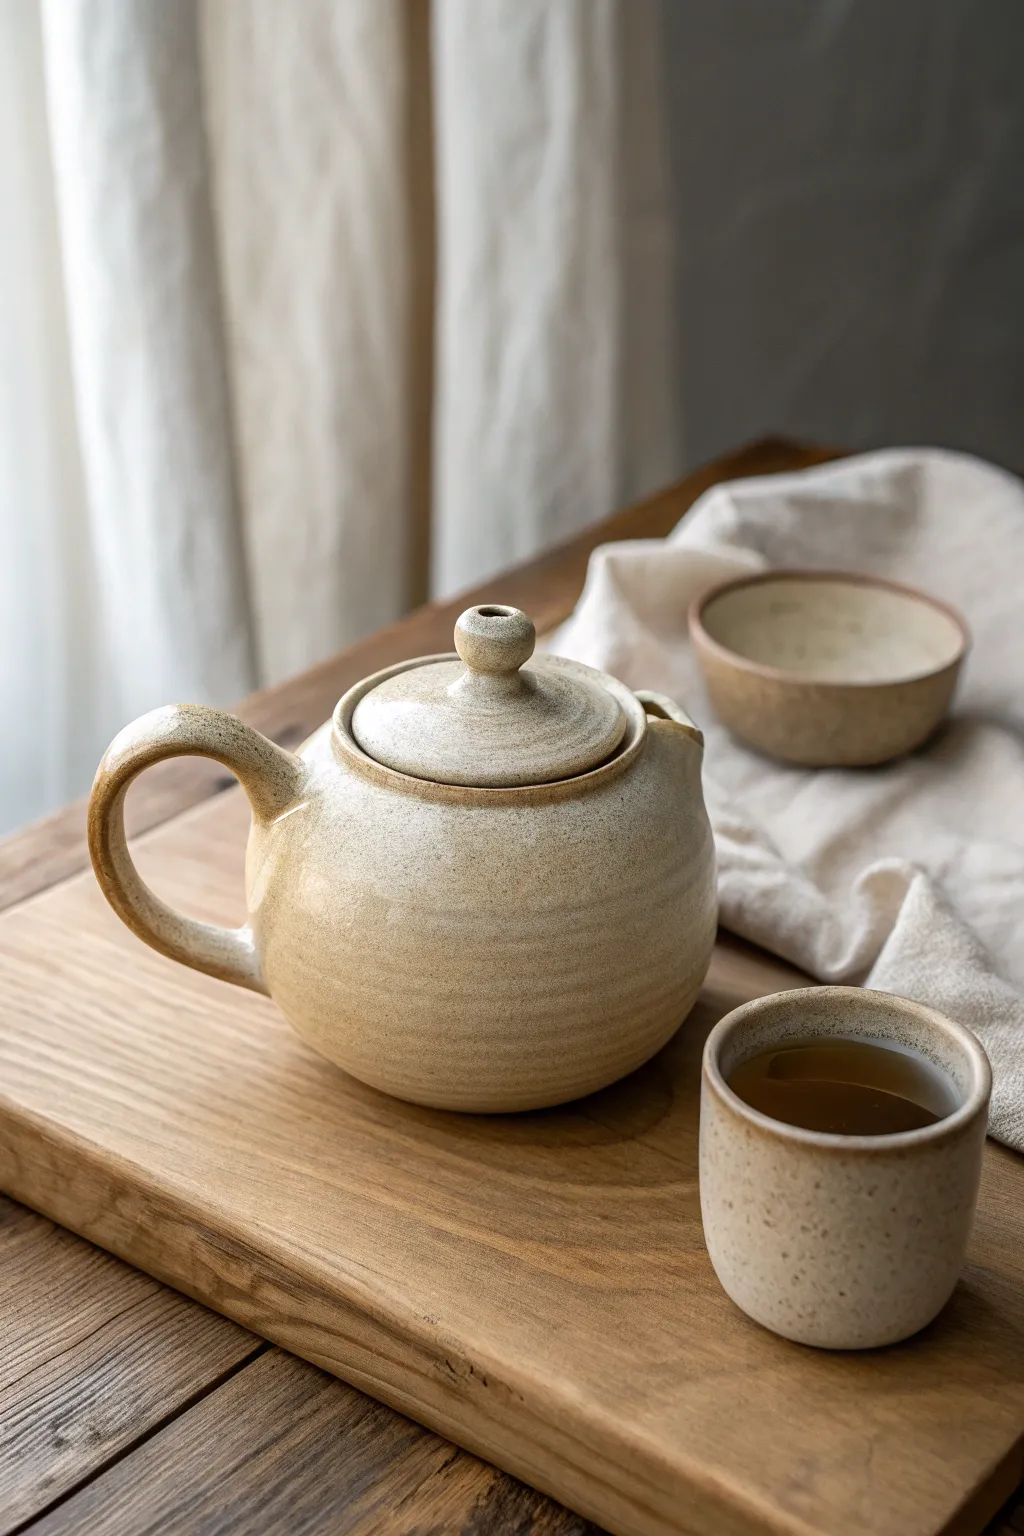
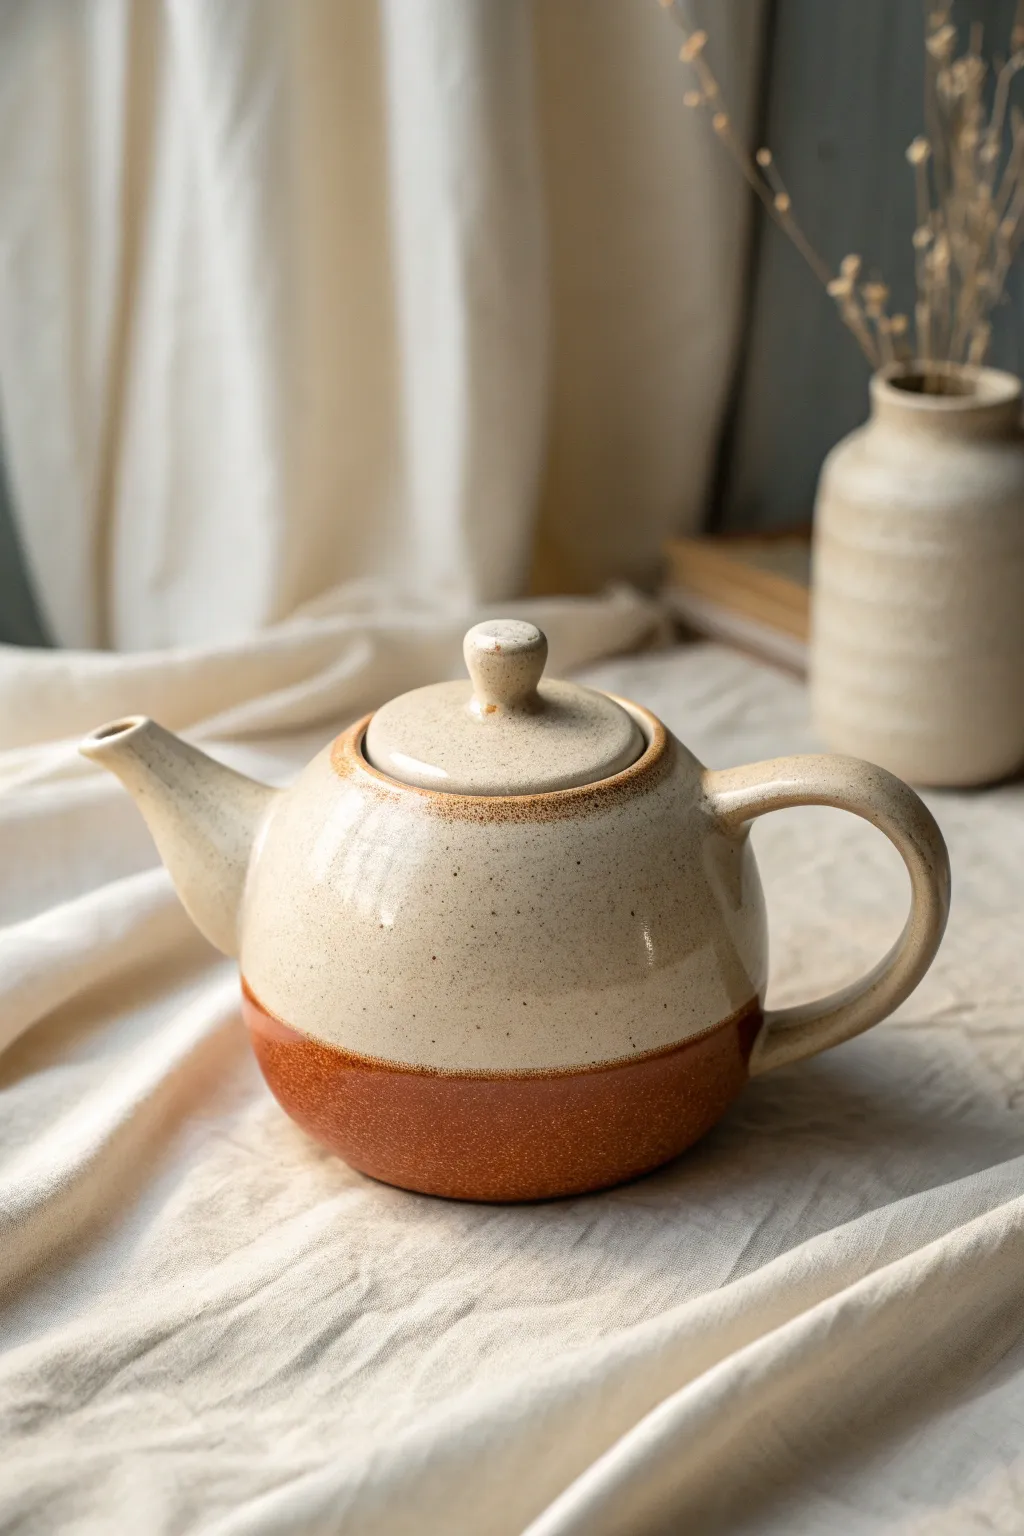
Squat Farmhouse Teapot With Big Loop Handle
This charming, squat teapot features a warm, toasted cream glaze with delightful iron speckles and a prominent overhead loop handle. Its sturdy, inviting form evokes a cozy farmhouse aesthetic, perfectly blending functional pottery with rustic beauty.
Step-by-Step Guide
Materials
- Stoneware clay (speckled or iron-rich)
- Potter’s wheel
- Throwing tools (rib, sponge, wire cutter)
- Needle tool
- Scoring tool or serrated rib
- Trimming tools
- Slip (made from your clay body)
- Hole cutter tool (for teapot filter)
- Cream or oatmeal speckled glaze
- Wax resist
Step 1: Throwing the Body and Lid
-
Center the clay:
Start with about 2-3 pounds of well-wedged speckled stoneware clay. Secure it firmly to the wheel head and center it, keeping the mound relatively low to encourage a squat final form. -
Open and widen the floor:
Open the clay, ensuring you leave at least half an inch of thickness at the bottom for later trimming. Pull the floor out wide rather than deep to establish that broad, farmhouse base. -
Pull the walls:
Pull the walls up, allowing the belly of the pot to balloon outward significantly. Keep the neck slightly narrower than the belly, bringing it in to create a distinct gallery (ledge) for the lid to sit on. -
Form the gallery:
Use a rib or your fingers to press a defined, flat ledge inside the rim. This seat needs to be perfectly round so the lid fits snugly later. -
Refine the shape:
Use a smooth kidney rib on the outside while pushing from the inside to maximize that spherical, squat volume. Refine the surface to remove throwing lines if you prefer a smoother look, or leave subtle ridges for texture. -
Throw the lid:
Using a separate, smaller lump of clay (measured with calipers to match your teapot’s gallery), throw a simple lid. Include a small, solid knob in the center for easy lifting.
Troubleshooting: Warping Handle
If the overhead loop starts drooping while wet, prop it up with a piece of foam or a rolled-up newspaper ball placed on the lid area until it stiffens to leather-hard.
Step 2: Crafting the Spout and Handle
-
Throw the spout:
Throw a small, tapering cylinder for the spout. I like to throw this off the hump (using a large mass of clay and only using the top portion) for stability. Ensure the spout has a slight curve at the rim specifically for pouring. -
Pull the handle clay:
For the overhead loop handle, pull a thick, uniform strap of clay. It needs to be sturdy enough to support the full pot’s weight but graceful enough to curve high over the lid. -
Review and dry:
Let all components (body, lid, spout, and handle strap) dry to a sturdy leather-hard stage. This is crucial for successful assembly.
Step 3: Assembly and Trimming
-
Trim the foot:
Center the main body upside down on the wheel. Trim the bottom to create a defined foot ring that mirrors the curve of the belly. This visually lifts the heavy form. -
Fit the lid:
Test the lid fit gently. If it’s too tight, carefully trim the lid edge; if it’s slightly loose, it’s safer for glazing, but ensure it doesn’t rattle excessively. -
Attach the spout:
Hold the spout against the body to find the right angle. Mark the attachment area, then use a hole cutter to create a sieve (pattern of small holes) in the body within that marked area. Score and slip both surfaces thoroughly before pressing the spout on. -
Shape the loop handle:
Take your pulled strap and arch it over the pot. The handle should attach at the shoulders, directly aligned with the spout. It needs plenty of clearance so you can remove the lid easily. -
Attach the handle:
Score and slip the attachment points deeply. Press the handle ends firmly onto the shoulder of the pot. Use a modeling tool to smooth the seams so the handle looks like it ‘grew’ out of the pot. -
Slow drying:
Cover the entire teapot loosely with plastic. Because of the overhead handle, tension can cause cracks. Dry very slowly over several days to ensure even shrinkage.
Pro Tip: Precise Pouring
When shaping the spout rim, gently pull the bottom lip slightly forward and sharpen that edge. A sharp, distinct edge cuts the flow of water cleanly, preventing drips.
Step 4: Glazing and Firing
-
Bisque fire:
Once bone dry, bisque fire the teapot to Cone 04 (or according to your clay’s specific schedule). -
Wax the foot:
Apply wax resist to the bottom inch of the teapot and the foot ring. This recreates the two-tone look in the reference image, exposing the raw, toasty clay body. -
Apply glaze:
Dip the teapot into a creamy, semi-opaque glaze. Ensure the inside is fully coated. If your clay isn’t naturally speckled, choose a glaze with iron flecks to mimic the farmhouse texture. -
Clean connection points:
Carefully wipe any glaze off the gallery ledge and the rim of the lid where they touch. Wax these contact points to prevent the lid from fusing to the pot during firing. -
Final firing:
Glaze fire to maturity (likely Cone 6 or 10 depending on your clay). The heat will interact with the iron in the clay, creating those lovely dark spots through the cream glaze.
Once cooled, brew a pot of your favorite tea and enjoy the warmth of your handmade vessel


Tall Teapot With Gooseneck Spout
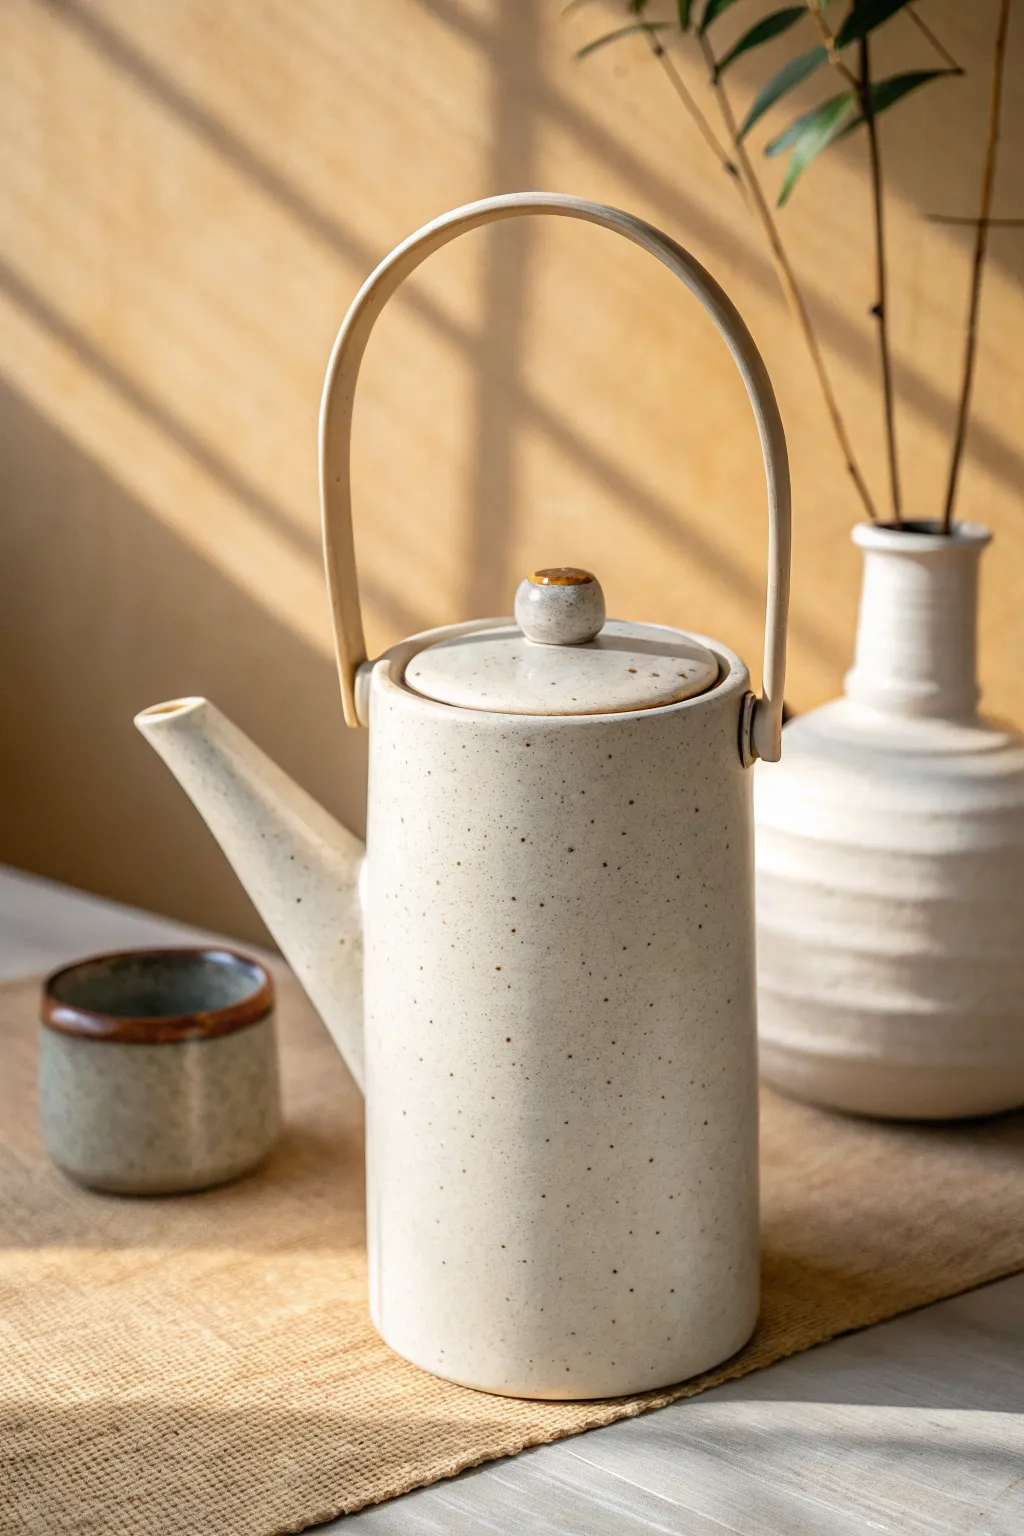
This elegant, cylindrical teapot features a soothing speckled cream glaze and a distinctive high-arching handle that evokes traditional Japanese aesthetics. Its clean lines and balanced form make it a perfect centerpiece for a calming tea ritual.
Step-by-Step
Materials
- Speckled stoneware clay body (cone 5-6)
- Pottery wheel (or slab roller for hand-building)
- Basic throwing tools (rib, sponge, needle tool, wire)
- Calipers
- Trimming tools
- Serrated rib and slip
- Soft fan brush
- Satin matte cream glaze
- Iron oxide wash (optional for rim accent)
- Kiln
Step 1: Throwing the Body and Lid
-
Center and open:
Begin with about 2-3 lbs of speckled clay. Center it on the wheel and open it up, keeping the floor relatively narrow to support a tall form. -
Pull the cylinder:
Pull the walls straight up to create a tall, even cylinder. Aim for a height of about 7-8 inches. Use a metal rib to smooth the outside and define that sharp, geometric profile seen in the image. -
Create the gallery:
At the rim, carefully split the clay or compress inward to create a gallery (a small shelf) where the lid will sit. Measure the gallery diameter with calipers before cutting the pot off the wheel. -
Throw the lid:
Using a smaller ball of clay (about 0.5 lb), throw a flat lid upside down. Use your caliper measurement to ensure it fits the gallery perfectly. Trim a small knob shape while it’s still attached, or throw a separate knob to attach later. -
Form the spout:
Throw a tall, narrow cone for the spout. I like to make it longer than necessary so I can trim it to the perfect angle later. Pull it thin to keep the teapot lightweight.
Step 2: Creating the Handle and Assembly
-
Pull the handle strap:
For that distinctive high arch, pull a long, flat strap of clay. Let it stiffen slightly on a board until it can hold its shape but is still flexible. -
Form the arch:
Bend the strap into a high ‘U’ shape. The key is to make it tall enough to clear the lid knob easily. Let it dry to leather hard in this shape. -
Trim the body components:
Once the body, lid, and spout are leather hard, trim the bottom of the cylinder to give it a clean foot. Refine the lid fit if needed. -
Prepare the spout connection:
Cut the spout at a sharp angle to fit against the cylinder body. Hold it up to the pot to check the visual flow; the tip should be level with the rim. -
Attach the spout:
Score the body and the spout heavily. Apply slip. Press the spout firmly onto the body, smoothing the seam with a small coil of clay to make it look integrated. -
Attach the handle lugs:
Instead of attaching the strap directly, fashion small clay loops or lugs on the shoulder of the pot. These will hold the handle ends. -
Secure the handle:
Attach the high arch handle to the lugs. Ensure the connection is reinforced, as this tall handle adds leverage weight when pouring.
Clean Pour Tip
To prevent dripping, sharpen the edge of the spout tip after throwing it. A crisp, sharp edge breaks the surface tension of the liquid much better than a rounded one.
Step 3: Glazing and Finishing
-
Bisque fire:
Allow the entire piece to dry slowly and completely before loading it into the kiln for a bisque fire (usually cone 04). -
Wax the contact points:
Wax the gallery and the edge of the lid where they will touch to prevent them from fusing during the glaze firing. -
Apply the glaze:
Dip the teapot into a satin matte cream glaze. If your clay body isn’t naturally speckled, use a glaze that contains iron speckles. -
Accent the rim:
For the look in the photo, carefully apply a thin line of iron oxide wash or a slightly darker tan glaze to the very top rim of the lid knob. -
Glaze fire:
Fire the piece to cone 5 or 6 (depending on your clay and glaze specifications). Let the kiln cool completely before unloading. -
Sand the bottom:
Once cool, use wet-dry sandpaper or a diamond pad to smooth the unglazed foot ring, ensuring it won’t scratch your table.
Make a Set
Create a cohesive tea set by throwing simple cylinder cups using the remaining clay. Trim them with a slight foot to match the teapot’s vertical profile.
Now you have a stunning, functional piece of art ready for your next tea steeping session


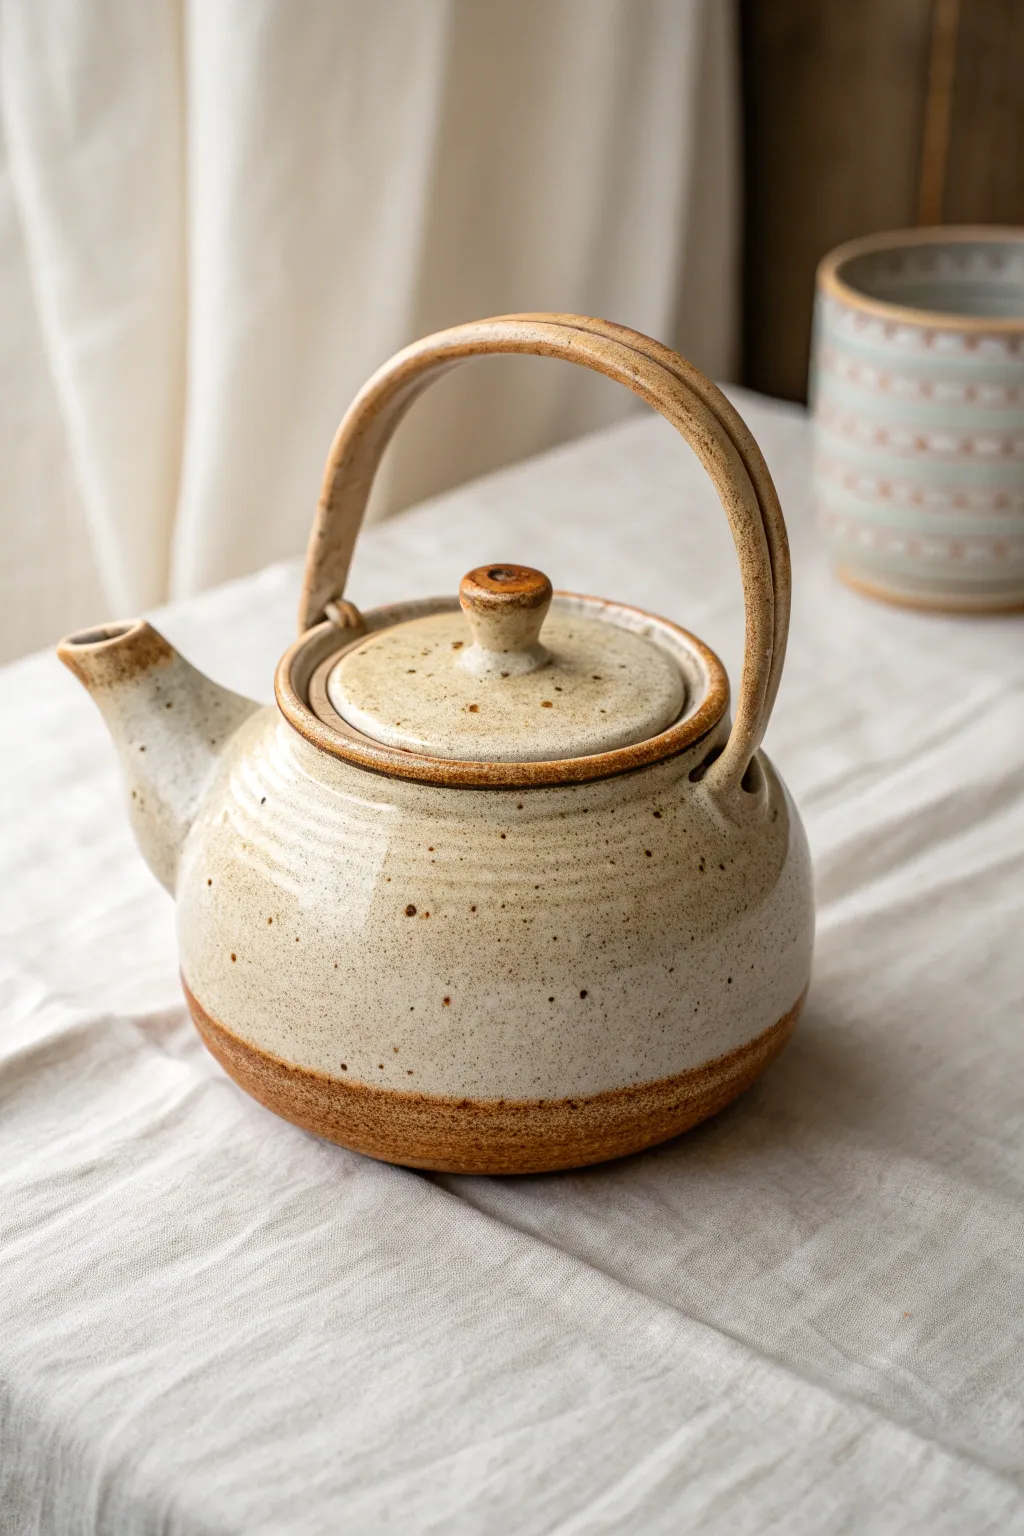
Side Handle Teapot (Kyusu-Inspired)
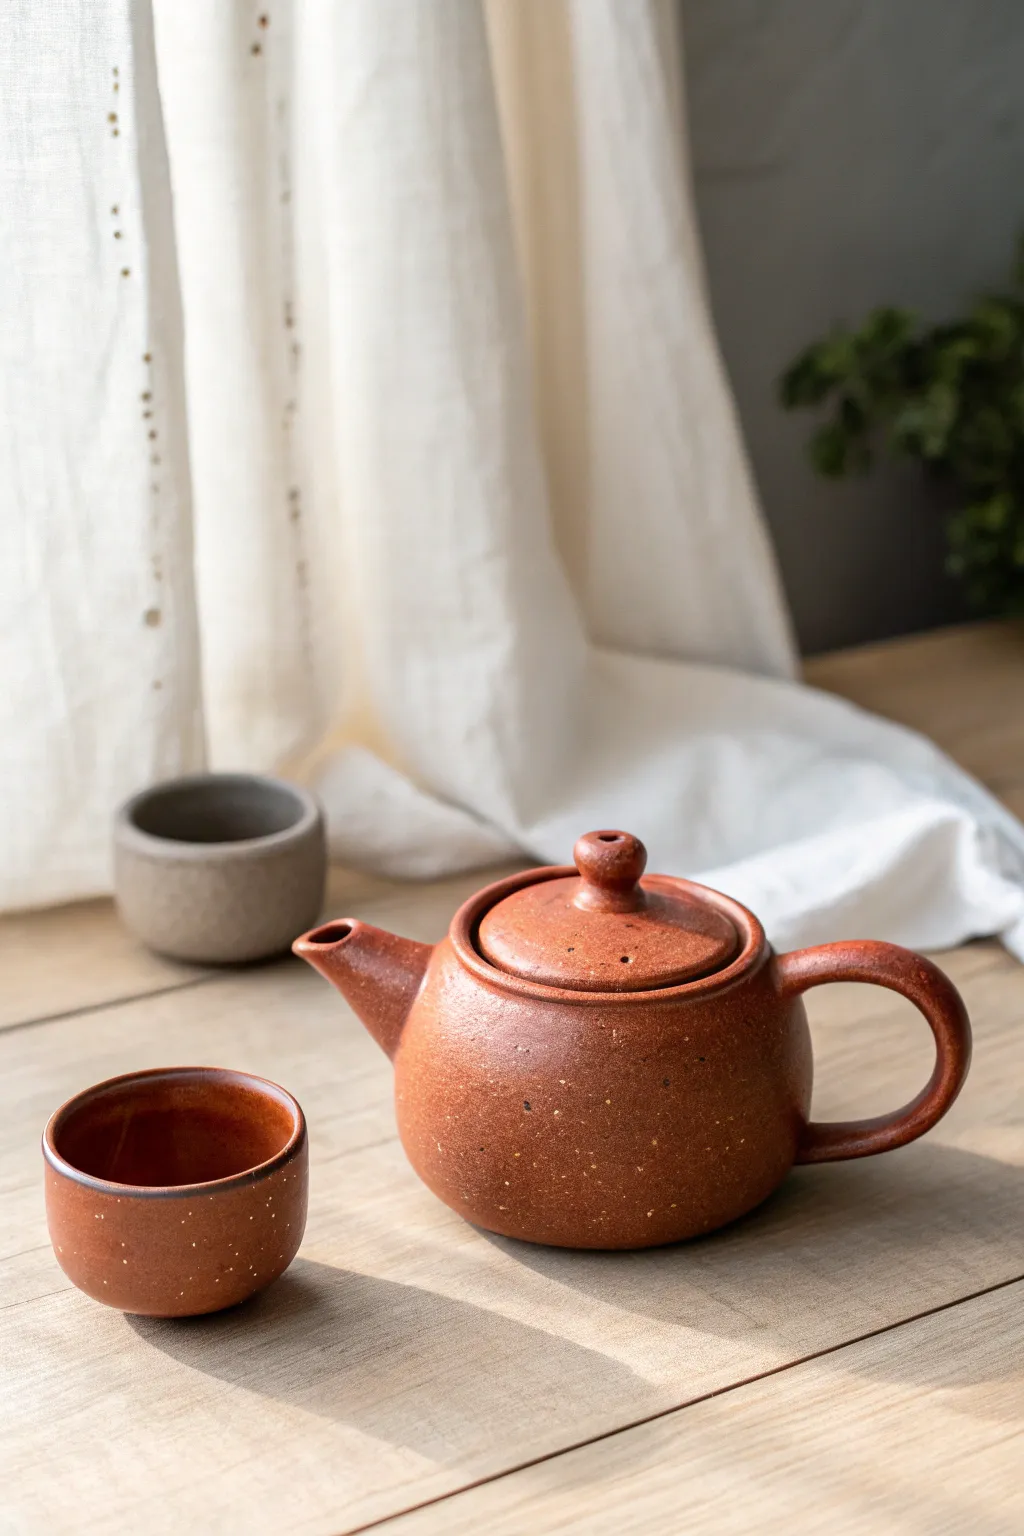
This project guides you through creating a charming, rustic tea set featuring a round-bodied teapot and matching handleless cups. The finish relies on an iron-rich stoneware clay that naturally speckles when fired, giving the pieces a warm, organic character without valid complex glazing.
Step-by-Step Tutorial
Materials
- Red stoneware clay with grog/speckles (e.g., Laguna Red Sculpture or similar)
- Potter’s wheel (or banding wheel for hand-building)
- throwing sponge and bucket of water
- Wire cutter
- Needle tool
- Wooden rib tool
- Metal kidney scraper
- Trimming tools (loop tool)
- Scoring tool (serrated rib)
- Slip (made from simple clay body)
- Clear matte glaze (food safe)
- Calipers (optional but helpful for lids)
Step 1: Throwing the Teapot Body
-
Center the clay:
Start with about 1.5 to 2 lbs of well-wedged clay. Smack it onto the wheel head and center it using steady, consistent pressure. -
Open the form:
Create your opening, but leave the floor slightly thicker than a standard bowl to allow for trimming a foot later. Pull the floor out to establish the width of your teapot belly. -
Pull the walls:
Pull the walls up into a cylinder first. Keep the walls even. Once you have height, gently belly out the form from the inside using a rib or your fingers to create that rounded, apple-like shape. -
Collar the neck:
Slowly collar in the top rim to narrow the opening where the lid will sit. Use a wooden tool or your finger to create a distinct gallery (a small ledge) inside the rim to support the lid. -
Smooth and finish body:
Run a metal rib over the exterior to remove throwing lines and compress the surface, enhancing that smooth, speckled texture. Cut the pot from the wheel but leave it on the bat to firm up to leather-hard.
Clean Spout Pour
To prevent dripping, sharpen the edge of the spout rim just slightly after throwing but before it dries. A crisp, sharp edge cuts the water stream cleanly.
Step 2: Creating Components
-
Throw the lid:
Using the calipers to measure your gallery, throw a small, domed lid upside down or right-side up depending on your preference. Ensure the flange fits perfectly into your teapot’s gallery. -
Throw the spout:
Throw a small, tapering cylinder without a bottom. It should look like a funnel. You’ll trim this later to attach it to the body. -
Make the cups:
Throw small cylinders for the cups using roughly 0.5 to 0.75 lbs of clay each. Shape them with straight, simple walls. Round the rim gently for comfortable sipping. -
Pull a handle:
Pull a strap of clay for the teapot handle. Curve it into a ‘C’ shape and let it stiffen slightly on a board until it holds its form but is still flexible.
Step 3: Assembly & Finishing
-
Trim all pieces:
Once leather hard, trim a neat foot ring on the teapot body and the cups. This lifts the form slightly and adds elegance. Trim the lid to refine its shape and add a small knob if you didn’t throw one. -
Prepare the spout:
Cut the base of the spout at an angle so it fits the curve of the pot’s belly. Hold it up to the pot to check the angle; the tip of the spout should be level with the rim of the pot. -
Attach the spout:
Score the attachment site and the spout base heavily. Apply slip. Gently press the spout onto the body. Smooth the seam completely with a small wooden tool or your finger. -
Drill strainer holes:
Before the spout is fully set, reach inside the pot (or go through the spout hole if needed) and pierce multiple small holes into the body wall behind the spout to act as a tea strainer. -
Attach the handle:
Score and slip the back of the pot opposite the spot. Attach the handle securely, blending the clay at the top and bottom joins. Ensure the loop is large enough for fingers. -
Final smoothing:
Wipe down the entire piece with a slightly damp sponge to expose the grog/speckles slightly and remove any sharp edges or burrs. -
Bisque fire:
Let everything dry slowly under plastic to prevent cracking, especially at the joins. Once bone dry, bisque fire to cone 04. -
Glaze application:
Since the clay body provides the color, apply a clear matte glaze to the interior of the pot and cups for functionality. You can leave the exterior unglazed for a raw texture, or apply a very thin wash of clear glaze to seal it without hiding the clay color. -
Final firing:
Fire to the maturity temperature of your clay (likely Cone 5 or 6 for stoneware). This brings out the rich toasted almond color and speckling seen in the reference.
Knob Variation
Swap the simple round knob for a looped piece of clay or a small natural driftwood piece attached post-firing with strong epoxy for a mixed-media look.
Brew your first batch of tea in this handmade set and enjoy the warmth of the clay in your hands.

The Complete Guide to Pottery Troubleshooting
Uncover the most common ceramic mistakes—from cracking clay to failed glazes—and learn how to fix them fast.
Teapot With A Strainer Spout (Pierced Holes)
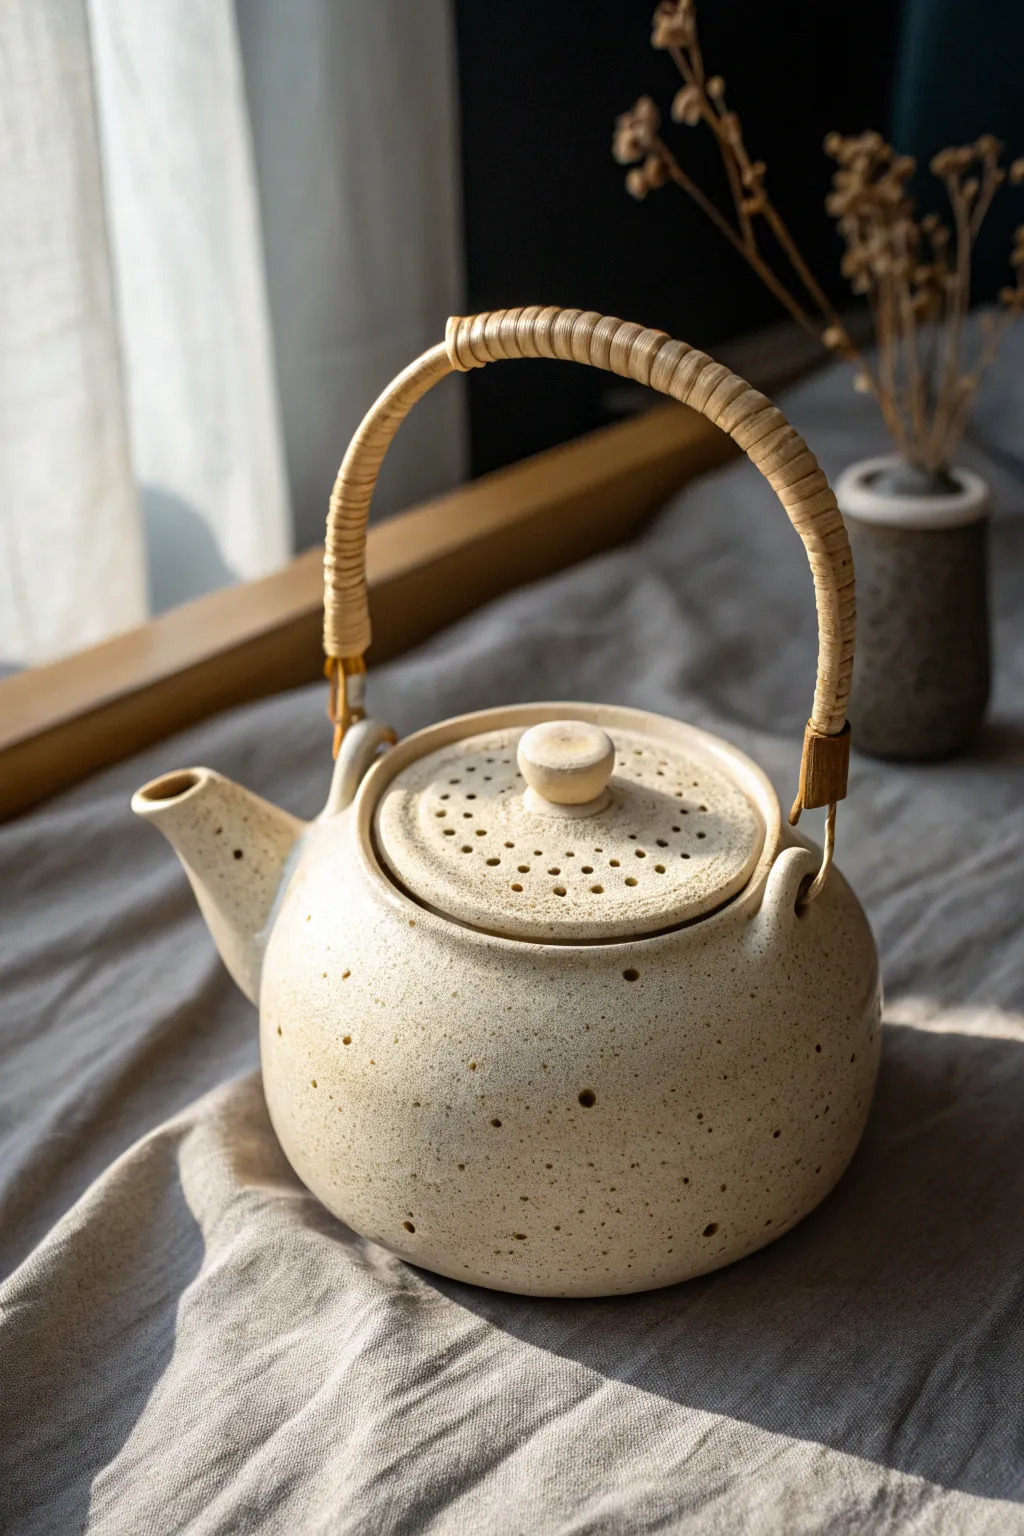
This rustic, nature-inspired teapot features a soothing cream glaze dotted with charming speckles and a unique perforated lid. The distinguishing feature is the built-in strainer functionality, achieved through carefully pierced holes in both the body and the spout, paired with an elegant bamboo-wrapped handle.
Step-by-Step Tutorial
Materials
- Stoneware clay (speckled or buff)
- Pottery wheel and throwing tools (ribs, sponge, wire cutter)
- Needle tool
- Small drill bit tool or hole cutter (1-2mm)
- Wooden throwing stick (for belly shaping)
- Bamboo or rattan handle material
- Strong epoxy or wire (for handle attachment)
- Cream/matte white glaze (transparent if using speckled clay)
- Sponge for smoothing
- Calipers
Step 1: Throwing the Body and Lid
-
Center and open:
Begin by centering about 2-3 lbs of speckled clay on the wheel. Open the mound and create a wide, flat floor to support the teapot’s generous round shape. -
Pull the walls:
Pull the walls up into a cylinder first. Ensure the walls are even in thickness, leaving the rim slightly thicker to support the lid later. -
Shape the belly:
Using a rib and internal pressure, gently belly out the form to create a spherical, pumpkin-like shape. Be careful not to let the walls collapse; collar the neck in significantly as you shape the body outward. -
Form the gallery:
At the rim, use a wooden tool or your finger to split the clay and create a distinct gallery (ledge) for the lid to sit on. Measure this opening carefully with calipers. -
Throw the spout:
Throw a separate, small conical shape for the spout. It should be wider at the base and taper upwards, with a slight flare at the pouring lip. -
Throw the lid:
Using your caliper measurements, throw a flat or slightly domed lid with a knob. For this specific design, keep the lid relatively flat to accommodate the piercing pattern.
Clean Cuts
When piercing the holes, wait until the clay is on the drier side of leather-hard. If it’s too wet, the needle tool will drag and create messy burrs that are hard to clean up.
Step 2: Assembling and Piercing
-
Trim the components:
Once leather hard, trim the foot of the teapot body to create a clean, shadowed lift. Trim the underside of the lid for a perfect fit. -
Attach the spout:
Hold the spout against the body to find the right angle. Mark the attachment area with a needle tool. Before attaching, drill or punch a cluster of small holes into the body where the spout will sit to act as an internal strainer. -
Secure the spout:
Score and slip both surfaces, then press the spout firmly onto the body. Smooth the join with a coil of clay so it looks seamless. -
Add lugs:
Create two small loops or ‘lugs’ from clay coils. Attach these securely to the shoulder of the pot on opposite sides; these will hold your handle later. -
Pierce the lid:
Using your small hole cutter or needle tool, create a decorative pattern of holes on the lid around the knob. Creating concentric circles of perforations adds a lovely texture and acts as a steam vent. -
Texture the body:
Mimic the lid’s texture by adding scattered, pierced holes or divots into the upper shoulder of the teapot body. I find random spacing looks more organic here.
Handle Harmony
Soak your bamboo handle in warm water for 30 minutes before attaching. This makes it pliable enough to bend without cracking, allowing you to shape the perfect arch.
Step 3: Glazing and Finishing
-
Bisque fire:
Slowly dry the piece to prevent cracking, especially around the spout and lugs. Fire to bisque temperature (usually Cone 04 or 06). -
Glaze application:
Dip or spray the teapot with a creamy matte glaze. If your clay isn’t naturally speckled, choose a glaze with iron speckles included. -
Clear the holes:
Crucial step: Check all your pierced holes (lid and internal strainer) and clear them of any heavy glaze buildup using a needle tool so they don’t seal shut during firing. -
Glaze fire:
Fire the piece to the final temperature required by your clay and glaze combination. -
Attach the handle:
Once cool, thread your bent bamboo or rattan handle through the lugs. Secure the ends by wrapping tightly with rattan strips or using a strong epoxy hidden inside the lug connection.
Brew a pot of your favorite loose-leaf tea and enjoy the beautiful pour from your handmade creation
Fluted Ribbed Teapot Body
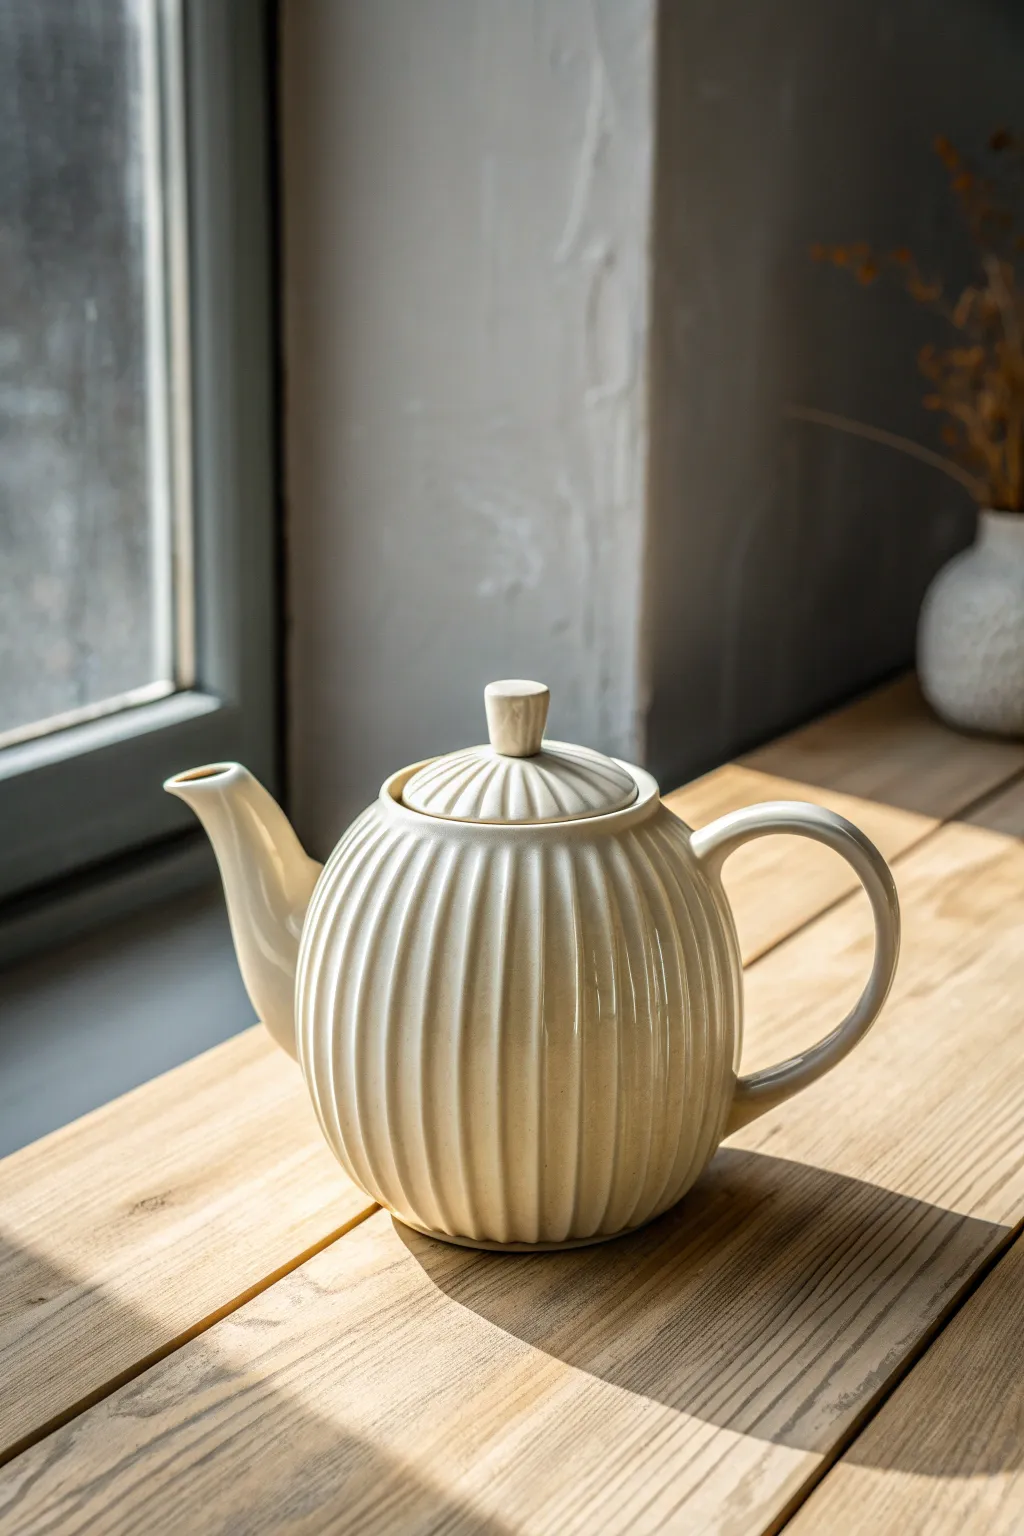
Capture the essence of cozy afternoons with this classically inspired ceramic teapot featuring a distinctively fluted body. The vertical ribs catch the light beautifully, creating a tactile rhythm that is as satisfying to hold as it is to look at.
Detailed Instructions
Materials
- Stoneware clay (smooth, light-firing body recommended)
- Pottery wheel
- Throwing tools (sponge, needle tool, wire cutter)
- Rib tool (metal or stiff plastic)
- Fluting tool (wire loop or carving tool)
- Calipers
- Trimming tools
- Scoring tool and slip
- Finishing sponge
- Cream or glossy white glaze
Step 1: Throwing the Body and Lid
-
Center and open:
Begin with about 2-3 lbs of wedged clay. Center it firmly on the wheel and open it up, leaving a floor thickness of about 1/4 inch. -
Pull the walls:
Pull the clay upward into a cylinder, then gently belly it out into a spherical shape. Aim for a wall thickness slightly thicker than usual (about 3/8 inch) to accommodate the carving later. -
Define the gallery:
At the rim, use a wooden stick or your finger to create a recessed gallery where the lid will sit. Ensure the rim is smooth and compressed. -
Measure the gallery:
Use calipers to measure the exact inner diameter of the gallery seating area. This is crucial for a tight-fitting lid. -
Throw the lid:
using a smaller ball of clay (about 1 lb) ‘off the hump’ or centered directly. Throw a low dome shape that matches your caliper measurements. Add a small knob in the center. -
Dry to leather hard:
Cut both pieces off the wheel and let them dry slowly to a sturdy leather-hard stage. This consistency is essential for crisp carving.
Clean Lines Pro Tip
For perfectly straight vertical flutes, rest your carving hand against a tall, sturdy object (like a heavy jar) placed on the table next to your banding wheel as a steady guide.
Step 2: Carving the Flutes
-
Mark vertical guides:
Gently place the leather-hard pot back on a banding wheel. Lightly scratch vertical lines at equal intervals (12, 3, 6, and 9 o’clock first) to guide your spacing. -
Select your tool:
Choose a U-shaped wire loop tool that corresponds to the width of the flutes you see in the photo. -
Carve the pot body:
Starting just below the rim and ending just above the foot, drag the tool decisively downward. Maintain constant pressure to ensure the depth is uniform. I find it helps to lock my elbows against my body for stability. -
Refine the flutes:
Continue this process around the entire circumference. If a burr of clay builds up, wait until the pot is bone dry to brush it away rather than smearing it now. -
Carve the lid:
Repeat the fluting process on the lid, radiating from the knob outward to the edge of the rim. Try to align the visual weight of these flutes with the body.
Lid Lock Trick
Add a tiny tab of clay on the underside of the lid rim near the back. This ‘locking tab’ catches under the gallery when pouring, preventing the lid from falling off at steep angles.
Step 3: Spout, Handle, and Assembly
-
Throw the spout:
Throw a tapered spout on the wheel. Ensure it has a slight curve and a sharp pouring edge. Set it aside to stiffen. -
Pull the handle:
Pull a strap handle from a lug of clay. Curve it into a question-mark shape or ear shape and let it stiffen until it holds its form. -
Attach the spout:
Cut the spout at an angle to fit the curve of the pot. Hold it up to the pot to check the angle; the tip should be level with the rim. Score, slip, and attach. -
Attach the handle:
Score and slip the attachment points for the handle directly opposite the spout. Firmly press the handle on, blending the clay smoothly into the body. -
Final smoothing:
Use a damp sponge to soften the sharp edges of the flutes slightly—you want them defined, but comfortable to touch. Check the lid fit one last time.
Step 4: Glazing and Firing
-
Bisque fire:
Fire the assembled teapot to cone 04 (or your clay’s bisque temperature). -
Apply glaze:
Pour a creamy, glossy glaze inside the teapot and swirl to coat. Dip the outside or spray the glaze to ensure it gets into the deep recesses of the fluting. -
Clean the foot and gallery:
Identify all contact points—the foot ring and the gallery where the lid sits. Wax or wipe these areas completely clean to prevent the lid fusing to the pot. -
Glaze fire:
Fire to the maturity temperature of your clay and glaze (likely cone 5 or 6). Allow the kiln to cool naturally.
Now brew a fresh pot of tea and enjoy how the light plays across your handmade textures


What Really Happens Inside the Kiln
Learn how time and temperature work together inside the kiln to transform clay into durable ceramic.
Carved Floral Teapot With Soft Underglaze Wash
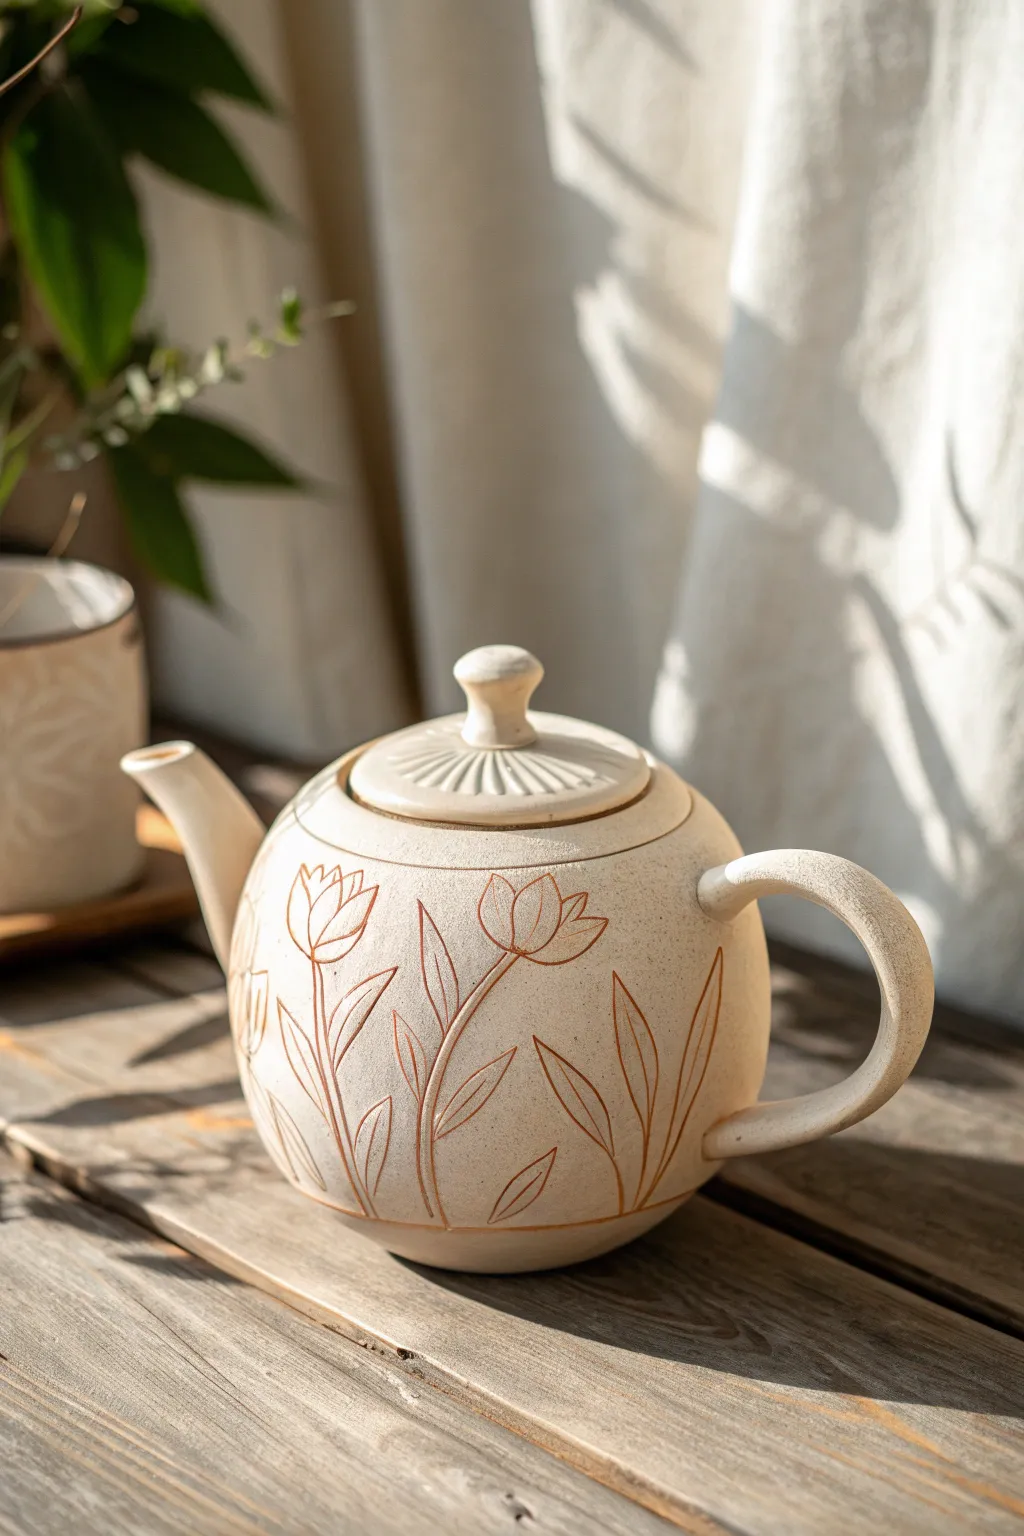
This project features a beautifully earthy teapot made from a speckled cream clay body, adorned with simple yet elegant incised tulip motifs. The rustic charm comes from the deep carving technique and an iron oxide wash that settles into the lines to make the botanical details pop against the matte surface.
Step-by-Step
Materials
- Speckled cream or buff stoneware clay
- Pottery wheel
- Throwing tools (sponge, ribs, wire cutter)
- Needle tool
- Trimming tools (loop tools)
- Sgraffito or carving tool (small loop or v-tip)
- Red iron oxide wash or brown underglaze
- Small paintbrush
- Damp sponge
- Matte clear glaze
Step 1: Throwing the Form
-
Center and Open:
Start with about 2-3 lbs of well-wedged speckled clay. Center it on the wheel and open it up, leaving the floor slightly thicker than a standard bowl to account for later trimming. -
Pull the Walls:
Pull the walls up into a cylinder first, then gently collar the neck in while pushing the belly out from the inside. You are aiming for a classic round, bulbous shape that sits squat and stable. -
Refine the Gallery:
Create a gallery (the ledge where the lid sits) inside the rim using a wooden rib or your finger. Ensure it is deep enough to hold a lid securely. -
Throw Spout and Lid:
Using smaller balls of clay, throw a tapered spout and a lid that fits your measured gallery. For the lid, throw a simple dome shape with a thick knob at the center. -
Dry to Leather Hard:
Allow all components to dry slowly to a leather-hard state. This stage is crucial for clean carving; if it’s too wet, the lines will be mushy.
Step 2: Assembling and Trimming
-
Trim the Body:
Invert the main body on the wheel and trim the bottom to create a clean, distinct foot ring. This elevates the pot and gives it a professional profile. -
Attach Handle and Spout:
Pull a strap handle from a lug of clay. Score and slip the contact points on the body, spout, and handle. Attach them firmly, smoothing the seams so they look seamless. -
Refine the Lid:
Trim the underside of the lid if necessary. While it’s on the wheel or a banding wheel, carve radial lines extending from the center knob to the edge to create the fluted texture seen in the photo.
Clean Lines Pro-Tip
Wait until the clay is on the drier side of leather-hard before carving. If the tool drags or creates jagged edges, the clay is too wet—wait another hour.
Step 3: Carving the Design
-
Sketch the Flora:
Lightly sketch your tulip design onto the leather-hard surface using a pencil. The pencil lead will burn off in the kiln, so don’t worry about marks. -
Carve the Outlines:
Using a sharp v-tip carving tool or a small loop tool, carve along your sketched lines. You want a groove deep enough to catch the stain later, but not so deep you weaken the wall. -
Clean the Burrs:
Once carved, gently rub the surface with a finger or a very slightly damp sponge to knock off any sharp clay crumbs or ‘burrs’ created by the tool. -
Bisque Fire:
Let the teapot dry completely (bone dry) and fire it to bisque temperature (usually cone 04 or 06).
Level Up: Texture Contrast
Make the flower petals pop by using a shinier clear glaze just on the petals, while leaving the rest of the pot matte or unglazed raw clay.
Step 4: Glazing and Finishing
-
Apply Oxide Wash:
Mix red iron oxide with water (or use a brown underglaze). Brush this wash generously over all the carved tulip lines and the fluted lid details. -
Wipe Back:
Using a clean, damp sponge, wipe away the excess oxide from the high points of the surface. The brown color should remain trapped in the recessed carved lines, highlighting the drawing. -
Glaze Interior:
Pour a functional liner glaze inside the teapot and spout to ensure it is food safe and water-tight. -
Glaze Exterior:
Dip or spray the exterior with a matte clear glaze. Alternatively, if your clay body is vitrified and smooth, you can leave the exterior unglazed for a raw texture, but a thin matte glaze enhances durability. -
Final Fire:
Fire the piece to the maturity temperature of your clay body (likely cone 5/6 or cone 10).
Now brew a fresh pot of tea and enjoy the tactile beauty of your hand-carved creation
Sgraffito Pattern Teapot With Bold Contrast
This striking teapot combines a moody, matte black surface with crisp, raw clay lines carved in a technique known as sgraffito. The high-contrast geometric pattern creates a modern yet tactile vessel that feels wonderful in the hand.
Step-by-Step Guide
Materials
- Stoneware clay (smooth, light-firing body for contrast)
- Black underglaze or slip
- Pottery wheel
- Rib tools (metal and rubber)
- Needle tool
- Sgraffito tool or fine loop tool
- Hake or soft fan brush
- Clear matte glaze (optional, for interior only)
- Ruler or measuring tape
- Sponge
Step 1: Throwing the Forms
-
Throw the body:
Begin with about 1.5 to 2 lbs of light-firing stoneware clay on the wheel. Center it and throw a rounded, bulbous belly shape, narrowing slightly at the opening. I like to keep the walls slightly thicker than a standard cup to allow for carving later. -
Refine the curve:
Use a flexible metal rib to smooth the exterior, removing throwing lines and emphasizing that nice round curve. This smooth canvas is crucial for the sgraffito step later. -
Throw the lid:
Measure the gallery opening of your teapot body with calipers. Throw a simple lid that fits snugly, adding a small, spherical knob at the top for lifting. -
Throw the spout:
Using a smaller amount of clay, throw a tapered spout. Ensure the base of the spout is wide enough to attach securely to the body. -
Pull the handle:
Pull a sturdy handle from a lug of clay, aiming for a curve that mimics the roundness of the pot body. Set all pieces aside to reach leather-hard consistency.
Clean Lines Tip
Work when the clay is leather hard—not bone dry. If the clay chips while carving, it’s too dry. Mist it lightly and wrap it in plastic for an hour.
Step 2: Assembly & Surface Prep
-
Trim the body:
Once leather hard, flip the teapot body and trim a defined foot ring. This elevates the pot and gives the round shape a place to rest. -
Attach the spout:
Hold the spout up to the body to check the angle. Cut the spout base to fit the curve, score both surfaces, apply slip, and press firmly to attach. Smooth the seam thoroughly. -
Attach the handle:
Score and slip the handle attachment points on the opposite side. Blending the clay at the seams is key for strength. Check for balance by gently lifting the pot. -
Smooth everything:
Go over the entire assembled piece with a slightly damp sponge or rubber rib to remove any fingerprints or rough attachment marks. -
Apply the background:
Using a soft hake brush, apply 2–3 even coats of black underglaze or black slip to the exterior of the body, lid, and spout. Let each coat dry until the sheen disappears before adding the next.
Level Up: Texture
Instead of smooth lines, try chatter-marking the carved areas or stippling inside the triangles for a difference in texture as well as color.
Step 3: Carving the Sgraffito Design
-
Plan the grid:
Once the underglaze is touch-dry but the clay is still leather hard, lightly scratch vertical guide lines around the pot’s belly using a needle tool or the back of a brush. -
Map out triangles:
Connect your vertical guides with diagonal lines to create the primary triangular structure. Don’t worry about perfection; the hand-drawn look adds character. -
Carve the main lines:
Using a sharp sgraffito tool or a fine wire loop, carve along your guide lines. Apply steady pressure to cut through the black layer and reveal the white clay body underneath. -
Add detail lines:
Inside the larger triangles, carve smaller, intersecting geometric shapes. I usually start from a corner and fan out, creating that shattered glass effect. -
Detail the lid:
Carve two concentric circles around the rim of the lid to frame the knob, tying the design together. -
Clean up burrs:
Wait until the pot is bone dry, then gently brush away any clay crumbs or ‘burrs’s from the carving lines with a stiff brush. Do not rub with your finger, or you might smudge the black.
Step 4: Finishing
-
Bisque fire:
Fire the piece to cone 04 (or your clay body’s bisque temperature). -
Glaze the interior:
Pour a clear or white liner glaze into the interior of the teapot and the spout to make it food safe and waterproof. Wipe any drips off the exterior immediately. -
Leave exterior unglazed:
To maintain the tactile contrast shown in the photo, leave the exterior unglazed. The vitrified black slip will provide a smooth, matte finish. -
Glaze fire:
Fire the teapot to the final maturity temperature of your clay body (likely Cone 6 or 10).
Once fired, the stark white lines popping against the dark background result in a stunning centerpiece for your tea table

TRACK YOUR CERAMIC JOURNEY
Capture glaze tests, firing details, and creative progress—all in one simple printable. Make your projects easier to repeat and improve.
Two-Tone Glaze Teapot With Clean Color Break
This project embraces the beauty of simplicity with a crisp, horizontal divide between a warm, rust-colored base and a creamy, speckled upper body. The clean break line highlights the form of the pot while the contrasting textural glazes add depth and character.
How-To Guide
Materials
- Stoneware clay body (smooth or speckle)
- Pottery wheel
- Throwing tools (rib, sponge, wire)
- Trimming tools
- Rust/Terracotta colored glaze (cone 5/6)
- Creamy matte white/beige glaze (cone 5/6)
- Wax resist (liquid)
- Sponge or brush for wax
- Large bucket for dipping
- Kiln
Step 1: Throwing and Assembling
-
Throw the body:
Begin by wedging about 2-3 pounds of stoneware clay. Center it on the wheel and throw a round, bulbous belly form, narrowing slightly at the neck to create a gallery for the lid. -
Refine the shape:
Use a metal rib to smooth the exterior curve, removing any finger ridges. A smooth surface is crucial for a clean glaze break later. -
Throw the spout and lid:
Throw a tapered spout and a lid that fits your gallery measurements. I always make the lid slightly larger than I think I need to account for shrinkage. -
Pull the handle:
Pull a strap handle from a lug of clay. Give it a gentle curve that mimics the roundness of the pot’s body. -
Leather hard assembly:
Once all pieces are leather hard, trim the foot ring of the body. Score and slip the spout and handle onto the pot, ensuring the spout tip is level with the rim. -
Bisque fire:
Let the assembled teapot dry slowly and completely before bisque firing it to Cone 04 to prepare it for glazing.
Wobbly Glaze Line?
If dipping creates an uneven horizon line, use electrical tape. Apply tape to the bisque for the first dip, peel it off, wax the glazed area, then dip the second color.
Step 2: Glazing the Interior
-
Clean the bisque:
Wipe down the entire bisque-fired teapot with a damp sponge to remove any dust that might interfere with glaze adhesion. -
Pour the liner glaze:
Pour your creamy white glaze inside the teapot body. Roll it around to coat every interior surface, then pour out the excess promptly. -
Clean the rim:
Immediately wipe any drips off the exterior rim and the gallery where the lid will sit.
Step 3: Creating the Two-Tone Exterior
-
Dip the top section:
Hold the teapot by the foot ring (or use glazing tongs if preferred). Dip the pot upside down into the cream glaze bucket, submerging the handle, spout, and about two-thirds of the body. -
Adjust the dip line:
Hold it steady for 3-4 seconds to get distinct coverage. Lift it out straight to keep the line even. -
Clean the distinct line:
If the glaze edge isn’t perfectly straight, wait until it’s powdery dry, then use a damp sponge or a straight-edge tool to gently tidy the horizontal line. -
Apply wax resist:
This is the most critical step for the clean break. Carefully brush a band of liquid wax resist over the cream glaze, right up to the edge where the bare bisque begins. This protects the top glaze from the second dip. -
Wax the foot:
Don’t forget to wax the bottom foot ring to prevent the pot from fusing to the kiln shelf. -
Dip the bottom section:
Once the wax is dry, dip the bottom third of the teapot into the rust-colored glaze. Overlap slightly onto the waxed area; the wax will repel the rust glaze, creating a perfect butt-joint between colors. -
Wipe away beads:
Immediately use a clean sponge to wipe away any beads of rust glaze that are sitting on top of the waxed cream section. -
Glaze the lid:
Dip the exterior of the lid in the cream glaze to match the top of the pot. Ensure the flange that touches the pot remains unglazed.
Clean Spouts
Immediately after dipping the top section, blow sharply into the sprout to clear the glaze. This prevents a clog from forming and keeps the pouring action smooth.
Step 4: Firing
-
Dry thoroughly:
Allow the teapot to dry for at least 24 hours. The double dipping introduces a lot of water to the bisque. -
Load and fire:
Load into the kiln and fire to Cone 5 or 6 (depending on your clay and glaze specifications). A medium speed firing schedule usually works best to allow gases to escape for a smooth finish.
Once cooled, your teapot will be ready for a cozy afternoon brew, displaying a beautiful modern contrast
Drip Glaze Teapot With Organic Movement
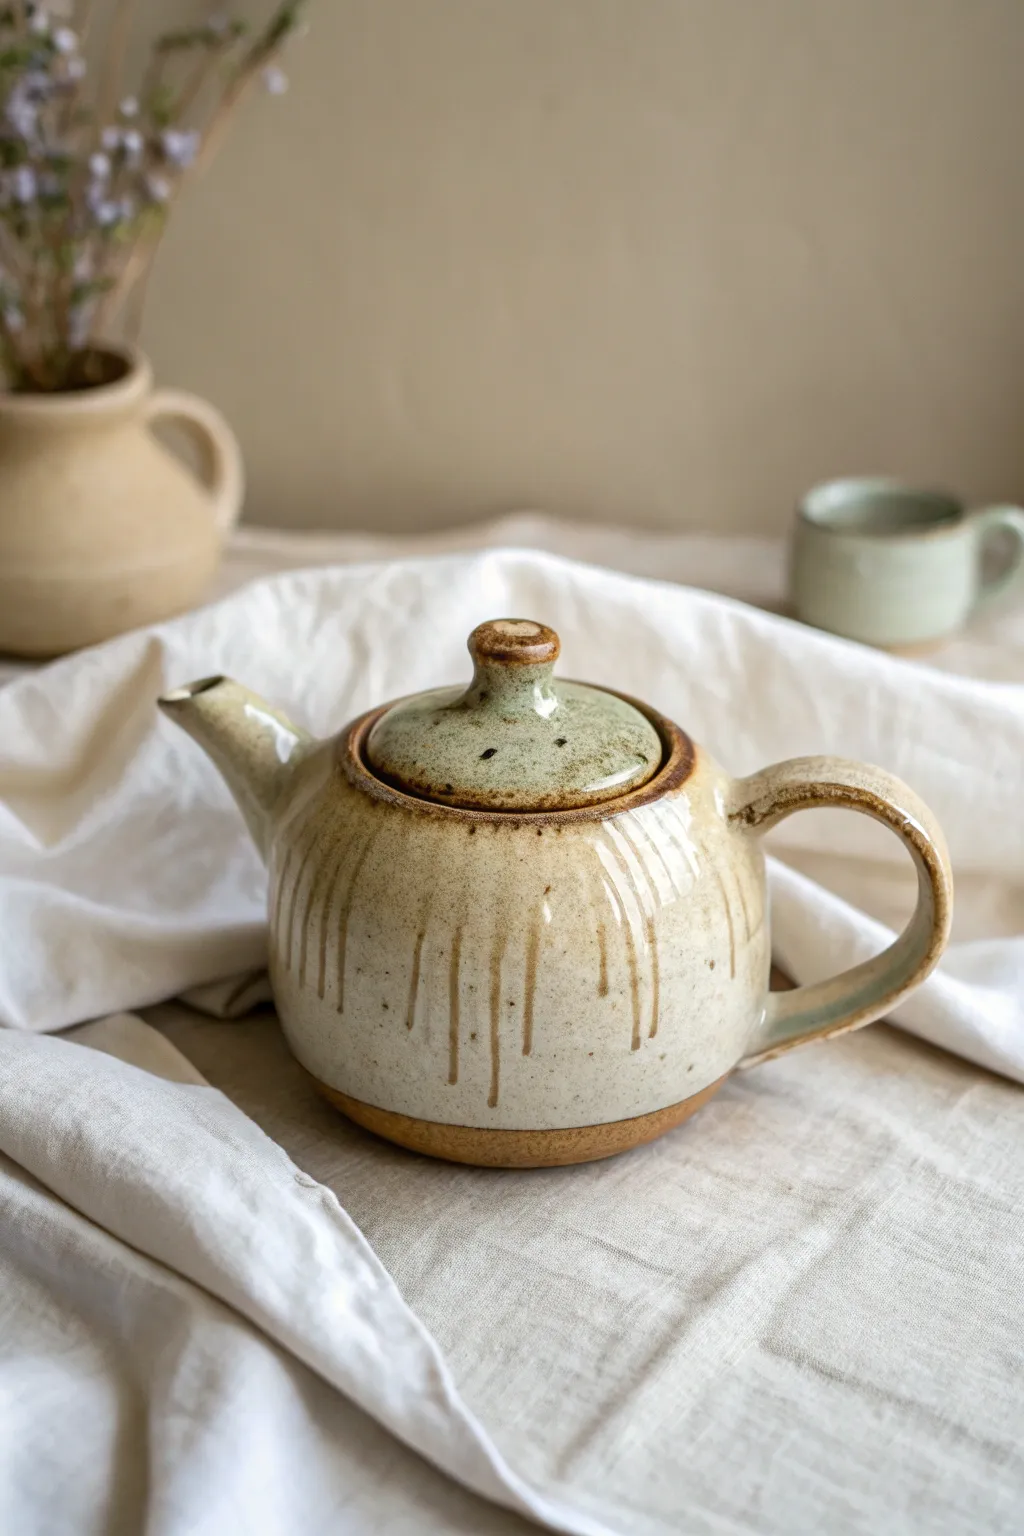
Embrace the natural fluidity of glazing with this rustic teapot project, featuring earthy tones and deliberate drip movement. The creamy speckled finish contrasts beautifully with the raw clay base, creating a piece that feels both grounded and dynamic.
Step-by-Step Tutorial
Materials
- Stoneware clay (speckled or buff)
- Pottery wheel
- Throwing tools (sponge, rib, wire cutter)
- Trimming tools
- Teapot spout maker or wooden dowel
- Scoring tool and slip
- Cream/White speckled glaze
- Iron wash or thin brown glaze (for drips)
- Small liner brush or bulb syringe
- Wax resist
- Kiln
Step 1: Throwing the Body and Lid
-
Center and open the clay:
Begin with about 1.5 to 2 lbs of wedged clay on the wheel. Center it firmly and open the clay to create a flat internal floor, leaving enough thickness for trimming later. -
Pull the walls:
Pull the walls into a cylinder first, then gently shape it into a bulbous, rounded belly by pushing from the inside out. Aim for a shape that feels full and organic. -
Form the gallery:
At the rim, use a wooden rib or your fingers to press a small ledge inward. This is the ‘gallery’ where the lid will sit. Measurement is key here; use calipers to measure the diameter of this gallery. -
Throw the lid:
Using a smaller amount of clay (about 0.5 lbs), throw a lid ‘off the hump’ or centered on a bat. Use your caliper measurement to ensure it fits the teapot’s gallery perfectly. Don’t forget to pull a small knob at the top. -
Throw the spout:
Throw a small, tapering cylinder without a bottom for the spout. Flare the base slightly so it can attach to the curved tea pot body. Refine the pouring edge to be sharp to prevent dripping.
Step 2: Assembling and Trimming
-
Trim the foot:
Once leather hard, flip the teapot body over and center it. Trim a neat foot ring, leaving approximately 1/2 inch of the bottom wall exposed to showcase the raw clay later. -
Prepare the spout attachment:
Hold the spout against the body to find the right angle. Trace the outline, then use a hole cutter or drill bit to create a strainer pattern (multiple small holes) inside that outline on the body. -
Attach the spout:
Score the attachment area and the base of the spout thoroughly. Apply slip and press the spout firmly onto the body. Smooth the join with a coil of clay if necessary to make it seamless. -
Pull and attach the handle:
Pull a strap handle from a lump of clay. Attach it directly opposite the spout. Score, slip, and blend the joins well. Create a comfortable C-curve that balances the visual weight of the spout. -
Refine the lid fit:
Test the lid on the pot. If it’s tight, sand or trim it slightly. Ensure the knob is securely attached and comfortable to grip. -
Bisque fire:
Allow the entire piece to dry slowly to prevent cracking, especially at the attachments. Fire to bisque temperature (usually vertically cone 04 or 06).
Drip Control
If your oxide wash is too runny, the lines can blur into a mess. Test the viscosity on a test tile first; it should be like ink, not water.
Step 3: Glazing the Drips
-
Apply wax resist:
Paint wax resist over the entire bottom foot ring and up the side about 1/2 inch. This creates the ‘resist line’ where the glaze will stop. -
Glaze the interior:
Pour your main cream/white glaze into the teapot, swirl it to coat the entire interior, and pour it out. Wipe any drips off the exterior rim immediately. -
Glaze the exterior:
Dip the exterior of the teapot into the cream glaze, stopping right at the wax line. Hold it upside down for a few seconds to let excess drip off. Do the same for the lid. -
Clean the fittings:
Sponge off any glaze from the gallery rim and the contact points of the lid so they don’t fuse together during firing. -
Apply the iron wash drips:
Using a liner brush loaded with iron wash or a thin brown glaze, press the brush firmly against the shoulder of the pot and drag purely vertical lines down. Vary the pressure to make the lines start thick and trail off thinly. -
Accentuate the lid:
Add a wash of the brown oxide or a secondary reactive glaze (like a soft green or darker beige) to the lid to separate it visually from the body. -
Final Fire:
Load into the kiln and fire to the glaze’s maturity temperature (e.g., cone 6 or 10). The heat will cause the iron wash to interact with the base glaze, creating movement.
Green Oxide
Mix a tiny amount of copper carbonate into your rim glaze or lid wash. This creates subtle sea-green hues where the glaze breaks.
Once cooled, your teapot is ready to brew a comforting cup with unmatched handmade charm
Textured Teapot With Stamped Slip Details

This charming teapot combines the rustic warmth of red stoneware with precise, folk-art inspired surface decoration. The contrast between the matte, speckled body and the glossy cobalt blue accents creates a piece that feels both traditional and uniquely handmade.
Step-by-Step Guide
Materials
- Red stoneware clay body (groggy/speckled)
- White or cream decorating slip (engobe)
- Cobalt blue glossy glaze
- Clear matte or satin glaze
- Pottery wheel
- Trimming tools
- Slip trailer or fine brush
- Triangle stamp tool (biscuit or carved wood)
- Needle tool
- Sponge
Step 1: Throwing the Form
-
Throw the body:
Begin with about 1.5 to 2 lbs of red stoneware clay. Center it on the wheel and open it up, pulling the walls into a rounded, bulbous belly shape. Neck in the top significantly to create a gallery (shelf) for the lid to sit on. -
Refine the profile:
Use a metal rib to smooth the exterior curve, ensuring a continuous, pleasing roundness. The belly should be widest just below the halfway point. -
Throw the spout and lid:
Throw a tapered spout, ensuring the base is wide enough to attach to the pot’s shoulder. Separately, throw a domed lid with a small, rounded knob. The lid must be measured carefully with calipers to fit inside the pot’s gallery. -
Create the handle:
Pull a strap handle from a lug of clay. I find it best to let this firm up into a slight curve before attaching it, aiming for an elegant ear shape.
Fixing Smudged Dots
If you accidentally smear a wet slip dot, let it dry completely rather than wiping immediately. Once dry, gently scrape the error off with an X-Acto knife.
Step 2: Assembling and Trimming
-
Trim the foot:
Once the body is leather hard, flip it over and trim a defined foot ring. This helps elevate the round form and gives the pot a lighter visual weight. -
Attach components:
Score and slip the contact points for the spout and handle. Attach the spout low on the belly, cutting the hole for the liquid first. Attach the handle opposite the spout, smoothing the joins seamlessly. -
Clean up:
Sponge away any excess slip or rough marks from the assembly process. The surface should be smooth and ready for decoration.
Try Colored Slip
Swap the white dots for a pastel mint or soft yellow slip to create a different vintage mood while keeping the same red clay base.
Step 3: Slip Decoration and Sgraffito
-
Define the shoulder:
Using a needle tool while the pot is spinning slowly on a banding wheel, lightly incise a horizontal line around the shoulder to mark the top boundary for the main pattern. -
Apply the triangle band:
Paint a band of blue underglaze or slip around the shoulder area. While it’s still damp, use a sgraffito tool to carve through the blue, revealing the red clay in a triangular zigzag pattern. -
Stamp the texture:
If you prefer stamping over sgraffito, you can stamp a triangle pattern into the raw clay first, then fill the impressions with blue slip, wiping back the excess once dry to mimic the look in the image. -
Dot the belly:
Fill a slip trailer with white or cream decorating slip. Systematically apply small dots in horizontal rows around the belly of the pot. Start from the top row and work your way down to prevent smudging. -
Varied spacing:
Notice how the dots aren’t perfectly rigid grids—allow some organic spacing to maintain the handmade folk aesthetic.
Step 4: Glazing and Firing
-
Bisque fire:
Once the pot is bone dry, fire it to cone 04 (or your clay body’s bisque temperature). -
Wax resist:
Apply wax resist over the white slip dots and the raw red clay areas if you want them to remain totally matte. However, for this specific look, the red clay appears to have a very thin transparent wash. -
Glaze the blue areas:
Brush three coats of a glossy cobalt blue glaze onto the spout, the handle, and the lid. Be careful to keep crisp lines where the blue meets the red clay body. -
Glaze the interior:
Pour a food-safe clear or white liner glaze inside the teapot and swirl to coat, pouring out the excess immediately. -
Final coat:
If not waxing the red body, dip the entire exterior quickly in a thin satin clear glaze to seal the slip dots without obscuring the clay color. -
Final firing:
Fire the piece to cone 5/6 (mid-range oxidation) to mature the clay and melt the glazes together.
Now brew your favorite loose-leaf blend and enjoy the tactile pleasure of your handmade vessel
Slab-Built Geometric Teapot
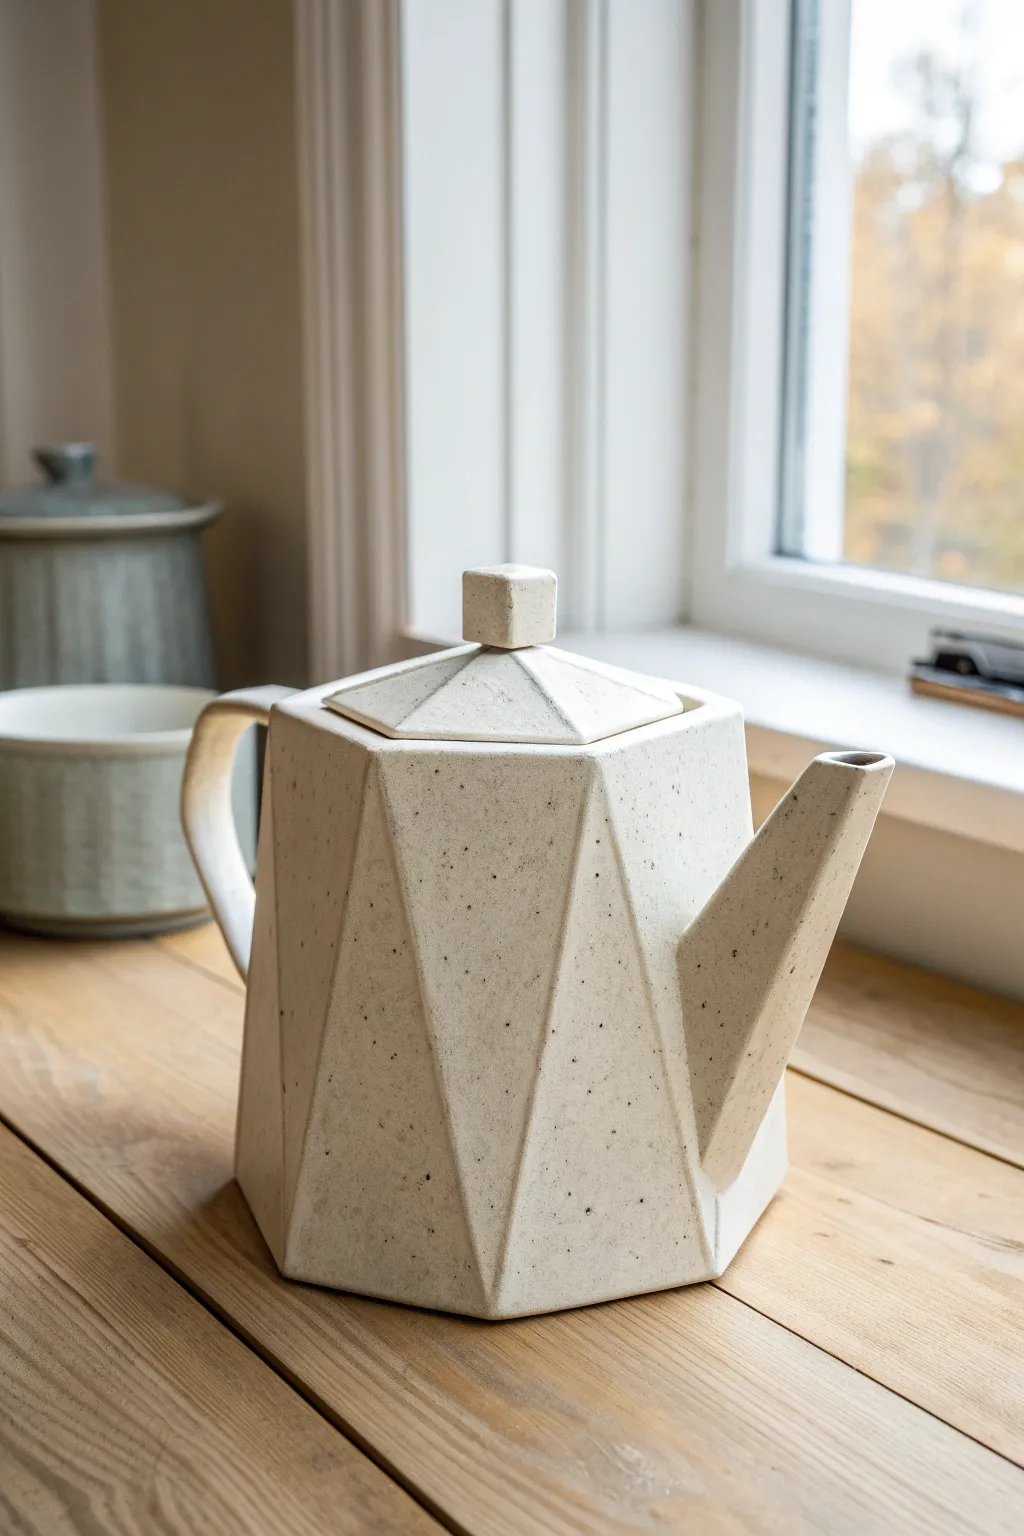
This stunning teapot features a modern, geometric silhouette built from sharp angles and clean lines, giving it a gemstone-like quality. The speckled matte white glaze softens the edges just enough while letting the clay’s natural texture shine through.
How-To Guide
Materials
- Speckled Stoneware Clay (mid-fire)
- Slab Roller or Rolling Pin with Guide Strips
- Fettling Knife or X-Acto Knife
- Paper Templates (Cardstock recommended)
- Scoring Tool or Serrated Rib
- Slip (clay and water mixture)
- Paddle (wooden)
- Surform Tool or Rasp
- Matte White Glaze (semi-translucent)
- Paintbrush or Spray Gun
Step 1: Creating the Geometric Body
-
Prepare the templates:
Design your templates on cardstock first. The body consists of several elongated triangles that alternate direction (point up, point down) to form a faceted cylinder. You will also need a hexagonal base piece. -
Roll the slab:
Roll out a consistent slab of speckled stoneware clay to approximately 1/4 inch thickness. Compress the clay with a rib on both sides to align particles and prevent warping later. -
Cut the facets:
Lay your templates over the leather-hard slab and cut out the triangular wall segments. Be precise with your knife angle; cutting at a 45-degree miter on the long edges helps the seams fit tighter. -
Assemble the walls:
Score and slip the long edges of your triangles. Stand them up, joining them side-by-side to create the faceted tube shape. I find it easiest to join two or three flat on the table first before standing them up. -
Attach the base:
Once the walls are connected into a ring, score and slip the bottom edge and attach it firmly to the hexagonal base slab. Use a thin coil on the interior seam for reinforcement.
Step 2: Spout, Handle, and Lid
-
Build the geometric spout:
Construct the spout using three small, tapered slab strips to create a triangular tube. The opening should be angled sharply. Ensure the base of the spout is cut at an angle that complements the slant of the teapot body. -
Attach the spout:
Score the body where the spout will sit and drill straining holes. Score and slip the spout base, pressing it firmly onto the body. Clean up excess slip immediately with a damp brush. -
Form the handle:
Pull or cut a strap handle. Instead of a traditional curve, try to press angular bends into it once it stifftens slightly to match the geometric theme. Attach it opposite the spout. -
Construct the lid structure:
For the lid, cut a hexagon slightly smaller than your top opening. Add a flange (a strip of clay) underneath that fits snugly inside the teapot rim to keep it secure. -
Add the lid peak:
Build a low, faceted pyramid on top of the hexagonal lid slab. Top it off with a small, solid cube of clay to act as the knob.
Seam Splitting?
If seams crack during drying, your clay was likely too dry when joining. Score deeper next time and use vinegar in your slip for a stronger bond.
Step 3: Refining and Finish
-
Refine the edges:
Once the pot is bone dry, gently sand or sponge the sharp geometric corners to make them crisp but safe to touch. This definition is crucial for the final look. -
Bisque fire:
Fire the piece to cone 04 (or your clay’s specific bisque temperature). -
Apply glaze:
Dip or spray a matte white glaze. Aim for a thickness that covers the clay color but is thin enough to allow the dark speckles of the stoneware to bleed through. -
Clean the foot:
Wipe the bottom of the teapot completely clean of glaze to prevent it sticking to the kiln shelf. -
Final firing:
Glaze fire to cone 5 or 6, depending on your clay body specifications.
Sharper Angles
Use a metal rib or paddle to gently beat the flat sides of the pot when leather hard. This emphasizes the planes and sharpens the corners.
Enjoy serving tea from your modern, sculptural masterpiece
Character Teapot With 3D Appliqué Accent
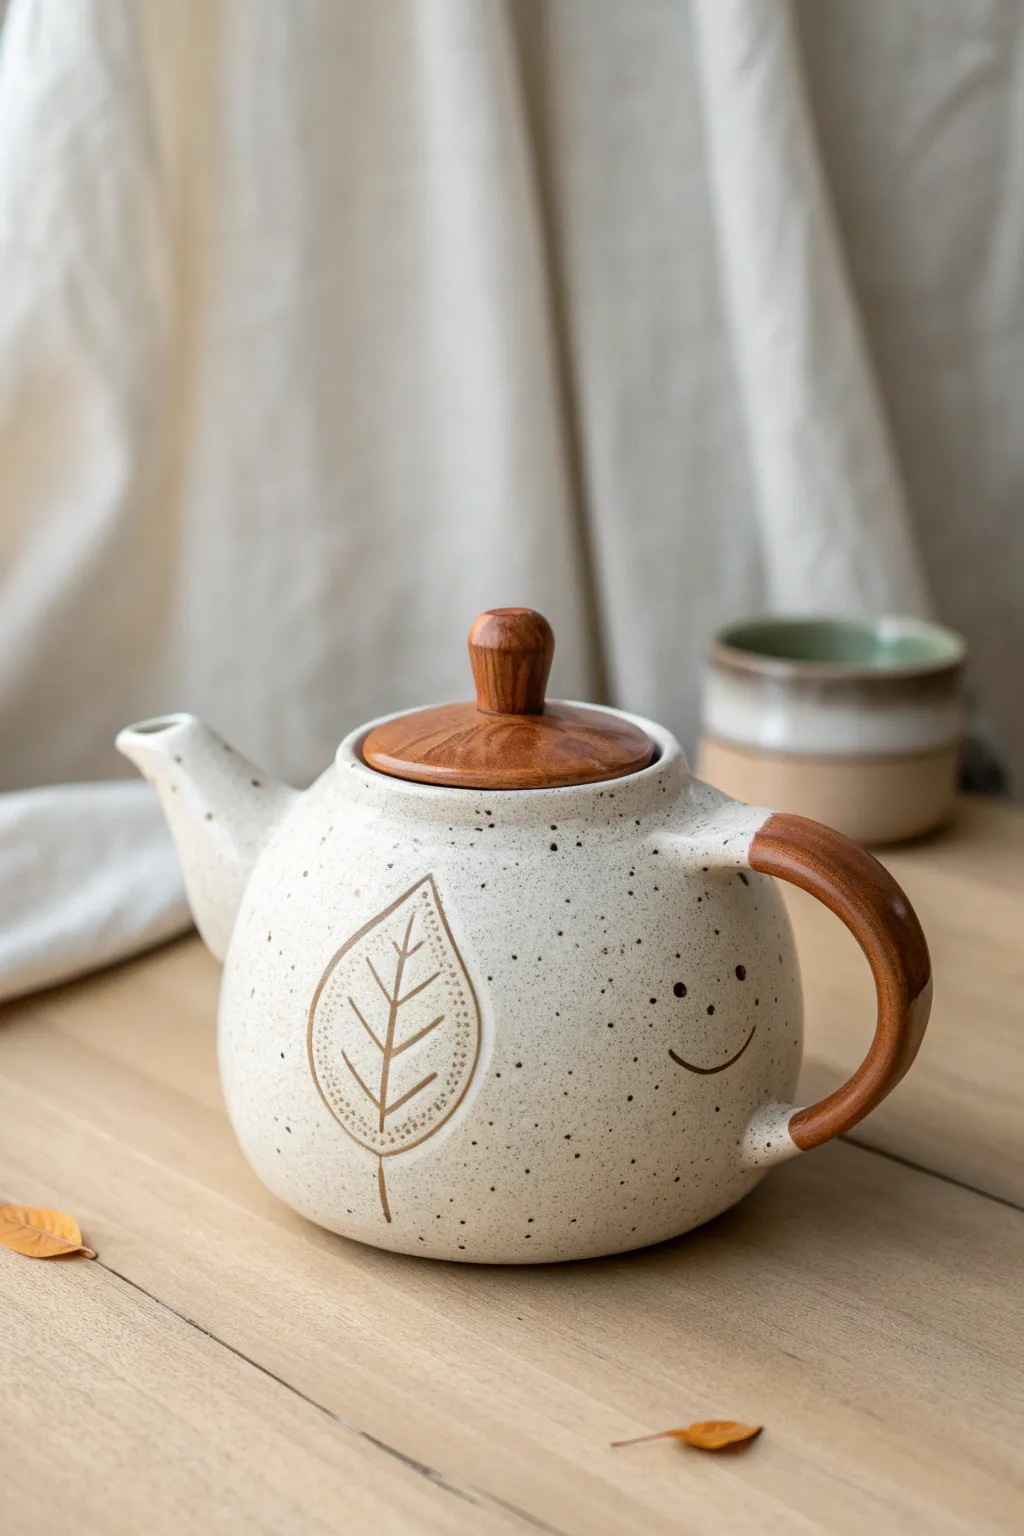
Bring a touch of playful charm to your tea ritual with this handcrafted ceramic teapot, featuring a warm speckled glaze and a friendly, carved smile. The unique combination of a ceramic body with a custom-fitted wooden lid and handle creates a delightful mix of textures perfect for cozy afternoons.
Step-by-Step Guide
Materials
- Stoneware clay (speckled or light buff body)
- Pottery wheel
- Throwing tools (rib, sponge, wire cutter)
- Trimming tools
- Carving tool or sgraffito loop
- Wooden dowel or carved wood piece (for handle attachment)
- Hardwood block (walnut or cherry) for lid and handle
- Woodworking tools (lathe or carving knife, sandpaper)
- Food-safe wood finish (tung oil or beeswax)
- Black underglaze
- Clear or matte white glaze (transparent enough to show speckles)
- High-temp epoxy or ceramic-to-wood adhesive
Step 1: Throwing the Body
-
Center and open:
Center about 2-3 lbs of speckled clay on the wheel. Open the mound, leaving a slightly thicker floor than usual to accommodate later trimming. -
Shape the belly:
Pull the walls up, ballooning them outwards to create a round, bulbous belly. Collar the neck in significantly as you reach the top to create the opening for the lid. -
Refine the gallery:
Create a clean gallery (the ledge where a lid usually sits) just inside the rim, ensuring it is level. Even though we are making a wooden lid, this ensures a good fit. -
Throw the spout:
Using a smaller amount of clay (about 0.5 lb), throw a short, tapered spout. Cut the base of the spout at an angle using a fettling knife so it fits the curve of the pot’s belly. -
Leather hard stage:
Allow both the pot and spout to dry to a leather-hard state. This is crucial for clean trimming and carving later.
Loose Lid Fix
If the wood lid is too loose after the clay shrinks, glue a strip of cork or a silicone ring around the inner flange of the wood for a snug, steam-tight seal.
Step 2: Assembling and Carving
-
Trim the base:
Invert the teapot body on the wheel and trim the bottom to create a defined foot ring, mirroring the roundness of the belly. -
Attach the spout:
Score and slip the attachment area on the belly and the spout base. Press firmly to join, smoothing the seam with a coil of fresh clay if necessary. -
Create handle attachments:
Instead of a clay handle, attach two small clay lugs or create sockets where the wooden handle will eventually insert. For the specific look in the photo, shape short clay stumps that will transition into the wood. -
Carve the leaf:
Using a fine loop tool or needle tool, gently carve a large leaf outline into the side of the pot. Divide the leaf with a central vein and branching veins. -
Add texture:
Stipple the inside edge of the leaf outline with a needle tool to create a dotted texture, giving the design depth and distinctness. -
The smiley face:
On the opposite side or adjacent to the leaf, use a small drill bit or hole punch tool to make two small eyes. Carve a simple, curved ‘U’ shape for the smile.
Coordinated Cup Set
Use the clay trimmings to throw a matching teacup. Glaze slightly differently, like the two-toned cup in the background, to create a complementary set.
Step 3: Finishing and Woodwork
-
Bisque fire:
Once bone dry, fire the teapot to bisque temperature (usually Cone 04 or 06, depending on your clay). -
Glazing:
Apply a wash of black underglaze into the carved leaf and smiley face, then sponge it back so the color remains only in the recesses. Dip or spray the entire pot in a clear or semi-opaque matte white glaze. -
Glaze fire:
Fire the piece to maturity (Cone 5, 6, or 10 depending on your clay body). I usually check specifically that the spout is clear of glaze drips before loading. -
Shape the wooden lid:
While the ceramic fires, turn a piece of walnut or cherry wood on a lathe (or hand carve) to fit the opening of your teapot. Create a small knob on top for lifting. -
Craft the handle:
Carve a curved wooden handle that matches the diameter of your clay attachment points. Sand it incredibly smooth, starting with 80 grit and moving up to 400 grit. -
Seal the wood:
Apply several coats of food-safe oil or wax to the wooden components to protect them from steam and moisture. -
Final assembly:
Using high-strength epoxy, carefully bond the wooden handle to the ceramic lugs. Let it cure fully before pouring your first cup.
Pour a warm brew and enjoy the charming personality of your new handmade creation