When I’m mixing glazes or trying a new surface idea, ceramic test tiles are my little reality-checks before I commit to a whole piece. Here are my favorite test tile ideas—from classic shapes to fun, slightly nerdy layouts that make glaze testing way easier to read later.
Hanging Tiles With One Clean Hole
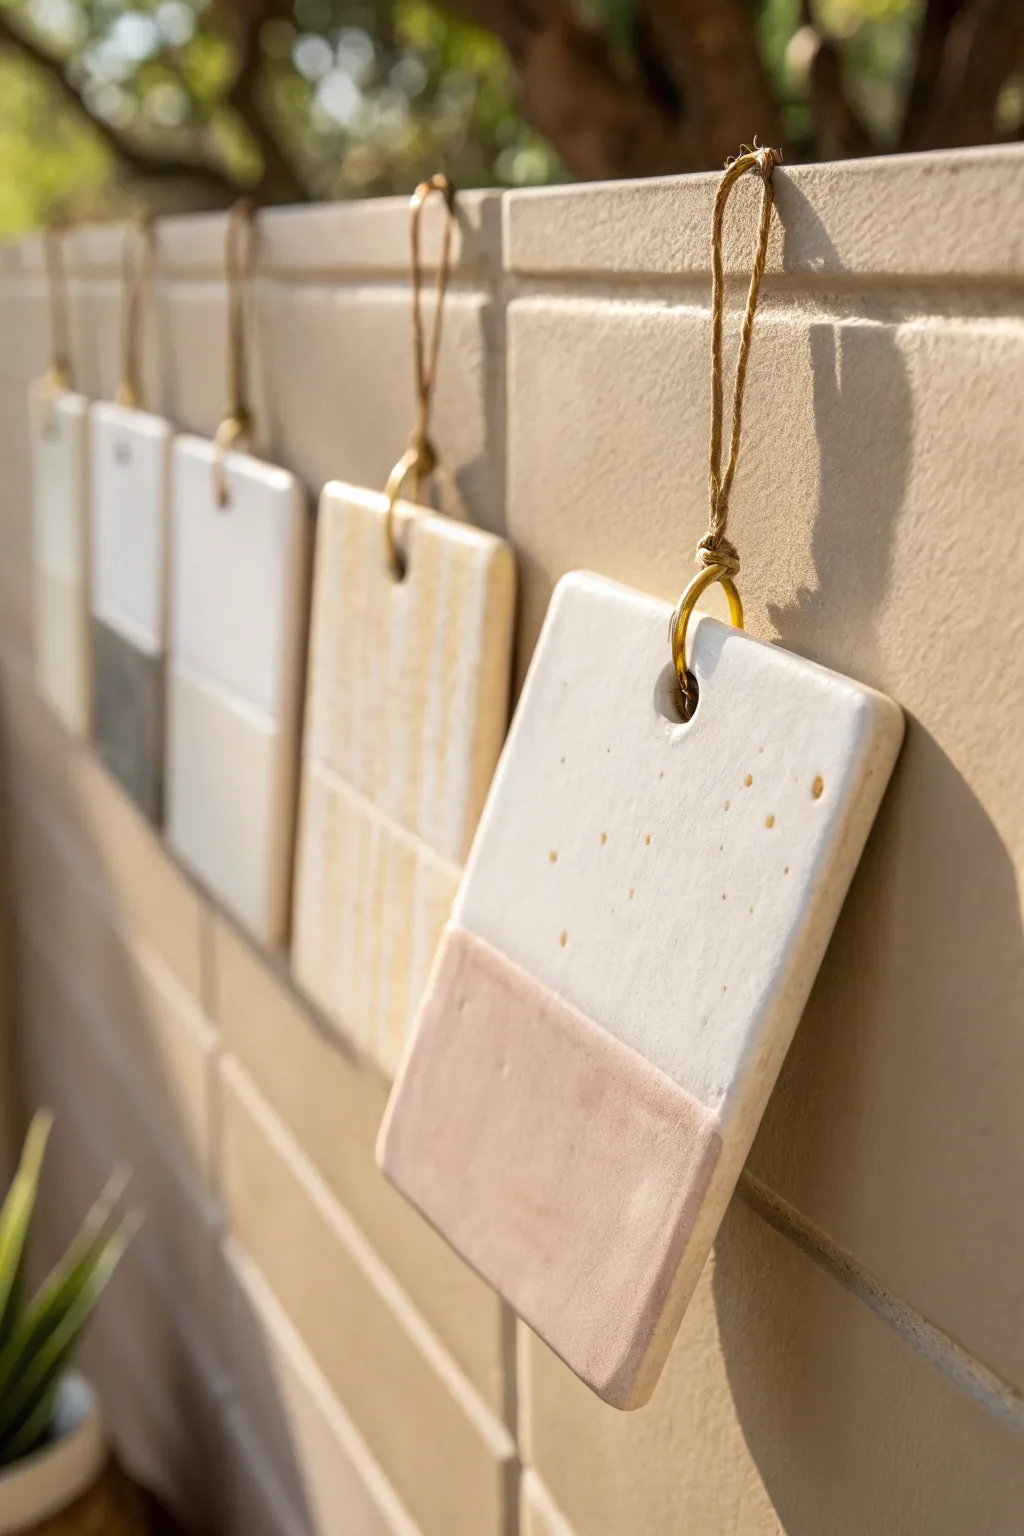
These elegant, hanging test tiles offer a visually pleasing way to organize your glaze library right on the studio wall. With their clean, rounded edges and simple two-tone design, they double as functional reference tools and beautiful wall art.
Step-by-Step Guide
Materials
- White or speckled stoneware clay
- Rolling pin
- Guide sticks or slab roller (approx. 1/4 inch thickness)
- Square cookie cutter (approx. 3×3 or 4×4 inches)
- Hole punch tool or drill bit (approx. 1/4 inch diameter)
- Small bowl of water and sponge
- Bisque firing kiln access
- Two contrasting glazes (e.g., Matte Cream and Terracotta Pink)
- Wax resist
- Glaze firing kiln access
- Brass jump rings (10-12mm diameter)
- Jute twine or hemp cord
- Scissors
Step 1: Shaping the Clay
-
Prepare the slab:
Begin by wedging your stoneware clay thoroughly to remove air bubbles. Roll it out into a smooth, even slab about 1/4 inch thick using guide sticks to ensure uniform thickness. -
Cut the shapes:
Using a square cookie cutter, stamp out your tile shapes. If you don’t have a cutter, a sharp needle tool and a straight edge work just as well to cut precise squares. -
Refine the edges:
Gently smooth the sharp cut edges with a damp sponge or your fingertip. I like to lightly press the corners inward to create a softer, slightly rounded profile rather than a sharp 90-degree angle. -
Create the hanging hole:
While the clay is leather-hard, use a hole punch tool or a drill bit to remove a clean circle of clay centered near the top edge. Ensure the hole is large enough to accommodate your jump rings, keeping in mind that clay shrinks during firing. -
Dry and bisque fire:
Place the greenware tiles on a flat board, covering them loosely to dry slowly and prevent warping. Once bone dry, bisque fire them according to your clay body’s specifications.
Warping Woes?
If your tiles curl while drying, flip them over daily and dry them between two pieces of drywall or wooden boards to keep them perfectly flat.
Step 2: Glazing the Tiles
-
Clean the bisque:
Wipe down your bisque-fired tiles with a damp sponge to remove any kiln dust, which can prevent glaze from adhering properly. -
Apply the base glaze:
Dip the top two-thirds of the tile into your base glaze (the white speckled glaze in the example). Hold it for 1-2 seconds and lift it out, letting excess drips run off. -
Clean the hole:
Immediately use a small brush or a fettling knife to clear any glaze out of the hanging hole so it doesn’t seal shut during firing. -
Apply the contrast glaze:
Once the top glaze is dry to the touch, dip the bottom third of the tile into your contrasting second color (the pink/terracotta shade). Try to create a straight horizontal line where the two glazes meet. -
Clean the back:
Sponge off any glaze that may have dripped onto the back of the tile or the bottom edge to protect your kiln shelves. -
Glaze fire:
Fire the tiles to the maturation temperature of your clay and glazes (typically Cone 5 or 6 for stoneware).
Make It Yours
Stamp the back of each tile with the glaze code or name while the clay is leather hard. You’ll never forget which combination is which.
Step 3: Assembly
-
Attach the hardware:
Once the tiles are cool, open a brass jump ring using two pairs of pliers. Thread it carefully through the glazed hole in the tile. -
Secure the ring:
Close the jump ring securely, ensuring the ends meet flush so there are no gaps. -
Prepare the hanging loop:
Cut a length of jute twine, approximately 6-8 inches long. Thread it through the brass jump ring. -
Knot the cord:
Bring the two ends of the twine together and tie a simple overhand knot near the ends to create a secure loop. -
Arrange the display:
Hang your finished test tiles in a row on hooks or nails to create your organized, aesthetic reference wall.
Now you have a stylish and practical system for referencing your favorite glaze combinations


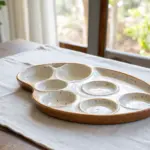
Round “Cookie” Swatch Tiles

These charming test tiles mimic the look of sugar cookies with royal icing, offering a playful way to test glaze opacity and stability while building a useful reference library. By layering dots of colored glaze over a base coat, you can immediately see how your choices interact, flow, or hold their shape during firing.
Step-by-Step Tutorial
Materials
- Stoneware clay (buff or speckled)
- Circle cookie cutter (approx. 3 inches)
- Rolling pin
- Guide strips or slats (approx. 1/4 inch thick)
- Sponge
- Bisque firing kiln access
- Glaze firing kiln access
- White opaque glaze (base)
- Blue glaze (or contrasting color of choice)
- Bulb syringe or slip trailer precision applicator
- Clean paintbrush
- Carving tool or pin tool (for labeling)
Step 1: Forming the “Cookies”
-
Roll the Slab:
Begin by wedging your clay to remove air bubbles. Lay out your guide strips on a canvas-covered surface and roll the clay out until the rolling pin rests evenly on the strips, ensuring a uniform thickness of about 1/4 inch. -
Cut the Circles:
Press your circle cookie cutter firmly into the slab. Try to maximize space to get as many tiles as possible from one roll. Gently push the clay out of the cutter if it sticks. -
Smooth the Edges:
Once cut, run a slightly damp sponge or your finger around the circumference of each circle. This removes the sharp cutting edge, giving it that soft, baked-cookie appearance. -
Dry and Bisque:
Flip the tiles occasionally while drying to prevent warping. Once bone dry, fire them to bisque temperature (usually cone 04 or 06) to prepare them for glazing.
Glaze Consistency Tip
If your dots are peaking like Hershey’s Kisses, your dotting glaze is too thick. Add a few drops of water or CMC gum solution to help it settle flat.
Step 2: Applying the Base Glaze
-
Label the Back:
Before glazing, use an underglaze pencil or iron oxide wash on the back of the bisque tile to write down the specific glaze combination you are testing. This is crucial for future reference. -
Prepare the White Glaze:
Stir your white opaque glaze thoroughly. It should have the consistency of heavy cream. Pour a small amount into a shallow dish wide enough to dip the face of the tile. -
Dip the Face:
Holding the tile by the edges, dip the face down into the white glaze. You want a distinct pool of glaze on top, stopping just before the edge to leave a rim of raw clay exposed—this mimics the crust of a cookie. -
Clean Up:
Quickly wipe away any drips that may have run down the side or onto the back base using a damp sponge. -
Dry the Base:
Allow the white base layer to dry until it is powdery to the touch. This ensures the dots you add later sit on top rather than bleeding immediately into wet glaze.
Step 3: Adding the Polka Dots
-
Load the Applicator:
Fill a bulb syringe or a precision slip trailer bottle with your secondary glaze color (in this case, blue). Ensure there are no clumps that might clog the nozzle. -
Test the Flow:
Squeeze a small amount of glaze onto a scrap surface or paper towel. You want a steady, controllable bead, not a splatter. -
Center Dot First:
Apply the first dot directly in the center of the tile. Keep the nozzle close to the surface but not touching the white glaze layer. -
Create the Pattern:
Work outward from the center, placing four to six dots in a ring around the middle one. I prefer to eyeball the spacing to keep it looking organic, but you can gently mark positions with a needle tool if you are nervous. -
Fill the Outer Ring:
Add a final outer circle of dots near the edge of the white glaze pool. Try to keep the volume of each glaze drop consistent. -
Let it Settle:
The dots will naturally flatten slightly as they dry. Let the tile dry completely before moving it to the kiln. -
Final Fire:
Load the tiles into the kiln for the glaze firing (match the temperature to your clay and glaze, typically cone 5, 6, or 10). Ensure the tiles are level so the dots don’t slide off.
Dots Running?
If the dots run excessively during firing, your base glaze might be too fluid. Test using a stiffer or matte base glaze to hold the decoration in place.
Now you have a sweet-looking reference library that shows you exactly how your glazes interact with one another


Three-Stripe Thickness Tiles
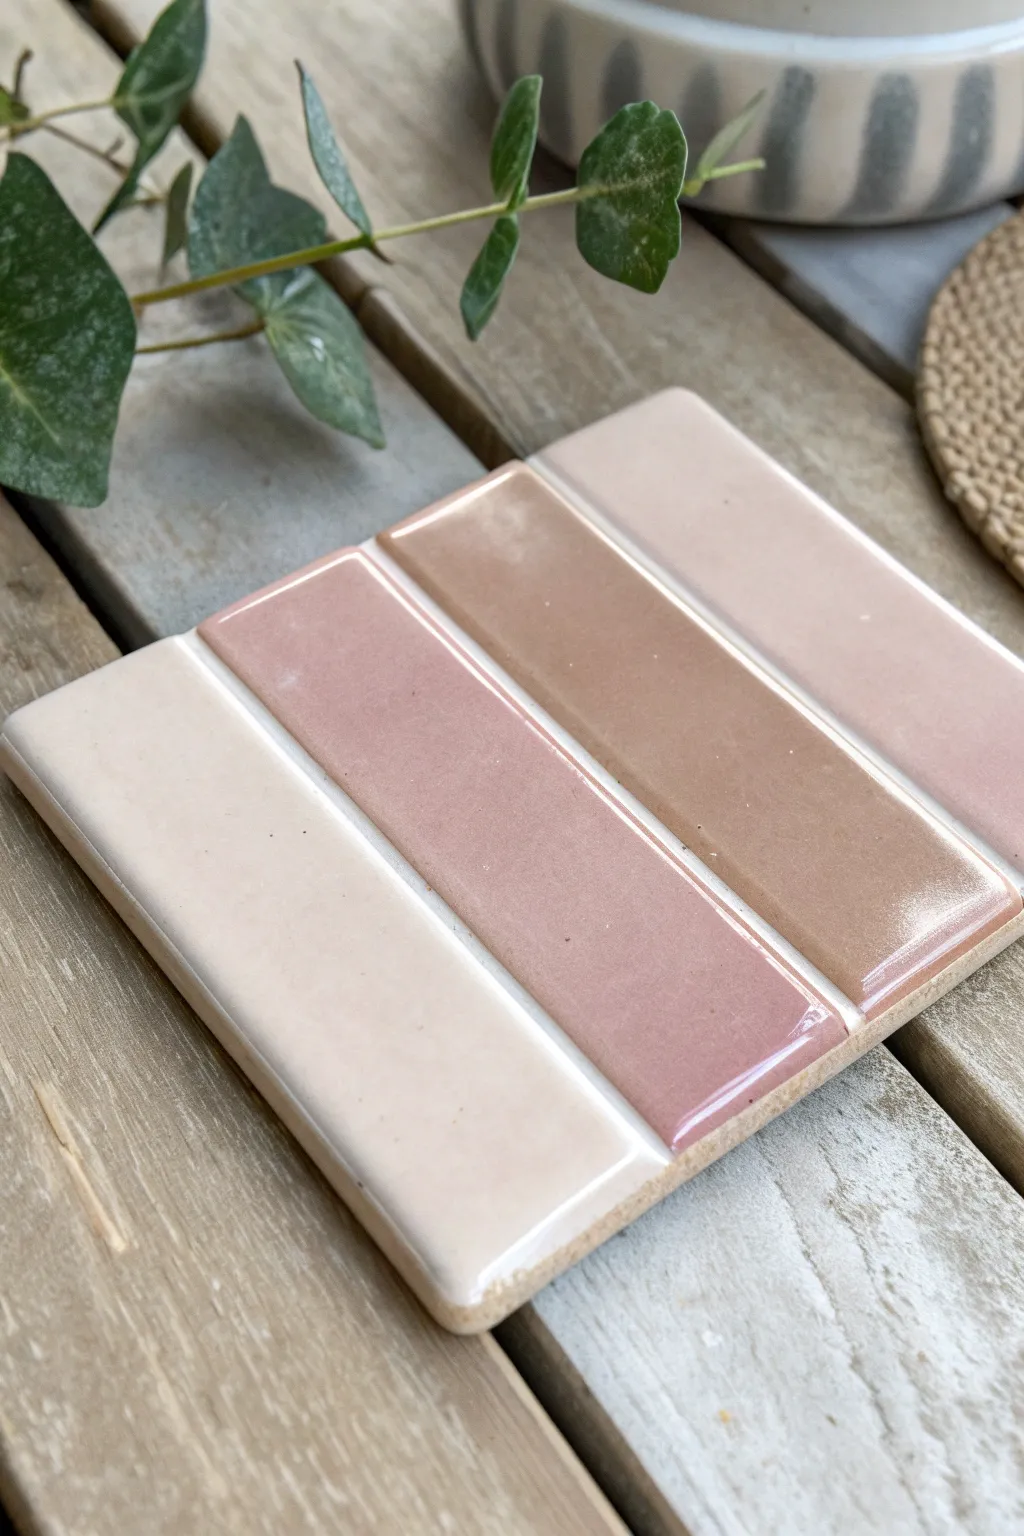
This elegant test tile demonstrates how different glaze thicknesses or interactions can create a beautiful gradient palette on a single clay body. The structured, grooved surface separates the colors cleanly while providing a professional, finished look that serves as both a reference tool and a potential coaster design.
Detailed Instructions
Materials
- Light-colored stoneware clay body (e.g., buff or white stoneware)
- Clay rolling pin
- Two 1/4-inch wooden thickness strips (rolling guides)
- Square cookie cutter (approx. 4×4 inches) or ruler and needle tool
- Wooden sculpting tool or chopstick (for creating grooves)
- Small soft sponge
- Three harmonious ceramic glazes (e.g., blush pink, translucent white, and caramel/tan)
- Glaze brushes (flat hake or soft synthetic)
- Kiln (bisque and glaze firing capabilities)
Step 1: Creating the Tile Base
-
Roll the Slab:
Begin by wedging your clay thoroughly to remove air bubbles. Set up your 1/4-inch thickness strips on either side of the clay and roll it into a smooth, even slab. -
Cut the Square:
Using your square cutter or a ruler and needle tool, cut a precise square from the slab. A size of 4×4 inches works well as it accounts for shrinkage while leaving enough surface area for testing. -
Smooth the Edges:
Gently compress the outer edges with your finger or a slightly damp sponge to remove any sharp burrs left by the cutting tool. This prevents sharpness after firing. -
Mark the Sections:
Lightly mark three vertical lines with a needle tool to divide the tile into four equal rectangular sections. Don’t cut through; just create guide marks for the grooves. -
Create the Grooves:
Use the rounded end of a wooden tool or a chopstick to press firmly along your marked lines. You want to create a distinct valley between the sections without cutting the tile apart. This groove acts as a dam to stop glazes from running into each other. -
Dry Slowly:
Place the tile on a ware board, lightly covered with plastic to dry slowly. This prevents the corners from curling up. Once bone dry, bisque fire the tile to cone 04 (or your clay’s specific bisque temperature).
Prevent Warping
Tiles love to warp. Dry them slowly between two pieces of drywall board or flip them daily during the drying phase to keep them perfectly flat.
Step 2: Glazing the Stripes
-
Clean the Bisque:
Wipe the fired bisque tile with a damp sponge to remove any kiln dust. This step is crucial for ensuring the glaze adheres properly without crawling. -
Select the Palette:
Choose three glazes that sit near each other on the color wheel or vary in opacity. For the look in the photo, select a sheer glossy white/cream, a dusty mauve-pink, and a translucent caramel or honey glaze. -
Glaze Section One:
Starting from the far left separation, apply the sheer cream glaze to the first rectangular section. Use a flat brush to get nice, even coverage right up to the indented groove. -
Glaze Section Two:
Move to the second section and apply your mauve-pink glaze. Be careful not to let the glaze pool too heavily in the groove itself, as this can obscure the separation. -
Glaze Section Three:
Apply the caramel or tan glaze to the third section. I specifically like using glazes that break over texture here, as they interact beautifully with the edges of the clay strip. -
Glaze Section Four:
For the final section on the far right, apply the lightest shade again (like the first section) or a slightly different variation of the pink to complete the gradient. This acts as a ‘control’ or bookend to the design. -
Clean the Grooves:
Take a very fine, damp brush or a specialized wipe-out tool and gently clean any glaze that has dripped into the valley grooves. The raw clay lines between the glazed sections add definition. -
Fire the Tile:
Load the tile into the kiln. Since the bottom of the tile is unglazed, you can place it directly on a kiln shelf. Fire to the maturity temperature of your clay and glazes (typically Cone 5 or 6 for stoneware).
Glazing Tip
If you struggle with shaky hands near the grooves, wax resist the indented lines before glazing. The glaze will bead up and wipe away easily.
Once fired, you’ll have a stunning reference piece that showcases how your glaze combinations work side-by-side


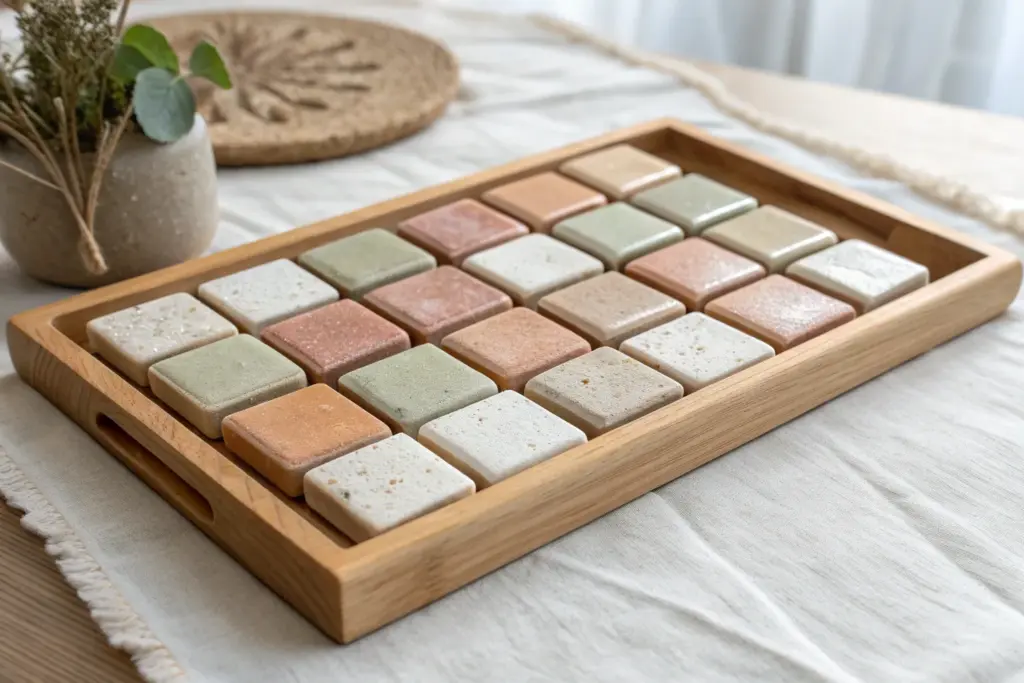
Simple Grid Tiles for Combo Testing
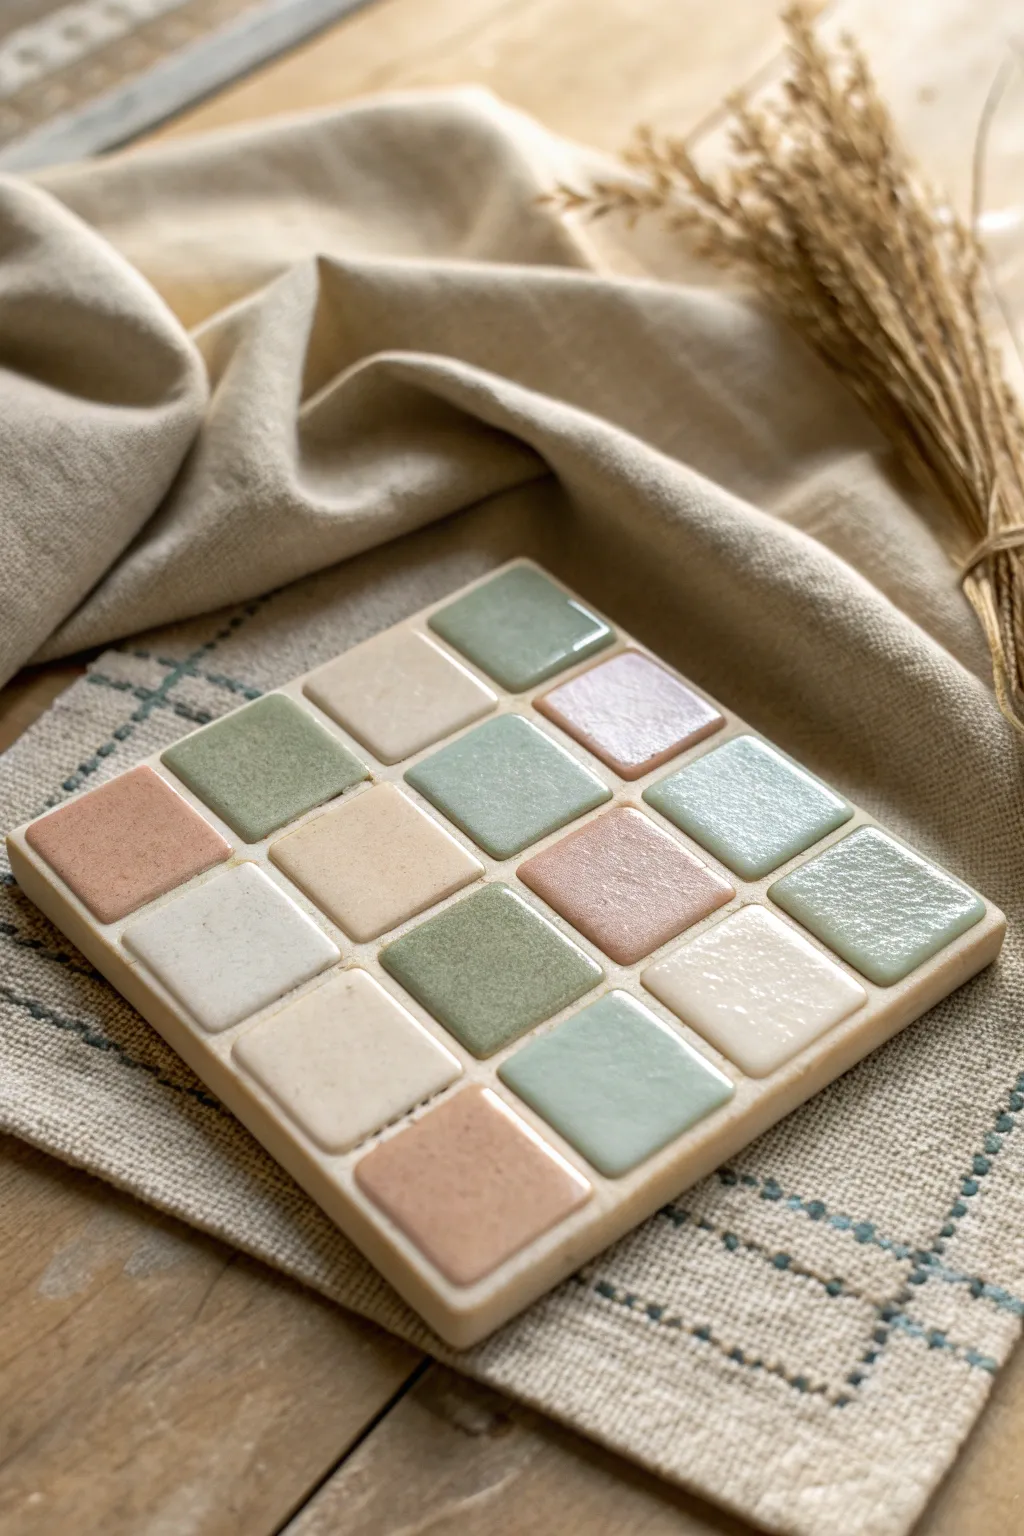
This elegant square test tile features a soft, muted palette of sage greens, dusty pinks, and creams arranged in a 4×4 grid. It serves as both a beautiful coaster-like object and a practical reference for how these specific glazes interact on a flat surface.
Step-by-Step Guide
Materials
- Light-colored stoneware clay body (cone 5/6)
- Rolling pin
- Two 1/4-inch thickness strips (slats)
- Fettling knife or X-Acto blade
- Square tile cutter or geometric cookie cutter (approx. 1 inch)
- Metal ruler
- Scoring tool or serrated rib
- Slip (clay mixed with water)
- Assorted pastel glazes (sage, dusty rose, cream, pale blue)
- Small soft fan brush or glaze mop
- Sponge
Step 1: Forming the Base
-
Prepare the slab:
Begin by rolling out a smooth slab of stoneware clay. Use your thickness strips on either side of the clay to ensure an even 1/4-inch thickness throughout, which is crucial for preventing warping. -
Compress the clay:
Take a rubber rib and firmly compress the surface of the slab. I always do this in multiple directions—vertical, horizontal, and diagonal—to align the clay particles and reduce the chance of cracking later. -
Cut the base:
Using a ruler and your fettling knife, cut a master square that is slightly larger than your intended 4×4 grid. A 5×5 inch square works well if you are using 1-inch tiles, allowing for slight gaps between them. -
Smooth the edges:
Run a damp sponge or your finger along the sharp cut edges of your base square to soften them. Sharp edges can become dangerously sharp after firing.
Step 2: Creating the Grid
-
Cut the small tiles:
Roll out a second slab of clay, slightly thinner than the base (about 3/16 inch). Use your square cutter or a ruler to cut out exactly 16 small squares. -
Refine the squares:
Gently tap the edges of each small square on your work surface to remove any cutting burrs and create a cleaner, slightly rounded profile. -
Score the base:
Take your scoring tool and roughen the entire surface of the large base square where the tiles will attach. -
Score the tiles:
Score the back side of each individual small square tile. -
Apply slip:
Dab a generous amount of slip onto the scored base. -
Arrange the grid:
Place the 16 small squares onto the base in a 4×4 pattern. Leave a tiny gap (about 1-2mm) between each tile to simulate grout lines and keep the glazes distinct. -
Secure the bond:
Place a board or book over the entire assembly and press down gently but firmly. This ensures all tiles are level with each other and adheres them securely to the base.
Clean Lines Pro-Tip
Use a small squeeze bottle or syringe to apply the glaze onto the squares. It flows more evenly than brushing and helps you avoid getting messy glaze splatter in the gaps.
Step 3: Drying and Bisque
-
Slow drying:
Place the tile on a piece of drywall or a wooden ware board. Cover it loosely with plastic for the first 24 hours to let moisture equalize, then uncover to dry completely. -
Bisque fire:
Once bone dry, fire the piece to bisque temperature (usually Cone 04). This prepares the clay to accept the glaze.
Warping Woes?
If your base tile curls up at the corners during drying, dry it sandwiched between two pieces of drywall. The slight weight and even absorption will keep it perfectly flat.
Step 4: Glazing
-
Clean surface:
Wipe the bisqued tile with a damp sponge to remove any kiln dust, which can cause pinholes in your glaze. -
Plan your palette:
Select 4 different pastel glazes. To recreate the look in the photo, you’ll want a pattern that avoids placing the same color directly next to itself. -
Apply first color:
Dip a small brush into your first color (e.g., dusty rose). Carefully fill in 4 specific squares according to your pattern. Apply 2-3 coats, letting each coat dry matte before adding the next. -
Complete the grid:
Repeat the process with the sage green, pale blue, and cream glazes until all 16 squares are filled. Be careful not to let the glazes run into the ‘grout’ channels between the tiles. -
Clean the gaps:
If any glaze dripped into the valleys between the squares, scrape it out with a needle tool or wipe it with a tiny brush to keep the definition sharp. -
Wipe the edges:
Use a sponge to wipe any stray glaze off the side walls and the bottom of the main base slab. -
Final Fire:
Fire the tile to the maturity temperature of your clay and glazes (likely Cone 5 or 6). Place it on a kiln shelf with stilts if you’re worried about drips, though these manageable squares usually stay put.
This methodical approach results in a satisfyingly geometric tile that doubles as a permanent color reference library for your studio

The Complete Guide to Pottery Troubleshooting
Uncover the most common ceramic mistakes—from cracking clay to failed glazes—and learn how to fix them fast.
Bare Clay Window Tiles

These elegant test tiles serve a dual purpose: testing your gaze chemistry while showcasing the natural beauty of the clay body underneath. The stark contrast between the creamy, speckled glaze and the warm, bare terracotta rim creates a framed effect that is as beautiful as it is functional.
Step-by-Step
Materials
- Terracotta or stoneware clay with grog/speckles
- Rolling pin
- 3/8 inch guide strips (painting sticks)
- Square cookie cutter (approx. 4 inches)
- Fettling knife
- Sponge
- Cream or white satin glaze
- Wax resist (emulsion)
- Small foam brush or paintbrush
- Kiln
Step 1: Creating the Tile Form
-
Wedge the clay:
Start by wedging a ball of terracotta or speckled stoneware clay thoroughly to remove any air bubbles and ensure particle alignment. -
Set up guides:
Place your 3/8-inch wooden guide strips on your canvas work surface. These are crucial for ensuring your tile has a uniform thickness, which prevents warping. -
Roll the slab:
Roll your clay out between the guide strips. Make several passes with the rolling pin, flipping the clay over occasionally to keep the texture even on both sides. -
Compress the slab:
Once rolled to thickness, take a rubber rib and firmly compress the surface of the slab. This aligns the clay particles and is the secret to flat tiles. -
Cut the shape:
Press your square cookie cutter firmly into the slab. If you don’t have a cutter, use a ruler and fettling knife to cut a precise 4-inch square.
Clean Lines
For an ultra-crisp border, use thin automotive masking tape instead of freehanding the wax. Apply the tape, wax over the edge of it, then peel before dipping.
Step 2: Refining and Drying
-
Soften the edges:
Once the tile is cut, run a damp fingertip or a very slightly damp sponge along the sharp 90-degree edges to round them off just a tiny bit. -
Dry slowly:
Place the tile on a piece of drywall or a wooden board. Cover it loosely with plastic for the first day to ensure the corners don’t dry faster than the center. -
Bisque fire:
Once bone dry, load the tile into the kiln for a bisque firing (usually Cone 06 or 04). Ensure it is firing flat on the shelf.
Step 3: Glazing the Center
-
Clean the bisque:
Wipe the fired tile with a damp sponge to remove any kiln dust, which can prevent the glaze from adhering properly. -
Apply wax resist:
Dip your brush in wax resist. Carefully paint a border around the top edge of the tile, about 1/8 to 1/4 inch wide. Also, coat the entire sides and bottom of the tile. -
Let wax cure:
Allow the wax to dry completely for about 15-20 minutes. It should feel firm and not tacky to the touch. -
Prepare the glaze:
Stir your cream or white satin glaze thoroughly. If there are speckles involved, ensure they are suspended well in the mixture. -
Dip the tile:
Hold the tile by the waxed edges and dip the face securely into the glaze. Hold it there for about 3 seconds to build up a nice layer. -
Clean the edges:
As you pull the tile out and the glaze dries, the wax will repel the glaze on the border. Use a damp sponge to wipe away any stubborn droplets that bead up on the waxed rim. -
Final wipe:
Check the vertical sides of the tile. I always do a final pass with a sponge here to make sure absolutely no glaze is hugging that side wall. -
Glaze fire:
Load the tile into your kiln for the final glaze firing (e.g., Cone 5 or 6). Since the bottom is unglazed, you don’t need stilts.
Warping Issues?
If your tiles curl up at the corners during drying, flip them over daily and weigh down the corners with small bean bags or weights while they are leather hard.
Now you have a perfect reference tile that displays how your glaze interacts with the clay’s natural texture
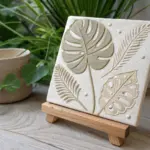
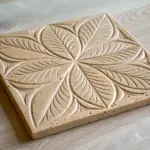
Carved Line Tiles for Breaking Glazes
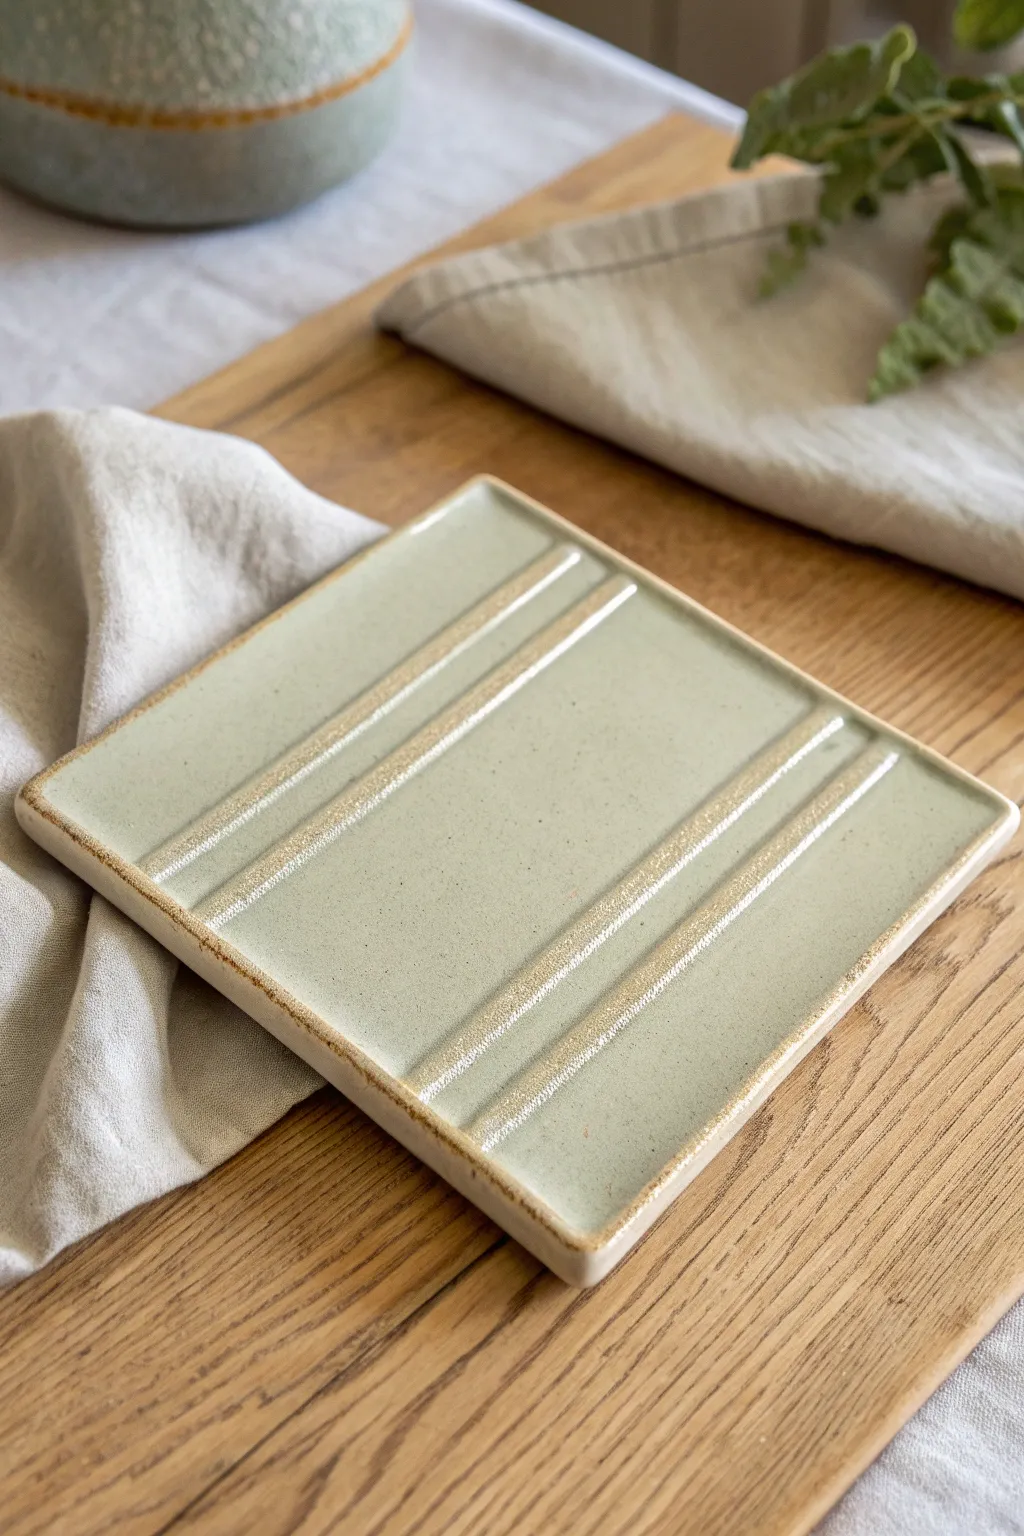
These simple yet effective square tiles are designed specifically to showcase how glazes break over edges and pool in recesses. With deep linear carvings and a soft, celadon-like glaze, this project perfectly demonstrates surface tension and texture interaction.
Step-by-Step Tutorial
Materials
- Light-colored stoneware clay body (smooth or slightly groggy)
- Rolling pin
- Two thickness strips (approx. 1/4 inch)
- Canvas or slab mat
- Needle tool
- Fettling knife
- Flexible metal rib
- Square template (cardboard or plastic, approx. 4×4 or 5×5 inches)
- Loop tool or U-shaped carving tool
- Sponge
- Celadon glaze or transparent breaking glaze
- Kiln
Step 1: Slab Preparation
-
Roll the slab:
Begin by wedging your clay thoroughly to remove air bubbles. Place the clay on your canvas between two thickness strips and roll it out until it is perfectly even. -
Compress the surface:
Run a flexible metal rib over the slab in multiple directions. This aligns the clay particles, preventing future warping, and creates a smooth canvas for your glaze. -
Cut the square:
Place your square template onto the smooth slab. Using a needle tool held vertically, cut around the perimeter to create your tile shape. -
Clean the edges:
Once the square is cut, gently run your finger or a slightly damp sponge along the sharp cut edges to round them slightly so the glaze won’t crawl away later.
Step 2: Carving & Shaping
-
Mark guidances:
Use a ruler to lightly impress where your lines will go. For this design, create a paired set of lines on the left third and another paired set on the right third, leaving a wide central plain. -
Carve the channels:
Take a loop tool or U-shaped ribbon tool. Drag it steadily along your guides to carve out clean, straight channels. Aim for a depth of about 1/8 inch—deep enough to catch glaze. -
Form the rim:
To create the slight raised border seen in the image, gently pinch the very outer edge of the tile upward, or press down the inner area with a damp sponge. -
Smooth the transitions:
After carving, run a damp fingertip through the grooves to remove any coarse clay crumbs or ‘burrs’. A smooth groove helps the glaze flow rather than snag. -
Dry partially:
Let the tile dry to a leather-hard state between two pieces of drywall or sheetrock to keep it perfectly flat.
Tool Selection Tip
Use a rounded U-shaped loop tool rather than a V-shaped specific gravity tool. Rounded channels allow glaze to pool beautifully without harsh breaks.
Step 3: Glazing & Firing
-
Bisque fire:
Once bone dry, fire the tile to cone 04 (or your clay’s bisque temperature). -
Prepare the glaze:
Mix your breaking glaze well. A breaking glaze is essential here, as it thins out over high points (appearing lighter) and pools in low points (appearing darker). -
Dip the tile:
Using glazing tongs or a steady hand, dip the entire tile into the glaze bucket for about 3 seconds to ensure an even coat. -
Check the grooves:
Inspect the carved lines. If glaze has bridged over a groove rather than flowing into it, gently blow on it or pop the bubble with a pin. -
Clean the foot:
Wipe the bottom of the tile clean with a damp sponge. I prefer to leave a millimeter of unglazed clay up the side wall to prevent sticking to the kiln shelf. -
Glaze fire:
Fire the tile to maturity (typically Cone 5 or 6 for stoneware). Allow the kiln to cool naturally.
Varying Textures
Try texturing the ‘plain’ center section with a subtle linen or burlap impression before carving the lines. The contrast between rough and smooth is stunning.
Once cooled, organize your new test tiles to build a comprehensive library of how your glazes interact with texture


What Really Happens Inside the Kiln
Learn how time and temperature work together inside the kiln to transform clay into durable ceramic.
Stamped Texture Sampler Tiles
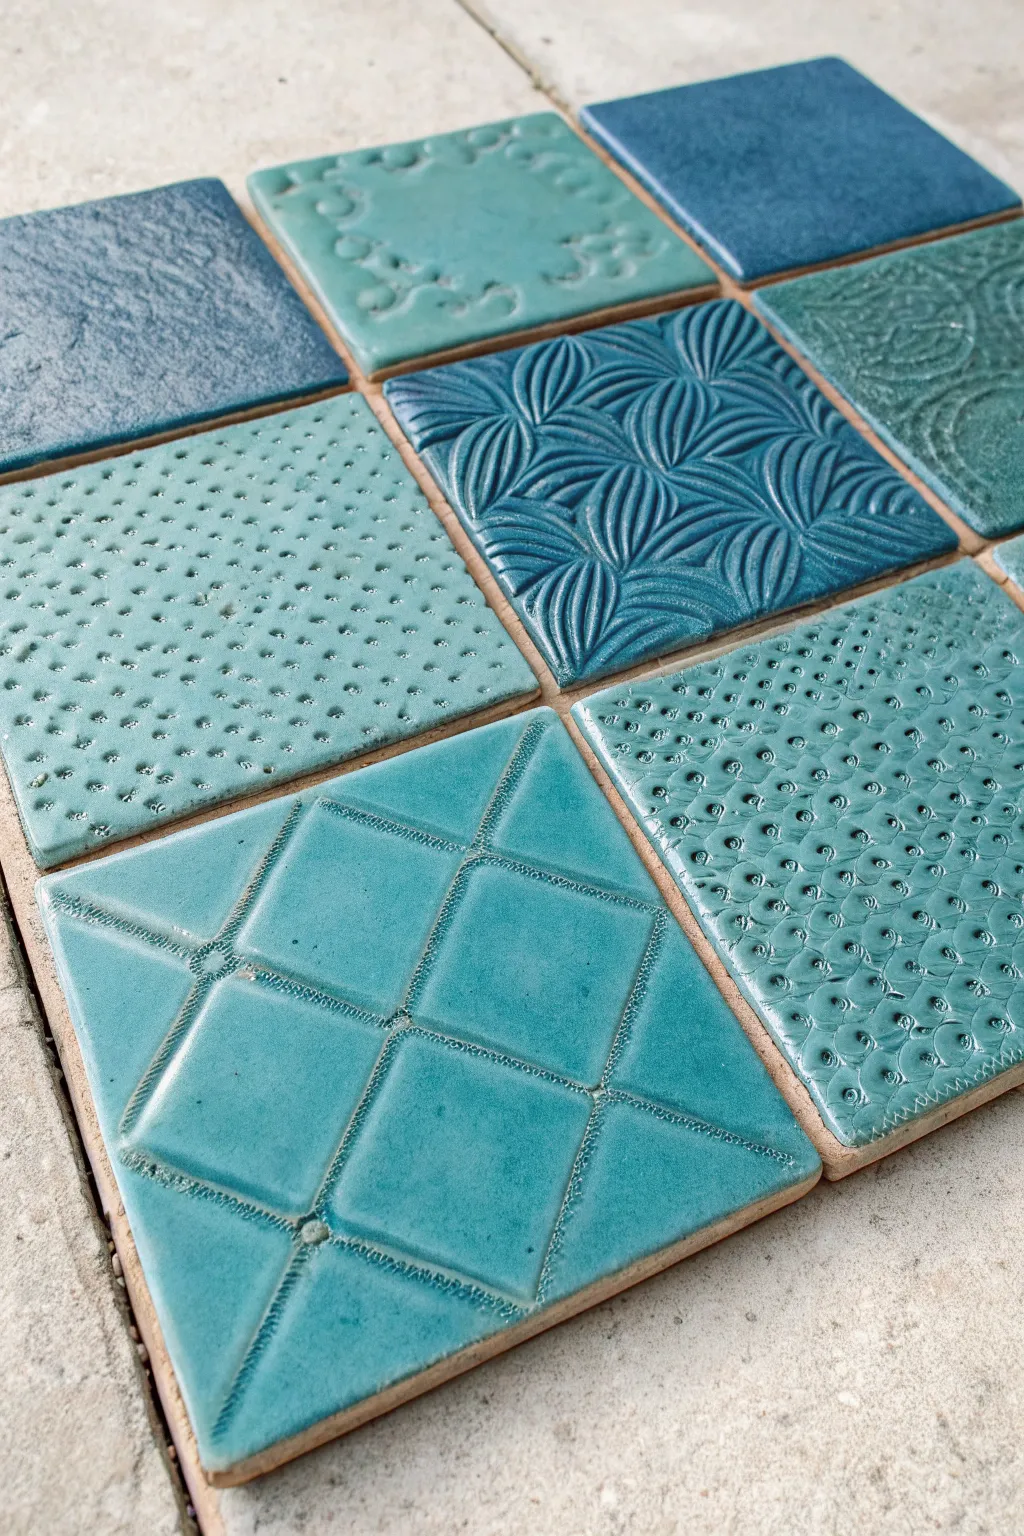
These delightful ceramic test tiles showcase a spectrum of teal, aqua, and navy glazes across varied surface patterns. Creating a sampler grid like this is the perfect way to test how your favorite glazes break and pool over different textures.
Detailed Instructions
Materials
- Stoneware clay body (white or buff recommended)
- Rolling pin
- Canvas work surface or slab mat
- Two wooden guide slats (approx. 1/4 inch thick)
- Ruler or square template
- Needle tool or fettling knife
- Assorted texture tools (stamps, textured rollers, lace, found objects)
- Small sponge
- Ceramic glazes (Turquoise, Navy, Aqua, Crackle/Celadon)
- Glaze brushes (fan brush and detail brush)
- Kiln access
Step 1: Forming the Tiles
-
Prepare the slab:
Begin by wedging your clay to remove air bubbles, then place it on your canvas work surface between two wooden guide slats. These slats ensure your slab is a perfectly even thickness. -
Roll out the clay:
Use your rolling pin to flatten the clay until the pin rides smoothly on top of your guide slats. Smooth the surface with a rib tool to compress the clay particles, which helps prevent warping later. -
Texture first, cut second:
I prefer to apply texture to the large slab before cutting individual tiles, as the pressure can distort a cut square. Get your texture tools ready. -
Create the geometric quilt:
For the diamond pattern seen in the foreground, use a straight edge to press lines into the clay, creating a grid. Then, press a small, circular tool at the intersections to mimic tufted fabric buttons. -
Stamp the organic patterns:
Press a floral or fan-patterned stamp firmly into another section of the slab. Rock the stamp slightly to ensure the design transfers fully without sticking. -
Dotting technique:
Use a small, round tool—like the end of a paintbrush handle or a distinctive point tool—to create the stippled texture. Vary the pressure: deep holes for the uniform grid look, and lighter, overlapping impressions for the ‘snake skin’ effect. -
Apply scrollwork:
For the ornate corner designs, use a detailed relief stamp. Press these into what will become the center of a tile, leaving some negative space around the edges for contrast. -
Cut the tiles:
Once your slab is fully textured with variety, use a ruler and needle tool to cut precise square tiles. Aim for 3×3 inch or 4×4 inch squares depending on your shrinkage rate.
Clean Release Tip
If your stamps are sticking to the clay, lightly dust the clay surface with cornstarch before pressing. It creates a barrier and burns off cleanly in the kiln.
Step 2: Refining and Firing
-
Smooth the edges:
Once the squares are cut, let them dry to a leather-hard state. Gently run a damp sponge or your finger along the cut edges to soften sharpness without disturbing your fresh texture. -
Bisque fire:
Allow the tiles to dry completely (bone dry). Load them into the kiln for a bisque firing (typically Cone 04) to prepare them for glazing.
Make Them Hangable
Make a small angled hole in the back of each tile while leather-hard to hang them on a wall later. This turns your test pieces into an instant art installation.
Step 3: Glazing the Sampler
-
Select your palette:
Choose a cohesive color story. This project uses deep navy, turquoise, and pale celadon. Translucent or ‘breaking’ glazes work best here as they will pool darker in the stamped recesses and lighter on the high points. -
Apply the first coat:
Using a fan brush, apply the first coat of glaze. For the deep navy tiles (like the fan pattern), ensure the glaze gets deep into the grooves. -
Glaze the geometric tiles:
On the diamond-tufted tile, use a turquoise glaze that breaks well over edges. This highlights the ‘stitched’ lines beautifully. -
Layering the dotted textures:
For the stippled tiles, consider a slightly thinner application or a celadon-type glaze. This prevents the small holes from filling up completely and losing definition. -
Clean footing:
Wipe the bottom of each tile and a millimeter up the side with a damp sponge to prevent them from fusing to the kiln shelf. -
Glaze firing:
Fire the tiles to your clay body’s maturity temperature (e.g., Cone 5 or 6 for stoneware). Follow the specific firing schedule recommended for your chosen glazes. -
Arrangement:
Once cooled and unloaded, arrange your tiles in a grid to compare how different textures interact with the same glazes, creating a beautiful reference library for future work.
Now you have a stunning set of reference tiles that are as beautiful as they are functional
“Rim and Foot” Pot-Part Tiles
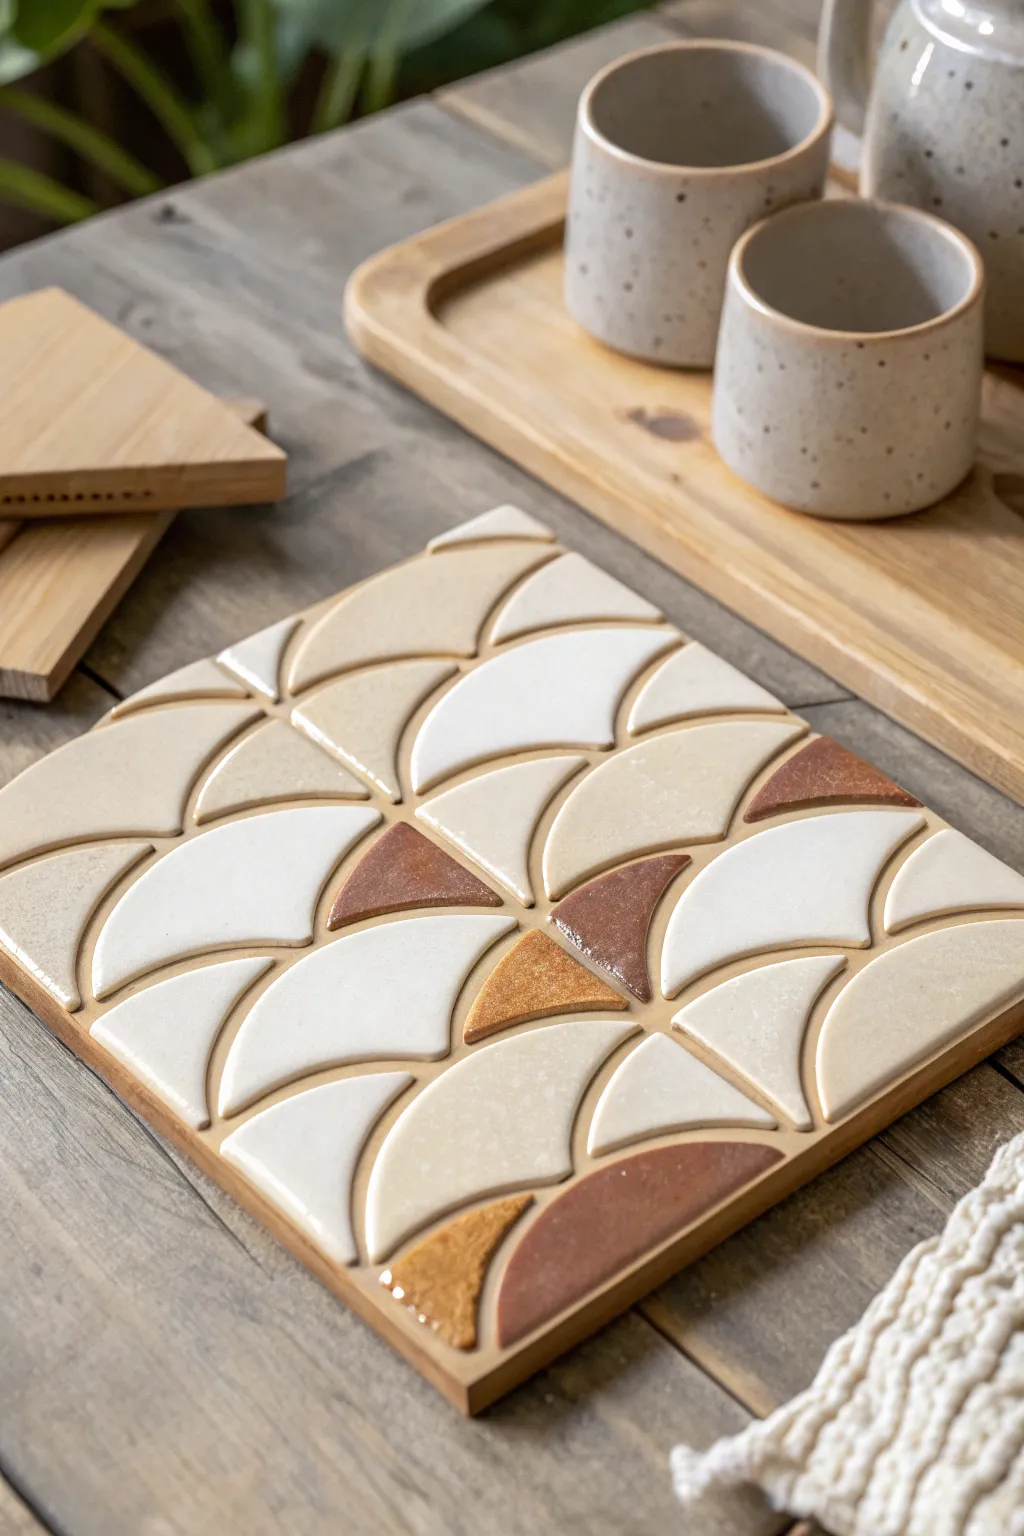
This stunning ceramic project transforms simple geometric shapes into a sophisticated, fan-patterned trivet that doubles as a beautiful glaze test. By arranging custom-cut clay pieces in alternating light and earthy tones, you create a functional piece of art that explores the subtle interplay between clay bodies and glazes.
Step-by-Step
Materials
- Stoneware clay (white and speckled buff)
- Red earthenware or terracotta clay
- Square wooden base (approx. 8×8 inches)
- Rolling pin
- Guide sticks (1/4 inch thick)
- Circular cookie cutter (3-inch diameter)
- Fettling knife or needle tool
- Pottery sponge
- Various glazes (clear, white, oatmeal)
- Strong tile adhesive or epoxy
- Grout (optional, though this style is ungrouted)
Step 1: Forming the Clay Shapes
-
Roll your slabs:
Start by rolling out your white stoneware, buff stoneware, and terracotta clays into separate slabs. Use your 1/4 inch guide sticks to ensure an even thickness across all slabs, which is crucial for a level surface later. -
Cut the circles:
Using your 3-inch circular cookie cutter, punch out numerous circles from each clay type. You will need more light-colored circles than dark ones for this specific pattern. -
Create the fans:
Take a circular cutout and cut it exactly in half to create two semi-circles. Then, cut each semi-circle in half again to create four equal quarter-circle wedges. -
Refine the shape:
To get the unique ‘fan’ look seen in the image, take each quarter-wedge and gently curve the straight edges slightly inward using your fingers, or leave them geometric for a sharper look. Smooth any rough cutting debris with a damp sponge. -
Dry and bisque:
Arranging the pieces on a ware board to prevent warping, let them dry slowly. Once bone dry, bisque fire them according to your clay body’s specifications.
Shrinkage Check
Remember clay shrinks! Cut your initial circles slightly larger than you think you need to account for shrinkage during drying and firing.
Step 2: Glazing and Firing
-
Sort your palette:
Separate your bisque-fired wedges by clay color. This project relies on a mix of raw clay texture and glazed surfaces. -
Apply the glazes:
Dip specific wedges into your chosen glazes. For the white clay, I like to use a clear glaze to make it shine. For the buff clay, try an oatmeal or creamy white glaze. Leave the terracotta pieces unglazed or use a thin wash to enhance their rich colour. -
Wipe the feet:
Since these are individual tiles, you must meticulously wipe the glaze off the bottom of each wedge so they don’t stick to the kiln shelf. -
Glaze fire:
Load the small pieces into the kiln. Since they are small, you can pack them fairly tight, but ensure they aren’t touching. Fire to the maturity temperature of your glaze and clay.
Make it a Set
Use the same technique to make matching coaster sets. Simply use a smaller cookie cutter (1.5 inch) so the scale fits a standard coaster size.
Step 3: Assembly
-
Prepare the base:
Sand your square wooden base until smooth. Ensure it is clean and dust-free so the adhesive bonds correctly. -
Dry layout:
Before gluing, arrange your fired pieces on the board to finalize the pattern. Start from the center and work outward. Create the ‘fan’ motif by grouping arcs creates a wave-like motion. -
Secure the center:
Apply a dab of strong tile adhesive or epoxy to the back of the central pieces first. Press them firmly onto the wood. -
Fill the edges:
Continue gluing pieces, moving toward the edges. You may need to have some custom-cut partial wedges ready for the very edges if you want a flush border, or simply let the pattern end naturally. -
Cure:
Allow the adhesive to cure fully for 24 hours before using the trivet.
Now you have a structured yet organic piece of ceramic art that brings warmth to any table setting

TRACK YOUR CERAMIC JOURNEY
Capture glaze tests, firing details, and creative progress—all in one simple printable. Make your projects easier to repeat and improve.
Multi Clay Body Match Sets
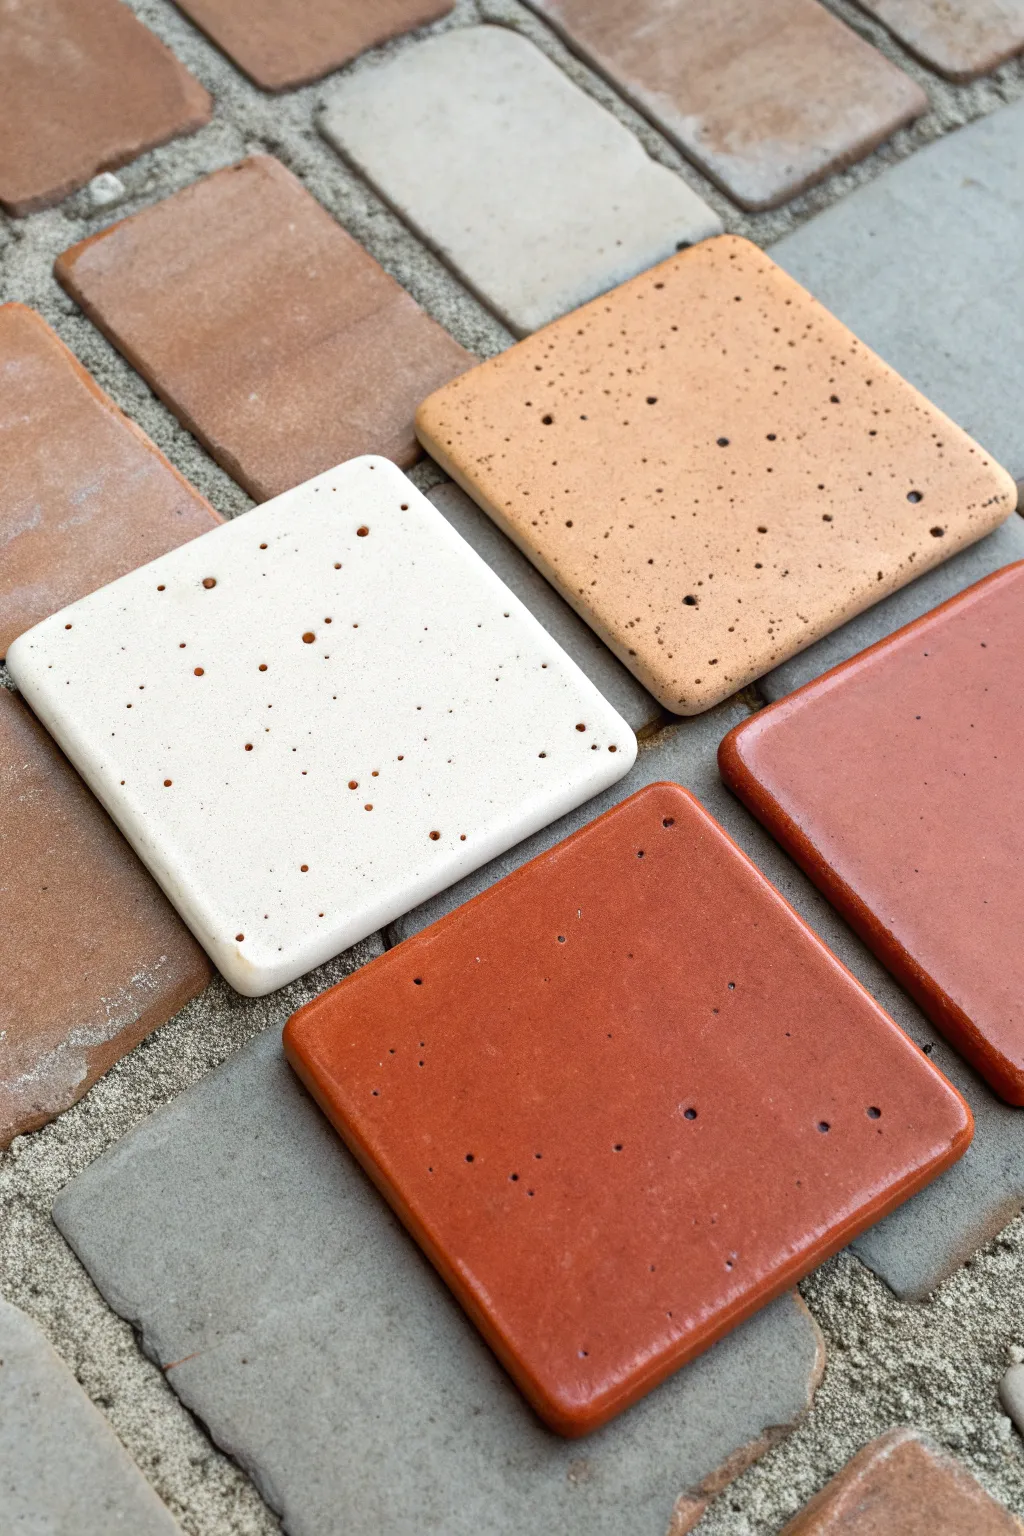
Create a stunning visual reference library for your studio by crafting this set of uniform test tiles that highlights the natural beauty of different clay bodies. These simple, square tiles are perfect for comparing how various clays react to clear glazes, revealing unique speckling and color depth.
How-To Guide
Materials
- 4 different clay bodies (e.g., White Stoneware, Speckled Buff, Terracotta, Red Stoneware)
- Rolling pin
- Two wooden guide strips (approx. 1/4 inch thick)
- Canvas or slab mat
- Square cookie cutter (approx. 3×3 inches) or ruler and needle tool
- Rib tool (soft smooth rubber or metal)
- Fettling knife
- Sponge
- Clear transparent glossy glaze
- Kiln
Step 1: Preparing the Slabs
-
Wedge the clay:
Begin by thoroughly wedging a small ball of each of your four chosen clay bodies. This removes air pockets and ensures the particles are aligned for strength. -
Set up guides:
Place your canvas on a flat work surface. Lay your two wooden guide strips parallel to each other, far enough apart to accommodate the width of your slab. -
Roll the first slab:
Taking your first clay type (perhaps the white stoneware), flatten it slightly by hand between the guides. Use the rolling pin to roll the clay out until the pin rests on the wooden strips, ensuring an even quarter-inch thickness. -
Compress the surface:
Take your rib tool and gently drag it across the surface of the clay slab. This compression aligns the clay particles again and creates a smooth, professional finish. -
Repeat for all clays:
Repeat the rolling and compressing process for the remaining three clay bodies. Make sure you clean your rolling pin and work surface between each clay type to avoid cross-contamination of colors.
Step 2: Cutting and Refining
-
Cut the squares:
Using a square cookie cutter or a ruler and needle tool, cut one perfect square from each of the four refined slabs. Press straight down to avoid warping the shape. -
Soften the edges:
Once the squares are cut, gently run a damp finger or a slightly moist sponge along the sharp cut edges to round them off slightly. This prevents chipping later. -
Smooth the corners:
Pay special attention to the four corners of each tile. I like to give them a tiny tap with my finger to gently blunt the sharp point, making them friendlier to handle. -
Dry properly:
Place the four tiles between two pieces of drywall or on a wire rack covered loosely with plastic. Let them dry slowly to the bone-dry stage to prevent warping. -
Bisque fire:
Load your bone-dry tiles into the kiln and fire them to your clay’s recommended bisque temperature (usually Cone 04).
Warped Tiles?
If your tiles curl up at the corners during drying, try drying them strictly between two pieces of drywall or wooden crafting boards. The weight keeps them flat as moisture evaporates.
Step 3: Glazing and Finishing
-
Clean the bisque:
After the bisque firing, wipe each tile with a damp sponge to remove any kiln dust that might interfere with glaze adhesion. -
Apply clear glaze:
Brush or dip each tile into a clear, transparent glossy glaze. A clear glaze is essential here because the goal is to see the raw character of the clay body underneath. -
Wipe the back:
Ensure the bottom of each tile is completely free of glaze. You can use a wax resist beforehand, or simply wipe it clean with a sponge. -
Check for pinholes:
If you notice small bubbles or pinholes in the wet glaze (especially on speckled clay bodies), gently rub them with your finger to smooth them out before firing. -
Glaze fire:
Fire the tiles to the maturity temperature of your clay and glaze (often Cone 5 or 6 for stoneware). Ensure the tiles are not touching in the kiln. -
Cool and inspect:
Allow the kiln to cool naturally. Once cool, remove your tiles and observe how the clear glaze interacts differently with the red, tan, and white clays. -
Arrange your set:
Layout your finished tiles side-by-side to serve as a permanent reference guide for future projects.
Texture Twist
Before cutting your squares, gently press a piece of lace or burlap into one corner of the slab. This tests how the glaze breaks over texture on each specific clay body.
You now have a beautiful, functional reference set that shows exactly how your favorite clays behave under a clear finish