Painting a ceramic turtle is one of those projects that feels instantly relaxing—the shape practically tells you where to put color. Here are my favorite ceramic turtle painting ideas that play up the shell segments, the sweet little face, and all that lovely texture.
Classic Realistic Sea Turtle Look
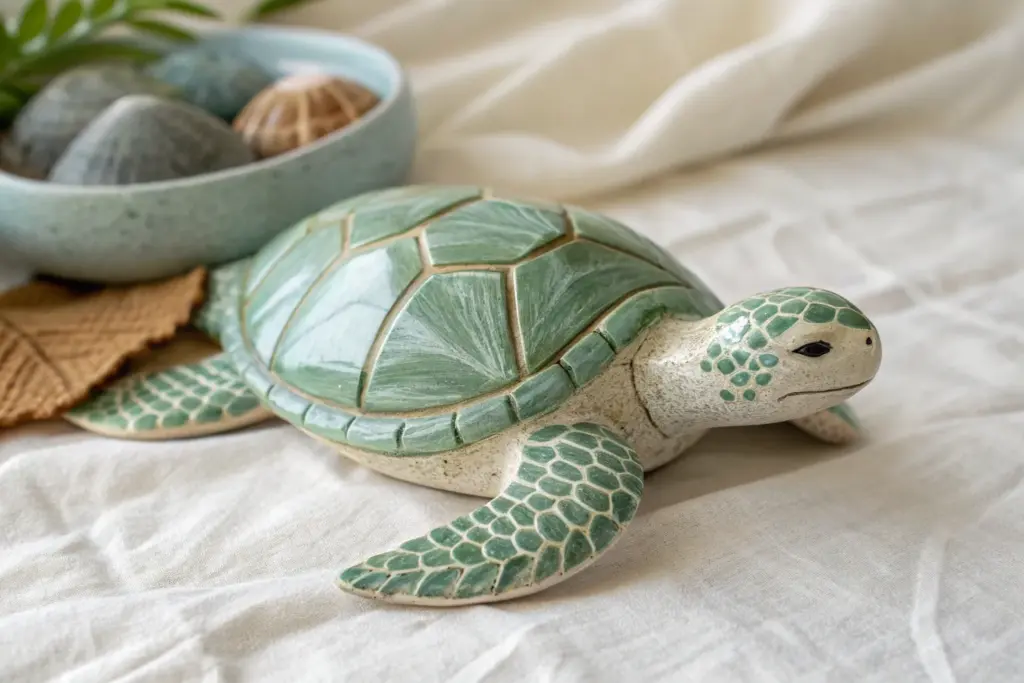
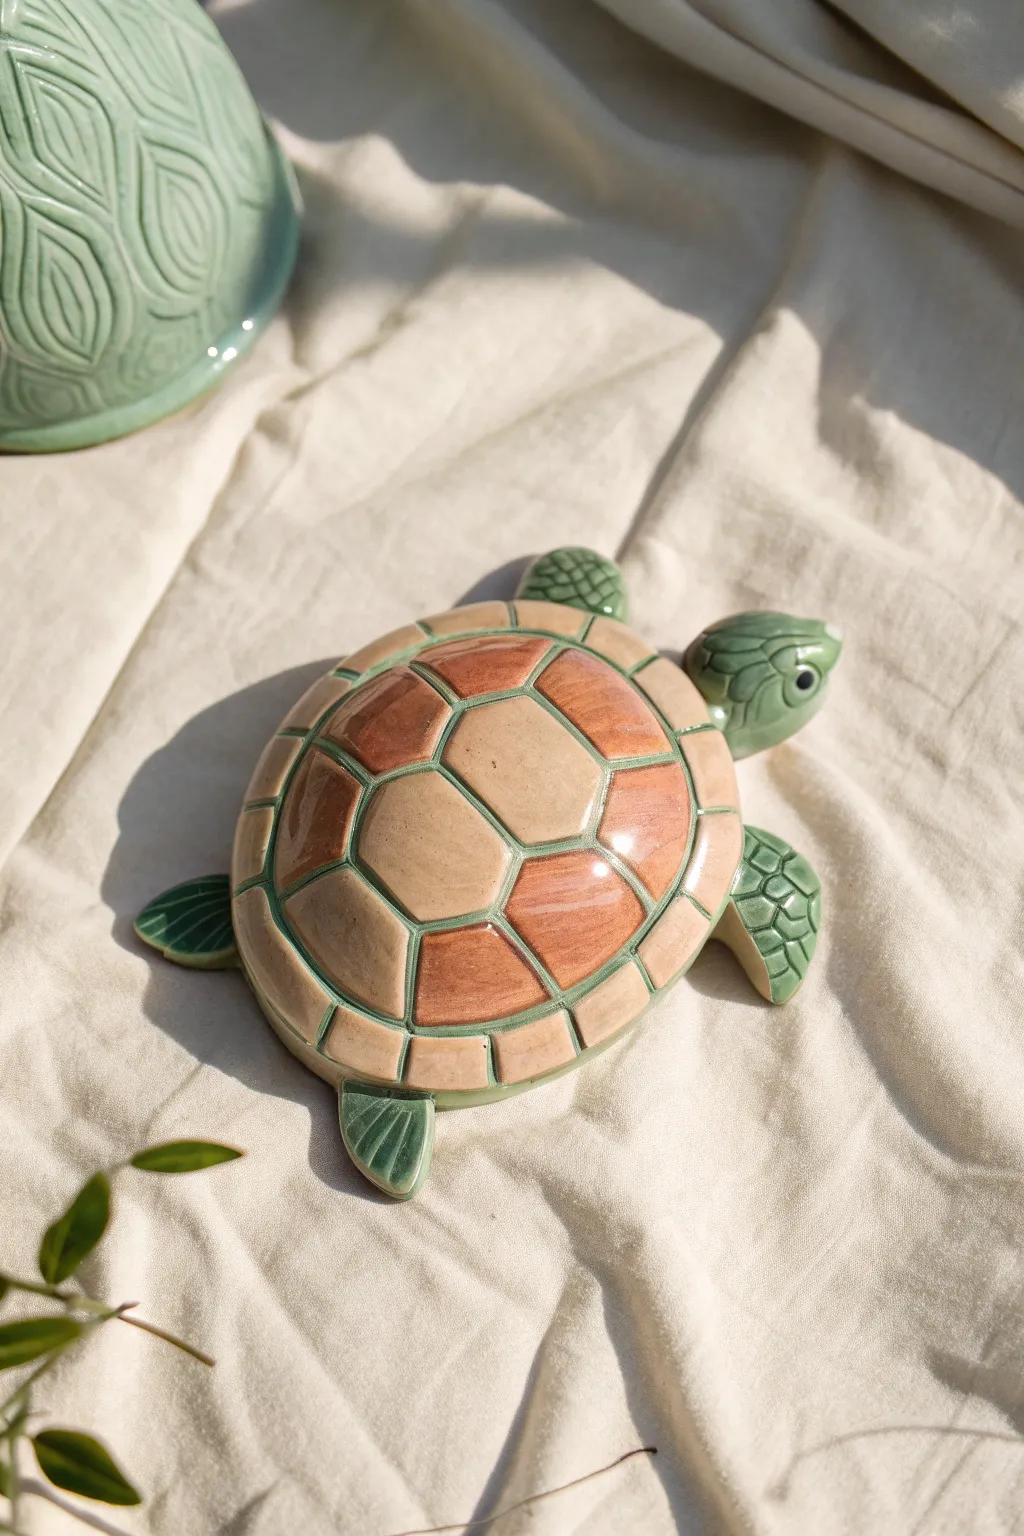
Capture the serene beauty of marine life with this classic, realistic sea turtle project. By layering earthy greens and warm ambers with a high-gloss finish, you’ll achieve that authentic, wet-shell ceramic look that makes the piece feel like it just swam out of the ocean.
Step-by-Step Tutorial
Materials
- Ceramic bisque turtle sculpture
- Acrylic paints (Olive Green, Hunter Green, Burnt Sienna, Raw Umber, Cream/Off-White, Black)
- Glazing medium or water (for thinning paint)
- High-gloss varnish or polyurethane sealer
- Soft synthetic brushes (flat shader, medium round, fine liner)
- Paper towels or sponge
- Palette for mixing
- Water cup
Step 1: Base Coating & Green Tones
-
Clean the surface:
Begin by wiping down your ceramic bisque turtle with a slightly damp sponge or cloth to remove any dust. This ensures your paint adheres smoothly without trapping debris. -
Apply the base green:
Mix a small amount of Cream into your Olive Green to create a soft, muted sage color. Paint the entire skin areas—head, flippers, and tail—with this mixture. Don’t worry about the shell just yet. -
Add depth to the skin:
While the base coat is still slightly tacky, take a small amount of Hunter Green on your brush. Gently shade the undersides of the flippers and the neck area where shadows naturally fall, blending the edges for a soft transition. -
Texture the flippers:
Using a dark wash of Raw Umber and water, lightly brush over the flipper scales. Quickly wipe the surface with a paper towel, leaving the darker paint settled into the recesses of the scale texture to define the pattern. -
Shell base layer:
Paint the entire shell with a thin coat of Olive Green. This doesn’t need to be opaque; a semi-transparent layer works beautifully here to help mimic the depth of a natural shell.
Glazing Secret
Mix a drop of gloss medium directly into your paint colors. It increases transparency and gives the layers a natural, shell-like luminosity.
Step 2: Shell Detailing & Patterns
-
Map the scutes:
With a round brush, paint the center of each shell segment (scute) with Burnt Sienna. Keep the edges irregular and organic rather than painting perfect circles. -
Layering warmth:
Dab a tiny bit of Cream or yellow ochre into the wet Burnt Sienna in the center of the largest scutes. Lightly swirl them together to create a mottled, tortoise-shell effect. -
Defining the borders:
Use a liner brush and full-strength Olive Green or a mix of Green and Raw Umber to paint the dividers between the shell plates. Keep these lines fairly crisp. -
Rim detailing:
Paint the outer rim of the shell with alternating patches of your light green mix and Burnt Sienna tones. This mimics the segmented edge found on real sea turtles. -
Enhancing the shell depth:
Before the paint fully dries, I like to take a very watered-down Raw Umber wash and glaze over the entire shell. This unifies the brown and green tones so they look like one cohesive biological material.
Beach Vibes
Create a display base by painting a flat stone or wood slice with sand textured paint and glue small seashells around your turtle.
Step 3: Face & Finishing Touches
-
Paint the eyes:
Using your fine liner brush, paint the eyeball black. Once dry, add a small dot of Burnt Sienna or dark brown for the iris if the eye is large enough, or keep it dark and glossy. -
Add a life-spark:
Dip the tip of a needle tool or toothpick into white paint and place a tiny reflection dot in the upper corner of the eye. This instantly brings the turtle to life. -
Facial details:
Lightly highlight the brow ridge and the beak-like mouth with a touch of Cream to give the face dimension. Add a tiny dot of rusty orange on the cheek for character. -
Highlight the texture:
Dry brush a little bit of the light green mix over the raised textures on the flippers. This catches the high points and emphasizes the scaly skin. -
Initial clear coat:
Once all paint is completely bone dry, apply a coat of high-gloss varnish. Brush it on in long, smooth strokes to avoid bubbles. -
Final glossy finish:
For that ultra-wet, ceramic-glazed appearance, apply a second or even third coat of gloss varnish, letting each layer dry in between. This depth makes the shell look polished and hard.
Now your turtle is ready to bring a peaceful, oceanic atmosphere to any shelf or table in your home


Earthy Woodland Box Turtle Palette

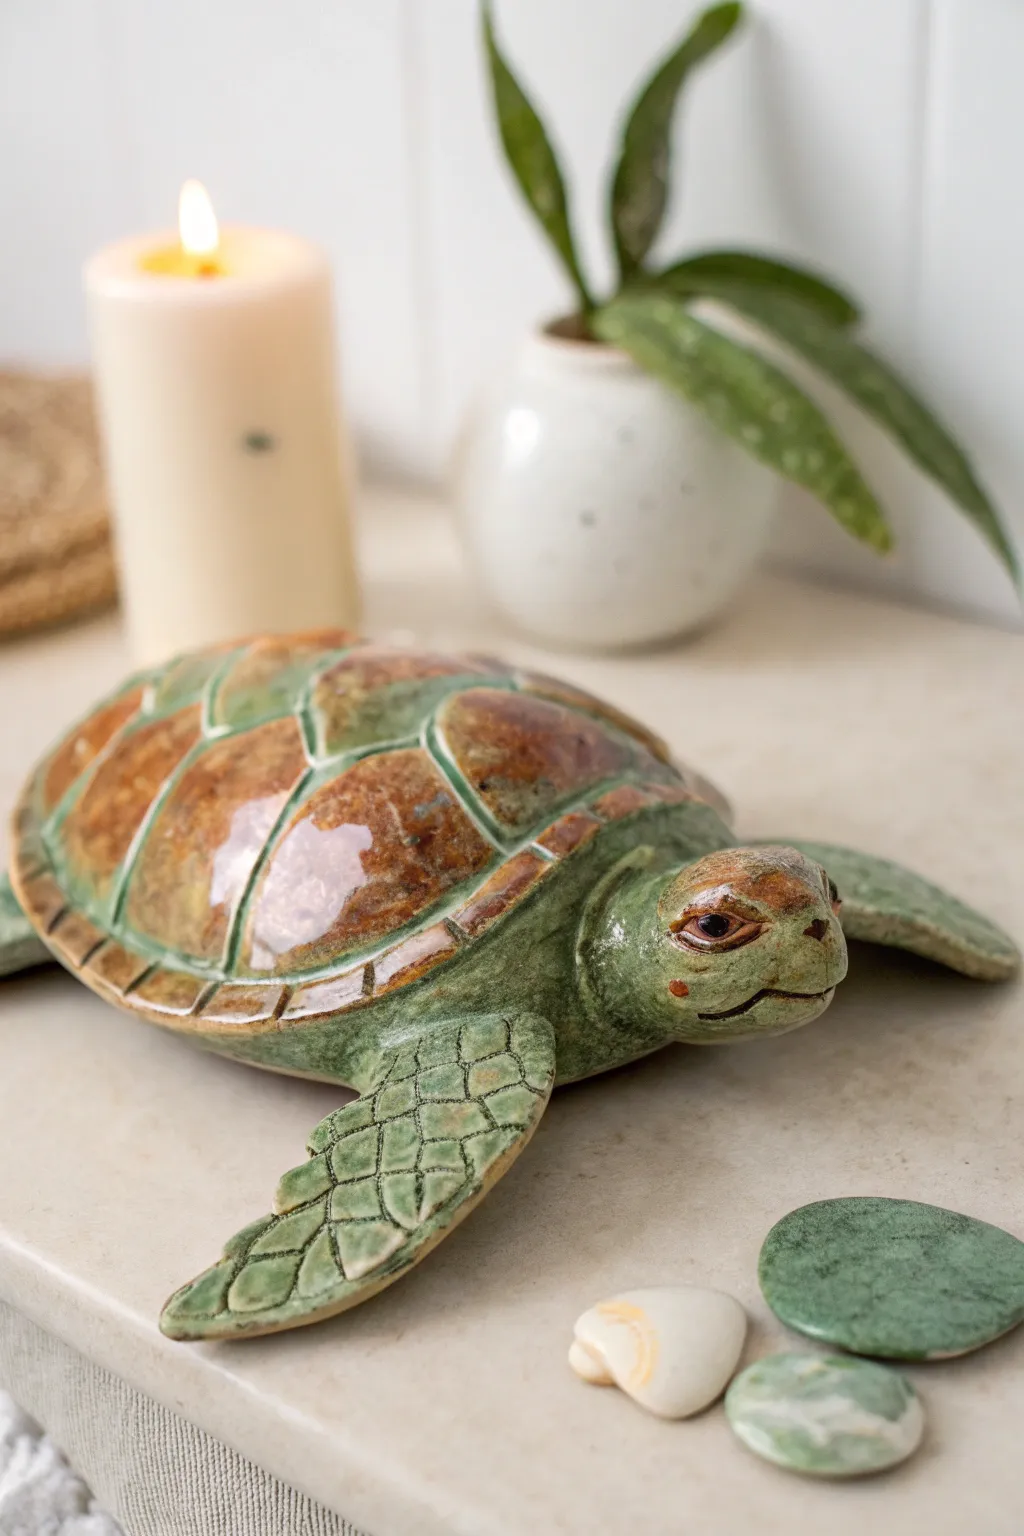
This project transforms a simple ceramic bisque turtle into a charming woodland creature using warm, natural tones. The finish mimics the organic textures of a box turtle’s shell, complete with speckled details and a glossy, polished look.
How-To Guide
Materials
- Ceramic turtle bisque figurine
- Acrylic paints (Burnt Sienna, Raw Umber, Yellow Ochre, Cream/Beige, Forest Green, Black)
- Glazing medium or gloss varnish
- Small round brushes (Size 0 and 2)
- Fine liner brush (Size 000)
- Palette for mixing
- Water cup and paper towels
- Sea sponge (optional)
Step 1: Base Coating
-
Prep the surface:
Wipe down your ceramic turtle with a slightly damp cloth to remove any dust or ceramic powder. This ensures the paint adheres smoothly without gritty textures. -
Base coat the shell:
Mix a warm, medium brown using Burnt Sienna and a touch of Yellow Ochre. Paint the entire shell area, ensuring you get into the crevices between the scutes. Apply two thin coats for opaque coverage. -
Base coat the skin:
For the legs and tail, mix Forest Green with a little Cream to create a muted, earthy green. Paint these areas carefully. For the head, use a solid Cream or light beige color, ensuring a clean separation where the neck meets the shell.
Step 2: Shell Detailing
-
Highlight the scutes:
Create a lighter version of your shell color by adding more Yellow Ochre or Cream. Using a size 2 brush, paint the center of each individual shell segment (scute), leaving the darker base coat visible near the edges. -
Deepen the crevices:
Dilute Raw Umber with water or glazing medium to create a wash. Use a fine liner brush to run this dark color into the deep grooves separating the shell plates. This adds instant dimension and separation. -
Add shell spotting:
Using the very tip of your brush or a toothpick, add tiny, random dots of Forest Green inside the center of the lighter scute areas. Keep them subtle and organic to mimic natural shell patterns. -
Create a scratched texture:
Dry brush a tiny amount of plain Burnt Sienna lightly over the shell. I find this helps blend the highlights and shadows together so the transition isn’t too stark.
Fixing Shaky Lines
If your shell separation lines get messy, wait for them to dry fully. Then, re-paint the adjacent scute color carefully over the mistake to tidy the edge back up.
Step 3: Face and Leg Details
-
Texture the legs:
The legs need a rougher, scaly look. Dip a sea sponge or an old scruffy brush into dark brown paint, offload most of it on a paper towel, and gently stipple texture over the green base coat on the legs. -
Add leg spots:
Once the stippling is dry, use a fine brush to add distinctive dark brown spots on the legs, concentrating them near the feet and claws. -
Detail the head:
Mix a light brown wash (about 80% water, 20% brown paint). Gently glaze over the neck area where it meets the shell to create a shadow, blending it out toward the lighter face. -
Speckle the crown:
Dip the tip of a toothpick or fine brush into Black paint. Add a cluster of small dots on the very top of the head, mimicking the speckled pattern often seen on box turtles. -
Paint the eyes:
Paint a solid black circle for the eye. Once dry, add a tiny white dot for a reflection highlight, and outline the eye socket with a very thin line of dark brown. -
Define the mouth:
Paint the mouth line with a fine liner brush using dark brown. Keep the expression neutral or slightly upturned for character.
Mossy Effect
Mix baking soda into your green paint for the legs to create actual raised texture, making the turtle look like it has been walking through a mossy forest.
Step 4: Finishing Touches
-
Rim the shell:
The outer rim of the shell often has distinct coloring. Paint the very edge of the shell rim with a mix of Burnt Sienna and Cream to frame the artwork. -
Define shell lines:
Go back over the separation lines on the shell with black or very dark brown using your finest liner brush to make the geometry pop crisp and clear. -
Seal the piece:
Apply a coat of gloss varnish over the shell to make it look wet and hard. Use a satin or matte varnish for the skin areas (head and legs) to create a realistic contrast in textures.
Place your finished turtle on a shelf or in a garden pot to enjoy its peaceful, earthy presence


Simple Two-Tone Shell With Dark Wash
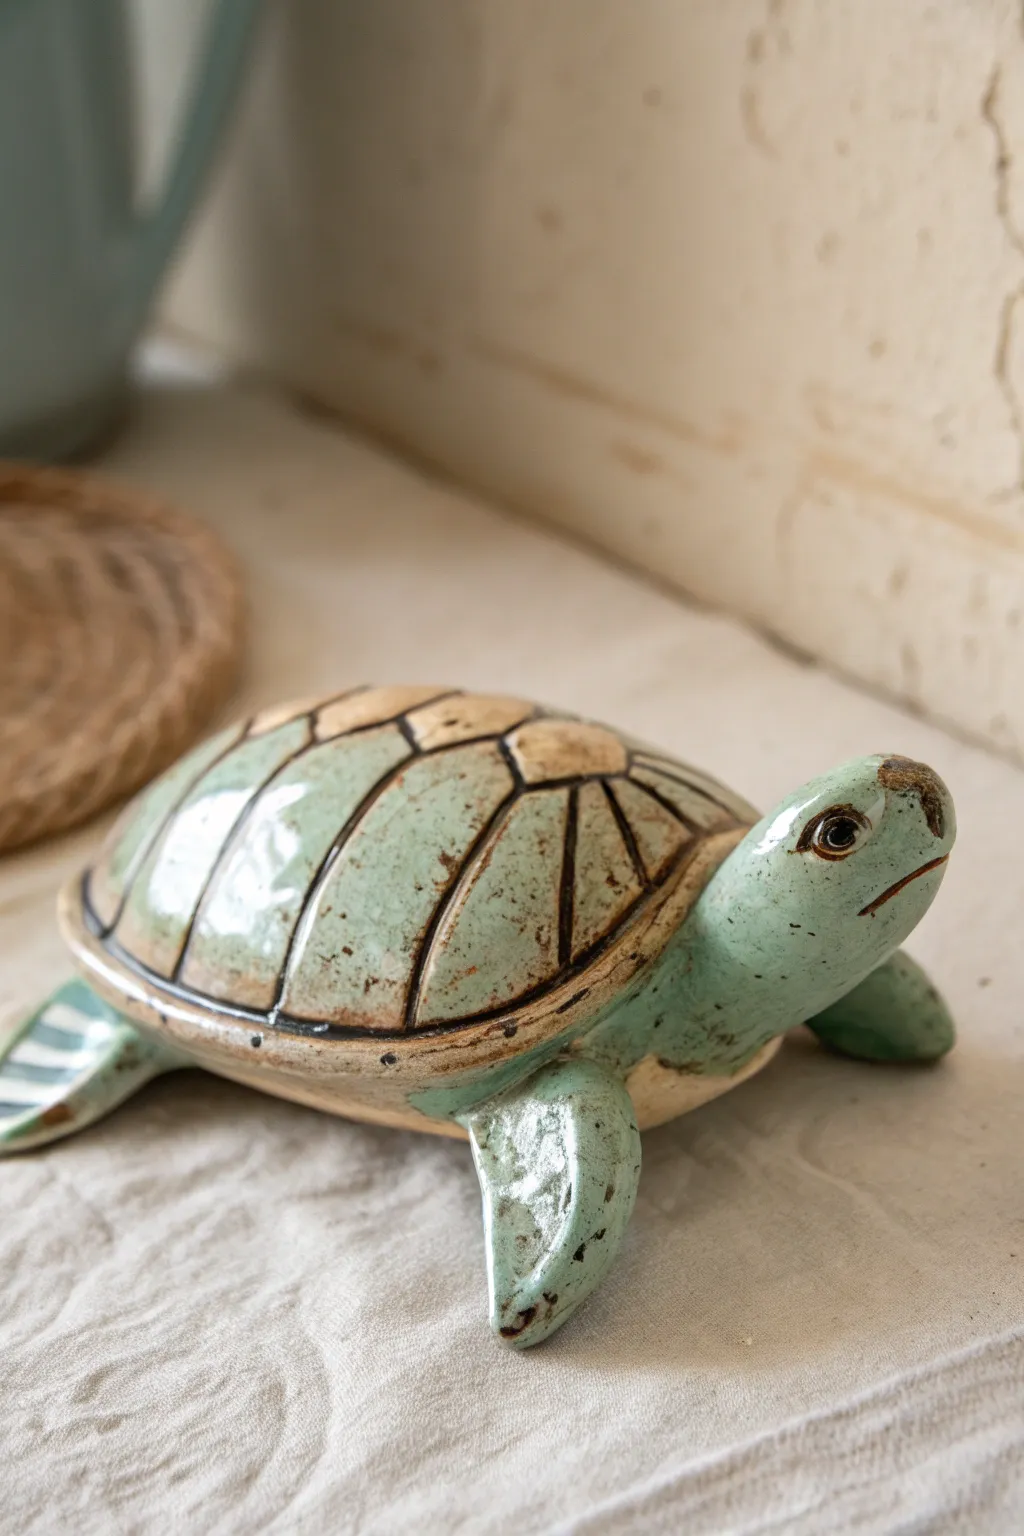
Capture the calm of the ocean with this beautifully finished ceramic turtle, featuring a soft seafoam green body and a naturally aged shell design. This project uses a wash technique to highlight the intricate grooves of the shell, giving a professional, kiln-fired look right at home.
Step-by-Step Guide
Materials
- Bisque ceramic turtle figurine
- Seafoam green acrylic paint (gloss or satin finish)
- Beige or warm cream acrylic paint
- Dark brown or burnt umber acrylic paint
- Glazing medium or water (for thinning)
- Small flat brush
- Fine liner brush or detail brush
- Soft cloth or paper towels
- High-gloss spray varnish or brush-on gloss sealer
- Palette for mixing
- Water cup
Step 1: Base Coating
-
Clean the bisque:
Begin by wiping down your ceramic turtle with a slightly damp cloth to remove any dust or ceramic particles. Let it dry completely to ensure the paint adheres smoothly. -
Apply the green base:
Load your flat brush with seafoam green paint. Apply a smooth, even coat over the turtle’s head, flippers, and the lower rim of the shell. You can leave the main top shell area bare for now. -
Paint the shell segments:
While the green dries, switch to the beige or warm cream paint. Carefully fill in the raised segments of the top shell. Don’t worry if you get paint in the grooves; we will cover that later. -
Second coat:
Once the first layers are dry to the touch, apply a second coat of green to the body and cream to the shell segments to ensure solid, opaque coverage without streakiness.
Step 2: Adding the Wash
-
Prepare the dark wash:
Mix a small amount of dark brown paint with water or glazing medium. You want a consistency similar to ink or heavy cream—fluid enough to flow into cracks but pigmented enough to stain. -
Wash the shell grooves:
Using a smaller brush, slather the dark brown wash generously over the entire shell, ensuring it sinks deep into the engraved lines between the shell plates. -
Wipe back:
I like to work quickly here—immediately take a damp soft cloth and wipe away the excess brown paint from the high points of the shell. This leaves the dark color in the crevices while revealing the cream color on top, creating an aged effect. -
Detail the rim:
Apply the wash to the rim of the shell where the green meets the cream. Wipe it back gently to create a ‘toasted’ edge look that mimics real ceramic firing. -
Speckle the body:
Load a stiff brush with a tiny bit of the brown wash. Flick the bristles or dab lightly to create subtle speckles on the green flippers and head for a natural, organic texture.
Clean Wipe Trick
When wiping back the dark wash on the shell, keep rinsing your rag or use fresh paper towels frequently. A dirty cloth will just smear mud colors everywhere rather than revealing the bright cream underneath.
Step 3: Defining Features
-
Outline the shell:
Once the wash is dry, use your fine liner brush and un-thinned dark brown paint to re-trace the deep grooves of the shell if they need more definition. This makes the segments ‘pop’ clearly. -
Paint the eyes:
With the detail brush, paint the entire eye shape dark brown. Allow it to tack up slightly. -
Add eye highlights:
Dip the very tip of a toothpick or a clean brush handle into white or light cream paint and dot the center of the eye to bring the turtle to life. -
Define the mouth:
Carefully drag a thin line of dark brown along the mouth indentation to give the turtle its gentle expression. -
Nose details:
Dab a small spot of brown on the tip of the nose to simulate the beak-like structure common in turtles.
Mosaic Shell Upgrade
For a artistic twist, paint each segment of the shell in slightly different shades of cream, tan, and soft brown before applying the dark wash to create a varied, mosaic stone effect.
Step 4: Gloss Finishing
-
Final drying:
Let the painted turtle sit until completely bone dry. Trapped moisture under sealer can cause cloudiness. -
Apply gloss coat:
Using a soft, clean brush, apply a thick layer of high-gloss varnish over the entire piece. This is crucial for mimicking the look of glazed pottery shown in the photo. -
Check for bubbles:
Inspect the wet varnish for air bubbles and gently brush them out before the sealer begins to set. -
Final cure:
Allow the project to cure for 24 hours to achieve that hard, glassy, ceramic-like sheen.
Place your shiny new turtle on a shelf or side table to add a charming touch of coastal decor to your room


Bold Outlined Shell Segments
This classic ceramic style highlights the natural geometry of a turtle’s shell by using distinct, contrasting colors separated by crisp lines. The result is a clean, semi-realistic finish with a lovely sheen that emphasizes the dimensional texture of the bisque.
Step-by-Step
Materials
- Ceramic bisque turtle figurine
- Underglaze (terra cotta/rust orange)
- Underglaze (warm beige/tan)
- Underglaze (sage green)
- Black underglaze (for the eye pupil)
- Small round brush (size 2 or 4)
- Fine liner brush (size 0 or 00)
- Clean water for rinsing
- Damp sponge
- Clear transparent glaze
- Fan brush (for glazing)
- Kiln access
Step 1: Base Coloring
-
Prep the bisque:
Begin by wiping down your entire ceramic turtle with a slightly damp sponge. This removes any dust from the shelf that might prevent the glaze from adhering properly. -
Map the shell pattern:
Look closely at the shell’s texture. You’ll see distinct segments. Plan to alternate your colors like a checkerboard, but focusing on rings. The center segments will be beige, the middle ring terra cotta, and the outer ring beige again. -
fill the beige segments:
Load your small round brush with the warm beige underglaze. Paint the central-most hexagonal plate and the outermost ring of rectangular segments. Apply 2-3 coats for solid opacity, letting each coat dry to the touch in between. -
Paint the accent ring:
Switch to your terra cotta or rust orange underglaze. Fill in the ring of segments that sits between your beige sections. I like to be careful here to keep the paint within the raised borders, but don’t stress if you spill over slightly—we will cover the lines later. -
Base coat the body:
Use the sage green underglaze to paint the head, legs, and tail. These areas usually have a scaly texture; make sure you work the brush bristles into the grooves so no white bisque shows through.
Blurred Lines?
If your green contour lines are bleeding into the beige panels, your brush is too wet. Blot it on a paper towel before painting to keep the paint flow controlled and crisp.
Step 2: Detailing & Lining
-
Create the outlines:
This is the most crucial step for this specific look. Using your fine liner brush and the sage green underglaze, carefully trace the ‘grout lines’ or crevices between every single shell segment. -
Clean up edges:
The green lines should serve as a border. If your beige or orange paint from earlier was messy, this green line acts as a clean-up tool to cover those ragged edges, giving that satisfying ‘bold outlined’ effect. -
Define the flippers:
The flippers have their own scale texture. While the base is green, you can add depth by mixing a tiny bit of the sage green with a white or lighter green, and dry-brushing the tops of the scales to make the texture pop. -
Paint the eyes:
Using the very tip of your detail brush, paint the eyeball white (if it isn’t already) and add a solid black dot for the pupil. A tiny white highlight dot can be added once the black is dry for extra life.
Level Up: Texture Pop
Before the clear glaze, gently wipe the green painted skin with a damp sponge. This removes paint from the high points, revealing white bisque while keeping green in the crevices.
Step 3: Glazing & Firing
-
Dry thoroughly:
Let all your underglaze work dry completely. It should look chalky and matte. If it feels cool to the touch, it still contains moisture. -
Apply clear glaze:
Using a soft fan brush, apply a coat of clear transparent glaze over the entire piece. Be gentle so you don’t smear the underlying design. Apply a second coat if your specific glaze brand recommends it. -
Check the bottom:
Flip the turtle over and ensure there is no glaze on the ‘foot’ or bottom surface where it will sit on the kiln shelf. Wipe it clean with a sponge if necessary. -
Fire the piece:
Load the turtle into the kiln and fire it to the temperature recommended for your specific clay and glaze combination (commonly Cone 06 or 05 for low-fire earthenware).
Once fired, the glossy finish will make those separated colors really shine against the green outlines

The Complete Guide to Pottery Troubleshooting
Uncover the most common ceramic mistakes—from cracking clay to failed glazes—and learn how to fix them fast.
Geometric Shell Pattern Blocks
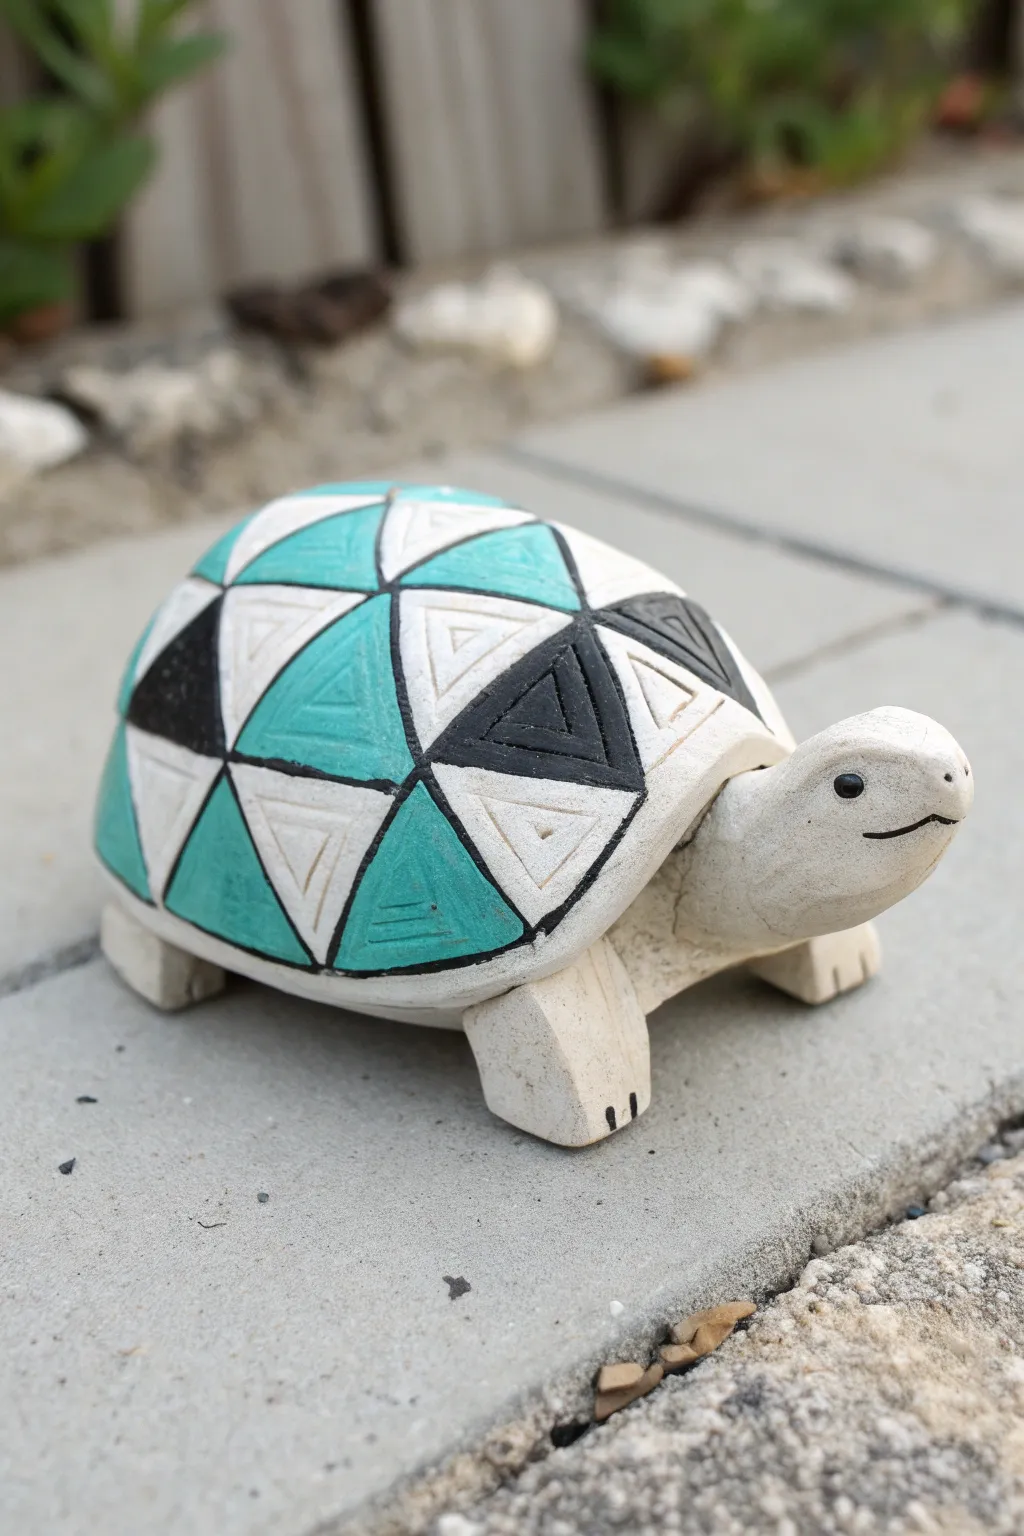
Transform a simple figurine into a modern art piece with this crisp, geometric shell design. The combination of teal, black, and natural white creates a striking look that feels both tribal and contemporary.
Step-by-Step Tutorial
Materials
- Unfinished ceramic or wood turtle figurine (smooth, rounded shell)
- Acrylic paints: Teal/Turquoise, Black, White
- Pencil
- Fine grit sandpaper
- Ruler or flexible measuring tape
- Fine-point black permanent marker or detail liner brush
- Small flat shader brush
- Round detail brush (size 0 or 1)
- Matte sealant spray
Step 1: Preparation & Mapping
-
Prepare the surface:
Before painting, ensure your turtle figurine is clean and dry. If using an unfinished ceramic or wood piece, give it a very light sanding with fine-grit sandpaper to smooth out any rough imperfections, then wipe away the dust. -
Base coat (optional):
If your figurine isn’t already a nice off-white or natural color like the one in the photo, apply a base coat of white or cream acrylic paint over the entire shell and body. Let it dry completely. -
Mark the center:
Using a pencil, find the very top center of the turtle’s shell. Make a faint dot. This will be the anchor point where your geometric pattern originates. -
Draft the grid:
Visualize a grid of hexagons or interlocking triangles. Starting from your center dot, lightly sketch a series of connecting triangles. You don’t need to be mathematically perfect; the hand-drawn look adds charm. -
Refine the lines:
Continue the pattern down the sides of the shell. Aim for rows of alternating triangles—some pointing up, some pointing down. Ensure the lines connect cleanly at the vertices.
Steady Hand Trick
Rest your pinky finger on a dry part of the shell while painting details. This anchors your hand and gives you much better control for those straight geometric lines.
Step 2: Painting the Shell
-
Plan your palette:
Decide which triangles will be which color. The design uses a repeating motif: a solid teal triangle, a solid black triangle, and a white/natural triangle with an inner triangular outline. -
Paint the teal sections:
Using a small flat shader brush, fill in the designated teal triangles. I find it helpful to outline the shape first with the brush tip, then fill the center. Start from the top and work your way down to avoid smudging. -
Apply a second coat:
Teal can be semi-transparent. Once the first layer is dry to the touch, apply a second coat to get that bold, opaque coverage seen in the image. -
Paint the black sections:
Switch to your black acrylic paint. Carefully fill in the alternating black triangles. These provide a strong contrast, so keep your edges as sharp as possible. -
Detail the white sections:
For the remaining white or natural triangles, paint a smaller, inner triangle using a very fine detail brush and the same cream or white color you used for the base (or leave it natural). This creates a subtle ‘carved’ texture effect. -
Add inner details:
Inside the teal triangles, you can add subtle horizontal lines if you want to mimic the texture in the photo, though a solid color works beautifully too.
Step 3: Defining Lines & Finishing
-
Outline the shapes:
This is the most crucial step for that crisp look. Use a fine-point black permanent marker or a liner brush with black paint to go over all your pencil grid lines. -
Thicken vertices:
Where the points of the triangles meet, slightly thicken the black line. This emphasizes the geometric structure and hides any slightly messy corners where colors meet. -
Paint the face:
Keep the face simple. Paint two small black dots for eyes. For the mouth, paint a thin, curved line that follows the natural separation of the turtle’s ‘beak’. -
Detail the feet:
On the turtle’s feet, paint two or three small vertical black lines at the very bottom to represent toes or claws. -
Check for gaps:
Look over the shell for any spots where the unfinished material shows through unintentionally. Touch up with the appropriate color. -
Seal the work:
Once fully dry (give it at least an hour), spray the entire turtle with a matte sealant. This protects the paint and unifies the sheen of the different colors without making it glossy.
Messy Lines?
If your painted triangles bleed over the lines, don’t panic. Let the paint dry completely, then use the thick black outline step to cover up the uneven edges.
Now you have a charming little companion ready to decorate your garden shelf or desk
Mandala Shell Medallion Design
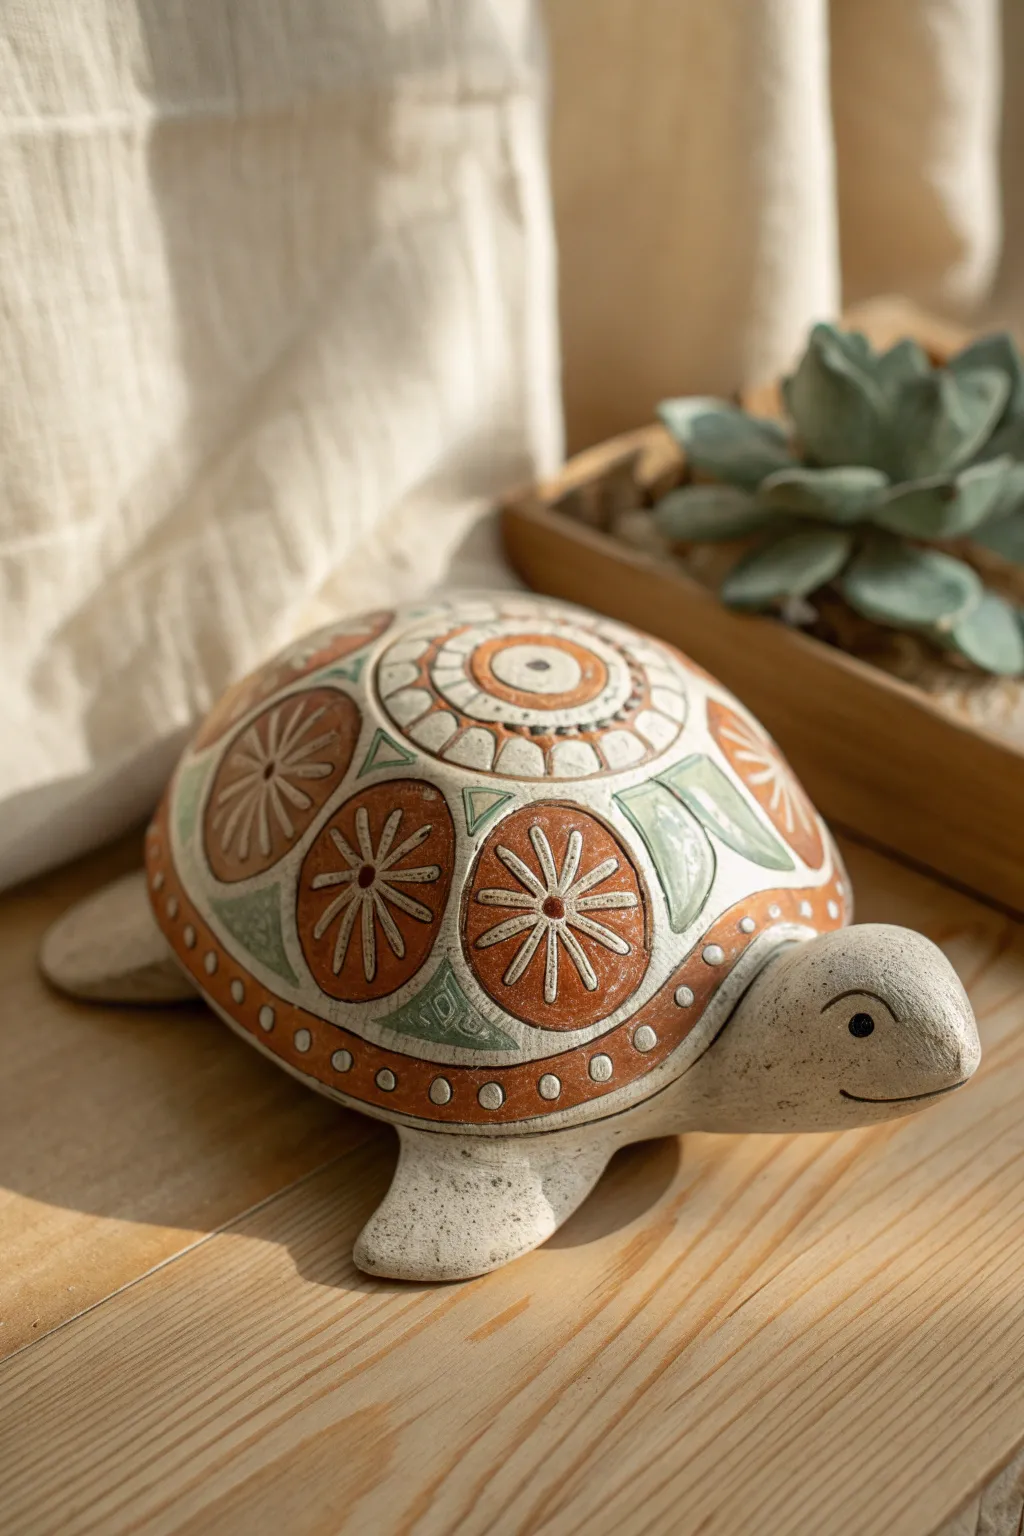
Capture the warmth of the sun with this earthy and intricate ceramic painting project. The design focuses on a repeating medallion pattern featuring rust-orange starbursts and soft green accents, creating a harmonious mandala effect on a classic turtle shape.
Step-by-Step Guide
Materials
- Bisque ceramic turtle figurine (with smooth shell)
- Acrylic paints: Rust Orange, Sage Green, Antique White/Cream, Dark Brown, Black
- Matte or Satin varnish/sealer
- Round pointed brushes (sizes 0, 2, and 4)
- Pencil for sketching
- Palette for mixing
- Water cup and paper towels
- Stylus tool or toothpick (optional)
Step 1: Base Preparation
-
Prime the surface:
Start by wiping down your ceramic turtle to remove any dust. Paint the entire surface, including the head and legs, with an Antique White or Cream acrylic paint. This provides a neutral, earthy canvas for the design. -
Create the speckled texture:
To mimic the stoneware look in the photo, dilute a tiny amount of Dark Brown or Black paint with water. Dip an old toothbrush or stiff brush into it and flick tiny specks across the head, legs, and shell base. Let this base coat dry completely. -
Map out the design:
Using a light pencil, sketch your main design elements directly onto the shell. Draw a large central circle at the top of the shell. Surround this with 4-6 large oval medallions spaced evenly around the sides. -
Connect with triangles:
Sketch triangular shapes in the negative spaces between the large oval medallions. These will become the green accents later.
Step 2: Painting the Medallions
-
Fill the medallions:
Using a size 4 brush, paint the interior of the side ovals with a rich Rust Orange. Apply two thin coats for opaque coverage, allowing drying time in between. -
Paint the top center:
For the central top circle, paint a thick ring of Rust Orange, leaving a cream circle in the very center and a cream rim on the outside. -
Add the green accents:
Fill in the triangular shapes you sketched earlier with Sage Green. I prefer a wash here rather than thick paint to keep it looking like stained ceramic glaze. -
Paint the bottom rim:
Paint a continuous band of Rust Orange along the very bottom edge of the shell where it meets the turtle’s body.
Uneven Lines?
If your brush feels shaky on the curved shell, steady your hand by resting your pinky finger on a dry part of the turtle while painting the fine details.
Step 3: Detailed Line Work
-
Outline the shapes:
Using a size 0 detail brush and thinned Dark Brown paint (or a fine-tip paint pen), carefully outline all your orange ovals, the green triangles, and the central top circle. Keep the lines thin and organic. -
Create the sunbursts:
Inside each orange side oval, paint a small Dark Brown dot in the center. From this dot, paint thin lines radiating outward like wheel spokes or flower petals. -
Detail the center mandala:
Inside the top orange ring, add small radiating dashes or ‘teeth’ pointing inward toward the cream center. Add a small black dot in the very middle of the bullseye. -
Decorate the green triangles:
Add simple interior details to the green triangles. You can paint a smaller triangle inside or a simple vein line if you want them to look like leaves. -
Add rim dots:
Dip the handle end of a brush or a stylus tool into the Cream paint. Dot evenly spaced circles along the orange rim at the bottom of the shell.
Make It 3D
Use ‘Puff Paint’ or dimensional fabric paint for the white dots on the rim or the brown outlines to give the shell real tactile texture like embossed clay.
Step 4: Finishing Touches
-
Paint the face:
Paint two small black circles for eyes on the head. Add a tiny white reflection dot in each eye to bring the turtle to life. Paint a simple curved line for a smile using the Dark Brown. -
Clean uph:
Check your work for any smudges. If you made a mistake with the brown lines, you can carefully touch up with the original orange or cream paint once dry. -
Seal the artwork:
Once the paint is fully cured (usually 24 hours), apply a coat of matte or satin varnish. This protects the intricate design and gives the piece a professional, finished ceramic look.
Now your turtle has a beautifully patterned shell that looks like a timeless piece of pottery ready to display


What Really Happens Inside the Kiln
Learn how time and temperature work together inside the kiln to transform clay into durable ceramic.
Dot Art Turtle Shell Texture
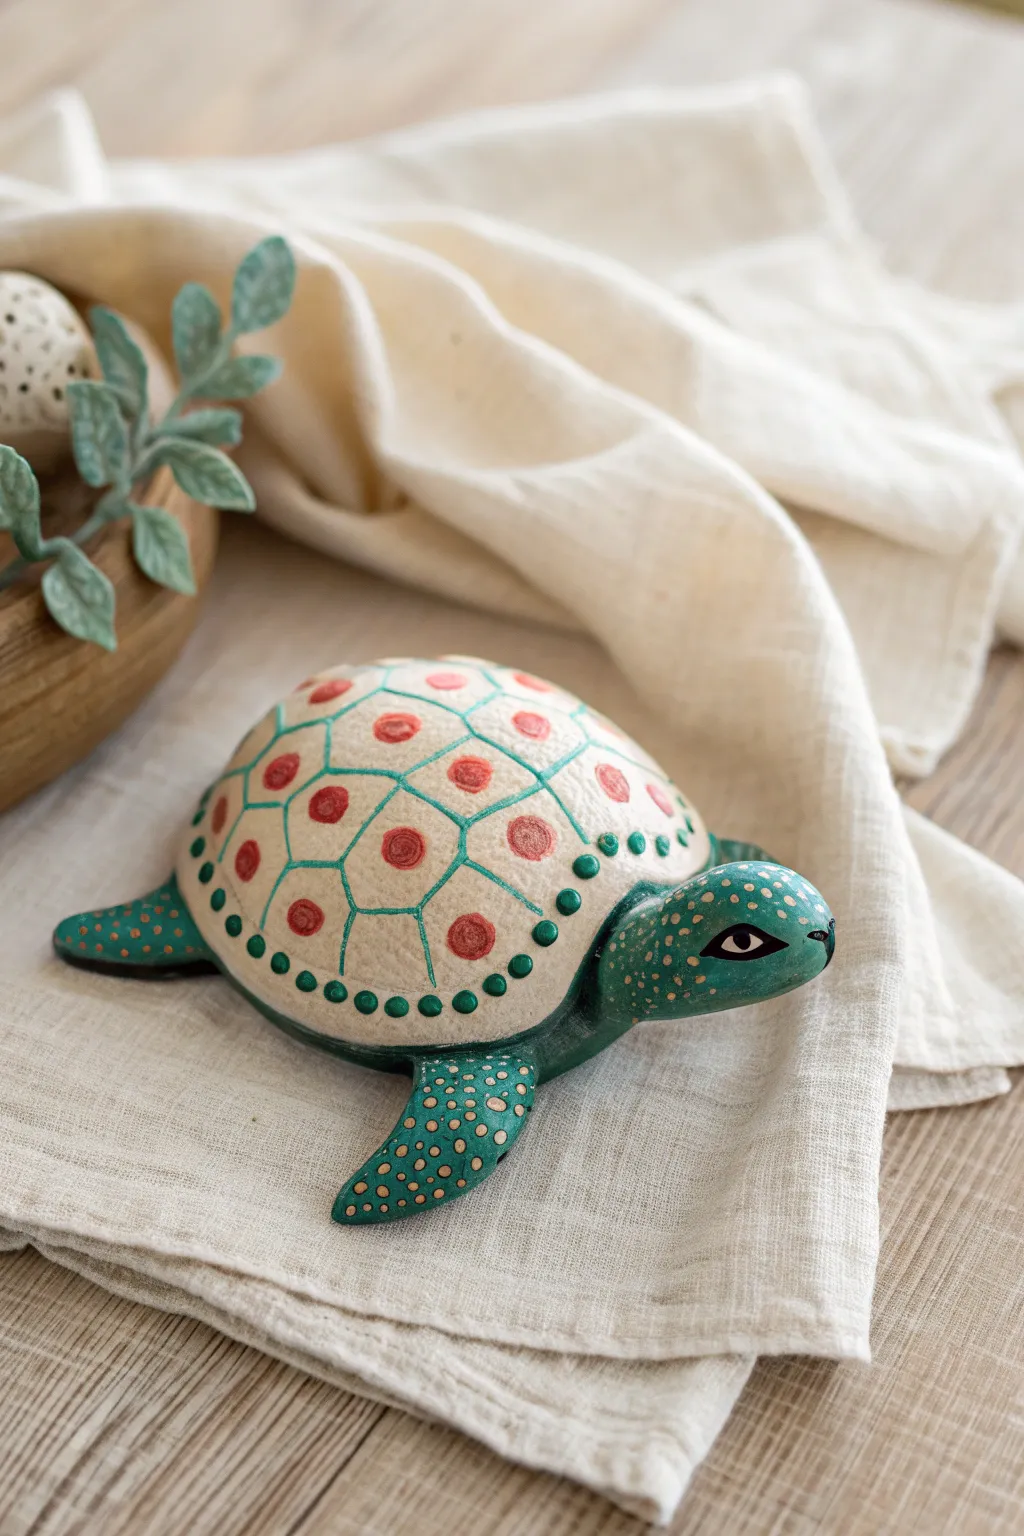
Bring a touch of playful charm to your decor with this folk-art inspired ceramic turtle. Featuring a creamy shell adorned with coral red dots and teal green accents, this project relies on simple brushwork and dotting tools to create lovely visual texture.
How-To Guide
Materials
- Unpainted ceramic turtle bisque (smooth finish)
- Acrylic craft paints: Cream/Off-White, Coral Red, Teal Green, Dark Hunter Green, Black, White
- Fine grit sandpaper (optional)
- Small flat shader brush (size 4 or 6)
- Fine liner brush (size 0 or 00)
- Dotting tools (various sizes) or ends of paintbrushes
- Pencil for sketching
- Matte or satin acrylic varnish
Step 1: Preparation and Base Coating
-
Surface Prep:
Begin by wiping down your ceramic turtle with a slightly damp cloth to remove any dust or ceramic powder. If you find any rough seams from the mold, gently sand them down with fine-grit sandpaper until smooth. -
Painting the Underbelly and Limbs:
Load a small flat brush with teal green paint. Carefully paint the head, flippers, and the underside of the turtle. You might need two thin coats to get solid, opaque coverage without brushstrokes showing. -
Base Coating the Shell:
Rinse your brush thoroughly. Paint the entire shell area with a creamy off-white color. Ensure you get nice, clean edges where the shell meets the teal body. Let this dry completely before moving on—a hairdryer on low heat can speed this up. -
Defining the Eyes:
Using a tiny detail brush, paint a white almond shape for the eye on each side of the head. Once dry, add a black pupil in the center and outline the eye shape with a very thin line illustrating the eyelids.
Uneven Dots?
If your dots are pointy or uneven, your paint is too thick. Mix in a tiny drop of water or flow medium to get rounded, smooth domes.
Step 2: Drafting the Pattern
-
Sketching the Grid:
Lightly sketch a honeycomb or geometric grid pattern onto the cream shell using a pencil. Start with a central hexagon at the very top and work your way down the sides. Don’t worry if it’s not mathematically perfect; organic shapes add character. -
Outlining the Sections:
Mix a small amount of teal green with a drop of water to improve flow. Using your fine liner brush, trace over your pencil lines to create the teal grid separating the shell plates. -
Refining Lines:
Go back over any lines that look too faint. The goal is a consistent, thin teal border between each ‘plate’ of the shell. I admit I sometimes hold my breath here to keep my hand steady. -
Adding the Rim Detail:
Paint a thin border around the very bottom edge of the shell where it meets the body, using the same teal green to frame the entire design.
Try a Glaze
For an antique look, wipe a thin brown glaze over the cream shell before varnishing. It settles in the texture for a vintage vibe.
Step 3: Dot Work and Texturing
-
Central Shell Dots:
Select a medium-sized dotting tool or the back of a paintbrush. Dip it into the coral red paint and place one large, confident dot in the exact center of each geometric shell section. -
Inner Shell Accents:
Switch to a much smaller dotting tool. Using the same coral red, add tiny dots inside the perimeter of each shell plate, creating a ring of small specks surrounding the central large dot. -
Shell Rim Decoration:
Load a medium dotting tool with dark hunter green paint. Apply a row of evenly spaced dots along the bottom rim of the shell, right on top of the cream border you established earlier. -
Creating Depth on Limbs:
To give the flippers texture, switch back to the cream paint. Using a very fine dotting tool, apply tiny clusters of dots all over the teal flippers and the top of the head. -
Flipper Variation:
Vary the size of the dots on the flippers slightly—make them bigger near the center of the limb and tiny near the edges for a natural, scaled look. -
Head Detailing:
Continue the cream dot pattern onto the top of the head, framing the eyes but being careful not to cover your painted eye details. -
Final Cleanup:
Inspect your work. If any red dots look translucent, carefully dab a second layer of paint directly on top of the first once it’s dry to make the color pop.
Step 4: Sealing and Protection
-
Drying Time:
Let the turtle sit undisturbed for several hours. The dots are thick paint, so they will take longer to dry than the base coats. -
Applying Varnish:
Use a soft, wide brush to apply a coat of matte or satin varnish. This unifies the sheen and protects your delicate dot work from chipping.
Place your finished turtle on a shelf or side table to enjoy its handcrafted beauty every day
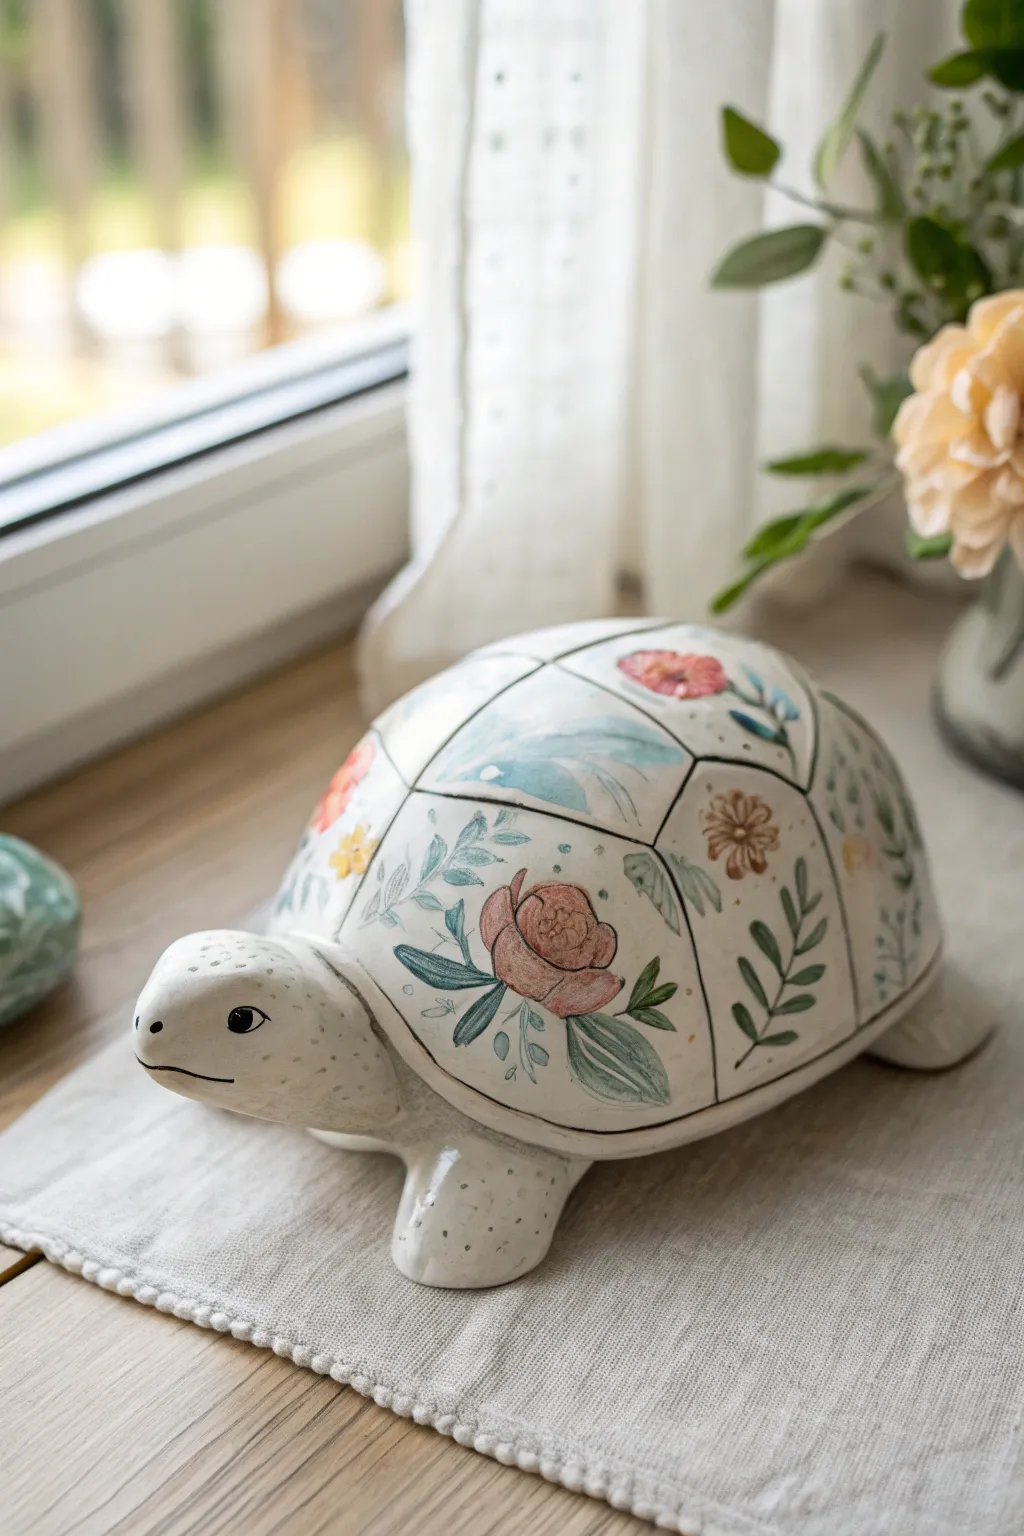
Whimsical Floral Shell Garden

Transform a plain ceramic turtle into a gentle woodland creature with this delicate botanical design. The soft, creamy base allows the sage greens, muted pinks, and terracottas to shine in a pattern that feels like a vintage illustration brought to life.
Detailed Instructions
Materials
- Bisque ceramic turtle figurine (smooth finish)
- Acrylic paints: Creamy off-white (base), sage green, forest green, coral pink, terracotta, mustard yellow, dark charcoal/black
- Matte spray sealant or clear coat
- Flat shader brush (size 6 or 8)
- Round detail brushes (size 0, 1, and 3)
- Small liner brush (size 00)
- Pencil for sketching
- Palette
- Water cup and paper towels
Step 1: Base Preparation
-
Clean the Surface:
Begin by wiping down your bisque turtle with a slightly damp paper towel to remove any ceramic dust. This ensures the paint adheres smoothly without gritty textures. -
Apply Base Coat:
Using your flat shader brush, apply an even coat of creamy off-white paint over the entire turtle. Don’t forget the underside of the shell and between the legs. -
Second Coat:
Once the first layer is dry to the touch, apply a second coat of the cream paint. This helps achieve the solid, porcelain-like finish seen in the image. I like to let this dry fully for at least 30 minutes before sketching. -
Light Sketching:
With a pencil, very lightly draw the outline of the shell segments. You don’t need a heavy hand here; you just want a guide for where your shell border will be.
Brush Control Tip
For the crispest stems and lines, thin your acrylic paint slightly with a drop of water until it has an ink-like consistency. It will flow much smoother.
Step 2: Painting the Shell Garden
-
Mix Your Greens:
Prepare two shades of green on your palette: a soft sage for lighter leaves and a deeper forest green for stems and contrast. -
Paint Main Stems:
Using a size 1 round brush and the darker green, paint delicate, curving lines originating from the bottom edge of the shell up toward the top center. Space them out generously to leave room for flowers. -
Add Leaf Shapes:
Switch to the sage green and a size 3 brush. Press the belly of the brush down and lift up to create almond-shaped leaves attached to your stems. Vary the direction so they look natural and wind-blown. -
Terracotta Blooms:
With the terracotta or burnt orange paint, add small five-petaled flowers using a round brush. Dot the petals gently, keeping them loose rather than perfectly geometric. -
Pink Accents:
Use the coral pink paint to add tulip-shaped buds or smaller filler flowers between the terracotta blooms. This color variation adds depth to the garden scene. -
Yellow Details:
Using mustard yellow and a size 0 brush, add small centers to the flowers. You can also paint tiny, bud-like dots at the ends of some smaller green stems. -
Petal Veins:
Once the flower shapes are dry, use your smallest liner brush and a diluted darker shade (like rust or dark pink) to paint tiny central lines or veins on the larger petals. -
Shell Border:
Using the liner brush and black or dark grey paint, carefully trace a thin, consistent line separating the floral shell dome from the turtle’s body. Extending this line slightly makes the shell look distinct.
Step 3: Finishing the Character
-
Face Coloring:
The head remains the same cream color as the body, but you can add a barely-there wash of grey around the nose area for subtle dimension. -
Painting the Eye:
For the eye, paint a solid black oval using a size 0 brush. I prefer to steady my hand on the table for this precision step. -
Eye Reflection:
Dip the back end of a paintbrush into white paint and place a single, tiny dot in the upper corner of the black eye oval. This ‘catchlight’ brings the turtle to life instantly. -
Facial Features:
Use the liner brush with diluted black paint to draw a very thin line for the mouth and a small arch above the eye for an eyebrow/lid crease. Add a tiny pink dot for the nostril. -
Feet Details:
At the ends of the feet, use your liner brush to paint three or four short, vertical strokes to suggest toes or claws. -
Final Seal:
Allow the entire project to cure for 24 hours. Take the turtle outside and spray it with a clear matte sealant to protect the paint without making it look glossy or plastic.
Glossy Shell Idea
Use a matte sealant on the body but brush a high-gloss varnish ONLY over the floral shell area. This makes the ‘garden’ pop and mimics a polished shell.
This charming painted turtle makes a peaceful desk companion or a lovely gift for a plant lover.

TRACK YOUR CERAMIC JOURNEY
Capture glaze tests, firing details, and creative progress—all in one simple printable. Make your projects easier to repeat and improve.
Ocean Wave Shell With Foam Highlights

Transform a simple ceramic bisque turtle into a stunning piece of functional art with a vibrant design inspired by rolling ocean waves. This project uses translucent underglazes or glazes to create a watercolor-like depth on the turtle’s shell, mimicking the sea’s movement.
Step-by-Step Guide
Materials
- Bisque fired ceramic turtle dish
- Underglazes (Teal, Navy Blue, Turquoise, White)
- Clear dipping or brush-on glaze
- Small round brush (size 2 or 4)
- Fine liner brush (size 00 or 0)
- Wax resist (optional but helpful)
- Pencil
- Sponge and water bowl
- Palette for mixing
Step 1: Preparation and Base Planning
-
Clean the bisque:
Start by gently wiping down your entire ceramic turtle with a slightly damp sponge. This removes any kiln dust or oils from your hands that might prevent the glaze from adhering properly. -
Sketch the wave pattern:
Using a soft pencil, lightly sketch large, curved scallop shapes across the inside of the shell. These will form your waves. Don’t worry about pencil marks; they will burn off in the kiln. I find starting from the center and working outward keeps the pattern symmetrical. -
Define the grid:
Ensure your scalloped lines intersect neatly, creating a scale-like grid. Draw similar curved lines on the flippers to imply movement. -
Wax resist application (Optional):
If you want very crisp white lines between your colors, carefully paint liquid wax resist over your pencil lines. Let this dry completely before moving to the painting phase. Alternatively, you can leave thin gaps unpainted.
Fixing Smudges
If blue paint bleeds into your white lines, wait for it to dry completely. Then, scratch the mistake away gently with a wooden toothpick before reapplying white.
Step 2: Painting the Ocean Shell
-
Mix your ocean palette:
Pour out a navy blue, a teal, and a bright turquoise onto your palette. You want a gradient effect, so consider mixing a drop of water into them if you’re using underglaze to make them slightly more translucent. -
Paint the dark waves:
Using your round brush, fill in alternating scallop shapes with the navy blue. Focus on the ‘bottom’ or outer edges of the shell for the darker tones to create depth. -
Apply the mid-tones:
Fill the next set of wave shapes with your teal color. If the edges tough the wet navy blue, let them bleed slightly for a watery look, or wait for them to dry for distinct separation. -
Highlight with turquoise:
Paint the remaining central shapes and the top curves with the bright turquoise. This simulates sunlight hitting the shallow water. -
Detail the head and flippers:
Paint the head and flippers completely in a solid teal or dark blue base coat. Let this layer dry to the touch. -
Add texture to the rim:
For the rim of the shell (the body of the turtle), leave it mostly the natural bisque color. You can sponge on a very light wash of beige or grey to enhance the speckled clay texture shown in the photo.
Add Pearl Lustre
For a magical finish, apply a Mother of Pearl overglaze to the blue sections after the main firing and re-fire at a lower temperature for an iridescent shine.
Step 3: Fine Details and Finishing
-
Create the white separators:
If you didn’t use wax resist, take your fine liner brush with white underglaze (or use a precision applicator bottle). Carefully trace over the gaps between your blue wave shapes to create the bright white separating lines. -
Outline the body:
Use a thin blue line to outline the wave pattern on the exterior rim of the shell, creating a decorative border that wanders along the side. -
Dot the flippers:
Dip the handle end of a brush or a dedicated dotting tool into white underglaze. Stamp varying sizes of dots onto the painted flippers to look like sea foam or patterned skin. -
Create the eye:
Paint a small white circle on the side of the head. Once dry, add a tiny black dot in the center for the pupil, and a thin black line to outline the eye shape. -
Add shell highlights:
Go back to the interior shell. Add a few small white dots inside the darkest blue wave shapes to tie the design together. -
Clear glaze application:
Once all underglaze is bone dry, apply a clear glaze over the entire piece. You can dip the piece or brush on two even coats. This will make the colors pop and make the dish food-safe. -
Final wipe:
Wipe the bottom of the turtle’s feet with a clean sponge to ensure no glaze is left there, preventing it from sticking to the kiln shelf.
Once fired, fill your beautiful new dish with trinkets or snacks and enjoy the coastal vibe it brings to your table
Galaxy Turtle With Star Speckles
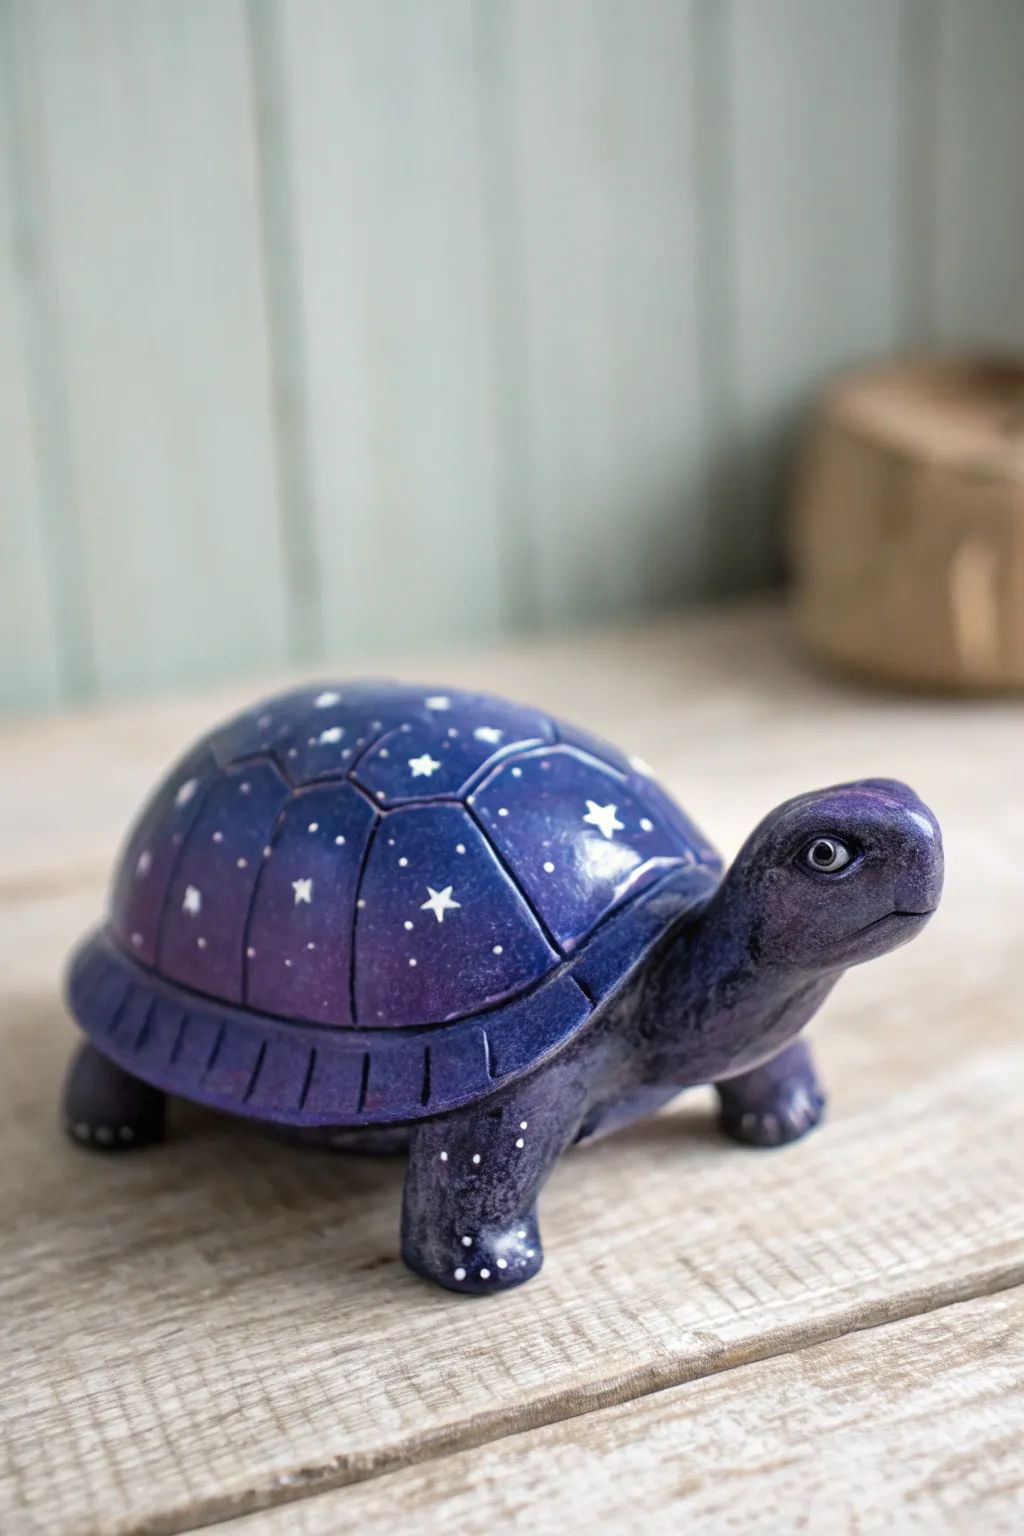
Transform a plain ceramic bisqueware turtle into a celestial masterpiece with this galaxy-inspired painting guide. The deep indigos and violets, speckled with starlight, create a stunning depth that turns a simple figurine into a window to the universe.
Step-by-Step Tutorial
Materials
- Ceramic turtle figurine (bisque)
- Acrylic paints: Black, Navy Blue, Violet, Magenta, White
- Gloss varnish or sealer
- Soft synthetic brushes (flat shader, round #4, fine liner #0 or #00)
- Small piece of kitchen sponge or dabber
- Palette for mixing
- Cup of water and paper towels
- Toothpick (optional)
Step 1: Preparing the Base
-
Clean surface:
Begin by wiping down your ceramic turtle with a slightly damp paper towel to remove any dust or oils from the surface. This ensures the paint adheres smoothly. -
Apply base coat:
Using a flat shader brush, apply an opaque coat of Navy Blue over the entire turtle—both the shell and the body. Don’t worry about shading yet; just aim for solid, even coverage. -
Dry and repeat:
Let the first layer dry for about 10-15 minutes. If streaks are visible, apply a second coat of Navy Blue to establish a rich, dark foundation.
Cosmic Nebulas
Don’t over-blend your sponge layers! Leaving slightly rough textures when applying the magenta and violet creates a more realistic gas-cloud effect than a perfectly smooth gradient.
Step 2: Creating the Galaxy Gradient
-
Sponge mixing:
Squirt a small amount of Black and Violet paint onto your palette. Take a small piece of sponge, dampen it slightly, and dab it into the Black paint first. -
Deepening shadows:
Gently sponge the black paint around the lower rim of the shell and into the crevices between the shell plates (scutes). This creates the deep ‘void’ of space. -
Adding nebula hues:
Switch to a clean area of the sponge or a round brush. Pick up some Magenta and sponge it softly onto the center of a few shell plates, blending it outwards into the navy base. -
Blending violets:
While the magenta is still tacky, sponge Violet paint around the edges of your magenta spots. The goal is a seamless transition: Magenta center -> Violet -> Navy -> Black edges. -
Body shading:
Use the sponge with a mix of Navy and Black to texture the turtle’s skin (legs, head, and tail). This gives it a stony, celestial look rather than a flat color. -
Highlighting:
Here, I like to mix a tiny drop of White into the Magenta to create a pale lavender. Dry brush this lightly onto the very highest points of the shell’s curve to simulate light hitting a nebula.
Glow in the Dark
Mix glow-in-the-dark medium into your white paint before adding the stars. Your turtle will look like a normal galaxy by day, but will illuminate with a soft green starlight when the lights go out.
Step 3: Detailing the Stars
-
Painting large stars:
Using your finest liner brush (#00) and pure White paint, carefully paint small five-pointed stars scattered across the shell. Place larger stars on the lighter nebula patches for contrast. -
Adding star clusters:
Dip the tip of a toothpick into White paint. Dot groups of three or four tiny specks close together on the darker parts of the shell to look like distant star clusters. -
Splatter technique:
Dilute a small amount of White paint with water until it’s inky. Load a stiff brush, hold it near the turtle, and flick the bristles to create a spray of fine mist (distant stars) across the legs and lower shell. -
The eyes:
Paint the eyeball Black. Once dry, add a small crescent of White or Light Grey at the bottom for reflection, and a tiny, crisp white dot near the top for the glint of life. -
Defining the shell:
To make the shell segments pop, mix a dark wash (water + Black paint). Run this thin liquid carefully into the recessed lines separating the shell plates.
Step 4: Finishing Touches
-
Final look over:
Check for any bald spots or messy edges. If your star splatter got too heavy in one spot, you can touch it up with a dab of Navy Blue. -
Sealing the work:
Once the paint is completely dry (wait at least an hour), apply a coat of gloss varnish. The gloss finish is crucial as it mimics the glassy look of a telescope lens and deepens the dark colors. -
Second coat:
For extra durability and shine, apply a second coat of varnish after the first is dry to the touch.
Now you have a little cosmic guardian ready to explore the vastness of your bookshelf
Iridescent or Metallic Fantasy Turtle
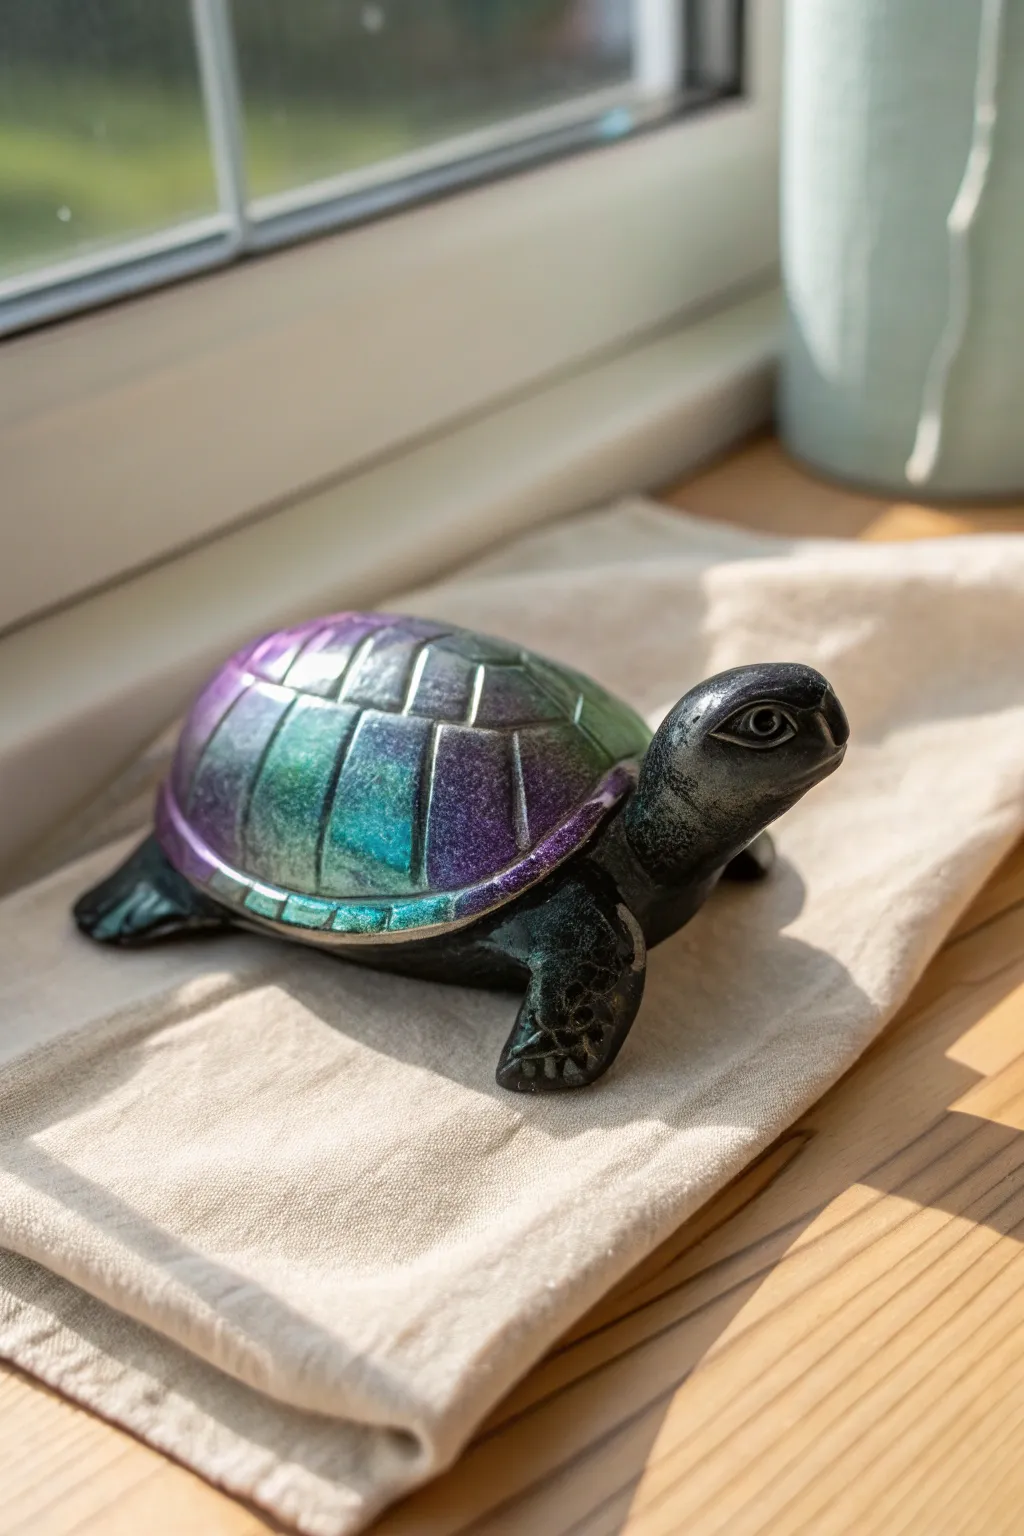
Transform a plain ceramic bisque turtle into a mystical creature that seems to originate from a galaxy far away. This project uses color-shifting techniques to create a shell that flashes between deep purple and emerald green, anchored by a realistic, shadowy stone-textured body.
Step-by-Step
Materials
- Unpainted ceramic turtle bisque
- Acrylic paint: Black (matte)
- Acrylic paint: Heavy body Titanium White
- Iridescent medium or color-shift acrylic paints (Purple/teal shift)
- Metallic acrylic paints: Emerald green, Amethyst purple
- Dry brush (stiff bristles)
- Soft synthetic flat brush
- Detailed round brush (size 1 or 2)
- Gloss varnish
- Matte varnish
- Spray sealer (optional base)
- Paper towels
- Water cup
Step 1: Preparation and Base Coat
-
Clean the Ceramic:
Begin by wiping down your ceramic turtle with a slightly damp paper towel. This removes any dust or oils from the surface that might repel the paint. -
Apply the Base Layer:
Using a soft flat brush, coat the entire turtle—shell, head, and legs—with a solid layer of matte black acrylic paint. Black provides the best background for metallic and iridescent colors to pop. -
Check for Coverage:
Let the first coat dry for about 15 minutes. Inspect the crevices near the shell’s rim and under the legs; apply a second coat if any white ceramic is peeking through.
Shift Not Showing?
Iridescent paints need a dark base to work. If the colors look milky or weak, sustain the dark underpainting or mix a tiny dot of black into the metallic paint.
Step 2: Creating the Stone Body
-
Load the Dry Brush:
Take a stiff-bristled brush and dip the very tip into a dark grey or charcoal paint (mix a tiny drop of white into your black). Wipe almost all the paint off onto a paper towel until the brush leaves only faint, dry scratch marks. -
Highlighting Texture:
Gently sweep the dry brush over the head, neck, and legs of the turtle. Focus on the raised areas like the ridges of the skin or the eyelids to create a weathered stone look. I like to keep this subtle so the shell remains the star. -
Painting the Eye:
Use your fine detail brush to carefully paint the eye socket. Keep it dark, adding just a tiny dot of white or silver as a reflection highlight to bring the turtle to life.
Starry Night Effect
Flick a stiff toothbrush dipped in diluted white paint over the shell before varnishing to add tiny ‘stars’ to your galaxy design.
Step 3: The Galaxy Shell
-
Isolate the Shell:
Switch to your metallic paints. We will be working exclusively on the shell plates (scutes) now. -
Base Metallic Layer:
Apply a thin layer of deep metallic emerald green to the center of the shell plates. Don’t worry about perfect blending yet; just get the color down. -
Adding the Gradient:
While the green is still slightly tacky or just after drying, paint metallic amethyst purple around the edges of the shell and on the sides where the light hits differently. -
Dry Brushing the Transition:
To blend these, take a clean dry brush with a tiny amount of the purple metallic. Lightly buff it over the boundary where the green meets the purple to create a soft transition. -
Applying Color Shift Topcoat:
This is the magic step. Apply a specialized iridescent or interference medium (purple/teal shift) over the entire painted shell area. This unifies the metallic base coats and creates that ‘wet’ shifting look. -
Defining the Grooves:
Use a very thin brush or a diluted black wash to carefully repaint the deep grooves between the shell plates. This separation makes the iridescent panels look like individual inlaid gems.
Step 4: Finishing Touches
-
Rim Detail:
Paint the rim of the shell (where it meets the body) with a distinct metallic color, like a brighter silver or a mix of the purple and white, to frame the artwork. -
Gloss the Shell:
Once the paint is fully cured (give it at least an hour), apply a high-gloss varnish strictly to the shell. This enhances the color-shift effect significantly. -
Matte the Body:
Contrast the shiny shell by applying a matte varnish to the head and legs. This difference in sheen makes the shell look separate and magical. -
Final Inspection:
Check for any stray gloss on the matte areas or vice versa, and touch up as needed.
Set your turtle on a windowsill where sunlight can reveal the full spectrum of your color-shifting work
Kawaii Pastel Turtle With Big Eyes
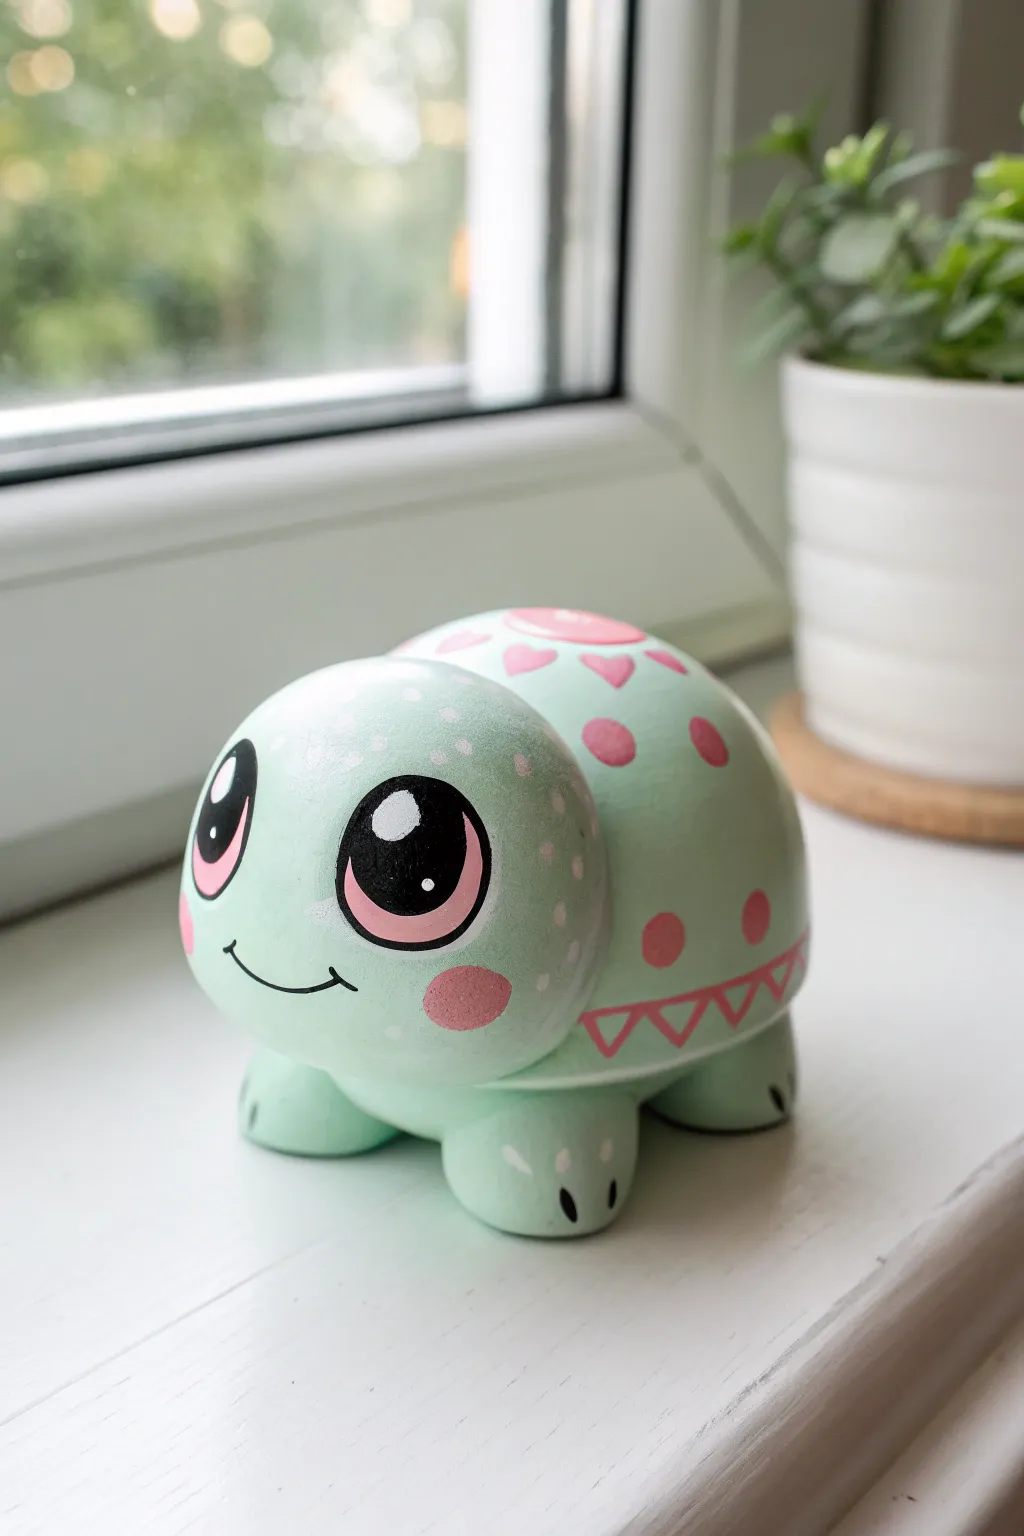
This adorable project transforms a simple ceramic blank into a kawaii companion with oversized, sparkling eyes and charming pastel details. The soft mint green base paired with playful pink patterns creates a sweet, gentle aesthetic perfect for brightening up any windowsill.
Step-by-Step Guide
Materials
- Unpainted ceramic turtle figurine
- Acrylic paints: Mint green, pastel pink, black, and white
- Flat shader brush (size 4 or 6)
- Round detail brushes (size 0 and 2)
- Dotting tools or toothpicks
- Spray gloss varnish or brush-on geometric sealer
- Water cup and paper towels
- Palette or paper plate
Step 1: Base Coating
-
Prepare the surface:
Wipe down your ceramic turtle with a slightly damp cloth to remove any dust or oils. Let it dry completely to ensure the paint adheres smoothly. -
Apply the first base coat:
Using the flat shader brush, cover the entire turtle in mint green acrylic paint. Work in smooth, even strokes to minimize brush marks. -
Add a second coat:
Once the first layer is dry to the touch, apply a second coat of mint green. This builds opacity and ensures the ceramic color underneath doesn’t show through. -
Smooth the head:
Pay extra attention to the head area, applying a slightly thinner third coat if necessary to get a porcelain-smooth finish for the face details later.
Uneven Dots?
If your polka dots look lumpy or uneven, wait for them to dry fully, then lightly sand the high spot with fine-grit sandpaper allowing you to re-paint a smoother circle.
Step 2: Painting the Shell Pattern
-
Add the central detail:
Using a size 2 round brush and pastel pink paint, create a small circle at the very top center of the shell. -
Paint heart accents:
Paint a ring of small pink hearts surrounding that central circle. Keep the points of the hearts facing outward. -
Create polka dots:
Scatter medium-sized pink polka dots randomly across the rest of the shell. Try to space them somewhat evenly, but don’t worry about perfect symmetry. -
Paint the rim border:
Along the bottom edge or rim of the shell, paint a continuous line of small, inverted triangles in pink. The points should face downward toward the turtle’s feet. -
Refine the shapes:
Go back over your pink shapes with a second layer of paint if the mint green is showing through, making the pink pop vividly.
Step 3: Creating the Kawaii Face
-
Outline the eyes:
This is the most crucial step for the ‘kawaii’ look. With a size 0 brush or a fine tip marker, lightly outline two very large, tall ovals on the front of the face. -
Fill the eyes:
Fill these large ovals completely with black acrylic paint. You may need two coats to get a solid, deep black. -
Add eye details:
At the bottom curved edge of each black oval, paint a crescent moon shape in pastel pink to give the eyes depth and warmth. -
Create the sparkle:
I usually hold my breath for this part. Dip the handle end of a paintbrush into white paint and stamp a large white dot in the upper left of each eye. Add a tiny second dot nearby for extra shine. -
Paint the smile:
Using your thinnest liner brush (size 0) and black paint, draw a small, simple curved smile right between the eyes. -
Blush the cheeks:
Paint two soft pink oval ‘blush’ marks directly under the outer edge of each eye.
Add Some sparkle
Mix a tiny pinch of iridescent glitter into your gloss varnish before applying the final coat. It gives the shell a magical, pearlescent shimmer in the sunlight.
Step 4: Finishing Touches
-
Separate the Head:
Add gentle definition where the head meets the shell with a very faint, watered-down line of darker green or grey if you want more separation, though the natural shape often provides enough shadow. -
Texture the skin:
Using a dotting tool or toothpick, add tiny groups of white speckles on the forehead and feet to mimic reptile skin texture in a cute way. -
Detail the toes:
Paint two short, thin black lines on the front of each foot to represent little toes. -
Seal the artwork:
Allow the turtle to dry for at least 24 hours. Once cured, apply a coat of gloss varnish to protect the paint and give the eyes a wet, glassy look.
Now your charming little friend is ready to bring a dash of sweetness to your home decor
Tiny Accessories Painted On for Personality
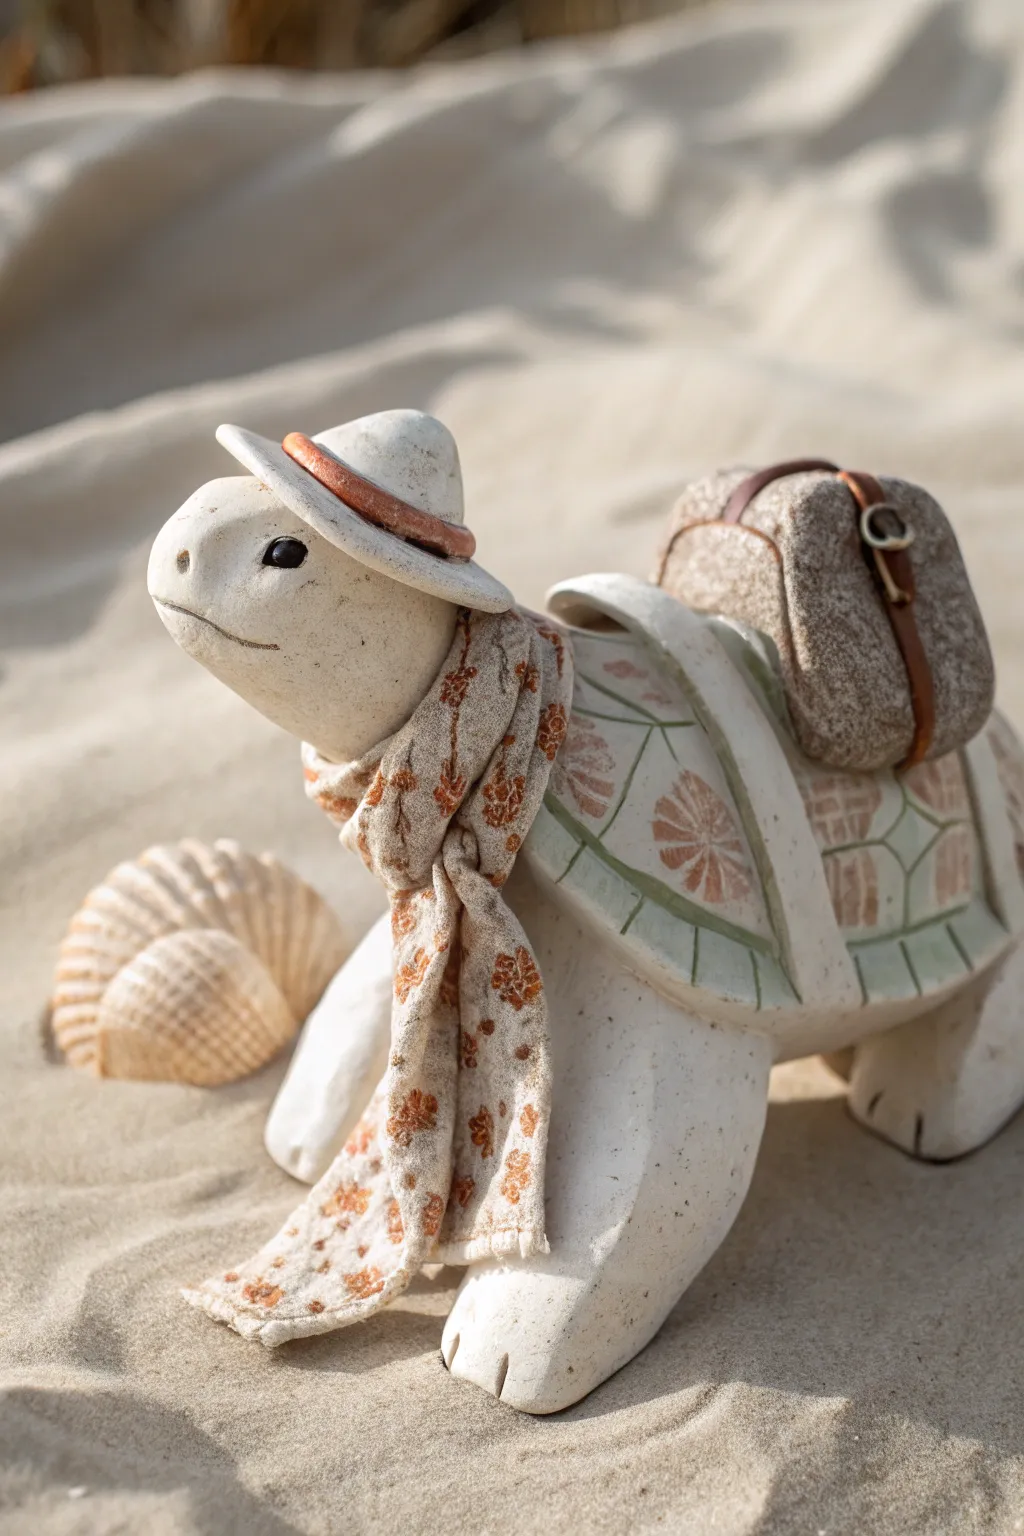
Transform a simple ceramic turtle into a seasoned traveler by sculpting and painting charming accessories directly onto the form. This project combines clay modeling with delicate painting techniques to creating a whimsical, storybook character ready for adventure.
Detailed Instructions
Materials
- Bisque ceramic turtle figurine (base)
- Air-dry clay or epoxy sculpt clay
- Sculpting tools (needle tool, smoother)
- Acrylic paints (Cream, Stone Grey, Rust, Olive Green, White, Black)
- Small flat shaders and fine liner brushes
- Matte varnish or sealant
- Water cup and palette
- Fine-grit sandpaper
Step 1: Sculpting the Accessories
-
Prepare the base:
Ensure your ceramic turtle is clean and dry. Lightly sand the areas where you plan to add the hat, scarf, and backpack to help the clay adhere better to the smooth bisque surface. -
Form the hat:
Roll a small ball of clay and flatten it into a disc for the brim. Place it on the turtle’s head at a slight tilt. Add a rounded dome on top for the crown, smoothing the seam where the two pieces join with a little water or slip. -
Add the hat band:
Roll a very thin snake of clay and wrap it around the base of the hat’s crown. Press it gently into place to create a distinct band. -
Sculpt the scarf base:
Roll a long, flat strip of clay. Drape it loosely around the turtle’s neck, allowing the ends to hang down naturally over the front legs. Create gentle folds and ripples in the clay to mimic the weight of fabric. -
Texture the backpack:
Form a soft rectangle for the backpack and press it onto the turtle’s shell. Use a stippling sponge or the tip of a stiff brush to press a rough texture into the clay, simulating a heavy canvas or wool material. -
Detail the straps:
Roll thin, flat strips for the leather straps. Lay them over the backpack and down the sides. Use a needle tool to poke tiny holes for stitching and sculpt small buckles where the straps would fasten. -
Let it cure:
Allow all the added clay elements to dry completely according to your material’s instructions. This usually takes 24 hours. Sand any rough fingerprints lightly once hard.
Step 2: Painting and Detailing
-
Base coat the turtle:
Paint the turtle’s skin in a creamy off-white. Apply two thin layers for even coverage, avoiding the newly sculpted areas. -
Paint the stone texture:
Mix a warm stone grey. Stipple this color onto the backpack completely. While it’s still slightly tacky, dry brush a lighter cream color over the top to highlight the texture you created earlier. -
Color the hat:
Paint the hat in a matching cream or light beige. Paint the hat band in a rust or terracotta color to create contrast. -
Create the scarf pattern:
Base coat the scarf in a light oatmeal or beige shade. Once dry, mix a burnt orange paint. Using your finest liner brush, dab small, irregular clusters of dots to create tiny floral motifs scattered across the scarf. -
Detail the shell:
Using a diluted olive green, outline the segments of the turtle’s shell. Inside the segments, paint faint geometric patterns or simple flower shapes in rust and soft pink to match the scarf’s aesthetic. -
Paint the leather straps:
Fill in the backpack straps with a rich brown. Add tiny silver or gold dots for the buckles for a realistic metallic touch. -
Add facial features:
Use a dotting tool or the end of a brush to place two solid black eyes. Add a tiny white reflection dot in the upper corner of each eye to bring the character to life. -
Final Wash:
I like to apply a very watered-down brown wash into the deep crevices of the scarf and under the backpack to add depth and shadow. Wipe away excess immediately with a damp paper towel. -
Seal the work:
Finish the piece with a coat of matte varnish to protect the paint and give the ceramic a uniform, non-glossy finish that mimics natural stone.
Clay Adhesion Trick
Score the ceramic surface with cross-hatch scratches before adding clay. Use a dab of PVA glue or slip as a binding agent to ensure parts don’t pop off later.
Weathered Wonder
After sealing, dust real sand sparingly over the turtle’s feet or the bottom of the shell while the varnish is wet for an authentic beach-comber vibe.
Place your little traveler on a shelf to inspire your next great adventure
Watercolor-Style Blended Shell Panels
Transform a plain bisque turtle into a charming garden accent with soft, watercolor-inspired glazes. This project focuses on delicate floral motifs isolated within shell segments, creating a patchwork quilt effect on your ceramic friend.
Step-by-Step Guide
Materials
- Bisque ceramic turtle figurine
- Underglaze (or ceramic-safe acrylics if not firing) in: Pale Blue, Sage Green, Rose Pink, Mustard Yellow, Charcoal Black, White
- Clear dipping glaze (if firing) or glossy spray sealant (if using acrylics)
- Small round detail brush (size 0 or 1)
- Medium round brush (size 4)
- Water container and palette
- Pencil for sketching
- Damp sponge
Step 1: Preparation and Base Coat
-
Clean surface:
Begin by wiping down your bisque turtle with a slightly damp sponge to remove any kiln dust or oils from your hands, ensuring a clean painting surface. -
Light wash:
Instead of a solid white coat, create a very watery wash of white underglaze. Apply this all over the turtle’s body and shell to soften the raw bisque texture while keeping the look airy. -
Sketch contours:
Using a pencil, lightly re-trace the existing grooves of the shell segments. This will guide your brush later and help you plan where each flower cluster will sit.
Step 2: Painting the Floral Panels
-
Plan placement:
Decide which panels will feature flowers and which might remain simpler. In the reference, the central top panels are less crowded, while the side panels feature prominent blooms. -
Paint main blooms:
Using the size 4 brush and Rose Pink watered down to a watercolor consistency, paint loose, circular shapes for the roses. Don’t worry about perfect petals; organic blobs work best here. -
Add secondary flowers:
Switch to Mustard Yellow or a lighter pink for smaller filler flowers or buds in adjacent panels. -
Create stems and leaves:
With Sage Green, paint thin, vine-like lines extending from your flowers. Use a ‘push and lift’ motion with the brush to create leaf shapes that are wider at the base and taper to a point. -
Layering details:
Once the base flower shapes are touch-dry, use a slightly more concentrated mix of the same color to add definition lines—swirls inside the roses or centers for the daisies. -
Soft blue accents:
In the upper or empty panels, add very faint, watery washes of Pale Blue to suggest sky or water reflections without overwhelming the white negative space.
Uneven Lines?
If your black outline feels too shaky or thick, wait for it to dry, then gently scratch the excess away with a toothpick to sharpen the edge.
Step 3: Defining Lines and Body
-
Speckling the skin:
Dilute your Charcoal Black heavily. Dip a stiff brush (or toothbrush) into it and flick tiny speckles onto the turtle’s head and flippers for a natural, stone-like texture. -
Painting the eyes:
Use the size 0 detail brush and solid Charcoal Black to carefully paint the eye, leaving a tiny white dot unpainted for the reflection ‘sparkle’. -
Lining the shell:
This step requires a steady hand. Using the detail brush and a thin consistency of black or dark grey, trace the deep grooves separates the shell panels to enhance the ’tiled’ look. -
Refining the mouth:
With the very tip of your detail brush, paint a thin, simple line for the mouth to give the turtle a gentle expression.
Gold Leaf Accents
For a luxe finish, skip the black outlines. After the final glaze firing, use liquid gold leaf to fill the shell grooves for a Kintsugi effect.
Step 4: Finishing Touches
-
Dry check:
Allow the underglazes to dry completely. The colors will look chalky and dull at this stage, but don’t panic—the clear glaze brings them to life. -
Clear coat:
Apply your clear dipping glaze according to manufacturer instructions. If you used acrylics, spray the piece with a high-gloss sealant in a well-ventilated area. -
Final drying/firing:
Fire the piece in the kiln or let the spray sealant cure fully for 24 hours before handling.
Place your finished glossy turtle near a window where the light can catch those soft watercolor hues
Negative Space Modern Turtle Design
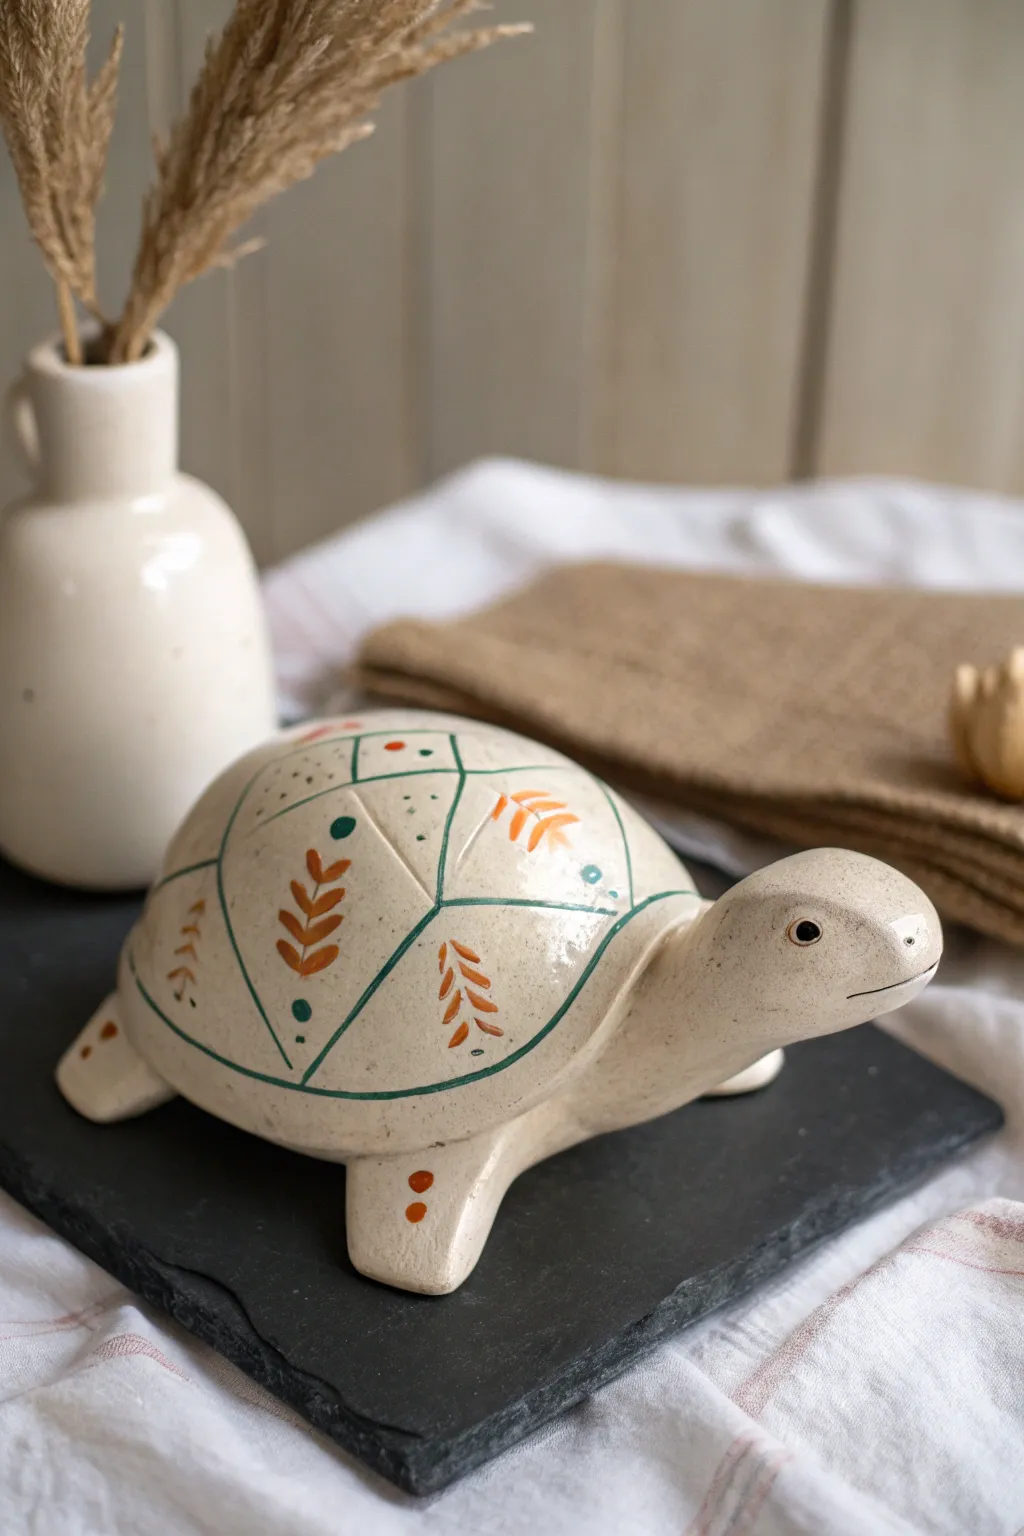
This elegant project transforms a plain ceramic bisque turtle into a modern piece of decor using negative space and simple botanical motifs. The creamy glaze base provides a soft background for the crisp teal geometric lines and warm terracotta leaf accents.
Step-by-Step Tutorial
Materials
- Bisque ceramic turtle figurine
- Creamy off-white gloss glaze (e.g., Mayco Almond or similar)
- Dark teal underglaze or acrylic paint (for lines)
- Terracotta or rust-orange underglaze/paint
- Soft fan brush (for base coat)
- Fine liner brush (size 00 or 000)
- Small round brush (size 1)
- Pencil
- Clear dipping glaze (if using underglazes)
Step 1: Base Preparation
-
Clean the bisque:
Start by wiping down your ceramic turtle with a slightly damp sponge to remove any dust from the shelf. This ensures your glaze adheres perfectly without bubbling. -
Apply base color:
Using a soft fan brush, apply three even coats of your creamy off-white gloss glaze to the entire turtle. Let each coat dry until it’s no longer shiny before adding the next. -
Check for smoothness:
Ensure the glaze is smooth, particularly on the shell where you will be doing detailed line work. If there are drips, gently sand them down once the glaze is bone dry.
Shaky Hands?
If you struggle with long, straight lines on the curved shell, try using specialized glaze drafting tape to mask off the geometric shapes before painting.
Step 2: Geometric Framework
-
Plan the geometry:
Lightly sketch a large geometric pattern onto the shell using a pencil. Focus on creating large, angular facets—think of a soccer ball or a gem cut. The graphite will burn off in the kiln, so don’t worry about mistakes. -
Mix the teal:
Prepare your dark teal color. If you are using acrylics, you might want to slightly thin the paint with water or a flow medium to help it glide for long lines. -
Line the shell:
With your fine liner brush, carefully trace over your pencil lines with the teal paint. Keep the pressure consistent to maintain a thin, uniform width. -
Paint the rim:
Add a definition line around the bottom edge of the shell where it meets the turtle’s body. This grounds the design and separates the shell from the limbs.
Step 3: Botanical Details
-
Paint the leaves:
Switch to your terracotta orange color and a small round brush. In the center of selected geometric ‘panels’, paint simple fern-like leaves. Use a ‘press and lift’ motion to create the tear-drop shape of each leaf segment. -
Vary the direction:
Don’t align all leaves the same way; have some pointing up and some angled sideways to keep the design dynamic and organic. -
Add accent dots:
Using the back of a paintbrush handle dipped in teal paint, add a single substantial dot near the tip of each fern or in empty corners of the geometric shapes. -
Create texture:
Dip an old toothbrush or stiff brush into diluted black or dark brown paint. Flick the bristles with your thumb to create a very subtle splatter of tiny specs across the shell for an earthy, speckled egg look. -
Detail the limbs:
Add a few simple orange dots to the turtle’s flippers or feet. Keep these minimal—just three or four dots per limb—to balance the busy shell.
Gold Leaf Finish
For an upscale look, apply gold leaf to the orange botanical leaves after firing (if ceramic) or after the sealant dries (if acrylic).
Step 4: Face and Finishing
-
Paint the eyes:
Using the finest brush or a dotting tool, paint the eyes solid black. I like to add a tiny white reflection dot once the black is dry to give the turtle a spark of life. -
Define the mouth:
Paint a very thin, simple line for the mouth using a dark grey or black, giving the turtle a gentle smile. -
Dry thoroughly:
Allow all your creative work to dry completely. If you used underglazes, the piece is now ready for a clear glaze dip (if your base wasn’t already glossy) and firing. -
Final inspection:
Check for any smudges on the underbelly or feet before finalizing. A clean finish makes the piece look professional.
Place your finished turtle on a slate coaster or linen cloth to highlight its sophisticated, earthy charm