When you’re planning a ceramics final project, you want something that shows off your skills and still feels like you. Here are my favorite ceramics final project ideas—starting with the classics teachers love to see, then moving into the more creative, portfolio-worthy stuff.
Wheel-Thrown Mug Set With Signature Handles
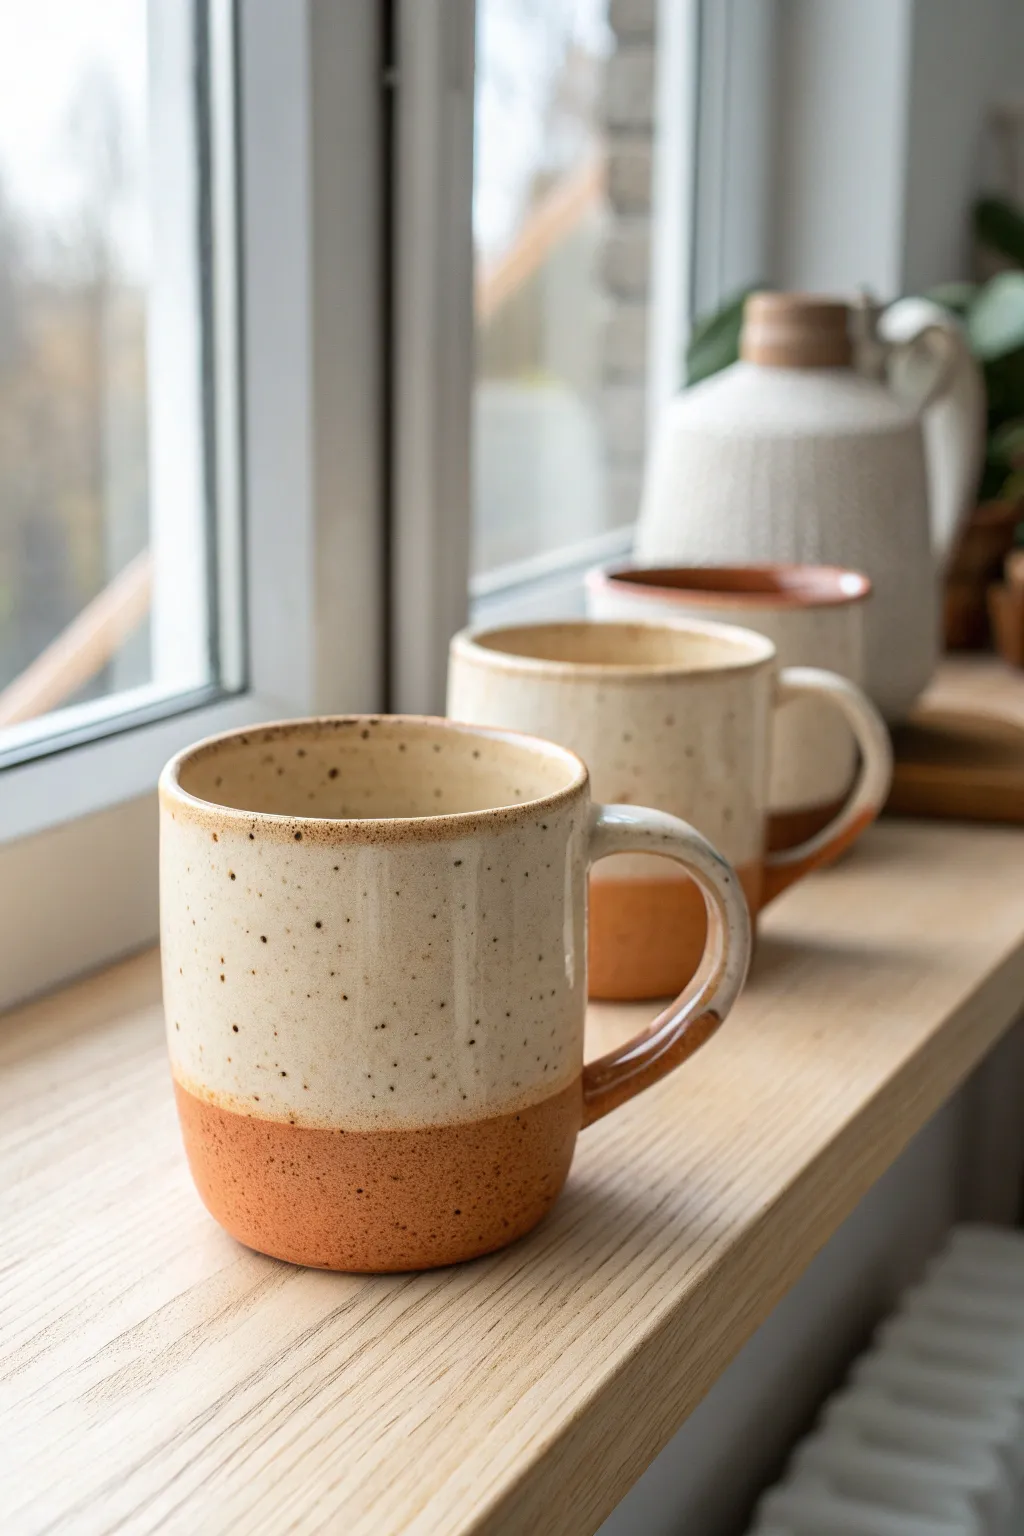
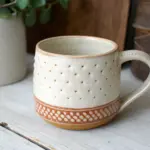
These cozy, rustic mugs embrace the natural beauty of clay with their exposed, earthy bases and speckled cream uppers. The distinct two-tone design highlights the texture of the raw material while providing a smooth, functional drinking surface.
Step-by-Step
Materials
- Speckled stoneware clay (buff or reddish-brown)
- Pottery wheel
- Throwing tools (sponge, rib, needle tool, wire cutter)
- Bucket of water
- Trimming tools
- Serrated rib or scoring tool
- Slip (clay mixed with water)
- Creamy white dipping glaze (matte or satin finish)
- Wax resist
- Kiln for bisque and glaze firing
Step 1: Throwing the Form
-
Center the Clay:
Begin with about 1 pound (450g) of speckled stoneware clay. Wedge it thoroughly to remove air bubbles, then slam it onto the center of your wheel head. Use steady pressure and plenty of water to center the mound perfectly. -
Open and Pull:
Open the center of the clay, leaving about 1/4 inch thickness for the base. Pull the walls up into a cylinder. Aim for straight, vertical walls with a slightly wider rim than base for that classic mug silhouette. -
Shape the Belly:
Using a rib tool on the inside and a sponge on the outside, gently belly out the form slightly if you prefer a rounded look, or keep it straight-sided like the example. Smooth the rim with a chamois or sponge. -
Refine the Surface:
While the wheel is spinning slowly, run a metal rib up the outside to remove throwing lines and slurry, creating a clean canvas for the speckles to shine later on. -
Cut and Dry:
Wire the mug off the wheel head. Carefully lift it onto a ware board and let it dry until it reaches a leather-hard state—firm enough to handle but not dry.
Slumping Handle?
If your handle droops after attaching, prop it up with a small wad of paper towel or sponge underneath the curve while it dries to leather hard. Remove once stiff.
Step 2: Trimming and Handles
-
Trim the Foot:
Place the leather-hard mug upside down on the wheel. Secure it with clay lugs. Trim the bottom to create a defined foot ring, removing excess weight from the base. -
Smooth the Transition:
Since the bottom portion will remain unglazed, pay extra attention to smoothing the exterior wall during trimming. Use a damp sponge to erase any tool marks. -
Pull a Strap:
Take a separate lump of clay and pull a long, uniform strap for the handle. Use plenty of water to keep it smooth. The handle should be about 3/4 inch wide. -
Attach the Handle:
Cut the strap to the desired length. Score the mug body and the handle ends. Apply slip and press the handle firmly onto the mug. I like to shape it into a roomy ‘ear’ shape that fits three fingers comfortably. -
Clean the Joint:
Wipe away excess slip around the attachment points with a damp brush or sponge. Ensure the transition looks seamless. -
Bisque Fire:
Allow the mug to dry completely to bone dry. Fire it in the kiln to bisque temperature (usually Cone 06 or 04) to prepare it for glazing.
Step 3: Glazing and Finishing
-
Prepare for Glazing:
Wipe the bisque-fired mug with a damp sponge to remove dust. This helps the glaze adhere properly but don’t saturate the clay. -
Wax the Base:
This is the crucial step for the two-tone look. Apply wax resist to the bottom third of the mug’s exterior. The line should be crisp and level. Everything below this line will remain raw clay. -
Protect the Foot:
Ensure the wax also covers the bottom foot ring completely so it doesn’t stick to the kiln shelf. -
Dip Glaze:
Hold the mug by the foot (or use dipping tongs) and submerge it swiftly into the creamy white glaze. Let the glaze come right down to the wax line, but try not to overlap it too heavily. -
Clean Up:
Once the glaze dries to the touch, use a damp sponge to wipe any stray droplets off the waxed area. The bottom section must be totally clean. -
Check the Interior:
Make sure the inside is fully coated. If you dipped the outside but not the inside, pour glaze inside, swirl to coat, and pour out excess before coating the exterior. -
Final Fire:
Load the kiln and fire to the glaze maturity temperature for your clay and glaze combination (likely Cone 6 or Cone 10 for stoneware). -
Cool and Sand:
After the kiln cools, unload your mugs. Use high-grit sandpaper to lightly smooth the unglazed bottom portion if it feels too rough against the skin.
Level Up: Iron Wash
For deeper contrast on the raw clay bottom, brush on a very thin red iron oxide wash before bisque firing. This enriches the rusty color of the exposed clay base.
Enjoy your morning coffee knowing you crafted the vessel yourself


Nesting Bowl Set That Actually Matches
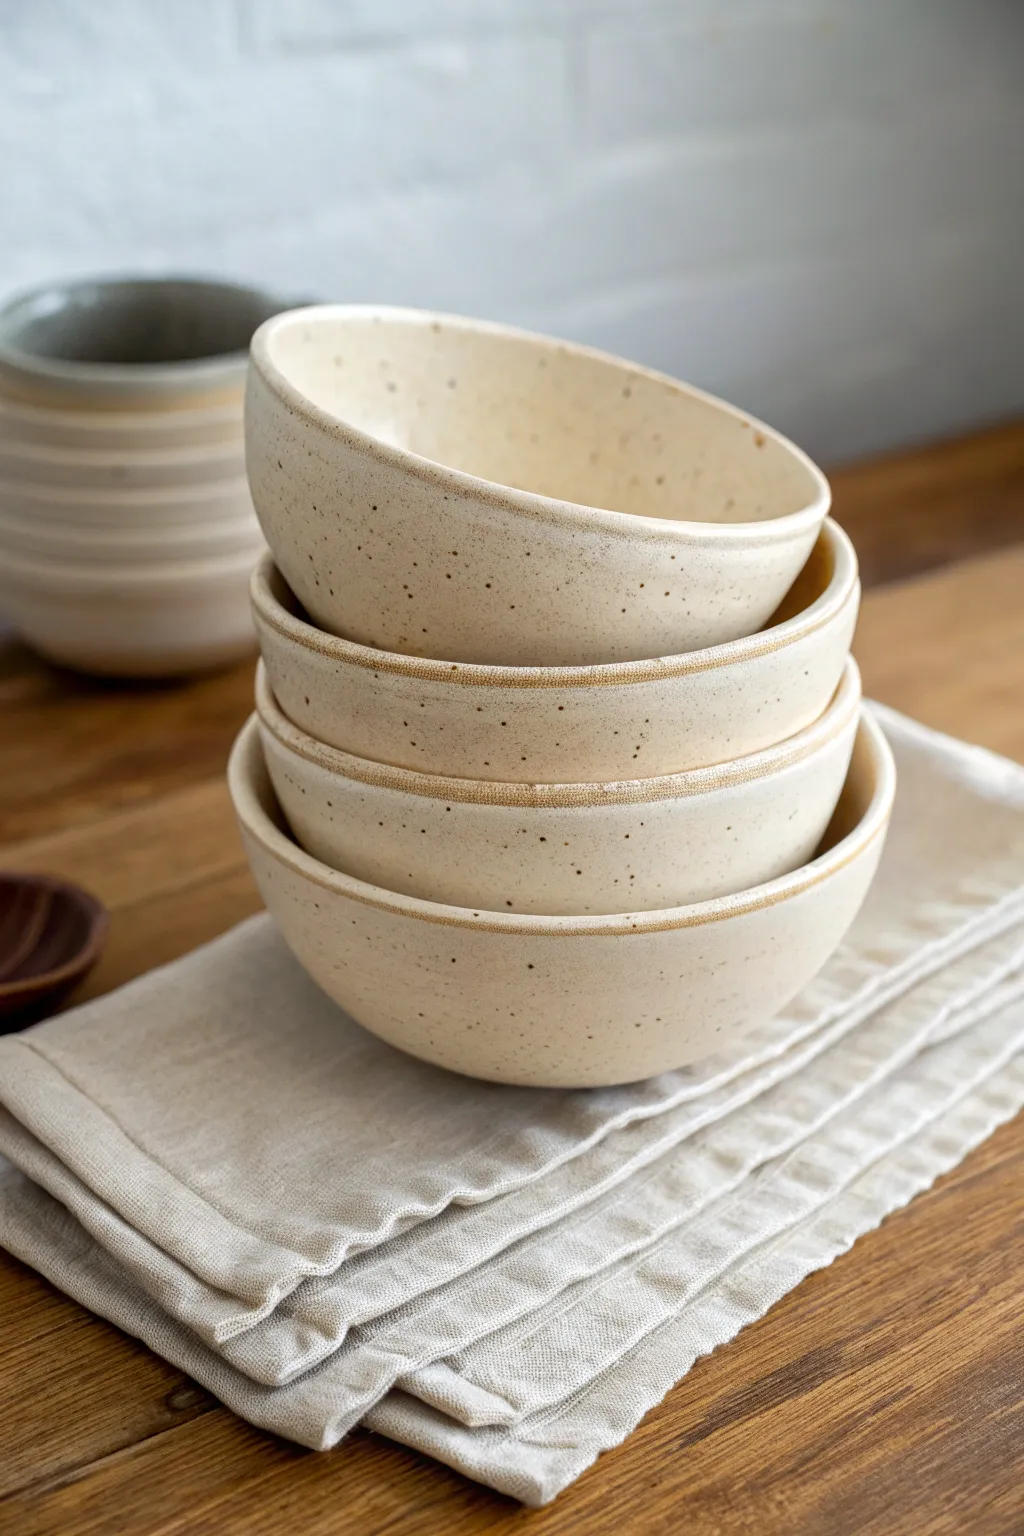
These four stoneware bowls create a harmonious family that stacks neatly while celebrating subtle organic imperfections. With their creamy oatmeal glaze and delicate speckling, this project teaches consistency in throwing and glazing to achieve a cohesive, professional-looking set.
How-To Guide
Materials
- Speckled buff stoneware clay (approx. 5-6 lbs)
- Pottery wheel
- Throwing sponge
- Needle tool
- Wire tool
- Rib tools (wood and metal)
- Trimming tools
- Calipers or a ruler
- Cream or oatmeal semi-matte glaze
- Wax resist
- Small glaze brush
Step 1: Planning & Wedging
-
Calculate clay weights:
To get a true nesting effect, you need graduated weights. Weigh out four balls of clay: 2 lbs, 1.5 lbs, 1 lb, and 0.5 lbs. These specific weights will naturally help create size differences before you even start shaping. -
Wedge thoroughly:
Wedge each ball until the clay is completely homogenous and free of air bubbles. Speckled clay bodies can sometimes be a bit stiffer, so ensure it’s pliable enough for centering. -
Establish dimensions:
Before throwing, sketch out target widths for each bowl using a caliper or ruler. A good rule of thumb is to decrease the diameter by about 1 to 1.5 inches for each smaller bowl in the set.
Step 2: Throwing the Set
-
Center the largest ball:
Start with your 2 lb ball. Center it firmly on the wheel head, keeping your base wide enough to support a broad bowl shape. -
Open and pull:
Open the clay to a curved, continuous interior—avoid a flat bottom with a sharp corner. Pull the walls up and out, aiming for a 45-degree angle. -
Shape the profile:
Use a kidney rib on the inside to compress the clay and define that smooth, continuous curve. The rim should remain slightly thick to prevent warping. -
Measure and cut:
Check your diameter with calipers against your plan. Once satisfied, undercut the base with a wooden tool and wire it off the bat. -
Repeat for smaller sizes:
Throw the remaining three bowls. As you work smaller, focus heavily on mimicking the exact curve of the first bowl. Continuity in the wall profile is what makes them “match” visually.
Uneven Stacking?
If bowls wobble when nested, your interior curves don’t match your exterior curves. Use a template rib when throwing to ensure every bowl follows the exact same profile arc.
Step 3: Trimming & Refining
-
Dry to leather hard:
Let the bowls dry slowly under loose plastic until they are leather hard. The rims should be firm enough to support the bowl’s weight when flipped. -
Shape the foot rings:
Center a bowl upside down on the wheel. Trim the exterior to mirror the interior curve, removing excess weight. Carve a distinct foot ring on each that allows the bowls to sit slightly elevated. -
Refine the rims:
Before flipping them back over, I like to gently smooth the rim with a damp sponge or piece of chamois leather to ensure it feels soft against the lips. -
Bisque fire:
Once bone dry, stack them carefully in the kiln (if space is tight) or place separately for a bisque firing to cone 04.
Raw Clay Contrast
Leave the bottom third of the exterior unglazed. The contrast between the smooth cream glaze and the rough, toasted speckled clay adds incredible tactile texture.
Step 4: Glazing
-
Clean and wax:
Wipe the bisque ware with a damp sponge to remove dust. Apply wax resist to the foot rings and the very bottom of the exterior to prevent sticking. -
Pour the interior:
Pour your cream glaze into the smallest bowl, swirl to coat, and pour it out. Repeat for the larger bowls. This ensures an even interior coat. -
Dip the exterior:
Holding the bowl by the foot, dip the exterior into the glaze bucket. Hold it submerged for 3 seconds, then pull straight up and shake off the last drip. -
Create the rim detail:
For that slightly darker rim seen in the photo, gently wipe the very edge of the rim with a damp sponge to thin the glaze, allowing the speckled clay body to show through. -
Final fire:
Load the kiln, ensuring bowls aren’t touching. Fire to the maturity temperature of your clay and glaze (likely cone 5 or 6 for stoneware).
Now you have a functional, beautiful set ready for everything from serving massive salads to holding your morning oatmeal.


Slab-Built Serving Platter With Texture
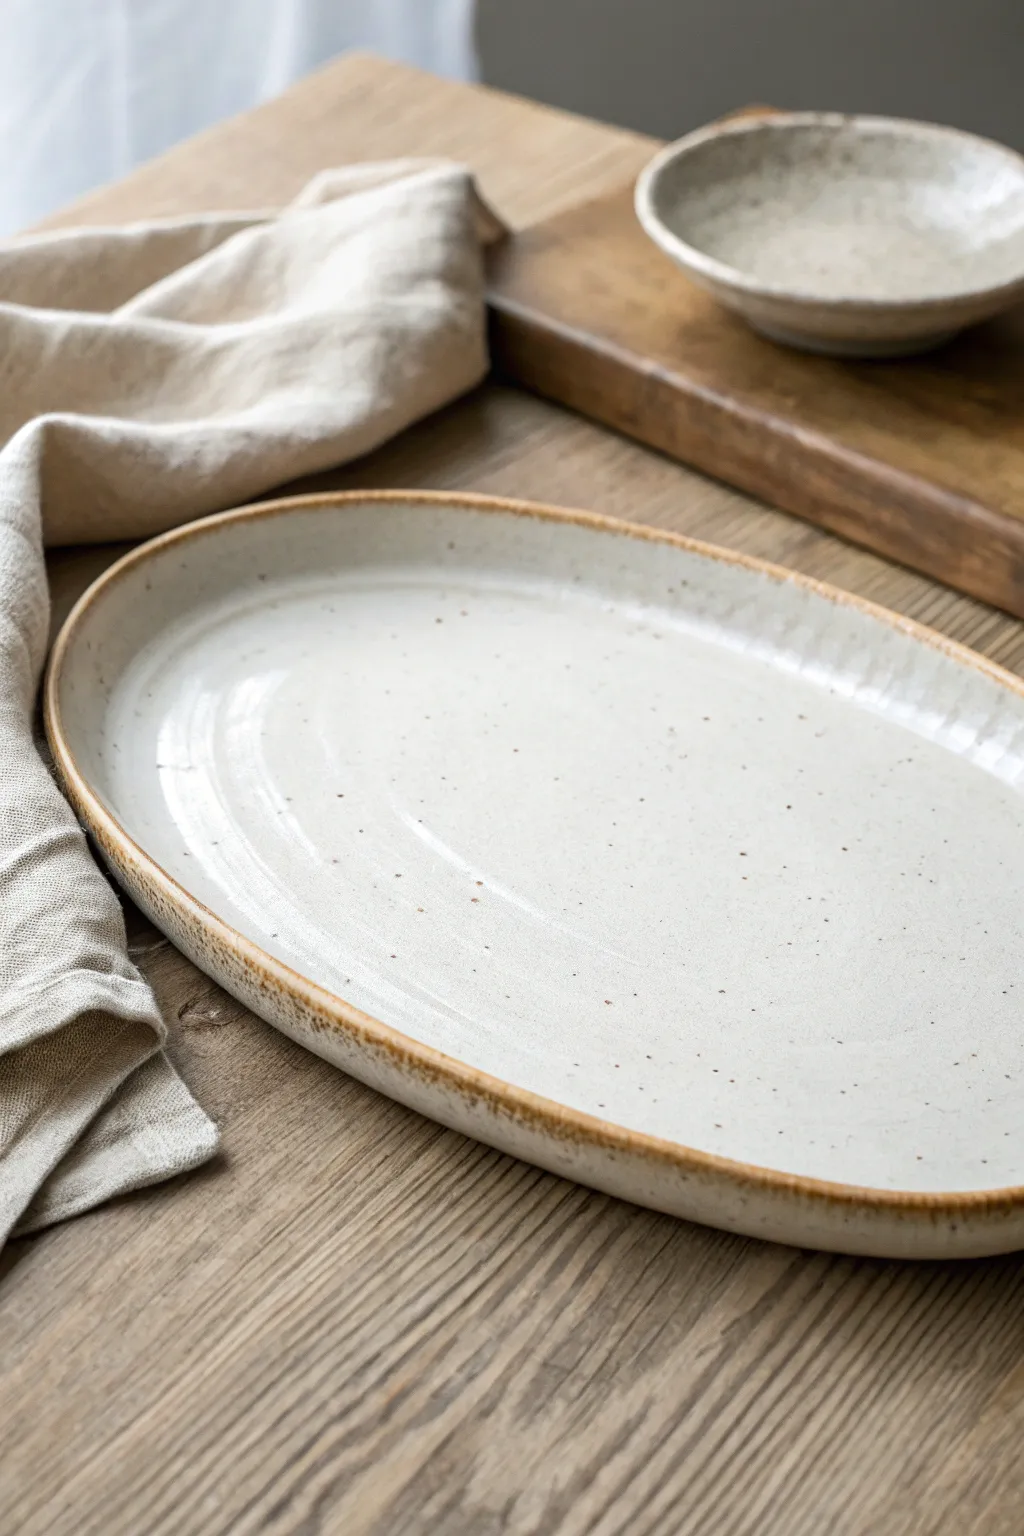
Embrace the beauty of simplicity with this rustic, slab-built serving platter. Featuring an organic oval shape and a warm, speckled cream glaze that breaks beautifully at the rim, this piece is perfect for serving family-style meals.
Detailed Instructions
Materials
- Speckled buff stoneware clay
- Rolling pin or slab roller
- Canvas working mat
- Oval paper template (approx. 14 x 10 inches)
- Needle tool
- Ribs (soft rubber and serrated)
- Sponge
- Slump mold or soft foam to support shape
- White or cream stoneware glaze (semi-opaque)
- Paintbrush or large dipping tongs
Step 1: Creating the Slab Base
-
Wedge the clay:
Begin with about 3-4 pounds of speckled buff stoneware clay. Wedge it thoroughly to remove any air bubbles and ensure particle alignment, which is crucial for preventing cracks in flat pieces. -
Roll the slab:
Roll your clay out onto canvas. Rotate the clay and flip it occasionally as you roll to ensure even compression on both sides. Aim for a consistent thickness of about 3/8 inch. -
Compress the surface:
Using a soft rubber rib, compress the clay surface on both sides. Run the rib firmly across the slab in multiple directions to smooth the texture and strengthen the platelets. -
Cut the shape:
Place your paper oval template onto the slab. Using your needle tool, trace around the template, holding the tool perpendicular to the table for a clean, straight edge. -
Refine the rim:
Once the oval is cut, use a damp sponge or your finger to soften the sharp corner of the cut edge. This prevents chipping later and gives the piece a professional finish.
Anti-Warping Trick
Make a “cookie” of clay that shrinks with your pot. Place the platter on this sacrificial slab in the kiln to reduce drag and warping during firing.
Step 2: Forming the Platter
-
Lift the edges:
Carefully transfer your slab onto a piece of foam or a shallow slump mold. Gently lift the edges of the oval to create a shallow curve, giving the platter its concave shape. -
Establish the curve:
If working on foam, I like to use small pieces of scrap clay or soft foam blocks tucked under the rim to prop it up while it dries. Ensure the curve is gradual and natural. -
Refine the interior:
Use your rib again on the interior surface to smooth out any handling marks. If you want subtle texture like the example, you can lightly drag a serrated rib in concentric oval motions before doing a final light smoothing. -
Checking the profile:
Crouch down to eye level with the table to check the rim’s silhouette. Adjust any high or low spots so the undulation feels intentional and organic rather than accidental. -
Slow drying:
Cover the piece loosely with plastic. Flat platters are prone to warping, so allow this to dry very slowly over several days, checking periodically to ensure the rim isn’t drying too much faster than the center.
Step 3: Glazing and Finishing
-
Bisque fire:
Once bone dry, fire the piece to bisque temperature (usually cone 04). Clean off any dust with a damp sponge before glazing. -
Prepare the glaze:
Mix your white or cream stoneware glaze well. A glaze that breaks over edges—meaning it gets thinner and darker on sharp points—is key for replicating the brown rim look. -
Apply the glaze:
Dip the platter or brush on 2-3 even coats. If brushing, alternate the direction of your brushstrokes with each coat to avoid streaks. -
Highlight the rim:
To ensure that beautiful brown edge, take a damp sponge and very lightly wipe just the sharpest point of the rim. This thins the glaze slightly, allowing the speckled clay body to burn through during firing. -
Bottom cleaning:
Wipe the foot or bottom surface entirely clean of glaze. Leave a few millimeters of bare clay up the side near the bottom to prevent the glaze from running onto the kiln shelf. -
Final firing:
Fire the piece to cone 5 or 6 (depending on your clay and glaze specifications). The heat will melt the glaze and bring out the iron speckles in the clay body.
Add Subtle Texture
Before lifting the edges, gently press a coarse fabric or lace doily into the damp slab for a ghost-like texture that glaze will pool into.
This versatile platter will become a staple on your table, perfect for everything from roasted vegetables to fresh fruit spreads


Lidded Jar With a Clean Fitted Lid
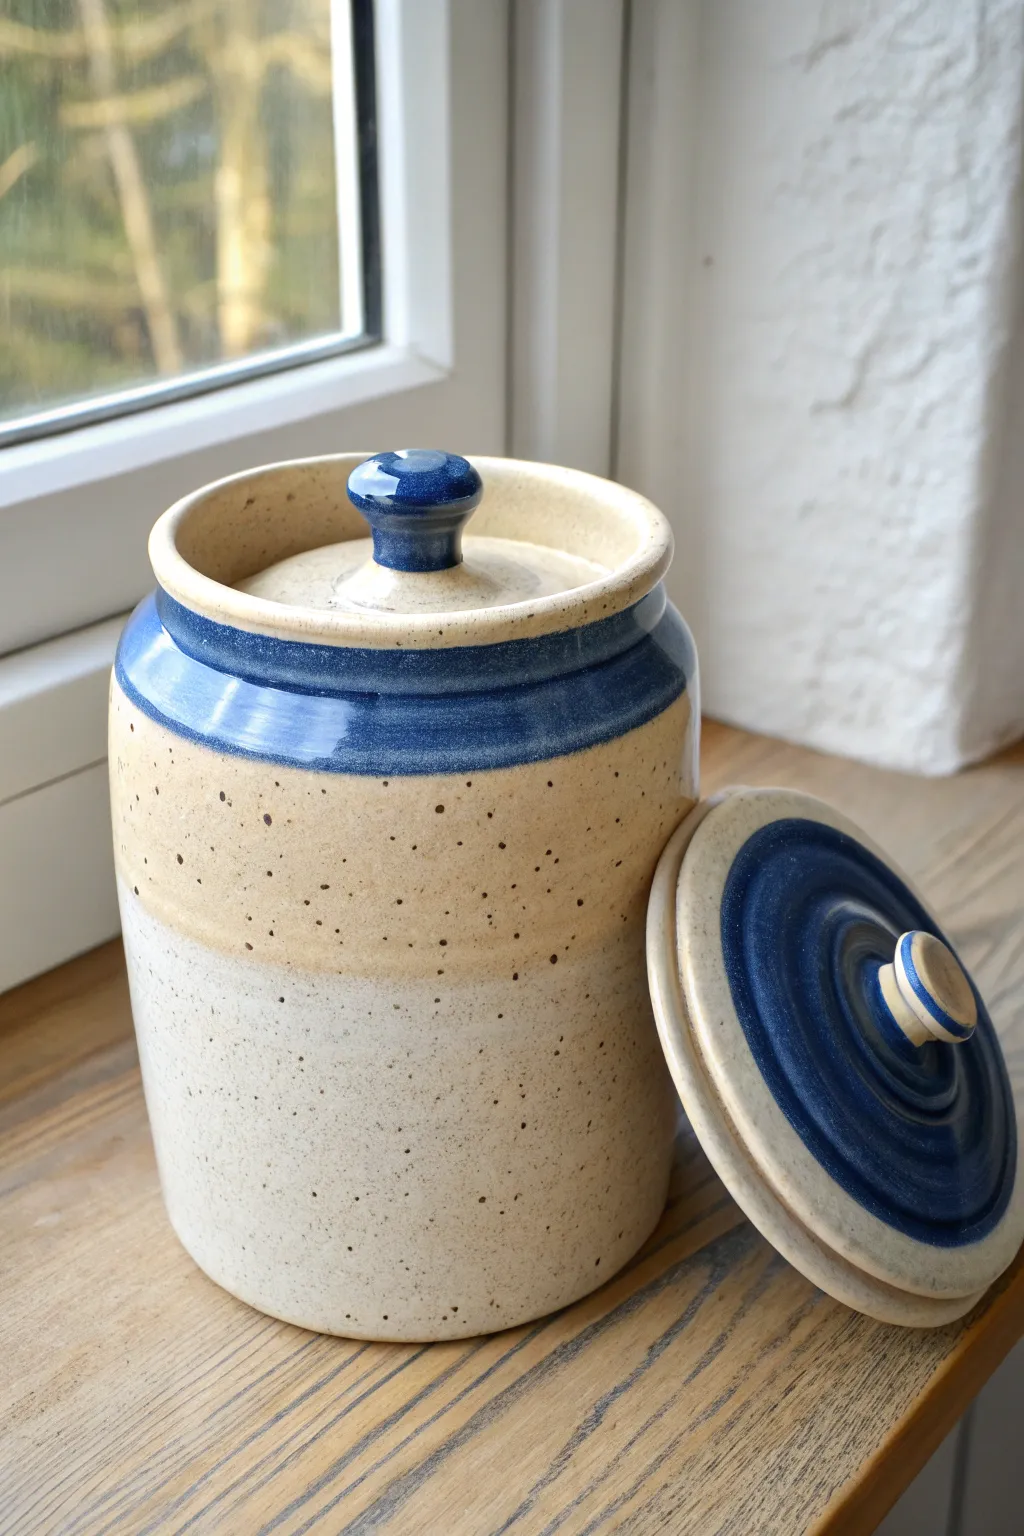
This project tackles the classic challenge of creating a perfectly fitted lid for a storage jar. The result is a robust, functional vessel featuring a beautiful tri-tone glaze interaction of speckled cream, warm sand, and deep cobalt blue.
How-To Guide
Materials
- Stoneware clay (speckled or flecked body recommended)
- Pottery wheel
- Throwing tools (sponge, rib, wire cutter)
- Calipers
- Trimming tools
- Needle tool
- Glossy Cobalt Blue glaze
- Oatmeal or Speckled Cream glaze
- Clear or Transparent glaze (optional)
Step 1: Throwing the Gallery Jar
-
Center and open:
Begin with about 2-3 lbs of clay. Center it firmly on the wheel and open the interior floor to a width of roughly 4-5 inches, compressing the bottom well to prevent S-cracks later. -
Pull the cylinder:
Throw the walls upward into a straight cylinder. Aim for vertical walls, keeping the thickness consistent from bottom to top, leaving a slightly thicker rim. -
Create the gallery split:
Using a wooden tool or your thumbnail, gently press down into the center of the rim to split it. Push the inner wall down slightly and outward to create a horizontal shelf (the gallery) inside the rim. -
Refine the gallery:
Clean up this internal ledge with a square-edged tool to ensure it is perfectly flat and creates a 90-degree angle with the wall. This is where your lid will rest. -
Measure immediately:
Before removing the jar from the wheel, use calipers to measure the exact interior diameter of the gallery shelf. Lock the calipers in place.
Stuck Lid Syndrome?
If the lid rattles, it’s too loose; if it binds, it’s too tight. A binding lid often cracks the pot during firing. Sand the lid edge while greenware for a little extra ‘wiggle room’ before glazing.
Step 2: Throwing the Fitted Lid
-
Throw off the hump:
It is often easier to throw lids ‘off the hump’ (using a large mass of clay and throwing just the top portion). Center a cone of clay and isolate a small amount at the peak. -
Flatten and shape:
Flatten this isolated clay into a disc. You want the diameter of this disc to match your caliper measurement exactly. -
Form the flange:
Define the outer edge of the lid so it has a slight taper; this will help it slide into the gallery seat without binding. -
Add the knob:
While the clay is still plastic, pinch and shape a small knob in the center. Give it a small mushroom cap shape for easy gripping, pulling from the center mass. -
Check the fit:
I prefer to double-check my measurements against the calipers one last time before cutting the lid free with a wire tool.
Gallery Depth
Make your gallery shelf slightly deeper than the thickness of the lid rim. This ensures the lid sits flush or slightly recessed, rather than hovering awkwardly above the jar rim.
Step 3: Trimming & Assembly
-
Drying to leather hard:
Let both the jar and lid dry slowly to leather hard stage. They need to shrink at the same rate to ensure the fit remains true. -
Trim the jar:
Invert the jar onto a chuck or the wheel head. Trim away excess weight from the bottom and clean up the foot ring. -
Trim the lid:
Place the lid upside down (knob down) in a chuck or a clay coil. Trim the underside to remove excess weight and create a pleasing curve that mirrors the knob. -
The test fit:
Gently place the leather-hard lid onto the jar. It should slot in comfortably. If it’s too tight, carefully sand or trim the lid edge slightly.
Step 4: Glazing Strategy
-
Wax resist application:
This is critical: Apply wax resist to the gallery shelf on the jar AND the outer contact rim of the lid. Any glaze here will fuse the lid to the pot during firing. -
Base dip:
Dip the entire jar (interior and exterior) into your Oatmeal/Speckled Cream glaze. Pour the same glaze over the lid, avoiding the waxed rim. -
Applying the blue band:
Once the base glaze is dry, brush or carefully dip the top 1-2 inches of the jar rim into the Cobalt Blue glaze. Allow some overlap with the cream glaze to create that warm, reactive sandy transition line. -
Glazing the lid:
Brush the Cobalt Blue glaze onto the center of the lid in a spiral pattern, covering the knob but leaving the outer edge creamy white. -
Clean up:
Wipe away any stray glaze droplets from the waxed gallery and foot ring with a damp sponge before loading into the kiln.
Once fired, you’ll have a beautifully fitted canister perfect for kitchen storage or keeping keepsakes safe

The Complete Guide to Pottery Troubleshooting
Uncover the most common ceramic mistakes—from cracking clay to failed glazes—and learn how to fix them fast.
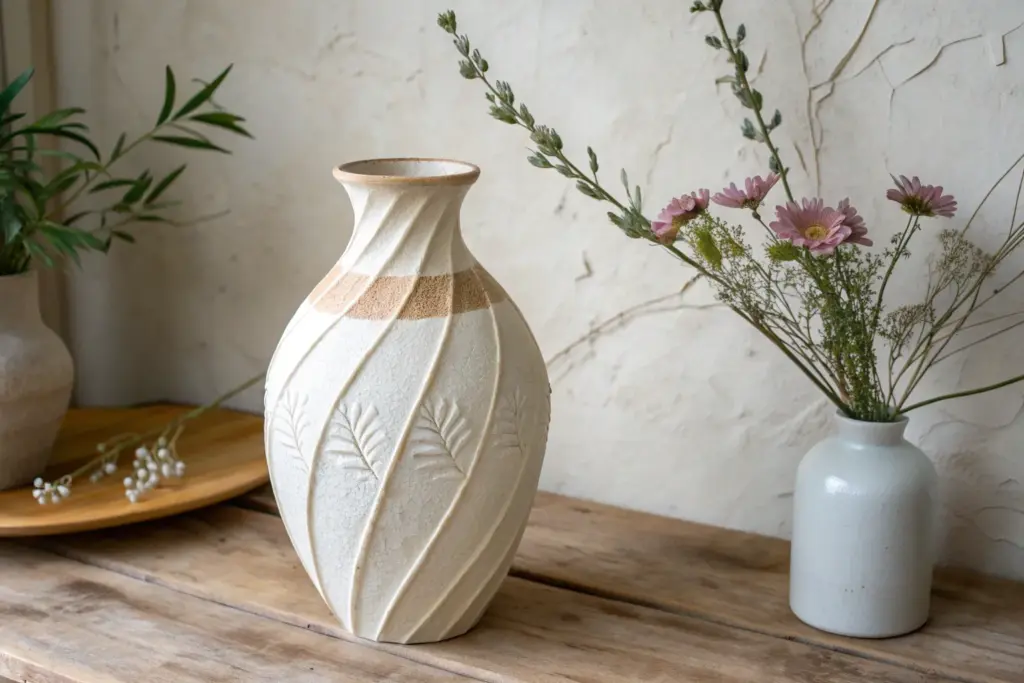
Carved Vase With Sgraffito Patterns
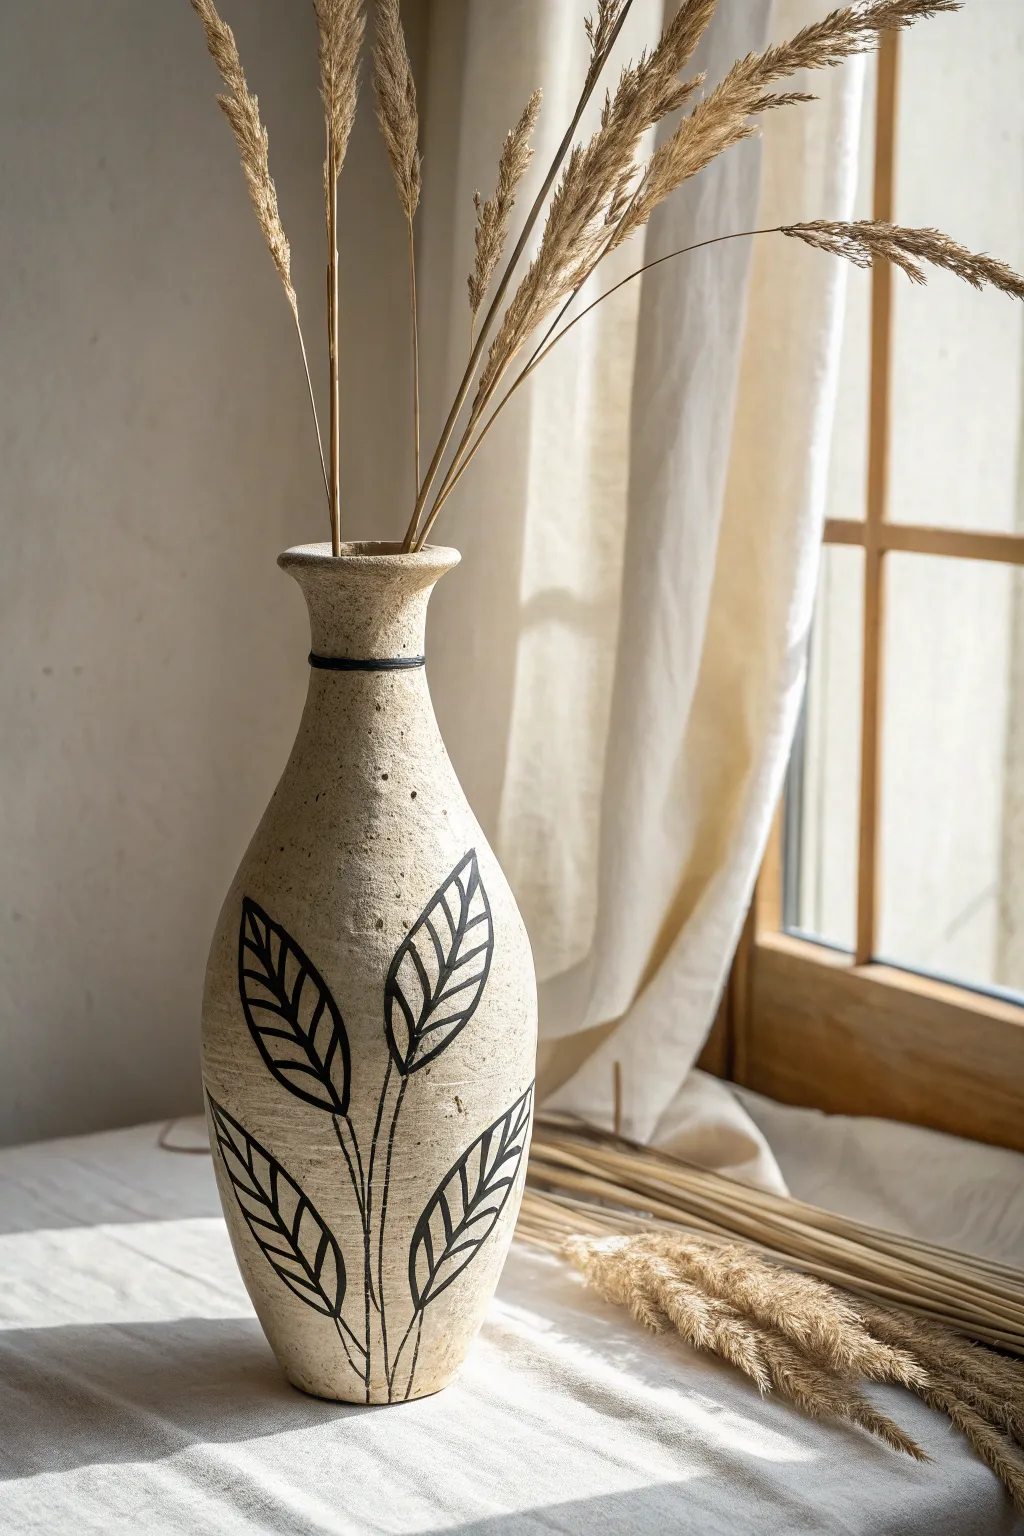
This project combines organic form with graphic contrast, featuring a tall, speckled beige vase adorned with bold black leaf motifs. The sgraffito technique allows you to carve through a layer of dark underglaze to reveal the clay body beneath, or conversely, paint focused designs and carve details into them for a clean, illustrative finish.
Step-by-Step Guide
Materials
- Stoneware clay (buff or speckled)
- Black underglaze
- Pottery wheel (or coil/slab building tools)
- Pattern carving tools (sgraffito loop tool or stylus)
- Synthetic brush for underglaze application
- Clear matte glaze
- Wire cutter
- Sponge
- Rib tool
- Kiln
Step 1: Shaping the Vessel
-
Center and throw:
Begin by centering roughly 3-4 pounds of stoneware clay on the wheel. Open the center and pull the walls up into a tall cylinder, aiming for a consistent thickness. This will be the foundational height for your vase. -
Shape the belly:
Using a rib tool on the outside and your fingers inside, gently belly out the bottom third of the cylinder to create a rounded, organic curve. This creates the visual weight at the base. -
Collar the neck:
Slowly collar in the upper two-thirds of the form to create a long, tapered neck. Keep your hands wet and move gradually to avoid buckling the clay walls. -
Refine the rim:
flare the very top rim slightly outward to give it a finished, classic look. I find that a small chamois cloth held over the rim while spinning smooths it perfectly. -
Dry to leather hard:
Allow the vase to dry slowly under plastic until it reaches a leather-hard state. The clay should be firm enough to handle without deforming but still hold moisture. -
Trim the foot:
Flip the vase onto a trimming chuck or secure it to the wheel head. Trim a clean foot ring at the bottom to define the base and reduce weight.
Smudged Lines?
If your carving tool drags underglaze into the clean clay areas, the underglaze is likely still too wet. Wait 10 more minutes for it to dry before carving again.
Step 2: Designing and Carving
-
Sketch the design:
Lightly sketch your leaf pattern directly onto the clay surface using a dull pencil. The graphite will burn off in the kiln. Plan for two large stems rising from the base, branching into bold, simple leaves. -
Apply the black band:
While the vase is still on the banding wheel (or pottery wheel), paint a thin, consistent looped line of black underglaze around the narrowest part of the neck. -
Paint the leaves:
Using a steady hand and a medium brush, paint the interior shapes of the leaves and stems with black underglaze. Apply 2-3 coats to ensure the black is solid and opaque. -
Define the edges:
Once the black underglaze has dried to the touch, use a sharp carving tool or sgraffito stylus to scratch through the edges of the black paint. This cleans up your lines and reveals the raw clay color for a crisp outline. -
Carve the veins:
Carve a central vein line down the middle of each black leaf shape, exposing the clay body underneath. This negative space creates the distinctive pattern shown in the image.
Step 3: Finishing and Firing
-
Bisque fire:
Let the vase dry completely to the bone-dry stage. Load it into the kiln for a bisque firing (usually cone 04 or 06) to harden the clay permanently. -
Apply clear glaze:
Wipe the bisque ware with a damp sponge to remove dust. Pour a clear matte glaze inside the vase, swirl to coat, and pour out. Dip or spray the exterior with the same clear matte glaze. -
Wipe the foot:
Ensure the foot ring is completely free of glaze using a wet sponge to prevent the pot from fusing to the kiln shelf. -
Glaze fire:
Fire the piece again to the maturation temperature of your specific clay and glaze (often cone 5 or 6). This final firing will vitrify the clay and seal the surface.
Sharp Tools Matter
Use a diamond-core carving tool or a very fine loop tool. The sharper the blade, the cleaner your carved lines will be, requiring less cleanup later.
Now you have a stunning, nature-inspired vessel ready to hold your favorite dried floral arrangements
Statement Planter With Matching Drip Tray
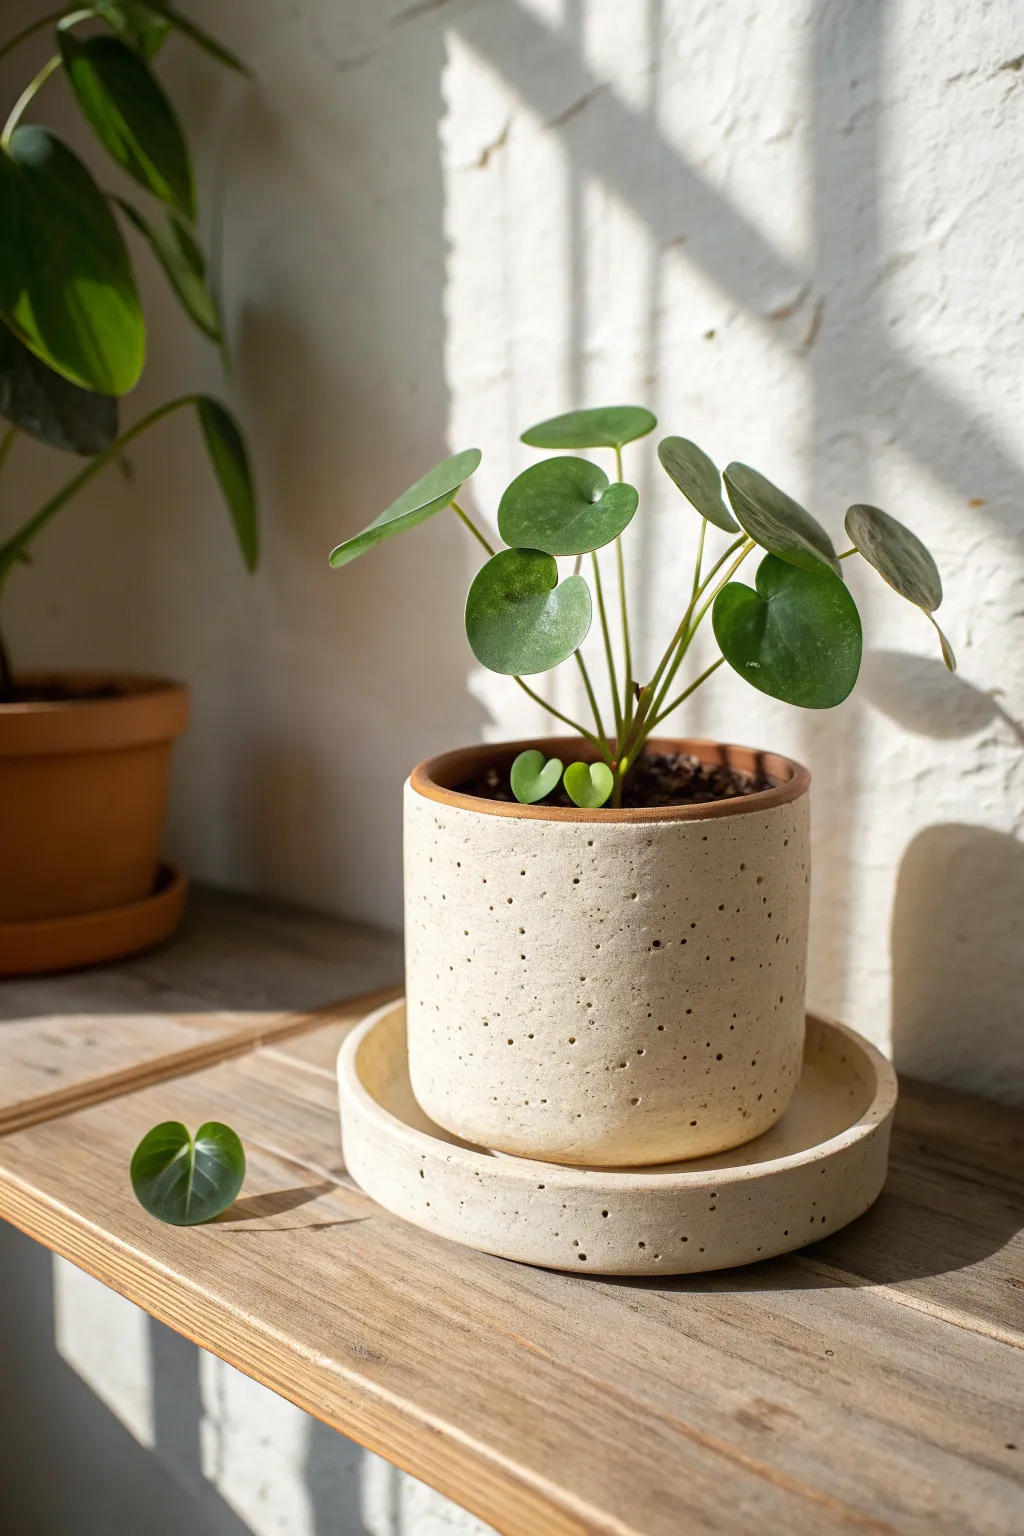
This project features a minimalist cylindrical planter paired with a generous, wide-rimmed drip tray that elevates the entire presentation. The textured clay body creates a beautiful, natural speckled finish that looks stunning against simple white glazes or left bare on the exterior.
Step-by-Step Tutorial
Materials
- Speckled buff stoneware clay (e.g., Laguna Speckled Buff)
- Pottery wheel (or slab roller for hand-building)
- Throwing bats
- Pin tool
- Ribs (metal and wood)
- Wire cutter
- Trimming tools
- Sponge
- Clear matte glaze on the interior (optional for exterior)
- Kiln
Step 1: Throwing the Cylinder
-
Center the Clay:
Begin with about 2-3 pounds of wedged speckled clay. Secure it to the wheel head and center it firmly using centered hand pressure and water for lubrication. -
Open and Compress:
Open the clay to create the floor. I always make sure to compress the bottom thoroughly with a rib or sponge to prevent S-cracks later. Aim for a floor about 1/2 inch thick. -
Pull the Walls:
Pull the clay upward to form a straight-sided cylinder. Focus on keeping the walls perpendicular to the wheel head rather than flaring out. You want a modern, clean shape. -
Refine the Profile:
Use a metal rib on the exterior while supporting the interior with your hand to scrape away slip and smooth the surface. This reveals the grog and speckles in the clay body. -
Finish the Rim:
Compress the rim with a piece of chamois or a sponge to make it smooth and durable. Use a wire tool to cut the pot from the bat.
Iron Spot Pop
To enhance the speckles if your clay body is subtle, wipe the bisque ware with a damp sponge before glazing. This exposes iron pyrite particles.
Step 2: Creating the Drip Tray
-
Throw a Low Cylinder:
Using about 1.5 pounds of clay, center a low, wide puck shape. Open it wider than your pot’s diameter—you want visible space around the planter base. -
Form the Base:
Pull a very short wall, about 1 inch high. This isn’t a plate; it’s a shallow containment vessel. -
Shape the Rim:
Use your rib to square off the sides of the tray so they match the verticality of the planter. The wall should be thick and substantial enough to visually anchor the pot.
Go Geometric
Instead of round, hand-build this set as a hexagon or square using slab construction for a sharper, architectural look.
Step 3: Trimming and Finishing
-
Drying to Leather Hard:
Allow both pieces to dry slowly to a leather-hard state. Cover them loosely with plastic if necessary to ensure even drying. -
Trim the Pot:
Center the pot upside down on the wheel. Trim away excess weight from the bottom, creating a distinct foot ring if desired, or a flat bottom for a modern look. -
Add Drainage:
Use a hole cutter or drill tool to create a center drainage hole in the bottom of the planter. This is crucial for plant health. -
Trim the Tray:
Flip the tray and trim a tidy foot ring. Ensure the inside surface (where the pot sits) is perfectly flat so the planter won’t wobble. -
Bisque Fire:
Once bone dry, load the pieces into the kiln for a bisque firing (usually Cone 04).
Step 4: Glazing and Final Fire
-
Wax Resist:
Wax the bottom of the pot and the bottom of the tray. I also like to wax the outer rim of the planter to leave a raw clay accent if glazing the rest. -
Glaze Application:
Pour a clear matte or satin white glaze inside the planter to waterproof it. For the exterior, you can leave it raw to show off the speckles (as seen in the photo) or apply a very thin wash. -
Glaze the Tray:
Glaze the interior of the tray to ensure it holds water without seeping. The exterior can match the pot’s finish. -
Final Firing:
Fire to the maturity temperature of your clay (typically Cone 5 or 6 for stoneware). Let the kiln cool completely before unloading.
Establish your favorite houseplant in its new home and enjoy the natural textures


What Really Happens Inside the Kiln
Learn how time and temperature work together inside the kiln to transform clay into durable ceramic.
Tile Series Telling One Visual Story
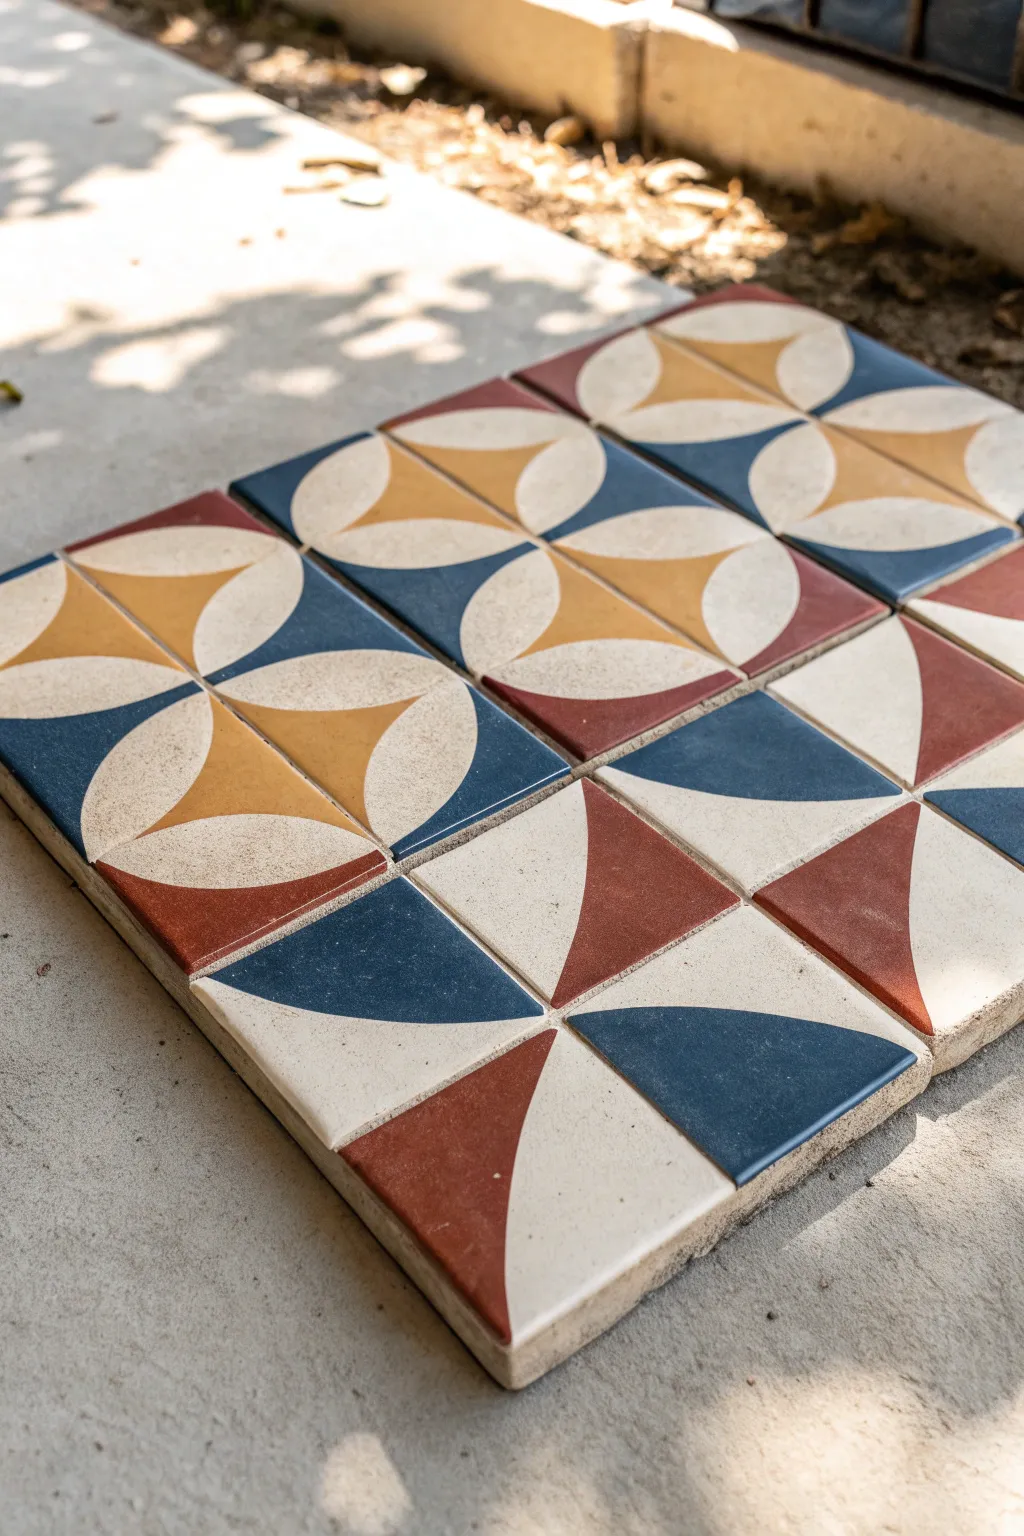
These handcrafted ceramic tiles create a cohesive visual narrative through a clever interplay of simple shapes and a warm, retro color palette. By repeating and rotating quadrant designs, you’ll build a larger motif that feels both modern and timeless.
Step-by-Step Guide
Materials
- Mid-fire white stoneware clay
- Rolling pin and guide strips (approx. 1/4 inch or 6mm)
- Square tile cutter or ruler and needle tool
- Paper or cardstock for templates
- Underglazes (Terracotta/Rust, Mustard Yellow, Navy Blue)
- Wax resist
- Clear matte or satin transparent glaze
- Sponge and bucket of water
- Fettling knife
- Soft fan brush and detail brushes
- Kiln
Step 1: Slab Construction & Cutting
-
Prepare the slab:
Begin by wedging your white stoneware clay thoroughly to remove air bubbles. Roll out a large, even slab using a rolling pin and guide strips set to 1/4 inch thickness. Compress the slab on both sides with a rib tool to align the clay particles, which is crucial for preventing warping later. -
Cut the squares:
Using a square tile cutter or a ruler and needle tool, cut out your base tiles. For this project, a 4×4 or 6×6 inch size works beautifully. Cut a few extra tiles to account for potential test pieces or kiln mishaps. -
Dry slowly:
Sandwich your cut tiles between two boards made of drywall or unpainted wood to keep them perfectly flat. Let them dry slowly to the leather-hard stage. Flipping them once or twice during this drying period helps ensure even moisture loss. -
Clean the edges:
Once leather-hard, gently smooth the sharp edges and corners with a slightly damp sponge or a finger. You don’t want razor-sharp edges on a finished floor or wall tile.
Warping Woes?
Tiles curl if they dry unevenly. Always dry them slowly under plastic or between drywall boards. If edges lift, weigh down centers with sandbags while drying.
Step 2: Designing & Glazing
-
Create the template:
Cut a square of cardstock the exact size of your leather-hard tiles. Draw an arc from corner to corner to create a quarter-circle shape, or divide the square diagonally. This specific design relies on intersecting curves, so plan your geometry on paper first. -
Transfer the design:
Lay your paper template onto the leather-hard clay surfaces. Lightly trace the dividing lines with a needle tool or a dull pencil. You only need a faint guide line to know where to stop your colors. -
Bisque fire:
Load the tiles into the kiln for a bisque firing (typically Cone 04 or 06). Stack them carefully or use a tile setter to save space, but ensure they are fully supported to confirm flatness. -
Clean bisqueware:
After firing, wipe down each tile with a damp sponge to remove any dust, which could prevent the glaze from adhering properly. -
Wax resist application:
To achieve crisp lines between colors, I like to apply wax resist over the areas intended to remain raw or white first, or paint lines of wax along your traced boundaries. Alternatively, you can use masking tape if you prefer hard lines, though wax feels more organic. -
Apply base colors:
Using underglazes, paint the specific geometric sections. Apply 2-3 coats of Navy Blue, Mustard Yellow, and Terracotta Red into their respective zones. Allow each coat to dry to the touch before adding the next. -
Leave negative space:
Ensure you leave specific sections unpainted (showing the bare white clay or white underglaze) to act as the ‘cream’ color in the pattern. This negative space is vital for the breathing room of the design. -
Review consistency:
Line your tiles up on a table to check that the colors will meet correctly at the edges when installed. Touch up any patchy areas with a small detail brush.
Pattern Play
Make all tiles identical, then rotate them 90 degrees during installation. This creates complex secondary shapes like circles and stars from one simple design.
Step 3: Final Firing & Finishing
-
Clear coat:
Once the underglaze is bone dry, carefully dip or brush a clear matte or satin glaze over the entire face of the tile. A zinc-free clear glaze often works best to keep the underglaze colors vibrant without clouding. -
Wipe the back:
Absolutely ensure the bottom of each tile is free of glaze. Wipe the bottoms and 1/8th inch up the side with a sponge to prevent sticking to the kiln shelf. -
Glaze fire:
Fire the tiles to your clay body’s maturity temperature (e.g., Cone 5 or 6). Avoid stacking tiles during the glaze firing; they must lie flat individually on the kiln shelf. -
Sand bottoms:
After the kiln cools, use sandpaper or a grinding stone to smooth any rough grit on the bottom of the tiles so they sit perfectly flush on a tabletop or floor.
Arrange your finished set on a flat surface to admire how your individual intersections create a stunning, continuous visual story.
Pierced Ceramic Lantern With Light Patterns
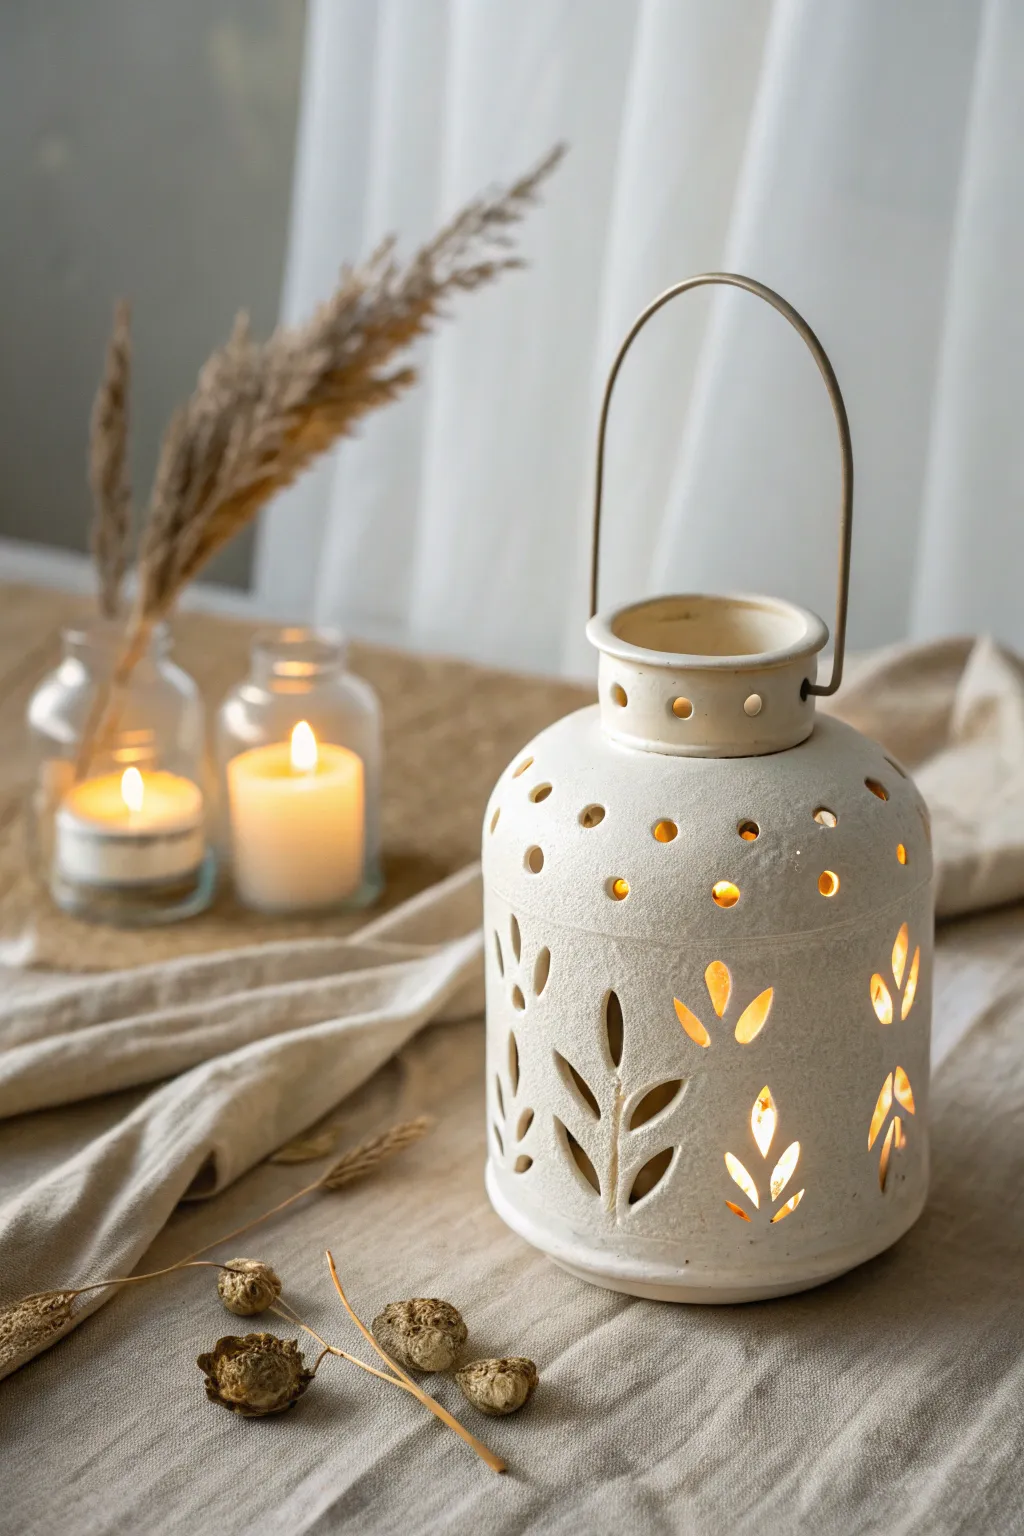
This charming project involves hand-building a bell-shaped lantern with delicate leaf and dot cutouts that cast enchanting shadows when lit. The rustic matte white glaze pairs beautifully with a simple wire handle, creating a cozy and organic centerpiece.
Step-by-Step
Materials
- White or speckled stoneware clay
- Rolling pin and guide strips (canvas covered)
- Circle cutter or template (for the base)
- Canvas or wooden work board
- Fettling knife
- Pottery needle tool
- Small leaf-shaped cookie cutters or X-Acto knife
- Hole punch tools (various sizes)
- Serrated rib tool
- Slip (clay mixed with water)
- Small sponge
- Soft paintbrush
- Wire (brass or jagged metal) for the handle
- Wire cutters
- Matte white glaze
Step 1: Building the Form
-
Roll the Slabs:
Begin by rolling out your clay into an even slab, approximately 1/4 inch thick. Use guide strips to ensure uniform thickness, which is crucial for structural integrity during firing. -
Cut the Components:
Cut a rectangular strip for the main body—measure the circumference you want plus an inch for overlap. Cut a circle for the base and a smaller strip for the top neck collar. -
Form the Cylinder:
Bend the large rectangular slab into a cylinder. Score and slip the connecting edges thoroughly, then press them together firmly to create a seamless join. -
Shape the Belly:
Gently gently paddle the outside or push from the inside of the cylinder to bulge it out slightly, giving it a bell-like or rounded shape rather than a straight pipe. -
Attach the Base:
Score and slip the bottom edge of your cylinder and the outer edge of your base circle. Join them together, smoothing the clay up from the base onto the wall to seal it. -
Create the Shoulder:
Gently dart or compress the top rim of the cylinder inward to create a shoulder that narrows towards the opening. -
Add the Collar:
Take your smaller clay strip and form a ring. Attach this to the narrowed top opening to create the distinct vertical neck shown in the photo.
Clean Cuts Pro Tip
Wait until the clay is ‘leather hard’ before cutting the intricate leaves. If the clay is too wet, the walls will collapse; too dry, and it will crack.
Step 2: Design and Detailing
-
Draft the Design:
Before cutting, lightly sketch your leaf pattern onto the leather-hard clay with a needle tool. I like to keep the design loose and organic rather than perfectly symmetrical. -
Carve the Leaves:
Using a small sharp knife or X-Acto blade, carefully cut out the leaf shapes. Remove the cutout clay pieces gently to avoid warping the lantern walls. -
Refine the Edges:
Once the clay stiffens slightly more, use a damp sponge or soft brush to smooth the sharp edges of your cutouts so they look polished. -
Punch the Holes:
Use a hole punch tool or the back of a drill bit to press circular holes around the shoulder of the lantern and on the collar neck for extra light ventilation. -
Add Handle Lugs:
Pierce two small, distinct holes on opposite sides of the neck collar. These will be used later to attach your wire handle. -
Texture the Surface:
If you want that stone-like texture, lightly tap the exterior with a stiff-bristled brush or a scouring pad to remove the smoothness of the slab.
Step 3: Finishing Touches
-
Bisque Fire:
Allow the piece to dry slowly under plastic to prevent cracking, then bisque fire it according to your clay body’s specifications. -
Glazing:
Apply a matte white glaze. Pour glaze inside and swirl to coat, then dip or brush the exterior. Wipe the bottom clean before the final firing. -
Glaze Fire:
Fire the kiln to the temperature required for your specific glaze and clay combination. -
Attach the Handle:
Cut a length of brass or heavy-gauge wire. Bend it into a high arch shape. Insert the ends into the lug holes you made on the neck and curl the ends upward with pliers to secure them.
Level Up: Texture
Mix a small amount of sand or grog into your slip before applying it to the surface for an even more rustic, tactile finishes that catches the light.
Now you have a warm, custom vessel ready to hold a tealight or votive candle

TRACK YOUR CERAMIC JOURNEY
Capture glaze tests, firing details, and creative progress—all in one simple printable. Make your projects easier to repeat and improve.
Altered Wheel Form Abstract Sculpture
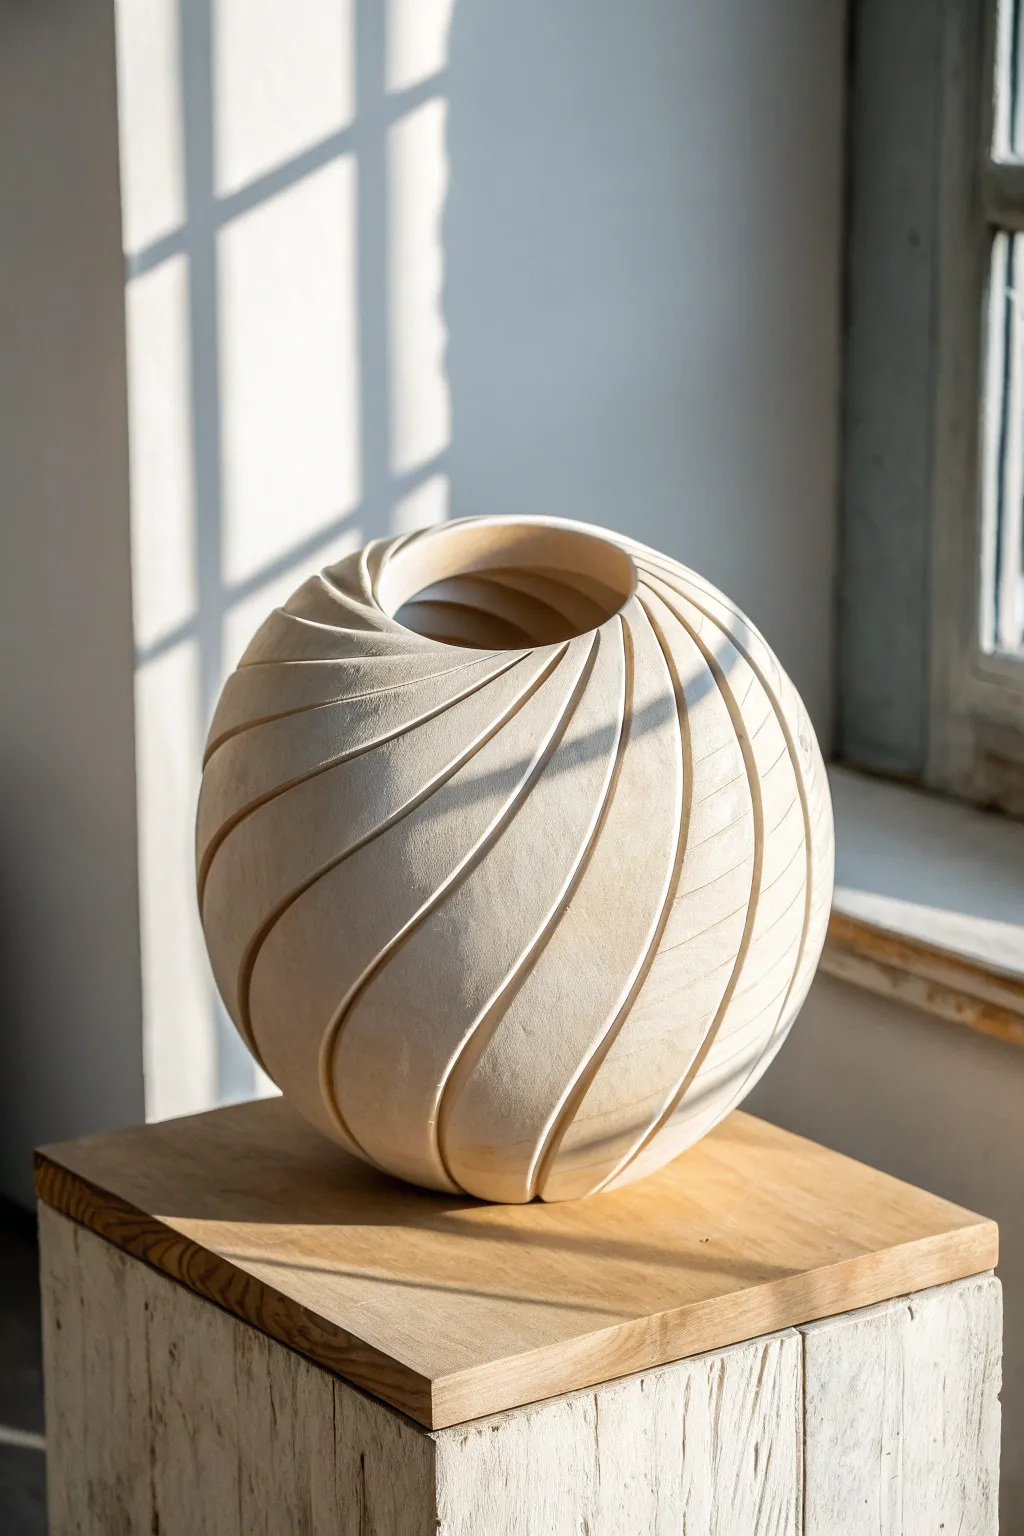
This project transforms a simple wheel-thrown sphere into a dynamic, abstract sculpture through the art of reductive carving. The deep, rhythmic spiral grooves catch the light beautifully, creating a mesmerizing sense of movement on the textured surface.
How-To Guide
Materials
- Stoneware clay body (smooth, fine grog)
- Potter’s wheel
- Throwing tools (sponge, rib, needle tool)
- Sharp trimming tools (loop tools vary in size)
- Measuring tape or flexible ruler
- Sanding sponges (medium and fine grit)
- Heat gun or torch (optional)
- Flexible metal rib
Step 1: Throwing the Form
-
Center and open:
Begin with a substantial amount of clay (around 4-5 lbs). Center it well and open the form, leaving the floor slightly thicker than usual to support the weight of the enclosed shape. -
Pull the cylinder:
Pull the walls up into a tall, relatively narrow cylinder first. Keep the walls consistent in thickness—this is crucial for the carving stage later. -
Shape the belly:
Using a rib on the inside and gentle pressure, belly the form out starting from the bottom. Push the clay outward gradually to create a rounded, spherical volume. -
Collar the neck:
As the body rounds out, you will need to collar the neck in significantly. Use both hands to compress the rim inward, maintaining the spherical curve all the way to the top. -
Close the form (mostly):
Continue collaring until the opening is quite small, about 3-4 inches wide. You aren’t closing it completely like a moon jar, but rather creating a structured opening that follows the curve of the sphere. -
Refine the curve:
Use a flexible metal rib on the exterior while pushing gently from the interior to smooth out any throwing lines and perfect the round profile. The surface needs to be pristine before altering.
Uneven Drying Risk
Walls vary in thickness due to deep carving, risking cracks. Dry very slowly under loose plastic for 5-7 days before exposing to open air to equalize moisture.
Step 2: Mapping the Design
-
Leather hard stage:
Allow the piece to dry slowly to a firm leather-hard stage. It should be stiff enough to handle without warping but soft enough to carve deeply. I find covering the rim with plastic helps it dry evenly with the base. -
Mark vertical guides:
Place the pot on a banding wheel. Using a flexible ruler or tape, lightly mark the circumference into equal sections at the rim and the foot (e.g., 16 or 20 sections) to guide your spacing. -
Draw the spirals:
Using a needle tool, lightly sketch swooping, curved lines connecting your top marks to offset bottom marks. Aim for a distinct ‘S’ curve or simple diagonal twist that wraps around the belly of the pot.
Step 3: Carving and Refining
-
Initial gouging:
Select a medium-sized loop tool. Begin carving along your drawn lines. Start shallow to establish the path, then deepen the cut on subsequent passes. -
Deepen the fluting:
Work progressively deeper to create substantial valleys. The goal is to make the high points (the ridges) sharp and the low points (the valleys) smooth and rounded. -
Beveling the edges:
Change the angle of your tool to undercut the ridges slightly if you want a sharper shadow line. Ensure the width of the carved channel is consistent from top to bottom, tapering only as the sphere’s circumference shrinks. -
Rim transition:
Pay distinct attention to how the grooves terminate at the rim. Allow them to curve over the lip and disappear into the interior for a continuous flow. -
Drying:
Once carving is complete, let the piece dry until it is bone dry. White clay dust will appear on the surface. -
Sanding:
Wearing a respirator, use a sanding sponge to smooth the valleys of your carving. Remove any tool marks or burrs. This is vital for that soft, machine-like finish seen in the image. -
Bisque firing:
Load the kiln carefully and bisque fire the piece. -
Finishing:
For this raw aesthetic, you might leave the exterior unglazed (vitrified bare clay) or apply a very dry, matte white glaze to maintain the sculptural quality without distracting reflections.
Soft Lighting Effect
After sanding, burnish the ‘high points’ of the ridges with a smooth stone or spoon before firing. This creates a subtle sheen contrast against the matte valleys.
Place your finished sculpture near a window where the shifting daylight will dance across the spiral ridges
Tall Coil-Built Vessel With Layered Texture
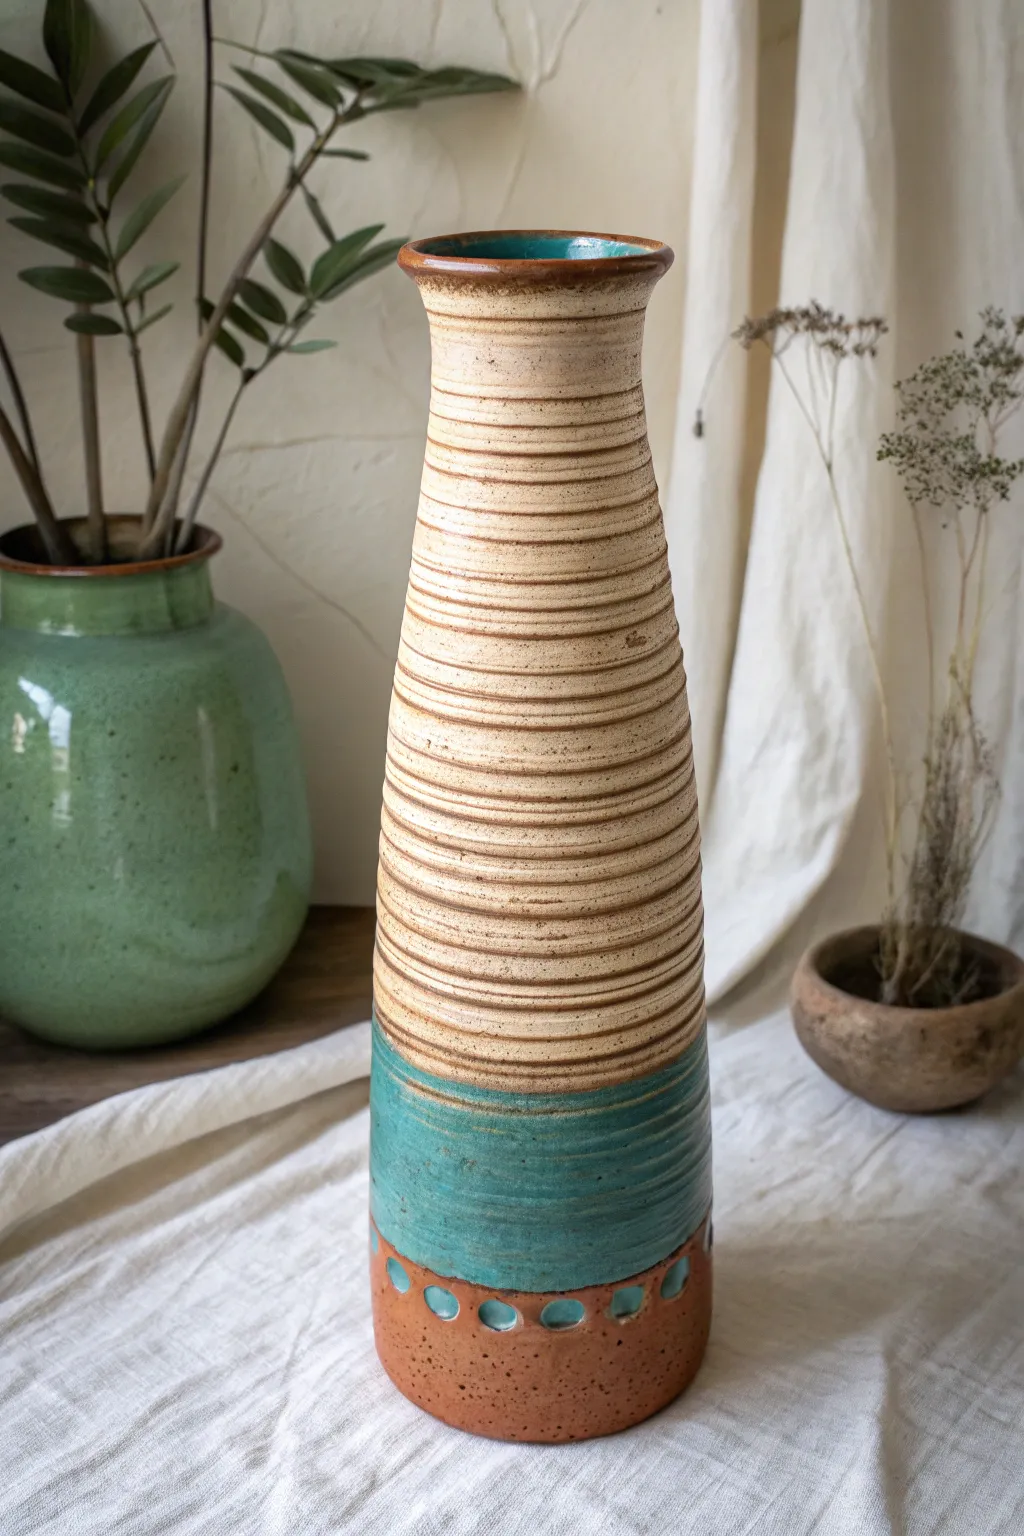
This elegant, tall vase combines the rhythmic beauty of exposed coils with distinct glazing zones. Its ascending trumpet shape and layers of texture—from smooth base to ribbed neck—make it a perfect study in form and surface decoration.
Detailed Instructions
Materials
- Stoneware clay (smooth or lightly grogged)
- Pottery wheel (or banding wheel for coil building)
- Needle tool
- Rib tool (metal and rubber)
- Sponge
- Wire texturing tool or serrated rib
- Turquoise/Teal layering glaze
- Cream/Beige matte glaze
- Small carving loop tool
- Kiln
Step 1: Building the Form
-
Establish the Base:
Begin by throwing a cylinder on the wheel with approximately 3-4 pounds of clay. If you are hand-building, create a sturdy circular slab base and attach your first thick coil. -
Pulling the Walls:
Work the clay upwards to create a tall, narrow cylinder. Aim for a height of at least 12-14 inches, tapering the form slightly inward as you rise to create a slender profile. -
Shaping the Neck:
Once you have the height, collar the neck in slightly about two-thirds of the way up, then flare the rim outwards gently to create a trumpet-like opening. -
Applying Texture:
While the wheel is spinning slowly, use the corner of a metal rib or a specialized grooved tool to press horizontal lines into the clay. Start just above the bottom third area and continue all the way to the rim. -
Smoothing the Base:
Leave the bottom third of the vessel relatively smooth, but don’t worry about perfection; a little texture here adds character to the unglazed section later. -
Refining the Rim:
Compress the rim using a chamois or a damp sponge to ensure it is smooth and resistant to chipping.
Groove Control
When creating the ribbed texture, vary your pressure. Deeper grooves hold more glaze and create darker stripes, while shallow grooves result in a more subtle, washed effect.
Step 2: Carving and Trimming
-
Drying to Leather Hard:
Allow the piece to dry to a leather-hard state. It should be firm enough to handle without warping but soft enough to carve. -
Carving the Dot Detailing:
Near the bottom edge, use a small loop tool to carve out a row of circular divots or dimples. I like to space these evenly around the circumference to create a decorative footer band. -
Trimming the Foot:
Flip the vessel over (using a tall chuck if necessary due to the neck shape) and trim a clean foot ring. This elevates the visual weight of the piece. -
Bisque Fire:
Once fully bone dry, load the vessel into the kiln for a bisque firing to prepare it for glazing.
Level Up: Oxide Wash
Before glazing the top section, brush an iron oxide wash into the grooves and wipe it back. This will dramatically highlight the horizontal banding under the cream glaze.
Step 3: Glazing Process
-
Wax Resist Application:
Apply wax resist to the bottom inch of the vase, including the foot ring and the raw clay area underneath the carved circular dimples. This will keep the raw terracotta color exposed. -
Glazing the Interior:
Pour a liner glaze (teal or clear) into the interior, swirl it to coat the entire inside surface, and pour out the excess. -
Applying the Teal Band:
Dip or brush a satin turquoise glaze onto the lower section of the vase, covering the carved dimples (wipe the high spots if you want more contrast) and extending up to where the heavy texture begins. -
Glazing the Upper Body:
For the top two-thirds, apply a matte cream or beige glaze. Ensure it settles well into the horizontal grooves to emphasize the ribbed texture. -
Creating the Transition:
Where the teal and cream glazes meet, lightly overlap them. The texture will help blend the transition, but be careful not to make the application too thick. -
Detailing the Rim:
Carefully wipe the very edge of the rim with a damp sponge to expose a thin line of the brown clay body, framing the top of the vessel. -
Final Firing:
Fire the piece to the maturity temperature of your clay and glazes (typically Cone 5 or 6 for stoneware).
Place your finished vase near a window where natural light can play across the beautiful horizontal ridges you created
Surreal Functional Cup With Sculpted Add-Ons
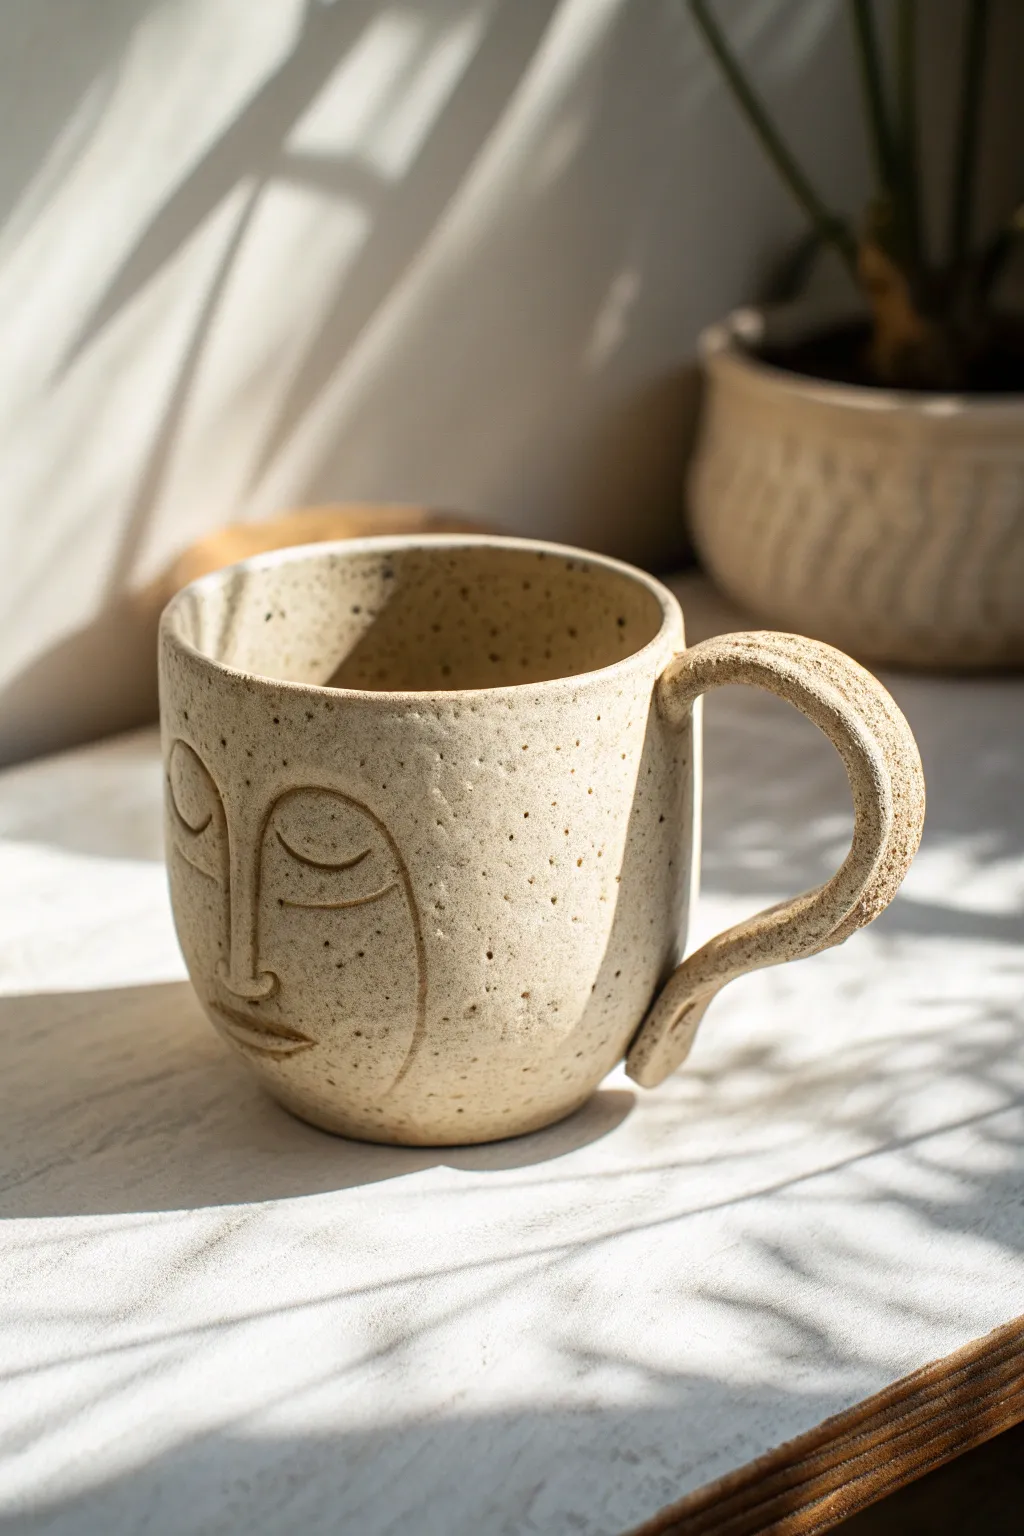
This serene, surreal mug transforms a functional vessel into a piece of sculpture with a stylized, sleeping face emerging from the clay. The speckled stoneware and matte finish give it an organic, earthen quality perfect for a cozy morning coffee.
Step-by-Step
Materials
- Speckled buff stoneware clay
- Pottery wheel (or slab roller/rolling pin for hand-building)
- Needle tool
- Wooden modeling tool (flat edge)
- Small loop tool
- Sponge
- Score and slip tool (serrated rib)
- Matte clear or matte cream glaze
- Kiln
Step 1: Forming the Body
-
Throw or Build the Cylinder:
Begin by throwing a medium-sized cylinder on the wheel with about 1 pound of clay. If you prefer hand-building, roll out a slab and form a clean cylinder. Aim for straight walls with a slightly rounded bottom curve. -
Refine the Shape:
Use a smooth rib to compress the walls and remove any throwing lines. You want a very blank canvas for the face, so ensure the surface is uniform and smooth. -
Leather Hard Stage:
Allow the cylinder to dry to a leather-hard state. It needs to be firm enough to handle carving pressure without warping, but soft enough to manipulate. -
Marking the Features:
Using a needle tool, very lightly sketch the placement of the face. Draw large, arched eyes, a long nose bridge that connects to the brow, and a small mouth near the base.
Cracking at the Nose?
If the added nose tends to crack away during drying, ensure you scored deeply enough. Next time, try pushing the wall of the cup out from the inside to form the nose, rather than adding a separate coil.
Step 2: Sculpting the Face
-
Building the Nose:
Roll a small coil of clay for the nose. Score and slip the area where the nose bridge goes, then attach the coil. Blend it seamlessly into the cup wall on the sides, but leave the profile distinct. -
Refining the Nose Shape:
Use a wooden modeling tool to sharpen the nose bridge. It should look like a continuous line flowing down from the forehead area, rather than a separate lump. -
Carving the Eyes:
Instead of adding clay for eyes, we will carve inward to create relief. Use a small loop tool or modeling tool to gently press in the area just below the eyebrow line, creating a shadow. -
Defining the Eyelids:
Take a small, thin coil and attach it in a semi-circle to form the closed eyelid. Smooth the top edge into the cup, leaving the bottom edge crisp to define the lash line. -
Sculpting the Mouth:
Add a tiny amount of clay for the lips. Shape them to be simple and serene. I find that keeping the mouth slightly smaller adds to the surreal, mask-like aesthetic. -
Incising Details:
Use your needle tool to re-trace the lines around the nose and eyelids to make them pop. This deep line work will catch the glaze later.
Step 3: The Handle & Finish
-
Pulling the Handle:
Pull a strap handle that is slightly thicker and more rustic than a standard mug handle. Don’t smooth it perfectly; let the clay’s texture show. -
Attaching the Handle:
Score and slip the attachment points on the side of the mug opposite the face. Attach the top of the handle near the rim and the bottom near the base. -
Creating Handle Texture:
Once attached, use a rough sponge or a wire brush tool to stipple the surface of the handle. This rough texture contrasts beautifully with the smooth face. -
Drying:
Cover the mug loosely with plastic to let the handle and body dry slowly and evenly, preventing cracks at the attachment points. -
Bisque Fire:
Once bone dry, bisque fire the piece to Cone 04 (or your clay body’s specifications). -
Glazing:
Dip the entire mug into a matte cream or transparent matte glaze. Avoid glossy glazes, as the reflection can hide the subtle sculpted details. -
Final Firing:
Glaze fire the piece to the maturity temperature of your clay (likely Cone 5 or 6). The speckles in the clay will bleed through the matte glaze for that sandy look.
Make It 3D
Add small clay ears on the sides of the mug instead of a handle, making it a true face-vessel (a ‘head’ cup). You can still hold it comfortably by the ears!
Enjoy using your new mug that quietly observes your morning routine with its peaceful expression
Mini Ceramic House Village Display
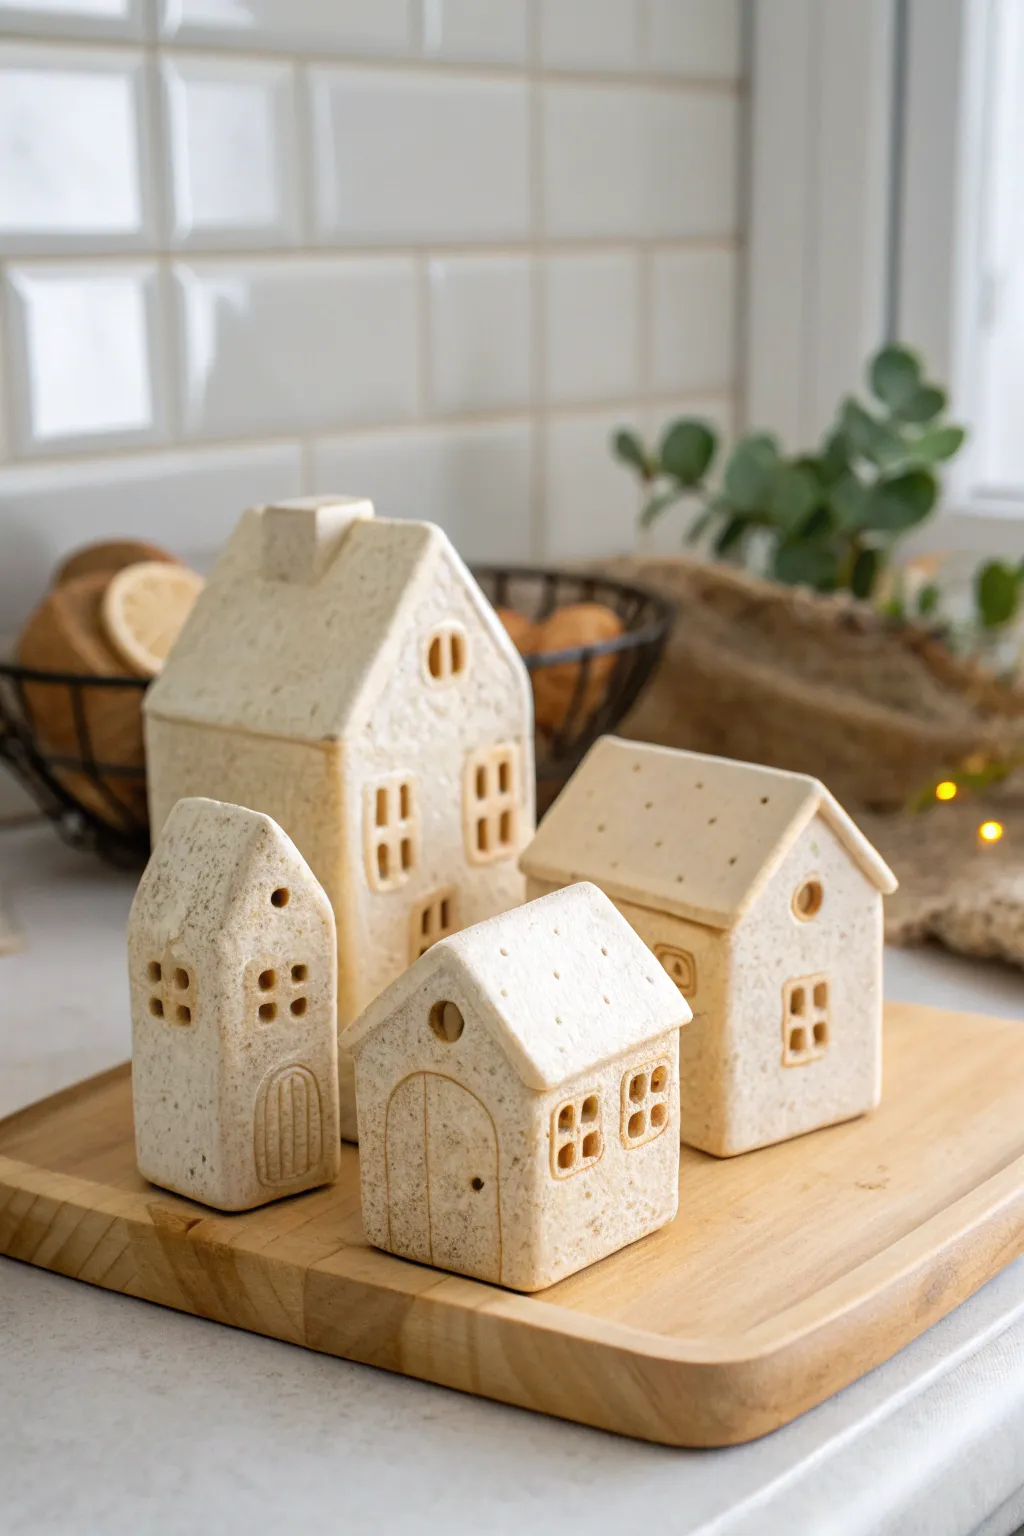
Create a charming hamlet of miniature ceramic houses using a speckled clay body that mimics the texture of gingerbread or rustic stone. These slab-built structures feature varied rooflines and hand-carved details, perfect for grouping together on a mantle.
Detailed Instructions
Materials
- Speckled clay body (e.g., Laguna Speckled Buff or similar stoneware)
- Rolling pin
- Canvas mat or slab roller
- Fettling knife or X-Acto knife
- Paper templates (cardstock recommended)
- Needle tool
- Loop tool (small)
- Slip and scoring tool (or fork)
- Smoothing finish sponge
- Wooden modeling tool
Step 1: Planning and Slab Preparation
-
Draft your templates:
Sketch four distinct house designs on cardstock. Aim for variety in height and width. For each house, you need a front/back piece (with gables), two side walls, and two roof panels. Cut these out carefully. -
Roll the slabs:
Roll out your speckled clay to an even thickness of about 1/4 inch. If you are rolling by hand, wood slats on either side of your rolling pin help maintain a consistent thickness. -
Rib the clay:
Before cutting, run a rib tool over the surface of the clay slab. This compresses the particles, strengthening the clay and creating a smoother canvas for your texture later. -
Cut the components:
Lay your cardstock templates onto the leather-hard slabs. Trace lightly with a needle tool, then cut cleanly with your fettling knife. Keep the pieces organized by ‘house’ so they don’t get mixed up. -
Stiffen the slabs:
Let the cut pieces sit until they reach a ‘soft leather-hard’ state. They should be firm enough to stand up without slumping but still flexible enough to join.
Clean Cuts
When cutting out tiny window panes, let the clay stiffen slightly more than usual. Soft clay drags and deforms; firmer leather-hard clay cuts cleanly like cheese.
Step 2: Assembly
-
Miter the edges:
For cleaner corners, cut a 45-degree bevel on the vertical edges of your walls where they will join. This isn’t strictly necessary, but it makes the box shape much neater. -
Score and slip:
Aggressively score the edges creating the box shape and apply a generous amount of slip. Press the walls together firmly. -
Reinforce the seams:
Roll a tiny coil of soft clay. Place it into the interior corners of the house walls and smooth it down with a wooden tool or your finger to lock the joint. -
Attach the roof:
Score the top edges of your walls and the undersides of your roof panels. Place the roof pieces on. I like to let the roof overhang slightly for a cottage look. -
Fill the peak:
Where the two roof panels meet at the very top, add a small coil of clay and smooth it out to ensure there is no gap or weak point. -
Add a chimney:
For the largest house, form a small rectangle of clay. Cut the base at an angle to match the slope of the roof, score, and attach it near the peak.
Step 3: Detailing and Surface Work
-
Map the windows:
Use your needle tool to lightly sketch where the windows and doors will go. Vary the styles—some arched, some square, some with grilles. -
Cut the openings:
Using a sharp X-Acto knife, cut out the window panes. For multi-pane windows, leave thin clay bars intact. Clean up any crumbs carefully. -
Texture the doors:
Instead of cutting the doors out completely, lightly carve vertical lines to simulate wood planks while leaving the clay wall solid behind it. -
Add roof texture:
On the smaller houses, use a needle tool to poke tiny, random holes or dashes on the roof to mimic thatch or nail marks. -
Smooth the edges:
Once assembled, take a barely damp sponge and round off the sharp corners of the house walls and roof edges for a softer, handmade feel. -
Final drying:
Dry the houses slowly under loose plastic for the first day to prevent warping, then uncover to bone dry. -
Firing:
Bisque fire the pieces. For the look in the image, fire to cone 5/6 without glaze to let the natural speckle of the clay body shine, or use a very matte clear glaze.
Warping Walls
If walls bow inward while building, stuff the house gently with crumpled newspaper or paper towels. This supports the structure while the seams set and dry.
Arrange your finished village on a wooden board or near a window to catch the light through the little openings
Animal-Themed Planter Trio With Consistent Style

Create a charming trio of small planters featuring simple, line-drawn animal illustrations like owls and a whale. These pots utilize a warm, speckled clay body left bare at the base for a natural, two-toned aesthetic that perfectly highlights your favorite succulents.
How-To Guide
Materials
- Speckled stoneware clay (mid-fire)
- Pottery wheel (or rolling pin for hand-building)
- Throwing tools (sponge, needle tool, rib, wire)
- Trimming tools
- White or cream underglaze
- Small fine-point paintbrush or underglaze pencil (brown/sepia)
- Clear matte or satin glaze
- Sponge and water bucket
- Kiln
Step 1: Forming the Vessels
-
Prepare Your Clay:
Wedge three balls of speckled stoneware clay, weighing approximately 1 to 1.5 lbs each, ensuring there are no air bubbles. -
Center and Open:
Center the first ball on your wheel head. Open the clay to create a flat inner floor about 3 inches wide, compressing the bottom well to prevent cracking. -
Pull the Walls:
Pull the walls up to a height of about 3.5 to 4 inches. Aim for a cylindrical shape with a very subtle outward curve in the middle, curving ever so slightly back in at the rim. -
Refine the Curve:
Use a kidney rib on the inside and outside to smooth the walls and refine that gentle ‘U’ curve shape. The rim should be rounded and smooth. -
Repeat for the Trio:
Repeat the throwing process for the other two balls of clay. Try to keep the height and width consistent, but embrace slight handmade variations. -
Leather Hard Stage:
Allow the pots to dry to a leather-hard state. This usually takes a day or two depending on humidity.
Smudged Lines?
If your underglaze lines blur when applying the clear glaze, try dabbing the clear glaze on gently with a sponge rather than dipping, or bisque fire a second time to set the design.
Step 2: Trimming and Decorating
-
Trim the Base:
Center a leather-hard pot upside down on the wheel. Trim the bottom to create a neat foot, revealing the fresh speckled grain of the clay. -
Apply Base Color:
While spinning the wheel slowly or using a banding wheel, paint a thick coat of white or cream underglaze starting from the rim and stopping about one-third of the way up from the bottom. I like to leave a crisp line where the glaze meets the raw clay. -
Let Underglaze Set:
Allow the white underglaze to dry until it’s no longer tacky to the touch so you can draw on it without smudging. -
Sketch the Animals:
Using a pencil (graphite will burn off in the kiln), lightly sketch your animal designs. Draw two different owls and a simple whale shape as seen in the reference. -
Paint the Outlines:
Using a fine liner brush and sepia or brown underglaze, trace over your pencil lines. Keep the strokes deliberate and somewhat rustic. -
Add Details:
Fill in small details like the owl’s feathers, the whale’s eye, and scattered snowflakes or stars using the same brown underglaze. -
Add the Border:
Paint a dotted line or small decorative dashes along the bottom edge of the white underglaze to create a transition border. -
Bisque Fire:
Once fully bone dry, load the pieces into the kiln for a bisque firing (usually Cone 04).
Step 3: final Glazing
-
Wax Resist:
Apply wax resist to the raw clay bottom and foot of each pot to prevent glaze from adhering to the unpainted sections. -
Clear Coat:
Dip the entire pot into a clear matte or satin glaze. This seals the underglaze illustration while letting the speckled clay show through. -
Cleanup:
Wipe away any stray glaze beads from the waxed bottom using a damp sponge. -
Final Fire:
Fire the pots to the maturation temperature of your clay body (likely Cone 5 or 6).
Scraffito Twist
Instead of painting brown lines, paint a dark block of underglaze first, then carve through it to reveal the white layer beneath for a reversed, textured effect.
Pot your succulents and enjoy your adorable handmade menagerie
Mosaic Slip Bowl With Swirls and Inlay
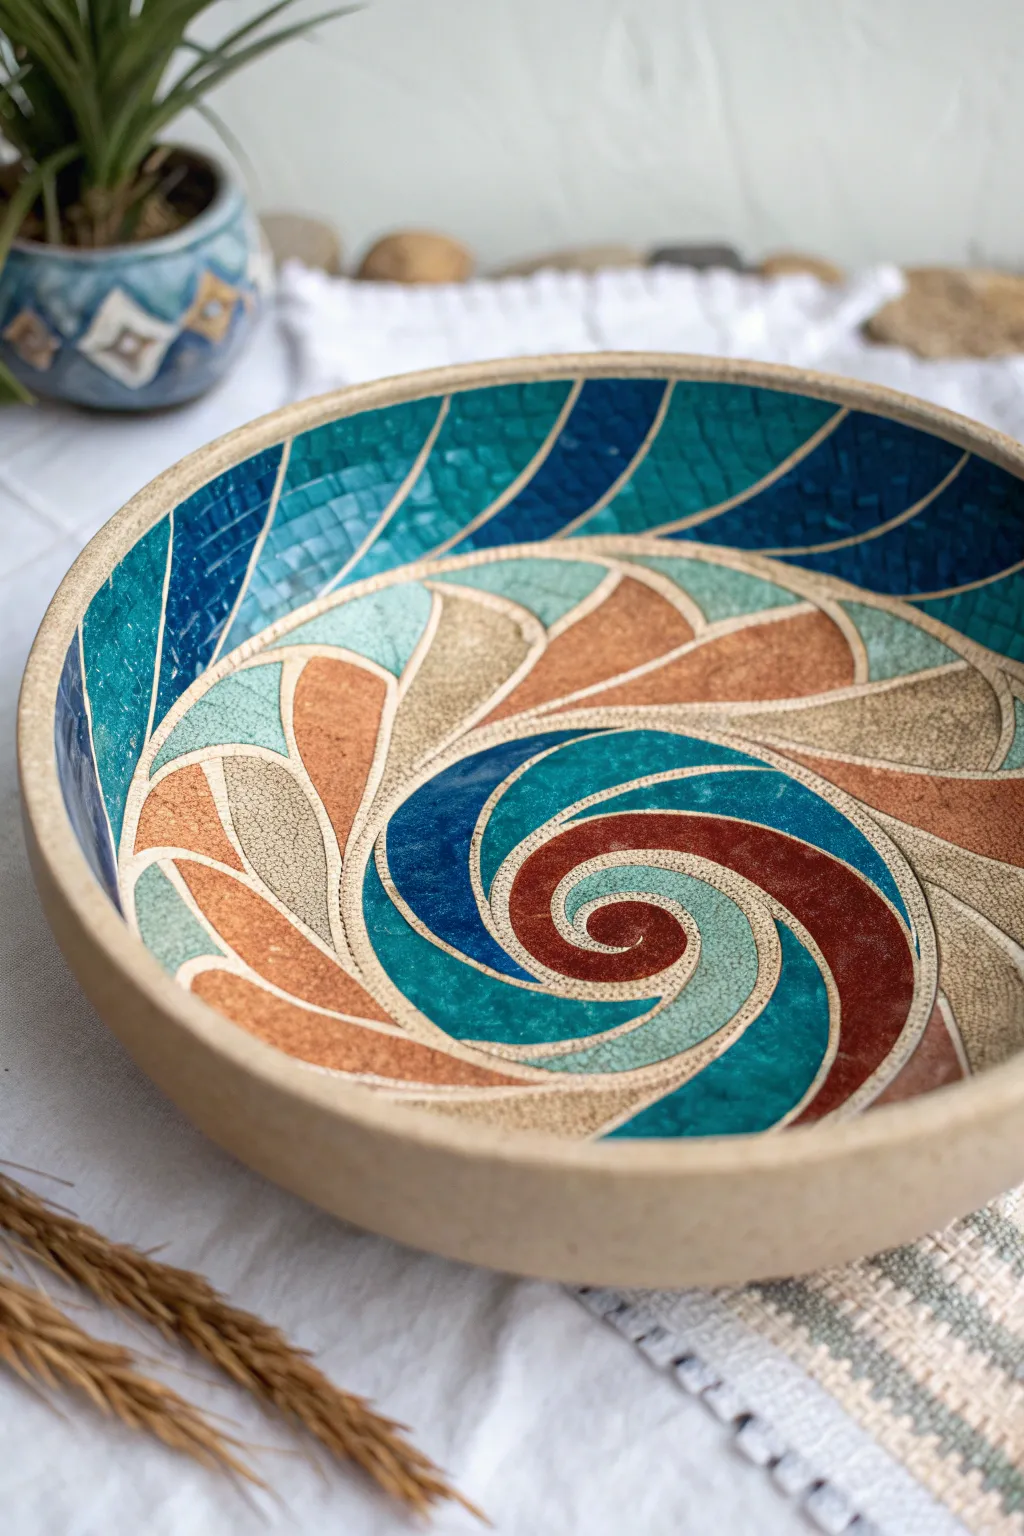
This stunning ceramic project combines the structural simplicity of a wide, shallow bowl with the complex beauty of a swirling, mosaic-like surface design. Using sgraffito or inlay techniques, you’ll create dynamic movement through contrasting colors of slip or underglaze.
Step-by-Step Guide
Materials
- Stoneware clay (smooth body preferred)
- Pottery wheel or slump mold/slab roller
- Colored decorative slips or underglazes (Teal, Dark Blue, Rust/Terracotta, Cream/Beige)
- Small carving loop tools (various sizes)
- Needle tool
- Soft ribs (silicone and rubber)
- Clear transparent glaze
- Soft fan brush
- Fine sponge
- Wax resist (optional)
Step 1: Forming the Basin
-
Prepare the Clay:
Begin by wedging your stoneware clay thoroughly to remove air pockets. A smooth clay body works best here, as grog can interfere with the fine carving lines later. -
Create the Form:
Throw a wide, shallow bowl on the wheel with thick walls (about 1/4 to 1/2 inch thick). Alternatively, roll a slab and drape it over a large slump mold for a more organic feel. -
Refine the Rim:
While the clay is still workable, compress the rim with a damp chamois or sponge. A slightly flattened rim, as seen in the photo, provides a nice framing edge for the interior design. -
Dry to Leather Hard:
Allow the bowl to dry slowly until it reaches a firm leather-hard stage. It needs to be stiff enough to carve without warping, but soft enough to cut cleanly.
Step 2: Designing the Swirl
-
Map the Spiral:
Lightly sketch your spiral design onto the interior surface using a needle tool or a dull pencil. Start from the center and spiral outward, dividing the bowl into segments resembling nautilus chambers or flower petals. -
Define the Channels:
Using a small loop tool, carve wide channels or shallow recesses where you intend to place your colors. Leave thin raised ‘walls’ of the original clay body between each shape; these will act as the outline for your design. -
Clean the Edges:
Gently brush away any clay crumbs. If your carving leaves rough burrs, I like to lightly smooth them with a finger, but be careful not to distort the raised lines.
Clean Lines
If slip smears onto your raised lines, let it dry partially before scraping it off. Wet slip smears; dry slip flakes off cleanly.
Step 3: Applying Color and Texture
-
Apply the Base Slips:
Fill the carved recesses with your colored slips or underglazes. Use the distinct color palette shown: deep teals and blues for the outer rim and inner swirl, transitioning to warm terracotta and cream tones for the middle sections. -
Layering Colors:
For depth, apply 2-3 coats of slip. Ensure the slip consistency is like heavy cream so it fills the carved areas nicely without running over the raised clay walls. -
Scratch Texture (Sgraffito):
Once the filled slip areas have stiffened slightly but aren’t bone dry, use a fine needle tool to scratch subtle textures into specific sections. Notice the ‘cracked’ texture in the cream sections and the directional lines in the blue areas. -
Clean the Separation Lines:
Use a damp sponge or a scraping tool to clean the top surface of the raised clay walls. This reveals the raw clay color, creating the crisp separation lines that define the mosaic look. -
Slow Drying:
Cover the bowl loosely with plastic to let it dry very slowly. Because we’ve added wet slip to drier clay, rushing this stage can cause cracks where the materials meet.
Mosaic Effect
Use a tiny loop tool to carve small squares into the blue rim sections before applying glaze to mimic individual mosaic tiles.
Step 4: Firing and Finishing
-
Bisque Fire:
Fire the piece to cone 04 (or your clay’s specific bisque temperature). This sets the form and prepares it for glazing. -
Wash and Wax:
Wipe the bisqued piece with a damp sponge to remove dust. If you want the exterior raw clay to remain unglazed, apply wax resist to the outside and the foot. -
Clear Glaze Application:
Dip or brush a clear, transparent glaze over the entire interior. A zinc-free clear is often best to preserve the vibrancy of the underglaze colors. -
Final Fire:
Glaze fire to maturity (likely Cone 5/6 or Cone 10 depending on your clay body). Ensure the kiln is well-vented to keep the colors bright.
Now step back and admire the intricate movement you’ve captured in clay