If you’ve ever held a pot and thought, “This needs a little more personality,” you’re already thinking like a texture-obsessed ceramic artist. These ceramics texture ideas are my go-to ways to build surface texture that feels amazing in your hands and looks even better once it’s glazed.
Simple Carved Line Patterns
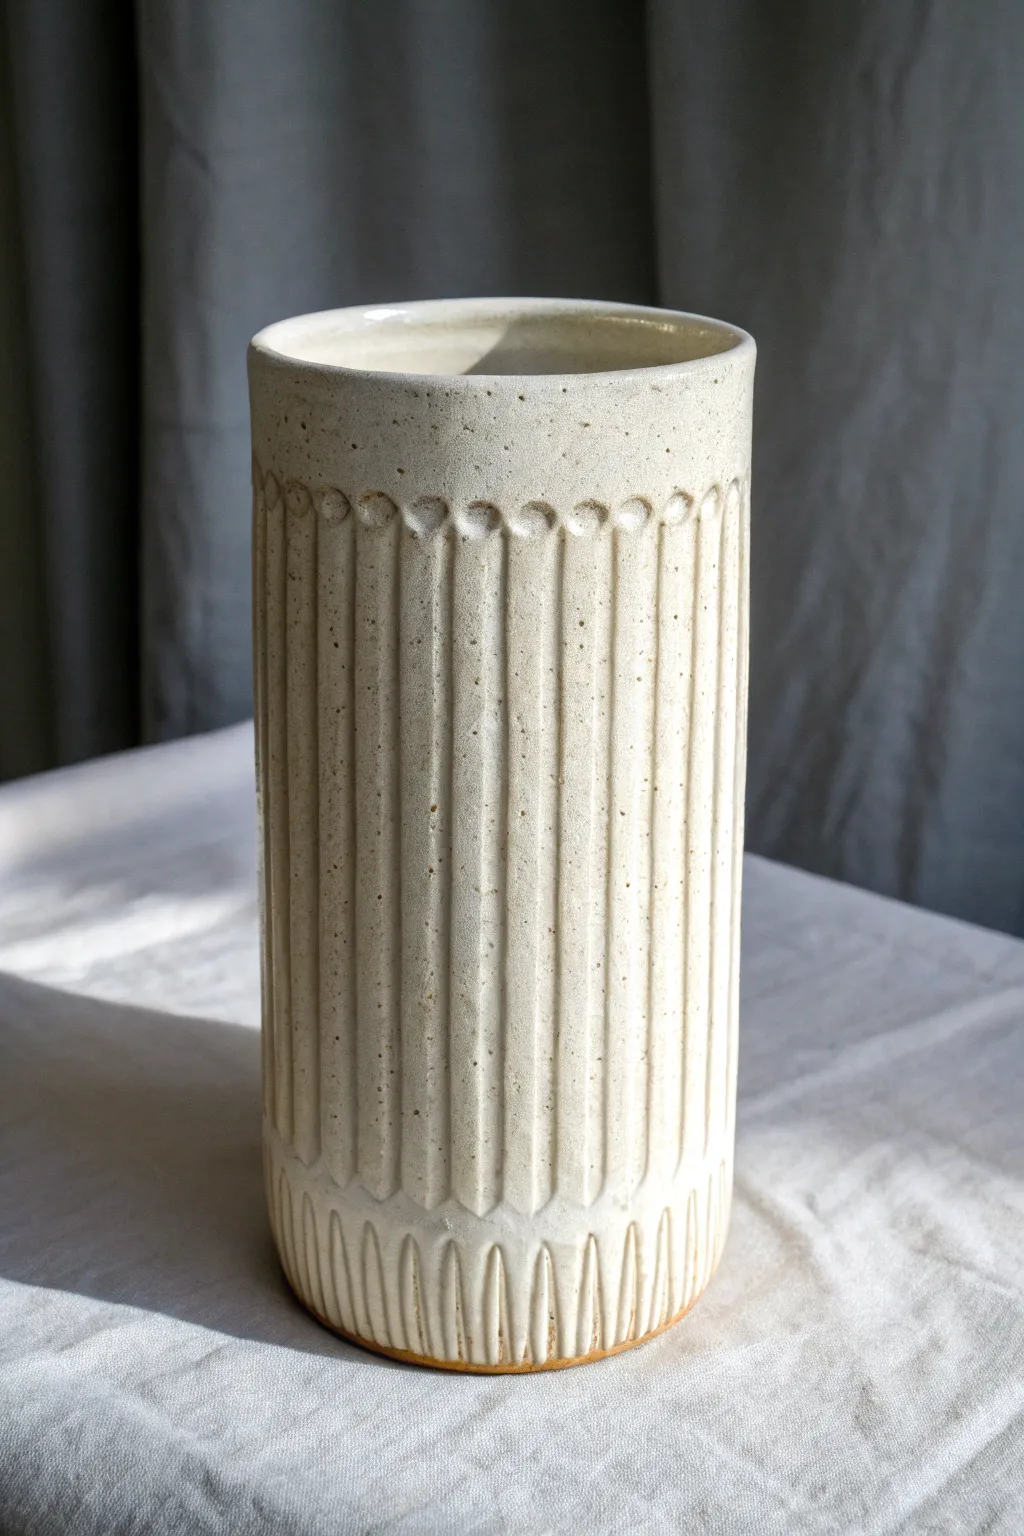
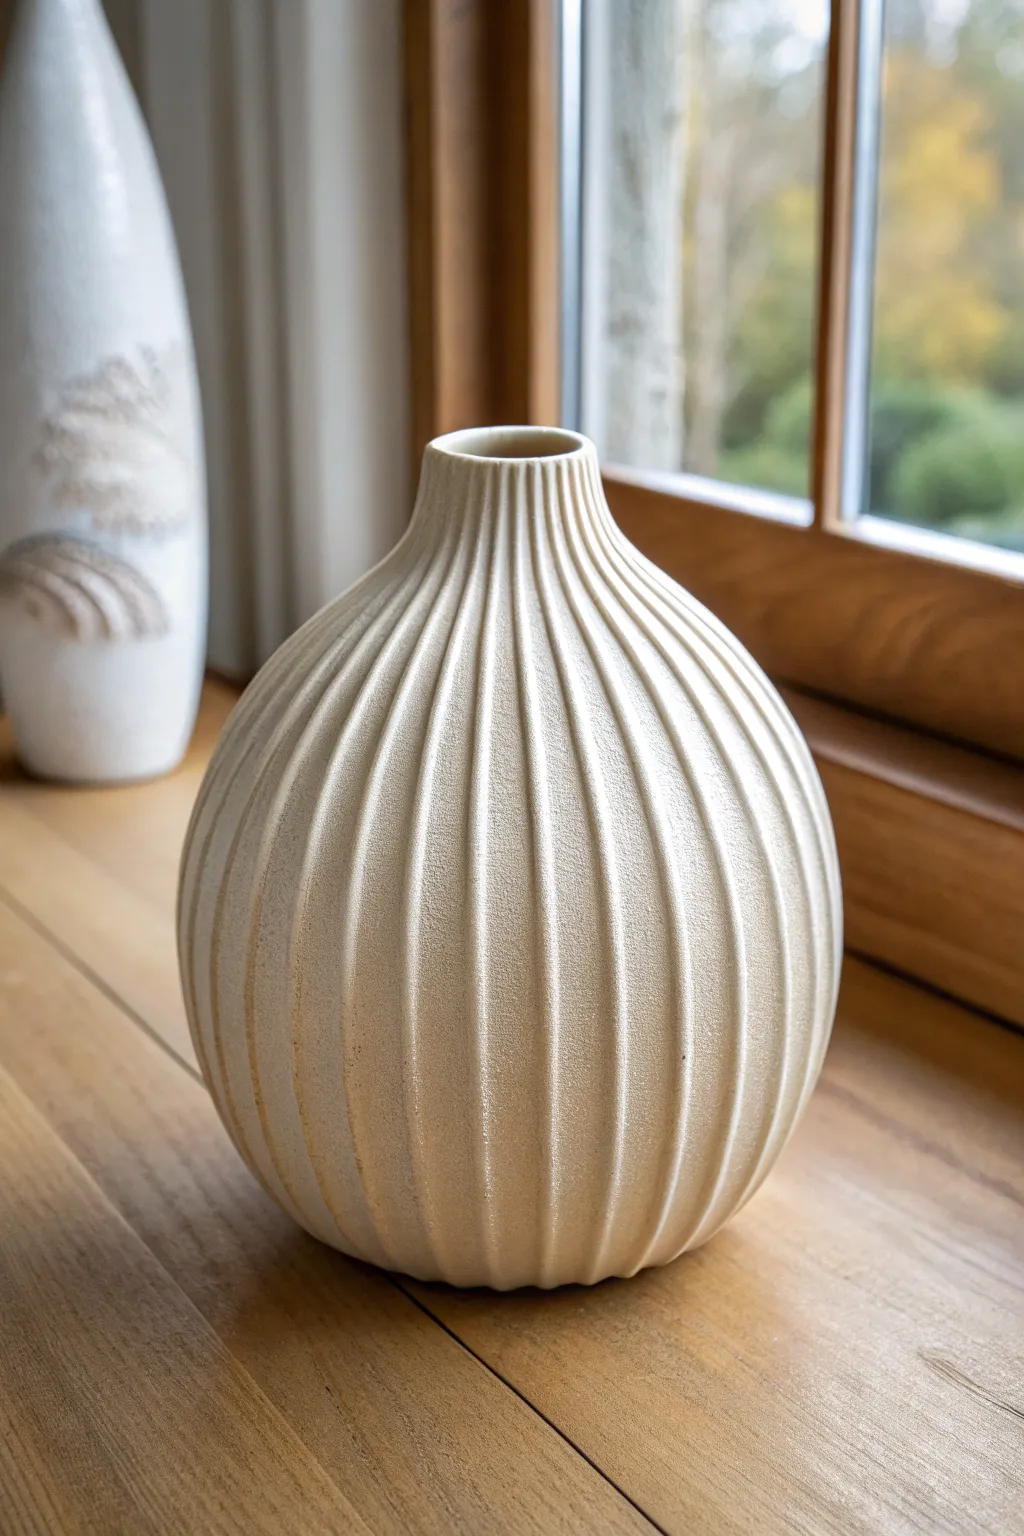
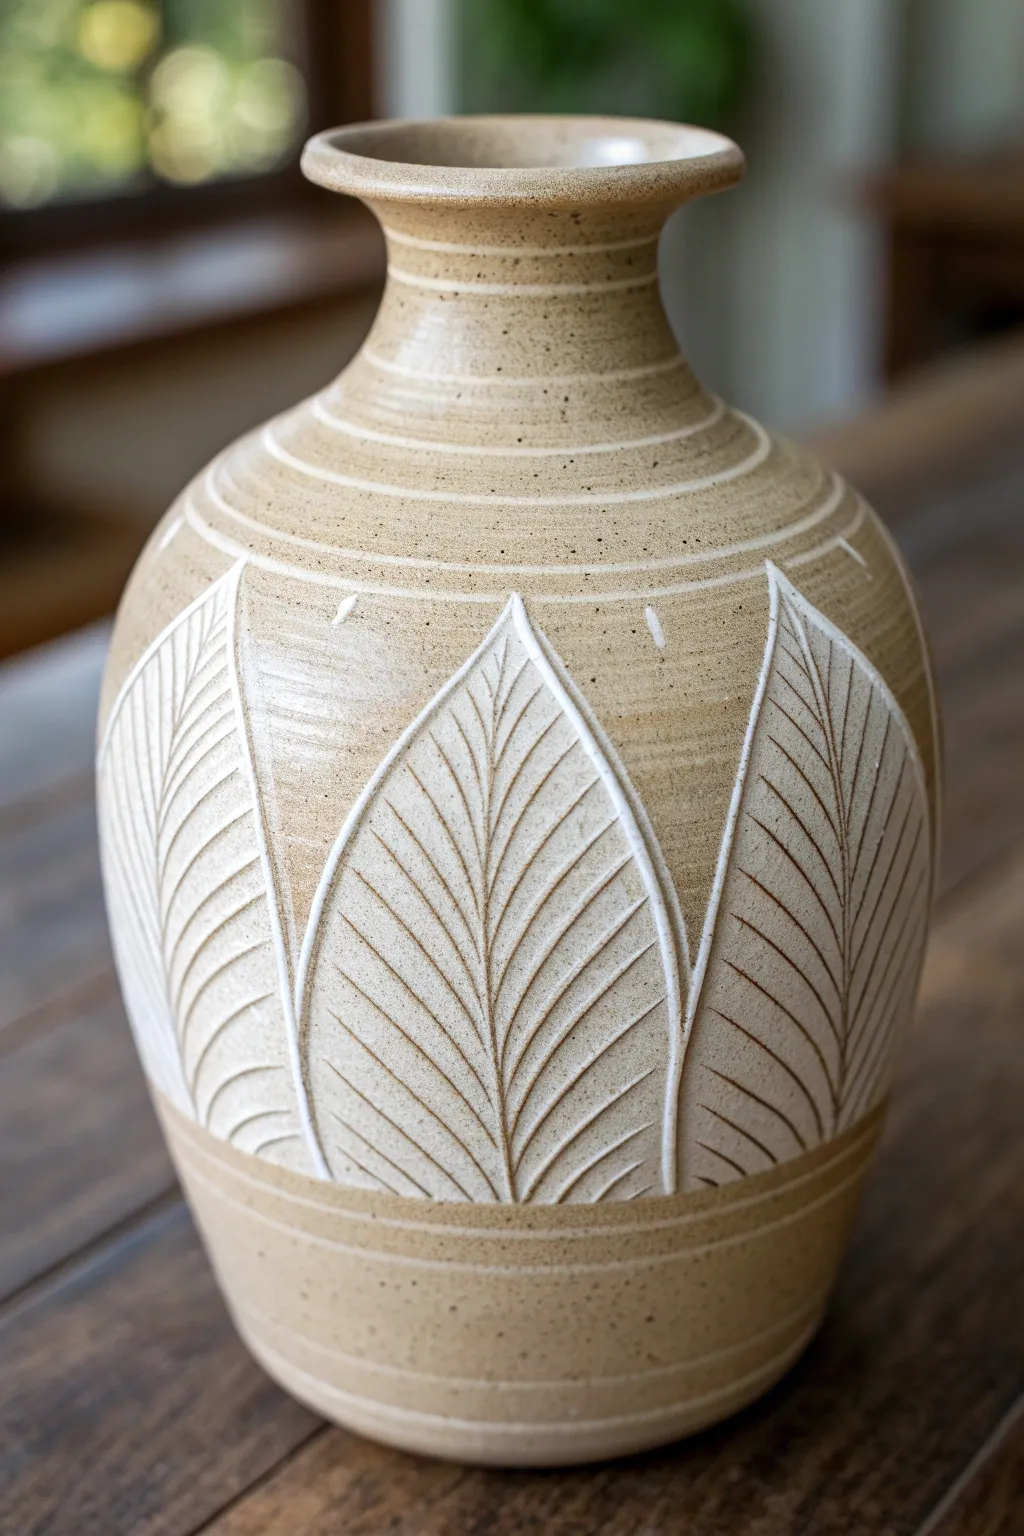
This elegant cylindrical vase features a timeless fluted texture created by carving repetitive vertical lines into leather-hard clay. The simple carved pattern is highlighted by a speckled creamy white glaze that breaks beautifully over the edges, adding depth and shadow.
Step-by-Step
Materials
- Speckled stoneware clay (approx 3-4 lbs)
- Pottery wheel
- Throwing tools (sponge, rib, needle tool, wire)
- Small U-shape carving tool or fluting tool
- Banding wheel (optional but helpful)
- Ruler or measuring tape
- Fine sponge for smoothing
- Satin white glaze
- Kiln
Step 1: Throwing and Shaping
-
Center and open:
Begin by centering your speckled stoneware clay on the wheel. Open the clay up, ensuring you leave a bottom thickness of about half an inch to account for trimming later. -
Pull the walls:
Pull the walls up into a tall, straight cylinder. Aim for a consistent wall thickness of about 1/4 inch; you need enough thickness to carve into without punching through, but not so much that the pot feels heavy. -
Refine the shape:
Use a metal or wooden rib to compress the outside wall and remove any throwing lines. You want a perfectly smooth canvas for your carving work. -
Rim finishing:
Compress the rim with a chamois or your sponge to ensure it is smooth and pleasant to the touch. Slightly bevel the rim inward or outward depending on your preference, though a flat, slight inward bevel complements this straight form well. -
Initial drying:
Wire the pot off the bat but leave it in place if possible, or carefully move it to a ware board. Allow the cylinder to dry slowly to a sturdy leather-hard stage. It should be firm enough to hold its shape when handled but soft enough to carve smoothly without chipping.
Step 2: Carving the Flutes
-
Set up for carving:
Place your leather-hard vase on a banding wheel. If you want perfect symmetry, you can use a ruler to lightly mark vertical guidelines around the pot, or trust your eye for a more organic feel. -
Plan the spacing:
Mark a horizontal line lightly near the top rim (about 1-2 inches down) and another near the bottom foot. These will be your start and stop points for the main flutes. -
Carve the first channel:
Using a U-shaped carving tool, start at your top mark. I prefer to push the tool downward in a straight, confident stroke toward the bottom mark. -
Create the top scallop:
At the top of your stroke, press slightly deeper to create a rounded, scalloped indentation before dragging the tool downward. This creates that decorative arch at the top of the flute. -
Establish the rhythm:
Repeat this vertical cut directly next to the first one. Leave a very thin ridge of uncarved clay between each flute to define the pattern. Continue this all the way around the cylinder. -
Detail the bottom:
For the bottom detail seen in the image, carve shorter, inverse flute shapes at the base. Position these shorter cuts so they nest in between the long vertical flutes, creating an alternating pattern near the foot ring. -
Refine the edges:
Once all carving is complete, wait for the clay to dry just a bit more—to a bone-dry state—and then gently brush away the ‘crumbs’ with a soft brush. -
Smooth sharp spots:
Use a barely damp sponge or your fingertip to soften any exceedingly sharp ridges created by the carving tool. You want the glaze to break over these lines, not pull away completely.
Clean Lines
When carving vertical lines, lock your elbows against your ribs and rotate the banding wheel instead of moving your arms. This stabilizes the tool for straighter lines.
Step 3: Glazing and Firing
-
Bisque fire:
Load your bone-dry vase into the kiln and bisque fire it to Cone 04 (or your clay body’s recommendation). -
Wax the foot:
Apply wax resist to the bottom of the vase and slightly up the side of the foot ring to protect the kiln shelf and create a clean line. -
Glaze application:
Dip the vase into a satin creamy white glaze. A satin matte glaze is ideal here because it doesn’t reflect too much light, allowing the shadows of the carved texture to stand out. -
Check thickness:
Ensure the glaze isn’t too thick, or it will fill in your beautiful carving. If you dipped it for too long, you can gently sponge off a little glaze once it’s powdery dry. -
Clean the distinct features:
Double-check that the glaze hasn’t pooled excessively in the top scallops. If it has, tap the sides of the vase while the glaze is wet to encourage it to settle evenly. -
Glaze fire:
Fire the vase to its final maturity temperature (typically Cone 6 or Cone 10 depending on your clay). The heat will cause the speckles in the clay to bleed through the white glaze, creating the texture seen in the photo.
Break the Uniformity
Try using a different carving tool tip for every other line, or alternate the depth of your pressure to create a complex rhythm of shadows in the final glaze.
Once cooled, fill your vase with fresh blooms or dried grasses to see how the light catches the unique texture you created


Crosshatch and Hatch Shading
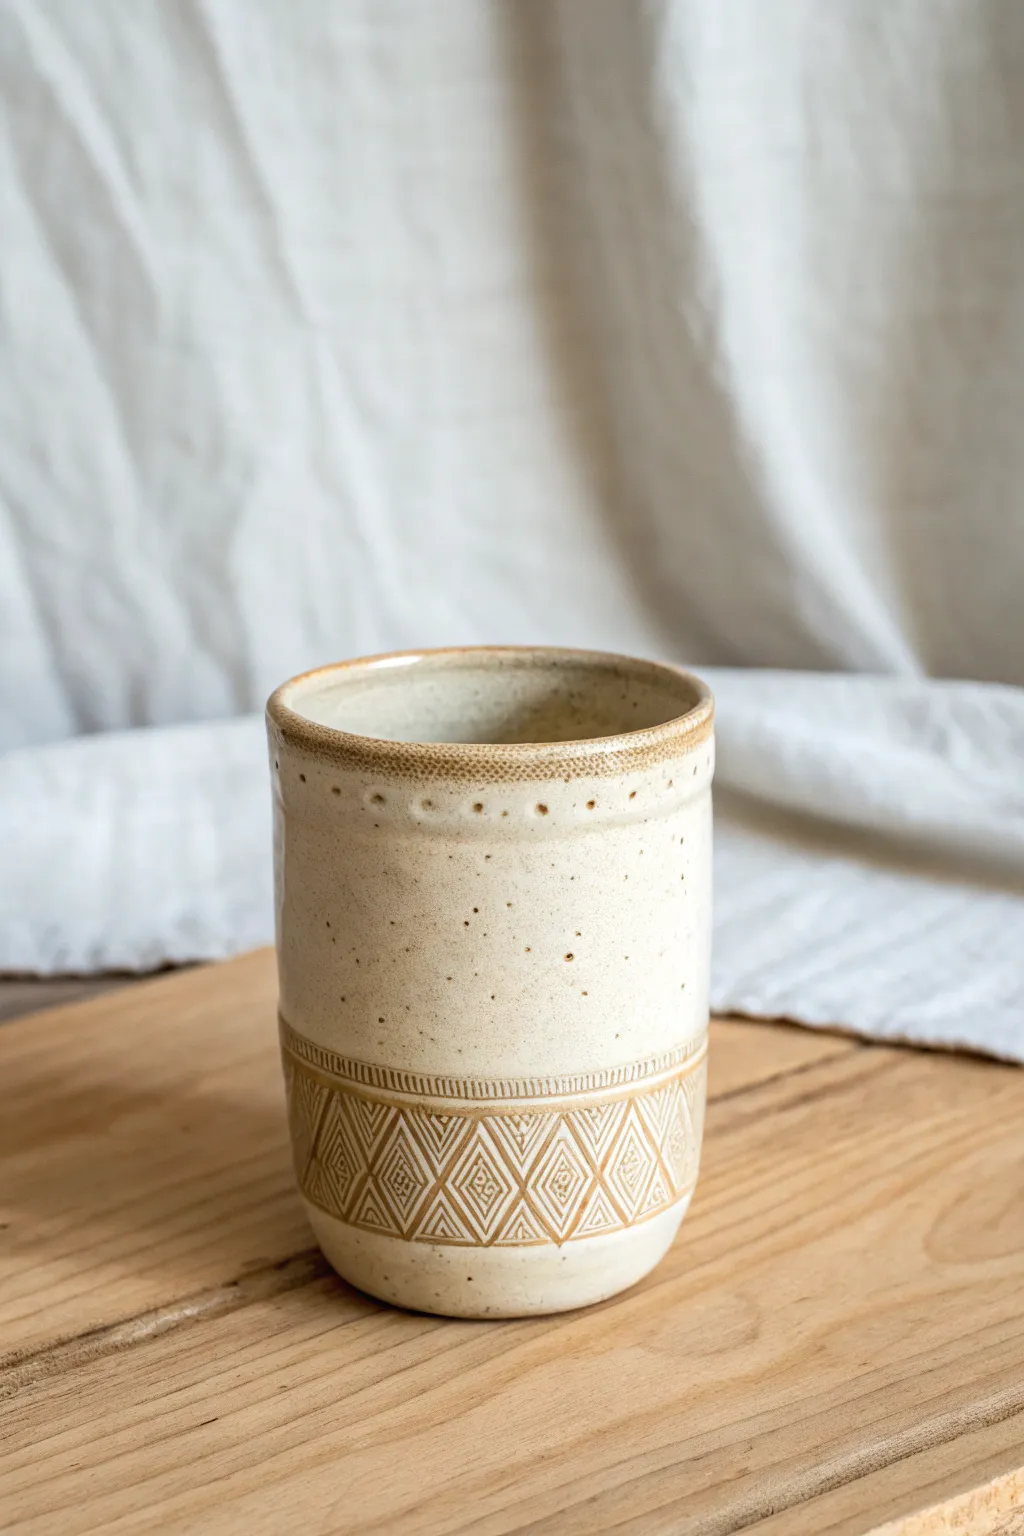
This rustic, hand-thrown tumbler features a creamy, speckled finish and delicate geometric carving along the base. The tactile diamond pattern, created with meticulous hatching, offers a beautiful contrast to the smooth upper body, making it a perfect example of surface decoration.
Step-by-Step Tutorial
Materials
- Stoneware clay (speckled or buff)
- Pottery wheel
- Throwing tools (sponge, ribs, wire cutter)
- Trimming tools
- Sgraffito tool or fine needle tool
- Loop tool (for larger carving)
- Small carving loop or fluting tool
- Speckled cream or matte white glaze
- Transparent glaze (optional)
- Kiln
Step 1: Throwing and Shaping
-
Center the Clay:
Begin with about 1 pound of speckled stoneware clay. Wedge it thoroughly to remove air bubbles, then slam it onto your wheel head. Using steady pressure, center the clay into a low, smooth mound. -
Open the Form:
Press your thumbs into the center to open the clay, leaving about a 1/4 to 1/2 inch floor thickness to allow for later trimming. -
Pull the Cylinder:
Slowly pull the walls upward to create a cylinder. Aim for straight, even walls that are slightly thicker at the bottom to support the eventual carving work. -
Shape the Rim:
Compress the rim with a chamois or sponge. While the wheel is spinning slowly, gently press a small, textured roller or the edge of a tool against just the rim to create the subtle dotted border seen in the image. -
Refine the Profile:
Use a metal or wood rib to smooth the outer walls, removing slip and slurry. This creates a clean canvas for your texture. Shape the bottom slightly convex if a rounded foot is desired. -
Dry to Leather Hard:
Wire the pot off the wheel and let it dry slowly. It needs to reach a sturdy leather-hard stage—firm enough to handle without warping, but soft enough to carve easily.
Clean Lines
For the crispest hatching lines, carve when the clay is on the drier side of leather-hard. If it’s too wet, the clay will drag and create messy burrs.
Step 2: Carving the Geometry
-
Trim the Foot:
Place the pot back on the wheel upside down and trim the excess clay from the bottom. Create a clean, defined foot ring. -
Mark the Band:
Using a needle tool, lightly score two horizontal lines around the lower third of the cup to define the area where the geometric pattern will live. -
Create the Diamond Grid:
Lightly sketch a zigzag line between your two horizontal bands to create a series of triangles, then invert the pattern to form diamonds. Don’t worry if they aren’t mathematically perfect; the handmade look is part of the charm. -
Carve the Outlines:
Use a fine loop tool or V-tip carving tool to deepen the outlines of your diamond shapes. Keep the cuts clean and uniform in depth. -
Inner Detailing:
Inside each large diamond, carve smaller diamond shapes. This creates a nesting doll effect that adds depth to the design. -
Apply Hatching:
This is the crucial step for the ‘hatching’ effect. Use a very fine needle tool or sgraffito tool to scratch parallel, vertical lines inside the varying sections of the diamonds. Vary the density of lines to create shading effects. -
Add Decorative Borders:
Above the main diamond band, carve a series of very small, tight vertical lines to create a ‘fringe’ border that frames the geometric section. -
Smooth Burrs:
Wait for the pot to dry a bit more towards bone dry, then gently rub the carved areas with a soft scrubby or your finger to knock off any sharp little clay crumbs.
Step 3: Glazing and Firing
-
Bisque Fire:
Once the piece is bone dry, load it into the kiln for a bisque firing (usually to Cone 04 or 06). This prepares the clay to accept glaze. -
Wax Resist:
I like to apply wax resist to the very bottom foot ring to prevent glaze from running onto the kiln shelf. -
Choose the Glaze:
Select a semi-opaque or transparent speckled cream glaze. The transparency is vital because it needs to ‘break’ over the texture, pooling in the carved recessions and thinning on the high points to reveal the clay color. -
Dip and Pour:
Pour the glaze inside the cup first and pour it out. Then, using tongs, dip the entire outside of the cup into the glaze bucket for about 3 seconds for an even coat. -
Clean the Texture:
If the glaze looks too thick over your fine hatching, gently wipe the carved area with a slightly damp sponge. You want the glaze to stay in the grooves but not obscure the fine liines. -
Final Fire:
Fire the piece to maturity (Cone 6 or 10, depending on your clay body). The heat will melt the glaze, highlighting the beautiful hatch marks you created.
Glaze Too Thick?
If you accidentally apply too much glaze over the texture, wait for it to dry, then gently scratch through the glaze with a needle tool to re-expose the deep grooves.
Now you have a stunning, tactile vessel ready for your morning coffee


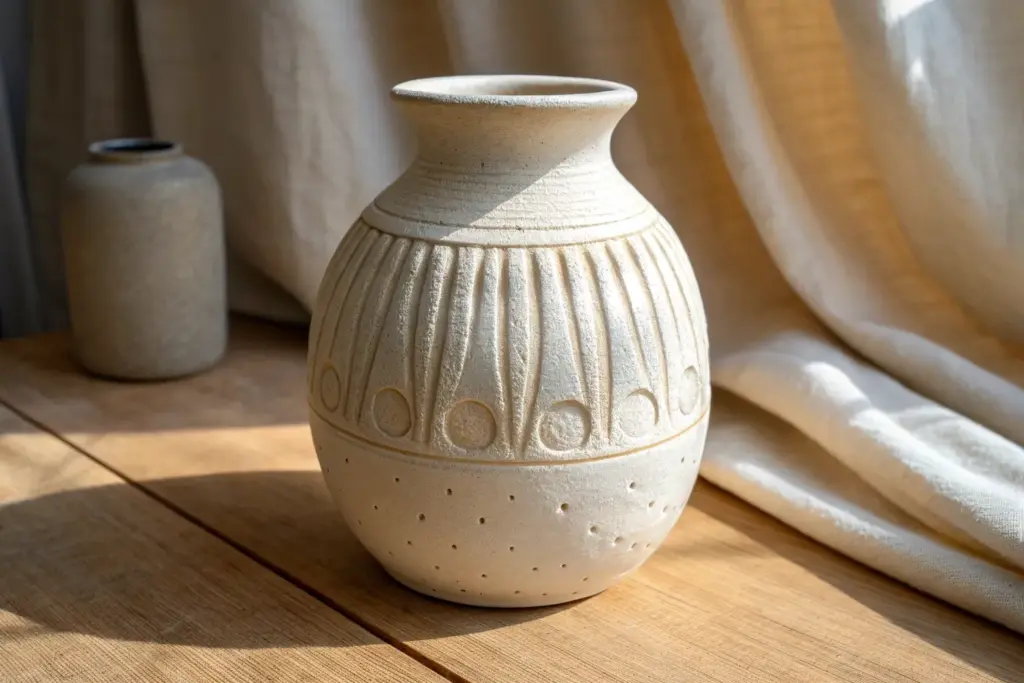
Fluting and Soft Facets
This project explores the timeless elegance of vertical fluting on a bulbous ceramic form, creating a piece that feels both organic and structured. The rhythm of the ridges catches the light beautifully, emphasizing the swelling volume of the pot while the matte cream glaze gives it a sophisticated, stone-like presence.
Step-by-Step
Materials
- Light-colored stoneware clay body (smooth or with fine grog)
- Potter’s wheel
- Throwing tools (sponge, rib, wire cutter)
- Fluting tool (rounded wire loop or specialized carving tool)
- Flexible metal rib
- Soft sponge
- Measuring calipers (optional)
- Matte cream or satin white glaze
Step 1: Throwing the Form
-
Center and open:
Begin with about 3-4 pounds of well-wedged clay. Center it firmly on the wheel head and open the clay, keeping the base somewhat narrow to encourage that eventual bulbous lift. -
Raise the cylinder:
Pull the walls up into a tall, relatively narrow cylinder first. Don’t belly it out yet; focus on getting even wall thickness from bottom to top, as uneven walls will warp during fluting. -
Shape the belly:
Using a rib on the inside and gentle pressure from the outside, gradually push the clay outward to create a voluminous, round belly. Leave the neck narrow. -
Refine the neck:
Collar the neck in significantly. You want a tight, vertical chimney that contrasts with the wide body. Use a sponge to compress the rim smooth. -
Smooth the surface:
Before taking it off the wheel, run a flexible metal rib over the entire exterior to remove throwing lines. A perfectly smooth canvas is essential for clean fluting.
Wobbly Lines?
If your hand shakes during long vertical cuts, try faster strokes. Moving the tool quickly uses momentum to keep the line straight, whereas moving slowly invites jitters.
Step 2: Carving the Texture
-
Dry to leather hard:
Allow the vase to dry slowly until it reaches a sturdy leather-hard stage. It should be firm enough to hold its shape under pressure but soft enough to carve without chipping. -
Mark your spacing:
If you want perfect symmetry, lightly mark vertical guidelines at the rim divided into even segments (quarters, then eighths) to help keep your vertical lines straight. -
First cut:
Using a rounded wire loop tool, start a cut at the very top of the neck. Drag the tool downward with steady, even pressure, following the curve of the pot all the way to the foot. -
Establish the depth:
Aim for a shallow, U-shaped groove. The depth should be consistent; if you press too hard on the belly where the clay is stretched, you risk cutting through. -
Create the ridge:
Place your next cut right beside the first one. Leave a tiny, sharp ridge of un-carved clay between the two grooves. This ridge is what catches the light. -
Continue rhythmically:
Work your way around the pot. I find it helpful to stand up while doing this to get a better view of the vertical alignment as the tool travels down the curve. -
Check the bottom:
As the lines converge at the narrower base, you may need to taper your cut slightly so the ridges don’t collide messily at the foot. -
Cleanup:
Once the carving is done, let the burrs dry until they are crumbly. Then, simply brush them off with a soft brush rather than smearing them while wet. -
Softening (Optional):
If the ridges feel too sharp, gently wipe the surface with a barely damp sponge to soften the edges just a touch, giving it that worn stone look.
Step 3: Glazing and Finishing
-
Bisque fire:
Bisque fire the piece to the appropriate temperature for your clay body (usually Cone 06 or 04). -
Wax the foot:
Apply wax resist to the bottom foot ring to prevent glaze from adhering to the kiln shelf. -
Glaze application:
Dip the vase into a matte cream or satin white glaze. A dipping application is better than brushing here, as it ensures the glaze pools evenly in the flutes without brush marks. -
Check thickness:
Ensure the glaze isn’t too thick. If it’s too thick, it will fill in the fluting grooves and you’ll lose the distinct shadow lines you worked so hard to carve. -
Final firing:
Glaze fire to maturity (e.g., Cone 6). The matte finish will enhance the tactile quality of the ridges.
Pro Tip: Tool Selection
Use a tool with a fixed depth gauge or a ‘ribbon’ tool with a specific width. This ensures every single flute remains exactly the same size and depth around the pot.
Place your finished vase near a window to watch how the shifting daylight plays across your carved texture


Wheel Chatter Texture Bands
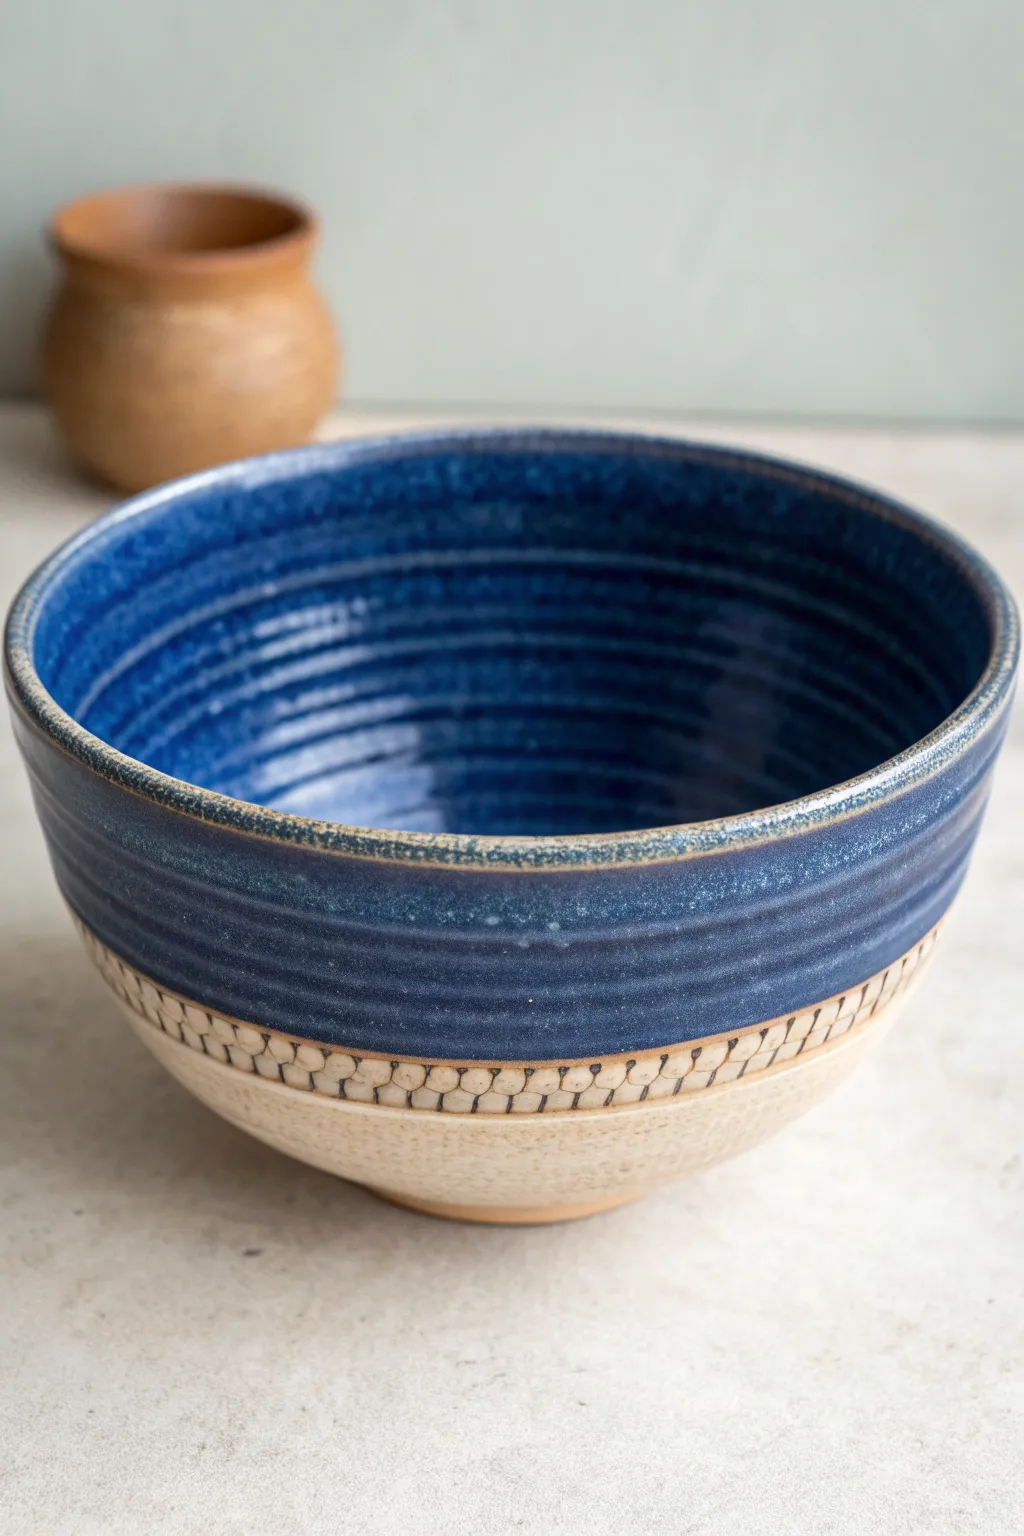
This project combines the rhythmic, tactile appeal of chattered texture with a stunning deep blue glaze. The contrast between the smooth, glossy upper body and the raw, earthy chatter band creates a piece that is as satisfying to hold as it is to look at.
Step-by-Step Tutorial
Materials
- Speckled buff stoneware clay
- Potter’s wheel
- Throwing tools (sponge, rib, wire)
- Trimming tools (large loop tool)
- Chatter tool (flexible metal strip or specialized tool)
- Deep cobalt blue glaze
- Wax resist
- Large glaze brush or dipping tongs
- Kiln
Step 1: Throwing the Form
-
Center and open:
Begin with about 2-3 pounds of speckled buff clay. Center it firmly on the wheel head and open the clay to create a wide, curved interior floor suitable for a serving bowl. -
Pull the walls:
Pull the walls up and out, aiming for a consistent thickness of about 1/4 inch. Shape the bowl into a gentle, open curve, ensuring the rim is slightly thickened for durability. -
Refine the interior:
Use a flexible metal or rubber rib to compress the inside curve. This removes throwing lines on the interior if you prefer a smooth finish, or leave subtle finger ridges for extra character as seen in the reference. -
Define the drying stage:
Wire the pot off the wheel bat but leave it in place until it reaches a sturdy leather-hard state. It needs to be firm enough to withstand the vibration of chattering without warping.
Chatter Timing Tip
Clay dampness is critical. If too wet, the tool digs deep gouges; if too dry, it barely scratches. Test on a scrap piece first to find the sweet spot.
Step 2: Trimming and Chattering
-
Secure for trimming:
Invert the leather-hard bowl onto the wheel head. Center it perfectly and secure it with wads of clay or a Giffin Grip. -
Initial trim:
Use a sharp loop tool to trim the excess clay from the bottom third of the exterior. Define the foot ring clearly, leaving a smooth surface where the texture will go. -
Prepare for chattering:
Spin the wheel at a moderate-to-fast speed. The clay surface should be slightly drier than typical leather-hard for the crispest chatter marks. -
Apply the chatter tool:
Hold your chatter tool firmly with the tip resting against the clay about an inch above the foot. Allow the flexible metal to bounce or ‘chatter’ against the surface as you slowly move the tool downward. -
Vary the rhythm:
Experiment with the pressure and angle to create the rhythmic, vertical divot pattern. Aim to create a band of texture roughly 1 to 1.5 inches wide. -
Clean up:
If the chattering created any sharp burrs or crumbs, lightly brush them away with a soft rib or your finger, but be careful not to smooth out the texture itself. -
Bisque fire:
Allow the bowl to dry completely (bone dry) before loading it into the kiln for a bisque firing to cone 04.
Celadon Shift
Instead of leaving the texture raw, cover the chatter band with a translucent celadon glaze. It will pool darker in the divots, emphasizing the pattern.
Step 3: Glazing
-
Clean the bisque:
Wipe the bisque-fired bowl with a damp sponge to remove any dust that might prevent glaze adhesion. -
Wax the foot and band:
Apply wax resist to the bottom foot ring. Carefully brush a line of wax just below the chatter band if you want the very bottom edge of the clay to remain completely bare. -
Glaze the interior:
Pour your deep cobalt blue glaze into the bowl, swirl it to coat the entire interior, and pour out the excess. Wipe any drips off the rim immediately. -
Glaze the exterior top:
Hold the bowl by the foot. Dip the top portion of the bowl into the glaze bucket, stopping just before you reach the chatter texture band. The glaze should stop right at the upper edge of your texturing. -
Refine the glaze line:
If the dip line is uneven, use a damp sponge to clean up the edge so the blue glaze ends in a crisp horizontal line right above the chatter marks. -
Highlight the texture (Optional):
To get the look in the image where the recesses are dark, you can brush a very thin wash of iron oxide or a diluted dark glaze into the chatter marks and wipe the surface clean, leaving color only in the divots. -
Final wipe:
Ensure the foot ring is completely free of glaze to prevent it from sticking to the kiln shelf. -
Glaze fire:
Fire the bowl to cone 5 or 6 (depending on your clay and glaze pairing) to mature the clay and melt the glaze into a rich, glassy finish.
Once cooled, your bowl is ready to bring a touch of artisan craftsmanship to your table

What Really Happens Inside the Kiln
Learn how time and temperature work together inside the kiln to transform clay into durable ceramic.
Scalloped Rim and Edge Texture
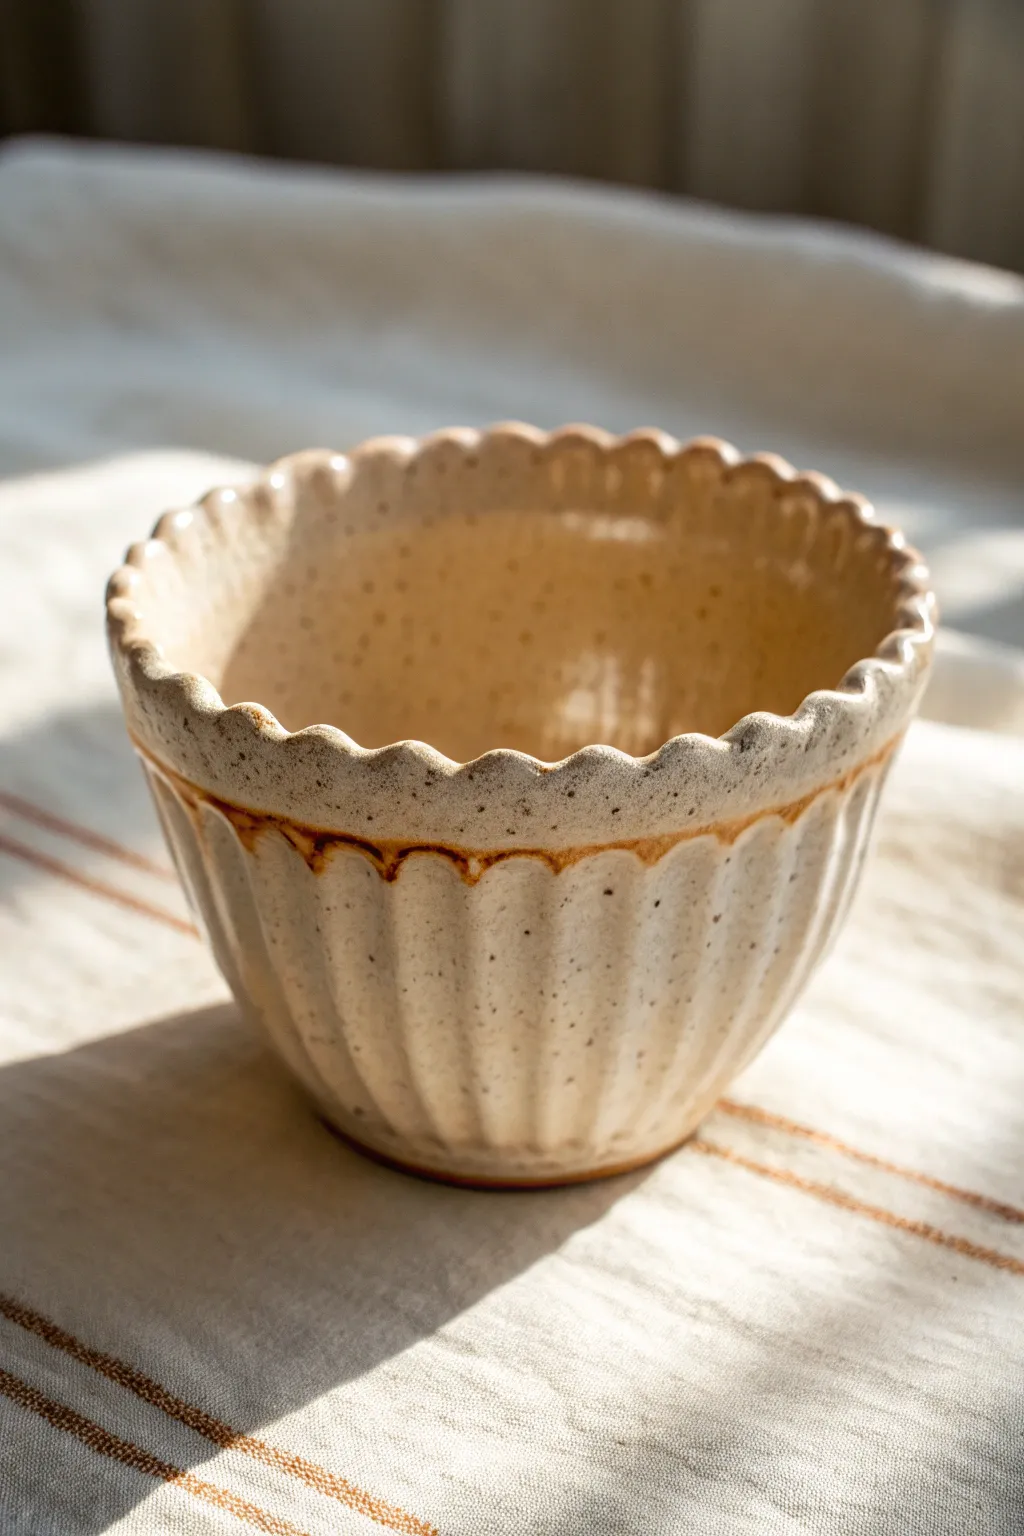
This tutorial guides you through creating a charming, vintage-inspired bowl that features a distinctive scalloped rim and fluted body. The speckled clay body and warm brown oxide wash emphasize the rhythmic textures, giving it a cozy, handmade feel perfect for your morning yogurt or berries.
How-To Guide
Materials
- Speckled stoneware clay (mid-fire)
- Pottery wheel
- Throwing tools (sponge, rib, needle tool, wire)
- Small carving tool or rounded loop tool
- Soft flexible rib
- Ruler or measuring tape
- Clear transparent glaze (mid-fire)
- Iron oxide wash or dark brown stain
- Sponge for wiping
- Kiln
Step 1: Throwing and Shaping
-
Center the Clay:
Begin with about 1.5 to 2 lbs of speckled stoneware clay. Wedge it thoroughly to remove air bubbles, then slam it onto your wheel head. Center the clay using firm pressure and water, ensuring it feels steady and symmetrical. -
Open and Pull:
Open the centered mound to your desired floor width—about 3 inches is good for this style. Pull the walls up, aiming for a height of roughly 4-5 inches. Keep the walls evenly thick, slightly thicker than a standard mug to accommodate the carving later. -
Create the Conical Shape:
Collar the clay slightly inward as you pull, creating a tapered, V-shaped profile rather than a straight cylinder. The rim should be wider than the base, flaring out gently. -
Refine the Rim:
Using a chamois or a wet sponge, compress the rim to make it smooth and rounded. It needs to be slightly substantial to hold the scalloped shape without cracking. -
Dry to Leather Hard:
Wire the pot off the wheel but leave it on the bat if possible, or move it carefully to a ware board. Let it dry slowly until it reaches a sturdy leather-hard stage. It should be firm enough to handle without deforming but soft enough to carve.
Even Spacing Secret
Use a decorating disk or simply divide the rim into 4 quadrants, then sub-divide those sections. This ensures your scallops meet perfectly at the end without an odd-sized gap.
Step 2: Carving the Flutes
-
Mark Guidelines:
Lightly mark vertical lines around the exterior to guide your spacing if you want precision, or trust your eye for a more organic look. Locate the top rim section where your flutes will terminate. -
Carve the Flutes:
Using a rounded loop tool or a specialized fluting tool, start about an inch below the rim. Carve vertical channels downwards towards the foot. Apply steady pressure to create deep, consistent grooves. -
Extend to the Rim:
Now, connect your vertical flutes to the rim. Instead of carving through the rim, press the tool gently into the rim edge to create the concave ‘dip’ of the scallop, aligning it with the vertical flute below. This creates that continuous wave effect. -
Smooth the Edges:
Once all flutes are carved, use a damp sponge or a soft finger to gently smooth the sharp ridges created between the flutes. You want the texture to feel soft in the hand, not jagged. -
Trim the Foot:
Turn the pot over and trim a neat foot ring. Since the walls are decorative, a simple, understated foot works best to keep the focus on the texture.
Step 3: Finishing and Glazing
-
Bisque Fire:
Let the bowl dry completely (bone dry). Fire it in the kiln to a bisque temperature (usually cone 04 or 06) to prepare it for glazing. -
Apply Oxide Wash:
Mix a small amount of iron oxide with water. Brush this wash specifically into the carved vertical grooves and along the scalloped rim. You don’t need to cover the whole pot, just the textured areas. -
Wipe Back:
Using a clean, damp sponge, wipe away the excess oxide from the raised surfaces. The dark color should remain only in the deep recesses and crevices, highlighting the fluted pattern. -
Glaze Application:
Dip the entire bowl into a clear, gloss transparent glaze. Shake off any excess drips. The clear glaze will seal the clay and allow the speckles and the oxide detail to show through clearly. -
Wipe the Foot:
Thoroughly wipe the bottom foot ring clean of any glaze to prevent it from sticking to the kiln shelf. -
Glaze Fire:
Load the kiln and fire to the maturity temperature of your clay and glaze (typically cone 5 or 6 for stoneware). Allow the kiln to cool naturally before unloading.
Rim Cracking?
If the rim cracks while scalloping, your clay is likely too dry. Mist it lightly and wrap it in plastic for a few hours to rehydrate the surface before attempting to carve again.
Enjoy using your new textured bowl, watching how the light catches those beautiful ridges every morning
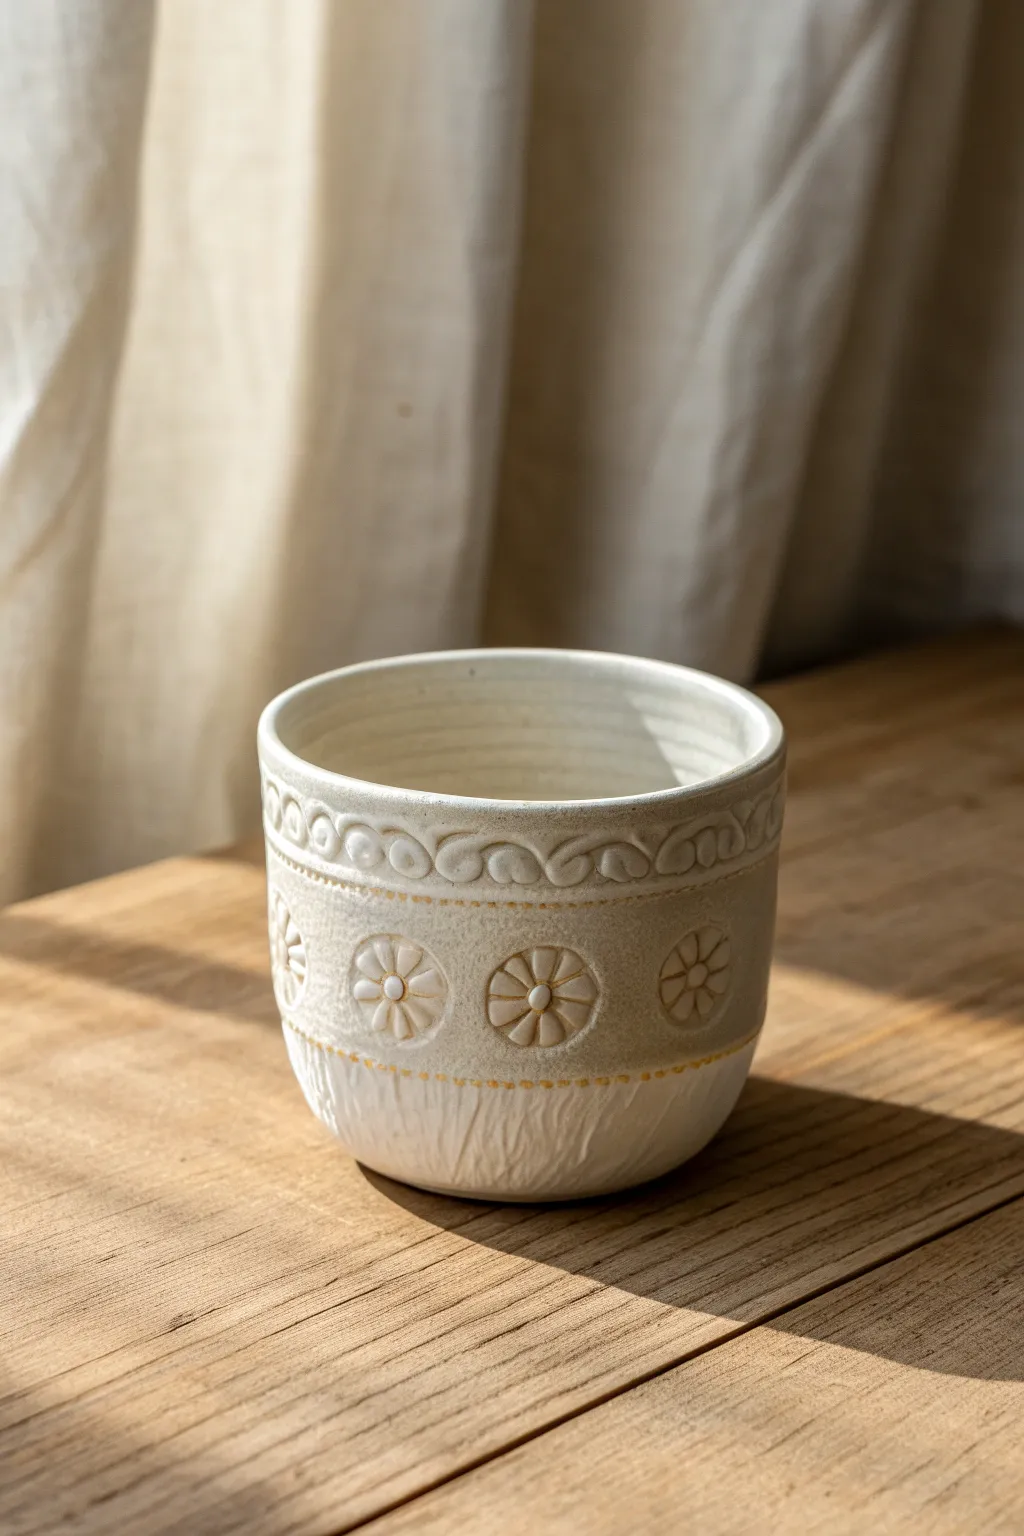
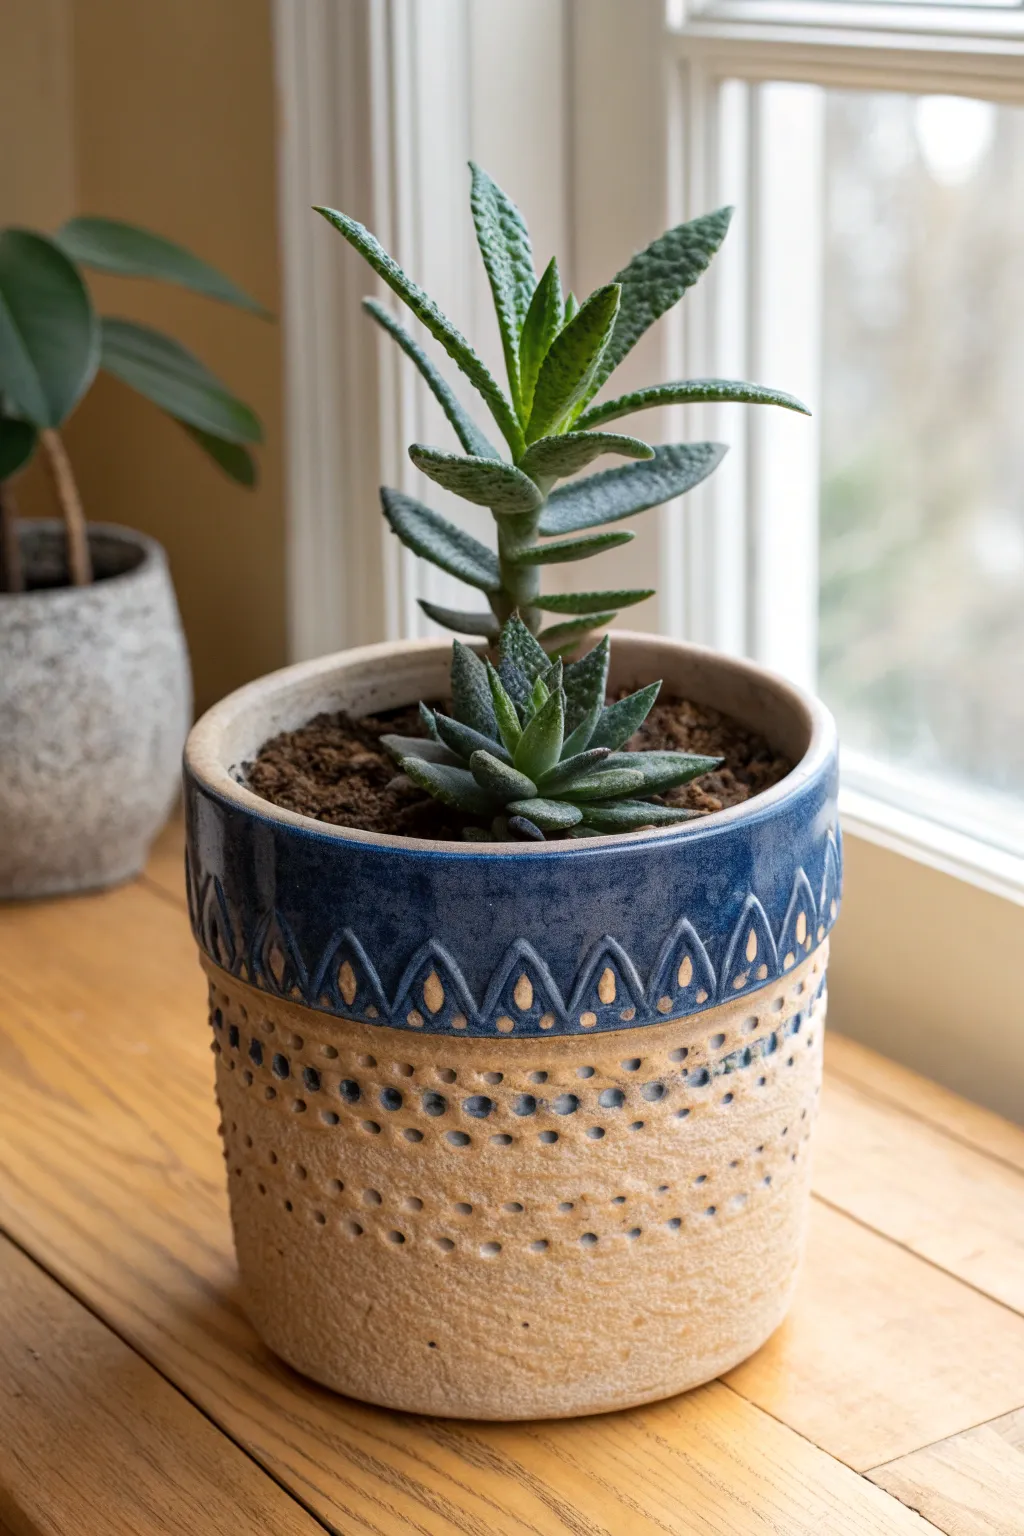
Stamped Repeating Geometrics
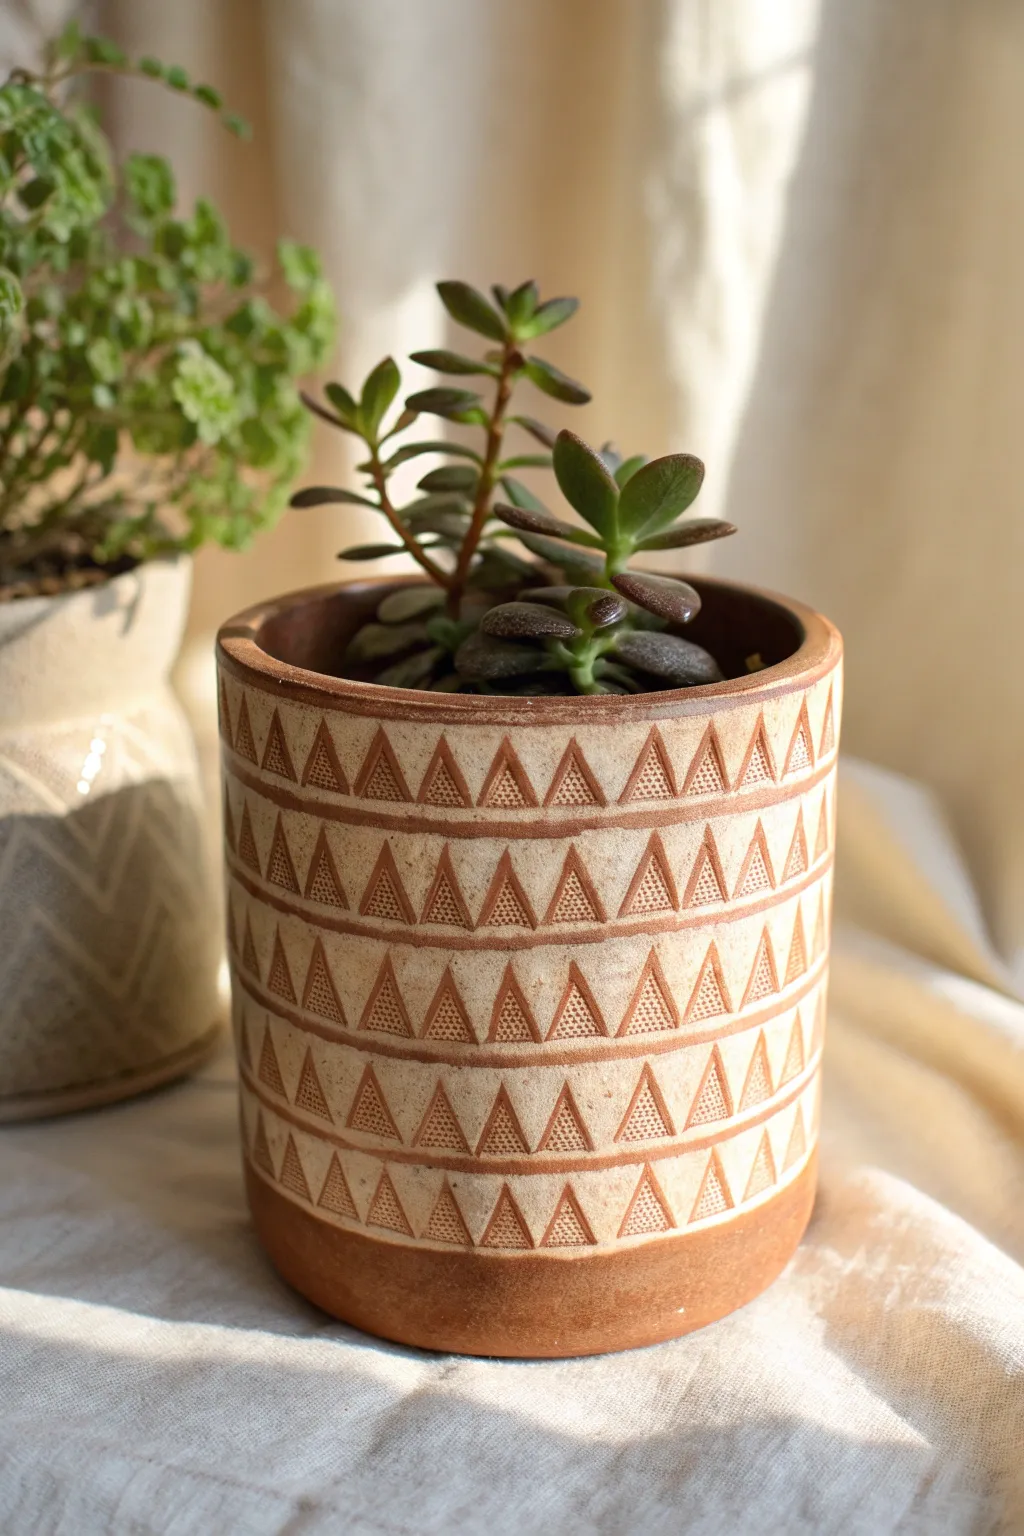
Achieve a clean, rhythmic aesthetic with this planter project that balances raw clay warmth with structured geometric patterns. By utilizing simple handmade stamps, you’ll create stacked rows of triangles that offer a delightful tactile contrast against the smooth vessel walls.
Detailed Instructions
Materials
- Stoneware clay body (smooth, buff or red)
- Small block of bisque clay or wood (for stamp making)
- Carving tools or X-Acto knife
- Pottery wheel (or slab-building tools)
- Needle tool
- Trimming tools
- Ruler or calipers
- White underglaze or slip
- Clear matte glaze
- Sponge and bucket of water
Step 1: Stamp Creation
-
Draft the design:
Sketch a small equilateral triangle on the end of a small, rectangular block of leather-hard clay or soft wood. The triangle should be about 1/2 inch wide. -
Carve the relief:
Carefully carve away the material surrounding the triangle so the shape is raised. Keep the edges sharp. -
Add internal texture:
Using a needle tool, stipple the face of the raised triangle to create a dotted texture. This will catch the glaze later. -
Finish the tool:
If using clay, bisque fire the stamp so it is durable and porous. If using wood, sand it slightly to remove burrs.
Stamp Release
If your stamp is sticking to the leather-hard clay, dust the stamp face slightly with cornstarch or dry clay dust before pressing it into the wall.
Step 2: Forming the Vessel
-
Throw the cylinder:
Center about 2-3 lbs of clay on the wheel and open it up. Pull the walls to create a straight-sided cylinder with a flat rim. -
Refine the shape:
Use a metal kidney rib to compress and smooth the outer walls, removing any throwing lines. A smooth canvas is essential for clean stamping. -
Trim the foot:
Allow the pot to dry to a leather-hard state. I prefer to trim a clean, right-angle foot leading into the body, leaving the bottom untextured band (about 1 inch) exposed.
Step 3: Pattern Application
-
Mark guidelines:
While the pot is on a banding wheel, lightly drag a needle tool or pencil against the surface to create faint horizontal guidelines. Space them slightly wider than the height of your stamp. -
Begin the first row:
Starting just below the rim, press your triangle stamp into the clay. Support the wall from the inside with your other hand to prevent warping. -
Complete the circuit:
Continue stamping around the circumference. Don’t worry if the spacing isn’t mathematically perfect; adjust the gap slightly as you approach the start to fit the last one in. -
Stack the rows:
Move to the next guideline down. Offset the triangles so the point of the new triangle aligns with the gap between the two above it, creating a brick-lay effect. -
Incise separation lines:
Once all rows are stamped, use a dull carving tool to deepen the horizontal guide lines between the rows, carving distinct channels that separate the bands of triangles. -
Clean up:
Smooth away any burrs or raised edges created by the stamping process using a barely damp sponge or your fingertip.
Make it a Set
Create a matching saucer using the same clay body. Stamp just the outer rim of the saucer with a single row of triangles to visually tie the two pieces together.
Step 4: Glazing and Finishing
-
Apply inlay:
Once the piece is bone dry, brush a generous coat of white underglaze or slip over the entire textured area, filling all the stamped impressions. -
Wipe back:
When the underglaze is stiff but not fully dry, wipe the surface with a damp sponge. This removes the white form the high points (the raw clay) but leaves it inside the stamped textures and carved lines. -
Bisque fire:
Fire the piece to cone 04 (or your clay’s specific bisque temperature). -
Clear coat:
Dip the interior and the exterior pattern area in a clear matte glaze. Leave the bottom inch of raw clay unglazed for that earthy contrast shown in the photo. -
Final firing:
Glaze fire the piece to maturity (Cone 5/6 for stoneware).
Now you have a beautifully textured home for your favorite succulent


The Complete Guide to Pottery Troubleshooting
Uncover the most common ceramic mistakes—from cracking clay to failed glazes—and learn how to fix them fast.
Botanical Impressions and Veins
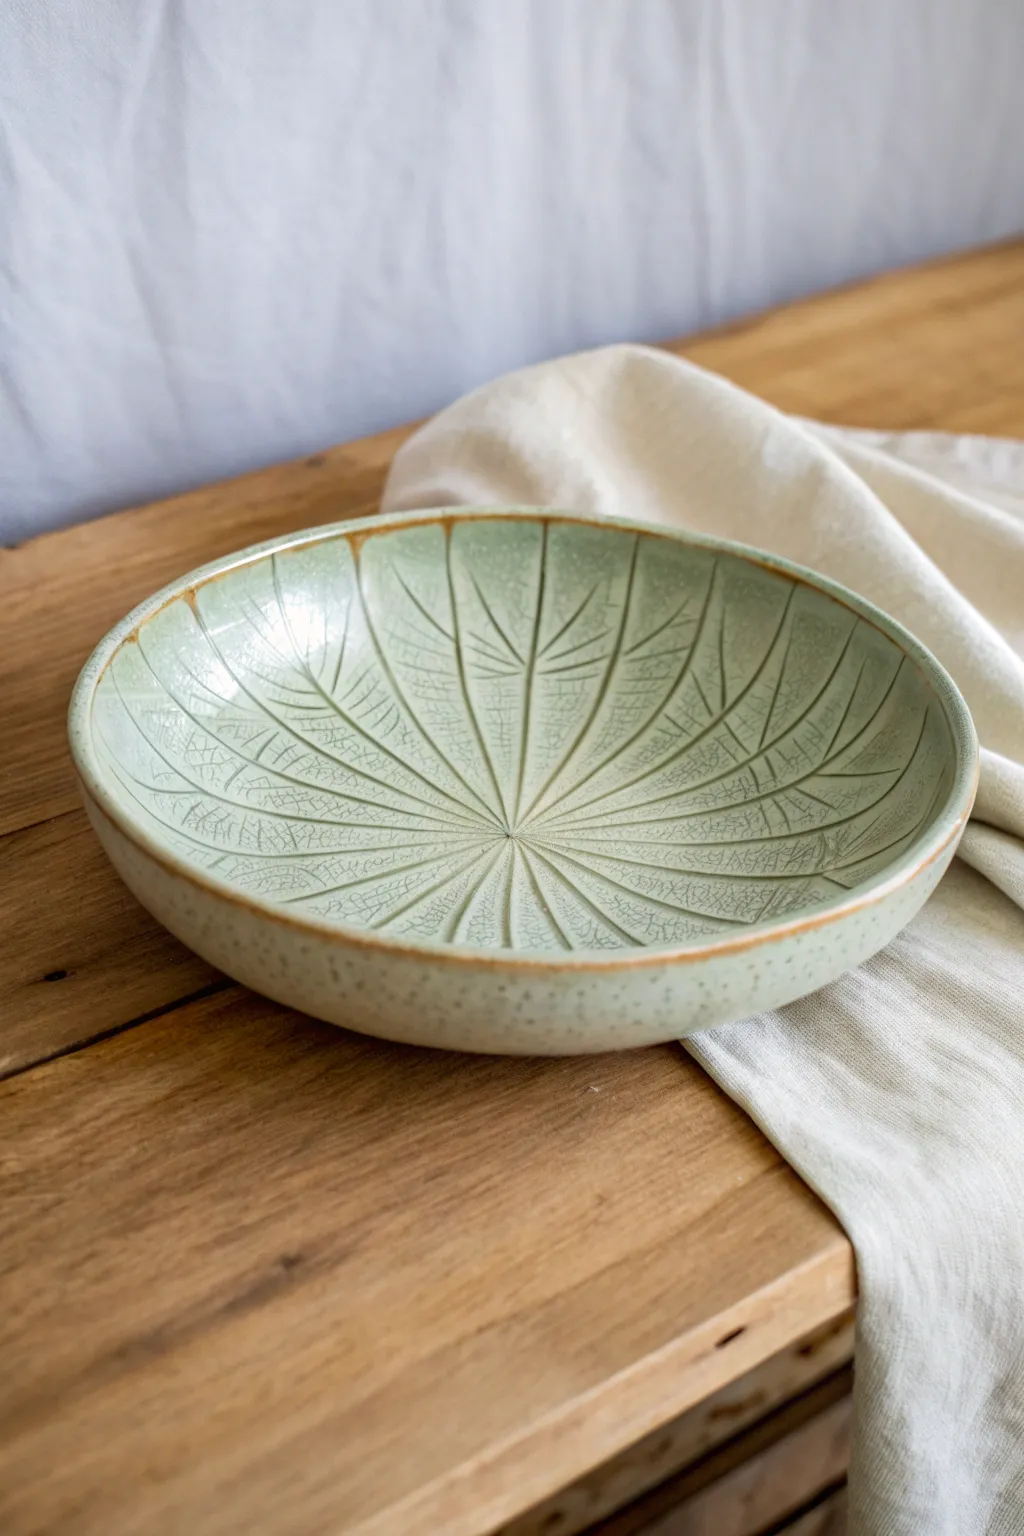
This elegant shallow bowl captures the serene beauty of a broad leaf with its subtle, radiating vein texture. The pale celadon glaze settles beautifully into the carved lines, creating depth and highlighting the botanical pattern against the natural clay body.
How-To Guide
Materials
- Stoneware clay (buff or speckled)
- Pottery wheel (or slab roller/mold for handbuilding)
- Rib tools (wood and metal)
- Needle tool
- Carving tool (small loop or sgraffito tool)
- Sponge
- Celadon glaze (crackled green)
- Oxide wash (iron oxide, optional)
- Clear glaze (optional)
Step 1: Forming the Base
-
Center and open:
Begin with about 2-3 pounds of well-wedged stoneware clay. Center it firmly on the wheel head and open it wider than you would for a cylinder, aiming for a shallow curve suitable for a fruit bowl. -
Pull the walls:
Pull the clay outward rather than upward, maintaining a consistent thickness of about 1/4 inch. The transition from the floor to the wall should be a gentle, continuous curve. -
Compress the rim:
Use a chamois or your sponge to smooth and compress the rim. A slightly rounded rim looks best with this organic design and prevents chipping later. -
Refine the curve:
Use a metal or wooden rib to refine the interior curve, removing any throwing rings. The surface needs to be perfectly smooth to serve as a blank canvas for your carving. -
Leather hard stage:
Allow the bowl to dry slowly to a leather-hard state. It should be firm enough to handle without warping but soft enough to carve cleanly.
Glaze Bubbling?
If tiny bubbles obscure your carving, your glaze application was likely too thick. Thin your glaze with water slightly or pour it out faster next time.
Step 2: Carving the Veins
-
Mark the center:
Locate the exact center of the bowl’s interior. Place a tiny dot with your needle tool as an anchor point for your radiating lines. -
Create primary veins:
Using a needle tool, lightly sketch 12-16 straight lines radiating from the center point all the way to the rim. Think of these as the spokes of a wheel or the main structure of a palm leaf. -
Carve the main lines:
Go over your sketch using a small carving tool. I prefer a u-shaped wire loop for this to create a clean, shallow channel. Vary the pressure slightly—deeper near the center, tapering as you reach the rim. -
Add secondary veins:
Between the main spokes, carve shorter, angled lines that connect to the main veins. These should branch off like the intricate network of a leaf, creating V-shapes that point toward the rim. -
Texturize the surface:
For added organic detail, you can use a dull pencil or a modeling tool to gently press subtle textures or smaller vein-lets between the carved lines. -
Clean up burrs:
Once the clay is bone dry, use a slightly damp sponge or a stiff brush to gently remove any sharp clay burrs created during carving. Be careful not to wash away your crisp lines.
Step 3: Glazing and Finishing
-
Bisque fire:
Fire the piece to bisque temperature (usually cone 04 or 06). Wipe the bisque ware down with a damp sponge to remove any kiln dust. -
Apply oxide (optional):
To accentuate the rim like the reference photo, brush a thin line of iron oxide wash along the very edge of the rim and wipe away the excess with a sponge. -
Glaze application:
Pour a translucent pale green celadon glaze into the bowl. Roll it around to coat the entire interior evenly, then pour out the excess. Dip or spray the exterior to match. -
Clean the foot:
Wipe the foot ring completely clean of glaze using a wax resist beforehand or a wet sponge afterwards to prevent the pot from sticking to the kiln shelf. -
Check the thickness:
Ensure the glaze isn’t too thick in the bottom center where the lines meet, as this can obscure the delicate carving. -
Final wipe:
If you want the texture to pop even more, you can gently wipe the high points of the interior texture with a sponge while the glaze is powdery, leaving more glaze in the recesses. -
Glaze fire:
Fire to the maturation temperature of your specific clay and glaze body (typically cone 5/6 for stoneware).
Go darker
Rub a dark oxide wash (like black copper or iron) into the carved lines and sponge it off before glazing. This creates a high-contrast ‘inlaid’ effect.
The finished bowl will serve as a lovely centerpiece, especially when light catches the interplay of glaze and texture
Found-Object Press Textures
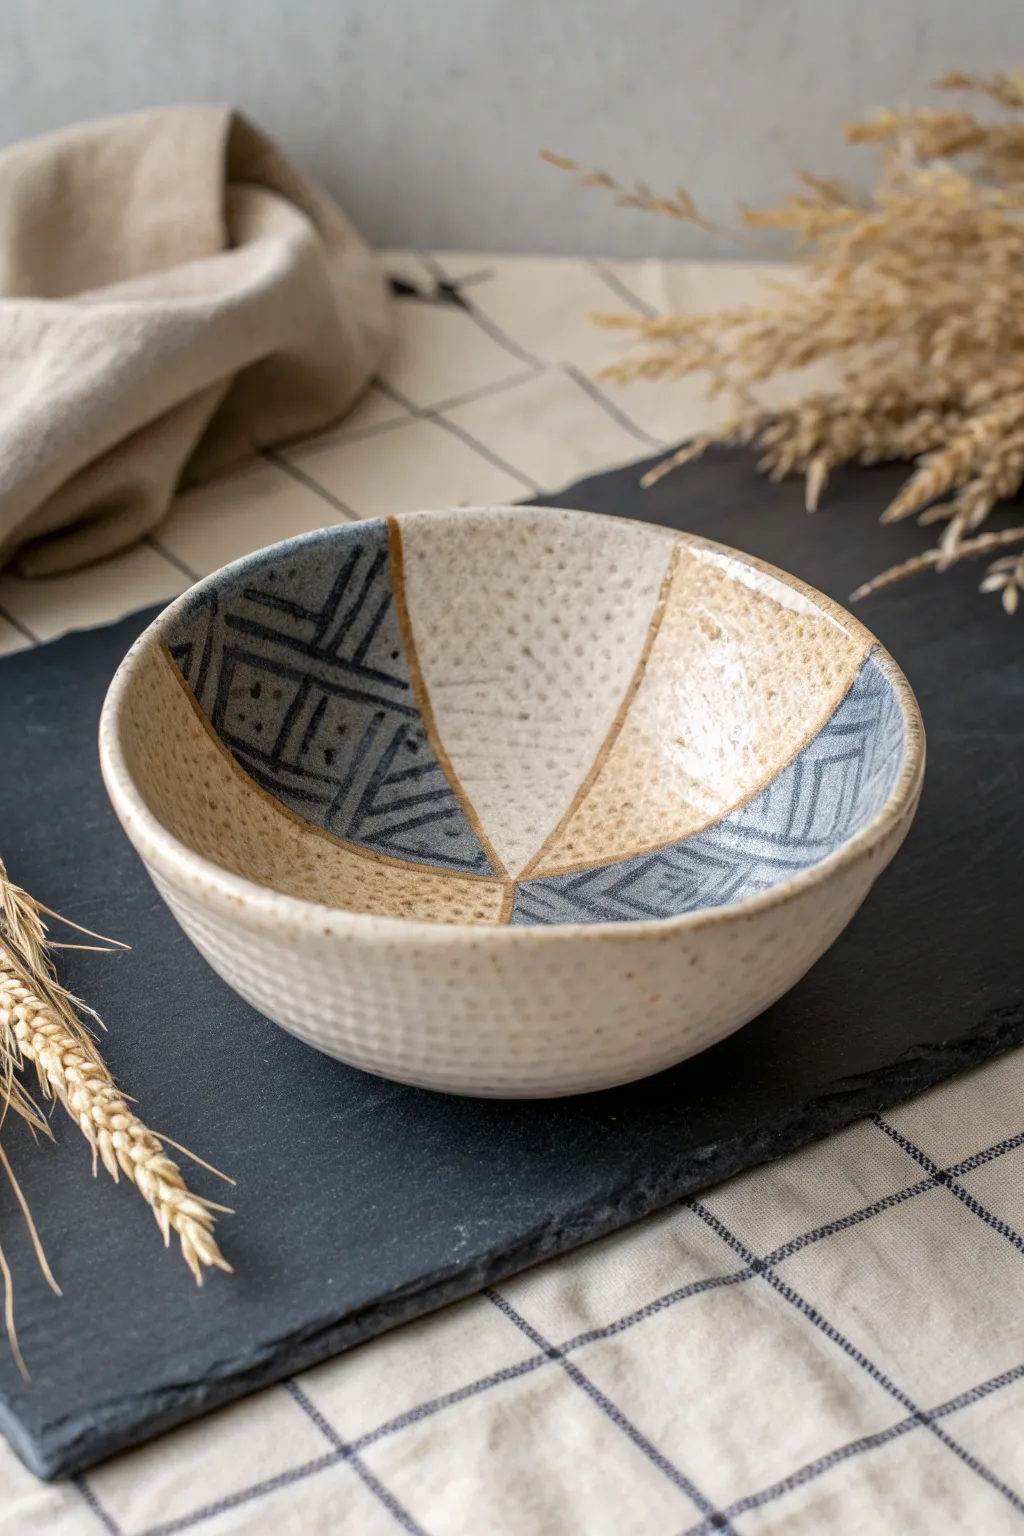
This project combines rough exterior texturing with a sophisticated interior design featuring alternating panels of geometric carving and speckled glaze. The result is a piece that feels both rustic and modern, perfect for showcasing contrasting ceramic techniques.
Step-by-Step Tutorial
Materials
- Stoneware clay body (speckled buff recommended)
- Pottery wheel or slab roller/mold
- Ribs (metal and wooden)
- Burlap, textured fabric, or a texturing paddle
- Carving tool (needle tool or fine sgraffito loop)
- Black underglaze
- Wax resist
- Clear matte glaze
- Warm beige/oatmeal glaze
- Sponge
- Paintbrushes
Step 1: Forming the Vessel
-
Prepare the Clay:
Wedge about 1.5 to 2 lbs of speckled stoneware clay thoroughly to remove air pockets. -
Throw the Basic Shape:
Center your clay on the wheel and open it up to a medium width. Pull the walls outward into a simple, hemispherical bowl shape. -
Shape the Curve:
Use a kidney rib to refine the interior curve, ensuring it is smooth and continuous. Leave the rim slightly thickened for durability. -
Apply Exterior Texture:
While the clay is still plastic but firm enough to hold shape, press a piece of coarse burlap or a textured paddle against the exterior while supporting the wall from the inside. This creates the ‘found object’ texture characteristic of the outside.
Smudged Lines?
If wiping back underglaze smears the clay, your sponge is too wet. Wring it out thoroughly and rotate to a clean spot on the sponge for every single swipe.
Step 2: Designing the Interior
-
Leather Hard Stage:
Let the bowl dry to a leather-hard state. This is crucial for crisp carving lines. -
Map the Sections:
Using a needle tool, lightly score lines from the rim to the center to divide the bowl’s interior into four or five equal triangular segments. -
Carve the Geometry:
In alternating sections, carve your geometric patterns. Create a mix of chevrons, straight lines, and grids. Carve deep enough to hold underglaze later. -
Add Subtle Texture:
In the non-carved sections, you can press a small, blunt tool repeatedly to create a dimpled or ‘orange peel’ texture if desired, or leave them smooth. -
Bisque Fire:
Slowly dry the piece completely, then load it into the kiln for a bisque firing to roughly Cone 04.
Add Gold Luster
For a luxe finish, paint a line of gold luster over the dividing lines between the panels after the glaze firing, then re-fire at a low temperature (Cone 018).
Step 3: Glazing and Finishing
-
Clean the Bisque:
Wipe the fired bowl with a damp sponge to remove any dust that might interfere with glaze adhesion. -
Inlay the Lines (Mishima):
Paint black underglaze into the carved geometric sections. Ensure the grooves are completely filled. -
Wipe Back:
Using a clean, damp sponge, wipe away the excess underglaze from the surface, leaving black pigment only trapped within the carved lines. -
Glaze the Alternates:
Apply a warm oatmeal or beige glaze to the non-carved triangular sections. Use a steady hand or wax resist to keep the edges sharp against the carved panels. -
Clear Coat:
Apply a thin layer of clear matte glaze over the geometric sections to seal the underglaze without obscuring it. -
Glaze the Exterior:
Apply the creamy beige glaze to the entire exterior, allowing it to pool slightly in the press textures you created earlier. -
Final Fire:
Fire the bowl to the maturity temperature of your clay body (typically Cone 5 or 6 for stoneware).
Now you have a stunning bowl that balances tactile roughness with precise graphic patterns

TRACK YOUR CERAMIC JOURNEY
Capture glaze tests, firing details, and creative progress—all in one simple printable. Make your projects easier to repeat and improve.
Fabric and Lace Roller Imprints
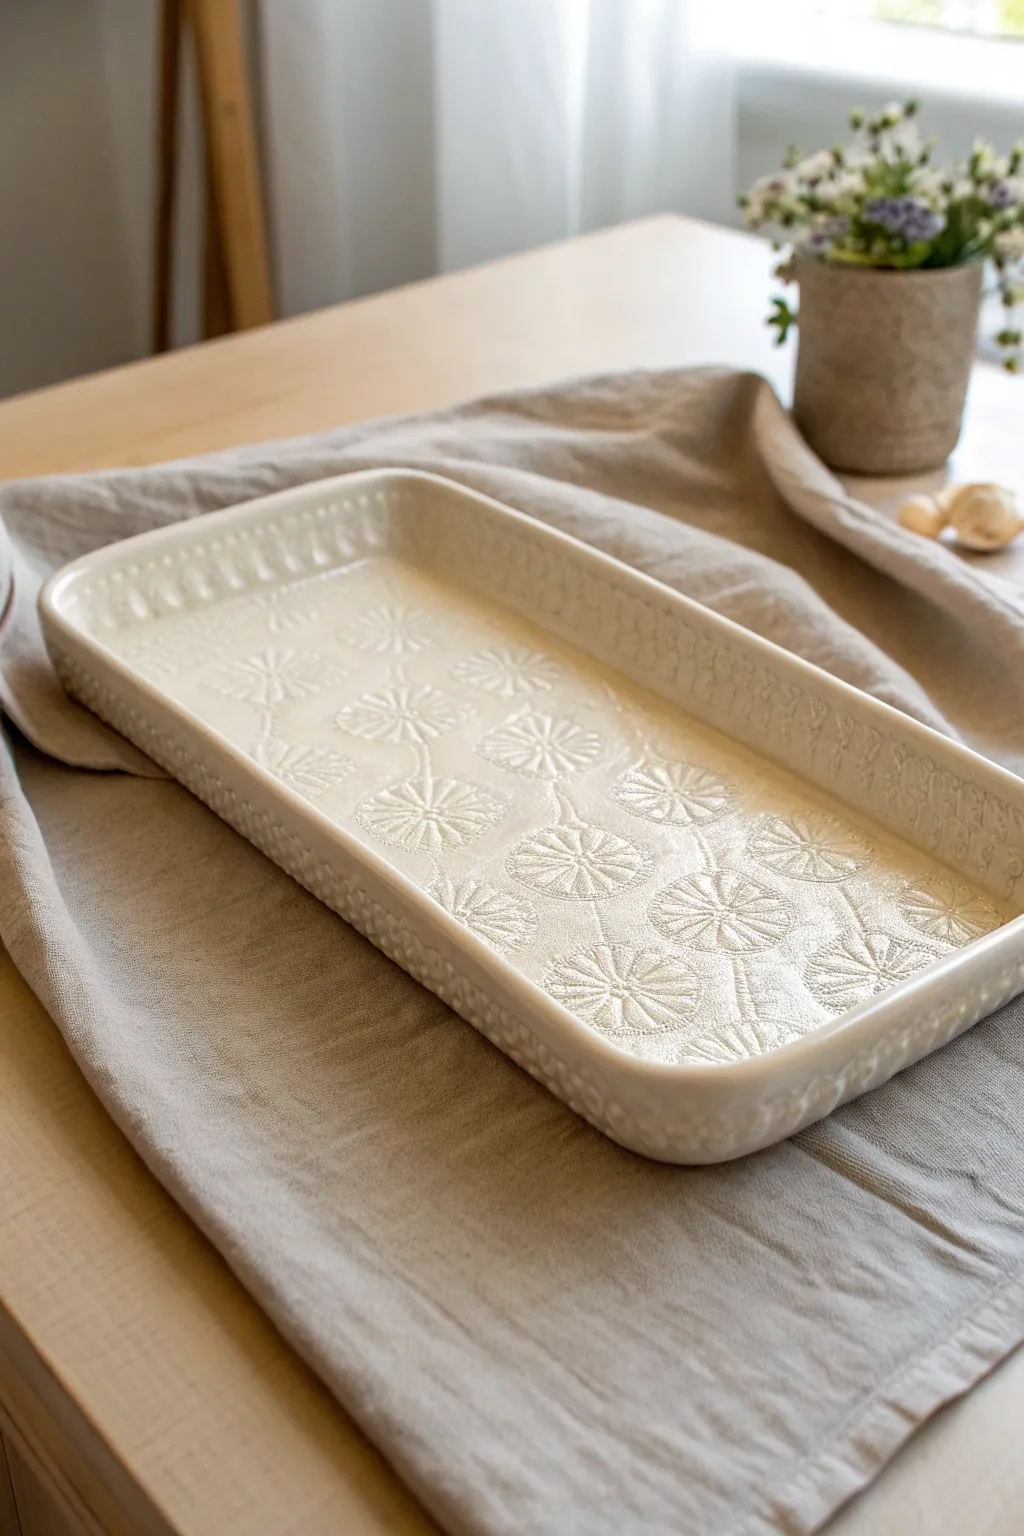
This project transforms a simple slab of clay into a stunning, heirloom-quality serving piece featuring delicate floral textures. By using lace or stamp rollers, you can embed intricate details that catch the glaze beautifully, resulting in a refined, vintage-inspired finish.
Detailed Instructions
Materials
- High-fire stoneware clay (white or speckled)
- Rolling pin
- Sturdy canvas or slab mat
- Wooden guide strips (1/4 inch thick)
- Floral pattern texture roller or large lace doily
- Geometric/ribbed texture tool for the rim
- Drape mold or rectangular bisqueware mold
- Fettling knife
- Pottery sponge
- Flexible rib tool
- Clear or translucent white glossy glaze
Step 1: Preparing the Slab
-
Wedge the Clay:
Begin by wedging your stoneware clay thoroughly to remove air pockets and ensure a consistent texture, which prevents warping later. -
Set Up Guides:
Place your wooden guide strips on either side of the clay on your canvas workspace. This ensures your slab will be a perfectly even thickness. -
Roll the Base:
Use the rolling pin to flatten the clay until the pin rides along the guide strips, creating a smooth, uniform slab approximately 1/4 inch thick. -
Smooth the Surface:
Take a flexible rib tool and compress the clay surface in both directions. This aligns the clay particles and creates a pristine canvas for your texture.
Clean Impressions
Dust your clay slab lightly with cornstarch before rolling your texture tool. This acts as a release agent, preventing sticky clay from clogging the fine details of your roller or lace.
Step 2: Adding Texture
-
Apply Floral Pattern:
For the interior design, position your floral texture roller or lace doily over the center of the slab. Press firmly and roll evenly to create a deep, clear impression without cutting all the way through. -
Texture the Edges:
If you want a contrasting texture on the walls, use a smaller ribbed tool or a different stamp along the outer edges of the slab where the tray walls will be formed. -
Cut to Size:
Measure your mold and cut the clay slab to the appropriate rectangular shape using a fettling knife, leaving enough excess material to fold up the sides.
Step 3: Forming and Refining
-
Lift and Drape:
Carefully lift the textured slab and place it into your drape mold or slump mold. I find it easiest to let the clay stiffen slightly before this step to prevent distorting the pattern. -
Shape the Corners:
Gently press the slab into the corners of the mold. If the clay buckles, cut a small dart (a V-shape wedge) in the corners and score-and-slip the edges together to create a seamless join. -
Define the Rim:
Use your fingers or a modeling tool to gently pinch the rim, giving it a slightly rounded, finished edge. This highlights the vertical texture on the sides. -
Dry Slowly:
Cover the piece with plastic loosely to allow it to dry slowly to leather hard. This is crucial for flat pieces to prevent warping.
Stain for Depth
Before the clear glaze, brush an iron oxide wash into the texture grooves and wipe away the excess on top. This darkens the recesses and makes the floral pattern pop dramatically.
Step 4: Glazing and Firing
-
Bisque Fire:
Once bone dry, fire the piece to bisque temperature (usually cone 04 or 06) to prepare it for glazing. -
Clean the Surface:
Wipe the bisque-fired tray with a damp sponge to remove any kiln dust, which helps the glaze adhere properly. -
Apply Glaze:
Pour or dip a clear or translucent milky white glaze over the piece. The goal is a thin, even coat. -
Reveal Texture:
If the glaze pools too thickly in the textured depressions, the pattern might get lost. You can gently wipe the high points with a clean, damp sponge to make sure the relief stands out. -
Final Fire:
Fire the tray to the maturity temperature of your clay and glaze (typically cone 5 or 6 for stoneware) and allow the kiln to cool completely before opening.
Enjoy using your beautiful new tray for serving fresh bread or displaying fruits on your table
Bark and Wood Grain Stamps
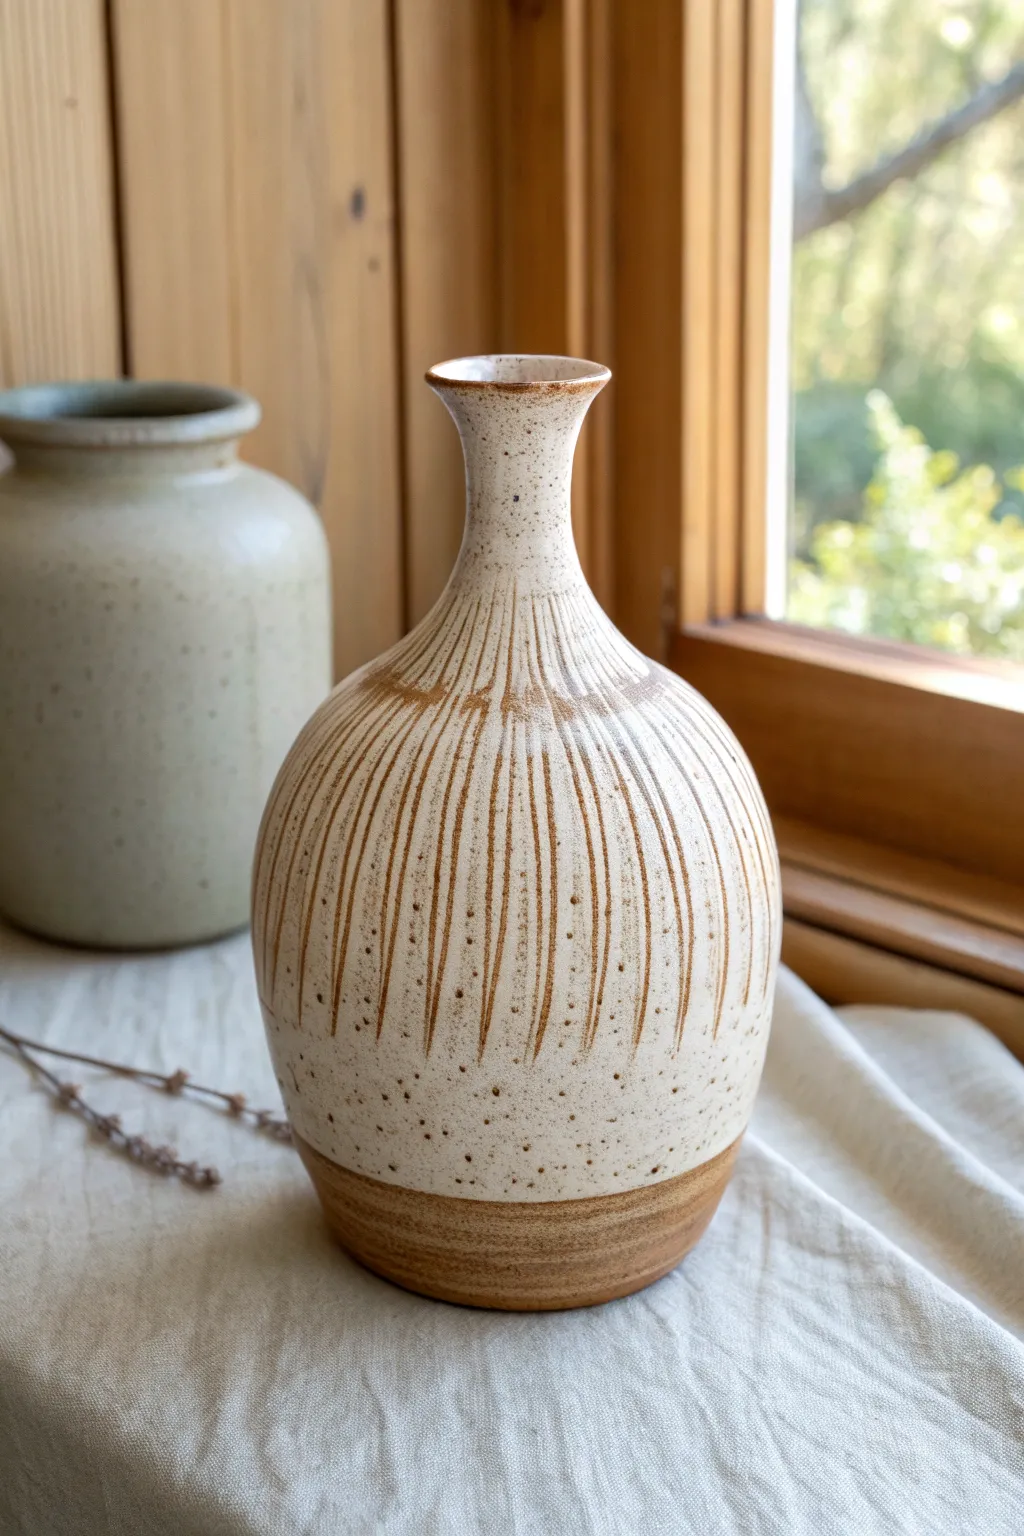
This elegant bottle vase mimics the quiet beauty of birch bark with vertical carving and speckled clay. The result is a tactile, earthy vessel that balances a refined silhouette with organic, wood-like textures.
Step-by-Step
Materials
- Speckled stoneware clay (buff or white)
- Pottery wheel and throwing tools
- Carving tool (V-tip or loop tool)
- Small carving loop or needle tool
- Matte white or satin cream glaze
- Sponge
- Wax resist
- Kiln
Step 1: Throwing the Form
-
Center and open:
Begin with about 2-3 pounds of speckled stoneware clay. Center it firmly on the wheel and open the clay, keeping a slightly narrower floor to support the bulbous shape. -
Pull the cylinder:
Pull the walls up into a tall cylinder, keeping the top rim slightly thicker to allow for later neck collaring. Don’t worry about the curve yet; just get even wall thickness. -
Belly out the form:
Using a rib inside the pot, gently push the belly of the vase outward while supporting the outside with your other hand. Aim for a full, round shape that tapers significantly toward the top. -
Collar the neck:
Slowly collar in the top third of the clay to form a narrow neck. Use water sparingly to avoid weakening the clay. I often compress the clay between pulls to keep the walls strong. -
Refine the rim:
Flare the very top of the rim outward slightly for a delicate finish. Use a chamois to smooth the lip completely. -
Trim the base:
Once the piece is leather hard, trim a clean foot ring. Leave the bottom inch or so of the exterior surface smooth, as this will remain unglazed.
Step 2: Carving the Texture
-
Map your spacing:
Lightly mark vertical guidelines around the shoulder of the pot to help keep your carving perpendicular, though natural variation is desirable. -
Carve primary lines:
Using a V-tip carving tool, start at the base of the neck and carve fluid lines downward. Let them taper off and fade as they reach the belly of the vase. -
Vary the lengths:
Ensure the lines aren’t all the same length. Some should stop high on the shoulder, while others extend further down the body to create a natural, organic rhythm. -
Add secondary details:
Between your main carved lines, use a smaller tool to add shorter, thinner scratches or dashes. This mimics the finer details found in wood grain or bark. -
Smooth the burrs:
Once the carving is bone dry, use a slightly damp sponge or a stiff brush to knock off any sharp clay crumbs or burrs created by the carving tools.
Sticky situation?
If your carving tool drags or creates ragged edges, your clay is too wet. Let it dry to a stiffer leather-hard stage for cleaner, crisp lines.
Step 3: Glazing and Firing
-
Bisque fire:
Fire the vase to cone 04 (or your clay body’s bisque temperature). -
Wax the foot:
Apply wax resist to the bottom inch of the vase and the foot ring. This exposed raw clay band is crucial for the final aesthetic. -
Apply glaze:
Dip the vase into a matte white or satin cream glaze. A dipping application helps the glaze pool nicely into the carved recesses. -
Wipe back (optional):
If your glaze is very thick, you might want to gently wipe the raised areas with a damp sponge to reveal more of the clay body’s speckles through the texture. -
Clean the line:
Ensure the transition line between the glazed body and the raw clay foot is crisp and clean. Use a fettling knife or damp sponge to tidy up any drips. -
Final fire:
Glaze fire the piece to maturity (typically Cone 5 or 6 for stoneware). The heat will draw out the iron speckles in the clay, contrasting beautifully with the pale glaze.
Depth perception
Vary your carving pressure. Deep cuts collect more glaze and create darker stripes, while shallow scratches allow the speckles to show more clearly.
Now you have a stunning vessel that brings a touch of nature’s texture into your home
Ribbed Drag Marks and Scraped Waves
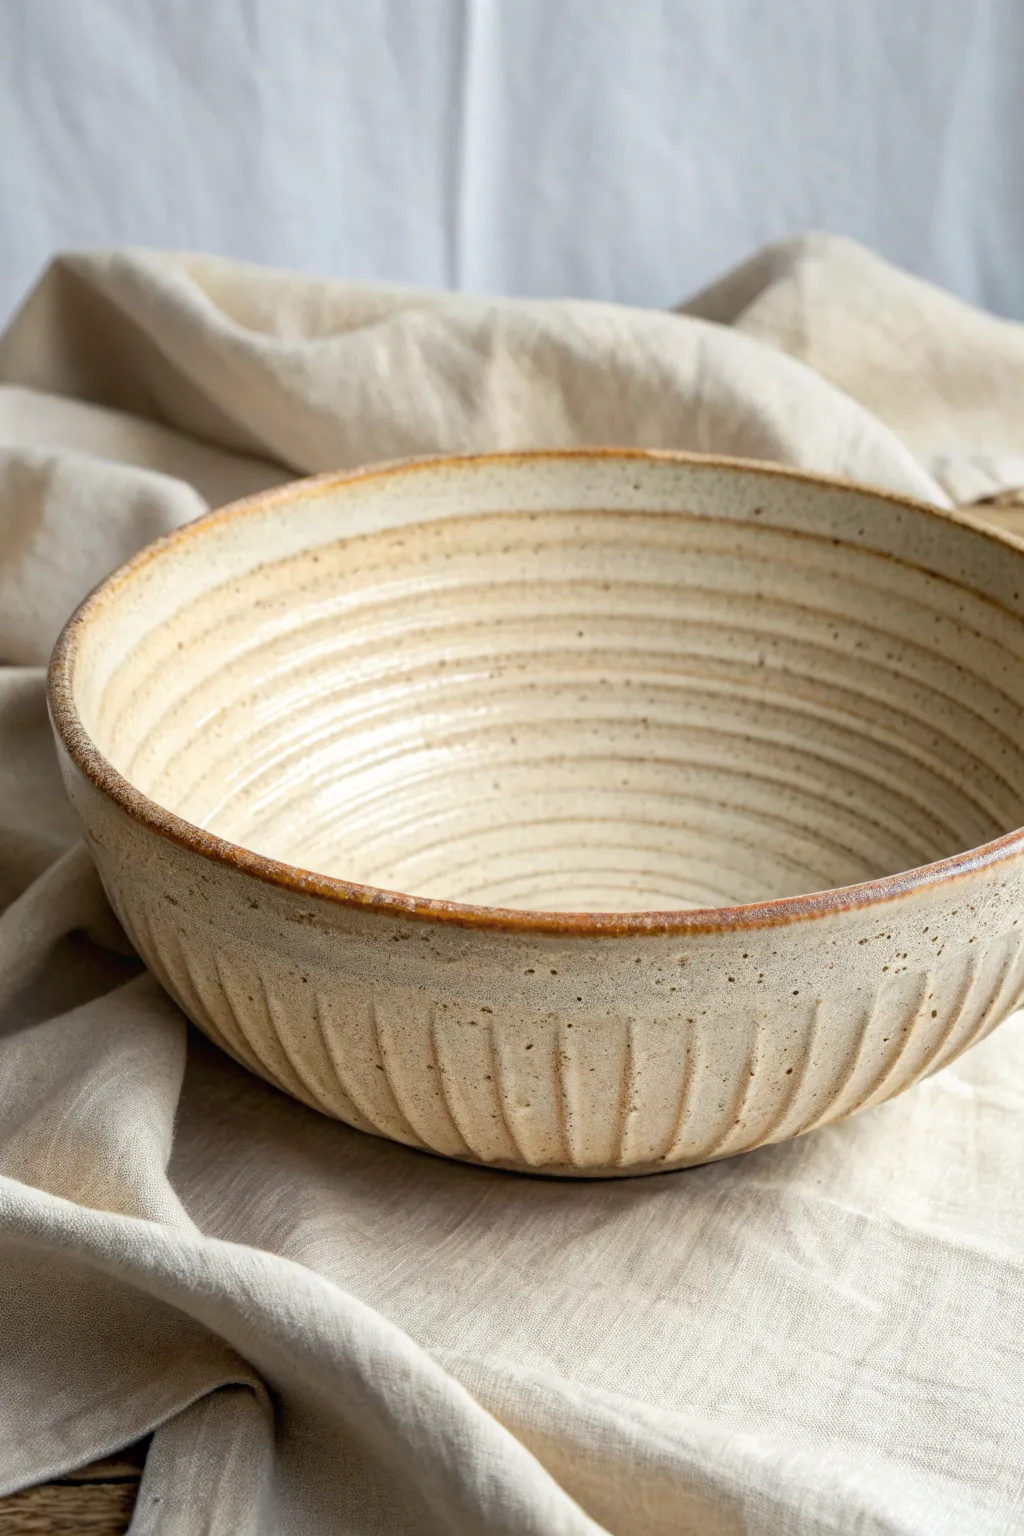
This handmade ceramic bowl showcases the beauty of contrasting tactile surfaces, featuring deep rhythmic throwing spirals on the interior and bold vertical fluting on the exterior. The speckled clay body and minimal glazing highlight the raw, organic feel of the textured clay.
Step-by-Step Guide
Materials
- Speckled stoneware clay (approx. 3-4 lbs)
- Potter’s wheel
- Wooden rib tool
- Sponge
- Wire cutter
- Wire loop carving tool (medium width)
- Needle tool
- Chamois cloth
- Clear matte or satin glaze
- Iron oxide wash (optional for rim)
- Kiln
Step 1: Throwing the Bowl
-
Center the clay:
Begin with a well-wedged ball of speckled stoneware clay. Secure it to the wheel head and center it effectively using firm pressure and water to ensure symmetrical walls later on. -
Open the form:
Open the clay to create a wide, curved floor. Instead of compressing the floor perfectly smooth, begin to establish a gentle curve that transitions seamlessly into the walls. -
Pull the walls:
Pull up the walls to form a wide, open bowl shape. Aim for a slightly thicker wall than usual (about 1/4 to 3/8 inch), as you will need extra material for carving away the exterior later. -
Create interior spirals:
Leaving your wheel at a slow, steady speed, use your fingertips or the soft edge of a wooden rib. Start at the very center of the bowl and slowly drag outward while the wheel spins. -
Deepen the ridges:
Press decisively to leave a visible spiral trail. I like to let my fingers linger just a fraction of a second longer to ensure the ridges are prominent enough to catch the glaze later. -
Refine the rim:
Compress the rim using a chamois cloth to smooth it out, ensuring it is rounded and sturdy. Do not remove the spiral marks from the upper interior wall. -
Cut underneath:
Use your wooden knife tool to trim the excess clay at the base, creating an undercut guide for later trimming. Run a wire cutter under the pot and slide the bat off to dry to leather-hard.
Uneven Carving Lines?
Work with gravity. Place the bowl in your lap (on a towel) and pull the carving tool downward towards you rather than sideways for straighter lines.
Step 2: Trimming and Exterior Texture
-
Prepare for trimming:
Once leather-hard, center the bowl upside down on the wheel. Secure it with lugs of clay. -
Trim the foot ring:
Trim away excess weight from the base and establish a clean, defined foot ring. The curve of the exterior should match the interior curve. -
Mark vertical guides:
To keep your spacing even, you can lightly mark vertical lines around the exterior using a needle tool, dividing the spacing based on how wide you want your flutes to be. -
Carve the flutes:
Using a U-shaped wire loop tool, carve vertical channels from the rim down toward the foot. Apply steady pressure to scoop out ribbons of clay. -
Vary thread depth:
Allow the texture to be organic; slightly varying the pressure creates that beautiful light-and-shadow effect seen in the photo. Stop the carving just before the foot ring. -
Soften the edges:
Once the carving is complete, gently run a damp sponge or your finger over the sharp ridges of the carved lines to knock down any burrs without erasing the texture.
Step 3: Glazing and Firing
-
Bisque fire:
Load the bone-dry bowl into the kiln and bisque fire to Cone 04 (or your clay’s specific bisque temperature). -
Apply oxide wash:
Dip a small brush into an iron oxide wash and run it along the rim of the bowl. Wipe it back gently with a sponge so it stains the clay rather than sitting on top. -
Glaze the interior:
Pour a clear or translucent matte glaze inside the bowl. Pour it out quickly to ensure the coating isn’t too thick, which would obscure the spiral ridges. -
Glaze the exterior:
Dip or spray the exterior with the same clear glaze. The speckled clay body will show through, providing the main color of the piece. -
Final fire:
Glaze fire the piece to the maturity temperature of your clay (likely Cone 5/6 or Cone 10), allowing the speckles to bloom through the creamy glaze.
Level Up: Rim Contrast
For a darker, rustic rim like the image, layer a thin band of Shino glaze or Tenmoku over the rim’s oxide wash before the final clear coat.
Enjoy using your beautifully textured bowl for salads or as a stunning centerpiece.
Sgraffito Through Colored Slip
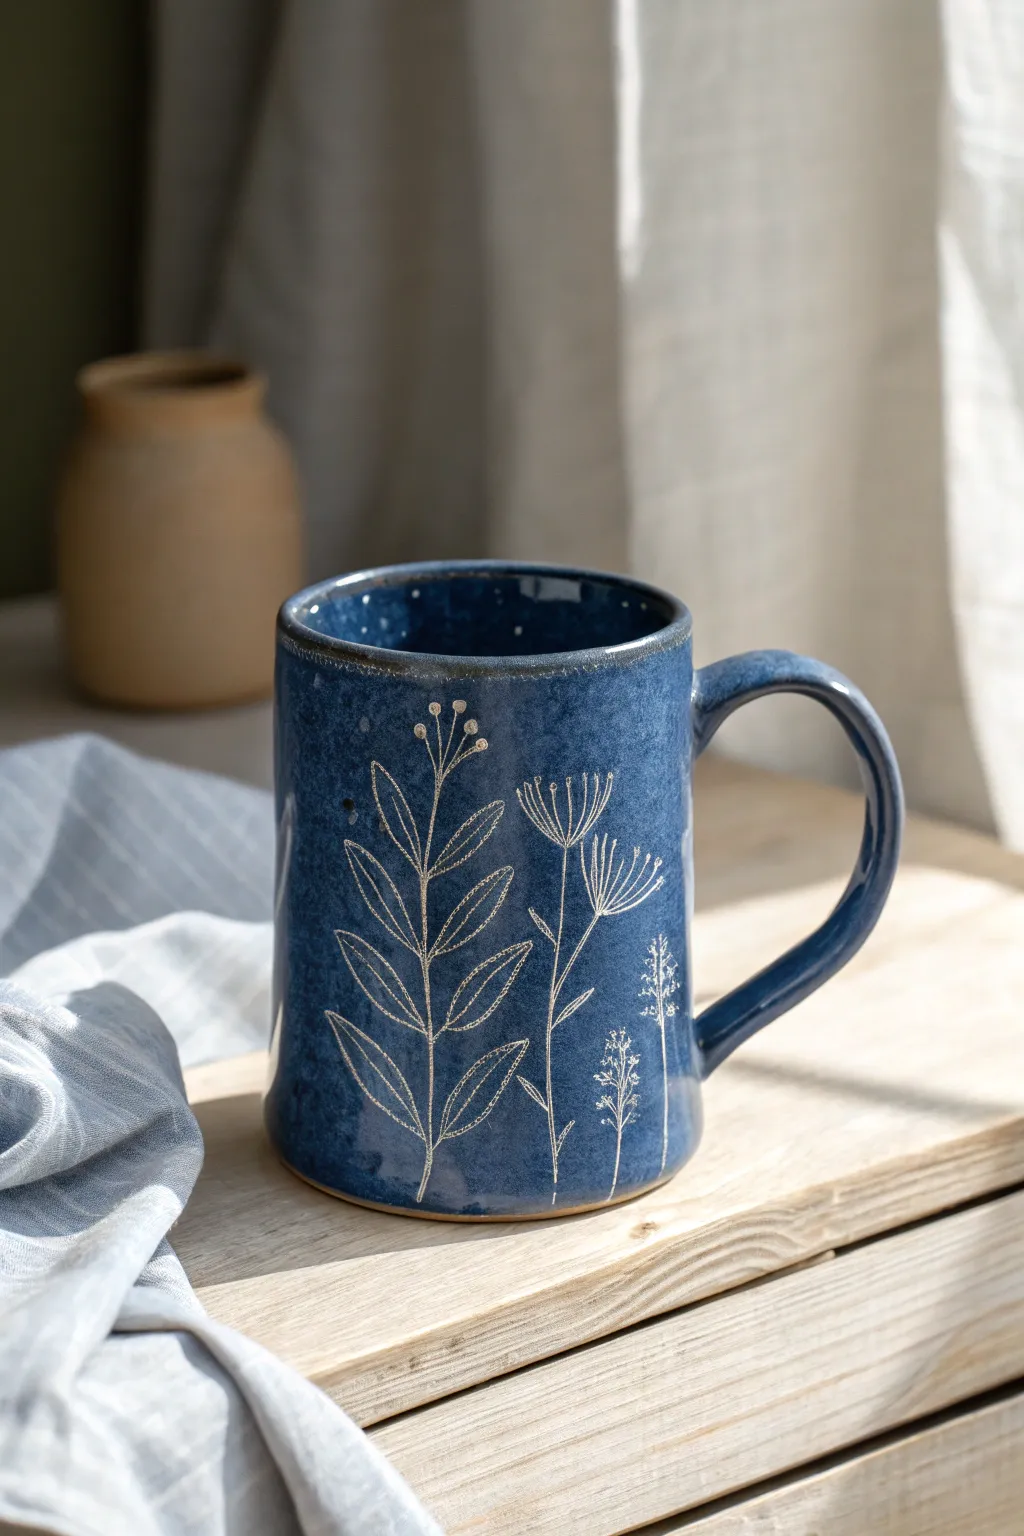
Capture the serene beauty of a moonlit garden with this deep blue sgraffito mug. By carving delicate botanical illustrations through a layer of rich colored slip, you’ll reveal the bright clay body below for stunning contrast.
Step-by-Step
Materials
- Stoneware clay body (white)
- Deep cobalt blue underglaze or slip
- Pottery wheel (or slab roller for hand-building)
- Rib tool (metal or rubber)
- Needle tool
- Loop tool (small, for carving)
- Sgraffito tool (wire loop or specialized stylus)
- Sponge
- Clear glossy glaze
- Kiln
Step 1: Forming the Mug
-
Wheel Throwing:
Center a ball of white stoneware clay on the potter’s wheel. Open the center and pull the walls up to form a cylinder about 4-5 inches tall. -
Refine the Shape:
Using a rib, smooth the exterior walls to create a straight-sided profile. Gently compress the rim with a sponge or chamois to ensure it’s comfortable for drinking. -
Trimming:
Once the clay is leather-hard (firm but still cool to the touch), trim the bottom to create a neat foot ring. This elevates the form and adds professionalism. -
Pulling the Handle:
Pull a strap of clay for the handle, tapering it slightly. I usually like to curve the handle into a graceful ‘C’ shape that mimics the organic lines of the plants we’ll draw later. -
Attaching the Handle:
Score and slip both the attachment points on the mug body and the handle ends. Press firmly to join, blending the clay seams until invisible.
Jagged Lines?
If your carved lines look torn or crumbly, the clay is too dry. Mist it lightly with water, wrap it in plastic, and let it rest for an hour to rehydrate the surface before trying again.
Step 2: Applying the Background
-
Preparation:
Ensure the mug surface is free of dust or crumbs. The clay should still be in the leather-hard stage—too dry and the slip won’t adhere; too wet and it will smear. -
Slip Application:
Using a soft, wide brush, apply the deep cobalt blue underglaze or slip to the entire exterior surface. -
Layering:
Let the first coat dry until it loses its sheen, then apply a second and possibly third coat. You want an opaque, solid color without brushstrokes showing through. -
Stiffening Up:
Wait for the slip to dry to a firm leather-hard state. It should not be tacky to the touch. If you carve too soon, the lines will be jagged.
Step 3: The Sgraffito Technique
-
Sketch Layout:
Lightly trace your botanical design onto the surface using a dull pencil or needle tool. Don’t press hard; you are just marking the placement for the stems. -
Carving Main Stems:
Using a specialized sgraffito tool or a fine wire loop, carve the central vertical lines for the plant stems. Apply consistent pressure to cut through the blue layer to the white clay. -
Adding Leaves:
Carve the leaves branching off the main stem. For the style shown in the image, keep the leaves simple and elongated, mirroring each other. -
Detailing the Veins:
Switch to a finer point tool. Inside each leaf outline, gently scratch a central vein and tiny diagonal veins. This texture adds depth compared to a solid white shape. -
Creating the Flower Heads:
For the seed-pod style flowers, draw a fan shape of straight lines radiating from a single point at the top of the stem. -
Clean Up:
As you carve, ‘crumbs’ of blue clay will accumulate. Use a large, soft, dry brush to gently sweep them away. Don’t wipe with your hand or you might smudge the blue.
Add Dimension
Make the design pop by varying your line weights. Use a wider loop tool for the main stems and leaf outlines, and a needle-thin point for the internal veins and dainty flower tops.
Step 4: Finishing and Firing
-
Bisque Fire:
Once the mug is bone dry, load it into the kiln for a bisque firing (usually to Cone 04). This sets the shape and the underglaze design. -
Glazing:
After the bisque fire, wipe the mug down with a damp sponge to remove dust. Dip the entire mug into a clear glossy glaze. -
Wiping the Foot:
Carefully wipe the glaze off the bottom of the foot ring so it doesn’t fuse to the kiln shelf. -
Final Firing:
Fire the mug to maturity (Cone 5, 6, or 10 depending on your clay body). The clear glaze will seal the carving and make the cobalt pop.
Now you have a functional piece of art that invites you to inspect the details with every sip of coffee
Slip Trailing Raised Lines and Dots
This project transforms a simple wheel-thrown form into a tactile masterpiece using slip trailing techniques. The repeating diamond pattern, accentuated by delicate raised dots and lines, creates a sophisticated texture that catches light beautifully under a creamy glaze.
Step-by-Step Tutorial
Materials
- White stoneware or porcelain clay body
- Pottery wheel and throwing tools
- Slip trailer bottle (bulb type or precision tip)
- Deflocculated slip (matching your clay body)
- Soft rib tool
- Trimming tools
- Pencil or needle tool for light marking
- Transparent cream or clear celadon glaze
- Sponge and water
Step 1: Forming the Base
-
Throw the Vessel Body:
Begin by centering about 1.5 to 2 pounds of clay on your wheel. Throw a bulbous, pear-shaped body with a rounded belly that tapers gently toward the top, keeping the walls even. -
Shape the Neck:
Collar in the clay at the top to form a distinct, narrow neck that flares out slightly at the rim. Use a damp sponge or chamois to smooth the lip for a professional finish. -
Refine the Curve:
Use a flexible rib on the exterior while pushing gently from the inside to perfect the roundness of the belly. This smooth surface is crucial for the slip trailing later. -
Trim the Foot:
Once leather hard, trim the pot to create a distinct foot ring. This elevates the form and provides a stopping point for your design near the base.
Step 2: Drafting the Design
-
Divide the Surface:
While the pot is leather hard, gently use a needle tool or soft pencil to mark vertical guidelines around the belly. Aim for 6 or 8 equal sections depending on the circumference. -
Sketch the Diamonds:
Lightly sketch intersecting curved lines between your vertical guides to form large, almond-shaped diamond panels that wrap around the belly of the vase. -
Smooth Faint Lines:
If your sketch lines are too deep, gently compress them with a smooth rib. You only need a faint guide for the slip trailer to follow.
Slip Consistency
Add a drop of sodium silicate to your slip. This deflocculates it, allowing it to flow smoothly while containing less water, reducing shrinkage cracks.
Step 3: Applying Slip Texture
-
Prepare the Slip:
Fill your slip trailer with deflocculated slip that has the consistency of heavy cream or yogurt. Test the flow on a scrap piece of clay first to ensure smooth lines without sputtering. -
Trail the Main Lines:
Squeeze the bulb gently to drag a solid line of slip over your sketched diamond outlines. Keep your hand steady and move at a consistent speed to ensure line thickness remains uniform. -
Add Decorative Dots:
On either side of the main raised lines, pipe small, individual dots of slip. Try to space them evenly, as this repetition creates the bead-like effect. -
Create the Central Accents:
Place a single, larger dot of slip directly in the center of each diamond panel. This acts as a focal point for the repeating pattern. -
Line the Neck:
Add two parallel rings of dots around the base of the neck where it meets the shoulder. This creates a visual collar that frames the top of the vase. -
Dot the Foot Ring:
Finish the texture by trailing a final ring of small dots just above the foot ring to ground the design. -
Dry Slowly:
Cover the piece loosely with plastic. I find that letting the raised slip dry at the same rate as the pot prevents the added texture from cracking or popping off.
Clogged Tip?
If the trailing tip clogs, use a thin needle tool or wire to clear it instantly. Keep a small cup of water nearby to rest the tip in when pausing.
Step 4: Glazing and Finishing
-
Bisque Fire:
Once bone dry, fire the piece to bisque temperature (usually cone 04 or 06). Handle carefully, as the raised slip lines are fragile at this stage. -
Apply Glaze:
Dip or spray a translucent cream or light celadon glaze. Avoid opaque or heavy glazes, which will hide your hard work. The glaze should pool slightly around the raised areas to accentuate the depth. -
Clean the Foot:
Wipe the foot ring completely clean of glaze with a damp sponge to prevent it from sticking to the kiln shelf. -
Final Firing:
Fire to the maturity temperature of your clay and glaze (e.g., cone 6 or 10). The heat will melt the glaze over the slip bumps, softening them into a tactile surface.
The result is a stunning, touchable vessel that feels as good in the hand as it looks on the shelf
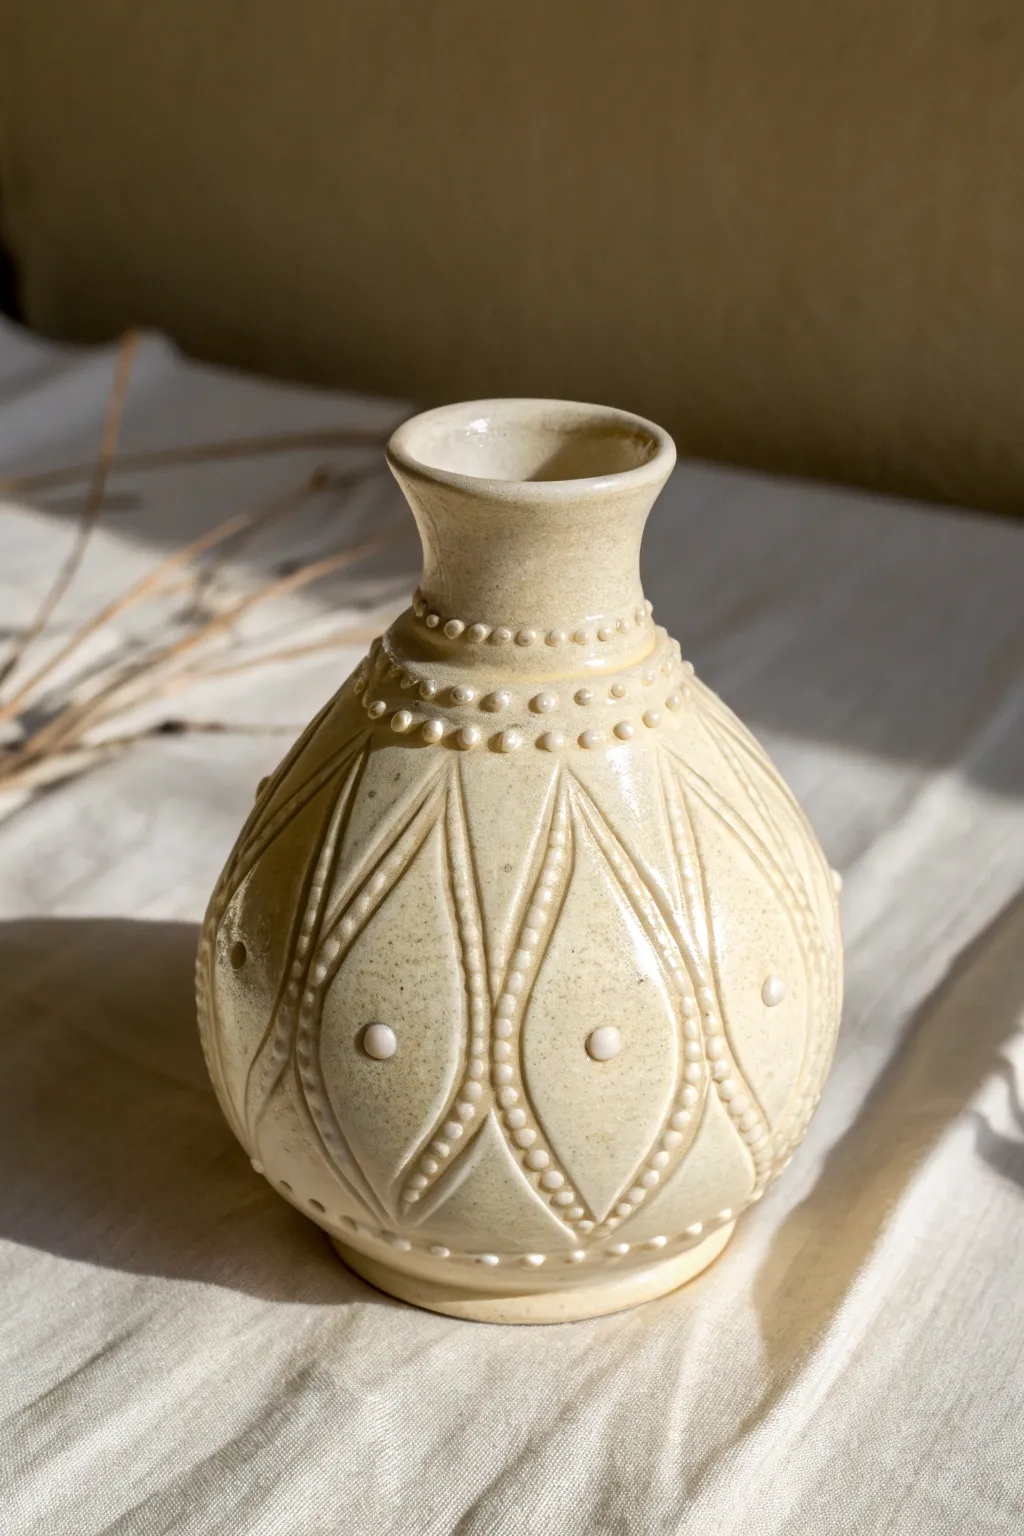
Sprigged Relief Motifs
This elegant ceramic vessel combines three distinct decorative techniques into one cohesive piece, featuring delicate floral sprigs sandwiched between rhythmic carving and incising. The finished pot offers a delightful tactile experience with its mix of smooth relief and raw clay textures.
Step-by-Step Guide
Materials
- White stoneware clay (suitable for wheel throwing)
- Pottery wheel
- Throwing tools (sponge, rib, wire cutter)
- Plaster sprig mold (flower/daisy design)
- Score and slip tool
- Soft rubber kidney
- Loop tool or small carving gouge
- Needle tool
- Wooden modeling tool
- Satin white glaze
- Iron oxide wash (optional, for highlighting texture)
- Small hake brush
- Wax resist
Step 1: Forming the Base
-
Throw the Cylinder:
Begin by centering your clay on the wheel and throwing a straight-sided cylinder. Aim for a medium wall thickness—don’t go too thin, as you’ll be pressing sprigs onto it later. -
Establish the Profile:
Soften the bottom edge into a gentle curve that transitions into the wall. Use a rib to smooth the outside and define where your vertical walls begin. -
Define the Bands:
While the wheel spins slowly, use the corner of a wooden rib or a modeling tool to lightly mark horizontal lines. You need three distinct zones: a top rim area, a wide middle belt for the flowers, and a bottom section for texture. -
Dry to Leather Hard:
Allow the piece to dry until it is leather hard. This is crucial; if it’s too soft, the shape will warp when you press on it.
Sprigs Won’t Stick?
Ensure your vessel isn’t too dry. If the pot is bone dry, sprigs will pop off. Both surfaces must be damp. Use vinegar in your slip for extra bite.
Step 2: Decorating the Surface
-
Texture the Base:
On the bottom third of the pot (below your lowest guideline), use a modeling tool or the edge of a textured rib to create vertical striations. Press into the clay and drag upward to simulate a rough, grassy texture. -
Prepare the Sprigs:
Press small balls of fresh soft clay into your plaster daisy mold. Ensure the clay is flush with the mold surface. -
release the Sprigs:
Wait a moment for the plaster to absorb moisture, then gently pop the clay flowers out. I usually make a few extras in case some get smushed during application. -
Score the Placement:
In the wide middle band, lightly score small circles where you want each flower to sit. Space them evenly around the circumference. -
Attach the Motifs:
Apply a dab of slip to the back of a flower sprig and press it firmly onto a scored spot. Support the wall from the inside with your hand to prevent the pot from deforming. -
Refine the Edges:
Use a small wooden tool or brush to clean up any excess slip squeezing out from under the flowers. This keeps the join invisible. -
Background Texture:
Around the attached flowers, lightly sponge the surface to create a subtle matte texture that contrasts with the smooth petals. -
Carve the Rim:
For the top band, use a small loop tool to carve a repeating rhythmic pattern. Carve half-circles or ‘U’ shapes that connect, creating a scalloped relief effect just below the rim. -
Clean Up:
Once all carving and sprigging is done, brush away any clay crumbs with a soft brush once the piece is bone dry.
Refining the Relief
After attaching sprigs, let them firm up slightly, then go back with a modeling tool to re-define the petal lines. Handling them often softens the sharp details.
Step 3: Glazing and Finishing
-
Bisque Fire:
Fire the piece to bisque temperature (usually cone 04-06) to prepare it for glazing. -
Wax the Details:
Apply wax resist carefully over the flower sprigs and the carved top band if you want those raw clay textures to remain unglazed or matte. -
Apply Glaze:
Dip the pot into a satin white or cream glaze. If you waxed the details, the glaze will bead off those areas, revealing the clay body. -
Wipe Back (Method A):
Alternatively, glaze the whole piece and firmly wipe the relief areas with a damp sponge. This leaves glaze in the recesses (like the flower centers and vertical lines) but exposes the high points. -
Add Oxide (Optional):
For an antique look, brush a very diluted iron oxide wash over the textured bands before glazing, then wipe it back. This enhances the depth of the carving. -
Final Fire:
Fire the vessel to the maturation temperature of your clay and glaze.
Enjoy using your beautifully textured vessel as a planter or a cozy tea cup
Mishima Inlay for Crisp Grooves
This elegant vase showcases the precision of the Mishima technique, where fine white inlaid lines contrast beautifully against a speckled tan clay body. The stylized leaf motif creates a structured yet organic pattern that highlights the crisp grooves of the carving.
Step-by-Step
Materials
- Light tan stoneware clay with speckles (e.g., speckled buff)
- White decorative slip or underglaze
- Pottery wheel
- Throwing tools (sponge, rib, wire cutter)
- Sharp carving tool (needle tool or fine sgraffito tool)
- Loop tool for trimming
- Metal rib or flexible scraper
- Clear transparent glaze
- Soft brush for slip application
- Wax resist (optional)
Step 1: Throwing the Form
-
Center and open:
Begin with about 3-4 pounds of wedged speckled stoneware clay. Center it firmly on the wheel, open the clay, and compress the floor well to prevent cracking. -
Pull the walls:
Pull the clay upward into a tall cylinder first, keeping the walls even. I like to keep the walls slightly thicker than usual to accommodate the carving later. -
Shape the belly:
Gently push from the inside to belly out the form, creating a smooth, rounded shoulder that transitions into a narrower neck. -
Differentiate the neck:
Collar the neck in so it is significantly narrower than the body, then flare the rim outward slightly for a classic vase silhouette. -
Refine the surface:
Use a smooth kidney rib on the exterior while supporting the interior to remove throwing rings and create a perfect canvas for your design.
Step 2: Leather Hard Finishing
-
Trim the foot:
Once leather hard, trim a clean foot ring on the bottom using a sharp loop tool. -
Incise banding lines:
While centered on the wheel, use a needle tool or the corner of a trimming tool to carve a series of horizontal banding lines around the neck and the base of the pot. -
Plan the leaf spacing:
Lightly mark vertical guidelines to divide the main body of the vase into equal sections for your leaves. -
Sketch the outline:
Lightly sketch the large leaf shapes using a dull pencil or very light touch with a needle tool. The design consists of tall, pointed ovals that meet at the bottom.
Smudged Lines?
If your white lines look smeared, your clay was likely too wet when you scraped. Wait longer next time! The slip needs to be dry enough to flake off rather than smear.
Step 3: Carving & Inlay (Mishima)
-
Carve the main veins:
Using a sharp carving tool or small loop tool, carve the central vertical vein of each leaf deep into the clay surface. -
Carve the outline:
Carve the outer perimeter of each leaf, ensuring the lines are crisp and clean. Remove the clay burrs immediately. -
Add detail veins:
Carve the angled veins radiating from the center to the edge. Keep these lines slightly finer than the main outline for visual hierarchy. -
Prepare the wax (optional):
For easier cleanup, you can brush a coat of wax resist over the entire surface before applying slip, but strictly speaking, you can just apply slip directly to the damp clay. -
Apply the inlay slip:
Generously brush thick white slip or underglaze over the carved areas, pushing it deep into the grooves. Don’t worry about being messy here; coverage is key. -
Wait for stiffening:
Let the slip dry until it is no longer wet or tacky, usually reaching a ‘bone dry’ state on the surface while the pot remains leather hard. -
Scrape the surface:
Using a sharp metal rib or a scraping tool, carefully scrape away the excess slip from the surface. The white slip will remain trapped in the carved grooves, revealing the pattern. -
Clean up:
Wipe the surface gently with a barely damp sponge to remove any hazy residue, but be careful not to wash the slip out of the grooves.
Clean Grooves
Before applying slip, run a soft brush over your carvings to remove tiny crumbs of clay. These crumbs can block the white slip from fully filling the lines.
Step 4: Firing
-
Bisque fire:
Allow the vase to dry completely, then bisque fire it to cone 04 (or your clay’s specific bisque temperature). -
Apply clear glaze:
Dip or pour a transparent clear glaze over the entire piece. This will seal the clay and heighten the contrast between the tan body and white inlay. -
Final firing:
Glaze fire the piece to the maturity temperature of your stoneware clay (typically cone 5 or 6).
The final result is a timeless vessel where texture and color work in perfect harmony
Deep Gouges and Cratered Divots
This project combines deep, satisfying carving with a striking high-contrast glaze technique to create a modern vessel with ancient roots. The interplay between the glossy indigo rim and the raw, cratered texture of the base makes for a tactile piece that demands to be touched.
Step-by-Step Tutorial
Materials
- Stoneware clay (buff or speckled)
- Pottery wheel (or slab roller for hand-building)
- Needle tool
- Loop tool or carving gouge
- Small round hole punch or drill tool
- Sponge
- Dark blue gloss glaze (cone 6)
- Wax resist
- Clear matte glaze (optional)
- Kiln access
Step 1: Forming the Base Vessel
-
Throw the cylinder:
Begin by centering your clay on the wheel and opening it up. Pull the walls straight up to create a simple, classic cylinder shape with a flat bottom. Aim for walls that are slightly thicker than usual—about 1/4 to 3/8 inch—to accommodate the deep texture we’ll add later. -
Define the rim:
Compress the rim well with a chamois or sponge. Create a slight outward flare or a defined bead at the very top edge to frame the future glazed section. -
Trim the foot:
Once the piece is leather-hard, flip it over and trim a clean, flat foot. This provides a stable base and elevates the craftsmanship of your final piece. -
Smooth the surface:
While spinning slowly, use a metal rib to remove any throwing lines from the exterior. You want a blank canvas for your texture work.
Step 2: Texturing the Surface
-
Map out the design:
Lightly trace a horizontal line around the pot about 2-3 inches down from the rim. This line separates your glossy blue top from the textured beige bottom. Use a needle tool for a faint guide. -
Carve the geometric band:
Just above your guide line, carve a series of repeating inverted ‘V’ shapes or triangles. Use a loop tool to gouge these out, cutting deep enough to create shadow but not through the wall. -
Add the accents:
Inside each inverted ‘V’, press a small circular tool or the back of a drill bit to create a ‘dot’ indentation. This creates the tribal-style border. -
Create the cratered field:
For the bottom section of the pot, use a small, round-headed loop tool or a specialized texturing tool. Press and twist or scoop out small divots in rows. -
Vary the pattern:
Start with a dense row of craters right below the geometric band. As you move down towards the bottom, space the craters out slightly or make them shallower to create a fading effect. -
Clean up burrs:
Once the carving is complete, let the clay dry to a stiff leather-hard stage. Gently rub the surface with a scouring pad or your finger to knock off any sharp clay crumbs or burrs created by the tools.
Clean Lines
For a perfect separation between the glazed top and raw bottom, use automotive detailing tape instead of freehanding the wax resist. It creates a razor-sharp barrier.
Step 3: Glazing and Finishing
-
Bisque fire:
Load your bone-dry pot into the kiln and bisque fire it to Cone 04. This prepares the porous surface for glazing. -
Wipe down:
Use a damp sponge to wipe any kiln dust off the bisque ware. This ensures your glaze sticks properly and doesn’t crawl. -
Sponge the bottom texture:
To highlight the texture on the bottom half without hiding the clay body, lightly sponge a wash of iron oxide or a very thinned-down dark stain over the craters, then wipe it back. The color will stay in the deep divots. -
Apply wax resist:
Carefully paint wax resist over the entire bottom textured section, right up to the bottom edge of your carved ‘V’ band. I like to be very precise here so the glaze line is crisp. -
Glaze the top:
Dip the top section of the pot into a bucket of dark blue gloss glaze. Hold it upside down and dip until the glaze creates a straight line just covering the geometric band. The wax resist should stop the glaze from running down, but dipping is cleaner. -
Break the glaze:
If the blue glaze is very thick, you might want to gently wipe the high points of the carved ‘V’ band with a sponge. This allows the blue to settle in the recesses while revealing the clay on the ridges, enhancing the definition. -
Clean the foot:
Double-check the bottom of the pot to ensure no glaze droplets have landed where they shouldn’t. Wipe the foot clean. -
Final Fire:
Fire the piece to Cone 6 (or whatever temperature your clay and glaze require). The heat will melt the blue glaze into a glassy finish that contrasts beautifully with the matte, textured base.
Glaze Running?
If your blue glaze runs into the textured bottom during firing, it was likely applied too thickly. Next time, dip quickly or thin the glaze slightly with water.
Now you have a stunning custom planter ready to showcase your favorite succulent or leafy friend
Layered Slip for Topographic Texture

This project explores the tactile beauty of layered slip to create a tumbler that feels like weathered sandstone in your hands. By carving through a creamy white slip to reveal the toasted clay body beneath, you achieve distinct bands of topographic texture and organic warmth.
Detailed Instructions
Materials
- Speckled stoneware clay (buff or tan)
- White decorating slip
- Pottery wheel
- Loop tool (small, rounded profile)
- Basic throwing tools (sponge, rib, needle tool, wire)
- Wide hake brush or soft fan brush
- Clear satin or matte glaze
- Kiln
Step 1: Throwing and Shaping
-
Prepare the Clay:
Begin by wedging about 1 to 1.5 lbs of speckled stoneware clay. Ensure it is free of air bubbles, as these will disrupt your carving later. -
Center and Open:
Center the clay on your wheel head. Open the form down to the bat, leaving about a quarter-inch for the floor. -
Pull the Walls:
Pull the walls up into a tall cylinder. Aim for a height of roughly 5-6 inches. Keep the walls even, but leave them slightly thicker than a standard mug (about 1/4 inch) to account for the material you will remove during carving. -
Refine the Profile:
Use a rib to compress the walls and create a subtle V-shape—narrower at the base and slightly flared at the rim. This modern profile highlights the horizontal banding well. -
Finish the Rim:
Chamois or sponge the rim to ensure it is rounded and comfortable for drinking. Cut the pot from the bat with a wire tool.
Slip Peeling Off?
If the slip flakes off during carving, the pot was likely too dry when slip was applied. Apply slip when the clay is leather hard, not bone dry.
Step 2: Slip Application and Carving
-
Leather Hard Stage:
Allow the tumbler to dry to a sturdy leather-hard stage. It should be firm enough to handle without deforming but still hold moisture. -
Apply the Slip:
While the pot is spinning slowly on the wheel (or use a banding wheel), apply a thick, even coat of white decorating slip using a wide hake brush. Cover the exterior fully, stopping just short of the very bottom foot. -
Dry to Touch:
Let the slip set up until it is no longer tacky but hasn’t fully dried out. If you carve too soon, it will smear; too late, and it will chip. -
Marking Guides (Optional):
If you want precise spacing, lightly score horizontal lines with a needle tool while spinning the pot, but freehanding often creates a more organic feel. -
Carving the Bands:
Place the tumbler back on the wheel. Spin it at a medium-slow speed. Using a small rounded loop tool, gently press into the surface to carve away the white slip in horizontal bands. -
Varying Pressure:
I like to vary my pressure slightly as I move down the pot. Deeper cuts reveal the raw speckled clay, while softer pressure might leave a thin veil of slip. -
Creating the Ridge:
Leave ridges of undisturbed white slip between your carved bands. In the reference image, the carved bands are distinct stripes on the lower two-thirds, with a solid field of slip on the upper third. -
Clean Up:
Once carved, use a slightly damp sponge to smooth any sharp burrs of clay, but be careful not to wash away the crisp definition of your texture.
Add Color Depth
For a richer look, stain the raw clay body with oxides or use a dark brown slip underneath the white layer for double-layered carving effects.
Step 3: Finishing and Firing
-
Bisque Fire:
Allow the piece to dry completely. Since slip and clay dry at different rates, slow drying under loose plastic is safest. Bisque fire to Cone 04 (or your clay’s specific bisque temperature). -
Waxing:
After the bisque, wax the foot and the very bottom edge where the clay is exposed. This prevents glaze from adhering to the kiln shelf. -
Glazing:
Dip the entire tumbler into a clear satin or clear matte glaze. A clear glaze is crucial here—it seals the pot while letting the contrast between the white slip and the toasted, speckled clay body shine through. -
Glaze Wipe Down:
If the glaze looks too milky over the dark clay bands, you can gently wipe it back with a sponge, leaving glaze only in the recessed textures and over the white slip areas. -
Final Fire:
Glaze fire to maturity (likely Cone 5 or 6 for stoneware). The iron specks in the clay will bleed through the slip and glaze, creating that beautiful peppered look.
Once cooled, your tumbler is ready to add a touch of earthy elegance to your morning routine
Crawling Glaze for Intentional Roughness
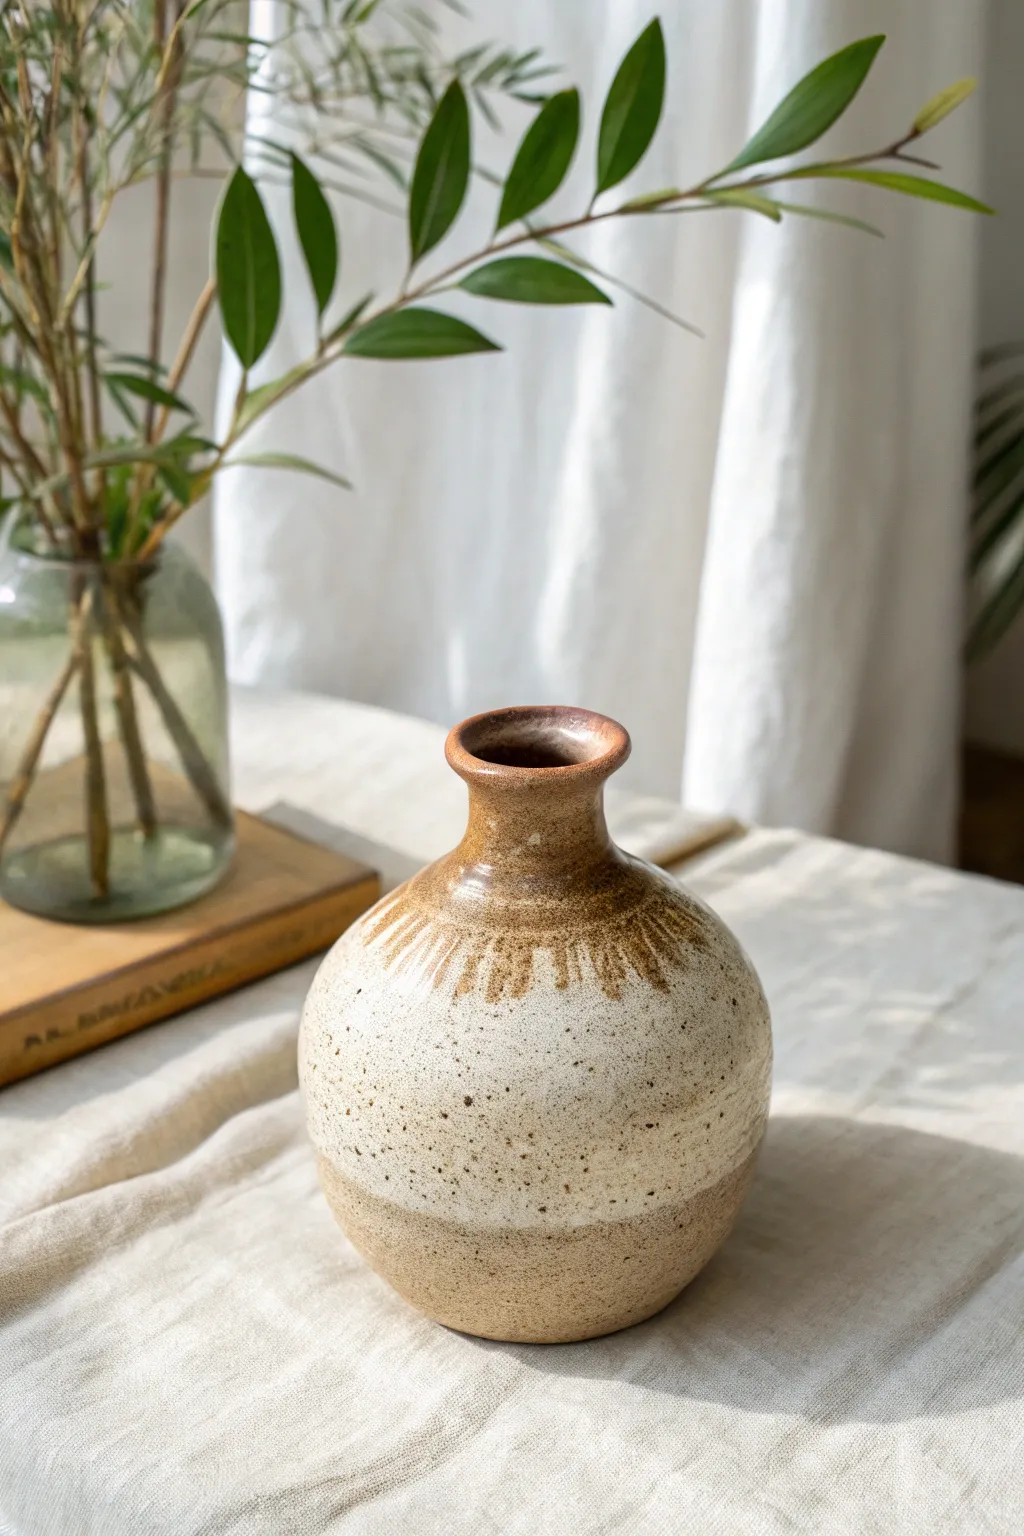
This vase project embraces the beauty of imperfection, featuring a speckled, stone-like texture that transitions into a rich, glossy brown neck. The contrast between the rough, sandy body and the smooth, dripping glaze creates a tactile piece that feels both grounded and elegant.
Step-by-Step Tutorial
Materials
- Stoneware clay (groggy or speckled body)
- Pottery wheel
- Throwing tools (sponge, rib, wire cutter)
- Trimming tools
- Wax resist
- Matte oatmeal or speckled cream glaze
- Glossy tenmoku or amber brown glaze
- Kiln for bisque and glaze firing
Step 1: Throwing the Form
-
Center the clay:
Start with about 2-3 pounds of wedged stoneware clay. Slam it onto the wheel head and center it firmly. Since we want a round body, centering a slightly wider, lower mound is helpful. -
Open the clay:
Create your opening, but keep the floor relatively narrow to allow the belly of the vase to swell outwards. Compress the floor well to prevent erratic cracking later. -
Pull the cylinder:
Begin pulling the walls up. Focus on height first rather than shape. You need enough clay at the top to later collar in for that narrow neck, so don’t make the rim too thin yet. -
Shape the belly:
Use a rib inside the pot to push the belly out while supporting the outside with your sponge. Gently swell the form into a round, spherical shape. -
Collar the neck:
Slow the wheel down. Using both hands, gently squeeze the clay inward at the shoulder to narrow the opening. Do this in several passes to avoid buckling the clay. -
Refine the rim:
Once the neck is narrow and tall enough, use a chamois or sponge to compress and round off the lip. Flare it slightly outward for that classic bottle shape.
Step 2: Trimming and Texture
-
Drying:
Allow the piece to dry to a leather-hard state. It should be firm enough to handle without warping but soft enough to carve. -
Trim the foot:
Center the pot upside down on the wheel. Use a trimming tool to refine the curve of the bottom so it flows uninterrupted into the foot. Carve a distinct foot ring. -
Smooth the surface:
I like to use a metal rib to scrape away any throwing lines on the belly if I want a clean slate for the speckles, but leaving subtle finger marks adds character too. -
Bisque fire:
Let the vase bone dry completely, which might take a week depending on humidity. Load it into the kiln for a bisque firing to cone 04 or your clay’s specific requirement.
Uneven Drips?
If the second glaze isn’t dripping naturally, your base layer might be too absorbent. Try quickly dipping the top layer while the pot is still slightly damp from the first dip.
Step 3: Glazing Technique
-
Wax the foot:
Apply wax resist to the bottom foot ring and about 1/4 inch up the side to prevent glaze from running onto the kiln shelf. -
Dip the base layer:
Dip the entire vase into your matte oatmeal or speckled cream glaze. Hold it for about 3 seconds to ensure an even coat. Let this layer dry completely to the touch. -
Expose the base (Optional):
For the two-tone look at the bottom seen in the image, you can wipe away the bottom third of the glaze with a damp sponge, revealing the raw clay body, or just leave the cream glaze all the way down. -
Dip the neck:
Invert the vase and dip just the neck and shoulder into the glossy brown (tenmoku) glaze. I often hold it for an extra second here to encourage a thicker application. -
Create the drip effect:
Immediately after dipping the brown glaze, flip the vase upright. The gravity will pull the wet brown glaze down over the dry cream glaze, creating natural variations and drips. -
Final Firing:
Load the glazed piece into the kiln. Fire to cone 6 (or your clay/glaze maturation temperature). This high heat will cause the brown glaze to interact with the cream base, creating that beautiful feathered transition.
Adding Iron Oxide
To enhance speckling on a plain clay body, brush a wash of iron oxide and water over the bisque ware before glazing. This adds depth beneath a semi-transparent matte glaze.
Place your finished vase near a window where natural light can highlight the contrast between the matte body and the glossy neck