
If you’re in the mood to make tiny, adorable accessories, kawaii clay charms are the quickest way to get that instant “cute payoff.” I’m sharing my favorite cute clay ideas that stay simple, beginner-friendly, and totally charm-sized—perfect for mixing into little collectible sets.
Kawaii Face Formula Charms
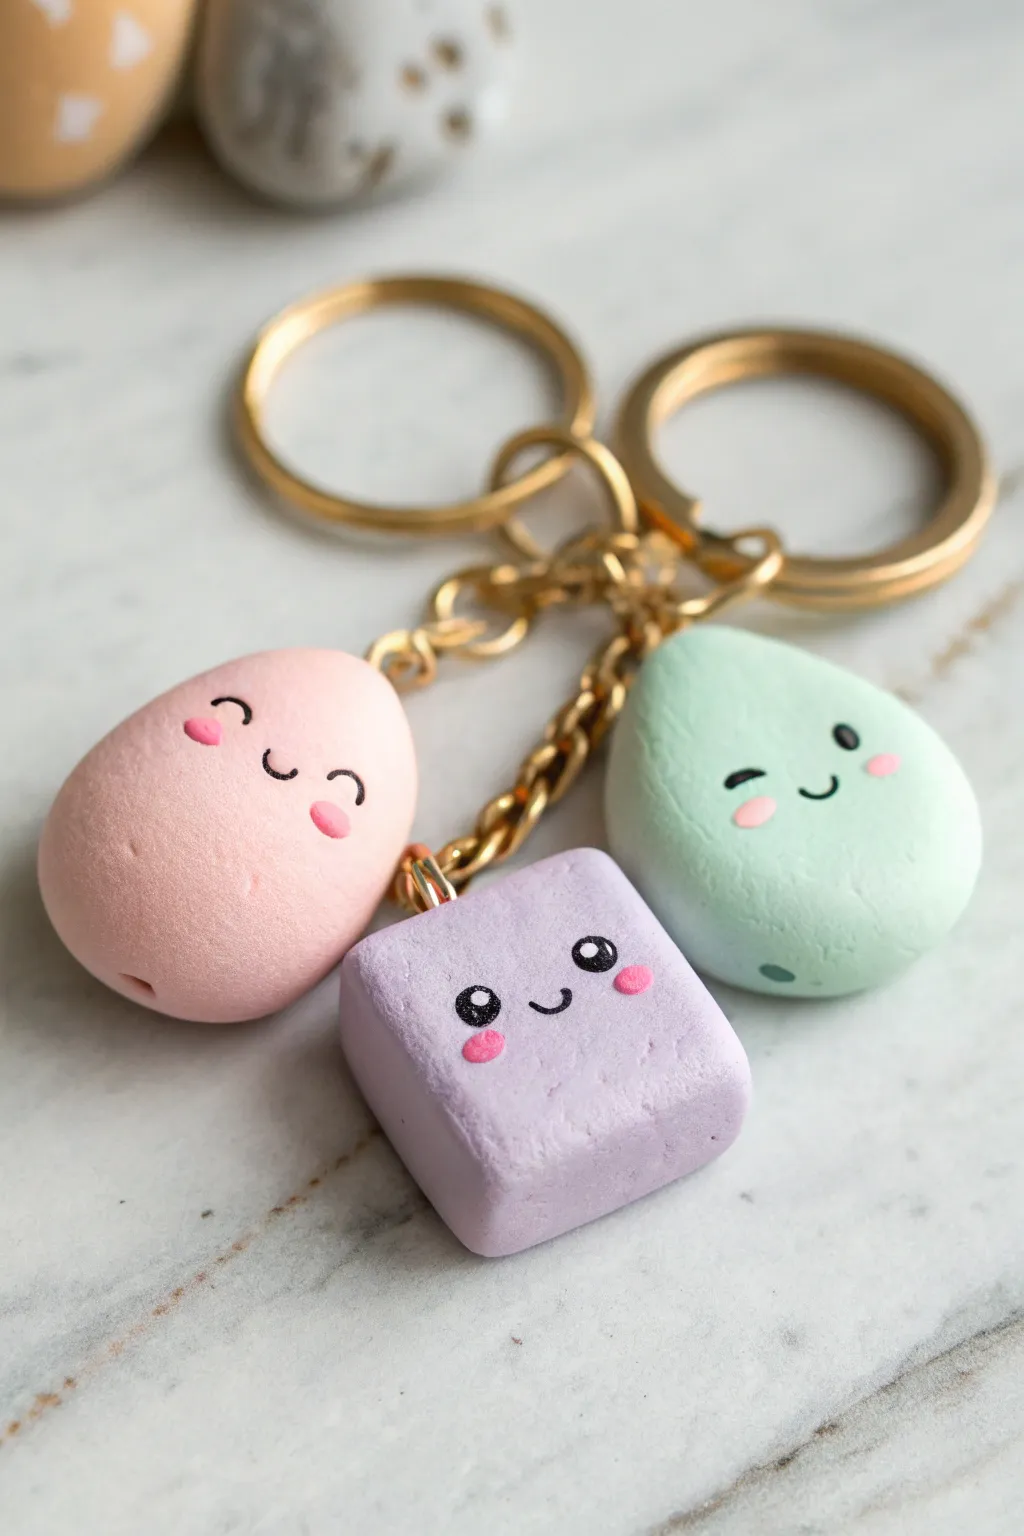
These adorable pastel charms prove that simple geometry is the perfect canvas for big personalities. With soft matte finishes and sweet expressions, this trio of a pink drop, green tear, and purple cube makes for a delightful keychain set.
Detailed Instructions
Materials
- Polymer clay (pale pink, mint green, lavender)
- Acrylic rolling pin
- Blade or craft knife
- Sandpaper (fine grit)
- Headpins or eye screws (gold)
- Gold keychain hardware and jump rings
- Black acrylic paint or fine tip marker
- Small dotting tool or toothpick
- Pink acrylic paint (for cheeks)
- Gloss or matte glaze (optional)
- Needle nose pliers
- Oven for baking
Step 1: Shaping the Trio
-
Condition the Pink Clay:
Start by taking a chunk of pale pink polymer clay. Warm and knead it in your hands until it becomes soft and pliable, which prevents cracks during baking. -
Form the Pink Body:
Roll the pink clay into a smooth ball about the size of a large grape. Gently taper the top half to create a rounded egg or teardrop shape, flattening the bottom slightly so it can stand upright. -
Shape the Green Charm:
Repeat the conditioning process with mint green clay. Form a teardrop shape similar to the pink one but flatten it a bit more, giving it a softer, pebble-like appearance like the one on the right. -
Create the Purple Cube:
Switch to your lavender clay. Roll a ball first, then gently press it against your work surface on six sides to form a soft cube. I like to tap the corners gently with a finger to round them off for a friendlier look. -
Refine the Surfaces:
Check all three shapes for fingerprints. Lightly buff them with a fingertip dipped in a tiny bit of baby oil or cornstarch to smooth everything out. -
Insert Hardware:
Carefully insert a gold eye screw or a trimmed headpin into the top center of each charm. Ensure it goes deep enough to be secure once baked.
Clean Lines Pro Tip
Before painting the faces, wipe the surface with rubbing alcohol to remove oils. If your hand shakes, rest your pinky finger on the table to stabilize your brush strokes.
Step 2: Baking and Prep
-
Bake the Pieces:
Arrange your charms on a parchment-lined baking sheet or ceramic tile. Bake according to your clay manufacturer’s instructions (usually around 275°F/135°C for 15-30 minutes depending on thickness). -
Cool Down:
Let the charms cool completely inside the oven with the door cracked open. This gradual cooling helps prevent thermal shock cracks. -
Surface Texture:
For that matte, stone-like texture seen in the photo, lightly sand the surface of the cooled charms with very fine-grit sandpaper.
Fixing Fingerprints
If you notice deep fingerprints after baking that sanding won’t fix, apply a thin layer of liquid polymer clay over the area and re-bake briefly to smooth it out.
Step 3: The Kawaii Faces
-
Pink Charm Expression:
Using a fine detail brush or marker, draw two arched curves for closed, happy eyes on the pink charm. Add a small ‘u’ shape in the center for a smiling mouth. -
Pink Charm Cheeks:
Dip a small dotting tool into pink paint and add two oval blushes under the eyes. -
Green Charm Expression:
For the green drop, draw the eyes slightly wider apart. Make the left eye a closed arch and the right eye a small solid circle. Add a tiny smile right between them. -
Green Charm Cheeks:
Apply the rosy cheeks again, perhaps making these slightly smaller dots. -
Purple Cube Expression:
The purple cube gets two large, open circular eyes. Draw a small white reflection dot inside each black circle for extra sparkle. -
Purple Cube Details:
Draw the mouth slightly higher up between the eyes, and add the signature pink cheek dots on the outer edges. -
Seal (Optional):
If you want to protect the paint without making the clay too shiny, apply a very thin layer of matte varnish over just the painted areas.
Step 4: Final Assembly
-
Prepare the Chain:
Take your gold keychain component. If it has a long chain, use pliers to remove a few links so the charms hang closer to the ring. -
Attach the Jump Rings:
Open a gold jump ring by twisting it sideways with two pairs of pliers. Slide it through the eye pin on a charm and then onto the keychain. -
Secure the Charms:
Close the jump ring securely. Repeat for all three charms, spacing them out on the chain links so they nestle together but don’t overcrowd.
Now you have a charming set of buddies to brighten up your keys or bag


Smiling Toast and Butter Charms
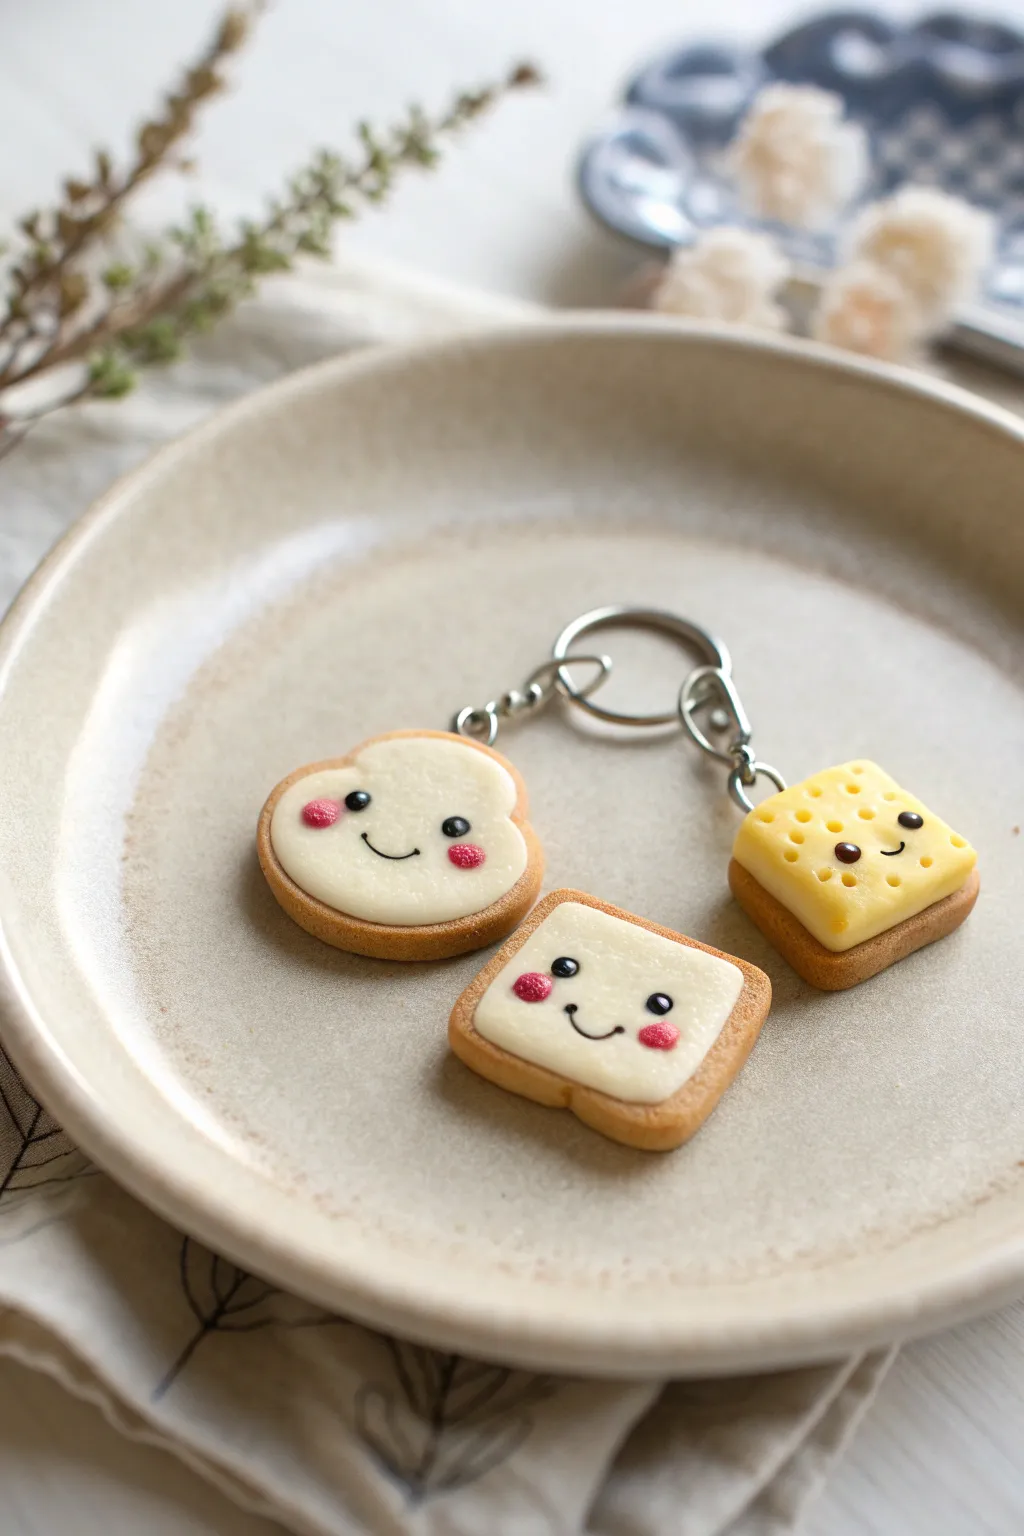
These adorable polymer clay charms capture the cozy feeling of a perfect breakfast with smiling faces and soft, warm textures. You’ll create a trio of cuties—a cloud-shaped toast, a classic square slice, and a cheeky wedge of cheese—perfect for sharing with friends or keeping on your keychain.
How-To Guide
Materials
- Polymer clay (tan/ochre for bread crust, white for bread/frosting, yellow for cheese, black)
- Soft pastels (brown, orange, pink)
- Liquid polymer clay (translucent or white)
- Needle tool or toothpick
- Ball stylus tool
- Small square cutter and flower/cloud cutter
- Old toothbrush or sandpaper (for texturing)
- Eye pins
- Jump rings and keychain findings
- Gloss glaze (optional)
Step 1: Shaping the Bread Bases
-
Mix the Perfect Dough Color:
Start by mixing a small amount of tan or ochre clay into white clay to create a pale unbaked dough color. You want it to look like the inside of soft bread. -
Cut the Shapes:
Roll your clay out to a thickness of about 1/4 inch (6mm). Use a small square cutter for the standard toast and a cloud or flower cutter for the rounded toast shape. Gently soften the sharp edges with your finger. -
Add Texture:
To make the bread look realistic, gently tap the surface of the clay with an old toothbrush or a piece of coarse sandpaper. This mimics the porous texture of bread. -
Create the Crust:
Take a soft cosmetic brush and shave some brown and orange soft pastels into a powder. Gently dust the edges of your bread shapes, shading inward slightly to create a baked crust effect.
Step 2: Creating the Toppings
-
Make the Frosting or Butter:
Roll out a very thin sheet of white clay. Cut shapes that are slightly smaller than your bread bases—try a wavy organic shape for the cloud toast and a slightly melted square for the regular toast. -
Apply the Topping:
Place the white shapes onto your textured bread bases. Use your finger to smooth the edges down slightly so it looks like it’s melting into the bread. -
Form the Cheese Slice:
Roll out yellow clay into a thick square, roughly the same size as your bread bases. Place this onto a square bread base (prepared in the previous phase). -
Stylize the Cheese:
Use a medium-sized ball tool to press indentations randomly into the yellow clay to create the classic Swiss cheese look. Make sure some indents are deeper than others for variety.
Pastel Shading Tip
Start with a lighter yellow-orange pastel for the first layer of crust, then layer a darker brown just on the very outer edges to create a perfectly baked gradient.
Step 3: Adding Faces & Hardware
-
Prepare the Eyes:
Roll tiny spheres of black clay. They should be very small to maintain the kawaii ratio. Press two eyes onto each charm, spacing them widely apart. -
Draw the Smiles:
Roll an incredibly thin snake of black clay. Cut tiny segments and carefully curve them into U-shapes. I find using a needle tool helps to position these tiny smiles right between the eyes. -
Add Rosy Cheeks:
Shave a bit of bright pink pastel. Use a small brush or a cotton swab to dab pink ‘blush’ just under the eyes on the white frosting. For the cheese, you can skip this or keep it subtle. -
Dimensional Blush (Optional):
Alternatively, like the cloud toast in the photo, you can use tiny flattened discs of pink clay for a more dimensional cheek look. Press them firmly into place. -
Insert Eye Pins:
Trim eye pins to the appropriate length. Dip the end in a tiny bit of liquid clay (a great glue substitute) and insert them into the top center of each charm.
Make it a Set
Create a matching ‘jam’ toast by mixing translucent clay with red alcohol ink or oil paint. The translucent effect looks just like real fruit preserves once baked.
Step 4: Baking & Assembly
-
Bake:
Bake the charms according to your clay manufacturer’s instructions (usually 275°F/135°C for 15-30 minutes per 1/4 inch thickness). -
Cool Down:
Let the pieces cool completely. The clay is fragile when hot, so patience is key here to avoid snapping the eye pins. -
Glazing:
If you want the cheese to look wet or the butter to shine, apply a thin coat of gloss glaze to just those areas, leaving the bread matte. -
Attach Hardware:
Use pliers to open a jump ring. Loop it through the eye pin and attach your keychain findings or clasp. Close the jump ring securely.
Now you have a charming set of breakfast friends ready to brighten up your bag or keys


Pastel Cupcake With Tiny Ears Charm
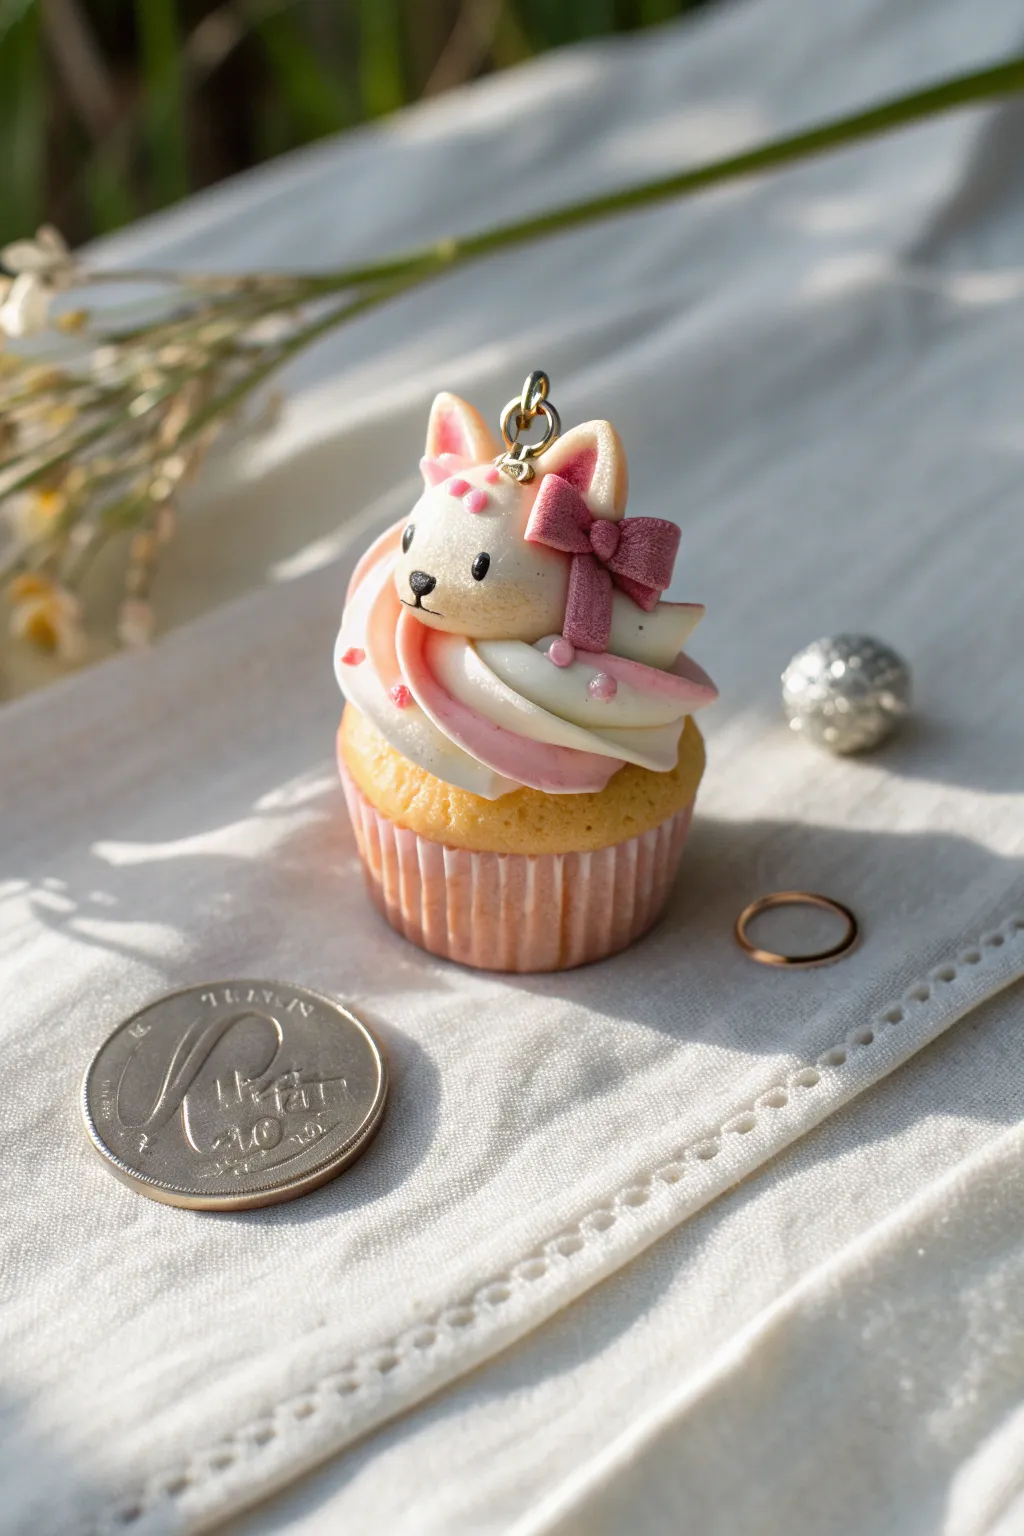
Blend the sweetness of bakery treats with adorable animal features in this tiny polymer clay charm. This project features a remarkably realistic swirl of icing topped with a cute fox face and delicate bow, perfect for a keychain or necklace.
Step-by-Step Tutorial
Materials
- Polymer clay (white, beige/tan, pastel pink, darker mauve/rose)
- Liquid polymer clay (Translucent Liquid Sculpey or Fimo Liquid)
- Chalk pastels (orange, brown, pink)
- Small paintbrush for shading
- Detailing tool or needle tool
- Ball stylus tool
- Small star tip for icing (optional but recommended)
- Eye pin or screw eye
- Black acrylic paint or tiny black clay bits
- Gloss glaze (UV resin or polyurethane varnish)
- Sandpaper or texture tool (toothbrush)
- Sharp blade
Step 1: Baking the Base
-
Form the cupcake base:
Start by conditioning your beige or tan clay until it’s soft. Roll it into a ball and then shape it into a tapered cylinder, slightly wider at the top, to mimic a cupcake sitting in a wrapper. -
Texture the wrapper:
Using a needle tool or a dull blade, press vertical lines all around the side of the beige cylinder to create the fluted look of a paper cupcake liner. -
Texture the cake top:
Gently texture the top surface of the cupcake using a clean toothbrush or a ball of crumpled tin foil to give it a convincing baked sponge appearance. -
Shade the cake:
Scrape some orange and brown chalk pastel into a fine dust. Use a soft brush to dust the top edges and the textured surface of the cupcake base to make it look golden brown and baked.
Step 2: Creating the Icing Swirl
-
Prepare the icing colors:
Mix white clay with a small amount of liquid clay to create a soft, pipeable consistency. Do the same with pastel pink clay. They should be soft like thick frosting but hold their shape. -
Create the swirl effect:
Roll both the softened white and pink clays into thin logs. Twist them gently together or place them side-by-side inside your piping tool. -
Pipe the icing:
Pipe a generous swirl onto the cupcake base, starting from the outer edge and spiraling inward and upward to create a peak. If you don’t have a piping tip, twist two tapered snakes of clay together and coil them manually.
Frosting Pro Tip
If you don’t have liquid clay, mix a dab of baby oil or Vaseline into your clay to soften it enough for the icing effect without losing structural integrity.
Step 3: Sculpting the Fox Head
-
Shape the head:
Roll a smooth ball of white clay. Slightly flatten the bottom so it sits securely on the icing swirl. Place it near the top of the icing mound. -
Form the ears:
Create two small triangles of white clay. Indent the centers with a small ball tool, then fill the indentation with a tiny bit of pink clay. Attach these to the top of the head. -
Add facial shading:
I like to use a clean brush to gently apply a dusting of orange or light brown pastel powder to the forehead area and the tips of the ears to suggest fur markings. -
Detail the face:
Use a tiny dot of black clay for the nose and place it in the center of the face. For the eyes, use two tiny black clay balls or paint them on after baking. Add tiny pink cheeks if desired.
Troubleshooting: Dirty Clay
White clay picks up dust easily. Keep a pack of baby wipes or rubbing alcohol nearby to clean your hands and tools often, especially before shaping the white fox head.
Step 4: Adding Accessories & Finishing
-
Make the bow:
Using the mauve/rose clay, shape two small flattened teardrops for the loops and a small rectangle for the center. Assemble them into a bow shape and press onto the side of the fox’s head. -
Texture the bow:
Gently press a piece of fabric or sandpaper against the bow clay to give it a realistic fabric texture, contrasting with the smooth fox face. -
Insert the hardware:
Trim an eye pin to the correct length. Dip the end in a little liquid clay for extra grip and insert it firmly through the top of the fox head, going down into the cupcake body. -
Add sprinkles:
Roll incredibly tiny balls of pink clay and scatter them on the icing swirl for decoration. Add a tiny dab of glitter or shimmer powder on the fox’s forehead for sparkle. -
Bake the charm:
Bake according to your clay manufacturer’s instructions (usually 275°F/130°C for 15-30 minutes). Let it cool completely before handling. -
Glaze and protect:
Apply a coat of gloss glaze or UV resin specifically to the eyes and nose to make them shine. Leave the cupcake wrapper and sponge matte for realism.
Attach a jump ring to your finished charm and it’s ready to be worn or gifted


Cute Sushi Roll Buddy Charms
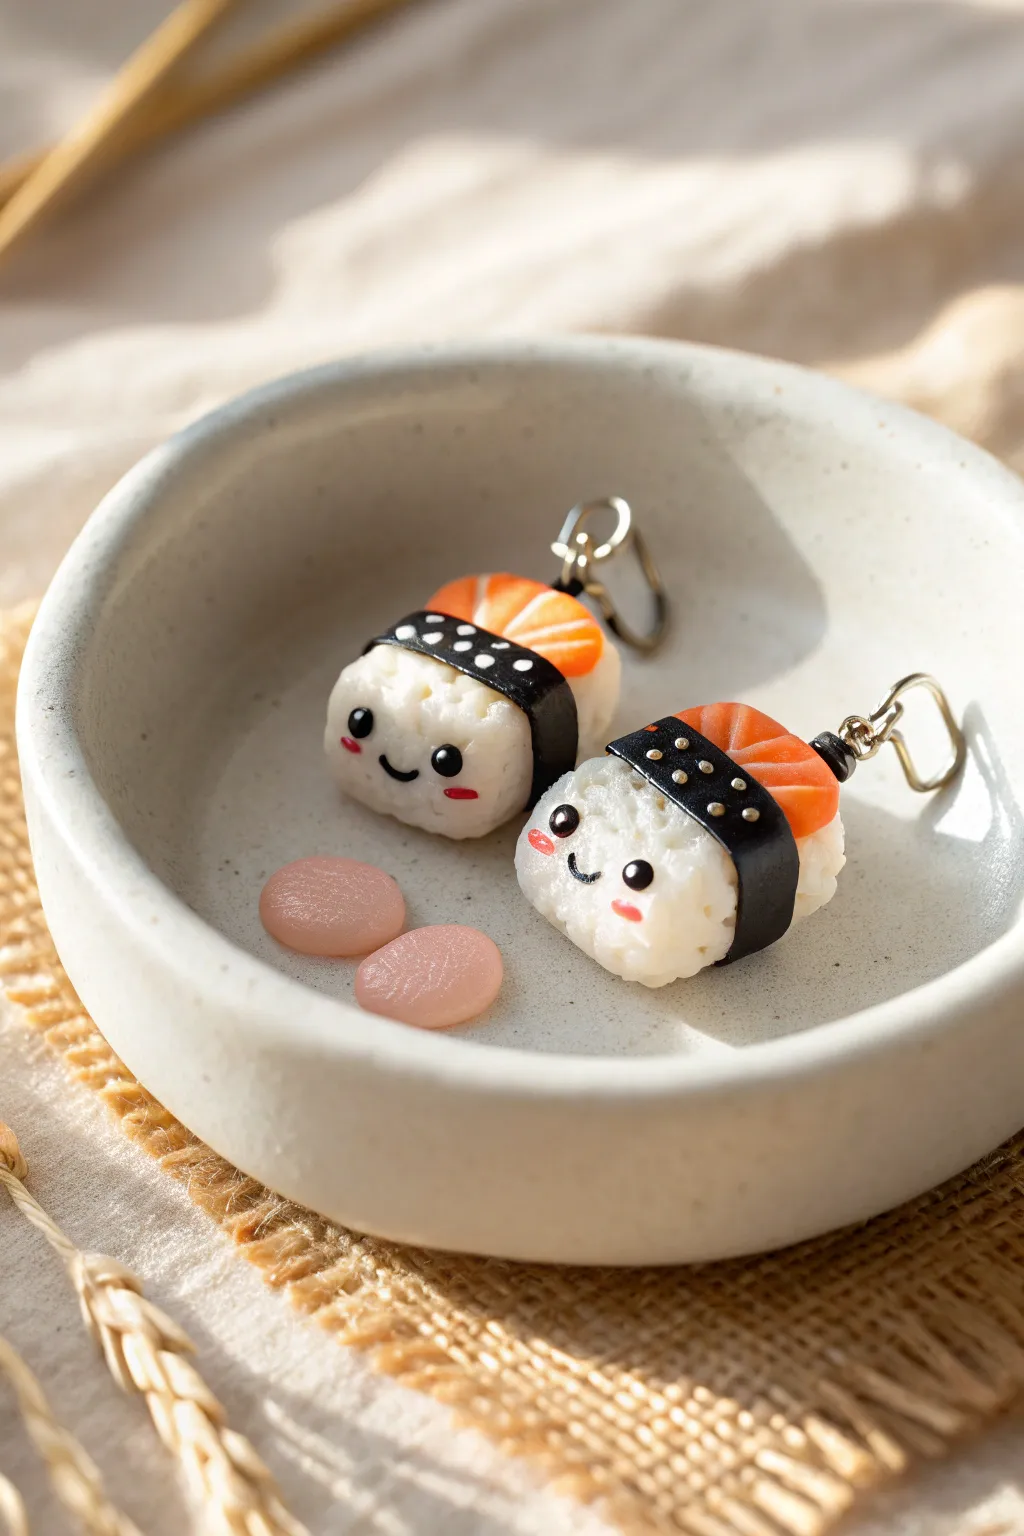
Transform humble polymer clay into an adorable pair of sushi nigiri charms that are almost too cute to eat. These tiny sculptural friends feature textured rice bodies, bright salmon toppings, and the sweetest little painted faces.
Step-by-Step
Materials
- White polymer clay (for the rice)
- Translucent polymer clay
- Orange polymer clay
- Black polymer clay (for the nori band)
- Black acrylic paint
- Pink acrylic paint or soft pastels
- Dotting tool or toothpick
- Headpins or eye screws
- Clear gloss glaze or UV resin
- Needle tool or stiff toothbrush (for texture)
- Clay blade or craft knife
- Jewelry findings (jump rings, earring hooks or lobster clasps)
Step 1: Forming the Rice Base
-
Condition the Clay:
Start by kneading a chunk of white polymer clay until it is soft and pliable. Since white clay picks up dust easily, ensure your hands and work surface are impeccably clean before starting. -
Shape the Nigiri:
Divide the white clay into two equal portions. Roll each rapidly into a ball between your palms to smooth out cracks, then gently press into an oblong, rectangular shape with rounded corners, mimicking the classic nigiri rice mound. -
Texturing the Rice:
This is the secret to realism: take a needle tool or an unused stiff toothbrush and gently stipple the entire surface of the white clay. Press just hard enough to create little indents that look like individual grains of rice without distorting the overall shape.
Clean Clay Trick
Keep baby wipes or a scrap piece of ‘waste’ clay nearby. Roll the waste clay in your hands before handling white clay to pull off any dust or lint from your skin.
Step 2: Creating the Salmon Topping
-
Mix the Salmon Color:
Combine orange clay with a significant amount of translucent clay (about a 1:1 or 1:2 ratio). This gives that realistic, slightly see-through look of raw fish. Add a tiny pinch of white if it looks too dark. -
Marble the Clay:
To create the fat lines, roll a thin snake of plain white or very light translucent white clay. Lay strips of this across your salmon mixture and fold/roll repeatedly. Stop before it’s fully blended; you want distinct, wavy striations. -
Cut the Slices:
Flatten your marbled salmon clay into a thick sheet. Use your clay blade to cut two rectangles slightly smaller than the top surface of your rice mounds. -
Attach the Fish:
Gently press the salmon slices onto the top of the textured rice bases. Curve the edges slightly downward so it looks like the fish is hugging the rice.
Fixing Fingerprints
If you smudge the rice texture while assembling, gently go back over the smooth spots with your stiff toothbrush before baking to restore the grain effect.
Step 3: Adding the Nori and Face using Clay
-
Roll the Nori Belt:
Roll out a very thin sheet of black clay. Use your blade to cut a long, narrow strip, about 3-4mm wide. -
Wrap the Sushi:
Wrap the black strip around the center of the sushi, going over the salmon and under the rice body. Trim any excess strip on the bottom and smooth the seam so it is invisible. -
Add Polka Dots (Optional):
For the decorative touch shown in the photo, roll tiny specks of white or gold clay into balls and press them onto the black nori band using a dotting tool. -
Create Eye Sockets:
Use a small ball tool to make two shallow indentations on the front face of the rice where the eyes will go. This helps the painted eyes stay in place later. -
Insert Hardware:
Insert a headpin or eye screw into the top center of each charm. I find twisting it as you insert helps it grip the raw clay better. -
Bake:
Bake the charms according to the manufacturer’s instructions for your specific brand of clay (usually 275°F/130°C for 15-30 minutes). Let them cool completely before handling.
Step 4: Bringing them to Life
-
Paint the Eyes:
Using a dotting tool dipped in black acrylic paint, place dots into the indentations you made earlier. Let dry slightly, then add a tiny white reflection dot in the upper corner of each eye. -
Draw the Mouth:
Use a very fine detail brush or a fine-tip black marker to draw a small ‘U’ shape between the eyes for a happy smile. -
Apply Blush:
Dip a Q-tip or dry brush into pink pastel dust (shave a pastel stick with a blade) or diluted pink paint. Dab gentle rosy cheeks right under the eyes and add little red accent lines if desired. -
Glaze:
Apply a coat of UV resin or glossy glaze over the salmon topping and the painted eyes to make them shine like fresh fish. Detailed touches like this really elevate the final look. -
Glaze the Nori:
Carefully glaze the black band as well, giving it that slight sheen of dried seaweed. -
Assemble:
Once everything is dry and cured, use jump rings to attach your earring hooks or keychain findings to the eye screws.
Now you have a charming pair of sushi buddies ready to hang from your ears or bag.

The Complete Guide to Pottery Troubleshooting
Uncover the most common ceramic mistakes—from cracking clay to failed glazes—and learn how to fix them fast.
Happy Fruit Slice Charms
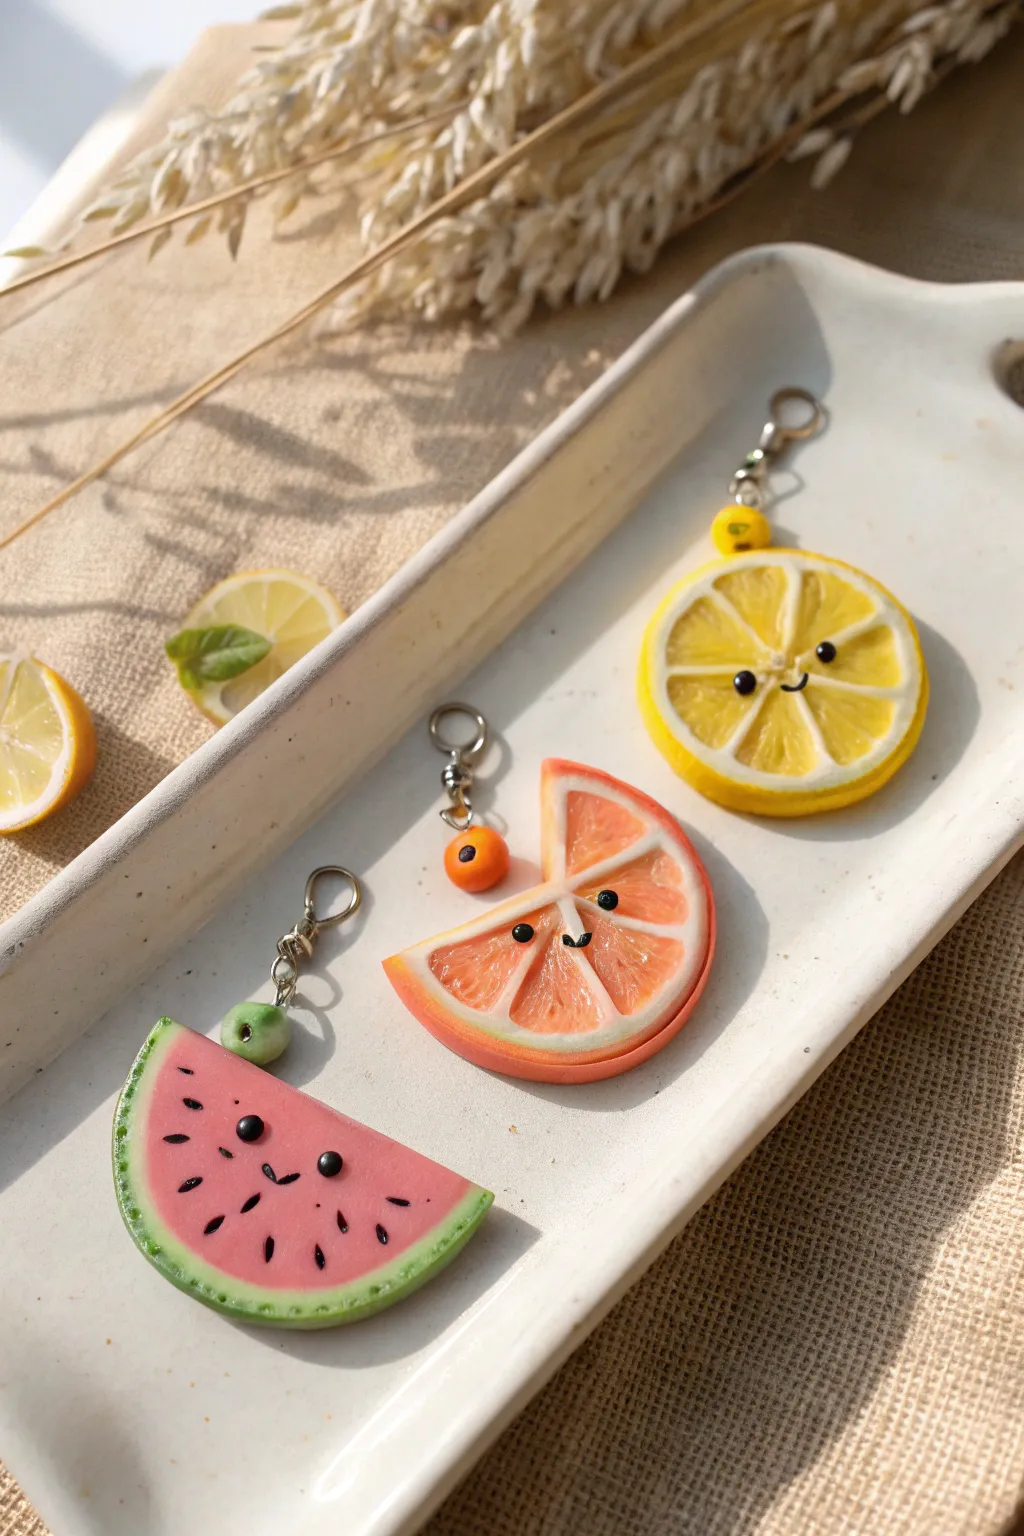
Brighten up your keyring or bag with these incredibly cheerful fruit slice charms made from polymer clay. Featuring a juicy watermelon, a zesty grapefruit, and a sunny lemon, each slice has its own sweet personality and realistic texture.
Step-by-Step Tutorial
Materials
- Polymer clay (translucent white, opaque white, yellow, pink/red, green, orange)
- Liquid polymer clay (translucent)
- Acrylic paint (black for faces, white for highlights)
- Small dotting tools or toothpicks
- Razor blade or tissue blade
- Eye pins and jump rings
- Lobster clasps
- Gloss glaze or UV resin
- Needle tool
- Round cutters (various sizes)
- Fine detail paintbrush
Step 1: Creating the Canes
-
Mix the fruit flesh colors:
Start by mixing translucent clay with a very small amount of colored clay (yellow for lemon, pink/orange for grapefruit). You want the fruit flesh to look slightly jelly-like and realistic after baking, so keep the mix mostly translucent. -
Form the segments:
Shape your translucent fruit color into a thick log. Wrap a thin sheet of opaque white clay around this log. Then, stretch and reduce the log until it is about the thickness of a pencil. -
Assemble the wheel:
Cut the cane into equal lengths (8 for the lemon, maybe 6-8 for the grapefruit). Pinch one side of each small log to form a teardrop or wedge shape. Arrange these wedges in a circle around a very thin center core of white clay to form the fruit’s segments. -
Wrap the rind:
Wrap this segmented circle with a layer of white clay (the pith), followed by a layer of colored clay for the skin (yellow for lemon, orange gradient for grapefruit). Gently roll the entire cane to bond the layers without distorting the inner pattern too much. -
Slice the charm:
Once your cane is firm (let it rest in the fridge for 10 minutes if needed), use your tissue blade to slice a clean, even cross-section about 4-5mm thick.
Step 2: Shaping the Watermelon
-
Layer the watermelon slice:
For the watermelon, making a full cane isn’t necessary. Roll a ball of pink clay and flatten it into a thick disk. Wrap a strip of white clay around the edge, followed by a strip of green clay. -
Cut into a semicircle:
Cut the disk in half to create two semicircles. If the slice looks too thick, gently press it down with an acrylic block to flatten it slightly. -
Add texture:
Use a needle tool or a stiff toothbrush to gently tap texture onto the pink area and the green rind, giving it a realistic porous look. -
Pre-bake seeds:
Roll tiny teardrop shapes from black clay for the seeds. Press them into the pink flesh in a random pattern, embedding them slightly so they don’t fall off.
Sussing out smudges
Is your white clay picking up dust? Keep a pack of baby wipes nearby to clean your hands and tools often, or use a piece of scotch tape to lift dust off raw clay.
Step 3: Adding Details & Baking
-
Insert eye pins:
Carefully insert a metal eye pin into the top center of the rind on each fruit slice. I find adding a tiny dab of liquid clay to the pin helps secure it permanently during baking. -
Create the mini beads:
Don’t forget the tiny accent beads! Roll miniature balls of matching clay colors (like a mini green ball for the watermelon or orange for the grapefruit), poke a hole through them, and add a tiny black dot for an eye if desired. -
Bake the clay:
Place your charms on a tile or parchment paper and bake according to your polymer clay manufacturer’s instructions, usually around 275°F (130°C) for 15-30 minutes.
Level Up: Fruity Texture
Before baking, use a needle tool to gently scratch tiny radial lines into the translucent flesh of the citrus slices to mimic the visible juice sacs.
Step 4: Finishing Touches
-
Cool and clean:
Let the pieces cool completely. If there are any fingerprints, you can sand them away gently with fine-grit sandpaper. -
Paint the faces:
Using a fine detail brush or a dotting tool, paint two small black eyes and a tiny smile right in the center of the fruit slice. For the watermelon, paint the face between the seeds. -
Add the sparkle:
Add the tiniest dot of white paint to the eyes to make them look alive. This ‘catchlight’ is crucial for that kawaii look. -
Glaze for shine:
Coat the fruit flesh area with gloss glaze or UV resin to make it look juicy and wet. Leave the rind matte for a realistic contrast. -
Assemble the hardware:
Once the glaze is dry, use jump rings to attach the main fruit charm and your tiny accent bead to the lobster clasp.
Now you have a refreshing set of fruit friends ready to tag along on your daily adventures
Kawaii Veggie Friend Charms
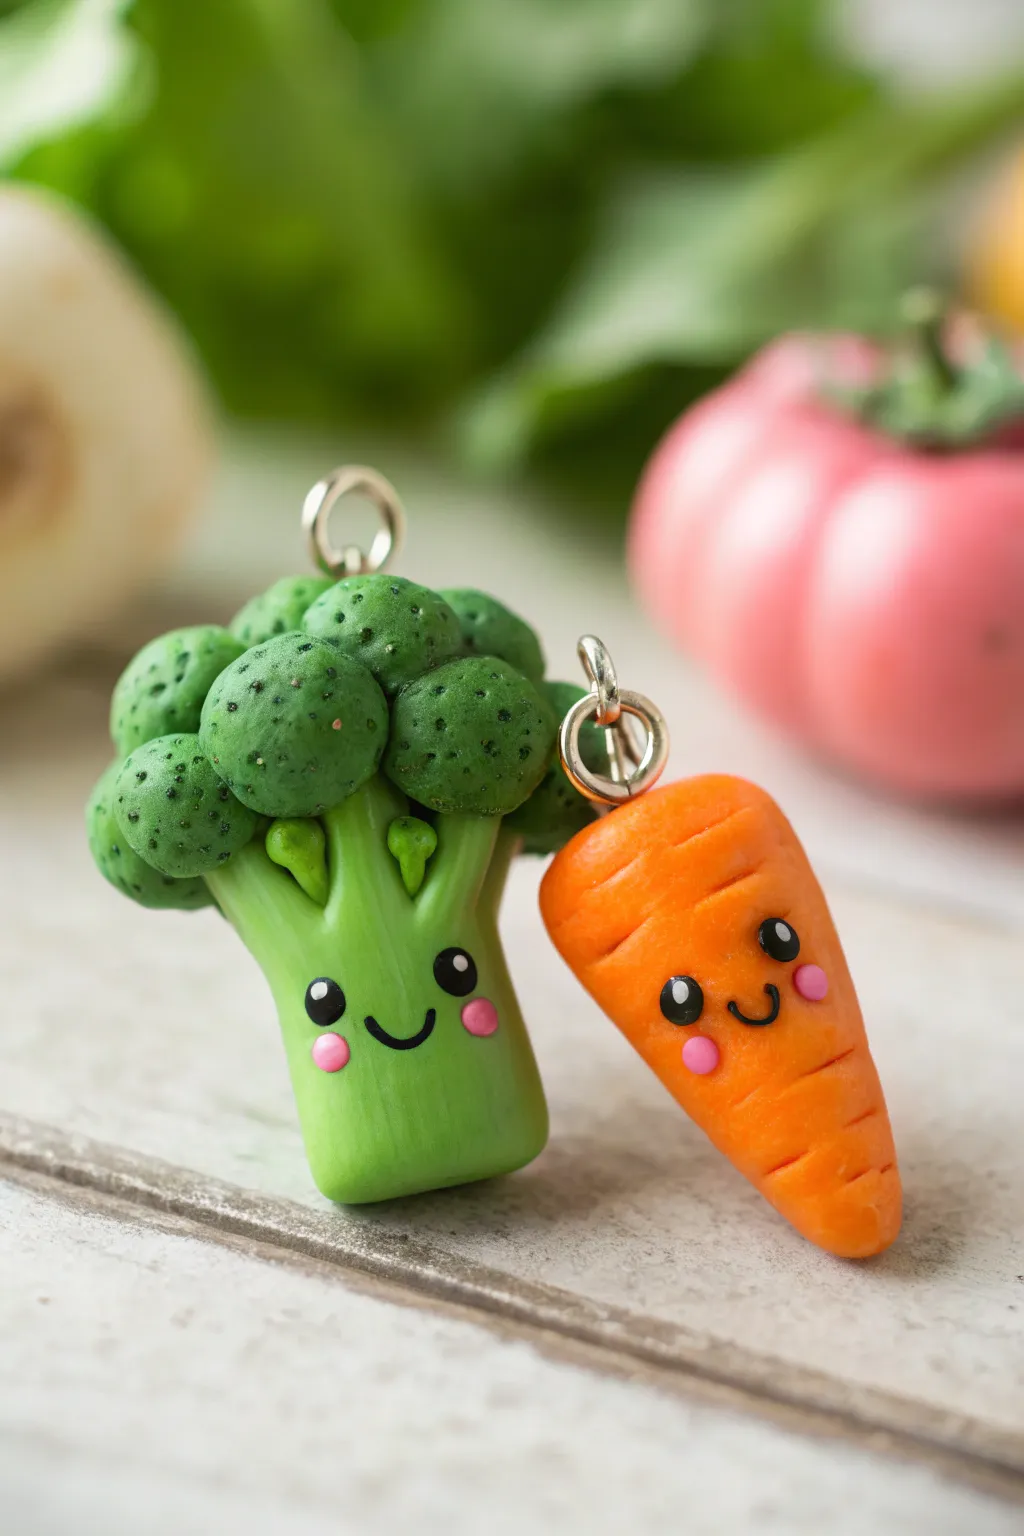
Celebrate healthy friendship with this adorable duo of polymer clay charms. Featuring a textured, bushy broccoli floret and a cheerful orange carrot, these smiling veggie friends are perfect for friendship necklaces or keychains.
Detailed Instructions
Materials
- Green polymer clay (two shades: light and medium)
- Orange polymer clay
- Black polymer clay (tiny amount)
- Pink polymer clay or acrylic paint
- Silver eye pins (2)
- Needle tool or toothpick
- Ball stylus tool
- Toothbrush or crumpled foil (for texturing)
- Liquid clay or bake-and-bond
- Gloss glaze (optional)
Step 1: Sculpting the Broccoli Buddy
-
Base Stalk:
Start by conditioning the lighter green clay. Roll it into a thick cylinder, slightly tapering the bottom to form the broccoli stalk. Flatten the bottom so it can stand upright. -
Floret Foundation:
Create the head of the broccoli by rolling several small balls of the darker green clay. These don’t need to be perfectly uniform; variety looks more natural. -
Attaching Florets:
Apply a tiny dab of liquid clay to the top of the stalk. Press the dark green balls onto the top, clustering them tightly together to create a domed, bushy shape. -
Texturing:
Using a toothbrush or a ball of crumpled aluminum foil, gently press into the dark green balls to give them a rough, ‘veggie’ texture. Be careful not to squash the shapes completely. -
Extra Details:
Use a needle tool to prick small holes randomly across the florets for added depth. Add two tiny teardrop shapes of light green clay just under the florets to mimic leafy stems. -
Eye Pin Insertion:
Trim an eye pin to the right length. Dipping the end in a little liquid clay helps secure it before pushing it straight down into the center of the broccoli head.
Step 2: Crafting the Cute Carrot
-
Carrot Shape:
Condition the orange clay and roll it into a cone shape. Round off the top (the wider end) and slightly blunt the bottom tip so it isn’t too sharp. -
Adding Ridges:
Take your needle tool or a dull knife and gently press horizontal indentations along the body of the carrot. These should be uneven and spaced out to look like natural growth lines. -
Curving the Body:
Give the carrot a very slight bend or tilt to add character and movement, making it look less like a stiff geometric cone. -
Secure the Hardware:
Similar to the broccoli, trim an eye pin, dip it in adhesive, and insert it firmly into the top center of the carrot.
Smudged clay?
If black clay smudges onto the light green, dip a Q-tip in rubbing alcohol or nail polish remover and gently wipe the stain away before baking.
Step 3: Bringing Faces to Life
-
Eye Sockets:
On both veggies, use a medium-sized ball tool to press two small indentations where you want the eyes to sit. This helps the eyes stay flush with the surface. -
Tiny Eyes:
Roll extremely tiny balls of black clay. Place them into the sockets and flatten gently. Add incredibly small specks of white clay (or paint after baking) for the ‘sparkle’ highlight. -
Sweet Smiles:
Roll a very thin snake of black clay. Cut tiny sections and curve them into a ‘U’ shape for the mouth. Press this gently onto the face between the eyes with a needle tool. -
Rosy Cheeks:
For the finishing touch, flatten two minuscule discs of pink clay and apply them just under the eyes for that classic blushing kawaii look. -
Baking:
Bake your charms according to the manufacturer’s instructions for your specific brand of clay. I usually tent them with foil to prevent scorching the light colors. -
Finishing:
Once cool, you can seal the eyes and cheeks with a drop of gloss glaze to make them shine and protect the small details.
Make it a set
Add a tiny magnet on the back instead of an eye pin to create cute fridge magnets, or make a whole salad bowl by adding a tomato and corn charm.
Now you have a pair of healthy, happy sidekicks ready to brighten up any accessory collection


What Really Happens Inside the Kiln
Learn how time and temperature work together inside the kiln to transform clay into durable ceramic.
Chubby Cat Head Cube Charms
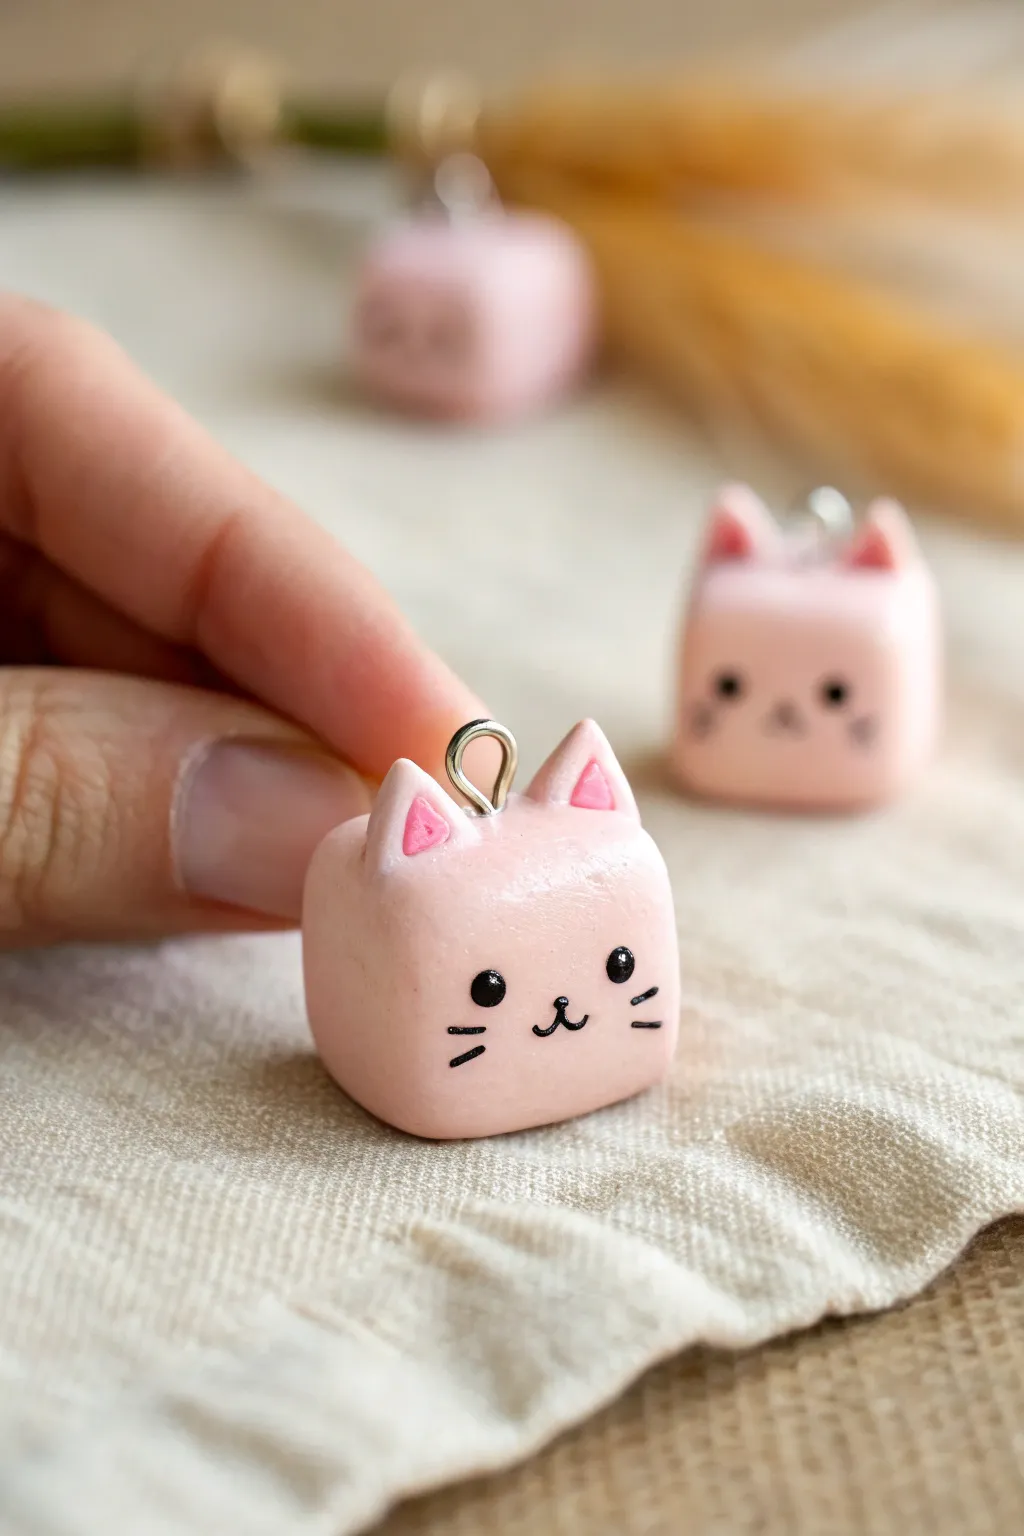
These adorable, minimalist cat charms combine the structured shape of a cube with soft, kawaii features. Perfect for beginners, this project turns simple geometric forms into sweet little feline friends that look great on keychains or necklaces.
Step-by-Step Guide
Materials
- Light pink polymer clay
- Darker pink polymer clay (for ears)
- Black acrylic paint
- Fine detail paintbrush or dotting tool
- Metal eye screw pins
- Soft gloss clay glaze or varnish
- Rolling pin or pasta machine
- Sharp crafting blade
- Sculpting tools (specifically a small ball tool)
- Baking sheet and oven
Step 1: Shaping the Base
-
Condition the clay:
Start by kneading your light pink polymer clay until it is soft, pliable, and free of cracks. Warm hands help speed up this process. -
Form a sphere:
Roll a small amount of the conditioned clay into a smooth ball, roughly the size of a large marble or a grape. -
Create the cube shape:
Gently press the ball against your work surface to flatten the bottom. Rotate and repeat for all six sides until you have a soft, rounded cube shape. -
Refine the edges:
Use your fingers or a flat acrylic block to gently tap the sides, sharpening the edges slightly while keeping the overall look distinctively chubby and soft. -
Smooth the surface:
Check for any fingerprints. I find that lightly brushing the clay with a tiny drop of baby oil helps remove prints before baking.
Step 2: Adding the Ears
-
Make the triangles:
Take two tiny pieces of the light pink clay and roll them into balls, then pinch one side to form small, distinct triangles. -
Attach the ears:
Place the triangles on the top corners of your cube. Use a blending tool or the back of a fingernail to smooth the seam where the ear meets the head so they don’t pop off later. -
Create the inner ear:
Take extremely tiny amounts of the darker pink clay and shape them into smaller flat triangles. -
Press into place:
Gently press these darker triangles onto the front of the main ears. Use a small tool to flatten them slightly so they look integrated rather than just stuck on top.
Clean Clay Trick
Keep baby wipes nearby! Use them to clean your hands and tools before touching the light pink clay to prevent dust or lint from getting trapped in your charm.
Step 3: Hardware and Baking
-
Insert the eye pin:
Take your metal eye screw and gently twist it into the center of the top of the cube, right between the ears. Twist until only the loop is visible. -
Secure the pin:
If the pin feels loose, pull it out, add a speck of liquid clay or translucent liquid sculpey to the threads, and re-insert it. -
Bake the charm:
Place your cat cubes on a baking sheet lined with parchment paper. Bake according to your brand of clay’s instructions (usually 230°F – 275°F for 15-30 minutes). -
Cool down:
Allow the charms to cool completely before handling. This is crucial as the clay is fragile while hot.
Make it a Bead
Instead of an eye pin on top, use a thick needle to pierce a hole vertically through the center before baking. Now you can string these onto a necklace.
Step 4: Painting and Finishing
-
Paint the eyes:
Using a dotting tool or the end of a toothpick dipped in black acrylic paint, create two perfectly round eyes wide apart on the face. -
Draw the details:
Using your finest brush, carefully paint a small ‘w’ shape for the mouth and add two short whiskers on each cheek. Keep your hand steady and use very little paint. -
Let paint dry:
Wait for the acrylic paint to dry completely to avoid smearing your hard work during the glazing step. -
Glaze the charm:
Apply a coat of soft gloss glaze over the entire charm to protect the paint and give it a finished, ceramic-like sheen.
Once the glaze is dry, attach a jump ring and enjoy your new geometric kitty companion
Marshmallow Bunny and Bear Charms
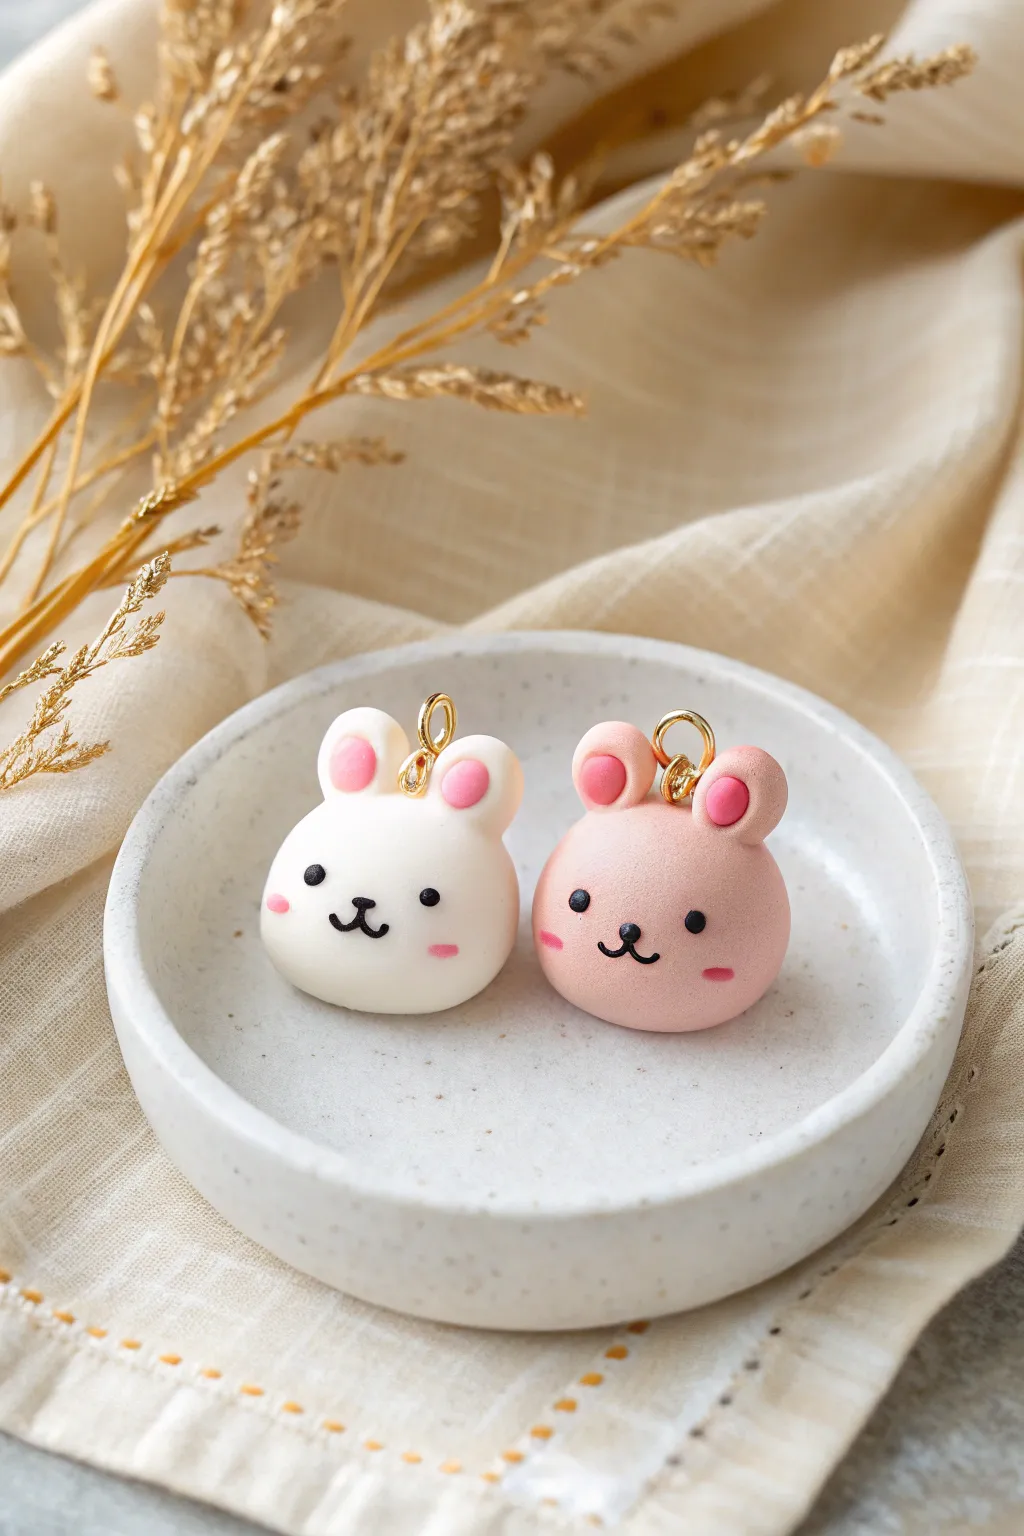
These delightfully chubby charms look just like soft, squishy marshmallows brought to life. With their simple round shapes and sweet minimalist faces, this project is perfect for beginners wanting to create matching bunny and bear friends.
Step-by-Step
Materials
- Polymer clay in White and Soft Pink
- Polymer clay in Hot Pink (very small amount for ear details)
- Black liquid clay or black acrylic paint
- Needle tool or toothpick
- Dotting tool or small ball stylus
- Small eye pins (gold)
- Gloss glaze (optional)
- Two-part epoxy (optional for securing pins)
- Oven for baking
Step 1: Shaping the Base
-
Prepare the portions:
Start by conditioning your white and soft pink clay until they are pliable. Roll two equal-sized balls, roughly 1 inch in diameter, to serve as the heads for your bunny and bear. -
Create the gumdrop shape:
Gently press the balls onto your work surface so the bottom flattens slightly. You want a rounded, dome-like gumdrop shape rather than a perfect sphere to mimic a sitting marshmallow. -
Smooth the surface:
Check for any fingerprints. I like to lightly roll the surface with a piece of acetate or plastic wrap to ensure it’s perfectly smooth before adding details.
Dust Magnets!
White clay attracts dust like crazy. Keep baby wipes nearby to clean your hands and tools often, and keep a piece of scrap white clay to roll lint off your fingers before shaping.
Step 2: Ear Assembly
-
Form the ears:
Roll four smaller balls of clay that match your base colors—two white and two soft pink. For the bunny, make them slightly elongated ovals; for the bear, keep them as small round buttons. -
Make the inner ear indents:
Using a small ball tool, press gently into the center of each ear piece to create a shallow depression. -
Add the pink centers:
Take tiny amounts of hot pink clay, roll them into minuscule balls, and press them into the depressions you just made. Smooth them down so they sit flush with the ear. -
Attach the ears:
Place the ears on top of the head domes. Use a blending tool or your finger to smooth the seam at the back of the ears so they are securely attached and won’t pop off later.
Texture Twist
Before baking, gently tap the surface with a stiff toothbrush or a textured sponge to give the clay a sugary, powdery look, just like a real marshmallow peep.
Step 3: Face Details
-
Mark eye placement:
Use a needle tool to make two tiny guide holes where you want the eyes to sit. Keeping them wide-set and low on the face enhances the kawaii look. -
Add the eyes:
Using a small dotting tool dipped in black acrylic paint or black liquid clay, carefully dot the eyes into your guide holes. -
Draw the nose and mouth:
With a very fine detail brush or a needle tool dipped in black paint, draw a tiny ‘Y’ or anchor shape between the eyes for the nose and mouth. -
Blush the cheeks:
For the rosy cheeks, you can use a tiny bit of pink soft pastel chalk dust applied with a Q-tip, or paint two small dashes of pink paint under the eyes.
Step 4: Hardware & Baking
-
Insert eye pins:
Trim your eye pins to the correct length. Dip the end in a tiny bit of liquid clay or glue for extra grip, then insert them straight into the top center of the head, between the ears. -
Bake:
Bake the charms according to your clay manufacturer’s instructions (usually around 275°F for 15-30 minutes). I recommend tenting them with foil to prevent the white clay from scorching. -
Cool down:
Let the charms cool completely inside the oven or on a wire rack before handling them. -
Secure the pin:
If the eye pin feels loose after baking, pull it out gently, add a drop of super glue or epoxy, and slide it back in. -
Final finish:
You can leave them matte for a realistic marshmallow texture, or add a coat of polyurethane gloss varnish for a porcelain-like shine.
Now you have a pair of sweet little friends ready to be turned into earrings or a matching keychain set

TRACK YOUR CERAMIC JOURNEY
Capture glaze tests, firing details, and creative progress—all in one simple printable. Make your projects easier to repeat and improve.
Cloud and Sun Buddy Charms
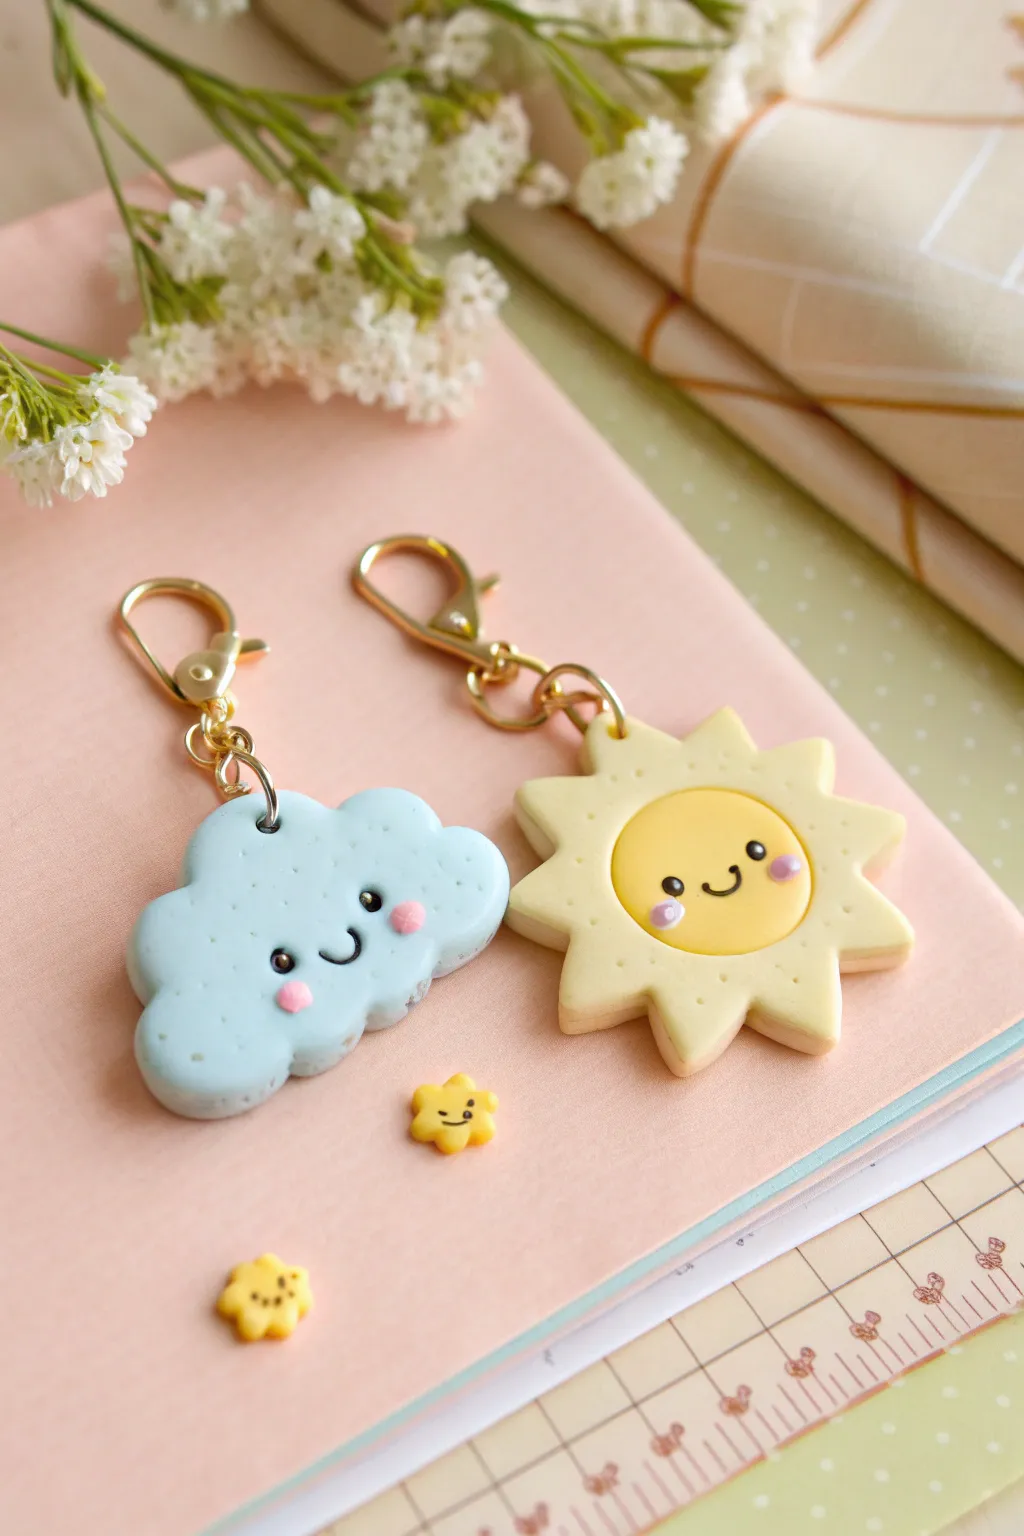
Brighten up your keychain collection with this adorable duo of weather-themed charms featuring a cheerful puff of cloud and a radiant sun. These polymer clay creations use simple shapes, soft pastels, and sweet kawaii expressions to bring a ray of sunshine to your accessories.
Step-by-Step Tutorial
Materials
- Polymer clay (light blue, pastel yellow, darker yellow, black, pink)
- Clay rolling pin or pasta machine
- Cloud shaped micro-cutter or craft knife
- Star or sunburst shaped cutter
- Circle cutter (small, for the sun’s face)
- Dotting tools or ball stylus (various sizes)
- Needle tool
- Gold eye pins
- Gold jump rings and lobster clasps
- Liquid polymer clay or Bake & Bond
- Gloss glaze or UV resin (optional)
- Soft brush for glazing
Step 1: Shaping the Bases
-
Condition the Blue Clay:
Start by thoroughly kneading and conditioning your light blue polymer clay until it is soft and pliable. Roll it out to a medium thickness, about 4-5mm, to ensure the charm is sturdy. -
Cut the Cloud Shape:
Using a cloud-shaped cutter, press firmly into the blue clay. If you don’t have a cutter, you can freehand the shape with a craft knife or shape several small balls of clay together and smooth the seams to create that fluffy look. -
Prepare the Sun Rays:
Condition the pastel yellow clay (the lighter shade) and roll it out to the same thickness as the cloud. Use a starburst or multi-pointed star cutter to create the backing for the sun. -
Create the Sun’s Face:
Take the slightly darker, warmer yellow clay creating a contrast. Roll this somewhat thinner than the base. Use a small circle cutter to punch out a round disc that fits comfortably in the center of your starburst shape. -
Assemble the Sun:
Apply a tiny drop of liquid clay or Bake & Bond to the back of the yellow circle. Press it gently onto the center of the starburst base, smoothing the edges slightly with your finger to ensure a good bond.
Clean Clay Tip
Keep baby wipes or hand sanitizer nearby. Clean your hands thoroughly when switching from the dark black clay back to the pastel yellow to avoid smudging the bright colors.
Step 2: Adding Kawaii Details
-
Texture the Cloud:
To give the cloud a bit of character, use a large ball tool or your fingertip to gently indent random spots on the surface, making it look pillowy and soft rather than perfectly flat. -
Add Eye Pins:
Take two gold eye pins. Trim them if they are too long. Carefully insert one into the top center of the cloud and one into a top ray of the sun. I find adding a dab of liquid clay to the pin’s shaft helps secure it permanently. -
Create Cheek Indentations:
Before adding color, decide where you want the cheeks to be. Use a medium-sized ball tool to press shallow indentations onto both the cloud and the sun face. -
Make the Cheeks:
Roll tiny balls of pink clay. Place them into the indentations you just made and flatten them gently so they sit flush with the surface. -
Add the Eyes:
Roll extremely small balls of black clay. Position them symmetrically on the faces. Press them down gently to secure them. -
Sculpt the Mouths:
Roll a very thin ‘snake’ of black clay. Cut tiny U-shapes for the smiles. Carefully place these between the cheeks using a needle tool to guide the clay into a perfect curve. -
Add Eye Sparkles:
For that signature kawaii look, add a microscopic dot of white clay or white acrylic paint (after baking) to the upper corner of each black eye.
Make It Sparkle
Mix a tiny amount of mica powder or ultra-fine glitter into your blue cloud clay before rolling it out to give the finished charm a subtle, magical shimmer.
Step 3: Baking and Assembly
-
Bake the Pieces:
Place your charms on a ceramic tile or a baking sheet lined with parchment paper. Bake according to your brand of clay’s instructions—usually around 275°F (130°C) for 15-30 minutes. -
Cool Down:
Allow the pieces to cool completely before handling. Polymer clay is slightly fragile when warm and strengthens as it cools. -
Glaze (Optional):
If you prefer a shiny finish, apply a thin coat of gloss glaze or UV resin to the front of the charms. Cure under a UV lamp if using resin, or let the glaze air dry fully. -
Attach Hardware:
Using two pairs of pliers, twist open a jump ring laterally. Hook it through the eye pin loop and the loop of your lobster clasp, then twist it closed securely. -
Mini Bonus:
If you have leftover yellow clay, create tiny mini-stars or flowers using similar face techniques to act as simple filler charms or beads.
Now you have a smiling set of weather buddies ready to brighten up your day wherever you go
Tiny Milk Carton and Cookie Charms
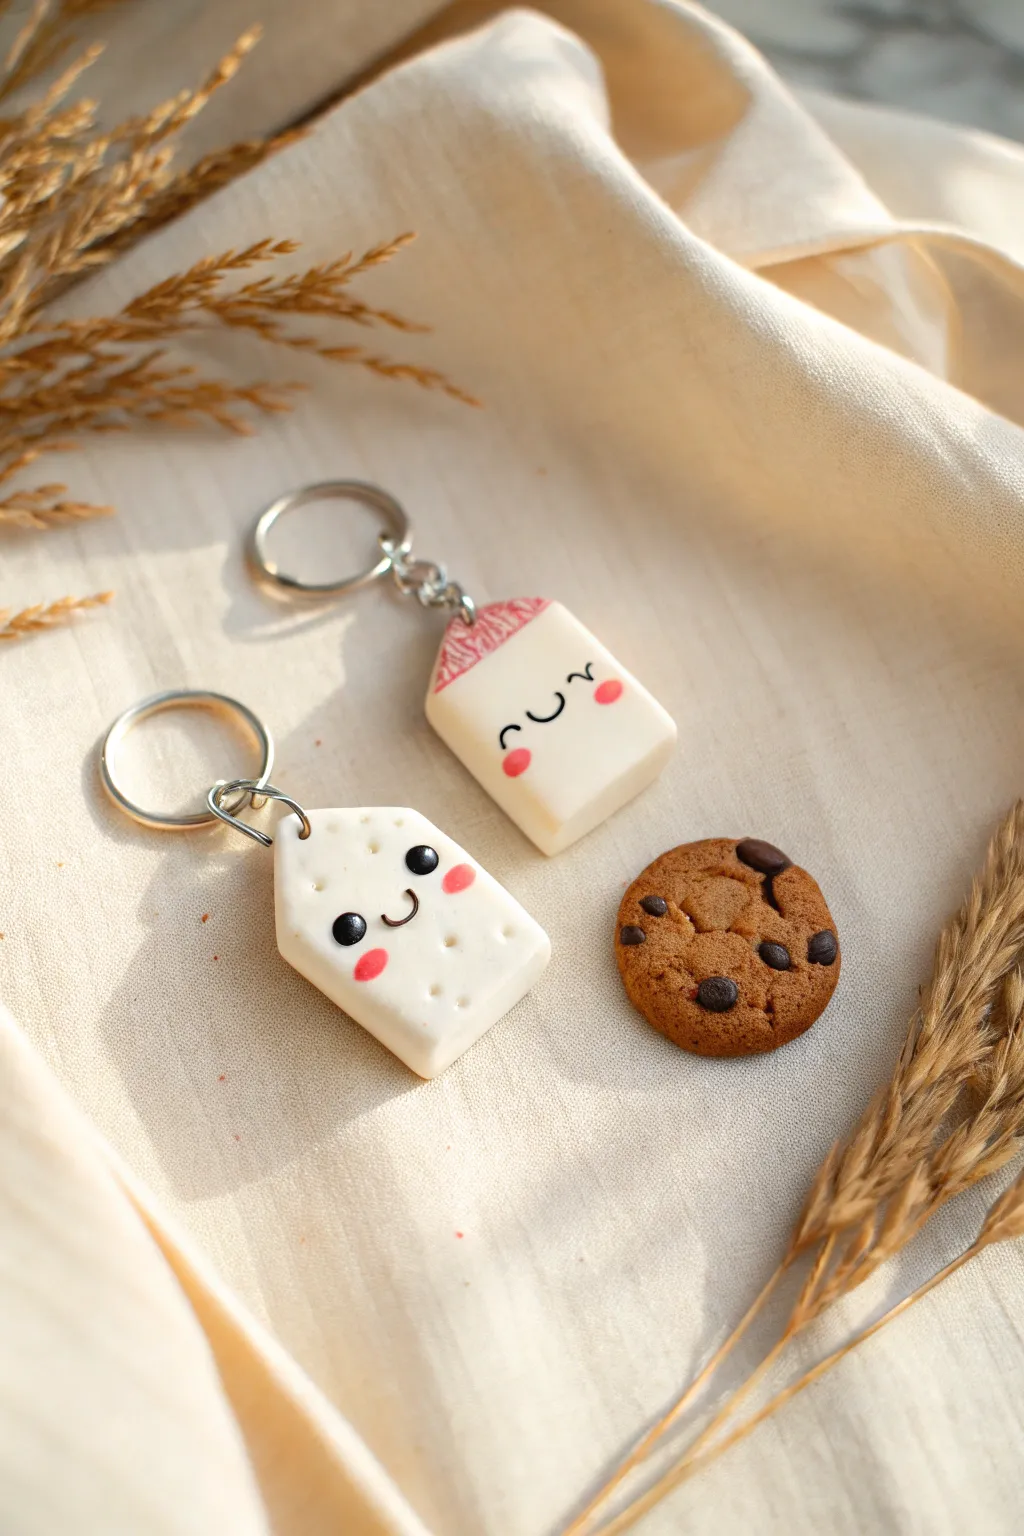
Create the perfect snack-time duo with these adorable polymer clay charms featuring a blushing milk carton and a tiny, realistic chocolate chip cookie. They make charming zipper pulls or friendship keychains for you and your bestie.
Step-by-Step
Materials
- White polymer clay
- Translucent liquid polymer clay (optional)
- Tan/beige polymer clay (cookie color)
- Dark brown polymer clay (chocolate chips)
- Black acrylic paint
- Pink acrylic paint or soft pastels
- Fine detail paintbrush or dotting tool
- Needle tool or toothpick
- Headpins or eye screws
- Keychains and jump rings
- X-acto knife or clay blade
- Gloss glaze (optional)
- Toothbrush (for texturing)
Step 1: Creating the Milk Carton
-
Shape the Base:
Start by conditioning a chunk of white clay until it’s soft. Roll it into a thick log and then press the sides against your work surface to form a rectangular cuboid shape, about 1 inch tall. -
Form the Roof:
Gently pinch the top of the rectangle to create a triangular peak, mimicking the classic gable top of a milk carton. Make sure the transition from the body to the roof is smooth but defined. -
Add Dimension:
Use your needle tool or the back of a blade to press a horizontal line just below the roof peak, separating the opening flap area from the rest of the carton. -
Insert Hardware:
Carefully insert an eye screw or headpin into the center of the roof peak. If the clay distorts, reshape it gently with your fingers before moving on. -
Pre-Bake (Optional):
To prevent smudging your white clay while painting later, you can do a partial bake now for about 10 minutes, or simply proceed carefully with raw clay.
Sticky Dust Woes?
White clay attracts dust like a magnet. Keep a pack of baby wipes nearby to clean your hands and tools often, or wear latex finger cots while shaping.
Step 2: Crafting the Cookie
-
Mix Dough Color:
Mix tan clay with a tiny speck of translucent or white to get a realistic dough shade. Roll a small ball, slightly smaller than a coin. -
Texture the Surface:
Flatten the ball slightly into a thick disk. Take an old toothbrush and tap it firmly all over the surface to create a baked crumb texture. -
Make Chocolate Chips:
Roll tiny snakes of dark brown clay and cut off minuscule bits. Roll these into imperfect balls to simulate chocolate chips. -
Embed the Chips:
Press the chocolate chips into the textured cookie surface. Don’t be afraid to let some stick out slightly for a chunky look. -
Shade the Edges:
I like to use a little scraped brown pastel chalk on a soft brush to dust the edges of the cookie, making it look perfectly golden-baked.
Make it a Set
Create a whole breakfast club! Try making a tiny croissant or a slice of toast with a pat of butter to hang alongside your milk carton.
Step 3: Faces and Finishing
-
Paint the Milk Face:
Using a very fine brush or needle tool dipped in black paint, draw two small ‘U’ shapes for sleeping eyes and a tiny smile in the center of the milk carton. -
Add Milk Blush:
Dab two small circles of pink paint on the milk carton’s cheeks, or use pink pastel dust for a softer, airbrushed look. -
Detail the Milk Top:
Paint a small reddish or pink pattern on the very top ridge of the carton to represent the branding or seal typically found on milk packaging. -
Create the Second Charm:
For the tea bag or house-shaped charm shown, repeat the white block steps but flatten it slightly more. Add dot eyes and a smile with black paint. -
Add Texture Details:
Use a needle tool to add small indentations resembling polka dots or cracker holes on the second white charm for extra tactical interest. -
Bake Instructions:
Bake all pieces according to your clay manufacturer’s instructions (usually 275°F/135°C for 15-30 minutes per 1/4 inch thickness). -
Cool and Glaze:
Let the charms cool completely. Apply a coat of gloss glaze to the chocolate chips to make them look melted, and a matte glaze to the cookie part if desired. -
Assembly:
Open a jump ring with pliers, loop it through the eye pin on your charm, and attach it securely to the keychain hardware.
Now you have a sweet little set of charms ready to brighten up your keys or backpack
Mini Potion Bottle Kawaii Charms
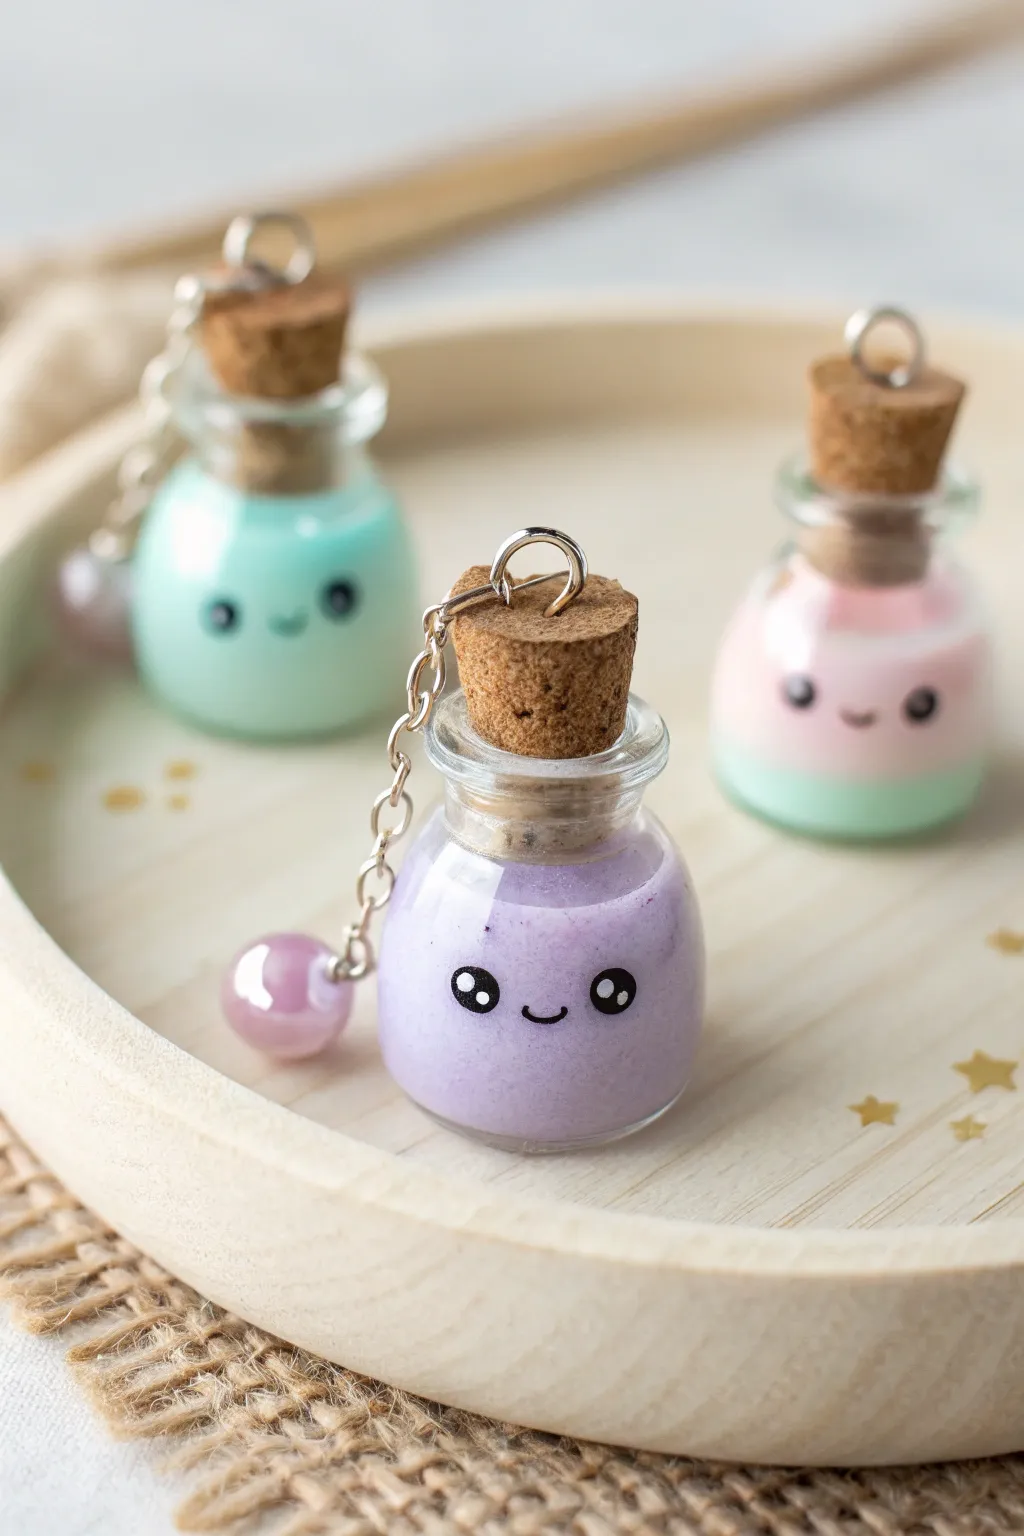
Capture a little bit of magic with these adorable miniature potion bottles, each featuring a sweet, smiling face. These charms use resin to create a permanent, spill-proof liquid look in soft pastel colors, perfect for keychains or jewelry.
Detailed Instructions
Materials
- Miniature glass cork bottles (approx. 2cm tall)
- UV resin (hard type)
- UV lamp
- Resin pigments or alcohol inks (pastel purple, mint green, soft pink)
- Fine bio-degradable glitter (optional)
- Acrylic paint (black and white)
- Fine detail paintbrush or dotting tool
- Screw eye pins (silver)
- Jump rings and keychain attachments
- Jewelry pliers
- Toothpicks
- Super glue (gel formula recommended)
Step 1: Preparing the Potions
-
Clean the bottles:
Start by removing the corks from your miniature glass bottles. Wipe the inside of the glass with a little rubbing alcohol on a cotton swab to ensure there’s no dust or oily residue, which helps the resin cure clearly. -
Mix the first potion color:
On a silicone mat or in a small mixing cup, pour a small amount of UV resin. Add a tiny drop of pastel purple pigment. I find it’s better to add color gradually; you want a milky, semi-translucent look rather than a solid opaque block. -
Add some magic dust:
Sprinkle a pinch of very fine white or iridescent glitter into the purple mix. Stir gently with a toothpick to distribute it without creating too many air bubbles, though a few tiny bubbles actually add to the fizzy potion effect. -
Fill the bottle:
Carefully pour or scoop the purple resin mixture into one of the glass bottles using your toothpick. Fill it to just below the neck of the bottle. -
Cure the resin:
Place the filled bottle upright under your UV lamp. Cure for 2-3 minutes until the resin is solid. If the bottle tips over easily, nestle it into a small lump of playdough or tac to keep it straight while curing. -
Create the layered potion:
For the pink and green bottle shown in the background, mix a small batch of mint green resin first. Pour it to fill the bottom third of a new bottle and cure it completely. Then, mix a pastel pink batch and pour it on top, curing again.
Sticky Resin?
If the resin feels tacky after curing, place the bottle in direct sunlight for 30 minutes. Glass can sometimes filter UV light, slowing down the cure.
Step 2: Adding the Kawaii Face
-
Paint the eye base:
Using a dotting tool or the back end of a paintbrush dipped in black acrylic paint, stamp two small, widely spaced circles onto the front of the glass bottle. Position them slightly lower than the center line for maximum cuteness. -
Add the smile:
With an ultra-fine detail brush, paint a tiny ‘u’ shape directly between the eyes. Keep the line thin and delicate. -
Add eye highlights:
Once the black paint is bone dry, use a clean toothpick dipped in white paint. Place a larger white dot in the upper right of each eye, and a tinier dot in the bottom left. This ‘sparkle’ brings the character to life. -
Seal the face:
To prevent the paint from scratching off the smooth glass, brush a very thin layer of clear UV resin over just the painted area and cure it for 60 seconds.
Step 3: Assembly and Hardware
-
Prepare the cork:
Take your screw eye pin and twist it into the center of the cork stopper. Remove it, add a dab of super glue to the threads, and screw it back in tightly to ensure it won’t pull out later. -
Seal the bottle:
Apply a ring of super glue around the sides of the cork stopper. Press the cork firmly into the bottle neck. This permanent seal prevents the cork from popping out if the keychain gets tugged. -
Attach the chain:
Using jewelry pliers, open a jump ring and loop it through the eye pin on the cork. Attach your keychain chain or charm strap before closing the jump ring securely. -
Add extra embellishments:
For that extra matching detail seen in the image, attach a small pearlescent bead or crystal dangle to the chain using a headpin and another jump ring.
Pro Tip: Bubble Control
Before curing, let the resin sit for 5 minutes. Use a lighter flame quickly over the surface to pop unwanted surface bubbles for a smooth finish.
Now you have a set of charming bottled friends ready to hang on your bag or gift to a friend
Sleepy Star and Moon Charms
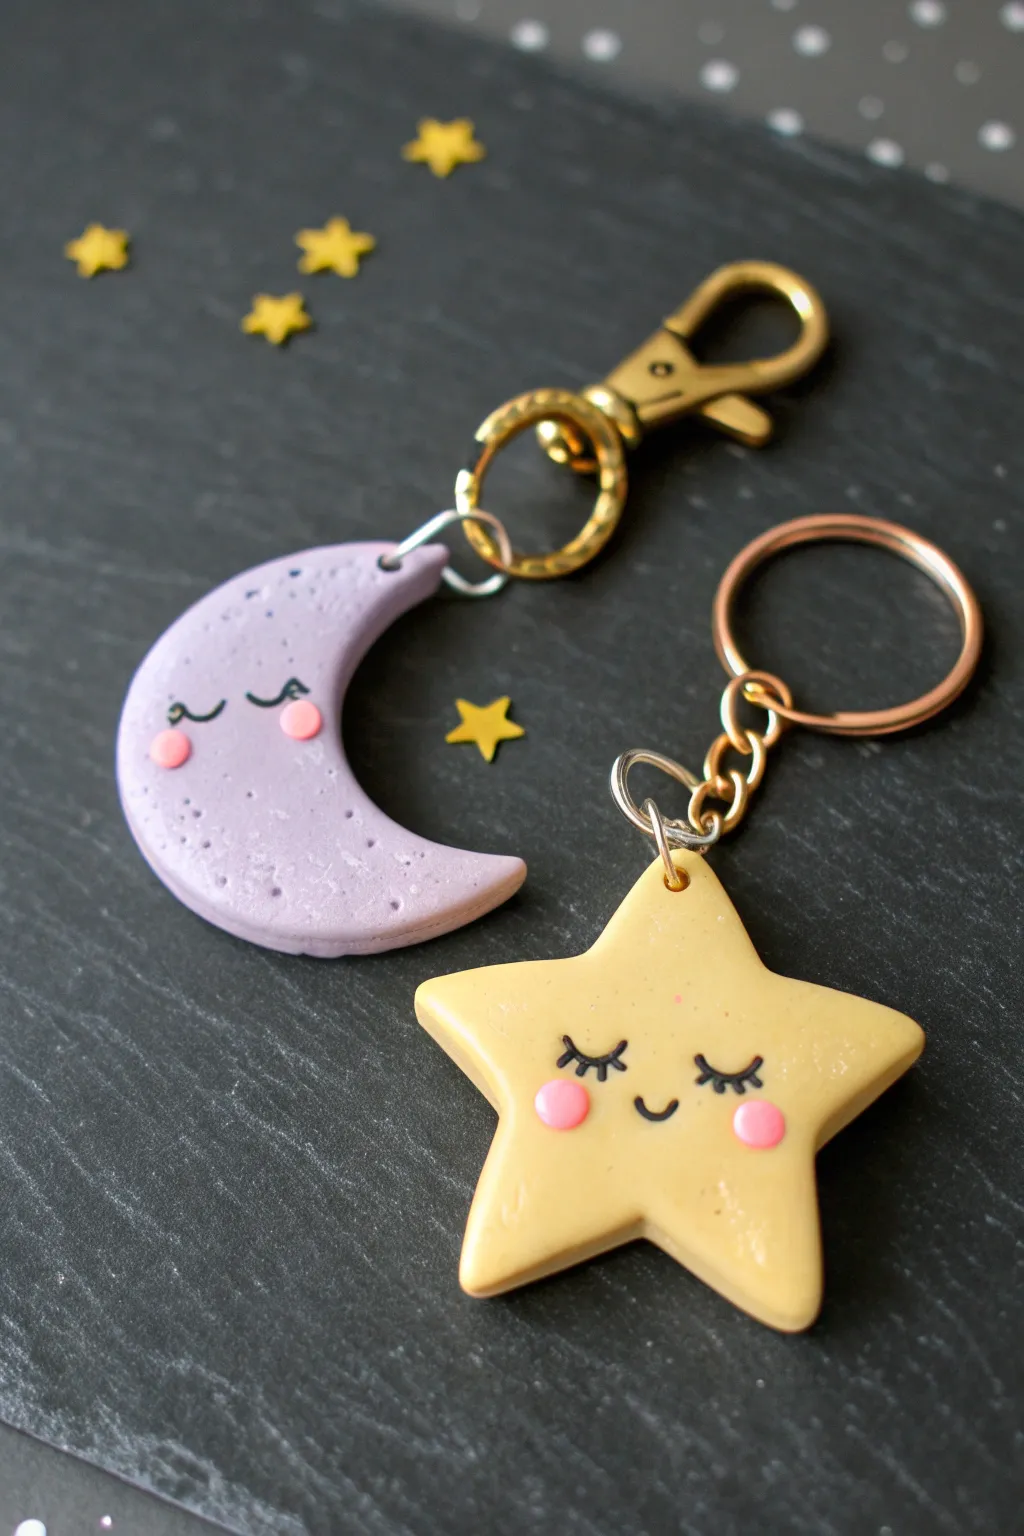
Create a dreamy set of celestial companions with these adorable sleeping star and crescent moon charms. Featuring soft pastel colors, sweet expressions, and sturdy hardware, these kawaii accessories are perfect for adding a touch of whimsy to your keys or backpack.
How-To Guide
Materials
- Polymer clay (Pastel purple, pastel yellow, soft pink)
- Acrylic rolling pin
- Star shaped cookie cutter (approx. 1.5 inch)
- Round cookie cutter (approx. 1.5 inch)
- Small dotting tool or ball stylus
- Fine detail paintbrush
- Black acrylic paint
- X-acto knife or clay blade
- Eye pins (silver or gold tone)
- Jump rings
- Lobster clasp keychain and split ring keychain hardware
- Jewelry pliers (round nose and flat nose)
- Gloss glaze or UV resin (optional for finish)
- Baking sheet and parchment paper
- Wet wipes (for cleaning hands between colors)
Step 1: Shaping the Moon
-
Condition the Clay:
Begin by kneading a chunk of pastel purple polymer clay in your hands until it becomes soft, pliable, and free of cracks. I usually roll it into a ball first to check for smoothness. -
Roll It Out:
Use your acrylic rolling pin to flatten the purple clay to an even thickness of about 1/4 inch (6mm). You want it thick enough to hold the hardware securely. -
Cut the First Circle:
Press your round cookie cutter firmly into the clay to cut out a perfect circle. Remove the excess clay from around the edges. -
Form the Crescent:
Take the same round cutter and position it overlapping the circle you just cut, offsetting it to create a crescent moon shape. Press down to cut away the inner curve, leaving a moon shape behind. -
Soften the Edges:
Gently tap the cut edges of the moon with your fingertip to round them off slightly, removing the sharp look left by the cutter.
Clean Clay Pro-Tip
Keep baby wipes nearby! Yellow and purple clay stain easily. Always wipe your hands and tools thoroughly when switching colors to keep your pastels looking bright and clean.
Step 2: Shaping the Star
-
Prepare Yellow Clay:
Clean your hands or surface to avoid color transfer, then condition and roll out the pastel yellow clay to the same 1/4 inch thickness as the moon. -
Cut the Star Shape:
Press your star-shaped cutter into the yellow clay sheet. If the clay sticks inside the cutter, gently push it out from the back or give it a soft tap on the table. -
Smooth the Points:
Carefully smooth the five points of the star with your finger so they aren’t dangerously sharp, giving the charm a softer, friendlier appearance.
Level Up: Glitter Galaxy
Mix a pinch of semi-translucent iridescent glitter into your purple clay before rolling it out. This gives the moon a subtle, magical galaxy effect without needing extra paint.
Step 3: Adding Hardware & Textures
-
Insert Eye Pins:
Take two metal eye pins. Trim them if they are too long for your shapes. Gently push one into the top tip of the moon and one into the top point of the star. A tiny dab of liquid clay or bake-and-bond on the pin shaft helps secure it permanently. -
Texture the Moon:
To mimic craters, use a small dotting tool or the rounded end of a paintbrush handle to gently press random indentations into the purple moon surface. Vary the pressure for different depths. -
Bake the Charms:
Place both clay pieces on a parchment-lined baking sheet. Bake according to your specific clay manufacturer’s instructions (usually 275°F/135°C for 15-30 minutes). Let them cool completely before handling.
Step 4: Painting the Faces
-
Draw the Eyelashes:
Once cool, dip your finest detail brush into black acrylic paint. Carefully paint two small U-shapes for closed eyes on both charms. Add two or three tiny lashes to the outer corners of each eye. -
Add the Mouths:
Paint a very small, simple curve between the eyes to create a sweet, sleeping smile. -
Create Rosy Cheeks:
Take a tiny amount of soft pink clay and roll four miniature balls. Flatten them into small discs and press them onto the baked clay cheeks. You can use a tiny drop of superglue to adhere them since the main piece is already baked, or simply paint pink circles instead. -
Seal the Design:
Protect your paint job by applying a thin layer of gloss glaze or UV resin over the charms. This also gives them a professional, shiny finish.
Step 5: Assembly
-
Attach Jump Rings:
Using your two pairs of pliers, twist open a jump ring laterally (don’t pull it apart). Hook it through the eye pin loop on your charm. -
Connect to Keychains:
Before closing the jump ring, slide on your keychain hardware (lobster clasp for the moon, split ring for the star). Close the jump ring securely so there is no gap.
Now you have a matching set of dreamy charms ready to gift to a friend or keep for yourself
Little House With Sweet Face Charm
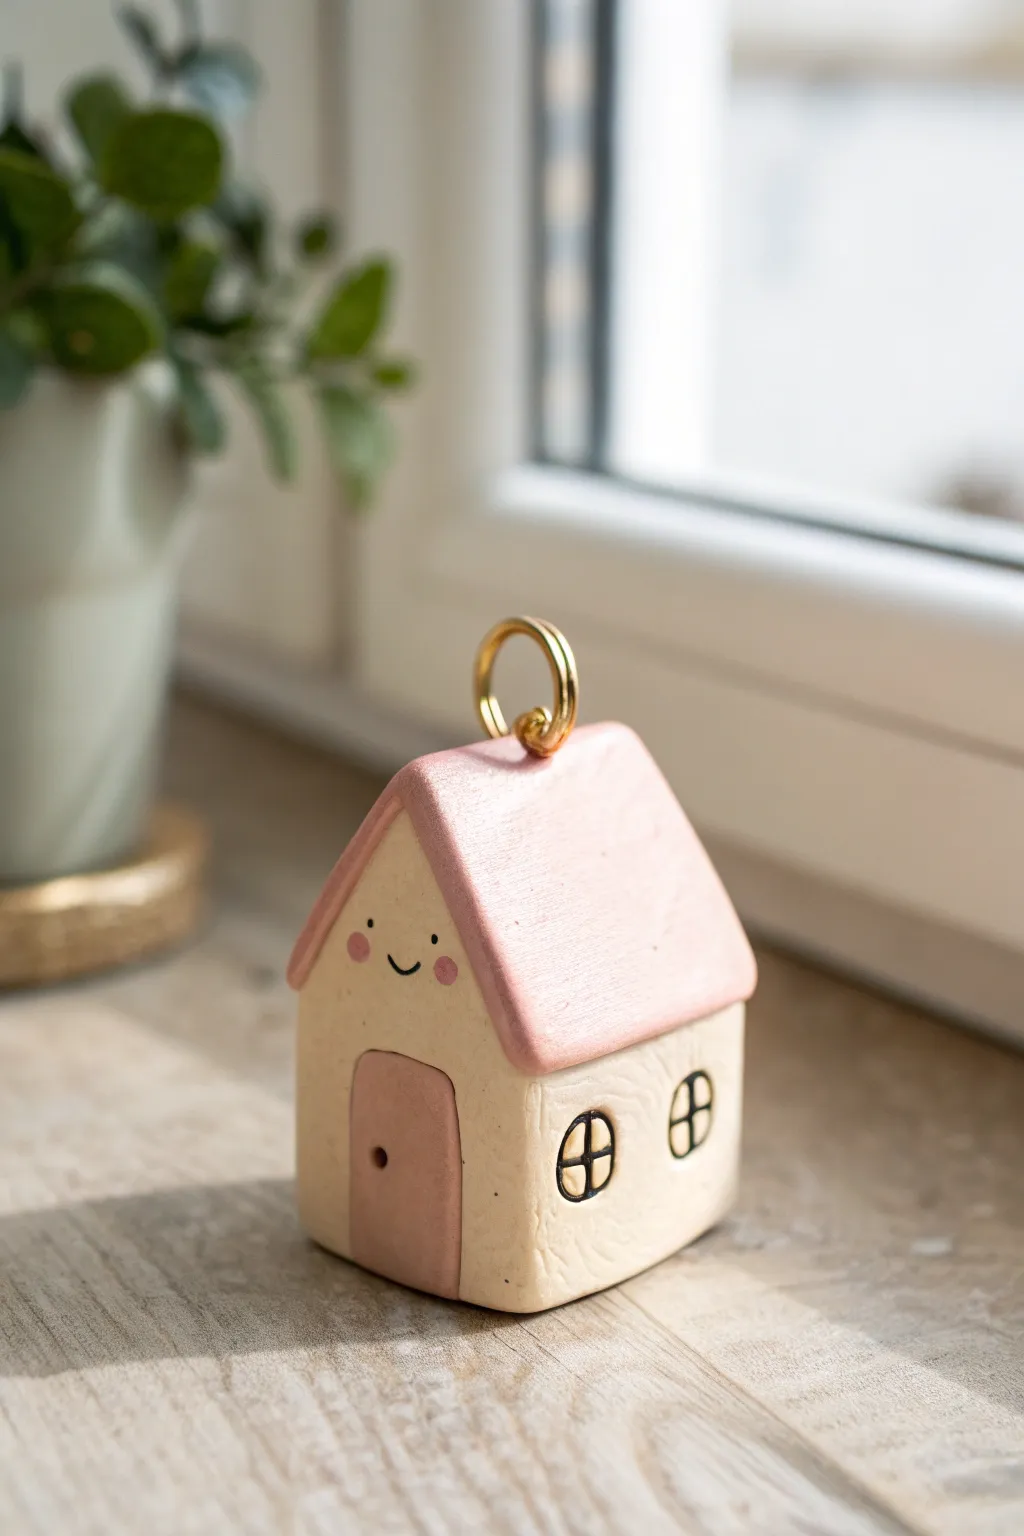
This adorable miniature house charm radiates coziness with its soft cream walls, blush pink roof, and the sweetest little smile. Crafted from clay, it transforms simple geometric shapes into a heartwarming keepsake perfect for keychains or shelf decor.
Step-by-Step Guide
Materials
- Polymer clay (cream or beige)
- Polymer clay (soft pastel pink)
- Black acrylic paint
- Pink acrylic paint (slightly darker than the clay)
- Small gold screw eye pin
- Large gold jump ring
- Gold split ring (keychain attachment)
- Clay blade or craft knife
- Rolling pin
- Needle tool or toothpick
- Dotting tool or small paintbrush back
- Fine detail paintbrush (000 size)
- Gloss or matte varnish (optional)
Step 1: Building the Foundation
-
Create the base block:
Start by conditioning your cream-colored clay until it is soft and pliable. Roll it into a smooth ball, then gently press it against your work surface to flatten the bottom. -
Shape the walls:
Use your fingers and a flat tool to shape the ball into a cube or rectangular prism. Keep the edges slightly rounded for a softer, cartoon-like appearance rather than sharp architectural corners. -
Form the roof peak:
On the top of your cream block, pinch and shape the clay to form a triangular peak. This triangular prism shape will support the roof later. Smoothing this transition is key so the roof sits flat. -
Prepare the roof slab:
Roll out a sheet of the soft pink clay to a thickness of about 3mm. You want it thick enough to look substantial but thin enough to fold without cracking. -
Cut and fit the roof:
Cut a rectangular strip from the pink sheet. Drape this strip over the peak of your house, allowing it to overhang slightly on the sides to create eaves. -
Secure the roof:
Gently press the pink clay onto the cream base to ensure a strong bond. Smooth out any fingerprints with a light touch.
Clean Lines Hack
To get super neat window grids, try using a fine-tip black permanent marker instead of paint. It gives you way more control on the tiny uneven surface.
Step 2: Adding Details & Hardware
-
Create the door:
Roll a small piece of pink clay into a pill shape and flatten it very thinly. Trim the bottom to be straight and press this onto the front center of the house for the door. -
Indent the doorknob:
Using a needle tool, poke a tiny indentation on the right side of the door to simulate a door handle or knob. -
Texture the walls (optional):
For a rustic look like the example, lightly tap the cream walls with a toothbrush or crumpled foil to add a subtle stone texture, avoiding the face area. -
Insert the eye pin:
Take your screw eye pin and carefully twist it into the very center of the roof ridge. If the clay is soft, you might need to bake it first and glue it in later, but for polymer clay, screwing it in before baking usually works well. -
Bake the clay:
Place your house on a baking tile or parchment paper. Bake according to your specific clay manufacturer’s instructions (usually 275°F/130°C for 15-30 minutes). Let it cool completely.
Step 3: Painting the Personality
-
Paint the eyes:
Using your tiniest detail brush or the tip of a toothpick dipped in black acrylic paint, create two small, widely spaced dots for the eyes on the upper half of the wall. -
Draw the smile:
Carefully paint a tiny ‘U’ shape between the eyes for the smile. I find holding my breath for a second helps keep my hand steady for these delicate lines. -
Add rosy cheeks:
Dip a dotting tool into pink paint and dab two soft circles right next to the smile to give the house its blushing, kawaii character. -
Outline the windows:
On the side of the house, paint two rounded-square outlines in black for the windows. Keep the lines thin. -
Add window panes:
Paint a cross (+) inside each window outline to create the window panes. Allow all paint to dry fully. -
Seal the piece:
Apply a coat of varnish if desired to protect the paint and give the house a finished sheen. -
Attach the hardware:
Open your large gold jump ring with pliers, loop it through the eye pin on the roof, add the split ring, and close the jump ring securely.
Make it a Village
Create a whole neighborhood by varying the roof colors (mint, lavender, baby blue) and changing the facial expressions on each house.
Now your charming little home is ready to dangle from your keys or brighten up a windowsill
Pastel Narwhal Unicorn Charm
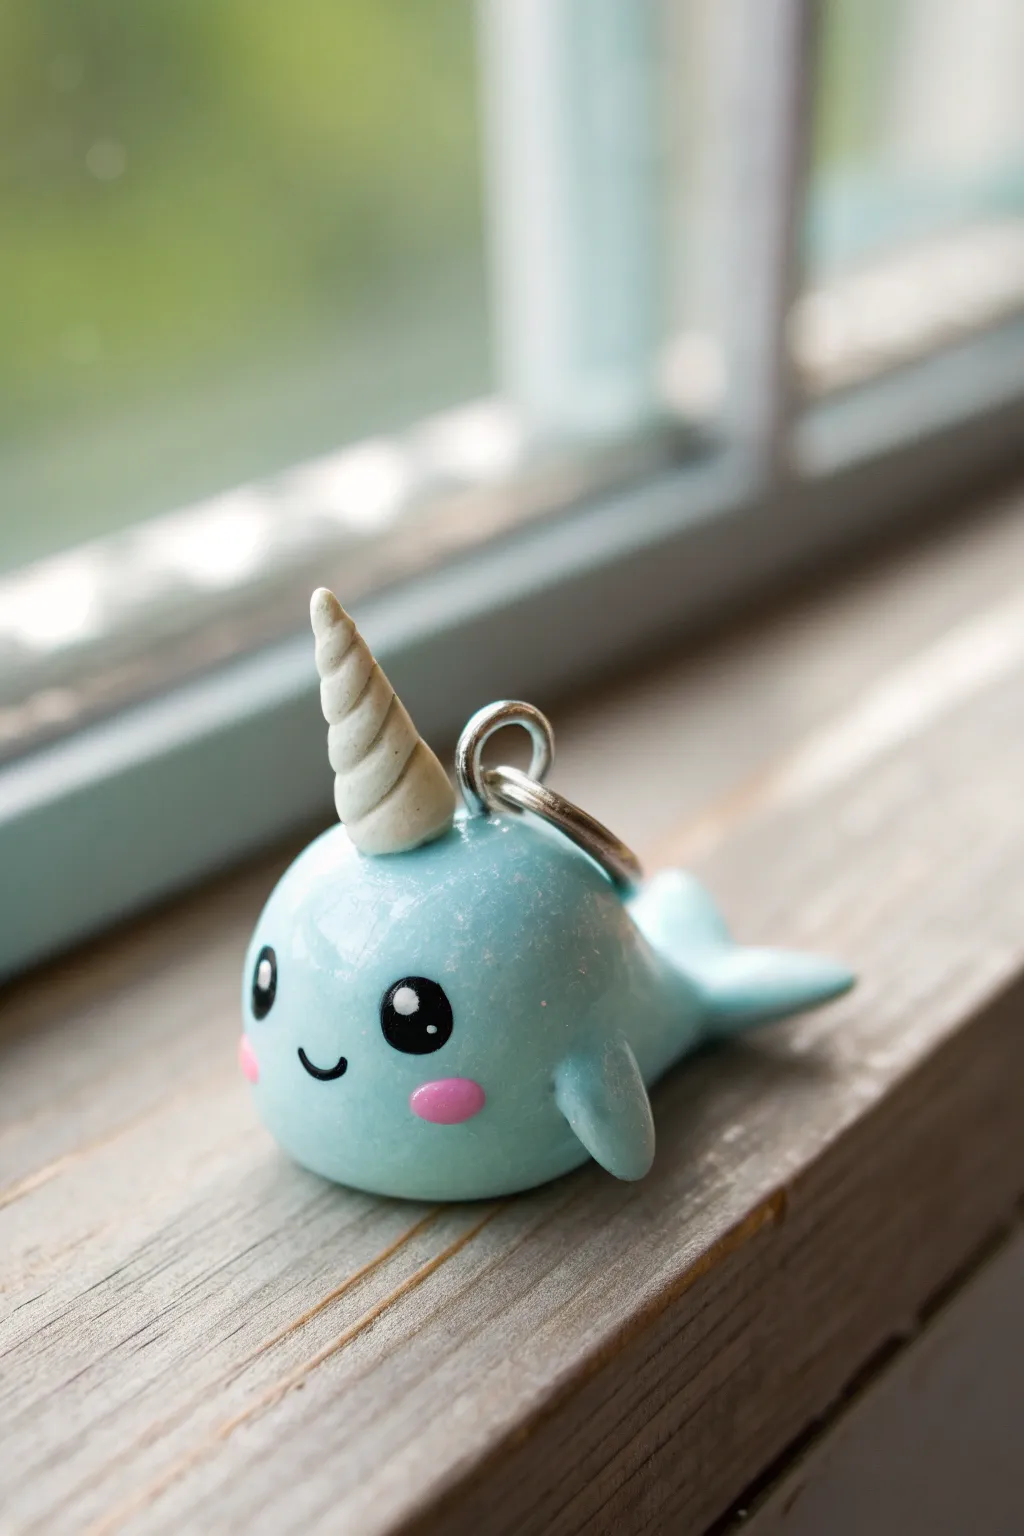
Bring the magic of the ocean to life with this adorable pastel blue narwhal charm. Its glossy finish and sweet expression make it a perfect addition to any keychain or jewelry collection.
Step-by-Step
Materials
- Polymer clay (Pastel Blue, White, Black, Pink)
- Clay sculpting tools (needle tool, ball tool)
- Eye screw pin (silver)
- Gloss glaze or UV resin
- Small paintbrush
- Oven for baking
- Parchment paper or baking tile
- Blade or craft knife
Step 1: Shaping the Body
-
Condition the Clay:
Start by thoroughly kneading your pastel blue clay until it is soft and pliable. This prevents cracks during baking. -
Form the Base:
Roll the blue clay into a smooth ball about the size of a large marble. Gently press it onto your work surface to create a slightly flattened bottom so it sits stably. -
Shape the Tail:
Take a smaller piece of blue clay and flatten it slightly. Use a blade to cut a ‘V’ notch into one end to create two flukes. Pinch and smooth the other end to attach it to the back of the narwhal’s body, blending the seam with your finger or a silicone tool. -
Add Flippers:
Create two small teardrop shapes from the blue clay. Flatten them gently and attach one to each side of the body just below the halfway point. Smooth the connecting edges so they are firmly attached.
Keep it Clean!
White clay picks up everything. Clean your hands and work surface with a baby wipe or rubbing alcohol before handling the white horn to keep it pristine.
Step 2: Adding the Horn
-
Create the Horn Cone:
Take a small amount of white clay and roll it into a thin, elongated cone shape. -
Texture the Horn:
Starting from the tip, gently twist the cone to create a spiral effect. Alternatively, you can use a needle tool to gently impress spiral lines running down the length of the horn. -
Attach the Horn:
Place the horn centrally on top of the head. Press it down gently to secure it without squashing the spiral detail.
Step 3: Creating the Face
-
Position the Eyes:
Roll two very tiny balls of black clay. Press them flat onto the face area, spacing them widely apart for that classic kawaii look. -
Add Highlights:
This is the secret to cuteness: roll incredibly tiny specks of white clay. Place one on the upper right corner of each black eye to create a sparkling reflection. -
Make the Mouth:
Roll a nearly microscopic snake of black clay. Use a needle tool to help you curb it into a tiny ‘U’ shape and place it centrally between the eyes. -
Apply Cheeks:
Take two small pieces of pink clay, flatten into discs, and press them onto the cheeks just below and outside the eyes.
Loose Eye Pin?
If the eye pin feels loose after baking, pull it out, add a tiny drop of super glue or E6000 to the threads, and screw it back into the hole.
Step 4: Finishing Touches
-
Insert Hardware:
Screw the eye pin into the top of the narwhal, just behind the horn. I find twisting it in slowly helps grip the clay better than just pushing it. -
Bake:
Bake the charm according to your clay manufacturer’s instructions (usually 275°F/135°C for 15-30 minutes). Let it cool completely. -
Glaze:
Once cool, apply a coat of gloss glaze or UV resin over the entire piece (avoiding the metal eye) to give it that shiny, wet look.
Now your little ocean friend is ready to hang on a bag or keep you company on your desk
Mini Donut Stack Charm Set
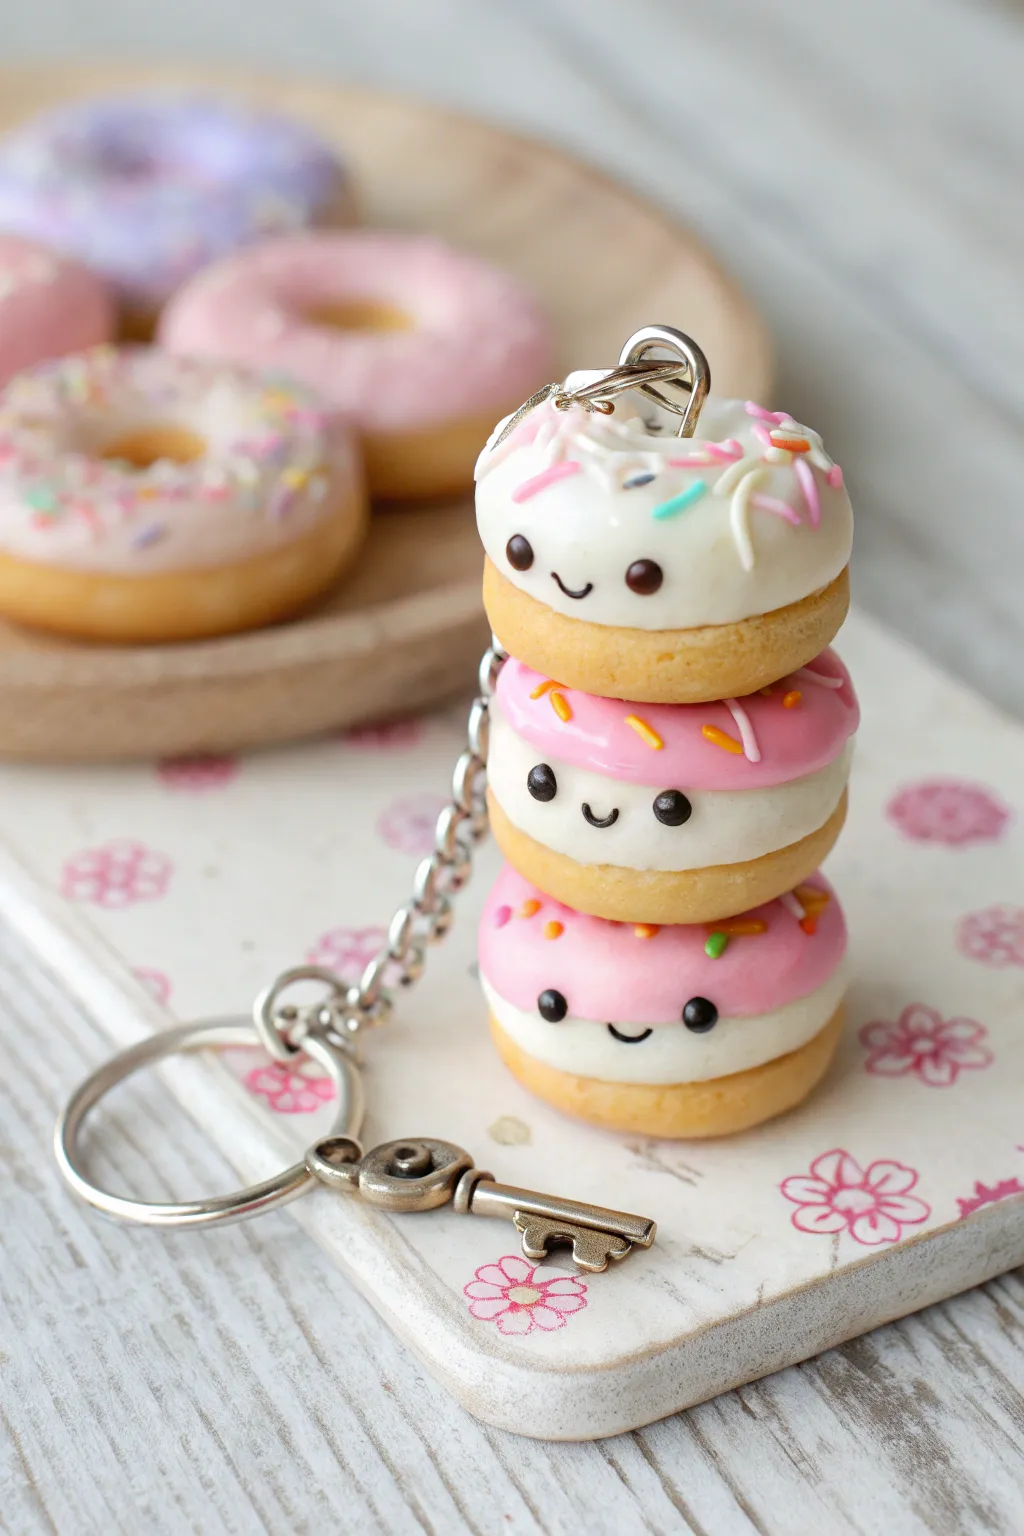
Delight your sweet tooth with this adorable stack of polymer clay donuts, each featuring a smiling face and colorful sprinkles. This charming keychain combines miniature baking skills with kawaii character design for a truly unique accessory.
Detailed Instructions
Materials
- Polymer clay (dough color/beige, white, light pink, black)
- Liquid polymer clay (translucent or white mixed with clay)
- Pastel chalks (brown, orange) for shading
- Soft paintbrush
- Pin tool or needle tool
- Small ball tool
- Headpin or eye pin (long enough for 3 donuts)
- Jump rings and keychain hardware
- Small metal key charm (optional)
- Gloss glaze (polyurethane varnish)
- Oven for baking
Step 1: Baking the Bases
-
Mix the Dough Color:
Start by conditioning your beige clay. If it’s too dark, mix in a little translucent or white clay to achieve a realistic ‘baked dough’ shade. -
Form the Shapes:
Roll three equal-sized balls of beige clay, roughly 1.5cm in diameter. Flatten them slightly into thick discs. -
Smooth the Edges:
Use your finger to gently round off the sharp edges of the discs so they look like puffy raised dough. -
Create the Centers:
Using a small ball tool or the end of a paintbrush, press into the center of each disc to create the donut hole indentation. Don’t punch all the way through; just create a deep dimple. -
Add Texture:
Take a toothbrush or a ball of crinkled textured foil and tap it gently over the surface of the clay to mimic a cake texture. -
Shade the Dough:
With a soft brush, dust shaved brown and orange pastel chalks around the edges and bottom of the donuts to create a golden-baked effect. I like to focus on the sides where the crust would be darkest.
Pastel Shading Tip
Apply the pastel shading BEFORE baking. The heat sets the chalk into the clay, making the golden-brown crust permanent and smudge-proof.
Step 2: Icing and Expressions
-
Prepare the Icing:
Mix liquid polymer clay with white clay for the top donut, and with pink clay for the middle and bottom donuts. The consistency should be thick but spreadable, like real icing. -
Aplying the Glaze:
Carefully spread the icing mixture over the top half of each donut. Use a needle tool to drag the icing down slightly in spots to create realistic drips. -
Add Sprinkles:
Roll extremely thin snakes of various colored clays (pink, yellow, blue, white) and bake them briefly until hard. Chop these into tiny bits to make sprinkles, then press them into the wet icing. -
Insert the Headpin:
Before baking, stack the three donuts carefully. Insert a long headpin or eye pin through the center of the stack, ensuring it goes straight through all three layers. -
Sculpt the Eyes:
Roll tiny balls of black clay for the eyes. Press two onto the front face of each donut, embedding them slightly into the icing layer. -
Add the Smiles:
Roll minuscule threads of black clay. Curve them into tiny ‘U’ shapes and place them centrally between the eyes to create happy mouths. -
Highlight the Eyes:
For that extra sparkle, place a microscopic dot of white clay on the upper corner of each black eye.
Step 3: Assembly and Finishing
-
Final Bake:
Bake the entire stack according to your clay manufacturer’s instructions (usually 275°F/130°C for 15-30 minutes). Let it cool completely. -
Secure the Pin:
If the pin feels loose after baking, pull it out, add a dab of superglue, and slide it back in. Trim the top of the pin and curl it into a loop using round-nose pliers. -
Glaze:
Apply a coat of gloss glaze only to the icing parts and the eyes to make them look wet and sugary. Keep the dough parts matte for contrast. -
Attach Hardware:
Open a jump ring and attach the donut stack to your keychain ring along with the metal key charm.
Scented Donuts
Mix a tiny drop of vanilla or strawberry fragrance oil into the clay while conditioning it to make your charm smell like a real bakery treat.
Clip this sweet trio onto your bag or keys and enjoy the smiles it brings
Shaker-Style Sprinkle Window Charms
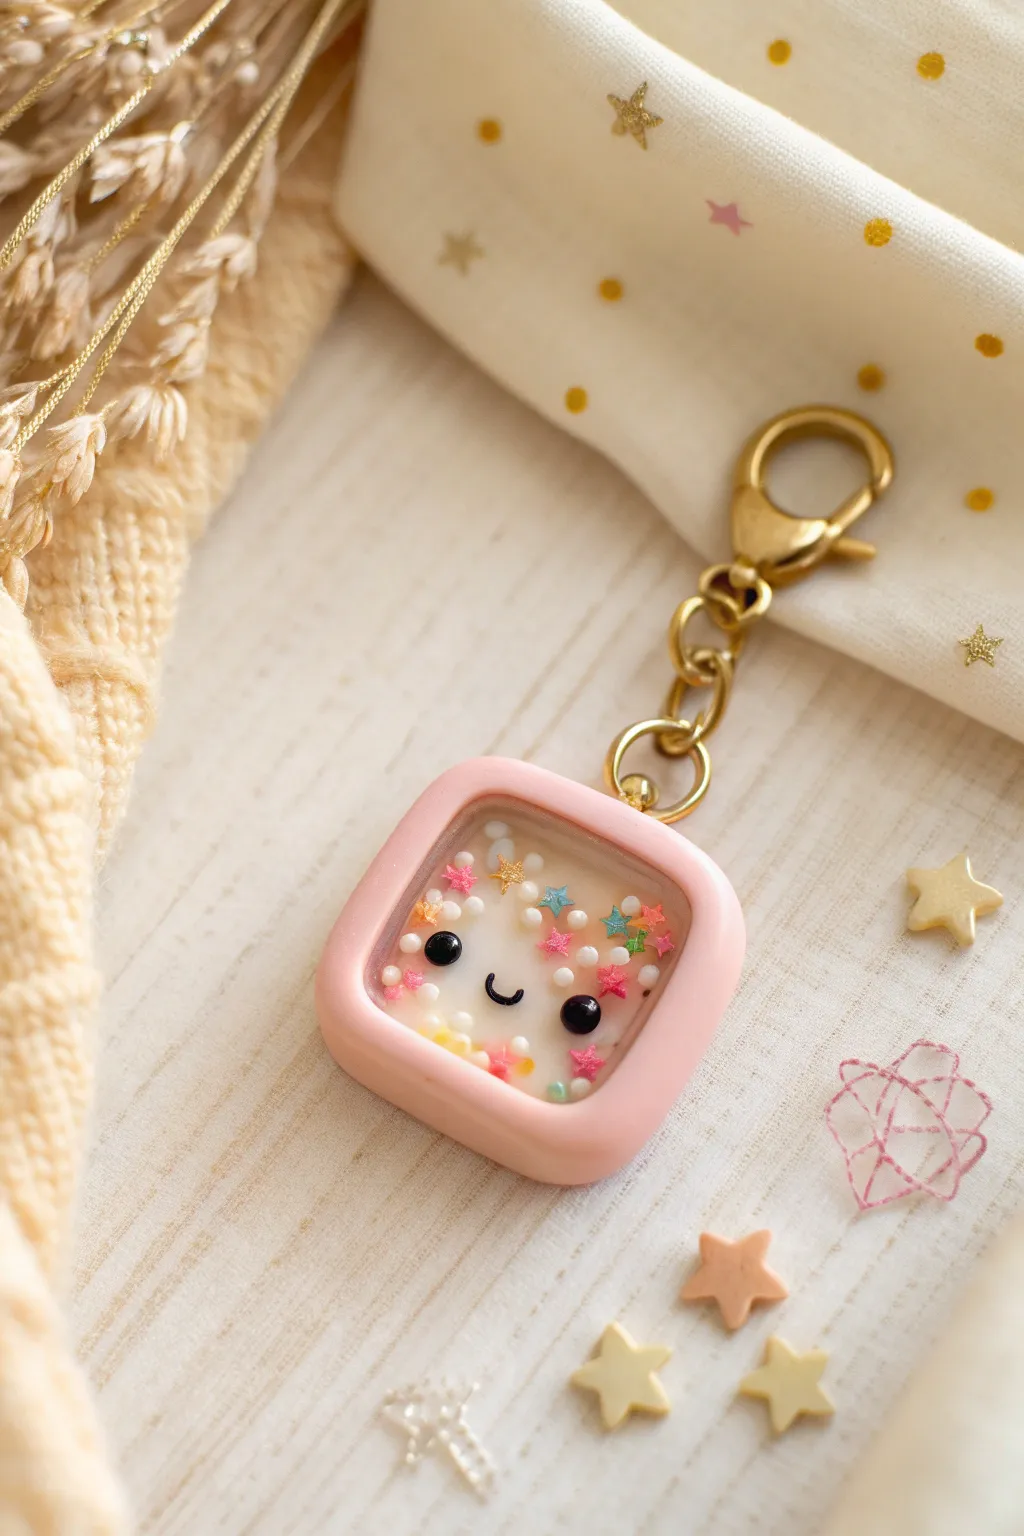
Capture magic in a tiny square with this adorable shaker-style charm, featuring a playful shaking window filled with stars. With its soft pink frame and sweet smiling face, this kawaii accessory adds a touch of whimsy to any bag or set of keys.
How-To Guide
Materials
- Light pink polymer clay
- White or translucent polymer clay (for backing)
- UV resin (hard type)
- UV lamp
- Square clay cutter (small, rounded corners)
- Smaller square cutter (for window cutout)
- Clear transparency film or shaker plastic sheet
- Star sprinkles (pastel colors: pink, blue, yellow)
- White microbeads or nonpareils
- Black polymer clay or black acrylic paint (for face)
- Dotting tool or toothpick
- Gold screw eye pin
- Gold lobster clasp keychain with chain
- Liquid clay (TLS) or strong craft glue
- Sandpaper or nail buffer (optional)
- Gloss glaze (optional)
Step 1: Creating the Frame
-
Condition the Clay:
Begin by conditioning your light pink polymer clay until it is soft and pliable. Roll it out into a slab that is roughly 4-5mm thick, ensuring it’s sturdy enough to hold the shaker contents. -
Cut the Base Shape:
Use your larger square cutter with rounded corners to punch out the main shape from the thick pink slab. -
Create the Window:
Take the smaller square cutter and center it carefully inside the pink square you just cut. Press down to remove the center, leaving you with a thick, even square frame. -
Smooth the Edges:
Gently tap the edges of the frame with your finger to round them off slightly so they aren’t sharp. I find that a soft touch here gives the finished piece a much friendlier, marshmallow-like look. -
Add Hardware:
Insert the gold screw eye pin into the center of the top edge of the frame. Ensure it goes in straight and doesn’t poke through into the window area. -
First Bake:
Place the frame on a baking sheet and bake according to your polymer clay package instructions. Let it cool completely before moving to the next phase.
Sticky Sprinkles?
If static makes sprinkles stick to the window, wipe the plastic film with a dryer sheet before sealing. This helps them dance freely.
Step 2: Assembling the Shaker
-
Prepare the Backing:
Roll out a thin sheet of white or translucent clay. Cut a square using the larger cutter (the same size as your frame). Bake this thin square separately and let it cool. -
Glue the Back (Alternative):
Alternatively, you can skip the clay backing and adhere a piece of transparency film to the back of the frame using UV resin, but a clay backing gives it a cleaner opaque look. -
Attach Frame to Backing:
Apply a thin layer of liquid clay or strong glue to the back of your baked pink frame. Press it firmly onto the baked white backing square. If using liquid clay, bake again briefly to bond them. -
Fill with Magic:
Now for the fun part: pour a small pinch of pastel star sprinkles and white microbeads into the center cavity. Don’t overfill it, or the pieces won’t move when you shake it. -
Cut the Window Pane:
Trace the shape of your frame onto the clear transparency film and cut it out. Trim it slightly so it sits perfectly flush on top of the frame without overhanging the rounded edges.
Add Some Sparkle
Mix a tiny amount of ultra-fine holographic glitter into your final resin top coat for a subtle shimmer that catches the light.
Step 3: Sealing and Decorating
-
Seal the Window:
Apply a thin line of UV resin around the top rim of the pink frame. Place your cut transparency film on top. Cure under a UV lamp for 60 seconds to seal the sprinkles inside. -
Dome the Top:
Pour a generous layer of clear UV resin over the top of the plastic film, spreading it to the edges of the pink frame. This creates a glassy, domed effect. Cure under the UV lamp until hard. -
Paint the Face:
Using a dotting tool and black acrylic paint (or tiny bits of black clay sealed with resin), add two wide-set eyes and a simple ‘U’ shaped smile directly onto the cured resin surface. -
Floating Sprinkles:
To mimic the image where some stars seem ‘stuck’ in place, you can place a few star sprinkles directly into the wet top layer of resin near the edges before curing, or just let them float freely inside. -
Final Cure:
Place the entire charm under the UV lamp for a final 2-3 minute cure to ensure the resin is completely non-tacky and durable. -
Attach Keychain:
Open the jump ring on your gold lobster clasp chain and loop it through the eye pin screw. Close the jump ring securely using pliers.
Now you have a charming little companion ready to clip onto your backpack or gift to a friend
Tiny Hidden Message Locket Charms
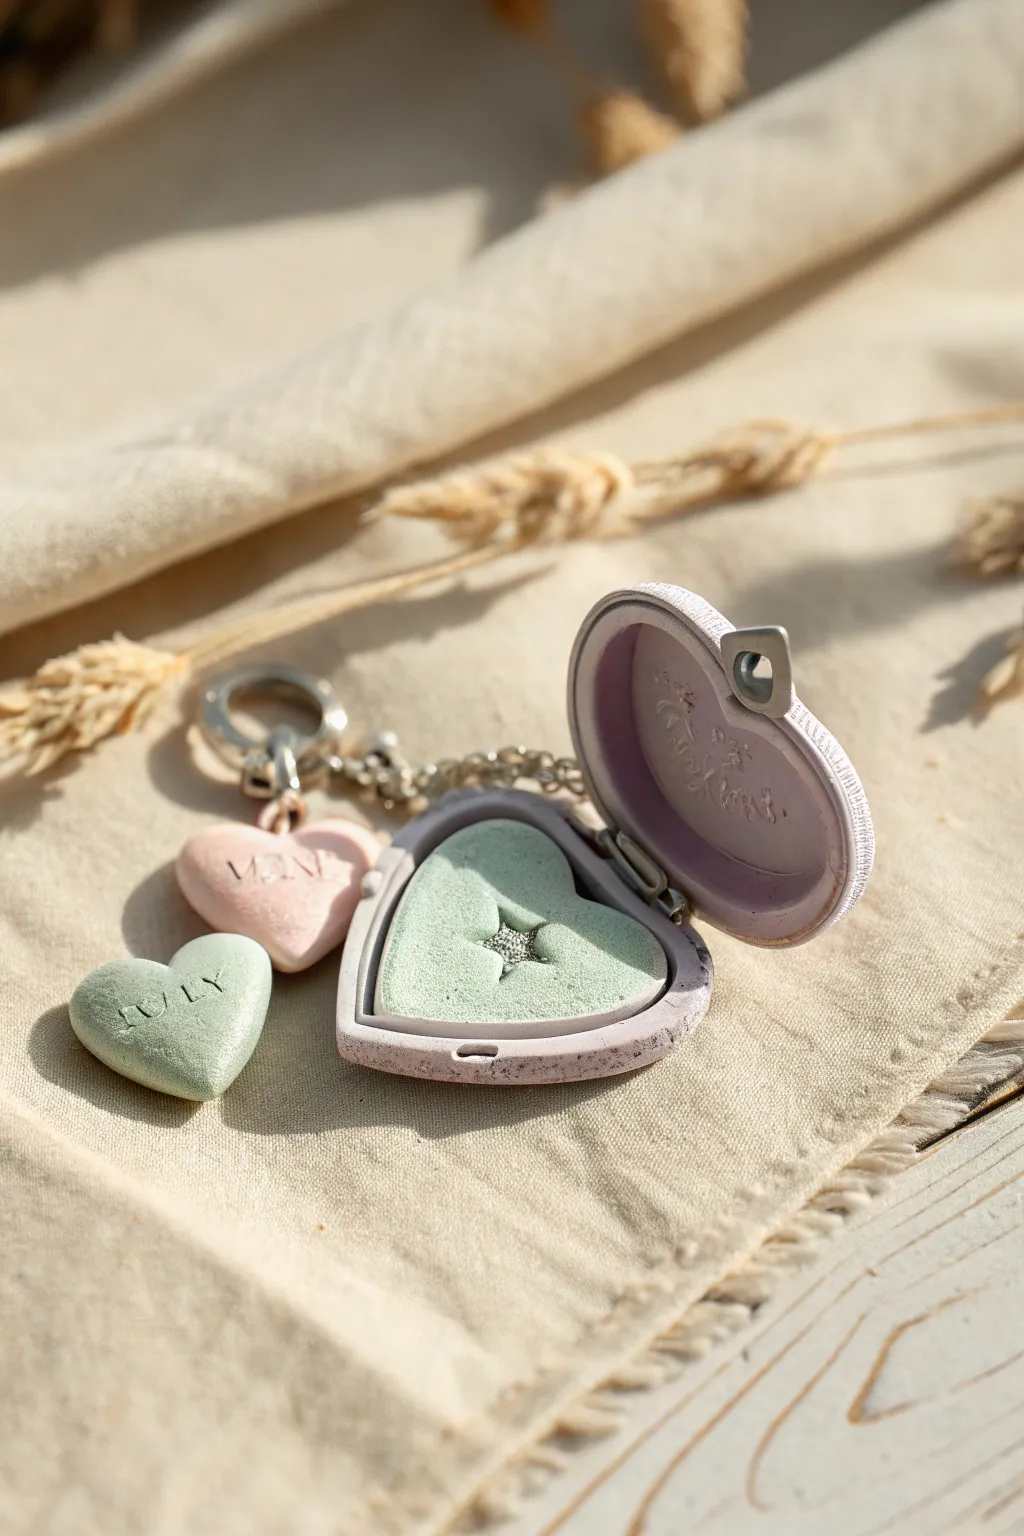
This adorable polymer clay project creates a functional, sweetly textured locket perfect for hiding tiny notes or beads. With its soft pastel colors and speckled ‘stone’ finish, it looks like a magical artifact found in a fairy garden.
Step-by-Step Guide
Materials
- Polymer clay (lilac, mint green, pale pink, white)
- Black pepper or brown acrylic paint (for speckling)
- Heart-shaped cutters (various small sizes)
- Needle tool or toothpick
- Ball stylus tool
- Miniature hinge mechanism (or wire and pliers to make one)
- Small magnets (neodymium)
- Liquid polymer clay (Bake & Bond)
- Gloss varnish or UV resin (optional)
- Small stamps or letter imprints
- Silver eye pins and jump rings
- Chain for keychain attachment
- Sandpaper (fine grit)
Step 1: Creating the Shell
-
Prepare the Clay:
Start by mixing your lilac clay with a tiny amount of white to achieve a soft pastel hue. To get that realistic ‘stone’ texture seen in the photo, mix in coarse ground black pepper or dried tea leaves directly into the raw clay. -
Cut the Base Shapes:
Roll your textured lilac clay out to about 3-4mm thickness. Use your medium-sized heart cutter to punch out two identical hearts. These will form the top and bottom of your locket case. -
Hollow the Interiors:
Take a slightly smaller heart cutter and gently press into the center of both violet hearts, but do not cut all the way through. Carefully scoop out the center clay with a needle tool to create recessed cavities, smoothing the inside walls with a ball stylus. -
Add the Hinge:
If using a pre-made mini hinge, press it into the side edges of the hearts where they will join. If making your own, embed small loops of wire into the clay on the connection side, ensuring the liquid clay secures them. -
Detail the Exterior:
Use a toothbrush or stiff brush to gently tap the exterior of the shell. This enhances the stone-like texture and removes fingerprints.
Step 2: The Surprise Interior
-
Create the Insert:
Roll out mint green clay (also textured with pepper specs) to fit snugly inside the bottom locket cavity. It should be flush with the rim. -
Make the Tiny Star:
In the center of the mint insert, press a tiny star-shaped tool or carve a star recess. Fill this recess with a tiny ball of silver clay or add a rhinestone after baking for sparkle. -
Install Magnets:
Embed a tiny neodymium magnet into the rim of the top shell and the corresponding spot on the bottom shell. Cover them with a thin smear of liquid clay so they are hidden but functional. -
First Bake:
Bake the locket pieces according to your clay package instructions (usually 275°F/130°C for 15-30 minutes). Let them cool completely before handling.
Stone Effect Pro Tip
For a realistic faux-stone look, don’t just use one color. Mix tiny bits of translucent clay into your pastel mix. It adds depth that opaque clay lacks.
Step 3: Tiny Tokens & Assembly
-
Sculpt Mini Hearts:
While the locket cools, create the tiny ‘truly’ and ‘mine’ heart charms. Use pale pink and extra mint green clay to form small, puffy hearts. -
Imprint Messages:
Use tiny letter stamps to press words like ‘TRULY’ or ‘MINE’ into the damp clay tokens. If you don’t have stamps, a needle tool works well to scratch the letters in manually. -
Add Hardware:
Insert eye pins into the top of the locket and the small heart tokens. Secure with a dab of liquid clay. -
Second Bake:
Bake the small tokens. If you added liquid clay to the locket for repairs or magnet covering, bake that again briefly as well. -
Highlighting:
Once cool, use diluted brown acrylic paint to wash over the stamped letters and the textured locket surface. Wipe it off quickly with a damp cloth, leaving the dark color only in the crevices to simulate age. -
Final Assembly:
Attach the tiny heart tokens to the main locket chain using jump rings. I find using two pairs of pliers makes opening and closing the rings much easier.
Make it Interactive
Instead of a solid clay insert, leave the locket empty and print a tiny photo or write a secret note on parchment paper to fold up and store inside.
Now you have a precious keepsake locket that carries a secret just for you
Build a Matching Kawaii Charm Collection
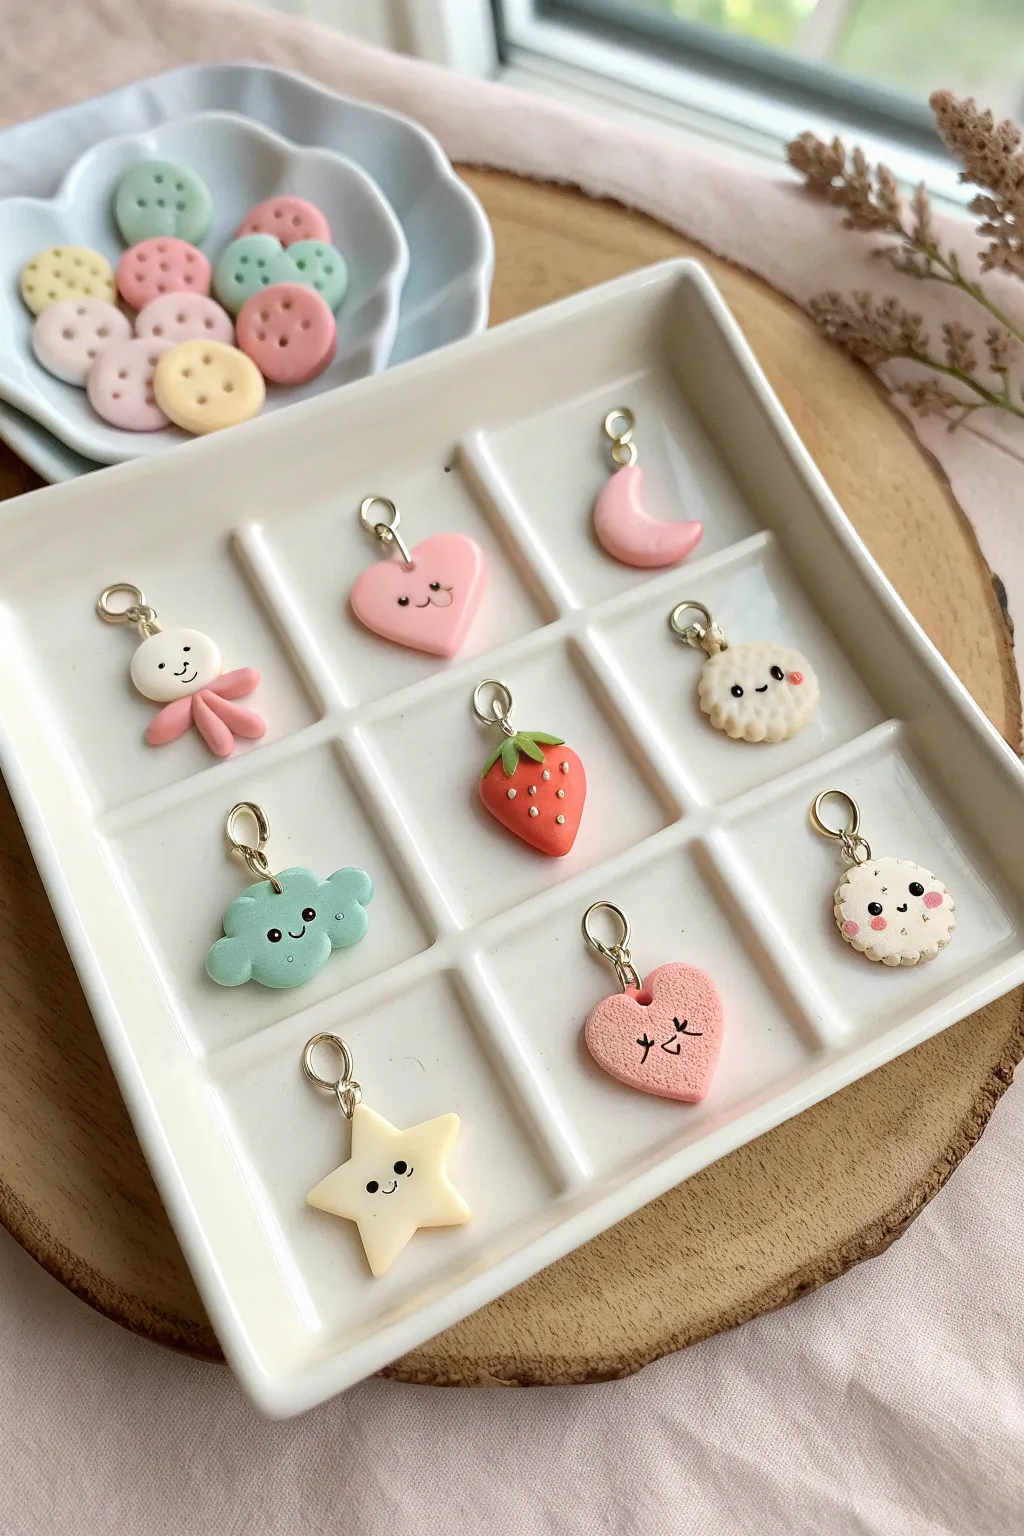
Create your own delightful set of kawaii charms featuring sweet treats and celestial friends with expressive little faces. These tiny, pastel polymer clay creations are perfect for jewelry making, keychains, or simply brightening up your desk space.
Step-by-Step
Materials
- Polymer clay in pastel pink, mint green, red, yellow, cream, and white
- Silver or gold eye pins
- Small dotting tool or toothpick
- X-acto knife or clay blade
- Needle tool
- Soft pastel chalks (pink) for blushing cheeks
- Small paintbrush
- Black acrylic paint or fine-tip permanent marker
- Glaze (glossy or matte)
- Baking sheet and parchment paper
- Oven
Step 1: Shaping the Celestial Charms
-
Model the Happy Cloud:
Start with a ball of mint green clay. Flatten it slightly, then use your fingers or a small ball tool to push in scalloped indents around the perimeter to form fluffy cloud bumps. -
Form the Crescent Moon:
Roll a small snake of pink clay, tapering both ends to points. Curve it gently into a ‘C’ shape and flatten it just a bit so it isn’t completely round. -
Create the Wishing Star:
Flatten a ball of pale yellow clay into a thick disc. Use your blade or fingers to pinch out five distinct points, smoothing the edges for a soft, rounded look.
Clean Clay Tip
Baby wipes are your best friend! Wipe your hands and tools between colors, especially before switching to white clay, to prevent lint and color transfer.
Step 2: Crafting Sweet Treats & Critters
-
Sculpt the Strawberry:
Shape red clay into a rounded cone. For the leaves, flatten a tiny piece of green clay, cut a star shape, and press it onto the top of the strawberry. -
Add Strawberry Seeds:
Using a needle tool, poke tiny, evenly spaced indentations all over the red surface of the strawberry to mimic seeds. -
Make the Biscuits:
Flatten balls of cream or white clay into thick discs. Use a needle tool to gently texture the edges to look like crumbled cookie dough or bite marks. -
Form the Octopus:
Roll a white ball for the head. Create four or five small pink teardrop shapes and attach them to the bottom of the head, splaying them out slightly like little tentacles. -
Shape the Hearts:
Create two hearts using pink clay. Keep them plump and rounded. You can use a small heart cutter or shape them by hand by indenting the top of a teardrop shape.
Step 3: Detailing and Assembly
-
Insert Eye Pins:
Before baking, carefully trim your eye pins to the right length. Push one into the top of each charm, ensuring it goes deep enough to be secure. -
Add Texture:
For the biscuits and the textural heart, use a toothbrush or a ball of aluminum foil to gently tap the surface, giving it a realistic baked texture. -
Baking Time:
Place all your charms on a parchment-lined baking sheet. Bake according to your brand of polymer clay instructions (usually around 275°F/135°C for 15-30 minutes). -
Cooling Down:
Let the charms cool completely before handling them. This step is crucial as the clay hardens fully as it cools.
Texture Pop
Dust the biscuit charms with a tiny bit of brown chalk pastel before baking. It settles into the texture and makes them look perfectly golden-baked.
Step 4: Bringing Them to Life
-
Paint the Faces:
Using a very fine dotting tool or toothpick dipped in black paint, add two tiny dots for eyes on each charm. Paint small smiles or winking expressions between the eyes. -
Alternative Face Details:
For the ‘scribbled’ face look on the textured heart, use a fine-tip permanent marker to draw the squinty eyes and mouth. -
Apply Rosy Cheeks:
I find that scraping a bit of pink pastel chalk into a dust and brushing it on with a dry brush creates the softest blush effect. Apply below the eyes. -
Highlight the Strawberry:
Use a tiny bit of white or yellow paint to fill in the seed indentations on the strawberry for extra pop. -
Seal the Charms:
Finish by applying a coat of glaze. A glossy glaze looks great on the strawberry and moon, while a matte finish suits the biscuits and clouds better.
Now you have a tray full of adorable companions ready to be turned into a bracelet or gifted to a friend