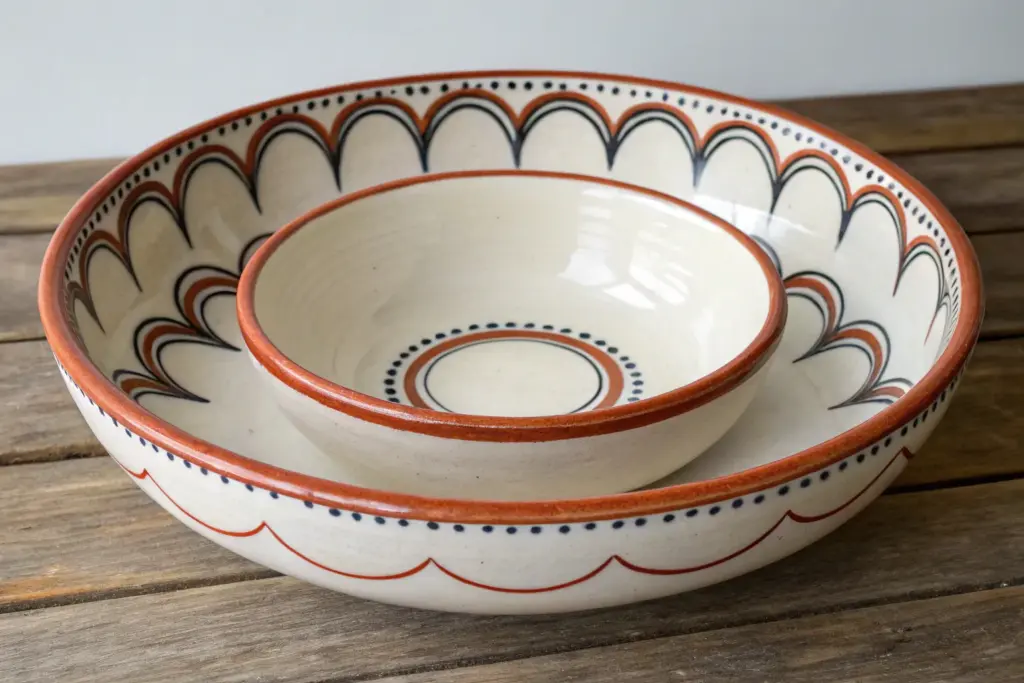
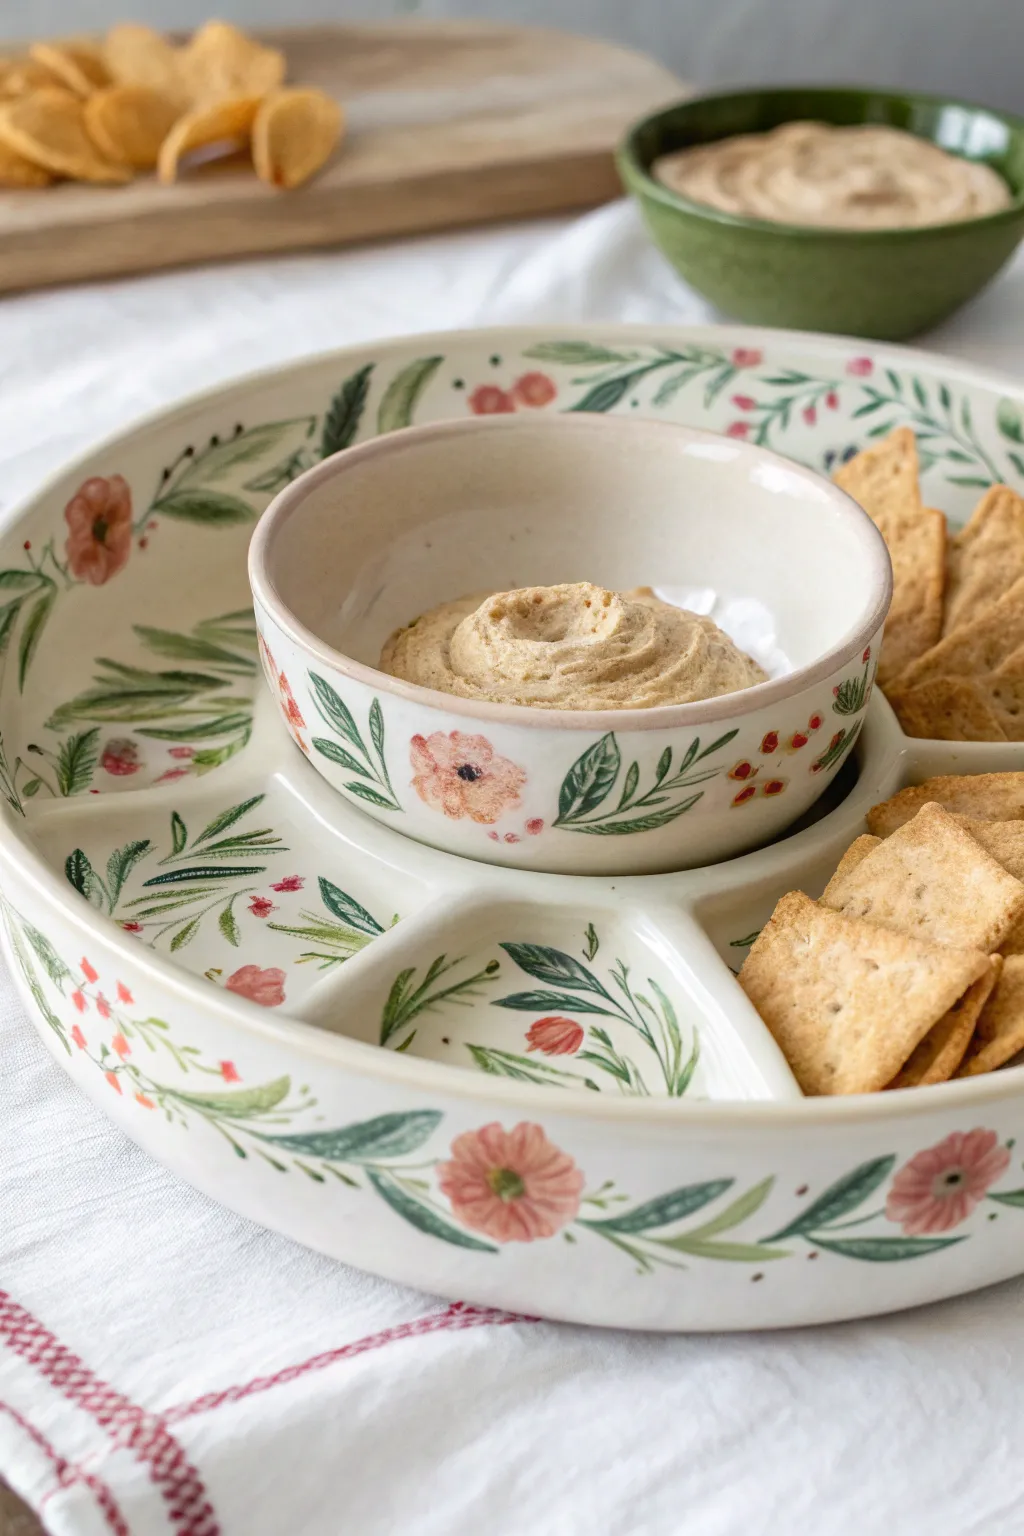
A chip and dip bowl is basically the most fun little canvas because you get to design two zones at once: the wide ring for chips and that cute center dip well. I love paint ideas that make the middle feel like a focal point while the outer bowl still looks intentional and party-ready.
Classic Two-Tone Center Pop
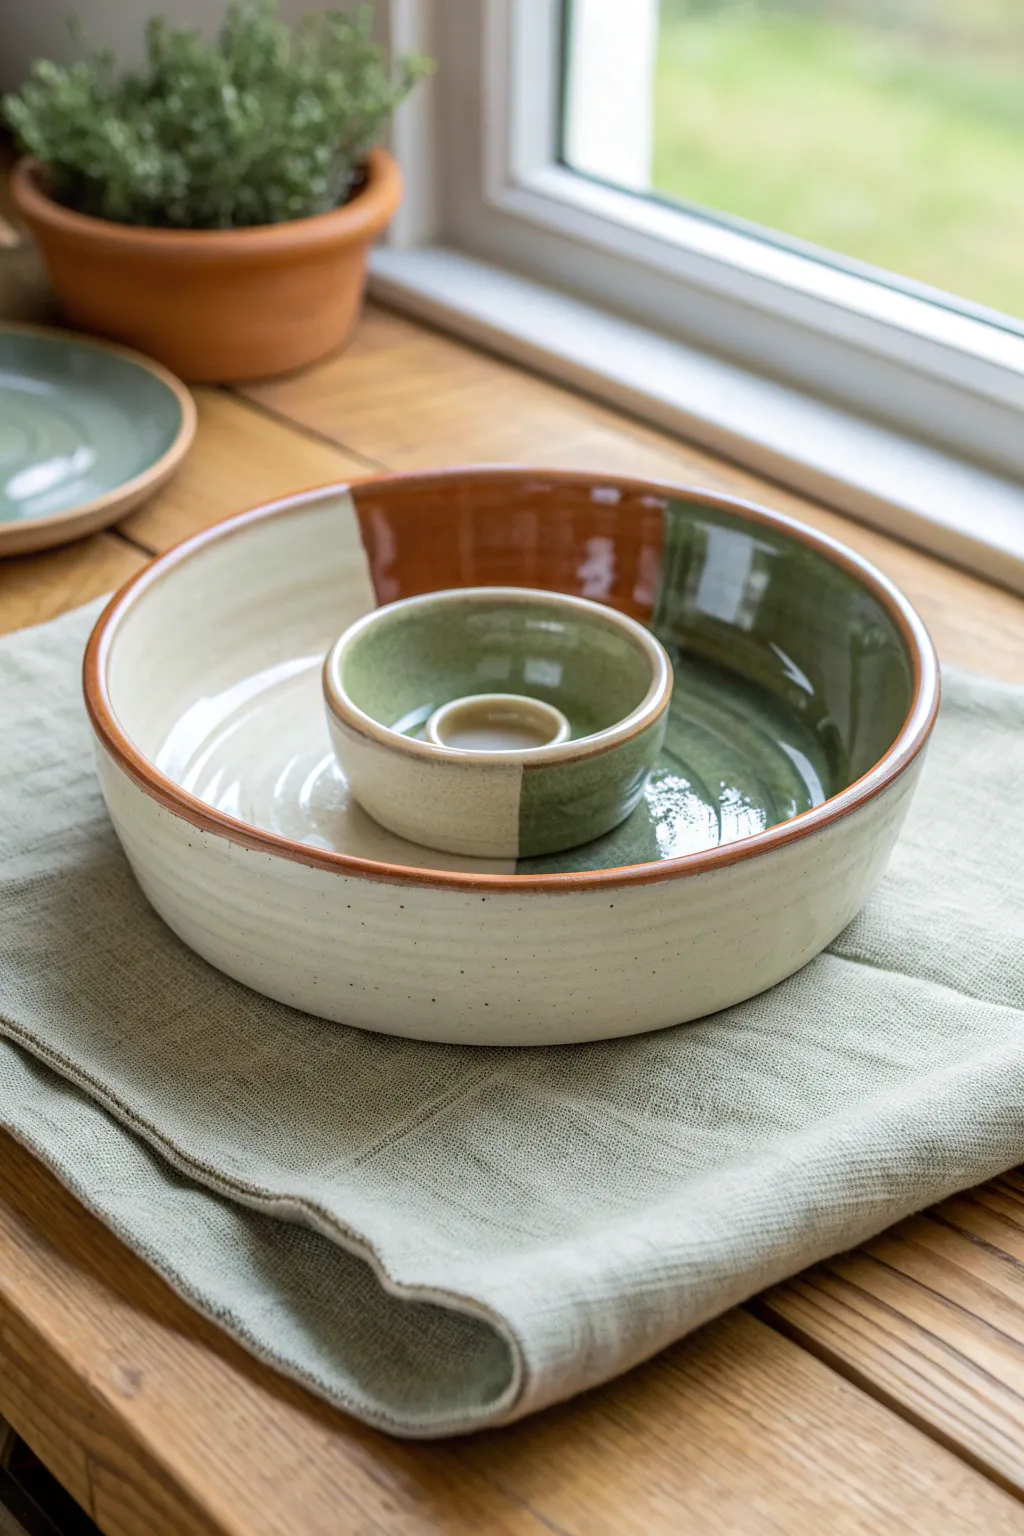
Achieve a sophisticated, earthy aesthetic with this glazing project that combines creamy white, warm terracotta, and mossy green. The design uses partially exposed clay and deliberate color blocking to create a modern farmhouse feel that lets the natural beauty of the ceramic shine through.
Detailed Instructions
Materials
- Bisque-fired ceramic chip and dip bowl (ready to glaze)
- Cream/Off-white dipping glaze (glossy opaque)
- Terra cotta/rust colored glaze (glossy)
- Moss green glaze (glossy, semi-transparent)
- Wax resist emulsion
- Soft fan brush
- Medium round brush
- Artist sponge
- Clean water container
- Fettling knife or clean-up tool
Step 1: Preparation & Masking
-
Wipe down bisque:
Before you begin, verify your bisque piece is free of dust. Take a slightly damp artist sponge and wipe the entire surface inside and out. This ensures your glaze adheres properly without pinholing. -
Protect the foot:
Flip the bowl over and apply a coat of wax resist to the bottom foot ring. This prevents glaze from sticking to the kiln shelf later. Allow the wax to dry completely until it’s no longer tacky. -
Plan your sections:
Looking at the reference, visualize the bowl divided into thirds. One large section will remains creamy white, while the other two-thirds will be split between rust and green. You can lightly sketch these dividing lines with a pencil if helpful; the graphite will burn off in the kiln.
Step 2: Base Glazing
-
Apply the cream base:
Stir your cream/off-white glaze thoroughly. Using a soft fan brush, apply a generous, even coat to the entire interior and exterior of the bowl. For dipping glazes, a quick dip works, but brushing gives more control over the rustic texture. -
Second cream coat:
Once the first coat loses its sheen, apply a second coat of the cream glaze. The goal is a solid, opaque coverage that hides the raw clay color. -
Establish the rim:
The rim in the image has a distinct, warm terracotta line. You can wipe away the cream glaze from the very top edge with a damp sponge to expose the clay body, or prepare to layer a rust glaze over it later. I prefer wiping it back for a cleaner line.
Uneven Lines?
If your color-block edges look messy, use automotive striping tape (or thin masking tape) on dry base glaze to get crisp, straight separation lines.
Step 3: Color Blocking
-
Map the green section:
Identify the section for the moss green. This color covers about one-third of the main bowl and extends into the corresponding side of the center dip bowl. It’s a ‘slice of pie’ shape. -
Apply green glaze:
With a medium round brush, apply the green glaze over the dry cream base in your designated section. Be intentional with your brushstrokes; let them follow the curve of the bowl. -
Start the rust section:
Clean your brush. Adjacent to the green section, map out the terracotta/rust area. This also takes up about a third of the bowl, originating from the rim and sweeping down. -
Paint the rust block:
Apply the rust-colored glaze. Be careful where it meets the green—you don’t want a muddy overlap. A tiny gap or a very straight butt-joint looks best. Paint this color into the center dip bowl as well, matching the section’s alignment. -
Refine the dip bowl:
The center bowl mirrors the outer pattern. Ensure the green on the outer rim flows visually into the green inside the small bowl. It creates a cohesive ‘slice’ effect across the whole piece. -
Glaze the rim:
Using a small detail brush or the edge of a Fan brush, carefully paint the rim with the rust/terracotta glaze. This frames the entire piece and adds that classic pottery definition.
Adding Depth
Overlap the green and rust glazes slightly at their meeting point. This third creates a unique transition color that adds complexity to the final firing.
Step 4: Finishing Touches
-
Check exterior speckles:
The main body has a lovely speckled appearance. If your cream glaze doesn’t have speckles built-in, you can use a stiff toothbrush to flick a tiny amount of iron oxide wash or brown underglaze onto the cream sections. -
Clean up rim lines:
Use a damp sponge or a clean-up tool to tidy any wobbles on the rim. The beauty is in the handmade imperfection, but you want the intention to be clear. -
Verify thickness:
Check that your colored sections have enough glaze thickness (usually 2-3 coats for brush-on glazes). Thin glaze might look streaky after firing. -
Dry and inspect:
Let the piece dry completely, usually overnight. Check for any glaze that may have dripped near the foot and scrape it away with your fettling knife. -
Firing:
Fire the piece in a kiln according to the specific cone rating of your clay and glazes (typically Cone 5 or 6 for stoneware). This melts the layers into that glossy, durable finish shown.
Once cooled from the kiln, your custom chip and dip set is ready to host your favorite snacks with rustic charm


Bold Rim Band and Clean Basin

This contemporary chip-and-dip set balances rustic charm with modern color-blocking. The speckled cream interior keeps snacks looking appetizing, while the bold terracotta rim and deep forest green base create a grounded, earthy aesthetic.
Step-by-Step Tutorial
Materials
- Bisque ceramic platter (low, wide rim)
- Small bisque bowl (matching shape)
- Speckled cream or ‘oatmeal’ ceramic glaze
- Terracotta orange underglaze or glaze
- Deep forest green underglaze or glaze
- Fan brush
- Medium flat brush
- Sponge
- Potter’s wheel or banding wheel (optional but helpful)
- Clear dipping glaze (if using underglazes)
Step 1: Preparation & Base Coat
-
Clean the bisque:
Wipe down your bisque platter and bowl with a slightly damp sponge to remove any kiln dust. This ensures your glaze adheres without pinholing. -
Shake the glazes:
Vigorously shake your speckled cream glaze. These glazes often have sediment that needs to be fully suspended to get that nice, even speckle effect. -
Apply the interior base:
Using a fan brush, apply three even coats of the speckled cream glaze to the entire interior of the bowl and the interior flat surface of the platter. -
Feather the edges:
When glazing the interiors, bring the speckled cream right up to the rim’s edge, but try to avoid glopping it over the side. A clean line here makes the next steps easier. -
Dry between coats:
Allow each coat of the cream glaze to dry until it loses its sheen before applying the next layer.
Wobbly Lines?
If your hand shakes while painting bands, rest your pinky finger against the ware for stability, or place your elbow firmly on the table surface.
Step 2: Adding the Color Bands
-
Set up your station:
Place your bowl on a banding wheel if you have one. This tool is fantastic for getting continuous horizontal lines without shaky hand marks. -
Paint the terracotta rim:
Load a medium flat brush with the terracotta orange glaze. Spin the wheel slowly and hold the brush steady against the top 1/2 inch of the exterior rim. -
Extend the orange:
Bring this orange band slightly over the lip to meet the cream interior, creating a finished look. Apply 3 coats for opacity. -
Create the emerald base:
Switch to your deep forest green glaze. Paint the lower section of the bowl’s exterior, starting from the bottom and working up to meet the orange band. -
Minding the gap:
I like to leave a hair-thin gap between the green and orange initially to prevent bleeding, then carefully close it on the final coat for a crisp seam. -
Repeat on the platter:
Move the platter to the banding wheel. Paint the exterior vertical rim with the terracotta orange glaze, matching the width of the bowl’s rim band. -
Detail the platter base:
If your platter has a foot or a lower side section like the bowl, add the green band there. If it’s a simple flared rim, you might choose to leave the underside speckled cream or solid white.
Make it a Trio
Make a tiny third bowl for pits or utensils. Paint it entirely green on the outside to invert the pattern and add visual interest to the set.
Step 3: Finishing Touches
-
Check the speckles:
Inspect the cream interior. If you want more density in the speckles, you can flick a stiff toothbrush dipped in the glaze lightly over the surface. -
Clean the foot:
Use a damp sponge to meticulously wipe any glaze off the very bottom foot ring of both pieces. Glaze on the foot will stick to the kiln shelf. -
Clear glaze application:
If you used underglazes for the colors, carefully dip the pieces in clear glaze or brush on two coats of clear brushing glaze. -
Final smooth:
Gently rub out any accidental finger marks on the raw glaze with a dry finger to ensure a smooth final texture. -
Fire the pieces:
Fire the ceramics according to the specific cone instructions on your glaze bottles (typically Cone 5 or 6 for this type of stoneware look).
Now you have a stunning, professional-looking serving set ready for your next gathering


Radiating Sunburst From the Dip Well
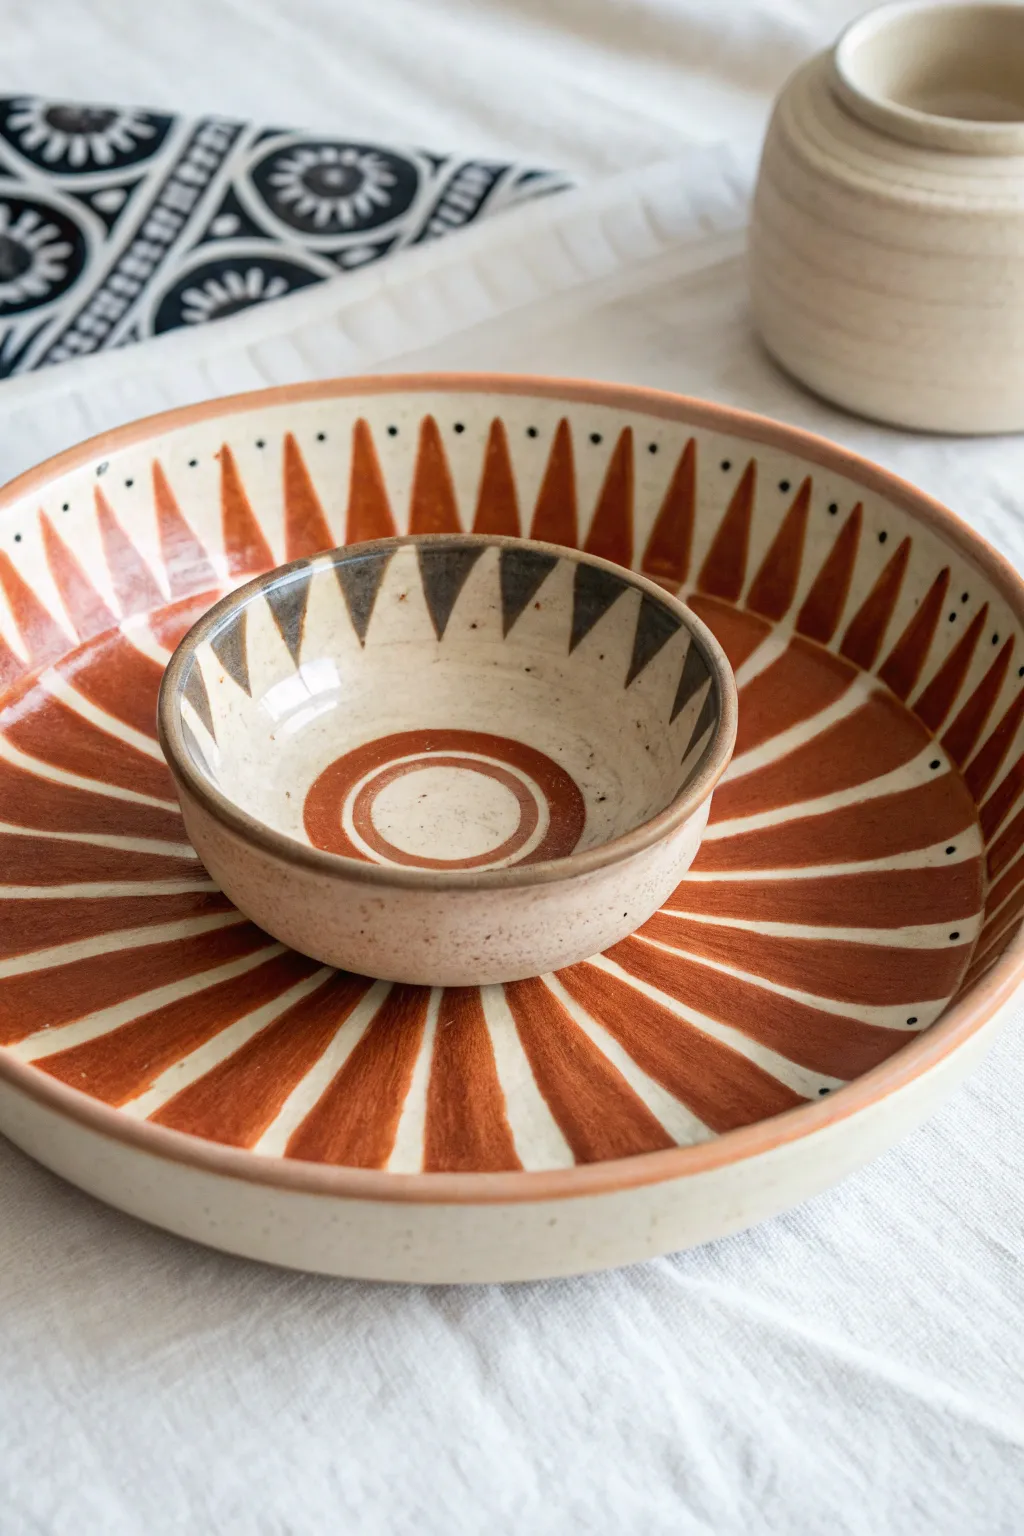
Capture the warmth of desert sunrises with this cohesive chip and dip set featuring a radiating sunburst pattern. The design uses earthy terracotta tones and deep charcoal accents to create a striking, bohemian centerpiece for your next gathering.
Detailed Instructions
Materials
- Large, shallow ceramic bowl (bisque ware)
- Small ceramic dip bowl (bisque ware)
- Terracotta or rust-orange underglaze
- Dark charcoal or soft black underglaze
- Cream or off-white underglaze (for base)
- Clear dipping glaze
- Pencil for sketching
- Fine liner brush
- Medium round brush
- Flat shader brush
- Damp sponge
Step 1: Preparation & Base Coat
-
Clean the bisque:
Start by wiping down both your large bowl and small dip bowl with a damp sponge. This removes any dust from the shelf that could prevent the glaze from adhering properly. -
Apply the creamy base:
Using a wide flat brush, apply three even coats of a cream or off-white underglaze to the interior of both bowls. Allow each coat to dry until it’s chalky to the touch before adding the next one. This sets a neutral canvas for your bold colors. -
Mark the centers:
Once the base is dry, lightly mark the exact center of the large bowl with a pencil. Place the small bowl in the center to visualize the spacing. Remove the small bowl and lightly sketch a circle where it sat to guide your sunburst rays.
Pro Tip: Pencil Marks
Don’t worry about erasing your pencil sketches perfectly. The graphite will burn off completely in the kiln, leaving only your clean painted lines behind.
Step 2: Painting the Large Bowl
-
Sketch the rays:
Lightly sketch radiating lines from the center circle out to the rim of the large bowl. These represent the sun’s rays. Aim for triangular shapes that widen as they reach the edge. -
Outline the triangles:
Using a fine liner brush and your terracotta underglaze, carefully outline the triangular rays you just sketched. -
Fill the rays:
Switch to a medium round brush to fill in the rays with the terracotta color. I find that working from the center outward helps maintain a smooth, tapered stroke. -
Add second coats:
Apply a second and third coat of terracotta to the rays to ensure the color is opaque and rich after firing. Let the paint dry completely between layers. -
Paint the rim:
With a steady hand or a banding wheel, paint a thin terracotta line along the very top rim of the bowl to frame the design. -
Add accent dots:
Dip the non-brush end of a paintbrush into the dark charcoal underglaze. Dot the paint into the cream spaces between the terracotta rays, placing one dot near the rim in each gap.
Level Up: Texture Play
Before painting the base coat, use a sgraffito tool to gently carve the outline of the sun rays into the clay. The glaze will pool slightly in the grooves for added depth.
Step 3: Painting the Dip Bowl
-
Create the interior bullseye:
Inside the small bowl, find the center bottom. Paint a small solid circle of cream (if not already coated), then paint a ring of terracotta around it, followed by a second, outer ring of terracotta. This creates a bullseye effect. -
Sketch the rim triangles:
Along the inner upper edge of the small bowl, lightly pencil in a row of small, downward-pointing triangles. -
Paint the dark accents:
Using the dark charcoal underglaze and your fine liner brush, fill in these small triangles. This contrast ties the two bowls together without matching them perfectly. -
Rim the small bowl:
Finish the small bowl by painting its rim with the terracotta color, matching the large bowl’s edge. -
Clean up details:
Check for any stray smudges or uneven lines. You can gently scratch away small mistakes with a toothpick or clean them up with a slightly damp brush.
Step 4: Finishing
-
Dry thoroughly:
Allow both pieces to dry completely, preferably overnight, to ensure all moisture has evaporated from the underglaze. -
Clear glaze application:
Dip both the large and small bowls into clear glaze. Hold them with dipping tongs and submerge quickly and evenly. Shake off excess glaze gently. -
Touch up tong marks:
Once the glaze is dry to the touch, rub a tiny bit of glaze over the marks left by the tongs with your finger to smooth them out. -
Fire the kiln:
Load the pieces into the kiln. Ensure they aren’t touching each other. Fire according to the specifications of your clay and glaze (typically cone 06 or 05).
Once cooled, your striking new set is ready to brighten up any snack table with its artisan charm


Simple Hand-Painted Polka Dots
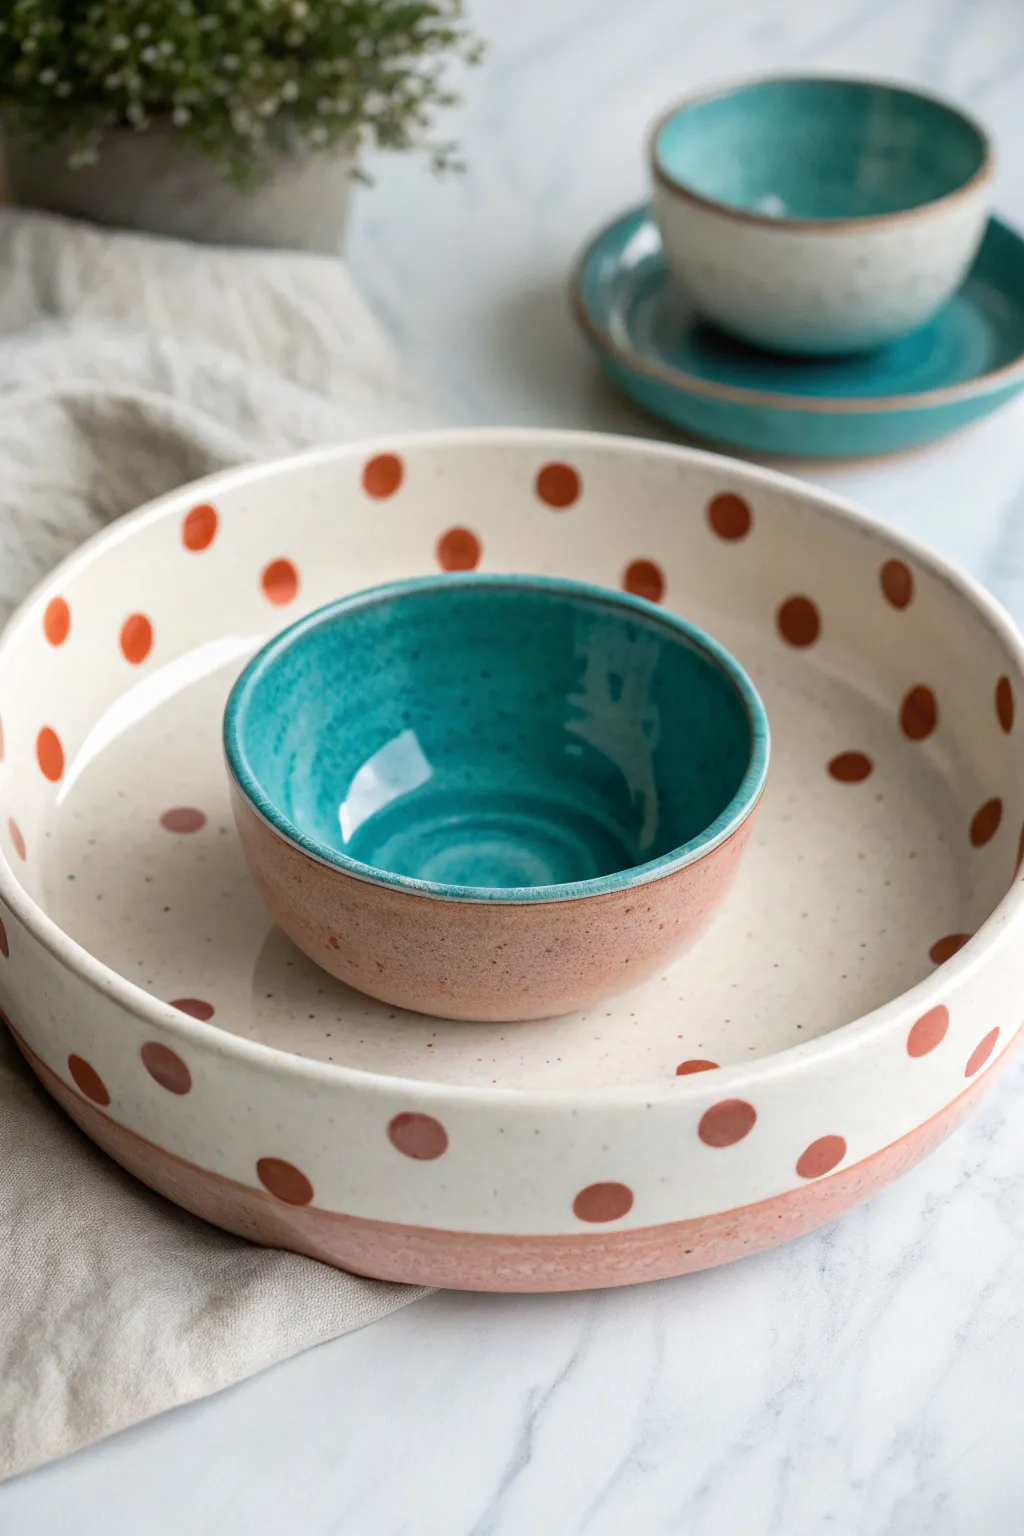
Create a stunning table centerpiece with this lively chip and dip bowl set featuring earthy polka dots and a vibrant turquoise surprise. The combination of raw clay texture, creamy speckled glaze, and bold patterns gives this project a modern yet handmade bohemian feel.
Step-by-Step
Materials
- Bisque-fired ceramic large shallow bowl (about 10-12 inches diameter)
- Bisque-fired ceramic small dip bowl (about 4-5 inches diameter)
- Glaze tape or wax resist
- Creamy white speckled ceramic glaze (glossy or satin)
- Reddish-brown or terracotta-colored ceramic glaze
- Turquoise or teal ceramic glaze (glossy)
- Soft fan brush
- Medium round paintbrush (size 6 or 8)
- Small round sponge applicator or pouncer (approx 0.5 – 0.75 inch diameter)
- Damp sponge for cleaning
- Kiln access (local studio or personal kiln)
Step 1: Preparation and Masking
-
Clean the bisque:
Start by wiping down both your large and small bisque bowls with a damp sponge. This removes any dust that might prevent the glaze from adhering properly. -
Mask the bases:
To achieve that beautiful raw clay look at the bottom, measure about 1 to 1.5 inches up from the base on the exterior of both bowls. Apply a clean line of glaze tape or paint a band of wax resist around this bottom section to keep it glaze-free. -
Mask the small bowl exterior:
For the small dip bowl, the entire exterior above the base remains unglazed raw clay in this design. Apply wax resist to the entire outside wall of the small bowl, stopping exactly at the rim.
Uneven Dots?
If your sponge leaves a texture or bubbles, smooth the wet glaze lightly with a soft fingertip or a damp brush immediately after stamping.
Step 2: Glazing the Interiors
-
Glaze the small bowl interior:
Pour a small amount of turquoise glaze into the center of the small bowl. swirl it around to coat the entire inside up to the rim, then pour out the excess. Clean up any drips on the rim immediately with a sponge. -
Apply second coat to small bowl:
Once the first coat is dry to the touch, use a fan brush to apply a second, even coat of turquoise glaze to the interior to ensure a deep, rich color after firing. -
Glaze the large bowl base coat:
Using a fan brush, apply a smooth coat of the creamy white speckled glaze to the entire interior of the large bowl. -
Glaze the large bowl exterior:
Continue applying the white speckled glaze to the exterior of the large bowl, covering the area from the rim down to your tape or wax line. -
Build opacity:
Allow the first layer to dry, then apply two more coats of the white glaze to the large bowl (inside and out). You want a solid, opaque background so the speckles show through clearly.
Level Up
Paint the bottom rim of the small dipping bowl with a gold luster overglaze after the main firing for a touch of metallic luxury.
Step 3: Painting the Polka Dots
-
Prepare the brown glaze:
Pour a small amount of reddish-brown glaze onto a palette or shallow dish. Ensure it is well-mixed so the pigment is consistent. -
Plan the spacing:
Visually plan where your dots will go on the large bowl. I like to imagine a grid first to keep the spacing somewhat even, rather than clustering them too close together. -
Stamp the interior dots:
Dip your round sponge applicator into the brown glaze. Press it gently onto the interior of the large bowl to create perfect circles. Space them generously, leaving plenty of white space between each dot. -
Stamp the exterior dots:
Repeat the stamping process on the exterior white section of the large bowl. Staggering the placement relative to the interior dots can add a nice sense of movement. -
Touch up the dots:
If the sponge didn’t leave a thick enough layer of glaze, use your medium round paintbrush to carefully fill in the circles with a second coat of brown glaze, staying neat within the edges.
Step 4: Finishing Touches
-
Remove masking:
If you used glaze tape, peel it off carefully now that the glaze is dry. If you used wax resist, you can leave it; it will burn off in the kiln. -
Clean the raw clay:
Use a damp sponge to wipe away any stray glaze smudges on the raw clay sections (the bottoms and the outside of the small bowl). These areas must be perfectly clean to achieve the matte contrast. -
Rim check:
Check the rims of both bowls. If the glaze looks thin, dab a little extra white (on the large) or turquoise (on the small) to ensure the edge is smooth and fully coated. -
Fire the piece:
Load the pieces into the kiln. Fire according to the instructions on your glaze bottles (usually Cone 5 or 6 for stoneware). Ensure the unglazed bottoms are clean so they don’t stick to the kiln shelf.
Once cooled, your custom set is ready to serve up salsa and chips with handmade flair

The Complete Guide to Pottery Troubleshooting
Uncover the most common ceramic mistakes—from cracking clay to failed glazes—and learn how to fix them fast.
Candy Stripe Spirals Around the Ring
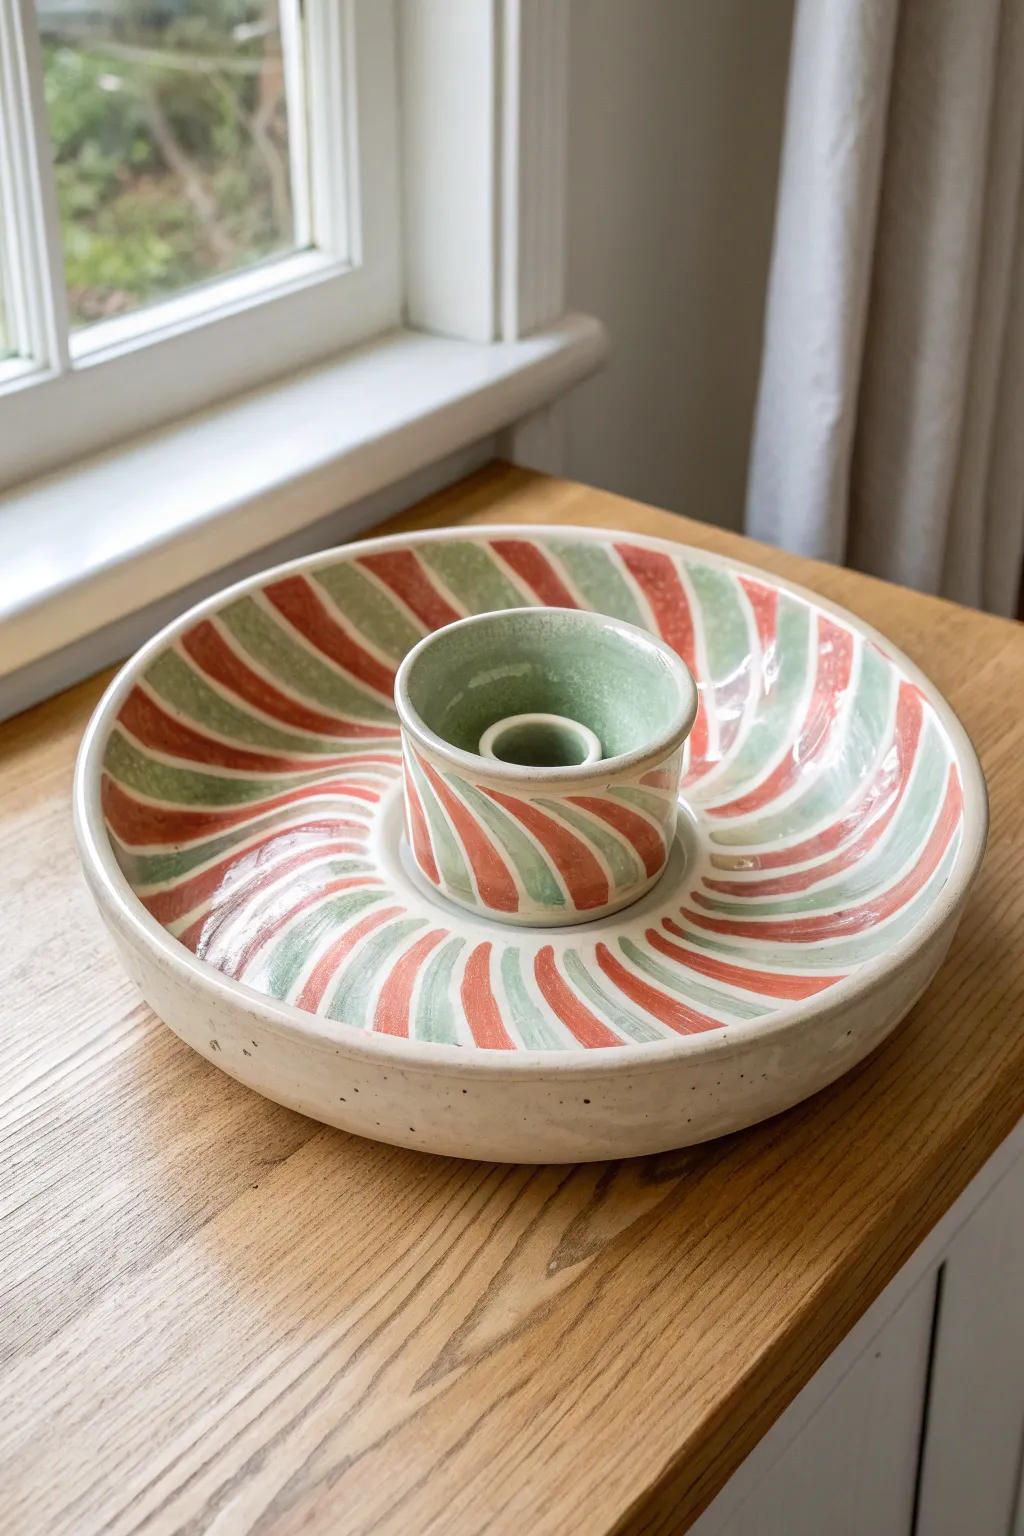
Bring a festive, confection-inspired touch to your table with this delightful peppermint-patterned server. The mesmerizing spiral design uses alternating red and green stripes that flow seamlessly from the outer rim into the central well, creating a sense of movement and joy.
How-To Guide
Materials
- Bisque-fired ceramic chip and dip bowl (with central cup)
- Underglaze paints: Muted Red and Sage Green
- Clear transparent dipping glaze
- Soft fan brush (for glaze application)
- Medium round brush (size 6 or 8)
- Small round detail brush (size 2 or 4)
- Pencil (for sketching guidelines)
- Clean water and sponge
- Lazy Susan or banding wheel (optional but helpful)
Step 1: Preparation & Sketching
-
Clean the bisque:
Begin by wiping down your ceramic bisque with a damp sponge. This removes any kiln dust or oils from handling that might resist the glaze later on. -
Mark the center:
Locate the exact center of the inner cup. Visualize a point from which all your spirals will radiate outward. -
Sketch the spiral structure:
Lightly sketch curved lines radiating from the base of the central cup up and over the rim, cascading down into the main bowl. Keep your pencil touch light; graphite burns off in the kiln. -
Define the stripe width:
Draw parallel lines to create ribbons of consistent width. Aim for stripes that are about a finger’s width, slightly tapered near the center and widening as they reach the outer rim.
Wobbly Lines?
Don’t panic! Use a wet toothpick or a rubber-tipped shaping tool to gently nudge wet glaze back into place or scrape away dry mistakes.
Step 2: Painting the Stripes
-
Start with the green:
Load your medium round brush with the Sage Green underglaze. I find it easier to start at the center cup and pull the brush stroke downwards and outwards, following the curve. -
Follow the flow:
Paint every other stripe green. Ensure the stroke goes all the way up the side of the central cup, over its rim, and continues onto the floor of the main bowl. -
Second coat of green:
Once the first layer is dry to the touch (it will turn chalky), apply a second coat to ensure opaque, solid coverage. Uneven swipes can look messy, so take your time here. -
Fill the gaps with red:
Using a clean medium brush, fill in the remaining alternating stripes with Muted Red underglaze. Be careful not to let the colors touch or bleed into one another. -
Apply second red coat:
Just like with the green, apply a second coat of red for vibrancy. If you want a more watercolor look, one coat might suffice, but two gives that bold candy look. -
Detail the center cup:
Don’t forget the inside of the central cup! Continue the stripes down into the interior, or paint the entire interior a solid Sage Green for a nice contrast as seen in the photo.
Step 3: Cleaning & Glazing
-
Tidy up edges:
Use a damp stiff brush or a specialized cleanup tool to gently scrape or wipe away any paint that strayed outside your lines. The white clay body acts as the white stripe, so keep these negative spaces clean. -
Check the rim:
Run a damp sponge around the very outer rim of the large bowl to clean up where the stripes end, creating a crisp stopping point. -
Dry thoroughly:
Allow the underglaze to dry completely. It should feel room temperature and look matte. -
Apply clear glaze:
Using a soft fan brush, apply two to three flowing coats of clear transparent glaze over the entire piece. Alternatively, dip the piece if you have a large enough container. -
Fire the piece:
Place the bowl in the kiln and fire to the specification of your clay and glaze (typically Cone 06 or Cone 6).
Make It Sparkle
For a true sugar-coated candy look, mix a tiny pinch of speckled glaze into your colors or use a glossy clear glaze with faint sparkles.
Once fired, fill your spiral masterpiece with chips and salsa for a dazzling centerpiece that looks good enough to eat
Confetti Party Speckles
Transform a plain ceramic set into a festive centerpiece with this playful confetti design that mimics the look of trendy terrazzo. The scattered, irregular shapes and subtle speckles create a joyful, handmade feel that looks sophisticated yet spontaneous.
How-To Guide
Materials
- Bisque ceramic chip and dip bowl set
- Ceramic underglazes (Cream/White, Red, Yellow, Teal, Dark Blue)
- Fan brush or large soft sponge
- Small round detail brush (size 2 or 4)
- Medium round brush
- Old toothbrush or stiff bristle brush
- Palette or small cups for paint
- Clear dipping glaze
- Water and paper towels
Step 1: Base Coat Prep
-
Clean the bisque:
Wipe down your ceramic bisque pieces with a damp sponge to remove any dust or kiln debris that might prevent the glaze from adhering properly. -
Mix the base color:
Prepare a creamy white or oatmeal-colored underglaze. If you want more translucency, you can thin it slightly with a drop of water. -
Apply the foundation:
Using a fan brush or a large soft sponge, apply three thin, even coats of the cream underglaze to the entire surface of the bowl and plate. Allow each coat to dry until it loses its sheen before applying the next. -
Smooth the surface:
Once the final base coat is dry, gently rub the surface with a clean finger or a very fine sanding sponge to knock down any brushstrokes.
Natural Variation Pro-Tip
Don’t try to make perfect geometric shapes. The charm of terrazzo is the chipped-stone look, so let your hand wobble intentionally when painting the edges.
Step 2: Creating the Speckles
-
Prepare the speckle mix:
Dilute a small amount of dark charcoal or dark blue underglaze with water until it has an inky consistency. -
Test your splatter:
Dip an old toothbrush into this mixture and practice flicking the bristles against a piece of paper first to control the spray. -
Apply fine mist:
Hold the toothbrush about 6-8 inches from the pottery pieces and run your thumb across the bristles to create a fine mist of dark speckles over the cream base. Less is more here; you want texture, not solid coverage. -
Let it set:
Allow the fine speckles to dry completely so they don’t smear during the next steps.
Smear Prevention
If you accidentally smear a wet confetti shape, wait for it to fully dry, then gently scrape the mistake off with a craft knife rather than wiping it wet.
Step 3: Painting the Confetti
-
Select your palette:
Pour small amounts of your confetti colors (red, yellow, teal, dark blue) onto your palette. They should be full strength for opaque coverage. -
Paint the blue anchors:
Start with the dark blue color. I like to paint small, irregular triangle and trapezoid shapes randomly around the outside of the bowl and the rim of the plate. Space them widely apart. -
Add teal accents:
Using your medium round brush, add teal blobs. Try varying the shapes—some can be rounded, others angular. Ensure they are scattered and don’t clump together. -
Brighten with yellow:
In the empty spaces, paint yellow shapes using the small detail brush. These look great as small ‘chips’ or shards. -
Pop with red:
Finally, add the red accents. These serve as the high-contrast focal points, so place them strategically where there are large gaps. -
Check for opacity:
For these colored shapes, you will likely need 2-3 coats to ensure the colors come out solid and bright after firing. check that no base coat is showing through the shapes.
Step 4: Interior & Finishing
-
Paint the bowl interior:
For a bold contrast, paint the inside bottom of the dip bowl with three coats of the solid teal color. -
Add interior confetti:
Once the teal floor is dry, add a few floating confetti shapes in red and yellow directly on top of the teal for a submerged look. -
Final dry:
Let the entire project dry for 24 hours to ensure all moisture has evaporated from the bisque. -
Glaze and fire:
Carefully dip the pieces in clear glaze or brush on two heavy coats of clear brushing glaze. Fire according to your clay and glaze instructions (typically Cone 06 for earthenware).
Once fired, fill your beautiful new set with savory treats and enjoy the party vibe it brings to your table


What Really Happens Inside the Kiln
Learn how time and temperature work together inside the kiln to transform clay into durable ceramic.
Modern Terrazzo Chip Ring
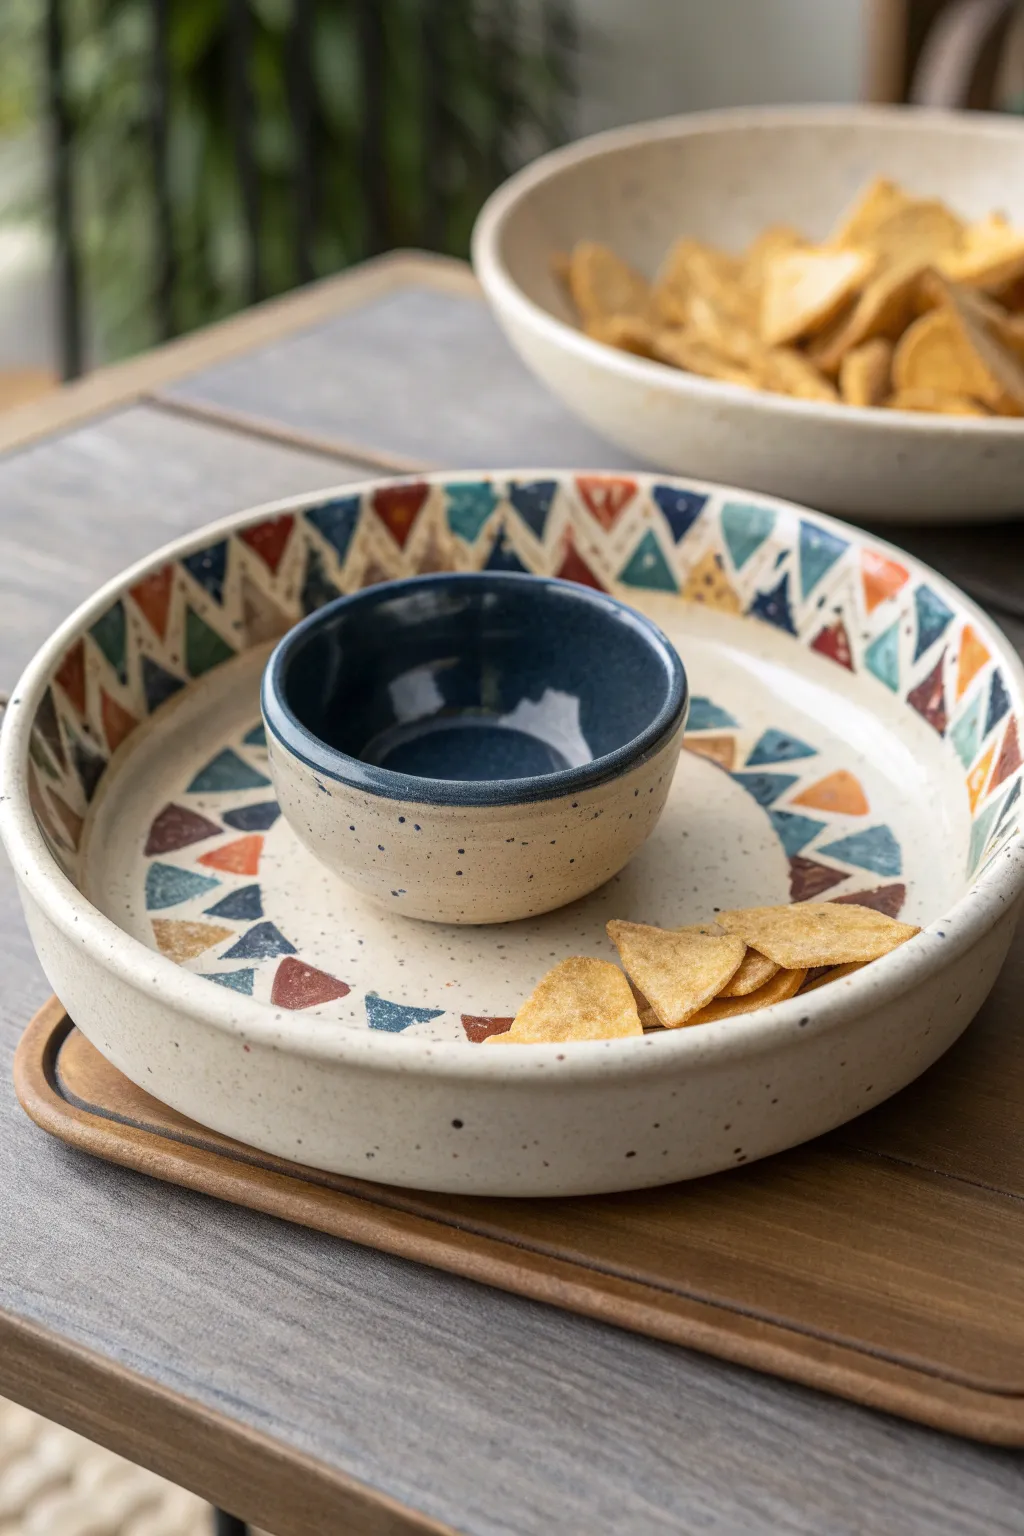
Bring a touch of artisan charm to your appetizer spread with this hand-painted geometric chip and dip set. The design features a playful repeated triangle motif in muted earth tones paired with a speckled stoneware finish and bold navy accents.
Step-by-Step Tutorial
Materials
- Bisque-fired chip and dip set (one large shallow bowl, one small dip bowl)
- Underglaze paints: Cream/Sand (base), Navy Blue, Burnt Orange, Mustard Yellow, Teal/Turquoise, Rust Red
- Clear dipping glaze or brushing glaze
- Fan brush (for base coats)
- Medium round brush (size 6 or 8)
- Small liner brush or detail brush
- Old toothbrush (for speckling)
- Pencil
- Water cup and paper towels
- Potter’s sponge
Step 1: Base Preparation
-
Clean the bisque:
Start by wiping down both the large bowl and the small dip bowl with a slightly damp sponge. This removes any ceramic dust that could prevent the glaze from adhering properly. -
Apply the base color:
Using a fan brush, apply three even coats of the Cream or Sand-colored underglaze to the entire surface of the large bowl (inside and out) and the exterior of the small bowl. Allow each coat to dry until it’s no longer shiny before applying the next. -
Paint the dip bowl interior:
Switch to the Navy Blue underglaze. Carefully paint the inside of the small dip bowl with three coats. Ensure a clean edge where the blue meets the cream exterior at the rim. -
Add the rim detail:
I like to add a defined rim to tie the pieces together. Use the Navy Blue and a steady hand (or a banding wheel if you have one) to paint the very top lip of the small bowl. -
Create the speckled effect:
Dip an old toothbrush into a small amount of watered-down Navy Blue or Dark Grey underglaze. Hold it over the pieces and run your thumb across the bristles to flick tiny speckles onto the cream surfaces. This mimics the look of natural stoneware clay.
Step 2: Geometric Patterning
-
Sketch the layout:
Lightly sketch your triangle pattern onto the dry base coat with a pencil. Draw a ring of triangles around the inner vertical wall of the large bowl. Draw a second, wider ring of triangles on the flat floor of the bowl. -
Plan the color sequence:
To keep the look balanced, plan an alternating sequence for your colors—Navy, Rust, Teal, Mustard, repeat. The triangles should generally point downwards or inwards, but slight variations add to the handmade feel. -
Paint the first color:
Start with your Navy Blue. Using a medium round brush, fill in every fourth or fifth triangle on your sketched pattern. Apply 2-3 coats for solid opacity. -
Add warm tones:
Next, fill in triangles with the Rust Red and Burnt Orange colors. These warm earthy tones provide a nice contrast to the blue. Be careful to stay within your pencil lines. -
Incorporate cool accents:
Fill the remaining triangles with Teal and Mustard Yellow. If you notice any sheer spots once the paint dries, dab a little extra underglaze on those areas. -
Clean up edges:
If any triangle edges look messy, you can carefully scratch away excess paint with a wooden skewer or touch up with the base cream color using a liner brush.
Steady Hands
Rest your pinky finger on the bowl’s surface as a stabilizer while painting the triangles. This acts as a pivot point and keeps your brush strokes clean and straight.
Step 3: Finishing Touches
-
Check for coverage:
Inspect the entire piece. The sketched pencil lines will burn off in the kiln, so don’t worry about erasing them perfectly, but ensure your paint coverage is solid. -
Clear coat application:
Once the underglaze is completely bone dry, apply a clear accompanying glaze. You can brush on two coats of clear brushing glaze, or dip the piece if you have access to a large dipping tank. -
Fire the piece:
Load the kiln and fire according to the specific temperature guidelines of your clay and glaze (usually cone 06 or cone 6). -
Final inspection:
After the kiln cools, check your piece for any sharp spots on the foot ring and sand them down if necessary before using.
Level Up: Texture
Use a dull pencil to gently scratch sgraffito lines through the colored triangles before glazing. This reveals the cream base beneath and adds great texture.
Now you have a stunning, durable serving set perfect for tacos or movie nights
Minimal Line Art Waves
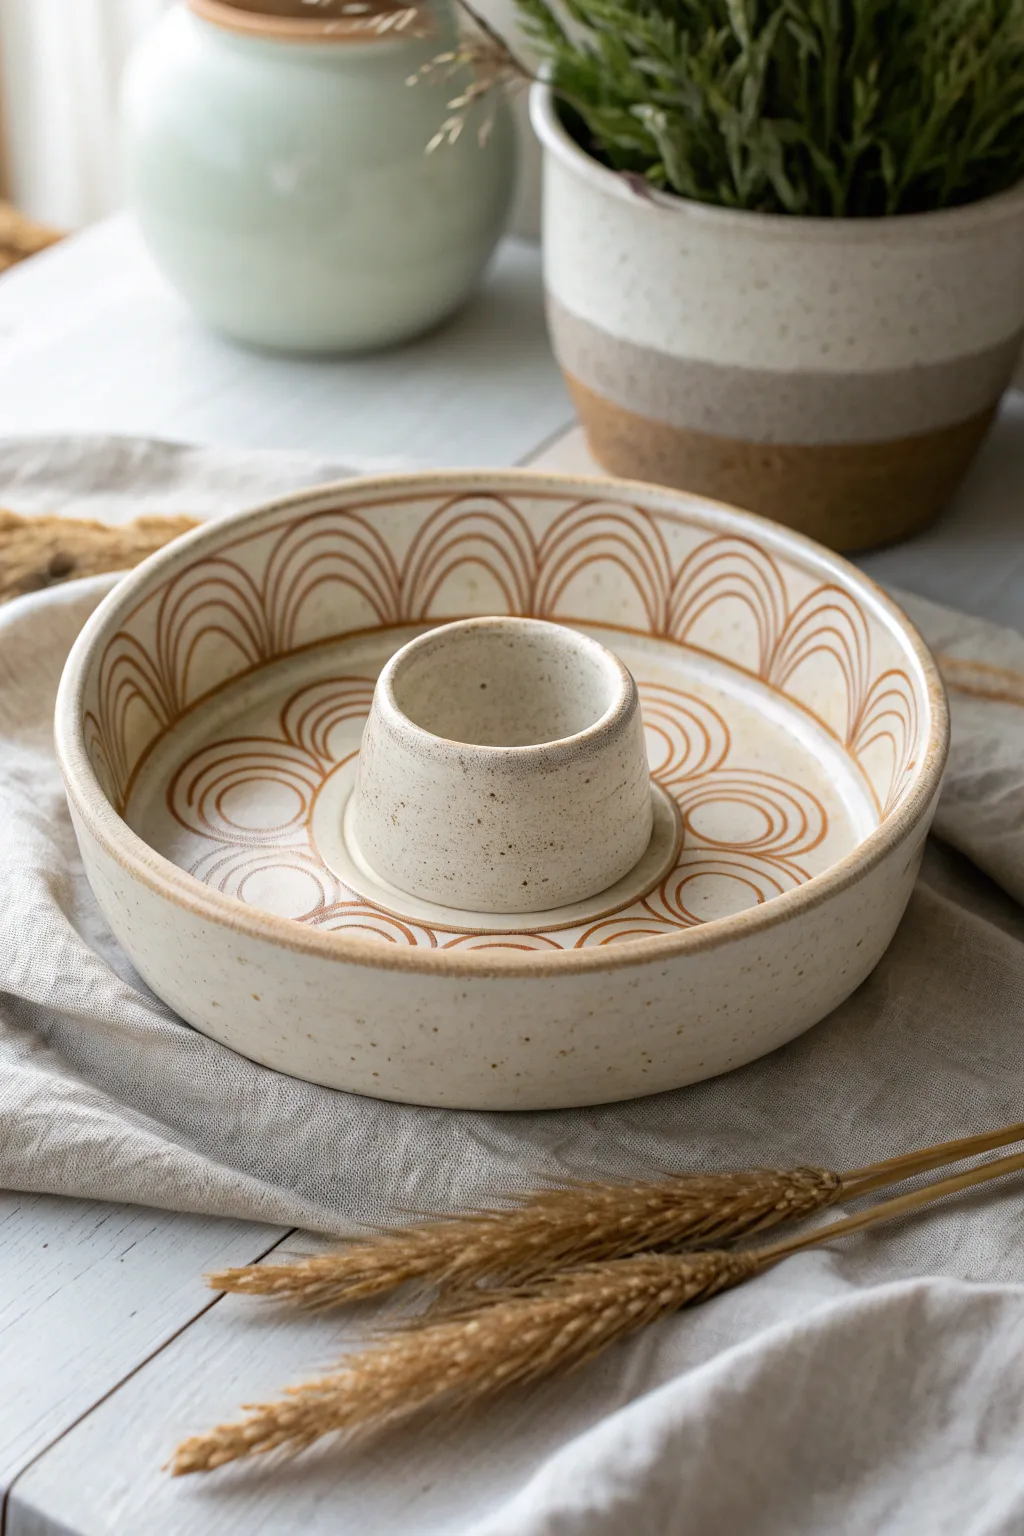
Embrace the warmth of natural tones with this simple yet striking line art design. Using a repetitive arch motif on a speckled clay body, you’ll create a modern chip and dip set that feels both handcrafted and sophisticated.
How-To Guide
Materials
- Bisque-fired chip and dip bowl (speckled clay preferred)
- Underglaze (terracotta or burnt orange)
- Fine liner brush (size 0 or 00)
- Pencil for sketching
- Clear dipping glaze or brush-on clear glaze
- Damp sponge
- Clean water
Step 1: Preparation & Planning
-
Clean the bisque:
Start by wiping down your bisque-fired bowl with a damp sponge. This removes any kiln dust or oils from your hands that might resist the underglaze application. -
Map out the grid:
Using a soft pencil, lightly mark the rim of the bowl at regular intervals to guide your arches. While the pencil marks will burn off in the kiln, they provide crucial anchor points to keep your repeating pattern symmetrical. -
Plan the floor layout:
For the flat bottom section around the center dip cup, visualize circles radiating outward. Just make a few light tick marks to ensure your floor arches align roughly with the wall arches.
Steady Hand Trick
Rest your pinky finger on the pottery surface while painting. It acts as a stabilizer, allowing your brush to create smoother curves without shaking.
Step 2: Painting the Walls
-
Load your brush:
Thin your terracotta underglaze slightly with a drop of water if it feels too thick. You want an ink-like consistency that flows smoothly off a fine liner brush without beading or running. -
Paint the first arch layer:
Starting at the bottom edge where the wall meets the floor, paint the outermost large arch first. Use your pencil guide to determine the height and width, keeping your hand steady and wrist relaxed. -
Add inner arches:
Paint three smaller, concentric arches inside the first one. I find it helpful to focus on the negative space between the lines rather than the lines themselves to keep the spacing consistent. -
Repeat around the perimeter:
Continue this process around the entire inner wall of the bowl. Ideally, the arches should touch at the bottom corners, creating a continuous scalloped effect along the base. -
Connect the peaks:
Once all wall arches are painted, check the top rim. If you like the look in the photo, carry the outermost line right up to or slightly over the rim for a finished appearance.
Step 3: Painting the Floor & Dip Cup
-
Detail the bowl floor:
Now move to the flat bottom surface. Paint semi-circular arches that radiate from under the wall design towards the center dip cup. These won’t be full arches but rather half-circles that look like reflections of the wall pattern. -
Create the concentric circles:
Inside these floor semi-circles, paint your matching inner curved lines. These should mimic the spacing of your wall design to maintain visual harmony. -
Keep the cup simple:
The center dip cup in this design is left largely unpainted to let the speckled clay shine, but you can add a single thin line around the very base where it meets the bowl floor to ground it. -
Define the rim:
Paint a solid, thin band of the terracotta color along the very top edge of the main bowl’s rim. This frames the artwork and gives it a professional finish. -
Clean up smudges:
If you made any mistakes or have wobbly lines, use a stiff, damp brush or a specialized cleanup tool to gently scratch or wipe away the stray underglaze before it sets permanently.
Uneven Lines?
Don’t stress over wobbly lines! If the underglaze is dry, you can gently scrape the edges with a wooden toothpick to refine the curve before glazing.
Step 4: Glazing & Firing
-
Let it dry completely:
Allow the underglaze to dry until it is chalky and cool to the touch. This usually takes about 20-30 minutes depending on humidity. -
Sponge lightly:
Once dry, verify there are no thick clumps of underglaze. You can very gently drift a damp sponge over the design to flatten any ridges, but be careful not to smear the lines. -
Apply clear glaze:
Dip the entire piece into a clear glaze, or brush on three even coats of a transparent brushing glaze. A clear glaze is essential here to seal the clay and make it food-safe while showing off the speckles. -
Check the thickness:
Ensure the glaze isn’t too thick, especially in the corners where the dip cup meets the bowl, as this can cause cloudiness. Wipe back any drips. -
Final Fire:
Fire the piece in the kiln according to the clay and glaze manufacturer’s instructions (typically Cone 5 or 6 for stoneware) to vitrify the clay and melt the glaze.
Once fired, fill the center with your favorite salsa and enjoy the stylish, handmade touch this bowl brings to your table

TRACK YOUR CERAMIC JOURNEY
Capture glaze tests, firing details, and creative progress—all in one simple printable. Make your projects easier to repeat and improve.
Citrus Slices Around the Chip Ring
Bring a splash of summer to your table with this vibrant chip and dip set adorned with cheerful citrus slices. The design features a playful mix of lemon, lime, and grapefruit motifs stamped and hand-painted for a rustic, artisanal finish.
Step-by-Step Guide
Materials
- Ceramic bisque chip and dip bowl
- Underglaze paints (Yellow, Lime Green, Pink/Coral/Red)
- Round foam pouncer or sponge brush (approx. 1.5 – 2 inches)
- Small liner brush (size 0 or 1)
- Pencil
- Clear dipping glaze
- Palette for mixing
- Water cup and paper towels
Step 1: Base Preparation & Stamping
-
Clean the bisque:
Wipe down your ceramic bisque with a slightly damp sponge to remove any dust. This ensures the underglaze adheres properly and prevents pinholing later. -
Plan your placement:
Lightly visualize where your citrus slices will go. You want them spaced somewhat evenly around the exterior of the large bowl, the interior rim, and the inside of the small dip bowl. -
Apply the first color stamp:
Pour a small amount of yellow underglaze onto your palette. Dip your round foam pouncer into the paint, ensuring even coverage but not dripping. -
Stamp the yellow rounds:
Press the foam pouncer firmly onto the bowl to create a perfect yellow circle. Repeat this sporadically around the bowl, leaving space for other colors. I like to let these dry briefly before switching colors. -
Switch to lime green:
Clean your pouncer or grab a fresh one. coat it with lime green underglaze and stamp new circles in the empty spaces, varying the height slightly for a bouncy, natural look. -
Add the grapefruit rounds:
Finally, use the pink or coral underglaze to stamp the remaining circles. Don’t forget to stamp the prominent centerpiece inside the small dip bowl.
Uneven Stamping?
If your foam stamps leave patchy spots on the curved surface, don’t panic. Use a flat brush to fill in the missing areas while the paint is still wet to smooth it out.
Step 2: Detailing the Fruit
-
Outline the rind:
Once the stamped circles are dry to the touch, load your liner brush with the same color as the specific fruit circle you are working on. -
Create the white pith gap:
You actually want to leave a tiny gap between the solid circle and the rind. However, since we stamped a solid circle, we will paint a darker, thin ring around the outer edge, and then use a ‘sgraffito’ or scratching technique later, or simply paint white lines over the color if your underglaze is opaque enough. -
Alternative method: The segmentation:
The easiest way to get the look in the photo is to paint thin lines of white underglaze (or scratch through the paint) to create the segments. Start by painting a small white dot in the direct center of a fruit circle. -
Draw the radial lines:
Using a very fine brush and white underglaze (or a scratching tool), draw straight lines radiating from the center dot to the outer edge, like bicycle spokes. Create about 8-10 segments per fruit. -
Round the corners:
At the outer edge of each segment, curve the white line slightly to soften the triangle shape, making it look like a natural fruit segment rather than a geometric pie chart. -
Define the interior rind:
Paint a thin white circle just inside the colored perimeter of the fruit. This creates the visual separation between the juicy segments and the peel. -
Add texture:
For that rustic, textured look seen in the photo, lightly dab a mostly dry brush with a slightly darker shade of the fruit color onto the segments. This simulates the pulp texture. -
Speckle the background:
Dilute a tiny bit of brown or grey underglaze with water on an old toothbrush. Run your thumb over the bristles to flick tiny specks across the white background of the bowl for a speckled pottery effect.
Step 3: Finishing Touches
-
Double check coverage:
Look closely at your citrus slices. If the color looks thin or streaky, carefully apply a second coat to the colored segments, avoiding your white definition lines. -
Glaze application:
Once all underglaze is completely dry, dip the entire piece into clear dipping glaze. Ensure an even coat and shake off excess drips gently. -
Fire the piece:
Place the bowl in the kiln and fire it according to the specific instructions for your clay and glaze (typically cone 06 or 05 for earthenware).
Crisp Lines Pro-Tip
For the sharpest white lines between segments, use a scratching tool (sgraffito) to scratch the colored paint away to reveal the white bisque underneath instead of painting white on top.
Now you have a refreshing serving piece that makes every snack time feel a little brighter
Coastal Shell Scatter With Ocean Center
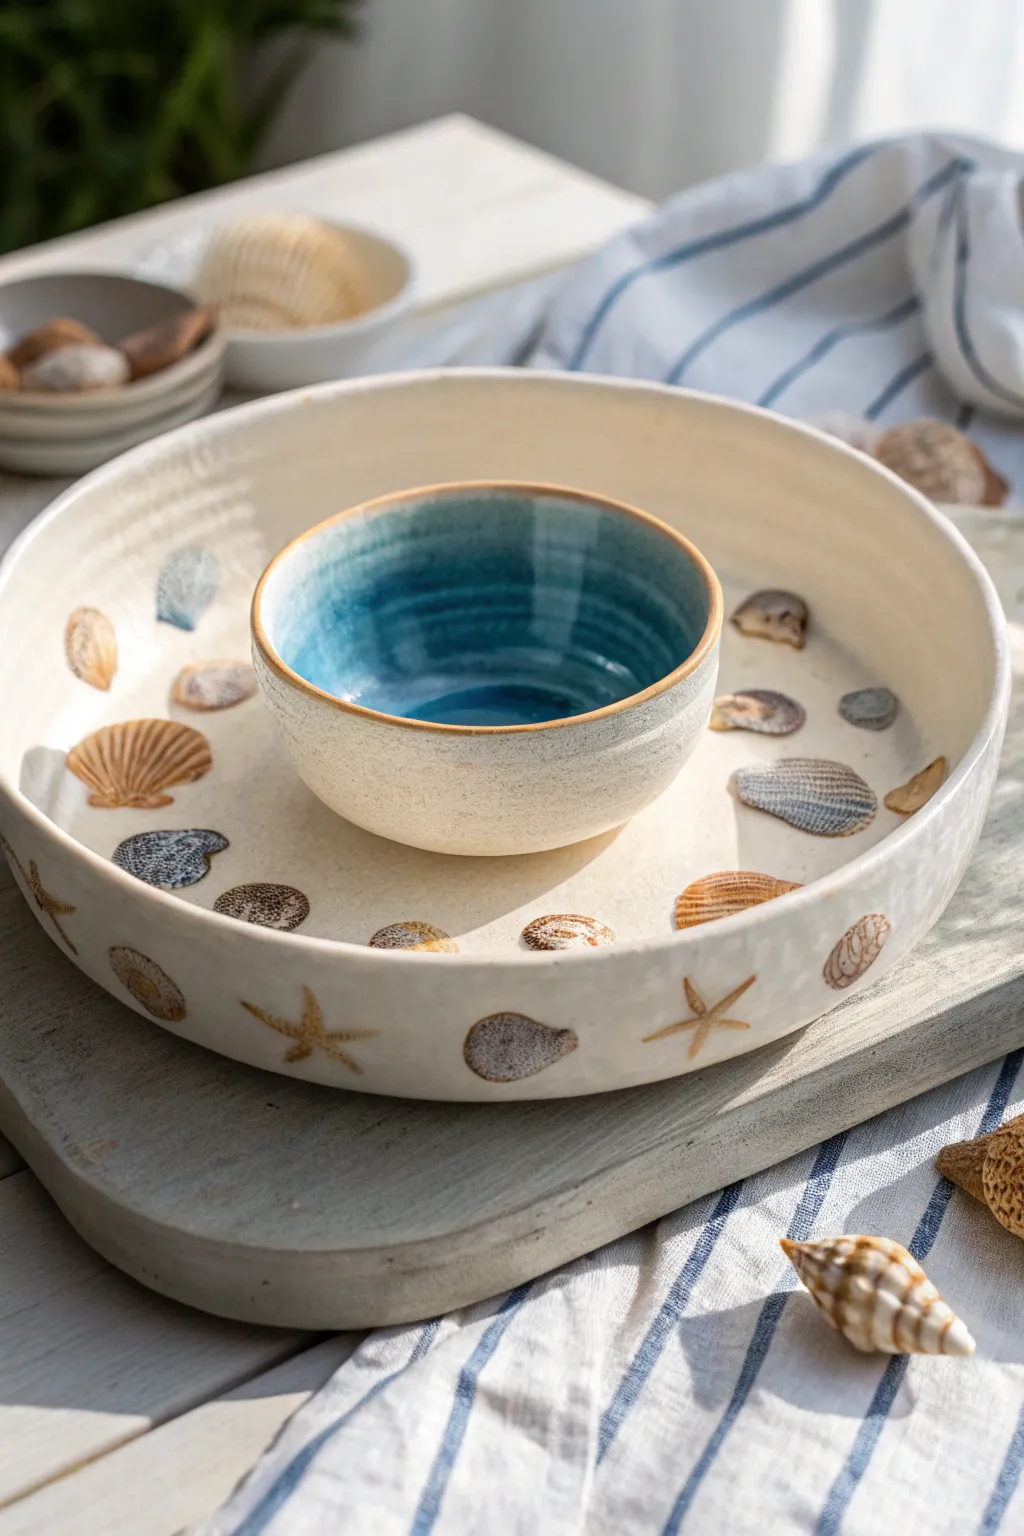
Bring the serene feeling of a beach walk to your table with this stunning chip and dip set featuring a scattered array of realistic shells and a captivating blue ocean center. The creamy white base provides the perfect sandy backdrop for hand-painted or transferred shell motifs that circle a deep, watery blue dip bowl.
Step-by-Step
Materials
- Bisque ceramic chip and dip bowl platter (one-piece or two-piece set)
- Underglaze paints (Cream/Sand, Deep Blue, Light Blue, various browns, tans, greys)
- Clear transparent dipping glaze
- Soft fan brush (for large coverage)
- Small round detail brushes (sizes #0, #2)
- Sea sponge (optional for texturing)
- Pencil
- Water cup and palette
- Kiln (or access to a pottery studio for firing)
Step 1: Base Preparation & Ocean Center
-
Clean the bisque:
Wipe down your entire ceramic bisque piece with a slightly damp sponge to remove any dust or oils that might repel the glaze. -
Apply the sandy base:
Using a soft fan brush, apply three even coats of a creamy off-white or sand-colored underglaze to the entire large outer bowl. Ensure each coat is dry before applying the next to achieve a solid, opaque coverage. -
Leave the center bare:
If your center bowl is attached, leave the inside of it bare for now. If it’s separate, set it aside. This interior space will become our pool of water. -
Start the ocean gradient:
For the center bowl’s interior, start by painting the bottom-most point with your deepest blue hue. -
Blend upward:
While the deep blue is still slightly damp, introduce a lighter blue tone halfway up the sides of the inner bowl. Use a slightly wet brush to blend the two blues where they meet, creating a soft transition. -
Finish the rim:
Continue blending the light blue up to the rim of the center bowl. Wipe any stray blue marks off the outer rim with a damp sponge to keep the edge crisp. Adding a thin line of tan oxide or brown on the very lip adds a nice definition.
Natural Texture Trick
Before painting, press real clean shells gently into wet clay (if making the bowl) or use a sponge with brown paint on the bisque to create a ‘sandy’ texture.
Step 2: Painting the Shell Scatter
-
Plan your placement:
Lightly sketch shell shapes onto the dry cream base using a pencil. Sketch them randomly scattered across the interior floor and climbing up the interior walls of the large bowl. -
Add exterior starfish:
Don’t forget the outside! Sketch simple five-point starfish shapes spaced evenly around the exterior vertical rim of the large platter. -
Base coat the shells:
Fill in your pencil sketches with flat base colors. Use light greys, tans, and warm browns. Vary the base color for each shell to create visual interest. -
Add shell ridges:
Once the shell base coats are dry, switch to your #0 detail brush. Mix a darker brown or grey and paint fine lines to represent the ridges on scallops and cockle shells. -
Detail the conch shells:
For spiral shells or conches, use a darker shade to outline the spiral and add small dots for texture. I find that stippling the paint slightly gives a more realistic, weathered look. -
Paint the starfish:
Fill in the exterior starfish with a warm golden-brown underglaze. Give them a slightly textured surface by dabbing the paint on rather than smoothing it out. -
Highlight and shadow:
Mix a tiny amount of water with black or dark brown underglaze to create a wash. Paint a very subtle shadow on the ‘sand’ underneath one side of each shell to ground them and give the illusion of depth.
Step 3: Glazing & Firing
-
Dry thoroughly:
Allow the painted piece to dry completely, preferably overnight, to ensure the underglaze design is stable. -
Apply clear glaze:
Dip the entire piece into a clear transparent glaze, or brush on three coats of clear brushing glaze. This will seal the clay and make the colors pop. -
Fire the piece:
Load the bowl into the kiln and fire to the appropriate cone temperature for your specific clay and glaze combination (usually Cone 06 or Cone 6).
Watercolor Effect
Water down your underglazes significantly for the shells. Layering translucent washes creates a more realistic, organic beach look than solid opaque colors.
Once fired, fill your beautiful new coastal creation with chips and salsa to enjoy a beachside vibe right at home
Garden Florals Framing the Dip
Bring the charm of a blooming garden to your table with this delicate floral chip and dip set. The loose, painterly brushstrokes create a soft and airy design that frames your snacks with pink blooms and trailing greenery.
Step-by-Step Guide
Materials
- Bisque ceramic chip and dip platter with matching center bowl
- Underglaze paints: Rose Pink, Sage Green, Forest Green, Berry Red, Cream (or white)
- Round watercolor brushes (Size 4 and Size 8)
- Fine liner brush (Size 0 or 00)
- Glazing medium or water for thinning
- Pencil (light sketching)
- Clear dipping glaze
- Kiln access
Step 1: Planning the Layout
-
Wipe down the bisque:
Before starting, ensure your ceramic pieces are free of dust by wiping them down with a slightly damp sponge. This ensures the underglaze adheres properly. -
Mark focal points:
Using a pencil, lightly mark where your main flower clusters will go. Aim for asymmetry to keep it looking organic—perhaps three clusters on the outer rim and two on the center bowl. -
Sketch the flow:
Draw faint, sweeping lines connecting your focal points. These will guide your vine placement later. Don’t worry about erasing; the pencil lines will burn off in the kiln.
Fixing Smudges
Made a mistake? Don’t panic. Use a stiff, clean brush dipped in water to gently scrub the unwanted underglaze off the bisque. Let the spot dry fully before repainting.
Step 2: Painting the Blooms
-
Mix your base pink:
Dilute the Rose Pink underglaze with a tiny drop of water or medium. You want a semi-translucent consistency for that watercolor effect. -
Paint flower shapes:
Load your Size 8 round brush. Press down to create petal shapes, lifting the brush as you pull toward the center. Keep the edges ragged and natural rather than perfect circles. -
Add depth to petals:
While the first layer is still slightly damp, drop a more concentrated Rose Pink into the center of the flowers. Let it bleed outward slightly for a natural gradient. -
Highlight the centers:
Once the pink is dry to the touch, use the liner brush and a dark Berry Red or black to add tiny stippled dots in the very center of each bloom. -
Create buds:
Scattered around the main flowers, paint small, simple circles in Berry Red or deep pink to represent unopen buds or berries.
Step 3: Adding Greenery
-
Paint main stems:
Using the Size 4 brush and Sage Green, follow your pencil guides to paint the main stems. Use a loose hand—shaky lines look more organic than straight ones. -
Layering leaves:
Load the brush with Sage Green and press-and-lift to create leaf shapes along the stems. Vary the pressure to make some leaves fat and others slender. -
Add darker accents:
Switch to Forest Green. Paint thin veins inside the larger leaves using your liner brush, or layer a darker leaf behind a lighter one for dimension. -
Connect the design:
Ensure the design flows from the outer platter to the inner bowl. I like to paint a few leaves ‘spilling’ over the edge of the center bowl for continuity.
Keep it Loose
To maintain the ‘watercolor’ style, don’t reload your brush for every single leaf. Let the paint run out naturally to create variation in opacity and texture.
Step 4: Finishing Touches
-
Rim detail:
If desired, run a very diluted wash of pink or green along the irregular rim of the pottery to frame the piece softly. -
Final check:
Look for any bare spots that feel unbalanced. Add a tiny floating leaf or a stray berry to fill awkward gaps. -
Clear glaze application:
Once the underglaze is bone dry, carefully dip the pieces into clear glaze. Ensure an even coat without drips. -
Fire:
Load the kiln and fire according to the clay and glaze specifications (usually Cone 06 or Cone 6 depending on your materials).
Your finished set will be a stunning centerpiece for your next gathering, perfectly blending function with floral beauty
Herb Wreath Around the Center Cup
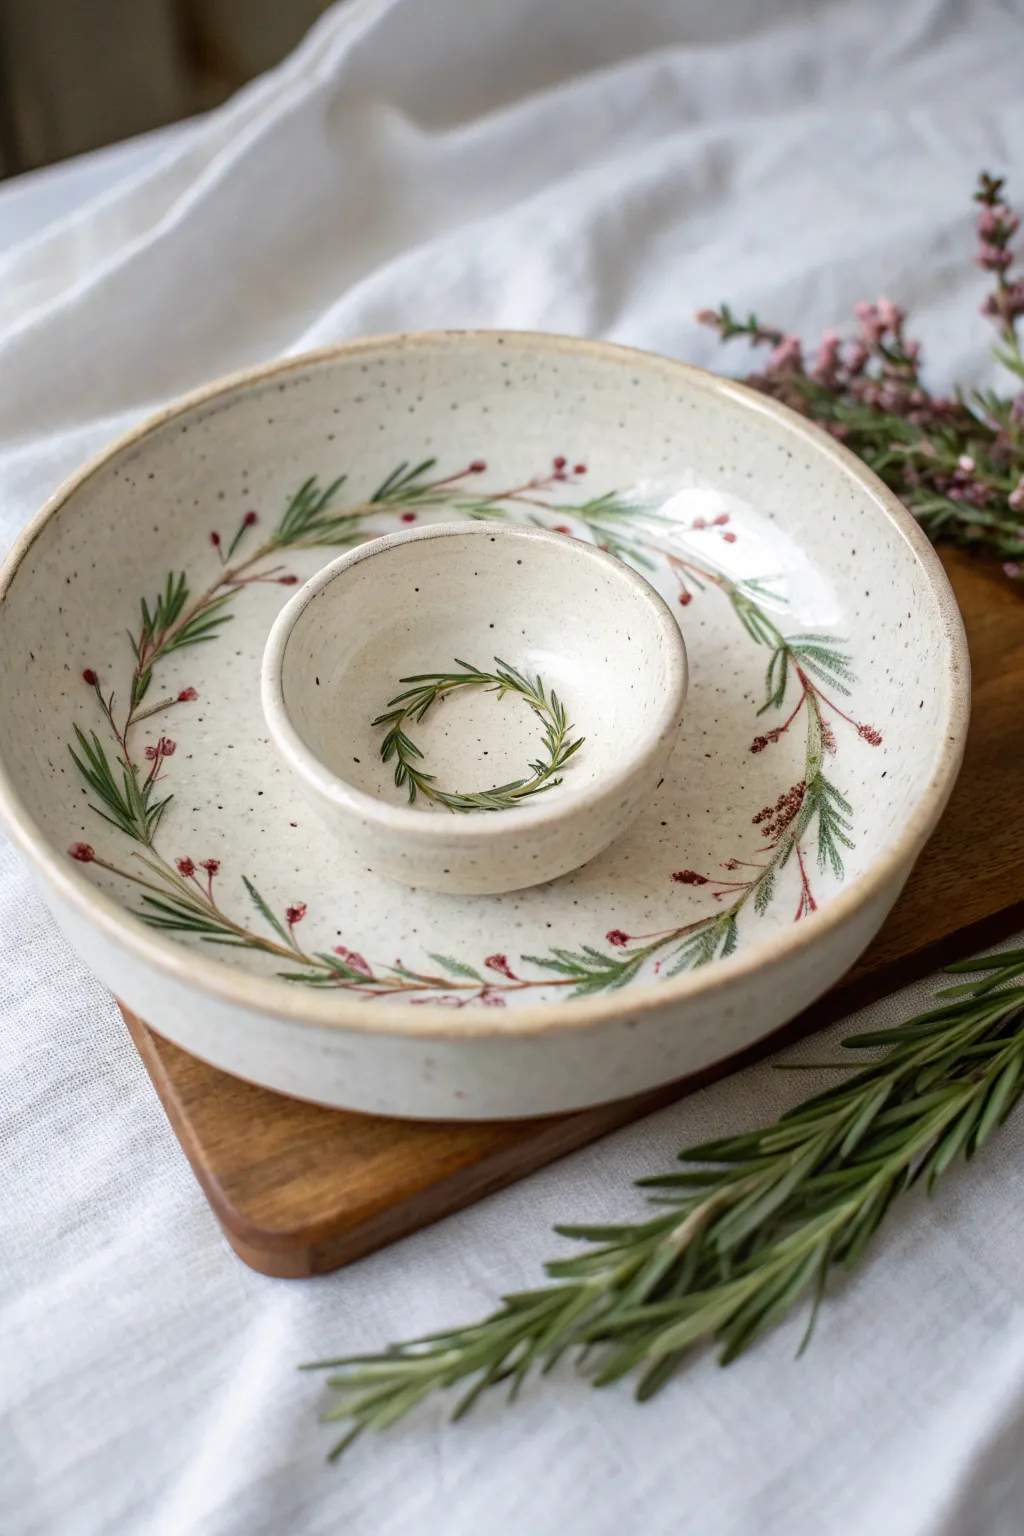
Bring a touch of the herb garden to your table with this speckled chip and dip bowl featuring delicate rosemary and floral motifs. The natural clay body peeking through the speckled cream glaze creates a rustic, earthy canvas for the hand-painted greenery.
Detailed Instructions
Materials
- Bisque-fired ceramic chip and dip bowl (attached center cup)
- Speckled cream or ‘oatmeal’ ceramic glaze
- Underglaze (Dark green, Sage green, Burgundy/Red-brown)
- Fine liner brush (size 0 or 00)
- Small round brush (size 2 or 4)
- Fan brush or soft glazing brush
- Pencil
- Clear dipping glaze (optional, depending on cream glaze type)
- Kiln access
Step 1: Base Glazing
-
Clean the bisque:
Begin by wiping down your bisque-fired bowl with a damp sponge. This removes any dust that could prevent the glaze from adhering properly to the clay surface. -
Apply the base glaze:
Stir your speckled cream glaze thoroughly to ensure the heavy speckles are evenly distributed. Using a soft glazing brush or fan brush, apply 2-3 even coats to the entire piece, including the inside of the small center cup. -
Watch the drying time:
Allow each coat to dry until it loses its sheen before applying the next. Since we will be painting details on top, ensure the final coat is dry to the touch but not bone dry—a slightly damp surface can help the underglaze flow better.
Step 2: Painting the Wreaths
-
Sketch the guides:
Very lightly sketch a circle halfway between the rim and the center cup using a pencil. This will be the spine for your main wreath. Do the same inside the small cup for the tiny wreath. Don’t worry, the pencil graphite will burn off in the kiln. -
Paint the stems:
Load your fine liner brush with a mix of dark green and a touch of brown underglaze. Paint thin, sweeping lines along your pencil guide. I like to break the line occasionally rather than making it one solid circle to keep it looking organic. -
Add rosemary needles:
Using the same fine liner brush and dark green, add the rosemary needles. Use a quick flicking motion, starting at the stem and pulling outward. vary the angles slightly so they look natural and not too uniform. -
Layer in sage green:
Clean your brush and switch to the lighter sage green. Add a second layer of needles in between the darker ones. This creates depth and makes the foliage look lush and three-dimensional. -
Create the mini wreath:
Move to the center dip cup. Repeat the needle process on a much smaller scale. Keep these strokes tiny and purposeful, creating a delicate ring of greenery at the bottom of the cup. -
Add floral buds:
Switch to the burgundy or red-brown underglaze. Using the very tip of your brush, dot small clusters of buds at the ends of some of the rosemary sprigs on the main bowl. -
Detail the buds:
For a bit more realism, add tiny stems connecting these floral dots to the main branch. You can also add a few loose ‘fallen’ petals or buds near the wreath line to fill empty spaces.
Smudged lines?
If underglaze smudges on the unfired base glaze, don’t wipe it! Let it dry, then gently scratch the mistake off with a needle tool or toothpick before re-painting.
Step 3: Finishing and Firing
-
Rim detail:
Dip a damp sponge lightly into your brown or dark cream underglaze. Gently run the sponge along the very rim of both the large bowl and the center cup to reveal the clay texture and create a rustic border. -
Final drying:
Let the piece dry completely for at least 24 hours. The underglaze needs to be fully integrated with the base glaze before firing. -
Clear glaze (optional):
If your speckled cream glaze is matte and you want a glossy finish, apply a thin coat of clear brush-on glaze over the painted designs. If your base glaze is already glossy, skip this step. -
Fire the piece:
Load the kiln carefully. Fire the piece according to the specific cone requirements of your clay and glaze (usually Cone 5 or 6 for stoneware). Once cooled, your chip and dip set is ready for serving.
Enhance text ure
Use a squeeze bottle with a fine tip to apply the floral buds. This leaves a raised, tactile bump for the flowers that adds physical texture to the visual design.
Serve your favorite appetizers in this charming handmade vessel and enjoy the compliments on your botanical artistry
Geometric Color Blocking With Contrast Dip
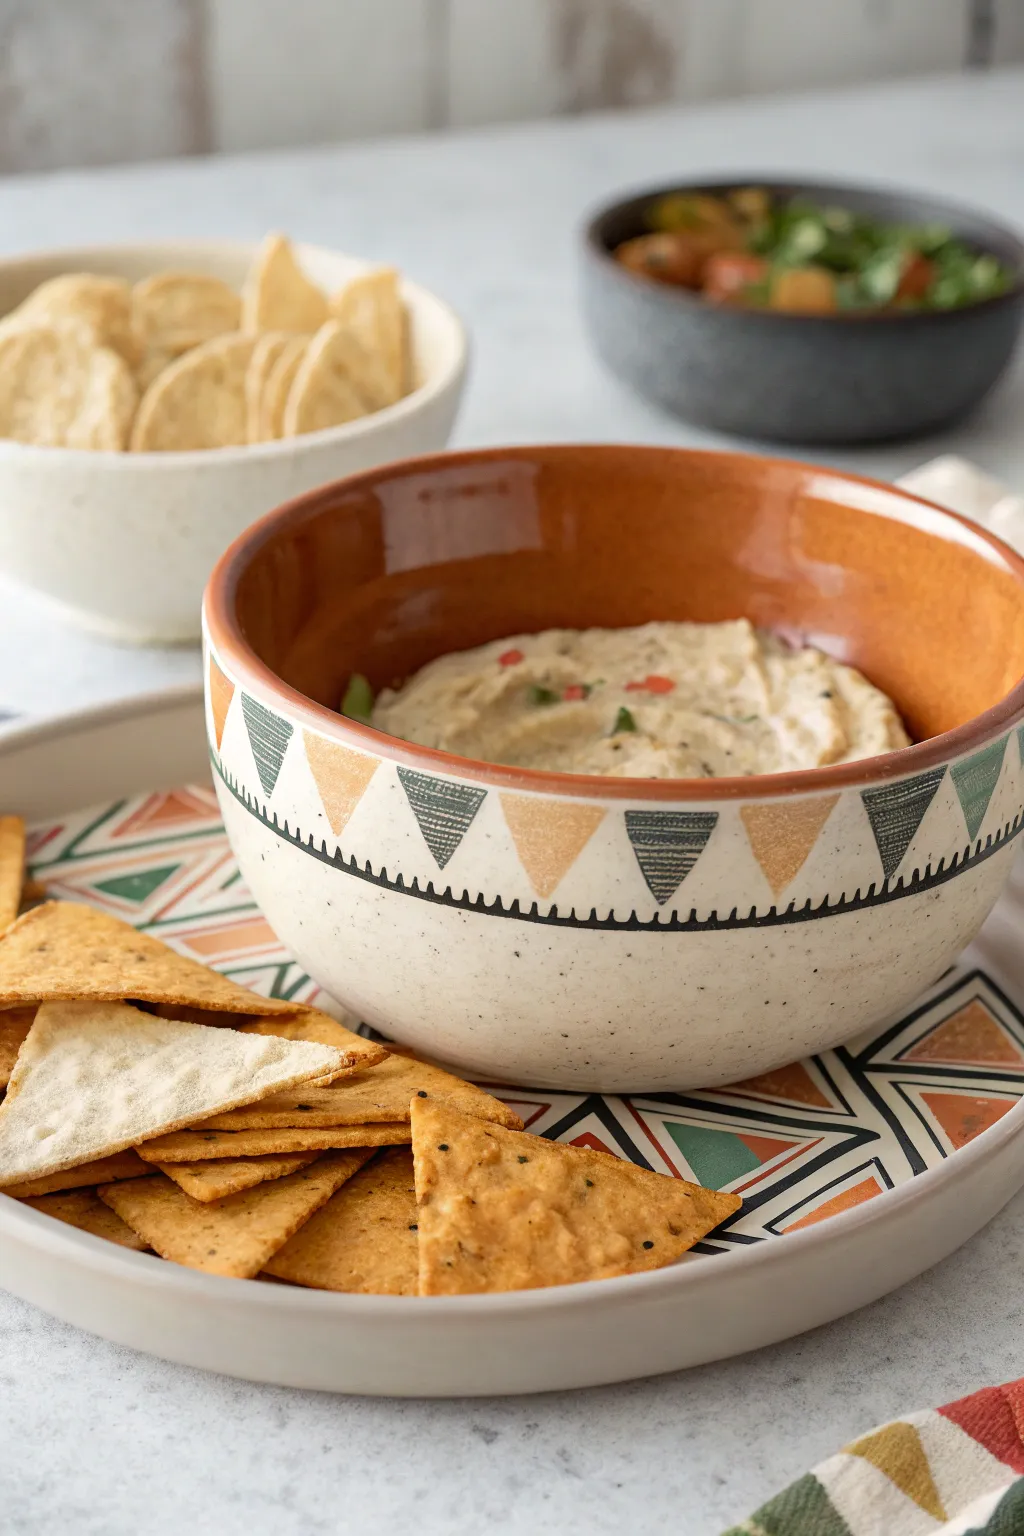
Embrace earthy warmth and structured patterns with this Southwest-inspired dip bowl design. The look contrasts a creamy speckled base with a striking rhythm of geometric triangles and a delicate sawtooth border.
Step-by-Step Guide
Materials
- Bisque ceramic bowl
- Bisque ceramic platter (optional, for the complete set)
- Underglazes: Creamy White, Terra Cotta/Rust, Mustard Yellow, Dark Forest Green, Black
- Clear dipping glaze
- Soft fan brush (for base coats)
- Small flat shader brush (size 4 or 6)
- Fine liner brush (size 0 or 00)
- Pencil
- Sponge
- Ruler or flexible measuring tape
Step 1: Preparation & Base Coat
-
Clean the bisque:
Start by wiping down your bisque bowl with a slightly damp sponge. This removes any dust that could prevent the glaze from adhering properly. -
Apply the interior color:
Using a fan brush, apply three even coats of Terra Cotta underglaze to the entire interior of the bowl. Allow each coat to dry until it loses its sheen before applying the next. -
Clean the rim:
Carefully wipe any excess color off the top rim with a damp sponge so you have a crisp edge between the inside and outside. -
Apply the exterior base:
Apply three coats of the Creamy White underglaze to the outside of the bowl. Ensure the coverage is solid and opaque. -
Add the speckled effect:
For that natural stoneware look, dilute a tiny drop of black underglaze with water on a toothbrush. Run your thumb over the bristles to gently flick very fine speckles onto the white exterior. Keep this subtle.
Clean Lines Hack
Use thin automotive detailing tape or flexible washi tape to mask off your triangles. This ensures razor-sharp edges without needing a perfectly steady hand.
Step 2: Drafting the Design
-
Mark the triangle band:
Lightly pencil a horizontal guideline around the circumference of the bowl, about one inch down from the rim. This will mark the bottom tip of your triangles. -
Mark the rim spacing:
Using a flexible tape measure, make small tick marks along the top rim at even intervals (about 1.5 inches apart). These are the top corners of your triangles. -
Sketch the triangles:
Connect your rim marks to a center point on the lower guideline to form a row of downward-pointing triangles. Sketch lightly so you can erase mistakes.
Uneven Spacing?
If your triangles don’t meet up perfectly at the end, make the last one slightly wider or narrower. Simply paint it as a solid color rather than a patterned one to hide the size difference.
Step 3: Painting the Motifs
-
Paint the first color:
Using a small flat brush, fill in every third triangle with the Rust/Terra Cotta underglaze. Apply 2-3 coats for solid opacity. -
Paint the second color:
Fill the next open triangle in the sequence with Mustard Yellow. I find it helps to rotate the bowl as you work to keep your hand position steady. -
Paint the textured triangles:
Fill the remaining triangles with Dark Forest Green. Once dry, use your fine liner brush with Creamy White to add tiny horizontal scratch marks or lines over the green for a textured fabric look. -
Outline the rim:
Use the Rust color and a steady hand to paint a thin band along the very top rim of the bowl, capping off the design.
Step 4: Border & Finishing
-
Draft the sawtooth line:
Pencil a straight horizontal line just below the tips of your triangles. Then, draw a small zig-zag pattern sitting directly on top of this line. -
Paint the black details:
Load a fine liner brush with Black underglaze. Carefully trace the horizontal line and the sawtooth/zig-zag pattern extending upward from it. -
Add triangle accents:
While you have the black paint, add tiny vertical tick marks descending from the bottom tip of each large triangle, connecting them visually to the black border line. -
Final dry and fire:
Let the piece dry completely overnight. Dip in clear glaze and fire according to your clay body’s instructions (usually cone 06 or 05).
Once fired, this bowl becomes a stylish centerpiece perfect for your next gathering
Sgraffito Swirls on a Dark Background
Bring a touch of stormy elegance to your table with this handmade ceramic set featuring a stunning contrast between smooth, speckled cream clay and deep, moody blue glazes. The star of the show is the sgraffito technique, carving swirling lines through the dark interior glaze to reveal the clay body beneath.
Step-by-Step
Materials
- Bisque-fired ceramic chip and dip bowl set
- Underglaze (Dark Navy or Charcoal Blue)
- Clear dipping glaze or brush-on clear glaze
- Sgraffito tool (loop tool or needle tool)
- Wide fan brush
- Sponge
- Clean water
- Potter’s wheel or banding wheel (optional but helpful)
Step 1: Interior Glazing
-
Clean the Surface:
Before you begin, wipe down your bisque-fired bowls with a slightly damp sponge. This removes any dust that could prevent the glaze from adhering properly. -
Apply the Base Coat:
Using a wide fan brush, apply a generous coat of your dark navy or charcoal blue underglaze to the entire interior of the large bowl. Ensure you get full coverage right up to the rim. -
Layering Up:
Let the first coat dry until it’s no longer shiny. Apply a second coat, and perhaps a third if your underglaze is thin, to ensure a solid, opaque darkness. Repeat this process for the interior of the smaller dip bowl. -
Checking Consistency:
Wait for the underglaze to reach a leather-hard state on the bisque. It should be dry to the touch but not bone dry, as carving is easier when there is a tiny bit of moisture left in the glaze layer.
Glaze Crawling?
If the dark glaze pulls away from the carved lines after firing, your underglaze was likely applied too thickly. Try slightly thinner layers next time
Step 2: Sgraffito Carving
-
Center Your Piece:
If you have a banding wheel, place the large bowl in the center. Give it a spin to check it’s aligned; this will make creating concentric circles much easier. -
Carve the Rim:
Start at the very top edge of the interior. Hold your sgraffito tool steady and spin the wheel slowly, carving a clean line that exposes the white clay beneath. This defines the border. -
Spiral Downwards:
Continue creating concentric rings as you move down the bowl’s interior wall. Vary the spacing slightly to give it a hand-thrown, organic feel rather than machine perfection. -
Center Spiral:
As you reach the flat bottom of the bowl, continue the spiral inward until you reach the very center, creating a mesmerizing vortex effect. -
Repeat on Small Bowl:
Perform the same carving process on the interior of the small dip bowl. I like to make the lines slightly thinner here to match the smaller scale of the piece. -
Clean Up Crumbs:
Use a soft, dry brush to gently sweep away the clay and glaze burrs created by carving. Do not use water yet, or you’ll smudge the design.
Step 3: Exterior Technique
-
Speckle Prep:
For the exterior, we want a natural, speckled stone look. If your clay body isn’t naturally speckled, you can mix a tiny amount of iron oxide or dark underglaze into a white engobe or slip. -
Apply Exterior Finish:
Brush a creamy white glaze or slip onto the exterior of both bowls. If adding speckles manually, flick them on with a stiff-bristled toothbrush for a random pattern. -
Refine the Rim:
Use a damp sponge to clean up the rim where the dark interior meets the light exterior. A clean, sharp line here makes the piece look professional.
Level Up: Rim Detail
Add a thin line of raw iron oxide wash to the very rim of the bowl before the final clear glaze. It creates a beautiful, rustic brown halo edge
Step 4: Final Glazing & Firing
-
Clear Glaze Application:
Once all underglaze and carving work is bone dry, apply a clear glaze over the entire piece (except the foot ring). Dipping is fastest, but brushing works if you apply even coats. -
Wipe the Foot:
Thoroughly wipe the bottom foot of both bowls with a wet sponge to remove any glaze. This prevents your magnificent bowls from fusing to the kiln shelf. -
Final Fire:
Fire the pieces in the kiln according to the clay and glaze manufacturer’s instructions (usually Cone 5 or 6 for stoneware).
Once cooled, your nested set is ready to host the perfect pairing of salsa and chips at your next gathering
Night Sky Galaxy With a Moon Dip

Transform plain bisque ware into a celestial masterpiece with this dreamy design. Featuring a deep indigo interior sprinkled with stars and a crescent moon, plus a soothing two-tone exterior, this bowl brings the calm of the night sky right to your table.
Step-by-Step Tutorial
Materials
- Bisque ceramic bowl (deep, wide shape)
- Underglaze (Deep Indigo/navy blue)
- Underglaze (Teal or Sea Green)
- Underglaze (Mint Green or Sage)
- Underglaze (Plum or Deep Purple)
- Underglaze (White)
- Clear dipping glaze or brush-on clear glaze
- Fan brush and medium round brush
- Fine liner brush (size 0 or 00)
- Small sponge
- Pencil
- Bowl of water and paper towels
Step 1: Painting the Exterior
-
Mark the dividing line:
Turn your bowl upside down or hold it sideways. Using a pencil, lightly draw a horizontal line around the entire outside circumference of the bowl, about halfway down. This will separate your two exterior colors. -
Apply the bottom color:
Using a soft round brush, apply the deep plum or purple underglaze to the bottom section of the exterior. Paint from the pencil line down to the foot of the bowl. -
Layer the purple:
Let the first coat dry until it’s chalky to the touch, then apply a second and third coat of purple for solid, opaque coverage. -
Apply the top color:
Switch to a clean brush and apply the mint green or sage underglaze to the top section of the exterior, stopping just below the rim to leave a small exposed clay edge if desired. -
Add speckles to the green:
Once the green section is dry, dip an old toothbrush or stiff bristle brush into the deep indigo paint you will use for the inside. Run your thumb over the bristles to flick tiny speckles onto the green band.
Step 2: Creating the Night Sky Interior
-
Paint the bottom well:
Inside the bowl, paint a circle at the very bottom using the teal or sea green underglaze. It doesn’t need to be a perfect circle; a slightly organic shape works well for a galaxy feel. -
Base coat the walls:
Use a fan brush or large round brush to apply the deep indigo underglaze to the interior walls, starting from the teal circle and moving up to the rim. -
Blend the transition:
While the indigo is still slightly wet, gently blend the edge where it meets the teal bottom using a damp sponge or a soft brush to create a subtle ombre effect rather than a hard line. -
Build opaque layers:
Apply 2-3 coats of the deep indigo to the walls to ensure a rich, dark night sky background. Let each coat dry completely before adding the next. -
Create the milky way dust:
Mix a tiny drop of white underglaze with water to make a thin wash. Using a sponge or dry brush, dab a very faint, cloudy shape on one side of the interior wall.
Uneven Coverage?
If your dark blue background looks streaky after drying, dab a slightly damp sponge over the area to smooth the brushstrokes before applying the final clear glaze.
Step 3: Detailing the Celestial Elements
-
Outline the stars:
With your fine liner brush and pure white underglaze, carefully paint small five-pointed stars over the indigo background. I like to vary the sizes to create depth. -
Add the crescent moon:
Near the top rim, paint a delicate crescent moon shape. You might need two coats of white to make sure it stands out bright against the dark blue. -
Dot the distant stars:
Using the very tip of your brush or the handle end, dotted tiny specks of white around the larger stars to represent distant constellations. -
Clean the rim:
Use a damp sponge to wipe away any paint that got onto the very top lip of the bowl, revealing the raw clay texturing seen in the original design. -
Clear glaze application:
Once all underglaze is bone dry, apply a transparent clear glaze over the entire piece (except the bottom foot ring) to make it food-safe and glossy. -
Final firing:
Fire the piece in a kiln according to the clay and glaze specifications (usually Cone 06 or Cone 6 depending on your materials).
Starry Precision
Use a toothpick instead of a brush for the tiniest star dots. It gives you perfect, round control without the bristles splaying out.
Now you have a stunning vessel perfect for late-night snacks or stargazing parties