When I want my holiday decor to feel extra personal, I reach for air dry clay and make a little Christmas magic right at the table. These Christmas air dry clay ideas are all about simple shapes, cozy textures, and that satisfying “I made this!” feeling.
Classic Cookie-Cutter Clay Ornaments
Capture the sweetness of holiday baking without the crumbs using this trompe-l’œil technique. By layering contrasting clays, you’ll create a durable, charming ornament that mimics a classic sugar-frosted gingerbread cookie.
Step-by-Step Guide
Materials
- White or cream air dry clay
- Terracotta or brown air dry clay
- Christmas tree cookie cutter
- Rolling pin
- Parchment paper or non-stick mat
- Small straw or cocktail stick
- Water in a small cup
- Fine-grit sandpaper (optional)
- Natural jute twine
- Clear matte varnish or sealant
Step 1: Creating the Base
-
Prepare the workspace:
Lay down your parchment paper or non-stick mat on a flat surface to prevent sticking. -
Work the brown clay:
Take a portion of the terracotta or brown clay and knead it in your hands until it is pliable and warm. This prevents cracking later. -
Roll the bottom layer:
Roll out the brown clay to a thickness of approximately 3-4mm. This will serve as the sturdy ‘cookie’ backing. -
Cut the base shape:
Press your Christmas tree cookie cutter firmly into the brown clay. Wiggle it slightly to ensure a clean cut. -
Release the shape:
Gently push the clay out of the cutter and lay it flat. Smooth any rough edges with a damp finger.
Step 2: Adding the ‘Icing’
-
Prepare the white clay:
Clean your hands thoroughly or switch tools to avoid staining the white clay. Knead the white clay until soft. -
Roll the top layer:
Roll the white clay slightly thinner than the base, aiming for about 2-3mm. -
Cut the top shape:
Using the same cookie cutter, cut out a matching white tree shape. -
Attach the layers:
Lightly brush the top surface of the brown tree with a tiny amount of water to act as glue. Carefully place the white tree directly on top, aligning the edges perfectly. -
Create the hole:
While the clay is still wet, use a small straw or cocktail stick to poke a hole near the top tip of the tree for hanging. Ensure you punch through both layers cleanly.
Layering Like a Pro
If the white layer slides around, score the surface of the brown clay with a needle tool before adding water. This texture helps the ‘icing’ grip the ‘cookie’ for a permanent bond.
Step 3: Refining and Drying
-
Smooth the surface:
Dip your finger in water and very gently run it over the white clay to smooth out any rolling pin marks or fingerprints. -
Begin drying:
Place the ornament on a clean sheet of parchment paper in a cool, dry place. I like to flip it over after about 12 hours to ensure both sides dry evenly. -
Wait patiently:
Allow the clay to dry completely for 24-48 hours. The color will lighten and the piece will feel hard to the touch. -
Sand the edges:
Once fully dry, you may notice slight unevenness where the layers meet. Use fine-grit sandpaper to gently smooth the edges, revealing a crisp definition between the brown ‘cookie’ and white ‘icing’. -
Apply sealant:
Brush a thin coat of clear matte varnish over the entire ornament to protect it from moisture and give it a finished look. -
String it up:
Cut a length of natural jute twine, thread it through the hole, and tie a secure knot to create a rustic hanging loop.
Texture Twist
Before the white clay dries, gently press a textured rolling pin or a piece of linen fabric onto the surface. This imitates the look of royal icing that has been patterned.
Hang your charming creation on a sturdy branch and enjoy the cozy, homemade vibe it brings to your winter decor


Pressed Evergreen Sprig Imprint Ornaments
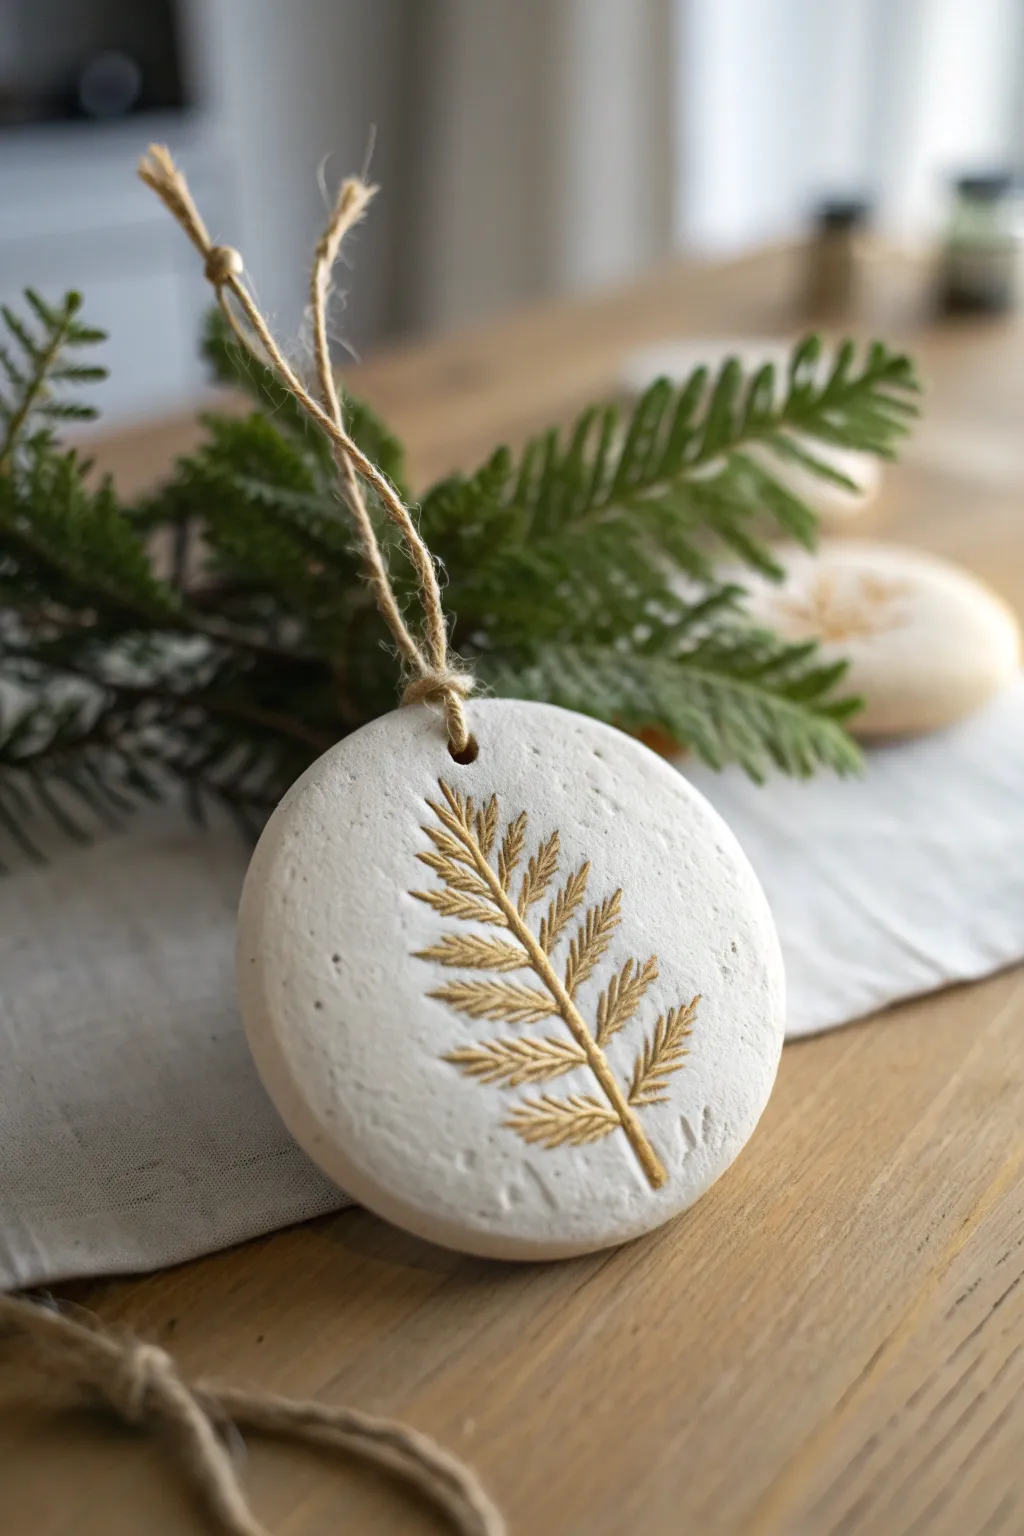
Capture the delicate beauty of winter greenery with these elegant air dry clay ornaments. The stark white clay provides a stunning canvas for the deep impression of a fern or evergreen sprig, highlighted with a touch of metallic gold for a festive shimmer.
Step-by-Step Tutorial
Materials
- White air dry clay
- Rolling pin
- Circle cookie cutter (approx. 3-4 inches)
- Fresh fern fronds or evergreen sprigs (flat varieties work best)
- Parchment paper or non-stick craft mat
- Drinking straw or small circular tool
- Fine grit sandpaper (optional)
- Gold metallic acrylic paint
- Fine detail paintbrush
- Jute twine for hanging
Step 1: Preparing the Clay Base
-
Condition the Clay:
Begin by taking a handful of air dry clay and kneading it in your hands for a minute. This warms it up and makes it smoother and less prone to cracking. -
Roll it Out:
Place the clay on a sheet of parchment paper. Use your rolling pin to flatten the clay to an even thickness, aiming for about 1/4 inch thick. Don’t make it too thin, or the impression won’t be deep enough. -
Cut the Shape:
Press your circle cookie cutter firmly into the rolled clay. Give it a tiny wiggle to ensure clean edges, then lift the cutter away. Remove the excess clay from around the circle. -
Smooth the Edges:
Dip your finger in a tiny bit of water and run it gently around the cut edge of the circle to smooth out any roughness or loose bits of clay.
Sticky Sprigs?
If the greenery sticks to the clay when lifting, lightly dust the sprig with cornstarch before pressing it down. This acts as a release agent.
Step 2: Creating the Impression
-
Position the Botanical:
Select a nice sprig of greenery. Lay it flat across the center of your clay circle. I like to position mine slightly off-center or diagonally for a more organic look. -
Press the Sprig:
Using your rolling pin, gently but firmly roll over the greenery once or twice. You want to press it deep enough to capture the texture, but not so deep it cuts through the ornament. -
Remove the Plant:
Carefully find the stem edge and peel the greenery away from the clay. Do this slowly to keep the impression sharp. -
Create the Hanging Hole:
Use a drinking straw to punch a hole near the top of the ornament. Twist the straw as you pull it out to get a clean hole.
Step 3: Drying and Finishing
-
Let it Dry:
Leave the ornament on the parchment paper to dry completely. This usually takes 24-48 hours depending on humidity. Flip it over halfway through properly dry the back. -
Sand Imperfections:
Once fully hard and white, check the edges. If there are any sharp bits, lightly buff them away with fine-grit sandpaper. -
Prepare the Paint:
Shake your gold metallic acrylic paint well. Dispense a small amount onto a palette or scrap paper. -
Painting the Imprint:
Using a fine detail brush, carefully paint inside the impressed lines of the botanical shape. The goal is to fill the depression with gold while keeping the top surface white. -
Clean Up Edges:
If you accidentally get gold paint on the flat surface, quickly wipe it away with a damp paper towel or wait for it to dry and gently sand it off. -
Dry the Paint:
Allow the gold paint to set fully, which should only take about 15-20 minutes. -
Add the Hanger:
Cut a length of jute twine, thread it through the hole, and tie a secure knot at the top to create a loop.
Pro Tip: Vein Detail
Use stiff greenery like cedar or fern tips. Soft herbs won’t leave a deep enough impression to hold the gold paint effectively.
Hang your beautiful handmade creation on the tree or use it as a sophisticated gift tag


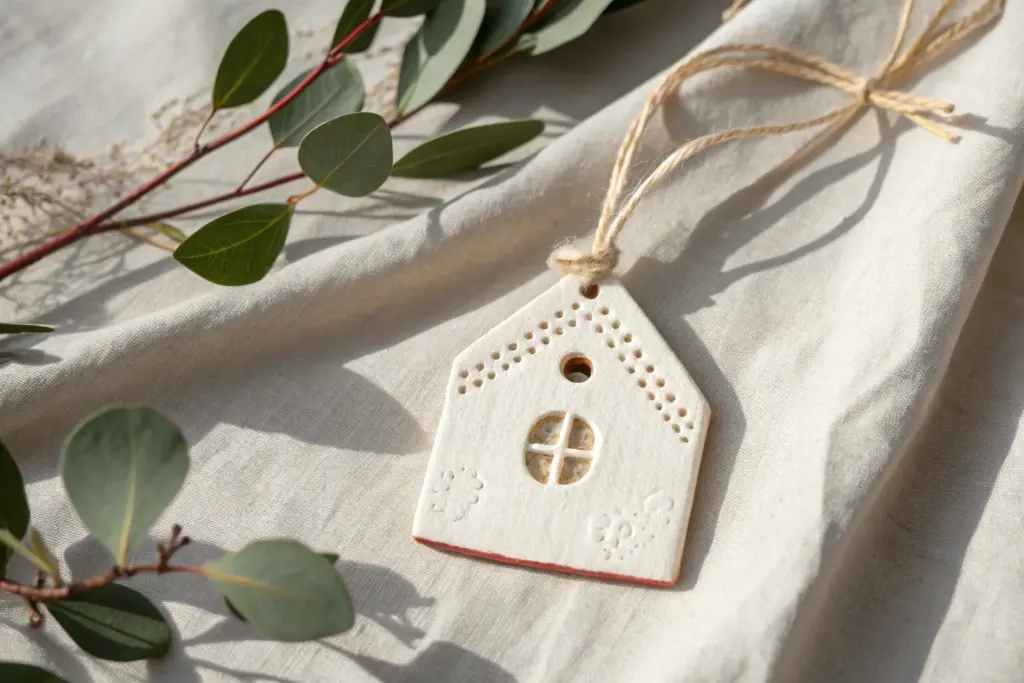
Personalized Name and Date Gift Tags
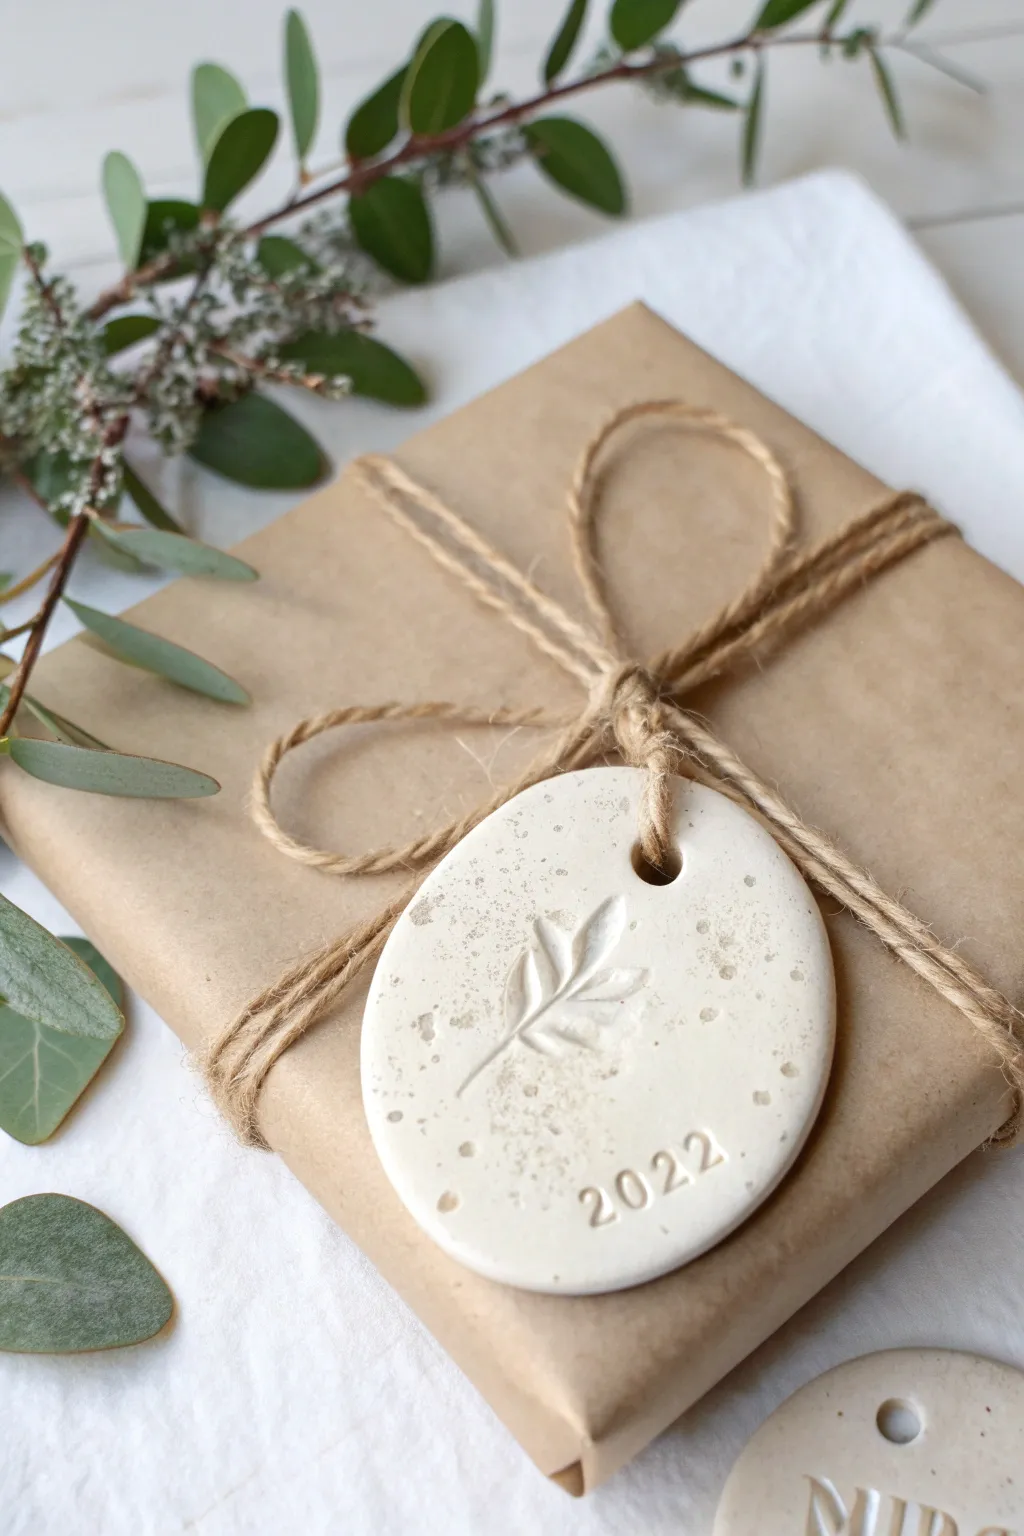
Elevate your holiday wrapping with these sophisticated, minimalist clay tags that double as memorable keepsakes. Featuring a delicate botanical impression and a subtle date stamp, they add a handcrafted touch of elegance to any gift.
How-To Guide
Materials
- White stone-effect or standard white air dry clay
- Rolling pin
- Parchment paper or canvas mat
- Oval cookie cutter (approx. 2-3 inches)
- Small sprig of eucalyptus or similar greenery
- Small rubber letter/number stamp set
- Spool of natural jute twine
- drinking straw or small circular cutter
- Fine-grit sandpaper (optional)
- Small bowl of water
Step 1: Shaping the Clay Base
-
Prepare your workspace:
Lay down a sheet of parchment paper or a canvas mat to prevent sticking. Grab a chunk of air dry clay about the size of a golf ball and knead it briefly in your hands to warm it up and make it pliable. -
Roll out the slab:
Place the clay on your surface and use a rolling pin to flatten it. Aim for an even thickness of about 1/4 inch (5-6mm). If the clay sticks to the roller, you can lightly dust it with cornstarch. -
Cut the shape:
Press your oval cookie cutter firmly into the rolled clay. Give it a tiny wiggle before lifting to ensure a clean cut. Carefully peel away the excess clay around the oval and set it aside for future tags. -
Smooth the edges:
Dip your finger into a small bowl of water and gently run it along the cut edges of the oval to smooth out any ragged bits or sharpness left by the cutter. -
Create the hole:
Using a drinking straw or a tiny circular clay cutter, punch a hole near the top center of the oval. Twist the straw slightly as you pull it out to remove the clay plug cleanly.
Step 2: Adding Impressions & Finishing
-
Position the botanical:
Take a small, fresh sprig of eucalyptus (or your chosen leaf) and center it on the clay oval. I find that leaves with prominent veins create the best texture. -
Press the design:
Using the rolling pin, gently roll over the leaf once with firm, even pressure. You want to press the leaf into the clay without squashing the tag’s overall shape distotedly. -
Reveal the imprint:
Locate the stem or edge of the leaf and very carefully peel it away from the clay. Use a needle tool or tweezers if the leaf is stubborn, revealing the detailed fossil-like impression underneath. -
Stamp the date:
Prepare your small rubber number stamps. Align them carefully near the bottom curve of the oval. Press gently but straight down to imprint the year ‘2022’ (or current year), ensuring you don’t rock the stamp which causes double lines. -
Initial Surface Cleaning:
Check the surface one last time. If your handling left any unwanted fingerprints, smooth them specifically with a tiny drop of water, avoiding the stamped areas. -
Allow to dry:
Transfer the tag to a wire drying rack or clean sheet of parchment. Let it air dry for 24-48 hours. Turn the tag over halfway through the drying process to prevent curling. -
Sand for perfection:
Once fully cured and hard, use a piece of fine-grit sandpaper to buff the edges and surface lightly. This removes any final burrs and gives the tag a professional, stone-like feel. -
Add the speckle (optional):
To mimic the stone look in the photo, you can flick a toothbrush with diluted brown watercolor paint lightly over the surface, though the natural texture of stone clay often provides this look on its own. -
String the tag:
Cut a length of natural jute twine, approximately 8 inches long. Fold it in half to create a loop. -
Secure the twine:
Feed the loop end through the hole in the tag, then pass the loose ends through the loop and pull tight to create a lark’s head knot. -
Attach to gift:
When wrapping your gift in brown kraft paper, incorporate the tag into your main bow, tying it securely so it rests flat against the package.
Keep it Flat
To prevent curling while drying, place a lightweight book or board gently on top of the tags once they are leather-hard (dry to touch but still cool).
Gilded Glamour
After drying, use a small detail brush to paint liquid gold leaf inside the botanical impression or along the rim of the tag for a luxurious, festive sparkle.
These charming tags are ready to make your gifts stand out under the tree


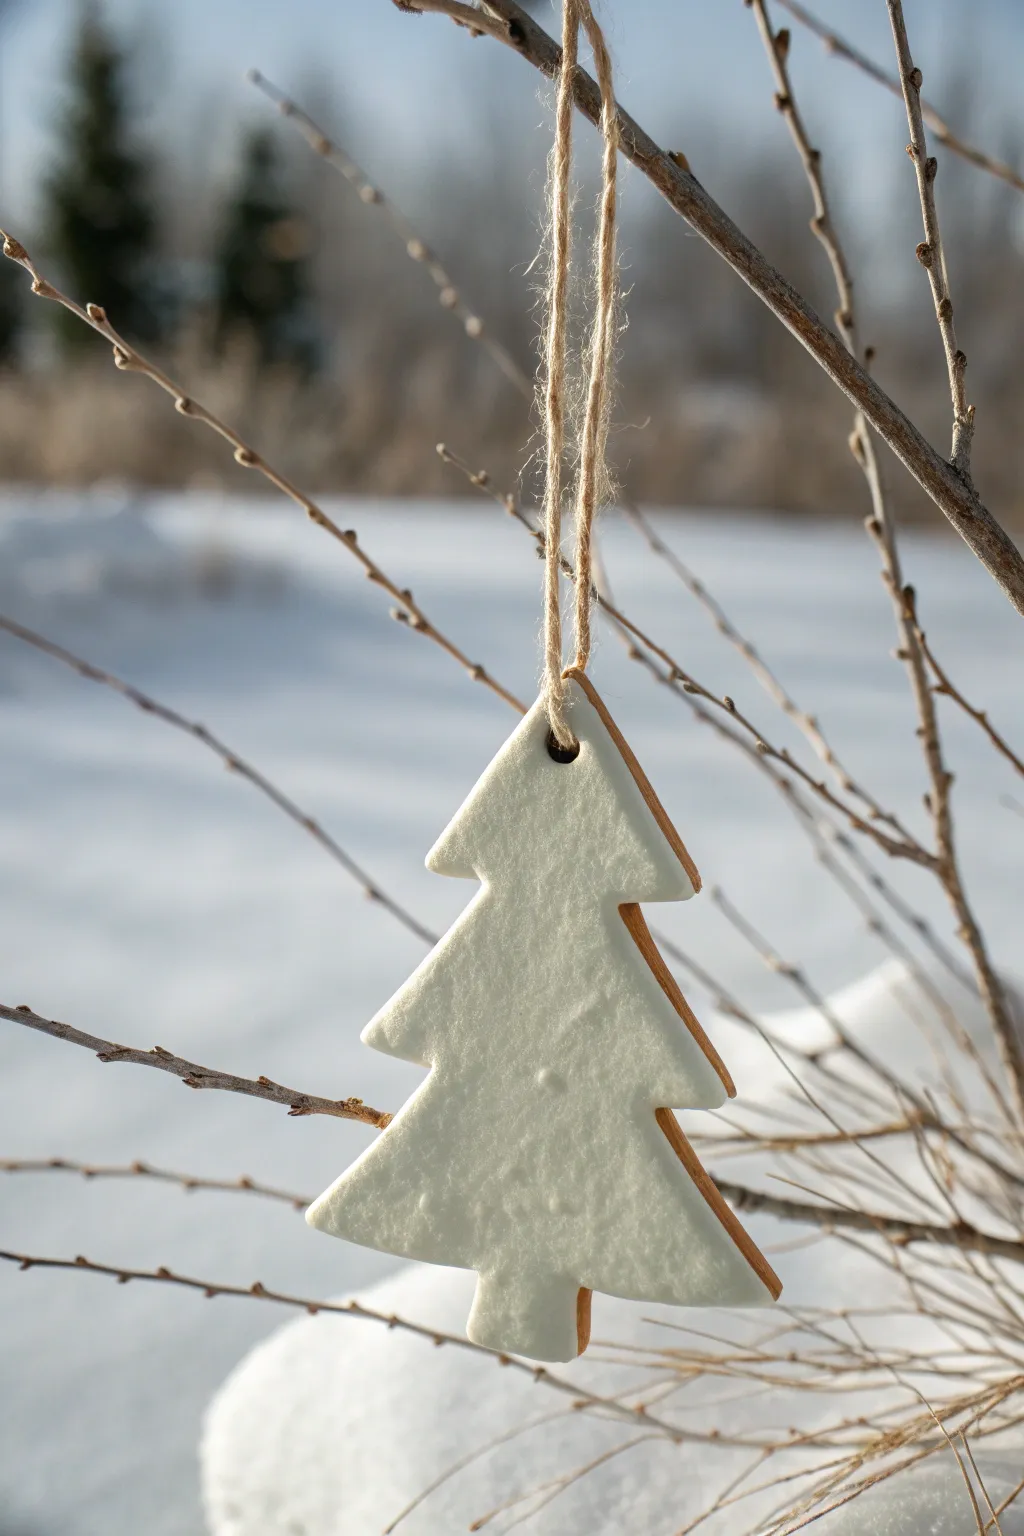
Fingerprint Christmas Tree Keepsake Ornaments
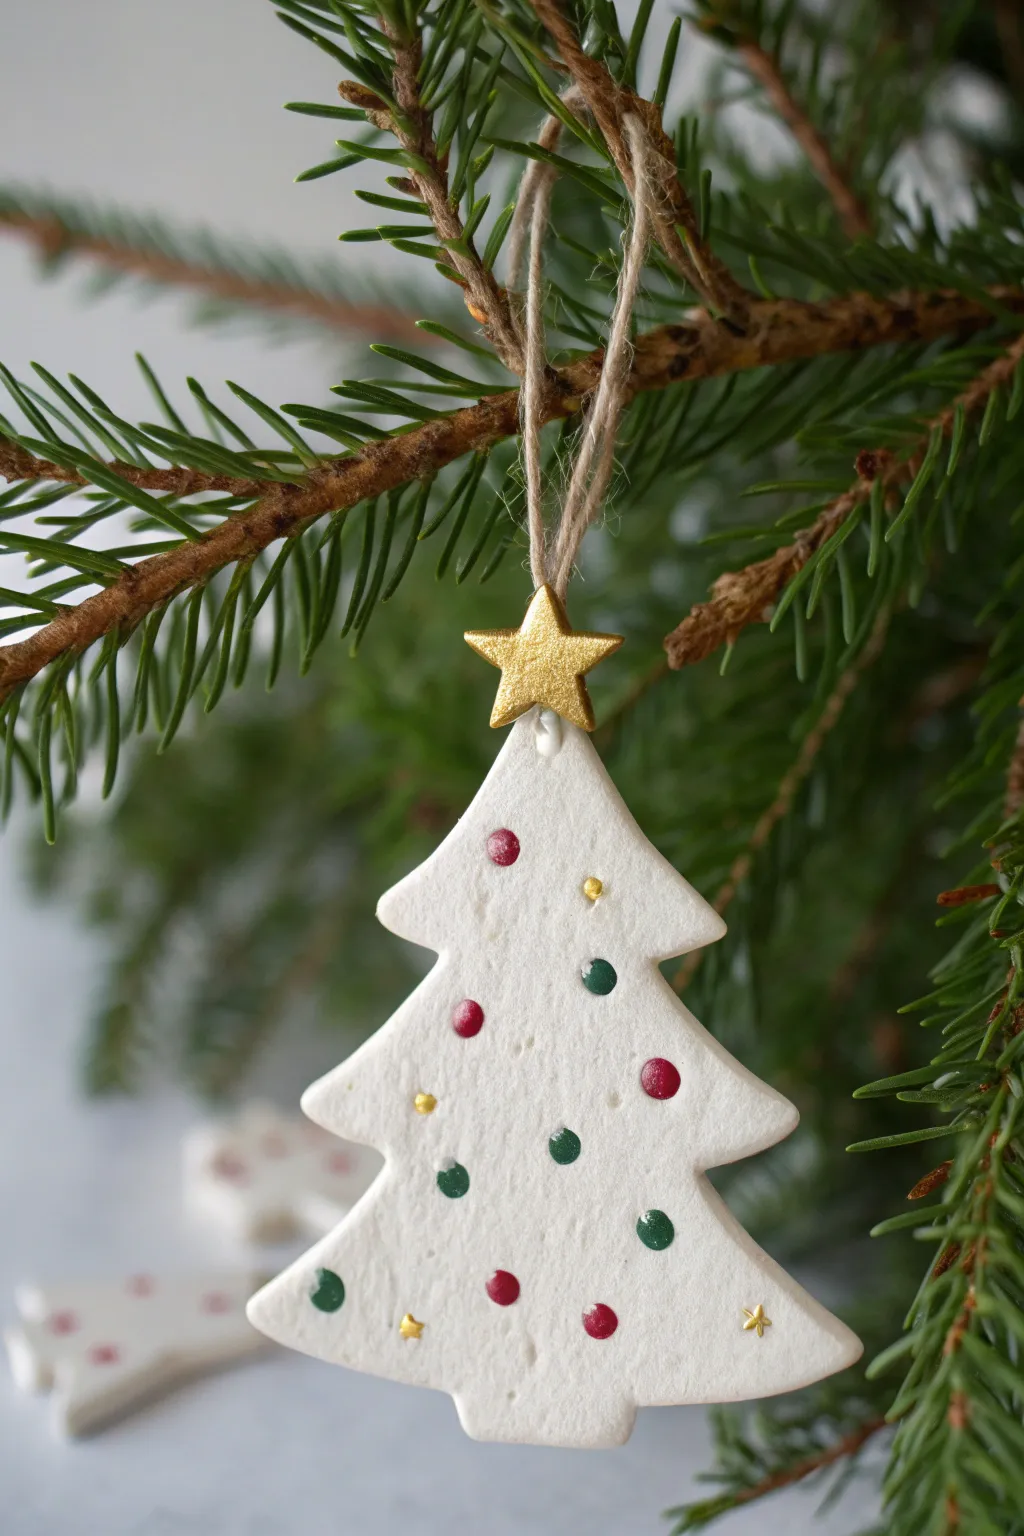
Create a classic winter look with these pristine white clay ornaments that pop against lush green pine needles. The simple tree silhouette is elevated by a sparkling gold star topper and delicate, jewel-toned textured dots that look just like miniature ornaments.
Step-by-Step
Materials
- White polymer clay or air-dry clay
- Christmas tree cookie cutter (medium size)
- Rolling pin
- Parchment paper
- Small straw or toothpick (for the hole)
- Acrylic paints (Metallic Gold, Red, Green)
- Small star embellishment or star mold
- Super glue or strong craft glue
- Fine detail paintbrush
- Twine or jute string for hanging
Step 1: Shaping the Base
-
Prepare your workspace:
Lay down a sheet of parchment paper on a flat surface to prevent sticking and keep your clay clean from dust. -
Condition the clay:
Take a handful of white clay and knead it in your hands until it becomes soft, pliable, and warm. -
Roll it out:
Using your rolling pin, flatten the clay to an even thickness of about 1/4 inch. Avoid going too thin, as the ornament needs to be sturdy. -
Cut the shape:
Press your Christmas tree cookie cutter firmly into the clay. Give it a tiny wiggle to ensure clean edges before lifting it away. -
Smooth the edges:
Dip your finger in a tiny bit of water and gently run it along the cut edges of the tree to smooth out any roughness from the cutter. -
Create the hanging point:
Use a straw to punch a neat hole at the very top point of the tree. Make sure not to get too close to the edge to prevent breaking later.
Clay Consistency
If your air-dry clay feels crumbly while rolling, dampen your hands slightly with water and knead it again until smooth and plastic-like.
Step 2: Adding Texture and Detail
-
Create indentation points:
Before the clay dries, use the rounded end of a small paintbrush handle or a dotting tool to gently press indentations into the surface where you want your colored ornaments to be. -
Make the star topper:
Fashion a small star out of leftover clay using a tiny mold or by hand-cutting. Paint this piece gold immediately if using color clay, or wait until dry. -
Drying time:
Let your clay tree sit undisturbed on the parchment paper. Air-dry clay usually needs 24-48 hours. I find flipping it over halfway through helps it dry flat.
Glitter Glam
While the paint for the ornaments is still wet, sprinkle a tiny pinch of super-fine glitter over the dots for a magical frosted effect.
Step 3: Painting and Assembly
-
Paint the ornaments:
Once the tree is fully hard and dry, take your fine detail brush and carefully fill the indentations with red and green acrylic paint. -
Add metallic accents:
Use metallic gold paint to add a few smaller dots or tiny star shapes scattered among the red and green ornaments for extra sparkle. -
Gold star finish:
Paint your separate clay star entirely in metallic gold. Apply 2-3 coats for a rich, solid shine. -
Attach the star:
Use a dab of super glue to secure the gold star to the top of the tree, positioning it just below the hanging hole so it doesn’t obstruct the string. -
Seal (Optional):
If you want a glossy finish or extra protection, apply a clear acrylic sealer or Mod Podge over the entire ornament. -
String it up:
Cut a length of natural jute twine, loop it through the hole at the top, and tie a secure knot to create the hanger.
Now your tree is ready to add a touch of handmade charm to your holiday decor

The Complete Guide to Pottery Troubleshooting
Uncover the most common ceramic mistakes—from cracking clay to failed glazes—and learn how to fix them fast.
Handprint Reindeer Keepsake Ornaments
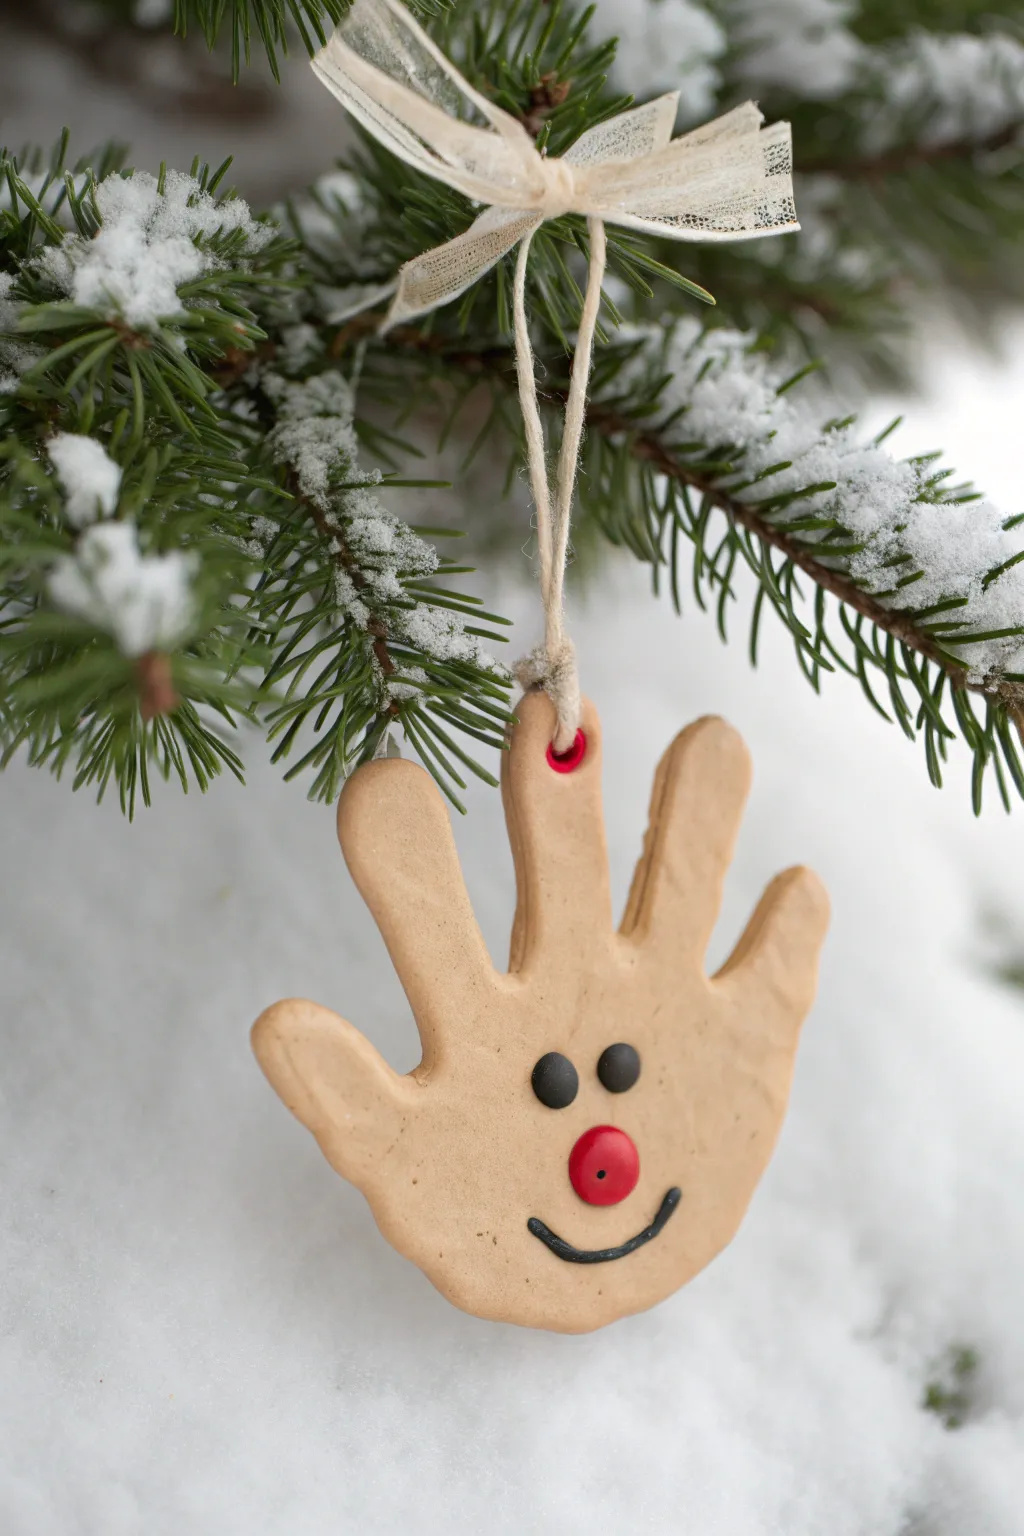
Capture a moment in time with this adorable handprint ornament that doubles as festive decor. Using simple air-dry clay, a child’s handprint transforms into a smiling reindeer, complete with a red nose and a snowy ribbon for hanging.
How-To Guide
Materials
- White or natural air-dry clay
- Rolling pin
- Parchment paper or craft mat
- Knife or clay cutting tool
- Straw or skewer (for the hole)
- Small black beads or black clay (for eyes)
- Red button or red clay (for nose)
- Fine-point black permanent marker or black acrylic paint
- Small piece of twine
- Sheer ribbon (white or cream)
- Sandpaper (fine grit, optional)
- Clear matte varnish (optional)
Step 1: Shaping the Handprint
-
Prepare the Clay:
Start by kneading a ball of air-dry clay until it is soft, pliable, and free of cracks. If it feels too dry, add a tiny drop of water to your fingers. -
Roll It Out:
Place the clay on a sheet of parchment paper. Use a rolling pin to flatten the clay to an even thickness of about 1/4 inch (6mm). Avoid rolling it too thin, or it may crack when drying. -
Make the Impression:
Have the child spread their fingers wide and press their hand firmly into the clay. Help them apply even pressure on the palm and each finger to ensure a clear imprint. -
Cut Out the Shape:
Using a craft knife or clay tool, carefully cut around the outline of the handprint. Leave a small border of clay around the edges, roughly 1/8 inch, to smooth out later. -
Smooth the Edges:
Dip your finger in a little water and run it along the cut edges of the clay to smooth away any roughness or sharp angles. -
Create the Hanging Hole:
Using a straw or a skewer, poke a hole near the base of the palm (which will become the top of the reindeer’s head). Pierce cleanly through the clay, ensuring the hole is large enough for your twine.
Step 2: Decorating the Face
-
Add the Eyes:
While the clay is still wet, gently press two small black beads into the palm area to form the eyes. Position them roughly in the center of the palm. -
Attach the Nose:
Press a small red button firmly into the clay below the eyes to create a cheerful nose. If the clay feels dry, dab a tiny bit of water or slip on the back of the button to help it adhere. -
Allow to Dry:
Place the ornament on a flat surface in a safe spot. Let it air dry completely according to your clay package instructions, typically 24–48 hours. I like to flip it over halfway through so the back dries evenly. -
Draw the Mouth:
Once the clay is fully hardened, use a fine-point permanent marker or a thin brush with black acrylic paint to draw a simple, curved smile below the red nose.
Keep it clean
Work on parchment paper so you can turn the clay easily without lifting it, which distorts the shape. This also prevents sticking.
Step 3: Finishing Touches
-
Sand Imperfections:
If there are any rough spots on the edges after drying, gently sand them down with fine-grit sandpaper for a polished look. -
Seal (Optional):
To protect your keepsake for years to come, apply a coat of clear matte varnish over the entire surface. -
Prepare the Twine:
Cut a piece of natural twine, about 8 inches long. Fold it in half to create a loop. -
Thread the Loop:
Push the folded end of the twine through the hole you made at the top of the ornament. -
Secure the Knot:
Pull the loose ends of the twine through the loop and tighten gently to secure it to the ornament (a cow hitch knot). -
Add the Ribbon Bow:
Take a length of sheer white or cream ribbon and tie a delicate bow around the base of the twine loop, right where it meets the clay.
Date the back
Use a permanent marker to write the child’s name and the year on the back of the ornament once it’s dry for a true time-capsule keepsake.
Hang this sweet creation on your tree or gift it to loved ones to spread holiday cheer
Delicate Snowflake Ornaments With Cutouts
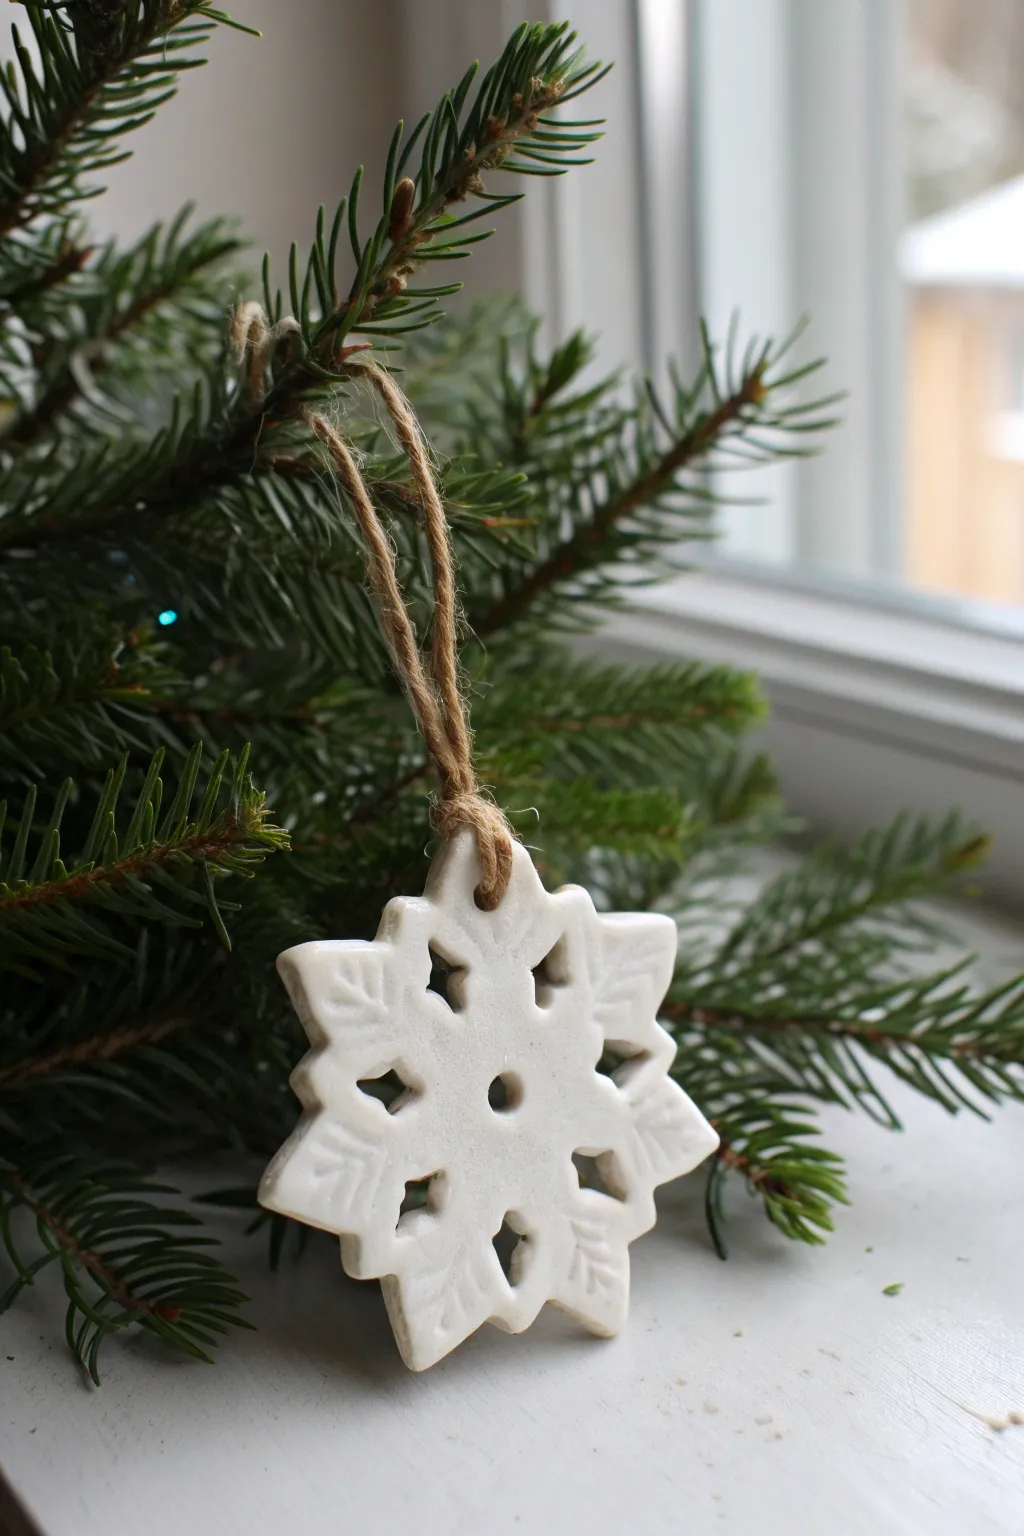
Capture the delicate beauty of winter with these charming air dry clay snowflake ornaments. Featuring intricate cutouts and stamped leaf impressions, they offer a sophisticated, minimalist look that hangs beautifully against evergreen branches.
Detailed Instructions
Materials
- White or natural air dry clay
- Rolling pin
- Snowflake or large star cookie cutter (approx. 3-4 inches)
- Small teardrop or oval mini cutter (can use a straw or clay tool for this)
- Small circular cutter or standard drinking straw
- Leaf patterned stamp or texture tool
- Sandpaper (fine grit)
- Jute twine or rustic string
- Parchment paper or non-stick mat
- Small bowl of water
- Gloss or matte varnish (optional)
Step 1: Shaping the Snowflake Base
-
Condition the Clay:
Begin by taking a handful of air dry clay and kneading it in your hands until it feels soft, pliable, and free of cracks. If it feels too dry, dip your fingers in water and work it in. -
Roll It Out:
Place your clay onto a sheet of parchment paper. Use a rolling pin to flatten the clay to an even thickness of about 1/4 inch. Try to keep the surface smooth and level. -
Cut the Main Shape:
Press your large snowflake or star cookie cutter firmly into the clay. Give it a gentle wiggle to ensure a clean cut, then lift the cutter. Carefully peel away the excess clay from around the shape.
Step 2: Adding texture and Cutouts
-
Smooth the Edges:
Dip your finger in a little bit of water and run it gently along the raw edges of your snowflake to smooth out any roughness or loose bits of clay left by the cutter. -
Create the Hanger Hole:
Use a drinking straw to punch a clean hole near the tip of one of the snowflake’s points. This will be for the twine later, so make sure it’s not too close to the very edge. -
Punch the Center Hole:
Using a slightly smaller straw or a small circular clay tool, punch a single round hole directly in the center of the snowflake. -
Add Decorative Cutouts:
With a mini teardrop cutter or a sharp clay knife, carefully remove small sections of clay from the inner part of the snowflake arms. Aim for a symmetrical pattern radiating from the center. -
Stamp the Leaf Pattern:
Take your leaf stamp or texture tool and gently press a vein pattern onto the tips of the snowflake arms. Don’t press too hard—you just want the surface impression, not to deform the shape. -
Final Surface Check:
Look over the ornament one last time. If the stamping caused any edges to bulge out slightly, gently pat them back into shape with your fingertip.
Fixing Cracks
If you spot hairline cracks as it dries, mix a tiny bit of fresh clay with water to make a paste (‘slip’) and smooth it over the crack with your finger.
Step 3: Drying and Finishing
-
Begin the Drying Process:
Leave the ornament on the parchment paper in a safe, dry spot. Let it air dry for at least 24 hours. Flipping it over gently after the first 12 hours helps prevent curling. -
Check for Dryness:
The clay should turn completely white and feel hard to the touch. If it feels cold or looks greyish in the center, it needs more time. -
Sand for Perfection:
Once fully dry, take a piece of fine-grit sandpaper and very lightly sand the edges and the surface to remove any tiny burrs or sharp points for a buttery smooth finish. -
Seal (Optional):
If you want extra durability or a specific sheen, brush on a thin coat of matte or gloss varnish. I find a matte finish keeps that lovely natural ceramic look intact. -
Prepare the Twine:
Cut a length of jute twine, roughly 6-8 inches long. Fold it in half to create a loop. -
Attach the Hanger:
Thread the looped end of the twine through the hole at the top of the snowflake. Pass the loose ends through the loop and pull tight to secure it with a lark’s head knot. -
Knot the Ends:
Tie the two loose ends of the twine together in a simple overhand knot to close the loop, trimming off any excess fraying for a tidy finish.
Pro Tip: Sharp Edges
To get super crisp edges on your cutouts, rub a tiny bit of baby oil or lotion on your cutting tools before pressing them into the clay.
Hang your finished snowflake in a window or on the tree to enjoy a touch of handmade winter magic all season long


What Really Happens Inside the Kiln
Learn how time and temperature work together inside the kiln to transform clay into durable ceramic.
Santa Face Medallion Ornaments
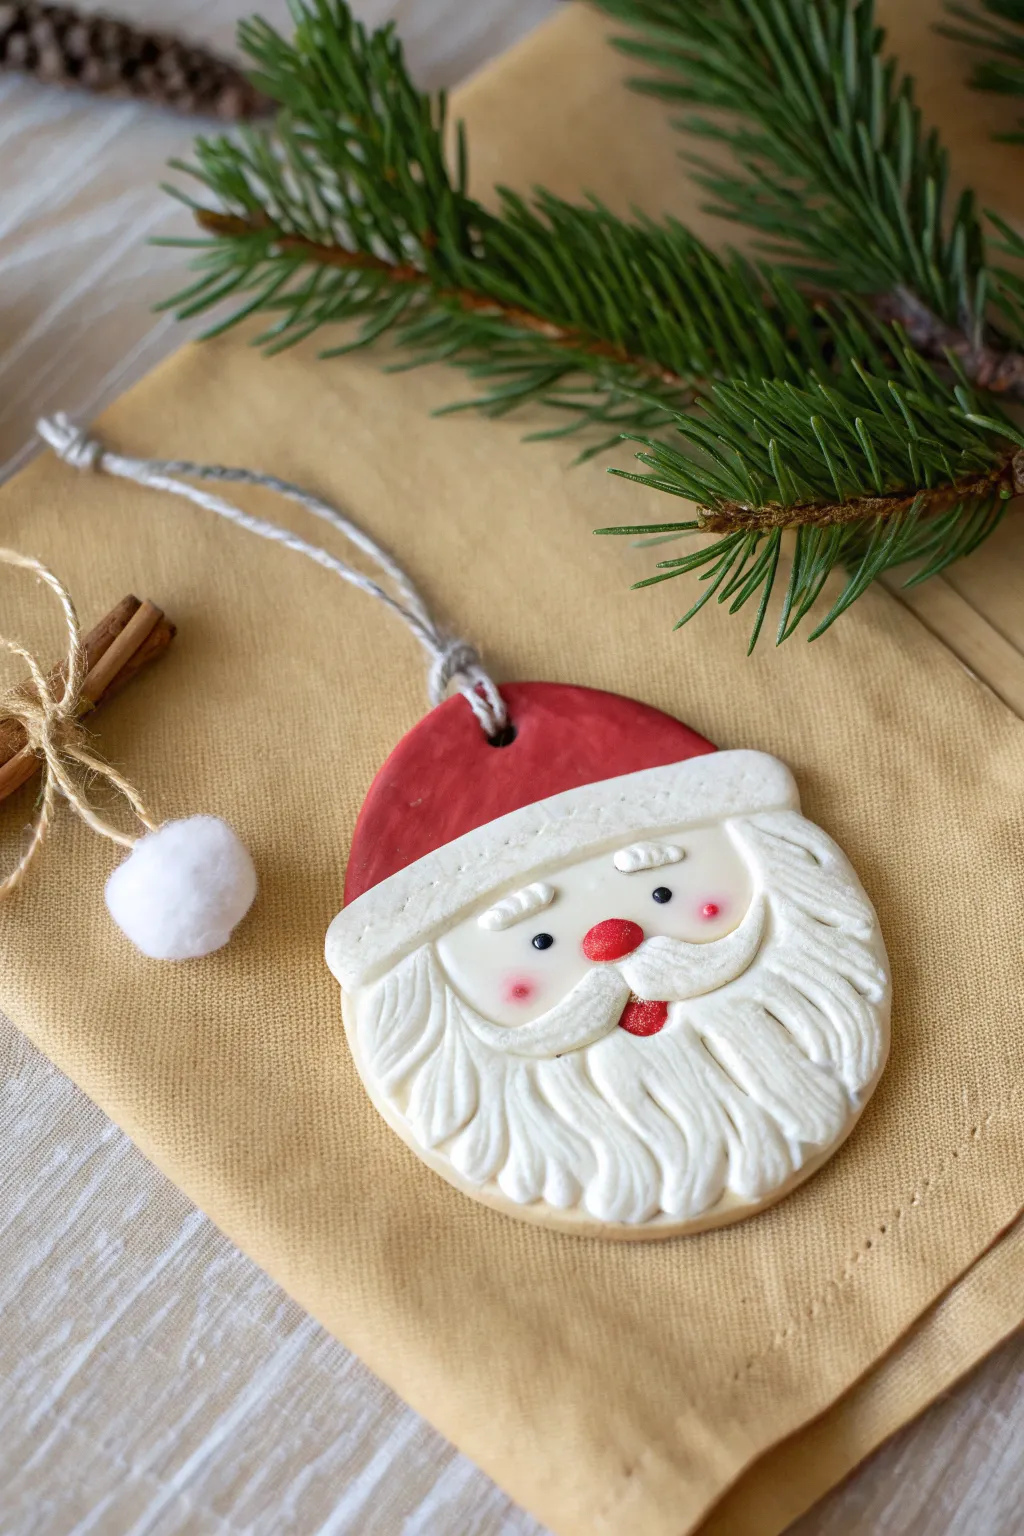
This classic Santa face ornament brings a touch of old-world charm to your tree with its detailed beard texture and rosy cheeks. The layered relief style gives it a wonderful three-dimensional quality that looks much more complicated than it actually is.
How-To Guide
Materials
- Air dry clay (white)
- Circle cookie cutter (approx. 3-4 inches)
- Rolling pin
- Modeling tools (or a toothpick and a small knife)
- Acrylic paints: Flesh tone, Red, White, Pink, Black
- Fine detail paintbrushes
- Twine or string for hanging
- Water in a small cup
- Clear matte varnish or sealant
- Sandpaper (optional)
Step 1: Creating the Base and Hat
-
Roll the base:
Begin by conditioning your clay until it is smooth and pliable. Roll it out to an even thickness of about 1/4 inch on a smooth surface. -
Cut the shape:
Use your circle cookie cutter to punch out a perfect round medallion shape. Smooth the edges with a finger dipped slightly in water to remove any rough burrs. -
Create the hanging loop:
Use a straw or the end of a paintbrush to punch a hole near the top edge for the string. Make sure it isn’t too close to the edge, or the clay might crack when drying. -
Paint the background:
To make layering easier later, you can optionally paint the top third of the circle red (for the hat) and the bottom two-thirds a flesh tone now, or wait until the end. I find painting the base face color now helps if you miss any spots later.
Step 2: Sculpting the Features
-
Add the hat trim:
Roll a small snake of clay and flatten it slightly. Attach this strip across the circle where the hat meets the face using a little water as glue. This is the fur trim. -
Texture the trim:
Take a needle tool or toothpick and stipple the white trim strip repeatedly to create a fluffy, fur-like texture. -
Form the beard base:
Roll a larger, flat piece of clay into a crescent moon or U-shape. Press this onto the bottom half of the circle to form the main volume of the beard. -
Detail the beard:
Using a modeling tool or knife, carve deep, flowing lines into the beard clay. Start from under the nose area and sweep outward toward the edges to mimic hair flow. -
Add the mustache:
Create two small teardrop shapes. Attach them right in the center of the face, tips pointing outward and the rounded ends meeting in the middle, curving slightly upwards. -
Sculpt mustache texture:
Add texture lines to the mustache pieces just like the beard, ensuring they look distinct from the magnificent beard below them. -
Make the nose:
Roll a small ball of clay for the nose and press it gently onto the center where the mustache pieces meet. -
Add eyebrows:
Form two tiny, curved rectangles for eyebrows and place them just below the hat trim. Texture these with small vertical lines.
Crack Control
If you see tiny cracks forming as the clay dries, mix a small amount of fresh clay with water to make a paste (slip) and smooth it into the cracks with a brush.
Step 3: Finishing Touches
-
Dry thoroughly:
Allow the ornament to dry completely. This usually takes 24-48 hours depending on humidity. Flip it over halfway through to ensure the back dries evenly. -
Base coat areas:
Paint the hat section bright red. Paint the face area (if you didn’t earlier) with flesh tone. Leave the beard, mustache, eyebrows, and hat trim white. -
Paint facial details:
Using a very fine brush or a dotting tool, add two black dots for eyes. Paint the nose red. Add a tiny red half-circle under the mustache for a smiling mouth. -
Add blush:
Dip a dry brush into a tiny amount of pink paint and wipe most of it off. Gently dry-brush rosy cheeks onto the flesh-colored area. -
Add highlights:
Add a tiny speck of white to the black eyes and a small highlight to the red nose to bring the face to life. -
Seal and string:
Once dry, coat the entire piece with a matte varnish to protect the paint. Thread twine through the hole and tie a loop.
Sparkle Upgrade
While the white paint on the beard and hat trim is still wet, sprinkle ultra-fine iridescent glitter over it to give Santa a magical, snowy shimmer.
Hang this cheerful fellow on a prominent branch where his friendly smile can be seen by everyone
Stacked Snowman Ornaments With Scarves

Create a charming winter companion for your tree with these stacked snowman ornaments made from air-dry clay. These textured figures feature cozy knit-style scarves and a rustic cork topper, giving them a delightful handcrafted feel.
Step-by-Step Guide
Materials
- White air-dry clay
- Small styrofoam balls (optional, as armature)
- Red fabric scrap or knit material
- Small cork stopper (wine cork size)
- Jute twine
- Black beads or small black clay bits
- Red/brown beads for eyes
- Pink bead or clay for nose
- Strong craft glue or hot glue
- Toothpick or sculpting tool
- Water for smoothing
Step 1: Forming the Body
-
Create the base spheres:
Begin by rolling three balls of white air-dry clay in graduating sizes: a large one for the base, a medium one for the torso, and a slightly smaller one for the head. To save on clay and weight, you can cover small styrofoam balls with a thin layer of clay instead. -
Texture the surface:
Instead of smoothing the clay perfectly, give it a slightly organic, snowball-like texture by gently dabbing the surface with a stiff brush or a crumpled ball of aluminum foil while the clay is still wet. -
Stack and join:
Press the medium ball firmly onto the large base ball. If the clay is fresh, it should stick, but you can add a tiny bit of water or slip (clay mixed with water) to strengthen the bond. -
Add the head:
Attach the smallest sphere to the top of the stack, ensuring it sits securely. Gently press down so the connection points flatten slightly, making the structure more stable. -
Insert an internal support:
For extra durability, I like to push a toothpick vertically down through the center of all three balls while the clay is soft. Trim off any excess sticking out of the top.
Cracking Clay?
If small cracks appear as the clay dries, mix a small amount of fresh clay with water to make a paste and fill them in with your finger.
Step 2: Adding Features
-
Place the buttons:
Press two small black beads or flattened bits of black clay into the middle sphere, one above the other. Add two more onto the bottom sphere to create the snowman’s classic coal buttons. -
Create the face:
Press two reddish-brown beads into the head for the eyes. Add a small pink bead or a tiny ball of pink clay in the center for the nose. -
Dry the clay:
Set the snowman aside to dry completely. Depending on the brand of clay and the thickness, this can take 24 to 48 hours. Turn it occasionally to ensure even drying.
Make It Sparkle
Brush the dried white clay with a thin layer of PVA glue and sprinkle on iridescent white glitter for a fresh snowfall effect.
Step 3: Dressing the Snowman
-
Prepare the cork hat:
Slice a thin round section (about 1/4 inch thick) from a wine cork using a sharp craft knife. -
Attach the hanging loop:
Cut a length of jute twine and tie it into a loop. Glue the knotted end firmly to the center of the cork slice. -
Mount the hat:
Once the clay is fully dry, glue the cork slice with the attached twine onto the very top of the snowman’s head. -
Make the scarf:
Cut a thin strip of red knit fabric or felt, approximately 6 inches long and 1/2 inch wide. If using fabric, slightly fray the ends with scissors to mimic fringe. -
Tie the scarf:
Wrap the fabric strip around the snowman’s neck area (between the head and the middle sphere). Tie a simple knot on the left side, letting the fringed ends hang down naturally. -
Secure the scarf:
Place a tiny dot of glue under the knot of the scarf to hold it in place and keep it from slipping off the smooth clay surface. -
Final touches:
Check all glued components to ensure they are secure. If you want a bit of sparkle, you can lightly dust the snowman with a spray of clear glitter adhesive.
Hang your frosty friend on the tree and enjoy the handmade warmth he brings to your holiday decor

TRACK YOUR CERAMIC JOURNEY
Capture glaze tests, firing details, and creative progress—all in one simple printable. Make your projects easier to repeat and improve.
Mini Wreath Ornaments With Berries
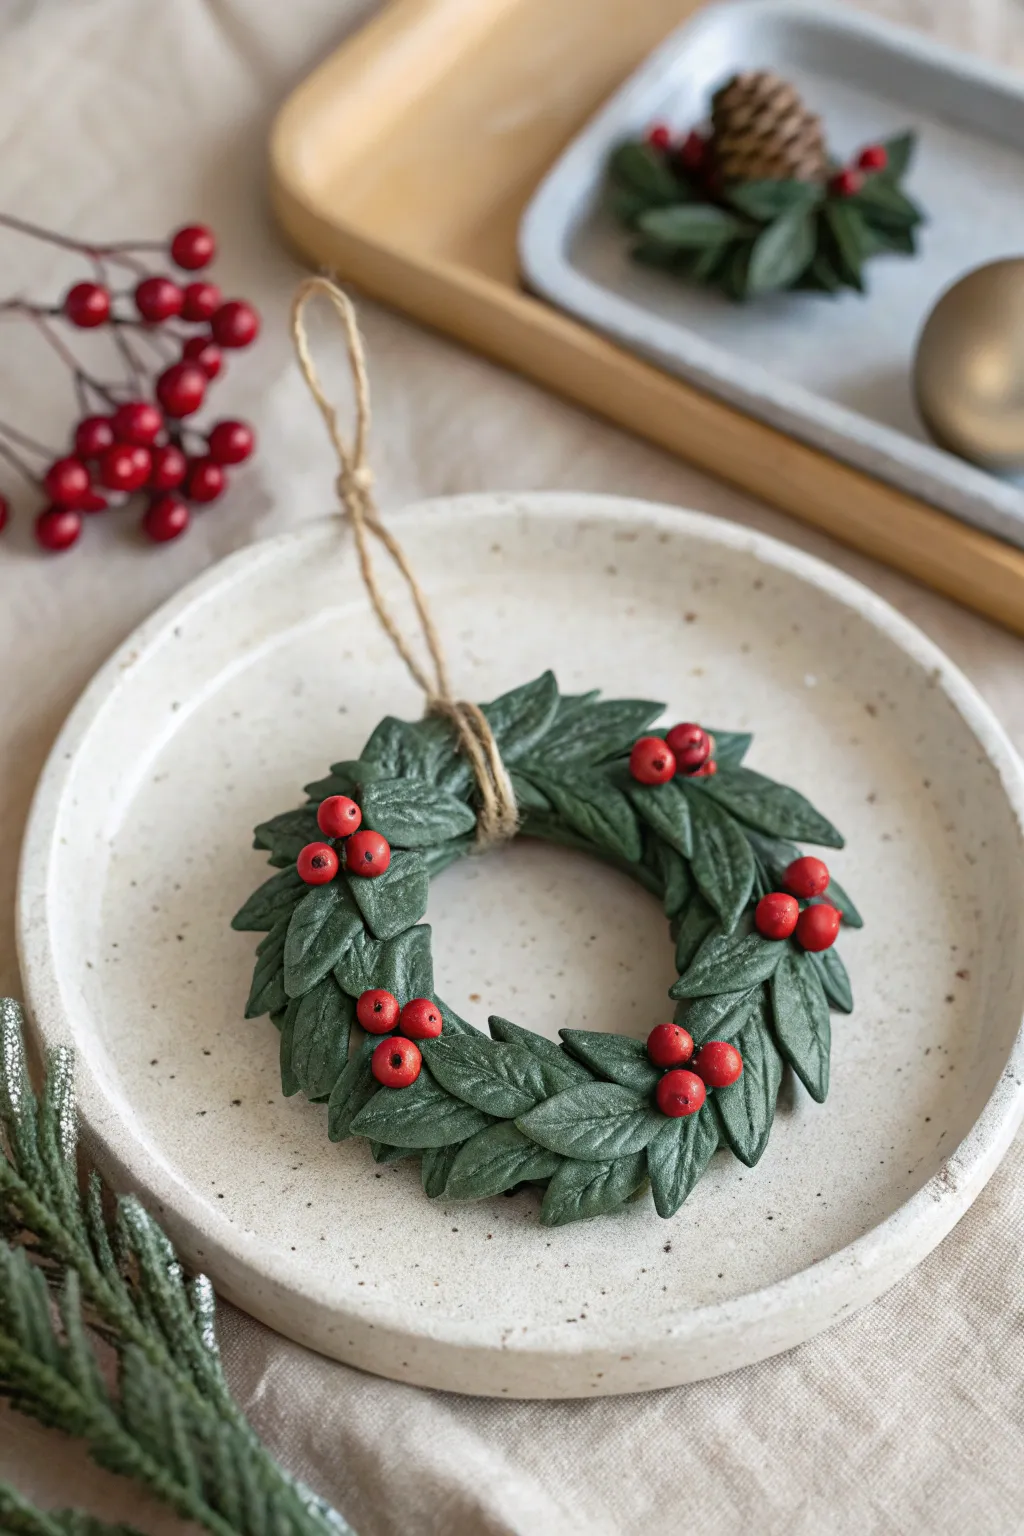
Bring the timeless charm of winter foliage to your tree with these delicate handcrafted mini wreaths. The deep green leaves feature realistic veining, while the bright red berry clusters add a traditional pop of color to the speckled ceramic-style finish.
Detailed Instructions
Materials
- Green air-dry clay (preferably a deep forest green)
- Red air-dry clay
- Rolling pin or smooth glass jar
- Small leaf cutter (or a craft knife)
- Needle tool or toothpick
- Circle cutter (approx. 2-3 inches) or a glass rim
- Liquid clay or PVA glue
- Jute twine or rustic string
- Matte varnish or sealant (optional)
- Work surface (silicone mat or parchment paper)
Step 1: Forming the Base
-
Prepare the Clay:
Condition your green clay by kneading it until it is soft and pliable. If you don’t have pre-colored green clay, mix green pigment or acrylic paint into white air-dry clay until you achieve a deep, natural forest shade. -
Create the Foundation Ring:
Roll a thick snake of green clay, about 1/4 inch thick. Form it into a circle with an opening diameter of about 2 inches, pressing the ends together to seal the ring. This hidden base will support your leaves. -
Roll Out Leaf Sheet:
Take the remaining green clay and roll it out into a thin, even sheet, roughly 1/8 inch thick. Aim for consistency to ensure the leaves look uniform.
Leaves Falling Off?
If dry leaves detach, your clay was too dry during assembly. Reattach with superglue for a permanent fix, as standard white glue may not hold heavy clay pieces.
Step 2: Creating the Foliage
-
Cut the Leaves:
Using a small leaf-shaped cutter, punch out approximately 25-30 small leaves. If you don’t have a cutter, use a craft knife to freehand simple almond shapes, keeping them relatively consistent in size. -
Texture the Leaves:
Take your needle tool or a toothpick and gently press a central vein down the middle of each leaf. Then, lightly etch tiny angled veins branching off the center line for realistic detail. -
Shape the Leaves:
Pinch the very tip of each leaf slightly to give it a sharper point, and gently curb the edges downwards so they aren’t perfectly flat. This dimensional curving makes the wreath look lush. -
Attach the First Layer:
Apply a tiny dab of glue or liquid clay to the base ring. Press a leaf onto the ring, angling it slightly outward. I like to work in a clockwise direction, slightly overlapping the base of step previous leaf. -
Complete the Circle:
Continue layering leaves around the entire ring until the base is completely hidden. Ensure the final leaf tucks neatly under the tip of the very first leaf for a seamless loop.
Realistic Coloring
Before sealing, lightly dust the leaf edges with a darker green pastel powder or diluted dark acrylic wash to accentuate the vein textures and create depth.
Step 3: Adding Details & Assembly
-
Roll the Berries:
Taking your red clay, pinch off tiny amounts and roll them into small spheres between your fingers. You will need about 12-15 berries, grouped into clusters. -
Texture the Berries:
Using the very tip of your needle tool, poke a tiny indentation into the top of each red berry to mimic the botanical ‘eye’ of real holly berries. -
Attach Berry Clusters:
Select three or four spots around the wreath that look like they need a focal point. Apply a dab of glue and press the berries on in tight groups of two or three. -
Prepare the Hanger:
Cut a 6-inch length of jute twine. Fold it in half to create a loop and tie a knot at the open ends. -
Secure the Twine:
While the clay is still slightly pliable, gently press the knotted end of the twine into the back of the wreath. You can secure this further by smoothing a small scrap of wet green clay over the twine on the backside. -
Dry the Wreath:
Lay the wreath flat on a clean surface to dry. Depending on humidity and clay thickness, this will take 24 to 48 hours. Flip it over halfway through to ensure the back dries evenly. -
Optional Sealant:
Once fully cured, you can brush on a matte varnish to protect the clay and deepen the colors slightly, giving it a finished ceramic look.
Hang your charming mini-wreath on the tree or use it as a festive gift topper for a handmade touch
Tiny Stocking Ornaments With Raised Cuffs
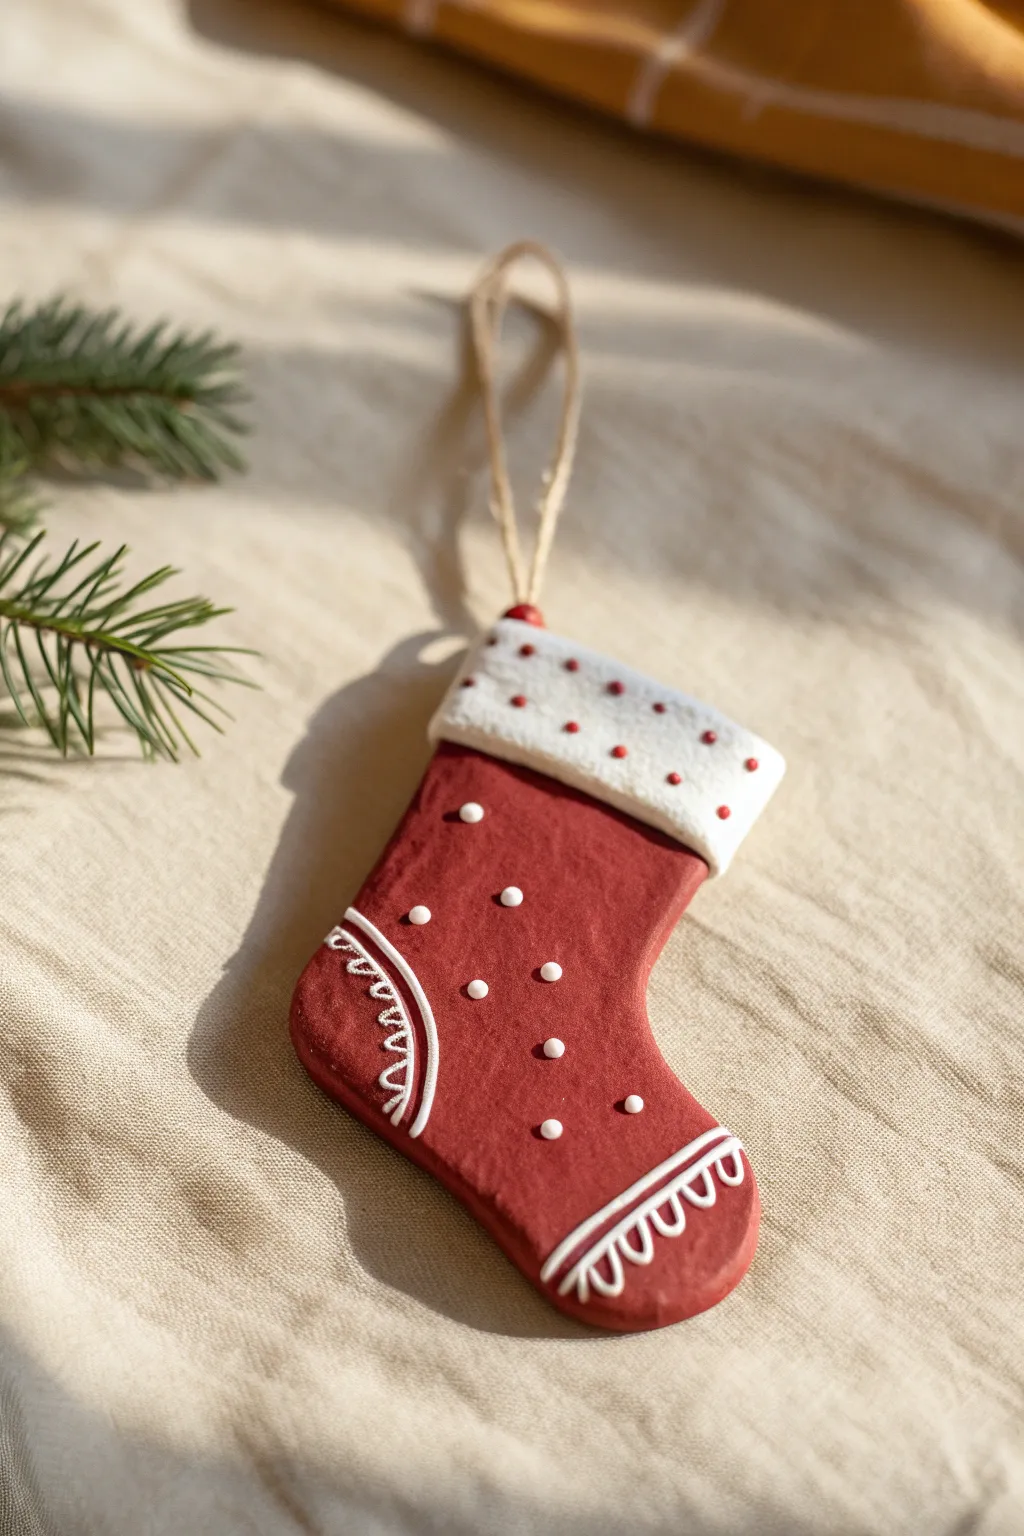
These charming stocking ornaments bring a cozy, handmade feel to your tree with their classic red and white palette and raised details. The rolled white cuff and delicate piping-style decorations give them a wonderful dimensional quality that looks just like a sugar cookie.
How-To Guide
Materials
- Air dry clay (white)
- Acrylic paint (red, white)
- Rolling pin
- Stocking cookie cutter (or a craft knife and cardstock template)
- Small paintbrush
- Fine-tip detail brush
- Clay sculpting tool or toothpick
- Jute twine for hanging
- Water bonding slip (water mixed with a little clay)
- Matte varnish (optional)
- Dotting tool or end of a paintbrush handle
Step 1: Shaping the Base
-
Roll the clay:
Begin by conditioning your air dry clay until it is smooth and pliable. Roll it out on a non-stick surface to an even thickness of about 1/4 inch. -
Cut the shape:
Use a stocking-shaped cookie cutter to stamp out your base. If you don’t have a cutter, place a paper template on the clay and carefully trace around it with a craft knife. -
Create the hanging hole:
While the clay is still wet, use a straw or a skewer to poke a hole at the top corner of the stocking for the twine. Ensure the hole goes all the way through. -
Smooth the edges:
Dip your finger in a tiny bit of water and run it gently along the cut edges to remove any roughness or stray bits of clay.
Step 2: Adding the Cuff
-
Form the cuff strip:
Roll out a separate, smaller strip of clay. This piece needs to be slightly thicker than the stocking base to create that nice raised effect shown in the image. -
Size the cuff:
Cut the strip into a rectangle that matches the width of the top of your stocking. -
Attach the cuff:
Score the back of the clay strip and the top of the stocking with a needle tool. Apply a dab of water or clay slip to the scored areas and press the strip firmly onto the top of the stocking. -
Soften the transition:
Gently smooth the sides of the cuff where it meets the stocking edge so it looks like one cohesive piece, but leave the bottom edge of the cuff distinct.
Cracking Cuff?
If the cuff separates while drying, use a small amount of wet clay paste as glue to reattach it, then smooth the seam with a damp finger.
Step 3: Painting the Base
-
First drying phase:
Allow the clay to dry completely according to the package instructions. This usually takes 24 to 48 hours depending on humidity; turn it over halfway through for even drying. -
Paint the red body:
Using a flat brush, paint the main body of the stocking with a deep, matte red acrylic paint. Avoid the white cuff area for now. -
Paint the white cuff:
Paint the raised cuff section with white acrylic paint. You may need two coats here to get a solid, opaque finish. -
Add cuff details:
Once the white paint is dry, use a dotting tool or the back of a brush to add small red polka dots scattered across the white cuff.
Textured Cozy Look
Before drying, gently pres a clean piece of knit fabric or sweater onto the red part of the clay to imprint a realistic knitted texture.
Step 4: Adding Raised Details
-
Create ‘icing’ mix:
To mimic the piped icing look, I like to mix a small amount of clay with water until it reaches a thick, paste-like consistency (similar to toothpaste). Alternatively, you can use dimensional fabric paint or ‘puff paint’ for this step. -
Pipe the heel and toe accents:
Put your clay paste into a small piping bag or plastic bag with the corner snipped. Squeeze a curved white line to define the heel area and another for the toe area. -
Add delicate loops:
Along the inside edge of those curved lines, pipe a series of small white ‘U’ shapes or loops, mimicking embroidery stitches. -
Dot the body:
Using your paste or white paint and a fine dotting tool, add scattered white dots across the red section of the stocking. -
Final drying:
Let the raised painted details dry completely. If you used clay paste, this might need several hours to harden firmly.
Step 5: Assembly
-
Seal (Optional):
For longevity, brush on a coat of matte varnish. This protects the paint and gives the ornament a finished, professional look. -
Thread the loop:
Cut a length of jute twine, fold it in half, and thread the loop end through the hole you made earlier. -
Secure the hanger:
Pull the tails of the twine through the loop and tighten gently to secure the hanger to the ornament.
Hang your new festive creation on the tree and enjoy the handmade warmth it adds to your holiday decor
Clay Present Toppers Shaped Like Mini Ornaments
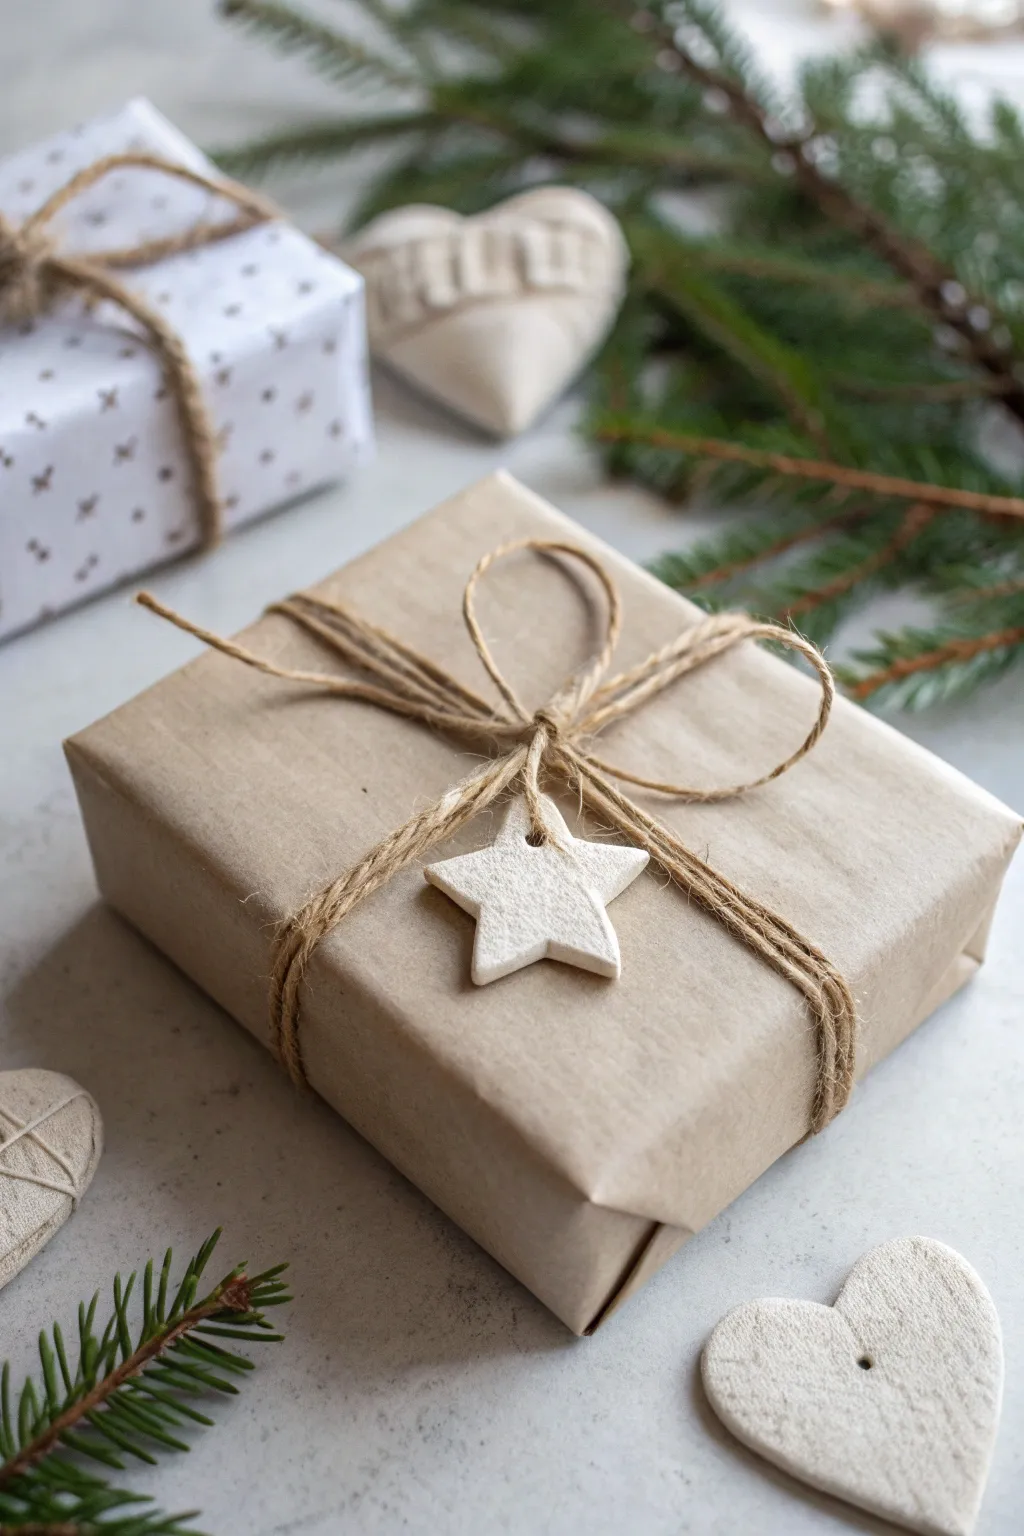
Elevate simple kraft paper wrapping with these rustic, handmade clay star tags that add a personal touch to any present. The stark white clay against natural brown paper creates a timeless, eco-friendly aesthetic that looks effortlessly chic.
Detailed Instructions
Materials
- White air-dry clay
- Rolling pin
- Small star-shaped cookie cutter (approx. 1.5 – 2 inches)
- Parchment paper or non-stick silicone mat
- Refined sandpaper or a nail file
- Wooden skewer or toothpick
- Jute twine
- Kraft wrapping paper
- Scissors
Step 1: Shaping the Clay Stars
-
Prepare your workspace:
Lay down a sheet of parchment paper or a silicone mat on a flat, stable surface to prevent the clay from sticking as you work. -
Condition the clay:
Take a handful of white air-dry clay and knead it in your hands for a minute until it feels soft, pliable, and free of cracks. -
Roll it out:
Use your rolling pin to flatten the clay to an even thickness. Aim for about 1/4 inch (approx. 5-6mm) thick—this ensures the star is sturdy enough not to snap but thin enough to lay flat on a gift. -
Cut the shapes:
Press your star-shaped cookie cutter firmly into the rolled clay. Wiggle it slightly to ensure a clean separation before lifting the cutter. -
Create the hole:
While the clay is still wet, take a wooden skewer or toothpick. Gently pierce a hole directly through one of the star’s points or center-top area. Make the hole slightly larger than your twine, as clay shrinks slightly when drying. -
Smooth the edges:
Dip your finger in a tiny bit of water and run it along the cut edges of the star to smooth out any roughness left by the cutter. -
Let it dry:
Place your clay stars on a clean sheet of parchment paper in a safe spot. Allow them to dry for at least 24-48 hours, flipping them halfway through to ensure the bottom dries evenly.
Step 2: Finishing and Wrapping
-
Sand for perfection:
Once completely dry and hard, use a piece of fine-grit sandpaper or a clean nail file to gently buffer away any remaining sharp edges or bumps. -
Wrap the box:
While your stars are finishing drying, wrap your gift neatly in brown kraft paper, ensuring the corners are crisp. -
Measure the twine:
Cut a generous length of jute twine. You need enough to wrap around the package multiple times plus extra for tying the bow. -
Wrap the twine:
Wrap the twine around the center of the box. Go around 3 or 4 times to create that clustered, rustic look shown in the photo. -
Thread the star:
Take one end of your twine (or a separate smaller piece if you prefer to tie it on independently) and thread it through the hole in your clay star. -
Position the topper:
Slide the star down so it sits comfortably on top of the twine cluster in the center of the package. -
Tie the bow:
Secure the twine with a simple shoelace knot or bow directly over the star or just above it. I like to fuss with the loops a bit to make them round and prominent. -
Trim the ends:
Snip the ends of the twine at an angle, leaving them slightly long for a relaxed feel.
Cracking Clay?
If you notice small surface cracks as the clay dries, mix a tiny bit of fresh clay with water to make a paste (slip) and smooth it into the cracks with your finger.
Add Texture
Before cutting the star shape, gently press a piece of lace or a textured fabric into the wet clay to leave an elegant, imprinted pattern on the surface.
Your gifts now have a charming, handcrafted element that recipients might just want to keep as an ornament after opening
Minimalist Nordic-Inspired Tree and Star Ornaments
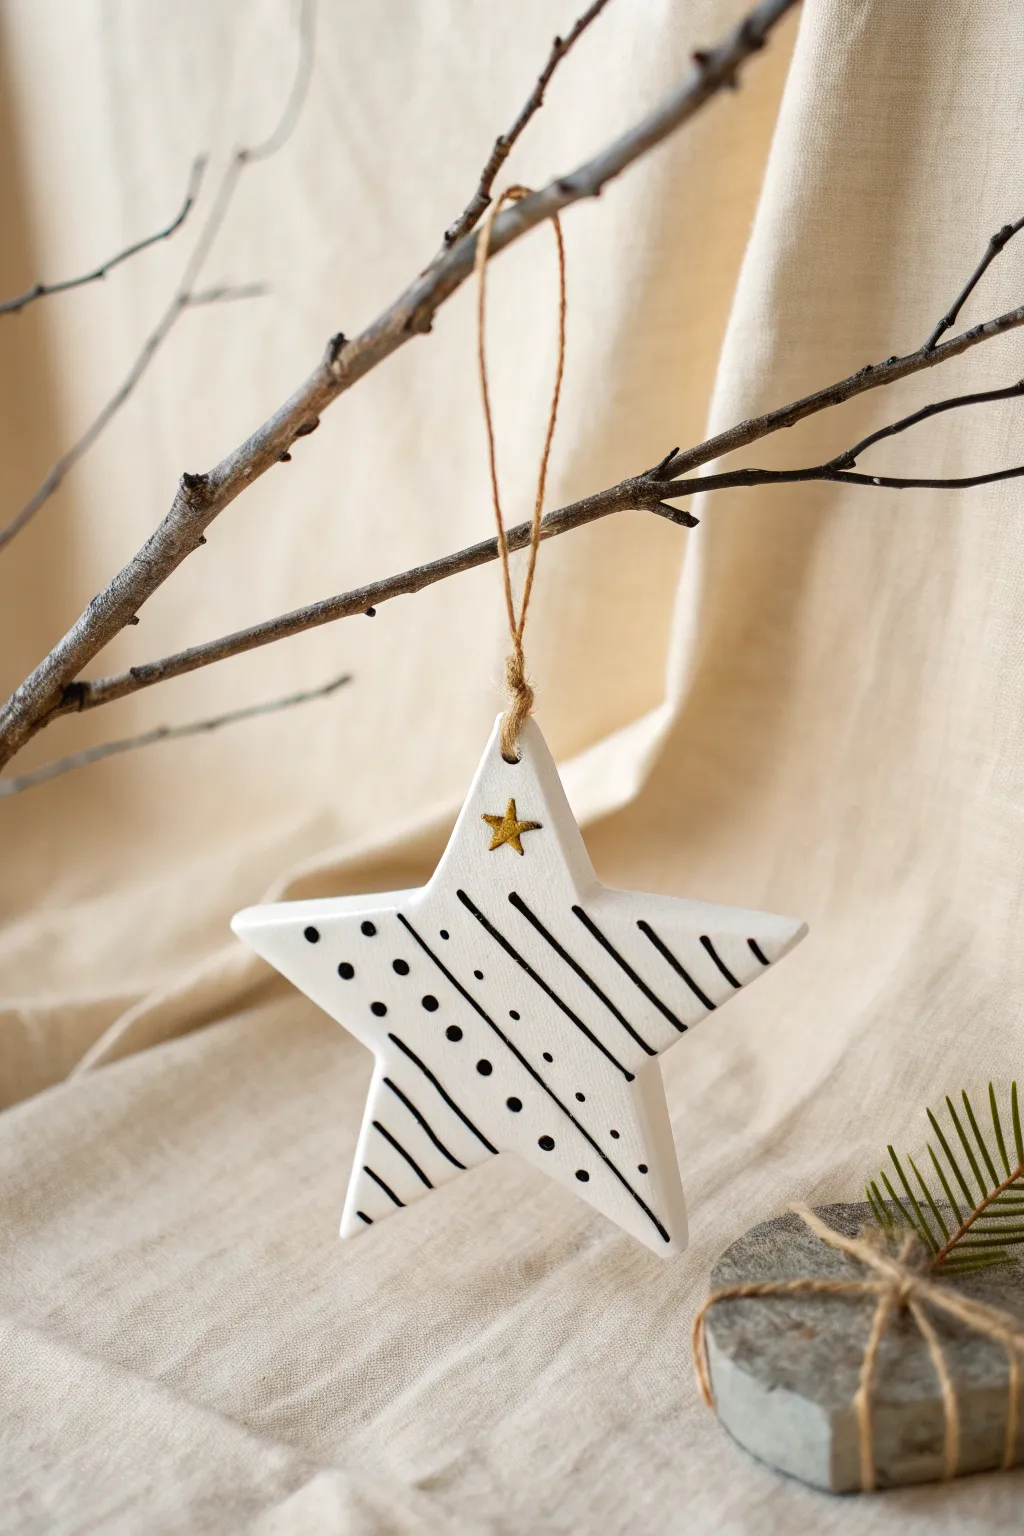
Embrace the clean lines of Scandinavian design with this minimalist star ornament, perfect for adding a modern touch to your holiday decor. Its striking black-and-white pattern and simple gold accent create an elegant, understated look that stands out against evergreen branches.
How-To Guide
Materials
- White air-dry clay
- Rolling pin
- Star cookie cutter (approx. 3-4 inches)
- Fine-grit sandpaper (around 220 or 400 grit)
- Black fine-tip paint pen or permanent marker
- Gold metallic paint pen
- Jute twine or string
- Parchment paper or non-stick mat
- Straw or wooden skewer
- Small bowl of water
Step 1: Shaping the Star
-
Prepare the workspace:
Lay down parchment paper or a non-stick mat on a flat surface to prevent sticking. -
Condition the clay:
Take a handful of air-dry clay and knead it in your hands until it becomes soft, pliable, and free of cracks. This conditioning step is crucial for a smooth final surface. -
Roll the slab:
Using your rolling pin, roll the clay out to an even thickness of about 1/4 inch (6mm). Rotate the clay occasionally to ensure it doesn’t stick to your surface. -
Cut the shape:
Position your star cookie cutter on the smoothest part of the slab and press down firmly. Wiggle slightly to separate the shape before lifting the cutter. -
Create hanging hole:
While the clay is still wet, use a straw or skewer to punch a hole at the top point of the star. Make sure the hole isn’t too close to the edge to prevent breaking later. -
Smooth the edges:
Dip your finger into a small bowl of water and gently run it along the cut edges of the star to smooth out any roughness or loose bits of clay. -
Initial Drying:
Let the star dry completely on a flat surface. Depending on humidity and thickness, this usually takes 24-48 hours. Flip deeply into the drying process so both sides dry evenly.
Step 2: Decorating the Surface
-
Sanding:
Once bone dry, take your fine-grit sandpaper and gently buff the surface and edges. This removes any fingerprints or imperfections, leaving a pro-quality matte finish. -
Clean the surface:
Wipe the star with a very slightly damp cloth or a dry soft brush to remove all sanding dust before you start drawing. -
Draw the accent star:
Using the gold metallic paint pen, draw a tiny five-pointed star just below the hanging hole. Fill it in carefully for a solid gold look. -
Draw the diagonal lines:
With the black fine-tip pen, draw parallel diagonal lines across the right side of the star. Vary the thickness slightly for visual interest, mirroring the image’s dynamic style. -
Add the dots:
On the left side of the star, add rows of small black dots. I find it easiest to follow the angle of the lines you just drew to keep the geometric pattern cohesive. -
Detail the points:
Finish the pattern by adding short diagonal stripes on the bottom left point and right point to balance the design. -
Seal (optional):
If desired, you can apply a matte varnish spray to protect the clay and ink, though leaving it raw maintains that lovely chalky texture. -
Stringing:
Cut a length of jute twine, thread it through the hole at the top, and tie a secure knot to create a loop for hanging.
Fixing Cracks
If small cracks appear while drying, don’t panic. Mix a tiny bit of fresh clay with water to make a paste (slip) and fill the crack, then sand smooth once dry.
Add Dimension
Before the clay dries, gently press a textured fabric or a stamp onto just one half of the star for a subtle, tactile contrast to the painted side.
Hang your finished star on a branch and enjoy the clean, modern warmth it brings to your space
Spiced “Scented” Clay Ornaments With Rustic Texture
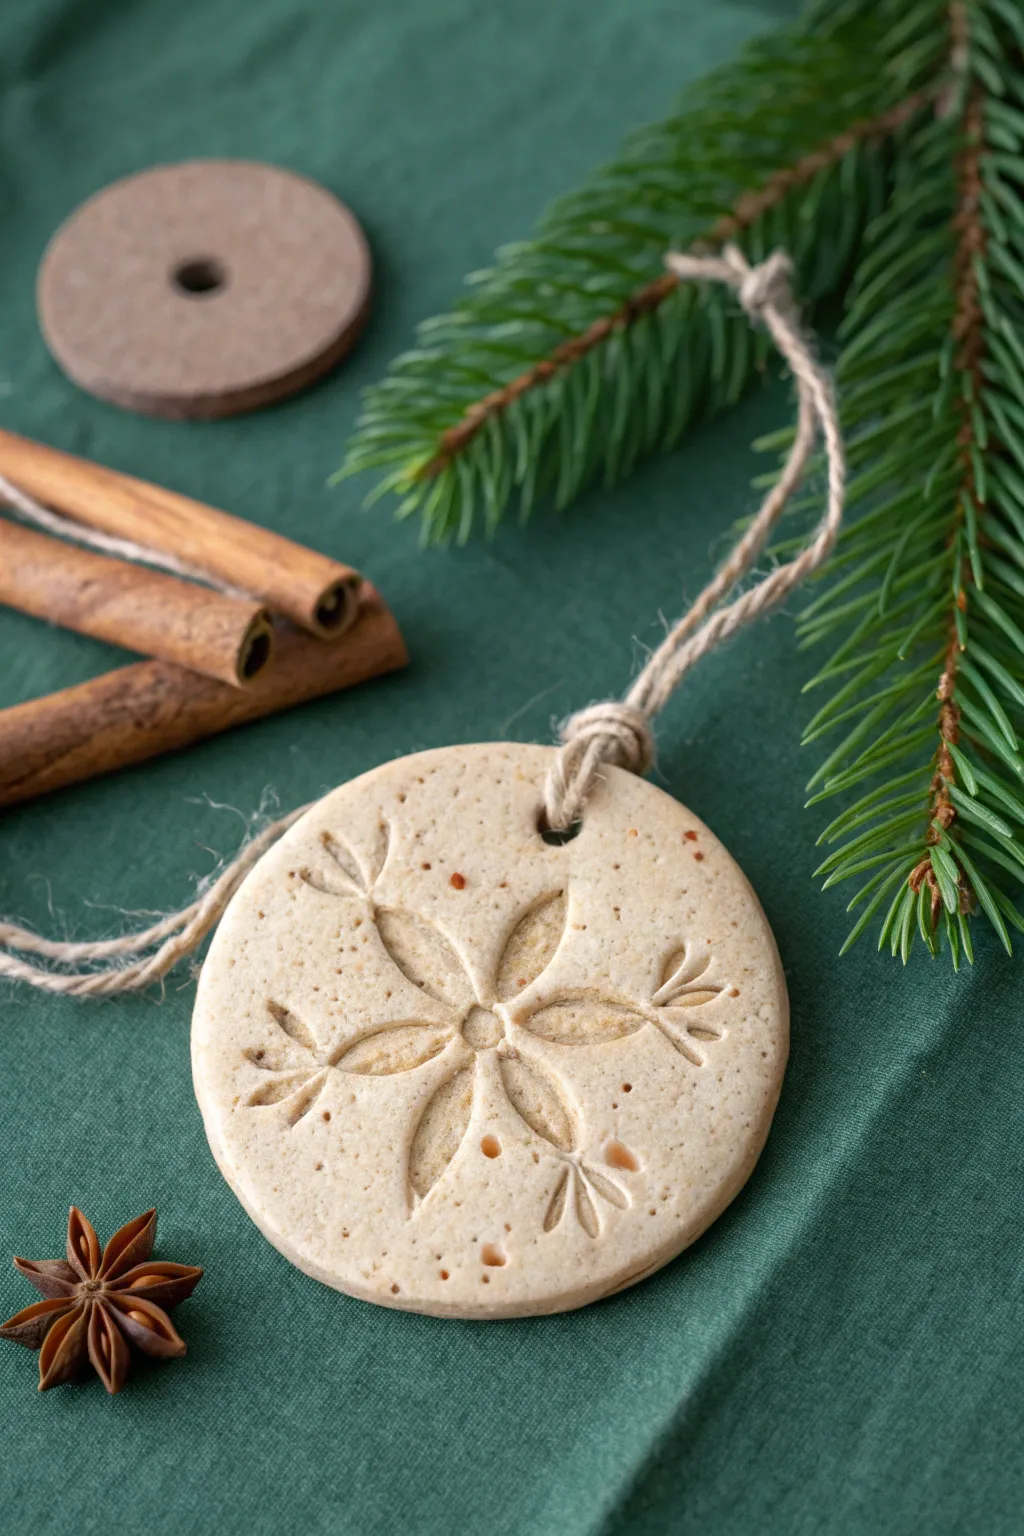
These simple yet elegant ornaments bring the warm, rustic charm of a farmhouse Christmas right into your home. Made with a spiced clay dough that retains a subtle speckle, they feature a delicate embossed snowflake design and hang from natural jute twine.
Step-by-Step Tutorial
Materials
- Air dry clay (or a homemade salt dough mixture)
- Ground cinnamon and nutmeg
- Rolling pin
- Round cookie cutter (approx. 3 inches)
- Small snowflake stamp or embossing tool
- Drinking straw (for the hanging hole)
- Natural jute twine
- Fine grit sandpaper
- Parchment paper
- Baking sheet or flat board
Step 1: Prepare the Clay
-
Mix the spices:
Begin by taking a handful of your air dry clay. To achieve that speckled, rustic look seen in the photo, sprinkle in a teaspoon of ground cinnamon and a pinch of nutmeg directly onto the clay. -
Knead thoroughly:
Fold the clay over the spices and knead continuously until the specks are evenly distributed throughout the white dough. If the clay feels too dry, dampen your fingers slightly with water. -
Roll out the slab:
Place the clay on a piece of parchment paper to prevent sticking. Using a rolling pin, roll the clay out to an even thickness of about 1/4 inch. You want it thick enough to hold the impression but thin enough not to be heavy.
Clean Impressions
If your stamp sticks to the clay, lightly dust the surface of the dough with a tiny bit of cornstarch or flour before pressing the design down.
Step 2: Shape and Emboss
-
Cut the rounds:
Press your round cookie cutter firmly into the rolled clay. Lift the cutter straight up to create a clean circle. Peel away the excess clay from the outside edges to reuse later. -
Smooth the edges:
Dip your finger in a tiny bit of water and run it gently around the circumference of the cut circle to smooth out any rough or sharp edges leftover from the cutter. -
Create the hanging hole:
Take a plastic drinking straw or a small circular tool and press it into the top center of the ornament, about half an inch from the edge. Twist slightly and lift to remove the small plug of clay. -
Center your design:
Position your snowflake stamp or embossing tool directly in the center of the clay circle. Eyeballing this alignment is usually sufficient for a handmade feel. -
Impress the pattern:
Press the stamp down firmly and evenly. You want the impression to be deep enough to show shadows, as seen in the reference image, but not so deep that it distorts the circular shape. -
Inspect and refine:
Carefully lift the stamp. If any clay stuck to the stamp’s crevices, use a needle tool or toothpick to gently clean up the lines of the snowflake design on the ornament.
Add Subtle Shimmer
For a magical touch, lightly brush pearl mica powder or a very sheer gold acrylic wash over the embossed snowflake pattern to make the details pop.
Step 3: Dry and Assemble
-
Let it dry:
Transfer the parchment paper with the ornaments to a flat board or baking sheet. Allow them to air dry in a cool, dry place for 24-48 hours. I find flipping them over halfway through helps them dry flat. -
Check for hardness:
The clay should be completely hard and lighter in color when fully dry. There should be no cold or damp spots in the center. -
Sand the surfaces:
Once fully cured, take a piece of fine-grit sandpaper and very gently buff the edges and the surface. This removes any final imperfections and softens the texture. -
Cut the twine:
Cut a piece of natural jute twine to a length of about 8 to 10 inches. -
Thread the loop:
Fold the twine in half. Push the folded loop end through the hole in the ornament from front to back. -
Secure the knot:
Pass the loose ends of the twine through the loop you just created and pull tight to secure it against the clay (a lark’s head knot). -
Tie the hanger:
Tie the two loose ends of the twine together in a simple overhand knot to create the hanger.
Now you have a set of charming, aromatic decorations ready to adorn your tree or be given as thoughtful gifts