When I’m in a holiday mood, nothing beats making Christmas clay art that you can actually hang up, gift, or keep as a little yearly tradition. Here are my favorite christmas clay art ideas—starting with the classics everyone loves, then sliding into some playful, studio-style twists.
Classic Cutout Tree Ornaments
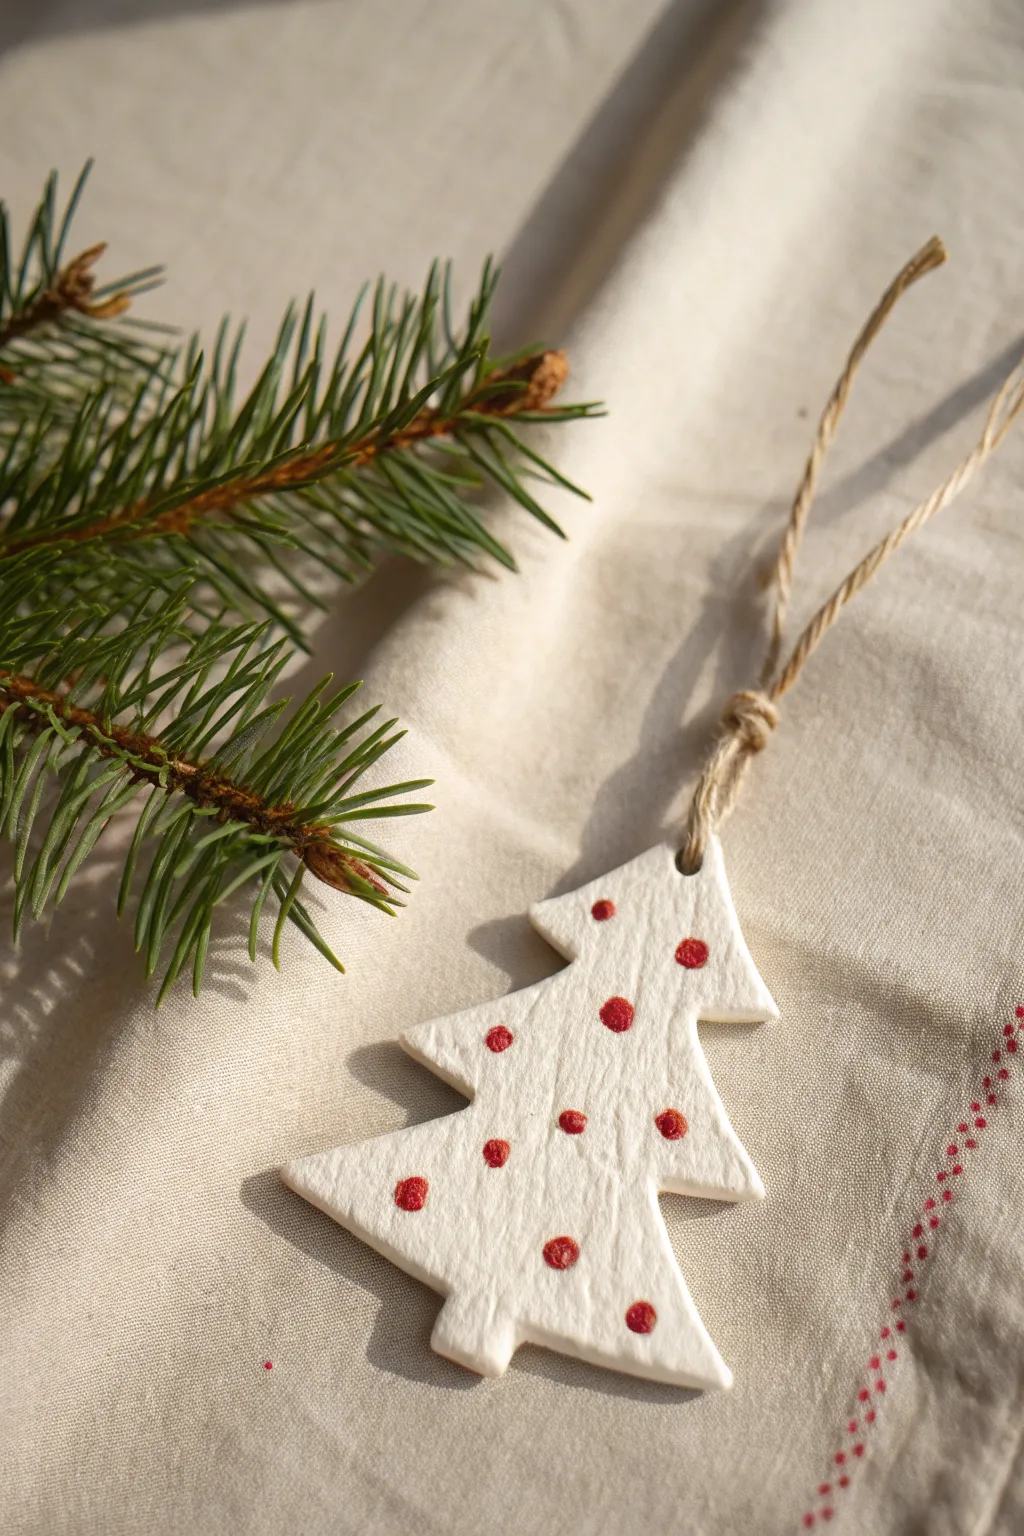
Embrace the charm of minimalism with this classic white clay tree dotted with cheerful red accents. Its slightly organic texture and rustic twine loop give it a cozy, handcrafted feel perfect for a traditional Christmas aesthetic.
How-To Guide
Materials
- White air-dry clay (or salt dough)
- Small Christmas tree cookie cutter
- Rolling pin
- Parchment paper or non-stick mat
- Straw or wooden skewer
- Sandpaper (fine grit)
- Red acrylic paint
- Small round paintbrush or dotting tool
- Jute twine or hemp cord
- Clear matte sealant (optional)
Step 1: Shaping the Clay Base
-
Prepare your workspace:
Lay down a sheet of parchment paper or a non-stick silicone mat to prevent your clay from sticking to the table. -
Condition the clay:
Take a handful of white air-dry clay and knead it in your hands for a minute until it feels soft, warm, and pliable. -
Roll it out:
Use a rolling pin to flatten the clay to an even thickness, aiming for about 1/4 inch thick so it’s sturdy but not too heavy. -
Cut the shape:
Press your Christmas tree cookie cutter firmly into the clay. Wiggle it very slightly to ensure a clean cut before lifting it away. -
Remove excess clay:
Peel away the scrap clay from around the tree shape, setting it aside for future ornaments. -
Create the hanging loop:
Using a straw or a wooden skewer, poke a clean hole through the very top tip of the tree. Make sure the hole is big enough for your twine to pass through. -
Smooth the edges:
Dip your finger in a tiny bit of water and run it gently along the cut edges of the tree to soften any jagged bits left by the cutter. -
Initial texture check:
If you want that slightly rustic, handmade look seen in the photo, don’t worry about smoothing the surface perfectly flat; a few natural fingerprints add character. -
Drying time:
Place the clay tree on a flat surface to dry. I like to flip mine over after about 12 hours to ensure the back dries evenly.
Cracking Clay?
Cracks often happen if clay dries too fast. Keep your drying ornaments away from direct heat sources like radiators or sunny windows to let them cure slowly.
Step 2: Decorating and Finishing
-
Check for dryness:
Wait 24-48 hours until the clay is completely hard and white. -
Refine the shape:
If any edges feel too sharp after drying, use a piece of fine-grit sandpaper to give them a quick, light buffing. -
Prepare the paint:
Squeeze a small amount of bright red acrylic paint onto a palette or scrap paper. -
Apply the dots:
Dip the end of a round paintbrush handle or a dotting tool into the paint. Press it gently onto the clay to create random polka dots. -
Vary the placement:
Space the dots out casually—don’t try to make a perfect grid. Getting a few dots near the edges makes the pattern look continuous. -
Let the paint dry:
Allow the red dots to dry completely, which should only take about 15-20 minutes. -
Seal the ornament (optional):
If you want extra durability, brush on a thin layer of clear matte sealant over the front and back. -
Cut the twine:
Cut a piece of jute twine to your desired length, roughly 6 to 8 inches. -
Thread the hanger:
Push the twine loop through the hole at the top of the tree. -
Secure the loop:
Tie a secure overhand knot at the end of the twine to finish your hanger.
Pro Tip: Textured Surface
For a subtle organic texture, gently press a piece of linen fabric or a paper towel onto the wet clay surface before cutting out your tree shape.
Your charming spotted tree is now ready to add a splash of artisan cheer to your branches


Pine and Holly Imprint Ornaments
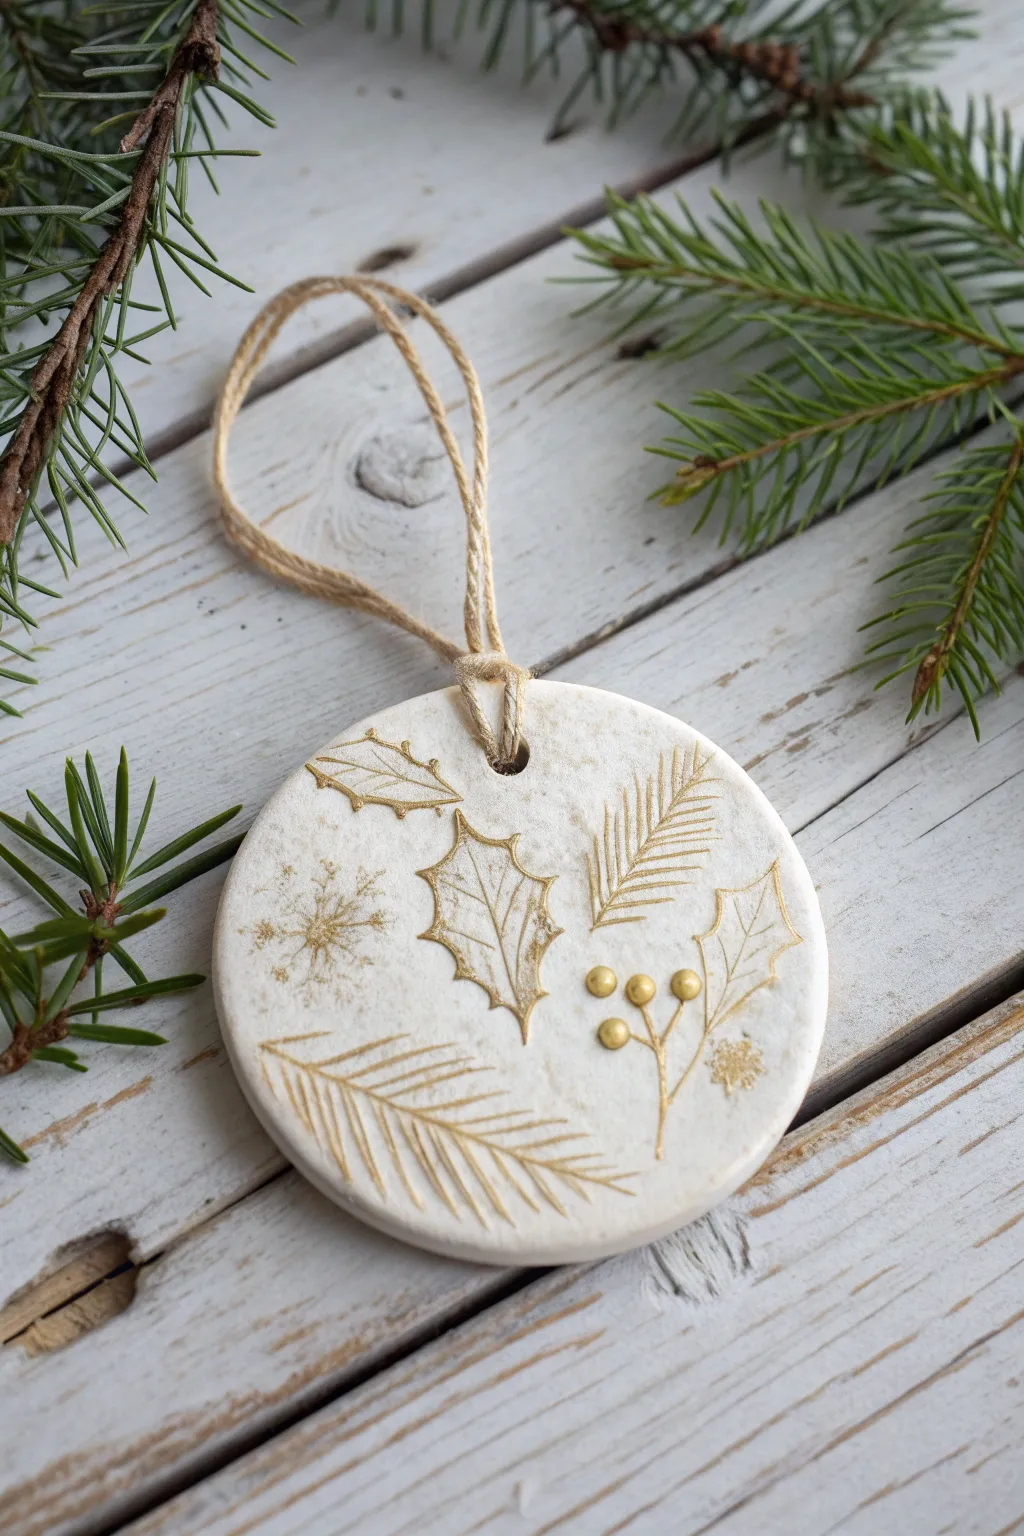
Capture the delicate beauty of winter foliage with these elegant clay ornaments boasting intricate golden details. The smooth white base provides the perfect canvas for shimmering imprinted designs of holly, pine, and snowflakes.
Detailed Instructions
Materials
- White sculpting clay (air-dry or polymer)
- Small rolling pin
- Circular cookie cutter or jar rim (approx. 3 inches)
- Rubber stamps (holly, pine branch, snowflake designs)
- Gold metallic pigment powder or gold acrylic paint
- Fine-detail paintbrush
- Drinking straw or small circular tool
- Jute twine or rustic string
- Sandpaper (fine-grit)
- Wax paper or parchment paper
Step 1: Preparation & Shaping
-
Condition the Clay:
Begin by kneading a handful of white clay until it is soft, pliable, and free of cracks. If you are using polymer clay, the warmth of your hands will make it easier to work with. -
Flatten the Base:
Place the clay on a sheet of wax paper or parchment paper to prevent sticking. Use your rolling pin to flatten it into an even slab, aiming for a thickness of about 1/4 inch. -
Cut the Shape:
Press your circular cutter firmly into the clay to create a clean, round shape. Remove the excess clay from around the edges and set it aside for future use. -
Create the Hanger Hole:
Use a drinking straw or a small circular tool to punch a hole near the top edge of the circle. Position it centered and far enough from the edge so the clay won’t tear later. -
Smooth the Edges:
Dip your finger in a tiny bit of water and gently run it along the cut edge of the circle to smooth out any roughness or sharp corners.
Sticky Stamps?
If your stamps are sticking to the clay and ruining the impression, lightly dust the stamp surface with cornstarch or baby powder before pressing it down.
Step 2: Imprinting & Drying
-
Plan Your Composition:
Before pressing into the clay, lightly hover your stamps over the surface to visualize where the holly leaves, pine branches, and snowflakes will look best. -
Stamp the Designs:
Gently press your clean rubber stamps into the soft clay. You want a clear impression, but be careful not to push all the way through the slab. -
Add Berry Details:
For the holly berries, I sometimes use the rounded end of a paintbrush handle to create small, raised or indented dots if my stamp doesn’t show them clearly. -
Dry the Ornament:
Allow the clay to dry completely according to the package instructions. For air-dry clay, this usually takes 24-48 hours; for polymer clay, bake it in the oven as directed. -
Refine the Surface:
Once fully cured and cooled, lightly sand any rough edges or uneven spots on the surface with fine-grit sandpaper for a professional finish.
Step 3: Gilding & Finishing
-
Prepare the Gold:
Dip your fine-detail brush into the gold acrylic paint or pick up a small amount of metallic pigment powder mixed with a drop of varnish. -
Filling the Grooves:
Carefully trace the indented lines of your stamped designs with the gold paint. The grooves will naturally help guide your brush. -
Highlighting Berries:
Dab a generous drop of gold onto each berry imprint to make them stand out as solid metallic dots. -
Dry the Paint:
Set the ornament aside to let the paint dry completely. Ensure it is placed on a flat surface so the paint on the berries doesn’t run. -
Attach the Hanger:
Cut a length of jute twine, fold it in half, and thread the looped end through the hole from front to back. -
Secure the Loop:
Pass the loose ends of the twine through the loop and pull tight to secure it, creating a rustic Lark’s Head knot.
Design Depth
For a truly embossed look, roll your initial clay slab slightly thicker. Deeper impressions hold more gold pigment and create better shadows.
Hang your finished masterpiece on a branch to add a touch of handmade elegance to your decor


Chubby Santa Figurines
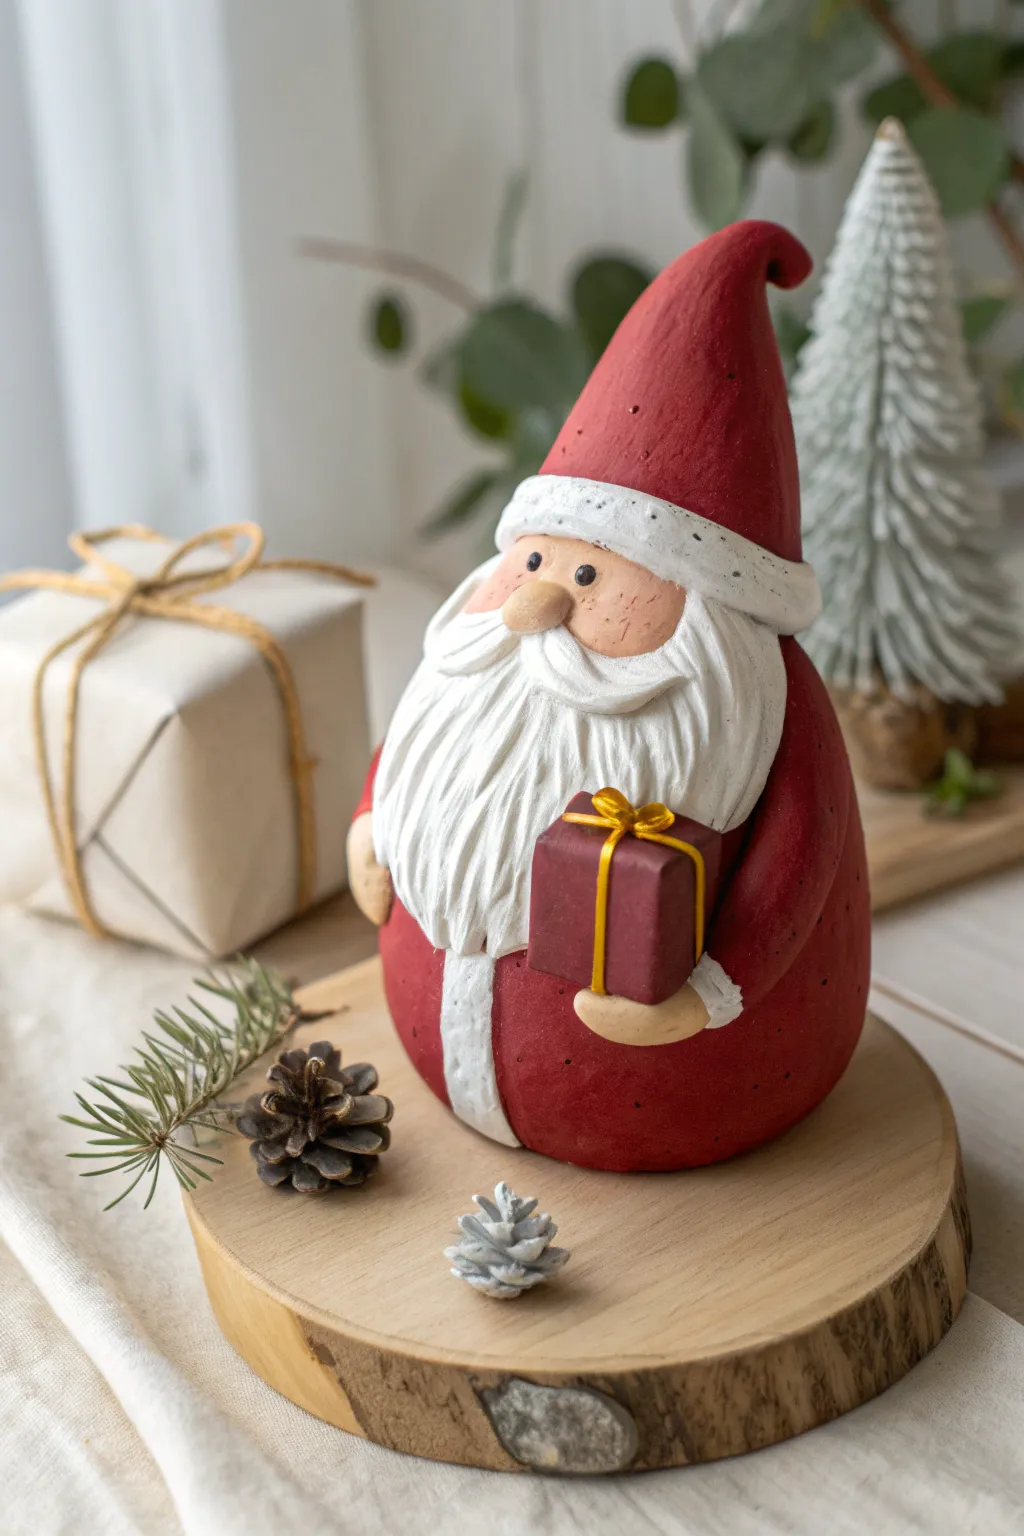
Capture the whimsical spirit of the holidays with this delightful, round Santa figurine made from air-dry clay. His textured beard, tall pointed hat, and tiny gift box create a heartwarming centerpiece for any rustic Christmas display.
How-To Guide
Materials
- White air-dry clay (or polymer clay)
- Acrylic paints (deep red, white, flesh tone, black, gold)
- Sculpting tools (needle tool, small ball tool)
- Aluminum foil (for the core)
- Fine-grit sandpaper
- Matte varnish or sealant
- Small paintbrushes (flat and fine liner)
- Water cup
Step 1: Forming the Base
-
Create the core:
Crumple a piece of aluminum foil into a pear-like shape that is wider at the bottom. This saves clay and keeps the figurine lightweight while providing a sturdy internal structure. -
Cover with clay:
Roll out a sheet of white clay to about 1/4 inch thickness. Wrap it entirely around your foil core, smoothing the seams with a bit of water on your finger until you have a seamless, cone-like body shape. -
Shape the head:
Refine the top of the cone to distinguish the head area slightly, though this style keeps the head and body integrated for that cute, chubby look. Ensure the bottom is flat so he stands securely.
Texturing Tip
Before the clay dries, gently dab the red hat and coat areas with a stiff bristle brush or a ball of tin foil to create a pitted, stone-like texture.
Step 2: Sculpting the Details
-
Add the coat trim:
Roll a thin strip of clay and run it vertically down the center of the body from the neck area to the base. Press it gently to adhere, creating the white fur lining of his coat. -
Attach the arms:
Roll two sausage shapes for arms. Attach them to the sides of the body, curving them forward so the hands meet in the middle where he will hold his gift. -
Sculpt the face:
Press a small oval of clay onto the upper facial area for the nose. Add tiny cheeks if desired, smoothing the edges into the main head shape. -
Create the beard:
Flatten a piece of clay into a bib shape and attach it under the nose area. Using a needle tool or knife, carve deep vertical lines to mimic thick, flowing hair. I like to twist the ends slightly for movement. -
Form the mustache:
Make two small teardrop shapes and place them horizontally under the nose, curving the tips upward. Texture these with your needle tool to match the beard. -
Fashion the hat:
Shape a tall cone of clay and place it on top of the head. Curve the tip slightly to one side for character. Add a textured band of clay around the rim where the hat meets the face. -
Make the gift box:
Form a small cube from clay. Place it securely between Santa’s hands (or mittens), pressing gently so it looks like he is gripping it.
Make it Sparkle
Mix a tiny amount of glitter into your white paint for the beard and trim, or dust the wet white paint with mica powder for a snowy, magical shimmer.
Step 3: Painting and Finishing
-
Initial drying:
Allow the sculpture to dry completely according to your clay’s instructions—usually 24 to 48 hours for air-dry clay. Sand any rough fingerprints lightly. -
Base coat the red:
Paint the hat and the main body coat with a deep, matte red acrylic. Leave the face, beard, trim, and gift box unpainted for now. -
Paint the details:
Paint the face area with a soft flesh tone. Carefully paint the beard, mustache, hat rim, and coat trim with white. Use multiple thin layers for solid coverage. -
Add facial features:
Using the back of a paintbrush or a dotting tool, dab two small black dots for eyes. Add a tiny blush of pink to the cheeks and nose for a frosty look. -
Decorate the gift:
Paint the gift box a contrasting color, like a deep burgundy or green. Once dry, use a fine liner brush and gold paint to draw the ribbon and bow on top. -
Apply texture specks:
To mimic the stone-like texture in the reference, you can lightly flick a toothbrush loaded with watered-down brown paint over the dried red areas. -
Seal:
Finish with a coat of matte varnish to protect the paint and give the Santa a professional, cohesive finish.
Place your charming Santa on a slice of wood or near some pinecones to complete the festive scene


Snowmen With Cozy Texture
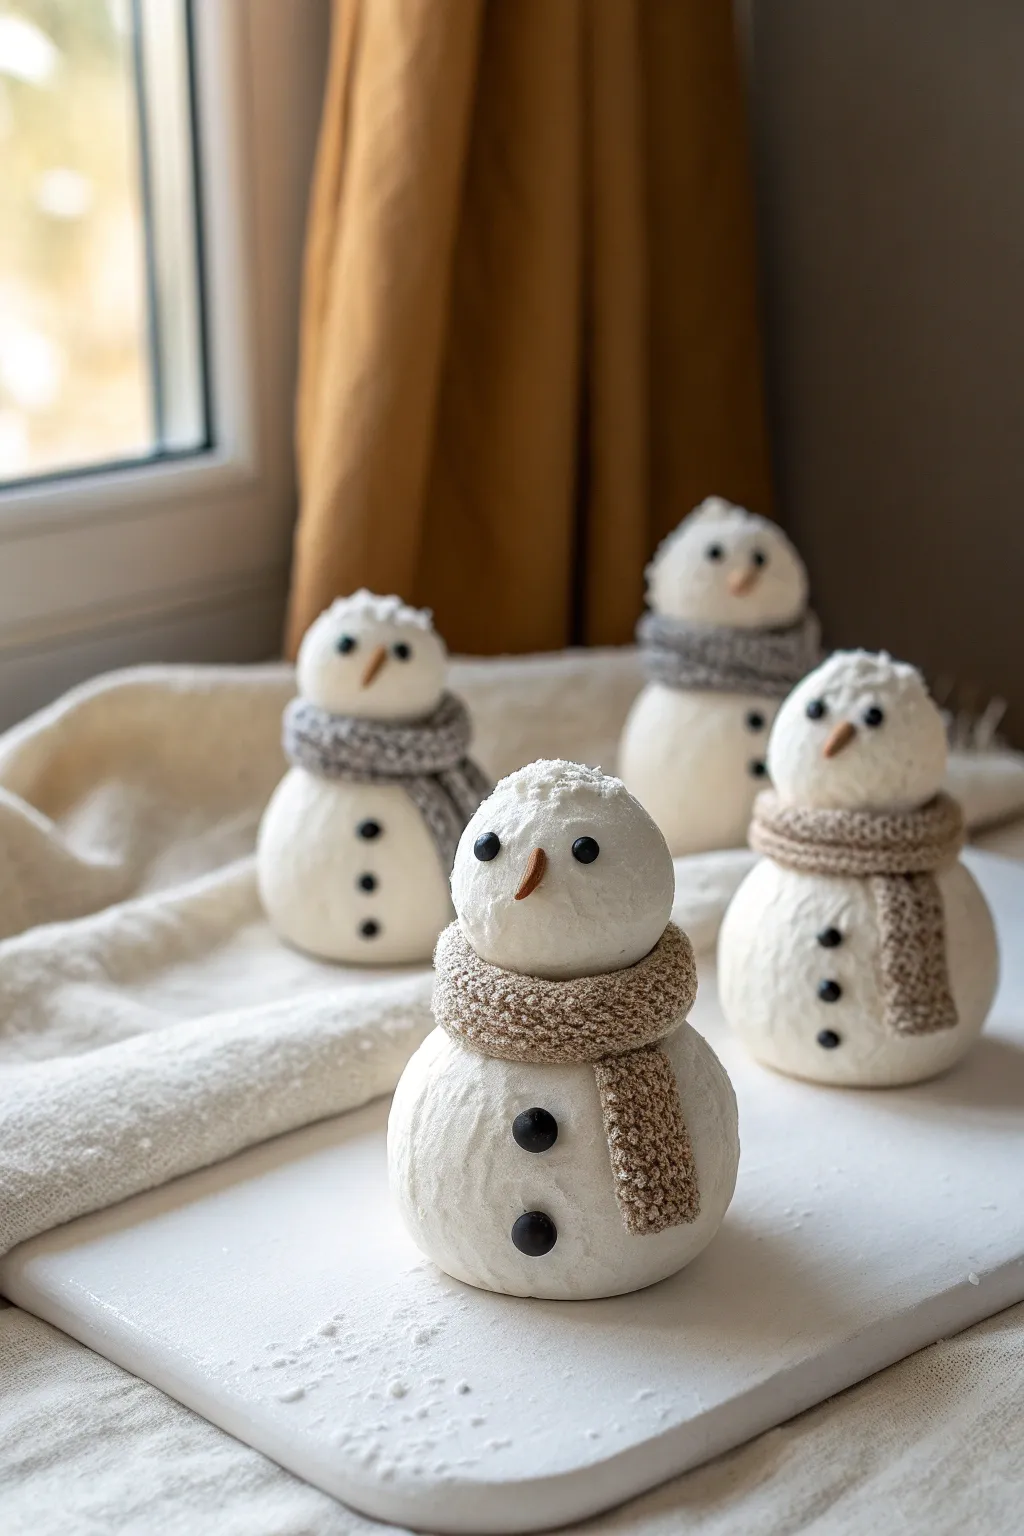
These adorable little figures bring the magic of a fresh snowfall indoors with their uniquely textured surfaces and realistic knit-effect scarves. The rough, snowy finish combined with the smooth clay accessories creates a charming tactile contrast perfect for a winter mantelpiece.
Detailed Instructions
Materials
- White polymer clay or air-dry clay
- Beige or grey polymer clay (for scarves)
- Orange polymer clay (tiny amount for noses)
- Small black beads or black clay
- Old stiff toothbrush or stiff bristle brush
- Needle tool or toothpick
- Piece of textured fabric (course linen or burlap) or a texture roller
- White acrylic paint (optional, for extra snow effect)
- Small roller
Step 1: Forming the Bodies
-
Condition the Clay:
Begin by thoroughly kneading your white clay until it is soft and pliable. If using polymer clay, make sure it’s warm enough to avoid cracking. -
Roll the Spheres:
For each snowman, you will need two balls of white clay. Roll one larger ball for the body (about the size of a golf ball) and one slightly smaller ball for the head. -
Create the Snow Texture:
Before assembling, grip a single clay ball gently. Take an old stiff toothbrush or a stiff bristle brush and firmly tap the entire surface of the clay. Don’t drag the brush; simple up-and-down tapping motions create that realistic, fluffy packed-snow look. -
Texture the Second Ball:
Repeat the texturing process on the second ball. I like to let the surface texture get a little messy here—real snowmen aren’t perfectly smooth. -
Stack and Secure:
Gently press the head onto the body. If using polymer clay, a firm press is usually enough. For air-dry clay, you might want to score the contact points with a needle tool and add a dab of water or slip to ensure a strong bond.
Texture Master Tip
For deeper ‘snow’ texture, wrap a ball of aluminum foil and roll it over the clay surface before using the toothbrush for fine details.
Step 2: The Cozy Scarves
-
Roll a Strip:
Roll out a small amount of beige or grey clay into a long, flat strip, approximately 3-4mm thick and 1cm wide. -
Add Knit Texture:
Press a piece of coarse fabric, like burlap or heavy linen, firmly onto the clay strip to imprint a woven texture. Alternatively, carefully use a needle tool to scratch tiny ‘V’ shapes in rows to mimic knitting. -
Wrap the Scarf:
Drape the textured strip around the snowman’s neck where the two snowballs meet. Overlap the ends slightly at the front. -
Create the Hang:
Cut a shorter piece of the textured strip to serve as the tail of the scarf. Tuck this piece under the overlap so it hangs down the snowman’s chest naturally.
Sparkle Upgrade
Before baking or drying, lightly brush the white parts with white or clear creative mica powder to make the snow glisten in the light.
Step 3: Adding Personality
-
Insert Eyes:
Take two small black beads and press them firmly into the face area for eyes. If you don’t have beads, roll tiny balls of black clay and press them in. -
Add Buttons:
Press two or three larger beads (or black clay balls) down the center of the body to create the buttons. -
Shape the Nose:
Roll a tiny piece of orange clay into a small cone shape. Taper one end to a point. -
Attach the Nose:
Press the flat end of the orange cone into the center of the face. Give it a very slight upward tilt for a cute, curious expression. -
Final Texturing Touch-up:
Handling the snowmen might have smoothed out your texture in spots. Use your toothbrush to carefully re-tap any flat areas, being careful not to hit the scarf or beads.
Step 4: Finishing Up
-
Optional Snow Dusting:
If you want an extra frosty look, lightly dab a tiny amount of white acrylic paint onto the top of the scarf and the very top of the head using a sponge. -
Bake or Dry:
If using polymer clay, bake according to the manufacturer’s instructions (usually 275°F/135°C for 15-30 minutes). If using air-dry clay, leave it in a dry circular spot for 24-48 hours.
Now you have a charming little winter family to brighten up your holiday display

The Complete Guide to Pottery Troubleshooting
Uncover the most common ceramic mistakes—from cracking clay to failed glazes—and learn how to fix them fast.
Sweet Reindeer Face Ornaments
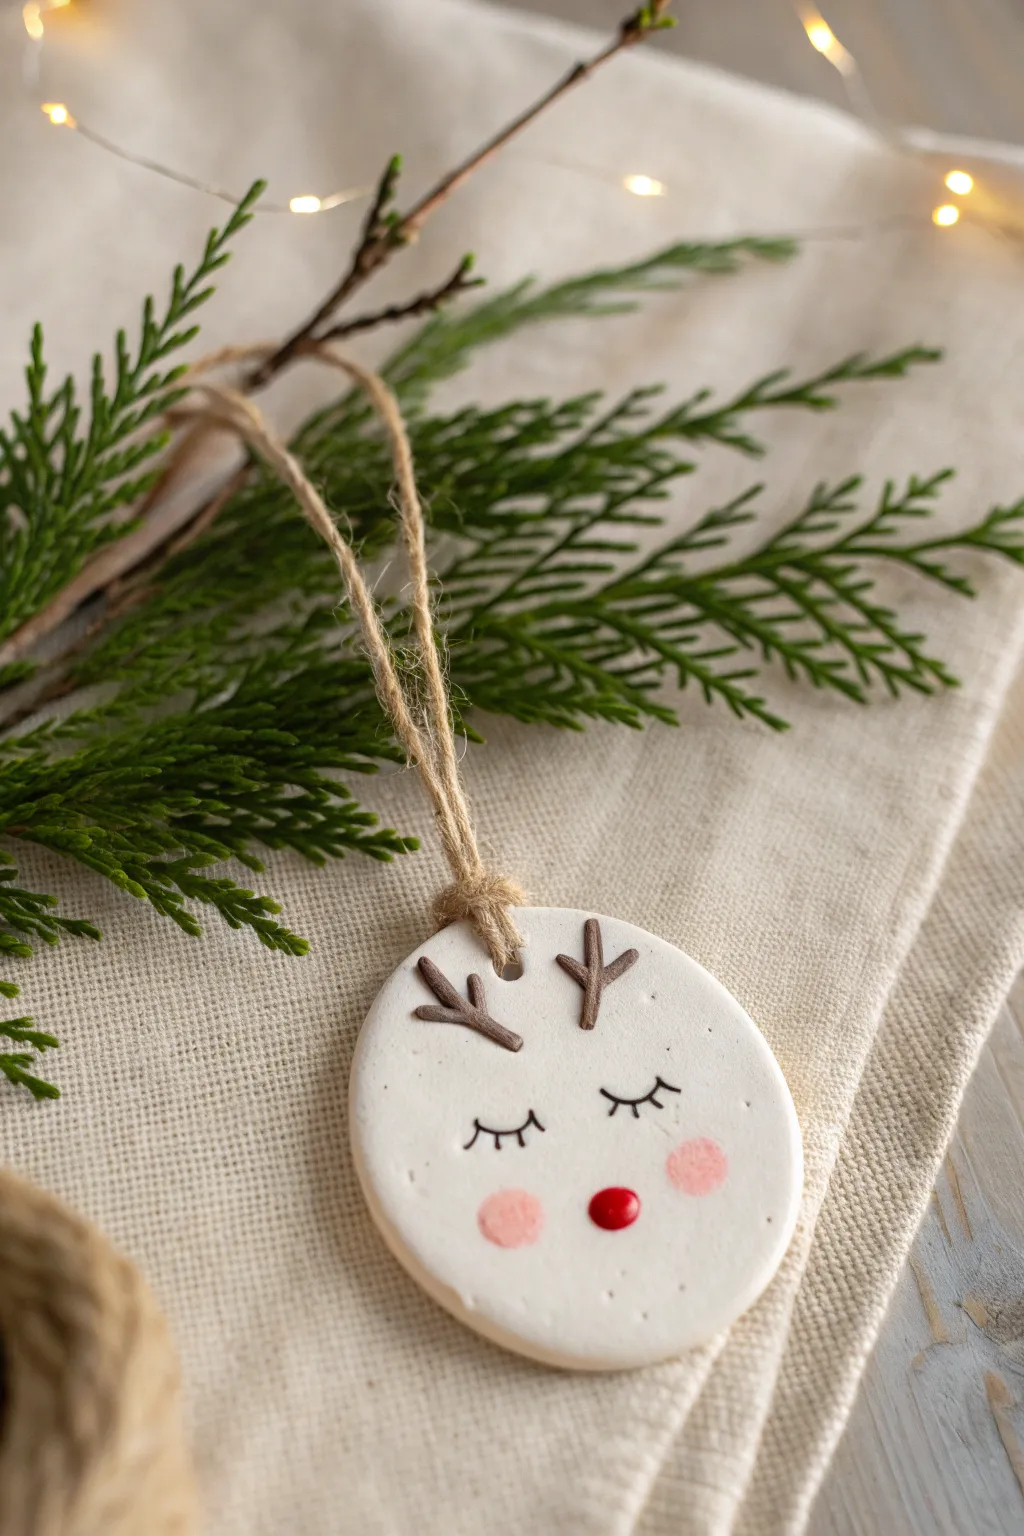
Create a peaceful moment of holiday cheer with this minimalist white clay reindeer ornament. Its sleeping eyes and rosy cheeks give it a gentle, whimsical sweetness that looks beautiful hanging alongside fresh greenery or twinkle lights.
Step-by-Step Tutorial
Materials
- White air-dry clay or polymer clay
- Rolling pin
- Oval or round cookie cutter (approx. 2.5-3 inches)
- Small straw or cocktail stick (for the hole)
- Fine-grit sandpaper (optional)
- Acrylic paints (Dark brown, pink, bright red)
- Very fine detail paintbrush (size 0 or 00)
- Small round sponge dobber or cotton swab
- Jute twine or rustic string
- Matte spray varnish (optional)
Step 1: Shaping the Base
-
Prepare the clay:
Begin by kneading your white clay until it is soft, pliable, and free of air bubbles. If you are using air-dry clay, keep your hands slightly moist to prevent cracking. -
Roll it out:
Using a rolling pin, flatten the clay to a consistent thickness of about 1/4 inch (6mm). You want it sturdy enough not to break, but not too heavy for a tree branch. -
Cut the shape:
Press your oval or round cutter firmly into the clay to create the face shape. If you don’t have an oval cutter, you can use a round one and gently stretch the clay slightly to elongate it. -
Create the hanging hole:
Use a straw or a cocktail stick to poke a clean hole near the top center of the shape. Ensure the hole is large enough for your jute twine to pass through later, keeping in mind clay sometimes shrinks slightly as it dries. -
Smooth the edges:
Dip your finger in a tiny bit of water and run it along the cut edges of the ornament to smooth out any roughness or burrs.
Clean Lines Hack
If you’re nervous about painting fine lines for the eyes and antlers, use a fine-tip permanent marker or archival ink pen instead of a paintbrush.
Step 2: Drying and Refining
-
Let it dry or bake:
If using air-dry clay, place the ornament on a flat wire rack to dry for 24-48 hours, flipping halfway through. If using polymer clay, bake according to the package instructions. -
Sand imperfections:
Once fully cured and hard, check the surface. I like to gently rub a piece of fine-grit sandpaper over the edges and face to ensure a perfectly smooth surface for painting.
Fixing Clay Cracks
If small cracks appear as air-dry clay dries, mix a tiny bit of fresh clay with water to make a paste and smooth it into the cracks with your finger.
Step 3: Painting the Features
-
Paint the antlers:
Using your finest detail brush and dark brown paint, carefully draw two simple antlers near the top of the head. Start with a main vertical line, then add two smaller branches coming off the sides. -
Add sleeping eyes:
Below the antlers, paint two downward-curving arcs for the closed, sleeping eyes. Add three tiny lashes to each eye for a gentle expression. -
Create the nose:
Dip the end of a paintbrush handle or a small round tool into bright red paint. Stamp a perfect small circle in the lower center of the face for the nose. -
Blush the cheeks:
Mix a soft pink color. Using a small sponge dobber, a cotton swab, or even your fingertip, very lightly dab two rosy circles on either side of the nose. Off-load most of the paint on paper first to keep the effect soft and powdery. -
Allow to dry:
Let the paint dry completely. This usually takes only 10-15 minutes for thin acrylic layers. -
Seal (optional):
To protect your artwork, give the ornament a light coat of matte spray varnish. Avoid glossy finishes, as the matte look suits the natural style better.
Step 4: Final Assembly
-
Thread the hanger:
Cut a length of jute twine, roughly 8 inches long. Thread one end through the hole you made earlier. -
Secure the loop:
Bring the ends of the twine together and tie a simple overhand knot near the clay to secure it, or tie a knot at the very top to create a loop.
Now hang your charming little reindeer on the tree to bring a handcrafted touch to your Christmas decor
Stocking and Mitten Keepsakes
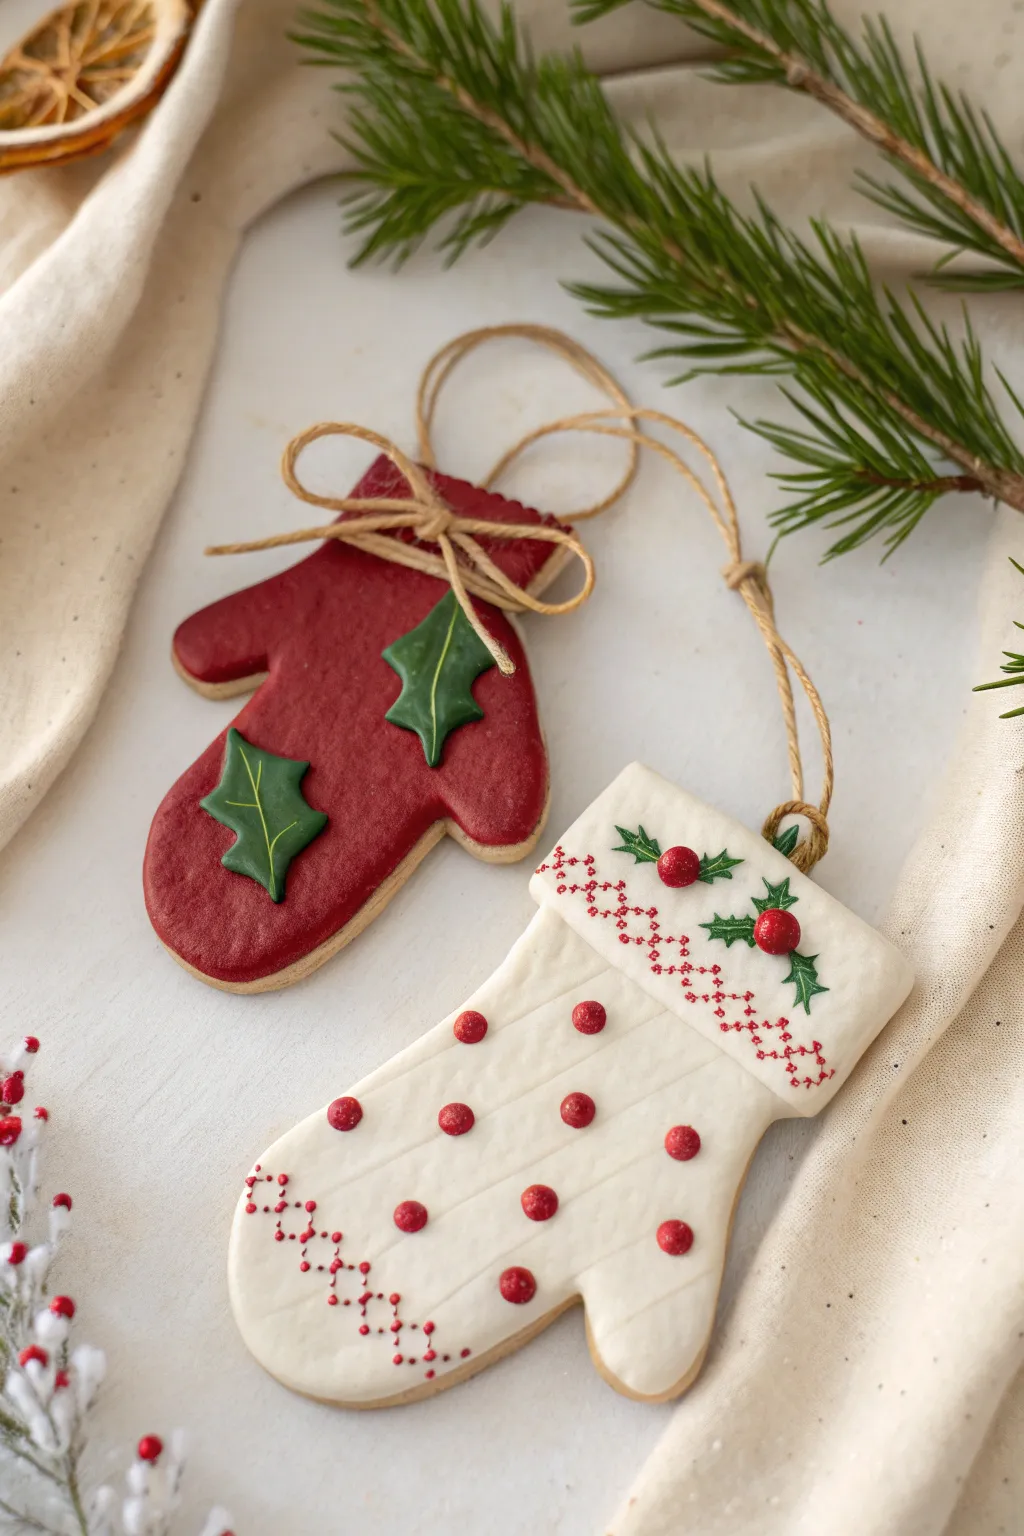
Capture the warmth of winter knits with these delightful clay mittens that mimic the charm of royal icing cookies. Featuring a classic red mitten with holly leaves and a white texted mitten with berry details, these ornaments make perfect heirloom keepsakes.
How-To Guide
Materials
- Polymer clay (white, red, green)
- Small rolling pin
- Mitten cookie cutter (or paper template and craft knife)
- Texture tool or toothpick (to simulate knit patterns)
- Liquid polymer clay (red, white)
- Needle tool
- Small ball stylus tool
- Jute twine
- Parchment paper
- Oven for baking
Step 1: Shaping the Base
-
Prepare the Clay:
Condition your white and red polymer clay separately until soft and pliable. Roll out a slab of white clay and a slab of red clay, approximately 1/4 inch thick. -
Cut the Shapes:
Using a mitten-shaped cookie cutter, press firmly into the clay to create your base shapes. If you don’t have a cutter, trace a mitten template lightly onto the clay and carefully cut around it with a craft knife. -
Smooth the Edges:
Gently run your finger along the cut edges to soften any sharp corners, giving the clay a rounded, baked-cookie appearance. -
Add Texture Details:
For the red mitten, use a needle tool or the edge of a ruler to gently indent a ribbed texture on the cuff area. For the white mitten, leave the cuff smooth for now as we will paint details later. -
Create Hanging Holes:
Use a straw or a larger stylus tool to punch a clean hole near the top center of the cuff or the corner of the mitten for the twine. -
Initial Bake:
Place your clay mittens on parchment paper and bake according to your clay manufacturer’s instructions for a partial bake (about 15 minutes) just to set the shape.
Pro Tip: Realistic Texture
To make the white base look more like fabric before adding details, gently press a piece of coarse sandpaper onto the unbaked clay surface.
Step 2: Decorating the Red Mitten
-
Create Holly Leaves:
Roll out a very thin piece of green clay. Cut out two small holly leaf shapes using a tiny cutter or a craft knife. -
Detail the Leaves:
Use a needle tool to gently press a central vein and smaller side veins into each green leaf for realistic texture. -
Apply the Holly:
Apply a tiny dab of liquid clay to the back of the leaves and press them onto the red mitten base. Arrange them slightly apart as shown in the photo. -
Tie a Clay Bow (Optional):
Roll a very thin snake of tan or white clay to mimic twine, loop it into a bow, and adhere it near the cuff. Alternatively, you can use real twine after baking.
Troubleshooting: Smudges
If red clay stains your white mitten while working, use a Q-tip dipped in a tiny bit of rubbing alcohol or baby oil to wipe the surface clean before baking.
Step 3: Decorating the White Mitten
-
Simulate Knitting:
Mix white liquid polymer clay to a consistency similar to royal icing. Put it in a needle-tip applicator bottle. -
Pipe the Cables:
Squeeze thin, diagonal lines of white liquid clay across the body of the mitten to create the raised ‘cable knit’ effect seen in the reference. -
Add Red Berries:
Roll tiny balls of red clay. Place them in a polka-dot pattern between the piped white lines on the main part of the mitten. -
Create the Cuff Pattern:
Using red liquid clay or red acrylic paint (post-baking), draw delicate ‘cross-stitch’ X patterns across the cuff area in two rows. -
Add Greenery Details:
Add tiny green clay leaves or paint small holly details near the top loop of the white mitten for a festive touch. -
Final Red Accents:
Place three slightly larger red clay balls near the green leaves on the cuff, mimicking holly berries.
Step 4: Finishing Touches
-
Final Bake:
Return both mittens to the oven for a full bake cycle to cure the liquid clay and secure all attached details. Let them cool completely in the oven to prevent cracking. -
Seal (Optional):
If you want a glossy ‘icing’ look, apply a thin coat of gloss glaze over the raised details only. I prefer a matte finish for the ‘cookie’ part. -
String the Ornaments:
Cut a length of jute twine. Thread it through the holes you created earlier. -
Secure the Knot:
Tie a secure knot at the base of the twine loop or add a decorative bow using the twine itself to complete the rustic look.
Hang these charming clay creations on your tree and enjoy the cozy, homemade vibe they bring to your holiday decor


What Really Happens Inside the Kiln
Learn how time and temperature work together inside the kiln to transform clay into durable ceramic.
Gingerbread Cookie-Style Ornaments
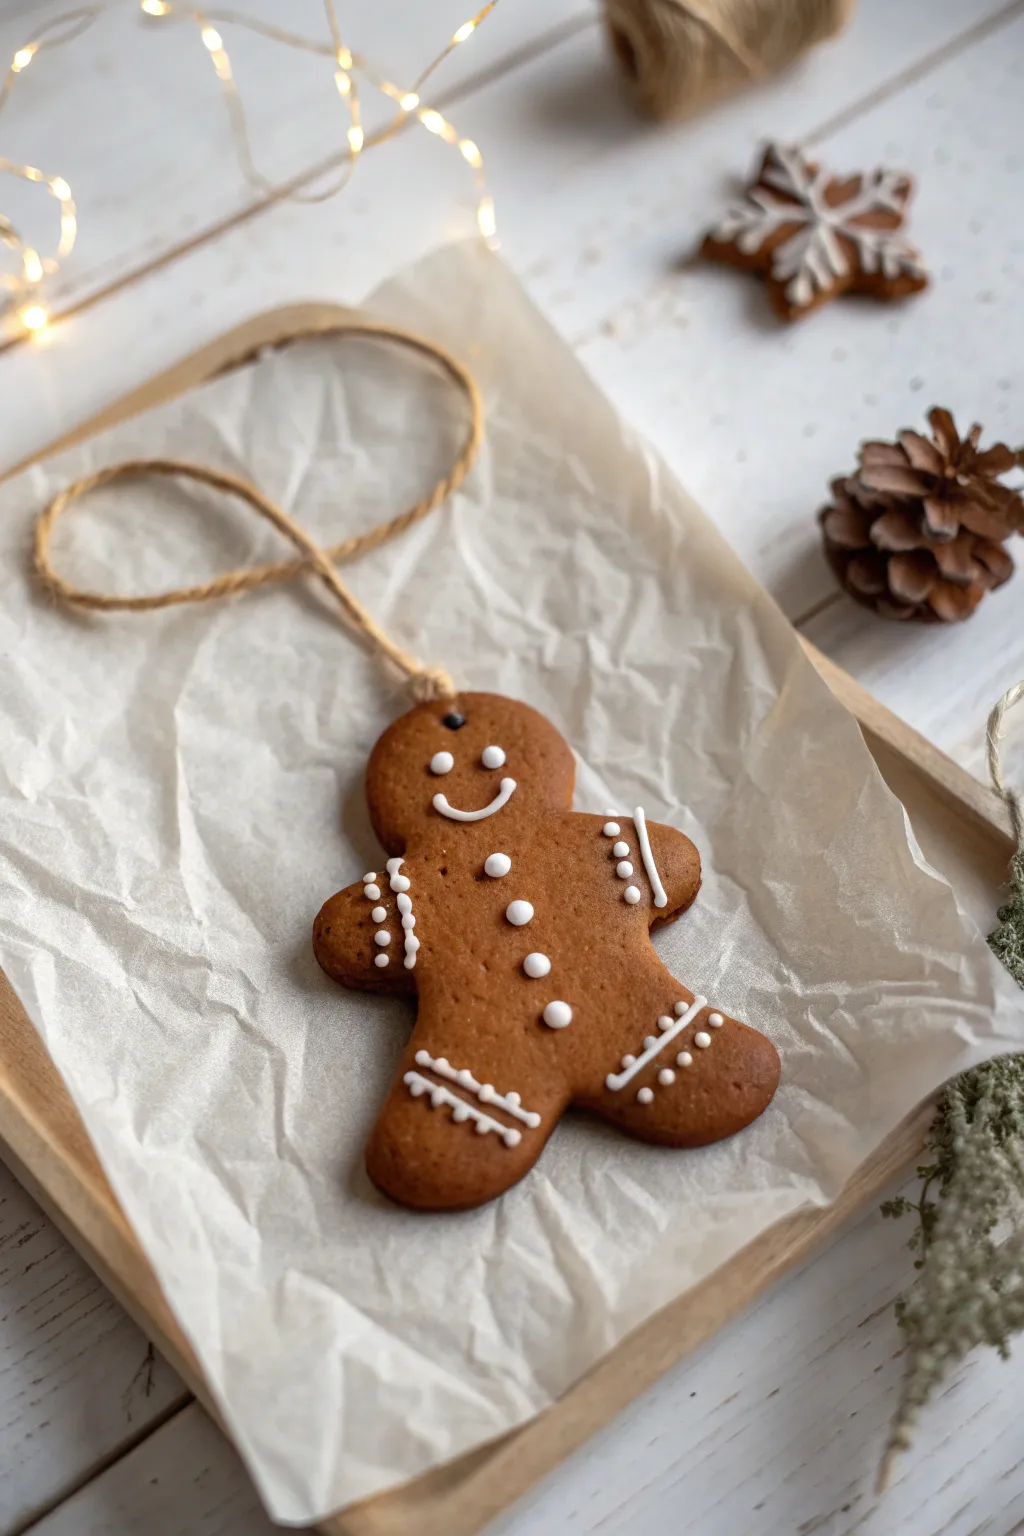
Create a classic gingerbread man that looks delicious enough to eat but will last for years on your tree. This project uses polymer or air-dry clay to mimic the texture of baked dough, complete with sweet white “icing” details and a rustic twine hanger.
Step-by-Step
Materials
- Brown polymer clay (or air-dry clay mixed with brown acrylic paint)
- White liquid polymer clay (or white dimensional puffy paint)
- Gingerbread man cookie cutter
- Rolling pin
- Texturing tool (old toothbrush or sandpaper)
- Needle tool or toothpick
- Jute twine
- Parchment paper
Step 1: Shaping the Dough
-
Prepare your workspace:
Lay down a sheet of parchment paper to protect your table and prevent sticking. This also makes it easier to move the clay later. -
Condition the clay:
Knead your brown clay until it is soft and pliable. If the color is too flat, try mixing in a tiny pinch of translucent clay to give it that realistic baked depth. -
Roll it out:
Use your rolling pin to flatten the clay to an even thickness, roughly 1/4 inch thick. Don’t go too thin, or the ornament might be fragile. -
Add texture:
Before cutting, lightly press a clean toothbrush or piece of sandpaper over the surface of the clay. This stippling effect mimics the porous, baked texture of a real cookie. -
Cut the shape:
Press your gingerbread man cookie cutter firmly into the textured clay. Give it a subtle wiggle before lifting to ensure a clean cut. -
Smooth the edges:
Use your finger to gently soften the sharp cut edges. Real cookies puff slightly when baked, so rounding the edges makes it look more authentic. -
Create the hanging hole:
Using a needle tool or a straw, punch a hole at the very top of the head for the string. Make sure the hole is large enough to accommodate your jute twine. -
Bake or dry:
If using polymer clay, bake according to the package instructions (usually 275°F for 15-30 mins). If using air-dry clay, let it sit for at least 24 hours until fully hardened.
Realistic Cookie Texture
Dust the raw clay lightly with real cinnamon or pastel chalk shavings before baking. It smells amazing and creates a ‘floured’ baked look.
Step 2: Decorating and Finishing
-
Prepare the icing:
If using liquid polymer clay for the icing, transfer it into a fine-tip squeeze bottle. If using puffy paint, simulate a test line on scrap paper first to check the flow. -
Pipe the face:
Carefully squeeze two small dots for eyes and a curved line for a smile. Keep the pressure steady to get nice round dots. -
Add buttons:
Place three evenly spaced dots down the center of the chest to create the classic gumdrop button look. -
Detail the hands:
Pipe a small ring around each wrist area. I like to add tiny dots next to the lines to make the icing look decorative. -
Detail the feet:
Create the signature squiggly lines on the legs. Draw a zigzag or wave pattern across the ankles and add a straight line underneath for contrast. -
Set the icing:
If using liquid clay, return the ornament to the oven for a short 10-15 minute bake to cure the white details. For paint, simply let it air dry completely. -
Cut the twine:
Snip a length of jute twine roughly 8 inches long. -
Thread the hanger:
Push one end of the twine through the hole in the head. Bring the ends together and tie a secure knot to form a loop. -
Final touches:
Adjust the knot so it sits near the hole or at the top of the loop, depending on your preference, and trim any excess frayed ends.
Scented Ornament Hack
Mix a drop of clove or cinnamon essential oil into the clay during the kneading phase. Your ornaments will smell like fresh gingerbread cookies.
Your charming faux cookie is now ready to add a cozy, homemade touch to your holiday decor
Christmas Gnomes With Tall Hats

These charming Scandinavian-inspired gnomes feature tall, whimsical hats and wonderfully textured beards that bring a modern rustic feel to your holiday decor. Their simple geometric shapes make them an accessible project for beginners, while the detailed carving offers a satisfying challenge for more experienced crafters.
How-To Guide
Materials
- Air-dry clay (white or natural stone color)
- Modeling tools (needle tool, small loop tool)
- Acrylic paints (Soft pink/terra cotta, white, flesh tone)
- Small twisting jute twine
- Paintbrushes (flat brush and fine detail brush)
- Water cup and sponge
- Fine-grit sandpaper
- Matte sealant or varnish
- Rolling pin
- Small wooden base or toothpick (optional for armature)
Step 1: Forming the Base Structure
-
Shape the body:
Begin with a fist-sized ball of clay. Roll it into a smooth, thick cylinder that is slightly wider at the bottom for stability. The top should taper just a bit where the hat will eventually sit. -
Create the hat cone:
Roll a second piece of clay into a long, dramatic cone shape. This should be roughly twice the height of the body segment. Make sure the base of the cone is wide enough to drape over the top of the body. -
Score and slip:
Before attaching, score (scratch) the top of the body and the underside of the hat with a needle tool. Add a dab of water or clay slip to these rough areas to act as glue. -
Join the pieces:
Press the hat firmly onto the body. Use your thumb or a modeling tool to smooth the seam on the back, but leave the front seam distinct, as the hat brim will cover it later. -
Sculpt the hat brim:
Gently pull and pinch the bottom edge of the hat cone outwards, creating a slight overlap that hangs over where the face would be. I generally like to make this brim slightly uneven for a hand-crafted look.
Hat Sagging?
If the tall hat droops while sculpting, insert a toothpick or a crumpled cone of aluminum foil inside the clay cone to provide internal support until it dries hard.
Step 2: Adding Details and Texture
-
Add the nose:
Roll a small, pea-sized ball of clay. Attach this right under the brim of the hat, centered on the front. Press it on securely so it doesn’t fall off during drying. -
Define the beard area:
Using a needle tool, visually mark the area below the nose where the beard will flow. The beard should start right under the hat brim and cascade down the front of the body. -
Carve the beard texture:
Use a needle tool or small knife tool to carve deep, vertical lines into the clay body to mimic hair. Start near the nose and sweep downward, creating slight waves for movement. -
Refine the beard strands:
Go back over the beard with a finer tool to add smaller, shorter strokes between the deep lines. This layering creates realistic depth and shadow. -
Texture the hat:
Take an old toothbrush or a stiff bristle brush and gently tap it all over the surface of the hat. This creates a porous, slightly stony texture that contrasts beautifully with the carved beard. -
Dry the sculpture:
Let your gnomes dry completely. Depending on the thickness of your clay and humidity, this usually takes 24 to 48 hours. Turn them occasionally to ensure even drying.
Clean Texture Lines
Clean your needle tool often with a damp sponge while carving the beard. Clay buildup on the tool drags through the fresh clay and creates messy, pilly crumbs.
Step 3: Painting and Finishing
-
Sand imperfections:
Once fully dry, use fine-grit sandpaper to gently smooth out any unintentional bumps on the bottom or back, being careful not to sand away your intentional textures. -
Paint the hat:
Apply a soft pink or terra cotta acrylic paint to the hat. You may need two coats for opaque coverage. Let the paint settle into the subtle textures you created. -
Paint the beard:
Paint the beard area totally white. For extra dimension, you can mix a tiny drop of grey into the white for the initial coat, then dry-brush pure white over the raised ridges. -
Paint the nose:
Use a flesh tone or soft beige for the nose. Keep this color solid and smooth to make it pop against the textured beard. -
Speckle effect (optional):
To mimic the stone look in the photo, dip a stiff brush in watered-down brown paint and flick the bristles with your thumb to splatter tiny dots lightly over the hat. -
Attach the twine:
Cut a length of jute twine. Wrap it around the base of the hat brim, right above the nose. Tie a simple knot or bow in the front. -
Seal the piece:
Finish by applying a matte varnish or sealant to protect the paint and give the clay a unified, professional finish.
Place these festive guardians on your mantle or arrange them as a centerpiece to add a touch of handmade warmth to your holiday season.

TRACK YOUR CERAMIC JOURNEY
Capture glaze tests, firing details, and creative progress—all in one simple printable. Make your projects easier to repeat and improve.
Winter Animals in Santa Hats

Create a cozy winter scene with this adorable pair of handmade clay figures, featuring a chubby penguin and a textured bear bundled up in festive accessories. These little characters have a rustic, matte finish that makes them perfect for holiday shelf decor or thoughtful handmade gifts.
Step-by-Step Tutorial
Materials
- Polymer clay (grey, white, brown, red, green, black, orange/yellow)
- Aluminum foil (for armature)
- Texture tools (needle tool, stiff bristle brush or toothbrush)
- Rolling pin
- Cutting blade
- Small ball tool
- Liquid clay or bake-and-bond
- Blush chalk pastel and soft brush
Step 1: Shaping the Base Forms
-
Create foil cores:
Start by crumpling two small balls of aluminum foil into egg shapes—one slightly rounder for the penguin and one slightly taller for the bear. This saves clay and keeps the figures lightweight. -
Cover the penguin body:
Roll out a sheet of grey clay and wrap it smoothly around the rounder foil core. Roll it gently between your palms to remove any seams until it’s perfectly smooth. -
Cover the bear body:
Repeat the process for the bear using light brown clay, ensuring the bottom is flattened slightly so the figure stands securely on its own. -
Add the penguin’s belly:
Flatten a small oval of white clay. Press it onto the front of the grey body. Use a stiff brush or toothbrush to gently stipple the white clay, giving it a fluffy, feathery texture.
Step 2: Building the Head and Face
-
Form the bear’s head:
Roll a ball of brown clay for the bear’s head and attach it to the body. Blend the seam at the neck slightly, though the scarf will cover most of it later. -
Texture the bear:
Before adding features, use a needle tool or stiff brush to texture the entire brown surface of the bear with short, directional strokes to mimic fur. -
Add bear ears and muzzle:
Attach two tiny brown semi-circles for ears. Place a small, flattened oval of lighter brown clay on the face for the muzzle. -
Create the penguin’s face:
Add a white heart-shaped piece of clay to the upper front of the penguin body for the face mask. Press two small indentations for eye sockets. -
Insert eyes and beaks:
Roll tiny black balls for the eyes and press them into both figures. Add a tiny orange triangle beak for the penguin and a black triangular nose for the bear. Use a needle tool to etch a small smile on the bear. -
Apply rosy cheeks:
Shave a little pink or red chalk pastel into a powder. Use a soft, dry brush to gently dust rosy cheeks onto both the penguin and the bear.
Head Heavy?
If the bear’s head feels wobbly before baking, insert a small piece of toothpick or wire between the head and body for invisible internal support.
Step 3: Dressing Them Up
-
Make the scarves:
For the penguin, roll a snake of red clay. Flatten it slightly and wrap it around the neck area. I like to texture this with a toothbrush to make it look like wool. -
Wrap the bear’s scarf:
Roll a snake of sage green clay. Wrap it around the bear’s neck, letting one end drape down the front. -
Add scarf fringe:
Use a needle tool or blade to cut small vertical lines into the end of the green scarf to create fringe. -
Form the hats:
Shape two small cones of red clay. Bend the tips slightly for a relaxed look. Place one on the penguin’s head and one on the bear’s head. -
Add hat trim:
Wrap a thin band of white clay around the base of each red hat. Add a small white ball to the tip of each hat. -
Texture the hat trim:
Use your needle tool to swirl or stipple the white hat bands and pom-poms so they look like fluffy fleece or fur.
Make it Sparkle
Before baking, lightly dust the red hat and scarf with fine white glitter or mica powder to give the effect of freshly fallen frost.
Step 4: Final Touches
-
Add penguin wings and feet:
Attach two flat teardrop shapes of grey clay to the sides of the penguin. Add two small grey ovals at the bottom for feet. -
Add bear arms and feet:
Roll two sausages of brown clay for arms and attach them to the sides of the bear. Add two small balls for feet. Don’t forget to texture these to match the body fur. -
Bake:
Bake the figures according to your clay package instructions (usually 275°F/135°C for 15-30 minutes). Let them cool completely before handling.
Set your finished duo on a little wooden coaster or shelf to bring a touch of winter warmth to your home
Simple Nativity Mini Scene
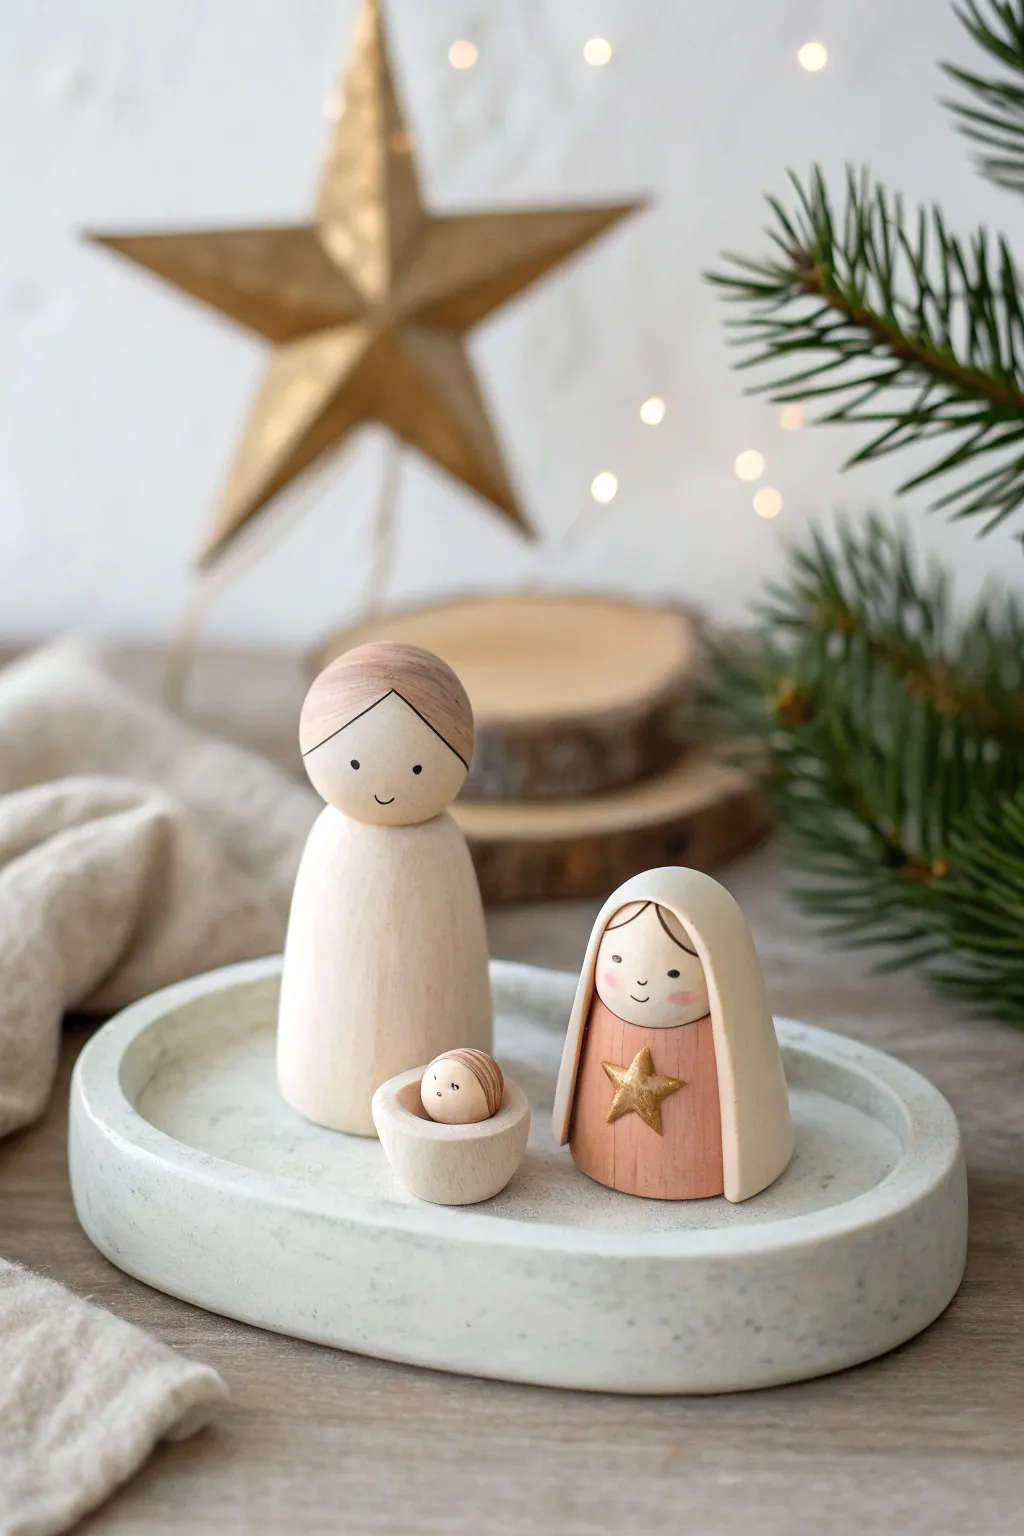
Embrace the beauty of simplicity with this charming, Scandinavian-inspired nativity set crafted from wooden peg dolls and polymer clay. Its clean lines, soft wood tones, and gentle painted details make it a peaceful addition to any modern holiday mantle.
How-To Guide
Materials
- Large wooden peg doll (round head, straight body) – for Joseph
- Medium wooden hollow turning or bell shape – for Mary
- Small wooden round bead (approx. 10mm) – for Baby Jesus head
- Air-dry clay or polymer clay (white/stone effect)
- Fine-grit sandpaper
- Acrylic paints: White, Blush Pink, Metallic Gold, Black
- Small flat brush and a fine detail liner brush
- Matte sealant or varnish
- Rolling pin
- A small oval cutter or craft knife
Step 1: Sculpting the Accessories
-
Form the Base Tray:
Begin by conditioning your stone-effect or white clay until it is soft and pliable. Roll it out to a thickness of about 1/4 inch. -
Shape the Oval:
Cut a smooth oval shape roughly 6 inches long. If you don’t have a cutter this size, trace a paper template and cut around it with a craft knife. -
Create the Rim:
Roll a long, thin snake of clay. Moisten the edge of your oval base lightly, then press the snake around the perimeter to create a raised rim, smoothing the seam with your finger or a sculpting tool. -
Mold the Manger:
Take a small ball of clay and press your thumb into the center to create a hollow bowl shape, sized perfectly to hold the small wooden bead ‘head’ later. -
Smooth and Seal:
Use a little water on your fingertip to smooth out any fingerprints or cracks on both the tray and the manger. Set these aside to dry completely according to your clay’s package instructions.
Uneven Clay Tray?
If your tray curls while air-drying, place a heavy book on it once it’s ‘leather hard’ (semi-dry) to force it to dry flat.
Step 2: Painting the Figures
-
Prepare the Wood:
While the clay dries, lightly sand your wooden peg dolls to ensure they are smooth and free of splinters. Wipe away any dust. -
Paint Joseph’s Body:
For the taller figure, leave the head natural wood. Paint the entire body section with a creamy white acrylic paint. You may need two thin coats for opaque coverage. -
Detail Joseph’s Hair:
Mix a very watery wash of light brown paint. Carefully paint a simple cap of ‘hair’ on the top of the head, letting the wood grain show through slightly for a textured look. -
Paint Mary’s Dress:
For the smaller, bell-shaped figure, paint the main body in a soft blush pink. Leave the head section natural wood. -
Create the Veil:
Paint a creamy white cloak over the back and sides of the pink figure, framing the face but leaving the pink dress visible in the front center. -
Add Mary’s Star:
Using your small brush and metallic gold paint, carefully draw a five-pointed star on the center of the pink dress. -
Paint Faces:
Use the finest detail brush or a black paint pen to add two tiny dots for eyes and a small curved line for a smile on both figures. I find a toothpick works great for the tiniest dots. -
Rosy Cheeks:
Dilute a tiny drop of pink paint with water. dab it onto the cheeks with a Q-tip or dry brush to give them a soft, blushing glow.
Step 3: Assembly and Finishing
-
Assemble the Baby:
Once the clay manger is dry, glue the small wooden bead into the hollow. Draw a tiny sleeping face (closed eyelids) on the bead. -
Swaddle Lines:
Paint very subtle, thin white lines around the clay manger base to mimic swaddling cloth texture, or leave it plain for a stone look. -
Seal the Project:
Once all paint is fully dry, apply a coat of matte varnish to the wooden figures to protect them and give a unified finish. -
Sand the Tray:
If your dried clay tray has rough edges, give it a quick sanding with fine-grit paper to achieve that polished, stone-like appearance. -
Final Arrangement:
Place the figures on the tray to ensure they stand flatter. If the bottom of the peg dolls is uneven, a quick sand will help them sit stable.
Add a Halo
Twist thin gold craft wire into tiny circles and glue them to the backs of the heads for subtle, floating halos.
Arrange your beautiful new scene near some evergreen branches to complete the cozy festive look
Tiny Christmas Village Houses
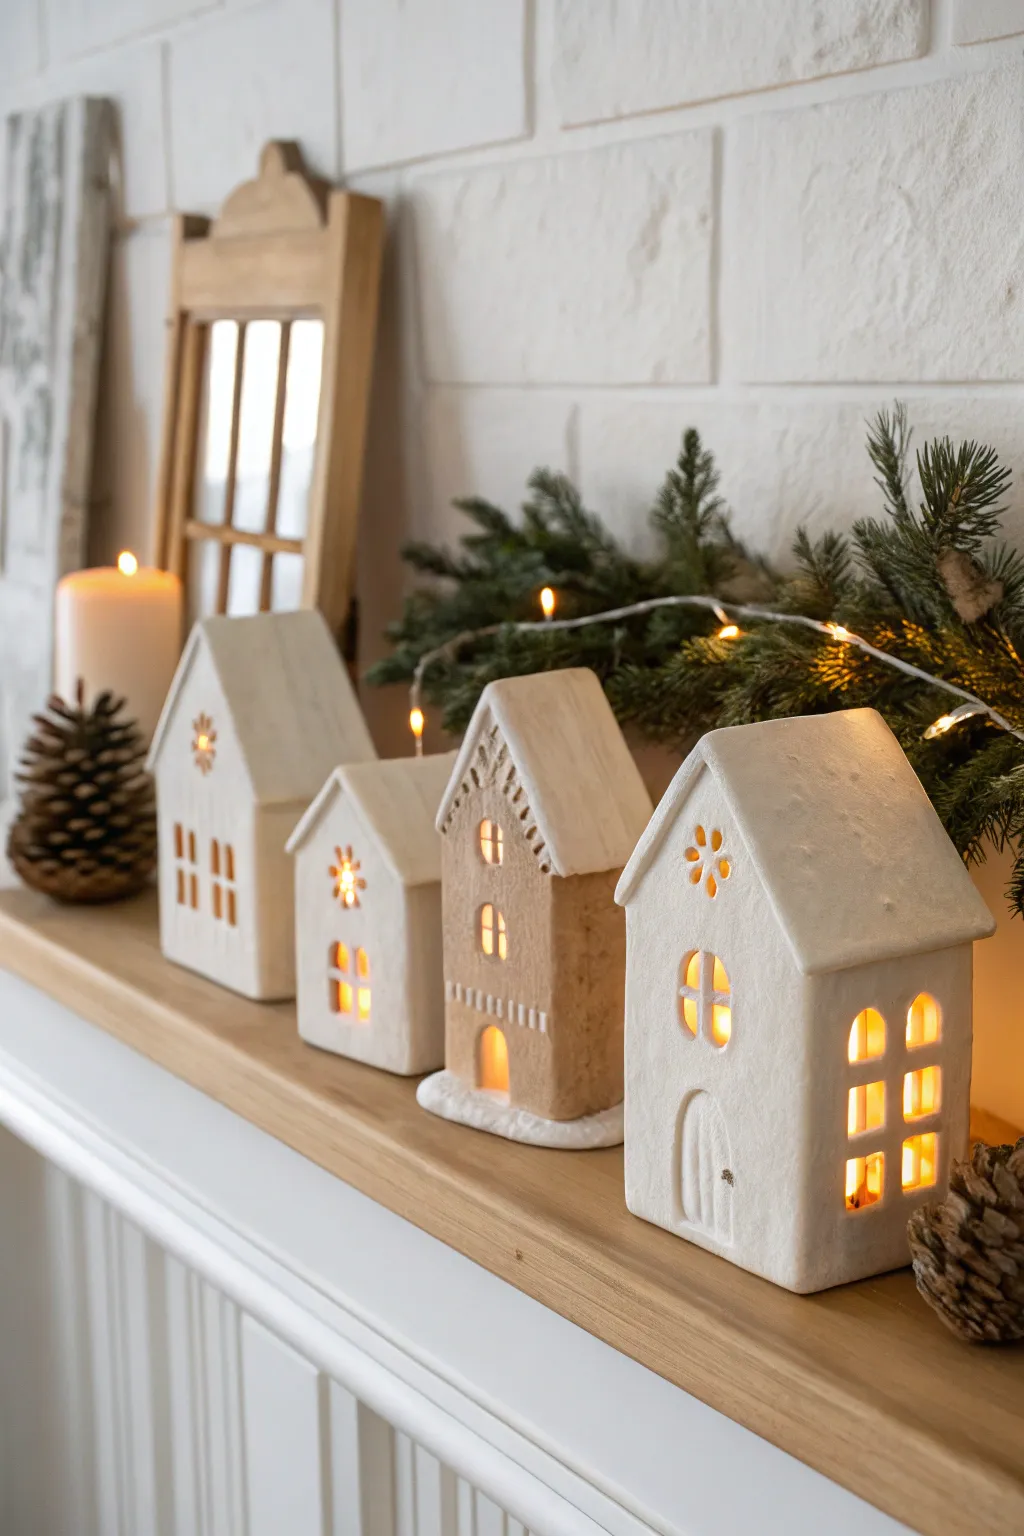
Recreate the charm of a cozy Nordic winter with these rustic, handmade clay houses. By using simple slab techniques and warm LED lights, you can build an enchanting display that flickers with life on your mantel.
Detailed Instructions
Materials
- Air-dry clay (white and terracotta/stone colors)
- Rolling pin with texture mat (optional)
- X-acto knife or clay cutting tool
- Ruler or straight edge
- Small shape cutters (circular or square) for windows
- Clay slip (water mixed with clay)
- Sanding sponge or fine-grit sandpaper
- Acrylic paint (white and cream)
- Battery-operated tea lights
Step 1: Planning and Rolling
-
Draft your templates:
Sketch simple house shapes on paper first. You’ll need a front and back piece (featuring the gable roof) and two rectangular side walls for each house. Vary the heights and roof pitches to create visual interest like the photo. -
Prepare the clay:
Knead your white air-dry clay until it’s smooth and pliable. If you want the tan house look, knead a separate batch of terracotta or stone-colored clay. -
Roll out the slabs:
Roll the clay into an even slab, approximately 1/4 inch thick. Keep the thickness consistent so the walls adhere properly later. -
Cut the shapes:
Place your paper templates onto the clay slab and carefully trace around them with your X-acto knife. Cut out all four walls for each house.
Cracks happen!
If hairline cracks appear while drying, mix a tiny bit of fresh clay with water to make a paste. Fill the crack, smooth it over, and let it dry again.
Step 2: Adding Details
-
Carve the windows:
Before assembling, cut out windows using small shape cutters or your knife. Create variety by using arched tops, square panes, or small circular holes near the roof peak. -
Add texture:
I like to gently press a texture mat or even a piece of coarse fabric onto the roof pieces to mimic shingles or weathering. You can also score lines for a ‘wood plank’ look. -
Cut the doors:
Slice an arched doorway on the front panel. Depending on your preference, you can cut it out completely or leave it partially attached to look slightly ajar. -
Dry the slabs (Partially):
Let the cut pieces sit for about 30-60 minutes. They should be ‘leather hard’—firm enough to stand up without slumping, but soft enough to join.
Add a chimney
Make small cubes of clay and attach them to the roof slope before drying. Poke a hole through the center so the tea light smoke—or just light—can escape.
Step 3: Assembly
-
Score and slip:
Use a needle tool to scratch cross-hatch marks (scoring) on the edges where walls will meet. Apply a dab of clay slip (your ‘glue’) to these rough areas. -
Construct the walls:
Press the side walls against the back wall, smoothing the seams with your finger or a modeling tool to ensure a tight bond. Attach the front wall last. -
Create the roof:
Measure two rectangular slabs for the roof. They should slightly overhang the walls. Score, slip, and attach them to the peak of the house structure. -
Reinforce interior seams:
Roll a very thin ‘snake’ of clay and press it into the inside corners of the house to reinforce the structure, smoothing it out so it disappears. -
Full drying:
Allow the constructed houses to dry completely for 24-48 hours. Turn them occasionally to ensure airflow reaches the inside.
Step 4: Finishing Touches
-
Sand the imperfections:
Once bone dry, use a sanding sponge to gently smooth out any rough edges or sharp points on the roof and windows. -
Rustic painting technique:
For the white houses, apply a matte white acrylic paint. Don’t aim for perfection; a little texture adds to the charm. -
The ‘snowy’ roof effect:
For the tan house, paint only the roof white. Dab the paint on thickly to simulate a layer of fresh snow sitting on top. -
Adding the glow:
Place battery-operated tea lights inside each house. Using real candles is unsafe for air-dry clay, as it isn’t fireproof.
Arrange your luminous village on a shelf with evergreen sprigs to complete the festive scene
Tea Light Luminary Houses
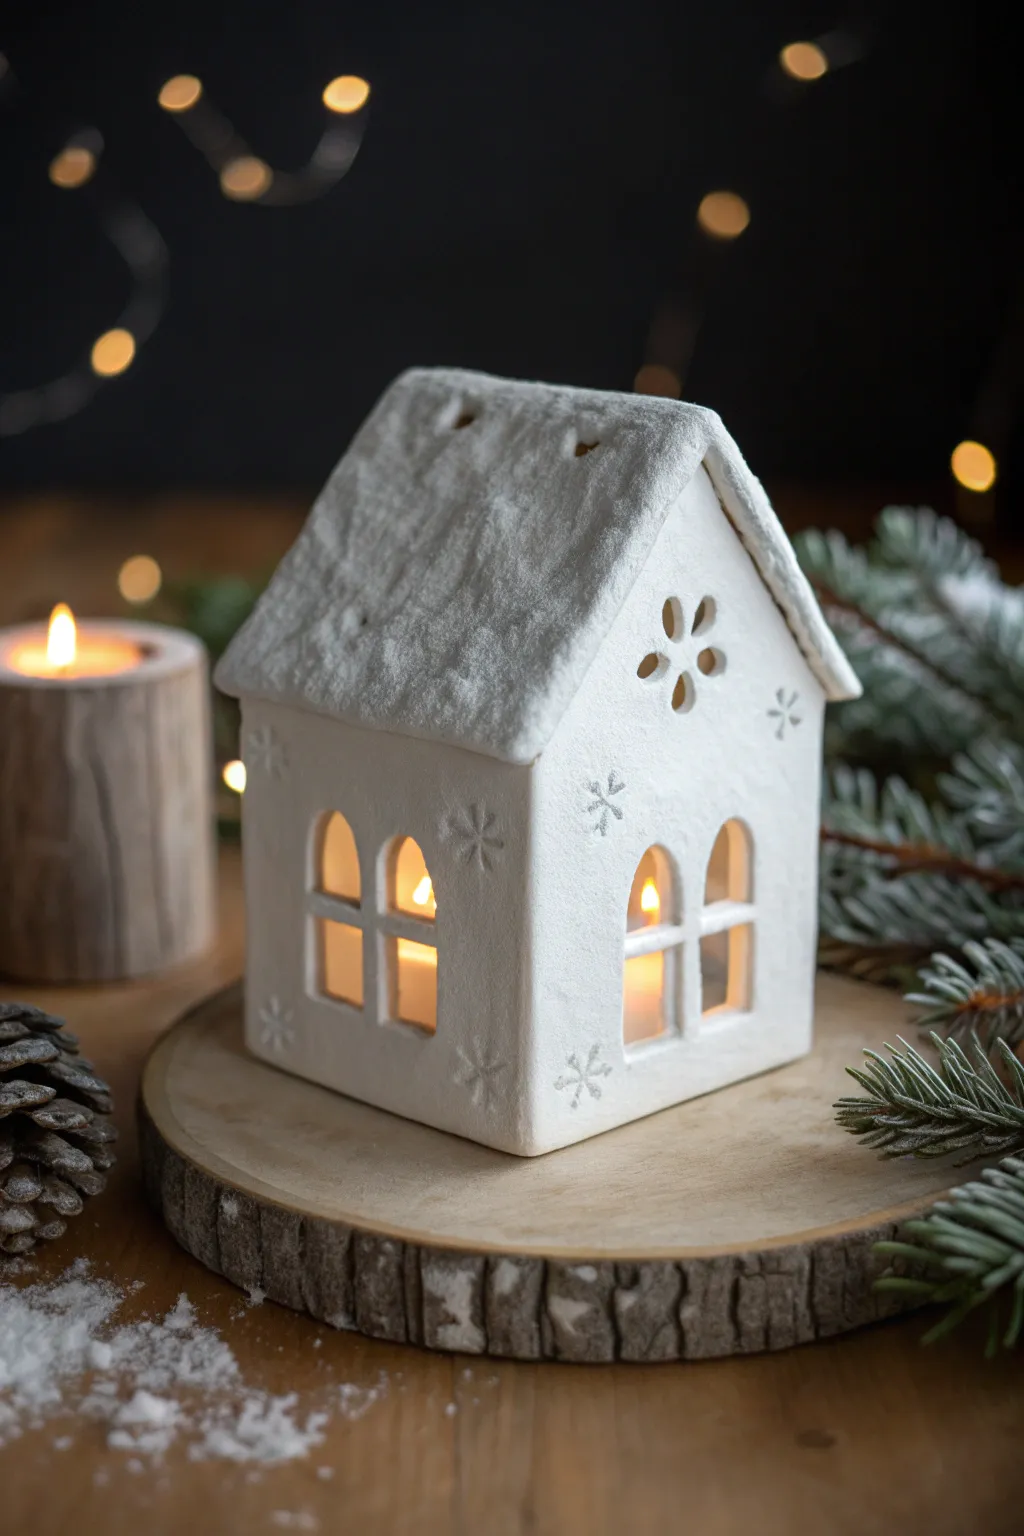
Create a cozy winter village scene with this charming clay luminary house, featuring a textured snowy roof and delicate snowflake imprints. The warm glow of a tea light shining through the arched windows brings an instant festive atmosphere to your mantelpiece.
Step-by-Step
Materials
- Air-dry clay (white) or polymer clay
- Rolling pin
- Clay knife or craft knife (X-Acto)
- Ruler
- Paper templates (walls and roof pieces)
- Textured sponge or toothbrush
- Small snowflake stamps or cookie plunger cutters
- Small flower petal cutter (for attic window)
- Slip (clay and water mixture) or liquid clay adhesive
- Sandpaper (fine grit)
- White acrylic paint (optional, for finish)
- Matte varnish
- LED tea light
Step 1: Preparation and Cutting
-
Roll out the clay:
Begin by conditioning your white clay until it is pliable. Roll it out on a smooth surface to an even thickness of about 1/4 inch (6mm). Using guide sticks on either side of your roller can ensure consistent thickness. -
Cut the shapes:
Place your paper templates onto the clay surface. You will need two pentagon shapes for the front and back (house gable shape) and two rectangular pieces for the side walls. Use a craft knife to cut cleaner, straight lines around the templates. -
Create the windows:
Before assembling, cut out the arched windows on the front and side wall panels. Use a small arched cutter if you have one, or carefully freehand with your knife. Leave a strip of clay in the center and across the middle to form the window panes. -
Add texture and details:
While the walls are still flat, gently press your snowflake stamps into the clay surface. Don’t press all the way through; you just want a surface impression. For the attic area on the front gable, use a petal cutter to create a flower-shaped opening for venting heat.
Fixing Sagging Roofs
If your roof starts to sag during drying, loosely crumple a ball of paper towel or foil and place it inside the house structure to support the weight of the roof panels until they harden.
Step 2: Assembly
-
Score the edges:
Take your craft knife and gently score (scratch cross-hatch marks) along the vertical edges of all your wall pieces where they will connect. This rough texture helps the bond hold stronger. -
Apply bonding agent:
Apply a small amount of slip (if using air-dry clay) or liquid clay (if using polymer) to the scored edges. I find applying it generously ensures no gaps appear later. -
Construct the walls:
Stand the walls up and press the scored edges together to form a box. Use your finger or a clay tool to smooth the seams on the inside and outside so the join becomes invisible. -
Correct the shape:
Once the four walls are standing, check that the structure is square and not leaning. If using air-dry clay, you might want to place a small box inside or prop the walls up while they firm up slightly.
Add Glittery Frost
While your paint is still wet on the ‘snowy’ roof section, sprinkle fine iridescent white glitter over it. This mimics the sparkle of fresh frost under the candlelight.
Step 3: Roof and Finishing
-
Cut the roof panels:
Roll out two rectangular slabs for the roof. These should be cut slightly larger than the house width so they overhang the eaves, giving it that classic cottage look. -
Create the snowy texture:
Before attaching the roof, use a coarse sponge or an old toothbrush to tap vigorously all over the roof panels. This creates a pitted, fluffy texture that resembles fresh snowfall. -
Attach the roof:
Score the top edges of your house walls and the underside of the roof panels where they will touch. Apply your slip or adhesive and gently press the roof pieces onto the house, joining them at the peak. -
Reinforce the peak:
Roll a very thin snake of clay and press it into the very top seam where the two roof panels meet. Blend this out with your finger and re-texture with your sponge to hide the join completely. -
Dry or bake:
If using polymer clay, bake according to the package instructions (usually 275°F/130°C for 15-30 minutes). If using air-dry clay, allow the house to dry slowly away from direct heat for 24-48 hours to prevent cracking. -
Sanding and painting:
Once fully cured or dry, use fine-grit sandpaper to smooth any sharp edges around the windows or corners. For an ultra-white snowy finish, paint the entire house with white acrylic paint. -
Seal the project:
Apply a coat of matte varnish to protect the clay while maintaining a natural, stone-like appearance. Place an LED tea light inside to illuminate your work.
Now you have a charming winter luminary ready to light up your evenings
Wreath-Shaped Photo Frame Ornaments
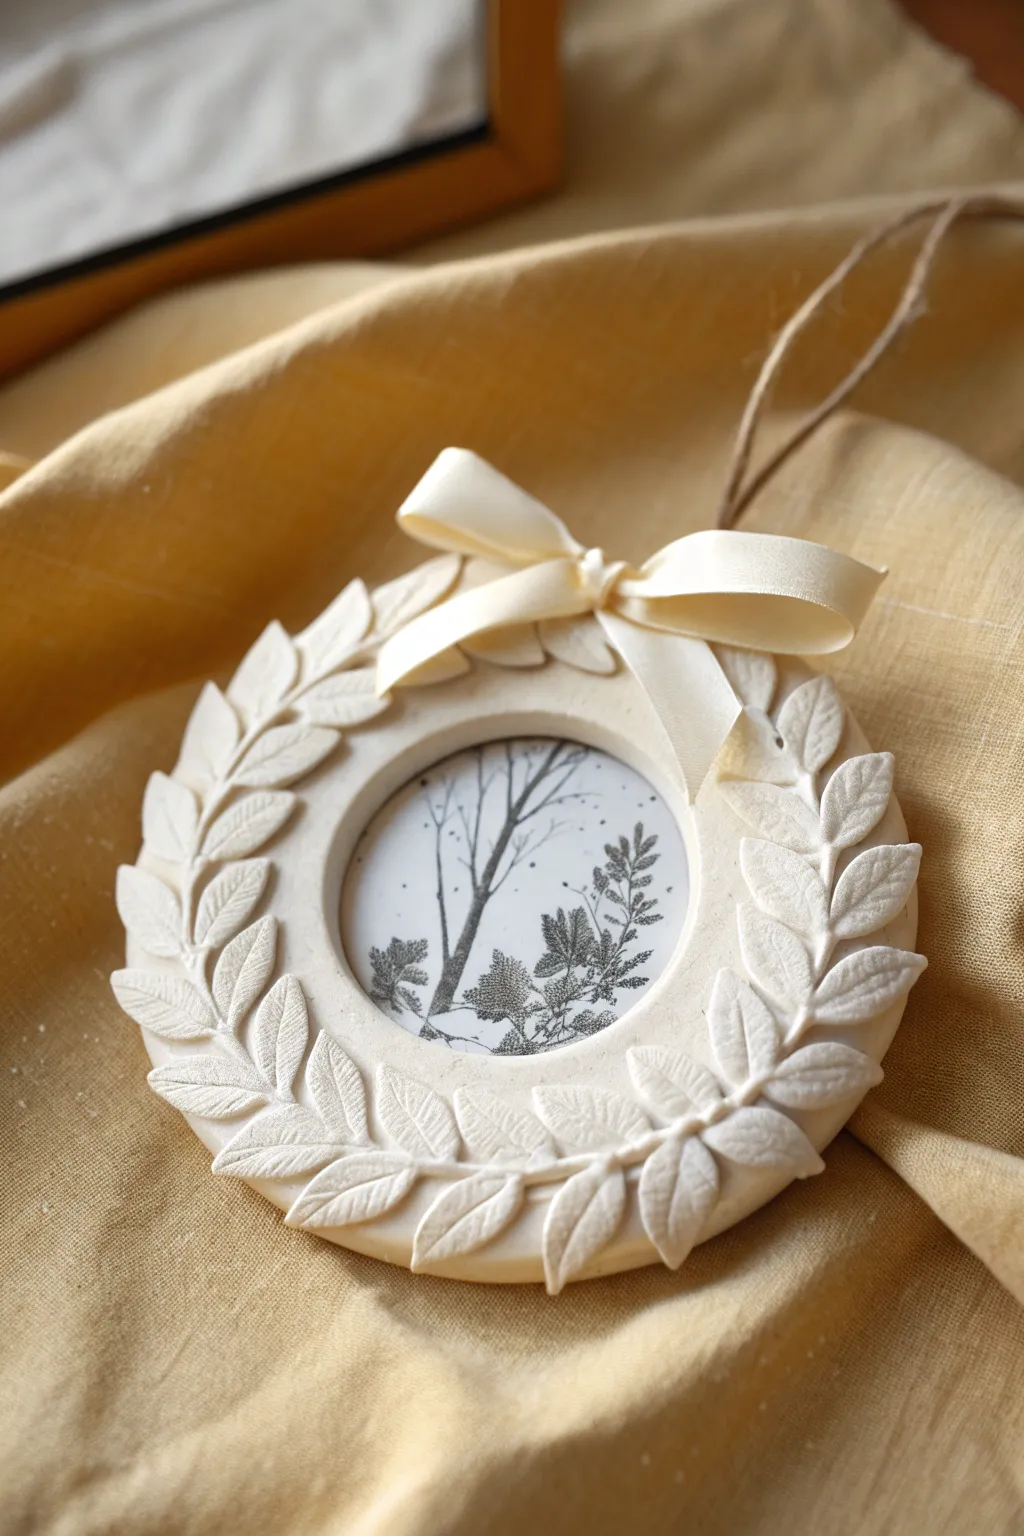
Create a timeless keepsake with this elegant laurel wreath frame ornament, perfect for showcasing botanical prints or cherished family photos. The monochromatic white clay paired with raised leaf details gives it a classic, sculptural look that fits beautifully with any holiday décor.
Detailed Instructions
Materials
- White air-dry clay or polymer clay
- Rolling pin
- Circle cutters (one large approx. 3-4 inches, one smaller for the window)
- Leaf silicone mold or small leaf plunger cutter
- Alternatively: Craft knife for hand-cutting leaves
- Clay sculpting tool or toothpick
- Small bowl of water or liquid clay (for adhesive)
- Sandpaper (fine grit)
- Cream or white satin ribbon (1/4 inch width)
- Twine for hanging
- Printed photo or botanical art
- Craft glue
- Cardstock backing
Step 1: Base Construction
-
Roll the foundation:
Begin by conditioning your clay until it is smooth and pliable. Roll it out on a non-stick surface to a uniform thickness of about 1/4 inch. If you want a perfectly flat surface, using guide rails on either side of your rolling pin is very helpful. -
Cut the frame shape:
Use your larger circle cutter to stamp out the main disc. Without moving the clay, center your smaller circle cutter inside the first one to create the donut-shaped frame. Remove the center circle and the excess outer clay. -
Smooth the edges:
Dip your finger in a little bit of water and run it gently around the cut edges of both the inner and outer circles to soften any sharp ridges left by the cutters. -
Create hanging holes:
Use a straw or a small sculpting tool to poke two holes at the very top of the frame. Space them about half an inch apart; these will anchor your hanging twine later.
Cracking Issues?
If air-dry clay cracks while drying, mix a tiny bit of fresh clay with water to make a paste. Fill the cracks, smooth with a damp finger, and let dry again.
Step 2: Sculpting the Foliage
-
Make the leaves:
Roll out a thinner sheet of clay (about 1/8 inch). Use a small leaf plunger cutter or a silicone mold to create roughly 25-30 small, identical leaves. If hand-cutting, use a craft knife to cut small oval shapes. -
Add vein details:
If your cutter or mold didn’t add texture, take a needle tool or craft knife and gently score a central vein and smaller side veins onto each leaf for realistic texture. -
Prepare for assembly:
Score the surface of the clay ring lightly with a needle tool where the leaves will go. This ‘scratching’ helps the attachment bond better. -
Attach the bottom layer:
Apply a dab of water (for air-dry clay) or liquid clay (for polymer) to the back of a leaf. Place the first leaf at the bottom center of the wreath. Continue placing leaves working upwards along the left side, slightly overlapping each one like shingles. -
Complete the right side:
Repeat the process starting from the bottom center again, this time working up the right side of the wreath. Attempt to mirror the angle of the leaves on the left side for symmetry. -
Refine the shape:
Before the clay sets, gently press down on the center of the leaves to ensure they are stuck, but curl the tips upward slightly to give the wreath volume and dimension. -
Drying or baking:
If using air-dry clay, let the piece sit flat in a cool, dry place for at least 24-48 hours. If using polymer clay, bake according to the manufacturer’s instructions on your specific package.
Step 3: Finishing and Assembly
-
Sand and smooth:
Once fully cured and cool, check the edges. Use fine-grit sandpaper to gently buff away any rough spots or fingerprints on the back or sides of the frame. -
Prepare the image:
Cut your photo or botanical print into a circle slightly larger than the inner window of your frame. -
Secure the backing:
Glue the image to the back of the clay frame. Cut a piece of cardstock the same size as the outer frame diameter and glue it over the back of the photo to seal everything neatly. -
Add the hanging loop:
Thread a piece of natural twine through one hole from the front, across the back, and out the other hole to the front (or simply through the top loop if you made one). Tie it securely. -
Tie the bow:
Take your cream satin ribbon and tie a sharp, neat bow. Use a dab of strong craft glue or a hot glue gun to affix the bow at the top center of the wreath, covering the gap between the two leaf directions.
Pro Tip: Custom Stains
For an antique look, brush diluted brown acrylic paint over the dried leaves, then immediately wipe it off with a damp cloth. The dark paint will stay in the vein grooves.
Hang your finished wreath on the tree or wrap it as a sophisticated handmade gift that looks deceptively professional
Fingerprint Light Tree Ornaments

These charming clay ornaments capture the magic of the season with colorful, indented “lights” that add a pop of cheer to any tree. The simple, organic white clay shape provides the perfect canvas for bright, festive fingerprints that double as decorative baubles.
Step-by-Step Guide
Materials
- White or cream-colored air-dry clay (or polymer clay)
- Rolling pin
- Christmas tree cookie cutter (medium size)
- Straw or skewer (for the hanging hole)
- Acrylic paints (Red, Green, Yellow, Blue, Orange)
- Small paintbrush
- Clear acrylic varnish or sealant
- Jute twine or ribbon
- Fine-grit sandpaper (optional)
- Parchment paper or smooth work surface
Step 1: Prepping and Shaping the Clay
-
Prepare your workspace:
Lay down a sheet of parchment paper on a flat surface to prevent sticking. Take a handful of white air-dry clay and knead it gently until it’s soft and pliable. -
Roll out the slab:
Using a rolling pin, flatten the clay to an even thickness of about 1/4 inch (6mm). Try to keep the pressure consistent so the ornament is sturdy but not too heavy. -
Cut the tree shape:
Press your Christmas tree cookie cutter firmly into the clay slab. Wiggle it slightly to ensure a clean cut, then lift the cutter away. -
Remove excess clay:
Peel away the scrap clay from around your tree shape. You can ball this up and store it in an airtight container for future ornaments. -
Create the hanging hole:
Using a plastic straw or a skewer, poke a hole near the top tip of the tree. Make sure the hole is big enough for your twine to pass through later, keeping in mind clay shrinks slightly as it dries. -
Smooth the edges:
Dip your finger in a tiny bit of water and run it along the cut edges of the tree to smooth out any roughness or burrs left by the cutter.
Fixing Cracks
If small cracks appear as the clay dries, mix a tiny bit of fresh clay with water to make a paste (slip) and smooth it over the crack with your finger.
Step 2: Adding the Fingerprint Lights
-
Make the indentations:
This is the fun part. Using your pinky finger or the rounded end of a paintbrush handle, gently press small, circular indentations into the surface of the tree. I like to space them out randomly like lights on a real tree. -
Check indentation depth:
Ensure the indents are deep enough to hold a little pool of paint later, but not so deep that they distort the back of the ornament. -
Let it dry completely:
Place the ornament on a flat, dry surface or a wire rack. Let it air dry according to the package instructions—usually 24 to 48 hours. Turning it over halfway through helps it dry evenly.
Step 3: Painting and Finishing
-
Sand imperfections:
Once fully dry and hard, check for any rough spots. You can lightly buff the edges with fine-grit sandpaper for a professional finish. -
Select your colors:
Squeeze small amounts of red, green, yellow, blue, and orange acrylic paint onto a palette. -
Paint the first light:
Dip a small brush into your first color (e.g., red) and carefully fill one of the indented circles. The paint should sit inside the divot like a jewel. -
Fill remaining lights:
Continue painting each indentation with different colors. Rinse your brush thoroughly between colors to keep them bright and distinct. -
Dry the paint:
Allow the paint to dry completely. Since the paint is pooled slightly in the indents, this might take a bit longer than a thin coat. -
Apply varnish:
Coat the entire ornament, front and back, with a clear acrylic varnish or sealant. This protects the clay and gives the colored lights a nice glossy shine. -
Add the hanger:
Cut a length of jute twine, thread it through the hole at the top, and tie a secure knot to create a loop.
Add Some Sparkle
Before the paint dries in the indentations, sprinkle a tiny pinch of fine glitter into the wet paint to make your Christmas lights shimmer.
Hang your festive creation on a branch and enjoy the personalized touch it brings to your holiday decor.