Every December, I find myself reaching for Christmas clay beads because they’re the quickest way to make something festive you can actually wear. Here are my favorite Christmas clay bead ideas—from classic color stacks to playful, charm-filled designs that feel like tiny holiday memories on your wrist.
Classic Red, White, and Green Heishi Stack

Embrace the timeless spirit of the holidays with this elegant five-strand bracelet set. Featuring a crisp combination of matte red, emerald green, and bright white polymer clay discs accented with gold, this stack feels both festive and sophisticated enough for daily wear.
Step-by-Step Tutorial
Materials
- Red polymer clay heishi beads (6mm)
- White polymer clay heishi beads (6mm)
- Emerald green polymer clay heishi beads (6mm or 8mm depending on desired thickness)
- Gold rondelle spacer beads (textured/corrugated style)
- Gold round bead (approx. 4-6mm)
- Strong elastic stretch cord (0.7mm or 0.8mm)
- Super glue or jewelry adhesive
- Scissors
Step 1: Planning and Measuring
-
Measure your wrist:
Wrap a flexible measuring tape around your wrist to find your exact size. Add about 0.5 to 0.75 inches to this measurement to ensure the bracelets roll on comfortably without feeling too tight. -
Pre-stretch the cord:
Cut five strands of elastic cord, each about 4 inches longer than your target length. Giving them a firm tug before you start helps prevent the bracelets from stretching out later. -
Prepare your workspace:
Lay out a bead design board or a soft towel. This prevents your heishi beads from rolling away and lets you visualize the stack before stringing.
Knot Slipping?
If your elastic knot refuses to stay tight while gluing, use a binder clip or a piece of tape to hold the tension on the cord while the glue sets.
Step 2: Creating the Solid Color Strands
-
String the solid red bracelet:
For the top bracelet, string the 6mm red heishi beads continuously until you reach your measured length. I like to double-check the length against a ruler before tying. -
String the solid white bracelet:
Repeat the process with the white heishi beads. This bracelet acts as a bright spacer between the darker colors in the final stack. -
Build the bottom green stack:
This design features two identical dark green bracelets at the bottom. For the very bottom strand, string green heishi beads continuously for the full length. -
Create the accented green strand:
For the second green bracelet (the one sitting just above the bottom), string green heishi beads almost the entire way around. -
Add the gold focal bead:
Pause stringing the second green bracelet and slide on a single gold round bead. This small detail adds a touch of shine that breaks up the matte texture.
Step 3: Assembling the Patterned Strand
-
Start the center pattern:
The middle bracelet is the most intricate. Place a bead stopper or piece of tape on one end of your elastic to keep the pattern secure. -
Create the bead sequence:
Slide on three red heishi beads, followed by one textured gold spacer bead. -
Continue the pattern:
Next, add three green heishi beads, followed by another gold spacer. -
Complete the motif:
Add three white heishi beads and a gold spacer. You now have a red-gold-green-gold-white-gold sequence. -
Repeat until full:
Continue repeating this specific pattern until the strand matches the length of your solid color bracelets. The rhythm of the gold spacers gives this piece a vintage garland look.
Make It Luxe
Swap the standard clay heishi beads for 14k gold-filled beads on the patterned strand to add significant weight and shine that won’t tarnish.
Step 4: Finishing Touches
-
Tie the first knot:
Take the ends of your first bracelet and tie a simple overhand knot, pulling it tight against the beads. -
Secure with a surgeon’s knot:
Tie a second knot, but loop the elastic through twice before pulling tight. This surgeon’s knot is much more secure for slick elastic cord. -
Apply adhesive:
Dab a tiny drop of jewelry glue or super glue specifically on the knot. Be careful not to get glue on the surrounding clay beads. -
Hide the knot:
While the glue is still slightly tacky but not wet, slide a neighboring bead over the knot to conceal it inside the hole. -
Trim the excess:
Once the glue is fully dry, snip off the remaining heavy tails of the elastic close to the bead. Repeat the tying and gluing process for all five bracelets.
Stack them all together on your wrist for a classic statement that rings in the season comfortably


Candy Cane Stripe Bracelet
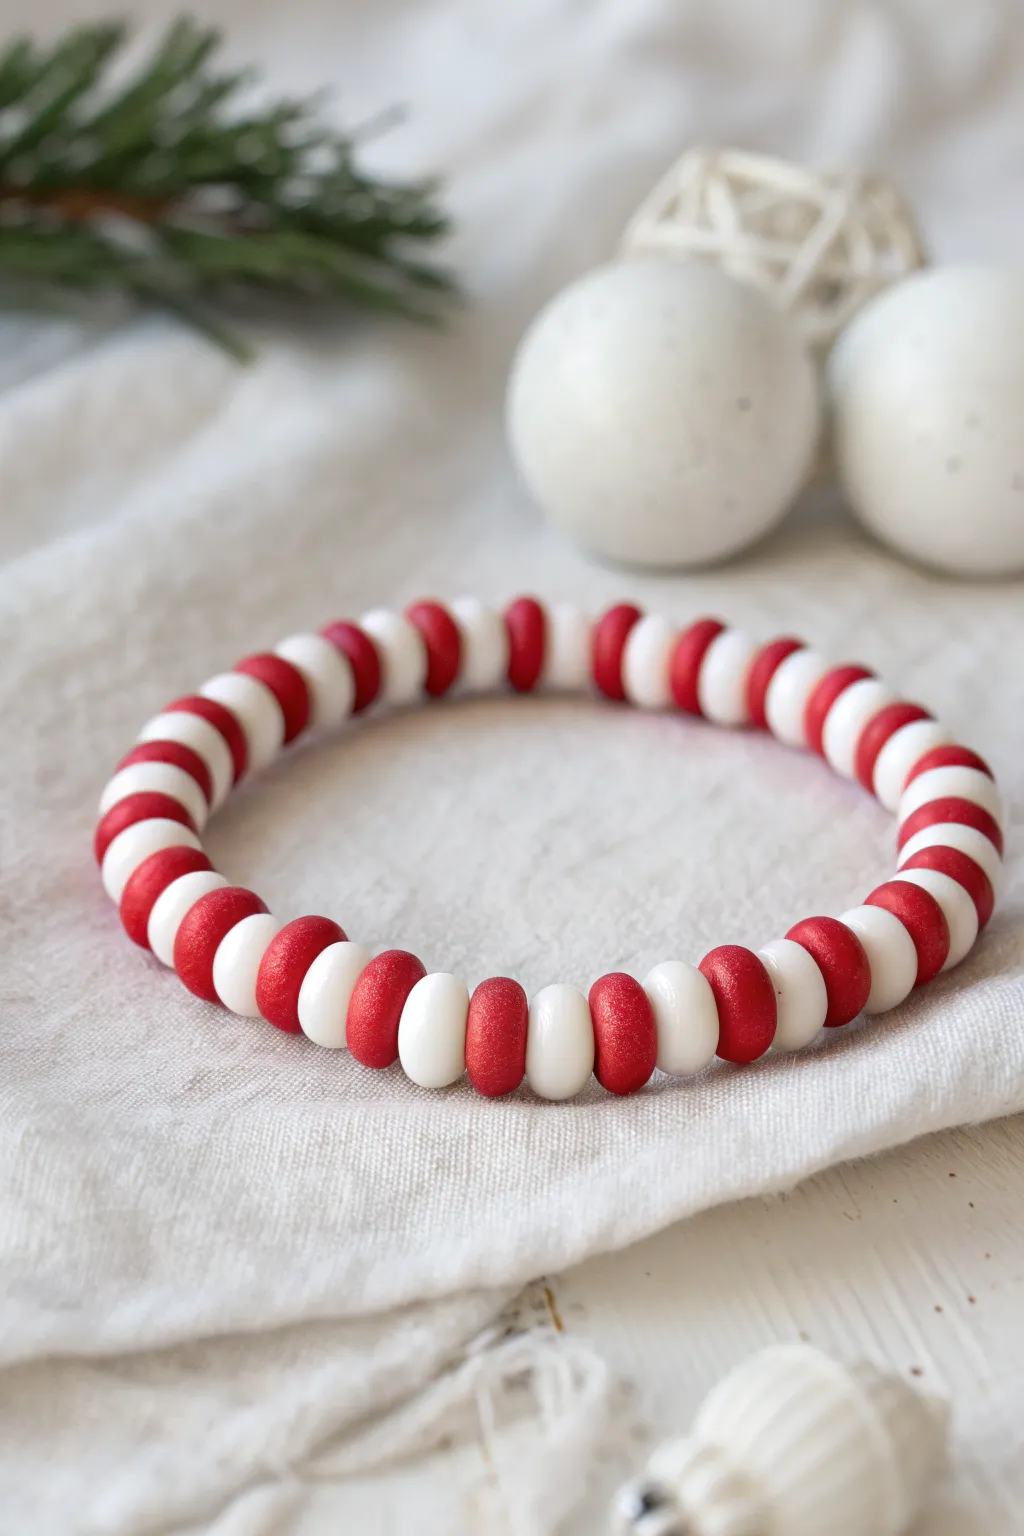
Bring the classic sweetness of holiday peppermint to your wrist with this festive polymer clay creation. The alternating red and white disc beads create a striking stripe pattern, enhanced by a subtle dusting of mica shimmer on the red sections.
Step-by-Step Guide
Materials
- Red polymer clay (e.g., Fimo or Sculpey)
- White polymer clay
- Red mica powder or ultra-fine red glitter
- Clear elastic bead cord (0.8mm or 1mm)
- Bead roller or acrylic sheet
- Small circle cutters or a straw (approx. 6mm diameter)
- Piercing pin or needle tool
- Jewelry glue (e.g., E6000 or specialized elastic knot glue)
- Oven and baking sheet
- Parchment paper
Step 1: Creating the Clay Cane
-
Condition the Clay:
Start by warming up your red and white clay separately in your hands. Knead them until they are soft, pliable, and free of cracks. -
Roll Logs:
Roll both the red and white clay into long, even snakes or logs. Try to keep them roughly the same thickness, about the diameter of a pencil. -
Slice Segments:
Using a tissue blade or sharp knife, cut small, equal-sized segments from both logs. Aim for pieces that are roughly pea-sized. -
Form Spheres:
Roll each small segment between your palms to create perfect little spheres. Uniformity is key here for a consistent looking bracelet. -
Flatten into Discs:
Gently press each sphere down onto your work surface using an acrylic block or just your thumb to create thick, rounded disc shapes (rondelles) rather than flat washers.
Smooth Edges Pro-Tip
To remove fingerprints before baking, lightly brush the white beads with a tiny amount of baby oil or cornstarch. It smoothes the surface instantly.
Step 2: Adding Shimmer & Piercing
-
Dust the Red Beads:
Place your red clay discs onto a piece of paper. Dip a soft brush or your finger into the red mica powder and gently rub it onto the surface of the unbaked red beads to give them that festive frosted look. -
Central Gathering:
Line up all your beads—both red and white—in a row to check size consistency before making holes. -
Pierce the Centers:
Using your needle tool or piercing pin, carefully poke a hole through the center of each disc. I find rotating the pin while pushing helps keep the bead round. -
Refine the Shape:
After piercing, the beads might deform slightly. Gently reshape them with your fingers to ensure they maintain that rounded, candy-like profile.
Level Up: Scented Clay
Mix a tiny drop of peppermint essential oil into the clay during the conditioning phase. Your bracelet will smell just like a real candy cane!
Step 3: Baking and Assembly
-
Prepare for Baking:
Arrange the beads on a baking sheet lined with parchment paper. Ensure they aren’t touching each other so they don’t fuse. -
Bake:
Bake the beads according to the manufacturer’s instructions on your specific package of clay (usually around 230°F – 275°F for 15-30 minutes). -
Cool Down:
Let the beads cool completely on the tray before handling. They are fragile while warm. -
Cut the Cord:
Cut a length of elastic cord about 10-12 inches long. This gives you plenty of extra room for tying knots. -
Pre-stretch Elastic:
Give the elastic cord a few firm tugs. This pre-stretching prevents the bracelet from sagging or loosening immediately after you wear it. -
String the Pattern:
Thread the beads onto the cord, strictly alternating one red bead and one white bead to create the candy cane stripe. -
Check fit:
Wrap the strand around your wrist to check the sizing. Add or remove beads as needed for a comfortable fit. -
Secure the Knot:
Tie a surgeon’s knot (right over left, left over right twice). Pull tight. -
Glue and Trim:
Dab a tiny drop of jewelry glue onto the knot. Let it dry, then trim the excess cord ends carefully.
Enjoy wearing your vibrant, custom-made holiday accessory that looks good enough to eat


“Merry” Letter Bead Centerpiece

Celebrate the festive season on your wrist with this classic Christmas beaded bracelet. Featuring a bold “MERRY” centerpiece flanked by traditional red, green, and gold accents, this piece is simple to string but makes a wonderful holiday gift or accessory.
How-To Guide
Materials
- Elastic stretch cord (0.8mm or 1mm)
- Square white letter beads (M, E, R, R, Y)
- Red round beads (approx. 6mm or 8mm, wood or acrylic)
- Green round beads (approx. 6mm or 8mm, wood or acrylic)
- Small gold spacer beads (round or faceted)
- Scissors
- Jewelry glue or clear nail polish
- Tape or binder clip (optional)
Step 1: Preparation
-
Measure your cord:
Cut a length of elastic cord about 10-12 inches long. This gives you plenty of extra room for tying knots without struggling to hold the ends. -
Pre-stretch the elastic:
Holds the cord firmly at both ends and give it a few gentle tugs. This pre-stretching helps prevent the bracelet from sagging or loosening up after you wear it a few times. -
Secure the end:
Place a piece of tape or attach a binder clip to one end of the cord. This simple trick prevents your beads from sliding right off while you work.
Step 2: Stringing the Centerpiece
-
Locate your letters:
Pick out your white square letter beads to spell ‘MERRY’. Double-check that you have all five letters ready to go. -
Thread the word:
Slide the letter beads onto the cord in the correct order: M, E, R, R, Y. Center them roughly in the middle of your cord length. -
Add flanking beads:
On the right side of the ‘Y’, add one red bead followed by one green bead. Repeat this on the left side of the ‘M’, adding one red bead then one green bead.
Knot Security Tip
When trimming excess cord, leave about 1-2mm of tail rather than cutting flush against the knot. This tiny buffer prevents the knot from unraveling under tension.
Step 3: Creating the Pattern
-
Start the right side pattern:
Moving outwards from your green bead on the right, add a gold spacer bead. -
Continue the sequence:
Follow the gold spacer with a pattern: one red bead, one green bead, one red bead, then another gold spacer bead. -
Mirror on the left:
Now move to the left side of your centerpiece. Add a gold spacer next to the green bead you already placed. -
Build the left side:
Mirror the pattern: add one red bead, one green bead, one red bead, and another gold spacer. -
Check the fit:
Wrap the unfinished strand around your wrist to gauge the size. If you need more length, continue adding red and green beads to both ends until it wraps comfortably.
Make It Glossy
Mix in pearl-finish white beads between the colored ones instead of gold spacers for a ‘candy cane’ snow theme that feels softer and more wintry.
Step 4: Finishing Touches
-
Prepare to tie:
Remove the tape or clip from the end carefully. Bring the two ends of the cord together, ensuring there are no gaps between the beads. -
Tie a surgeon’s knot:
Cross the ends like a normal knot, but loop the top string through the circle twice instead of once before pulling tight. This creates a much stronger hold. -
Secure the knot:
Tie one more standard overhand knot on top of your surgeon’s knot for extra security. Pull the elastic tight; I usually tug quite firmly here to lock it in. -
Add adhesive:
Put a tiny dab of jewelry glue or clear nail polish directly onto the knot. Let it dry for a few minutes to ensure it won’t slip. -
Hide the knot:
Once the glue is dry, trim the excess cord ends close to the knot. If fit allows, gently pull the knot inside one of the adjacent round beads to hide it completely.
Enjoy wearing your festive creation throughout the holiday season


Personalized Name Stocking Stuffer Bracelet
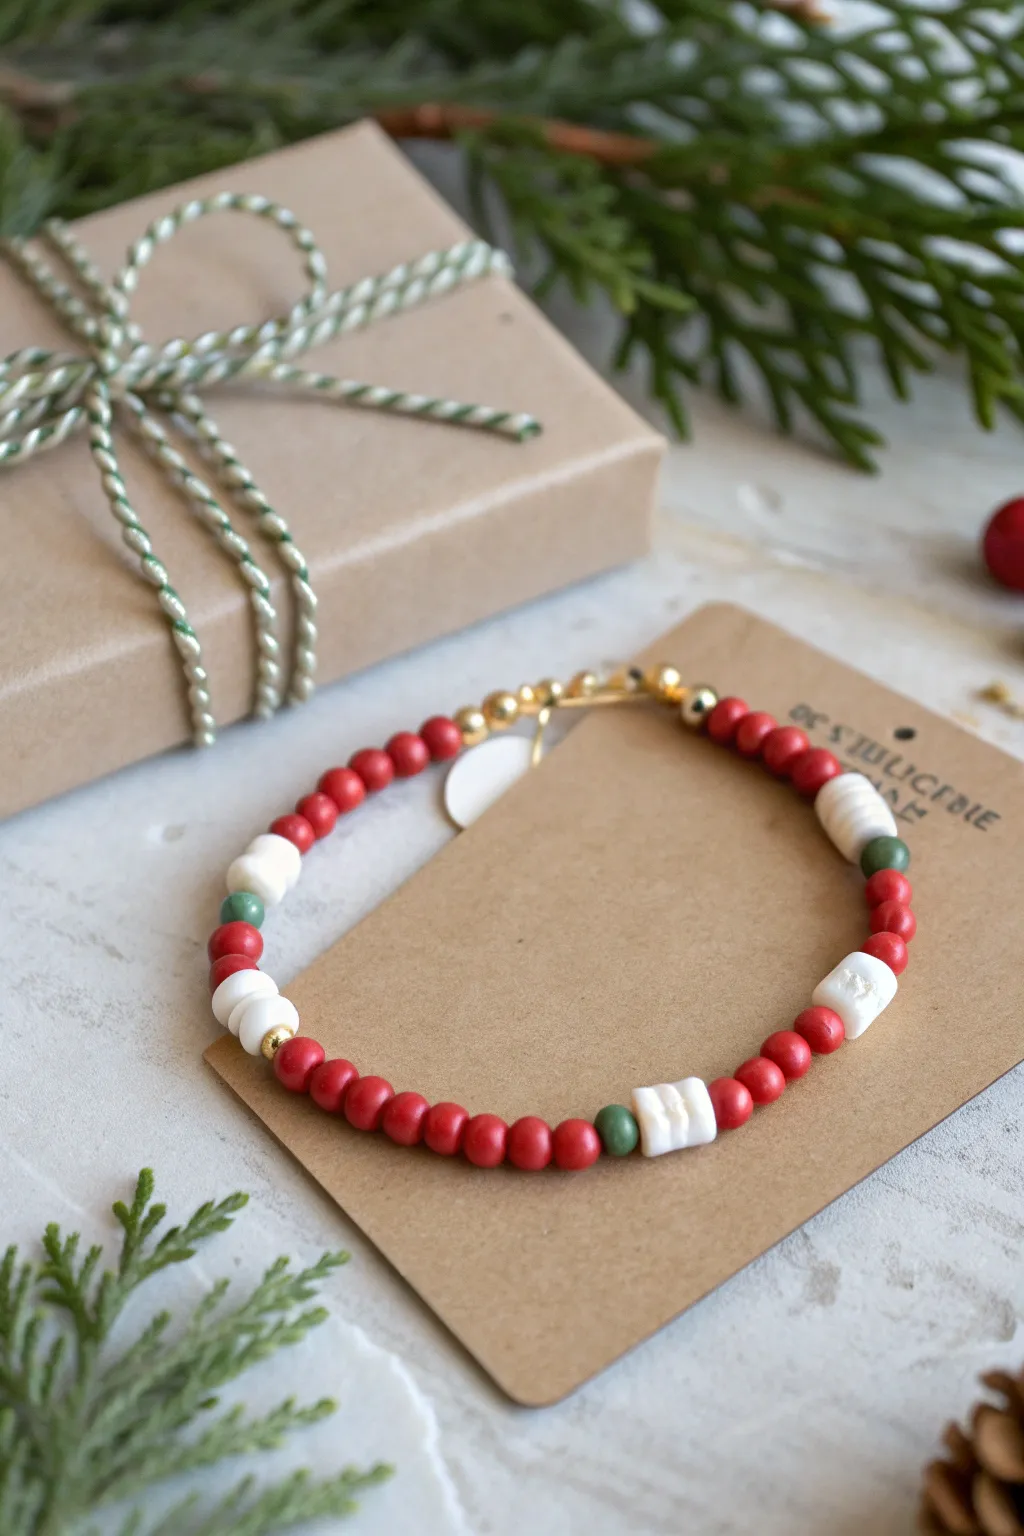
Capture the spirit of the season with this elegant yet playful beaded bracelet, perfect for tucking into a stocking. Combining matte red rounds with textured white spacers and touches of gold, this accessory offers a sophisticated take on classic holiday colors.
Step-by-Step
Materials
- Red wooden or matte clay round beads (4mm-6mm)
- White heishi polymer clay disc beads (approx. 6mm)
- Green round spacer beads (small, 3mm-4mm)
- Gold round spacer beads (3mm)
- Gold crimp beads
- Gold crimp covers
- Gold wire guardians (optional but recommended)
- Gold jump rings
- Gold lobster clasp
- Clear beading wire (e.g., Beadalon 7-strand)
- Wire cutters
- Crimping pliers
- Flat-nose pliers
Step 1: Planning and Preparation
-
Measure your wrist:
Before cutting any wire, measure your wrist or estimate the size if it’s a gift. A standard women’s bracelet is usually around 7 inches long. -
Cut the beading wire:
Cut a length of beading wire about 10-12 inches long. This extra length will make it much easier to add the clasp and finish the ends without frustration. -
Secure one end:
String a crimp bead and a wire guardian onto one end of your wire. Thread the wire back through the crimp bead to create a loop. If you aren’t using a wire guardian, simply make a small loop with the wire. -
Attach the clasp:
Hook your lobster clasp onto the loop you just created inside the wire guardian. -
Crimp the wire:
Use your crimping pliers to flatten the crimp bead securely, locking the wire in place. I like to give it a gentle tug to ensure it holds. -
Cover the crimp:
Place a gold crimp cover over the flattened crimp bead and gently close it with your flat-nose pliers until it looks like a round gold bead.
Pro Tip: Clean Cuts
When trimming the excess beading wire, pull the wire slightly away from the beads before snipping. The end will snap back inside the bead hole, disappearing completely.
Step 2: Stringing the Pattern
-
Start with gold accents:
String on two or three small gold round spacer beads first. This gives the bracelet a professional, finished look near the clasp. -
Begin the red section:
Thread on approximately 8 to 10 red round beads. The exact number will depend on how spaced out you want your white accents to be. -
Add the first accent cluster:
Slide on a white heishi disc bead, followed by a small green spacer bead to act as a pop of color. -
Continue the pattern:
Revert to your main color by adding another set of red round beads. This time, try a shorter segment, perhaps 3 to 5 red beads. -
Create a white bead section:
String on two white heishi disc beads back-to-back. If you have letter beads, this is where you could swap in an initial for a personalized touch. -
Add a gold touch:
Place a single gold spacer bead on the wire before continuing with your red beads. -
Repeat until desired length:
Continue alternating sections of red beads with the white discs, green spacers, and gold accents. Vary the pattern slightly to keep it organic, or stick to a strict repetition for a uniform look. -
Check the fit:
Wrap the unfinished bracelet around your wrist to check the length, keeping in mind that the clasp assembly will add about half an inch.
Step 3: Finishing Touches
-
Finish the stringing:
End your pattern with a few gold spacer beads to mirror the beginning of the bracelet. -
Add final hardware:
String on a crimp bead and a wire guardian. Thread the wire back through the crimp bead to form a loop. -
Attach jump ring:
Before closing the loop, attach a sturdy gold jump ring into the wire guardian. This will be what the lobster clasp hooks onto. -
Secure the end:
Pull the wire tight so there are no gaps between beads, but not so tight that the bracelet becomes stiff. Flatten the crimp bead securely with your pliers. -
Hide the tail:
Thread the excess wire tail back through the first few gold and red beads to hide it, then trim closely with wire cutters. -
Add the final cover:
Place the last crimp cover over your flattened crimp bead and gently squeeze it shut.
Level Up: Charm It Up
Add a small gold charm, like a star or stamped variety tag, to the jump ring near the clasp. It adds a professional boutique touch and extra movement.
This classic red and white design makes a wonderful stackable piece for wearing throughout the holiday season

The Complete Guide to Pottery Troubleshooting
Uncover the most common ceramic mistakes—from cracking clay to failed glazes—and learn how to fix them fast.
Tiny Tree Charm Focal Bracelet
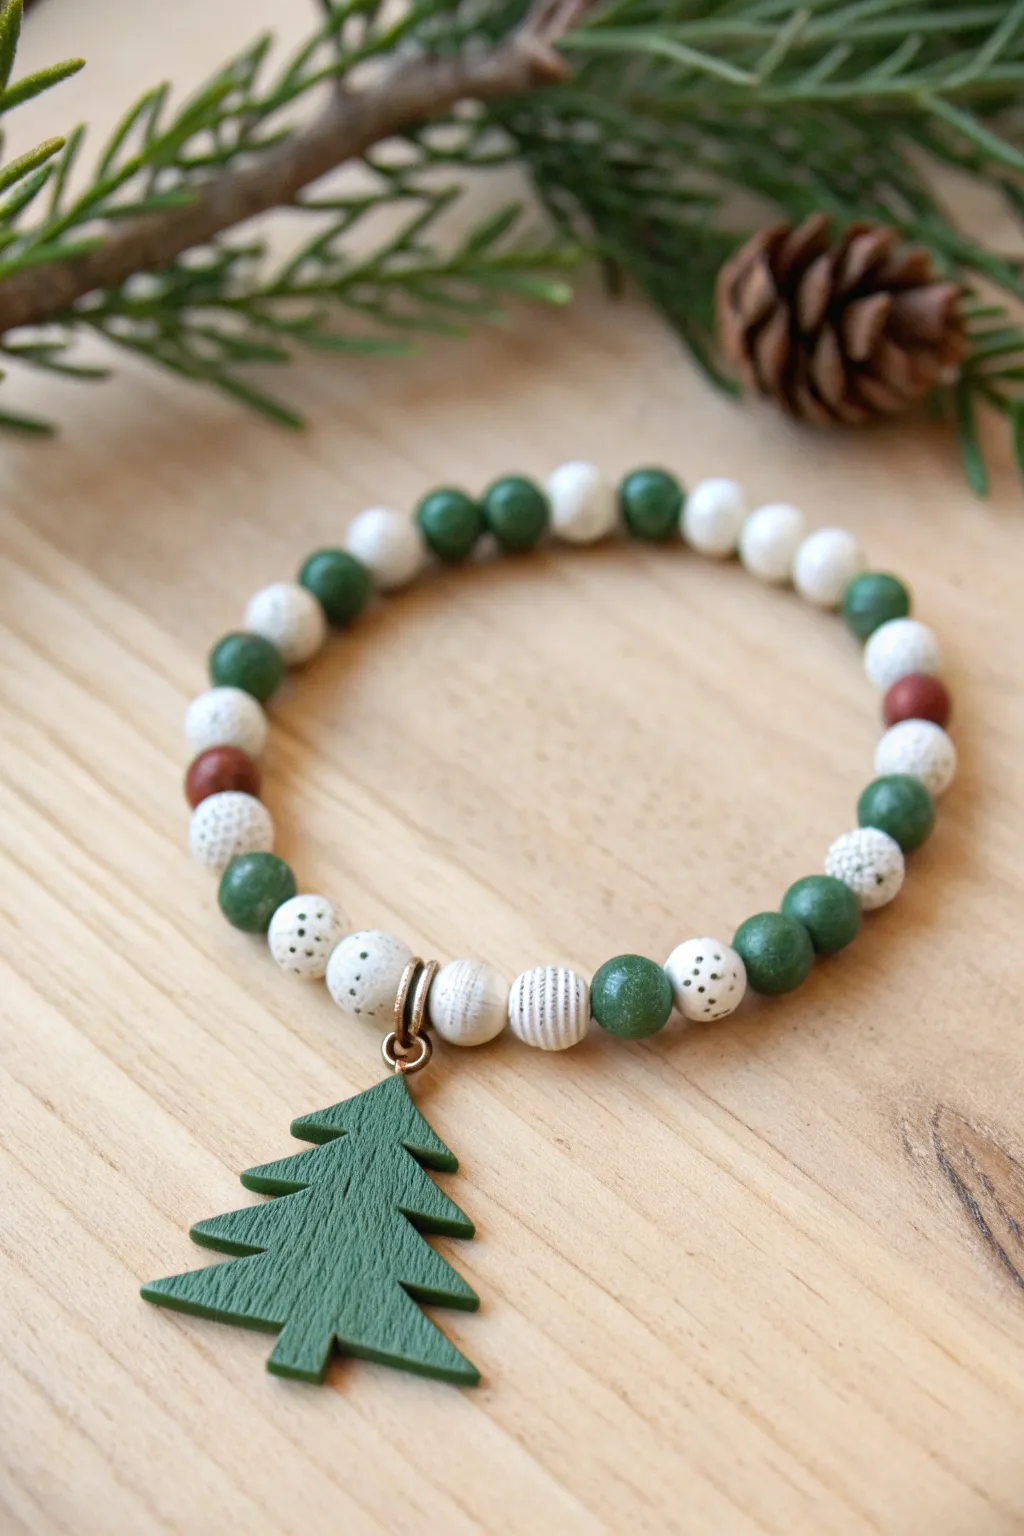
Bring the quiet beauty of a winter forest to your wrist with this earthy and elegant beaded bracelet. Featuring a unique green wooden tree charm as the centerpiece, it mixes smooth green beads, speckled white clay textures, and natural wood tones for a perfectly rustic holiday accessory.
Step-by-Step Tutorial
Materials
- Green wooden Christmas tree charm (approx. 1 inch)
- 6mm-8mm smooth moss green round beads (wood or stone)
- 6mm-8mm white polymer clay beads (smooth and textured/speckled)
- 6mm-8mm reddish-brown wooden spacer beads
- Strong elastic beading cord (0.8mm or 1mm recommended)
- Gold or brass open jump ring (6mm-8mm size)
- Jewelry pliers (chain nose and flat nose)
- Super glue or jewelry cement
- Scissors
Step 1: Preparing the Focal Charm
-
Assess the charm:
Begin by inspecting your green wooden tree charm. Ensure the pre-drilled hole at the top is clear of any paint or uneven wood splinters. If it’s blocked, gently use a thick needle to clear the path. -
Open the jump ring:
Using two pairs of pliers, grip the open jump ring solely on either side of the split. Twist one hand forward and the other backward to open the ring sideways—never pull it apart horizontally, as this weakens the metal. -
Attach the charm:
Slide the open jump ring through the loop or hole at the top of the wooden tree. Don’t close it yet; you can choose to slip the cord directly into the ring later, or attach a bail if you prefer more movement. -
Secure the ring:
For this design, we will string through the jump ring directly. Carefully twist the jump ring back into a closed position using your pliers, ensuring the two ends meet perfectly flush so the elastic cord won’t slip out.
Step 2: Designing the Bead Pattern
-
Layout the design:
Before stringing, lay your beads out on a bead board or soft cloth. This precise planning helps you avoid re-doing the bracelet later. -
Establish the center:
Place your tree charm (or a placeholder) in the center. Flank it immediately with two visually interesting beads—in the photo, these are textured white clay beads followed by smooth white ones. -
Build the pattern outward:
Create a repeating sequence radiating from the center. Work in sections: try a pattern like three green beads, one white, three green, then a reddish-brown accent bead. -
Incorporate texture:
Mix your smooth green beads with the textured white clay beads. Use the speckled or striped white beads intermittently to break up the solid colors and add that handmade clay feel. -
Check the length:
Continue the pattern until the strand measures about 7 inches (or your desired wrist size). I usually add about 0.5 inches extra to account for the bulk of the larger beads.
Knot Slipping?
If the elastic knot won’t stay tight while glueing, ask a friend to hold a finger on the knot, or clamp it gently with a wondrous clip until the glue sets.
Step 3: Stringing and Finishing
-
Cut the cord:
Cut a piece of elastic cord about 12 inches long. Having this extra length makes tying the final knot much less frustrating. -
Pre-stretch the elastic:
Give the elastic cord a few firm tugs. This pre-stretching step is crucial because it prevents the bracelet from sagging or stretching out permanently after the first wear. -
Start stringing:
Thread your beads onto the elastic, following your laid-out pattern. Start from one end of your design and work towards the other. -
Add the charm:
When you reach the center point of your design, thread the elastic through the jump ring attached to your tree charm. -
Complete the strand:
Finish stringing the remaining beads. Double-check the symmetry of your pattern to ensure the charm sits exactly where you want it. -
Tie the knot:
Bring the two ends of the elastic together carefully. Tie a surgeon’s knot: essentially a square knot but loop the elastic through twice on the first pass for extra friction. -
Secure with glue:
Pull the knot tight. Apply a tiny dot of super glue or jewelry cement directly onto the knot. Let it dry for a minute or two. -
Hide the knot:
Trim the excess elastic ends close to the knot (but not too close!). Gently pull the adjacent bead over the knot to hide it inside the bead hole.
Scented Charm
Since the tree charm is raw wood, apply a single drop of pine or cedarwood essential oil to the back of it. It acts as a passive diffuser for a festive scent!
Slip on your new bracelet and enjoy the festive, natural touch it adds to your holiday outfits
Snowflake Charm “Snow Day” Palette
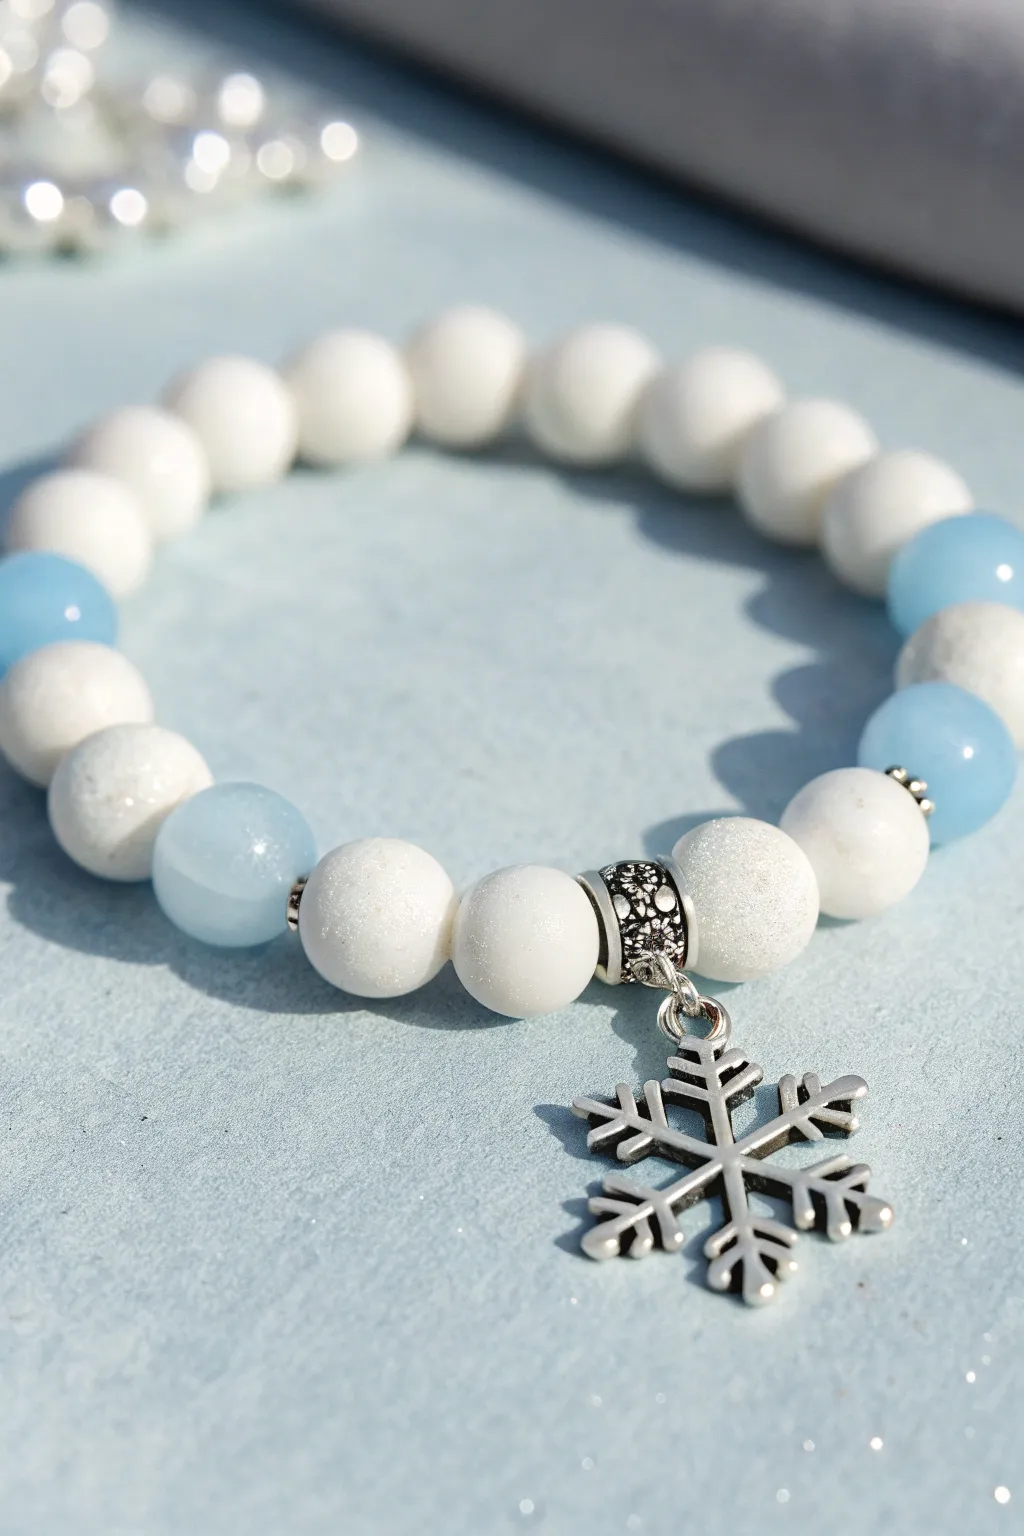
Capture the magic of a fresh snowfall with this elegant beaded bracelet featuring a classic “Snow Day” palette. The mix of icy blue and matte white beads creates a stunning winter accessory, anchored perfectly by a delicate silver snowflake charm.
Step-by-Step Guide
Materials
- Matte white round beads (8mm or 10mm) – likely frosted agate or sugar jade
- Light blue translucent round beads (8mm or 10mm) – aquamarine or blue jade style
- Stretch cord (0.8mm or 1.0mm depending on bead hole size)
- Silver snowflake charm
- Silver carved cylinder bail bead (large enough hole for the cord)
- Small silver spacer beads (optional)
- Jump ring (4mm or 6mm silver)
- Jewelry glue (GS Hypo Cement recommended)
- Scissors
- Pliers (flat nose and bent nose for jump rings)
Step 1: Preparation
-
Measure your wrist:
Before you begin stringing, measure your wrist with a flexible tape measure. Add about half an inch to this measurement to ensure a comfortable fit that isn’t too tight. -
Cut the cord:
Cut a piece of stretch cord about 10-12 inches long. I always like to have plenty of extra length; it makes tying the final knot much less frustrating than working with short ends. -
Stretch the cord:
Pre-stretch your elastic by pulling it firmly several times. This crucial step prevents the bracelet from sagging or loosening permanently after you wear it a few times. -
Prepare the charm:
Using your two pairs of pliers, carefully open the silver jump ring. Ideally, twist the ends away from each other rather than pulling them apart to maintain the ring’s circular shape. -
Attach the charm:
Thread the open jump ring through the loop on your silver snowflake charm and the loop on the silver carved cylinder bead. Close the jump ring securely so there is no gap.
Sticky Situation
If the knot won’t hide inside a bead hole, try enlarging the hole gently with a bead reamer, or ensure your knot is right next to a bead with a larger opening before gluing.
Step 2: Pattern Design
-
Lay out your design:
Arrange your beads on a bead board or a soft towel to finalize your pattern. The featured design creates a balanced look with sections of white and accents of blue. -
Create the focal section:
Start with your center section: place the silver charm assembly in the middle. Flank it on either side with one matte white bead. -
Add texture with spacers:
Place a tiny silver spacer bead after each of those first white beads if you want to replicate the metallic detail shown in the image. -
Build the sides:
Continue the pattern outward. Add one blue bead, then a run of about 3-4 white beads, then another blue bead. This creates a soft rhythm of color. -
Complete the circle:
Fill in the rest of the length with smooth white beads until you reach your desired bracelet size. It helps to check the length against your wrist as you go.
Step 3: Assembly
-
Start stringing:
Begin threading your beads onto the elastic cord. A helpful trick is to place a piece of tape or a binder clip on the end of the string so beads don’t slide off while you work. -
String the charm:
When you reach the center of your design, slide on the silver bail bead with the attached snowflake charm. Ensure it hangs freely and faces the direction you prefer. -
Check the fit:
Once all beads are strung, wrap the strand around your wrist to verify fit. It should sit comfortably without pinching skin or leaving large gaps between beads. -
Tie the knot:
Bring the two ends of the cord together. Tie a standard surgeon’s knot: loop the ends over each other twice, pull tight, then loop once more and pull tight again. -
Secure the knot:
Apply a tiny dot of jewelry glue (like GS Hypo Cement) directly onto the knot. This prevents it from slipping over time. -
Hide the knot:
While the glue is still slightly tacky but drying, gently tug on the cord to pull the knot inside the hole of the nearest large bead. This gives your finish a professional, seamless look. -
Trim excess cord:
Once dry, use your small scissors to trim the remaining tails of the elastic cord close to the bead hole, being careful not to nick the main structural knot.
Frosty Finish
Swap standard matte beads for “crackle quartz” or glimmering “stardust” beads to add an extra icy sparkle that catches the light like fresh snow.
Enjoy wearing your frosty creation or gift it to someone special to celebrate the season


What Really Happens Inside the Kiln
Learn how time and temperature work together inside the kiln to transform clay into durable ceramic.
Gingerbread-Inspired Bead Mix
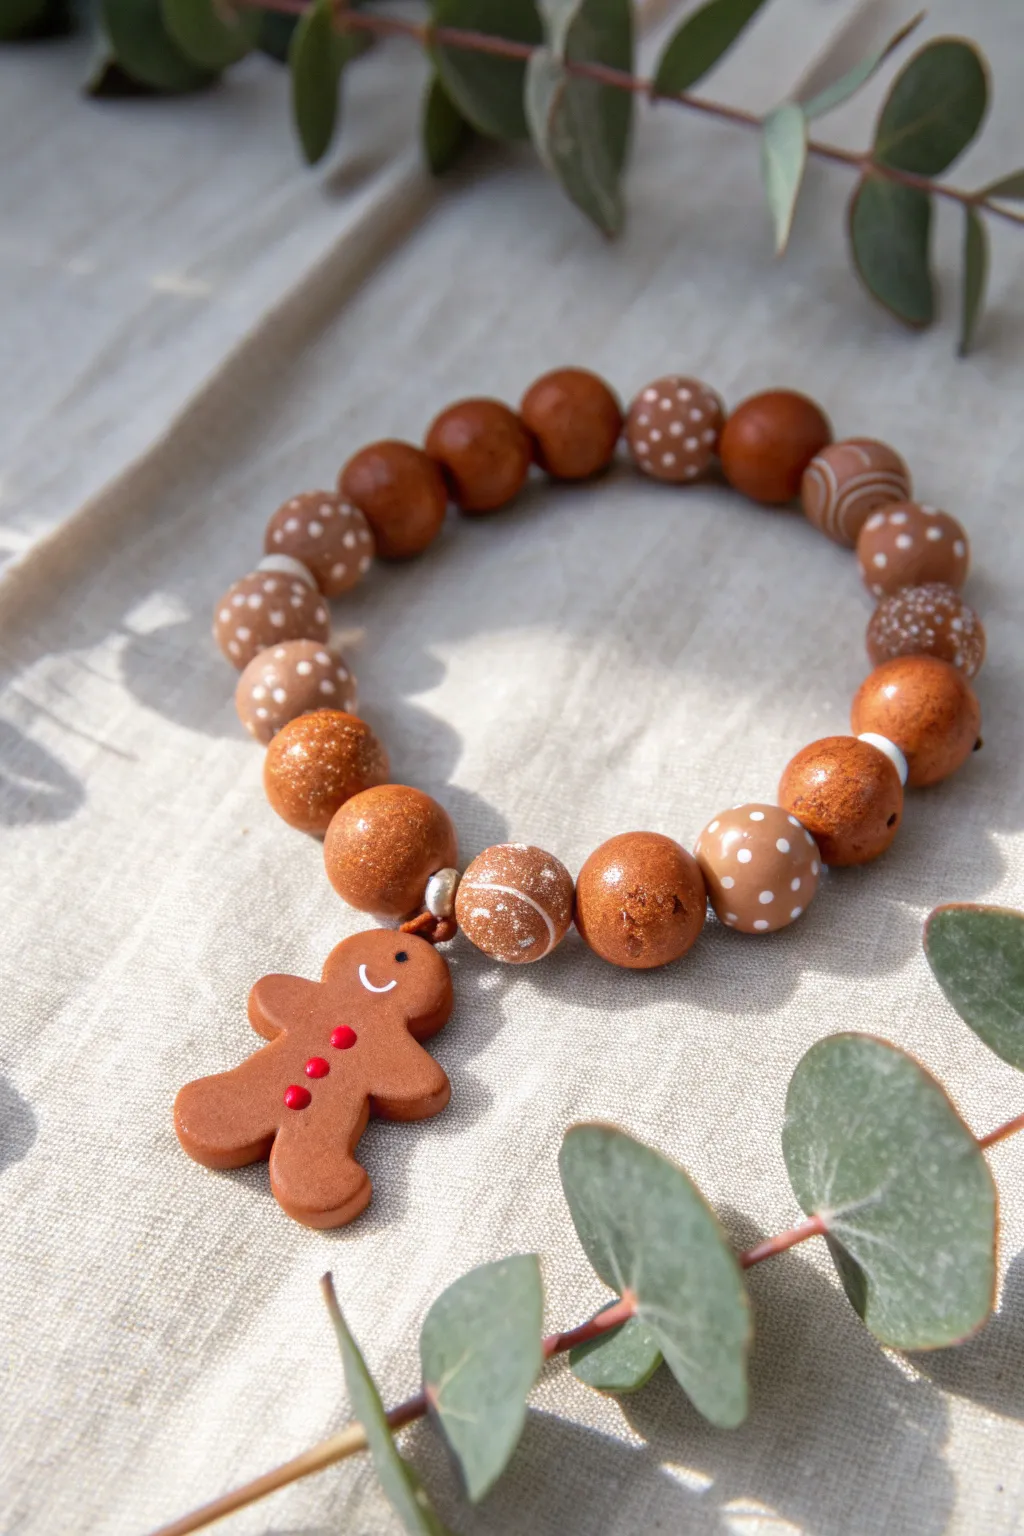
Capture the warmth of holiday baking with this delightful beaded bracelet featuring a handmade gingerbread man charm. The mix of textures—from matte to glossy and speckled—mimics real cookies and spices for a truly festive accessory.
Detailed Instructions
Materials
- Polymer clay (terracotta or gingerbread brown)
- Polymer clay (white for details)
- Red acrylic paint or red clay
- Small eye pin
- Elastic beading cord (strong, clear)
- Needle tool or toothpick
- Small ball stylus tool
- Gloss glaze (optional)
- Glitter or sand (optional for texture)
- Rolling pin or pasta machine
- Small gingerbread man cutter (custom or freehand)
- Baking sheet and parchment paper
- Super glue
Step 1: Creating the Gingerbread Beads
-
Prepare the clay base:
Start by conditioning your terracotta or brown polymer clay until it is soft and pliable. If the color is too dark, mix in a tiny bit of white; if it’s too plain, knead in a pinch of fine glitter or sand to simulate the texture of a baked cookie. -
Roll spheres:
Pinch off equal-sized amounts of clay to form the round beads. You will need about 18-20 beads for a standard adult bracelet. Roll them between your palms to create smooth spheres. -
Add polka dots:
For the polka-dotted beads, take tiny specks of white clay and roll them into microscopic balls. Press these gently onto several of the brown beads, flattening them slightly so they adhere without losing their round shape. -
Create swirled accents:
For a marbled or ‘icing drizzle’ effect, roll a very thin snake of white clay. Wrap it gently around a brown bead and roll the bead again in your palm to smooth the white line into the surface of the brown sphere. -
Pierce the beads:
Using a needle tool or toothpick, carefully pierce a hole through the center of each bead. I find twisting the tool as you push through prevents the bead from squashing out of shape. -
Detail the sparkly beads:
If you created plain brown beads with glitter mixed in, leave these unadorned to act as ‘sugar-coated’ accent beads. Ensure their holes are clear of debris.
Make it ‘Tasty’
Mix varying amounts of translucent clay into your brown base. This creates depth and makes the clay look more like real baked dough rather than flat plastic.
Step 2: Sculpting the Charm
-
Shape the gingerbread man:
Roll a small slab of brown clay to about 1/4 inch thickness. Use a mini cutter or carefully cut a gingerbread shape freehand with a craft knife. Smooth the edges with your finger to soften the look. -
Add the face:
Roll a hairline-thin thread of white clay for the smile and curve it onto the face. Use a needle tool to create two small indentations for the eyes, then fill them with tiny balls of black or dark brown clay. -
Place the buttons:
Apply three tiny dots of red clay down the center of the body for buttons. Alternatively, you can indent these spots now and paint them red after baking. -
Insert the eye pin:
Trim a metal eye pin to a short length (about half an inch). Dip the end in a tiny bit of liquid clay or glue for grip, and insert it into the top of the gingerbread man’s head. -
Bake the pieces:
Arrange all your beads and the charm on a parchment-lined baking sheet. Bake according to your clay manufacturer’s instructions (usually around 275°F for 15-30 minutes). Let them cool completely.
Fingerprint Fix
Before baking, lightly brush your unbaked clay beads with a little cornstarch or baby baby powder. This smooths out fingerprints without adding texture.
Step 3: Assembly
-
Seal the beads:
Once cool, you can apply a light coat of semi-gloss or gloss glaze to the beads if you want them to look ‘iced.’ If you prefer a rustic cookie look, leave them matte. -
Attach the charm:
Attach a small jump ring to the eye pin on your gingerbread charm. This will allow it to dangle freely from the bracelet elastic. -
Layout the design:
Plan your pattern on a bead board or towel. Alternate between the plain ‘sugared’ beads, the polka dot beads, and the swirled beads to create a balanced rhythm. -
String the beads:
Cut a piece of elastic cord (about 10 inches). Thread your beads onto the elastic, sliding the gingerbread charm on at the halfway point so it sits centrally. -
Tie the knot:
Bring the ends of the elastic together and tie a secure surgeon’s knot (right over left, left over right, looping through twice). Pull tight to secure. -
Finishing touches:
Add a tiny drop of super glue to the knot to ensure it holds. Once dry, trim the excess elastic and tuck the knot inside the hole of a neighboring bead.
Now you have a sweet, festive accessory that looks good enough to eat
Peppermint Swirl Statement Beads
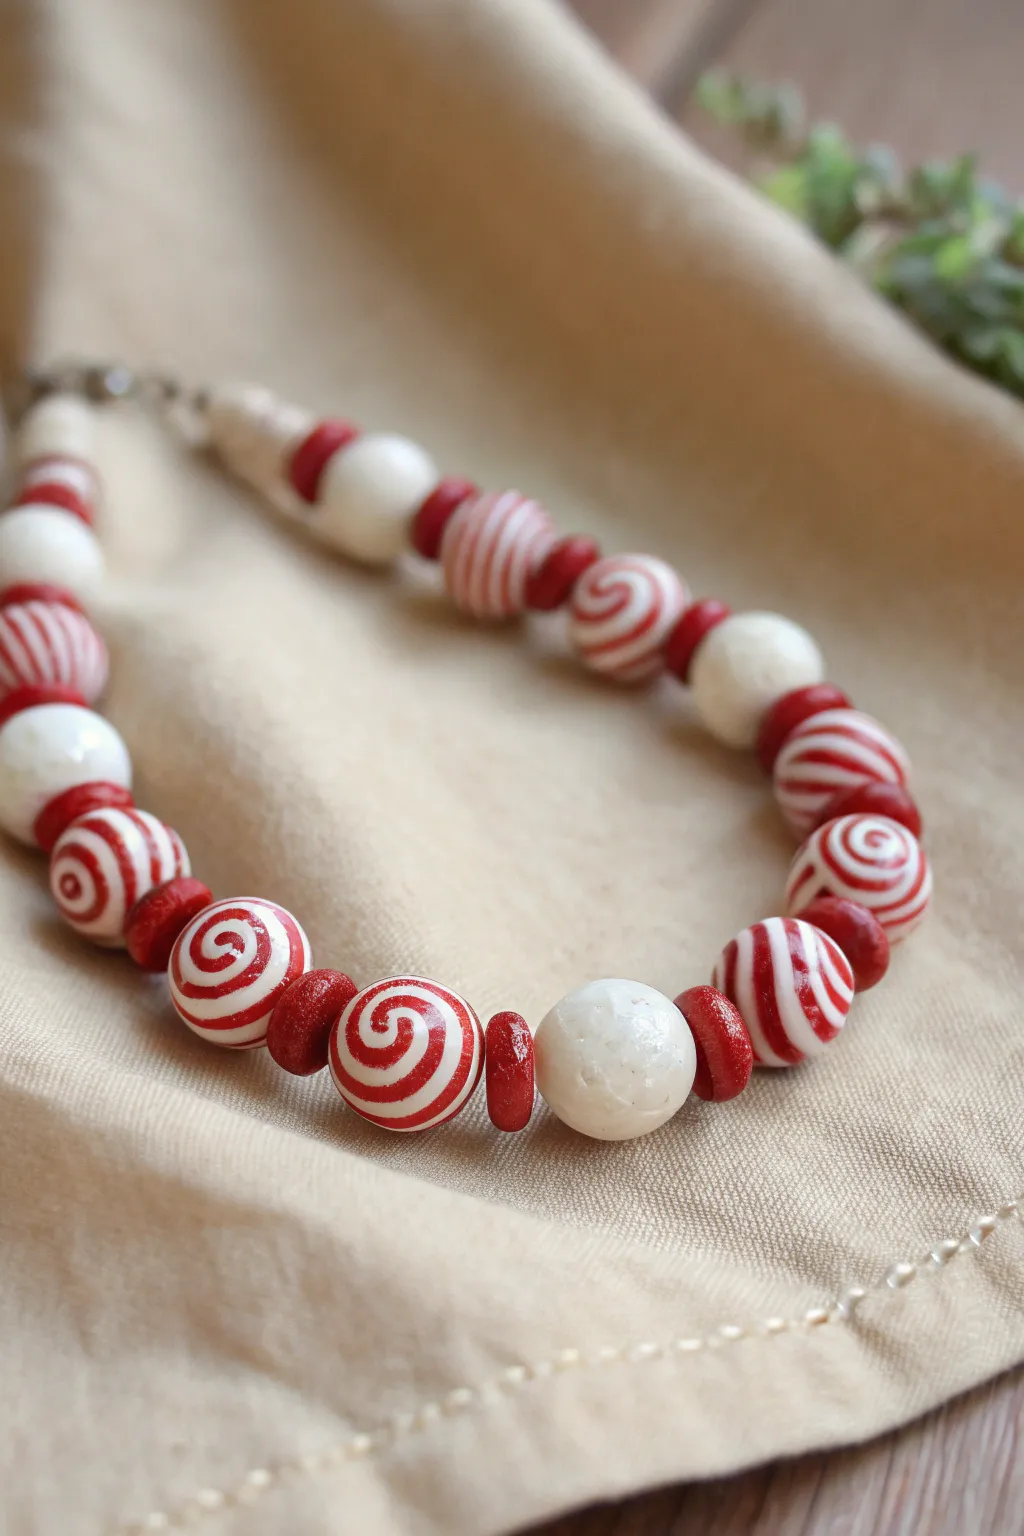
Capture the sweetness of the season with this festive necklace featuring hand-rolled polymer clay beads that mimic classic peppermint candies. The mix of hypnotic swirls, bold stripes, and snowy white accents creates a cheerful accessory perfect for holiday gatherings.
Step-by-Step
Materials
- Polymer clay (Bright Red, White, Translucent White)
- Clay roller or pasta machine
- Clay blade or craft knife
- Bead piercing pins or toothpicks
- Baking sheet and parchment paper
- Gloss glaze or resin (for the swirl beads)
- Matte varnish (optional for spacer beads)
- Jewelry wire or strong beading cord
- Crimp beads and jewelry pliers
- Clasp of your choice
Step 1: Creating the Canes
-
Condition the clay:
Begin by conditioning your red and white polymer clay separately until it is soft and pliable. Warm clay prevents cracking later on. -
Roll out sheets:
Roll out a slab of white clay and a slab of red clay to approximately the same thickness, about 1/8 inch. -
Make the jelly roll cane:
Stack the red sheet on top of the white sheet. Carefully trim the edges to make a neat rectangle. Rolling from the short end, tightly coil the stack into a spiral known as a ‘jelly roll’ cane. -
Reduce the cane:
Gently roll and squeeze the cane to lengthen it and reduce its diameter until it’s about the thickness of a large marker. This will be used for the swirl beads. -
Create the striped cane:
For the striped beads, create a stack of alternating red and white layers (block form) instead of rolling them. Compress the block and slice thinly, or reduce into a round cylinder for a striped effect.
Smudged Colors?
If red smears onto the white clay while rolling, wipe your hands and workspace with baby wipes frequently. If a bead gets dirty, use acetone on a Q-tip to clean it before baking.
Step 2: Forming the Beads
-
Cut swirl slices:
Take your jelly roll cane and slice off rounds. To make the round swirl beads, you can either wrap a thin slice around a scrap ball of clay or gently gently manipulate a thick slice into a sphere. -
Smoothing the swirls:
Roll the swirl beads between your palms. Use a light touch to smooth the seams without distorting the spiral pattern too much. -
Shape the solid whites:
Roll balls of white clay for the spacer beads. I like to mix a tiny pinch of translucent clay into the white for a more natural, stone-like appearance. -
Create textured red spacers:
Roll smaller, disc-like beads from the red clay. To get the texture seen in the photo, gently roll them over sandpaper or dab them with a stiff toothbrush. -
Pierce the beads:
Carefully pierce a hole through the center of each bead using a bead pin. Rotate the pin as you push through to avoid squashing the bead’s shape.
Pro Tip: Consistent Sizes
Use a small circle cookie cutter or a dedicated clay measuring plunger to ensure you use the exact same amount of clay for every bead of a specific type.
Step 3: Baking and Assembly
-
Bake the beads:
Arrange your beads on a parchment-lined baking sheet. Bake according to your clay manufacturer’s instructions, usually around 275°F (135°C) for 30 minutes. -
Cool and finish:
Allow the beads to cool completely. For that candy-like shine on the swirl beads, apply a coat of gloss glaze or UV resin. Leave the textured red spacers matte for contrast. -
Arrange the pattern:
Lay out your design on a bead board. The pattern in the image alternates: swirl bead, textured red spacer, solid white, red spacer, striped bead, and so on. -
String the beads:
Cut a length of jewelry wire. Attach one end to a clasp using a crimp bead. Thread your beads following your laid-out pattern. -
Final touches:
Finish the necklace by securing the second end of the wire to a jump ring or the other half of your clasp with a crimp bead. Trim any excess wire.
Now you have a stunning piece of holiday jewelry that looks good enough to eat

TRACK YOUR CERAMIC JOURNEY
Capture glaze tests, firing details, and creative progress—all in one simple printable. Make your projects easier to repeat and improve.
Plaid-Patterned Christmas Disc Beads
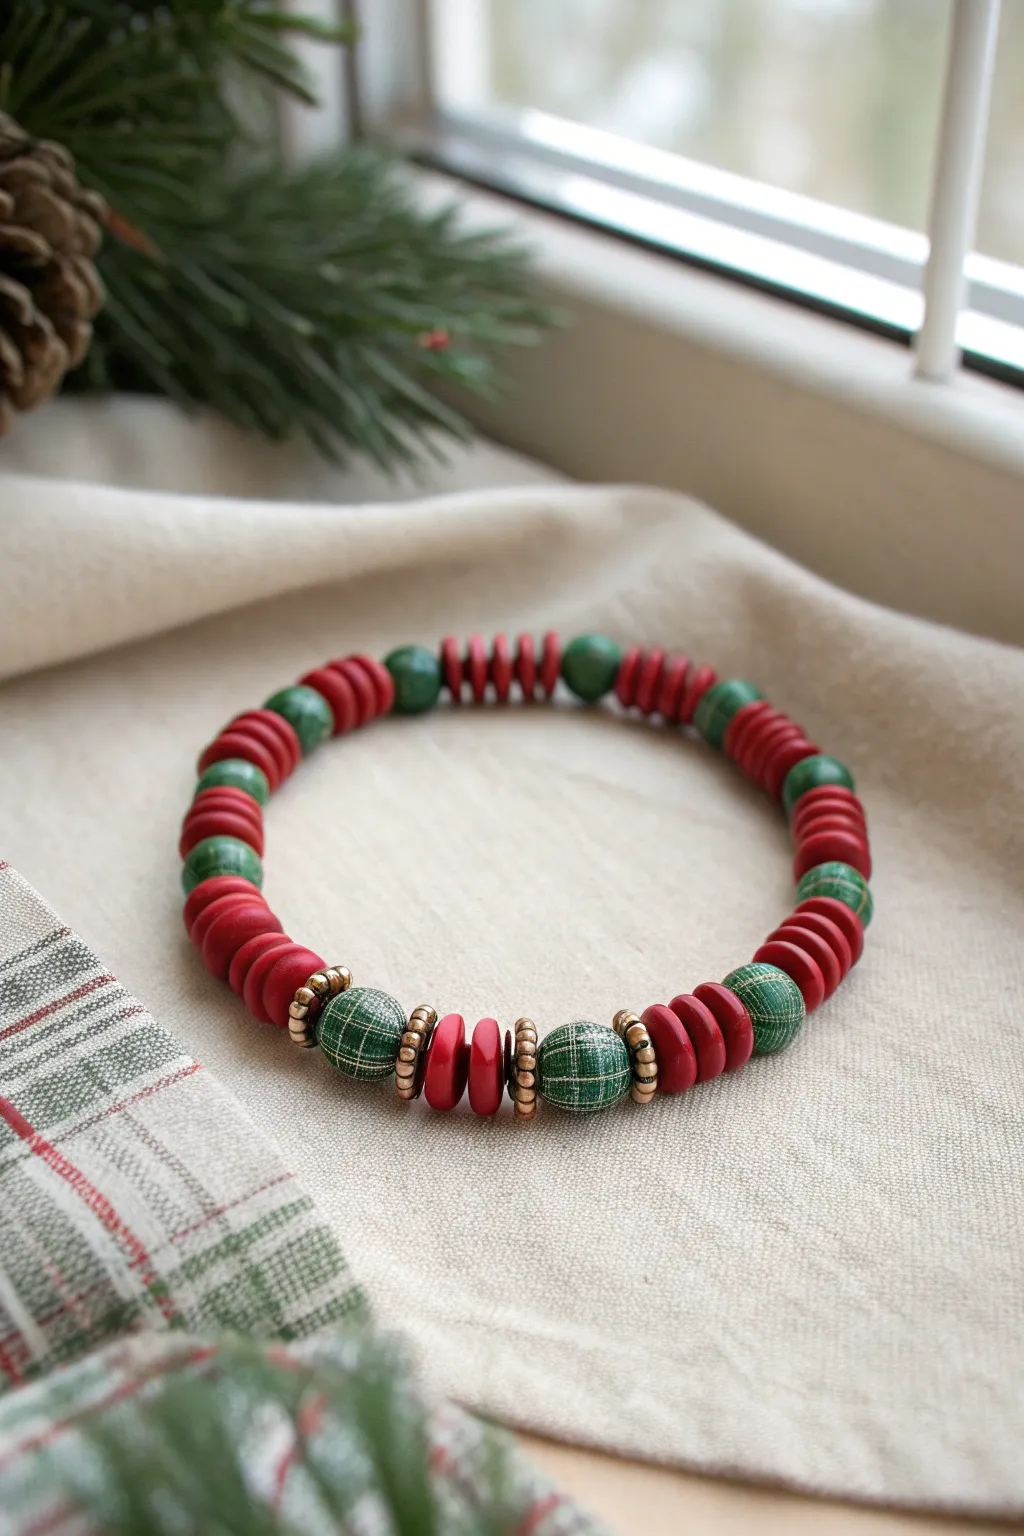
This festive bracelet combines the trendy look of matte red disc beads with classic green plaid accents for a sophisticated Christmas accessory. The addition of distressed gold spacer rings adds a touch of vintage warmth that pulls the whole piece together.
How-To Guide
Materials
- Red polymer clay Heishi disc beads (approx. 6-8mm)
- Green plaid-patterned polymer clay or wooden round beads (10mm)
- Antiqued gold daisy spacer beads or disc spacers
- Elastic stretch cord (0.7mm or 0.8mm)
- Super glue or jewelry cement
- Scissors
Step 1: Preparation & Design
-
Measure your wrist:
Wrap a piece of string around your wrist to find your comfortable size. Add about half an inch to this measurement to account for the bulk of the larger plaid beads. -
Cut the cord:
Cut a length of elastic cord about 10-12 inches long. Having this extra length makes tying off the bracelet significantly easier later on. -
Pre-stretch the elastic:
Hold the cord between your hands and give it a few firm tugs. This pre-stretching prevents the bracelet from sagging or loosening shortly after you wear it. -
Secure the end:
Attach a piece of tape or a bead stopper to one end of the cord so your beads don’t slide off while you work.
Knot Slipping?
If the elastic feels too slick for a single knot, try tying two separate square knots on top of each other before gluing. It creates a slightly bulkier finish but guarantees security.
Step 2: Creating the Focal Section
-
Start the center pattern:
Begin by threading on one of the large green plaid round beads. This will be part of your main focal point. -
Add gold spacers:
On either side of the green plaid bead, slide on a gold daisy spacer. The textured surface of these spacers adds wonderful dimension against the smooth plaid. -
Insert red discs:
Thread on two red Heishi disc beads next to the gold spacer. These act as a small pop of color between the larger elements. -
Repeat the focal motif:
Add another gold spacer, followed by a second green plaid bead, and then another gold spacer. Repeat this pattern until you have three green plaid beads centered in the design.
Custom Plaid Look
Can’t find plaid beads? Paint plain green wood beads! Use a fine liner brush with gold & white acrylic paint to create cross-hatching, then seal with a matte varnish.
Step 3: Completing the Wrap
-
Begin the side sections:
After your central focal section is complete, thread on a stack of approximately 6-8 red Heishi disc beads. -
Insert a plaid accent:
Place one green plaid bead after the stack of red discs. Unlike the focal section, do not use gold spacers here; let the green rest directly against the red for contrast. -
Continue the pattern:
Thread on another stack of 8-10 red disc beads, followed by another single green plaid bead. -
Adjust the spacing:
As you move toward the back of the bracelet, you can increase the number of red discs between the green beads if needed. This helps ensure the detailed focal point stays on top of your wrist. -
Check the fit:
Wrap the strand around your wrist to check the length. Add or remove red disc beads at the very ends until the two ends of the cord meet comfortably without stretching the elastic tight.
Step 4: Finishing Touches
-
Prepare to knot:
Remove the tape or bead stopper carefully. Bring the two ends of the elastic cord together. -
Tie a surgeon’s knot:
Cross the ends over each other like a regular knot, loop one end through a second time, and pull tight. This extra loop adds friction to keep the knot secure. -
Glue the knot:
I like to apply a tiny dot of jewelry cement or super glue directly onto the knot. Let it dry for a minute or two. -
Hide the knot:
If possible, slide one of the beads (the large plaid ones work best due to larger holes) over the knot to conceal it. -
Trim excess cord:
Using sharp scissors, trim the excess elastic cord close to the knot, being careful not to cut the knot itself.
Now you have a cozy, custom piece of jewelry perfect for holiday gatherings
Ornament Color-Block Bracelet
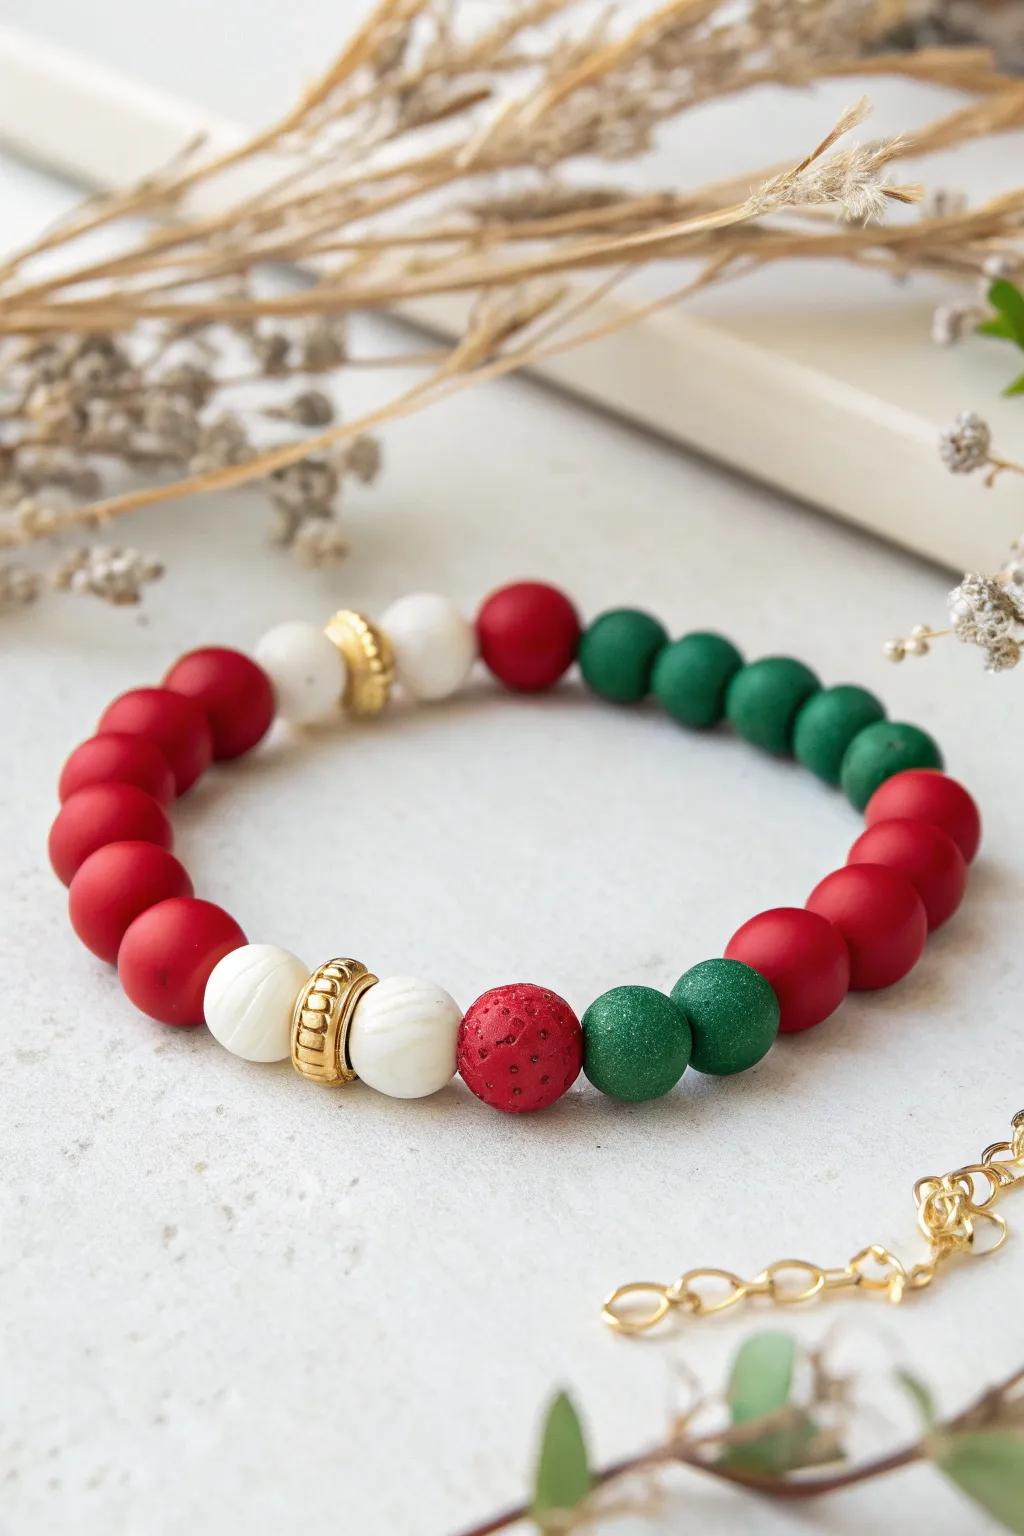
Embrace the festive spirit with this elegant yet playful color-blocked bracelet featuring rich matte reds and greens paired with creamy whites. The gold accents add a touch of sophistication, making it perfectly versatile for both holiday parties and cozy winter days.
Step-by-Step Tutorial
Materials
- Matte red round beads (8mm or 10mm)
- Matte green round beads (8mm or 10mm)
- White or cream round beads (8mm or 10mm)
- Textured red clay bead (lava stone or pitted texture)
- Textured green clay bead (sparkle or stone texture)
- Carved white melon beads or textured cream beads
- Gold spacer beads (heishi or ring style)
- Strong elastic display cord (0.8mm or 1mm)
- Jewelry glue (e.g., E6000 or G-S Hypo Cement)
- Scissors
Step 1: Planning and Preparation
-
Measure your wrist:
Before cutting any cord, wrap a measuring tape loosely around your wrist to determine the desired length. Add about 1/2 to 1 inch to this measurement depending on how loose you like your fit. -
Prepare the elastic:
Cut a piece of elastic cord about 10-12 inches long. Having this extra length makes tying the final knot much easier than struggling with short ends. -
Pre-stretch the cord:
I always give the elastic a few firm tugs before stringing. This ‘pre-stretching’ helps prevent the bracelet from sagging or loosening up immediately after you finish it. -
Lay out your design:
On a bead board or a soft towel, arrange your pattern to visualize the color blocking. The pattern in the image relies on sections of solid color rather than a simple A-B-A-B pattern.
Step 2: Stringing the Beads
-
Start with the red section:
Begin by threading on about 5 to 7 matte red beads. This creates the first solid block of color on one side of the bracelet. -
Add a touch of white:
Next, add a single plain white bead, followed by a gold spacer bead, and then another plain white bead. This creates a bright transition point. -
Form the red centerpiece:
Thread on a single red bead to act as a bridge into the next section. -
Switch to green:
Now string on your matte green beads. Aim for about 5 to 6 beads here to balance the red block on the opposite side. -
Create the second transition:
Similar to the first side, add more red beads—about 3 or 4—followed by a single white bead.
Knot Security
Use a flexible glue like G-S Hypo Cement rather than superglue. Superglue can make elastic brittle and prone to snapping.
Step 3: Creating the Focal Point
-
Add the gold accent:
Place a prominent gold spacer bead next to the white one. This draws the eye to the focal section of the bracelet. -
Insert texture:
Now use your special textured beads. Thread a carved white melon bead, followed by a textured red bead (like a lava stone or pitted clay bead). -
Finish the focal pattern:
Thread on two textured green beads to complete this unique, varied section. These distinct textures break up the smoothness of the matte beads beautifully. -
Check the sizing:
Wrap the strung beads around your wrist to check the fit. If there are gaps, add a few more solid color beads to the ends until the ends touch comfortably.
Essential Oil Diffuser
Use unsealed wood or lava stone beads for the textured sections. Add a drop of cinnamon or pine oil for a wearable holiday scent!
Step 4: Finishing Touches
-
Secure the circle:
Bring the two ends of the elastic together carefully. Tie a simple overhand knot, but don’t pull it fully tight yet. -
Tie a surgeon’s knot:
For extra security, tie a surgeon’s knot. Make a normal knot loop, but pass the tail end through the loop twice instead of once before pulling it tight. -
Apply glue:
Dab a tiny drop of jewelry glue directly onto the knot. This prevents the slippery elastic from slowly unravelling over time. -
Hide the knot:
If one of your beads has a slightly larger hole (the gold spacers are often great for this), gently tug the elastic so the knot slides inside that bead, hiding it from view. -
Trim the excess:
Once the glue is tacky or dry, trim the excess elastic cord close to the bead, being very careful not to nick the main knot.
Slip on your new festive creation and enjoy the cozy colors of the season.
Frosty Blue and Silver Winter Night Stack
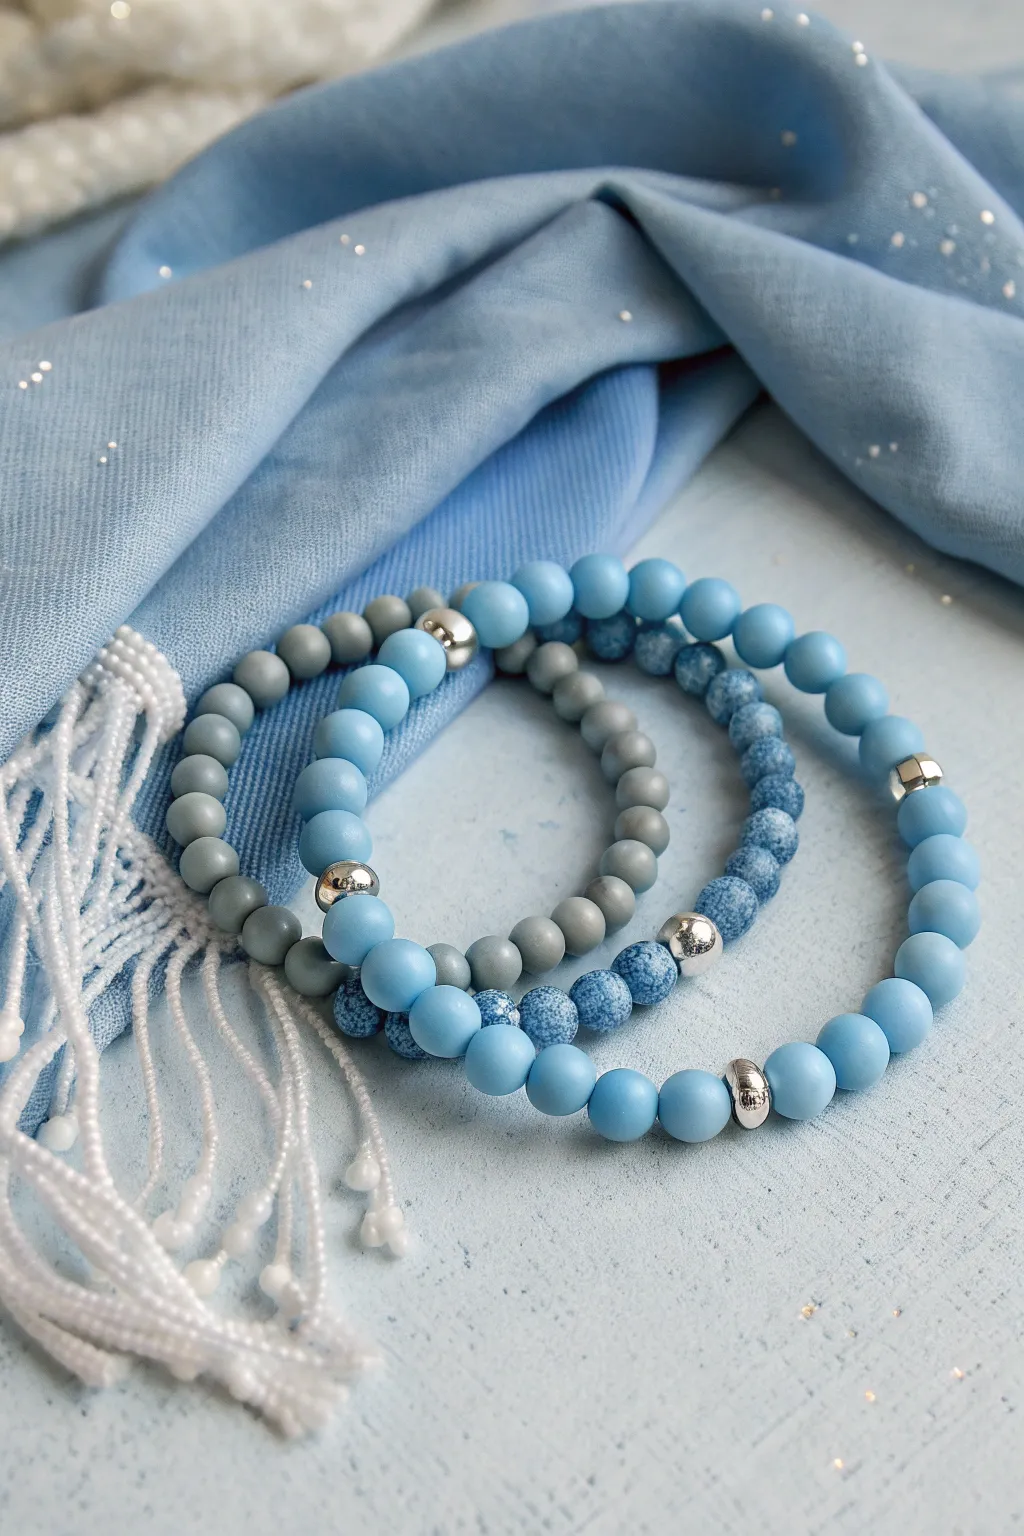
Capture the serene beauty of a frosty evening with this elegant trio of bracelets in varying shades of matte blue and soothing grey. The combination of textures—from smooth matte to speckled stone—paired with bright silver accents perfectly evokes glistening snow on a winter’s night.
Step-by-Step
Materials
- Matte light blue round beads (8mm)
- Matte grey round beads (8mm)
- Speckled blue stone or ceramic beads (8mm)
- Silver spacer beads or large hole metal beads
- Strong elastic bead cord (0.8mm or 1mm)
- Jewelry glue (optional, for securing knots)
- Scissors
Step 1: Planning Your Stack
-
Measure your wrist:
Before cutting any cord, wrap a measuring tape around your wrist to find your size. Add about half an inch to this measurement for a comfortable fit. -
Select your palette:
Gather your beads. You’ll need three distinct styles for this look: a solid matte grey, a solid matte light blue, and a textured or speckled blue bead. This variety creates depth. -
Pre-stretch the cord:
Cut three lengths of elastic cord, each about 10-12 inches long. Give each piece a gentle tug several times to pre-stretch it; this prevents the bracelets from stretching out later.
Step 2: Creating the Solid Blue Strand
-
Start the pattern:
On your first piece of cord, begin stringing the solid matte light blue beads. -
Add silver accents:
After stringing about 7-8 blue beads, add one silver spacer bead. This breaks up the solid color. -
Complete the loop:
Continue the pattern until the strand reaches your desired length. I like to aim for at least two or three silver accents spaced evenly around the bracelet. -
Check the fit:
Wrap the unfinished strand around your wrist to ensure it sits comfortably without gaps.
Hiding the Knot
Use crimp covers or specifically large-hole metal spacer beads next to your knot. You can easily tuck the knot inside for a professional, seamless finish.
Step 3: Creating the Textured Mix Strand
-
String the base beads:
For the second bracelet, use the speckled blue beads. These add a wonderful ‘snowy’ texture to the stack. -
Incorporate silver:
Just like the first bracelet, intersperse silver metal beads. Try placing them slightly differently than the first bracelet so they don’t line up perfectly when worn together. -
Create a focal point:
Consider stringing a section of 3-4 darker blue or slightly different textured beads in the center for visual interest, though a continuous pattern works beautifully too.
Stiff Bracelets?
If your bracelet feels stiff and kinky, you’ve strung the beads too tightly. Leave a tiny bit of slack (about 1mm) before knotting so beads can roll freely.
Step 4: Creating the Grey Strand
-
String the grey beads:
For the third strand, use the matte grey beads. This neutral tone grounds the brighter blues. -
Minimal accents:
Keep this strand simpler. You might only add one silver bead to act as a hidden knot cover, or skip the metallic accents entirely for a pure, stormy look. -
Align the sizes:
Ensure this bracelet is the exact same length as the previous two so they stack neatly.
Step 5: Finishing Touches
-
Tie the knots:
For each bracelet, tie the ends together using a surgeon’s knot (right over left, then wrap twice; left over right, and pull tight). -
Secure with glue:
Place a tiny drop of jewelry glue on the knot. Be careful not to get glue on the beads themselves. -
Hide the knot:
If possible, pull the knot inside the hole of a nearby bead or one of the silver spacers while the glue is still tacky. -
Trim the excess:
Once the glue is fully dry, trim the excess cord close to the bead. -
Final arrangement:
Stack the three bracelets on your wrist, mixing the order to see which arrangement highlights the textures best.
Now you have a frosty, coordinated set perfect for wearing with cozy winter knits
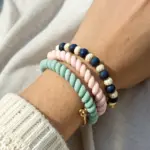
Pastel Sugarplum Christmas Palette
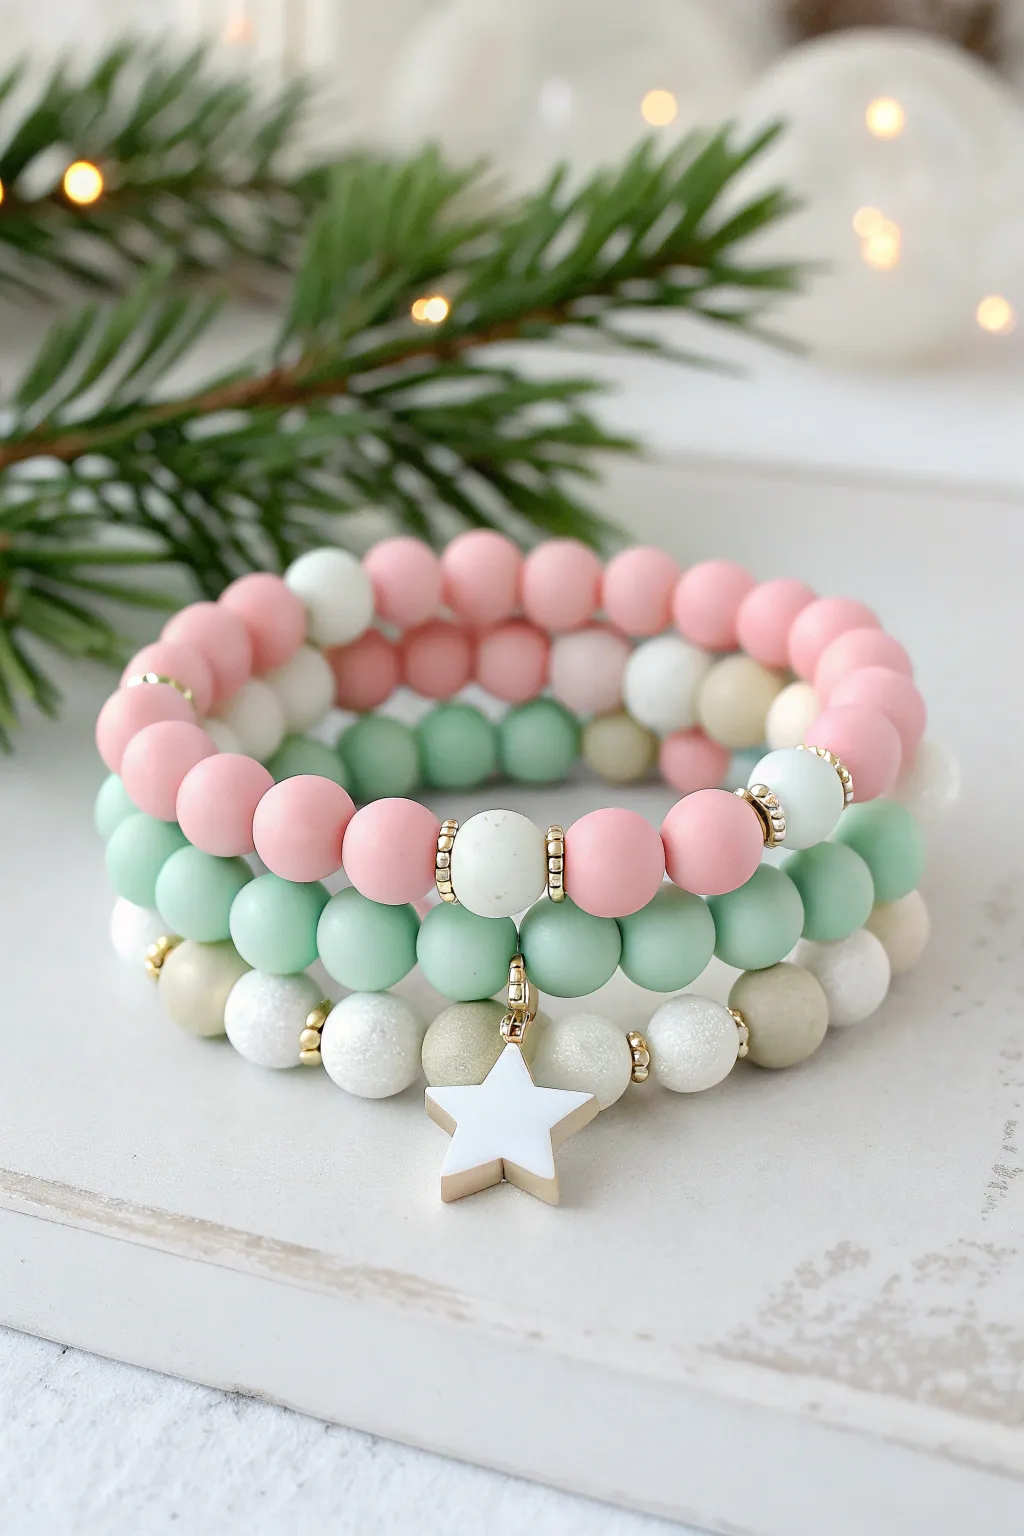
Capture the sweetness of the season with this dreamy trio of beaded bracelets featuring soft mint, baby pink, and snowy white tones. The matte finish of the clay-style beads contrasts beautifully with a single gold-rimmed star charm for a sophisticated holiday look.
Detailed Instructions
Materials
- 8mm matte acrylic or polymer clay beads (Baby Pink)
- 8mm matte acrylic or polymer clay beads (Mint Green)
- 8mm matte acrylic or polymer clay beads (Cream/Off-White)
- 8mm snowy/sugar-texture beads (White)
- 8mm shimmer beads (Champagne/Light Gold)
- Gold rhinestone rondelle spacers (approx. 6mm or 8mm)
- Gold tone star charm with white enamel center
- Gold tone jump ring (4mm or 6mm)
- Elastic beading cord (0.7mm or 0.8mm typical)
- Jewelry adhesive (e.g., E6000 or G-S Hypo Cement)
- Scissors
Step 1: Planning and Prep
-
Measure your wrist:
Wrap a flexible measuring tape around your wrist where you want the bracelets to sit. Add about 0.5 inches to this measurement to determine the final length needed for a comfortable fit. -
Cut the elastic:
Cut three pieces of elastic cord, making each about 10-12 inches long. Having this extra length makes tying the finishing knots much easier than struggling with short ends. -
Pre-stretch the cord:
Hold each segment of elastic firmly and give it a few gentle pulls. This pre-stretching step helps prevent the bracelets from sagging or stretching out permanently after the first wear.
Step 2: The Pink Accent Bracelet
-
Secure the end:
Place a bead stopper or a piece of tape on one end of your first elastic cord to stop beads from sliding off while you work. -
Start the pattern:
Begin stringing the matte baby pink beads. String about 10-12 pink beads to form the back section of the bracelet. -
Add the focal section:
Now, add a gold rhinestone spacer, followed by one cream bead, another gold spacer, and then transition back to pink beads. You can create a second focal point on the opposite side with a white bead flanked by spacers if you like symmetry. -
Fill to length:
Continue adding pink beads until the strand reaches your desired length minus about half an inch to account for stretching.
Knot Hiding Trick
If your bead holes are too small to hide the knot, finish the bracelet next to a large-hole gold bead or metal spacer. These usually accommodate the knot bulk much better than clay beads.
Step 3: The Mint Green Strand
-
Solid color sequence:
For the second bracelet, we aim for a block of color to ground the set. Secure your second string and begin adding the matte mint green beads. -
Check consistency:
As you string, ensure all beads are uniform in size. If you want to add a tiny sparkle, you can hide a gold spacer near the knot, but a solid green line looks truest to the inspiration image. -
Verify length:
Wrap the unfinished strand around your wrist to check the fit against the pink bracelet; they should be identical in size.
Bumpy Bracelet?
If the bracelet kinks or won’t lay flat, the knot is likely too tight. You want the elastic taut but not stretched when resting. Retie with slightly more slack so the beads drape fluidly.
Step 4: The Sugar & Star Bracelet
-
Create the texture mix:
This bottom layer relies on texture. Alternate between your snowy white beads, the champagne shimmer beads, and plain cream beads in a random, organic pattern. -
Insert spacers:
Every 3 to 4 beads, slip on a gold rhinestone spacer to add that festive holiday sparkle. -
Prepare the charm:
Open a gold jump ring using two pairs of pliers (twist side-to-side, don’t pull apart). Slide on the star charm and loops it onto the elastic cord at the center point of your design. -
Close the ring:
Twist the jump ring closed securely. Ensure the star hangs freely between two beads or directly next to a gold spacer for a polished look. -
Finish stringing:
Complete the rest of the strand with your mixed white and champagne beads until it matches the length of the previous two.
Step 5: Finishing Touches
-
Tie the knots:
For each bracelet, remove the tape/stopper and tie a surgeon’s knot. This is a standard square knot, but you loop the elastic through the knot an extra time before pulling tight. -
Secure with glue:
Place a tiny dot of jewelry adhesive on each knot. I like to let this dry for about 15 minutes before handling to ensure it’s fully secure. -
Hide the mechanism:
Once the glue is tacky or dry, trim the excess elastic tails closely. If the hole of a neighboring bead is large enough, gently tug the knot inside to hide it.
Stack them together for a cozy, festive look that pairs perfectly with a warm sweater
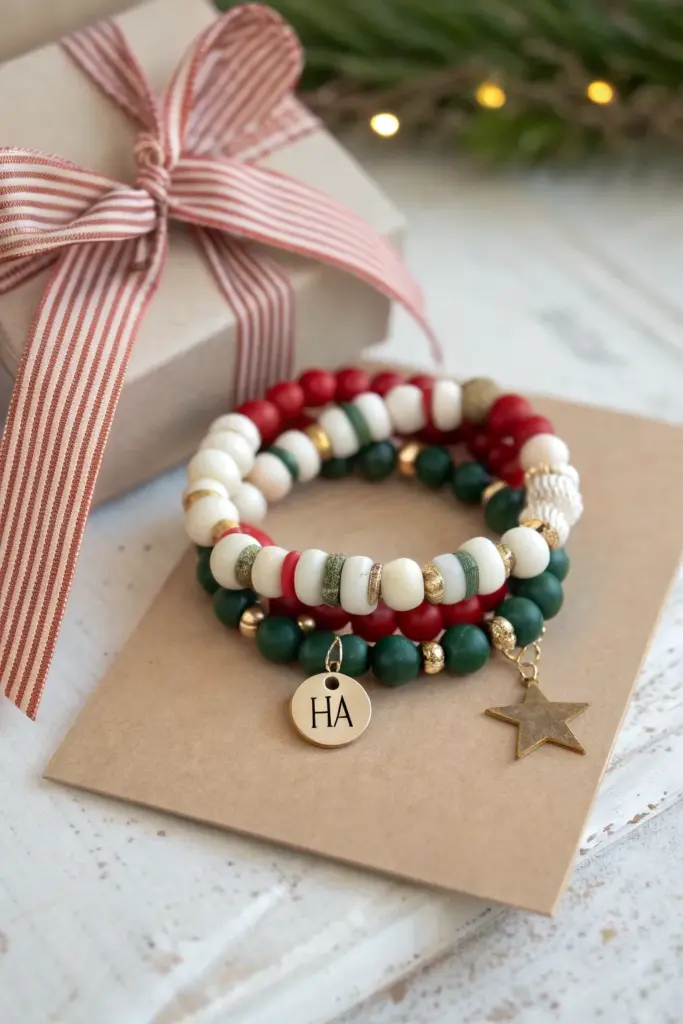
Coordinated Christmas Bracelet Gift Sets

Embrace the festive spirit with this coordinated trio of stretch bracelets, featuring a classic palette of deep forest green, cranberry red, and creamy white. The set combines matte round beads, unique striped accents, and personalized gold charms for a sophisticated yet handmade holiday gift.
Step-by-Step Tutorial
Materials
- Polymer clay beads (10mm round) in dark green, red, and white
- Polymer clay stripe or textured accent beads (white with red/green details)
- Small gold spacer beads (3mm and 5mm round)
- Gold rondelle spacer beads
- Gold plated initial charm
- Gold plated star charm
- Strong elastic cord (0.8mm transparent)
- Hypo-cement or strong jewelry glue
- Scissors
Step 1: The Green & Gold Foundation Strand
-
Prepare your workspace:
Lay out a bead design board or a soft towel to prevent beads from rolling away. Cut a piece of elastic cord about 10-12 inches long—it’s always better to have extra length to tie knots comfortably. -
Start the green pattern:
Begin threading your deep green 10mm beads onto the elastic. After every 2-3 green beads, slide on a small gold spacer beat to break up the solid color and add shimmer. -
Create the focal point:
Once you have beaded about halfway, slide the gold initial charm onto the cord. Ensure it sits freely between two gold spacers for the best movement. -
Finish stringing:
Continue the green bead and gold spacer pattern until the bracelet measures about 7 inches (or your desired wrist size). -
Secure the first bracelet:
Tie a secure surgeon’s knot (right over left, left over right) and pull tight. Apply a tiny dot of jewelry glue to the knot, let it dry for a moment, and trim the excess cord, tucking the knot inside a bead hole if possible.
Knot Mastery
Pre-stretch your elastic cord before beading! Tug it firmly a few times. This prevents the bracelet from growing loose and saggy after the first few wears.
Step 2: The Striped Accent Strand
-
Design the mixed pattern:
For the middle bracelet, cut another length of elastic. This design uses a repeating pattern: one white bead, one textured/striped bead, one white bead, followed by a gold rondelle spacer. -
Incorporate color pops:
To make it cohesive, swap a few of the white beads for red or green striped beads at random intervals. I find this irregularity gives the stack a more boutique feel. -
Check the fit:
Wrap the strand around the first green bracelet to ensure they are exactly the same size before tying. -
Knot and seal:
Repeat the surgeon’s knot and glue process to finish this second tier.
Step 3: The Red & White Statement Strand
-
Start the final strand:
Cut your third piece of elastic. This bracelet will focus on the red and white beads to complete the color triad. -
Alternate the colors:
Thread alternating sections of 3-4 red beads and 3-4 white beads. Separate these sections with the larger gold spacer beads. -
Add the star charm:
Midway through the strand, attach the gold star charm using a jump ring or slide it directly onto the cord if the loop is large enough. -
Final adjustments:
Hold all three bracelets together. Ensure the charms don’t overlap too much; you want them to jingle alongside each other, not tangle. -
Complete the set:
Tie off your final strand with a strong knot and glue. Allow all glue to cure fully (at least 1 hour) before stretching the bracelets.
Level Up The Look
Use gold-filled beads instead of plated ones. They cost a little more but won’t tarnish, ensuring your holiday creation lasts for years of Christmas seasons.
Stack them up on your wrist or wrap them around a card for a heartfelt handmade gift