When I’m in the studio craving something festive but quick, I always reach for clay bead bracelets—they’re simple, cute, and instantly give that holiday vibe. Here are my favorite Christmas clay bracelet ideas with classic color combos, easy patterns, and a few playful twists you can mix into stacks.
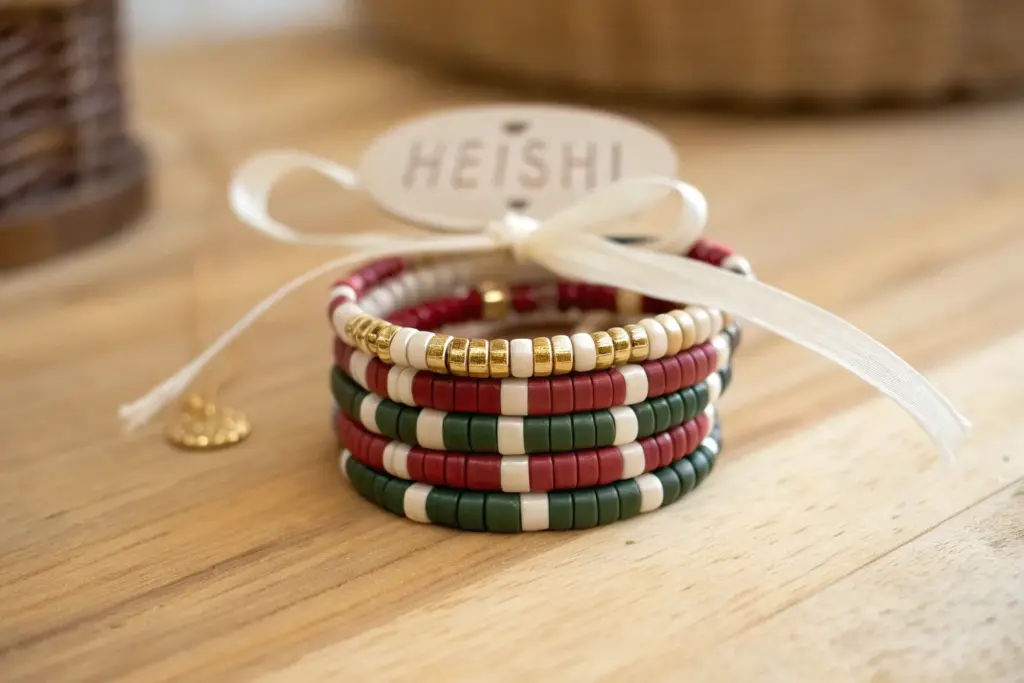
Candy Cane Stripe Stack
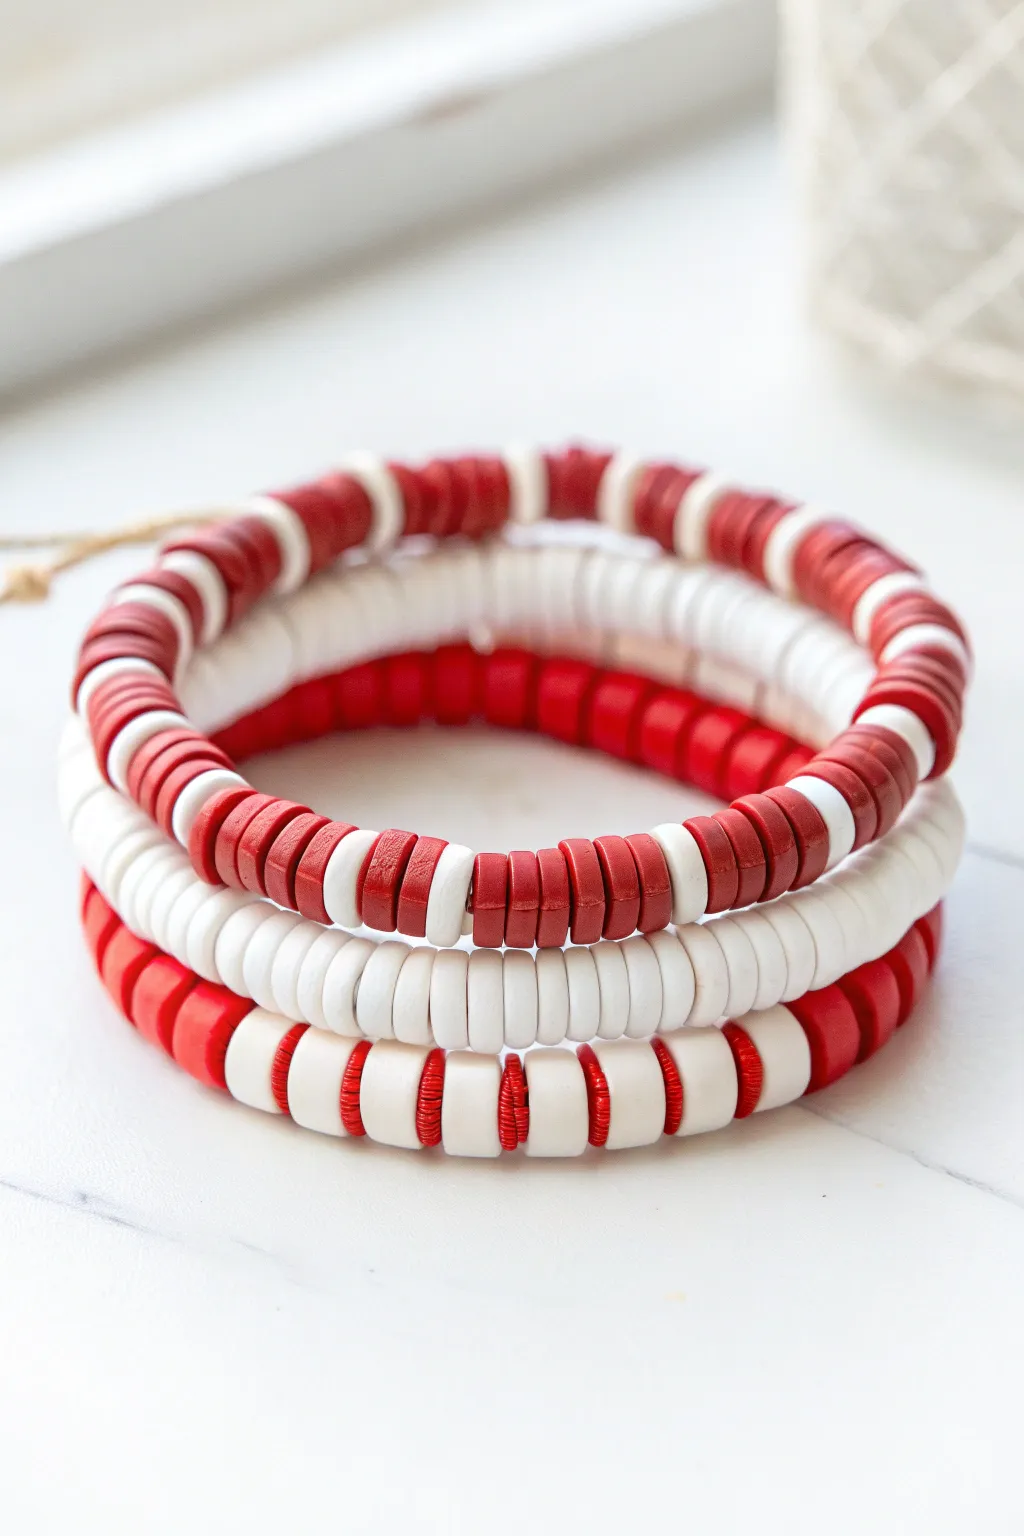
These classic red and white bracelets channel the festive spirit of peppermint candy without being overly complicated. The clean lines of the flat clay disc beads create a modern, satisfying texture that looks great stacked in groups of three.
How-To Guide
Materials
- Red flat polymer clay disc beads (approx. 6mm or 8mm)
- White flat polymer clay disc beads (approx. 6mm or 8mm)
- Strong elastic cord (0.8mm or 1mm recommended)
- Scissors or jewelry nippers
- Super glue or jewelry glue (optional)
- Bead stopper or binder clip
- Measuring tape
Step 1: Preparation
-
Measure your wrist:
Wrap a measuring tape comfortably around your wrist to get your base size. Add about 0.5 inches to this measurement so the bracelets fit comfortably stacked without pinching. -
Cut the elastic:
Cut three pieces of elastic cord, each about 10-12 inches long. This generous length gives you plenty of room to tie secure knots later without struggling with tiny ends. -
Secure the ends:
Attach a bead stopper or a simple binder clip to one end of each elastic strand. This prevents your beads from sliding off while you work on your patterns.
Knot Security Tip
When tightening your final knot, pull all four strands (the two tail ends and the two bracelet sides) simultaneously to lock the knot in place tightly.
Step 2: Bracelet 1: Red with White Accents
-
Start the pattern:
Begin threading your beads onto the first cord. For this predominantly red design, verify the bead count you prefer for the red sections. -
Create the segments:
Thread approximately 5 to 7 red disc beads, followed by a single white disc bead. I like to keep the red sections consistent, so count carefully. -
Repeat until length is reached:
Continue this alternating pattern—group of reds, one white—until you reach your measured wrist length, ending with a red section to maintain the pattern’s flow when tied.
Step 3: Bracelet 2: Solid White
-
Load the white beads:
For the middle bracelet in the stack, simply thread solid white disc beads continuously onto your second piece of elastic. -
Check for consistency:
Periodically hold this strand up against your first finished strand to ensure they are the exact same length before tying anything off.
Gold Rush Upgrade
Replace the single accent beads with gold spacer disc beads instead of contrasting colors for a more elegant, glamorous holiday party look.
Step 4: Bracelet 3: White with Red Accents
-
Establish the reverse pattern:
For the bottom bracelet shown in the stack, you’ll create the inverse of the first bracelet. This time, the white beads will be the dominant color. -
Thread the segments:
Thread a single red disc bead, followed by approximately 3 white disc beads. This creates a more frequent, striped appearance compared to the top bracelet. -
Check spacing:
Notice how the red pops against the white. Continue the ‘1 red, 3 white’ pattern until this strand matches the length of the previous two.
Step 5: Finishing Touches
-
Pre-stretch the cord:
Before tying, gently give each bracelet a little tug to pre-stretch the elastic. This prevents the cord from stretching out and sagging later on. -
Tie the knots:
Remove the bead stopper and tie the ends of the elastic together using a surgeon’s knot (loop the elastic through twice before pulling tight) or a tight square knot. -
Secure with glue:
Dab a tiny drop of super glue or specialized jewelry glue onto the knot. Let this dry completely before trimming any excess string. -
Hide the knot:
Once the glue is dry and the excess string is trimmed close, gently slide a nearby bead over the knot to conceal it inside the bead hole for a seamless finish.
Stack these cheerful bands together to add an instant pop of holiday color to your winter wardrobe


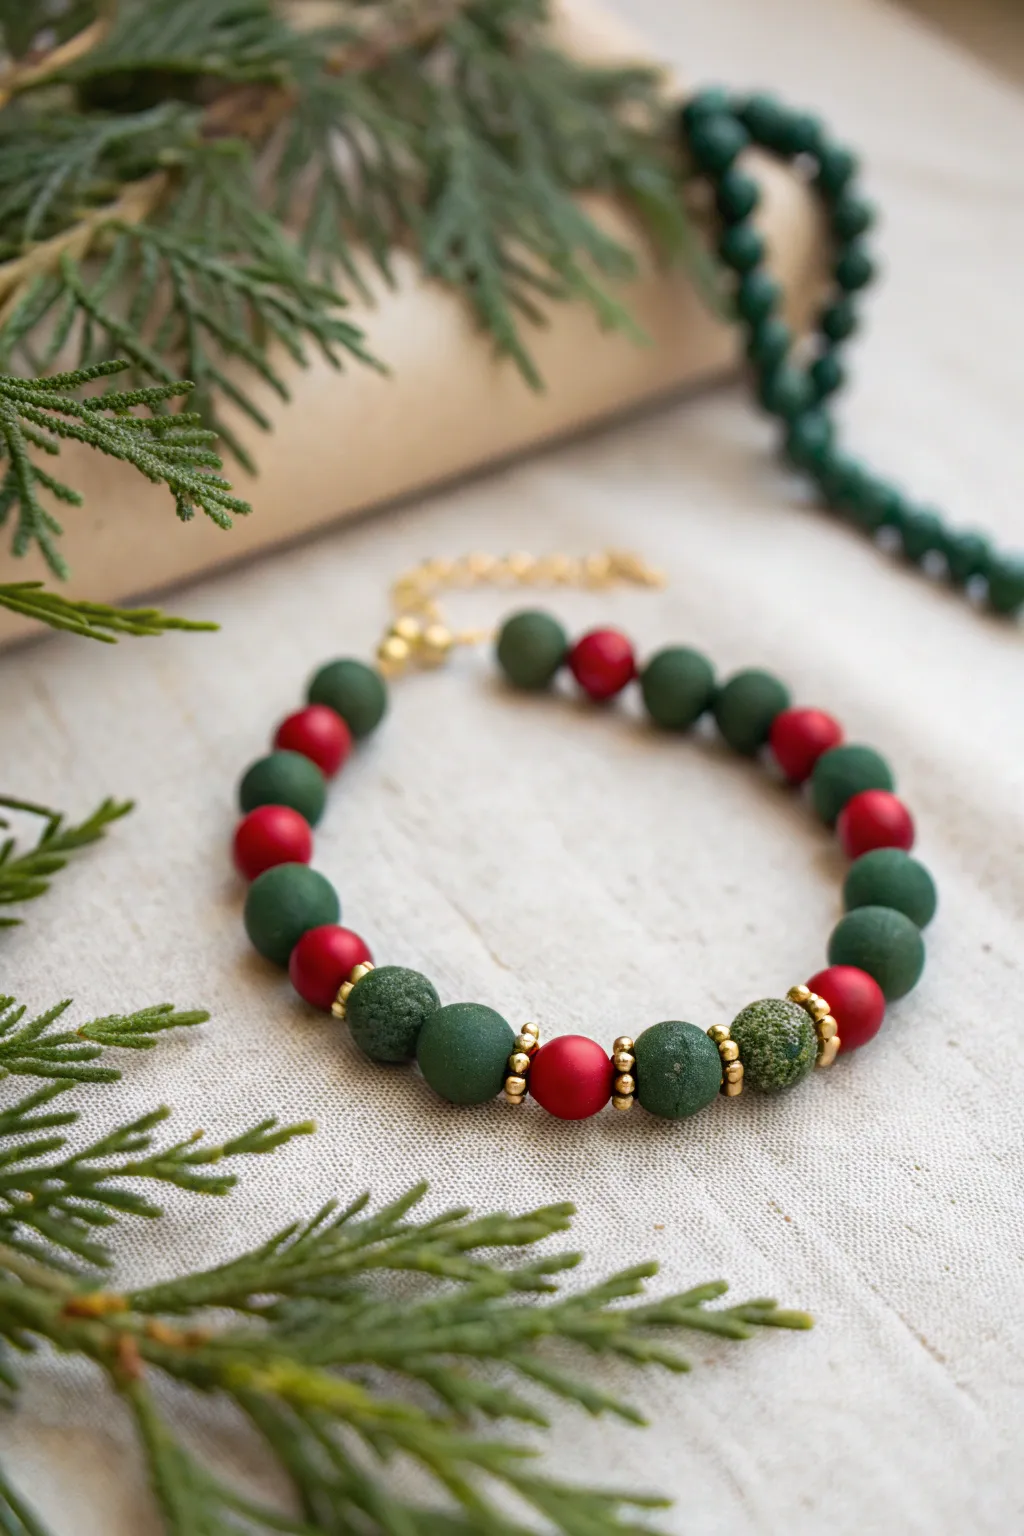
Classic Red, Green, White, and Gold
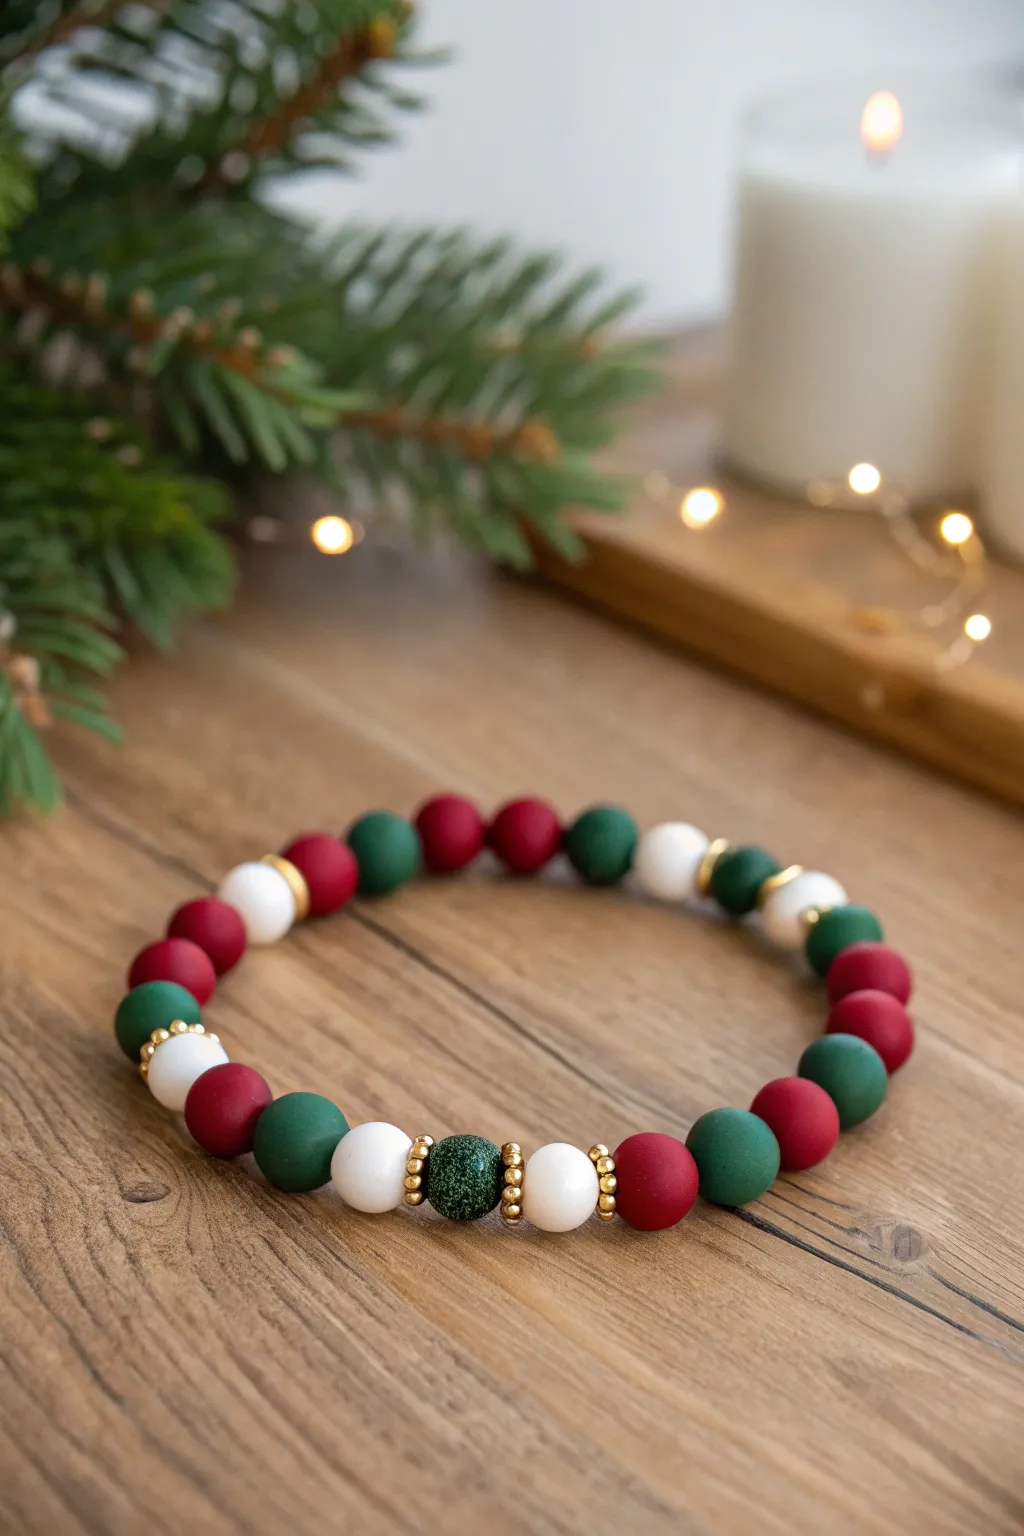
Capture the timeless spirit of Christmas with this elegant beaded bracelet featuring deep matte tones of red and green alongside crisp white. The addition of gold accents and a sparkling focal bead elevates this simple design into a sophisticated holiday accessory.
Step-by-Step Guide
Materials
- Polymer clay in deep red (e.g., Alizarin Crimson or Burgundy)
- Polymer clay in forest green
- Polymer clay in brilliant white
- Polymer clay in sparkly emerald glamer or glitter mix
- Gold tone heishi or rondelle spacer beads (approx. 3-4mm)
- Strong elastic bead cord (0.8mm or 1mm)
- Bead roller tool (optional but recommended for uniform sizing)
- Needle tool or toothpick
- Clay slicer blade
- Ceramic tile or baking sheet
- Super glue or jewelry cement
Step 1: Creating the Clay Beads
-
Condition the clay:
Start by thoroughly kneading each color of polymer clay separately until they are soft and pliable. This prevents cracking later. -
Roll logs:
Roll each color into a long, even snake or log shape. Try to keep the diameter of all logs consistent, roughly half an inch thick. -
Measure segments:
Using your clay slicer, cut equal segments from the red, green, and white logs. You will need approximately 8-10 of each color depending on your wrist size. -
Form the round beads:
Roll each cut segment between your palms or use a bead roller to create perfectly smooth spheres. I prefer a bead roller here to ensure every bead is exactly the same size. -
Create the focal bead:
Taking your sparkly green clay, roll a slightly larger sphere than the others. This will serve as the center anchor of your design. -
Pierce the holes:
Gently hold a bead and use a needle tool to pierce a hole through the center. Twist the tool as you push to avoid squishing the perfectly round shape. -
Double-check the holes:
Rotate the bead and pierce from the opposite side to clean up the exit hole and ensure the channel is straight. -
Bake the beads:
Place all beads on a ceramic tile or baking sheet lined with parchment paper. Bake according to your specific clay brand’s package instructions, usually around 275°F (135°C) for 30 minutes. -
Cool down:
Allow the beads to cool completely before handling. They are fragile when hot but harden as they return to room temperature.
Fingerprint Freedom
To avoid leaving fingerprints on your matte beads, lightly dust your hands with cornstarch before rolling, or wear latex gloves.
Step 2: Assembly
-
Prepare the elastic:
Cut a piece of elastic cord about 10-12 inches long. Pre-stretch the elastic by pulling it gently a few times; this prevents the bracelet from stretching out later. -
Start the pattern:
Thread your sparkly green focal bead onto the center of the cord. -
Add gold accents:
Place two or three gold spacer beads on either side of the focal bead to frame it. -
Begin the sequence:
On one side, add a white bead, then a gold spacer if desired (as seen near the focal point), then continue with your color pattern. -
Establish the rhythm:
Follow the pattern shown: Red, Green, White, Red, Green. Notice that the pattern is random but balanced—alternate colors so two of the same shade don’t touch. -
Insert spacers:
Add a gold spacer bead periodically, perhaps every 3-4 clay beads, to break up the matte texture with a metallic shine. -
Check fit:
Wrap the strand around your wrist to check the length. Add or remove beads until it sits comfortably without digging in. -
Tie the knot:
Secure the bracelet with a surgeon’s knot (right over left, left over right). Pull tight. -
Secure and hide:
Dab a tiny drop of super glue on the knot. Once dry, trim the excess cord and gently tuck the knot inside the hole of a neighboring bead.
Pro Tip: Baking Rack
Thread raw beads onto a stiff wire suspended over a foil tray to bake them. This prevents flat spots from forming on the bottom.
Now you have a festive, custom-sized accessory perfect for holiday parties or gifting to a friend


Holly Berry and Leaf Pattern
Capture the essence of a winter forest with this sophisticated polymer clay bracelet featuring matte textures and rich holiday hues. The combination of deep green moss-textured beads, smooth holly berries, and gold accents creates a timeless accessory perfect for the festive season.
Step-by-Step Tutorial
Materials
- Polymer clay in deep forest green
- Polymer clay in bright berry red
- Polymer clay in light moss green (or mix green with a little white/yellow)
- Gold seed beads or small gold spacer beads (heishi style)
- Beading wire (flexible nylon-coated)
- 2 crimp beads
- 2 wire guards (optional but recommended)
- Gold finish lobster clasp and jump ring/extender chain
- Coarse sea salt or sandpaper (for texturing)
- Needle tool or toothpick
- Acrylic roller
- Baking sheet and parchment paper
- Wet/dry sandpaper (fine grit 400-800)
- Jewelry pliers (crimping and cutting)
- Matte varathane or varnish (optional)
Step 1: Creating the Clay Beads
-
Condition the Green Clay:
Start by conditioning your deep forest green polymer clay until it is soft and pliable. Roll it into a uniform log or snake, roughly 1/2 inch thick. -
Create Green Spheres:
Cut the green log into equal segments to ensure your beads are standard in size. Roll each segment between your palms to form perfect, smooth spheres. Aim for a diameter of about 8-10mm. -
Condition the Red Clay:
Repeat the conditioning process with the bright red clay. This red needs to be vibrant to mimic holly berries. -
Form the Red Berries:
Roll the red clay into a slightly thinner log than the green one. Cut segments and roll them into spheres that are slightly smaller than your green beads, approximately 6-8mm, to create visual variety. -
Texture the Moss Beads:
Take your lighter moss green clay and form a few focal beads (2-3 beads). To achieve the ‘mossy’ pitted texture shown in the photo, gently roll these specific spheres in coarse sea salt, pressing just enough so the granules embed into the surface. -
Pierce the Beads:
Using a needle tool or toothpick, carefully pierce a hole through the center of every bead. I find twisting the needle slightly as it goes through prevents the bead from squishing out of shape.
Step 2: Baking and Finishing
-
Bake the Beads:
Arrange all your pierced beads on a parchment-lined baking sheet. Bake according to your specific clay brand’s instructions (usually around 275°F/130°C for 15-30 minutes). -
Remove Salt Texture:
Once bakes and fully cooled, place the moss-textured beads in a bowl of warm water. The salt will dissolve, leaving behind organic-looking craters and pits. -
Finish the Surface:
The image shows a distinct matte finish. If your clay is naturally shiny, lightly buff the cured red and smooth green beads with fine-grit wet sandpaper to remove any sheen. Do not varnish them, or use a specifically matte varnish.
Clean Bead Holes
If your bead holes closed up slightly during baking, use a small hand drill or a heated needle to re-open them cleanly before stringing.
Step 3: Assembly
-
Prepare the Wire:
Cut a length of beading wire about 10-12 inches long. This gives you plenty of room to work without beads sliding off the end. -
Secure the First End:
String a crimp bead and a wire guard onto one end. Loop the wire through the jump ring (or extender chain), back through the wire guard, and back through the crimp bead. Flatten the crimp bead securely with pliers. -
Plan Your Pattern:
Lay out your beads on a layout board or cloth. Copy the chaotic but balanced pattern from the inspiration photo: mix runs of alternating red and green smooth beads with a focal section featuring the textured moss beads flanked by gold spacers. -
String the Focal Section:
Thread a gold spacer, a red berry, a gold spacer, a textured moss bead, a gold spacer, a red berry, another spacer, and another moss bead. The gold highlights really make the matte clay pop. -
Complete the Strand:
Continue stringing the rest of the smooth green and red beads according to your pattern until the bracelet reaches your desired wrist length (usually 6.5 to 7 inches). -
Add the Clasp:
On the finishing end, add a crimp bead and wire guard. Loop through the lobster clasp, back through the guard and crimp bead. -
Final Secure:
Pull the wire tight so there are no gaps between beads, but not so tight the bracelet stays stiff. Crimp the bead flat and trim the excess wire close.
Fingerprint Fix
If you see fingerprints on your raw clay spheres, gently roll them plain on a piece of paper or lightly buff with cornstarch before baking.
Now you have a stunning, festive accessory ready to wear to your next holiday gathering


Christmas Tree Charm Centerpiece
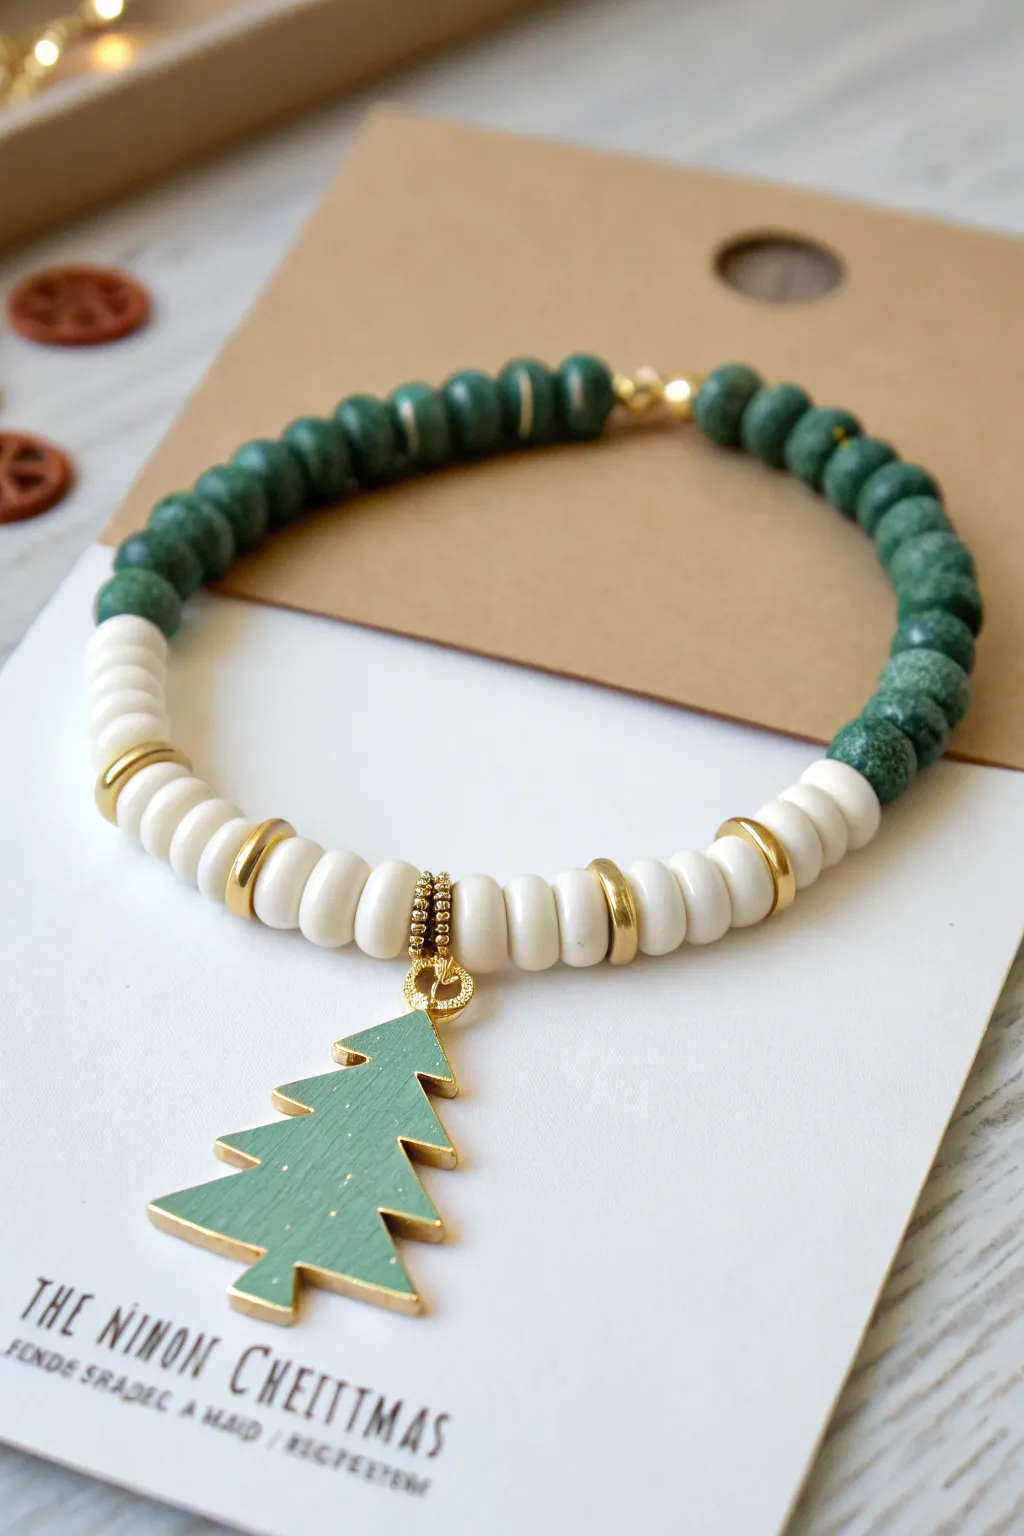
This elegant holiday bracelet combines the rustic charm of polymer clay with the sophistication of gold accents. Featuring a festive two-tone design of forest green and creamy white beads, the centerpiece is a stunning handmade clay tree charm with golden edges.
Step-by-Step Guide
Materials
- Forest green polymer clay
- White or cream polymer clay
- Gold polymer clay or gold acrylic paint
- Gold jewelry wire (20 or 22 gauge)
- Gold jump rings (6mm or 8mm)
- Gold bead spacers (flat disc style)
- Elastic jewelry cord (0.8mm)
- Clay roller or pasta machine
- Small Christmas tree cookie cutter (approx. 1 inch)
- Small circle cutter (approx. 5-7mm for beads)
- Needle tool or toothpick
- Baking sheet and parchment paper
- Jewelry pliers and wire cutters
- Glaze or varnish (optional)
Step 1: Crafting the Beads
-
Condition the clay:
Start by kneading the forest green and white polymer clays separately until they are soft and pliable. This conditioning step is crucial to prevent cracking later. -
Roll out the bead snakes:
Roll both the green and white clay into long, even logs or snakes, roughly 1/2 inch in diameter. Try to keep the thickness consistent for uniform beads. -
Slice the bead segments:
Using a tissue blade or a sharp knife, slice the clay logs into equal segments. These slices should be about 3-4mm thick to create the flat Heishi-style bead look. -
Shape the rounds:
Take each slice and gently roll the edges between your fingers just enough to smooth them out, whilst maintaining that disc-like shape rather than a perfect sphere. -
Pierce the holes:
Use a needle tool or toothpick to poke a hole through the center of every bead. I find twisting the tool as you push through helps keep the bead round.
Sticky Situation?
If your clay is sticking to the cutter or work surface, dust the clay lightly with cornstarch or dip your cutter into water before pressing down.
Step 2: Creating the Tree Charm
-
Roll clay for the charm:
Roll out a portion of the green clay into a flat sheet, approximately 3mm thick. It should be slightly thicker than your beads for durability. -
Cut the tree shape:
Press your small Christmas tree cutter into the clay to create the charm. If rough edges appear, smooth them gently with your finger. -
Add a connector loop:
Form a small U-shape or loop with a short piece of gold wire. Insert the ends into the top point of the clay tree so the loop protrudes; this will hold your jump ring. -
Texture the surface (Optional):
If you want a slight wood-grain or rustic texture, you can very lightly drag a needle tool across the surface, though the example is quite smooth.
Step 3: Baking and Gilding
-
Prepare for baking:
Arrange all your beads and the tree charm on a baking sheet lined with parchment paper. Ensure they aren’t touching each other. -
Bake the clay:
Bake in the oven according to your specific brand of polymer clay’s instructions (usually around 275°F/135°C for 15-30 minutes). Let them cool completely. -
Paint the charm edges:
Using a fine detail brush and metallic gold paint, carefully paint the sides/edges of the tree charm. This creates that high-end ‘dipped’ look. -
Add gold speckles:
Dip a stiff brush or toothbrush into the gold paint and lightly flick it over the front of the green tree to create subtle gold speckles. -
Attach the jump rings:
Once the paint is dry, open a gold jump ring using your pliers. Secure a decorative gold connector bead or bail to the wire loop you baked into the tree, then close the ring.
Make It Festive
Try marbleizing the green clay with a tiny bit of white before cutting the beads for a snowy forest effect, or swap the gold paint for silver.
Step 4: Assembly
-
Prepare the cord:
Cut a piece of elastic cord about 10-12 inches long. Preset the elastic by stretching it a few times to prevent it from sagging later. -
String the beads:
Begin threading your beads. Start with the white section, adding about 8-10 white beads. Slide on a gold spacer disc, add 4-5 more white beads, then the charm, then mirror the pattern on the other side. -
Complete the loop:
Fill the rest of the bracelet with the green clay beads until you reach your desired wrist size (usually around 7 inches total). Use a bead stopper or tape on the end so they don’t slide off. -
Knot the elastic:
Bring the ends together and tie a strong surgeon’s knot (right over left, left over right). Pull tight to secure. -
Hide the knot:
Add a dab of super glue or jewelry glue to the knot. Once dry, trim the excess cord and gently pull the knot inside one of the larger bead holes to hide it.
Now you have a charming, handmade accessory perfect for holiday parties or gifting

The Complete Guide to Pottery Troubleshooting
Uncover the most common ceramic mistakes—from cracking clay to failed glazes—and learn how to fix them fast.
Snowflake Charm in Icy Neutrals
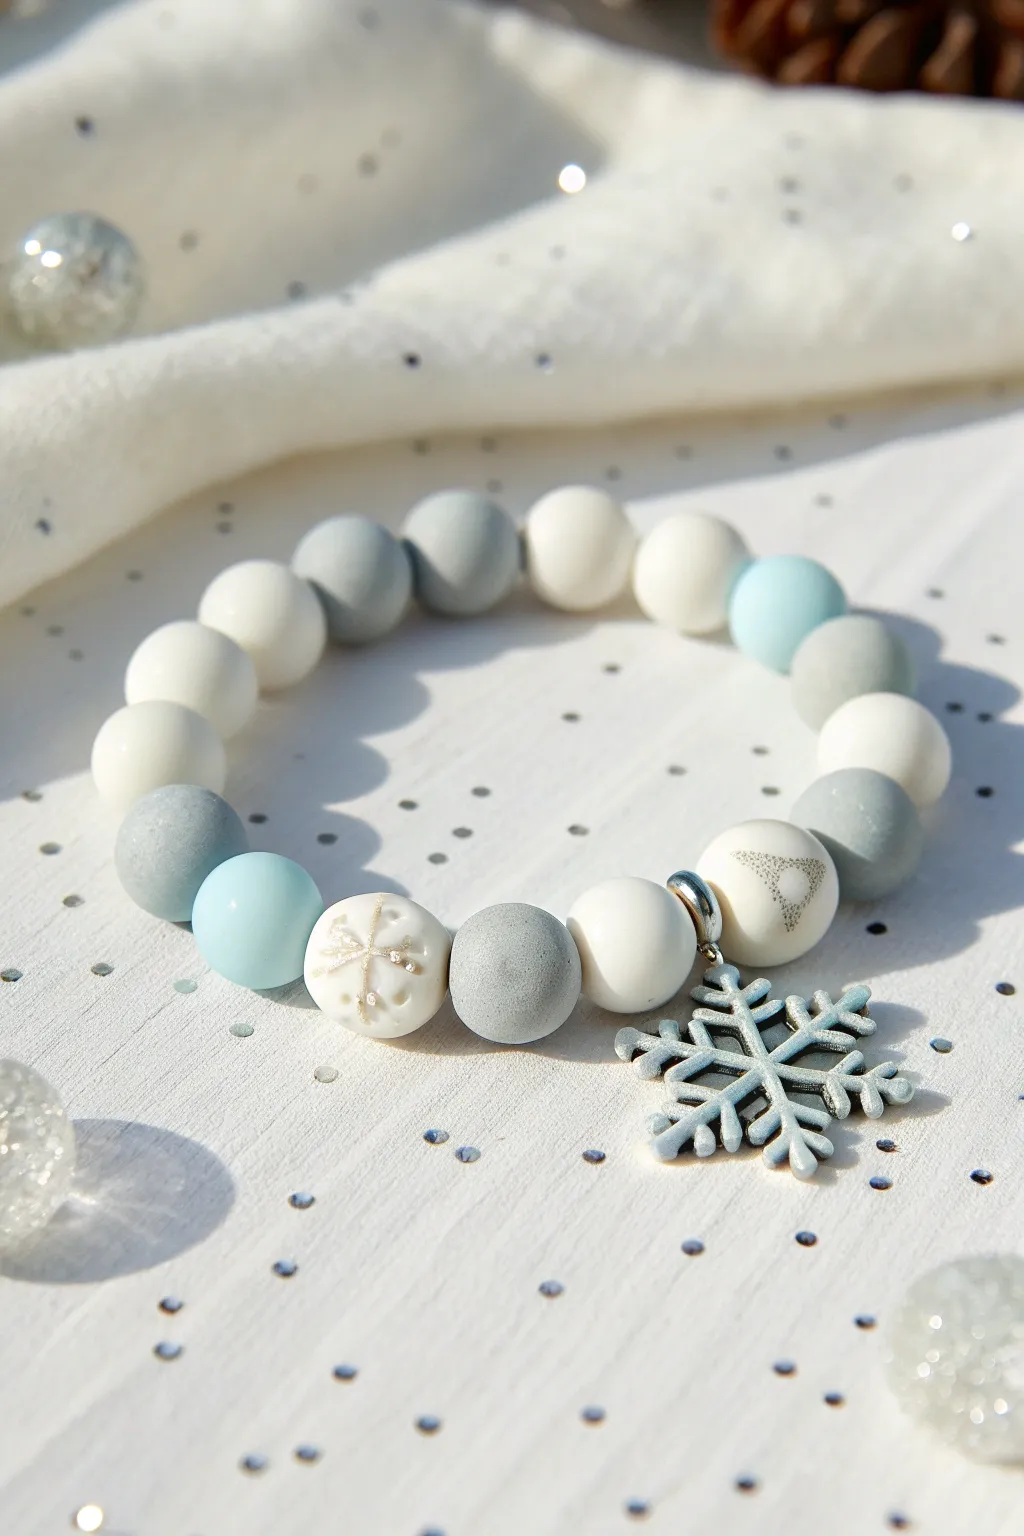
Capture the serene beauty of a winter landscape with this elegant polymer clay bracelet featuring a soft palette of whites, greys,/ and icy blues. The matte finish of the hand-rolled beads combined with a delicate snowflake charm creates a sophisticated accessory perfect for the holiday season.
Step-by-Step Tutorial
Materials
- Polymer clay (white, light grey, icy blue)
- Silver or translucent glitter polymer clay (optional for accents)
- Rubber snowflake stamp or texture tool
- Silver mica powder or acrylic paint
- Silver snowflake charm
- Jump ring (silver)
- Beading elastic cord (0.8mm or 1mm)
- Needle tool or bead piercing pins
- Bead roller (optional but helpful)
- Oven for baking
- Super glue (gel type recommended)
Step 1: Creating the Clay Beads
-
Condition the clay:
Start by thoroughly conditioning your white, light grey, and icy blue polymer clay separately until they are soft and pliable. This prevents cracking later. -
Portion the clay:
Pinch off equal-sized pieces of clay for your beads. You will need approximately 15-20 pieces depending on your wrist size. Aim for pieces that roll into roughly 10-12mm spheres. -
Roll the spheres:
Roll each piece of clay between your palms or use a bead roller to create smooth, uniform balls. Create a mix of plain white, grey, and blue beads. -
Create the textured beads:
Select two white beads to be your feature beads. Gently press a snowflake stamp or texture tool into the surface to create an impression. Do not flatten the bead; just make a surface mark. -
Highlight the texture:
Dip your finger or a small brush into silver mica powder and lightly brush it over the stamped impression to make the design pop. -
Design the triangle bead:
Take another white bead and create a small triangle pattern using a needle tool or stamp, filling the shape with tiny stippled dots for texture. -
Pierce the holes:
Using a bead piercing pin or needle tool, carefully poke a hole through the center of each bead. I find twisting the tool as you push through helps keep the bead round. -
Bake the beads:
arrange your beads on a baking sheet or bead rack. Bake according to your clay manufacturer’s instructions (usually 275°F/135°C for 15-30 minutes per 1/4 inch thickness). -
Cool and finish:
Allow the beads to cool completely. If there are any fingerprints, you can lightly sand them with fine-grit sandpaper for a matte finish.
Baking Tip
To prevent flat spots on your round beads during baking, arrange them in a bed of cornstarch or baking soda on your tray. This cushions the clay while it hardens.
Step 2: Assembly
-
Prepare the elastic:
Cut a piece of elastic cord about 10-12 inches long. Pre-stretch the cord by pulling it gently a few times; this prevents the bracelet from stretching out later. -
Attach the charm:
Open a silver jump ring with pliers, slide on your snowflake charm, and attach it to a bead carrier or simply thread it onto the elastic between two beads later. -
Plan the pattern:
Lay your beads out on a board to design your pattern. Arrange them in a color gradient or random mix, placing the stamped snowflake beads and the textured triangle bead near the center focal point. -
String the beads:
Thread the beads onto the elastic cord according to your pattern. Add the jump ring with the snowflake charm between the two focal beads. -
Check the fit:
Wrap the strung beads around your wrist to check the size. Add or remove plain beads if necessary to ensure a comfortable fit. -
Secure the knot:
Tie a secure surgeon’s knot (right over left, left over right). Pull the elastic tight to ensure there are no gaps between beads. -
Glue the knot:
Apply a tiny drop of super glue to the knot for extra security. Let it dry for a moment. -
Hide the knot:
Trim the excess elastic ends close to the knot, then gently tug the bracelet to pull the knot inside the hole of the nearest bead to hide it.
Make it Sparkle
Mix a small amount of translucent glitter clay into your icy blue color before rolling. This adds a subtle shimmer that mimics fresh snow in sunlight.
Now you have a frosty, custom-made accessory ready to wear for winter gatherings
Santa Hat Color Blocking
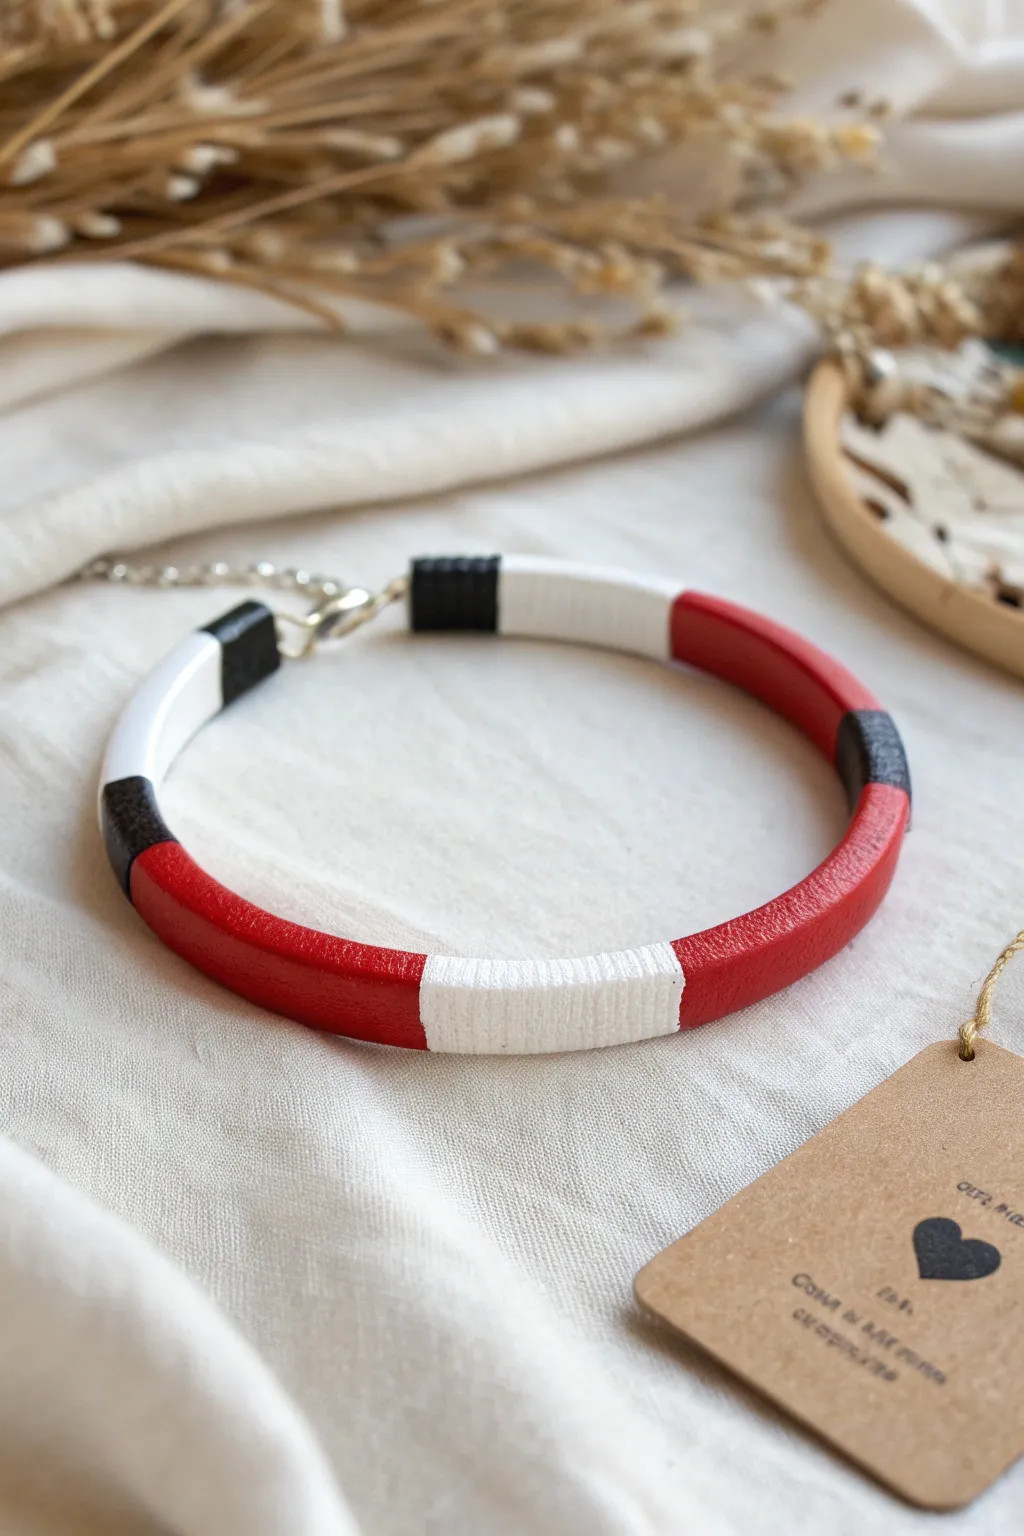
Embrace a minimalist holiday aesthetic with this sleek, color-blocked collar necklace that mimics the classic Santa suit palette without being kitschy. The smooth, leather-like finish is achieved using polymer clay, creating a modern accessory that’s surprisingly lightweight and comfortable to wear.
Step-by-Step Guide
Materials
- Red polymer clay (Premo or similar strong brand)
- White polymer clay
- Black polymer clay
- Liquid polymer clay (clear or matching colors)
- Extruder tool (optional but helpful for uniform thickness)
- Thick memory wire necklace coil (choker size)
- Jewelry pliers (round nose and flat nose)
- Wire cutters
- Extension chain
- Lobster clasp
- Texture sponge or old toothbrush
- Sandpaper (various grits)
- Matte varnish or sealant
Step 1: Preparing the Clay Base
-
Condition the Clay:
Begin by thoroughly conditioning your red, white, and black polymer clay separately until it is soft and pliable. This step is crucial to prevent cracking later. -
Create the Tube Shape:
The goal is to cover the memory wire. Roll your clay into snakes, or for the most consistent result, use a clay extruder with a medium circle die to create long, uniform cylinders of each color. -
Determine Locking Pattern:
Plan your color blocking. Looking at the design, you’ll need a long red section for the front, flanked by small white sections, then red again, followed by black near the clasp attributes. Cut your clay snakes to these lengths. -
Slice and Hollow:
Carefully slice lengthwise down each clay cylinder using a sharp tissue blade. Do not cut all the way through; just create a slit deep enough to snug around the wire.
Dirty White Clay?
White clay picks up dust instantly. Clean your hands and tools with alcohol wipes before handling the white sections, or use gloves.
Step 2: Assembly & Texturing
-
Prepare the Wire:
Cut your memory wire to the desired choker length, leaving a little extra room for loop finishing. -
Wrap the Wire:
Open the slit in your first clay section (starting from the center red piece works well) and slip it over the wire. Press the seam closed gently with your fingers. -
Join the Colors:
Add the adjacent white sections. Apply a tiny drop of liquid clay between the red and white clay ends to act as ‘glue’ and bond them during baking. Push them firmly together so there are no gaps. -
Smooth the Seams:
Using your finger or a clay shaper tool, blend the seams where the colors meet so the transition is flush, though the color line remains sharp. Also, smooth out the longitudinal seam you created to cover the wire. -
Add Texture:
To mimic the leather look seen in the photo, gently press a texture sponge or an old toothbrush against the surface of the raw clay. Don’t press too hard; you just want surface indentation. -
Refine the White Sections:
For the white segments, you might want a slightly distinct texture to resemble Santa’s fur trim. I like to use a needle tool to drag tiny vertical lines here for a ribbed effect. -
Clean Up:
Before baking, wipe the clay gently with a baby wipe or a q-tip dipped in rubbing alcohol to remove any fingerprints or dust specks, especially on the white sections.
Level Up: Gold Accent
Add a thin strip of gold clay or gold leaf between the color transitions. It acts like a ‘buckle’ and adds a festive metallic pop.
Step 3: Baking & Finishing
-
Bake the Piece:
Place the choker on a ceramic tile or a bed of polyester batting (to prevent flat spots). Bake according to your clay manufacturer’s instructions—usually around 275°F (130°C) for 30-45 minutes. -
Cool Down:
Let the piece cool completely in the oven before handling. Clay is fragile when hot. -
Seal the Surface:
Apply a thin coat of matte varnish to the red and black sections to enhance the leather effect. Leave the white sections unvarnished or use a very matte finish to keep the contrast. -
Finish Wire Ends:
If the clay has shrunk slightly, trim any excess wire sticking out. Use your round nose pliers to turn the exposed ends of the memory wire into secure loops against the clay. -
Attach Hardware:
Open a jump ring and attach the lobster clasp to one loop. Attach the extension chain to the loop on the opposite side.
This sophisticated take on holiday jewelry pairs perfectly with a winter sweater or a little black dress


What Really Happens Inside the Kiln
Learn how time and temperature work together inside the kiln to transform clay into durable ceramic.
Reindeer Neutrals With a Red Nose Pop
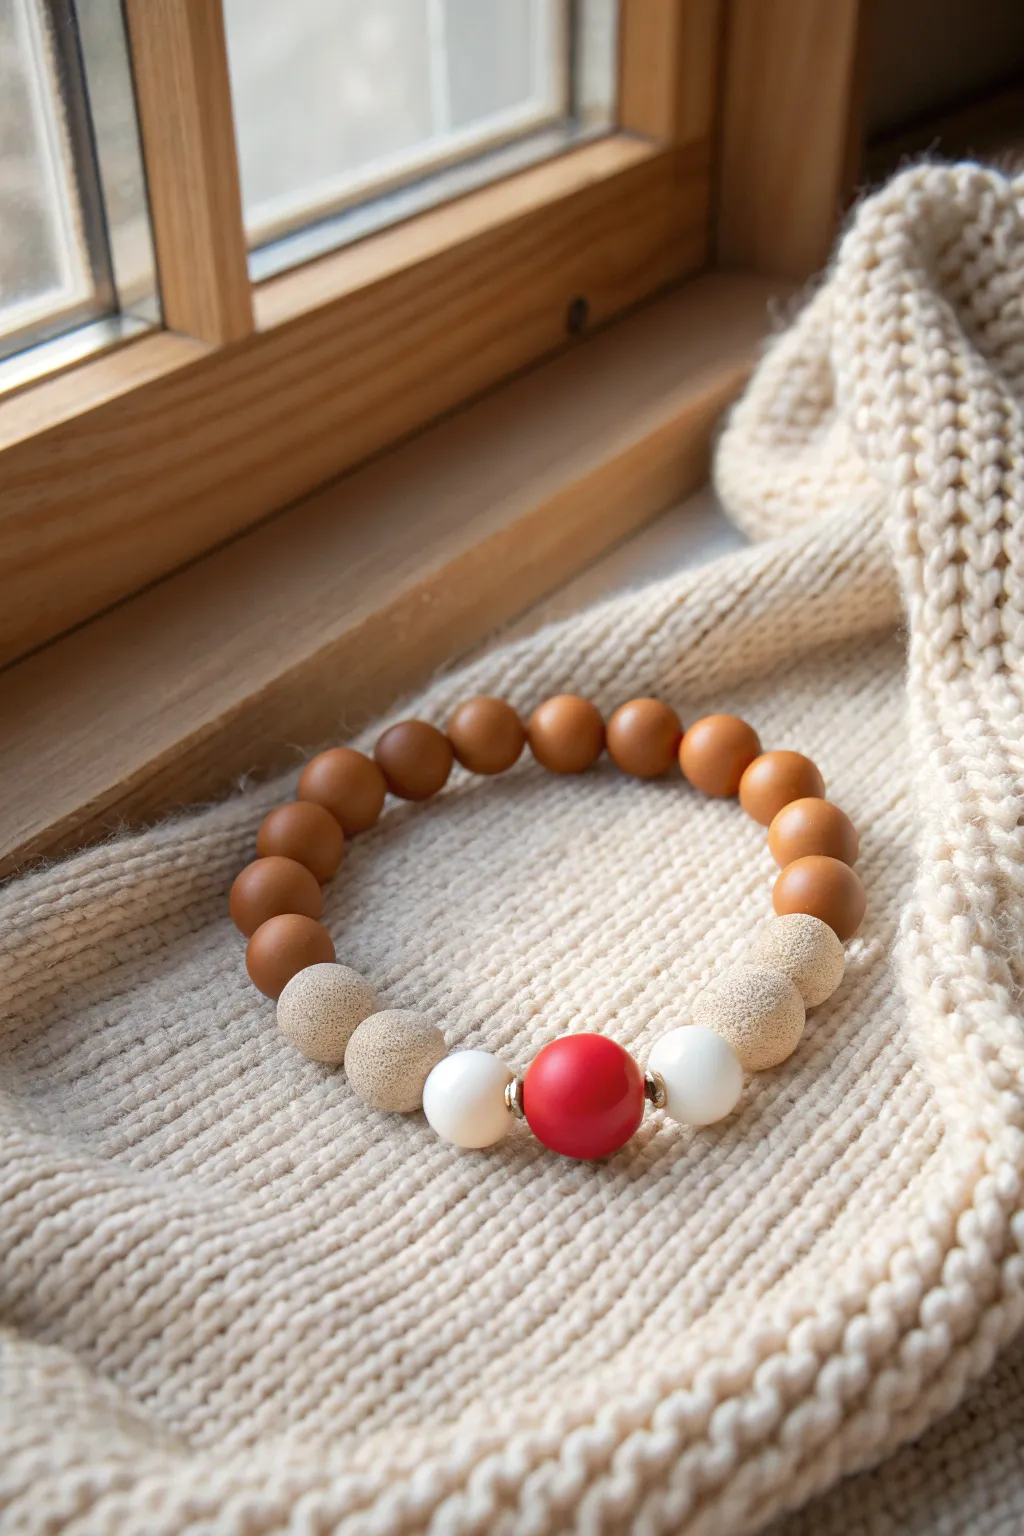
This charming beaded bracelet captures the essence of Rudolph with a subtle, modern twist. By combining warm caramel tones with textured neutrals and a single bright red accent, you’ll create a festive accessory that remains elegant enough for everyday winter wear
Step-by-Step
Materials
- Polymer clay in caramel brown, beige, white, and bright red
- Pumice stone or heavy-grit sandpaper (for texturing)
- Stretch elastic beading cord (0.8mm or 1mm)
- Beading needle (optional but helpful)
- Small gold spacer beads (2 items)
- Bead reamer or toothpick
- Superglue or specialized jewelry glue
- Scissors
Step 1: Crafting the Clay Beads
-
Condition the clay:
Start by warming up your polymer clay in your hands. You’ll need the caramel brown for the main beads, a speckled beige for the texture beads, white for the nose flankers, and bright red for the nose itself. -
Roll the main beads:
Pinch off small portions of the caramel brown clay and roll them into smooth, even spheres. Aim for a size of about 8-10mm. You will need roughly 10-14 beads depending on wrist size. -
Create the texture beads:
Roll four beads using the beige clay, making them the same size as your caramel beads. -
Apply texture:
Take a piece of pumice stone or coarse sandpaper and gently press it against the surface of the unbaked beige beads. Roll the bead against the texture to create a pitted, stone-like surface. -
Form the accent beads:
Roll two beads from the white clay and one single bead from the bright red clay. I like to make these just slightly larger than the brown ones to make them stand out. -
Pierce the holes:
Using a bead reamer or a toothpick, carefully poke a hole through the center of every bead. Rotate your tool as you push through to prevent the bead from squishing out of shape. -
Bake the beads:
Arrange your beads on a baking sheet or tile. Bake them according to the temperature and time instructions on your specific package of polymer clay. -
Cool and inspect:
Allow the beads to cool completely before handling. Check that the holes are clear; if any clay closed up during baking, gently use a small drill bit or reamer to open them.
Stone Effect
Mix a tiny pinch of black pepper or ground coffee into your beige clay before rolling. This creates realistic specks that enhance the stone-like look of the textured beads.
Step 2: Assembling the Bracelet
-
Measure the cord:
Cut a length of elastic cord about 10-12 inches long. This extra length makes tying the knot much easier at the end. -
Pre-stretch the cord:
Give the elastic several firm tugs. This is a crucial step that prevents the bracelet from stretching out and becoming loose the first time you wear it. -
Start with the centerpiece:
Thread on one white bead, followed by a gold spacer, then the red ‘nose’ bead, followed by the second gold spacer, and finally the second white bead. -
Add texture beads:
On either side of your white/red centerpiece section, thread on two of the textured beige beads. -
Fill with caramel:
String the smooth caramel brown beads onto the remaining cord length until the bracelet reaches your desired wrist size. -
Check the fit:
Wrap the strand around your wrist to ensure it fits comfortably without pinching or hanging too loose. Add or remove brown beads if necessary. -
Tie the knot:
Tie a surgeon’s knot (right over left twice, then left over right) to secure the bracelet. Pull the elastic tight so the knot is firm. -
Secure with glue:
Place a tiny drop of superglue or jewelry glue directly onto the knot. Let it dry for a minute or two. -
Hide the knot:
Once the glue is dry, trim the excess cord ends close to the knot. Gently pull the elastic so the knot slides inside the hole of the nearest bead to hide it.
Antler Accents
Replace the two textured beige beads nearest the centerpiece with small gold branched charms or roughly shaped dark brown clay pieces to mimic reindeer antlers.
Wear your subtle reindeer bracelet singly or stacked with gold bangles for a sophisticated holiday look
Gingerbread Cookie Colors
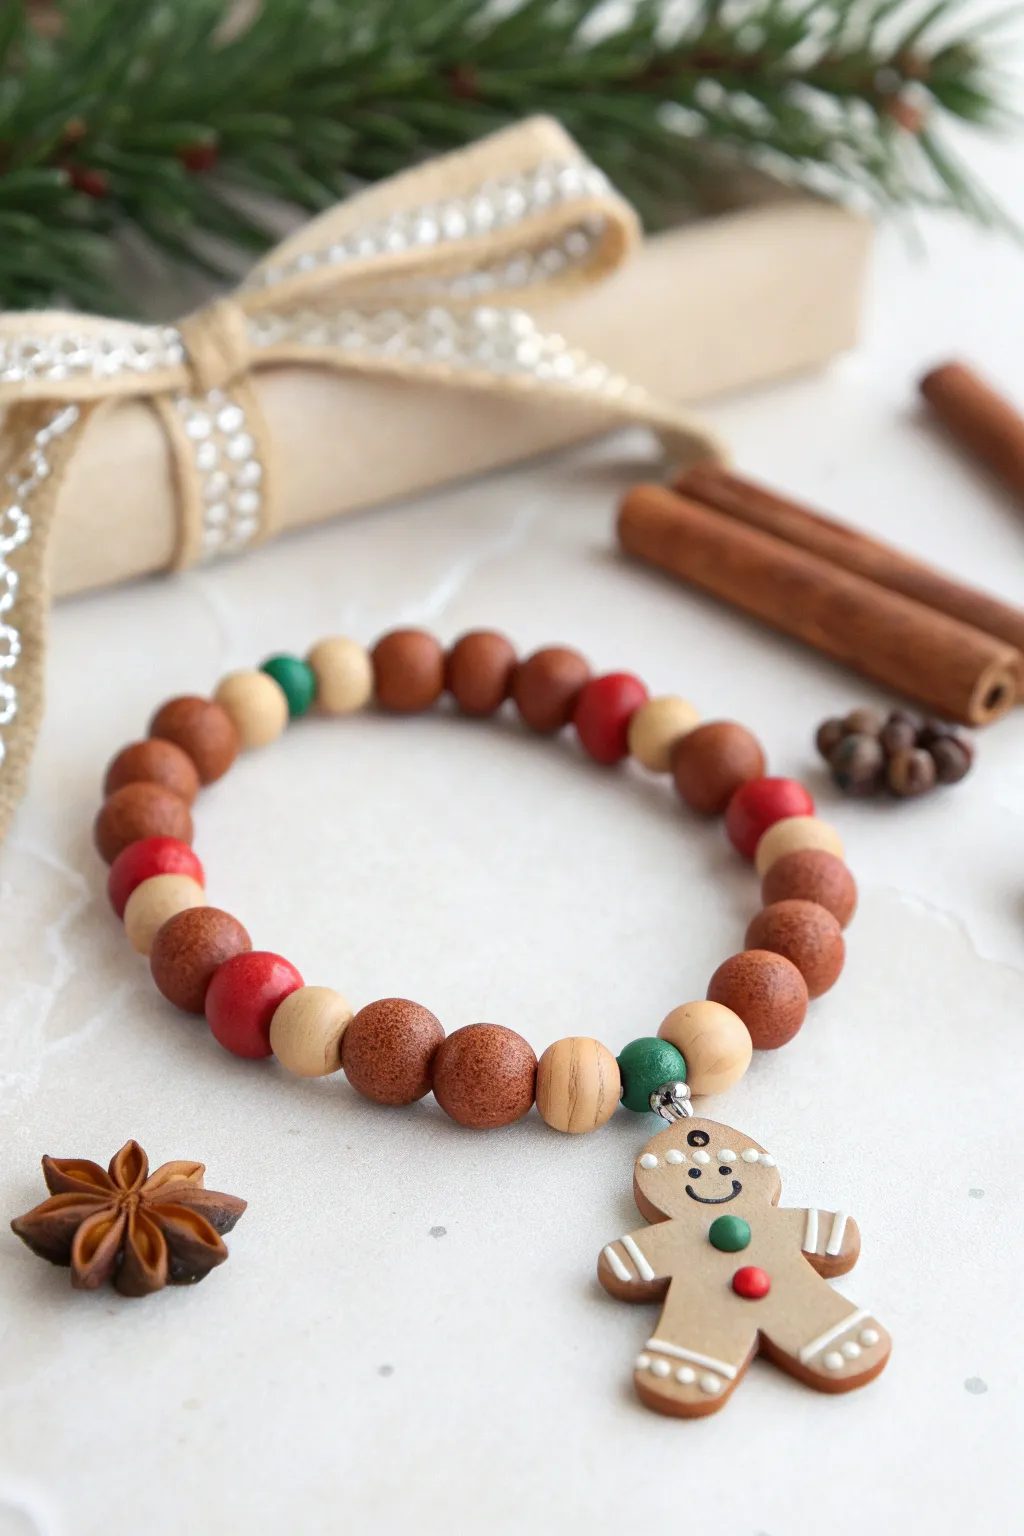
Capture the cozy warmth of holiday baking with this charming beaded bracelet featuring rich hues of brown, cream, red, and green. The focal point is an adorable hand-sculpted gingerbread man charm that adds a playful touch to this festive accessory.
Detailed Instructions
Materials
- Polymer clay (colors: terracotta brown, beige/tan, Christmas red, forest green, white)
- Stretch cord (0.8mm or 1mm)
- Clay roller or pasta machine
- Small circle cutter (approx. 1 cm) or bead roller
- Needle tool or toothpick
- Small gingerbread man cookie cutter (approx. 1 inch) or craft knife
- Silver jump ring (6-8mm)
- Jewelry pliers
- Super glue or jewelry glue
- Gloss or matte glaze (optional)
- Eye pin or screw eye pin
- Sandpaper (fine grit)
Step 1: Sculpting the Clay Beads
-
Condition the clay:
Start by kneading each color of polymer clay—terracotta, beige, red, and green—until they are soft and pliable. This prevents cracks during baking. -
Portion the bead sizes:
Roll the terracotta and beige clay into logs of equal thickness. Use a blade to slice equal sized segments to ensure your beads are uniform. You will need mostly terracotta and beige, with just a few red and green accents. -
Roll the spheres:
Take each clay segment and roll it between your palms to form a smooth sphere. I find a gentle circular motion helps eliminate any seams or fingerprints. -
Texture the brown beads:
To mimic the look of a baked cookie, gently roll the terracotta beads over a piece of sandpaper or tap them lightly with a stiff toothbrush to create a subtle texture. -
Create the bead holes:
Using a needle tool or toothpick, carefully pierce a hole through the center of each bead. Rotate the tool as you push through to avoid distorting the sphere shape.
Texturizing Tip
For a realistic baked look on the brown beads, roll a ball of aluminum foil over the raw clay surface gently. It creates perfect ‘cookie’ crumbs.
Step 2: Crafting the Gingerbread Charm
-
Cut the gingerbread shape:
Roll out a sheet of beige or light brown clay to about 3-4mm thickness. Use a mini gingerbread man cutter or carefully hand-cut the shape using a craft knife. -
Insert the attachment point:
Carefully insert a small screw eye pin into the top of the gingerbread man’s head. If using a regular eye pin, trim it short and bend the end slightly so it anchors inside the clay. -
Add the face details:
Roll tiny snakes of black or dark brown clay for the smile and eyes, or use acrylic paint after baking. Press them gently onto the face. -
Decorate with ‘icing’:
Roll extremely thin snakes of white clay. Wrap them around the wrists and ankles to look like piped icing cuffs. Use a needle tool to add small dots or texture to the white bands. -
Add ‘buttons’:
Form two tiny balls of clay, one green and one red. Press them onto the chest of the gingerbread man to serve as festive gumdrop buttons. -
Bake everything:
Arrange all your beads and the charm on a tile or baking sheet. Bake according to your polymer clay package instructions (usually 275°F/135°C for 15-30 minutes). Let them cool completely before handling.
Fixing Distorted Beads
If your bead holes squish the bead shape, re-roll the bead gently between your fingers with the needle tool still inside the hole.
Step 3: Assembly
-
Secure the charm hardware:
Once cool, gently tug firmly on the charm’s eye pin. If it feels loose, remove it, add a drop of super glue, and reinsert it immediately. -
Attach the jump ring:
Open a silver jump ring with your pliers using a twisting motion (don’t pull apart). Slide it through the eye pin loop on the gingerbread man and close it securely. -
Pre-stretch the cord:
Cut a piece of stretch cord about 10-12 inches long. Give it a few firm tugs to pre-stretch it; this prevents the bracelet from sagging later. -
Plan the pattern:
Lay out your beads on a surface. A nice sequence to mimic the photo is: 5-6 terracotta beads, 1 red, 1 beige, repeat, interspersed with occasional green accents. -
String the beads:
Thread the beads onto the cord in your planned order. Slide the gingerbread charm onto the cord at the center point, perhaps flanked by two different colored beads like green and beige for emphasis. -
Check the fit:
Wrap the strung beads around your wrist to check the size. Add or remove terracotta beads as needed for a comfortable fit. -
Tie the knot:
Tie a surgeon’s knot (right over left twice, then left over right twice). Pull the cord tight to secure the knot. -
Final touches:
Apply a tiny dab of jewelry glue to the knot. Once dry, trim the excess cord ends and tuck the knot inside a neighboring bead hole to hide it.
Enjoy wearing your delightful holiday creation or wrap it up as a sweet handmade gift this season

TRACK YOUR CERAMIC JOURNEY
Capture glaze tests, firing details, and creative progress—all in one simple printable. Make your projects easier to repeat and improve.
Peppermint Swirl Confetti Mix
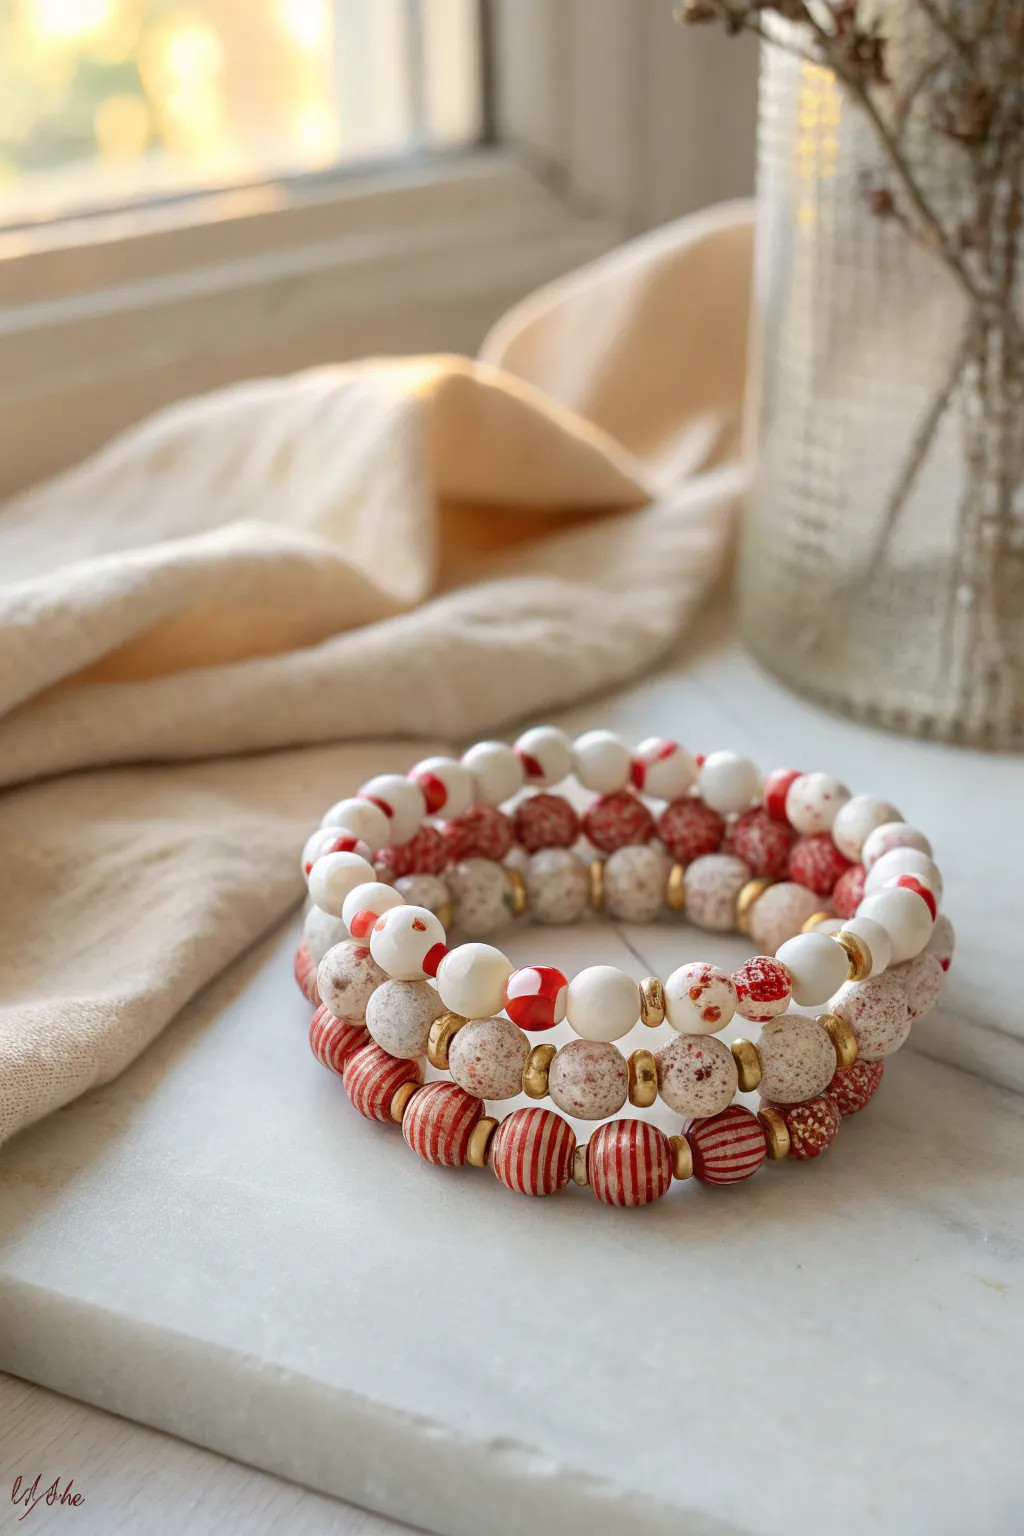
Capture the festive spirit with this delightful trio of polymer clay bracelets that evoke images of peppermint candies and snowy days. The stack features a mix of textures, from smooth striped beads to speckled ‘confetti’ clay, all tied together with elegant gold spacers.
Step-by-Step Tutorial
Materials
- Polymer clay (Bright Red, White, Translucent)
- Speckled pottery-style polymer clay (or make your own with black pepper/craft sand)
- Gold tone heishi spacer beads (metal or gold-painted clay)
- Strong elastic bead cord (0.8mm or 1mm)
- Bead roller tool (optional but helpful for uniform rounding)
- Piercing tool or heavy needle
- Superglue or jeweler’s cement
- Tile or baking sheet
- Oven
Step 1: Prepping the Clay Canes
-
Condition the simple colors:
Begin by conditioning your white and bright red polymer clay separately until they are soft and pliable. Roll each into a simple snake about 1cm thick. -
Create the striped cane:
Flatten a sheet of red clay and a sheet of white clay. Stack them in alternating layers (red, white, red, white) to form a block. Slice thin cross-sections and roll them gently to create a striped log for the peppermint beads. -
Mix the confetti clay:
For the confetti look, take a chunk of white clay and chop up very tiny, irregular bits of red clay. Mix these red chips into the white clay without fully blending them—you want visible chunks, not pink clay. Roll this into a log. -
Prepare the speckled clay:
If using pre-made speckled clay, condition it now. If making your own, knead a pinch of black pepper or fine craft sand into translucent or white clay to achieve that sandy, stone-like texture.
Uneven Stripes?
If your candy stripes look smeared after rolling, try chilling the clay for 10 minutes before slicing and rolling. Firmer clay holds detailed patterns much better.
Step 2: Forming the Beads
-
Portion the clay:
Cut your various clay logs into equal-sized segments. Aim for beads that are roughly 8-10mm in diameter when rolled. Keeping size consistent ensures the bracelets stack neatly. -
Roll the confetti beads:
Take the white segments with red chunks and roll them between your palms. Use a circular motion to smooth them into perfect spheres. The red chips should appear as festive splotches on the surface. -
Shape the peppermint beads:
Using your striped clay segments, roll them carefully. Try to keep the stripes running vertically or swirling around the bead like a candy wrapper. I find that a light resizing roll in a bead roller helps maintain the pattern without smearing. -
Create the speckled stone beads:
Roll the speckled clay segments into round spheres. These effectively act as the neutral anchor in the stack, balancing the bright red and white patterns. -
Pierce the holes:
Before baking, gently pierce a hole through the center of each bead using your piercing tool. Twist the tool as you push through to avoid squashing the bead’s round shape.
Glossy Finishes
After baking, coat just the red-and-white ‘candy’ beads with a high-gloss UV resin or polyurethane varnish. Leave the speckled beads matte for lovely texture contrast.
Step 3: Baking & Assembly
-
Bake the beads:
Arrange your beads on a ceramic tile or baking sheet lined with paper. Bake according to your brand of clay’s instructions (usually around 275°F/135°C for 30 minutes). Let them cool completely. -
Plan the layout:
Lay out your design on a bead board or towel. For the bottom bracelet, use the striped peppermint beads separated by gold spacers. For the middle, use the speckled stone beads with gold accents. For the top, alternate the confetti beads with smaller red accents. -
String the first bracelet:
Cut a piece of elastic cord about 10 inches long. Pre-stretch it to prevent sagging later. Thread your striped peppermint beads, placing a gold heishi spacer between every single bead. -
String the middle stack:
Repeat the process for the speckled beads. For variety, you can use two polymer beads together followed by a gold spacer, creating a different rhythm than the first bracelet. -
String the top bracelet:
Thread the white confetti beads. You might mix in a few solid red beads or smaller stone-texture beads here to tie all three designs together. -
Secure the knots:
Tie off each bracelet using a surgeon’s knot (right over left, left over right twice). Pull tight until the beads touch snugly but don’t buckle. -
Final touches:
Dab a tiny drop of superglue on each knot to secure it. Allow it to dry fully before trimming the excess elastic, then tuck the knot inside a neighboring bead to hide it.
Now you have a charming set of holiday bracelets perfect for stacking or gifting to friends
Christmas Lights Rainbow With Green Base
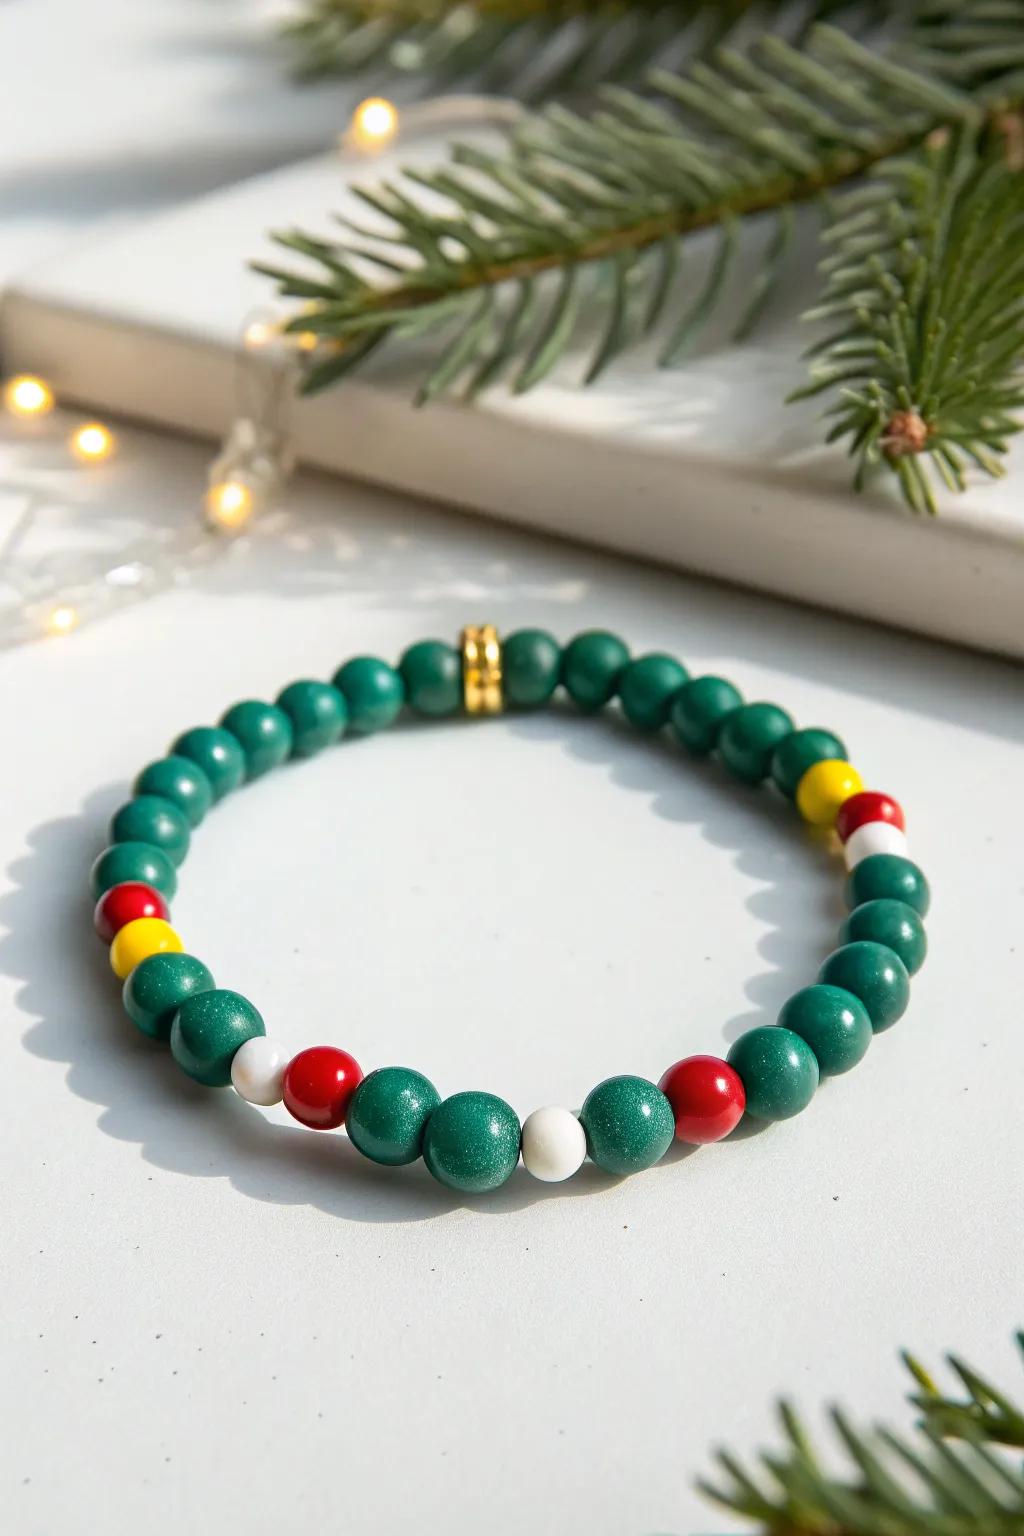
This festive bracelet mimics the glow of colorful holiday lights against a classic evergreen backdrop. It features a predominantly green base accented by pops of red, yellow, and white, making for a subtle yet cheerful seasonal accessory.
Step-by-Step
Materials
- Polymer clay (emerald green, cherry red, bright yellow, white)
- Beading elastic cord (0.8mm or 1mm)
- Gold tone spacer beads (small, flat disc or rondelle shape)
- Clay roller or pasta machine
- Small round bead roller tool (optional but helpful)
- Toothpick or bead piercing pin
- Baking tray and parchment paper
- Superglue or jewelry glue
- Scissors
Step 1: Prepping the Clay
-
Condition the Green Clay:
Begin by taking a large chunk of emerald green polymer clay. Knead it thoroughly until it is soft, pliable, and free of any cracks. -
Create a Log:
Roll the conditioned green clay into a long, even snake about 1/2 inch in diameter. Try to keep the thickness consistent along the entire length. -
Condition Accent Colors:
Repeat the conditioning process with smaller amounts of red, yellow, and white clay. You won’t need as much of these since they are just the ‘lights’ on the strand. -
Section the Clay:
Using a tissue blade or sharp knife, cut the green log into equal-sized segments. Aim for pieces that will roll into beads roughly 6-8mm in diameter. -
Section Accent Pieces:
Cut a few equal-sized segments from your red, yellow, and white clay logs as well. You will need about 2-4 pieces of each color, depending on your desired pattern.
Smooth Surface Trick
To remove fingerprints before baking, lightly brush your raw clay beads with a little cornstarch or baby powder. It smooths the surface instantly.
Step 2: Forming the Beads
-
Roll Spheres:
Take each clay segment and roll it between your palms to form a smooth sphere. I find using a light circular motion helps eliminate fingerprints. -
Refine the Shape:
For perfectly uniform beads, use a bead roller tool if you have one. If rolling by hand, gently check that all your green beads are roughly the same size as your accent beads. -
Pierce the Holes:
Hold a bead gently between your thumb and forefinger to avoid squishing it. Use a bead piercing pin or toothpick to carefully drill a hole through the center. -
Clean the Holes:
Rotate the pin as you push it through to keep the hole clean. Pushing straight through can sometimes distort the sphere shape. -
Bake Instructions:
Arrange the pierced beads on a baking sheet lined with parchment paper. Bake them according to the manufacturer’s instructions for your specific brand of clay (usually around 275°F/130°C for 15-30 minutes). -
Cool Down:
Allow the beads to cool completely before handling. They harden as they cool.
Hole Distortion?
If your beads squish into ovals while piercing, let the raw clay sit in the fridge for 10 minutes first. Firmer clay holds its shape better.
Step 3: Assembly
-
Measure the Cord:
Cut a length of elastic cord about 10-12 inches long. This gives you plenty of extra room to tie the knot comfortably. -
Pre-stretch Elastic:
Give the elastic cord a few firm tugs. This prevents the bracelet from stretching out permanently after wearing it the first time. -
Plan the Pattern:
Lay out your beads on a flat surface to visualize the design. The pattern shown uses a long run of green beads, followed by a gold spacer, then more green, and finally a sporadic cluster of ‘lights’ (red, yellow, white). -
Start Stringing:
Begin threading the beads onto the elastic. Start with the main green section to hide the knot later inside one of these darker beads. -
Add the Spacers:
When you reach the midway point opposite where your ‘lights’ will be, slide on two or three small gold spacer beads to add that metallic elegant touch. -
Add the Lights:
Continuing threading, adding the colored accent beads (red, yellow, white) in small groups separated by green beads, mimicking the image layout. -
Tie the Knot:
Once the strand is the correct length for your wrist, tie a surgeon’s knot (looping the elastic through twice before pulling tight). -
Secure and Trim:
Place a tiny drop of superglue on the knot and let it dry. Trim the excess elastic close to the knot and gently pull the knot inside a neighboring bead to hide it.
Your finished bracelet is now ready to add a subtle shine to your holiday outfits
Letter Bead Holiday Words
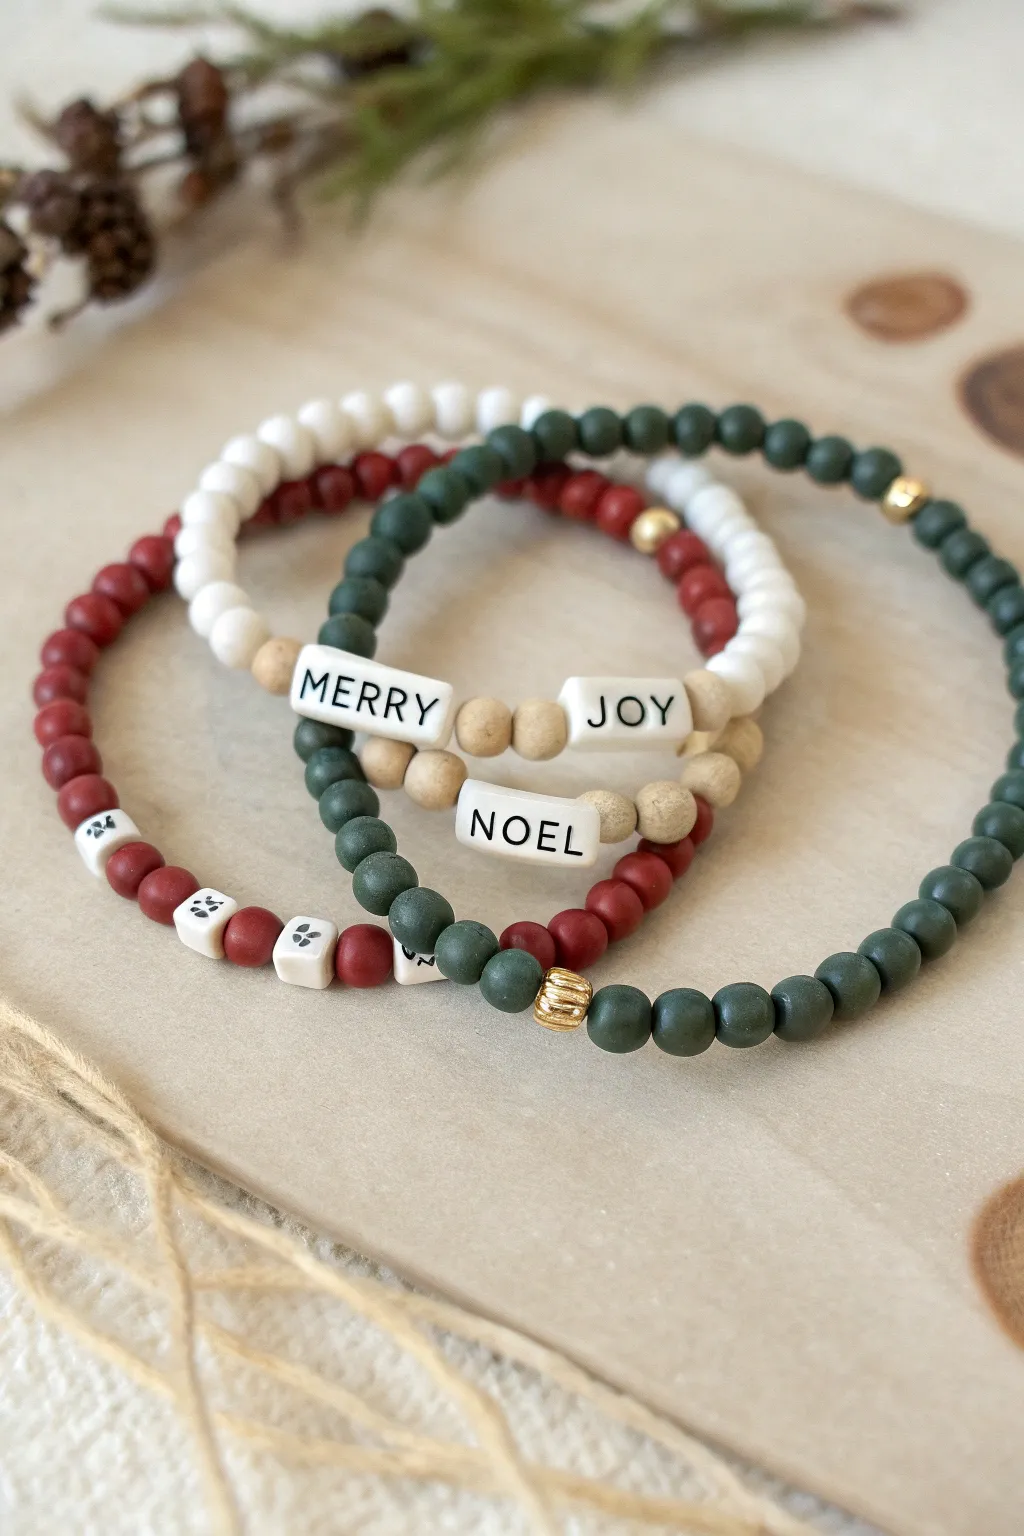
Embrace the holiday spirit with this charming trio of stretch bracelets featuring classic Christmas colors and sentiments. The matte finish of the clay beads gives them a sophisticated, modern look, while the gold accents add just the right amount of seasonal sparkle.
Step-by-Step Tutorial
Materials
- 6mm matte polymer clay beads in dark pine green
- 6mm matte polymer clay beads in deep rust red
- 6mm matte polymer clay beads in cream or off-white
- 6mm natural wood beads (unfinished/blonde)
- Rectangular white alphabet beads with black letters
- Square white beads with black paw prints (optional, for pet lovers)
- Small gold spacer beads (round)
- Small gold fluted/corrugated spacer beads
- 0.8mm clear elastic jewelry cord
- Jewelry glue or clear nail polish
- Scissors
Step 1: Planning Your Designs
-
Measure your wrist:
Wrap a piece of string around your wrist to find a comfortable length, then add about half an inch for a comfortable fit. Most adult bracelets are between 6.5 to 7.5 inches. -
Lay out the ‘MERRY’ bracelet:
For the first design (seen in the center of the stack), you will be mixing textures. Locate your white alphabet beads to spell out ‘MERRY.’ -
Arrange the pattern:
On your bead board or a towel, lay out a pattern of cream clay beads for the main band. Plan to place the ‘MERRY’ beads in the center, flanked by natural wood beads on either side to break up the white styling. -
Lay out the ‘JOY / NOEL’ bracelet:
This bracelet uses a two-word focal point. Find letters for ‘JOY’ and ‘NOEL.’ Prepare your wood beads for the center section and dark pine green clay beads for the rest of the band.
Step 2: Stringing the Bracelets
-
Cut the cord:
Cut a piece of elastic cord about 10-12 inches long. Having extra length makes tying the final knot much easier than struggling with short ends. -
Pre-stretch the elastic:
Give your cord a few firm tugs before stringing. This crucial step prevents the bracelet from stretching out and becoming loose after the first few times you wear it. -
Start the ‘MERRY’ strand:
Thread your beads onto the elastic, following the layout you created. I usually start stringing from the back of the bracelet so the knot ends up hidden opposite the focal words. -
Add accent beads:
When you reach the letter section, add a few wood beads, then string the letters M-E-R-R-Y, and finish with a symmetrical set of wood beads before continuing with cream clay beads. -
String the ‘JOY / NOEL’ strand:
Repeat the process for the second bracelet. Thread your pine green beads, then transition to wood beads. Thread J-O-Y, add a single wood spacer, then N-O-E-L. Finish the pattern symmetrically. -
Create the red accent strand:
For the third bracelet, use deep rust red beads. In the example, this strand features cute paw print beads, but you can swap these for another word like ‘PEACE’ or simply use a single gold bead for simplicity.
Knot Slipping?
If your elastic knot feels slick and won’t hold, try sanding the very ends of the cord lightly with a nail file before tying to create friction.
Step 3: Adding Gold Details & Finishing
-
Incorporate gold spacers:
As you string the red and green bracelets, add a small gold round bead or a larger fluted gold bead at the very back (opposite the words). This adds a professional, high-end finish. -
Check the sizing:
Wrap each unfinished strand around your wrist to verify the fit. Add or remove a bead or two from the back section if necessary. -
The surgeon’s knot:
To tie off, cross the left end over the right, then wrap it under twice. Pull tight. Then cross the right end over the left and wrap it under once. Pull very tight to secure. -
Secure the knot:
Dab a tiny drop of jewelry glue or clear nail polish directly onto the knot. This ensures it won’t slip undone over time. -
Hide the knot:
While the glue is still tacky, gently slide the knot inside the hole of the nearest large bead (like one of the clay or wood beads) to hide it completely. -
Trim the ends:
Once the glue is fully dry, use sharp scissors to trim the excess elastic cord as close to the bead as possible without nicking the knot itself.
Design Balance
Mix textures strictly in the ‘focal’ area. Keep the back of the bracelet uniform (all green or all red) so the words pop without visual clutter.
Stack your new creations together or wrap them up as a thoughtful handmade gift for a friend
Personalized Gift Exchange Name Bracelets
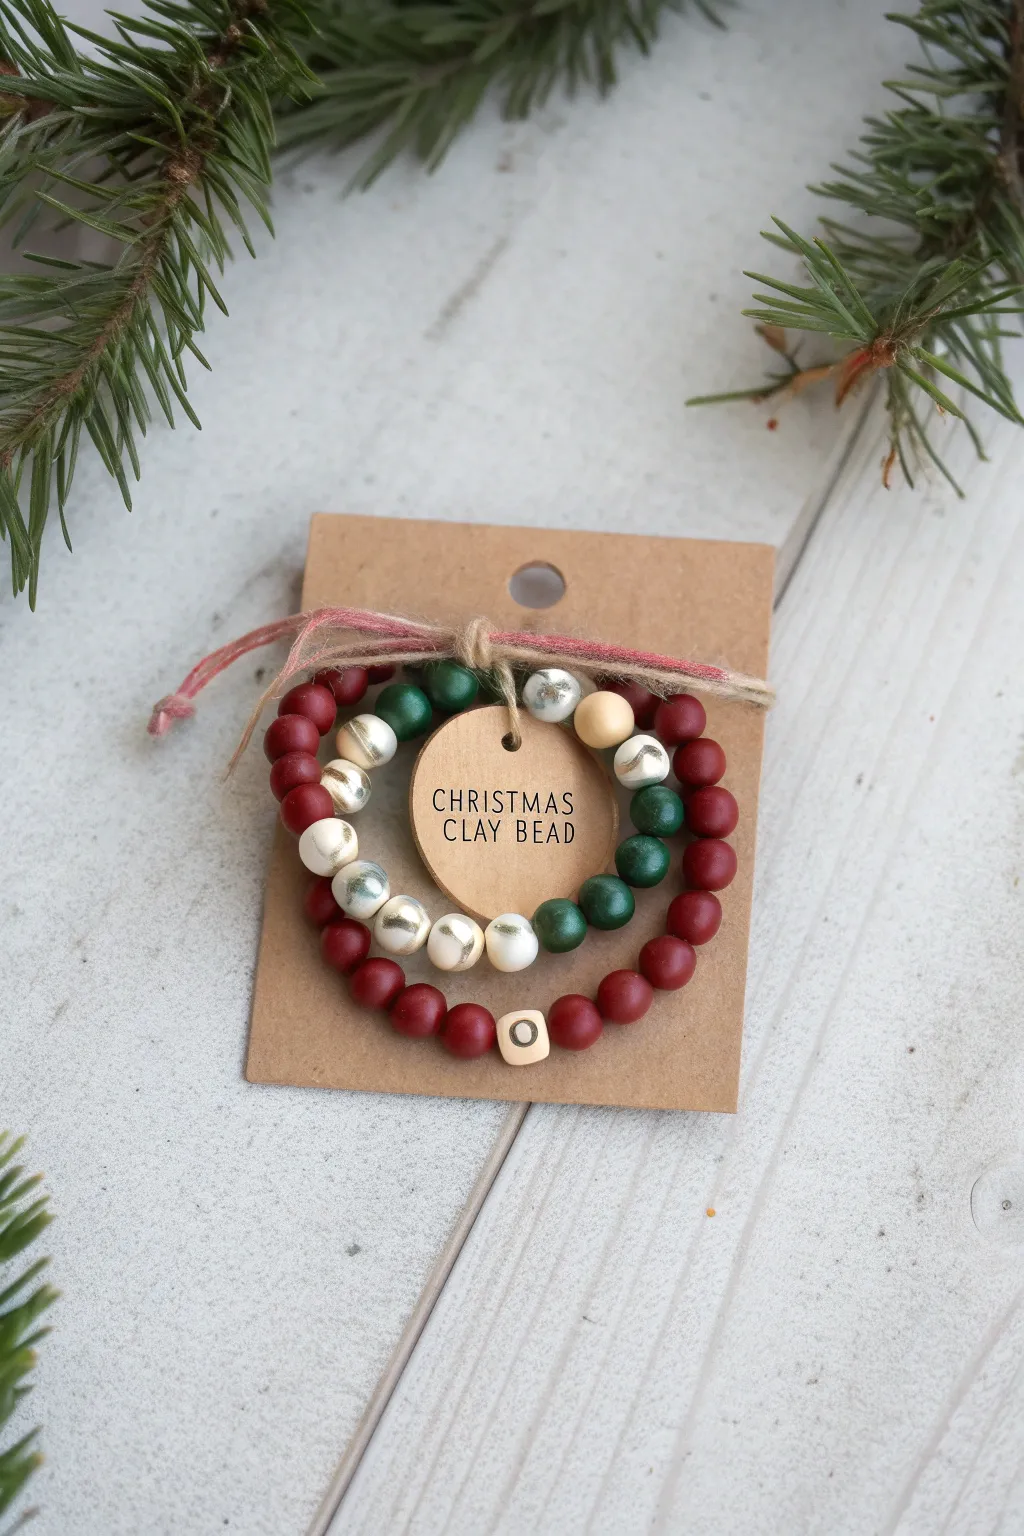
Create a charming, personalized holiday gift with this set of stackable clay bead bracelets attached to a rustic cardboard display. The combination of matte reds, deep greens, and marbled whites captures the festive spirit perfectly, while the wooden ‘O’ bead adds a personalized touch.
How-To Guide
Materials
- Polymer clay (red, deep green, white, gold/silver metallic)
- Wooden letter beads (square)
- Elastic beading cord (clear, 0.7mm or 0.8mm)
- Kraft cardstock or thin cardboard
- Jute twine and red string
- Small round wooden tag (pre-made or cut from wood veneer)
- Small letter stamps and black ink pad
- Super glue or jewelry glue
- Scissors
- Hole punch
- Needle tool or toothpick (for piercing beads)
- Oven for baking clay
Step 1: Crafting the Clay Beads
-
Condition the clay:
Begin by kneading your red, green, and white polymer clay separately until each is soft and pliable. This conditioning step prevents cracks during baking. -
Create the solid colors:
Roll the red and green clay into small, uniform spheres about 6-8mm in diameter using the palms of your hands to smooth out any fingerprints. -
Marbelize the accent beads:
Take a chunk of white clay and mix in streaks of silver or gold metallic clay. Twist them together like a candy cane, fold, and twist again, but stop before the colors blend completely to keep that distinct marbled look. -
Shape the marbled beads:
Roll this marbled mixture into spheres the same size as your solid colored beads. You can also mix a little white into some green or red for variation. -
Pierce the beads:
Use a needle tool or toothpick to carefully pierce a hole through the center of each bead. I find it helps to twist the tool as you push through to avoid squishing the bead’s round shape. -
Bake the batch:
Arrange your beads on a baking sheet lined with parchment paper or cardstock. Bake according to your specific clay package instructions (usually around 275°F/130°C for 15-30 minutes) and let them cool completely.
Step 2: Assembling the Bracelets
-
Cut the elastic:
Cut a length of elastic cord about 10-12 inches long. This gives you plenty of extra room for tying knots later. -
String the first bracelet:
Thread your cooled red clay beads onto the elastic. In the center, add your wooden letter bead (like the ‘O’ shown) to personalize it for your recipient. -
String the second bracelet:
For the second strand, create a pattern using the green, white, and marbled beads. Alternating solid colors with the marbled ones creates a nice visual rhythm. -
Tie the knots:
Once sized correctly for a wrist, tie a secure surgeon’s knot (right over left, left over right twice) for each bracelet. -
Secure and trim:
Place a tiny drop of super glue on the knots to secure them. Once dry, trim the excess elastic close to the knot and tuck it inside a bead if possible.
Smooth Operator
To remove fingerprints from raw clay beads before baking, lightly brush them with a little baby oil or cornstarch.
Step 3: Creating the Display Packaging
-
Prepare the backer card:
Cut a rectangle from your kraft cardstock, roughly 3×4 inches. Use a standard hole punch to create a hole at the top center for hanging. -
Cut side notches:
Snip small, angled notches on the left and right sides of the card. These create a groove that will hold the bracelets in place. -
Stamp the wooden tag:
Take your small round wooden tag and use the letter stamps to press ‘CHRISTMAS CLAY BEAD’ or a personal message onto the surface. -
Attach the tag:
Thread a piece of jute twine through the loop of the wooden tag and tie it loosely around the center of the bracelets. -
Mount the bracelets:
Slide the bracelet stack onto the card, settling the cord into the side notches you cut earlier. -
Final wrap:
Use a strand of red string and extra jute twine to wrap horizontally around the card and bracelets, tying a bow at the front to hold everything securely and decoratively.
Scented Surprise
Add a drop of cinnamon or pine essential oil to the wooden tag or the unglazed wooden letter bead for a festive aroma.
Now you have a beautifully packaged, handmade gift ready for your holiday exchange
Deep Evergreen and Gold Minimalist
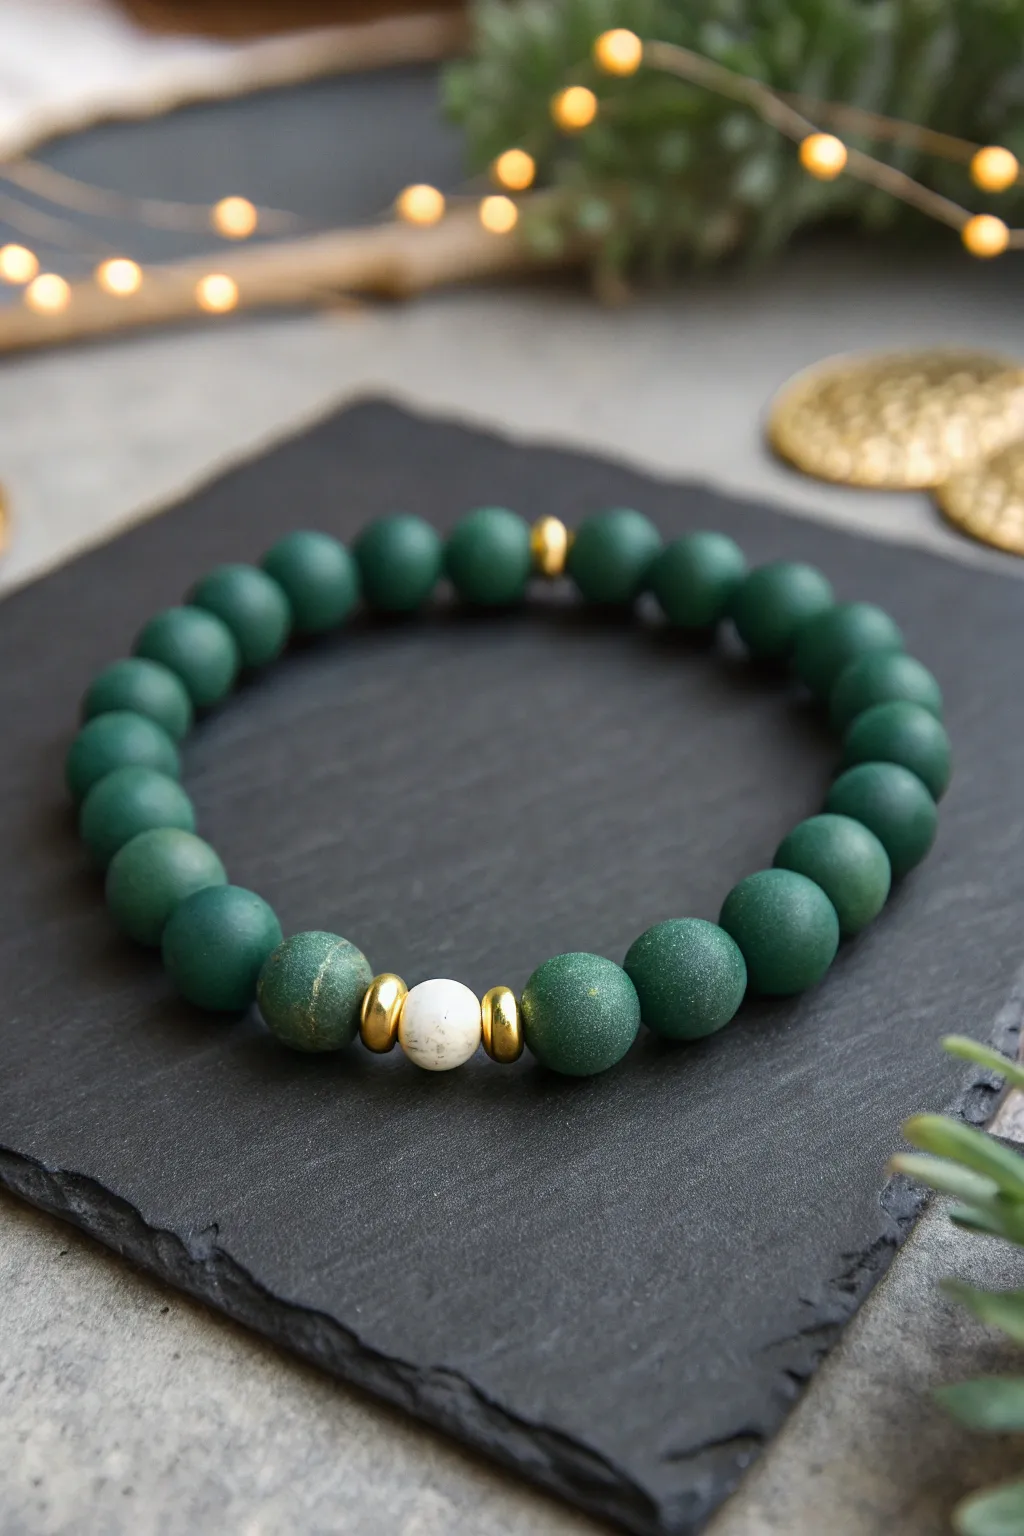
Embrace the quiet elegance of winter with this understated bracelet design featuring rich matte evergreen beads highlighted by striking gold accents. This sophisticated piece pairs deep forest hues with a singular white focal point for a modern, minimalist holiday look.
Step-by-Step Tutorial
Materials
- Polymer clay (Deep Forest Green, White, and Gold)
- Bead rolling tool or acrylic block
- Toothpicks or bead pins
- Baking tile or parchment paper
- Wet/dry sandpaper (400 and 800 grit)
- Strong elastic cord (0.8mm or 1mm)
- Super glue or jewelry cement
- Gloss glaze (optional, for gold beads only)
- Gold mica powder (optional)
- Beading needle (optional)
Step 1: Creating the Clay Beads
-
Condition the Green Clay:
Start by thoroughly conditioning your deep forest green polymer clay until it is soft and pliable. If the green is too bright, I like to mix in a tiny pinch of black to deepen the tone to a true evergreen. -
Portion the Clay:
Roll the green clay into a consistent log or use a clay cutter to slice equal-sized chunks. You will need approximately 20-22 pieces for a standard wrist, aiming for beads that are about 8-10mm in diameter. -
Roll the Spheres:
Roll each green chunk between your palms first, then refine the shape using a bead roller or an acrylic block moving in a circular motion on your work surface to get perfect spheres. -
Texture the Surface (Optional):
To achieve the matte, stone-like texture seen in the image, lightly roll the green beads over a piece of coarse sandpaper or gently tap them with a toothbrush before baking. -
Create the Accent Beads:
Repeat the rolling process to create one single white bead and one small gold bead. For the two gold spacer discs, roll small balls of gold clay and gently flatten them into thick coin shapes. -
Drill the Holes:
Using a toothpick or a bead pin, carefully pierce the center of each bead. Rotate the bead as you push the tool through to prevent it from squashing out of shape. -
Bake the Beads:
Arrange your beads on a baking tile, ensuring they aren’t touching. Bake according to your clay manufacturer’s instructions (usually 275°F/130°C for 15-30 minutes per 1/4 inch of thickness).
Wonky Beads?
If your hand-rolled beads aren’t perfectly round, let them rest in the fridge for 15 minutes before piercing. The firmer clay resists squishing.
Step 2: Finishing and Assembly
-
Cool and Sand:
Allow the beads to cool completely. Once cool, briefly sand the optional matte texture if needed, or simply buff off any fingerprints using denim or a soft cloth. -
Enhance the Gold (Optional):
If your gold clay isn’t metallic enough, this is the time to brush on a little gold mica powder or apply a thin coat of gloss glaze to just the gold spacer discs for extra shine. -
Prepare the Cord:
Cut a piece of elastic cord about 10-12 inches long. Pre-stretch the cord by pulling it firmly several times; this prevents the bracelet from sagging later. -
String the Centerpiece:
Thread your beads corresponding to the pattern: start with a gold spacer disc, then the white focal bead, then the second gold spacer disc. -
Add Green Beads:
String the matte green beads onto the cord on either side of your centerpiece. Continue adding green beads until you reach the desired length for your wrist. -
Insert the Rear Gold Bead:
Count to finding the exact middle of your green strand (opposite the white bead) and insert the small single gold bead there if you wish to replicate the image perfectly. -
Tie the Knot:
Bring the ends of the elastic together. Tie a surgeon’s knot (looping the cord through twice before pulling tight) to secure the bracelet. -
Secure and Hide:
Apply a tiny dot of super glue or jewelry cement to the knot. Let it dry for a moment, then trim the excess cord and gently tug the knot inside one of the adjacent distinct beads to hide it.
Level Up: Faux Stone
Mix black pepper or dried tea leaves into the white clay before rolling to create a realistic speckling effect that looks like real stone.
Now you have a refined accessory perfect for holiday parties or cozy winter evenings in.
Pastel Christmas Stack
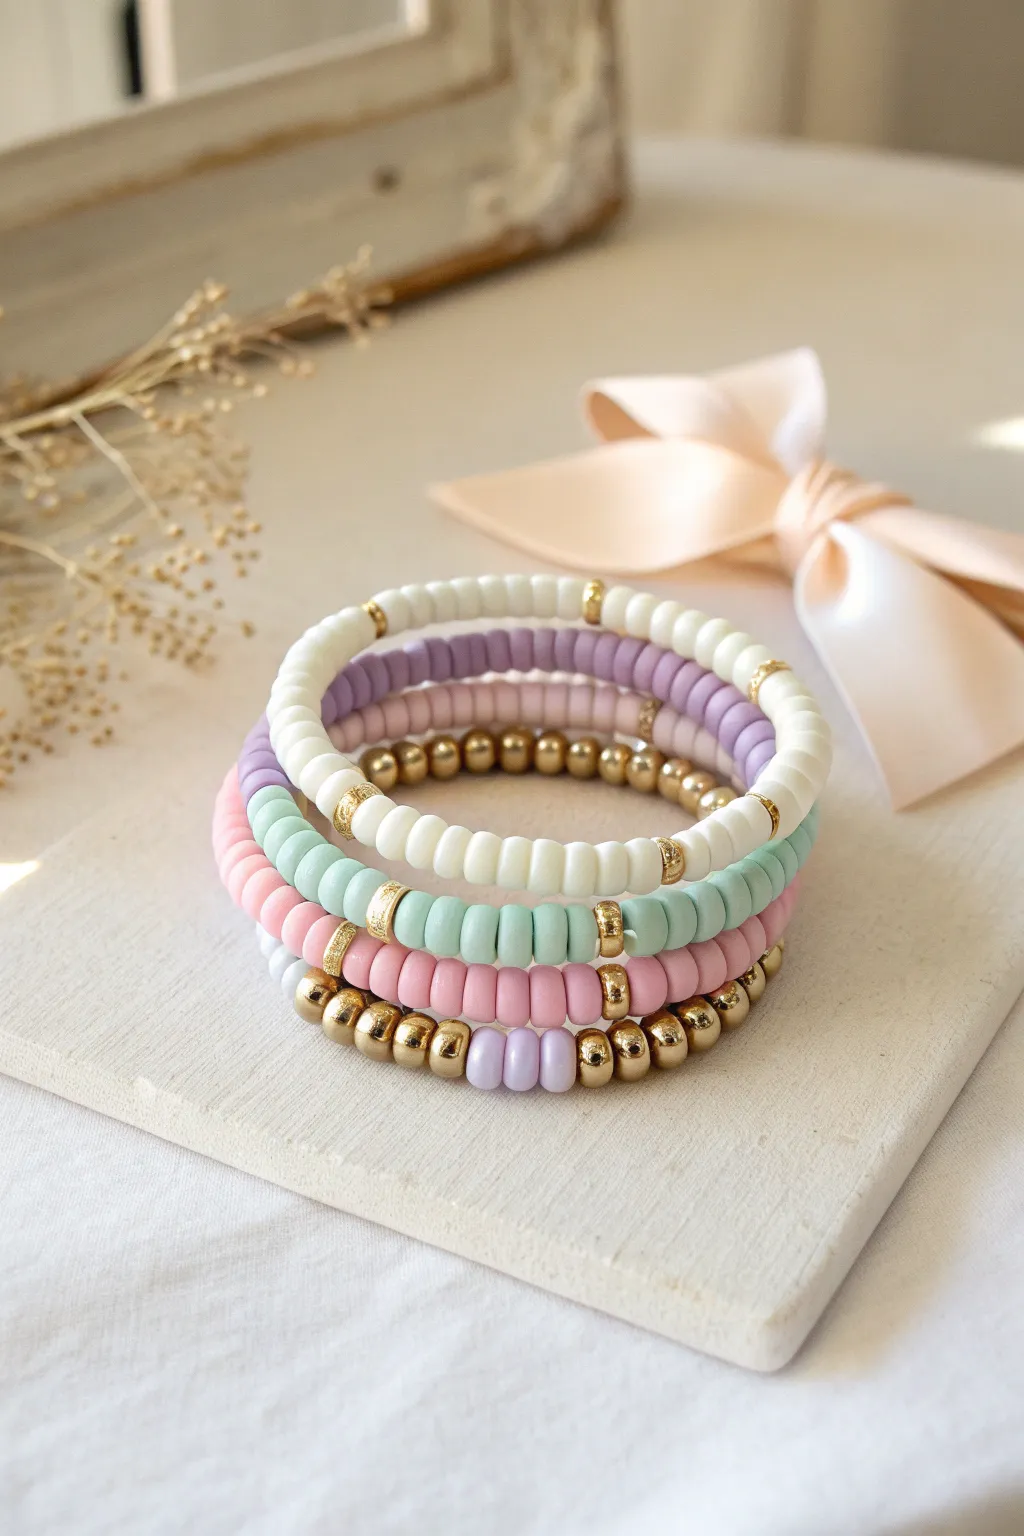
Move away from traditional red and green this season with a soft, dreamy stack of pastel polymer clay bracelets. This set combines mint, lavender, pink, and white heishi beads with varied gold accents for a sophisticated, feminine holiday look.
Step-by-Step
Materials
- Polymer clay heishi disc beads (6mm) in white, lavender, mint green, and baby pink
- Gold tone metallic spacer beads (round/ball style, approx. 4-6mm)
- Gold tone metallic heishi spacer beads (thin discs)
- Elastic beading cord (0.7mm or 0.8mm clear stretch cord)
- Super glue or jewelry cement (e.g., G-S Hypo Cement)
- Scissors
- Tape or bead stopper
- Measuring tape
Step 1: Preparation
-
Measure your wrist:
Wrap a measuring tape comfortably around your wrist to find your size. Add about half an inch to this measurement to ensure the bracelets roll on comfortably without over-stretching. -
Cut the cord:
Cut five strands of elastic cord, each about 10-12 inches long. This generous length makes the final knotting process much easier. -
Secure the ends:
Pre-stretch your elastic by pulling it gently a few times to prevent sagging later. Attach a piece of tape or a bead stopper to one end of each cord so your beads don’t slide off.
Knot Security
Pre-stretching your elastic cord is crucial! If you skip this, the bracelets will permanently stretch out and become loose after wearing them just a few times.
Step 2: Designing the White Bracelet
-
Start the white base:
Thread approximately 15-20 white heishi beads onto your first cord. -
Insert gold spacers:
Add a gold heishi spacer bead. Continue the pattern by adding sections of white beads separated by single gold spacers until you reach your desired length.
Sliding Beads?
If the knot keeps slipping out of the bead hole, use a crimp bead cover over the knot, or try to hide the knot inside one of the larger clay beads by carefully widening the hole with a reamer.
Step 3: Creating the Lavender & Pink Strands
-
String the lavender strand:
For the purple bracelet, thread strictly lavender heishi beads for almost the entire length. -
Add a gold focal point:
Instead of spacing them out, place three to five gold heishi spacers together in one block to create a shiny focal section, then finish filling the strand with lavender beads. -
Build the pink strand:
Recreate the white bracelet’s pattern using baby pink beads. Use the flat gold disc spacers every 1.5 inches to break up the color.
Step 4: The Mint & Mixed Metal Bracelets
-
Assemble the mint strand:
For the green bracelet, use mint heishi beads. This time, grab your larger round gold ball beads. -
Space the round gold accents:
Place a round gold bead after every 10 mint beads. The round shape adds a nice textual contrast to the flat clay discs. -
Create the mixed bottom strand:
For the final bracelet at the bottom of the stack, alternate between small sections of lavender/pink beads and long runs of the round gold ball beads. -
Vary the texture:
I like to mix the bead shapes here, using both flat gold spacers and round gold balls to make this bottom bracelet the most ornate of the group.
Step 5: Finishing Touches
-
Check the fit:
Wrap each unfinished strand around your wrist to verify the size. Add or remove a bead or two if necessary for a perfect fit. -
Tie the surgeon’s knot:
Remove the tape. Cross the ends, loop one side under twice, pull tight, and then tie a standard overhand knot on top. -
Secure with glue:
Place a tiny dab of jewelry cement or super glue directly on the knot. Let it dry for a few minutes. -
Hide the knot:
Once dry, trim the excess cord close to the knot. If possible, gently tug the elastic so the knot slides inside one of the larger gold beads to hide it.
Enjoy mixing and matching your new pastel stack for a uniquely soft holiday style
Winter Wonderland Blue-to-White Ombre
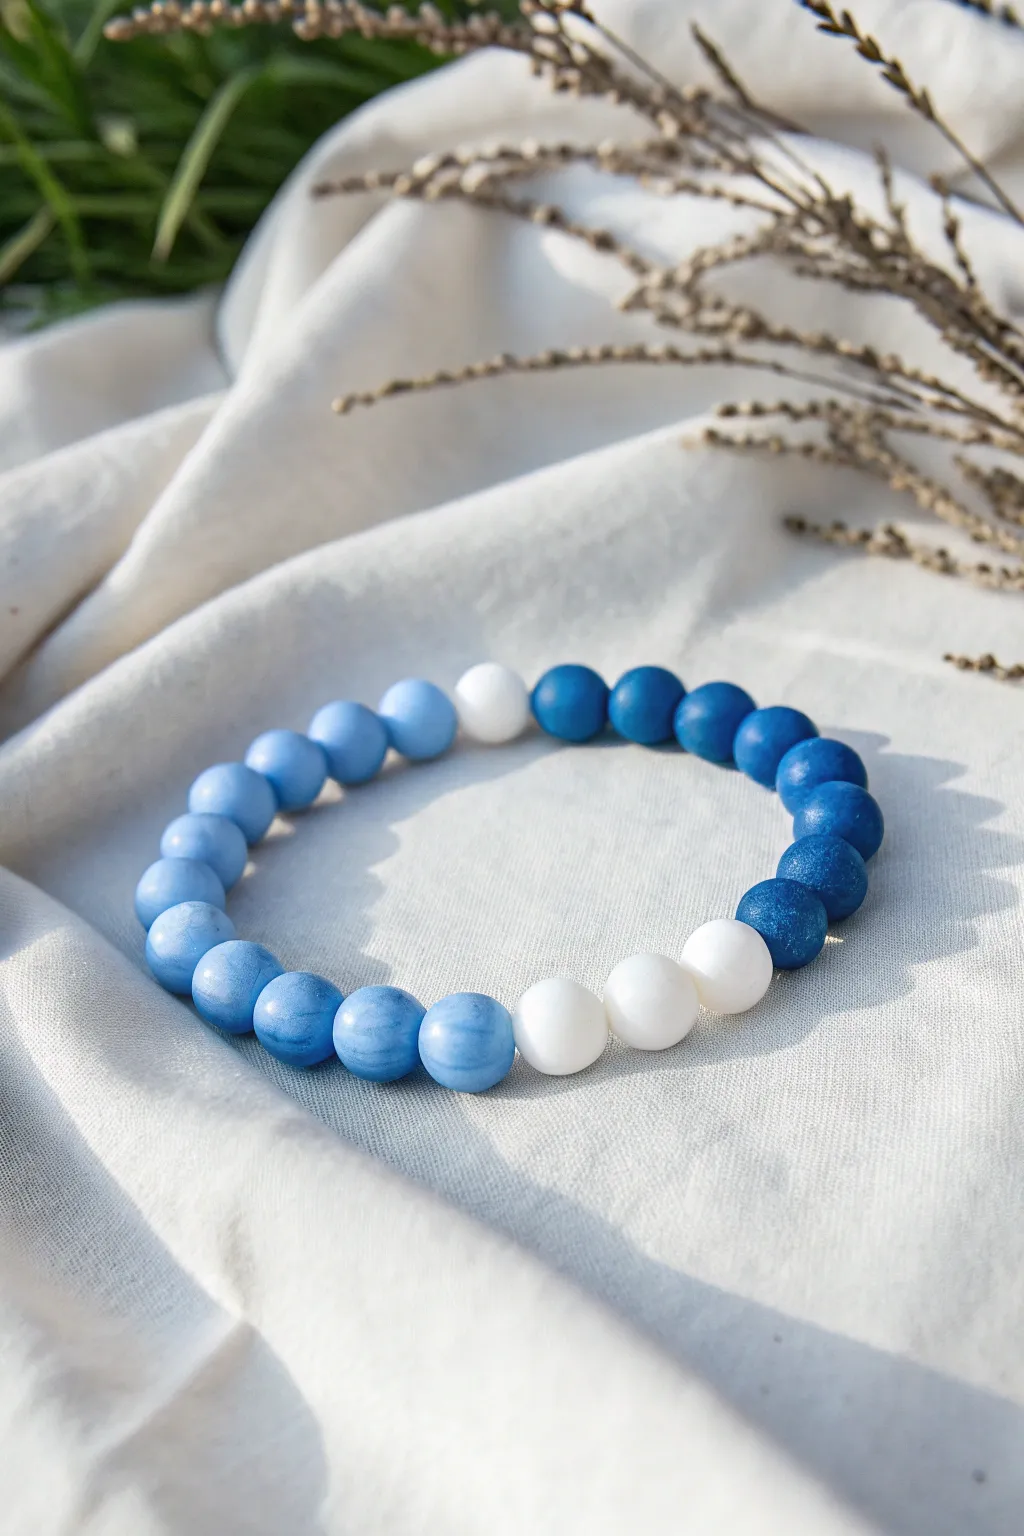
Capture the serene transition of a winter twilight with this soothing gradient bracelet. Hand-rolled polymer clay beads fade gently from deep indigo to frosty white, creating a wearable piece of the winter sky.
How-To Guide
Materials
- Polymer clay in Indigo (Deep Blue)
- Polymer clay in Regular Blue
- Polymer clay in White
- Bead rolling tool (optional, hand-rolling works too)
- Toothpicks or a bead piercing pin
- Elastic jewelry cord (0.7mm or 0.8mm)
- Super glue or jewelry adhesive
- Baking sheet and parchment paper
- Gloss or matte glaze (optional)
- Scissors
Step 1: Mixing the Gradient Palette
-
Establish your base colors:
Condition your three blocks of clay—Indigo, Blue, and White—by kneading them in your hands until they are soft and pliable. This warmth is key for smooth blending later. -
Create the darkest shade:
Pinch off a portion of pure Indigo clay. Roll it into a ball about the size of a large pea; this will be your darkest anchor bead. -
Mix the first transition shade:
Take a piece of Indigo and mix it with a small amount of the Regular Blue. Knead them together thoroughly until you have a uniform color that is just slightly lighter than the pure Indigo. -
Create the mid-blue tone:
Prepare a portion of the pure Regular Blue clay. This serves as the true blue center of your spectrum. -
Blend the light blue shade:
Mix a large portion of White clay with a very small amount of Regular Blue. You want a pale, icy blue tone here, barely tinted. -
Create the lightest shade:
Reserve a portion of pure, bright White clay for the final steps of the gradient. -
Arrange your palette:
Line up your mixed clay balls in order from darkest to lightest to ensure your gradient flows smoothly before you start rolling individual beads.
Step 2: Rolling and Baking
-
Portion the beads:
Pinch off equal-sized amounts from each of your color mixes. Aim for roughly 1cm diameter pieces to match the look of the reference image. -
Roll spheres:
Roll each piece between your palms in a circular motion. I like to apply gentle pressure at first and lighten up towards the end to get them perfectly round. -
Add texture (optional):
If you want the slight organic texture seen in the photo, gently roll the finished beads over a piece of fine-grit sandpaper or a textured fabric before baking. -
Pierce the holes:
Gently insert a toothpick or bead pin through the center of each sphere. Twist the tool as you push to prevent flattening the bead. -
Refine the shape:
Once pierced, you might need to give the bead a tiny reshaping roll to ensure it remains spherical. -
Bake the beads:
Arrange the beads on a parchment-lined baking sheet. Bake according to your clay package instructions (usually 275°F/135°C for 15-30 minutes). -
Cool down:
Allow the beads to cool completely in the oven with the door open. This tempering helps the clay become durable.
Smooth Surface Secret
Before baking, wipe each raw clay bead with a baby wipe or a finger dipped in a little baby oil. This removes fingerprints and dust for a flawless finish.
Step 3: Assembly
-
Layout the design:
Lay your cooled beads out on a flat surface. Arrange them in the gradient pattern: Indigo > Dark Mix > Mid Blue > Light Mix > White. Repeat the pattern in reverse if you want a mirrored look, or create a continuous loop. -
String the beads:
Cut a piece of elastic cord about 10 inches long. Thread the beads onto the cord following your laid-out pattern. -
Check the fit:
Wrap the strung beads around your wrist to check the size. Add or remove beads as needed for a comfortable fit. -
Tie the knot:
Tie a surgeon’s knot (loop the elastic twice instead of once on the first pass). Pull it tight gently but firmly to secure the circle. -
Secure and trim:
Place a tiny drop of super glue directly on the knot. Let it dry for a minute, then trim the excess cord ends close to the knot. For a cleaner look, slide the knot inside one of the bead holes.
Frosty Texture
After baking, sponge a tiny amount of white acrylic paint lightly over the blue beads to enhance the ‘frosted’ winter look seen in the inspiration image.
Slip on your new winter ombre bracelet and enjoy the cool, custom hues you’ve created
Cozy Sweater Pattern Blocks
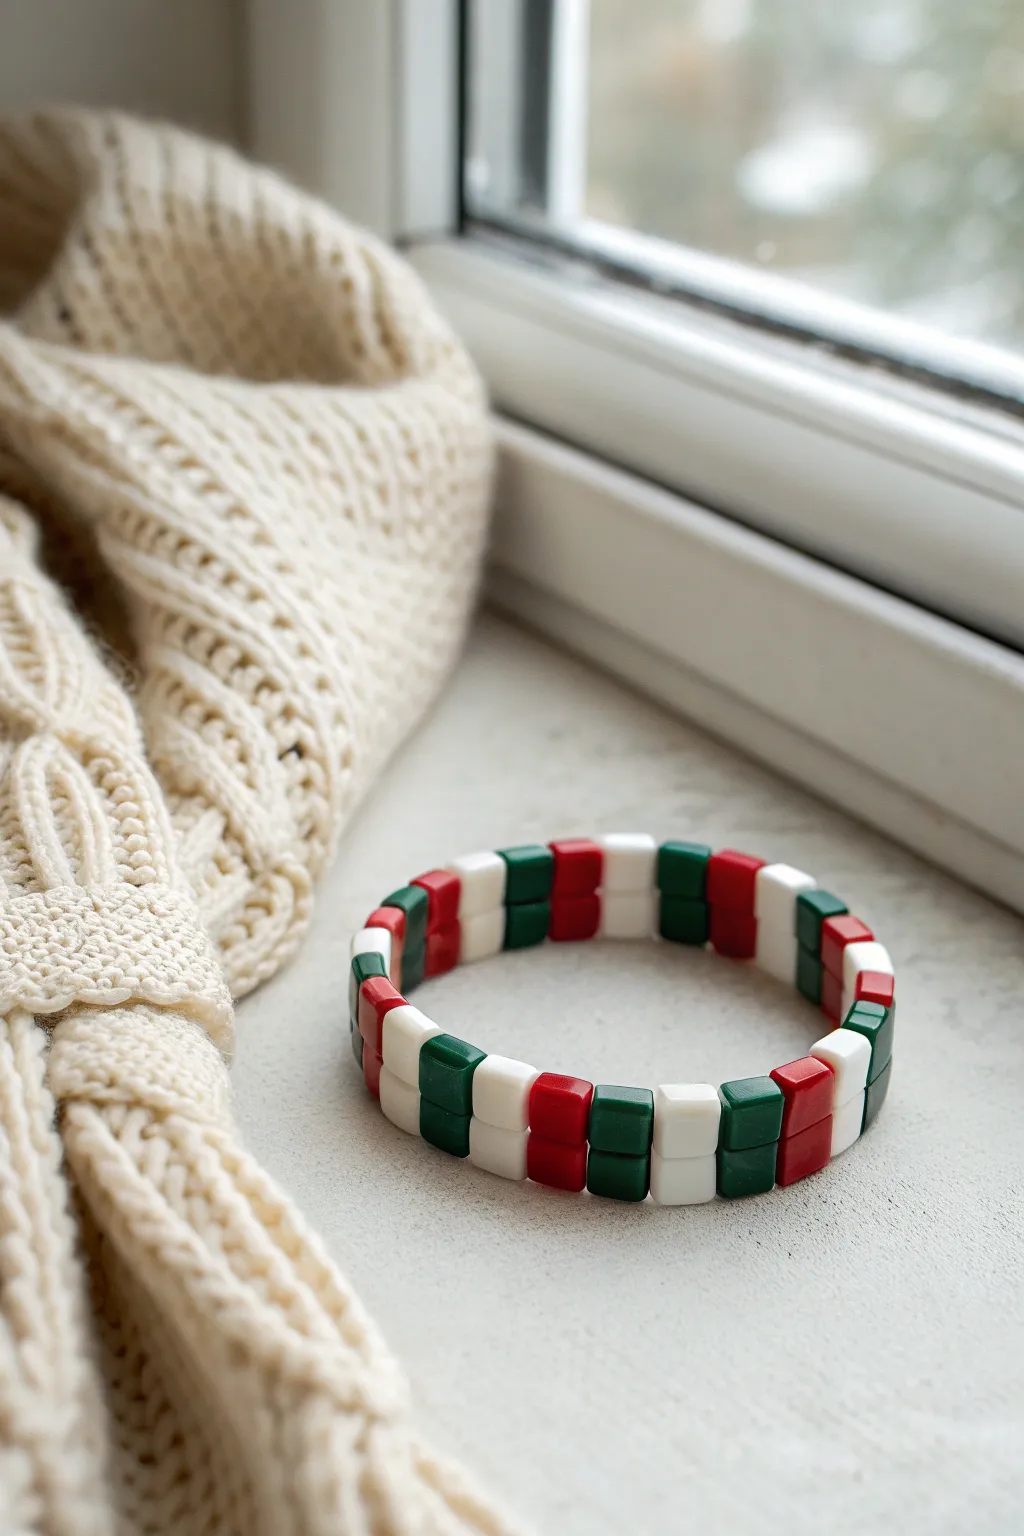
Echo the chunky comfort of your favorite winter sweater with this geometric tile bracelet. Using square-shaped polymer clay beads or Japanese tile beads, this project creates a structured yet festive accessory featuring a repeating red, green, and white block pattern.
Step-by-Step Guide
Materials
- Red square 2-hole tile beads (approx. 6mm)
- Green square 2-hole tile beads (approx. 6mm)
- White or cream square 2-hole tile beads (approx. 6mm)
- 0.8mm clear elastic cord (stretchy jewelry string)
- Super glue or specialized jewelry glue (e.g., G-S Hypo Cement)
- Beading needle (collapsible eye works best)
- Scissors
Step 1: Planning and Sorting
-
Design the pattern:
Before stringing, lay out your beads on a flat surface or bead mat. The pattern shown consists of alternating blocks of color: two columns of green, two columns of white, two columns of red, and then two columns of white. Repeat this sequence. -
Verify the stack:
Ensure you are using ‘two-hole’ beads. Each ‘column’ in the bracelet is actually a stack of two square beads sitting on top of each other. This double-decker structure is what gives it that chunky, blocky look. -
Measure your wrist:
Wrap a piece of string around your wrist to find the circumference. Add about 0.5 inches to this measurement to account for the thickness of the beads. Count out enough bead sets to match this length.
Step 2: Stringing the Bottom Row
-
Prepare the elastic:
Cut two lengths of elastic cord, each about 12 inches long. This generous length makes tying knots much easier later. I prefer to stretch the elastic firmly a few times before starting to prevent it from sagging later. -
Thread the needle:
Thread your first piece of elastic onto the beading needle. We will be working on the bottom holes first. -
String the bottom beads:
Referencing your laid-out pattern, pick up only the *bottom* bead of each column. Thread the elastic through the lower hole of every bead in your sequence. -
Check the sequence:
Double-check your pattern. You should have pairs of red, pairs of white, and pairs of green. Don’t worry if they twist around for now; just ensure the color order is correct. -
Secure temporarily:
Tie a loose, temporary overhand knot or use a bead stopper at the ends of the elastic to keep your work from sliding off while you prep the second strand.
Tile Alignment Tip
Keep the beads flat on the table while stringing the second row. It prevents twisting and makes it easier to match the top bead to its bottom partner correctly.
Step 3: Stacking the Top Row
-
Thread the second elastic:
Remove the needle from the first cord and thread it onto your second piece of elastic cord. -
Align the top beads:
This is the crucial step. Pick up the corresponding *top* bead for the first column. Thread the elastic through its top hole. -
Continue the stack:
Continue adding the top beads in order. As you add a top bead, align it directly over the corresponding bottom bead that is already strung. This creates vertical stacks of two. -
Maintain tension:
Keep a light tension on both cords as you work. You’ll see the bracelet start to form a solid ‘wall’ of tiles rather than a floppy string. -
Final check:
Before tying off, wrap the strand around your wrist one last time to confirm the fit. The two rows of elastic should run parallel through the top and bottom holes.
Metallic Accent
Swap out one set of the white columns for gold or silver tile beads. The metallic sheen adds a sophisticated holiday sparkle against the matte clay colors.
Step 4: Finishing Touches
-
Tie the first knot:
Bring the ends of the *bottom* elastic cord together. Tie a surgeon’s knot (right over left twice, then left over right). Pull tight to close the gap between the first and last bead. -
Tie the second knot:
Repeat the surgeon’s knot with the *top* elastic cord. Ensure both knots have equal tension so the bracelet sits flat and doesn’t curve. -
Secure with glue:
Apply a tiny dot of jewelry glue or super glue to both knots. Be very careful not to get glue on the visible face of the beads. -
Hide the knots:
While the glue is still tacky, gently pull the elastic so the knot slides inside the hole of the nearest bead. This hides the knot completely for a professional finish. -
Wait and trim:
Let the glue dry for at least 15 minutes. Once secure, trim the excess elastic tails as close to the bead hole as possible using sharp scissors.
Slip on your new block-pattern bracelet and enjoy the perfectly ordered holiday cheer on your wrist
Buffalo Plaid Inspired Checks
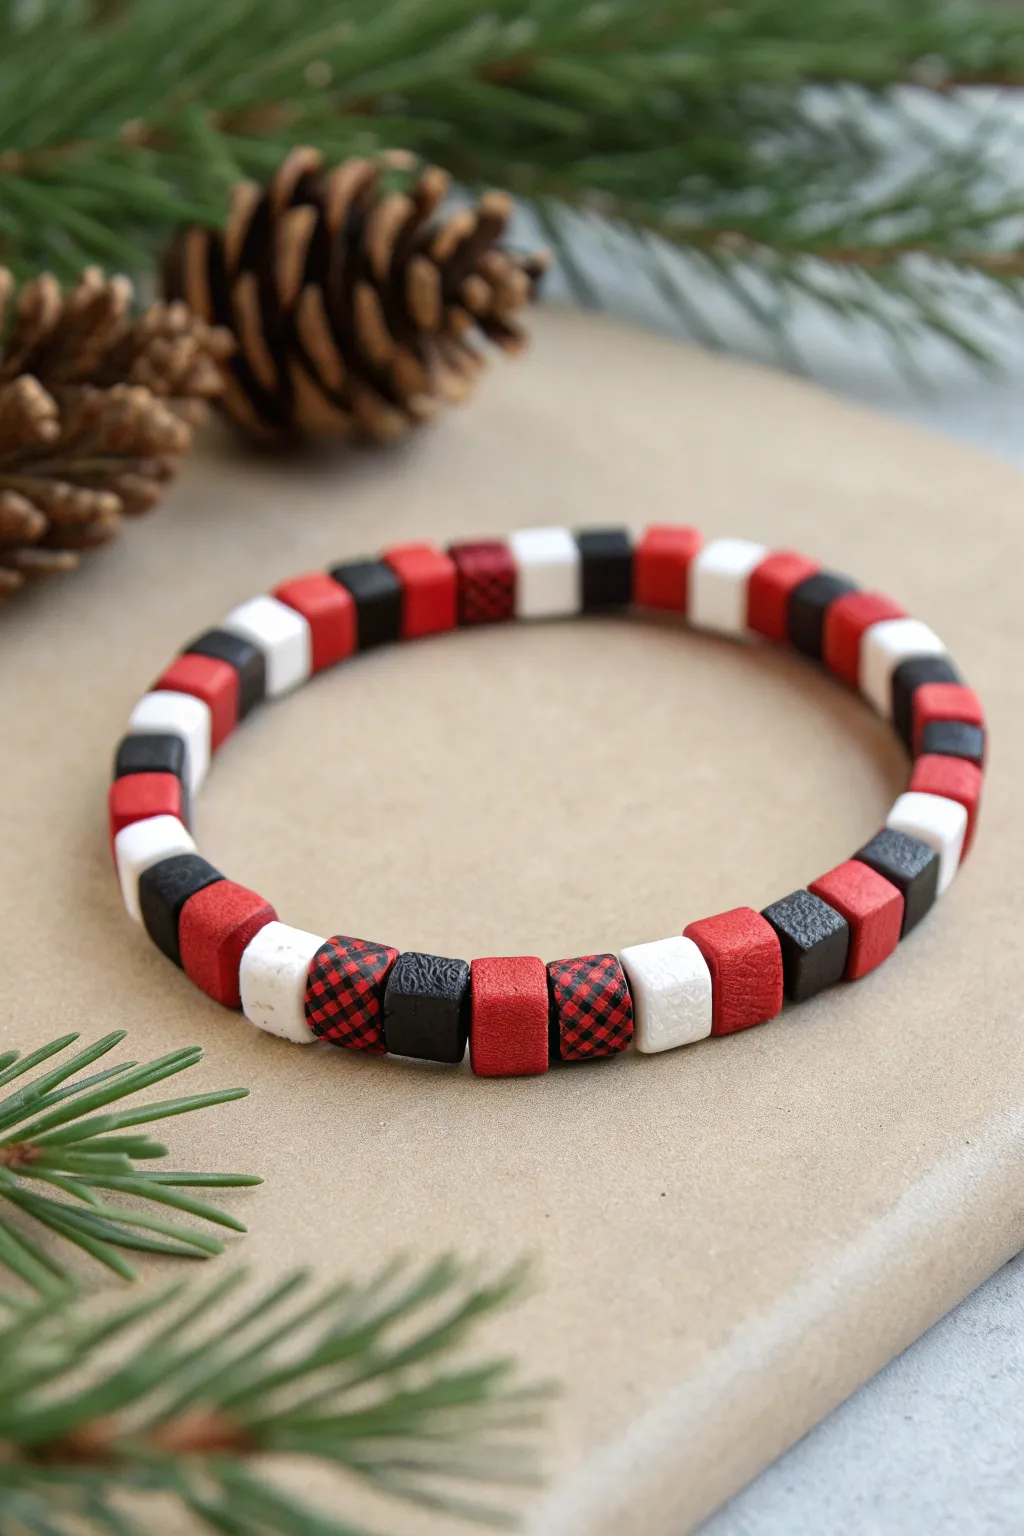
Capture the rustic charm of the holidays with this lumberjack-chic accessory. This bracelet features alternating solid squares and a delightful buffalo plaid pattern created entirely from polymer clay, perfect for matching your favorite flannel shirt.
Step-by-Step
Materials
- Polymer clay in Red, Black, and White
- Acrylic roller or pasta machine
- Tissue blade or sharp clay knife
- Needle tool or small drill bit
- Extruder (optional)
- Elastic jewelry cord
- Jewelry glue (optional)
- Ruler
- Small bead rack or parchment paper
Step 1: Prepping The Cane
-
Condition the Clay:
Begin by thoroughly conditioning your red and black polymer clay until it is soft and pliable. This step is crucial to prevent cracking later on. -
Form the Base Logs:
Roll out a log of pure red clay and a log of pure black clay. Try to keep them roughly the same thickness, about 1/2 inch in diameter. -
Create the Check Mix:
Mix equal parts red and black clay thoroughly to create a dark maroon or deep shadow red. This ‘hybrid’ color is the secret to a realistic plaid effect. -
Shape the Square Logs:
Using your acrylic roller or simply pressing against a flat surface, reshape your round logs (red, black, and the new hybrid color) into square logs. They need to be uniform. -
Stack the Pattern:
Arrange the square logs into a 3×3 or 4×4 checkerboard grid. The pattern relies on the hybrid color touching both true black and true red sections to create the illusion of overlapping fabric threads. -
Reduce the Cane:
Gently squeeze and roll the stacked cane to reduce its size. Keep compressing evenly on all four sides so the inner pattern shrinks but maintains its square checkerboard shape.
Smudged Checks?
If your plaid pattern is smearing while cutting, the clay is too warm. Pop the cane in the freezer for 10-15 minutes to firm it up for crisp, sharp slices.
Step 2: Forming the Beads
-
Cut the Plaid Cubes:
Once your plaid cane is reduced to about a 5-6mm diameter, use your sharp tissue blade to slice off cube-shaped sections. I find chilling the cane for 15 minutes makes slicing much cleaner. -
Create Solid Cubes:
Roll out slabs of your plain red, black, and white clay to the same thickness as your plaid cane. Cut these into cubes that match the size of your plaid slices. -
Refine the Shapes:
Gently tap the sides of each cube (both solid and print) to sharpen the corners and ensure they are all uniform in size. -
Add Texture (Optional):
For the rustic look seen in the photo, gently roll the solid red and white beads over a fine sandpaper or texture sponge to give them a matte, fabric-like surface. -
Pierce the Holes:
Using a needle tool, carefully poke a hole through the center of each cube. Twist the tool as you push to avoid squashing the cube shape.
Step 3: Baking and Assembly
-
Bake the Beads:
Arrange your beads on a baking sheet or bead rack. Bake according to your brand’s specific temperature instructions, typically for about 30 minutes to ensure durability. -
Cool Down:
Allow the beads to cool completely before handling. Polymer clay is slightly soft when hot and hardens as it returns to room temperature. -
Plan the Design:
Lay out your beads to design the pattern. The image uses a sequence like: Plaid, Black, Red, Plaid, White, Red… but randomizing them gives a great organic look. -
String the Bracelet:
Thread the beads onto the elastic cord. Check the fit around your wrist, adding or removing beads until it sits comfortably. -
Secure the Knot:
Tie a strong surgeon’s knot with the elastic cord. Pull it tight, dab a tiny drop of jewelry glue on the knot, and let it dry. -
Hide the Knot:
Trim the excess cord and gently tug the elastic so the knot slides inside one of the larger beads to hide it.
Mattify the Finish
To get that ultra-matte, fabric look seen in the photo, lightly buff the baked beads with ultra-fine steel wool to remove any natural clay shine.
Now you have a charming accessory perfect for winter gatherings
Advent Countdown Number Bracelet
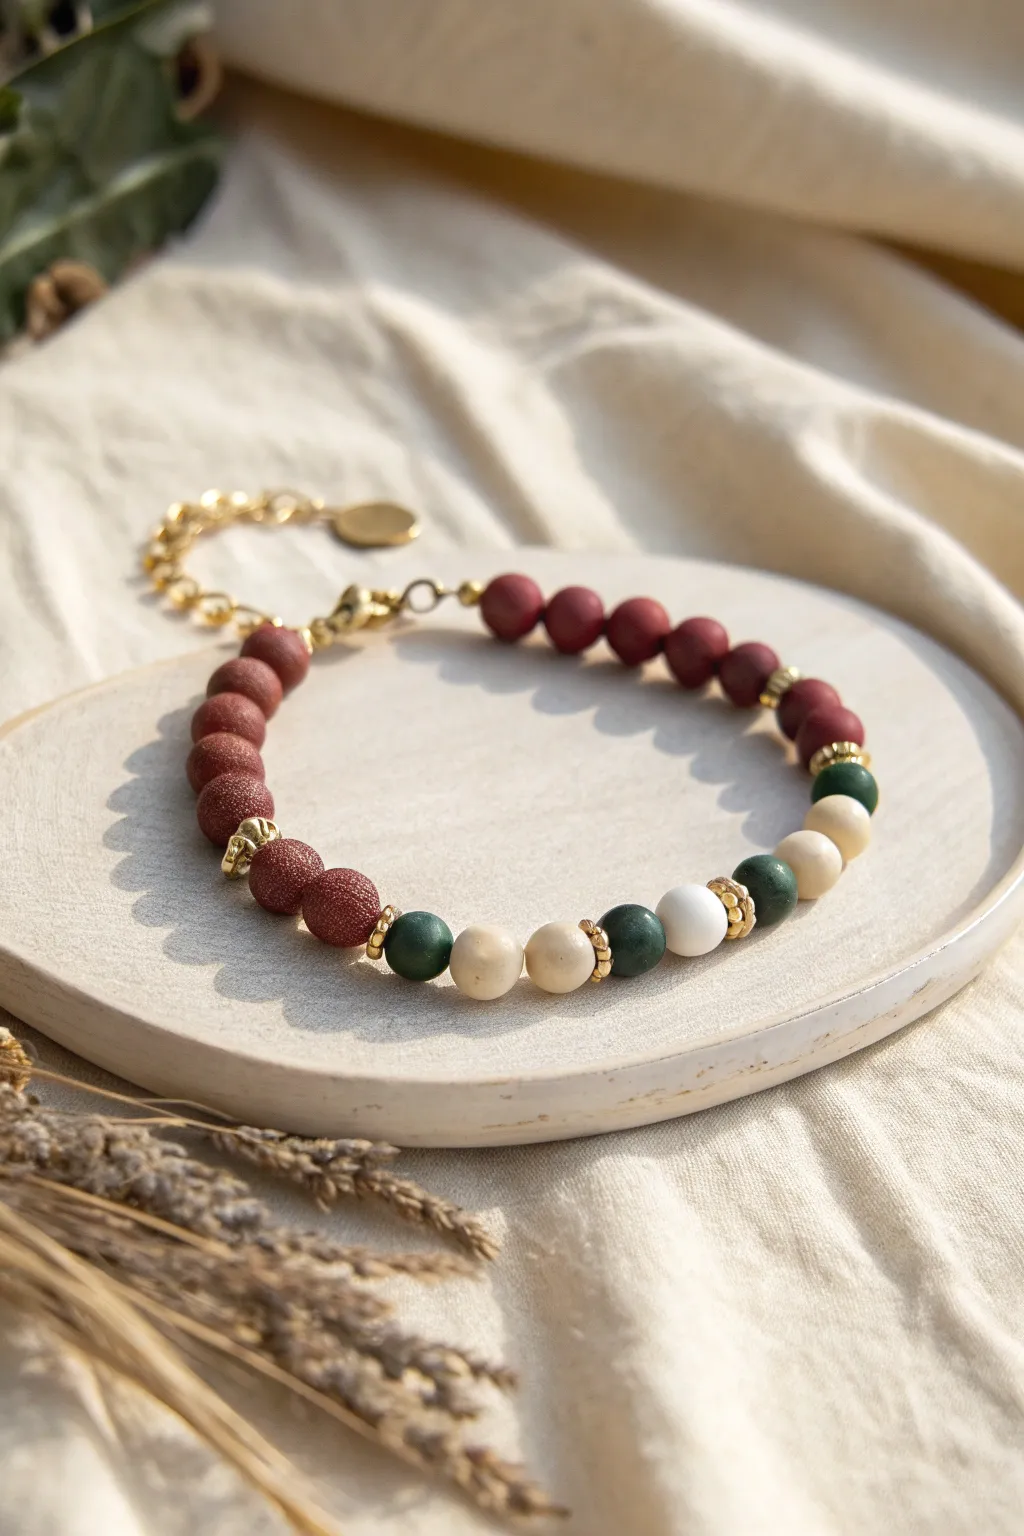
This elegant beaded bracelet captures the warmth of the season with deep maroon, forest green, and creamy white tones accented by flashes of gold. The shimmering finish on the main beads adds a festive touch perfect for holiday gatherings or counting down the days until Christmas.
Detailed Instructions
Materials
- Polymer clay in deep maroon (with glitter or mica powder mixed in)
- Polymer clay in dark forest green
- Polymer clay in cream or bone white
- Gold tone spacer beads (various flat and decorative shapes)
- Beading wire or strong jewelry elastic
- 2 Gold crimp beads
- 2 Gold crimp covers
- Gold jewelry chain extender
- Gold lobster clasp
- Gold jump rings
- Needle tool or bead piercing pin
- Clay roller or pasta machine
- Small round cutter (or a straw) for uniform sizing
- Gloss varnish (optional for extra shine)
- Jewelry pliers (flat nose and wire cutters)
- Baking sheet and parchment paper
Step 1: Preparing the Clay Beads
-
Condition the maroon clay:
Start by warming up your maroon polymer clay in your hands until it’s pliable. If your clay doesn’t already have sparkle, knead in a generous amount of gold mica powder or extra-fine glitter to mimic the goldstone look seen in the photo. -
Create uniform maroon portions:
Roll the clay into a thick log. Use a ruler to mark even segments, or use a small round cutter on a rolled-out sheet to ensure every bead starts with the same volume of material. -
Roll the maroon spheres:
Take each portion and roll it between your palms to create perfectly smooth spheres. You will need about 14-16 of these maroon beads depending on your wrist size. -
Prepare accent colors:
Repeat the conditioning and portioning process for the dark green and cream clay. Aim for slightly smaller portions for these accent beads to add visual variety. -
Form the pattern set:
Roll roughly 3-4 green spheres and 4-5 cream spheres. Keep them smooth and free of fingerprints by lightly dusting your hands with cornstarch if needed. -
Pierce the beads:
Using your needle tool or bead pin, carefully pierce a hole through the center of each sphere. Rotate the bead as you push the needle through to prevent it from flattening into an oval shape. -
Bake the beads:
Arrange all your pierced beads on a parchment-lined baking sheet. Bake according to your brand of polymer clay’s instructions (usually 275°F/135°C for 15-30 minutes). -
Cool and finish:
Let the beads cool completely. If you want a glass-like finish, apply a thin coat of gloss varnish, though the matte look is also very sophisticated.
Step 2: Assembling the Bracelet
-
Cut the wire:
Measure your wrist and cut a piece of beading wire about 3 inches longer than you need to allow room for finishing the ends. -
Secure the first end:
Thread a crimp bead onto one end of the wire, followed by a jump ring attached to the clasp. Loop the wire back through the crimp bead and use flat nose pliers to squash it tight. -
Cover the crimp:
Place a gold crimp cover over the smashed crimp bead and gently close it with pliers to make it look like a regular gold bead. -
Start the pattern:
Begin threading your beads. Start with the main maroon section. Thread about 7 or 8 maroon beads onto the wire. -
Add first gold accent:
Slide on a decorative gold spacer bead after the maroon section to break up the color block. -
Create the center pattern:
Thread your accent beads in this order: Maroon, Green, Cream, Cream, Green, Cream. I like to place small gold spacer beads between changes in clay color to elevate the design. -
Finish the beading:
Complete the strand by mirroring the first half: add another gold spacer, then fill the rest of the wire with the remaining maroon beads. -
Close the loop:
Thread a crimp bead onto the open end, followed by the chain extender. Loop the wire back through the crimp bead. -
Tighten and trim:
Pull the wire taut so there are no gaps between beads, but not so tight that the bracelet becomes stiff. Flatten the crimp bead securely and trim the excess wire close to the crimp. -
Final polish:
Add a final crimp cover over the end to hide the mechanics, ensuring all your gold hardware matches beautifully.
Smooth Surface Secret
To remove fingerprints from raw clay beads before baking, gently roll them in a small dish of water mixed with a drop of baby oil. This smooths the surface perfectly.
Countdown Charm Addition
Add a small numbered charm (1-25) to the clasp chain. You can make a new charm each day of Advent and swap it onto the bracelet as you count down.
Enjoy wearing your festive creation throughout the season as a stylish reminder of the holidays
Tiny Clay Charm “Ornaments” Bracelet
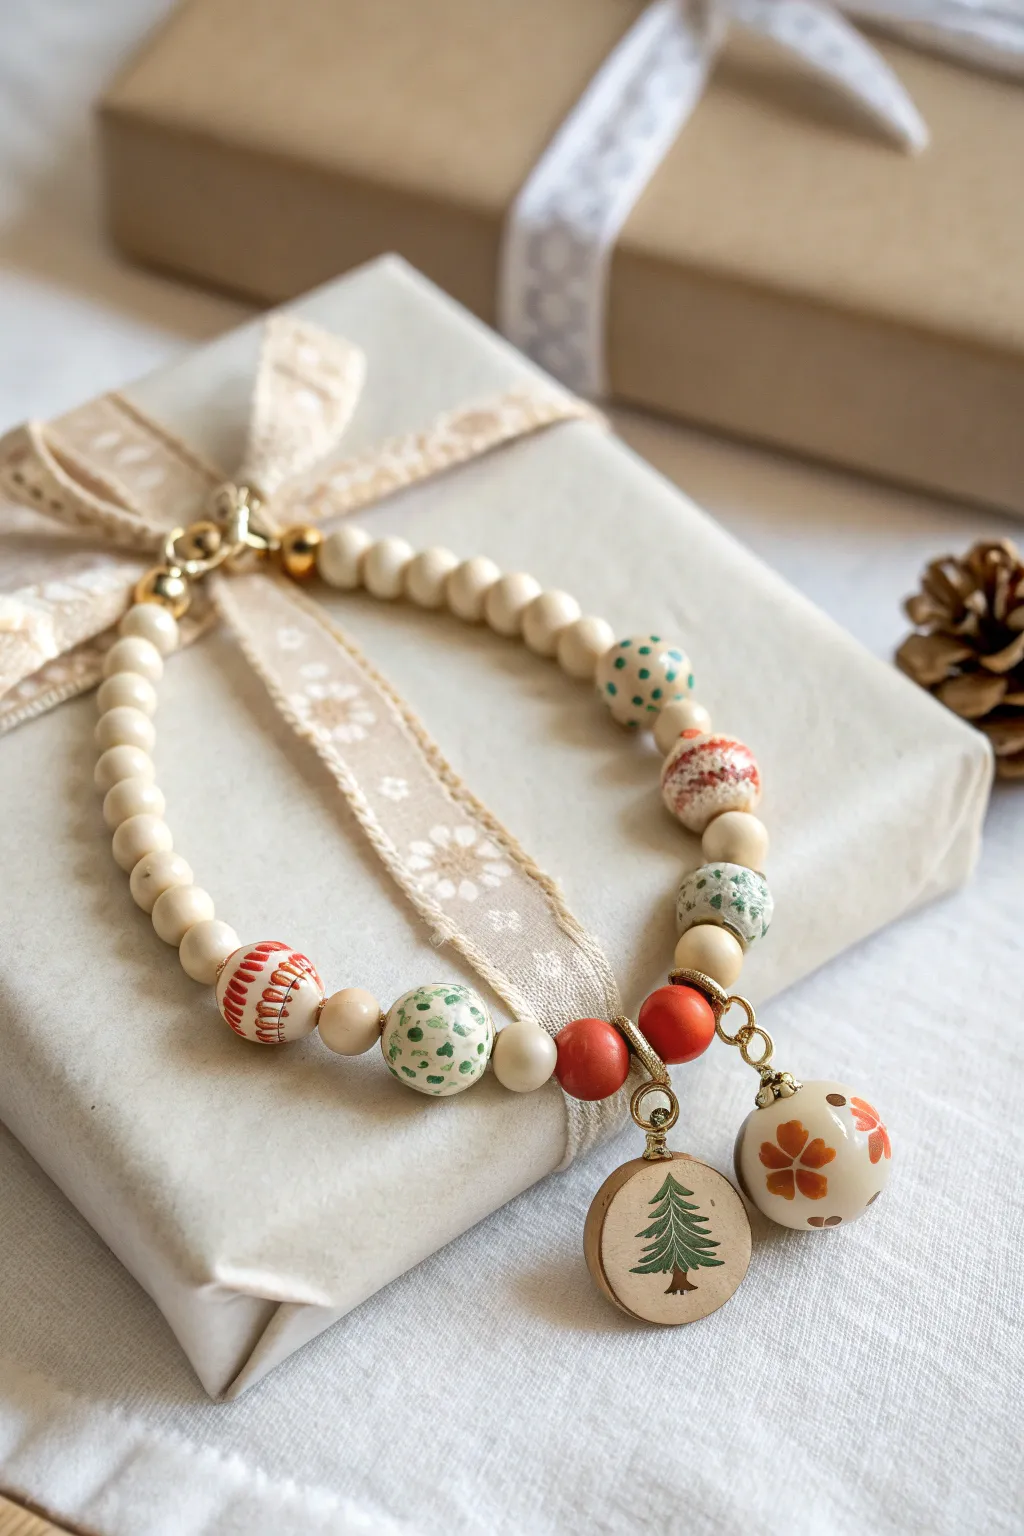
This elegant holiday accessory combines the rustic warmth of natural wood with hand-painted polymer clay accents in a creamy, festive palette. The standout feature is a pair of delicate charms—a tiny evergreen tree and a floral bauble—that add a cheerful jingle to your wrist.
Step-by-Step
Materials
- White or cream polymer clay
- Wooden spacer beads (cream/natural, approx. 6-8mm)
- Red and orange wooden beads (small, 6mm)
- Acrylic paints (dark green, burnt orange, terracotta red, cream)
- Fine detail paintbrushes (00 or 000 size)
- Gold beading wire or strong elastic cord
- Gold jump rings (4mm and 6mm)
- Gold crimp beads and clasp (lobster claw or spring ring)
- Gloss glaze or polyurethane varnish
- Jewelry pliers (round nose and flat nose)
- Toothpicks or bead reamer
- Baking sheet and parchment paper
Step 1: Sculpting the Clay Beads and Charms
-
Prepare the patterned beads:
Start by conditioning your cream polymer clay until soft. Roll out four to five medium-sized spheres (approx. 10-12mm) to serve as your feature beads. Use a toothpick to carefully pierce a hole through the center of each, gently rotating to keep the shape round. -
Create the tree charm:
Roll a small ball of clay and flatten it into a thick coin shape, about 15mm in diameter. Pierce a hole near the top edge for the jump ring. Smooth out any fingerprints with a drop of baby oil if needed. -
Form the floral bauble:
Roll a slightly larger sphere for the floral charm. Like the other beads, pierce a hole through the center, but ensure this hole is wide enough to accommodate a headpin or wire loop later. -
Bake the clay:
Arrancge all your clay pieces on a parchment-lined baking sheet. Bake according to your clay manufacturer’s instructions (usually 275°F/130°C for 15-30 minutes). Let them cool completely before painting.
Uneven Bead Holes?
If paint clogs the bead holes, gently twist a small drill bit or sanding needle through the opening by hand. Do this before glazing to avoid cracking the finish.
Step 2: Painting the Details
-
Paint the green dot beads:
Select two of your cooled round beads. Using your finest brush and dark green paint, dab small, irregular clusters of dots around the surface to mimic a speckled ceramic look. -
Paint the red texture bead:
On another round bead, use terracotta red paint to create short, vertical hatch marks in bands. Keep the lines loose and hand-painted rather than perfectly straight for rustic charm. -
Illustrate the tree charm:
On the flat coin charm, paint a simple evergreen tree using the dark green paint. Start with a vertical line for the trunk, then feather outward with short, downward strokes for branches. Add a tiny brown trunk at the base. -
Detail the floral bauble:
On the large bauble charm, paint simple four-petal flower shapes using burnt orange paint. Add tiny darker centers to the flowers once the orange layer is dry. -
Seal the pieces:
Once all paint is thoroughly dry, apply a coat of gloss glaze or varnish to protect the designs and give them a finished, ceramic-like sheen.
Step 3: Assembling the Bracelet
-
Prepare the wire:
Cut a length of beading wire or elastic about 9 inches long to give yourself plenty of working room. Secure one end with a piece of tape or a bead stopper. -
Start stringing:
Begin threading your beads. I like to start with a section of the plain cream wooden spacer beads (about 8-10 beads) to form the back of the bracelet. -
Add the feature section:
Slide on your hand-painted clay beads, alternating them with single cream wooden spacers to let each design stand out. Follow the pattern in the image: painted bead, spacer, painted bead. -
Position the charm holders:
Between the last two patterned beads, thread on two solid colored beads (orange and red). Place a gold jump ring directly onto the wire between these colored beads—this will act as the anchor for your charms. -
Finish the strand:
Use crimp beads and jewelry pliers to attach leading jump rings and a clasp to the ends of your wire. If using elastic, tie a secure surgeon’s knot and hide it inside a bead hole. -
Attach the charms:
Open the jump ring on your flat tree charm using two pairs of pliers. Hook it onto the anchor location you created between the red and orange beads. Repeat this process for the floral bauble charm.
Add Subtle Sparkle
Mix a tiny amount of gold mica powder into your varnish before sealing. It gives the cream clay a subtle, festive shimmer that catches the light beautifully.
Now you have a charming, handcrafted piece of holiday jewelry perfect for gifting or keeping for yourself.