The second the holiday season starts, I’m reaching for clay because it’s the quickest way to turn cozy Christmas vibes into something you can actually hold. These christmas clay ideas are all about easy, small-scale makes you can hang, gift, or scatter around your home like tiny bits of winter magic.
Stamped Ornament Discs With Simple Holiday Shapes
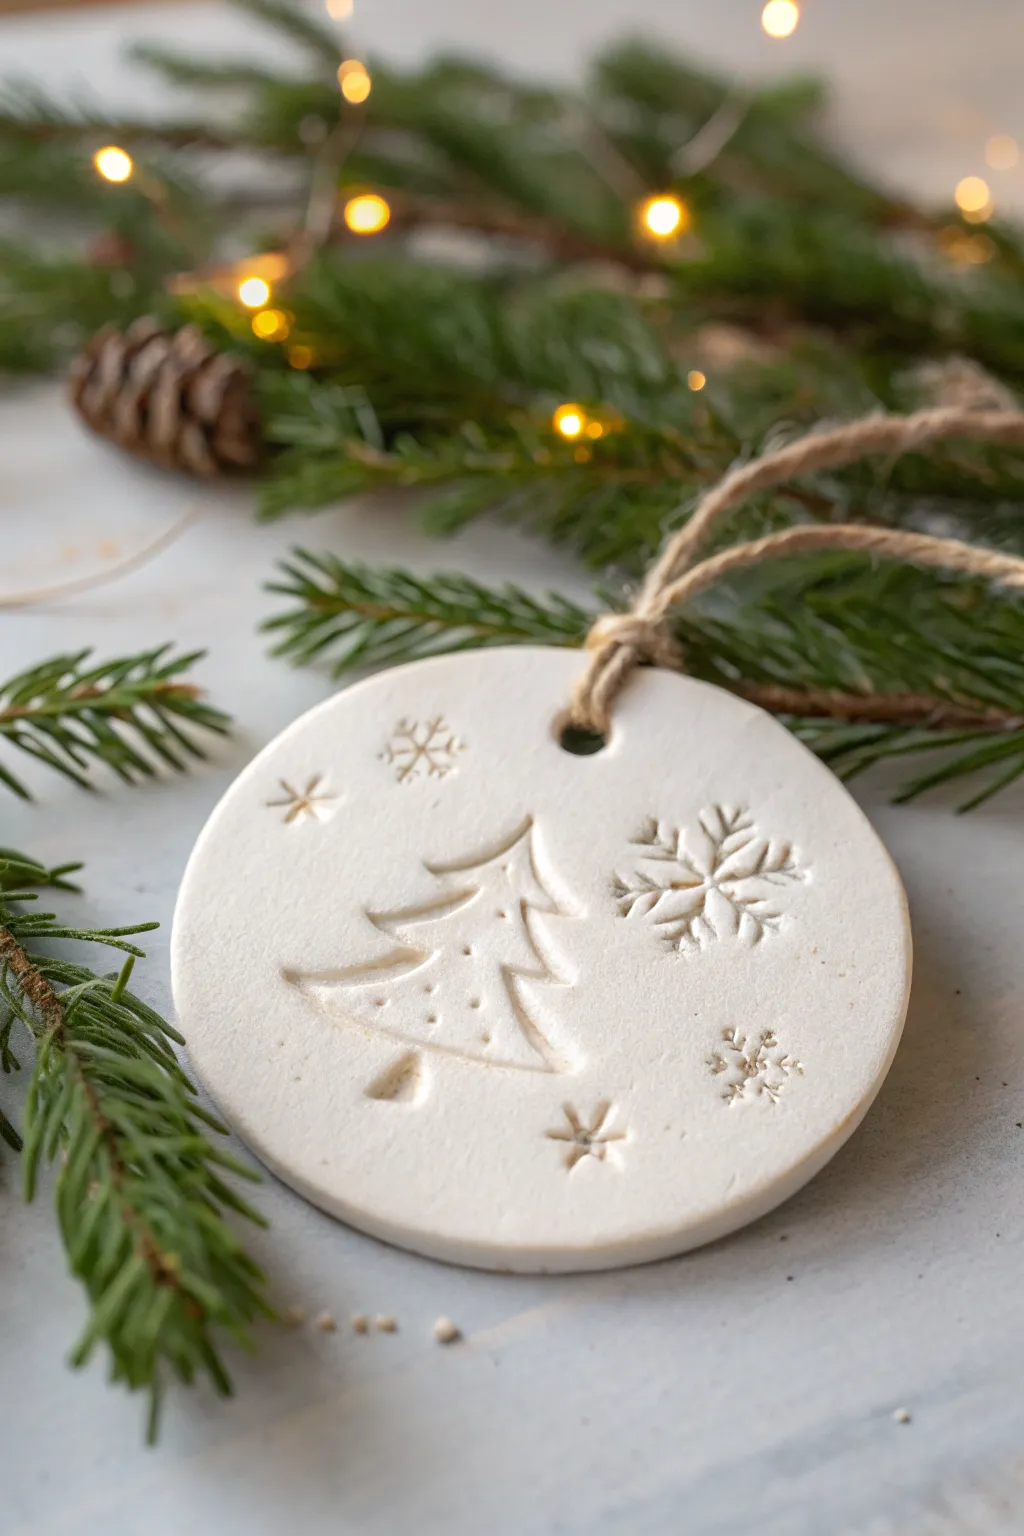
Capture the serene beauty of a winter forest with these elegant, minimalist ornaments. Using simple air-dry clay and basic stamps, you can create smooth, porcelain-like discs featuring delicate holiday motifs like evergreens and snowflakes, finished with rustic twine.
Detailed Instructions
Materials
- White air-dry clay (or polymer clay)
- Rolling pin
- Circle cookie cutter (approx. 3-inch diameter)
- Holiday stamps (Christmas tree, snowflakes of varying sizes)
- Sandpaper (fine-grit)
- Straw or cocktail stick for creating holes
- Jute twine or clear fishing line
- Wax paper or craft mat
- Small bowl of water
- Sponge
Step 1: Preparation and Rolling
-
Condition the Clay:
Begin by taking a handful of white air-dry clay. Knead it in your hands for a few minutes to warm it up and ensure there are no air bubbles trapped inside. The clay should feel soft and pliable, like fresh dough. -
Set Up Your Surface:
Lay down a piece of wax paper or a dedicated craft mat. This prevents sticking and makes it easier to lift the delicate shapes later without distorting them. -
Roll It Out:
Using a rolling pin, flatten the clay to an even thickness. Aim for about 1/4 inch (6mm) thick. Avoid rolling it too thin, as this makes the ornament fragile and prone to cracking as it dries. -
Smooth the Surface:
inspect the surface for any lint or fingerprints. If you see imperfections, dip your finger slightly in water and gently glide it over the clay to smooth it out perfectly before cutting.
Stamp Clarity Tip
If your stamps stick to the clay, dust them lightly with cornstarch or baby powder before pressing. Brush away excess powder after the clay dries.
Step 2: Cutting and Stamping
-
Cut the Circles:
Press your circle cookie cutter straight down into the rolled clay. Twist slightly to ensure a clean cut, then lift the cutter. Carefully peel away the excess clay from around the circle. -
Smooth the Edges:
Dip your finger in water again and run it gently around the circumference of the clay disc to soften the sharp edge left by the cutter. This gives a more professional, finished look. -
Plan Your Design:
Before pressing, hover your stamps over the clay to verify spacing. For this specific look, you want a central Christmas tree flanked by a large snowflake on the right and smaller stars or flakes scattered around. -
Stamp the Centerpiece:
Press the Christmas tree stamp into the center-left area of the disc. Apply firm, even pressure to get a crisp impression, but don’t push all the way through the clay. -
Add Secondary Motifs:
Take a medium-sized snowflake stamp and press it to the right of the tree. I always like to angle the stamp slightly so the snowflakes look like they are dancing rather than lined up in a grid. -
Fill the Gaps:
Using a tiny star or mini-snowflake stamp, fill in the empty negative space above and below the main tree design. These tiny details help balance the composition. -
Create the Hanging Hole:
Use a straw or a cocktail stick to punch a hole near the top edge of the ornament. Ensure the hole is centered above the design and not too close to the edge to prevent tearing.
Step 3: Drying and Finishing
-
Initial Drying:
Transfer the disc carefully to a drying rack. Leave it to dry for 24-48 hours. Turn the ornament over halfway through the drying time to prevent the edges from curling upward. -
Check for Dryness:
The clay is ready when it is completely white (no grey spots) and feels room temperature to the touch rather than cool. -
Sand Imperfections:
Once fully cured, use fine-grit sandpaper to buff away any rough spots on the rim or backing. Be very gentle to avoid scratching the smooth surface. -
Dust Off:
Wipe the ornament with a dry, soft cloth or brush to remove any clay dust from the sanding process. -
Add the Hanger:
Cut a length of jute twine about 8 inches long. Fold it in half, push the loop through the hole from front to back, and pull the tails through the loop to secure it with a lark’s head knot.
Make It Sparkle
After the clay dries completely, apply a thin layer of matte varnish and sprinkle subtle white glitter into the indented stamped areas for a snowy effect.
Hang your new creation on a branch near some lights to highlight the beautiful texture of the stamped impressions


Personalized Name-and-Year Keepsake Ornaments
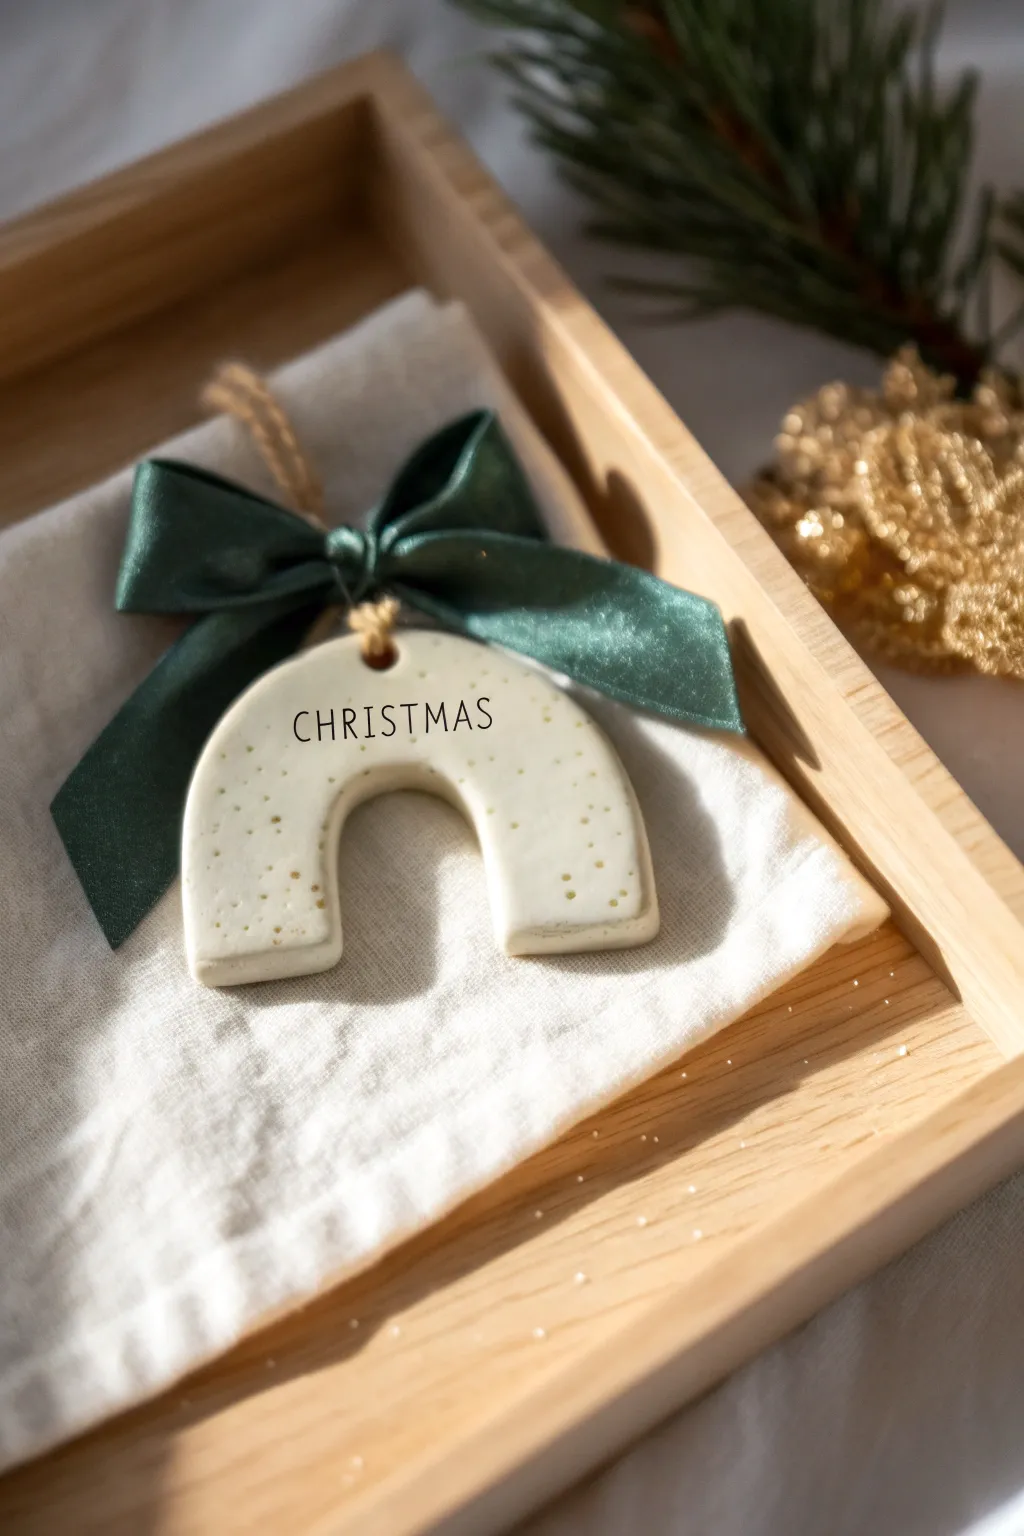
This minimalist arch ornament combines a trendy rainbow shape with classic holiday elegance. Its creamy ceramic look, subtle gold speckles, and deep green satin ribbon make it a sophisticated keepsake for your tree.
Step-by-Step
Materials
- White polymer clay (approx. 2oz)
- Acrylic rolling pin
- U-shaped or arch clay cutter (approx. 2.5 inches)
- Small circle cutter or straw (for the hole)
- Gold glitter or gold leaf flakes (fine)
- Alphabet stamp set (small serif font)
- Black acrylic paint
- Cotton swab or paper towel
- Oven and baking sheet
- Parchment paper
- Sandpaper (fine grit, 400-600)
- Gloss glaze (optional)
- Dark green satin ribbon (1 inch wide)
- Twine or gold string
Step 1: Preparing the Clay Base
-
Condition the clay:
Start by kneading the white polymer clay in your hands until it becomes soft, pliable, and warm. This prevents cracking later on. -
Add the sparkle:
Flatten the clay slightly and sprinkle a small pinch of fine gold glitter or gold leaf flakes into the center. Fold the clay over and knead again to distribute the gold evenly throughout the mixture. -
Roll it out:
Place the clay on a clean, flat surface or cutting mat. Use your acrylic rolling pin to roll it out to an even thickness of about 1/4 inch (6mm). Avoid rolling it too thin, or the ornament might be fragile. -
Cut the shape:
Using your arch-shaped cutter, press firmly into the clay. Give the cutter a tiny wiggle before lifting to ensure a clean release. -
Create the hanging hole:
Take a small circle cutter or a sturdy straw and punch a hole at the very top center of the arch. Make sure it’s not too close to the edge to prevent breaking. -
Smooth the edges:
Dip your finger in a little bit of water (or cornstarch) and gently run it along the cut edges of the clay to smooth out any roughness or sharp debris.
Fixing Smudges
If acrylic paint dries on the surface outside the letters, use a Q-tip dipped in a tiny bit of rubbing alcohol or acetone to gently rub it away without damaging the clay.
Step 2: Stamping and Baking
-
Prepare the stamps:
Arrange the letters for ‘CHRISTMAS’ (or your chosen name) on your stamp handle or holder. Test the stamp on a scrap piece of clay first to ensure the spacing and orientation are correct. -
Stamp the text:
Press the stamp gently but firmly into the center of the arch. You want a distinct impression, but don’t press so hard that you deform the overall shape of the ornament. -
Bake the ornament:
Transfer the clay shape to a baking sheet lined with parchment paper. Bake according to your specific clay brand’s package instructions—usually around 275°F (135°C) for 15–30 minutes. -
Cool down:
Once baked, remove the tray from the oven and let the ornament cool completely. It will harden fully as it cools.
Go Botanical
Before baking, press a sprig of rosemary or pine needle into the clay surface. Remove it to leave a botanical impression, then paint the impression green after baking.
Step 3: Finishing Touches
-
Sand imperfections:
If there are any rough spots on the edges after baking, lightly sand them securely with wet sandpaper for a polished feel. -
Darken the letters:
Squeeze a tiny dot of black acrylic paint onto the stamped impression. Use a brush to work the paint into the grooves of the letters. -
Wipe away excess:
Immediately take a damp paper towel or cotton swab and wipe across the surface. The paint will stay inside the stamped letters while wiping clean from the raised surface. -
Add glaze (optional):
If you prefer a glossy ceramic look over a matte finish, apply a thin layer of gloss glaze and let it dry completely. -
Tie the bow:
Cut a length of dark green satin ribbon. Tie it directly through the hole, or for a neater look, tie a perfect bow separately. -
Attach the hanger:
Thread a piece of twine or gold string through the hole (behind the bow if you attached one) and knot it to create the hanging loop.
Hang your beautiful new ornament on the tree or wrap it up as a thoughtful handmade gift this season


Classic Clay Snowflake Ornaments With Cutouts

Capture the stillness of winter with this thick, matte clay snowflake ornament that emphasizes simple shapes and natural textures. The unpainted white clay offers a clean Scandinavian aesthetic, while the rustic twine hanger keeps it grounded and cozy.
How-To Guide
Materials
- White creative air-dry clay (or polymer clay)
- Rolling pin
- Parchment paper or silicone mat
- Large snowflake cookie cutter (approx. 3-4 inches)
- Small straw or round piping tip (for cutouts)
- Fine-grit sandpaper (220-400 grit)
- Jute twine
- Small bowl of water
- Toothpick (optional, for edge clean-up)
Step 1: Preparation and Rolling
-
Prepare your surface:
Lay down a sheet of parchment paper or a silicone mat on a flat, stable work surface. This prevents the clay from sticking and ensures the back of your ornament remains smooth. -
Condition the clay:
Take a generous handful of white air-dry clay and knead it in your hands for a minute until it feels pliable and warm, removing any air bubbles. -
Roll out the slab:
Place the clay ball onto your parchment paper and use the rolling pin to flatten it. Aim for a thickness of about 1/4 inch (6mm). You want these ornaments to be chunky and substantial, not fragile wafers. -
Check for smoothness:
Examine the surface of the clay slab. If you see creases or cracks, dip your finger in a tiny bit of water and gently smooth them out before cutting.
Cracking Up?
If small hairline cracks appear while drying, don’t panic. Mix a tiny bit of fresh clay with water to make a paste (slip) and fill the crack, then smooth it over with your finger.
Step 2: Cutting and Detailing
-
Cut the snowflake shape:
Press your snowflake cookie cutter firmly into the clay. Wiggle it ever so slightly to ensure the edges separate cleanly, then lift the cutter. Peel away the excess clay around the shape first before moving the snowflake. -
Smooth the edges:
Dip your finger in water again and run it along the cut edges of the snowflake to soften any sharp ridges left by the cutter. This makes the final product look much more professional. -
Create the hanging hole:
Using a straw or a small round tool, punch a hole in the top point of the snowflake for the twine. Make sure it’s not too close to the edge to prevent breakage later. -
Add decorative cutouts:
To mimic the design in the photo, use a small straw or a small round piping tip to press six holes into the center body of the snowflake in a hexagonal pattern. Press all the way through and remove the clay plugs.
Step 3: Drying and Finishing
-
Let it dry:
Place the parchment paper with the snowflake on a flat drying rack or board. Let it sit undisturbed. I usually flip the ornament over gently after about 12 hours to ensure the bottom dries evenly. -
Wait for full curing:
Allow the snowflake to dry completely for at least 24-48 hours. The clay will turn from a cool grey-white to a bright, bone-white color when fully dry. -
Sand imperfections:
Once fully hard, take your fine-grit sandpaper and very gently buff the edges and surface. This removes any fingerprints or roughness, giving it that soft, matte ceramic look. -
Wipe clean:
Use a dry cloth or soft brush to whisk away the clay dust left from sanding. -
Cut the twine:
Cut a length of natural jute twine, approximately 8-10 inches long. -
thread the hanger:
Fold the twine in half to create a loop. Push the folded end through the hole at the top of the snowflake from front to back. -
Secure the loop:
Pull the two loose tails of the twine through the loop you just pushed through the hole and pull tight to create a lark’s head knot. -
Knot the ends:
Tie the two loose ends of the twine together in a simple overhand knot to close the hanger loop.
Clean Cuts Every Time
If your clay sticks inside the straw when making the decorative holes, dip the tip of the straw into cornstarch or baby powder before pressing it into the wet clay.
Hang your finished snowflake on the tree to add a touch of handmade calm to your holiday decor


Mini Wreath Ornaments With Holly and Berries
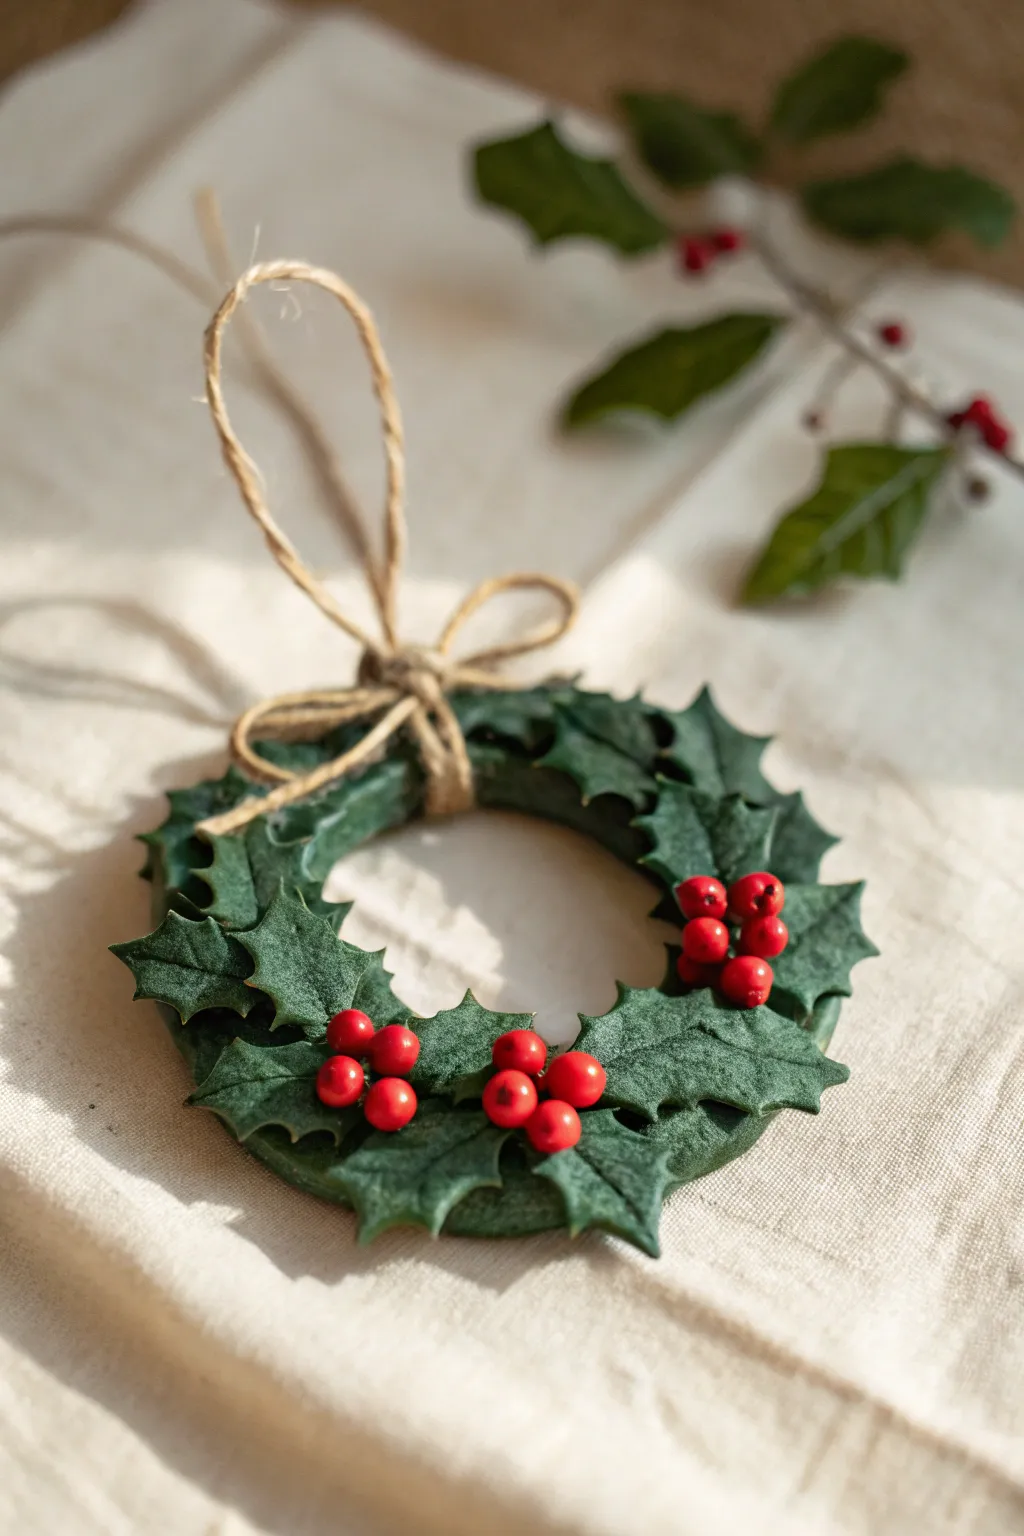
Capture the essence of traditional holiday greenery with these miniature clay wreath ornaments. Featuring textured holly leaves and bright red berries, they add a rustic, handcrafted touch to any Christmas tree.
Step-by-Step
Materials
- Green polymer clay
- Red polymer clay
- Small circle cutter (approx. 2-3 inches)
- Smallest leaf cutter (or X-Acto knife)
- Needle tool or toothpick
- Jute twine
- Rolling pin or pasta machine
- Liquid clay adhesive (optional)
- Gloss varnish (optional)
- Baking sheet and parchment paper
- Cardstock or foil (for structure)
Step 1: Forming the Base
-
Condition the clay:
Start by kneading the green polymer clay until it is soft and pliable. This prevents cracking later on. -
Roll out the base:
Roll a portion of the green clay into a flat sheet, about 1/4 inch thick. -
Cut the ring shape:
Using your circle cutters, cut out a large circle, then cut a smaller circle from the center to create a donut-shaped ring. This is your wreath base. -
Smooth the edges:
Gently run your finger around the cut edges of the ring to soften any sharp corners.
Step 2: Creating the Foliage
-
Roll clay for leaves:
Roll out another sheet of green clay, slightly thinner than your base. -
Cut holly shapes:
Use a mini holly leaf cutter to punch out numerous leaves. If you don’t have a cutter, use a craft knife or needle tool to freehand cut jagged leaf shapes. -
Texture the leaves:
Using a needle tool, gently score a central vein down each leaf. You can add faint side veins for extra realism. -
Apply the first layer:
Press leaves onto the clay ring base. Overlap them slightly so the base is mostly hidden, arranging them to point in a uniform circular direction. -
Add dimension:
I like to gently curl the tips of a few random leaves upward to make the wreath look fuller and less flat.
Pro Tip: Leaf Texture
Before cutting your leaves, gently press a piece of sandpaper or scouring pad onto the clay sheet. This gives the smooth clay a subtle, organic texture.
Step 3: Adding Berries & Details
-
Make the berries:
Roll tiny bits of red clay into small spheres. Try to vary the sizes slightly for a natural look. -
Group the berries:
Press the red spheres onto the leaves in clusters of three. A drop of liquid clay adhesive helps secure them if the green clay has started to firm up. -
Add berry details:
Using the very tip of a needle tool, poke a tiny dot into the center or side of each red berry to mimic real fruit. -
Create a hanging hole:
Carefully poke a hole through the top of the wreath ring (between leaves) large enough for your twine to pass through.
Level Up: Frosty Effect
Before baking, lightly dust the tips of the holly leaves with white mica powder or white pastel chalk shavings to create a beautiful winter frost look.
Step 4: Finishing Touches
-
Bake the ornament:
Place the wreath on a parchment-lined baking sheet and bake according to your clay package instructions (usually around 275°F/135°C for 15-30 minutes). -
Cool slightly:
Allow the wreath to cool completely on a flat surface before handling to ensure it hardens fully. -
Varnish (Optional):
If you want a shiny finish, brush a light coat of gloss varnish over the leaves and berries. -
Attach the twine:
Cut a length of jute twine. Thread it through the hole created earlier. -
Add a bow:
Tie the twine into a hanging loop, and tie a separate small bow at the base of the loop, right against the wreath, to complete the rustic look.
Hang your finished wreath on the tree and enjoy the miniature festive cheer it brings to your home

The Complete Guide to Pottery Troubleshooting
Uncover the most common ceramic mistakes—from cracking clay to failed glazes—and learn how to fix them fast.
Gingerbread Cookie Ornaments With Icing Details

Create the warmth of holiday baking without ever turning on the oven. These polymer clay gingerbread men look so realistic with their warm brown dough tone and crisp white “icing” that you’ll be tempted to take a bite.
Step-by-Step Tutorial
Materials
- Polymer clay (gingerbread/terracotta brown)
- White liquid polymer clay (or white 3D puffy paint)
- Gingerbread man cookie cutter
- Rolling pin
- Parchment paper or clay mat
- Needle tool or toothpick
- Jute twine
- Sandpaper (optional)
- Fine-tip applicator bottle (if using liquid clay)
Step 1: Shaping the Dough
-
Condition the clay:
Start by warming the brown polymer clay in your hands. Knead and fold it repeatedly until it is soft, pliable, and free of cracks. -
Roll it out:
Place the clay on your mat or parchment paper. Use the rolling pin to flatten it into an even sheet, aiming for about 1/4 inch thickness to mimic a real cookie. -
Texture the surface:
To get that baked-good texture, I like to gently press a clean piece of sandpaper or a toothbrush onto the surface of the clay locally before cutting. It removes that artificial plastic shine. -
Cut the shape:
Press your gingerbread man cookie cutter firmly into the clay. Give it a little wiggle to ensure clean edges, then lift the cutter straight up. -
Smooth the edges:
Carefully remove the excess clay. Run your fingertip gently along the cut edges of your ornament to smooth down any rough clay burrs left by the cutter. -
Make the hole:
Use a needle tool or the blunt end of a skewer to pierce a hole at the very top of the head. Make sure the hole is wide enough to accommodate your jute twine later.
Realism Trick
Mix a tiny pinch of translucent clay into your brown clay before rolling. This adds depth and makes the ‘cookie’ look less opaque and more like real baked dough.
Step 2: Baking and Decorating
-
Bake the base:
Transfer the clay cutout to a baking sheet lined with parchment paper. Bake according to your specific brand of polymer clay’s instructions (usually around 275°F/135°C for 15-30 minutes). Let it cool completely. -
Prepare the icing:
Fill a fine-tip applicator bottle with white liquid polymer clay. If you don’t have liquid clay, white 3D fabric paint works wonderfully as a substitute and doesn’t require a second bake. -
Pipe the face:
Start with the face. Carefully squeeze two small dots for eyes and pipe a thin, curved line for a smile. The liquid clay should stand up slightly, just like royal icing. -
Pipe the buttons:
Move to the torso and pipe three vertically aligned dots down the center for the buttons. Keep them evenly spaced. -
Outline the cuffs:
Choose an arm or leg to start detailing. Pipe a straight line across the wrist or ankle area. -
Add detail dots:
Along that straight cuff line, pipe small, evenly spaced dots on either the top or bottom side (or both) to create a decorative border pattern. -
Finish the limbs:
Repeat the line-and-dot pattern on the remaining three limbs so the gingerbread man has matching cuffs on his hands and feet. -
Final cure (if using clay):
If you used liquid polymer clay for the icing, carefully place the ornament back in the oven for about 10-15 minutes to set the white details. If using paint, simply let it air dry overnight. -
String it up:
Once fully cooled and set, cut a length of jute twine. Thread it through the hole in the head and tie a simple knot to create a rustic hanging loop.
Scented Surprise
Knead a generous sprinkle of real cinnamon and nutmeg directly into the polymer clay. The ornament will hold a subtle, spicy holiday scent for years.
Hang your new creation on the tree and enjoy the cozy charm of gingerbread that handles year after year
Candy Cane Twist Charms in Red and White
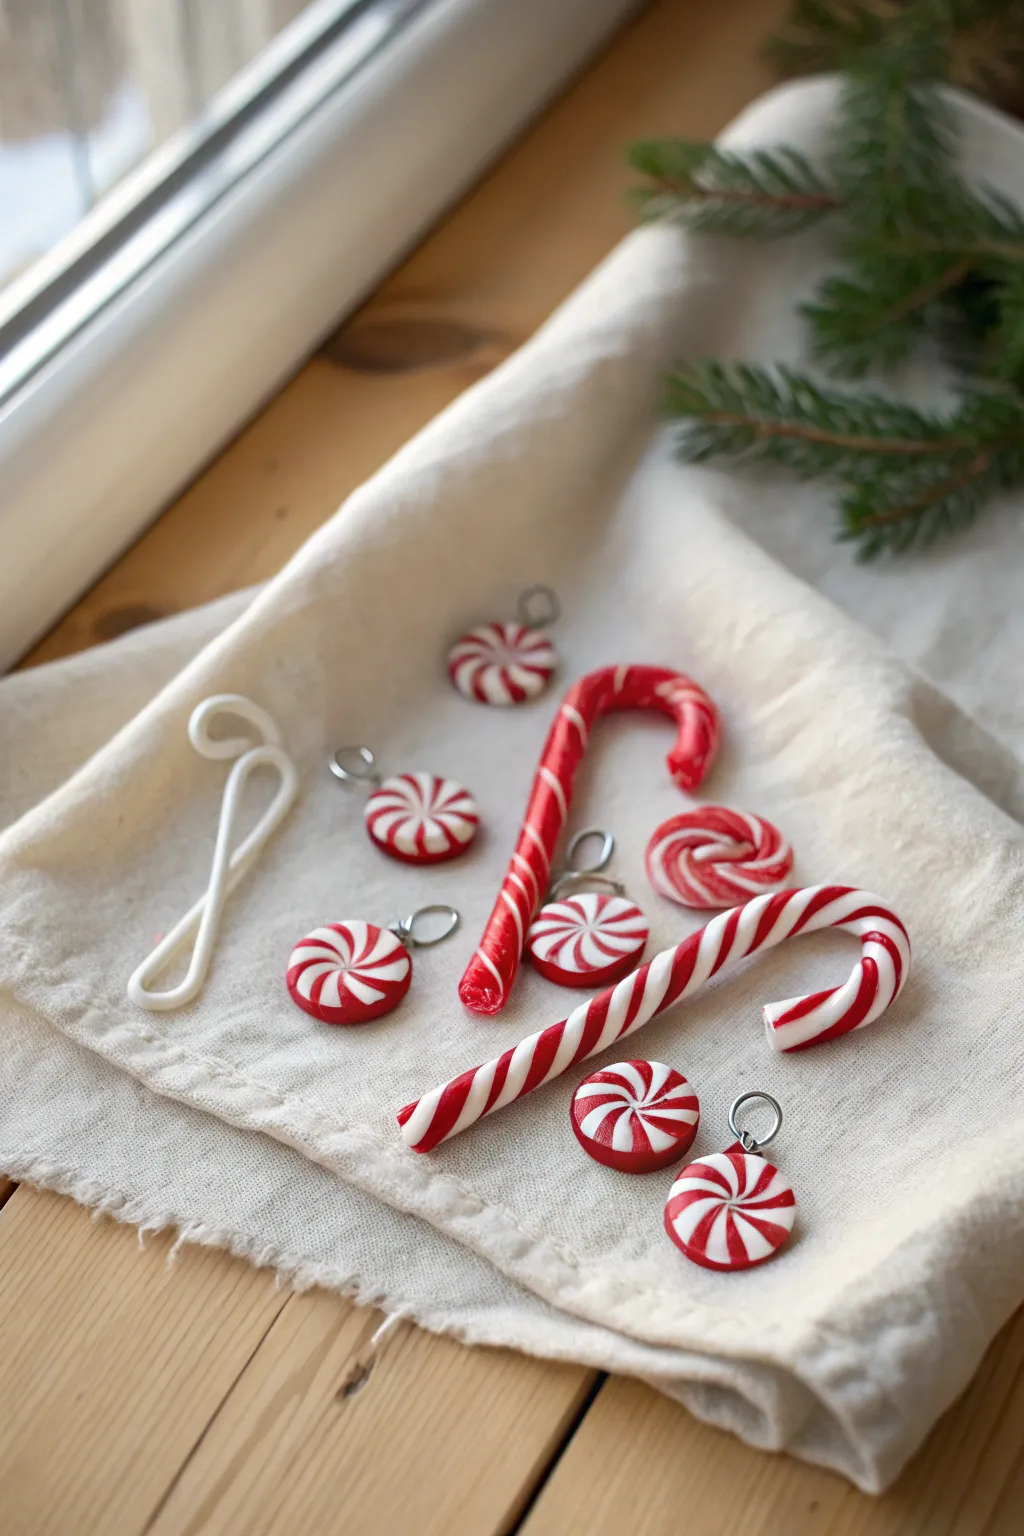
Capture the classic sweetness of the holidays with these glossy red and white polymer clay creations. This project features traditional twisted candy canes and matching peppermint swirls that look good enough to eat but are designed to last for seasons to come.
How-To Guide
Materials
- Red polymer clay
- White polymer clay
- Gloss glaze or polyurethane varnish
- Small paintbrush
- Silver eye pins or jump rings
- Needle tool or toothpick
- Clean rolling surface (ceramic tile or acrylic sheet)
- Blade or craft knife
- Oven for baking
Step 1: Prepping the Cane
-
Condition the clay:
Begin by working the red and white clay separately in your hands until they are soft, pliable, and free of cracks. Ensure your hands are clean when switching to white to avoid color transfer. -
Create base logs:
Roll each color into a long, even log or snake. Aim for a thickness of about 1/4 inch (6mm) for both strands. -
Start the twist:
Place the red and white logs side-by-side, gently pressing them together without distorting their shape. Twist the two strands together carefully, working from one end to the other. -
Refine the spiral:
Once twisted, gently roll the combined log on your work surface. This smooths out the ridges and joins the colors into a seamless candy cane stripe pattern. Roll until you reach your desired thickness—usually slightly thinner than a pencil.
Clean stripes only
Wipe your hands with baby wipes or wash them thoroughly before handling the white clay. Even tiny specks of red lint will show up clearly on the white stripes.
Step 2: Shaping the Candy Canes
-
Cut to length:
Using your craft blade, cut the long twisted rope into shorter segments, approximately 3 to 4 inches long, depending on how large you want your final ornament. -
Form the hook:
Gently bend one end of a segment into a classic ‘J’ hook shape. Be careful not to smudge the stripes; light pressure is key here. -
Smooth the ends:
Tap the cut ends gently against your work surface or use your fingertip to round them off slightly so they aren’t sharp or flat.
Make them sparkly
Before baking, brush the raw clay lightly with white iridescent glitter or sanding sugar to mimic the look of real sugar coating on the candy.
Step 3: Creating Peppermint Swirls
-
Roll a tight coil:
Take a remaining section of your twisted rope and taper one end slightly by rolling it between your fingers. -
Spiral the clay:
Start curling the tapered end inward, creating a flat spiral snail-shell shape. Keep the coil tight so there are no gaps between the layers. -
Finish the edge:
Once the peppermint is the desired size (about the size of a quarter), slice the rope at an angle and tuck the tail underneath the charm to hide the seam. -
Add hardware:
Insert a small metal eye pin into the top of the peppermint swirl or candy cane. If you prefer jump rings later, pierce a hole using a needle tool.
Step 4: Baking and Finishing
-
Bake:
Arrange your pieces on a baking sheet or tile. Bake according to your brand of clay’s specific instructions (typically 275°F/135°C for 15-30 minutes). -
Cool down:
Let the pieces cool completely in the oven or on the counter. The clay hardens fully as it cools. -
Apply gloss:
Using a soft brush, apply a coat of gloss glaze to the cooled charms. This gives them that realistic, hard-candy shine. -
Secure hardware:
I like to add a tiny drop of super glue to the eye pin shaft before re-inserting it if it feels loose after baking, or attach your jump rings now.
Hang these sweet treats on a miniature tree or attach them to gifts for a handmade holiday touch


What Really Happens Inside the Kiln
Learn how time and temperature work together inside the kiln to transform clay into durable ceramic.
Stocking Ornaments With Fluffy-Look Cuffs
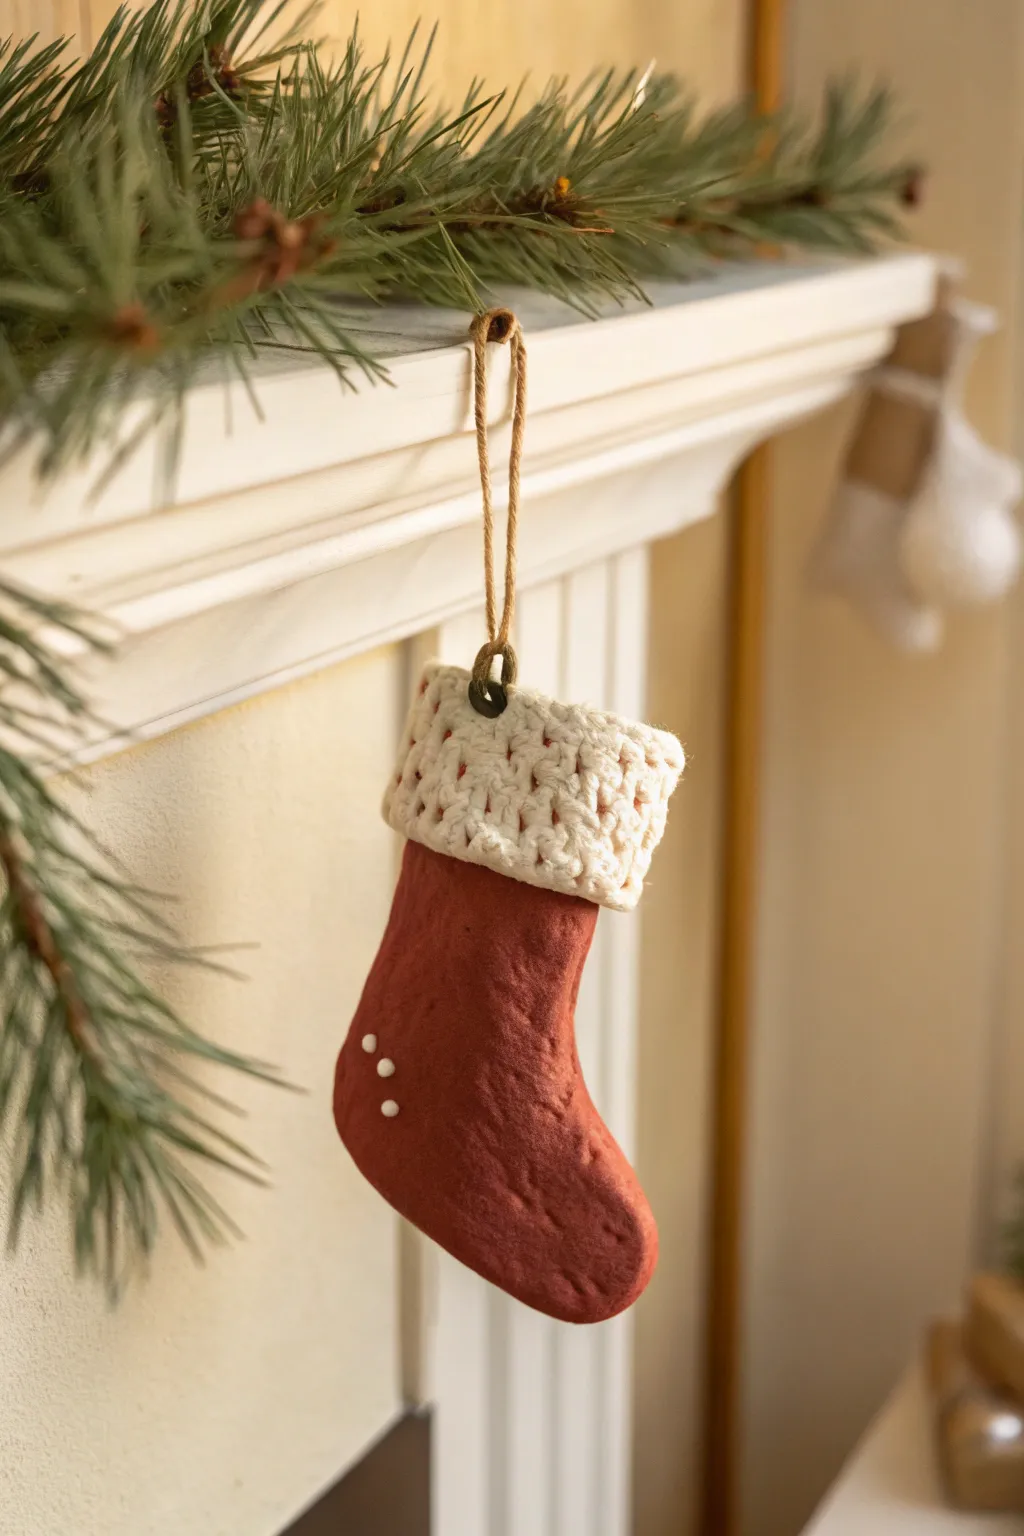
Capture the cozy charm of a woolen stocking in durable clay form with this clever ornament project. By combining textured terracotta-colored clay with a faux-knit cuff technique, you’ll create a rustic decoration that looks soft to the touch but lasts for years.
Step-by-Step Guide
Materials
- Terracotta-colored polymer clay (or air-dry clay painted terracotta)
- White or cream polymer clay
- Rolling pin or acrylic roller
- Stocking cookie cutter (or craft knife and paper template)
- Extruder tool with small round disc (optional but helpful)
- Needle tool or toothpick
- Small metal loop or eye pin
- Jute twine
- Liquid clay (TLS) or strong craft glue
- White puff paint (dimensional fabric paint)
- Texturing sponge or rough fabric piece
- Baking sheet and parchment paper (if using polymer clay)
Step 1: Shaping the Stocking Base
-
Condition the Clay:
Begin by conditioning your terracotta-colored clay until it is soft and pliable. If you are using white clay to paint later, condition that instead. Warm hands help this process go faster. -
Roll the Sheet:
Roll the clay out onto a smooth surface to a thickness of about 1/4 inch. You want enough thickness to create a substantial ornament that won’t crack easily. -
Cut the Shape:
Press your stocking cookie cutter firmly into the clay. If freehanding, lay your paper template on the clay and carefully trace around it with a craft knife. -
Smooth the Edges:
Gently run your finger along the cut edges of the stocking to soften any sharp angles left by the cutter or knife. -
Add Texture:
To mimic the look of felt or worn fabric shown in the photo, gently press a texturing sponge or a piece of rough denim onto the clay surface. Don’t press hard enough to distort the shape, just enough to matte the finish. -
Insert the Hanger:
Push a small metal loop or eye pin into the top center of the stocking shape. If the clay distorts, smooth it back down around the metal to secure it.
Cuff Not Sticking?
If the white cuff won’t adhere to the base, use ‘Needle Tool Scoring.’ Scratch cross-hatch lines on both joining surfaces and add a drop of liquid clay for a permanent bond.
Step 2: Creating the Faux-Knit Cuff
-
Prepare White Clay:
Condition your white or cream clay. This needs to be very soft as we will be creating thin strands. -
Create Strands:
Using a clay extruder helps create even snakes of clay. If you don’t have one, roll small snakes of clay by hand, keeping them as uniform in thickness as possible. -
Twist the Snakes:
Take two clay strands and twist them together tightly to look like a piece of yarn. Repeat this to make a second twisted pair. -
Form the Knit V-Shape:
Lay the two twisted strands side-by-side so the twists mirror each other, creating a series of ‘V’ shapes running down the center. This is the classic knit stich look. -
Build the Cuff Panel:
Make enough of these faux-knit strips to cover the width of your stocking cuff. I find it easier to assemble these strips on the work surface first, slightly pressing them together to form a rectangle. -
Attach the Cuff:
Apply a thin layer of liquid clay or score the top of the stocking base. Gently lift your faux-knit rectangle and press it onto the top of the stocking, wrapping the edges around to the back for a clean finish. -
Trim Excess:
Use your blade to carefully trim any white clay that hangs too far off the sides, ensuring the cuff looks snug.
Step 3: Finishing Touches
-
Add Decorative Buttons:
Using the white puff paint (or tiny balls of white clay flattened slightly), create three small dots in a diagonal line near the heel of the stocking. -
Bake or Dry:
Follow the manufacturer instructions for your specific clay. For polymer clay, shape the stocking slightly on the baking sheet if you want a wavy, organic look before baking. -
Cool Down:
Let the ornament cool completely before handling. It will be fragile while warm. -
Attach the Twine:
Cut a length of jute twine. Thread it through the metal loop at the top. -
Tie the Knot:
Tie a secure knot at the ends of the twine to create a rustic hanging loop, trimming any excess fray.
Create Realistic Texture
For an ultra-realistic knit look, gently press a piece of real sweater fabric onto your white clay cuff before baking to imprint distinct fabric fibers into the strands.
Once hung, these charming little socks bring a distinct handcrafted warmth to your holiday display
Cute Santa Face Ornaments With Simple Features
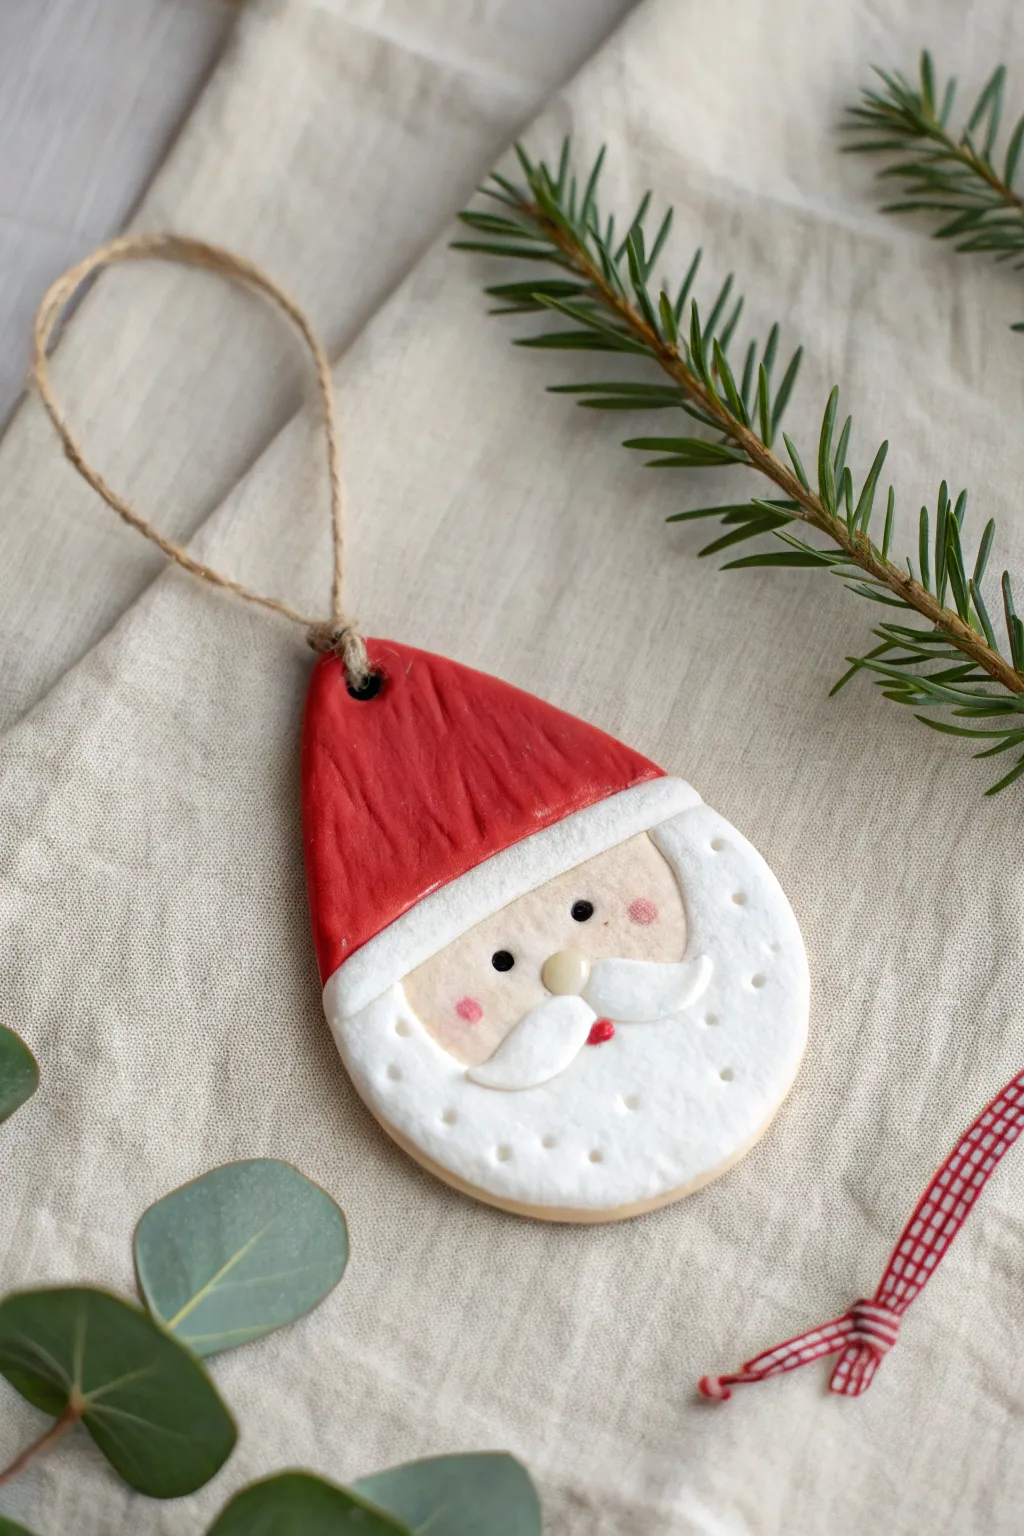
These charming Santa face ornaments feature a minimalist design with a textured red hat and a sweet, simple expression. The mix of sculpted features and painted details creates a warm, handmade feel perfect for your tree.
How-To Guide
Materials
- White air-dry clay or polymer clay
- Rolling pin
- Teardrop-shaped cookie cutter (approx. 3-4 inches tall)
- Acrylic paints (Red, Skin/Cream tone, Black, Pink)
- Small paintbrush
- Dotting tool or toothpick
- Craft knife
- Jute twine
- Rolling pin with texture (optional)
- Matte varnish or sealant
Step 1: Shaping the Base
-
Roll the clay:
Begin by conditioning your clay until it is soft and pliable, then roll it out to a uniform thickness of about 1/4 inch on a smooth surface. -
Cut the teardrop:
Use your teardrop-shaped cookie cutter to press out the main form. If you don’t have a cutter, you can hand-cut a rounded teardrop shape using a craft knife and a paper template. -
Smooth the edges:
Dip your finger in a little bit of water and gently run it along the cut edges of the clay to smooth out any roughness or sharp corners. -
Add the hanging hole:
Using the blunt end of a paintbrush or a straw, pierce a neat hole at the very top, pointed end of the teardrop for the string.
Step 2: Sculpting the Features
-
Create the hat trim:
Roll a thin snake of clay and flatten it slightly. Attach this horizontally across the teardrop, about one-third of the way down from the top point, to define the brim of Santa’s hat. -
Texture the beard:
For the bottom portion of the ornament (the beard area), use a small dotting tool or a toothpick to gently prick random dots all over the surface, stopping just below where the face will be. -
Form the mustache:
Shape two tiny, curved teardrops of clay. Press them together in the center of the face area, curling the tips slightly upward to create a handlebar mustache. -
Add the nose:
Roll a very small ball of clay and press it gently right in the center, overlapping the top of the mustache slightly. -
Dry the clay:
Allow the clay to dry completely according to your manufacturer’s instructions. For air-dry clay, turn it over halfway through the drying process to prevent warping.
Texturing Trick
Before drying, gently rub the red hat area with a piece of crumpled foil to give the ‘fabric’ a subtle, realistic texture compared to the smooth face.
Step 3: Painting and Finishing
-
Paint the hat:
Paint the top pointed section above the brim with a bold red acrylic paint. I find that applying two thin coats gives a much smoother finish than one thick one. -
Paint the face:
Mix a soft cream or beige skin tone and carefully paint the area between the hat brim and the beard line. Be careful around the mustache and nose. -
Highlight the nose:
Paint the small nose ball with the same cream color, perhaps adding a tiny bit more white to make it stand out slightly. -
Paint the whites:
Use white acrylic paint to cover the hat brim, the mustache, and the textured beard area, ensuring crisp lines where the white meets the skin tone. -
Draw the eyes:
Using the small end of a dotting tool or the back of a paintbrush dipped in black paint, stamp two small eyes just above the mustache. -
Add rosy cheeks:
Dip a dry brush or cotton swab into a tiny amount of pink paint and dab it gently onto the cheeks to create a soft blush effect. -
Detail the mouth:
Place a tiny red dot just beneath the center of the mustache to suggest a smiling mouth. -
Seal the ornament:
Once all paint is fully dry, apply a coat of matte varnish or sealant to protect the colors and give the piece a finished look. -
Attach the string:
Cut a length of jute twine, thread it through the hole at the top, and tie a secure knot to create the hanger.
Cracking Clay?
If small cracks appear as the clay dries, mix a tiny amount of fresh wet clay with water to make a paste and fill the cracks, then smooth with a damp finger.
Hang these adorable Santas on your tree or use them as personalized gift tags for special presents

TRACK YOUR CERAMIC JOURNEY
Capture glaze tests, firing details, and creative progress—all in one simple printable. Make your projects easier to repeat and improve.
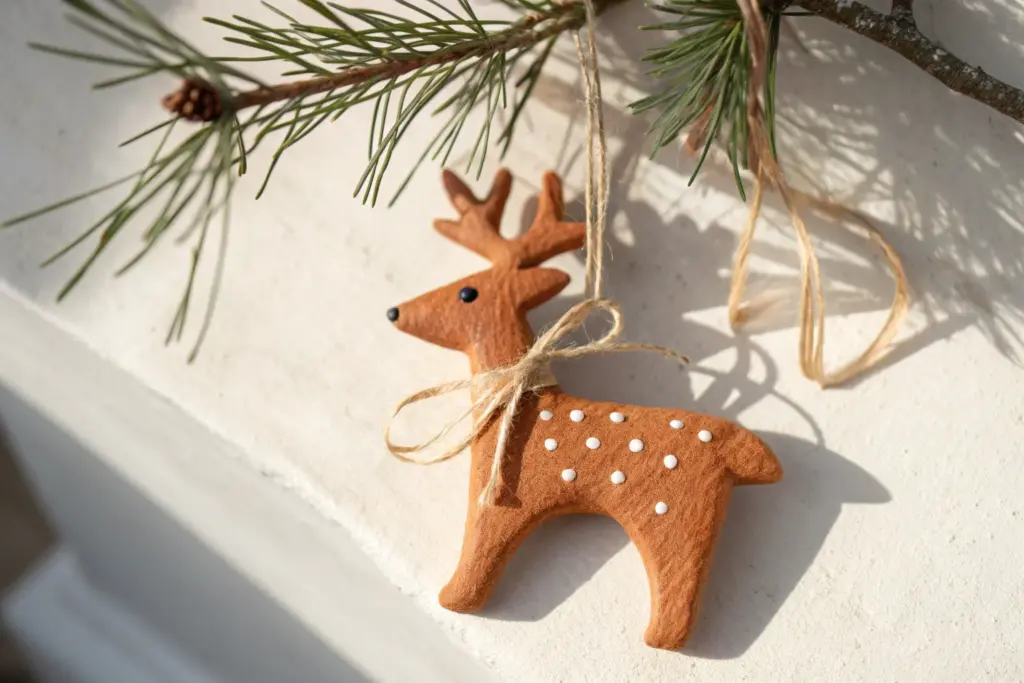
Reindeer Face Ornaments With Antlers and a Red Nose
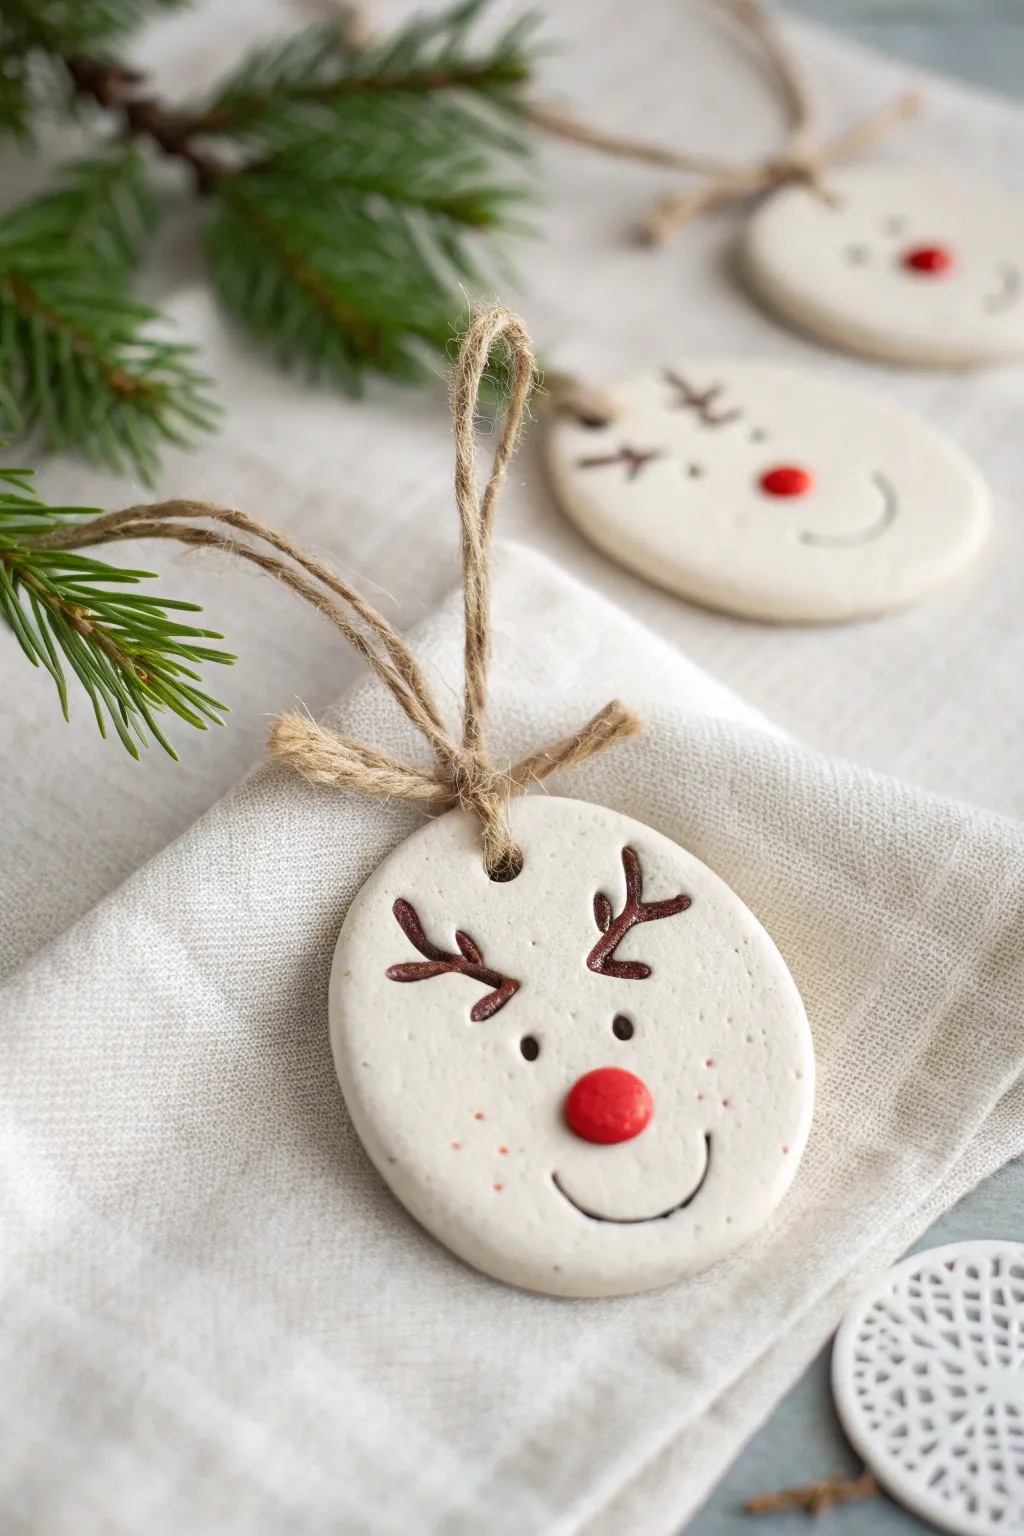
These charming reindeer ornaments capture the rustic warmth of the holidays with a simple white clay base and delightful hand-painted details. Each minimal face features a bright red nose and textured antlers, making them perfect for gift tags or trimming the tree.
Step-by-Step Tutorial
Materials
- White air-dry clay or polymer clay
- Rolling pin
- Oval cookie cutter (or a round one slightly compressed)
- Straw or cocktail stick
- Jute twine
- Fine-grit sandpaper
- Dark brown acrylic paint
- Bright red acrylic paint
- Fine detail paintbrush (size 0 or 00)
- Small dotting tool or toothpick
- Clear matte varnish (optional)
Step 1: Shaping the Clay Base
-
Prepare the workspace:
Begin by cleaning your work surface thoroughly to prevent dust or lint from sticking to the white clay. Lay down a sheet of parchment paper or a silicone mat. -
Roll the clay:
Take a handful of white clay and condition it in your hands until soft. Roll it out to an even thickness of about 1/4 inch (6mm). -
Cut the shapes:
Press your oval cutter firmly into the clay. If you don’t have an oval cutter, use a round glass or cutter and gently squeeze the sides of the clay circle to elongate it into an oval shape. -
Smooth the edges:
Dip your finger in a tiny bit of water and run it along the cut edges of each ornament to smooth out any roughness or stray bits of clay. -
Create the hanging hole:
Use a straw or cocktail stick to poke a hole near the top center of the oval. Make sure the hole is large enough for your jute twine to pass through later. -
Dry the ornaments:
Set the shapes aside to dry completely. If using air-dry clay, flip them over halfway through the drying process (usually 24-48 hours) to prevent curling. If using polymer clay, bake according to package instructions.
Fixing Cracks
Using air-dry clay? If small surface cracks appear as it dries, make a ‘slurry’ paste by mixing a tiny scrap of clay with water and smooth it into the cracks with your finger.
Step 2: Painting the Features
-
Sand imperfections:
Once fully dry or cool, check the edges one last time. I like to run a piece of fine-grit sandpaper lightly over the edges to make them perfectly smooth. -
Outline the antlers:
Load your fine detail brush with dark brown paint. Paint two antler stems starting from the forehead area, curving slightly outward. -
Add antler branches:
Add small ‘Y’ shapes or little branching lines to the main antler stems to give them a natural, twig-like appearance. -
Paint the eyes:
Using the back of your paintbrush handle or a dotting tool, dip into the brown paint and create two small dots for the eyes just below the antlers. -
Add the smile:
With the finest brush tip, paint a simple, wide ‘U’ shape for the smile. Keep the line thin and delicate for that sweet, minimalist look. -
Create the nose:
Load a slightly larger brush or dotting tool with bright red paint. Place a generous, raised dot in the center of the face for the nose. You want this to have a little texture and volume. -
Add freckles:
Using a toothpick and a tiny amount of diluted red or brown paint, add three tiny specks on each cheek for freckles. -
Seal the work:
Allow the paint to dry completely. For longevity, apply a thin coat of clear matte varnish over the front of the ornament.
Sparkle Upgrade
Before the red nose paint dries, sprinkle a tiny pinch of fine red glitter onto it. It catches the tree lights beautifully and emphasizes the ‘Rudolph’ character.
Step 3: Finishing Touches
-
Cut the twine:
Cut a length of jute twine, approximately 8-10 inches long. -
Thread the loop:
Fold the twine in half and push the looped end through the hole from front to back. -
Secure the hanger:
Thread the loose ends of the twine through the loop and pull tight to create a lark’s head knot right at the top of the ornament. -
Tie the bow:
Tie the loose ends into a simple knot at the top to create the hanging loop, or tie a small decorative bow at the base of the string near the clay for extra flair.
Now you have a herd of adorable reindeer ready to bring holiday cheer to your home
Snowman Trio Figurines With Scarves and Buttons
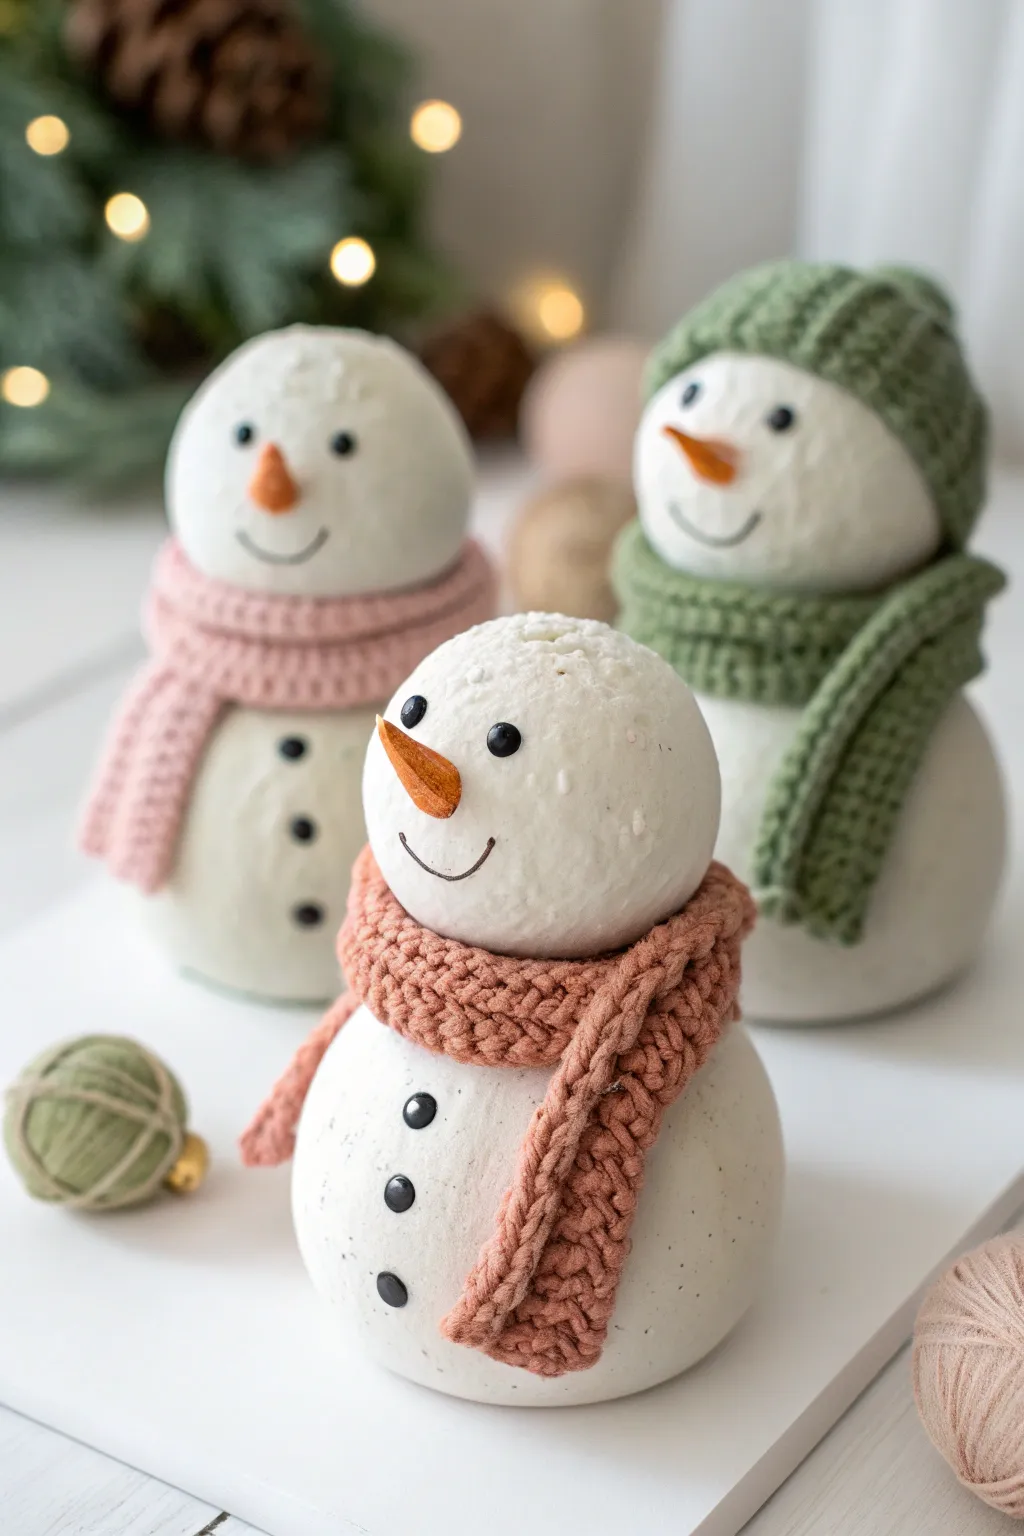
These adorable snowman figurines bring a touch of winter wonder to your holiday decor with their chunky knit scarves and sweet smiling faces. Crafted from simple air-dry clay and accented with miniature textiles, they make for a charming mantel display or a heartfelt handmade gift.
How-To Guide
Materials
- White stone-effect air-dry clay (or standard white polymer clay)
- Small amount of orange polymer clay
- Tiny black beads or seed beads (for eyes and buttons)
- Textured sponge or toothbrush
- Needle tool or toothpick
- Super glue or strong craft glue
- Aluminum foil (for armature)
- Miniature knitted fabric scraps (pink, brown, green) or yarn
- Scissors and needle/thread (optional)
Step 1: Sculpting the Bodies
-
Create the base cores:
To save clay and keep the figurines lightweight, crumple three small balls of aluminum foil. Two should be about the size of a golf ball (for the bodies) and one slightly smaller. -
Cover the bodies:
Take a portion of white clay and roll it into a flat sheet about 1/4 inch thick. Wrap this around your foil balls, smoothing the seams completely so the foil is hidden. -
Form the heads:
Repeat the foil and clay wrapping process for three smaller head spheres. They should be proportionate to the bodies, like a large marshmallow sitting on a tangerine. -
Add texture:
Before assembling, take a textured sponge or an old toothbrush and gently dab the surface of all your clay spheres. This gives them that mimic-snow, stone-like finish seen in the photo rather than a shiny plastic look. -
Assemble the snowmen:
Gently press a head sphere onto a body sphere. If the clay is still wet, score both contact points with a needle tool and add a dab of water or liquid clay to bond them securely. -
Flatten the bases:
Press the bottom of each assembled snowman firmly onto your work surface to create a flat bottom so they stand up without wobbling.
Texture Trick
Mix baking soda into your white paint if you’re painting them later. It creates a gritty, powdery texture perfect for fake snow.
Step 2: Adding Charming Details
-
Sculpt the carrot noses:
Roll tiny pieces of orange clay into cone shapes. Keep them quite small and pointy. You can use a needle tool to add tiny texture lines to mimic a real carrot. -
Attach the noses:
Press the carrot nose into the center of the face. Using a tiny dot of glue here ensures it won’t pop off later once everything dries. -
Place the eyes:
Press two small black beads into the clay above the nose for eyes. Push them in deep enough so they look embedded, not just resting on the surface. -
Add the buttons:
Press three black beads vertically down the front of the body sphere to create the classic coal buttons. -
Create the smile:
Use a needle tool or a curved piece of wire to impress a simple, thin smile line directly into the clay under the nose. -
Let them dry:
Allow your clay figures to dry completely according to the package instructions. I find waiting a full 24 hours is best to prevent cracks.
Step 3: Cozy Accessories
-
Source the scarves:
You can cut strips from an old sweater or sock, or if you know how to knit, create simple garter stitch strips about 6 inches long and 0.5 inches wide. -
Tie the scarves:
Wrap a fabric strip around the neck of each snowman. Tie a simple overhand knot so one end hangs down longer than the other. -
Secure the fabric:
Arrange the scarf so it looks natural and cozy. Place a tiny drop of glue under the knot and at the back of the neck to hold the fabric in place permanently. -
Make the green hat:
For the green snowman, use a wider piece of knitted fabric. Wrap it around the head to measure, cut to size, and glue the back seam. -
Finish the hat:
Gather the top of the fabric tube and tie it off with a matching piece of yarn, then enhance the cuff by folding the bottom edge up.
Cracked Clay?
If small cracks appear during drying, create a slip by mixing a little clay with water and smooth the paste into the cracks with your finger.
Now you have a trio of chilly friends ready to warm up your shelf for the season
Mini Christmas Tree Cone Sculptures With Tiny “Lights”
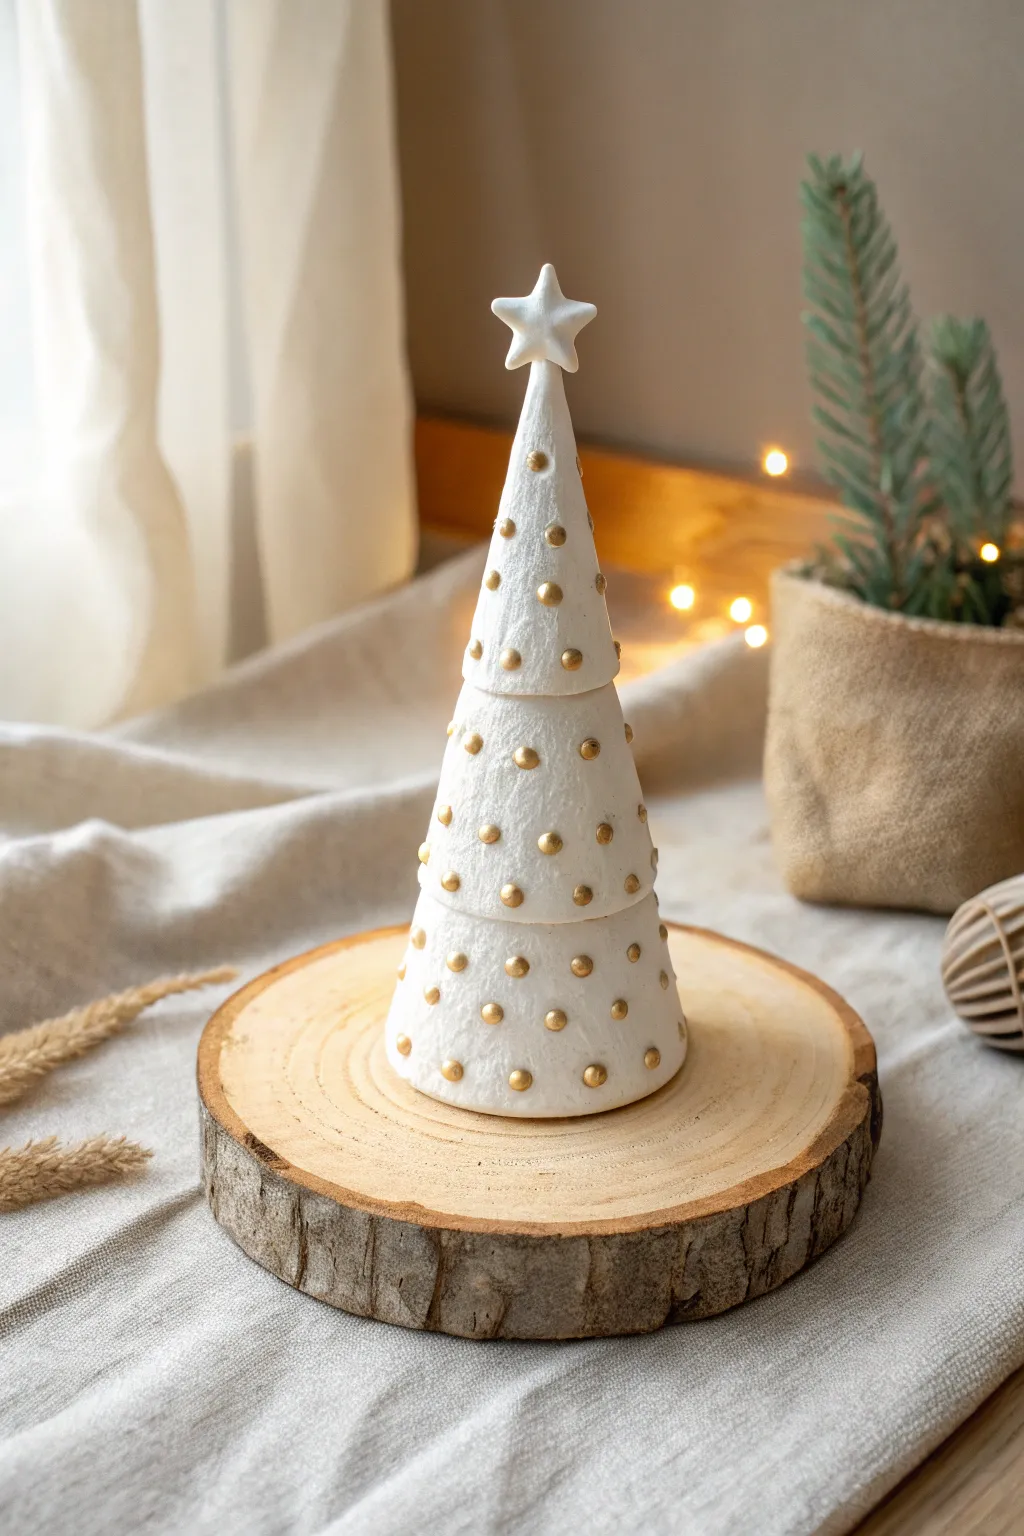
Bring a touch of minimalist elegance to your holiday display with this stacked white clay Christmas tree. Featuring three distinct tiers and charming gold bead accents, this sculpture mimics the look of high-end ceramic decor for a fraction of the cost.
Step-by-Step Tutorial
Materials
- Air-dry clay (white)
- Small rolling pin
- Cone form template (cardstock or paper)
- Scissors or craft knife
- Small bowl of water
- Wooden skewer or toothpick
- Sandpaper (fine grit)
- White acrylic paint (matte)
- Gold metallic paint (or liquid gold leaf)
- Fine detail paintbrush
- Gloss varnish (optional)
Step 1: Forming the Cones
-
Prepare your template:
Create three semi-circle templates from cardstock in graduating sizes (small, medium, and large). These will form the three tiers of your tree, so ensure the arc lengths correspond to how wide you want each section to be. -
Roll the clay:
Take a portion of air-dry clay and condition it by kneading until smooth. Roll it out on a flat surface to an even thickness of about 1/4 inch. -
Cut the shapes:
Place your cardstock templates onto the rolled clay slab. Use a craft knife to carefully trace around them, cutting out three separate clay semi-circles. -
Shape the tiers:
Take the largest piece and gently curve it into a cone shape. Dampen your finger with water and score the joining edges before pressing them together to create a seam. Smooth the seam with your finger until it is invisible. -
Repeat for all layers:
Form the medium and small cones using the same method. You should now have three separate cone shapes. -
Create the star:
Roll a small ball of clay and flatten it slightly. Use a small star cookie cutter or cut a 5-point star shape freehand with your knife. Smooth the edges with a wet finger.
Cracking Clay?
If cracks appear while drying, don’t panic. Mix a small amount of fresh clay with water to make a paste and fill the cracks. Smooth it over and let dry again.
Step 2: Sculpting the Details
-
Add the lights:
Roll tiny, pea-sized balls of clay for the ‘lights.’ You will need roughly 30-40 depending on your tree size. I like to make them slightly irregular for organic charm. -
Attach the lights:
Score the surface of the clay cones where you want the lights to go. Dab a tiny bit of water on the spot and press a clay ball firmly onto the cone. -
Stack the tree:
To assemble the structure, score the top tip of the largest cone and the inside bottom of the medium cone. Apply water or slip (clay and water mix) and press them together gently. -
Complete the stack:
Attach the smallest cone to the top of the medium one using the same scoring and wetting method. Ensure the tree stands straight. -
Position the star:
Score the very tip of the top cone and the bottom of your clay star. Press the star vertically onto the peak, blending the clay at the base slightly if needed for stability. -
Add texture:
Before the clay dries, take an old toothbrush or a stiff bristle brush and gently tap the surface of the white tree parts. This creates that lovely, stucco-like snowy texture seen in the photo. -
Let it dry:
Allow the sculpture to air dry completely. This usually takes 24-48 hours depending on humidity. Turn it occasionally to ensure even drying.
Alternative Sparkle
Instead of gold paint, apply glue to the dots and sprinkle fine gold glitter over them for a tree that truly twinkles in candle light.
Step 3: Painting and Finishing
-
Sand imperfections:
Once bone dry, lightly sand any sharp edges or rough seams, being careful not to sand off your texture or the tiny light bumps. -
Base coat:
Paint the entire tree (excluding the star if you wish, though painting it white first helps) with matte white acrylic paint. This unifies the color and seals the clay. -
Gild the lights:
Dip a fine detail brush into metallic gold paint. Carefully paint each raised clay bump. A single coat often works, but add a second if you want a richer gold. -
Paint the star:
Apply the white paint to the star if you haven’t yet. The star in the image is kept white to match the body, maintaining that clean, minimalist aesthetic. -
Final seal:
Optional: finish with a light coat of matte spray varnish to protect the clay from moisture and dust over the years.
Place your finished tree on a wood slice or mantle for a cozy, handmade holiday vignette
Cozy Gnome Ornaments With Oversized Hats
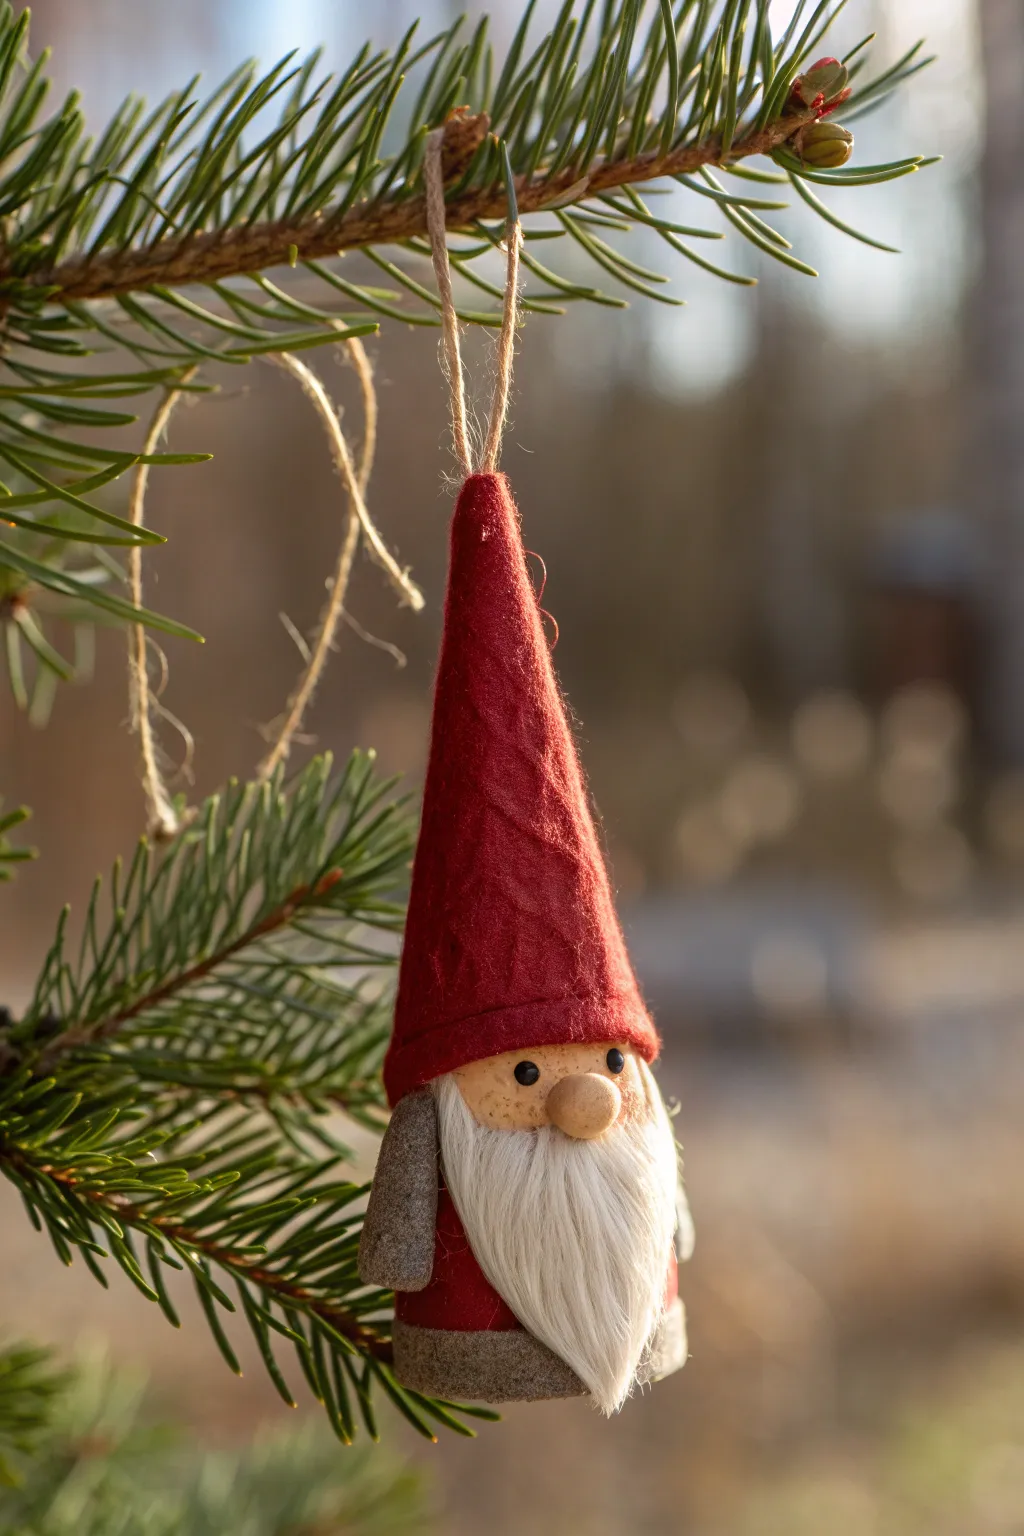
Bring a touch of Scandinavian folklore to your Christmas tree with this adorable handmade gnome ornament. Featuring a wonderfully oversized red felt hat and a scruffy white beard, this little guy adds instant coziness to any holiday branch.
Detailed Instructions
Materials
- Polymer clay (flesh tone or beige/tan)
- Red craft felt (stiff or semi-stiff works best)
- Grey craft felt (heathered or textured preferred)
- White faux fur or wool roving
- Jute twine or thin hemp cord
- Hot glue gun and glue sticks
- Fabric scissors
- Small black beads or black acrylic paint (for eyes)
- Needle
Step 1: Crafting the Clay Body & Face
-
Form the base:
Start by rolling a piece of flesh-toned polymer clay into a smooth cylinder, roughly 1.5 inches tall and 1 inch wide. This will serve as the core body and face area. -
Add the nose:
Roll a small pea-sized ball of the same clay to create the signature bulbous nose. Press it firmly onto the upper middle section of your cylinder base, blending the back edges slightly so it adheres well. -
Texture the surface (optional):
If you want a rustic look, gently tap the surface of the clay with a toothbrush to give it a slightly porous texture, though smooth is perfectly fine too. -
Bake the clay:
Bake the clay piece according to the manufacturer’s instructions on your package (usually 275°F for 15-30 minutes). Let it cool completely before handling. -
Add the eyes:
Once cool, use a tiny dot of superglue to attach two small black beads just above the nose for eyes. Alternatively, you can paint two simple black dots using a fine detail brush.
Beard Styling Secret
When cutting faux fur, only snip the fabric backing, not the hair itself. This keeps the beard long and fluffy instead of giving it a blunt haircut.
Step 2: Assembling the Felt Clothes
-
Cut the hat shape:
Cut a wedge or cone shape from the red felt. It needs to be tall enough to create that dramatic point—aim for about 4-5 inches in height. -
Form the hat cone:
Roll the red felt wedge into a tight cone shape. Apply a line of hot glue along the overlapping edge to seal it shut. I like to hold this for a few seconds to ensure the seam is flat. -
Prepare the hanger:
Cut a 6-inch length of jute twine and tie the ends in a knot to form a loop. Thread the loop up through the inside of the hat so the loop pokes out the tip, securing the knot inside with a dab of glue. -
Cut the tunic pieces:
From the red felt, cut a small rectangular strip that will wrap around the bottom of the clay body to form the shirt. -
Prepare the grey trim:
Cut a strip of grey felt for the bottom hem of the shirt and two small semi-circles for the sleeves or arms.
Forest Texture Boost
Embroider a simple snowflake or fern pattern onto the red felt hat with white thread before gluing it for an extra handmade touch.
Step 3: Final Assembly
-
Attach the beard:
Cut a triangular piece of white faux fur. Apply a dab of hot glue underneath the clay nose and press the fur into place, ensuring the ‘hair’ hangs downward naturally. -
Attach the hat:
Apply a ring of hot glue around the top of the clay head (just above the eyes). Press the red felt cone down firmly, pulling it low so it touches the top of the nose. -
Attach the red tunic:
Glue the red felt strip around the lower portion of the body, covering the clay below the beard. -
Add the grey hem:
Glue the strip of grey felt around the absolute bottom edge of the red tunic to create a finished hemline. -
Place the arms:
Take your grey felt arm pieces and glue one to each side of the body. Angle them slightly forward so it looks like the gnome’s hands are tucked in or resting at his side. -
Secure the hanger:
Give a gentle tug on the twine loop to make sure it’s secure. If it feels loose, add a tiny extra drop of glue inside the very tip of the hat.
Hang your new woodland friend on a sturdy pine branch and enjoy the charm he adds to your holiday decor
Mini Fireplace Mantel Scene Tile
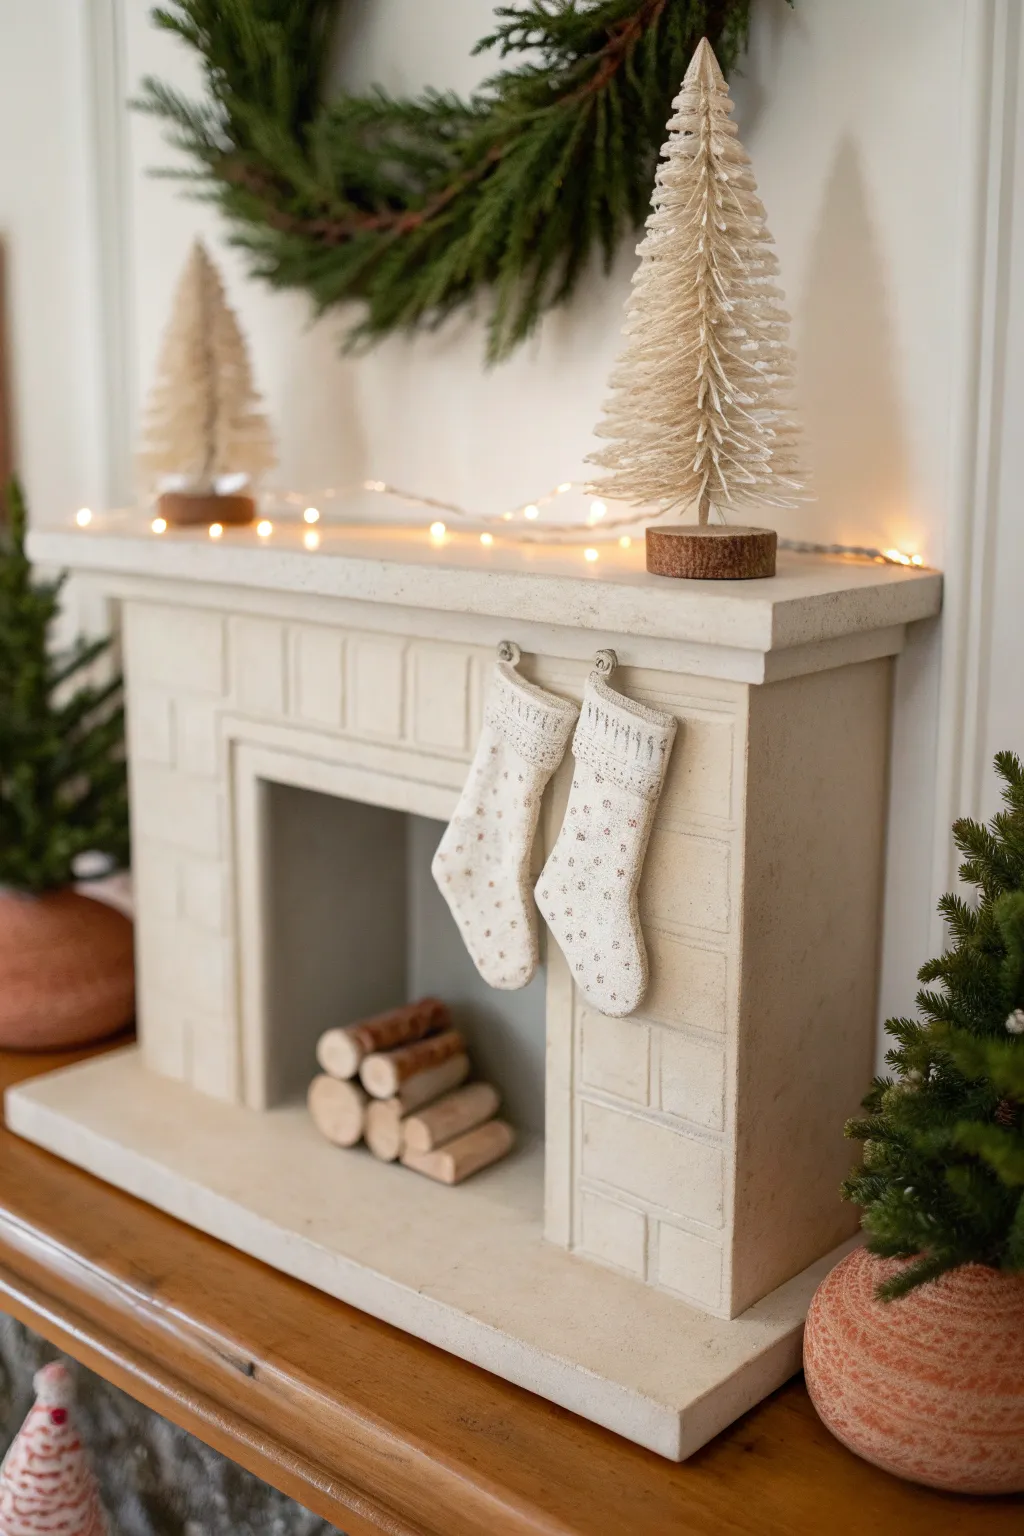
Bring the cozy charm of a holiday hearth to your home on a tiny scale with this delightful clay project. This miniature fireplace mantel creates a perfect festive vignette complete with textural bricks, tiny stockings, and a stack of faux firewood.
Step-by-Step Guide
Materials
- Air-dry clay (stone or white color) or polymer clay
- Rolling pin
- Craft knife or scalpel
- Ruler
- Clay sculpting tools (needle tool, flat shader)
- Textured rolling pin or stiff bristle brush (optional for texture)
- Liquid clay or slip (for joining)
- Sandpaper (fine grit)
- Small wooden dowels or twigs (for logs)
- White fabric scraps or textured white clay (for stockings)
- Miniature S-hooks or wire
- Acrylic paints (cream, light grey, brown)
- Matte varnish
Step 1: Constructing the Structure
-
Prepare the slabs:
Begin by rolling out your clay into a consistent thickness, roughly 1/4 inch thick. You will need a large rectangular base, a front face piece with a rectangular cutout for the firebox, two side walls, and a slightly thicker top piece for the mantel shelf. -
Cut the components:
Using a ruler and craft knife, cut out your pieces cleanly. Measure the front face first to decide the overall size, then ensure the side walls match that height. Cut a rectangular opening in the center of the front face for the hearth. -
Assemble the box:
Join the side walls to the front face piece. If using air-dry clay, score the edges and apply a bit of water or slip before pressing them together. For polymer clay, use a thin line of liquid clay. Stand the structure on the base slab and attach it securely. -
Add the firebox interior:
Cut a slightly smaller back wall and two inner side walls to line the inside of the fireplace opening. Slide these into place behind the front face to create the depth of the firebox, sealing all interior seams so it looks like a solid stone box. -
Attach the mantel shelf:
Place the final slab on top. I like to let this top piece overhang the front and sides by about half an inch to create a realistic shelf profile. Smooth any rough edges with your finger dipped in water or clay softener.
Step 2: Adding Texture and Detail
-
Create the brickwork:
Using a needle tool or the back of a knife, gently score horizontal lines across the front and sides of the fireplace. Then, stagger vertical lines between them to create a running bond brick pattern. Don’t press too deep; you just want the suggestion of stone. -
Detail the trim:
Roll thin snakes of clay and flatten them slightly. Attach these around the opening of the fireplace and just under the mantel shelf to create architectural molding details. -
Add surface texture:
To mimic the look of cut stone or limestone, gently tap the surfaces with a stiff bristle brush or a ball of crumpled aluminum foil. This removes the artificial smoothness of the clay. -
Dry or bake:
Follow the instructions for your specific clay type. If using air-dry clay, let it sit for at least 24-48 hours until fully hard and white. If polymer, bake according to the manufacturer’s suggested temperature.
Clean Corners Pro Tip
When joining slab walls, use a square wooden block inside the corner while pressing pieces together. This ensures your fireplace stands perfectly straight.
Step 3: Finishing Touches
-
Sand and refine:
Once fully cured, use fine-grit sandpaper to smooth out any sharp corners or uneven edges on the mantel shelf and base. -
Paint the stone:
Mix a creamy, off-white acrylic paint. Apply a base coat to the entire fireplace. Once dry, dry-brush a very light grey or taupe over the textured areas to highlight the brick lines and stone texture. -
Create the logs:
Take small twigs or roll small cylinders of brown clay. Stack them in a pyramid shape inside the firebox. Glue them together for stability. -
Make the stockings:
Shape two tiny stocking forms out of white clay, using a needle tool to press a knit pattern into the surface. Alternatively, cut tiny shapes from textured fabric. Add small wire hooks to the top. -
Hang the stockings:
Using a tiny dab of strong glue, attach the stockings just under the mantel shelf on the right side, letting them hang naturally. -
Final assembly:
Place your miniature trees on the mantel top and position the log stack inside. A final coat of matte varnish will protect the finish without making it look glossy.
Level Up: Flicker Effect
Before sealing the firebox, drill a tiny hole in the back wall. Insert a single amber LED or fairy light behind the logs to create a cozy, glowing hearth.
Step back and admire your tiny, festive architectural masterpiece as it sits proudly on your shelf
Gingerbread House Mini Village Display

Create a charming, everlasting holiday village that captures the warmth of baking without the crumbs. These miniature houses use clay to mimic the texture of gingerbread, topped with snowy white icing and delicate pastel details for a modern, festive centerpiece.
Step-by-Step Tutorial
Materials
- Light brown polymer clay (or terracotta air-dry clay)
- White polymer clay (or white puffy paint)
- Pastel pink and sage green polymer clay
- Rolling pin with spacing guides
- Sharp craft knife or clay blade
- House cookie cutters or paper templates
- Texture sponge or stiff bristle brush
- Liquid clay (TLS) or strong craft glue
- Small round piping tip or straw
- Toothpicks and dotting tools
- Baking sheet and parchment paper
- Fine sandpaper (optional)
Step 1: Baking the Dough
-
Roll the walls:
Condition your light brown clay until pliable. Roll it out to a consistent 1/4-inch thickness. You want the walls sturdy enough to stand but thin enough to look like cookies. -
Texture the surface:
Before cutting your shapes, gently press a coarse sponge or a stiff bristle brush over the entire surface of the clay sheet. This creates that realistic, porous baked-good texture. -
Cut the shapes:
Using your templates or cutters, cut out two front/back pentagon shapes and two rectangular side walls for each house. Cut two roof rectangles that are slightly wider than the house base. -
Add windows and doors:
Use a small square cutter or your knife to remove windows. For the round window seen on the larger house, use a small circle cutter. Save the clay scraps from the door cuts to re-attach later or create stoops. -
Pre-bake decoration (optional):
If you want the door slightly ajar, position it now. Use a toothpick to impress small hinge details or doorknobs directly into the raw clay. -
First bake:
Arrange all your flat pieces on a parchment-lined baking sheet. Bake according to your clay manufacturer’s instructions for a partial cure (usually about 15-20 minutes). Let them cool completely flat.
Sagging Roofs?
If the roof panels slide down while baking, crumple a ball of aluminum foil and place it inside the house structure to support the roof pieces from underneath.
Step 2: Assembly and Icing
-
Construct the base:
Once cool, use thick tacky glue or liquid clay to assemble the four walls. I find it help to prop the walls up with small distinct items, like spice jars, while the adhesive sets to ensure 90-degree angles. -
Attach the roof:
Glue the roof panels on. If there’s a slight gap at the peak, don’t worry—the ‘icing’ will cover it beautifully. -
Prepare the ‘frosting’:
Soften your white clay. Roll it into a thin sheet and cut pieces sized to cover the roof panels, allowing roughly 1/4 inch of overhang. -
Create the drip effect:
On the overhanging edge of the white clay, use your fingers to gently pull and round the edges to look like dripping royal icing. Drape this over the baked roof. -
Add decorative shingles:
For the scalloped roof look, hand-form small U-shapes of white clay and layer them like fish scales, or use a small round cutter to create an overlapping pattern. -
Make the candies:
Condition small amounts of pastel pink and sage green clay. Roll tiny spheres for ‘gumdrops’ and flatten small discs for the roof decorations. -
Decorate the roof:
Press the pastel discs onto the white roof. Use a needle tool to poke two small holes in the center of each disc to mimic buttons or candies. -
Detail the eaves:
Roll tiny balls of pink clay and press them along the roof ridge for a cute, piped finish. Add a tiny white ball for a doorknob. -
Window details:
Roll extremely thin snakes of white clay. Outline the circular window and add little dots around the frame to simulate piped icing details. -
Final cure:
Place the fully assembled houses back in the oven. Bake again for the full recommended time to set the liquid clay glue and the fresh decorations.
Make it Sparkle
After the final bake, brush a very thin layer of matte varnish over the ‘icing’ areas and sprinkle with ultra-fine white glitter to mimic sugar crystals.
Arrange your village on a platter with loose faux snow for a cozy winter scene
Evergreen Sprig Imprint Ornaments for a Rustic Look
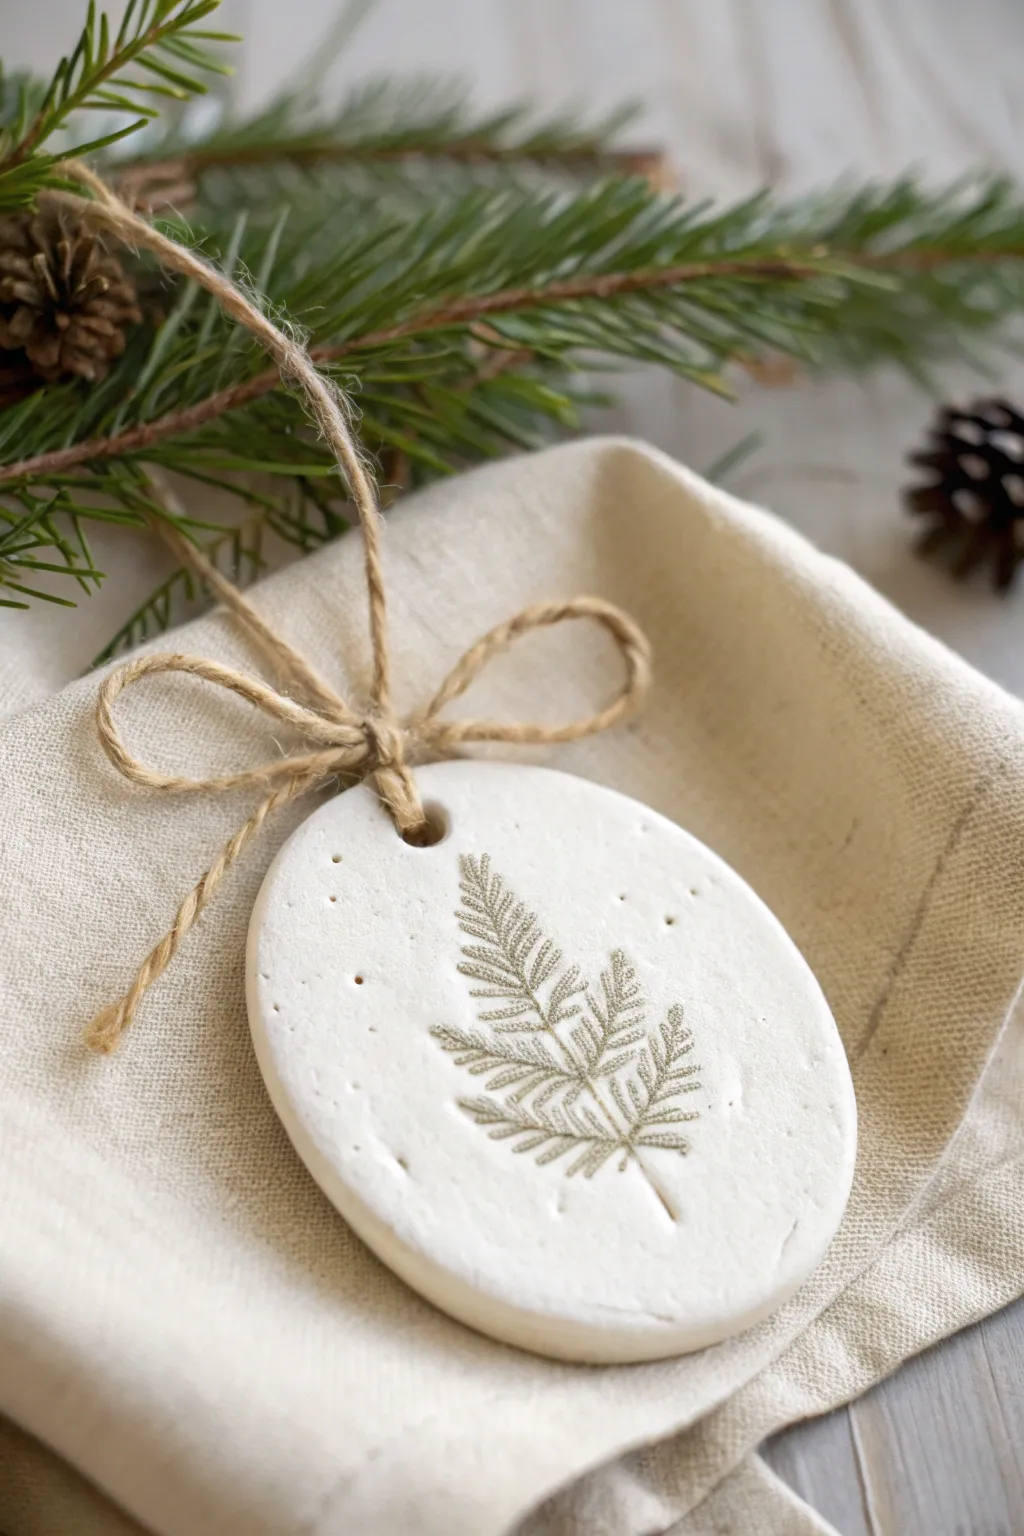
Capture the delicate beauty of winter greenery with these elegant, minimalist clay ornaments. The subtle imprint of an evergreen sprig creates a timeless, fossil-like texture that brings a touch of woodland charm to your holiday decor.
Step-by-Step
Materials
- White air-dry clay (or polymer clay)
- Fresh evergreen or fern sprigs (firm leaves work best)
- Rolling pin
- Oval cookie cutter (or a knife and cardboard template)
- Straw or cocktail stick
- Jute twine
- Sandpaper (fine grit)
- Parchment paper or craft mat
- Small bowl for water (for smoothing)
- Matte sealant or varnish (optional)
Step 1: Preparing the Clay Base
-
Condition the clay:
Begin by taking a handful of white air-dry clay and kneading it in your hands. You want it to be soft, pliable, and free of any air bubbles before you start rolling. -
Roll it out:
Place the clay on a sheet of parchment paper to prevent sticking. Use a rolling pin to flatten the clay to an even thickness of about 1/4 inch (6mm). -
Smooth the surface:
Dip your finger slightly in water and gently glide it over the surface of the clay. This helps remove any initial fingerprints or imperfections, creating a pristine canvas for your imprint.
Clean Rolling Tip
To keep white clay pristine, wipe your rolling pin and work surface with a baby wipe before starting to avoid transferring dust or darker clay particles.
Step 2: Creating the Botanical Imprint
-
Select your botanical:
Choose a fresh sprig of evergreen or a small fern leaf. Inspect it to ensure it’s clean and the structure is firm enough to leave a mark without breaking apart. -
Position the sprig:
Lay the sprig gently onto the center of your rolled-out clay. Think about the composition; placing it slightly off-center or on a diagonal can look very artistic. -
Press the design:
Take your rolling pin and gently roll over the sprig one single time with firm, even pressure. This presses the plant matter deep into the clay to capture the veins and details. -
Remove the greenery:
Carefully find the stem edge and peel the sprig away from the clay. Do this slowly to ensure you don’t smudge the fresh impression. -
Highlighting texture (optional):
If the impression seems faint, I sometimes carefully use a needle tool to deepen the central stem line just a tiny bit, though usually, the rolling pin does the trick.
Gilded Edges
For a luxe upgrade, use a small detail brush to paint the rim of the oval with liquid gold leaf or metallic acrylic paint after the clay is fully dry.
Step 3: Cutting and Finishing
-
Cut the shape:
Position your oval cookie cutter over the imprint, framing the botanical design nicely. Press down firmly to cut the shape. -
Clean the edges:
Peel away the excess clay from around the oval. If the edges are ragged, wet your finger again and smooth them down gently so they are rounded and neat. -
Create the hanging hole:
Using a drinking straw or a cocktail stick, poke a hole near the top of the oval. Make sure it’s not too close to the edge to prevent cracking later. -
Drying time:
Let the ornament dry flat on parchment paper. Air-dry clay typically takes 24-48 hours. Is flip it over halfway through the drying process to ensure both sides dry evenly and to prevent curling. -
Sanding imperfections:
Once fully hard and white, check for rough spots. Use fine-grit sandpaper to buff the edges or surface gently for a professional, porcelain-like finish. -
Adding subtle color (optional):
To match the photo, you can leave it plain white, or very lightly brush a tiny amount of diluted olive green watercolor into the impressions and wipe the surface clean, leaving color only in the grooves.
Step 4: Assembly
-
Cut the twine:
Cut a length of jute twine, approximately 10 inches long. This rustic material contrasts beautifully with the smooth white clay. -
Thread the loop:
Fold the twine in half and push the loop end through the hole from front to back. Pull the tails through the loop to create a lark’s head knot, or simply thread it through and tie a knot at the top. -
Tie the bow:
For the specific look in the photo, take a second, shorter piece of twine. Tie it into a small, neat shoelace bow around the base of the loop where it meets the clay. -
Trim the ends:
Snip the ends of the bow and the hanging loop to your desired length to keep everything looking tidy.
Hang your new rustic masterpiece on the tree and enjoy the natural elegance it adds to the season
Marbled Holiday Baubles With Swirled Color
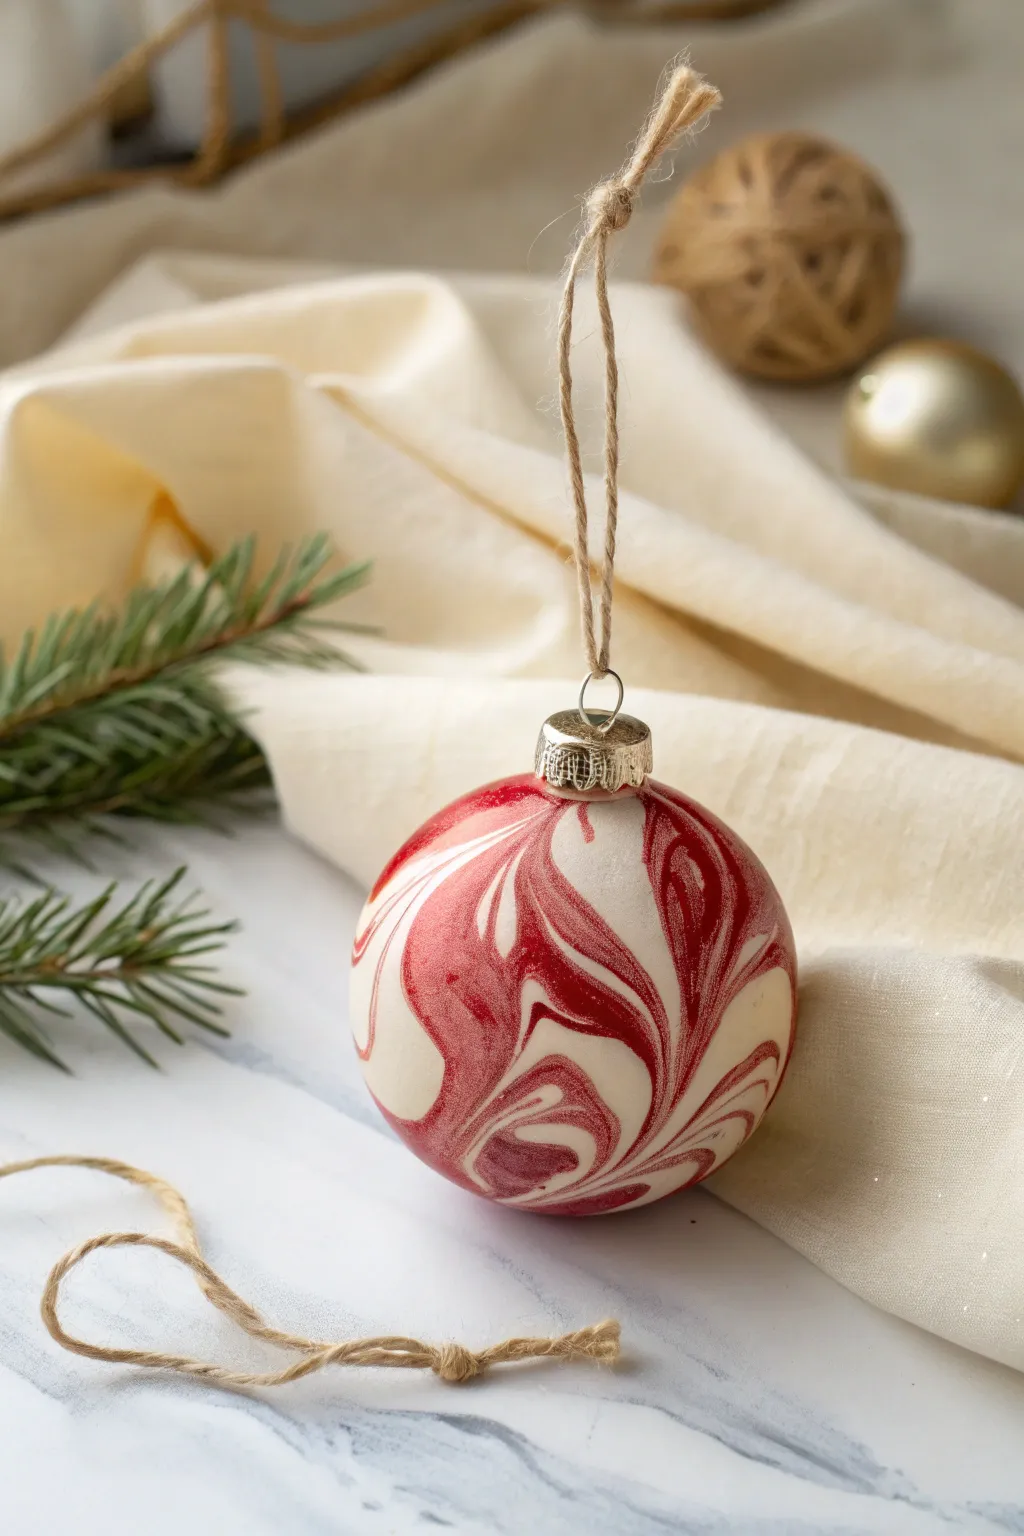
Capture the classic elegance of candy canes and cream with these stunning spherical ornaments, featuring a mesmerizing red and white swirled pattern. This technique creates a seamless, sophisticated finish that looks high-end but is surprisingly simple to achieve with basic clay crafting techniques.
How-To Guide
Materials
- White polymer clay
- Red polymer clay (preferably a deep, rich red)
- Polystyrene foam balls (1.5 to 2 inch diameter)
- Polymer clay roller or pasta machine
- Craft knife or tissue blade
- Metal ornament caps with loops (recycled from old ornaments or bought new)
- Liquid polymer clay or Bake and Bond
- Superglue
- Glossy polyurethane varnish or glaze
- Soft paintbrush
- Jute twine or ribbon for hanging
- Oven and baking sheet
Step 1: Preparing the Base
-
Prepare the core:
Select your polystyrene foam ball. If the surface is very rough, you can lightly roll it on a table to smooth it down, though the clay will cover most imperfections. -
Attach the cap hardware:
Take your metal ornament cap. Remove the wire loop temporarily. Press the metal cap into the top of the foam ball to create an indentation. -
Secure the mount:
Remove the cap, add a generous drop of superglue into the indentation, and press the cap back firmly onto the foam. Let this dry completely so you have a handle to hold.
Pink Panic?
If your clay turns pink instead of red/white swirls, you over-mixed. Stop twisting sooner! The colors should sit next to each other, not blend into a new hue.
Step 2: Creating the Marble Mix
-
Condition the white clay:
Take a large block of white polymer clay. Condition it by kneading it in your hands until it is soft, pliable, and warm. -
Condition the red clay:
Repeat the conditioning process with a smaller amount of red clay. You generally want a ratio of about 3 parts white to 1 part red to keep the design looking bright and not muddy. -
Form snakes:
Roll both clay colors into long, thin snakes or ropes. They should be roughly similar in length. -
Twist together:
Twist the red and white snakes together to form a candy-cane-like rope. Fold this rope in half and twist it again. -
Roll and fold:
Roll the twisted rope into a single snake again to smooth it. Fold it over and twist once more. Repeat this folding and twisting process 3-4 times. Stop before the colors blend into pink; distinct streaks are the goal. -
Ball it up:
Roll the twisted clay into a solid ball in your palms. You should see swirls of red through the white.
Step 3: Covering the Ornament
-
Flatten the marble sheet:
Using your acrylic roller or pasta machine, flatten your marbled ball into a sheet about 3mm thick. Observe the pattern and choose the section with the most beautiful swirls. -
Apply adhesive:
Brush a thin layer of liquid polymer clay or Bake and Bond all over the foam ball. This ensures the clay sheet sticks permanently during baking. -
Wrap the enhance:
Gently drape the marbled clay sheet over the foam ball. Start smoothing it down from the top (near the cap) towards the bottom. -
Trim excess:
Use your craft knife to slice away any heavy excess clay at the bottom, carefully pinching the seams together. I find smoothing the seams with a fingertip dipped in a tiny bit of baby oil helps erase join lines. -
Roll to smooth:
Once the ball is fully covered, gently roll the ornament between your palms in a circular motion. This is the secret to getting that perfect spherical shape and completely hiding any seams.
Add Some sparkle
Mix a pinch of translucent glitter heavily into the white clay before marbling. It adds a subtle ‘sugared’ look perfect for holiday lights.
Step 4: Finishing Touches
-
Details around the cap:
Use a small tool or your fingernail to slightly tuck the clay under the edge of the metal cap you glued on earlier, ensuring a neat transition. -
Bake the ornament:
Place the ornament on a baking sheet. Follow the temperature instructions on your specific brand of polymer clay. Since there is a foam core, bake at a slightly lower temperature (around 230°F or 110°C) for a longer time (45-60 minutes) to prevent the foam from melting excessively. -
Cool down:
Let the ornament cool completely in the oven before removing it. This prevents cracking due to thermal shock. -
Glaze for shine:
Apply a coat of glossy polyurethane varnish with a soft brush. This mimics the look of glass and makes the colors pop. -
Add the hanger:
Reattach the wire loop to the metal cap and thread a piece of natural jute twine through it, tying a knot to finish the rustic look.
Hang these gorgeous swirled creations on your tree and watch how they catch the light.
Threaded Clay Ornaments With Cutout Patterns
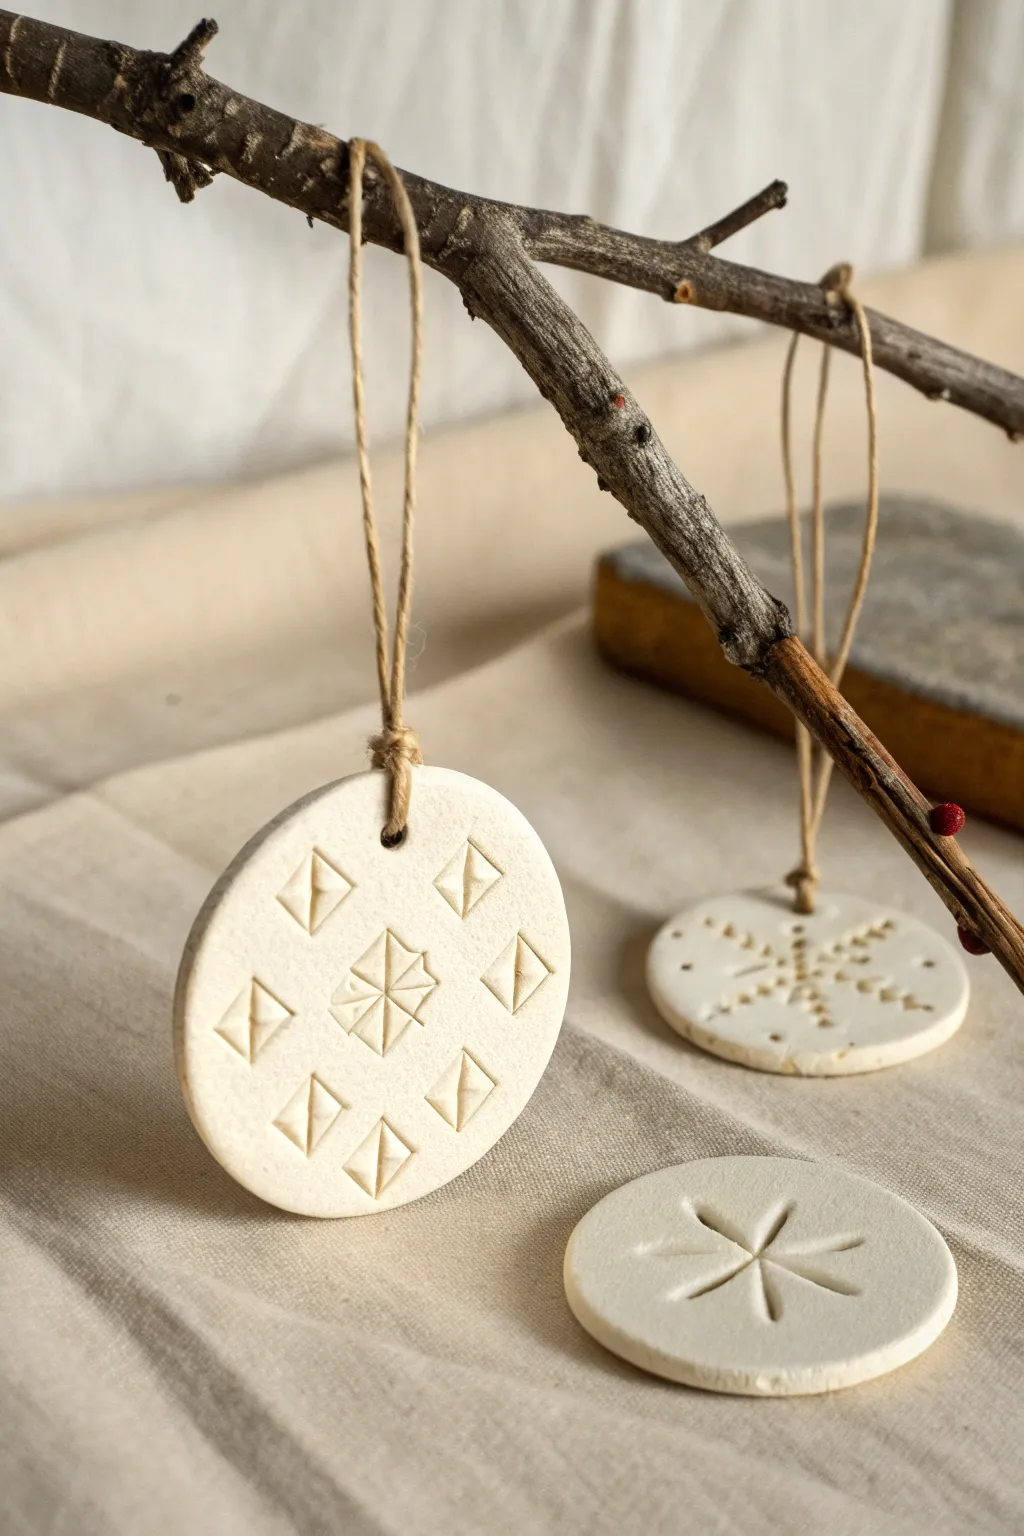
These minimalist ornaments bring a touch of rustic elegance to your holiday decor with their clean lines and natural texture. Featuring crisp geometric impressions and a soft matte finish, they capture the simplicity of Scandinavian design perfectly.
Step-by-Step Tutorial
Materials
- White original Sculpey or air-dry clay
- Rolling pin
- Circle cookie cutter (approx. 3 inches)
- Clay carving tools or a small linoleum cutter
- Drinking straw or small piping tip (for the hole)
- Fine-grit sandpaper (400 grit)
- Jute twine or hemp cord
- Parchment paper or baking mat
- Needle tool or toothpick
Step 1: Preparing the Base
-
Condition the clay:
Start by kneading your white clay in your hands until it becomes warm and pliable. This conditioning step is crucial to prevent cracks and ensures a smooth surface for your intricate carvings later. -
Roll it out:
Place your clay on a parchment-lined surface or baking mat. Using a rolling pin, flatten the clay to an even thickness of about 1/4 inch. If you want them uniform, I place two wooden craft sticks on either side of the clay to guide the rolling pin height. -
Cut the shapes:
Press your circle cookie cutter straight down into the clay. Give it a gentle wiggle to ensure a clean cut, then lift it away. Repeat to create as many ornaments as you need, then carefully peel away the excess clay scrap.
Step 2: Creating the Designs
-
Mark the center:
For the geometric design shown in the foreground, use a needle tool to make a tiny, faint prick in the absolute center of the circle. This will serve as your guide for symmetry. -
Carve the central star:
Using a V-gouge tool or the tip of a small knife, carve a central square distinctively divided into four smaller triangles. Make the lines deep enough to catch shadows. -
Add radiating lines:
From the corners of your central square, carve four more triangular grooves radiating outward to create an eight-pointed star effect in the middle. -
Create the surrounding pattern:
Imagine a ring around the center design. Press your carving tool into the clay to create a series of eight small squares or diamond shapes evenly spaced around the perimeter. Inside each square, carve a diagonal line to create relief. -
Alternative star design:
For the flat ornament shown at the bottom, simply use a rounded tool or the side of a chopstick to press six deep indentations meeting in the center, forming a simple flower or snowflake shape. -
Poke the hanging hole:
Use a drinking straw or a small piping tip to punch a clean hole near the top edge of each ornament. Make sure it’s not too close to the edge to prevent tearing later. -
Smooth the edges:
Dip your finger in a tiny bit of water and run it gently around the outer rim of the clay circles to soften any sharp ridges left by the cookie cutter.
Fixing Cracks
If tiny cracks appear while drying, mix a small amount of fresh clay with water to make a paste (slip) and smooth it into the crack with your finger.
Step 3: Finishing Touches
-
Dry or bake:
If using polymer clay, bake according to the package instructions (usually 275°F for 15 minutes per 1/4 inch). If using air-dry clay, let them sit flat on a wire rack for 24-48 hours, flipping halfway through. -
Sand for perfection:
Once fully cured and cool, take your fine-grit sandpaper and very gently buff the surface and edges. This removes any fingerprints and gives that professional, stone-like matte finish. -
Clean dust:
Wipe the ornaments down with a slightly damp cloth or a soft brush to remove any white sanding dust from the carved grooves. -
Prepare the twine:
Cut a length of jute twine or hemp cord, approximately 8-10 inches long for each ornament. -
Create the loop:
Fold the twine in half and thread the folded end through the front of the ornament hole. -
Secure the hanger:
Pull the loose ends of the twine through the loop you just created and tighten it gently against the clay top (a larks head knot). Alternatively, thread it through and tie a simple overhand knot at the top.
Add a Wash
Dilute brown acrylic paint with water and brush over the texture. Wipe off the surface immediately to leave dark color only in the grooves for contrast.
Hang your finished creations on a sturdy branch or your tree to enjoy their handmade charm
Mini Advent Calendar Charm Set for a Countdown Garland
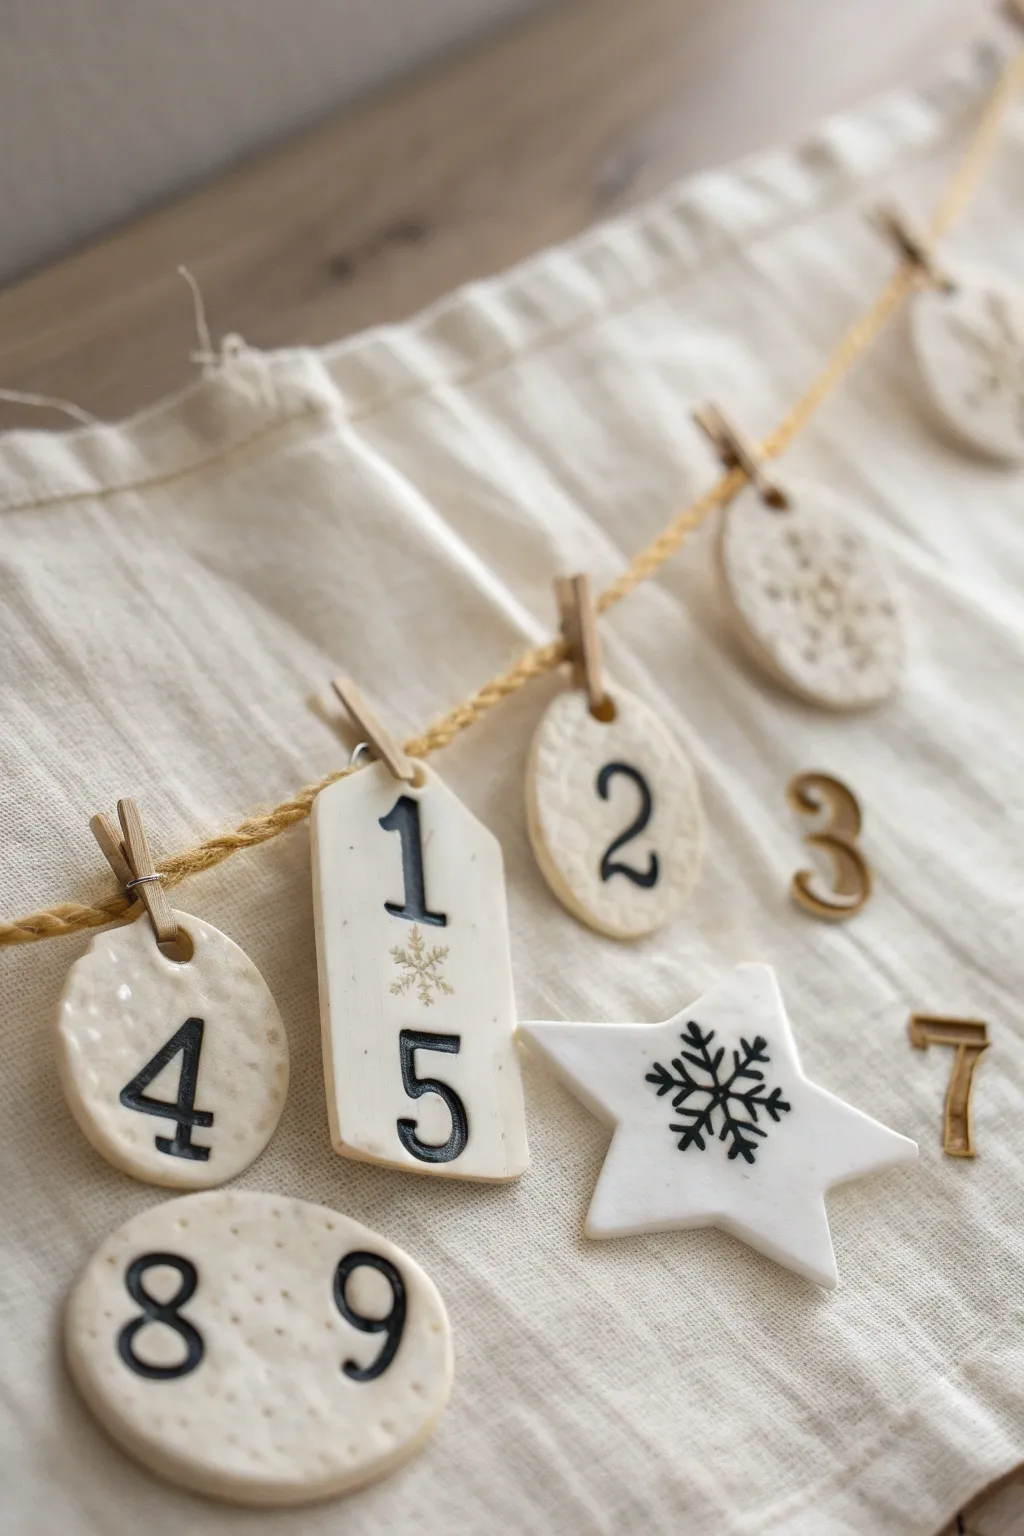
Count down the days to Christmas with this charming set of handmade clay tags, perfect for creating a minimalist garland. The soft white clay and crisp black numbers offer a timeless, rustic look that pairs beautifully with natural twine and wood accents.
Step-by-Step Guide
Materials
- White polymer clay or air-dry clay
- Rolling pin or acrylic roller
- Parchment paper or wax paper
- Small cookie cutters (circles, stars, ovals)
- Ruler and craft knife
- Rubber alphabet/number stamp set
- Black ink pad suitable for clay (or black acrylic paint)
- Straw or small circular tool for holes
- Fine-grit sandpaper
- Clear matte varnish (optional)
- Jute twine
- Mini wooden clothespins
Step 1: Prepping and Shaping
-
Condition the clay:
Begin by taking a chunk of your white clay and kneading it in your hands until it is soft, pliable, and free of cracks. -
Roll out the slab:
Place the clay on a sheet of parchment paper. Use your roller to flatten it into an even slab, aiming for a thickness of about 1/8 to 1/4 inch. -
Cut circular shapes:
Press your round cookie cutters into the clay to create the base for single-digit numbers. Wiggle the cutter slightly before lifting to ensure a clean edge. -
Create rectangular tags:
For double-digit numbers or larger tags, use a ruler and craft knife to cut rectangular shapes. Angle the top corners inward slightly if you want a traditional tag silhouette. -
Add variety with stars:
Cut out a few star shapes to intersperse among the numbers; these act as decorative spacers or special markers for Sundays. -
Texture the surface (optional):
If you want a dotted texture like the number ‘8’ charm shown, gently press a textured sponge or the bumpy side of a meat mallet onto the raw clay before cutting your shapes.
Step 2: Stamping and Finishing
-
Ink the stamps:
Press your rubber number stamp firmly onto the black ink pad. Check the face of the stamp to ensure it’s evenly coated but not gloopy. -
Stamp the clay:
Align the stamp carefully over your cut shape and press straight down with even pressure. Lift straight up to avoid smudging the ink. -
Add decorative motifs:
Use a snowflake stamp or other winter symbol to add details to larger tags or the star shapes. -
Pierce the holes:
Using a straw or a small circular tool, punch a hole near the top of each charm tall enough to accommodate your string or clothespin clip. -
Smooth the edges:
Dip your finger in a little bit of water and run it along the cut edges of the clay to smooth out any roughness before drying. -
Dry the clay:
If using air-dry clay, let the pieces sit on a drying rack for 24-48 hours. If using polymer clay, bake according to the manufacturer’s instructions on the package. -
Sand rough spots:
Once fully cured and cooled, use fine-grit sandpaper to gently buff away any sharp edges or irregularities on the perimeter. -
Seal the charms:
Apply a thin coat of clear matte varnish over the top to protect the ink and give the clay a finished, professional look. -
String the garland:
Measure a length of jute twine suitable for your display area and tie loops at both ends. -
Assemble the calendar:
Use mini wooden clothespins to clip each number in order onto the twine, spacing them evenly to complete your festive countdown.
Stamp Clean-Up
Keep a baby wipe or damp paper towel nearby. If you mis-stamp the ink on raw clay, you can often gently wipe it off or slice off the very top layer and try again.
Gold Accents
Before sealing, dry-brush a tiny amount of gold paint onto the edges of the stars or the raised textures for a hint of holiday shimmer.
Hang your beautiful new garland on a mantel or wall to start the holiday season with style