If you’ve got a plain mug and some clay, you’ve basically got the perfect canvas for Christmas mug decorating. I love these ideas because they’re all about cozy, raised 3D clay embellishments that turn an everyday cup into a gift-worthy holiday keepsake.
Santa Belt Wrap Design
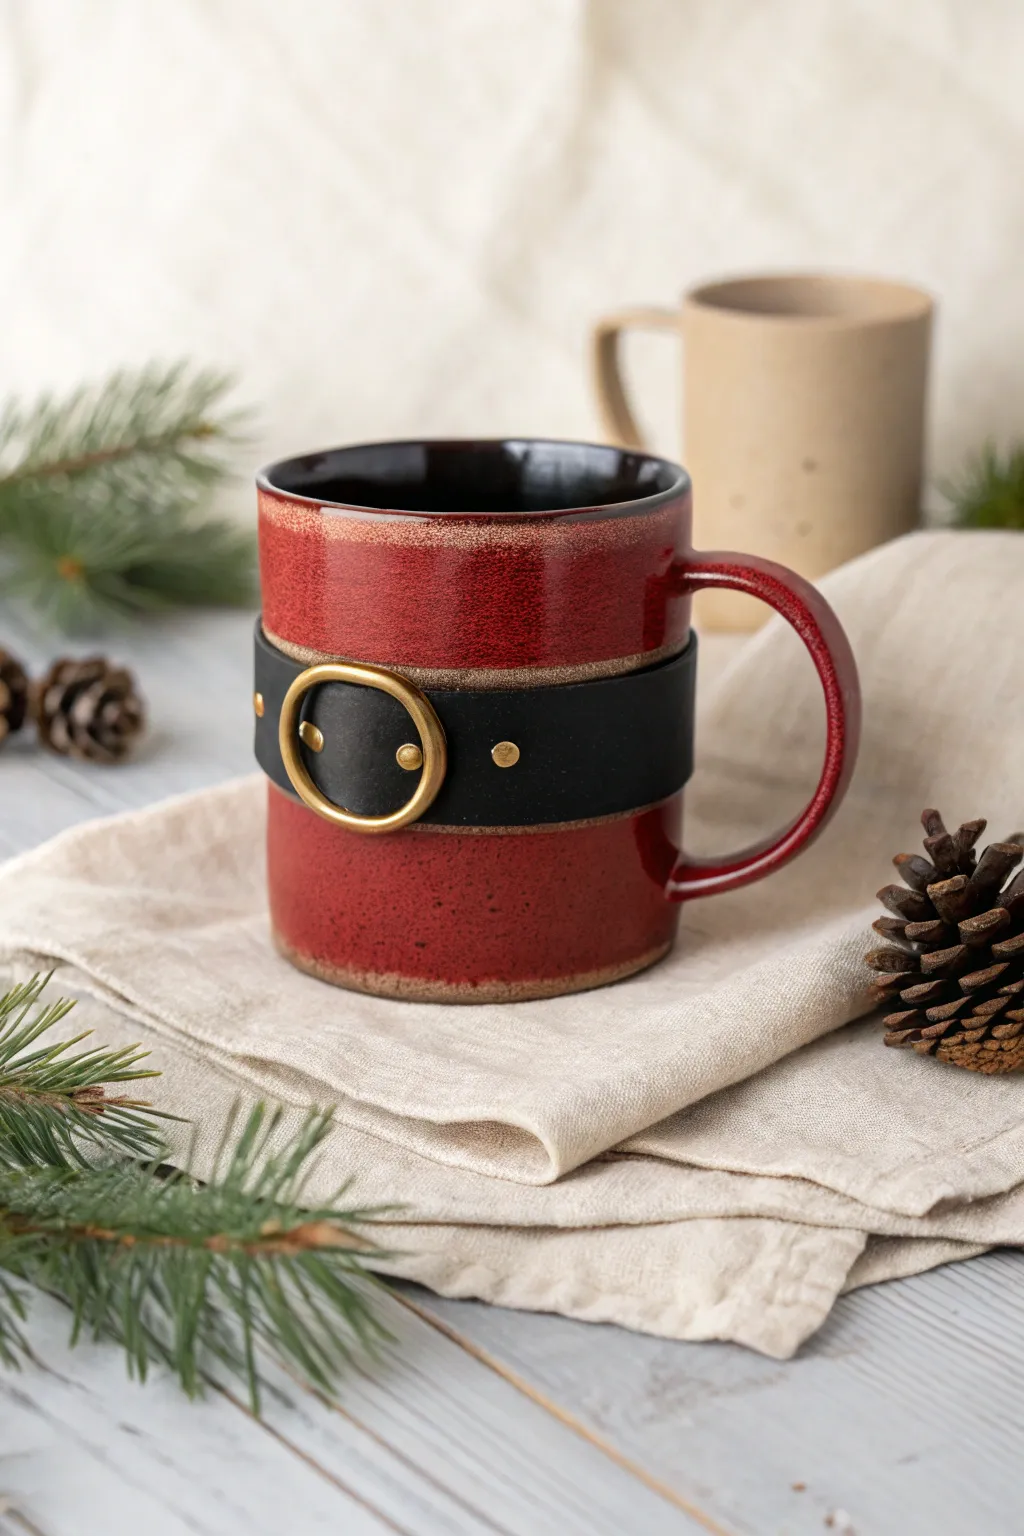
Transform a simple slab-built cup into a festive masterpiece with this Santa-inspired design. The contrast between the speckled red glaze and the matte black belt creates a charming, tactile piece that feels perfectly cozy for winter cocoa.
Step-by-Step Guide
Materials
- Red stoneware or earthenware clay
- Rolling pin and guide strips (approx. 1/4 inch)
- Black underglaze
- Speckled red glaze (glossy)
- Gold or brass luster overglaze
- Pottery knife or scalpel
- Scoring tool and slip
- Small circular cookie cutter or bottle cap
- Paintbrushes (soft for glaze, detail for luster)
- Loop tool for trimming
- Sponge
Step 1: Forming the Mug Body
-
Roll the slab:
Begin by wedging your red clay thoroughly to remove air pockets, then roll out a smooth slab using 1/4 inch guide strips to ensure even thickness. -
Cut the rectangle:
Measure and cut a rectangular strip for the body of the mug. A standard mug size is usually about 11-12 inches long and 4-5 inches tall, depending on shrinkage. -
Form the cylinder:
Bevel the short edges of the rectangle at a 45-degree angle. Score the beveled edges, apply slip, and wrap the slab into a cylinder, pressing the seam firmly together. -
Attach the base:
Cut a circle slightly larger than your cylinder’s diameter. Score and slip the bottom edge of the cylinder and the circle, then attach them. Trim any excess clay flush with the wall. -
Smooth the surfaces:
Use a damp sponge or rib tool to smooth the seam and the entire surface of the mug, ensuring a clean canvas for the belt design.
Uneven Belt?
If the belt looks crooked, lightly mark a guide line on the cylinder with a needle tool while spinning the mug on a banding wheel before attaching the clay strip.
Step 2: Sculpting the Belt & Handle
-
Create the belt strip:
Roll a thinner slab (approx. 1/8 inch) and cut a strip about 1 inch wide. This will be the Santa belt that wraps around the center. -
Attach the belt:
Score a horizontal band around the middle of your mug. Apply slip and gently press the belt strip onto the mug body, blending the edges slightly if you want it seamless, or leaving them crisp for a layered look. -
Sculpt the buckle:
Cut a small oval or circle from the thin slab. Use a smaller cutter to remove the center, creating a ring ‘buckle’ shape. Score and slip this onto the center of the belt. -
Add detail studs:
Roll tiny balls of clay for the belt holes or rivets. Press these flat onto the belt strip, arranging them symmetrically on either side of the buckle for that classic leather belt appearance. -
Form the handle:
Pull or roll a coil for the handle. Shape it into a question-mark ear shape and attach it securely to the back of the mug, opposite the buckle, using the score-and-slip method.
Step 3: Glazing and Finishing
-
Bisque fire:
Allow the mug to dry completely (bone dry) before firing it in the kiln to bisque temperature (usually Cone 04). -
Apply wax resist:
Once bisque fired, apply wax resist carefully over the belt strip, the buckle, and the studs. This prevents the red glaze from adhering to these specific areas. -
Glaze the body:
Dip or brush the entire mug with your speckled red glossy glaze. Wipe away any errant droplets that beaded up on the waxed areas with a damp sponge. -
Paint the belt:
Carefully paint the leather belt section with three coats of black underglaze or a matte black glaze to mimic the texture of leather. Avoid the buckle itself if possible. -
Glaze fire:
Fire the mug to the maturity temperature of your clay and glaze (often Cone 5 or 6). I find this temperature really brings out the depth in speckled glazes. -
Apply gold luster:
After the glaze firing, use a detail brush to apply gold luster overglaze to the buckle ring and the stud details. -
Final firing:
Fire the mug one last time at a very low temperature (Cone 018-019) to set the gold luster.
Pro Tip: Rustic Texture
Don’t over-smooth the red clay body. Leaving slight finger marks or sponge textures allows the red glaze to pool and break, enhancing the vintage, handmade warmth.
Once the final luster firing is complete, your festive mug is ready to be filled with hot chocolate and marshmallows


Cute Snowman Face Appliqué
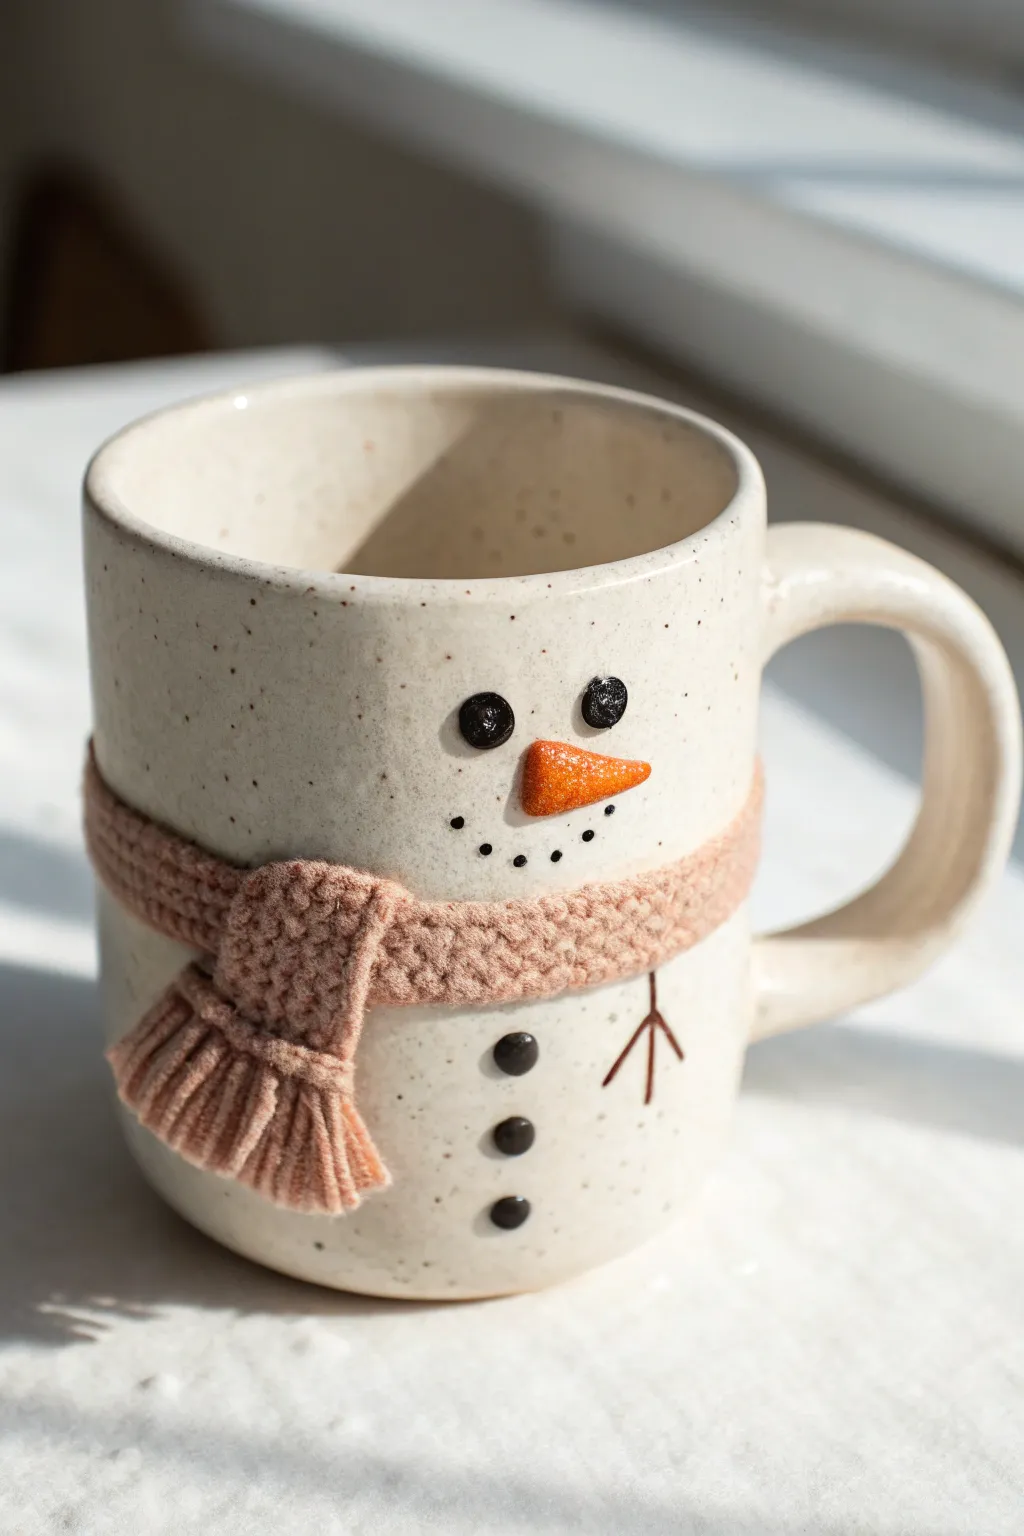
Transform a plain mug into a frosty friend with this charming textured appliqué project. The standout feature is the incredibly realistic knit-textured scarf that wraps warmly around the snowman’s middle.
Step-by-Step Tutorial
Materials
- White or speckled stoneware clay body
- Underglaze (Black, Orange, Dusty Rose/Pink, Brown)
- Clear dipping glaze
- Canvas or textured fabric (like burlap or sweater knit) for impressions
- Scoring tool and slip
- Small needle tool
- Fine-point paintbrush
- Rolling pin
Step 1: Forming the Mug Body
-
Create the Cylinder:
Begin by either throwing a standard cylinder on the wheel or hand-building one using slab construction. Aim for a height of about 4-5 inches with straight sides to serve as the snowman’s ‘body’. -
Add Speckles (Optional):
If you aren’t using pre-speckled clay, you can flick a stiff toothbrush dipped in iron oxide wash lightly over the surface to achieve that snowy, rustic cookie-dough look. -
Attach the Handle:
Pull a medium-thickness handle and attach it firmly to the right side of the mug. Ensure the curve is generous enough for fingers, as this adds to the cozy aesthetic.
Step 2: Sculpting the Snowman Face
-
Shape the Eyes:
Roll two tiny balls of clay, roughly the size of peppercorns. Flatten them just slightly so they look like lumps of coal but still protrude from the surface. -
Attach the Eyes:
Score the mug surface where the eyes will go and apply a dab of slip. Press the clay balls on firmly to ensure they don’t pop off during firing. -
Form the Carrot Nose:
Roll a small cone of clay. Gently pinch and curve the tip slightly to give it character. It shouldn’t be perfectly straight; an organic shape looks more natural. -
Attach the Nose:
Score and slip the center of the face area. Press the wide end of the carrot cone onto the mug, smoothing the attachment point with a modeling tool so it blends seamlessly.
Cracking Scarf?
If the scarf cracks during drying, make sure you score aggressively! You can also wrap the drying mug in plastic for 2 days to equalize moisture.
Step 3: Creating the Knit Scarf
-
Prepare the Texture:
Roll out a thin slab of clay. To get that realistic knit look, press a piece of actual coarse knit fabric or a texture mat firmly into the clay slab. -
Cut the Strips:
Slice a long strip from the textured clay, about half an inch wide. This will be the main wrap of the scarf. -
Wrap the Mug:
Score a horizontal line around the middle of the mug. Apply slip and wrap the textured strip around, ensuring the ends meet near the front where the knot will be. -
Build the Knot:
Cut a small rectangle of textured clay and fold it over the meeting point of the scarf strip to simulate the knot loop. -
Add the Fringe:
Cut a short, wide piece of textured clay for the hanging scarf end. Use your needle tool to slice vertical lines at the bottom to create the fringe tassels. Attach this piece under the knot loop.
Make the Texture Pop
After glazing the pink scarf, wipe it back lightly with a damp sponge. This leaves more glaze in the crevices and highlights the knit pattern.
Step 4: Details and Glazing
-
Add Buttons:
Create three smaller clay balls for the coal buttons. Score and slip them in a vertical line beneath the scarf. -
Bisque Fire:
Allow the mug to dry very slowly to prevent the thick appliqué from cracking. Once bone dry, bisque fire to cone 04. -
Glaze the Scarf:
Carefully paint the scarf area with a Dusty Rose or Pink underglaze. I find that dabbing the brush rather than stroking helps get color into the deep knit texture. -
Detail the Face:
Paint the eye and button relief pieces with black underglaze. Use a fine liner brush and black underglaze to paint the dotted smile and the thin stick arms. -
Finish the Nose:
Apply a bright orange underglaze to the carrot nose. Don’t worry if it looks flat now; the clear glaze will pop the color later. -
Final Glaze:
Dip the entire mug into a clear glossy glaze. This will seal the underglaze work and make the surface food-safe and shiny. -
Final Firing:
Glaze fire to the temperature appropriate for your clay body (usually cone 6) to finish the piece.
Now you have the perfect festive vessel for your hot cocoa all winter long


Reindeer Nose and Antlers Accent
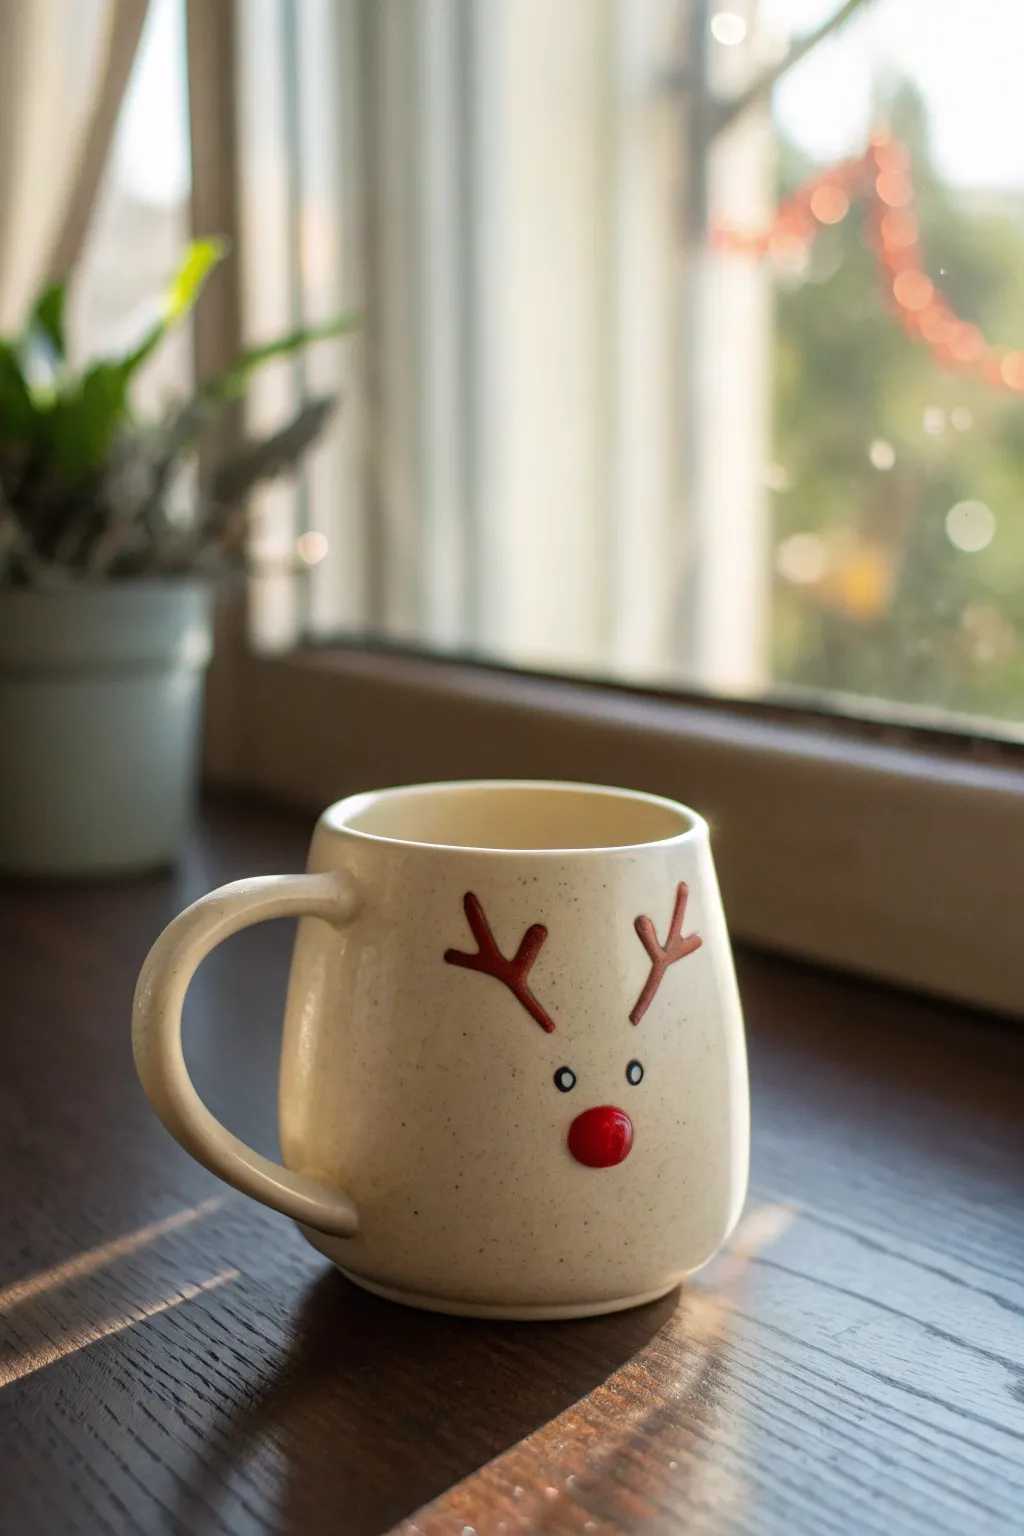
Embrace the holiday spirit with this delightfully understated design featuring minimal painted details and a charmingly prominent, sculpted red nose. The speckled creamy glaze gives the finished piece a cozy, rustic winter vibe perfect for hot cocoa.
Step-by-Step
Materials
- White stoneware clay body
- Pottery wheel or slab roller (depending on construction method)
- Needle tool
- Sponge
- Rib tool
- Scoring tool
- Cream/Speckled white glaze (food safe)
- Red underglaze
- Black underglaze
- Brown underglaze
- Fine detail brush
- Clear glaze (optional, for the nose)
Step 1: Forming the Mug Body
-
Construct the Base:
Begin by either throwing a simple cylinder on the wheel or hand-building a cylinder using the slab method. Aim for a slightly tapered shape that is wider at the bottom and gently narrows toward the rim for that cozy, huggable look. -
Smooth the Surface:
Using a rib tool, smooth the exterior walls to remove prominent throwing lines or canvas textures. You want a relatively clean canvas for the face, though slight imperfections add character. -
Pull and Attach Handle:
Pull a medium-thickness handle from a lug of clay. Allow it to stiffen slightly into a curve before scoring and slipping it onto the side of the mug opposite where the face will go. -
Clean Transitions:
Use a damp sponge to smooth the connection points of the handle, ensuring a seamless flow into the mug body.
Nose Detaching?
If the nose falls off during drying, you didn’t score deeply enough. Re-score aggressively, add vinegar to your slip for a stronger bond, and dry very slowly under plastic.
Step 2: Sculpting the Red Nose
-
Roll the Nose:
Pinch off a very small amount of fresh clay, about the size of a large pea. Roll it between your palms until it forms a perfect, smooth sphere. -
Score the Placement:
Determine the center of the mug’s ‘face’ area, positioned slightly lower than the vertical midpoint. Use your needle tool to gently score a small circle where the nose will sit. -
Attach the Sphere:
Apply a dab of slip to the scored area. Press the clay sphere firmly onto the spot. I like to wiggle it gently to ensure a tight bond without flattening the round shape too much. -
Refine the Edges:
Use a small modeling tool or your pinky finger to smooth the very back edge of the sphere where it meets the mug wall, ensuring there are no gaps for glaze to get trapped.
Step 3: Painting the Details
-
Bisque Fire:
Allow the mug to dry completely to the bone-dry stage. Fire it in the kiln to your clay body’s bisque temperature (usually Cone 04 or 06). -
Sketch the Antlers:
Once cool, use a regular graphite pencil to lightly sketch the placement of the eyes and antlers. The graphite will burn off in the kiln, so don’t worry about mistakes. -
Outline Antlers:
Dip a fine detail brush into brown underglaze. Paint two simple Y-shapes above the nose area. Keep the lines relatively thick and rounded at the ends for a cartoonish softness. -
Add the Eyes:
Using the very tip of your smallest brush or a ball stylus tool dipped in black underglaze, dot two small eyes evenly spaced between the nose and antlers. Keep them small and wide-set for cuteness. -
Paint the Nose:
Carefully paint the raised clay sphere with bright red underglaze. Apply 2-3 coats to ensure a vibrant, opaque red, letting each coat dry briefly in between.
Pro Tip: Eye Placement
Place the eyes lower than you think! Aligning them closer to the nose creates a ‘cute’ baby-animal proportion, whereas high eyes can make the reindeer look surprised.
Step 4: Glazing and Final Fire
-
Wax Resist:
Apply wax resist carefully over the red nose, the brown antlers, and the black eyes. This prevents the main glaze from obscuring your design. -
Dip in Base Glaze:
Dip the entire mug into a creamy white speckled glaze. If you want the specific look in the photo, choose a glaze labeled ‘speckled vanilla’ or similar. -
Clean the Decoration:
Once the glaze is dry to the touch, use a damp sponge to gently wipe any beads of white glaze off the waxed nose and painted details. -
Optional Shine:
For an extra shiny nose like the photo, you can carefully dab a tiny drop of clear gloss glaze over just the red nose area (on top of the underglaze) if your base glaze isn’t glossy enough. -
Glaze Fire:
Load the mug into the kiln and fire to the maturity temperature of your glaze and clay (typically Cone 5 or 6 for stoneware).
Now you have a festive, handcrafted mug ready to be filled with steaming hot chocolate


Gingerbread Icing Drip Rim
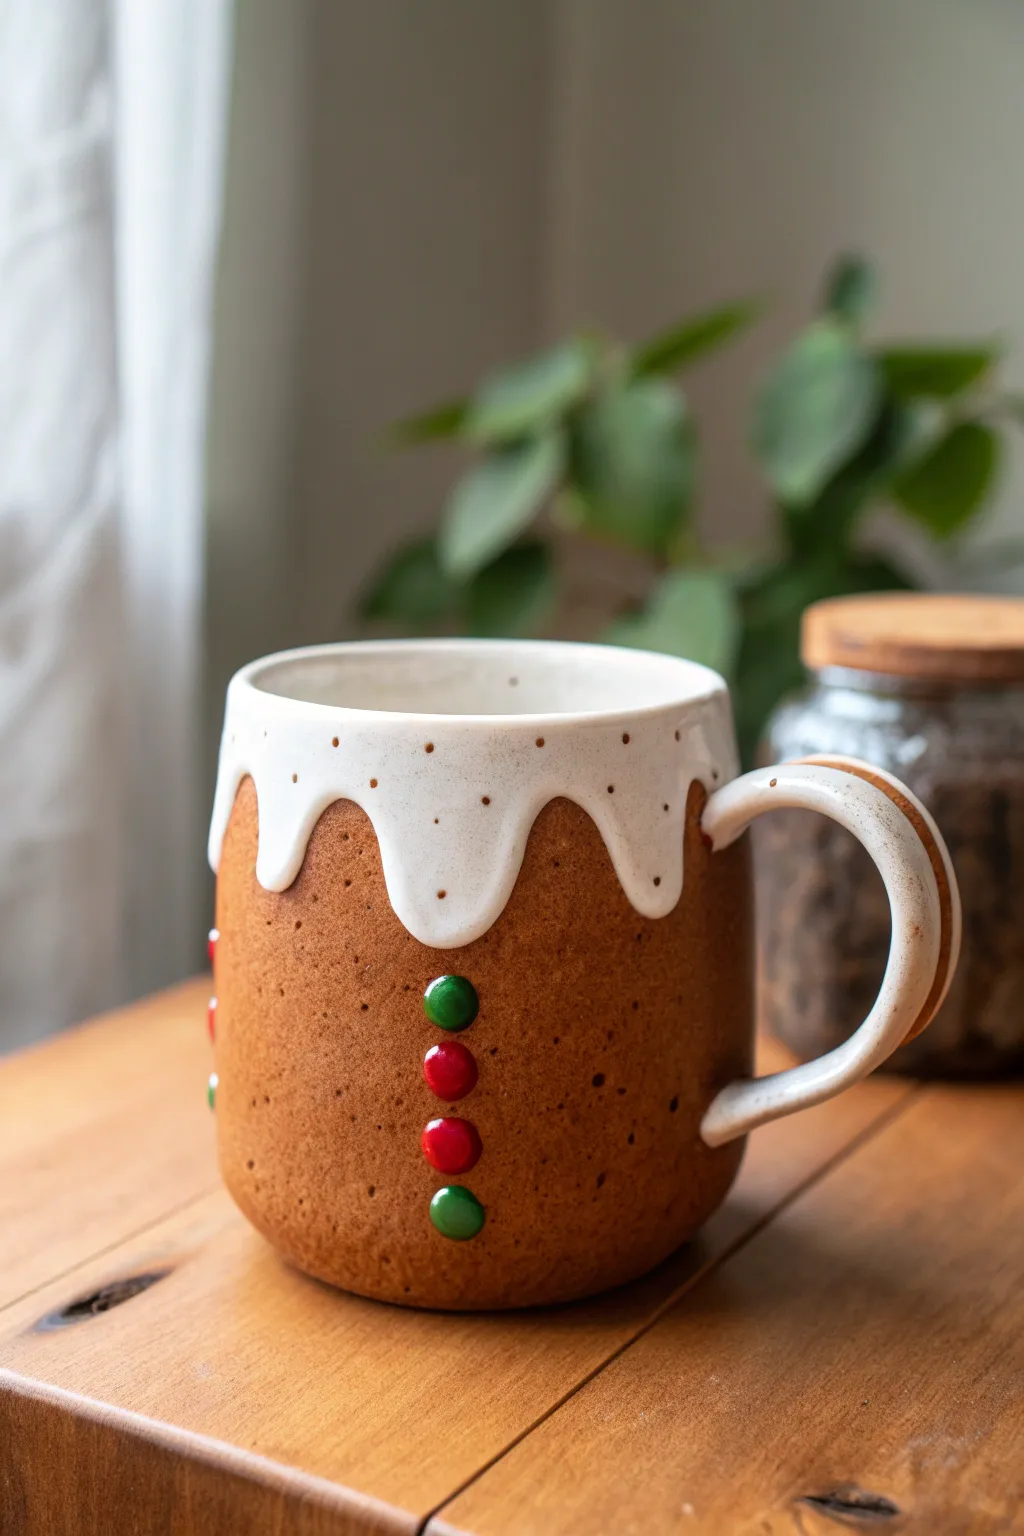
Transform your morning coffee routine with this deliciously deceptive mug that mimics the texture and charm of a classic gingerbread cookie. The speckled clay body and thick, glossy white glaze create a convincing baked effect, topped off with festive red and green candy buttons.
Step-by-Step Guide
Materials
- Stoneware clay (speckled or warm brown)
- White slip or white underglaze (thick consistency)
- Red and green underglaze
- Clear dipping glaze
- Rolling pin and guide sticks
- Mug template or ruler
- Pottery knife or needle tool
- Scoring tool and slip
- Small round cutter or straw (for buttons)
- Sponge
- Smoothing rib
- Kiln
Step 1: Forming the Mug Body
-
Roll the Slab:
Begin by rolling out your clay slab to a uniform thickness, about 1/4 inch. If you are using guide sticks, ensure they are placed securely to keep the height even. -
Cut the Rectangle:
Using your template or a ruler, cut a clean rectangle for the mug body. A standard size is roughly 12 inches long by 4.5 inches high, but adjust to your preference. -
Texture the Clay:
Before assembling, lightly sponge the surface to bring out the grog or speckles in the clay. This creates that slightly rough, ‘baked cookie’ texture we want rather than a perfectly smooth finish. -
Create the Cylinder:
Curve the slab into a cylinder. Bevel the short edges at a 45-degree angle to create a seamless overlap. -
Join the Seam:
Score the beveled edges thoroughly and apply slip. Press the edges together firmly and smooth the seam inside and out until it disappears. -
Add the Base:
Roll a small piece of clay for the base. Place your cylinder on top, trace around it, cut the circle, and attach it using the score-and-slip method. Use a smoothing rib to compress the join.
Drip Control
If your glaze is too thin, the ‘icing’ will run all the way down. Let your white glaze sit open for an hour to evaporate water and thicken up before dipping.
Step 2: Handle and Decoration
-
Pull the Handle:
Pull a strap handle or roll a coil, flattening it slightly. Shape it into a ‘question mark’ ear shape and let it stiffen slightly until it holds its form. -
Attach Handle:
Score and slip the contact points on both the mug and handle. Attach firmly, blending the clay at the joints for strength. Ensure the loop is large enough for comfortable gripping. -
Make the Buttons:
Roll a very thin coil of clay and cut small discs, or punch small circles from a thin slab. Gently round off the sharp edges with your finger so they look like rounded candies. -
Attach Buttons:
Score and slip the buttons onto the front of the mug in a vertical line. Press them in enough to adhere, but keep their dome shape intact.
Pro Tip: Cookie Texture
Use a darker stoneware clay with manganese speckles. When fired under a clear glaze, the natural speckles look exactly like spices in gingerbread dough.
Step 3: Glazing and Finishing
-
Bisque Fire:
Allow the mug to dry slowly and completely before loading it into the kiln for a bisque fire. -
Paint the Buttons:
Once bisqued, carefully paint the buttons with two coats of red and green underglaze. Alternate colors for that holiday pattern. -
The Drip Technique:
This is the crucial step. Mix your white glaze or slip to a very thick, heavy cream consistency. You want it to be viscous. -
Apply the Icing:
Dip just the rim of the mug into the white glaze. Immediately flip the mug upright and give it a gentle shake or tap on the table to encourage the heavy glaze to slide down in organic drips. -
Refine Drips:
I usually watch the drips for a few seconds; if one is running too far, I catch it with my finger. You want the heavy, scalloped look of royal icing. -
Wax Resist:
Apply wax resist over the white icing drips and the colored buttons to protect them. -
Clear Glaze:
Dip the entire mug into a clear, gloss glaze. The wax will prevent the clear glaze from adhering to the icing (which is already glazed) and buttons (unless you want them extra glassy), unifying the surface. -
Final Fire:
Fire the mug to the temperature required by your clay and glaze combination.
Enjoy your cozy new mug that looks good enough to eat with a warm holiday drink

The Complete Guide to Pottery Troubleshooting
Uncover the most common ceramic mistakes—from cracking clay to failed glazes—and learn how to fix them fast.
Holly Wreath Medallion
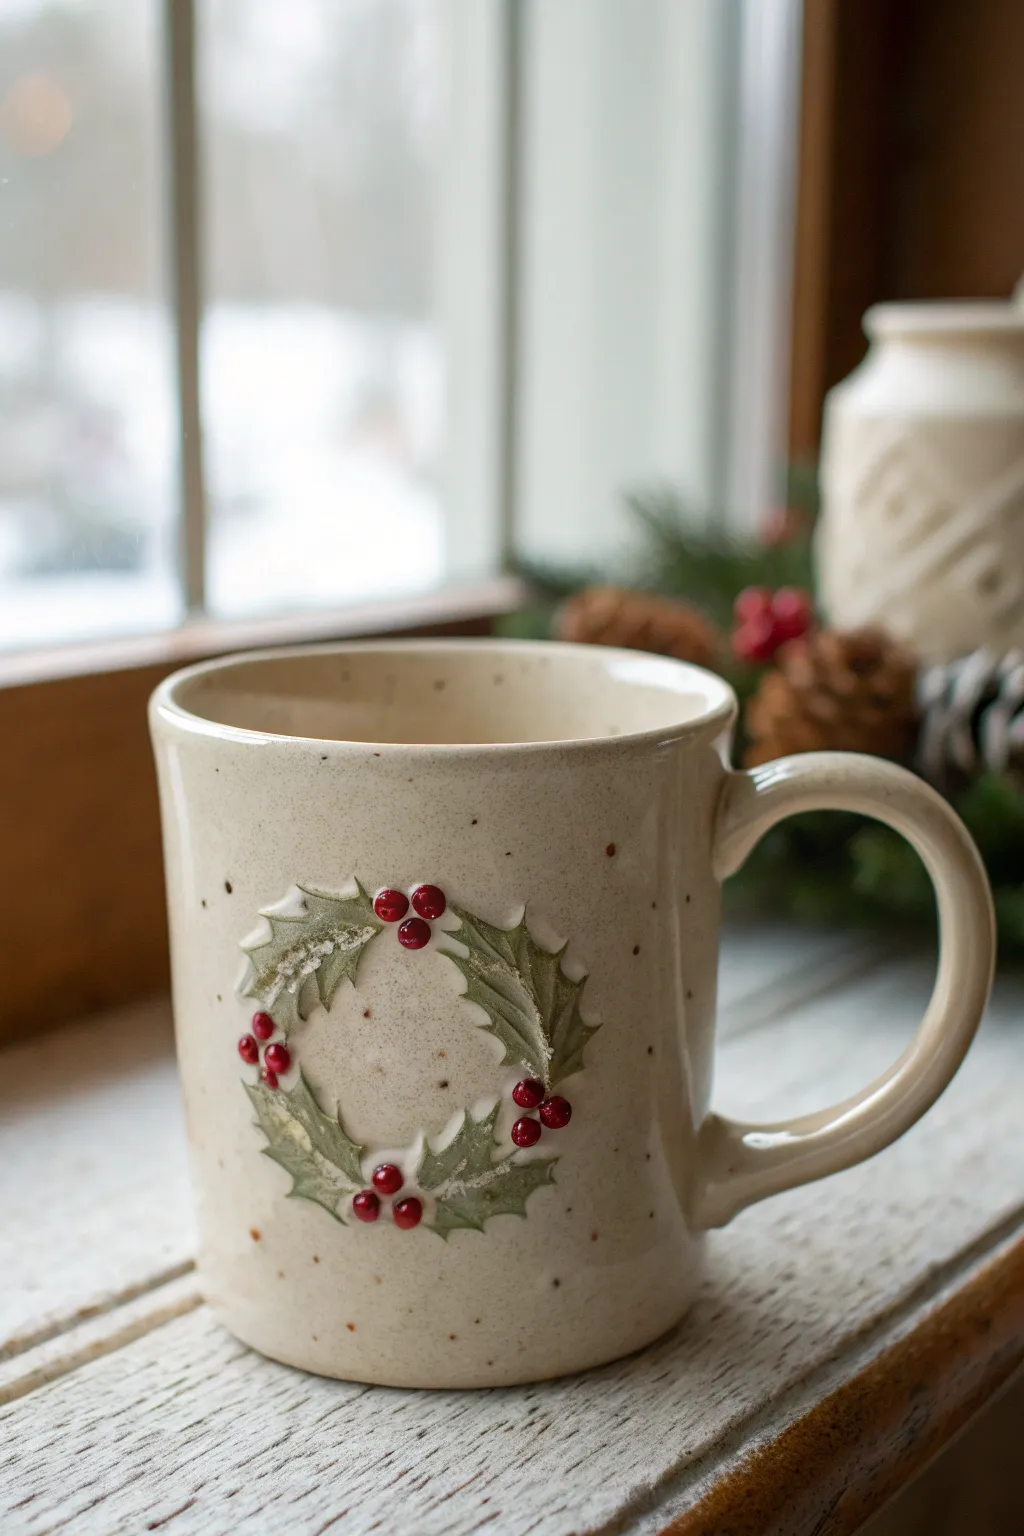
This charming project adds a touch of classic Christmas elegance to a simple speckled stoneware mug by utilizing bas-relief techniques. The raised holly leaves and bright red berries create a lovely tactile experience, perfect for sipping hot cocoa by a snowy window.
How-To Guide
Materials
- Speckled buff stoneware clay
- Rolling pin
- Needle tool or X-acto knife
- Slip (liquid clay)
- Scoring tool (or serrated rib)
- Small holly leaf cutter (optional)
- Underglazes: Deep Forest Green, Bright Red
- Clear transparent glaze
- Small detail brushes
- Sponge
Step 1: Forming the Mug Base
-
Roll the Slab:
Begin by rolling out a medium-sized slab of speckled buff stoneware clay to approximately 1/4 inch thickness. Ensure the thickness is even to prevent warping during firing. -
Cut the Body:
Measure and cut a rectangle for the body of the mug. A standard size is roughly 10-11 inches long and 4-5 inches high, but adjust this based on your preferred mug volume. -
Create the Cylinder:
Bevel the short edges of your rectangle at a 45-degree angle. Score these edges thoroughly, apply slip, and overlap them to form a cylinder. Compress the seam well from both the inside and outside. -
Attach the Base:
Roll a small separate piece of clay for the floor. Place your cylinder on top, trace around it, and cut out the circle. Score and slip the bottom of the cylinder and the edge of the circle, then join them firmly. -
Pull the Handle:
Pull a strap of clay for the handle, tapering it slightly. Shape it into a ‘C’ or ear shape and let it stiffen slightly so it holds its curve. -
Attach Handle:
Score and slip the attachment points on both the mug body and handle. Press the handle firmly onto the mug, smoothing the joints with a wooden tool or your finger to ensure a strong bond.
Cracking Leaves?
Thin appliqué dries faster than the mug body, causing cracks. Cover the finished mug with plastic for 24-48 hours to equalize moisture before unmasking.
Step 2: Sculpting the Holly Wreath
-
Map the Design:
Lightly trace a circle on the side of the mug using a needle tool to guide where your wreath will sit. This ensures your layout remains centered. -
Create Leaves:
Roll a very thin coil of clay and flatten it slightly, or roll a thin slab and cut out small, spiky holly leaf shapes. You can use a tiny cookie cutter, but hand-cutting gives them a more organic, rustic look. -
Texture the Leaves:
Use a needle tool to gently impress a central vein down the middle of each leaf. I like to lift the edges slightly to give them a three-dimensional, fluttering appearance. -
Attach Leaves:
Score and slip the traced circle area and the backs of your leaves. Arrange the leaves in a circular pattern, overlapping them slightly to create a continuous wreath. -
Add Berries:
Roll tiny spheres of clay for the berries. Make them in clusters of two or three. -
Secure Berries:
Score small spots on top of or between the leaves where you want the berries to sit. Apply a dot of slip and press the berries gently into place.
Snowy Texture
For a frosty look, lightly sponge a white underglaze onto the leaf tips before the final clear glaze layer creates that wintery magic.
Step 3: Finishing and Glazing
-
Bisque Fire:
Allow the mug to dry slowly and completely under loose plastic to prevent the handle or appliqué from cracking. Once bone dry, bisque fire to Cone 04 (or your clay’s specification). -
Apply Underglaze:
Using a fine detail brush, paint the leaves with Deep Forest Green underglaze. Use a lighter touch on the high points to let the clay speckles show through later. -
Paint Berries:
Carefully dab Bright Red underglaze onto the berry clusters. Apply two coats for opacity to ensure a vibrant pop of color against the neutral clay. -
Wax Resist (Optional):
If you want the wreath to remain matte or satin while the mug is glossy, carefully apply wax resist over the painted wreath design. -
Dip in Clear:
Dip the entire mug into a clear transparent glaze. The speckled clay body provides the natural ‘oatmeal’ background without needing colored glaze. -
Glaze Fire:
Fire the mug to maturity (usually Cone 5 or 6 for stoneware). The clear glaze will seal the piece and make the underglaze colors vibrant.
Enjoy using your festive handmade mug for warm drinks all season long
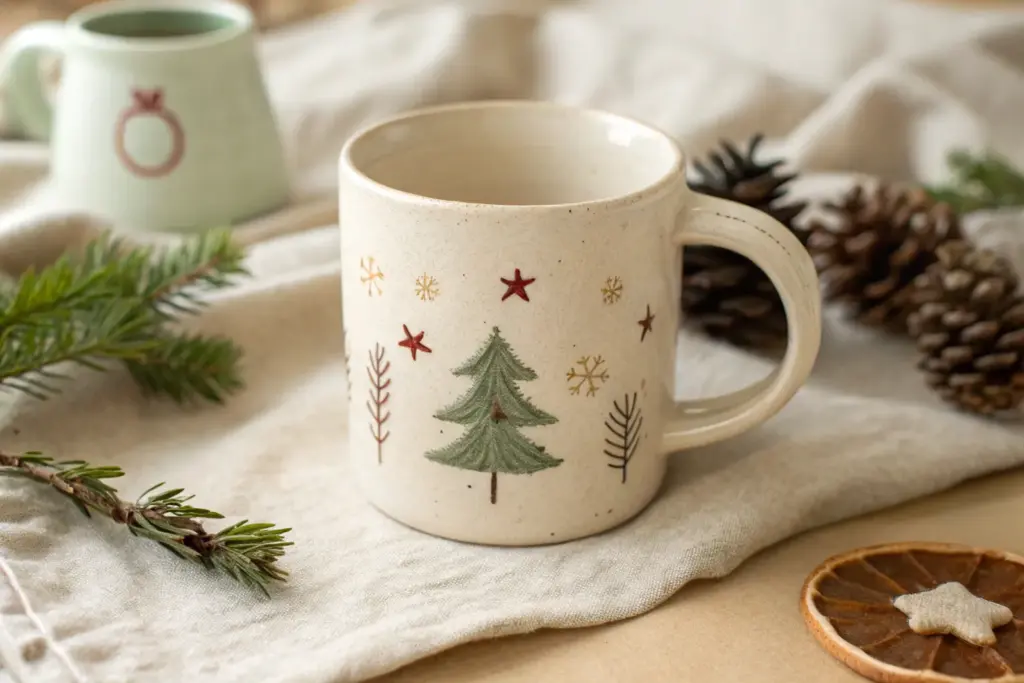
Mini Christmas Tree Centerpiece
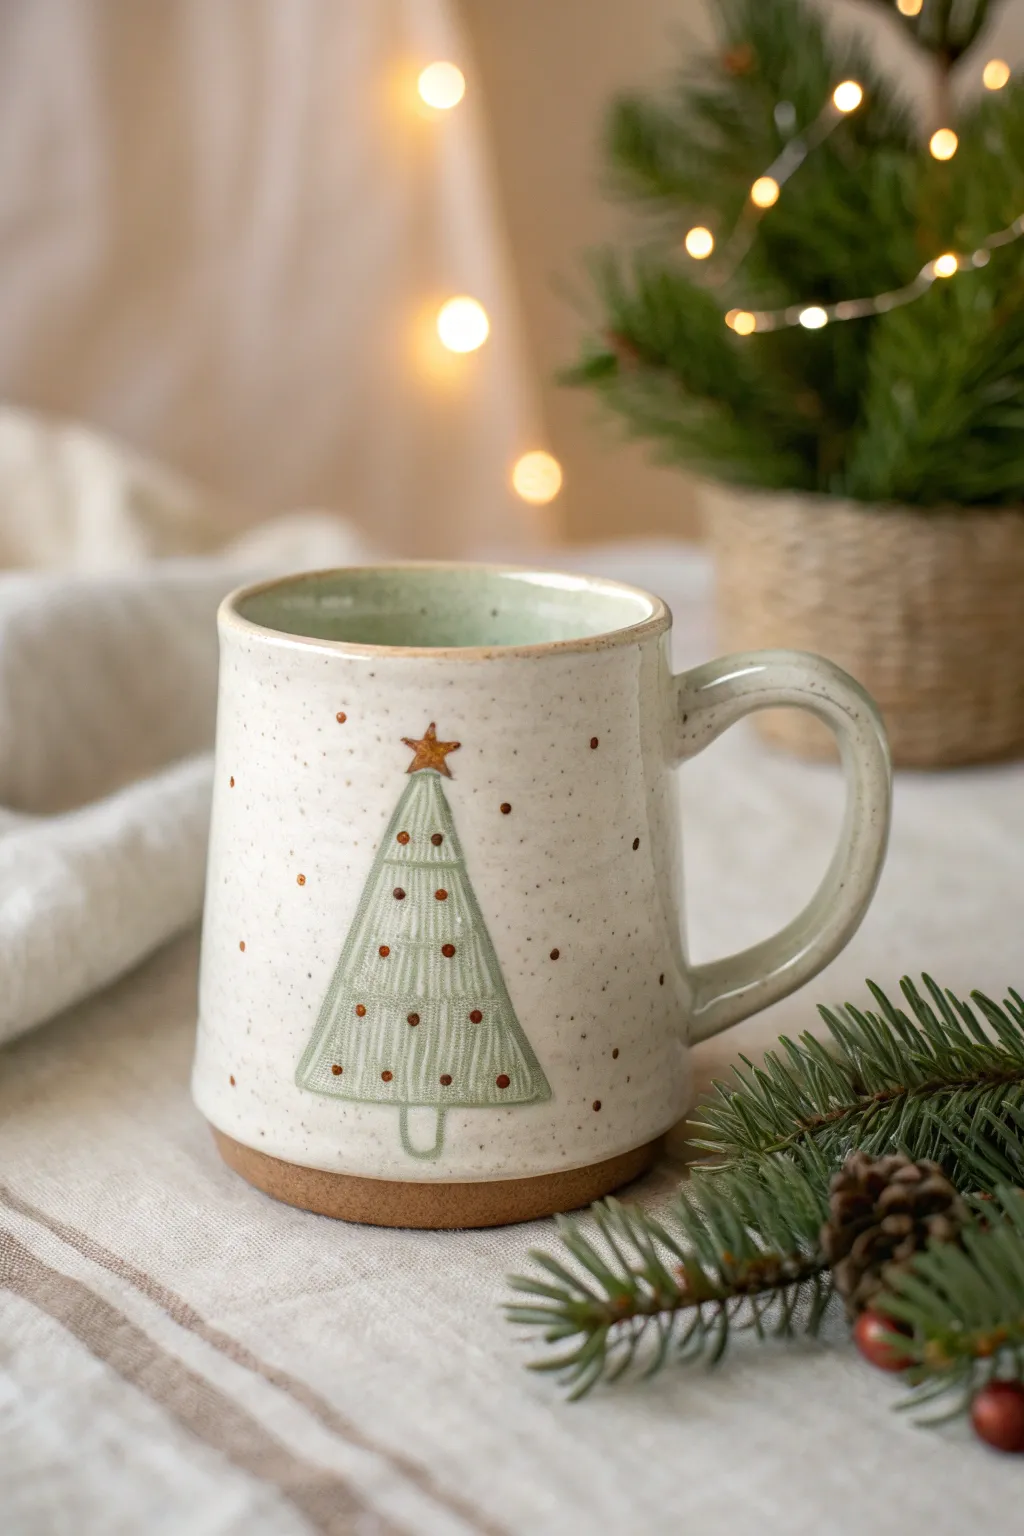
Embrace the cozy charm of the holidays with this hand-built ceramic mug, featuring subtle speckles and a whimsical evergreen tree design. Its sturdy handle and creamy, natural finish make it the perfect vessel for warm winter drinks.
Detailed Instructions
Materials
- Stoneware clay (speckled or buff)
- Rolling pin
- Canvas mat or slab roller
- Rectangle template (approx. 4″ x 11″)
- Needle tool
- Scoring tool or fork
- Slip (clay mixed with water)
- Sponge
- Underglaze (sage green, reddish-brown, gold/yellow)
- Fine detail paintbrush
- Clear or transparent matte glaze
- Kiln access
Step 1: Forming the Mug Body
-
Roll the Slab:
Begin by rolling out a medium-sized ball of clay on your canvas mat until it is a uniform slab, roughly 1/4 inch thick. Compress the slab on both sides with a rib tool to prevent warping later. -
Cut the Rectangle:
Place your paper template onto the slab and trace around it with a needle tool. Cut out the rectangle, which will become the walls of your mug. -
Bevel the Edges:
Cut the shorter ends of your rectangle at a 45-degree angle in opposite directions so they will overlap seamlessly when formed into a cylinder. -
Join the Seams:
Score the beveled edges thoroughly and apply a generous amount of slip. Bring the ends together to form a cylinder, pressing the seam firmly. Smooth the join inside and out until it disappears. -
Attach the Base:
Roll a smaller piece of clay for the base. Place your cylinder on top, trace around it, and cut out the circle. Score and slip both the bottom edge of the cylinder and the base, then press them together firmly. -
Refine the Lip:
Use a damp sponge or a chamois cloth to smooth the rim of the mug, ensuring it is rounded and comfortable for drinking. I like to spend extra time here to make sure it’s perfectly smooth.
Crack Control
If small cracks appear at the handle join while drying, compress the area with a rounded tool and apply a tiny bit of vinegar slip to mend them immediately.
Step 2: Adding the Handle
-
Pull or Roll a Coil:
Create a thick coil or strip of clay for the handle. If pulling the handle, use water to shape it into a tapered curve. If rolling, flatten it slightly for a comfortable grip. -
Shape and Dry:
Curve the clay into a ear-shape and hold it against the mug to check proportions. Let it stiffen slightly on a board for about 15-20 minutes so it holds its shape during attachment. -
Attach the Handle:
Score the attachment points on both the mug and the handle ends. Apply slip and press the handle firmly onto the mug body. Use a small wooden tool to blend the clay at the connection points for a strong bond.
Rustic Reveal
Wipe back the underglaze slightly with a damp sponge before the clear glaze firing. It creates a vintage, worn look that highlights the clay’s natural texture.
Step 3: Decorating and Glazing
-
Outline the Tree:
Once the mug is leather-hard, use a needle tool to faintly scratch a triangle shape for the Christmas tree on the front. Add a small rectangle at the bottom for the trunk. -
Paint the Base Green:
Using sage green underglaze, fill in the triangle shape. You may need 2-3 coats for opacity, allowing each layer to dry briefly in between. -
Add Texture Details:
Take a very fine brush with a slightly darker green or watered-down black underglaze to paint delicate vertical lines inside the tree for a pine needle effect. Alternatively, you can carve these lines through the green paint (sgraffito technique) to reveal the clay underneath. -
Paint Ornaments and Star:
Dip a fine brush or the end of a matchstick into reddish-brown underglaze to dot small ornaments onto the tree. Paint a small star at the peak using a gold or yellow underglaze. -
Add Snowy Dots:
Scatter tiny dots of the reddish-brown underglaze around the background of the mug to mimic falling snow or floating embers, adding to that rustic holiday feel. -
Bisque Fire:
Allow the mug to dry completely (bone dry) before firing it in a bisque kiln to approximately Cone 04. -
Apply Glaze:
Dip the bisqued mug into a clear or transparent matte glaze. If you used a plain clay body and want the spotted look shown, use a ‘speckled’ clear glaze. -
Final Firing:
Fire the mug again to the maturity temperature of your clay and glaze (typically Cone 5 or 6). Once cool, sand the bottom if necessary to ensure it sits flat.
Enjoy sipping your favorite hot cocoa from your beautiful new handmade holiday mug


What Really Happens Inside the Kiln
Learn how time and temperature work together inside the kiln to transform clay into durable ceramic.
String of Lights Garland Wrap
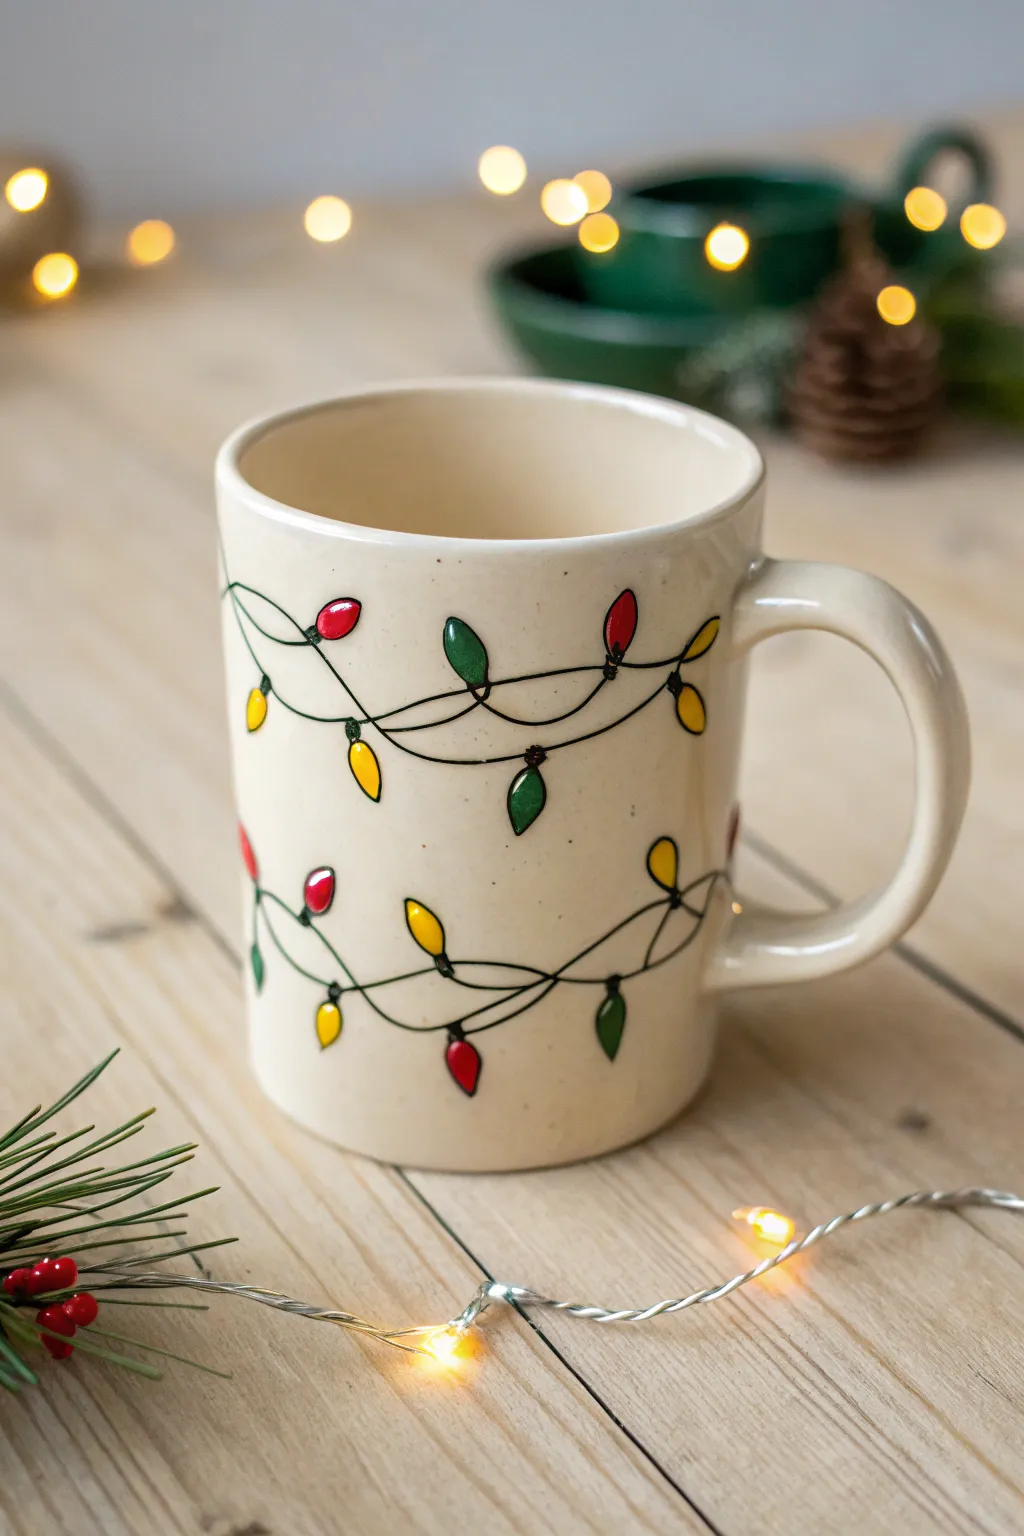
Brighten up your morning coffee with this festive mug featuring a playful string of holiday lights that wraps endlessly around the cup. The simple, looping black wire design allows you to add pops of cheerful color with classic bulb shapes for a nostalgic, handmade touch.
Step-by-Step Tutorial
Materials
- Bisque-fired ceramic mug (beige or cream stoneware)
- Underglaze pencil or fine liner brush (black)
- Ceramic glazes (Red, Forest Green, Bright Yellow)
- Detail brush (size 0 or 00 round)
- Clear dipping glaze
- Pencil for sketching
- Kiln (or oven if using oil-based baked paints)
Step 1: Planning the String
-
Clean the surface:
Before starting, wipe down your bisque mug with a slightly damp sponge to remove any dust or oils from your hands, ensuring the glaze adheres perfectly. -
Sketch the path:
Using a regular graphite pencil, lightly draw a wavy, looping line that travels all the way around the mug. Let the lines cross over each other gently to create a natural tangled look. -
Plan bulb placement:
Mark small “X” spots or dots along your pencil line where you want your light bulbs to hang. Spacing them irregularly makes the strand feel more authentic.
Step 2: Drawing the Wiring
-
Trace the wire:
Using a black underglaze pencil or a very fine liner brush dipped in black underglaze, carefully trace over your graphite line. Keep the pressure consistent for a thin, even wire. -
Add the sockets:
At each spot where you planned a bulb, paint a tiny black rectangle or trapezoid directly onto the wire line to represent the socket base. -
Create loops:
Where the wire wraps around the socket, add a tiny extra loop of black ink to show how the cord twists around each fixture.
Glaze Consistency
For the bulbs, use glaze the consistency of heavy cream. Too thin and it will run; too thick and it might crawl. Two generous coats usually work best.
Step 3: Painting the Bulbs
-
Outline the bulbs:
Using your detail brush, carefully paint the teardrop outline of the first color bulbs (let’s start with red) attached to the black sockets. -
Fill the color:
Fill in the outlines with your red glaze. I find that dabbing the glaze on thick creates a nice raised texture, rather than brushing it flat. -
Switch colors:
Rinse your brush thoroughly and repeat the process for the green bulbs. Try to distribute the colors randomly so no two same-colored lights are right next to each other. -
Add the yellow:
Finish by painting the remaining teardrop shapes with bright yellow glaze to complete the trio of classic holiday colors. -
Clean up edges:
If any glaze spilled outside the lines, use a clean, slightly damp brush or a rubber tipped tool to gently scrape or wipe away the excess.
Make it Sparkle
Use a metallic gold luster over the yellow bulbs after the main firing (requires a second low-fire) to make some of the lights truly shine like gold.
Step 4: Firing and Finishing
-
Add highlights (optional):
For extra dimension, add a tiny dot of white underglaze to the upper curve of each bulb to mimic a light reflection. -
Burn off pencil:
Don’t worry about erasing your original sketch marks; the graphite will burn away completely in the kiln, leaving only your painted design. -
Dip in clear glaze:
Once the underglaze design is fully dry to the touch, dip the entire mug into a clear transparent glaze to seal the design and make it food safe. -
Check the foot:
Wipe the bottom foot of the mug with a sponge to ensure no glaze is left there, which would stick to the kiln shelf. -
Fire the mug:
Load the mug into the kiln and fire it according to the specific temperature requirements of your clay and glaze combination.
Enjoy your cozy new mug filled with hot cocoa and admire the festive glow of your hand-painted lights
Ugly Sweater Texture Band
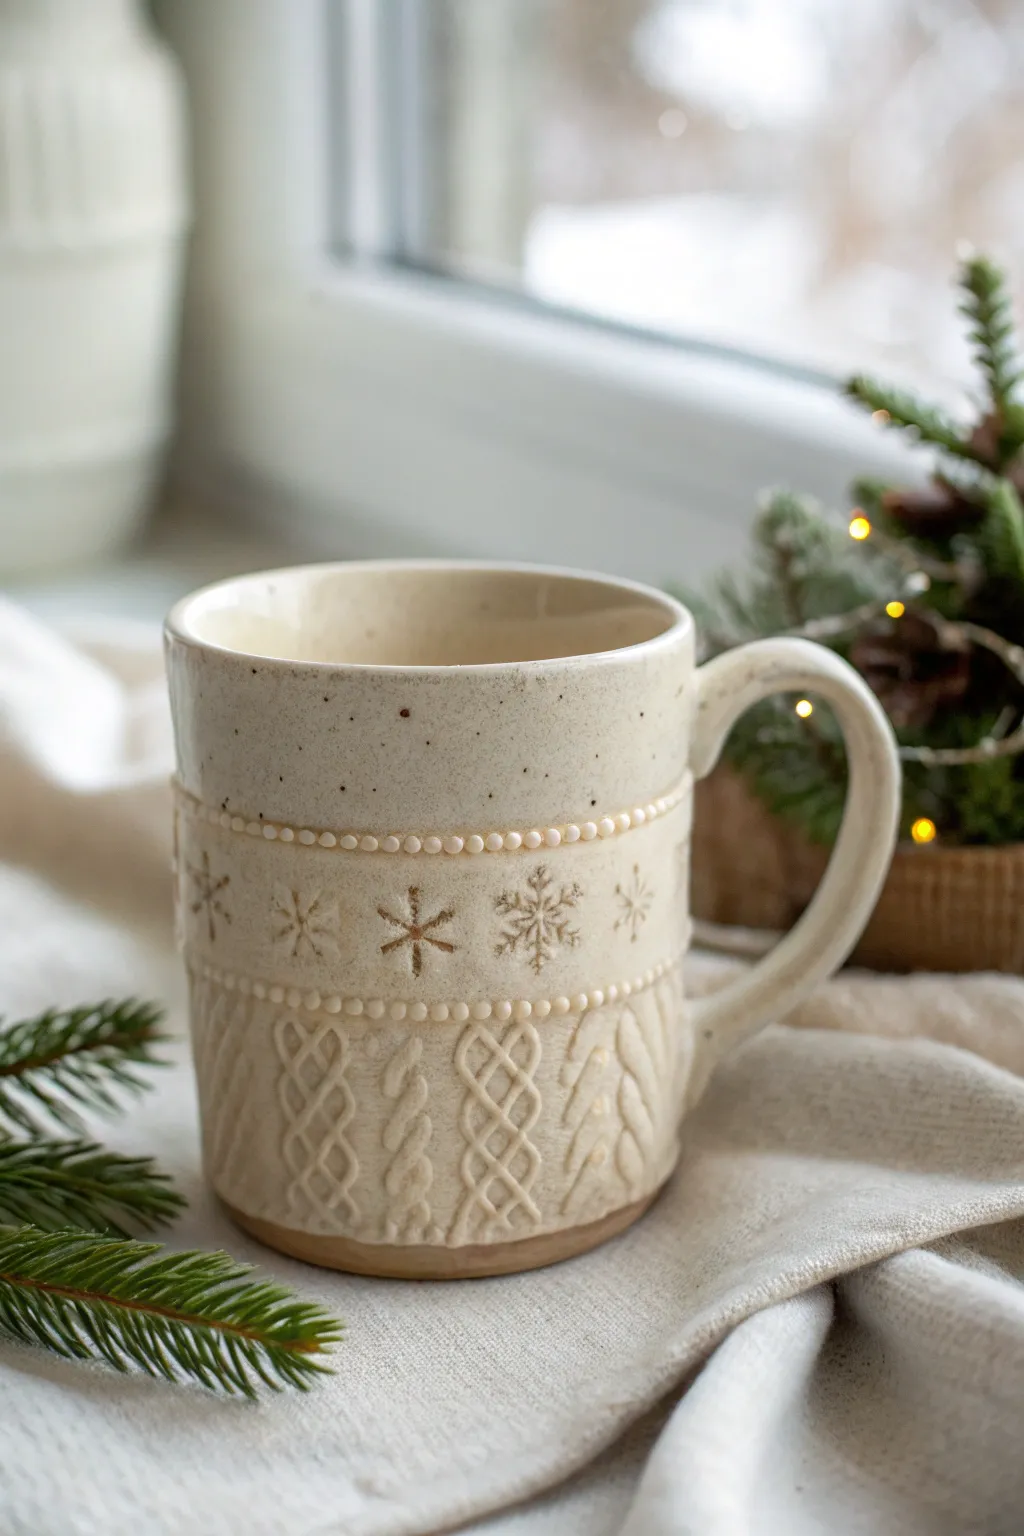
Capture the warmth of a winter sweater in ceramic form with this textured mug project. This design combines a classic cable-knit pattern with delicate stamped snowflakes, all finished in a creamy, speckled glaze that feels perfect for hot cocoa.
Step-by-Step
Materials
- Stoneware clay body (white or buff)
- Pottery wheel (or slab roller for hand-building)
- Needle tool
- Small extruder tool (clay gun)
- Cable knit texture roller or carved stamp
- Snowflake mini-stamps (various sizes)
- Slip and scoring tool
- Sponge
- Cream/Oatmeal speckled glaze
- Clear glaze (optional)
Step 1: Forming the Mug Body
-
Throw the cylinder:
Begin by centering your clay on the wheel and throwing a straight-sided cylinder. Aim for a height of about 4-5 inches, keeping the walls relatively thick (about 1/4 inch) to support the added texture later. -
Shape the profile:
Gently belly out the form slightly if you prefer a rounder look, but keep the sides vertical enough to display the texture bands clearly. Refine the lip so it is comfortable for drinking. -
Trim the base:
Once leather hard, trim a distinct foot ring on the bottom. I like to leave a small unglazed reveal near the bottom edge for a rustic touch.
Sticky Stamps?
If your snowflake stamps are sticking to the clay, dust them lightly with cornstarch or baking soda before pressing. This acts as a release agent and burns off in the kiln.
Step 2: Creating the Sweater Texture
-
Roll out clay coil:
Using your extruder or rolling by hand, create thin coils of clay. You will need these for the braided cable-knit look if you are sculpting it manually. -
Apply the cable pattern:
Determine the bottom section of your mug (the lower third). If using a texture roller, firmly roll the cable-knit pattern onto a slab of clay, cut a strip, and attach it to the mug. Alternatively, braid two thin coils together and score-and-slip them vertically onto the mug surface to mimic knitting. -
Add vertical dividers:
Between your cable braids, place simple vertical coils or textured strips to separate the patterns, just like a real Aran sweater. -
Smooth the joins:
Carefully blend the edges of your added clay pieces so they adhere well, but try not to smudge the beautiful knit texture.
Faux-Knit Handle
Take the sweater theme further by adding a braided coil of clay down the center of the handle, giving your fingers a textured grip that matches the mug’s body.
Step 3: The Snowflake Band
-
Create the pearl borders:
Roll two very thin clay coils. Attach one horizontally above the cable-knit section and another about an inch above that. Use a dull tool or the back of a paintbrush to press small indents along these coils, turning them into rows of ‘pearls’ or beads. -
Clear the middle canvas:
Ensure the space between your two pearl rows is smooth. This 1-inch band is where your snowflakes will live. -
Stamp the snowflakes:
Press your snowflake stamps into the clay between the pearl borders. Alternate between different snowflake designs or sizes for variety. Press deep enough to hold glaze, but not through the wall. -
Add the handle:
Pull a sturdy C-shaped handle. Attach it securely, ensuring the top attachment blends into the smooth upper rim and the bottom attachment sits comfortably near the textured area.
Step 4: Glazing and Firing
-
Bisque fire:
Slowly dry the mug to prevent cracking around the added textures. Once bone dry, bisque fire to cone 04. -
Select your glaze:
Choose a creamy, semi-opaque glaze, preferably one with iron speckles. The semi-opaque quality is crucial because it will pool in the cable divots and break over the high points, highlighting the texture. -
Dip and clean:
Dip the entire mug into your glaze. Shake off excess immediately so the texture doesn’t get flooded and lost. -
Wipe the foot:
Use a damp sponge to wipe the glaze off the very bottom foot ring and slightly up the side if you want that exposed clay look shown in the inspiration image. -
Glaze fire:
Fire to the maturity temperature of your clay and glaze (typically Cone 5 or 6 for stoneware). Allow the kiln to cool completely before unloading.
Now you have a mug that feels just as warm and comforting as the beverage inside it

TRACK YOUR CERAMIC JOURNEY
Capture glaze tests, firing details, and creative progress—all in one simple printable. Make your projects easier to repeat and improve.
Winter Cabin Relief Scene
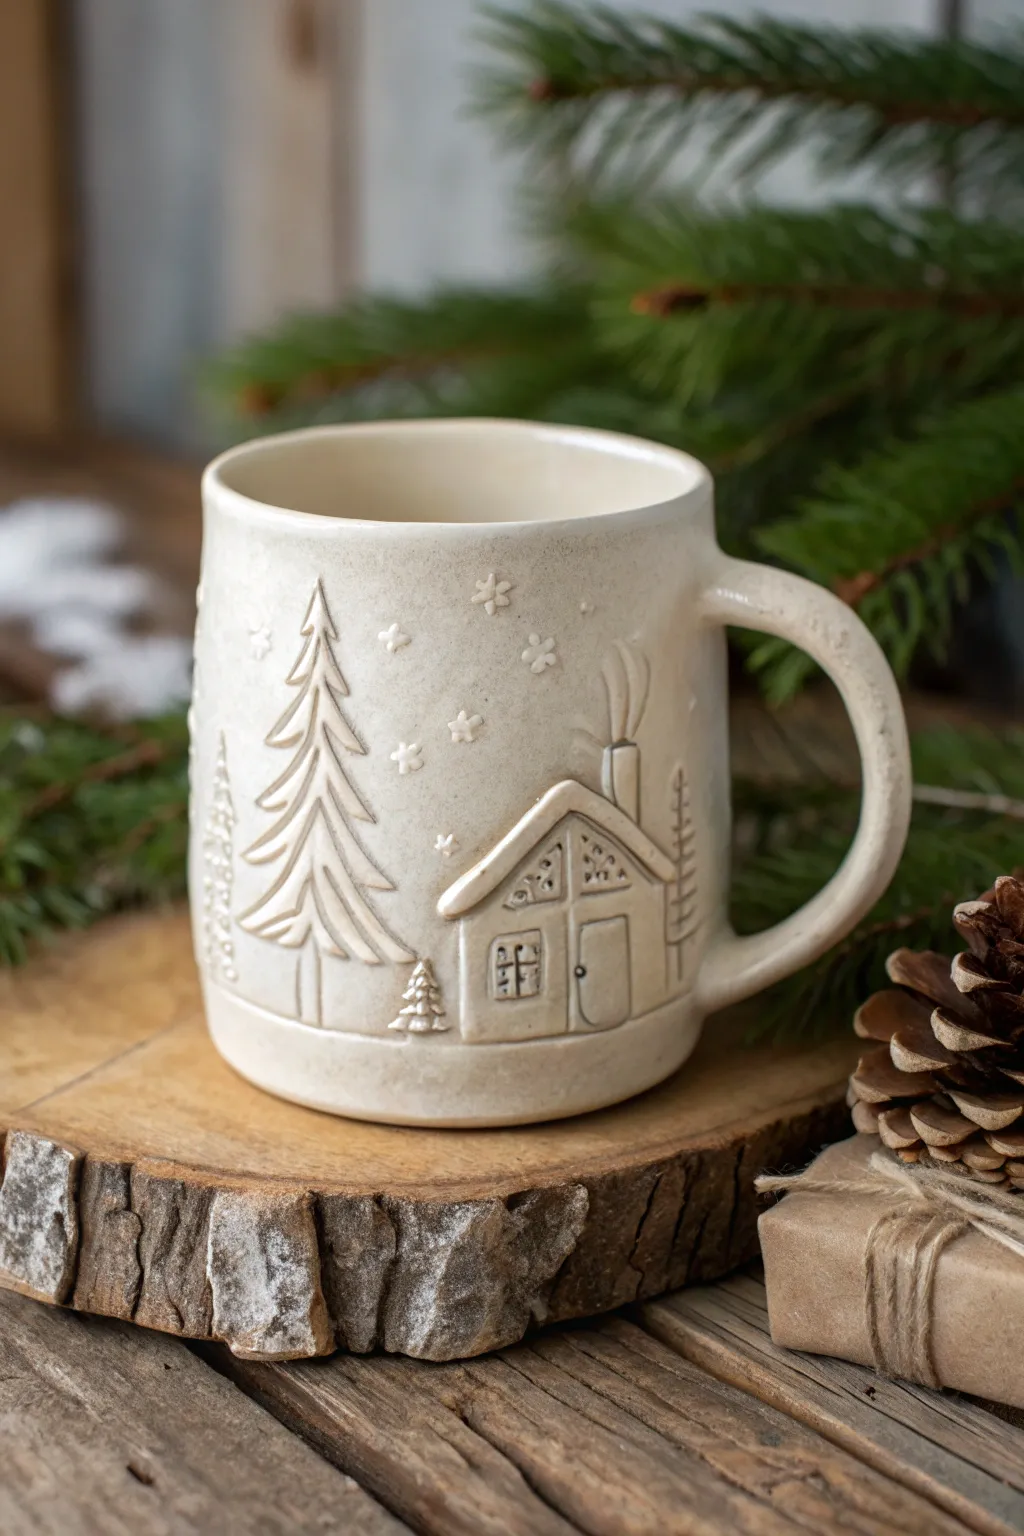
Capture the stillness of a snowy evening with this charming ceramic mug, featuring a raised relief design of a rustic cabin and pine trees. The creamy white glaze highlights the subtle textures, making it the perfect vessel for your favorite hot holiday beverage.
How-To Guide
Materials
- White stoneware clay body (cone 5/6 recommended)
- Pottery wheel (or slab roller/rolling pin for hand-building)
- Rib tool (kidney)
- Needle tool
- Small loop tool or carving set
- Slip and scoring tool
- Soft paintbrush
- Sponge
- Creamy white satin or matte glaze
- Small snowflake stamps (optional)
- Wooden modeling tool
Step 1: Forming the Base Mug
-
Prepare the clay:
Begin by wedging about 1 to 1.5 pounds of white stoneware clay to remove air bubbles and ensure a consistent texture. -
Throw the cylinder:
Center your clay on the wheel and throw a straight-sided cylinder. Aim for walls that are slightly thicker than usual—about 1/4 inch—to support the added relief elements later without warping. -
Refine the shape:
Use a rib tool to smooth the exterior and create a slight inward curve at the rim for a comfortable drinking edge. Trim the base if necessary. -
Create a handle:
Pull a strap handle from a separate piece of clay. Let it set up to a soft leather-hard stage, curve it into a comfortable ear shape, and attach it to the mug using the score and slip method. Smooth the connection points perfectly.
Clean Lines
When attaching the tiny cabin pieces, use a damp paintbrush immediately to wipe away excess slip. This keeps the relief edges crisp and prevents messy blobs.
Step 2: Sculpting the Relief Scene
-
Sketch the design:
Once the mug is leather-hard, lightly sketch your cabin and tree placement directly onto the surface using a needle tool. Don’t press too hard; these are just guide lines. -
Add clay for the cabin:
Roll out a very thin slab of clay (about 1/8 inch). Cut out the basic house shape—a rectangle for the base and a triangle for the roof—and attach them to your sketched area with slip. -
Define the cabin details:
Use a wooden modeling tool to press in details like the door frame and the window grid. Add a tiny chimney rectangle to the roof. -
sculpt the pine trees:
For the trees, you have two options: either add thin triangular coils and blend them down, or carve away the negative space around the tree shape. I prefer adding clay to create a true raised relief. -
Texture the trees:
Using a small carving tool or needle, create downward strokes on your tree shapes to mimic pine boughs. Vary the pressure to give the branches depth. -
Create the background trees:
For the smaller trees in the distance (like on the far left), simply incise or carve the tree outline directly into the mug wall rather than adding clay, creating visual depth. -
Add smoke and snow:
Roll tiny, thin coils to create the curling smoke coming from the chimney. For the snowflakes, either use a specialized small stamp or press a star-shaped tool gently into the sky area. -
Smooth and refine:
Go over all your attached edges with a damp brush. This smooths out any harsh connection points and ensures the relief looks integrated, not just stuck on.
Step 3: Glazing and Firing
-
Bisque fire:
Allow the mug to dry slowly and completely to avoid cracks, especially around the handle and relief attachments. Fire to bisque temperature (usually Cone 04). -
Clean the bisque:
Wipe the fired mug with a damp sponge to remove any kiln dust, which helps the glaze adhere properly. -
Apply the glaze:
Dip the mug into a creamy white satin or matte glaze. Avoid high-gloss glazes, as they tend to obscure the fine relief details. -
Check the thickness:
Ensure the glaze isn’t too thick where the tiny windows and snowflakes are; you want the glaze to ‘break’ over the textured edges to highlight the design. -
Wipe the foot:
Clean the bottom of the mug with a sponge to prevent it from sticking to the kiln shelf. -
Final fire:
Fire the mug to maturity (Cone 5 or 6, depending on your clay and glaze). Let the kiln cool naturally before opening.
Warping Walls?
If the mug wall starts to buckle while you are pressing on the relief details, support the inside of the mug with your other hand or a dry sponge for counter-pressure.
Once cooled, your custom winter mug is ready to be filled with hot cocoa and enjoyed by the fire
Poinsettia Flower Cluster
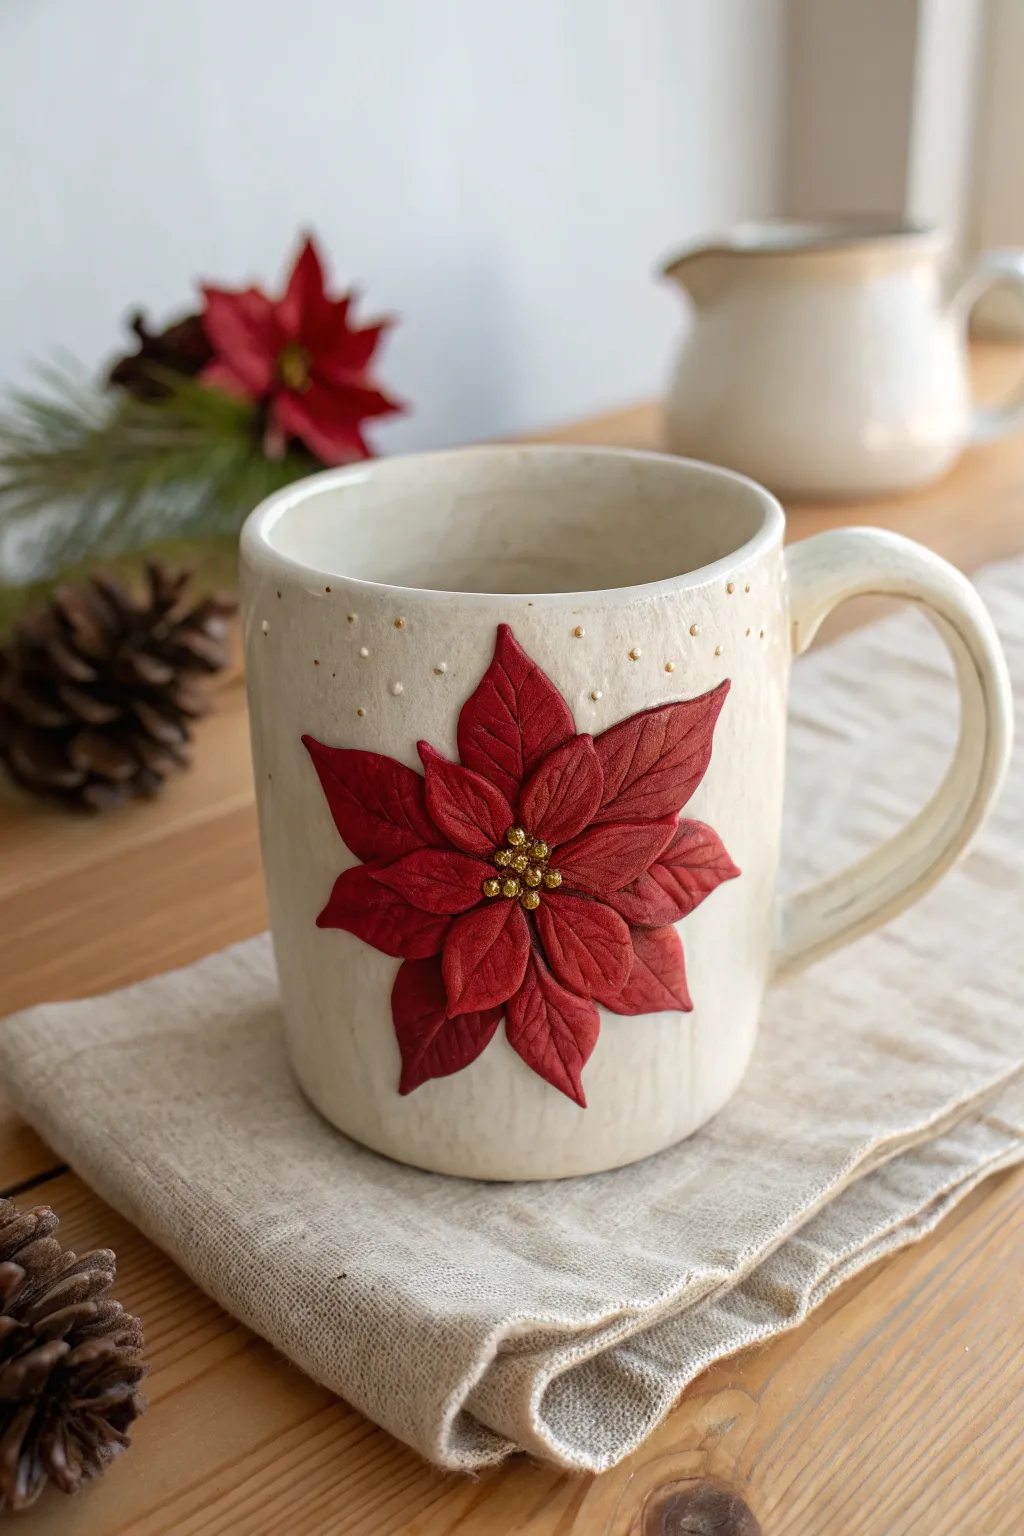
Transform a plain ceramic mug into a festive masterpiece with this elegant raised relief design. Using polymer or air-dry clay, you’ll sculpt a stunning red poinsettia that blooms right off the surface, accented with delicate gold detailing for a touch of holiday sparkle.
Step-by-Step
Materials
- Plain white ceramic mug (smooth surface)
- Red polymer clay (e.g., Fimo or Sculpey)
- Gold polymer clay or small gold beads
- Liquid polymer clay (Bake & Bond) or strong ceramic glue
- Sculpting tools (needle tool, small ball stylus)
- Rubbing alcohol and cotton pads
- Gloss varnish or resin (optional)
- Oven (if using polymer clay)
Step 1: Preparation & Base
-
Clean surface:
Begin by thoroughly cleaning the exterior of your mug with rubbing alcohol. This removes oils and fingerprints, ensuring the clay adheres properly to the ceramic surface. -
Design placement:
Decide exactly where you want the flower cluster. It’s best to place it opposite the handle or slightly off-center so it remains comfortable to hold while drinking. -
Adhesive layer:
Apply a thin smear of liquid polymer clay (or bake-able adhesive) to the center of your chosen spot. This acts as the anchor for the flower petals.
Needle Tool Trick
Leaf veins look stiff if they are too straight. Curve your needle tool slightly as you drag it through the clay to give the petals movement and life.
Step 2: Sculpting the Poinsettia
-
Prepare clay:
Condition your red clay by kneading it until it is soft and pliable. This prevents cracking later during the baking process. -
Form teardrops:
Roll small balls of red clay in varying sizes—you will need about 5 large ones for the bottom layer, 5 medium ones for the middle, and 3-4 small ones for the top. -
Shape petals:
Take a clay ball and pinch one end to create a teardrop shape. Flatten it gently between your thumb and forefinger to form a leaf-like petal. -
Add texture:
Using a needle tool or a dull knife edge, carefully score a central vein down the middle of the petal. Then, add smaller diagonal veins branching out from the center to mimic a real poinsettia leaf. -
Base layer:
Place the largest petals onto the prepared adhesive spot on the mug, arranging them in a radial star pattern. Press the centers firmly against the mug, but leave the tips slightly lifted for dimension. -
Middle layer:
Repeat the texturing process with the medium-sized petals. Layer these over the gaps between the larger base petals, pressing the centers down to bond them. -
Top layer:
Add the smallest petals in the very center to complete the bloom. I sometimes like to curl one or two petal tips inward slightly for a more organic, natural look.
Step 3: Finishing Details
-
Center cluster:
Roll tiny spheres of gold clay (or use pre-made gold micro-beads). Cluster about 6-8 of these in the very center of the flower to create the cyathia (the flower’s central buds). -
Texture check:
Use your needle tool to re-emphasize any vein lines that might have been flattened while you were layering the petals. -
Gold accents:
Take tiny pin-sized bits of gold clay and press them onto the mug surface randomly around the flower, creating a scattered ‘snow’ or stardust effect. -
Final clean:
Wipe away any fingerprints or smudges on the ceramic around the clay work using a cotton swab dipped in a little alcohol. -
Baking:
Place the mug in a cold oven and set it to the temperature recommended on your clay package (usually around 275°F/130°C). Let it heat up with the oven to prevent the ceramic from cracking. -
Cooling:
Once the baking time is up, turn off the oven and leave the door slightly ajar. Let the mug cool down completely inside the oven before removing it. -
Sealing (Optional):
For extra durability, carefully brush a coat of gloss varnish or resin over the clay flower, avoiding the ceramic mug surface part.
Clay Won’t Stick?
If the clay keeps sliding off while you work, your mug might be too glossy. Use liquid clay adhesive generously, or gently sand the spot under the flower.
Enjoy sipping your warm winter beverages from this beautiful, custom-designed holiday mug
Mini Snow Globe Frame Scene
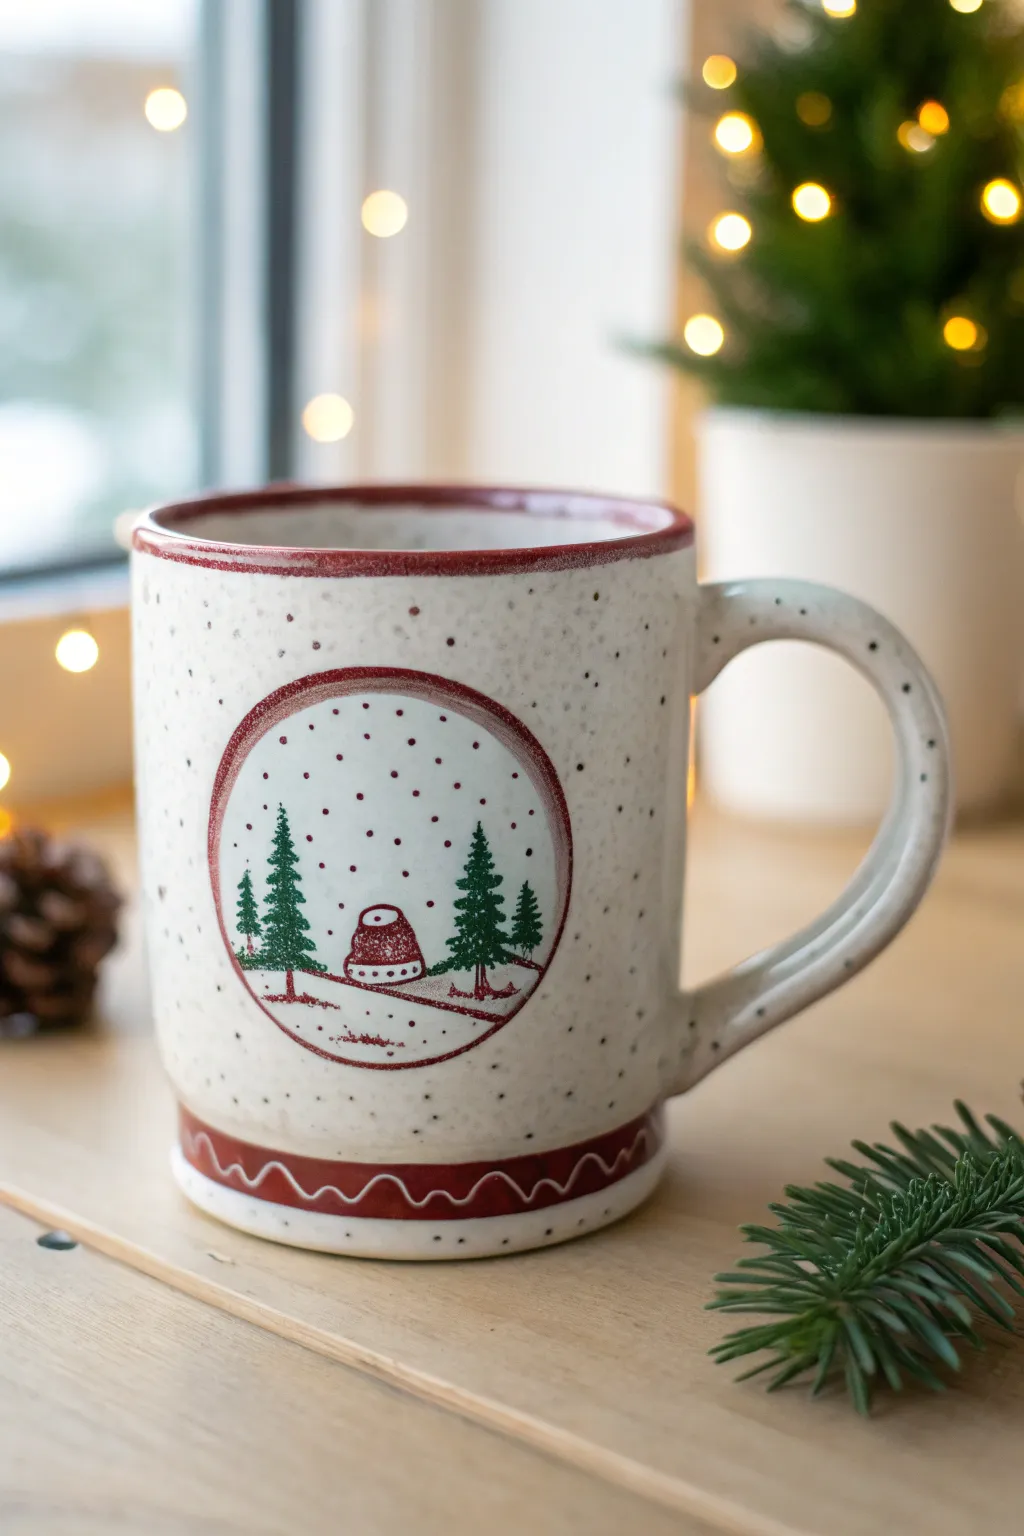
Create a cozy winter wonderland right on your coffee cup with this speckled ceramic mug tutorial. The design features a charming circular vignette, framing a snowy forest scene with a pop of holiday red that feels both rustic and timeless.
Step-by-Step Tutorial
Materials
- Stoneware clay body (speckled or light color)
- Pottery wheel or slab roller (for hand-building)
- Underglaze in Bright Red and Forest Green
- Clear dipping glaze or brush-on clear glaze
- Fine detail paintbrushes
- Round cookie cutter or template (approx. 2.5 inches)
- Needle tool
- Trimming tools
- Sponge
Step 1: Forming the Mug Body
-
Prepare the Clay:
Begin by wedging your stoneware clay thoroughly to remove air bubbles. If you want that natural speckled look shown in the photo, choose a clay body that already contains manganese speckles. -
Throw or Build the Cylinder:
Throw a standard cylinder on the wheel, aiming for straight walls with a slight curve at the bottom. Alternatively, hand-build a cylinder using a textured slab for a more handmade feel. -
Refine the Shape:
While leather hard, trim the bottom to create a distinct foot ring. This separation is crucial for the red wavy border design later. -
Attach the Handle:
Pull a strap handle and attach it firmly. Ensure the curve is large enough for a comfortable grip, integrating the connection points smoothly.
Keep it Clean
If you smudge the red circle while painting, let it dry completely, then gently scratch the mistake off with an X-Acto knife or needle tool.
Step 2: Creating the Snow Globe Scene
-
Outline the Frame:
Once the mug is bone dry or leather hard (depending on your underglaze preference), use a round template to lightly trace a circle in the center of the mug wall. -
Paint the Border:
Using a steady hand and a fine liner brush, paint the traced circle with Bright Red underglaze. Make the line slightly thick to create a bold frame effect. -
Establish the Ground:
Inside the circle, near the bottom third, paint a gentle, sloping horizon line in red to suggest snowy hills. -
Add the Pine Trees:
Switch to Forest Green underglaze. Paint two taller trees on the left and right, and smaller ones tucked behind. Use small, quick dabbing strokes to mimic pine needles. -
Draw the Hut:
In the center, paint a small, rounded hut or haystack shape in red. Add small white dots or leave negative space for windows to give it texture. -
Let Is Snow:
Using a very fine brush tip or a needle tool dipped in red underglaze, dot the sky area within the circle to create falling snow. Add a few red dots outside the circle for a dispersed looks.
Seasonal Switch
Swap the red oxide for a deep navy blue and paint white stars instead of snow for a ‘Silent Night’ midnight version of this scene.
Step 3: Adding Decorative Borders
-
Rim Detail:
Place the mug on a banding wheel. Spin it slowly while holding a brush loaded with red underglaze against the top rim to create a perfect, consistent band. -
Base Banding:
Paint a solid red band around the trimmed foot of the mug. I like to make this band about half an inch thick to ground the design. -
Sgraffito Waves:
Allow the red base band to dry until it’s matte. Use a carving tool to scratch a wavy line through the red underglaze, revealing the raw clay color beneath.
Step 4: Final Glazing
-
Bisque Fire:
Load the mug into the kiln for a bisque fire according to your clay’s specifications (usually Cone 04). -
Clear Glaze Application:
Wipe the bisque ware with a damp sponge to remove dust. Dip the entire mug into a clear glaze to seal the underglaze design and make it food safe. -
Final Firing:
Fire the mug to maturity (Cone 5, 6, or 10 depending on your clay). The clear glaze will become glossy and amplify the speckles in the clay.
Enjoy your first sip of hot cocoa in your charming new winter mug