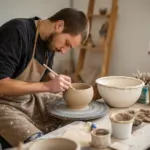
When the studio feels extra cozy this time of year, I love turning a plain ceramic mug into something that instantly screams Christmas. These Christmas mug painting ideas are approachable, giftable, and perfect for making your daily hot drink feel a little more special.
Candy Cane Stripe Wrap
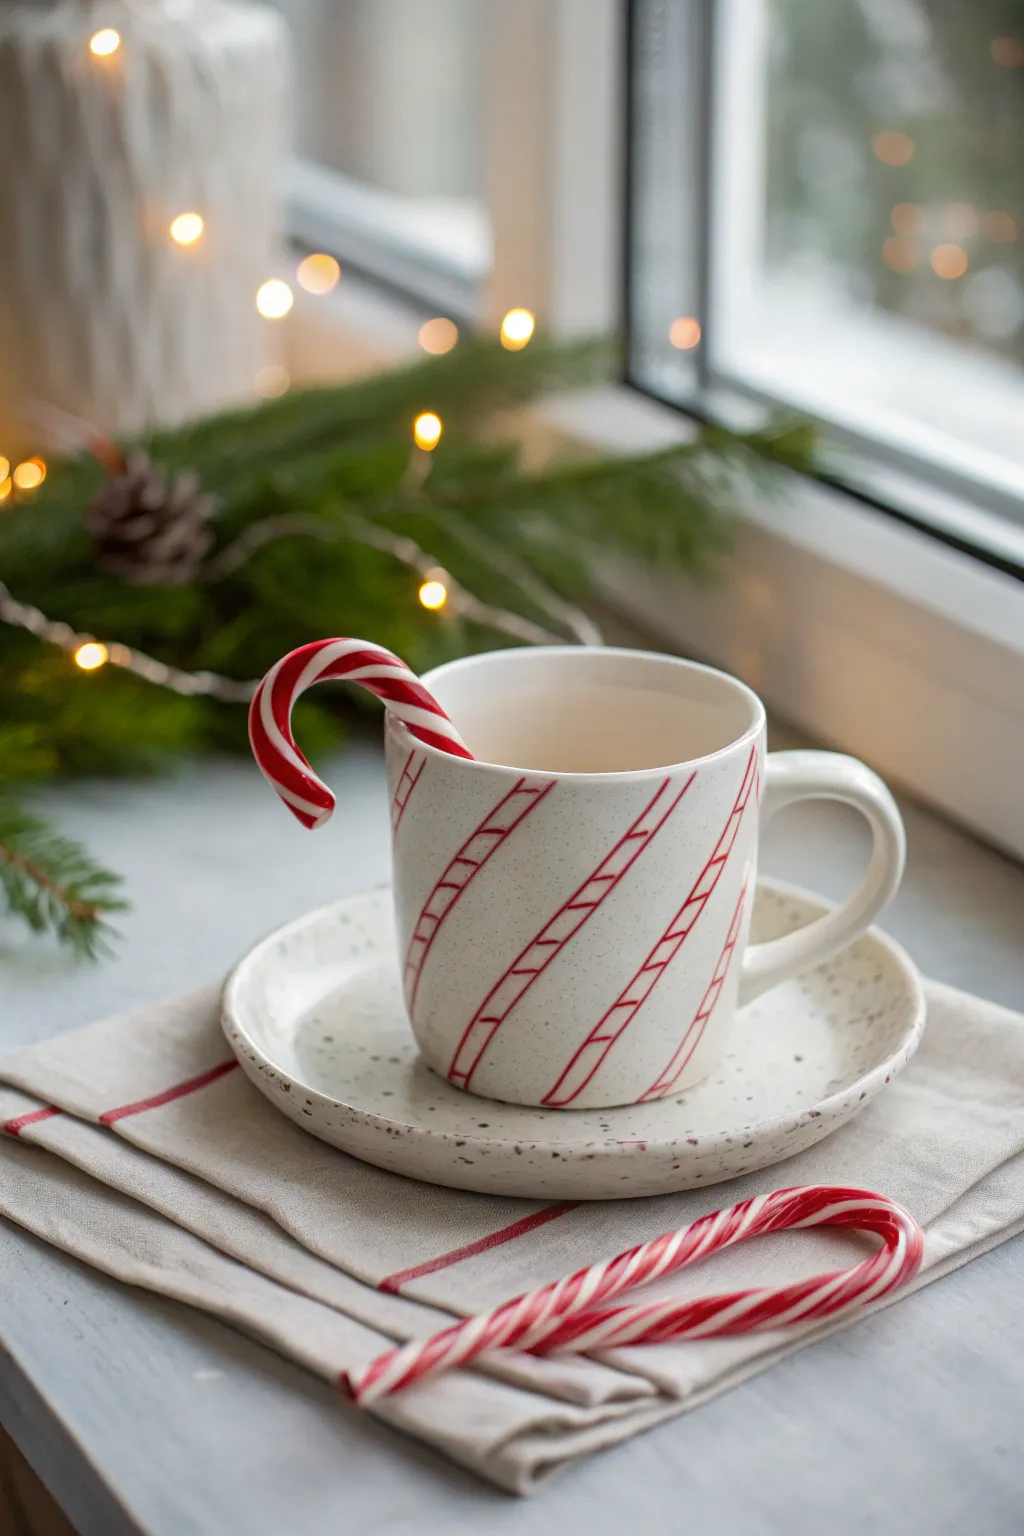
Transform a plain white mug into a holiday classic with this deceptively simple candy cane design. The beauty lies in the imperfect, hand-painted red stripes that wrap diagonally across a speckled ceramic base, giving it a cozy, rustic charm.
Detailed Instructions
Materials
- Plain white ceramic mug and matching saucer
- Ceramic paint (Red and Grey/Black)
- Flat shader paintbrush (small to medium width for the stripes)
- Fine liner detail brush
- Old toothbrush (for the speckle effect)
- Rubbing alcohol
- Paper towels
- Masking tape or painter’s tape (optional)
- Palette or small plate
- Oven (for curing)
Step 1: Preparation and Base
-
Clean surface:
Before you unscrew any paint caps, thoroughly wipe down the entire mug and saucer with rubbing alcohol. This removes unseen oils or fingerprints that prevent the ceramic paint from adhering permanently. -
Mix speckle color:
Squeeze a tiny dot of black or dark grey ceramic paint onto your palette. Mix it with a drop or two of water to thin it out slightly; you want an ink-like consistency that splatters easily. -
Create the texture:
Dip an old toothbrush into your thinned grey paint. Hold the brush about 6 inches away from the mug and run your thumb across the bristles to flick tiny specks onto the surface. Rotate the mug to cover all sides. -
Speckle the saucer:
Repeat the splatter technique on the saucer, ensuring you get the rim and the center. The goal is a subtle, uneven texture, so don’t worry about perfection. -
Dry the base:
Let the speckles dry completely. This usually takes about 15-20 minutes, as the drops are very small. If you paint over wet speckles, they will smear into the red.
Step 2: Painting the Candy Stripes
-
Plan the angle:
Visualize the diagonal wrap of your candy cane stripes. They should start low on one side and twist upward. If you aren’t confident freehanding, you can lightly mark the path with a pencil, which will burn off during baking. -
Load the brush:
Proportionally load your flat shader brush with red ceramic paint. You want enough paint for a smooth stroke, but not so much that it creates raised globs. -
Start the main stripes:
Start painting your thick diagonal red lines. Keep a consistent gap between each red stripe—roughly the width of the stripe itself. I find it easiest to paint from the rim downwards, twisting the mug as I go. -
Handle the tricky spots:
When you reach the handle area, carefully paint ‘behind’ it if the spacing dictates a stripe should be there, or simply stop the line cleanly at the handle junction. -
Refine the edges:
If your main stripes look a little shaky, use the very edge of your damp brush to gently tidy up the lines while the paint is still wet. -
Add detail lines:
Using your fine liner brush and the same red paint, add two very thin parallel lines *inside* the white space between your thick red stripes. -
Check the spacing:
These thin lines mimic the twisting pattern of a traditional candy cane. Try to keep them equidistant from the thick red stripes on either side. -
Add cross-hatching:
To mimic the specific look in the reference, use your fine liner to paint tiny, diagonal hash marks crossing over the thick red stripes at regular intervals. -
Paint the handle:
Decide on your handle design. In the image, the handle is left mostly white, but you can add a single red stripe running down the center or wrap it horizontally. -
Saucer rim:
Don’t forget the saucer. Paint a delicate, thin red line around the very outer edge of the saucer rim to tie the set together.
Clean Lines?
Struggling to keep stripes straight? Apply thin strips of painter’s or washi tape to mask off the white areas before painting. Remove the tape while the paint is still slightly wet.
Step 3: Finishing and Curing
-
Clean up errors:
Before the paint sets hard, use a cotton swab dipped in rubbing alcohol or water to wipe away any serious smudges or mistakes. -
Initial dry time:
Allow the painted mug to dry for at least 24 hours. This is crucial—if moisture is trapped under the surface skin of the paint, it will bubble in the oven. -
Place in cold oven:
Put your mug and saucer into a *cold* oven. Do not preheat. This prevents the ceramic from cracking due to thermal shock. -
Bake carefully:
Follow the specific instructions on your ceramic paint bottle for temperature and time (usually around 300°F-325°F for 30 minutes). -
Cool down slowly:
Once the timer goes off, turn the oven off but leave the door closed. Let the mug cool down completely inside the oven before removing it.
Metallic Twist
Swap the thin red detail lines for metallic gold or silver ceramic paint. This adds a sophisticated, shimmering element that catches the light beautifully.
Enjoy your festive new mug with a steaming cup of cocoa


Holly Leaves and Berry Clusters
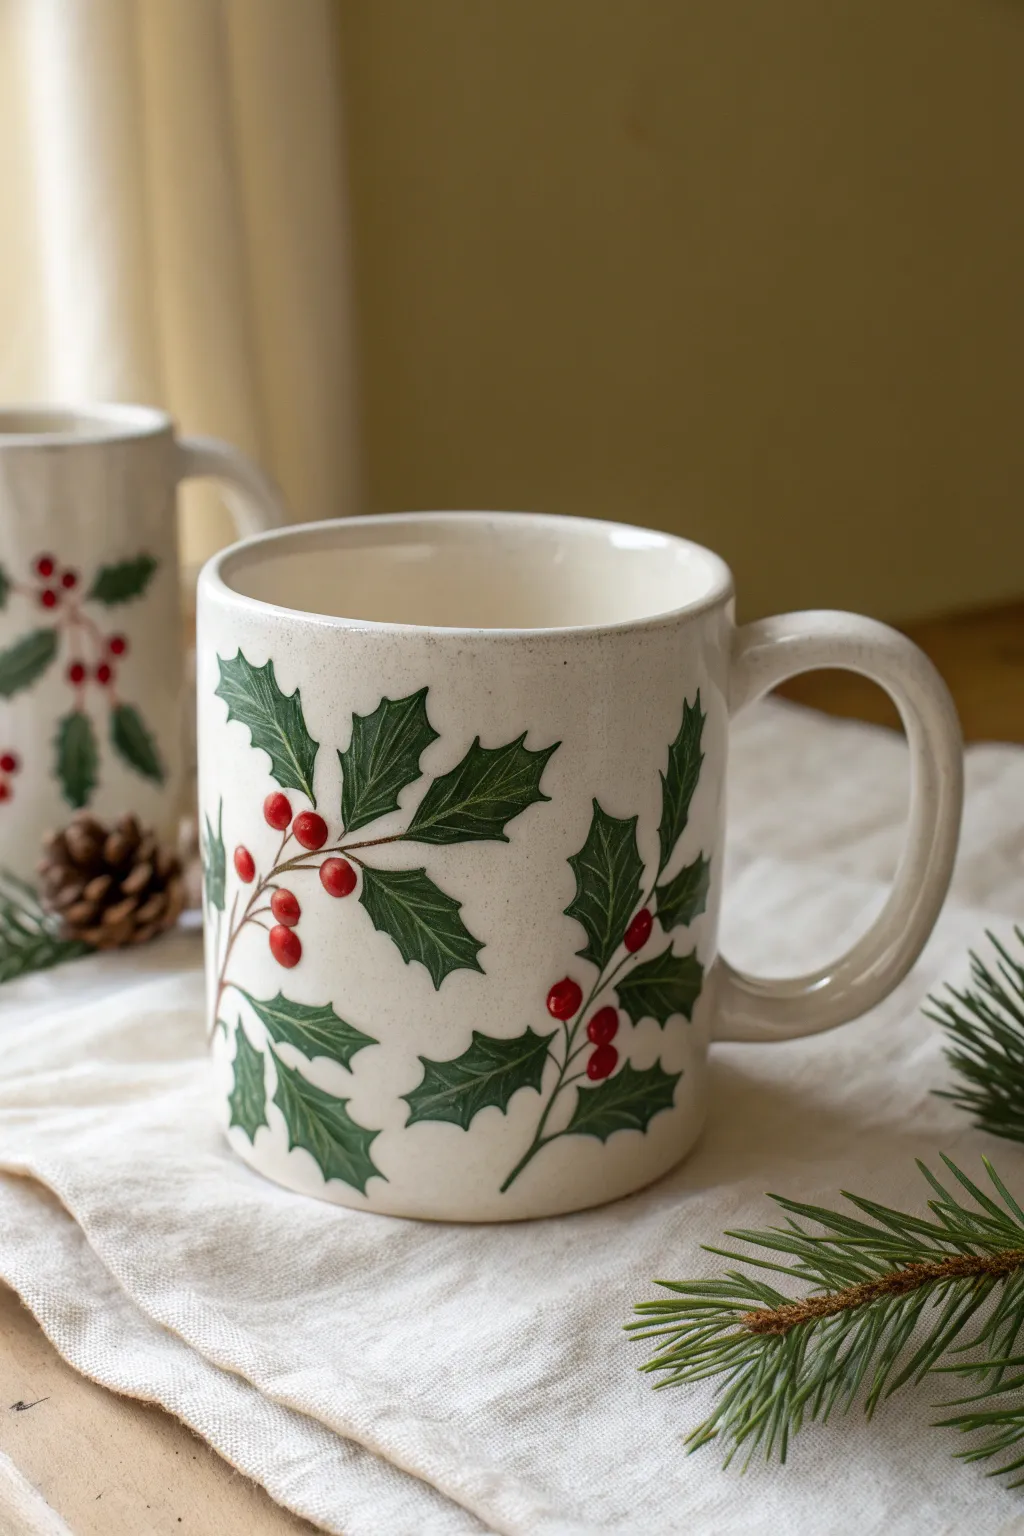
This classic holiday mug features beautifully shaded holly leaves and bright red berry clusters on a creamy ceramic base. The design mimics a vintage botanical illustration, bringing a cozy and timeless Christmas aesthetic to your morning coffee ritual.
How-To Guide
Materials
- Bisque ceramic mug (plain, cream, or white base)
- Ceramic underglaze paints (forest green, lime green, bright red, dark brown)
- Small round brushes (size 0 and 2)
- Fine liner brush (size 00 or 000)
- Glazing medium or water for thinning
- Clear dipping glaze
- Pencil for sketching
- Palette or mixing surface
Step 1: Planning the Layout
-
Clean the surface:
Begin by wiping down your bisque mug with a slightly damp sponge to remove any dust or oils that might prevent the paint from adhering properly. -
Sketch the main stems:
Lightly sketch the flowing lines of the stems using a pencil. Create a few main branches that curve gently around the mug’s body, leaving plenty of negative space. -
Outline leaf shapes:
Along the stem lines, sketch the outline of the holly leaves. Remember to give them their characteristic spiky edges with sharp points, typically 5-7 points per leaf. -
Draft berry placements:
Draw small circles in clusters of two or three at the junctions where leaves meet the stems, or at the stem ends. Keep the pencil lines light, as the glaze will eventually cover them or burn off in the kiln.
Natural Leaf Texture
Don’t over-blend the greens on your leaves. Letting the brushstrokes show slightly creates a textured, botanical look that resembles real holly veins.
Step 2: Painting the Foliage
-
Base coat the leaves:
Using a small round brush (size 2), fill in the leaf outlines with a dark forest green underglaze. Apply an even, somewhat thin layer first. -
Create gradients:
While the base coat is still slightly damp, drop a tiny amount of lighter lime green near the center vein or tips of the leaves to imply light reflection. -
Add veining details:
Switch to your fine liner brush. Using the darkest green (or mixing a tiny bit of brown into your green), paint a thin central vein line down the middle of each leaf. -
Define the side veins:
From the center vein, paint fine lines extending out toward the spiky points of the leaves. Feather these lines so they look natural and blend slightly into the leaf body. -
Layering for opacity:
Once the first layer is dry to the touch, go back over the darker areas of the leaves with a second coat of forest green to ensure rich, solid color coverage after firing.
Sheer or Streaky Color?
If your red berries look transparent after the first coat, let them dry completely and apply 2-3 total coats. Red pigments are often translucent.
Step 3: Adding Berries and Stems
-
Paint the stems:
Load your fine liner brush with dark brown underglaze. Carefully trace over your initial pencil lines for the stems, connecting the leaves together. Vary the pressure slightly to make the stem look organic, not mechanical. -
Fill the berries:
Using a size 0 round brush, paint the berry circles with a bright red underglaze. Be generous with the paint here to get a plump, raised look, but avoid dripping. -
Add berry highlights:
I like to leave a tiny speck of unpainted white space on each berry to act as a highlight, or add a dot of white underglaze on top of the red once it’s dry. -
Connect berries to stems:
Use the liner brush with the brown paint to add tiny, short stems that connect the berry clusters to the main branch.
Step 4: Final Touches
-
Refine the edges:
Check the edges of your leaves. If they look too soft, use the liner brush and dark green to sharpen the spiky points. -
Final inspection:
Look over the mug for any stray smudges. You can gently scrape away mistakes on bisque ware using a craft knife or a toothpick. -
Clear glaze application:
Once the design is completely bone dry, dip the entire mug into a clear transparent glaze. Ensure the glaze is evenly coated without drips. -
Fire the piece:
Place the mug in the kiln and fire according to the specifications of your clay and glaze (typically cone 06 or 05 for low-fire ceramics).
Once fired, fill your beautiful new mug with hot cocoa and enjoy the festive spirit you’ve created by hand


String Lights Around the Mug
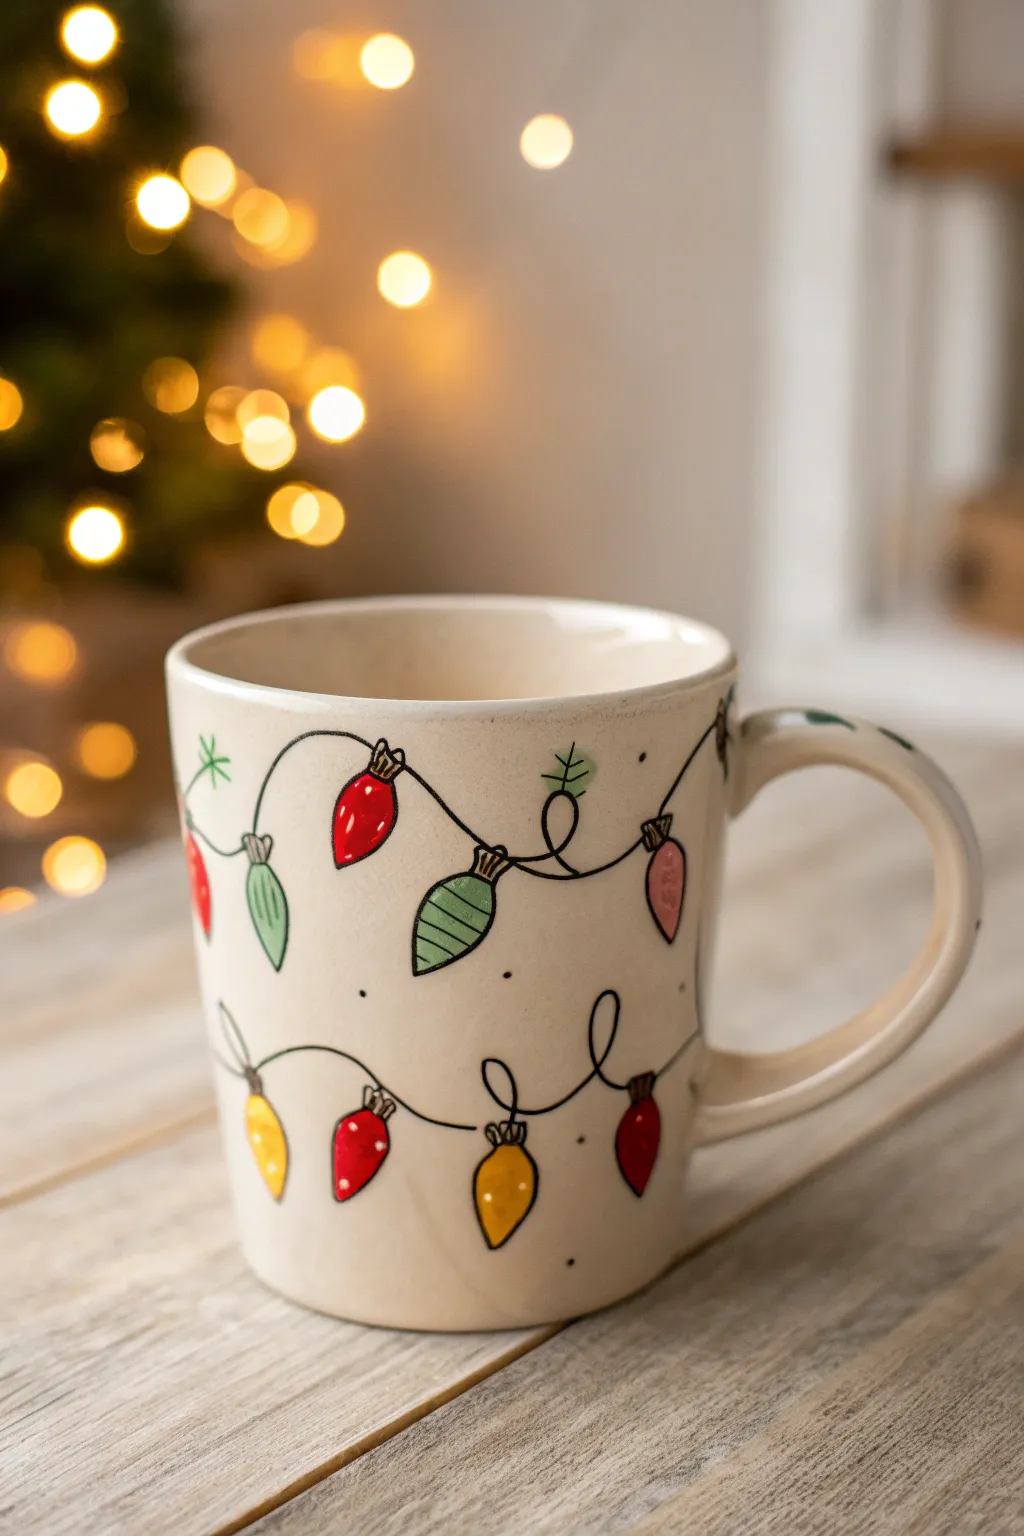
Wrap your favorite warm beverage in a string of colorful lights with this charming hand-painted mug design. The loose, whimsical lines and bright bulbs create a festive look that feels both cozy and cheerful.
Detailed Instructions
Materials
- Simple ceramic mug (cream or off-white)
- Ceramic paint or porcelain markers (black, red, green, yellow, pink)
- Fine liner paintbrush (size 0 or 00)
- Small round paintbrush (size 2)
- Rubbing alcohol
- Cotton pads
- Oven (for curing)
Step 1: Preparation & Planning
-
Clean surface:
Before you make a single mark, wipe the entire exterior of the mug with rubbing alcohol on a cotton pad. This removes invisible oils from your fingers that can prevent paint from adhering properly. -
Plan the path:
Visualize where your string of lights will go. You want two distinct wavy lines wrapping around the mug—one near the top rim and a second curve near the bottom.
Step 2: Drawing the Strings
-
Paint the top string:
Using a fine liner brush loaded with black ceramic paint, or a fine-tip porcelain marker, draw a sweeping, wavy line around the upper third of the mug. -
Add the loops:
As you draw the line, occasionally create a small loop-de-loop. This mimics the way tangled Christmas lights look when pulled out of storage. -
Paint the bottom string:
Repeat the process for the lower section of the mug, ensuring the waves don’t perfectly mirror the top line; slight asymmetry adds to the hand-drawn charm. -
Add bulb sockets:
Along both black lines, paint small, rectangular boxes or little trapezoids spaced about an inch apart. These will act as the caps for your light bulbs. -
Quick dry:
Let the black outlines dry for about 10–15 minutes so you don’t accidentally smudge the lines while adding color.
Fixing Smudges
Made a mistake? Don’t stress. While the paint is wet, use a damp Q-tip or a toothpick to gently scrape or wipe away the error. Clean the spot with alcohol again before repainting.
Step 3: Adding the Bulbs
-
Paint the first color:
Start with your red paint. Using the small round brush, paint teardrop shapes hanging from several of the black sockets. Scatter them randomly rather than in a pattern. -
Add green bulbs:
Clean your brush and switch to green. Paint more teardrop shapes on empty sockets on both the top and bottom strings. Vary the sizes slightly for a playful look. -
Incorporate yellow:
Fill in several more spots with bright yellow or gold paint. These lighter colors really pop against the cream ceramic background. -
Finish with pink:
If you have a soft pink or coral shade, fill in the remaining sockets. I find this unexpected color adds a nice modern twist to the classic palette. -
Stripe details:
Once the green bulbs are dry to the touch, use your ultra-fine black liner to add tiny horizontal stripes across a few of them for texture.
Add Some sparkle
For a magical touch, use a metallic gold pen for the light bulb sockets instead of black, or add a layer of glitter glaze over the bulbs before baking.
Step 4: Final Flourishes
-
Draw sprigs:
Using a green marker or fine brush, draw tiny pine needle sprigs or starbursts floating near the string lines to fill empty negative space. -
Add dots:
Using the tip of a toothpick or the back of a paintbrush handle dipped in black paint, dot tiny specks randomly around the design. -
Highlights:
For a glossy glass look, add a tiny white dot or comma shape to the upper curve of each colored bulb once the base colors are fully dry. -
Cure the mug:
Follow the instructions on your specific paint brand to cure the mug. This usually involves placing the mug in a cool oven, heating it to 300–350°F, and baking for 30 minutes.
Enjoy your warm holiday drinks in your brand new, custom-painted mug


Snowflake Scatter in White and Blue
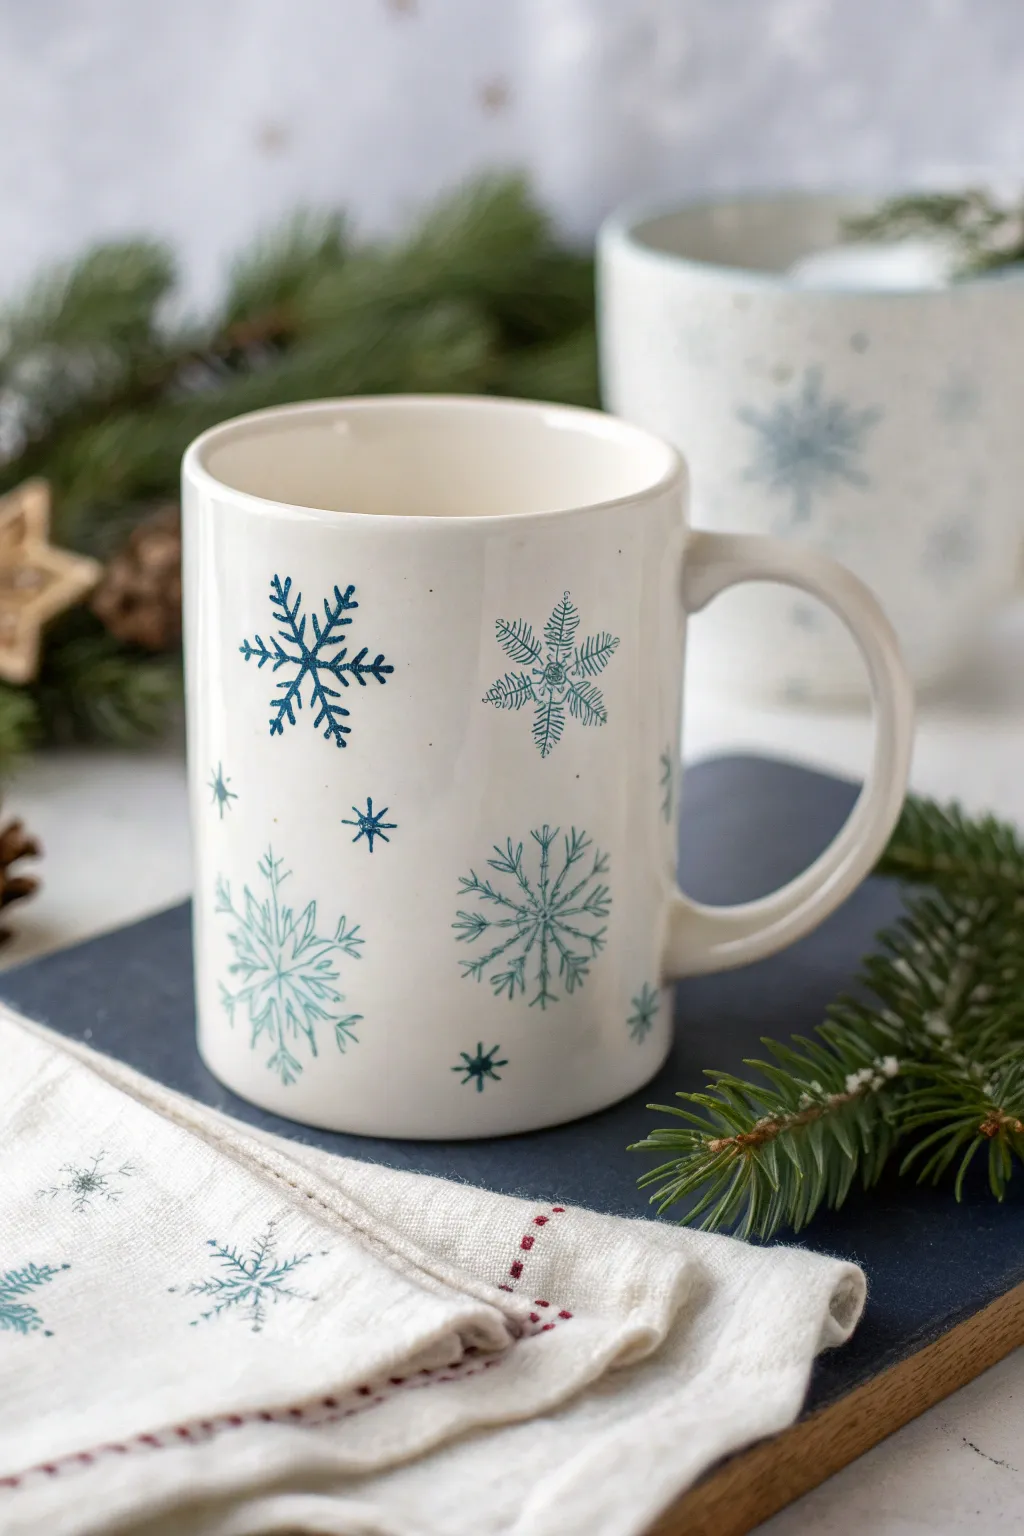
Capture the delicate beauty of falling snow with this elegant mug design featuring a scatter of intricate snowflakes in shades of wintry blue. The minimalist white background allows the teal, navy, and sky-blue patterns to truly pop, creating a cozy vessel perfect for hot cocoa.
How-To Guide
Materials
- White or cream ceramic mug
- Ceramic paint or porcelain paint markers (Teal, Navy Blue, Light Blue)
- Rubbing alcohol and cotton pads
- Fine-point liner brush (0 or 00 size)
- Pencil (optional)
- Small palette or ceramic dish
- Oven for curing (if required by paint choice)
Step 1: Preparation & Planning
-
Clean surface:
Before any paint touches the mug, wipe the entire outer surface thoroughly with rubbing alcohol on a cotton pad. This removes oils and fingerprints that could prevent the paint from adhering properly. -
Plan the layout:
Visualize where you want your largest snowflakes to go. I prefer to place three or four large ‘hero’ flakes around the mug first, leaving plenty of negative space between them for smaller details. -
Sketch guides (optional):
If you are nervous about freehand painting, use a pencil to very lightly mark a small ‘X’ or cross where the center of each main snowflake will be. The graphite will burn off in the oven later.
Steady Hand Pro-Tip
Rest your pinky finger against the mug surface while painting. This anchors your hand, giving you better control for those delicate snowflake arms and straight lines.
Step 2: Painting the Main Flakes
-
Mix your first color:
Start with your darkest blue (navy). Place a small amount on your palette. If using markers, give them a good shake and test the flow on a paper towel first. -
Paint the skeleton:
Using your fine-point brush or marker, draw a simple six-armed cross or asterisk. Keep the lines thin and relatively straight; these will be the backbone of your flake. -
Add the V-shapes:
Working from the center outward, add small ‘V’ shapes or chevrons to the end of each arm. This creates that classic crystalline snowflake look. -
Switch colors:
Clean your brush and switch to a teal or medium-blue shade. Find a new spot on the mug for a different style of flake. Try drawing one with eight arms instead of six for variety. -
Create fern-style arms:
For the teal flakes, try a ‘fern’ pattern. Instead of straight lines, draw the arms slightly curved and add many tiny, hair-like strokes along the sides to mimic pine needles or frost patterns. -
Layering the large designs:
Continue adding these larger, complex flakes around the mug, alternating between navy and teal. Aim for about 4-5 major snowflakes total.
Step 3: Adding Detail & Filler
-
Paint medium flakes:
Now, switch to your lightest blue. Look for the larger empty gaps and paint simpler, medium-sized asterisks. These don’t need complex V-shapes, just simple crossed lines. -
Tiny accents:
Using the very tip of your brush or a dotting tool, add tiny stars (simple crosses) and small dots in the empty white spaces. This creates the illusion of distant, falling snow. -
Vary the line weight:
Go back to a few original flakes and darken the center point or thicken the very middle lines slightly to add visual weight and dimension. -
Check consistency:
Rotate the mug slowly. Ensure you haven’t smudged any wet paint with your hand while working. If you find a mistake, wipe it quickly with a damp Q-tip before it sets.
Level Up: Metallic Magic
Add a touch of silver or pearl metallic paint to the tips of the snowflakes or the center dots. It will catch the light beautifully and look like glistening ice.
Step 4: Curing & Finishing
-
Dry time:
Allow the mug to dry completely. For most ceramic paints, this means leaving it untouched for at least 24 hours. -
Baking preparation:
Place your mug in a cold oven. Do not preheat the oven, as sudden temperature changes can crack the ceramic. -
Bake to set:
Set the oven to the temperature specified on your paint bottle (usually around 300°F/150°C) and bake for 30 minutes. Turn the oven off and let the mug cool down completely inside.
Now you have a custom piece of winter art ready to cradle your favorite warm beverage all season long

The Complete Guide to Pottery Troubleshooting
Uncover the most common ceramic mistakes—from cracking clay to failed glazes—and learn how to fix them fast.
Evergreen Tree Silhouettes
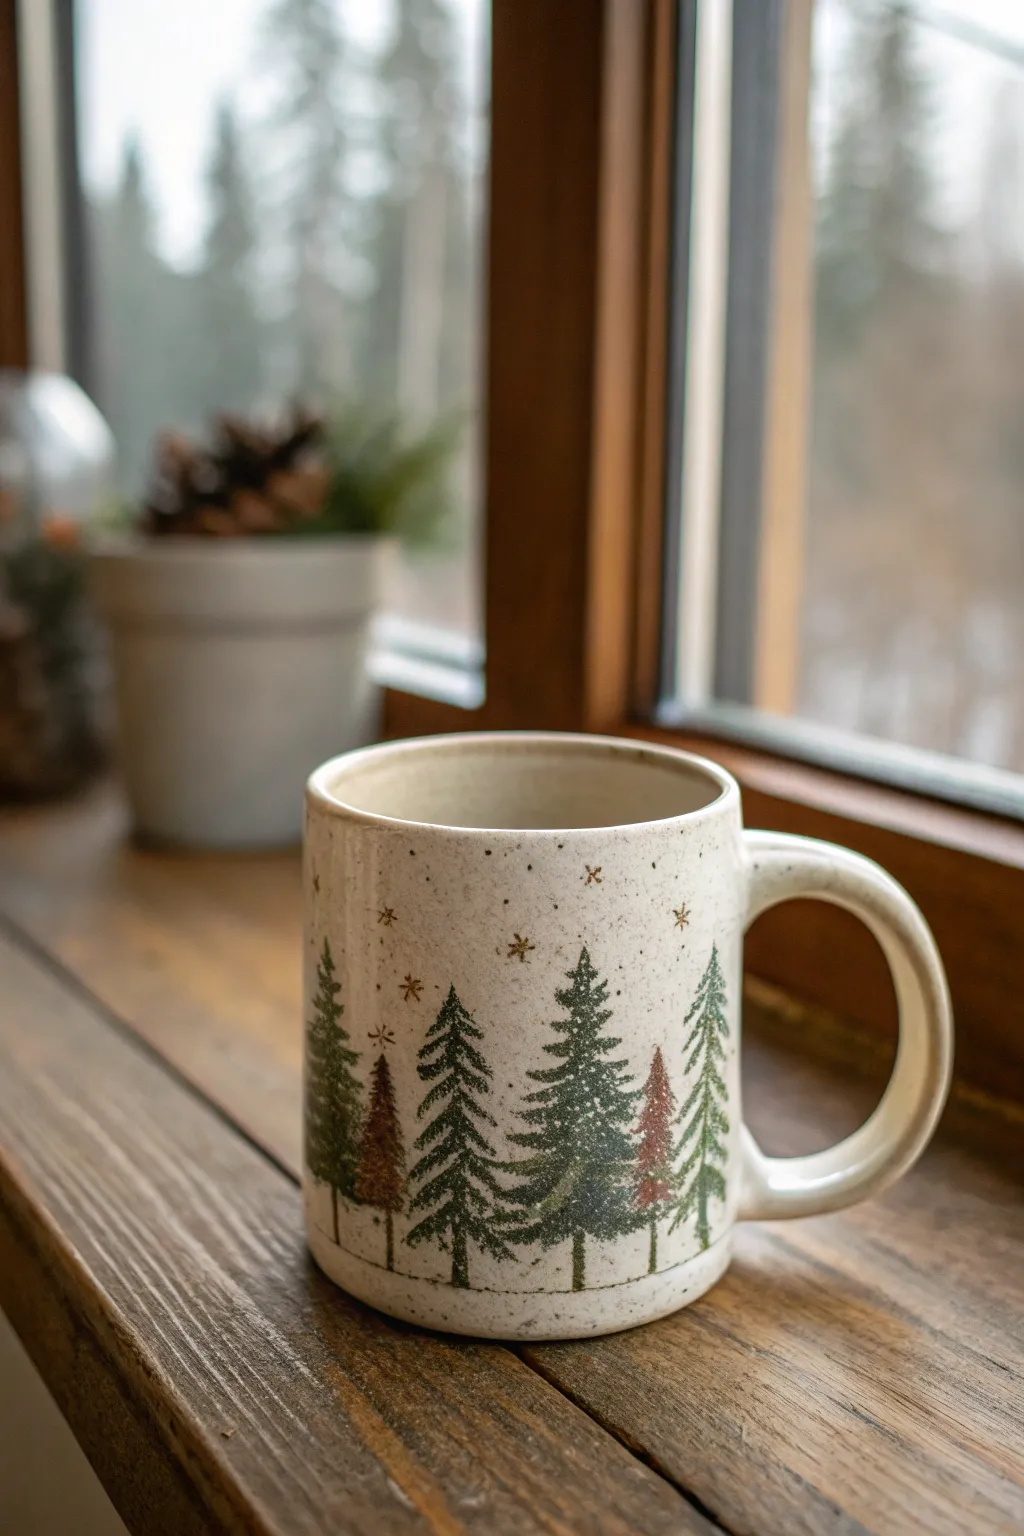
Transform a plain ceramic mug into a cozy winter scene with this elegant evergreen tree design. The speckled finish and hand-painted pines create a rustic, cabin-inspired aesthetic that is perfect for sipping hot cocoa by the window.
Step-by-Step Tutorial
Materials
- Plain white or cream ceramic mug
- Ceramic or porcelain paints (Forest Green, Burnt Sienna/Copper, White, Black)
- Small flat brush (size 2 or 4)
- Fine liner brush (size 0 or 00)
- Rubbing alcohol and cotton pads
- Old toothbrush (optional for speckling)
- Oven for baking (if using bake-to-set paints)
- Palette for mixing
Step 1: Preparation and Base
-
Clean surface:
Begin by thoroughly cleaning the outside of your mug with rubbing alcohol and a cotton pad. This removes any oils or fingerprints that might prevent the paint from adhering properly. -
Create the speckled effect:
To mimic the rustic stone-look in the photo, mix a tiny amount of black paint with a drop of water. Dip an old toothbrush into this mixture and gently flick the bristles with your thumb to spray fine speckles across the mug’s surface. -
Let speckles dry:
Allow the speckled layer to dry completely for about 15-20 minutes before handling the mug again to avoid smudging your base texture.
Fixing Smudges
If you smudge a tree branch while it’s wet, quickly wipe it away with a damp Q-tip dipped in rubbing alcohol. Do this immediately before the paint skins over.
Step 2: Painting the Trees
-
Mix your greens:
On your palette, prepare two shades of green. Use a deep Forest Green straight from the bottle, and mix a second batch with a tiny dot of black to create a darker, shadowed pine color. -
Start the center trunk:
Using your fine liner brush, paint a thin vertical line for the trunk of your first tree. I like to start slightly above the bottom rim to leave space for the ground line. -
Paint the branches:
Switch to your small flat brush or keep the liner brush if preferred. Start at the top of the trunk and dab small, downward-slanting lines to create the boughs. Make the strokes wider as you move down the tree to create a triangular silhouette. -
Texture the foliage:
Don’t make the branches too solid. Leave small gaps between strokes so the mug color peeks through, giving the tree a natural, airy texture. -
Add color variety:
While the green paint is still wet, dip your brush tip into the darker green mix and add lowlights to the bottom of the branches for depth. -
Paint accent trees:
Intersperse a few reddish-brown trees among the green ones. Mix Burnt Sienna with a touch of red or copper paint. Paint these using the same technique: a central trunk line followed by downward sweeping branches. -
Vary the heights:
As you work your way around the mug, paint some trees slightly taller and others shorter to create a natural, un-uniform forest line. -
Overlap carefully:
If you want a dense forest look, you can slightly overlap the trees. Paint the background trees first, let them dry for 5 minutes, then paint foregound trees over them.
Metallic Magic
Mix a small amount of gold mica powder or metallic gold paint into your Burnt Sienna for the reddish trees. This adds a subtle, festive shimmer that catches the light.
Step 3: Details and Finishing
-
Add snow details:
Once the green trees are touch-dry, use a clean liner brush with white paint. Gently dab the tops of a few branches to look like settled snow. -
Draw the ground line:
Using your black or dark grey paint, draw a very thin, sketchy line connecting the bases of the trees. This grounds your forest so the trees aren’t floating. -
Add starlit sky elements:
Dip the very tip of your liner brush into gold or brown paint. Paint tiny ‘x’ shapes or asterisks in the empty white space above the trees to represent distant stars. -
Final dry time:
Let the painted mug sit undisturbed for at least 24 hours to allow the paint to fully cure before the baking phase. -
Bake to set:
Place the mug in a cold oven. Set the temperature to 350°F (175°C) and bake for 30 minutes. Turn off the oven and let the mug cool down completely inside to prevent cracking.
Enjoy your morning coffee surrounded by your own calm, hand-painted winter forest
Cute Snowman Face With a Scarf
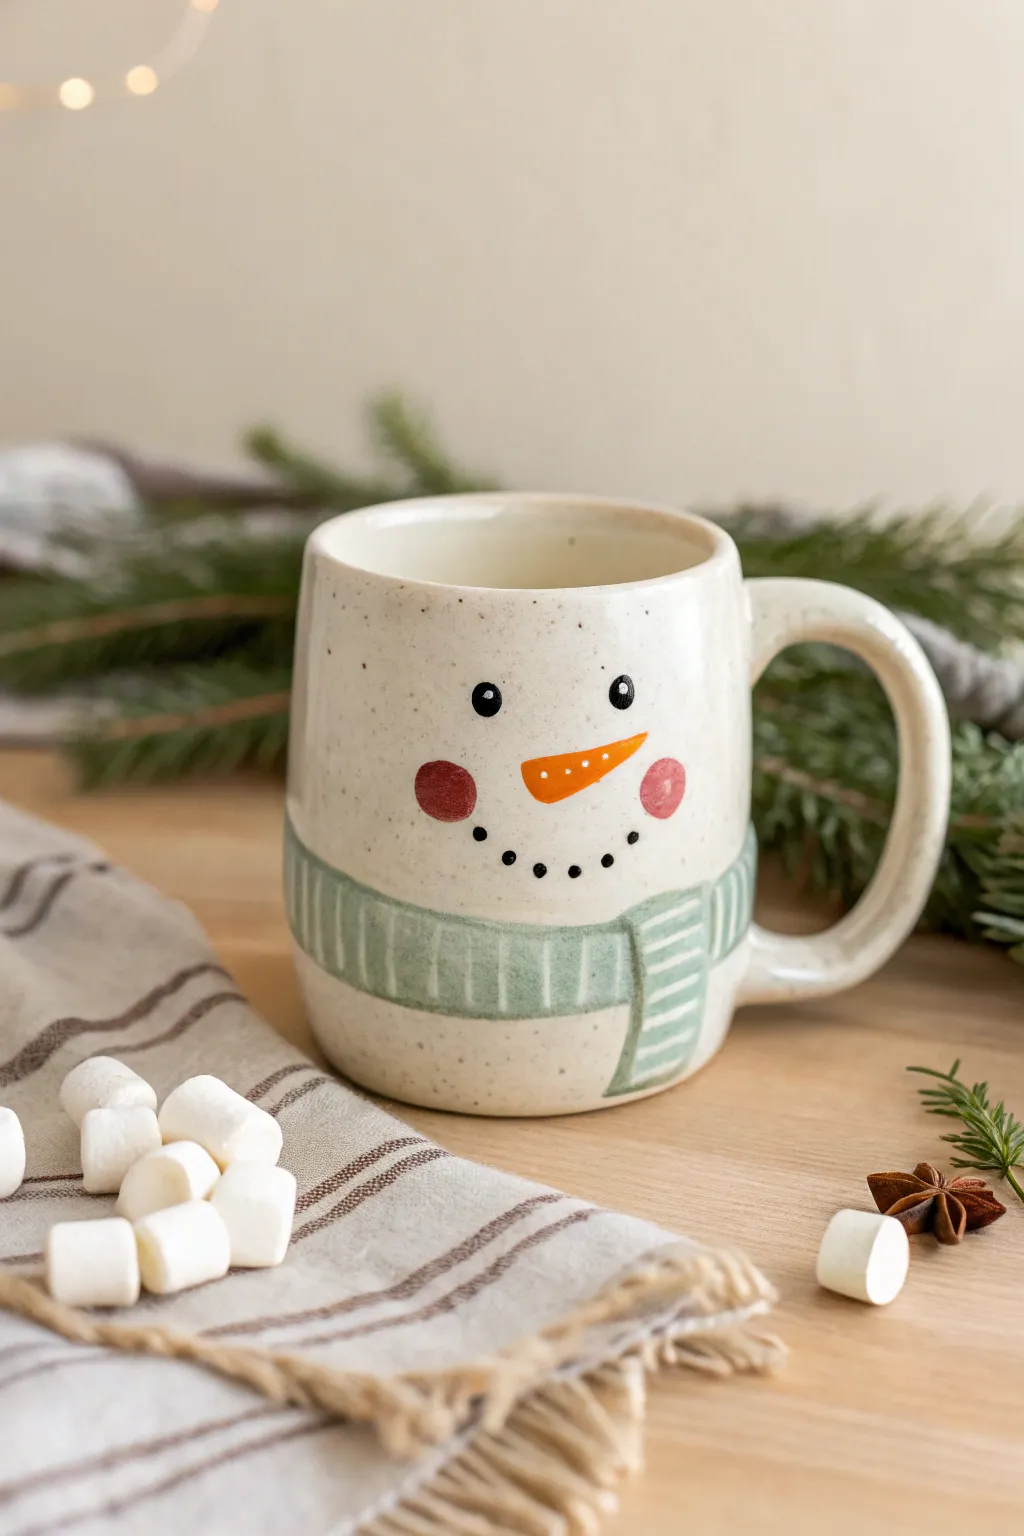
Transform a plain ceramic mug into a heartwarming winter companion with this adorable snowman face design. The soft speckled finish and gentle pastel scarf give it a delightful handmade charm perfect for hot cocoa nights.
How-To Guide
Materials
- Plain cream or off-white ceramic mug
- Ceramic or porcelain paints (Black, Orange, Pink, Sage Green, White)
- Small round paintbrush (size 0 or 1)
- Medium flat paintbrush (size 4)
- Dotting tool or toothpick
- Rubbing alcohol and cotton pads
- Oven (for curing, if required by your paint brand)
- Palette or paper plate
Step 1: Preparation & Base
-
Clean the surface:
Before painting, wipe down the entire outer surface of the mug with rubbing alcohol. This removes oils and fingerprints, ensuring your paint adheres properly. -
Create the speckled effect:
If your mug isn’t already speckled, mix a tiny bit of water with brown or grey ceramic paint. Dip an old toothbrush into it and run your thumb across the bristles to flick tiny specks onto the mug. Let this dry completely before moving on.
Step 2: Painting the Face
-
Draft the eyes:
Using the back of your medium paintbrush or a large dotting tool, dip into black paint and stamp two solid circles for eyes about an inch apart near the top third of the mug. -
Add eye highlights:
Once the black circles are tacky or dry, use a toothpick with a tiny dot of white paint to add a ‘sparkle’ highlight to the upper right area of each eye. -
Paint the carrot nose:
With your small round brush and orange paint, create a sideways elongated triangle between the eyes. I like to wobble the line slightly to give it that organic veggie shape. -
Detail the nose:
Add tiny white dots along the top edge of the carrot nose using a toothpick to create texture and shine. -
Apply rosy cheeks:
Dip a round sponge dabber or your fingertip lightly into pink paint. Stamp a soft circle on either side of the face, slightly lower than the nose. -
Create the smile:
Using the small end of a dotting tool or the tip of a paintbrush handle, dip into black paint. Dot five small circles in a wide ‘U’ shape to form the coal smile.
Fixing Wobbly Lines
If your hand shakes while painting stripes, use masking tape or washi tape to block off the sections. Press edges firmly to prevent paint bleed.
Step 3: Adding the Scarf
-
Outline the scarf shape:
Mix a soft sage green color. With a medium brush, paint a wide band starting from one side of the handle, wrapping around the bottom third of the mug. -
Add the scarf tail:
Where the band ends (usually off-center to the right), paint a vertical rectangle dangling down to represent the scarf’s tail. -
Fill the color:
Apply a second coat of the green paint within your outlines to ensure the color is opaque and solid. -
Paint the stripes:
Once the green base is completely dry, mix a lighter version of the green or use white. Paint vertical stripes along the main band of the scarf. -
Detail the tail stripes:
On the dangling tail section, switch the direction and paint horizontal stripes to mimic the texture of fabric hanging down. -
Define the edges:
For a crisper look, you can outline the scarf edges with a very thin line of darker green or grey, though the soft edge in the example looks lovely too.
Make It 3D
Use dimensional fabric paint (puffy paint) for the carrot nose and scarf stripes. This adds a fun tactile texture you can feel when holding the mug.
Step 4: Finishing Up
-
Cleanup:
Check for any smudges or unwanted paint marks. Use a damp cotton swab to gently wipe them away before the paint sets fully. -
Drying time:
Allow the mug to dry for at least 24 hours. Don’t rush this step, as moisture can ruin the curing process. -
Bake to cure:
Follow the instructions on your specific paint bottle. Typically, place the mug in a cool oven, heat to 350°F (175°C), bake for 30 minutes, then turn the oven off and let it cool completely inside.
Now you have a charming winter mug ready to be filled with marshmallows and hot chocolate


What Really Happens Inside the Kiln
Learn how time and temperature work together inside the kiln to transform clay into durable ceramic.
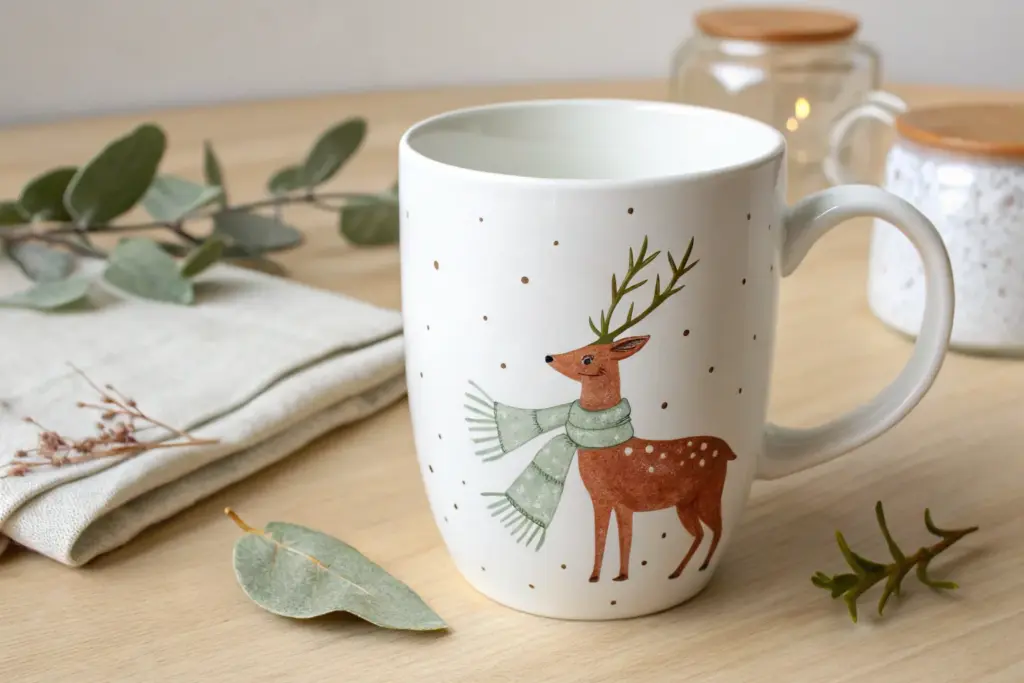
Reindeer Antlers and a Red Nose
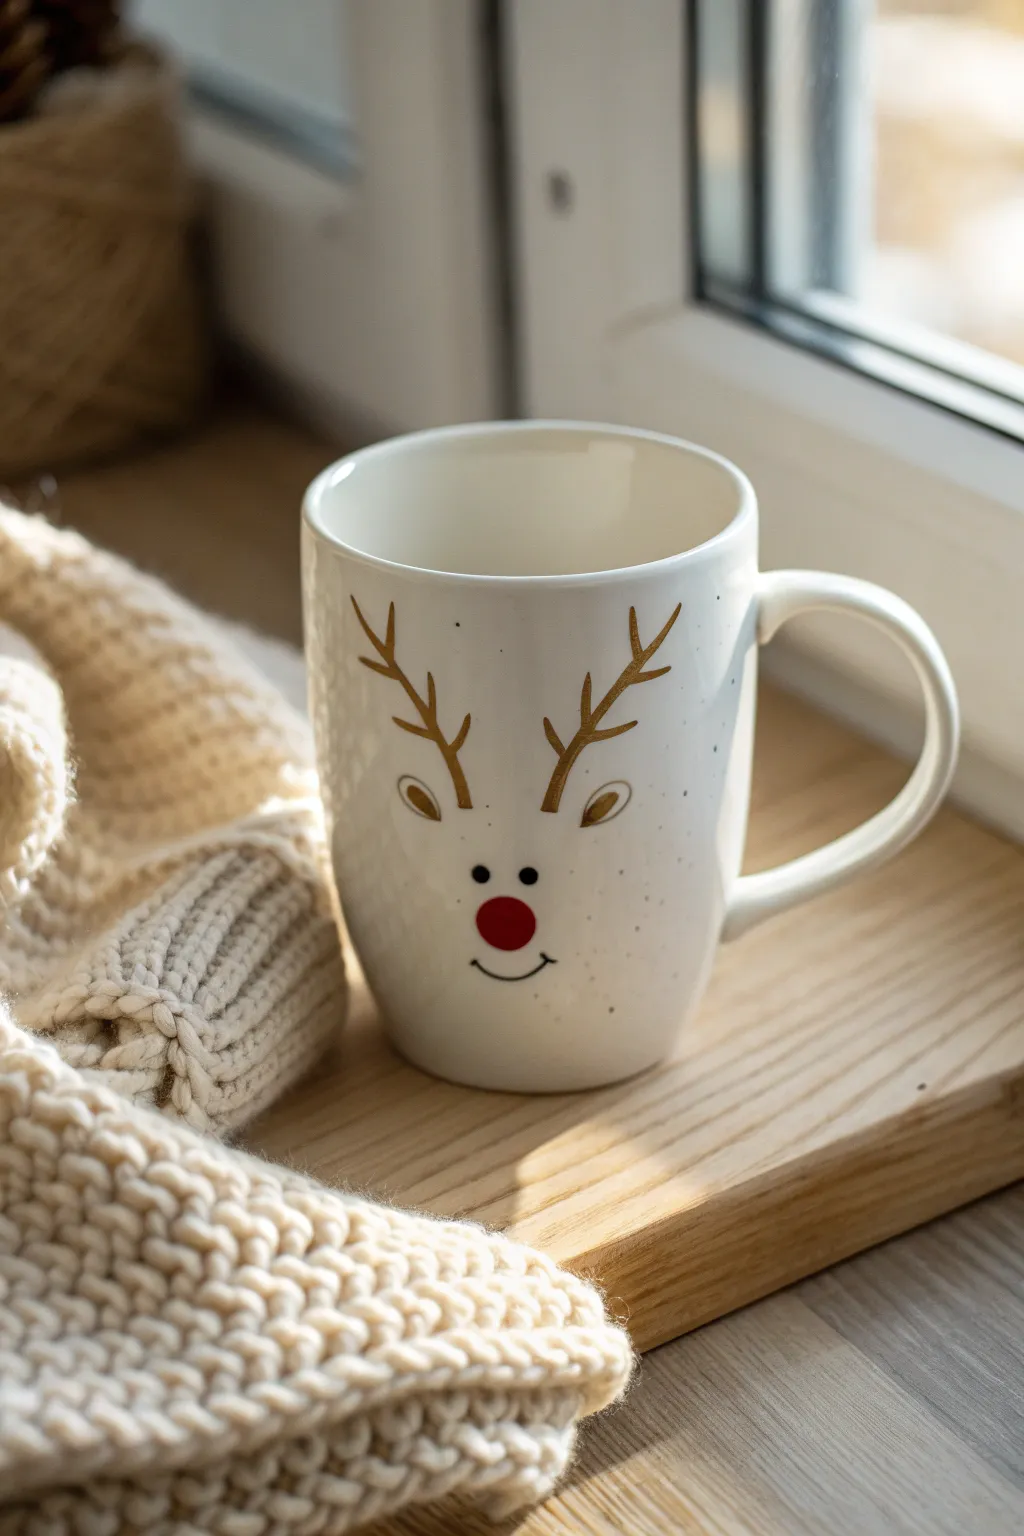
This elegant take on the classic reindeer face combines minimalist line art with festive shimmer. The design features sweeping gold antlers and a bright red nose on a creamy white background, making it perfect for cozy holiday mornings by the window.
Step-by-Step
Materials
- Plain white ceramic mug
- Ceramic or glass paint (Metallic Gold)
- Ceramic or glass paint (Bright Red)
- Ceramic or glass paint (Black)
- Fine detail paintbrush (size 0 or 00)
- Round paintbrush (size 2)
- Paper towel
- Rubbing alcohol
- Cotton pads
- Pencil (optional)
Step 1: Preparation and Planning
-
Clean surface:
Begin by thoroughly wiping the outside of your mug with rubbing alcohol on a cotton pad to remove any oils or fingerprints that could prevent the paint from adhering. -
Determine placement:
Hold the mug comfortably to decide where the face should sit; generally, centering the design opposite the handle works best for visibility while drinking. -
Sketch lightly:
If you’re nervous about freehanding, use a pencil to very faintly sketch the central nose position and the general curve of the antlers directly onto the ceramic.
Step 2: Painting the Gold Antlers
-
Load the brush:
Dip your fine detail brush into the metallic gold paint, ensuring the bristles are coated but not dripping. -
Base lines:
Start near the imaginary forehead area and paint two vertical, slightly curved lines drifting outward to form the main stems of the antlers. -
Add branches:
From each main stem, paint smaller V-shaped branches extending outward and upward, tapering the ends to sharp points to mimic organic antler growth. -
Refine the shape:
Go back over the gold lines to ensure they are opaque; adding a second layer while the paint is still slightly tacky can create a richer gold finish. -
Paint the ears:
Just below the base of each antler, paint a small, leaf-shaped loop on either side to represent the reindeer’s ears.
Paint Consistency Pro-Tip
If your ceramic paint feels too thick or drags on the surface, mix in a tiny drop of paint thinner or medium to help get those sharp, tapered points on the antler tips.
Step 3: Adding the Face Details
-
Paint the nose:
Using the size 2 round brush, dab a generous amount of bright red paint in the center of the face area to create a perfect circle for the nose. -
Smooth the circle:
I like to gently swirl the brush in the center of the red dot to push the paint outward, ensuring a smooth, round edge without lumps. -
Create the eyes:
Switch back to a clean detail brush with black paint and place two small dots equidistant above the nose for eyes. -
Draw the smile:
Beneath the red nose, paint a thin, gentle U-shaped curve in black for the mouth. -
Add cheek creases:
Finish the smile by adding tiny vertical ticks at the very ends of the mouth line to give the reindeer a cheerful expression. -
Sprinkle speckles:
Dip an old toothbrush or stiff brush into the gold paint and lightly flick it, or manually dot a few tiny specks around the antlers to add a magical, starry effect.
Level Up: 3D Texture
Use ‘puffy’ 3D decorative paint for the red nose instead of flat paint. This gives the finished mug a fun tactile element and makes the nose really pop off the ceramic surface.
Step 4: Curing and Setting
-
Dry completely:
Allow the mug to dry undisturbed for at least 24 hours to ensure the design is fully set on the surface. -
Oven bake:
Place the mug in a cold oven and set the temperature to 350°F (175°C). Once it reaches temperature, bake for 30 minutes. -
Cool down:
Turn the oven off and leave the mug inside to cool down completely with the door closed to prevent the ceramic from cracking due to thermal shock.
Your custom reindeer mug is now ready to hold your favorite hot cocoa or be gifted to someone special.
Ornaments Hanging From the Rim
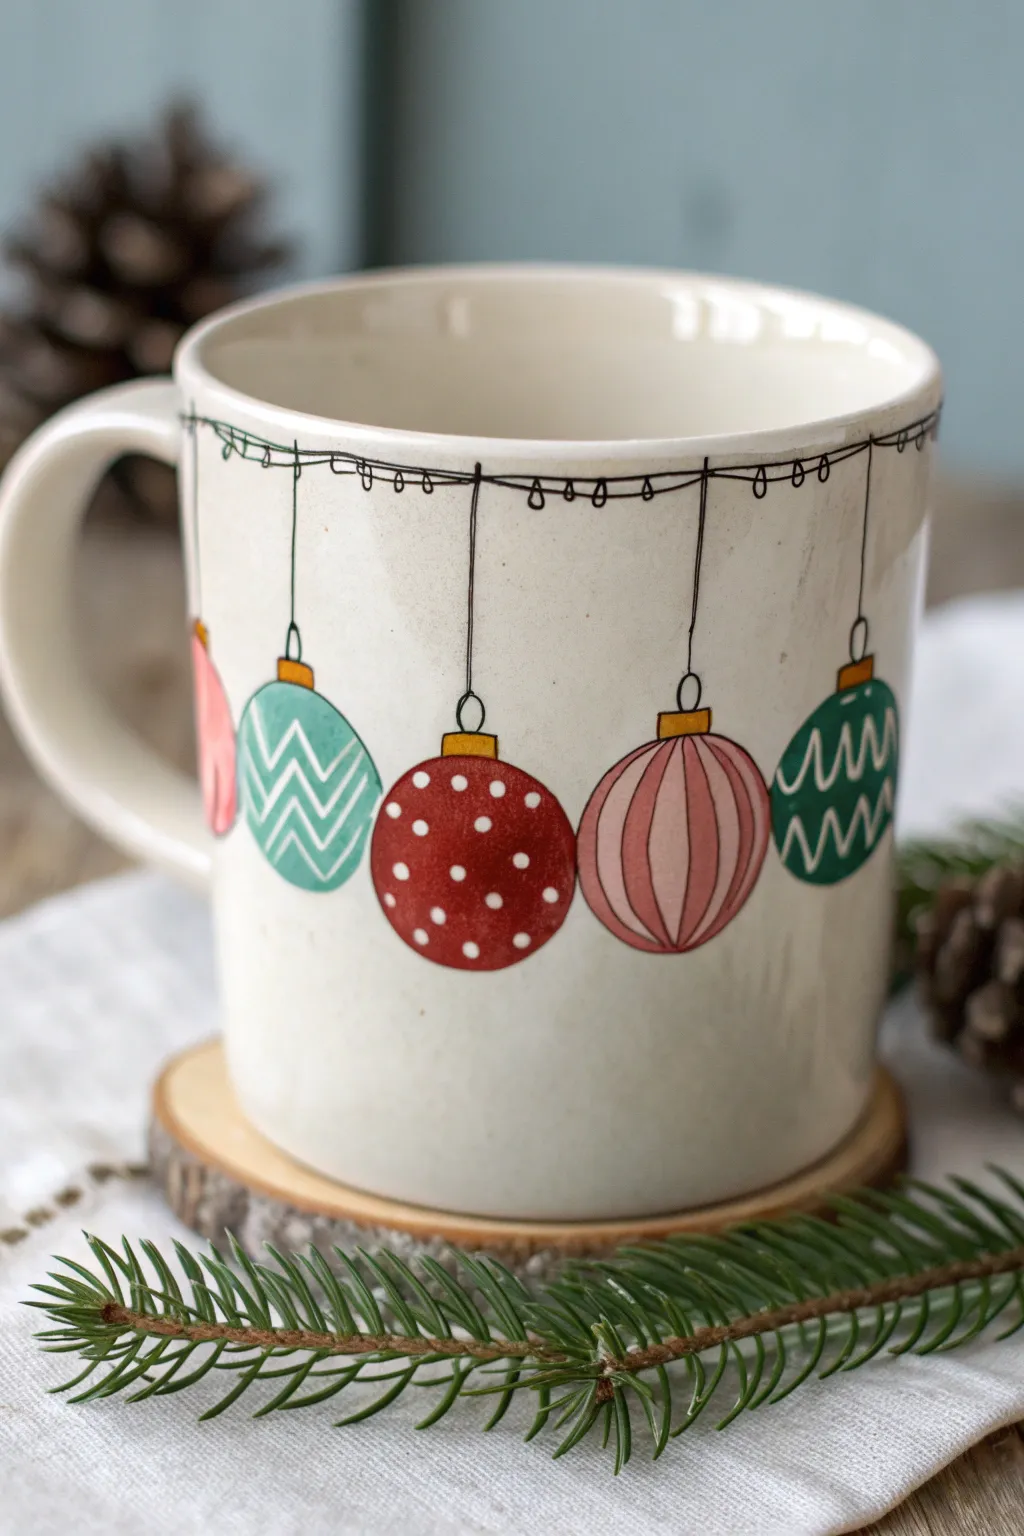
Transform a plain ceramic mug into a festive masterpiece with this delicate hand-painted design featuring a string of colorful ornaments hanging right from the rim. The clean lines and cheerful patterns give it a charming, almost illustrated look that is perfect for holiday cocoa.
Step-by-Step Tutorial
Materials
- Plain white or cream ceramic mug (cleaned with rubbing alcohol)
- Pebeo Porcelaine 150 paints (or similar ceramic paints) in: Red, Teal/Green, Pink, Gold/Yellow, Black
- Fine liner brush (size 0 or 00)
- Small round brush (size 2)
- Rubbing alcohol and cotton pads
- Paper towel
- Palette or small dish
- Oven (for baking the paint)
Step 1: Preparation and Main Lines
-
Prepping the surface:
Before you start painting, wipe the entire outer surface of the mug with rubbing alcohol. This removes any oils or fingerprints that could prevent the paint from adhering properly. -
Planning the layout:
Visualize where your five main ornaments will hang. You want them spaced relatively evenly around the front face of the mug, varying slightly in shape and size. -
Drawing the string:
Using your fine liner brush and black ceramic paint, draw a thin, continuous horizontal line about half an inch below the rim. It doesn’t need to be perfectly straight; a little waviness adds character. -
Adding the mini-lights:
Along this top wire, paint tiny little loops or ‘u’ shapes hanging down at regular intervals to mimic a string of miniature lights. -
Dropping the vertical lines:
From your main horizontal wire, paint five vertical black lines of varying lengths downward. These will verify where each large ornament will hang.
Step 2: Painting the Ornaments
-
Base shape: The red bauble:
At the end of the central vertical line, use the round brush to paint a solid red circle. I find it easiest to start in the middle and spiral outward to get a nice round shape. -
Base shape: The pink bauble:
To the right of the red one, paint a slightly larger, slightly elongated oval shape in pink. -
Base shape: The teal bauble:
To the left of the center, paint a teal or light turquoise circle, keeping it roughly the same size as the red one. -
Base shapes: The side ornaments:
Paint the final two ornaments on the far left (pink partial shape) and far right (jade green circle) to complete the arrangement. -
Letting the base dry:
Allow these base colors to dry for at least 15-20 minutes. They need to be touch-dry before you add pattern details so the colors don’t muddy. -
Adding ornament caps:
Using gold or yellow paint and a small detail brush, paint small rectangles right where the black vertical string meets the top of each colored ornament.
Fixing Wobbly Lines
Keep a damp cotton swab or toothpick handy while working. If a line goes astray or a circle isn’t round, quickly wipe it away before the paint sets and try again.
Step 3: Refining Details
-
Detailing the red ornament:
Use the tip of your smallest brush (or a dotting tool) to dab small white polka dots onto the red ornament. -
Striping the pink ornament:
Mix a slightly darker shade of pink or use a diluted red to paint vertical curved stripes on the pink oval ornament, giving it a 3D ribbed appearance. -
The chevron pattern:
On the teal ornament, paint white connection lines in a zigzag or chevron pattern across the center. -
The squiggle pattern:
On the far right green ornament, use white paint to create loose, looping squiggle lines horizontally. -
Outlining the ornaments:
Once the colors are fully dry, take your fine liner brush with black paint and carefully outline each ornament shape and the gold caps to make them pop. -
Connecting the hooks:
Draw a tiny loop connecting the black vertical string to the top of the gold cap on each ornament to complete the illusion of hanging. -
Final drying and baking:
Let the mug dry for 24 hours. Then, place it in a cool oven, set the temperature to 300°F (150°C), and bake for 35 minutes (or follow specific paint bottle instructions) to set the design dishwasher safe.
Add Some Sparkle
Once the paint is baked and cooled, use a gold oil-based marker to add tiny stars or sheen reflections on the ornaments for an extra festive touch that catches the light.
Now you have a cozy, custom mug ready for hot chocolate or gifting to a friend

TRACK YOUR CERAMIC JOURNEY
Capture glaze tests, firing details, and creative progress—all in one simple printable. Make your projects easier to repeat and improve.
Hand-Lettered Merry and Bright

Capture the simple elegance of the holidays with this charming hand-lettered mug project. Featuring playful script, scattered stars, and delicate dots, this design transforms a plain white ceramic mug into a festive masterpiece perfect for cozy mornings.
Detailed Instructions
Materials
- Plain white ceramic mug (smooth surface)
- Black oil-based paint marker (fine tip)
- Gold oil-based paint marker (fine and medium tip)
- Rubbing alcohol
- Cotton pads or paper towel
- Pencil (optional)
- Masking tape or painter’s tape (optional)
- Oven (for curing)
Step 1: Preparation & Planning
-
Clean surface:
Begin by thoroughly cleaning the exterior of your mug with soap and water to remove any stickers or residue. -
Degrease:
Wipe the entire surface down with rubbing alcohol on a cotton pad. This removes invisible oils from your fingers that can prevent paint from adhering properly. -
Dry completely:
Let the alcohol air dry for a minute or two. Avoid touching the painting area with your bare hands from this point forward. -
Plan layout:
Visualize where the text will sit. I like to aim for the center of the mug, opposite the handle, keeping the design slightly elevated so it’s visible when held. -
Guidance lines (optional):
If you’re worried about straight lines, lightly place two strips of masking tape as top and bottom boundaries for your text block.
Fixing Wobbly Lines
If a line goes astray, don’t panic. While paint is wet, a damp Q-tip works as an eraser. If dry, carefully scratch off the error with a toothpick.
Step 2: Lettering
-
Activate marker:
Shake your fine-tip black oil-based marker well and press the nib on a scrap piece of paper until the ink flows smoothly. -
Drafting ‘Merry’:
Start with the word ‘Merry’ in a bouncy cursive script. Keep the letters slightly loose and relaxed, rather than perfectly rigid. -
Drafting ‘&’:
Place a small ampersand or a decorative colon directly centered beneath ‘Merry’. In this design, a simple stacked colon or small symbol works well to bridge the gap. -
Drafting ‘bright’:
Write ‘bright’ underneath, matching the style of the first word. Ensure the tails of the ‘g’ and ‘h’ add a bit of flair without overlapping the word above too much. -
Thicken downstrokes:
Go back over your letters and carefully thicken only the downstrokes—the parts where your pen moved downward—to create a faux-calligraphy look. -
Refine edges:
Smooth out any wobbles in your lettering lines with the fine tip to make the script look polished and intentional. -
Let ink set:
Allow the black ink to dry for at least 15 minutes before adding any surrounding elements to prevent smudging.
Step 3: Decorative Elements
-
Primary stars:
Take your gold marker and draw a classic five-point star near the top right of the text block. -
Secondary stars:
Add a few smaller five-point stars scattered randomly around the words—perhaps one near the bottom center and one to the left. -
Tiny starbursts:
Draw tiny four-point sparkle shapes (like a cross) in the empty spaces to add variety to the celestial theme. -
Add dots:
Using the very tip of the gold marker (or a fine black marker for contrast), dot the empty white space around the words and stars. Vary the spacing so it looks like falling snow or stardust. -
Gold accents:
If you want extra dimension, add tiny gold dots slightly overlapping or next to the black dots. -
Clean up:
Use a cotton swab dipped in rubbing alcohol to erase any mistakes or stray marks. Do this carefully to avoid ruining the main design.
Add a Surprise
Paint a small matching gold star on the very bottom inside of the mug. It’s a delightful hidden detail revealed only when the drink is finished.
Step 4: Curing
-
Dry time:
Let the mug sit for at least 24 hours to ensure the paint feels completely dry to the touch. -
Bake settings:
Place the mug into a cold oven. Turn the oven to 350°F (175°C). -
Baking process:
Once the oven reaches temperature, bake for 30 minutes. Turn the oven off and let the mug cool down completely inside the oven to prevent cracking.
Now fill your new creation with hot cocoa and enjoy the festive spirit you’ve crafted by hand
Gingerbread Cookie Characters
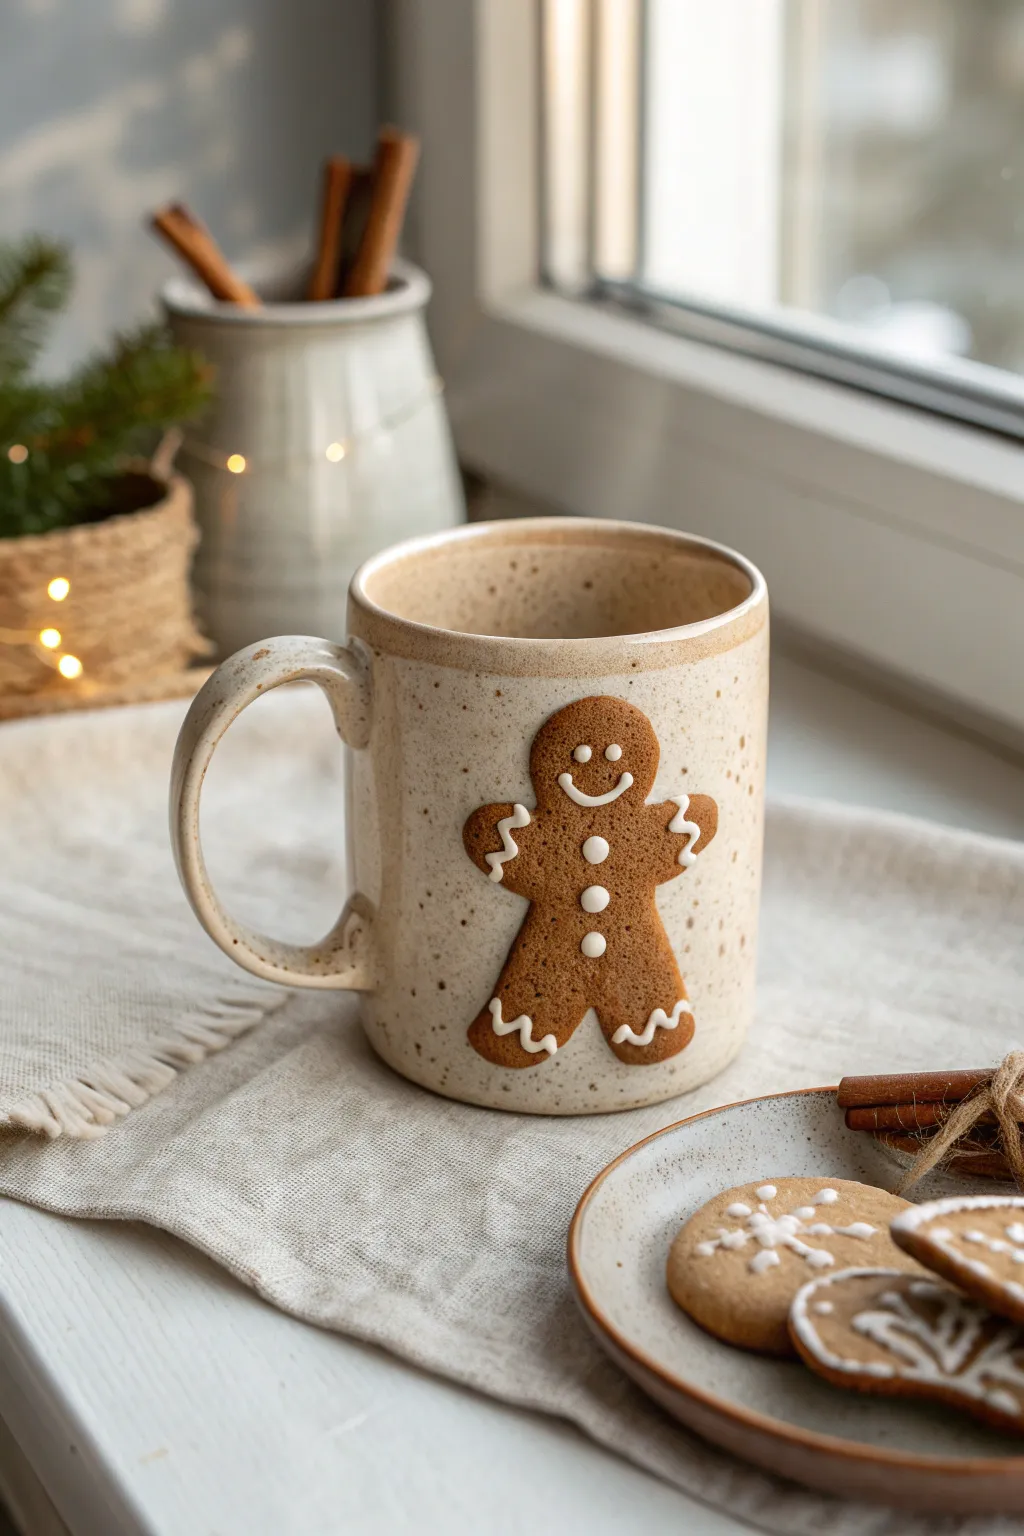
Transform a plain speckled mug into a warm holiday favorite by adding a delightful, raised gingerbread man that looks like a real cookie stuck right onto the cup. This project combines simple sculpting with ceramic painting to create a charming, tactile character that stands out against a creamy background.
Step-by-Step Tutorial
Materials
- Plain cream or speckled ceramic mug
- Brown polymer clay (oven-bake) or air-dry ceramic clay
- Strong ceramic glue (like E6000)
- White 3D puffy paint or white relief liner
- Small rolling pin
- Gingerbread man cookie cutter (mini size)
- Fine-grit sandpaper
- Isopropyl alcohol
- Matte mod podge or clay sealant (optional)
- Speckled egg spray paint (optional, if starting with plain mug)
Step 1: Preparing the Base
-
Clean the surface:
Before doing anything, thoroughly wash your mug with soap and water to remove any grease or oils. -
Wipe down with alcohol:
Take a cotton pad soaked in isopropyl alcohol and wipe the specific area where you plan to attach the gingerbread man to ensure the strongest bond possible. -
Create the speckle effect (optional):
If you are starting with a plain white mug and want that rustic stoneware look, lightly mist the mug with speckled effect spray or flick brown acrylic paint onto it using an old toothbrush. Let this dry completely before proceeding.
Glue slipping?
If the clay figure keeps sliding down the mug while the glue dries, use painter’s tape or a large rubber band to secure it tightly against the surface until fully cured.
Step 2: Sculpting the Cookie
-
Condition the clay:
Warm up your brown polymer clay by kneading it in your hands until it becomes soft and pliable. -
Roll the dough:
Use your small rolling pin to flatten the clay to about 1/4 inch thickness. Like real cookies, you want it to have a bit of chunkiness, not be paper-thin. -
Cut the shape:
Press your mini gingerbread cutter firmly into the clay. If you don’t have a cutter, you can sketch the shape with a toothpick and cut it out carefully with a craft knife. -
Soften the edges:
Gingerbread cookies create a soft, baked edge in the oven, so use your fingertip to gently smooth and round off the sharp cut edges of your clay figure. -
Texture the surface:
Take a clean toothbrush or a piece of crumpled aluminum foil and gently press it all over the clay surface to mimic the porous texture of a baked cookie. -
Shape to the mug:
Before hardening the clay, press the raw clay figure gently against your mug to curve the back of the gingerbread man so it fits the contour of the cup perfectly.
Make it sweeter
Add a tiny red clay bow tie before baking, or use pink paint to add rosy cheeks after the clay is mounted for an extra cute and personalized expression.
Step 3: Baking and Mounting
-
Bake the clay:
Follow the manufacturer instructions on your clay package (usually baking at 275°F for 15-30 minutes) and let the piece cool completely on a flat surface. -
Sand the back:
Once cool, use fine-grit sandpaper to rough up the back of the clay cookie slightly; this texture helps the glue grip better. -
Apply adhesive:
Apply a generous amount of strong ceramic glue to the back of the gingerbread man. I find it helpful to stay a few millimeters away from the edge so it doesn’t squish out. -
Attach to mug:
Press the figure firmly onto the mug in your desired spot and secure it with masking tape to hold it in place while the glue sets (usually 24 hours).
Step 4: Icing and Finishing
-
Pipe the face:
Using your white 3D puffy paint or relief liner, carefully squeeze out two small dots for eyes and a curved line for the classic smile. -
Add the buttons:
Pipe three evenly spaced, plump white dots down the center of the torso for the gumdrop buttons. -
Decorate the limbs:
Add the signature squiggly ‘icing’ lines on the wrists and ankles. Keep your pressure steady on the bottle to ensure smooth, continuous lines. -
Let it cure:
Allow the paint to dry completely according to the bottle instructions. Resist the urge to touch it, as puffy paint can flatten easily while wet. -
Seal the cookie:
For longevity, brush a thin layer of matte sealer over just the brown clay parts (avoiding the white icing) to protect it from moisture during hand washing.
Now you have a cozy, custom mug that brings a touch of bakery warmth to your morning coffee
Hot Cocoa With Marshmallow Pile Illustration
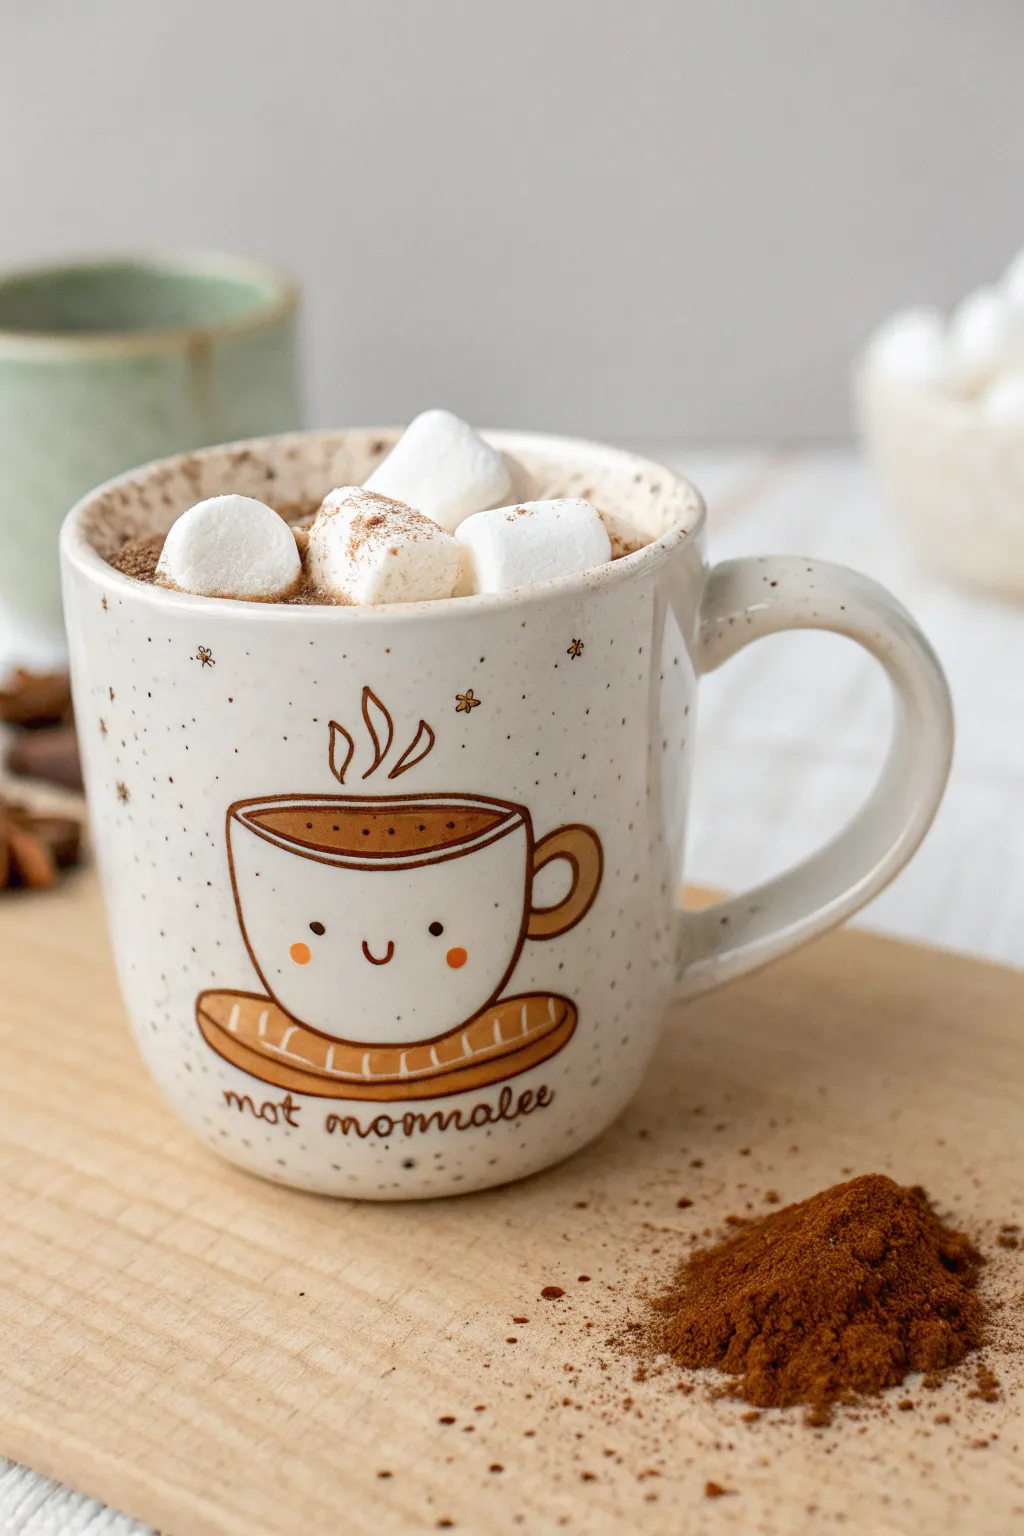
Transform a plain ceramic mug into a heartwarming piece of drinkware featuring a cheerful, anthropomorphized cocoa cup. This rustic, speckled design mimics the comforting feeling of a warm winter beverage with its simple line work and friendly face.
Detailed Instructions
Materials
- Plain cream or off-white ceramic mug
- Ceramic paints (warm browns, cream/white, peach/orange)
- Fine-point detail paintbrush (size 0 or 00)
- Small flat shader paintbrush (size 2)
- Rubbing alcohol and cotton pads
- HB pencil
- Oven (for curing)
- Brown ceramic marker or fine-tip paint pen (optional for text)
Step 1: Preparation & Base Sketch
-
Clean the Surface:
Thoroughly wipe down the mug’s surface with rubbing alcohol on a cotton pad to remove any oils or fingerprints. This is crucial for paint adhesion. -
Sketch the Outline:
Lightly sketch your design directly onto the mug using an HB pencil. Draw a wide, squat cup shape sitting on a flat oval saucer. Don’t worry about perfection; pencil lines will burn off in the oven later. -
Add Handle and Steam:
Sketch a small ‘C’ shaped handle on the right side of the cup body. Above the cup, draw three loose, teardrop-shaped swirls to represent rising steam.
Step 2: Painting the Cocoa Cup
-
Mix Your Brown:
Create a warm, medium-brown tone using your ceramic paints. If your brown is too dark, lighten it slightly with a touch of cream to match the ‘cocoa’ look. -
Outline the Rim:
Using your fine-point brush and the brown paint, carefully trace the top oval rim of the cup. Make the back line slightly thinner than the front line for perspective. -
Fill the Coffee Level:
Paint the inside of the rim oval with a darker brown to represent the hot chocolate liquid. While wet, stipple in a few tiny lighter brown dots for froth texture. -
Define the Cup Body:
Outline the main body of the cup and the saucer below it with the medium brown paint. Keep your lines steady but organic; a little variation adds to the hand-drawn charm. -
Paint the Saucer Detail:
Add vertical hatch marks along the rim of the saucer to give it a textured, biscuit-like appearance. Paint a solid line at the very bottom of the saucer for shadow.
Paint Slipping?
If paint beads up on the glaze, the surface is too sleek. Lightly sand the painting area with fine grit sandpaper (400+) before cleaning with alcohol to give the paint grip.
Step 3: Adding Personality & Details
-
Paint the Face:
Using the very tip of your detail brush and dark brown paint, add two small dots for eyes wide apart on the cup body. Paint a small ‘u’ shape between them for a smile. -
Add Rosy Cheeks:
Dip the back end of your paintbrush handle into peach or orange paint. Gently dot this onto the cup just outside the eyes to create perfect circular cheeks. -
Steam and Sparkles:
Trace over your pencil steam lines with brown paint. Afterward, add tiny asterisks or starburst shapes around the steam and cup to create a magical, sparkling effect. -
Speckled Effect:
Dilute a small amount of dark brown paint with water. Load an old toothbrush or stiff brush, and flick the bristles with your thumb to spray fine speckles across the entire design area. -
Lettering:
Using a script style, carefully paint the phrase ‘hot chocolate’ or a name underneath the saucer. I find a ceramic marker offers more control here than a brush.
Level Up: 3D Foam
Mix a tiny bit of baking soda into white ceramic paint to create a puffy texture. Dab this ‘foam’ onto the brown liquid area for a relief effect representing marshmallows.
Step 4: Finishing Touches
-
Clean Up:
Use a damp cotton swab or toothpick to gently scrape away any paint mistakes or stray splatters before the paint dries completely. -
Dry Time:
Allow the mug to dry for at least 24 hours. Placing it in a dust-free cupboard is best to protect the wet surface. -
Bake to Cure:
Place the mug in a cold oven. Set the temperature to 350°F (175°C) and bake for 30 minutes. Turn the oven off and let the mug cool completely inside before removing to prevent cracking.
Now you have a charming custom vessel ready to hold your favorite winter treat
Simple Winter Village Wraparound Scene
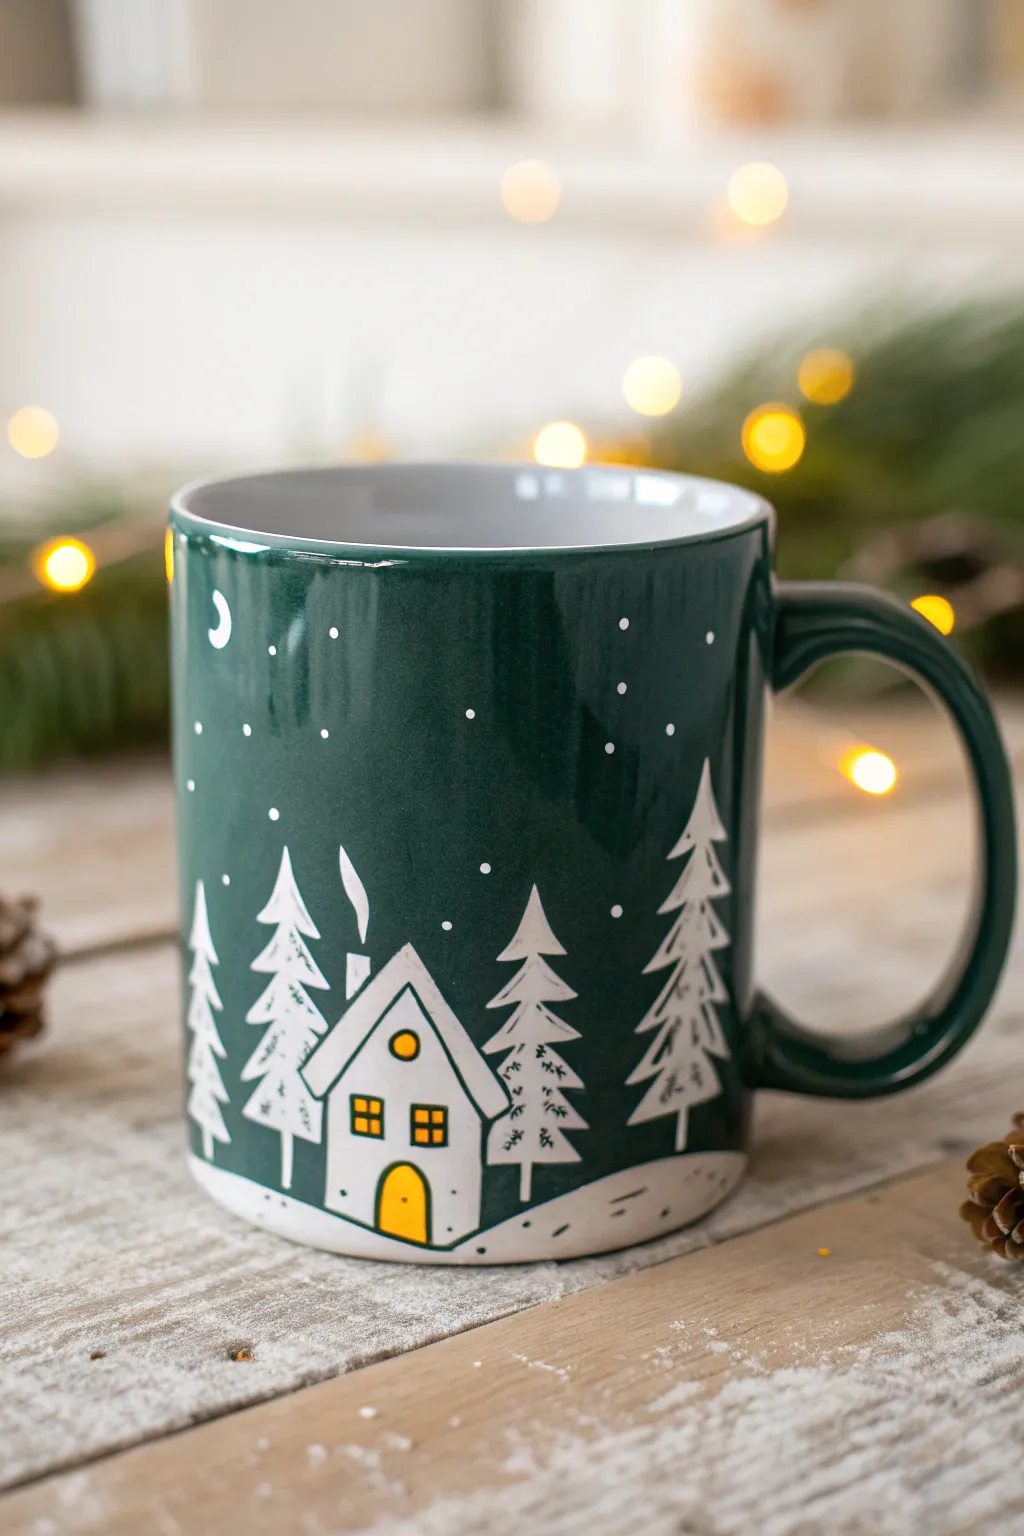
Transform a plain green mug into a cozy snowy retreat with this charming wraparound design. Contrast is key here, as bright white paint pops beautifully against the dark forest green ceramic to create a simple yet striking winter village scene.
Step-by-Step
Materials
- Dark green ceramic mug (straight-sided preferred)
- White ceramic/porcelain paint (or oil-based paint marker)
- Yellow ceramic/porcelain paint (small amount)
- Fine detail paintbrush (size 0 or 00)
- Small flat angular brush
- Rubbing alcohol
- Cotton pads
- Paper plate or palette
- Oven (for curing, check paint instructions)
Step 1: Preparation & Base Layout
-
Clean surface:
Before dipping your brush, wipe the exterior of the mug thoroughly with rubbing alcohol and a cotton pad. This removes invisible oils from your fingers that could cause the paint to flake off later. -
Map the ground:
Using your white paint and a flat brush, paint a wavy, uneven line near the very bottom of the mug. Fill in the space between this line and the bottom edge to create a snow-covered ground layer. -
Outline the house:
Switch to your fine detail brush. Slightly off-center (or wherever you want the focal point), paint the outline of a simple house shape: a square base with a triangle serving as a steep, pitched roof. -
Add the chimney:
Paint a small rectangle emerging from the left side of the roof for the chimney. Add a tiny, wavy line drifting upward from it to look like smoke.
Step 2: Painting the Trees
-
Tree trunks:
Draw three or four vertical lines of varying heights spaced around the house. These will be the trunks of your pine trees. Stagger them so some look closer and some further away. -
Layering branches:
Starting from the top of a trunk line, use short, downward-angled strokes to create branches. I like to keep these strokes loose and slightly uneven to mimic natural pine needles. -
Building volume:
Work your way down the trunk, making the branches slightly wider as you go. Leave some gaps between the ‘boughs’ so the green mug background shows through. -
Tree details:
Repeat this process for all your trees. Vary the fullness; allow some to be tall and thin, while others can be shorter and bushier for variety.
Fixing Wobbly Lines
If your lines aren’t crisp, let the paint dry slightly. Then, use a wooden toothpick to gently scratch and ‘push’ the edges of the paint back into a straight line.
Step 3: Detailed Architecture & Sky
-
Fill the house:
Return to the house outline. Paint the interior of the house shape solid white, but leave small square voids for the windows and an arched void for the door if possible. If it’s easier, paint it solid white first and let it dry completely. -
Roof details:
Thicken the white line on the roof to make it look like a heavy layer of snow is resting on top. Extend the eaves slightly past the walls. -
Window frames:
If you painted the house solid white, use a very fine brush (or a toothpick) to carefully apply yellow paint for the windows. A round attic window and two square lower windows create a cute face-like arrangement. -
Door and trim:
Paint the arched door yellow. Once the yellow is dry, use your finest brush with a tiny amount of black or dark green (or a fine tip marker) to outline the window panes and door frame for crisp definition. -
Starry sky:
Dip the non-brush end (the handle tip) of your paintbrush into white paint. Dot it randomly around the upper empty space of the mug to create falling snow. -
Tiny dots:
For variety in your snowfall, use a toothpick to add even tinier specks of white between the larger dots. -
Crescent moon:
Paint a small, slender crescent moon in the upper left corner to complete the night sky effect.
Add Metallic Magic
Swap the plain yellow paint for metallic gold when filling in the windows and door to make the cabin look like it’s truly glowing with warm candlelight.
Step 4: Finishing Touches
-
Ground texture:
Add a few small, thin dashed lines in black or grey onto the white snow ground at the bottom to give it texture and movement. -
Cleanup:
If you made any smudges, use a damp cotton swab or a toothpick to gently scrape away the mistake before the paint fully hardens. -
Dry time:
Allow the mug to dry for at least 24 hours. Do not touch the design during this time. -
Bake to set:
Place the mug in a cold oven, then heat to the temperature specified on your paint bottle (usually around 350°F/176°C) for 30 minutes to cure the design permanently.
Enjoy your cozy new mug with a hot cocoa as you watch the real snow fall outside
Festive Plaid in Red, Green, and White
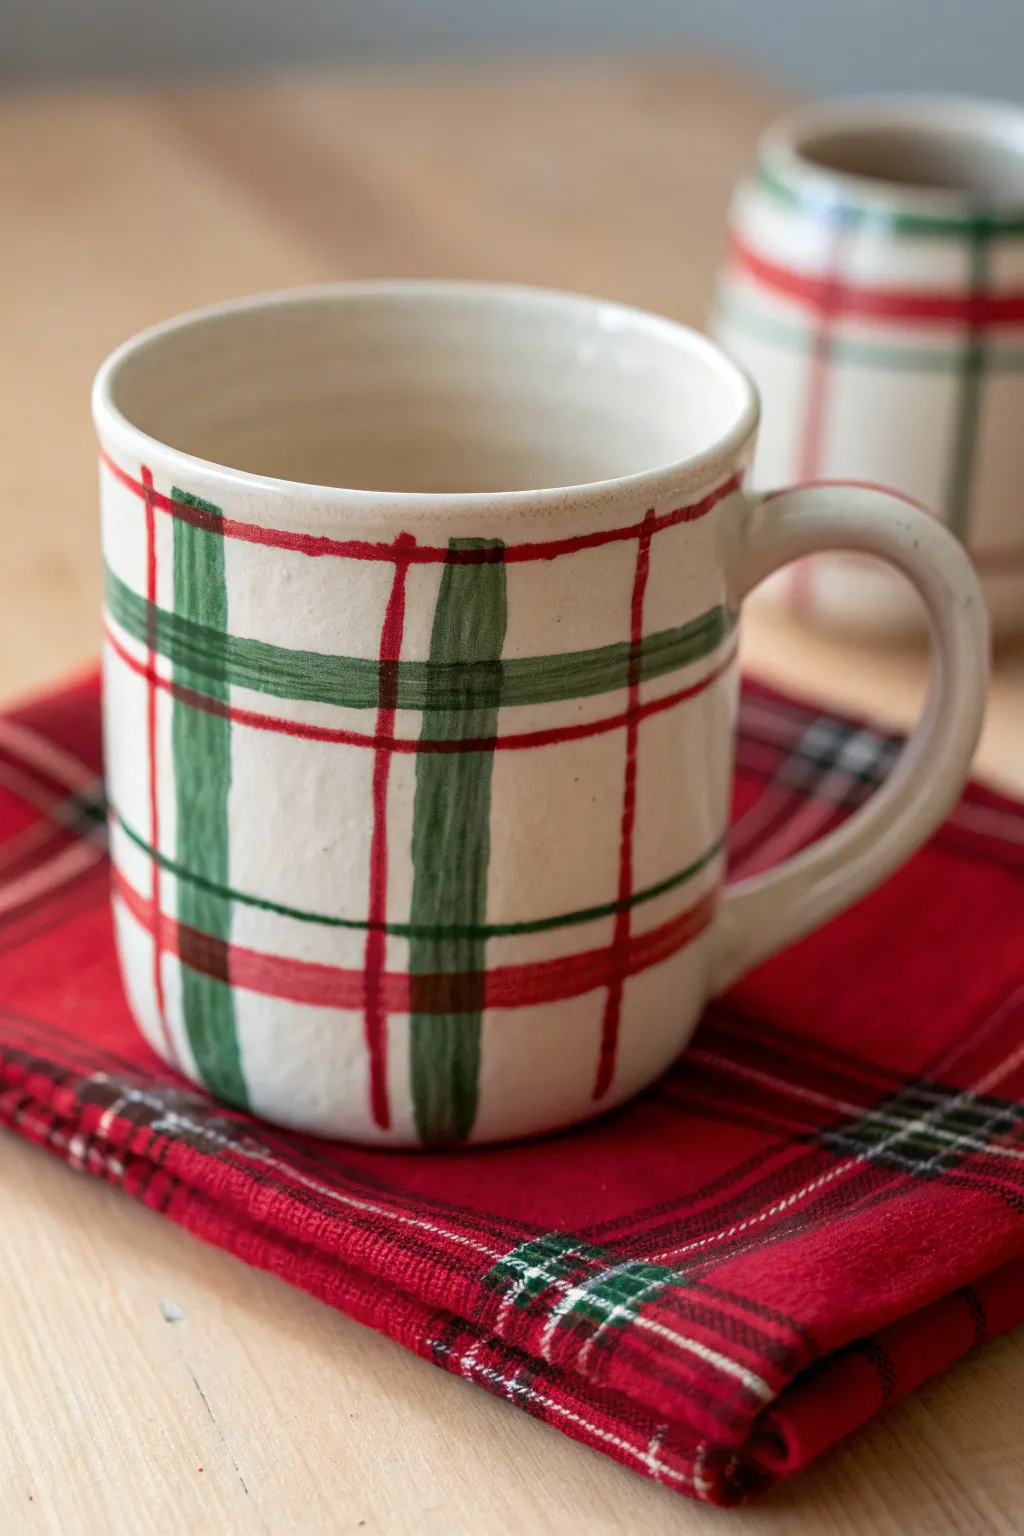
Achieve a classic holiday look by transforming a plain white ceramic mug with this hand-painted plaid design. The charming imperfections of the lines give it a rustic, cozy feel that perfectly complements bright reds and deep forest greens.
Step-by-Step Tutorial
Materials
- Plain white ceramic mug
- Ceramic or porcelain paints (Kelly Green, Bright Red)
- Medium flat brush (approx. 1/2 inch width)
- Small round detail brush (size 1 or 2)
- Rubbing alcohol and cotton pad
- Palette or paper plate
- Cup of water for rinsing
- Paper towels
- Oven (for curing, if required by paint type)
Step 1: Preparation and Base Lines
-
Clean the Surface:
Before you begin, wipe down the entire exterior surface of the mug with rubbing alcohol on a cotton pad. This removes any oils or fingerprints that could prevent the paint from adhering properly. -
Load the Flat Brush:
Squeeze a generous amount of Kelly Green ceramic paint onto your palette. Dip your medium flat brush into the paint, ensuring the bristles are fully coated but not dripping. -
Paint Vertical Stripes:
Hold the mug steady and paint thick vertical stripes from the rim down to the base. Space these green stripes about 1.5 to 2 inches apart around the circumference of the mug. -
Create Texture:
Don’t worry about making these lines perfectly opaque. I like to let the brush strokes show through slightly, as this gives the plaid a more authentic, woven fabric appearance. -
Paint Horizontal Stripes:
Reload your flat brush with green paint. Paint horizontal stripes around the mug, crossing over the vertical ones you just made. Aim for two or three distinct horizontal bands. -
Initial Drying:
Allow these thick green bands to dry to the touch before moving on to the next color. This prevents muddying the red lines that come next. 15-20 minutes is usually sufficient.
Step 2: Adding the Grid
-
Switch to Red:
Clean your brush thoroughly or switch to your small round detail brush. Load it with Bright Red paint. -
Vertical Red Accents:
Paint thin vertical red lines. Place two of these lines between each of the thick green vertical stripes you painted earlier. -
Keep it Loose:
Allow your hand to be relaxed. The charm of this mug lies in the hand-painted look, so if the lines wobble slightly, embrace it. -
Horizontal Red Lines and Rim:
Paint corresponding horizontal red lines running across the mug. Additionally, paint a nice solid red line directly beneath the rim of the mug to frame the design. -
Check Intersections:
Where the red lines cross the green stripes, apply a little extra paint if needed to ensure the red stands out against the darker green background.
Tape for Sharper Lines
If freehand isn’t your thing, use thin washi tape or painters tape to mask off your lines. Remove the tape while the paint is still wet to avoid peeling
Step 3: Final Details and Curing
-
Load Detail Brush with Green:
Using a clean small round brush, pick up a small amount of the Kelly Green paint again for the final thin details. -
Add Thin Green Lines:
Paint a very thin vertical green line directly down the center of the white space between your red vertical lines. -
Complete the Pattern:
Repeat this process horizontally. These thin lines add complexity to the plaid pattern, making it look like true tartan. -
Cleanup Edges:
If any paint has strayed onto the rim or handle where you don’t want it, use a damp cotton swab or a toothpick to gently scrape or wipe it away while wet. -
Paint the Handle Tip:
For a cohesive look, brush a small accent of red or green onto the top curve of the handle where it meets the mug body. -
Full Dry:
Let the mug sit undisturbed for at least 24 hours to ensure the paint is completely dry throughout. -
Bake to Cure:
Place the mug in a cold oven. Set the temperature to 350°F (175°C) and bake for 30 minutes. Let the mug cool down completely inside the oven before removing to prevent cracking.
Gold Accent Upgrade
Add a touch of luxury by painting the very thin center lines with metallic gold ceramic paint instead of green or red for extra holiday sparkle
Now you have a cozy, custom mug ready for your favorite hot cocoa or tea
Ugly Sweater Knit Pattern Bands
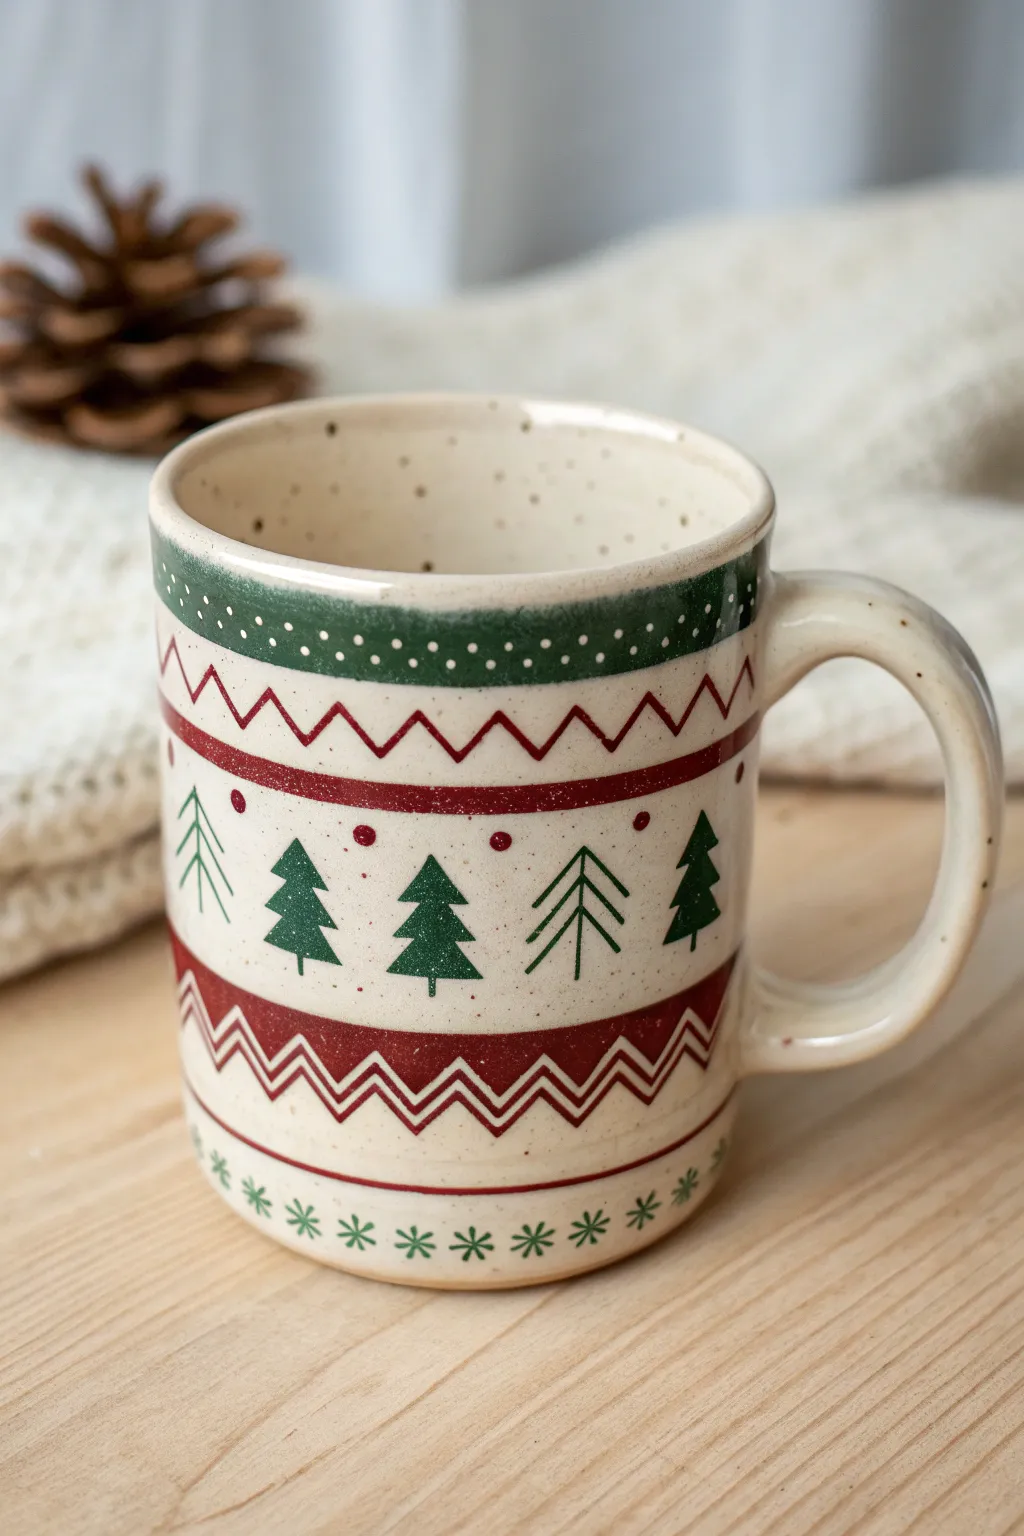
Transform a plain ceramic mug into a festive masterpiece with this cozy knit-inspired design. Featuring repeating bands of chevron patterns, pine trees, and delicate snowflakes, this project mimics the charm of a classic Christmas sweater.
How-To Guide
Materials
- Plain ceramic mug (cream or off-white)
- Ceramic or glass paints (Hunter Green, Deep Red, White)
- Soft flat brush (medium size)
- Fine detail liner brush (size 0 or 00)
- Small dotting tool or toothpick
- Rubbing alcohol and cotton pads
- Pencil
- Paper towels
- Oven (for curing, if required by paint type)
Step 1: Preparation and Planning
-
Clean surface:
Begin by thoroughly wiping down the outside of your mug with rubbing alcohol on a cotton pad. This removes any oils or fingerprints that could prevent the paint from adhering properly. -
Sketch guides:
Using a pencil, lightly sketch horizontal rings around the mug to establish where your different pattern bands will go. You don’t need to draw every detail, just the boundaries for the green stripes, red zig-zags, and the central tree section.
Pro Tip: Steady Hands
Place the mug on a lazy susan or a turntable. Hold your brush still in one spot while slowly rotating the base to get perfectly straight horizontal bands.
Step 2: Painting the Bands
-
Top green band:
Load your flat brush with Hunter Green paint. Carefully paint a solid band around the upper rim of the mug, about half an inch thick. Keep your hand steady and rotate the mug as you go for a continuous line. -
Upper red zig-zags:
Switch to your fine liner brush and Deep Red paint. Below the green band, paint a thin, continuous zig-zag or chevron line. Try to keep the peaks and valleys consistent in height. -
Lower red border:
Paint a solid red line just below your zig-zag pattern to frame the central section. I find it helpful to anchor my pinky finger on the mug handle for better stability while pulling these long lines. -
Bottom geometric band:
Move to the lower third of the mug. Create a wider band of red geometric patterns. Start by painting two parallel red lines, then fill the space between them with a double zig-zag pattern, mimicking a knit texture.
Troubleshooting: Drippy Lines
If your horizontal lines are dripping or bleeding, your paint is likely too thin or overloaded. Blot your brush on a paper towel before painting to control the flow.
Step 3: Central Motif and Details
-
Paint solid trees:
In the wide central band, use your liner brush and Hunter Green to paint solid pine tree shapes. Paint a small triangle for the top, followed by two slightly wider tiers below it, creating a classic Christmas tree silhouette. -
Add line trees:
Alternating with the solid trees, paint stylized ‘line’ trees. Draw a vertical trunk, then add downward-slanting branches on either side. This variation adds visual interest and lightness to the design. -
Red accent dots:
Using the Deep Red paint and a small dotting tool (or the wrong end of a brush), place small dots in the white space above the trees, spacing them evenly between the peaks of the tree tops. -
Snowflake base:
At the very bottom of the mug, below your complex red band, use the Hunter Green paint to create a row of simple asterisks or snowflakes. Draw a small ‘X’ with a vertical line through the center for each one.
Step 4: Finishing Touches
-
Top band dots:
Return to the top green band you painted first. Once it’s dry to the touch, use a clean dotting tool and white paint to add a row of tiny, delicate dots along the bottom edge of the green stripe. -
Speckled effect:
To give the mug that rustic, speckled ceramic look, dilute a tiny amount of brown or black paint with water. Dip an old toothbrush or stiff brush into it and lightly flick speckles across the entire design. -
Clean up:
Check for any smudges or uneven lines. You can scrape away mistakes with a damp toothpick or a cotton swab dipped in rubbing alcohol while the paint is still fresh. -
Drying:
Allow the mug to dry completely according to your paint manufacturer’s instructions. This usually takes at least 24 hours. -
Curing:
Most ceramic paints require distinct curing to become dishwasher safe. Place the mug in a cold oven, heat to the specified temperature (often 350°F), bake for 30 minutes, and let it cool down inside the oven.
Now you can enjoy your favorite hot cocoa in a mug that feels just as warm and fuzzy as your favorite holiday sweater
Metallic Starburst Christmas Star Accent

Transform a plain white mug into a celestial masterpiece with this striking metallic starburst design. The intricate gold detailing creates a sophisticated, festive look that shines beautifully against the ceramic surface.
Step-by-Step
Materials
- Plain white ceramic mug (clean and dry)
- Oil-based metallic gold paint marker (fine point)
- Oil-based metallic gold paint marker (extra-fine point)
- Rubbing alcohol and cotton pads
- Ruler or straight edge (flexible painter’s tape works too)
- Pencil (optional)
- Oven (for curing)
Step 1: Preparation & Mapping
-
Clean surface:
Begin by thoroughly wiping down the entire exterior of the mug with rubbing alcohol. This removes any oils or fingerprints that could prevent the paint from adhering properly. -
Mark the center:
Find the center point on the front of the mug where you want the starburst to live. You can make a tiny, faint dot with your pencil to guide you. -
Draft the primary cross:
Using a pencil or just eyeballing with your fine-point marker, draw a tall vertical line through your center dot. This should be the longest line of the star. -
Draft the horizontal beam:
Draw a horizontal line crossing through the center. Make this line slightly shorter than the vertical one to create that elongated, elegant star shape.
Uneven Ink Flow?
If the marker skips, press the nib on a scrap piece of paper to recharge the tip. Don’t press down directly on the mug, as it might cause a puddle.
Step 2: Forming the Star
-
Draw the diagonal beams:
Add two diagonal lines crossing through the center point. These should be shorter than both the vertical and horizontal lines. -
Connect the points:
Now, connect the tips of your lines to the center. Instead of drawing straight to the center, draw lines that angle slightly inward to meet the main axis lines, creating the 3D diamond shapes for each star point. -
Thicken the outline:
Go over the outer perimeter of your eight-pointed star with the fine-point marker to create a clean, bold outline. -
Refine the inner lines:
Redraw the internal lines that connect to the center point, ensuring they look sharp. This divides each star point into two triangular facets.
Step 3: Detailing & Texture
-
Create shading with stippling:
Switch to your extra-fine point marker. Pick one side of each star point’s facet (for example, always the right side of the facet) to fill with texture. -
Dotting technique:
Fill these chosen facets with tiny, dense dots. I like to cluster them heavily near the center of the star and let them fade out as they reach the tips. -
Add scattered stars:
around the large starburst, draw tiny five-pointed stars using the extra-fine marker. Keep them random and delicate. -
Create a galaxy effect:
In the empty white spaces between the stars, add very fine dots. Vary the pressure to create different sized speckles. -
Gold rim accent:
Carefully run the side of your fine-point marker along the rim of the mug to create a thin gold band. -
Handle detail:
Add a matching gold stripe along the top or side of the handle to tie the design together.
Steady Hand Trick
Rest your painting hand’s pinky finger on the mug surface (or on a dry cloth if the surface is wet) to stabilize your hand while drawing fine lines.
Step 4: Finishing Touches
-
Clean up mistakes:
If any lines went astray, dampen a cotton swab with rubbing alcohol and carefully wipe away the wet paint metal. -
Air dry:
Let the mug sit undisturbed for at least 24 hours to allow the paint to fully settle. -
Bake to cure:
Place the mug in a cold oven, then heat to 350°F (175°C). Bake for 30 minutes, then turn the oven off and let the mug cool completely inside before removing.
Now you have a stunning, shimmering mug that looks professional and feels festive
Nordic-Inspired Folk Motifs
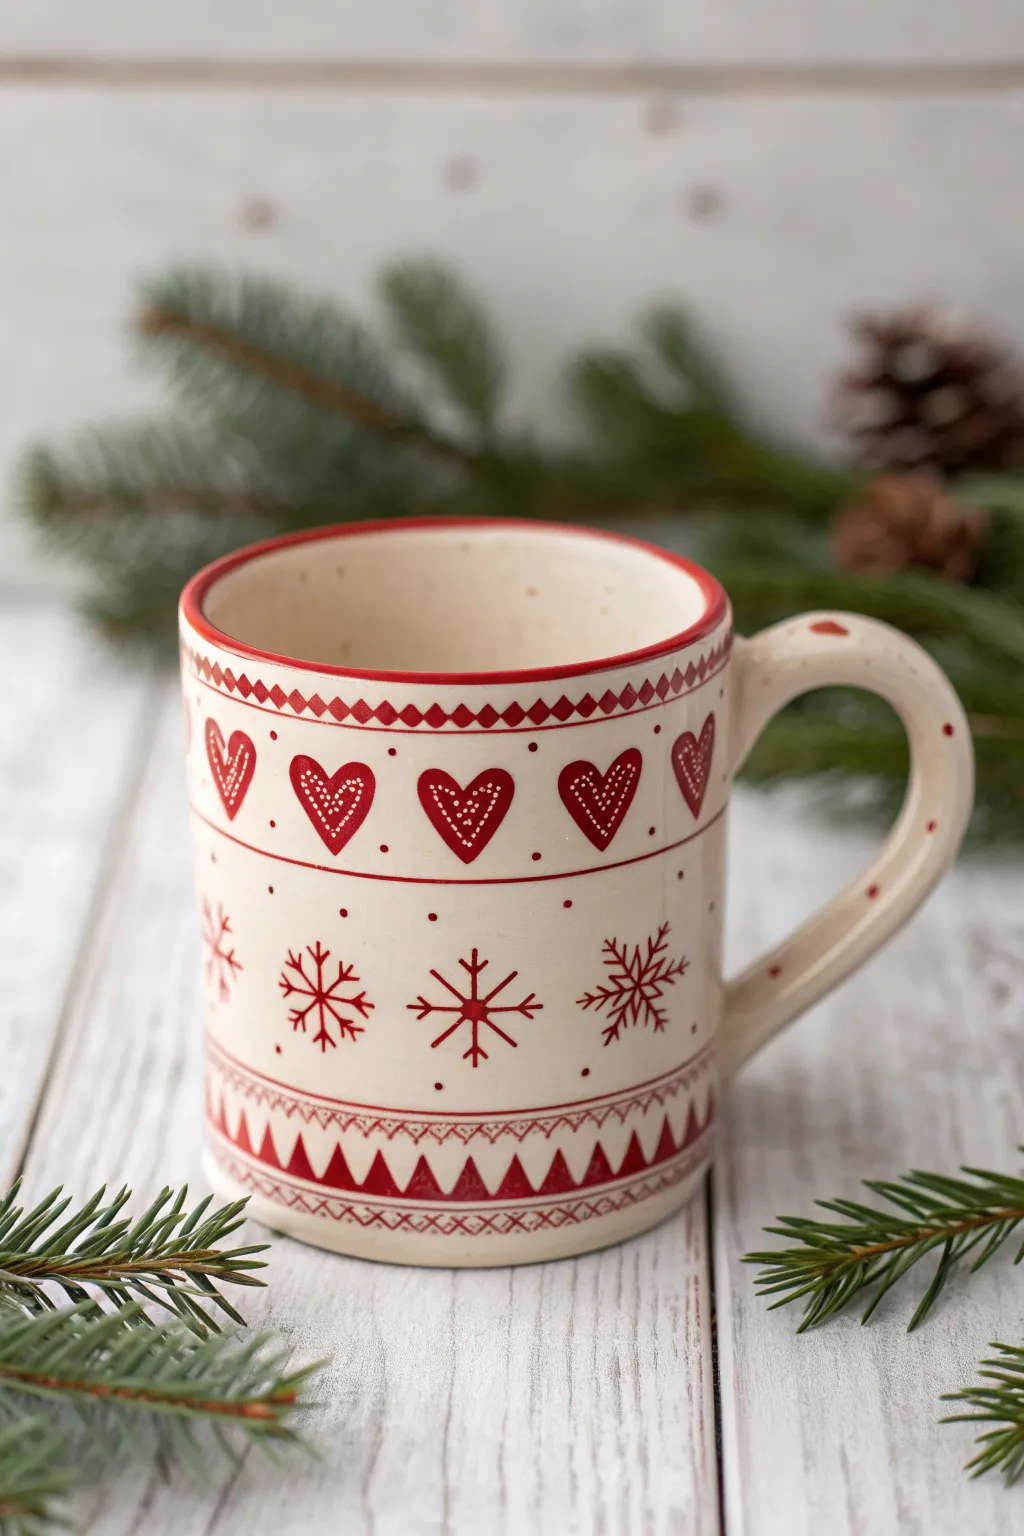
Bring the warmth of a Scandinavian winter into your home with this deliciously festive mug design. Featuring classic red folk art motifs like hearts and snowflakes on a creamy base, this project creates a timeless piece perfect for sipping hot cocoa by the fire.
Step-by-Step Guide
Materials
- Plain cream or white ceramic mug (straight-sided works best)
- Red porcelain paint (gloss finish)
- Fine round paintbrush (size 0 or 00)
- Small dotting tool or toothpick
- Rubbing alcohol
- Cotton pads
- Painter’s tape or masking tape (optional)
- Oven for baking (if using bake-to-set paints)
- Paper plate or palette
Step 1: Preparation and Base Lines
-
Clean the surface:
Before making a single mark, wipe the entire exterior of your mug with rubbing alcohol on a cotton pad to remove any oils or fingerprints that could prevent paint adhesion. -
Paint the rim:
Dip your fine brush into the red porcelain paint. Carefully paint a thin, steady line along the very top edge of the mug rim. If you find your hand shaking, rest your pinky finger against the mug for stability. -
Create the upper border guide:
About half an inch below the rim, you want to create the geometric border. You can freehand a horizontal line around the circumference or use a strip of masking tape as a gentle guide to keep it straight. -
Paint the zigzag pattern:
Along this upper location, paint a continuous zigzag line to create a row of small diamonds. Fill in the top and bottom triangles of the diamonds so they connect into a solid geometric band.
Step 2: Heart Motif Band
-
Space out the hearts:
Visualize the spacing for your main heart band just below the geometric border. Use a pencil to lightly mark where the center of each heart will go to ensure they are evenly distributed around the mug. -
Outline the hearts:
Using your fine brush, paint the outline of simple heart shapes at each marked spot. Keep the lines crisp and relatively thick. -
Fill the hearts:
Fill in the heart shapes completely with red paint. Apply a second coat if the first looks streaky, but let it dry slightly between layers. -
Add the inner detail:
Once the red hearts are touch-dry, take a clean toothpick or fine tool. Scratch away the paint gently or use white porcelain paint to create a dotted ‘stitch’ line inside the heart shape, following the contour. -
Intermediate dots:
Using a dotting tool or the back of a brush, place single small red dots between the hearts and slightly above the snowflakes to fill the negative space.
Steadier Lines
Rest your painting hand on a heavy book or block while turning the mug with your other hand. This acts like a rudimentary lathe, helping you keep horizontal bands perfectly straight.
Step 3: Snowflakes and Lower Bands
-
Start the snowflakes:
Move lower down the mug for the snowflake band. Start by painting a simple vertical cross (+) for each snowflake. -
Add diagonal limbs:
Paint a diagonal cross (x) over the vertical one to create an eight-pointed star shape. -
Detail the flakes:
Add tiny ‘V’ shapes at the ends of the main vertical and horizontal lines to give the snowflakes their feathery, crystalline look. -
Create the bottom border:
Near the base of the mug, replicate the geometric pattern from the top. Paint another horizontal band, this time focusing on a repeating triangle or ‘sawtooth’ pattern. -
Add the cross-hatch detail:
Above the solid red triangles at the bottom, use your finest brush to paint a delicate cross-hatch or diamond net pattern for intricate texture. -
Handle detail:
Don’t forget the handle! Add a small red heart or a few dots on the top curve of the handle to tie the design together.
Faux-Stitch Effect
Instead of dots inside the hearts, paint tiny dashes in white around the edges to mimic embroidery thread, enhancing the cozy sweater aesthetic.
Step 4: Finishing Touches
-
Clean up:
Inspect your work. If you made any smudges, use a damp cotton swab or a toothpick to gently scrape away excess paint while it’s still semi-wet. -
Dry thoroughly:
Let the mug sit undisturbed for at least 24 hours. The paint needs to fully cure before the baking process. -
Bake to set:
Place the mug in a cool oven, then set the temperature to 300°F (150°C) or according to your paint manufacturer’s instructions. Bake for 30-35 minutes. -
Cool down:
Turn the oven off and leave the mug inside until the oven is completely cool. This prevents the ceramic from cracking due to thermal shock.
Now you have a charming custom piece ready to hold your favorite winter brew
Night-Sky Gradient With Falling Snow
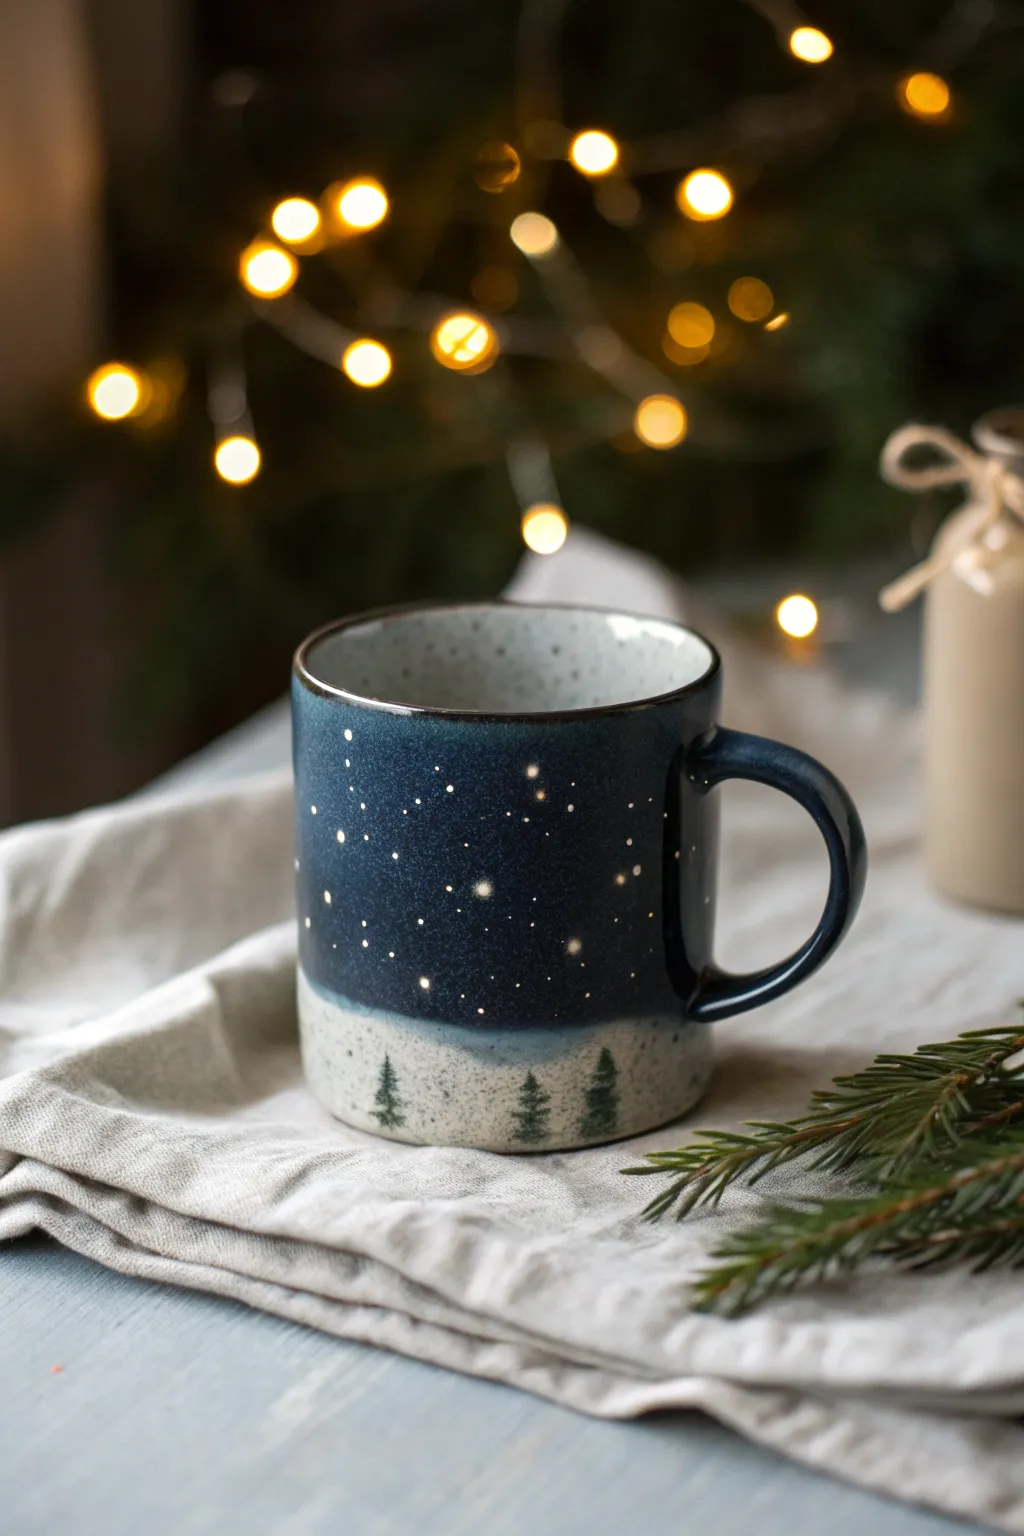
Capture the magic of a silent winter evening on your favorite coffee cup with this serene design. A deep midnight blue sky filled with delicate stars meets a snowy base, creating a cozy scene perfect for sipping hot cocoa.
How-To Guide
Materials
- White or cream ceramic mug (clean and dry)
- Ceramic paints or porcelain markers (Midnight Blue, White, Forest Green, Dark Green)
- Rubbing alcohol
- Cotton pads or paper towels
- Soft flat paintbrush (medium size)
- Small round paintbrush (size 0 or 1)
- Small sponge dabber or cosmetic sponge
- Toothpick or dotting tool
- Palette or small plate
- Oven (for baking the paint, if required by your brand)
Step 1: Preparation & Base Coat
-
Clean the surface:
Before you begin, wipe down the entire outer surface of your mug with rubbing alcohol and a cotton pad. This removes any oils or fingerprints that could prevent the paint from adhering properly. -
Define the horizon:
Visualize a line about one-third of the way up from the bottom of the mug. This lower section will remain the natural cream color of the mug to represent the snowy ground. -
Apply the midnight sky:
Squeeze a generous amount of Midnight Blue ceramic paint onto your palette. Using your flat brush, paint the upper two-thirds of the mug, creating a solid block of color. -
Feather the edge:
As you reach the bottom edge of the blue paint (where it meets the unpainted ‘snow’), use a slightly drier brush or a dainty sponge to feather the paint downward gently. This creates a soft, misty transition rather than a harsh line. -
Let the first coat dry:
Allow the blue base layer to dry completely according to the manufacturer’s instructions. If the blue looks streaky, apply a second coat for a deep, opaque night sky finish.
Step 2: Creating the Stars
-
Prepare the stars:
Put a small dollop of White ceramic paint on your palette. You want this paint specifically to be a bit thick so passing stars have texture. -
Create distant stars:
Dip the very tip of a toothpick into the white paint. Gently dot random, tiny specks all over the blue section of the mug to create the look of distant stars. -
Add bright stars:
Use the small round brush or a larger dotting tool to add fewer, slightly larger white dots scattered among the tiny ones. These represent brighter, closer stars. -
Make the stars glow:
I find that adding a tiny halo helps the realism. Mix a tiny drop of white with a lot of water (or clear medium) to make a glaze, and dab it very faintly around the larger stars. -
Create falling snow:
Add a few concentrated clusters of white dots closer to the horizon line where the blue meets the cream base, simulating snow settling on the ground.
Paint Slipping?
If paint beads up on the ceramic, the surface might still be oily. Wipe it again with alcohol and try lightly sanding the area with fine-grit sandpaper for better grip.
Step 3: Painting the Forest
-
Mix your greens:
On your palette, place your Forest Green and Dark Green paints. You can mix them slightly to get a natural variation in tone. -
Start the trees:
Using your smallest round brush (size 0), paint a thin vertical line starting from the creamy base section and extending just slightly up into the blue sky area. This is your tree trunk. -
Add branches:
Starting at the top of the trunk, use tiny, quick dabbing motions or short horizontal strokes to create the pine branches. Keep the strokes very narrow at the top and widen them as you move down. -
Create a texture:
Don’t worry about being too neat; jagged, irregular edges look more like real pine needles. Let the darker green show through in the middle of the tree for depth. -
Vary the heights:
Paint three or four small trees spaced out along the bottom of the mug. Vary their heights slightly creates a more natural landscape look. -
Ground the trees:
Where the base of the tree meets the mug, use a clean, slightly damp brush to blur the green paint into the ceramic, making it look like the tree is buried in snow.
Add a Moon
Make the scene dreamier by adding a crescent moon. Use a stencil or freehand a thin curve in white or pale yellow amongst the stars.
Step 4: Finishing Touches
-
Inspect the rim:
Check the rim of the mug. If you painted all the way to the top, use a damp cloth to wipe away about 1/4 inch of paint from the rim to ensure a comfortable (and food-safe) drinking edge. -
Clean up details:
If you made any mistakes or smudges, use a cotton swab dipped in rubbing alcohol to carefully erase them before the paint sets fully. -
Final cure:
Allow the mug to dry for at least 24 hours. Then, follow the specific baking instructions for your paint brand (usually baking at 300-350°F for 30 minutes) to make the design dishwasher safe.
Now you have a cozy winter mug nestled in your hands, ready for your favorite warm beverage