If you’re craving that cozy, twinkly holiday feeling, Christmas pottery is one of my favorite ways to bring it to life with your own two hands. These ideas are festive, practical, and totally doable—whether you’re hand-building, throwing, or just decorating bisque with holiday glazes and paint.
Classic Christmas Tree Luminaries
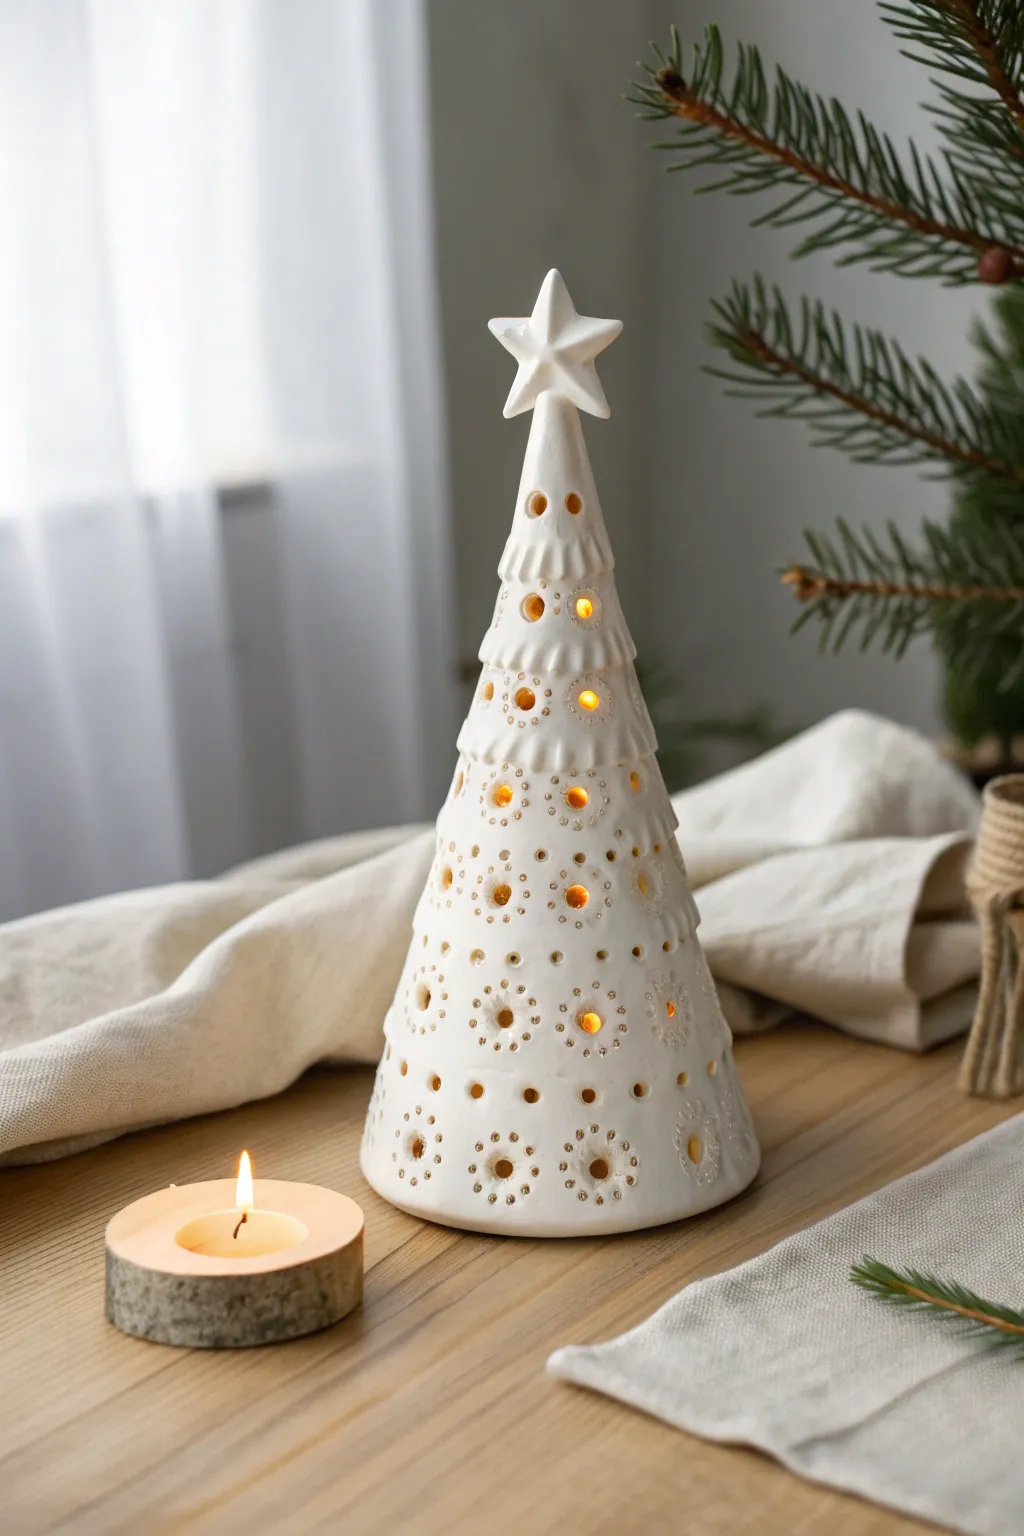
Capture the serene beauty of a snowy forest with this handcrafted ceramic luminary, featuring delicate light-piercing details. Its pure white glaze and classic conical shape make it a timeless centerpiece that glows warmly from within.
Step-by-Step Tutorial
Materials
- White stoneware or porcelain clay body
- Rolling pin
- Canvas work surface
- Cone template (paper or cardstock)
- Potter’s needle tool
- Fettling knife
- Slip and scoring tool
- Hole punch tools (various sizes)
- Small drill bit or needle for detail dots
- Sponge
- White gloss or satin glaze
- Kiln
Step 1: Forming the Cone
-
Prepare the slab:
Begin by wedging your white stoneware clay thoroughly to remove air bubbles. Roll it out into a smooth, even slab that is approximately 1/4 inch thick using your rolling pin and canvas. -
Cut the shape:
Place your cone template onto the slab. Trace around it with a needle tool and cut out the shape cleanly using a fettling knife. -
Create the texture:
Before assembling, you might want to add subtle horizontal ridges. I like to run a rib tool or a flat modeling tool gently across the surface to create distinct bands that mimic tree branches. -
Score and slip:
Score the straight edges of your clay wedge aggressively and apply clay slip. This join needs to be strong to hold the conical shape. -
Assemble the cone:
Carefully roll the slab into a cone shape, overlapping the scored edges. Press the seam firmly together from both the inside and outside to ensure a secure bond. -
Refine the seam:
Smooth out the seam so it blends invisibly with the rest of the tree. You can use a damp sponge or a wooden rib tool to tidy up the join.
Clean Cuts Matter
Cut holes when clay is leather-hard, not soft. Clean rough edges with a barely damp synthetic sponge only after the piece is bone dry to avoid smearing detail.
Step 2: Adding Details and Piercing
-
Shape the star:
Roll a small piece of excess clay slightly thicker. Cut out a simple five-pointed star shape. Smooth the edges with a damp finger. -
Attach the star:
Score and slip the very top point of your cone and the base of the star. Press the star firmly onto the peak of the tree, ensuring it stands upright. -
Let it stiffen:
Allow the clay to dry to a firm leather-hard stage. This is crucial; if the clay is too wet, the walls will collapse when you start cutting holes. -
Plan the pattern:
Using the needle tool, lightly mark where you want your illumination holes to go. Creating a repeating pattern of circles usually works best. -
Punch the main holes:
Use a circular hole punch tool to remove clay for the larger light openings. Twist the tool gently as you push through to keep the edges clean. -
Add detail dots:
For the delicate ‘snowflake’ look around the larger holes, use a very fine drill bit or needle tool to pierce a ring of tiny dots around each main opening. -
Clean the edges:
Once the piercing is done, go back with a slightly damp sponge or a soft brush to smooth away any burrs or sharp crumbs of clay around the holes.
Step 3: Firing and Glazing
-
Bisque fire:
Allow the completed tree to bone dry completely, which may take several days depending on humidity. Load it into the kiln and bisque fire to Cone 04. -
Glaze application:
Dip the tree into a white gloss or satin glaze. Ensure the glaze covers the inside and outside, but shake off excess so holes don’t get clogged. -
Check the holes:
Inspect all the tiny piercings. If glaze has filled them, use a pin to clear the airway before the glaze dries. -
Final firing:
Fire the piece again to the maturation temperature of your clay and glaze (typically Cone 5 or 6 for stoneware).
Slumping Issues?
If the cone warps while drying, rest it over a scrunched-up newspaper cone or specific foam support form until it stiffens enough to hold its own weight.
Place a battery-operated tea light inside and enjoy the gentle, festive glow of your new creation


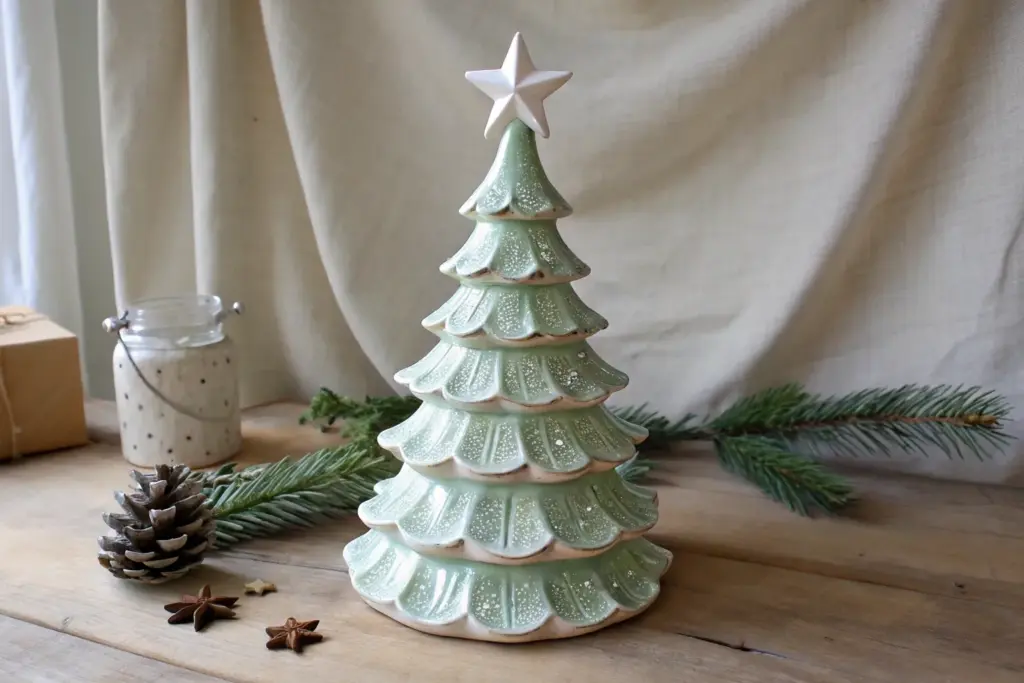
Handbuilt Christmas Tree Trinket Dishes
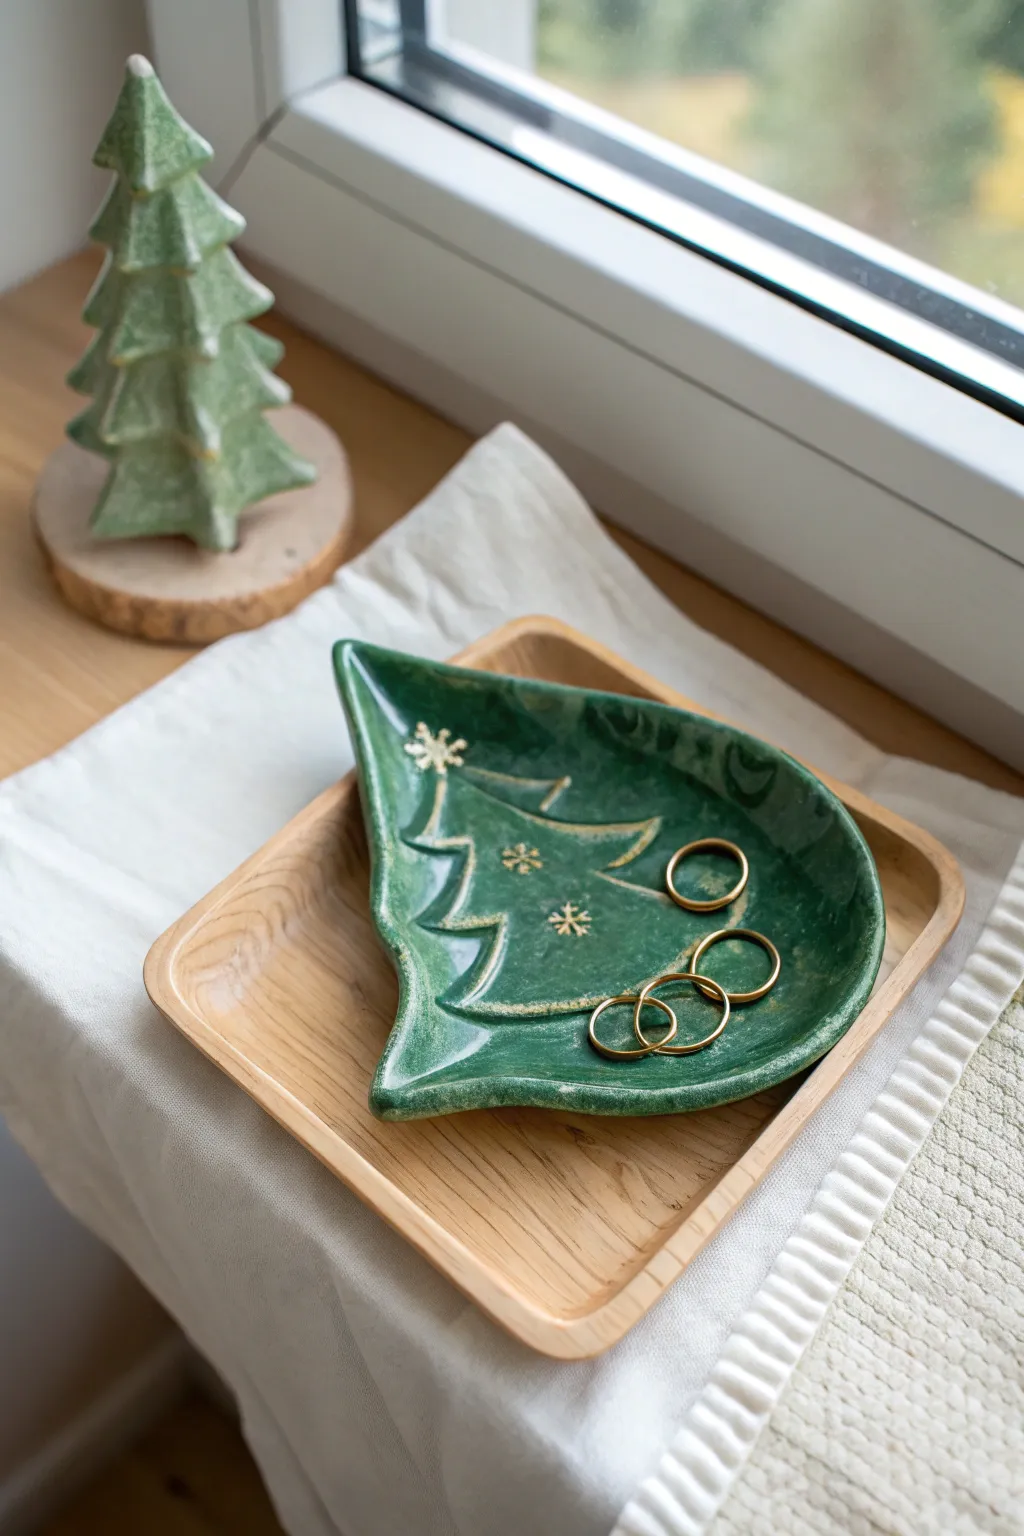
This elegant trinket dish blends festive charm with sophisticated style, featuring a deep forest green glaze and delicate gold accents. It’s perfectly sized for holding rings or earrings and makes a thoughtful handmade holiday gift.
How-To Guide
Materials
- Low-fire white clay or stoneware
- Rolling pin
- Christmas tree cookie cutter (large) or paper template
- Fettling knife or needle tool
- Small snowflake stamps
- Sponge
- Canvas working mat
- Forest green ceramic glaze (glossy)
- Gold overglaze or gold luster
- Fine liner brush
- Kiln
Step 1: Shaping the Base
-
Prepare the slab:
Begin by rolling out a slab of clay on your canvas mat to an even thickness of about 1/4 inch. Smooth the surface with a rib tool to remove any canvas texture. -
Cut the shape:
Place your large tree cookie cutter or paper template onto the slab. Cut around the outline cleanly using a fettling knife or needle tool. -
Smooth the edges:
Run a damp sponge or your finger along the cut edges to round them off. Sharp edges can become brittle after firing, so taking time here ensures a durable rim. -
Lift the edges:
Gently lift the edges of the tree shape upwards to create a dish form. Use your thumbs to press the center down slightly while curling the rim up to create a concave space for jewelry. -
Refine the curve:
Smooth the transition between the floor and the wall of the dish so it feels seamless. I like to support the underside with one hand while smoothing the inside curve.
Step 2: Adding Details
-
Carve the branches:
Use a needle tool or a small carving loop to Incise swags or curved lines across the surface to represent the layers of tree branches. Don’t cut all the way through; just create shallow channels. -
Stamp snowflakes:
Press small snowflake stamps into the clay at random intervals between the carved branch lines. Ensure the impression is distinct but not too deep. -
Dry slowly:
Cover the dish loosely with plastic and allow it to dry slowly to the leather-hard stage, then uncover to let it dry completely bone dry. This prevents warping of the lifted edges. -
Bisque fire:
Load the bone-dry piece into the kiln and fire to cone 04 (or your clay’s specific bisque temperature).
Warping Rims?
If the tree tip droops while drying, prop it up with a small wedge of foam or crumpled newspaper until the clay is leather-hard and can hold its own shape.
Step 3: Glazing & Finishing
-
Apply green glaze:
Brush 2-3 coats of deep forest green glossy glaze over the entire top surface. Let each coat dry before applying the next. You can leave the bottom unglazed or use wax resist. -
Wipe back (optional):
If you want the carved lines to be subtler, you can gently wipe the raised areas with a damp sponge, leaving more glaze in the recesses, though for this solid look, an even coat works best. -
Glaze fire:
Fire the piece again to the maturation temperature of your glaze (typically cone 05/06 for low fire or cone 5/6 for stoneware). -
Apply gold luster:
Once the piece has cooled completely from the glaze firing, use a very fine liner brush to apply gold luster (overglaze) into the carved branch lines and carefully paint inside the snowflake impressions. -
Third firing:
Place the dish back in the kiln for a third, low-temperature firing (usually cone 018-019) to set the gold luster. -
Final inspection:
Check the gold accents for brightness and ensure the rim is smooth before using or gifting.
Level Up: Texture
Instead of carving lines, press real evergreen sprigs into the wet clay for authentic texture, then paint the gold luster over the raised impressions after glazing.
Your finished dish will be a timeless piece of holiday decor ready to sparkle on any dresser or windowsill


Cookies for Santa Plate With Holiday Lettering
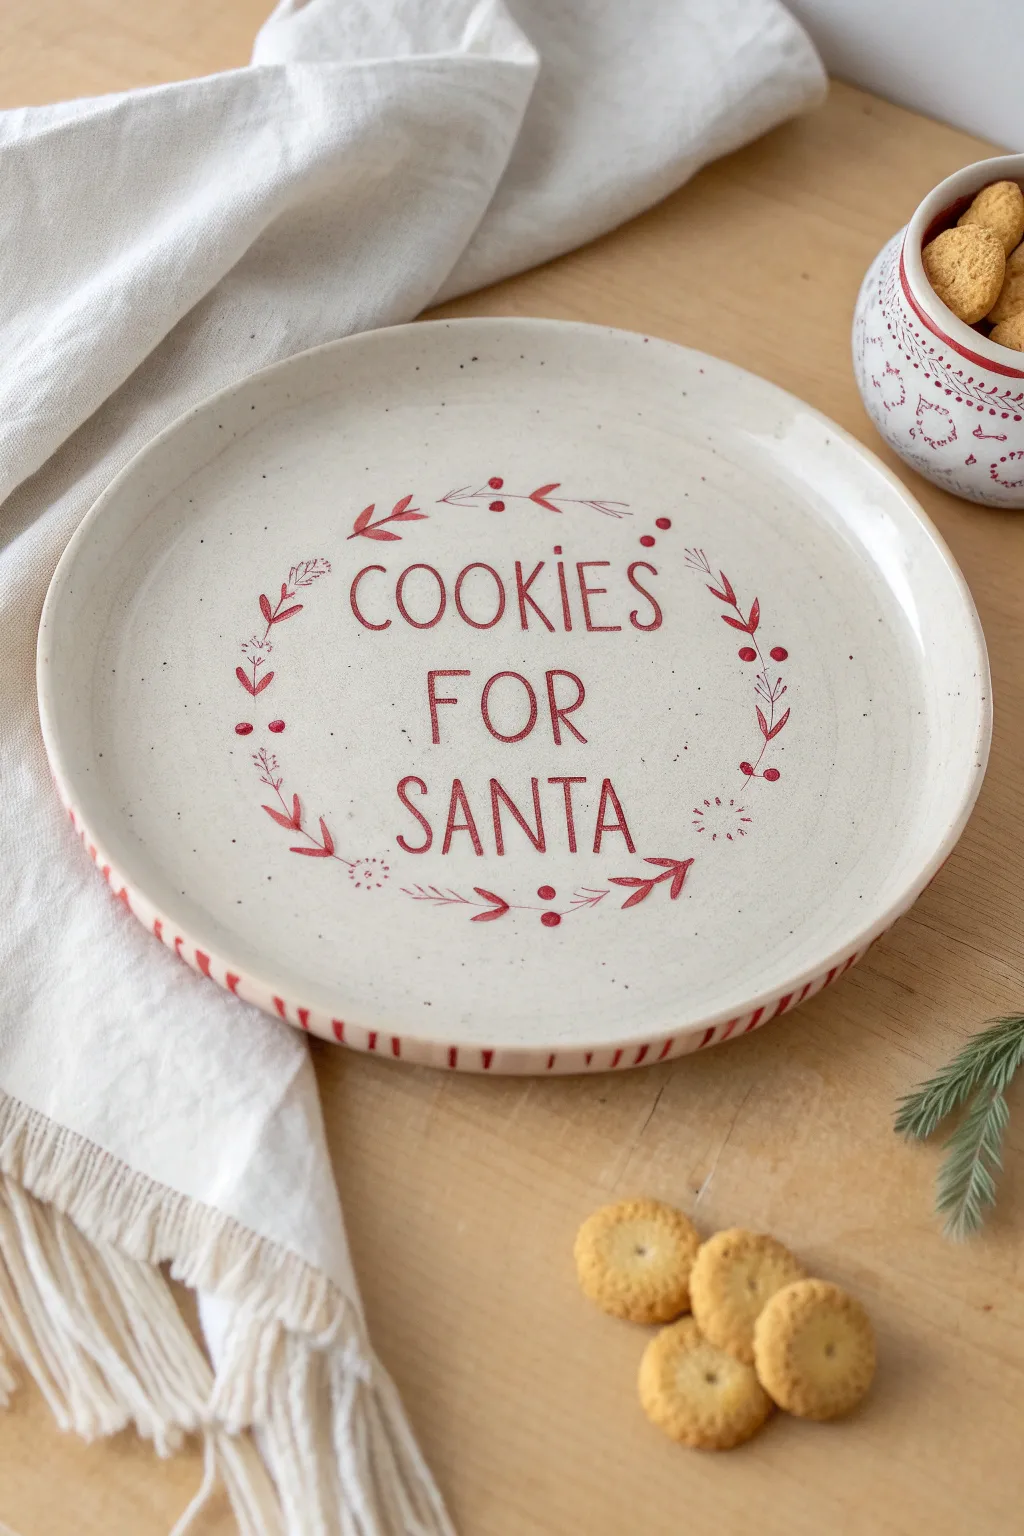
This charming ceramic plate combines a rustic, speckled finish with crisp, festive red lettering to create a timeless piece for Christmas Eve. The delicate wreath design framing the typography adds a sweet, handmade touch that looks professional yet inviting.
Step-by-Step
Materials
- Bisque-fired ceramic plate (flat, rimmed style)
- Speckled cream or oatmeal underglaze
- Deep cranberry or cherry red underglaze
- Carving tool or sgraffito tool (optional)
- Small round detail brush (size 0 or 1)
- Medium flat brush (for base coat)
- Pencil (HB or lighter)
- Clear dipping glaze
- Tracing paper (optional)
- Damp sponge
Step 1: Preparation and Base Coat
-
Clean the Bisque:
Start by wiping down your bisque plate with a damp sponge. This removes any dust that might prevent the glaze from adhering properly. -
Apply the Base Color:
Using your medium flat brush, apply 2-3 even coats of the speckled cream underglaze to the entire front surface of the plate. Ensure each coat is dry to the touch before adding the next. -
Smooth the Surface:
Once the final base coat is dry, lightly run a clean finger over the surface to smooth down any brush strokes or bumps. This creates a nicer canvas for your lettering. -
Sketch the Grid:
Using a pencil, lightly mark the vertical center of the plate. Then, draw three horizontal guide lines spaced evenly apart where your words ‘COOKIES’, ‘FOR’, and ‘SANTA’ will sit.
Step 2: Lettering
-
Draft the Text:
Lightly sketch the words onto the plate with your pencil. Don’t worry about mistakes; the pencil lead will burn off in the kiln. Focus on centering the text and keeping the letters tall and narrow. -
Outline the Letters:
Dip your fine detail brush into the red underglaze. Carefully outline the letters of ‘COOKIES’. Keep your hand steady and use only the very tip of the brush for crisp lines. -
Fill the Text:
Continue painting ‘FOR’ and ‘SANTA’. I find it helpful to reload the brush frequently to maintain opacity. You only need one solid coat if your underglaze is thick enough. -
Refine Edges:
Go back over any shaky lines or thin spots. Sharp, clean edges on this typography are key to the modern-rustic look.
Steady Hands Pro-Tip
Rest your painting hand’s pinky finger on the dry part of the plate while you work. It acts as a stabilizer, preventing shakes when painting thin letters.
Step 3: Wreath Details
-
Sketch the Wreath:
Lightly pencil a rough circle surrounding the text to act as a guide for your wreath branches. -
Paint Main Branches:
Using the same red underglaze and fine brush, paint thin, curving lines following your circle guide. Leave small gaps between the segments to keep it airy. -
Add Small Leaves:
Paint tiny V-shaped leaves extending from the main branches. Keep these marks quick and gestural rather than perfect. -
Add Decorative Dots:
In the spaces between branch segments, dot small clusters relative to the leaves. Vary the sizes slightly for visual interest. -
Paint Branch Accents:
Add a few larger, stylized sprigs or arrows at the bottom center and sides to anchor the design.
Level Up: Texture
Instead of painting the red dashes on the rim, try carving small notches into the leather-hard clay before the first firing, then fill them with red glaze later.
Step 4: Finishing Touches
-
Decorate the Rim:
Flip the plate over or work carefully on the edge. Paint short, vertical red tick marks (dashes) all along the outer rim. Space them about 1/4 inch apart. -
Final Inspection:
Check for any stray smudges of red glaze on the cream background. You can gently scrape these away with a clean tool or scratch them off. -
Clear Glaze Application:
Once the underglaze is bone dry, dip the entire plate into a clear mixing glaze. Shake off excess gently to ensure an even coat. -
Fire the Piece:
Load the plate into the kiln and fire according to the specifications of your clay and glaze, usually to cone 6 for stoneware.
Once fired, this custom plate becomes a cherished part of your family’s holiday tradition for years to come


Gnome Figurines With Tall Hat Silhouettes
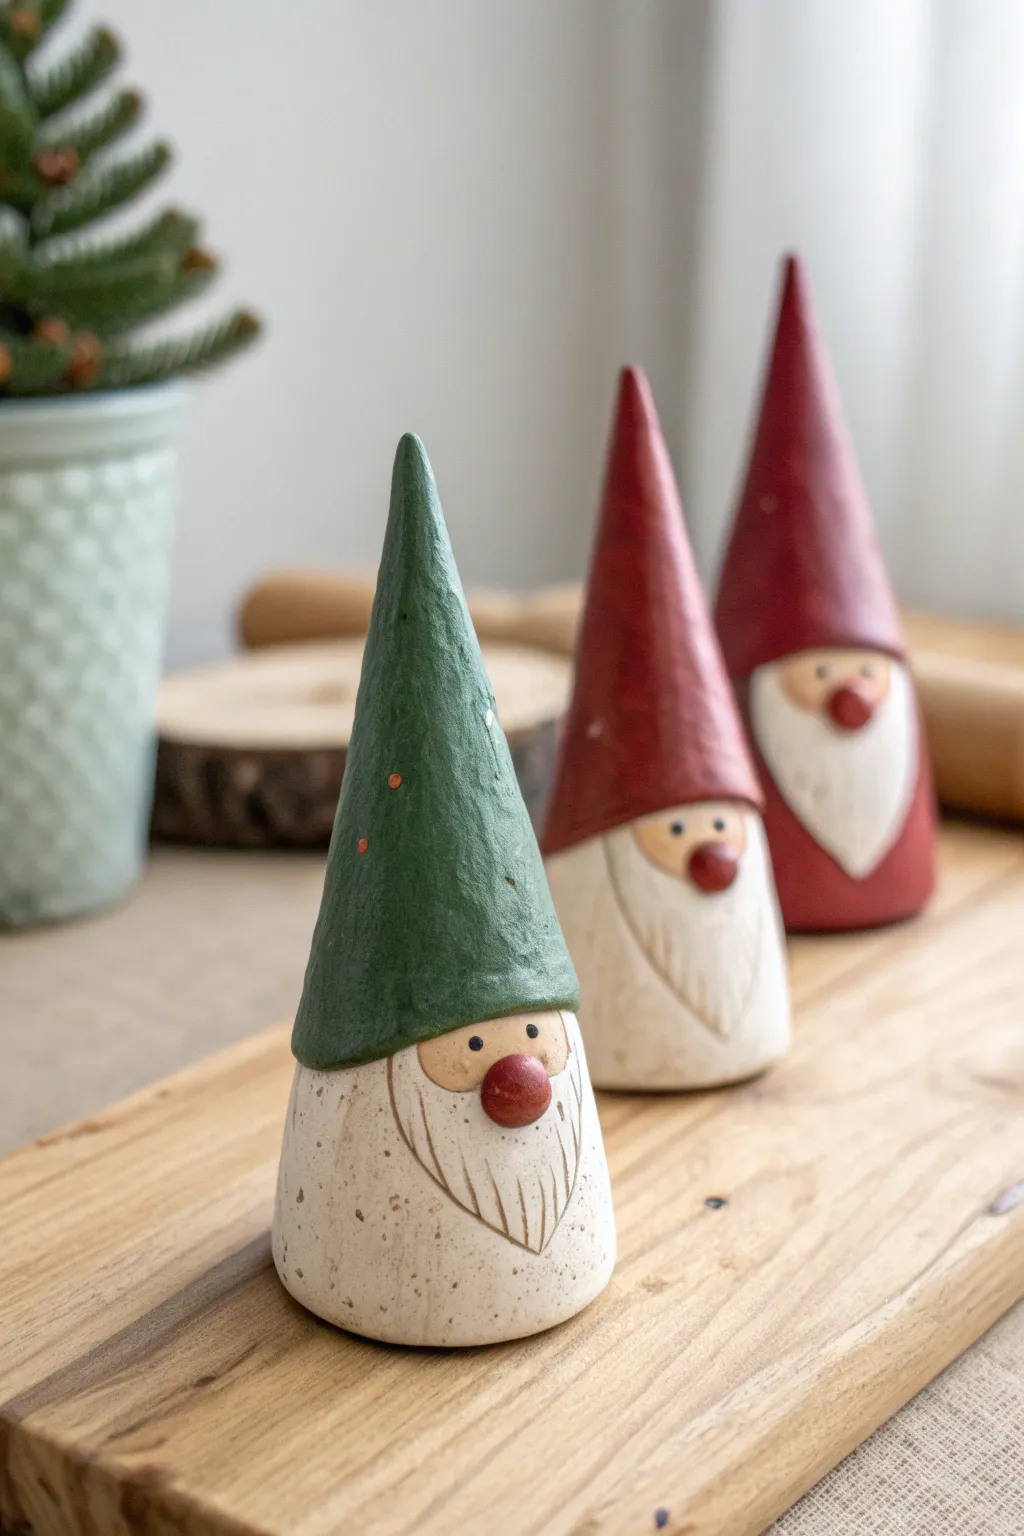
These charming gnome figurines rely on simple geometric shapes to create a modern, minimalist holiday decoration. With their tall conical hats and textured beards, they bring a touch of woodland whimsy to any mantle or shelf.
Step-by-Step
Materials
- White stoneware clay or polymer clay (if not firing)
- Rolling pin
- Fettling knife or clay cutter
- Slip and scoring tool (if using ceramic clay)
- Small sponge
- Underglazes (forest green, deep red, beige/flesh tone)
- Needle tool or toothpick
- Clear matte glaze (optional)
- Kiln (if using stoneware)
Step 1: Forming the Base Body
-
Prepare the cone:
Begin by rolling out a solid cone of clay. For the larger gnomes shown here, start with a ball of clay about the size of a tennis ball and roll it on your work surface, applying more pressure on one side to taper it. -
Refine the shape:
Stand the cone up and gently tap the base on the table to flatten it so it stands securely. Use your fingers to smooth the sides, ensuring the taper is consistent from the wide base to the pointy tip. -
Hollow out (optional):
If you are working with solid clay thicker than an inch, use a loop tool or your thumb to hollow out the bottom of the base slightly. This ensures even drying and prevents cracking during firing.
Clean Lines
Use masking tape or a rubber band around the cone to help you sketch a perfectly straight and level line for the bottom of the hat brim.
Step 2: Sculpting the Features
-
Define the hat line:
Visually divide the cone. The top two-thirds will become the hat. Use a needle tool to lightly sketch a curved line where the hat brim sits, drooping slightly lower in the back. -
Add the nose:
Roll a very small pea-sized ball of clay. Score the spot just below the front hat line and dab on a bit of slip (or water for polymer clay). Press the nose firmly into place centered on the ‘face’ area. -
Outline the beard:
Using your needle tool, deeply scribe the outline of the beard. It should start from the sides of the hat brim and curve down to a point near the bottom of the base. -
Texturize the beard:
Create the hair texture by dragging your needle tool or a stiff brush vertically through the clay inside the beard outline. I find that varying the pressure creates a more natural, whisker-like look. -
Clean up edges:
Use a barely damp sponge to smooth out any rough crumbs of clay created by the incising tools, particularly around the nose connection.
Pattern Play
Instead of a solid color, paint small white polka dots, snowflakes, or stripes on the hats using a fine detail brush before the final firing.
Step 3: Decoration and Finishing
-
Apply hat color:
Paint the hat section with two to three coats of underglaze. Use a forest green for some and a deep crimson red for others to create a matching set. -
Paint facial details:
Carefully paint the small exposed face area with a beige or flesh-toned underglaze. Paint the nose a reddish-brown or bright red for that ‘cold nose’ winter look. -
Enhance texturing:
If you want the beard texture to pop, you can apply a thin wash of dark oxide or diluted brown underglaze over the beard and wipe it back with a sponge, leaving dark color only in the crevices. -
Add the eyes:
Using the handle end of a small paintbrush or a dotting tool, dip into black underglaze and place two tiny dots on either side of the nose. -
Add decorative speckles:
To mimic the speckled clay look in the photo, you can flick a toothbrush loaded with diluted brown underglaze lightly over the white sections of the body. -
Bisque fire:
Let the gnomes dry completely (bone dry) before loading them into the kiln for a bisque firing. -
Glaze and final fire:
Once bisqued, apply a clear matte glaze if you want a sealed finish, or leave the unpainted parts raw for a rustic texture. Fire to the temperature appropriate for your clay body.
Group your finished gnomes in odd numbers for a professionally styled holiday vignette

The Complete Guide to Pottery Troubleshooting
Uncover the most common ceramic mistakes—from cracking clay to failed glazes—and learn how to fix them fast.
Snowman Mugs With Cozy Expressions
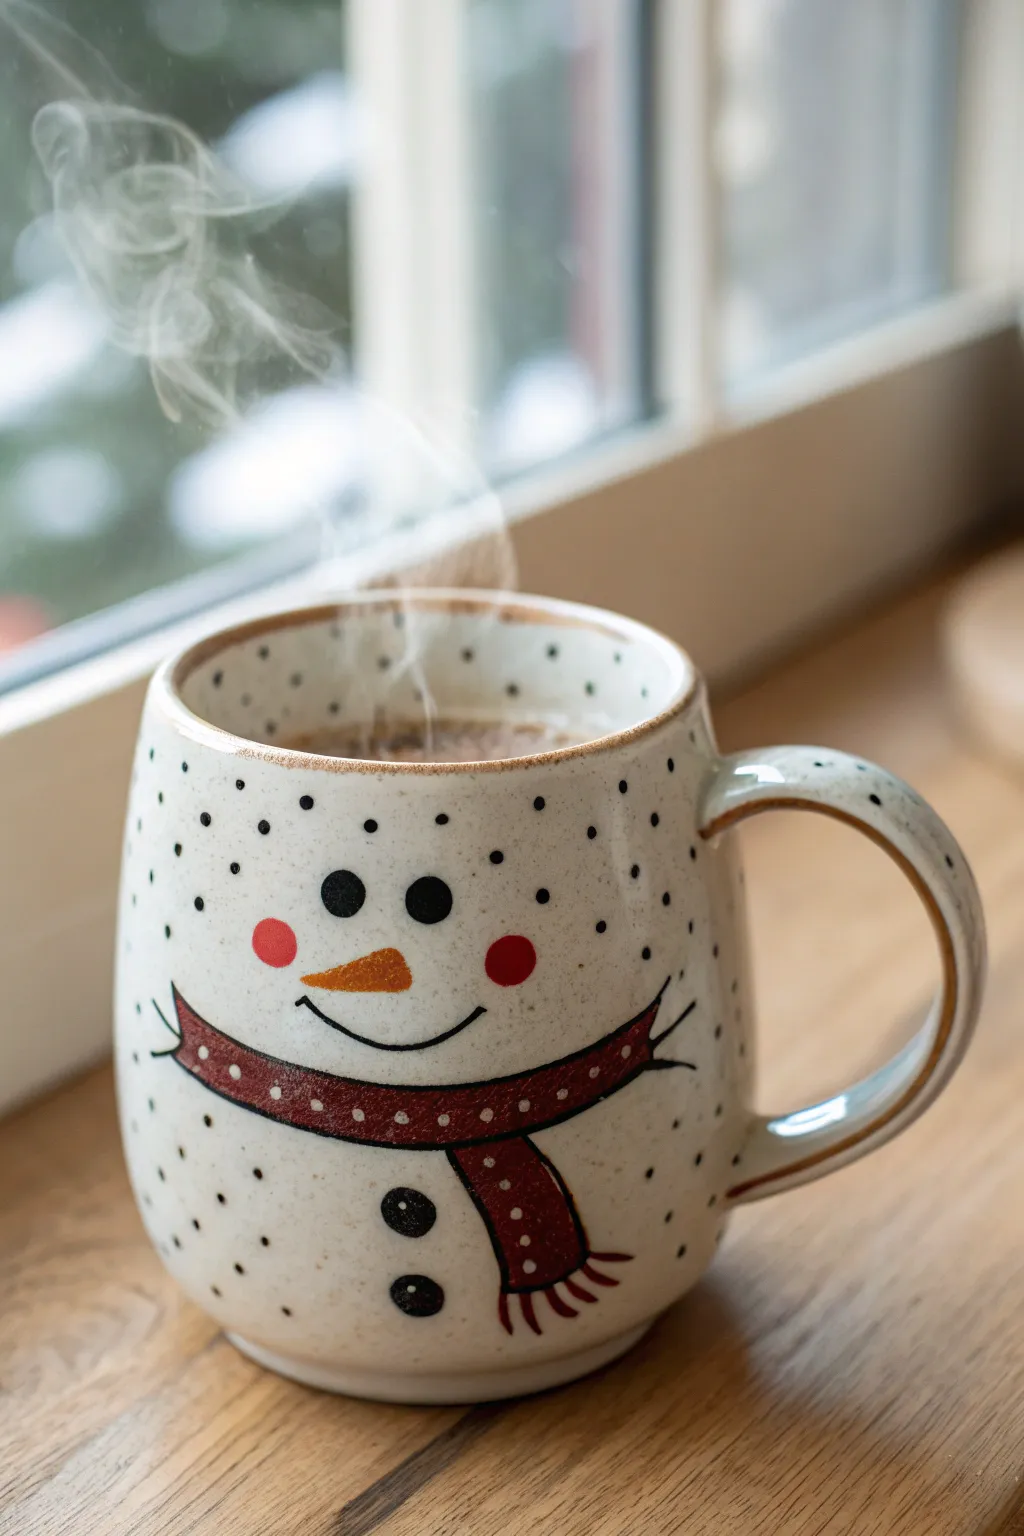
Capture the magic of winter with this delightful ceramic mug featuring a cheerful snowman face. With its speckled clay body, festive red scarf, and cozy expression, this handcrafted piece adds immediate warmth to any holiday beverage.
Step-by-Step Tutorial
Materials
- White stoneware clay with speckles (e.g., Laguna Speckled Buff)
- Pottery wheel or slab roller (for hand-building)
- Potter’s needle tool
- Underglaze (Black, bright red, orange)
- Small fine-point liner brush
- Medium round brush
- Clear glossy glaze
- Sponge
- Wire cutter
- Rib tool
- Scoring tool or fork
- Slip (clay glue)
Step 1: Forming the Mug Body
-
Wedging and Centering:
Begin by wedging your speckled clay to remove air bubbles. Center approximately 1 pound of clay on the wheel, or roll out an even slab if you are hand-building. -
Throwing the Cylinder:
Pull up the walls to form a slightly rounded cylinder. Aim for a gentle curve at the bottom that tapers slightly inward at the top rim to keep drinks warm. -
Smoothing the Shape:
Use a rib tool to smooth the outside, refining that bellied shape that evokes a snowball-like roundness. Clean up the rim with a chamois or sponge. -
Trimming:
Once the mug is leather hard, trim the foot. I prefer to leave a distinct foot ring to elevate the mug slightly.
Step 2: Adding the Handle
-
Pulling the Handle:
Pull a strap of clay for the handle. For this cozy feel, a medium-thickness C-shape works best. -
Attaching the Handle:
Score the mug body and the handle ends deeply. Apply slip generously and press the handle firmly onto the mug. -
Cleaning Seams:
Wipe away excess slip with a damp sponge or brush. Ensure the connection points are smooth so they don’t catch while glazing.
Pro Tip: Consistent Eyes
To get perfectly round eyes without a steady hand, use the back end of a drill bit or a dowel dipped in underglaze as a stamp for the circles.
Step 3: Painting the Snowman
-
Drafting the Design:
Lightly sketch the face placement on the leather-hard clay using a needle tool. Don’t press too hard; just make faint guidelines. -
Painting the Scarf Outline:
Using a fine liner brush and black underglaze, paint the outline of the scarf sweeping across the lower third of the mug. -
Filling the Scarf:
Fill in the scarf shape with bright red underglaze. You may need two to three coats for opacity, letting each layer dry in between. -
Adding Scarf Details:
Once the red draws, use the needle tool or a fine brush to add white polka dots (using white underglaze) or scratch through to reveal the clay. Use the black liner brush to add the fringe tassels. -
The Eyes and Buttons:
Paint two solid black circles for eyes and two vertically aligned buttons on the mug’s belly below the scarf. -
The Carrot Nose:
Paint a small, triangular carrot nose using orange underglaze. Position it right between the eyes. -
The Smile and Cheeks:
Draw a thin, curved black line for the smile directly under the nose. Add two rosy cheeks with diluted red underglaze or a lighter pink shade. -
Adding Speckles:
If your clay body isn’t naturally speckled enough, flick a stiff toothbrush dipped in iron oxide wash or black underglaze around the white space to create extra ‘snow’ texture.
Troubleshooting: Smudged Lines
If you smear the black outline while painting, wait for it to dry completely, then gently scratch the mistake off with an X-Acto knife before clear glazing.
Step 4: Glazing and Firing
-
Bisque Fire:
Once the mug is bone dry, load it into the kiln for a bisque firing (usually Cone 04). -
Applying Clear Glaze:
Wipe the bisque-ware with a damp sponge to remove dust. Dip the entire mug into a clear glossy glaze. -
The Rim Detail:
Before firing, wipe the very edge of the rim with a damp sponge to thin the glaze slightly, allowing the speckled clay color to frame the top. -
Final Firing:
Glaze fire the piece to the temperature appropriate for your clay body (typically Cone 5 or 6 for stoneware).
Now you have a charming, durable mug ready to hold your favorite steaming winter cocoa
Reindeer Planters for Tiny Evergreens

Transform a simple pinch pot into a festive holiday character with this adorable reindeer planter project. The finished piece features a warm speckled beige glaze, sculpted ears, and sweet hand-painted antlers, making it the perfect home for a tiny evergreen sapling.
Detailed Instructions
Materials
- Stoneware clay (speckled or buff)
- Pottery wheel (optional, can be hand-built)
- Needle tool
- Small loop tool
- Scoring tool or serrated rib
- Slip (clay and water slurry)
- Modeling tool or wooden knife
- Underglaze (dark brown)
- Small detail paintbrush
- Clear or matte speckled glaze
- Sponge
Step 1: Forming the Base
-
Create the cylinder:
Begin by throwing a simple, straight-sided cylinder on the wheel, or pinch a consistent pot if hand-building. Aim for a slightly rounded bottom edge rather than a sharp 90-degree angle to give the reindeer a softer face shape. -
Shape the nose curve:
While the clay is still plastic, gently push the pot outwards slightly at the midway point to create a subtle cheek area, then taper slightly inward toward the rim. -
Smooth and trim:
Refine the surface with a rib tool to remove finger marks. I like to make sure the rim is comfortably rounded here, as sharp rims can chip easily later. -
Leather hard stage:
Allow the pot to dry until it is leather hard—firm enough to hold its shape but soft enough to carve and attach additions.
Don’t Forget Drainage
Before drying, use a hole punch tool to create a drainage hole in the bottom center. Your evergreen needs to drain or the roots will rot.
Step 2: Sculpting Features
-
Shape the nose bump:
Take a small ball of fresh clay, flatten it slightly into an oval, and score both the back of the nose and the lower center of the pot. -
Attach the nose:
Apply slip and press the nose firmly onto the pot. Smooth the edges down with a modeling tool to blend the clay seamlessly, leaving the center of the nose slightly raised and dimensional. -
Create the ears:
Form two tear-drop shapes from small coils of clay. Press your thumb into the center of each to create the inner ear depression. -
Attach the ears:
Score and slip the sides of the pot where the ears will sit. Attach them curving slightly outward. Support the underside of the ear with a small coil if gravity is pulling them down too much. -
Blend the seams:
Use a small wooden tool to thoroughly blend the attachment point of the ears into the main pot body so they don’t crack off during firing.
Step 3: Detailing and Glazing
-
Inlay the antlers:
Using a needle tool or small loop tool, gently carve the outline of the antlers into the forehead area. You want a shallow groove, just deep enough to hold underglaze. -
Carve the expression:
Carve two small arches for closed, smiling eyes and a small vertical line connecting the nose to the mouth area. -
Bisque fire:
Allow the piece to bone dry completely, then bisque fire it according to your clay body’s specifications (usually Cone 04 or 06). -
Apply underglaze:
Paint dark brown underglaze into the antler grooves, the sculpted nose, the inner ears, and the eye lines. -
Wipe back:
Using a damp sponge, carefully wipe away excess underglaze from the surface, leaving color only in the recessed carvings and specifically painted areas like the nose button. -
Glaze application:
Dip or brush the entire pot with a speckled matte cream or beige glaze. Ensure the glaze isn’t too thick over the carved details so it doesn’t obscure the face. -
Final fire:
Fire the piece to maturity (Cone 5, 6, or 10 depending on your clay). Once cool, it’s ready for planting.
Cracked Ears?
Ears often dry faster than the body and crack off. Wrap the ears in small strips of plastic while the main pot dries to equalize moisture levels.
Pop in your miniature cypress or rosemary plant and enjoy your festive handmade creation


What Really Happens Inside the Kiln
Learn how time and temperature work together inside the kiln to transform clay into durable ceramic.
Holly Berry Spoon Rests for Holiday Cooking
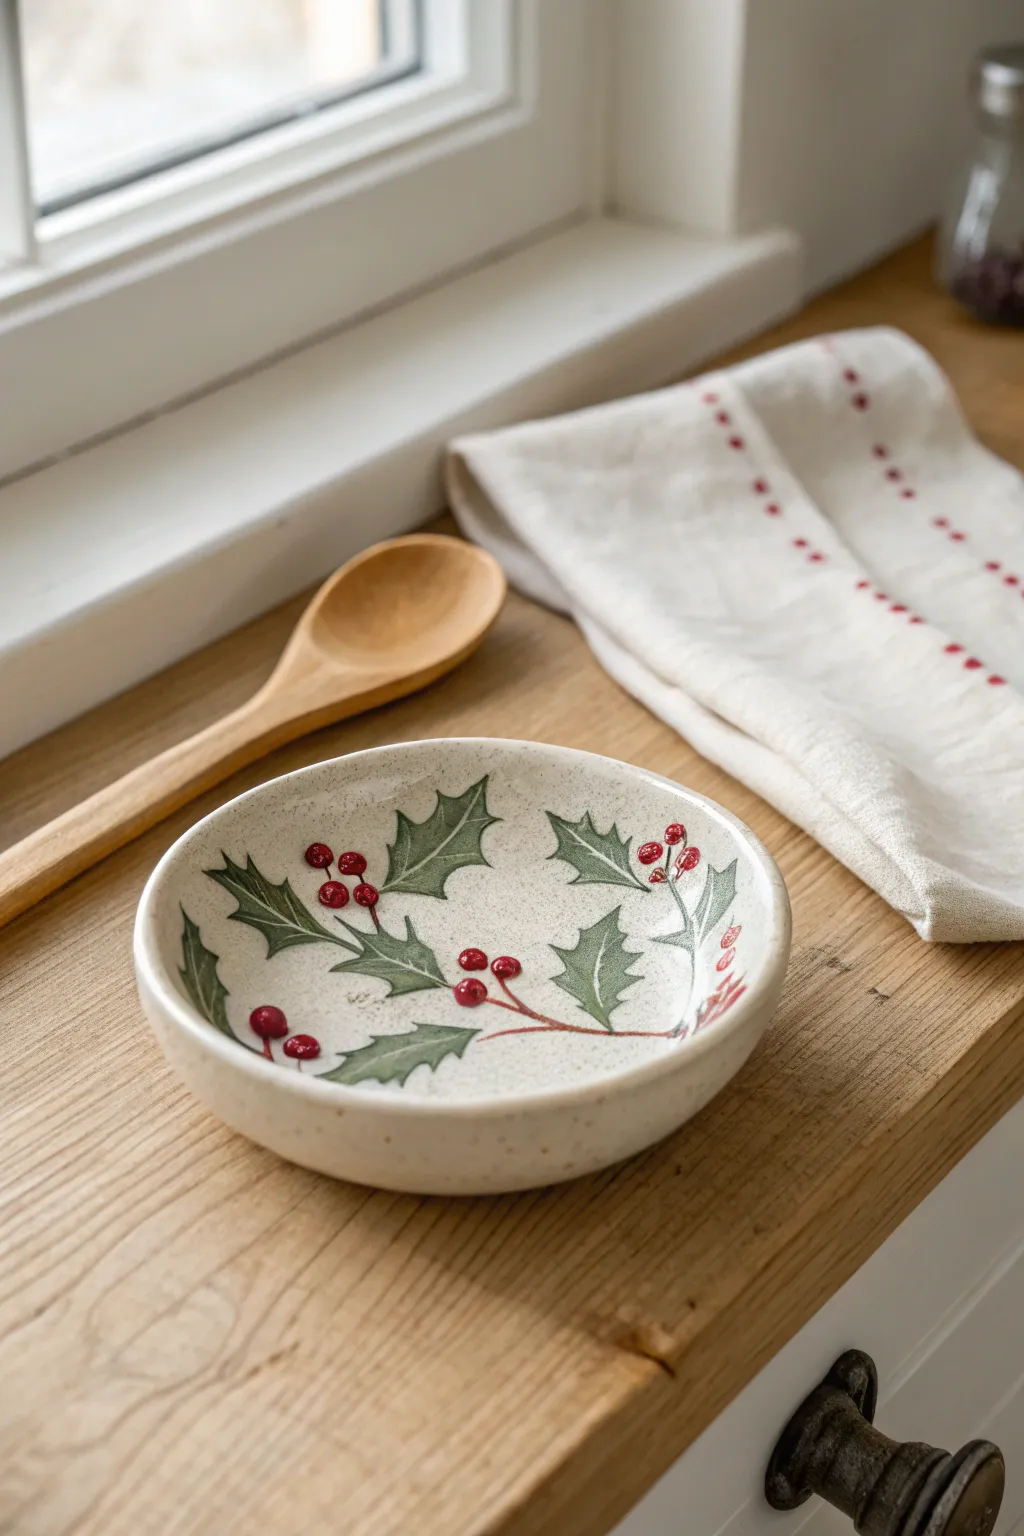
Bring a touch of festive cheer to your kitchen counter with this charming ceramic spoon rest, featuring delicate hand-painted holly leaves and bright red berries. The subtle speckled clay body gives it a warm, rustic feel that fits perfectly with farmhouse or traditional holiday decor.
Step-by-Step Tutorial
Materials
- Speckled Stoneware Clay (e.g., Laguna B-Mix Speckled or similar)
- Small bowl mold or hump mold (approx. 5-6 inches diameter)
- Rolling pin and guide sticks (1/4 inch)
- Potter’s needle tool
- Sponge
- Underglazes: Hunter Green/Dark Green, Bright Red, Brown
- Fine detail brushes (liner and round sizes)
- Clear transparent glaze (food safe)
- Rib tool
- Kiln
Step 1: Forming the Bowl
-
Prepare the Clay:
Begin by wedging a small ball of speckled stoneware clay to remove any air bubbles. The speckles in the clay are crucial for achieving that textured, snowy background look without extra painting. -
Roll the Slab:
Roll the clay out into an even slab using your rolling pin and 1/4 inch guide sticks. Ensure the surface is smooth and free of canvas texture by compressing it gently with a rib tool. -
Cut the Circle:
Place your bowl mold upside down on the slab to use as a template, or use a circle cutter. Cut a circle roughly 6 inches in diameter, which will shrink slightly during firing. -
Shape the Form:
Gently drape the clay circle inside your slump mold (or over a hump mold) to create a shallow curve. You want a distinct rim but a flat enough bottom to hold a spoon comfortably. -
Refine the Rim:
While the clay is still leather hard, use a damp sponge to smooth the rim. I like to round it off nicely so it feels soft to the touch after firing.
Berry Volume Trick
For 3D berries that you can feel, apply 3-4 layers of red slip or underglaze, letting each dry in between. This creates a raised relief texture.
Step 2: Painting the Design
-
Sketch the Branch:
Once the piece is bone dry or stiff leather hard, lightly pencil in a sweeping branch line across the bottom third of the bowl. Don’t worry, the graphite burns off in the kiln. -
Outline the Leaves:
Using a very fine liner brush and dark green underglaze, paint the spiky outlines of the holly leaves. Aim for variations in size and direction to make the foliage look natural. -
Fill the Leaves:
Fill in the leaf outlines with the same green. For a watercolor effect similar to the image, you can dilute the underglaze very slightly with water, allowing the speckled clay to show through faintly in some spots. -
Add Veins:
If you want extra detail, wait for the green to dry and use a darker green or thin black wash to paint a delicate center vein on the larger leaves. -
Paint the Stems:
Connect the leaves using a thin brown line for the branch. Keep the line fluid and slightly organic rather than perfectly straight. -
Dot the Berries:
Using a small round brush or the handle end of a paintbrush, dip into bright red underglaze and place clusters of 2-3 berries near the leaf junctions. -
Add Highlights:
To give the berries that glossy, dimensional look seen in the photo, add a tiny dot of white underglaze to the top curve of each red berry.
Step 3: Firing and Glazing
-
Bisque Fire:
Load the bone-dry spoon rest into the kiln and bisque fire to Cone 04 (or your clay body’s specific recommendation). -
Clean the Bisque:
After cooling, wipe the piece down with a damp sponge to remove any dust that might prevent the glaze from adhering properly. -
Apply Clear Glaze:
Dip the entire piece into a food-safe clear transparent glaze. A dipping tong works best to ensure an even coat without finger marks. -
Check the Foot:
Wipe the bottom foot ring completely clean of glaze using a wax resist beforehand or a wet sponge afterwards, preventing it from sticking to the kiln shelf. -
Glaze Fire:
Fire the piece for the final time, typically to Cone 5 or 6 for stoneware. This reveals the beautiful brown speckles through the clear glaze.
Gold Rim Upgrade
Add a third firing with gold luster painted just on the rim. The metallic shine pairs elegantly with the rustic speckled clay for a premium look.
Once cooled, your custom spoon rest is ready to catch sauce drips or be wrapped up as the perfect handmade hostess gift for the holidays
Christmas Candle Holders for a Festive Table
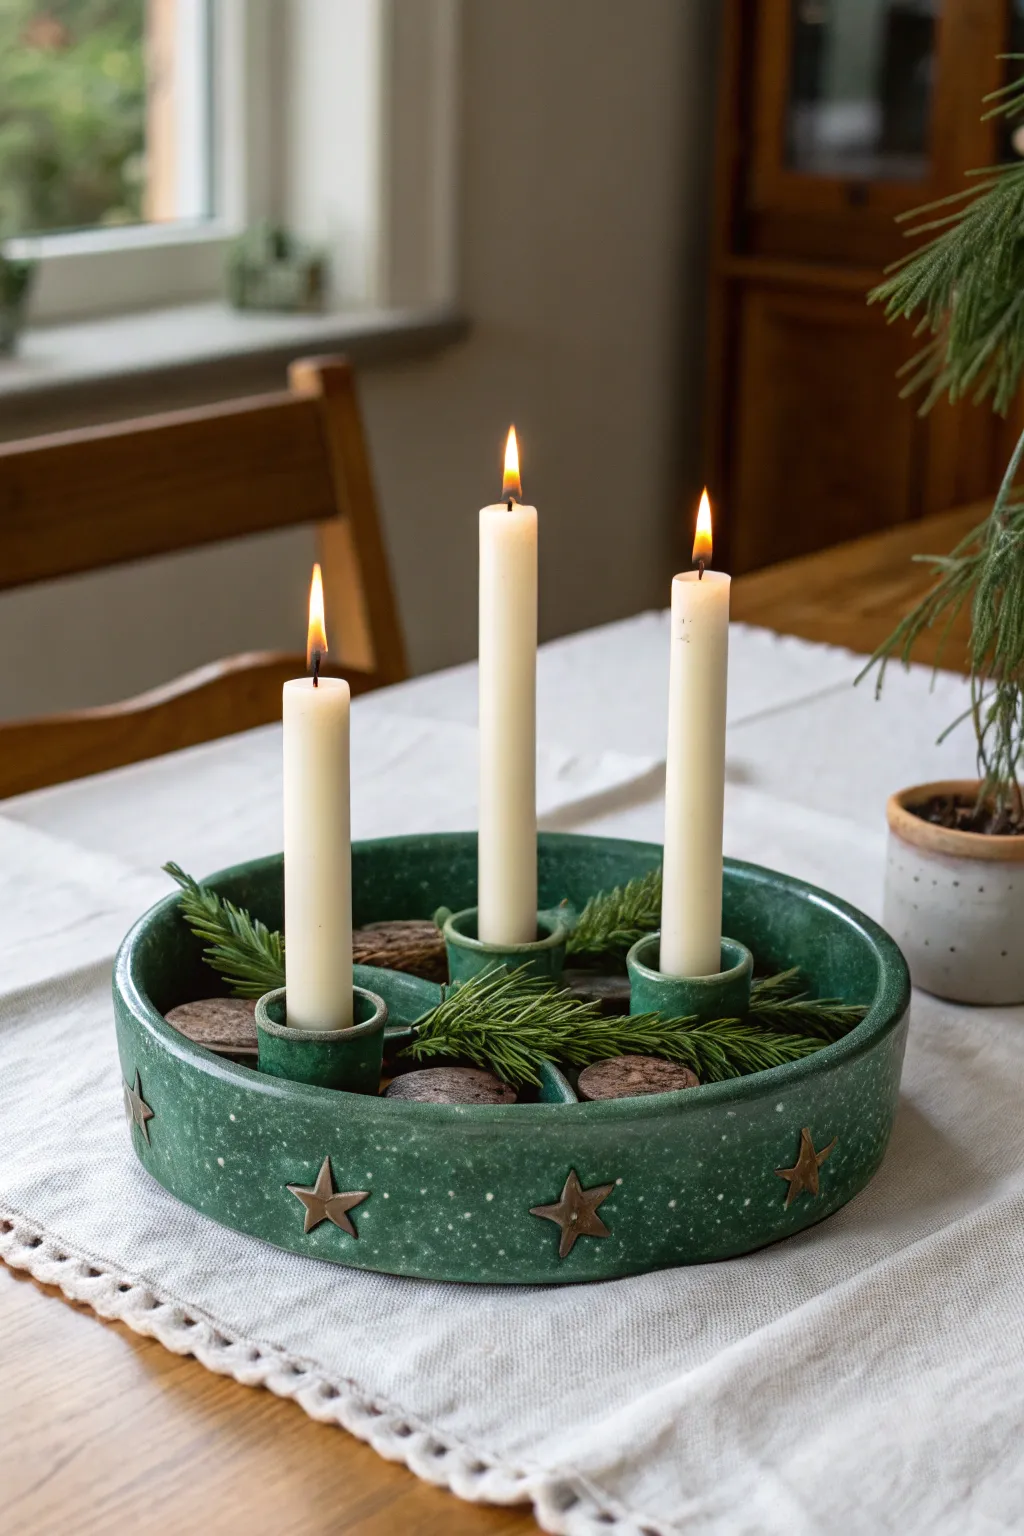
Bring the warmth of the season to your table table with this handcrafted clay advent wreath. Featuring a deep, speckled green glaze and rustic embossed stars, this durable centerpiece is designed to hold tapered candles securely while offering space for festive greenery.
Step-by-Step
Materials
- Stoneware clay (buff or white)
- Rolling pin and guide sticks (approx. 1cm thickness)
- Needle tool
- Pottery wheel (optional) or slab building tools
- Circle cutter or template (for the base)
- Star-shaped cookie cutter
- Slip and scoring tool
- Sponge
- Speckled green glaze
- Clear glaze (optional)
- Candles for sizing
- Kiln
Step 1: Forming the Base Structure
-
Prepare the slab base:
Roll out a slab of clay to an even thickness of about 1cm. Cut a large circle for the base of your ring—aim for a diameter of roughly 25-30cm depending on your table size. -
Create the inner donut hole:
Cut a smaller circle out of the center of your base to create the classic ring shape unless you prefer a solid bowl bottom. For the specific look in the photo, a solid bottom with dividers is best, so leave the base intact. -
Construct the outer wall:
Roll a long slab or coil to create the outer wall. It should be approximately 5-6cm high. Attach this wall to the perimeter of your base using the score and slip method, blending the seams thoroughly for strength. -
Add radial dividers:
Measure the interior radius and cut four rectangular strips of clay. Attach these inside the bowl, running from the center to the outer wall, effectively dividing the ring into four equal quadrants. -
Smooth the surfaces:
Take a damp sponge and run it over the rim and walls to soften any sharp edges. Ensure the connection points of the dividers are seamless.
Step 2: Adding Candle Holders
-
Form the cylinders:
Roll a small slab and cut four strips. Wrap these strips around a dowel or the base of your intended candles to form four cylinders that are about 3cm tall. -
Refine the holders:
Join the seams of your cylinders well. Flare the top rim slightly outward with your thumb to make inserting candles easier later on. -
Attach the holders:
Place one cylinder at the center of each of the four quadrants. Score the bottom of the cylinder and the spot on the base, apply slip, and press firmly to attach. I usually run a tiny coil of clay around the base of the holder to reinforce the join.
Wobbly Candles?
If your baked holders end up slightly too large for your taper candles, drip a small amount of melted wax into the holder’s base before inserting the candle to secure it upright instantly.
Step 3: Decoration and Finishing
-
Cut out star accents:
Roll a thin slab of clay (about 3-4mm). Use your star-shaped cutter to punch out several stars. You will need enough to space them evenly around the exterior wall. -
Attach the stars:
Score and slip the back of each star and press them onto the outer wall of the ring. Use a modeling tool to clean up any slip that squishes out. -
Create the speckled texture:
If your clay is smooth, you can gently press coarse sand or grog into the surface now for texture, or rely on a specialty glaze later. -
Bisque fire:
Allow the piece to dry slowly and completely to avoid warping. Once bone dry, fire it in the kiln to the bisque temperature appropriate for your clay body.
Festive Variations
Instead of stars, cut out holly leaves or snowflakes for the exterior. You can also glaze the interior a contrasting color, like a deep glossy brown, to make the green pine branches pop.
Step 4: Glazing
-
Clean the bisque:
Wipe the fired piece with a damp sponge to remove any kiln dust ensuring the glaze adheres properly. -
Apply the green glaze:
Dip or brush on your speckled green glaze. Ensure you get good coverage inside the dividers and around the candle holders. Avoid glazing the very bottom of the piece. -
Highlight the stars:
For the metallic look on the stars seen in the image, carefully wipe the green glaze off the star surfaces. Apply an oxide wash or a gold luster (if doing a third firing) to just the stars. -
Final firing:
Fire the piece again to the maturity temperature of your glaze. Once cool, fill the quadrants with wood slices and greenery, and place your candles.
Enjoy the cozy glow of your handmade centerpiece throughout the holiday season

TRACK YOUR CERAMIC JOURNEY
Capture glaze tests, firing details, and creative progress—all in one simple printable. Make your projects easier to repeat and improve.
Snowy Speckled Serving Bowl for Holiday Sides
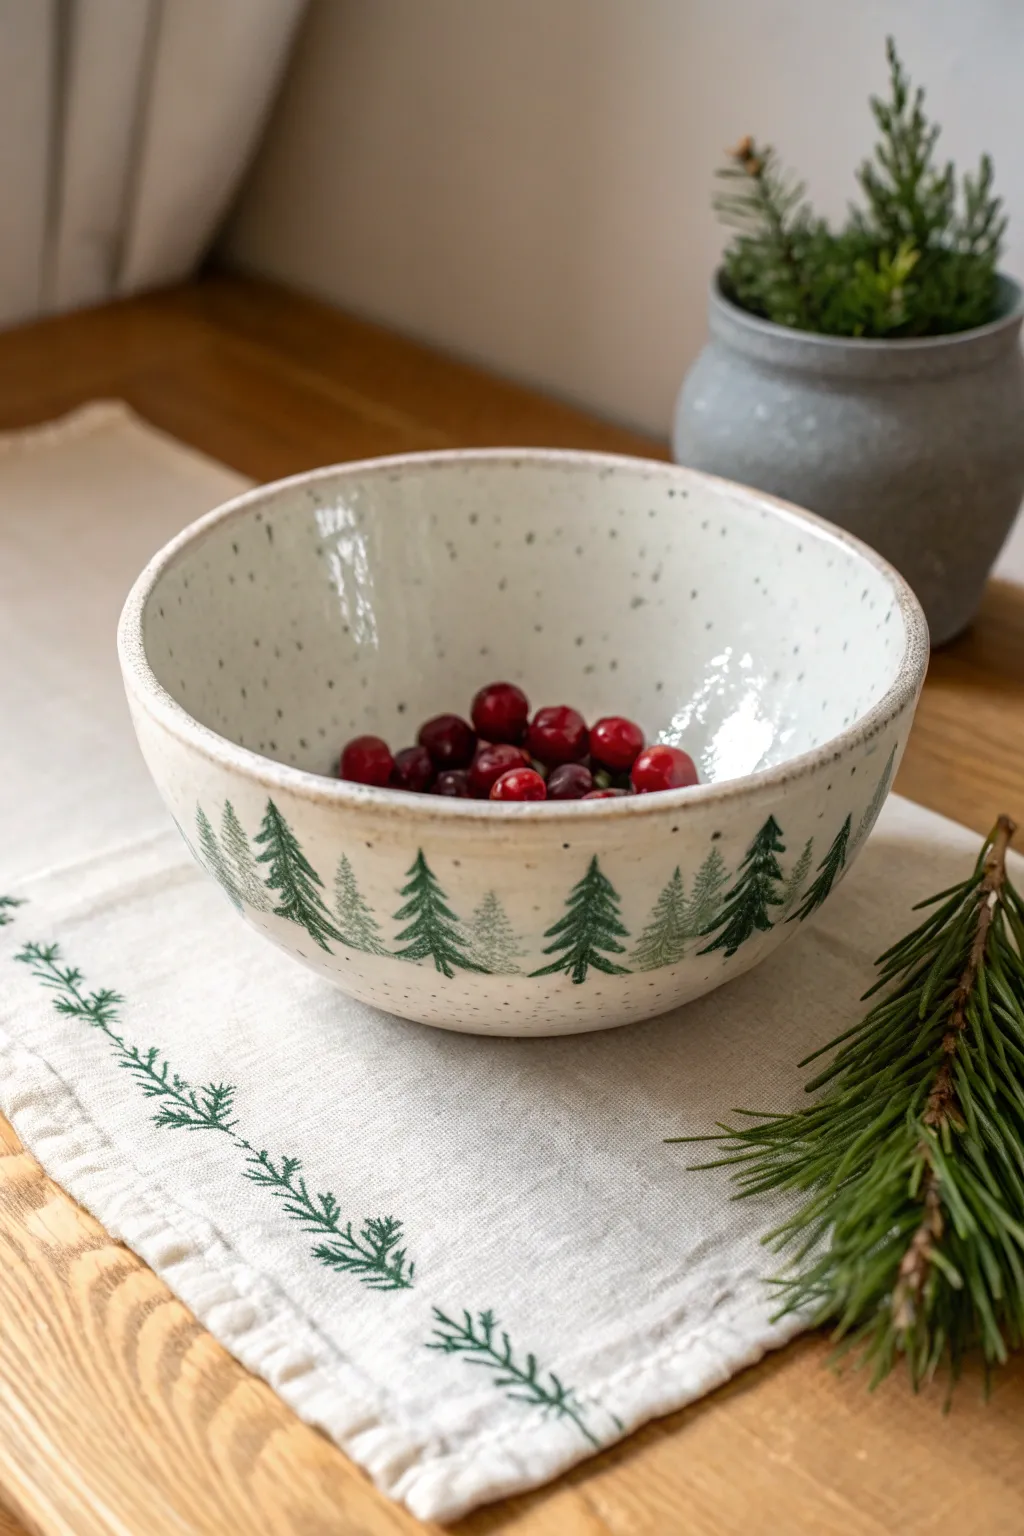
Bring the quiet beauty of a winter forest to your table with this speckled serving bowl featuring a delicate border of evergreens. The natural speckling in the clay or glaze mimics falling snow, creating a perfect backdrop for your holiday side dishes.
How-To Guide
Materials
- Speckled stoneware clay (or white clay with speckle additive)
- Pottery wheel
- Throwing tools (sponge, rib, wire cutter)
- Trimming tools
- Underglaze pencil or fine liner brush
- Dark green underglaze
- Medium green underglaze
- Clear or transparent white glaze (food safe)
- Kiln
Step 1: Forming the Bowl
-
Center and open:
Begin with about 3-4 pounds of speckled stoneware clay. Center it firmly on the wheel and open the mound to create a wide, curved interior floor. -
Pull the walls:
Pull the walls upward and outward, aiming for a consistent thickness. Shape the bowl into a classic hemisphere, ensuring the rim is slightly thicker than the walls to prevent warping. -
Define the rim:
Use a chamois or a damp sponge to compress and round the lip of the bowl. This creates that smooth, professional finish that feels good to hold. -
Dry to leather hard:
Cut the bowl from the bat and let it dry slowly until it reaches a leather-hard state. It should be firm enough to handle without deforming but still cool to the touch. -
Trimming the foot:
Flip the bowl over onto the wheel head or a trimming chuck. Trim away excess weight from the bottom and carve a clean, distinct foot ring.
Smudged Trees?
If you smudge the underglaze while painting, let it dry completely, then gently scrape the mistake off with an X-Acto knife rather than wiping, which spreads the pigment.
Step 2: Painting the Forest
-
Clean surface:
Wipe the exterior surface with a slightly damp sponge to remove any dust from trimming, ensuring a clean canvas for your trees. -
Mark specific spacing:
Lightly mark vertical guidelines around the bottom third of the bowl where you want your largest trees to stand. This helps keep the pattern balanced before you commit with glaze. -
Paint the main trunks:
Using a fine liner brush and dark green underglaze, paint thin vertical lines for the trunks. Vary the heights slightly to make the forest look natural. -
Add evergreen branches:
Start at the top of a trunk and paint downward-slanted dashes using quick, feathery strokes. Widen the strokes as you move down the tree to create that classic conical pine shape. -
Layering colors:
Once the dark green dries slightly, I like to go back in with a medium green underglaze. Paint shorter, smaller trees in the gaps between the large ones to create depth and a sense of distance. -
Bisque firing:
Let the bowl dry completely (bone dry) before loading it into the kiln for the bisque fire (usually Cone 04 or 06 depending on your clay body).
Winter Texture
For a tactile ‘snowy’ feel, don’t smooth the glaze perfectly. Use a glaze with a slight satin matte finish rather than high gloss to mimic soft snow.
Step 3: Glazing and Finishing
-
Wax the foot:
Apply wax resist to the bottom foot ring to prevent glaze from adhering to the kiln shelf. -
Prepare the glaze:
Mix your transparent clear or transparent white glaze thoroughly. If your clay isn’t naturally speckled, you can add a granular ilmenite or speckle additive to the glaze now. -
Dip or pour:
Dip the entire bowl into the glaze bucket for an even coat. Alternatively, pour the glaze inside, swirl to coat, pour it out, and then dip the exterior. -
Check the trees:
If the glaze looks too thick over your painted trees, gently rub the area with your finger to thin the glaze layer slightly so the green design shows through clearly. -
Glaze fire:
Fire the bowl to the maturity temperature of your clay and glaze (typically Cone 5 or 6 for stoneware). This final firing vitrifies the clay and makes the bowl food safe.
Now you have a stunning, functional winter centerpiece ready for cranberry sauce or pine cones
Surprise Inside: Hidden Message Christmas Mugs
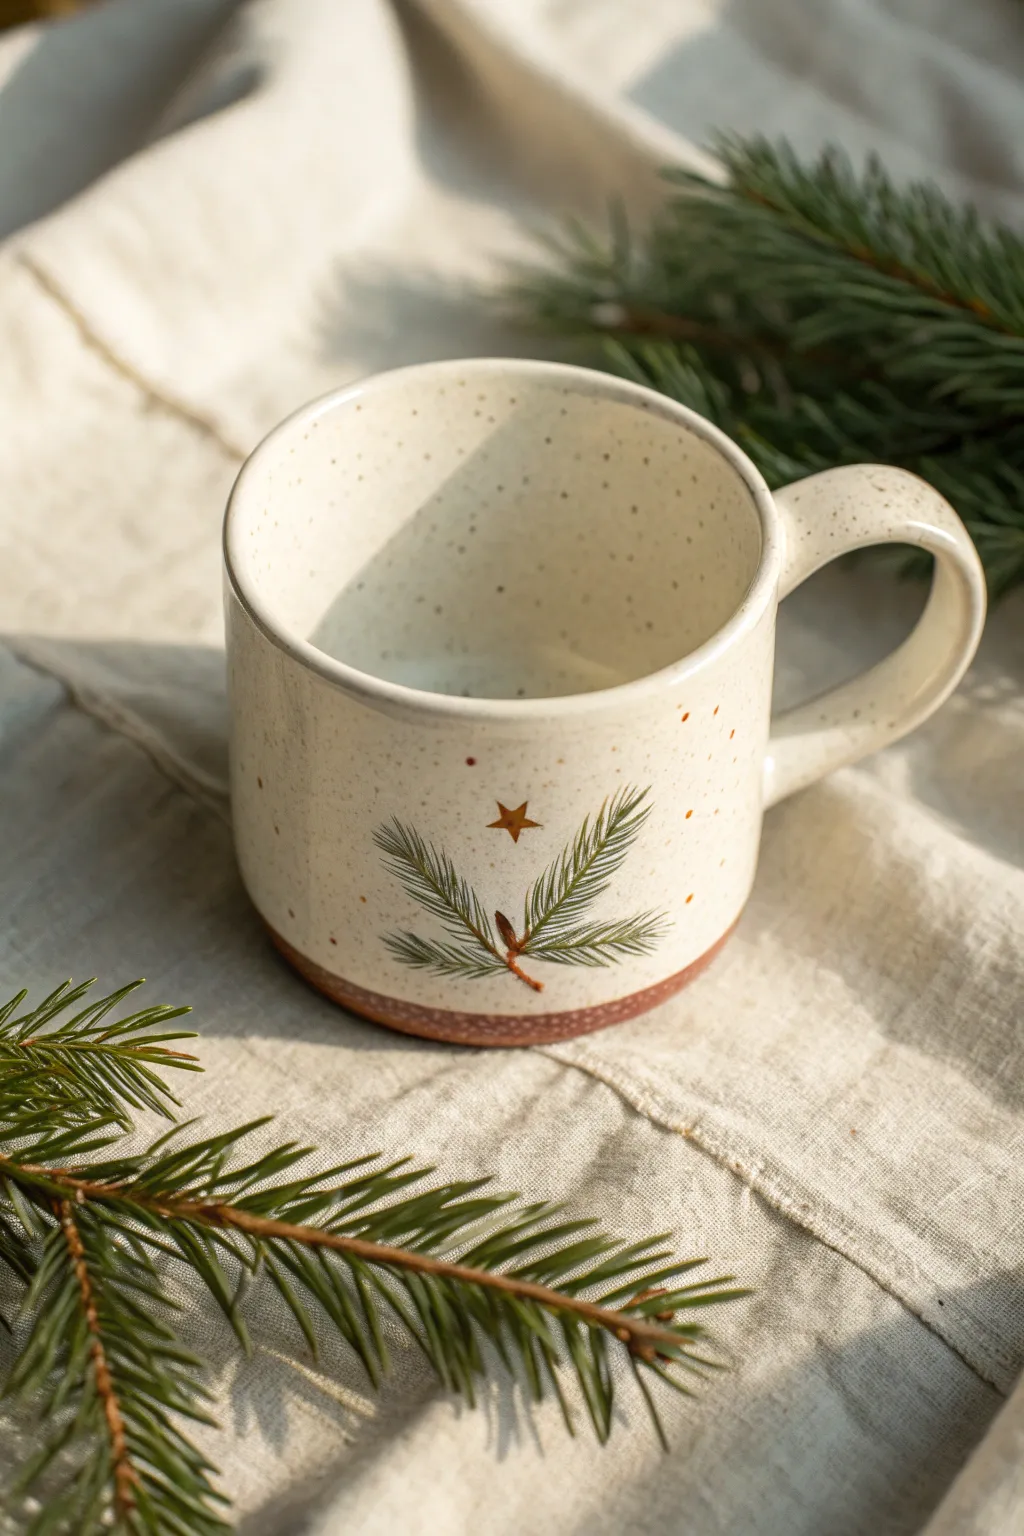
Embrace the cozy simplicity of the holidays with this charming hand-built mug featuring delicate pine boughs and a subtle, starry sparkle. The speckled clay body adds a rustic warmth, while a hidden message stamped at the bottom awaits the drinker as a festive surprise.
How-To Guide
Materials
- Speckled stoneware clay (pyrite or grog speckled)
- Pottery wheel or slab roller (depending on construction method)
- Rib tool (wooden or silicone)
- Fettling knife
- Sponge
- Underglaze (Pine Green, Deep Brown/Sienna, Gold)
- Small detail brushes (liner and round #2)
- Gold luster (overglaze) – optional for extra shine
- Clear transparent glaze
- Alphabet stamp set
- Scoring tool and slip
- Kiln
Step 1: Forming the Vessel
-
Prepare your clay:
Wedge your speckled stoneware clay thoroughly to remove air bubbles. This clay has natural inclusions that will bloom into speckles when fired. -
Construct the cylinder:
Throw a cylinder on the wheel with straight, vertical walls and a flat bottom. Alternatively, roll out a slab and form a hand-built cylinder, smoothing the seam invisible. -
Refine the rim:
While the clay is still plastic, compress the rim with a chamois or sponge to ensure it’s smooth and pleasant to drink from. -
Stamp the surprise:
While the clay is leather-hard but still receptive, take your alphabet stamps and press a short message into the very bottom of the inside floor (e.g., ‘JOY’, ‘PEACE’, or ‘HI!’). -
Trim the base:
Once leather-hard, trim the bottom of the mug. Create a distinct, slightly recessed foot ring about 1/4 inch high. This unglazed foot adds a nice tactile contrast later.
Step 2: Handle & Surface Prep
-
Pull the handle:
Pull a strap of clay for the handle. For this design, aim for a simple ear shape that offers a comfortable grip. Let it stiffen slightly. -
Attach the handle:
Score the mug body and the handle attachment points. Apply slip and press the handle firmly onto the mug. Smooth the connections with a damp sponge or modeling tool. -
Bisque fire:
Allow the mug to dry completely (bone dry). Fire it to cone 04 (or your clay body’s bisque temperature) to prepare it for glazing.
Needles Pro Tip
For realistic pine needles, use a ‘dagger’ or ‘striper’ brush. Load it with glaze and press down then lift up quickly as you pull away to get tapered, sharp points.
Step 3: Painting the Winter Motif
-
Paint the branch stem:
Using a fine liner brush and brown underglaze, paint a thin, slightly curved line for the central twig. Keep the stroke loose and organic. -
Add pine needles:
Switch to your green underglaze. Using a small round brush, paint quick, flicking strokes outward from the stem. Vary the lengths to mimic real pine needles. -
Create depth:
I like to go back in with a slightly darker green or a mix of green and brown to add a second layer of needles near the base of the branch for visual density. -
Add the star:
With gold underglaze (or yellow if planning to luster later), carefully paint a five-point star floating just above the pine branch. -
Add subtle splatters:
For extra atmosphere, dilute a tiny bit of orange-brown underglaze and flick the bristles of a toothbrush near the design to create tiny, warm background dots. -
Highlight the hidden message:
Paint a wash of underglaze into the stamped letters inside the mug, then wipe back the surface with a damp sponge so the color remains only in the recessed text.
Troubleshooting: Smudged Text
If your underglaze wipes out of the stamped letters completely, the recess isn’t deep enough. Let the glaze dry slightly longer before wiping so it grips the clay.
Step 4: Glazing & Finishing
-
Wax the foot:
Apply wax resist to the bottom foot ring and the exposed clay section immediately above it (the terra-cotta colored band in the image). This keeps the raw clay aesthetic. -
Apply clear glaze:
Dip the entire mug into a clear, glossy glaze. Ensure the inside is fully coated to make the mug food safe and durable. -
Clean the foot:
Wipe any stray glaze drips off the waxed foot area with a sponge. The wax helps, but a final wipe ensures a clean line. -
Glaze fire:
Fire the mug to cone 5 or 6 (mid-range), or whatever your speckled clay body requires. The heat will bring out the natural iron speckles in the clay. -
Optional gold luster:
If you want real gold on the star, apply gold luster over the fired glaze on the star shape only. Fire a third time to cone 018 for that metallic shine.
Fill your new mug with hot cocoa and wait for the smile when someone discovers the hidden greeting at the bottom