
If you’ve been craving fresh clay animal sculpture inspiration, I’ve got a whole menu of creatures you can model right at your worktable. These ideas range from super beginner-friendly to a little more adventurous, so you can pick the animal that matches your mood (and your patience that day).
Simple Sitting Cat Figurine
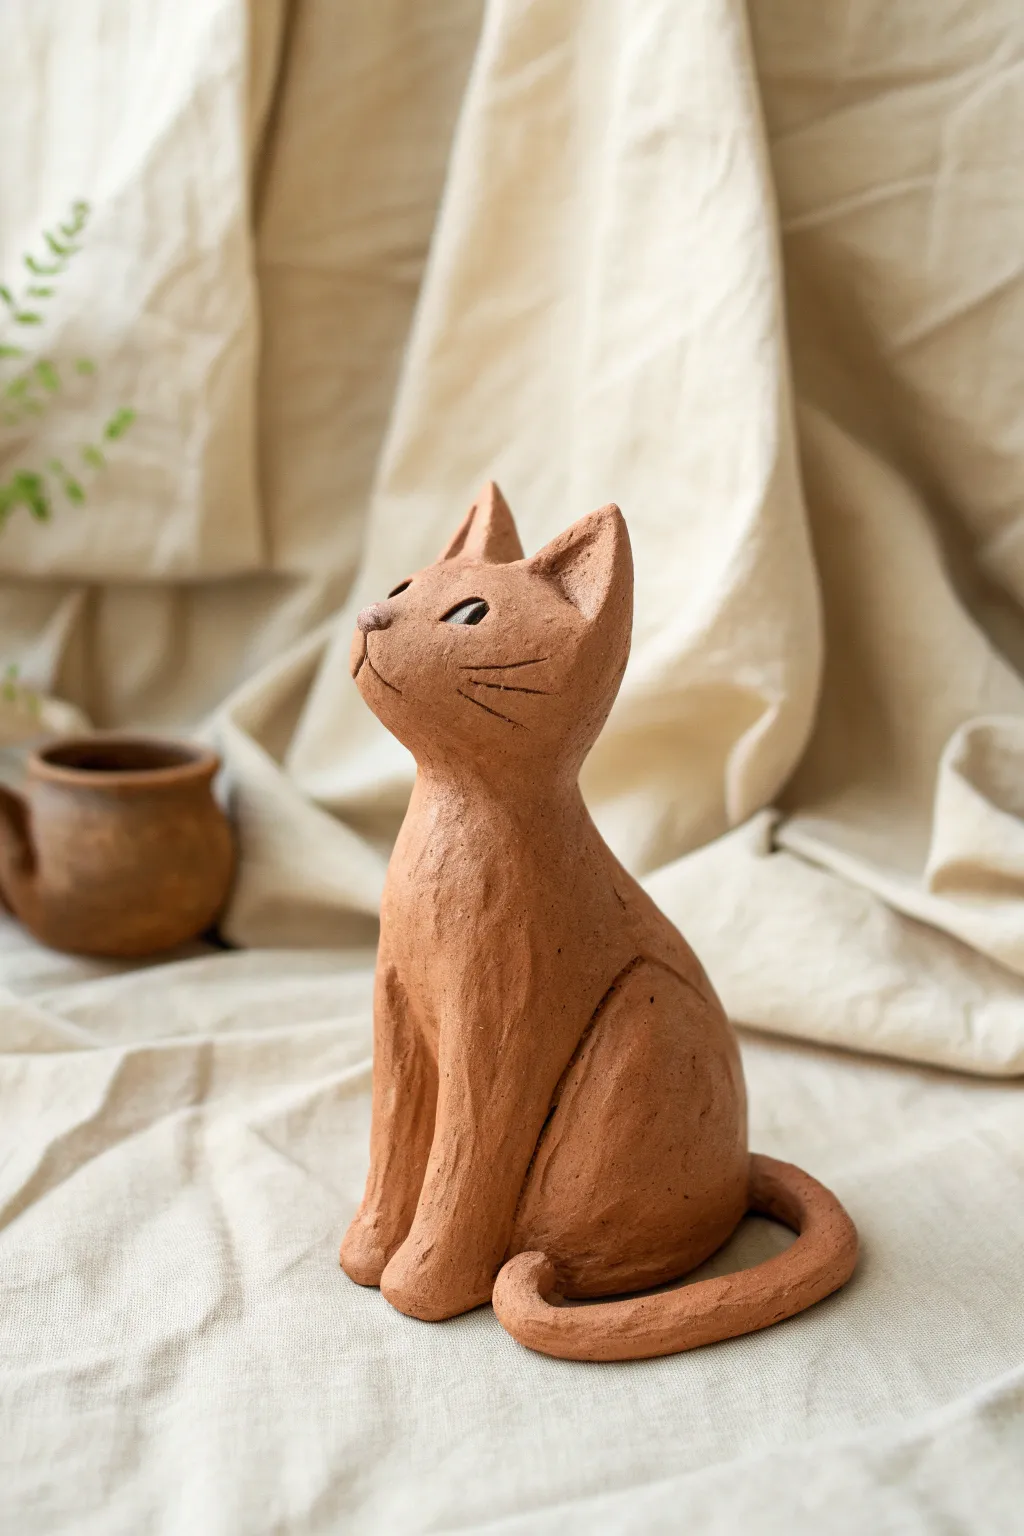
Capture the charm of a feline friend with this simple yet expressive clay sculpture. Using basic hand-building techniques, you’ll create a smooth, stylized cat figurine with a warm, earthy finish that looks right at home on any shelf.
How-To Guide
Materials
- Terracotta or red earthenware clay
- Wooden modeling tool or clay knife
- Needle tool
- Small sponge
- Bowl of water
- Slip (clay mixed with water)
- Scoring tool or old toothbrush
Step 1: Forming the Main Body
-
Shape the torso:
Begin with a fist-sized ball of clay. Roll it between your palms to smooth it out, then gently elongate it into a pear shape. This will serve as the cat’s main body, with the wider bottom creating a stable base for the sitting pose. -
Create the head:
Take a smaller piece of clay, roughly one-third the size of the body. Roll it into a smooth sphere, then slightly flatten one side where it will attach to the neck. -
Attach head to body:
Score the top of the pear shape and the flattened side of the head sphere. Apply a dab of slip to both scored areas. Press them firmly together, blending the clay across the seam with your thumb or a wooden tool until the neck transition is seamless. -
Refine the posture:
With the head attached, gently tilt it upwards and slightly to the side to give the cat an inquisitive look. Smooth the neck area again to ensure the new angle is supported.
Step 2: Defining Features
-
Pull the ears:
Pinch two small triangles of clay from the top of the head. Gently pull and shape them upwards to form pointed ears. Use your thumb to create a small depression inside each ear for depth. -
Shape the snout:
Add a very small, flattened oval of clay to the lower front of the face for the snout. Blend the edges thoroughly into the cheeks so it doesn’t look like a separate piece. -
Carve the eyes:
Using a modeling tool, gently press into the clay to form the eye sockets. Instead of adding clay eyes, carve an almond shape and leave the center raised slightly to suggest the pupil, or press a small bead of clay in. -
Add whisker details:
Take your needle tool and carefully draw three radiating lines on each cheek. Keep your hand steady and apply light pressure to create thin, crisp whisker marks.
Fixing Cracks
If small hairline cracks appear as it dries, mix a tiny amount of vinegar into your clay slip and fill the cracks. The vinegar helps the new clay bond securely.
Step 3: Completing the Body
-
Form the front legs:
Roll two small coils of clay. Flatten them slightly and attach them to the front of the body, blending the top seamlessly into the chest. These should run vertically down to the base. -
Shape the paws:
At the bottom of the front legs, press slightly to widen the clay into paws. Use a knife tool to mark two small indents on each paw to suggest toes. -
Sculpt the haunches:
Add extra clay to the sides of the lower body to build up the rear haunches. Smooth this clay backward to suggest the folded hind legs of a sitting cat. -
Create the tail:
Roll a long, tapered coil for the tail. I find it works best to attach it to the lower back, wrapping it around the side of the body toward the front paws. -
Secure the tail:
Score and slip the entire length of the tail where it touches the body. Press it down firmly and blend the underside so there are no gaps where cracking could occur.
Texture Twist
Before the clay dries, gently press a piece of rough linen or canvas against the body to leave a subtle woven texture that looks great once glazed.
Step 4: Finishing Touches
-
Initial smoothing:
Run your fingers over the entire sculpture to soften any harsh tool marks. The goal is a look that feels organic and hand-molded rather than mechanically perfect. -
Sponge finish:
Dampen your small sponge slightly (wring it out well) and gently wipe the surface of the clay. This brings the fine clay particles to the surface creates a consistent, warm texture. -
Check stability:
Tap the base gently on the table to ensure it sits perfectly flat. If it wobbles, gently press the figure down to flatten the bottom. -
Dry slowly:
Cover the sculpture loosely with plastic for the first day to let the moisture even out, then uncover to let it dry completely before firing or painting.
Once fired, this lovely feline will be ready to keep watch over your home with quiet grace


Floppy-Eared Puppy Pose
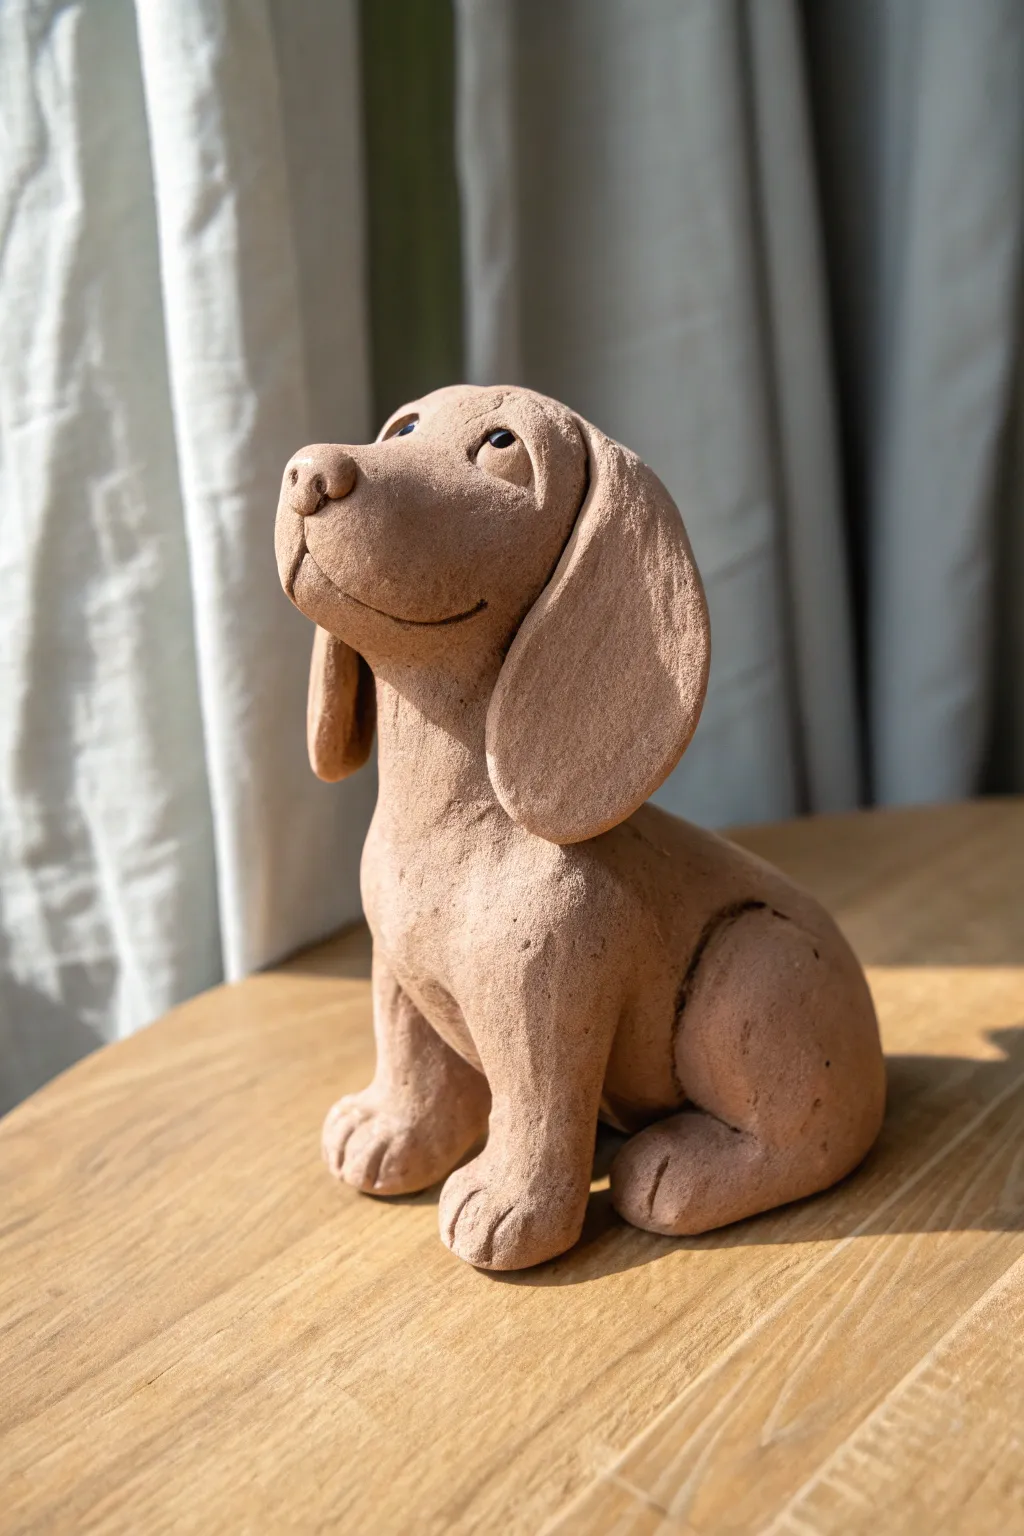
Capture the unconditional love of a canine companion with this sitting puppy sculpture, featuring oversized ears and an upward gaze. The rough, textured finish of the clay gives it a warm, rustic charm that looks beautiful simply fired or air-dried without glaze.
Step-by-Step
Materials
- Stoneware clay (terracotta or buff)
- Small wooden sculpting tool
- Metal kidney scraper or serrated rib
- Pointed needle tool
- Small sponge
- Slip (clay mixed with water)
- Paintbrush (for applying slip)
- Two small black beads (for eyes)
Step 1: Building the Base Form
-
Shape the torso:
Begin with a fist-sized ball of well-wedged clay. Gently roll and elongate it into a rounded pear shape to form the puppy’s main body, keeping the bottom flat for stability. -
Form the head:
Roll a slightly smaller ball for the head. Press your thumbs gently into the clay to create eye sockets, then pinch the front forward to pull out a rounded snout area. -
Attach head to body:
Score the top of the body and the bottom of the neck area with your needle tool. Apply a generous amount of slip. Press the pieces together firmly, smoothing the clay downward from the neck to the shoulders to create a seamless join. -
Adjust the pose:
While the clay is still malleable, tilt the head slightly upward and to the side. This viewing angle is crucial for that hopeful, ‘waiting for a treat’ expression.
Crack Prevention
If the ears are heavy, they might pull away as they dry. Prop them up with small sponges or crumpled paper towels until the clay is leather-hard to support the weight.
Step 2: Adding Limbs and Features
-
Create the hind legs:
Roll two thick sausages of clay. Bend them into a ‘C’ shape to mimic the haunches. Score and slip them onto the sides of the rear body, blending the upper thigh into the torso so only the lower leg protrudes. -
Form the front legs:
Roll two straight cylinders for the front legs. Attach them vertically to the front of the chest, ensuring they are sturdy enough to support the chest’s weight. Blend the shoulders smoothly into the main body. -
Define the paws:
Using your wooden tool or a dull knife, press three vertical indentations into the bottom of each limb to suggest toes. Gently round the tops of these toes to make them look soft. -
Sculpt the tail:
Roll a small, tapered cone for the tail. Attach it to the lower rear, curling it slightly around the side of the haunch so it’s visible from the front view.
Collar & Tag Customization
Roll a thin strip of clay to create a collar before firing. Use a small stamp or needle tool to embrace a name onto a tiny clay circle for a personalized ID tag.
Step 3: Bringing the Face to Life
-
Make the ears:
Flatten two slabs of clay into teardrop shapes. These should be large and slightly heavy to get that ‘floppy’ look. I find it helpful to taper the attachment point so it’s thinner than the bottom edge. -
Attach the ears:
Score and slip the sides of the head. Press the ears on, allowing gravity to pull the bottom heavy sections down naturally. Blend the top seam into the skull completely. -
Refine the snout:
Add a tiny triangle of clay to the tip of the muzzle for the nose. Use a needle tool to poke two small nostrils. -
Carve the smile:
Use the edge of your wooden tool to carve a clear, curved line under the snout for the mouth. Hook the corners up slightly to ensure a happy expression.
Step 4: Texturing and Finishing
-
Insert the eyes:
Press the two small black beads into the eye sockets you prepared earlier. Push them deep enough that the clay slightly hugs the edges, securing them as the clay shrinks. -
Create eyelids:
Roll tiny, thin worms of clay and place them over the top half of each bead. Smooth the top edge into the forehead to create a droopy, relaxed eyelid. -
Add surface texture:
Take a serrated rib or a rough sponge and gently drag it across the entire surface of the sculpture. We don’t want it perfectly smooth; the scratchy texture mimics short fur. -
Hollow out (thick pieces only):
If your body piece is thicker than an inch, let it stiffen slightly, then carefully hollow out the bottom of the base with a loop tool to prevent cracking during firing. -
Final check:
Do a 360-degree inspection. Smooth any sharp mechanical edges from tools, but leave the fur texture intact. Set aside to dry slowly under loose plastic.
Once fully dry and fired, your loyal little friend will be ready to sit faithfully on your shelf


Chubby Bunny With Long Ears
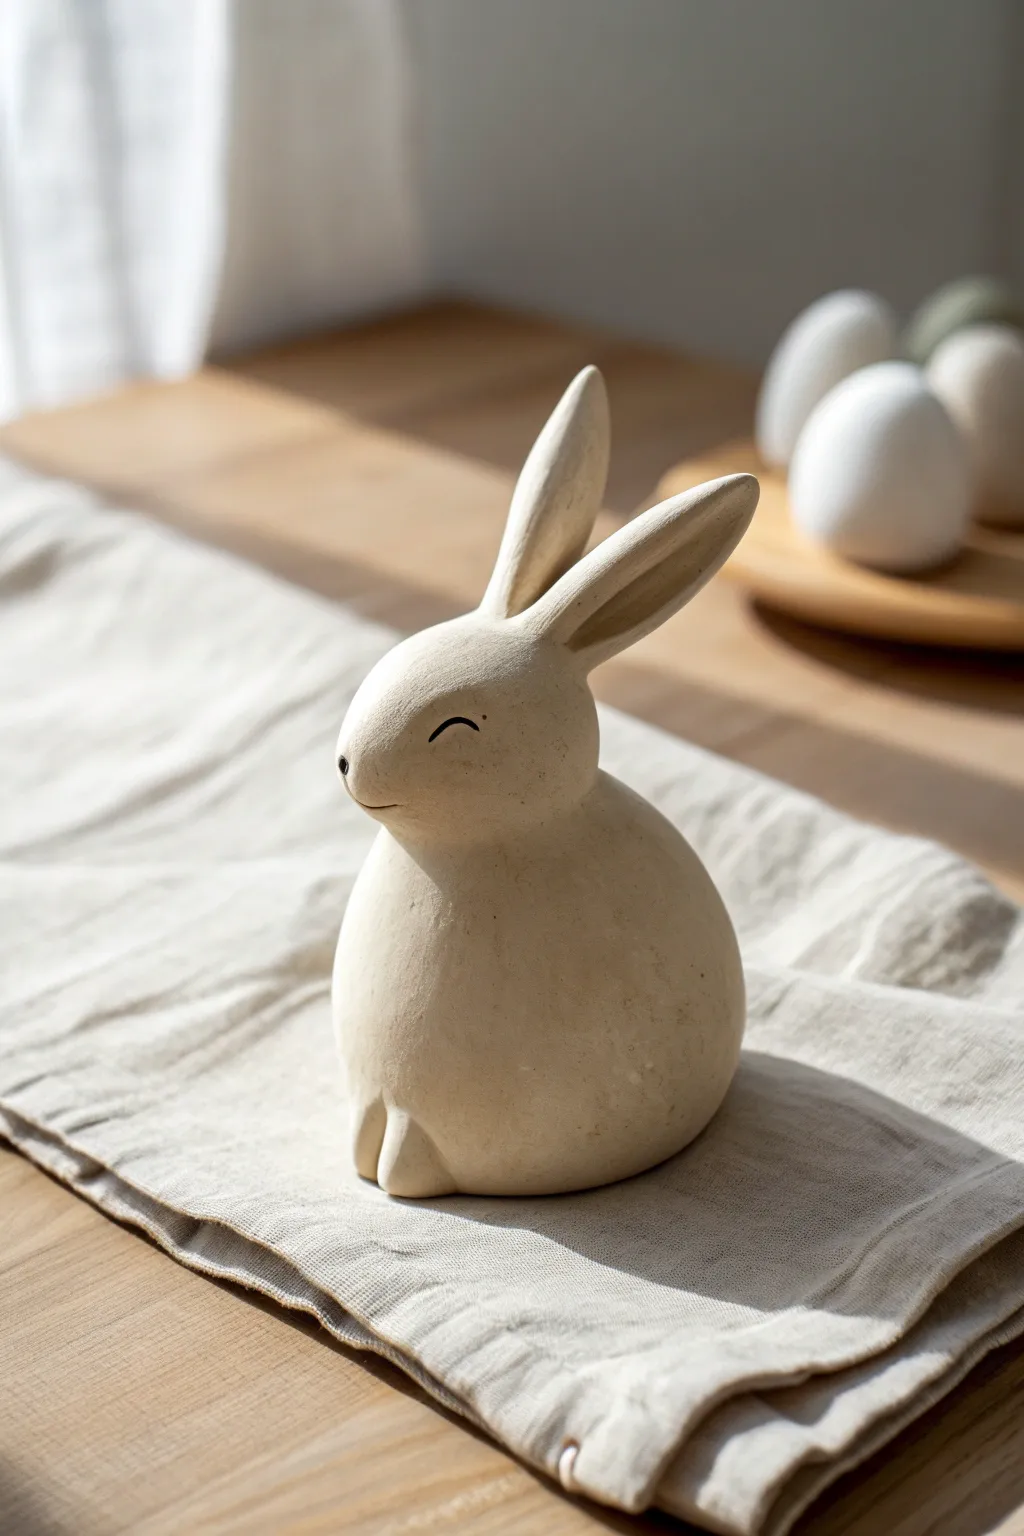
Capture the essence of sweet simplicity with this delightfully round clay rabbit sculpture. Featuring smooth curves, elongated ears, and a calm, sleeping expression, this project relies on clean lines rather than complex details to create a charming decorative piece.
Step-by-Step Tutorial
Materials
- White air-dry clay or polymer clay (approx. 250g)
- Clean work surface or rolling mat
- Small cup of water (for smoothing)
- Modeling tool with a small rounded tip
- Needle tool or toothpick
- Fine-grit sandpaper (optional)
- Matte sealant (optional)
Step 1: Forming the Body
-
Prepare the clay:
Begin by kneading your clay thoroughly to remove air bubbles and warm it up. Condition it until it is pliable and smooth, ensuring there are no cracks. -
Create the base shape:
Roll approximately two-thirds of your clay into a large, smooth ball. This will be the main body, so take your time rolling it to eliminate any seams. -
Taper the form:
Gently gently roll the top portion of the ball between your palms to create a slight pear shape. You want the bottom to remain heavy and round, while the top narrows slightly for the neck area. -
Flatten the base:
Tap the bottom of your pear shape firmly against your work surface. This creates a stable flat base so the bunny won’t roll over.
Stay Smooth
Keep a wet wipe or damp sponge nearby. Wiping your hands constantly prevents drying clay crumbs from sticking to your smooth bunny surface.
Step 2: Sculpting the Head & Ears
-
Attach the head:
Roll a smaller ball of clay for the head. Score the top of the body and the bottom of the head creates a rough texture, add a tiny dab of water (slip), and press the head firmly onto the body. -
Blend the neck:
Using your thumb or a modeling tool, drag clay from the head down to the body to seal the connection. Smooth this area carefully so the neck transition looks seamless and organic. -
Elongate the face:
Gently pull the clay at the front of the head forward just a bit to create a subtle snout profile, keeping everything very rounded. -
Form ear coils:
Roll two small sausages of clay that are tapered at both ends. Flatten them slightly to create a petal-like shape for the ears. -
Attach the ears:
Score the connection points on top of the head and the base of the ears. Press them onto the head, angling them slightly backward for a relaxed look. -
Blend the ears:
Just like the neck, use a small tool to blend the clay at the base of the ears into the head so they appear to grow naturally from the skull. -
Refine ear shape:
Once attached, gently pinch the tips of the ears and smooth the edges. I find it helpful use a damp finger to round off any sharp angles here.
Make it a Set
Make a trio of bunnies in different sizes. For the smallest one, try positioning the ears flopped down for added personality.
Step 3: Adding Details & Finishing
-
Suggest the feet:
At the very bottom front of the body, use a rounded modeling tool to press two small vertical indentations. This hints at paws tucked under the belly without needing to sculpt individual toes. -
Carve the expression:
Using a needle tool, carefully carve a simple curved line for the closed eye. Keep the arch gentle to convey happiness. -
Add the mouth and nose:
Below the eye, mark a tiny dot for the nose and a faint line for the mouth. The goal is minimalism, so keep these markings very subtle. -
Final smoothing:
Dip your finger in a little water and run it over the entire sculpture to remove fingerprints. Pay focus to the back and the curve of the belly. -
Drying:
Let the sculpture dry slowly away from direct heat sources. This may take 24-48 hours depending on thickness. -
Sanding and sealing:
Once fully dry, lightly sand any rough spots with fine-grit sandpaper. You can leave it raw for a natural look or apply a matte varnish for protection.
Place your finished bunny near a window where the light can catch its smooth curves and celebrate your handiwork


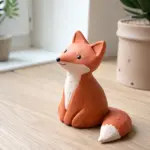
Tiny Sleeping Fox Curl

Capture the peaceful essence of a woodland creature with this simple, charming clay sculpture. This project focuses on distinctive curved shapes and minimal details to create a cozy, stylized fox figure that looks perfect resting on a windowsill.
Step-by-Step Guide
Materials
- Terracotta-colored air-dry clay or polymer clay
- Basic sculpting tools (or a toothpick and a dull knife)
- Black acrylic paint
- Fine-point detail brush
- Water (for smoothing)
- Matte varnish (optional)
Step 1: Shaping the Base
-
Create the main body:
Start with a lime-sized ball of terracotta clay. Roll it into a smooth sphere to remove any cracks, then gently elongate one side to form a thick teardrop shape. -
Curve the form:
Take the tapered end of your teardrop and curve it around the larger, round end. This will become the fox’s body curling around itself. -
Form the head:
Pull a smaller piece of clay from the main lump at the rounded end, or attach a separate grape-sized ball. Use your thumb to smooth the connection seam completely until it is invisible. -
Refine the snout:
Gently pinch the front of the head to create a pointed snout. The head should look slightly tilted downward, as if the fox is tucking its nose in for a nap.
Cracks Appearing?
If using air-dry clay, keep a damp sponge nearby. Tiny cracks can set in quickly; smooth them immediately with a wet finger or a slurry of clay and water.
Step 2: Ears and Tail
-
Attach the ears:
Roll two small, triangular pieces of clay. Score the bottom of these and the top of the head slightly to roughen the surfaces, then press them firmly onto the head. -
Blend the seams:
Use a modeling tool or your finger to smooth the clay at the base of the ears downwards into the head so they look organic and attached, not just stuck on. -
Shape the tail:
Focusing on the tapered end of your original teardrop body, define the tail. It should wrap snugly around the side of the fox’s body, ending near the nose. -
Add volume:
If the tail looks too thin, overlay a slightly flattened snake of clay along the curve. Blend the edges well so the tail looks fluffy and substantial.
Make it Wintery
Before the clay dries, paint the tip of the tail with white clay slip (or white acrylic after drying) to create a classic red fox ‘snow tip’ look.
Step 3: Refining Details
-
Sculpt the paws:
Create two tiny, flattened ovals of clay. Tuck them just under the fox’s chin, peeking out slightly, to show where the paws are tucked in. -
Texture the tail:
Using a needle tool or toothpick, gently scratch shallow lines along the length of the tail to simulate fur texture. Keep the lines flowing in the same direction as the curve. -
Ear details:
Use your tool to make small indentations inside the ears to give them depth. I also like to add a few tiny scratch marks on the tips for a furry effect. -
Final smoothing:
Dip your finger in a tiny bit of water and run it over the smooth parts of the body (back and head) to remove fingerprints. -
Drying:
Allow the sculpture to dry completely. For air-dry clay, this usually takes 24-48 hours; for polymer clay, bake according to package instructions.
Step 4: Painting
-
Paint the eyes:
Using a very fine brush and black acrylic paint, carefully paint two curved arches for the sleeping eyes. Keep the lines thin and delicate. -
Add the nose:
Dab a small spot of black paint on the very tip of the snout. -
Add whisker spots:
Using the very tip of your brush or a toothpick dipped in paint, add usually three small dots on either side of the snout for whisker follicles. -
Ear accents:
Lightly brush a few strokes of black inside the ears to emphasize the depth and shadow. -
Seal:
Once the paint is dry, you can apply a matte varnish to protect the clay, though leaving it raw preserves that lovely earthy texture.
Place your little sleeping friend on a bookshelf or desk for a touch of handmade calm

The Complete Guide to Pottery Troubleshooting
Uncover the most common ceramic mistakes—from cracking clay to failed glazes—and learn how to fix them fast.
Classic Owl With Layered Feathers
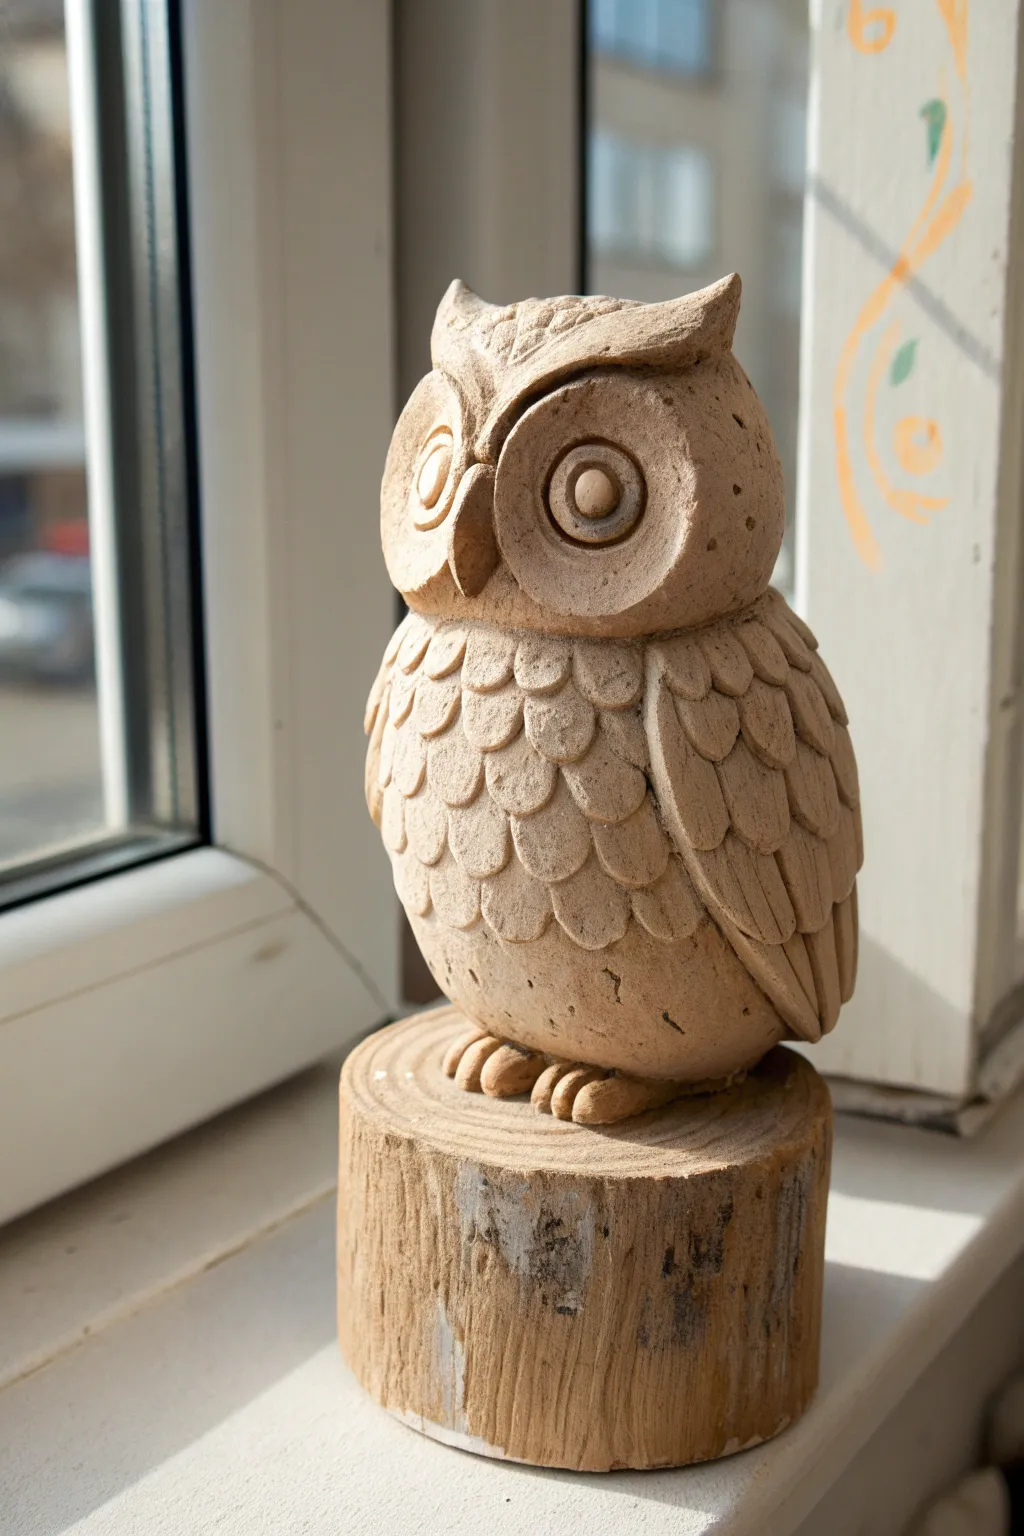
Capture the wisdom of the forest with this charming, rustic owl sculpture featuring deeply carved details and layered plumage. The finished piece has a lovely natural stoneware look that brings a touch of woodland whimsy to any windowsill.
Step-by-Step Tutorial
Materials
- Air-dry clay or polymer clay (stone or granite color recommended)
- Wooden dowel or armature wire (optional for internal support)
- Set of clay sculpting tools (needle tool, loop tool, ball styluses)
- Small rolling pin
- Water in a small cup (for smoothing)
- Sponge or brush
- Cylindrical wooden block (for display)
- Strong craft glue (e.g., E6000)
Step 1: Forming the Core Structure
-
Build the base shape:
Start by conditioning your clay until it is pliable. Roll a large ball for the body and slightly flatten it into an egg shape, making sure the bottom is flat so it stands securely. -
Shape the head:
Form a second, slightly smaller ball for the head. Instead of leaving it perfectly round, gently pinch the top corners to create the initial suggestion of ear tufts. -
Attach head to body:
Score the bottom of the head and the top of the body with a needle tool, dampen with a little water (or slip if using ceramic clay), and press them firmly together. Smooth the seam so the neck transition looks natural but distinct. -
Refine the silhouette:
Gently press the front of the belly to flatten it slightly, creating a surface where you will later apply the feathers. Ensure the owl isn’t leaning too far forward or backward.
Clay Cracking?
If you see tiny fissures forming while working, your clay is getting dry. Dip your finger in water and smooth over the cracks immediately to seal them back up.
Step 2: Facial Features
-
Create the eye sockets:
Using your thumbs or a large ball tool, press two deep, concave circles into the face area. These indents should take up a significant portion of the face to give that classic wide-eyed owl look. -
Add the eyes:
Roll two small balls of clay and flatten them into discs. Place these inside the sockets you just made. Using a smaller tool or tube, impress a circle in the center for the pupil. -
Sculpt the beak:
Form a small, sharp triangle of clay. Attach it right between the eyes, blending the top edge into the forehead while leaving the tip protruding slightly downwards. -
Define the eye rims:
Roll thin snakes of clay and wrap them around the outer edge of the eye sockets. Blend the outer edges into the head, but keep the inner edges sharp to create distinct rims. -
Detail the forehead:
Use a needle tool to scratch fine, curved lines radiating from the center of the forehead up toward the ear tufts, mimicking small, fine feathers.
Easy Eyeballs
Use the cap of a marker or a pen casing to stamp perfectly round pupils into the clay eyes. It saves sculpting time and ensures symmetry.
Step 3: Feathering and Wings
-
Prepare feather scales:
Roll out a thin sheet of clay. Use a small round cutter or a knife to cut out many small U-shaped or tongue-shaped pieces. These will be your chest feathers. -
Layer the chest feathers:
Starting from the bottom of the belly and working upward, attach the clay scales in overlapping rows. Use a dab of water to secure each one. Stagger the rows like bricks. -
Texture the feathers:
Once the chest is covered, I like to take a loop tool to gently press or carve a slight depression into the center of select feathers, giving them a more three-dimensional, fluffy appearance. -
Form the wings:
Shape two large, flattened teardrop pieces for the wings. These should be long enough to reach from the shoulder down to the tail area. -
Carve wing details:
Before attaching, use a knife tool to carve long, vertical grooves into the wings to represent flight feathers. Make simpler, scalloped cuts near the top ‘shoulder’ area. -
Attach the wings:
Press the wings firmly onto the sides of the body, curving them slightly to hug the owl’s form. Blend the clay at the shoulder joint so it looks seamless.
Step 4: Feet and Finishing
-
Make the talons:
Roll six small, sausage-like shapes for toes. Group them into two sets of three and attach them to the very bottom front of the owl, curving them slightly as if gripping a perch. -
Add surface texture:
To mimic the stone look in the reference, take a coarse sponge or a crumpled ball of foil and gently tap it over the smooth areas of the head and wings to add a pitted texture. -
Final drying:
Let the sculpture dry completely according to your clay’s instructions. If using air-dry clay, rotate it occasionally so the bottom dries too. -
Mounting:
Once dry and cured, apply a strong craft glue to the bottom of the owl and press it firmly onto your cylindrical wooden block base.
Now you have a stoic, hand-sculpted guardian ready to watch over your home.
Turtle With Patterned Shell
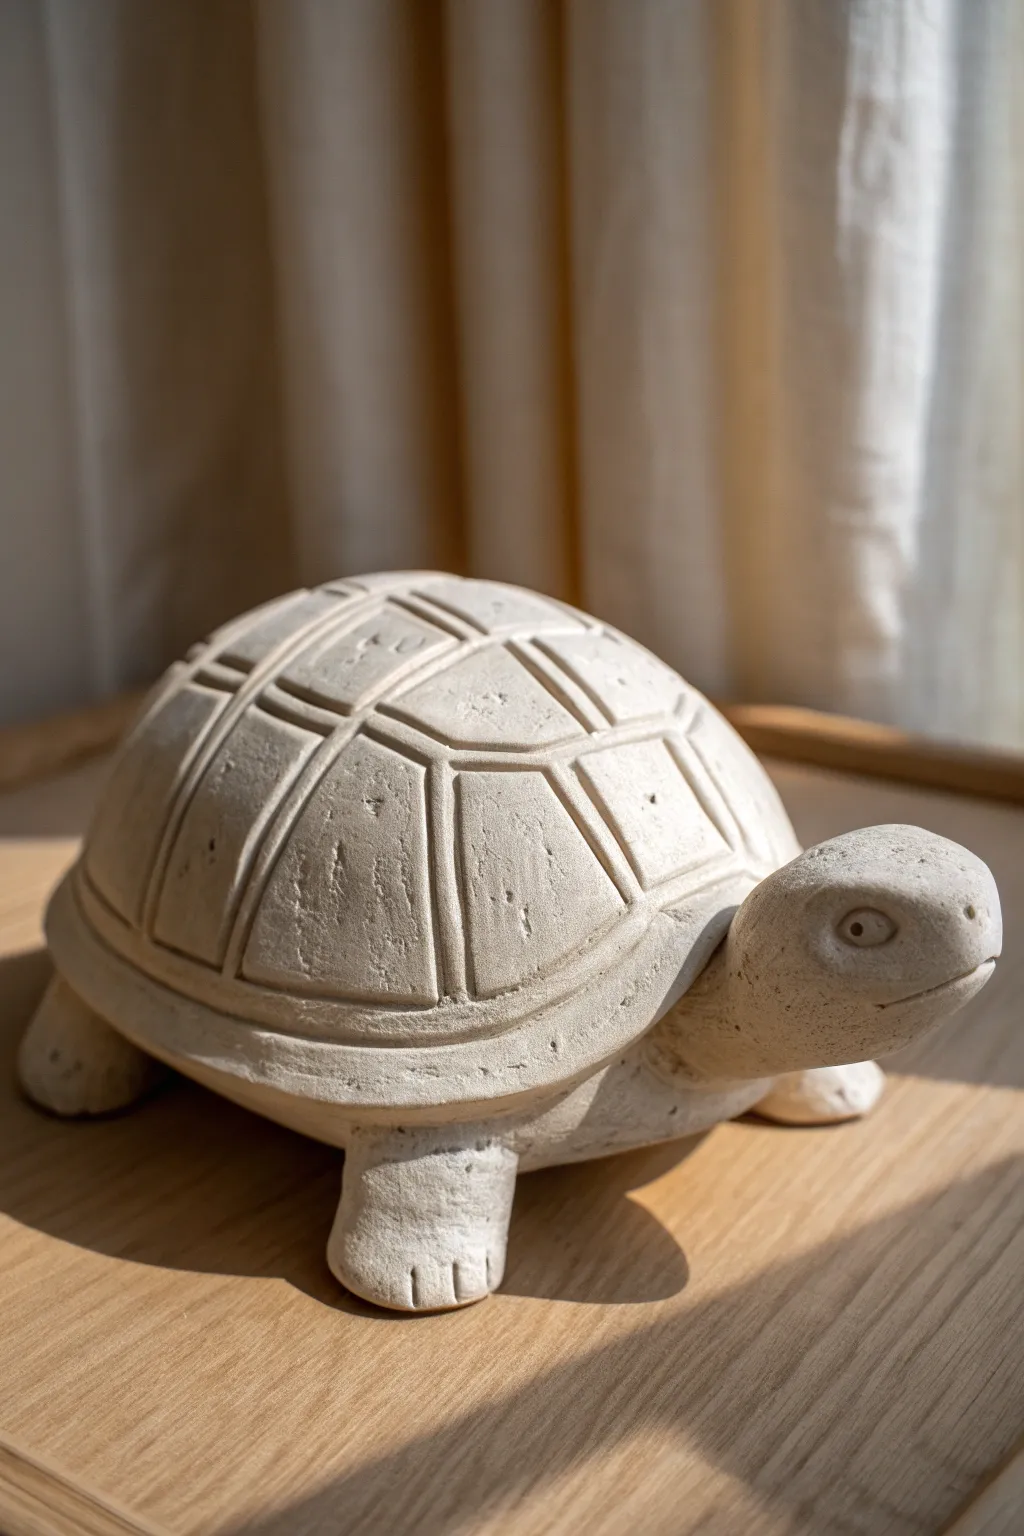
This charming, cream-colored clay turtle features a wonderfully textured shell that brings a sense of calm to any shelf. Its simple geometric patterns and sturdy, rounded form make it an approachable yet impressive sculpture for beginners and intermediate artists alike.
How-To Guide
Materials
- Air-dry clay or stoneware clay (white or light cream)
- Modeling tools (specifically a needle tool and a small loop tool)
- Sponge
- Water in a small bowl
- Rolling pin
- Canvas mat or wooden board (to work on)
- Slip (clay mixed with water to a muddy consistency)
- Scoring tool (or serrated kidney)
- Sandpaper (fine grit, for post-firing/drying)
Step 1: Forming the Base Structure
-
Create the shell base:
Start with a large ball of clay, roughly the size of a grapefruit. Gently pat and press it against your work surface to flatten the bottom while keeping the top nice and domed. You want a distinct hemisphere shape. -
Hollow out the shell:
Carefully pick up the dome and use a loop tool or your thumbs to hollow out the underside. This ensures the clay dries evenly and isn’t too heavy. Leave the walls about a half-inch thick for stability. -
Smooth the surface:
Flip the dome back over. Dip your sponge lightly in water and run it over the entire surface of the shell to remove any fingerprints or cracks. The surface should be pristine before you start carving. -
Shape the plastron (belly):
Roll out a slab of clay about 1/4 inch thick. Cut out an oval shape that matches the footprint of your hollowed dome. This will be the turtle’s belly. -
Attach the shell to the belly:
Score the bottom edge of the dome and the outer edge of the slab. Apply slip to both scored areas, press them firmly together, and smooth the seam completely so it looks like one solid piece.
Crack Control
If hairline cracks appear at the neck or leg joints while drying, fill them immediately with a mixture of vinegar and clay (creating a paste) to bond the gap back together.
Step 2: Sculpting the Body Parts
-
Form the legs:
Roll four short, thick cylinders of clay. They should be sturdy and slightly wider at the bottom to support the weight. Gently flatten the bottoms so the turtle stands flat. -
Attach the legs:
Score and slip the four corners of the turtle’s underside. Press the legs firmly into place. I find it helpful to wiggle them slightly as I press to create a strong suction bond. -
Blend the seams:
Use a modeling tool to drag clay from the leg onto the body, blending the seams until they are invisible. Smooth it over with a damp finger. -
Shape the head:
Roll a medium-sized oval of clay for the head. Slightly taper one end where it will connect to the body, and round off the snout area. -
Attach the head and tail:
Score and slip the front of the shell and the neck area of the head. Press them together, tilting the head slightly upward for a curious expression. Add a small triangular nub at the back for a tail if desired. -
Refine the connection:
Add a small coil of clay around the neck seam if needed to potential cracks, blending it smoothly into both the shell and the head.
Step 3: Detailing and Finishing
-
Carve the shell rim:
Using a needle tool, draw a horizontal line all the way around the base of the shell, about half an inch up from the bottom edge. This creates the visual rim of the carapace. -
Draw the main vertical lines:
Lightly sketch vertical lines running from the top center of the shell down to the rim using your needle tool. Space them evenly to create the segments. -
Create the horizontal segments:
Connect your vertical lines with horizontal curves to create the classic tortoiseshell pattern of scutes (the plate-like scales). -
Deepen the grooves:
Once you are happy with the spacing, use a specialized carving tool or the edge of a loop tool to widen and deepen these lines. The grooves should be distinct and V-shaped. -
Detail the face:
Use a small, round tool to press indentations for the eyes. Use a needle tool to carve a simple, horizontal line for the mouth, curving it slightly up at the ends. -
Add pupils:
Roll tiny spheres of clay and press them into the eye sockets. Use a needle tool to poke a small hole in the center of each sphere for the pupil. -
Texture the skin:
Lightly stipple the head and legs with a stiff brush or a textured sponge to mimic rough skin, contrasting it with the smooth segments of the shell. -
Add toes:
Use a knife tool to press two or three vertical indentations into the front of each foot to suggest toes. -
Final smooth and dry:
Do one last inspection for sharp crumbs of clay. Let the piece dry slowly under loose plastic for a few days before firing or painting.
Stone Effect
After the clay is fully dry or fired, apply a wash of diluted brown acrylic paint and wipe it back quickly with a rag. The dark color stays in the grooves, making it look like carved stone.
Place your finished turtle in a sunny spot to highlight those beautiful shell textures


What Really Happens Inside the Kiln
Learn how time and temperature work together inside the kiln to transform clay into durable ceramic.
Elephant With Curved Trunk
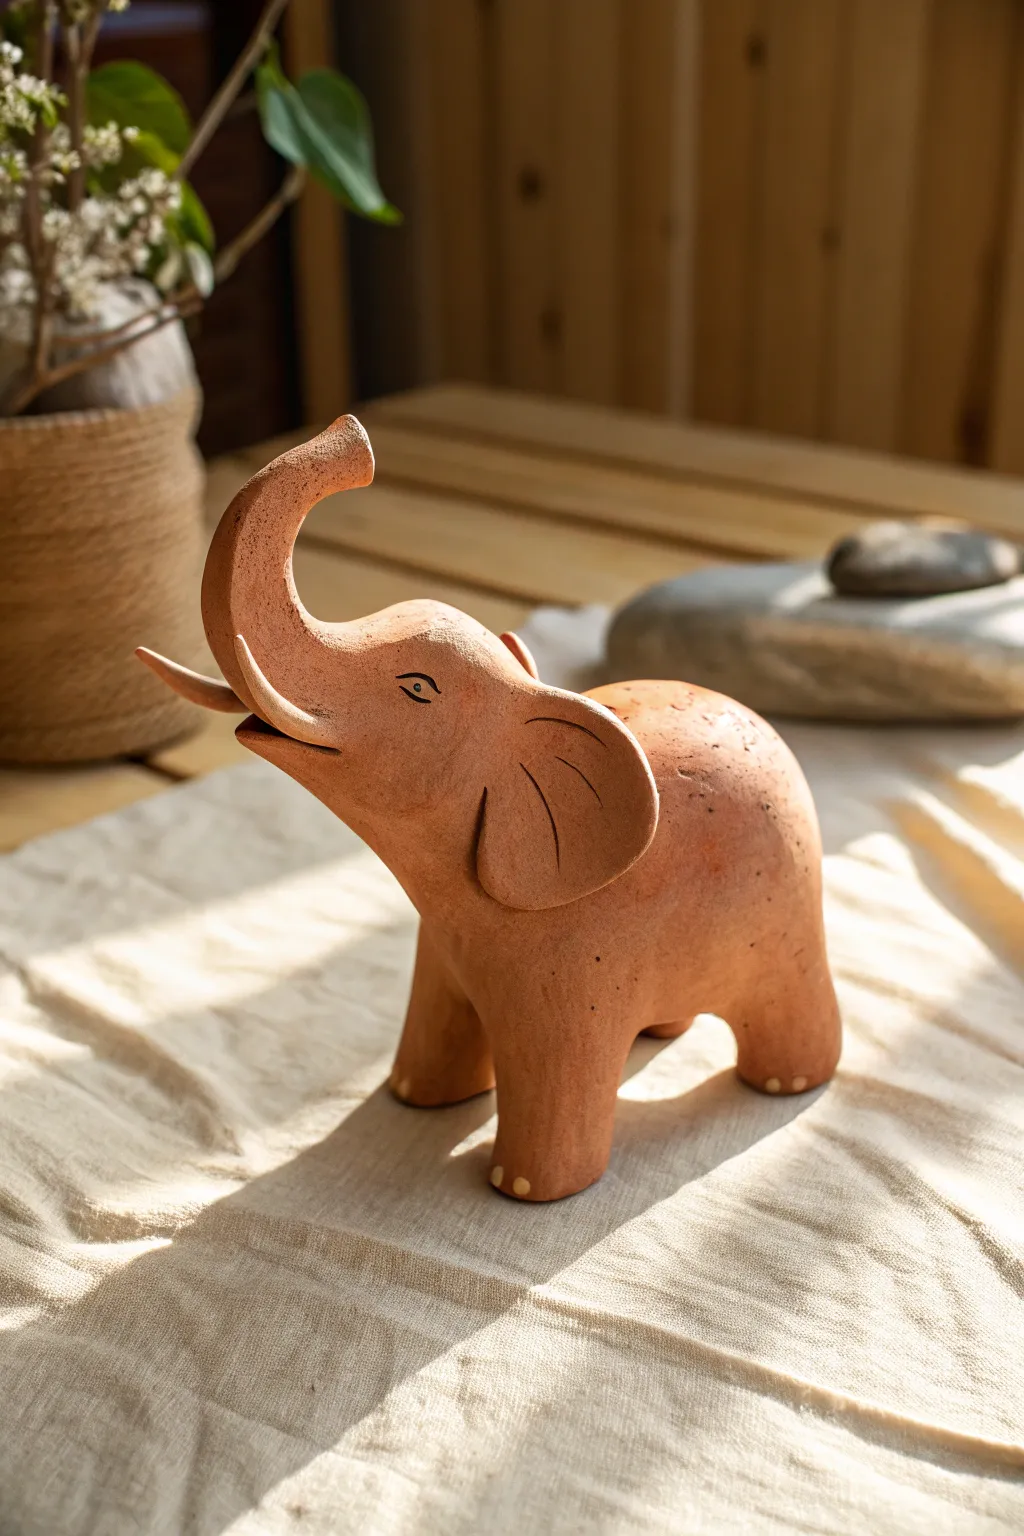
Capture the playful spirit of this gentle giant using warm terracotta clay, sculpting a sturdy body and an expressive, upward-curving trunk. The finished piece radiates a natural, earthy charm with its simple engraved details and smooth, polished finish.
Step-by-Step
Materials
- Terracotta baking clay or air-dry clay (warm reddish-brown tone)
- Sculpting tools (needle tool, loop tool, wooden smoothing tool)
- Small rolling pin
- Water and slip (clay slurry) for joining
- Small paint brushes or sponge
- Acrylic paint (black for eyes, light yellow for nails)
- Fine sandpaper (optional, for post-drying)
- Clean work surface or mat
Step 1: Forming the Body and Legs
-
Shape the main body:
Start with a large ball of terracotta clay about the size of an orange. Gently roll and press it into a smooth, oval-shaped mound that will serve as the elephant’s torso. -
Prepare the legs:
Create four equal-sized cylinders of clay for the legs. They should be thick and sturdy, slightly wider at the top where they will join the body. -
Attach the legs:
Score the bottom of the body and the tops of the four legs with a needle tool. Apply a little slip or water to these rough areas. -
Blend the seams:
Press the legs firmly onto the body. Use a wooden tool or your thumb to drag clay from the body down onto the legs, smoothing the seam until it disappears completely. -
Check stability:
Stand the elephant up on its new legs. Press down gently to ensure it stands flat and doesn’t wobble. This helps create that grounded, heavy look.
Trunk Support Tip
If the trunk droops while wet, prop it up with a crumpled piece of paper towel or foam until the clay begins to firm up or dry.
Step 2: Sculpting the Head and Trunk
-
Form the head shape:
Take a slightly smaller ball of clay and shape it into a rounded form. Attach this securely to the front of the body, blending the neck area smoothly so it looks like one continuous piece. -
Create the trunk:
Roll a long, tapered coil of clay. Stick the wider end to the face area and blend it well. Bend the trunk upwards in a graceful ‘S’ curve, lifting the tip high. -
Hollow the trunk tip:
Use a small rounded tool or the end of a paintbrush to gently press an indentation into the very end of the trunk for the nostril opening. -
Shape the ears:
Flatten two discs of clay into expansive ear shapes. I like to keep them slightly thick so they don’t crack. Attach one to each side of the head. -
Detail the ears:
Press the ears back slightly against the body but keep the edges flared out. Use a needle tool to lightly carve two or three curved lines inside the ears for texture. -
Add the tusks:
Roll two very small, sharp cones of clay. Attach them under the trunk on either side of the mouth area, curving them slightly upward.
Step 3: Details and Finishing
-
Define the mouth:
Carefully carve a horizontal line under the trunk to create a smiling mouth. You can open it slightly to give the elephant a cheerful expression. -
Sculpt the eyes:
Using a small carving tool, etch almond-shaped eyes onto the sides of the face. Add a small ‘crease’ line above the eye for character. -
Smooth the surface:
Dip a sponge or your finger in a tiny bit of water and rub it over the entire sculpture to remove fingerprints and refine the skin texture. -
Add texture dots (optional):
If you want the speckled look from the photo, you can lightly stipple the back with a stiff brush or poke tiny, shallow holes with a needle tool. -
Dry or Bake:
Follow the instructions for your specific clay type. If baking polymer clay, ensure you use an oven thermometer. For air-dry, let it sit for at least 24-48 hours. -
Paint the eyes:
Once fully cured or dry, use a fine detail brush and black acrylic paint to carefully fill in the engraved eye lines. -
Highlight the toenails:
Dip a small tool or brush into pale yellow or cream paint. Dot three small circles onto the bottom front of each foot to create adorable toenails.
Texture Twist
Before drying, gently press a piece of rough fabric or burlap against parts of the skin to give the elephant a realistic, wrinkly texture.
Now you have a charming clay companion ready to bring good luck to your shelf
Deer Fawn With Delicate Legs
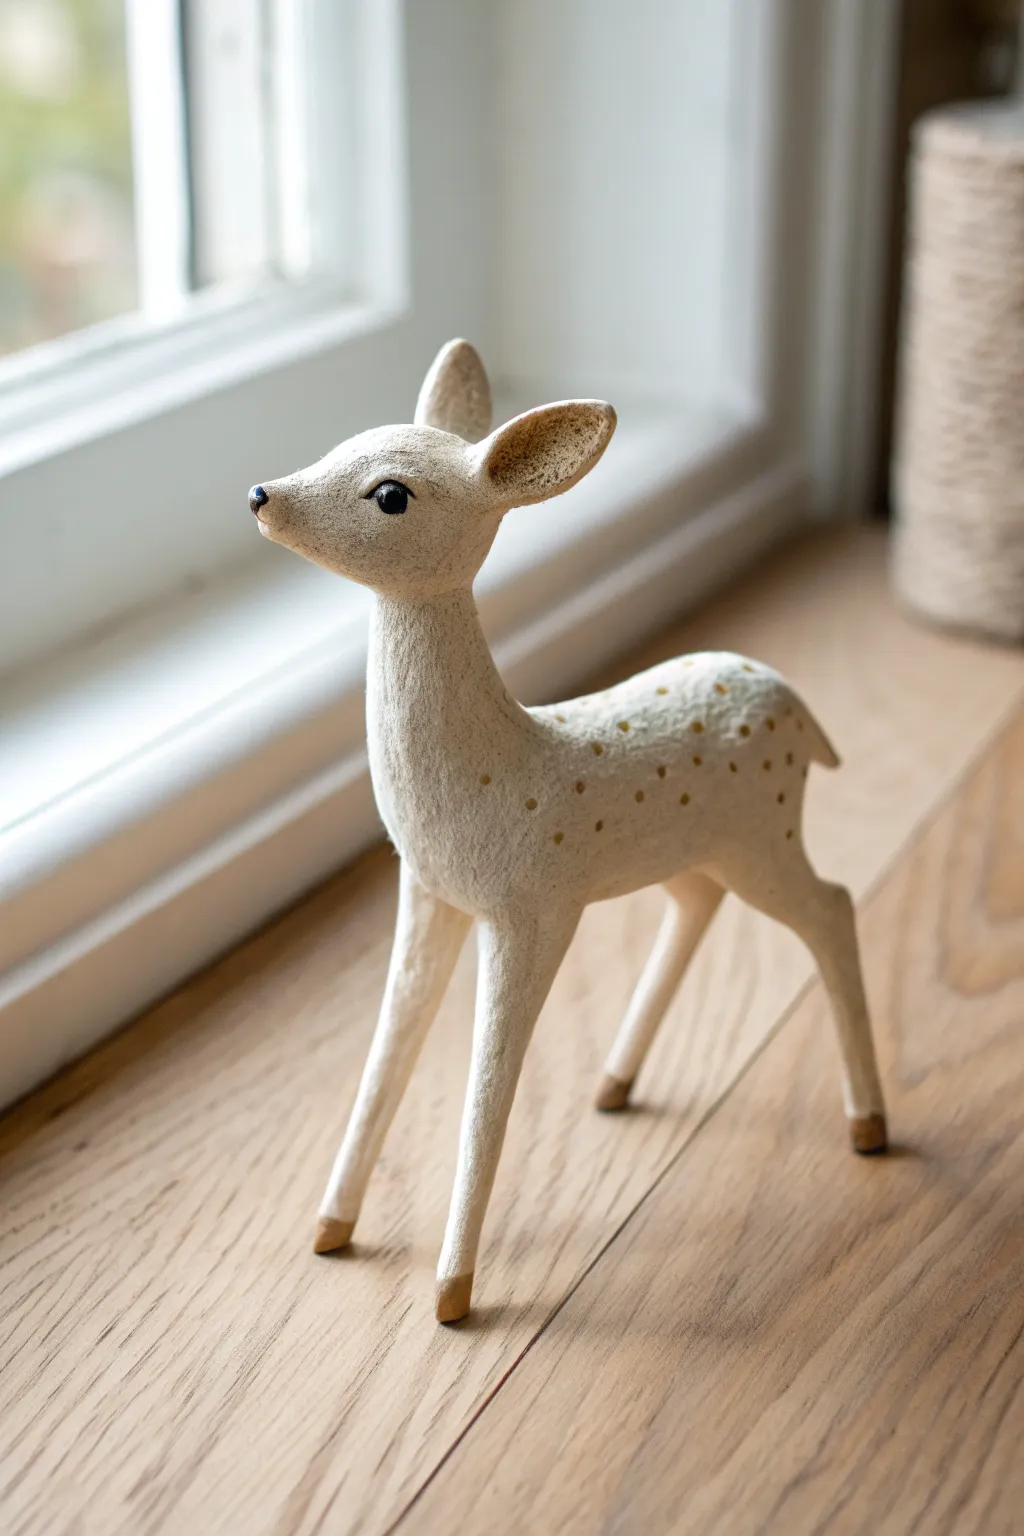
Capture the graceful innocence of a young deer with this delicate sculpture project. Using air-dry paper clay, you’ll sculpt long, slender legs and a gentle face, finishing it with a soft textured cream finish and subtle gold spots.
How-To Guide
Materials
- White creative paper clay or stone clay
- Strong armature wire (aluminum, 1.5mm – 2mm)
- Thinner binding wire (24 gauge)
- Small styrofoam ball or aluminum foil (for the body core)
- Wood glue or PVA glue
- Needle sculpting tool or awl
- Sandpaper (medium and fine grit)
- Acrylic paints (warm white/cream, black, soft brown, metallic gold)
- Small paintbrushes (fine tip for details)
- Matte spray varnish
Step 1: Building the Skeleton
-
Form the core:
Begin by crumping aluminum foil into two main shapes: a larger oval for the body (about the size of a small lemon) and a smaller, slightly elongated sphere for the head. Compress them tightly so they become dense. -
Create the wire armature:
Cut two long pieces of thick armature wire—one for the front legs and one for the back. Bend them into U-shapes. The bend will go over the foil body, and the ends will become the legs. Make the legs longer than you think you need; you can trim them later. -
Connect the parts:
Poke the leg wires into or wrap them over your foil body core. Attach a separate wire for the neck and head, piercing it into the body foil and the head foil to join them. Secure everything tightly with thin binding wire so nothing wobbles. -
Secure the joints:
Apply a dab of super glue or hot glue to the wire connection points for extra stability. This prevents the sculpture from twisting while you add clay.
Cracking Clay?
Minimal cracking is normal with air-dry clay. If cracks appear on the legs while drying, fill them with a wet slurry of clay and water, smooth it over, and let it dry again before sanding.
Step 2: Sculpting the Form
-
Base layer:
Roll out thin sheets of your paper clay. Brush a little PVA glue onto the foil and wire, then wrap the clay around the form. Don’t worry about details yet; just cover the armature completely. -
Build the legs:
Add small snakes of clay down the leg wires. Taper them gently—thicker at the shoulder/hip and very thin towards the ankles. Keep the hooves slightly flared at the bottom. -
Refine the neck and head:
Build up the neck so it flows smoothly into the shoulders. For the face, add a tiny bit of bulk to the snout area and smooth it back towards the cheeks. The nose should be dainty and slightly upturned. -
Add the ears:
Form two teardrop shapes for the ears. Attach them to the top of the head using a touch of water or slip (clay mixed with water) as glue. Use your needle tool to blend the seams perfectly so they look like one piece. -
The eyes:
Use a small ball tool or the end of a paintbrush to press gentle indents where the eyes will go. This creates the socket structure. -
Drying time:
Let the sculpture dry completely before sanding. I prefer to let this sit for at least 24 hours near a gentle heat source, as the legs are delicate.
Make it a Reindeer
Modify the design for the holidays by creating small, branching wire antlers. Wrap them thinly in clay and attach them between the ears before the head dries.
Step 3: Finishing and Painting
-
Sanding:
Once bone dry, sand the entire piece. Start with medium grit to remove lumps, then switch to fine grit for a porcelain-smooth finish. Be very gentle with the ears and legs. -
Creating texture:
Instead of a smooth paint job, we want a slight texture. Mix your cream acrylic paint with a tiny amount of baking soda or use a stiff stippling brush to dab the paint on, creating a ‘fur-like’ matte surface. -
Painting the eyes and nose:
Using your finest brush, paint the nose tip black. Paint the eyes glossy black, adding a tiny white reflection dot once dry to bring the fawn to life. -
Adding the spots:
Dip the back end of a paintbrush or a toothpick into metallic gold or soft brown paint. Gently dot a pattern of spots along the fawn’s back and flanks, clustering them more densely near the spine. -
The hooves:
Paint the bottom few millimeters of each leg with a soft brown to define the hooves. -
Seal the work:
Finish with a light coat of matte spray varnish to protect the paint without making the animal look shiny or plastic.
Place your fawn on a windowsill or shelf where the light can catch the subtle gold details

TRACK YOUR CERAMIC JOURNEY
Capture glaze tests, firing details, and creative progress—all in one simple printable. Make your projects easier to repeat and improve.
Stag With Bold Antlers
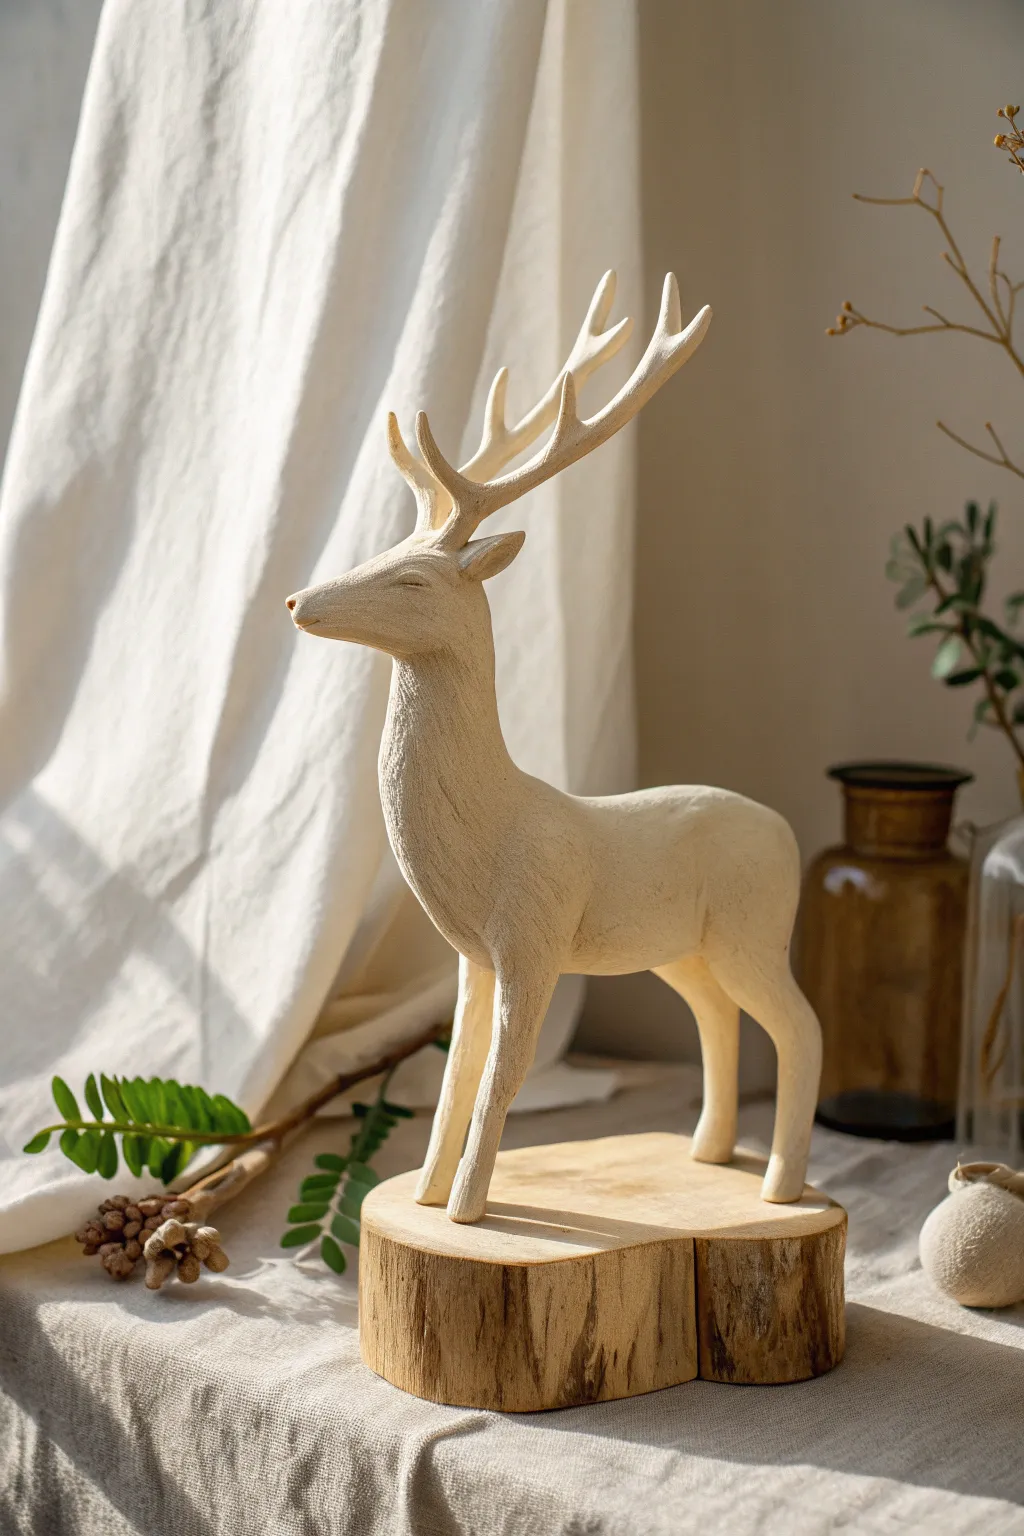
Capture the stillness of the woods with this serene stag sculpture, designed to mimic the texture and warmth of carved wood. The simple, elegant lines focus attention on the striking antlers and the peaceful expression of the deer.
Detailed Instructions
Materials
- Air-dry clay (stone or wood color preferred)
- Armature wire (measured for legs and neck)
- Aluminum foil
- Sculpting tools (needle tool, clay shapers)
- Texture tool or stiff bristle brush
- Wooden base slice
- Acrylic paints (cream, beige, very light brown)
- Matte varnish
- Strong craft glue or epoxy
Step 1: Building the Skeleton
-
Form the Armature:
Twist your armature wire to create a basic stick-figure skeleton for the stag. Ensure you have four legs of equal length and a neck extension that reaches up for the head. Leave extra length at the bottom of the feet to anchor into the base later. -
Bulking with Foil:
Wrap aluminum foil tightly around the wire frame to create the core body shape. Focus on building up the chest area and the hindquarters, keeping the legs relatively thin but sturdy. -
Securing the Foil:
Squeeze the foil firmly so it doesn’t shift. The shape should resemble a rough abstraction of a deer’s body—make sure the neck is long and elegant.
Sculpting Secret
Cover antler wires with masking tape before adding clay. The tape gives the slick wire ‘tooth,’ helping the thin clay layer stick without sliding off.
Step 2: Sculpting the Body
-
Applying the Clay Base:
Roll out sheets of your air-dry clay to about a quarter-inch thickness. Wrap these sheets around the foil armature, smoothing the seams together with a bit of water. -
Shaping the Legs:
Add sausages of clay to the leg wires. Blend the clay upwards into the body for a seamless transition. The front legs should be straight and elegant, while the back legs need that characteristic hock joint bend. -
Refining the Torso:
Smooth the torso, ensuring the belly tucks up slightly towards the back legs. I find using a wet sponge helps achieve a really smooth surface before adding detail. -
Creating the Head:
Form a teardrop shape for the head and attach it to the neck. Use a sculpting tool to carve out the eye sockets and define the snout.
Step 3: Antlers and Details
-
Adding the Ears:
Attach two small, leaf-shaped pieces of clay just behind the eye area for ears. Angle them slightly back to suggest a listening or relaxed pose. -
Wire for Antlers:
Insert two pieces of thinner wire into the top of the head for the antlers. Twist on smaller branch wires to create the tines. -
Coating the Antlers:
Carefully coat the antler wires with thin snakes of clay. Smooth the clay down so it bonds with the wire, tapering the ends to gentle points rather than sharp spikes. -
Texturing the Surface:
Before the clay dries, use a stiff bristle brush or a texture tool to scratch shallow, vertical lines across the body and neck. This mimics the grain of wood or short fur. -
The Face Detail:
Use a needle tool to create a simple horizontal slit for the closed eye, emphasizing the peaceful expression.
Make It Yours
For a holiday twist, paint the antlers gold or silver, or wrap tiny fairy lights around them for a festive winter centerpiece.
Step 4: Finish and Assembly
-
Drying Time:
Allow the sculpture to dry completely. This usually takes 24-48 hours depending on humidity; turn it occasionally so the underside dries too. -
Sanding:
Once bone dry, lightly sand any rough imperfections, particularly around the antler joints or feet, to maintain that smooth, carved look. -
Painting the Base Coat:
Paint the entire deer in a cream or off-white acrylic color. Let this layer dry fully. -
Adding Wood Tones:
Mix a very watery wash of beige or light brown paint. Brush this over the textured areas and immediately wipe most of it off with a rag. The color will settle into the texture lines, enhancing the wood-grain effect. -
Mounting:
Drill small holes into your wooden slice base corresponding to the leg wires. Apply strong glue into the holes and insert the deer’s feet for a permanent hold. -
Sealing:
Finish with a coat of matte varnish to protect the paint without adding an unnatural shine.
Now you have a tranquil piece of nature to display on your mantle or shelf
Mini Horse With Flowing Mane
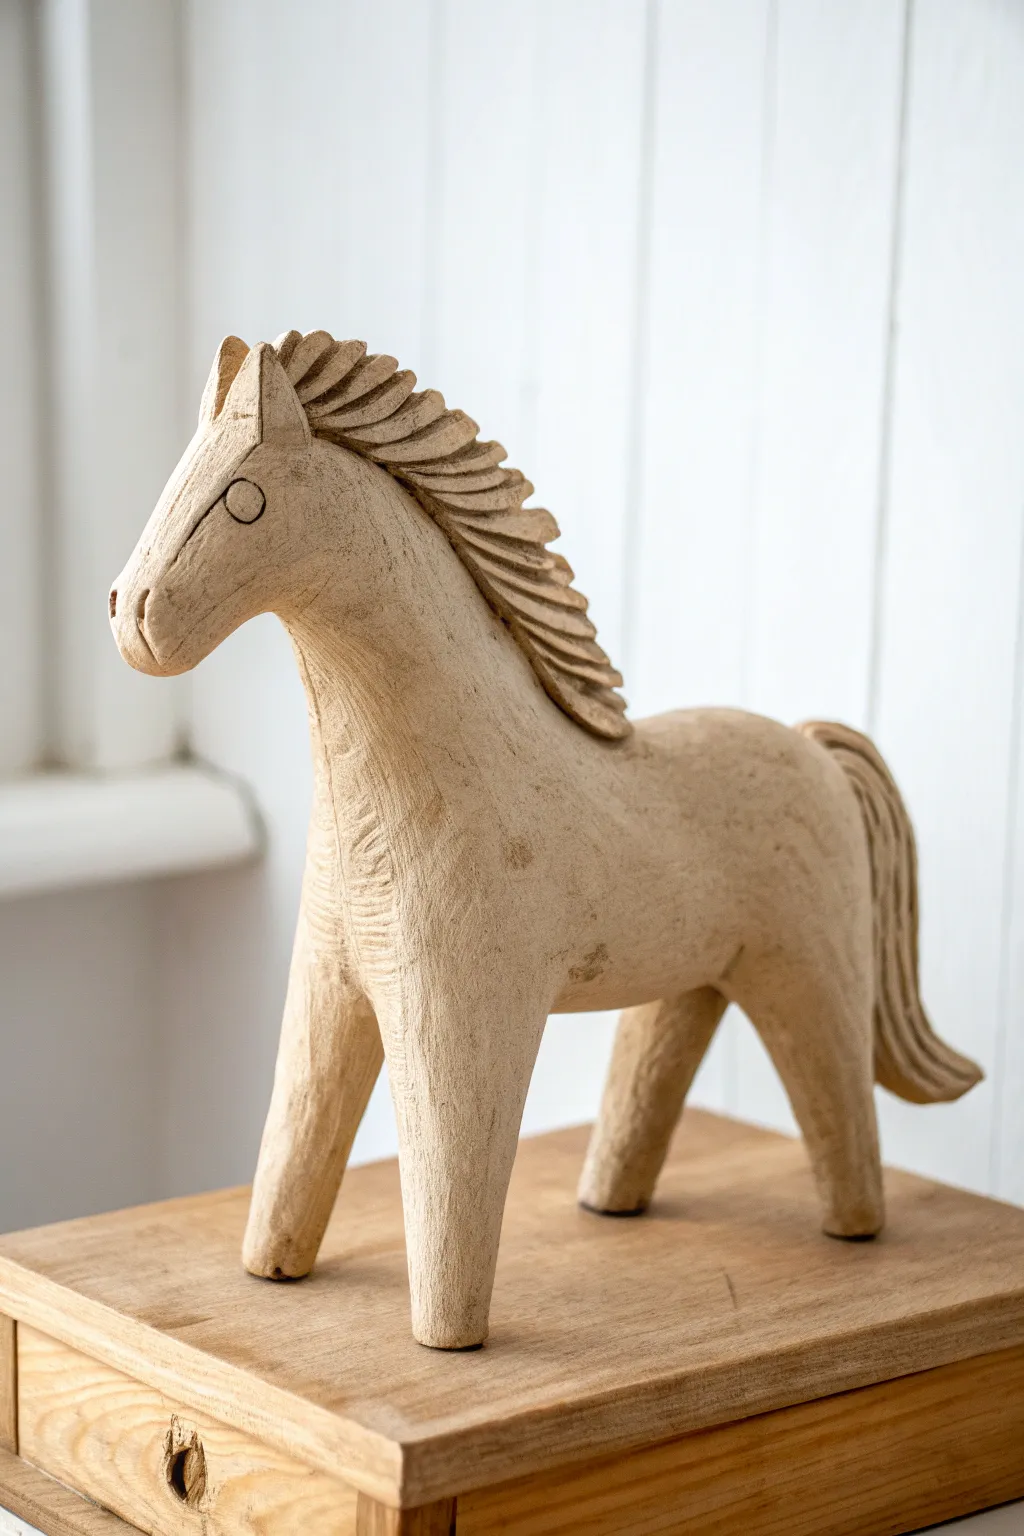
This rustic horse sculpture captures the charm of hand-carved wood using accessible air-dry or polymer clay. With its sweeping mane and textured surface, it makes for a timeless, organic decor piece perfect for a mantle or bookshelf.
Step-by-Step
Materials
- Air-dry clay (stone or wood variety preferred) or beige polymer clay
- Strong wire for armature (14 or 16 gauge)
- Aluminum foil
- Masking tape
- Sculpting tools (needle tool, loop tool, rubber shaper)
- Texture tool or stiff bristle brush
- Water or slip (for joining)
- Acrylic paints (brown washes, optional)
- Matte varnish
Step 1: Building the Core
-
Construct the armature:
Begin by twisting your sturdy wire into a basic skeleton shape. Create a horizontal spine, loops for the head and hips, and four legs extending downwards. Ensure the legs are even so the horse stands balanced. -
Add bulk with foil:
Crumple aluminum foil firmly around the wire armature to build the body’s mass. Fashion a thick neck, a rounded barrel chest, and hindquarters. Compress the foil tightly so the clay won’t have air pockets underneath. -
Secure the form:
Wrap the foil layer completely with masking tape. This smooths out sharp foil edges and gives the clay a surface it can grip onto much better than bare metal.
Pro Tip: Seamless Mane
Score (scratch) the contact points on the neck and the underside of the mane pieces before attaching. Use a little water or slip to create a glue-like bond that won’t crack off later.
Step 2: Sculpting the Body
-
Apply the base layer:
Roll out a sheet of clay about 1/4 inch thick. Wrap this around the legs first, smoothing the seams together with a bit of water. Work your way up to the body, ensuring full coverage. -
Refine the shape:
Add extra clay to build up the shoulder muscles and hindquarters. Use your thumbs to blend the new clay into the base layer seamlessly. -
Shape the head:
Form the head into a gentle, elongated wedge shape. Smooth the transition from the neck to the jawline, keeping the look slightly stylized and solid rather than hyper-realistic. -
Create the legs:
Shape the legs to be sturdy and slightly tapered towards the bottom. Flatten the very bottom of each hoof against your work surface to ensure stability.
Level Up: Antique Finish
After the base color dries, dry-brush a lighter cream or beige color lightly over the raised areas. This highlights the texture and makes the sculpture look like aged, sun-bleached driftwood.
Step 3: Detailing and Texture
-
Sculpt the mane:
Roll several thick, teardrop-shaped coils of clay. Attach them one by one along the crest of the neck, overlapping them slightly to create a wind-swept, flowing effect. -
Create the tail:
Form a larger mass of clay for the tail, shaping it with deep grooves to mimic strands of hair. Attach it to the rump, blending the connection point smoothly. -
Refine mane details:
Use a modeling tool to press subtle grooves into each segment of the mane, enhancing the separation between ‘locks’ of hair. -
Add facial features:
Use a small loop tool or stylus to carve a simple circle for the eye. Add distinct nostril indentations at the end of the snout and a small line for the mouth. -
Texturizing the surface:
To mimic the ‘carved wood’ look seen in the photo, take a stiff bristle brush or a texture tool and lightly drag it vertically down the legs and neck. I find this subtle scratching unifies the piece beautifully. -
Simulate tool marks:
For extra rustic character, use a flat modeling tool to create small, flat planes on the body, as if the horse were whittled from a block of wood.
Step 4: Finishing
-
Dry thoroughly:
Let the sculpture dry completely. If using air-dry clay, this may take 2-3 days depending on thickness. Keep it away from direct heat to prevent cracking. -
Sand gently:
Once dry, lightly sand any unintended rough spots, but be careful not to smooth away your deliberate ‘wood grain’ texture. -
Apply a wash (optional):
To enhance the texture, mix a very watered-down brown acrylic paint. Brush it over the sculpture and immediately wipe it back with a rag, leaving darker color in the recesses. -
Seal the piece:
Finish with a coat of matte varnish. This protects the clay and gives it a soft, natural sheen similar to polished wood.
Place your finished horse on a prominent shelf and enjoy the warmth of your handcrafted folk art
Penguin With Clean Color Blocks
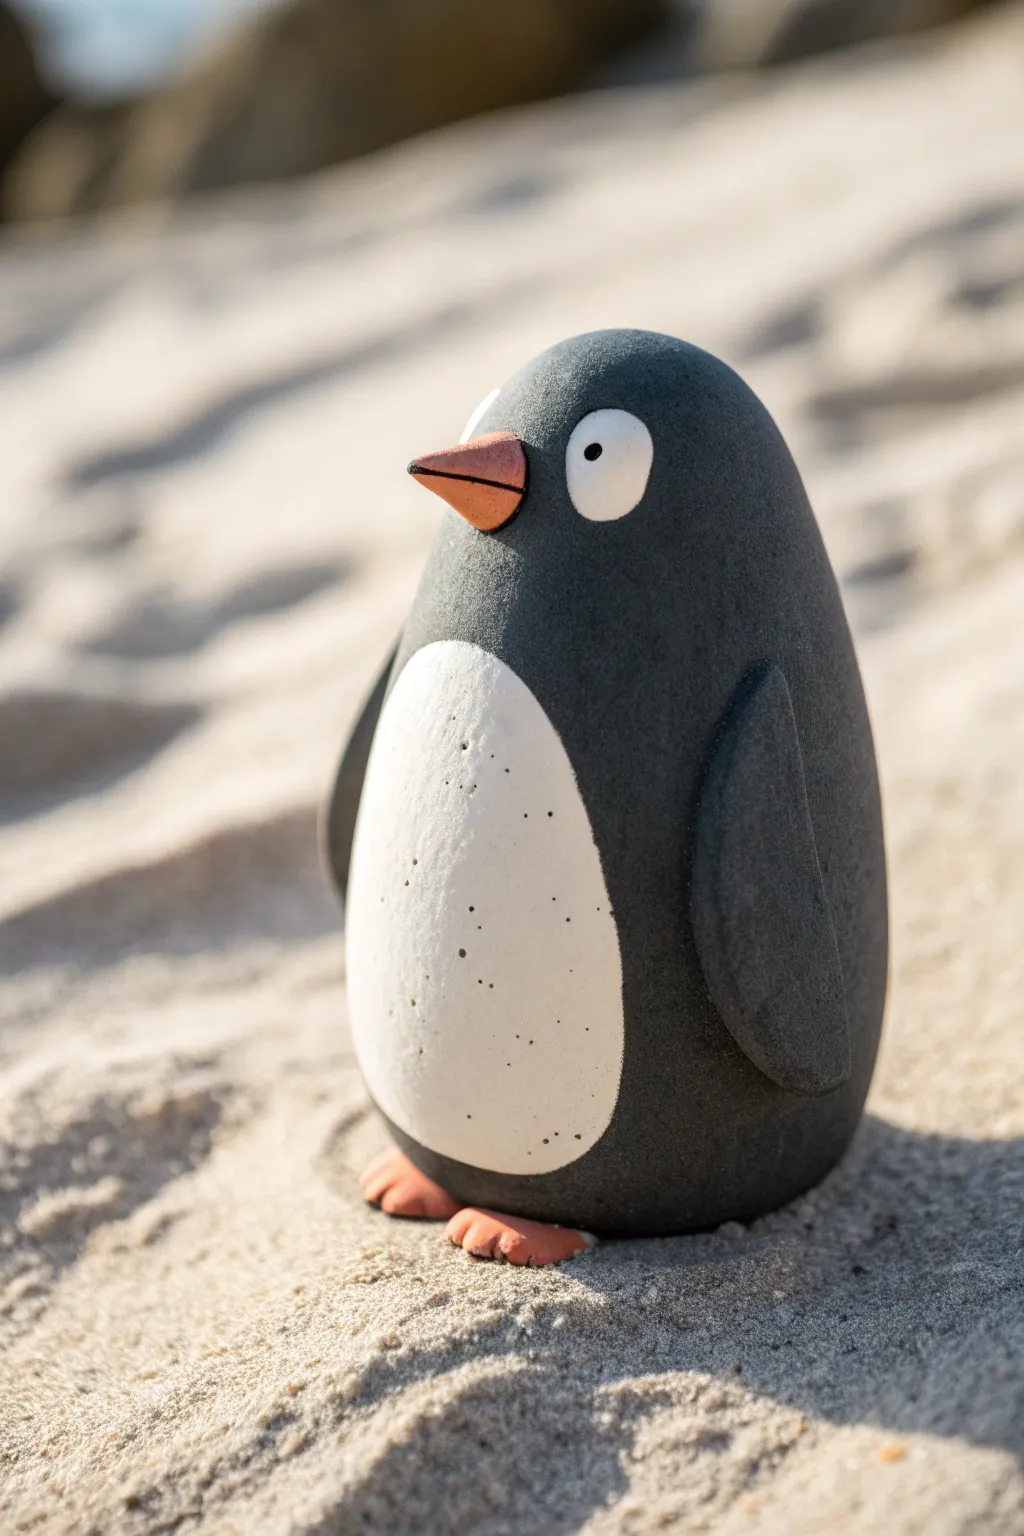
This minimalist penguin sculpture relies on smooth, clean lines and distinct color blocks to create its charming character. Whether you are using polymer or air-dry clay, the key is achieving that matte, stone-like finish that makes it feel like a modern art piece.
How-To Guide
Materials
- Black polymer clay (or dark grey air-dry clay)
- White polymer clay
- Terra cotta or dull orange polymer clay
- Basic sculpting tools (needle tool, blending tool)
- Smooth rolling pin or acrylic roller
- Round cutter (optional, for the belly)
- Fine-grit sandpaper (400-800 grit)
- Oven (if using polymer) or sealant (if strictly air-dry)
Step 1: The Base Form
-
Condition the dark clay:
Begin by thoroughly conditioning a large block of black or dark grey clay. You want it warm and pliable to avoid any internal air bubbles which can cause cracks later. -
Form the main egg shape:
Roll the clay into a smooth ball, then gently taper the top half to create a tall, rounded egg shape. This will be the combined head and body. -
Flatten the base:
Tap the wider bottom of your egg shape firmly against your work surface. The penguin needs a flat, stable bottom so it stands upright without tipping. -
Smooth the surface:
Spend a good amount of time smoothing the exterior with your fingers. Remove any fingerprints; the hallmark of this style, which I always aim for, is that sleek, untouched look.
Clean Hands, Clean Belly
Black clay loves to stain white clay. Keep baby wipes or a scrap piece of ‘cleaning’ clay nearby to purify your hands before touching the white pieces.
Step 2: Creating the Belly
-
Prepare the white clay:
Clean your hands thoroughly (black clay residue stains white clay easily) and condition a portion of white clay. -
Roll out a sheet:
Roll the white clay into a thin, even sheet, approximately 2-3mm thick. -
Cut the belly shape:
Use a round cutter or freehand cut a tall oval shape. It should cover the front center of the body but leave plenty of black visible on the sides/top. -
Attach the belly:
Gently press the white oval onto the front of the body. Start from the center and smooth outwards to trap no air. -
Blend the seam:
Use a smooth tool or your finger to gently feather the edges of the white clay so it sits flush with the black body rather than protruding too much. -
Add texture (optional):
For the stone-like effect seen in the example, gently tap the white area with a stiff bristle brush or a textured sponge to create tiny pits.
Step 3: Features & Details
-
Form the wings:
Create two flattened teardrop shapes from the black clay. They should curve slightly to contour against the body. -
Attach the wings:
Press the wings onto the sides of the body where the black meets the white. Blend the top shoulder connection seamlessly into the body, but leave the tips free. -
Make the beak:
Using the terra cotta clay, form a small cone. Flatten the sides slightly to give it a triangular profile. -
Secure the beak:
Attach the beak to the face area. Use a needle tool to score a horizontal line across the beak to suggest a mouth opening. -
Create the eyes:
Make two tiny balls of white clay and flatten them onto the head. Add even tinier pupils using black clay pressed into the center of the white. -
Build the feet:
Form two small, flat ovals from the terra cotta clay. Use a tool to impress two or three lines into each to delineate toes. -
Mount the feet:
Place the feet just under the front edge of the belly so they peek out slightly.
Granite Texture Trick
Before baking, mix a tiny pinch of black pepper or craft sand into the white clay. It creates an instant, natural stone texture without any painting needed.
Step 4: Finishing Touches
-
Bake or Dry:
Follow your specific clay manufacturer’s instructions for baking temperature and time. If using air-dry clay, allow 24-48 hours for full drying. -
Sand for matte finish:
Once hardened and cooled, very lightly sand the surface with fine-grit sandpaper if you want to enhance the stone-like texture. -
Speckling (Optional):
To mimic the speckled look of the white belly, you can flick a toothbrush with very diluted grey paint lightly over the white area.
Place your sleek new penguin on a shelf or desk where its simple geometry can bring a bit of calm order to your space
Frog With Wide Eyes
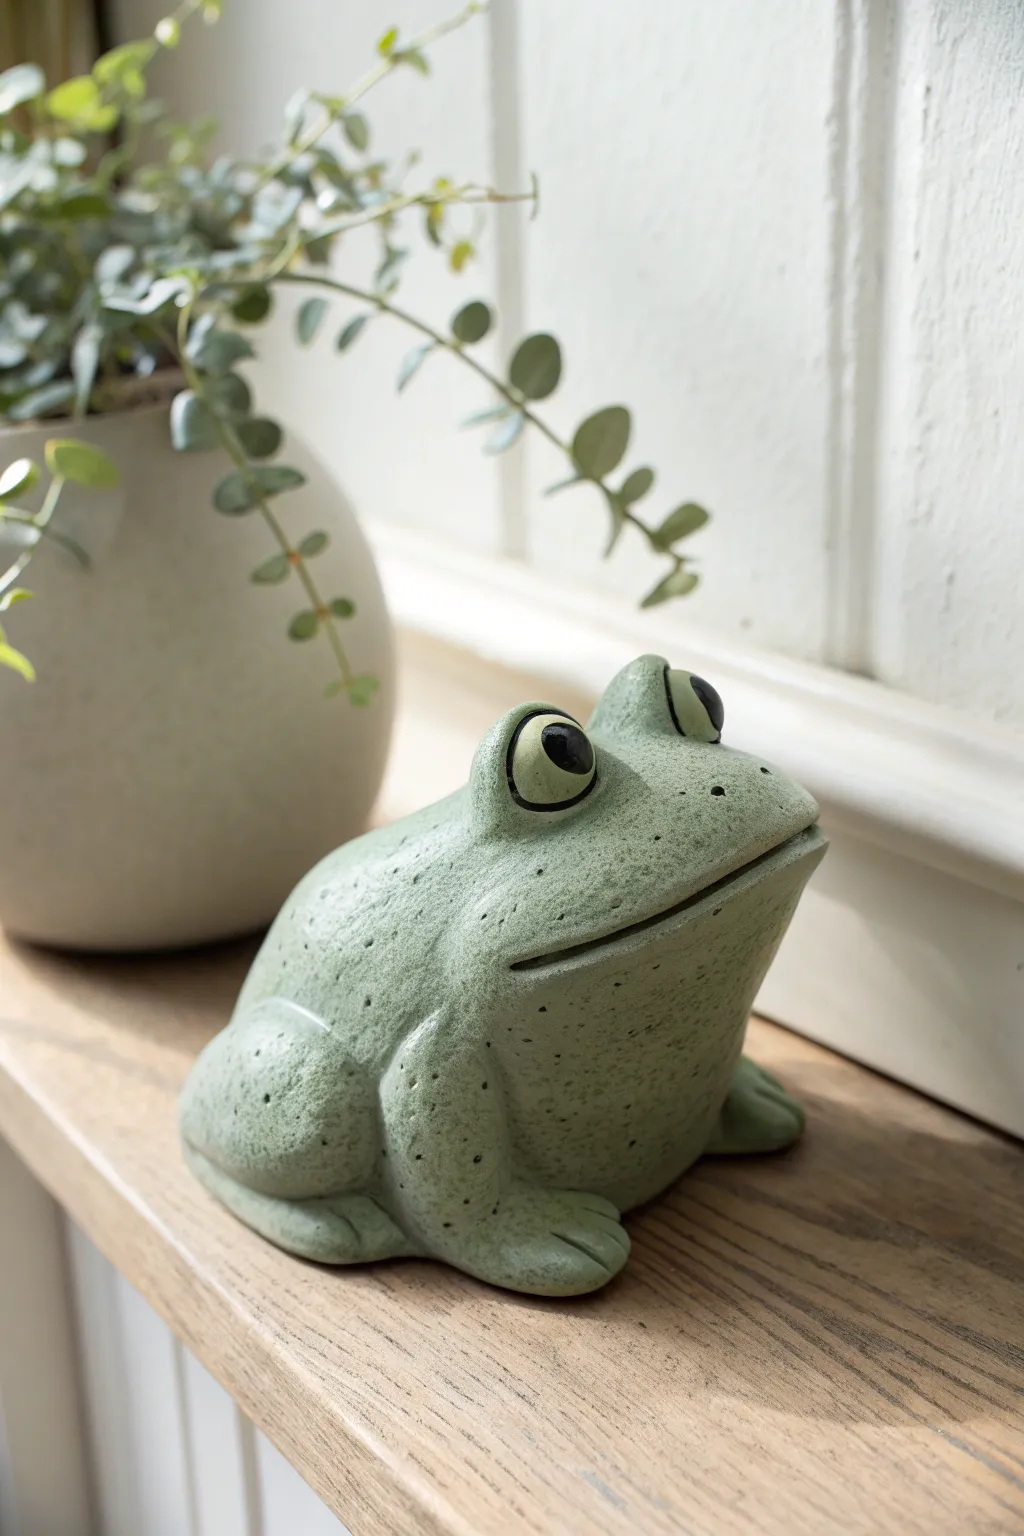
Capture a whimsical charm with this delightfully expressive frog sculpture, characterized by its wide, curious eyes and gentle grin. The finish mimics weathered stone with a speckled green glaze, making it a perfect accent for a window ledge or garden shelf.
Step-by-Step
Materials
- Stoneware clay or polymer clay (grey or white base)
- Modeling tools (needle tool, rib tool, loop tool)
- Sponge
- Slip (if using pottery clay)
- Speckled green glaze or acrylic paints (sage green, dark grey, black)
- Clear matte sealant (if painting)
- Small paintbrush
- Water container
Step 1: Forming the Body
-
Shape the base:
Start with a large ball of well-wedged clay, roughly the size of a grapefruit. Gently pat it into a rounded, slightly flattened gumdrop shape to form the main body and head as one continuous unit. -
Define the face slope:
Using your thumb, press gently into the upper third of the front to create a noticeable slope for the frog’s face, ensuring the nose area is slightly narrower than the base. -
Hollow out the form:
If working with ceramic clay, turn the piece over and carefully hollow out the interior until the walls are about 3/4-inch thick. This prevents cracking during firing. If using polymer clay, scrunch a core of aluminum foil and build the clay around it. -
Smooth the surface:
Use a damp sponge or a rubber rib tool to smooth over the entire surface, erasing any fingerprints or rough patches while maintaining the organic, rounded silhouette.
Step 2: Adding Legs and Feet
-
Create the haunches:
Roll two medium-sized balls of clay into tear-drop shapes. Flatten them slightly and attach them to the rear sides of the body using the score-and-slip method (scatching the connecting surfaces and adding water/slip). -
Blend the seams:
Use a modeling tool or your fingers to blend the clay of the haunches seamlessly into the main body, leaving a distinct bulge to represent the muscular hind legs. -
Form the front legs:
Roll two thick coils for the front legs. Attach them vertically to the front of the body, starting just under where the mouth will be and extending down to the base. -
Shape the feet:
At the bottom of the front legs and rear haunches, press small pads of clay flat. Use a dull knife or needle tool to press indentations that create simple, rounded toes. -
Refine the posture:
Check the frog from all angles to ensure it sits stable and flat. Sometimes I gently tap the whole sculpture on the table to flatten the bottom perfectly.
Stone Effect Secret
Mix sand or dried coffee grounds into your acrylic paint or clay body before sculpting. This adds physical grit that makes the faux-stone finish incredibly convincing.
Step 3: Sculpting the Expression
-
Carve the mouth:
Use a sharp needle tool or wire loop to slice a wide, sweeping smile across the front of the face. The cut should go relatively deep to create a shadowy line. -
Soften the lips:
Gently run a damp finger or soft brush along the cut edges of the mouth to round them off, making the smile look natural rather than sharp. -
Add the eye sockets:
At the top of the head, press two thumb-sized indentations where the eyes will sit. Build up slight ridges of clay around these areas to create prominent brows. -
Insert the eyes:
Roll two perfect spheres of clay. Score and slip the sockets, then press the spheres firmly into place. They should bulge out significantly to achieve that ‘wide-eyed’ look. -
Detail the nose:
Use a small, round tool to press two tiny nostrils just above the center of the mouth line.
Uneven Eyes?
If the eyes look lopsided, roll both clay spheres at the same time in your palms to ensure equal volume before attaching them to the head.
Step 4: Texture and Finishing
-
Add skin texture:
To mimic the stone look in the photo, take a stiff bristle brush or a crumpled ball of aluminum foil and gently tap it all over the frog’s skin. This creates a porous, realistic texture. -
Final smoothing:
Go over the eyes one last time with a very smooth tool or finger to ensure they are perfectly sleek, contrasting with the textured skin. -
Firing or Baking:
Allow the piece to dry completely (for ceramic clay) before bisque firing, or bake the polymer clay according to the manufacturer’s package instructions. -
Painting the base:
Apply a base coat of pale sage green. For ceramic pieces, a speckled glaze works best. For acrylics, sponge on the green paint to keep the texture visible. -
Adding the speckled effect:
If using acrylics, mix a watery dark grey paint and flick it onto the green surface using an old toothbrush to create the speckled stone appearance seen in the image. -
Define the eyes:
Paint the eyeballs an off-white or pale cream color. Once dry, carefully paint large, round black pupils in the center, leaving a tiny white dot for a reflection highlight.
Place your finished frog in a bright spot where its cheerful expression can catch the light
Playful Squirrel With Big Tail
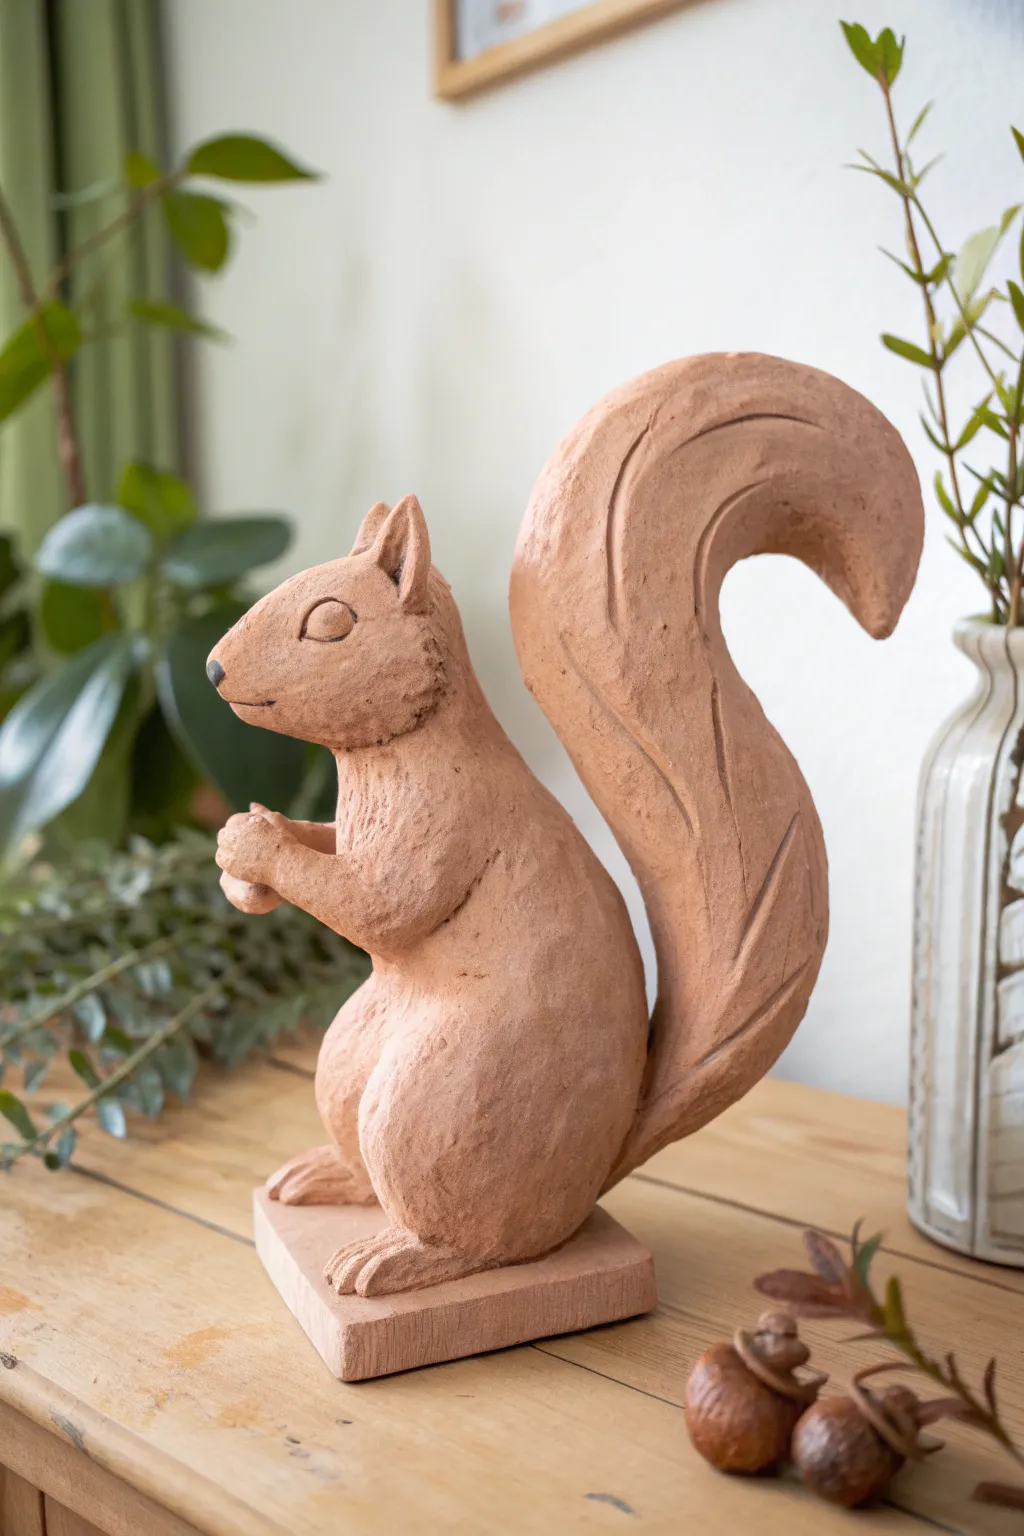
Capture the charm of woodland wildlife with this delightful squirrel sculpture, featuring a beautifully exaggerated tail and a textured terracotta finish. This project balances sturdy construction with expressive details, resulting in a warm, rustic piece perfect for a shelf or mantel.
Detailed Instructions
Materials
- Terracotta air-dry clay or polymer clay (approx. 2-3 lbs)
- Aluminum foil
- Masking tape
- Armature wire (12-gauge or similar)
- Pliers
- Sculpting tools (needle tool, loop tool, wooden modeling tool)
- Water and sponge (if using air-dry clay)
- Rolling pin
- Optional: Acrylic sealant or matte varnish
Step 1: Building the Armature
-
Create the wire skeleton:
Cut a length of armature wire to form the spine and tail. Bend it into an ‘S’ shape that mimics the curve of the squirrel’s back leading up into the large tail. Twist a separate loop of wire at the bottom to form a base for stability. -
Bulk up with foil:
Crumple aluminum foil tightly around your wire frame. Create a teardrop shape for the body and a large, curved sausage shape for the tail. The foil acts as a lightweight core so your sculpture isn’t solid heavy clay. -
Secure the form:
Wrap masking tape snugly around the entire foil form. This not only holds the foil in place but gives the clay a better surface to grip than slippery metal.
Cracking Up?
If you see cracks forming as the clay dries, mix a small amount of clay with water to make a paste (slip) and fill the cracks. Smooth over with a damp finger.
Step 2: Adding the Clay Body
-
Cover the base:
Roll out a slab of clay about 1/2 inch thick to rectangular shape for your base. Press the wire armature firmly into this slab, blending extra clay over the wire loop to anchor the squirrel standing up. -
Apply the first layer:
Flatten chunks of clay and press them onto the foil body and tail. Ensure you cover the tape completely, aiming for an even layer about 1/4 to 1/2 inch thick. -
Blend the seams:
Use your thumbs or a wooden tool to smudge the clay pieces together until the surface is unified. Don’t worry about perfect smoothness yet; the texture is part of the charm. -
Shape the legs:
Add oval-shaped mounds of clay to the lower body for the powerful hind haunches. Blend these onto the main body and the base, shaping little paws at the bottom with three toes each.
Make It Yours
For a varied look, lightly brush diluted brown acrylic paint into the crevices of the tail and fur texture, then wipe the surface clean to highlight the depth.
Step 3: Sculpting the Head and Details
-
Form the head:
Roll a ball of clay and attach it to the top of the body. Shape it into a slight triangular wedge for the snout. I find it helpful to look at profile photos of squirrels to get the slope of the nose just right. -
Add the ears:
Pinch two small triangles of clay and attach them to the top of the head. Use a small modeling tool to blend the seams at the base of the ears so they look like they grow naturally from the head. -
Create the arms:
Roll two small coils for the arms. Attach them to the upper chest, bending them at the elbow so the hands meet in front of the chest. -
Sculpt the nut:
Place a small ball or acorn shape of clay between the paws. wrap the tiny clay fingers around it gently and blend everything securely.
Step 4: Refining and Texturing
-
Detail the face:
Use a needle tool or small loop tool to carve a simple curved line for the closed eye and a small line for the mouth. Add a tiny ball of darker clay (or paint it later) for the nose tip. -
Refine the tail:
The tail is the showstopper here. Use your fingers to sweep deep, curved grooves along the length of the tail to suggest volume and flow rather than individual hairs. -
Surface texture:
Instead of smoothing the clay perfectly with water, use a slightly dry sponge or a rough cloth to pat the surface. This creates that lovely organic, stone-like texture seen in the photo. -
Define the fur:
Use a modeling tool to etch subtle, sweeping lines on the haunches and back. Keep these loose and stylized to match the rustic aesthetic. -
Final check:
Look at your sculpture from all angles. Ensure the squirrel isn’t leaning too far forward or back. Adjust the balance if necessary before the clay begins to harden.
Allow your woodland friend to dry completely in a cool place away from direct sunlight to prevent warping.
Leaping Animal Using a Simple Armature
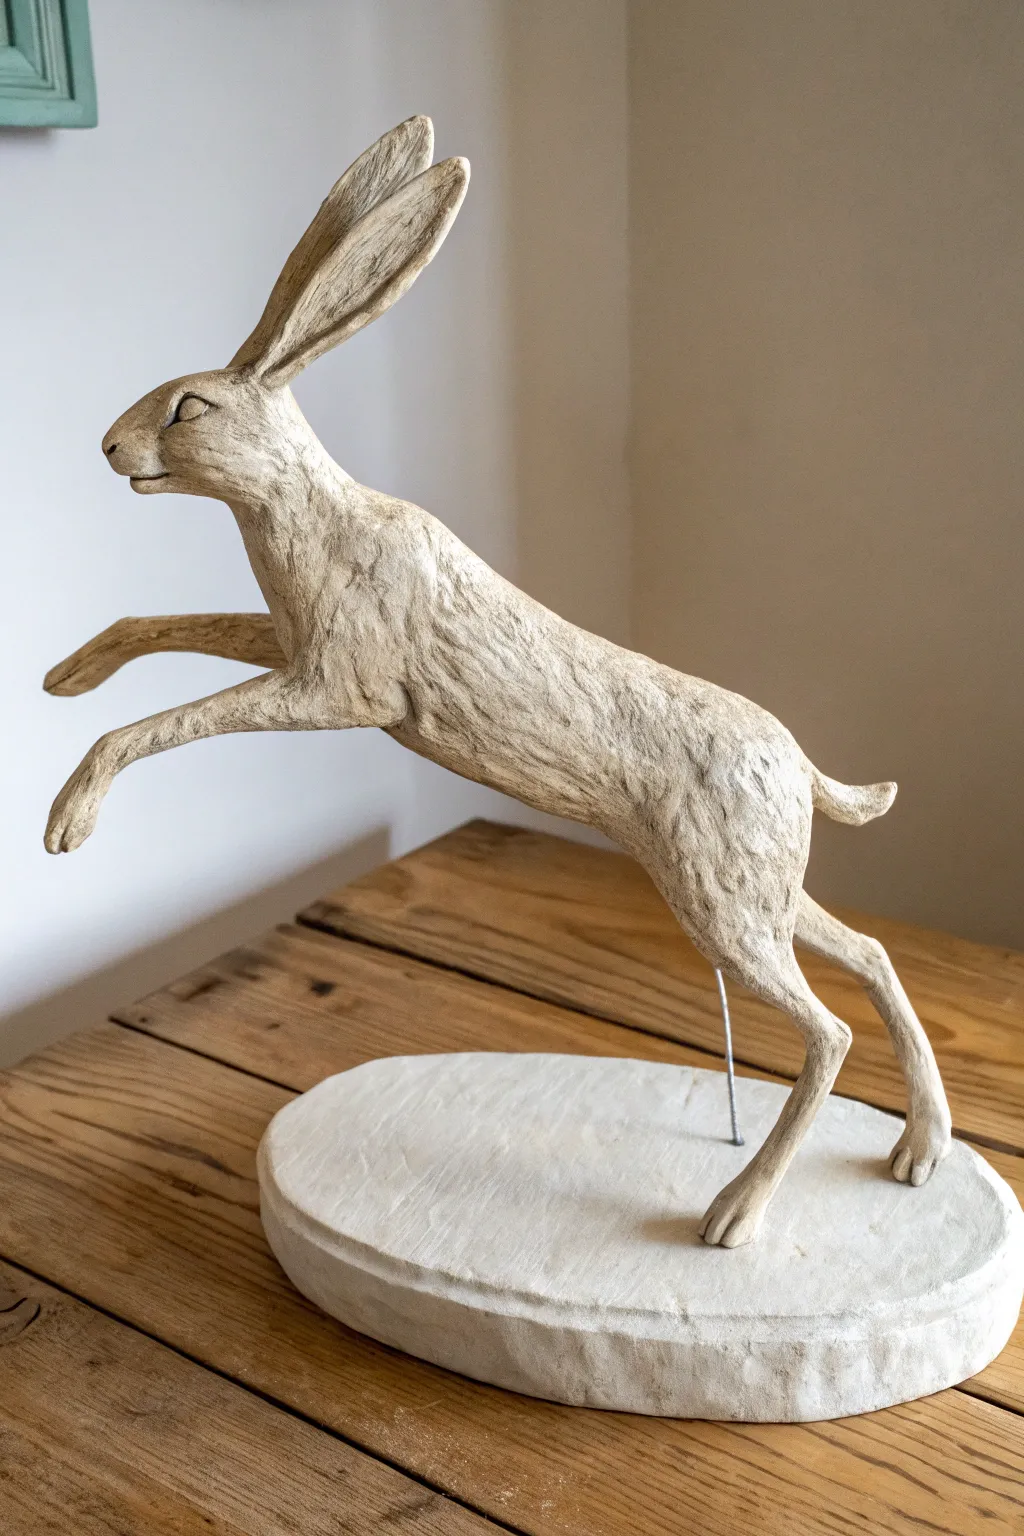
Capture the boundless energy of spring with this dynamic sculpture of a hare in mid-leap. Using a simple wire armature hidden within, you’ll create a beautifully textured piece that appears to defy gravity as it springs from its base.
How-To Guide
Materials
- Stone-effect air dry clay (or paper clay)
- Strong craft wire (approx. 12-14 gauge for the spine/legs)
- Thinner binding wire
- Aluminum foil
- Wooden base or thick clay slab for mounting
- Sculpting tools (needle tool, loop tool)
- Small cup of water
- Pliers
- Sandpaper
Step 1: Building the Bones
-
Twist the spine:
Cut a length of your thicker wire, roughly twice the length of the hare’s body. Twist it back on itself to create a strong central spine loop for the torso, leaving extra length at the back end for the rear legs. -
Attach the legs:
Cut two lengths of wire for the front legs and two for the back. Twist these securely onto your spine wire using pliers. Bend the back legs into a ‘Z’ shape to mimic the powerful leaping muscles, and extend the front legs forward and slightly down. -
Mount to the base:
If you are using a prepared wooden base, drill holes for the rear feet and glue the wire ends in. If making a clay base like the photo, shape a large oval slab of clay now and insert the rear leg wires deeply into it; you may need a temporary prop to hold the wire up while it dries. -
Secure the floating leg:
Since the hare is mid-air, use a strong piece of wire to act as a clear support rod. Insert this into the belly area of your armature and plant the other end firmly into the base. This provides the primary support for the body’s weight.
Step 2: Bulking the Form
-
Wrap with foil:
Tightly crush aluminum foil around the wire armature. Build up the bulk of the chest, the rounded haunches, and the neck. This saves clay and keeps the sculpture lightweight. -
Secure the foil:
Wrap thin binding wire around the foil layer to prevent it from sliding around on the armature. This also gives the clay something to grip onto. -
Add the first clay layer:
Flatten pieces of clay and press them firmly over the foil skin. Aim for an even coverage of about 1/4 inch thickness. Don’t worry about details yet; just get the main masses covered. -
Smooth the seams:
Dip your finger in a little water and smooth out any joins or cracks between the clay patches. Let this base layer stiffen for a few hours so it can support more weight without sagging.
Armature Strength
A wobbly armature ruins the sculpt. Use two wires twisted together for the legs if your wire feels too flimsy to support the clay weight.
Step 3: Refining and detailing
-
Sculpt the head:
Roll a teardrop shape of clay for the head. Add it to the neck, blending the clay downwards. Pay attention to the profile—hares have slightly Roman noses. -
Add the ears:
Form two long, flattened spoon shapes for the ears. Attach them high on the head, angled backwards to emphasize speed. Use a small snake of clay around the base of each ear to blend the seam invisibly. -
Define the muscles:
Add small pads of clay to the shoulders and thighs to suggest muscle definition. I prefer to use a modeling tool to carve slight depressions behind the shoulder blade and along the flank. -
Shape the paws:
Refine the ends of the legs. Split the clay slightly at the tips to suggest toes, keeping the overall shape slender and elegant. -
Create the texture:
Using a needle tool or a stiff bristled brush, scratch purposeful lines into the damp clay. Follow the direction of fur growth—backwards along the spine and down the legs—to create that rough, organic surface texture. -
Refine the base:
Texture the sides of the oval base to look like rough-hewn stone by scraping it with a serrated tool or fork. Check that the support rod is vertical and tidy. -
Final drying and touches:
Allow the sculpture to dry slowly away from direct heat to prevent cracking. Once fully bone dry, I like to lightly sand the highest points of the texture to add contrast before sealing.
Bronze Finish
Paint the dry sculpture dark brown, then dry-brush with metallic gold or bronze acrylic paint for a classic foundry-cast look.
Place your leaping hare on a mantelpiece or shelf where the light can catch the directional fur texture you created
Animal Bowl or Planter Sculpture
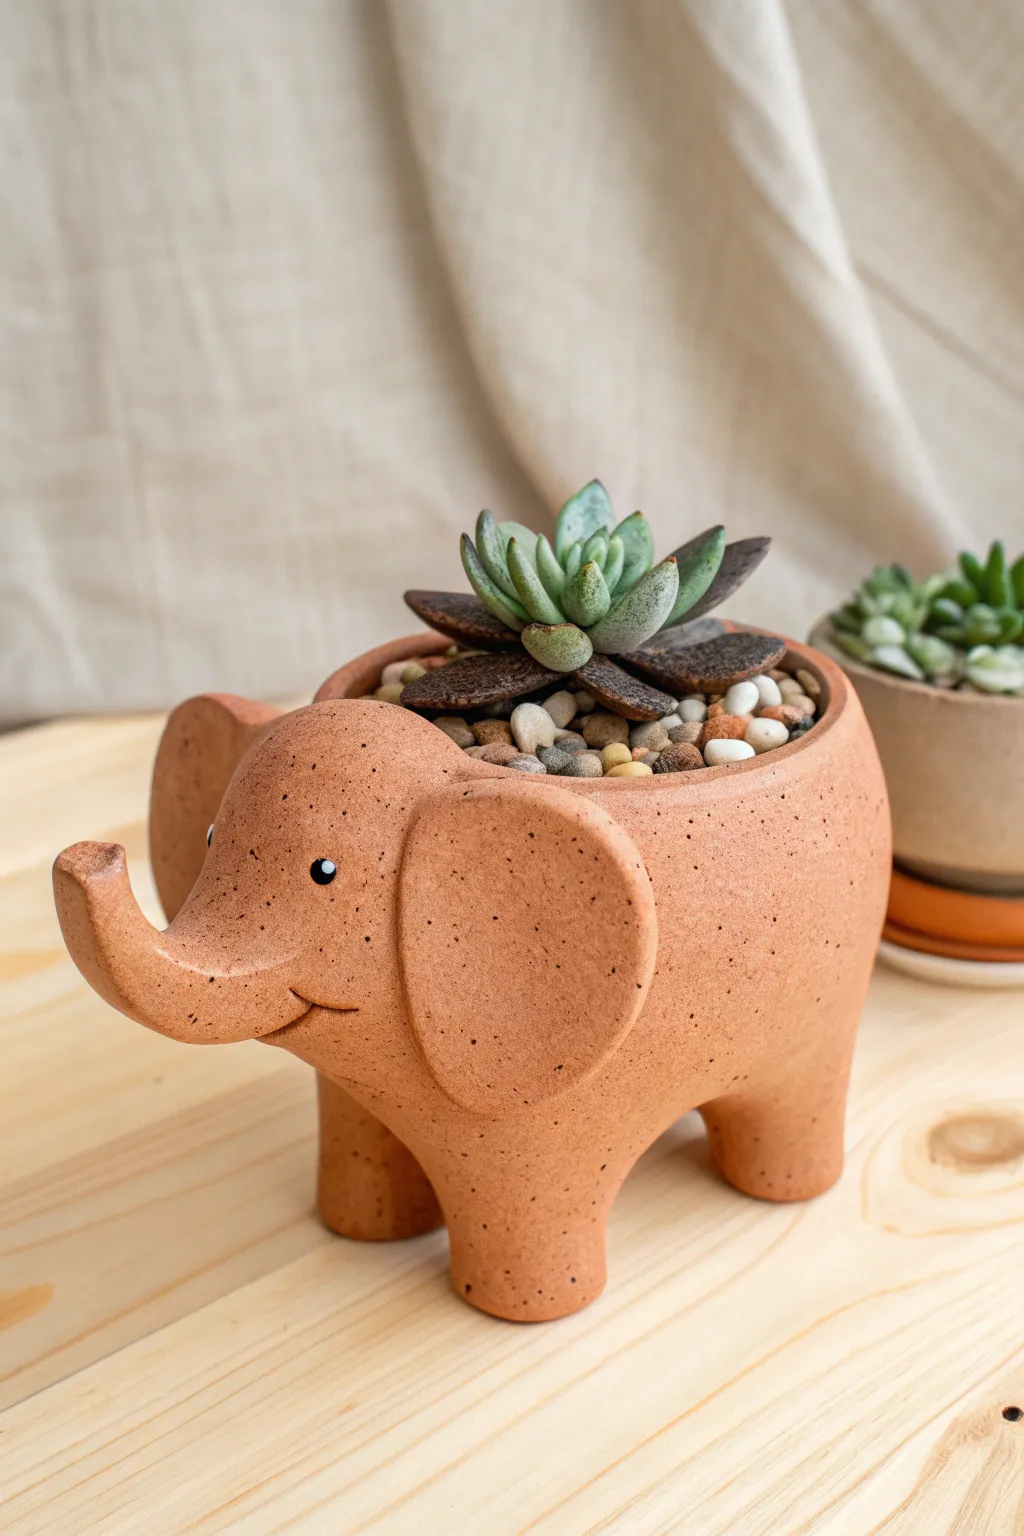
This friendly elephant planter adds a touch of whimsy to any succulent collection with its warm terracotta tone and simple, rounded forms. The hand-built ceramic body features a speckled finish and stylized features that are both charming and functional.
Step-by-Step Guide
Materials
- Speckled stoneware clay (terracotta color)
- Pottery tools (needle tool, rib tool, loop tool)
- Slip and scoring tool
- Rolling pin
- Canvas mat or wooden board
- Small sponge
- Black underglaze or acrylic paint (for eyes)
- White underglaze or acrylic paint (for eye highlights)
- Clear matte glaze (optional)
- Succulent soil and small pebbles
Step 1: Forming the Body
-
Create a pinch pot base:
Start with a ball of clay about the size of a large grapefruit. Press your thumb into the center and pinch the walls evenly as you rotate the ball, creating a deep, rounded bowl shape. This will be the main body. -
Thicken the rim:
Unlike a regular bowl, you want the rim here to be slightly thicker and rounded to give the elephant a sturdy look. Tap the rim gently against your work surface to flatten it just a tiny bit. -
Smooth the exterior:
Use a flexible rib tool to smooth out the finger marks on the outside of your pinch pot. You want a nice, organic curve that creates a chubby belly for the elephant.
Step 2: Building the Legs
-
Roll four coils:
Roll out a thick coil of clay, roughly an inch in diameter. Cut this coil into four equal segments, each about 1.5 to 2 inches long. These will act as the legs. -
Attach the legs:
Turn your pinch pot upside down. Score the bottom of the pot and the tops of your four clay cylinders. Apply slip generously to the scored areas. -
Secure them firmly:
Press the legs onto the body. Use a modeling tool or your finger to smooth the clay from the leg onto the body, eliminating the seam completely so they look like one continuous piece. -
Level the planter:
Flip the elephant back onto its feet. I like to tap the whole piece gently on the table to ensure all four legs are even and the planter stands flat without wobbling.
Leg Wobble Fix
If the legs are uneven, place a piece of sandpaper on a flat surface and gently rub the elephant’s feet over it in a circular motion until leveled.
Step 3: Adding the Head and Trunk
-
Form the head shape:
Take a smaller ball of clay and attach it to the front of the bowl shape using the score and slip method. Blend the seams thoroughly so the head flows naturally from the body, rather than looking stuck on. -
Pull the trunk:
Gently pull the clay from the front of the head outward and upward to form the trunk. Curve it slightly upwards at the end. The trunk should be thick at the base and taper slightly toward the tip. -
Refine the trunk tip:
Flatten the very end of the trunk slightly to resemble the snout. You can add a small indentation with a tool for clarity. -
Carve the mouth:
Use a needle tool or a small loop tool to carve a simple, curved smile just under the base of the trunk on one side (or both).
Texture Variation
Before the clay dries, gently press a piece of coarse fabric or canvas against the ears to give them a subtle, rough texture distinct from the smooth body.
Step 4: Ears and Details
-
Create ear slabs:
Roll out a small slab of clay about 1/4 inch thick. Cut out two large, rounded shapes somewhat resembling butterfly wings or kidney beans. -
Attach the ears:
Score and slip the straight edge of your ear shapes and attach them to the sides of the head. Curve them slightly against the body so they don’t stick straight out, giving a relaxed look. -
Smooth the connections:
Blend the clay behind the ear where it meets the head ensuring a strong bond that won’t crack during firing. -
Add the eyes:
Roll two tiny balls of clay and press them into the face above the trunk, or simply indent small circles where you want to paint the eyes later.
Step 5: Finishing Touches
-
Final smoothing:
Go over the entire piece with a slightly damp sponge to remove any sharp edges or rough texture, but be careful not to wash away the speckled character of the clay. -
Create drainage (Optional):
If you plan to plant directly inside, use a hole cutter to make a drainage hole in the center of the belly, between the four legs. -
Fire the piece:
Allow the clay to dry slowly and completely before bisque firing according to your clay body’s specifications. -
Paint the eyes:
Once fired (or dried if using air-dry clay), paint the small eye circles black. Add a tiny dot of white in the upper corner of each eye for a lively reflection. -
Planting:
Fill your new friend with succulent soil, nestle a rosette succulent inside, and top dress with small decorative pebbles to complete the look.
Your adorable elephant planter is now ready to hold its first green companion
Fantasy Hybrid Creature Totem
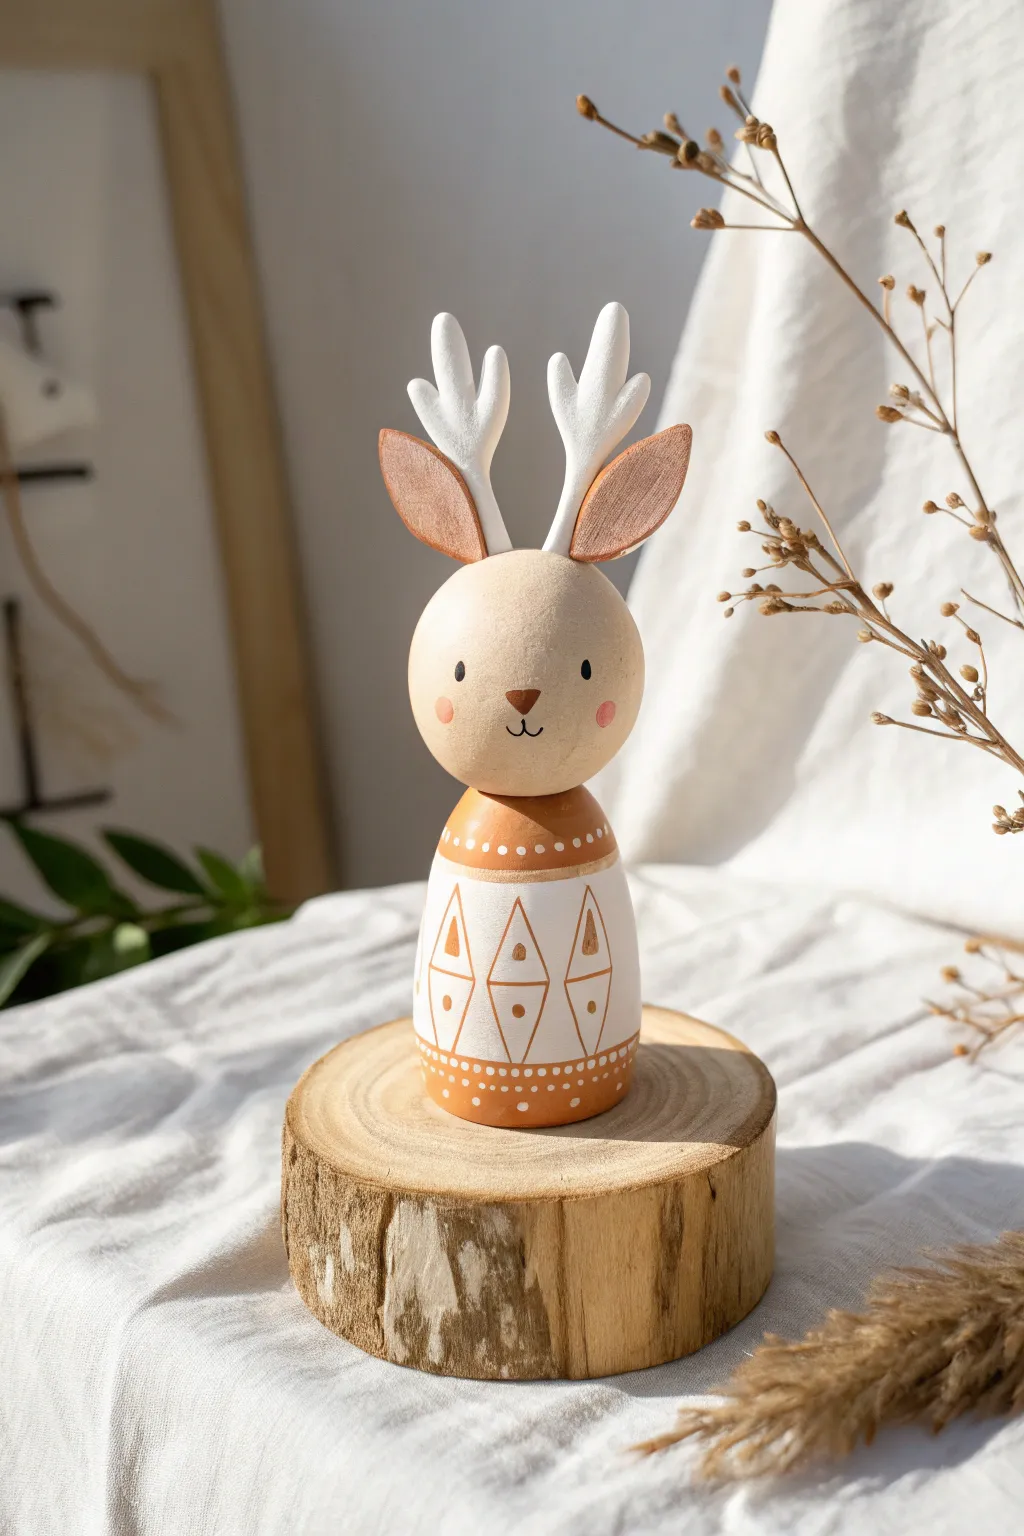
This charming little sculpture blends the gentle features of a rabbit with the majestic antlers of a deer, creating a stylized folk-art jackalope. Its smooth, rounded forms and earthy color palette make it a perfect minimalist decoration for a cozy shelf or nursery.
Detailed Instructions
Materials
- Air-dry clay (white or natural)
- Small wooden sphere (approx. 1.5 – 2 inches diameter)
- Small wooden egg shape (slightly larger than sphere)
- Acrylic paints (White, Terracotta/Burnt Sienna, Beige/Buff, Black, Pink)
- Strong craft glue or wood glue
- Fine grit sandpaper
- Sculpting tools or toothpicks
- Detail paintbrushes (liner brush and small flat brush)
- Matte varnish or sealant
- Small wood slice for display
Step 1: Forming the Base Structure
-
Prepare the Body Parts:
Begin with your pre-made wooden shapes: a sphere for the head and an egg shape for the body. Lightly sand them to ensure a smooth surface for painting. If you prefer to sculpt entirely from clay, roll a smooth ball and a slightly flattened egg shape, then let them dry completely before proceeding. -
Connect Head and Body:
Apply a dab of strong wood glue to the narrower top of the egg shape. Center the wooden sphere on top and press firmly. Wipe away any excess glue immediately and let the structure cure for at least 30 minutes so it doesn’t shift while you work.
Step 2: Sculpting the Features
-
Shape the Ears:
Take two small balls of clay and flatten them into elongated teardrop shapes. These should be roughly the height of the head. Gently pinch the pointed ends to curve them slightly inward, mimicking rabbit ears. -
Create the Antlers:
Roll thin snakes of clay to form the main stems of the antlers. Create smaller offshoot branches and attach them to the main stem, blending the clay seams with a damp tool or finger until smooth. The antlers should look organic but sturdy. -
Attach Features to Head:
Using a tiny amount of water or clay slip, attach the ears to the top sides of the head sphere. Place the antlers just behind or between the ears. I find it helpful to use small pieces of wire or toothpick snippings inside the clay to pin them securely to the wooden head if the clay alone feels wobbly. -
Smooth and Dry:
Check all seams where the clay meets the wood. Use a damp finger to smooth these transitions perfectly. Allow the added clay parts to dry completely, usually 24 hours depending on humidity.
Wire Reinforcement
Clay ears and antlers are fragile! Drill tiny holes in the head and insert short wires. Sculpt the clay directly over these wires for a permanent sturdy bond.
Step 3: Painting the Folk Details
-
Base Coat:
Paint the bottom section of the egg-shaped body with a warm terracotta or caramel-brown acrylic. Paint the head and the antlers a creamy beige or natural wood tone, leaving the body’s middle band white or painting it white if your base material isn’t already. -
Geometric Body Design:
On the white middle band of the body, paint a row of triangles pointing upward using a fine liner brush and the terracotta paint. Inside each triangle, add a small dot and a vertical line to create that tribal, folk-art look. -
Decorative Dots:
Using the handle end of a paintbrush or a dotting tool, dab a row of white dots along the upper terracotta border (the neck area) and another row of white dots along the bottom terracotta base. -
Ear Details:
Paint the sculpted ears. Use the terracotta color for the front/inner face of the ears and white or beige for the backs. This contrast helps define the shape. -
Antler Painting:
Paint the antlers a solid, crisp white. This bright white contrasts beautifully with the warm wood tones of the head. -
Adding the Face:
With your smallest detail brush or a fine-tip paint pen, draw two small, wide-set black eyes. Add a tiny inverted triangle nose in brown, and a simple ‘w’ shape for the mouth. Using very watered-down pink paint or a blush powder, gently dab rosy cheeks onto the face.
Uneven Geo Patterns?
If your hand shakes while painting triangles, sketch them lightly with a pencil first. Or, use masking tape cut into small strips to stencil perfect lines.
Step 4: Finishing Touches
-
Seal the Totem:
Once the paint is fully dry, apply a coat of matte varnish over the entire figure. This protects the paint and gives the piece a cohesive, professional finish without making it too shiny. -
Mount on Display Base:
Apply glue to the bottom of your finished jackalope and center it onto the rustic wood slice. Press down securely and allow the glue to set.
Now you have a whimsical guardian for your desk or shelf that combines modern simplicity with natural charm