If you’re going to make an ashtray, you might as well make it a tiny piece of art you actually want sitting out. These clay ashtray ideas lean into playful shapes, fun textures, and clever little cigarette rests that feel like part of the sculpture.
Pinch-Pot Ashtray With Clean Notches

This project transforms a simple ball of clay into a functional, beautifully glazed piece reminiscent of mid-century pottery. With its deep basin and precisely carved notches, the finished ashtray combines rustic hand-building charm with a sleek, glossy emerald finish.
Step-by-Step Guide
Materials
- Stoneware clay (smooth body recommended)
- Pottery sponge
- Loop tool or fettling knife
- Rib tool (metal or rubber)
- Small round object (like a dowel or marker) for smoothing notches
- Emerald green cone 6 glaze (high gloss)
- Clear glaze (optional)
- Kiln access
- Rolling pin (optional for compressing bottom)
Step 1: Forming the Base
-
Prepare your clay:
Start with a ball of clay roughly the size of a tennis ball. Wedge it thoroughly to remove any air bubbles, as trapped air can cause explosions in the kiln. Pat it into a smooth, perfect sphere. -
Open the pot:
Hold the clay ball in your non-dominant hand. Push your thumb into the center, stopping about a half-inch from the bottom. This thickness is crucial for a sturdy base. -
Pinch the walls:
Using your thumb on the inside and fingers on the outside, gently pinch and rotate the clay. Work your way from the bottom up, aiming for an even wall thickness of about 1/4 inch. -
Shape the cylinder:
Instead of flaring the walls out like a bowl, try to keep them relatively vertical to match the reference image. The rim should be flat and substantial, so don’t pinch the very top edge too thin. -
Flatten the bottom:
Gently tap the base of your pot against your work surface to create a flat, stable bottom. You want it to sit level without rocking.
Step 2: Refining and Notching
-
Smooth the interior:
Use a damp sponge or a soft rib tool to smooth the inside curve of the bowl. Remove any fingerprints or deep pinch marks to create that seamless, manufactured look on the interior. -
Level the rim:
Turn the pot upside down on a flat board and gently rotate it to level the rim. If it’s very uneven, you can slice a thin layer off the top with a fettling knife. -
Mark the notches:
Turn the pot right-side up. Visualize a clock face; lightly mark the rim at the 12, 3, 6, and 9 o’clock positions where your cigarette rests will go. -
Cut the notches:
Using a loop tool or simply your thumb, press or carve a U-shape into the rim at your marked spots. I like to make these slightly wider than a cigarette to account for clay shrinkage during drying. -
Refine the rests:
Take a dowel or a smooth marker cap and gently roll it back and forth in the notches. This compresses the clay and creates that perfectly rounded, professional groove seen in the photo. -
Smooth the edges:
Run a damp chamois or smooth sponge over the sharp edges of the rim and the notches. The glaze will break beautifully over these softened edges later.
Warping Walls?
If your walls start flopping outward while pinching, the clay is too tired or wet. Let it stiffen for 30 minutes, or use a hair dryer briefly to firm it up before continuing.
Step 3: Glazing and Firing
-
Bisque fire:
Allow your piece to dry slowly and completely. Once bone dry, fire it to a bisque temperature (usually Cone 04) to prepare it for glazing. -
Wax the bottom:
Apply wax resist to the bottom foot of the ashtray. This prevents glaze from sticking to the kiln shelf during the final firing. -
Apply the glaze:
Pour your emerald green glaze into the interior, swirl it to coat, and pour out the excess. Then, dip or brush the exterior. Detailed pieces like this often look best with two generous coats for depth. -
Check the rim:
Ensure the glaze isn’t too thick on the rim notches, or it might fill them in. If needed, gently wipe a tiny bit of glaze off the sharpest edges to encourage the ‘breaking’ effect where the brown clay body subtlely shows through. -
Glaze fire:
Fire the piece to the maturity temperature of your clay and glaze (likely Cone 6). Let the kiln cool completely before opening to avoid thermal shock cracking.
Pro Tip: Depth Check
Use a needle tool to poke through the bottom center to check thickness. It should be at least 1/4 inch. Simply plug the tiny hole and smooth over it afterwards.
Once cooled, your durable stoneware ashtray is ready for use or display on a side table


Slab-Built Square Ashtray With Corner Rests
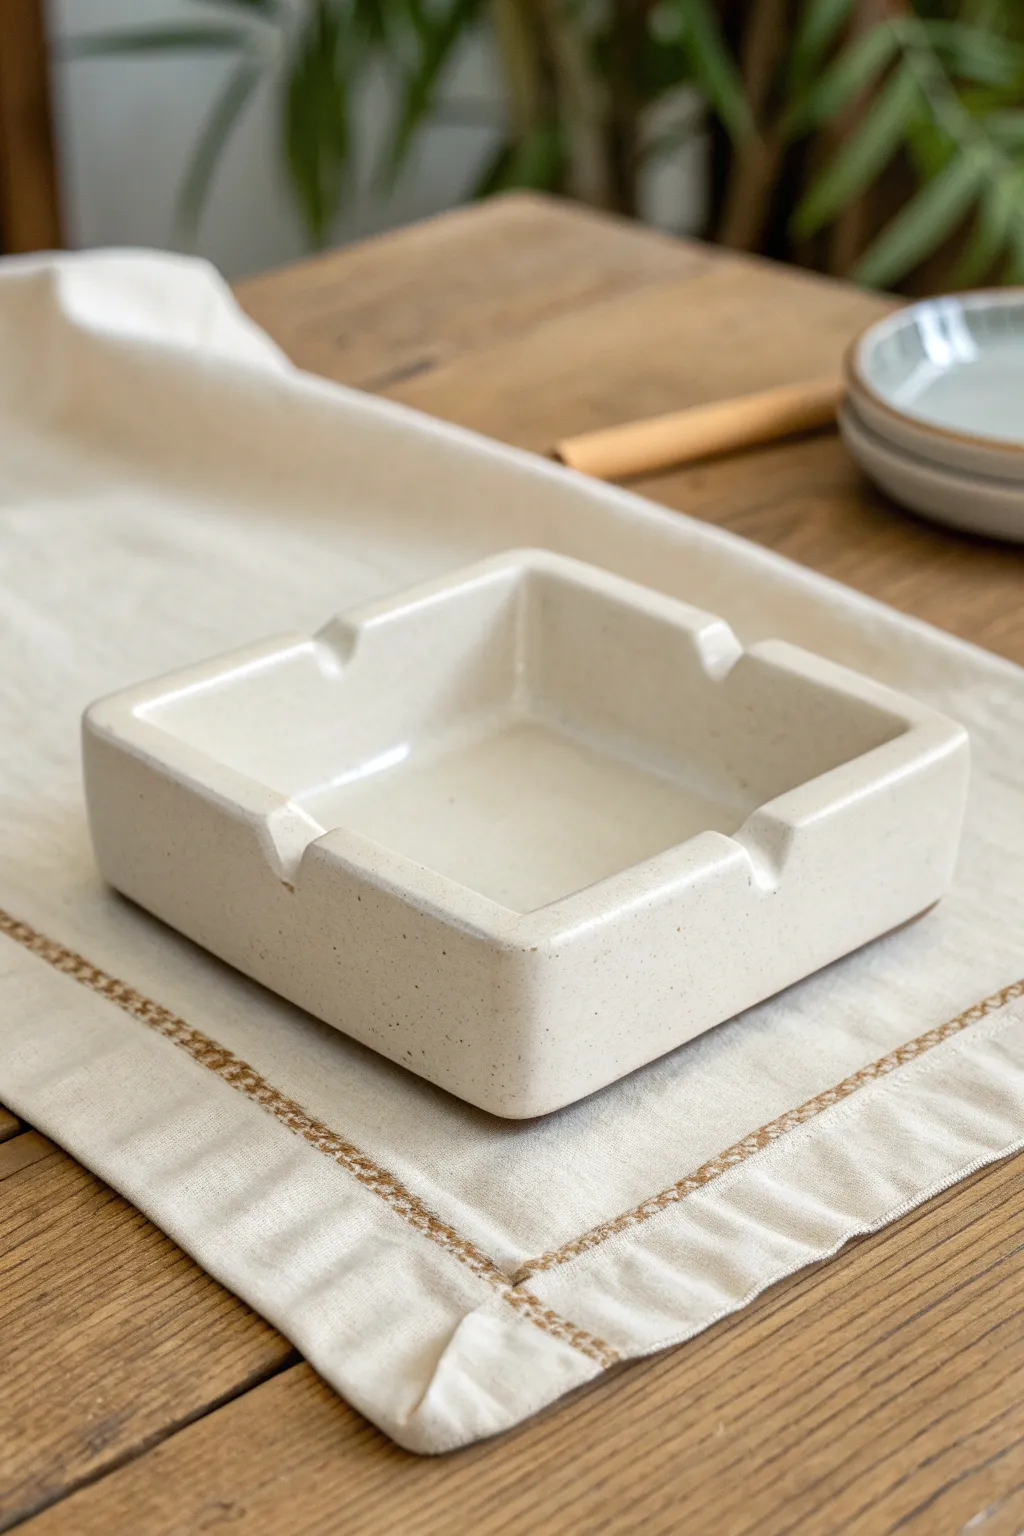
This minimalist, cream-colored ashtray features a clean square form with distinct notches placed uniquely at the corners rather than the sides. The subtle speckled clay body gives it a warm, natural feel that fits perfectly in modern rustic decor.
Step-by-Step Tutorial
Materials
- Speckled stoneware clay (mid-fire)
- Rolling pin
- Two 1/4-inch guide sticks (for even slab thickness)
- Fettling knife or X-Acto blade
- Ruler or square templates
- Scoring rib (serrated rib)
- Slip (clay mixed with water)
- Sponge
- Modeling tool or wooden stick (simulating cigarette size)
- Small paintbrush
- Clear or white glossy glaze (food safe recommended)
Step 1: Creating the Base Slab
-
Roll the slab:
Begin by wedging your speckled clay to remove air bubbles. Place your guide sticks on either side of the clay and use a rolling pin to roll out a smooth, consistent slab that is about 1/4-inch thick. -
Cut the components:
Using a ruler and fettling knife, measure and cut a 5×5 inch square for the base. Next, cut four rectangular strips for the walls; they should be 5 inches long and roughly 1.5 inches tall. -
Stiffen the clay:
Let the pieces sit on a ware board for about 30-60 minutes until they reach a ‘soft leather-hard’ state. I like to wait until the clay no longer feels tacky but is still flexible enough to bend slightly without cracking.
Cracking Seams?
If corner seams split during drying, your clay was likely too dry when joining. Score deeply, use more slip, and wrap tightly with plastic for 24 hours to rehydrate components together.
Step 2: Assembling the Form
-
Bevel the edges:
For easier corner joints, cut the ends of your wall strips at a 45-degree angle. This allows them to fit together snugly at the corners of the square base. -
Score and slip:
Use your serrated rib to rough up the perimeter of the base square and the bottom edges of your wall strips. Apply a generous amount of slip to these scored areas. -
Attach the walls:
Press the walls firmly onto the base. Score and slip the vertical 45-degree bevels where the walls meet at the corners, pressing them together to form a box. -
Reinforce the seams:
Roll a very thin coil of clay and press it into the interior seams where the floor meets the walls. Smooth this coil out with a modeling tool or your finger to ensure a watertight seal. -
Refine the shape:
Use a straight edge or paddle to gently tap the exterior walls, ensuring they are perfectly straight and the overall shape is a true square. Smooth the top rim with a damp sponge.
Make it Match
Create a matching set by making a smaller nesting version inside the larger one. Just reduce your base square dimensions by 1.5 inches and build using the same technique.
Step 3: Adding the Corner Rests
-
Mark the corners:
Identify the exact center of each corner joint on the top rim. This project is unique because the rests are at the corners, not the flat sides. -
Create the notch:
Take a circular tool or a wooden dowel roughly the size of a cigarette. Press it firmly into the corner joint while supporting the wall from the outside with your hand so it doesn’t collapse. -
Clean the indentation:
Depending on the clay’s plastic state, you might need to carefully carve out excess clay displaced by the dowel to make a clean, semi-circular notch. -
Round the edges:
Smooth the edges of the new notches with a slightly damp sponge. The goal is a soft, rounded look rather than sharp, machined edges.
Step 4: Finishing and Firing
-
Dry slowly:
Loosely cover the piece with plastic to let it dry slowly for the first day, which prevents the corner seams from cracking. Then uncover and dry until bone dry. -
Bisque fire:
Fire the piece in a kiln to cone 04 (or your clay’s specific bisque temperature). -
Glaze application:
Dip or brush a glossy white or clear glaze over the entire piece. Because the clay is speckled, a sheer white glaze will allow those lovely iron spots to show through. -
Final wipe:
Wipe the foot (bottom) of the ashtray clean with a sponge to prevent it from sticking to the kiln shelf. -
Glaze fire:
Fire to the final temperature recommended for your stoneware clay (typically cone 5/6).
Place your finished piece on a wooden table to highlight the earthy, speckled tones of the stoneware clay


Flower Petal Ashtray
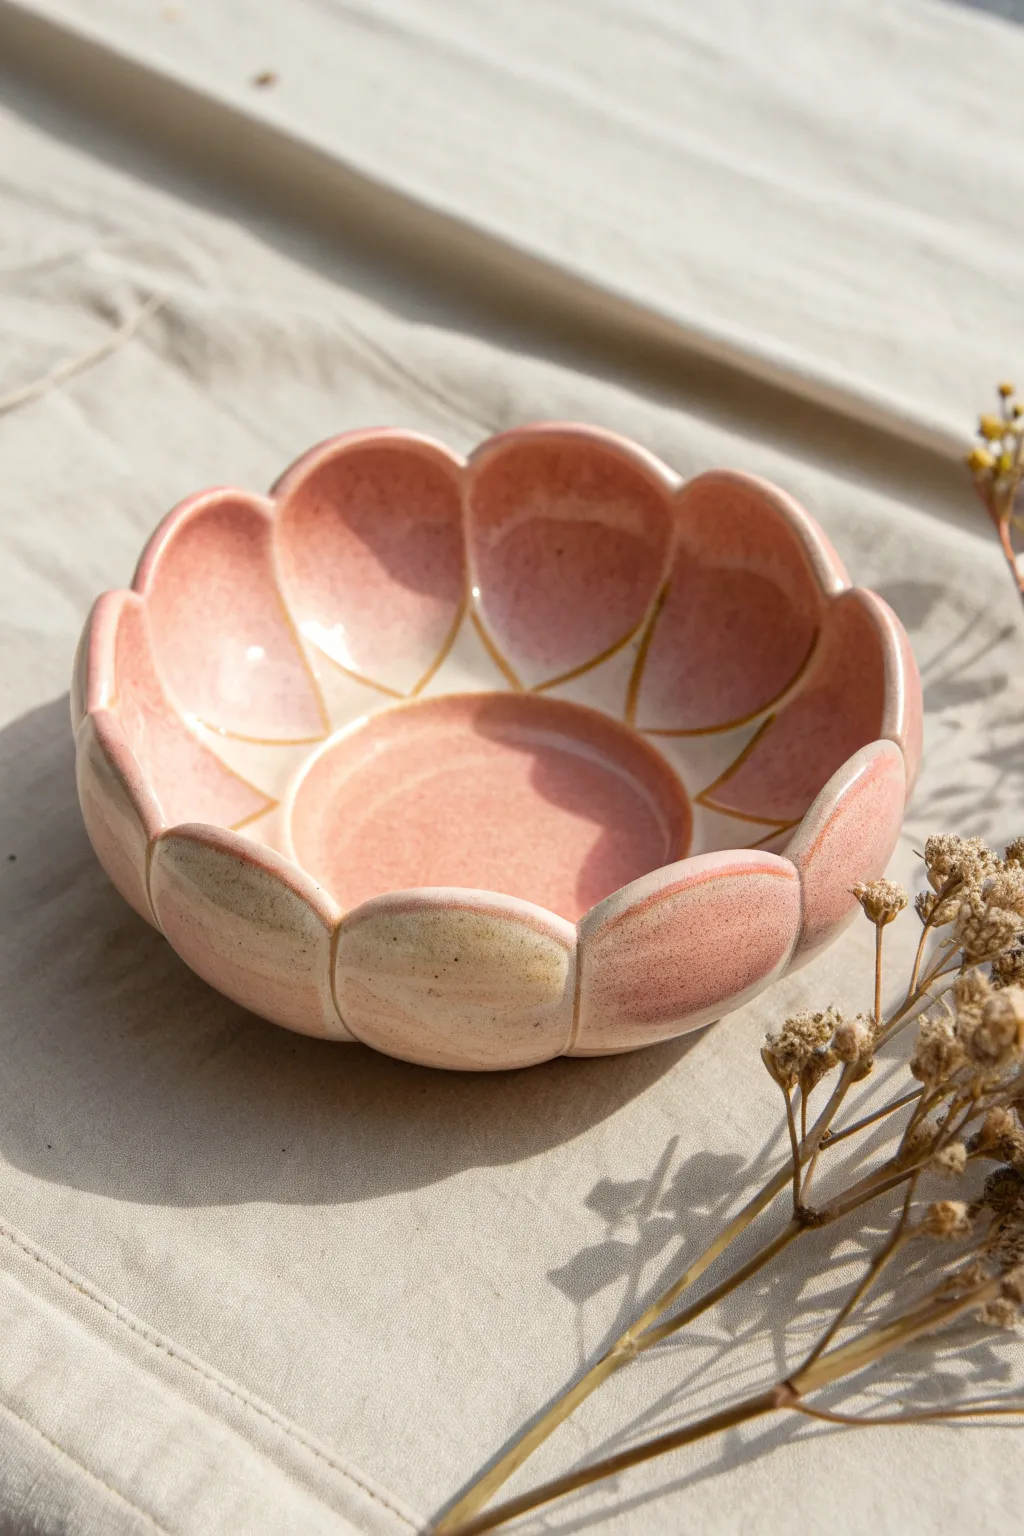
This elegant flower petal dish combines the organic beauty of a blooming lotus with functional design, perfect for use as an ashtray or jewelry holder. The soft pink glaze settles into the curves of each petal, creating lovely variation and depth in the finished piece.
Step-by-Step
Materials
- Light colored stoneware or porcelain clay
- Rolling pin
- Canvas work surface
- Needle tool or fettling knife
- Rib tool (flexible metal or rubber)
- Sponge
- Small bowl or slump mold (approx 5-6 inches diameter)
- Paper template (flower shape)
- Scoring tool
- Slip (liquid clay)
- Pink reactive glaze (cone 5/6)
- Detail brush
- Clear glaze (optional)
Step 1: Forming the Base
-
Prepare the slab:
Begin by wedging your clay thoroughly to remove air pockets, then roll it out on your canvas to a consistent thickness of about 1/4 inch. Smooth the surface with a rib tool to compress the clay particles. -
Cut the flower shape:
Place your paper flower template on the slab. Using a needle tool, carefully trace and cut around the perimeter to create a large floral silhouette with roughly 8-10 rounded petals. -
Define the center:
Cut a separate circle of clay, about 2.5 inches in diameter, from the remaining slab. This will reinforce the base and create that distinct inner circle seen in the reference. -
Attach the center:
Score the center of your flower slab and the underside of the clay circle. Apply a dab of slip and press the circle firmly into the middle of the flower shape, smoothing the edges slightly so it integrates but remains distinct.
Natural Petal Curves
To make the petals look plump and organic, gently push the clay outward from the inside of each petal with your thumb while it sits in the mold.
Step 2: Shaping the Petals
-
Slump the form:
Gently lift your clay flower and place it into your slump mold or bowl. Allow gravity to pull the clay down, curving the petals upward naturally. -
Define petal separation:
While the clay is in the mold, use a modeling tool or your fingers to gently press into the valleys between each petal. This emphasizes the individual lobes rather than just a simple bowl shape. -
Smooth the rims:
Take a damp sponge and run it along the top edge of every petal. You want to round off any sharp cuts from the needle tool to get that soft, puffy look. -
Dry slowly:
Cover the piece loosely with plastic and let it dry to a leather-hard state. This ensures it holds its shape when removed from the mold. -
Refine the surface:
Once leather hard, remove the piece from the mold. Use a damp sponge to smooth out any imperfections on the exterior or interior surfaces. -
Bisque fire:
Allow the clay to dry completely (bone dry) before firing it in the kiln to cone 04 for the bisque firing.
Step 3: Glazing and Finishing
-
Apply base glaze:
Pour a speckled pink reactive glaze into the interior of the bowl, swirl it to coat, and pour out the excess. This method ensures an even internal coat. -
Glaze the exterior:
Brush the same pink glaze onto the exterior petals. I prefer applying slightly thinner coats on the outside so the clay texture shows through a bit more. -
Highlight the rims:
To achieve the effect in the photo, wipe back the glaze slightly on the very rim of the petals with a sponge, or apply a wax resist to the rim before glazing if you want raw clay exposed. -
Add detail lines:
If your glaze breaks naturally, skip this. If not, use a thin brush to paint a line of oxide or slightly darker glaze in the grooves between the petals to exaggerate the separation. -
Clean the foot:
Wipe the bottom of the dish completely clean of glaze with a wet sponge to prevent it from fusing to the kiln shelf. -
Final smooth:
Check for any drips or thick spots of glaze that might run during firing and gently smooth them out with your finger. -
Glaze fire:
Fire the piece to the temperature recommended for your specific glaze (likely cone 5 or 6). Allow the kiln to cool completely before opening.
Gold Rim Upgrade
For extra luxury, apply a ring of gold luster to the rim of each petal after the glaze firing and refire at a lower temperature (cone 018).
Now you have a stunning, sculptural ceramic piece ready to hold floral arrangements or standing alone as art.


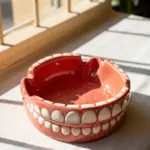
Heart-Shaped Ashtray With Sculpted Grooves
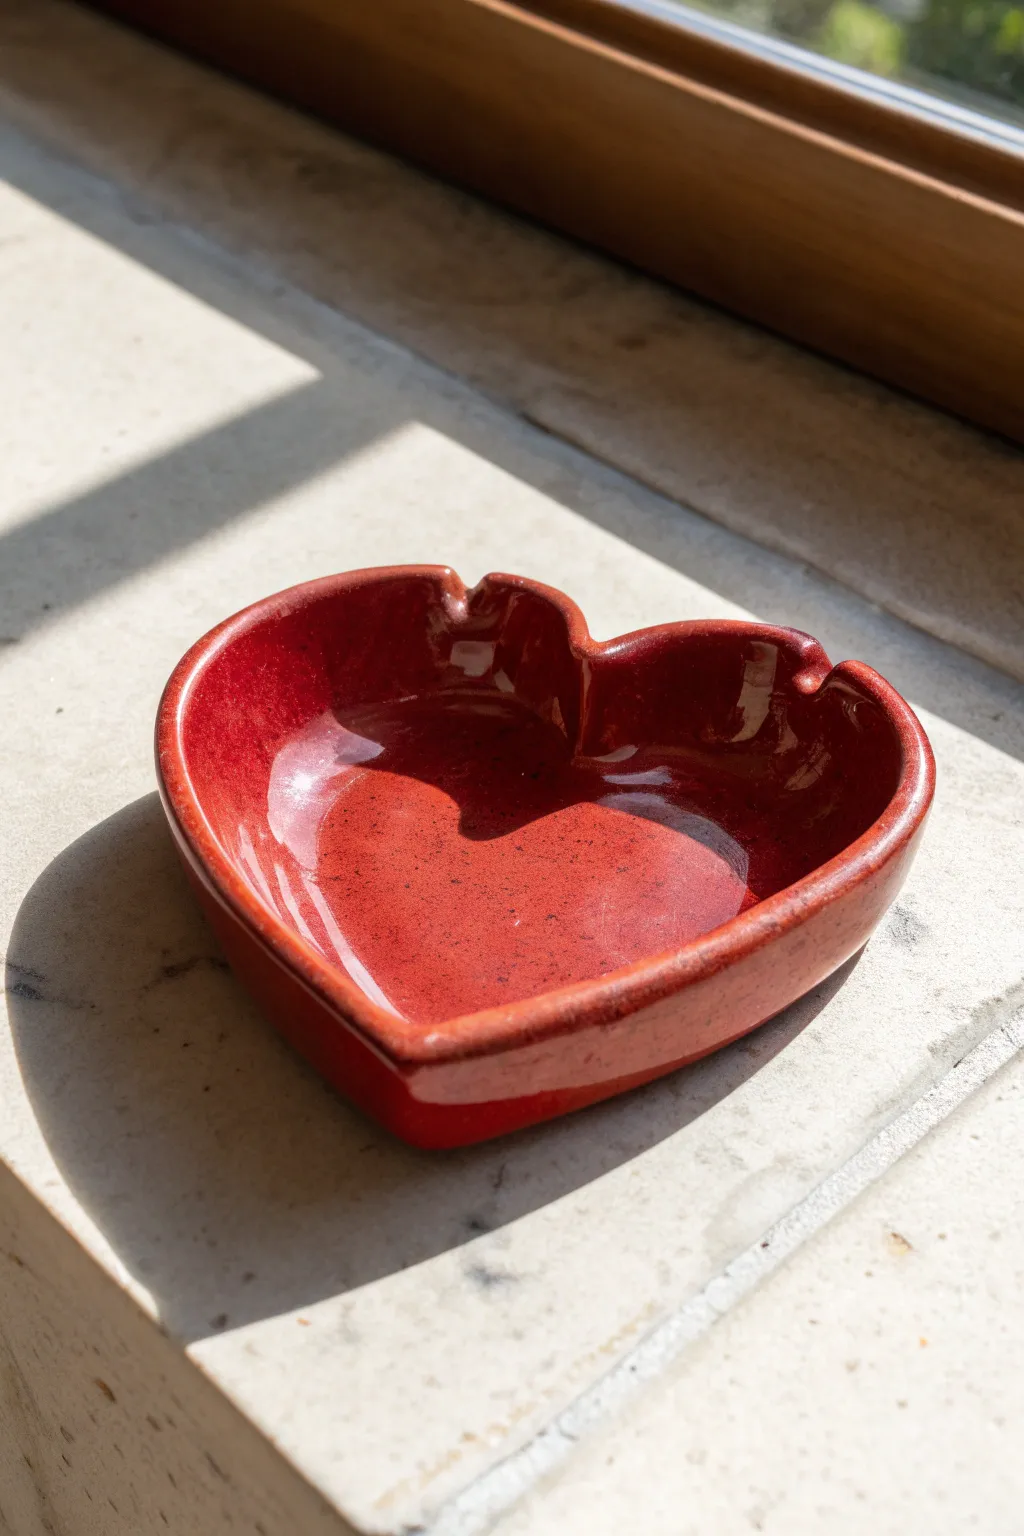
Sculpt a symbol of affection with a functional twist using this project for a deep red, heart-shaped ashtray. The piece features a high-gloss finish and carefully carved grooves, making it both a striking decor item and a practical accessory.
Detailed Instructions
Materials
- Earthenware or stoneware clay (approx. 1 lb)
- Rolling pin
- Heart-shaped paper template or cookie cutter
- Fettling knife
- Needle tool
- Modeling tool (rounded end)
- Sponge
- Rib tool (kidney)
- Small bowl of water
- High-gloss red glaze (cone 04-06 compatible)
- Clear glaze (optional, for extra shine)
- Kiln access
Step 1: Shaping the Base
-
Prepare the slab:
Begin by wedging your clay thoroughly to remove air bubbles. Roll it out into a smooth slab that is approximately 1/4 inch thick. I find using wooden guide strips on either side helps keep the thickness consistent. -
Cut the heart shape:
Place your heart-shaped template onto the slab. Using a needle tool or fettling knife, cut straight down around the template to create the base of your ashtray. -
Smooth the edges:
Run a damp sponge or your finger along the cut edges of the heart base to soften any sharp corners left by the knife.
Step 2: Building the Walls
-
Create coils:
Roll out a long, even coil of clay, roughly the thickness of your pinky finger. Ensure it is long enough to outline the entire perimeter of your heart base. -
Score and slip:
Score the outer edge of the heart base and the bottom of your coil using a needle tool or serrated rib. Apply a small amount of slip (clay and water mixture) to the scored areas. -
Attach the wall:
Gently press the coil onto the scored edge of the base. If one coil isn’t long enough, join a second one smoothly, blending the seam so it disappears. -
Blend the seams:
Use a modeling tool or your thumb to drag clay from the coil down onto the base on the inside, and from the base up onto the coil on the outside. This creates a strong, unified bond.
Cracking at the V?
The inner point of the heart is a stress point. Compress this area extra well with a rib tool during the base creation to prevent splitting during drying.
Step 3: Sculpting the Details
-
Refine the shape:
Pinch the walls gently to reach your desired height, slightly flaring the top edge outward for a pleasing curve. Use a rib tool to smooth the interior and exterior walls. -
Carve the rests:
Locate the two upper lobes of the heart. Using a rounded modeling tool or the handle of a paintbrush, press down firmly into the rim to create two U-shaped grooves. These will serve as cigarette rests. -
Smooth the grooves:
Use a little water on your finger to smooth the inside of these new indentations, ensuring they are rounded and comfortable to the touch. -
Final smoothing:
Take a damp sponge and wipe down the entire piece to remove any fingerprints or rough texture. Pay close attention to the rim. -
Drying:
Allow the piece to dry slowly under loose plastic for a day, then uncover it to become bone dry. This prevents warping.
Speckled Finish
To mimic the subtle texture seen in the photo, use a clay body with fine grog or choose a glaze labeled ‘speckled red’ for added visual depth.
Step 4: Glazing and Firing
-
Bisque fire:
Load the bone-dry piece into the kiln for a bisque firing (usually around Cone 04). This hardens the clay and prepares it for glazing. -
Clean the bisque:
Wipe the fired piece with a damp sponge to remove any kiln dust, which can prevent the glaze from sticking properly. -
Apply red glaze:
Stir your glossy red glaze thoroughly. Apply 2-3 even coats to the entire piece, allowing each coat to dry to the touch before applying the next. Do not glaze the bottom surface that sits on the shelf. -
Inspect coverage:
Check for pinholes or missed spots. Since red is a bold color, uneven application will show, so take your time here. -
Glaze fire:
Fire the piece again to the temperature recommended by your glaze manufacturer (often Cone 05 or 06). Let the kiln cool completely before opening.
Place your finished piece in the light to let that glossy red surface truly shine

The Complete Guide to Pottery Troubleshooting
Uncover the most common ceramic mistakes—from cracking clay to failed glazes—and learn how to fix them fast.
Terrazzo Speckle Ashtray
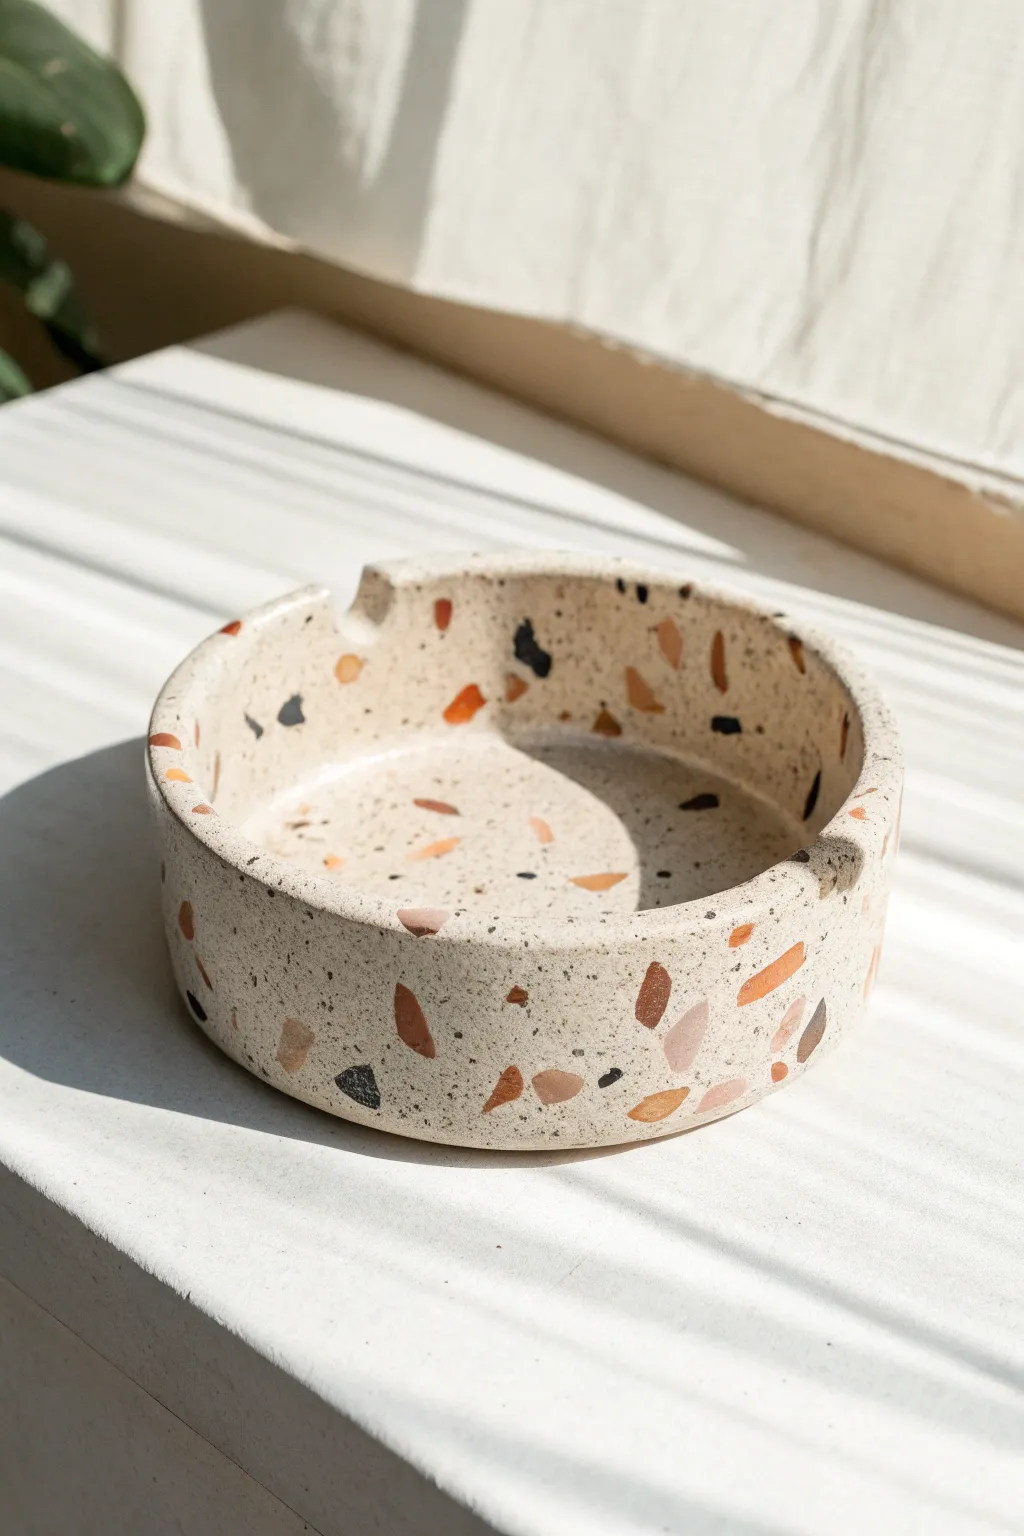
Embrace the modern, earthy aesthetic of terrazzo with this simple yet striking clay project. By embedding colored clay chips into a neutral base, you will create a chic, functional piece with a high-end speckled finish that looks effortlessly artisanal.
How-To Guide
Materials
- Polymer clay (white/cream for base)
- Polymer clay (terracotta, light pink, dark grey, black for chips)
- Acrylic rolling pin
- Circle cutter or bowl (approx. 4-5 inches diameter)
- Craft knife or clay scalpel
- Fine grit sandpaper (400, 600, 1000 grit)
- Rolling guides or playing cards (optional)
- Oven and baking sheet
- Gloss or matte varnish (optional for sealing)
Step 1: Prepping the ‘Chips’
-
Condition colored clay:
Start by conditioning your colored clays—terracotta, light pink, dark grey, and black—until they are soft and pliable. Use small amounts of each. -
Roll thin sheets:
Roll each colored clay into a very thin sheet. The thinner the sheet, the cleaner your chips will look later. -
Bake the sheets:
Place these thin colored sheets on a baking tray and bake them for about 10-15 minutes at the temperature recommended on your clay package. They need to be hard enough to chop. -
Cool and chop:
Let the baked sheets cool completely. Once cool, use your craft knife to chop them into irregular, angular fragments. Aim for a mix of tiny specks and larger chunks to mimic real stone aggregate.
Uneven Sanding?
If chips aren’t revealing evenly, focus pressure only on the cloudy spots. Keep the paper extremely wet to prevent clay dust from clogging the grit and dulling the reveal.
Step 2: Creating the Base
-
Condition base clay:
Take a large block of your white or cream clay and condition it thoroughly until it is warm and smooth. -
Mix in the chips:
Sprinkle your chopped colored chips onto the conditioned white clay. Fold the clay over the chips and knead gently to distribute them throughout the block, appearing random but even. -
Roll the slab:
Roll out the chip-filled clay into a slab about 1/4 inch thick. I find turning the slab frequently helps keep the shape circular. -
Smooth the surface:
Run your roller over the surface one last time to ensure the chips are pressed flat into the clay, reducing the amount of sanding needed later. -
Cut the base:
Use your circle cutter or a bowl as a template to cut out the base circle of your ashtray. -
Create the walls:
From the remaining terrazo-mixed clay, cut a long rectangular strip. This should be about 1 inch tall and long enough to wrap around the circumference of your base.
Step 3: Assembly and Refining
-
Attach the wall:
Wrap the strip around the edge of your circle base. Ensure the strip sits on top of the base edge rather than wrapping around the outside for a cleaner profile. -
Blend the seams:
On the inside of the ashtray, use a clay tool or your finger to smudge the clay downwards, blending the wall seamlessly into the floor. Do the same on the outside seam where the strip ends meet. -
Cut the notches:
Use a round object like a pen or a large straw to gently press indents into the rim for cigarette rests. Use your craft knife to clean up the U-shape. -
Final smooth:
Check the rim and surfaces for fingerprints. Lightly smooth them away with a drop of baby oil on your finger if needed. -
Bake the project:
Bake the assembled ashtray according to the manufacturer’s instructions. Usually, this takes about 30 minutes to ensure full curing.
Make it Sparkle
Add a touch of glam by mixing in small flakes of gold or copper leaf along with your clay chips. The metal bits will shimmer beautifully once the top layer is sanded back.
Step 4: The Terrazzo Reveal
-
Cool down:
Allow the ashtray to cool completely. The colors might look muted or hidden under a thin film of white clay at this stage. -
Start sanding:
Begin sanding vigorously under running water with the coarse grit sandpaper (400). This is the magic step where you sand away the top layer of clay to reveal the sharp, bright colors of the chips underneath. -
Refine the finish:
Switch to 600 grit, then 1000 grit sandpaper. Continue wet sanding until the surface feels incredibly smooth and the scratch marks disappear. -
Buff and seal:
Dry the piece thoroughly. You can buff it with a soft cloth for a natural sheen or apply a thin layer of matte varnish to protect the surface.
Enjoy the satisfaction of seeing those colorful specs emerge as you polish your piece to perfection
Minimal Face Ashtray With Nose Rest
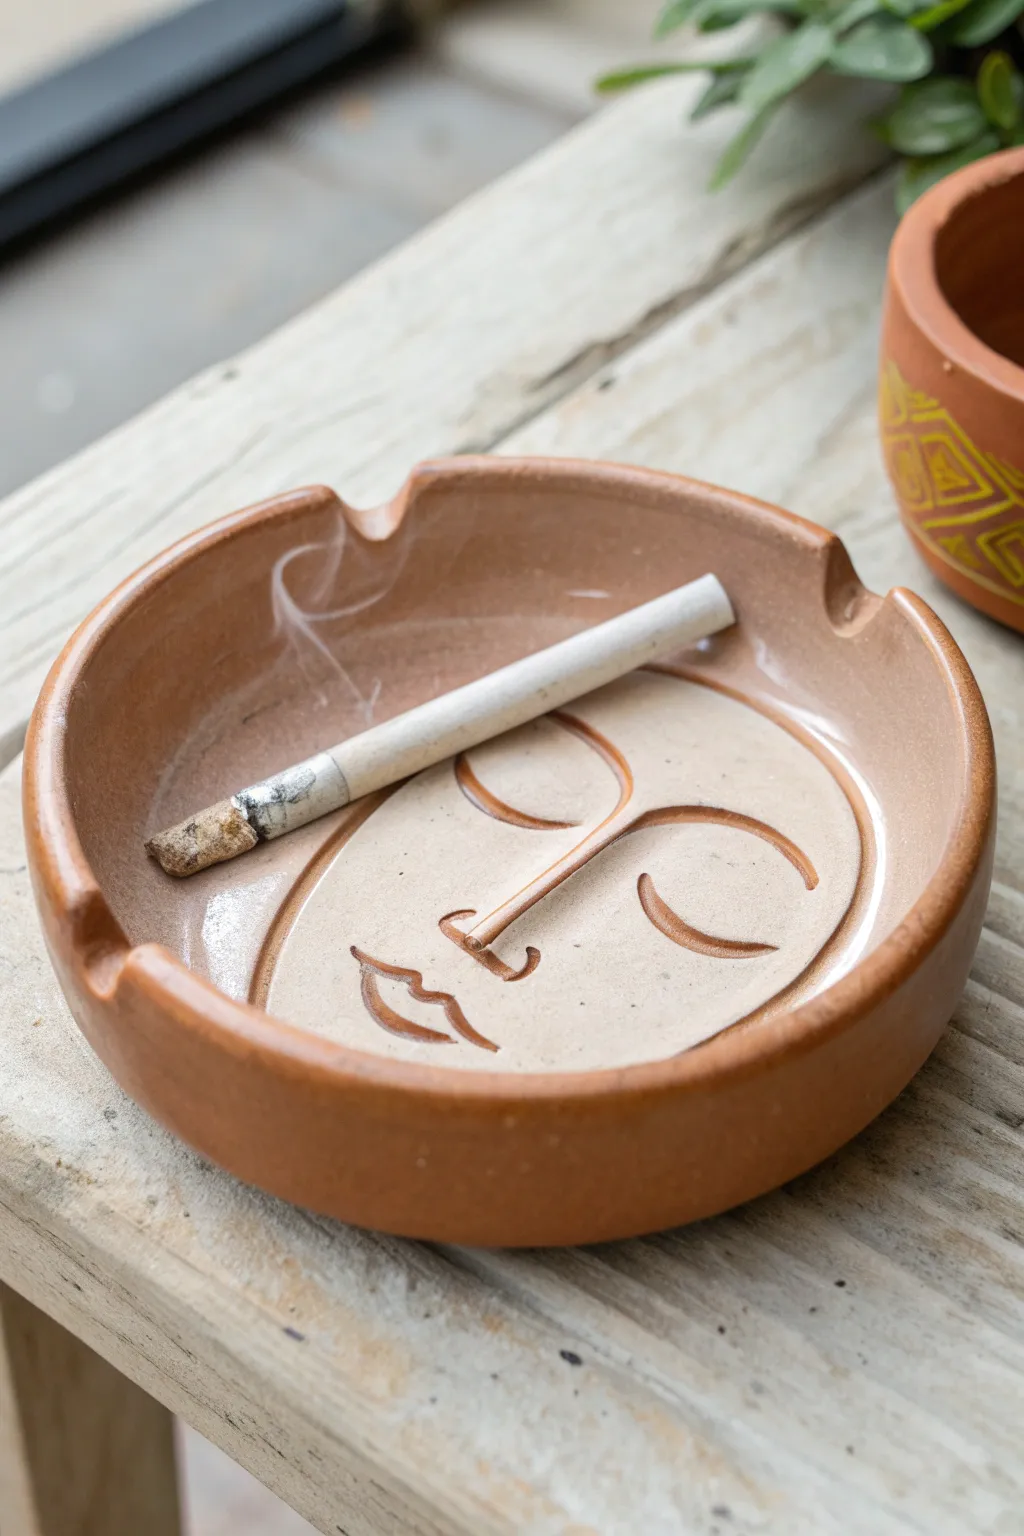
This charming terracotta ashtray combines functionality with modern line art, featuring a serene face where the sculpted nose cleverly doubles as a cigarette rest. Its warm, earthy tones and smooth, recessed design make it a subtle yet striking conversation piece for any table.
Step-by-Step Guide
Materials
- Terracotta air-dry clay or low-fire earthenware clay
- Rolling pin
- Circle template or round bowl (approx. 4-5 inches diameter)
- Fettling knife or clay cutting tool
- Ribs (rubber and wood for smoothing)
- Needle tool
- Loop tool (small)
- Sponge
- Bowl of water
- Clear acrylic sealant (if using air-dry) or clear glaze (if firing)
Step 1: Forming the Base
-
Prepare the slab:
Begin by wedging your terracotta clay to remove air bubbles. Roll it out into a smooth, even slab that is roughly 1/4 to 1/2 inch thick. -
Cut the circle:
Place your circular template or an overturned bowl onto the clay slab. Use your needle tool or fettling knife to cut a clean circle, which will form the body of the ashtray. -
Create the rim:
Roll a long, thin coil of clay, roughly the thickness of your pinky finger. Score and slip the outer edge of your circular base, then attach the coil around the perimeter to build up the wall. -
Blend the coil:
Use your thumb or a wooden tool provided in most clay kits to blend the coil seamlessly into the base on the inside and outside. I find pulling the clay down from the coil to the base works best for a strong bond. -
Smooth the shape:
Take a damp sponge and a rubber rib to smooth the walls and floor. You want a seamless transition so it looks like a single piece rather than a coil pot. -
Carve the cigar rests:
Using a small loop tool or your thumb, gently press or carve out two to three divots in the rim where cigarettes can sit. Ensure these are smooth and rounded.
Rim Cracking?
If the rim separates during drying, your slip wasn’t wet enough. Fill cracks with a mix of vinegar and soft clay (‘magic water’) and smooth over.
Step 2: Sculpting the Face
-
Draft the features:
Lightly trace the outline of a face onto the flat interior floor of the ashtray using a needle tool. Draw two closed semicircles for eyes, a mouth, and a line indicating where the nose will go. -
Form the nose rest:
Roll a small, tapered cylinder of clay—this is the signature feature. Score the center of the face where you marked the nose line and slip the area heavily. -
Attach the nose:
Press the clay cylinder firmly onto the scored area. It should be raised enough to act as a snuffer or secondary rest. Blend the edges into the floor completely so it looks like it’s rising from the calm surface. -
Carve the lines:
Use a small carving tool or the tip of your needle tool to deepen the lines for the eyes and lips. Since this is a minimalist style, keep the lines clean and uniform in depth. -
Refine the surface:
Go over the carved lines with a damp paintbrush to remove any clay burrs or crumbs. Smooth the bridge of the nose so it feels organic.
Add Dimension
Instead of carving lines, roll extremely thin ‘spaghetti’ coils of clay and slip them onto the surface for a raised, relief-style line art effect.
Step 3: Finishing Touches
-
Slow drying:
Loosely cover the piece with plastic to let it dry slowly over 24-48 hours. This prevents the rim from cracking away from the base. -
Sanding:
Once bone dry (if using kiln clay) or fully hardened (if air-dry), inspect the surface. Use fine-grit sandpaper to gently smooth any rough spots on the rim or the nose. -
Sealing or firing:
If using kiln clay, bisque fire and then clear glaze the interior for easy cleaning. If using air-dry clay, apply several coats of a high-quality sealant or clear resin to make the surface ash-resistant.
Enjoy your handmade piece that perfectly balances artistic flair with practical design


What Really Happens Inside the Kiln
Learn how time and temperature work together inside the kiln to transform clay into durable ceramic.
Coiled Rope Edge Ashtray
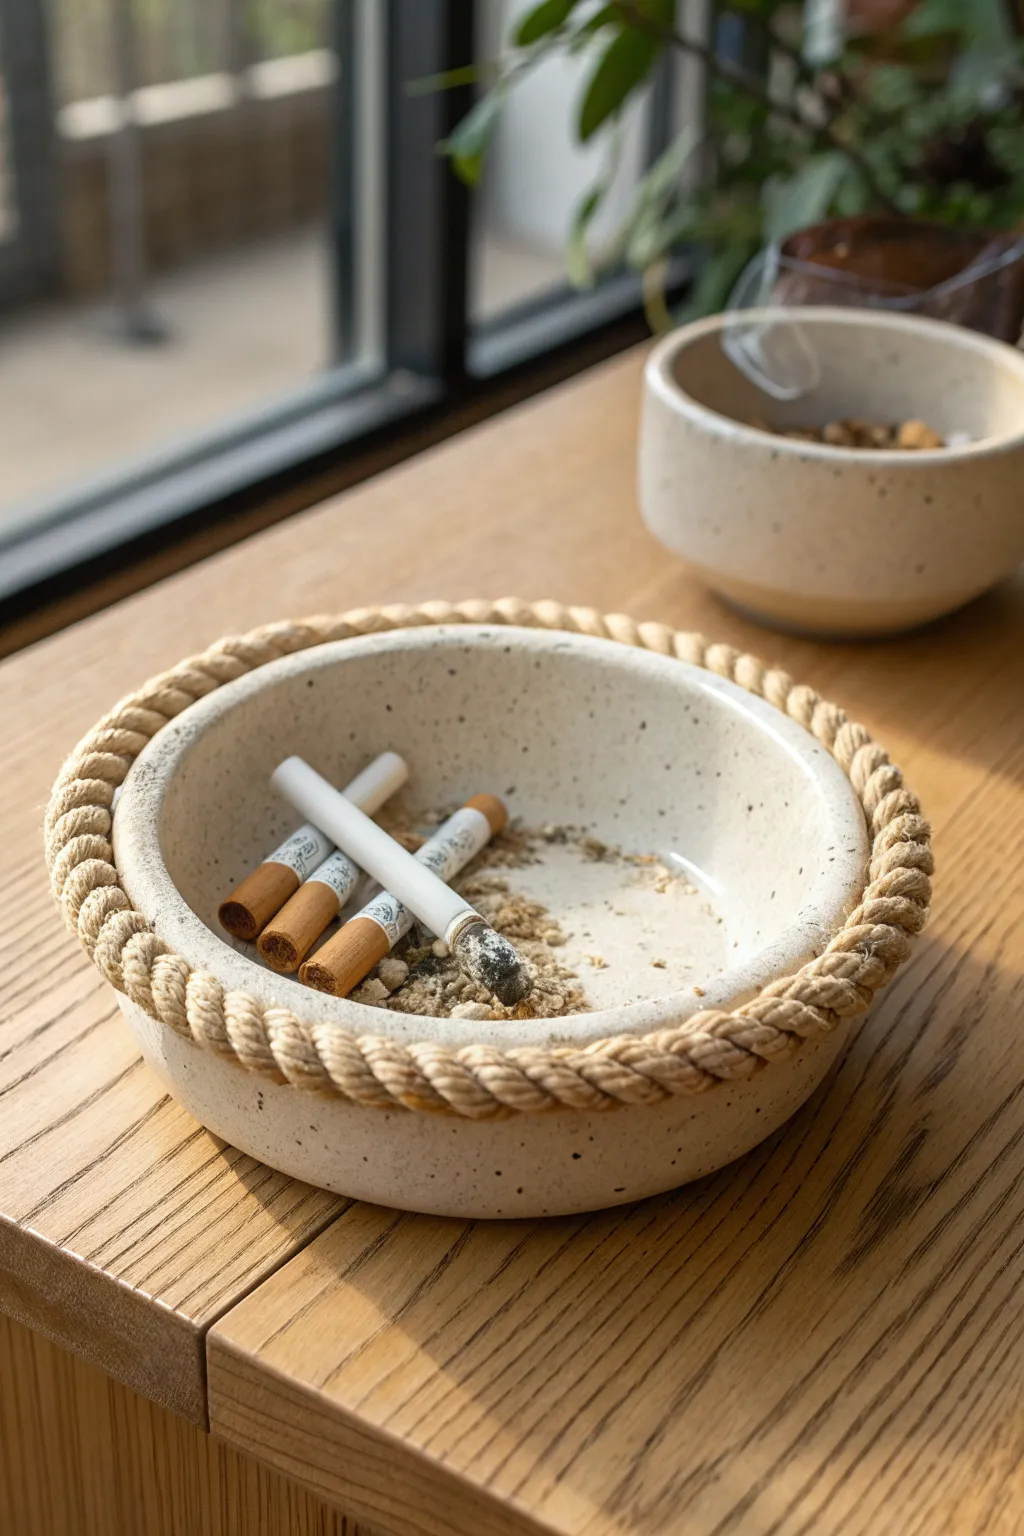
This rustic yet refined ashtray combines a smooth, speckled clay body with a distinctively textured rope rim, creating a beautiful contrast. The creamy white glaze and twisted edge give it a relaxed, coastal vibe perfect for a coffee table or outdoor patio.
How-To Guide
Materials
- Speckled buff stoneware clay (or white clay with speckles)
- Pottery wheel (or slab roller/rolling pin for hand-building)
- Rib tool (wood or rubber)
- Needle tool
- Scoring tool (or serrated rib)
- Slip (clay mixed with water)
- Sponge
- Clear matte or satin-white glaze
- Kiln
Step 1: Forming the Base Dish
-
Prepare the clay:
Begin by wedging about 1.5 lbs of speckled stoneware clay to remove air bubbles. This clay body is essential for achieving that natural, peppered look in the final piece. -
Throw the base form:
Center the clay on the wheel and open it up to a width of approximately 5-6 inches. Pull the walls up to create a shallow bowl shape, about 2 inches high. -
Refine the walls:
Use a rib tool to smooth the interior curve, ensuring a seamless transition from the floor to the wall. The walls should be sturdy and thick enough to support the rope rim later, about 1/4 inch thick. -
Trim the rim:
Use a needle tool or wooden knife to trim the rim flat and level. This provides a clean platform for attaching the decorative coil. -
Dry to leather hard:
Wire cut the pot from the wheel bat and allow it to dry until it is leather hard. It should be firm enough to handle without warping but still cool to the touch. -
Trim the foot:
Flip the leather-hard bowl over, center it on the wheel, and trim a neat foot ring. This adds elegance and visual lift to the piece.
Step 2: Creating the Rope Texture
-
Roll the coils:
Take fresh clay and roll out two long, even snakes, roughly the thickness of a pencil. They need to be long enough to encircle the entire rim of your bowl. -
Twist the rope:
Lay the two coils side-by-side. Gently twist them around each other to create a two-ply rope effect. Try to keep the twist tightness consistent along the entire length. -
Score the rim:
Heavily score (scratch) the flat top rim of your leather-hard bowl. Apply a generous amount of slip to the scored area. -
Attach the rope:
Carefully place the twisted clay rope onto the slipped rim. Gently press it down to ensure a good bond, being careful not to squash the beautiful twisted texture. -
Join the ends:
Where the two ends of the rope meet, cut them at an angle and blend the clay together carefully so the ‘rope’ appears to be one continuous loop. I like to use a tiny bit of slip here to hide the seam. -
Secure the underside:
Use a small modeling tool or your fingertip to gently blend the underside of the rope coil onto the exterior wall of the bowl. This ensures it won’t pop off during firing.
Twist Unraveling?
If your clay rope tries to untwist while attaching, roll the coils slightly wetter than usual. The extra moisture keeps the clay plastic and helps hold the twist shape better.
Step 3: Finishing and Glazing
-
Bisque fire:
Once the piece is bone dry, load it into the kiln for a bisque firing (usually Cone 04). This hardens the clay and prepares it for glazing. -
Wax the foot:
Apply wax resist to the bottom foot ring to prevent glaze from sticking to the kiln shelf. -
Glaze application:
Dip the entire piece into a satin-white or clear matte glaze. A translucent or light-colored glaze is best because it allows the natural clay speckles to show through. -
Check the crevices:
Inspect the twisted rope area. If the glaze is too thick in the deep crevices of the twist, the details will be lost. Use a clean, slightly damp brush to wipe away excess glaze from the recesses. -
Glaze fire:
Fire the piece again to the maturation temperature of your specific clay and glaze (typically Cone 5 or 6 for stoneware).
Highlight the Texture
Use a glaze that ‘breaks’ over edges. This type of glaze naturally thins out on high points (the rope ridges) and pools in crevices, accentuating the twisted design.
Now you have a durable, distinctively textured piece ready to add character to any table setting
Octopus Rim Ashtray With Tentacle Holders
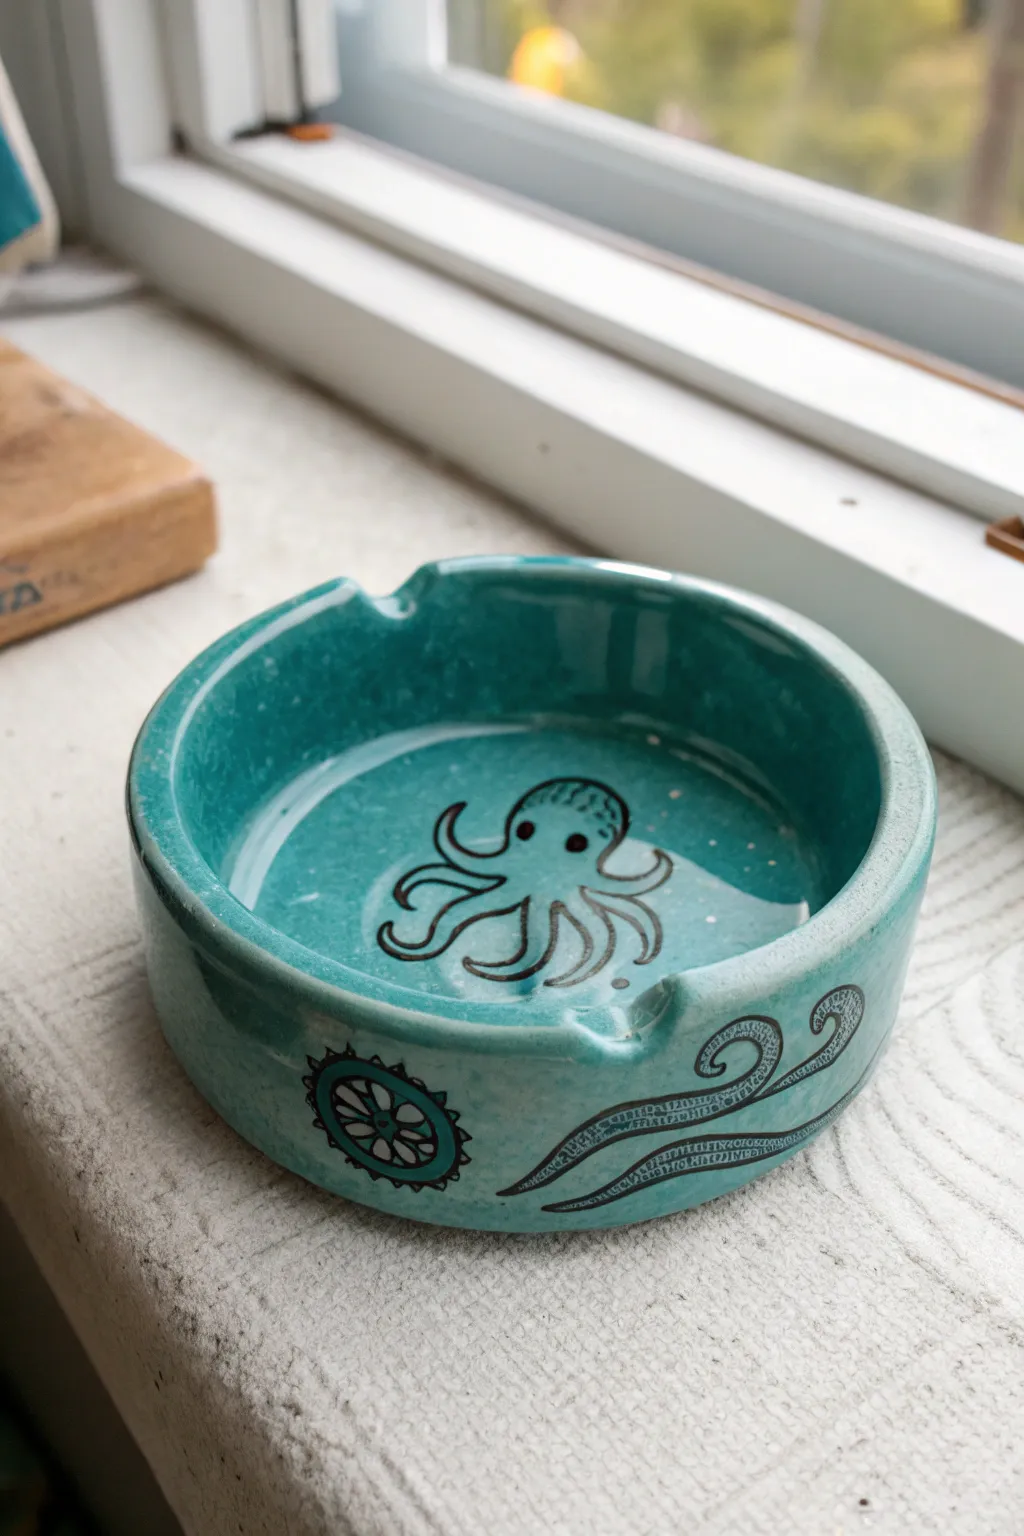
Bring the mysteries of the deep to your tabletop with this charming teal ashtray featuring a hand-drawn octopus rising from the center. The smooth, glossy finish combined with quirky tentacle details along the side makes this a functional piece that doubles as striking decor.
Step-by-Step Tutorial
Materials
- White stoneware or porcelain clay body
- Rolling pin and canvas mat
- Circle template or compass
- Needle tool
- Fettling knife
- Rib tool (wooden or rubber)
- Black underglaze pencil or fine-tip underglaze applicator
- Teal celadon or semi-transparent glaze
- Sponge
- Pottery wheel (optional, can be hand-built)
- Kiln
Step 1: Forming the Basin
-
Prepare the Clay:
Begin by wedging about 1-1.5 lbs of white stoneware clay to remove any air bubbles. This ensures your canvas is smooth for the drawing later. -
Roll the Slab:
Roll out a slab of clay to an even thickness of about 1/4 inch. If you are hand-building, cut a perfect circle about 5 inches in diameter for the base. -
Create the Walls:
Cut a long rectangular strip for the wall, roughly 1.5 inches tall. Score and slip the edge of the base and the bottom of the strip, then attach them firmly to create a straight-walled cylinder. -
Smooth the Seams:
Use a rib tool to smooth the connection point on both the interior and exterior. I find that compressing the rim at this stage prevents future cracking. -
Shape the Notches:
While the clay is leather hard, use a round tool or your finger to gently press down two or three indents on the rim to serve as cigarette rests.
Keep it Clean
Work cleanly with the underglaze pencil. Smudges can be hard to erase once applied, so rest your hand on a piece of paper.
Step 2: Adding the Illustrations
-
Dry to Leather Hard:
Let the piece dry until it is firm leather hard. The surface needs to be sturdy enough to take the underglaze pencil without gouging. -
Draft the Octopus:
Using a very light touch with a regular pencil, sketch the outline of the octopus in the center of the bowl. Don’t worry, the graphite will burn off in the kiln. -
Line the Interior:
Trace over your sketch with a black underglaze pencil or a fine-tip applicator bottle. Draw the bulbous head and eight wavy legs radiating outward. -
Detail the Face:
Add two small, solid black circles for the eyes. This simple addition gives the creature immediate personality. -
Decorate the Exterior:
On the outside wall, draw a sweeping, wavy tentacle shape wrapping horizontally around the pot. -
Add Exterior Motifs:
Draw stylized suction cup circles or gear-like shapes near the tentacle to fill negative space and add visual interest.
Step 3: Glazing and Firing
-
Bisque Fire:
Load the bone-dry piece into the kiln and bisque fire it to cone 04. This sets the underglaze drawing permanently. -
Clean the Surface:
Wipe the bisque-fired piece with a damp sponge to remove any dust that might resist the glaze. -
Apply the Glaze:
Dip the entire piece into a teal celadon or semi-transparent turquoise glaze. The transparency is crucial so your black drawing shows through clearly. -
Wipe the Foot:
Carefully sponge off any glaze from the very bottom of the piece so it doesn’t fuse to the kiln shelf. -
Glaze Fire:
Fire the piece again to the maturity temperature of your clay and glaze, typically cone 5 or 6 for stoneware.
Tentacle Texture
Instead of drawing the outside tentacle, use a coil of clay to add a 3D relief tentacle that users can actually feel.
Once cooled, your glossy teal creation is ready to hold ash or trinkets with nautical style

TRACK YOUR CERAMIC JOURNEY
Capture glaze tests, firing details, and creative progress—all in one simple printable. Make your projects easier to repeat and improve.
Eyeball Cluster “Trippy” Ashtray
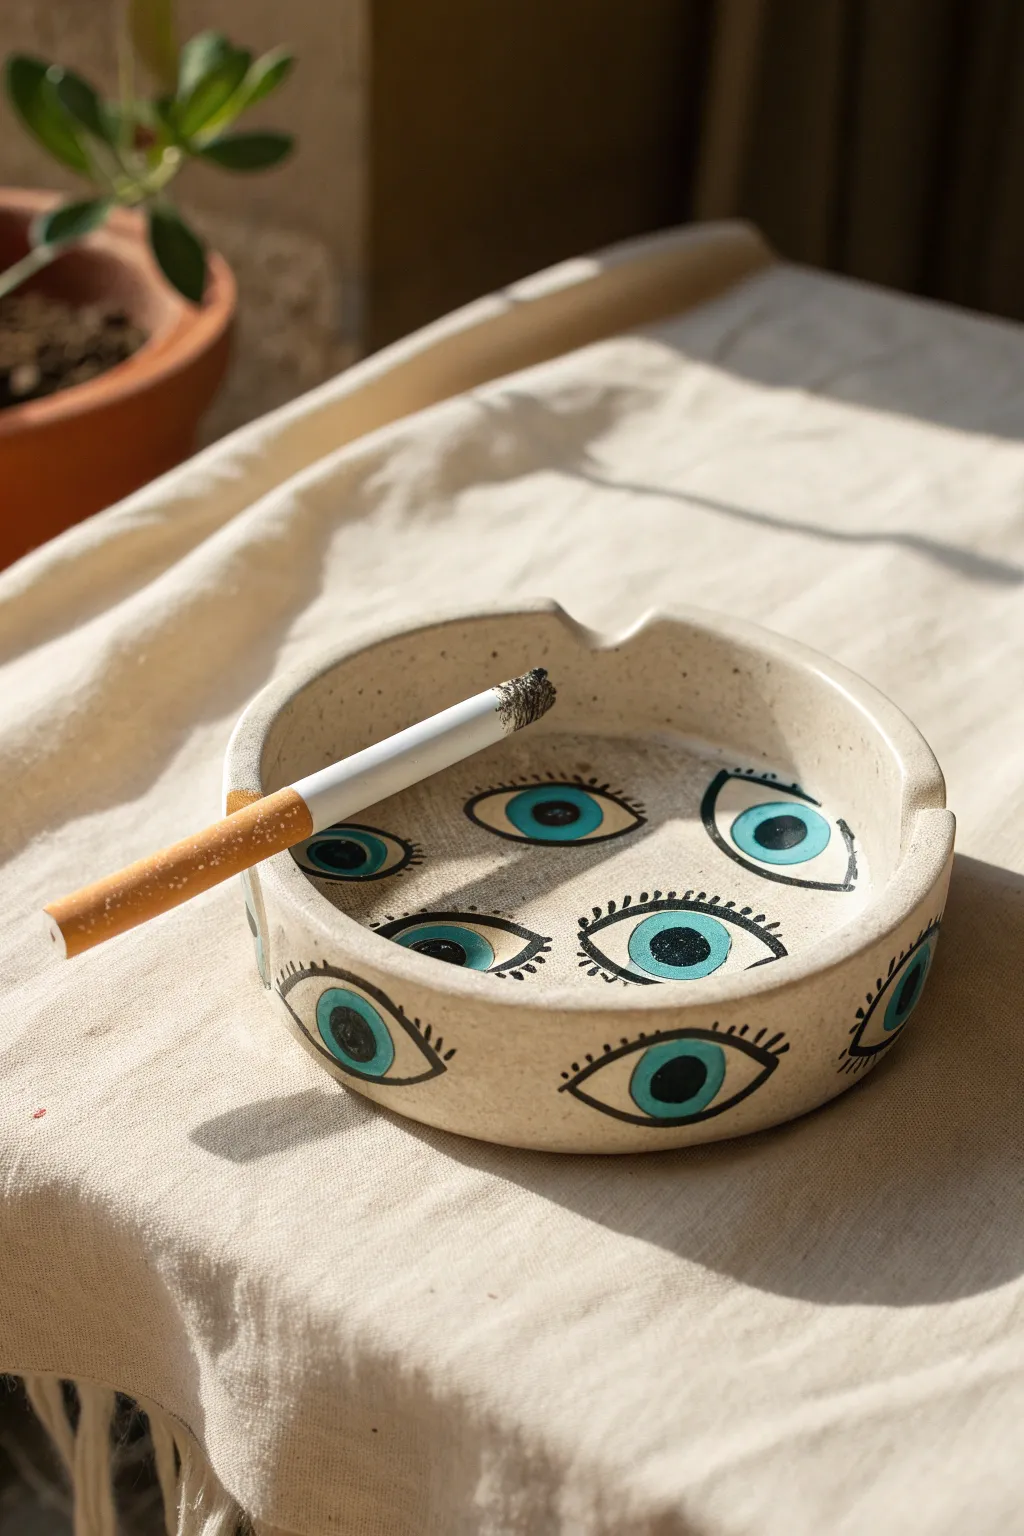
This whimsical, surveillance-themed ashtray transforms a functional object into a conversation piece with its mesmerizing cluster of graphic eyeballs. The sandy, speckled clay body provides the perfect neutral canvas for the striking turquoise irises and bold black lashes.
Step-by-Step
Materials
- Speckled stoneware clay (mid-fire)
- Potter’s wheel (or rolling pin for hand-building)
- Needle tool
- Sponge
- Loop tool for trimming
- Black underglaze
- Turquoise or Teal underglaze
- Small round detail brush (size 0 or 1)
- Medium round brush (size 4)
- Clear matte or satin glaze
- Kiln
Step 1: Forming the Base
-
Wedge the clay:
Start by wedging a pound of speckled stoneware clay to remove any air bubbles. This ensures a smooth throwing or building process and prevents kiln explosions. -
Center and open:
If using a wheel, center your clay ball and open it up to create a flat floor about 4-5 inches wide, leaving the base about 1/4 inch thick. -
Pull the walls:
Pull up short, vertical walls. Aim for a height of about 1.5 inches. Keep the rim slightly thick and rounded for durability and a pleasant aesthetic. -
Refine the shape:
Use a rib tool to smooth the interior floor and compress the walls. The goal is a clean, cylindrical shape with straight sides. -
Add cigarette rests:
While the clay is still wet but sturdy, use your finger or the handle of a tool to gently press down two or three indentations into the rim. Smooth these notches with a sponge to ensure they are curved enough to hold a cigarette. -
Leather hard drying:
Allow the piece to dry to a leather-hard state. This usually takes a day lightly covered in plastic.
Step 2: Trimming and Painting
-
Trim the foot:
Flip the leather-hard piece over and center it on the wheel. Use a loop tool to trim away excess weight from the bottom and create a clean, defined foot ring. -
Smooth the surface:
Wipe the entire piece down with a slightly damp sponge to remove any trimming crumbs and create a pristine surface for painting. -
Paint the irises:
Using the medium round brush and turquoise underglaze, paint simple circles scattered randomly across the interior floor, interior walls, and exterior walls. I find it looks best if some overlap the corners or vary slightly in size. -
Apply second coat:
Let the first layer of turquoise dry for a few minutes, then apply a second coat to ensure the color fires opaque and vibrant. -
Outline the sclera:
Switch to the small detail brush and black underglaze. Paint an almond or football shape around each turquoise circle to define the white of the eye (using the raw clay color as the ‘white’). -
Add pupils:
Paint a solid black circle in the exact center of each turquoise iris to create the pupil. -
Detail the lashes:
Carefully paint short, tick-mark lashes radiating outward from the top and bottom of the almond outlines. Keep your hand steady and use just the tip of the brush. -
Outline the iris:
Finally, add a thin black ring around the turquoise iris to separate it from the sclera, giving the eye a sharp, graphic pop.
Steadier Brushstrokes
Rest your pinky finger on the dry surface of the clay to stabilize your hand while painting the fine black eyelashes.
Step 3: Firing and Glazing
-
Bisque fire:
Let the piece bone dry completely (several days), then load it into the kiln for a bisque firing (usually cone 04). -
Wax resist:
Once cool, wipe the bisque ware with a damp sponge to remove dust. Apply wax resist to the bottom foot ring to keep glaze off the kiln shelf. -
Apply clear glaze:
Dip the entire ashtray into a clear matte or satin glaze. A glossy glaze works too, but a satin finish feels more modern and highlights the stone texture. -
Final glaze fire:
Fire the piece again to the maturation temperature of your specific clay and glaze (typically cone 5 or 6 for stoneware).
Smudged Underglaze?
If you smudge the black line, let it dry completely and gently scratch the mistake off with a needle tool rather than wiping it.
Once cooled from the kiln, your mystical ashtray is ready to keep a watchful eye on your table
Melting Smile Ashtray
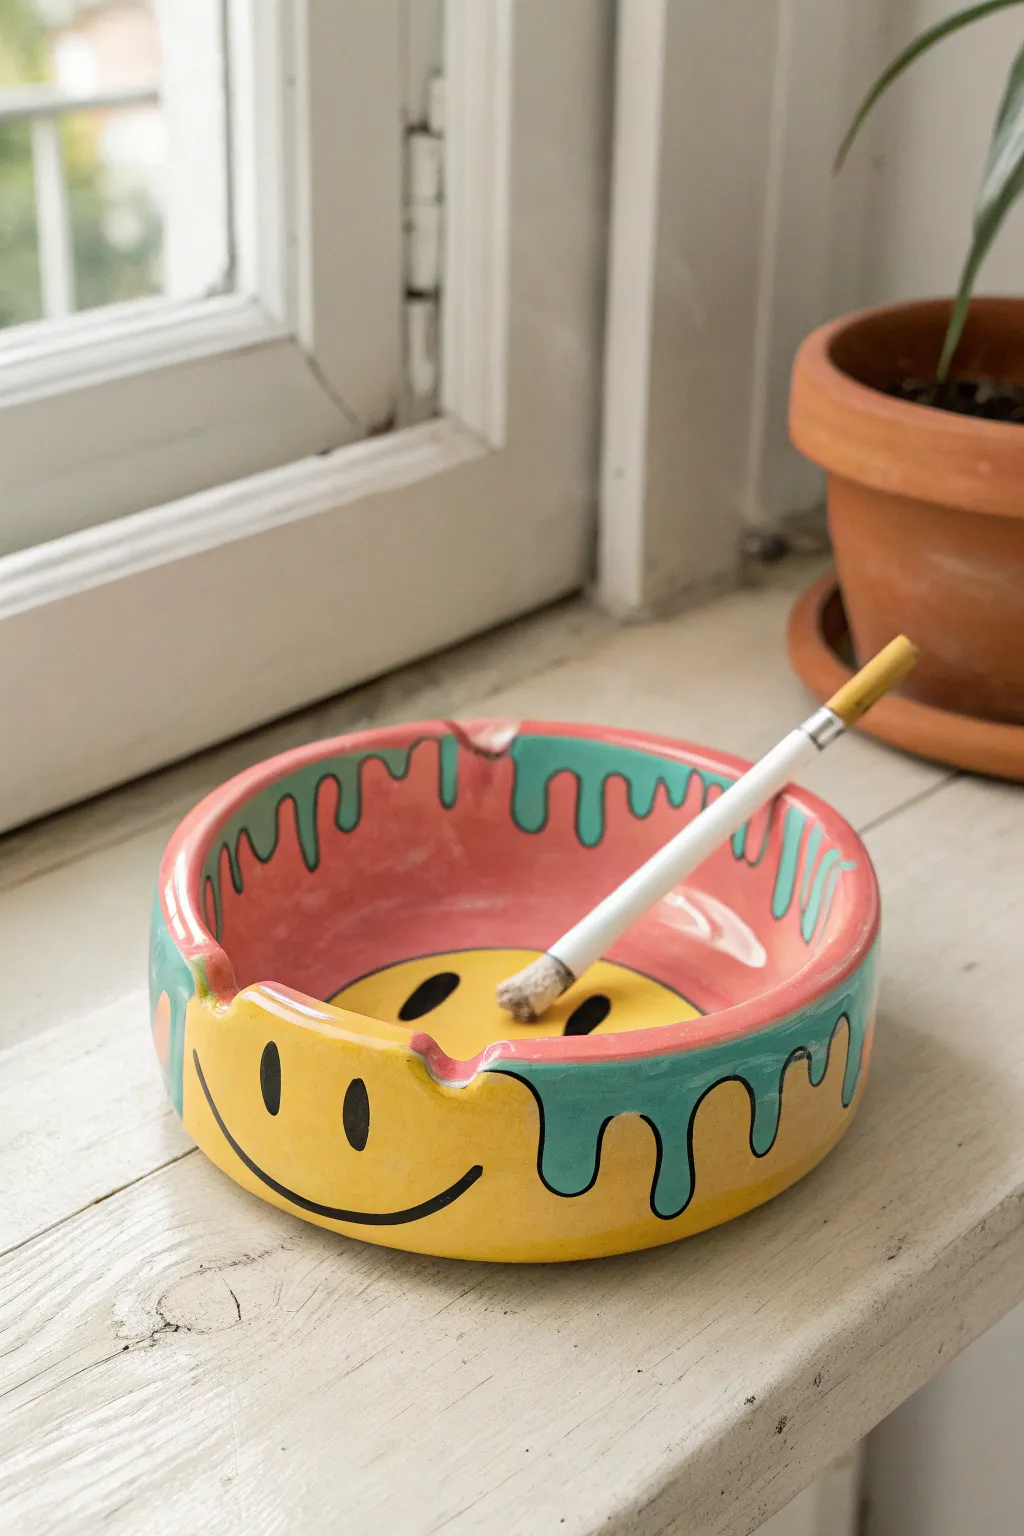
This playful project combines a classic smiley face motif with a surreal, dripping twist. The finished piece features a cheerful yellow base with a contrasting pink interior, all brought together by a turquoise drip glaze effect along the rim.
Detailed Instructions
Materials
- Air-dry clay or polymer clay (white)
- Clay rolling pin
- Circle template or round bowl (approx. 4-5 inches diameter)
- Craft knife or clay needle tool
- Sponge and water bowl
- Acrylic paints (Yellow, Hot Pink, Turquoise/Teal, Black)
- Fine detail paintbrush
- Medium flat paintbrush
- High-gloss varnish or sealant (waterproof if possible)
- Sandpaper (fine grit)
Step 1: Sculpting the Base
-
Prepare the clay:
Begin by kneading a fist-sized ball of clay until it is warm and pliable. This conditioning step is crucial to prevent cracks later on. -
Roll the slab:
Roll the clay out into an even slab, aiming for a thickness of about 1/4 inch. Try to keep the thickness consistent so the ashtray sits flat. -
Cut the base:
Use your circle template or a bowl to trace and cut out a perfect circle from the slab. This will be the floor of your ashtray. -
Form the walls:
Roll a long snake or coil of clay, roughly the same thickness as your base. Place this coil on top of the outer edge of your circle base to form the wall. -
Blend the seams:
Use your thumb or a modeling tool to blend the coil downwards into the base, both on the inside of the bowl and the outside. The seams should completely disappear. -
Smooth the surfaces:
Dip a sponge lightly in water and run it over the entire piece to smooth out fingerprints and bumps. I find this creates a nice, professional surface for painting later. -
Create cigarette rests:
Use your thumb or the side of a rounded tool to gently press indentations into opposite sides of the rim. These notches will hold cigarettes in place. -
Dry and sand:
Allow the clay to dry completely according to package instructions (usually 24-48 hours). Once dry, gently sand any rough spots or sharp edges with fine-grit sandpaper.
Smooth Operator
For the smoothest paint application, lightly sand your base coat layers with extremely fine sandpaper before applying details. It feels like painting on glass.
Step 2: Painting and Finishing
-
Base coat interior:
Paint the entire interior of the bowl (except the very bottom center if you wish) and the upper inner rim with the Hot Pink acrylic paint. You may need two coats for full opacity. -
Base coat exterior:
Paint the exterior walls and the outer bottom with a bright Yellow acrylic paint. Ensure the yellow meets the pink seamlessly at the top edge. -
Paint the bottom face:
In the interior center of the bowl, paint a yellow circle. Add two black ovals for eyes and a wide U-shape for the smile to create the interior face. -
Draft the drip pattern:
Using a pencil, lightly sketch a wavy, dripping line around the top exterior of the rim. Vary the length of the ‘drips’ to make it look organic and melting. -
Paint the drips:
Fill in the area above your pencil line—covering the rim and the top portion of the exterior wall—with Turquoise/Teal paint. Use a steady hand to make the drip edges crisp against the yellow and pink. -
Outline the drips:
For a pop art look, use a very fine liner brush and black paint to outline the turquoise drips. This separates the ‘melting’ section from the rest of the ashtray. -
Add the exterior face:
On the yellow section of the exterior wall, paint a large smiley face using black paint. The smile can curve along the bottom of the bowl for a nice effect. -
Seal the piece:
Once all paint is fully dry, apply 2-3 coats of high-gloss varnish. This protects the paint from ash and gives it a finished ceramic look.
Cracks happen
If small cracks appear as the clay dries, mix a tiny bit of fresh wet clay with water to make a paste (slip) and fill them in before painting.
Enjoy your groovy, functional piece of art
Cereal Bowl Illusion Ashtray
This clever ashtray disguises itself as a charming, speckled breakfast bowl, perfect for adding a touch of whimsy to your coffee table. The high-gloss glaze and realistic cereal loop accessories make this piece a functional conversation starter that blends seamlessly into a cozy morning aesthetic.
Step-by-Step Tutorial
Materials
- White stoneware or polymer clay (oven-bake)
- Pottery wheel (if throwing) or rolling pin (if hand-building)
- Sponge and bucket of water
- Pottery trimming tools (loop tool, needle tool)
- Modeling tool or toothpick
- Speckled clay body or ‘speckled egg’ glaze
- Clear high-gloss glaze
- Various shades of brown/tan acrylic paint or underglaze
- Small stiff paintbrush
- Toothbrush (for speckling)
- Kiln (if using stoneware) or Oven (if using polymer)
Step 1: Forming the Bowl Base
-
Prepare your clay:
Begin by wedging your white clay thoroughly to remove air bubbles. Whether you are throwing on a wheel or hand-building, you’ll need a ball roughly the size of a large orange. -
Shape the vessel:
If using a wheel, center the clay and pull up the walls into a classic, low-profile bowl shape. Keep the walls relatively thick at the rim, about 1/4 inch, to mimic sturdy stoneware. -
Hand-building alternative:
If hand-building, roll out a slab to 1/4 inch thickness. Draper it over a mold or bowl to form the shape, smoothing the clay gently with a rib tool to erase any canvas textures. -
Refine the rim:
Using a sponge or a piece of chamois, round over the lip of the bowl. This soft curve is essential for that comfortable crockery feel. -
Create the foot ring:
Once the clay is leather-hard, trim the bottom to create a defined foot ring. This elevates the piece and gives it a professional ‘store-bought’ silhouette. -
Add the ridge detail:
Using a small loop tool or modeling stick, verify the exterior has that subtle, indented ring just below the rim, characteristic of stackable diner-style bowls.
Glaze Hack
If you don’t have speckled clay, mix coarse black pepper or dry coffee grounds into polymer clay for instant, realistic organic speckling.
Step 2: Speckling and Glazing
-
Bisque fire or bake:
Follow your clay manufacturer’s instructions to harden the piece. For polymer clay, bake at the recommended temperature; for ceramic, fire to bisque cone. -
Apply the base color:
If your clay wasn’t naturally cream-colored, apply a creamy off-white underglaze or acrylic paint to the entire surface. -
Create the speckles:
Dip an old toothbrush into brown iron oxide wash or thinned brown acrylic paint. I like to test the spray pattern on paper first, then run your thumb across the bristles to flick tiny speckles across the bowl’s exterior and interior. -
Seal the surface:
Once the speckles are dry, apply 2-3 coats of a high-gloss clear glaze (or gloss varnish for polymer). This gives it that wet, ceramic shine depicted in the photo.
Milk Illusion
Pour a layer of white resin into the bottom of the bowl and let it cure. It mimics milk perfectly and serves as a functional ash catcher.
Step 3: Crafting the Cereal Loops
-
Mix cereal colors:
Take small amounts of clay and tint them into varying shades of toasted grain—tan, light brown, and pale oat colors. -
Roll the loops:
Roll thin snakes of clay, roughly the thickness of a pencil. Cut them into small segments and join the ends to form rings. -
Texturize the loops:
Gently press a piece of sandpaper or a stiff brush against the raw clay rings to mimic the porous texture of real cereal. -
Bake or fire accessories:
Harden these small pieces separately. Don’t glaze them; the matte texture contrasts beautifully with the glossy bowl. -
Arrangement:
Scatter the finished clay loops around the bowl or glue a few permanently to the rim to suggest spillage, blending the line between art object and breakfast.
Enjoy using your deceptive new creation that brings a playful morning vibe to any time of day
Potion Cauldron Ashtray With Glossy “Liquid”
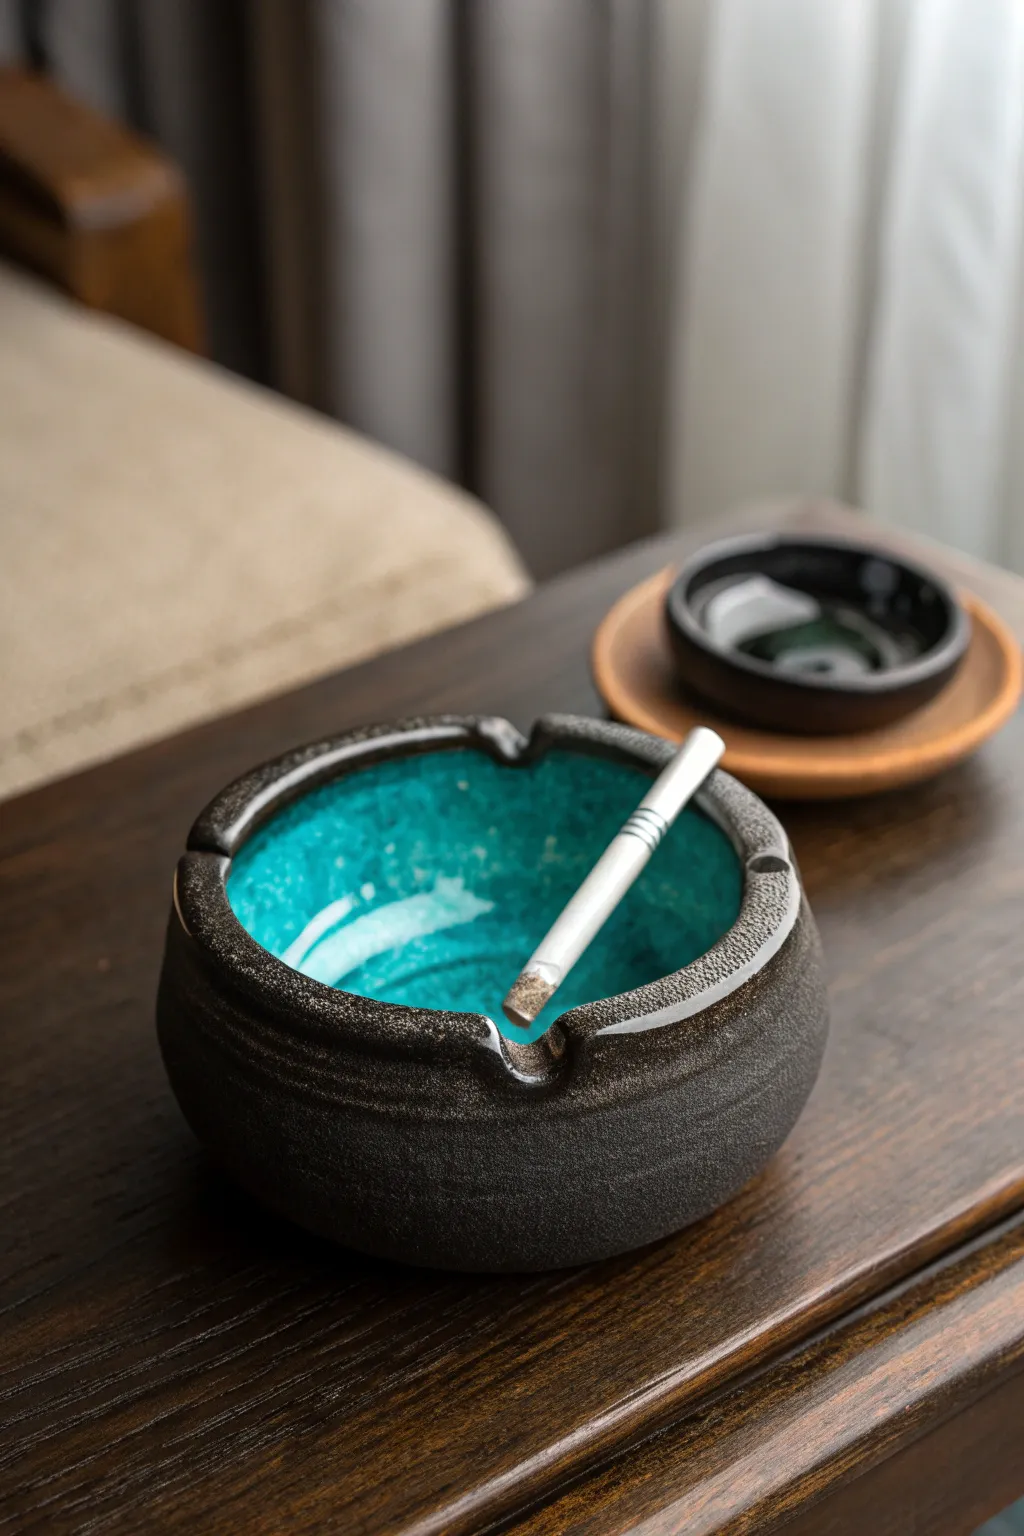
Transform a simple lump of clay into a bewitching accessory that looks like a miniature cauldron brewing a glowing turquoise potion. The contrast between the rough, dark stoneware exterior and the glossy, pooled interior glaze creates a striking visual effect perfect for fantasy lovers.
Step-by-Step Guide
Materials
- Dark stoneware clay (speckled or black mountain)
- Pottery wheel (optional, can be hand-built)
- Needle tool
- Rib tool (wood or rubber)
- Loop trimming tool
- Sponge
- High-gloss turquoise or teal reactive glaze
- Clear glaze (optional top coat)
- Kiln access
Step 1: Shaping the Cauldron
-
Prepare the Clay:
Begin by wedging a softball-sized ball of dark stoneware clay to remove air bubbles. Since the final look relies on a gritty texture, a clay body with grog or speckles works best. -
Form the Base:
Throw the clay on the wheel, centering it firmly. If hand-building, pinch out a thick, rounded bowl shape, ensuring the walls are even and substantial. -
Create the Cauldron Curve:
Pull the walls up, allowing them to curve slightly inward at the top to create a rounded, enclosed ‘cauldron’ feel rather than an open bowl shape. Keep the rim thick and sturdy. -
Separate the Rim:
Using a wooden rib or just your finger, create a slight delineation or groove about half an inch below the rim on the exterior. This visual break separates the ‘lip’ of the cauldron from the body. -
Carve the Notches:
While the clay is leather hard, use your thumb or a round tool to gently press down three or four equidistant notches into the rim for resting cigarettes. Smooth the edges of these indentations so they look intentional and worn, not sharp. -
Refine the Exterior:
Unlike typical pottery where smoothness is key, I like to leave the exterior slightly rough. You can sponge it lightly to remove sharp burrs, but maintain that natural, earthy texture.
Glaze Crawling?
If your interior glaze pulls away leaving bare spots (crawling), you likely applied it too thickly or over dust. Wash the bisque piece and let it dry fully before reglazing.
Step 2: Glazing the Potion
-
Bisque Fire:
Once bone dry, fire the piece to cone 04 (or your clay’s specific bisque temperature) to prepare it for glazing. -
Wax the Exterior:
Apply wax resist to the entire exterior surface and the top of the rim. We want the dark, raw clay to remain unglazed to contrast with the bright interior. -
Select the Potion Color:
Choose a high-gloss reactive glaze in turquoise, teal, or emerald. Reactive glazes are crucial here because they break and pool, mimicking the look of swirling liquid. -
Pour the Interior:
Pour the glaze inside the bowl, swirl it around to coat every inch of the inner curve, and pour out the excess. Ensure the coverage is thick enough to create depth but not so thick it crawls. -
Clean the Rim:
Use a damp sponge to wipe away any glaze that dripped onto the rim or the notches. The transition from the colorful ‘liquid’ to the dark rim should be crisp. -
Add a Second Layer:
For that deep, pooling effect at the bottom, brush a second coat of glaze just in the very center well of the ashtray. This adds dimension to the ‘potion’. -
Final Fire:
Fire the piece to the maturity temperature of your clay and glaze (usually Cone 5 or 6 for stoneware). Let the kiln cool completely before opening to prevent thermal shock.
Make it Bubble
Before the final firing, sprinkle a few tiny shards of clear or white glass into the bottom center. They will melt into the glaze, creating ‘bubbles’ in your potion.
Now you have a functional piece of art that looks like it was pulled straight from a wizard’s laboratory.
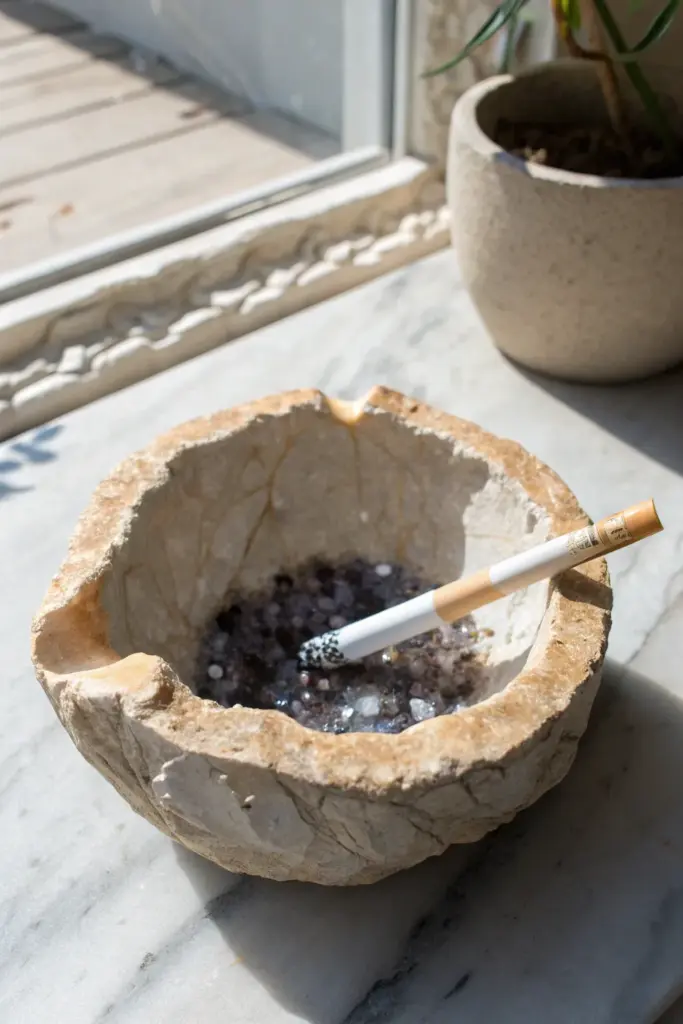
Crystal Geode Ashtray With Sparkly Interior
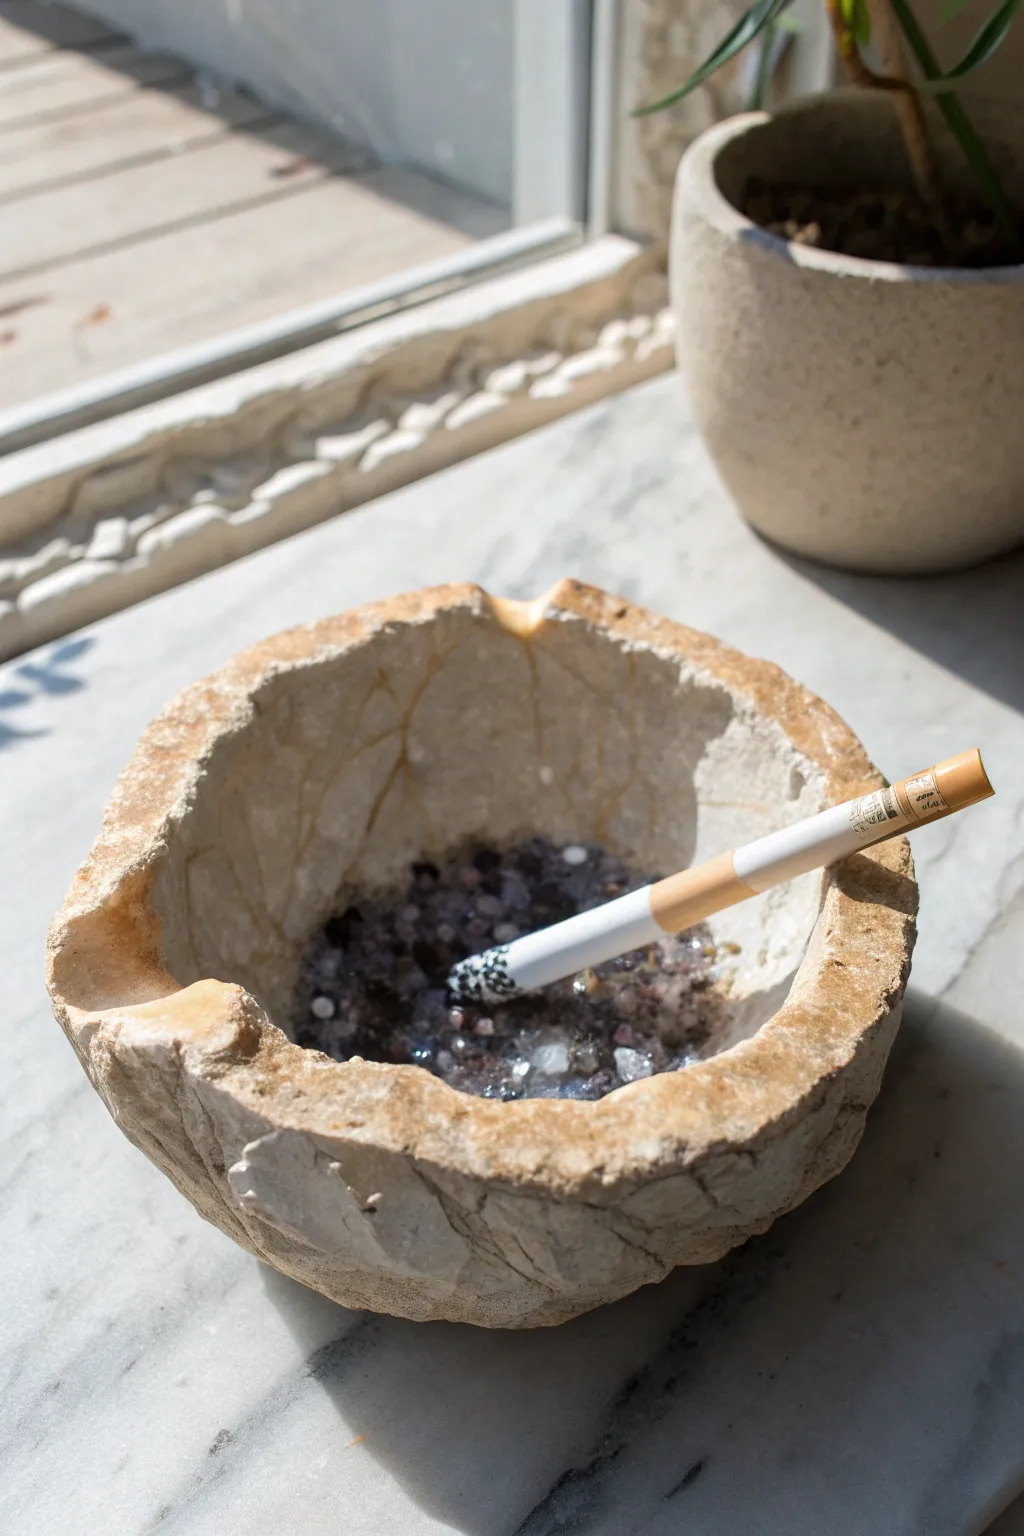
This unique project mimics the raw beauty of a split geode, combining a rugged, textured clay exterior with a mesmerizing, sparkling interior. It serves as both a functional ashtray and a striking conversation piece for any coffee table.
Detailed Instructions
Materials
- Air-dry clay (stone or grey color)
- Crushed glass pieces or dark crystal chips (purple/black mix)
- Mod Podge or strong craft glue
- Glossy varnish or resin
- Sculpting tools (hook tool, needle tool)
- Small bowl (for shaping)
- Plastic wrap
- Acrylic paint (thinned beige/tan wash)
- Sponge or stiff brush
- Sandpaper (medium grit)
Step 1: Sculpting the Base
-
Prepare the mold:
Begin by selecting a small bowl that matches the desired size of your ashtray. Line the inside completely with plastic wrap to prevent sticking, leaving plenty of overhang to lift the clay out later. -
Form the clay slab:
Roll out a thick slab of air-dry clay, aiming for about 1/2 inch in thickness. You don’t want this too thin, or you won’t be able to achieve the deep rock textures later. -
Shape the bowl:
Press the clay slab into your lined bowl, pushing firmly against the bottom and sides to take the shape. Don’t worry about smoothing the rim; a rough edge is actually better for this organic look. -
Create the textures:
Using a hook tool or simply your fingers, tear away chunks of clay from the rim to create an uneven, jagged ‘broken stone’ effect. -
Carve the exterior:
Take the clay form out of the bowl carefully. On the outside surfaces, use a sculpting tool to carve deep fissures and cracks, mimicking the exterior of a raw rock. -
Add cigarette rests:
While the clay is still wet, use your thumb or a thick marker to gently press one or two indentations into the jagged rim to serve as rests.
Geode Authenticity
Mix two sizes of crushed glass. Use larger chunks in the center and fine ‘dust’ near the edges to mimic natural crystal growth patterns.
Step 2: Developing the Geode Effect
-
Initial drying:
Allow the clay to dry until it is leather-hard—firm to the touch but still cold. This usually takes about 24 hours depending on humidity. -
Apply the adhesive base:
Generously coat the bottom interior of the bowl with a thick layer of Mod Podge or craft glue. I find pouring a small pool works best to ensure the crystals sink in. -
Embed the crystals:
Pour your crushed glass or crystal chips into the glue. Press them down firmly so they are partially submerged, creating a dense, craggy floor. -
Add wall details:
For a natural geode look, dab glue sporadically up the sides of the inner wall and sprinkle a few smaller crystal chips there, so they look like they are growing out of the stone. -
Full cure:
Let the piece sit undisturbed for another 24-48 hours until the clay is bone dry and the glue has turned completely clear.
Step 3: Finishing Touches
-
Weathering the stone:
Mix a small amount of beige or tan acrylic paint with water to create a thin wash. Brush this over the exterior clay, letting the pigment settle into the carved cracks. -
Wipe back:
Immediately wipe the high points of the exterior with a damp sponge or cloth. This leaves the darker color in the recesses, highlighting the rock texture. -
Seal the crystals:
To ensure the crystals are heat resistant and won’t dislodge, pour a thin layer of resin or heavy gloss varnish over the crystal floor. -
Final coat:
Brush a matte varnish over the exposed clay parts to protect the material without making the ‘rock’ look unnaturally shiny, while leaving the crystal interior glassy and wet-looking.
Glow Up
Mix a tiny amount of glow-in-the-dark powder into your resin pour or glue. The crystals will charge in sunlight and emit a soft glow at night.
Once the final seal is dry, your geode ashtray is ready to bring a touch of earthy elegance to your space