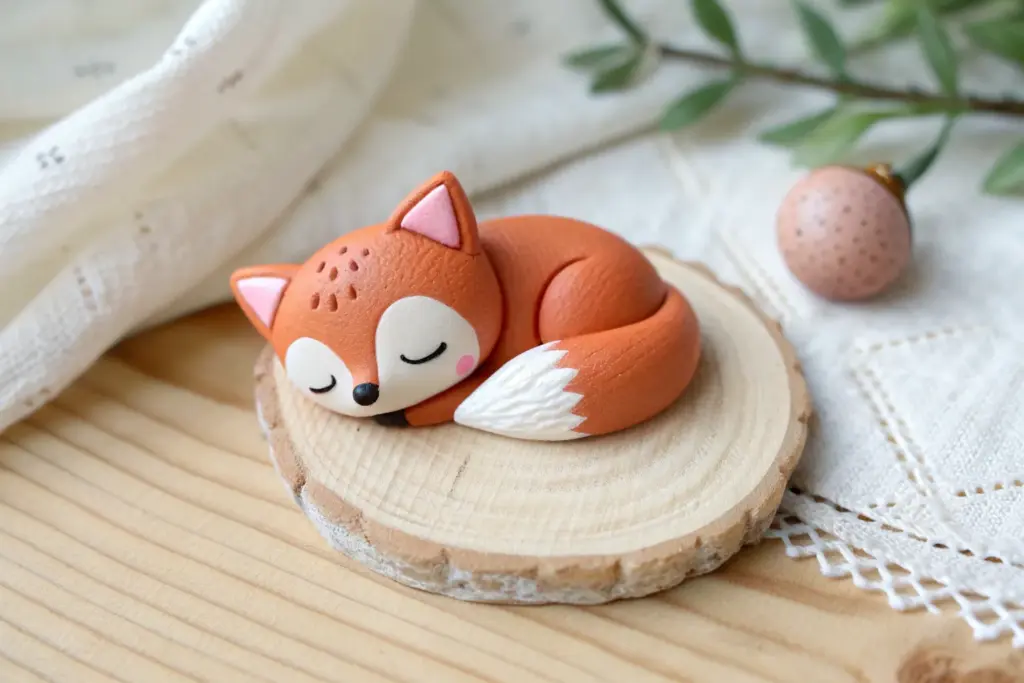
When you’re craving fresh clay art inspiration, the best clay ideas are the ones that feel cute, doable, and actually useful once they’re done. Here are my favorite beginner-friendly projects I keep coming back to in the studio, especially with air-dry clay and polymer clay.
Mini Animal Charms
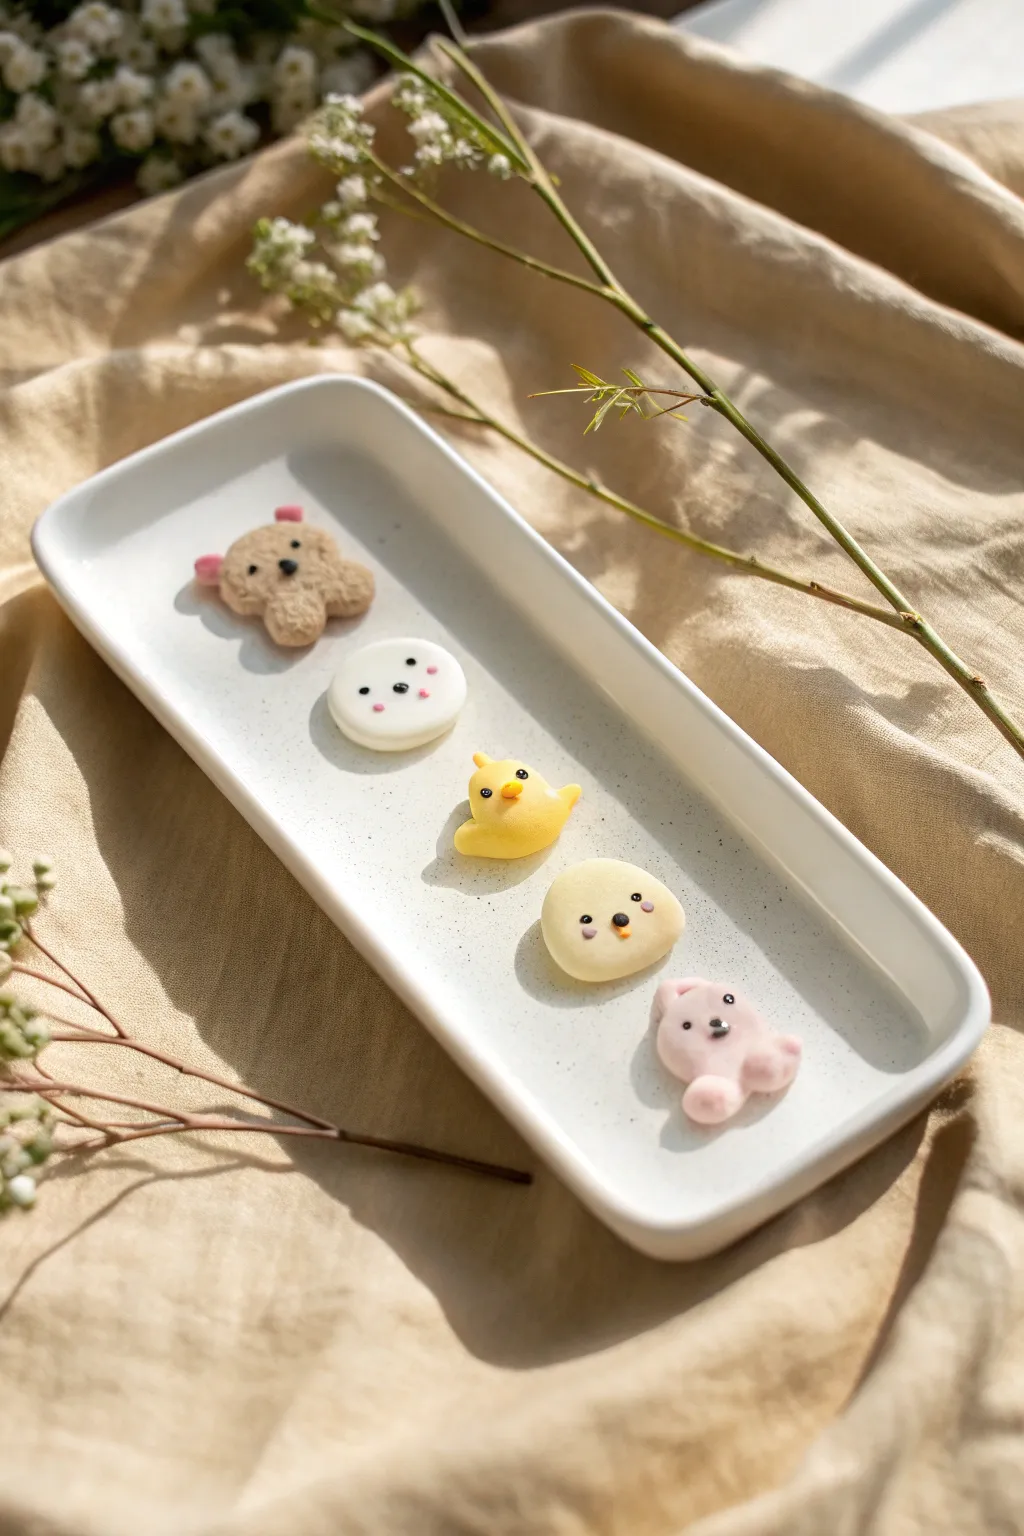
These miniature animal charms capture the soft, airy aesthetic of Japanese marshmallows with their matte finish and gentle pastel palette. Perfect for beginners, this project transforms simple spheres of clay into an adorable row of bears, chicks, and friends.
Step-by-Step
Materials
- Polymer clay or air-dry clay (light brown, white, lemon yellow, cream/ivory, pastel pink)
- Black acrylic paint or clay slip (for eyes/noses)
- Needle tool or toothpick
- Ball stylus tool (small)
- Clean work surface or ceramic tile
- Soft paintbrush
- Matte varnish (optional)
Step 1: Shaping the Brown Bear
-
Base Shape:
Start with a small ball of light brown clay, about the size of a large blueberry, and flatten it slightly to create a thick, rounded cushion shape. -
Adding Ears:
Roll two tiny brown balls for ears. Press them gently onto the top left and right of the head, blending the seam slightly at the back so they stay attached. -
Pink Accents:
Take two minuscule specks of pink clay and press them into the center of the brown ears to create the inner ear detail. -
Creating the Muzzle:
Roll a very small ball of the same brown clay (or slightly lighter if you prefer) and press it onto the center of the face for the snout area.
Clean Clay Tip
White and pastel clay attracts dust like a magnet. Keep a pack of baby wipes nearby and clean your hands thoroughly between colors to keep your pastels bright.
Step 2: Crafting the White & Yellow Friends
-
The White Roundie:
Roll a ball of white clay and flatten it just like the bear into a smooth disc. -
Yellow Chick Body:
For the middle yellow chick, shape a ball of lemon yellow clay. Pinch the tail end slightly to create a tiny point and flatten the bottom so it sits stable. -
Chick Wings:
Form two tiny teardrops of yellow clay. Press these against the sides of the chick body, smoothing them downwards to look like folded wings. -
The Cream Chick:
Create the fourth figure using cream or ivory clay. Keep this shape simple and round, similar to a mochi ball. -
Tiny Beaks:
Using a microscopic amount of orange or dark yellow clay, roll tiny cones and press them onto the centers of both the yellow and cream chick faces.
Turn Them into Magnets
Before baking or drying, embed a small neodymium magnet into the back of each figure. They are light enough to make adorable fridge decorations.
Step 3: The Pink Bear & Details
-
Pink Bear Body:
Roll a ball of pastel pink clay. Flatten it gently. Pinch two small ears at the top directly from the main ball, rather than attaching separate pieces, for a smoother look. -
Arm Details:
Roll two small sausages of pink clay and attach them to the bottom front of the figure to look like little paws or legs sticking out. -
Pre-Baking Texture:
I like to gently tap the surface of all figures with a clean finger or a toothbrush to remove fingerprints and give them a soft, matte texture. -
Baking or Drying:
Bake according to your polymer clay package instructions (usually 275°F/135°C for 15-30 mins) or let air-dry clay harden completely for 24 hours.
Step 4: Painting the Faces
-
Preparing Paint:
Squeeze a drop of black acrylic paint onto a palette. You need a very fine point for this. -
Dotting Eyes:
Dip a needle tool or toothpick into the black paint. Carefully dot two wider set eyes on the white face, and closer set eyes on the bear and chicks. -
Nose Details:
Add a tiny triangular nose to the brown and pink bears using the very tip of your tool. -
Blush Cheeks:
Using a watered-down pink paint or actual pink chalk pastel dust, dab tiny pink cheeks onto the white round character and the cream chick. -
Finishing:
Once the paint is fully dry, you can leave them matte for a sugar-paste look, or apply a matte varnish for protection.
Arranging these tiny friends on a tray completes the sweet, confectionery look of your new collection


Chibi Animal Figurines
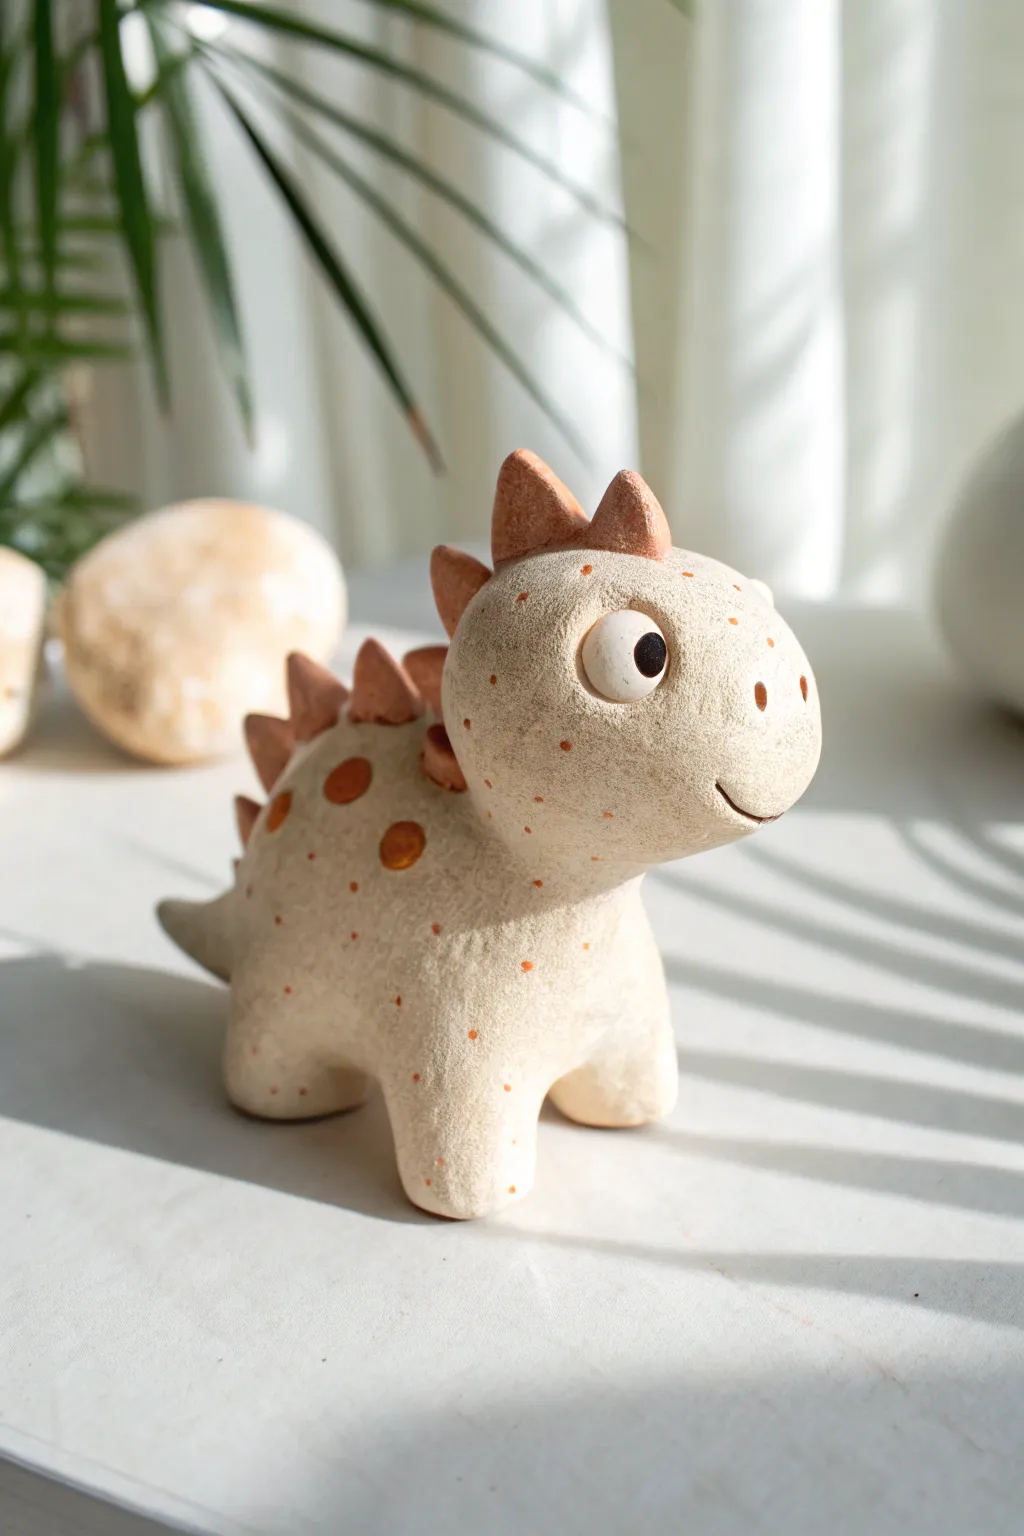
This adorable dinosaur figurine captures the essence of chibi style with its oversized head, tiny limbs, and charming expression. Made from textured light clay with playful reddish accents, it sits perfectly on a desk or shelf to brighten your day.
Step-by-Step Tutorial
Materials
- Light beige or cream polymer clay (or air-dry clay)
- Terracotta or rust-orange colored clay
- White clay (for eyes)
- Black clay (for pupils)
- Modeling tools (ball styluses, needle tool, smoothing tool)
- Soft texture sponge or stiff bristle brush
- Acrylic paint (rust/orange and brown)
- Fine paintbrush or toothbrush (for speckling)
- Matte varnish (optional)
Step 1: Basic Body Construction
-
Condition the Clay:
Begin by thoroughly kneading your beige or cream clay until it is soft and pliable. This prevents cracks later on. -
Shape the Body:
Roll a medium-sized ball of clay into a smooth egg shape. Gently flatten the bottom so it can sit upright securely on your work surface. -
Form the Head:
Roll a larger ball for the head—chibi proportions mean the head should be almost as big as the body. Shape it into a rounded oval. -
Attach Head to Body:
Score the top of the body and the bottom of the head slightly for better adhesion. Press them firmly together, blending the clay at the neck seam with a smoothing tool until the joint is invisible. -
Create the Legs:
Roll four small, equal-sized logs of beige clay. Attach them to the bottom of the body as stout, stubby legs, blending the seams upwards into the torso. -
Add the Tail:
Shape a small cone of clay for the tail. Attach it to the lower back of the body, curving it slightly to one side for a dynamic pose, and blend the connection point.
Texturing Trick
To get that fossil-like gritty finish seen in the photo, gently roll your unbaked clay ball over a piece of coarse sandpaper before assembling the parts.
Step 2: Facial Features and Texture
-
Apply Surface Texture:
Before adding details, gently tap a sponge or stiff brush over the entire surface of the dinosaur to give it that organic, stone-like texture visible in the image. -
Sculpt the Eye House:
Use a large ball tool to press a shallow indentation on the side of the head where the eye will go. -
Make the Eye:
Roll a small ball of white clay, flatten it slightly, and press it into the indentation. Add a tiny black clay circle for the pupil, placing it off-center to make the dino look curiously sideways. -
Carve the Smile:
Use a needle tool or a small curved blade to carve a simple, upward-curving smile line near the snout area. -
Add Nostrils:
Poke two small vertical oblong holes near the front of the face using a small stylus to create the nostrils.
Make it a Trio
Create a whole prehistoric family by making two more dinos in different pastel base colors like sage green or dusty blue, but keep the rust spikes.
Step 3: Spikes and Finishing Details
-
Form the Spikes:
Using the terracotta or rust-orange clay, create several small triangles. They should vary in size, with larger ones for the head and back, and smaller ones for the tail. -
Attach the Spines:
Press the triangular spikes firmly down the center line of the dinosaur’s head, back, and tail. I find it helps to blend the base of each spike into the beige body slightly for durability. -
Add Large Spots:
Take tiny pinched pieces of the rust clay, flatten them, and press them randomly onto the dino’s back and sides to create larger, organic spots. -
Bake or Dry:
Follow the instructions for your specific clay type. If using polymer clay, bake it in the oven at the recommended temperature. If using air-dry clay, let it sit for 24-48 hours. -
Speckle Effect:
Dilute a small amount of rust-orange acrylic paint with water. Dip a stiff brush (or toothbrush) into it and flick the bristles to spray fine speckles over the entire figurine, concentrating on the back. -
Final Varnish:
Once the paint is completely dry, apply a coat of matte varnish if you want to protect your creation while maintaining that natural, non-glossy finish.
Place your little dinosaur near a window to let the natural light highlight its charming texture


Animal Trinket Dishes
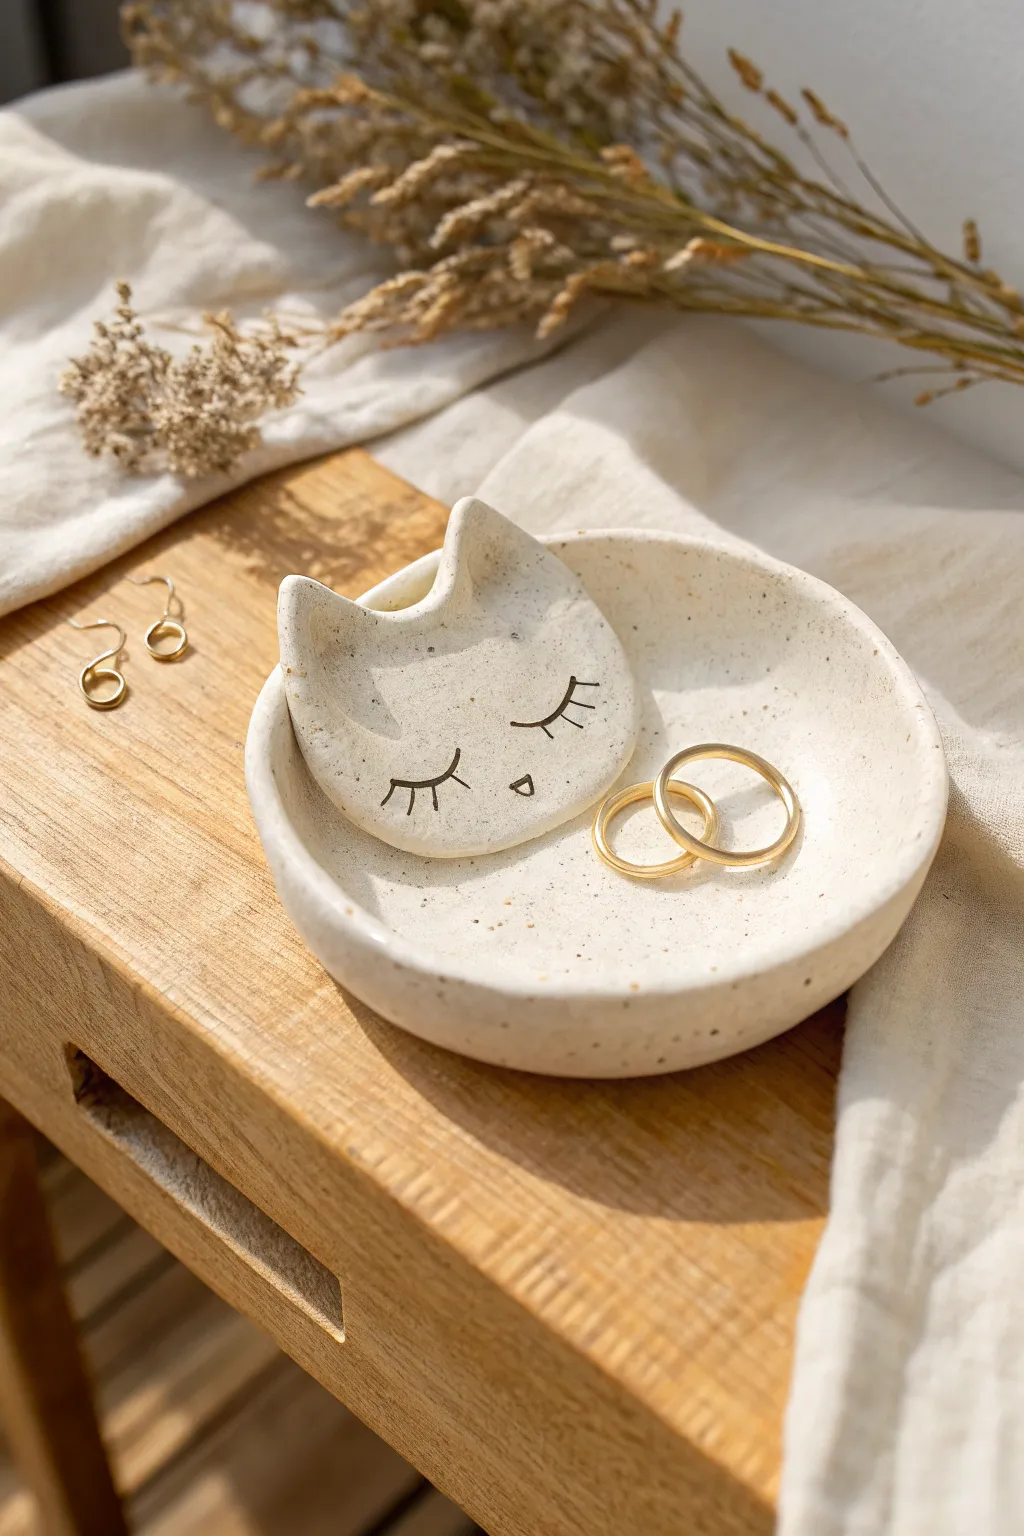
This adorable trinket dish features a sleeping cat face nestled inside a shallow bowl, perfect for guarding your favorite rings. The speckled clay finish gives it a warm, organic feel that looks beautiful on any bedside table.
Step-by-Step Guide
Materials
- White polymer clay or air-dry clay (preferably with speckles)
- Small rolling pin
- Circle cutter (approx. 4-5 inches)
- Small cat face template or freehand sketch
- X-acto knife or clay blade
- Small sponge
- Water slip (if using air-dry clay) or liquid polymer clay
- Black acrylic paint
- Find detail paintbrush
- Fine grit sandpaper
- Gloss or matte varnish (optional)
Step 1: Creating the Base Bowl
-
Condition the clay:
Start by warming up a good chunk of your speckled clay in your hands. Knead it until it is soft, pliable, and free of cracks. -
Roll out the slab:
Using your rolling pin, roll the clay out into an even slab. You want it to be about 1/4 inch thick—sturdy enough to hold its shape but not clunky. -
Cut the circle:
Press your circle cutter firmly into the designated area of your slab to cut out the base shape. Peel away the excess clay. -
Shape the curve:
Gently lift the clay circle and place it into a shallow bowl or over a curved form to give it a cupped shape. Smooth the edges with your finger dipped in a little water to soften the rim.
Step 2: Sculpting the Cat Face
-
Roll additional clay:
Take a smaller portion of the remaining clay and roll it out slightly thicker than your base, perhaps closer to 1/3 inch thick. -
Cut the shape:
Using a knife or a cutter, cut out an oval shape, then carefully slice two triangles out of the top to form the ears. You want a distinct cat silhouette. -
Refine the edges:
Use your fingertip or a damp sponge to round off the sharp cut edges of the cat face so it looks soft and organic, matching the style of the bowl. -
Create the ear depth:
With a rounded sculpting tool or the back of a paintbrush, gently press into the center of the clay ears to create a slight depression, adding dimension. -
Prepare for attachment:
Score the back of the cat face and the spot inside the bowl where you want it to sit. Cross-hatching marks help the pieces bond securely.
Cracking Clay?
If you see cracks forming while air-drying, dip your finger in water and smooth a tiny bit of fresh clay paste into the fissure before it fully hardens.
Step 3: Assembly and Detail
-
Attach the face:
Apply a small amount of slip or liquid clay to the scored areas. I usually wiggle the piece slightly as I press it down to ensure a tight seal without trapping air. -
Blend the seam:
If you want a seamless look, use a modeling tool to smooth the bottom edge of the cat face into the bowl. Alternatively, leave it distinct for a layered effect. -
Dry or Bake:
Follow the instructions for your specific clay type. Air-dry clay will need 24-48 hours to fully cure; polymer clay requires baking in the oven at the manufacturer’s specified temperature. -
Sand imperfections:
Once fully cured and cooled, lightly sand any rough edges on the rim or the cat ears using fine-grit sandpaper. -
Paint the features:
Dip your fine detail brush into black acrylic paint. Carefully paint two closed, curved eyelids with eyelashes and a tiny triangular nose. -
Seal the piece:
To protect your painting and the clay surface, apply a thin coat of matte or gloss varnish over the entire dish.
Add Whimsy
Before baking, use a needle tool to stamp tiny patterns or stars into the background of the bowl around the cat, then fill them with gold paint later.
Place this charming dish on your dresser and enjoy the peaceful vibe it brings to your space


Desk Buddy Pencil Holders
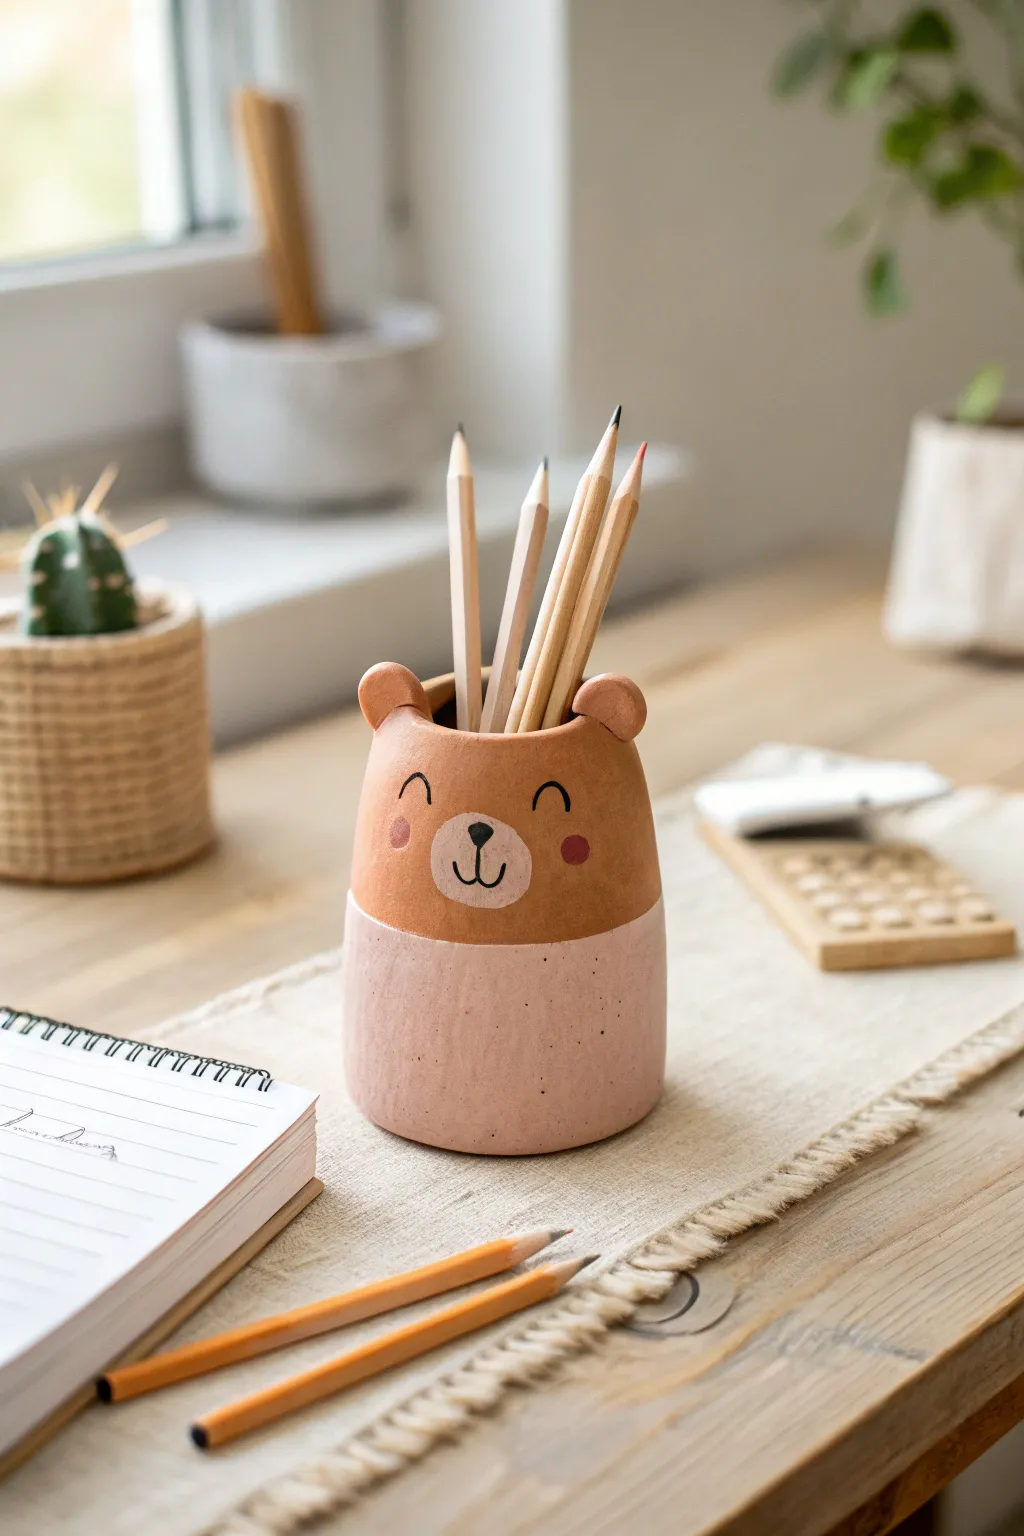
This adorable desk buddy combines the warmth of terracotta tones with a modern, dipped-paint aesthetic. With its sweet expression and functional design, this bear-shaped pencil holder is the perfect beginner-friendly project to brighten up your workspace.
Step-by-Step Tutorial
Materials
- Air-dry clay (white or terracotta)
- Rolling pin
- Clay knife or craft knife
- Empty can or jar (for use as a mold)
- Small bowl of water
- Slip (clay mixed with water)
- Acrylic paints (terracotta orange, light pink, white, black)
- Paintbrushes (flat brush and fine detail brush)
- Matte varnish or sealant
- Sandpaper (fine grit)
Step 1: Shaping the Base
-
Prepare the slab:
Start by kneading your clay to remove air bubbles, then roll it out into a rectangular slab about 1/4 inch thick. Ensure the slab is long enough to wrap around your chosen can or jar mold. -
Cut to size:
Using the clay knife, trim the slab into a neat rectangle. The height should be about 4-5 inches. -
Form the cylinder:
Wrap the clay slab gently around your mold. If you don’t want the clay to stick, you can wrap the mold in parchment paper first. -
Join the seam:
Score the edges where the clay meets by making small hash marks, apply a little slip or water, and press them firmly together. Smooth the seam with your finger or a tool until it sits flush. -
Add the bottom:
Roll out a small circle of clay for the base. Place your cylinder on top of it, trace around it, and cut out the circle. Score and slip the bottom edge of the cylinder and attach the base, smoothing the clay upwards to seal the join.
Seam Splitting?
If the back seam cracks while drying, apply a mixture of wet clay and vinegar (called ‘magic water’) into the crack and smooth it over.
Step 2: Adding Character Details
-
Create the ears:
Pinch off two small, equal-sized balls of clay. Flatten them slightly into semicircles to form the bear ears while indenting the center of each with your thumb. -
Attach the ears:
Score the top rim of the cylinder where you want the ears to sit. Use a dab of slip to attach them securely, blending the clay at the back of the ears into the main body for stability. -
Smooth the surface:
Dip your finger in water and gently run it over the entire piece to remove any fingerprints or rough textures. I find this creates a much more professional finish. -
Dry thoroughly:
Let the pot dry completely. Depending on your clay and humidity, this could take 24 to 48 hours. Don’t rush this step or cracks may appear. -
Sand for perfection:
Once bone dry, use fine-grit sandpaper to gently smooth out any uneven spots or sharp edges, particularly around the rim and the ear joins.
Step 3: Painting and Finishing
-
Paint the top half:
Mix a warm terracotta brown color using acrylics. Paint the upper half of the bear, including the ears and the inside rim. Create a straight horizontal line where the color stops. -
Paint the bottom half:
Mix a soft, dusty pink shade. Paint the bottom half of the pot, carefully meeting the terracotta line. You might need two coats for opaque coverage. -
Add speckles:
Load a toothbrush or stiff brush with slightly watered-down brown paint. Flick the bristles to spatter tiny speckles over the pink section for a textured ceramic look. -
Paint the muzzle:
Paint a small, soft oval in the center of the terracotta section using a creamy beige or off-white color. -
Add facial features:
Using your finest detail brush and black paint, draw two small arcs for closed, happy eyes. Add a triangular nose and a small ‘w’ mouth inside the beige muzzle area. -
Rosy cheeks:
Dip the end of a paintbrush handle or a cotton swab into reddish-pink paint and dab two small circles onto the cheeks. -
Seal the piece:
Finally, apply a coat of matte varnish over the entire pencil holder to protect the paint and give it a finished, ceramic-like quality.
Use Tape for Lines
To get a perfectly crisp line between the brown and pink sections, wrap a piece of painter’s tape around the pot before you start painting.
Now your desk has a cheerful new guardian ready to keep your tools organized.

The Complete Guide to Pottery Troubleshooting
Uncover the most common ceramic mistakes—from cracking clay to failed glazes—and learn how to fix them fast.
Flower Clay Coasters
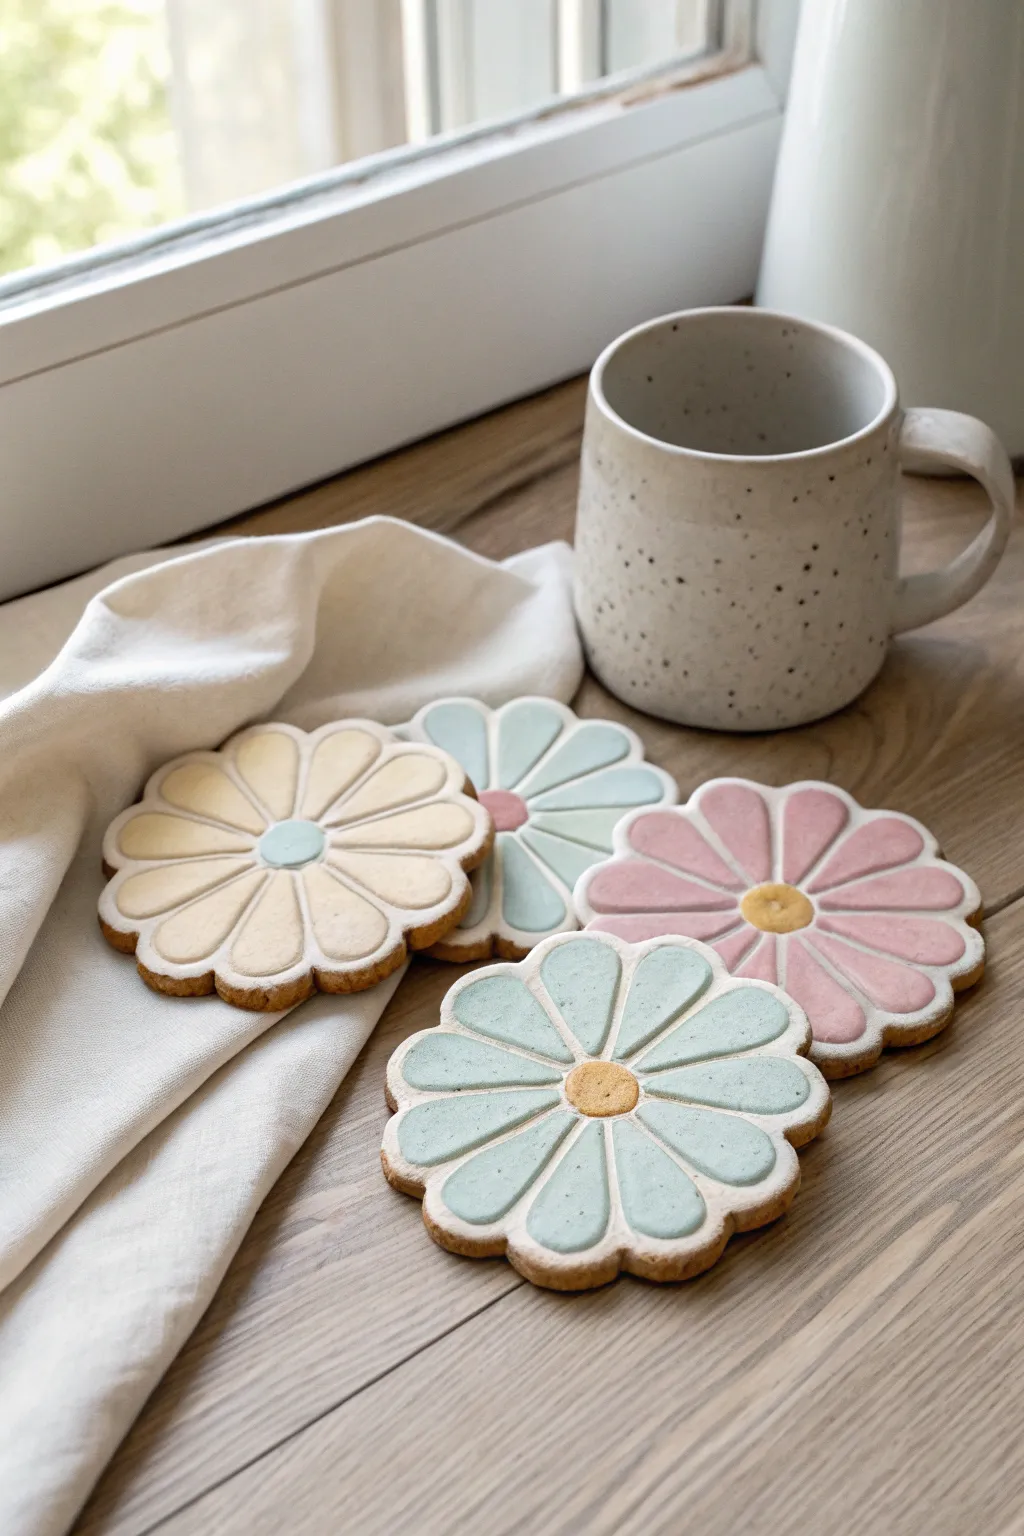
Bring the softness of spring to your coffee table with these charming flower-shaped coasters. Featuring a warm clay base and delicate pastel petals separated by crisp white lines, they offer a delightful mix of rustic texture and modern design.
Detailed Instructions
Materials
- Air-dry clay (terra cotta or light brown colored)
- Rolling pin
- Flower-shaped cookie cutter (large, about 4 inches)
- Modeling tool or dull knife
- Fine-grit sandpaper
- Acrylic paints (white, pastel pink, pastel blue, pastel yellow, cream)
- Fine detail paintbrush
- Matte spray varnish or sealant
- Two wooden guide strips (approx. 1/4 inch thick) – optional
Step 1: Shaping the Base
-
Prepare the clay:
Start by taking a handful of your brown air-dry clay and kneading it until it is soft and pliable. This warms up the material and prevents cracking later on. -
Roll out the slab:
Place your clay on a flat working surface. I like to use two wooden guide strips on either side of the clay to ensure an even thickness of about 1/4 inch as you roll across with the rolling pin. -
Cut the shapes:
Press your large flower-shaped cookie cutter firmly into the clay slab. Make sure to wiggle it slightly before lifting to ensure a clean cut. -
Smooth the edges:
Dip your finger in a little water and gently run it along the cut edges of the flower to smooth down any roughness or loose clay bits.
Step 2: Creating the Design
-
Draft the center:
Using a small circular object (like a bottle cap) or freehanding with a tool, lightly scribe a circle in the exact center of the flower. Don’t press too deep; this is just a guide. -
Draft the petals:
Draw lines radiating from the center circle to the indentations between the outer petals. This will create the distinct petal shapes for your design. -
Carve the relief lines:
Using a modeling tool with a slightly rounded tip or a dull knife, retrace your drafted lines. Press down to create grooves that are about 1-2mm deep. These grooves will become the white dividing lines later. -
Refining the surface:
Gently smooth over any clay ridges that lifted up during the carving process. You want the surface of the ‘petals’ to remain flat. -
Drying time:
Place your coasters on a wire rack or a piece of parchment paper to dry. Flip them over halfway through the process to prevent warping. This usually takes 24-48 hours depending on humidity.
Clean Lines
To get super crisp edges between the colors and white lines, try using a white paint pen for the grooves instead of a brush. It offers much better control.
Step 3: Painting and Finishing
-
Sand for smoothness:
Once fully dry, lightly gently buff the surface and edges with fine-grit sandpaper to remove any imperfections. -
Paint the dividing lines:
Using a fine brush and white acrylic paint, carefully fill in the carved grooves. It’s okay if you get a little on the petals, as you can paint over it in the next step. -
Paint the centers:
Choose contrasting colors for the centers (like yellow or teal). Paint the central circle carefully, avoiding the white groove you just painted. -
Paint the petals:
Select your main petal color (pink, light blue, or cream). Fill in each petal section, using the white groove as a barrier. You might need two coats for opaque coverage. -
Leave the rim raw:
For that rustic look shown in the photo, leave the very outer edge of the cookie unpainted, letting the natural brown clay show through. -
Seal the coaster:
Since these are coasters, protection is key. Apply two light coats of matte spray varnish to seal the paint and protect the clay from moisture.
Warping Issues?
If the clay edges curl up while drying, gently weigh the center down with a small book or tile once the surface is dry to the touch but still slightly flexible.
Enjoy your lovely handmade garden on your tabletop
Cute Incense Holders
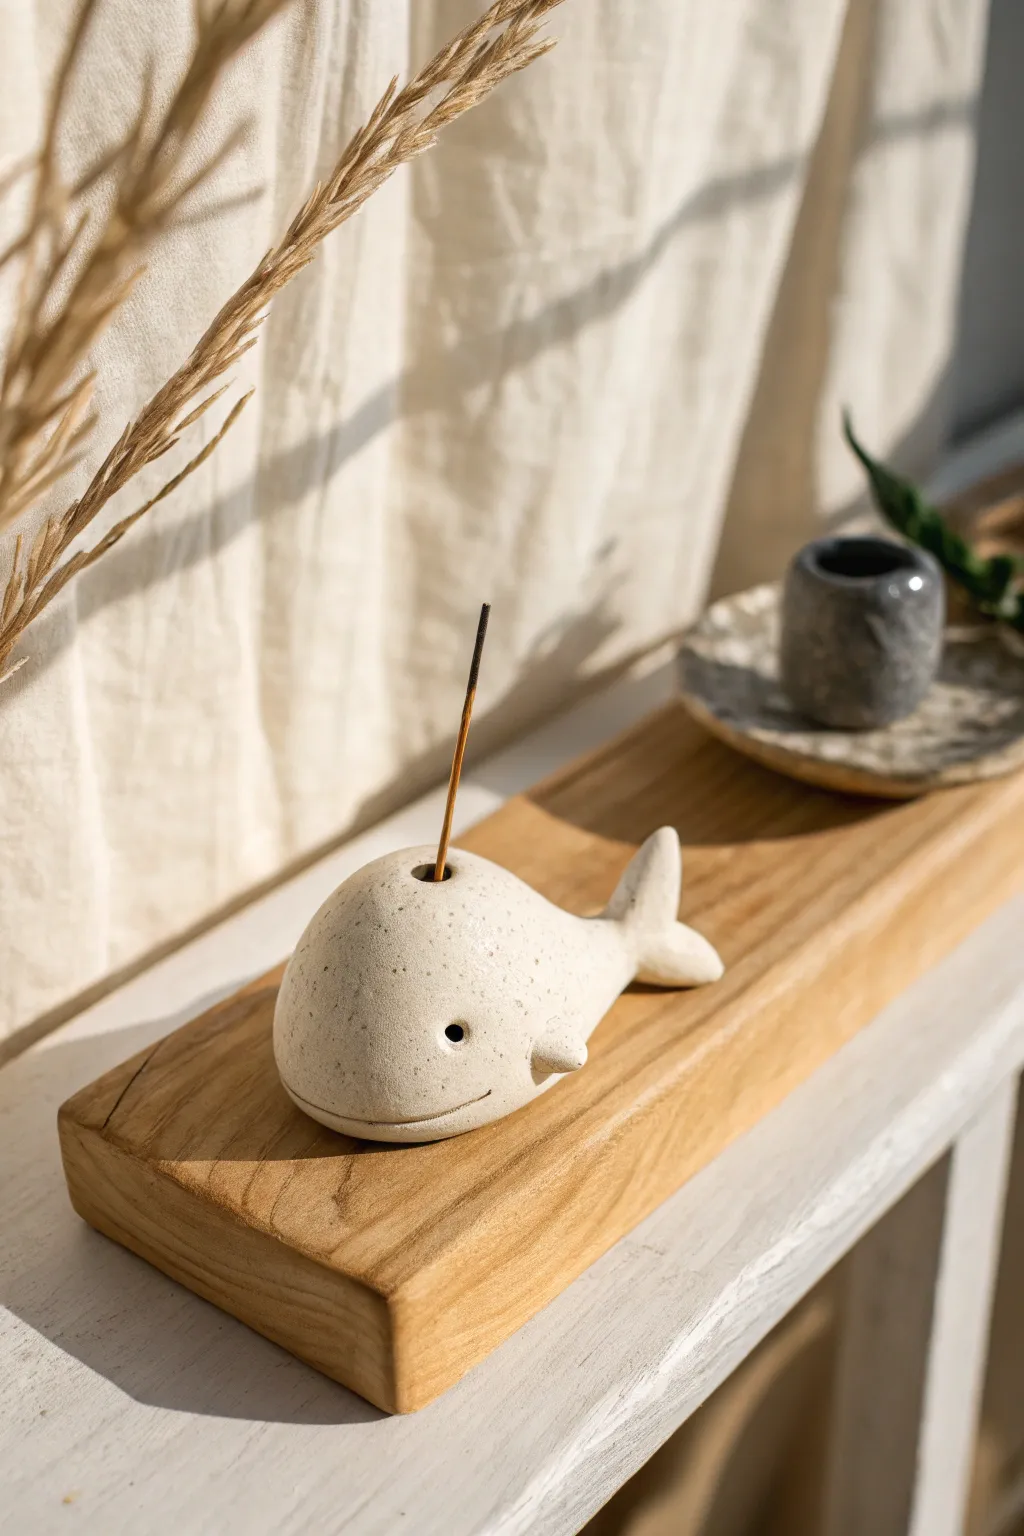
This adorable incense holder features a minimalist whale design with a charmingly rotund body and a speckled, creamy finish. It serves as both a functional burner for your favorite scents and a serene piece of clay art to brighten your shelf.
Detailed Instructions
Materials
- Light-colored stoneware or polymer clay (white or cream)
- Speckled clay additive (if using plain polymer clay) or speckled stoneware clay
- Rolling pin
- Pointed modeling tool or needle tool
- Small sponge
- Water (for stoneware) or liquid clay (for polymer)
- Incense stick (for sizing the hole)
- Black underglaze or acrylic paint
- Clear matte glaze or sealant
Step 1: Shaping the Main Body
-
Prepare your clay:
Start with a ball of clay about the size of a lemon. If you are using stoneware, wedge it well to remove air bubbles. If using polymer clay, condition it until soft and pliable. -
Form the basic shape:
Roll the ball in your palms to get it smooth, then gently press one side against your work surface to create a flat bottom so the whale won’t roll away. -
Refine the teardrop:
Gently taper one end of the ball to create a very subtle teardrop shape. The rounded, bulbous end will be the head, and the tapered end will connect to the tail. -
Smooth the surface:
Using your fingertips or a damp sponge, smooth out any fingerprints or cracks on the main body. The charm of this piece relies on that smooth, pebble-like finish.
Clean Hole Tip
Twist your needle tool as you remove it from the blowhole. Pulling straight out can lift the edges and ruin the smoothness.
Step 2: Adding Fins and Tail
-
Create the tail flukes:
Take a smaller piece of clay and flatten it slightly. Cut a triangle shape, then make a notch in the center of the wide end to create two flukes. Soften the cut edges with your fingers. -
Attach the tail:
Score the tapered end of the body and the attachment point of the tail (scratch cross-hatch marks). Add a dab of water or liquid clay. Press the tail firmly onto the rear of the body, angling it upwards slightly for a lively look. -
Blend the seams:
Use a modeling tool to drag clay across the seam where the tail meets the body, ensuring a strong bond. Smooth it over so it looks like one continuous piece. -
Make the side fins:
Form two small, flattened tear-drop shapes for the pectoral fins. They should be quite small to match the cute proportions of the whale. -
Attach the fins:
Score and slip (or use liquid clay) to attach these fins to the lower sides of the whale’s body. I like to angle them slightly backward as if the whale is swimming.
Step 3: Refining Details
-
Create the blowhole:
This is crucial functionality! Use the blunt end of a needle tool or the actual stick of an incense stick to poke a hole in the very top center of the whale’s back. -
Check the angle:
Insert your tool into the hole at a slight angle towards the tail. Wiggle it vary gently to ensure the hole is wide enough to hold a standard incense stick, but not so wide it flops over. -
Carve the mouth:
Use a needle tool to carve a simple, curved line for the mouth. Start low on the side, curve up slightly, and wrap around the front to the other side for a gentle smile. -
Add the sleepy eyes:
With a small round tool or the end of a paintbrush, make a small indentation on each side of the head, just above the corner of the mouth smile. -
Final smoothing:
Give the entire piece one last check. Use a barely damp sponge to wipe away any sharp clay crumbs from your carving work.
Make It Splash
Make a matching saucer plate or ‘water ripples’ base for the whale to sit on, which will also catch the falling ash.
Step 4: Firing and Finishing
-
Dry or bake:
If using air-dry or stoneware clay, let the whale dry slowly and completely. If using polymer clay, bake according to the package instructions. -
Bisque fire:
For stoneware, fire the piece to bisque temperature once it is bone dry. -
Highlight the eyes:
Using a tiny detail brush, drop a small dot of black underglaze or acrylic paint into the eye indentations to make them pop. -
Glazing:
Apply a clear matte glaze to the entire whale to protect it and give it a finished stone look. Alternatively, leave the raw clay unglazed if using a high-fire speckled stoneware that vitrifies well. -
Final Fire:
For stoneware, fire the piece a second time to set the glaze. Once cool, test the hole with an incense stick to ensure a perfect fit.
Now you have a serene little ocean friend ready to fill your room with calming scents


What Really Happens Inside the Kiln
Learn how time and temperature work together inside the kiln to transform clay into durable ceramic.
Mini Magnet Bud Vases
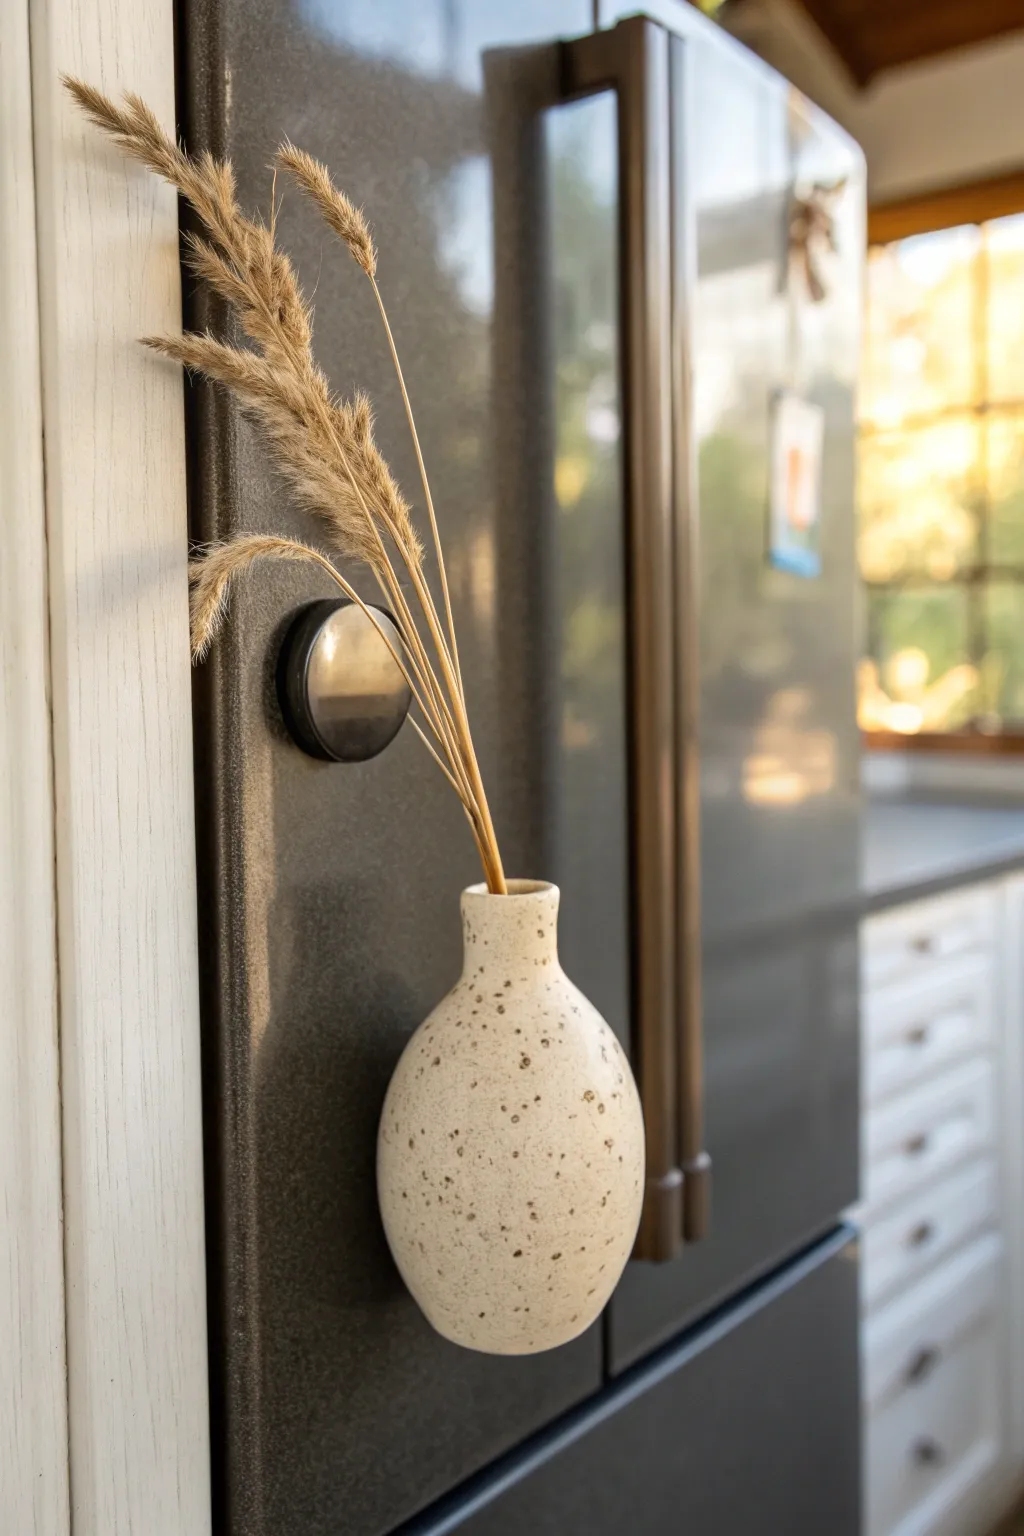
Brighten up your kitchen appliances with this charming mini magnet bud vase, perfect for holding lightweight dried blooms. Its natural, speckled stone finish adds an organic touch to sleek metal surfaces.
Step-by-Step Tutorial
Materials
- Polymer clay (white or beige)
- Speckle inclusions (coarse black pepper or dried coffee grounds)
- Two strong neodymium magnets
- Rolling pin or acrylic roller
- Small circle cutter (approx. 1 inch)
- Modeling tools (ball tool)
- Cornstarch (for release)
- Liquid clay adhesive (Bake & Bond)
- Gloss or matte varnish (optional)
- Oven for baking
Step 1: Preparing the Clay
-
Condition the base:
Start by conditioning a block of white or beige polymer clay in your hands until it becomes soft and pliable. -
Add texture:
To achieve that organic speckled look, knead in a pinch of coarse black pepper or dried coffee grounds. Fold the clay repeatedly until the specks are evenly distributed. -
Create a ball:
Roll the prepared clay into a smooth ball, roughly the size of a golf ball. Ensure there are no cracks on the surface.
Step 2: Shaping the Vase Body
-
Form the basic shape:
Gently gently roll one end of the ball between your palms to create a teardrop or pear shape, leaving the bottom rounded and wide. -
Flatten the back:
Press the shape flat against your work surface. This flat side will eventually sit flush against the refrigerator. -
Hollow the neck:
Using a small ball tool or the end of a paintbrush, create an opening at the top narrow end. Gently push down to create a deep enough channel for stems, but don’t pierce through the bottom. -
Shape the rim:
Refine the rim of the opening, slightly flaring it outward if you want a more traditional pottery look. -
Smooth the surface:
Dip your finger in a little cornstarch and lightly buff out any fingerprints or tool marks on the rounded front of the vase.
Magnet Issues?
If magnets pop out after baking, use superglue (cyanoacrylate) to reattach them. Liquid clay bonds best during baking, but superglue is great for repairs.
Step 3: Embedding the Magnets
-
Mark magnet spots:
Turn the vase over to expose the flat back. Mark two spots for your magnets—one near the top and one towards the bottom for stability. -
Create indentations:
Press your magnets directly into the clay at the marked spots to create perfectly sized divots, then carefully remove them. -
Secure magnets:
Place a small drop of liquid clay or Bake & Bond into the indentations and press the magnets back in. I like to smear a thin layer of clay over the back of the magnet to lock it in completely. -
Final smoothing:
Ensure the back surface is completely flat again so it will stick well to the fridge. You can gently run your roller over the back to even it out.
Color Wash
Before baking, lightly brush on some brown eyeshadow or pastel chalk dust to give the clay an aged, earthy patina.
Step 4: Baking and Finishing
-
Bake carefully:
Place the vase on a tile or baking sheet. Bake according to your clay manufacturer’s instructions (usually around 275°F or 130°C for 15-30 minutes). -
Cool down:
Allow the piece to cool completely in the oven before handling. Polymer clay is fragile while hot. -
Seal (Optional):
If you want a glazed pottery look, apply a coat of gloss varnish. For a raw stone look like the photo, leave it matte or use a matte varnish. -
Arrangement:
Select a few stalks of dried ornamental grass or wheat. Trim the stems to fit the depth of your new mini vase.
Now stick your creation to the fridge and enjoy a tiny burst of nature every time you reach for a snack
Happy Face Fridge Magnets
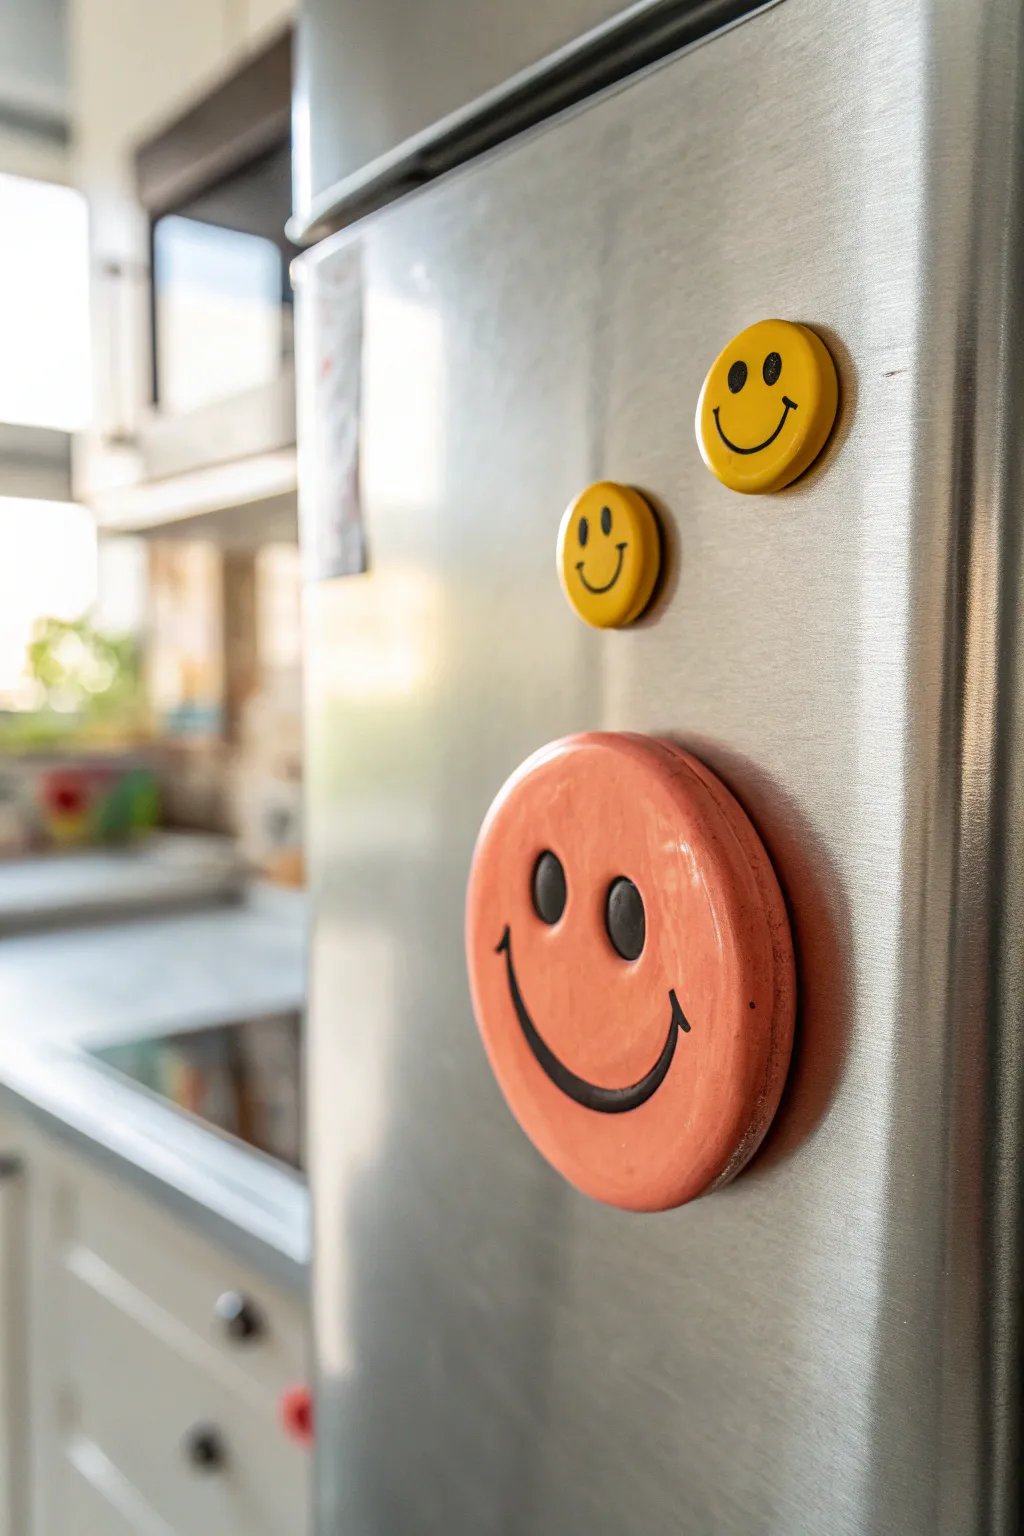
Brighten up your kitchen with these cheerful, glossy fridge magnets that beam with positivity. This tutorial guides you through creating a set of three smiley faces—one large statement piece in salmon pink and two smaller companions in sunshine yellow, all finished with a professional-looking shine.
Detailed Instructions
Materials
- Polymer clay (white or pre-colored pink/yellow)
- Acrylic rolling pin
- Circle cutters (various sizes: approx. 2.5 inch and 1 inch)
- Black polymer clay (or black acrylic paint)
- Glossy polymer clay glaze or resin
- Strong round magnets
- Super glue (E6000 recommended)
- Soft paintbrush
- Oven and baking sheet
- Needle tool or toothpick
- Sandpaper (optional)
Step 1: Shaping the Bases
-
Condition the Clay:
Begin by warming up your polymer clay in your hands. Knead it thoroughly until it is soft and pliable. If you are mixing custom colors to match the photo, blend white with a tiny touch of red and orange for the large salmon face, and primary yellow for the smaller ones. -
Roll Smooth Sheets:
Using your acrylic rolling pin, roll the clay out into an even slab. Aim for a thickness of about 1/4 inch (6mm). This thickness ensures the magnets are sturdy and have a nice, substantial feel on the fridge. -
Cut the Circles:
Press your large circle cutter firmly into the salmon clay to create the main face. Repeat the process with the smaller cutter on the yellow clay to make the two accompanying faces. -
Smooth the Edges:
Gently run your finger around the perimeter of each clay circle. You want to soften the sharp cut edge slightly so it looks rounded and finished, rather than harsh and angular.
Fixing Bubbles
Tiny bubbles in your clay or glaze? Pop air pockets in raw clay with a needle. For glaze bubbles, gently blow on the wet surface through a straw to release them before drying.
Step 2: Creating Expressions
-
Prepare Black Clay:
Take a small amount of black clay and roll it into a very thin snake for the smiles. For the eyes, roll slightly thicker logs. If you don’t have black clay, you can skip this and paint the features after baking. -
Form the Large Smile:
Cut a segment of the thin black snake. Curve it gently into a wide ‘U’ shape and press it lightly onto the lower half for the large salmon face. Use a tool to taper the ends slightly. -
Add Large Eyes:
Cut two small, equal slices from your thicker black log. Roll them into balls, then flatten them into ovals. Press these firmly onto the clay above the smile. I like to slant them slightly inward to give the face a friendly look. -
Detail the Small Faces:
Repeat the process for the yellow circles, scaling down your clay snakes. The smaller faces require a steady hand; tweezers can be helpful for placing tiny eyes or mouth curves. -
Secure the Features:
Once you are happy with the expressions, gently roll over the entire surface with your acrylic roller—very lightly. This helps embed the black clay into the base color so it’s flush rather than sticking out.
Interactive Art
Create a set with interchangeable features! Embed tiny magnets on the face front and bake separate eyes/mouths with glued washers to swap expressions daily.
Step 3: Baking and Finishing
-
Bake the Pieces:
Place your clay circles on a parchment-lined baking sheet. Bake according to your specific clay brand’s package instructions (usually 275°F/135°C for 15-30 minutes). -
Cool Down:
Allow the pieces to cool completely on the baking sheet. They will be slightly soft when hot but will harden as they return to room temperature. -
Sand Imperfections:
If there are any fingerprints or rough edges, lightly wet-sand them with fine-grit sandpaper. Wipe them clean with a damp cloth and let them dry. -
Apply Glaze:
To achieve that glass-like finish seen in the photo, apply a thick coat of gloss glaze or UV resin. If using glaze, let it dry and apply a second coat for extra shine. If using resin, cure it under a UV lamp. -
Attach Components:
Flip the cured and glazed faces over. Place a pea-sized dot of super glue or E6000 on the back center of each piece. -
Set the Magnets:
Press a strong round magnet into the glue. Let the adhesive cure fully (usually 24 hours for maximum hold) before sticking them to your refrigerator.
Now your fridge is ready to greet you with a happy smile every time you reach for a snack

TRACK YOUR CERAMIC JOURNEY
Capture glaze tests, firing details, and creative progress—all in one simple printable. Make your projects easier to repeat and improve.
Animal Plant Markers
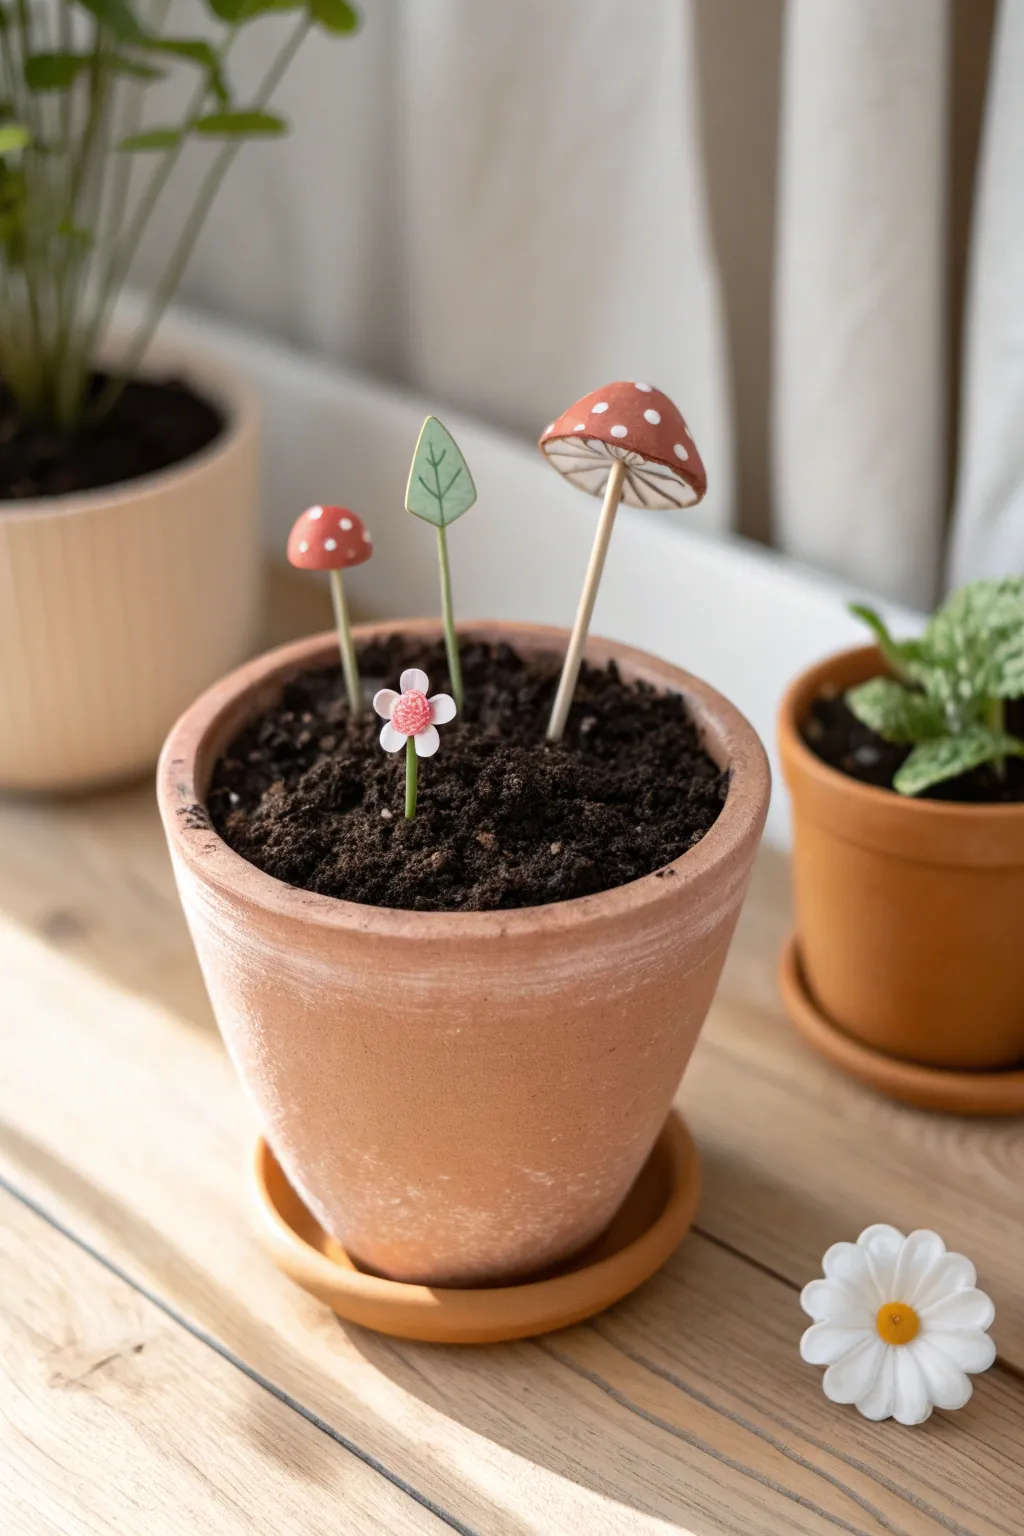
These charming miniature garden markers add a pop of color and personality to your indoor planters. Using simple polymer or air-dry clay, you can craft a tiny everlasting garden featuring glossy mushrooms, delicate leaves, and sweet blooms.
Step-by-Step
Materials
- Polymer clay (white, red, green, pink, yellow)
- Wooden skewers or thick floral wire
- Clay sculpting tools (needle tool, small ball tool)
- Acrylic rolling pin
- Gloss varnish or glaze
- Small paintbrush
- White acrylic paint (if using colored clay) or set of acrylics (if using white clay)
- Super glue or strong craft adhesive
- Parchment paper or baking mat
Step 1: Preparation & Basic Shapes
-
Prepare your stakes:
Begin by cutting your wooden skewers to your desired heights. For a varied look like the example, cut one short (about 3 inches), one medium (4 inches), and one tall (5-6 inches). -
Condition the clay:
Warm up your red, green, and pink clay by kneading it in your hands until it becomes soft and pliable. If you are painting white clay later, just condition a large batch of white. -
Form the large mushroom cap:
Roll a sphere of red clay about the size of a walnut. Flatten the bottom slightly and gently dome the top with your fingers to create the classic mushroom cap shape. -
Create the mushroom underside:
Roll a smaller ball of white clay and flatten it significantly. Press this onto the bottom of your red cap. Use a needle tool to score fine lines radiating from the center to the edge to mimic gills. -
Sculpt the small mushroom:
Repeat the process for the smaller mushroom using about half the amount of clay. This one can be fuller and rounder, more like a button mushroom shape.
Clean Stick Tip
Twist the skewer gently as you insert it into the clay to prevent the shape from deforming. Remove it once to check depth, then reinsert before baking.
Step 2: Creating Foliage & Flowers
-
Shape the leaf:
Take a piece of light green clay and roll it into a teardrop shape. Flatten it gently with your roller or thumb to about 3mm thickness. -
Detail the leaf:
Using your needle tool or a craft knife, carefully etch a central vein down the middle of the leaf. Add smaller veins branching off in a chevron pattern. -
Make the pink flower:
Roll five tiny balls of white or pale pink clay for petals. Press them together in a circle, flattening them slightly. I like to use a ball tool to indent the center of each petal slightly for dimension. -
Add the flower center:
Roll a tiny ball of textured pink or yellow clay and press it firmly into the center of your petal ring. You can create texture by stippling it with a toothbrush or needle tool. -
Craft the white daisy:
For the standalone daisy, create slightly longer, teardrop-shaped white petals. Arrange them around a bright yellow center, overlapping them slightly for a fuller look.
Fairy Garden Magic
Add tiny clay snails or ladybugs climbing up the stems of your mushrooms for extra character and a true enchanted forest vibe.
Step 3: Assembly & Finishing
-
Attach the skewers:
While the clay is still soft, carefully insert the blunt end of your wooden skewers into the bottom of each piece. Ideally, push the skewer at least half an inch into the clay for stability. -
Secure the leaf:
For the thin leaf, you might need to insert the skewer carefully or attach the leaf to the side of the skewer. Smooth the clay around the wood to secure it. -
Bake or dry:
If using polymer clay, bake the pieces (with the wooden skewers inserted) according to the package instructions, usually at 275°F (135°C). If using air-dry clay, let them sit undisturbed for 24-48 hours. -
Paint the details:
Once cool and hard, use a fine paintbrush and white acrylic paint to dab small, irregular dots onto the red mushroom caps. This gives them that classic toadstool look. -
Reinforce join points:
If any pieces feel loose on their sticks after baking, remove them, add a drop of super glue to the stick tip, and reinsert it into the hole. -
Seal the work:
Apply a coat of gloss varnish to the mushroom caps to make them look wet and shiny. You can leave the leaf and flowers matte or use a satin varnish for a softer finish.
Place your new creations into a pot filled with dark soil to really make the colors pop
Food Friend Mini Sculptures
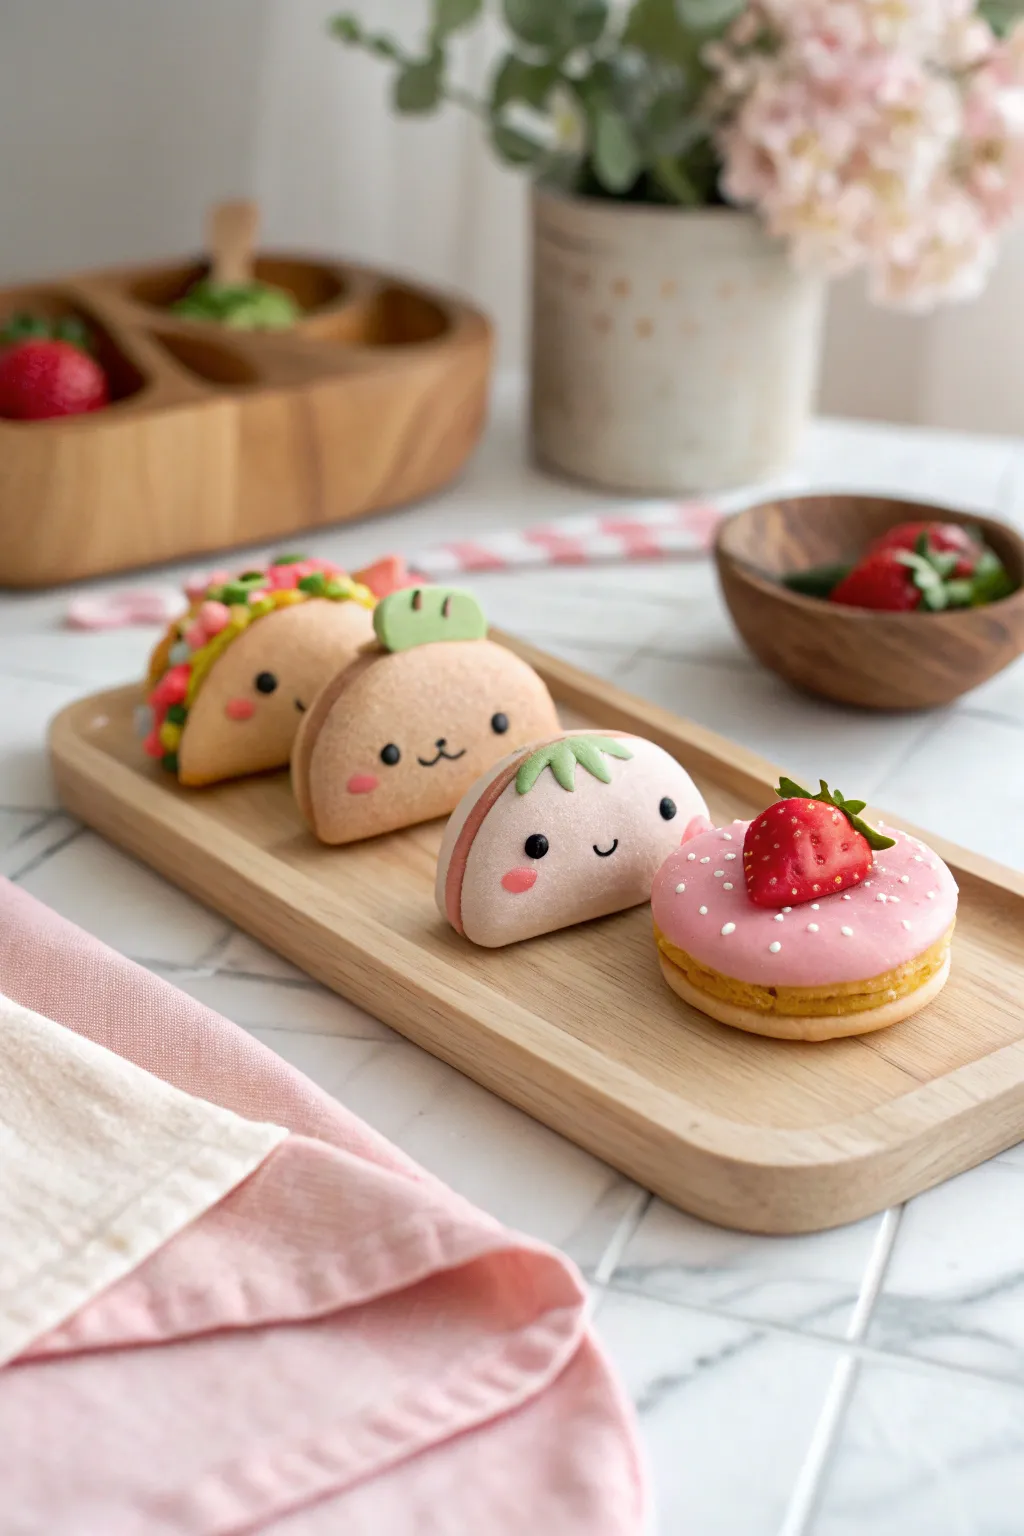
These adorable food-themed mini sculptures combine the sweetness of macarons with friendly character designs. Featuring a taco, a bear, a strawberry-cream pastry, and a classic strawberry donut, this project is perfect for practicing kawaii expressions.
Step-by-Step Tutorial
Materials
- Polymer clay (beige, pink, light brown, green, red, white, yellow, dark brown)
- Black clay or acrylic paint for eyes/details
- Liquid clay (optional, for frosting)
- Texture tools (toothbrush, needle tool)
- Rolling pin
- Circle cutters (various sizes)
- Dotting tool or ball stylus
- Soft pastels (pink for cheeks, brown for shading)
- Gloss glaze
- Clay knife/blade
Step 1: Sculpting the Taco Pal
-
Prepare the shell:
Mix beige clay with a tiny bit of yellow for a corn tortilla color. Roll it into a flat circle about 2 inches in diameter. Gently fold it in half without creasing the spine, creating a taco shape. -
Add texture:
Before filling, use a toothbrush to gently tap the surface of the shell to give it a realistic, baked texture. -
Create the filling:
Roll a snake of dark brown clay for ‘meat’ and tuck it into the bottom of the fold. Mix tiny scraps of green, red, and yellow clay to simulate lettuce, tomatoes, and cheese, arranging them to peek out the top. -
Add the face:
Roll two tiny balls of black clay and press them onto the shell for eyes. Add a tiny black smile. Use a dry brush to dust pink pastel powder for rosy cheeks.
Sticky Situation?
If your clay is getting too soft and sticky to hold detail, put it in the fridge for 10 minutes. Cooling firms it up, making tiny details like eyes much easier to handle.
Step 2: Creating the Bear Pastry
-
Form the base:
Take light brown clay and roll it into a thick semi-circle shape, standing flat on its cut edge to resemble a folded turnover or a half-macaron. -
Make the ears:
Shape a small piece of light green clay into a rounded shape resembling a small hat or leaf atop the head. Add two tiny brown triangles for ears if preferred, or stick with the green accent shown in the inspiration. -
Detail the face:
Using a needle tool, mark a small ‘w’ shape for the mouth. Place wide-set black clay eyes on either side. Don’t forget the signature oval pink cheeks!
Step 3: Crafting the Strawberry Cream Friend
-
Shape the shell:
Mix white and red clay to achieve a soft baby pink. Shape this into a taco-style fold similar to the first figure, but slightly plumper. -
Insert the cream:
Roll a smooth log of dark pink or reddish-brown clay to represent a jam or chocolate filling. Place this inside the fold so a thin line of color is visible. -
Top garland:
Create three small teardrop shapes from green clay. Flatten them slightly and attach them to the top curve of the shell to look like strawberry leaves. -
Finalize expression:
Add wide black eyes and a simple U-shaped smile. I like to use a dotting tool to ensure the eyes are perfectly round before pressing them in.
Realistic Texture Tip
For ultra-realistic pastry textures, gently shade the edges of your ‘baked’ clay with soft brown pastel chalk dust before putting them in the oven.
Step 4: Assembling the Strawberry Donut
-
Base layer:
Roll beige clay into a thick disk. Use a toothbrush to texture the sides to look like fluffy cake. -
Frosting layer:
Roll out a thin sheet of bright pink clay. Cut a circle the same size as your base and drape it over the top, smoothing the edges down. -
Strawberry topper:
Sculpt a small red cone for a strawberry. Use a needle tool to poke tiny indentations for seeds. Add tiny green leaves to the top and place it center-left on the donut. -
Sprinkle details:
Roll impossibly tiny snakes of white clay and cut them into bits for sprinkles, scattering them across the pink frosting.
Step 5: Finishing Touches
-
Bake:
Place all four friends on a ceramic tile or baking sheet. Bake according to your brand of polymer clay instructions (usually 275°F/135°C for 15-30 minutes). -
Glaze:
Once cool, brush a coat of gloss glaze over the strawberry topper and the eyes to make them shine. Leave the bread parts matte for realism.
Arranging these little friends on a desk or shelf is sure to bring a smile to anyone’s face
Clay Suncatcher Shapes
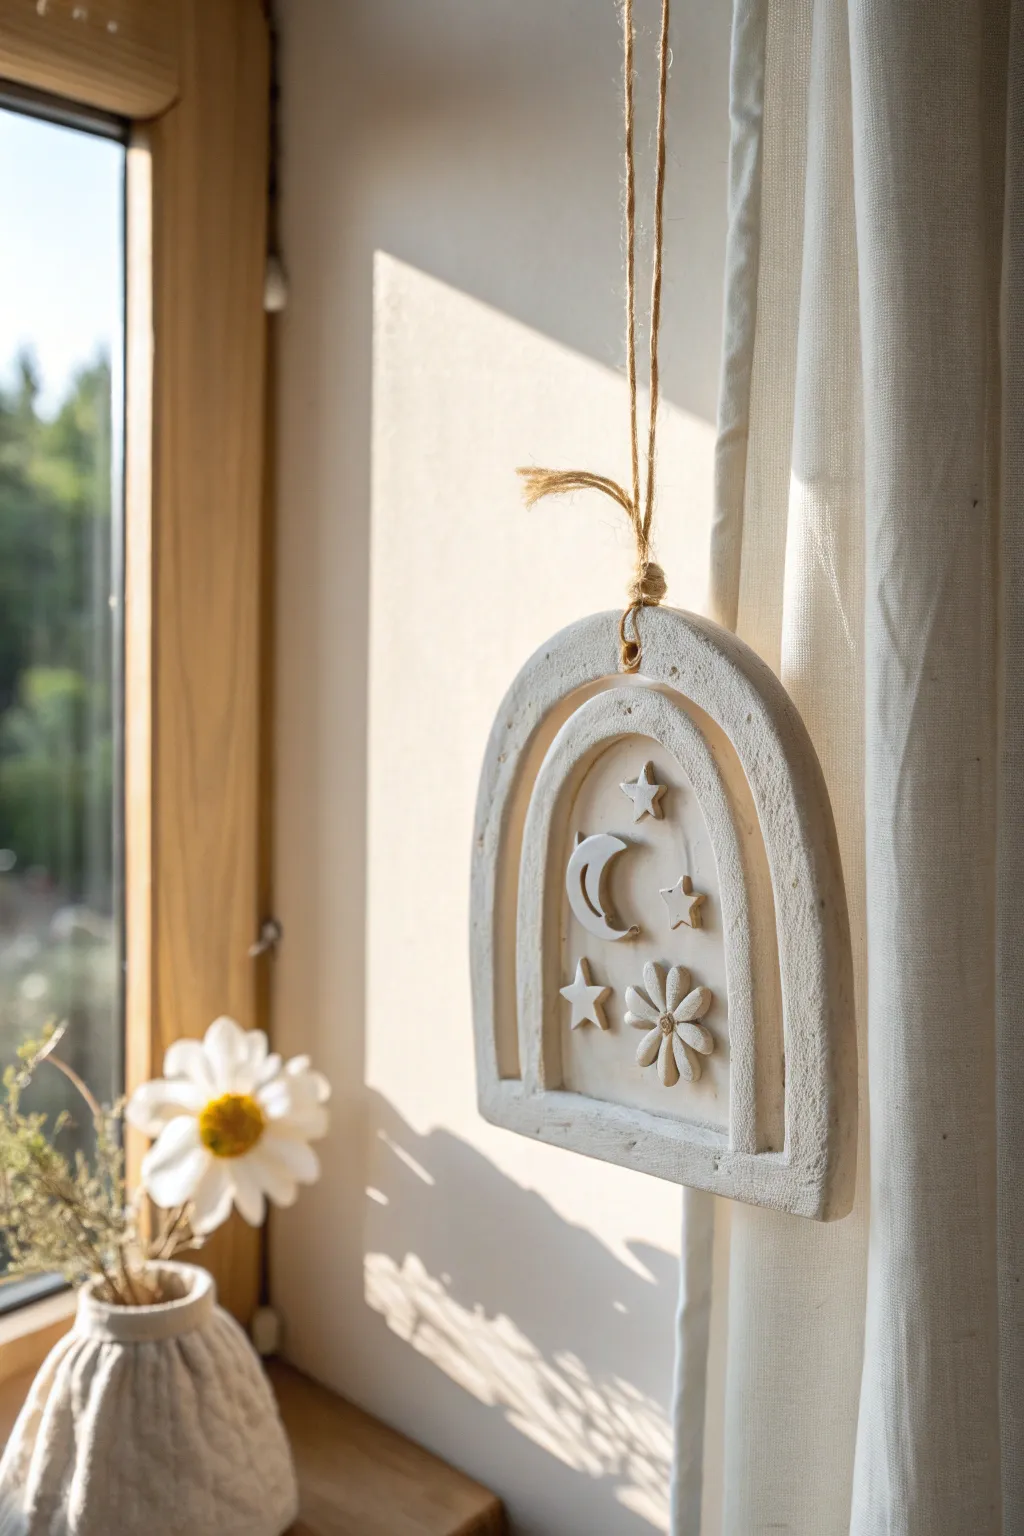
Bring a touch of cosmic charm to your window with this textured clay arch decoration. This minimalist suncatcher features raised celestial motifs like a moon, stars, and flowers, all finished in a natural, matte stone look.
Step-by-Step
Materials
- White or cream air-dry clay (or polymer clay)
- Rolling pin
- Sharp craft knife or clay needle tool
- Arch template (paper or cardboard)
- Small star and flower cookie cutters (optional)
- Water and a small sponge/brush
- Jute twine for hanging
- Sandpaper (fine grit)
- Toothpick or skewer
- Baking soda or cornstarch (optional, for texture)
Step 1: Shaping the Base
-
Prepare the Clay:
Start by kneading your white air-dry clay until it is soft and pliable. If you want a more stone-like texture right from the start, mix in a teaspoon of baking soda as you knead. -
Roll the Slab:
Roll out the clay to a uniform thickness of about 1/4 inch (6mm). Ensure it’s thick enough to be sturdy but not so heavy that it will struggle to hang. -
Cut the Outer Arch:
Place your paper arch template on the clay slab. Using a sharp craft knife, carefully trace around the outside to cut the main arch shape. -
Form the Inner Arch:
To create the raised border, roll out a long, thin snake (coil) of clay. Gently flatten it slightly with your fingers or a rolling pin so it becomes a narrow strip. -
Attach the Border:
Score the surface of the main arch where the border will go using a needle tool, and wet it slightly. Lay the flattened strip onto the arch to create the frame, trimming the ends neatly at the bottom. -
Add the Hanging Hole:
Use a skewer or straw to poke a hole through the very top center of the arch. Make sure the hole is big enough for your jute twine to pass through later.
Stay Smooth
Keep a small bowl of water nearby. Wetting your fingertips before smoothing edges prevents fingerprints and helps “erase” tiny cracks instantly.
Step 2: Creating the Motifs
-
Make the Celestial Shapes:
Roll out a fresh, slightly thinner piece of clay. Cut out a crescent moon, three small stars, and one flower shape. You can use cutters for precision or freehand cut them with your knife. -
Detail the Shapes:
Add texture to your flower by pressing a small indentation into the center of each petal. I find this gives it a lovely organic look compared to a flat cutout. -
Arrange the Design:
Place the shapes onto the center of the arch without glue first to test your spacing. The moon looks great slightly offset to the left, with the stars and flower balancing the composition. -
Attach the Motifs:
Score the backs of your shapes and the spot on the arch where they will sit. Apply a dab of water (slip) and press them firmly into place. -
Smooth the Edges:
Dip your finger or a small brush in water and gently run it over all harsh edges, blending the seams slightly where the shapes meet the base to ensure a strong bond.
Golden Glow
For a luxe upgrade, paint just the crescent moon or the center of the flower with metallic gold acrylic paint after the clay is completely dry.
Step 3: Finishing Touches
-
Create Stone Texture:
While the clay is still damp, take an old toothbrush or a stiff bristle brush and gently tap it all over the surface. This stippling creates that weathered, stone-like effect seen in the photo. -
Dry the Piece:
Let the clay dry completely according to the package instructions. Keep it flat and away from direct heat to prevent warping. Turning it over halfway through the process helps it dry evenly. -
Refine and Sand:
Once fully cured, use fine-grit sandpaper to smooth out any unintentional bumps on the outer edges or back. -
Add the Hanger:
Cut a length of jute twine. Fold it in half, thread the loop through the hole from front to back, and pull the tails through the loop to create a lark’s head knot. -
Secure the Knot:
Tie a simple overhand knot with the two loose ends of the twine to finish the loop, adjusting the length to suit your window space.
Hang your new celestial creation near a window where the textured surface can catch the changing daylight
Tiny Room Diorama Trinket Tray
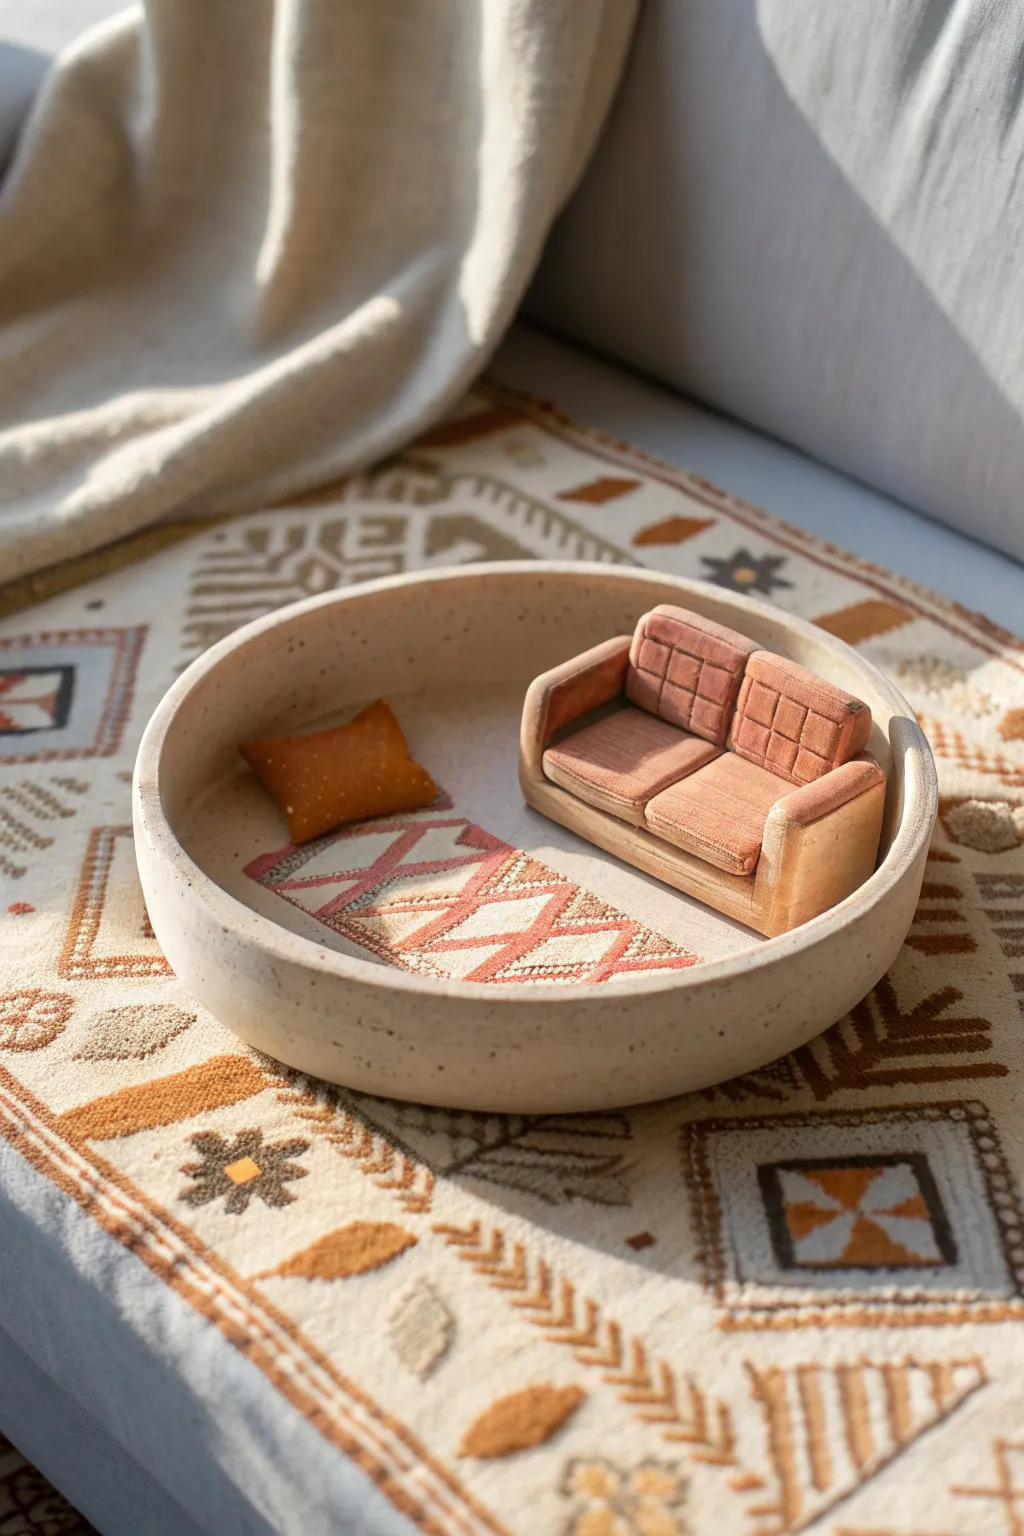
Transform a simple clay pinch pot into a delightful tiny world with this diorama-style trinket tray. Featuring a miniature sofa and patterned rug, this project doubles as both functional decor for your rings and a whimsical art piece.
How-To Guide
Materials
- Air-dry clay or polymer clay (white or cream)
- Sculpting tools (needle tool, smoothing rib)
- Acrylic paints (terracotta, mustard yellow, cream, brown)
- Fine detail paintbrushes (size 0 and 00)
- Water cup and paper towels
- Rolling pin
- Sandpaper (fine grit)
- Matte spray varnish or sealant
- Ruler
Step 1: Base Construction
-
Roll the base:
Start by conditioning your clay until it’s pliable. Roll out a smooth slab of clay to about 1/4 inch thickness. Use a large circular cookie cutter or trace around a bowl (approx. 4-5 inches diameter) to cut out the base circle. -
Create the walls:
Roll a long snake or coil of clay, keeping it even in thickness. Flatten it slightly into a strip about 1 inch high. Attach this strip to the perimeter of your circle base, scoring and slipping the edges (using a bit of water or liquid clay) to ensure a strong bond. -
Smooth the seams:
Blend the wall into the base on both the inside and outside using a smoothing tool or your finger. Wet your finger slightly to get a seamless, speckled-stone looking finish. -
Shape the rim:
Gently pinch and smooth the top rim of the tray so it is rounded and uniform. Set the tray aside to firm up slightly while you work on the furniture.
Step 2: Sculpting the Furniture
-
Form the sofa base:
Create a small rectangular block of clay for the seat of the sofa, sized to fit comfortably within one side of your tray. -
Add back and arms:
Roll narrower strips of clay to create the backrest and armrests. Attach these to the seat block. I like to keep the edges slightly rounded to mimic cushion softness rather than hard carpentry. -
Detail the cushions:
Using a needle tool or the back of a knife, gently press a grid pattern into the backrest to create a tufted upholstery look. Trace a line down the middle of the seat to separate the two bottom cushions. -
Sculpt the accent pillow:
Roll a tiny square of clay and pinch the corners. Place this directly onto the floor of the tray, opposite the sofa area. -
Secure the placement:
Once you are happy with the sofa arrangement, score the bottom of the sofa and the spot on the tray floor where it will sit. Join them permanently with a little slip or water. -
Texture the rug:
Before the main tray dries, use a needle tool to lightly scratch a rectangular rug outline on the floor of the tray in front of the sofa. You can gently stipple the area to mimic a woven texture. -
Dry completely:
Allow the entire piece to dry fully. For air-dry clay, this usually takes 24-48 hours depending on thickness. Sand any rough edges on the rim once dry.
Shrinkage Warning
Remember that both air-dry and polymer clays shrink slightly when drying or baking. Don’t make the furniture too tight against the walls.
Step 3: Painting the Scene
-
Base coat the tray:
Paint the entire tray (inside and out) with a creamy, speckled stone color. You can achieve this by mixing a tiny bit of brown into white paint, and flicking a toothbrush with diluted brown paint for speckles. -
Paint the sofa:
Use a warm terracotta or dusty rose color for the sofa. Apply two thin coats for even coverage, getting into the grooves of the tufting. -
Highlight the upholstery:
Mix a lighter version of your sofa color and dry-brush it over the tops of the cushions and arms to accentuate the sculpted texture. -
Paint the pillow:
Color the floor pillow in a contrasting mustard yellow. Add tiny white dots for texture if desired. -
Detail the rug:
Paint the etched rug area. Start with a solid background color, then use your smallest detailing brush (size 00) to paint a geometric diamond pattern in rust and cream tones. -
Seal:
Once all paint is completely dry, finish with a matte spray varnish to protect the surface and the miniature scene.
Realistic Fabric Texture
Press a piece of real canvas or coarse fabric gently onto the raw clay sofa before baking/drying to imprint a genuine textile weave.
Now you have a charming little habitat to keep your jewelry safe and stylish