Whenever I’m stuck on what to make next, I go back to the basics: tiny shapes, bold color, and that satisfying squish of air-dry clay or polymer clay. Here are some of my favorite clay art ideas that feel approachable, cute, and totally doable at your kitchen table.
Tiny Cute Animal Figurines
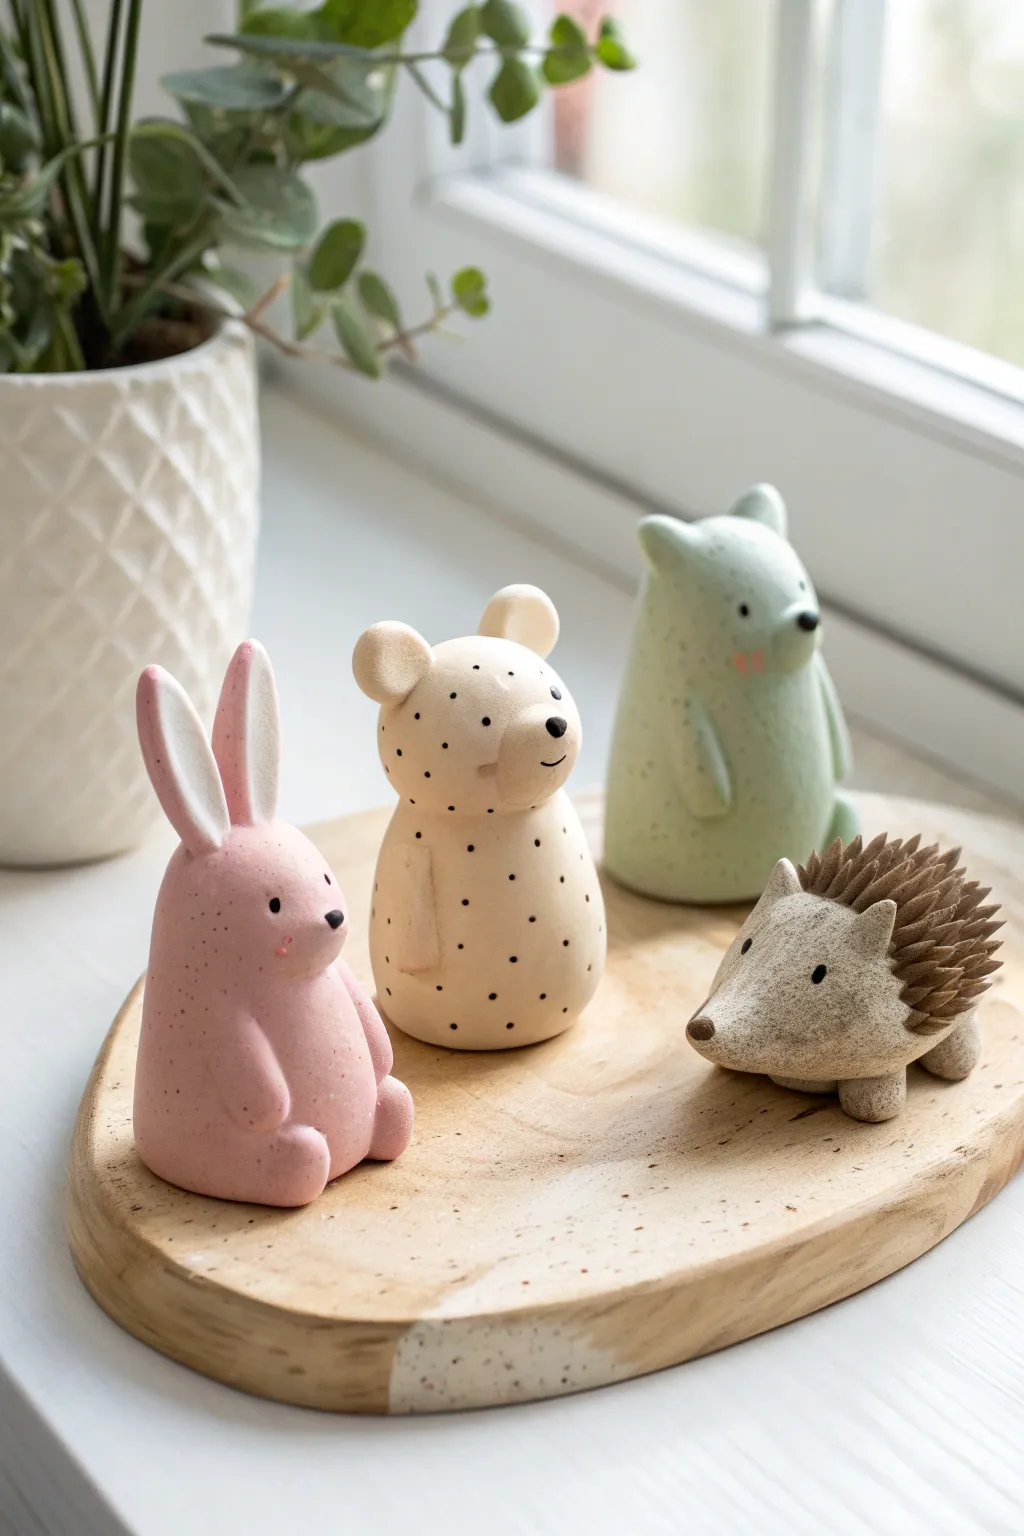
These charming, minimalist animal figurines bring a touch of woodland magic to any shelf with their soft pastel tones and sweet expressions. The project focuses on simple, rounded shapes and delicate details to create a cohesive set of tiny friends, including a rabbit, bear, and hedgehog.
How-To Guide
Materials
- Polymer clay (Soft pink, beige/cream, pale sage green, warm brown)
- Black clay (or black acrylic paint)
- Speckled clay effect medium (or fine black pepper/sand)
- Needle peeling tool
- Ball stylus tool
- Fine detail paintbrush
- Craft knife
- Small scissors (optional for hedgehog spikes)
Step 1: Prepping the Clay Base
-
Create the Speckled Effect:
Before sculpting, mix your base colors (pink, beige, green) with a tiny pinch of speckled effect medium, fine black sand, or even ground pepper. Knead thoroughly until the specks are evenly distributed. This gives that organic, stoneware look seen in the finished pieces. -
Form the Bodies:
Roll three balls of clay—one pink, one beige, one green—into smooth, egg-like shapes. The bottom should be slightly flattened so they stand upright on their own. Aim for a height of about 2-3 inches per figure.
Fixing Cracks
If you see tiny cracks appear while smoothing joints, brush on a tiny drop of baby oil (for polymer) or water (for air-dry) and massage gently to heal the seam.
Step 2: Sculpting the Rabbit
-
Shape the Ears:
Take two small pieces of pink clay and roll them into elongated logs, tapering one end. Gently press a smaller, white or lighter pink strip into the center of each ear for depth. -
Attach the Ears:
Blend the wider base of the ears onto the top of the pink body. I like to use a silicone tool to smooth the seam completely so it looks like one continuous piece. -
Add Limbs:
Create two small teardrop shapes for arms and press them flush against the sides of the body. Add two small rounded stubs at the front base for feet.
Make it a Set
Try crafting a tiny clay tree stump or a miniature mushroom to create a complete forest scene for your new friends.
Step 3: Creating the Spotted Bear
-
Head Definition:
For the beige bear, gently pinch the upper part of the egg shape to slightly define a head area, keeping it very subtle and rounded. -
Add Ears and Snout:
Attach two small half-circles to the top of the head. Add a tiny flattened oval of lighter beige clay to the front face area for the snout. -
Patterning:
Using a fine-tip tool or the very tip of a paintbrush, paint tiny black polka dots randomly across the bear’s body. Keep the dots small and spaced out.
Step 4: Making the Green Bear
-
Ear Variation:
Roll two small cones for the green bear’s ears. Unlike the round bear ears, pinch these slightly at the tip for a more pointed look. -
Arm Placement:
Roll long, thin teardrops for arms and attach them so they hang straight down the sides, blending the shoulders smoothly into the main body.
Step 5: Forming the Hedgehog
-
Base Shape:
Form a horizontal oval from beige clay. Pinch one end into a gentle point to create the snout. -
The Spines:
Switch to brown clay. Create a ‘cap’ that covers the back two-thirds of the body. Using small scissors or a sharp knife, snip into the clay repeatedly to lift up small triangular flakes, mimicking quill texture. -
Tiny Feet:
Add four tiny balls of beige clay to the underside for stability and cuteness.
Step 6: Finishing Details
-
Facial Features:
Using tiny bits of black clay (or black paint after baking), add small bead eyes and nose tips to all animals. Place the eyes wide apart for a dreamy, innocent look. -
Blushing Cheeks:
Use a dry brush with a tiny amount of pink pastel chalk or diluted paint to dust rosy cheeks onto the rabbit and green bear. -
Bake or Dry:
Follow your clay manufacturer’s instructions for baking or air-drying. If baking, ensure the figures are stable on the tray. -
Matte Varnish:
Once cool and dry, apply a coat of matte varnish. Avoid glossy finishes to maintain that soft, modern ceramic aesthetic.
Arranging your finished figurines on a windowsill brings a quiet, joyful energy to your workspace


Simple Sea Creature Miniatures
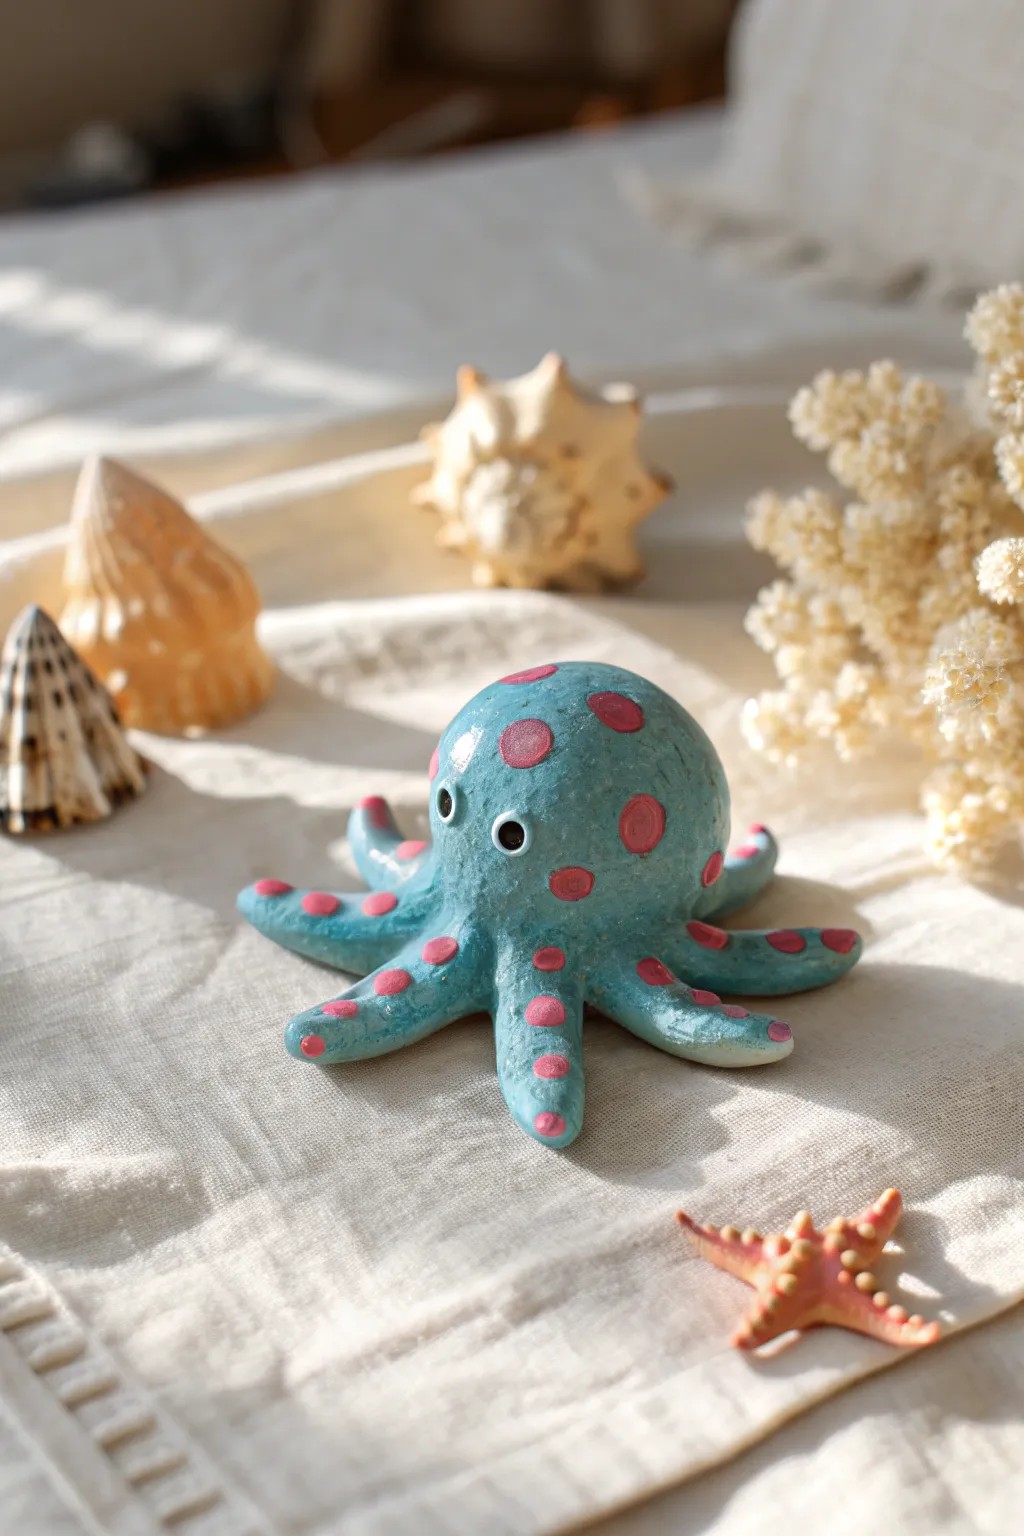
This charming clay octopus is the perfect addition to any miniature seaside collection, featuring a gentle teal body covered in cheerful pink polka dots. Its rounded shape and wide-set eyes give it a friendly, whimsical personality that is simple enough for beginners to sculpt.
Detailed Instructions
Materials
- Polymer clay (Teal or Light Blue)
- Polymer clay (Pink)
- Small googly eyes (approx. 3-4mm)
- Clay sculpting tools (specifically a dotting tool or rounded stylus)
- Rolling pin or pasta machine for clay
- Gloss glaze or polyurethane varnish
- Soft brush (for glazing)
- Oven for baking
Step 1: Sculpting the Body
-
Condition the clay:
Start by kneading a chunk of your teal clay until it is soft, warm, and pliable. This ensures the finished octopus won’t crack during baking. -
Form the head shape:
Roll the clay into a smooth ball about the size of a large walnut or a golf ball. Gently flatten the bottom slightly so it can sit securely on your work surface. -
Prepare the legs:
Pull eight smaller pieces of teal clay from your block. Roll each one into a tapered cone shape, thicker at one end and pointed at the tip, roughly 1 to 1.5 inches long. -
Attach the legs:
Flip the main body ball over. Press the thicker ends of the eight legs onto the bottom center of the ball in a radial pattern, blending the clay seams upward into the body for a strong bond. -
Pose the tentacles:
Turn the octopus upright. The legs should naturally splay out. Gently curve the tips of the tentacles upward or sidewards to give them a sense of movement, rather than having them lie perfectly flat. -
Smooth the surface:
Use your finger or a soft silicone tool to smooth over the area where the legs meet the head, ensuring a seamless transition and a unified teal skin.
Sticky Fingerprints?
If your fingerprints are visible on the smooth head, lightly brush a tiny amount of baby oil or cornstarch over the clay before baking to smooth them out.
Step 2: Adding Details
-
Create the spots:
Condition a small amount of pink clay. Roll it into a very thin sheet using a rolling pin. -
Cut the circles:
Use a small circular cutter or the end of a straw to punch out tiny pink circles. Varying the sizes slightly adds to the organic look. -
Apply body spots:
Gently press the pink circles onto the teal head. Place them randomly, but try not to crowd them too much. I like to gently roll over them with a finger to embed them flush into the teal clay. -
Decorate the legs:
Add smaller pink dots down the length of each tentacle. This mimics the look of suckers or patterns often found on sea creatures. -
Create eye sockets:
Using a medium-sized ball tool or the rounded end of a paintbrush, press two indentations into the front of the face where the eyes will go. Space them widely for a cute expression. -
Baking:
Place your octopus on a baking sheet or ceramic tile. Bake according to your specific brand of clay’s instructions (usually around 275°F or 135°C for 15-30 minutes per 1/4 inch thickness).
Step 3: Finishing Touches
-
Cool down:
Allow the sculpture to cool completely before handling. Polymer clay is slightly fragile when hot and hardens fully as it returns to room temperature. -
Attach the eyes:
Apply a tiny dab of strong craft glue or superglue into the indented eye sockets. Press the googly eyes firmly into place. -
Glaze the figure:
Using a soft brush, apply a coat of gloss glaze over the entire clay surface. This not only protects the clay but gives it that wet, fresh-from-the-ocean shine. -
Dry:
Let the glaze dry fully in a dust-free area for the time recommended on your varnish bottle.
Texture Play
Before baking, use a piece of coarse sandpaper or a toothbrush to gently tap the teal clay. This creates a realistic skin texture instead of a purely smooth plastic look.
Place your little spotted friend among some seashells and enjoy the splash of color it brings to your shelf


Easy Clay Earrings With Color Blocking
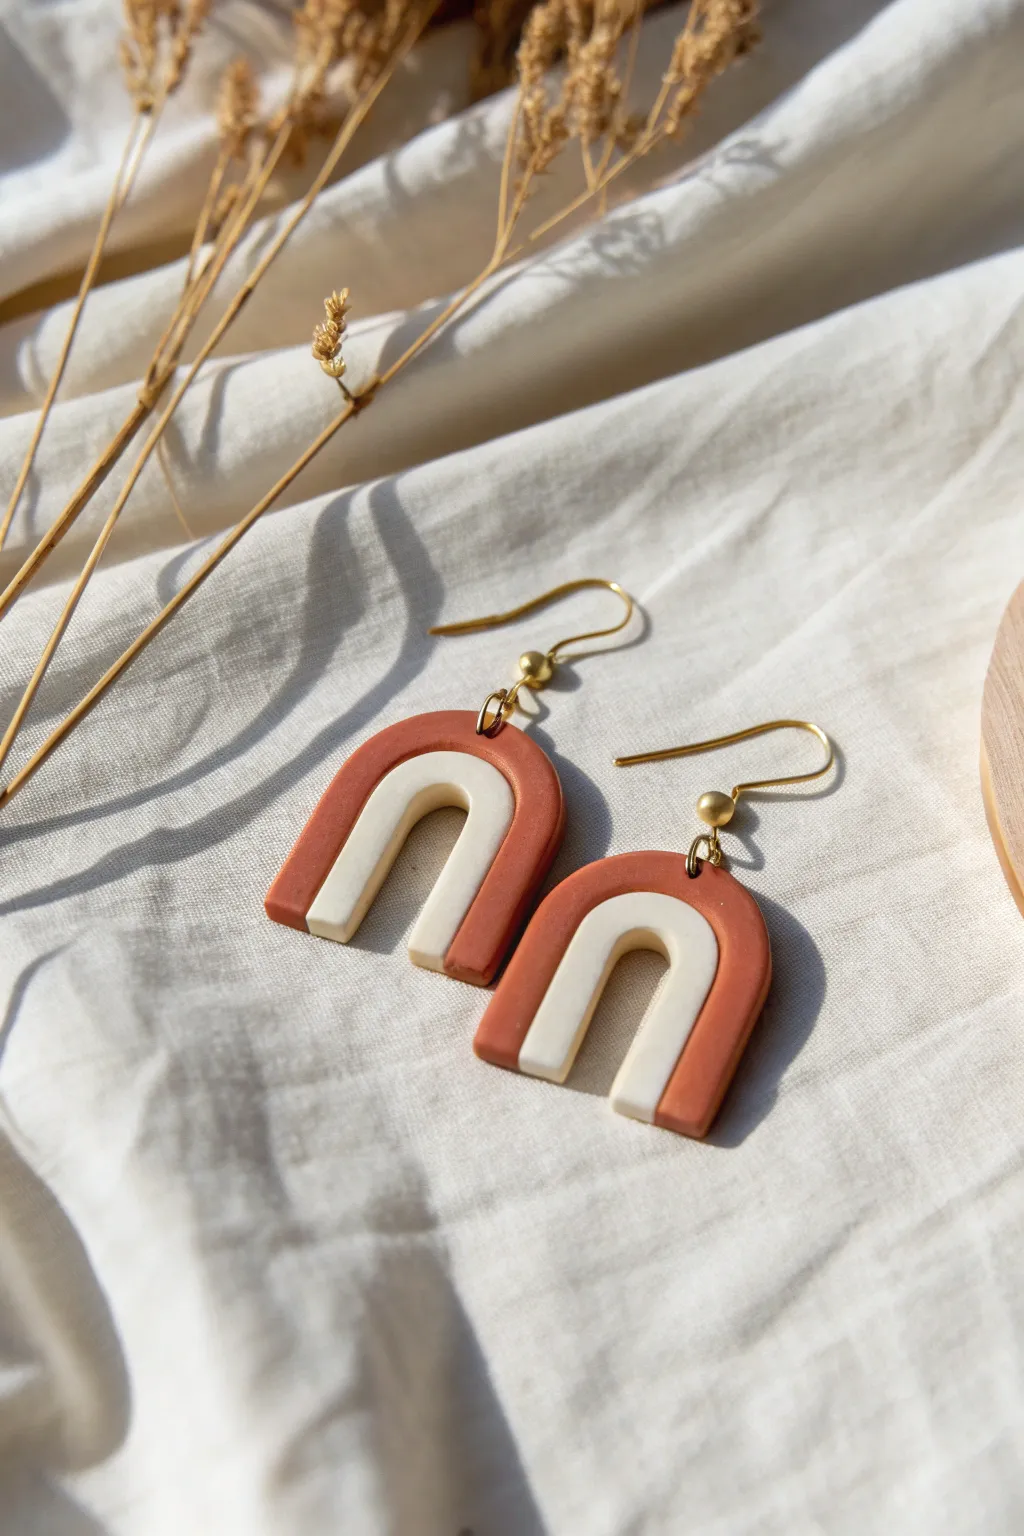
These stylish earrings feature a classic double-arch design, combining warm terracotta with soft cream tones for a modern, minimalist look. The nested color-blocking technique adds dimension while keeping the overall aesthetic clean and sophisticated.
How-To Guide
Materials
- Polymer clay (terracotta/burnt orange)
- Polymer clay (cream/ivory)
- Acrylic rolling pin or clay machine
- Nested arch cutters (or U-shaped cutters in two sizes)
- Clay slicer blade or craft knife
- Hand drill or pin vibe
- Jump rings (gold finish)
- Fish hook ear wires (gold finish)
- Jewelry pliers (flat nose and round nose)
- Parchment paper or ceramic tile
Step 1: Preparing the Clay
-
Condition the clay:
Start by kneading the terracotta clay in your hands until it becomes soft, pliable, and free of cracks. Repeat this process separately with the cream-colored clay. -
Roll out the terracotta:
Using your acrylic rolling pin or a pasta machine on a medium setting (approx. 3mm thick), roll the terracotta clay into a smooth, even sheet. -
Roll out the cream clay:
Roll the cream clay to the exact same thickness as the terracotta sheet to ensure the finished surface of the earring is level. -
Check for bubbles:
Inspect both clay sheets for any air bubbles. Gently pop them with a needle tool and smooth the surface with your finger if necessary.
Seamless Finish
Apply a tiny bit of liquid polymer clay (Bake & Bond) to the inner edge of the terracotta frame before inserting the cream piece for a super strong, gap-free hold.
Step 2: Cutting and Assembling
-
Cut the outer arches:
Press your larger arch cutter firmly into the terracotta sheet. Cut two shapes for the pair of earrings. -
Cut the inner hollow:
Take the smaller arch cutter and center it inside the terracotta arches you just cut. Press down to remove the center, leaving just the outer terractotta frame. -
Cut the cream inserts:
Using the same smaller arch cutter, cut two solid arch shapes from the cream clay sheet. -
Nest the pieces:
Gently lift the cream arch and place it into the empty space of the terracotta frame on your work surface or baking tile. Fit them together like puzzle pieces. -
Secure the seam:
To ensure the pieces bond, gently press the connection points on the back side or lightly roll over the top with the rolling pin using very light pressure. -
Trim the bottoms:
Use your sharp clay blade to make a swift, straight cut across the bottom of both assembled arches to ensure the legs are even and the design sits flat. -
Smooth the edges:
Dip your finger in a tiny bit of water or cornstarch and gently smooth any rough edges around the perimeter of the clay.
Lint on Light Clay?
Cream clay acts like a magnet for dust. If you spot lint before baking, lightly dip a cotton swab in rubbing alcohol or acetone and gently wipe the surface clean.
Step 3: Finishing Up
-
Create holes:
Before baking, use a needle tool or toothpick to poke a hole at the very top center of the terracotta arch. Alternatively, wait to drill this after baking for cleaner lines. -
Bake the clay:
Place your clay pieces on a ceramic tile or parchment-lined baking sheet. Bake according to your specific brand’s package instructions (usually 275°F/135°C for 15-30 minutes). -
Cool down:
Allow the pieces to cool completely in the oven or on a wire rack before handling them to prevent bending. -
Drill (optional method):
If you didn’t poke holes earlier, use a hand drill or pin vise to carefully drill a hole at the top center of each earring. -
Open jump rings:
Using two pairs of pliers, twist a gold jump ring open (twist sideways, don’t pull apart) and thread it through the hole in the clay. -
Attach ear wires:
Slide the loop of the fish hook ear wire onto the open jump ring. -
Close the hardware:
Gently twist the jump ring back into a closed position using your pliers, ensuring the gap is fully sealed so the clay doesn’t slip out.
Now you have a stunning pair of geometric statement earrings ready to wear or gift


Personalized Initial Keychains and Bag Charms
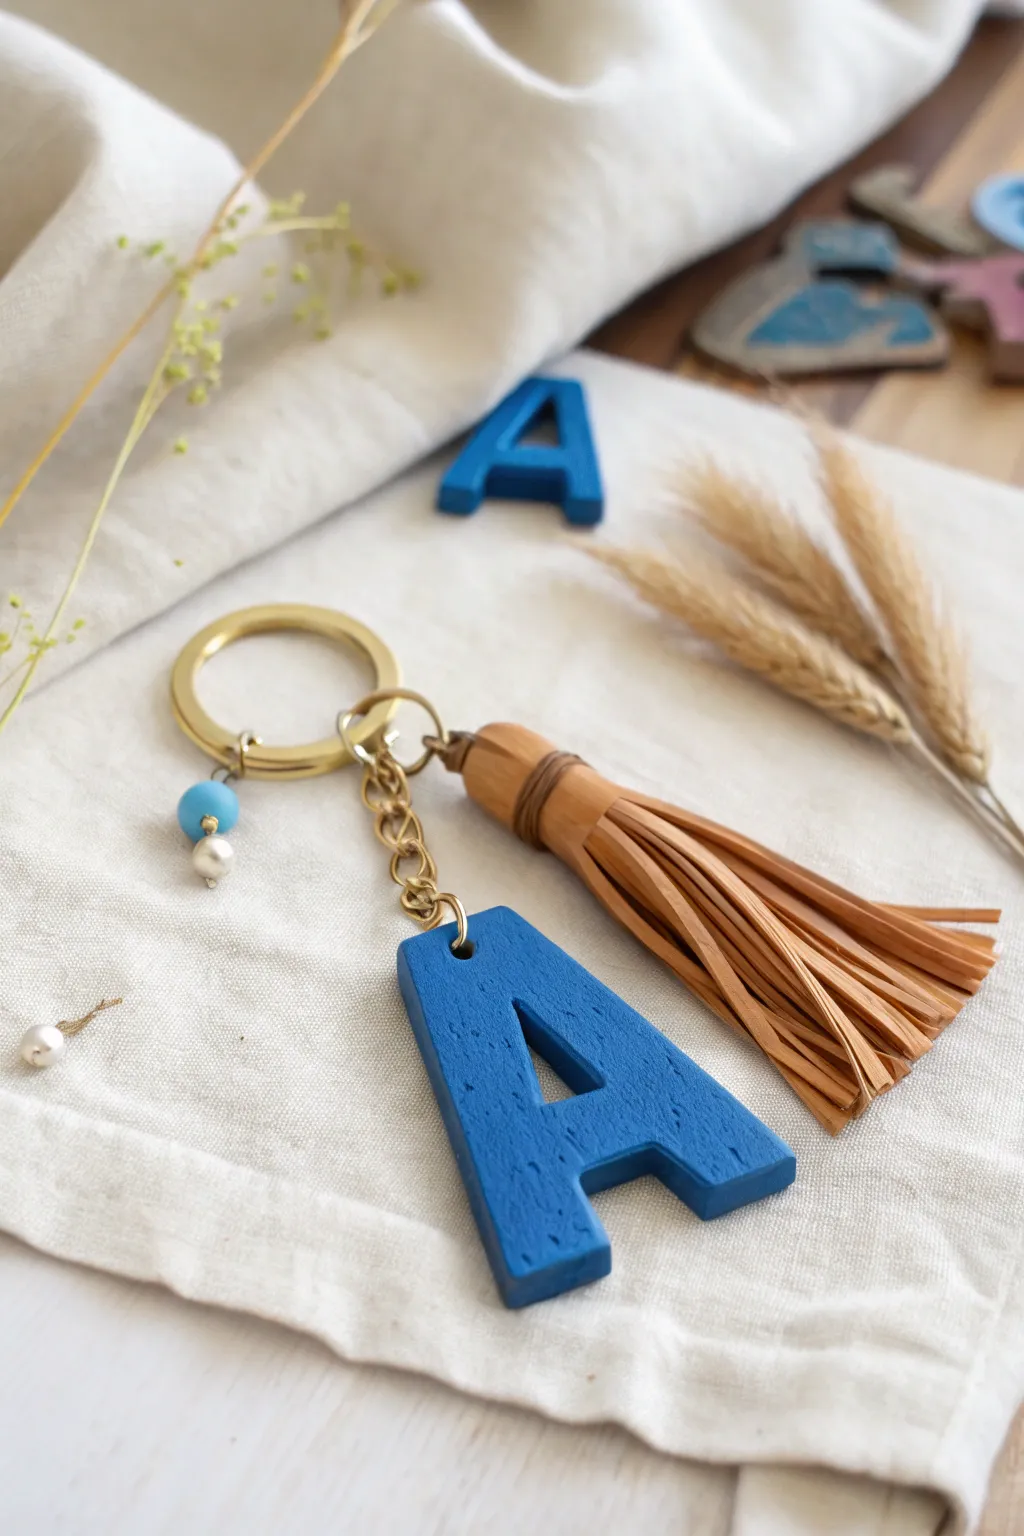
Create a personalized accessory with this charming sturdy clay keychain, featuring a textural wood-like finish in deep azure. Paired with a stylish leather tassel and gold accents, it makes for a sophisticated and thoughtful handmade gift.
Step-by-Step
Materials
- Air-dry clay or polymer clay (white or neutral base)
- Letter cookie cutters (or a sharp craft knife)
- Sandpaper (fine and medium grit)
- Acrylic paint (Deep azure blue or similar)
- Flat paintbrush
- Gold keychain ring with chain attached
- Jump rings (gold, 6-8mm)
- Jewelry pliers (needle-nose and flat-nose)
- Leather or faux leather strip (tan/camel color)
- Cord for binding tassel (waxed cotton or thin leather)
- Small eye pins (gold)
- Small head pin (gold)
- Small blue bead and pearl accent bead
- Clear sealant or varnish (matte finish)
Step 1: Shaping the Clay Initial
-
Condition the clay:
Begin by kneading your clay until it is soft, pliable, and free of cracks. If using air-dry clay, keep your hands slightly damp to prevent sticking. -
Roll out the slab:
Roll the clay out on a smooth surface to an even thickness of about 1/4 inch (6mm). You want it substantial enough to be durable but not too heavy. -
Cut the letter:
Press your chosen letter cookie cutter firmly into the clay. If you don’t have a cutter, print a letter template, place it over the clay, and carefully trace and cut around it with a sharp craft knife. -
Smooth the edges:
Dip your finger in a little water (for air-dry) or baby oil (for polymer) and gently run it along the cut edges to soften any sharp corners. -
Add the hardware hole:
Before the clay hardens, insert a small gold eye pin into the top center of the letter. Alternatively, use a straw or tool to poke a clean hole if you plan to use a large jump ring directly. -
Dry or cure:
Allow the clay to dry fully according to package instructions. For air-dry clay, this may take 24-48 hours; for polymer clay, bake it in the oven at the recommended temperature.
Fixing Rough Edges
If your dried clay has sharp burrs you missed while wet, use an emery board or nail file. It’s gentler than sandpaper and perfect for getting into the tight curves of letters like ‘S’ or ‘B’.
Step 2: Texturing and Painting
-
Sand for texture:
Once fully cured or dry, use sandpaper to smooth any rough spots. I actually like to use a coarser grit here to intentionally scratch the surface slightly, giving it that rustic, wood-grain appearance seen in the photo. -
Apply base coat:
Paint the entire letter, including the sides and back, with your deep azure blue acrylic paint. Let this layer dry completely. -
Apply second coat:
Add a second coat for opaque coverage. If you want to enhance the texture, use a slightly drier brush to keep paint from pooling in the sanding scratches. -
Seal the piece:
Protect your paint job with a coat of matte varnish or sealant. This is crucial for a keychain that will face daily wear and tear.
Step 3: Creating the Tassel
-
Cut leather fringe:
Cut a rectangle of leather roughly 3 inches tall by 4 inches wide. Leaving a 1/2-inch margin at the top uncut, slice the rest of the rectangle into thin vertical strips to create fringe. -
Roll the tassel:
Create a small loop of leather or cord and glue it to the top left corner of your fringe piece (this will be the hanger). Apply glue along the uncut top margin and tightly roll the leather up. -
Secure the neck:
Wrap a piece of waxed cord or contrasting thin leather strip around the ‘neck’ of the tassel (the uncut top section) several times and knot it securely to hold the roll together.
Pro Tip: Stronger Connections
For maximum durability, dip the end of your eye pin in super glue or liquid clay before inserting it into the wet clay letter. This ensures the hardware won’t pull out over time.
Step 4: Assembly
-
Attach letter to ring:
Open a jump ring using your pliers. Hook it through the eye pin on your clay letter and attach it to the chain on the main keyring hardware. Close the jump ring securely. -
Add the tassel:
Use another heavy-duty jump ring to attach the leather tassel loop directly to the large keyring loop. -
Create a bead charm:
Thread a small blue bead and a pearl bead onto a gold head pin. Use round-nose pliers to curl the remaining wire at the top into a loop. -
Final attachment:
Attach this small beaded charm to the main keyring using a small jump ring for that extra pop of detail.
Now you have a custom, boutique-style accessory ready to organize your keys in style

The Complete Guide to Pottery Troubleshooting
Uncover the most common ceramic mistakes—from cracking clay to failed glazes—and learn how to fix them fast.
Small Trinket Dish Catchalls
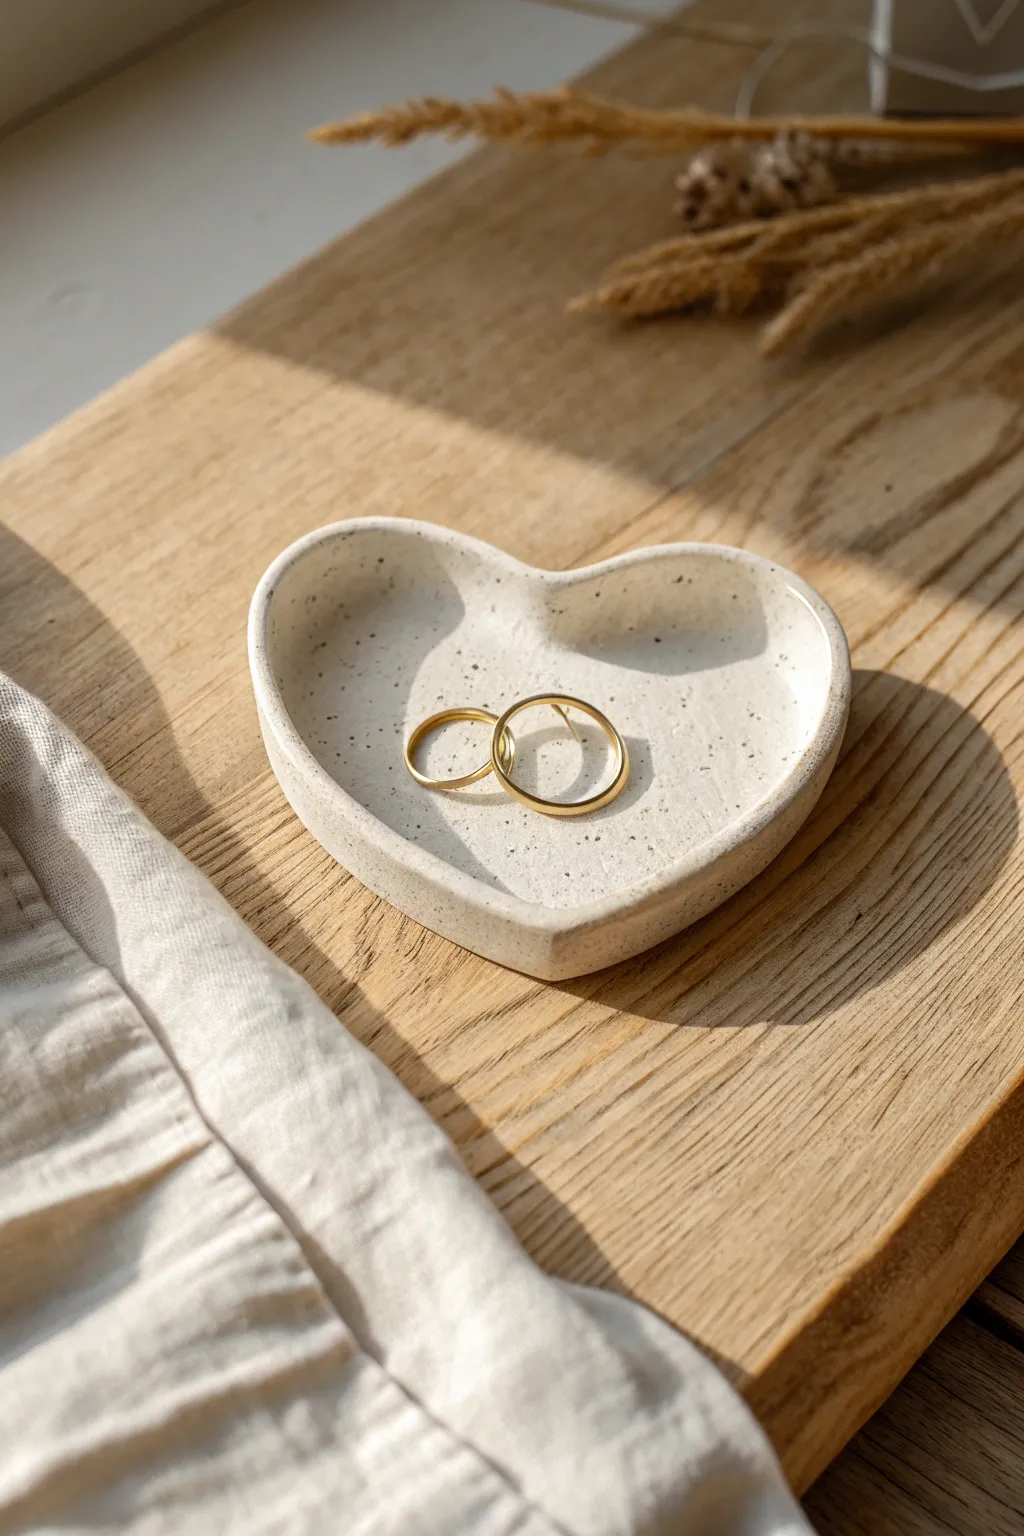
This charming little catchall combines a classic romantic shape with a modern, speckled stone aesthetic. Perfect for keeping your favorite rings safe, its organic form and smooth finish make it a delightful addition to any bedside table.
Step-by-Step Guide
Materials
- White air-dry clay or polymer clay
- Rolling pin
- Heart-shaped cookie cutter (medium size)
- Speckled clay additive (like cracked pepper or dried coffee grounds) or black acrylic paint for faux speckles
- Small bowl of water
- Sponge
- Sandpaper (fine grit)
- Gloss varnish or glaze
- Soft paintbrush
- Craft knife
Step 1: Preparing the Clay
-
Condition the clay:
Start by taking a handful of white clay and kneading it in your hands until it becomes soft, warm, and pliable. If you are using polymer clay, this step is crucial to prevent cracking. -
Add texture (Method A):
If you want the speckles embedded in the clay itself, sprinkle a small pinch of dried coffee grounds or black pepper into the clay now. Fold and knead the clay repeatedly until the specks are distributed evenly throughout the ball. -
Flatten the base:
Place your clay ball on a smooth, clean surface. Press it down slightly with your palm to create a thick puck shape. -
Roll it out:
Using your rolling pin, roll the clay out to a thickness of about 1/4 inch (6mm). Try to keep the thickness consistent across the entire slab.
Step 2: Shaping the Heart
-
Cut the shape:
Press your heart-shaped cookie cutter firmly into the rolled clay. If you don’t have a cutter, you can sketch a heart on paper, cut it out, place it on the clay, and trace around it with a craft knife. -
Remove excess:
Peel away the excess clay from around the heart shape. Save the scraps for another project, but keep them covered so they don’t dry out. -
Lift the edges:
Gently lift the heart off your work surface. To create the dish shape, use your fingertips to softly pinch and curl the edges upward around the entire perimeter. -
Smooth the form:
Dip your finger in a little bit of water. Run your wet fingertip along the rim to smooth out any cracks or sharp angles created by the pinching process. -
Refine the curve:
Place the dish back down. Gently press the center of the heart down while pulling the walls slightly up to ensure a nice concave shape that will hold rings securely.
Smooth Rim Secret
Use a damp makeup sponge instead of your finger to smooth the rim. The dense foam smooths clay without leaving distinct ridges like your fingertips might.
Step 3: Refining and Drying
-
Sponge smooth:
Take a slightly damp sponge and wipe it gently over the entire surface of the dish. This erases fingerprints and gives the clay that professional, high-end look. -
Let it dry:
Allow the dish to dry completely according to your clay package instructions. For air-dry clay, this usually takes 24-48 hours. I like to flip it over halfway through so the bottom dries evenly. -
Sand imperfections:
Once fully cured and hard, check the rim for any rough spots. Use fine-grit sandpaper to buff the edges until they feel perfectly smooth to the touch. -
Clean up dust:
Wipe away all sanding dust with a barely damp cloth or paper towel. The surface needs to be dust-free for the finish to stick.
Golden Edge Upgrade
Paint the very top rim of the heart with liquid gold leaf or metallic gold paint before varnishing for a luxurious, chic finished look.
Step 4: Finishing Touches
-
Speckle (Method B):
If you didn’t mix speckles into the wet clay earlier, mix a tiny drop of black acrylic paint with water. Dip an old toothbrush in the mix and flick the bristles to splatter tiny dots across the white dish. -
Apply varnish:
Using a soft brush, apply a coat of gloss varnish or glaze. This seals the clay and gives it the shiny, ceramic-like appearance seen in the photo. -
Dry the finish:
Let the first coat of varnish dry completely. If you want a deeper, glassier shine, apply a second coat and let it cure fully before placing any jewelry inside.
Your speckled heart dish is now ready to hold your most treasured small jewelry pieces on your vanity
Minimal Incense Holders With Cute Details
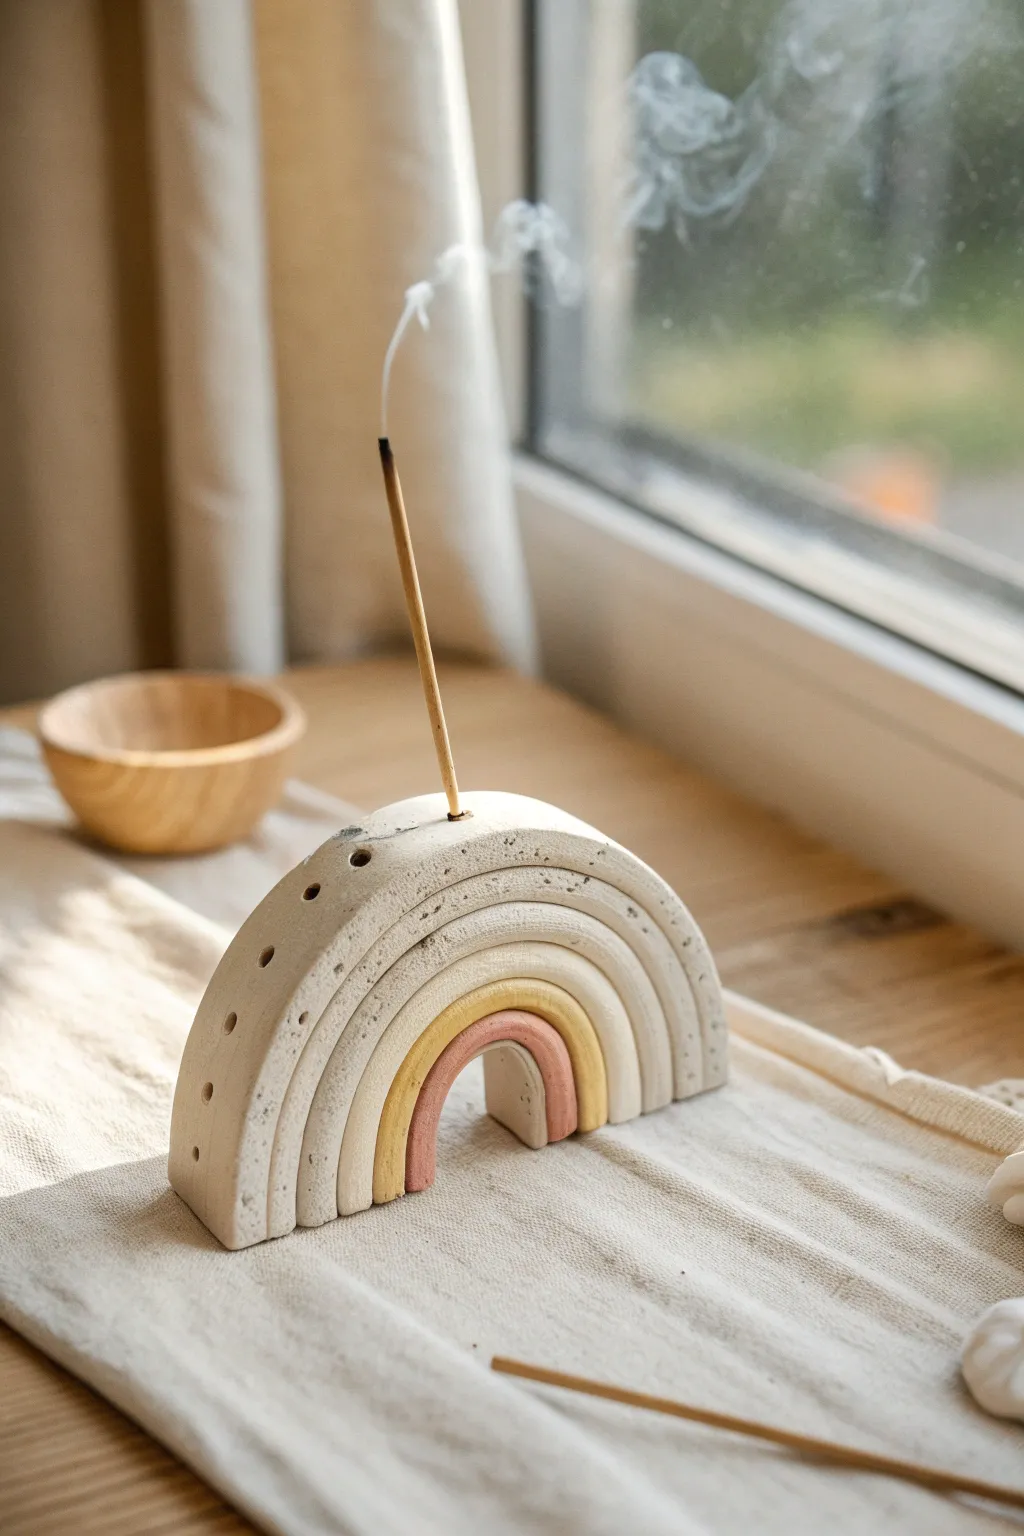
Bring a touch of calm to your space with this minimalist rainbow arch incense holder. Featuring soft, earthy tones and varied textures, this project doubles as sculptural decor even when not in use.
How-To Guide
Materials
- Air-dry clay (white or light grey) or polymer clay
- Rolling pin
- Craft knife or scalpel
- Small round cookie cutters (graduated sizes) or cardstock for templates
- Wooden skewer or toothpick
- Sandpaper (medium and fine grit)
- Acrylic paints (Cream, Mustard Yellow, Terracotta/Dusty Pink)
- Small flat paintbrush
- Matte varnish or sealant
- Water and sponge (for smoothing)
Step 1: Shaping the Arches
-
Prepare the workspace:
Lay down a clean mat or parchment paper to prevent sticking. Knead your clay until it’s soft, pliable, and free of air bubbles. -
Roll the slab:
Roll out a slab of clay to a consistent thickness of about 1.5 cm (approximately 0.6 inches). You want it thick enough to stand stable. -
Cut the largest arch:
Using a large round cutter or a paper template, cut out a semi-circle shape. This will form the main body of the rainbow. -
Carve the inner arches:
Carefully trace concentric semi-circles inside your main shape. You can use smaller cutters as guides or freehand it for a more organic look. Use your craft knife to slice along these lines. -
Create distinct layers:
Separate the arches slightly. The design relies on the visual separation of the bands, so ensure the cuts are clean and distinct. -
Smooth the edges:
Dip your finger in a little water and run it along all cut edges to soften any sharpness. The goal is a smooth, stone-like finish.
Stone Effect
Mix baking soda into your acrylic paint. It creates a gritty, textured finish that looks incredibly like real stone or concrete.
Step 2: Adding Details
-
Make the incense hole:
At the very top center of the largest outer arch, press a wooden skewer straight down about 1 inch deep. Wiggle it slightly to ensure the hole is wide enough for a standard incense stick. -
Create decorative texture:
Using the same skewer or a smaller tool, poke small, evenly spaced holes running down the side of the largest arch. These are purely decorative and add a nice porous texture. -
Add surface imperfections:
To mimic concrete or stone, lightly press a coarse sponge or crumpled foil against the wet clay surface to create subtle pitting. -
Reassemble and bond:
If you separated the pieces entirely, score the touching edges (make cross-hatch marks), add a dab of clay slip or water, and press them back together firmly.
Make it a Set
Create a matching circular dish to sit underneath the rainbow. This catches falling ash and completes the display.
Step 3: Finishing and Painting
-
Let it dry completely:
Allow the piece to dry for 24-48 hours. Turn it over occasionally to ensure the bottom dries evenly. It should be bone dry and lighter in color. -
Sand for smoothness:
Once fully dry, use fine-grit sandpaper to refine the shape, smooth out any fingerprints, and sharpen the definition between the arch layers. -
Apply the base coat:
Paint the two largest outer arches with a creamy off-white or light stone color. You might need two coats for opaque coverage. -
Paint the color bands:
Paint the third arch (middle) with a muted mustard yellow and the smallest inner arch with a soft terracotta or dusty pink. -
Distress the paint:
I like to wipe a dry paper towel over the paint just before it fully dries to reveal some of the clay texture beneath, enhancing the rustic look. -
Clean the holes:
Use your clean skewer to double-check that paint hasn’t clogged the incense holder hole or the decorative side dots. -
Seal the piece:
Finish with a coat of matte varnish. This is crucial for protecting the clay from ash and ensuring the paints don’t chip over time.
Place your favorite scent in the holder and watch the smoke drift through your handmade sculpture


What Really Happens Inside the Kiln
Learn how time and temperature work together inside the kiln to transform clay into durable ceramic.
Simple Ring Cones and Jewelry Stands
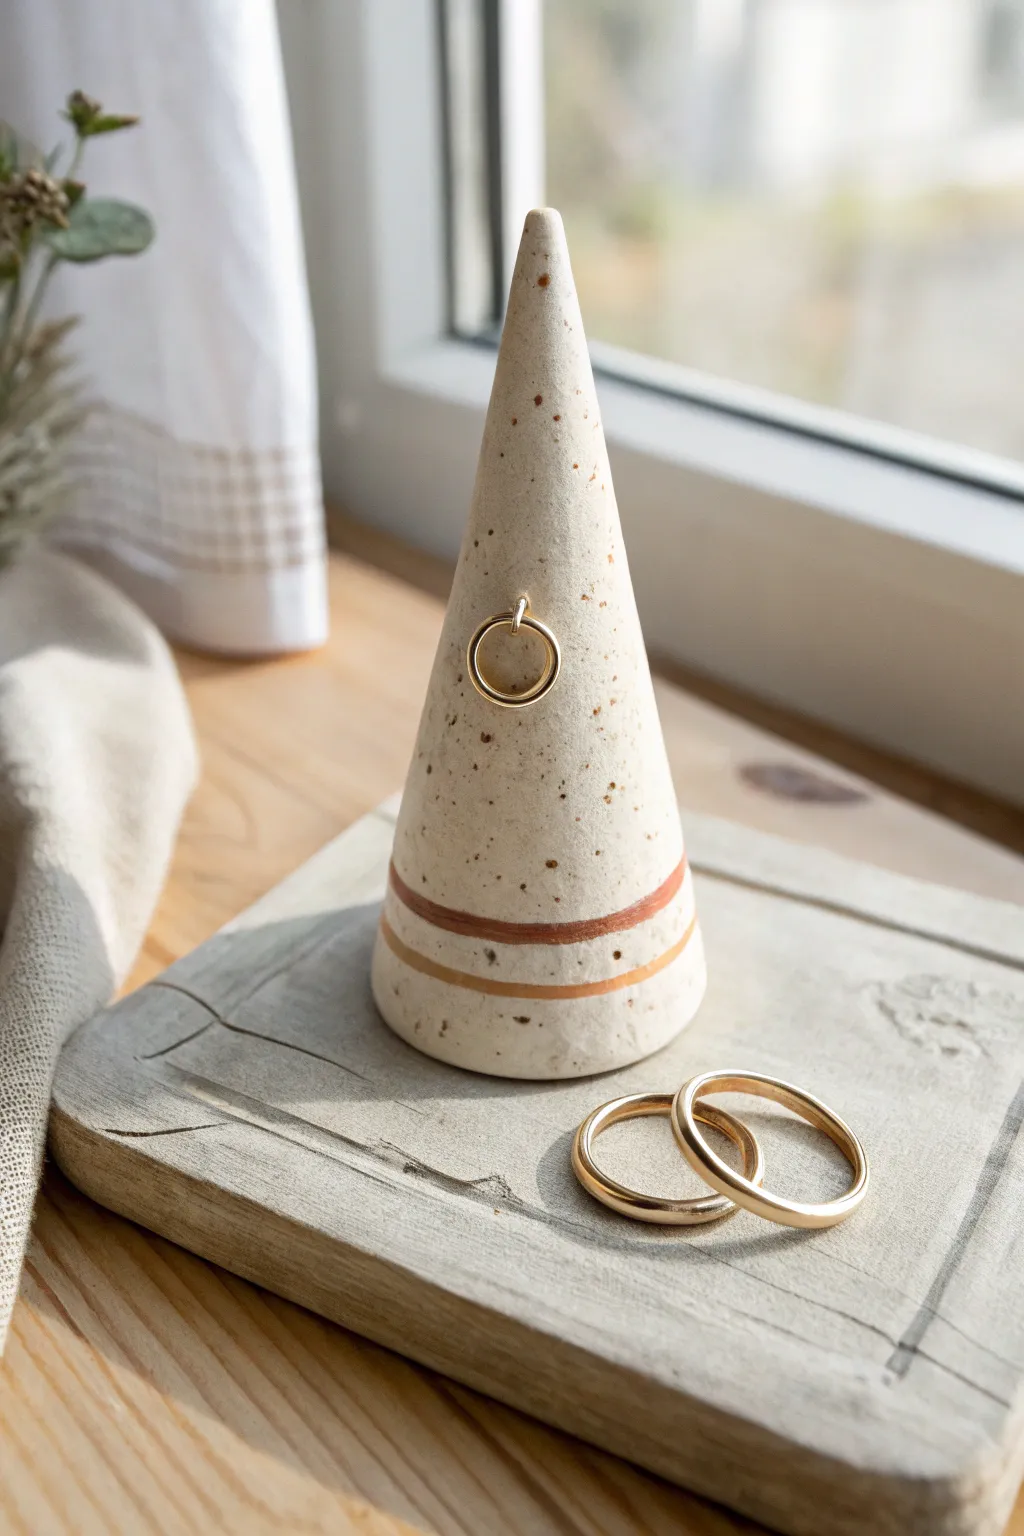
Embrace minimalist elegance with this two-piece jewelry stand set featuring a speckled clay ring cone and a textured display slab. The warm, earthy stripes on the cone and the raw, unglazed finish create a modern, organic look perfect for showcasing your favorite gold bands.
Step-by-Step Tutorial
Materials
- White or cream polymer clay (or air-dry clay)
- Speckled clay additive or finely ground black pepper/coffee grounds
- Rolling pin or pasta machine
- Craft knife or tissue blade
- Coarse sandpaper or canvas for texturing
- Terracotta or warm brown acrylic paint
- Mustard or ochre acrylic paint
- Small fine-point paintbrush
- Cardstock paper/tape (for cone template)
- Oven (for polymer clay) or drying space (for air-dry)
Step 1: Preparing the Speckled Clay
-
Condition the clay:
Begin by thoroughly kneading your white or cream-colored clay until it is soft and pliable. This warmth helps prevent cracks later. -
Add the speckles:
To achieve that natural ceramic look, mix in your speckling agent. You can buy specialized granite-effect clay, or simply knead in a tiny pinch of dried coffee grounds or coarse black pepper until evenly distributed.
Clean Lines Hack
For perfectly crisp painted stripes on your cone, wrap thin washi tape or masking tape around the form as a stencil guide before painting.
Step 2: Forming the Ring Cone
-
Create a cone shape:
Take a portion of the clay and roll it into a ball, then begin rolling it back and forth on your work surface, applying more pressure to one side to taper it into a cone. -
Refine the height:
Stand the cone up and gently roll it between your palms to smooth the sides. Aim for a height of about 3 to 4 inches with a sharp, defined point at the top. -
Flatten the base:
Press the cone firmly onto your work surface to ensure the bottom is perfectly flat and stable. I check from eye level to make sure it isn’t leaning. -
Create the pin detail:
Roll a very tiny snake of clay, form a small loop, and gently press it into the side of the cone about halfway up. You can use a needle tool to blend the seams so it stays attached.
Step 3: Crafting the Display Base
-
Roll out the slab:
Roll the remaining clay into a thick slab, approximately 1/4 inch thick. It doesn’t need to be perfectly uniform; a little rustic variation is nice. -
Cut the square:
Use your craft knife to cut a rough square or rectangle. Soften the sharp corners specifically by tapping them gently with your finger. -
Add rough texture:
Press a piece of coarse sandpaper, canvas, or even a crumpled ball of foil onto the surface of the slab to give it a weathered, concrete-like texture. -
Carve the border:
Use a needle tool or the back of your craft knife to deeply score a border line about half an inch from the edge. Don’t worry about keeping lines straight; wiggly lines add character. -
Imprint decorative motifs:
Gently press a small floral stamp or use a tool to sketch a faint leaf design in one corner of the slab for subtle detail.
Marble Effect
Twist a small amount of beige or grey clay into your white speckled clay before rolling to create subtle marble veining for extra depth.
Step 4: Finishing and Painting
-
Bake or dry:
Follow the instructions for your specific clay. Bake polymer clay on a tile or parchment paper, or let air-dry clay sit for 24-48 hours until fully hardened. -
Cool down:
Allow the pieces to cool completely before applying any paint, as warm clay can cause acrylics to dry too fast and streak. -
Paint the first stripe:
Dip your fine brush into the terracotta paint. Carefully paint a thin horizontal ring around the lower third of the cone. It helps to secure your elbow on the table and rotate the cone, rather than moving the brush. -
Paint the second stripe:
Leave a small gap of exposed clay below the first line, then paint a second ring using the mustard or ochre paint. -
Seal (Optional):
If you want a matte finish like the image, leave the clay raw. If you prefer durability, apply a very thin coat of matte varnish.
Place your new ring cone on the textured base and enjoy the organized beauty of your handmade display
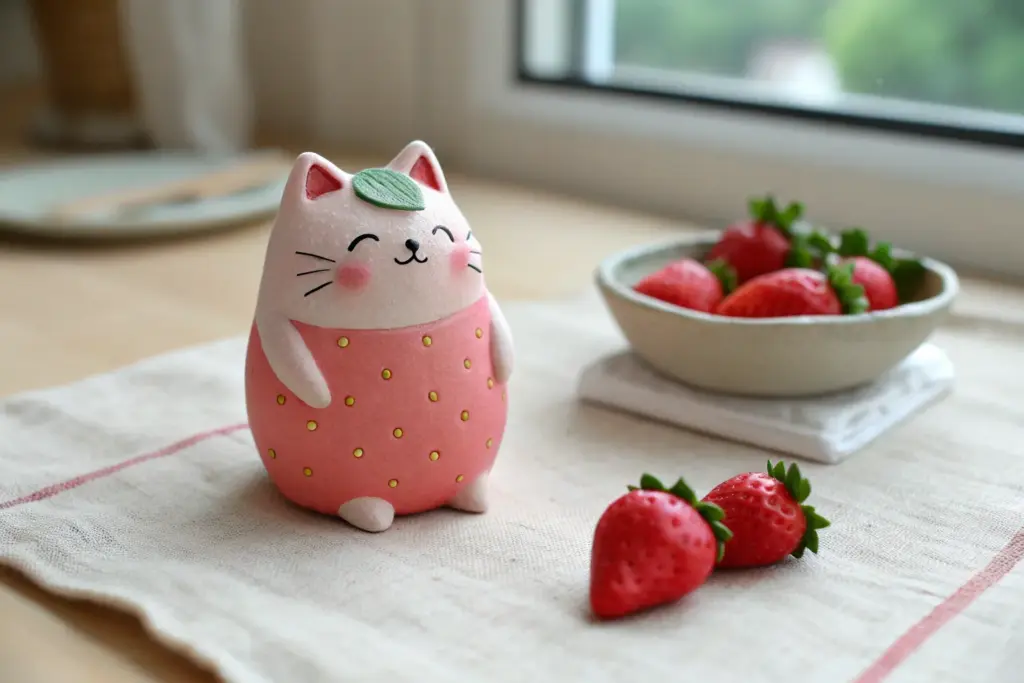
Face Planters and Pencil Cups
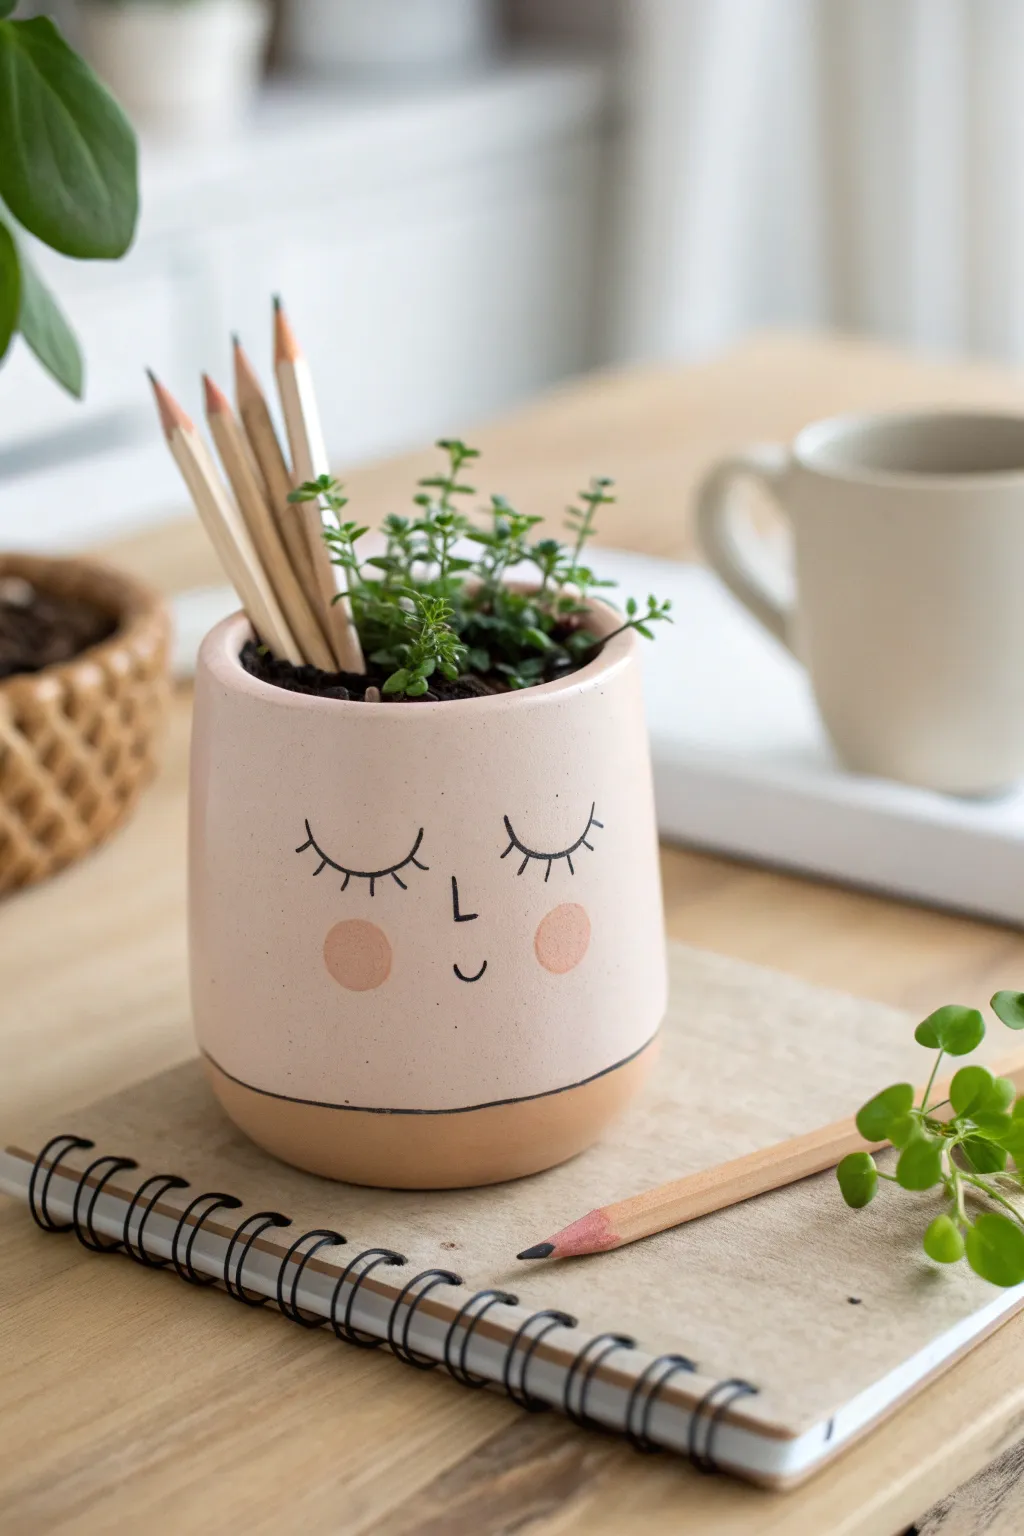
This charming little vessel does double duty as a succulent planter or a desktop pencil holder, featuring a sweet, sleepy face that adds instant warmth to any workspace. The soft blush glaze paired with delicate hand-painted details creates a modern, Scandi-inspired aesthetic.
Step-by-Step
Materials
- White stoneware or polymer clay (oven-bake)
- Rolling pin
- Cylindrical mold (like a sanitized tin can or glass jar)
- Clay knife or craft blade
- Scoring tool or old fork
- Slip (liquid clay) for joining
- Pale pink matte glaze or acrylic paint
- Fine-point black permanent marker or black ceramic underglaze pencil
- Terracotta-colored acrylic paint (for base color)
- Small round paintbrush
- Clear matte sealer (if using acrylics)
Step 1: Forming the Cylinder
-
Roll the slab:
Start by rolling out a generous slab of clay to a uniform thickness of about 1/4 inch. Ensure it’s wide enough to wrap around your chosen overlapping mold. -
Cut the base:
Place your cylindrical mold onto the clay slab and trace around the bottom with your knife to create a perfect circle for the base. -
Cut the wall:
Measure the circumference of your mold and cut a rectangular strip of clay that is slightly longer than that circumference and as tall as you want your pot to be (approx. 4 inches). -
Score and slip:
Score (scratch) the edges of the circular base and the bottom edge of your rectangular strip. Apply a small amount of slip or water to the scratched areas. -
Assemble the cylinder:
Wrap the rectangular strip around the base circle. I find it easiest to work on a small turntable or piece of parchment paper to rotate the piece without touching it too much. -
Seal the seam:
Where the two ends of the wall meet, score and slip the vertical edges. Press them firmly together, smoothing the clay with your finger or a rib tool to make the seam invisible. -
Smooth the interior:
Don’t forget the inside; use a damp sponge or your finger to smooth the coil where the wall meets the floor to ensure a watertight bond. -
Refine the rim:
Gently smooth the top rim with a damp sponge to round off any sharp edges created during cutting.
Uneven Seams?
If the vertical seam is bumpy inside, wrap sandpaper around a dowel or marker to sand it smooth after the clay is dry but before painting.
Step 2: Finishing and Decorating
-
Initial drying or baking:
If using ceramic clay, let it dry slowly to leather-hard. If using polymer clay, bake according to the manufacturer’s package instructions and let it cool completely. -
Base coat application:
Paint the bottom half-inch of the pot with a terracotta or warm beige color to mimic raw clay, creating a dipped look. Let this dry. -
Main color application:
Apply the pale pink paint or glaze to the rest of the exterior, carefully creating a clean line where it meets the terracotta base. You may need 2-3 coats for opacity. -
Drawing the eyes:
Once the base color is completely dry, use a fine-point black marker or brush to draw two curved ‘U’ shapes for closed eyes about midway down the pot. -
Adding lashes:
Add three small, distinct lashes to the outer corner of each eye curve and two smaller lashes toward the inner corner. -
Nose and mouth:
Draw a small, capital ‘L’ shape for the nose centered below the eyes, and a tiny ‘u’ shape for a smiling mouth. -
Rosy cheeks:
Mix a slightly darker, peachier tone of paint. Dip your pinky finger or a small round sponge dabber into the paint and stamp a soft circle on either side of the smile. -
Final seal:
Protect your artwork with a clear matte sealer spray or varnish, especially if you plan to use this for real plants where water might touch the surface.
Texture Twist
Before rolling the slab into a cylinder, press a piece of lace or textured fabric into the bottom ‘terracotta’ section for a tactile contrast.
Now you have a serene little friend to hold your greenery or art supplies

TRACK YOUR CERAMIC JOURNEY
Capture glaze tests, firing details, and creative progress—all in one simple printable. Make your projects easier to repeat and improve.
Cute Expression Magnets for the Fridge
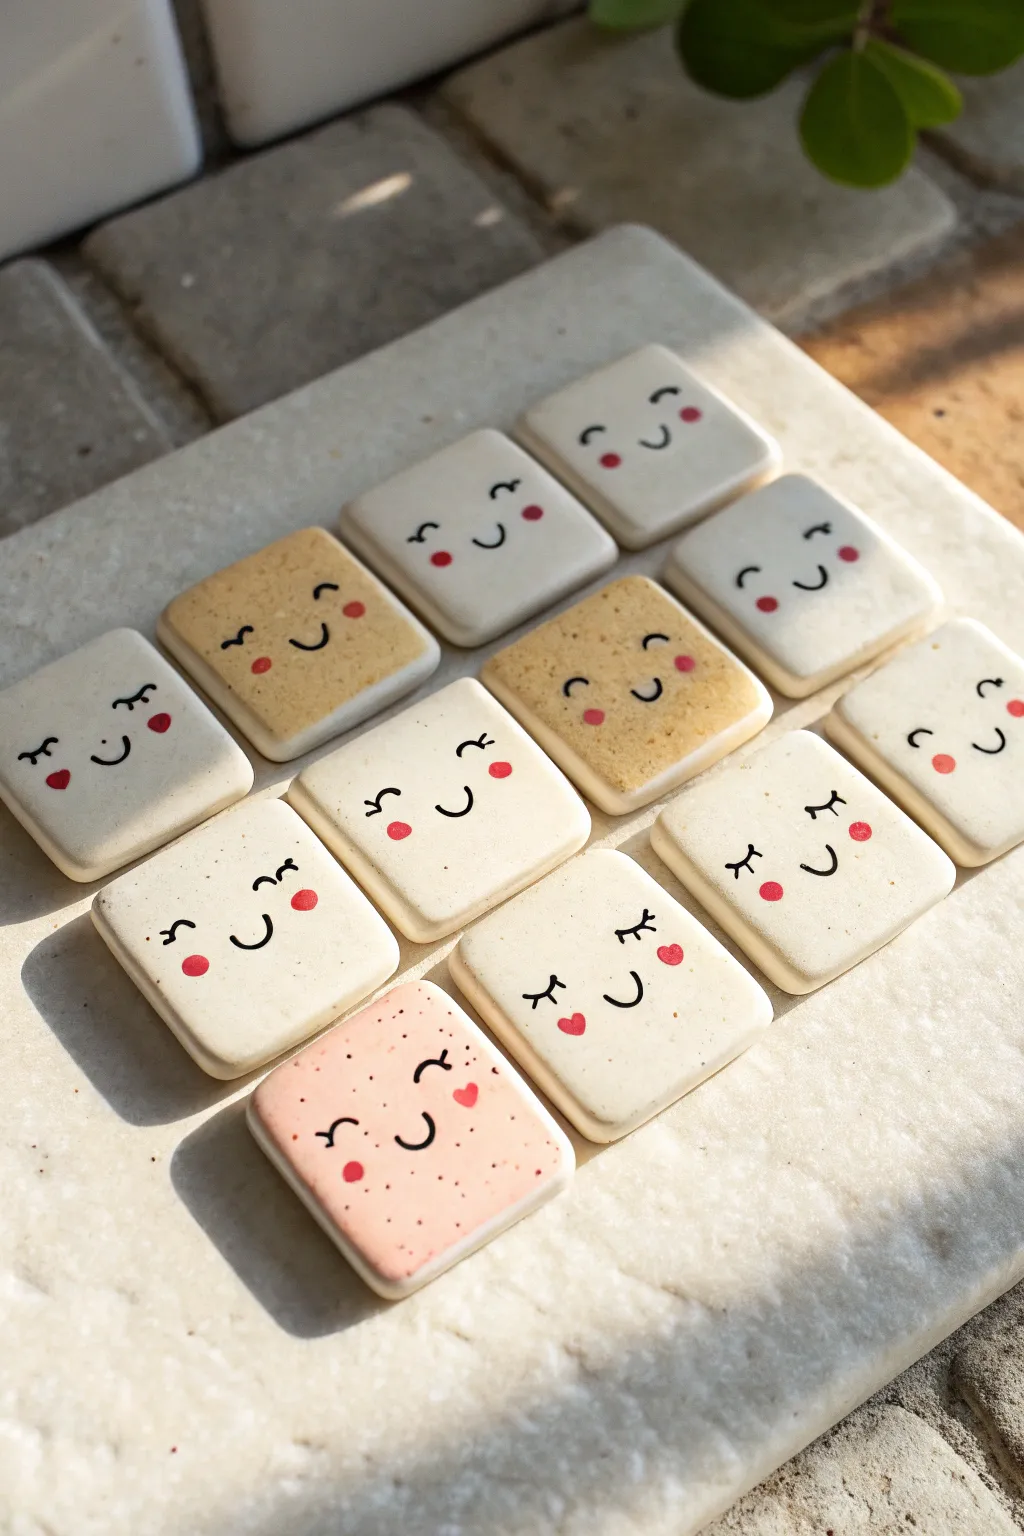
Brighten up your kitchen with these adorable, biscuit-inspired clay magnets that are guaranteed to make you smile. With their soft, speckled textures and sweet expressions, they look almost good enough to eat while holding your favorite photos in place.
How-To Guide
Materials
- Polymer clay (whites, beiges, and a pale pink)
- Black acrylic paint
- Red acrylic paint
- Fine-grit sandpaper (optional)
- Rolling pin or clay machine
- Square clay cutter (approx. 1 inch)
- Fine detail paintbrush (00 or 000 size)
- Dotting tool or toothpick
- Coarse ground black pepper or dried herbs (for texture)
- Strong craft glue (E6000)
- Small round magnets
- Matte sealant or varnish
Step 1: Shaping the Crackers
-
Prepare the dough:
Start by conditioning your polymer clay until it is soft and pliable. For variety, create three color batches: pure white, a warm biscuit beige, and a very soft pastel pink. -
Add the speckles:
To achieve that realistic ‘baked good’ texture seen in the photo, sprinkle a tiny amount of coarse black pepper or dried herbs into your beige and pink clay batches. Knead the clay thoroughly until the specks are evenly distributed. -
Roll it out:
Roll your clay out into an even slab. You want these to be substantial enough to hold a magnet but not too heavy—aim for about 1/4 inch (6mm) thickness. A clay machine is great here for consistent thickness, but a rolling pin works perfectly too. -
Cut the shapes:
Using your square cutter, punch out your tile shapes. If you don’t have a cutter, you can use a ruler and a craft knife to measure even squares. -
Soften the edges:
The squares in the image have lovely, soft rounded corners rather than sharp edges. Gently tap the corners and edges with your finger to round them off slightly, giving them that puffed pillowed look. -
Bake the clay:
Arrange your squares on a baking sheet lined with parchment paper. Bake according to your brand of polymer clay instructions (usually around 275°F/135°C for 15-30 minutes). Let them cool completely before handling.
Uneven Clay Surface?
If your clay creates bumps or ‘moons’ while rolling, place the clay between two sheets of parchment paper before rolling. This prevents sticking and keeps the surface perfectly smooth.
Step 2: Painting the Expressions
-
Sand for smoothness (Optional):
If there are any fingerprints or rough spots after baking, lightly buff the surface with fine-grit sandpaper. Wipe away any dust with a damp cloth. -
Paint the eyes:
Using your finest detail brush and black acrylic paint, carefully paint the eyes. Try different styles: simple U-shapes for happy closed eyes, small curves with eyelashes, or little winks. Keep the lines thin and delicate. -
Add the mouths:
Paint a simple, small ‘U’ shape in the center for the smile. I like to place the mouth slightly higher than you might expect, closer to the eyes, which creates a cuter ‘kawaii’ proportion. -
Create rosy cheeks:
Dip a dotting tool or the blunt end of a toothpick into red or dark pink paint. Gently stamp two small circles on either side of the smile for cheeks. -
Heart details:
For some of the tiles, substitute the round cheek dots with tiny red hearts. Use the very tip of your brush to paint two minuscule tear drops connecting at the bottom. -
Let the paint set:
Allow the acrylic paint to dry completely. This usually takes about 10-15 minutes since the details are so small.
Step 3: Finishing Up
-
Seal the surface:
Apply a thin layer of matte varnish or sealant over the front of the tiles. This protects the painted faces from scratching off and gives the clay a finished, professional look without making it too shiny. -
Attach the magnets:
Flip the tiles over. Place a small dab of strong craft glue (like E6000) in the center of the back. -
Secure the backing:
Press a magnet firmly into the glue. If your magnet is strong, make sure to space the drying tiles far apart so they don’t snap together and mess up the glue placement. -
Final cure:
Let the glue cure for at least 24 hours to ensure maximum strength before sticking them onto your fridge.
Add a Scent!
Mix a tiny drop of vanilla or cookie-scented essential oil into the clay before baking. Your magnets will not only look like little biscuits but will smell like a bakery too.
Now you have a charming set of friendly faces ready to greet you every time you reach for a snack
Mini Photo and Card Holders
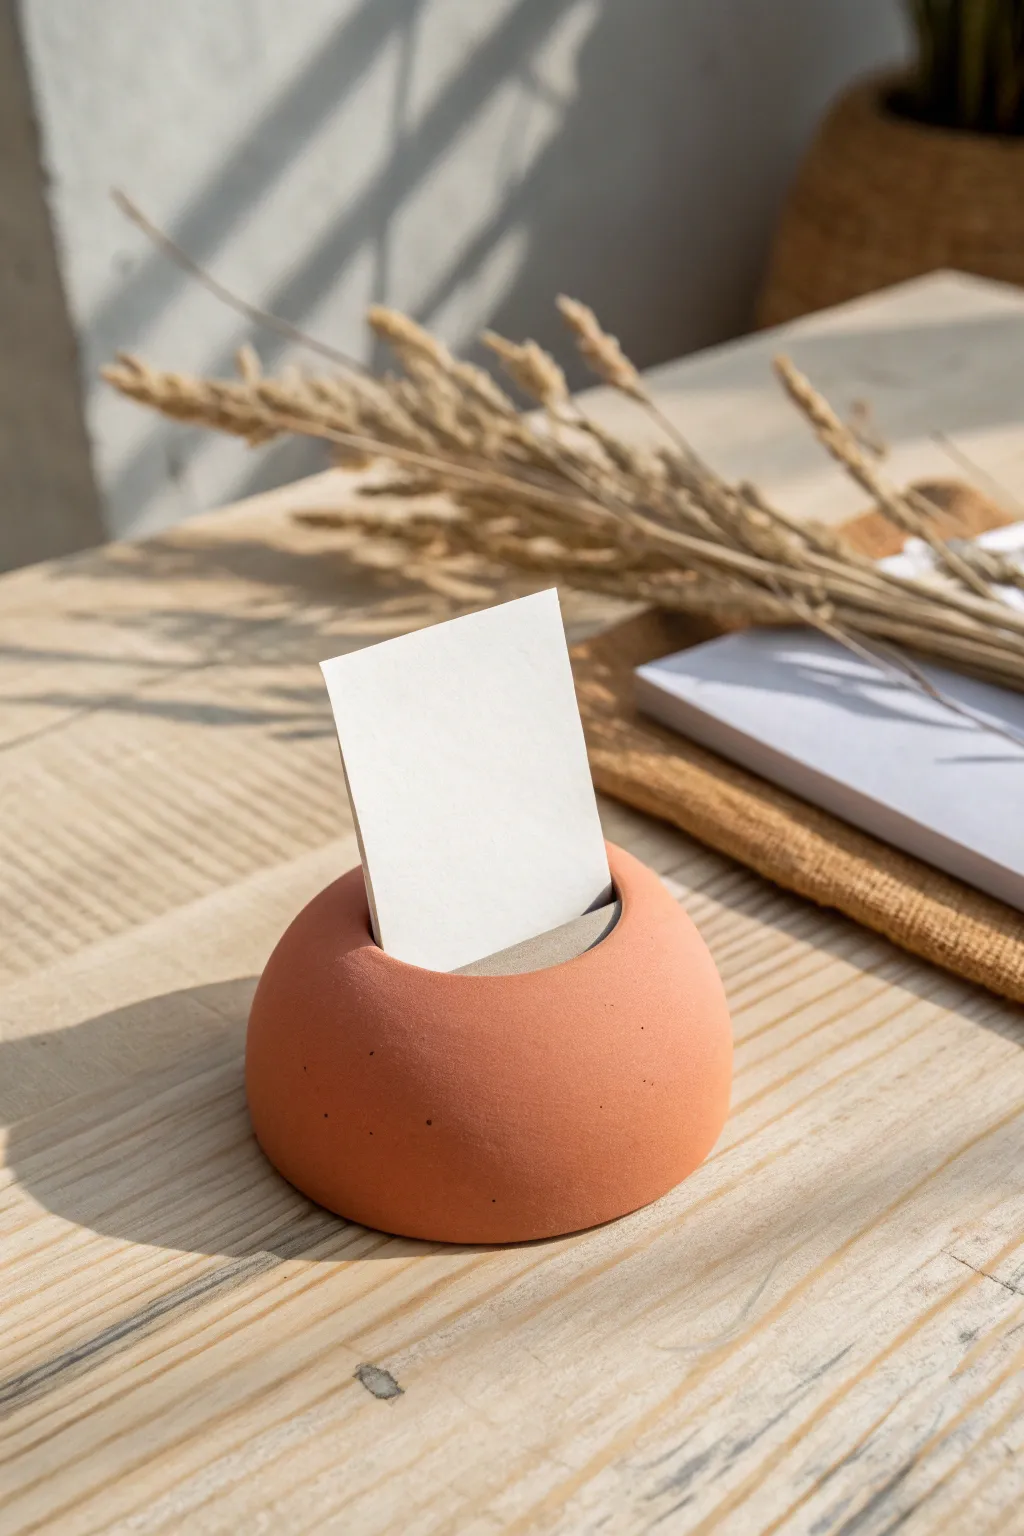
These minimalist, warm-toned card holders bring an earthy elegance to any desk or event table. Their smooth, rounded shape and matte terracotta finish provide the perfect grounded contrast for displaying airy paper goods or favorite photos.
Detailed Instructions
Materials
- Air-dry clay (terra cotta color) or polymer clay
- Rolling pin
- Small circle cutter (approx. 2.5 inches)
- Small bowl using as a slump mold (or a smooth sphere/ball)
- Craft knife or scalpel blade
- Ruler or straight edge
- Fine-grit sandpaper (400-600 grit)
- Water in a small cup
- Sponge or smoothing tool
- Matte sealant (optional)
Step 1: Shaping the Base
-
Prepare the Clay:
Start by taking a generous handful of terracotta-colored air-dry clay. Knead it thoroughly in your hands to awaken the material, ensuring it is warm, pliable, and free of any air bubbles. -
Form a Ball:
Roll the kneaded clay between your palms to create a smooth, tight ball. Aim for a sphere about the size of a tangerine or a oversized golf ball. -
Flatten Slightly:
Place the ball on your work surface. Press down gently with your palm just enough to create a flat bottom so the piece won’t roll away, but keep the overall dome shape intact. -
Refine the Dome:
Using your palms, cup the sides of the clay to smooth out the dome shape. You want a consistent, semi-sphere silhouette without any lumpy protrusions. -
Smooth the Surface:
Dip your finger or a small sponge into a little bit of water. Gently rub the exterior of the dome to erase any fingerprints or small cracks, creating a pristine surface.
Step 2: Creating the Slot
-
Mark the Center:
Look at the holder from directly above. Use a subtle mark with a needle tool to identify the exact center of the dome to ensure your card will stand straight. -
Initial Cut:
Take your craft knife or a rigid blade. Press straight down into the center of the dome to create the initial slit. I find precise, downward pressure works better than a sawing motion here. -
Widen the Opening:
Most business cards are thicker than a single knife cut. Carefully slice a very thin wedge or second line parallel to the first one, removing a sliver of clay to create a gap about 1-2mm wide. -
Check the Depth:
Ensure the cut goes about halfway down into the sphere. If it’s too shallow, the card will flop over; too deep, and it might split the base. -
Smooth the Cut Edges:
Use a damp paintbrush or a wet finger to gently soften the sharp edges of the slot you just cut. This prevents the clay from looking ragged once it dries.
Crack Control
If you see hairline cracks while drying, mix a tiny amount of clay with water to make a paste (slip) and fill them in immediately, then smooth over.
Step 3: Drying and Finishing
-
Slow Drying:
Place the distinctive dome in a cool, dry area away from direct sunlight. Let it air dry slowly for 24-48 hours. Rushing this with heat can cause cracks. -
Rotate Carefully:
Halfway through the drying process, gently turn the holder or lift it briefly to ensure the bottom dries evenly with the top. -
Initial Sanding:
Once the clay is bone dry and lighter in color, take your fine-grit sandpaper. Gently sand the entire surface in circular motions to remove any remaining imperfections. -
Refining the Slot:
Fold a small piece of sandpaper in half. flossing it gently through the card slot to ensure the inside walls are smooth and won’t scratch your photos. -
Dusting Off:
Wipe the entire piece down with a slightly damp cloth or a dry tack cloth to remove all the fine clay dust generated by sanding. -
Optional Sealing:
If you want to protect the finish, apply a very thin coat of matte varnish. This deepens the terracotta color slightly while keeping that natural, earthy look. -
Testing the Fit:
Wait for the sealant to cure completely. Insert a sample card to test the hold; it should sit snugly without leaning.
Weighted Base
For extra stability with larger photos, press a large metal washer or coin into the bottom of the clay ball before flattening it on the table.
Enjoy styling your desk with these simple, organic holders that let your memories take center stage
Cutout Votive Lanterns for Cozy Light
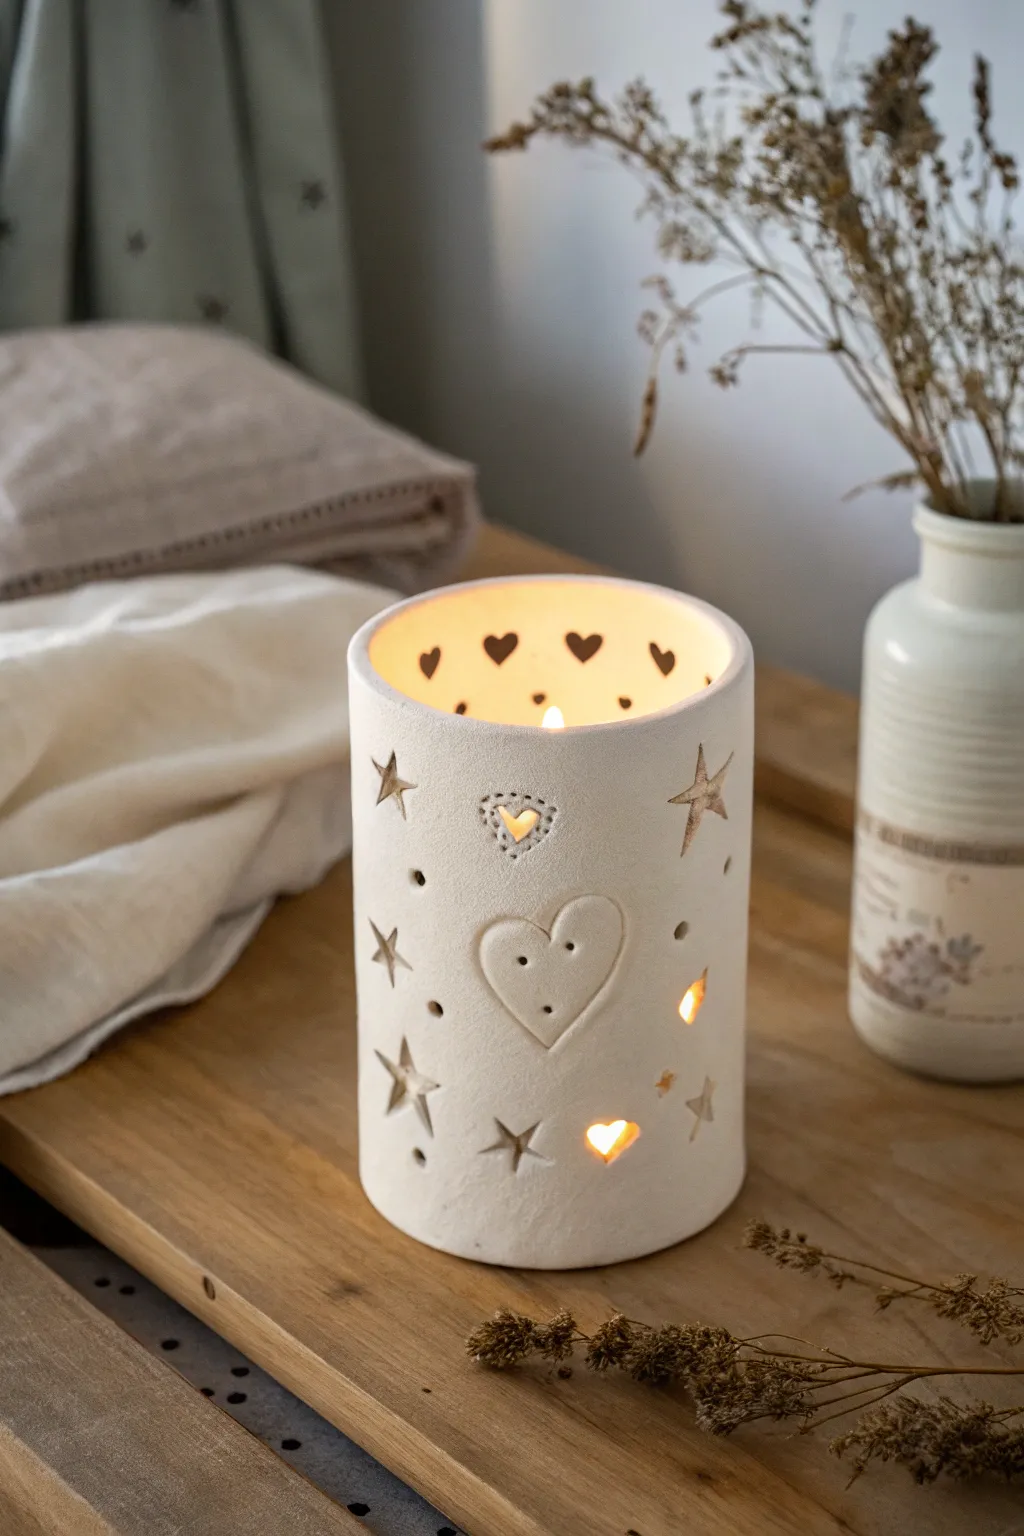
Illuminate your space with the soft glow of this handcrafted clay luminary, featuring whimsical star cutouts and a central embossed heart. The textured white clay and warm candlelight create a cozy, rustic atmosphere perfect for quiet evenings.
Step-by-Step
Materials
- White stoneware or air-dry clay (approx. 1-2 lbs)
- Rolling pin
- Canvas mat or slab roller
- Cylindrical mold (PVC pipe, glass jar, or cardboard tube, approx. 4 inches diameter)
- Newspaper or paper towel
- Fettling knife or craft knife
- Small cookie cutters (stars, hearts)
- Needle tool or small drill bit
- Slip and scoring tool (if using ceramic clay)
- Sponge and water
- Clear matte glaze (optional, for ceramic clay)
Step 1: Forming the Cylinder
-
Prepare the Slab:
Begin by wedging your white clay to remove air bubbles, then roll it out into a rectangular slab about 1/4 inch thick. Aim for a long, even strip that is tall enough for your lantern height (around 6 inches) and long enough to wrap around your chosen mold with a little overlap. -
Prepare the Mold:
Wrap your cylindrical mold with a layer of newspaper or paper towel. This prevents the clay from sticking to the mold and makes removal much easier later on. -
Construct the Body:
Carefully lift your clay slab and wrap it around the prepared mold. Where the ends meet, trim them at an angle (beveled cut) to create a larger surface area for the join. -
Secure the Seam:
Score the beveled edges with a needle tool and apply a bit of slip (clay and water loose mixture) or water. Press the edges firmly together to bond them. -
Smooth the Join:
Use your fingers or a wooden rib to smooth over the seam on both the outside and inside, blending the clay until the join is invisible. I usually keep the seam at the ‘back’ of the design just in case.
Step 2: Adding Designs and Texture
-
Emboss the Central Heart:
Ideally while the clay is still on the mold for support, roll a small coil of clay into a heart shape. gently press this onto the front center of the cylinder. Use a modeling tool to blend the outer edges of the coil into the main body, leaving the heart shape raised. -
Create the Heart Cutout:
Above the embossed heart, near the rim, use a small heart-shaped cutter to punch a hole. Alternatively, freehand cut a small heart using a craft knife. -
Add Decorative Holes:
Around the cutout heart, use a needle tool to poke a decorative dotted border. Push the tool straight in to create clean, uniform circular impressions. -
Cut Out the Stars:
Using a small star cutter or knife, remove clay to create star-shaped openings scattered randomly around the lower half and sides of the cylinder. These will let the most light escape. -
Carve Star Details:
For added texture without full holes, use a carving tool to scratch star shapes lightly into the surface. Leave the clay intact but define the outline to catch shadows.
Slumping Cylinder?
If the clay wall sags when removing the mold, it’s too wet. Put it back on the form and let it stiffen to a ‘leather hard’ state before trying again.
Step 3: Finishing Touches
-
Add Texture Dosing:
Scatter small pinholes randomly across the surface using your needle tool or a small drill bit. This mimics the starry night look and adds visual interest to the plain white surface. -
Refine the Rim:
Run a damp sponge along the top rim of the cylinder to soften any sharp edges. You don’t want it perfectly straight; a slight organic wave adds to the handmade charm. -
Remove the Mold:
Once the clay is leather-hard (firm to the touch but not dry), carefully slide the cylinder off the mold. Peel away the newspaper lining. -
Smooth the Edges:
Check all your cutouts. Use a damp brush or fingertip to smooth any rough crumbs of clay inside the star and heart holes. -
Dry and Fire:
Allow the piece to dry slowly under loose plastic to prevent warping. If using ceramic clay, bisque fire it, apply a clear matte glaze if desired, and glaze fire. If using air-dry clay, let it cure fully for 24-48 hours.
Golden Glow
Paint the interior with a metallic gold acrylic or glaze. When a candle is lit inside, the interior will reflect a much warmer, richer light through the cutouts.
Place a tea light or LED candle inside and enjoy the dancing shadows cast by your beautiful creation
Storybook Mini Dioramas on a Tiny Base
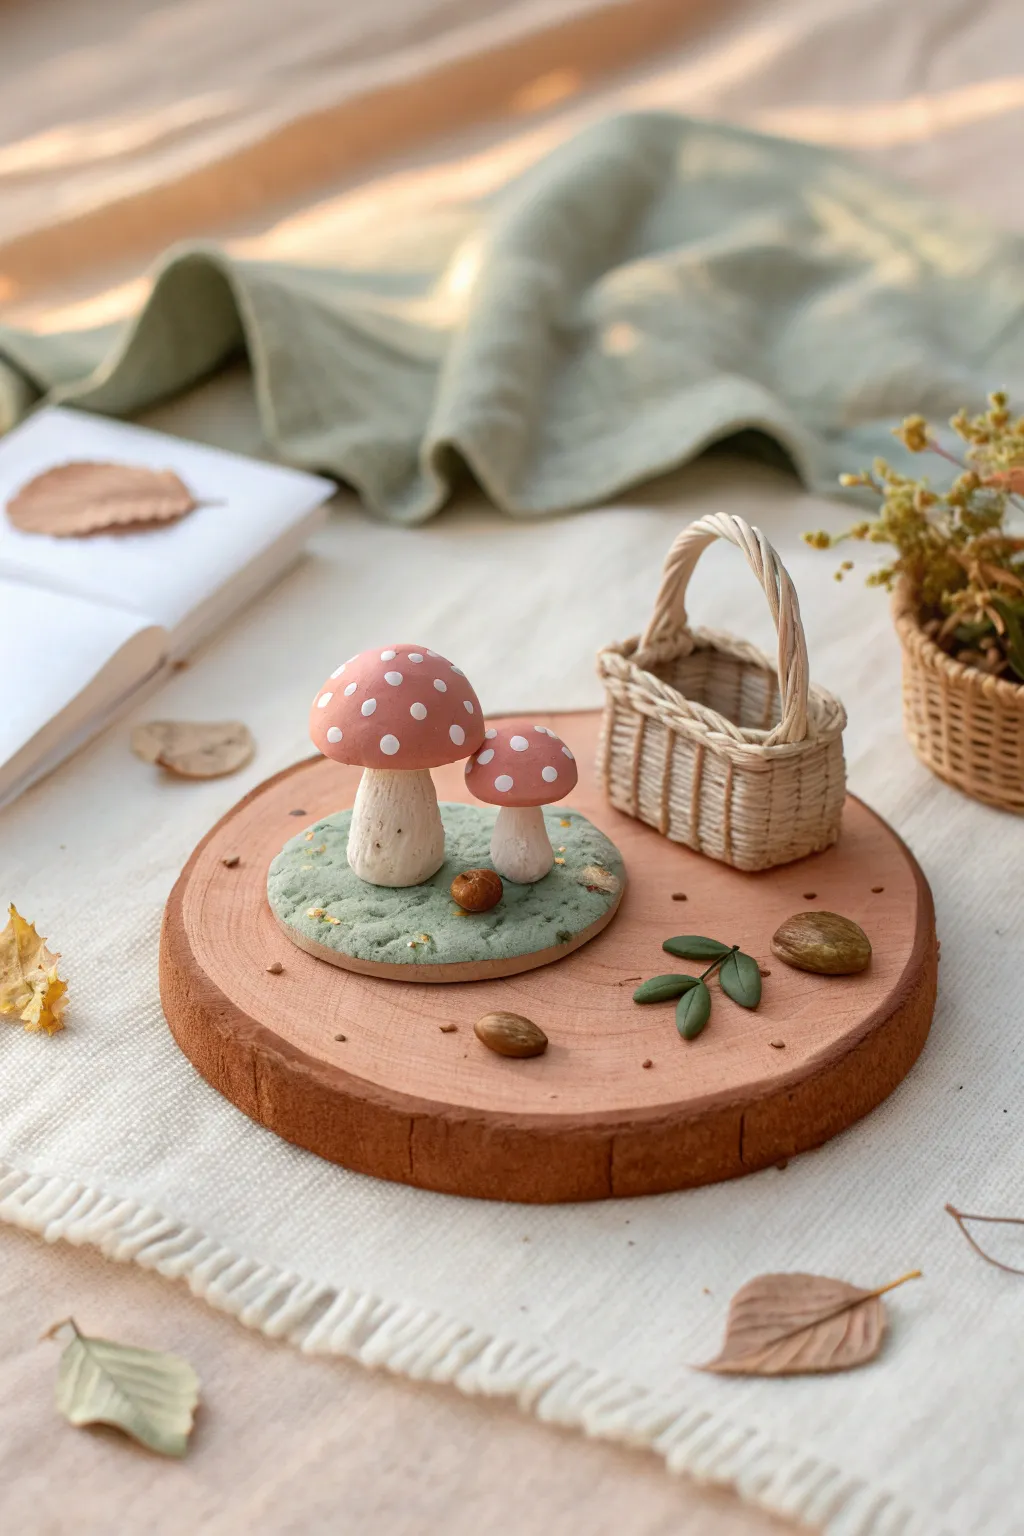
Create a whimsical slice of the forest floor with this charming mini diorama, featuring spotted mushrooms and a tiny woven basket. This project combines polymer clay sculpting with natural wood elements for a cozy, storybook aesthetic that fits in the palm of your hand.
Step-by-Step Guide
Materials
- Polymer clay (terracotta/red, white, olive green, light green, dark green, beige)
- Small circular wood slice (coaster size)
- Sculpting tools (needle tool, ball stylus)
- Liquid clay or strong craft glue
- Aluminum foil
- Fine-grit sandpaper
- Small dried seeds or tiny acorns (optional details)
- Thin wire or toothpicks (for armature)
- Soft pastel chalks (for shading)
Step 1: Sculpting the Mushroom Base
-
Prepare the mound:
Mix olive green and light green clay to create a marbled, mossy color. Flatten a ball of this mixture into a roughly circular pad about 1.5 inches in diameter and texture the surface by gently poking it repeatedly with a stiff brush or a crumpled ball of aluminum foil. -
Form the stems:
Roll two cylinders of beige clay, making one slightly thicker and taller than the other. I like to gently pinch the base of each stem so they flare out slightly for stability. -
Texture the stems:
Use a needle tool to drag shallow vertical lines up the stems, simulating the fibrous texture of mushroom stalks. Lightly brush some brown pastel dust near the bottom for an earthy look. -
Attach stems to base:
Press the stems firmly onto your textured green mound. If needed, insert a small piece of toothpick or wire into the center of each stem to act as an armature for the caps later.
Realistic Moss Texture
For ultra-realistic moss, mix green tea leaves or colored sand into your green clay before sculpting the base mound.
Step 2: Creating the Mushroom Caps
-
Shape the red caps:
Take terracotta or soft red clay and roll two balls. Flatten the bottom of each and dome the top to create the classic mushroom cap shape—one larger for the big stem, one smaller. -
Add the spots:
Roll tiny, varied sizes of white clay balls. Press them gently onto the red caps until they are flush with the surface, giving that iconic speckled look without protruding too much. -
Assemble the mushrooms:
Place the caps onto the prepared stems. Use a drop of liquid clay or bake-and-bond to ensure they adhere securely during baking. -
Add tiny details:
Roll a very small brown ball to look like a tiny acorn or nut and press it into the green moss base near the stems.
Sticky Fingerprints?
If fingerprints are ruining your smooth mushroom caps, lightly brush them with baby oil or cornstarch before baking.
Step 3: Weaving the Tiny Basket
-
Prepare clay coils:
Technically you could use real cord, but for a full clay project, extrude very thin strings of beige or tan clay using a clay extruder or roll them by hand. -
Construct the base:
Cut a small rectangle of flattened tan clay for the basket floor. Attach vertical clay ‘stakes’ (short bits of coil) around the perimeter. -
Weave the sides:
Carefully weave a long clay coil in and out of the vertical stakes. Alternatively, for an easier method, twist two thin coils together and stack them in layers to mimic a woven texture. -
Add the handle:
Twist two slightly thicker coils together to form a handle. attach it to the inside walls of the basket, arching it over the top. -
Bake components:
Bake the mushroom mound and the basket separately according to your clay manufacturer’s instructions (usually 275°F for 15-30 minutes). Let them cool completely.
Step 4: Final Assembly
-
Prepare the wood slice:
Ensure your wood slice is clean and dry. You can lightly sand the top surface if it is too rough. -
Secure the diorama:
Glue the cooled mushroom mound onto the left side of the wood slice and the basket on the right side using strong super glue or epoxy. -
Sculpt scattered leaves:
Create tiny teardrop shapes from dark green clay. Use a needle tool to impress a central vein. You can bake these separately or carefully cure them with a heat gun if adding them raw now. -
Place loose details:
Glue the green leaves and a few real tiny seeds or clay pebbles onto the bare wood areas to integrate the scene. -
Matte finish:
If the clay looks too shiny, brush on a matte varnish to protect the piece and give it a natural, non-plastic appearance.
Now you have a quiet little forest corner to sit on your desk or bookshelf.