If you’re craving aesthetic clay art that feels soft, cozy, and display-worthy, you’re in the right place. I’m sharing my favorite cute, dreamy ideas that look polished without needing a professional setup.
Pastel Trinket Dish With Soft Curves
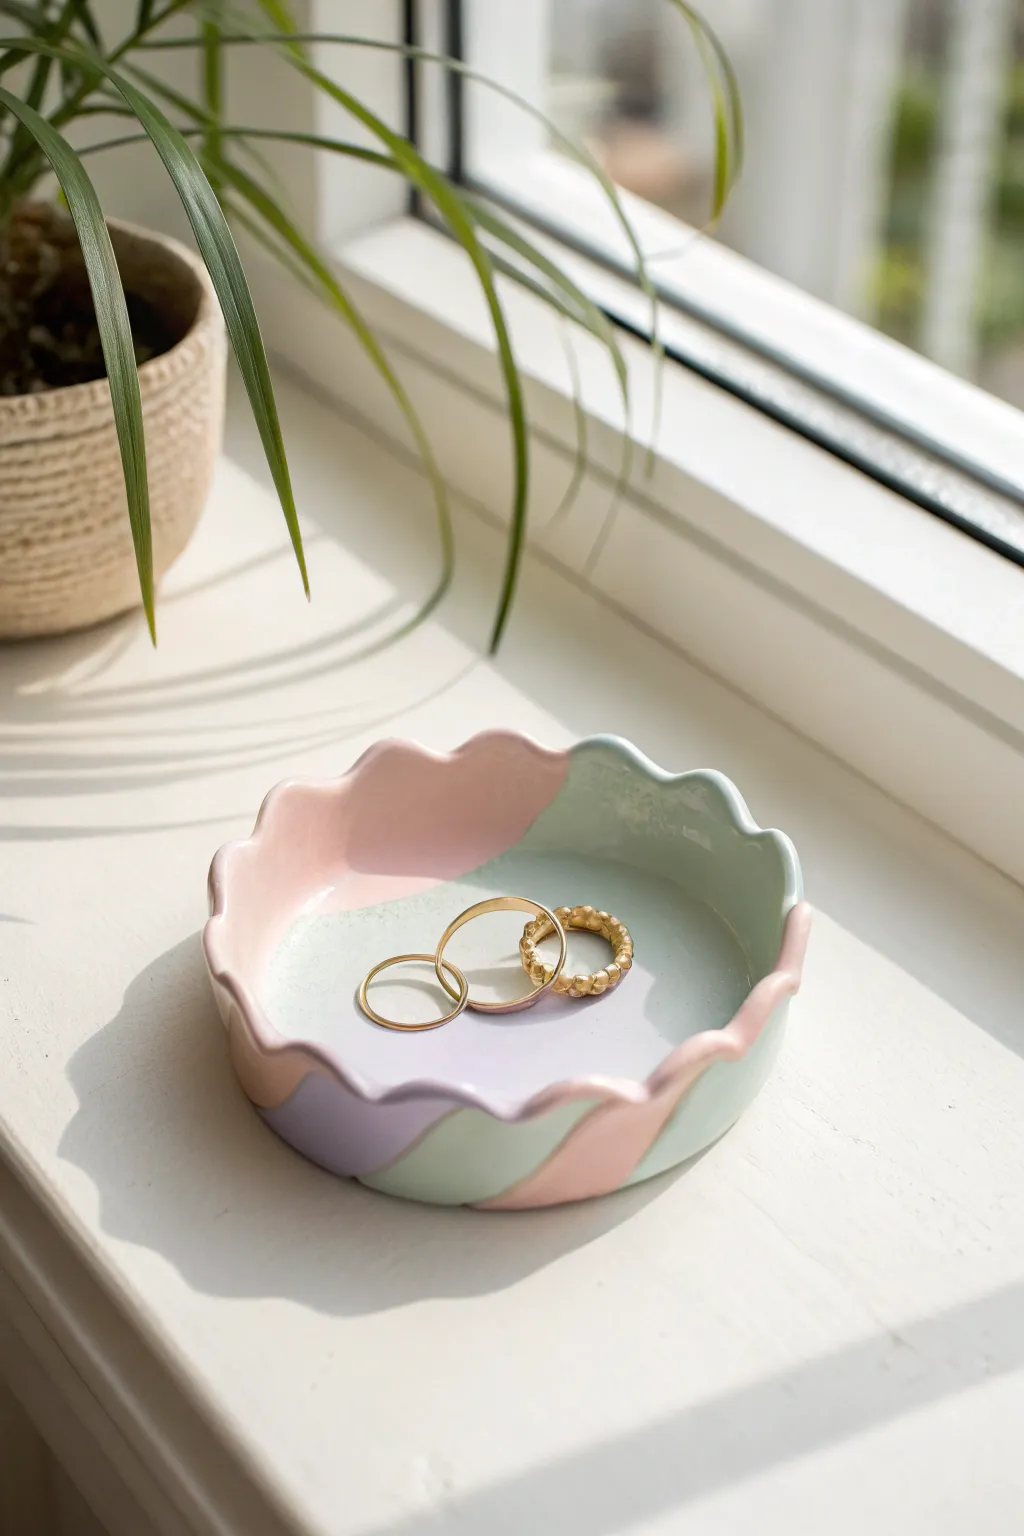
This charming trinket dish combines soft pastel hues with gentle curves for a dreamy, aesthetic piece of functional decor. The scalloped edges and smooth, glazed finish make it the perfect resting spot for your favorite rings and small jewelry.
Step-by-Step Tutorial
Materials
- White air-dry clay or polymer clay
- Rolling pin
- Circle cutter or small bowl (approx. 4-5 inches diameter)
- Craft knife
- Sandpaper (fine grit)
- Acrylic paints (pastel pink, mint green, lavender)
- Paintbrushes (flat and detail)
- High-gloss varnish or glaze
- Small bowl for shaping
- Palette or wax paper
Step 1: Shaping the Base
-
Condition the Clay:
Begin by taking a handful of white clay and kneading it thoroughly until it is soft, pliable, and free of any cracks. If using polymer clay, warm it up in your hands first. -
Roll it Out:
Place the clay on a clean, flat surface or wax paper. Use a rolling pin to flatten it into an even sheet, aiming for about 1/4 inch thickness. Rotate the clay occasionally to ensure a uniform shape. -
Cut the Circle:
Place your circle cutter or an inverted bowl onto the rolled clay. Press down firmly or trace around the bowl with a craft knife to cut out a perfect circle. -
Create the Scalloped Edge:
Using your fingertips, gently push the edges of the circle inward at regular intervals to create a wavy, scalloped rim. You want soft, organic curves rather than sharp points. -
Form the Dish Shape:
Carefully lift your clay circle and place it inside a slightly larger bowl to help it hold a curved shape while drying. Gently press the center down so it conforms to the bowl’s curve. -
Refine the Edges:
While the clay is resting in the bowl, use a little water on your finger to smooth out any roughness along the rim or surface. I find this step crucial for a professional finish. -
Let it Dry:
Allow the clay to dry completely according to the package instructions. For air-dry clay, this usually takes 24-48 hours. Ensure it is fully hardened before moving to the next step.
Cracks in air-dry clay?
Mix a tiny bit of fresh clay with water to create a paste (slip). Fill the cracks, smooth over with a damp finger, and let it dry again before sanding.
Step 2: Painting and Finishing
-
Sand for Smoothness:
Once dry, remove the dish from the molding bowl. Gently sand the edges and surface with fine-grit sandpaper to remove any bumps or fingerprints. -
Plan the Design:
Lightly sketch curved sections on the inside and outside of the dish with a pencil. These lines will guide where your different pastel colors will go. -
Mix Your Pastels:
Prepare your palette with pastel pink, mint green, and lavender acrylic paints. Ideally, mix white into standard colors to achieve that soft, aesthetic look. -
Paint the Sections:
Using a flat brush, fill in the sketched sections. Paint sweeping curves that wrap from the inside of the dish over the rim to the outside. -
Clean Up Lines:
Use a finer detail brush to neaten the edges where two colors meet. You want crisp, clean lines between the pink, green, and lavender sections. -
Apply Second Coats:
Let the first layer dry, then apply a second coat if the color looks streaky. Opaque, solid color blocks look best for this style. -
Dry Thoroughly:
Allow the paint to dry completely. This prevents any smudging when you apply the final sealant. -
Glaze the Dish:
Apply a coat of high-gloss varnish or glaze over the entire dish. This gives it that ceramic-like shine and protects the paint from chipping. -
Final Cure:
Let the glaze cure in a dust-free area for the time recommended on your varnish bottle. Once hard, your dish is ready to solve your jewelry storage needs.
Add a gold rim
For an extra touch of elegance, use a gold leaf pen or metallic acrylic paint to carefully line just the very top edge of the scalloped rim.
Place your newly created dish on a sunny windowsill or vanity to enjoy its soft colors every day


Flower-Shaped Jewelry Tray
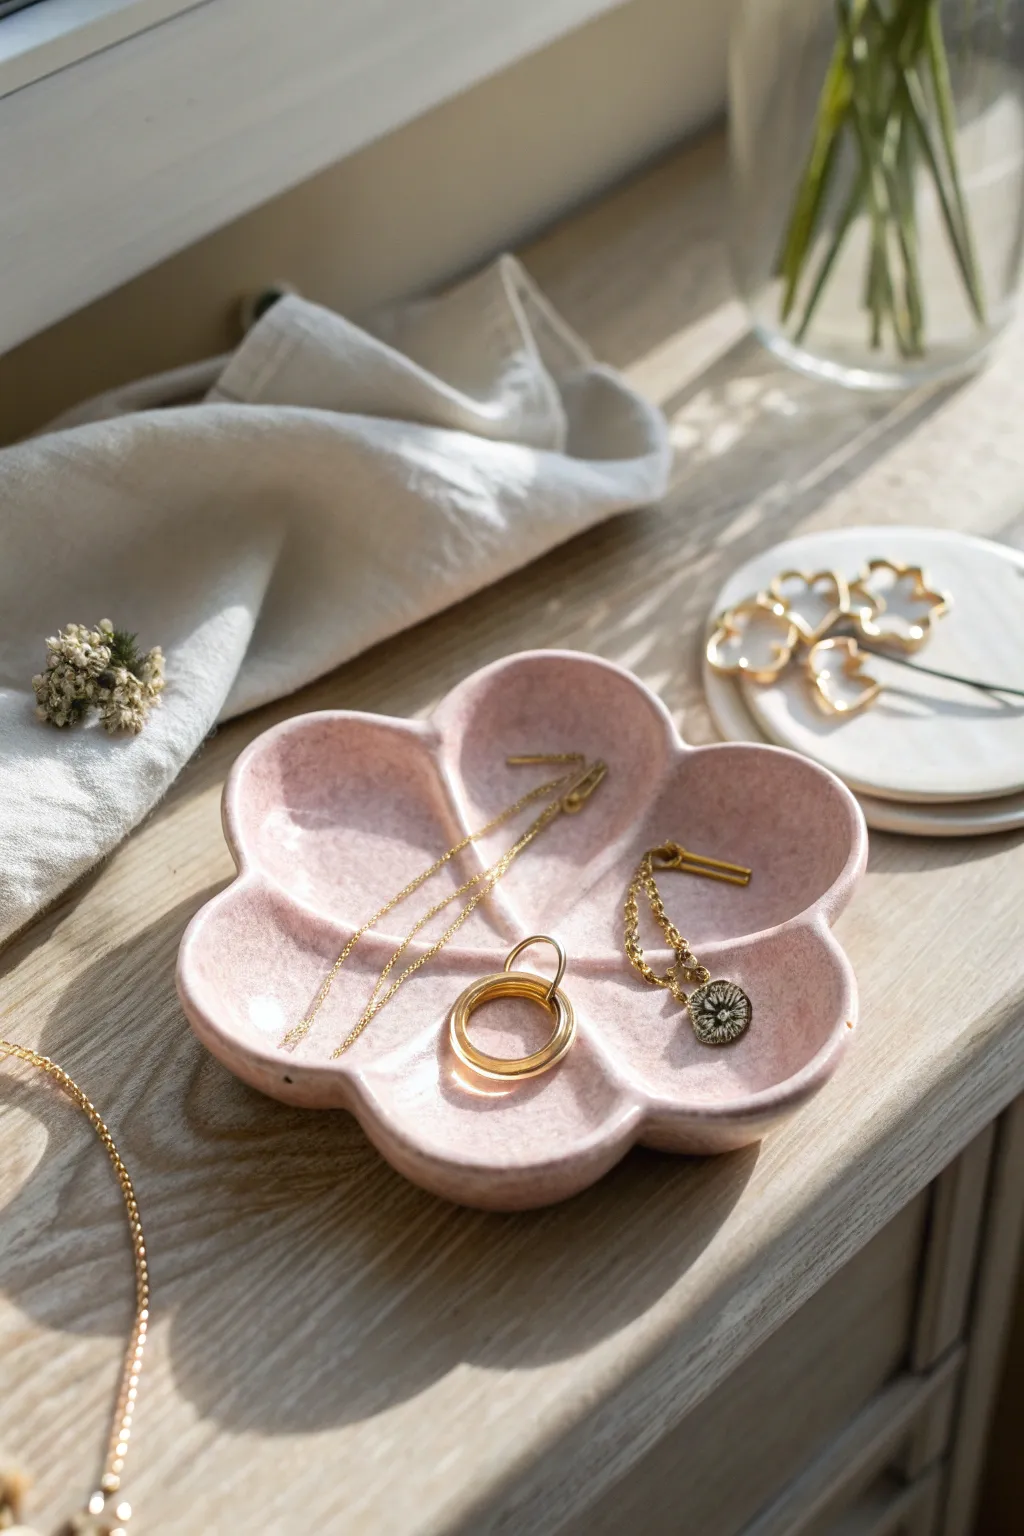
Bring a touch of perpetual spring to your vanity with this charming flower-shaped jewelry tray. Its gentle curves and soft pink speckled glaze create a dreamy, organic home for your favorite rings and necklaces.
Step-by-Step Guide
Materials
- Air-dry clay or polymer clay (white)
- Rolling pin
- Paper template of a 6-petaled flower
- X-Acto knife or clay cutting tool
- Small bowl or sponge (to use as a drying form)
- Water and a small brush (if using air-dry clay)
- Fine-grit sandpaper
- Pink acrylic paint (soft pastel shade)
- White acrylic paint (for speckles)
- Glossy varnish or glaze (polyurethane or resin-based)
- Old toothbrush (for splashing technique)
Step 1: Shaping the Clay
-
Prepare your workspace:
Begin by cleaning a flat surface and laying down a silicone mat or wax paper to prevent sticking. Take a handful of clay and knead it until it’s pliable and warm, removing any air bubbles. -
Roll the slab:
Using your rolling pin, roll the clay out into an even slab. Aim for a thickness of about 1/4 inch (6mm). If you want it sturdier, go slightly thicker, but keep it consistent so it dries evenly. -
Cut the shape:
Place your paper flower template gently onto the clay slab. Using your cutting tool, trace carefully around the petal edges. Remove the excess clay and set it aside for future projects. -
Smooth the edges:
Dip your finger in a little water (for air-dry clay) or baby oil (for polymer) and run it along the cut edges of the flower to soften any sharp angles. You want a rounded, organic rim. -
Create the curve:
Lift the clay flower carefully and place it into a shallow bowl or atop a curved sponge. Gently press the center down so the petals curve upward naturally, mimicking a blooming flower. -
Define the petals:
I like to use a modeling tool or the back of a paintbrush to gently press indentation lines radiating from the center out towards the dip between each petal, enhancing the flower structure. -
Drying or baking:
If using air-dry clay, leave it in the form for 24-48 hours until completely hard. If using polymer clay, bake it alongside the oven-safe bowl according to the package instructions.
Cracking Up?
If air-dry clay cracks while drying, fill the fissures with a “slip” made of clay mixed with water. Smooth it over, let dry, and sand it back.
Step 2: Refining and Painting
-
Sand the surface:
Once fully cured and cool, take your fine-grit sandpaper and lightly buff the edges and surface. Focus on removing any fingerprints or rough spots on the rim for a professional finish. -
Apply the base color:
Mix your soft pink acrylic paint. Apply a thin, even coat over the entire dish, including the underside. Let this layer dry completely before adding a second coat for opacity. -
Create the speckled effect:
Dilute a tiny amount of white paint with water until it’s inky. Dip an old toothbrush into it, and running your thumb over the bristles, flick a fine mist of speckles over the pink surface. -
Wait for paint to set:
Allow the paint and speckles to dry thoroughly. This is crucial so you don’t smear the design during the glazing step.
Gilded Edges
For a luxe upgrade, paint the very rim of the petals with gold leaf liquid or a metallic gold paint pen after the pink base dries.
Step 3: Finishing Touches
-
Glaze the top:
Apply a thick coat of glossy varnish to the top surface of the dish. A high-gloss finish mimics the look of fired ceramic glaze shown in the photo. -
Glaze the bottom:
Once the top is dry to the touch, flip the dish over and coat the underside. This seals the clay completely and gives it a finished feel. -
Correcting drips:
Watch for any glaze pooling at the bottom of the curved petals or dripping off the rim. Wipe these away quickly with a clean, dry brush before they harden. -
Final cure:
Let the final coat of varnish cure for at least 24 hours in a dust-free area before placing any jewelry inside.
Now you have a delicate, custom-made spot to keep your treasures safe and beautifully displayed


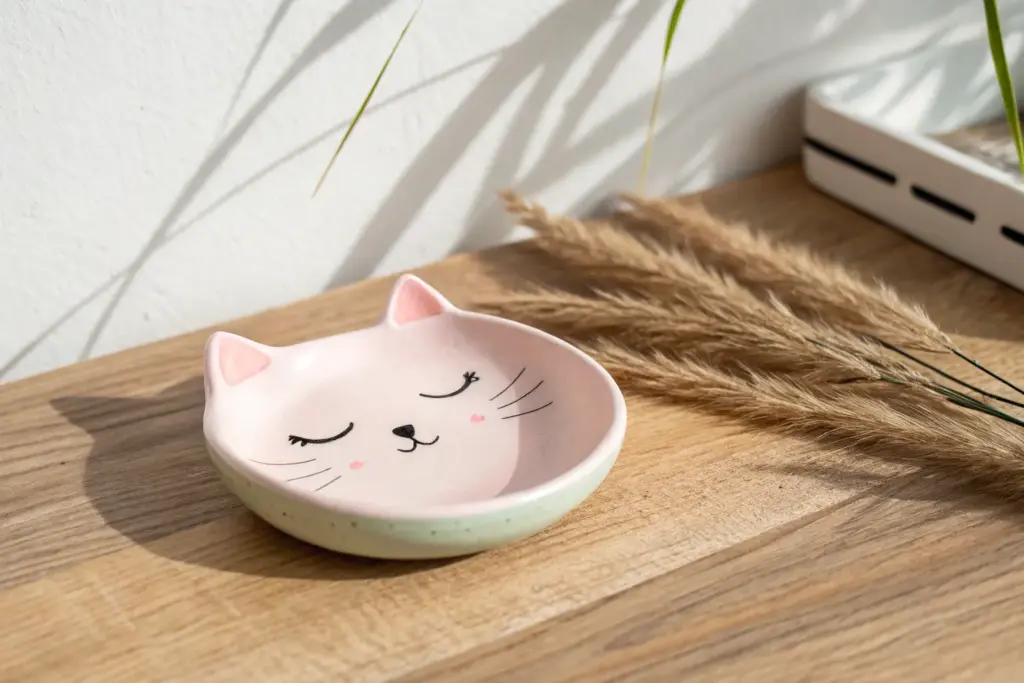
Cute Character Ring Holder
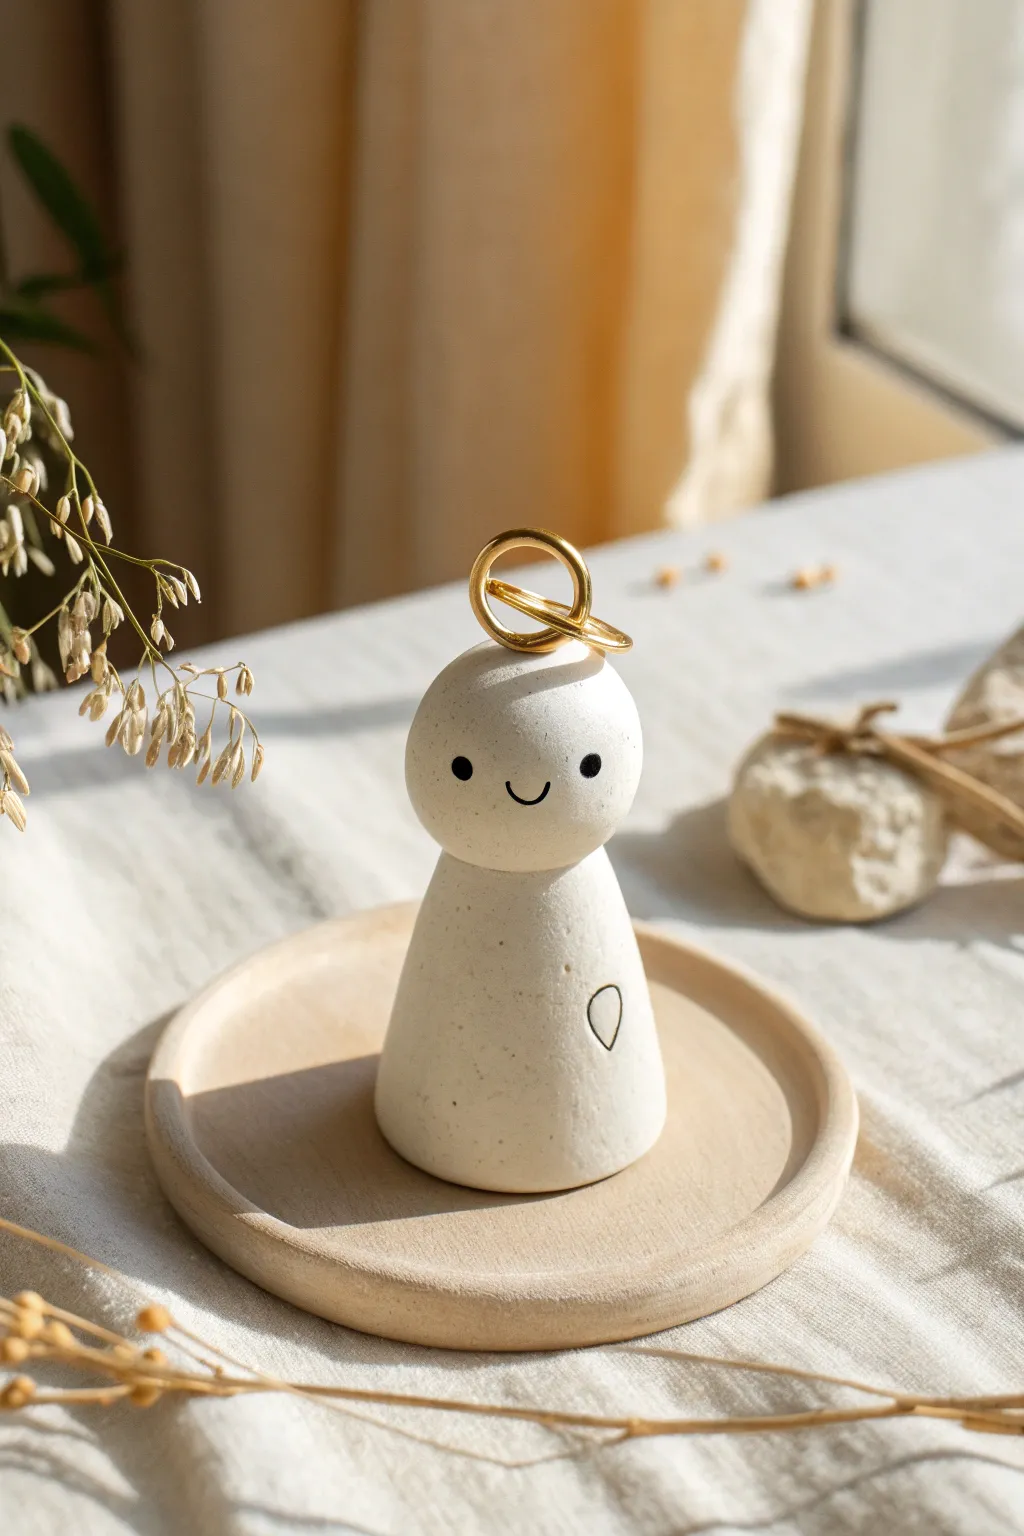
This charming little clay friend isn’t just adorable decor; it serves a practical purpose as a ring holder. With its smooth, speckled finish and minimalist face, this project captures a perfect balance of modern aesthetic and handmade warmth.
Step-by-Step
Materials
- white polymer clay or air-dry clay (granite or speckled effect preferred)
- black acrylic paint or a fine-tip black paint pen
- rolling pin
- craft knife or clay slicer
- fine-grit sandpaper
- water (for smoothing)
- clean work surface or silicone mat
- small brush (if using paint)
- acrylic varnish or polyurethane sealant (matte finish)
Step 1: Shaping the Base
-
Condition the clay:
Start by kneading your speckled white clay until it is soft and pliable. If you don’t have speckled clay, I like to mix a tiny pinch of black pepper or dried coffee grounds into plain white clay to achieve that faux-granite look. -
Form the cone shape:
Roll a ball of clay roughly the size of a golf ball. Place it on your work surface and begin rolling it into a cone shape, flattening the bottom so it stands upright securely. -
Refine the cone:
Gently taper the top of the cone so it is slightly narrower than the base. You want a sturdy, sloping shape that mimics a draped robe or a classic playing piece. -
Smooth the surface:
Dip your finger in a little water (for air-dry clay) or baby oil (for polymer) and smooth out any fingerprints or bumps on the cone. -
Create the head:
Roll a second, smaller ball of clay for the head. It should be proportional to the body but distinct enough to hold a ring without it sliding off immediately. -
Attach the head:
If using air-dry clay, score both the top of the cone and the bottom of the head with your knife, add a dab of water, and press them together firmly. For polymer clay, simply press firmly and smooth the seam slightly.
Wobbly Figure?
If your figure keeps tipping over, the base isn’t flat enough. Before baking or drying, press the figure firmly down onto a flat surface or a piece of glass to create a perfect suction-flat bottom.
Step 2: Adding Details & Refining
-
Blend the neck seam:
Use a modeling tool or your finger to gently blend the clay where the head meets the body. You want a distinct neck indentation for rings to sit on, but the two pieces must be securely fused. -
Check balance:
Before drying or baking, place a test ring on the head to ensure the figure doesn’t tip over. If it does, flatten the base more or add a little weight to the bottom. -
Add the heart detail:
Using a needle tool or a very fine paintbrush, gently outline a small, simple heart or teardrop shape on the lower right side of the body. Do not carve too deep; just create a surface impression. -
Cure the clay:
Follow the instructions for your specific clay. Bake in the oven strictly according to the package temperature if using polymer, or let air-dry clay sit for 24-48 hours until fully hardened. -
Sand for perfection:
Once fully cured and cool, take a piece of fine-grit sandpaper and gently buff the surface. This removes any lingering fingerprints and gives that professional, matte stone finish.
Golden Halo Upgrade
For a luxe touch, form a small ring of wire or gold polymer clay and attach it to the top of the head before baking to create a permanent ‘halo’ that can hold extra rings or earrings.
Step 3: Painting & Finishing
-
Paint the face:
Using a fine-tip paintbrush or a black paint pen, carefully dot two eyes onto the center of the face. Keep them wide-set for a cuter look. -
Add the smile:
Paint a tiny, curved smile right between the eyes. A smaller mouth often makes the character look sweeter. -
Outline the body detail:
Go back to the heart or teardrop shape you indented earlier and carefully trace that line in black ink or paint to make it pop against the white clay. -
Let the paint dry:
Wait for the facial features to dry completely to avoid any smudging when applying the sealant. -
Apply sealant:
Coat the entire figure with a matte varnish. This protects the paint from chipping and seals the clay against moisture, which is especially important for bathroom decor.
Now you have a serene little guardian to keep your jewelry safe and bring a smile to your face every day


Frog Toothbrush Cup Buddy
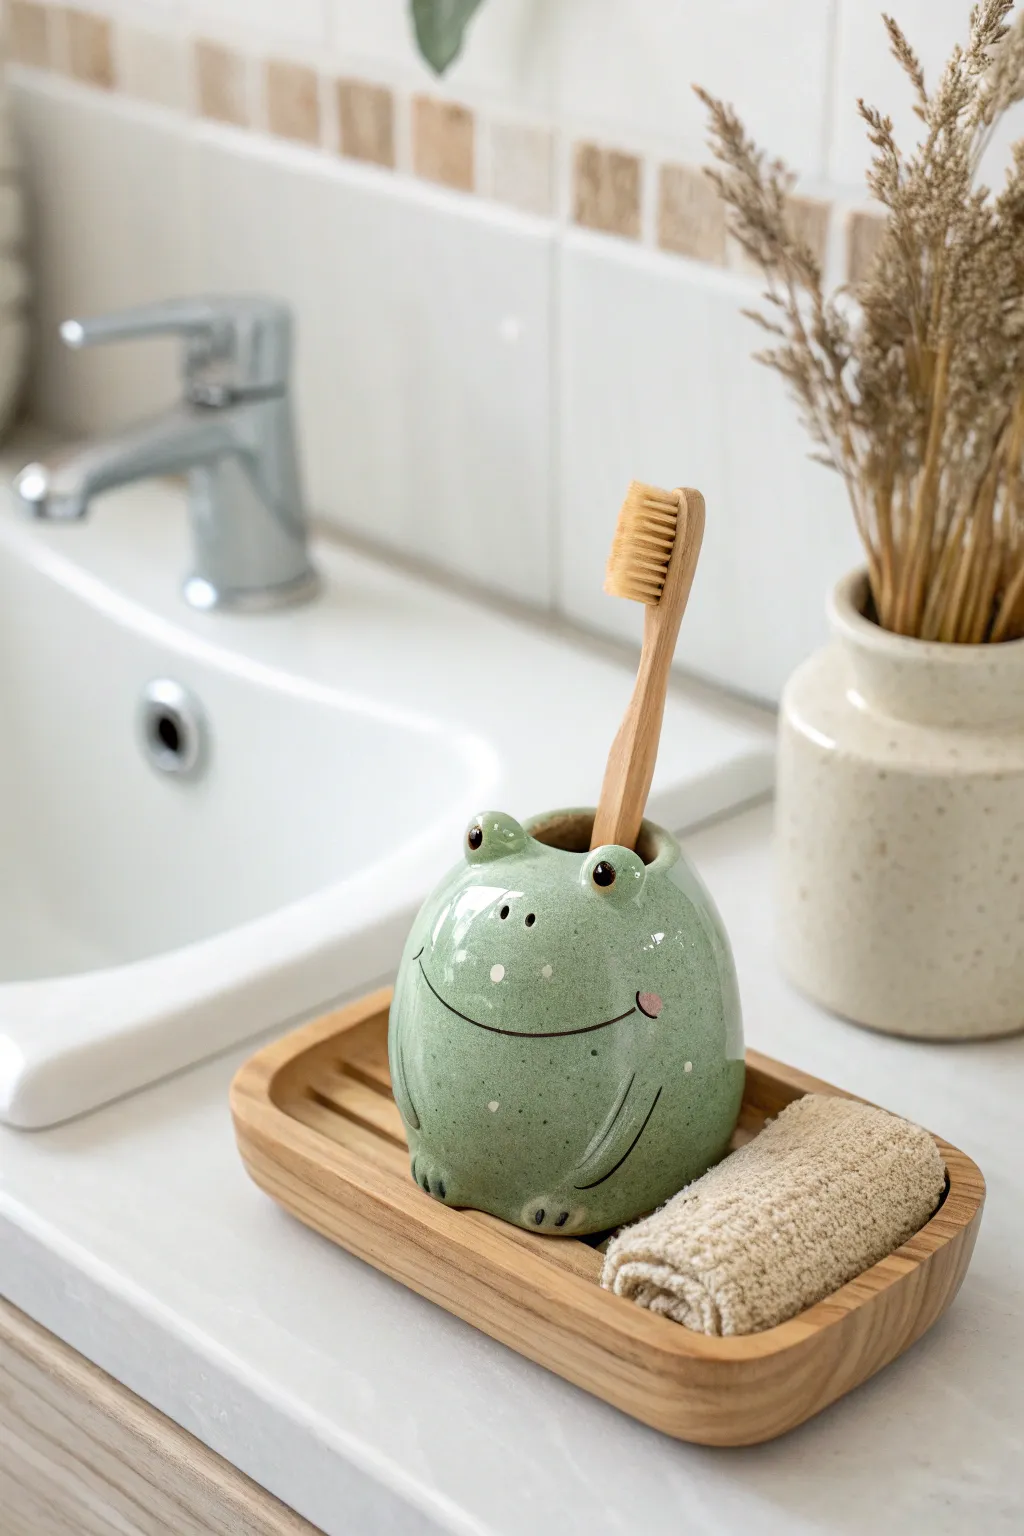
Brighten up your morning routine with this utterly charming frog toothbrush holder, crafted to look like a friendly pond dweller. With its speckled green glaze, wide smile, and perfectly placed hold for your brush, this ceramic piece balances functional design with whimsical aesthetic.
Detailed Instructions
Materials
- Light-colored stoneware or earthenware clay
- Pottery wheel (or rolling pin for hand-building)
- Fettling knife
- Ribs (kidney tools) for smoothing
- Needle tool
- Ball stylus tool
- Sponge
- Underglaze (Black, pink)
- Celadon glaze (Soft speckle green or jade)
- Clear transparent glaze (optional, if green glaze is matte)
- Kiln
Step 1: Forming the Body
-
Throwing the base:
Begin by centering about 1-1.5 lbs of clay on the wheel. Open the clay and pull a cylinder that is wider at the bottom than the top, creating a pear-like or gourd shape. -
Shaping the belly:
Use a rib from the inside to gently push the clay outward, creating a rotund, full belly for the frog. Narrow the neck slightly at the top, but leave the opening wide enough to comfortably fit a toothbrush or two. -
Alternative: Hand-building:
If you don’t use a wheel, pinch two large pinch pots and join them together to form a hollow sphere. Slice off the top to create the opening and flatten the bottom slightly so it stands stability. -
Refining the form:
Smooth out any throwing lines or finger marks with a soft rib or sponge to ensure a clean, smooth surface for the face details later.
Uneven Glaze?
If glaze pools too thickly in the carved arm lines, use a clean, stiff paintbrush to wick up excess liquid immediately after dipping. This keeps the detailed carving visible.
Step 2: Sculpting Features
-
Raising the eyes:
Take two small balls of clay, about the size of marbles, and score and slip them onto the rim of the opening to create the prominent frog eyes. -
Blending the eyes:
Use a modeling tool to firmly blend the clay from the eyes into the main body so they look integrated rather than just stuck on. Smooth the transition area with a slightly damp sponge. -
Adding feet:
Roll two small coils or flattened ovals for the feet. Attach these to the bottom front of the ‘belly’ area. Use a needle tool to press in three indentations on each foot to suggest toes. -
Defining the arms:
Instead of full arms, use a needle tool or small loop tool to carve shallow, curving lines into the side of the body that suggest folded arms resting against the belly.
Better Brush Holder
Make the top opening slightly oval (wider side-to-side) rather than perfectly round. This accommodates the toothbrush handle better and keeps it leaning at a jaunty angle.
Step 3: Detailing & Firing
-
Carving the smile:
When the clay is leather-hard, use a needle tool to carve a wide, sweeping smile across the front. Keep the line fluid and slightly upturned at the corners. -
Adding nostrils:
Poke two very small, symmetrical holes between the eyes for nostrils. Be careful not to puncture all the way through if you want to keep the interior watertight, though simple indents work fine too. -
Bisque fire:
Allow the piece to dry slowly and completely before loading it into the kiln for a bisque fire (typically Cone 04 or 06). -
Painting the face:
Once bisqued, use a fine liner brush and black underglaze to carefully fill in the carved smile line. Paint small black pupils onto the raised eye mounds. -
Adding the blush:
Dab a tiny spot of pink underglaze at the corner of the smile to give the frog a rosy cheek. -
Wax resist application:
Apply wax resist over the black eyes, the smile line, and the pink cheek spot. This prevents the green glaze from obscuring these crisp details. -
Glazing:
Dip or brush the entire piece in a semi-transparent, speckled green celadon glaze. The speckles in the glaze add wonderful texture that mimics frog skin. -
Checking the bottom:
Ensure the bottom of the frog is wiped clean of any glaze to prevent it from fusing to the kiln shelf. -
Final firing:
Fire the piece again to the maturation temperature of your specific clay and glaze (often Cone 5 or 6 for stoneware).
Now your bathroom sink has a cheerful guardian ready to greet you every morning and night

The Complete Guide to Pottery Troubleshooting
Uncover the most common ceramic mistakes—from cracking clay to failed glazes—and learn how to fix them fast.
Mushroom Spoon Rest
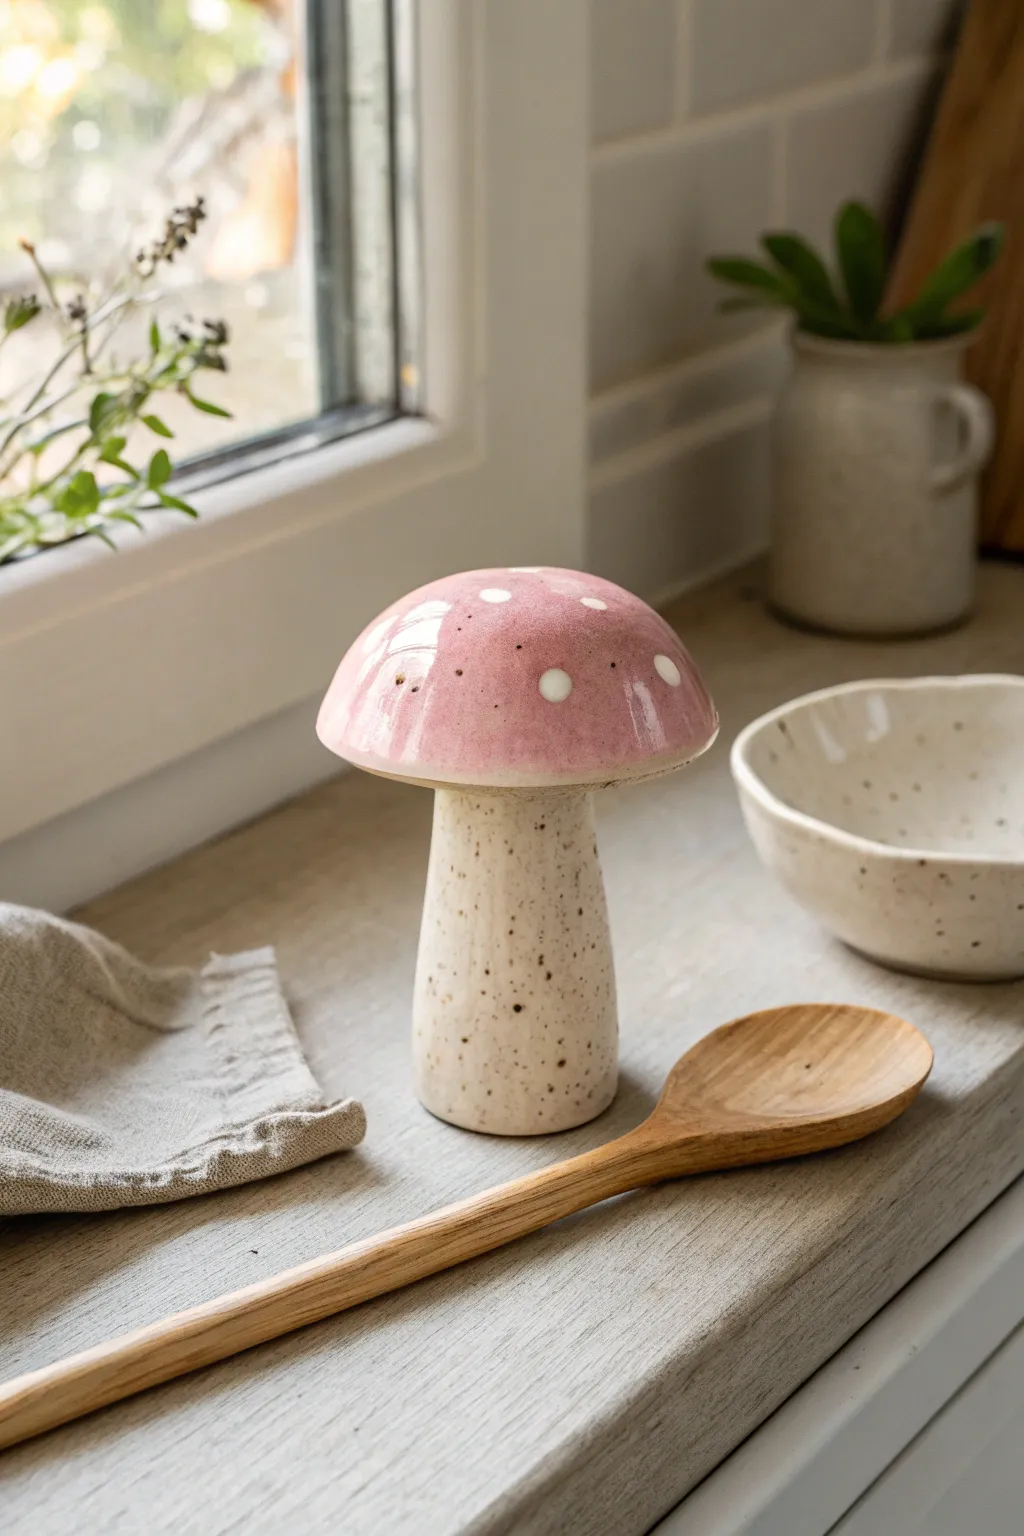
Add a touch of woodland whimsy to your kitchen with this charming ceramic mushroom. Featuring a glossy, polka-dotted pink cap and a natural, speckled clay stem, this piece acts as both adorable decor and a functional spot to rest a small spoon or ring.
Step-by-Step Tutorial
Materials
- White stoneware clay or speckled clay body
- Pottery wheel (optional, can be hand-built)
- Needle tool
- Wire cutter
- Sponge
- Rib tool
- Scoring tool (or fork)
- Slip (clay and water mixture)
- Underglaze (Light Pink and White)
- Clear glossy glaze
- Small round paintbrush
- Kiln access
Step 1: Forming the Stem
-
Prepare the clay:
Start with a ball of clay about the size of a tennis ball. Wedging it thoroughly is crucial to remove air bubbles, ensuring your mushroom stands strong. -
Center on the wheel:
If throwing on a wheel, center your clay ball. If hand-building, roll a thick coil that tapers slightly upward, creating a sturdy cone shape. -
Shape the stalk:
Pull the clay up to form a cylinder that is wider at the base for stability. The stalk should be roughly 3-4 inches tall. I like to leave the walls slightly thick to give it a nice weight. -
Smooth the surface:
Use a rib tool or a damp sponge to smooth out any finger marks on the stalk. The texture should be clean but organic. -
Cut from wheel:
Use your wire cutter to slice the stalk from the bat. Set it aside on a ware board to firm up until it’s leather-hard.
Clean Lines
Use wax resist on the stalk where it meets the cap before glazing. This ensures a crisp line where the pink glaze stops and the natural clay begins.
Step 2: Sculpting the Cap
-
Throw or pinch the cap:
Using a slightly smaller ball of clay, form a shallow, curved bowl shape. This will be the mushroom cap. -
Refine the curve:
Ensure the cap has a nice dome shape on the outside. The rim should be smooth and rounded, not sharp. -
Check the fit:
Hold the cap over your stalk to ensure the proportions look pleasing. The cap should overhang the stalk slightly, like an umbrella. -
Dry to leather-hard:
Allow the cap to dry until it matches the moisture content of the stalk. This usually takes a few hours or overnight under plastic.
Step 3: Assembly and Decoration
-
Score the connection points:
Use your needle tool or a fork to scratch up (score) the top of the stalk and the underside center of the cap. -
Apply slip and join:
Dab a generous amount of slip onto the scored areas. Press the cap firmly onto the stalk, giving it a tiny wiggle to lock the clay particles together. -
Clean the distinct seam:
Unlike many projects where you blend seams, here you want to keep the definition between the cap and stalk. Just wipe away excess slip with a damp brush. -
Bisque fire:
Once the piece is bone dry, fire it in the kiln to cone 04 (or your clay’s specific bisque temperature). -
Apply pink glaze:
Dip or brush the cap with a light pink glaze. Be careful not to drip onto the raw clay stem. You want 2-3 coats for an opaque, glossy finish. -
Add the polka dots:
Dip a small round brush or the end of a chopstick into white glaze. Dot it randomly onto the pink surface while it’s still powdery. -
Seal the stem:
If you used speckled clay, coat the stem in a clear matte or glossy glaze to let the speckles show through. If using white clay, paint speckles with iron oxide wash first. -
Glaze fire:
Fire the piece again to the final temperature required for your glaze (usually Cone 5 or 6) to vitrify the clay and melt the glass.
Make it a Trio
Create a little forest by making two additional mushrooms in varying heights and cap widths. Varying the pink shades creates a lovely gradient set.
Place your finished mushroom near a sunny window to let the light catch those glossy polka dots
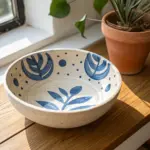
Scalloped Catchall Bowl
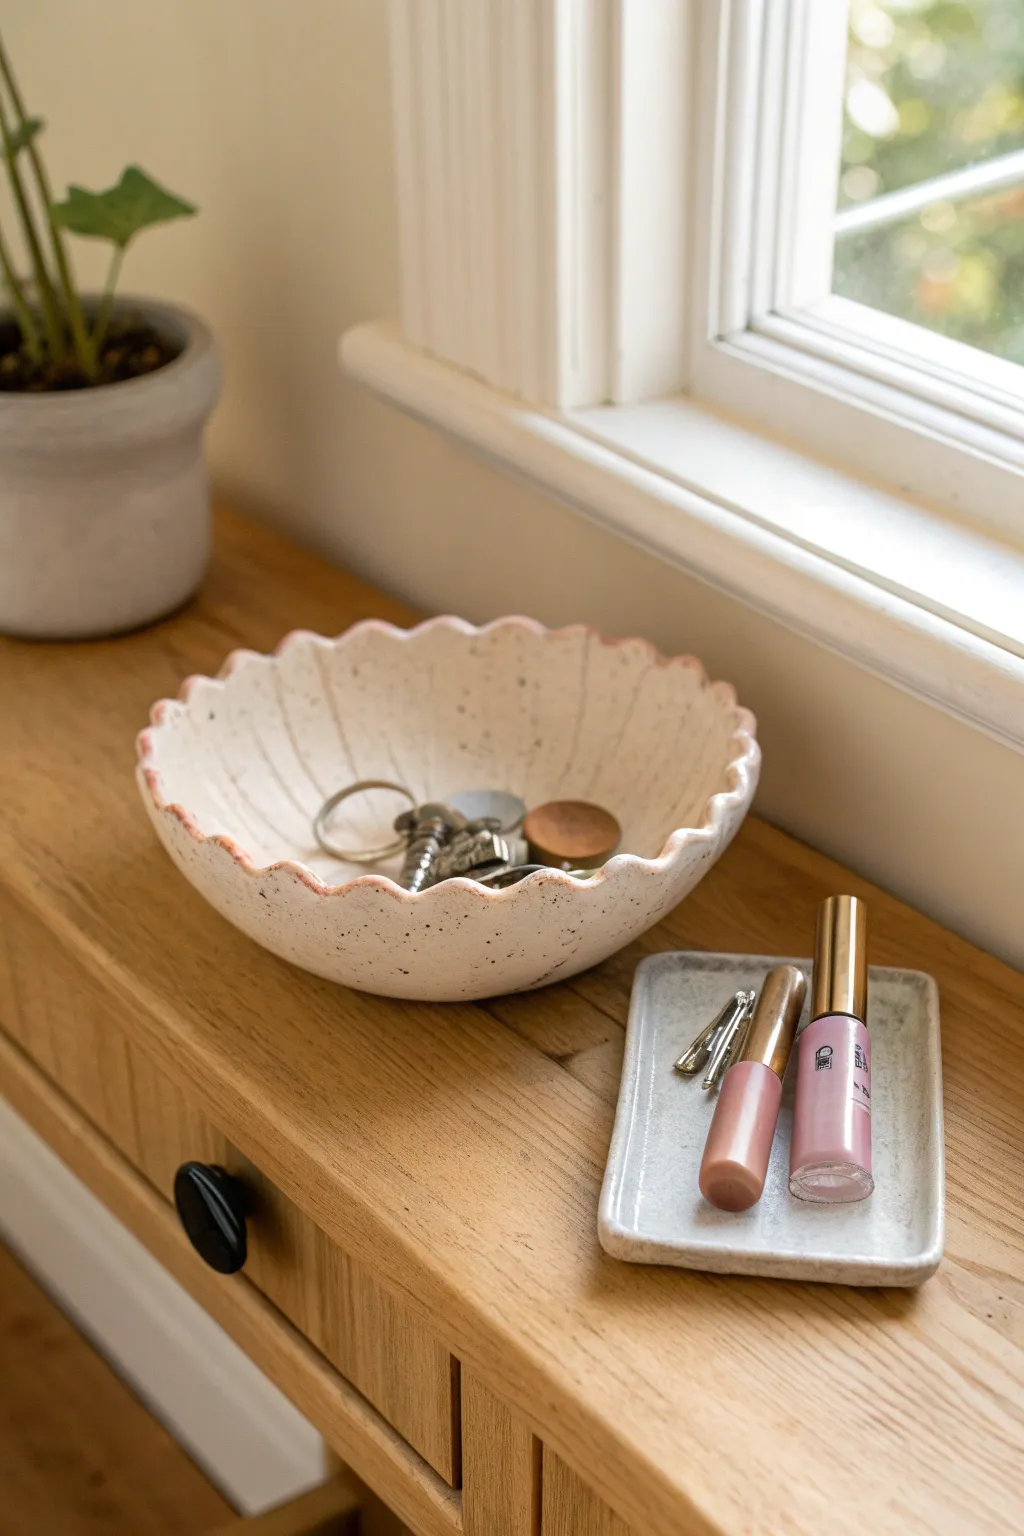
This charming, organically shaped bowl features a gentle scalloped rim and a delicate speckled finish that adds instant warmth to any surface. It’s the perfect size for holding keys, jewelry, or small treasures, bringing a touch of handmade elegance to your daily routine.
Detailed Instructions
Materials
- White air-dry clay or polymer clay
- Rolling pin
- Canvas mat or parchment paper
- Medium-sized bowl (for use as a slump mold)
- Round cookie cutter or glass (approx. 6-inch diameter)
- Small round cutter or bottle cap (approx. 0.5-inch diameter)
- Small bowl of water
- Sponge
- Modeling tool or butter knife
- Fine-grit sandpaper
- Acrylic paint (warm white/cream)
- Acrylic paint (black/dark brown for speckles)
- Acrylic paint (terracotta or soft pink for the rim)
- Old toothbrush
- Gloss varnish or sealant
Step 1: Shaping the Clay Body
-
Condition the clay:
Begin by kneading a ball of white clay in your hands until it becomes soft, pliable, and free of air bubbles. If you are using air-dry clay, keep your hands slightly moist to prevent cracking. -
Roll the slab:
Place the clay on your canvas mat or parchment paper. Use the rolling pin to flatten the clay into an even slab, aiming for a thickness of about 1/4 inch. Try to keep the thickness consistent across the entire surface. -
Cut the base circle:
Place your large round cutter or a 6-inch bowl upside down on the slab. Cut around it using a needle tool or knife to create a perfect circle. Remove the excess clay. -
Smooth the edges:
Dip your finger in a little water and run it along the cut edge of the clay circle to smooth out any sharpness or roughness. -
Create the scalloped edge:
Using your small round cutter or a bottle cap, press gently into the edge of the clay circle to remove half-circle bites. Repeat this process methodically around the entire circumference. -
Refine the scallops:
Once all scallops are cut, use a wet finger or a damp sponge to soften the points between the scallops. You want them to look soft and rounded rather than sharp and jagged.
Step 2: Forming and Drying
-
Texture the surface (optional):
Looking at the image, there’s a subtle vertical texture. Gently press the side of a modeling tool or a chopstick from the center of the bowl out toward each scallop point to create faint radial lines. -
Prepare the mold:
Cover your slump mold (the medium-sized bowl) with a layer of plastic wrap or cling film to ensure the clay doesn’t stick. -
Slump the clay:
Carefully lift your clay circle and lay it inside the mold. I like to gently press the center down first, letting the scalloped edges naturally curve upward against the sides of the bowl. -
Dry completely:
Let the clay sit in the mold until it is leather-hard (usually 24 hours for air-dry clay). Once it holds its shape, you can remove it from the mold and let it air dry completely for another 24-48 hours. If baking polymer clay, create the shape on an oven-safe form and bake according to package directions. -
Sand the surface:
Once the piece is fully cured or dry, use fine-grit sandpaper to smooth out any bumps on the rim or the underside. Wipe away all dust with a slightly damp cloth.
Keep it Clean
When cutting the scallops, wipe your cutter clean with a damp cloth after every few cuts. Clay buildup inside the cutter creates drag and can result in ragged edges.
Step 3: Painting and Finishing
-
Apply the base coat:
Paint the entire bowl, inside and out, with a warm white or cream acrylic paint. You may need two coats to get a solid, opaque finish. Let this dry completely. -
Create the speckles:
Dilute a small amount of black or dark brown paint with water. Dip an old toothbrush into the mixture, then hold it over the bowl and run your thumb across the bristles to flick tiny speckles across the surface. Practice on paper first to control the density. -
Paint the rim:
Using a fine detail brush and your terracotta or soft pink paint, carefully paint the very edge of the scalloped rim. This creates that lovely definition seen in the original piece. -
Dry and seal:
Allow all paint layers to dry fully. Finally, apply a coat of gloss varnish or sealant to protect the paint and give the bowl a finished ceramic look.
Make it Functional
Turn this into a jewelry holder by adding a small clay cone or pillar in the center before drying. It’s perfect for stacking rings while keeping the dish open for earrings.
Now your catch-all is ready to organize your space with its quiet, artistic charm


What Really Happens Inside the Kiln
Learn how time and temperature work together inside the kiln to transform clay into durable ceramic.
Minimal Face Magnets Set
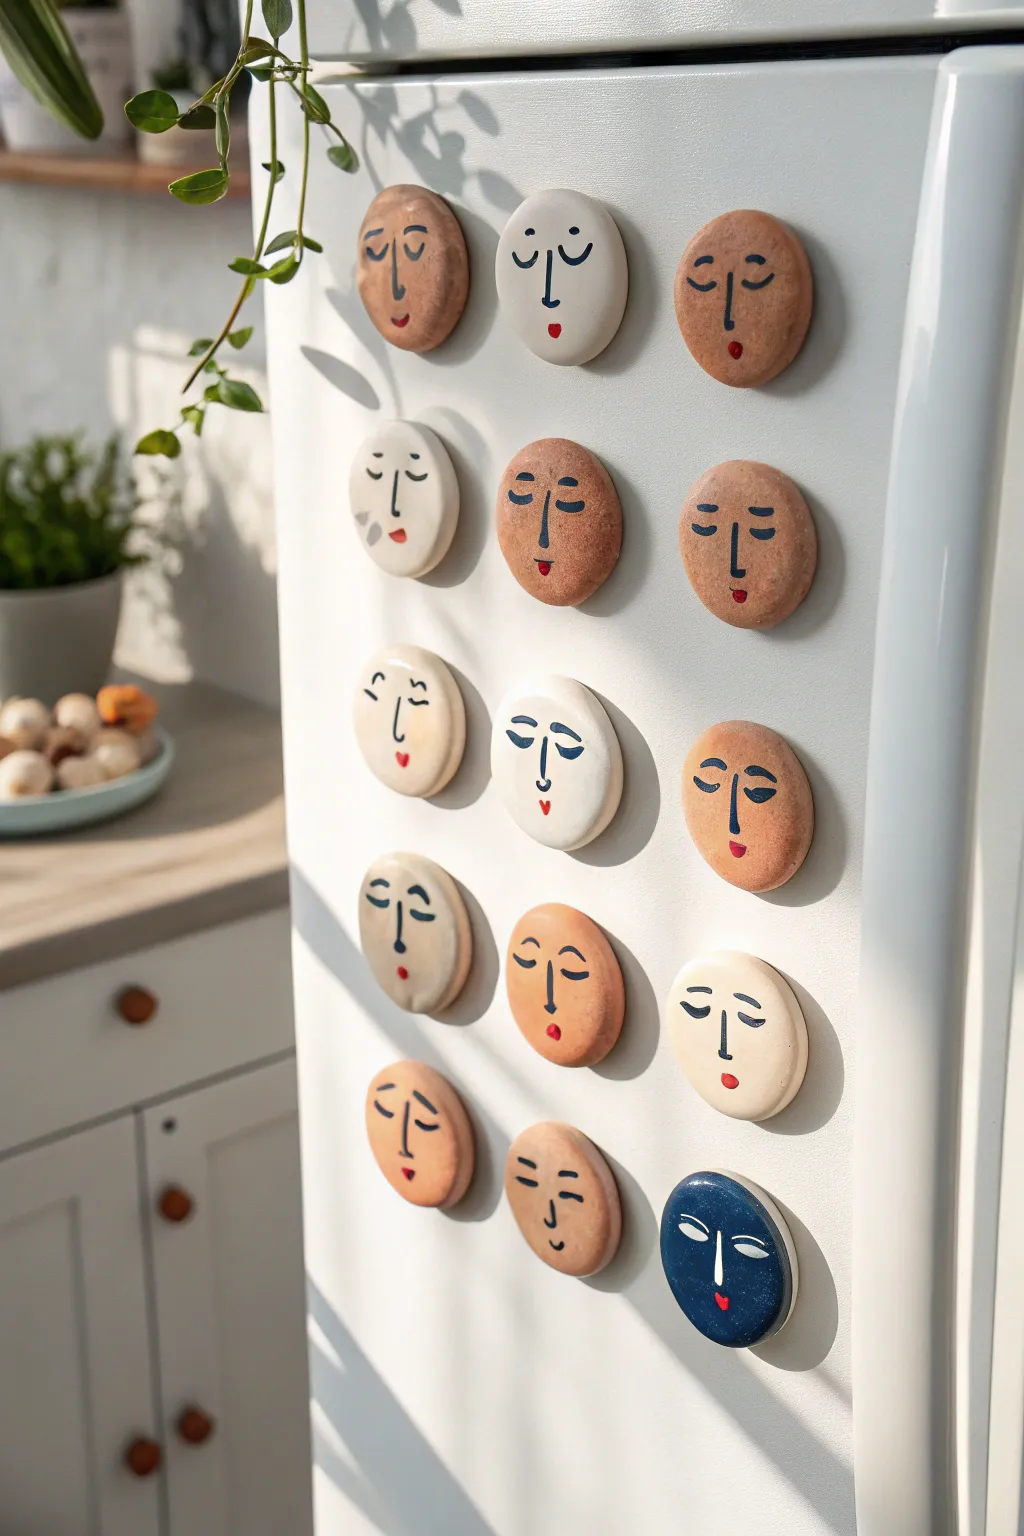
Transform small lumps of clay into a gallery of serene expressions with these charming minimalist face magnets. Their mismatched earth tones and simple line drawings bring a modern, artsy aesthetic to any magnetic surface.
Step-by-Step Tutorial
Materials
- Air-dry clay (white and terracotta/brown)
- Acrylic paints (dark blue, black, red, tan/beige)
- Fine detail paintbrushes (size 0 or 00)
- Rolling pin
- Circle cookie cutter or small jar lid (approx. 1.5-2 inches)
- Sandpaper (fine grit)
- Clear matte varnish or sealant
- Strong craft magnets (neodymium recommended)
- Strong craft glue (E6000 or superglue)
- Cup of water
- Sponge
Step 1: Shaping the Discs
-
Prepare your clay:
Start by conditioning your air-dry clay. Knead it until it’s pliable and smooth. If you want a variety of skin tones like the photo, you can use pre-colored terracotta clay for some, white clay for others, or marble them slightly for a natural look. -
Roll out the slab:
Roll your clay out on a smooth surface to an even thickness of about 1/4 inch. Avoid making them too thin, or they might crack; too thick, and the magnets might struggle to hold them up. -
Cut the circles:
Use your circle cutter or a small jar lid to punch out your magnet shapes. For that organic, handmade feel seen in the image, don’t worry if they aren’t geometric perfection. -
Soften the edges:
Dip your finger in a little water and run it gently around the cut edges of each circle to smooth down any sharpness or burrs. This gives them that soft, pebble-like quality. -
Dry thoroughly:
Place the discs on a wire rack or a sheet of parchment paper to dry. This usually takes 24-48 hours depending on humidity. Flip them halfway through to ensure even drying and prevent warping.
Magnet Sliding?
If your magnets slide down the fridge, the clay might be too heavy. Use neodymium (rare earth) magnets instead of standard black craft magnets for a much stronger hold.
Step 2: Adding Color & Detail
-
Sand for smoothness:
Once fully dry, lightly sand the surface and edges with fine-grit sandpaper to remove any fingerprints or bumps. Wipe away the dust with a slightly damp sponge. -
Base coat specific pieces:
If you used white clay but want varied tones (like the dark blue or beige faces), paint the entire surface of those discs now. Let the base coats dry completely before adding faces. -
Practice your expressions:
Before painting the clay, sketch a few minimalist faces on paper. Focus on simple curves for closed eyes, long vertical lines for noses, and tiny shapes for mouths. -
Paint the noses:
Using a very fine brush and dark paint (black or deep blue), paint a simple vertical line in the center of the face. Some noses in the example have a slight curve at the bottom, while others are straight. -
Add the eyes:
Paint two small curved lines for eyes. Experiment with placement—placing them wider apart or slightly lower changes the character’s expression significantly. -
Detail the lips:
Switch to a small dot of red or pink paint. Add a tiny heart, circle, or short line below the nose to create the mouth. Keep it small to maintain the minimalist style. -
Add eyebrows:
Above the eyes, paint floating curved lines for eyebrows. You can make them arched for a surprised look or flat for a calm expression.
Make it 3D
Before drying, create relief by pressing a tiny ball of clay onto the face for a 3D nose, or use a tool to gently carve the eye lines rather than just painting them.
Step 3: Finishing Touches
-
Seal the artwork:
Once the face details are bone dry, apply a coat of clear matte varnish. I find this step crucial as it protects the paint from chipping and gives the clay a finished, professional look without being too glossy. -
Prepare the back:
Flip the discs over. If the back surface is uneven, give it a quick sanding so the magnet will sit flush against the clay. -
Apply adhesive:
Place a small dab of strong craft glue (like E6000) onto the center of the back of the clay disc. -
Attach the magnet:
Press your magnet firmly into the glue. If you are using ceramic magnets, hold them for a few seconds to ensure initial contact. -
Final cure:
Allow the glue to cure fully according to the package instructions (usually 24 hours) before sticking them to your fridge to prevent sliding.
Now you have a collection of silent, serene friends to keep your grocery lists company
Tiny Bud Vase Magnets
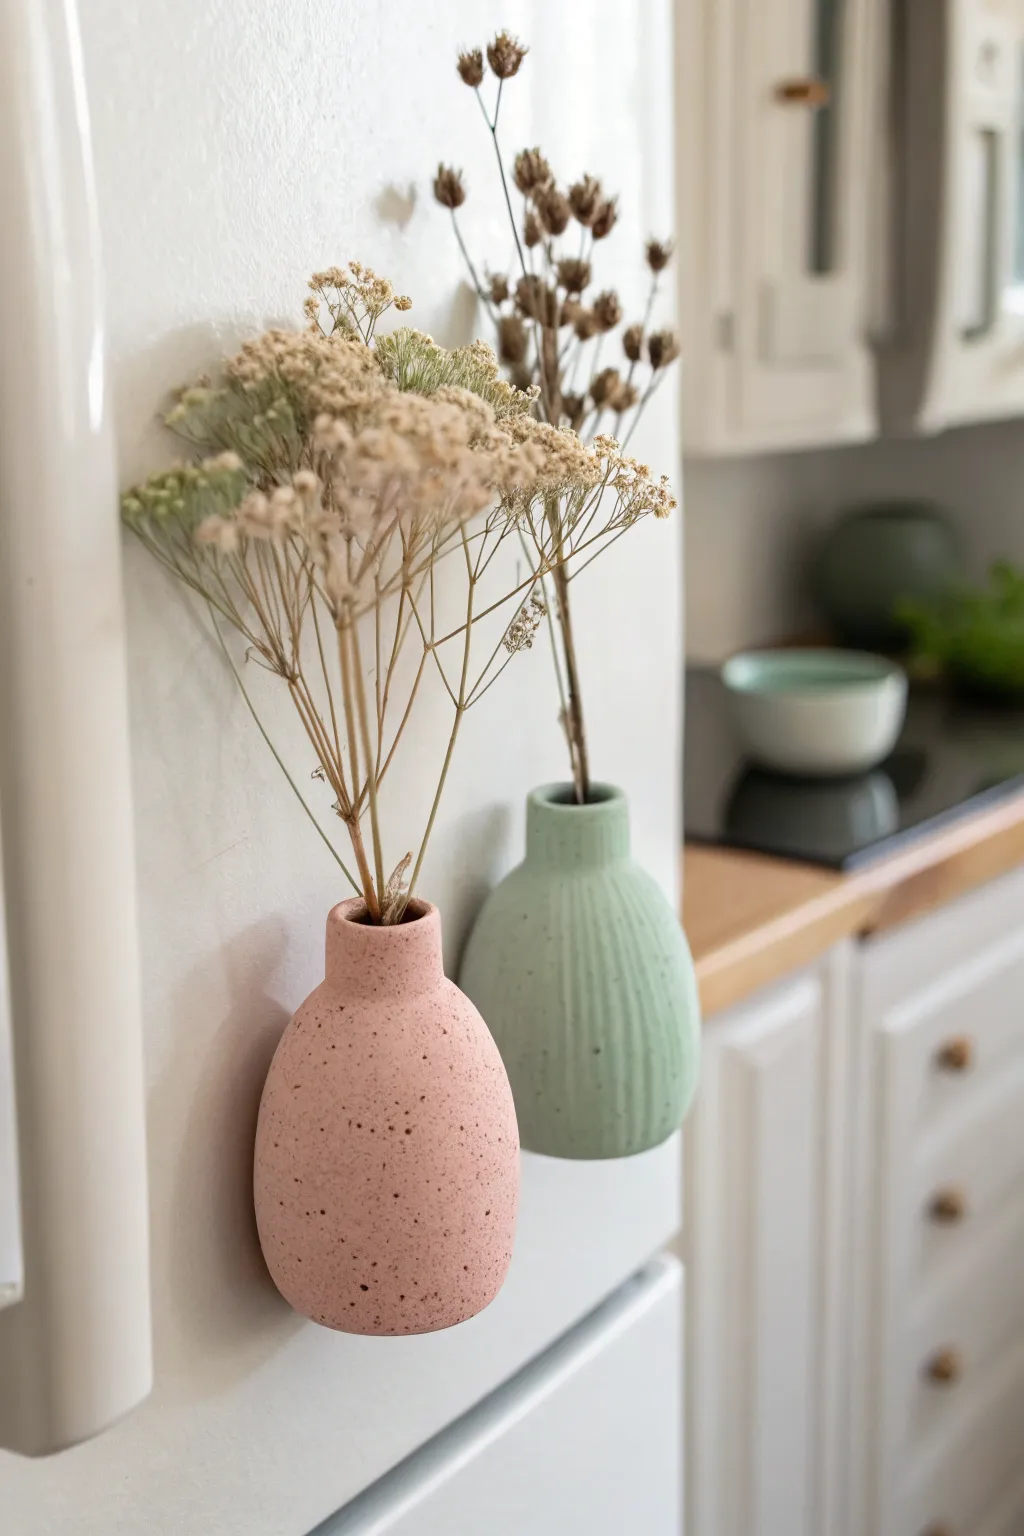
Bring a touch of organic beauty to your kitchen appliances with these adorable magnetic bud vases. Crafted to look like speckled ceramic, they serve as the perfect vessel for showing off tiny dried floral arrangements.
Step-by-Step Guide
Materials
- Polymer clay (pale pink and mint green)
- Black pepper or coarse black sand
- Rolling pin
- Small round cutter or craft knife
- Strong neodymium magnets (round, approx. 10mm)
- Super glue or strong gel adhesive
- Modeling tools (or a toothpick)
- Various dried flower stems
- Parchment paper
Step 1: Preparing the Clay
-
Condition the clay:
Start by warming up your chunk of pink polymer clay in your hands. Knead and roll it until it becomes soft, pliable, and easy to shape without cracking. -
Create the faux-stone effect:
To achieve that trendy speckled ceramic look without buying special clay, sprinkle a generous pinch of ground black pepper or coarse black sand onto your flattened clay. -
Incorporate the speckles:
Fold the clay over the pepper and knead thoroughly. Continue folding and rolling until the black specks are evenly distributed throughout the entire ball. -
Initial shaping:
Roll the clay into a smooth ball about the size of a golf ball, ensuring there are no visible seams or cracks.
Glue Won’t Stick?
If the magnet pulls off the clay, the surface is likely too smooth. Scuff the back of the clay and the magnet face with sandpaper to give the glue more ‘tooth’ to grab onto.
Step 2: Sculpting the Vase
-
Form the base:
Gently gently flatten the bottom of your ball on your work surface so it stands upright. Use your fingers to start shaping the body into an oval or egg-like silhouette. -
Create the neck:
Pinch the top portion of the clay gently to define where the neck of the vase will be. I like to slowly pull the clay upward to elongate this section. -
Hollow the opening:
Using a small rounded tool or the back of a paintbrush, press into the top center of the neck to create the opening. Make it deep enough to hold a stem (about 1 inch), but be careful not to poke through the sides. -
Refine the shape:
Smooth out the transition between the round body and the narrower neck. You can use a little water on your finger if the clay feels too dry. -
Flatten the back:
Lay the vase on its side and press it gently against the table to create a completely flat back surface. This is crucial for the magnet to sit flush against the fridge. -
Add vertical texture (Optional):
For the mint green version seen in the photo, use a needle tool or toothpick to gently score vertical lines down the body of the vase. Keep the pressure light to create subtle grooves rather than deep cuts.
Step 3: Baking and Assembly
-
Embed the magnet (Method A):
If you want the magnet flush, press your neodymium magnet into the flat back of the raw clay to create an indentation, then remove it before baking. This ensures a perfect fit later. -
Bake the pieces:
Place your vases on a parchment-lined baking sheet. Bake according to your polymer clay manufacturer’s instructions (usually around 275°F/135°C for 15-30 minutes). -
Cool down:
Allow the clay pieces to cool completely in the oven with the door slightly ajar. Sudden temperature changes can sometimes cause cracks. -
Attach the magnet:
Apply a drop of strong super glue or gel adhesive to the indentation you made (or directly to the flat back). Press the magnet firmly in place and let it cure fully. -
Matte finish:
The image shows a very matte texture. If your clay baked up slightly shiny, you can lightly sand the surface with very fine-grit sandpaper or apply a matte varnish. -
Selecting flowers:
Choose lightweight dried botanicals like baby’s breath, dried grasses, or small wildflowers. Heavier stems might cause the magnet to slide. -
Arranging:
Trim your dried stems to varying heights. Place two or three stems into the vase opening, adjusting them so they fan out slightly without toppling the vase.
Level Up: Ombré Effect
Mix a tiny amount of white clay into your colored clay but stop kneading halfway through to create a beautiful marbled or ombré effect on the vase body.
Now you have a charming vertical garden growing right on your refrigerator door

TRACK YOUR CERAMIC JOURNEY
Capture glaze tests, firing details, and creative progress—all in one simple printable. Make your projects easier to repeat and improve.
Cloud-Shaped Photo Holder
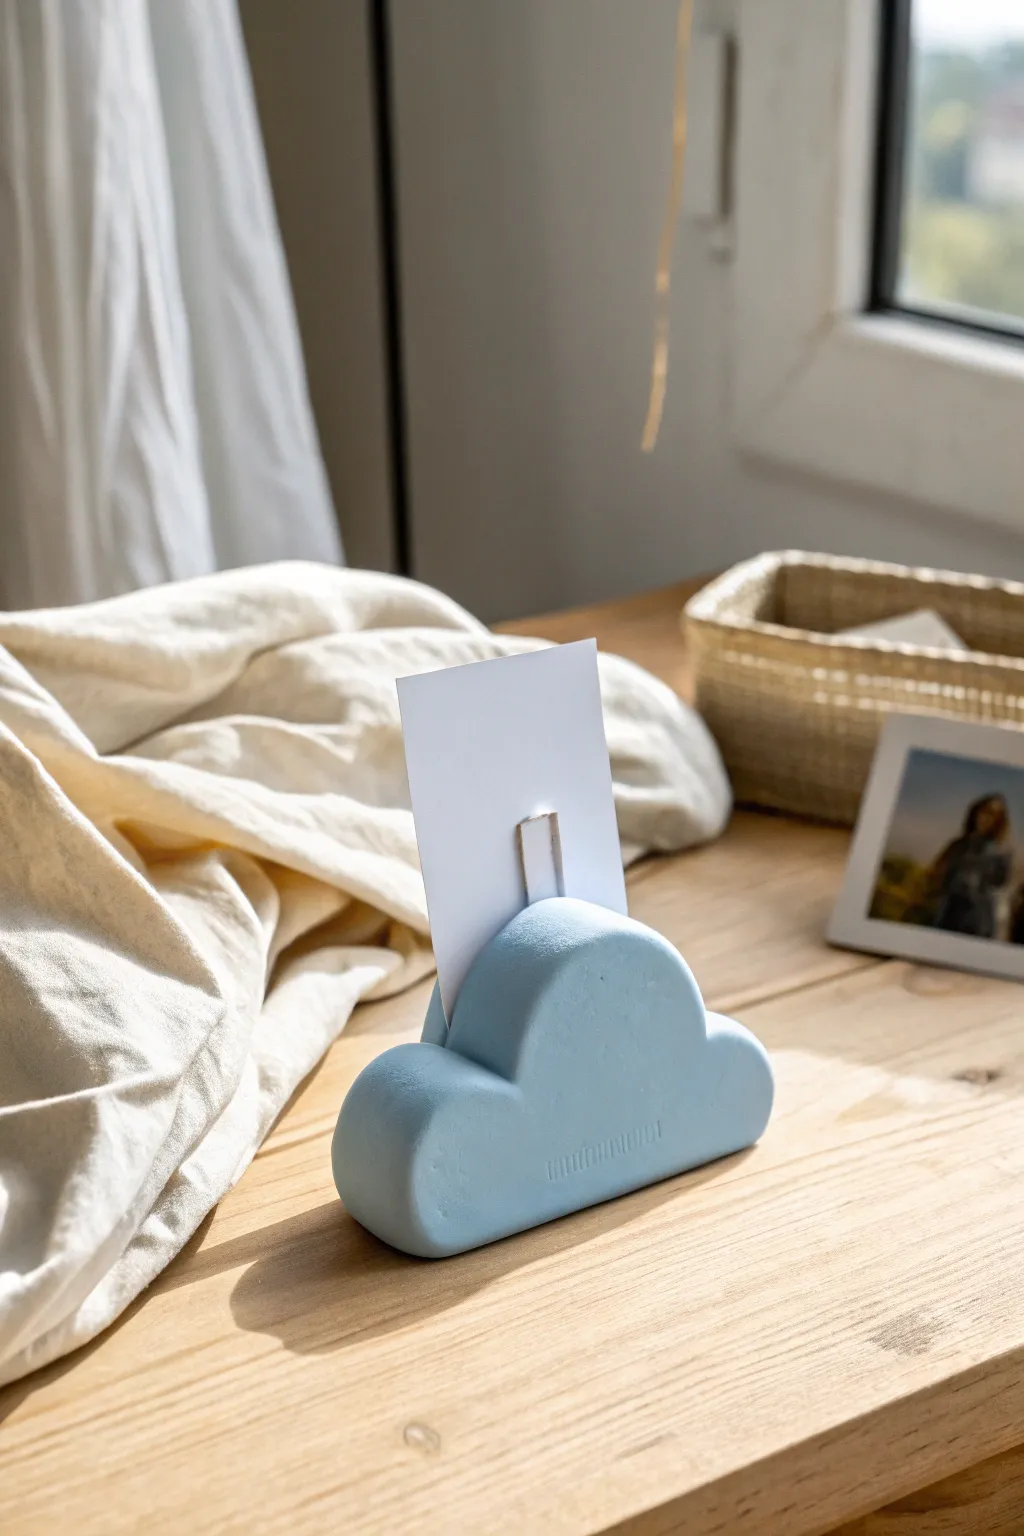
Bring the sky down to your desk with this charming, minimalist cloud-shaped photo holder. Its soft matte blue finish and simple curves make it the perfect functional accent for holding cherished Polaroids or important reminders.
Step-by-Step Tutorial
Materials
- Air-dry clay (white)
- Acrylic paint (pastel blue)
- Wide popsicle stick or sturdy cardstock
- Rolling pin
- Cloud template (printed or hand-drawn)
- Craft knife or clay tool
- Fine-grit sandpaper
- Water in a small cup
- Matte sealant or varnish
Step 1: Shaping the Cloud
-
Condition the Clay:
Start by taking a generous handful of air-dry clay. Knead it thoroughly in your hands until it feels warm, pliable, and free of any cracks. -
Form the Base Shape:
Roll the clay into a thick log, then gently flatten the bottom against your work surface so it stands upright securely. You want it to be about 1.5 to 2 inches thick. -
Sculpt the Curves:
Instead of cutting a flat shape, use your fingers to mold the top of the log into rounded humps. Create a larger central hump flanked by two smaller ones to mimic a fluffy cloud silhouette. -
Create the Slot:
While the clay is still soft, take your wide popsicle stick. Press it vertically into the center of the highest hump, going about an inch deep. Wiggle it ever so slightly to ensure the gap is wide enough for a photo, then carefully remove it. -
Smooth the Surface:
Dip your finger in a little water and run it over the entire surface of the cloud. This melts away fingerprints and minor imperfections. I find taking extra time here saves a lot of sanding later.
Fixing the Slot
If the photo slot shrank too much during drying, carefully use folded sandpaper or an emery board to widen the gap until your picture slides in easily.
Step 2: Refining and Drying
-
Initial Drying Phase:
Set the cloud in a cool, dry place away from direct sunlight. Let it dry for about 24 hours. Rotate it occasionally so the bottom gets air exposure too. -
Check for Cracks:
As clay shrinks, small cracks might appear. If you spot any, mix a tiny bit of fresh clay with water to make a paste (slip) and fill them in. -
Complete Drying:
Allow another 24-48 hours for the piece to cure completely. It should feel lightweight and not cold to the touch when fully dry. -
Sand for Smoothness:
Use fine-grit sandpaper to buff the surface. Focus on the rounded edges to make them look soft and organic. Wipe away the dust with a slightly damp cloth.
Level Up: Texture
Before the clay dries, gently dab the surface with a stiff bristle brush or a crumpled ball of foil to give the cloud a realistic, stone-like texture.
Step 3: Painting and Finishing
-
Mix the Color:
Prepare your palette with a pastel blue acrylic paint. If you only have dark blue, mix in plenty of white until you achieve that soft, airy sky tone. -
First Coat:
Apply a thin, even layer of paint over the entire cloud, including the bottom. Don’t worry if it looks streaky; thin layers are key. -
Second Coat:
Once the first layer is dry to the touch, apply a second coat for solid, opaque coverage. Use a smaller brush to get just inside the rim of the photo slot. -
Seal the Project:
To protect the paint and give it a finished look, apply a coat of matte sealant. A matte finish looks more modern and ‘soft’ than a glossy one for this specific design. -
Final Touch:
Let the sealant cure completely before inserting your favorite photo or memo note.
Now you have a serene little piece of the sky ready to brighten up your workspace
Star and Moon Desk Dish
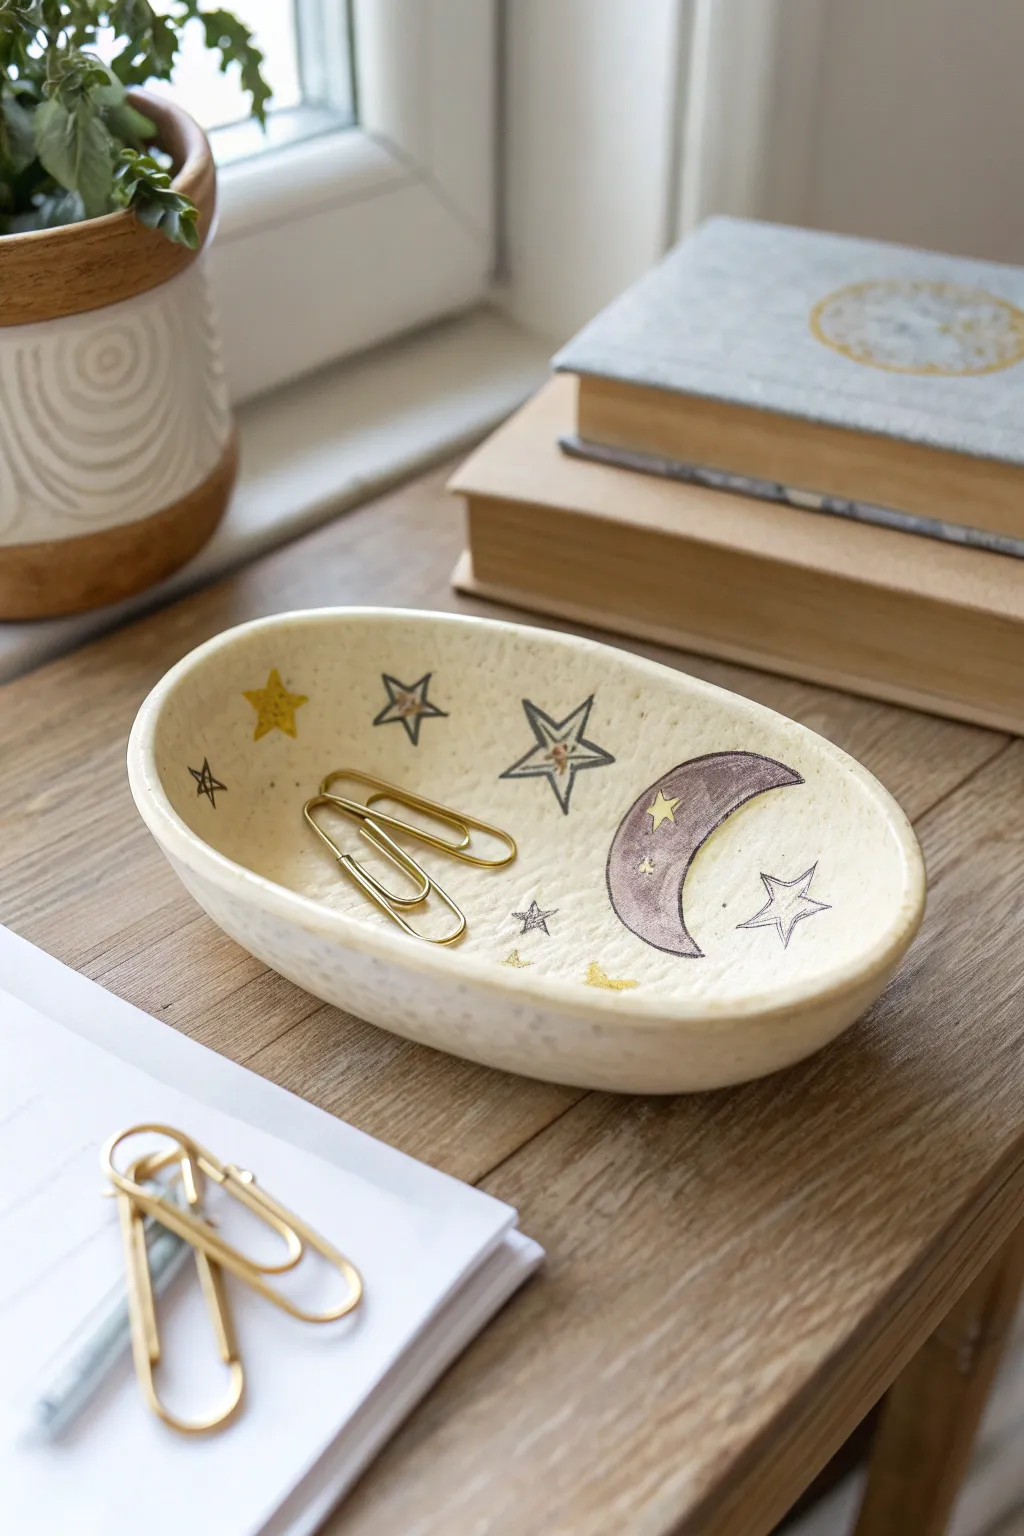
Bring a touch of cosmic charm to your workspace with this hand-shaped oval dish, perfect for holding small trinkets like paperclips or rings. The speckled cream finish paired with delicate moon and star illustrations gives it a dreamy, pottery-studio aesthetic without needing a kiln.
Step-by-Step Tutorial
Materials
- Air-dry clay (white or cream)
- Acrylic paints (pale yellow, lavender/purple, black, gold)
- Fine-point paintbrush
- Rolling pin
- Oval template or cookie cutter (optional)
- Bowl of water
- Fine-grit sandpaper
- Toothbrush (for speckling)
- Brown watercolor or diluted acrylic paint
- Gloss or satin varnish sealant
Step 1: Shaping the Base
-
Condition the Clay:
Start by taking a handful of air-dry clay and kneading it in your hands until it feels warm and pliable. This removes air bubbles and prevents cracking later. -
Roll out a Slab:
Using your rolling pin, flatten the clay into a slab that is roughly 1/4 inch thick. Aim for an even thickness throughout to ensure it dries effectively. -
Cut the Shape:
Use a craft knife to cut out an oval shape freehand, or trace around an oval template if you prefer perfect symmetry. The dish pictured is about 4-5 inches long. -
Lift the Edges:
Gently lift the edges of your oval slab upwards to create a shallow rim. Use your thumbs to press the inner curve and your fingers to support the outside, smoothing as you go. -
Refine the Rim:
Dip your finger in a little water and run it along the top edge of the rim to smooth out any cracks or roughness. You want a soft, rounded lip. -
Dry Completely:
Set your dish aside in a cool, dry place. Let it cure for at least 24-48 hours. I like to flip it over halfway through the drying process to ensure the bottom dries evenly.
Cracks while drying?
Mix a small amount of fresh clay with water to create a paste called ‘slip.’ Fill any cracks with this paste, let it dry, and then sand it smooth.
Step 2: Painting & Decoration
-
Smooth the Surface:
Once bone dry, lightly sand any bumps or rough edges with fine-grit sandpaper. Wipe away the dust with a slightly damp cloth. -
Create the Base Tone:
Paint the entire dish with a creamy off-white acrylic paint. Give it two coats for solid coverage. -
Add the Speckles:
Dilute a tiny bit of brown paint with water. Dip an old toothbrush into it, and flick the bristles with your thumb to spray fine speckles over the dish. Practice on paper first to control the spray. -
Outline the Moon:
Using a very fine brush and black paint (or a fine-tip paint pen), draw a crescent moon shape on the right side of the inner dish. -
Fill the Moon:
Paint inside the crescent shape with a muted lavender or dusty purple color. It might need a second coat to be opaque. -
Draw Star Outlines:
Sketch several five-pointed stars around the dish using your fine black liner/paint. Vary their sizes and orientation for a whimsical look. -
Add Gold Details:
Use gold or pale yellow paint to fill in some of the smaller solid stars. Add tiny dots or ‘sparkles’ in the negative space. -
Embellish the Moon:
Paint a few tiny yellow stars directly over the dried purple moon to create depth. -
Seal the Project:
Finish by applying a coat of gloss or satin mod podge or varnish. This protects the paint from chipping and gives it that finished ceramic sheen.
Pro Tip: Vintage Look
For an aged pottery look, water down brown paint and wash it over the whole dried piece, then immediately wipe it off with a paper towel, leaving pigment only in the crevices.
Now your celestial dish is ready to organize your desk with quiet elegance
Shell Trinket Bowl for Beachy Softcore
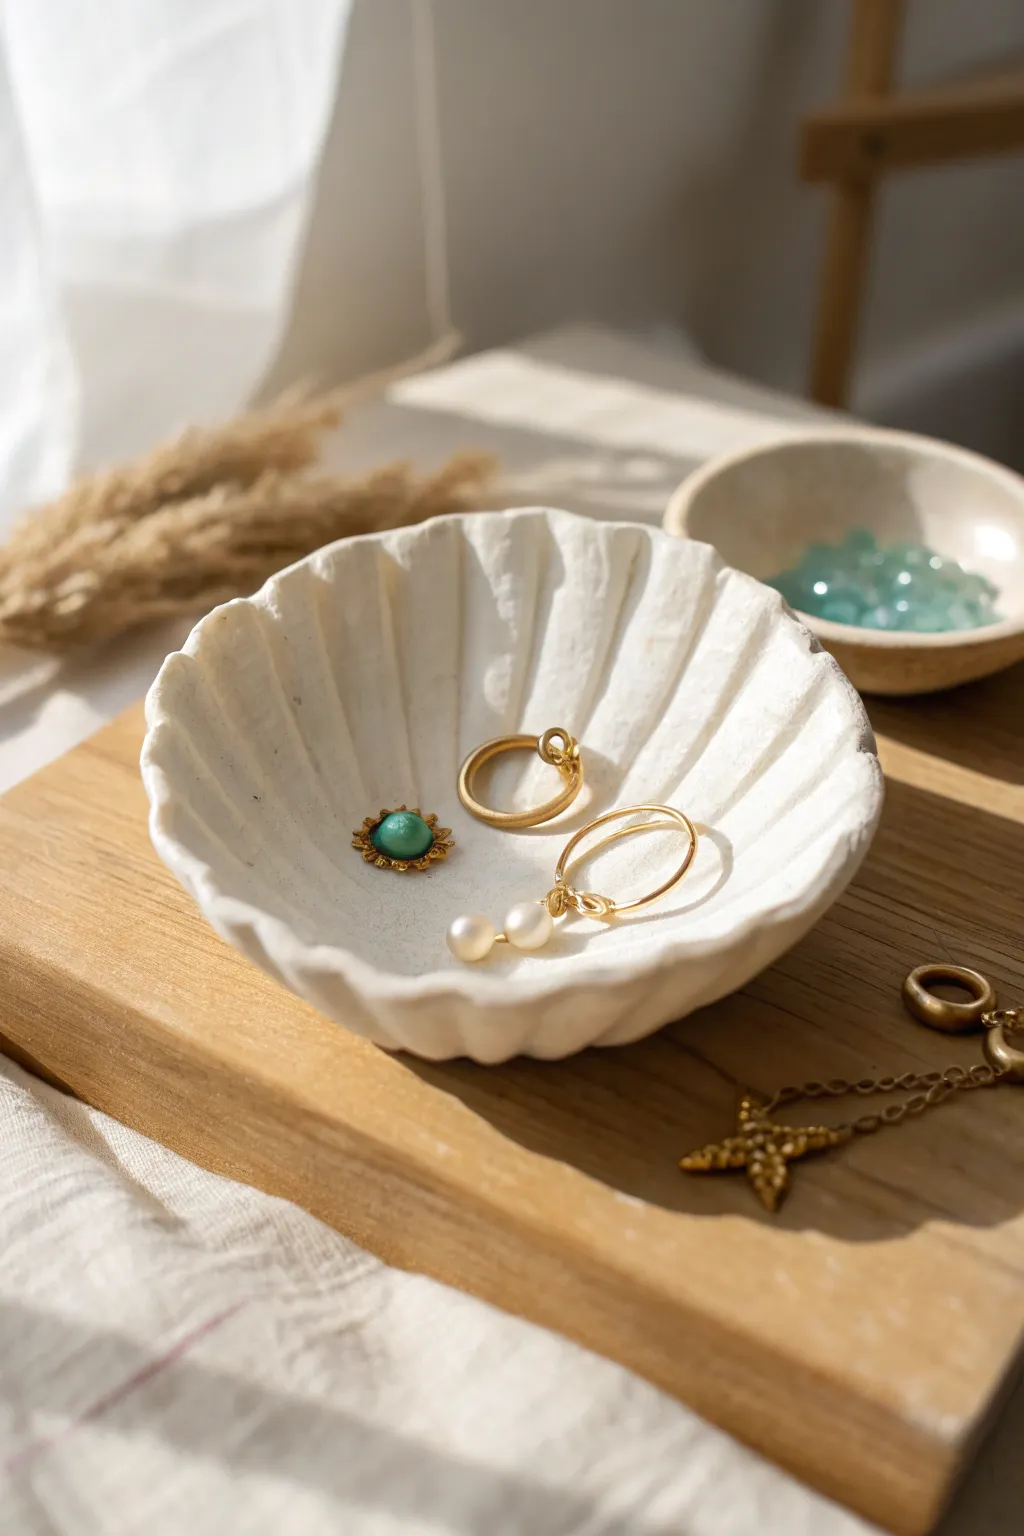
Bring the calming vibes of the coast to your vanity with this minimalist shell-shaped bowl. Its matte white finish and gentle ridges make it the perfect sophisticated catch-all for your favorite gold jewelry.
Step-by-Step
Materials
- White or cream air-dry clay (approx. 200g)
- Small rolling pin or glass bottle
- Rolling mat or parchment paper
- Real scallop shell (medium/large size) for a template
- Clay knife or craft knife
- Small bowl of water
- Fine-grit sandpaper (400 grit)
- Sponge
- Small rounded carving tool or wooden skewer
- Acrylic matte varnish (optional)
Step 1: Shaping the Base
-
Condition the clay:
Begin by kneading a ball of air-dry clay until it is warm and pliable. This prevents cracks from forming later on. -
Roll it out:
On your parchment paper or mat, roll the clay into an even slab, aiming for a thickness of about 1/4 inch (6mm). Avoid going too thin, or the final bowl will be fragile. -
Cut the shape:
Place your real scallop shell lightly onto the clay as a guide, or freehand a fan shape. Use your craft knife to cut around the outline, creating the basic scallop silhouette. -
Smooth the edges:
Dip your finger in a little water and run it along the cut edges to smooth out any sharpness or dragged clay bits.
Step 2: Adding Texture and Form
-
Create the ribs:
Using a rounded carving tool or the side of a wooden skewer, press lines radiating from the bottom narrow point of the shell out toward the wide scalloped edge. -
Deepen the grooves:
Go over lines a second time to ensure they are distinct. I find that pressing slightly harder near the rim creates a deeper, more realistic shell texture. -
Scallop the rim:
Where your pressed lines meet the outer edge, use your finger or a tool to gently indent the rim, emphasizing that classic wavy shell border. -
Form the curve:
To give the flat slab a bowl shape, carefully lift the clay and drape it inside a real bowl lined with plastic wrap, or simply cup it in your hands and gently curve the edges upward. -
Refine the shape:
While it rests in its curved form, gently press the center down slightly to ensure there is a stable, flat spot on the bottom so it won’t wobble on your table.
Cracks Appearing?
Mix a tiny bit of fresh clay with water to create a thick paste (slip). Fill the cracks, smooth over with a damp finger, and let re-dry.
Step 3: Finishing Touches
-
Initial drying:
Let the clay dry for 24-48 hours. Keep it in a draft-free area to ensure it dries evenly and minimizes warping. -
Check density:
Once the clay looks white and chalky rather than grey and damp, it is ready for sanding. -
Sand for smoothness:
Take your fine-grit sandpaper and very gently buff the edges and surface. Be careful not to sand away the ribbed texture you created. -
Wipe down:
Use a barely damp sponge or cloth to wipe away all the sanding dust to reveal a clean, pristine surface. -
Seal (optional):
For durability, apply a thin coat of matte acrylic varnish. This preserves that raw clay look while protecting it from moisture and oils.
Texturizing Tip
For an organic feel, lightly dab the wet clay with a crumpled piece of aluminum foil before drying to give it a stone-like surface.
Place your new shell dish on a wooden board and enjoy the serene coastal atmosphere it brings to your space
Turtle Jewelry Box With Lift-Off Shell
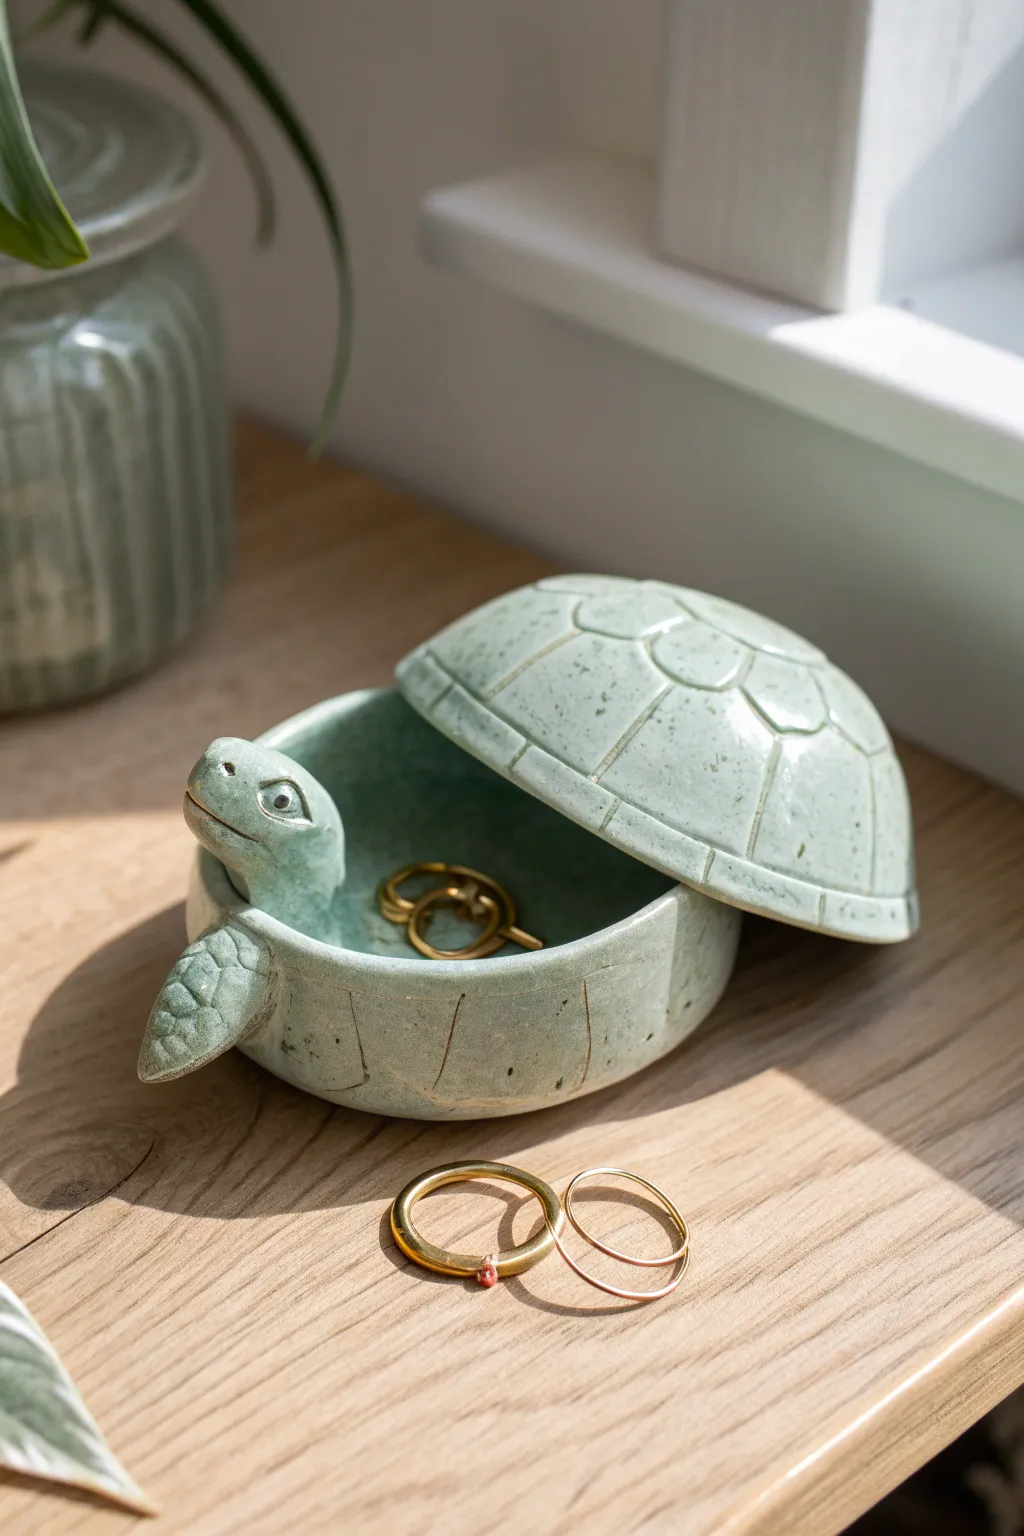
This adorable jewelry box features a serene sea turtle emerging from the ocean, with its shell serving as a clever removable lid. The soft, speckled celadon glaze gives it a vintage, handcrafted pottery feel perfect for guarding your favorite rings.
Step-by-Step Guide
Materials
- White or light gray stoneware clay
- Rolling pin
- Circle template or cookie cutter (approx. 3-4 inches)
- Small bowl or sphere mold (for shaping the shell)
- Fettling knife or clay needle tool
- Scoring tool (or an old toothbrush)
- Slip (clay mixed with water)
- Modeling tools (wooden and rubber ribs)
- Celadon glaze (speckled seafoam or light green)
- Small kiln (or oven-bake clay alternative instructions if using polymer)
- Sponge
Step 1: Forming the Base
-
Roll the Slab:
Begin by rolling out a slab of clay to an even thickness of about 1/4 inch. Ensure it’s smooth and free of air bubbles. -
Cut the Base:
Cut a circle from your slab; this will be the floor of the jewelry box. -
Create the Wall:
Cut a long rectangular strip from the remaining slab. The height should be roughly 1.5 inches, and the length must be enough to wrap around the circumference of your base circle. -
Attach the Wall:
Score and slip the edge of the circular base and the bottom edge of the rectangular strip. Wrap the strip around the base, pressing firmly to join them. Smooth the seam where the strip ends meet and seal the interior connection with a coil if needed.
Uneven Lid?
If the lid rocks, place a sheet of sandpaper on a flat surface. hold the lid flat and rub it in circles on the sandpaper to grind the rim perfectly level.
Step 2: Sculpting the Lid & Features
-
Shape the Shell:
Roll another slab and drape it over a small bowl or a sphere mold that is slightly larger than your box base. Let it stiffen slightly until it holds a dome shape. This forms the turtle’s shell lid. -
Trim the Lid:
Once leather hard, trim the edge of the dome so it rests neatly on top of the base walls you created earlier. -
Carve Shell Details:
Using a needle tool, lightly carve the hexagonal scute patterns onto the dome lid. I also like to continue these lines down the side of the box base to make the shell look like one cohesive piece when closed. -
Sculpt the Head:
Shape a small lump of clay into a rounded, slightly elongated head with a neck. Use a modeling tool to create the mouth line and poke small indentations for nostrils. -
Add Eyes:
Attach tiny balls of clay for eyes or sculpt them directly into the head, adding eyelids for a realistic sleepy expression. -
Create Flippers:
Ideally, model two front flippers. Keep them relatively flat and textured with a scale pattern similar to the shell.
Texture Tip
After carving lines, wipe them gently with a damp sponge. This softens sharp burrs but keeps the indentation deep enough for glaze to pool inside.
Step 3: Assembly & Finishing
-
Attach Appendages:
Score and slip the neck to the front of the *base* box, not the lid, so the turtle looks out when the box is open. Attach the flippers to the sides of the base similarly. -
Refine and Smooth:
Use a damp sponge to smooth out any rough fingerprints or harsh edges, paying attention to the rim where the lid meets the base. -
Bisque Fire:
Allow the piece to dry slowly and completely before firing it in a bisque kiln to prepare it for glazing. -
Glaze Application:
Apply a speckled celadon glaze. This type of glaze is translucent enough to show your carving work but pools beautifully in the recesses to highlight the shell pattern. -
Clean the Contact Points:
Wipe away any glaze from the rim of the base and the underside rim of the lid. Using wax resist here is a smart move to prevent the lid from fusing to the box during firing. -
Final Firing:
Fire the piece again according to your clay and glaze specifications.
Once cooled, fill your little shelled friend with rings or earrings for a charming vanity display
Soft-Edge Mini Shelf in Dreamy Shapes
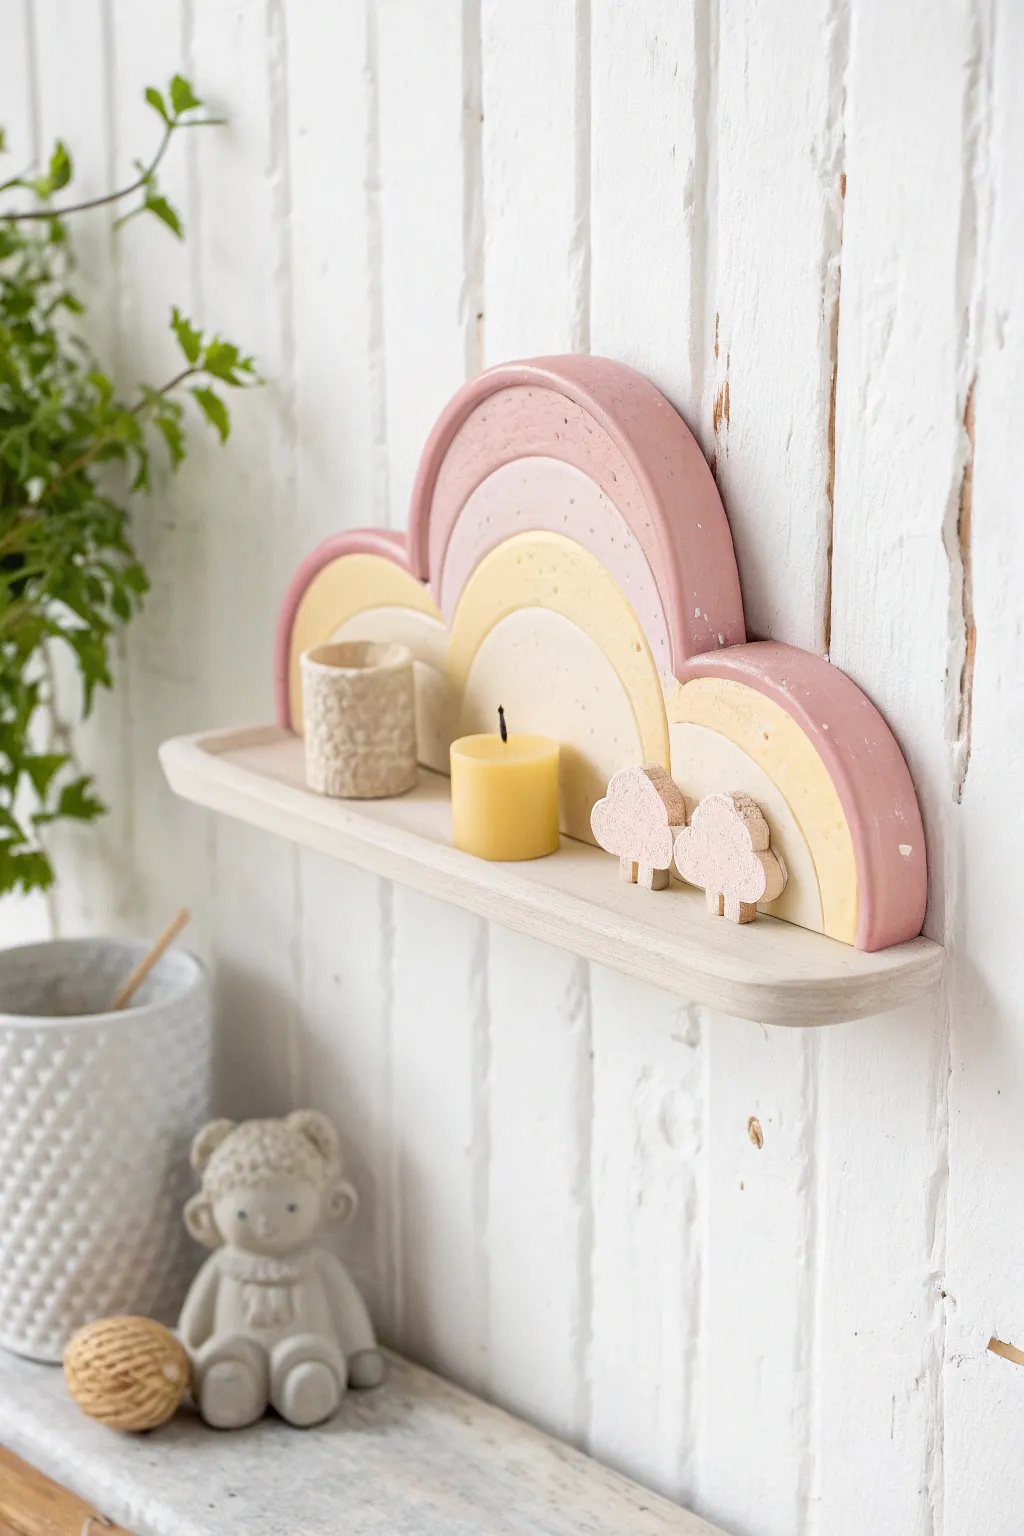
This whimsical little floating shelf creates a dreamy spot for tiny treasures, blending soft pastel arches with a sturdy ledge. Its matte, stone-like texture and gentle curves bring a touch of playful serenity to any empty wall space.
Step-by-Step Tutorial
Materials
- White classic air-dry clay or stone clay (approx. 1kg)
- Rolling pin
- Sharp craft knife or scalpel
- Cardboard or cardstock for templates
- Sandpaper (medium and fine grit)
- Acrylic paints (pastel pink, soft yellow, warm white)
- Strong craft glue or heavy-duty construction adhesive
- Small paintbrush
- Clear matte varnish or sealant
- Wall hanging hardware (sawtooth hanger or mounting tape)
Step 1: Shaping the Base Components
-
Draft your template:
Sketch a rainbow cloud shape onto cardboard. You want a central high arch flanked by two lower arches, creating a bubbly cloud silhouette. Cut this out to use as your master guide. -
Roll out the slab:
Take a large portion of your air-dry clay and knead it until pliable. Roll it out into an even slab, approximately 1cm thick. Keeping it thick is crucial for the shelf’s structural integrity. -
Cut the back panel:
Place your cardboard template onto the rolled clay. Using your craft knife, trace around the edge cleanly to cut out the rainbow back panel. Smooth the raw edges with a little water on your finger. -
Create the shelf ledge:
Roll out a second slab, slightly thicker than the first (about 1.5cm). Cut a semi-circle or rounded rectangle shape that is the same width as your rainbow back panel. This will be the horizontal shelf. -
Add detail layers:
Roll a thinner slab (about 3-4mm). Cut out smaller arch shapes that fit inside your main rainbow arches to create dimension. Adhere these to the back panel using the score-and-slip method.
Keep it Straight
To prevent the back panel from curling as it dries, place a light book or flat board on top of the lying-flat sections during the first few hours of drying.
Step 2: Assembly and Drying
-
Score surfaces for joining:
Take your back panel and identify where the shelf ledge will attach. Use a needle tool or knife to scratch up (score) this contact area and the corresponding edge of the shelf piece. -
Apply slip:
Mix a small amount of clay with water to make a paste called ‘slip.’ Apply this generously to the scored areas. -
Join the pieces:
Press the shelf ledge firmly against the bottom of the rainbow back panel. I like to reinforce this seam by rolling a very thin snake of clay and pressing it into the back joint, smoothing it out completely. -
Level and prop:
This is the most critical step. Prop up the shelf ledge with objects (like small boxes or blocks) so it sits at a perfect 90-degree angle to the back panel while drying. -
Slow drying process:
Let the piece dry slowly away from direct sunlight for at least 48 hours. Flip it occasionally if possible to ensure even drying and prevent warping.
Step 3: Refining and Decorating
-
Sand for smoothness:
Once fully cured and bone dry, use medium grit sandpaper to level out any bumps. Switch to fine grit to finish the edges, giving them that soft, rounded look seen in the photo. -
Mix pastel shades:
Prepare your palette with a dusty rose pink and a buttery yellow. You may need to mix white into standard colors to achieve that chalky, pastel aesthetic. -
Paint the arches:
Paint the outer larger arches in the pink tone. Use a steady hand to define the edges where the layers meet. -
Fill the inner sections:
Paint the inner arches with the soft yellow. Leave the shelf ledge itself and the very center arches in a natural, warm white or unpainted clay color for contrast. -
Add speckles (optional):
For a stone-like effect, dilute a tiny bit of darker brown paint. Flick the bristles of an old toothbrush to lightly splatter speckles across the surface. -
Seal the piece:
Apply a coat of clear matte varnish. This protects the clay from moisture and gives the paint a finished, professional look without making it glossy. -
Attach hardware:
Glue a strong sawtooth hanger to the back using heavy-duty construction adhesive, or use strong double-sided mounting tape if the shelf will only hold very light items.
Terrazzo Twist
Instead of painting, knead small chips of colored dried clay into your wet white clay before rolling. Sanding later will reveal a gorgeous embedded terrazzo pattern.
Style your new mini shelf with a small LED candle or tiny succulents to complete the dreamy vibe