Whenever I need a low-pressure project that still turns out ridiculously cute, I reach for clay animals—they’re basically little bundles of joy you can finish in one sitting. The trick is starting with simple shapes (balls, teardrops, coils) and letting a few tiny details turn them into instant critters.
Chibi Cat Figurines

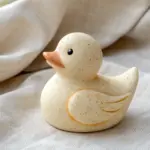
Create a whimsical clay companion with this adorable chibi cat figurine, featuring a soft speckled body and a textured collar. Its simplified, rounded forms make it a perfect project for beginners looking to practice clean shaping and delicate facial details.
Detailed Instructions
Materials
- Polymer clay (pale peach or beige)
- Small amount of orange or terracotta clay (or soft pastels)
- Dark brown or black acrylic paint
- Fine detail paintbrush (size 0 or 00)
- Dotting tool or ball stylus
- Aluminum foil (for armature core)
- Modelling tools (needle tool, rubber shaper)
- Rubbing alcohol or baby oil (for smoothing)
- Matte or satin varnish
Step 1: Shaping the Base
-
Prepare the core:
Crumple a small piece of aluminum foil into a rough egg shape about the size of a walnuts. This saves clay and makes the figurine lighter. -
Wrap the body:
Condition your pale peach clay until soft, then flatten a sheet and wrap it completely around the foil core. Roll it between your palms to smooth out any seams until you have a flawless oval shape for the body. -
Form the legs:
Instead of attaching separate legs, gently pinch the bottom corners of the oval to pull out two small, stubby legs. Tap the bottom against your work surface to flatten it slightly so the cat stands on its own. -
Create the head:
Roll a second ball of peach clay, slightly larger than the body section to achieve that classic chibi look. Press it gently to flatten the bottom where it will join the neck. -
Join the parts:
If using polymer clay, you can insert a small piece of toothpick or wire between the head and body for strength. Press the head firmly onto the body and blend the clay at the seam slightly if desired, though the collar will cover this later.
Uneven Standing?
If your cat wobbles after baking, glue a small circle of felt to the bottom, or gently sand the feet against a piece of fine-grit sandpaper until flat.
Step 2: Adding Features
-
Make the ears:
Shape two small triangles of peach clay. Use your thumb or a ball tool to gently indent the front of each triangle to create the inner ear curve. -
Attach the ears:
Place the ears on top of the head. Use a rubber shaping tool to blend the bottom edges of the ears seamlessly into the scalp so they don’t look like they are just stuck on. -
Add inner ear color:
Take a tiny amount of orange clay (or scrape some orange pastel dust) and press it into the indented part of the ears for a soft, warm glow. -
Sculpt the arms:
Roll two small sausage shapes for the arms. Attach them to the sides of the body, angling them slightly forward. Blend the shoulder area into the main body for a smooth transition. -
Create the collar:
Roll a thin snake of clay. Create a twisted rope effect by pressing diagonal lines into it with a needle tool, or gently twisting it. Wrap this around the neck seam.
Step 3: Details & Finishing
-
Smooth the surface:
Before baking, examine your piece. I like to brush a little rubbing alcohol over the clay with a soft brush to remove fingerprints and dust. -
Bake the clay:
Bake according to your clay manufacturer’s instructions. Usually, this means around 275°F (130°C) for 15-30 minutes depending on thickness. Let it cool completely. -
Paint the face:
Using your fine brush and dark paint, add two small oval eyes widely spaced apart. Paint a tiny triangular nose and a simple ‘w’ mouth just below it. -
Add whiskers and cheeks:
Paint three very fine whisker lines on each cheek. For the blush, dry-brush a tiny bit of orange pastel or diluted acrylic paint under the eyes. -
Create the spots:
Mix a light brown or terracotta paint shade. Use the tip of a toothpick or a small dotting tool to add irregular speckles all over the cat’s body. -
Paint the collar:
If you didn’t use colored clay for the collar, paint it now with an ochre or gold tone. Carefully paint thin brown lines in the crevices of the rope texture to encourage depth. -
Seal the work:
Once all paint is dry, apply a thin coat of matte varnish to protect your new friend.
Customize It
Swap the rope collar for a tiny fabric scarf, or add a miniature clay fish in one of the paws to give your figurine even more personality.
Now you have a sweet, handmade keepsake to brighten up your desk or shelf


Puppy Dog Pocket Pals
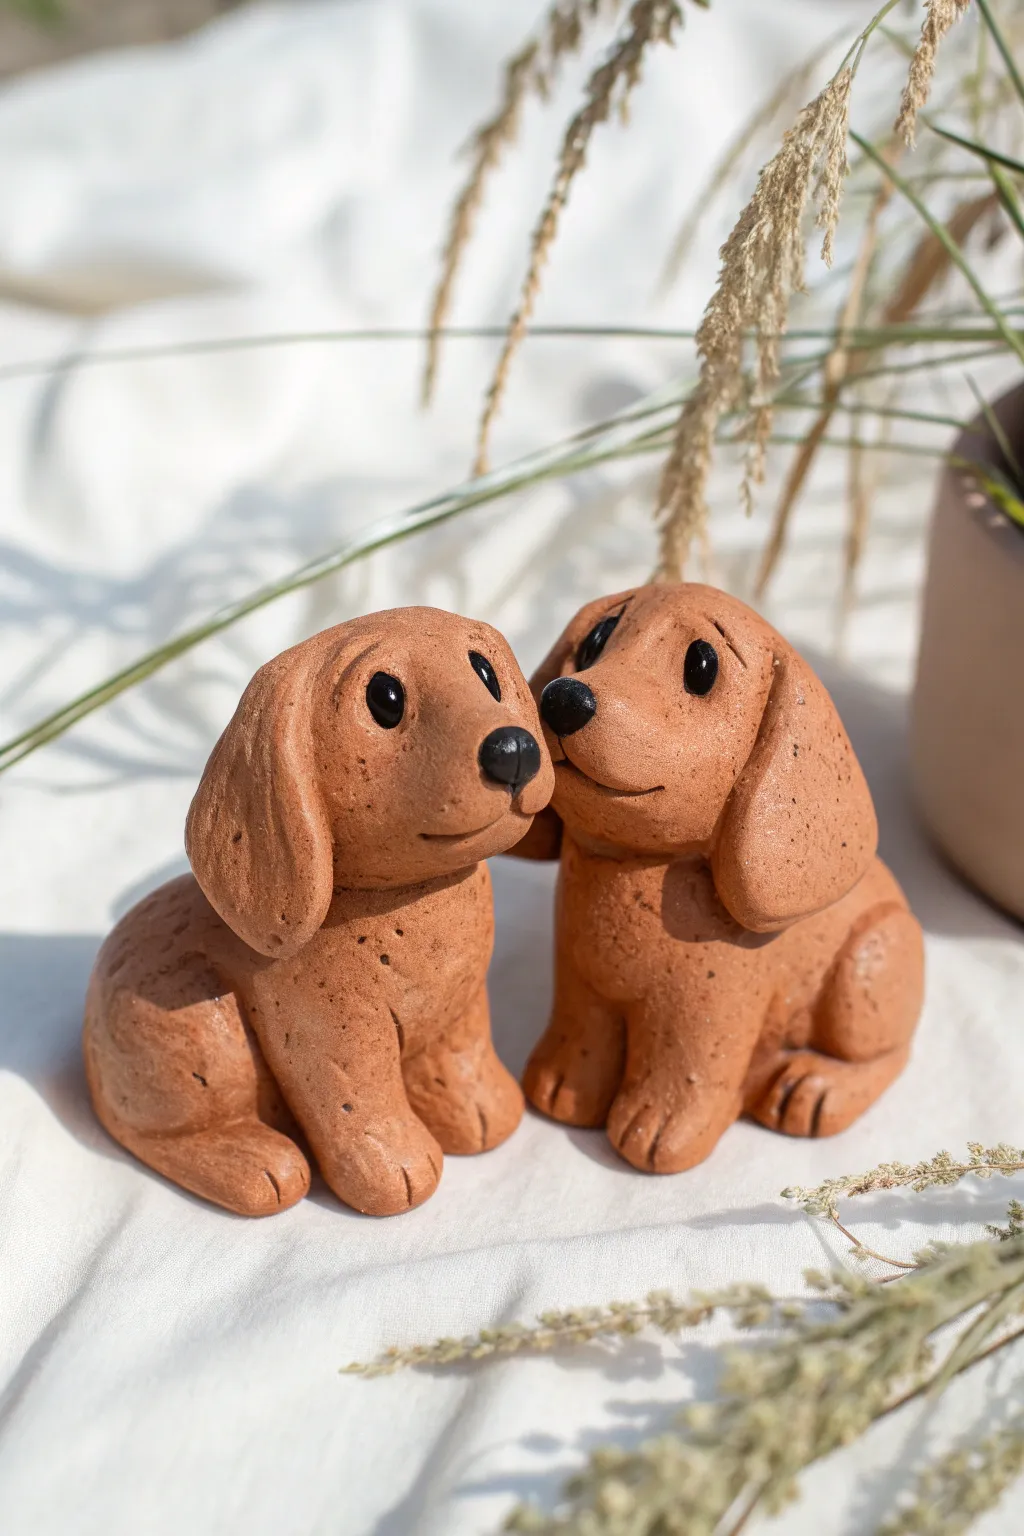
These adorable twin dachshund-style puppies are crafted from warm, speckled terracotta clay, giving them a natural and rustic charm. With their sweet, upturned snouts and floppy ears, they make perfect little companions for a desk or shelf.
Step-by-Step
Materials
- Terracotta-colored polymer clay or air-dry clay (speckled variety preferred)
- Black acrylic paint
- Small detail paintbrush
- Fine-grit sandpaper (optional)
- Clay sculpting tools (needle tool, ball stylus)
- Water (for smoothing)
- Clear matte varnish (optional)
Step 1: Shaping the Bodies
-
Prepare the Clay:
Start by conditioning your clay until it is soft and pliable. If you are using polymer clay, knead it thoroughly in your hands to warm it up. -
Create the Torso Base:
Roll two equal-sized balls of clay, roughly the size of a golf ball. Gently shape them into rounded pear shapes; the wider bottom will form the seated haunches, while the slightly tapered top is where the neck meets the head. -
Form the Chest:
Slightly flatten the front of the pear shape to define the chest area. You want the puppy to sit upright comfortably without tipping over. -
Sculpt the Head:
Roll two slightly smaller balls for the heads. Shape them into ovals, then gently pinch one side to pull out a distinct snout area, keeping the forehead rounded. -
Attach Head to Body:
Place the head onto the tapered top of the body. Blend the clay at the neck seam using a modeling tool or your finger to ensure a strong bond. I like to tilt the heads slightly upward or to the side for a curious expression.
Step 2: Adding Features & Limbs
-
Shape the Front Legs:
Roll two small sausages of clay for each dog. Flatten one end of each sausage gently to create a paw. -
Attach Front Legs:
Press the front legs onto the body, blending the top of the limb into the chest and shoulder area so it looks seamless. The paws should rest flat on the surface. -
Detail the Paws:
Use a needle tool or a dull knife edge to press two or three small indentations into each paw to create the toes. -
Create the Hind Legs:
Roll two small balls for the hind legs and flatten them into teardrop shapes. Press these onto the sides of the lower body, blending the edges to look like folded haunches. -
Refine the Back:
Smooth out the back area where the haunches meet the spine to ensure the dog looks rounded and chubby rather than bumpy. -
Form the Ears:
Flatten two pieces of clay into long, rounded teardrop shapes for the ears. They should be relatively thick to match the whimsical style. -
Attach the Ears:
Press the narrow end of the ear onto the side of the head, just below the crown. Fold them down gently so they flop against the cheeks, blending the attachment point carefully. -
Add a Tail:
Roll a tiny, short cone of clay for the tail. Attach it to the lower back center, blending it upwards so it doesn’t break off easily.
Keep it Clean
Keep baby wipes nearby while working. Terracotta clay can stain hands, and keeping your fingers clean ensures you don’t accidentally smudge dust or dirt onto your fresh clay sculpture.
Step 3: Refining & Painting
-
Sculpt the Face:
Use a ball stylus to make shallow indentations for the eyes on the sides of the snout. Use a knife tool to carve a gentle, curved smile line under the nose area. -
Add the Nose:
Roll a very tiny ball of clay and press it onto the tip of the snout. Flatten it slightly into a triangular nose shape. -
Texture & Smooth:
If your clay isn’t naturally speckled, you can gently prick the surface with a stiff toothbrush to add a realistic stone texture. Smooth away any fingerprints with a drop of water. -
Bake or Dry:
Follow the manufacturer instructions for your specific clay. If baking polymer clay, create a foil tent to prevent scorching the ears. -
Paint the Details:
Once fully cured and cool, use a fine brush and black acrylic paint to fill in the nose and paint simple round eyes inside the indentations you made earlier. -
Add Highlights:
For a spark of life, dip a toothpick in white paint and add a tiny dot to the black nose or eye, though the original look creates charm with simple matte black features.
Accessories
Once you master the basic dog shape, try sculpting tiny accessories like a red bandana, a little bone, or a bright flower collar to give each puppy a unique personality.
Your loyal little clay companions are now ready to sit faithfully by your side


Bunny With a Tiny Carrot
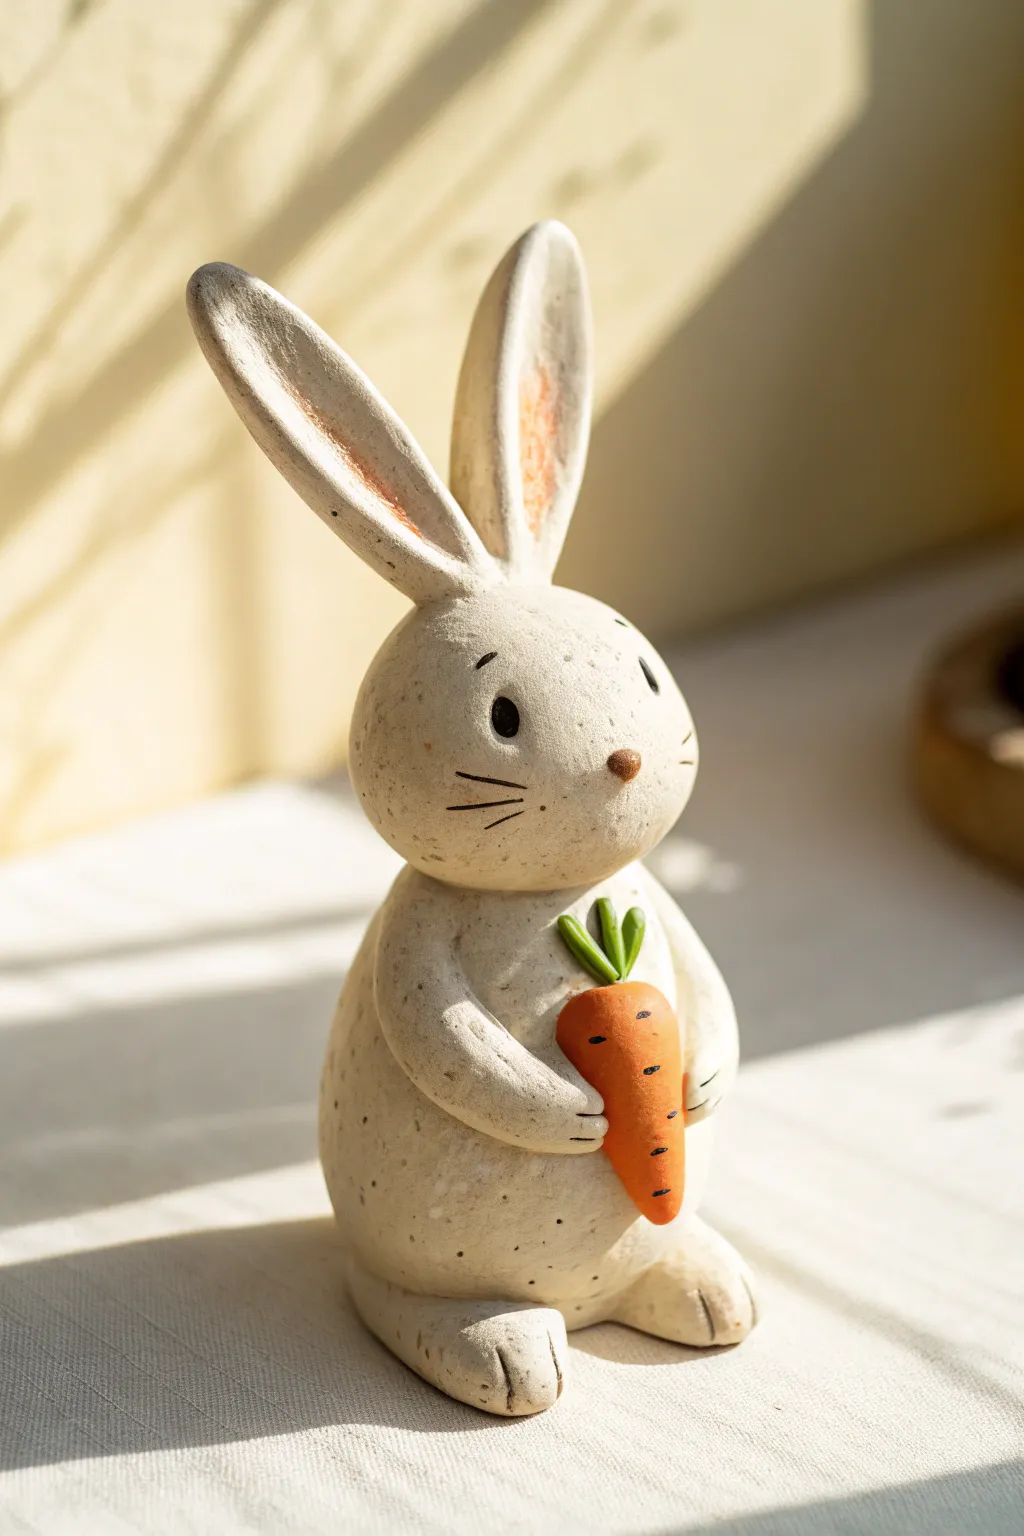
Capture the charm of rustic pottery with this adorable clay bunny holding its prize carrot. With a warm, speckled finish and minimal painted details, this figurine makes a perfect addition to a springtime mantle or a thoughtful handmade gift.
How-To Guide
Materials
- White air-dry clay or polymer clay
- Orange and green acrylic paint
- Brown acrylic paint (for speckling and features)
- Black fine-tip marker or acrylic paint
- Toothbrush or stiff bristle brush
- Modeling tools (or a toothpick)
- Water bonding slip (if using air-dry clay)
- Clear matte varnish
Step 1: Shaping the Body
-
Form the Base:
Start with a ball of white clay about the size of a tangerine. Roll it until smooth, then gently shape it into a rounded pear shape. Flatten the bottom slightly by tapping it on your work surface so the bunny stands stably. -
Create the Head:
Roll a second, slightly smaller ball for the head. It should be roughly spherical but just a tiny bit flattened on the cheeks. -
Attach the Head:
Score the top of the body and the bottom of the head with a texturing tool or toothpick. If using air-dry clay, add a dab of water or clay slip. Press the head firmly onto the body and blend the clay at the neck seam until invisible. -
Add Feet:
Create two small ovals for the feet. Flatten them slightly and attach them to the front base of the body. Use a tool to impress two lines into each foot to denote toes. -
Sculpt the Arms:
Roll two sausage shapes for the arms. Adhere them to the sides of the body, curving them forward so the hands meet near the belly, leaving a gap to hold the carrot later.
Ears flopping over?
If the long ears droop while wet, prop them up with crumpled aluminum foil or cardboard scraps until the clay begins to set and hold its own weight.
Step 2: Ears and Details
-
Make the Ears:
Roll two longer cylinders and flatten them into long, spoon-like shapes. Taper the tops slightly. These should be generous in size—almost as tall as the bunny body itself. -
Attach the Ears:
Score and slip the top of the head. Press the ears on firmly. I find it helpful to blend the clay at the base of the ear downward into the head for a seamless look and stronger bond. -
Create the Inner Ear:
Use a modeling tool to create a shallow depression or groove running up the center of each ear. -
Sculpt the Carrot:
Shape a small cone from fresh clay. Insert it between the bunny’s paws. Add two or three tiny leaves at the top made from small teardrops of clay. -
Add Texture:
Before the clay dries, use a stiff brush or even a ball of foil to gently tap texture all over the bunny’s surface, giving it a stone-like appearance rather than perfectly smooth plastic.
Smoother blending
Use a slightly damp finger (for water-based clay) or a drop of baby oil (for polymer) to smooth out seams where limbs attach to the body.
Step 3: Painting and Finishing
-
Dry Completely:
Allow your sculpture to dry fully according to your clay’s instructions. Air-dry clay may take 24-48 hours. -
Base Tone Options:
The clay in the image is naturally off-white. If your dried clay looks too stark white, apply a wash of diluted cream or beige paint and wipe it back to settle in the textures. -
The Speckled Effect:
Dip a toothbrush into diluted brown paint. Run your thumb over the bristles to flick tiny specks of paint all over the bunny. Practice on a paper towel first to control the spray. -
Paint the Carrot:
Paint the carrot cone a muted orange and the leaves a deep olive green. Let dry. -
Inner Ears:
Mix a very watery wash of orange-brown paint. Apply this inside the grooves of the ears for a soft, blushed look. -
Facial Features:
Use a small dot of brown clay or paint for the nose. Paint simple arching eyebrows and small oval eyes using black paint or a fine marker. -
Whiskers and Carrot Details:
Draw three simple whiskers on each cheek. Add tiny horizontal dashed lines on the carrot for texture. -
Seal:
Finish with a coat of matte varnish to protect the paint and give the piece a completed ceramic feel.
Now you have a charming little companion ready to brighten up your desk or shelf


Sleepy Owl Minis
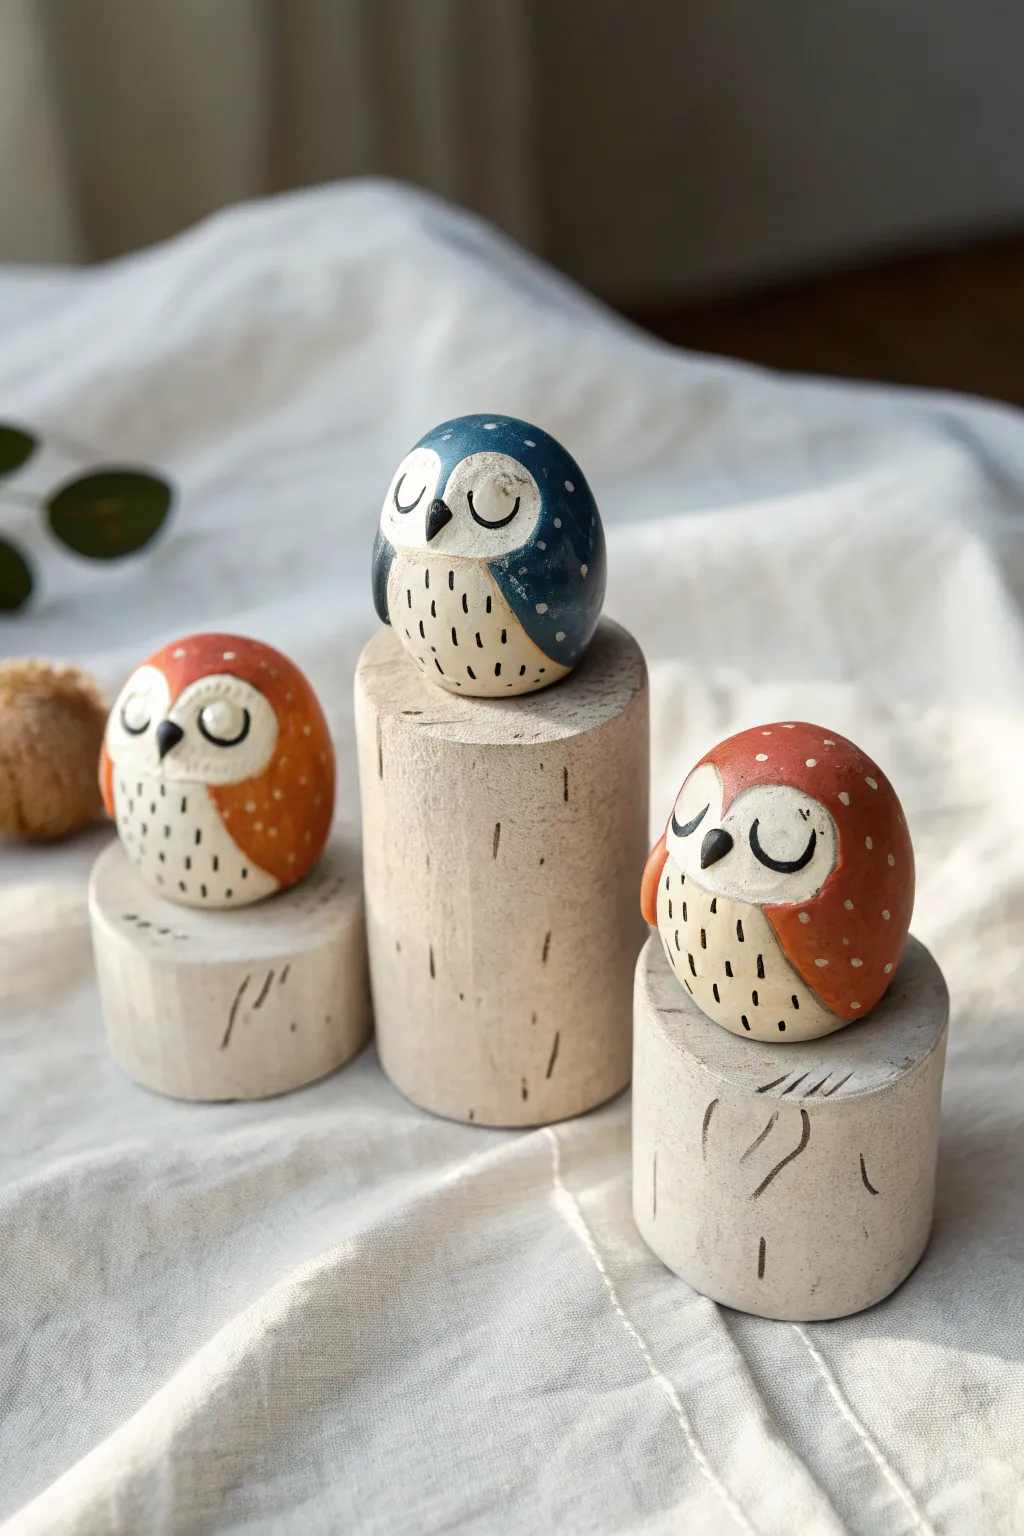
These adorable egg-shaped owls make charming desk companions with their serene, sleeping expressions. The project combines simple sculpting with folk-art inspired painting techniques to create a cozy trio perfect for any shelf.
Detailed Instructions
Materials
- Air-dry clay or polymer clay (white)
- Acrylic paints (navy blue, terracotta orange, white, black)
- Small wooden dowels or branch slices (approx. 1-1.5 inch diameter)
- Fine grit sandpaper
- Detail paintbrushes (sizes 0 and 00)
- Dotting tool or toothpick
- Matte varnish or sealant
- Strong craft glue
- Black fine-tip permanent marker (optional)
Step 1: Sculpting the Shapes
-
Form the base:
Start with a ball of clay about the size of a golf ball or slightly smaller. Roll it between your palms until it’s smooth and crack-free. -
Shape the egg:
Gently taper the top of the ball to create a rounded egg shape. The bottom should be slightly flatter so it can stand upright on its own. -
Create the face mask:
Use your thumb to gently press an indentation on the front upper half of the egg. This heart-shaped or rounded ‘mask’ area is where the face details will go. -
Refine the surface:
Dip your finger in a tiny bit of water and smooth over any fingerprints or bumps. Let the shapes dry completely according to your clay package instructions (usually 24-48 hours for air-dry). -
Sand for smoothness:
Once fully dry, lightly sand the surface with fine-grit sandpaper to ensure a porcelain-like finish before painting.
Step 2: Designing the Owls
-
Base coat the body:
Paint the back and sides of the owl with your chosen main color (navy blue or terracotta), leaving the front belly area and the face mask unpainted or white. -
Define the face:
Paint the indented face mask area crisply with white paint. You want a clean curve separating the white face from the colored head. -
Paint the beak:
Using a tiny brush and black paint, add a small, downward-pointing triangle right in the center of the face mask for the beak. -
Add sleeping eyes:
Paint two ‘U’ shapes for closed eyelids. Add three tiny lashes to the outer corner of each eye for a sweet, slumbering look. -
Create belly feathers:
On the white belly area below the face, paint small vertical dashes using black paint to simulate soft breast feathers. -
Add wing details:
Along the sides where the color meets the white belly, paint a curved line to suggest wings. I like to add a few white dots on the colored wing area for texture. -
pattern the head:
Using a dotting tool or toothpick, add tiny white speckles to the top of the colored head area to give it a starry or snowy appearance.
Uneven Eyes?
If painting symmetrical eyes is tricky, lightly sketch them with a pencil first. Or, use a fine-tip permanent marker instead of a brush for better control.
Step 3: The Wooden Perch
-
Prepare the stands:
Cut your wooden dowel into three slightly different heights (e.g., 1 inch, 2 inches, 1.5 inches) to create visual interest. -
Whitewash the wood:
Mix white paint with a little water and brush it over the wood. Wipe off the excess with a rag so the wood grain still shows through. -
Add bark details:
Once the whitewash is dry, use a very fine brush and black paint (or a marker) to draw thin, scratchy vertical lines and small ‘V’ shapes to mimic birch bark texture. -
Seal everything:
Apply a coat of matte varnish to both the clay owls and the wooden stands to protect the paint and give a unified finish. -
Final assembly:
Use strong craft glue to secure the bottom of each owl to the top of its corresponding wooden perch.
Winter vibe
Add tiny felt scarves around their necks or paint the wooden bases with glitter glue to make them look like snowy stumps for a holiday display.
Group your sleepy owls together on a mantle to enjoy their peaceful presence

The Complete Guide to Pottery Troubleshooting
Uncover the most common ceramic mistakes—from cracking clay to failed glazes—and learn how to fix them fast.
Turtle With a Patterned Shell
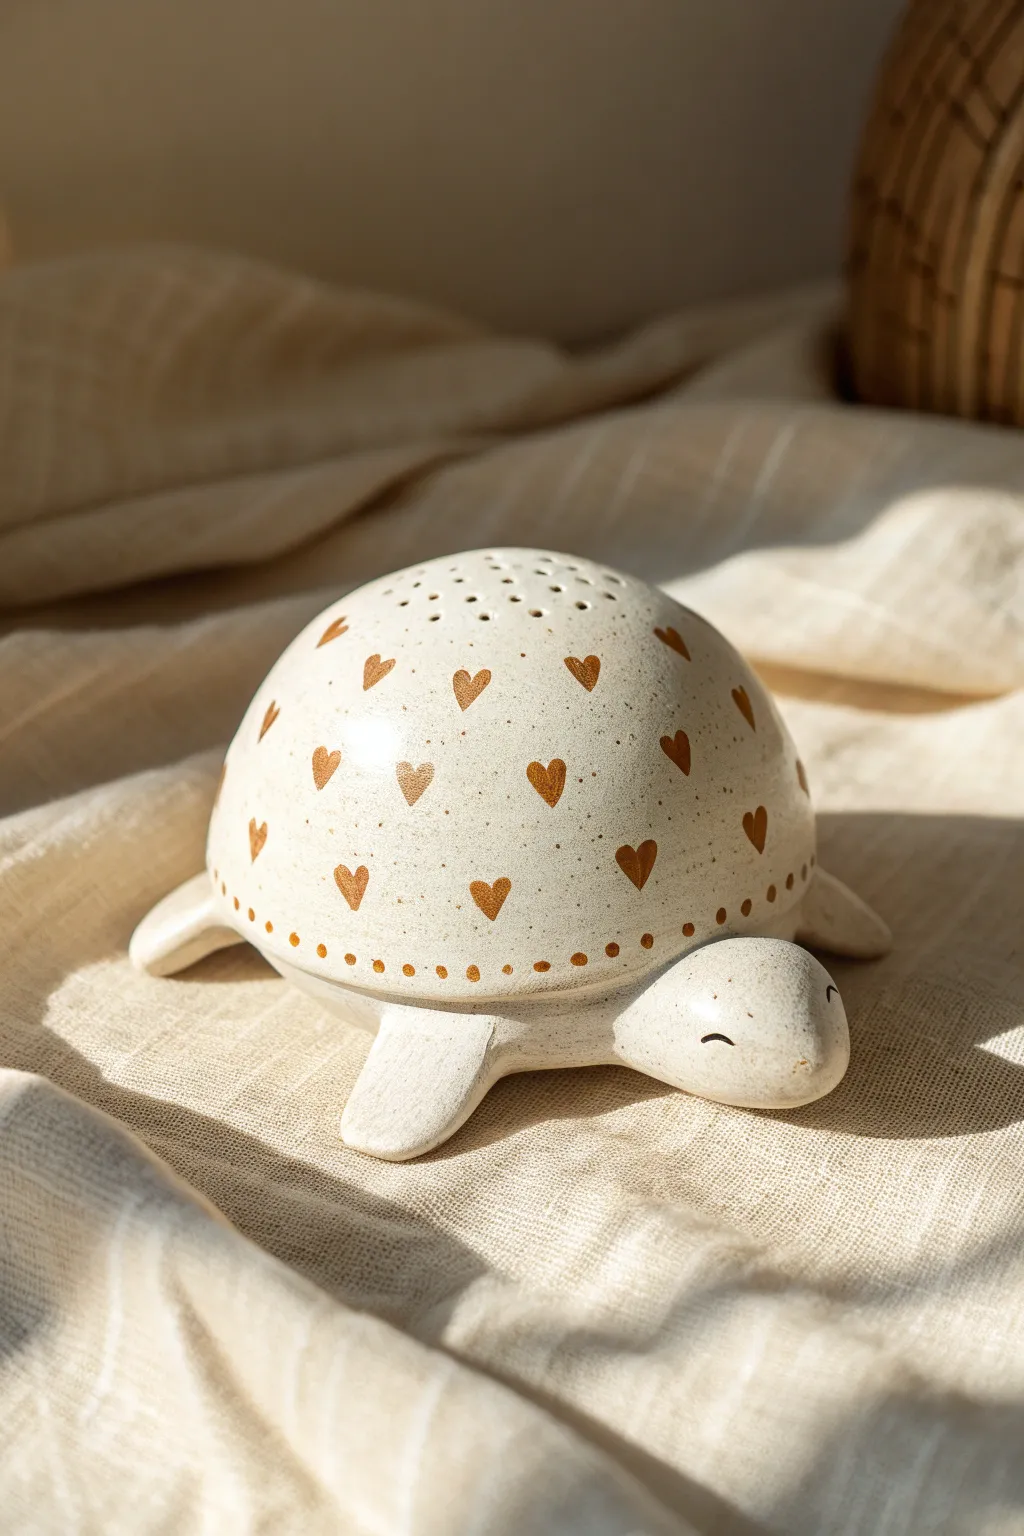
This adorable ceramic turtle features a smooth, domed shell decorated with charming brown hearts and a gentle speckled finish. It functions beautifully as a small luminary or decorative shaker, adding a touch of sweetness to any shelf.
How-To Guide
Materials
- White earthenware or stoneware clay
- Rolling pin
- Small bowl or slump mold (approx. 4-5 inch diameter)
- Needle tool
- Small sponge
- Slip (clay and water mixture)
- Scoring tool or old toothbrush
- Creamy speckled glaze (e.g., vanilla speckle)
- Underglaze pencil or fine brush (warm brown)
- Clear transparent glaze (optional, depending on speckled glaze)
- Wooden modeling tool
- Small circular hole cutter or drill bit
Step 1: Sculpting the Body
-
Prepare the slab:
Roll out a slab of white clay to approximately 1/4 inch thickness. Ensure the clay is smooth and free of air bubbles by compressing it gently with a rubber rib. -
Form the shell:
Cut a circle from your slab that is slightly larger than your slump mold. Gently press the clay into or over the mold to create a perfect dome shape for the shell. Trim the edges so they are even and flat. -
Create the base:
Roll a second, slightly thicker slab for the turtle’s belly. Place your domed shell on top and trace lightly around it, then cut this base circle out. -
Shape the appendages:
Hand-model four flat, flipper-like legs, a small pointed tail, and a rounded head. Keep the head smooth and simple, tapering slightly towards the neck area. -
Attach the limbs:
Score the underside of the base slab where the legs, head, and tail will go. Apply slip and firmly press the appendages onto the base. Blend the clay seams with a modeling tool until seamless. -
Add the face:
On the head, use a needle tool to gently carve two curved, sleeping eye slits. Use the rounded end of a tool to create a tiny indentation for the mouth if desired, though the original is minimalist.
Clean Lines Tip
If you are struggling to paint hearts over raw powdery glaze, you can paint the brown pattern on the bisque first with wax resist, then dip the cream glaze over it.
Step 2: Assembly and Refining
-
Hollow the shell:
Before attaching the shell, create holes in the top of the dome if you want it to function as a luminary or shaker. Use a small hole cutter to create a decorative cluster of perforations at the apex. -
Connect shell to base:
Score the top edge of the base (where the limbs are attached) and the bottom rim of the dome. Apply slip abundantly. Press the dome onto the base, trapping air inside if you haven’t made holes, so be gentle. -
Blend the seams:
Work the clay from the shell down onto the base to create a unified object. Then, smooth the transition area with a damp sponge so the connection looks fluid. -
Smooth the surface:
Wipe the entire turtle with a damp sponge to remove fingerprints and rough textures. The finish needs to be very smooth to match the sleek look of the reference image. -
Dry and bisque:
Let the turtle dry slowly under plastic for at least 24 hours, then uncover until bone dry. Fire it in a kiln to bisque temperature (usually cone 04).
Glow Up
Leave the bottom open (hollow) instead of adding a base slab. This turns the turtle into a dedicated cover for an LED tea light, letting light shine through the top holes.
Step 3: Decorating and Glazing
-
Apply base glaze:
Dip the bisque-fired turtle into a creamy, speckled glaze. I prefer dipping to brushing here to get that perfectly even coat. Shake off excess drips and clean the foot of the turtle. -
Paint the hearts:
Once the base glaze is dry to the touch, use a warm brown underglaze or a glaze-on-glaze product. Paint small hearts in alternating rows around the shell surface. -
Add detail dots:
Using the tip of a brush handle or a dotting tool, apply a row of small brown dots around the rim of the shell where it meets the legs. -
Final inspection:
Check that the eyes aren’t filled with glaze. If they are, carefully clear them out with a needle tool. -
Glaze fire:
Fire the turtle again to the temperature required by your specific glaze (typically cone 5 or 6 for stoneware).
Place your finished turtle in a sunny spot where the speckled glaze can catch the light
Tiny Bear Cub Poses
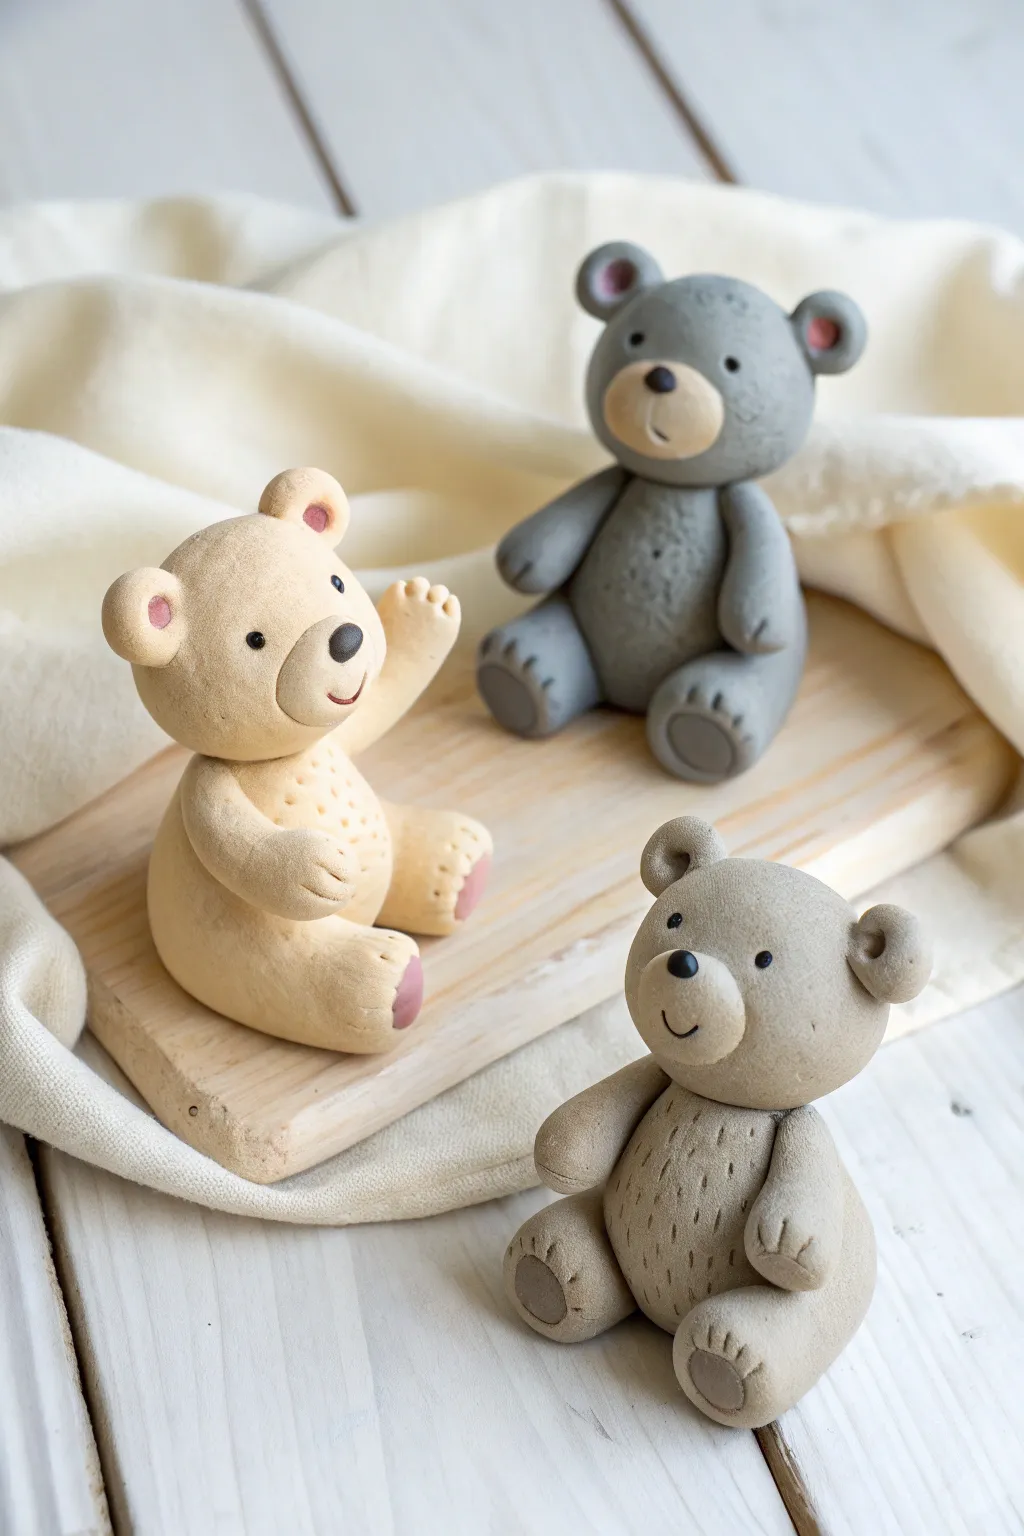
Create a charming set of three tiny teddy bears, each with its own unique personality and pose. These smooth, matte-finish figures feature simple shapes and sweet expressions, making them perfect for beginners looking to practice posing characters.
Step-by-Step Tutorial
Materials
- Polymer clay or smooth air-dry clay (beige, grey, and taupe)
- Black clay (for eyes/nose)
- Pink chalk pastel or soft pastel (for blushing)
- Needle tool or toothpick
- Ball stylus tool (small)
- Clean work surface or mat
- Soft paintbrush
- Optional: Cornstarch or baby powder (to prevent sticking)
Step 1: Basic Sculpting
-
Mix your base colors:
Start by conditioning your clay well. You will need three distinct colors: a warm beige, a cool grey, and a brownish-taupe. If your colors are too bright, mix in a tiny speck of brown or black to desaturate them for that natural, earthy look. -
Form the head and body:
For the first bear (the beige one), roll a smooth ball for the head about the size of a walnut. Roll a separate, slightly larger teardrop shape for the body. Gently press the head onto the top of the teardrop, blending the clay at the neck slightly if you want a seamless join, or leave it distinct for a toy-like appearance. -
Add the muzzle:
Create a lighter shade of your base color by mixing in some white clay. Flatten a small oval of this lighter clay and press it onto the lower half of the face to form the muzzle area. -
Sculpt the ears:
Roll two tiny spheres of the main body color. Press them gently with a small ball tool to create an indentation, then attach them to the top corners of the head. For the beige bear, add a tiny dot of pink clay inside the ear or dust it with pink pastel later. -
Create the limbs:
Roll four sausage shapes for the arms and legs. They should be thicker at the paw end. Smooth the ends to round them off.
Head won’t stay on?
If the head keeps drooping or falling off before baking, insert a short piece of toothpick or uncooked spaghetti into the neck to act as an internal sculpted armature.
Step 2: Posing and Details
-
Assemble the beige bear:
Attach the legs to the bottom of the body, pressing them forward so the bear is in a sitting position. Attach the right arm resting on the belly. For the left arm, angle it upwards in a welcoming wave. Smooth the seams where the limbs meet the body using a modeling tool. -
Assemble the grey bear:
Follow the same head/body steps with grey clay. When attaching legs, splay them slightly wider. Place both arms resting downwards between the legs for a relaxed, slouchy look. -
Assemble the taupe bear:
Create the third bear with the taupe clay. Pose this one sitting upright with both arms resting naturally at its sides, hands touching the thighs. -
Add facial features:
Roll incredibly tiny specks of black clay for the eyes and noses. Press them gently onto the faces. Use a needle tool to softly etch a small curved line for the mouth immediately under the nose. -
Texture the fur:
Using a needle tool, add minimal texture. For the taupe bear, add small ticked lines on the tummy to suggest fur direction. For the beige bear, poke tiny dots in a pattern on the chest. -
Add paw details:
Use the needle or a small knife tool to press three small lines into the ends of each paw to create toes. On the beige bear, add small flattened pads of pink clay to the bottom of the feet and palms.
Clean Clay Pro Tip
Keep baby wipes handy! Clean your hands thoroughly when switching from dark colors (like the grey bear) to lighter ones (like beige) to avoid transferring color smudges.
Step 3: Finishing Touches
-
Apply blush:
Scrape a little pink chalk pastel into a powder. Use a soft, dry paintbrush to gently dust the inside of the ears and the cheeks for a soft, rosy glow. -
Smooth out fingerprints:
Before baking or drying, dip your finger in a tiny bit of rubbing alcohol (for polymer) or water (for air dry) and very gently smooth away any unintentional fingerprints. -
Bake or dry:
If using polymer clay, bake according to the manufacturer’s instructions (usually 275°F/135°C for 15-30 minutes). If using air-dry clay, leave them in a dry, safe spot for 24-48 hours.
Now you have an adorable trio of bears ready to decorate a shelf or gift to a friend


What Really Happens Inside the Kiln
Learn how time and temperature work together inside the kiln to transform clay into durable ceramic.
Penguins With Little Scarves
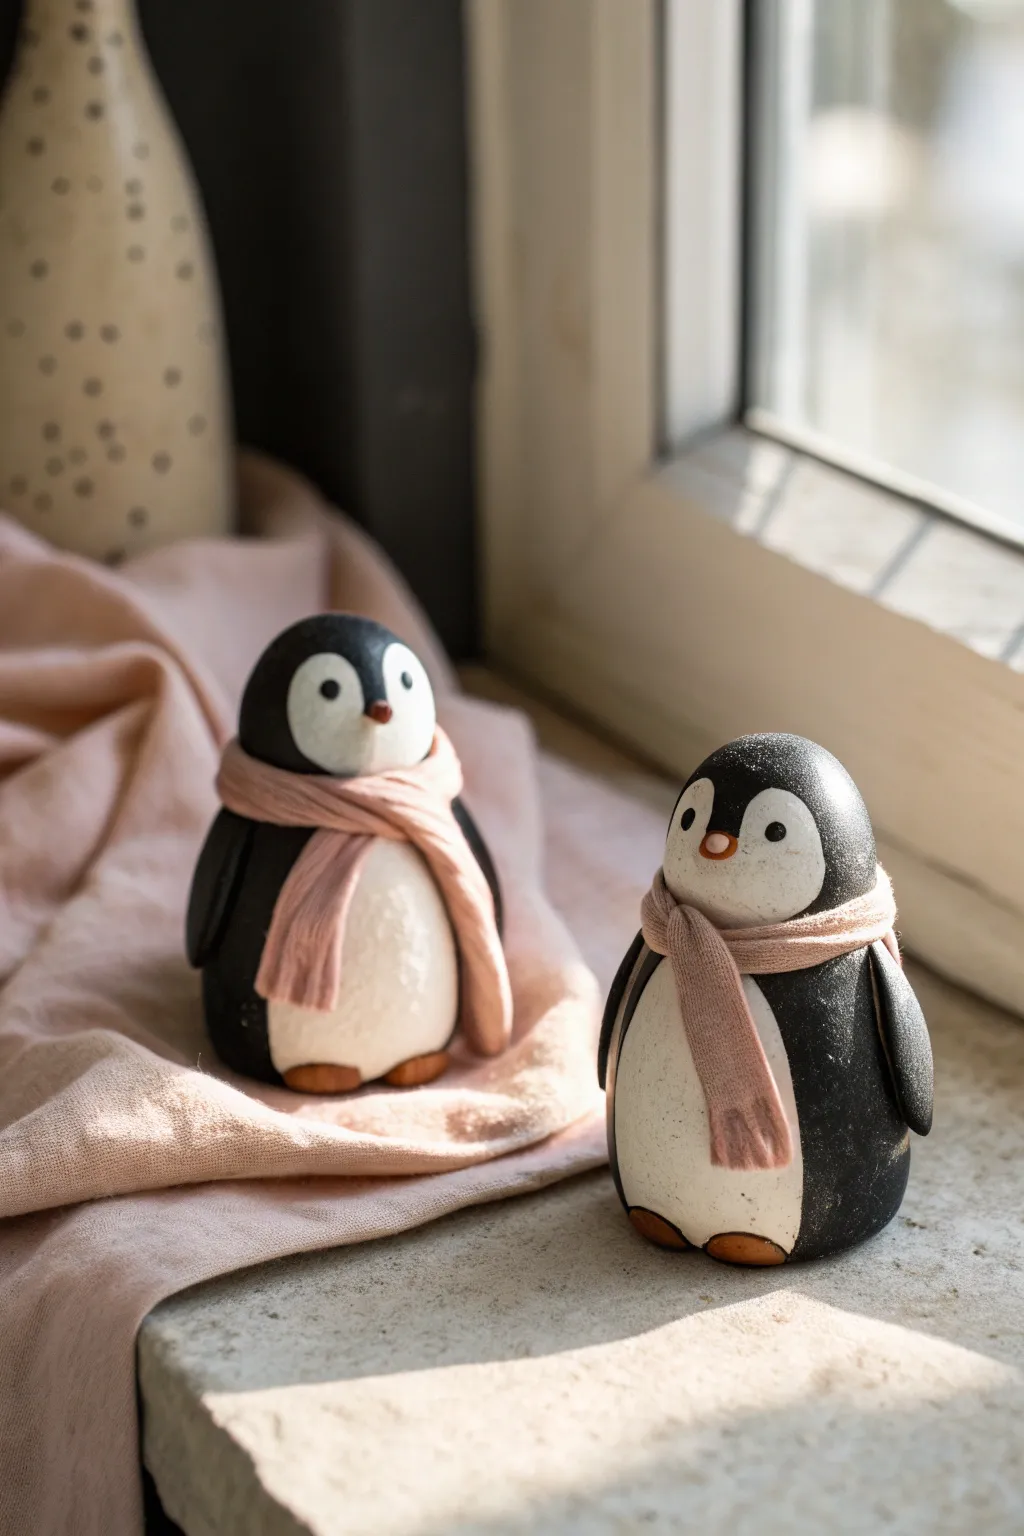
These adorable egg-shaped penguins are simple enough for beginners but full of personality thanks to their tiny knitted accessories. Their plump, minimalist form makes them perfect for a winter window display or a thoughtful handmade holiday gift.
Step-by-Step Guide
Materials
- Air-dry clay or polymer clay (white)
- Acrylic paints (black, white, burnt orange)
- Small artist paintbrushes (flat and detail)
- Parchment paper or silicone mat
- Water cup
- Aluminum foil (for armature)
- Small piece of pink knitted fabric or yarn
- Fine-grit sandpaper
- Matte or satin varnish
Step 1: Shaping the Bodies
-
Create the core:
Crumple a small amount of aluminum foil into a tight egg shape about the size of a large duck egg. This saves clay and makes the figure lighter. -
Cover with clay:
Roll out a sheet of white clay about 1/4 inch thick. Wrap this around your foil core, pressing the seams together firmly. -
Smooth the form:
Roll the clay egg between your palms to smooth out any lines or fingerprints. You want a very clean, continuous egg shape for that minimalist look. -
Flatten the base:
Gently tap the bottom of the egg on your work surface so the penguin can stand upright without wobbling. -
Add wings:
Form two small, flat teardrop shapes from clay. Attach them to the sides of the body, blending the upper edge into the shoulder area while leaving the bottom tips slightly raised from the body. -
Form the feet:
Create two small flattened ovals for feet. Attach them to the bottom front of the penguin, ensuring they stick out just enough to be visible. -
Add the beak:
Roll a tiny cone of clay for the beak. Press it gently into the face area, slightly above the center line. -
Dry completely:
Let the sculpture dry fully according to your clay’s instructions. Air-dry clay usually takes 24-48 hours for a piece this thick.
Step 2: Painting and Finishing
-
Sand the surface:
Once dry, use fine-grit sandpaper to buff away any tiny bumps or rough textures, focusing on the belly area. -
Outline the belly:
Lightly sketch a large oval or heart-curve shape on the front with a pencil to mark where the white belly will be. -
Paint the black coat:
Paint the back, sides, wings, and head with black acrylic paint. Careful use of a flat brush helps keep the edge of the white belly crisp. -
Paint the white belly:
Fill in the front belly area with white acrylic paint. You might need two coats to ensure it looks opaque and bright. -
Detail the face:
Paint the feet and beak with a warm burnt orange color. Use a dotting tool or the back of a brush to add two small black dots for eyes. -
Add highlights:
I like to add a tiny white speck to each eye to bring them to life. -
Seal the work:
Apply a coat of matte or satin varnish to protect the paint and give the penguin a finished, professional sheen.
Cracked Clay?
If small cracks appear during drying, mix a tiny bit of fresh clay with water to make a paste (slip) and fill the cracks, then sand smooth once dry.
Step 3: The Tiny Scarf
-
Prepare the fabric:
Cut a thin strip (about 0.5 inches wide) from an old pink t-shirt or use a strip of chunky knitting ribbon. -
Tie the scarf:
Wrap the strip around the penguin’s neck area. Tie a simple overhand knot so one end hangs longer than the other. -
Secure the accessory:
Adjust the drape of the scarf so it looks natural. If it slips, a tiny dot of glue behind the neck will hold it permanently in place.
Texture Tricky
To make the penguin look like stone or ceramic instead of plastic, dab the wet paint with a sponge rather than brushing it on smoothly.
Now you have a charming winter companion ready to brighten up your shelf
Elephant With Oversized Ears
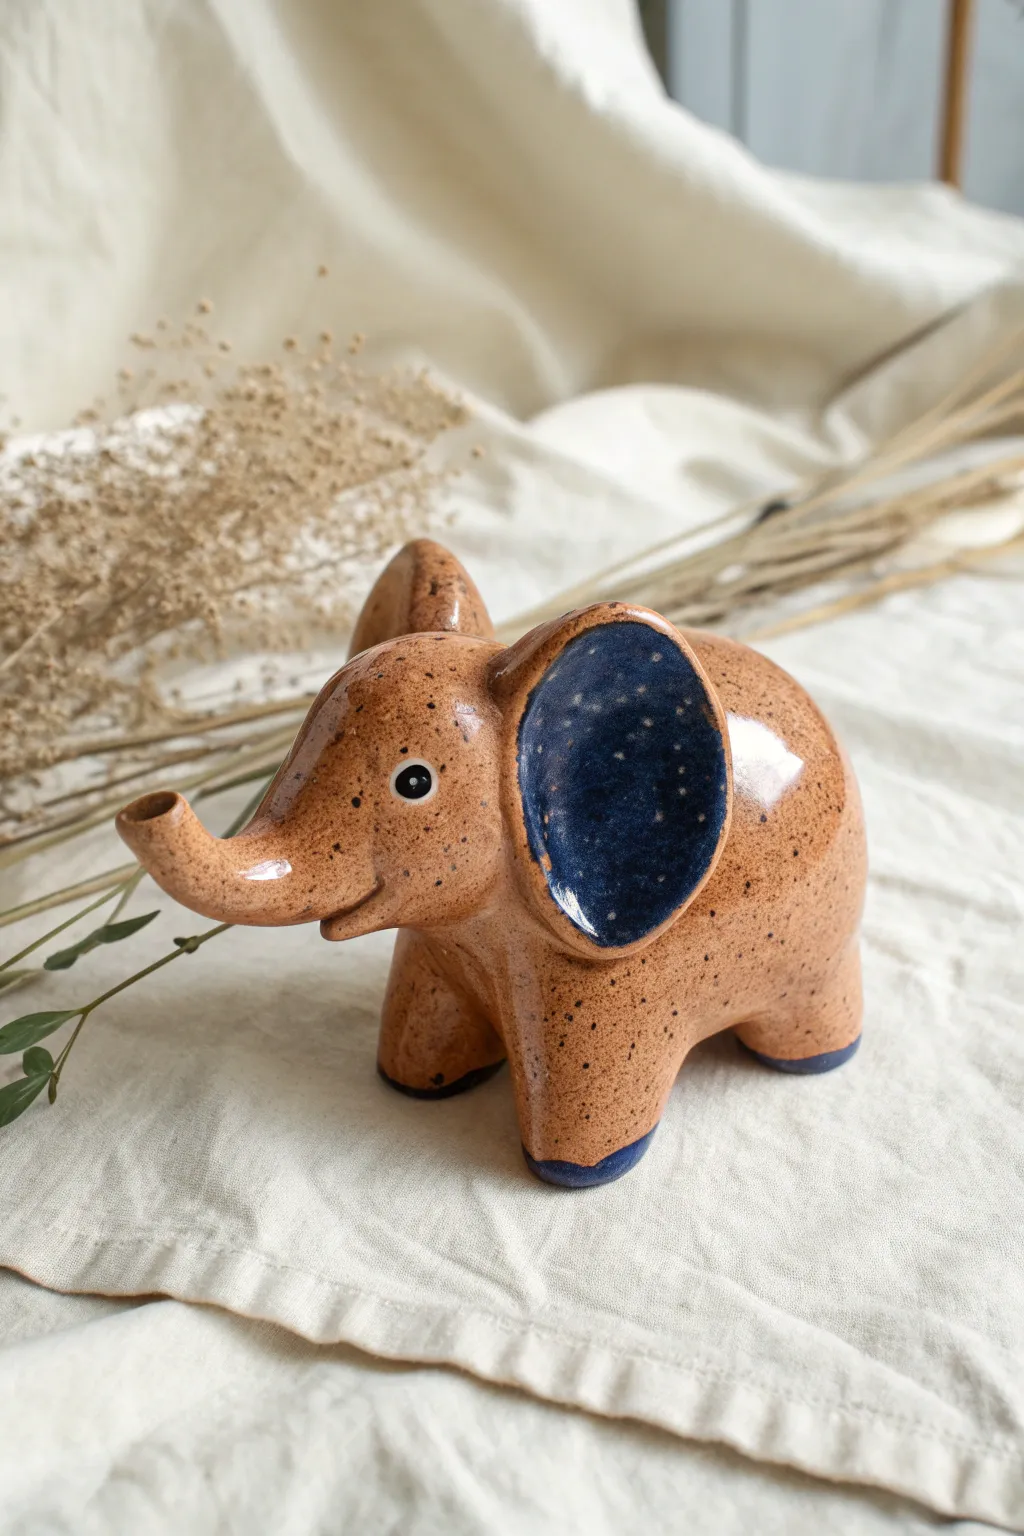
This charming little elephant features exaggerated round ears with a starry blue interior, contrasting beautifully against a warm, speckled tan body. Its simple, rounded forms make it an approachable project for intermediate potters looking to practice form assembly and glazing techniques.
Step-by-Step Tutorial
Materials
- Speckled buff stoneware clay
- Pottery tools (needle tool, sponge, rib, clay knife)
- Slip and scoring tool (or serrated kidney)
- Small rolling pin
- Underglaze (Black for eyes)
- Glaze (Clear glossy for body)
- Glaze (Dark cobalt blue or starry night blue for accents)
- Kiln access
Step 1: Forming the Body and Legs
-
Shape the main body:
Start with a ball of well-wedged clay about the size of a large orange. Gently tap and roll it into a smooth, slightly elongated oval shape to form the torso. -
Create the legs:
Roll four smaller, equal-sized balls of clay for the legs. Flatten the tops slightly so they will attach flush to the body. -
Attach the legs:
Score the underside of the body and the tops of the leg balls deeply. Apply slip generously and press the legs firmly into place. -
Blend the seams:
Using a wooden modeling tool or your thumb, drag clay from the legs onto the body to eliminate the seam. Smooth the transition with a damp sponge until the legs look like they grew out of the torso. -
Check for stability:
Set the elephant on a flat surface and give it a gentle tap to ensure it stands evenly on all four feet without wobbling.
Air Escape Venting
Since the body and head are solid thick clay, use a needle tool to poke a hidden hole underneath the belly. This lets steam escape and prevents explosions in the kiln.
Step 2: Sculpting the Head and Trunk
-
Form the head:
Roll a slightly smaller ball for the head. Shape one side into a tapered snout that pulls upward. -
Hollow the trunk:
Carefully press the end of a paintbrush handle or a small loop tool into the tip of the trunk to create the hollow spout-like opening. -
Attach the head:
Score and slip the neck area of the body and the back of the head. Press them together firmly, blending the clay across the join line just as you did with the legs. -
Construct the ears:
Roll out a small slab of clay about 1/4 inch thick. Cut out two large, circular shapes—these should be oversized relative to the head for that cute factor. -
Shape the ears:
Gently cup the clay circles in your palm to give them a concave shape. I like to smooth the edges with a moist finger so they are rounded, not sharp. -
Attach the ears:
Position the ears on the sides of the head. Score, slip, and blend the attachment point thoroughly on the back side of the ear so the connection is invisible. -
Add the tail:
Roll a tiny coil of clay for a tail. Attach it to the rear, curving it slightly against the body so it doesn’t break off easily.
Make it a Incense Holder
Before firing, angle the hole in the trunk deeper and slightly upward. Once fired, it becomes a perfect functional holder for stick incense.
Step 3: Firing and Decoration
-
Bisque fire:
Allow your elephant to dry slowly and completely (at least a week). Fire it to cone 04 (or your clay’s bisque temperature). -
Glaze the accents:
Once bisqued, carefully paint the inside of the ear cups and the very bottom of the feet (leave the resting points unglazed or use wax resist) with a dark blue or ‘starry night’ glaze. Apply 2-3 coats for depth. -
Detail the eyes:
Use a fine liner brush and black underglaze to paint a small circle for the eye. Leave a tiny speck of white unpainted for the reflection highlight. -
Glaze the body:
Dip or brush the rest of the elephant with a clear glossy glaze. This will seal the clay and allow the natural speckles of the stoneware to show through. -
Final wipe:
Wipe the very bottom of the feet with a sponge to ensure no glaze touches the kiln shelf. -
Glaze fire:
Fire the piece again to cone 5/6 (or your clay/glaze specific temperature) to finish the piece.
Once cooled, your elephant will have a durable, glassy finish ready for display

TRACK YOUR CERAMIC JOURNEY
Capture glaze tests, firing details, and creative progress—all in one simple printable. Make your projects easier to repeat and improve.
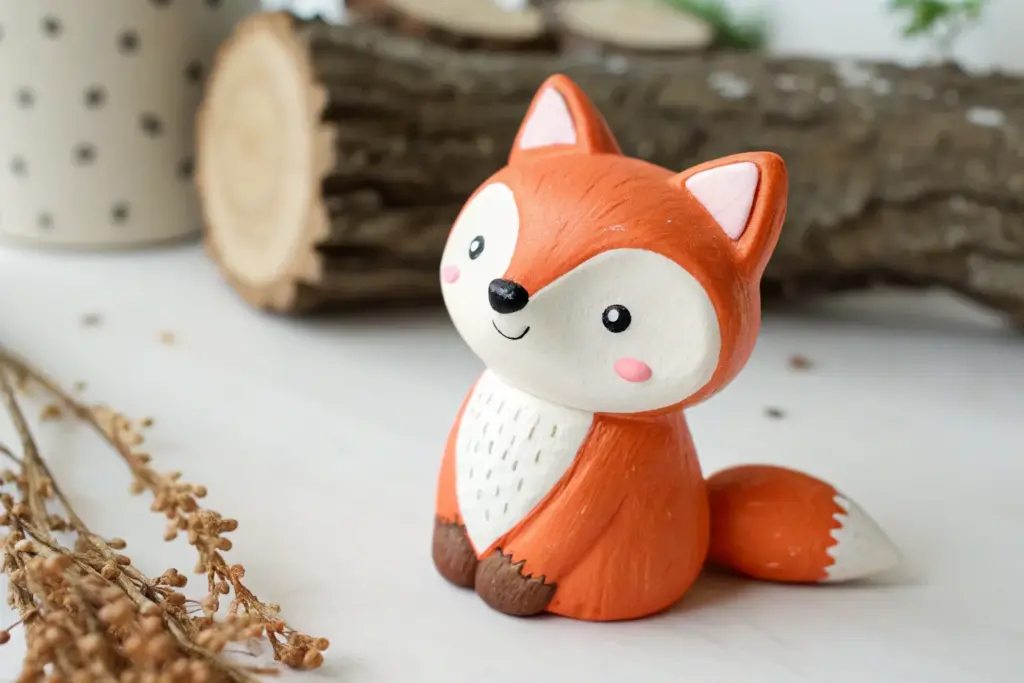
Fox With a Curled Tail
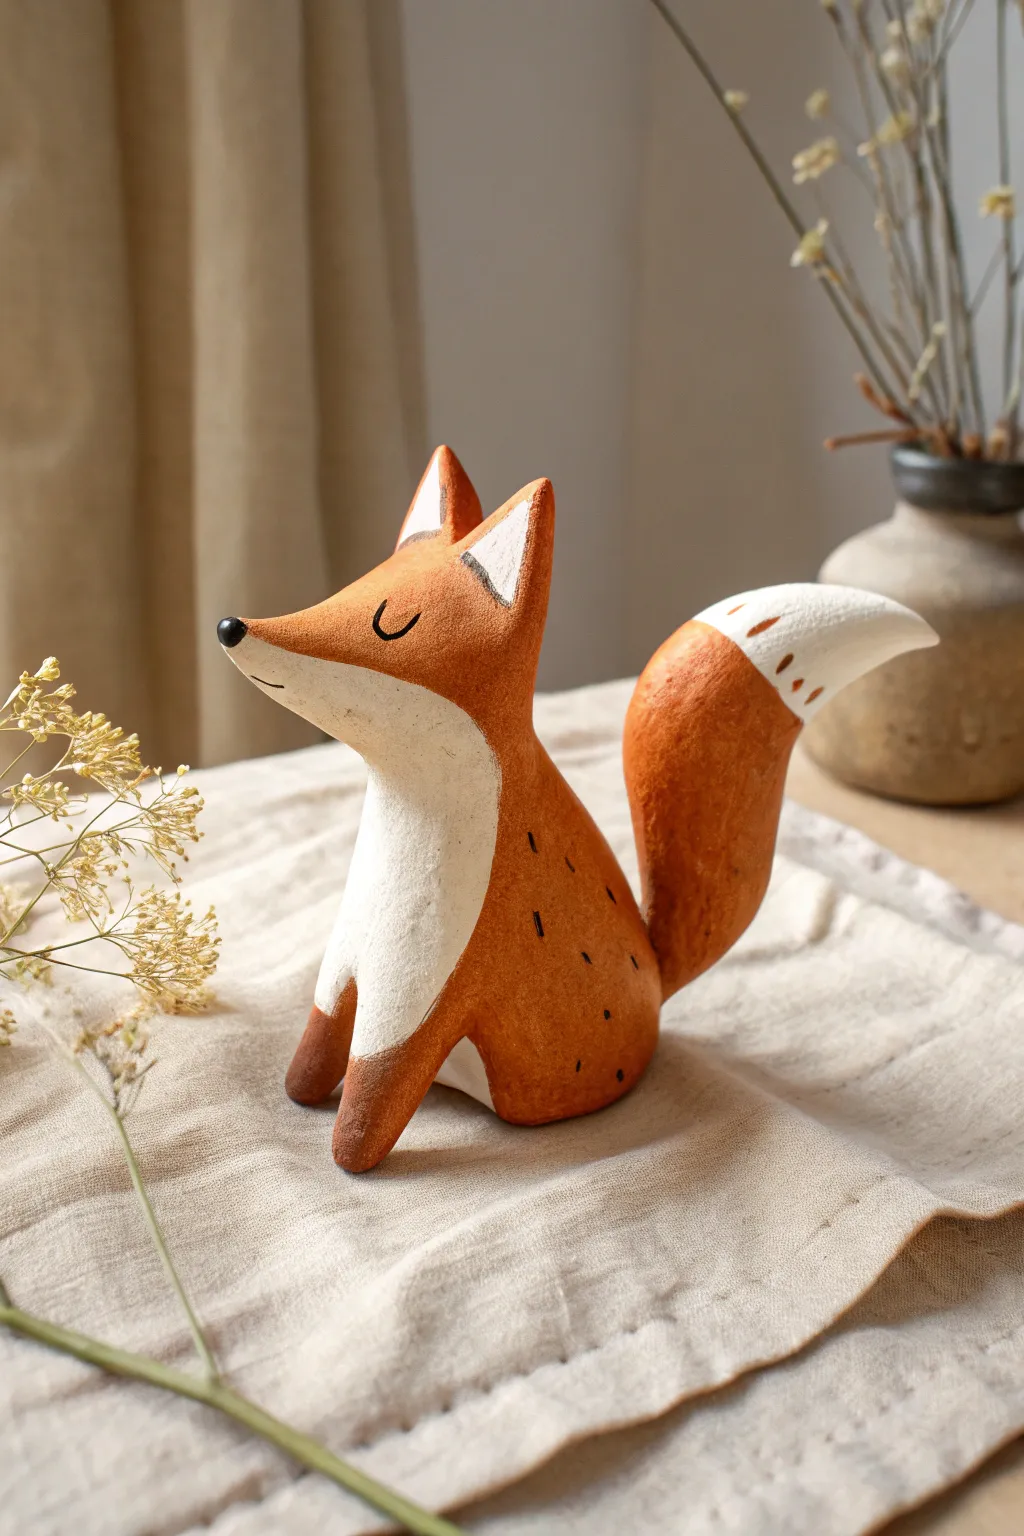
Sculpt a charming woodland companion with this simple yet expressive fox tutorial. The finished piece features a lovely matte texture and rustic painted details that give it a handmade storybook quality.
Detailed Instructions
Materials
- Air-dry clay (or polymer clay in terracotta/orange)
- Acrylic paints (orange, white, black, dark brown)
- Small paintbrushes (fine tip and flat)
- Clay sculpting tools (needle tool, smoothing tool)
- Water cup (for smoothing)
- Aluminum foil (for armature)
- Fine-grit sandpaper
- Matte varnish (optional)
Step 1: Forming the Base
-
Prepare the core:
Crumple a small piece of aluminum foil into a pear shape. This will be the core of the fox’s body, helping to use less clay and keeping the sculpture lightweight. -
Cover with clay:
Roll out a slab of your clay and wrap it fully around the foil core. Smooth the seams together with a little water on your finger until the surface is uniform. -
Shape the body:
Mold the slightly tapered top of the pear shape to represent the neck area, leaving the bottom wider for the sitting posture. Tap the bottom gently on your table to create a flat base so it stands securely.
Step 2: Adding Key Features
-
Sculpt the head:
Roll a separate ball of clay for the head. Pinch one side gently to pull out a pointed snout, curving it slightly upward for a sweet expression. -
Attach the head:
Score (scratch) the top of the neck and the bottom of the head. Add a dab of water or clay slip, then press the head firmly onto the body. Smooth the clay across the join line so the neck flows seamlessly into the head. -
Create the ears:
Form two small triangles of clay. Attach them to the top of the head using the slip-and-score method. I like to pinch the tips slightly to make them look perky and alert. -
Form the legs:
Roll two small sausages of clay for the front legs. Attach them to the front of the chest, blending the top of the leg into the body but leaving the bottom paws distinct.
Cracks Appearing?
If you see cracks as the clay dries, don’t panic. Mix a tiny bit of fresh clay with water to make a paste (slip) and fill the cracks. Smooth it over and let it dry again.
Step 3: The Tail & Texture
-
Make the tail:
Roll a large, thick coil of clay. Taper one end to a point. This needs to be voluminous to balance the figure. -
Attach and curl:
Attach the thicker end to the lower back of the fox. Curve the tail upward and slightly to the side so it hugs the body, mimicking the reference image. -
Refine the surface:
Use a damp sponge or finger to smooth out any fingerprints. The fox in the photo has a clean, organic look, so aim for smoothness but keep soft, rounded edges. -
Dry completely:
Let the sculpture dry fully. For air-dry clay, this usually takes 24-48 hours. Turn it occasionally to ensure the bottom dries too. -
Sand imperfections:
Once bone dry, take fine-grit sandpaper and gently buff away any rough bumps or distinct tool marks.
Go Botanical
Before the clay dries, gently press a real leaf or flower texture into the side of the fox’s body. Paint this impression in gold or dark brown for a subtle nature-inspired tattoo.
Step 4: Painting the Details
-
Apply base color:
If you used white clay, paint the entire fox (except the tip of the tail and chest area) with a warm terracotta orange. You might need two coats for opaque coverage. -
Paint the white accents:
Using a smaller brush, carefully paint cream or white onto the chest, belly, inner ears, and the tip of the tail. Allow the white to have rough, painterly edges where it meets the orange. -
Add face details:
With a very fine liner brush and black paint, draw two small ‘U’ shapes for sleeping eyes. Paint the very tip of the nose black. -
Add texture marks:
Using a dark brown or black paint, add tiny dash marks along the back and tail to suggest fur texture. Add three small dots on the white tail tip for extra character. -
Accent the paws:
Deepen the color of the paws by painting a gradient of darker brown at the very bottom of the legs. -
Seal:
Finish with a matte varnish to protect the paint without making it shiny, preserving that earthy, natural look.
Set your finished fox on a shelf or near a potted plant to enjoy its calm presence
Hedgehog With Textured Spines
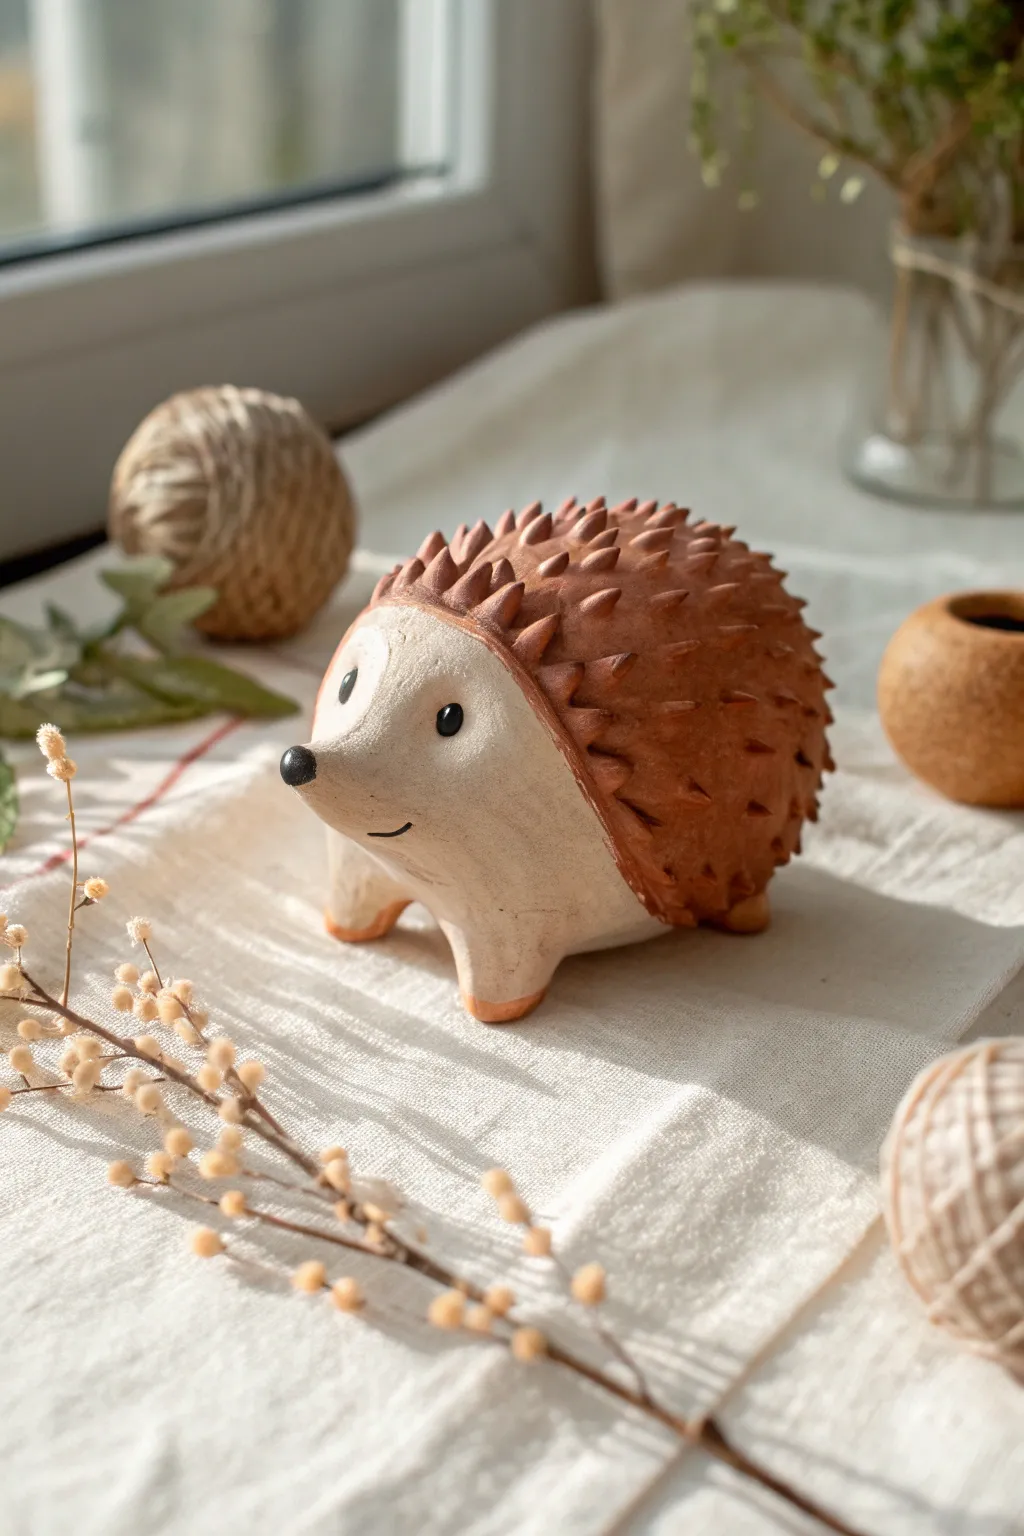
Create a charming woodland friend with this delightful clay hedgehog project, featuring wonderful tactile contrast between smooth and spiky surfaces. With its upturned snout and neatly arranged spines, this figurine brings a warm, rustic feel to any shelf.
Step-by-Step
Materials
- Air-dry clay or polymer clay (white or light beige)
- Clay sculpting tools (needle tool, small spatula)
- Acrylic paints (terracotta/rust brown, black, cream)
- Small paintbrushes
- Water cup and sponge
- Rolling pin
- Aluminum foil (optional for armature)
Step 1: Shaping the Base Form
-
Form the Body Mass:
Start with a ball of clay roughly the size of a tennis ball. Gently roll it into an oval or egg shape, keeping one end slightly larger for the back and tapering the other for the head. -
Create the Flat Base:
Tap the bottom of your oval shape against your work surface to create a flat belly. This ensures your hedgehog sits stably without rolling over. -
Pull Out the Snout:
On the tapered end, gently pinch and pull the clay upwards to form a distinct, upturned snout. Smooth the transition from the forehead to the nose with a wet finger. -
Define the Face Line:
Use a modeling tool to lightly score a curved line where the ‘spiny’ back will meet the smooth face. This guideline runs from behind the ears (which we’ll add next) over the top of the head. -
Add Little Legs:
Roll four small, equal-sized nubs of clay. Attach them to the four corners of the flat bottom, blending the clay seams completely so they look like they are growing out of the body.
Step 2: Adding Textural Details
-
Mark the Spine Area:
Working behind the face line you drew earlier, prepare the surface for texturing. If using polymer clay, ensure it’s conditioned well. -
Create Individual Spines:
You have two options here: either pinch the clay directly on the back into small points, or roll tiny cones of clay and attach them individually. For the look in the photo, attaching small cones works best. -
Attach the Spines:
Start at the back bottom edge and work your way up in rows. Place each small clay cone, blend the base into the body, and keep the tip sharp. I prefer to stagger the rows like bricks for a fuller look. -
Fill the Back:
Continue covering the entire back area up to your face line with these little spikes. Keep them fairly uniform in size but vary their direction slightly for natural movement. -
Smooth the Face:
While the back is textured, take a moment to ensure the face remains perfectly smooth. Use a bit of water (for air-dry) or baby oil (for polymer) to polish away any fingerprints. -
Indent the Smile:
Use a needle tool or small blade to press a tiny, curved smile into the side of the snout.
Uneven Spines?
If your spines feel too varied or messy, try forming a long ‘snake’ of clay first, cutting it into equal segments, and rolling those segments into cones before attaching.
Step 3: Coloring and Finishing
-
Dry or Bake:
Allow your clay to dry completely (24-48 hours for air-dry) or bake according to your polymer clay package instructions. Let it cool fully before painting. -
Paint the Spines:
Mix a warm terracotta or rust-brown acrylic paint. Carefully paint only the spiny section of the hedgehog. Get paint into the crevices between spines, but keep the face unpainted. -
Add Leg Details:
Use the same rust-brown color to paint just the tips of the little feet, creating a cute dipping effect. -
Define the Eyes:
Dip the back of a paintbrush handle into black paint and dot two eyes onto the face. The spacing is key—place them wide apart for a friendly expression. -
Add Eye Highlights:
Once the black dots are dry, use a pin or a very fine tool to add a tiny white dot in the upper corner of each eye. This ‘catchlight’ brings the character to life. -
Paint the Nose:
Paint the very tip of the upturned snout black using a small brush. -
Highlight the Smile:
Use a very fine liner brush with black paint to carefully trace the indented smile line you made earlier. -
Dry Brush Highlights:
To make the texture pop, take a dry brush with a tiny amount of lighter orange or beige paint and lightly dust the tips of the brown spines.
Autumn Vibes
Give your hedgehog a seasonal twist by painting the spines in an ombré gradient, transitioning from deep brown at the base to bright orange or yellow tips.
Now find a sunny windowsill for your new spiky companion to enjoy the view
Frogs With Lily Pad Bases

These charming amphibious sculptures capture the glossy, rounded appeal of pond frogs resting on their favorite perches. With their expressive wide-set eyes and simplified, smooth bodies, they make for adorable desk companions or garden accents.
How-To Guide
Materials
- Green polymer clay (one medium shade)
- White polymer clay
- Black polymer clay
- Rolling pin or pasta machine
- Needle tool or toothpick
- Ball stylus tool
- Clay knife or blade
- Circle cutter (approx. 2-3 inches)
- Texture sponge or foil ball (optional)
- Gloss glaze or varnish
Step 1: Creating the Lily Pad Base
-
Roll the base:
Start by conditioning a portion of green clay until it is soft and pliable. Roll it out into a flat sheet about 1/4 inch thick. -
Cut the circle:
Use your circle cutter to punch out a perfect round shape for the lily pad. Gently smooth the edges with your finger to remove any sharpness. -
Score the veins:
Using a needle tool or the back of a knife, lightly press lines radiating from the center of the pad to the outer edge to mimic leaf veins. Don’t cut all the way through. -
Add nature’s notch:
Cut a small ‘V’ shape out of one edge of the circle and smooth the cut edges again to complete the classic lily pad silhouette.
Smooth Seams
Before baking, use a drop of baby oil or clay softener on your finger to buff away any fingerprints. This makes the final frog look professionally smooth.
Step 2: Sculpting the Frog Body
-
Shape the torso:
Roll a large ball of green clay for the main body. Gently taper the top slightly to form a very subtle teardrop shape, keeping the bottom wide and flat so it sits stable. -
Form the legs:
Create two smaller sausage shapes for the rear legs. Flatten them slightly and bend them into a ‘greater than’ sign (>) to mimic a folded frog leg. -
Attach rear legs:
Press these folded shapes onto the sides of the body towards the back. Use a blending tool or your finger to smooth the seam where the thigh meets the body. -
Create the front arms:
Roll two smaller, short cylinders for the front arms. Attach them vertically under the ‘chest’ of the frog so they prop the body up. -
Detail the toes:
Use your needle tool to press indentations into the ends of the front and back feet to suggest toes. -
Refine the pose:
Gently press the frog onto the center of your prepared lily pad base to bond them together.
Color Spotting
Before baking, adhere tiny, flattened random dots of lighter green clay onto the back and legs. Roll over them gently to embed them flush for a speckled pattern.
Step 3: Adding the Face and Details
-
Carve the mouth:
Use a needle tool or a thin blade to slice a wide, curved smile into the face area. I find pressing the tool in and dragging sideways creates a cleaner line than cutting. -
Shape the eye sockets:
Roll two small balls of green clay and press them onto the top of the head for the eye mounds. Smooth the bottom edges onto the head. -
Add the whites:
take tiny bits of white clay, flatten them into discs, and press them onto the green eye mounds. -
Place the pupils:
Roll two even smaller balls of black clay and press them into the center of the white discs. Flatten them slightly so they don’t bulge out too much. -
Texture the skin:
For a bit of realism, lightly dab the green skin with a texture sponge or a crumpled ball of foil to create a porous look, avoiding the smooth eyes. -
Bake:
Bake the sculpture according to your polymer clay package instructions (typically 275°F for 15-30 minutes per 1/4 inch thickness). -
Glaze:
Once fully cooled, apply a coat of gloss varnish to the eyes to make them look wet and alive. You can leave the body matte or glaze it for a ‘just emerged from water’ look.
Your little green friends are now ready to bring a peaceful pond vibe to your shelf
Whale Blobs With Water Spouts
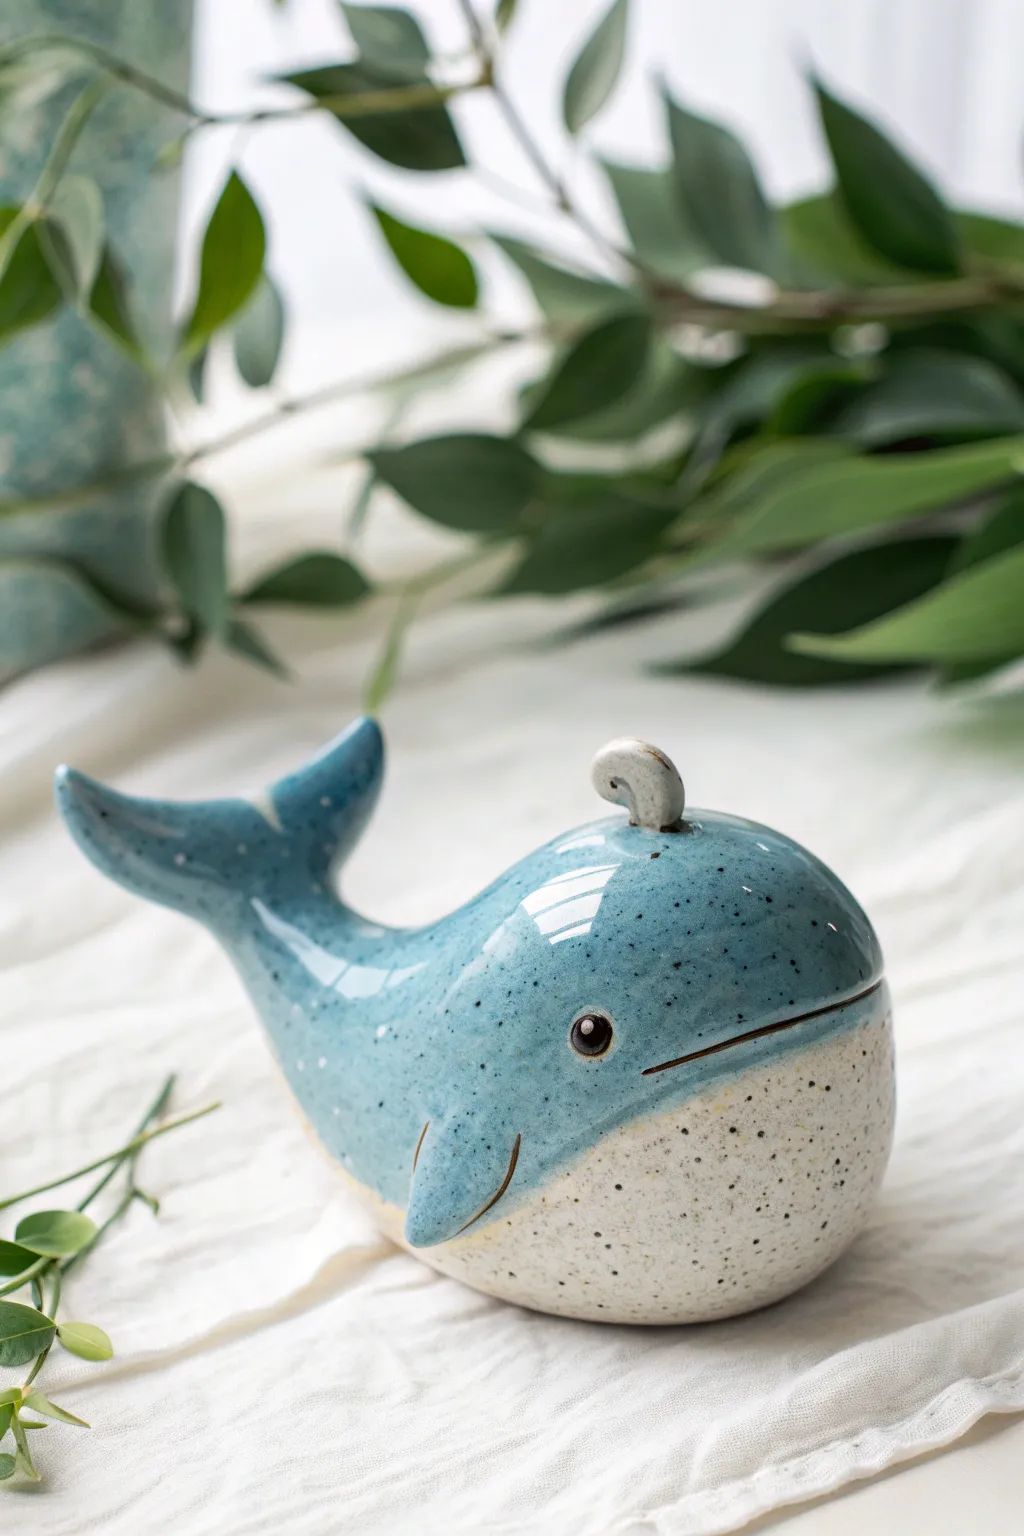
This adorable ceramic whale features a smooth, rounded body with a distinct two-tone glaze effect that mimics the ocean’s surface and the sandy floor. Its charming spout and sweet expression make it a delightful addition to any shelf or desk.
Step-by-Step Guide
Materials
- White stoneware or porcelain clay
- Pottery tools (needle tool, rib tool, modeling tool)
- Slip (liquid clay)
- Scoring tool or old fork
- Underglaze (black)
- Speckled blue glaze (glossy)
- Clear glaze (optional, depending on clay body)
- Small sponge
- Fine paintbrush
- Kiln
Step 1: Sculpting the Body
-
Form the base shape:
Start with a lump of clay about the size of a large orange. Roll it into a smooth ball, then gently elongate one side to create a teardrop shape. This tapered end will become the tail section. -
Pinch the tail:
At the tapered end, gently pinch and flatten the clay to widen it. Use your thumb and forefinger to press the center down and pull the edges up, creating the quintessential curved fluke shape of a whale’s tail. -
Smooth the transition:
Use a damp sponge or your finger to smooth the area where the body meets the tail. You want a seamless, flowing curve rather than a sharp angle. -
Refine the body:
Tap the bottom of the main body gently on your work surface to create a slightly flat base so the whale sits stable without rolling over. Use a rib tool to ensure the top remains perfectly round and smooth.
Step 2: Adding Details
-
Create the fins:
Roll two small, equal-sized balls of clay and flatten them into teardrop shapes. Curve them slightly to mimic the movement of swimming. -
Attach the fins:
Score the sides of the whale body and the back of the fins. Apply a dab of slip to both scored areas and press the fins firmly onto the body. Smooth the seams with a modeling tool so they look integrated, not just stuck on. -
Make the spout:
Roll a very small coil of clay and curl it into a hook or wave shape. Score the very top of the whale’s head and attach this small piece securely. I like to reinforce this join with a tiny bit of extra slip since it’s a delicate part. -
Carve the mouth:
Using a needle tool or a thin modeling tool, carve a long, gentle curve along the side of the face to create the smile. Make the line deep enough so the glaze doesn’t fill it in completely later. -
Form the eye:
Use the rounded end of a paintbrush or a small ball tool to press a gentle indentation where the eye should be. This creates a focused socket for the eye detail later. -
Add the eye pupil:
Roll a minuscule ball of clay and press it into the socket you just made. Alternatively, you can leave the socket empty to paint later, but a raised clay eye adds nice dimension. -
Initial drying:
Let the piece dry slowly under plastic for a day, then uncover it to reach bone-dry stage. Once dry, bisque fire it in the kiln according to your clay’s specifications.
Spout troubles?
If the water spout feels too fragile or keeps breaking off, try making it shorter and thicker, or model it as a simple raised bump with a hole in the center to suggest a blowhole instead.
Step 3: Glazing and Finishing
-
Wax resist application:
Dip your brush in wax resist and carefully paint the bottom third of the whale, covering the belly area up to where you want the blue glaze to stop. Don’t forget to wax the very bottom so it doesn’t stick to the kiln shelf. -
Detail the face:
Using a fine brush and black underglaze, carefully paint the eye pupil and darken the carved mouth line. If you get underglaze outside the lines, scratch it off gently with a needle tool once dry. -
Dip glazing:
Hold the whale by the un-waxed bottom area (or use glazing tongs) and dip the top portion into your glossy speckled blue glaze. The wax resist will protect the belly, creating that sharp, clean line between color and raw clay. -
Clean up:
Use a damp sponge to wipe away any beads of glaze that might be sitting on top of the waxed belly area. The transition line should be crisp. -
Glaze the spout:
If the dip didn’t catch the spout perfectly, or if you want it a differing shade (like white), you can carefully hand-paint glaze onto that specific detail. -
Final wipe:
Double-check the foot of the whale to ensure absolutely no glaze is on the bottom surface. -
Glaze firing:
Fire the piece again to the maturation temperature of your glaze (typically Cone 5 or 6 for stoneware). The heat will melt the blue glaze and reveal the lovely speckles in the clay body.
Planter variation
Make the whale hollow by using two pinch pots joined together. Cut a large hole in the top instead of adding a spout to turn this figurine into an adorable air plant holder.
Once cooled, your glossy whale is ready to swim onto your display shelf
Octopus With Rolled Tentacles
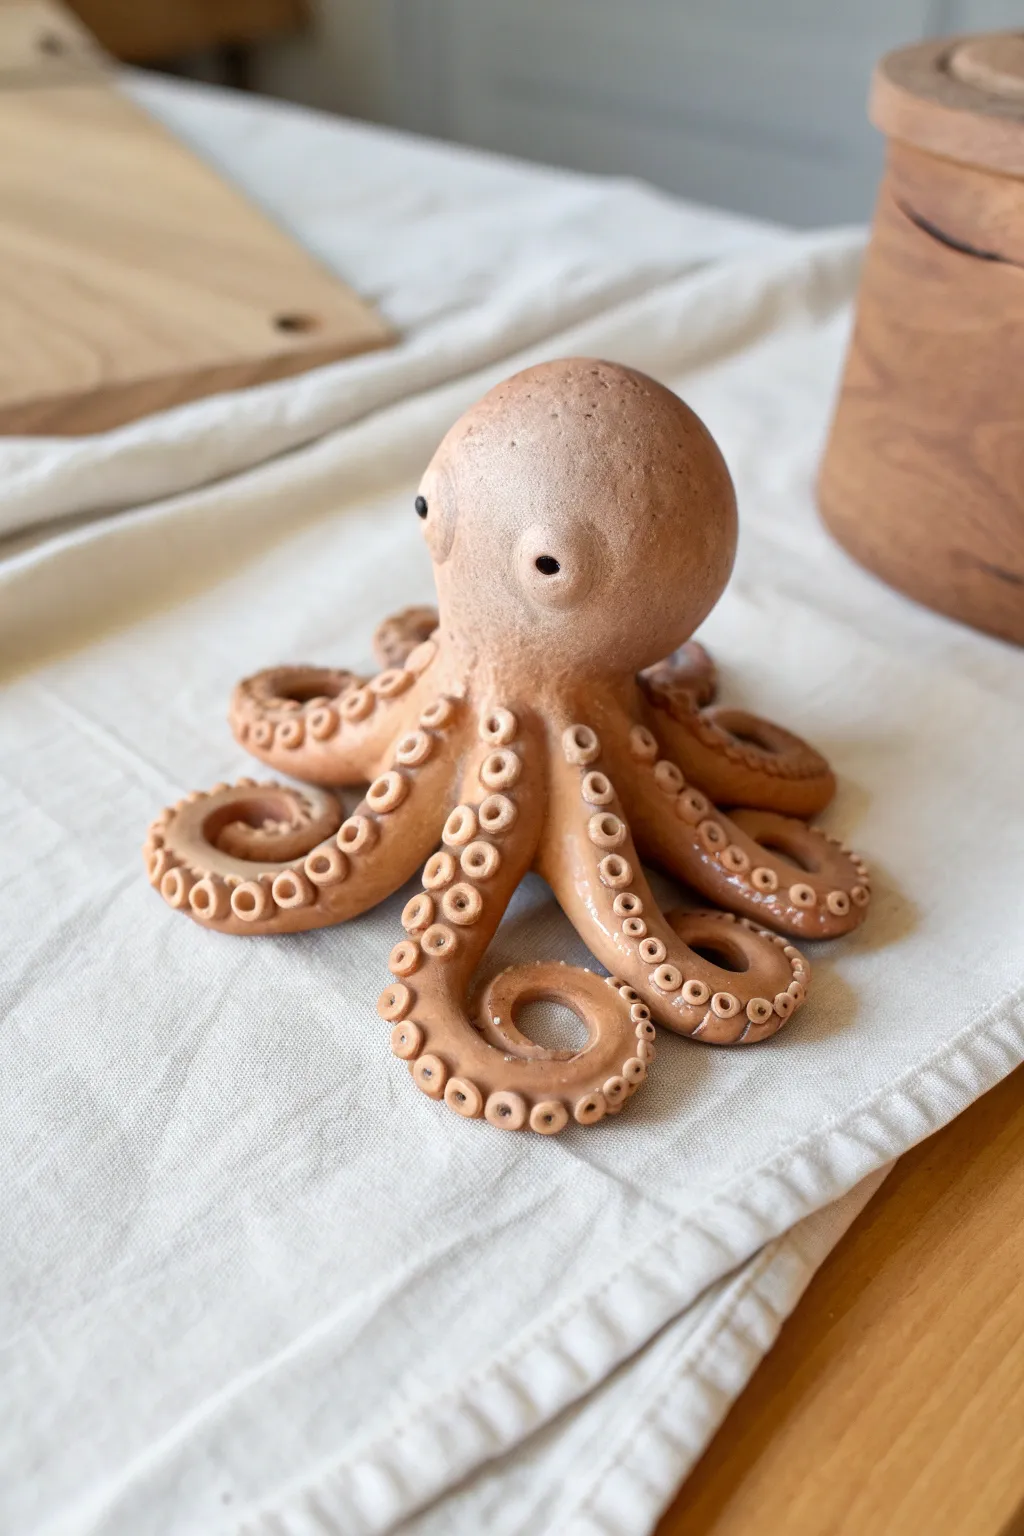
This charming clay octopus features delightfully curled tentacles and a smooth, rounded head that captures the playful spirit of the ocean. The natural terracotta-like finish and intricate sucker details make it a standout piece for any shelf or desk.
Step-by-Step
Materials
- Air-dry clay or terracotta polymer clay
- Basic sculpting tools (needle tool, ball stylus)
- Small rolling pin
- Water (for smoothing)
- Sponge
- Small black bead or black clay (for eyes)
- Clear acrylic gloss varnish
- Fine-grit sandpaper (optional)
Step 1: Forming the Body
-
Shape the head:
Start with a ball of clay roughly the size of a tangerine. Roll it between your palms until it is perfectly smooth and round. -
Elongate slightly:
Gently taper the bottom third of the ball to create a slight teardrop shape, or ‘bulb’ form, which will sit atop the tentacles later. -
Create eye sockets:
Using a large ball stylus or the rounded end of a paintbrush, press two indentations on opposite sides of the head for the eyes. -
Insert the eyes:
Place a tiny ball of black clay or a small black bead into the center of your indentation to create the pupil. -
Smooth the transition:
Use a small amount of water on your finger to smooth the clay around the eye socket so the ‘skin’ looks like it is naturally surrounding the eye.
Cracking Seams?
If tentacle joints crack while drying, mix a small amount of clay with water to make a paste (slip). Fill the cracks, smooth over, and let dry again.
Step 2: Sculpting the Tentacles
-
Roll coils:
Roll out eight even snakes of clay, each about 4 to 5 inches long. Taper one end of each snake to a fine point. -
Attach the base:
Flip the head upside down. Score and slip (scratch and wet) the bottom of the head and the thick ends of your tentacles. -
Join the parts:
Press the thick ends of the tentacles firmly onto the underside of the head in a circular pattern. Smooth the clay seams upward onto the head so the join is invisible. -
Pose the tentacles:
Flip the octopus back upright. Arrange the tentacles so they spread out like a star. I like to curl the ends of each tentacle tightly inward or outward to give it movement and personality. -
Flatten for suckers:
Slightly flatten the top surface of the curled tentacles where you plan to place the suckers.
Coral Reef Base
Mount your octopus on a textured rock or a piece of jagged drift wood before the clay hardens to create a dynamic underwater scene.
Step 3: Detailing and Finishing
-
Make the suckers:
Roll many tiny balls of clay, graduating in size from small to very tiny. -
Apply the suckers:
Press these tiny balls in two rows along the top of each tentacle. Use the larger balls near the head and the tiniest ones near the tentacle tips. -
Indent the suckers:
Use a small, hollow tube tool (like an empty mechanical pencil tip or a small straw) or a small stylus to press a hole into the center of each tiny ball, turning them into rings. -
Refine the texture:
Check the head for any fingerprints. Gently wipe the surface with a damp sponge to create a slight skin texture. -
Dry completely:
Allow the sculpture to dry according to your clay’s instructions. Air-dry clay may take 24-48 hours. -
Sand imperfections:
Once fully dry or cured, lightly sand any rough patches on the head with fine-grit sandpaper. -
Apply varnish:
Brush a coat of clear acrylic gloss varnish over the entire piece. This mimics the ‘wet’ look of an octopus fresh from the sea.
Place your shiny new cephalopod on a sunny windowsill where its glossy finish can catch the light
Dinosaur With Simple Spikes
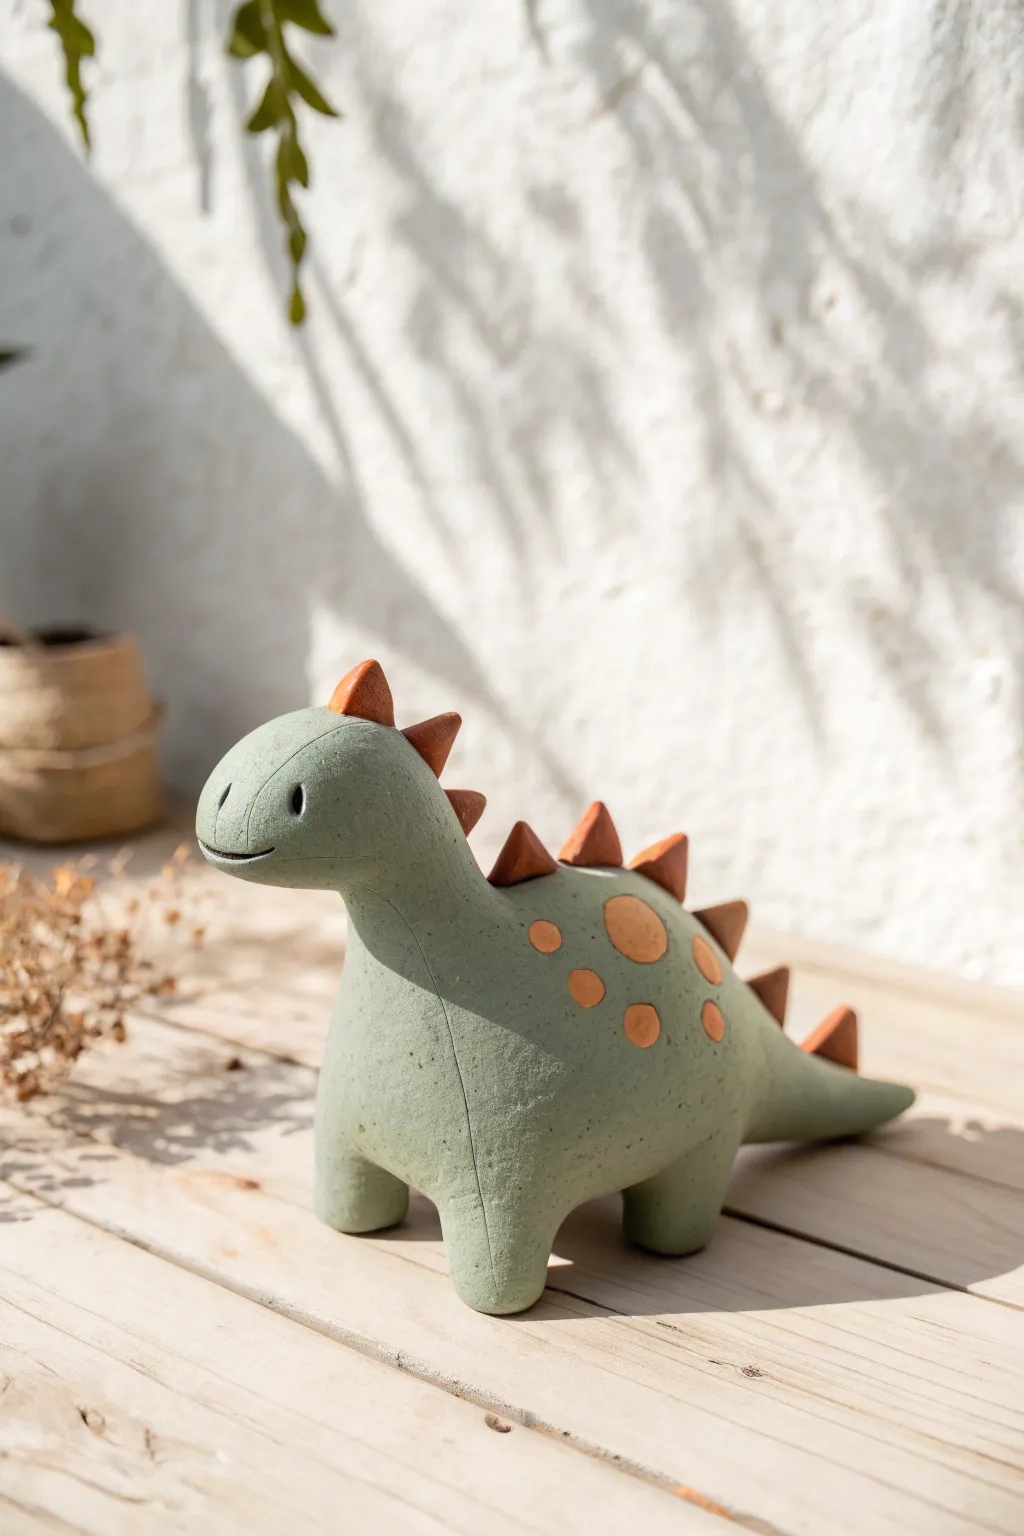
This charming, stylized dinosaur brings a touch of whimsy with its soft sage green body and contrasting terracotta orange spikes. Its smooth, rounded form and simple details make it a delightful project for sculptors of any skill level, resulting in a gentle, matte-finished keepsake.
Step-by-Step Guide
Materials
- Air-dry clay or polymer clay (white or pre-colored)
- Acrylic paints (Sage Green, Terracotta Orange/Burnt Sienna, Black)
- aluminum foil (for armature core)
- Clay sculpting tools (blending tool, needle tool)
- Rolling pin
- Sandpaper (fine grit)
- Matte varnish or sealant
- Paintbrushes (soft synthetic bristles)
- Water and sponge (for smoothing)
Step 1: Forming the Body
-
Create the core:
Begin by crumpling aluminum foil into an elongated bean shape. One end should be slightly larger for the body, swooping up into a smaller, rounded end for the head. This saves clay and keeps the sculpture lightweight. -
Roll out the clay sheet:
Roll your clay out to a thickness of about 1/4 inch. If you are using white clay to paint later, simple white air-dry clay works best here. -
Cover the armature:
Wrap the foil core completely with the clay sheet. Trim away excess clay with a craft knife or scissors, ensuring there are no exposed foil spots. -
Smooth the seams:
Using a little water on your finger or a smoothing tool, blend the seams where the clay edges meet until they are invisible. The goal is a seamless, organic lump. -
Sculpt the neck and tail:
Shape the neck by gently squeezing and elongating the clay upwards. Pull the back end of the body outwards and taper it to a point to form the tail.
Step 2: Adding Extremities
-
Shape the legs:
Roll four short, thick sausages of clay. These should be sturdy enough to support the body’s weight. Flatten the tops slightly to create a good attachment surface. -
Attach the legs:
Score (scratch hatch marks) the underside of the body and the tops of the leg pieces. Add a dab of water or clay slip, then press the legs firmly onto the body. -
Blend the joints:
Use a clay blending tool to drag the clay from the leg up onto the body, smoothing the transition so the legs look like they grow naturally from the torso. -
Create the spikes:
Roll out a small snake of clay and slice it into small triangular chunk shapes. You will need about 7 to 9 spikes, graduating in size from small to large and back to small.
Cracks Appearing?
If hairline cracks appear while drying, mix a small amount of fresh clay with water to make a paste. Fill the cracks, let it dry, and sand it smooth again.
Step 3: Refining Details
-
Attach the spikes:
Starting at the top of the head and working down to the tail, attach the triangular spikes along the spine. Score and slip each one, blending the bottom edges into the back. -
Add facial features:
Use a needle tool or a small stylus to gently carve a simple, curved mouth line near the snout. Create small indentations for the eyes, but keep them subtle. -
Dry the sculpture:
Allow the dinosaur to dry completely. For air-dry clay, this might take 24-48 hours depending on humidity. Rotate it occasionally so the bottom dries evenly. -
Sand for smoothness:
Once fully cured, use fine-grit sandpaper to buff away any fingerprints or rough bumps, creating that lovely stone-like texture visible in the photo.
Texture Twist
Before the clay dries, gently press a clean sponge or a piece of rough fabric onto the skin to give the dinosaur a pebbled, realistic skin texture.
Step 4: Painting and Finishing
-
Base coat:
Paint the entire body with a sage green acrylic paint. You may need two thin coats for opaque coverage. Avoid painting the spikes if possible, though you can touch them up later. -
Paint the accents:
Use a warm terracotta or burnt orange color to paint the spikes. I find a small angled brush helps keep the paint off the green body. -
Add the spots:
Using the same orange paint, paint freehand circles on the side of the body. Vary their sizes for a more natural, organic look. -
Define the eyes:
Use a very fine brush or a toothpick dipped in black paint to fill in the eye indentations. Adding a tiny white dot as a highlight brings the character to life. -
Seal the piece:
Finish with a coat of matte varnish. This protects the paint and unifies the sheen, giving it that soft, professional ceramic appearance.
Place your little dino on a shelf or desk where its friendly face can keep you company
Axolotl With Feathery Gills
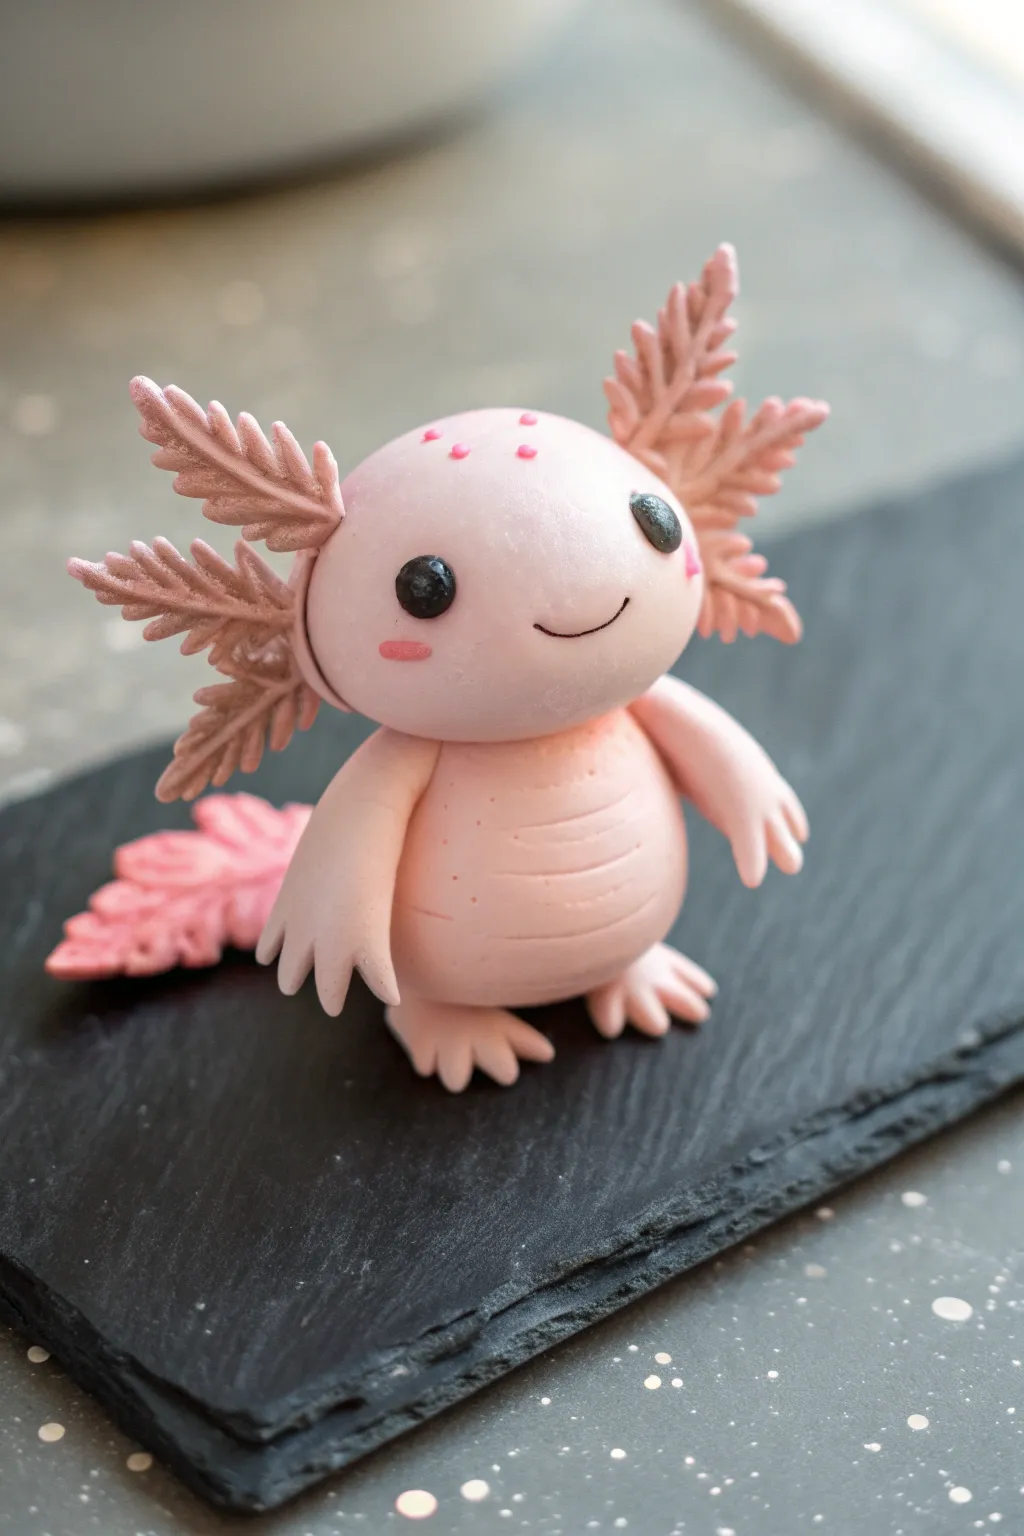
This adorable axolotl sculpture captures the charm of the famous ‘walking fish’ with its gentle pink hue and signature feathery gills. The smooth, matte finish gives it a professional look that’s perfect for a desk buddy or a unique cake topper.
Detailed Instructions
Materials
- Pale pink polymer clay (or fondant/gum paste)
- Darker antique rose/dusty pink clay
- Black clay
- Translucent liquid clay or bakeable adhesive
- Basic sculpting tools (ball tool, needle tool)
- Small craft knife or scalpel
- Black slate or baking surface
Step 1: Shaping the Head
-
Create the base:
Start by conditioning a large ball of pale pink clay until it is smooth and pliable. Roll it into a slightly flattened oval shape to form the main head structure. -
Add the gills:
Using the darker dusty pink clay, roll out six small tapered snake shapes. Flatten them gently to create leaf-like forms for the external gills. -
Texture the feathers:
With a needle tool or small knife, carefully cut tiny notches along both edges of each flattened gill piece to create the feathery, fringe-like texture. -
Attach the gills:
Press three gills onto each side of the head, arranging them in a fan shape. Use a small ball tool to blend the base of the gills seamlessly into the head. -
Detail the face:
Roll two tiny balls of black clay for the eyes and press them firmly onto the face. Use a needle tool to drag a gentle curve for the smiling mouth. -
Add finishing touches:
For extra cuteness, I like to press tiny flattened ovals of darker pink clay onto the cheeks for a blush effect, and add a few small pink dots on the forehead.
Smooth Surface Secret
To remove fingerprints before baking, lightly brush your polymer clay with a tiny amount of rubbing alcohol or baby oil. This melts the top layer slightly.
Step 2: Forming the Body
-
Sculpt the torso:
Create a pear-shaped piece of pale pink clay for the body, slightly smaller than the head. Flatten the bottom so it sits stably on your work surface. -
Create the belly texture:
Using a needle tool or a dull knife blade, gently impress horizontal curved lines across the tummy area to mimic the axolotl’s segmented underside. -
Make the limbs:
Roll four small sausages of pale pink clay for the arms and legs. Flatten one end of each piece slightly to form the paws. -
Cut the fingers:
Carefully cut three small triangular notches into the flattened ends of the limbs to create the toes and fingers. Smooth the cut edges gently with your finger. -
Attach limbs:
Press the legs onto the bottom sides of the body and the arms onto the upper sides. Blend the clay at the connection points so the limbs look integrated.
Floppy Gills Fix
If the delicate gill feathers are drooping while you work, prop them up with small pieces of cardstock or foil supports until the clay is baked or dried hard.
Step 3: Assembly and Tail
-
Form the tail:
Roll a piece of darker pink clay into a flat, wide teardrop shape. Use a texturing tool to create a swirling or wavy pattern on the surface. -
Create the tail fin:
Cut notches along the edge of the tail, similar to the head gills but larger, to give it an organic, fin-like appearance. -
Join the sections:
Place the head onto the body. If using polymer clay, inserting a short piece of wire or toothpick between them adds structural stability. -
Attach the tail:
Press the finished tail onto the lower back of the body, curving it slightly to the side so it is visible from the front. -
Final smoothing:
Check the entire figure for fingerprints. Gently buff them away with a drop of baby oil or by lightly rolling a soft brush over the clay. -
Bake or Dry:
Bake according to your clay manufacturer’s instructions, or let it air dry completely if using air-dry clay.
Enjoy displaying your charming pink amphibian crafted with your own hands
Bees With Stripey Belly Beads
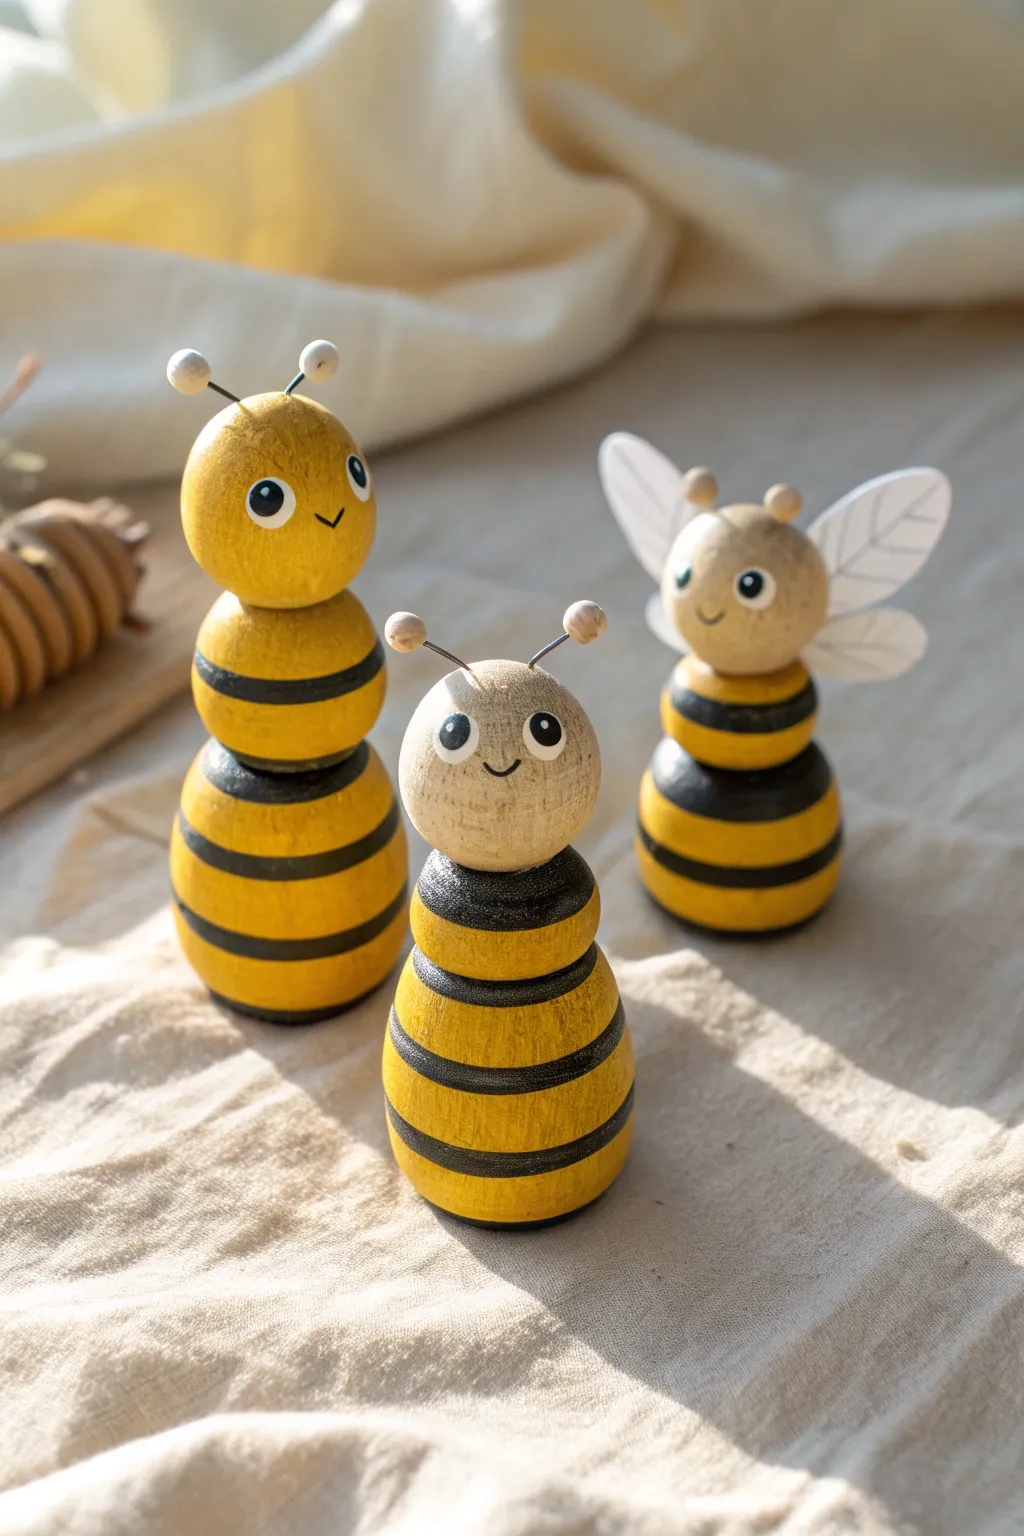
These charming little bees combine the warmth of natural wood with cheerful yellow stripes for a delightful desk companion or shelf decoration. By stacking wooden beads of varying sizes, create a trio of buzzing friends with adorable painted expressions and delicate wire antennae.
How-To Guide
Materials
- Wooden beads (assorted sizes: 20mm, 25mm, 30mm recommended)
- Wooden balls or doll heads for the faces (unvarnished)
- Acrylic paint (bright yellow, black, white)
- Pencil
- Fine-grit sandpaper
- Paintbrushes (flat shader and fine detail liner)
- Strong craft glue or wood glue
- Black craft wire (20-22 gauge)
- Wire cutters
- Small wooden beads or clay balls for antenna tips
- White cardstock or stiff felt for wings
- Matte or satin varnish (optional)
Step 1: Preparing the Bodies
-
Sand the surfaces:
Before painting, lightly sand your wooden beads and head pieces if they feel rough. This ensures the paint adheres smoothly and prevents splinters. -
Test the stack:
Experiment with different arrangements of your beads to create body shapes. For the tallest bee, try three graduated sizes; for the smaller ones, stacked pairs work well. Ensure they sit flat and stable. -
Base coat the yellow:
Paint the body beads with a bright yellow acrylic paint. You may need two coats for opaque coverage, letting the first layer dry completely before adding the second. -
Paint the black segments:
Once the yellow is dry, paint thick black stripes onto the beads. You can paint entire beads black for a bold look, or carefully hand-paint rings around the yellow beads. -
Add stripe details:
For a cleaner finish, use a flat brush to create the horizontal stripes. Don’t worry if the lines aren’t perfectly straight; a jagged edge adds a bit of organic charm.
Sticky Stripes?
If painting straight lines on round beads is tricky, use thin strips of washi tape or masking tape to mark off your sections before painting the black stripes.
Step 2: Creating the Faces
-
Sketch the features:
On the unpainted wooden head beads, lightly sketch circle eyes and a small mouth using a pencil. Keeping the face simple is key to the cute aesthetic. -
Paint the eyes:
Use a fine liner brush or a dotting tool to paint the round eyes with black acrylic. Fill them in completely. -
Add the highlights:
Dip the very tip of a toothpick or a tiny brush into white paint and add a small ‘catchlight’ dot to the upper corner of each eye. This brings the bee to life instantly. -
Draw the smile:
Carefully paint a thin, curved line for the mouth using your finest brush and black paint. A tiny smirk or a simple ‘u’ shape works perfectly.
Step 3: Assembly and Details
-
Glue the stacks:
Apply a strong craft glue between the beads to assemble your stacked bodies. Press them firmly together and wipe away any excess glue that squeezes out. -
Attach the heads:
Glue the painted head bead to the top of the body stack. Hold it in place for a few moments to ensure the bond starts to set properly. -
Prepare the antennae:
Cut two short lengths of black wire (about 1.5 inches each) for every bee. Gently curl them slightly if you want a whimsical look. -
Add antenna tips:
Glue tiny wooden beads or small balls of air-dry clay to the ends of the wire pieces. Let these dry fully before handling. -
Install the antennae:
You can either glue the wires directly to the top of the head or, for a sturdier hold, drill tiny pilot holes first and glue the wires into them. -
Create the wings:
Cut teardrop shapes from white cardstock or stiff felt. If using paper, you can draw faint vein lines with a light grey pencil for texture. -
Attach wings:
Glue the wings to the back of the upper body bead or the back of the neck area. Angle them slightly upward for a happy, active posture. -
Seal the work:
Protect your bees with a coat of matte or satin varnish if desired, focusing on the painted body sections to keep the colors vibrant.
Garden Glow Up
Turn these into plant picks by gluing a wooden skewer into the bottom hole of the lowest bead before assembling, letting them hover over your indoor pots.
Arrange your charming hive on a windowsill to bring a buzz of joy to your room
Animal Totem Stack Sculptures
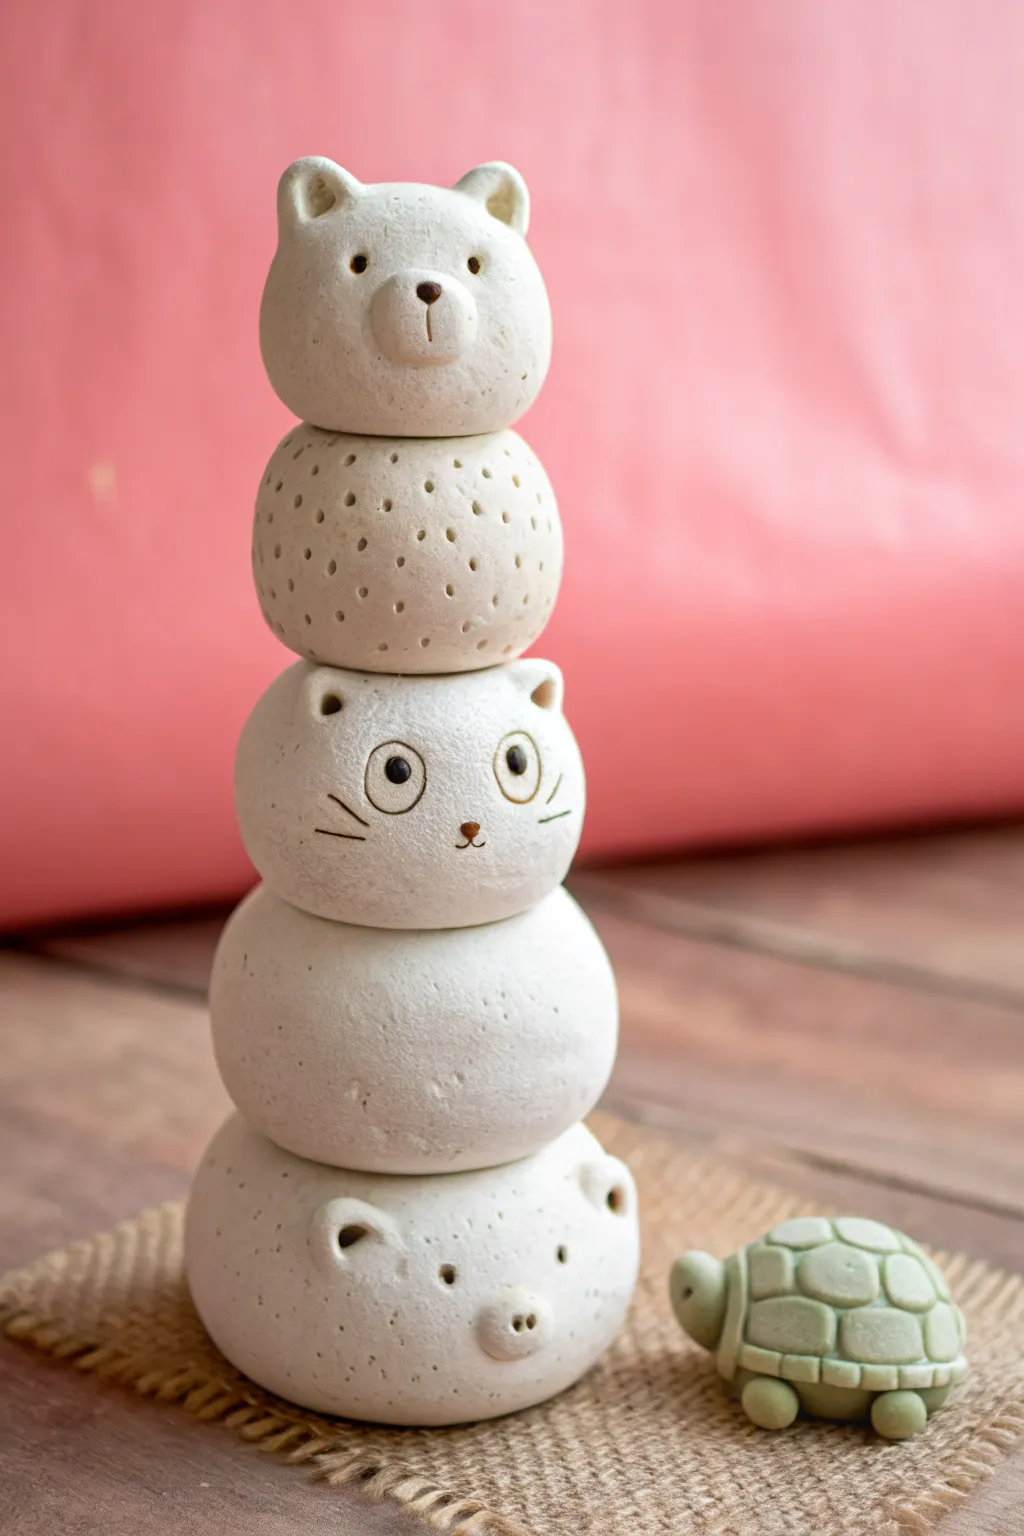
Create a charming vertical sculpture featuring a playful stack of minimalist animal friends. This project uses simple spherical forms to build a teetering tower of character, perfect for displaying on a shelf or desk alongside a tiny turtle companion.
Detailed Instructions
Materials
- White sculpting clay (air-dry, polymer, or ceramic based on your kiln access)
- Small amount of green clay (for the turtle)
- Black and brown acrylic paint or underglaze
- Modeling tools (needle tool, ball stylus)
- Small sponge
- Water slip or liquid clay (for joining)
- Fine-grit sandpaper
- Rolling pin
- Piece of burlap or textured fabric (optional for base)
Step 1: Forming the Base Components
-
Roll the Spheres:
Begin by wedging your white clay to remove air bubbles. Divide the clay into five portions of roughly graduating sizes. Roll each portion into a smooth, even ball using the palms of your hands. -
Flatten Contact Points:
Gently tap the top and bottom of each sphere on your work surface to create slight flat spots. This increases stability and makes stacking much easier later on. -
Check proportionality:
Test stack your spheres to ensure they taper nicely from the wide base (the bottom bear) to the smallest sphere at the top (the top bear). Adjust sizes now while the clay is still workable.
Stay Centered
Insert a wooden skewer or wire vertically through the center of all spheres while still wet. This acts as an armature to keep the stack perfectly aligned.
Step 2: Sculpting the Animal Characters
-
Shape the Bottom Bear:
Take the largest base sphere and pinch out two small sections for ears near the top. Use a ball stylus to push indentations into the ear centers. -
Bottom Bear Details:
Create a small snout by adding a tiny flattened ball of clay to the center face area, blending the edges smooth. Use a needle tool to poke two small eye holes and nostril indentations. -
Shape the Middle Cat:
Take the middle sphere (the third one up) and pinch upward to form pointed cat ears. They should be sharper and arguably taller than the bear’s rounded ears. -
Cat Face Detailing:
For the cat’s eyes, press small, flat discs of clay onto the face. Use a needle tool to scratch in whiskers and a small nose. You can define the pupils by carving out a small circle or painting them later. -
Texturing the Spacer Sphere:
Take the second sphere from the top (between the cat and the top bear). Use a needle tool to poke random, decorative holes all over the surface, creating a porous, sponge-like texture. -
Shape the Top Bear:
Repeat the ear-pinching process on the smallest top sphere. Add a slightly more prominent snout for this character, similar to the bottom one, to bookend the design. -
Refining Surfaces:
I prefer to use a slightly damp sponge to smooth out any fingerprints on the plain spheres (the second from the bottom) and the animal faces, keeping the finish clean and matte.
Leaning Tower?
If your stack keeps tilting, the contact points are too round. Separate them and flatten the joining surfaces more aggressively before re-stacking.
Step 3: Assembly and Turtle Companion
-
Joining the Stack:
Score the flat spots between each sphere (scratch hatching markings) and apply slip or liquid clay. Press the pieces firmly together, stacking them in order: bottom bear, plain sphere, cat, textured sphere, top bear. -
Forming the Turtle Shell:
Using the green clay, roll a small ball and flatten the bottom to make a dome. Use a knife tool or needle to carve a hexagonal shell pattern into the top. -
Turtle Head and Limbs:
Roll five tiny balls of green clay. Attach four as feet emerging from under the shell and one slightly larger one appearing as the head. Poke tiny holes for eyes. -
Drying or Baking:
Allow your sculpture to dry completely if using air-dry clay, or bake/fire according to your specific polymer or ceramic clay instructions. -
Adding Contrast Details:
Once hardened, use a very fine brush to paint the noses brown and fill in the eyes with black. Paint the whiskers on the cat with thin, delicate strokes. -
Final Surface Finish:
If there are rough spots after drying, gently sand them down with fine-grit sandpaper. For a natural stone look, leave the majority of the white clay unglazed and matte.
Place your totemic stack on a burlap mat to emphasize the natural, earthy texture of your new creation