
Whenever I’m teaching grown-up students, the biggest lightbulb moment is realizing clay art can feel playful and still look totally polished on your shelf or on your body. These clay art ideas for adults are all about simple forms, elevated finishes, and pieces you’ll actually use every day.
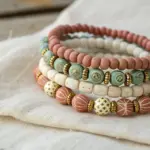
Polymer Clay Statement Earrings in Modern Shapes
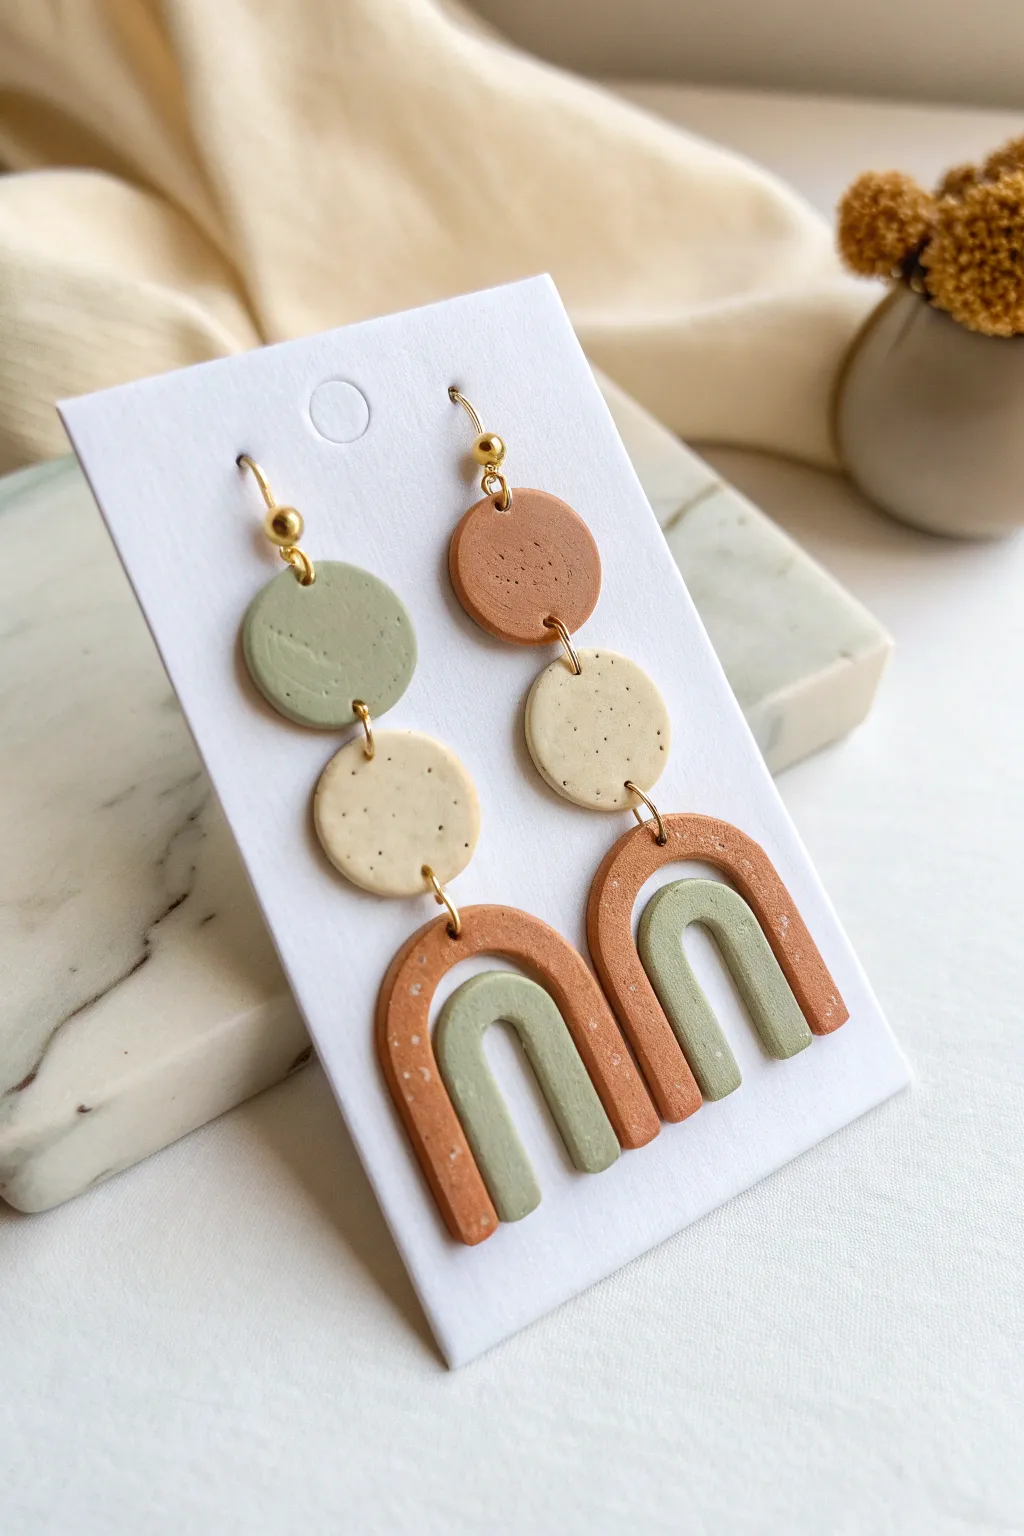
Embrace earthy tones and geometric charm with these statement earrings, featuring a soothing palette of terracotta, sage green, and speckled cream. The combination of stacked circles and a dual-arch bottom piece creates sophisticated movement that elevates any casual outfit.
Step-by-Step Guide
Materials
- Polymer clay in three colors: Terracotta (burnt orange), Sage Green, and Speckled Cream (or granite)
- Acrylic rolling pin
- Circle cutters in two small sizes (approx. 10mm and 15mm)
- Arch cutter (or a U-shaped cutter)
- Smaller arch cutter (to fit inside the larger one)
- X-Acto knife or clay blade
- Hand drill or pin vibe
- Jump rings (gold finish, 6-8mm)
- Earring hooks (French hooks, gold finish)
- Pliers (flat nose and round nose)
- Parchment paper or ceramic tile for baking
- Fine grit sandpaper (optional)
Step 1: Preparing the Clay
-
Condition the clay:
Start by warming up each color of clay separately in your hands. Knead and roll them until they are soft, pliable, and free of cracks. -
Create a slab:
Using your acrylic rolling pin, roll out each color onto a flat surface or ceramic tile. Aim for an even thickness of about 3mm—I prefer using depth guides to ensure every piece is perfectly uniform. -
Check surface texture:
Inspect your rolled slabs for air bubbles or lint. Smooth the surface gently with your fingertip or a piece of plastic wrap if needed.
Clean The Edges
Before baking, dip your finger in acetone or rubbing alcohol and gently run it along the cut edges. This melts the clay slightly, removing fingerprints and jagged bits for zero sanding later.
Step 2: Cutting the Shapes
-
Cut the top circles:
For the left earring: cut one small circle in sage green. For the right earring: cut one small circle in terracotta. -
Cut the middle circles:
Use the same small circle cutter to stamp two circles from the speckled cream clay. These will serve as the connectors between the top stud piece and the bottom arch. -
Form the large arches:
Using your larger arch cutter, cut two shapes from the terracotta clay. If you don’t have a hollow arch cutter, cut a solid arch first, then use a smaller cutter to remove the center. -
Form the inner arches:
Using a smaller arch cutter that nests inside the terracotta one, cut two shapes from the sage green clay. Ensure these fit comfortably inside the negative space of the terracotta arches. -
Assemble the arch unit:
Gently place the sage green arch inside the terracotta arch on your baking tile. Press the seams together very lightly just to check fit, but they will hang as a single unit or be glued later. For this specific look, we want them independent but nested. -
Clean the edges:
Before baking, use a fingertip dipped in a tiny bit of rubbing alcohol or cornstarch to smooth any rough edges left by the cutters.
Step 3: Piercing and Baking
-
Pierce holes for assembly:
Using a needle tool or toothpick, create holes for the jump rings. Top circles need holes at the top and bottom. Middle cream circles need holes at top and bottom. The large terracotta arches need a hole at the very top center. -
Double-check hole size:
Ensure your holes are large enough for your jump rings to move freely. Wiggle the tool slightly to widen the opening without distorting the clay shape. -
Bake the pieces:
Place your tile with the clay pieces into the oven. follow the temperature and timing instructions on your specific brand of polymer clay packaging (usually 275°F/135°C for 30 minutes). -
Cool and sand:
Allow the pieces to cool completely. If any rough spots remain, lightly sand the edges with fine-grit sandpaper or a buffing block to get that professional finish.
Texture Twist
Before cutting your shapes, press a piece of coarse sandpaper or a stiff fabric onto the clay slab. This adds a stone-like texture that makes the simple matte colors look much more expensive.
Step 4: Assembly
-
Anchor the inner arch:
To keep the small green arch suspended inside the terracotta one, apply a tiny dab of strong jewelry glue (like E6000) to the inner sides of the terracotta arch and press the green arch into place, or simply let them dangle independently if preferred—though the reference shows them as a solid unit. -
Connect top to middle:
Open a gold jump ring using two pairs of pliers (twist sideways, don’t pull apart). Thread the top colored circle and the middle cream circle together, then close the ring securely. -
Attach the arch unit:
Using another jump ring, connect the bottom of the cream circle to the top of the terracotta arch unit. -
Add the hardware:
Open the loop on your earring hook. Thread it through the top hole of the uppermost colored circle and close the loop ensuring the front of the earring faces forward. -
Repeat:
Repeat the assembly process for the second earring, ensuring the color pattern is mirrored correctly (Green top/Cream mid/Terracotta bottom vs. Terracotta top/Cream mid/Terracotta bottom).
Wear your new geometric creations with pride, knowing you’ve mastered the art of color blocking and balance


Terrazzo-Style Coasters for a Coffee Table Set
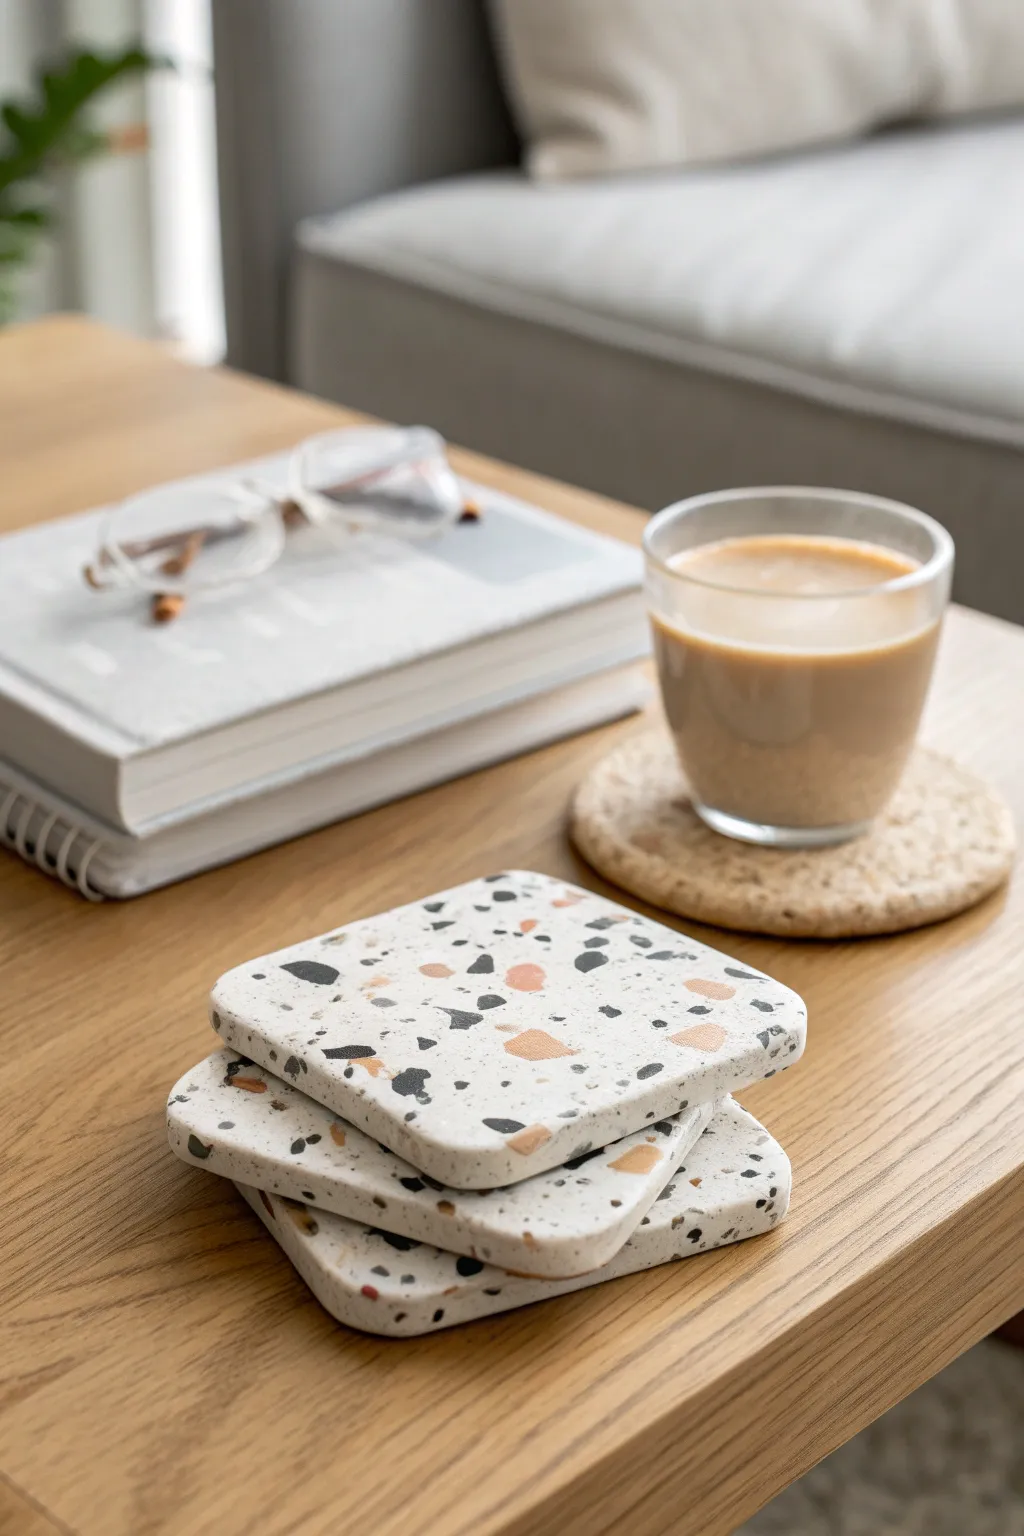
Bring a touch of modern Italian design to your living room with these chic terrazzo-style coasters. Using polymer clay, you can mimic the speckled beauty of real stone in a lightweight, durable format that protects your surfaces in style.
How-To Guide
Materials
- White or translucent white polymer clay (approx. 2 oz per coaster)
- Black polymer clay
- Gray polymer clay
- Muted orange or terracotta polymer clay
- Acrylic rolling pin or pasta machine
- Craft knife or tissue blade
- Square cookie cutter (approx. 3.5-4 inches) with rounded corners
- Parchment paper or baking mat
- Oven thermometer
- Fine-grit sandpaper (400, 600, and 1000 grit)
- UV resin or polyurethane gloss varnish (optional for sealing)
- Small rolling tool or brayer
Step 1: Preparing the ‘Chips’
-
Condition the colored clays:
Start by conditioning your accent colors—the black, gray, and terracotta. Knead them until soft and pliable. -
Roll thin sheets:
Roll each colored clay into a very thin sheet. You want these to be almost paper-thin, as they will become the chips embedded in the base. -
Bake the thin sheets:
Place these thin sheets on parchment paper and bake them for about 10–15 minutes according to the package instructions. Baking them first ensures sharp, distinct edges for your terrazzo chips rather than smearing. -
Cool and crumble:
Once baked and fully cooled, break the sheets into irregular, jagged pieces. Use your fingers or a craft blade to chop them into various small sizes resembling stone aggregate.
Step 2: Creating the Base Slab
-
Condition the white clay:
Take your block of white polymer clay and condition it thoroughly until it’s smooth and warm. -
Roll the base thickness:
Roll the white clay out to a thickness of about 1/4 inch. This needs to be thick enough to be sturdy but thin enough to look elegant. -
Scatter the chips:
Take your pre-baked colored chips and scatter them generously over the surface of the white clay slab. Aim for a random, organic distribution. -
Embed the chips:
Use your acrylic roller or brayer to press the chips firmly into the white clay. Roll over the surface repeatedly until the chips are flush with the white base and the surface feels relatively smooth. -
Check the underside:
I prefer to flip the slab over and add a few chips to the bottom side as well, just so it looks finished from every angle, though this is optional.
Stone Effect
Use translucent white clay instead of opaque white for the base. It adds depth and mimics the look of real polished marble or quartz much better.
Step 3: Cutting and Refining
-
Cut the shapes:
Place your square cutter over the most visually interesting section of your patterned slab. Press down firmly to cut out the coaster shape. -
Smooth the edges:
Gently lift the cut shape. Use your finger to smooth the sharp cut edges, slightly rounding them off so they aren’t brittle after baking. -
Final smooth:
inspect the surface for any fingerprints. A light rub with a little bit of baby oil can help smooth imperfections before the final bake. -
Final Bake:
Bake the coasters on a flat tile or baking sheet covered with parchment. Follow the specific temperature for your brand of clay, usually baking for 30–45 minutes to ensure durability.
Smudged Colors?
If your colored chips are smearing into the white base while rolling, it means they weren’t fully baked or cooled. Chill the chips before embedding.
Step 4: Finishing Touches
-
Wet sanding:
Once cooled, wet sand the surface. Start with 400 grit to reveal the crisp edges of the colored chips, then move to 600 and 1000 grit for a silky smooth finish. Keep the paper wet to avoid dust. -
Buffing:
Dry the coasters thoroughly. Use a soft cloth (like denim or microfiber) to vigorously buff the surface. This creates a natural sheen. -
Sealing (Optional):
For extra protection against coffee spills, apply a thin layer of UV resin or polyurethane varnish. If using resin, cure under a UV lamp.
Stack your new set on the coffee table and enjoy the modern vibe they bring to your space


Tiny Bud Vases for Single-Stem Styling
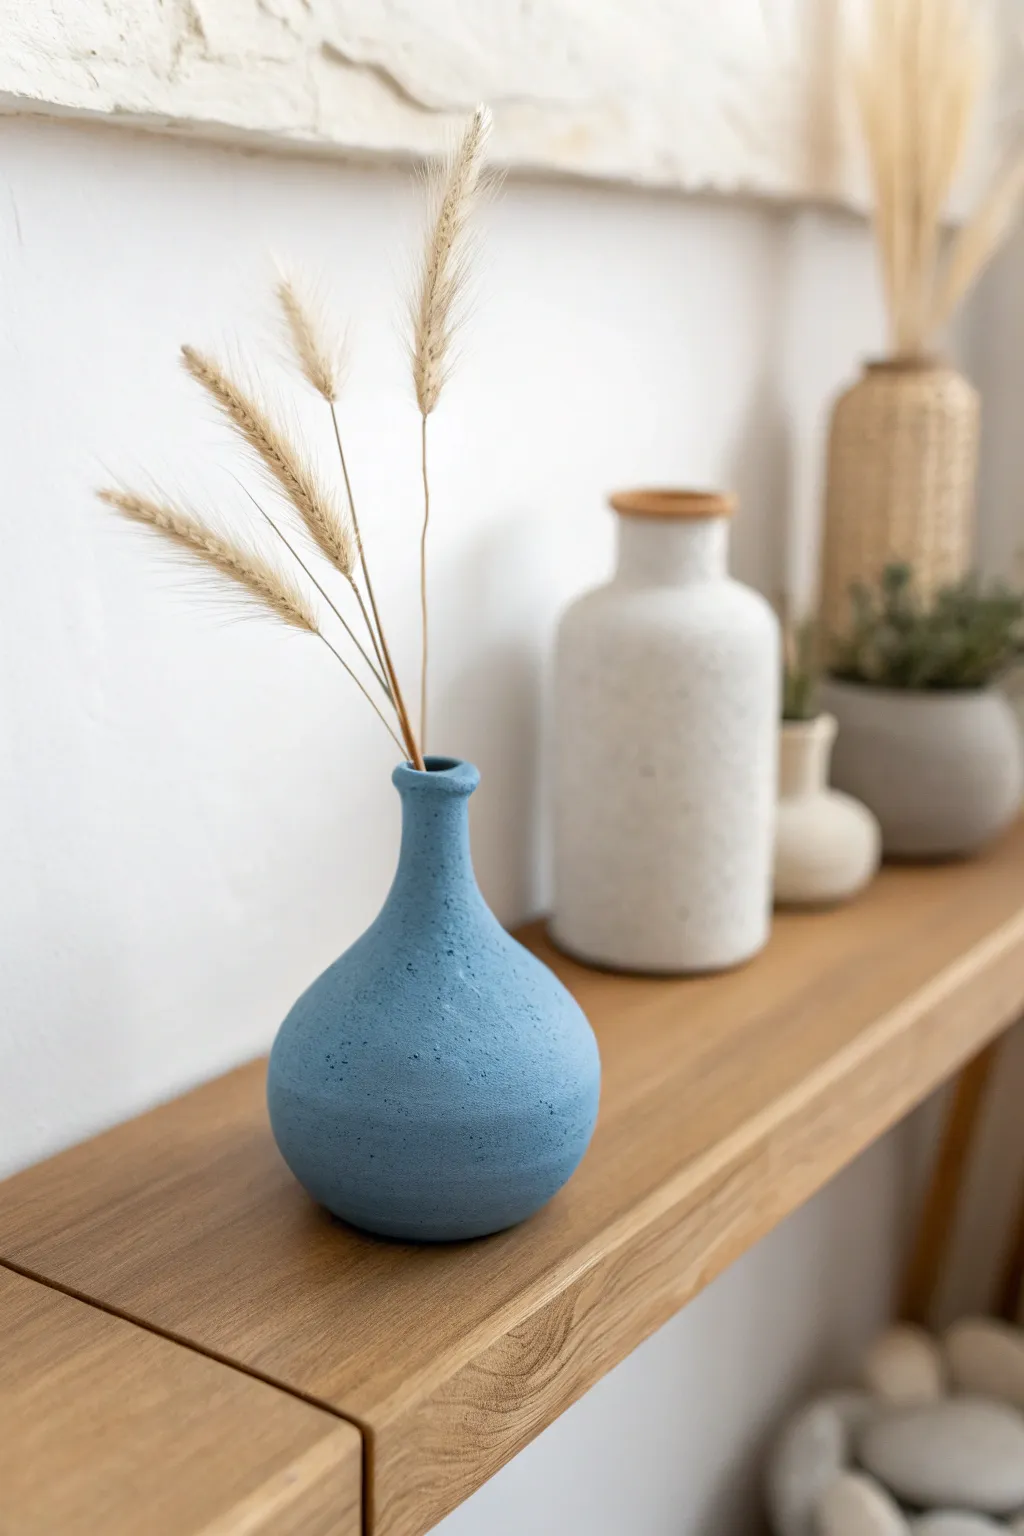
This charming little project focuses on creating a classic bulb-shaped vase with a distinct, tactile surface that feels both rustic and modern. The vibrant azure blue finish combined with the rough, stone-like texture makes it a perfect centerpiece for minimalist dried floral arrangements.
Detailed Instructions
Materials
- Air-dry clay (white or terracotta)
- Small rolling pin
- Pottery sponge
- Loop tool or clay knife
- Slip (clay mixed with water)
- Sandpaper (medium grit)
- Acrylic paint (Azure or Matte Blue)
- Baking soda or texture paste
- Paintbrush (flat bristle)
- Matte spray sealant
- Dried bunny tail grass (for styling)
Step 1: Forming the Base Structure
-
Prepare the clay:
Start with a ball of air-dry clay roughly the size of a tennis ball. Knead it thoroughly to remove air bubbles and warm it up, ensuring it’s pliable and ready for shaping. -
Create the pinch pot:
Push your thumb into the center of the ball, leaving about half an inch at the bottom. Gently pinch the walls while rotating the clay in your hand to create a simple bowl shape. -
Define the bulb shape:
Continue pinching and turning, but instead of opening the bowl wide, curve the walls inward as you move up. You want a rounded, bulbous belly for the vase that tapers slightly toward the top. -
Smooth the exterior:
Using a slightly damp sponge, smooth out the exterior fingerprints. Don’t worry about perfection yet, but aim for a symmetrical round shape.
Pro Tip: Weight it Down
Since dried flowers are light, the vase can be tippy. Drop a clean pebble or marble inside the bottom before the clay dries to add stability and prevent tipping.
Step 2: Sculpting the Neck
-
Roll a coil:
Take a separate small piece of clay and roll it into a thick coil, roughly the thickness of your finger. -
Attach the neck:
Score the top opening of your bulb and the bottom of the coil using a needle tool or knife. Apply a little slip (clay glue) and press the coil firmly onto the top of the bulb. -
Blend the seams:
Use your thumb or a modeling tool to drag the clay from the coil down onto the bulb, and from the bulb up onto the coil. Creating a seamless transition is key for structural integrity. -
Refine the neck shape:
Gently squeeze and pull the neck upwards to elongate it slightly. Flare the very top lip outward just a tiny bit to give it that traditional pottery silhouette. -
Initial drying:
Set the vase aside to dry until leather-hard—firm to the touch but still cold. This usually takes about 2-4 hours depending on humidity.
Level Up: Speckled Effect
For a faux-granite look, load an old toothbrush with thinned black or dark grey paint and flick the bristles to spray fine speckles over the dried blue paint.
Step 3: Creating the Texture
-
Surface distressing:
Once leather-hard, take a crumpled ball of aluminum foil or a stiff-bristled brush. Press it gently all over the exterior of the vase to create organic pitting and roughness. -
Refining the lip:
Check the rim of the vase. If it’s too sharp, smooth it down with a damp finger, but keep the overall look slightly uneven to match the rustic aesthetic. -
Full dry:
Allow the vase to dry completely. This creates the best canvas for our textured paint. Wait at least 24-48 hours until the clay is bone dry and chalky white. -
Light sanding:
If there are any egregiously sharp jagged bits, sand them lightly, but leave most of the imperfections alone.
Step 4: Finishing and Painting
-
Mix textured paint:
Mix your azure blue acrylic paint with a teaspoon of baking soda. I like to let this sit for a minute; the reaction creates a thick, fluffy paint that mimics a stone finish perfectly. -
Apply base coat:
Dab the paint onto the vase using a stippling motion (up and down) rather than brushing strokes. This enhances the textured look. -
Layering depth:
While the first coat is tacky, add a second layer. If you want more dimension, add a tiny drop of white to your mix for the second coat to highlight the texture peaks. -
Seal the work:
Once the paint is fully dry, spray the entire piece with a matte sealant. Avoid glossy sprays, as the matte finish is crucial for that modern ceramic look. -
Final styling:
Pop in a few dried stems like bunny tails or wheat grass. Remember, air-dry clay isn’t waterproof, so stick to dried botanicals only.
Now you have a stunning, textured vessel ready to bring a pop of color to your shelf styling


Wall Hangings With Neutral Beads and Clay Tiles
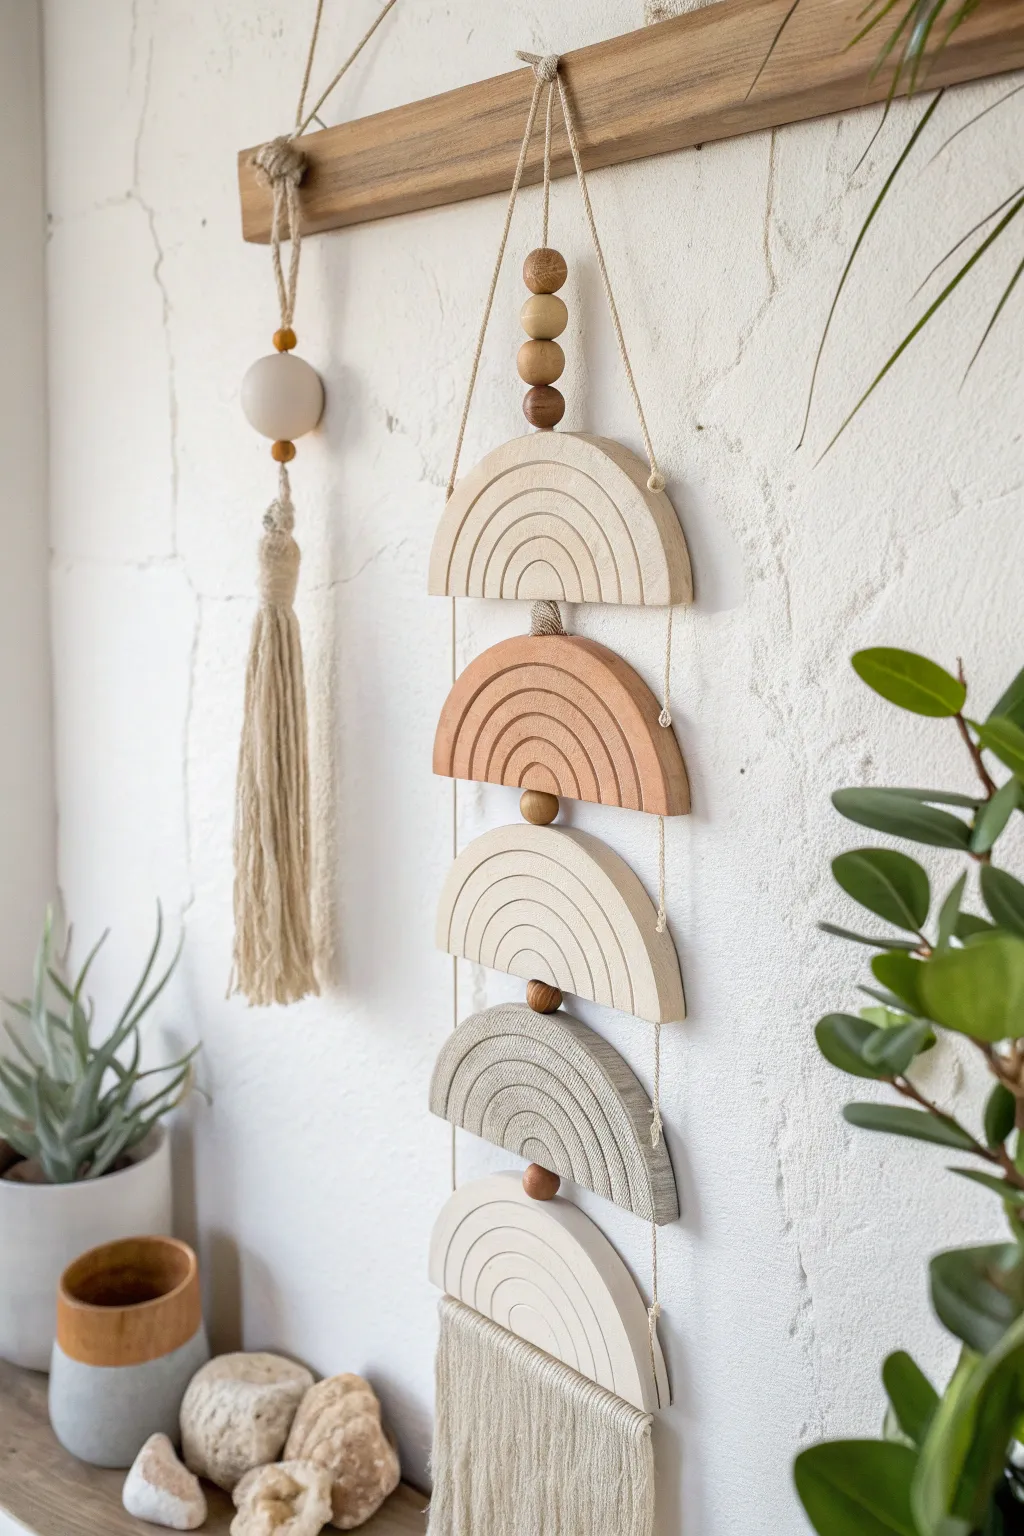
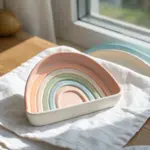
Embrace earthy simplicity with this stunning vertical wall mobile, featuring etched clay semi-circles in soothing neutral tones. Suspended by delicate cord and accented with wooden beads, this piece adds texture and a modern bohemian touch to any living space.
Detailed Instructions
Materials
- Air-dry clay (white and terracotta/stone colors) or polymer clay
- Rolling pin
- Circle cutters (large approx 4-5 inches diameter) or a bowl and craft knife
- Sculpting needle tool or toothpick
- Wooden beads (various sizes, natural finish)
- Hemp cord or cotton twine
- Wooden dowel (1/2 inch to 1 inch thick)
- Sandpaper (fine grit)
- Ruler
- Macramé comb (optional)
- Clear matte varnish (optional)
Step 1: Shaping the Clay Arches
-
Prepare the workspace:
Cover your work surface with parchment paper or a silicone mat to prevent the clay from sticking. This also makes moving the pieces easier later. -
Roll out the clay:
Start with your white clay. Condition it by kneading until soft, then roll it out to an even thickness of about 1/4 inch. Repeat this process with the terracotta and grey clay portions separately. -
Cut the circles:
Using a large circle cutter or tracing around a bowl, cut out five large circles. You will need roughly three white/cream circles, one terracotta, and one grey/sage circle to match the photo. -
Create semi-circles:
Use a long blade or a ruler to slice each circle exactly in half. You will have two semi-circles per circle; choose the best five for your hanging. -
Smooth the edges:
Dip your finger in a little water and gently run it along the cut edges of the clay to smooth out any sharpness or ragged bits. -
Etch the rainbow design:
Take your needle tool. Starting from the bottom center of a semi-circle, gently carve concentric arches radiating outward. Apply light pressure to create visible grooves without cutting all the way through. -
Pierce holes for hanging:
Using a straw or a tool slightly larger than your cord thickness, poke a vertical hole through the center thickness of the arch, running from the top curved edge straight through to the flat bottom edge. If this is too difficult, you can poke a hole front-to-back at the top and bottom center instead.
Step 2: Drying and Finishing
-
Allow to dry:
Lay the clay pieces flat on a drying rack or mesh screen. Let them air dry for 24-48 hours, flipping them occasionally to ensure even drying and prevent curling. -
Sand imperfections:
Once fully cured and hard, use fine-grit sandpaper to gently smooth the edges or any surface bumps. Wipe away the dust with a slightly damp cloth. -
Seal the clay (optional):
If you want extra durability, brush on a thin layer of clear matte varnish. I find this helps protect the white clay from gathering dust over time.
Keep it Straight
To prevent the clay arches from tilting when hung, ensure your vertical holes are perfectly centered. Use a ruler to mark the exact middle before piercing.
Step 3: Assembly and Suspension
-
Prepare the top mount:
Cut a length of hemp cord. Tie a loop at the top center for hanging, then secure the two trailing ends to your wooden dowel using a lark’s head knot or simple double knots. -
Start the bead sequence:
Thread a long piece of cord (roughly 3 feet) through the center of the wooden dowel if it has a hole, or tie it firmly around the center. Thread on three to four wooden beads in graduating sizes. -
Thread the first arch:
Feed the cord down through the vertical channel of your first white clay arch. Secure it with a knot underneath the arch if necessary to keep it in place, or add a small bead as a stopper. -
Add spacing beads:
Thread a single wooden bead onto the cord to act as a spacer between this arch and the next one. -
Continue the pattern:
Repeat the threading process: add the terracotta arch, a spacer bead, a white arch, a spacer bead, the grey arch, a spacer bead, and finally the last white arch. -
Create the bottom tassel:
Cut several 10-inch lengths of cream cotton cord. Fold them in half and group them together. -
Attach the tassel:
Tie the main suspension cord around the center of your folded tassel bundle. Secure it tightly with a gathering knot. -
Comb and trim:
Use a comb to brush out the strands of the tassel so they are fluffy and straight. Trim the bottom with sharp scissors to create a clean, straight edge.
Color Variations
Mix acrylic paint into your white air-dry clay before rolling it out to create custom pastel shades that perfectly match your room’s existing decor.
Hang your new masterpiece near a window to let the natural textures catch the light softly

The Complete Guide to Pottery Troubleshooting
Uncover the most common ceramic mistakes—from cracking clay to failed glazes—and learn how to fix them fast.
Desk Organizers That Actually Look Chic
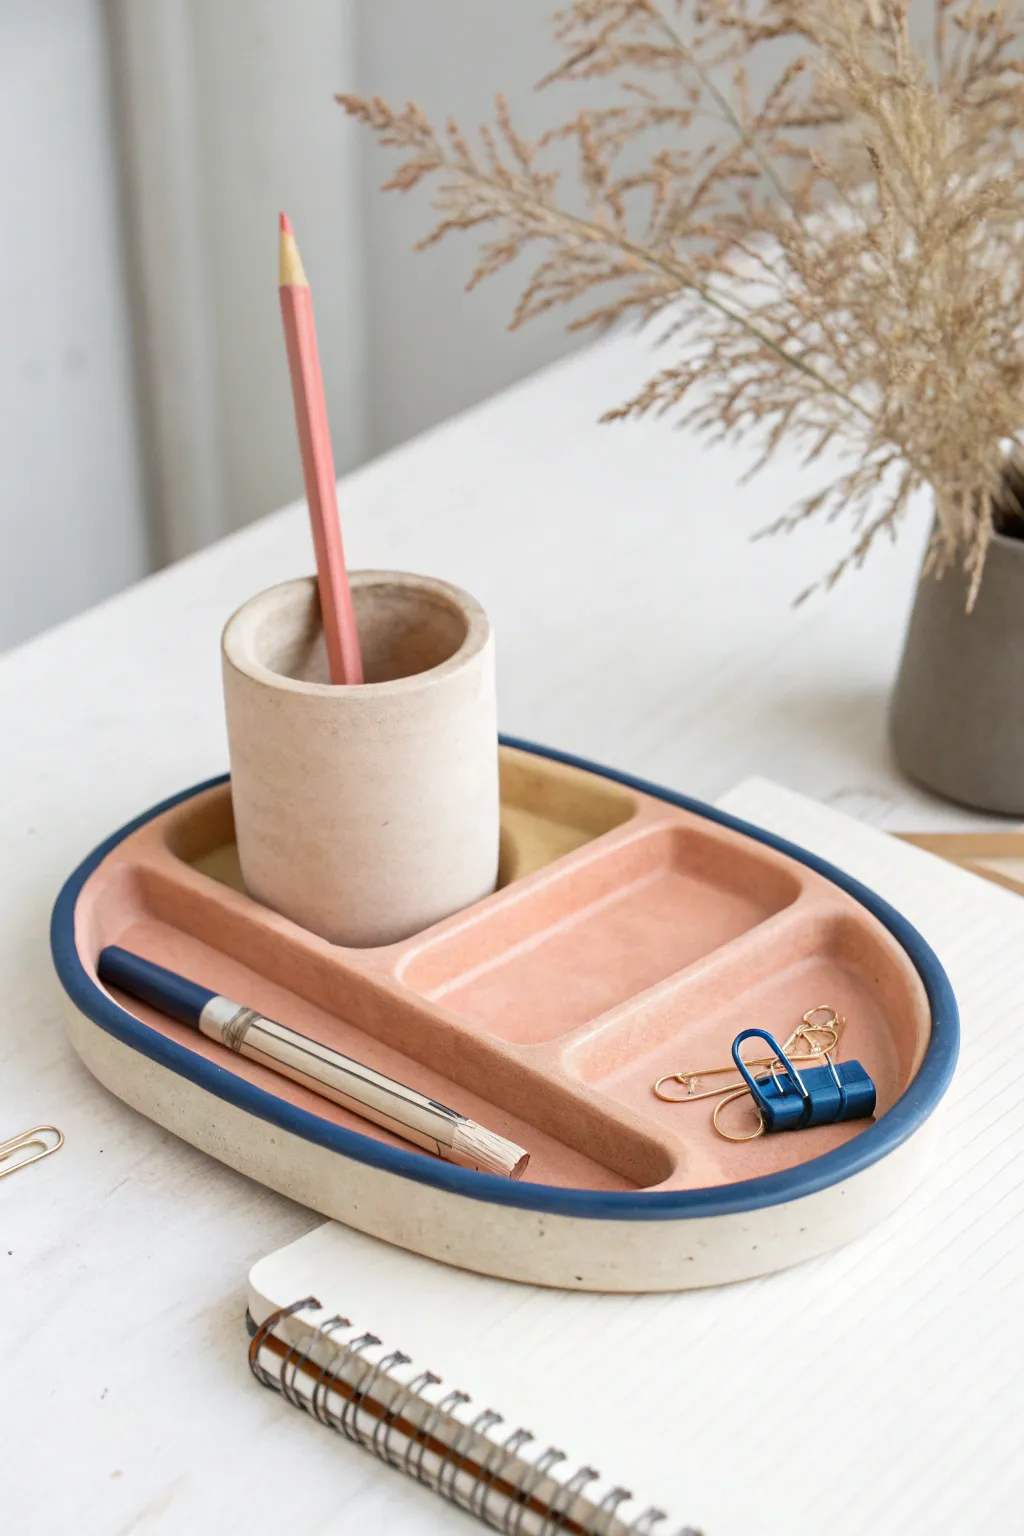
Tying together minimalism and playfulness, this desk organizer features a creamy speckled exterior and a warm terra cotta interior framed by a striking navy rim. The integrated cup adds height while keeping your pencils upright and at the ready.
Step-by-Step
Materials
- White or cream speckled stoneware clay
- Terra cotta colored underglaze or slip
- Navy blue underglaze
- Rolling pin
- Canvas mat or slab roller
- Oval paper template
- Needle tool
- Scoring tool or serrated rib
- Slip (clay and water mixture)
- Sponge
- Soft paintbrush
- Clear matte glaze
Step 1: Creating the Base
-
Roll the slab:
Begin by wedging your speckled clay to remove air bubbles, then roll out a smooth, even slab that is approximately 1/4 inch thick using your rolling pin on a canvas mat. -
Cut the oval:
Place your paper oval template onto the slab and carefully trace around it with a needle tool to cut out the base shape. -
Form the walls:
Roll a long coil of clay for the rim, or cut a long strip from the remaining slab if you prefer a straighter edge. Attach this to the top edge of your oval base by scoring both surfaces, applying slip, and pressing them firmly together. -
Smooth the seams:
Using your finger or a modelling tool, blend the coil or strip downwards into the base on both the inside and outside until the seam disappears completely. -
Shape the rim:
Gently pinch and smooth the rim to ensure it is level and has a pleasant rounded thickness. A damp sponge wipe here helps clean up rough edges.
Rim Wobbles?
If your oval rim looks warped, let the clay firm up slightly to leather hard, then use a flat paddle or ruler to gently tap the top edge level.
Step 2: Adding Internal Structure
-
Build the pencil cup:
Roll a smaller rectangular slab and join the ends to create a cylinder. Measure it to ensure it fits comfortably within one side of your oval tray. -
Attach the cup:
Score the bottom of the cylinder and the spot on the tray where it will sit. Apply slip and press the cylinder firmly into place, smoothing the interior connection with a long tool if your fingers don’t fit. -
Create dividers:
Cut small strips of clay to act as dividers. I find it easiest to measure the width of the tray first, then cut the strip to match. -
Install partitions:
Score, slip, and attach these dividers to create compartments. Based on the inspiration, place one long horizontal divider and one short vertical one to create distinct zones. -
Final smoothing:
Go over the entire piece with a barely damp sponge to remove any fingerprints or sharp burrs before letting it dry to bone dry leather hard state.
Step 3: Glazing and Finishing
-
Apply interior color:
Once bisque fired (or at greenware stage if using underglaze), paint the entire interior floor and walls of the tray sections with terra cotta underglaze. -
Detail the rim:
Using a steady hand and a fine brush, apply the deep navy blue underglaze specifically to the top rounded edge of the rim. This creates that defining outline. -
Leave the exterior:
Keep the exterior walls and the pencil cup unpainted to let the natural speckle of the clay body shine through. -
Clear glaze:
Apply a clear matte glaze over the entire piece (or just the interior if you prefer a raw clay exterior) to seal the underglaze and make the surface durable. -
Final fire:
Fire the piece in the kiln according to the clay and glaze temperature guidelines.
Clean Lines
For a super crisp line between the pink interior and blue rim, use automotive detailing tape or thin washig tape to mask off areas before painting.
Now you have a custom spot for every clip and pen on your desk
Sculptural Knot Paperweights for a Minimal Shelf Moment
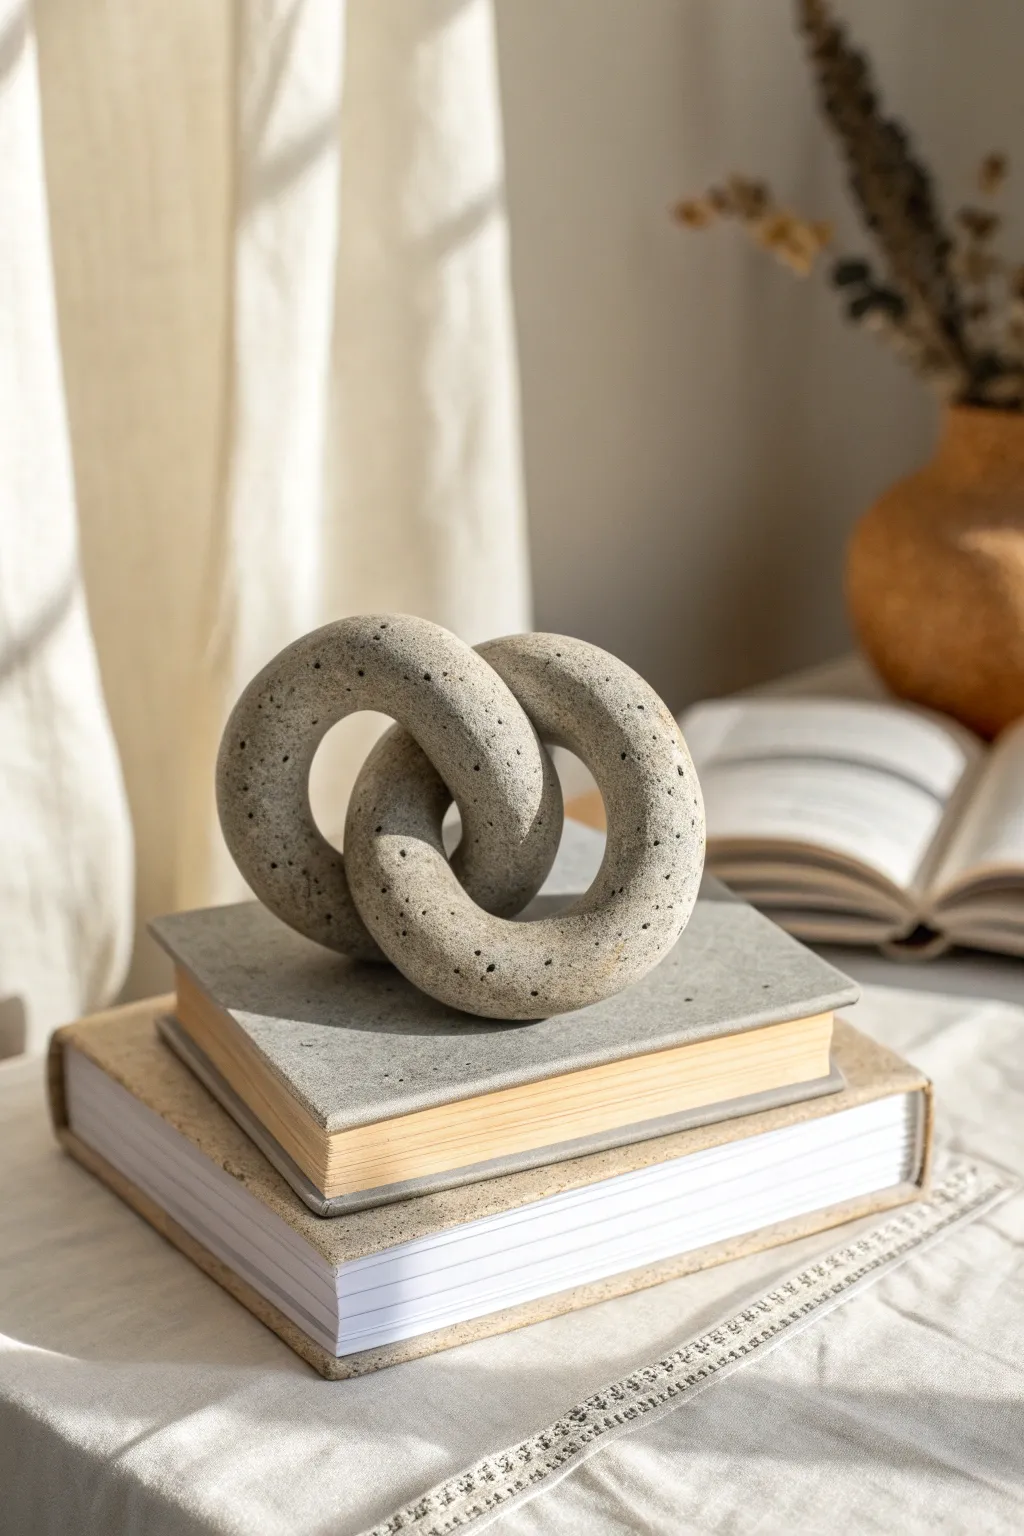
Achieve a high-end, gallery-worthy aesthetic with this surprisingly simple interlocking knot sculpture. The finished piece mimics volcanic stone or honed granite thanks to a clever speckling technique, adding organic texture to any minimal shelf display.
Detailed Instructions
Materials
- Air-dry clay (stone, grey or white)
- Black acrylic paint
- Water spray bottle
- Old toothbrush
- Rolling pin
- Sandpaper (fine and medium grit)
- Sponge
- Clear matte sealant spray
- Small bowl of water
- Clay sculpting tools (or a butter knife)
Step 1: Forming the Links
-
Condition the clay:
Begin by taking a generous amount of air-dry clay and kneading it thoroughly in your hands until it is warm, pliable, and free of cracks. -
Roll the first coil:
Roll the clay on a flat surface into a long, even snake or coil. Aim for a thickness of about 1 inch and a length of roughly 8-10 inches. -
Create the first ring:
Bring the ends of the coil together to form a circle. Score (scratch) both ends with a tool, dab a little water on them, and press them firmly together to join. -
Smooth the seam:
Using your thumb or a modeling tool, blend the clay across the seam until it disappears completely. Wet your finger slightly to help smooth out the surface. -
Position the first ring:
Let this first ring sit for about 15-20 minutes to firm up slightly so it holds its shape during the next step. -
Roll the second coil:
While the first ring rests, roll out a second coil that matches the thickness and length of the first one as closely as possible. -
Interlock the rings:
Carefully thread the second coil through the center of the first ring before joining the ends. -
Seal the second ring:
Repeat the scoring and slipping process to join the ends of the second coil, ensuring you blend the seam perfectly so it looks continuous.
Cracks while drying?
If hairline cracks appear as the clay shrinks, mix a small amount of fresh clay with water to make a paste (slip) and fill the cracks, then sand smooth once dry.
Step 2: Refining and Texturing
-
Initial shaping:
Gently manipulate the two rings so they drape naturally against each other. I like to check that the sculpture sits stable on a flat surface at this stage. -
Texture the surface:
To mimic the stone look, take a stiff bristle brush or a crumbled ball of aluminum foil and tap it gently all over the wet clay to create a porous, pitted texture. -
Dry completely:
Allow the sculpture to dry for 24-48 hours. Turn it over gently halfway through the drying process to ensure the bottom gets air exposure. -
Sand for finish:
Once bone dry, use sandpaper to smooth out any unintentional bumps or sharp ridges, while preserving the intentional stone texture you added. -
Wipe down:
Use a barely damp sponge or cloth to wipe away all the clay dust from sanding.
Step 3: The Stone Effect
-
Prepare the speckle mix:
Dilute a small amount of black acrylic paint with water until it is very runny and ink-like. -
Apply the speckles:
Dip an old toothbrush into the black wash. Hold it near the sculpture and run your thumb across the bristles to flick tiny droplets of paint onto the surface. -
Vary the density:
Apply more speckles in some areas and fewer in others to create a natural, organic stone appearance. Let the paint dry fully. -
Seal the piece:
Finish by spraying the entire sculpture with a clear matte sealant. This protects the clay and locks in the speckled design without adding an unnatural gloss.
Level Up: Color Tint
Knead a drop of burnt umber or grey acrylic paint directly into the white clay before rolling to create a deeper, integrally colored base tone.
Place your new faux-stone sculpture atop a stack of books or a linen runner to complete the calm, organic vibe


What Really Happens Inside the Kiln
Learn how time and temperature work together inside the kiln to transform clay into durable ceramic.
Mini Architectural Keepsakes That Feel Personal
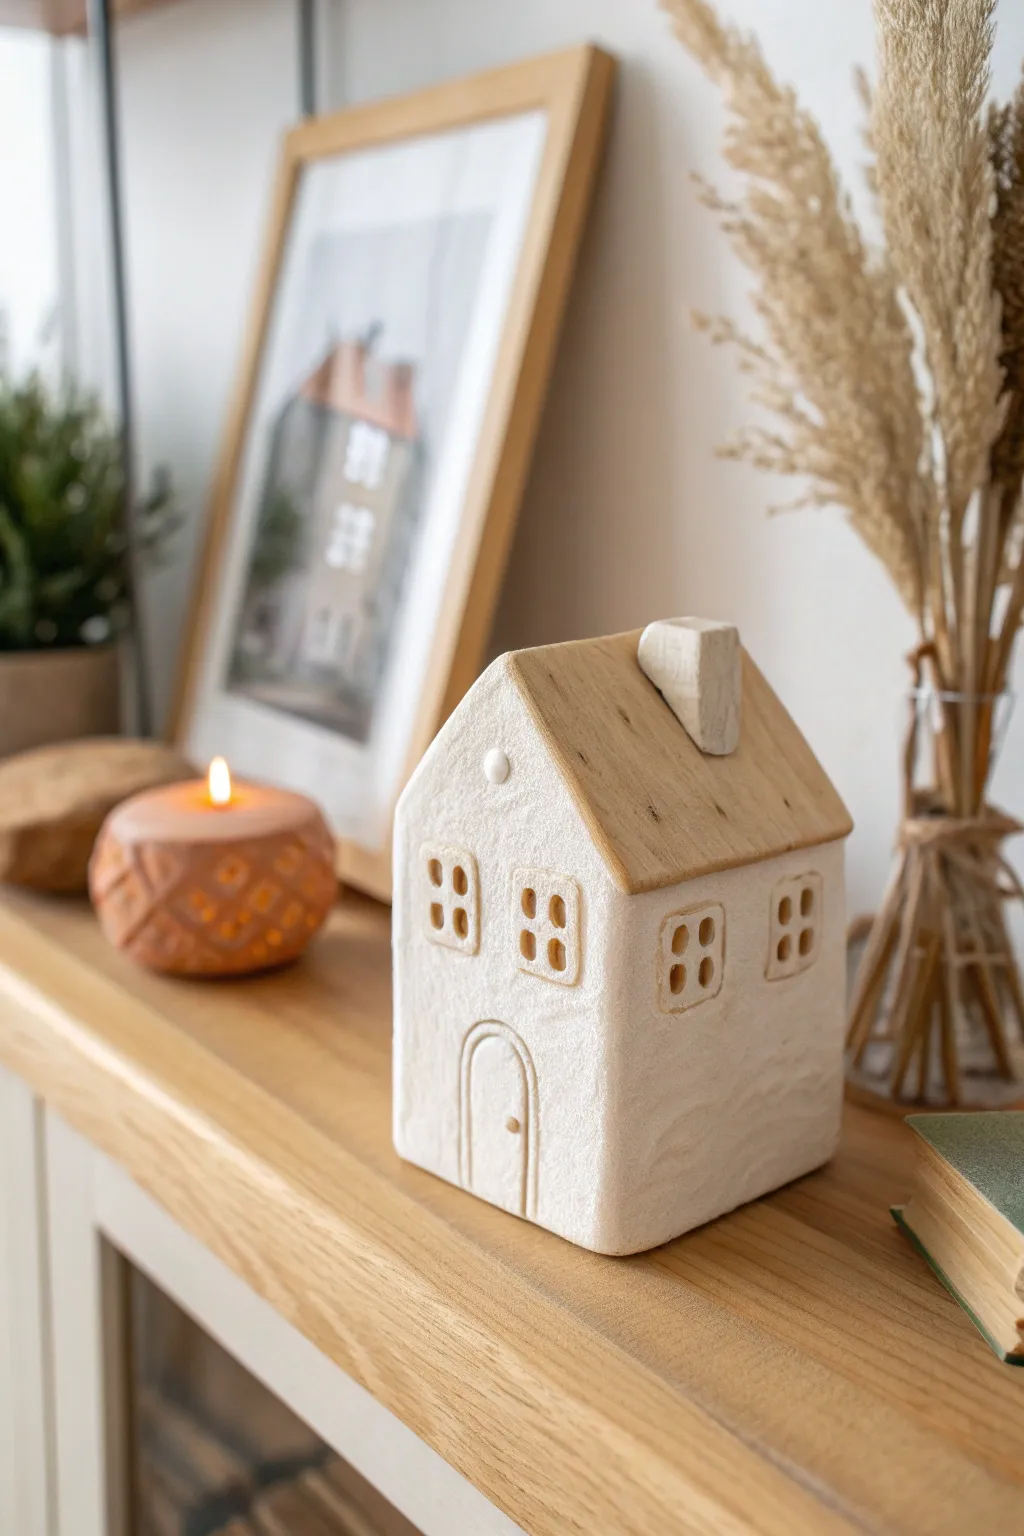
Capture the cozy charm of Scandinavian design with this textured clay house, featuring raw wood accents and a beautifully imperfect finish. This miniature architectural piece combines the warmth of natural materials with the minimalist beauty of white air-dry clay.
Step-by-Step Tutorial
Materials
- White stone-effect or standard air-dry clay
- Rolling pin
- Craft knife or scalpel
- Ruler
- Balsa wood or basswood sheet (approx. 2-3mm thick)
- Small block of scrap wood (for the chimney)
- Wood glue or strong craft glue
- Pencil
- Sandpaper (fine grit)
- Texture tool (toothbrush or stiff bristle brush)
- Small square cutter (optional, for windows)
- Sculpting tools (needle tool and smoothing tool)
Step 1: Shaping the Base Structure
-
Roll out the clay:
Begin by conditioning your white air-dry clay until it is pliable. Roll it out into a slab that is roughly 1cm thick. You want it substantial enough to stand on its own without warping. -
Cut the walls:
Using a ruler and craft knife, cut four rectangular pieces. Two will be the side walls, and two will be the front and back gable ends. Ensure the gable ends have a pointed triangular top matching the desired pitch of your roof. -
Create window openings:
Before assembling, lay the front gable piece flat. Use a small square cutter or your craft knife to carefully cut out four square window openings. Try to keep the spacing symmetrical for that neat architectural look. -
Add window details:
Roll tiny, thin snakes of clay. Place them inside the window squares to create a cross shape, forming the window panes. Gently press them into the inside edges of the window frame to secure them. -
Carve the door:
Use a needle tool to etch an arched door shape at the bottom center of the front piece. Deepen the lines to make it stand out, and add a tiny ball of clay for the doorknob. -
Add texture:
To achieve the stucco-like finish seen in the photo, gently tap the surface of all clay wall pieces with a toothbrush or a stiff bristle brush. I find this creates a lovely, realistic stone effect.
Step 2: Assembly and Stonework
-
Score and slip:
Score the edges where the walls will meet with a needle tool and apply a little water or liquid clay (slip) to act as glue. -
Join the walls:
Stand the walls up and press the corners together firmly. Use a smoothing tool or your finger to blend the seams on the inside for strength, but keep the outside corner seams relatively crisp. -
Reinforce the shape:
If the clay feels wobbly, place a small object (like a spice jar) inside the house structure temporarily to hold the walls square while they firm up. -
Dry the clay base:
Let the clay structure dry completely. This usually takes 24-48 hours depending on humidity. Rotate it occasionally so all sides dry evenly.
Texturing Trick
For a truly rustic stucco look, press a piece of coarse sandpaper against the wet clay instead of a brush. It leaves a dense, uniform grit pattern.
Step 3: Roofing and Finishing
-
Prepare the wood roof:
While the clay dries, cut two rectangular pieces of balsa wood for the roof. They should be slightly wider and longer than the house footprint to create an overhang. -
Cut the chimney:
Carve a small block of scrap wood into a simple chimney shape. Angle the bottom so it will sit flush against the slope of your roof. -
Whitewash the chimney:
Paint the wooden chimney white or coat it thinly with a scrap of clay to match the house walls. -
Attach the roof:
Once the clay base is fully dry and hard, apply wood glue to the top gable edges. Press the two balsa wood roof pieces into place so they meet at the peak. -
Secure the chimney:
Glue the chimney onto one side of the wooden roof. -
Final wood detailing:
You can lightly sand the edges of the wooden roof for a softer, worn look. Leave the wood raw for contrast, or apply a very diluted white wash if you prefer a paler aesthetic. -
Clean up:
Wipe away any excess glue with a damp cloth immediately, and verify your house stands flat on the table.
Warped Walls?
If walls bow inward while drying, cut cardboard squares to fit inside the house as temporary braces. Remove them only when the clay is bone dry.
Place your finished cottage on a shelf or mantelpiece to bring a quiet, handmade elegance to your decor