If you’re craving clay art ideas latest enough to feel fresh but still totally doable on a casual crafting day, you’re in the right headspace. In my studio, these are the newest clay trends I keep coming back to because they look modern, photograph beautifully, and don’t require fancy equipment.
Modern Arch Candle Holders
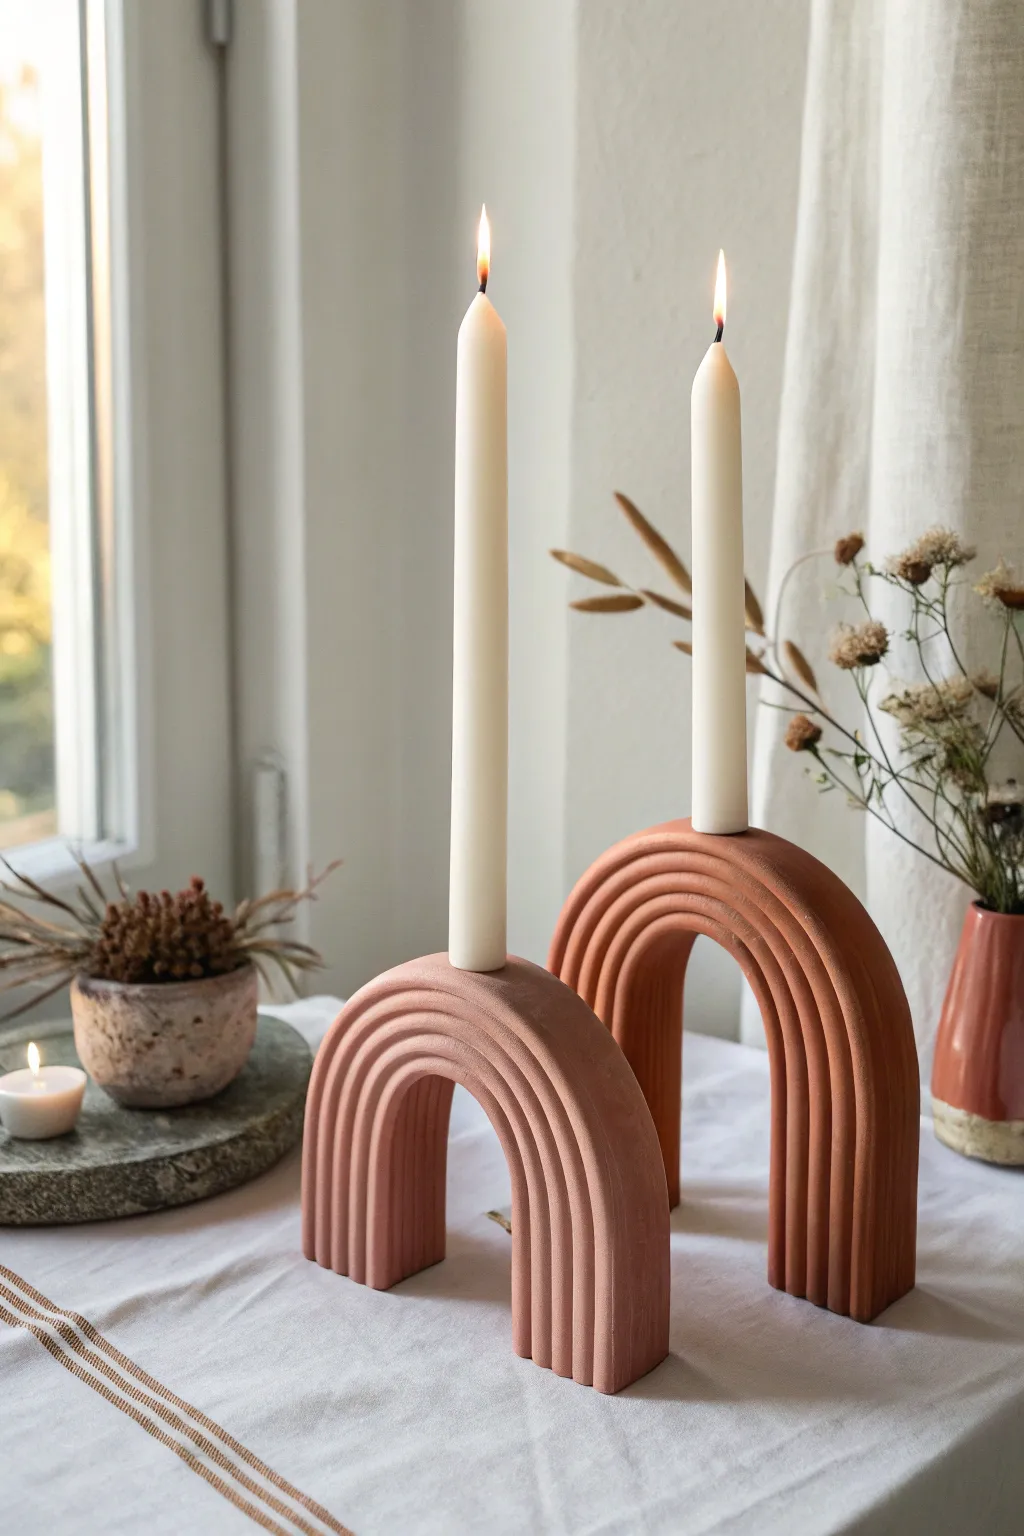
Embrace the modern, earthy aesthetic with these stunning ribbed arch candle holders. Made from terracotta-colored clay, their structured architectural shape and soft, repetitive curves bring a sophisticated warmth to any mantle or dining table.
How-To Guide
Materials
- Terracotta air-dry clay or polymer clay (approx. 1kg)
- Acrylic roller
- Sharp clay blade or X-Acto knife
- Ruler
- Two straight wooden dowels or square dowels (for thickness guides)
- Metal candle cup inserts (standard taper size)
- U-shaped mold (a jar, heavy cardboard tube, or bent wire armature)
- Clay extruder with a half-round or D-shaped disc (optional but recommended)
- Water and sponge for smoothing
- Sandpaper (fine grit)
- Matte sealant or varnish
Step 1: Creating the Base Structure
-
Prepare the workspace:
Begin by protecting your surface with a silicone mat or parchment paper. If you are using air-dry clay, keep a small bowl of water nearby for joining pieces. -
Roll the main slab:
Condition your clay until it is pliable. Using your depth guides (dowels), roll out a long, rectangular slab of clay about 1/2 inch to 3/4 inch thick. This will form the core structure of the arch. -
Cut the base strip:
Using your ruler and clay blade, cut a precise rectangular strip from the slab. The width should match the desired depth of your candle holder (approx. 2 inches), and the length should be enough to drape over your U-shaped mold. -
Form the arch:
Carefully lift the clay strip and drape it over your U-shaped mold. Gently press it down to ensure it takes the shape without cracking. If you are using a jar, you might need to support the sides so they don’t flare outward. -
Trim the legs:
While the clay is still on the mold, use your blade to trim the bottom of the ‘legs’ so they are perfectly flat and level with the table surface. This ensures the holder won’t wobble.
Use an Extruder
For perfectly uniform ribs, use a clay extruder tool. Hand-rolling ‘snakes’ often leads to uneven thickness, which ruins the clean, architectural look of this piece.
Step 2: Adding the Ribbed Texture
-
Prepare the ribs:
To create the ribbed effect, you need consistent strips of clay. The easiest method is using a clay extruder with a D-shaped (half-round) disc. Extrude several long strands. -
Alternative rolling method:
If you don’t have an extruder, roll long, even snakes of clay. Flatten the back of each snake slightly against the table to create a D-profile. -
Score and slip:
If using air-dry clay, lightly score the surface of your arch base and the back of your first clay strip. Apply a tiny amount of water or slip to act as glue. -
Apply the first rib:
Starting at the very bottom of one leg, attach the first clay strip. Run it all the way up, over the curve, and down the other side. Press gently to adhere without flattening the rounded top. -
Trimming ends:
Trim the excess length of the strip at the bottom so it is flush with the base of the leg. -
Repeat the process:
Continue adding strips side-by-side until the entire width of the arch is covered. Ensure they are packed tightly together so no base clay shows through. -
Smooth the seams:
I find it helpful to run a damp finger or a soft brush along the grooves between the ribs to smooth out usage marks and ensure a strong bond.
Speckled Finish
Mix dried coffee grounds or black pepper into your clay before rolling. When sanded later, this creates a beautiful faux-stone or ceramic speckle effect.
Step 3: Finishing Touches
-
Install the candle cup:
Locate the exact center top of the arch. Press your metal candle cup insert firmly into the clay ribs. You may need to carve out a small amount of clay to make it sit flush. -
Secure the insert:
Blend the clay slightly around the base of the metal insert to lock it in place, or plan to glue it in after drying. -
Drying or baking:
Allow the piece to dry completely on the mold (24-48 hours for air-dry clay) or bake according to package instructions if using polymer clay. Don’t rush this step or the arch may warp. -
Sanding:
Once fully cured, gently sand the bottom legs to ensure they are perfectly flat. You can also lightly sand the ribs if there are any rough fingerprints. -
Seal:
Apply a coat of matte varnish or sealant to protect the terracotta finish and give it a professional, finished look.
Place your sleek new candle holders near a window to let the light play across the textured ribs


Abstract Polymer Clay Earrings
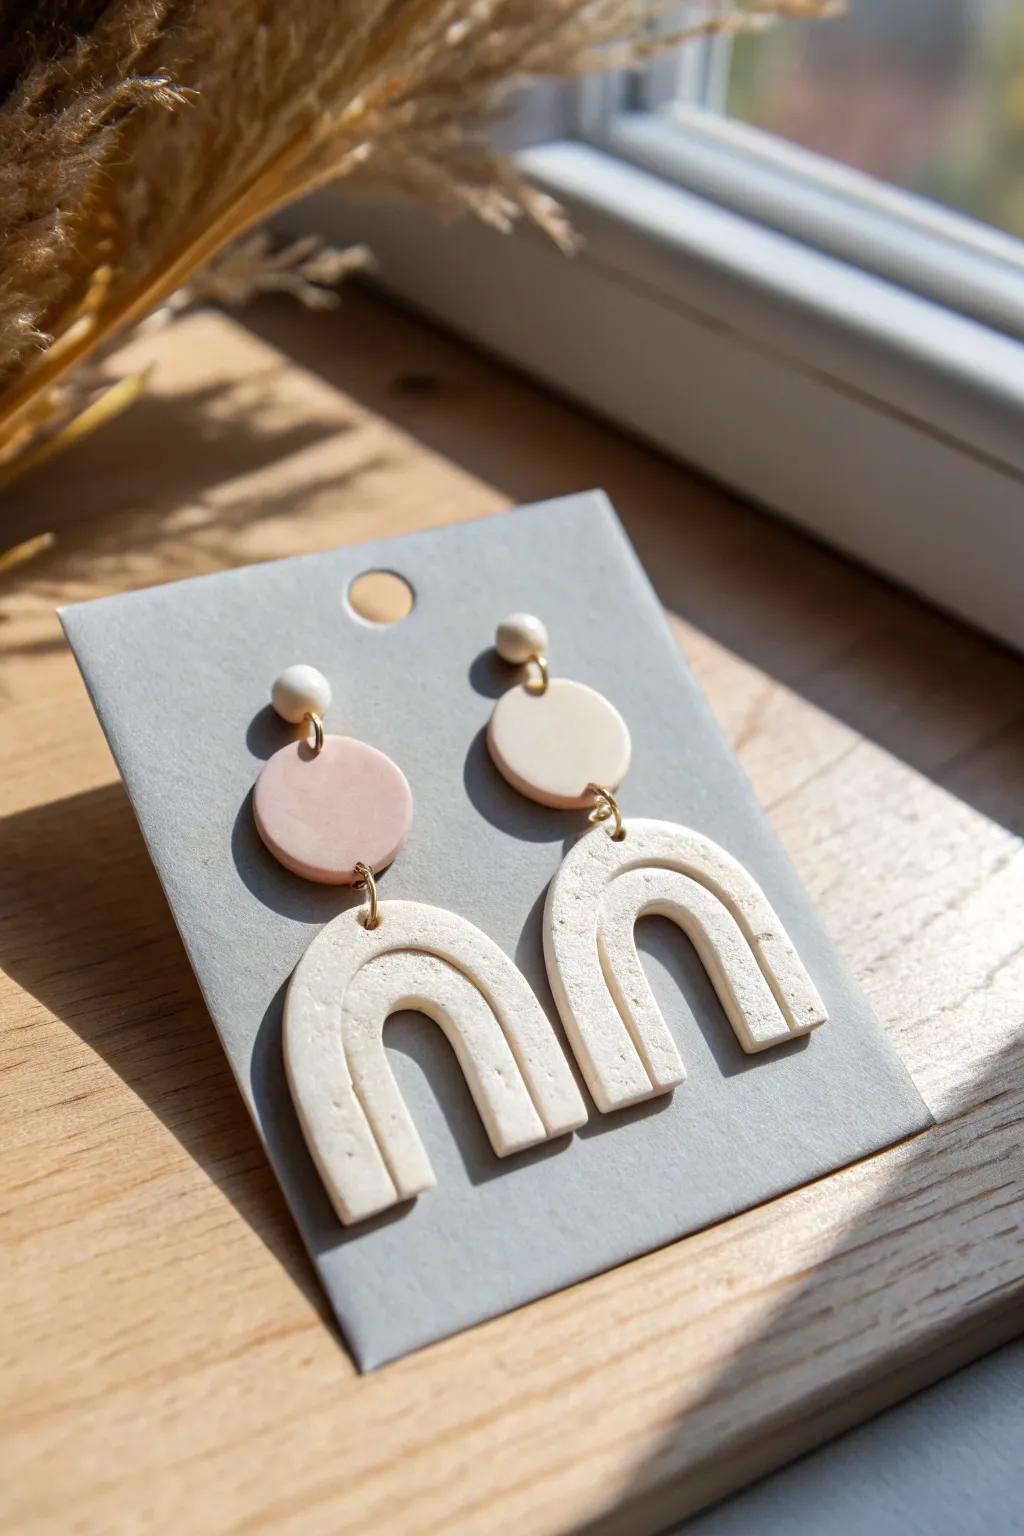
These trendy polymer clay dangles feature a lovely textured finish that mimics natural stone. The soft, neutral color palette of blush and cream makes them a versatile accessory for any outfit.
Step-by-Step Guide
Materials
- Polymer clay (white, beige, translucent, and a pinch of black)
- Acrylic roller
- U-shape / Arch clay cutter
- Small circle clay cutter (approx. 15mm)
- Texture sponge or coarse sandpaper
- Jump rings (gold tone)
- Ball post earring studs
- Needle tool or toothpick
- Jewelry pliers
- Oven
- Parchment paper
Step 1: Creating the Stone Texture
-
Mix the Base Color:
Start by conditioning a block of white polymer clay until it’s soft and pliable. Mix in a very small amount of beige to warm up the white, creating a creamy off-white base. -
Add the Speckles:
To achieve the stone effect, take a tiny crumb of black clay—truly, just a speck—and mix it into your cream clay. Stop mixing while the black is still streaky or barely blended. -
Incorporate Translucency:
Add a small portion of translucent clay (about 25% of the total volume) to the mix. This gives the final piece a realistic depth rather than a flat plastic look. -
Chop and Re-roll:
Finely chop the clay with a blade, then gather the bits and press them back together. Roll this into a ball and flatten. Repeat this process until you have a varied, organic speckled pattern throughout the slab.
Fingerprints everywhere?
Before baking, adhere a piece of painter’s tape to your finger (sticky side out) and dab the clay surface to lift away dust and faint fingerprints.
Step 2: Forming the Shapes
-
Roll the Slab:
Using your acrylic roller, roll the speckled clay out to a thickness of about 3mm. Ensure it is even. -
Cut the Arches:
Press your U-shape cutter firmly into the clay slab to cut two identical arch shapes. If the clay sticks to the cutter, I find a light dusting of cornstarch helps it release cleanly. -
Texture the Surface:
Before baking, gently press a coarse sponge or a piece of rough sandpaper over the surface of the arches. This adds a tactile, matte finish that enhances the stone look. -
Mix Accent Colors:
For the top circles, mix two shade variations: one light cream and one soft blush pink. Roll these out to the same thickness as your arches. -
Cut the Circles:
Use your small circle cutter to punch out two rounds. Notice in the photo that the colors are mismatched for an asymmetric look; cut one of each color if you want to replicate that style exactly. -
Pierce the Holes:
Use a needle tool to carefully poke a hole at the top center of each arch and the bottom center of each circle. Make sure the hole is large enough for your jump rings.
Level Up: Gold Leaf
Press tiny flakes of gold leaf onto the clay slab before cutting your shapes. The metallic shine contrasts beautifully with the matte stone texture.
Step 3: Baking and Assembly
-
Bake the Pieces:
Place all clay components on a parchment-lined baking sheet. Bake according to your clay manufacturer’s instructions (usually 275°F/135°C for 30 minutes). -
Cool Down:
Let the pieces cool completely inside the oven or on a wire rack before handling, as warm clay can be brittle. -
Sand the Edges:
If there are any rough spots on the sides where you cut the clay, gently sand them smooth with fine-grit sandpaper. -
Attach Jump Rings:
Using two pairs of jewelry pliers, twist the jump rings open laterally. Thread one ring through the top of the arch and the bottom of the circle, then twist it closed. -
Secure the Post:
The earring post in the project is a decorative ball stud attached to the top of the circle. Position the stud at the top edge of the clay circle. -
Glue or Embed:
Secure the stud to the back of the clay circle using strong jewelry glue. Alternatively, if you plan ahead, you can embed the post into the clay before baking for a seamless finish.
Enjoy wearing your sophisticated, handcrafted stone-effect earrings


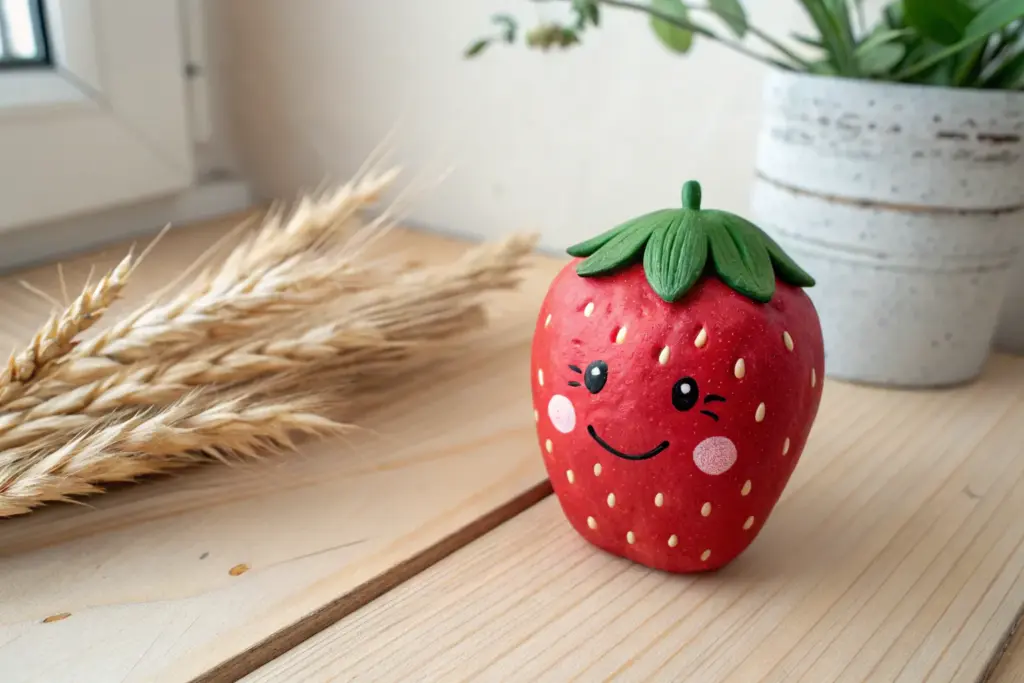
Smiley Face Magnets
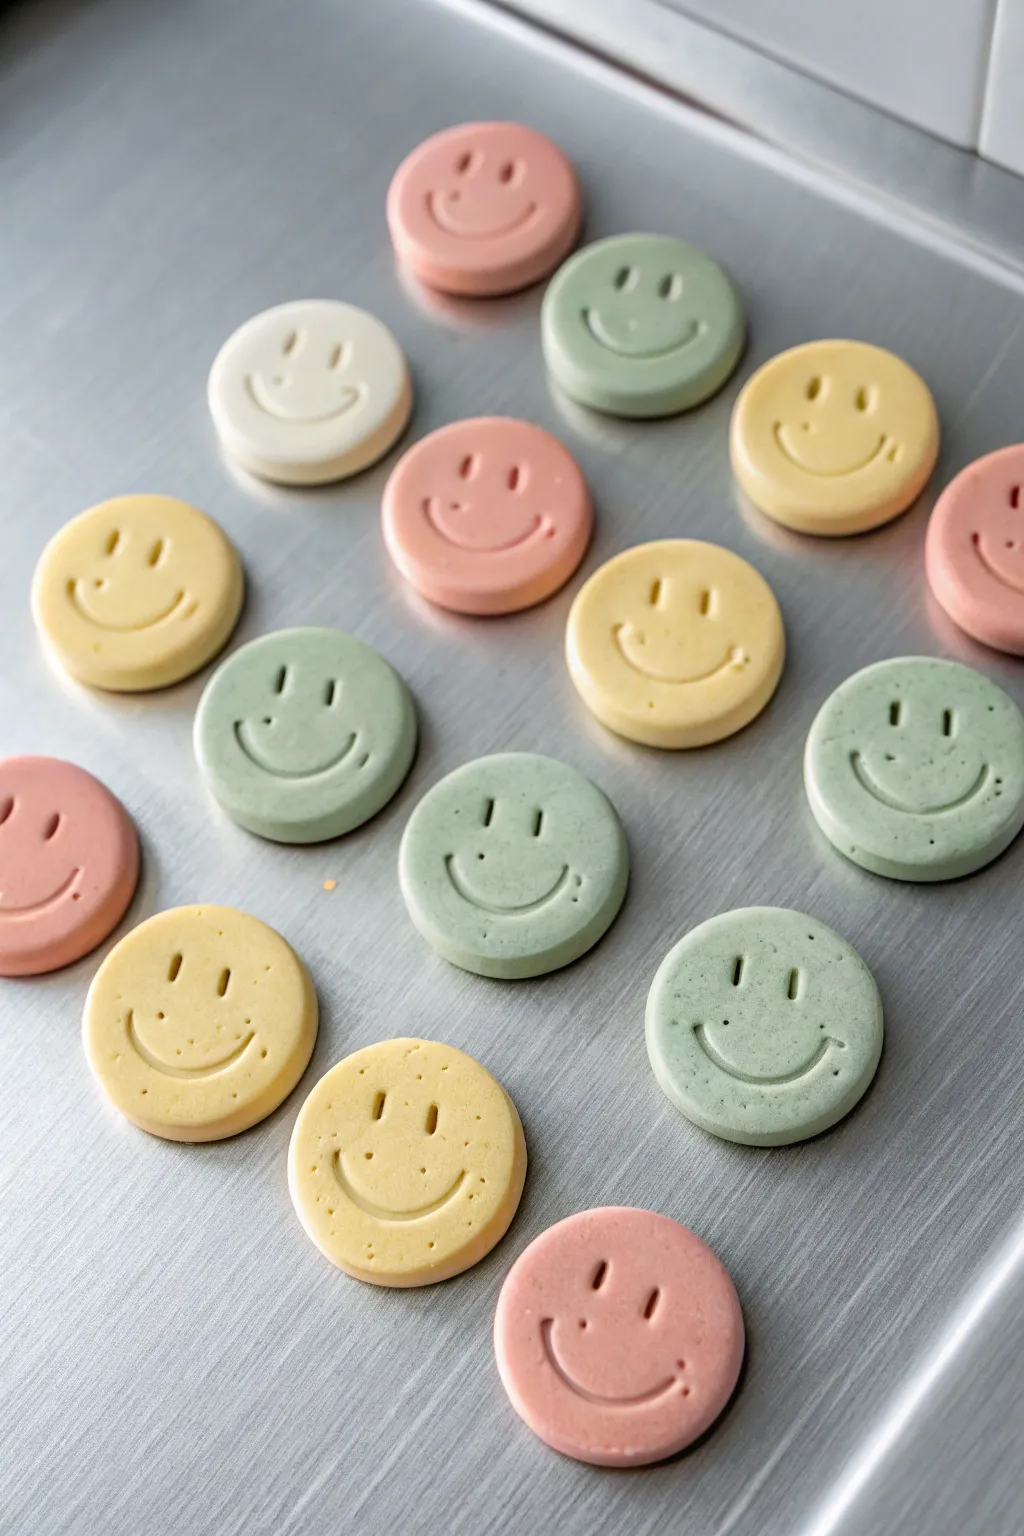
Brighten up your fridge or magnetic board with these charming, minimalist clay magnets. These pastel-hued smiles are incredibly simple to make, featuring a clean, matte finish and adorable imprinted expressions that add a touch of positivity to any space.
How-To Guide
Materials
- Polymer clay (in pastel pink, yellow, mint green, and cream/white)
- Circle cookie cutter (approx. 1.5 – 2 inches in diameter)
- Acrylic roller or pasta machine
- Small round piping tip or sturdy straw (for eyes)
- Curved clay tool, small spoon edge, or metal U-shaped cutter (for mouths)
- Parchment paper
- Baking sheet
- Strong round craft magnets
- Strong adhesive (E6000 or super glue)
- Optional: Cornstarch (to prevent sticking)
Step 1: Preparing the Clay
-
Condition the clay:
Start by taking a portion of your first clay color (e.g., pastel pink). Knead it thoroughly in your hands until it becomes warm, soft, and pliable. -
Mix custom shades:
If you want that soft, muted look from the photo, try mixing a tiny bit of white clay into your standard colors. I find this helps achieve that cohesive pastel aesthetic. -
Roll it out:
Using your acrylic roller or pasta machine, flatten the clay into an even sheet. Aim for a thickness of about 1/4 inch (6mm) so the magnets feel substantial but aren’t too heavy. -
Cut the circles:
Press your circle cutter firmly into the clay sheet to punch out your bases. If the clay sticks to the surface, a light dusting of cornstarch underneath helps release it cleanly.
Sticky Situation?
If clay sticks to your cutter or tools, dip them in cornstarch or water before pressing. This releases the clay cleanly without dragging.
Step 2: Adding the Expressions
-
Smooth the edges:
Gently verify the edges of your cut circles. If there are any jagged bits, lightly tap them smooth with your fingertip to create a nice, rounded rim. -
Stamp the eyes:
Take your small piping tip or straw. Press it gently into the upper half of the circle to create two oval or round indentations for eyes. Don’t punch all the way through, just deep enough to make a shadow. -
Create the smile:
Using your curved tool or the edge of a spoon, press a U-shape into the lower half of the circle. Rock the tool slightly back and forth to widen the groove of the smile. -
Refine the details:
Look closely at the expression. If the clay displaced slightly, use a soft silicone tool or your finger to smooth down any raised ridges around the eyes or mouth. -
Add character (optional):
For variety, punch the eyes slightly unevenly or tilt the smile to give each magnet a unique personality, or use a needle tool to add tiny ‘dimples’ at the corners of the mouth. -
Repeat for all colors:
Continue this process with your yellow, mint, and cream clay until you have a whole family of smiley faces.
Step 3: Baking and Assembly
-
Arrange for baking:
Place your finished clay discs onto a baking sheet lined with parchment paper. Ensure they aren’t touching. -
Bake the pieces:
Bake the clay according to the manufacturer’s instructions on your specific package (usually around 275°F/135°C for 15-30 minutes). I prefer to tent foil over them to prevent any darkening of the light colors. -
Cool down completely:
Once baked, remove the tray from the oven and let the clay pieces cool undisturbed. They harden fully as they cool. -
Prepare the magnets:
Flip the cooled clay faces over. Apply a small dab of strong adhesive, like E6000, to the center of the back of each disc. -
Attach the magnets:
Press your magnet firmly into the glue. Let the adhesive cure for the recommended time (often 24 hours for full strength) before sticking them to your fridge.
Smoother Surfaces
Before baking, lightly wipe surface with baby oil or rubbing alcohol on a finger. This removes fingerprints and dust for a pro finish.
Now you have a cheerful collection of faces ready to hold up your important notes and photos


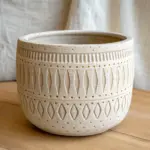
Simple Face Planters
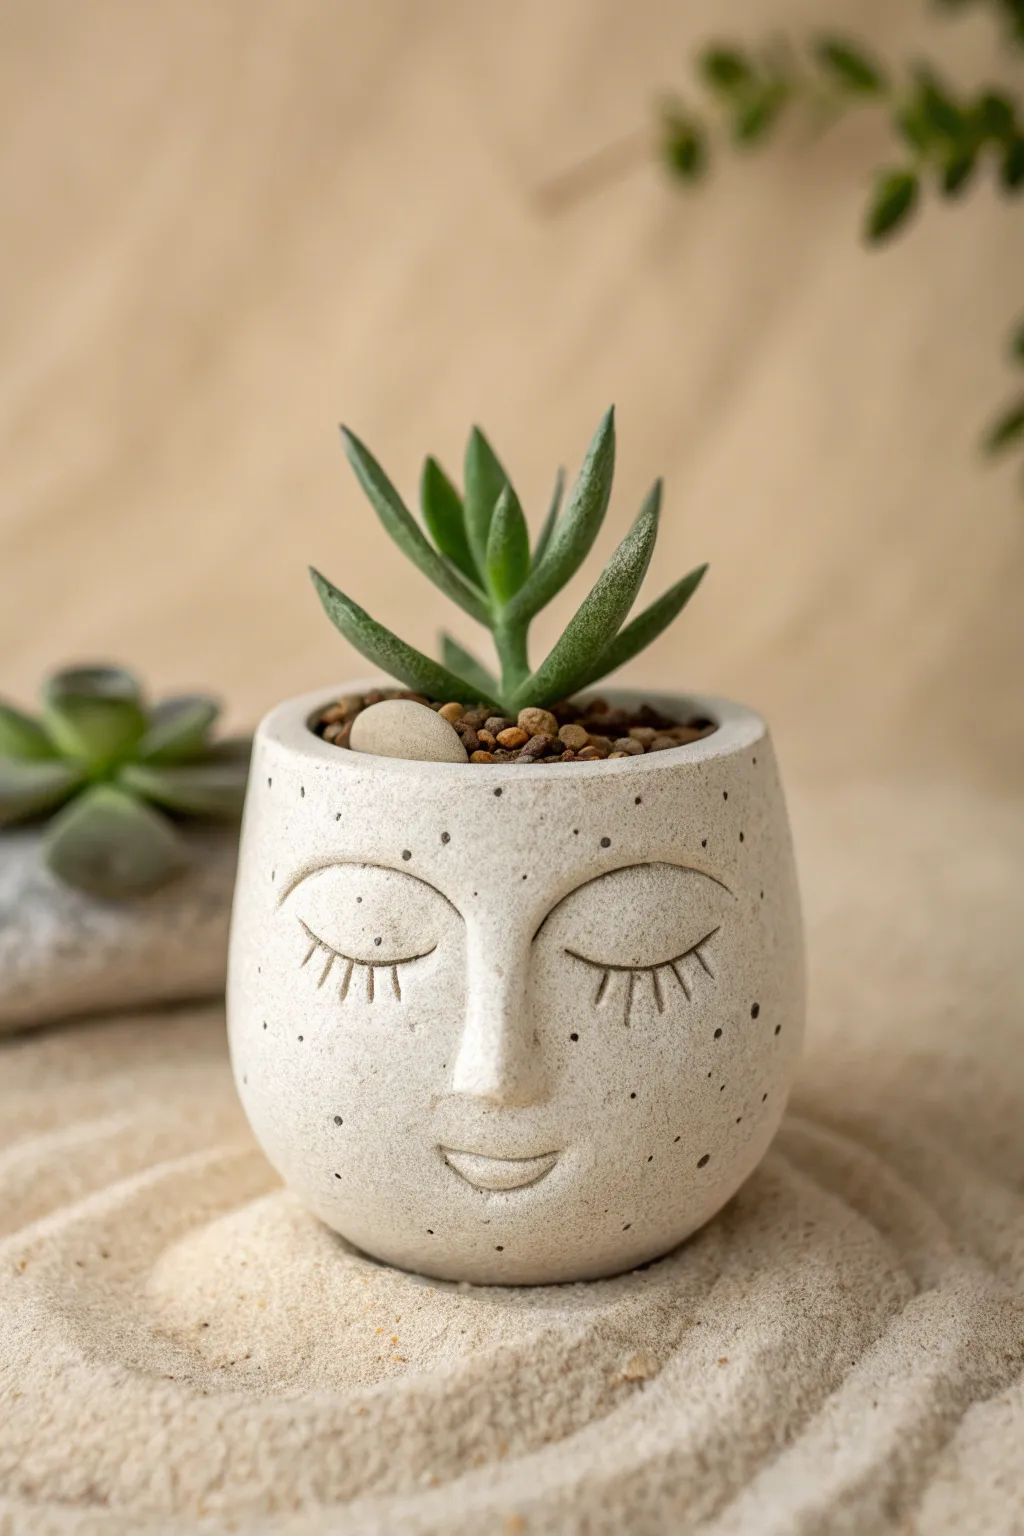
Capture a moment of tranquility with this minimalist face planter that evokes the peacefulness of a Zen garden. The textured, speckled finish and gently closed eyes give this piece a dreamy quality perfect for housing small succulents.
Step-by-Step Guide
Materials
- White polymer clay or air-dry stoneware clay
- Dried coffee grounds or coarse black pepper (for speckling)
- Small rolling pin
- Circular cookie cutter or jar lid (approx. 3-4 inches diameter)
- Needle tool or toothpick
- Small loop tool or carving set
- Water and sponge (for smoothing)
- Craft knife
- Tiny pebble (for nose support, optional)
- Matte sealant or varnish
Step 1: Preparing the Speckled Clay
-
Condition the clay:
Begin by warming up your white clay in your hands until it becomes pliable and soft. If you are using polymer clay, this might take a few minutes of kneading. -
Add the texture:
To achieve that organic, stone-like look, flatten your clay slightly and sprinkle in a pinch of dried coffee grounds or coarse black pepper. Fold the clay over and knead it repeatedly until the specks are evenly distributed throughout the batch. -
Roll out the base:
Roll a portion of the clay into a flat slab about 1/4 inch thick. Use your circular cutter to punch out a perfect circle; this will be the bottom of your pot. -
Create the walls:
Roll out the remaining clay into a long, rectangular strip. It should be the same thickness as the base and long enough to wrap around the circumference of your circle with a little overlap.
Nose Profile Trick
Look at the pot from the side profile while blending the nose. This ensures the nose stick out far enough and doesn’t look too flat against the cylinder.
Step 2: Assembling the Form
-
Score and slip:
If using air-dry clay, score (scratch) the edges of the base and the bottom of the wall strip, then add a little water. For polymer clay, you can simply press firm, clean edges together, but blending liquid clay can act as a strong glue. -
Building the cylinder:
Wrap the rectangular strip around the base circle. Join the vertical seam where the walls meet by smoothing the clay over the line with your thumb or a modeling tool, creating a seamless cylinder. -
Shape the curve:
This pot is slightly rounded, not a perfect cylinder. Gently cup your hands around the pot and apply light pressure to curve the walls slightly inward at the top rim and bottom, creating a soft, barrel-like shape. -
Smooth the surface:
Dip your finger or a sponge in a tiny bit of water (or clay softener) and run it over the entire outside surface to remove fingerprints and ensure the speckles look embedded within the stone.
Step 3: Sculpting the Features
-
Add the nose:
Roll a small, elongated teardrop shape of clay. Position it in the center of the ‘face’ area. Blend the edges of the nose seamlessly into the pot, leaving the bridge and tip prominent. -
Refine the bridge:
Use a modeling tool to smooth the slope from the forehead into the nose bridge so it looks like it emerges naturally from the surface rather than being stuck on. -
Carve the eyes:
Using a needle tool, gently etch two curved semi-circles on either side of the nose for the closed eyelids. Keep your hand steady to ensure the curves are symmetrical. -
Add eyelashes:
Below the eyelid curves, press small, straight lines fanning downward to create the lashes. I like to make the center lashes slightly longer than the ones on the corners for a sweet look. -
Sculpt the mouth:
Press a small, shallow curved line below the nose for the smile. Use a small ball tool to indent the corners slightly, giving the expression a soft, peaceful lift.
Cracks While Drying?
If using air-dry clay and small cracks appear, mix a tiny bit of fresh clay with water to make a paste and fill the cracks, then smooth over.
Step 4: Finishing Touches
-
Refining the rim:
Check the top rim of the pot. It should be smooth and somewhat thick to match the sturdy aesthetic. Use your sponge to soften any sharp edges. -
Drainage hole check:
create a small hole in the center of the bottom slab using a straw or tool, which is crucial for succulent health. -
Drying or baking:
Follow your specific clay’s instructions. For air-dry clay, let it sit in a cool, dry place for 24-48 hours. For polymer clay, bake it on a dedicated sheet according to the package temperature. -
Sealing:
Once fully cured, apply a matte varnish to the outside to protect it. If using air-dry clay, waterproof the inside thoroughly with a resin or heavy-duty sealer so watering plants won’t damage it.
Place your favorite succulent inside and enjoy the calm presence this little planter brings to your space

The Complete Guide to Pottery Troubleshooting
Uncover the most common ceramic mistakes—from cracking clay to failed glazes—and learn how to fix them fast.
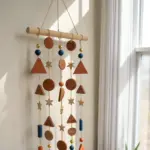
Phase-of-the-Moon Wall Tiles
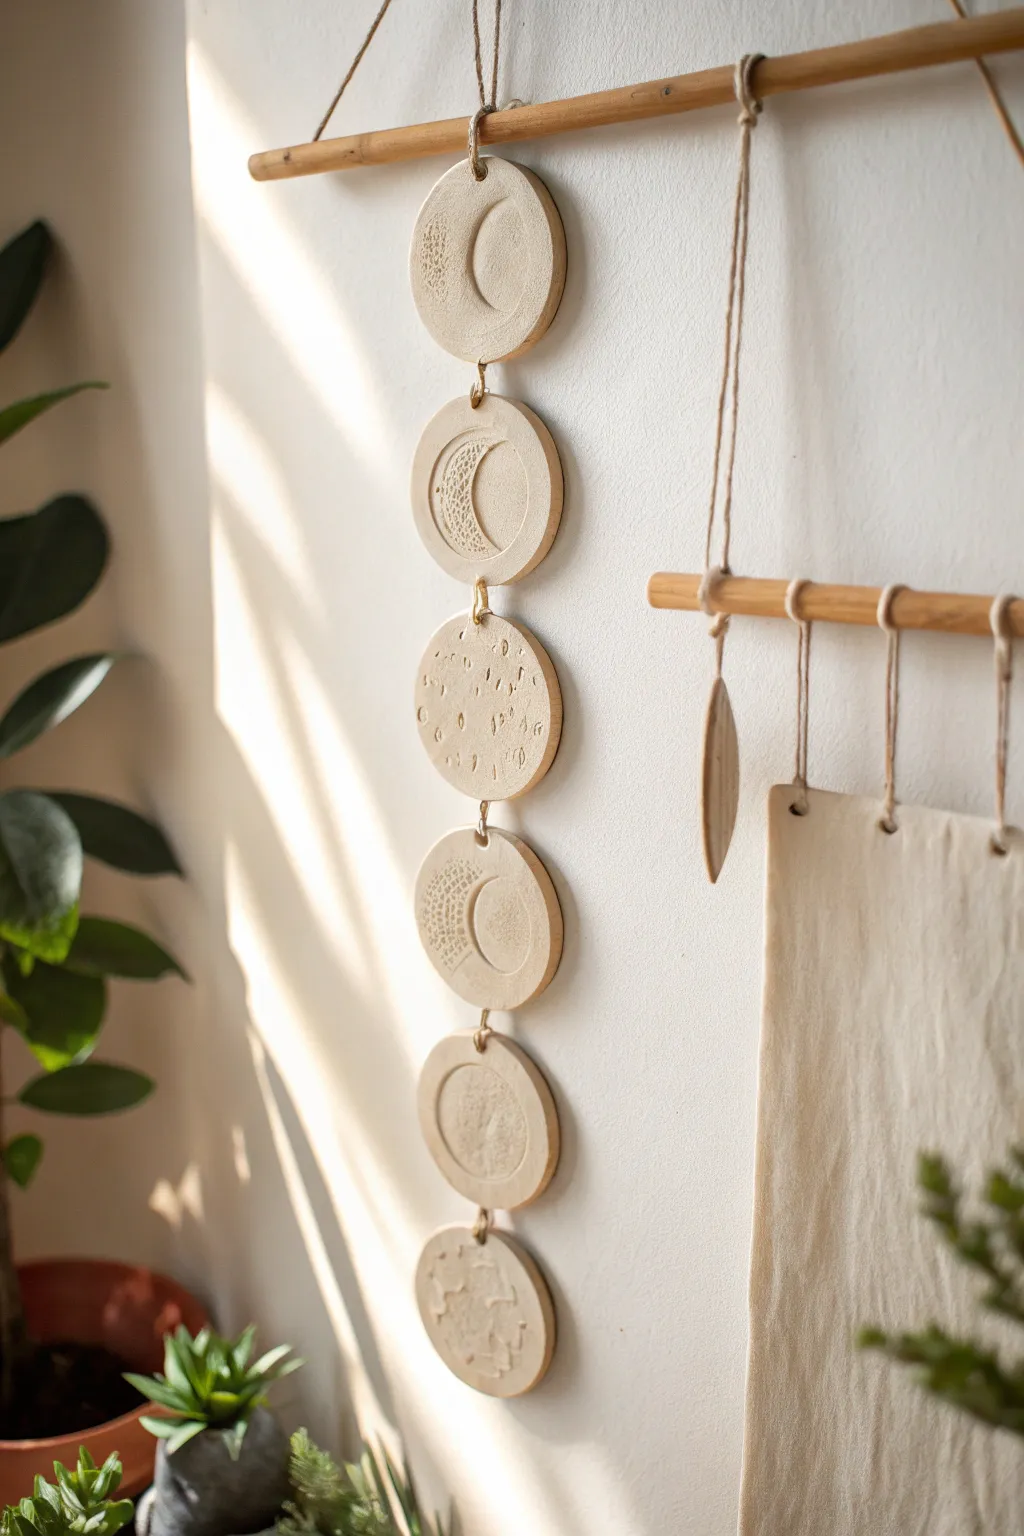
Bring the calming influence of the cosmos into your home with this vertical mobile of textured moon crescents. Suspended from a natural wooden dowel, these clay discs feature subtle, tactile details that catch the light beautifully.
Step-by-Step
Materials
- White air-dry clay (or polymer clay)
- Rolling pin
- Circle cookie cutter (approx. 3-4 inches)
- Round objects for imprinting (film canister, bottle cap)
- Lace or textured fabric scraps
- Wooden dowel or driftwood branch
- Jute twine or natural cord
- Sandpaper (fine grit)
- Straw or skewer (for piercing holes)
- Small cup of water
Step 1: Shaping the Moons
-
Prepare your clay:
Cut off a substantial chunk of white air-dry clay and knead it in your hands until it becomes warm, pliable, and free of cracks. -
Roll out the slab:
Using a rolling pin on a smooth surface or craft mat, roll the clay out to an even thickness of about 1/4 inch. Aim for consistency so the hanging balances well. -
Cut the circles:
Press your circle cutter firmly into the clay to create six separate discs. You may need to re-roll scraps to get enough material for all the pieces. -
Smooth the edges:
Dip your finger in a little water and gently run it around the cut edges of each circle to smooth out any roughness or sharp burrs left by the cutter.
Step 2: Adding Texture & Detail
-
Create the crescent outlines:
Take a slightly smaller round object (like a jar lid or cookie cutter) and gently press it off-center into a clay disc. Don’t cut all the way through; just create an indented arc to define the moon shape. -
Imprint textures:
For the crescent sliver, press a piece of lace or textured fabric gently into the clay to leave a delicate pattern. This creates the ‘shadow’ part of the moon. -
Vary the patterns:
For other discs, use a toothpick or the end of a paintbrush to stipple small dots, creating a cratered surface. I like to keep one or two discs relatively smooth for visual contrast. -
Pierce hanging holes:
Use a drinking straw or skewer to poke a hole at the very top and very bottom of each disc. Exception: The bottom-most disc only needs a hole at the top. -
Clean up the holes:
Check the back of the discs where the straw exited and smooth down any pushed-out clay so the area is flat.
Keep it flat
To prevent curling while drying, place a lightweight book on top of the clay discs once the surface is dry to the touch, sandwiching them between paper towels.
Step 3: Assembly
-
Allow to dry:
Place your discs on a wire rack or parchment paper. Let them dry completely, flipping them occasionally to prevent curling. This usually takes 24-48 hours depending on humidity. -
Sand for perfection:
Once bone dry, take fine-grit sandpaper and lightly buff the edges and surface to remove any fingerprints or imperfections. -
Cut your twine:
Cut a long main piece of jute twine for hanging the dowel, and several shorter lengths (about 3-4 inches each) to connect the circles. -
Attach the top hook:
Tie the main suspension cord to both ends of your wooden dowel, creating a triangle shape for hanging the entire piece. -
Connect the first moon to the dowel:
Thread a piece of twine through the top hole of your first moon disc and tie it securely around the center of the wooden dowel. Trim excess string. -
Link the chain:
Using small knots or loops, tie the bottom of the first disc to the top of the second disc. Continue linking them in a vertical chain. -
Final adjustments:
Hang the piece on a wall hook to check the balance. Adjust the knots slightly if any moon is hanging crookedly.
Add some sparkle
Once dry, paint inside the textured crescent areas with gold leaf paint or metallic watercolor to catch the sunlight and add a magical touch.
Hang your new celestial art near a window to watch the shadows play across the textured surfaces throughout the day
Bubble-Texture Desk Cups

This striking desk cup features a mesmerizing tactile surface created by a rhythmic pattern of raised bubbles. The deep ocean-blue glaze pools beautifully around the texture, creating natural highlights that make this piece pop on any workspace.
Step-by-Step Guide
Materials
- White stoneware or porcelain clay body
- Rolling pin
- Clay slab guides (approx. 1/4 inch thickness)
- Cylindrical form (PVC pipe or rolling pin) for shaping
- Needle tool or fettling knife
- Scoring tool (serrated rib)
- Slip (clay mixed with water)
- Sponge
- Small round loop tool or melon baller (optional)
- Deep cobalt blue gloss glaze
- Clear glaze (optional)
- Paintbrush for glazing
Step 1: Forming the Base Cylinder
-
Roll the slab:
Begin by rolling out your white clay on a canvas board. Use slab guides to ensure an even thickness of about 1/4 inch across the entire surface. -
Measure and cut:
Determine the desired height and circumference of your cup. Cut a rectangular strip of clay based on these measurements, adding a slight overlap for the seam. -
Cut the base:
Place your cylindrical form or a cookie cutter onto the remaining slab to cut out a perfect circle for the bottom of the cup. -
Score and slip the seam:
Score the short edges of your rectangular strip and the outer edge of the circular base. Apply a generous amount of slip to the scored areas. -
Assemble the cylinder:
Wrap the rectangular slab around your cylindrical form or simply curl it to join the edges. Press the seam firmly together. -
Attach the bottom:
Place the cylinder onto the scored base. Use a modeling tool to blend the clay from the outside of the wall down onto the base to create a sealed join. -
Smooth the surface:
Remove the form if you used one. Use a damp sponge to smooth out the vertical seam and the bottom connection until they are invisible.
Adhesion Pro-Tip
If the clay is too dry, the bubbles might pop off. Make sure your cylinder is still leather-hard (damp but firm) when attaching the texture balls.
Step 2: Creating the Bubble Texture
-
Prepare clay balls:
Roll dozens of small, peas-sized balls of clay. Try to keep them relatively consistent in size, though slight distinct variations add organic charm. -
Score the surface:
Lightly score the entire exterior surface of your cylinder where you intend to place the bubbles. You can do this in rows or all at once. -
Apply the bubbles:
Dip each small clay ball into a little slip and press it firmly onto the cylinder wall. Start from the bottom row and work your way up. -
Establish the pattern:
Arrange the rows in a grid pattern. Ensure the balls are close enough to touch or nearly touch, creating a dense texture. -
Secure the attachments:
Once a row is placed, use your thumb to gently press the center of each ball to flatten it slightly and ensure a strong bond with the wall. -
Refine the shape:
Go over the bubbles with a damp finger or soft brush to smooth away any rough edges or slip globs, rounding them off perfectly. -
Dry slowly:
Cover the piece loosely with plastic to let it dry slowly. This prevents the varying thicknesses of clay from cracking as they shrink.
Level Up: Ombré Effect
Dip the top half in a lighter blue glaze after the dark base coat dries. The two glazes will interact during firing for a unique drift.
Step 3: Glazing and Finishing
-
Bisque fire:
Fire the completely dry piece in a kiln to cone 04 (or your clay’s specific bisque temperature). -
Clean the bisque:
Wipe the fired piece with a damp sponge to remove any kiln dust before glazing. -
Apply the interior glaze:
Pour a deep cobalt blue glaze into the cup, swirl it around to coat the entire interior, and pour out the excess. -
Glaze the exterior:
Brush or dip the exterior in the same blue glaze. Allow the glaze to pool naturally in the crevices between the bubbles. -
Highlight the texture:
I like to gently wipe the very tops of the bubbles with a damp sponge. This thins the glaze on the high points, allowing the lighter clay body to show through after firing. -
Clean the rim:
Wipe the top rim of the cup clean with a sponge to leave a crisp, unglazed white line for contrast. -
Final firing:
Fire the piece to the glaze maturity temperature (likely cone 5 or 6). The glaze will break over the texture, creating the dimensional effect.
Once cooled, fill your new textured cup with brushes or pens and enjoy the satisfaction of using your own handmade pottery


What Really Happens Inside the Kiln
Learn how time and temperature work together inside the kiln to transform clay into durable ceramic.
Pressed-Botanical Imprint Plates
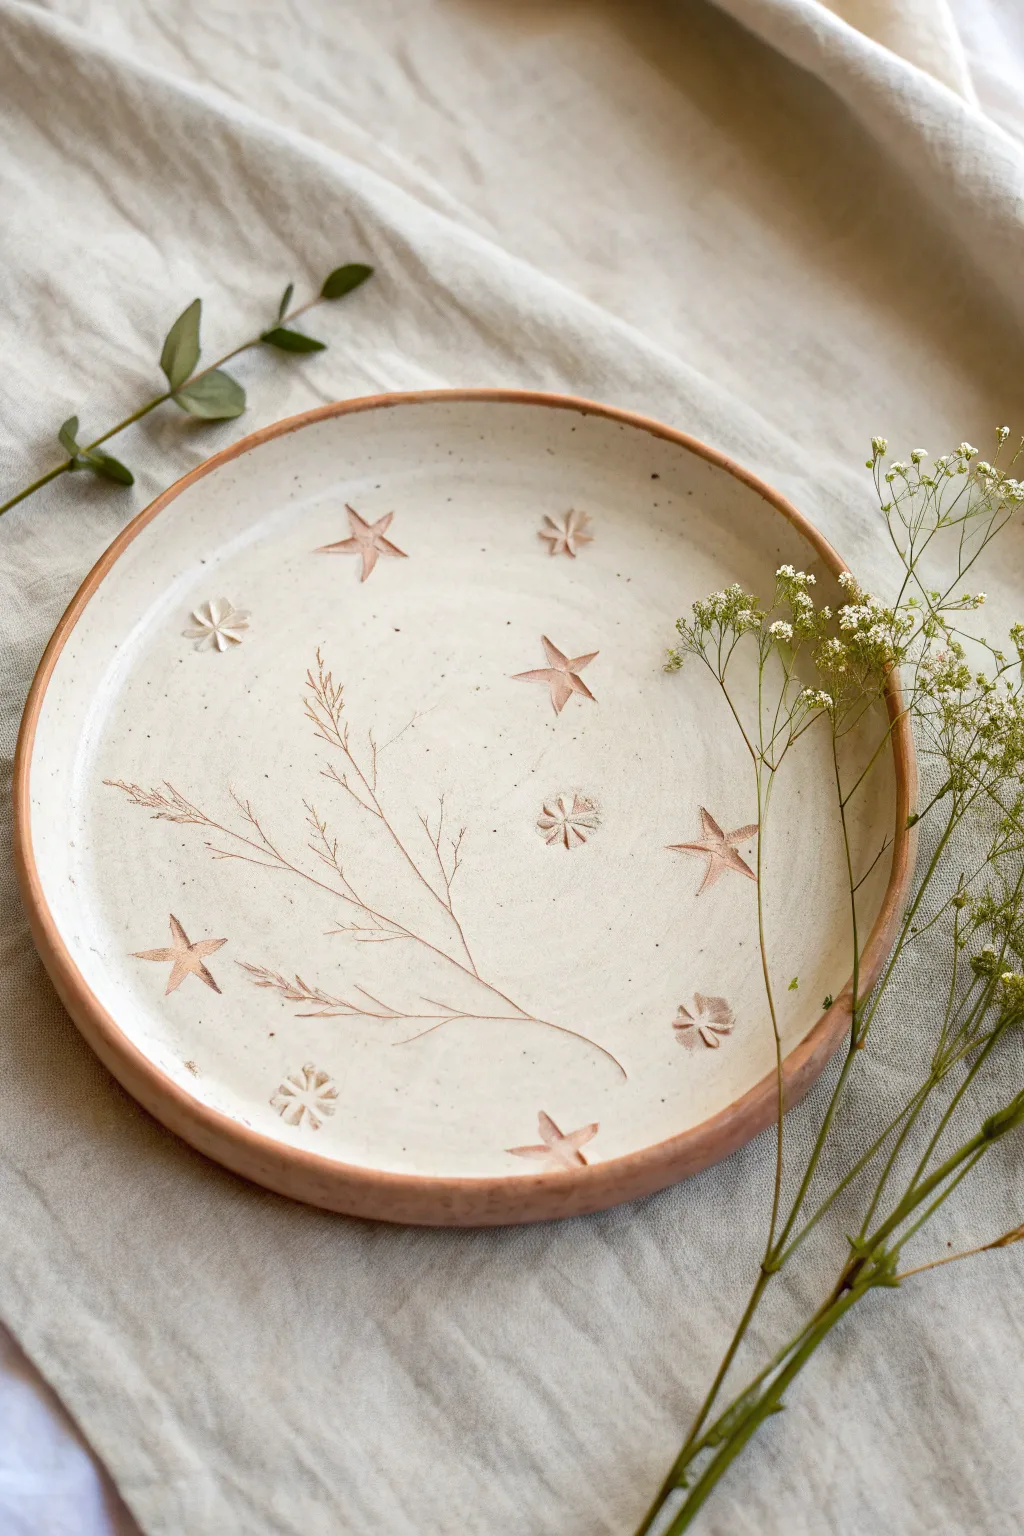
Capture the delicate beauty of nature and the magic of the night sky in this handmade ceramic plate. Using real pressed dried grass and stamps, you’ll create a functional piece of art with a warm, speckled cream glaze and exposed clay rim.
Step-by-Step Guide
Materials
- Terra cotta or red earthenware clay (smooth body)
- Circular bat or wooden board
- Rolling pin
- Guide sticks (approx. 5mm thickness)
- Needle tool or fettling knife
- Slightly damp sponge
- Dried wild grasses or wispy weeds (stems and seed heads)
- Small star stamps (various sizes)
- Small flower or asterisk stamps
- Creamy white dipping glaze (food safe)
- Clear matte glaze (optional)
- Pottery wheel (helpful for trimming) or a simple banding wheel
- Kiln
Step 1: Forming the Base
-
Prepare the slab:
Begin by wedging your red earthenware clay thoroughly to remove air bubbles. Lay it on a canvas-covered surface or wooden board. -
Roll to thickness:
Place your 5mm guide sticks on either side of the clay. Roll the clay out into a smooth, even slab, ensuring the rolling pin rides on the sticks for uniform thickness. -
Compress the surface:
Take a soft rib tool and gently drag it across the surface of the clay in multiple directions. This aligns the clay particles and creates a pristine canvas for your imprints. -
Cut the circle:
Place a circular template (like a dinner plate or paper cutout) over the slab. Using your needle tool, cut vertically around the edge to create your perfect circle. -
Create the rim:
Gently lift the edges of the circle. You can shape the raised rim by pinching it slightly or placing the slab into a shallow mold or slump mold to give it a gentle curve upwards.
Fixing Shallow Prints
If your grass impression looks too faint, try using ‘leather hard’ clay instead of fresh soft clay, or spritz the dried grass lightly with water to make it sturdier before pressing.
Step 2: Adding the Imprints
-
Arrange the botanical:
Select a delicate, dried grass stem with a nice seed head. Lay it gently across the lower third of the plate, allowing the stem to curve naturally. -
Press the grass:
Using a small pony roller or your fingers, firmly press the grass into the clay. I find that rocking your finger over the thicker parts helps embed them deeply without distorting the surrounding area. -
Remove the botanical:
Carefully lift the grass stem out using a needle tool or tweezers. Pull straight up to keep the impression sharp. -
Stamp the stars:
Take your star stamps and press them randomly around the botanical design. Vary the pressure slightly for visual interest, placing some closer to the rim and others near the center. -
Add floral details:
Interperse the small flower or asterisk stamps among the stars to create a celestial, meadow-like pattern. -
Clean up:
If pressing raised any sharp clay burrs, smooth them down very gently with a soft brush or a fingertip barely dampened with water.
Add Oxide Wash
For higher contrast, brush red iron oxide wash into the stamped lines and wipe back with a sponge before glazing. This makes the design pop darkly against the cream glaze.
Step 3: Finishing and Glazing
-
Slow drying:
Cover the plate loosely with plastic to let it dry slowly. This prevents the rim from warping. Once bone dry, bisque fire the plate according to your clay body’s specifications. -
Wax the rim:
Apply a line of wax resist along the very top edge of the rim and the exterior/underside. This will keep the raw red clay exposed, creating that beautiful contrast seen in the photo. -
Glaze application:
Pour a creamy white glaze into the center of the plate, swirl it to coat the entire interior surface, and pour out the excess. Ensure the glaze fills the impressions. -
Reveal the pattern:
This is crucial: The glaze will naturally pool in the deep impressions of the grass and stars. Because the glaze is translucent, the red clay underneath will show through darker where the glaze is thickest or where the clay is exposed, highlighting the design in varied tones. -
Clean up edges:
Use a damp sponge to wipe away any glaze droplets that may have splashed onto the waxed rim or the underside of the plate. -
Final firing:
Glaze fire the piece to the temperature required by your glaze and clay combination.
Enjoy using your new plate for serving or simply displaying it as a piece of quiet, natural beauty
3D Relief Story Plaques
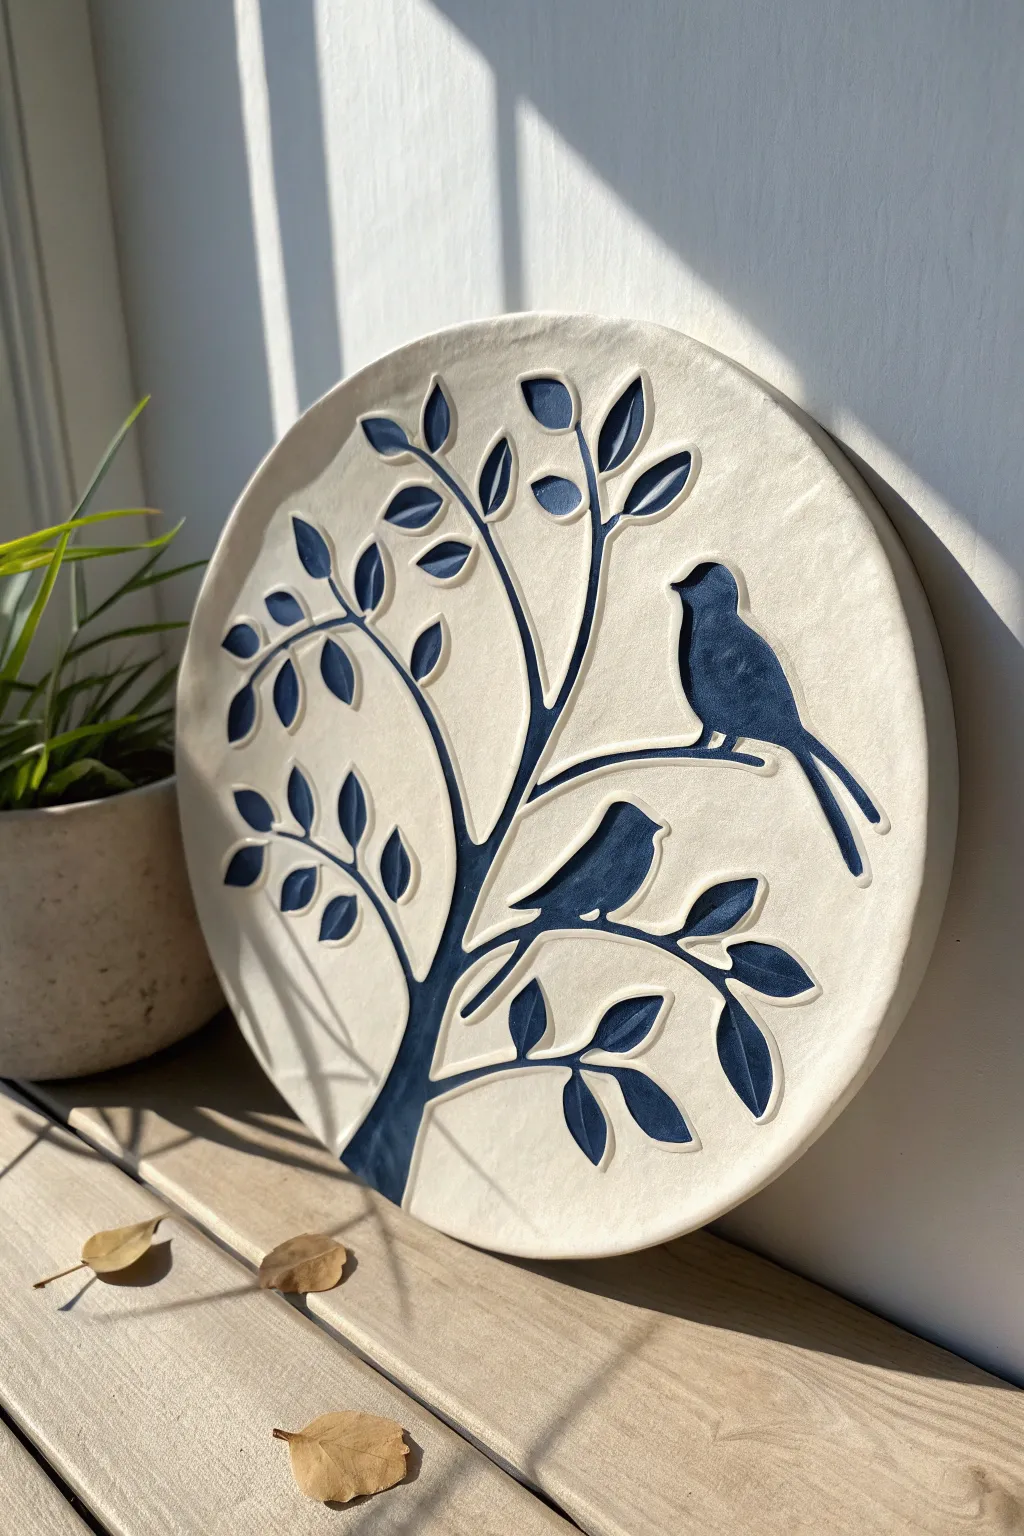
This elegant ceramic relief plaque features a striking contrast between raw white clay and a deep indigo glaze, depicting two birds perched on leafy branches. The design relies on clean lines and negative space, creating a serene, nature-inspired focal point for any wall.
Detailed Instructions
Materials
- Earthenware or stoneware clay (white body)
- Rolling pin
- Two 1/4-inch thick wooden slats (guide rails)
- Round template (paperplate or cardboard)
- Needle tool
- Loop carving tools (various sizes)
- Sponge
- Underglaze (Deep Navy or Indigo)
- Clear matte or satin glaze
- Soft fan brush
- Detail brush
- Kiln
Step 1: Slab Preparation
-
Roll out the slab:
Begin by wedging your white clay thoroughly to remove air bubbles. Place the clay between two 1/4-inch wooden slats and roll it out with a rolling pin to ensure an even, consistent thickness. -
Cut the shape:
Place your circular template onto the smooth slab. Using a needle tool held vertically, trace around the template to cut out your perfect circle. -
Smooth the edges:
Dampen a small sponge and gently run it along the cut rim of the circle to compress the clay particles and smooth out any sharp edges. -
Initial drying:
Allow the slab to dry slowly to a distinct ‘leather-hard’ state. This is crucial; if it’s too soft, the carving will be messy, but if it’s too dry, it will chip.
Step 2: Design Transfer & Carving
-
Sketch the design:
Lightly sketch your tree and bird design directly onto the leather-hard clay using a dull pencil or a stylus. Press very lightly so you don’t groove the clay deeply yet; you just want a guide. -
Carve the outlines:
Using a fine V-tip carving tool or a dedicated sgraffito tool, carve along the lines of your sketch. Create a distinct channel that outlines the tree trunk, branches, leaves, and the birds’ silhouettes. -
Excavate the background (Relief method):
For a true relief look, use a larger loop tool to gently shave away a thin layer of clay from the background *around* the tree and birds. In this specific style, however, the main effect is achieved by creating deep ‘moats’ around the subjects. -
Define the interior shapes:
Ensure the outlines are deep and crisp. These channels will help contain the underglaze later. The birds and leaves should feel slightly raised compared to the carved dividing lines. -
Clean up burrs:
Once carving is complete, you’ll likely have little clay crumbs (burrs). Wait until the clay feels bone dry, then gently brush them away with a soft, dry brush. I find trying to remove them while wet just smears the clay back into the lines.
Clean Lines Pro-Tip
For ultra-crisp edges, use a ‘mishima’ technique: cover the whole piece in wax, carve through the wax into the clay, then paint underglaze into the carved lines before wiping clean.
Step 3: Glazing & Finishing
-
Bisque fire:
Fire the piece to cone 04 (or your clay’s bisque temperature). This hardens the clay and makes it ready for glazing. -
Apply underglaze:
Using a detail brush, carefully paint the Deep Navy underglaze inside the shapes of the tree trunk, branches, leaves, and birds. You want solid, opaque coverage, so apply 2-3 coats as needed. -
Clean the edges:
If any blue underglaze spills over onto the white background or the carved outlines, wipe it away immediately with a clean, damp sponge or a stiff brush. -
Wax resist (Optional):
To keep the white areas pristine, you can apply wax resist over the white background parts if you plan to do an all-over dip, but for this piece, careful brushing is usually sufficient. -
Clear glaze application:
Once the underglaze is dry, apply a coat of clear matte or satin glaze over the entire face of the plaque. This seals the clay and deepens the blue color. -
Check the foot:
Ensure the back and bottom edge of the plaque are free of glaze so it doesn’t stick to the kiln shelf. -
Final firing:
Fire the piece again to the maturation temperature of your clay and glaze (typically cone 5 or 6 for stoneware).
Fixing Smudges
If blue underglaze stains the porous white bisque where you don’t want it, sand it gently with 220-grit sandpaper (wear a mask!) before applying the clear glaze.
Hang your finished relief plaque near a window to let natural light play across the carved textures.

TRACK YOUR CERAMIC JOURNEY
Capture glaze tests, firing details, and creative progress—all in one simple printable. Make your projects easier to repeat and improve.
Muted Rainbow Arches
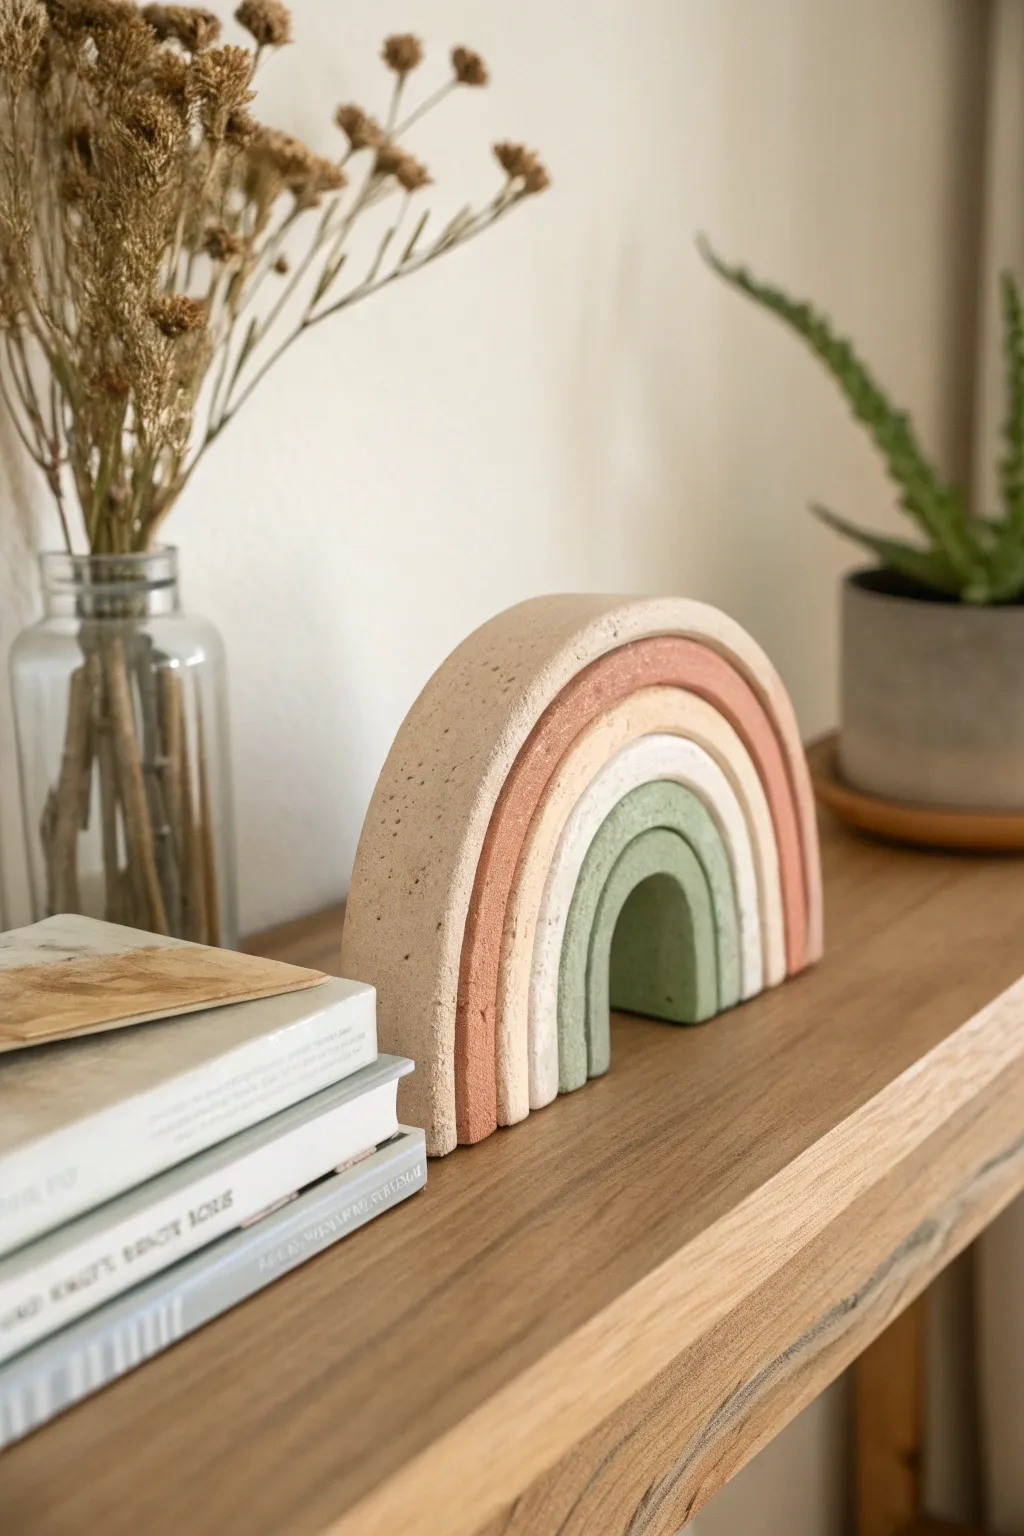
Bring a touch of modern minimalism to your shelf with this textured, free-standing rainbow sculpture. By using air-dry clay and a clever speckling technique, you can replicate the high-end look of raw ceramic or sandstone without needing a kiln.
Step-by-Step Tutorial
Materials
- Air-dry clay (white or light grey)
- Rolling pin
- Sharp craft knife or clay slicing tool
- Acrylic paints (terracotta, cream, sage green, beige, brown)
- Baking soda or fine sand (for texture)
- Old toothbrush
- Fine-grit sandpaper
- Circular templates (bowls, cookie cutters, or cardboard)
- Ruler
- Parchment paper or silicone mat
Step 1: Shaping the Arches
-
Prepare your workspace:
Lay down parchment paper or a silicone mat to prevent sticking. Start by kneading your air-dry clay until it is soft, pliable, and free of cracks. -
Roll the slab:
Roll out a large slab of clay to a uniform thickness, aiming for about 1/2 inch to 3/4 inch. Thickness is crucial here so the arches can stand upright later. -
Create templates:
If you don’t have nesting cookie cutters, trace concentric semi-circles onto cardboard. You will need about five sizes, each slightly smaller than the last to fit inside one another comfortably. -
Cut the largest arch:
Place your largest template on the clay slab. Using a sharp craft knife held completely vertical, cut around the outer edge. Then, cut the inner curve to create the first rainbow band. -
Cut the remaining bands:
Repeat this process for the remaining four arches, working from largest to smallest. Ensure the width of each band is relatively consistent for visual balance. -
Smooth the edges:
Dip your finger in a little water and gently run it along the cut edges of each arch to soften sharp corners and remove any dragging marks from the knife. -
Check the fit:
Before drying, gently nest the wet arches together on your work surface to ensure they fit. If one is too tight, trim a sliver off its outer edge now. -
Initial drying:
Separate the arches slightly so air can circulate between them. Let them dry flat for at least 24-48 hours. I usually flip them over halfway through to prevent warping.
Warp-Free Drying
To keep arches perfectly flat, place a light book on top of them (sandwiching them between parchment paper) once they are leather-hard but not yet rigid.
Step 2: Creating the Stone Texture
-
Sand for stability:
Once fully bone-dry, lightly sand the bottom feet of each arch against a flat surface. This ensures they sit perfectly flush and won’t wobble. -
Mix the base colors:
Prepare your palette with muted, earthy tones: a creamy beige, a soft terracotta, a pale off-white, and a sage green. Keep the tones desaturated for that modern aesthetic. -
Add the texture agent:
Mix a teaspoon of baking soda or very fine sand into each paint color. This transforms standard acrylics into a thick, textured paste that mimics stone. -
Paint the base layers:
Apply the textured paint to each arch, using a stiff brush to dab the paint on rather than stroking it. This enhances the rough, stony surface. Let this layer dry completely. -
Prepare the speckle mix:
Dilute a small amount of dark brown or dark grey paint with water until it is very runny, almost ink-like. -
Apply the speckles:
Dip an old toothbrush into the watery dark paint. Hold it over your painted arches and run your thumb across the bristles to flick tiny droplets onto the surface. -
Refine the look:
Practice the splatter technique on a scrap piece of paper first. You want fine misting, not large blobs, to achieve a realistic stoneware appearance. -
Final assembly:
Once the paint is completely cured, nest the arches back together. You can leave them loose for interactive play or use a dab of strong glue between layers for a permanent sculpture.
Too Much Texture?
If the baking soda paint looks too clumpy, lightly sand the painted surface with high-grit sandpaper to knock back the highest peaks before doing the speckle step.
Place your new sculptural piece on a bookshelf or mantle where the natural light can highlight its beautiful, gritty texture
Cutout Clay Sun Catchers
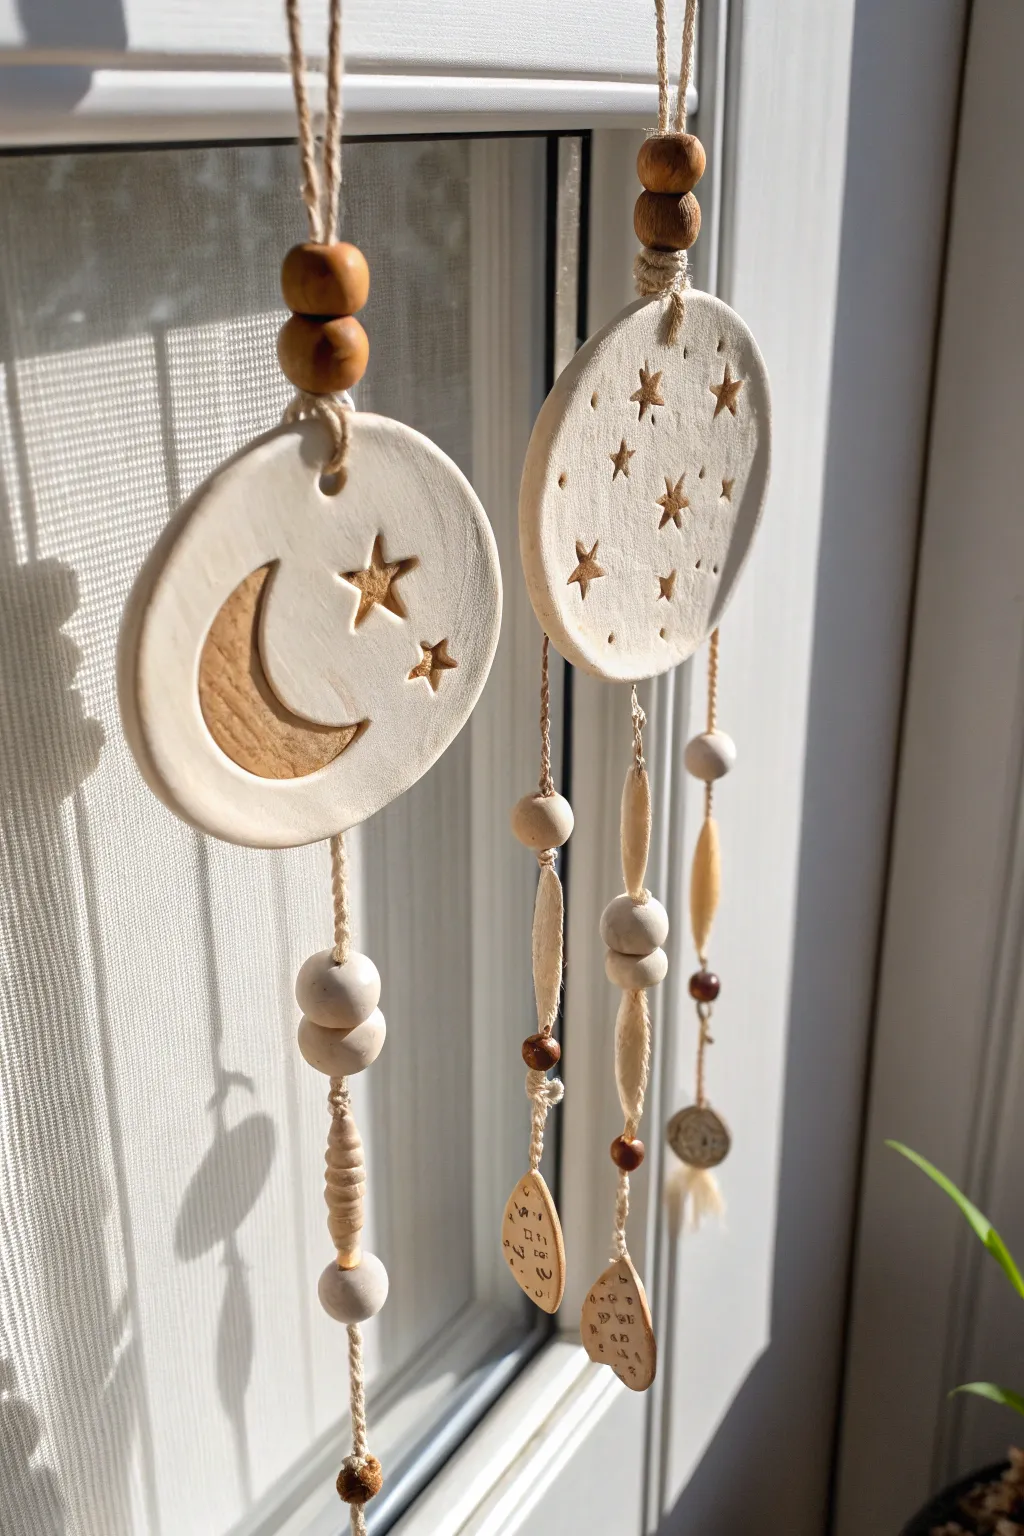
Brighten your space with these ethereal, bohemian-style suspended decorations that catch the light beautifully. Featuring simple crescent moon and starry night motifs impressed into white clay, they combine rustic twine and natural wood beads for a calming, grounded aesthetic.
Step-by-Step Guide
Materials
- Air-dry clay or polymer clay (white)
- Rolling pin
- Circle cookie cutter (approx. 3-4 inches)
- Small star-shaped mini cutters (various sizes)
- Modeling tool or knife
- Jute twine or hemp cord
- Wooden beads (various sizes and shapes)
- Drill bit or drinking straw (for holes)
- Sandpaper (fine grit)
- Acrylic paint (gold or light wood tone)
- Small paintbrush
- Matte sealant or varnish
Step 1: Shaping the Celestial Disks
-
Prepare the clay:
Start by conditioning your clay until it is soft and pliable. Roll it out on a smooth surface to an even thickness of about 1/4 inch. I find that using rolling guides helps keep the slab perfectly level. -
Cut the circles:
Press your large circle cutter firmly into the clay slab to create the main body of your sun catchers. Gently lift away the excess clay from the edges. -
Smooth the edges:
Dip your finger in a little water and run it along the cut edge of the circle to smooth out any roughness or sharpness left by the cutter. -
Create the hanging hole:
Use a straw or a tool to poke a clean hole near the top edge of each circle. Position it centered, about a half-inch from the rim, ensuring it’s large enough for your twine to pass through later. -
Design the Moon motif:
For the moon charm, lightly sketch a crescent shape on the clay surface with a needle tool. Carefully carve out the crescent shape to a shallow depth—don’t cut all the way through—creating a recessed relief. -
Add star impressions:
Take your mini star cutters and press them into the clay around the moon. Press firmly enough to leave a deep impression but not to cut through. For the second disk, scatter star impressions across the entire surface. -
Add texture:
Using a needle tool, poke tiny dots randomly around the stars to simulate distant stardust and add visual interest to the negative space. -
Create the drop pendants:
With your leftover clay, hand-shape several small tear-drop or almond shapes. Flatten them slightly and poke a hole through the top of each one. You can stamp tiny letters or patterns onto these if you wish. -
Drying time:
Let all your clay pieces dry completely according to the package instructions. Flip them over halfway through the drying process to prevent warping.
Step 2: Painting and Assembly
-
Sand imperfections:
Once fully dry (and cured if using oven-bake clay), gently sand the edges with fine-grit sandpaper for a professional finish. -
Highlight the details:
Dilute a small amount of gold or wood-tone acrylic paint with water to create a wash. Carefully paint inside the recessed moon and star shapes. Wipe away any excess on the surface quickly with a damp cloth, leaving pigment only in the indented areas. -
Seal the work:
Apply a coat of matte varnish to all clay pieces to protect them from dust and moisture. -
Prepare the top hanger:
Cut a length of jute twine about 12 inches long. Fold it in half and create a lark’s head knot or simply loop it through the top hole of your main disk. -
Add top beads:
Thread two or three wooden beads onto the double strand of twine above the disk to secure the loop and add decoration. -
Prepare the bottom strands:
Cut three separate lengths of twine (varying from 6 to 10 inches). Attach these to the bottom of your disk. Note: You may need to have drilled small holes at the bottom of the disk during the wet phase, or you can secure the twine to the back with strong glue if you forgot holes. -
String the charms:
Thread a mix of wooden beads and your handmade clay teardrops onto these hanging strands. Knot the twine securely underneath each element to hold it in place at different heights. -
Final touches:
Trim any excess twine tails for a neat look. Ensure your knots are tight and the mobile feels balanced when held upright.
Warping Woes?
If your clay circles curl up while drying, gently weigh them down with a heavy book placed over a piece of parchment paper once they are leather-hard.
Textured Trick
To get the rough texture inside the moon, press a piece of coarse sandpaper or a scrunched-up ball of foil into the recessed clay before it dries.
Hang your new celestial creation in a sunny window and enjoy the play of light and shadow