Whenever I’m stuck or stressed, I grab a lump of clay and let my hands do the thinking. Here are my favorite clay art project ideas—from classic beginner wins to artsy, unexpected pieces that still feel totally doable.
Pinch Pot Bowls With Texture
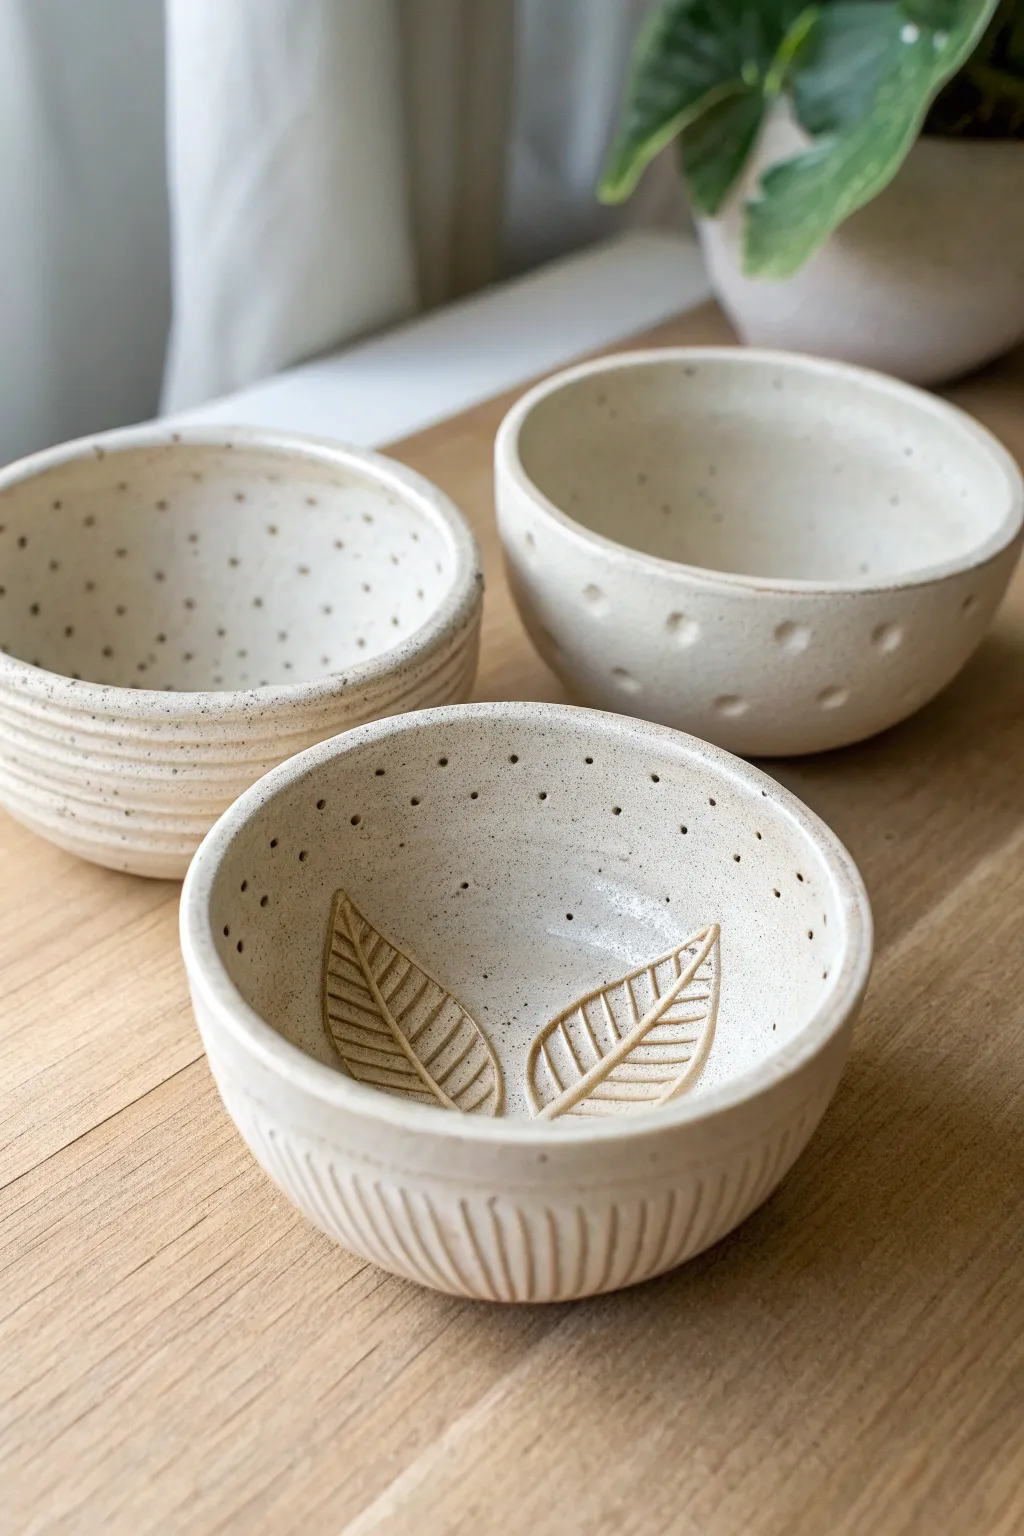
These charming, rustic bowls showcase the beauty of simple pinch pot construction elevated by thoughtful textures and carved details. The creamy, speckled stoneware clay gives them an organic warmth, while distinct patterns—striped ridges, indented dots, and carved leaves—give each piece its own personality.
Step-by-Step
Materials
- Speckled stoneware clay (white or cream body)
- Needle tool or toothpick
- Loop tool (small)
- Wooden modeling tool or popsicle stick
- Sponge
- Bowl of water
- Rolling pin (optional)
- Clear or transparent white glaze
- Kiln access (or air-dry clay alternatives for non-food use)
Step 1: Forming the Base Bowls
-
Prepare your clay balls:
Start by wedging your clay to remove air bubbles. Divide the clay into three equal portions, each roughly the size of a tennis ball or slightly larger, depending on your desired finished size. -
Create the pinch pot:
Take one ball of clay and hold it in your non-dominant hand. Gently press your thumb into the center, stopping about a half-inch from the bottom. This is the foundation of your pinch pot. -
Pinch the walls:
Rotate the ball slowly while rhythmically pinching the clay between your thumb and fingers. Work your way from the bottom up to the rim, aiming for an even thickness of about 1/4 inch throughout the wall. -
Refine the shape:
Once the basic bowl shape is formed, gently tap the bottom against your work surface to create a flat, stable foot. Smooth the rim with a slightly damp sponge to ensure it’s rounded and comfortable to the touch. -
Repeat for the set:
Follow the same process for the remaining two clay balls so you have three matching blank canvases ready for texturing.
Step 2: Adding Distinct Textures
-
Design 1: The Ridged Line Bowl:
For the first bowl, you will create horizontal texture. Support the inside of the bowl with one hand. using a wooden modeling tool or the edge of a credit card, press gently into the exterior clay. -
Carve the grooves:
Rotate the bowl slowly on a banding wheel or in your hand while holding the tool steady to create continuous horizontal grooves. I like to start from the bottom and spiral my way up to the rim. Smooth any sharp crumbs with a soft brush. -
Design 2: The Dimpled Dot Bowl:
Take the second bowl. Using the rounded end of a paintbrush handle or a dedicated ball stylus, press firmly into the exterior clay to create indentations. -
Create a pattern:
Space these dimples evenly around the bowl. You can do random spacing or organized rows near the bottom rim as seen in the inspiration image. -
Design 3: The Leaf & Fluted Bowl:
For the third bowl (the feature piece), start with the exterior. Use a loop tool to carve vertical flutes or channels from the foot up toward the rim, creating a ribbed effect on the outside.
Keep it uniform
To ensure your pinch pots have even walls, close your eyes while pinching. Feeling the clay without looking helps you identify thick or thin spots more accurately.
Step 3: Detailing the Interior
-
Outline the leaves:
On the interior floor of the third bowl, use a needle tool to faintly sketch two large leaf shapes meeting at the center. Make sure they fit comfortably within the curve of the bowl. -
Carve the veins:
Using a sharp carving tool or needle, incise the central vein and the smaller offshoot veins into the clay. Press deeply enough to be seen through glaze but not so deep you endanger the bottom structural integrity. -
Add speckled details:
For the interior walls of this leaf bowl, use a needle tool to poke tiny, shallow holes in a random scattering pattern. This mimics the natural speckling of the clay and adds visual interest. -
Smooth and dry:
Run a barely damp sponge over all sharp edges, especially around the carved leaves and rims. Let the bowls dry slowly under loose plastic to the bone-dry stage. -
Bisque fire:
Load the bone-dry bowls into the kiln for a bisque firing (usually to Cone 04). This hardens the clay and prepares it for glazing. -
Glaze application:
Dip or brush a clear or transparent white glaze over the entire piece. A transparent glaze is crucial here because it allows the natural speckles of the clay body to shine through. -
Final wipe:
Use a damp sponge to wipe any glaze off the very bottom foot of the bowls to prevent them sticking to the kiln shelf. -
Final firing:
Fire the bowls a second time to the maturation temperature of your specific clay and glaze (often Cone 5 or 6 for stoneware).
Highlight Your Carving
Before glazing, rub a mix of water and black underglaze into the carved leaf lines, then wipe the surface clean. The dark color stays in the crevices to make the design pop.
Once cooled, fill your new textured bowls with snacks or succulents and enjoy the handmade warmth they bring to your space


Ring Dishes and Trinket Trays
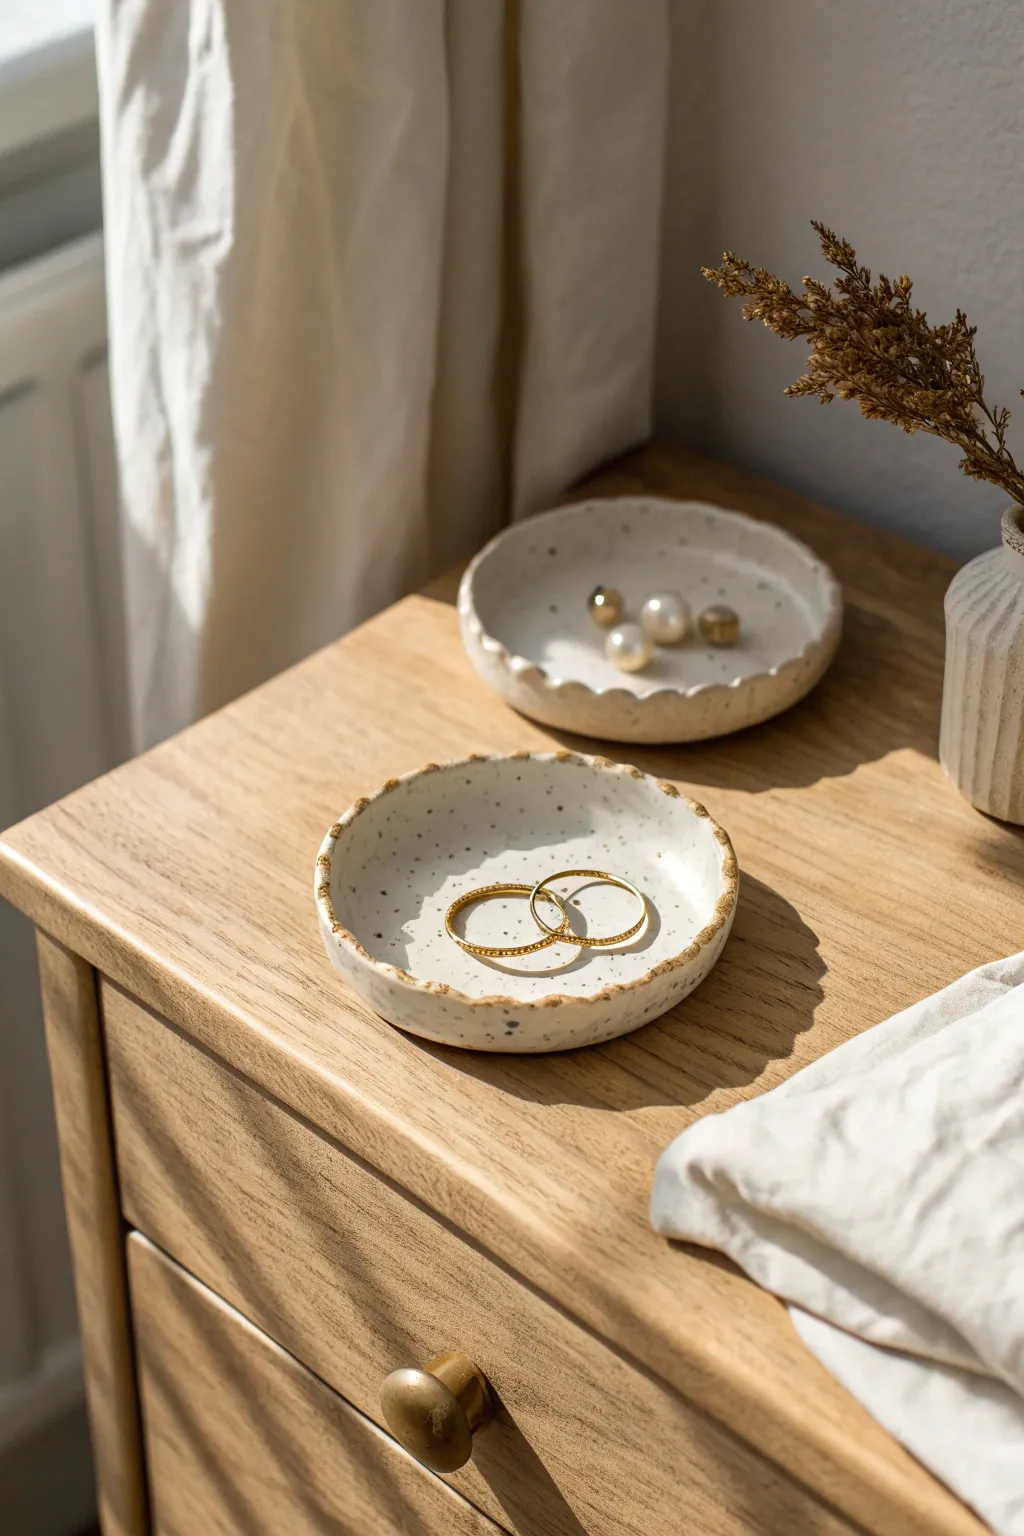
These charmingly imperfect trinket dishes combine the organic feel of speckled clay with a touch of modern elegance. The scalloped edges and gold rims make them perfect for catching rings, earrings, or simply adding a decorative accent to your dresser.
Step-by-Step Tutorial
Materials
- Speckled pottery clay (stoneware or polymer with granite effect)
- Rolling pin
- Circle cutter or small bowl (approx. 4-5 inches)
- Potter’s needle tool or craft knife
- Small sponge
- Bowl of water
- Liquid gold leaf or gold glaze luster
- Small fine-point paintbrush
- Clear glaze (if using kiln-fire clay) or gloss varnish (if polymer)
- Canvas mat or parchment paper
Step 1: Shaping the Clay
-
Prepare your clay:
Start by taking a handful of your speckled clay and kneading it well to remove any air bubbles. If you are using polymer clay, condition it until it’s pliable. -
Roll out the slab:
Place your clay on a canvas mat or parchment paper. Use the rolling pin to flatten it into an even slab, aiming for a thickness of about 1/4 inch. -
Cut the circle:
Press your circle cutter or a small bowl firmly into the clay slab to mark your shape. Use the needle tool or craft knife to slice along the edge if using a bowl template. -
Smooth the edges:
Dip your finger or a small sponge lightly in water and run it along the cut edge of the circle. This softens the sharp angle created by the cutter. -
Form the curved sides:
Gently lift the edges of the circle upward with your thumbs while supporting the base with your fingers. Rotate the piece as you go to create a shallow bowl shape. -
Create the scalloped rim:
To achieve that organic, wavy look seen in the photo, use your index finger to gently press down on the rim at regular intervals. -
Refine the indentations:
After making the initial impressions, pinch the raised sections lightly between your thumb and forefinger to define the scallops further. -
Final smoothing:
Take your damp sponge and do a final pass over the entire surface, ensuring no fingerprints remain and the rim feels soft to the touch.
Cracking Up?
If edges crack while lifting them, your clay might be too dry. Dab a little water (or clay softener for polymer) onto the crack and smooth it over with your finger immediately.
Step 2: Firing and Finishing
-
Dry the piece:
Allow your clay dish to dry completely according to the manufacturer’s instructions. For air-dry or kiln clay, this usually takes 24-48 hours until bone dry. -
First firing (Bisque):
If using traditional pottery clay, fire the piece in a kiln to bisque temperature. For oven-bake clay, bake it now according to package directions. -
Apply clear glaze:
Once cool, brush a coat of clear transparent glaze over the entire dish to seal it and make those natural speckles pop. I find 2-3 coats usually gives the best depth. -
Second firing (Glaze):
Fire the piece again for the glaze cycle. If using polymer clay, simply apply a gloss varnish and let it dry. -
Prepare the gold accent:
Once your dish is fully finished and cool, shake your liquid gold leaf or luster well. Pour a tiny amount onto a palette or scrap piece of paper. -
Paint the rim:
Using a very fine paintbrush, carefully apply the gold along the top edge of the uneven rim. Let the brush naturally follow the peaks and valleys you created earlier. -
Add gentle drips:
For a rustic look, allow the gold to come down slightly further on the high points of the scallops, mimicking a worn, vintage edge. -
Final cure:
Let the gold leaf dry completely. If using a ceramic luster, this will require a third, low-temperature firing. If using gold leaf paint, simply let it cure for 24 hours.
Gold Luster Look
Don’t have a kiln for real gold luster? Use a ‘liquid gold leaf’ paint on your finished piece. It looks nearly identical but doesn’t require firing—just don’t put it in the dishwasher.
Place your new heirloom-quality treasure on your nightstand and enjoy the subtle sparkle it adds to your routine
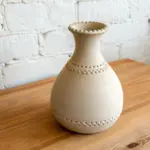


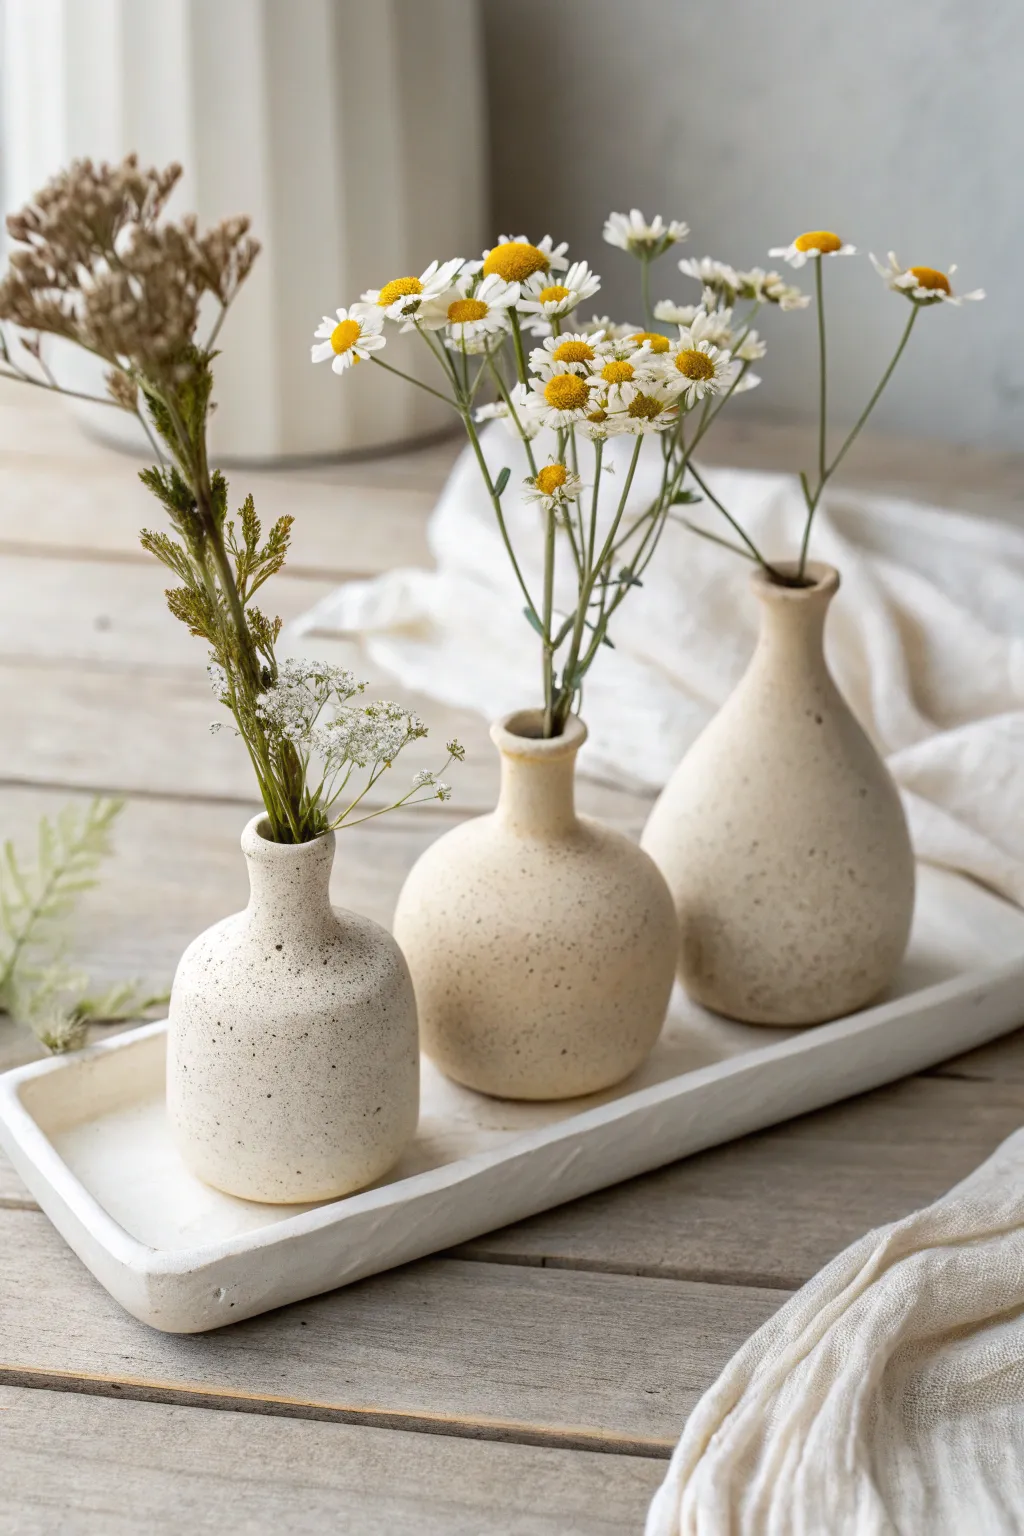
Coil-Built Mini Vases
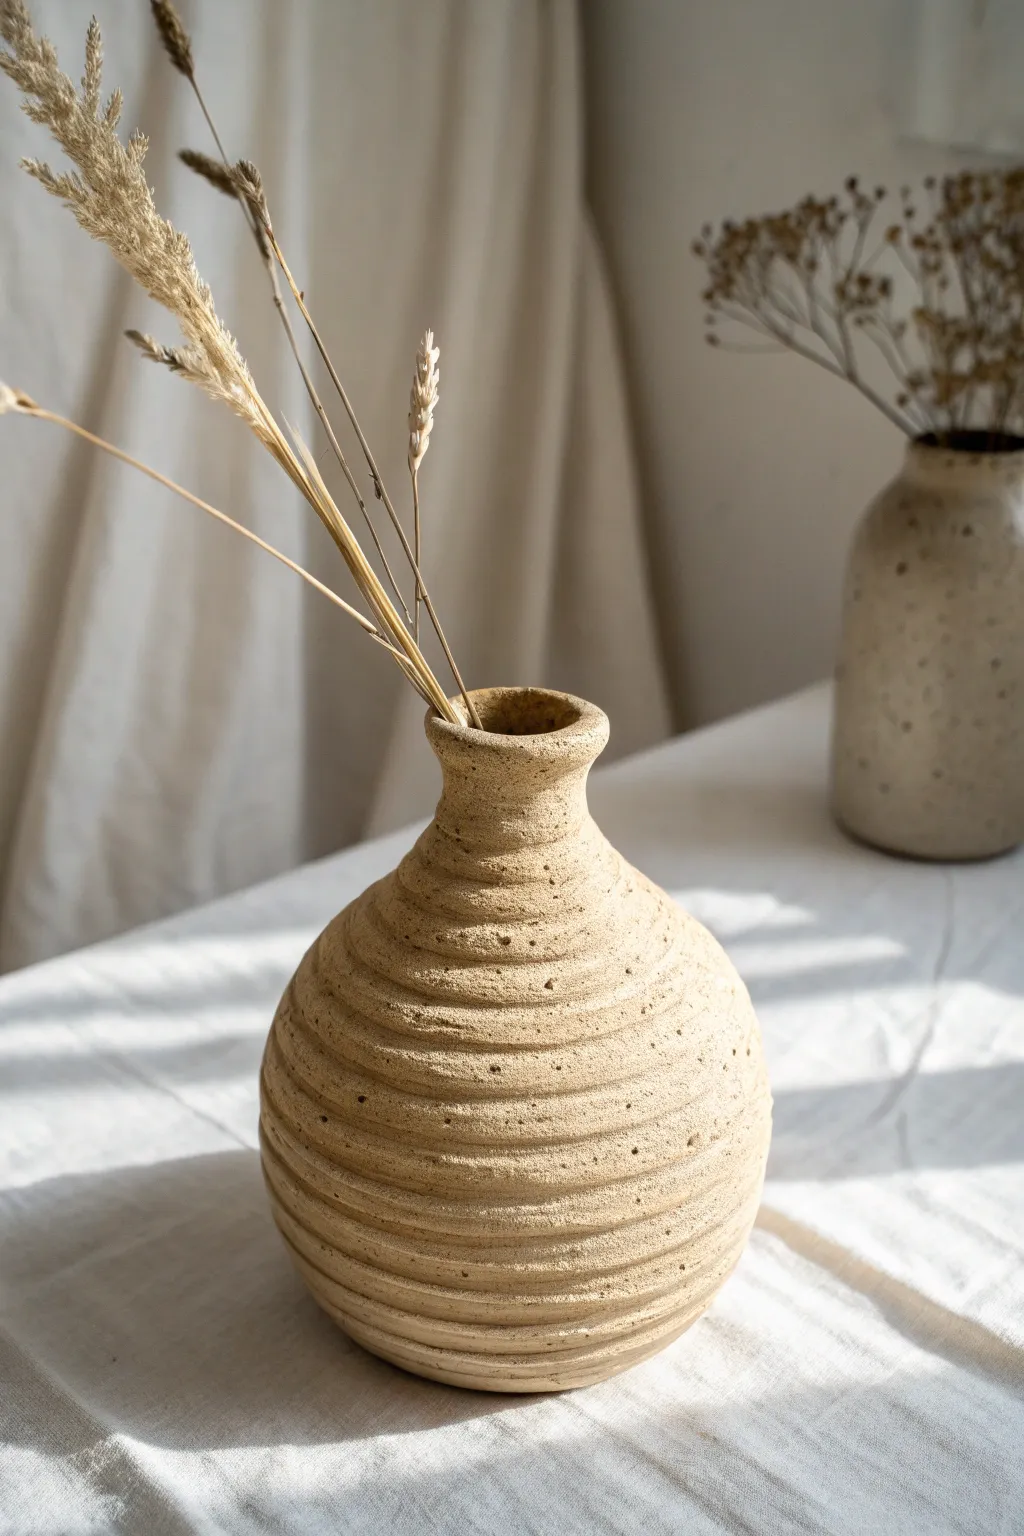
Embrace the rustic charm of exposed coils with this wheel-free pottery project that highlights the natural texture of stoneware. This mini vase features distinct horizontal ridges and a speckled, sandy finish that perfectly complements dried florals.
Step-by-Step Guide
Materials
- Speckled stoneware clay (grogged)
- Small bowl of water
- Score and slip tool (or a needle tool and fork)
- Wooden modeling tool
- Sponge
- Cutting wire
- Canvas or wooden board
- Potter’s curved rib (optional)
Step 1: Base and Preparation
-
Wedge the clay:
Begin by thoroughly wedging a grapefruit-sized ball of speckled stoneware clay to remove air bubbles and ensure an even consistency. -
Form the base slab:
Take a small portion of the clay and flatten it into a circular disc about 1/4 inch thick. This will be the sturdy floor of your vase. -
Cut the circle:
Use a needle tool or knife to trim the disc into a perfect circle, roughly 3 to 4 inches in diameter. I like to smooth the edges with a damp finger immediately to prevent cracking later. -
Score the perimeter:
Rough up the outer edge of the top surface of your base disc using your scoring tool, creating a texture for the first coil to grab onto.
Pro Tip: Seamless Seams
Stagger the vertical joints where your coils meet (where one snake ends and begins). Don’t line them all up on one side, or the vase wall becomes weak.
Step 2: Building the Body
-
Roll your first coils:
Roll out several long, even snakes of clay on your workspace. Aim for a thickness similar to your pinky finger for a delicate but stable wall. -
Attach the first ring:
Place the first coil onto the scored edge of the base. Cut off excess length and join the ends of the coil together. -
Blend the interior:
This is crucial for structural integrity: use your thumb or a wooden tool to smear the clay from the coil downward onto the base *on the inside only*. Leave the outside coil texture visible. -
Build outward:
Add the next 3-4 layers of coils. To create the wider belly of the vase, place each new coil slightly toward the outer edge of the coil below it. -
Continual blending:
After every single coil, smooth the inside seam downward to lock the layers together. Support the outside wall with one hand while you work. -
Taper inward:
Once you reach the widest point of the vase, reverse the stacking pattern. Place the next few coils slightly toward the inner edge of the previous layer to narrow the form towards the neck. -
Refine the exterior:
Using a slightly damp sponge, gently wipe the exterior coils to soften sharp edges, but don’t press hard enough to erase the horizontal ridge lines.
Step 3: Neck and Finishing
-
Construct the neck:
Stack two smaller coils straight up to form the vertical neck. Ensure the transition from the shoulder to the neck feels fluid. -
Flare the rim:
For the final lip, use your thumb to gently press the top coil outward, creating a soft flare that makes arranging flowers easier. -
Smooth the lip:
Run a damp chamois or sponge over the very top rim to make it perfectly smooth and pleasant to touch. -
Enhance the texture:
If the speckles aren’t showing enough, wipe the surface again with a damp sponge to expose the grog (sand) in the clay body. -
Dry slowly:
Loosely cover the vase with plastic for the first day to equalize moisture, then uncover it to let it reach bone dry status before firing.
Troubleshooting: Sagging Walls
If the belly starts sagging while you build, the clay is too wet. Stop building, cover the rim with plastic, and let the bottom section stiffen for an hour.
Now you have a timeless, earthy vessel ready for kiln firing or air drying depending on your clay choice


Stamped Tile Coasters
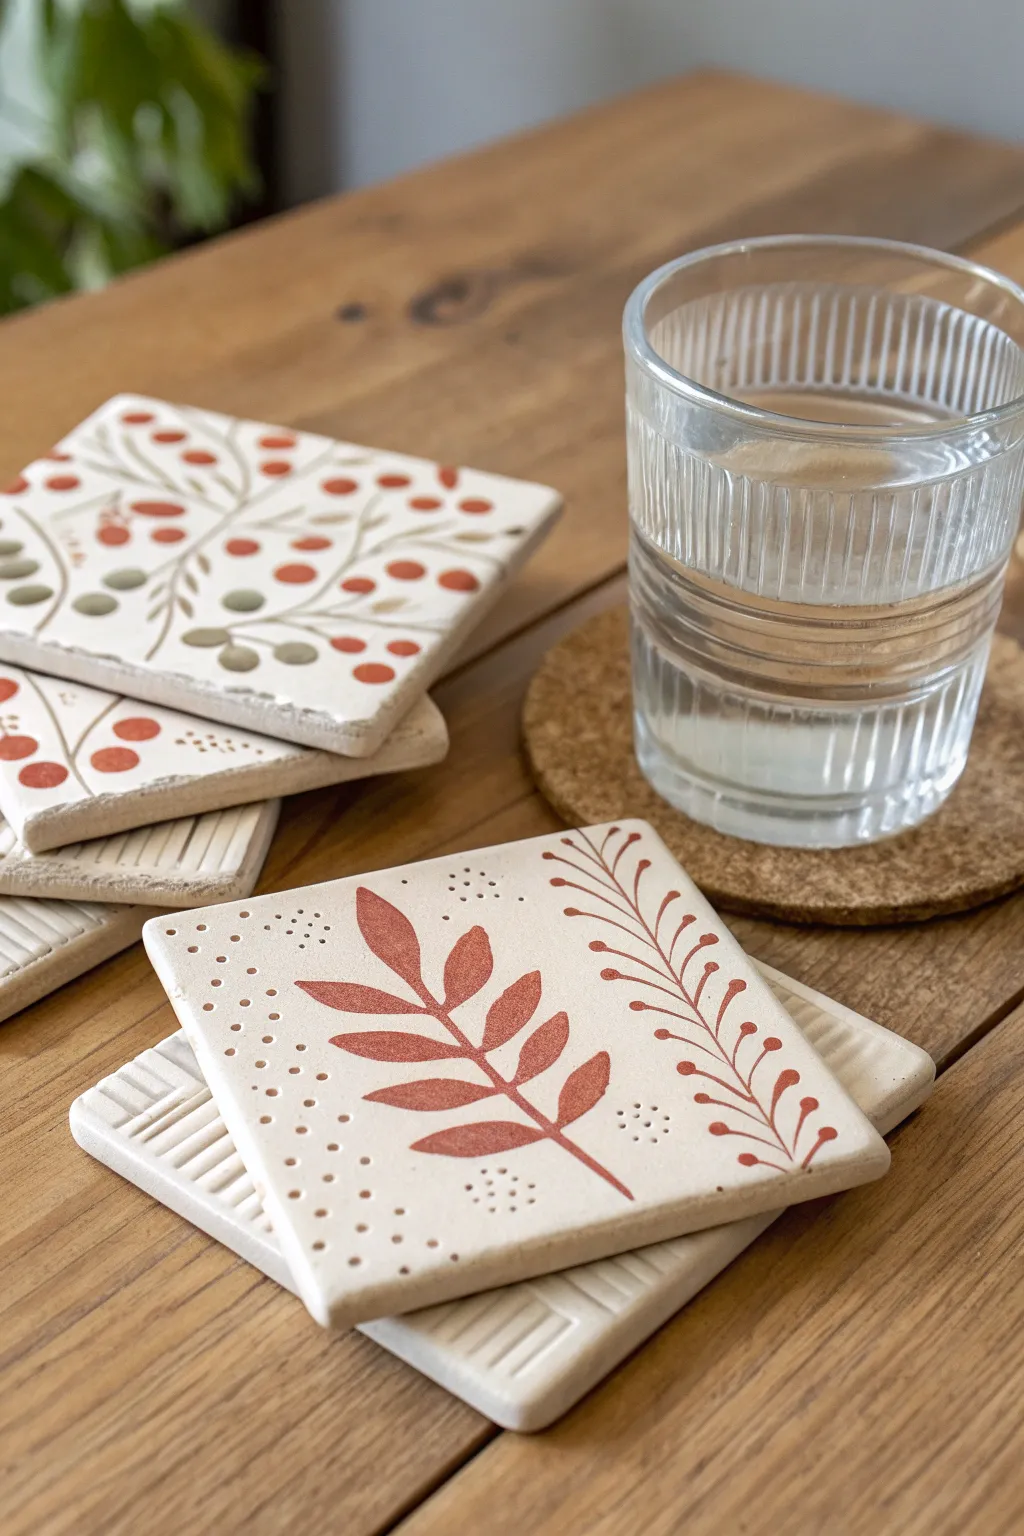
These charming, rustic coasters combine the tactile beauty of relief textures with delicate botanical painting. The finish mimics the look of high-end ceramic tiles, but you can create them right at home using air-dry or polymer clay.
Step-by-Step
Materials
- White or cream-colored air-dry clay (or polymer clay)
- Square cookie cutter (approx 3.5 – 4 inches)
- Small rolling pin
- Wooden guide strips (1/4 inch thick) or a rolling guide
- Texture tools: fork, back of a knife, or texturing combs
- Small round piping tip or stylus tool (for dots)
- Acrylic paints: Terra cotta red, sage green, dark brown
- Fine liner brush and small round brush
- Matte or satin sealant (waterproof varnish)
- Fine grit sandpaper
- Adhesive cork backing sheet or felt pads
Step 1: Shaping the Clay Base
-
Condition the Clay:
Start by kneading your clay until it is smooth and pliable. If using air-dry clay, keep your hands slightly damp to prevent cracking. -
Roll an Even Slab:
Place your wooden guide strips on either side of your clay ball. Roll the clay out until it is perfectly flat and even with the guides, aiming for a thickness of about 1/4 inch to ensure durability. -
Cut the Squares:
Press your square cutter firmly into the slab. Create at least four squares for a complete set. If the edges are ragged, smooth them gently with a wet finger or a damp sponge. -
Create Relief Textures:
For the grooved coasters shown in the stack, use a fork or a texturing comb to press creating alternating horizontal and vertical lines into the wet clay. Leave the coasters intended for painting smooth. -
Add Dotted Details:
On the coasters designated for the leaf design, use a small stylus or the open end of a piping tip to press small, decorative dot patterns into the background while the clay is still soft.
Preventing Warping
To stop corners from curling up while drying, place a light book or a board on top of the tiles once they are ‘leather hard’ (firm but still cool to the touch).
Step 2: Drying and Refining
-
Initial Drying Phase:
Place your tiles on a wire rack or a piece of clean cardboard. Let them dry for 24-48 hours. I like to flip them over halfway through the process to ensure both sides dry evenly and stay flat. -
Sanding the Edges:
Once bone dry, take fine-grit sandpaper and gently smooth the edges and corners. Focus on removing any sharp burrs created during the cutting process. -
Wipe Clean:
Use a dry, soft brush or a tack cloth to remove every speck of clay dust before you start painting; otherwise, the paint won’t adhere smoothly.
Step 3: Painting the Botanicals
-
Sketching the Outline:
Lightly sketch your botanical design with a pencil directly on the dry clay. For the main fern design, draw a central stem with symmetrical leaves branching out. -
Painting the Fern:
Load a round brush with terra cotta paint slightly thinned with water. Fill in the fern leaves, using a single stroke for each leaf where possible—press down to widen the leaf and lift up for the tip. -
Adding Twig Accents:
Using a fine liner brush, paint delicate vertical twigs or stylized wheat stalks on the side of the coaster using a similar red or a contrasting brown. -
Painting Berry Branches:
For the alternate design, paint thin brown branches first. Once dry, add small circles of sage green and terra cotta red to represent berries. -
Drying the Paint:
Allow the acrylic paint to cure fully for at least an hour before touching the surface.
Fixing Cracks
If small hairline cracks appear during drying, make a ‘slip’ paste by mixing a little clay with water and fill the crack. Let dry and sand smooth.
Step 4: Sealing and Finishing
-
Apply Sealant:
Apply a coat of waterproof satin or matte varnish. This step is crucial because coasters must resist moisture from sweating glasses. I prefer doing two thin coats rather than one thick one. -
Dry and Cure:
Let the varnish dry according to the manufacturer’s instructions, usually overnight, to reach full hardness. -
Add Cork Backing:
Cut a square of adhesive cork slightly smaller than your tile. Peel and stick it to the bottom to prevent the ceramic from scratching your table surface.
Now you have a stunning set of custom coasters ready to protect your surfaces with style

The Complete Guide to Pottery Troubleshooting
Uncover the most common ceramic mistakes—from cracking clay to failed glazes—and learn how to fix them fast.
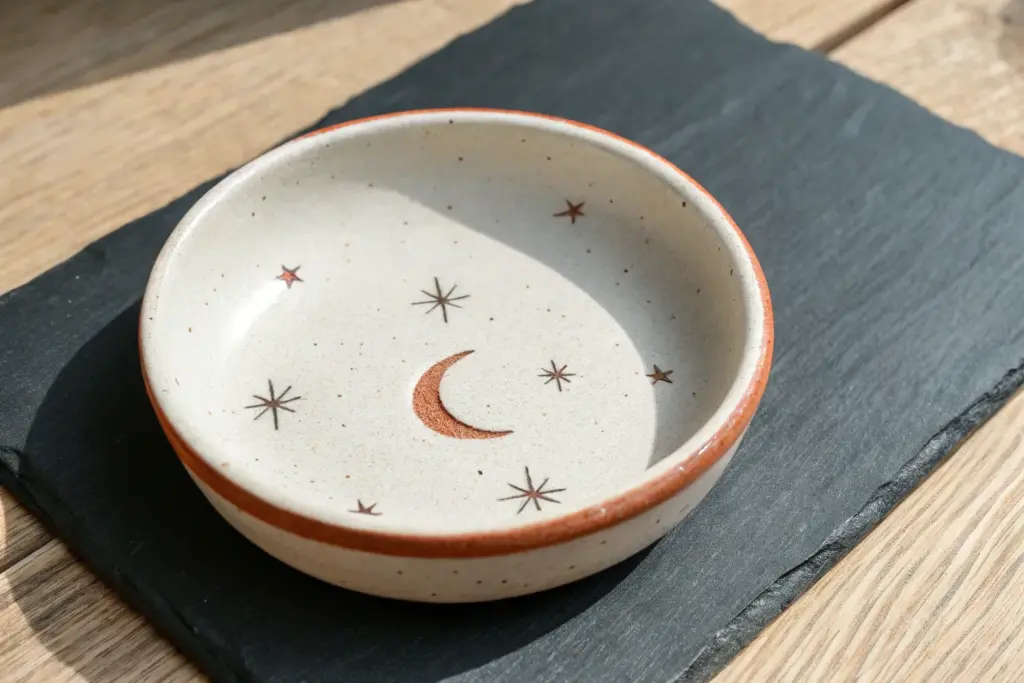
Incense Holders With Groove Designs
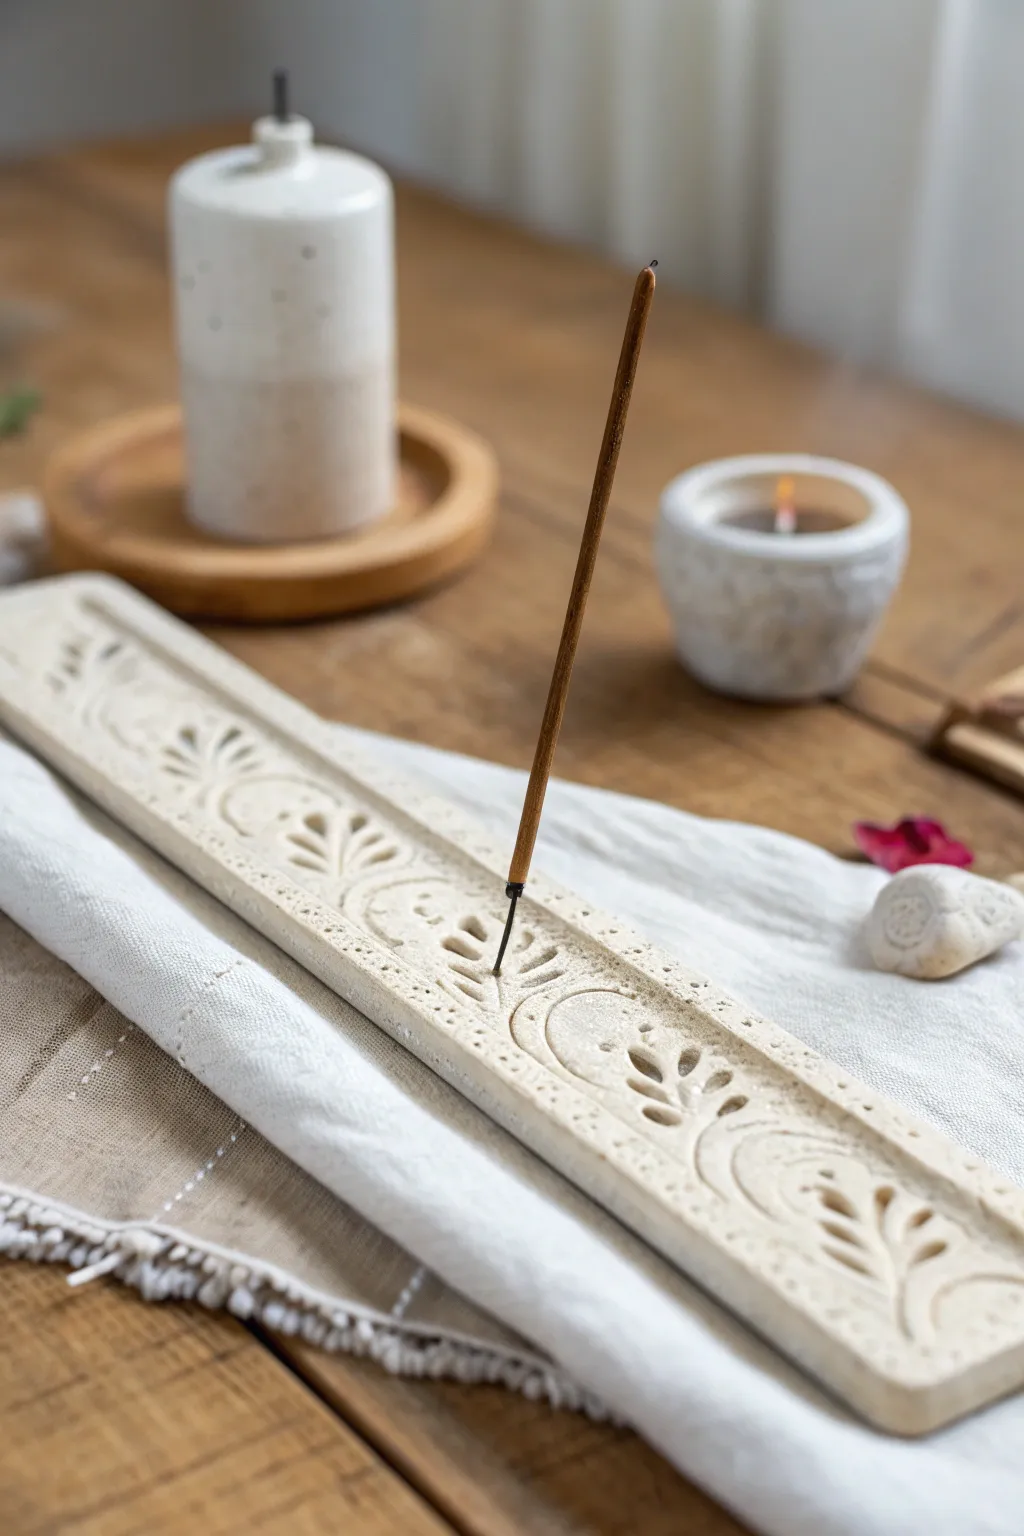
Create a sophisticated, minimalist home accessory with this textured clay incense holder that mimics the look of carved sandstone. The long, slender design features intricate embossed grooves and a subtle speckled finish, making it a functional piece of art for your meditation space.
How-To Guide
Materials
- White polymer clay or air-dry clay (approx. 200g)
- Speckled clay additive or black pepper/sand (for texture)
- Rolling pin
- Long rectangular cutting template (cardstock or ruler)
- Craft knife or clay blade
- Carving tools (loop tool or linocut gouge)
- Needle tool or toothpick
- Fine-grit sandpaper
- Matte spray varnish sealant
Step 1: Preparing the Slab
-
Condition the clay:
Begin by thoroughly kneading your white clay until it is soft and pliable. If using polymer clay, the warmth of your hands is essential here to prevent cracking later. -
Add the speckled texture:
To achieve that natural stone look seen in the photo, knead in a small pinch of speckled additive, black sand, or even coarse black pepper. Mix it until the specks are evenly distributed but sparse. -
Roll it out:
Roll the clay into a long sausage shape first, then flatten it with your rolling pin. Aim for a distinct, even thickness of about 1/4 inch (6mm) to ensure sturdiness. -
Cut the shape:
Lay your ruler or template over the clay slab. Use your craft knife to cut a long, clean rectangle, approximately 10-12 inches long and 2 inches wide. -
Smooth the edges:
Dip your finger in a little water (for air-dry) or baby oil (for polymer) and run it along the cut edges to soften any sharp corners.
Step 2: Carving the Design
-
Mark the center line:
Lightly drag your needle tool down the exact center of the strip to create a faint guide line. This won’t be part of the final design but helps with symmetry. -
Outline the pattern:
Using the needle tool, lightly sketch a repeating swooping motif. The design in the photo features stylized leaf or feather shapes that curve inward toward the center. -
Start the relief carving:
Using a small loop tool or a U-shaped linocut gouge, begin carving out the negative space inside your sketched shapes. You want to remove clay to create depth, leaving the ‘walls’ of the design raised. -
Refine the grooves:
I prefer to go back over the carved channels with a slightly damp brush to smooth out any clay burrs or rough bits left by the carving tool. -
Add detail dots:
Use the point of your needle tool to press small, decorative dots into the border areas or between the swooping shapes for added texture. -
Create the incense hole:
Find the center point of the tray’s design or pick a spot slightly off-center like the example. Pierce a hole straight through using an incense stick or tool of the same diameter. -
Angle the hole:
Wiggle the tool slightly to ensure the hole is loose enough that the incense won’t get stuck once the clay shrinks during drying or baking.
Clean Lines Hack
Chill your clay slab in the fridge for 10 minutes before carving. Harder clay carves cleaner and drags less.
Step 3: Finishing Touches
-
Cure or dry:
If using polymer clay, bake according to the package instructions (usually 275°F/135°C for 15-30 mins). If using air-dry clay, let it sit on a wire rack for 24-48 hours until fully hardened. -
Sanding:
Once fully cured and cooled, take a piece of fine-grit sandpaper and gently buff the surface. This highlights the ‘stone’ texture and removes any sharp carving ridges. -
Dusting:
Wipe the piece down with a slightly damp cloth to remove all sanding dust from the deep grooves. -
Sealing:
Apply a coat of matte spray varnish. A glossy finish would look too plastic; matte preserves that raw, organic ceramic feel.
Antique Wash
After baking, wipe diluted brown acrylic paint into the grooves and wipe the surface clean to make the pattern pop.
Now light your favorite scent and enjoy the serene atmosphere your handmade piece creates
Clay Candle Holders in Simple Shapes
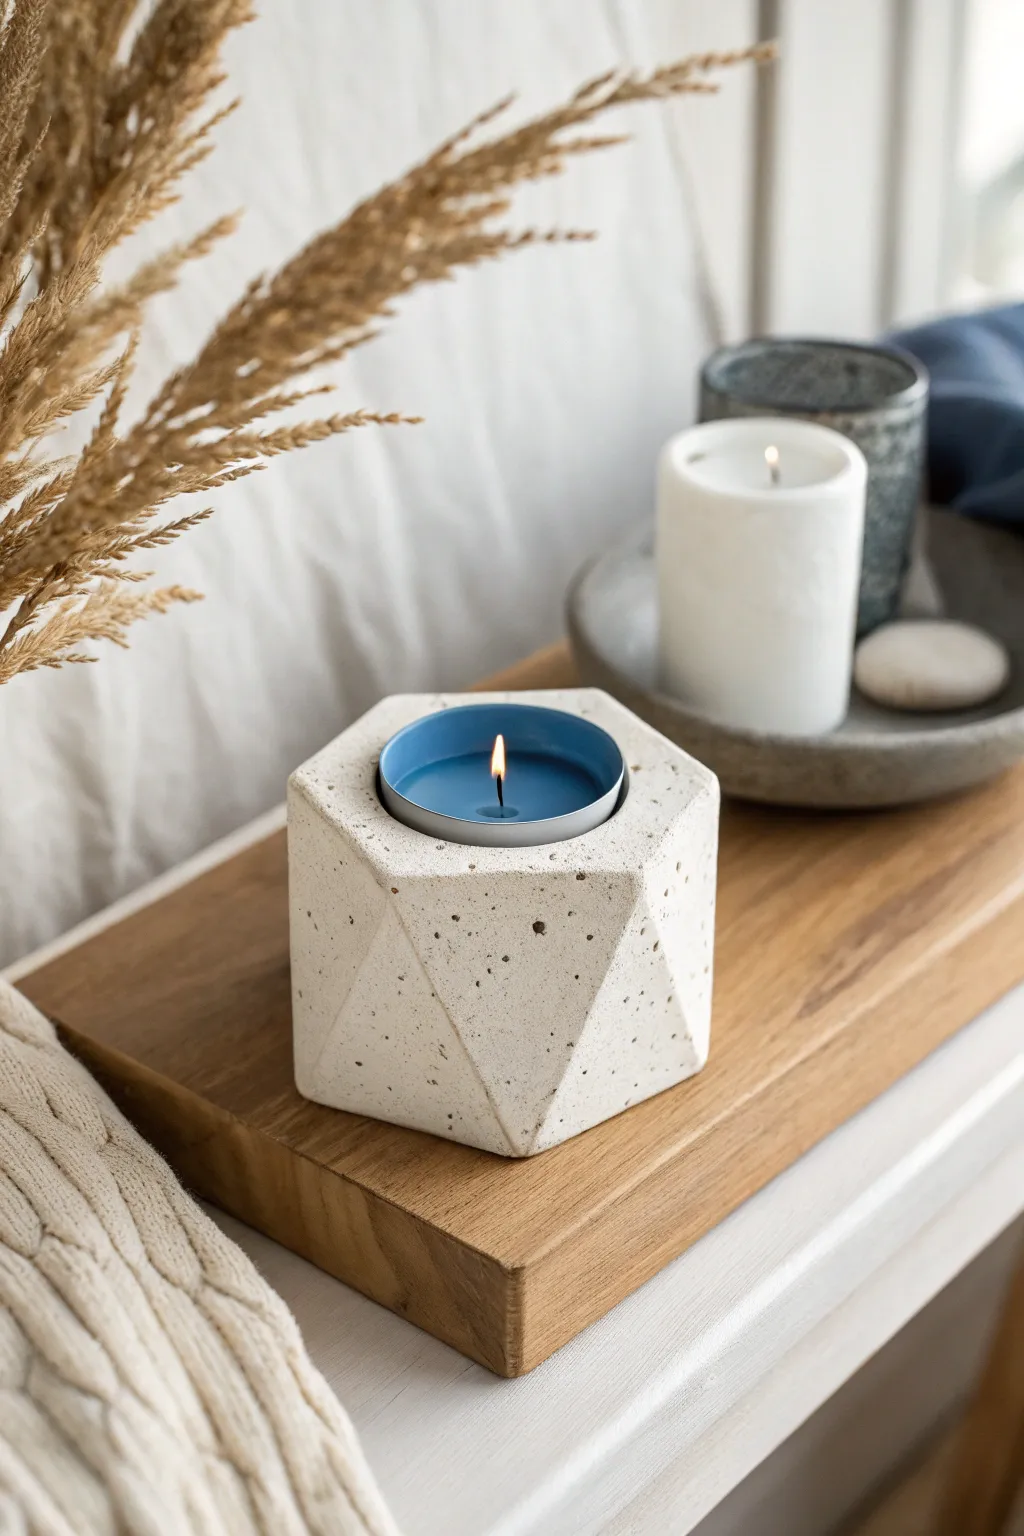
This project combines minimalist geometric angles with a trendy, speckled stone finish that looks incredibly high-end. Despite its intricate faceted appearance, the shape is surprisingly easy to achieve using a simple silicone mold or a slab-building technique.
Step-by-Step Tutorial
Materials
- Air-dry clay (white or light grey)
- Black acrylic paint or black sand (for speckles)
- Geometric silicone planter mold (hexagonal prism shape)
- Alternatively: ruler, craft knife, and cardboard (for slab building)
- Fine-grit sandpaper (220-400 grit)
- Small rolling pin
- Measuring spoon or coin (for smoothing)
- Tea light candle (for sizing)
- Clay varnish or sealant (matte finish)
Step 1: Preparing the Clay
-
Create the Speckled Effect:
Before shaping, you need to create that faux-concrete look. Take a large ball of white air-dry clay and flatten it slightly. -
Mix in Texture:
Sprinkle a pinch of black sand or fine dried coffee grounds onto the clay. Alternatively, you can use a few drops of black acrylic paint, but don’t over-mix it if you want distinct speckles. -
Knead Thoroughly:
Fold the clay over and knead it until the black speckles are evenly distributed throughout the white base. The goal is a consistent ‘cookies and cream’ appearance.
Step 2: Molding the Shape
-
Fill the Mold:
If you are using a geometric silicone mold, press the speckled clay firmly into it. Ensure you push it into every faceted corner to avoid air pockets. -
Create the Opening:
Take a standard tea light candle (or a circle cutter of the same diameter) and press it gently into the top center of the clay. -
Define the Well:
Wiggle the tea light slightly to widen the hole just a fraction so the candle fits easily once the clay shrinks during drying. Remove the candle before the clay sets. -
Level the Bottom:
Use a straight edge or a knife to slice off any excess clay from the bottom of the mold, ensuring the candle holder will sit perfectly flat on your table. -
Let it Set:
Allow the clay to dry inside the mold for at least 24 hours. Because the clay is thick, it needs this time to firm up before you demold it.
Pro Tip: Release Agent
If using a deep silicone mold, dust the inside lightly with cornstarch before pressing in the clay. This ensures the geometric corners pop out sharply without sticking.
Step 3: Manual Sculpting (Alternative Method)
-
Form a Cylinder:
If working without a mold, roll your clay into a thick, smooth cylinder that is slightly wider than your tea light. -
Carve the Facets:
I prefer to use a sharp craft knife or a wire clay cutter here. Slice distinct, flat planes off the sides of the cylinder at varying angles to create that geometric, gem-like shape. -
Create the Center:
Press a tea light into the top to mark the size, then use a spoon to scoop out the well to the correct depth. -
Refine Edges:
Use a slightly damp finger to smooth away any burrs or rough crumbs on your cut facets, but keep the edges crisp.
Level Up: Marbled Effect
Mix a small amount of grey clay with the white speckled clay but stop kneading before they blend fully. This creates swirling distinct marble veins.
Step 4: Finishing Touches
-
Dry Completely:
Whether molded or hand-carved, let the piece air dry for another 24-48 hours until it is fully hard and no longer cool to the touch. -
Sand for Smoothness:
Take your fine-grit sandpaper and very gently sand the flat surfaces. This helps expose more of the black speckles and gives the ‘stone’ a polished feel. -
Clean Up:
Wipe away all sanding dust with a soft, dry brush or a microfiber cloth. -
Seal the Surface:
Apply a coat of matte varnish. This protects the clay from heat and wax drips while maintaining that natural, unglazed concrete aesthetic. -
Insert Candle:
Once the varnish is dry, pop in a blue or white tea light to complete the look.
This sophisticated little holder makes a perfect centerpiece or a thoughtful handmade gift


What Really Happens Inside the Kiln
Learn how time and temperature work together inside the kiln to transform clay into durable ceramic.
Magnet Vases for Tiny Flowers
These charming, tiny clay vases bring a touch of nature to your refrigerator or magnetic board, perfect for displaying the smallest wildflowers or dried stems. With their organic, speckled finish and varying bulbous shapes, they evoke a sophisticated, modern ceramic aesthetic on a miniature scale.
How-To Guide
Materials
- White air-dry clay or polymer clay
- Rolling pin
- Small round magnets (strong rare-earth magnets recommended)
- Black pepper or dried coffee grounds (for speckling)
- Sculpting tools (needle tool, small ball stylus)
- Sandpaper (fine grit)
- Water
- Clear matte varnish or sealant
- Strong craft glue (E6000 or similar)
Step 1: Preparing the Speckled Clay
-
Condition the clay:
Start by kneading a golf-ball-sized amount of white clay until it is soft and pliable. If you are using air-dry clay, keeping your hands slightly damp prevents cracking. -
Add the texture:
To achieve that organic, speckled stoneware look without using special glazes, sprinkle a pinch of coarse black pepper or dried coffee grounds into the clay. -
Mix thoroughly:
Fold the clay over itself repeatedly and knead until the dark speckles are distributed evenly throughout the white mass.
Magnet Slipping?
If the magnet slides down the back while gluing, use a piece of masking tape to hold it firmly in place until the adhesive has fully set.
Step 2: sculpting the Forms
-
Divide the clay:
Separate your speckled clay into three small balls of slightly different sizes to create variety in your set. -
Form the base:
Roll one piece into a smooth sphere. Gently flatten the bottom just enough so it creates a flat surface for the magnet later, though the primary back side will also need flattening. -
Shape the neck:
Using your fingers, gently pinch and pull the top center of the sphere upwards to create a bottleneck shape. I like to rotate the piece constantly as I pinch to keep it symmetrical. -
Create the opening:
Use a needle tool or a small brush handle to press a hole down through the neck into the body of the vase. Ensure it is deep enough to hold a flower stem but doesn’t pierce the bottom. -
Refine the silhouette:
Smooth out the transition between the round body and the neck. For one vase, keep the body round; for another, elongate it into a tear-drop shape as seen on the right in the image. -
Flatten the back:
Since these are magnets, press the back side of each vase gently against your work surface to create a flat plane. This ensures they will sit flush against the fridge. -
Smooth the lip:
Dip your finger in a little water and run it around the rim of the vase opening to flare it slightly and remove any sharp edges.
Make it Waterproof
To hold live blooms, coat the *inside* with two layers of resin or waterproof varnish to prevent the clay from softening over time.
Step 3: Finishing and Assembly
-
Dry the pieces:
Allow the clay to dry completely according to the package instructions. For air-dry clay, this usually takes 24-48 hours. Rotate them occasionally so the back dries evenly. -
Sand for smoothness:
Once fully cured, use fine-grit sandpaper to gently buff out any fingerprints or rough spots, paying special attention to the rim and the flat back. -
Seal the surface:
Apply a coat of clear matte varnish. This protects the clay from moisture—essential if you plan to put fresh flowers with a drop of water inside—and enhances the visibility of the speckles. -
Attach the magnet:
Place a dab of strong craft glue on the flat spot you created on the back of the vase. -
Secure the hardware:
Press a strong magnet into the glue. Let the vase sit face-down (magnet-up) while the glue cures completely to prevent sliding. -
Styling:
Select tiny dried sprigs, daisies, or baby’s breath, and trim the stems short enough to rest comfortably in your new miniature vessels.
Now you have a trio of rustic, functional art pieces ready to hold your tiniest botanical finds.
Polymer Clay Earrings With Bold Color
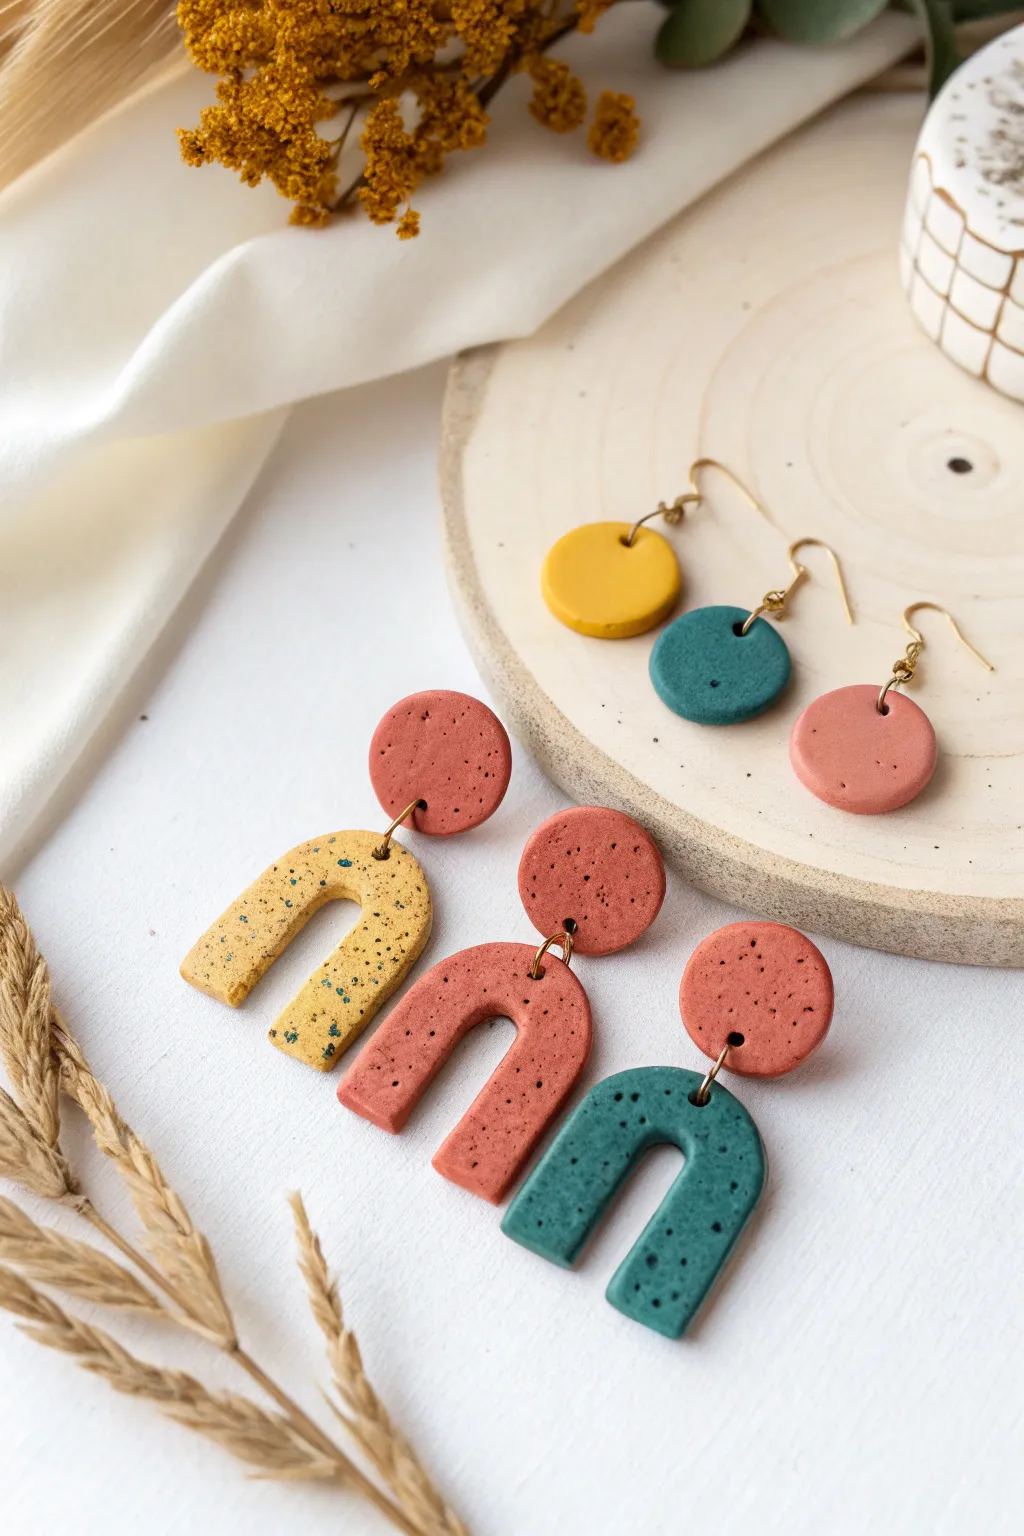
Embrace earthy tones and modern shapes with these stunning polymer clay earrings featuring a speckled stone effect. This project combines classic terracotta, mustard, and teal hues into trendy arch and circle designs that add a bold pop of color to any outfit.
Step-by-Step Guide
Materials
- Polymer clay (Terracotta, Mustard Yellow, Teal, Black, White)
- Acrylic roller or pasta machine
- U-shape clay cutter
- Small circle clay cutter (approx. 10-12mm)
- Medium circle clay cutter (approx. 15mm)
- Needle tool or toothpick
- Jump rings (gold finish)
- Earring hooks and earring posts
- Jewelry pliers
- Superglue or liquid clay
- Fine-grit sandpaper (optional)
- Ceramic tile or glass work surface
- Oven
Step 1: Preparing the Speckled Clay
-
Condition the clay:
Start by warming up your main colored clays—terracotta, mustard, and teal—in your hands. Knead them separately until they are soft and pliable to prevent cracking later. -
Create the ‘pepper’ speckles:
To achieve that faux-stone look, take a very small amount of black clay. Roll it into a super thin snake, then chop it into tiny, dust-like particles. Do the same with a hint of white translucent clay for depth if desired. -
Mix in the speckles:
Sprinkle the chopped black bits over your flattened colored clay sheets. Fold the clay over and pass it through your pasta machine or roll it out. Repeat the folding and rolling process just enough to distribute the speckles evenly without blending the black into the base color. -
Roll out slabs:
Roll each color into a slab of even thickness, approximately 3mm thick. I find playing cards stacked on either side of my roller help keep the thickness consistent if I’m not using a machine.
Step 2: Cutting and Shaping
-
Cut the arches:
Using your U-shape cutter, press firmly into the clay slabs. Cut one arch from the mustard slab, one from the terracotta slab, and one from the teal slab if you want to recreate the exact set shown. -
Cut the stud circles:
Use the small circle cutter to punch out the top pieces for the arch earrings. You’ll need a terracotta circle for the mustard arch, a terracotta circle for the terracotta arch, and a terracotta circle for the teal arch to match the image precisely. -
Cut the dangle circles:
For the simpler drop earrings, use the medium circle cutter. Cut one circle each of yellow, teal, and terracotta. -
Smooth the edges:
Gently run your finger along the cut edges of all pieces to smooth out any harsh lines or burrs left by the cutters. -
Pierce holes:
Using a needle tool, carefully poke a hole at the top center of each U-shape arch. Then, poke a hole at the bottom center of the corresponding stud circles. For the simple circle dangles, poke a single hole near the top edge.
Fixing Bubbles
If you see air bubbles after baking, sand the surface gently. Next time, release trapped air by slicing into the bubble with a craft knife before baking and smoothing it down.
Step 3: Baking and Assembly
-
Bake the pieces:
Place all your clay shapes on a ceramic tile or baking sheet lined with parchment paper. Bake according to your clay manufacturer’s instructions (usually 275°F/130°C for 15-30 minutes per 1/4 inch thickness). -
Cool down:
Let the pieces cool completely inside the oven or on a wire rack. Polymer clay is slightly soft when hot and hardens fully as it cools. -
Sand for perfection:
If there are any rough spots on the edges, lightly sand them with fine-grit sandpaper under water to keep dust down. -
Attach posts to studs:
Apply a small dab of superglue to the back of the small terracotta circles (the ones for the arches). Press an earring post into the glue. For extra durability, I sometimes cover the post base with a tiny bit of liquid clay and bake again briefly. -
Open jump rings:
Use two pairs of pliers to twist open your gold jump rings. Remember to twist sideways (front to back), never pull them apart, to maintain the circle shape. -
Connect the arches:
Thread an open jump ring through the hole in the U-shape and the hole in the corresponding stud circle. Close the jump ring securely with your pliers. -
Assemble the simple dangles:
For the standalone circle earrings, thread a jump ring through the top hole and then attach an earring hook before closing the ring.
Level Up: Texture
Before cutting your shapes, gently press a piece of coarse sandpaper or a clean toothbrush onto the raw clay surface to give it a realistic, stone-like pitted texture.
Now you have a gorgeous set of speckled statement earrings ready to wear or gift.

TRACK YOUR CERAMIC JOURNEY
Capture glaze tests, firing details, and creative progress—all in one simple printable. Make your projects easier to repeat and improve.
Cute Clay Animal Figurines
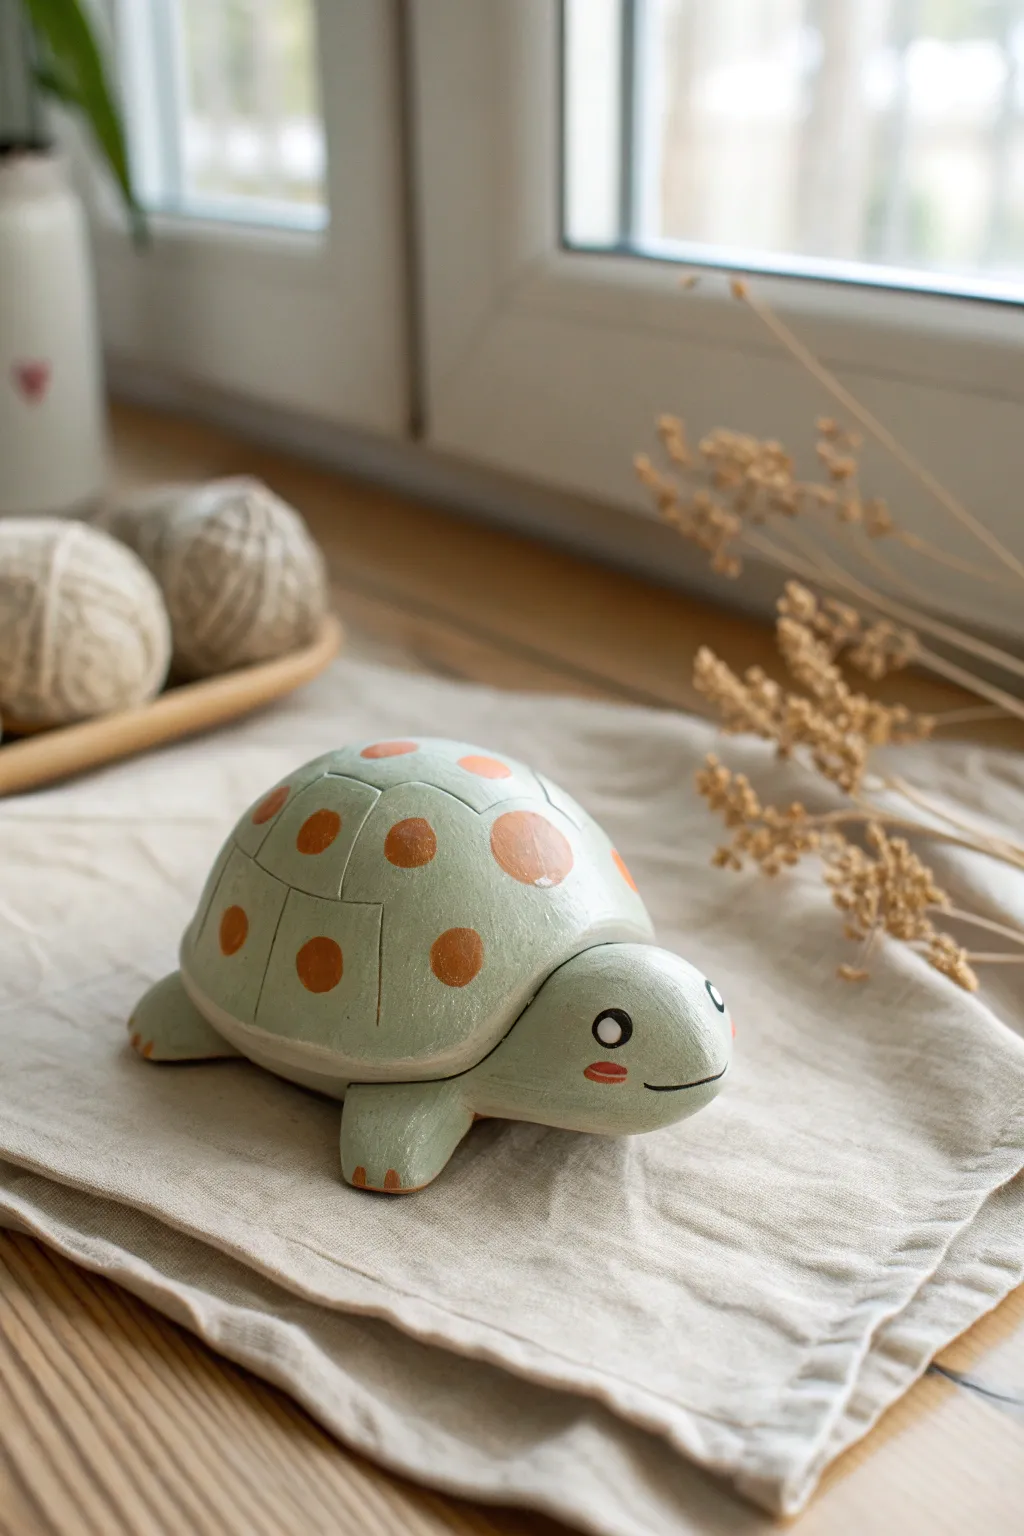
This charming, stylized turtle figurine features a soft celadon green finish with playful terracotta-colored dots. Its smooth, segmented shell and friendly painted expression make it a delightful desk companion or a sweet handmade gift.
Step-by-Step Tutorial
Materials
- Air-dry clay or polymer clay (white)
- Clay rolling pin
- Sculpting tools (needle tool, modeling tool)
- Aluminum foil (for the core)
- Acrylic paints: sage green, terracotta orange, white, black
- Fine detail paintbrushes
- Medium flat paintbrush
- Matte or satin varnish
- Water cup and sponge (for smoothing)
Step 1: Forming the Base Structure
-
Create the core:
Crumple a piece of aluminum foil into a tight half-sphere shape, about the size of a tangerine. This acts as an armature to save clay and reduce weight. -
Roll the shell slab:
Roll out a slab of white clay to about 1/4 inch thickness. Drape this over your foil dome, pressing it down gently to conform to the shape without trapping air bubbles. -
Close the shell:
Trim the excess clay around the bottom edge and smooth the clay underneath to fully encapsulate the foil. Roll the dome on your work surface to ensure it is perfectly round and smooth. -
Form the head:
Roll a separate ball of clay regarding the size of a large walnut. Shape one side slightly flatter to attach to the body, and round off the snout area gently. -
Attach the head:
Score the surface of the shell where the head will go, and score the back of the head piece. Add a dab of water or liquid clay (slip) and press the head firmly onto the body, blending the seam underneath until invisible.
Step 2: Sculpting Details
-
Add the feet:
Create four small, flattened oval shapes for the flippers. Attach two near the front and two near the back using the score-and-slip method, blending the upper seams into the body. -
Refine the shape:
Use a damp sponge or your finger to smooth out any fingerprints or rough textures on the entire turtle. The surface needs to be very clean for the painting phase. -
Carve shell segments:
Using a needle tool, lightly sketch the segment lines on the shell. Draw a central rounded shape, surrounded by curved rectangular panels. Once happy with the placement, retrace the lines deeper to create distinct grooves. -
Dry or bake:
If using air-dry clay, let the turtle sit in a dry spot for 24-48 hours. If using polymer clay, bake according to the manufacturer’s instructions and let it cool completely.
Cracks while drying?
For air-dry clay, mix a tiny bit of fresh clay with water to make a paste. Fill the crack, smooth it over with a wet finger, and let it dry again.
Step 3: Painting and Finishing
-
Base coat:
Apply a coat of white acrylic paint first to prime the surface. This helps the final colors pop, especially if your clay dried slightly grey. -
Apply the green:
Mix a soft sage or celadon green. Paint the entire turtle—shell, head, and flippers—with this color. You may need two coats for full opacity. -
Add the dots:
Using a terracotta or burnt orange paint, carefully paint circular dots in the center of each shell segment. I find that rotating the turtle as you work helps keep the circles even. -
Detail the feet:
Use the same terracotta color to paint three tiny toe claws on the tip of each flipper. -
Paint the face:
Use a fine liner brush to paint large white circles for eyes. Once dry, add solid black pupils, leaving a tiny dot of white for a highlight. Paint a thin, black curved smile and oval pink cheeks. -
Seal the work:
Once all paint is completely dry, apply a layer of matte or satin varnish to protect your new friend from dust and scratches.
Add Texture
Before the clay dries, gently press a piece of coarse fabric or canvas onto the shell’s surface to give it a subtle, woven texture beneath the paint.
Now you have an adorable, patterned turtle ready to brighten up your bookshelf
Face Pots With Personality
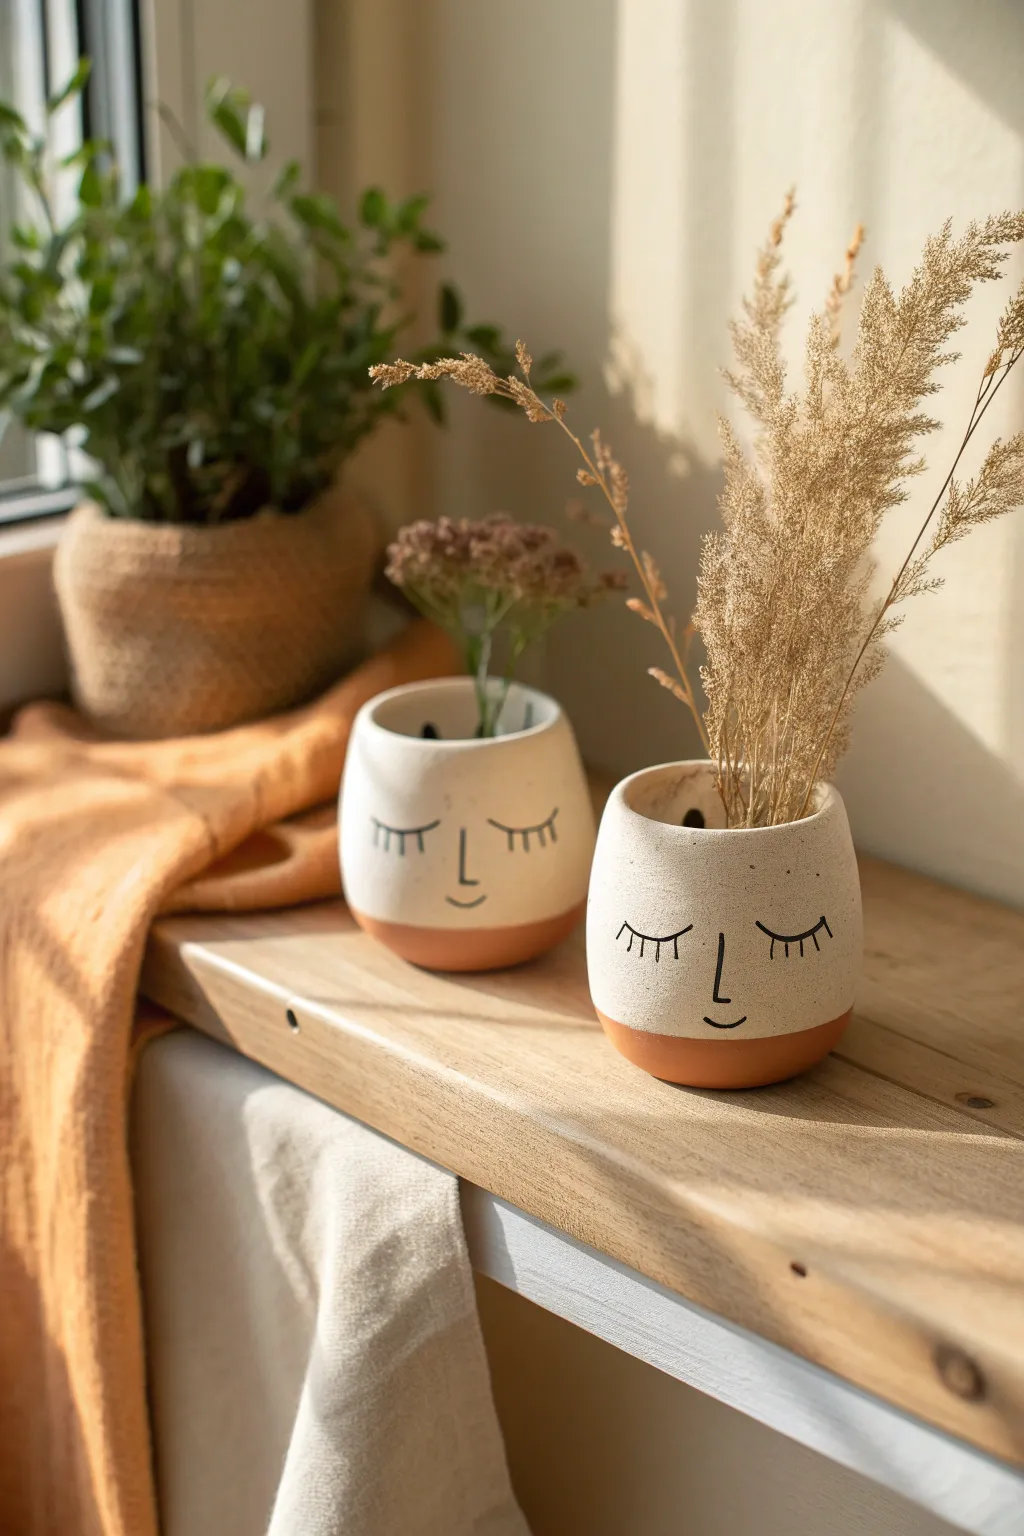
These charming, miniature vessels bring a sense of serenity to any windowsill with their minimalist sleeping faces and warm terracotta bases. Perfect for holding dried florals or tiny succulents, this project combines simple pinching techniques with delicate surface decoration.
Step-by-Step Tutorial
Materials
- White air-dry clay or polymer clay
- Terracotta-colored acrylic paint
- Black fine-tip permanent marker or acrylic paint pen
- Rolling pin
- Clay cutting tool or knife
- Sponge or fine sandpaper
- Small paintbrush
- Clear matte sealant or varnish
- Bowl of water (for smoothing)
Step 1: Shaping the Base
-
Prepare the Clay:
Start by conditioning a ball of white clay about the size of a tangerine until it is soft and free of cracks. Ensure your hands are clean so the white clay stays pristine. -
Begin the Pinch Pot:
Insert your thumb into the center of the ball, pushing down but stopping about half an inch from the bottom to create a sturdy base. -
Pinch the Walls:
Rotate the ball in one hand while gently pinching the clay between your thumb and fingers with the other. Work your way from the bottom up to thin out the walls evenly. -
Refine the Shape:
Aim for a slightly rounded, cylindrical shape rather than a wide bowl. Gently tap the bottom of the pot against your work surface to create a flat, stable standing area. -
Smooth the Rim:
The rim should be slightly organic but smooth. Use a damp finger or a barely wet sponge to run along the edge, softening any sharp or jagged bits. -
Surface Smoothing:
Dip your finger in a little water and glide it over the exterior walls to erase fingerprints and create that seamless, eggshell-like finish seen in the photo. -
Drying Phase:
Set your pots aside to dry completely. If using air-dry clay, this might take 24-48 hours depending on humidity; turn them over halfway through to ensure the bottom dries thoroughly.
Step 2: Adding the Details
-
Sand for Perfection:
Once fully dry, inspect the surface. I like to use a very fine-grit sandpaper to buff away any remaining bumps, creating a perfect canvas for the face. -
Mark the Paint Line:
Lightly sketch a guideline around the bottom circumference of the pot, about one-fifth of the way up, to mark where the terracotta color will go. -
Paint the Base:
Using the terracotta acrylic paint, fill in the bottom section below your guideline. You may need two thin coats for opaque coverage, letting the first coat dry before applying the second. -
Sketch the Face:
Before committing to ink, very faintly sketch the sleeping face features with a pencil. Place the nose centrally and the curved, closed eyes symmetrically on either side. -
Draw the Nose:
Using your black fine-tip marker or paint pen, draw the nose first. Create a simple ‘L’ shape or a straight vertical line with a small curve at the bottom. -
Add the Eyes:
Draw two U-shaped curves for the closed eyelids. Pay attention to the spacing; keeping them wide set gives the pot a peaceful, dreamy expression. -
Detail the Lashes:
Add three to four short, vertical strokes extending downward from each eyelid curve to represent eyelashes. Keep these strokes light and swift. -
Add the Mouth:
Draw a tiny, gentle upward curve directly below the nose line for a subtle smile. -
Seal the Work:
To protect the paint and marker from smudging or fading, apply a coat of clear matte sealant over the entire pot. -
Final Styling:
Once the sealant is cured, fill your new character pot with dried grasses, wheat, or faux stems to complete the rustic, natural look.
Clean Lines
To get a perfectly straight paint line at the bottom, wrap a rubber band around the pot or use painter’s tape as a guide while you paint the terracotta section.
Speckled Effect
Mix a tiny amount of black sand or used coffee grounds into your white clay before shaping to mimic the natural speckled finish shown in the photo.
Enjoy the calming presence these little face pots bring to your home decor
Body-Inspired Vases and Planters
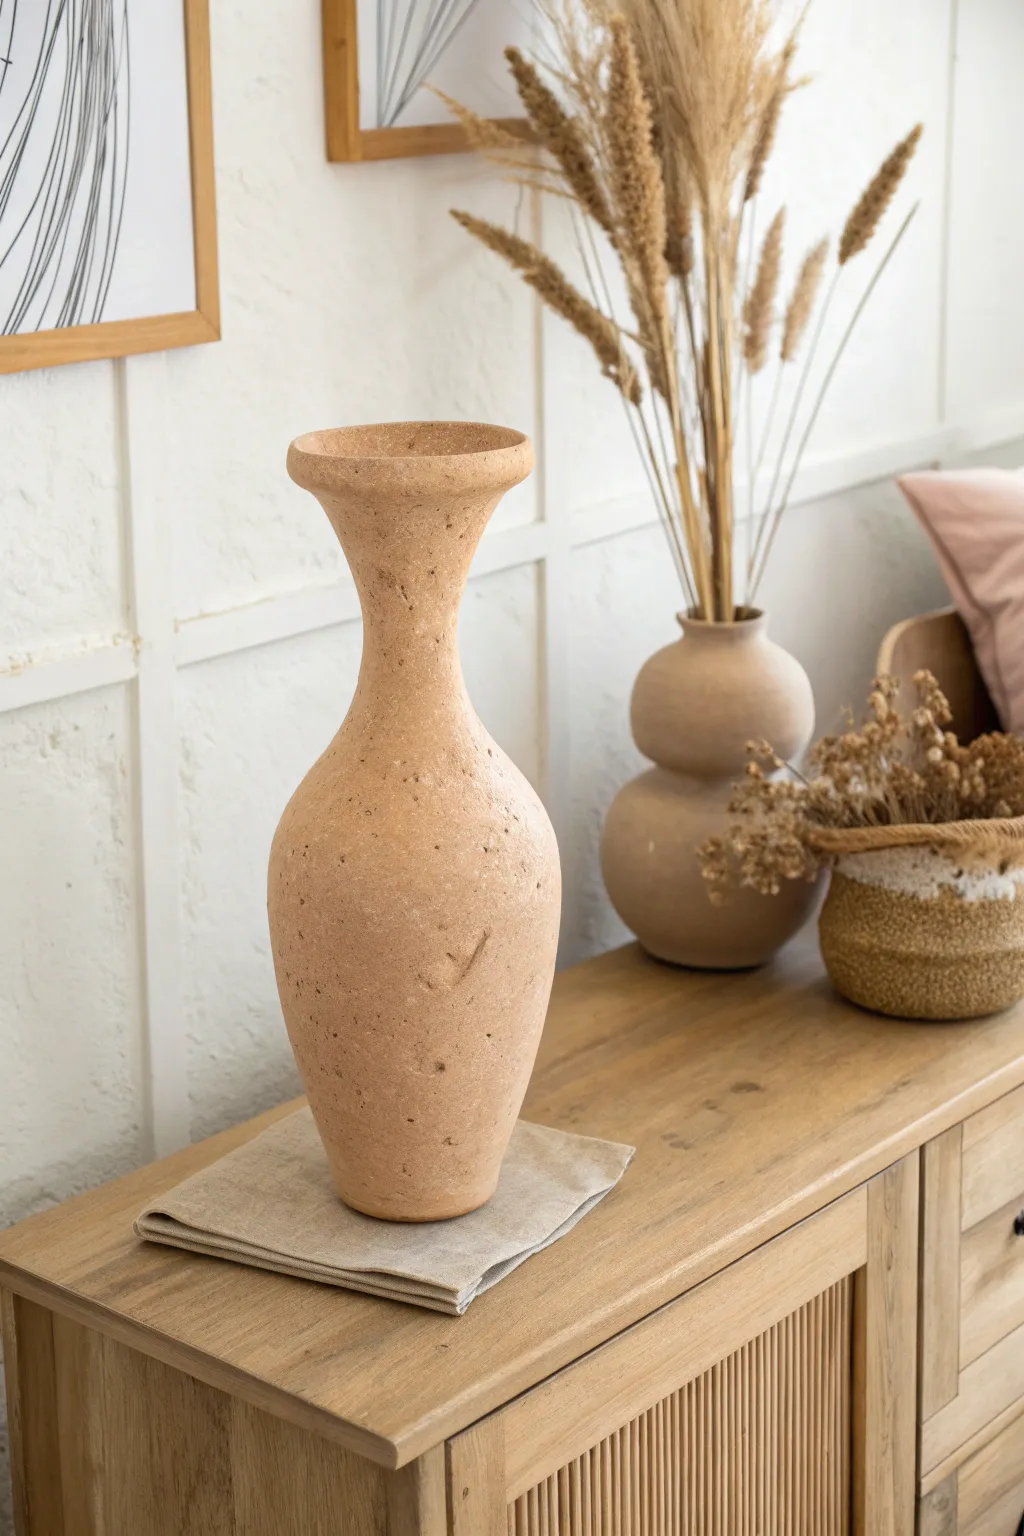
This elegant, tall-necked vase draws inspiration from organic curves, offering a minimalist yet textural addition to your shelf decor. The natural, unglazed finish highlights the raw beauty of terracotta clay, featuring subtle imperfections that give it a timeless, hand-built character.
Detailed Instructions
Materials
- Terracotta clay (low-fire or air-dry depending on kiln access)
- Pottery wheel (optional, can be hand-built with coils)
- Wooden modeling tools
- Metal kidney rib
- Sponge
- Cutting wire
- Rolling pin (for hand-building)
- Canvas mat
Step 1: Forming the Base Structure
-
Prepare the clay:
Begin by thoroughly wedging about 3 to 4 pounds of terracotta clay. This removes air bubbles and ensures the clay has a consistent texture, which is crucial for structural integrity. -
Establish the base:
If throwing on a wheel, center your clay and open it to create a floor about 4 inches wide. If hand-building, roll a slab for the base and begin coiling upwards. -
Build the height:
Pull the walls upward to create a cylinder. It helps to keep the walls slightly thicker at the bottom to support the height of this particular design. -
Shape the belly:
Gently push the clay outward from the inside to create the rounded ‘belly’ of the vase. The widest point should be roughly one-third of the way up the form.
Step 2: Refining the Neck and Rim
-
Collar the neck:
Slowly collar the clay inward above the belly to form the slender neck. Do this gradually to prevent the clay from buckling. -
Pull the neck higher:
Once narrowed, pull the clay upwards to extend the neck length, maintaining an elegant, elongated curve. -
Flare the rim:
At the very top, gently flare the clay outward to create a distinct, wide lip. This balances the visual weight of the belly below. -
Smooth the transition:
Use a wet sponge or chamois to smooth the rim, ensuring it is rounded and classic rather than sharp.
Fixing a Wobbly Neck
If the long neck starts to twist or slump while building, stop immediately. Let the clay stiffen with a heat gun or hair dryer for 5-10 minutes before continuing upward.
Step 3: Texturing and Finishing
-
Initial drying:
Allow the vase to dry to a ‘leather-hard’ state. I like to let this sit for a few hours loosely covered so it firms up but is still carveable. -
Trim the foot:
Turn the pot over (if wheel-thrown) and trim the excess clay from the bottom to create a defined foot ring. -
Create texture:
Take a rough sponge or a stiff brush and dab the surface of the clay. You aren’t trying to smooth it perfectly; you want to leave small pits and marks to mimic aged stone. -
Add character marks:
Use a needle tool or small stick to press tiny, random indentations or scratches into the surface, replicating the natural flaws seen in the reference image. -
Refine the curve:
Go over the silhouette one last time with a metal rib, lightly scraping away any major bumps while preserving the micro-texture you just added. -
Final drying:
Let the piece dry completely. This is a tall, thin shape, so slow drying away from drafts is best to prevent warping. -
Firing or sealing:
If using kiln-fire clay, bisque fire the piece. Once out, leave it unglazed to maintain the matte, earthy look. If using air-dry clay, seal it with a matte varnish.
Level Up: Faux Aging
Mix a tiny amount of watered-down white acrylic paint or slip and sponge it lightly over the textured spots. Wipe most of it off to leave a dusty, antique residue in the crevices.
This statuesque piece creates a stunning focal point on any sideboard, ready to hold your favorite dried botanicals
Abstract Chain Link Sculptures

Embrace the beauty of modern minimalism with this stunning faux-stoneware chain sculpture. Featuring a textured, speckled finish and organic, chunky loops, this piece brings a high-end, gallery feel to any coffee table or bookshelf.
Step-by-Step Guide
Materials
- Air-dry clay (white or light grey)
- Acrylic rolling pin
- Parchment paper or silicone mat
- Ceramic cutting tool or craft knife
- Small bowl of water
- Sanding sponge (fine grit)
- Stone-texture spray paint (cream/light grey)
- Matte black acrylic paint (optional for custom speckling)
- Old toothbrush (optional)
- Matte clear sealant spray
Step 1: Forming the Clay Links
-
Prepare your clay:
Begin by taking a large chunk of air-dry clay and kneading it in your hands to warm it up. This conditioning process helps prevent cracks later on. -
Roll the coils:
Divide your clay into three equal portions. Roll the first portion on your work surface into a long, even snake or coil. Aim for a thickness of about 3/4 inch to 1 inch for that chunky look seen in the photo. -
Length check:
Ensure your coil is roughly 10-12 inches long. The ends should be blunt, not tapered, so trim them straight if necessary. -
Form the first loop:
Gently bend the coil into an oval shape. Bring the two flat ends together to close the loop. -
Join the seam:
Score the touching ends with your knife (make little hash marks) and dab on a bit of water or slip. Press them firmly together. -
Smooth the connection:
Use your finger dipped in water to smooth the clay over the seam until the join is invisible. It should look like one continuous piece. -
Shape the oval:
Adjust the shape while it’s still pliable. You want a nice, elongated oval rather than a perfect circle. -
Add the second link:
Roll your second coil of clay to the same thickness. Thread this new snake through the center of your first finished loop before bringing the ends together. -
Close the second link:
Repeat the scoring, slipping, and smoothing process to close this second loop, interlocking it permanently with the first. -
Finish the chain:
Repeat the threading and joining process with your third coil. You should now have a chain of three connected clay loops.
Step 2: Refining and Finishing
-
Allow to dry:
Let the sculpture dry completely on a porous surface or wire rack. I find rotating the links every few hours helps them dry evenly and prevents flat spots. -
Sand imperfections:
Once fully cured (usually 24-48 hours), use a fine-grit sanding sponge to gently smooth out any bumps, fingerprints, or rough seams. -
Apply base texture:
Take the sculpture to a well-ventilated area. Spray it with a stone-texture spray paint in a light cream or beige color. Apply thin, even coats to build up that grainy surface. -
Enhance the speckle (Optional):
If your texture spray needs more contrast, dilute a tiny drop of black acrylic paint with water. Dip an old toothbrush in it and flick the bristles to spatter tiny dots across the sculpture. -
Seal the piece:
Protect your work with a matte clear sealant spray. This ensures the clay is durable and the textured finish doesn’t flake off over time.
Cracking Up?
If small cracks appear as the clay dries, don’t panic. Mix a small amount of fresh clay with water to make a paste, fill the crack, let it dry, and sand smooth.
Make it Heavy
To mimic heavy stoneware, wrap your clay around a core of crumpled heavy-duty foil. This saves clay and makes the drying time significantly faster.
Style your new artisan chain atop a stack of books for an effortlessly chic vignette