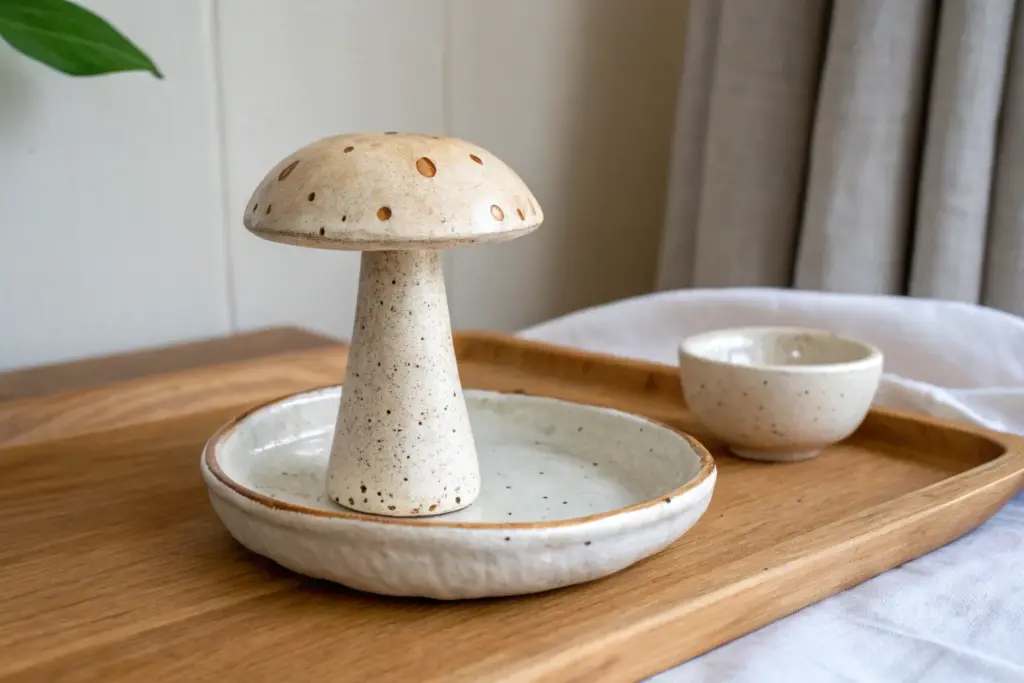
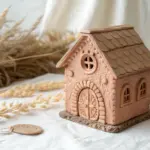
Whenever I’m stuck, I grab a fresh lump of clay and let the shapes tell me what they want to become. These clay art work ideas are my favorite projects for making pieces that feel playful, personal, and totally doable at your own table.
Pinch Pot Bowl Trio With Texture
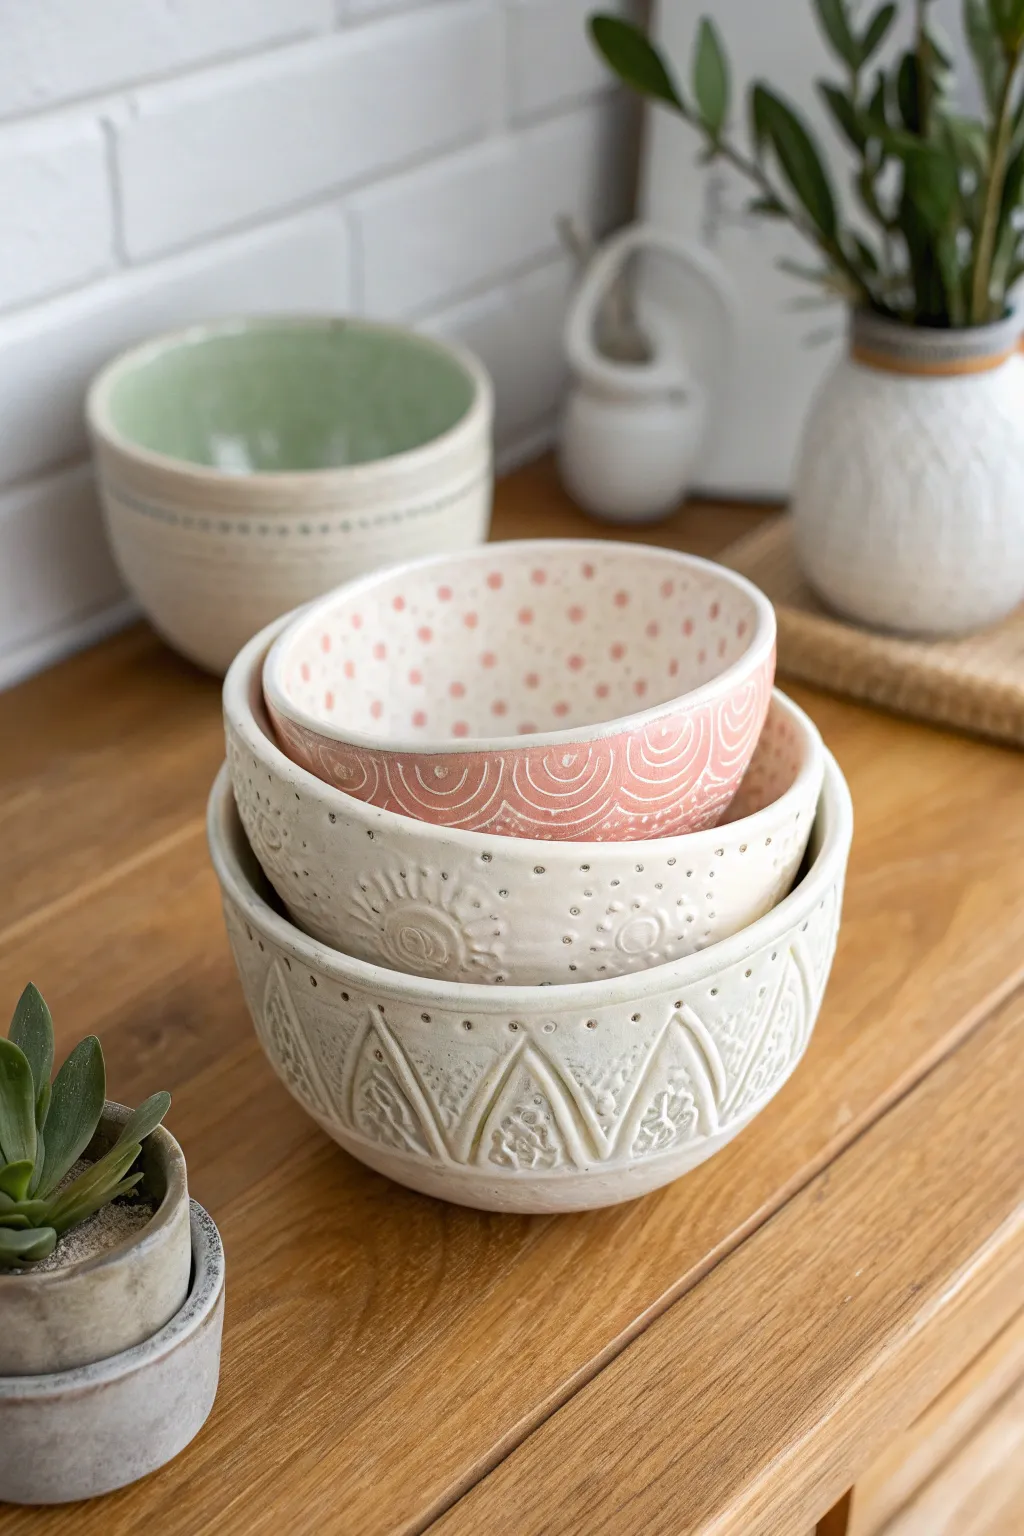
These three nesting pinch pots showcase the beauty of varied textures, featuring a delightful mix of stamped patterns, carved reliefs, and soft pastel glazes. The project builds upward from a sturdy base bowl to a delicate, pink-patterned top piece, creating a cohesive yet eclectic stack perfect for trinkets or display.
Step-by-Step Guide
Materials
- White stoneware or polymer clay (oven-bake)
- Pottery tools: rib, needle tool, sponge
- Rolling pin
- Texture tools: lace doily, stamps, or found objects
- Loop tool for carving
- Slip and scoring tool (if using ceramic clay)
- Underglazes: Soft pink, mint green (optional for interior)
- Clear matte or semi-gloss glaze
- Kiln (if using ceramic clay) or home oven (if using polymer)
Step 1: Forming the Basic Shapes
-
Prepare your clay:
Start by wedging your clay thoroughly to remove air bubbles. Divide the clay into three portions of graduating sizes—large, medium, and small—to ensure the bowls will nest perfectly inside one another. -
Pinch the base forms:
Take the largest ball of clay and press your thumb into the center, stopping about a half-inch from the bottom. Gently pinch and turn the plastic clay between your thumb and fingers, working the walls up and out until you have an even thickness. -
Create the smaller bowls:
Repeat the precision pinching process for the medium and small balls of clay. Periodically test the fit by gently placing them inside the larger bowls to check the nesting clearance. -
Smooth and refine:
Use a damp sponge specifically to smooth the rims and interiors of all three bowls. Run a flexible rib tool over the exterior to remove fingerprints and create a clean canvas for your textures.
Step 2: Texturing the Large & Medium Bowls
-
Carve the bottom bowl:
On the largest bowl, use a needle tool to lightly sketch a chevron or triangle pattern around the lower half. Once planned, use a small loop tool to carve out the negative space inside the triangles, creating a raised relief effect. -
Add detail to the relief:
Press a small floral stamp or a textured object into the recessed areas of your carved triangles to add depth. I find that using the head of a screw or a textured button works surprisingly well here. -
Texture the medium bowl:
For the middle bowl, focus on a repeating circular motif. Use a small, round stamp or the cap of a marker to press distinct circle impressions in a horizontal band around the center of the pot. -
Embellish the middle band:
Take a needle tool and gently poke tiny dots around your stamped circles to create a ‘sunburst’ or stitched effect. Keep the pressure light so you don’t puncture through to the inside.
Cracked Rims?
If the rim starts cracking while pinching, your clay is too dry. Dip your fingers (not the clay!) in water or vinegar and smooth the cracks immediately with a damp sponge.
Step 3: Designing the Top Bowl
-
Apply the scalloped pattern:
On the smallest bowl, use a curved tool—like the end of a popsicle stick or a specific U-shaped wire tool—to impress rows of scallops or scales. Start from the bottom and overlap them slightly as you move upward toward the rim. -
Refine the rim:
Check the rims of all three bowls one last time. If they have become warped during the texturing process, gently reform them into perfect circles and smooth them with a chamois or soft plastic.
Pro Tip: Clean Lines
When carving the bottom bowl, let the clay firm up to ‘leather hard’ first. This prevents the tool from dragging and creates crisp, sharp relief edges rather than mushy ones.
Step 4: Finishing and Glazing
-
Dry or bake:
If using ceramic clay, let the bowls dry slowly to leather-hard, then bone dry, before bisque firing. If using polymer clay, bake according to the package instructions. -
Paint the top bowl:
For the smallest bowl, brush a soft pink underglaze (or acrylic if using polymer) over the scalloped exterior. Wipe back the surface with a damp sponge so the color remains primarily in the indented lines, highlighting the texture. -
Add interior color:
Paint the interior of the top bowl with varying sized pink polka dots to match the exterior. For the medium bowl, consider a soft wash of cream, while the bottom bowl can remain natural or white. -
Seal or fire:
Apply a coat of clear matte glaze to the entire surface of the ceramic bowls and fire them to the clay body’s maturation temperature. For polymer clay, seal with a matte varnish to protect your paint job.
Once fired or sealed, stack your beautiful trio on a shelf to admire the interplay of light and shadow on the textures

Wavy-Edged Trinket Trays
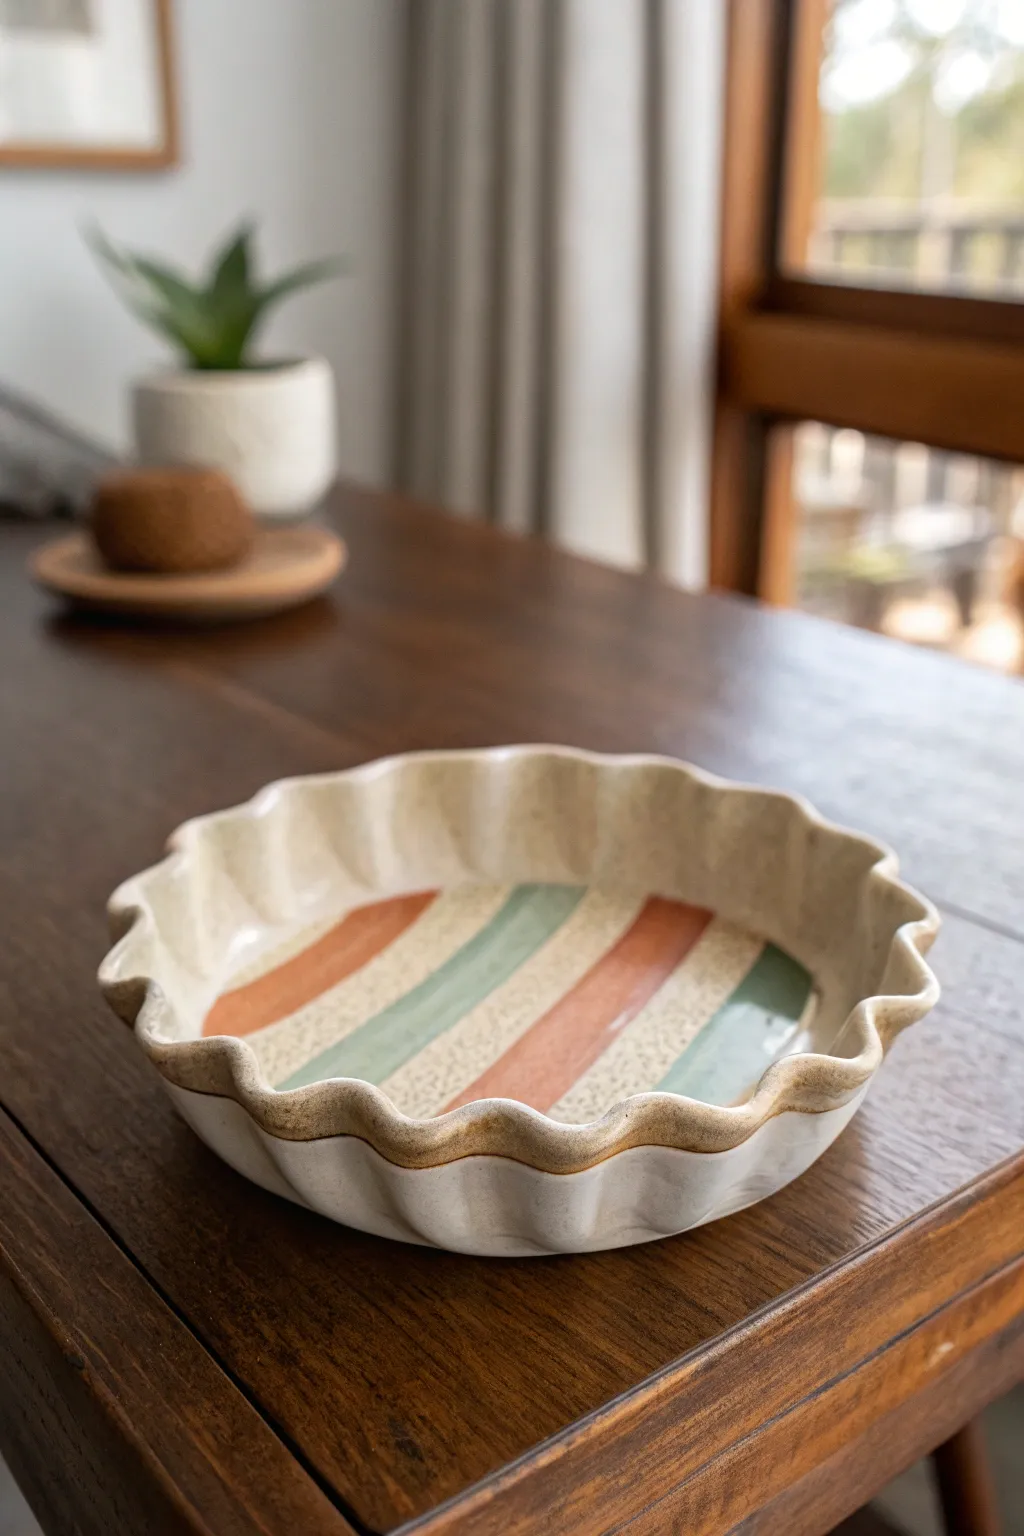
Bring a touch of playful elegance to your space with this fluted trinket tray, featuring gentle undulating edges and a comforting palette of sage and terracotta stripes. This project combines simple slab-building techniques with a stylized rim to create a functional piece that feels both modern and handmade.
Detailed Instructions
Materials
- White stoneware or earthenware clay
- Rolling pin
- Canvas mat or slab roller
- Round template (paper or bowl, approx. 6-8 inches)
- Fettling knife or needle tool
- Underglazes (terracotta/rust, sage green, cream/off-white)
- Clear transparent glaze
- Soft bristle brushes (flat and round)
- Sponge
- Potter’s rib (smooth kidney)
- Circular slump mold or a wide bowl for shaping
- Banding wheel (optional)
Step 1: Prepping and Shaping the Slab
-
Roll the clay:
Begin by rolling out a distinctive slab of your white clay to a consistent thickness of about 1/4 inch. Ensure you roll in multiple directions to compress the clay particles, which helps prevent warping later. -
Smooth the surface:
Use a damp sponge or a soft rib to compress the surface of the slab, removing any canvas texture or rolling pin marks. This creates a clean canvas for your painting later. -
Cut the circle:
Place your round template on the clay slab. Using a needle tool or fettling knife, cut vertically around the template to create a perfect circle. -
Smoothen the edges:
Run a damp finger or a slightly moist sponge along the fresh cut edge to round it off softly, ensuring there are no sharp burrs.
Consistent Waves
Use the handle of a thick paintbrush as a shaping tool. Press it against the rim while molding the clay around it for perfectly uniform flute sizes.
Step 2: Forming the Wavy Rim
-
Initial lift:
Gently lift the clay circle and place it into your slump mold or bowl. Press the center down lightly so it conforms to the curve, but leave the top 1-2 inches of the rim loose. -
Create the flutes:
Using your thumb and forefinger, gently pinch the rim to create a wave. Push down with your thumb while supporting underneath with your finger to create the ‘valley,’ and reverse for the ‘peak.’ -
Refine the spacing:
Continue this pinching motion around the entire circumference. I usually aim for about 8 to 10 wide waves to keep the look relaxed rather than frantic. Adjust them so they are roughly symmetrical. -
Define the lip:
Once the waves are formed, use a wet finger to run along the very top edge again, enhancing the undulation and ensuring the wall thickness remains consistent. -
Slow drying:
Allow the piece to dry to a leather-hard state. Cover it loosely with plastic so the rim doesn’t dry significantly faster than the base.
Step 3: Painting and Glazing
-
Clean the surface:
Once bone dry (or bisque fired, depending on your underglaze type), wipe the piece with a slightly damp sponge to remove any dust. -
Mark the stripes:
Lightly sketch the stripe pattern using a soft pencil. The graphite will burn off in the kiln. Plan for wide, equal bands running straight across the bowl’s interior. -
Apply the cream base:
Paint the ‘white’ stripes with a cream underglaze. Apply 2-3 coats for solid opacity, letting each coat dry briefly in between. -
Paint color bands:
Fill in the alternating bands with your terracotta and sage green underglazes. Use a flat brush to keep the edges crisp where the colors meet. -
Accent the rim:
Dip a sponge or brush in a diluted brown or oxide wash and gently dab it along the wavy rim. This emphasizes the organic shape and gives it that toasted, vintage look. -
Bisque fire:
If you haven’t yet, fire the piece to cone 04 (or your clay’s bisque temperature) to set the shape and underglazes. -
Apply clear glaze:
Dip the entire piece into a clear transparent glaze, or brush on three even coats. Ensure the foot is wiped clean of any glaze. -
Final firing:
Fire the piece to its final maturity temperature (likely Cone 5/6 for stoneware). Let the kiln cool naturally before removing your finished tray.
Uneven Drying?
If the rim starts cracking while the center is wet, drape a damp paper towel just over the edges to slow their drying rate while the base catches up.
Once cooled, fill your beautiful new tray with jewelry or keys to admire your handiwork daily


Pressed Flower Clay Coasters

Capture the delicate beauty of a garden walk with these elegant clay coasters featuring botanical motifs. The soft white clay provides the perfect canvas for painted floral designs that mimic the look of pressed wildflowers.
Step-by-Step Tutorial
Materials
- White air-dry clay (or polymer clay)
- Rolling pin
- Circle cutter (approx. 3.5-4 inches)
- Sandpaper (fine grit)
- Fine detail paintbrushes (size 00 or 0)
- Acrylic paints (olive green, sage green, burnt orange, burgundy, muted red)
- Matte or satin sealant/varnish
- Parchment paper or canvas mat
- Small cup of water
- Paper towels
Step 1: Shaping the Coasters
-
Condition the clay:
Begin by taking a handful of white air-dry clay and kneading it in your hands until it becomes warm, soft, and pliable. This prevents cracks from forming later. -
Roll it out:
Place the clay on a sheet of parchment paper or a canvas mat. Use your rolling pin to flatten the clay to an even thickness of about 1/4 inch (6mm). Rotate the clay occasionally to ensure it doesn’t stick. -
Cut the shapes:
Press your circle cutter firmly into the rolled clay to create your coaster rounds. If you don’t have a cutter, you can trace around a wide mug or bowl with a craft knife. -
Smooth the edges:
Lift the circles carefully. Dip your finger in a little bit of water and gently run it around the circumference of each coaster to smooth out any rough cutting marks. -
Create a slight texture:
For that organic, stone-like feel seen in the photo, gently tap the surface with a crumpled piece of aluminum foil or a stiff paintbrush to add tiny pores and imperfections. -
Dry thoroughly:
Lay the coasters flat on a drying rack or parchment paper. Let them dry completely for 24-48 hours. I usually flip them over halfway through the drying process to keep them from curling. -
Sand for perfection:
Once fully rigid and dry, use fine-grit sandpaper to lightly buff the edges and surface, removing any unintentional bumps.
Step 2: Painting the Botanicals
-
Prepare the palette:
Squeeze out small amounts of your acrylic paints. You’ll want earthy, muted tones rather than bright primaries to match the aesthetic. Mix a little olive green with brown to get a natural stem color. -
Draft the stems:
Using your finest brush (size 00), lightly paint the main central stem line. Keep the line thin and slightly curved to look organic, not rigid. -
Add leaves:
Paint small, elongated leaves branching off the stem. For the fern-like designs, use quick, short strokes pulling away from the stem. Vary the green shades slightly between leaves for depth. -
Paint the blooms:
For the floral elements, use the burnt orange or burgundy. paint small clusters of dots or tiny tear-drop shapes at the ends of stems to resemble berries or buds. -
Detail work:
Go back in with a darker green or brown to add a tiny vein line down the center of the larger leaves. This crisp detail makes the painting look more like a botanical illustration. -
Imitate texture:
To mimic the ‘pressed flower’ look, keep the paint application relatively flat and matte, rather than building up thick impasto layers. -
Initial drying:
Allow the paint to dry completely, which usually takes about 20–30 minutes.
Warping Woes?
If coasters curl while drying, place a heavy book on top of them once they are leather-hard (semi-dry) to force them to dry completely flat.
Step 3: Sealing and Finishing
-
Apply the sealant:
Using a soft, clean brush, apply a thin layer of matte or satin varnish over the entire top surface. This protects the paint and clay from moisture. -
Repeat for durability:
Apply a second coat of sealant once the first is dry. Since coasters handle wet mugs, this step is crucial for longevity. -
Finish the bottom:
Optionally, glue a circle of felt or cork to the bottom of each coaster to prevent them from scratching your table.
Real Impression Trick
Instead of painting, press real fresh leaves into the wet clay, remove them, and then gently paint into the debossed impression for an embedded look.
Now you have a charming set of nature-inspired coasters ready to cradle your morning coffee


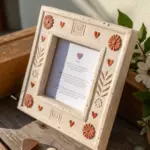
Coil-Decorated Picture Frame
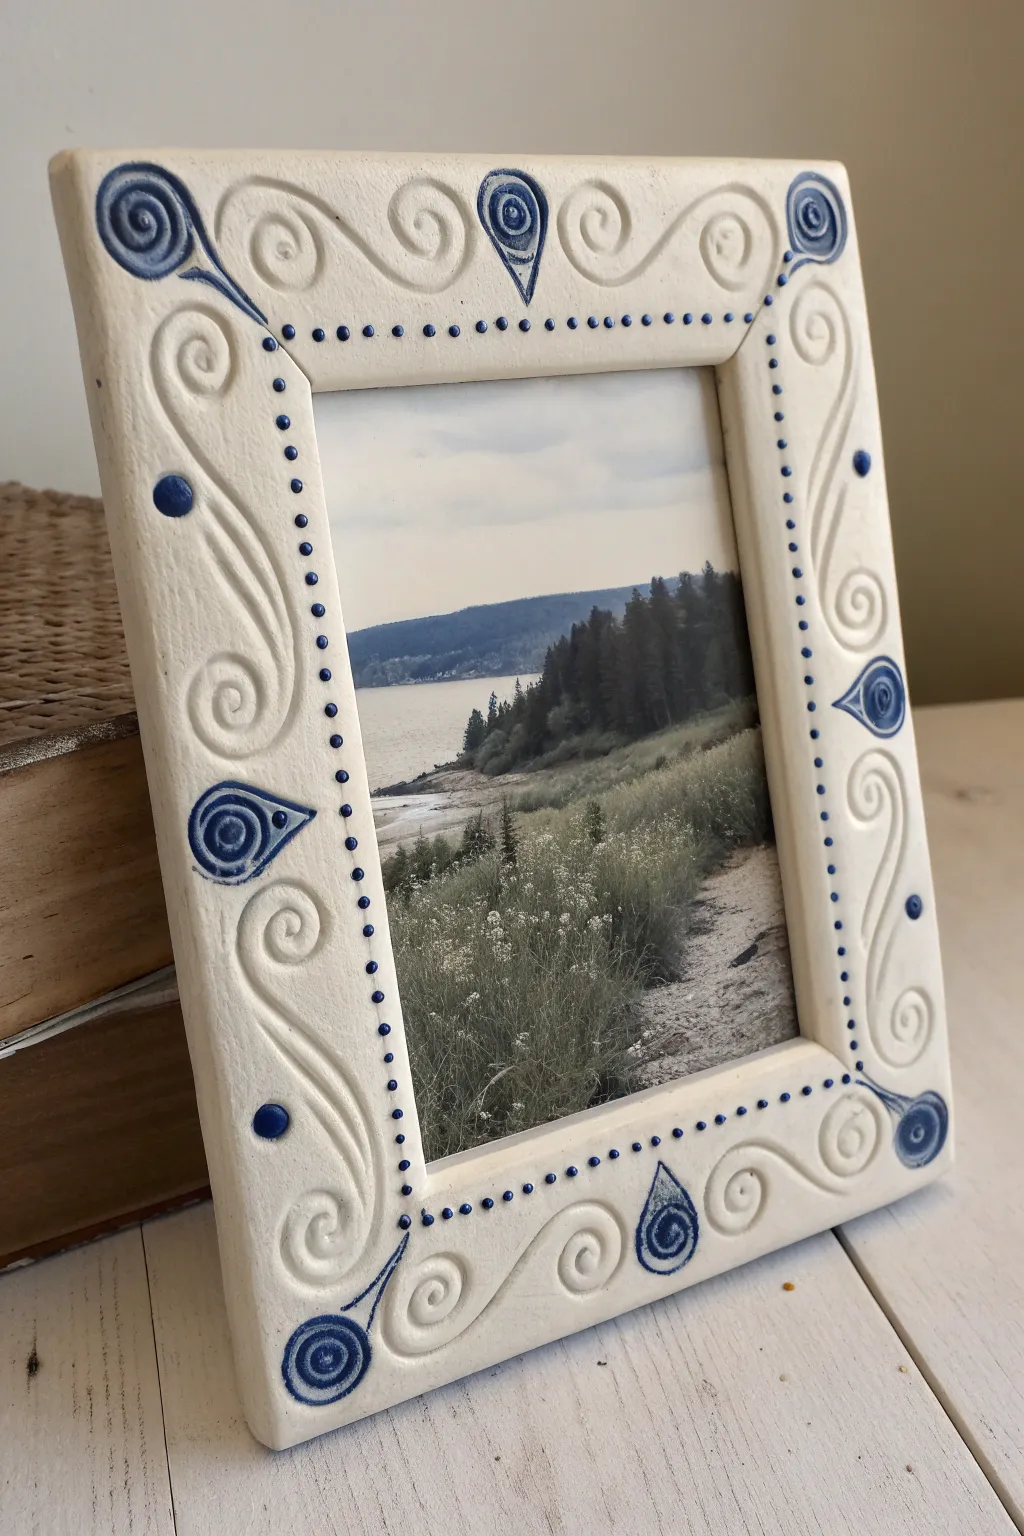
Transform a plain wooden frame into a textured masterpiece using air-dry clay and simple coiling techniques. This design features elegant cream-colored clay swirls accented with deep nautical blue details, perfect for showcasing your favorite beach memories.
Step-by-Step Guide
Materials
- Wide, flat wooden photo frame (unfinished wood works best)
- White air-dry clay (smooth texture)
- Clay rolling pin
- Clay extruding tool (optional, for even coils)
- Slip (clay mixed with a little water) or strong craft glue
- Modeling tools (or a toothpick and a dull knife)
- Sponge
- Acrylic paints: Cream/Off-white and Navy Blue
- Fine detail paintbrush
- Dotting tool or the end of a paintbrush handle
- Matte spray varnish
Step 1: Base Preparation
-
Prep the frame:
Remove the glass and backing board from your wooden frame. Lightly sand the wood surface to give the clay a better grip. -
Roll the clay sheet:
Roll out a slab of air-dry clay to about 1/4 inch thickness. It needs to be large enough to cover the entire front face of your frame. -
Apply the base layer:
Brush a layer of craft glue onto the front of the wooden frame. Lay your clay slab over the wood, pressing gently to remove air bubbles. Trim the excess clay from the outer and inner edges using a craft knife so it sits flush with the wood.
Step 2: Creating the Relief Pattern
-
Form the coils:
Roll out several thin, even snakes of clay using your hands or an extruder. They should be roughly the thickness of a shoelace. -
Shape the large swirls:
Starting at the corners, curl the clay ropes into S-shapes and spirals. I find it easiest to form the shape on the table first, then transfer it to the frame. -
Attach the coils:
Score the back of your swirls and the spot on the frame where they will sit. Apply a little slip or water, then press the coil onto the frame. Use a modeling tool to smooth the edges of the coil into the base layer so they look like raised relief rather than stuck-on pieces. -
Add teardrop accents:
Place teardrop-shaped pieces of flat clay in the centers of the frame’s sides and corners. Blend the edges smoothly into the background. -
Detail the spirals:
Press a small circular indentation into the center of each swirl to define the spiral shape further. Ensure all seams between added clay parts and the base are seamless.
Smooth Moves
Keep a small bowl of water nearby while working. If the clay begins to crack while you are bending the coils, a tiny drop of water on your finger can smooth it back together seamlessly.
Step 3: Texture and Drying
-
Smooth the surface:
Use a slightly damp sponge to gently wipe over the entire piece. This removes fingerprints and softens any harsh tool marks. -
Clean the edges:
Check the inner and outer rims one last time to ensure the clay hasn’t overhung the space where the glass fits. Trim if necessary. -
Dry completely:
Allow the frame to dry for 24-48 hours. Keep it away from direct heat to prevent cracking. Turning it over halfway through can help the wood and clay dry evenly.
Antique It
After the blue paint dries, lightly brush a diluted brown wash over the textured areas and wipe it back immediately with a cloth. This will settle in the crevices for an aged look.
Step 4: Painting and Finishing
-
Base coat:
Paint the entire hardened clay surface with a creamy off-white acrylic paint. You may need two coats for full opacity. -
Highlight the spirals:
Using a fine brush and diluted navy blue paint, carefully paint spirals inside the raised teardrop shapes and corner accents. -
Add dot details:
Dip the end of a paintbrush handle or a dotting tool into undiluted navy blue paint. -
Create the border:
Stamp a border of small blue dots along the inner edge of the frame, spacing them evenly. Add larger single dots near the main swirl elements. -
Seal the artwork:
once the paint is fully dry, spray the frame with a matte varnish to protect the clay and give it a finished, professional look. -
Reassemble:
Clean the glass and place it back into the frame, followed by your favorite photo and the backing board.
Now you have a charming, handcrafted frame ready to display your landscape photography

The Complete Guide to Pottery Troubleshooting
Uncover the most common ceramic mistakes—from cracking clay to failed glazes—and learn how to fix them fast.
Textured Mandala Wall Tile
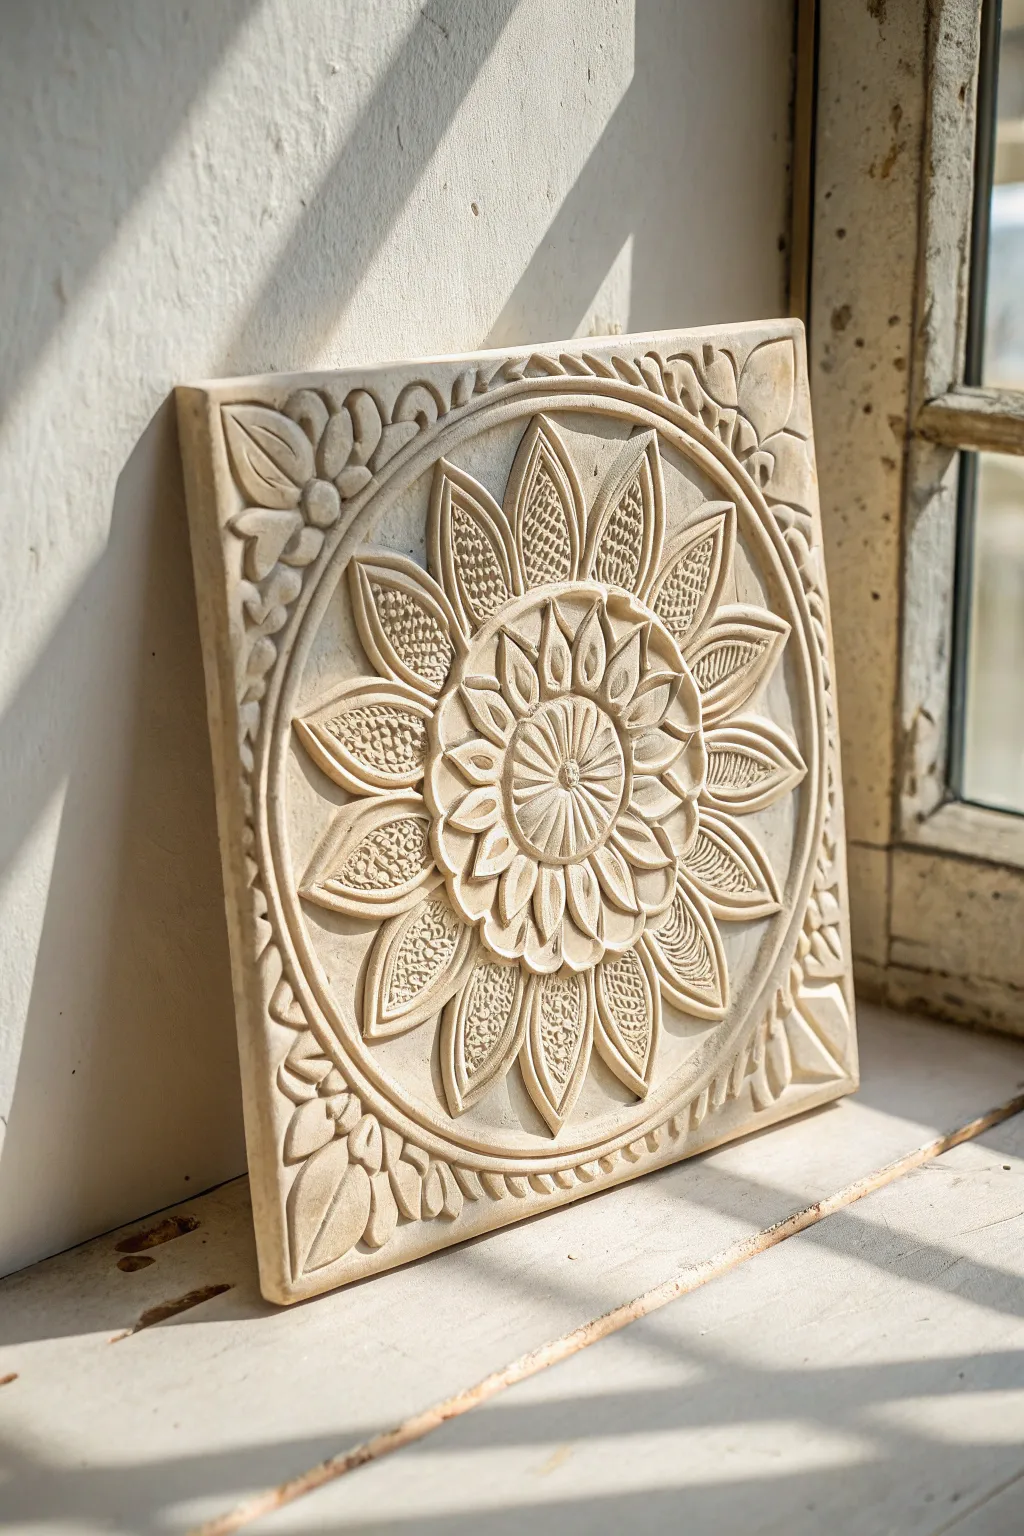
This project transforms a simple slab of clay into a piece of architectural art, capturing the warmth of stone carving in a manageable format. The finished square tile features a radiating sun-flower mandala with intricate petal textures and corner scrollwork, perfect for adding a touch of rustic elegance to any shelf or mantel.
How-To Guide
Materials
- Air-dry clay (stone or natural color) or stoneware clay
- Rolling pin
- Two wooden guide strips (approx. 1/2 inch thick)
- Square template (paper or cardboard, approx. 8×8 inches)
- Needle tool or fettling knife
- Loop carving tools (various sizes)
- Compass or round objects for tracing circles
- Modeling tool with a ball end
- Rubber kidney rib
- Slip (clay mixed with water)
- Sponge
Step 1: Preparing the Slab Base
-
Roll the slab:
Begin by wedging your clay to remove air bubbles, then place it between your wooden guide strips. Roll the clay out until it is perfectly even and sits flush with the guides. This ensures your tile has a uniform thickness and resembles a professional architectural piece. -
Cut the square:
Place your square template onto the smooth slab gently. Using a needle tool held vertically, slice around the template to create clean, sharp edges. Don’t discard the trimmings immediately—keep them moist under plastic as you’ll need them for adding raised details later. -
Smooth the surface:
Use a rubber kidney rib to compress the surface of the tile. Work in long, gentle strokes to remove canvas texture or rolling pin marks, creating a pristine canvas for your carving. I find doing this now saves a lot of sanding time later.
Warping Woes
Is your tile curling up at the edges? Flip it over every few hours during the drying process. Drying it on a wire rack or a piece of drywall helps moisture escape evenly from both sides.
Step 2: Mapping the Design
-
Mark geometric guides:
Find the exact center of your square by lightly pressing a ruler from corner to corner to make a faint ‘X’. Use your compass to lightly etch a large circle that nearly touches the edges of the square, creating the main border for your mandala. -
Define the center:
Using the same center point, lightly etch two smaller concentric circles in the middle. The innermost circle will become the flower’s pistil, and the second circle defines the boundary for the first layer of petals. -
Draft the petals:
Lightly sketch the flower petals radiating outward. Aim for 12-16 large, pointed petals reaching toward the outer ring. Don’t worry about perfection here; these are just guidelines for your carving tools.
Pro Tip
For the stippled texture on the petals, try pressing a piece of coarse sandpaper or a textured fabric into the soft clay instead of poking individual holes to save time and add uniformity.
Step 3: Sculpting the Relief
-
Carve the outer ring:
Using a small loop tool, carve a shallow trench just inside your largest circle guideline. This creates a raised border effect, separating the central mandala from the corner details. -
Define the primary petals:
Use a needle tool or small knife to cut deeper outlines around your large petals. Instead of removing the clay entirely, press the tool in at an angle to create a ‘V’ channel, giving the petals distinct separation. -
Excavate the background:
Carefully remove the clay from the negative spaces between the tips of the large petals using a flat-edged loop tool. Lowering the background level makes the flower appear to pop forward in high relief. -
Sculpt the center flower:
In the center circles, carve small, teardrop shapes for the inner petals. Use a ball-ended tool to press an indentation into the very center, then use a needle tool to draw radiating lines inside that center divot for a seed-head texture.
Step 4: Detailing and Texturing
-
Add petal texture:
This is where the piece comes to life. On alternating large petals, use a fine-point tool to stipple tiny dots or carve cross-hatching patterns. Leave the neighboring petals smooth for visual contrast. -
Veining the smooth petals:
For the petals you left smooth, take a needle tool and gently carve two or three curved veins running from the base toward the tip to emphasize their organic shape. -
Corner elements:
In the four triangular corners outside the main ring, sketch simple leaf or vine shapes. Carve away the background around them so the leaves stay at the original surface height. -
Refine the edges:
Go over all your cut lines with a slightly damp brush or your finger to soften any sharp ‘crumbs’ of clay. The goal is for the piece to look like carved stone, not cut cheese.
Step 5: Finishing
-
Create a hanging mechanism:
If you plan to hang the tile, flip it over carefully. Score a small area near the top and attach a small loop of clay with slip, or simply carve a keyhole notch into the back. -
controlled drying:
Place a piece of sheetrock or a wooden board on top of the tile (sandwiching it) for the first day to prevent the corners from curling up. This weight is crucial for flat tiles. -
Final dry:
Remove the top weight after 24 hours and let the tile dry slowly away from direct heat or drafts. Once bone dry (or fired, if using kiln clay), the piece is ready to display.
Once fully dry, place your beautifully textured tile near a window to let the changing light highlight your intricate carving work
Framed 3D Clay Landscape
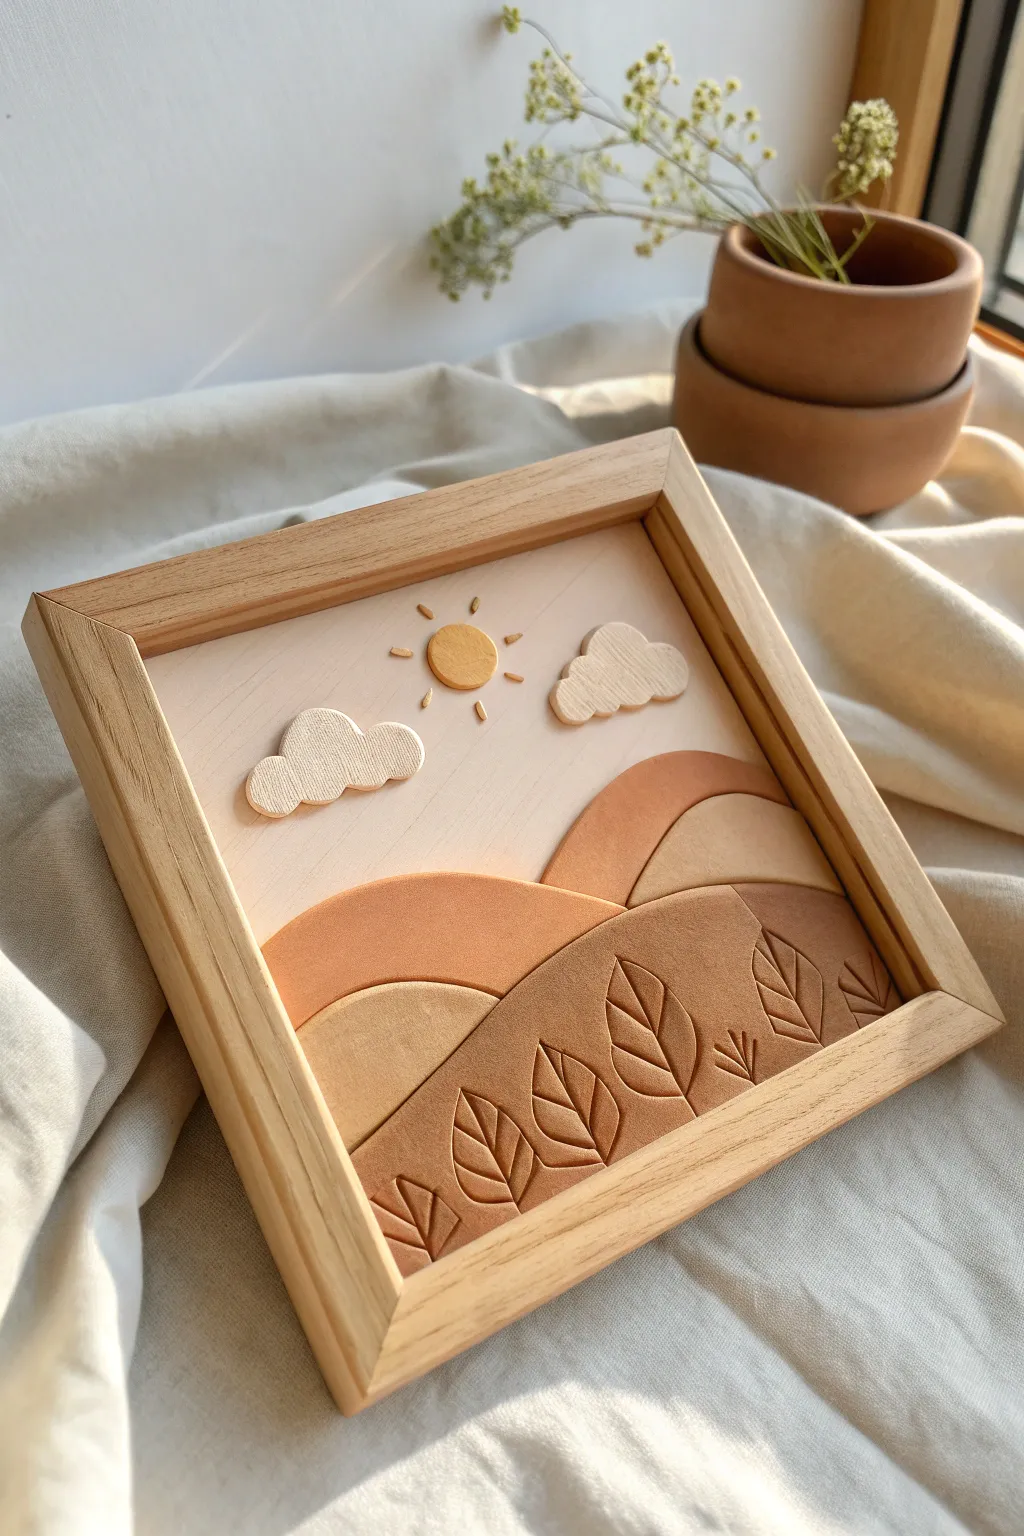
Bring the warmth of nature indoors with this serene, multi-layered clay landscape. Framed in natural wood and featuring a soothing palette of terracotta, ochre, and cream, this dimensional piece adds a tactile and organic touch to any wall.
Step-by-Step
Materials
- Polymer clay or air-dry clay (colors: white, terra cotta, light brown, beige/ochre, yellow)
- Small wooden shadow box frame (square)
- Wooden backing board (sized to fit inside the frame)
- Rolling pin or acrylic roller
- Craft knife or clay blades
- Modeling tools (specifically a needle tool or small stylus)
- Piece of textured fabric (like coarse linen or canvas) for stamping
- Strong craft glue (E6000 or similar)
- Sandpaper (fine grit)
- Clean work surface (ceramic tile or silicone mat)
Step 1: Preparing the Base and Sky
-
Measure your canvas:
Remove the backing from your shadow box frame. This wooden square will serve as the base for building your landscape. -
Create the sky:
Roll out a thin, even sheet of pale beige or off-white clay. It should be large enough to cover the top two-thirds of your wooden backing board. -
Smooth and trim:
Place the clay sheet onto the upper portion of the board. Smooth it down gently to remove air bubbles, then use your craft knife to trim the edges flush with the board’s sides.
Clean Lines Secret
Use a round cookie cutter or a small jar lid to cut the curved tops of your hills perfectly smooth, rather than trying to freehand the curves with a knife.
Step 2: Sculpting the Landscape Layers
-
Mix your colors:
Prepare three distinct earth tones for the hills. You’ll need a light ochre/tan for the back hill, a medium terracotta for the middle, and a darker brown for the foreground. -
Roll the back hill:
Roll out the medium terracotta clay to about 1/8 inch thickness. Cut a gentle, curved mound shape that spans the width of the frame. -
Roll the tertiary hill:
Roll out the lightest ochre clay. Cut a smaller, rounded hill shape that will peek out from behind the others on the right side. -
Create the foreground:
Roll out the darkest brown clay slightly thicker than the previous layers to add depth. -
Shape the foreground:
Cut a wide, rolling hill shape for the very front. This piece should cover the bottom third of the composition. -
Detail the leaves:
Using a needle tool or a small stylus, carefully carve stylized leaf shapes into the wet dark brown foreground clay. Draw a central vein line first, then add the outer leaf shape and angled veins. Include a few small vertical lines between leaves to suggest grass.
Step 3: Adding Sky Elements
-
Make the sun:
Roll a small ball of yellow clay and flatten it into a perfect circle. Place it in the upper center of the sky area. -
Texture the clouds:
Roll out some white clay. Before cutting shapes, press a piece of coarse linen or canvas firmly into the clay surface to imprint a fabric texture. -
Cut cloud shapes:
Cut out two fluffy cloud shapes from the textured white clay. I like to smooth the cut edges slightly with my fingertip so they look soft rather than sharp. -
Add sun rays:
Roll tiny, thin snakes of yellow clay. Cut them into small segments and arrange them radially around the sun disc.
Make it Pop
For extra dimension, adhere the clouds and the foreground hill using thick foam double-sided tape or a small scrap of clay behind them to physically raise them off the background.
Step 4: Assembly and Finishing
-
Dry or bake:
If using polymer clay, bake the pieces according to the package instructions (usually 275°F for 15-30 minutes). If using air-dry clay, allow everything to dry completely for 24-48 hours. -
Sand edges:
Once hardened, gently sand any rough edges on your clay pieces with fine-grit sandpaper for a professional finish. -
Layering up:
Begin gluing your landscape layers onto the backing board starting from the back (the sky layer you already applied) and moving forward. -
Glue the hills:
Glue the light ochre and terracotta hills first, overlapping them slightly. Finish with the dark brown, textured foreground hill at the very bottom. -
Attach sky details:
Glue the sun, sun rays, and textured clouds into position on the upper sky section. -
Final framing:
Once the glue is fully cured, place the completed artwork back into the wooden shadow box frame and secure the back.
Hang your new textured landscape in a sunny spot to let the shadows play across the raised surfaces


What Really Happens Inside the Kiln
Learn how time and temperature work together inside the kiln to transform clay into durable ceramic.
Marbled Clay Wall Clock Face
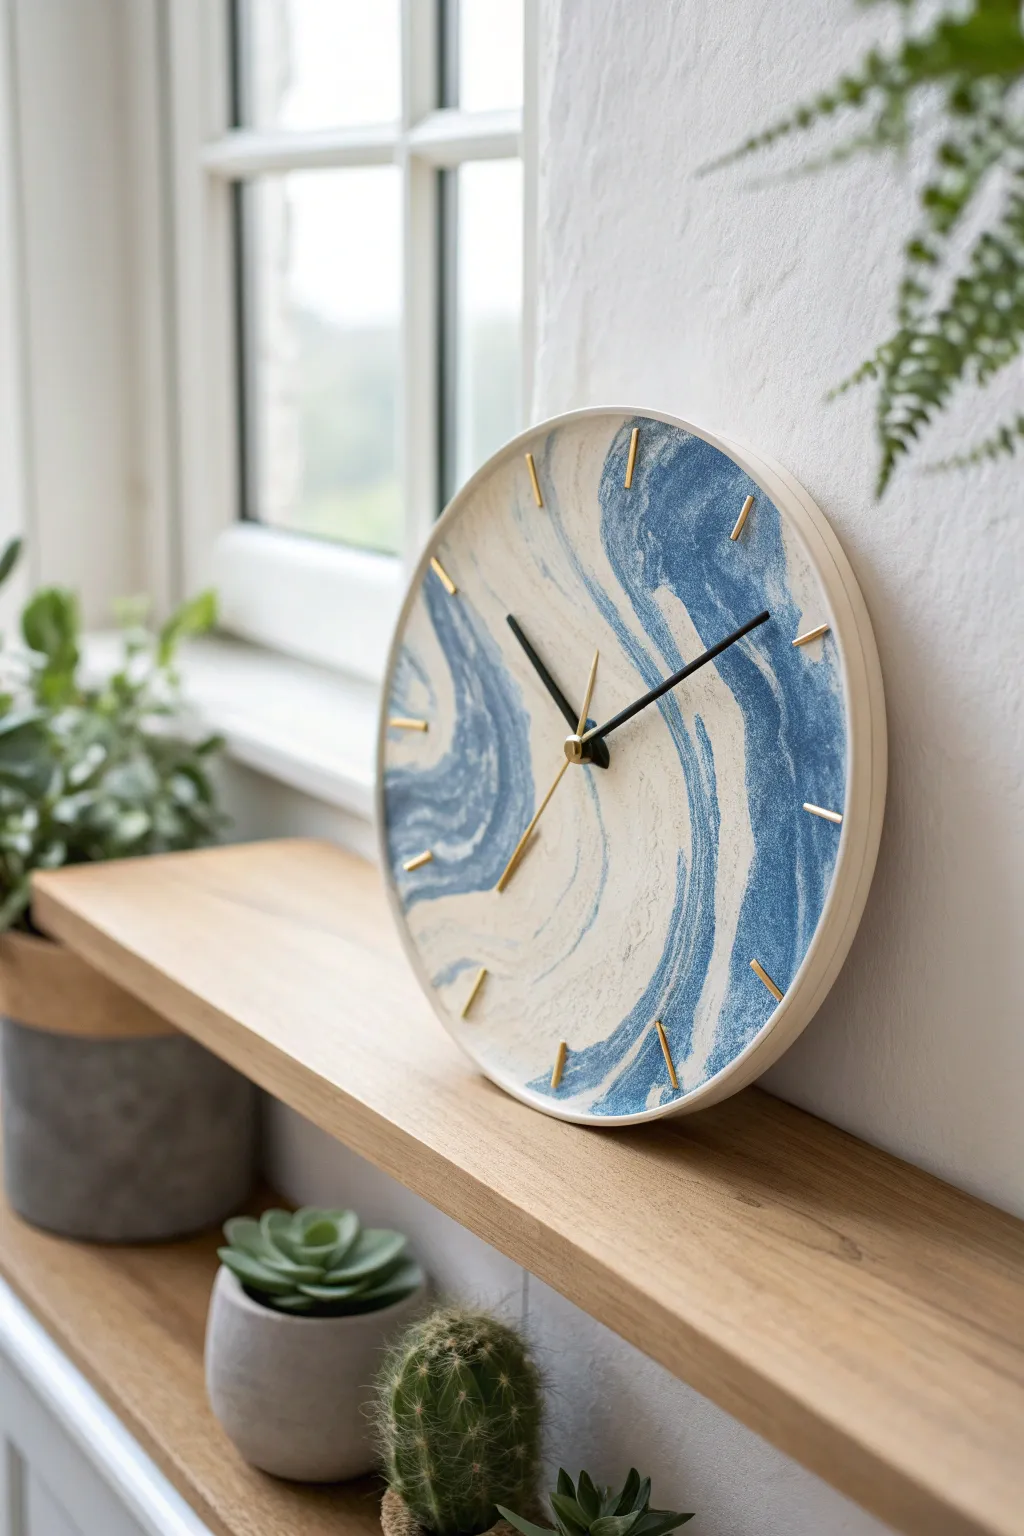
Transform simple polymer clay into a sophisticated timepiece with this swirling marble design. The combination of sandy beige and deep ocean blue creates a calming, organic pattern that looks like genuine stone hanging on your wall.
How-To Guide
Materials
- White or Beige Polymer Clay (large block)
- Blue Polymer Clay (navy or denim shade)
- Acrylic rolling pin
- Clock mechanism kit with gold hands
- Round cutter or large bowl/plate template (approx. 10-12 inches)
- Craft knife
- Gold acrylic paint or gold leaf pen
- Baking sheet and parchment paper
- Fine grit sandpaper
- Ruler
- Small drill bit or awl
Step 1: Prepping the Clay
-
Condition the base:
Start by thoroughly conditioning your white or beige clay until it is soft and pliable. You will need enough to roll out a circle about 1/4 inch thick and 10-12 inches in diameter. -
Prepare the accent color:
Condition the blue clay separately. Roll it into several thin ‘snakes’ or logs of varying thicknesses. -
Create the marble mix:
Lay the blue logs across your block of beige clay. Twist the two colors together into one large log, then fold it in half and twist again. Be careful not to over-mix; you want distinct ribbons of color, not a blended light blue.
Air Bubble Trouble
If you see air bubbles while rolling the clay, pierce them with a needle and smooth them down immediately. Trapped air can cause cracks or bumps during baking.
Step 2: Forming the Clock Face
-
Roll the slab:
Place your twisted clay log on parchment paper. Using the acrylic roller, flatten the clay into a smooth sheet. As you roll, the marble pattern will stretch and emerge—stop when you are happy with the swirl design. -
Cut the shape:
Place your circle template or a large dinner plate over the most attractive part of the marbled pattern. Use a sharp craft knife to trace around the edge, cutting a clean, perfect circle. -
Smooth the edges:
Dip your finger in a little water (for air dry clay) or baby oil (for polymer) and run it along the cut edge to soften any sharp corners. -
Locate the center:
Use a ruler to find the exact center of your circle. Mark this spot lightly with a pencil or needle tool. -
Make the spindle hole:
Use a straw, awl, or small circular cutter to punch a hole in the center mark. Ensure the hole is slightly larger than the shaft of your clock mechanism to allow for shrinkage during drying or baking.
Step 3: Adding Details
-
Mark the hours:
Using your ruler as a guide, lightly press small indentations into the clay at the 12, 3, 6, and 9 o’clock positions first to ensure symmetry. -
Complete the markings:
Fill in the remaining hour marks between your main points. I find it easiest to visualize a pizza slice to get the spacing just right. -
Create recessed markers:
For a sleek look, press a small rectangular tool or the side of a ruler into the clay at each hour mark to create a slim, embossed line. Alternatively, you can leave the surface flat and paint them later.
Add Subtle Texture
Before baking, gently dab a crumpled piece of aluminum foil over the white sections of clay. This mimics the porous texture of real sandstone or coral.
Step 4: Finishing and Assembly
-
Bake or dry:
Bake the clay according to the package instructions (usually 275°F for polymer clay) on your parchment-lined sheet. If using air-dry clay, allow it to cure for 24-48 hours flat on a wire rack. -
Sand the edges:
Once fully cooled and cured, use fine-grit sandpaper to gently smooth the outer rim of the clock face for a professional finish. -
Paint the markers:
Using a fine brush and gold acrylic paint (or a gold leaf pen), carefully paint inside the indented hour markers. This metallic touch brings elegance to the raw stone look. -
Install mechanism:
Insert the clock movement shaft through the back of the center hole. Secure it with the washer and nut provided in your kit. -
Attach hands:
Press the hour hand onto the shaft first, followed by the minute hand, and finally the second hand or cap nut. Make sure they are parallel so they don’t catch on each other. -
Final check:
Insert a battery and gently adjust the hands using the dial on the back of the mechanism to set the correct time.
Now you have a timeless piece of functional art ready to grace your shelf or wall
Sculpted Clay Mirror Frame
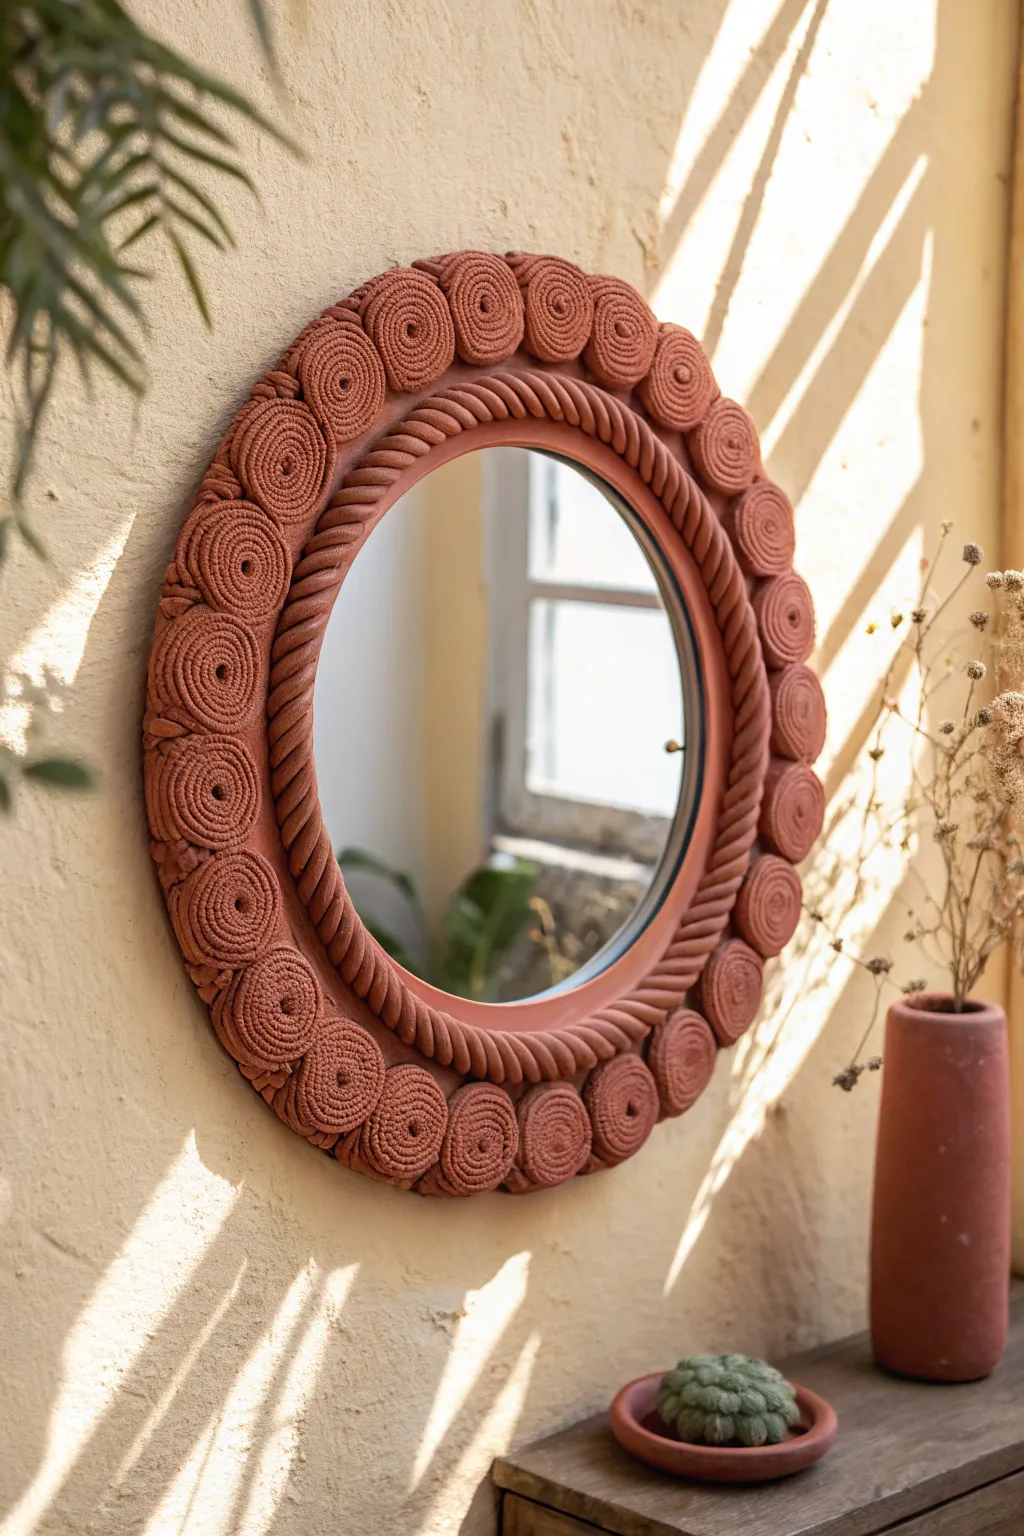
Bring earthy warmth to your walls with this textured clay mirror frame that mimics traditional artisan pottery. The design combines a classic twisted rope inner border with a playful outer ring of coiled spirals, all finished in a rich terracotta hue.
Step-by-Step Tutorial
Materials
- Round mirror (approx. 10-12 inches diameter)
- Wooden craft ring or MDF base (flatter and wider than the mirror)
- Terracotta-colored air-dry clay (or polymer clay)
- Strong craft glue (e.g., E6000 or heavy-duty wood glue)
- Rolling pin
- Clay extruder (optional, but helpful for consistent coils)
- Clay sculpting tools (specifically a needle tool and a blending tool)
- Sponge and water bowl
- Fine-grit sandpaper
- Acrylic sealer (matte finish)
Step 1: Preparing the Base
-
Prepare the backing:
Begin with your flat wooden ring or MDF base. Ensure the center hole is slightly smaller than your mirror glass so the glass can be mounted from behind later, or if mounting the mirror on top, ensure you have a clean surface. Lightly sand the wood to help the clay adhere. -
Apply base clay layer:
Roll out a thin, even sheet of terracotta clay, about 1/8 inch thick. Apply a thin layer of glue to the front of your wooden base and lay the clay sheet over it, trimming the edges flush with the wood. This provides a unified color background for your sculpted elements. -
Smooth the foundation:
Use a damp sponge to smooth out any fingerprints or seams on this base layer. Let it set for about 30 minutes so it’s firm enough to support the decorative layers without squishing.
Crack Control
If small cracks appear while drying, don’t panic. Mix a small amount of fresh clay with water to make a paste and fill the cracks, then smooth over.
Step 2: Creating the Twisted Rope
-
Roll the rope strands:
Roll two long, even snakes of clay. They should be long enough to encircle the inner edge of your frame. Try to keep them about the thickness of a finger. -
Twist the design:
Gently twist the two snakes together to form a classic rope pattern. Do this on your work surface first to ensure the twist is tight and even before moving it to the frame. -
Attach the rope border:
Score the inner edge of your clay-covered base (make small scratches) and dab a little water or slip (clay mixed with water) as glue. Place the twisted rope along the inner circumference, pressing gently to adhere without flattening the texture. -
Refine the join:
Where the two ends of the rope meet, carefully trim them at an angle and blend the clay together so the twist looks continuous. Use a sculpting tool to redefine the twist lines at the seam.
Step 3: Sculpting the Spirals
-
Create uniform coils:
Process a good amount of clay into long, thin cords. This is where I find a clay extruder saves a ton of time, but rolling by hand works too—just aim for uniform thickness, roughly like a pencil. -
Wrap the first spiral:
Take one cord and start coiling it tightly into a flat disc, like a cinnamon roll. Make it large enough to cover the remaining width of your frame border. -
Texture the coil:
To mimic the texture in the photo, you can gently press a piece of coarse fabric or a specialized clay texture stamp onto the flat surface of the spiral while it’s still soft, or leave the natural coil lines visible for a more rustic look. -
Attach the spirals:
Score the outer area of your frame base. Apply slip/water and press your spiral onto the frame, snugged right up against the twisted rope border. -
Complete the circle:
Continue making identical spirals and attaching them side-by-side around the entire frame. If you reach the end and the gap is too small or large, you may need to slighty adjust the size of the last few spirals to fit perfectly. -
Fill the gaps:
You’ll notice small triangular gaps between the round spirals and the twisted rope. Roll tiny balls of clay and press them into these crevices to add stability and a finished look.
Level Up: Antique Look
After sealing, brush on a diluted dark brown acrylic paint and wipe it off immediately with a rag. The dark paint will stay in the coil crevices for depth.
Step 4: Finishing Touches
-
Final smoothing:
Check over the entire piece. Use a damp brush to smooth any harsh edges or unintentional fingerprints, paying special attention to where the spirals touch each other. -
Drying phase:
Allow the frame to dry completely. For air-dry clay of this thickness, this might take 48-72 hours. Keep it away from direct heat to prevent cracking. -
Sanding and sealing:
Once bone dry, very gently sand any rough spots. Apply two coats of a matte acrylic sealer to protect the clay and give it that soft, finished sheen. -
Mount the mirror:
Flip the frame over and glue your mirror glass securely to the back (or into the center recess if you built one). Let the glue cure fully before hanging.
Hang your new masterpiece in a sunny spot and enjoy the artisanal charm it adds to your room.

TRACK YOUR CERAMIC JOURNEY
Capture glaze tests, firing details, and creative progress—all in one simple printable. Make your projects easier to repeat and improve.
Cute Character Succulent Planter
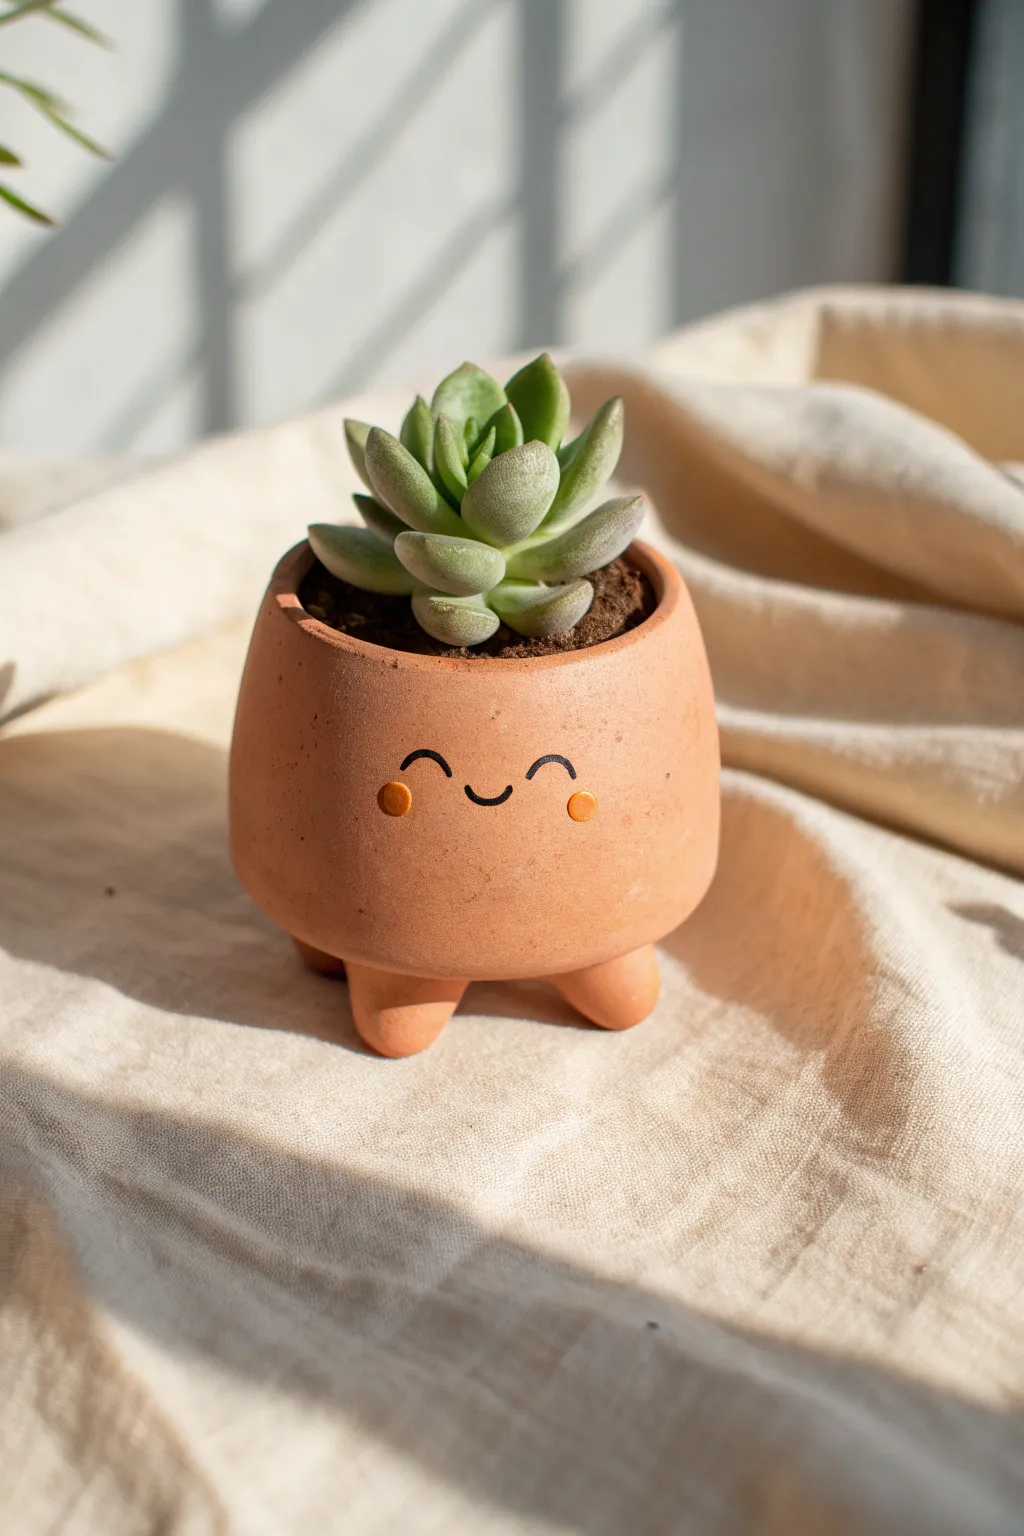
Bring a smile to your windowsill with this adorable terracotta-style planter that features tiny feet and a charming face. Its warm, earthy tone and simple expression make it the perfect home for a vibrant green succulent.
Step-by-Step
Materials
- Air-dry clay (terracotta color) or polymer clay
- Rolling pin
- Circle cookie cutter (approx. 3-4 inches)
- Small bowl or cup (to use as a mold)
- Clay sculpting tools (specifically a smoothing tool)
- Water (for slip)
- Black acrylic paint or paint pen
- Orange acrylic paint
- Fine detail paintbrush or dotting tool
- Matte varnish or sealant
- Small succulent and potting soil
Step 1: Shaping the Base
-
Prepare the clay:
Start by conditioning your terracotta-colored clay until it is soft and pliable. If you are using air-dry clay, keep a damp cloth nearby to prevent it from drying out while you work. -
Roll the slab:
Roll out a portion of the clay into an even slab, aiming for a thickness of about 1/4 inch. This ensures the walls of your pot will be sturdy enough to hold soil. -
Cut the base:
Use your circle cutter to punch out a perfect circle from the slab. This will serve as the bottom of your planter. -
Create the walls:
Roll a long, rectangular strip of clay with the same thickness as your base. The length should be just slightly longer than the circumference of your base circle. -
Attach the walls:
Wrap the strip around the circular base. I like to score both the edge of the base and the bottom of the strip with a needle tool, adding a little water to create slip for a strong bond. -
Seal the seam:
Where the two ends of the wall meet, blend the clay together thoroughly using a smoothing tool or your finger so the seam completely disappears. -
Smooth the shape:
Gently curve the walls slightly inward at the top to create a rounded, bowl-like silhouette. Use a little water on your fingertip to smooth out any cracks or fingerprints on the surface.
Step 2: Adding Feet & Details
-
Shape the feet:
Roll three small spheres of clay, each about the size of a large marble. Gently flatten the tops slightly so they can attach flush against the pot. -
Attach the feet:
Flip your pot upside down. Score and slip the bottom of the pot and the flat side of the feet. Press them firmly onto the base in a triangular formation for stability. -
Blend the join:
Use a sculpting tool to drag a little clay from the feet onto the base of the pot, smoothing the transition so they look like they grew out of the pot rather than just being stuck on. -
Check stability:
Turn the pot right-side up and gently press down. This ensures the feet are level and the pot won’t wobble. Let the clay dry completely according to package instructions (usually 24-48 hours). -
Sand for smoothness:
Once fully dry, use fine-grit sandpaper to gently buff away any rough spots or fingerprints, wiping away the dust with a barely damp cloth.
Cracks while crying?
If small surface cracks appear as the clay dries, mix a tiny amount of fresh clay with water to make a paste and fill them in before painting.
Step 3: Painting the Face
-
Sketch the face:
Lightly use a pencil to mark where the eyes and mouth will go. Aim for the center of the pot to give it that cute, balanced look. -
Paint the eyes:
Using a fine detail brush or a black paint pen, draw two small arched semi-circles for the smiling eyes. -
Add the mouth:
Paint a small, simple ‘U’ shape exactly centered between the eyes to create the smile. -
Add rosy cheeks:
Dip a dotting tool or the back end of a paintbrush into orange acrylic paint. Dab two small circles just below and to the outside of the eyes to create adorable blush marks. -
Seal the work:
Once the paint is totally dry, apply a coat of matte varnish over the entire outside of the pot to protect the paint and clay from moisture. -
Planting:
Fill your new friend with cactus soil and tuck your succulent inside so it looks like a funky hairdo.
Make it a family
Create a whole set in varying heights and widths, giving each one a different expression—winking, surprised, or sleeping—for a full windowsill family.
Now you have a cheerful little companion to brighten up your desk or shelf
Mini Cartoon Animal Shelf Sitters
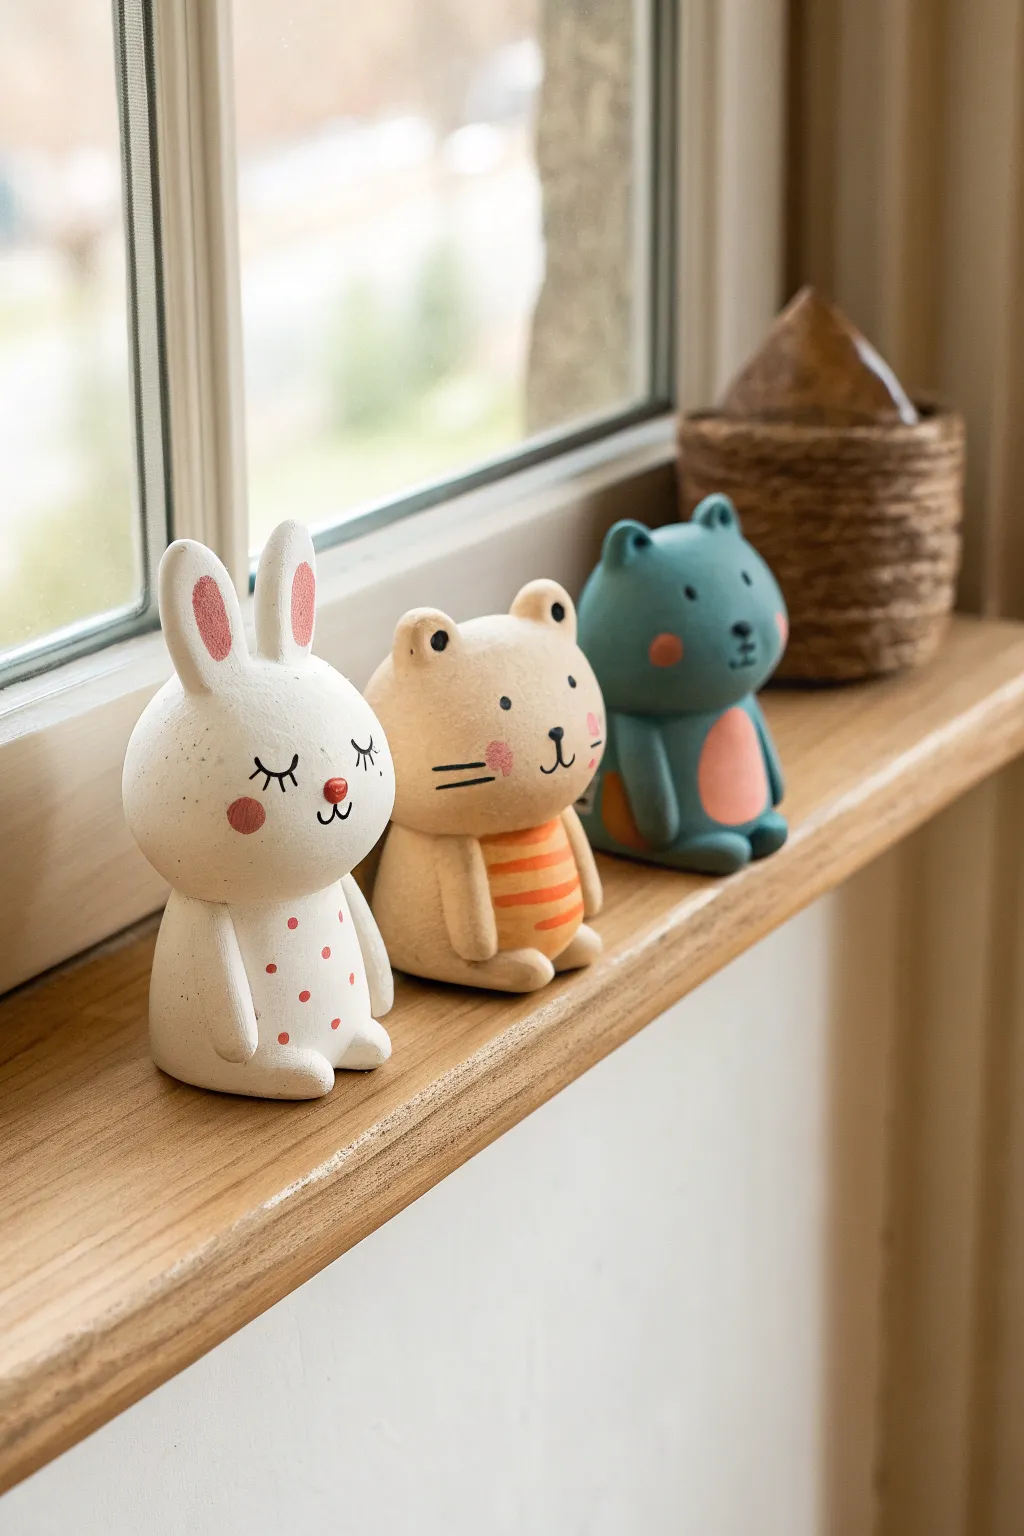
Bring a touch of charm to your shelves with these adorable mini cartoon animal figurines. Featuring a matte, stone-like finish and sweet hand-painted expressions, this trio—a bunny, a cat, and a bear—makes for a perfect beginner-friendly sculpting project.
How-To Guide
Materials
- White air-dry clay or polymer clay (approx. 500g total)
- Acrylic paints (White, Beige, Teal/Blue-Grey, Pink, Black, Orange)
- Fine grit sandpaper
- Small detail paintbrushes (00 and 1 sizes)
- Ball stylus tool
- Cup of water for smoothing
- Matte varnish or sealant
Step 1: Sculpting the Base Forms
-
Prepare the Clay:
Start by kneading your clay until it is soft and pliable. Divide the clay into three equal portions, one for each animal character. -
Shape the Bodies:
For each animal, roll the clay into a smooth, slightly flattened egg shape. The bottom needs to be flat enough so the figure stands securely on its own. -
Create the Heads:
Roll three slightly smaller spheres for the heads. Gently press one onto each body piece. I recommend scoring the join surfaces and using a dab of water (for air-dry) or liquid clay (for polymer) to ensure a strong bond. -
Blend the Seams:
Use your thumb or a modeling tool to smooth the clay where the head meets the body. You want a seamless transition, though a slight indentation to define the neck adds character. -
Form the Arms:
Roll thin sausage shapes for the arms. Attach them vertically along the sides of the body, curving them slightly inward at the bottom as if the animal is resting its hands on its tummy. -
Add Little Feet:
Create small, flattened ovals for the feet and attach them at the very bottom front of the body, just peeking out.
Stone Effect
To get that speckled, stone-like texture, mix a tiny pinch of dried coffee grounds or black pepper into your white clay before sculpting.
Step 2: Adding Character Details
-
Bunny Ears:
For the bunny, shape two long, tall ovals. Press them onto the top of the head, keeping them upright and close together. Smooth the connection point thoroughly. -
Cat and Bear Ears:
For the middle figure (cat) and the teal figure (bear), make small triangular for pinch-rounded nubs. Attach these to the top corners of their respective heads. -
Refining Surfaces:
Dip your finger in a little water and gently rub over all three sculptures to remove fingerprints and bumps. Let the clay dry completely (24-48 hours for air-dry) or bake according to package instructions. -
Sanding:
Once fully cured, use fine-grit sandpaper to gently buff the surface. This creates that lovely, soft textural look seen in the photo.
Cracks while Drying?
If using air-dry clay, cracks can happen. Keep a ‘slurry’ of clay and water handy to fill them in, then sand smooth once dry.
Step 3: Painting and Finishing
-
Base Coats:
Paint the first figure solid white. Paint the middle figure a warm beige. Paint the third figure a muted teal or slate blue. You may need two coats for opaque coverage. -
Adding Pink Accents:
Using a soft pink, paint the inner ears of the bunny and small circular cheeks on all three animals. Use a darker salmon pink for the tummy patch on the teal bear. -
Striped Details:
For the beige cat, mix an orange hue and paint horizontal stripes across the tummy area. -
Painting Faces:
Using a very fine brush and black paint, add the facial features. Give the bunny closed ‘sleepy’ eyes with lashes. Give the other two simple dot eyes and small noses. -
Whiskers and Mouths:
Add tiny whiskers to the beige cat and simple anchor-shaped mouths to all three. A small red dot makes a cute nose for the bunny. -
Matte Sealant:
Finish by applying a coat of matte varnish. Avoid glossy finishes to maintain the soft, ceramic-like aesthetic of the original inspiration.
Now you have a charming trio of friends ready to keep watch over your window ledge
Play-Food Magnet Set
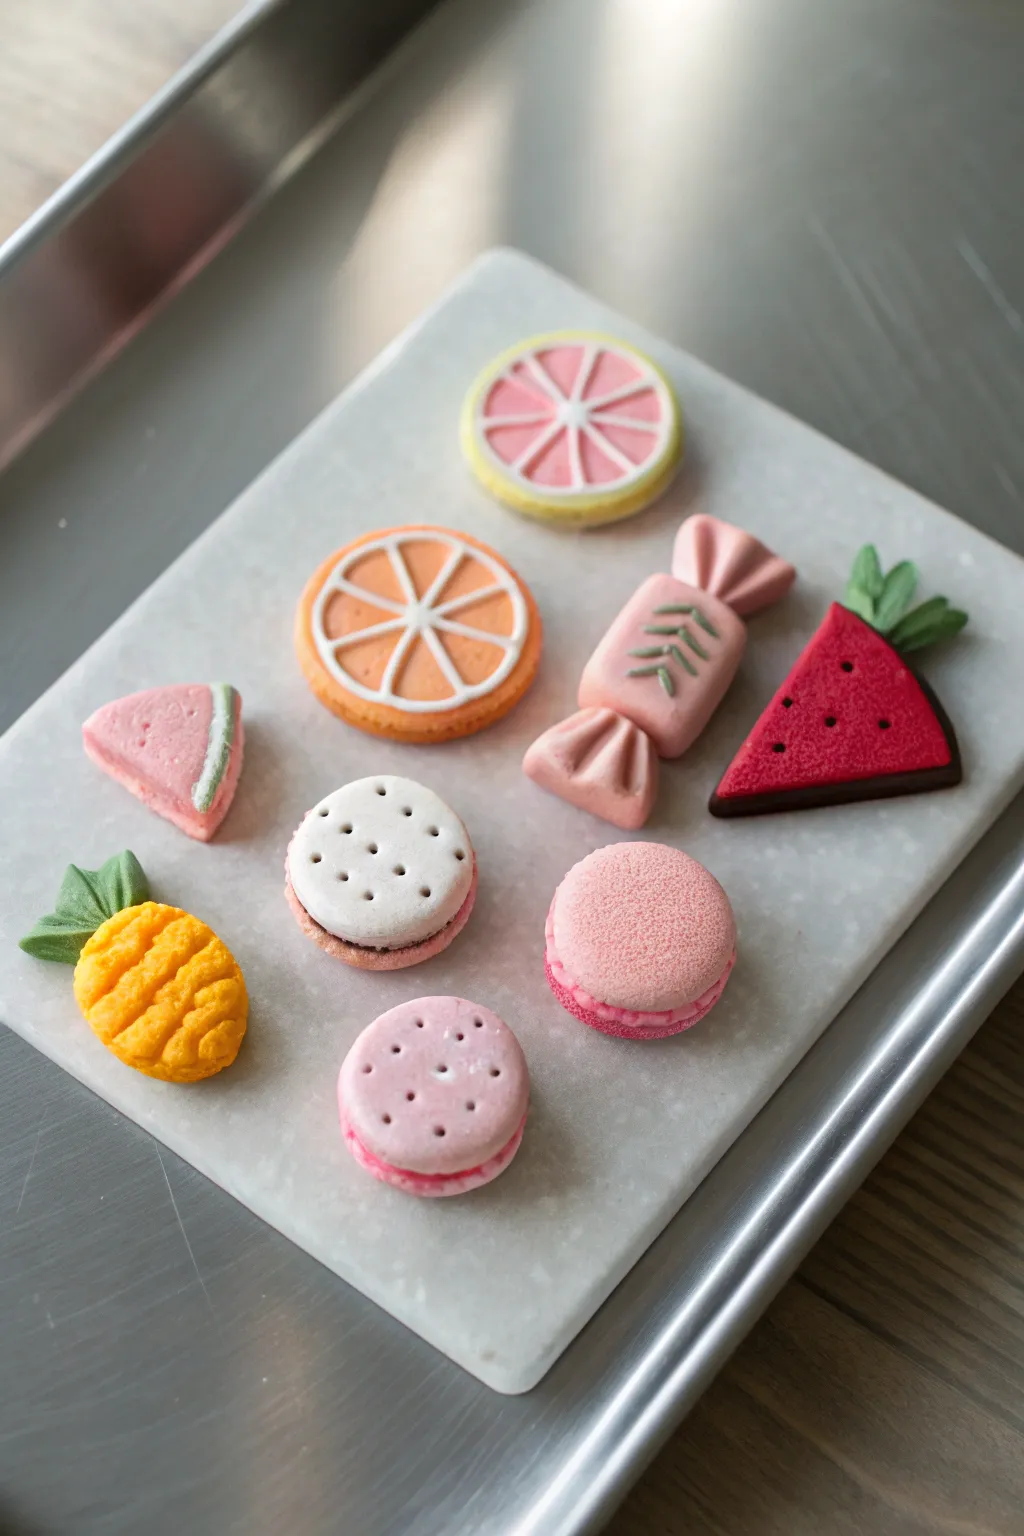
Transform vibrant polymer clay into a delightful assortment of faux pastries and fruits that look good enough to eat. This project creates a set of 9 whimsical fridge magnets, featuring macarons, citrus slices, juicy watermelon, a pineapple, and sweet treats, all with a soft matte finish.
Detailed Instructions
Materials
- Polymer clay (colors: white, pink, orange, yellow, red, light green, dark green, brown)
- Small round cookie cutters (various sizes)
- Needle tool or toothpick
- Small craft knife or blade
- Liquid clay (translucent or white)
- Texturing tool (toothbrush or stiff brush)
- Small strong magnets (neodymium recommended)
- Strong craft glue (E6000 or superglue)
- Rolling pin (acrylic)
- Baking sheet and parchment paper
Step 1: Citrus Slices & Watermelon
-
Prepare the citrus base:
For the grapefruit and orange slices, roll out a thick sheet of white clay and a slightly thinner sheet of your fruit color (pink or orange). Cut matched circles from both sheets, stacking the colored circle inside a rim of white clay. -
Add segmented details:
Roll very thin ‘snakes’ of white clay. Lay them across the colored fruit center in a spoke pattern (like a bicycle wheel) to create the segments, pressing them gently flat so they embed into the surface. -
Create the watermelon wedge:
Form a thick triangle of red clay. Press a thin layer of white clay onto the bottom edge, followed by a thin layer of dark green clay to create the rind. -
Texture the fruit:
Using a needle tool, poke small random holes heavily into the red watermelon flesh to simulate its texture. Do the same for the inner colored sections of the citrus slices. -
Add watermelon seeds:
Roll extremely tiny teardrops of dark brown clay and press them randomly onto the textured red surface of the watermelon wedge.
Clean Clay Tip
Keep baby wipes nearby! Clean your hands and tools often, especially between colors. White clay picks up red or green residue instantly, ruining the clean look.
Step 2: Pineapple & Wrapped Candy
-
Base pineapple shape:
Shape a lump of yellow clay into a flattened oval. Use your knife to score diagonal lines across the surface in both directions to create a diamond cross-hatch pattern. -
Pineapple leaves:
Cut three small leaf shapes from green clay. Press them together in a fan shape and attach them firmly to the top of the yellow oval. -
Candy body:
Roll a cylinder of pink clay for the candy center. Pinch two smaller lumps of pink clay into flared triangle shapes and attach them to either end for the wrapper twists. -
Candy details:
Use a knife to indent creases into the flared ends to look like twisted paper. Finally, adhere a tiny green clay decoration (like a fern or stripe pattern) onto the center of the candy body.
Fixing Magnet Strength
If your magnets slide down the fridge, the clay piece might be too heavy. Use two magnets spaced apart on the back, or buy neodymium ‘rare earth’ magnets for serious hold.
Step 3: Macarons & Sandwich Cookies
-
Macaron shells:
For the pink macaron, roll a ball of pink clay and flatten the bottom. Use a needle tool to scratch and texture the very bottom edge of the dome to create the messy ‘feet’ characteristic of macarons. -
Sandwich assembly:
Create a second identical shell or a flat bottom piece. Sandwich a thin disc of slightly darker pink clay between them for the filling. -
Cookie biscuits:
For the white and pink sandwich cookies, roll out clay and cut two identical thick circles. Use a toothpick to poke a ring of ventilation holes on the top surface of each. -
Cookie filling:
Place a dark brown (for chocolate) or dark pink (for jam) disc of clay between the cookie halves. Gently press them together without squishing the texture. -
Texture the cookies:
I find that lightly tapping the surface of the cookies with a clean toothbrush adds a realistic baked texture that looks great once cured.
Step 4: Finishing Up
-
Baking:
Arrange all your pieces on a parchment-lined baking sheet. Bake according to your customized clay package instructions (usually around 275°F/135°C for 15-30 minutes). -
Cooling:
Let the pieces cool completely on the tray. Moving them while hot can cause them to warp or crack. -
Attaching magnets:
Flip each piece over. Apply a dab of strong craft glue or E6000 to the back and press a magnet firmly into place. Let the glue cure fully (usually 24 hours) before sticking them to your fridge.
Now you have a charming collection of sweets to brighten up your kitchen
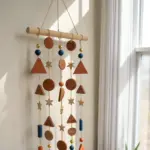
Hanging Moon-and-Shape Mobile
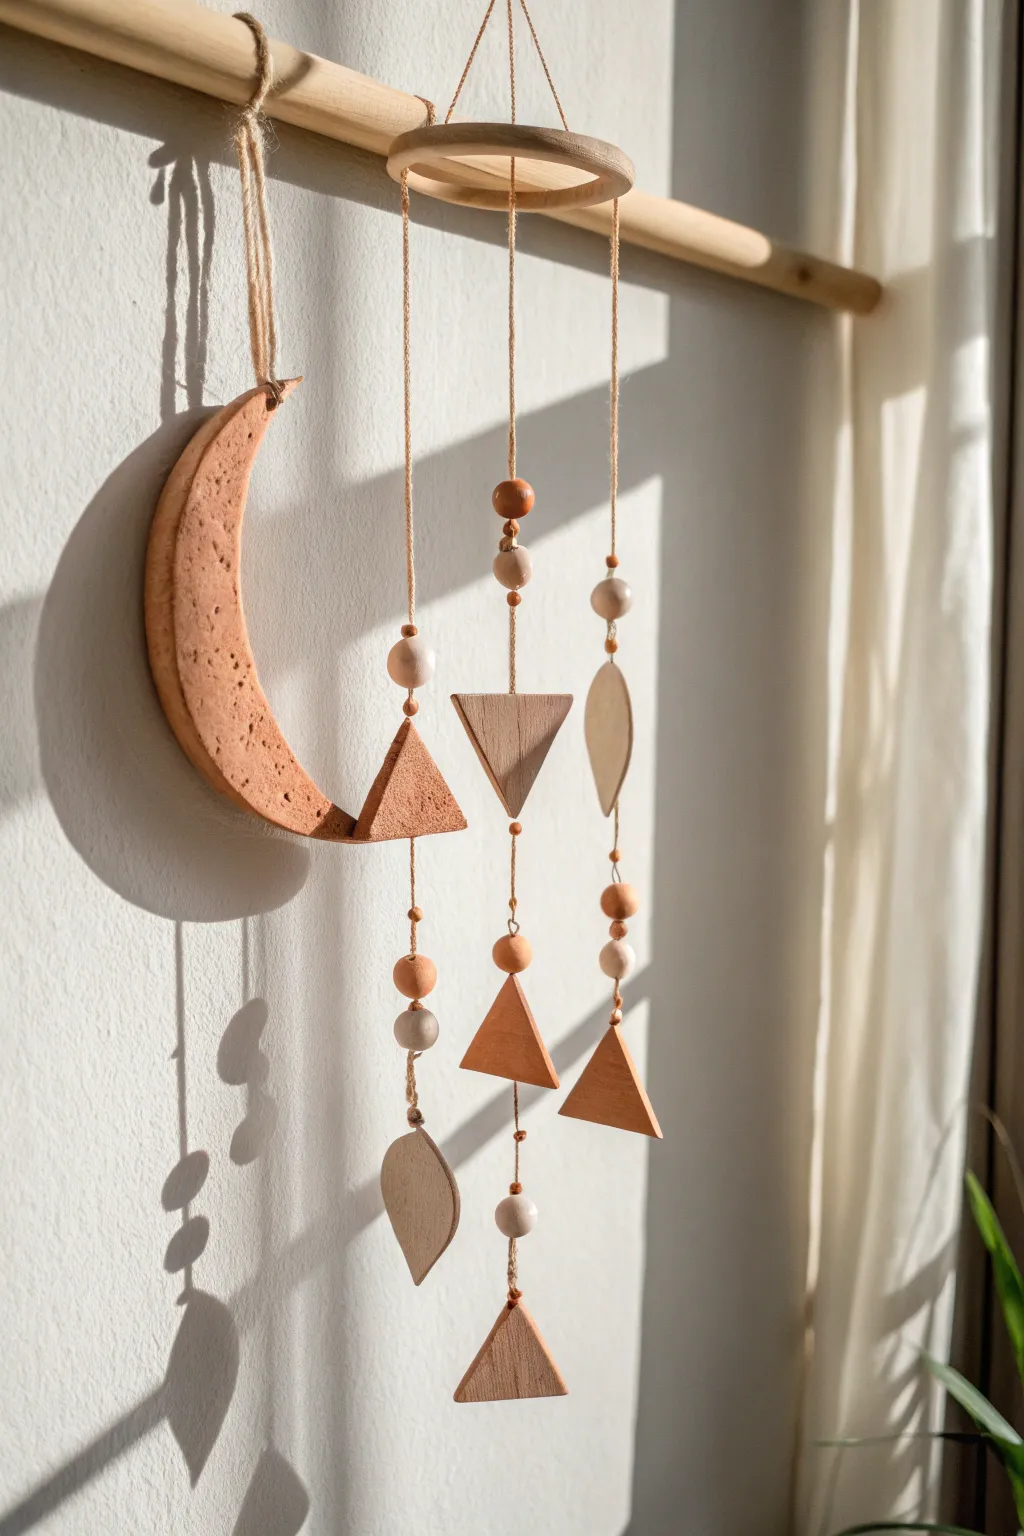
Bring a touch of celestial calm to any room with this earthy, textured hanging mobile. Featuring a distinctively pitted crescent moon and geometric accents in warm terracotta tones, it blends natural wood elements with handmade clay artistry for a stunning piece of wall decor.
Step-by-Step
Materials
- Air-dry clay (terracotta or reddish-brown color)
- Wooden dowel (approx. 12-16 inches)
- Small wooden craft ring (approx. 3-4 inches diameter)
- Jute twine or natural hemp cord
- Wooden beads (assorted sizes, natural and dark finish)
- Rolling pin
- Parchment paper
- Craft knife or clay cutter
- Toothpick or skewer (for making holes)
- Texturing tool (coarse sponge, crumpled foil, or rock)
- Fine-grit sandpaper
- Scissors
- Ruler
Step 1: Sculpting the Clay Components
-
Prepare your workspace:
Lay down a sheet of parchment paper to prevent sticking. Take a large chunk of terracotta air-dry clay and condition it by kneading until it’s pliable and smooth. -
Roll the moon slab:
Roll out the clay to a thickness of about 1/4 to 1/2 inch. You want the moon to have some substantial weight and presence. -
Cut the crescent shape:
Use a large circular cutter or a bowl as a guide to cut the outer curve of the moon. Then, reposition the cutter to slice out the inner curve, creating a crescent shape. Smooth the sharp edges with a damp finger. -
Add texture:
Before the clay dries, take your texturing tool—I find a crumpled ball of aluminum foil works perfectly—and press it gently all over the surface of the moon to create that distinct, pitted, stone-like appearance. -
Create geometric accents:
Roll out leftover clay slightly thinner than the moon. Cut out 4-5 triangles and a couple of oval or leaf shapes using a craft knife and a ruler for straight edges. -
Pierce holes for hanging:
Using a toothpick or skewer, poke a hole at the top tip of the moon for suspension. For the triangles and other shapes, poke holes vertically through the center (top to bottom) so they can slide onto the cord later. -
Dry completely:
Allow all clay pieces to dry on a flat wire rack for 24-48 hours. Turn them occasionally to ensure even drying and prevent warping.
Natural Polish Tip
To make the clay color pop, rub a tiny amount of olive oil regarding the finished, dry clay pieces. It darkens the terracotta slightly and creates a subtle sheen.
Step 2: Sanding and Prep
-
Refine the edges:
Once bone dry, gently sand the edges of your clay pieces with fine-grit sandpaper to remove any burrs or sharp spots, being careful not to sand away your surface texture. -
Prepare the wooden ring:
Take your small wooden ring. If it doesn’t already have holes, you’ll simply be tying the cords around the rim. If you prefer the look in the photo, ensure your ring is clean and smooth.
Drilling Danger
Did you forget to poke a hole before drying? Don’t force a needle through dry clay or it will crack. Use a small hand-drill bit and twist very slowly without pressure.
Step 3: Assembly and Rigging
-
Measure and cut cords:
Cut three long lengths of jute twine (approx. 24-30 inches each) for the vertical strands, and one shorter piece to hang the moon. -
Tie the moon:
Thread the shorter piece of twine through the top hole of the moon. Tie it securely to the left side of the wooden dowel, adjusting the height so the moon hangs slightly lower than the dowel itself. -
Rig the ring:
Suspend the wooden ring from the center of the wooden dowel using a separate piece of twine tied to create a triangle suspension shape. -
String the first strand:
Take one long cord and tie a knot at the very bottom. Thread on a clay triangle (base first), then a bead, then another shape. Use knots effectively under beads to space items out so they float separately. -
Create the pattern:
Repeat this threading process for the remaining two cords, varying the pattern. Mix the wooden beads with your handmade clay triangles and ovals to create visual interest. -
Attach strands to the ring:
Tie the top of each beaded strand to the wooden ring. Space them evenly around the ring’s circumference or tie them across the diameter if your ring allows. -
Final balance check:
Hold up the dowel to check the balance. If the moon is much heavier than the ring mobile assembly, slide the suspension point on the main dowel slightly toward the moon to equalize the weight distribution. -
Trim excess:
Snip off any excess twine tails near the knots for a clean finish.
Hang your new mobile near a window where shadows can play across the textured moon surface as the light changes.
Tiny Clay Room Shadowbox Scene
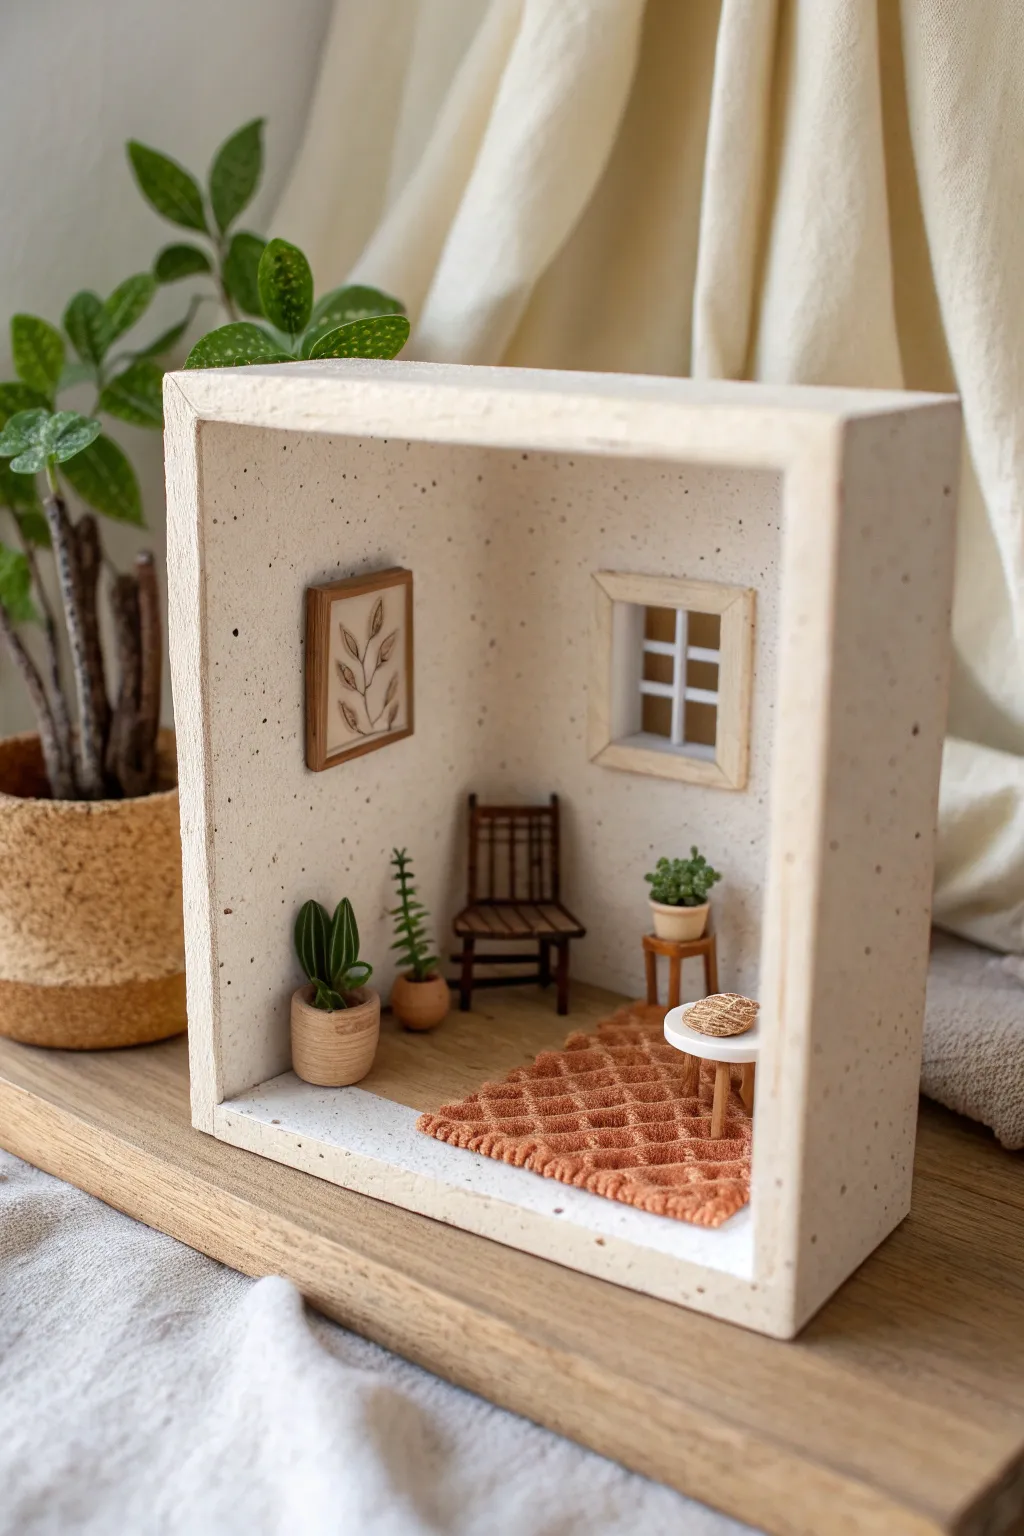
Capture the serenity of a quiet afternoon in miniature form with this delightful shadowbox project. Combining structure building with polymer clay detailing, you’ll construct a cozy, sun-drenched corner complete with tiny furnishings and specked clay walls.
Step-by-Step Guide
Materials
- White polymer clay (can use specked granite effect or mix in black pepper/sand)
- Wood glue and tacky glue
- Balsa wood or Basswood sheets (1/16″ or 1/8″ thick)
- Square wooden shadowbox frame (or construct your own)
- Acrylic paint (warm terracotta, various greens, browns)
- Thin wooden dowels or toothpicks
- A scrap of textured fabric (velvet or corduroy)
- X-acto knife and cutting mat
- Rolling pin for clay
- Fine-grit sandpaper
- Miniature wire or headpins (for plant stems)
- White cardstock or heavy paper
Step 1: Building the Room Shell
-
Prepare the clay:
Begin by conditioning your white speckled polymer clay. If you don’t have pre-speckled clay, knead fine black pepper or black sand into plain white clay for that lovely stone-like texture. -
Line the box:
Roll out sheets of the speckled clay to roughly 1/8 inch thickness. Cut three panels to fit the back and two side ‘walls’ of your wooden box. I like to texture these slightly with a toothbrush before baking. -
Bake the walls:
Bake the clay panels flat on a tile according to the manufacturer’s instructions. Baking them flat ensures they don’t warp before installation. -
Construct the floor:
While the walls bake, cut a piece of balsa wood to fit the floor of the box. You can lightly score lines into it to mimic wooden planks, or leave it smooth. -
Assemble the shell:
Once the clay panels are cool, glue them into the interior of the wooden box using strong tacky glue. Glue the wooden floor piece in last.
Step 2: Crafting the Furnishings
-
Build the window frame:
Cut thin strips of balsa wood to create a square frame and inner muntins (the crossbars). Paint a small square of cardstock sky-blue, glue it behind the frame, and mount the window to the back wall. -
Create the art frame:
Form a tiny rectangle from wood strips for the picture frame. Draw a simple botanical leaf design on paper using a brown fine-liner pen, glue it inside the frame, and attach it to the wall. -
Assemble the chair:
This is the trickiest part. Use small cuts of wood for the seat and legs. For the backrest, glue thin pieces of toothpick vertically onto a horizontal rail. Stain the wood dark walnut for contrast. -
Make the side table:
Cut a small circle of white clay and bake it for the tabletop. Glue three small wooden legs underneath it to create a tripod table. -
Sculpt the plant pots:
Roll small balls of terracotta-colored clay (or paint wood beads). Press your thumb or a tool into the top to create a hollow for the plants. Bake these tiny pots.
Wobbly Furniture?
If your tiny chair legs are uneven, don’t cut them! Instead, sand the bottom of the longer legs gently on fine-grit sandpaper until the piece sits flat.
Step 3: Details and Display
-
Make the rug:
Cut a rectangle from your textured fabric scrap. Fray the short edges using a needle to create a miniature fringe. -
Create the greenery:
Mix various shades of green clay. For the snake plant, roll thin, flat strips and twist them slightly. For the trailing plant, make tiny teardrop shapes. -
Plant the pots:
Glue the green clay leaves into your baked pots. I sometimes use a tiny dab of brown paint inside the pot first to mimic soil. -
Final arrangement:
Place the rug diagonally on the floor. Glue the chair in the corner and arrange the plants and side table naturally around the room. -
Seal the front edge:
To finish the ‘framed’ look, add a final thick strip of the speckled clay (or painted wood) to the front face of the box, framing your new tiny world.
Scale Check
Keep a ruler handy. For a realistic look, ensure the seat of the chair is roughly 1/3 the height of the wall, and the window is placed at ‘eye level’ for a mini person.
Place your finished shadowbox on a bookshelf where the light can catch the tiny details you’ve created.