Whenever I’m craving a creative reset, I grab some air-dry clay or polymer clay and make something small enough to finish in a cozy afternoon. Here are my favorite clay arts and crafts ideas—from classic starter projects to a few playful curveballs once you’re warmed up.
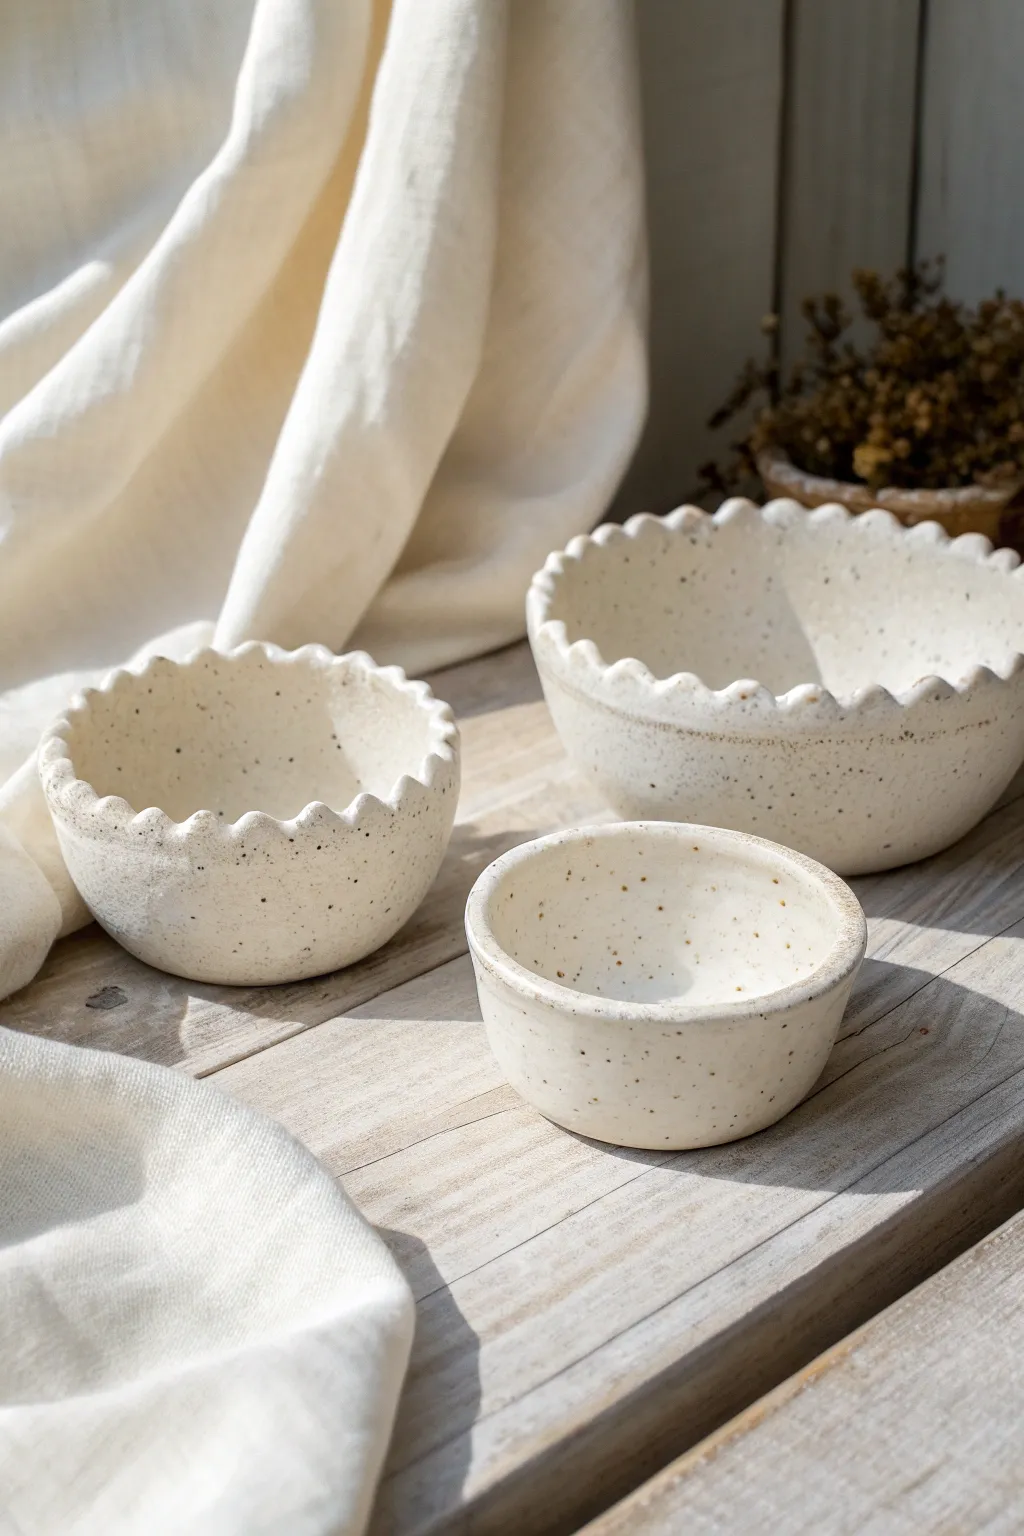
Speckled Trinket Dishes
This charming, rustic trinket dish combines a classic cream finish with delightful black speckles that mimic natural stone. Perfect for holding rings or small treasures, it brings an organic, handcrafted warmth to any nightstand or dresser.
Step-by-Step Tutorial
Materials
- White air-dry clay or polymer clay
- Rolling pin
- Round cookie cutter or bowl (approx. 4-5 inches)
- Small bowl (for shaping)
- Sandpaper (fine grit)
- Acrylic paint (warm cream/off-white)
- Acrylic paint (black)
- Old toothbrush or stiff bristle brush
- Gloss varnish or sealant
- Sponge or soft paintbrush
- Water cup
Step 1: Shaping the Clay Base
-
Condition the clay:
Begin by taking a handful of clay and kneading it in your hands until it becomes soft, pliable, and warm. This prevents cracks from forming later. -
Roll it out:
Place the clay on a clean, flat surface. Use your rolling pin to flatten it into an even sheet, aiming for a thickness of about 1/4 inch. -
Cut the circle:
Press your round cookie cutter or invert a bowl onto the clay sheet to cut out a perfect circle. Use a knife to trace around the bowl if you don’t have a cutter large enough. -
Smooth the edges:
Dip your finger in a little water and run it along the cut edge of the clay circle to smooth out any roughness or sharp creates. -
Create the curve:
Gently lift your clay circle and place it inside a slightly larger bowl to give it a curved shape. Gently press it down so it takes the form of the bowl’s bottom. -
Let it dry:
Allow the clay to dry completely inside the mold. For air-dry clay, this usually takes 24-48 hours. If using polymer clay, bake according to the package instructions while it’s still supported by an oven-safe bowl.
Step 2: Refining and Painting
-
Remove and sand:
Once fully dry or baked and cooled, pop the dish out of the mold. Use fine-grit sandpaper to gently smooth the rim and any uneven spots on the surface. -
Wipe clean:
Use a slightly damp cloth or paper towel to wipe away all the sanding dust. A clean surface ensures the paint adheres properly. -
Apply base coat:
Paint the entire dish—front, back, and rim—with the warm cream or off-white acrylic paint. You may need two to three coats for full opacity. -
Dry between coats:
I prefer to let each coat dry for about 20 minutes before adding the next to avoid streaks. Ensure the base color is solid and even.
Uneven drying?
If the clay curls while drying, weigh down the center with a small bag of rice or beans to keep the bottom flat while the sides curve up.
Step 3: The Speckled Effect
-
Prepare the splatter paint:
Mix a small amount of black acrylic paint with a few drops of water. You want it to be runny, like the consistency of ink or heavy cream. -
Load the brush:
Dip the bristles of an old toothbrush or a stiff brush into the watered-down black paint. -
Test the splatter:
Before hitting your dish, test your flicking technique on a scrap piece of paper. Run your thumb across the bristles to flick tiny droplets forward. -
Speckle the dish:
Hold the brush over the dish and flick the bristles to create the speckled pattern. Vary your distance from the dish to create different sized dots. -
Add larger spots:
For the larger, distinctive black spots seen in the image, dip the very tip of a paintbrush handle or a toothpick into un-thinned black paint and dot them randomly. -
Dry the details:
Allow the speckles and dots to dry completely. This step is crucial so you don’t smear the design when sealing. -
Seal the piece:
Apply a coat of gloss varnish or sealant over the entire dish. This gives it that ceramic-like shine and protects your paint job from scratches.
Add a Gold Rim
elevate the look by painting just the very top edge of the rim with metallic gold leaf paint for a luxe, dipped finish.
Place your finished dish on your bedside table to hold your favorite jewelry pieces safely


Stamped Clay Coasters
Bring a touch of nature to your coffee table with these elegant, minimalist coasters. Featuring delicate leaf impressions and a charming dotted border, this project mimics the look of high-end ceramic studio pottery using accessible air-dry or oven-bake clay.
How-To Guide
Materials
- White or beige air-dry clay (or polymer clay)
- Rolling pin
- Circle cutter (approx. 3.5-4 inches diameter) or a jar lid
- Leaf stamps or fresh foliage for impressing
- Wooden skewer or toothpick (for the dotted border)
- Fine-grit sandpaper
- Matte or satin clear sealant (varnish or Mod Podge)
Step 1: Preparing the Base
-
Condition the Clay:
Begin by taking a handful of your clay and kneading it in your hands until it becomes soft, pliable, and warm. This prevents cracks later on. -
Roll it Out:
Place the clay on a smooth work surface or silicone mat. Using your rolling pin, roll the clay out to an even thickness of about 1/4 inch. If you want identical coasters, place two wooden rulers on either side of the clay to guide the rolling pin height. -
Cut the Circles:
Press your circle cutter or jar lid firmly into the clay to cut out your coaster shapes. Create as many as you need, leaving a little space between cuts. -
Smooth the Edges:
After removing the excess clay, dip your finger in a tiny bit of water and run it gently around the rim of each circle to smooth out any rough cutting marks.
Stamp Tip
If using real leaves, lightly dust the clay surface with cornstarch before pressing. This acts as a release agent so the leaf doesn’t stick and tear the clay.
Step 2: Adding the Design
-
Plan Your Layout:
Before stamping, visualize where you want your leaves. The reference image uses a scattered pattern with three main focal points. -
Stamp the Foliage:
Take your leaf stamps (or real leaves vein-side down) and press them firmly into the clay. Apply even pressure to ensure the stem and veins leave a clear impression without pushing all the way through the coaster. -
Create the Dotted Border:
Using the blunt end of a wooden skewer or a small dotting tool, press a series of small holes around the entire perimeter of the coaster. Keep them about 1/8 inch from the edge and try to space them evenly. -
Add Inner Details:
For extra texture, you can add a few tiny dots randomly between the leaf impressions, mimicking the speckled look of the mug in the photo.
Make a Matching set
Don’t stop at coasters—roll out a larger slab to create a matching trivet for your teapot, using the same border and leaf pattern for a cohesive look.
Step 3: Finishing and Sealing
-
Drying Phase:
If using air-dry clay, move the coasters to a wire rack to ensure airflow. Let them dry for 24-48 hours, flipping them occasionally to prevent curling. If using polymer clay, bake according to the package instructions. -
Sanding:
Once fully cured and hard, take fine-grit sandpaper and very gently buff the edges and surface. This removes any fingerprints or rough spots. -
Highlight the Texture (Optional):
To make the leaves pop like the image, dilute a small amount of brown acrylic paint with water (a ‘wash’). Brush it over the designs, then immediately wipe the surface with a damp paper towel, leaving pigment only in the recessed lines. -
Final Seal:
Stir your matte or satin sealant gently to avoid bubbles. Apply a thin, even coat over the top and sides of the coaster. -
Second Coat:
Allow the first coat to dry completely, then apply a second coat for durability, especially since these will hold drinks. -
Backing:
For a professional finish that protects your furniture, cut a circle of cork or felt slightly smaller than the coaster and glue it to the bottom.
Enjoy using your beautiful, custom-made pottery pieces for your next morning coffee


Easy Ring Holder Cones

These minimalist ring holder cones are both functional and decorative, adding a chic touch to any dresser or vanity. With simple geometric shapes and earthy paint details, they are the perfect beginner clay project.
Step-by-Step
Materials
- Air-dry clay (white or terracotta)
- Acrylic rolling pin
- Sharp crafting knife or X-Acto blade
- Bowl of water
- Sponge
- Fine-grit sandpaper
- Acrylic paints (Rust/Terracotta, Mustard Yellow, White)
- Small round paintbrush
- Fine liner brush
- Clear matte varnish or sealant
- Parchment paper or craft mat
Step 1: Shaping the Cones
-
Condition the clay:
Begin by taking a chunk of air-dry clay roughly the size of a golf ball. Knead it in your hands until it becomes soft, pliable, and free of cracks. -
Form the basic shape:
Roll the clay into a smooth ball first, then gently begin rolling it back and forth on your work surface while applying more pressure to one side. -
Refine the cone:
Continue rolling until you have a tapered cone shape. You want the base to be wide enough to stand stable, about 1-1.5 inches in diameter. -
Flatten the base:
Stand the cone upright on your work surface. Press down gently to ensure the bottom is perfectly flat. If it wobbles, pick it up and tap the bottom against the table a few times. -
Smooth the surface:
Dip your finger or a small sponge into a little water and smooth out any fingerprints or join lines on the clay service. Don’t use too much water, or the clay will get mushy. -
Create the second cone:
Repeat the process for the second cone. Try varying the height or width slightly to create visual interest when they are displayed together. -
Let them dry:
Place your finished shapes on parchment paper. Allow them to dry completely for 24-48 hours. I find turning them on their sides occasionally helps the bottom dry thoroughly. -
Sand for perfection:
Once fully cured and hard, use fine-grit sandpaper to gently buff away any remaining lumps or rough textures for a professional finish. Wipe away the dust with a barely damp cloth.
Smooth Operator
To get a perfectly smooth cone without fingerprints, roll the final shape gently against the table using a flat acrylic block or a ruler instead of your hands.
Step 2: Painting & Decoration
-
Base coat (optional):
If you want a uniform background, paint the entire cone with a coat of white or cream acrylic paint. For a natural look, like the speckled cone, you can leave the raw clay if it’s a nice color. -
Mix the rust color:
For the striped cone, mix a burnt orange or rust color. If you only have primary colors, mix red, yellow, and a tiny dot of blue or brown to achieve that earthy terracotta tone. -
Paint the stripes:
Using a small round brush, lovingly paint horizontal rings around one of the cones. Don’t worry about making them perfectly straight; the slightly organic, wobbly line adds to the handmade charm. -
Add stripe variation:
Vary the thickness of your stripes. Leave bands of the raw clay or base color showing between the rust stripes. -
Speckle the second cone:
For the second cone, distinct yellow dots are key. Dip the tip of a fine liner brush into mustard yellow paint. -
Apply the dots:
Gently dab small dots randomly across the surface of the second cone. -
Add white accents:
Once the yellow dots are dry, add tiny white speckles or tinier dots in the spaces between to give it a terrazzo-style texture. -
Seal the deal:
After all paint is completely dry, apply a coat of clear matte varnish. This protects the clay from moisture and gives it a finished look without being too glossy.
Cracking Up?
If small cracks appear as the clay dries, mix a tiny bit of fresh clay with water to make a paste (slip) and fill the cracks, then sand smooth once dry.
Now you have a stylish set of custom ring holders ready to organize your jewelry


Polymer Clay Bead Jewelry
Embrace the natural beauty of polymer clay with this simple yet striking beaded bracelet. Featuring a matte finish and an earthy palette of deep blues, terracotta, mustard, and speckled cream, this piece adds a grounded, artisanal touch to any outfit.
How-To Guide
Materials
- Polymer clay in five colors: dark blue, terracotta/rust orange, mustard yellow, olive green, cream/beige
- Fine black pepper or dried coffee grounds (for texturing the cream beads)
- Bead piercing tool or toothpick
- Brown waxed cotton cord or thin leather cord (approx. 1mm thick)
- Ruler
- Sandpaper or denim scrap (for texturing)
- Oven and baking sheet
- Parchment paper
Step 1: Preparing the Clay
-
Condition the colors:
Begin by conditioning each block of polymer clay separately. Knead them warm in your hands until they are soft and pliable, ensuring there are no air bubbles trapped inside. -
Mix the speckled clay:
Take your cream or beige clay and flatten it out. Sprinkle a tiny pinch of fine black pepper or dried coffee grounds onto it. Fold the clay over and knead it thoroughly until the speckles are evenly distributed to mimic stone or ceramic. -
Portion the beads:
Roll each color into a uniform log or snake, roughly 1/2 inch in diameter. Using a blade, slice equal portions from each log to ensure your beads end up roughly the same size.
Step 2: Shaping and Piercing
-
Roll spheres:
Take each slice and roll it between your palms to create a smooth sphere. Aim for a slightly organic shape rather than perfect factory-made roundness to maintain that rustic appeal. -
Add surface texture:
For a matte, stone-like finish, gently roll the unbaked beads over a scrap of denim or lightly tap them with fine-grit sandpaper. This removes fingerprints and adds subtle surface interest. -
Pierce the holes:
Hold a bead gently between your thumb and forefinger. Insert your bead piercing tool or toothpick into the center, rotating it as you push through to avoid deforming the sphere. -
Widen the openings:
Because we are using a thicker cord, ensure the holes are wide enough. Give the tool a little wiggle inside the hole to expand it slightly.
Stone-Wash Finish
For an ultra-matte, chalky look, lightly sand the baked beads with a nail buffer block. Follow up with a tiny bit of liquid waxbuffed in with a soft cloth.
Step 3: Baking and Assembly
-
Bake the beads:
Arrangement the beads on a baking sheet lined with parchment paper. Check your clay package for specific temperature instructions, but generally, bake at 275°F (135°C) for about 30–45 minutes. -
Cool down:
Once baked, turn off the oven and let the beads cool completely before handling. This allows the structural integrity of the clay to fully set. -
Prepare the cord:
Cut a length of brown waxed cord approximately 25 inches long. Fold it in half to find the center, then unfold. -
Start stringing:
Tie a simple overhand knot about 8 inches from one end. String your beads in a random, pleasing pattern—alternating the rust, blue, yellow, green, and speckled cream. -
Secure the beads:
Once all chosen beads are strung (usually 16-18 beads for a standard wrist), tie another tight overhand knot snug against the last bead to keep them in place.
Scent Diffuser
Leave one or two beads made from terracotta or porous air-dry clay unsealed. You can drop essential oils onto these specific beads to act as a wearable diffuser.
Step 4: Creating the Adjustable Closure
-
Form the loop:
Bring the two tail ends of the cord together so they overlap. You will be creating a sliding knot over these two parallel cords. -
Tie the sliding knot:
Cut a separate piece of cord about 6 inches long. Place it under the two main cords. Create a square knot or a series of macramé knots around the main cords. I usually do 3-4 knots for stability. -
Trim and finish:
Trim the excess from your knotting cord and dab a tiny drop of glue on the cut ends (being careful not to glue the main sliding cords). -
Add end beads:
Tie a small knot at the very end of each main cord tail. You can optionally add one extra small bead before the knot for a decorative dangle.
Slip on your new handcrafted accessory and enjoy the custom pop of color it brings to your day

The Complete Guide to Pottery Troubleshooting
Uncover the most common ceramic mistakes—from cracking clay to failed glazes—and learn how to fix them fast.
Cute Animal Magnets
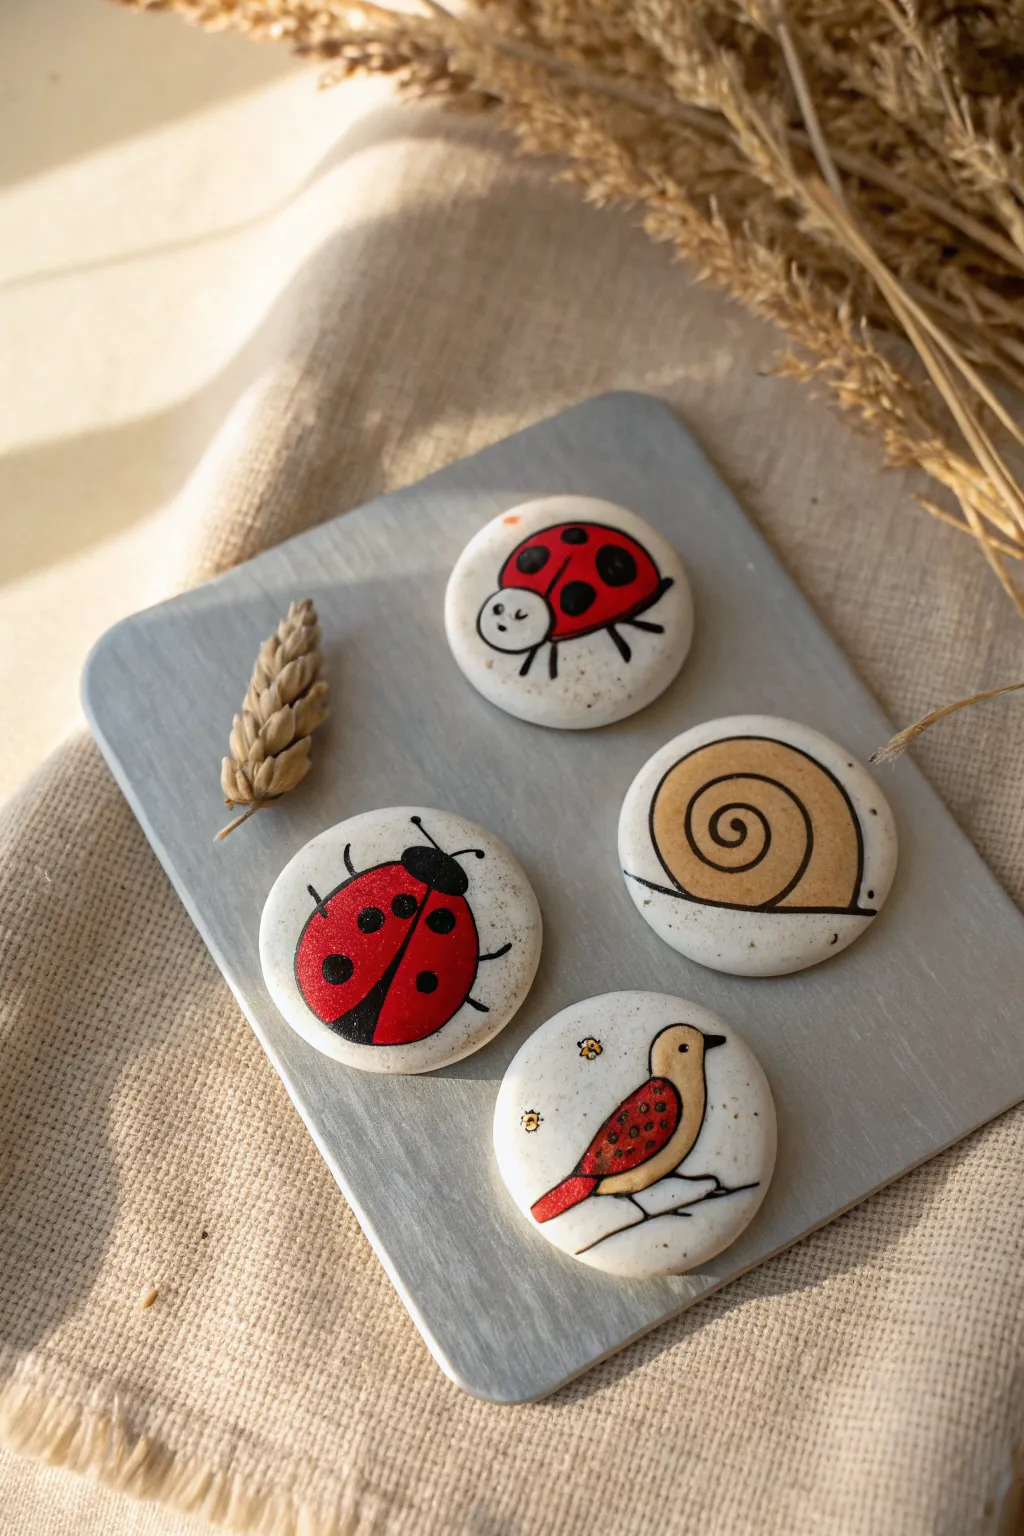
Brighten up your fridge or magnetic board with these charming, hand-painted clay pebbles. Featuring sweet motifs like ladybugs, a snail, and a little bird, this project combines simple sculpting with illustrative painting for a delightful finish.
Detailed Instructions
Materials
- White air-dry clay or polymer clay (white)
- Acrylic paints (Red, Black, Yellow, Beige/Ochre, White)
- Fine detail paintbrushes (Size 0 and 00)
- Fine-tip black permanent marker or micron pen
- Rolling pin
- Small round cookie cutter (approx. 1.5 inches) or a small glass
- Sandpaper (fine grit)
- Gloss varnish or clear sealant (Mod Podge or spray)
- Round magnets
- Strong craft glue (E6000 or similar)
Step 1: Shaping the Canvas
-
Condition the clay:
Start by taking a chunk of your white clay and kneading it in your hands until it becomes warm, soft, and pliable. This prevents cracks later on. -
Roll it out:
Use a rolling pin to flatten the clay on a clean, smooth surface. You’re aiming for a thickness of about 1/4 inch—thick enough to be sturdy but thin enough to look like a smooth pebble. -
Cut the circles:
Using your small round cutter or the rim of a small glass, punch out four distinct circles. If the edges are a bit sharp from the cutter, gently tap them with your finger to round them off. -
Smooth the surface:
Dip your finger in a tiny bit of water and rub it gently over the top surface of the clay discs to remove any fingerprints or imperfections. -
Dry the clay:
Let the clay circles dry completely according to the package instructions. For air-dry clay, this usually takes 24-48 hours. I find flipping them over halfway through helps them dry flat. -
Sand for perfection:
Once fully cured and hard, lightly sand the edges and surface with fine-grit sandpaper to ensure a porcelain-like finish.
Pro Tip: Smoother Circles
If using air-dry clay, wipe your cookie cutter with a little vegetable oil before cutting. The clay will release instantly without dragging or warping the perfect circle shape.
Step 2: Painting the Motifs
-
Sketch the designs:
Lightly sketch your four designs—the top-down ladybug, the side-profile ladybug, the snail shell, and the bird on a branch—onto the clay using a very light pencil touch. -
Paint the ladybugs’ red base:
For the top-down ladybug, paint a large red circle leaving a small white gap for the head. For the profile ladybug, paint a red semi-circle humped shape. Let the red dry completely. -
Paint the snail shell:
Mix a warm beige or ochre color and paint a simple spiral shape that fills most of the circle. While the paint is still wet, you can swirl in a lighter tone for subtle variation. -
Paint the bird’s body:
Use the beige/ochre mixture for the bird’s head and back. Use the red paint for the wing and tail feathers. Add tiny dots of yellow or orange near the bird for flowers. -
Add the speckled texture:
To mimic the stone-like look in the photo, dip an old toothbrush or stiff brush into diluted brown or black paint and flick very tiny, subtle speckles over the white background areas.
Step 3: Inking and Finishing
-
Outline in black:
Once all paint is bone dry, use a fine-tip black marker or a very thin brush with black ink to outline your shapes. Draw the legs, antennae, bird branch, and snail ground line. -
Add details:
Draw the black spots on the ladybugs and the swirl line on the snail shell. Don’t forget the bird’s eye and beak. -
Highlighting:
Using a toothpick or tiny brush, add a minuscule dot of white paint to the black parts of the ladybug heads or eyes to bring them to life. -
Seal the artwork:
Apply a coat of gloss varnish or clear sealant over the painted side. This protects the paint from scratches and gives it a professional ceramic shine. -
Attach the magnets:
Flip the dry clay pieces over. Apply a strong craft glue to the back of the clay and press a round magnet firmly into the center. Let the glue cure fully before sticking them to your fridge.
Troubleshooting: Curling Clay
Did your clay discs curl up while drying? Use fine sandpaper to flatten the back side before gluing the magnet on so it sits flush against the magnetic surface.
Now you have a set of adorable little art pieces to organize your notes
Mini Bud Vases

Bring earthy warmth to your windowsill with this trio of textured clay vases that celebrate simple, organic forms. The rich, rust-colored finish and subtle horizontal ridges mimic the look of wheel-thrown pottery without needing a wheel at all.
Step-by-Step Guide
Materials
- Terracotta-colored air-dry clay (or polymer clay)
- Small bowl available for water
- Potter’s sponge or soft piece of foam
- Flexible rib tool or old credit card
- Wooden sculpting tools
- Rolling pin
- Fine-grit sandpaper
- Clear matte varnish (optional)
- Dried grasses for styling
Step 1: Forming the Base
-
Prepare the Clay:
Begin by taking a substantial chunk of terracotta air-dry clay. Knead it thoroughly in your hands to warm it up and remove air bubbles, ensuring it’s pliable and smooth. -
Shape the Sphere:
Roll the clay into a smooth ball. For the large vase shown in the foreground, aim for a ball roughly the size of a grapefruit. For the smaller companion vases, make golf-ball and tennis-ball sized spheres. -
Create the Pinch Pot:
Hold the ball in one hand and push your thumb deep into the center, leaving about half an inch of thickness at the bottom. This establishes the internal cavity. -
Expand the Walls:
Gently pinch the clay between your thumb and fingers, rotating the ball as you go. Work your way from the bottom up, thinning the walls evenly until you have a round, hollow bowl shape.
Step 2: Building the Neck
-
Gather the Opening:
Instead of keeping the rim open like a bowl, start gently pushing the clay inward towards the center at the top. Use a collaring motion, encircling the clay with both hands and squeezing slightly to narrow the opening. -
Add a Coil:
If the clay gets too thin at the top, roll a small snake of fresh clay. Score and slip the rim of your base, then attach the coil to build upward. -
Refine the Neck:
Smooth the attached coil downward into the body of the vase using your thumb or a wooden tool so no seam remains. -
Shape the Spout:
Continue collaring and smoothing the neck until it is narrow and vertical. For the main vase, you want a tapered look that flows seamlessly from the round body. -
Level the Rim:
Once the neck is the desired height, use a needle tool or knife to trim the very top rim flat and even.
Keep it Moving
To get concentric rings without a pottery wheel, place your vase on a piece of paper or a lazy susan. Spin the paper/base with one hand while holding your sponge steady with the other.
Step 3: Texturing and Finishing
-
Create Texture:
This is the crucial step for that rustic look. Dampen a potter’s sponge slightly—not soaking wet—and drag it horizontally around the exterior of the vase as you rotate it. This creates distinct, organic rings. -
Enhance Rings:
I prefer to use a flexible rib tool or even a credit card edge here gently against the spinning pot to define those horizontal ridges further, mimicking throw lines. -
Smooth the Lip:
Run a wet finger around the rim to soften any sharp edges left from trimming. -
Repeat for Set:
Repeat the process for the smaller vases. Make one a short, squat sphere with a wider mouth, and the other a medium-height bottle shape to complete the set. -
Dry Slowly:
Place your vases in a cool, dry area away from direct drafts. Let them dry slowly for 24-48 hours to prevent cracking. -
Sand Touches:
Once bone dry, you can lightly sand any unintended jagged spots, but keep the horizontal ridge texture intact. -
Seal (Optional):
If you plan to use fresh flowers, you must seal the inside with a waterproof resin. For dried grasses as shown, a simple matte varnish on the outside is sufficient to protect the finish.
Faux-Stone Effect
Mix a small amount of used coffee grounds or cracked black pepper into the clay before sculpting. This adds speckles that look like grog or fired ceramic once the piece dries.
Arrange your finished trio in natural light to highlight the beautiful clay texture


What Really Happens Inside the Kiln
Learn how time and temperature work together inside the kiln to transform clay into durable ceramic.
Pinch Pots With Modern Shapes
These charming, nesting-style bowls combine the organic feel of speckled clay with modern, scalloped rim details. The project creates a set of three distinct shapes that are perfect for holding jewelry, spices, or simply adding a touch of handmade warmth to your table.
Step-by-Step
Materials
- Speckled stoneware clay (white or cream body)
- Small bowl of water
- Sponge
- Wooden modeling tool or popsicle stick
- Smooth wooden board or canvas mat
- Needle tool
- Soft rib tool (rubber or silicone)
- Clear matte or satin glaze
- Kiln (or access to firing services)
Step 1: Forming the Base Shapes
-
Prepare clay balls:
Start by wedging your speckled clay to remove air bubbles. Divide the clay into three portions of varying sizes: one large for the main bowl, a medium piece for the side bowl, and a smaller amount for the condiment dish. -
Shape the spheres:
Roll each portion of clay between your palms until you have three smooth, round spheres. The smoothness here sets the foundation for a crack-free pot. -
Open the clay:
Holding the largest sphere in your non-dominant hand, press your thumb gently into the center. Don’t go all the way through; leave about a half-inch of thickness for the base. -
Pinch the walls:
Rotate the ball while rhythmically pinching the clay between your thumb (inside) and fingers (outside). Start at the bottom and work your way up to the rim. -
Refine the curve:
Continue pinching until the walls are an even thickness, roughly 1/4 inch. Aim for a wide, open bowl shape rather than a tall cup shape. -
Repeat for all three:
Repeat the pinching process for the medium and small clay balls. The smallest pot should have slightly straighter, vertical walls compared to the open curvature of the larger two. -
Flat bottoms:
Gently tap the bottom of each pot against your work surface to create a stable, flat base so they won’t wobble.
Step 2: Detailing and Smoothing
-
Smooth the surfaces:
Use a slightly damp sponge or a soft rubber rib to smooth the interior and exterior of all three pots. I like to support the wall with my hand on the outside while smoothing the inside to keep the shape true. -
Create the heavy scallop:
For the largest bowl, use your index finger to press indentations gently into the rim from the outside. Support the clay from the inside with two fingers to create undulating, scallop-like waves. -
Create the delicate scallop:
For the medium bowl, create smaller, tighter scallops. Instead of pressing down, try gently pinching small sections of the rim upward and outward to create a frilled edge effect. -
Refine the small pot:
Leave the smallest pot with a simple, smooth rim. Use your dampened chamois or sponge to round off the lip so it isn’t sharp. -
Final sponge wipe:
Take a damp sponge and run it lightly over the scalloped edges of the larger bowls. This softens the peaks and valleys, giving it that worn, handmade aesthetic rather than a sharp, mechanical look. -
Drying:
Loosely cover the pots with plastic for a day to let the moisture equalize, then uncover them to dry slowly until bone dry.
Cracks on the rim?
If the rim starts splitting while pinching, the clay is too dry. Compress the cracks immediately with a damp sponge or score and add a tiny bit of slip to heal the gap.
Step 3: Firing and Glazing
-
Bisque fire:
Fire the bone-dry pieces in a kiln to bisque temperature (usually cone 04 or 06). This prepares the clay to accept glaze. -
Apply clear glaze:
Dip each pot into a clear matte or satin glaze. Alternatively, brush on three even coats if using brush-on glaze. The clear glaze is crucial as it allows the natural speckles of the clay body to shine through. -
Wipe the bases:
Use a sponge to meticulously wipe off any glaze from the flat bottom of each pot. Any glaze left here will fuse the pot to the kiln shelf. -
Glaze fire:
Place the pots back in the kiln for the final glaze firing (temperature depends on your specific clay body, often cone 5 or 6 for stoneware).
Make it a planter
Before drying, punch a small hole in the bottom center of the pots using a straw or needle tool. These shapes are perfect sizes for small succulents.
Once cooled, your speckled trio is ready to organize your trinkets or serve snacks with artisan flair
Terrazzo-Style Trinket Tray
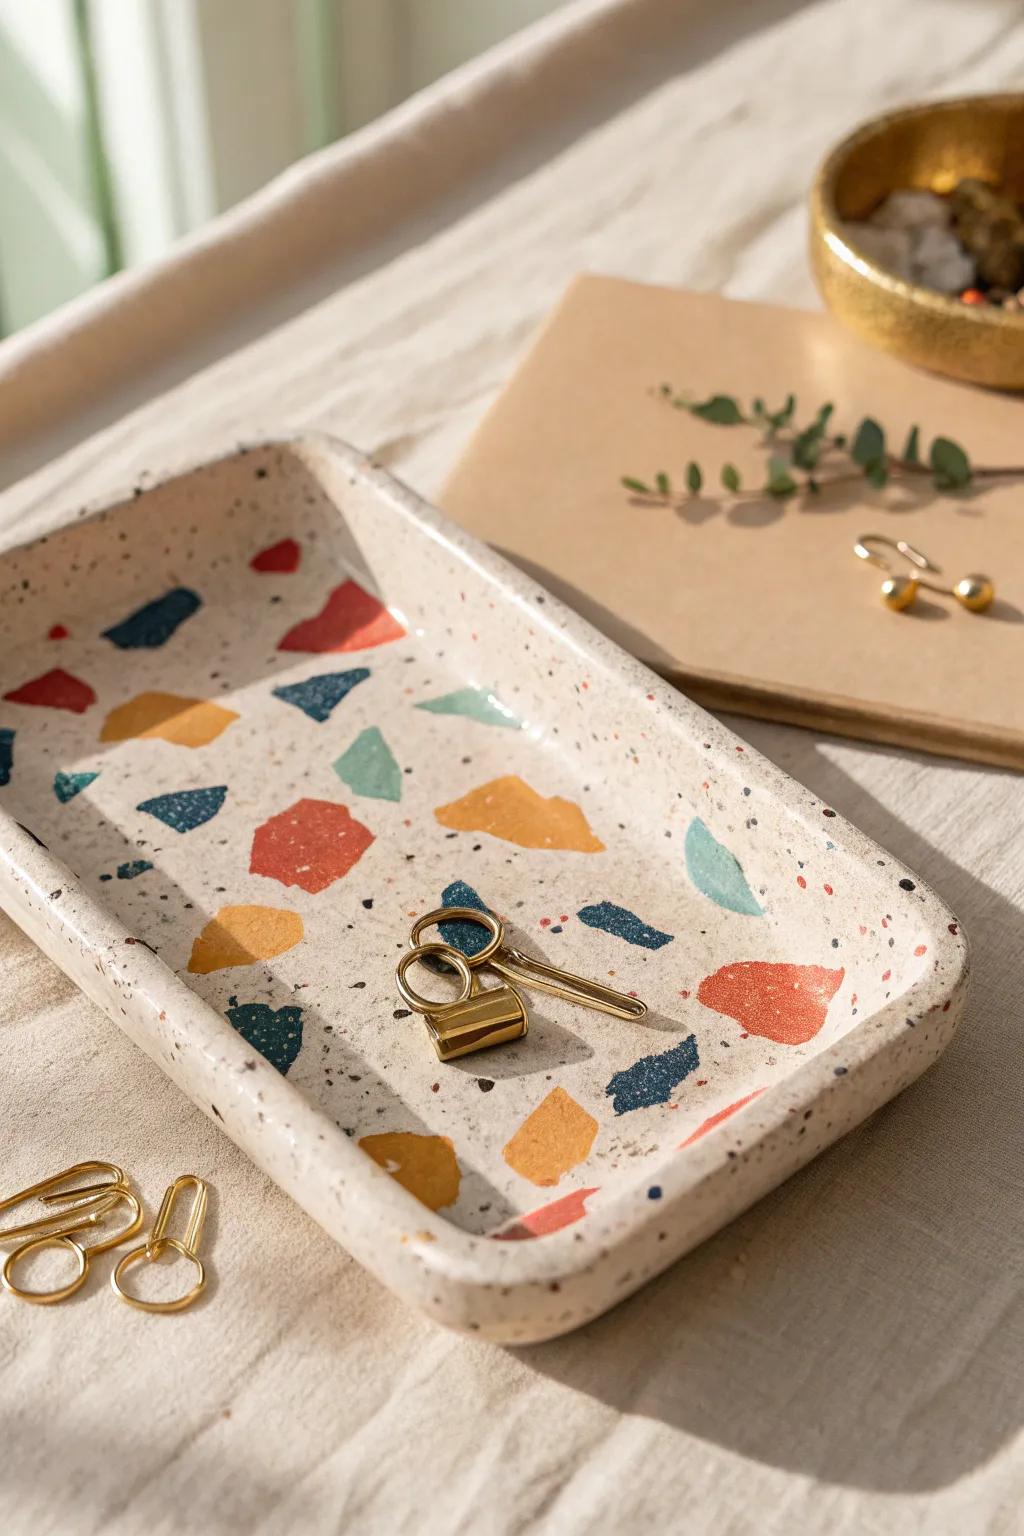
Capture the trendy, speckled aesthetic of polished concrete without the heavy lifting using polymer clay. This project results in a stylish, rectangular tray speckled with vibrant red, blue, and mustard chips, perfect for holding your favorite jewelry pieces.
How-To Guide
Materials
- White polymer clay (large block)
- Small amounts of colored polymer clay (mustard yellow, terracotta red, navy blue, teal)
- Black pepper or black embossing powder (for fine speckles)
- Acrylic rolling pin
- Craft knife or clay blade
- Rectangular baking dish or metal tray mold
- Parchment paper
- Fine-grit sandpaper (400 to 1000 grit)
- Satin or gloss clay glaze (optional)
- Soft paintbrush
Step 1: Preparing the Terrazzo Chips
-
Roll out colors:
Begin by conditioning your colored clays—mustard, terracotta, navy, and teal—until soft. Roll each color into a thin, uneven sheet, roughly 1-2mm thick. -
Bake the sheets:
Place these thin colored sheets on parchment paper and bake them for about 10-15 minutes at the temperature recommended on your clay package. They should be firm but not fully cured since they will be baked again. -
Create the chips:
Once the colored sheets have cooled completely, chop them up. Use your clay blade to cut them into irregular, angular fragments of varying sizes to mimic real stone chips.
Chips Won’t Stick?
If pre-baked chips won’t embed, brush a tiny amount of liquid polymer clay or ‘bake and bond’ onto the white base before scattering them.
Step 2: Creating the Base
-
Condition the white clay:
Condition the large block of white clay thoroughly. It needs to be pliable enough to hold the chips. -
Add fine speckles:
Flatten the white clay slightly and sprinkle cracked black pepper or black embossing powder over it. Fold the clay and knead it until the black specks are evenly distributed throughout. -
Form the slab:
Roll the speckled white clay out into a thick slab, approximately 5-6mm thick. Aim for a rectangular shape slightly larger than your intended final tray.
Step 3: Assembling the Terrazzo
-
Apply the chips:
Scatter your pre-baked colored chips over the surface of the white slab. I like to press them down gently with my fingers first to ensure they stick. -
Embed the colors:
Use your acrylic roller to roll over the slab again firmly. This forces the hard, colored chips into the soft white base, creating a flat, unified surface. -
Check coverage:
If there are large empty white spaces, add a few more chips to those specific spots and roll again until smooth. -
Trim the edges:
Using your clay blade and a ruler, cut a clean rectangle from the slab. Save the scrap clay; you can re-roll it for a smaller matching item. -
Build the rim:
Roll a snake of white clay and flatten it into a long strip. Attach this strip to the perimeter of your rectangle base to create the raised wall of the tray, smoothing the seams on the inside and outside with your finger or a clay tool.
Golden Touch
Mix small flakes of gold leaf in with your colored chips before embedding. The sanding step will reveal beautiful metallic flashes.
Step 4: Shaping and Finishing
-
Shape the tray:
Carefully lift your clay rectangle and place it into your baking dish or over a mold to help it hold its shape. Gently press the corners to ensure they are defined. -
Final bake:
Bake the assembled tray according to the manufacturer’s instructions for the full duration required for the thickness of the base. -
Cool down:
Allow the tray to cool completely before removing it from the mold to avoid warping. -
Sand for stone effect:
This is the most crucial step. Use wet/dry sandpaper under running water to sand the surface. This reveals the sharp edges of the chips and makes the surface feel like real stone. -
Seal:
Wipe away any sanding dust and let dry. Apply a thin layer of satin or gloss glaze to protect the tray and make the colors pop.
Place your new tray on a dresser or nightstand to add a modern splash of color to your room

TRACK YOUR CERAMIC JOURNEY
Capture glaze tests, firing details, and creative progress—all in one simple printable. Make your projects easier to repeat and improve.
Boho Wall Hanging Tiles
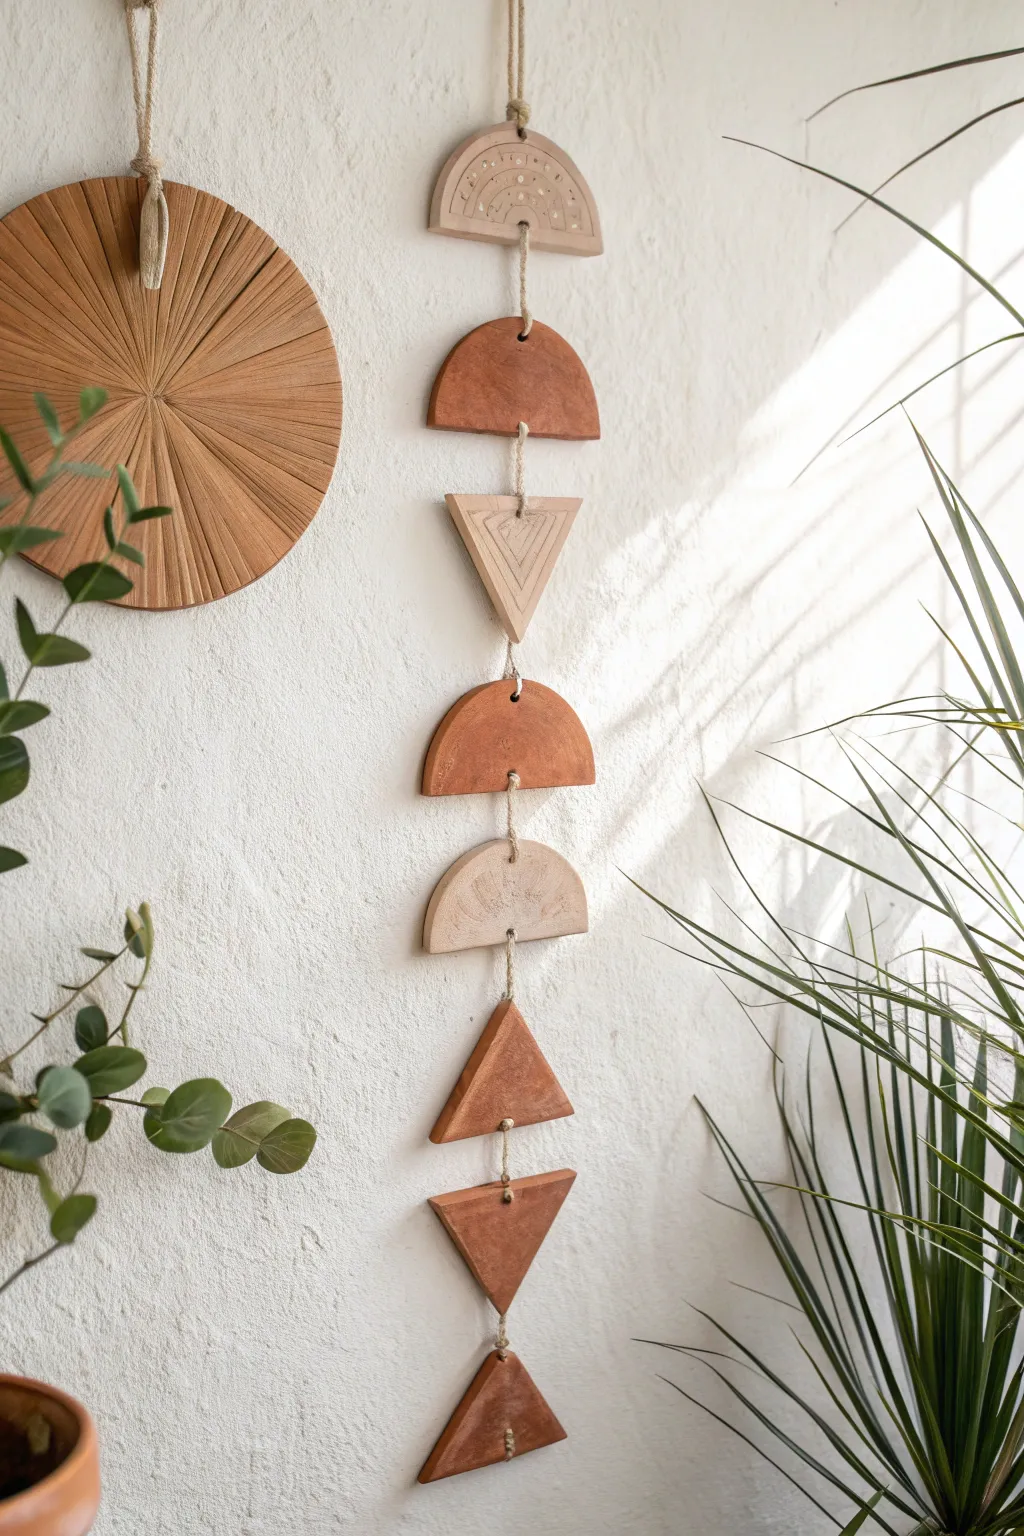
Bring earthy warmth to your walls with this vertical mobile featuring cascading geometric shapes in terracotta and beige tones. The alternating semicircles and triangles create a soothing rhythm, while simple carved textures add depth to this minimalist boho statement piece.
Step-by-Step Guide
Materials
- Air-dry clay (terracotta and white/beige colors)
- Rolling pin
- Parchment paper or canvas mat
- Cookie cutters (circle and triangle) or a craft knife and cardstock templates
- Texturing tools (needle tool, old comb, or toothpick)
- Drinking straw or small circular cutter
- Jute twine or hemp cord
- Fine-grit sandpaper
- Matte sealant or Mod Podge (optional)
Step 1: Planning and Cutting
-
Prepare your workspace:
Lay down parchment paper or a canvas mat to prevent the clay from sticking to your table. If you are using white clay and want to tint it terracotta, knead in acrylic paint now, or simply use pre-colored terracotta air-dry clay. -
Roll out the clay:
Take a portion of your terracotta clay and roll it out to a uniform thickness, aiming for about 1/4 inch thick. Repeat this process with the beige or white clay. -
Cut the semicircles:
Use a large circular cookie cutter (or a bowl as a guide) to cut out circles. Use a long blade or ruler to slice these circles exactly in half to create your semicircles. -
Cut the triangles:
Using a triangle cutter or a ruler and craft knife, cut out several equilateral triangles. For the project shown, you will need a mix of both shapes in both colors. -
Smooth the edges:
Dip your finger in a little bit of water and gently run it along the cut edges of each shape to smooth out any roughness or loose clay bits.
Keep it Flat
To prevent air-dry clay from curling as it dries, place a light book or a cutting board on top of the pieces once they are ‘leather hard’ (dry to touch but still cool).
Step 2: Adding Texture and Holes
-
Punch suspension holes:
Using a drinking straw or a small circular tool, punch a hole at the top and bottom center of each piece. Important: The very bottom triangle only needs one hole at the top. -
Detail the beige semicircle:
On the top beige semicircle piece, use a needle tool to lightly carve a rainbow arch pattern. Press small dots into the clay between the arches for extra detail. -
Add geometric lines:
For the beige triangle, use a ruler edge or needle tool to press a series of smaller, nested triangles inside the shape, creating a linear geometric effect. -
Create a scratched texture:
For one of the terracotta semicircles, try lightly scratching the surface with a toothbrush or rough sandpaper to give it a more rustic, stone-like appearance. -
Dry the tiles:
Lay all pieces flat on a clean sheet of parchment paper. Let them dry for 24-48 hours. I find flipping them over halfway through helps them dry evenly and prevents curling.
Step 3: Assembly and Hanging
-
Sand for perfection:
Once fully dry, lightly sand the edges with fine-grit sandpaper to remove any sharp burrs or uneven spots. -
Plan the layout:
Arrange your dried tiles on a table in your desired vertical order. The image shows a pattern starting with a beige semicircle, followed by terracotta shapes, alternating with the beige triangle. -
Cut the connecting cords:
Cut several short lengths of jute twine, about 6 inches each. You will trim the excess later. -
Knot the first connection:
Start from the top. Loop a piece of twine through the bottom hole of the first tile and the top hole of the second tile. Tie a secure knot, leaving about 1 to 1.5 inches of space between tiles. -
Hide the knots:
Adjust the knot so it sits directly behind one of the tiles, or tie a simple decorative knot that sits visibly between the pieces if you prefer that look. -
Continue linking:
Continue this process all the way down the chain. Ensure the spacing remains consistent visually as you verify the length. -
Create the top loop:
Thread a longer piece of twine through the top hole of the very first tile. Tie a loop at the top for hanging. -
Final trim:
Trim any excess twine tails close to the knots for a clean finish. Hang your mobile and enjoy the movement.
Add Some Shine
Mix gold mica powder into clear sealant and paint it into the carved grooves of the beige tiles for a touch of metallic glamour.
Hang your new mobile near a window where the light can catch the textures and cast playful shadows.
Moon Phase Garland
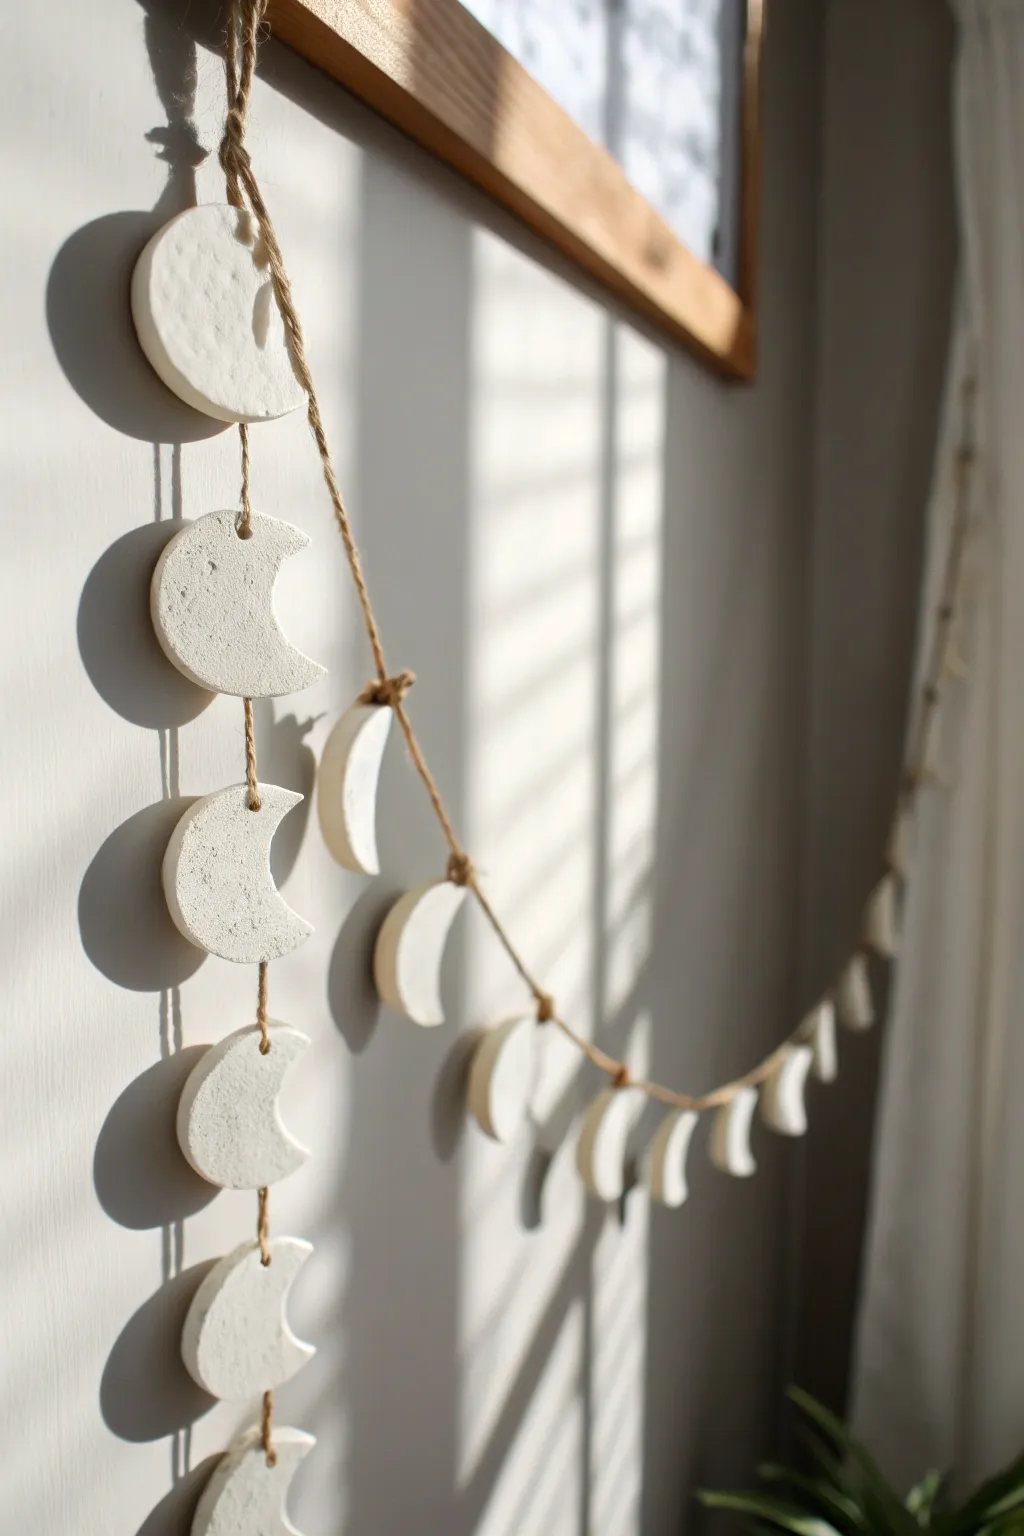
Bring the magic of the night sky indoors with this minimalist, textured clay garland. Featuring a cascading series of crescent moons strung on natural jute, this piece adds a serene, bohemian touch to any wall.
Step-by-Step Tutorial
Materials
- White air-dry clay (or polymer clay)
- Rolling pin
- Circle cookie cutters (approx. 2-3 inches diameter)
- Jute twine or hemp cord
- Straw or toothpick (for piercing holes)
- Sandpaper (fine grit)
- Parchment paper or craft mat
- Scissors
- Optional: Texture tool like a toothbrush or concrete slab
Step 1: Shaping the Moons
-
Prepare the Clay:
Begin by kneading a large handful of air-dry clay until it is soft, pliable, and free of cracks. A warm, conditioned clay is essential for avoiding jagged edges later. -
Roll it Out:
Place the clay on a sheet of parchment paper. Roll it out to an even thickness of about 1/4 inch. If you want a uniform look, you can place wooden guide strips on either side of your rolling pin. -
Cut the Circles:
Use your circle cookie cutter to press firmly into the clay, cutting out as many full circles as you need for your garland. For the design shown, you will need at least 10-12 shapes. -
Form the Crescents:
To make the crescent shape, take the same circle cutter and overlap it slightly with one of your cut-out circles. Press down to slice away a portion, leaving a perfect crescent moon shape behind. -
Add Texture:
The moons in the image have a lovely, subtle grainy texture. Before cutting, or gently after, press a clean rough sponge or a stone texture mat onto the surface to replicate this organic look. -
Pierce the Holes:
Using a drinking straw or a thick skewer, poke a hole near the top center of each crescent. Wiggle the tool slightly to ensure the hole is large enough for your jute twine to pass through easily. -
Smooth the Edges:
Dip your finger in a little bit of water and run it along the cut edges of each moon to smooth out any roughness or loose clay bits.
Stone Effect
Mix a small amount of used coffee grounds or black pepper into the white clay before rolling. This creates a speckled, faux-stone appearance.
Step 2: Drying and Refining
-
Let it Dry:
Lay the moons flat on a clean sheet of parchment paper in a cool, dry place. Let them air dry for at least 24-48 hours. I usually flip them over halfway through the drying process to prevent curling. -
Sand for Perfection:
Once fully cured and hard, check the edges again. If they feel sharp, gently sand them with fine-grit sandpaper until they are smooth to the touch.
Step 3: Assembly
-
Plan the Layout:
Lay out your moons on a table or the floor to decide on the arrangement. The image features a vertical strand connected to a draped horizontal strand. -
Cut the Twine:
Cut a long piece of jute twine for the main vertical hanging section, and a second piece if you are creating the swag effect. -
Knot the Moons:
Thread the twine through the hole of the first moon. Tie a simple overhand knot just above the moon to keep it in place, or tie a knot below if the hole is small enough for the knot to act as a stopper. -
Space Them Out:
Measure about 3-4 inches up the twine and tie another knot where you want the next moon to sit. Thread the next moon on and let it rest on that knot. -
Repeat the Process:
Continue adding moons, ensuring the spacing remains consistent. For the swag look, create a separate garland and tie its ends to the main vertical string. -
Create a Loop:
At the very top of your vertical strand, tie a strong loop for hanging. -
Final Adjustments:
Hang your garland on the wall and gently twist the moons so they face outward. Since they are suspended on string, they may naturally rotate, adding dynamic movement to the piece.
Gilded Edges
Once the clay is dry, use a small brush to paint the edges or just the tips of the crescents with liquid gold leaf for a touch of celestial luxury.
Hang your new lunar creation near a window to catch the shifting light throughout the day.
Clay Rainbow Arch Decor
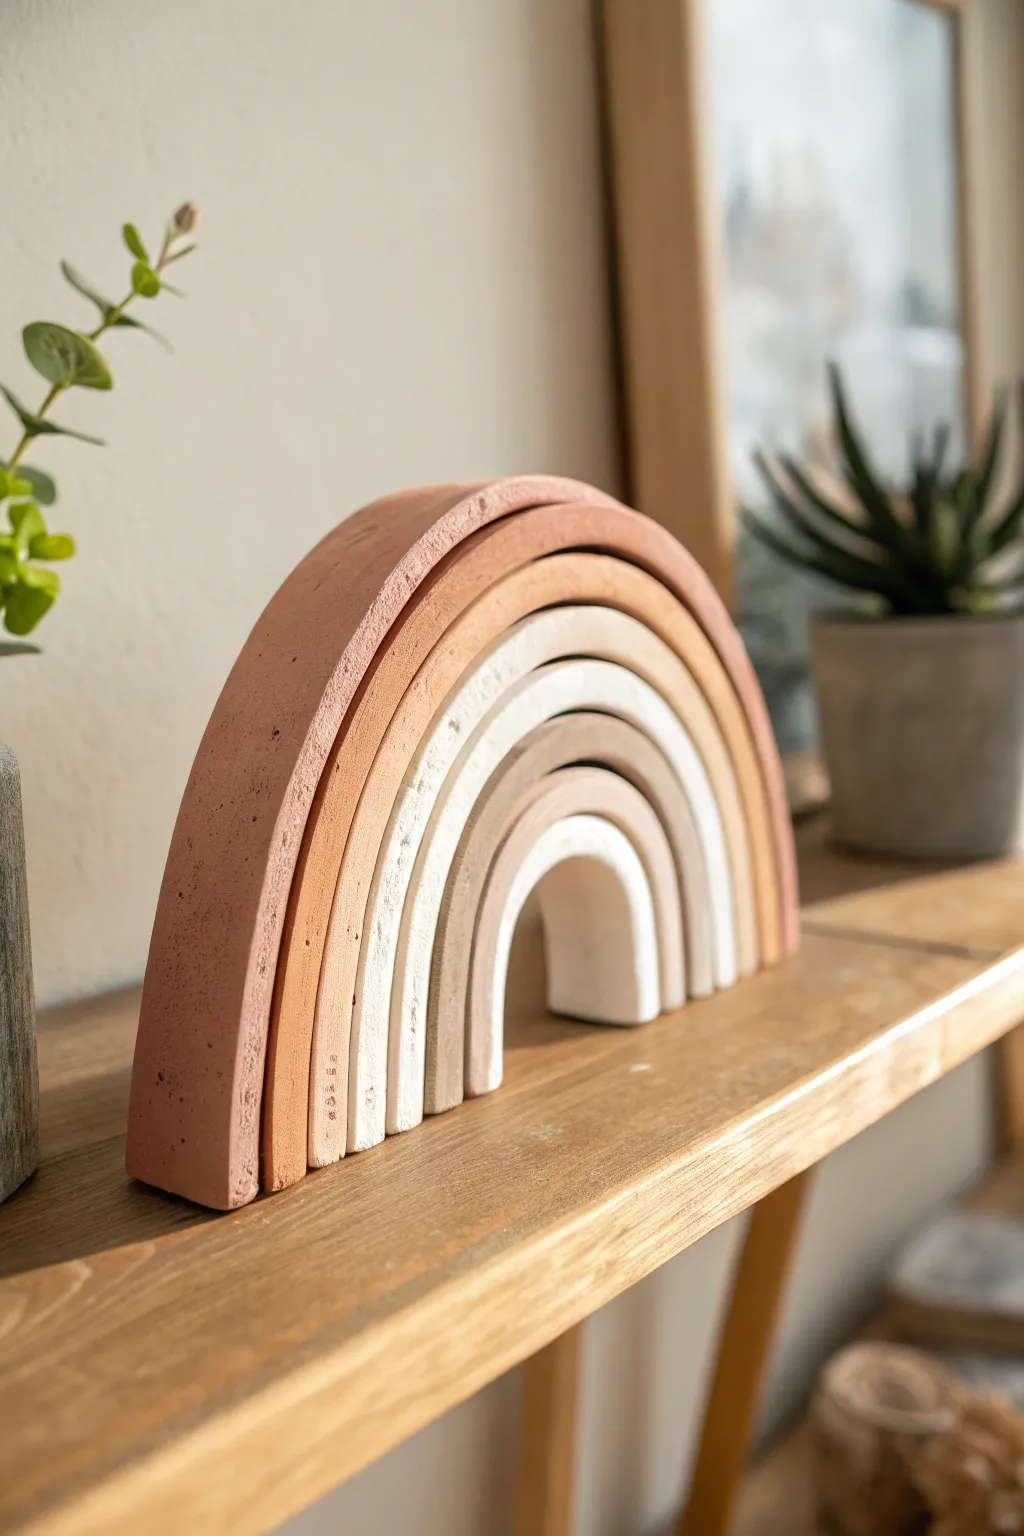
This minimalist, earth-toned rainbow arch adds a touch of modern bohemian charm to any shelf or nursery. Using simple air-dry clay, you can sculpt these organic nesting arches to create a sturdy, textured decor piece with a timeless aesthetic.
How-To Guide
Materials
- Air-dry clay (white or terracotta)
- Acrylic paints (terracotta, peach, beige, cream, warm grey)
- Rolling pin
- Sharp craft knife or clay cutter
- Sandpaper (fine grit)
- Parchment paper or silicone baking mat
- Cup of water
- Sponge or paintbrush
- Ruler
Step 1: Shaping the Arches
-
Prepare your workspace:
Lay down parchment paper or a silicone mat to prevent sticking. Take a large chunk of air-dry clay and knead it well until it is soft, pliable, and free of cracks. -
Roll the first coil:
Roll a section of clay into a long, thick snake. Aim for a consistent thickness of about 3/4 inch to 1 inch throughout the entire length. -
Form the smallest arch:
Curve the clay snake into a tight ‘U’ shape to form the center arch. Use a ruler to cut the bottom edges flat and even. -
Create the second layer:
Roll another clay snake of the same thickness. Gently drape it over the first arch to measure the length, ensuring it hugs the curve tightly without distorting the shape underneath. -
Trim to size:
Once positioned, trim the bottom ends of the second arch so they sit flush with the bottom of the first arch. -
Continue nesting:
Repeat this process for the remaining layers. The image shows about six layers total, but you can adjust based on your preference. Ensure each snake is roughly the same thickness for a uniform look. -
Squared edges:
Instead of leaving the snakes perfectly round, I like to gently flatten the front and back faces of the rainbow with a flat object or book. This gives it that modern, architectural squared-off look seen in the photo. -
Separate for drying:
Carefully separate the arches slightly so they aren’t touching. This is crucial for airflow and preventing them from sticking together permanently as they shrink. -
Smooth the imperfections:
Dip your finger or a small sponge in water and run it over any cracks or rough patches. Don’t use too much water, just enough to slick down the surface.
Clean Cuts Every Time
When trimming the bottom of your arches, cut straight down with firm pressure rather than sawing back and forth. This prevents the clay from squishing out of shape.
Step 2: Finishing and Painting
-
Let it dry completely:
Allow the clay to dry for at least 24-48 hours. Turn the pieces over halfway through the drying process to ensure the undersides dry evenly. -
Sand the surfaces:
Once fully hard, use fine-grit sandpaper to smooth out any sharp edges or uneven bumps. Wipe away the dust with a slightly damp cloth. -
Mix your palette:
Prepare your acrylic paints. You want a gradient of earth tones: start with a deep terracotta for the outer arch, moving to lighter peach, beige, and finally cream. -
Paint the first coat:
Apply the paint to each arch individually. Use matte acrylics to replicate the chalky texture in the photo. Let the first coat dry. -
Add texture (optional):
To get that stony, concrete-like finish, dab the wet second coat of paint with a dry sponge or mix a tiny pinch of baking soda into your paint before applying. -
Refine the edges:
Check the flat bottom markings of each arch. If paint dripped underneath during the process, sand it lightly for a clean base. -
Final assembly:
Once the paint is fully cured, nest the arches back together. They should stand freely without needing adjustment.
Speckled Stone Effect
After painting, flick a toothbrush loaded with slightly watered-down brown or grey paint over the arches to create a subtle speckled, ceramic pottery look.
Place your beautiful handmade sculpture on a favorite shelf or mantle to enjoy its soothing earthy tones
Simple Incense Holders
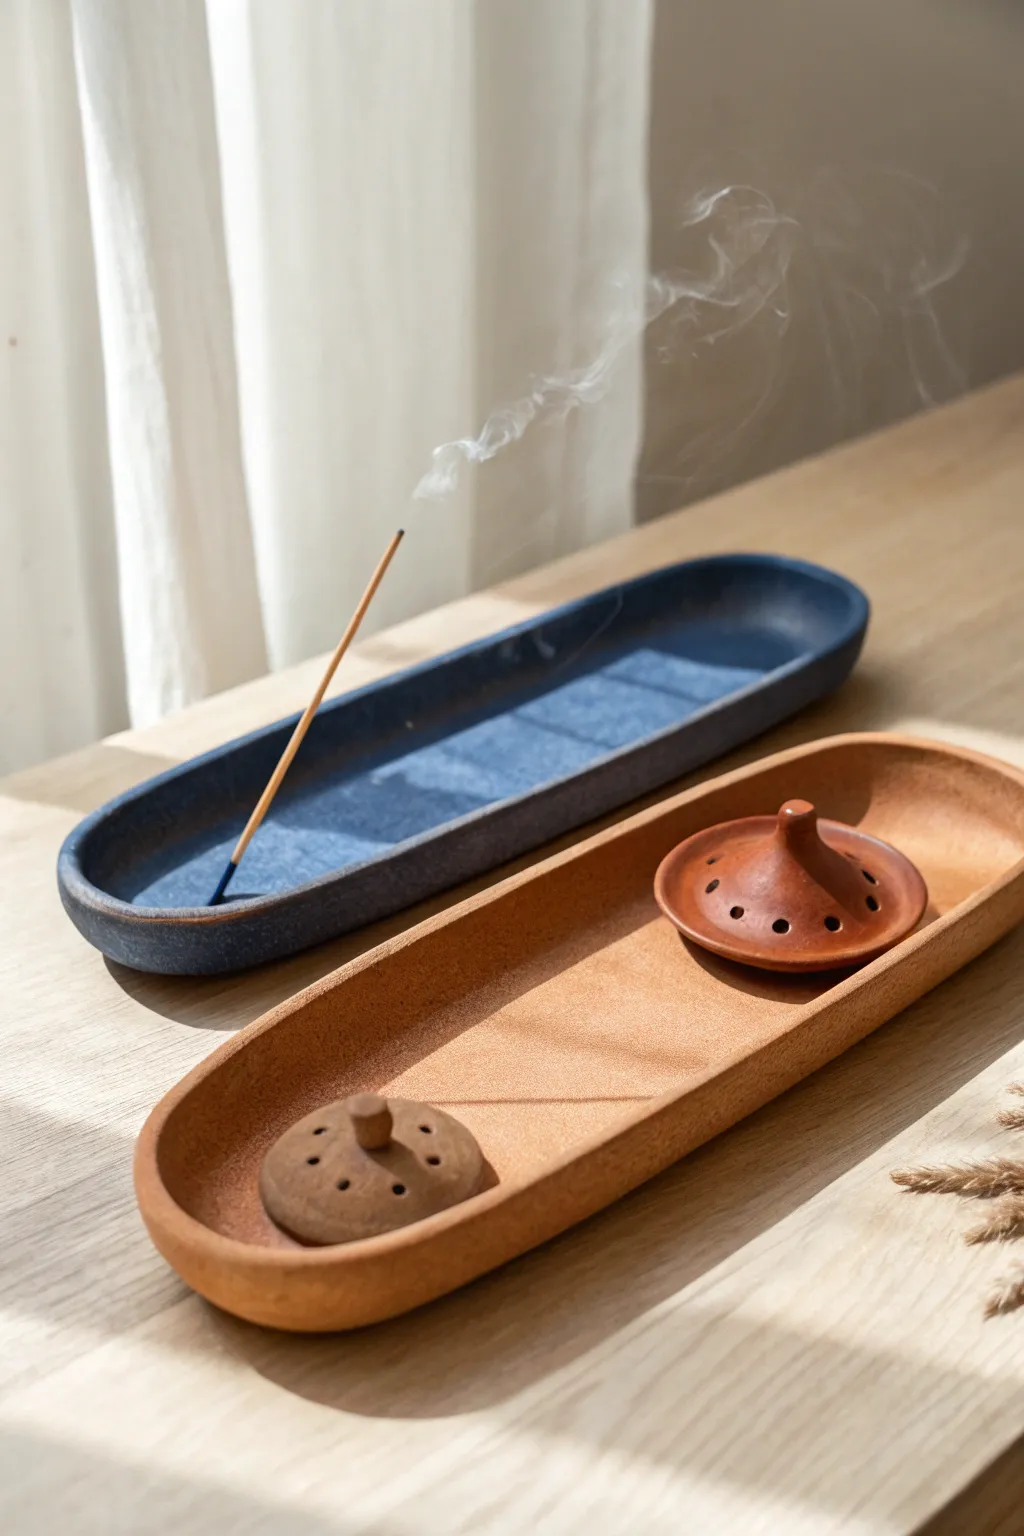
These sleek, elongated trays bring a touch of modern serenity to your space, crafted in contrasting deep slate and warm terracotta tones. The design features a simple basin alongside geometric cone holders, perfect for catching ash while looking effortlessly chic.
Detailed Instructions
Materials
- Air-dry clay or polymer clay (Terracotta and Dark Slate/Blue colors)
- Rolling pin
- Sharp crafting knife or clay blade
- Oval paper template (approx. 8-10 inches long)
- Small bowl or water for smoothing
- Needle tool or cocktail stick
- Fine-grit sandpaper
- Sponge
- Small round object (like a bottle cap) for creating the cone tops
- Matte sealant or varnish (optional)
Step 1: Shaping the Oval Trays
-
Roll the Base:
Begin by conditioning your clay until it is pliable and smooth. Roll it out into a flat, even slab about 1/4 inch thick. Aim for a consistent thickness to prevent warping during drying. -
Cut the Shape:
Place your oval paper template onto the rolled slab. Using your sharp knife, carefully trace around the template to cut out the base shape of your tray. -
Create the Coils:
Roll a long snake of clay, keeping the diameter relatively thin—about the width of a pencil. This coil needs to be long enough to wrap around the entire circumference of your oval base. -
Attach the Walls:
Score the outer edge of your oval base and one side of your clay coil. Apply a tiny amount of water (or liquid clay if using polymer) to the scored areas, then gently press the coil onto the edge of the base to form the rim. -
Blend the Seams:
Using your thumb or a modeling tool, blend the clay coil downwards onto the base on both the inside and outside surfaces. Seamless blending is key here for that modern, manufactured look. -
Refine the Rim:
Gently pinch and smooth the rim to ensure it stands up straight. I like to run a damp sponge along the top edge to round it off slightly and remove any fingerprints.
Step 2: Creating the Cone Holders
-
Form the Cones:
Take a smaller ball of clay and shape it into a low, wide cone. Create a slightly flattened brim at the bottom and a raised peak in the center. -
Hollow the Underside:
Gently press your thumb into the bottom of the cone to hollow it out slightly, making it lighter and helping it sit flat on the tray. -
Add Decorative Holes:
Using your needle tool, poke a series of small, evenly spaced holes around the slope of the cone for ventilation and aesthetic detail. -
Create the Incense Insert:
Use the needle tool to create a single, larger hole at the very tip of the cone peak. Ensure this hole is wide enough to hold your specific incense sticks, accounting for slight shrinkage. -
Make the Companion Piece:
Repeat the process to make a second, smaller mound-shaped holder if desired, varying the height slightly for visual interest as seen in the terracotta set.
Fixing Cracks
If small cracks appear while air-drying, mix a tiny bit of clay with water to make a paste (slip) and fill them in. Smooth over with a finger and let dry again.
Step 3: Finishing Touches
-
Dry or Bake:
If using air-dry clay, let the pieces dry slowly away from direct sunlight for 24-48 hours. If using polymer clay, bake according to the manufacturer’s instructions on the package. -
Sand for Smoothness:
Once fully cured or dry, use fine-grit sandpaper to gently buff away any remaining unevenness on the rims or the curve of the cones. -
Add Texture:
For the stone-like finish on the blue tray, you can lightly stipple the surface with a coarse brush before sealing, or leave the terracotta smooth for a natural earthenware feel. -
Seal:
Apply a coat of matte varnish or sealant to protect the clay from ash residue and make cleaning easier.
Level Up: Speckled Effect
Mix dried coffee grounds or coarsely ground black pepper into your clay before rolling it out to mimic a natural, speckled stone or terrazzo texture.
Place your finished cones inside the tray and enjoy the calm, structured elegance they bring to your meditation corner
Textured Candle Holders

These stunningly simple candle holders bring a touch of handcrafted elegance to any tabletop with their varied heights and intricate surface details. By using everyday objects to create texture, you can turn basic clay into a sophisticated centerpiece that looks straight out of a designer boutique.
Step-by-Step Guide
Materials
- White air-dry clay (or polymer clay)
- Wooden dowel (slightly wider than your candles)
- Rolling pin
- Sharp crafting knife
- Water and sponge
- Old lace or textured fabric (for imprinting)
- Small spherical tool or bead (for dots)
- Ribbon tool or clay loop tool (for carving)
- Fine-grit sandpaper
Step 1: Preparation and Basic Structure
-
Condition the Clay:
Start by kneading a large block of clay until it is warm, pliable, and free of air bubbles. If the clay feels too dry, mist it lightly with water, but be careful not to make it sticky. -
Roll the Slabs:
Roll out the clay on a flat surface to a uniform thickness of about 1/4 inch. You will need separate slabs for each candle holder design. -
Cut the Base Rectangle:
Using a ruler and your craft knife, cut rectangular strips of clay. The height of the rectangle will determine the height of your candle holder, and the length must be sufficient to wrap around your chosen form.
Cracks Appearing?
If you see hairline cracks while drying, mix a tiny amount of clay with water to make a paste (slip) and fill the cracks. Smooth over with a damp finger.
Step 2: Creating the Cylinder Holder
-
Add Lace Texture:
For the tallest holder, press a piece of vintage lace or textured fabric deeply into the clay slab before rolling it up. Peel it back carefully to reveal the intricate pattern. -
Form the Cylinder:
Wrap the textured clay slab around a cardboard tube or large dowel to help it hold its shape. Score the connecting edges with a knife, add a little water (slip), and press them together firmly to create a seam. -
Refine the Seam:
Smooth the seam carefully with your finger or a damp sponge so it blends in with the rest of the cylinder, taking care not to smudge your beautiful lace texture. -
Add a Solid Top:
Cut a circular disc of clay slightly larger than your cylinder’s diameter. Place it on top, smooth the edges down, and then use your candle-sized dowel to press a deep indentation into the center where the candle will sit.
Step 3: Sculpting the Beaded Holder
-
Form the Base Shape:
Create a shorter, stout cylinder using the same method as before. I like to make this one slightly wider at the bottom for stability. -
Create Tiny Spheres:
Roll dozens of tiny, pea-sized balls of clay in your palms. Try to keep them consistent in size for a uniform look. -
Attach the Dots:
Score the surface of the cylinder where you want the dots. Dab a tiny bit of water on each spot and press the clay balls on firmly in a grid pattern. -
Finish the Rim:
Add a flat, donut-shaped ring of clay to the top rim to give it a finished, professional edge before creating the candle divot.
Pro Tip: Seamless Join
When wrapping clay into a cylinder, cut the joining edges at a 45-degree angle (beveling). Overlap these angled cuts for a much stronger, invisible seam.
Step 4: Carving the Architectural Holder
-
Build a Multi-Piece Structure:
For the intricate middle holder, build a wide base shape and a thinner neck cylinder separately. Join them by scoring and slipping the clay, then smoothing the connection point. -
Carve Initial Grooves:
Using a loop tool or ribbon tool, carve vertical fluting lines up the neck of the holder. Keep your hand steady and pull the tool downward in long, even strokes. -
Detail the Base:
Use a pointed tool to carve arch shapes around the wide base. You can press small stamps or the end of a paintbrush inside the arches to create floral-style relief patterns. -
Create the Lip:
Roll a small coil of clay and attach it around the very top where the candle sits, pressing texture into it with a piece of mesh or burlap for contrast.
Step 5: Final Touches
-
Verify Candle Fit:
Before the clay begins to dry fully, do a final check with your actual candles (or a dowel of the same size) to ensure they fit snugly into the openings. Wiggle the dowel slightly to create a tiny bit of clearance for shrinkage. -
Dry Slowly:
Loosely cover your creations with plastic wrap for the first 24 hours to prevent cracking. Then, remove the plastic and let them air dry completely for 2-3 days. -
Sand and Smooth:
Once fully dry and hard, take fine-grit sandpaper and gently buff away any rough edges or fingerprints, paying special attention to the rims and bottoms.
Group your finished trio together on a linen runner for an effortlessly chic display
Desk Organizer Catchall Set
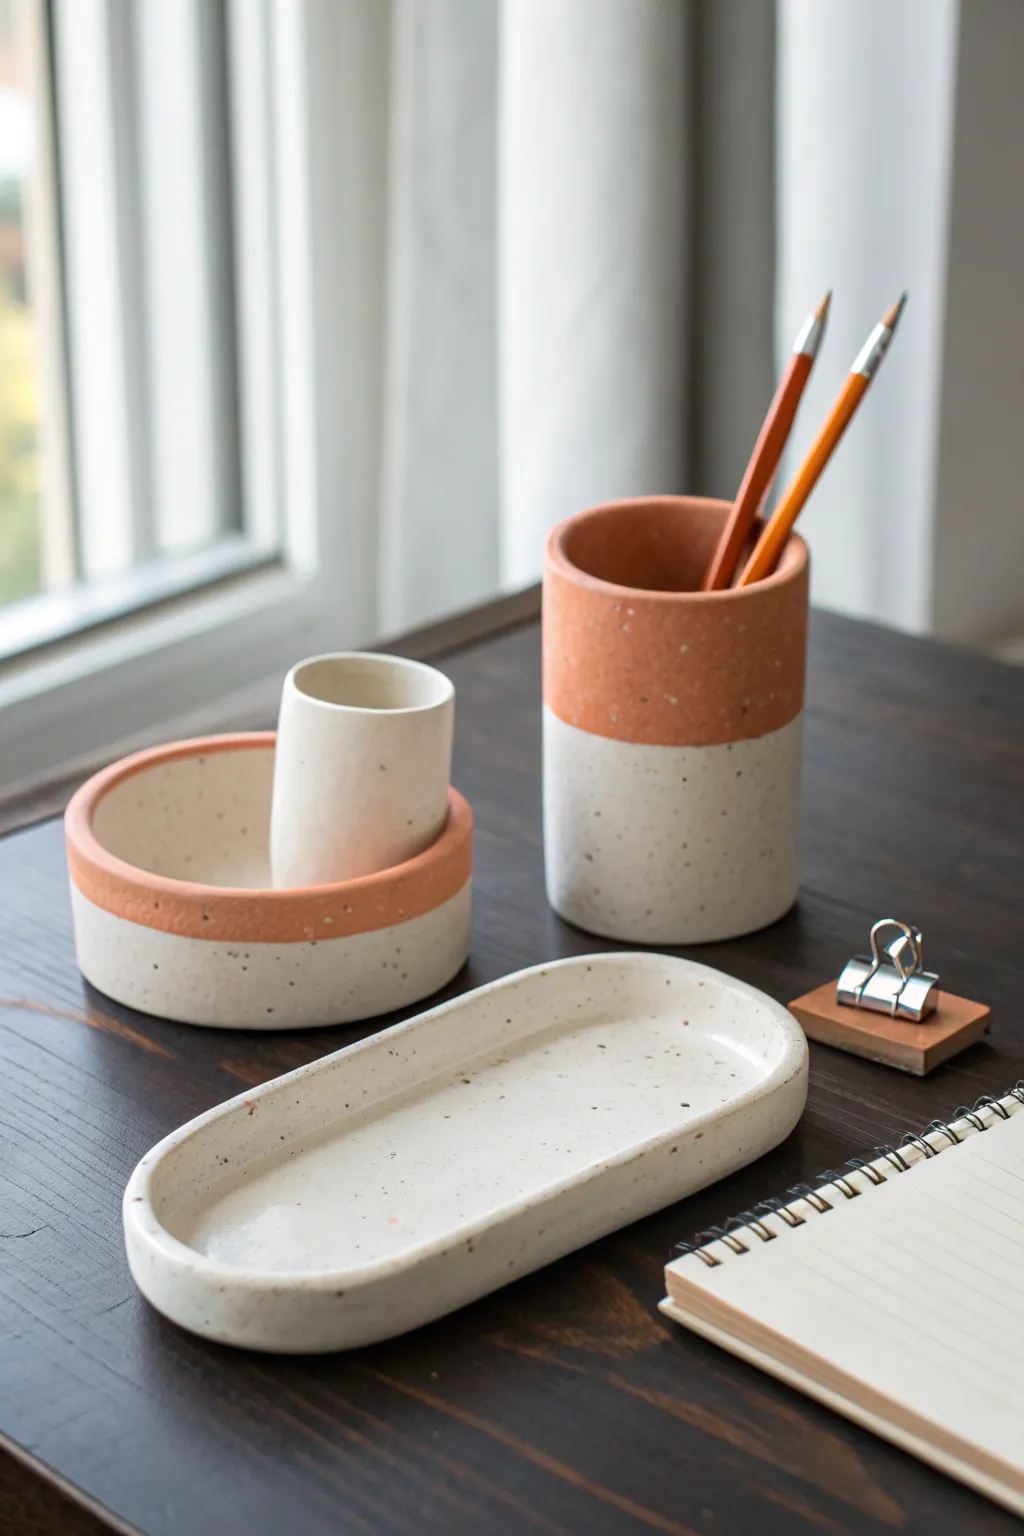
Elevate your workspace with this modern, four-piece desk organizer set featuring a trendy two-tone aesthetic. The combination of warm terracotta hues and speckled cream clay creates a minimalist, earthy vibe perfect for holding pencils, clips, and trinkets.
Detailed Instructions
Materials
- White or cream polymer clay (approx. 1lb block)
- Terracotta colored polymer clay
- Coarse black pepper or dried coffee grounds (for speckling)
- Small circle cutter (approx. 3-4 inches diameter)
- Smaller circle cutter (approx. 1.5 inches diameter)
- Rolling pin or pasta machine
- Parchment paper
- X-acto knife or clay blade
- Liquid polymer clay (bake-and-bond)
- Smooth sanding sponge or fine-grit sandpaper
- Matte varnish (optional)
Step 1: Preparation & Clay Mixing
-
Condition the white clay:
Start by warming up your white or cream clay in your hands until it’s soft and pliable. This step creates the base for our speckled finish. -
Create the speckled effect:
Flatten the white clay and sprinkle a pinch of coarse black pepper or dried coffee grounds onto it. Fold the clay over and knead it thoroughly until the specks are evenly distributed throughout the batch. -
Condition the terracotta:
Condition your terracotta clay separately, ensuring your hands are clean first so you don’t transfer any dark specks or white residue to the solid color. -
Roll out slabs:
Roll both the speckled white clay and the terracotta clay into flat slabs of even thickness, aiming for about 1/4 inch thick for durability.
Clean Seams Tip
When joining two colors, roll over the seam gently with an acrylic roller. This compresses the join without distorting the shape too much.
Step 2: Sculpting the Pencil Cup
-
Cut the cup base:
Using your medium circle cutter, punch out a base from the speckled white clay slab. -
Create the white wall:
Cut a rectangular strip of speckled clay long enough to wrap around the circumference of your base. Trim the height to roughly 2.5 inches. -
Create the terracotta top:
Cut a matching strip of terracotta clay, about 1.5 inches tall, with the same length as the white strip. -
Join the colors:
carefully press the bottom edge of the terracotta strip to the top edge of the white strip. Use your finger or a clay tool to smooth the seam on both sides until they become one solid sheet. -
Form the cylinder:
Wrap this two-tone strip around your circular base. I like to cut the vertical seam at a 45-degree angle to create a cleaner overlap join. -
Blend seams:
Smooth the vertical seam and the connection to the base with a modeling tool, blending the clay so no gaps remain.
Creative Twist
Try swapping the color palette by using a dark granite base and a muted sage green for the accents to create a cool-toned forest version.
Step 3: Forming the Tiered Catchall & Tray
-
Shape the round dish base:
Use your large circle cutter on the speckled clay again to make the base for the round catchall. -
Add the rim:
Create a long strip of speckled clay for the wall, topped with a thin strip of terracotta clay (about 1/4 inch tall) joined just like you did for the cup. Wrap this around the base to form a shallow bowl. -
Make the internal cup:
Form a small, simple cylinder from white speckled clay only (using the smaller cutter for the base). This should be slightly taller than the bowl rim. -
Attach the internal cup:
Place the small white cylinder inside the round bowl. Secure it with a drop of liquid clay and press firmly to bond. -
Mold the oval tray:
Roll an oval shape from the speckled clay. Roll a long snake of speckled clay, flatten it slightly, and attach it to the perimeter of the oval base to create a raised rim, smoothing the seam thoroughly.
Step 4: Refining & Baking
-
Smooth the surfaces:
Before baking, use a fingertip dipped in a tiny bit of baby oil or cornstarch to gently buff away any fingerprints or harsh tool marks. -
Bake the set:
Place your pieces on a parchment-lined baking sheet. Bake according to your clay package instructions (usually 275°F for 15-30 minutes depending on thickness). -
Cool and finish:
Allow the pieces to cool completely in the oven. Once cool, use fine-grit sandpaper to smooth any sharp edges, especially around the rims. -
Seal:
For extra protection, apply a thin coat of matte varnish to seal the clay, though raw polymer clay often looks great left unsealed for a matte finish.
Arrange your new set on your desk and enjoy the satisfaction of an organized, custom-made workspace
Minimal Photo Holders
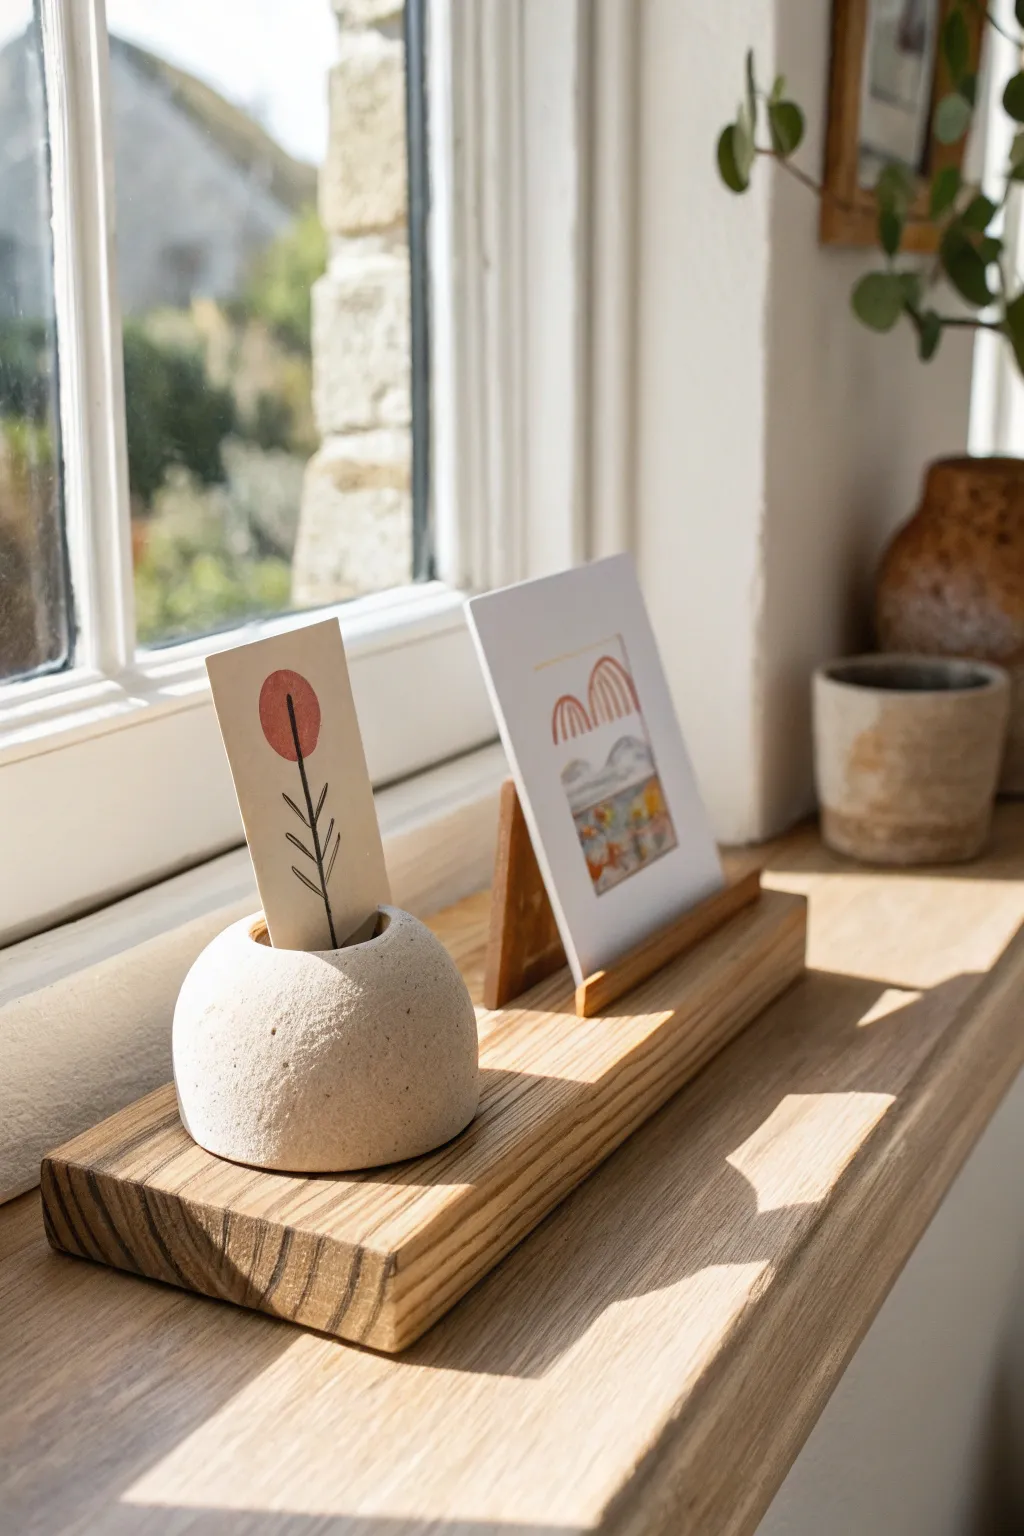
Embrace the beauty of natural textures with this minimalist desk display that combines warm wood tones with cool, stone-like clay. This dual-purpose stand offers a sculptural clay pod for single stems or notes alongside a sleek wooden groove perfect for showcasing art prints.
Step-by-Step Guide
Materials
- Air-dry clay (white or light grey)
- Small block of scrap wood (approx. 2x2x8 inches)
- Texturing tool (old toothbrush or stiff bristle brush)
- Craft knife or scalpel
- Sandpaper (medium and fine grit)
- Wood stain (light oak or teak) and rag
- Measuring tape or ruler
- Table saw or handsaw with miter box
- Wood glue
- Strong craft adhesive (e.g., E6000)
- Acrylic rolling pin
Step 1: Sculpting the Clay Pod
-
Prepare the clay:
Start by conditioning a golf-ball-sized amount of air-dry clay. Knead it in your hands until it is warm, pliable, and free of cracks. -
Form the basic shape:
Roll the clay into a smooth sphere between your palms. Once round, gently press the bottom against your work surface to create a flat base, forming a dome shape. -
Create the card slot:
Using a craft knife or a thick piece of cardstock, press a slot directly into the center of the dome. Create a deep enough groove to hold a card upright, but stop before you hit the bottom. -
Add stone texture:
To mimic the faux-stone look seen in the photo, take an old toothbrush or a stiff brush and rigorously tap it all over the surface. Rotate the dome as you work to ensure even texture. -
Refine the opening:
Wiggle your slot tool slightly to ensure the opening remains wide enough after texturing, as clay can sometimes swell back together. -
Let it cure:
Set the clay pod aside to dry completely. Depending on your humidity, this usually takes 24-48 hours. Rotate it occasionally to let air reach the bottom.
Natural Speckles
Mix black pepper or dried tea leaves into your white clay before sculpting. This creates an organic, speckled granite effect without needing paint.
Step 2: Crafting the Wooden Base
-
Cut the base board:
Cut your main wooden board to size, aiming for a rectangle about 8-10 inches long and 3 inches wide. Sand any rough edges until smooth. -
Create the support triangle:
Cut a small right-angled triangle from a scrap of wood. This will act as the vertical support for the secondary photo holder. -
Fashion the ledge:
Cut a thin strip of wood, roughly 3 inches long and 1/4 inch thick, to serve as the front ledge that will keep your second photo in place. -
Dry fit the components:
Arrange the clay pod on the left and the triangular support on the right to visualize spacing. Ensure there is breathing room between the two elements. -
Assemble the photo stand:
Glue the wooden triangle onto the base board securely. Then, glue the thin wooden ledge about half an inch in front of the triangle, creating a channel for a larger photo. -
Sand the wood:
Once the glue is dry, give the entire wooden assembly a thorough sanding. Start with medium grit to soften corners and finish with fine grit for a silky touch. -
Apply stain:
Using a rag, wipe a light layer of wood stain over the wood. I find a neutral oak tone keeps the look airy and modern. Wipe away excess and let dry.
Wobbly Card?
If the clay slot dried too loose, apply a tiny dot of clear glue inside the groove or thicken the bottom of your card with a layer of tape for a snug fit.
Step 3: Final Assembly
-
Attach the pod:
Apply a strong adhesive to the bottom of your dried clay pod and press it firmly onto the left side of the wooden base. -
Create the art card:
While the glue sets, cut a small strip of thick watercolor paper. Use a fine liner pen to draw a simple botanical illustration, adding a pop of color with a watercolor circle. -
Final touches:
Place your homemade botanical card into the clay pod and lean your favorite postcard or photo against the wooden stand.
Now you have a serene, gallery-worthy display ready to brighten your windowsill
Earring Display Stand

Elevate your jewelry photography or vendor table with this minimalist arch display stand that mimics the look of speckled stoneware. Crafted from polymer clay, it features a sturdy rectangular base and a slotted arch that perfectly frames your hanging earring designs.
Detailed Instructions
Materials
- White or beige polymer clay (approx. 4oz)
- Black pepper or dried coffee grounds (for speckling)
- Acrylic rolling pin
- Sharp clay blade or X-Acto knife
- Paper template (arch shape)
- Ruler
- Oven-safe baking tile or parchment paper
- Oven
- Fine-grit sandpaper (400-800 grit)
- Liquid polymer clay (optional, for bonding)
- Super glue (gel formula recommended)
Step 1: Preparing the Faux Stone Clay
-
Condition the clay:
Start by thoroughly conditioning your white or beige polymer clay until it is soft and pliable. Warm hands make this process much easier. -
Add the speckles:
Flatten the clay slightly and sprinkle a generous pinch of ground black pepper or very finely ground dried coffee onto the surface. -
Mix for texture:
Fold the clay over the speckles and knead repeatedly. Continue until the particles are evenly distributed throughout the block, creating a convincing stone effect. -
Roll out the slab:
Using your acrylic roller, roll the clay out into a thick, even slab. Aim for a thickness of about 1/4 inch (6mm) to ensure the stand is sturdy enough to hold weight.
Uneven Connection?
If the arch won’t stand straight, tape a piece of sandpaper to a table (grit side up) and rub the bottom of the arch back and forth to flatten it perfectly.
Step 2: Cutting the Components
-
Draft your template:
Sketch a simple arch shape on a piece of paper or cardstock. The width should be roughly 4-5 inches, but size it according to your longest earrings. -
Cut the arch:
Place the paper template onto your rolled clay slab. Use your sharp blade to carefully trace and cut around the arch shape. Keep your blade perpendicular to the work surface for straight edges. -
Smooth the edges:
Gently run your finger dipped in a little cornstarch or water along the cut edges of the arch to soften any harsh sharpness. -
Create the base:
From the remaining clay, cut a rectangle slightly wider than your arch and about 2-3 inches deep. This will be the foundation. -
Double the thickness (optional):
If your base feels flimsy, layer two sheets of clay together and roll gently to fuse them. A heavier base prevents tipping. -
Create the mounting slot:
You can either cut a groove into the base now, or bake the pieces separately and glue them later. For this method, we will bake separately to ensure flat surfaces.
Step 3: Baking and Assembly
-
Prepare for baking:
Place both the arch and the rectangular base on a ceramic tile or baking sheet lined with parchment paper. -
Bake the pieces:
Bake according to your clay manufacturer’s instructions (usually 275°F/135°C). Since these pieces are thick, I usually bake them for at least 45-60 minutes to ensure full curing. -
Cool down:
Allow the pieces to cool completely in the oven with the door cracked open. This prevents thermal shock and cracking. -
Sand for finish:
Once cool, use fine-grit sandpaper under running water to smooth out any fingerprints or uneven edges, giving the ‘stone’ a professional matte finish. -
Position the arch:
Stand the arch upright on the center of the rectangular base. Mark the position lightly with a pencil if needed. -
Glue the joint:
Apply a strong line of gel super glue (or liquid clay if you plan to re-bake) along the bottom edge of the arch. Press it firmly onto the base. -
Support while drying:
Prop the arch up with heavy objects (like books or jars) on either side to keep it perfectly vertical while the glue sets completely. -
Add earring holes:
Use a small hand drill or pin vise to create two small holes near the top of the arch for your jump rings or earring hooks.
Level Up: Color Tinting
Mix a tiny speck of translucent amber or brown clay into your white base. It adds a warm, realistic undertone that looks less like plastic and more like ceramic.
Now your display is ready to showcase your favorite handmade jewelry with a professional touch.
Relief Landscape Clay Discs
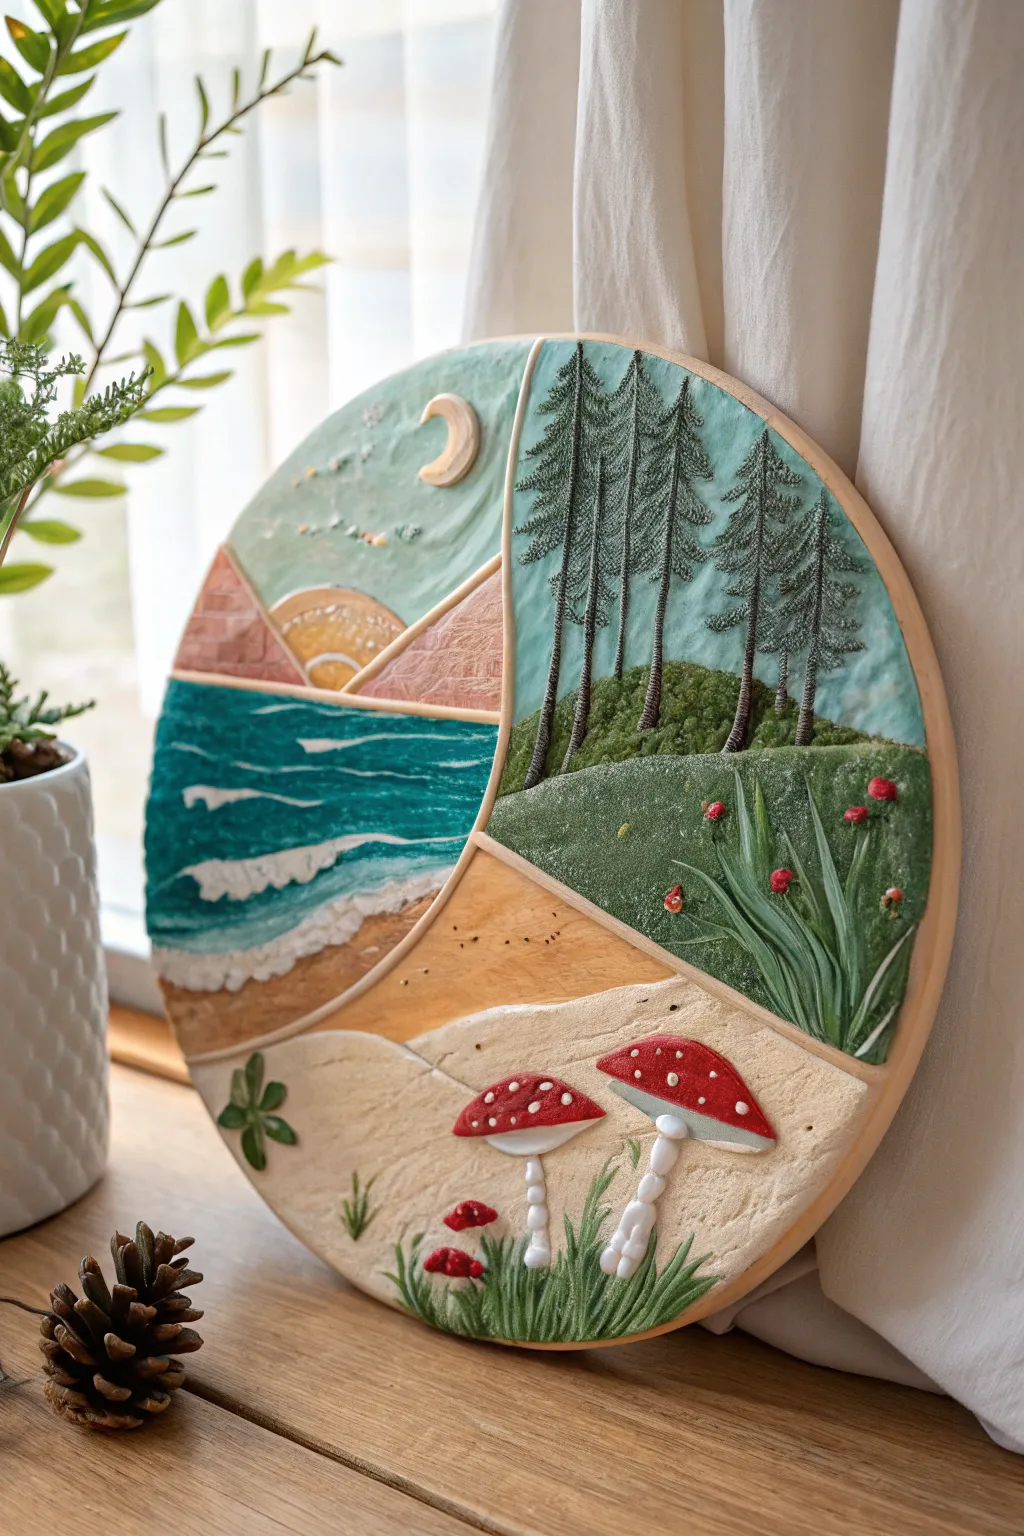
This stunning circular relief sculpture divides a single canvas into four distinct ecosystems, blending the serenity of an ocean sunset with the crispness of a pine forest. Using air-dry clay on a sturdy base, you’ll sculpt textures ranging from crashing waves to delicate mushroom gills, finishing with a vibrant acrylic wash.
How-To Guide
Materials
- Round wooden panel or sturdy canvas board (approx. 10-12 inches)
- Air-dry clay (smooth, white)
- Clay sculpting tools (needle tool, ball stylus, loop tool)
- Acrylic paints (teal, white, deep green, brown, red, earthy tones)
- Paintbrushes (flat wash brush, fine liner brush, dry brush)
- Rolling pin
- Bowl of water
- Sandpaper (fine grit)
- Matte or satin varnish
Step 1: Setting the Foundation
-
Map your composition:
Begin by sketching the four main sections directly onto your wooden base with a pencil. Draw two large curved lines that intersect off-center, creating four distinct areas for the sunset, forest, meadow, and mushroom patch. -
Create the dividing ridges:
Roll thin coils of clay (snakes) and lay them over your pencil lines. Flatten them slightly to create raised borders that will separate the different ‘biomes’ of your landscape. Use wet fingers to blend the edges of these strips into the wood.
Clean Lines Pro-Tip
Keep a damp sponge nearby while sculpting. Wiping your tools frequently prevents clay buildup, ensuring your pine needle textures and grass blades remain sharp and defined.
Step 2: Sculpting the Top Left: Ocean & Sunset
-
Lay the sky base:
Fill the top section with a thin layer of clay. Press a small crescent moon shape into the upper right corner of this section. -
Carve the mountains:
Below the moon, add triangular slabs for distant mountains. Use a needle tool to scratch geometric rock textures into their surface. -
Form the waves:
For the water, layer horizontal strips of clay. Use a modeling tool to smudge and drag the clay white it’s wet, creating the look of frothy whitecaps and rolling swells.
Level Up: Metallic Accent
Use gold leaf paint or metallic acrylic for the crescent moon and the dividing raised lines. This turns the structural borders into an elegant, gilded frame.
Step 3: Sculpting the Top Right: The Pine Forest
-
Establish the background:
Spread a flat layer of clay for the sky and a hilly mound at the bottom for the forest floor. Stipple the hill texture with a stiff brush or a ball of aluminum foil to simulate mossy undergrowth. -
Build the tree trunks:
Roll four vertical, slender coils for tree trunks. Press them firmly onto the background, making sure they taper slightly toward the top. -
Add pine texture:
Using a sharp needle tool or small knife, make thousands of tiny downward flicks along the trunks to create the dense, bristly texture of pine needles.
Step 4: Sculpting the Bottom Right: The Meadow
-
Texture the grass:
Fill this section with clay, smoothing it out first. Then, use a comb or a stiff bristle brush to drag vertical lines through the clay, simulating tall field grass. -
Sculpt foreground foliage:
Hand-shape long, pointed leaves for the large plant in the foreground. Layer them over the background grass, curving the tips for movement. Add tiny balls of clay for scattered flower buds.
Step 5: Sculpting the Bottom Left: Mushroom Haven
-
Smooth the sandy ground:
Apply a smooth layer of clay for the sandy floor. Gently press your thumb in random spots to create uneven terrain. -
Construct the mushrooms:
Form two large caps and stems. Attach the stems first, blending them into the base. Place the caps on top, tilting them slightly. Add tiny clay dots on the caps for texture. -
Detail the undergrowth:
Roll very thin, short coils and cluster them at the base of the mushrooms to create tufts of grass. Add a tiny four-leaf clover shape to the left side.
Step 6: Painting & Finishing
-
Dry thoroughly:
Allow the entire piece to dry for at least 24-48 hours. If any cracks appear, fill them with a slurry of clay and water. -
Base coating:
Start painting with the largest areas first. Use a teal-blue for the ocean and sky, deep forest green for the pine section, and a sandy beige for the bottom left. -
Adding dimension:
Once the base coats are dry, dry-brush lighter shades over the textured areas. Use white on the wave crests, light green on the pine needles, and cream on the mushroom stems to catch the raised details. -
Detail work:
Use your finest brush to paint the red mushroom caps with white dots, the tiny red flower buds in the meadow, and the golden sun rays. -
Seal the artwork:
Finish with a coat of matte or satin varnish to protect the clay and deepen the acrylic colors.
Hang your textured masterpiece near a window to let the natural light play across the relief surfaces
Mushroom Mini Sculptures
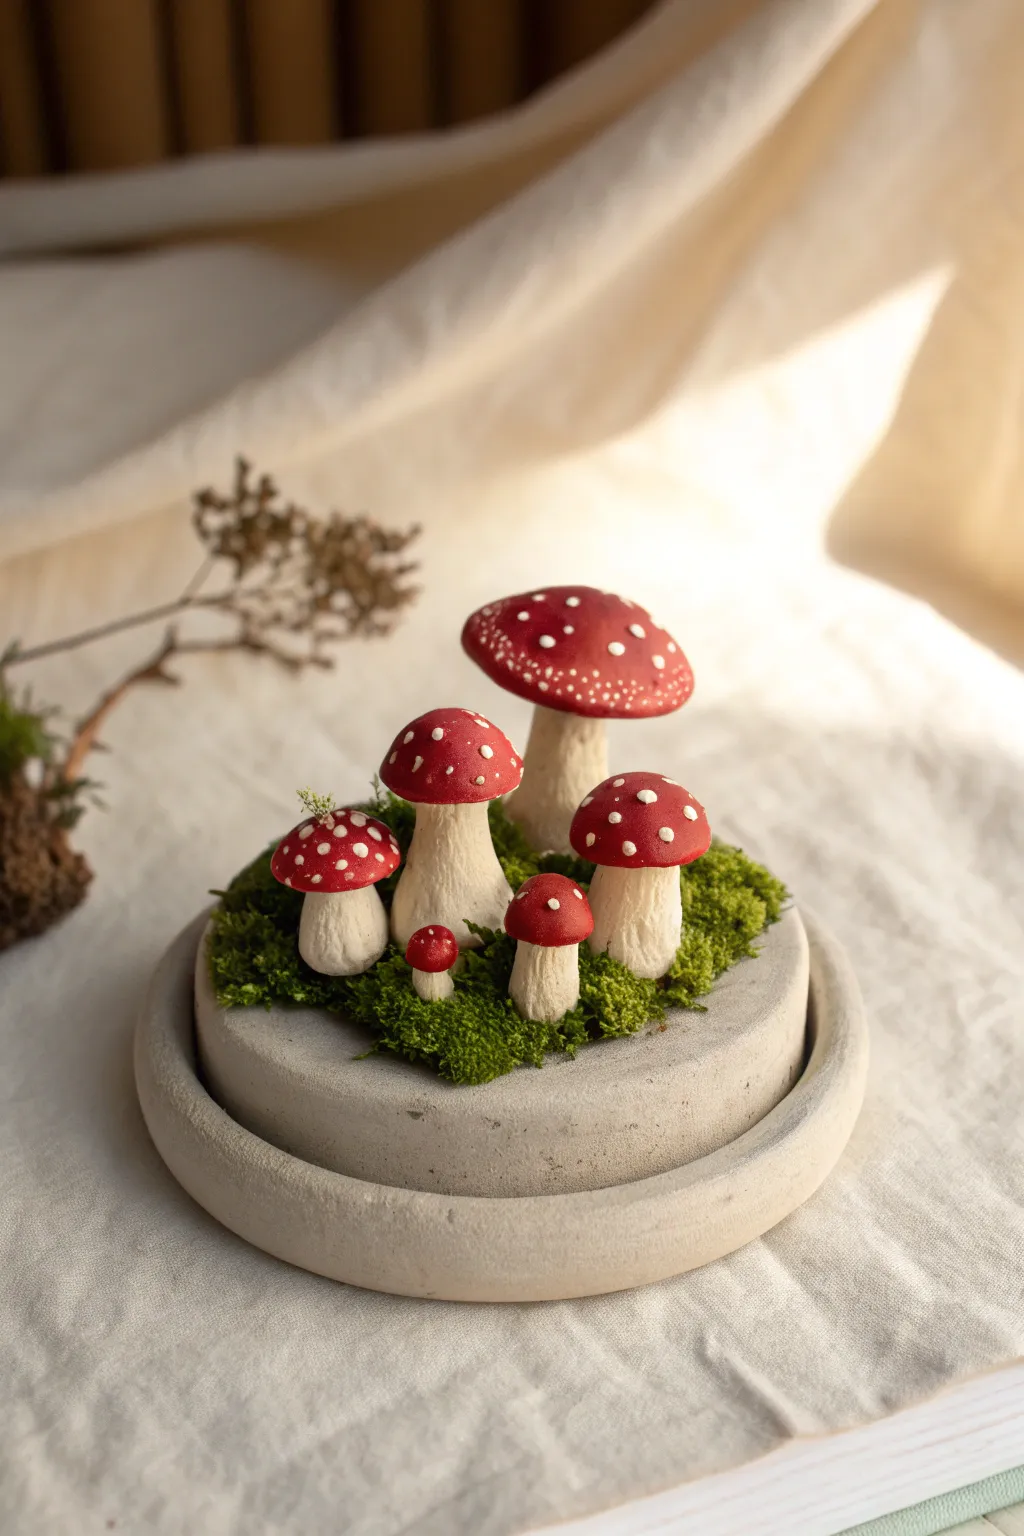
Bring a touch of the forest floor into your home with this enchanting miniature sculpture featuring realistic Amanita-style mushrooms. Set on a simple concrete-look base with vibrant green moss, this piece captures the magical simplicity of nature.
Step-by-Step
Materials
- Polymer clay (white and bright red)
- Small round wooden plaque or tin lid (approx. 4-5 inches diameter)
- Grey acrylic paint (light concrete grey)
- White liquid clay or thick white acrylic paint
- Preserved reindeer moss (bright green)
- Sculpting tools (needle tool, ball stylus)
- Textured sponge
- Strong craft glue (E6000 or superglue gel)
- Matte varnish
- Wire armature (thin crafting wire)
- Fine grit sandpaper
Step 1: Creating the Base
-
Prepare the foundation:
Begin with your round base structure. If you are using a wooden plaque, sand it smooth. If reusing a tin lid or jar cap, ensure it is clean and dry. This tiered look can be achieved by stacking two discs of different sizes. -
Texture application:
Mix your light grey acrylic paint with a little baking soda or fine sand to create a textured, concrete-like paste. Apply this generously over your base layers. -
Refining the stone finish:
While the paint is tacky, dab it gently with a porous sponge to remove brush strokes and enhance the stony appearance. Let this dry completely.
Step 2: Sculpting the Stems
-
Forming the armature:
Cut five pieces of wire in varying lengths (from 0.5 to 2 inches) to support your mushrooms. Twist the bottom of each wire into a small loop so they stand upright easily. -
Wrapping the stems:
Condition your white polymer clay until soft. Wrap a log of clay around each wire armature, tapering it slightly so it’s thicker at the bottom and narrower at the neck. -
Adding organic texture:
Using a needle tool, gently scratch vertical lines up and down the stems to mimic the fibrous texture of a real mushroom stalk. Don’t smooth this out too much; the imperfections add realism. -
Creating the skirt:
For the larger stems, flatten a tiny snake of white clay and wrap it around the upper third of the stem to create the mushroom’s ‘skirt’ or annulus. Frill the edges slightly with your tool.
Uneven Standing?
If your mushrooms wobble or won’t stand straight on the base, sand the bottom of the baked clay stems against fine-grit sandpaper until perfectly flat before gluing carefully.
Step 3: Crafting the Caps
-
Shaping the domes:
Roll balls of red polymer clay corresponding to your stem sizes. Gently flatten the bottom and round the top to create a dome shape. The largest one should be fairly wide, while the smallest remains almost spherical. -
Attaching caps to stems:
Press the red caps onto the tops of your white stems. If the wire pokes through slightly, just smooth the red clay over it. Ensure the bond is secure by blending the clay underneath the cap slightly. -
Adding the spots:
Roll tiny, irregular specks of white clay. Press these randomly onto the red caps. I prefer to flatten them slightly so they look embedded rather than just sitting on top. -
Baking:
Preheat your oven according to the clay manufacturer’s instructions (usually around 275°F/130°C). Place your mushrooms on a baking tile and bake for 15-20 minutes. Let them cool completely.
Glow Up
Mix glow-in-the-dark powder into your white clay when making the spots on the caps. Your little forest scene will transform into a magical glowing night-light when the lights go out.
Step 4: Assembly & Detail
-
Positioning the cluster:
Arrange your cooled mushrooms on the concrete base before gluing to decide on the best composition. Group them naturally, with the tallest in the back and the tiny button mushroom in front. -
Securing the fungi:
Apply a dab of strong craft glue to the bottom of each stem and press them firmly onto the grey base. Hold them for a few seconds until they stand on their own. -
Planting the moss:
Take small clumps of preserved green moss. Apply glue to the base around the mushroom stems and press the moss down, covering any visible wire loops or glue blobs. -
Final touches:
Ensure the moss looks lush and slightly overgrows the edge of the center tier. Use a soft brush to sweep away any loose debris. -
Sealing:
Apply a thin coat of matte varnish over the red caps to protect the clay and give them a soft, satin sheen resembling a slightly dewy surface.
Place your finished sculpture near a window or amongst your houseplants for a delightful woodland surprise
Coil Pots With Animal Faces

Bring a touch of sleepy sweetness to your plant collection with this charming coil-built planter. The textured, terracotta-style finish and serene expression make it the perfect cozy home for a small succulent.
Detailed Instructions
Materials
- Terracotta-colored air-dry clay or polymer clay
- Rolling pin
- Clay sculpting tools (needle tool, small loop tool)
- Small bowl of water (for smoothing)
- Slip (clay mixed with water, if using air-dry clay)
- Black acrylic paint
- Small round paintbrush
- Clear matte varnish or sealant
- Small bead or ball of black clay (for the nose)
Step 1: Building the Base
-
Roll the base slab:
Begin by rolling out a ball of clay into a flat, even circle about 1/4 inch thick. This will be the bottom of your pot. Use a cookie cutter or a cup rim to get a perfect circle if you like. -
Create your first coils:
Take a chunk of clay and roll it between your palms or on the table to create a long, snake-like coil. Aim for a thickness similar to a pencil. -
Attach the first layer:
Score the outer edge of your base circle (scratch it up with a needle tool) and add a little water or slip. Lay your first coil directly on top of this roughed-up edge. -
Blend the inside:
To make the pot strong, smear the inside of the coil down onto the base using your thumb or a modeling tool. The outside can remain distinct for now.
Cracks while drying?
If you see hairline cracks forming as the clay dries, mix a tiny bit of clay with vinegar or water to make a paste and fill the cracks immediately, then smooth over.
Step 2: Constructing the Walls
-
Stack upwards:
Continue rolling coils and stacking them one on top of the other. Remember to score and slip between each layer so they fuse properly. -
Shape the silhouette:
Keep the walls relatively straight, but you can widen the circle slightly as you go up to create a gentle outward slope, then bring it back in slightly at the top rim. -
Semi-smooth the exterior:
For this specific rustic look, you don’t want to completely smooth out the coil lines on the outside. Instead, use a damp sponge to gently soften the ridges so they look like textured fur rather than distinct ropes. -
Refine the rim:
Once you reach your desired height (about 3-4 inches), smooth the top rim with a wet finger so it is comfortable to touch and level.
Step 3: Sculpting the Face
-
Add the nose:
Roll a small ball of clay and press it firmly into the center of the pot’s face. If you are using a bead, press it in now, or if sculpting, flatten a small black clay ball here. -
Carve the mouth:
Using a needle tool, gently carve a ‘W’ shape extending down from the nose to create the classic animal muzzle smile. Deepen the lines slightly so they show up clearly. -
Sculpt the sleepy eyes:
Draw two U-shapes for the closed eyes. Add three small lashes to the outer corner of each eye for a gentle, feminine touch. Pressing a small loop tool into the clay works great for these curved lines. -
Indent the cheeks:
Use the rounded end of a paintbrush handle to press small, shallow indentations where the rosy cheeks will go. Add a tiny spiral detail inside the cheeks if you’re feeling detailed.
Level Up: Textile Texture
Before rolling your coils, gently roll the clay over a piece of burlap or canvas. When you stack the coils, the pot will have a realistic fabric-like texture.
Step 4: Finishing Touches
-
Dry thoroughly:
Let your pot dry completely. If you used air-dry clay, this might take 24-48 hours. Keep it away from direct heat to prevent cracking. -
Paint the details:
Once dry, use a fine brush with black acrylic paint to carefully fill in the carved lines of the eyes, lashes, and mouth so they pop against the terracotta color. -
Rose up the cheeks:
Mix a tiny bit of red or pink paint with water to create a wash, and dab it specifically into the cheek indentations. -
Seal the pot:
Apply a coat of clear matte varnish to the entire pot. If you plan to put a real plant inside, ensure the sealant is waterproof, or simply use the pot as a cachepot (a decorative cover) for a plastic nursery pot.
Now you have a peaceful little friend ready to hold your favorite greenery
Mini Room Scene Shadowbox
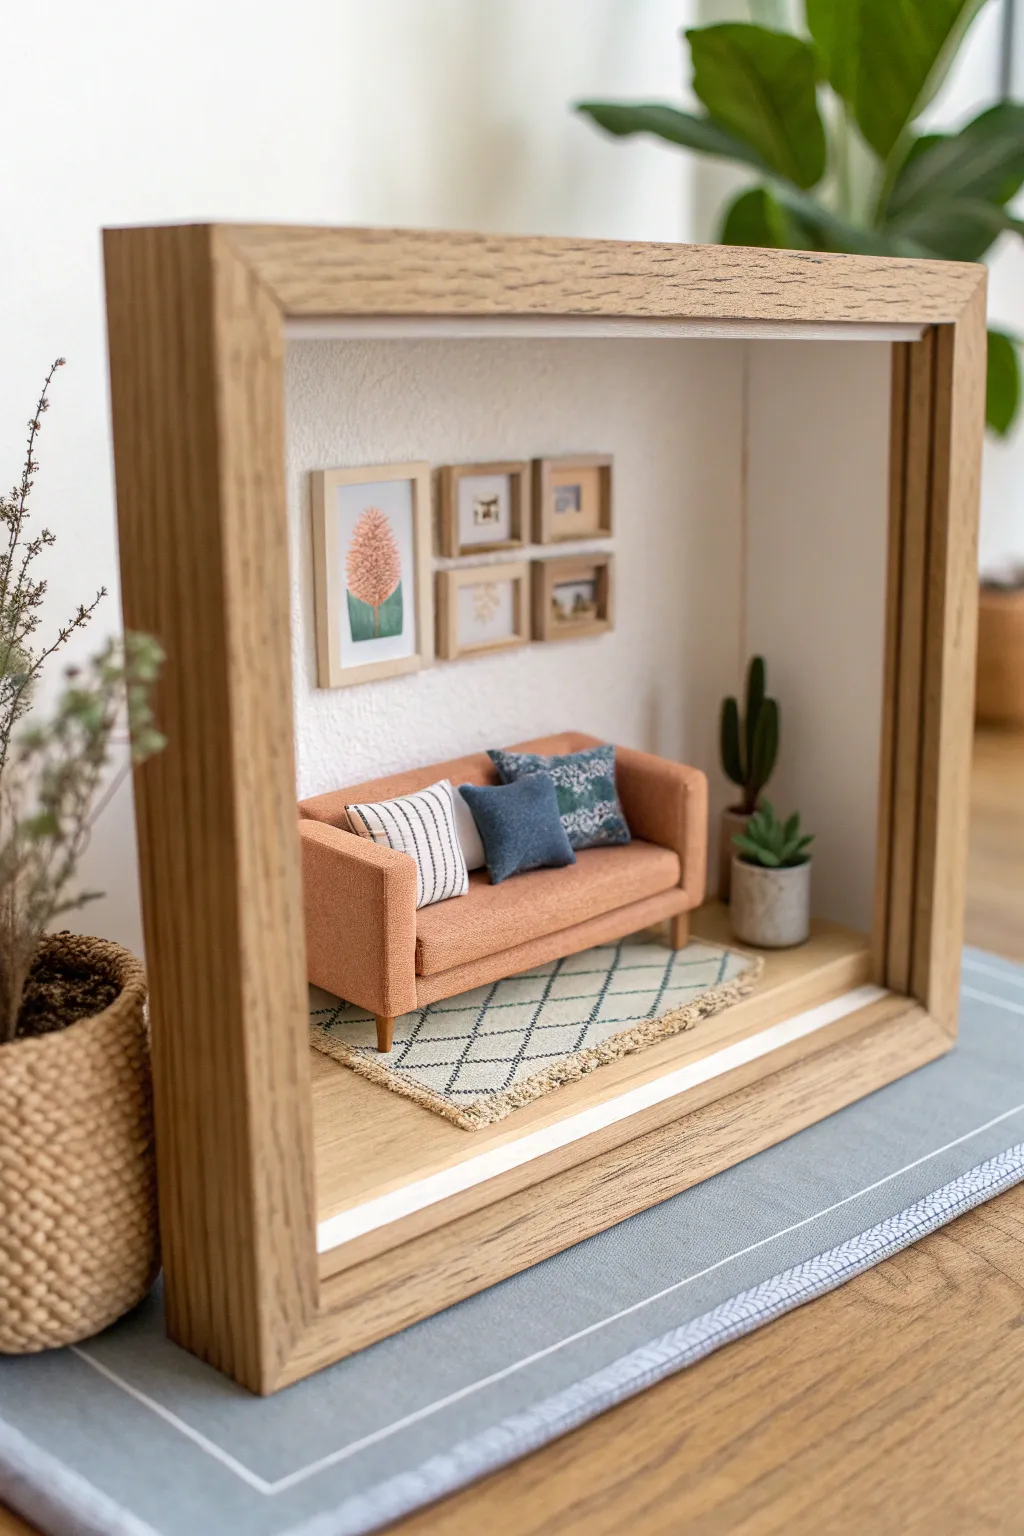
Capture the cozy essence of home in miniature with this delightful shadowbox project. Using basic materials like wood, fabric, and polymer clay, you’ll construct a serene, sun-drenched living space that fits perfectly on a bookshelf.
Step-by-Step
Materials
- Deep wooden shadowbox frame (approx. 8×8 or 10×10 inches)
- Balsa wood sheets (various thicknesses)
- Polymer clay (terracotta, green, white, grey)
- Textured fabric scraps (cream, blue, patterns)
- Small scraps of cardstock or heavy paper
- Acrylic paints (various colors) and fine brushes
- Wood stain or light oak varnish
- Tacky glue or strong craft adhesive
- Sharp craft knife and cutting mat
- Sandpaper
Step 1: Setting the Stage
-
Prepare the box:
Disassemble your shadowbox frame. If the interior backing isn’t already white, paint it with a textured white acrylic paint or glue on a sheet of textured white paper to mimic a stucco wall. -
Lay the floor:
Measure the bottom depth of the frame interior. Cut a piece of balsa wood to fit this floor area perfectly. Sand it smooth and apply a light oak wood stain to match the outer frame, then glue it in place once dry. -
Construct the rug:
Cut a small rectangle of cream-colored fabric or felt. Using a fine-tip permanent marker or watered-down blue acrylic paint, draw a simple diamond grid pattern. Pull threads gently from the short edges to create a realistic fringe.
Step 2: Furnishing the Room
-
Sofa base:
Cut a rectangular block of foam or balsa wood for the sofa seat, and a thinner piece for the backrest. The scale should fit comfortably within the frame’s depth. -
Upholstery:
Wrap your seat and backrest blocks in the terracotta-colored fabric. Use tacky glue to secure the fabric on the unseen sides, pulling it tight for a smooth, upholstered look. Glue the backrest to the seat. -
Armrests and legs:
Create two small matching fabric-wrapped rectangular blocks for armrests and attach them to the sides. For the legs, cut four short lengths of dowel or toothpicks, stain them to match the floor, and glue them to the underside. -
Mini pillows:
Sew or glue tiny squares of patterned blue and striped fabrics. Stuff them lightly with cotton or fabric scraps to give them a plump, realistic shape before sealing the final edge.
Sticky Situations
If fabric glue bleeds through thin upholstery, try using double-sided tape or a dry adhesive sheet instead for a cleaner finish.
Step 3: Adding Details & Decor
-
Frame gallery:
Cut tiny squares of balsa wood to serve as picture frames. Print out miniature artworks or paint simple abstract designs on paper, then glue these inside your balsa frames. -
Clay plants:
Mold small cactus shapes from green polymer clay. For the larger cactus, create two vertical oblong shapes. For the smaller succulent, shape tiny teardrops and arrange them in a rosette. -
Plant pots:
Form two small cylinders from grey or terracotta clay for the pots. Gently press the clay plants into the pots. Bake the clay pieces according to the package instructions. -
Final assembly:
Arrangement is key here. Glue the rug down first, slightly off-center. Place the sofa on top. Glue the plant pots to the right of the sofa. -
Hanging the art:
Using tweezers for precision, glue your gallery wall frames onto the white background above the sofa. I like to arrange them on a table first to find the perfect layout before committing with glue. -
Seal it up:
Clean the glass of your shadowbox thoroughly to remove fingerprints. Reassemble the frame, sliding your finished room scene inside and securing the back.
Light It Up
Add a hidden LED strip to the top interior edge of the frame to create a warm, realistic overhead light effect at night.
Display your miniature world on a shelf where it can catch the light and spark curiosity