Whenever I’m stuck for inspiration, I remind myself that clay artwork can be tiny, functional, sculptural, or totally flat like a little painting you can touch. Here are my favorite clay artwork ideas to spark your next studio session—easy to start, satisfying to finish, and super fun to personalize.
Polymer Clay Statement Earrings
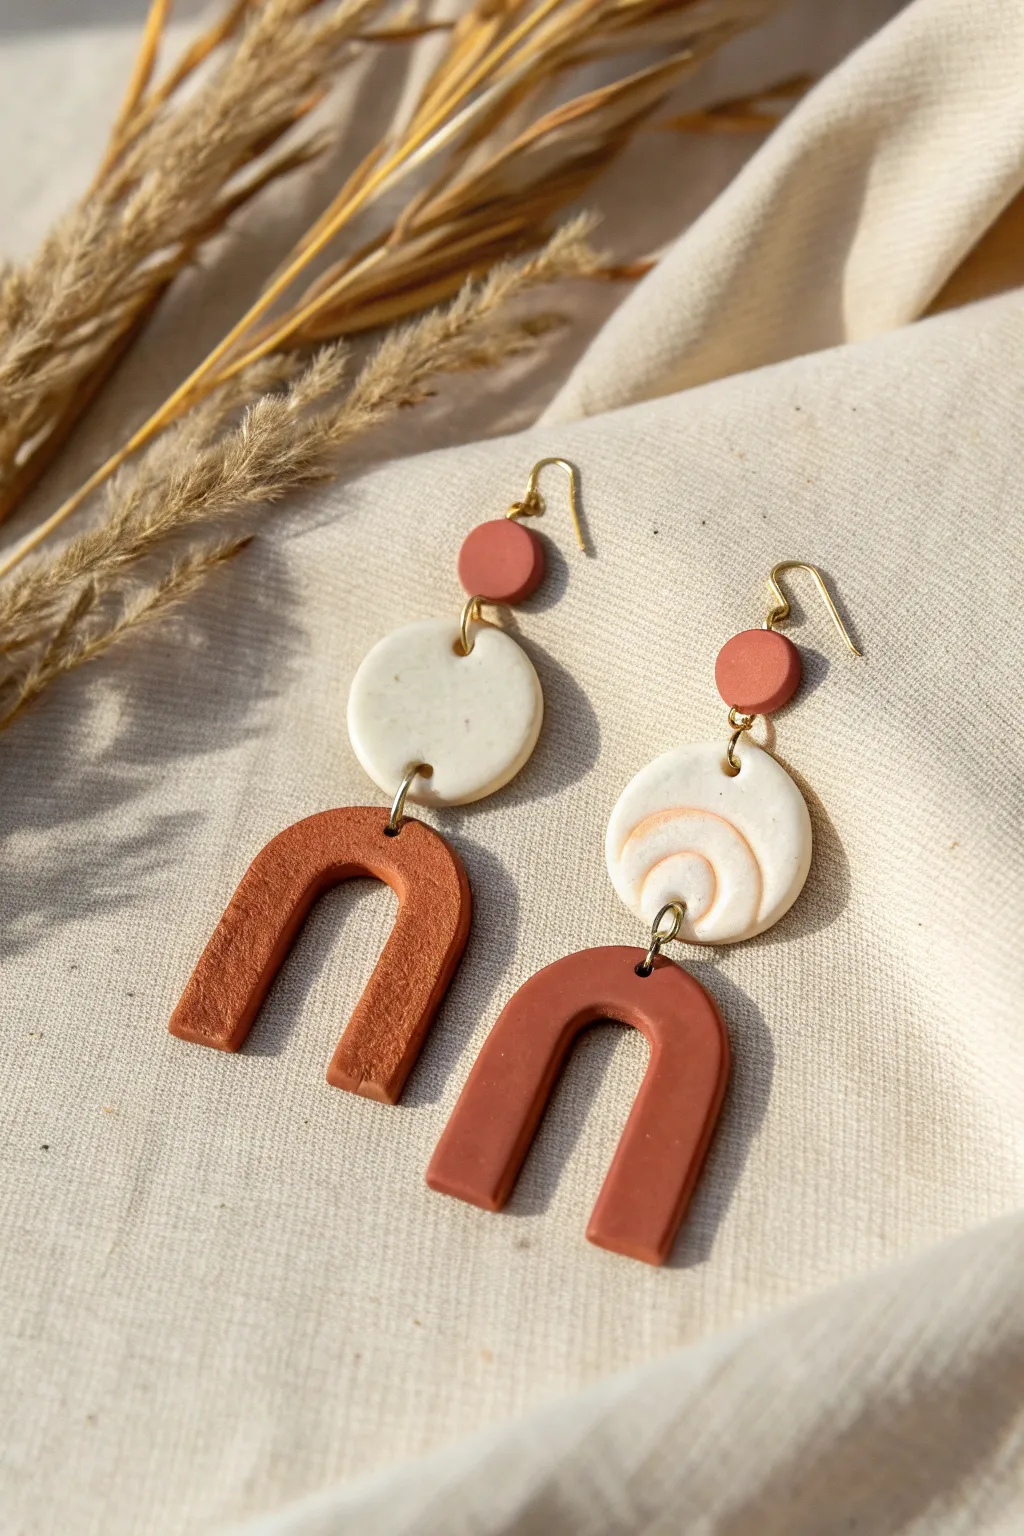
These bohemian-inspired statement earrings combine earthy terracotta tones with creamy whites for a modern, architectural look. The design features a delicate interplay of textures, contrasting a smooth, speckled finish with a tactile, ridged rainbow pattern.
Step-by-Step Tutorial
Materials
- Polymer clay in terracotta/burnt orange color
- Polymer clay in white or translucent white
- Fine ground black pepper or dried herbs (for speckling)
- Acrylic rolling pin
- Clay slicer or craft knife
- Small circle cutter (approx. 1 cm)
- Medium circle cutter (approx. 2.5 cm)
- U-shaped or arch-shaped clay cutter (or a printed template)
- Hand drill or needle tool
- Jump rings (gold finish)
- Earring hooks (gold finish)
- Jewelry pliers (flat nose and round nose)
- Oven for baking
- Piece of cardstock or parchment paper
Step 1: Creating the Terracotta Components
-
Condition the Clay:
Start by warming the terracotta clay in your hands, kneading it until it is soft and pliable. This conditioning step is crucial to prevent cracks during baking. -
Roll the Slabs:
Using your acrylic rolling pin, roll a portion of the terracotta clay into a slab about 3-4mm thick. Ensure the thickness is even throughout. -
Cut the Small Circles:
Use your smallest circle cutter to punch out two small discs. These will serve as the stud connectors at the very top of the earring. -
Create the Arches:
Using the rest of your terracotta slab, cut two large U-shaped arches. If you don’t have a specialized cutter, lightly trace a paper template onto the clay and carefully cut around it with your craft knife. -
Smooth the Edges:
Gently run your finger dipped in a tiny bit of cornstarch or water along the cut edges of the fresh clay to smooth out any harsh lines or burrs.
Step 2: Creating the Textured White Centers
-
Prepare the Speckled Clay:
Take your white polymer clay and sprinkle in a pinch of ground black pepper or dried herbs. Fold and knead the clay repeatedly until the speckles are evenly distributed for a stone-like effect. -
Roll and Cut Circles:
Roll this speckled white clay to the same 3-4mm thickness as the terracotta. Use your medium circle cutter to punch out two circles. -
Texture One Circle:
Take one of the white circles. Roll a very thin snake of white clay and gently press it into the surface in an arch shape. Repeat with a second, smaller snake inside the first to create a raised rainbow texture. -
Flatten the Texture:
Place a piece of parchment paper over the textured circle and gently roll over it once with the roller to fuse the ridges creating an embedded look without flattening them completely. -
Refine the Shape:
If the circle distorted during texturing, use the cutter to trim the edges back into a perfect round.
Fixing Fingerprints
Before baking, lightly brush your clay with a little baby oil or cornstarch. This helps smooth out accidental fingerprints and lint for a professional finish.
Step 3: Assembly Prep and Baking
-
Pierce the Holes:
Before baking, use a needle tool to create holes for your jump rings. You need holes at the top and bottom of the white circles, the bottom of the small terracotta circles, and the top center of the arches. -
Double Check Alignment:
Lay the pieces out on your baking sheet to ensure the holes align correctly for hanging. The small circle goes on top, followed by the white circle, and finally the arch at the bottom. -
Bake the Pieces:
Place all components on a ceramic tile or baking sheet with parchment paper. Bake according to your brand of clay’s instructions (usually 275°F/135°C for 15-30 minutes). -
Cool and Sand:
Let the pieces cool completely inside the oven to prevent brittleness. Once cool, I like to use a high-grit sandpaper to buff the edges if needed.
Make it Shine
Want a glossier look? After baking and cooling, apply a thin layer of UV resin or localized gloss varnish just to the raised rainbow ridges to make them pop against the matte background.
Step 4: Final Jewelry Construction
-
Connect the Arch:
Using your flat-nose pliers, twist open a jump ring. Loop it through the hole in the terracotta arch and the bottom hole of the white circle, then twist it closed. -
Attach the Top Circle:
Use another jump ring to connect the top of the white circle to the bottom of the small terracotta stud circle. -
Add the Hook:
Finally, open the loop on your earring hook slightly. If your small top circle doesn’t have a top hole, you can glue a post to the back instead. If it does, attach the hook with a small jump ring. -
Repeat for Second Earring:
Repeat the entire assembly process for the second earring, ensuring the textured white circle is paired correctly if you want the textures to face a specific way.
You have just created a stunning pair of architectural earrings ready to elevate any outfit with their handmade charm


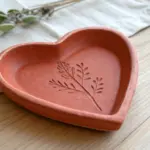
Minimal Trinket Dishes With Color Blocking
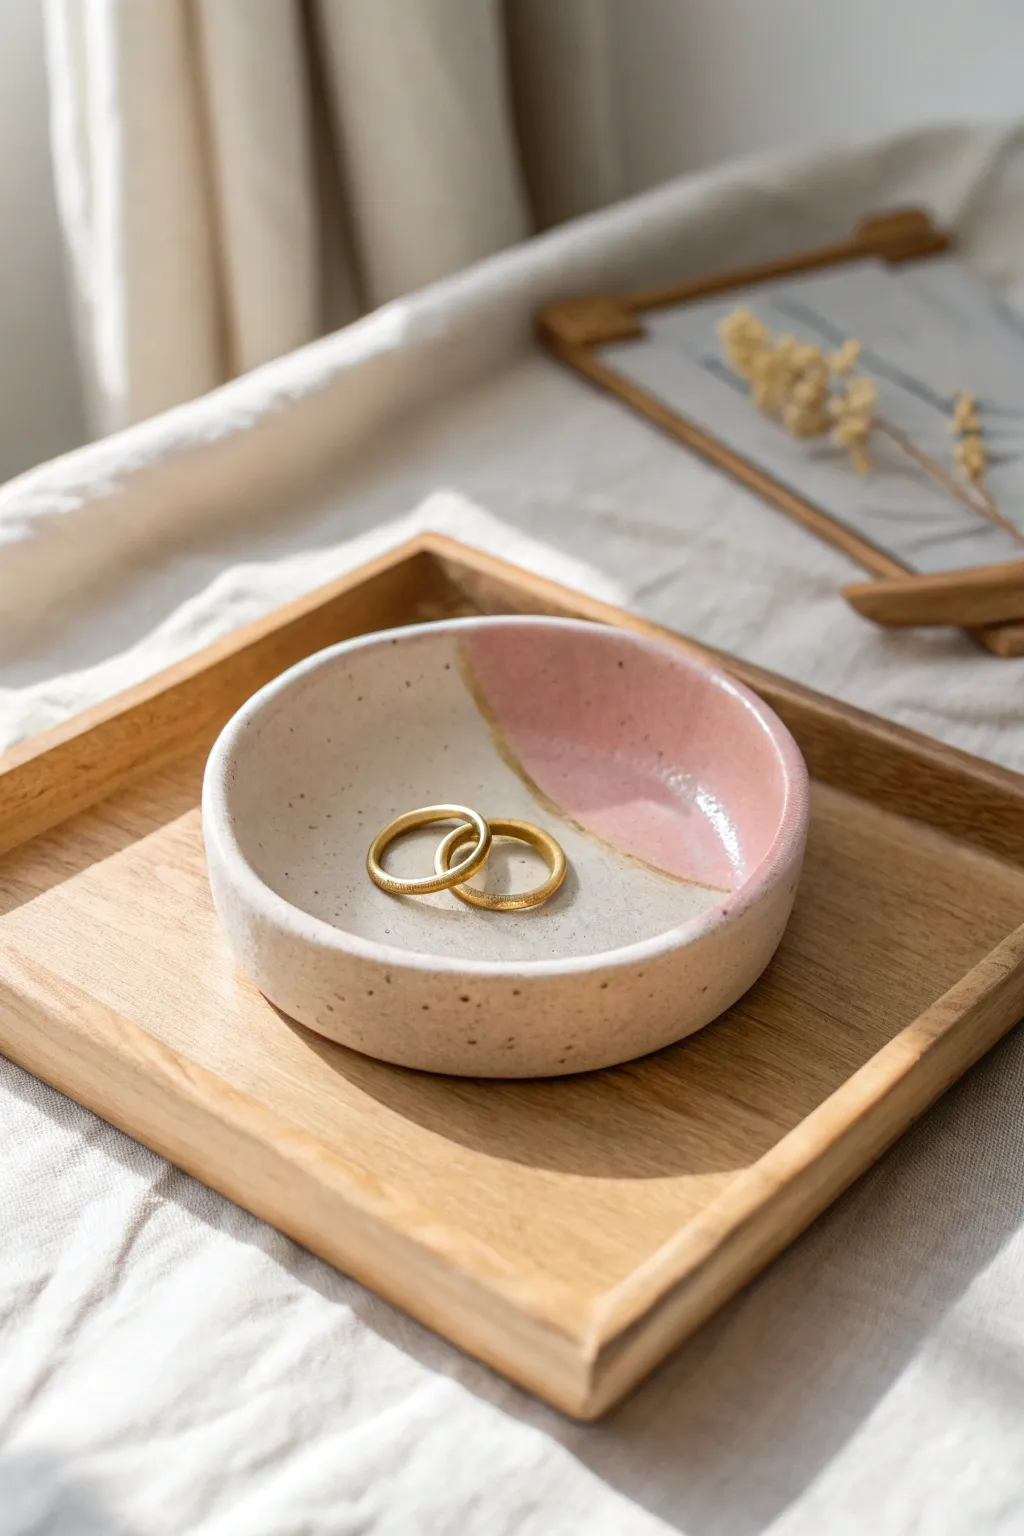
This minimalist trinket dish combines earthy, speckled textures with a soft blush pink glaze for a modern, sophisticated look. It’s the perfect size for holding your favorite rings or daily jewelry essentials on a nightstand.
How-To Guide
Materials
- White air-dry clay or polymer clay
- Rolling pin
- Circular cookie cutter or bowl (approx. 4-5 inches)
- Small bowl for shaping (drying form)
- Sandpaper (fine grit)
- Acrylic paint (blush pink and warm beige/off-white)
- Old toothbrush or stiff paintbrush
- Dark brown or black acrylic paint (watered down)
- Gloss varnish or sealant
- Small flat paintbrush
- Painter’s tape (optional)
- Modeling tool or butter knife
Step 1: Shaping the Clay Base
-
Condition the clay:
Begin by kneading a ball of clay in your hands until it becomes soft, pliable, and free of cracks. Warm clay is much easier to work with. -
Roll it out:
Use your rolling pin to flatten the clay ball into an even slab, approximately 1/4 inch thick. Rotate the clay frequently to ensure it doesn’t stick to your work surface. -
Cut the circle:
Press your circular cutter or trace around a small bowl to cut a perfect circle from the slab. Remove the excess clay. -
Smooth the edges:
Dip your finger in a little water and gently run it along the cut edge of the circle. This smooths out any harsh lines or roughness from the cutting process. -
Form the curve:
Lift the clay circle and gently press it into your shaping bowl. Don’t press too hard; you just want the clay to take on the slight curve of the bowl’s bottom. -
Refine the rim:
While it’s in the form, check the rim again. I like to gently tap the rim downward slightly to create a blunted, soft edge rather than a sharp one. -
Let it dry:
Allow the clay to dry completely inside the form. For air-dry clay, this usually takes 24-48 hours. If using polymer clay, bake according to package instructions while it rests on an oven-safe form.
Step 2: Adding Texture & Color
-
Sand for smoothness:
Once fully dry (and cool, if baked), gently sand any rough spots, especially around the rim. Wipe away dust with a slightly damp cloth. -
Base coat:
Paint the entire dish, inside and out, with two coats of warm beige or off-white acrylic paint. Let the first coat dry before applying the second. -
Create the speckles:
Dilute a small drop of dark brown or black paint with water until it’s inky. Dip an old toothbrush into this mixture. -
Splatter technique:
Hold the toothbrush over the dish and run your thumb across the bristles to flick tiny specks of paint onto the surface. Practice on a paper towel first to control the spray. -
Set the speckles:
Allow the splatter effect to dry completely so you don’t smudge it during the next steps. -
Map the color block:
Visualize a curved line dividing the dish. You can lightly sketch this with a pencil or apply painter’s tape if you want a super crisp line, though a hand-painted edge looks more organic. -
Paint the pink section:
Using a flat brush, fill in the color-blocked section with blush pink paint. Follow the curve of the bowl carefully. -
Layer the color:
Apply 2-3 thin layers of the pink paint to get a solid, opaque coverage, letting each layer dry in between. -
Gold rim detail:
If you want the subtle separation seen in some designs, you can paint a very thin gold or metallic line between the pink and beige sections, though simple blocking works beautifully too. -
Seal perfect:
Finish by applying a glossy varnish over the entire dish. This gives it that ceramic-like shine and protects your paint job from scratches.
Clean Splatters
When flicking paint for the speckled look, stand further back for finer mist-like dots, or get closer for larger, distinct spots. Wear an apron!
Liquid Gold
Paint the very top edge of the rim with liquid gold leaf for an elegant, high-end finish that frames the color blocking perfectly.
Now you have a chic, modern dish ready to organize your treasures


Pinch Pot Bud Vases
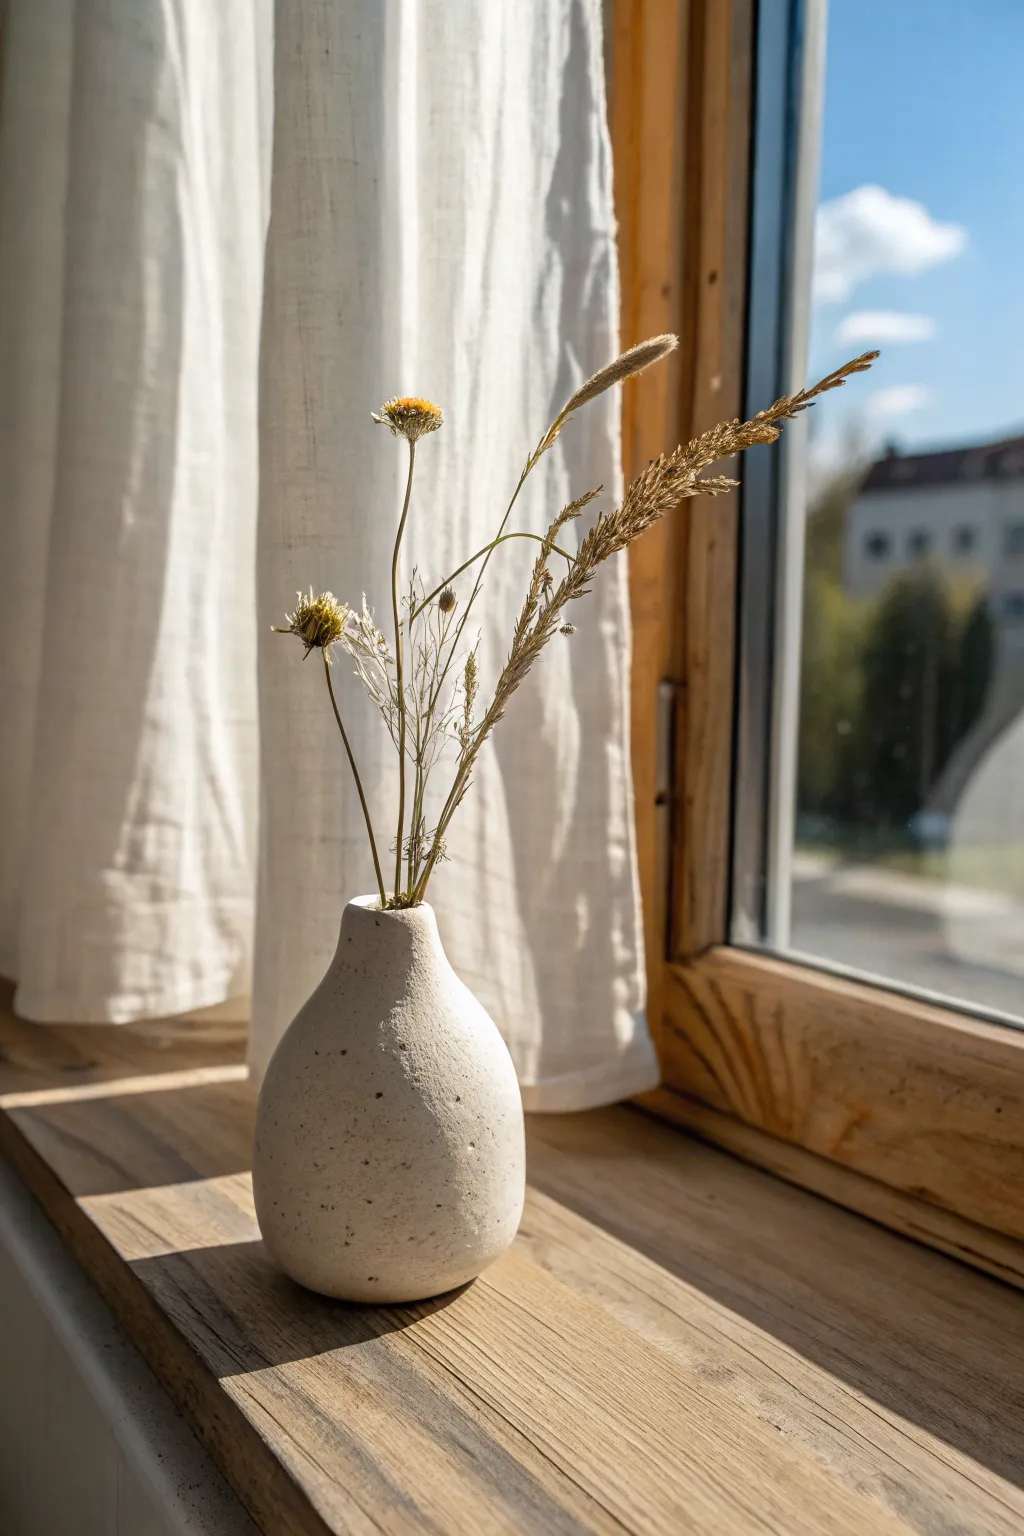
Embrace the imperfect beauty of hand-building with this minimalist bud vase, featuring a gently tapered neck and a rustic, speckled finish. Its organic shape is perfect for displaying a few stems of dried wildflowers or grasses on a sunny windowsill.
Step-by-Step
Materials
- Speckled stoneware clay (white or buff with grog)
- Small bowl of water
- Potter’s needle tool or wooden skewer
- Wooden rib or smooth stone
- Sponge
- Matte white glaze (optional, if clay isn’t naturally white)
- Canvas working mat or wooden board
- Wire clay cutter
Step 1: Forming the Base
-
Prepare the Clay:
Cut a piece of speckled stoneware clay roughly the size of a tennis ball. Wedging it well is crucial to remove air bubbles and ensure an even consistency before you begin. -
Shape a Sphere:
Roll the clay between your palms until you have a smooth, round ball. Pat it gently against your work surface to create a small flat spot, which will serve as the stable foot of your vase. -
Open the Pot:
Hold the ball in your non-dominant hand. Gently press your thumb into the center top of the sphere, pushing down until you are about half an inch from the bottom. Be careful not to breakthroughs the base. -
Pinch the Walls:
Starting at the bottom and rotating the ball as you go, gently pinch the clay between your thumb and fingers. Work your way up the walls in a spiral motion to thin the clay evenly.
Step 2: Shaping the Neck
-
Collar Inward:
Once the body is roughly a 3-inch sphere, begin to ‘collar’ the top third. Gently squeeze the clay inward with both hands forming a ‘C’ shape, gradually narrowing the opening to create a bottleneck. -
Refine the Opening:
If the rim becomes uneven as you collar it in, use your needle tool to trim the very top edge straight. Smooth the fresh cut with a damp finger. -
Adjust the Belly:
If the body lost its roundness during the collaring phase, gently push from the inside out with a finger to re-inflate that bottom curve. I like to keep the transition from belly to neck subtle and sloping. -
Smooth the Surface:
Using a slightly damp sponge, wipe away any harsh fingerprints. For a smoother finish like the photo, run a flexible rib tool over the exterior to compress the clay and refine the silhouette.
Cracking Neck?
If the neck starts splitting while you narrow it, the clay is likely too dry. Mist it lightly with water, score the crack, add a tiny bit of slip, and smooth it over before continuing.
Step 3: Glazing and Finishing
-
Slow Drying:
Loosely cover your vase with plastic for the first day, then uncover it to dry completely. This slow process prevents the narrow neck from cracking as it shrinks. -
Bisque Fire:
Fire the bone-dry piece in a kiln to cone 04 (or according to your clay body’s instructions) to prepare it for glazing. -
Apply Glaze:
Pour a matte white glaze inside the vase, swirl to coat, and pour out the excess. For the exterior, dip the vase or brush on 2-3 coats. If you used speckled clay, the dark spots will naturally bleed through the white glaze. -
Wipe the Foot:
Use a damp sponge to clean any glaze off the very bottom of the vase so it doesn’t fuse to the kiln shelf during firing. -
Final Firing:
Fire the piece a second time to the temperature required by your glaze and clay body (typically cone 5 or 6 for stoneware). -
Add Florals:
Once cooled, arrange a few stems of dried grasses, wheat, or billy buttons to complement the textured, earthy vibe of your new creation.
Faux Stone Look
No kiln? Use air-dry clay mixed with used coffee grounds or cracked pepper. Once dry, seal it with a matte acrylic spray for that same speckled stoneware aesthetic without the heat.
Place your finished vase in a spot with natural light to highlight the subtle texture and simple form


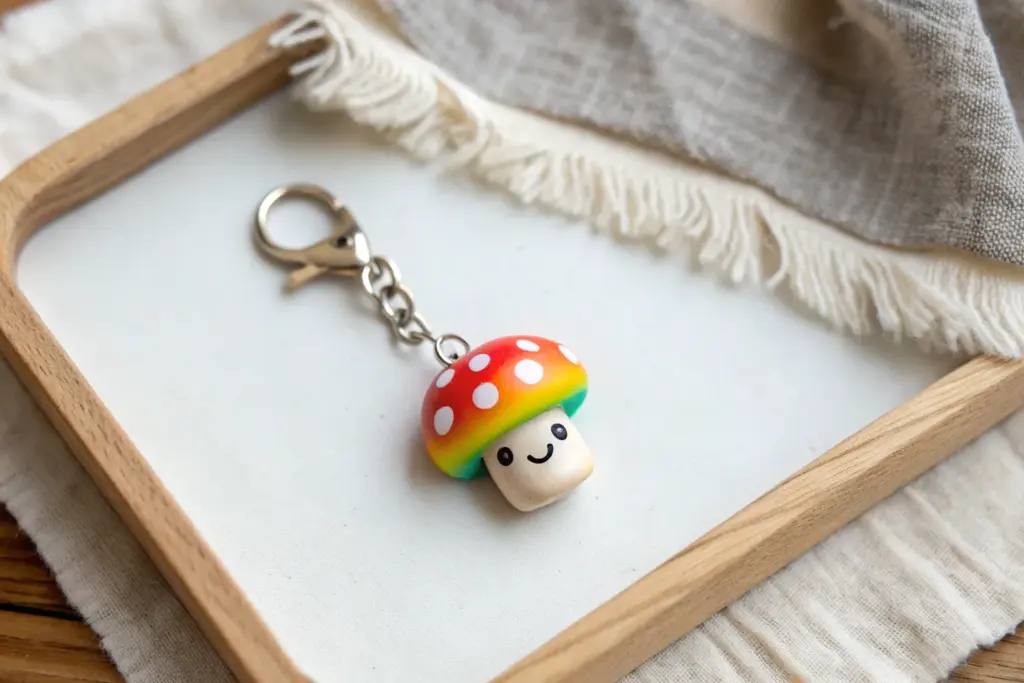
Cute Character Planters
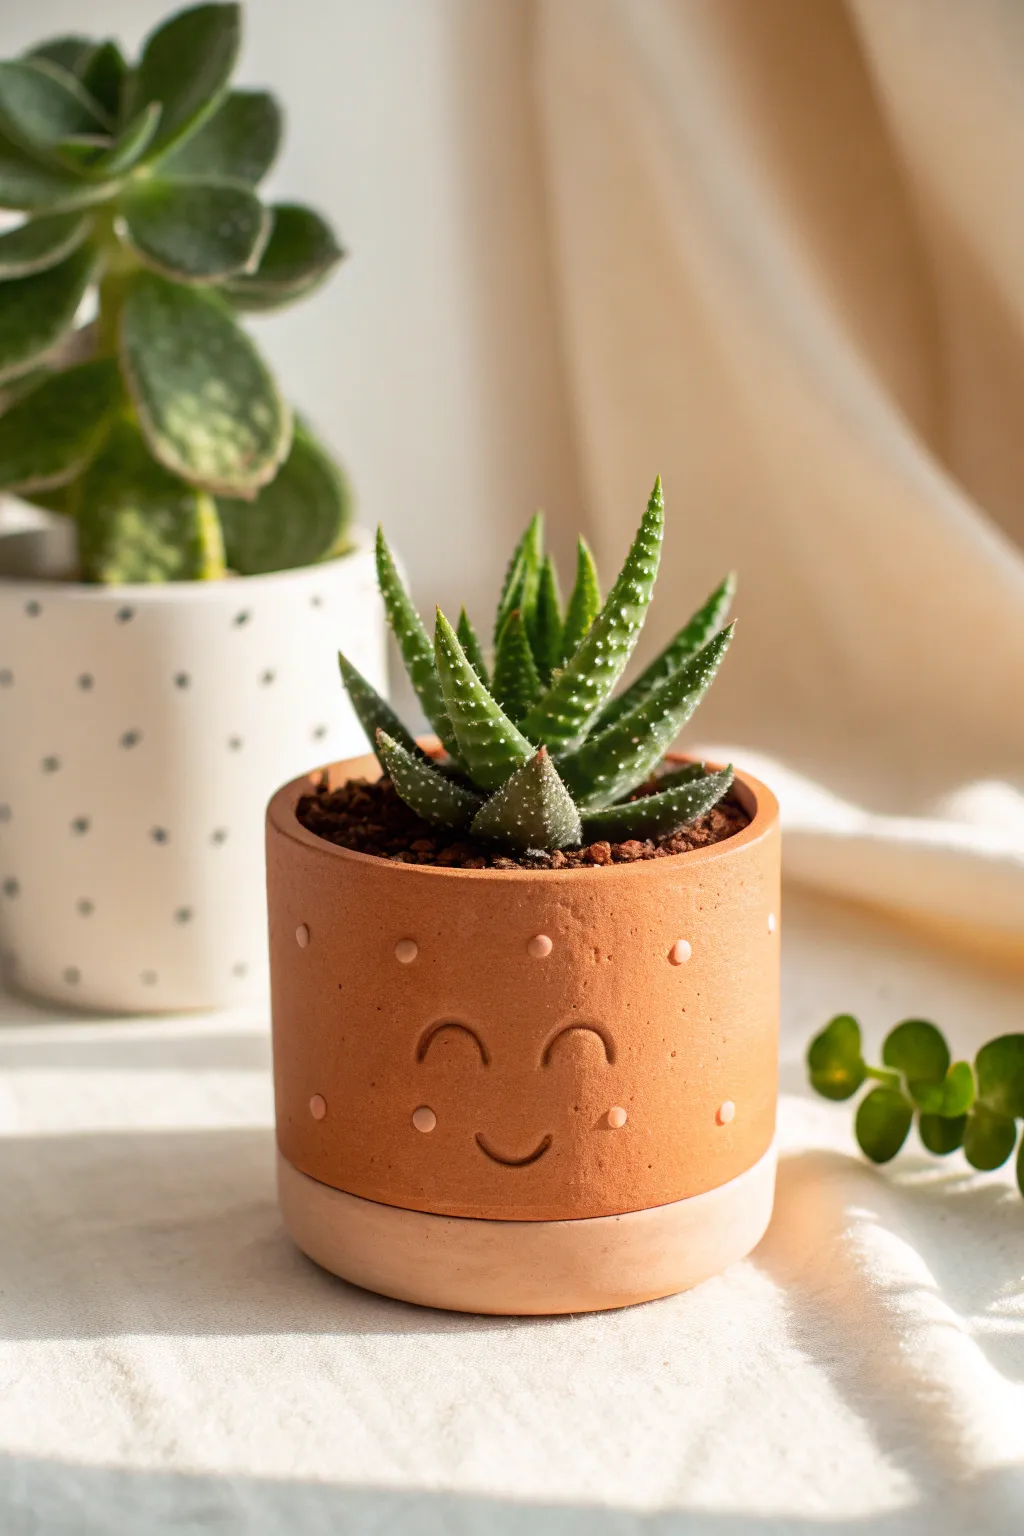
Brighten up your windowsill with this adorable terracotta-colored planter featuring a simple carved smile and sweet polka dot details. The combination of earthy orange clay and soft pink accents creates a warm, inviting home for your favorite small succulent.
How-To Guide
Materials
- Terracotta-colored polymer clay or air-dry clay
- Light pink polymer clay (for base and dots)
- Rolling pin
- Circle cutter (approx. 3-inch diameter for base)
- Clay knife or craft blade
- Needle tool or small carving tool
- Slip and score tool (if using air-dry clay)
- Small round piping tip or straw (for dots)
- Sanding block or fine-grit sandpaper
- Matte varnish (optional)
Step 1: Forming the Planter Body
-
Condition the clay:
Start by warming up your terracotta-colored clay in your hands until it becomes pliable and smooth. If you are using polymer clay, this might take a few minutes of kneading to prevent cracking later. -
Roll the slab:
Roll the clay out into a long rectangular slab, about 1/4 inch thick. Aim for a height of roughly 2.5 to 3 inches and a length long enough to wrap around your desired circumference. -
Cut the base:
Roll out a separate circular piece of terracotta clay for the bottom of the pot. Use your circle cutter to create a perfect disc. -
Create the cylinder:
Wrap the rectangular slab around the circular base. Carefully join the two vertical ends of the rectangle together. -
Smooth the seam:
If using polymer clay, blend the seam with your fingers or a smoothing tool until it disappears. For air-dry clay, remember to score and slip the edges before joining. -
Attach the base:
Flip the cylinder upside down and blend the bottom edge of the wall onto the circular base piece to ensure a watertight seal.
Clean Carving
When carving the smile, place a piece of plastic wrap over the clay before pressing your tool down. This softens the edges instantly and prevents crumbled bits.
Step 2: Adding the Cute Face
-
Sketch the features:
Lightly mark where you want the eyes and mouth to go using the tip of your needle tool. Keep the face centered on the smoothest side of your pot. -
Carve the smile:
Using a small carving tool or the side of a needle tool, press deeply into the clay to create the U-shape for the mouth. Widen the line slightly so it’s visible from a distance. -
Carve the happy eyes:
Create two inverted U-shapes above the mouth for the eyes. I find that placing them slightly wider apart makes the expression look friendlier. -
Smooth the carved edges:
Gently run your finger or a specialized silicone tool over the carved lines to remove any rough clay burrs or crumbs.
Drainage Drill
Don’t forget plant health! Before baking or drying, use a straw to punch a drainage hole in the very center of the bottom to prevent root rot.
Step 3: Applying Dots & Base
-
Make the pink dots:
Roll out a very thin sheet of light pink clay. Use a small straw or the tiny end of a piping tip to punch out several small circles. -
Attach the cheeks:
Place two pink dots just outside the smile line to serve as rosy cheeks. Press them gently so they adhere flush with the surface. -
Add decorative dots:
Randomly place the remaining pink dots around the rest of the pot’s surface. Press them in firmly. -
Form the saucer base:
Take a larger amount of pink clay and form a thick disc slightly wider than your pot. Shape the edges so they are rounded and soft. -
Join the pieces:
Place your terracotta pot onto the pink base. Press them together so they become one solid unit.
Step 4: Finishing Touches
-
Final smooth:
Check the entire piece for fingerprints or lint. Lightly buff them out with a drop of baby oil on your finger if using polymer clay. -
Bake or dry:
Follow the manufacturer’s instructions for your specific clay type. If baking, tent it with foil to prevent the light pink clay from darkening. -
Sand and seal:
Once fully cured or dry, use fine-grit sandpaper to smooth any sharp edges on the rim. Apply a matte varnish if you plan to put a real plant inside for extra durability.
Pop in your favorite spiky succulent and enjoy your new smiling companion

The Complete Guide to Pottery Troubleshooting
Uncover the most common ceramic mistakes—from cracking clay to failed glazes—and learn how to fix them fast.
Coil-Built Sculptural Vase
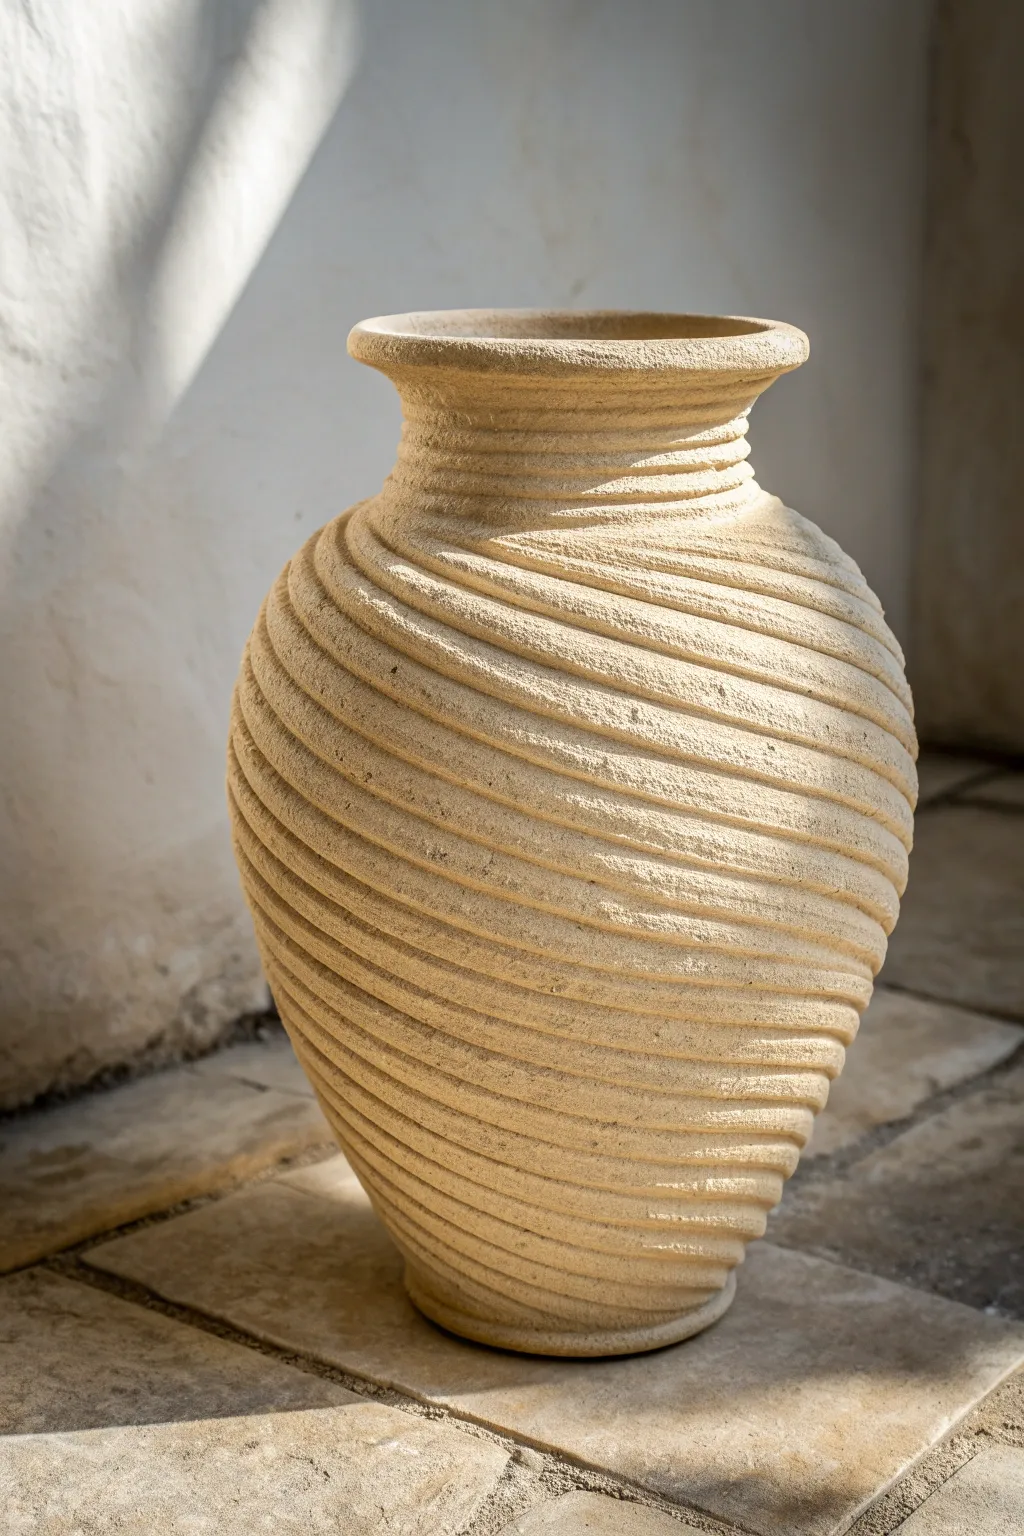
This striking vase captures the raw beauty of unglazed clay with a rhythmic, swirling texture that dances up its curvaceous form. By combining traditional coil-building techniques with a heavily grogged clay body, you’ll create a sculptural vessel that feels both ancient and modern.
Step-by-Step Guide
Materials
- High-grog stoneware clay (sand color)
- Potter’s wheel (optional, for base/centering)
- Banding wheel or turntable
- Large serrated kidney scrape
- Wooden modeling tools
- Clay extruder (optional, for consistent coils)
- Slip and scoring tool
- Sponge and water bucket
- Paddle tool
- Spray bottle
Step 1: Building the Foundation
-
Prepare the base:
Start by rolling out a thick slab of clay or throwing a flat disk on the wheel, approximately 5-6 inches in diameter. This will serve as the sturdy foot for your vase. -
Roll your coils:
Prepare a large batch of thick, consistent coils. They should be roughly the thickness of your thumb. Using an extruder saves time, but hand-rolling works perfectly well if you keep the pressure even. -
Begin the ascent:
Score and slip the outer edge of your base. Lay your first coil down, pressing it firmly into the base. Pinch the clay upwards slightly to ensure a strong bond before adding the next layer. -
Join and smooth inside:
As you stack the first few coils to create the narrow foot, blend the coils together completely on the *interior* of the pot ensuring it is watertight and structurally sound. Leave the outside rough for now. -
Widen the form:
As you build upward, place each coil slightly outward from the one below it. This will create the swelling ‘belly’ of the vase. Use your banding wheel to check that the expansion is symmetrical.
Slumping Walls?
If the belly starts sagging, stop building immediately! Use a heat gun to stiffen the lower walls or wait a few hours until the bottom section is leather hard before adding more weight.
Step 2: Sculpting the Spiral Texture
-
Establish the texture early:
Unlike typical coil pots where you smooth everything at the end, I find it easier to establish the ridge pattern every 4-5 inches of height. Use a curved wooden tool to deepen the horizontal groove between coils on the exterior. -
Create the diagonal drift:
This is the signature look. Instead of leaving the coils perfectly horizontal, gently push and smear the clay of each coil diagonally upwards. Use a serrated kidney or rib tool to scratch deep, directional lines that follow this spiral path. -
Enhance the grit:
The surface has a sandy look. If your clay isn’t gritty enough, you can press coarse sand or grog into the surface while the clay is still tacky. Rub it in with the serrated rib. -
Close the form:
Once you’ve reached the widest point (the belly), begin placing coils slightly inward. Continue blending the inside and texturing the outside as you go, narrowing the shape towards the neck. -
Form the neck:
Build a vertical cylinder section for the neck using 3-4 distinct coils. Keep the ridges here more horizontal and stacked to differentiate the neck from the swirling belly.
Consistent Coils
If rolling consistent coils by hand is tricky, trace two parallel lines on your table as a guide. Roll the clay between them until it touches both lines perfectly.
Step 3: Refining and Finishing
-
Flair the rim:
Add a final, slightly thicker coil at the very top. Squeeze and shape this outward to create a graceful, flared rim that overhangs the neck slightly. -
Deepen the ridges:
Wait until the clay is leather hard. Take a carving tool or the edge of a wooden rib and re-trace the spiral grooves between your textured sections to make the visual separation crisp and deep. -
Rough it up:
Use a stiff brush or a scouring pad to vigorously scrub the surface. This removes smooth tool marks and exposes the grog in the clay, enhancing that ‘stone-carved’ aesthetic. -
Clean the foot:
Use a trimming tool to undercut the bottom edge of the vase slightly, giving it a slight lift off the table and cleaning up any messy clay bits near the base. -
Drying process:
This is crucial for a large coil pot. Drape plastic loosely over the top rim to keep it from drying too fast while the thicker bottom catches up. Dry slowly over a week to prevent cracks. -
Bisque fire:
Fire the piece to cone 04 (or your clay’s specific bisque temperature). This sets the form permanently. -
Finishing touch:
To maintain the raw sandstone look shown in the image, you might skip a glaze entirely. Instead, apply a wash of iron oxide or a matte, sandy engobe, then wipe most of it back to highlight the deep textures before final firing.
Once fired, the distinct ridges will catch the light beautifully, giving your space an organically modern focal point
Textured Slab Wall Tiles
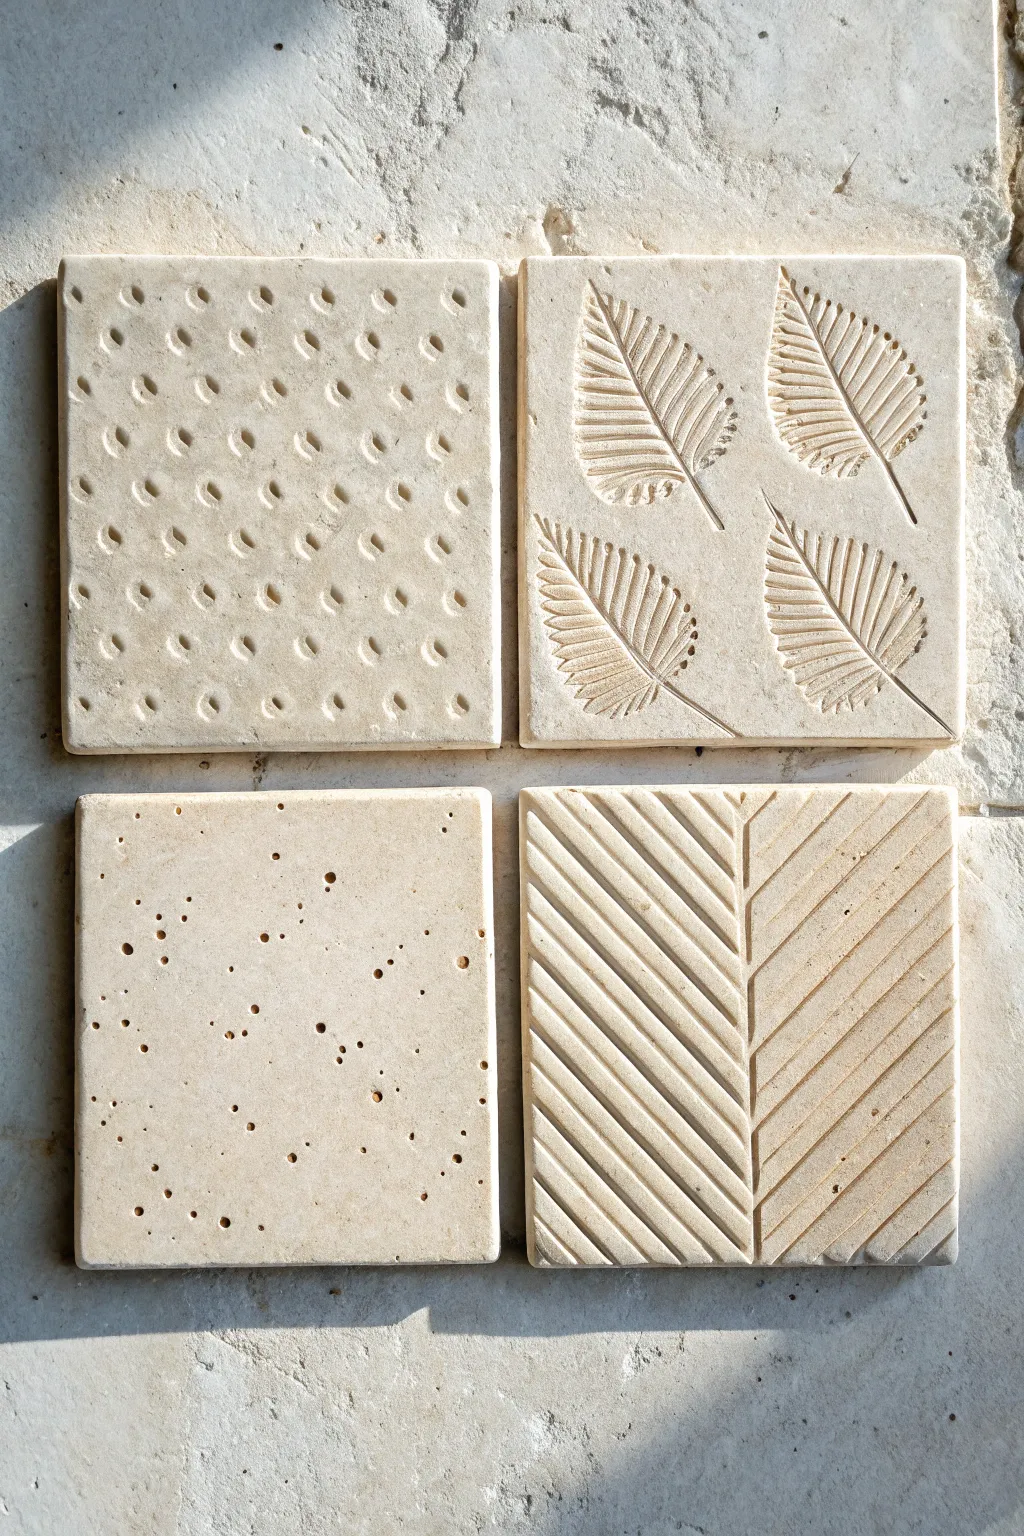
These four distinct clay tiles showcase the versatility of surface design, exploring everything from rhythmic carved lines to organic stippling. Created as a cohesive set, they make for beautiful wall art or unique, handmade coasters that celebrate the raw beauty of ceramic material.
How-To Guide
Materials
- White or cream stoneware clay (low-grog for smoother carving)
- Rolling pin
- Two wooden guide strips (approx. 1/4 inch thick)
- Square cookie cutter or ruler and needle tool
- Loop tool or carving gouge
- Ball stylus tool (various sizes)
- Needle tool
- Clean sponge
- Canvas board or ware board
Step 1: Preparation & Shaping
-
Wedging the clay:
Begin by thoroughly wedging your clay to remove air bubbles and align the particles. For a set of four tiles like this, a grapefruit-sized ball of clay should suffice. -
Rolling the slab:
Place your clay on a canvas-covered surface between two wooden guide strips. Roll the clay out until the rolling pin rests flat on the guides, ensuring a perfectly even thickness across the entire slab. -
Compressing the surface:
Using a metal or rubber rib, firmly compress the clay surface on both sides. This aligns the clay platelets, reducing the chance of warping later and creating a silky smooth canvas for your textures. -
Cutting the squares:
Use a square cutter or measure equal squares (around 4×4 inches) with a ruler and cut them out using a needle tool. You will need four steady squares for this project. -
Cleaning edges:
Gently smooth the cut edges with a damp finger or sponge to remove any sharp burrs or crumbs before you start texturing.
Smooth Moves
Wipe textures with a damp sponge after the clay reaches leather-hard stage. This softens sharp carving marks without erasing the design’s depth.
Step 2: Texturing the Set
-
Tile 1: The Dimpled Grid:
For the first tile, take a medium-sized ball stylus or the rounded end of a paintbrush. Press gently into the clay at regular intervals to create rows of varied indentations. -
Creating movement:
Instead of pressing straight down, try pressing and slightly dragging the tool to create a teardrop or ‘comma’ visual effect, alternating directions for a dynamic feel. -
Tile 2: The Botanical Relief:
Sketch four leaf shapes lightly with a needle tool. Using a small carving gouge or loop tool, carve out the negative space inside the leaf outline to create the veins, or alternatively, stamp real leaves into the clay and enhance lines with a tool. -
Refining the leaves:
Use a needle tool or very fine stylus to add serrated edges and distinct central veins to each leaf, mimicking the detailed texture seen in beach leaves. -
Tile 3: The Random Stipple:
This tile relies on organic randomness. Use tools of varies sizes—a needle tool, a small drill bit, and a stylus—to poke holes of different depths and diameters scattered across the surface. -
Softening the holes:
Avoid creating sharp ‘volcano’ edges around the holes. After stippling, lightly run a soft rib or finger over the surface to push any displaced clay back down flat. -
Tile 4: Heronbone Chevron:
Lightly draw a vertical center line down the fourth tile. Using a V-tip carving tool or a sharp knife, carve diagonal parallel lines extending outward and upward from the center line to the edge. -
Mirroring the pattern:
Repeat the carving on the opposite side of the center line, ensuring the angles match to create a clean ‘leaf vein’ or chevron effect. Varying the depth of your cut adds shadow and dimension.
Step 3: Finishing
-
Slow drying:
Place your finished tiles on a ware board. To prevent the corners from curling up, I prefer to loosely cover them with plastic for the first 24 hours to ensure even drying. -
Bisque firing:
Once bone dry, fire the tiles to bisque temperature (usually cone 04). Since the beauty is in the raw texture, you can choose to leave them unglazed or apply a matte, transparent wash to highlight the relief.
Make it Functional
Glue cork or felt pads to the bottom of fired tiles to turn these art pieces into functional, surface-safe beverage coasters.
Display your textured quartet together to showcase how simple clay manipulation can yield wonderfully complex visual results


What Really Happens Inside the Kiln
Learn how time and temperature work together inside the kiln to transform clay into durable ceramic.
Mini Relief “Canvas” Art Squares
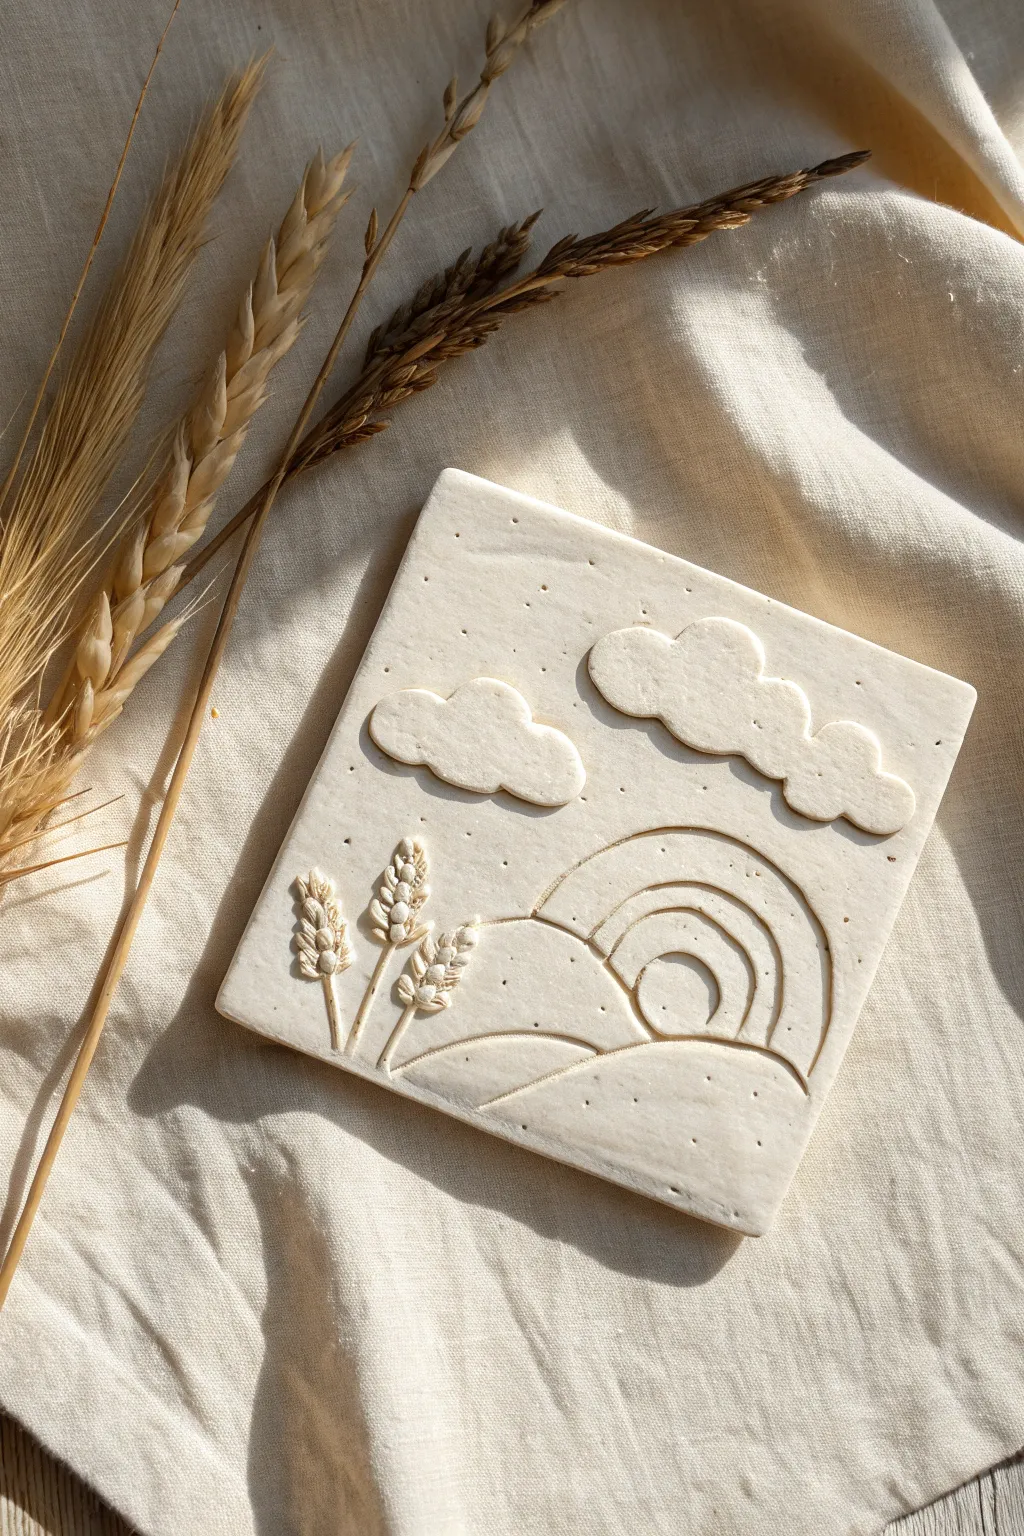
Capture the serene beauty of a harvest landscape with this minimalist polymer clay relief. This mini canvas features a gentle monochrome palette, blending raised elements like puffy clouds and textured wheat with incised line work for a modern, tactile finish.
Detailed Instructions
Materials
- White polymer clay (approx. 2oz block)
- Square clay cutter (approx. 3×3 or 4×4 inches) or a ruler and craft knife
- Acrylic roller or pasta machine
- Needle tool or toothpick
- Ball stylus tool (small)
- Small circle cutter (optional, for the rainbow arcs)
- Baking tile or parchment paper
- Oven (for baking)
- Sandpaper (fine grit, optional)
- Reference photo of wheat stalks
Step 1: Base Preparation
-
Condition the Clay:
Begin by warming the white polymer clay in your hands, kneading it until it is soft, pliable, and free of cracks. This conditioning step is crucial for a smooth surface. -
Roll the Slab:
Roll out the clay to a uniform thickness of about 1/4 inch (6mm). Using depth guides or rolling strips can help ensure the slab is perfectly level across the entire surface. -
Cut the Canvas:
Use your square cutter to punch out the base shape. Alternatively, measure a perfect square with a ruler and carefully slice the edges with your craft knife for clean, sharp corners. -
Smooth the Surface:
Gently run your finger dipped in a tiny bit of water or cornstarch over the surface and edges to smooth out any fingerprints or cutting debris.
Step 2: Sculpting the Relief Landscape
-
Outline the Rolling Hills:
Using a needle tool, lightly sketch two curving horizon lines near the bottom third of the tile. These lines should overlap slightly to create depth, defining the foreground and background hills. -
Inscribe the Rainbow Arcs:
Above the hills on the right side, press three concentric semi-circles into the clay. You can freehand this with a needle tool or lightly press the edge of a circle cutter to create clean, even arcs. -
Deepen the Lines:
Go back over your hill and rainbow lines with the needle tool or a small modeling tool to deepen the grooves, ensuring they are distinct enough to be seen clearly after baking. -
Form the Cloud Shapes:
Roll out a separate, thinner piece of clay (about 1/8 inch thick). Use a small cutter or a knife to cut out two irregular, fluffy cloud shapes. Soften the cut edges with your fingertip so they look pillowy. -
Attach the Clouds:
Place the clouds in the upper sky area. Press them down gently to bond them to the base tile without flattening their 3D volume. You can use a dab of liquid clay if you have it, though simple pressure usually works on raw clay.
Fixing Cracks
Cracks often happen if clay wasn’t conditioned enough. If a crack appears after baking, fill it with a mix of liquid clay and white clay, then rebake briefly to seal it.
Step 3: Wheat Details and Finishing
-
Create Wheat Stalks:
Roll three very thin snakes of clay for the stems. Attach them to the left side of the foreground hill, pressing them lightly into place. -
Sculpt Wheat Grains:
Roll tiny rice-sized grains of clay. I find it easiest to arrange these in a ‘V’ pattern stacking up the top of each stem to form the heads of the wheat. -
Texture the Wheat:
Use the needle tool to press a small indentation or line into the center of each tiny grain. This adds realistic texture and secures the small pieces to the base. -
Add Atmospheric Speckles:
Take your needle tool or a small ball stylus and poke random, shallow holes across the sky area. This stippling effect adds visual interest and fills the negative space around the clouds. -
Final Inspection:
Check for any lint or dust particles. Carefully pick them out with the tip of your knife or smooth them over before baking. -
Bake:
Place the tile on a ceramic tile or baking sheet lined with parchment paper. Bake according to your customized clay package instructions (typically 275°F/135°C for 15-30 minutes per 1/4 inch thickness). -
Cool and Finish:
Allow the piece to cool completely in the oven to prevent cracking. Once cool, you can lightly sand any rough edges for a professional, matte finish.
Make it a Magnet
Turn this art piece into functional decor! Once baked and cooled, use strong E6000 glue to attach a heavy-duty ceramic magnet to the back center of the tile.
Display your monochrome masterpiece on a small easel or use adhesive strips to mount it as part of a wall collage
Clay Food Magnets
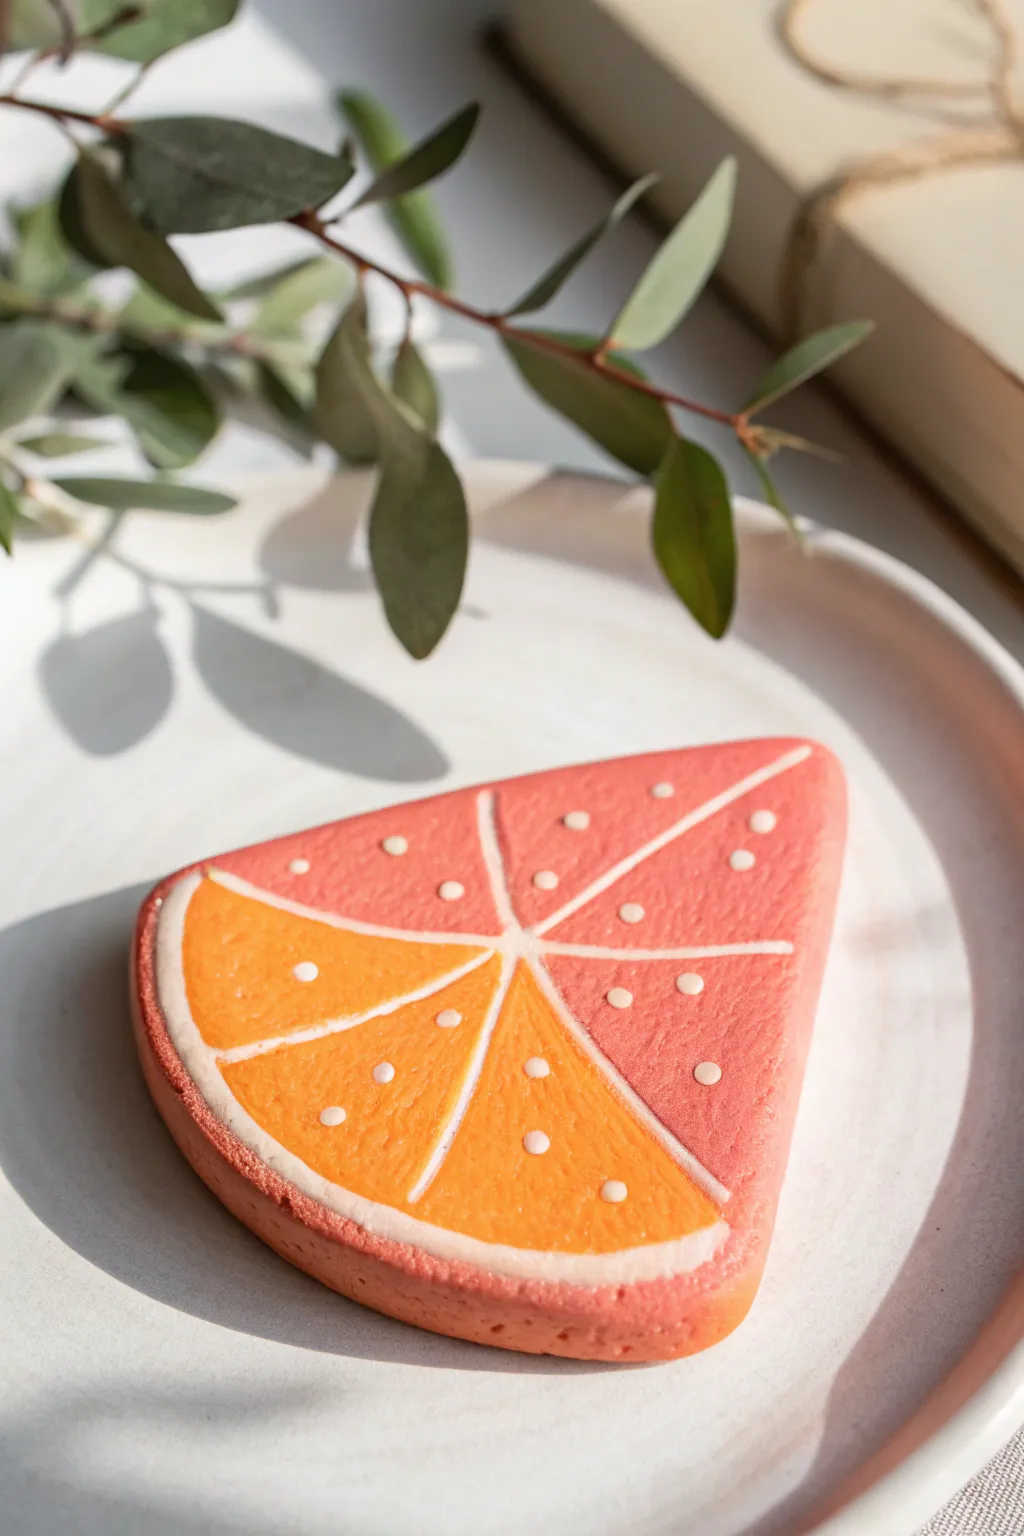
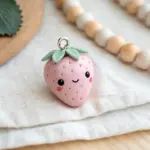
Capture the refreshing zest of summer with this realistic citrus slice magnet. Molded to look just like a decorated sugar cookie, it features distinct orange and pink segments separated by crisp white icing lines.
How-To Guide
Materials
- Polymer clay (white, translucent, orange, pink/red)
- Liquid polymer clay (white)
- Clean ceramic tile or glass work surface
- Rolling pin or pasta machine
- Parchment paper
- Needle tool or fine awl
- Small craft knife
- Round cookie cutter (approx. 2-3 inches)
- Small round magnet
- Super glue or E6000
- Texturing tool (clean toothbrush or sandpaper block)
- Soft pastels (brown, orange) for shading
- Paintbrush for pastels
Step 1: Shaping the Base
-
Prepare the dough color:
Mix white polymer clay with a very small amount of orange and brown to create a pale, baked cookie dough color. Condition it well until pliable. -
Roll the sheet:
Roll your dough-colored clay out to a thickness of about 1/4 inch. It needs to be thick enough to hold the magnet later but look like a substantial cookie. -
Cut the shape:
Use a round cookie cutter to stamp out a circle. Then, using your craft knife, cut a pie-shaped wedge from the circle. This wedge will be your fruit slice. -
Softening the edges:
Gently tap the sharp cut edges with your finger to round them slightly, mimicking the spread of a baked cookie. -
Adding texture:
Lightly press a clean toothbrush or fine-grit sandpaper over the surface and sides of the clay wedge to give it a realistic, porous baked texture.
Step 2: Creating the Icing Effect
-
Outline the segment:
Before adding color, we need to create a barrier. Take your white liquid polymer clay and carefully pipe or paint an outline around the top face of the wedge, leaving a small border of ‘cookie’ visible. -
Draw the internal lines:
Pipe a central point near the tip of the wedge, then draw lines radiating outward to create the individual fruit segments. You want three or four distinct sections. -
Bake the outline:
Bake this base layer for about 10-15 minutes according to your clay package instructions to set the white lines. This prevents the colored fillings from bleeding into each other. Let it cool completely.
Sticky Situation?
If your liquid clay is too runny and flowing over the lines, let it sit on a piece of cardboard for 10 minutes. The paper will leech out some plasticizer, thickening the mix.
Step 3: Filling the Fruit Segments
-
Mix the fruit colors:
Mix translucent clay with a tiny bit of orange clay for one tone, and translucent clay with pink/red for the second tone. The translucent clay is key for that juicy, jelly-like look. -
Soften the filling:
Mix these colored clays with a few drops of liquid clay or clay softener until they reach a frosting-like consistency. You want a thick paste, not a runny liquid. -
Fill the orange sections:
Using a needle tool, scoop small amounts of the orange paste into alternating segments defined by your white lines. Spread it carefully to the edges. -
Fill the pink sections:
Repeat the process with the pinkish-red paste for the remaining segments. The ‘flood’ technique works best here—don’t overfill, or it will spill over the white lines. -
Add texture:
Once filled, gently tap the surface of the colored sections with the needle tool to create tiny dimples, mimicking the texture of fruit pulp. -
Add the seeds/dots:
Dip the very tip of your needle tool into white liquid clay (or white acrylic paint if preferred later) and place three small dots in a triangle pattern within each fruit segment.
Make a Set
Create a whole citrus collection by changing the filling colors! Use bright yellow for lemons, deep green for limes, and translucent orange for standard oranges.
Step 4: Finishing Touches
-
Shade the crust:
Scrape some brown and orange soft pastel into a fine dust. Use a soft brush to lightly dust the outer edges of the cookie base to make it look perfectly golden-brown. -
Final Bake:
Bake the entire piece again for the full duration recommended by the manufacturer (usually 30 minutes per 1/4 inch of thickness). Let it cool completely. -
Attach the magnet:
Flip the cooled slice over. Place a drop of strong super glue or E6000 on the back and press your round magnet firmly into place. -
Seal (Optional):
If you want extra shine on the fruit parts, apply a gloss varnish only to the colored segments, leaving the cookie crust matte.
Now you have a sweet, permanent treat to brighten up your fridge or filing cabinet

TRACK YOUR CERAMIC JOURNEY
Capture glaze tests, firing details, and creative progress—all in one simple printable. Make your projects easier to repeat and improve.
Sculpted Animal Minis
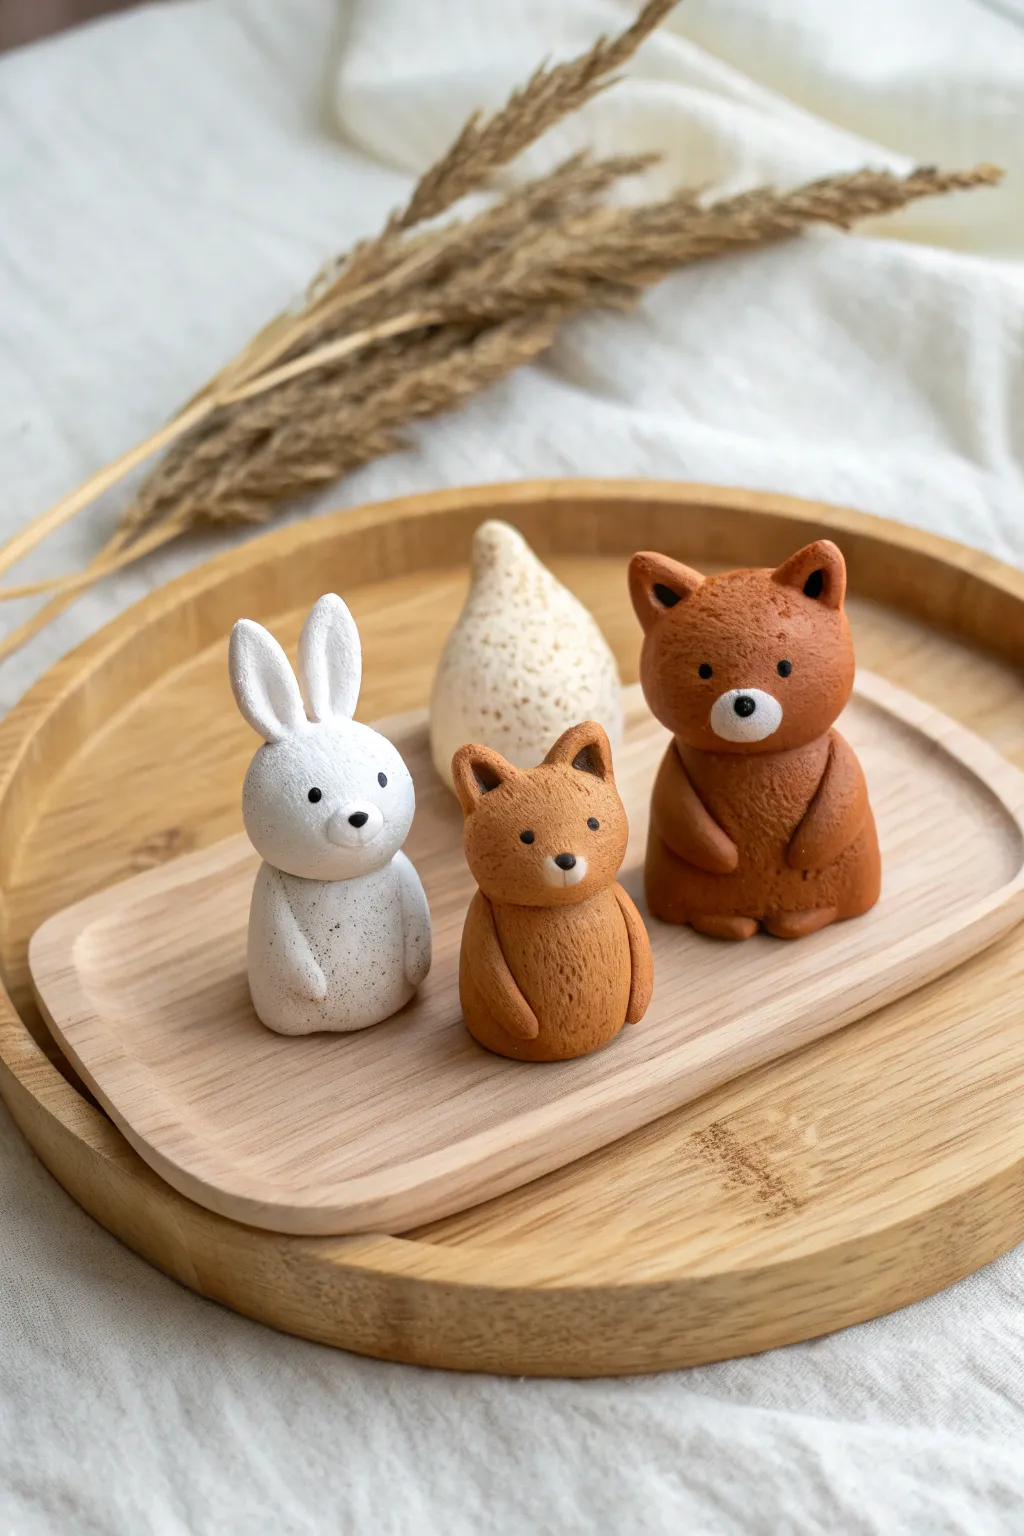
These charming, minimalist animal figurines feature a tactile, stone-like texture and sweet, simple expressions. This project guides you through sculpting a rabbit, a fox, and a bear, perfect for a nursery shelf or a whimsical desk display.
Step-by-Step
Materials
- Polymer clay (white, terracotta, and dark brown)
- Speckled clay or faux granite polymer clay (optional, for texture)
- Black acrylic paint or black clay for details
- Ball stylus tools (various sizes)
- Toothbrush or stiff bristle brush
- Aluminum foil (for armature cores)
- Needle tool
- Baking sheet and parchment paper
- Oven (for baking polymer clay)
Step 1: Base Preparation
-
Prepare the foil cores:
To save clay and keep the figurines lightweight, tightly scrunch aluminum foil into three egg shapes. Make one slightly taller for the rabbit, a rounder one for the bear, and a medium one for the fox. -
Condition the clay:
Warm up your polymer clay by kneading it until it’s soft and pliable. If you want that speckled look shown in the image but don’t have speckled clay, mix a tiny pinch of black pepper or sand into your white and terracotta clays. -
Cover the cores:
Flatten sheets of clay—white for the rabbit, lighter terracotta for the fox, and darker brown for the bear. Wrap these sheets around your foil cores, smoothing out seams until you have three clean, solid egg shapes. -
Create the texture:
Before adding limbs, gently tap the entire surface of each shape with a toothbrush or a stiff brush. This creates the stone-like, matte texture visible in the photo.
Step 2: Sculpting the Rabbit
-
Form the ears:
Roll two medium logs of white clay. Flatten them slightly and taper the ends. Attach them to the top of the white body, blending the seams at the base carefully with a modeling tool. -
Add the muzzle:
Roll a small ball of white clay and flatten it onto the lower face area to create a subtle snout definition. -
Attach the arms:
Roll two small sausage shapes for arms. Press them against the sides of the body, curving them slightly forward as if the bunny is resting its hands on its belly.
Texturing Tip
To get that specific porous look, try rolling your finished shapes over a piece of rough sandpaper or a clean scouring pad before baking.
Step 3: Sculpting the Fox & Bear
-
Shape the fox ears:
For the fox, create two small triangles of terracotta clay. Press them onto the head, and use a small ball tool to indent the centers slightly. -
Refine the fox face:
Add a small, flattened circle of white clay to the snout area for the fox’s muzzle. This contrast is key to the design. -
Form the bear ears:
Roll two small balls of dark brown clay. Press them onto the bear’s head and use a larger ball tool to create the inner ear depression. -
Add the bear muzzle:
Similar to the fox, add a small white clay circle for the bear’s snout, placing it slightly higher up on the round body. -
Attach remaining limbs:
Create arm shapes for both the fox and bear, mirroring the simple, resting pose of the rabbit. Blend the shoulder connection points so they look seamless. -
Texture the additions:
Go back over the ears, arms, and muzzles with your toothbrush to ensure the texture is consistent across the new additions.
Unwanted Fingerprints?
If you smudge the texture while attaching limbs, lightly brush the area with a little baby oil or clay softener, then re-texture with your brush.
Step 4: Finishing Details
-
Create eye sockets:
Use a small ball stylus to press indentations where the eyes will go. This helps seat the paint or clay eyes securely. -
Add the eyes and noses:
You can either roll extremely tiny balls of black clay and press them into place, or bake the figures first and paint these details on later. I find using black clay creates a cleaner, more dimensional look. -
Sculpt the tree (optional):
If you want the background tree, form a white cone shape, texture it heavily, and curve the top slightly to the side. -
Bake the batch:
Place all figures on parchment paper on a baking sheet. Bake according to your clay package instructions (usually 275°F/135°C for 15-30 minutes). -
Cool down:
Let the figures cool completely in the oven with the door slightly ajar to prevent cracking from thermal shock.
Arranging these little textured friends together on a wooden tray creates an instantly cozy woodland scene
Simple Photo And Card Holders
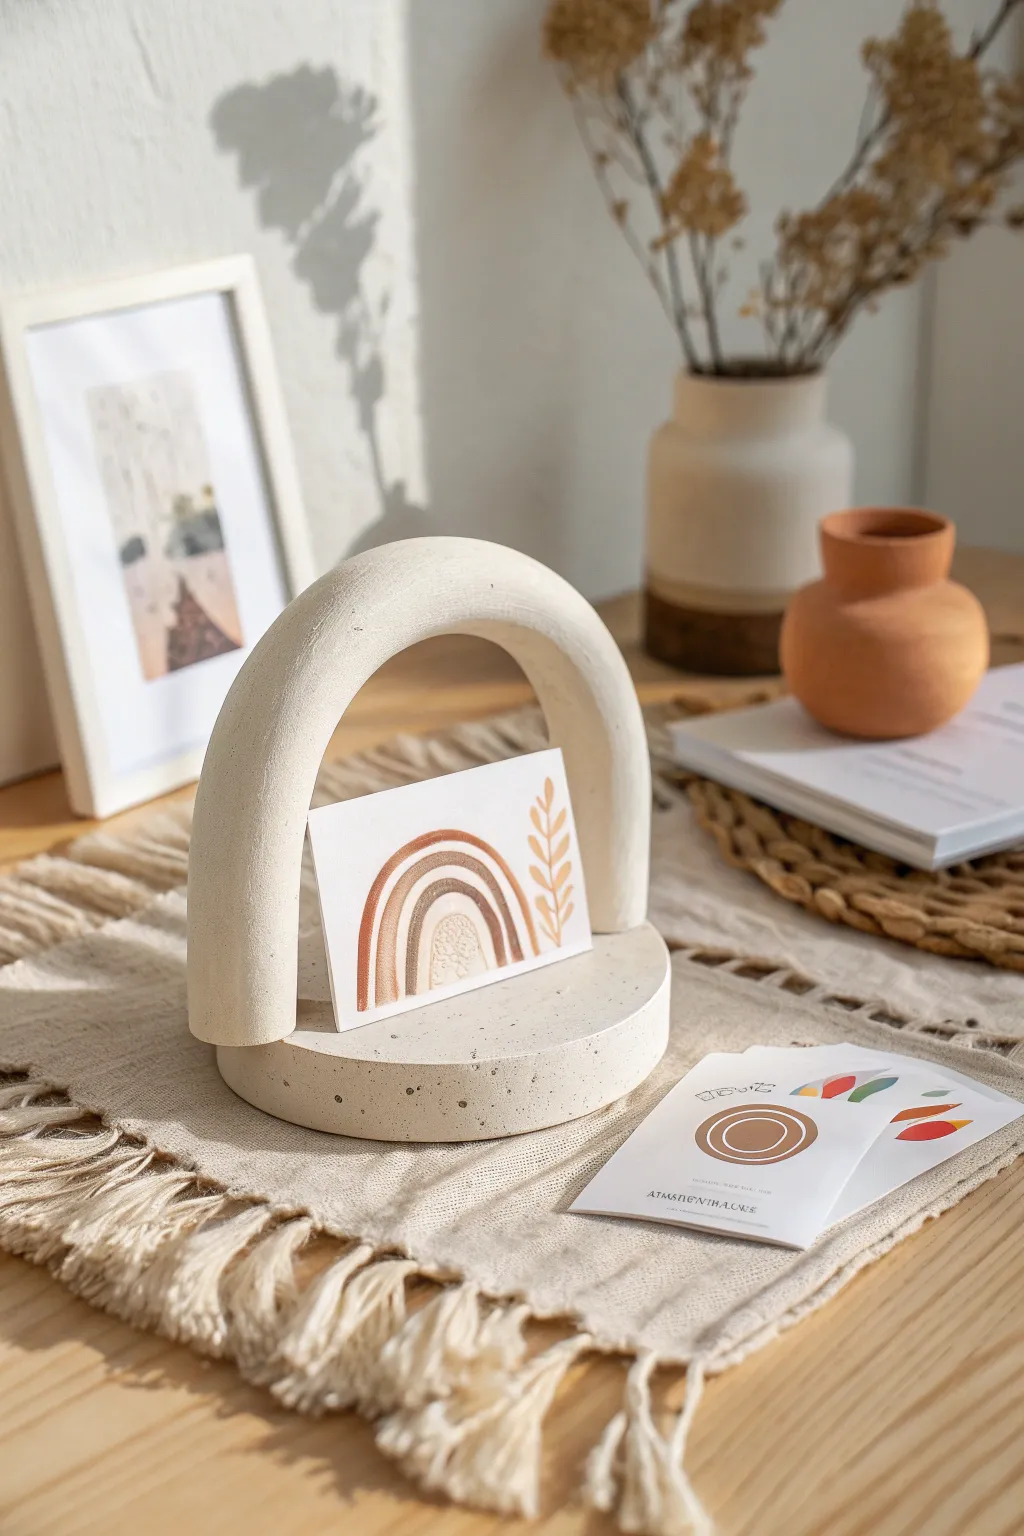
This modern, architectural card holder combines a sturdy circular base with a soaring arch, creating a perfect frame for your favorite photos or postcards. Its speckled stone-effect finish adds an organic texture that feels both trendy and timeless.
Detailed Instructions
Materials
- Air-dry clay or polymer clay (white or cream)
- Faux stone spray paint (or black pepper/sand for texture)
- Rolling pin
- Circle cutter (approx. 4-5 inches diameter)
- Craft knife
- Water and slip (if using air-dry clay)
- Liquid clay (if using polymer clay)
- Sandpaper (fine grit)
- Cardboard or foam core for arch support
- Varnish or sealant (matte)
Step 1: Forming the Base
-
Condition the clay:
Start by kneading your clay thoroughly until it is soft and pliable. If you want that speckled look integrally, knead in a pinch of coarse black pepper or clean sand now. -
Roll the slab:
Roll out a slab of clay to a substantial thickness, aiming for about 1/2 to 3/4 of an inch. A thicker base provides the necessary weight for stability. -
Cut the circle:
Use your large circle cutter or trace around a bowl to cut a perfect circle from the slab. Smooth the edges with a damp finger to remove any harsh cut lines. -
Create the card slot:
Using a ruler or a thick piece of cardstock, press a straight line into the center of the circle, going about halfway deeper into the clay. Ensure the slot is wide enough to hold a thick card but not so wide it leans too far back.
Step 2: Creating the Arch
-
Roll a coil:
Roll a thick snake of clay, ensuring it maintains an even thickness of about 1 inch throughout its length. -
Shape the arch:
Bend the coil into a U-shape. Measure it against your base to ensure the width of the arch matches the diameter of the circular base perfectly. -
Flatten the ends:
Slice the bottom ends of the arch flat with your craft knife so it can stand upright flush against a surface. -
Refine the shape:
Gently press the surface of the coil to flatten the front and back faces slightly, giving it a more modern, squared-off tubular look rather than a perfect cylinder. -
Dry fit:
Place the arch onto the back edge of your circular base to check proportions. The arch should rise vertically from the back half of the circle.
Clean Cuts
To avoid warping your circle shape when lifting it off your work surface, roll the clay directly onto a piece of parchment paper that can be moved into the oven or drying area.
Step 3: Assembly and Finishing
-
Score and slip:
If using air-dry clay, score (scratch) the bottom of the arch legs and the corresponding spots on the base. Apply slip (clay water paste) to join them. For polymer clay, use a thin layer of liquid clay. -
Attach the arch:
Press the arch firmly onto the base. Blend the clay seams together at the back for a seamless look, or leave a clean seam line if you prefer a modular appearance. -
Support the structure:
While the clay is soft, I firmly recommend placing a crumpled ball of paper or a cardboard cutout under the arch to prevent it from sagging while it cures. -
Drying or baking:
Follow your clay’s instructions. Air-dry clay needs 24-48 hours to dry completely; polymer clay requires baking in the oven according to the package temperature. -
Sanding:
Once fully cured, use fine-grit sandpaper to smooth out any fingerprints, bumps, or sharp edges on the rim of the base. -
Apply texture:
If you didn’t mix speckles into the clay, lightly mist the piece with a stone-effect spray paint or flick diluted brown/black acrylic paint onto it with a toothbrush. -
Seal the piece:
Protect your work with a coat of matte varnish. This prevents the white clay from yellowing or picking up dust over time.
Color Pop
Instead of the stone finish, paint the arch in a bold terracotta or sage green while leaving the base white for a trendy two-tone aesthetic.
Place your favorite stylized postcard in the slot and enjoy your new modern art display
Ring Cones And Jewelry Catchers
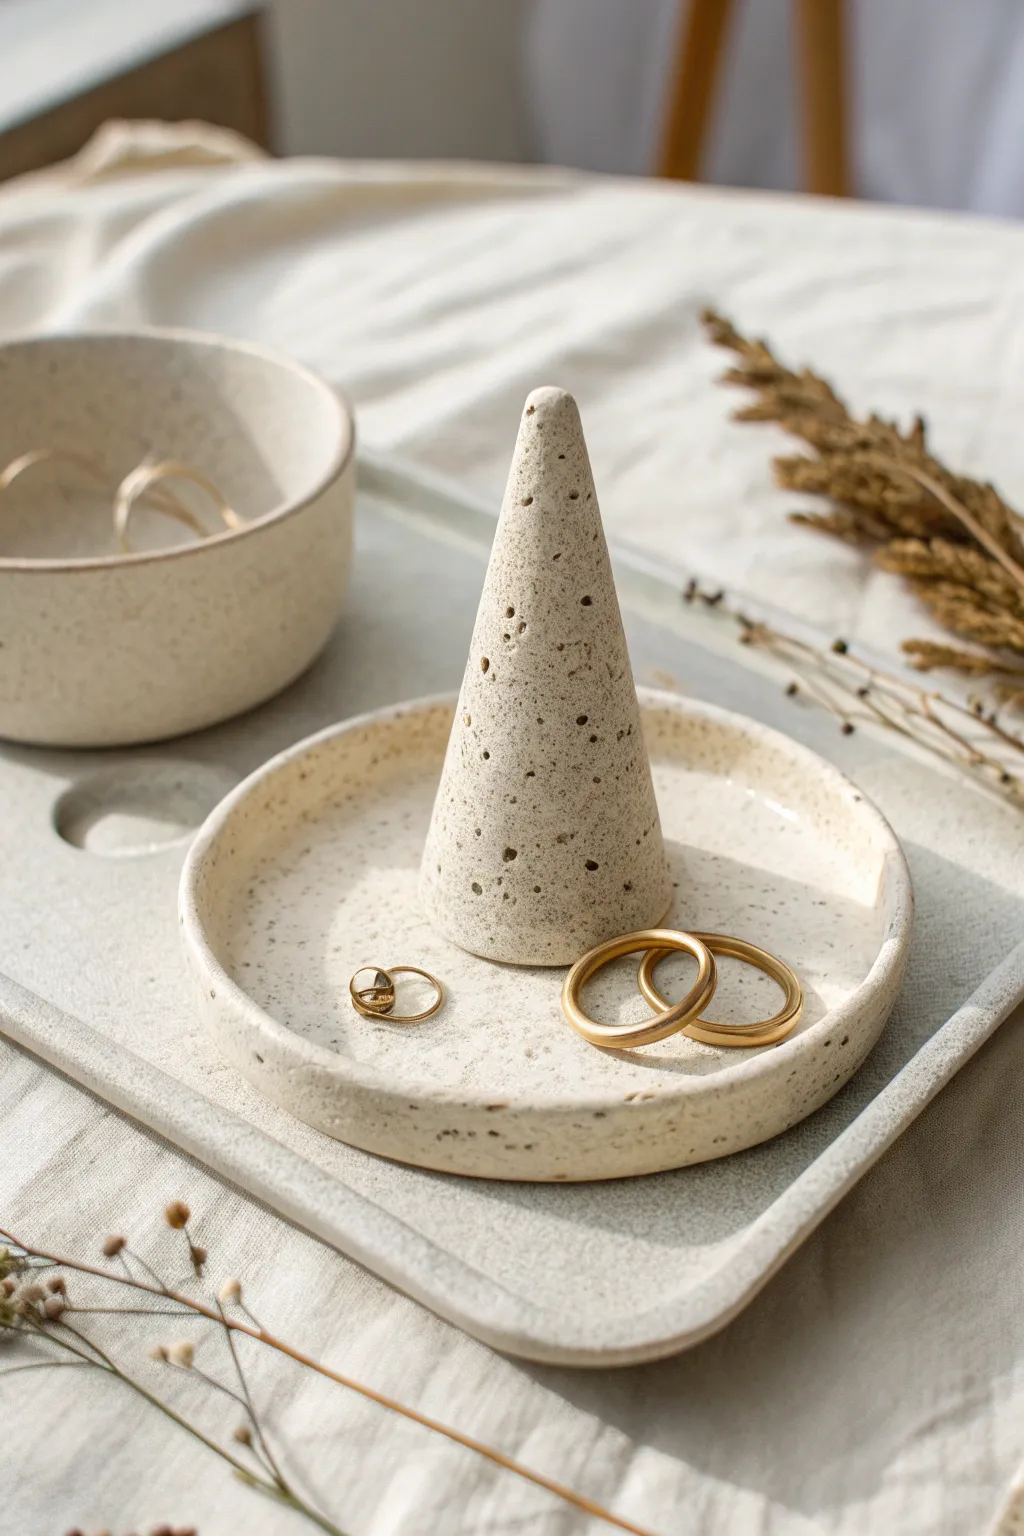
Bring a touch of organic minimalism to your dresser with this matching jewelry organization set, featuring a ring cone, a catch-all dish, and a nesting tray. The finish mimics natural stone with its warm, sandy tone and distinct speckling, perfect for displaying your favorite gold pieces.
Step-by-Step Tutorial
Materials
- White polymer clay or air-dry clay
- Coarse black pepper or dried coffee grounds (for speckling)
- Acrylic rolling pin
- Circle cutters (various sizes)
- Fettling knife or craft blade
- Smoothing sponge
- Sandpaper (fine grit)
- Matte varnish or sealant
- Water (if using air-dry clay)
- Ruler
Step 1: Preparing the Clay
-
Condition the clay:
Begin by kneading your white clay until it is soft and pliable. If you are using polymer clay, the warmth of your hands is essential here; for air-dry clay, keep a damp cloth nearby to prevent drying. -
Create the texture:
To achieve that beautiful stony look, sprinkle a generous amount of coarse black pepper or dried coffee grounds onto your clay block. I like to fold the clay over and knead it repeatedly until the ‘speckles’ are evenly distributed throughout the mass. -
Roll out the slab:
Roll the clay out into a uniform slab, approximately 1/4 inch thick. Aim for an even surface, as this will form the base for all three components.
Stone Effect Secret
Mix different sizes of ‘speckles’ (like fine pepper AND coarse coffee grounds) to create a more realistic, varied stone texture.
Step 2: Sculpting the Components
-
Cut the tray base:
For the large rectangular tray, use a ruler and knife to cut a rectangle roughly 6 inches by 8 inches. Round the corners slightly with your fingers for a softer look. -
Cut the circle bases:
Using your circle cutters or a bowl as a template, cut two circles: a larger one (approx. 4 inches) for the ring dish and a smaller one (approx. 3 inches) for the deeper bowl. -
Form the tray rim:
Roll a long snake of clay. Score the edges of your rectangular base (scratch cross-hatch marks) and attach the snake along the perimeter. Blend the seams smoothly using your thumb or a modeling tool so it looks like one solid piece. -
Form the ring dish rim:
Similarly, roll a thinner snake of clay and attach it to the edge of the 4-inch circle to create a low rim for the ring catcher. -
Build the small bowl:
For the deeper bowl, create a slightly taller wall by rolling a flat strip of clay instead of a snake. Attach this strip to the edge of the 3-inch circle, smoothing the seams on both the inside and outside.
Gilded Edge
After sealing, paint just the very top rim of the bowl or the tip of the cone with liquid gold leaf for a luxurious, high-end contrast.
Step 3: Creating the Cone
-
Shape the cone:
Take a lump of the remaining speckled clay and roll it into a ball. Slowly roll one side of the ball back and front on your work surface, applying more pressure to one end to taper it into a cone shape. -
Refine the height:
Stand the cone up. It should be tall enough to hold rings but proportional to the dish. Tap the base gently on the table to flatten it so it stands perfectly straight. -
Add surface detail:
To mimic the porous texture seen in the photo, gently poke small, shallow holes randomly around the surface of the cone using a needle tool or toothpick. Don’t go too deep; it’s just for texture.
Step 4: Finishing Touches
-
Assembly check:
Place the cone into the center of the ring dish. You can choose to score and slip it to attach it permanently, or leave it separate. Place the dish and bowl onto the rectangular tray to ensure everything fits comfortably. -
Smooth the surfaces:
Dip your finger or a sponge in a little water (or baby oil for polymer clay) and gently smooth out any fingerprints or harsh seam lines on all pieces. -
Dry or bake:
If using air-dry clay, let the pieces dry slowly away from direct sunlight for 24-48 hours. If using polymer clay, bake according to the manufacturer’s temperature instructions, usually around 275°F (135°C). -
Sand for perfection:
Once fully cured or dry, use fine-grit sandpaper to gently buff away any rough edges, particularly around the rims and the tip of the cone. -
Seal the work:
Apply a coat of matte varnish to protect the clay while maintaining that natural, unglazed pottery aesthetic.
Arrange your new handmade set on your vanity and enjoy the satisfaction of organizing your jewelry in style
Candle Holders With Cutout Patterns
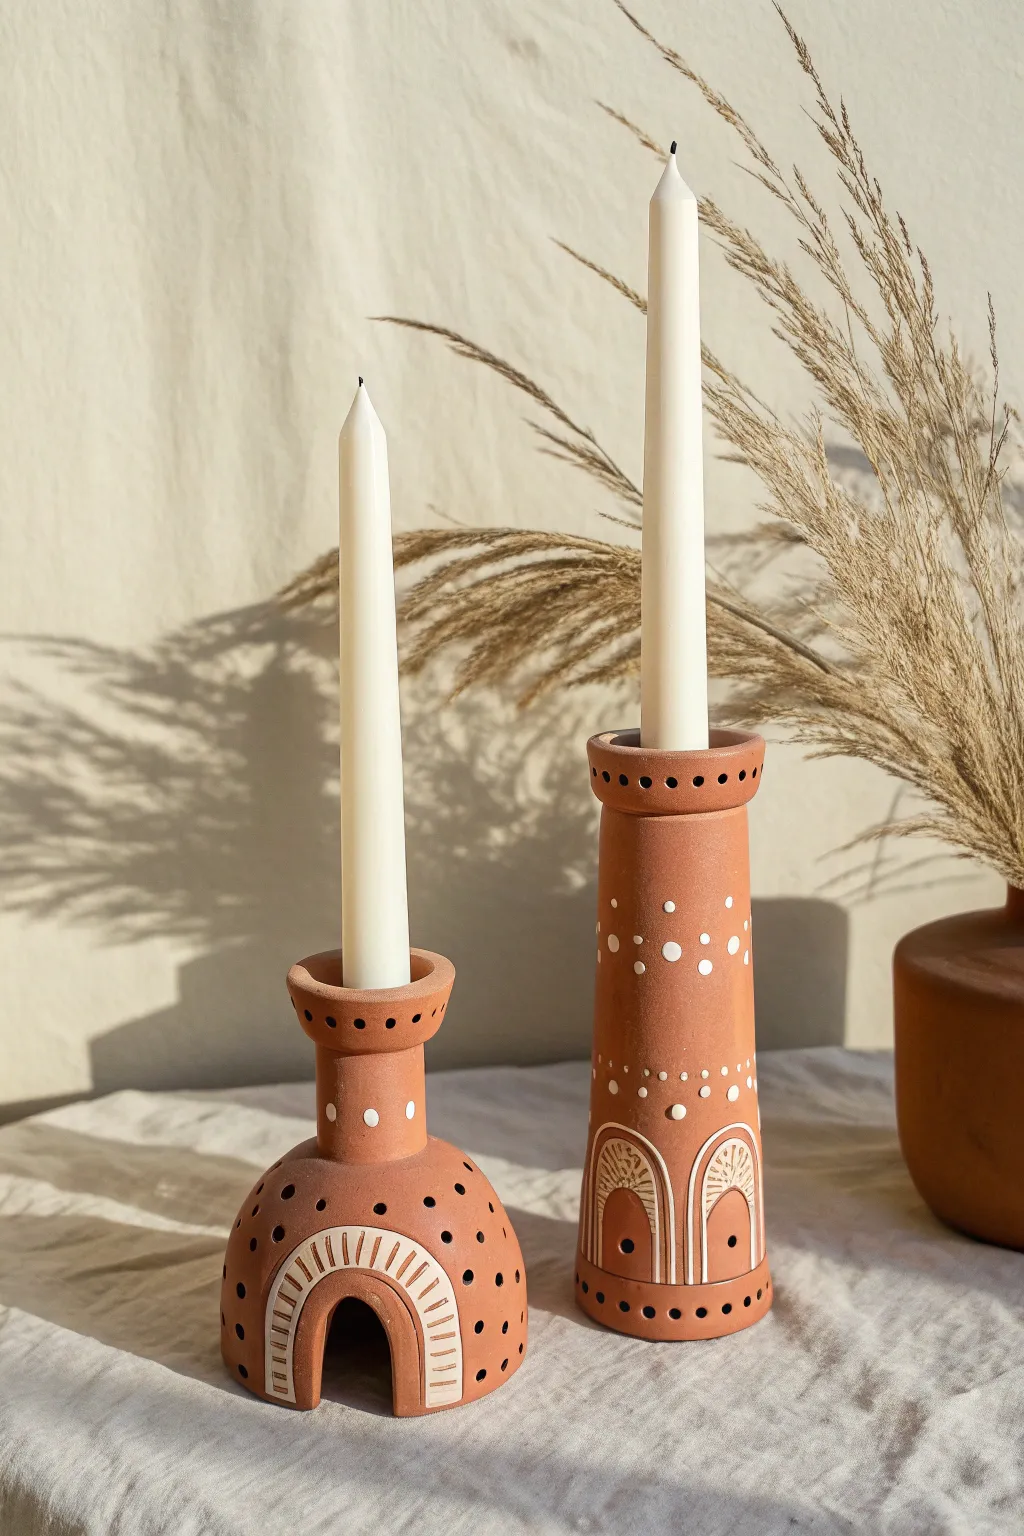
Embrace the warmth of natural clay with these architectural candle holders featuring charming arch cutouts and delicate painted details. The terracotta finish combined with white accents creates a modern bohemian look perfect for cozying up any corner of your home.
Step-by-Step
Materials
- Air-dry clay (terracotta color) or polymer clay
- Rolling pin
- Craft knife or scalpel
- Cookie cutters (circle for rims)
- Small straw or clay hole punch tool
- PVC pipe or wooden dowel (approx. 1 inch diameter for the neck)
- Slip (clay mixed with water) and a scoring tool
- Fine grit sandpaper
- White acrylic paint
- Fine tip paintbrush
- Clear matte varnish (optional)
Step 1: Shaping the Bases
-
Roll the Slabs:
Begin by conditioning your clay until it’s pliable, then roll it out into an even slab about 1/4 inch thick. You will need enough for two cylindrical forms. -
Form the Tall Cylinder:
For the taller holder, cut a rectangular strip of clay. Wrap this strip around a cylindrical form (like a PVC pipe or a glass jar wrapped in parchment paper) to create a tall, straight tube. Score and slip the seam to join it securely. -
Create the Bulbous Base:
For the shorter holder, form a pinch pot by creating a ball and pressing your thumb into the center, working the walls outwards to create a dome shape. Flatten the bottom slightly so it stands stable. -
Add the Neck:
Roll a smaller rectangle of clay to form a short tube for the neck of the shorter holder. Attach this to the top of your dome using the score and slip method, blending the clay with a modeling tool for a seamless transition.
Step 2: Refining and Cutting
-
Attach the Rims:
Cut two thick rings of clay or mold small coils to place at the very top of both candle holder necks. These rims should flare out slightly and be wide enough to hold a standard taper candle securely. -
Cut the Arches:
Using a craft knife, carefully cut an arch shape out of the bottom of the shorter, bulbous holder. For the tall cylindrical holder, you can choose to carve shallow arched indentations or cut fully through the clay at the base. -
Smooth the Edges:
Dip your finger in a little water and run it along all cut edges, especially the new archways and the top rims, to remove any sharpness or burrs. -
Punch the Holes:
Using a small straw or a clay hole punch, press small holes into the clay. Create a pattern of dots around the top rim of both holders and scattered around the base sections. -
Dry Completely:
Allow your pieces to dry completely. For air-dry clay, this usually takes 24-48 hours. Turn them occasionally to ensure even drying.
Smooth Seams Secret
Use a little vinegar on your finger when smoothing air-dry clay seams. It breaks down the surface slightly better than water, creating a stronger bond.
Step 3: Decoration and Finishing
-
Sand for Smoothness:
Once bone dry, gently sand any rough patches or uneven seams with fine-grit sandpaper. Wipe away the dust with a slightly damp cloth or sponge. -
Paint the Arches:
Using a fine-tip brush and white acrylic paint, outline the arch shapes. Add parallel lines inside the arch outline to mimic a sunburst or structural bricks. -
Add Dotted Accents:
Dip the back end of your paintbrush into the white paint to create perfect dots. Stamp a pattern of dots around the neck and body of the holders, complementing the punched holes you made earlier. -
Seal the Project:
To protect the paint and give the clay a finished look, apply a coat of clear matte varnish. This will also deepen the terracotta color slightly.
Faux Ceramic Look
Mix baking soda into your white paint before applying the details. This gives the paint a textured, gritty finish that looks like glazed ceramic.
Place your favorite taper candles inside and enjoy the warm, artisanal vibe they bring to your space
Incense Holders With Organic Curves
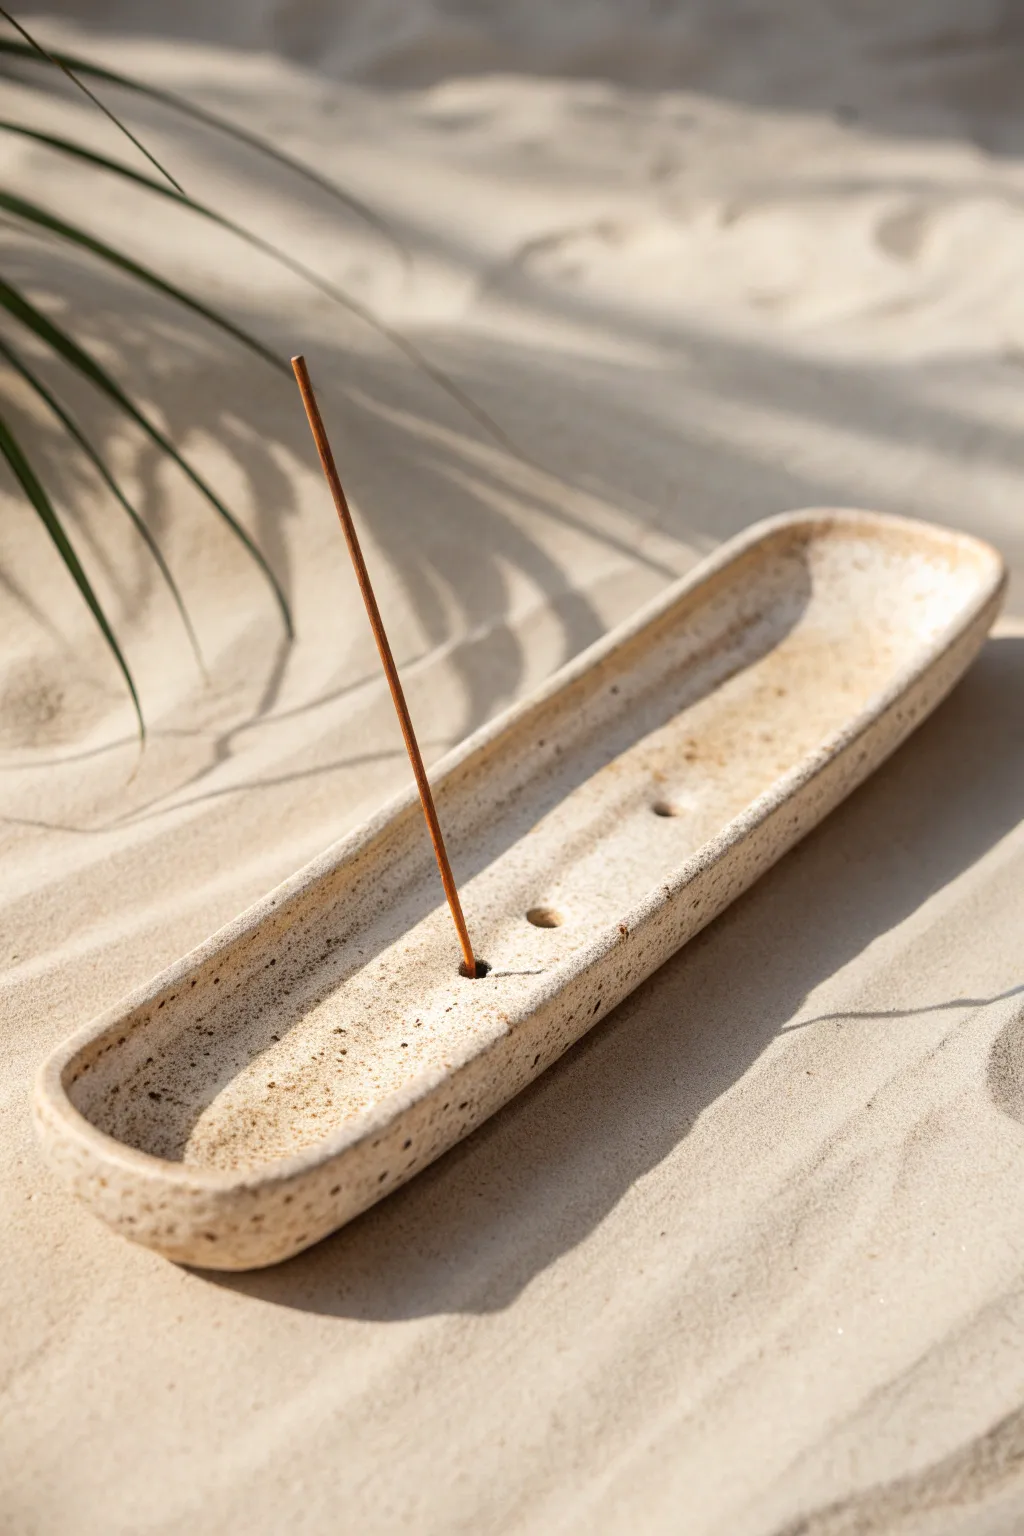
Embrace the tranquility of organic forms with this elongated incense holder, featuring a speckled, stone-like texture and soft, rounded edges. Its natural aesthetic is perfect for holding your favorite scents while doubling as a minimalist decor piece.
Step-by-Step Guide
Materials
- Speckled buff stoneware clay (or light clay with grog)
- Rolling pin
- Canvas mat or cloth (to prevent sticking)
- Needle tool or fettling knife
- Rib tool (soft kidney)
- Sponge
- Small circular cutter or straw (for incense holes)
- Water in a small bowl
- Sandpaper (fine grit)
- Matte transparent glaze (optional)
Step 1: Shaping the Base
-
Prepare the slab:
Start by wedging a medium-sized ball of speckled clay to remove air bubbles. Flatten it onto your canvas mat. -
Roll it out:
Use your rolling pin to create a long, consistent slab. Aim for a thickness of about 1/4 inch (6mm) so it feels substantial but not heavy. -
Cut the shape:
Visualize a long, narrow pill shape. Using a needle tool, freehand create an elongated oval approximately 10-12 inches long and 2-3 inches wide. You can also sketch this on paper first to use as a template. -
Smooth the edges:
Run a damp sponge or your finger along the cut edges to compress the clay and remove any sharp crumbs left by the cut.
Shrinkage Check
Make incense holes 15-20% larger than the actual stick. Clay shrinks during drying and firing, and you don’t want the fit to be too tight later.
Step 2: Forming the Curves
-
Lift the sides:
Gently lift the outer edges of the oval slab with your fingertips. You want to create a shallow sidewall, curving the clay upwards rather than creating a sharp 90-degree angle. -
Pinch and smooth:
Work your way around the entire perimeter, slightly pinching the clay to maintain the height. Use your thumb on the inside and fingers on the outside to encourage a soft, organic curve. -
Refine the interior:
Take a soft rib tool and gently sweep it along the inside bottom of the tray. This smooths out any fingerprints and reinforces the subtle transition from the flat bottom to the raised sides. -
Check symmetry:
Look at the piece from eye level. Ensure the rim height is relatively consistent, though a little waviness adds to the natural, handmade charm.
Step 3: Adding Details & Finishing
-
Mark the center:
Lightly mark a line or dots down the center axis of the tray where you want your incense sticks to stand. -
Create the holes:
Use a specialized hole cutter, a needle tool, or even a bamboo skewer to pierce holes into the clay. I often wiggle the tool slightly to make the hole just a bit larger than the incense stick, accounting for clay shrinkage. -
Clean the holes:
Once the holes are pierced, smooth the displaced clay around the rim of each hole with a damp fingertip so they look intentional and tidy. -
Slow drying:
Cover the piece loosely with plastic to let it dry slowly to a leather-hard state. This prevents warping, especially with long, flat shapes. -
Final smoothing:
Once bone dry, use a barely damp sponge or fine sandpaper (wear a mask!) to gently buff away any remaining rough spots on the rim. -
Bisque fire:
Fire the piece in a kiln to the appropriate temperature for your specific clay body (usually Cone 04 or 06). -
Glazing:
Apply a matte transparent glaze to sealing the clay while keeping the raw, speckled look visible. Wipe the bottom clean with a sponge. -
Final firing:
Load the kiln again for the glaze firing (often Cone 5 or 6 for stoneware) to finish firmly setting the piece.
Warping Woes?
If the long tray curls up while drying, place a lightweight wooden board gently on top of the rim while it’s in the leather-hard stage to keep it flat.
Place your finished holder on a surface, light a stick of incense, and enjoy the calm atmosphere you have created
Terrazzo-Style Clay Art Pieces
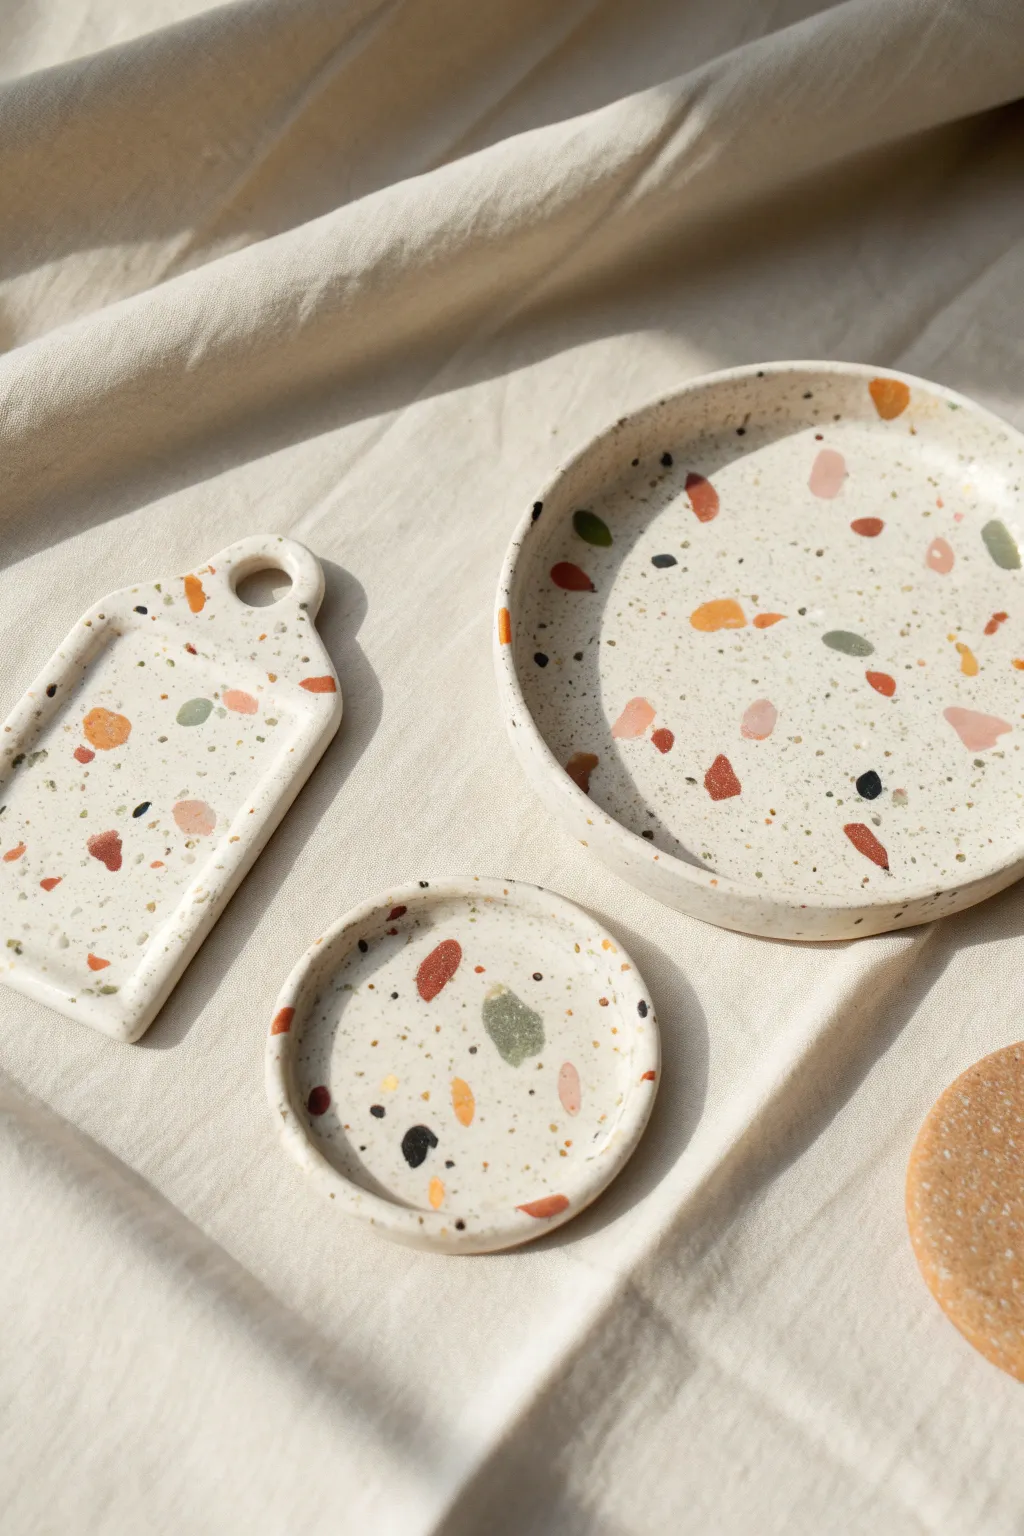
Capture the trendy, speckled aesthetic of terrazzo without the heavy concrete work using polymer or air-dry clay. These charming trinket dishes feature a creamy white base scattered with vibrant, organic chips of color, perfect for holding jewelry or adding a modern touch to your desk.
Detailed Instructions
Materials
- White polymer clay (approx. 2 blocks)
- Small amounts of colored polymer clay (terracotta, mute pink, sage green, mustard yellow, black)
- Rolling pin (acrylic preferred)
- Clay slicer or craft knife
- Round cookie cutters (various sizes)
- Rectangular clay cutter or ruler
- Small circle cutter (for the handle hole)
- Parchment paper or silicone mat
- Fine-grit sandpaper (400 to 1000 grit)
- Matte or satin glaze/varnish
- Soft paintbrush
- Oven (if using polymer clay)
Step 1: Preparing the Terrazzo Chips
-
Condition the colored clay:
Start by taking small amounts of your colored clays—terracotta, pink, green, yellow, and black. Knead each color individually until soft and pliable to prevent cracking later. -
Flatten the colors:
Roll out each color into a very thin sheet. You want these to be paper-thin because they need to embed seamlessly into the white base. -
Create the chips:
Using your clay slicer or craft knife, chop the thin colored sheets into jagged, irregular pieces. Vary the sizes from tiny specks to larger, distinct chunks for a natural look. -
Separate the pieces:
Gently scatter the chopped pieces on your work surface so they aren’t sticking together in clumps. I like to keep the colors slightly separate so I can control the distribution later.
Smearing Colors?
If your colored chips drag or smear during rolling, the clay might be too warm or soft. Let the slab sit in the fridge for 10 minutes to firm up before that final roll.
Step 2: Forming the Base
-
Condition the white clay:
Take your large blocks of white clay and condition them thoroughly. This is the bulk of your project, so ensure it is warm and unified. -
Roll the base sheet:
Roll the white clay out onto parchment paper or a silicone mat. Aim for a thickness of about 1/4 inch (6mm) to ensure the trays are sturdy. -
Scatter the chips:
Take your pre-cut colored chips and sprinkle them randomly over the white sheet. Don’t overthink the pattern; random placement looks most authentic. -
Add dimension:
Ensure you have a mix of large ‘statement’ chips and tiny specks of black or dark grey for contrast. -
Embed the chips:
Place a piece of parchment paper over the clay to prevent sticking, then gently roll over the slab with your rolling pin. Press firmly enough to force the chips flush with the white surface. -
Roll until smooth:
Continue rolling until the surface is completely flat and the colored pieces are no longer raised bumps. The slab might get slightly thinner during this process.
Make it Sparkle
For a luxe twist, mix small flakes of gold leaf or metallic granite clay into your colored chip pile before scattering them onto the white base.
Step 3: Shaping the Trays
-
Cut the round dish:
Place your large round cutter on the best-looking section of the slab and press down firmly to cut the main circle. -
Create the rim:
Cut a long strip of clay from the remaining terrazzo slab, about 1/2 inch wide. Carefully wrap this strip around the edge of your circle base to create a raised wall. -
Blend the seams:
On the outside and inside, gently smooth the clay where the wall meets the base using your finger or a clay tool until the seam disappears. -
Cut the rectangular tray:
Use a rectangular cutter or a ruler and knife to cut a rectangle shape. Round off the top corners if you want the arch shape shown in the image. -
Add the handle detail:
At the top of the rectangular piece, use a very small circle cutter to punch out a hole, creating a handle look. -
Build the small coaster:
Cut a smaller circle for the coaster. Similar to the large tray, attach a thin strip of clay around the edge to create a low lip. -
Smooth edges:
Run your finger dipped in a tiny bit of baby oil (or water for air-dry clay) around all rims to soften any sharp cutting marks.
Step 4: Finishing
-
Bake or dry:
Follow the manufacturer’s instructions for your specific clay. For polymer clay, bake on a tile or baking sheet (usually 275°F/130°C) for 30 minutes. -
Cool down:
Allow the pieces to cool completely before handling. They are fragile when hot. -
Sand for stone effect:
Once cool, wet-sand the pieces under running water using fine-grit sandpaper. This removes fingerprints and reveals the crisp edges of the colored chips. -
Seal the work:
Apply a thin layer of matte or satin varnish to protect the surface and give it a slight sheen without making it look like plastic.
Arranging these handmade pieces on a vanity creates an instantly sophisticated display for your favorite jewelry
Marbled Clay Wall Clock Face
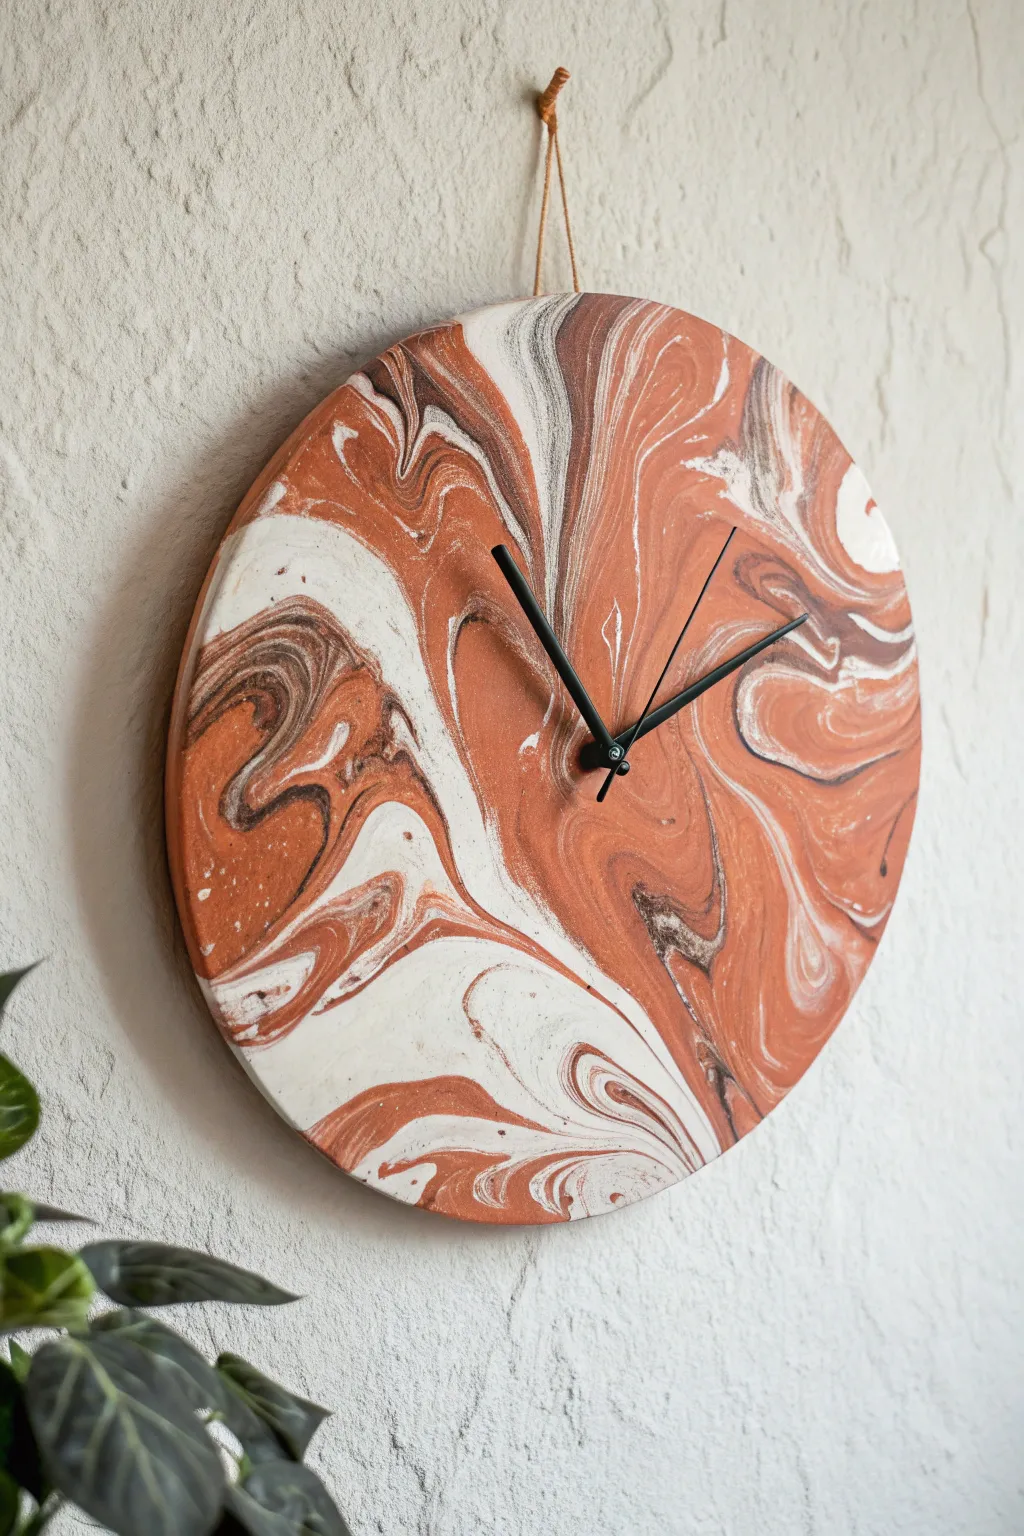
Bring earthy warmth to your walls with this sophisticated marbled clay clock. Creating faux-stone patterns with clay is surprisingly intuitive, resulting in a functional piece of art that looks like polished agate or jasper.
Step-by-Step Guide
Materials
- Polymer clay (white, terracotta/burnt orange, dark grey)
- Acrylic rolling pin
- Circle cutter or sharp craft knife
- Large circular template (a plate works)
- Clock mechanism kit (hands and battery pack)
- Sandpaper (fine grit)
- Drill with bit matching the clock shaft size
- Leather cord or twine
- Parchment paper
- Oven (for baking polymer clay)
Step 1: Marbling the Clay
-
Condition the clay:
Start by warming up your clay blocks. You’ll need about 50% terracotta, 40% white, and 10% dark grey. Knead each color separately until soft and pliable. -
Create snakes:
Roll each color into several long, snake-like ropes of varying thicknesses. Keep the terracotta ropes the thickest to serve as the dominant base color. -
Twist together:
Gather all your ropes into a single bundle. Twist them together tightly like a candy cane to begin merging the colors without fully blending them. -
Fold and roll:
Fold the twisted rope in half, then roll it out again. Repeat this twist-fold-roll process 3-4 times. Stop when you see beautiful thin streaks—don’t overmix or it will turn muddy. -
Form a ball:
Squash your marbled rope into a tight ball. This helps create those organic, circular swirls seen in the final piece rather than just straight stripes.
Step 2: Shaping the Clock Face
-
Roll flat:
Place the clay ball on parchment paper. Using your acrylic rolling pin, roll the clay out into a slab about 1/4 inch thick. Rotate your rolling direction frequently to keep the pattern random. -
Check the pattern:
Inspect both sides of your slab. Sometimes the underside has a more dramatic marbling effect that you might prefer as the front face. -
Cut the circle:
Place your circular template over the best part of the pattern. Use a craft knife to cut straight down around the edge for a clean, perpendicular rim. -
Smooth the edges:
Dip your finger in a little water (or baby oil for polymer clay) and run it gently along the cut edge to soften any sharp corners or drag marks from the knife. -
Create the center hole:
Find the exact center of your circle. Poke a small pilot hole with a toothpick or skewer. This hole will be drilled out later, but marking it now ensures accuracy. -
Add hanging holes:
If you want the leather cord hanger shown in the example, pierce two holes near the top edge, spaced about 2 inches apart.
Clean Cuts Pro Tip
Chill your rolled clay sheet in the fridge for 10 minutes before cutting the circle. Firm clay cuts much cleaner and drags less under the knife blade.
Step 3: Finishing and Assembly
-
Bake the clay:
Transfer the clay on the parchment to a baking sheet. Bake according to the manufacturer’s instructions (usually 275°F/135°C for 15-30 minutes depending on thickness). -
Cool under weight:
As soon as the clay comes out of the oven, place a heavy book on top of it while it cools. This prevents the large flat disc from warping. -
Sand for smoothness:
Once fully cool, use fine-grit sandpaper to buff the surface and edges. This gives it that smooth, professional ceramic feel. -
Drill the center:
Using a drill bit that matches your clock mechanism’s shaft diameter, carefully drill through your pilot hole. Go slowly to avoid cracking carefully. -
Install mechanism:
Push the clock shaft through the hole from the back. Secure it with the washer and nut provided in your kit on the front side. -
Attach the hands:
Press the hour hand onto the shaft first, followed by the minute hand. Make sure they are parallel so they don’t catch on each other. -
Add the hanger:
Thread a piece of leather cord through the top holes. Tie knots on the front side for a decorative touch, or tie them in the back for a hidden finish.
Air Bubble Trouble
If you see a bubble while rolling, pierce it with a needle and smooth the air out immediately. Trapped air can expand in the oven and cause unsightly surface bumps.
Hang your new timekeeper and enjoy the organic movement it adds to your space
Clay Wall Hanging With Leaf Shapes
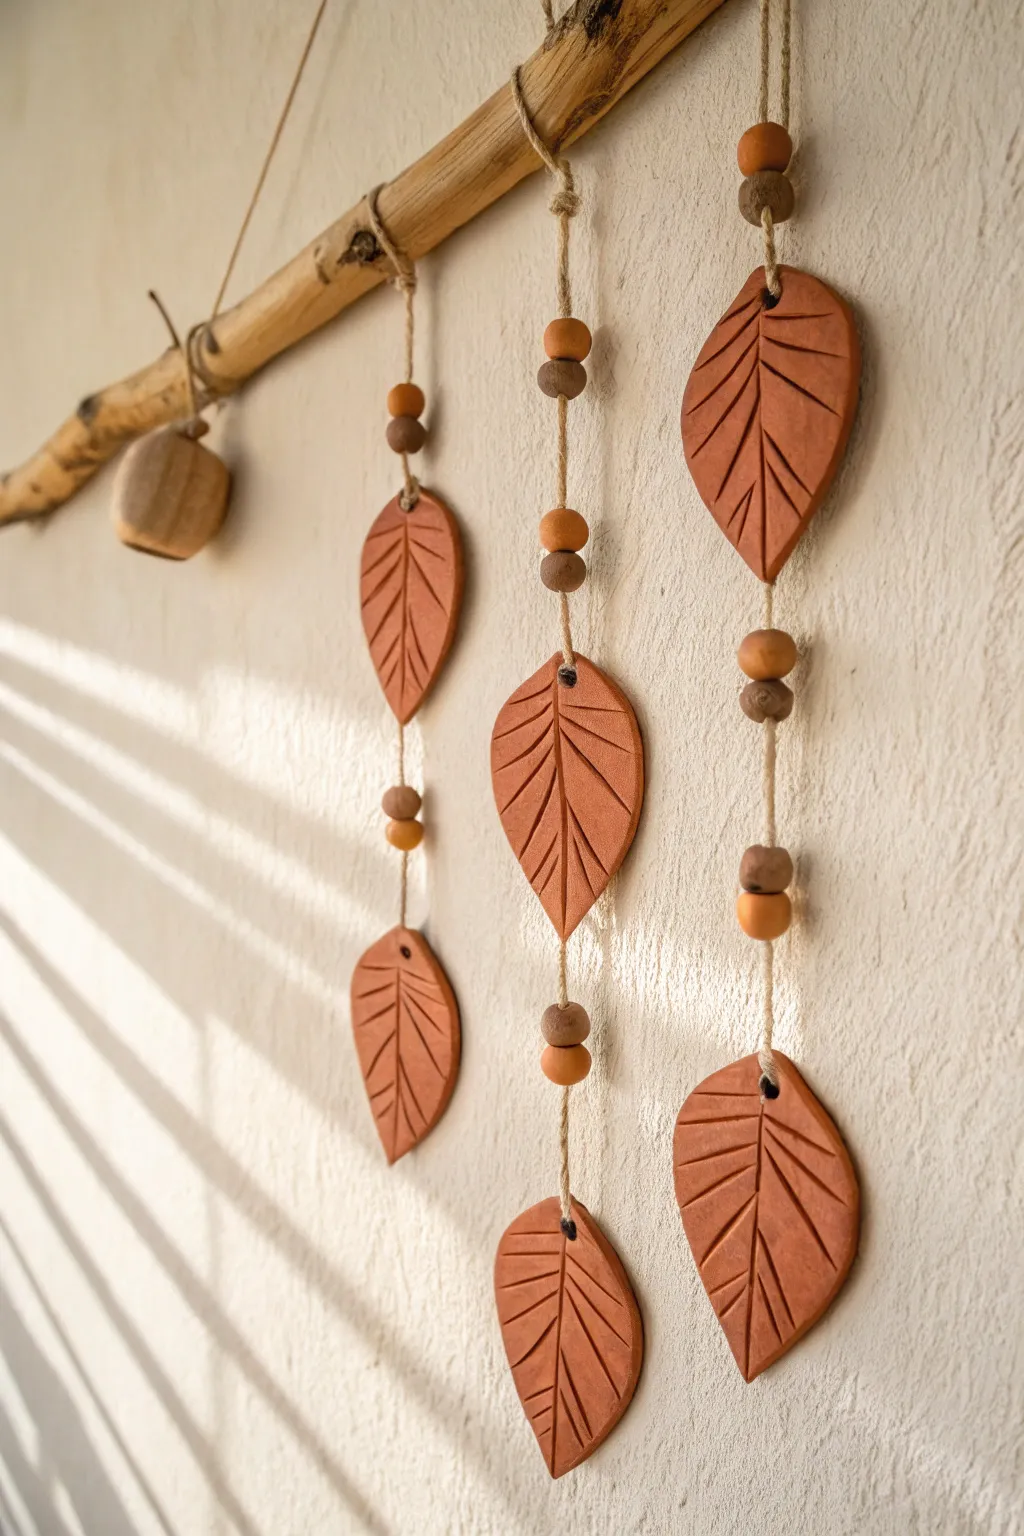
Bring a touch of nature indoors with this rustic wall hanging featuring terracotta clay leaves and wooden beads. The warm, earthy tones and organic textures create a calming piece of decor that looks beautiful catching the afternoon light.
Detailed Instructions
Materials
- Terracotta air-dry clay (or polymer clay)
- Wooden dowel or foraged branch (approx. 18-24 inches)
- Jute twine or hemp cord
- Rolling pin
- Leaf-shaped cookie cutter (or a knife and paper template)
- Needle tool or toothpick
- Straw or small circle cutter
- Wooden beads (various sizes, mixed brown and natural tones)
- Fine-grit sandpaper
- Matte varnish (optional)
Step 1: Creating the Clay Leaves
-
Prepare the clay:
Begin by taking a chunk of your terracotta clay and kneading it in your hands until it feels soft and pliable. This warms it up and prevents cracking later. -
Roll it out:
On a clean, flat surface, roll the clay out to an even thickness of about 1/4 inch. If you want a uniform look, you can place two wooden rulers on either side of the clay as depth guides for your rolling pin. -
Cut the shapes:
Use a leaf-shaped cookie cutter to punch out your forms. If you don’t have a cutter, simply lightly sketch a leaf shape onto the clay with a needle tool and cut it out carefully with a craft knife. -
Smooth the edges:
Dip your finger in a tiny bit of water and run it along the cut edges of each leaf to smooth down any roughness or stray clay bits. -
Add texture details:
Using a needle tool or a blunt knife, gently score a central vein line down the middle of each leaf, stopping just short of the edges. -
Create the veins:
Make diagonal lines branching out from the center line to create the leaf veins. Vary the pressure slightly so the lines look organic and not too rigid. -
Punch holes:
Use a drinking straw or a small circle cutter to punch a hole at the very top of each leaf for hanging. For the leaves that will be in the middle of a strand, you will also need to punch a hole at the bottom tip. -
Let them dry:
Place your leaves on a wire rack or parchment paper to dry completely. This usually takes 24-48 hours depending on humidity; flip them halfway through to ensure they dry flat.
Leaves curling up?
Air-dry clay tends to curl as moisture evaporates unevenly. To prevent this, flip your leaves over every few hours while they dry, or place valid a light book on top once they are ‘leather hard’.
Step 2: Assembly and Hanging
-
Sand imperfections:
Once fully dry, check your leaves for any sharp edges. I like to give them a quick pass with fine-grit sandpaper for a professional finish. -
Seal (Optional):
If you want extra durability or a slight sheen, apply a coat of matte varnish now and let it dry. -
Cut the twine:
Cut three lengths of jute twine. The length will depend on how low you want the mobile to hang, but starting with three 3-foot pieces gives you plenty of room to work. -
Start the center strand:
Tie a knot at the bottom of one piece of twine and add a large wooden bead. Thread your bottom-most leaf onto the twine so it rests on the bead. -
Add spacing beads:
Thread a few wooden beads above the leaf. Tie a knot in the twine a few inches higher where you want the next leaf to sit. -
Attach the second leaf:
Thread a bead, then the second leaf (running the twine through both top and bottom holes if this is a middle piece), and then another bead to secure it in place. -
Repeat for side strands:
Repeat this beading and knotting process for the other two strands. You can vary the number of leaves per strand—try two leaves on the side strands and three in the center for balance. -
Prepare the branch:
Take your wooden branch and determine where the three strands will hang. Mark these spots lightly with a pencil. -
Attach strands to branch:
Tie the top of each beaded strand secure onto the branch at your marked spots. Trim any excess twine. -
Create the hanger:
Cut a final piece of twine for the main hanger. Tie one end to the far left of the branch and the other to the far right, creating a triangle shape for hanging.
Earth Tone Pro Tip
If you can’t find terracotta-colored clay, you can mix standard white air-dry clay with a generous dollop of burnt sienna acrylic paint before rolling it out for that faux-ceramic look.
Hang your beautiful new mobile near a window and enjoy the play of shadows it casts throughout the day
Window Suncatchers With Cutout Silhouettes
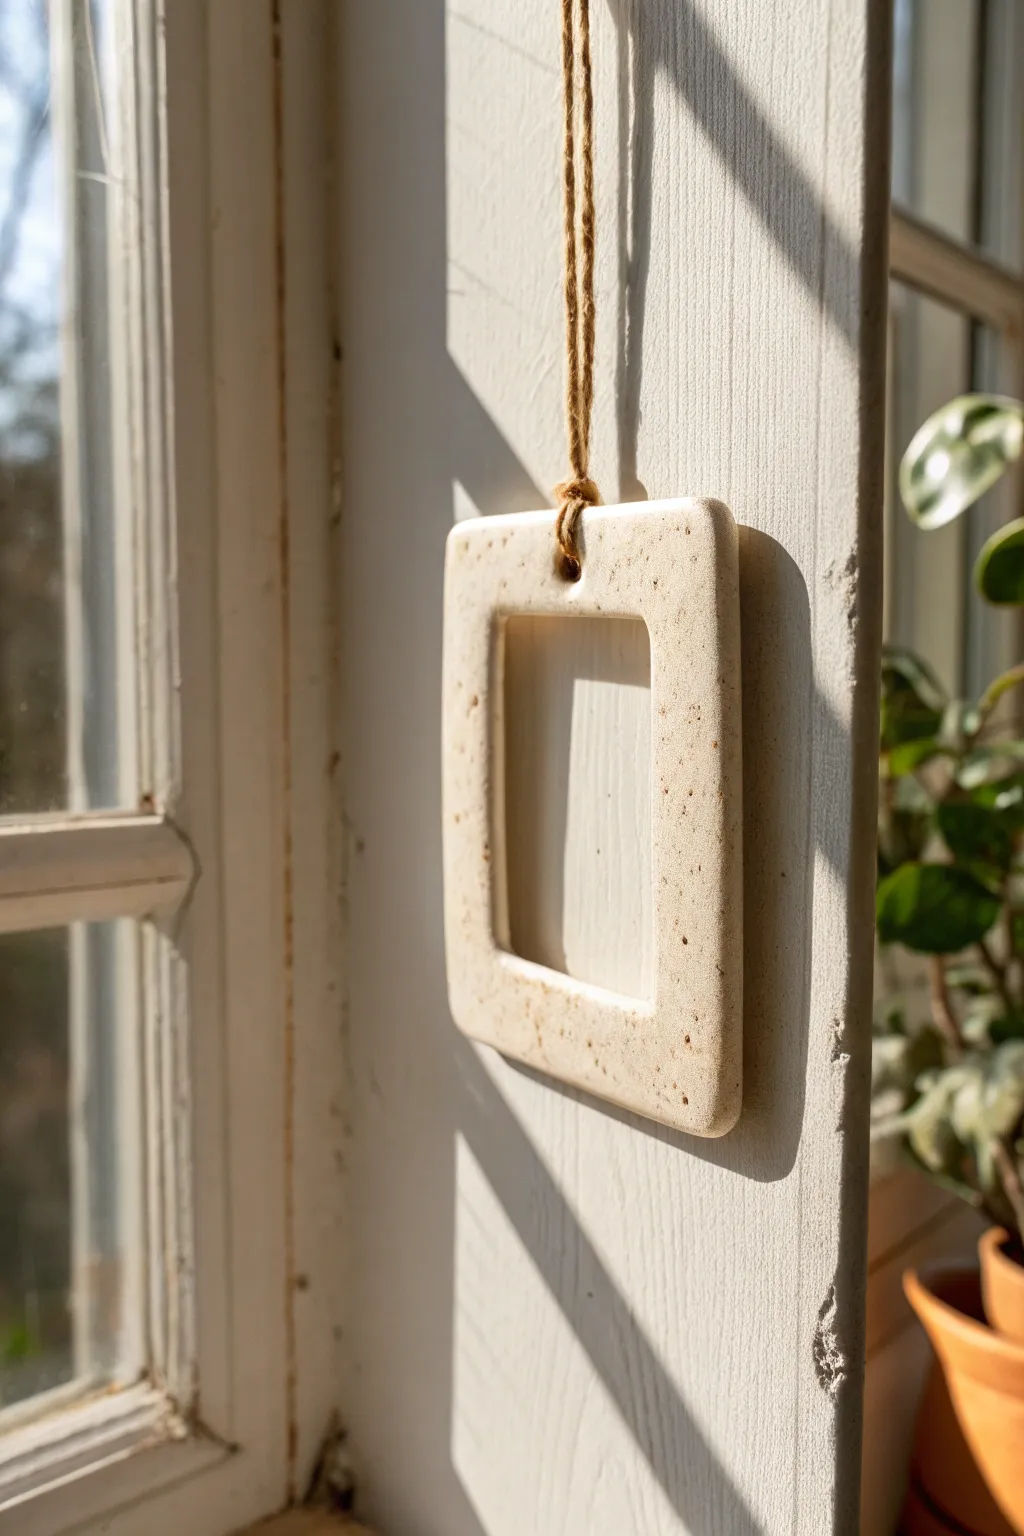
Embrace the beauty of simplicity with this understated rectangular suncatcher. Made from speckled clay, its open center invites the light to pass through, turning any window into a living frame for the world outside.
Step-by-Step Guide
Materials
- Speckled polymer clay (like Premo ‘Granite’ or Fimo ‘Stone’)
- Rolling pin or pasta machine
- Sharp blade or clay knife
- Two rectangular cookie cutters (nesting sizes) or a ruler and paper template
- Small round cutter or drinking straw (for the hole)
- Fine-grit sandpaper (400-600 grit)
- Jute twine or hemp cord
- Ceramic tile or parchment paper
Step 1: Shaping the Clay
-
Condition the clay:
Begin by warming the speckled clay in your hands, kneading it until it is soft and pliable to prevent cracks later on. -
Roll it out:
Roll the clay onto a smooth work surface or tile. Aim for a thickness of about 1/4 inch (6mm); thicker clay looks more like natural stone and hangs better. -
Cut the outer shape:
Use your larger rectangular cutter or a ruler and blade to cut the main exterior rectangle. A size of 3×4 inches works well for a standard window. -
Center the inner cutout:
Place your smaller rectangular cutter in the center of the clay slab. Measure the distance from the edge on all sides to ensure your frame borders will be even. -
Remove the center:
Press down firmly to cut the inner window. Carefully lift away the center piece of clay (save this for a smaller project!). -
Refine the edges:
Use your finger or a smoothing tool to gently soften the sharp cut edges of both the inner and outer rectangles. This gives it that handmade, organic pottery feel. -
Create the hanging hole:
Using a small straw or round cutter, punch a hole in the center of the top border. Ensure there is at least 1/4 inch of clay above the hole for strength.
Step 2: Baking and Finishing
-
Bake carefully:
Preheat your oven according to the clay manufacturer’s instructions (usually 275°F/130°C). Bake the piece on a ceramic tile or parchment-lined tray for 30 minutes. -
Cool down:
Let the frame cool completely in the oven with the door cracked, or remove and let sit at room temperature. Do not handle while hot as the clay is still fragile. -
Sand for stone effect:
Once cool, use fine-grit sandpaper under running water to smooth any imperfections. Wet sanding keeps dust down and polishes the speckled surface beautifully. -
Prepare the hanger:
Cut a length of jute twine, about 12-15 inches long depending on how low you want the piece to hang. -
Thread the twine:
Fold the twine in half to create a loop. Push the folded end through the hole in the clay frame from front to back. -
Secure the knot:
Pull the loose ends of the twine through the loop you just pushed through the hole, tightening it to create a ‘lark’s head’ knot securely against the top of the frame. -
Tie the top:
Bring the two loose ends of the twine together at the top and tie a simple overhand knot to close the hanger loop. -
Hang and enjoy:
Place your suncatcher on a window latch or hook where the sunlight can highlight the natural texture of the faux stone.
Stone Texture Trick
Add real black pepper or dried coffee grounds to plain white clay if you can’t find pre-made granite clay. It creates an authentic speckled pottery look.
Uneven Edges?
If your rectangle looks warped after cutting, use a ruler to gently push the sides back into straight lines before baking without touching the clay surface.
Now you have a serene, modern piece of decor that captures the changing light throughout the day
Tiny Clay Room Dioramas
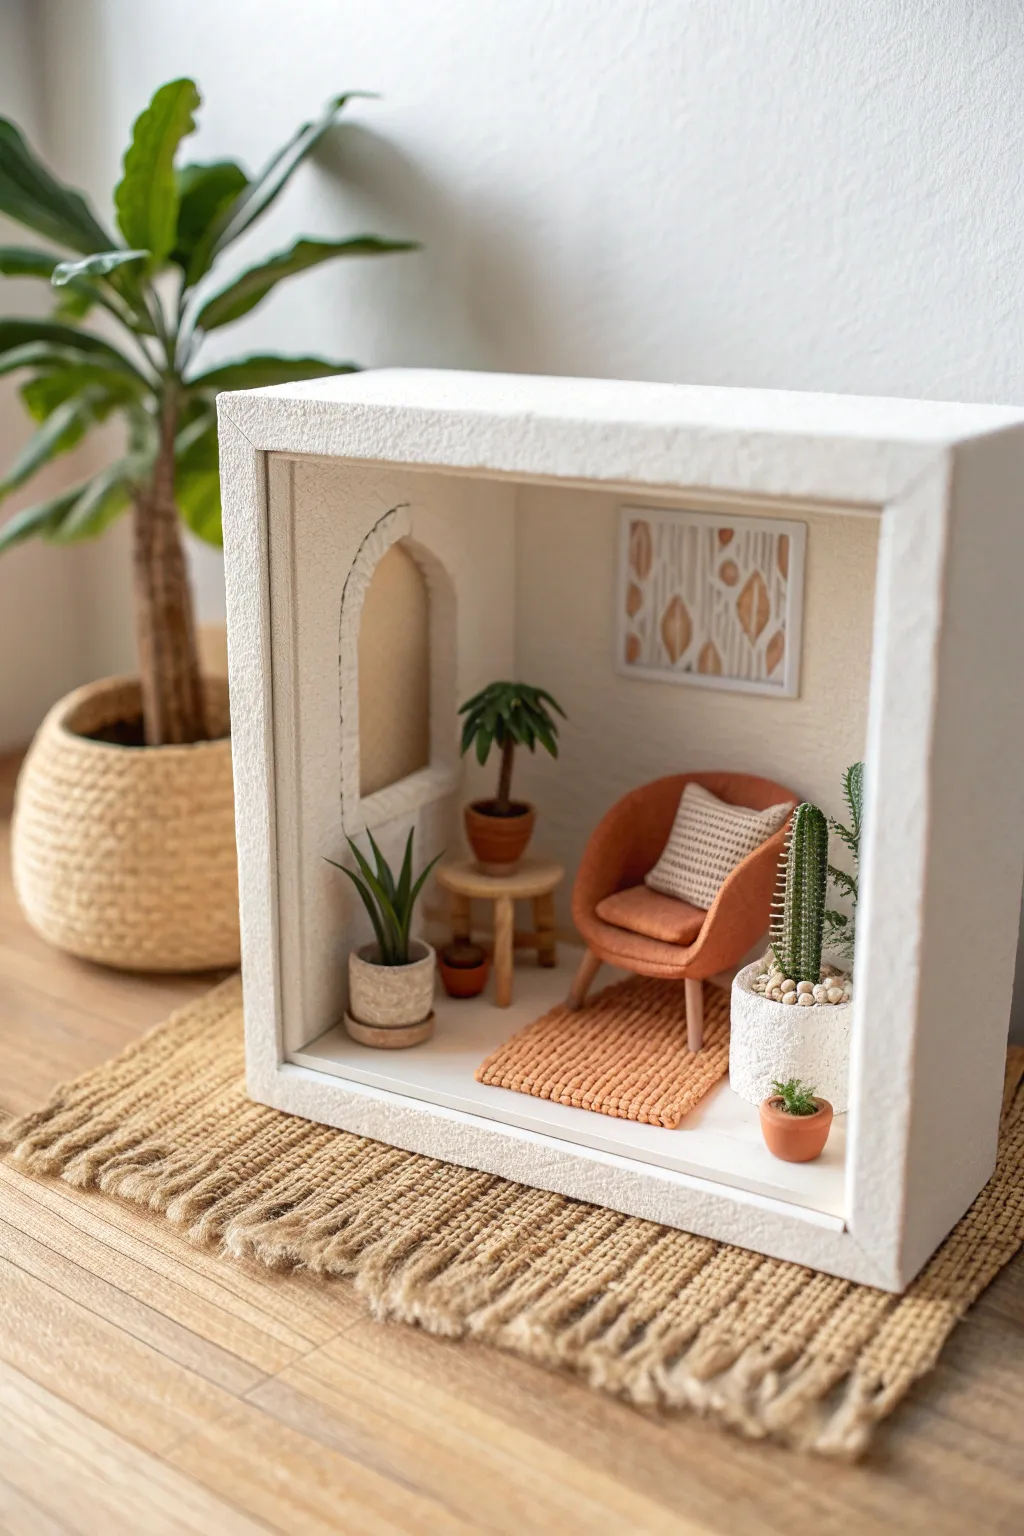
This serene, boho-inspired miniature room captures the warmth of the desert in a compact diorama. Featuring tiny terracotta pots, realistic clay succulents, and specialized furniture, this project turns a simple shadow box into a cozy retreat.
Step-by-Step Tutorial
Materials
- Deep shadow box frame (white or wood)
- Polymer clay (white, terracotta, green varieties, brown)
- Liquid clay or strong craft glue
- Cardstock or thin balsa wood (for furniture framing)
- Textured fabric scraps (terracotta and cream)
- Acrylic paints (terracotta, cream, sage green)
- Small piece of textured paper or jute (for the rug)
- Sculpting tools (needle tool, ball stylus)
- Thin floral wire or toothpicks
- Sandpaper or nail file
Step 1: Setting the Scene
-
Prepare the Box:
Begin by removing the glass from your shadow box if possible, or masking it off. Paint the interior walls a warm, textured white to mimic stucco. I like to mix a little baking soda into acrylic paint to get that gentle grit. -
Create the Arch Feature:
Cut a thick piece of cardstock or foam board into an arched window shape. Glue this to the left wall. Paint over it with your textured white paint so it blends seamlessly into the wall, creating architectural depth. -
Add the Floor:
Measure the bottom of the box. Cut a piece of cardstock to fit perfectly and paint it a clean white or light beige to serve as the flooring. Glue it in place once the paint is fully dry.
Uneven Legs?
If your tiny table or chair wobbles, don’t try to recut the legs. Instead, glue a tiny piece of sandpaper flat on a table and gently rub the furniture legs over it in circles to level them out perfectly.
Step 2: Sculpting the Plants & Pots
-
Form the Pinch Pots:
Roll small balls of terracotta-colored polymer clay. Using a ball stylus or the end of a paintbrush, press down into the center to form hollow pot shapes. Create varying sizes—one large for the cactus, medium for the palm, and tiny ones for accents. -
Texture the Planters:
For the largest white planter, roll a cylinder of white clay. Use a needle tool or an old toothbrush to tap the surface, giving it a rough, stone-like texture. Add tiny pebbles made of beige clay to the top ‘soil’ area. -
Sculpt the Cactus:
Roll a snake of green clay for the tall cactus. Use a knife tool to press vertical ridges down the sides. Dot the ridges with white acrylic paint using a toothpick after baking to simulate spines. -
Create the Palm:
Wrap brown clay around a piece of floral wire for the trunk. Create leaves by flattening small green teardrop shapes and slicing the edges with a blade to make fronds. Attach these to the top of the trunk. -
Make the Agave:
For the spiky plant, shape several thin, pointed leaves from dark green clay. Press them together at a central base, flaring them outward. -
Bake the Clay Components:
Place all your pots and plant parts on a tile or baking sheet. Bake according to your clay manufacturer’s instructions (usually 275°F for 15-30 minutes).
Light It Up
Drill a small hidden hole in the top of the box frame and thread a single warm-white LED battery light through it. Position it like a recessed ceiling light to cast realistic shadows in your room.
Step 3: Furnishing the Room
-
Build the Chair Frame:
Shape the chair base using wire or carve it from balsa wood for stability. It needs four legs and a rounded back structure. -
Upholster the Chair:
Cover the chair structure with a layer of clay to round it out, then bake. Once cooled, glue terracotta-colored fabric over the clay form, tucking edges underneath for a neat finish. -
Sew a Tiny Pillow:
Cut two tiny squares of cream fabric. Glue or sew the edges together, stuffing slightly with cotton or clay scraps. Use a fine-tip marker to draw a delicate pattern on the front. -
Construct the Side Table:
Cut a small circle from balsa wood or form a disc from clay. Attach three small dowels or clay legs. Keep the design simple and Scandinavian. -
Weave the Rug:
Cut a small rectangle of jute fabric or textured heavy paper. Fray the short edges slightly to look like tassels, then paint the body a warm terracotta orange.
Step 4: Final Assembly
-
Install the Wall Art:
Cut a tiny square of paper and paint an abstract botanic pattern using sage and ochre paints. Frame it with thin strips of balsa wood or cardstock and glue it to the back wall. -
Arrange the Furniture:
Glue the rug down first, slightly angled for a casual look. Place the chair and side table on top. -
Place the Greenery:
Position the tall cactus in the front right corner to frame the scene. Place the palm on the side table or near the arch, and scatter the smaller pots on the floor. -
Final Touches:
Check all angles to ensure pieces are secure. Use a tiny brush to touch up any paint or add definition to the plant leaves.
Display your miniature oasis on a bookshelf or wall to bring a permanent touch of calm to your space
Woven-Texture Rainbow Arch Sculptures
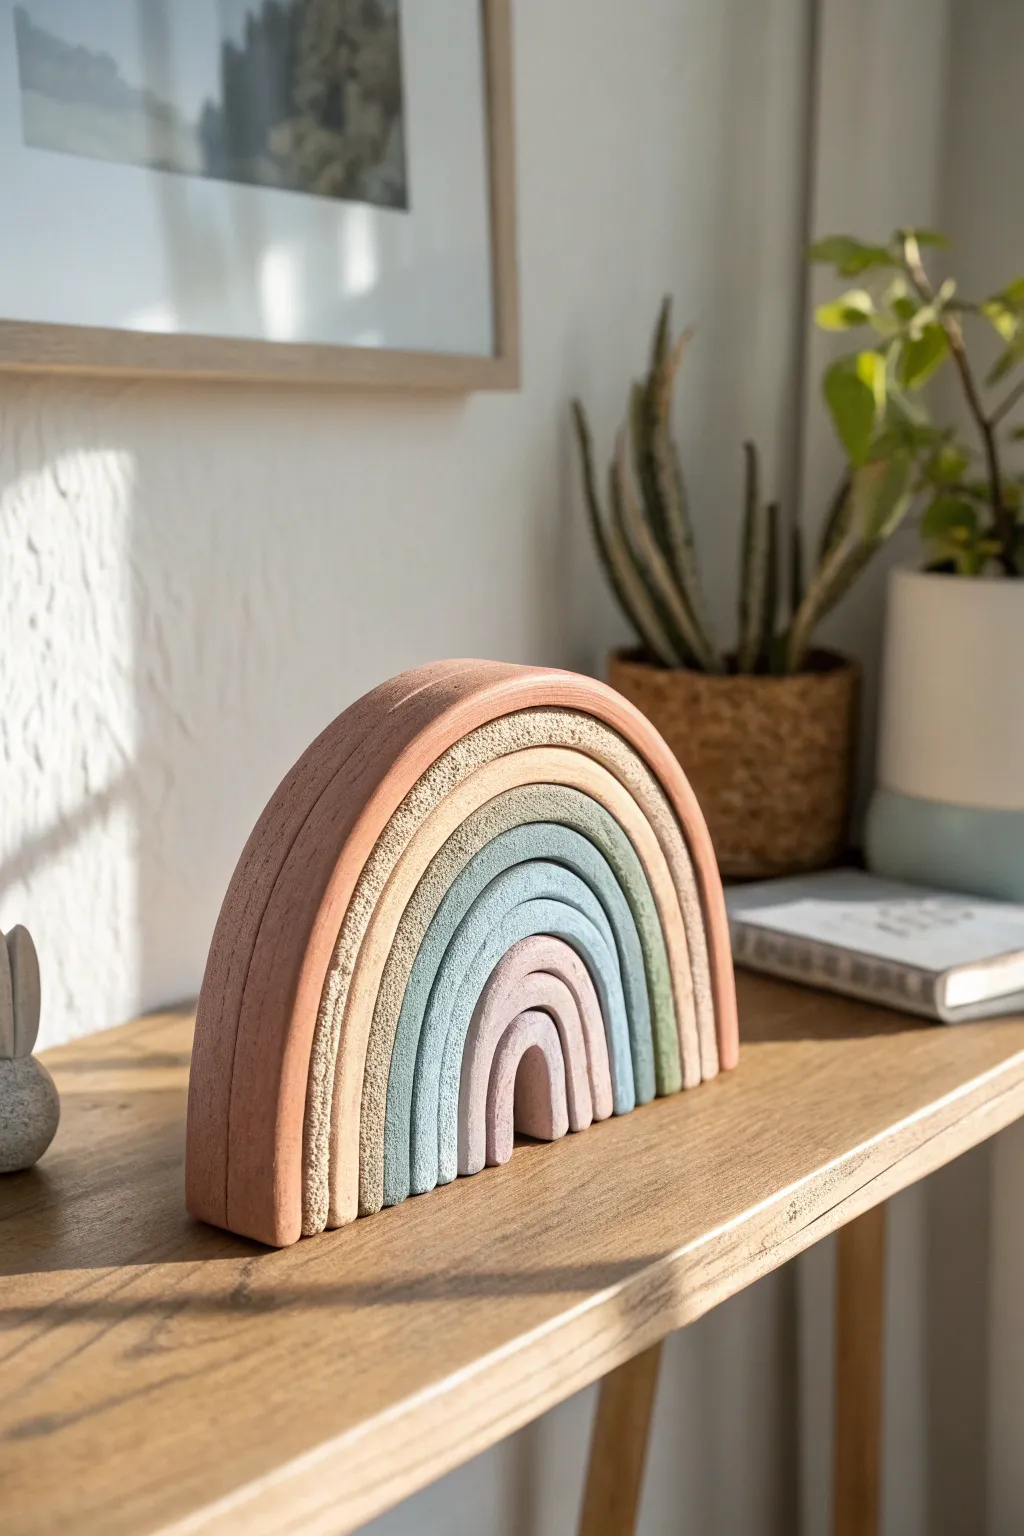
Recreate the cozy charm of a wooden stacking toy using air-dry clay and clever texturing techniques. This sculptural rainbow features muted, earthy tones and a delightful tactile finish that mimics organic wood grain and fabric textures.
Detailed Instructions
Materials
- Air-dry clay (white or terracotta)
- Rolling pin
- Sharp craft knife or scalpel
- Sandpaper (various grits)
- Acrylic paints (muted pink, terracotta, ochre, sage, dusty blue, lilac)
- Texturing tools (old toothbrush, stiff bristle brush, or rough sponge)
- Cardboard or cardstock (for templates)
- Matte sealant spray or varnish
Step 1: Shaping the Arches
-
Create templates:
Begin by sketching a series of 6-7 concentric arches on a piece of cardstock to ensure your rainbow stacks perfectly. Cut these out to use as cutting guides for your clay. -
Condition the clay:
Knead your air-dry clay thoroughly until it is warm, pliable, and free of air bubbles. This prevents cracking later on. -
Roll out the slab:
Roll the clay out into an even slab, approximately 1/2 to 3/4 inch thick. You want it substantial enough to stand upright on a shelf. -
Cut the arches:
Place your cardstock templates on the clay slab. Using a sharp craft knife, carefully cut around each arch. Keep the knife vertical to ensure flat, stacking edges. -
Refine the edges:
Dip your finger in a little water and smooth down any sharp corners or jagged edges left by the knife.
Step 2: Texturing and Drying
-
Add surface texture:
To mimic the organic, slightly rough look in the photo, gently press a stiff bristle brush or an old toothbrush into the surface of the wet clay. Focus on the front and back faces, leaving the stacking edges relatively smooth. -
Create ‘wood’ grain:
For the larger outer arches, you might want a directional texture. Drag the bristles gently from one side of the arch to the other to simulate wood grain. -
Initial drying:
Lay the arches flat on a clean board or wire rack. Let them dry for about 24-48 hours. Turn them over occasionally to ensure even drying and prevent warping. -
Sanding:
Once fully cured and hard, use fine-grit sandpaper to smooth out any unintentional bumps on the bottom edges so they sit flush against each other.
Warping Prevention
To stop arches from warping while drying, place a light book or a flat board on top of them once the surface is dry to the touch.
Step 3: Painting and Finishing
-
Base coat:
Mix a ‘whitewash’ consistency paint by diluting white acrylic with a drop of water. Apply a thin layer to prime the clay without filling in your beautiful texture. -
Mix your palette:
Prepare your colors. I like to mix a tiny bit of brown or grey into standard acrylics to achieve those dusty, vintage hues seen in the reference image (terracotta, beige, sage green, sky blue, lavender). -
Dry brushing technique:
Load a brush with paint, then wipe most of it off on a paper towel. Lightly sweep the dry brush over the textured clay. This deposits color on the raised areas while leaving the recesses darker, emphasizing the faux-stone or wood effect. -
Layering color:
If the color feels too flat, stipple a slightly lighter shade of the same hue onto the center of the arch to create dimension. -
Painting the sides:
Paint the flat sides and bottom of each arch with a solid coat of the corresponding color for a clean, finished look. -
Sealing:
Finish with a matte spray varnish to protect the paint and give the piece a unified, non-glossy sheen that resembles natural wood.
Speckled Effect
Flick tiny droplets of diluted brown or black paint onto the finished arches with a toothbrush to create a trendy ceramic speckle look.
Arrange your beautiful new sculpture on a mantle or bookshelf for a touch of handmade warmth