A good clay ashtray is the perfect little project: small, quick, and super satisfying to customize. Here are my favorite clay ashtray ideas—from classic shapes you can knock out in an afternoon to playful statement pieces that feel like tiny sculptures.
Classic Pinch-Pot Ashtray With Clean Notches
This project produces a wonderfully sturdy, classic ceramic piece that feels both rustic and refined. With its distinctive creamy glaze and subtle crackle finish, it serves as a minimalist yet functional object perfect for any tabletop.
Step-by-Step Tutorial
Materials
- Stone or earthenware clay body (white or buff)
- Potter’s wheel (optional, can be hand-built)
- Needle tool
- Wire cutter
- Rib tool (metal or wood)
- Sponge
- Carving tool or loop tool (for notches)
- Clear or Cream Crackle Glaze
- Iron oxide wash (or brown underglaze)
- Kiln access
Step 1: Forming the Base
-
Wedging:
Begin by wedging a ball of clay roughly the size of a large orange to remove air bubbles and ensure consistency. -
Centering:
Throw the ball onto the wheel head and center it firmly. If you are hand-building, start by forming a neat, symmetrical pinch pot with a flattened bottom. -
Opening the floor:
Open the centered clay, pressing down to establish a flat interior floor about 3/8-inch thick. Avoid going too thin, as this piece needs some heft. -
Pulling the walls:
Pull the walls up vertically. Keep them relatively thick and sturdy, aiming for a consistent cylinder height about 2 to 2.5 inches tall. -
Shaping the rim:
Gently compress the rim with a chamois or sponge to round it off perfectly. Slightly curve the walls inward very subtly near the top to create a contained shape.
Smooth Operator
Use a metal kidney rib on the outside while the wheel spins slowly to remove all throwing lines for that ultra-sleek, modern surface.
Step 2: Refining and Notching
-
Drying to leather hard:
Allow the piece to dry slowly until it reaches a leather-hard state. It should be firm enough to handle without deforming but still cool to the touch. -
Trimming (if wheel-thrown):
Flip the piece over and trim the foot. I like to keep the bottom flat and smooth, mirroring the clean aesthetic of the visible areas. -
Marking notch placement:
Using a needle tool, lightly mark three equidistant points (120 degrees apart) along the top rim for your cigarette rests. -
Carving the notches:
Use a round loop tool or a U-shaped carving tool to gently press and scoop out the clay at your marks. Aim for a distinct, rounded U-shape that dips comfortably below the rim. -
Smoothing the cuts:
Use a slightly damp sponge or your finger to round over the sharp edges created by the cut notches. The transition should be soft, not jagged. -
Bisque firing:
Once fully bone dry, fire the piece to bisque temperature (usually cone 04 or 06, depending on your clay body).
Step 3: Glazing and Finishing
-
Applying oxide wash:
Mix a small amount of iron oxide with water. Using a fine brush, carefully paint this onto the very edge of the rim and inside the carved notches to create that darkened, vintage border effect. -
Wiping back:
Gently sponge off any excess oxide that dripped down the walls, leaving the pigment primarily in the texture of the rim and notches. -
Glazing the interior:
Pour a cream or clear crackle glaze into the interior, roll it around to coat evenly, and pour out the excess. -
Glazing the exterior:
Dip or brush the exterior with the same glaze. Ensure the coat is even, but not so thick that it obscures the form. -
Final firing:
Fire the piece to the maturity temperature of your glaze (likely Cone 5/6 or Cone 10). Allow the kiln to cool completely before opening to encourage the crazing (crackle) effect. -
Enhancing the crackle (optional):
If the crackle is too subtle, rub a little India ink or strong black tea over the surface and wipe it off. The dark liquid will settle into the glaze fissures, highlighting the spiderweb pattern.
Retro Texture
Before the clay dries, gently tap the exterior with a wooden paddle wrapped in linen to add a subtle woven texture under the glaze.
Place this on your patio table and enjoy the satisfaction of using something handmade and durable


Square Slab Ashtray With Crisp Corners

This tutorial guides you through creating a sleek, square ashtray with a natural, speckled stoneware finish. Its sturdy walls and precise notches make it a functional piece of modern decor that celebrates the simple beauty of raw clay.
How-To Guide
Materials
- Speckled stoneware clay (1-2 lbs)
- Canva or heavy fabric working surface
- Rolling pin
- Two wooden guide strips (approx. 1/4 inch thick)
- Fettling knife or clay needle tool
- Ruler or square templates
- Scoring tool or serrated rib
- Slip (clay and water mixture)
- Wooden modeling tool or spoon handle
- Smooth kidney rib
- Sponge
Step 1: Preparing and Cutting Slabs
-
Wedge the clay:
Begin by wedging your speckled stoneware clay thoroughly to remove air bubbles and ensure an even consistency, which is crucial for sturdy slab construction. -
Set up guides:
Place your canvas on a flat table. Lay down your two wooden guide strips parallel to each other, spacing them wide enough to fit your rolling pin. -
Roll the slab:
Place the ball of clay between the guides. Using the rolling pin, roll the clay out until the pin rests flat on the wooden strips, ensuring a perfectly even thickness. -
Compress the clay:
Take a kidney rib and gently drag it across the surface of the slab in multiple directions. This aligns the clay particles and prevents warping later on. -
Measure the base:
Using a ruler, measure and mark a perfect square for the base. A 5×5 inch square is a good standard size, but adjust to your preference. -
Measure the walls:
Mark out four rectangular strips for the walls. The length of each strip should match the side of the base square plus the thickness of the clay, and the height should be about 1.5 inches. -
Cut the pieces:
Use your fettling knife or needle tool to cut out the base square and the four wall strips. Keep your knife perpendicular to the table for straight, crisp edges.
Warping Walls?
If walls sag inward, the clay was too wet. Let slabs stiffen to ‘leather hard’ before assembly. You can also prop walls with foam blocks while the joints firm up.
Step 2: Assembling the Form
-
Condition the edges:
Let the pieces sit for about 20-30 minutes until they are ‘leather hard’—stiff enough to hold their shape but still flexible. -
Score the connection points:
Rough up the edges of the base and the bottom/sides of the wall strips with a serrated tool. Apply a generous amount of slip to these scored areas. -
Attach the first wall:
Place the first wall strip onto the base. Press it down firmly to ensure a strong bond, wiping away excess slip that squeezes out. -
Complete the square:
Attach the remaining three walls, scoring and slipping the vertical corners where the walls meet. I like to overlap the corners slightly and then trim for a seamless look. -
Reinforce the seams:
Roll a very thin coil of wet clay. Press this into the interior seams where the walls meet the floor and smooth it down with a modeling tool to strengthen the join.
Make it Marble
Before rolling your slab, wedge two contrasting clay bodies (like white and tan) together loosely. Roll out to create a stunning natural marble effect.
Step 3: Refining to Finish
-
Smooth the walls:
Use a damp sponge or a smooth rib to even out the exterior and interior walls, blending the corner seams until they are invisible. -
Round the edges:
Gently run your damp sponge or finger along the sharp top rim and the vertical corners to soften them slightly, giving the piece that comfortable, finished look seen in the photo. -
Create the notches:
Select the center point (or desired location) on typically two or four sides of the rim. Use a round wooden tool or the handle of a thick spoon to press down firmly, creating the half-circle rests. -
Clean the notches:
Smooth out any displaced clay around the notches with a wet finger, ensuring the curve is clean and consistent. -
Final texture check:
If you want to emphasize the gritty stoneware texture, wipe the surface one last time with a slightly wetter sponge to expose the grog or speckles. -
Dry slowly:
Loosely cover the ashtray with plastic for the first day to let the moisture even out, then uncover to dry completely before firing.
Now you have a functional, heavy-duty piece ready for the kiln and years of use


Scalloped Rim Ashtray for a Soft, Girly Look

This charming, handmade ashtray features a gentle, ruffled rim that looks almost like a pie crust or a flower, softening the utilitarian object with a decidedly feminine touch. The natural speckling and curved design give it an organic, airy feel perfect for a sunny windowsill.
Detailed Instructions
Materials
- Speckled stoneware clay (white or light buff)
- Rolling pin
- Canvas mat or wooden board
- Needle tool
- Small bowl or circle template (approx. 4-5 inches)
- Sponge
- Rib tool (metal or rubber)
- Small paintbrush
- Clear or transparent blush glaze
- Kiln access
Step 1: Forming the Base
-
Prepare the clay:
Begin with a ball of speckled stoneware clay about the size of a large orange. Wedge it thoroughly to remove any air bubbles and ensure the consistency is even. -
Roll out the slab:
Place the clay on your canvas mat. Using a rolling pin, roll the clay out into an even slab that is roughly 1/4 inch thick. Rotate the slab frequently to keep it circular. -
Cut the circle:
Place your bowl or circle template onto the slab. Using your needle tool, trace around the template to cut out a perfect circle. Remove the excess clay. -
Smooth the surface:
Take a damp sponge or a rubber rib tool and gently compress the surface of the clay circle. This removes the canvas texture and prevents future warping.
Cracking Rims?
If the rim cracks while bending, your clay is too dry. Spray a mist of water over it and cover with plastic for 20 minutes to rehydrate before trying again.
Step 2: Creating the Ruffled Rim
-
Raise the edges:
Gently cup the clay circle in your hand or place it inside a shallow bowl lined with plastic wrap. Carefully lift the outer edges upward to create a shallow bowl shape. -
Pinch the scallops:
To create the signature wavy rim, place your thumb on the inside of the rim and your index and middle fingers on the outside. Gently press outward with your thumb while supporting the clay with your fingers. -
Repeat the pattern:
Move about an inch along the rim and repeat the pinching motion. Continue this rhythm all the way around the circumference until you have a continuous scalloped edge. -
Refine the waves:
Go back around the rim and adjust the waves. I like to use a damp finger to smooth the peaks and valleys, ensuring they are rounded and soft rather than sharp. -
Smooth the rim:
Run a damp sponge along the very top edge of the rim to ensure it is comfortable to the touch and to compress the clay particles one last time.
Cigarette Rest Tip
While the clay is still soft, gently press the side of a pencil into one of the ‘valleys’ of your scallops to create a perfect resting groove for a cigarette.
Step 3: Drying and Finishing
-
Slow drying:
Let the piece dry slowly away from direct drafts. Cover it loosely with plastic for the first day, then uncover it to let it reach bone dry status. -
Bisque fire:
Once bone dry, fire the piece in the kiln to cone 04 (or your clay’s specific bisque temperature). This hardens the clay and prepares it for glazing. -
Wipe down:
After the kiln cools, remove the ashtray and wipe it with a damp sponge to remove any dust that settled during firing. -
Glaze application:
Dip the piece into a clear glaze or a semi-transparent blush pink glaze. The transparency is key here as you want those natural clay speckles to show through. -
Clean the foot:
Use a sponge to wipe the glaze completely off the bottom of the ashtray so it doesn’t stick to the kiln shelf. -
Glaze fire:
Fire the piece a second time to the maturation temperature of your clay and glaze (typically cone 5 or 6 for stoneware).
Once the kiln cools, you’ll have a beautifully organic piece ready for use or display


Minimal Oval Ashtray With Two Long Rests
Embrace simplicity with this sleek, teal-green oval ashtray featuring deep, elongated rests that keep cigarettes secure. Its glossy finish and smooth curves make it a modern yet functional piece perfect for any tabletop.
Step-by-Step Guide
Materials
- High-fire stoneware clay (or polymer clay for a no-kiln version)
- Pattern template (oval shape drawn on paper)
- Rolling pin
- Guide sticks or slats (approx. 1/4 inch thick)
- Needle tool or fettling knife
- Rib tool (rubber or metal)
- Sponge
- Pottery trimming loop tool
- Small round file or dowel (for shaping notches)
- Teal or dark emerald reactive glaze
- Clear glaze (optional overlaid)
- Kiln (if using stoneware)
Step 1: Shaping the Base
-
Prepare the slab:
Begin by wedging your clay to remove air bubbles, then flatten it slightly with your palms. Place your guide sticks on either side of the clay to ensure an even thickness. -
Roll it out:
Use your rolling pin to create a smooth, consistent slab. Roll over the guide sticks until the clay is uniform, roughly 1/4 inch thick. -
Cut the oval:
Place your paper oval template onto the slab. Using a needle tool, trace around the template and cut out the base shape cleanly. Remove the excess clay. -
Smooth the edges:
Run a slightly damp sponge along the cut edge of the oval base to round off the sharpness and compress the clay particles.
Clean Rests Tip
Use a round wooden dowel wrapped in plastic wrap to press the notches into the wet clay instead of carving. This compresses the clay and prevents cracking.
Step 2: Building the Walls
-
Create a coil or strip:
Roll a long coil or cut a long strip of clay from the remaining slab to serve as the wall. If using a strip, ensure the height is about 1 to 1.5 inches. -
Score and slip:
Aggressively score the top outer edge of your oval base and the bottom edge of your clay strip. Apply clay slip (liquid clay) to both scored areas. -
Attach the wall:
Press the strip firmly onto the base, following the oval curve. Overlap the ends where they meet, cut through both layers at an angle for a clean seam, and join them together. -
Blend the seams:
Use a wooden modeling tool or your thumb to drag clay from the wall down to the base on both the inside and outside to create a seamless transition. -
Refine the shape:
Use a rubber rib to smooth the walls, pushing gently from the inside while supporting the outside to create a slight outward curve near the bottom and a vertical rim.
Warping Woes?
If your oval turns into a circle or twists, dry it slower. Place a weighted board gently on the rim (with paper in between) during the initial leather-hard drying phase.
Step 3: Carving the Rests
-
Mark the placements:
Identify two opposite points on the long sides of the oval where you want the cigarette rests to be. Mark these gently with your needle tool. -
Carve the notches:
Using a loop tool or a round file, slowly carve downwards into the rim at your marked spots. I prefer to go slow here to ensure the depth is symmetrical on both sides. -
Widen and smooth:
Use a damp sponge or a finger to widen the notch slightly into a ‘U’ shape and smooth away any rough burrs created by the carving tool. -
Final smoothing:
Go over the entire piece with a barely damp sponge to remove fingerprints and ensure the rim is perfectly rounded and comfortable to touch.
Step 4: Firing and Glazing
-
Drying:
Wrap the piece loosely in plastic for a day to equalize moisture, then uncover and let it dry completely to the bone-dry stage. -
Bisque fire:
Fire the piece in a kiln to cone 04 (or according to your clay body’s instructions) to harden it for glazing. -
Wax the bottom:
Apply wax resist to the very bottom of the ashtray to prevent glaze from sticking it to the kiln shelf. -
Apply the glaze:
Dip or brush on your teal reactive glaze. Ensure a thick, even coat to achieve that deep, vitreous look seen in the photo. -
Glaze the rim:
Pay special attention to the rim and the notches; slight thinning of the glaze here adds character where the clay body shows through slightly. -
Glaze fire:
Fire the piece a final time to the temperature recommended for your specific glaze (typically cone 5 or 6 for stoneware).
Once cooled from the kiln, your sleek ashtray is ready to add a touch of handcrafted elegance to your space

The Complete Guide to Pottery Troubleshooting
Uncover the most common ceramic mistakes—from cracking clay to failed glazes—and learn how to fix them fast.
Deep Bowl Ashtray That Actually Holds Ash

This project focuses on creating a functional, deep-walled ashtray with a warm, toasted finish and natural speckling. Its substantial depth is perfect for minimizing mess, while the simple notches add classic utility to the minimal form.
How-To Guide
Materials
- Speckled stoneware clay (mid-fire or high-fire)
- Pottery wheel (or banding wheel for hand-building)
- Wooden rib tool
- Metal kidney rib
- Needle tool
- Wire cutter
- Trimming tools
- Sponge
- Round craving tool (for notches)
- Clear matte or satin glaze
Step 1: Throwing the Form
-
Prepare the clay:
Begin by thoroughly wedging about 1.5 to 2 pounds of speckled stoneware clay to remove air bubbles and align the particles. -
Center specifically:
Throw the clay onto the wheel head and center it into a low, wide puck shape rather than a tall cone, preparing it for a bowl form. -
Open the floor:
Open the clay to create a flat interior floor. Compress this floor repeatedly with your fingers to prevent S-cracks during drying. -
Pull the walls:
Pull the walls straight up. Unlike a cereal bowl that flares out, keep these walls relatively vertical to create that ‘deep bowl’ containment. -
Define the rim:
Leave the rim slightly thicker than the walls. Use a piece of chamois or a wet sponge to round it off smoothly. -
Refine the interior:
Use a wooden rib to smooth the interior curve where the wall meets the floor, ensuring there are no sharp angles for ash to get stuck in. -
Smooth the exterior:
Run a metal kidney rib up the outside while the wheel spins to remove throwing lines and compress the surface, highlighting the clay’s natural grain. -
Wire off:
Run a wire cutter underneath the pot and set it aside on a ware board until it reaches a leather-hard state.
Warped Rim Woes?
If the rim distorts after cutting the notches, handle it less. Cut the notches when the clay is firmer (stiffer leather-hard) to maintain the circle.
Step 2: Trimming and Detailing
-
Secure for trimming:
Once leather-hard, center the pot upside down on the wheel. Secure it with clay lugs. -
Trim the base:
Trim away excess weight from the bottom, creating a clean, flat foot or a slight indented foot ring depending on your preference. -
Smooth the surface again:
After trimming, I find it helpful to burnish the outside slightly with a smooth stone or the back of a spoon to really bring out the speckles later. -
Mark the notches:
Turn the pot right side up. Visualize where you want your rest points; usually, two opposite sides work best for symmetry. -
Carve the rests:
Using a round carving tool or the side of a loop tool, gently press into the rim to create a smooth, U-shaped indentation. -
Refine the notches:
Use a damp sponge or your finger to smooth the edges of your cuts so they aren’t sharp. -
Dry slowly:
Cover the piece loosely with plastic to let it dry slowly and evenly, preventing the rim from warping.
Add Texture
Before firing, try leaving the exterior unglazed (raw clay) for a rougher texture, glazing only the interior for easy cleaning.
Step 3: Firing and Glazing
-
Bisque fire:
Load the bone-dry piece into the kiln for a bisque firing (usually cone 04 or 06). -
Apply clear glaze:
Dip or brush a clear matte or satin glaze over the interior and exterior to seal the clay while letting the natural color show through. -
Wipe the foot:
Ensure the bottom of the piece is completely free of glaze to prevent it from sticking to the kiln shelf. -
Glaze fire:
Fire to the maturation temperature of your specific clay body (likely cone 5/6 or cone 10) to bring out those beautiful iron speckles.
Now you have a sturdy, beautifully simple vessel ready for use or display
Terrazzo-Style Speckled Clay Ashtray
Bring a touch of modern design to your space with this handmade terrazzo-style ashtray. By embedding colorful clay chips into a neutral base, you create a polished, stone-like finish that is both functional and stylish.
Detailed Instructions
Materials
- White or cream polymer clay (base)
- Small amounts of colored polymer clay (earth tones: rust, mustard, forest green, black)
- Acrylic rolling pin
- Circle cutter or bowl (approx. 4-5 inches)
- Clay knife or craft blade
- Small round cutter or bottle cap (for indentations)
- Fine-grit sandpaper (400, 600, and 1000 grit)
- Oven for baking
- UV resin or clear gloss varnish (optional for shine)
Step 1: Preparing the Terrazzo Chips
-
Condition the colored clay:
Start by conditioning your small amounts of colored clay until they are soft and pliable. You want a mix of earthy tones like rust, mustard yellow, dark green, and a bit of black for contrast. -
Create thin sheets:
Roll each colored piece of clay out very thinly, about the thickness of cardstock. The thinner they are, the easier they will be to chop up later. -
Bake the sheets partially (Optional):
I like to pop these thin sheets in the oven for just 5-10 minutes at a low temperature to harden them slightly. This makes chopping them into crisp ‘chips’ much easier than cutting raw clay. -
Chop the clay:
Once cool (or while still raw if you skipped baking), use your blade to chop the colored sheets into irregular, angular fragments. vary the sizes from tiny specks to larger chunks.
Clean Cuts Matter
When making the cigarette rests, press down firmly in one motion rather than sawing back and forth. This keeps the indentation smooth and rounded.
Step 2: Forming the Base
-
Condition the base clay:
Take a large block of your white or cream clay and condition it thoroughly. It needs to be soft enough to accept the chips but firm enough to hold its shape. -
Incorporate the chips:
Sprinkle a generous layer of your chopped colored chips onto the white clay. Fold the clay over, roll it out, add more chips, and repeat. Do this gently so the chips stay distinct and don’t smear into mud. -
Roll the final slab:
Roll the clay out into a slab that is roughly 1/4 inch thick. Make sure the chips are visible on the surface; if not, you can press a few extra chips into the top layer and roll over them once more to flatten.
Smudged Colors?
If your colored chips look smeared after rolling, your clay was likely too warm. Pop the slab in the fridge for 10 mins before final rolling to keep lines crisp.
Step 3: constructing the Ashtray
-
Cut the base:
Use your circle cutter or a bowl as a template to cut out the flat, circular base of the ashtray. -
Cut the wall strip:
From the remaining slab, cut a long, rectangular strip. The width of this strip determines the height of your ashtray walls—about 1.5 to 2 inches is standard. -
Attach the walls:
Wrap the long strip around the circumference of the circular base. Where the ends meet, slice through both layers at an angle and press them together to create a seamless join. -
Blend the seams:
Use a modeling tool or your finger to smooth the seam where the wall meets the base on both the inside and outside. Ensure a tight seal so no ash can get trapped in crevices. -
Create the rests:
Use a small round object, like a marker body or a large straw, to press indentations into opposite sides of the rim. Gently smooth the edges of these divots with your finger.
Step 4: Finishing Touches
-
Bake the piece:
Bake your ashtray according to the manufacturer’s instructions for your specific brand of polymer clay. Usually, this is around 275°F (130°C) for 30 minutes. -
Sanding for stone effect:
Once fully cooled, the magic happens. Wet sand the piece starting with 400 grit sandpaper. This removes the top layer of polymer and exposes the crisp shapes of the colored chips inside. -
Polish surface:
Move up to 600 and then 1000 grit sandpaper. The surface should feel incredibly smooth and look like real terrazzo stone. -
Seal (Optional):
For a glossy look like the photo, apply a thin layer of UV resin or gloss varnish. If you prefer a matte stone look, you can leave it sanded or buff it with a soft cloth.
Now you have a chic, speckled accessory that looks professionally crafted and ready for display


What Really Happens Inside the Kiln
Learn how time and temperature work together inside the kiln to transform clay into durable ceramic.
Marbled Swirl Ashtray in Two Contrasting Colors
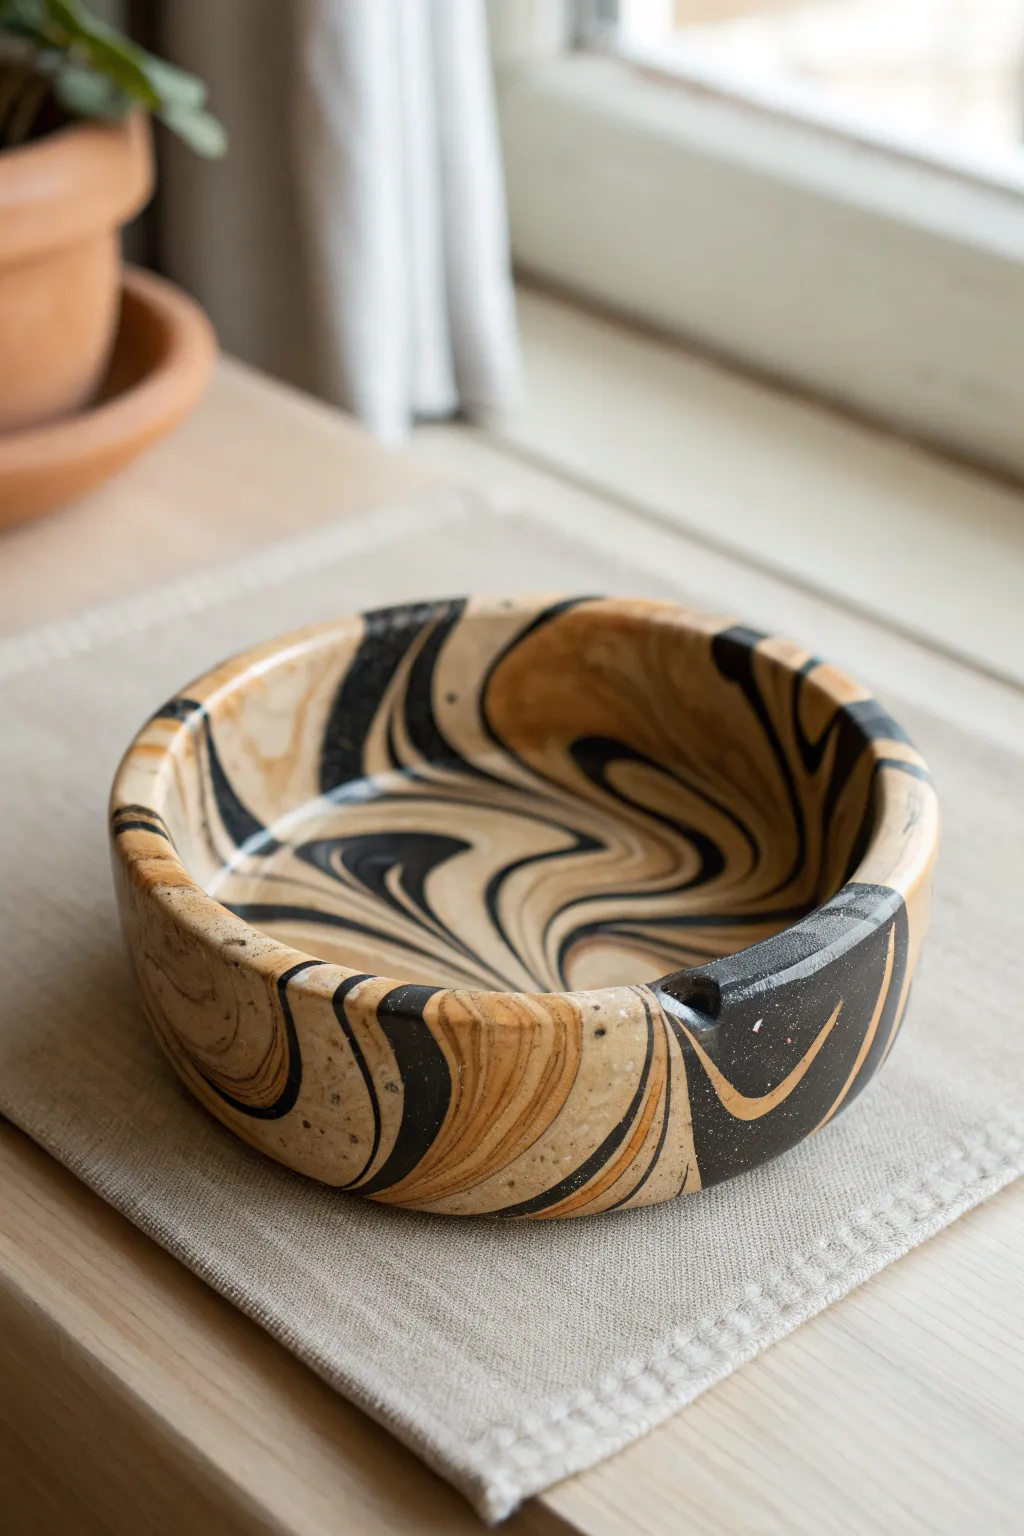
This sophisticated project creates a functional piece of art featuring swirling ribbons of black and beige clay. The organic, fluid pattern ensures that no two ashtrays are ever identical, giving you a truly unique result.
Step-by-Step Tutorial
Materials
- Polymer clay (black)
- Polymer clay (beige or light tan)
- Rolling pin or pasta machine
- Circle cutter or bowl to use as a template (approx. 4-5 inches)
- Craft knife
- Small indenting tool or wooden dowel
- Fine-grit sandpaper (400-1000 grit)
- Gloss or satin polymer clay glaze
- Soft paintbrush
- Oven and baking sheet
Step 1: Prepping and Mixing
-
Condition the clay:
Begin by thoroughly conditioning both your black and beige polymer clays separately. Knead them until they are soft, pliable, and warm to the touch. -
Form logs:
Roll each color into a long, even snake or log shape, roughly equal in length and thickness. -
Twist together:
Twist the black and beige logs together like a candy cane. Keep twisting until tight, then fold the twisted log in half and twist again. -
Create the marble:
Roll the twisted clay into a ball, then into a log again. Repeat the twisting and folding process 3-4 times. Stop before the colors blend completely into a muddy gray; you want distinct ribbons of color. -
Form a block:
Squish your marbled clay into a rough block or thick patty, ensuring the swirls are visible on the surface.
Step 2: Shaping the Ashtray
-
Roll out the slab:
Using a rolling pin or pasta machine, roll the marbled block into a thick sheet, roughly 1/4 inch thick. I prefer to roll in different directions to stretch the pattern interestingly. -
Cut the base:
Use your circle cutter or a template to cut a perfect circle from the slab. This will be the base of your ashtray. -
Create the wall:
Gather the scrap clay, re-roll it into a long strip about 1 inch wide and slightly thicker than the base. The pattern will be tighter here due to re-rolling. -
Attach the wall:
Wrap the strip around the edge of your circle base. Gently press the seam where the wall meets the base to bond them. -
Blend the seams:
On the outside and inside, use your fingers or a modeling tool to smooth the clay downward and upward, erasing the line between the wall and base so it becomes one seamless piece. -
Shape the rim:
Smooth the top rim of the wall with your finger to create a rounded, comfortable edge. Ensure the wall height is consistent all the way around. -
Add cigarette rest:
Use a smooth dowel or the side of your finger to gently press a U-shaped indentation into the rim. This creates the classic functional notch.
Muddy Colors?
If your marble pattern looks gray or blurry, you over-mixed the clay. Stop twisting as soon as you see thin, distinct lines of color.
Step 3: Finishing Touches
-
Bake carefully:
Place the piece on a baking sheet and bake according to your clay manufacturer’s instructions. Usually, this is around 275°F (130°C) for 30 minutes per 1/4 inch of thickness. -
Cool down:
Allow the ashtray to cool completely inside the oven with the door slightly ajar to prevent thermal shock cracks. -
Sand for smoothness:
Once cool, wet-sand the piece under running water. Start with 400 grit to remove fingerprints and move up to 1000 grit for a silky finish. -
Clean surface:
Wash the ashtray with a little soap and water to remove any sanding dust, then dry thoroughly with a lint-free cloth. -
Apply glaze:
Brush on a thin coat of gloss or satin glaze to protect the surface and make the marble colors pop. Let it dry fully before use.
Gold Veins
For a luxe touch, add a thin strip of gold leaf or metallic gold clay into the twist at the very beginning to create metallic veins.
Now you have a striking, modern accessory that perfectly balances functionality with artistic flair
Checkerboard Indie-Kid Ashtray
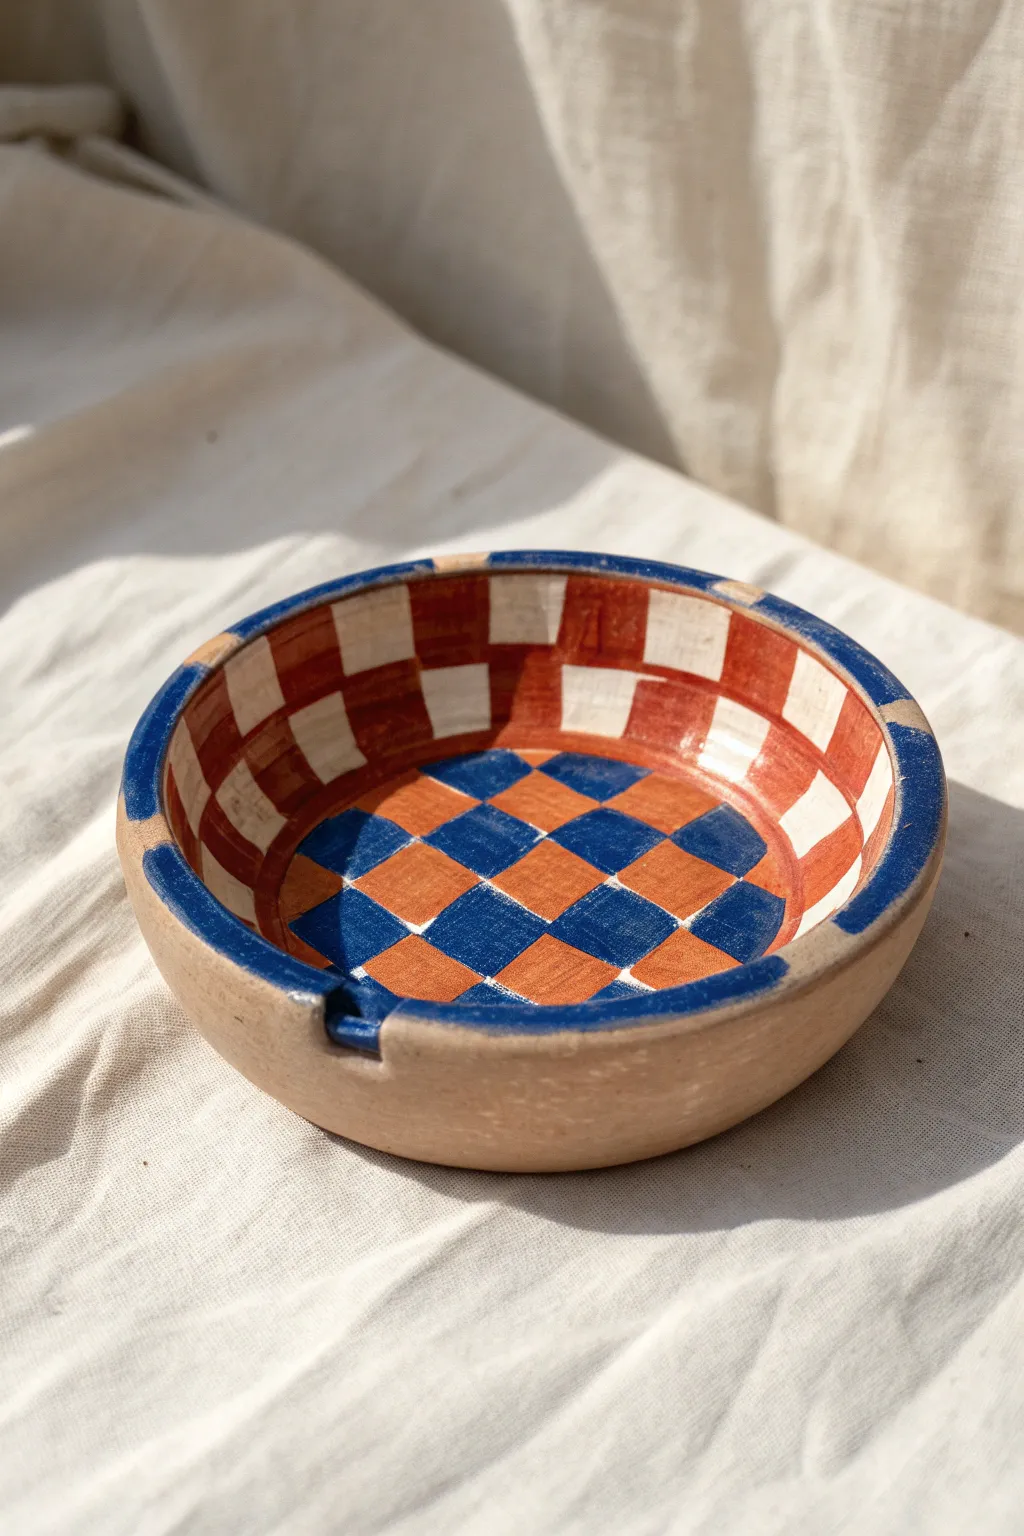
Embrace the playful, retro aesthetic with this handmade checkerboard ashtray featuring bold cobalt blue and burnt orange tones. The contrasting patterns on the base and walls create a delightful optical illusion that turns a functional object into a statement piece for your coffee table.
Step-by-Step Guide
Materials
- Air-dry clay (terracotta color) or earthenware clay
- Rolling pin
- Circle template or bowl (approx. 5-6 inches diameter)
- Clay knife or fettling tool
- Sponge
- Acrylic paints (Cobalt Blue, Burnt Orange/Terracotta, White)
- Fine detail paintbrush
- Flat shader brush
- Pencil
- Gloss varnish or clear sealant (glossy finish)
- Cup of water
- Sandpaper (fine grit)
Step 1: Shaping the Base
-
Roll the slab:
Begin by taking a handful of your terracotta-colored clay and rolling it out into an even slab, approximately 1/4 inch thick. Aim for a consistent thickness to ensure even drying. -
Cut the circle:
Place your bowl or circle template onto the clay slab. Using your clay knife, trace around the edge to cut out a perfect circle base, then smooth the raw edges with a damp finger. -
Create the walls:
Roll a long snake or coil of clay, slightly thicker than your base slab. Flatten it gently with the rolling pin to create a long strip about 1 inch tall. -
Attach the rim:
Score (scratch) the outer edge of your base and the bottom edge of your clay strip. Add a little water or slip to the scratched areas and press the strip onto the base to form the wall. -
Blend the seams:
Use your thumb or a modeling tool to smudge the clay from the wall down into the base on both the inside and outside, ensuring the seam disappears completely. -
Add cigarette rests:
While the clay is still pliable, use your index finger or the handle of a paintbrush to gently press down two to three indentations into the top rim for cigarette rests.
Grid Game Strong
Use drafting tape or bits of washi tape to mask off the squares before painting. It guarantees super sharp lines without needing a perfectly steady hand.
Step 2: Refining and Priming
-
Smooth the surface:
Take a slightly damp sponge and run it over the entire piece to remove fingerprints and imperfections. I find that spending extra time here makes the painting phase much easier later. -
Initial drying:
Allow the ashtray to dry completely. For air-dry clay, this usually takes 24-48 hours depending on humidity; turn it over occasionally so the bottom dries evenly. -
Sand for perfection:
Once fully dry, use fine-grit sandpaper to buff away any rough spots, especially around the rim and the cigarette rests. Wipe away the dust with a dry cloth.
Step 3: Painting the Design
-
Draft the grid:
Lightly sketch your design with a pencil directly on the dry clay. Draw a checkerboard grid on the interior base and vertical stripes along the inner walls. -
Paint the base grid:
Using a flat shader brush, fill in alternating squares on the bottom with cobalt blue. Leave the adjacent squares unpainted to show the natural terracotta color. -
Second base color:
Fill the remaining ‘blank’ squares on the base with a burnt orange paint that matches or slightly enhances the natural clay tone. -
Wall checkerboard:
For the inner walls, paint a checkerboard pattern using burnt orange and white. The white creates a high-contrast brightness that pops against the darker base. -
Detail the rim:
Paint the top rim in alternating sections. Use the cobalt blue to create dashed segments along the edge, sometimes painting over the cigarette rest indentations for emphasis. -
Clean up lines:
Go back in with your fine detail brush to sharpen any wobbly edges where the squares meet. Crisp lines are key to the geometric look.
Uneven Drying?
If the base starts curling up as it dries, gently weigh it down with a small bag of rice or sand. This keeps the bottom flat and prevents rocking.
Step 4: Finishing Touches
-
Seal the interior:
Once the paint is bone dry, apply a coat of gloss varnish to the inside of the ashtray. This protects the paint from ash and creates that shiny, ceramic-like finish. -
Seal the exterior:
Apply a coat of sealant to the outside as well, even if you left it unpainted. This brings out the warmth of the raw clay and unifies the sheen of the piece.
Place your finished piece in a sunny spot and enjoy the vibrant pop of color it adds to your space

TRACK YOUR CERAMIC JOURNEY
Capture glaze tests, firing details, and creative progress—all in one simple printable. Make your projects easier to repeat and improve.
Smiley Face Ashtray With Bold Painted Lines

This project combines classic hand-building techniques with a graphic, minimalist design that feels straight out of the 90s. The result is a sturdy, speckled white clay vessel featuring a cheerful smiley face and bold text, perfect for adding a touch of personality to any table.
Detailed Instructions
Materials
- White speckled stoneware clay (low fire or mid-fire)
- Rolling pin
- Canvas mat or cloth for rolling
- Needle tool or fettling knife
- Rib tool (smooth wood or rubber)
- Small sponge
- Underglaze (Sunshine Yellow and Royal Blue)
- Small round paintbrush
- Fine detail brush
- Letter stamps or stencils (optional)
- Clear transparent glaze
- Kiln access
Step 1: Forming the Base
-
Prepare the Clay:
Begin by wedging a ball of white speckled clay weighing about 1 pound. Remove any air bubbles to ensure a smooth firing process. -
Roll out a Slab:
On your canvas mat, roll the clay out into an even slab approximately 1/4 inch thick. Rotate the clay occasionally so it doesn’t stick to the fabric. -
Cut the Circle:
Use a circle template—a small bowl or lid about 4-5 inches wide works perfectly—and trace around it with your needle tool to cut out the base of your ashtray. -
Prepare a Coin:
Roll out a long, snake-like coil of clay about the thickness of your pinky finger. Ensure it is long enough to circle the entire circumference of your base.
Uneven Walls?
If your coil walls look lumpy, use a flat wooden paddle to gently tap the outside while supporting the inside with your hand to straighten them out.
Step 2: Building Walls
-
Score and Slip:
Rough up the outer edge of your circular base and one side of your clay coil using a needle tool or serrated rib. Apply a dab of water or clay slip to the scored areas. -
Attach the Coil:
Place the coil on top of the scored edge of the base. Press it down firmly but gently to secure the connection without squashing the height. -
Blend the Seams:
Using your thumb or a wooden modeling tool, drag the clay from the coil down onto the base on both the inside and outside. I like to blend downwards to ensure a seamless transition. -
Smooth the Walls:
Use a damp sponge or a rubber rib to smooth out the walls. Compress the rim gently to make it flat and even, giving it that modern, cylindrical look.
Level Up: Colored Clay
Mix Mason stains directly into your white clay body before building to create a colored vessel that doesn’t need underglaze for the background color.
Step 3: Applying the Design
-
Dry to Leather Hard:
Let the piece dry slowly until it reaches a leather-hard state. It should be firm enough to handle without deforming but still cool to the touch. -
Outline the Smiley:
Lightly sketch a circle in the center of the dish using a pencil. Graphite burns off in the kiln, so don’t worry about marks. -
Paint the Yellow Face:
Fill in the circle with 2-3 coats of Sunshine Yellow underglaze. Allow each layer to dry until matte before applying the next for solid opacity. -
Add the Blue Outline:
Once the yellow is dry, use a steady hand and a round brush to paint a thick Royal Blue ring around the yellow circle. -
Detail the Face:
Switch to your fine detail brush. With the same blue underglaze, paint two small ovals for eyes and a simple U-shape for the smile directly over the yellow base. -
Add the Text:
Beneath the smiley face, carefully paint the word ‘ASHTRAY’ in capital block letters using black or dark blue underglaze. Stencils can be very helpful here for crisp lines.
Step 4: Finishing and Firing
-
Bisque Fire:
After the piece is bone dry (no longer cool to the touch), load it into the kiln for a bisque fire, typically to Cone 04. -
Glazing:
Wipe the bisque-fired piece with a damp sponge to remove dust. Dip the entire piece into a clear transparent glaze or brush on three even coats. -
Wipe the Foot:
Clean the bottom of the ashtray with a sponge to ensure no glaze touches the kiln shelf. -
Final Fire:
Fire the piece again to the maturity temperature of your clay and glaze, usually Cone 5 or 6.
Once cooled, your cheerful custom ceramic piece is ready for use or display
Heart-Shaped Ashtray With Sweet Rim Rests
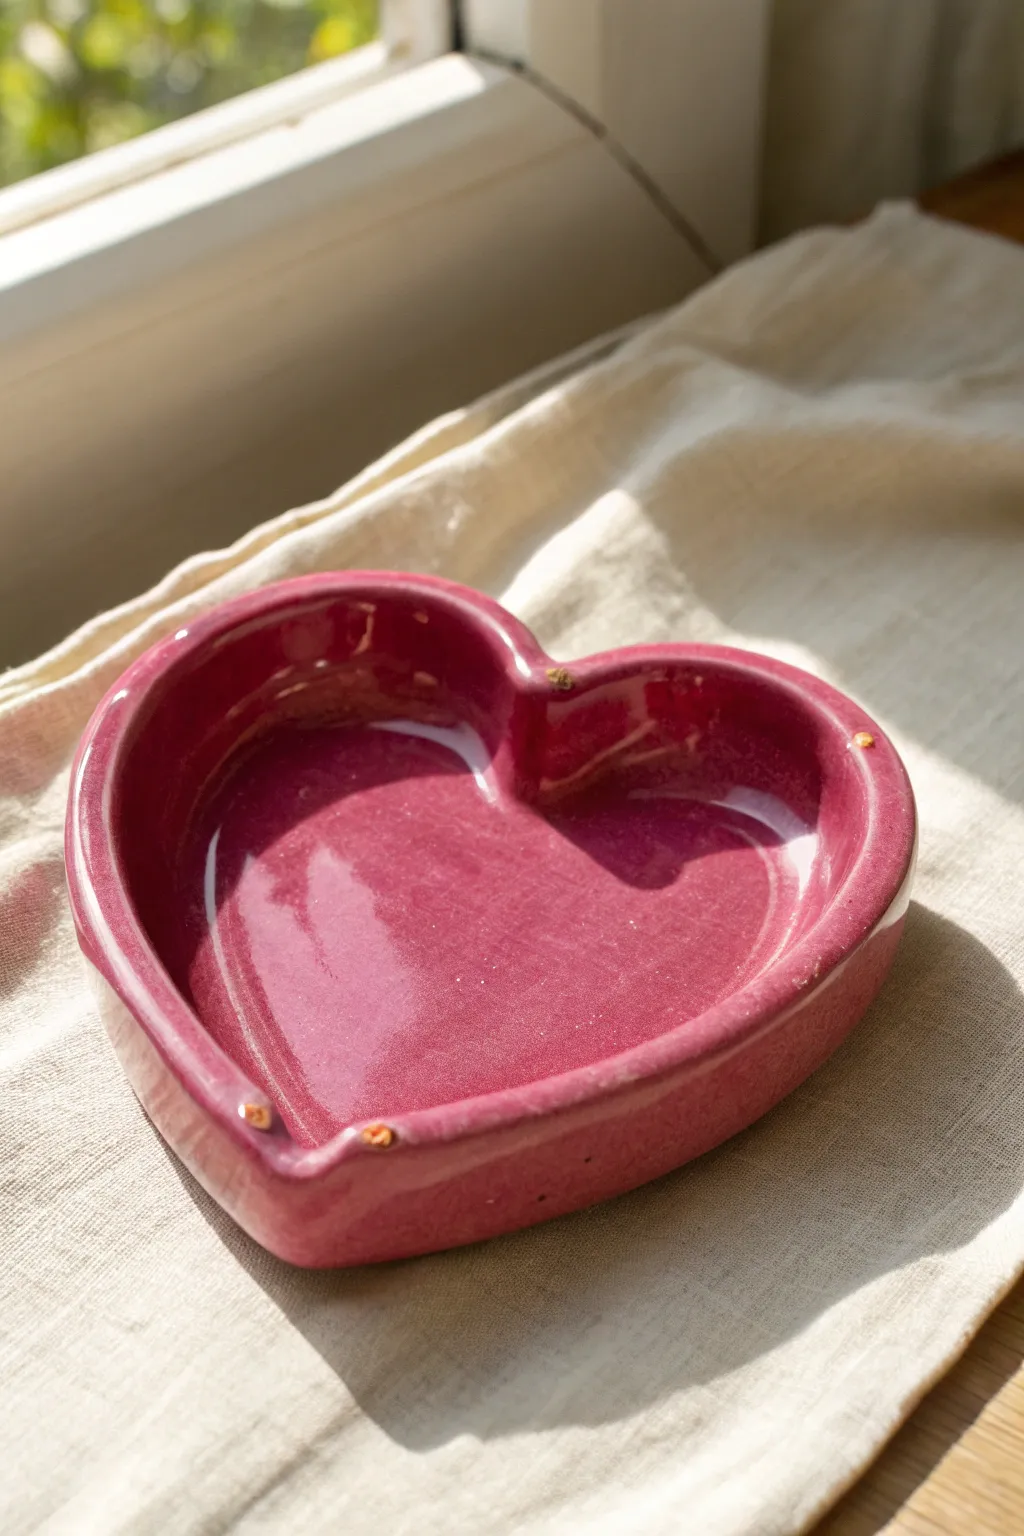
This charming heart-shaped ashtray combines functionality with a lovely pop of color, featuring a glossy raspberry glaze and subtle, handmade cigarette rests along the rim. It’s a perfect beginner-friendly clay project that results in a sturdy, personalized piece for your home.
How-To Guide
Materials
- Air-dry clay or polymer clay (white)
- Acrylic rolling pin
- Heart-shaped cookie cutter (large) or paper template
- Clay sculpting tools (specifically a smoothing tool)
- Small bowl of water
- Fine-grit sandpaper (220-400 grit)
- Acrylic paint (berry/raspberry pink)
- High-gloss varnish or resin (for heat resistance)
- Paintbrushes (soft synthetic)
- Small round tool (like a paintbrush handle bottom)
Step 1: Shaping the Base
-
Condition the clay:
Start by kneading a generous handful of clay until it is warm, pliable, and free of air bubbles. This ensures a smooth finish later on. -
Roll out the slab:
Using your acrylic roller, flatten the clay into a slab that is roughly 1/4 to 1/3 inch thick. Keep the thickness consistent to prevent cracking during drying. -
Cut the heart shape:
Press a large heart-shaped cutter into the clay slab. If you don’t have a cutter, place a paper template on the clay and trace around it carefully with a craft knife. -
Smooth the edges:
Dip your finger in a little water and run it along the cut edges of your heart base to soften any sharp angles left by the cutter.
Wall Height Trick
Keep walls slightly thicker at the base and taper them thinner at the top. This adds structural stability and prevents the heart shape from warping.
Step 2: Building the Walls
-
Create a coil:
Roll a long snake of clay on your work surface. Aim for a thickness of about 1/2 inch, ensuring it’s long enough to go around the entire perimeter of your heart base. -
Attach the wall:
Score the outer edge of the heart base and the bottom of your coil with a needle tool to create rough textures. Apply a dab of water or liquid clay (slip) to these areas. -
Secure the coil:
Press the coil firmly onto the perimeter of the heart base. Pinch the clay gently to bond the wall to the floor. -
Merge the seams:
Using a modeling tool or your thumb, drag clay from the coil down onto the base on both the inside and outside. Smooth these drag marks away until the transition is seamless. -
Refine the heart shape:
The walls might distort the shape slightly. Use your hands to re-emphasize the dip at the top of the heart and the point at the bottom.
Step 3: Adding Details & Drying
-
Create the rests:
Choose 3 or 4 spots along the rim. Using the handle of a paintbrush or a round sculpting tool, gently press down into the rim to create smooth, concave indentations for cigarettes to rest. -
Final smoothing:
Give the entire piece a final check. Dip a sponge or finger in water and smooth out any fingerprints or uneven textures on the walls and floor. -
Let it dry:
Allow the piece to dry completely. For air-dry clay, this usually takes 24-48 hours. Rotate the piece occasionally to ensure even airflow. -
Sand for perfection:
Once fully cured, use fine-grit sandpaper to buff away any remaining roughness on the rim or the exterior.
Uneven Glaze?
If your gloss varnish looks streaky, use a very soft brush and apply the final coat in a generous ‘flooding’ motion rather than brushing back and forth.
Step 4: Painting & Glazing
-
Apply base color:
Paint the entire ashtray with a deep raspberry or berry pink acrylic paint. Lay down thin, even coats. -
Layering color:
I prefer to let the first coat dry completely before adding a second one to get that rich, opaque color coverage. -
Highlight the rests:
If desired, you can add tiny touches of gold or a lighter pink inside the rim indentations for contrast, though a solid color works beautifully too. -
Apply the gloss:
To achieve the ‘ceramic’ look seen in the photo, apply 2-3 coats of a thick, high-gloss varnish or clear resin. This seals the paint and adds that wet-look shine.
Now you have a glossy, lovely handmade tray ready to add personality to your space
Yin-Yang Split-Color Ashtray
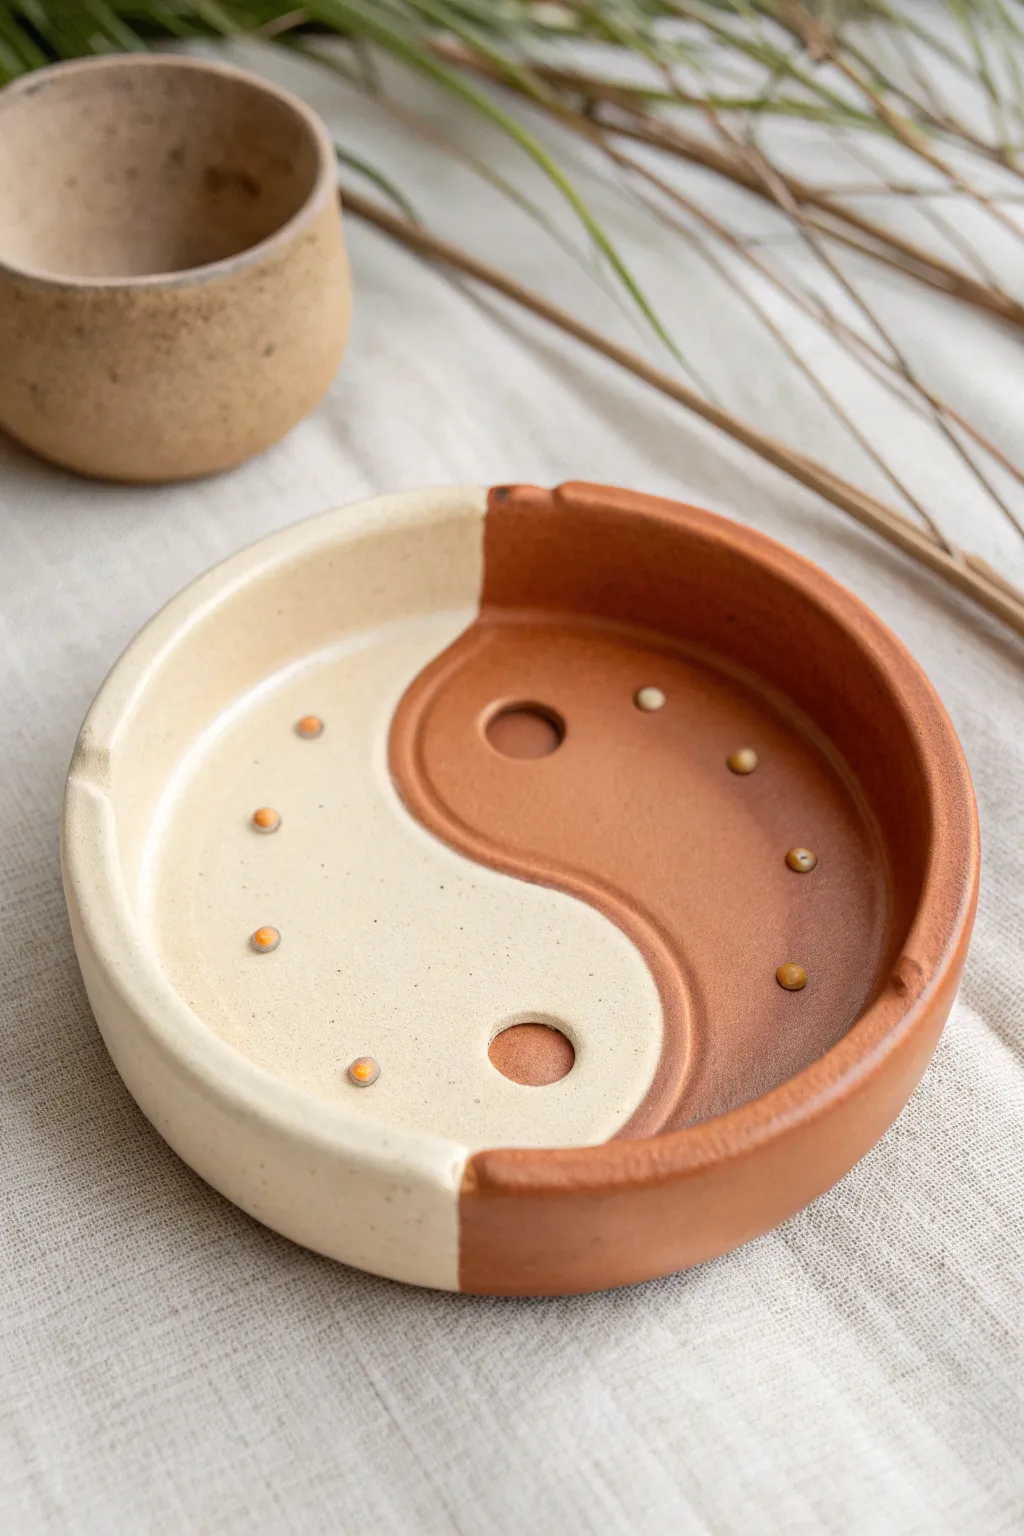
Embrace the concept of duality with this elegant ceramic ashtray featuring the classic Yin-Yang symbol. The design cleverly uses the contrast between raw terracotta clay and a smooth cream glaze to create a striking, tactile finish.
Step-by-Step
Materials
- Red terracotta clay (low fire)
- White or Cream glossy glaze (cone 04-06)
- Circular cookie cutter or template (approx. 5-6 inches)
- Sponge
- Rolling pin
- Canvas mat or cloth
- Needle tool
- Loop tool (small)
- Pottery rib tool (rubber or wood)
- Small paintbrush
- Slip (clay and water mixture)
- Scoring tool (or fork)
- Small circular punch or straw (for the holes/dots)
Step 1: Forming the Base
-
Roll the slab:
Begin by wedging your terracotta clay to remove air bubbles, then roll it out on your canvas mat to an even thickness of about 1/4 inch. -
Cut the circle:
Place your circular template or cookie cutter onto the slab and cut out a perfect circle. This will serve as the floor of your ashtray. -
Create the walls:
Roll out a long coil of clay, approximately 3/8 inch in diameter. Roll it gently to ensure it’s uniform along the entire length. -
Attach the coil:
Score the outer edge of your circular base and brush on a little slip. Lay the coil directly on top of the scored edge to form the rim. -
Blend the seams:
Using your thumb or a wooden modeling tool, smooth the coil downwards into the base on both the inside and outside. I like to use a damp sponge afterward to make the transition seamless.
Step 2: Sculpting the Design
-
Draft the S-curve:
Lightly trace an ‘S’ shape across the middle of the dish with a needle tool to divide the circle into the two tear-drop shapes of the Yin-Yang symbol. -
Define the divide:
Using a small loop tool, gently carve along one side of your traced line to create a slight relief or step down, giving the symbol physical dimension rather than just a painted line. -
Create cigarette rests:
Use a round formatting tool or your thumb to gently press two or three indentations into the rim for cigarettes to rest on. -
Add the central dots:
Use a small circular cutter or the end of a straw to impress a circle into the center of each teardrop shape. Don’t punch all the way through; just create deep, clean wells. -
Add decorative texture:
If desired, create small, raised ‘bumps’ or tiny balls of clay. Slip and score them onto the surface in a radial pattern, or simply impress small dots around the Yin-Yang curves for added detail. -
Bisque fire:
Allow the piece to dry slowly under plastic for a few days to prevent warping, then let it air dry completely before bisque firing to the appropriate cone for your clay body.
Clean Lines Hack
If you don’t have wax resist, use painter’s tape or a strict steady hand. For the sharpest S-curve, lightly carve the line 1mm deep before glazing to create a dam for the liquid.
Step 3: Glazing and Finishing
-
Wax resist application:
Apply wax resist carefully to the half of the Yin-Yang symbol that you want to remain raw terracotta. This includes the ‘dot’ on the glazed side to keep it contrasting. -
Apply the glaze:
Brush three smooth coats of cream or white glaze onto the non-waxed side. The wax should repel any accidental strokes, keeping your lines crisp. -
Clean the edges:
Use a damp sponge to wipe away any glaze beads that may be sitting on top of the wax resist to ensure they don’t fire onto the clay. -
Glaze fire:
Load the kiln carefully and fire the piece for a second time to the maturation temperature of your glaze. -
Sand the bottom:
Once cooled and removed from the kiln, briefly sand the bottom of the dish with high-grit sandpaper to ensure it won’t scratch your table surface.
Warping Woes?
If the base lifts while drying, weight it down with a small sandbag. Uneven drying causes warping, so keep it covered with loose plastic for the first 24-48 hours.
Now you have a functional piece of art that brings a sense of balance to any room.
Sunflower Ashtray With Petal Rim Texture
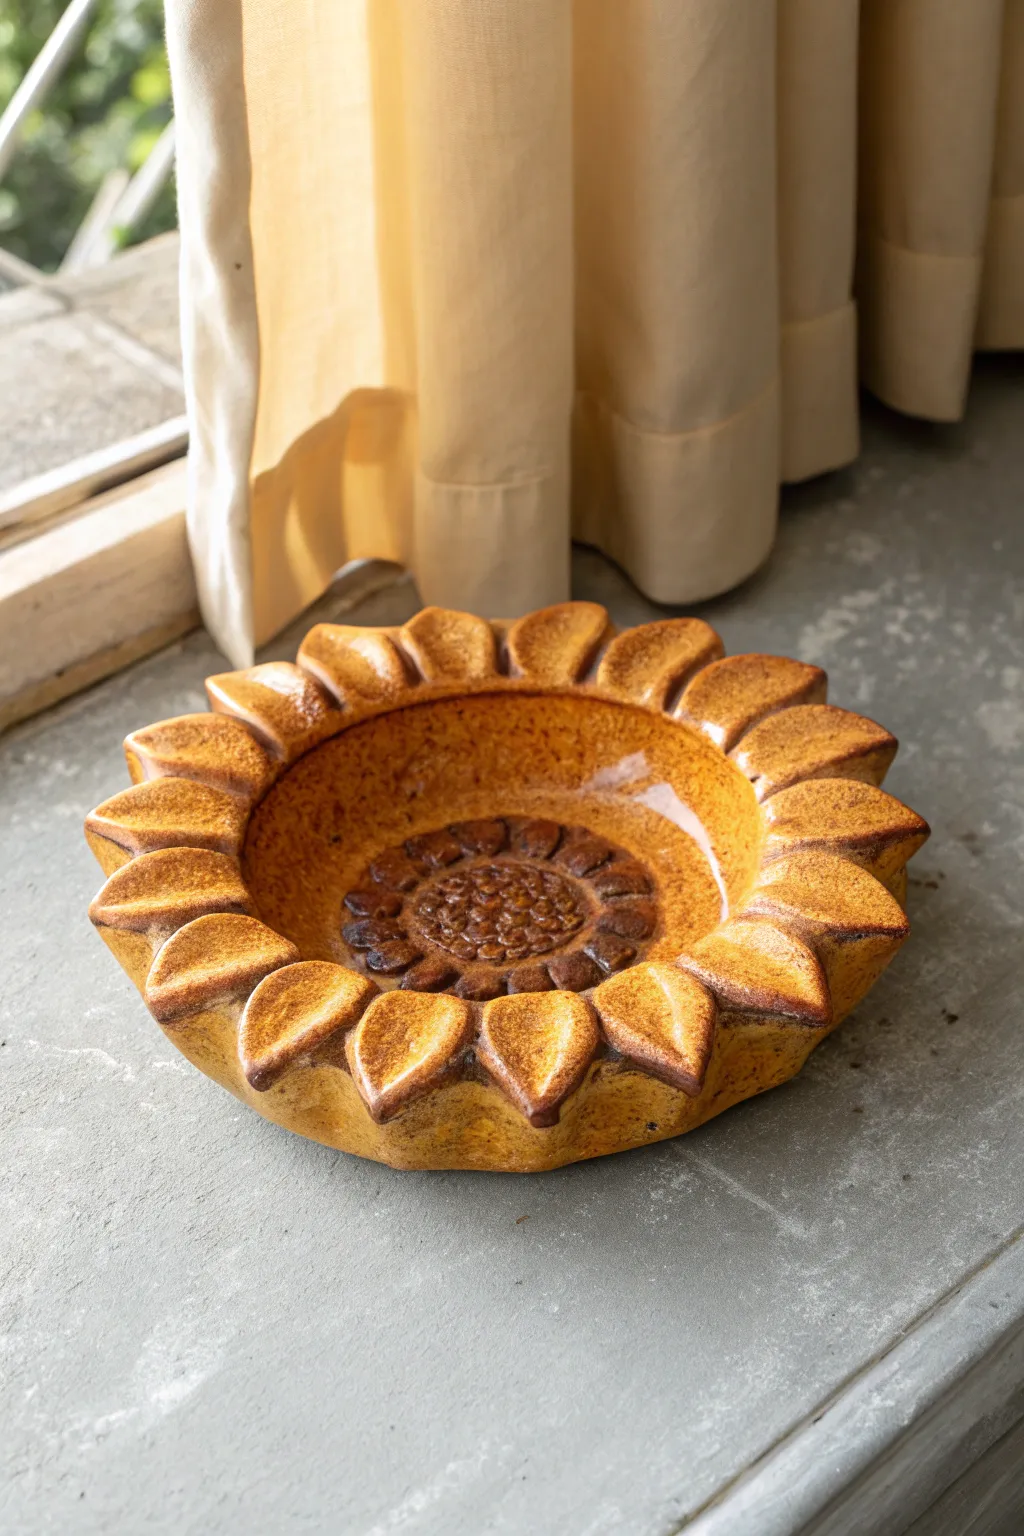
Brighten up your space with this charming ceramic sunflower bowl, functioning perfectly as a decorative ashtray or ring dish. Its warmth comes from the honey-toned glaze and the tactile, sculpted petal rim that frames a detailed seed center.
Step-by-Step Tutorial
Materials
- Stoneware clay (buff or white)
- Pottery wheel (optional, can be hand-built)
- Rib tool
- Pin tool or needle tool
- Sponge
- Loop tool for trimming
- Carving tool or small stylus
- Amber/Honey semi-transparent glaze
- Dark brown underglaze or stain
- Kiln
Step 1: Forming the Base
-
Prepare the clay:
Begin with a ball of well-wedged clay, about 1.5 to 2 lbs. If throwing on the wheel, center it firmly. If hand-building, roll out a slab about 1/4 inch thick and slump it over a shallow bowl mold. -
Open and widen:
Open the clay to create a wide, low floor. You want a generous flat bottom for the ‘seeds’ later. Pull the walls outward gently to create a shallow bowl shape. -
Define the rim:
Leave the rim significantly thicker than a standard bowl—about 1/2 to 3/4 inch thick. Flatten this thick rim horizontally so it creates a wide ledge; this ledge will become your petals. -
Smooth the interior:
Use a soft rib to compress the floor and interior walls, ensuring a smooth transition from floor to wall. This is crucial for easy cleaning later. -
Dry to leather hard:
Allow the piece to dry slowly until it reaches a leather-hard state. It needs to be firm enough to hold detailed carving without warping. -
Trim the foot:
Turn the piece over (on the wheel or a banding wheel) and trim a neat foot ring. This lifts the piece slightly and gives it a professional finish.
Step 2: Sculpting the Sunflower Details
-
Mark the petals:
On the wide, flattened rim, lightly scratch guidelines to divide the circle into roughly 16-18 equal sections. These will correspond to your individual petals. -
Cut the petal shapes:
Using a pin tool or knife, cut V-shaped notches into the outer edge of the rim at each mark to separate the petals. -
Sculpt the points:
Pinch the tip of each section gently to form a rounded point. Use your fingers to slope the clay downwards from the center of each petal to the edges, creating a convex, puffy shape for each individual leaf. -
Define the separation:
Take a modeling tool or the back of a paintbrush and press firmly into the valleys between the petals to create deep grooves. This separation prevents the glaze from merging everything into one blob. -
Create the seed center:
In the center floor of the bowl, lightly scribe a circle about 2 inches in diameter. I like to use a small loop tool to carve this area down just slightly, creating a recessed medallion. -
Texture the seeds:
Press a small, round tool or a textured stamp repeatedly into this center circle to mimic packed sunflower seeds. Create a second ring of larger, flatter indentations around the seeds to represent the inner florets. -
Smooth sharp edges:
Go over the petals and rim cuts with a slightly damp sponge to soften any sharp burrs created during carving.
Breathing Room
When carving the grooves between petals, make them deeper than you think necessary. Glaze tends to fill small gaps, so deep cuts ensure distinct petals after firing.
Step 3: Glazing and Finishing
-
Bisque fire:
Load the bone-dry piece into the kiln and fire to cone 04 (or your clay’s bisque temperature). -
Apply the brown wash:
Mix dark brown underglaze or an iron oxide wash with water. Brush it heavily into the textured center and the deep grooves between the petals. -
Wipe back the dark details:
Using a clean, damp sponge, wipe the surface of the raised areas. You want the dark color to remain only in the recesses of the seeds and petal crevices to accentuate the depth. -
Apply main glaze:
Dip or brush the entire piece with a glossy, semi-transparent honey or amber glaze. This transparency allows the dark brown details underneath to show through. -
Check the rim:
Because the glaze will flow, ensure the coat on the sharp tips of the petals isn’t too thick, or it might run off. A slightly thinner application on high points highlights the clay body’s texture. -
Glaze fire:
Fire the piece again to the maturity temperature of your glaze and clay body (typically cone 5 or 6 for stoneware).
Uneven Petals?
If your petal spacing is uneven, don’t restart! Nature is imperfect. Varying petal widths actually make the sunflower look more organic and realistic.
Once cooled, your golden sunflower is ready to catch the light on your windowsill
Leaf Dish Ashtray for a Cottagecore Feel
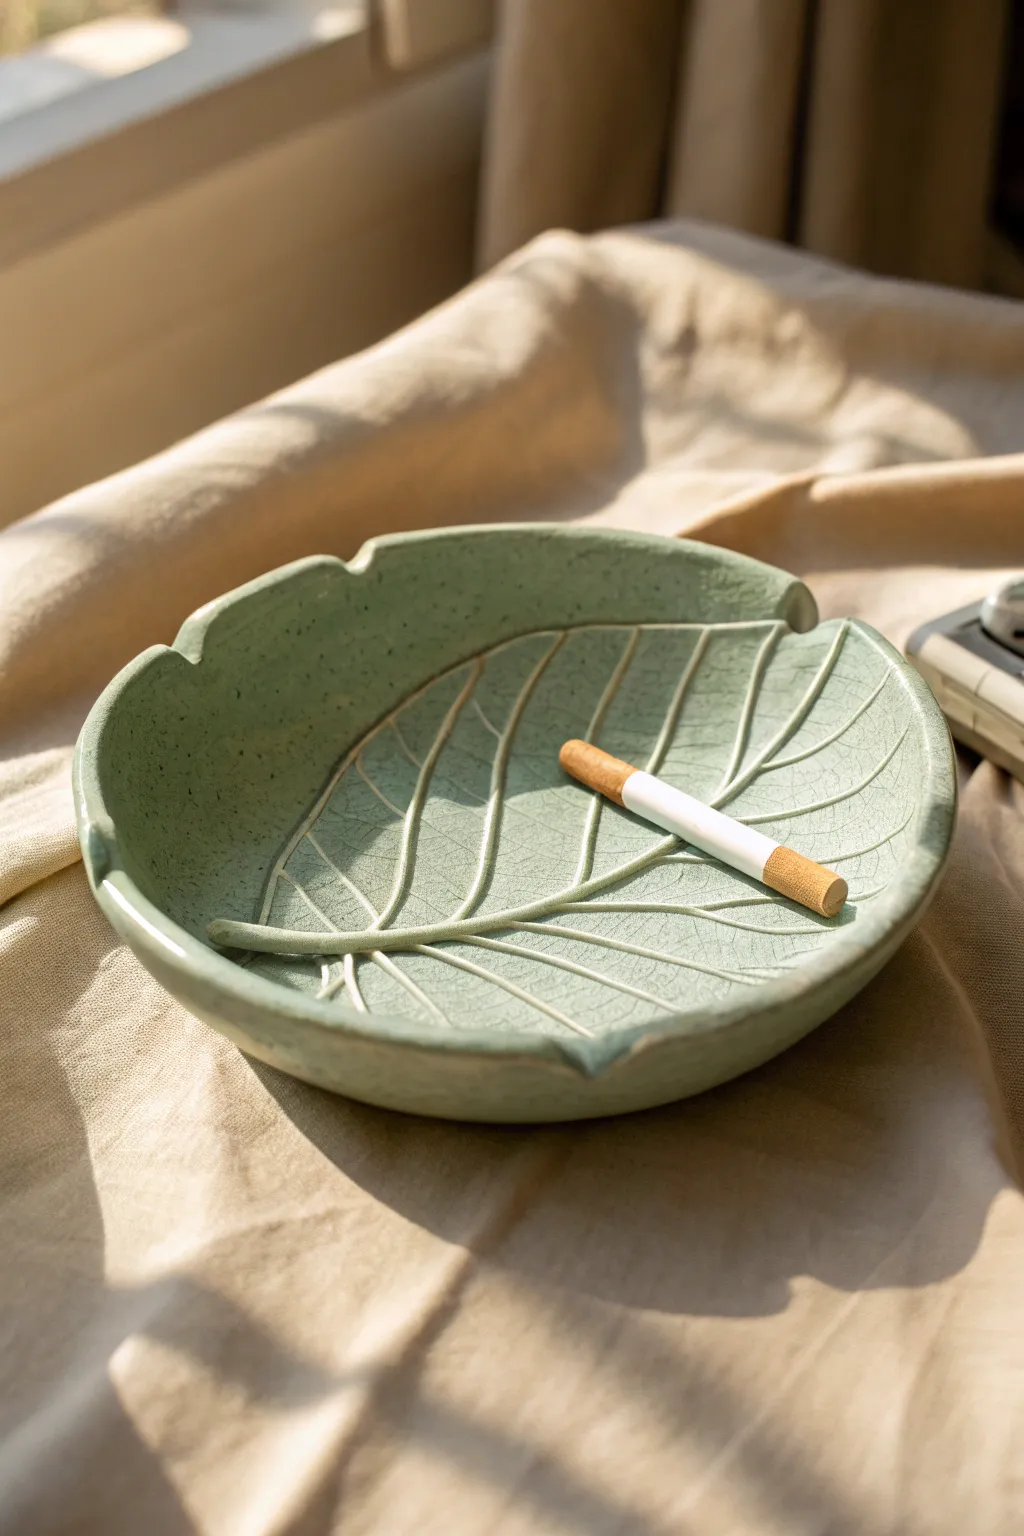
Bring a touch of nature indoors with this charming green ceramic ashtray molded into the shape of a broad leaf. With its subtle speckled texture and raised vein details, it feels wonderfully organic and perfect for a rustic or cottage-style decor.
How-To Guide
Materials
- Speckled stoneware clay or light-colored polymer clay
- Rolling pin
- Large, fresh leaf with prominent veins (e.g., Hosta or Hydrangea) or a leaf template
- Pottery needle tool or craft knife
- Small bowl or plate (for shaping)
- Smoothing sponge
- Carving tool or loop tool (for refining veins)
- Celadon or transparent green glaze (if using ceramic)
- Matte sealant (if using polymer clay)
- Kiln (for ceramic) or oven (for polymer)
Step 1: Shaping the Leaf
-
Prepare your clay:
Start by wedging your speckled clay to remove air bubbles, then roll it out to a uniform slab about 1/4 inch thick. Aim for an even surface to ensure the final dish sits flat. -
Impress the texture:
Place your large fresh leaf vein-side down onto the clay slab. If you don’t have a real leaf, you can lightly sketch the outline and main veins, but a real leaf provides the best texture. -
Secure the impression:
Gently roll over the leaf with your rolling pin once or twice to press the veins deeply into the surface without distorting the shape too much. -
Cut the shape:
Using a needle tool or sharp craft knife, carefully trace around the edge of the leaf to cut out the clay form, then peel away the excess clay from the outside. -
Smooth the edges:
Dip a sponge in a little water and run it along the cut edges of your clay leaf to soften any sharp angles or crumbly bits left by the knife.
Step 2: Creating the Bowl Form
-
Add cigarette rests:
While the clay is still soft, use your rounded dull tool or finger to gently press large indents into the rim at opposite sides. These notches will serve as the holders. -
Enhance the veins:
Remove the real leaf. If the vein impressions are too faint, use a carving tool to gently deepen the central stem and the branching veins, mimicking the white lines seen in the reference. -
Initial shaping:
Lift the clay slab carefully and drape it into a shallow bowl or curved plate. This support will determine the final curvature of your ashtray. -
Refine the curve:
Press the clay gently against the mold to ensure the bottom is slightly flattened for stability while firmly curving the sides upward. -
Dry slowly:
Allow the clay to dry to a leather-hard state inside the mold. I find covering it loosely with plastic helps it dry evenly without warping.
Keep it clean
Use a translucent ‘breaking’ glaze rather than an opaque one. Opaque glazes will hide the delicate vein texture you worked hard to create.
Step 3: Finishing and Glazing
-
Bisque fire:
Once fully bone dry, fire the piece in a kiln according to your clay body’s instructions (usually bisque temperature, cone 04). -
Clean surface:
Wipe the bisque-fired piece with a damp sponge to remove any kiln dust, which helps the glaze adhere properly. -
Wax resist (optional):
If you want the veins to remain raw and textured like the image, carefully paint a thin line of wax resist into the deep carved vein lines. -
Apply glaze:
Pour or brush a celadon or light sage green glaze over the entire piece. These translucent glazes break beautifully over texture, pooling darker in the recesses and staying light on high points. -
Wipe back:
If you didn’t use wax resist, gently wipe the raised areas with a damp sponge to reveal some of the speckles and create that washed, vintage look. -
Second firing:
Fire the piece again to your glaze temperature (often cone 5 or 6 for stoneware) to melt the glass and seal the clay. -
Final inspection:
Check the bottom for any sharp burrs; sand them down if necessary to protect your furniture.
Go Botanical
Instead of carving veins, lay a coil of white clay into the green slab before rolling. This creates actual white veins rather than just carved lines.
Now you have a functional piece of art that looks like it was just gathered from the forest floor
Mushroom Forest Ashtray With Mini Toadstools
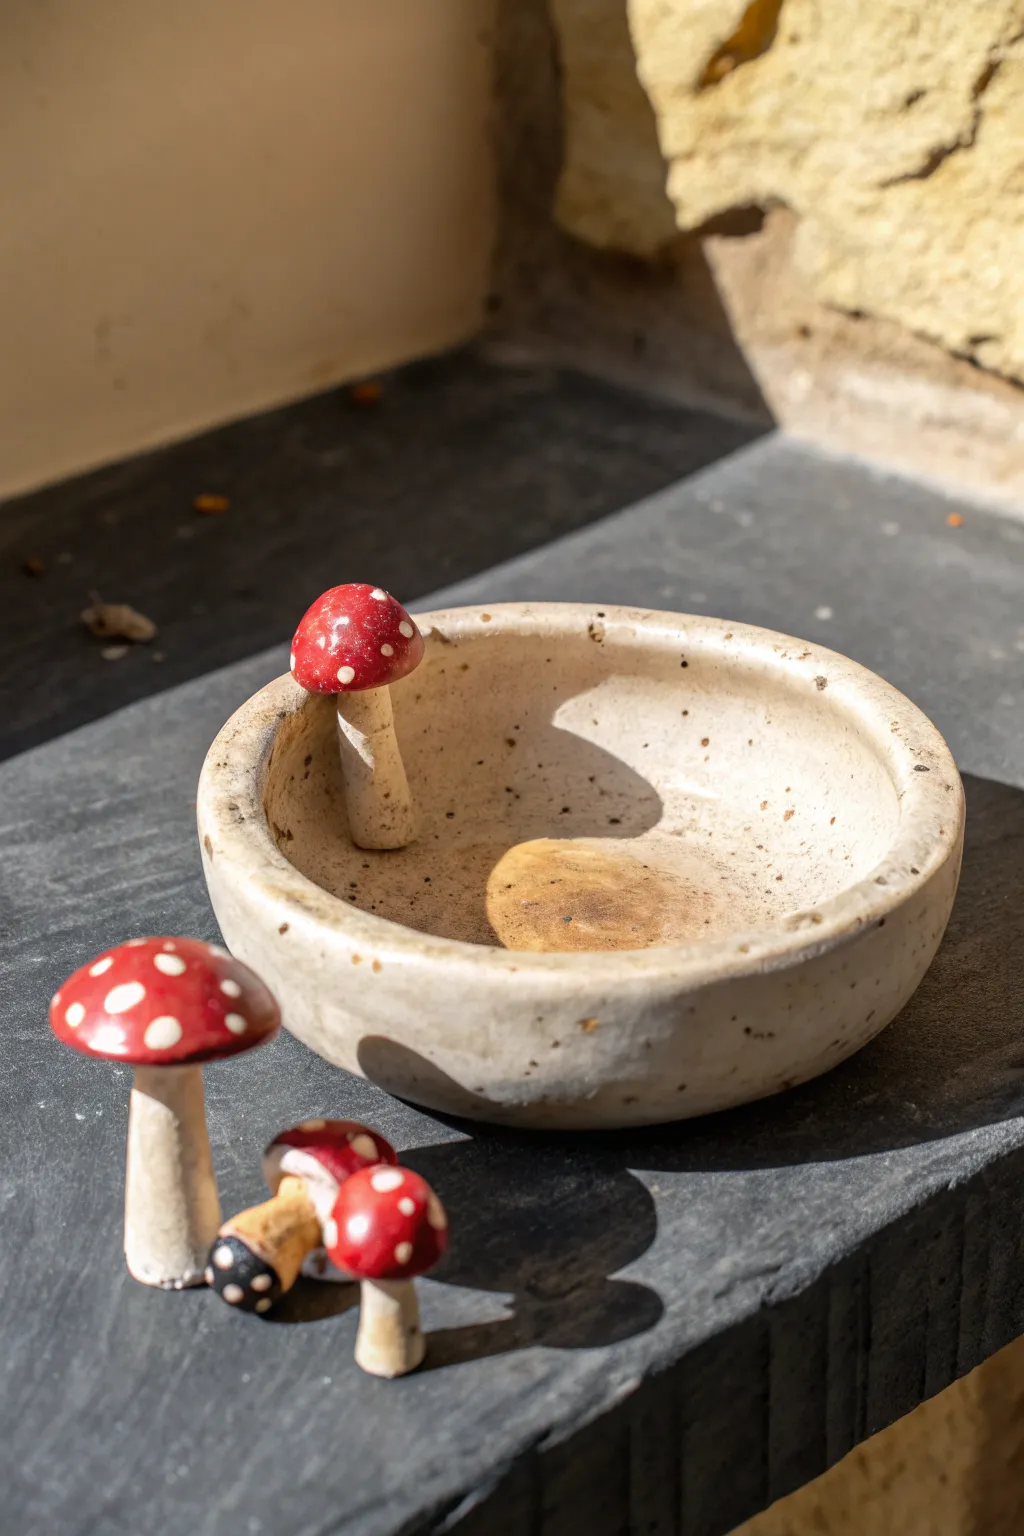
Bring a touch of the forest floor into your home with this charming clay ashtray featuring tiny, hand-sculpted toadstools. The speckled, stone-like finish and vibrant red caps create a delightful contrast that feels both earthy and magical.
Detailed Instructions
Materials
- White or beige polymer clay (approx. 200g)
- Speckled clay or play sand (to mix in)
- Red acrylic paint
- White acrylic paint
- Clear gloss varnish
- Matte varnish (optional)
- Sculpting tools or a toothpick
- Small round bowl (as a mold)
- Rolling pin
- Fine grit sandpaper
- Strong craft glue or liquid clay
Step 1: Shaping the Base
-
Prepare your clay:
Start by conditioning your polymer clay until it’s soft and pliable. To achieve that organic, speckled stone look seen in the photo, knead in a small amount of fine play sand or faux granite inclusions. If using pre-speckled clay, simply condition it well. -
Form the main bowl:
Roll the clay into a ball and then flatten it into a thick disc, about 1/2 inch thick throughout. -
Shape the walls:
Gently press this disc into your small bowl mold or shape it by hand, pushing the center down while pinching the edges up to create a rim. Aim for a diameter suitable for an ashtray, roughly 4-5 inches. -
Refine the rim:
Smooth out the rim with your fingers. It doesn’t need to be perfectly symmetrical; a slightly organic, uneven edge adds to the rustic charm. -
Add texture:
Use a crumpled ball of aluminum foil or a stiff brush to gently tap the surface of the clay, giving it a porous, stone-like texture.
Step 2: Sculpting the Mushrooms
-
Create the stems:
Roll out several small cylinders of clay for the mushroom stems. You’ll need one attached to the bowl rim and a few separate ones for the loose mushrooms. Taper them slightly so they are thicker at the bottom. -
Sculpt the caps:
Roll small balls of clay and flatten the bottoms to create domes. Make them various sizes for a natural look. Press your thumb gently into the underside to create a space for the stem. -
Attach the rim mushroom:
Take one stem and attach it vertically to the inside rim of your ashtray. Blend the clay at the base of the stem into the bowl wall so it looks like it’s growing seamlessly from the stone. I like to use a little liquid clay here to ensure a strong bond. -
Secure the cap:
Place one of your prepared caps onto the rim-mounted stem. Press down gently to secure it without flattening the dome shape. -
Assemble loose mushrooms:
Attach the remaining caps to their respective stems to create the freestanding mushrooms shown in the image. Ensure the bottoms of the stems are flat so they can stand upright.
Clay Cracking?
If your clay cracks while shaping the bowl over a mold, mix in a tiny drop of baby oil or clay softener to improve elasticity before reshaping.
Step 3: Baking and Painting
-
Bake the project:
Place your ashtray and the separate mushrooms on a ceramic tile or baking sheet. Bake according to your polymer clay package instructions (usually around 275°F/135°C for 15-30 minutes). -
Cool and sand:
Once fully cooled, lightly sand any rough fingerprints or sharp edges with fine-grit sandpaper. -
Base coat the stems:
Paint the stems of the mushrooms with a watered-down beige or off-white acrylic paint. Wipe some of it off immediately to let the clay color show through, creating a weathered effect. -
Paint the caps red:
Paint the mushroom caps with a bright, solid red acrylic paint. You may need two coats for full opacity. -
Add the spots:
Using a toothpick or a very fine detail brush, dot small white spots onto the red caps. Vary the sizes of the dots for a realistic toadstool appearance. -
Create the ‘burnt’ look:
To mimic the used look in the photo, mix a very watery brown or black paint wash. Dab a small puddle of this into the center of the ashtray bowl and let it dry, creating a stained shadow effect.
Glow in the Dark
Mix glow-in-the-dark powder into the white paint for the mushroom spots. Your forest floor scene will magically light up when the lights go out.
Step 4: The Final Finish
-
Seal the caps:
Apply a coat of clear gloss varnish only to the red mushroom caps. This makes them look wet and shiny like real fungi. -
Seal the stone:
Apply a matte varnish to the rest of the bowl and the stems to seal the paint while keeping that dry, stony texture. -
Secure loose pieces (Optional):
If you want the extra mushrooms permanently part of the set, you can glue them to the outside base of the ashtray, or leave them loose for arrangement.
Place your finished piece near a window where the sunlight can catch the glossy red caps and enjoy your handmade forest creation
Seashell Ashtray With Beachy Ridges
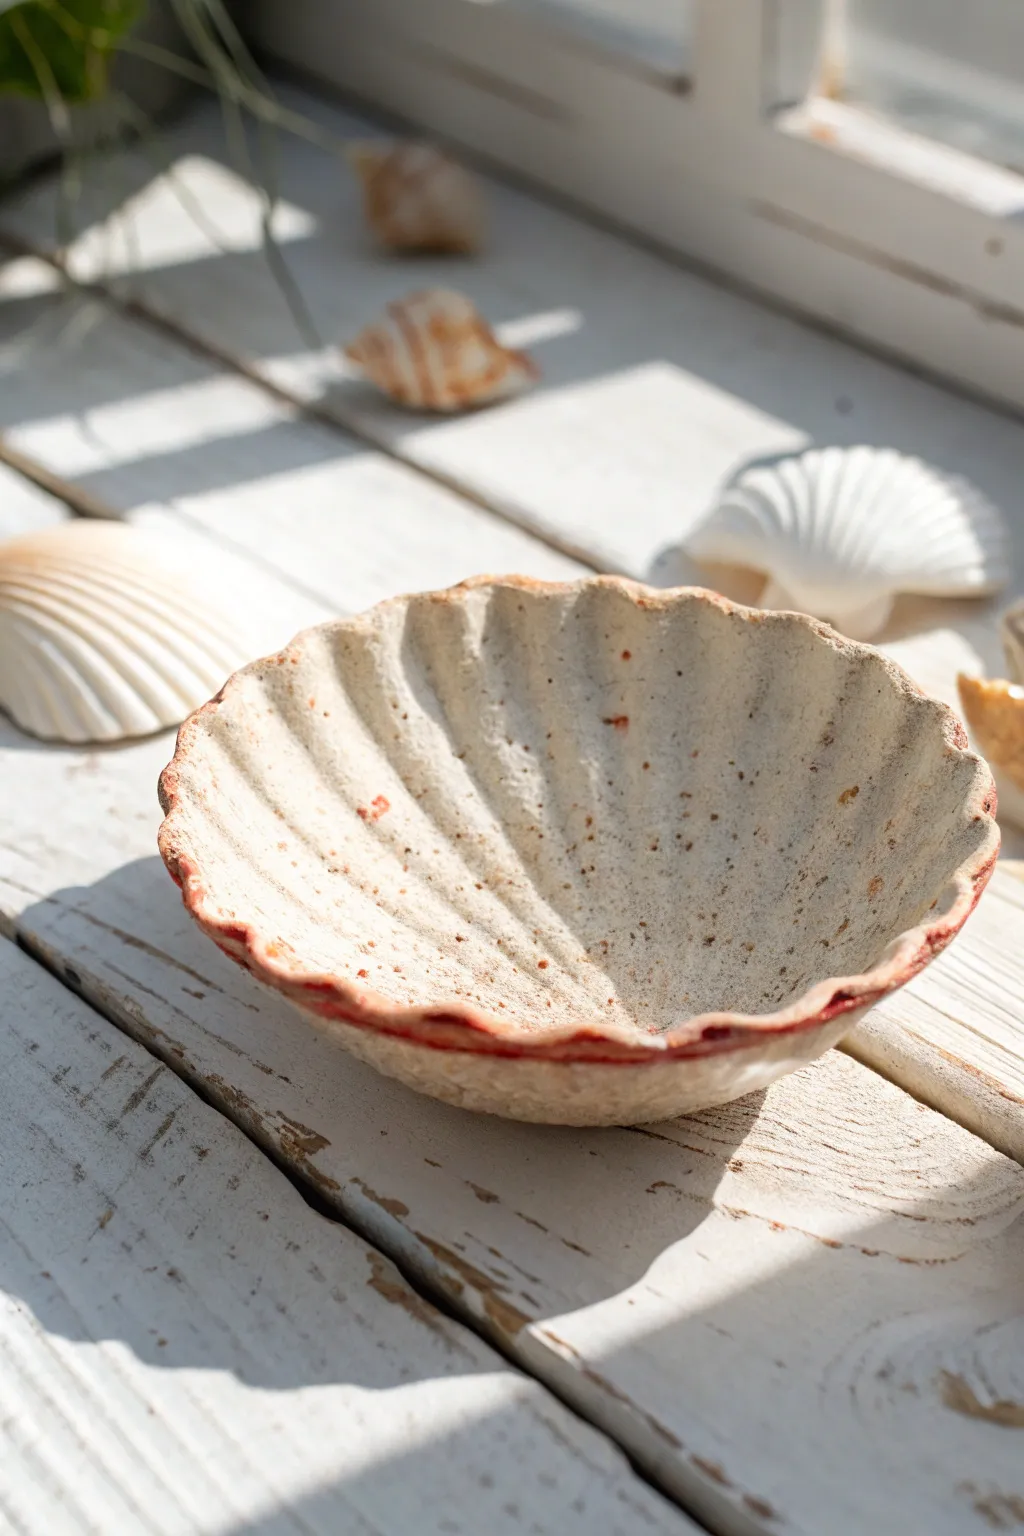
Capture the serene essence of the coast with this handcrafted clay ashtray designed to mimic a sun-bleached scallop shell. Its textured ridges and subtle speckled finish bring an organic, breezy charm to any tabletop.
Step-by-Step
Materials
- Air-dry clay (white or light grey)
- Scallop shell (real or plastic mold) for reference
- Rolling pin
- Modeling tool or butter knife
- Small bowl (for shaping)
- Sandpaper (medium and fine grit)
- Acrylic paints (cream, speckled sand, rust/terracotta)
- Toothbrush (old)
- Small detail brush
- Matte sealant or varnish
Step 1: Shaping the Shell
-
Prepare the clay:
Start by kneading a tennis-ball-sized chunk of air-dry clay until it is soft, pliable, and free of air bubbles. -
Roll it out:
Use your rolling pin to flatten the clay into a slab about 1/4 inch thick. Aim for a roughly circular shape, though it doesn’t need to be perfect. -
Create the fan shape:
Using a knife or modeling tool, cut the clay into a wide fan shape, slightly tapering one end to form the ‘hinge’ of the shell. -
Form the ridges:
To create the signature scallop ridges, use your modeling tool to firmly press varying lines radiating from the narrow hinge point outward toward the wide rim. -
Enhance the texture:
Run your finger along the grooves to smooth them slightly, ensuring they look worn and natural rather than sharp and mechanical. -
Scallop the edge:
Gently press down on the clay between the ridge lines at the outer rim to create a wavy, scalloped edge. -
Curve the form:
Carefully lift your clay slab and place it inside a small bowl lined with plastic wrap. This will help it hold a curved, cup-like shape while it dries. -
Initial drying:
Let the clay sit in the bowl for at least 24 hours until it’s firm enough to hold its shape without support.
Step 2: Refining and Painting
-
Sand the surfaces:
Once fully dry, use medium-grit sandpaper to smooth out any rough patches on the rim, then switch to fine grit for the interior bowl. -
Base coat application:
Paint the entire piece inside and out with a creamy off-white acrylic paint. You may need two coats for full opacity. -
Add speckles:
Dip an old toothbrush into diluted light brown or ‘sand’ colored paint. Run your thumb over the bristles to flick tiny speckles across the inside of the shell for a sandy texture. -
Paint the rim:
Using a small detail brush, carefully apply a rust or terracotta color along the very edge of the scalloped rim. I like to keep this line a bit uneven to mimic natural wear. -
Highlight the hinge:
Brush a very small amount of the rust color near the bottom hinge of the shell and wipe most of it away with a paper towel for a weathered look. -
Seal the project:
Protect your work with a coat of matte sealant. This is crucial for an ashtray to ensure ash doesn’t stain said porous clay.
Fixing Cracks
If you notice tiny hairline cracks after drying, mix a small amount of fresh clay with water to make a paste (slip) and fill them in before painting.
Glazed Look
Swap the matte varnish for a high-gloss spray sealant. This makes the interior look like wet ceramic or mother-of-pearl found fresh from the ocean.
Now you have a functional piece of decor that brings a permanent touch of summer to your home
Citrus Slice Ashtray With Segment Details
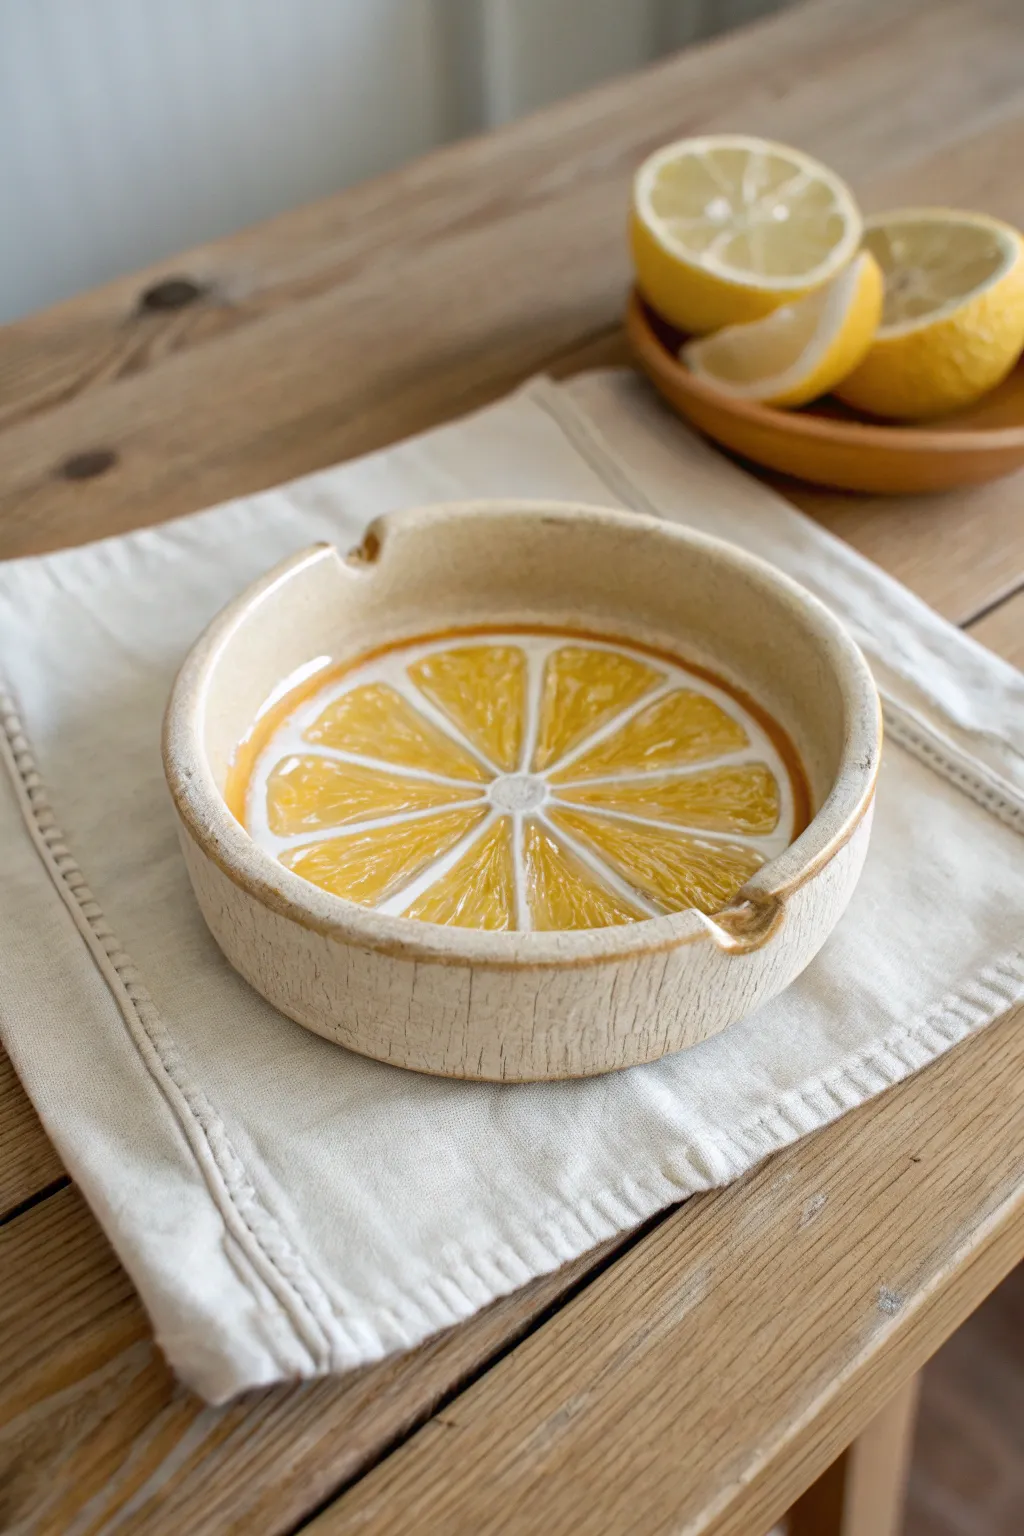
Bring a touch of citrusy freshness to your tabletop with this delightful ceramic project. This ashtray features a detailed lemon slice interior glaze contrasted against a rustic, textured cream exterior.
Step-by-Step Tutorial
Materials
- Light-colored stoneware clay
- Pottery wheel (or rolling pin for hand-building)
- Sponge
- Needle tool
- Loop trimming tool
- Rib tool (wooden or silicone)
- Underglaze (bright yellow, white, ochre)
- Clear glossy glaze
- Small fine-point liner brushes
- Medium flat brush
- Kiln
Step 1: Forming the Base
-
Center and open:
Begin with a ball of well-wedged clay, centering it firmly on your wheel head. Open the clay to form a flat, wide floor, leaving about a half-inch thickness for the base. -
Pull the walls:
Pull up short, vertical walls to create a shallow dish shape. The walls should be about 1.5 inches high. Keep the rim slightly thick and rounded for durability. -
Smooth the interior:
Use a rib tool to compress the floor and ensure it is perfectly flat and smooth, as this will be your canvas for the lemon design later. -
Leather hard drying:
Wire the piece off the bat and let it dry to a leather-hard state. It should be firm enough to handle without warping but soft enough to carve. -
Trim the foot:
Flip the piece over and center it on the wheel. Use a loop tool to trim a clean foot ring on the bottom, refining the exterior shape. -
Add exterior texture:
While the clay is still leather hard, use a serrated rib or a stiff brush to gently scratch vertical textures into the outside walls. This mimics the rustic finish seen in the photo. -
Carve the rests:
Using a needle tool or a small loop tool, carve out two to three U-shaped notches on the rim where a cigarette would rest. Smooth the edges of these cuts with a damp sponge.
Juicy Texture Trick
For 3D texture, apply the clear glaze thicker over the yellow segments than the white lines. The glaze will pool slightly, making the fruit sections look plump.
Step 2: Painting the Citrus Interior
-
Bisque fire:
Load your dry greenware into the kiln and bisque fire it according to your clay body’s specifications (usually Cone 04-06). -
Outline the segments:
Once cooled, lightly sketch the lemon segments onto the interior floor with a pencil. Draw a center circle, then radiate lines outward to the edge, creating triangular wedges. The pencil marks will burn off in the kiln. -
Base coat the pith:
Using a thin liner brush and white underglaze, paint the ‘pith’ lines. This includes the center circle, the radiating spokes, and a ring around the outer edge of the floor. -
Fill the segments:
Fill in the triangular wedges with bright yellow underglaze. Apply 2-3 coats for solid opacity, letting each coat dry briefly in between. -
Add translucent depth:
To make the fruit look juicy, I like to mix a tiny bit of ochre or orange underglaze with the yellow. Dab this darker mix near the outer curve of each segment to create a shadow or ‘rind’ effect. -
Detailing the vesicles:
With an ultra-fine brush and a slightly watered-down white underglaze, paint tiny, curved highlights inside the yellow segments. These little lines mimic the juice vesicles of real citrus. -
Glazing:
Dip or brush a clear glossy glaze over the entire interior to give the fruit a wet, shiny look. For the exterior, you can leave it unglazed to highlight the clay texture or apply a thin matte clear glaze. -
Final wipe:
Wipe the foot ring clean with a damp sponge to prevent it from sticking to the kiln shelf. -
Glaze fire:
Fire the piece again to your clear glaze’s maturation temperature (e.g., Cone 5/6).
Go Tropical
Switch up the color palette to create a lime (green), orange (orange), or grapefruit (pink/red) version. A set of three makes a perfect gift.
Once cooled, your vibrant citrus ashtray is ready to add a pop of color to your table
Waffle-Inspired Ashtray With a Butter Pat Detail
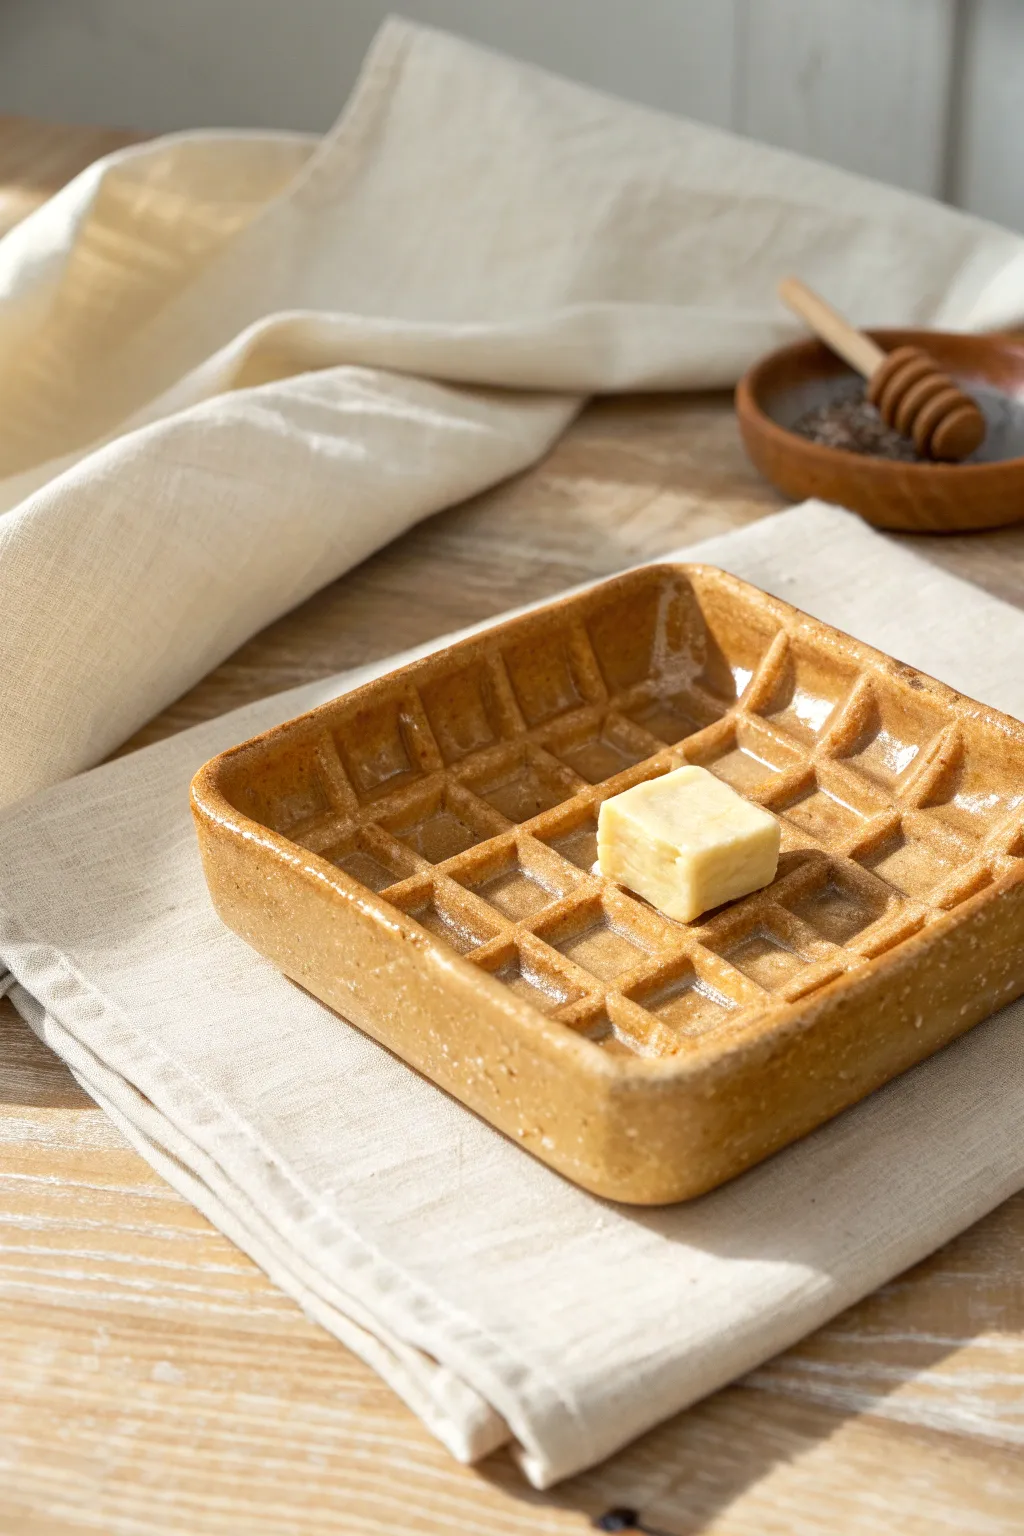
This whimsical ceramic piece transforms a breakfast favorite into a functional tray that’s sure to spark conversation. With its realistic grid texture, golden-brown glaze, and a melting butter pat centerpiece, this project achieves a delightful trompe-l’œil effect perfect for holding trinkets or ash.
Detailed Instructions
Materials
- Light-colored stoneware or earthenware clay (no grog or fine grog)
- Rolling pin
- Two 1/4-inch wooden slats (thickness guides) or guide rings
- Ruler
- Fettling knife or X-Acto knife
- Square template (approx. 5×5 inches)
- Square wooden dowel or specialized clay texturing tool
- Needle tool
- Scoring tool (or serrated rib)
- Slip (liquid clay)
- Underglazes (Butter Yellow, Cream)
- Translucent Amber or Honey glaze (glossy)
- Clear gloss glaze
- Small flat brush
- Sponge
Step 1: Forming the Base
-
Prepare the slab:
Begin by wedging your clay thoroughly to remove air bubbles. Place the clay between two 1/4-inch wooden slats and roll it out into a smooth, even slab. This thickness ensures the tray feels substantial, like a real thick Belgian waffle. -
Cut the square:
Lay your square template over the slab. Using your fettling knife held vertically, cut around the template to create a clean square base. Smooth the cut edges with a damp sponge to remove any sharpness. -
Create the rim walls:
From the remaining clay slab, cut four strips that match the length of your square’s sides. These strips should be about 3/4-inch tall to form the outer crust of the waffle. -
Attach the rim:
Score the top edges of your square base and the bottom of your four clay strips. Apply slip generously. Press the strips onto the base to form a box. Reinforce the inside seams by running a small coil of clay along the join and smoothing it down. -
Soften the edges:
Waffles aren’t perfectly sharp squares. Gently round over the top edges of your rim and the outside corners with your fingers or a sponge to give it that baked, doughy appearance.
Uneven Grid?
If your grid strips look wonky, use a square wooden dowel to gently press against the sides of the grid walls while the clay is soft to straighten them out.
Step 2: Creating the Grid Texture
-
Measure and mark:
Lightly use a ruler to mark a grid pattern inside the tray. You want the squares to be relatively large and deep, mimicking a Belgian waffle iron. Mark lines roughly 3/4-inch apart. -
Construct the inner grid:
Roll out thin coils or cut thin strips from a slab that are slightly shorter than the outer rim height. You will assemble these inside the box following your marked lines. -
Install the grid lines:
Install the strips in one direction first, scoring and slipping them to the base. Then, cut small individual pieces to fit perpendicularly between the long strips to create the cross-hatch pattern. This takes patience, but it creates cleaner corners than simply pressing a tool into the clay. -
Refine the pockets:
Once the grid is assembled, use the back of a square potting tool or your finger to smooth the bottom of each little pocket. Ensure the grid walls are securely attached to the base and the outer rim.
Step 3: The Butter Pat & Finishing
-
Sculpt the butter:
Cut a small block of clay, roughly 1 inch by 1 inch. Don’t make it a perfect cube; soften the corners and slightly slump one side so it looks like it is beginning to melt from the heat. -
Attach the detail:
Choose a spot slightly off-center for visual interest. Score and slip the bottom of the butter pat and the top of the grid where it will sit. Press it down firmly, smoothing the bottom edges so they merge slightly with the waffle ridges to simulate melting. -
Bisque fire:
Allow the piece to dry slowly to prevent warping, covering it loosely with plastic for the first day. Once bone dry, bisque fire it according to your clay body’s instructions (usually cone 04). -
Glaze the butter:
Apply a pale, creamy yellow underglaze specifically to the butter pat. Be careful to keep this distinct from the waffle. Follow this with a coat of clear gloss glaze just on the butter. -
Glaze the waffle:
For the waffle itself, use a translucent amber or honey-colored glaze. This type of glaze naturally pools in the deep pockets and thins out on the high ridges, perfectly mimicking the toasted color variation of a real waffle. -
Final firing:
Fire the piece again to the temperature required by your glaze (commonly cone 5 or 6). I always check the kiln shelf is well-washed beforehand, as the flat bottom needs a clean surface.
Make it Drip
Before glazing, sculpt thin, trailing drips of slip running from the butter pat down into the nearby pockets to enhance the ‘melting’ illusion.
Once cooled, your ceramic waffle is ready to add a touch of delectable humor to your coffee table
Playing Card Ashtray With Graphic Icon Corners
Bring the casino vibes home with this elegant, square clay ashtray featuring classic playing card motifs. The design combines bold black and red icons with touches of gold for a vintage, high-roller aesthetic that looks great on any patio table.
How-To Guide
Materials
- White polymer clay or air-dry clay (approx. 1lb)
- Square cookie cutter (approx. 4-5 inches wide)
- Small rolling pin
- Modeling tools (knife, smoothing rib)
- Acrylic paints: Black, Bright Red, Metallic Gold
- Fine detail paintbrush (size 0 or 00)
- High-gloss varnish or resin
- Parchment paper
- Fine-grit sandpaper (400 grit)
- Ruler
Step 1: Shaping the Base
-
Roll the slab:
Begin by conditioning your clay until it is pliable and smooth. Roll it out on a piece of parchment paper to an even thickness of about 1/4 inch. If you want a perfectly flat bottom, I like to use depth guides or wooden slats on either side of the roller. -
Cut the square:
Use your square cookie cutter or a ruler and knife to cut a perfect square from the slab. This will be the base of your ashtray. -
Create the walls:
Roll out four strips of clay that are the same thickness as your base and slightly longer than the sides of your square. The height should be about 1 to 1.5 inches. -
Attach the walls:
Score the edges of the square base and the bottom of your wall strips. Apply a little water or liquid clay (depending on your clay type) and press the walls firmly onto the base. -
Blend the seams:
Use a modeling tool to smooth the clay where the walls meet the base and where the corners join. Blend the clay upwards on the outside and downwards on the inside until the seams disappear completely. -
Form the cigarette rests:
While the clay is still soft, use a round tool or your finger to gently press down four indentations—one in the center of each wall rim. These notches should be smooth and wide enough to hold a cigarette. -
Curve the corners:
Gently gently round off the sharp outer corners of the square with wet fingers or a sponge to mimic the soft, modeled look of the original piece. -
Dry or bake:
Follow the instructions for your specific clay. If baking polymer clay, support the walls with foil. If using air-dry clay, let it dry slowly away from direct heat to prevent cracking.
Stamp It Out
Don’t trust your freehand painting? Buy a cheap deck of playing cards, cut out the shapes to make tiny paper stencils, and sponge the paint on.
Step 2: Painting the Design
-
Sand for smoothness:
Once fully cured or dry, lightly sand the entire surface with fine-grit sandpaper. Focus on the rim and corners to ensure a professional, store-bought feel. Wipe away all dust with a slightly damp cloth. -
Sketch the layout:
Lightly pencil in your design grid. Draw a diamond in the direct center of the bowl. Plan for three symbols on each outer wall and one large symbol on each interior wall. -
Paint the center diamond:
Using your bright red acrylic and a fines detail brush, paint the central diamond inside the bowl. It may need two thin coats for full opacity. -
Paint the black suits:
Mix a tiny drop of water into your black acrylic to help it flow. Paint the spades and clubs. Notice on the original that some clubs are solid black, while others are outlines. Recreate this variety on the outer walls. -
Add the red suits:
Paint the red diamonds on the exterior. Keep your edges as sharp as possible; a square-tipped detail brush can help with the straight edges of the diamond shape. -
Apply the gold accents:
Dip your brush into metallic gold paint. Fill in the heart symbols and the secondary club symbols as shown. I prefer to stipple the gold slightly rather than stroke it, which gives it that textured, vintage shimmer. -
Outline the gold:
Once the gold is completely dry, use your finest brush and black paint to carefully outline the gold hearts and clubs. This high-contrast outline is crucial for the graphic look. -
Seal the piece:
Finish by applying two coats of high-gloss varnish or a thin layer of resin. This not only protects the paint from ash but gives the clay that ceramic-like glazed shine.
Vintage Patina
To age the piece, wipe a diluted wash of brown acrylic paint over the dried white clay before sealing. It settles in crevices for an antique look.
This charming handmade piece is now ready to hold trinkets or serve its intended purpose on your next game night
All-in-One Ashtray With a Built-In Lighter Pocket
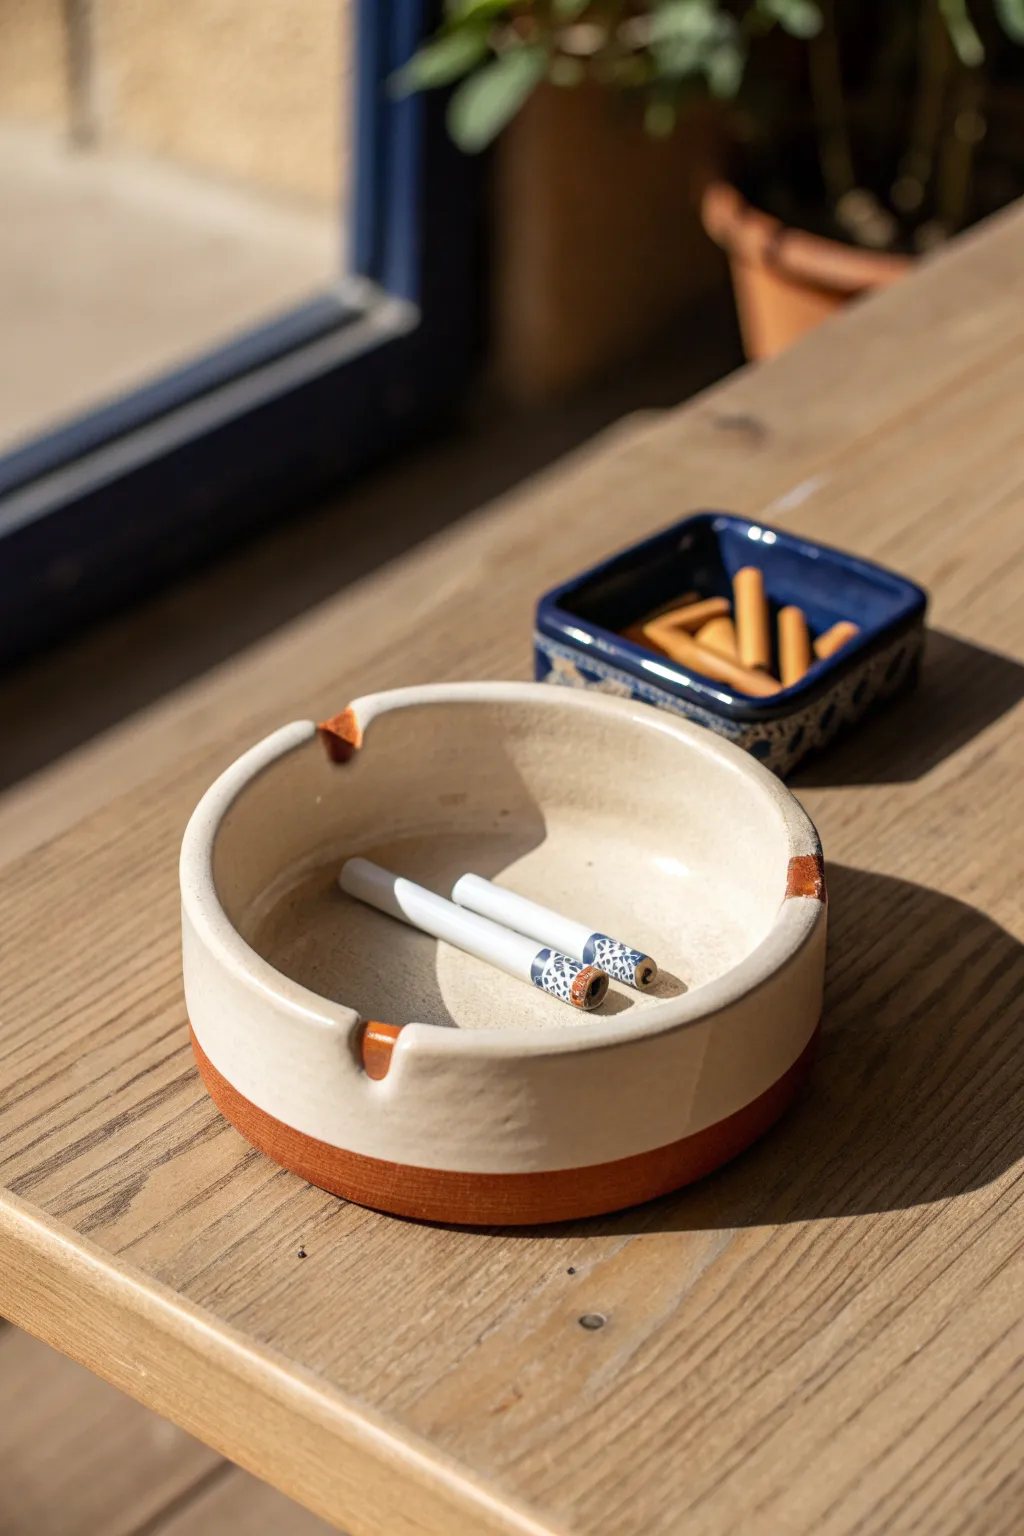
This project features a deep, wheel-thrown style ash receiver with a beautifully contrasting exposed clay base. The smooth cream glaze pairs perfectly with the raw terracotta texture for a rustic yet modern finish.
Detailed Instructions
Materials
- High-fire stoneware clay or terracotta clay
- Pottery wheel (or coil building tools for hand-building)
- Wooden throwing rib
- Needle tool
- Wire cutter
- Trimming tools
- Carving tool or round file
- Sponge
- Cream or off-white glaze meant for dipping/pouring
- Wax resist
- Kiln access
Step 1: Forming the Base
-
Prepare your clay:
Begin by thoroughly wedging about 1.5 to 2 pounds of clay to remove air bubbles. Center the ball firmly on your wheel head. -
Open the form:
Open the clay to create a floor that is at least 1/2 inch thick. This extra thickness at the bottom adds valuable weight and stability to the finished piece. -
Pull the walls:
Pull the walls up vertically. Aim for a cylindrical shape rather than a bowl shape. The walls should be about 3 inches high and fairly thick (approx 1/4 inch) to give it a sturdy, chunky feel. -
Refine the rim:
Compress the rim with a chamois or sponge. I like to slightly flatten the top edge rather than leaving it perfectly round to give it a more manufactured look. -
Shape the interior:
Use a rounded wooden rib on the inside to create a smooth, continuous curve from the floor to the wall. This makes cleaning the ashtray much easier later. -
Cut from wheel:
Run your wire cutter underneath the pot to separate it from the wheel head, but leave it on the bat to firm up until leather hard.
Uneven Glaze Line?
If your wax line is shaky, use a banding wheel while applying the wax. Rest your hand on a steady stack of books to keep the brush perfectly level as you spin.
Step 2: Trimming and Notching
-
Center for trimming:
Once the clay is leather hard, center it upside down on the wheel. Secure it with clay lugs. -
Define the foot:
Trim away excess clay from the bottom third of the exterior. Create a distinct vertical transition where the glaze line will eventually stop. -
Smooth the exterior surface:
Use a smooth metal kidney rib to burnish the trimmed area slightly, removing any grog lines or tool marks. -
Flip and mark:
Turn the piece right side up. Visualize a triangle and mark three equidistant points on the rim where the cigarette rests will go. -
Carve the rests:
Using a round file or a carving tool, gently notch out the three semicircles on the rim. Angle the cut slightly downward toward the center of the bowl so the cigarettes don’t roll outward. -
Smooth the notches:
Use a damp sponge or your finger to smooth the sharp edges created by the carving tool. The notches should feel soft to the touch. -
Bisque fire:
Let the piece dry completely (bone dry) before loading it into the kiln for the designated bisque firing schedule.
Step 3: Glazing and Finishing
-
Clean the bisque:
Wipe the fired piece with a damp sponge to remove any dust that might prevent the glaze from adhering properly. -
Apply wax resist:
Paint a clean line of wax resist around the bottom exterior, covering the bottom inch and the underside foot. This will keep the raw clay exposed. -
Pour the interior:
Pour your cream glaze inside the ashtray, swirl it to coat the entire interior surface, and pour out the excess. -
Dip the exterior:
Flip the ashtray over and dip the exterior into the cream glaze until you reach the wax resist line. Hold it there for 3-5 seconds for an opaque coat. -
Clean up drips:
Once dry to the touch, use a sponge to wipe away any glaze beads that settled on the waxed bottom area. -
Glaze fire:
Load the piece into the kiln for the final glaze firing according to your clay and glaze cone rating.
Companion Piece
Make a matching square dish glazed in a deep cobalt blue to hold filters or lighters (as seen in the background) for a complete smoking set.
Once cooled, the bare clay bottom will provide a pleasing tactile contrast to the glossy interior