If you’re making clay bead bracelets for your best friend, the magic is in designing two pieces that clearly belong together while still feeling like each person. Here are my favorite clay bead bracelet ideas that highlight your bond with matching, complementary, and a few delightfully unexpected twists.
Classic BFF Letter Centerpiece
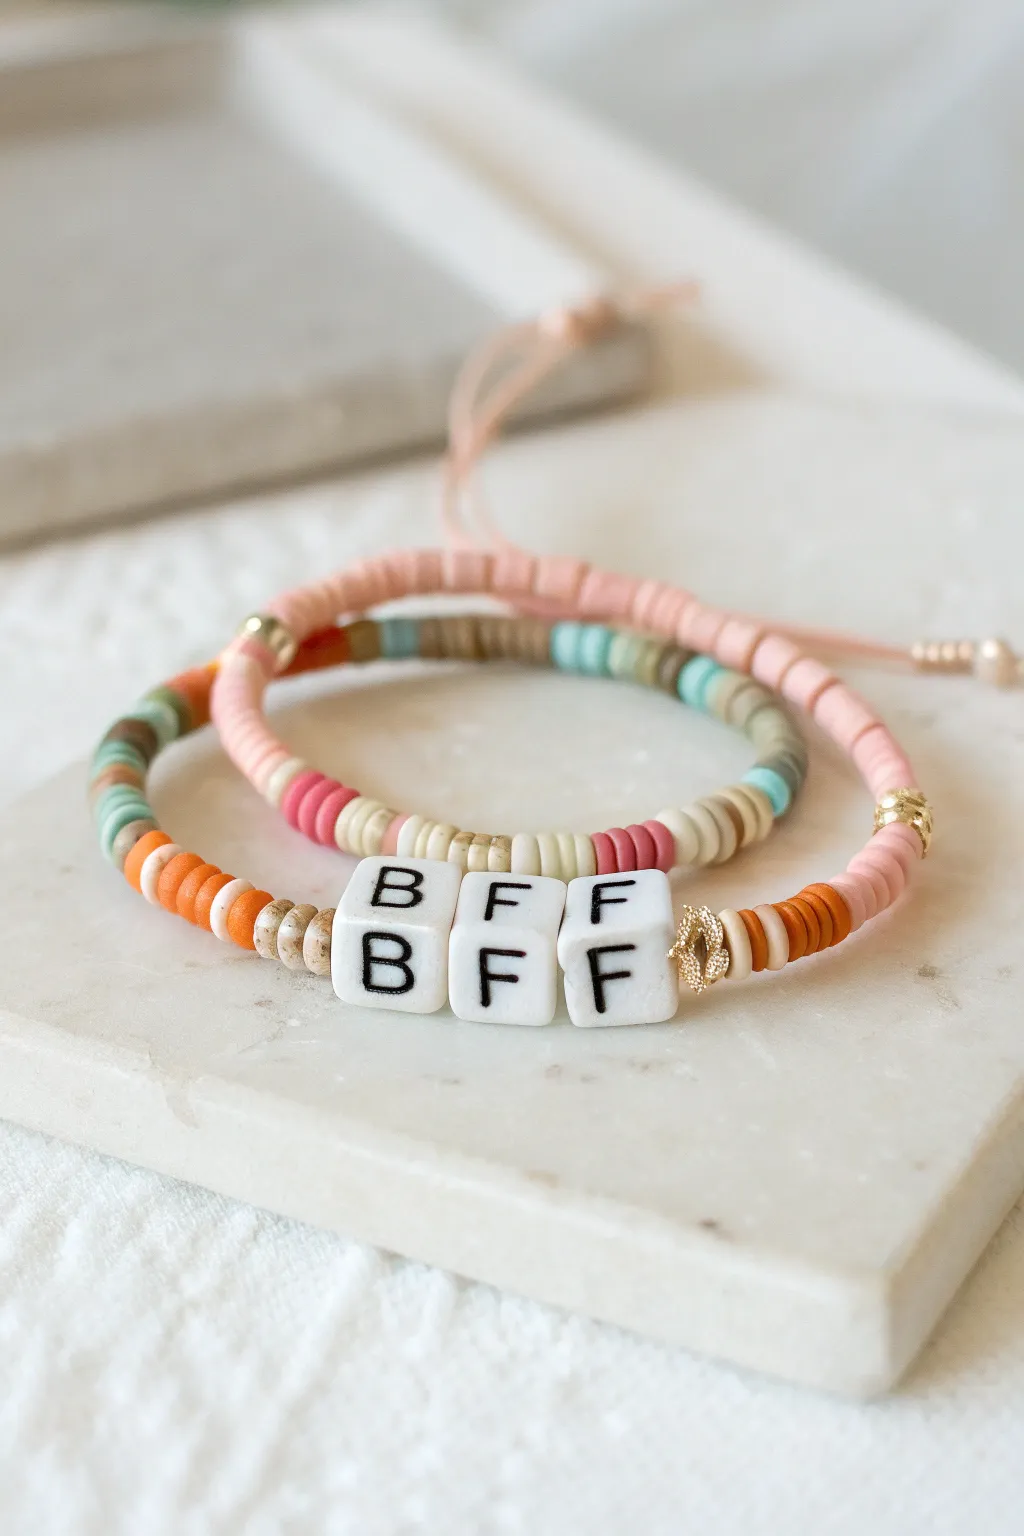
Showcase your bond with these charming, stackable clay bead bracelets that feature a classic square letter centerpiece. The warm, earthy palette of peach, teal, orange, and beige heishi beads creates a sophisticated yet playful accessory perfect for sharing.
Step-by-Step
Materials
- Polymer clay heishi beads (6mm or similar) in peach, beige, burnt orange, teal, olive green, and dark pink
- Square white alphabet beads with black lettering (enough for two ‘BFF’ sets)
- Small gold spacer beads or metal accent beads (round)
- Gold textured knot cover or large decorative bead (optional)
- Light pink nylon cord or strong elastic string (0.8mm)
- Scissors
- Super glue or jewelry glue
- Tape or a bead stopper
Step 1: Planning Your Pattern
-
Measure the wrist:
Before cutting any cord, measure your wrist and your best friend’s wrist. Add about 3-4 inches to this measurement to ensure you have enough slack for tying knots later. -
Secure the cord:
Cut your nylon cord or elastic to the calculated length. Tape one end of the cord firmly to your work surface or use a bead stopper to prevent beads from sliding off as you work. -
Layout the beads:
Lay out your beads on a design board or a piece of felt. This project uses two distinct color patterns: one bracelet favors solid peach tones, while the other uses a more intricate multicolor stripe pattern.
Stiff Bracelet Trouble?
If the finished bracelet feels too stiff and doesn’t drape well, the beads are strung too tightly. Leave a tiny gap (about 1mm) of bare cord before tying your final knot.
Step 2: Creating the Multipart Bracelet
-
Start the first side:
For the bottom bracelet shown, begin stringing the left side. Start with about 1.5 inches of burnt orange heishi beads, followed by a small section of beige speckled beads. -
Add the centerpiece:
Slide on the first ‘B’ letter bead. Follow it immediately with an ‘F’ and then the second ‘F’. Ensure they are all facing the same direction so the word reads correctly. -
Add the gold accent:
Right after the last ‘F’ bead, string a textured gold accent bead or a festive knot cover. This adds a little sparkle right next to the message. -
Complete the second side:
Continue the pattern on the right side. Mirror the start by adding a short section of burnt orange beads, then transition into a long section of soft peach beads to finish the loop.
Step 3: Creating the Striped Companion
-
Pre-string the pattern:
For the second (top) bracelet, the pattern is more regular. You’ll want to alternate small blocks of color—try 5-6 beads of teal, then 5-6 of beige, then olive green. -
Insert gold spacers:
Every few inches, insert a small round gold spacer bead between color sections to break up the matte texture of the clay. -
Add the letter block:
Just like the first bracelet, find the center point of your design and thread on your ‘BFF’ letter beads. Sandwich this block with sections of white or cream clay beads to make the letters pop. -
Finish with variety:
Complete the rest of the strand with alternating sections of pink, mustard, and teal beads until you reach the desired length.
Pro Tip: Adjustable Fit
Instead of elastic, use nylon cord and leave 3-inch tails. Braiding these tails and adding a macramé sliding knot creates an adjustable closure that fits any wrist size.
Step 4: Finishing Touches
-
Check the fit:
Wrap the unfinished bracelet around your wrist to check the size. It should fit comfortably without being too tight, as the clay beads can pinch if they don’t have a little wiggle room. -
Tie the knot:
Remove the tape or stopper. Bring both ends of the cord together and tie a strong surgeon’s knot (right over left, left over right). I usually pull it very tight to secure it. -
Glue and trim:
Apply a tiny drop of jewelry glue or super glue to the knot to prevent it from slipping. Let it dry for a minute before trimming the excess cord close to the knot. -
Hide the knot:
If possible, gently tug the bracelet so the knot slides inside one of the larger letter beads or the gold accent bead to hide it from view.
Stack your new creations together for a trendy, layered look that celebrates friendship


Split Heart Best Friend Set
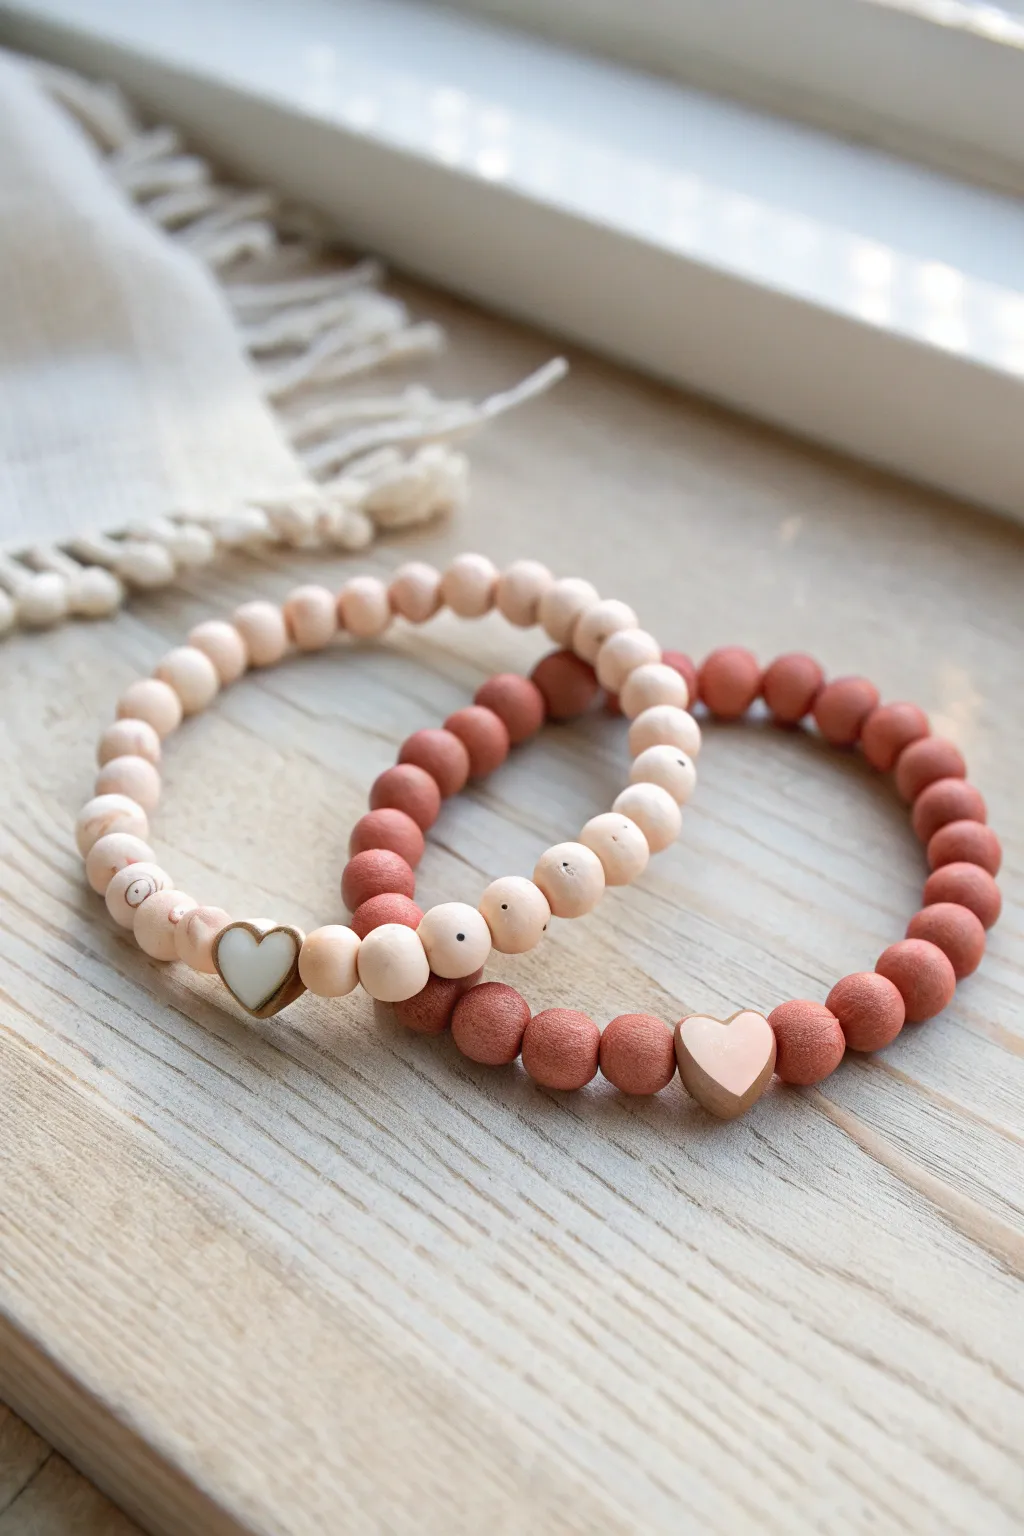
Celebrate your connection with these understated, earthy friendship bracelets featuring natural wood and clay tones. The design uses soft matte textures and complimentary heart charms to create a sophisticated take on the classic best friends set.
Step-by-Step Tutorial
Materials
- 8mm smooth unfinished wood beads (light maple tone)
- 8mm terracotta or matte clay round beads (rust/terracotta tone)
- Small heart-shaped metal beads or charms (gold or bronze finish)
- White or cream enamel paint (for the heart center)
- Pale pink or blush enamel paint (for the heart center)
- Fine detail paintbrush or toothpick
- High-quality elastic cord (0.8mm or 1mm)
- Jewelry adhesive or super glue
- Scissors
- Tape or bead stopper
- Clear matte sealant (optional)
Step 1: Preparation & Painting
-
Measure your wrist:
Before cutting any string, measure your wrist and your best friend’s wrist to determine the needed length. Add about 3 inches of extra cord to each measurement to make knotting easier later. -
Prepare the heart charms:
If your metal heart beads aren’t already colored, you’ll customize them now. Clean the surface of the hearts with a little alcohol on a cloth to remove any oils. -
Fill the first heart:
Take the first heart bead. Using a toothpick or a very fine brush, carefully fill the recessed heart area with the white or cream enamel paint. -
Fill the second heart:
Repeat the process for the second heart bead, but this time fill the center with the blush pink paint. I like to let these sit for at least an hour to ensure they aren’t tacky while stringing. -
Seal the paint (optional):
Once the paint is fully dry, you can dab a tiny amount of clear matte sealant over the painted area to protect it from chipping over time.
Natural Wood Tip
Unfinished wood beads can absorb oils over time. Briefly rubbing them with a tiny bit of beeswax before stringing keeps them looking fresh and prevents staining.
Step 2: Stringing the Light Bracelet
-
Secure the cord:
Cut your first length of elastic cord. Place a piece of tape or a bead stopper on one end so your beads don’t slide off while you work. -
Begin the pattern:
Start stringing the light maple wood beads. You will use these for the entire circumference of this first bracelet. -
Add the focal point:
Once you have strung exactly half of your calculated bead count, pause. Slide on the white-filled heart charm. -
Finish the strand:
Continue adding the rest of the light wood beads until you reach the desired length. Check the fit by wrapping it loosely around your wrist; it should be snug but not tight.
Sticky Bead Holes
If the clay beads have jagged edges or blocked holes preventing stringing, use a metal bead reamer or a thick needle to gently smooth the channel before threading.
Step 3: Stringing the Dark Bracelet
-
Start the second strand:
Cut your second piece of elastic cord and secure one end just like before. -
String the terracotta beads:
Begin threading the rust-colored clay or matte beads. These have a slightly grippier texture, so ensure they are sliding down smoothly. -
Insert the matching heart:
At the halfway point—matching the placement of the first bracelet—slide on the blush pink-filled heart charm. -
Complete the loop:
Finish stringing the remaining terracotta beads until this bracelet matches the length of the first one.
Step 4: Finishing Touches
-
Pre-stretch the elastic:
Before tying, gently stretch each bracelet a few times. This prevents the elastic from loosening up immediately after you wear it. -
Tie the surgeon’s knot:
Remove the tape/stopper. Cross the ends, loop one under the other twice, and pull tight. Then repeat the process to secure the knot firmly. -
Apply adhesive:
Place a tiny drop of jewelry glue or super glue directly onto the knot. Be careful not to get glue on the beads themselves, as it can discolor the wood. -
Hide the knot:
While the glue is still slightly wet, gently pull the knot inside the hole of the nearest bead to hide it. Hold it there for a moment until the glue sets. -
Trim the ends:
Once the glue is completely dry, use your small scissors to trim the excess elastic cord as close to the bead hole as possible without nicking the knot.
Now you have a beautifully coordinated set of bracelets ready to gift to your favorite person


Inverted Color Palettes (You + Me)
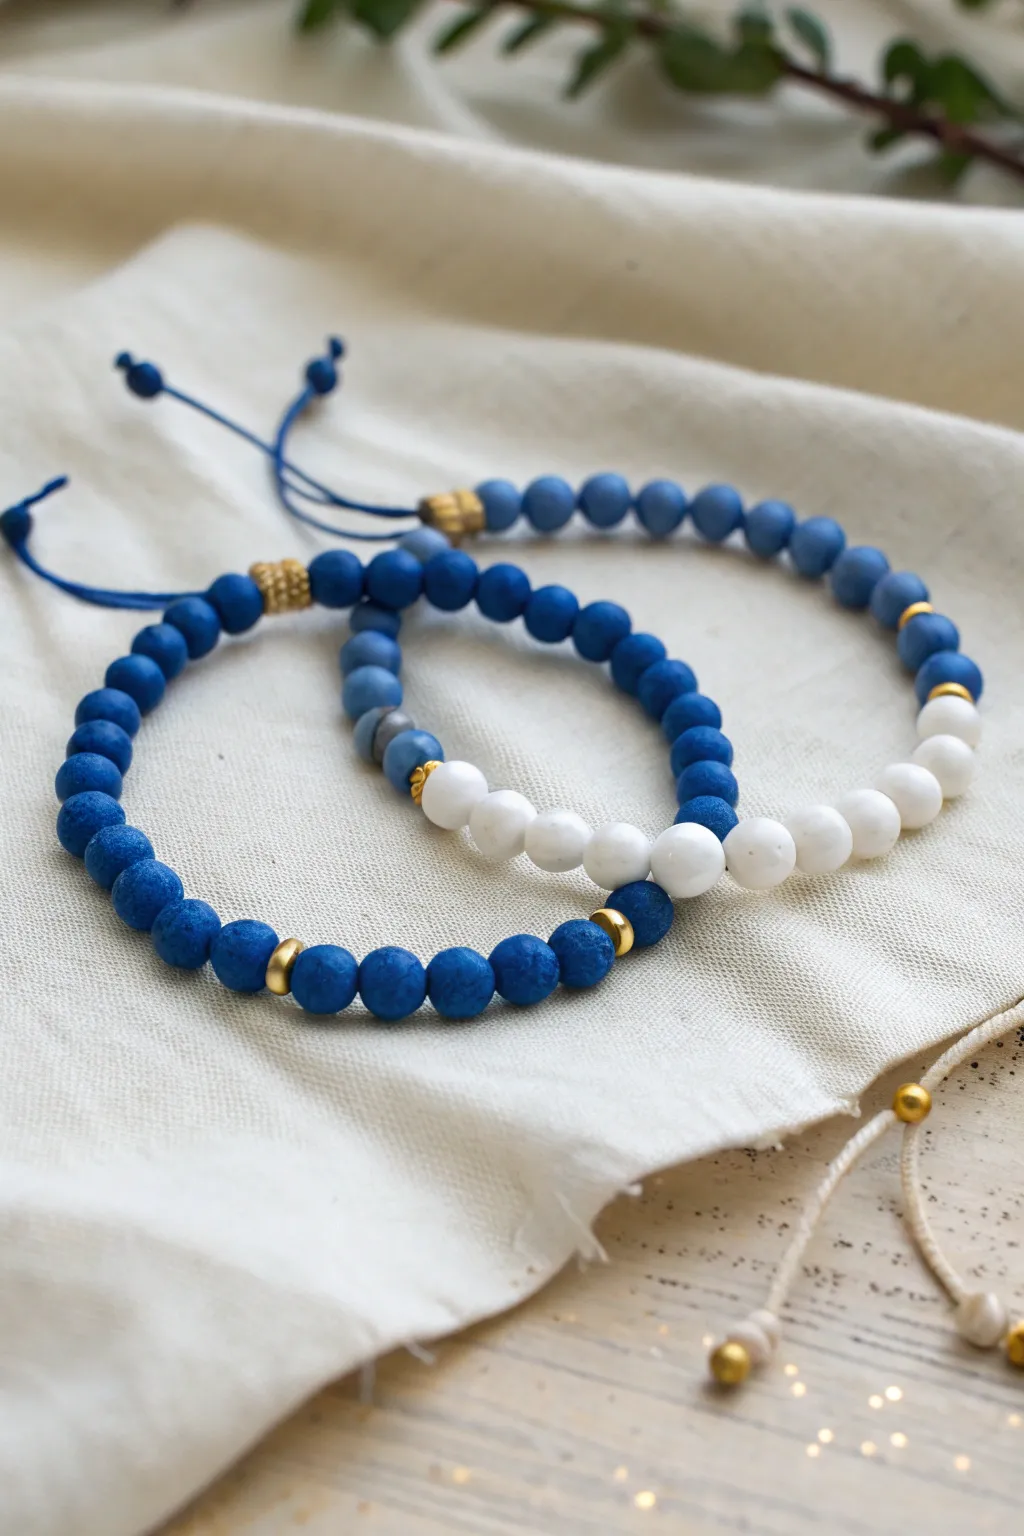
Celebrate your friendship with this sophisticated take on matching jewelery, featuring a stunning interplay of matte blue and creamy white beads. The inverted palettes create a subtle ‘yin and yang’ effect that connects the two designs while keeping each bracelet distinct.
Step-by-Step Guide
Materials
- Matte blue round beads (6mm or 8mm, polymer clay or matte agate)
- White or cream round beads (same size as blue beads)
- Gold disc spacer beads or small gold nuggets
- Blue nylon cord (0.8mm or 1mm thickness)
- Grey-blue variegated beads (optional accent)
- Scissors
- Hypo-cement or jewelry glue
- Lighter (to singe cord ends)
- Ruler or measuring tape
Step 1: Preparation & Planning
-
Measure the wrist:
Before cutting anything, measure your wrist and your best friend’s wrist. For an adjustable sliding knot closure, you’ll need significantly more cord than the wrist circumference. -
Cut the cord:
Cut a piece of blue nylon cord approximately 12-14 inches long for each bracelet. This generous length gives you plenty of room to work on the knots later. -
Prepare the ends:
Briefly run a lighter flame over the very tips of your nylon cord to prevent fraying. I find this also stiffens the end, acting like a built-in needle for easier threading. -
Create a stopper:
Tie a loose overhand knot about 4 inches from one end of the cord. This is just temporary to keep beads from sliding off while you work.
Knot Slipping?
If your square knots unravel, apply a tiny dot of clear jewelry glue or hypo-cement to the melted ends of the knotting cord. Let it cure fully before sliding.
Step 2: Designing Bracelet One (Mostly Blue)
-
Start the blue base:
Begin by threading about 8 to 10 of the matte blue beads onto the cord. -
Add gold accents:
Slide on a single gold spacer bead or nugget. This adds a flash of warmth against the cool blue tones. -
Create the focal section:
Thread on your contrast section. For the first bracelet, this consists of 5 to 6 white round beads. -
Close the focal section:
Add another gold spacer bead immediately after the white section to frame it symmetrically. -
Finish the strand:
Resume threading blue beads until the beaded length covers about 3/4 of the total wrist circumference. The adjustable knot will make up the rest of the space.
Step 3: Designing Bracelet Two (The Inversion)
-
Establish the pattern:
For the matching friend bracelet, you want to invert the color ratio. Start with a smaller section of blue beads. -
Insert the variegated accent:
To add unique character, I like to place 2-3 grey-blue variegated beads near the center of this design before transitioning. -
The main white run:
Thread a long section of white beads now, making this the dominant color for the second bracelet. -
Gold detailing:
Intersperse gold spacers randomly or symmetrically within the white section to tie it visually to the first bracelet. -
Final blue touch:
Finish the strand with a few more blue beads to mirror the starting point.
Texture Pro-Tip
Mix textures for a richer look. Use matte ‘frosted’ stone beads for the main color, but smooth glossy beads for the contrast section to make it pop.
Step 4: The Sliding Knot Closure
-
Position the ends:
Undo your temporary stopper knots. Cross the two tail ends of the bracelet over each other so they overlap by about 2 inches. -
Cut a knotting cord:
Cut a separate, fresh piece of blue cord about 10 inches long. This will become the sliding mechanism. -
Tie the square knot:
Place the new cord under the two crossed bracelet tails. Tie a series of square macramé knots (left over right, right over left) around both tails. -
Build the slider:
Continue knotting until you have a neat bar about 0.5 inches long. Pull tight to ensure security but check that the main cords can still slide through it. -
Trim and seal:
Trim the excess ends of the knotting cord (not the bracelet tails!) very close to the knot. Carefully melt the stubs with a lighter to seal them against the knot body. -
Finish the tails:
Tie a small overhand knot at the very end of each bracelet tail so they can’t slip through the slider. You can add a tiny bead here for decoration if you like.
Now slip them on and enjoy your perfectly mismatched set that symbolizes how well you complement each other


Half-and-Half Mirror Bracelets
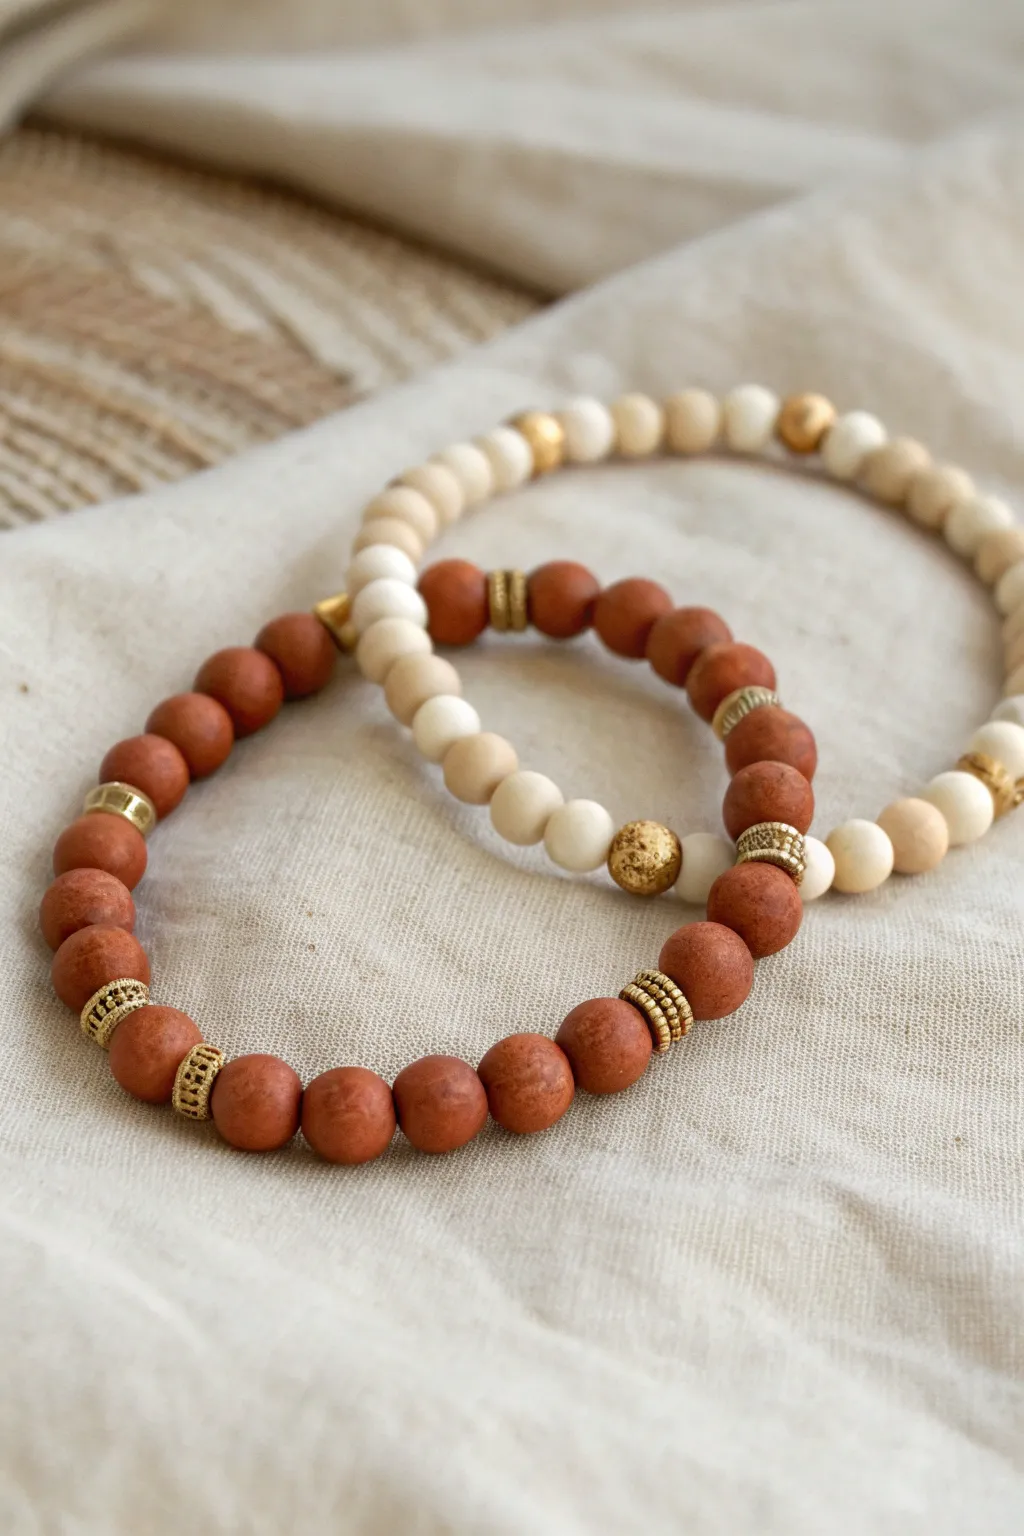
Celebrate friendship with these beautifully balanced bracelets that trade colors in a subtle mirror effect. Featuring earthy terracotta clay beads and smooth cream accents, highlighted by textured gold spacers, these pieces feel both grounded and elegant.
Step-by-Step
Materials
- 8mm terracotta polymer clay beads (matte finish)
- 8mm cream or off-white wooden or clay beads
- Gold tone textured spacer rings (wheel or rondelle shape)
- Gold tone accent beads (faceted or textured metal)
- Strong elastic bead cord (0.8mm or 1mm)
- Scissors or jewelry snips
- Optional: Bead stopper or masking tape
- jewelry glue (like G-S Hypo Cement)
Step 1: Planning the Design
-
Measure your wrist:
Wrap a piece of string around your wrist to find the circumference, then add about half an inch for a comfortable fit. Cut a length of elastic cord about 10-12 inches long to give yourself plenty of room for tying knots. -
Secure the end:
Attach a bead stopper or simply a piece of masking tape to one end of your elastic cord to prevent beads from slipping off while you work. -
Sort your beads:
Separate your terracotta beads, cream beads, and various gold spacers into piles. Notice that one bracelet is ‘terracotta dominant’ and other is ‘cream dominant’—decide which one you are starting with.
Knot Slipping?
If your elastic knot feels slippery, try pulling it very tight and adding a second drop of glue. Using a ‘surgeon’s knot’ is essential for slick elastic material.
Step 2: Creating the Terracotta-Dominant Bracelet
-
Start the main sequence:
Begin threading the terracotta beads. String about 5 or 6 terracotta beads to form the base section. -
Add first gold accents:
Slide on a textured gold wheel spacer, followed by another terracotta bead, and then another gold spacer. This frames a single bead. -
Continue the pattern:
Add another segment of plain terracotta beads—about 4 to 5 beads is usually good for balance. -
Create the focal point:
Now, introduce the ‘friendship’ element by switching colors. Thread on 3 to 4 cream beads to create a contrasting section. -
Embellish the contrast:
Between the cream beads, you can add a small gold spacer or simply let the color change speak for itself depending on your total bead count. -
Finish the strand:
Fill the rest of the length with terracotta beads until you reach your measured size. I like to double-check the length by wrapping it loosely around my wrist before tying.
Add Scents
Use unfinished wood or lava stone beads for the cream sections. You can add a drop of essential oil to them, turning your friendship bracelets into diffusers.
Step 3: Creating the Cream-Dominant Bracelet
-
Reverse the palette:
For the second bracelet, your main color will be cream. Start by stringing 5 to 6 cream beads onto your second piece of elastic. -
Insert the mirror section:
To match the first bracelet, add a section of the terracotta beads here. Thread on about 4 terracotta beads. -
Add gold dividers:
Frame this terracotta section with your textured gold wheel spacers on either side to make the color pop against the cream. -
Include a focal gold bead:
Somewhere in the cream section, add a single, larger textured gold bead (gold lava stone style or faceted metal) as a unique centerpiece. -
Complete the length:
Continue adding cream beads until the bracelet matches the length of the first one.
Step 4: Finishing Touches
-
Pre-stretch the cord:
Gently pull on both ends of the elastic cord for each bracelet. This ‘pre-stretching’ helps prevent the bracelet from sagging later on. -
Tie the knot:
Remove the tape or stop bead. Tie a surgeon’s knot (a square knot with an extra loop through) to secure the bracelet tightly. -
Secure with glue:
Dab a tiny drop of jewelry glue onto the knot. Let it dry completely according to the glue’s instructions. -
Hide the knot:
Once dry, trim the excess elastic carefully. If possible, gently tug the bracelet so the knot slides inside the hole of a neighboring bead to hide it.
Now you have a perfectly matched set of bracelets ready to share with your best friend

The Complete Guide to Pottery Troubleshooting
Uncover the most common ceramic mistakes—from cracking clay to failed glazes—and learn how to fix them fast.
Shared Accent Spacer Rhythm
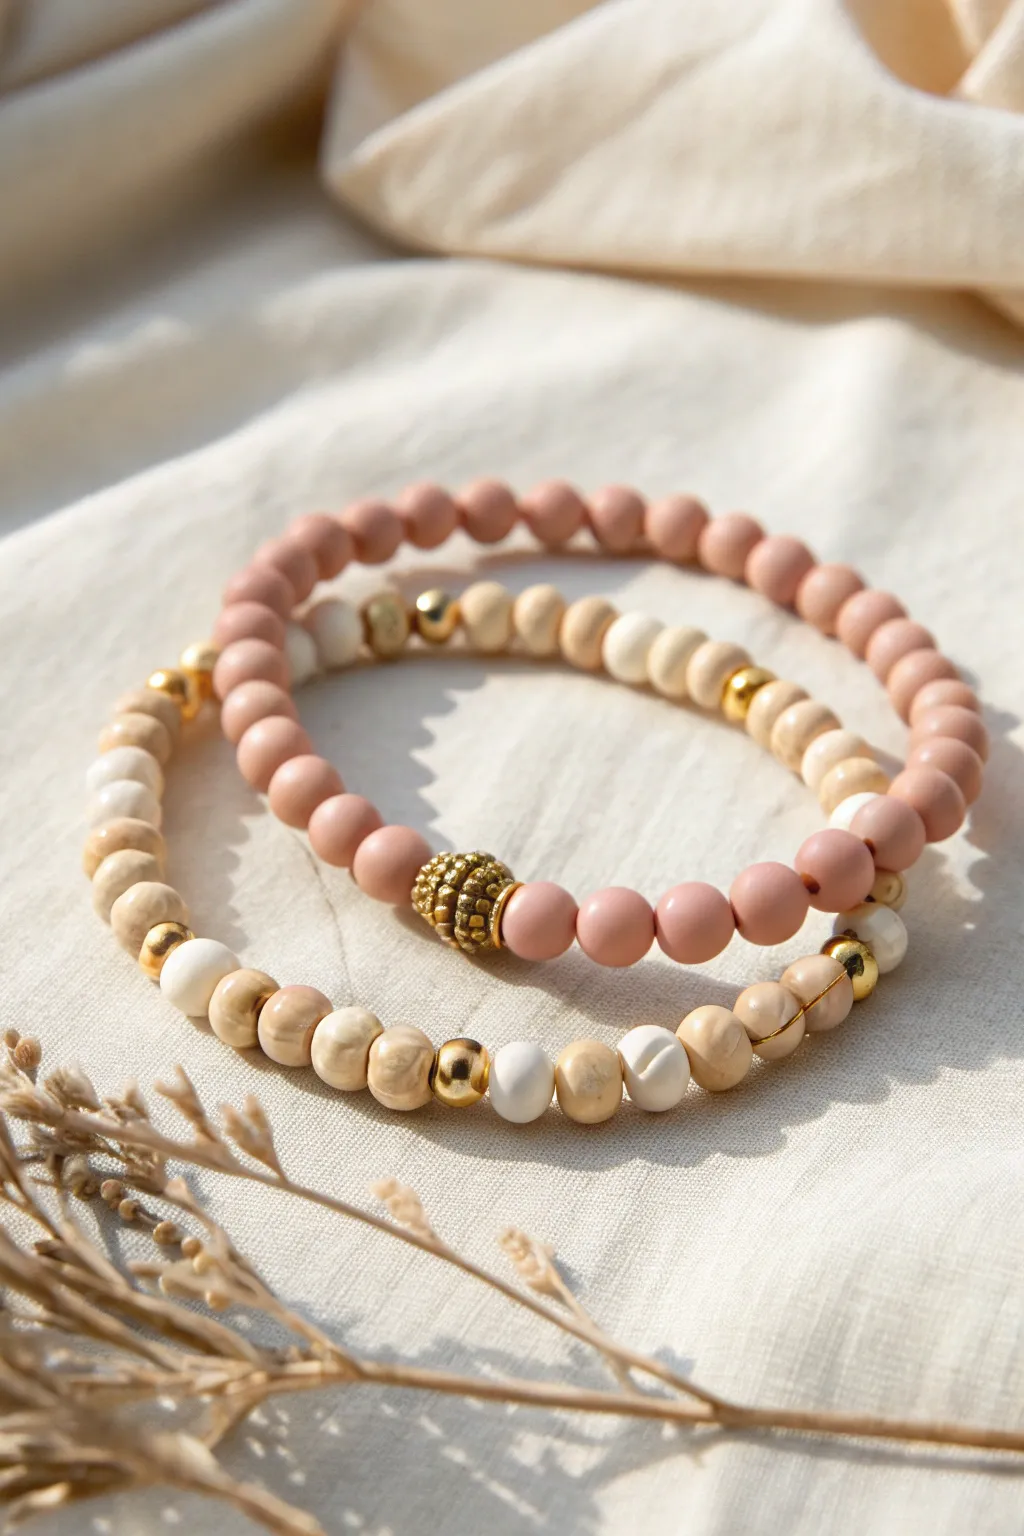
These complementary bracelets blend soft matte mauve tones with earthy marbled beige and bright gold accents for a sophisticated, bohemian look. The design relies on a thoughtful but simple rhythm of spacer beads to create texture without overwhelming the gentle color palette.
Step-by-Step Tutorial
Materials
- Matte round polymer clay beads (6mm or 8mm) in dusty mauve/rose
- Marbled or wood-look round beads (6mm or 8mm) in beige/sand
- Solid white round accent beads
- Gold tone metal spacer beads (small round)
- Gold tone textured focal bead (large, lantern or barrel shape)
- Small gold disc spacers or heishi beads
- 0.8mm clear elastic stretch cord
- Hypo-cement or strong jewelry glue
- Scissors
Step 1: Preparation
-
Measure and Cut:
Begin by measuring your wrist with a flexible measuring tape. Adds about 1/2 to 1 inch to this measurement depending on how loose you want the fit. Cut a piece of elastic cord about 4 inches longer than your final desired length to give you plenty of room for tying knots. -
Pre-stretch the Cord:
Give your cut piece of elastic a few firm tugs. This pre-stretching technique prevents the bracelet from sagging or expanding permanently after you wear it nicely the first time. -
Sort Your Beads:
Lay out your beads on a bead board or a piece of felt towel. This prevents them from rolling away and lets you visualize the ‘rhythm’ of the pattern before you start stringing.
Knot Hiding Trick
Can’t hide the knot inside a bead? Thread both tail ends back through the adjacent bead before gluing and trimming. It pulls the knot tighter inside.
Step 2: The Mauve Focal Bracelet
-
Start the Strand:
Secure one end of your elastic with a piece of tape or a bead stopper. Begin stringing the matte mauve clay beads. String about 10-12 beads to start the foundation of the bracelet. -
Insert Gold Spacers:
Create a subtle rhythm by adding a small gold round spacer. Follow this with another 3-4 mauve beads, then another gold spacer. This breaks up the solid color block without being too busy. -
Add the Centerpiece:
Once you reach the halfway point of your strand, slide on the large, textured gold focal bead. This bead acts as the anchor for the design. -
Mirror the Pattern:
Continue stringing the other side of the bracelet, mirroring the pattern you created on the first half. If you used a specific count between spacers, repeat that here to maintain symmetry. -
Check the Length:
Wrap the unfinished strand around your wrist to check the fit. Add or remove a bead or two near the ends if necessary to get the perfect size.
Level Up: Texture
Replace the beige beads with unfinished wood beads for an essential oil diffuser bracelet. The porous wood absorbs scent perfectly.
Step 3: The Sand & White Accent Bracelet
-
Begin the Scramble Pattern:
For the second bracelet, we want a more organic feel. Start by stringing a random mix of the marbled beige beads. Do groups of 3 or 5. -
Integrate White Accents:
Intersperse the beige sections with single white round beads. Place a small gold spacer or disc bead on either side of the white bead to make it pop. -
Create Gold Clusters:
Instead of a single focal point, create visual interest by grouping 2-3 gold beads together at uneven intervals or placing a gold bead between every two beige beads for a segment. -
Vary the Spacing:
Unlike the mauve bracelet, don’t worry about perfect symmetry. Let the pattern shift slightly as you go around, perhaps having a longer run of just beige beads on the back side.
Step 4: Finishing Touches
-
Tie the Knot:
Once both bracelets are strung, remove the tape or stopper. Bring the ends together and tie a standard surgeon’s knot (right over left, left over right) or a strong square knot. -
Tighten Securely:
Pull the elastic ends firmly to tighten the knot. I find that pulling on the elastic strands themselves, rather than the beads, helps seat the knot deeply. -
Glue the Knot:
Apply a tiny dot of Hypo-cement or jewelry glue directly onto the knot. Let it dry for a few minutes to ensure it won’t slip. -
Hide the Evidence:
If one of your beads has a slightly larger hole, carefully slide it over the knot to hide it. If not, simply trim the excess elastic close to the knot with sharp scissors.
Wear your new stacked set together for textured harmony, or gift one to a friend as a shared style statement
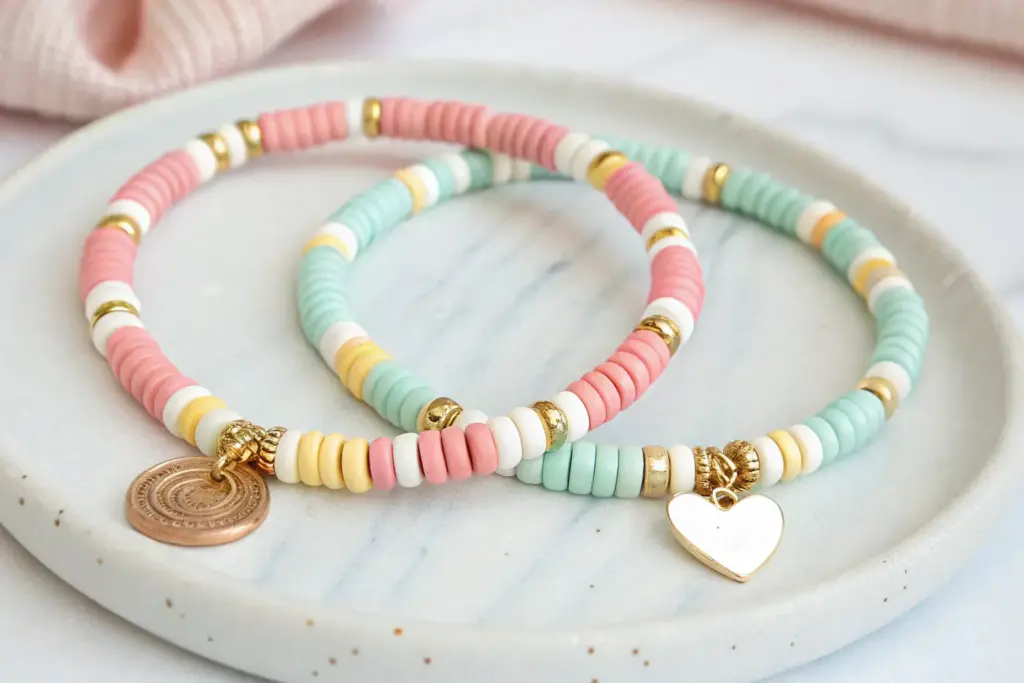
Tiny Charm Focal for Both
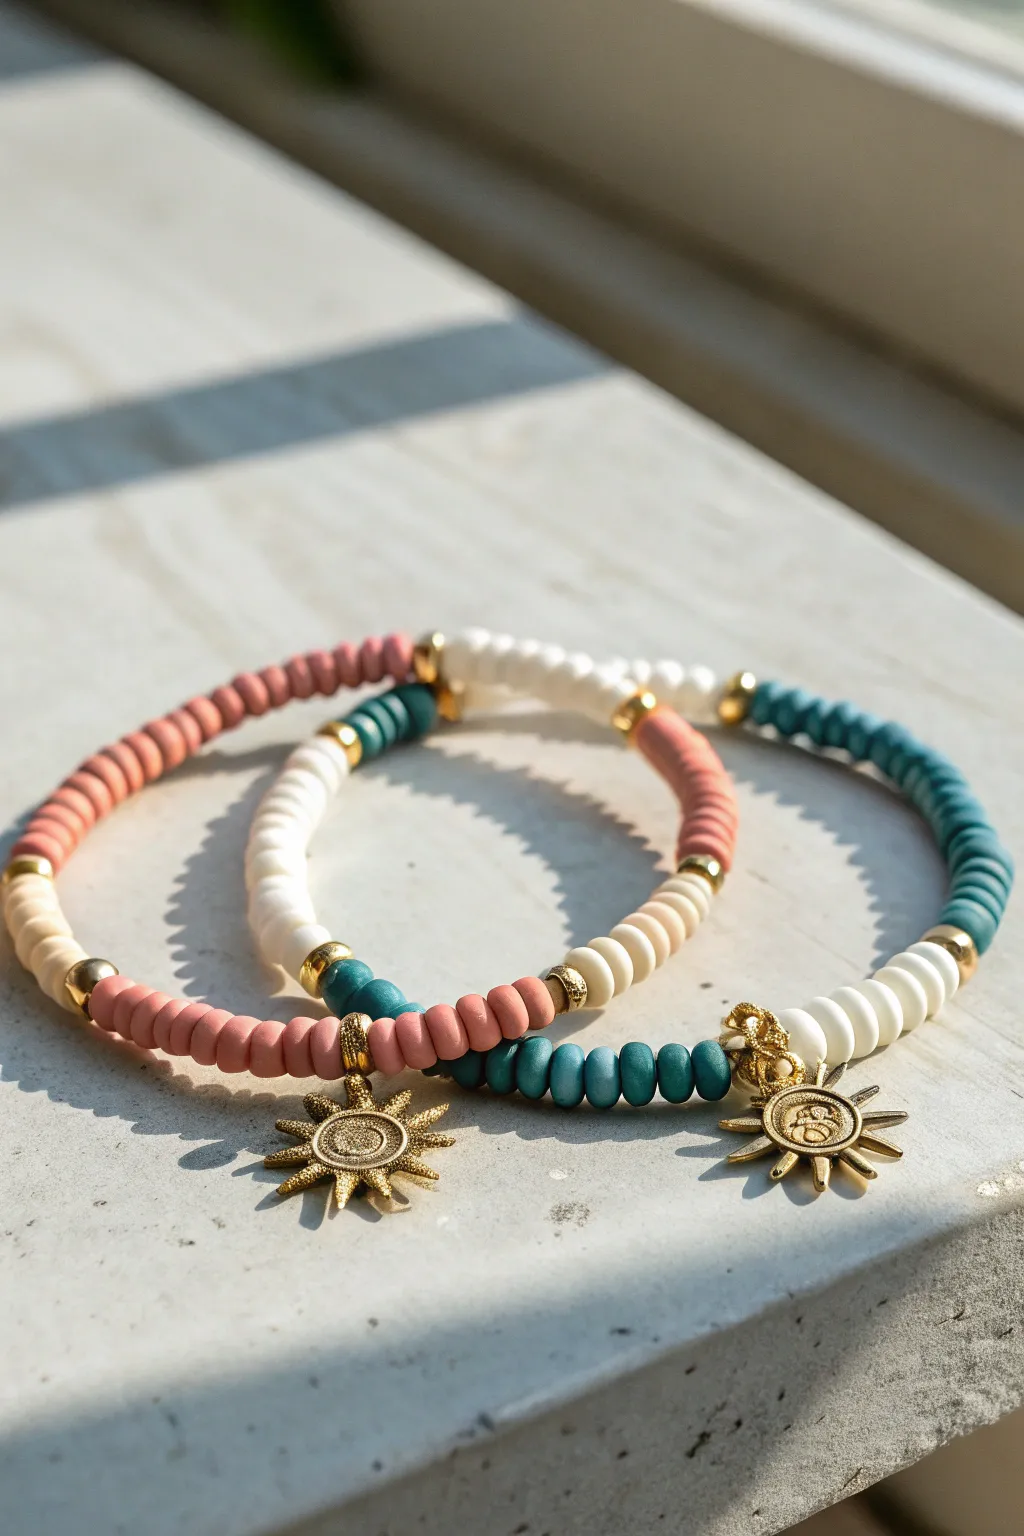
Celebrate your friendship with these matching yet unique bracelets that capture the warmth of the sun in both color and design. Featuring a mix of matte clay beads and gleaming gold accents, the real star of the show is the intricate sun charm that focalizes the entire look.
Step-by-Step Guide
Materials
- Polymer clay heishi beads (6mm or similar): muted rose pink, teal/petrol blue, cream/off-white, peach/tan
- Gold tone metal spacer beads (round or saucer shape)
- Small gold tone jump rings (4mm or 6mm)
- Gold tone sun pendant charms (antique finish preferred)
- Clear elastic string cord (0.8mm recommended for durability)
- Scissors
- Jewelry glue or clear nail polish
- Chain nose pliers (optional, for jump rings)
- Tape or bead stopper
Step 1: Preparation and Planning
-
Measure your wrist:
Wrap a piece of string around your wrist to find the desired length, adding about half an inch for a comfortable fit. -
Cut the cord:
Cut a length of elastic cord about 10-12 inches long. This gives you plenty of extra room for tying knots later. -
Secure the end:
Place a piece of tape or a bead stopper on one end of the cord to prevent your beads from sliding off while you work. -
Attach the charm:
Since the charm is the focal point, we want to attach it first. Open a jump ring using your pliers (or fingers if the gauge is thin enough) by twisting the ends away from each other. -
Thread the charm:
Slip the sun pendant onto the jump ring, then close the ring securely. Thread this onto the center of your elastic cord.
Knot Slipping?
If your elastic knot keeps slipping undone, try a dab of superglue. But be quick! Tuck the knot into a bead hole immediately before the glue sets fully so it doesn’t get stuck on the outside.
Step 2: Beading the Pattern
-
Start the center segment:
On either side of your sun charm, add a gold spacer bead. This frames the pendant and gives it a professional finish. -
Create the color blocks:
For the pink-focused bracelet, thread 10-12 muted rose clay beads on the left side of the charm, and 10-12 teal beads on the right side. -
Add separation:
Slide a gold spacer bead onto the cord after each color block to define the sections clearly. -
Continue the pattern:
Switch to cream or off-white beads for the next section. String about 10 beads, followed by another gold spacer. -
Introduce the third color:
Add a section of the peach/tan beads next. I find that alternating warm and cool tones really makes the bracelet pop. -
Repeat until fits:
Continue adding color blocks separated by gold spacers—rose, teal, cream, peach—until the beaded length matches your wrist measurement. -
Mirror or mix:
For the second ‘best friend’ bracelet shown in the background, you can swap the order. Place the white and teal sections directly next to the charm instead.
Step 3: Finishing Touches
-
Check the size:
Wrap the unfinished strand around your wrist one last time to ensure it fits comfortably without stretching the elastic too much. -
Pre-stretch the cord:
Gently pull on both ends of the elastic. Pre-stretching helps prevent the bracelet from loosening up after you’ve worn it a few times. -
Tie the knot:
Remove the tape or stopper. Tie a simple overhand knot, pulling it tight. Follow this with a surgeon’s knot (looping the cord through twice) for extra security. -
Secure with glue:
Dab a tiny drop of jewelry glue or clear nail polish directly onto the knot. Let it dry for a few minutes. -
Hide the knot:
Once dry, trim the excess string close to the knot. If possible, gently tug the bracelet so the knot slides inside the hole of the nearest bead.
Pro Tip: Texture Mix
Mix up your finishes! The image shows matte clay beads contrasting with shiny gold spacers. This interplay of matte and metallic adds depth and makes the jewelry look more expensive.
Now you have a stunning set of sun-themed bracelets ready to share with your best friend


What Really Happens Inside the Kiln
Learn how time and temperature work together inside the kiln to transform clay into durable ceramic.
Ombre Twins in Two Colorways
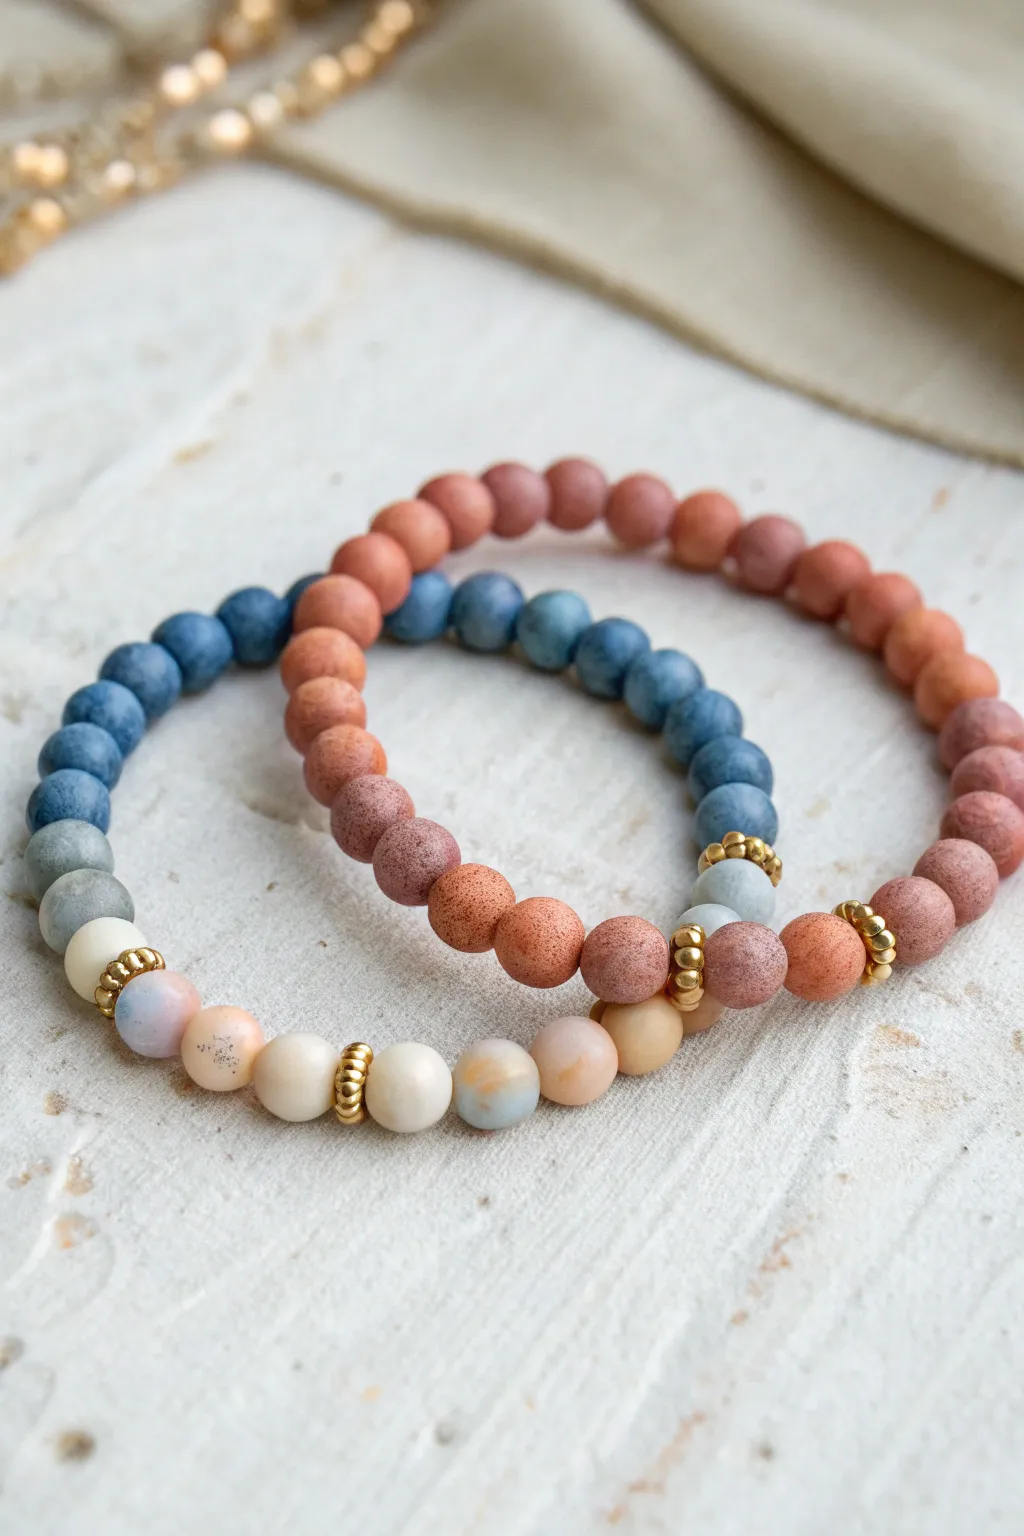
Celebrate your friendship with these matching stretch bracelets that feature a stunning ombré effect using natural clay beads. One design transitions from deep indigo to soft cream, while its twin moves from terracotta rust to pale blush, creating a cohesive yet individual look for you and your bestie.
How-To Guide
Materials
- Matte round clay or stone beads (8mm) in Indigo Blue
- Matte round clay or stone beads (8mm) in Terracotta/Rust
- Assorted lighter shade beads (8mm) for transitions (grey-blue, cream, blush, pale orange)
- Gold spacer beads (daisy or rondelle style, approx. 4-6mm)
- Strong elastic bead cord (0.8mm clear)
- Beading needle (optional but helpful)
- Scissors
- Jewelry glue or clear nail polish
- Bead design board or masking tape
Step 1: Planning the Gradient
-
Measure and prepare:
Begin by measuring your wrist and your friend’s wrist. Cut two lengths of elastic cord, leaving about 3-4 inches of extra slack on each end to make tying knots easier later. -
Secure the end:
Pre-stretch your elastic cord by pulling it firmly a few times; this prevents the bracelet from loosening over time. Place a piece of masking tape on one end of the cord so beads don’t slip off while you work. -
Design the Blue Ombré:
Lay out your beads for the first bracelet on a design board or towel. Start with the darkest indigo beads, which will make up about two-thirds of the bracelet. -
Create the transition:
Arrange the lighter beads to create the gradient. Transition from dark indigo to a medium grey-blue, then to a lighter hazy blue, and finally to cream or white at the focal center. -
Design the Rust Ombré:
Repeat the layout process for the second bracelet. Use the deep terracotta beads for the majority of the strand, transitioning into lighter clay tones, peach, and finally a soft blush or cream center.
Hiding the Magic
Use a bead reamer or a thick needle to slightly widen the hole of the bead next to your knot. This makes it much easier to tuck the bulky knot inside for a seamless finish.
Step 2: Stringing and Accents
-
Start stringing:
Pick up your designated first strand. Begin threading the main block of dark color beads onto the elastic. -
Add gold accents:
As you reach the transition area where the colors start to shift, insert a gold spacer bead. This metallic pop highlights the change from dark to light. -
Thread the gradient:
String the lighter transitional beads. I like to place another gold spacer before the very lightest ‘center’ beads to frame the focal point. -
Complete the pattern:
Finish stringing the lightest beads and the final few transitional beads on the other side of the gradient to create a symmetrical fade. -
Check the fit:
Wrap the strung beads around your wrist to check the size. If it feels too tight, add one or two more of the darkest beads to the back section; remove one if it’s too loose.
Knot Slipping?
If your elastic knot feels slick and won’t hold while you glue it, try rubbing rough sandpaper gently on the cord ends before tying. The texture helps the knot grip better.
Step 3: Finishing Touches
-
Prepare the knot:
Remove the masking tape from the end. Bring the two ends of the elastic together, ensuring there is no gap between the beads, but don’t pull so tight that the jewelry buckles. -
Tie the surgeon’s knot:
Tie a standard overhand knot, then tie a surgeon’s knot (loop the elastic through twice) for extra security. Pull the knot tight. -
Secure with glue:
Add a tiny drop of jewelry glue or clear nail polish directly onto the knot. Let this dry for a few minutes before moving to the next step. -
Hide the knot:
Trim the excess elastic ends close to the knot (but not too close!). Gently tug the beads so the knot slides inside the hole of a neighboring bead to hide it. -
Final repeat:
Repeat the entire stringing and tying process for the second bracelet so you have a complete matching set.
Give one to your best friend and wear them together as a symbol of your unique bond
Birth Month Color Pairing
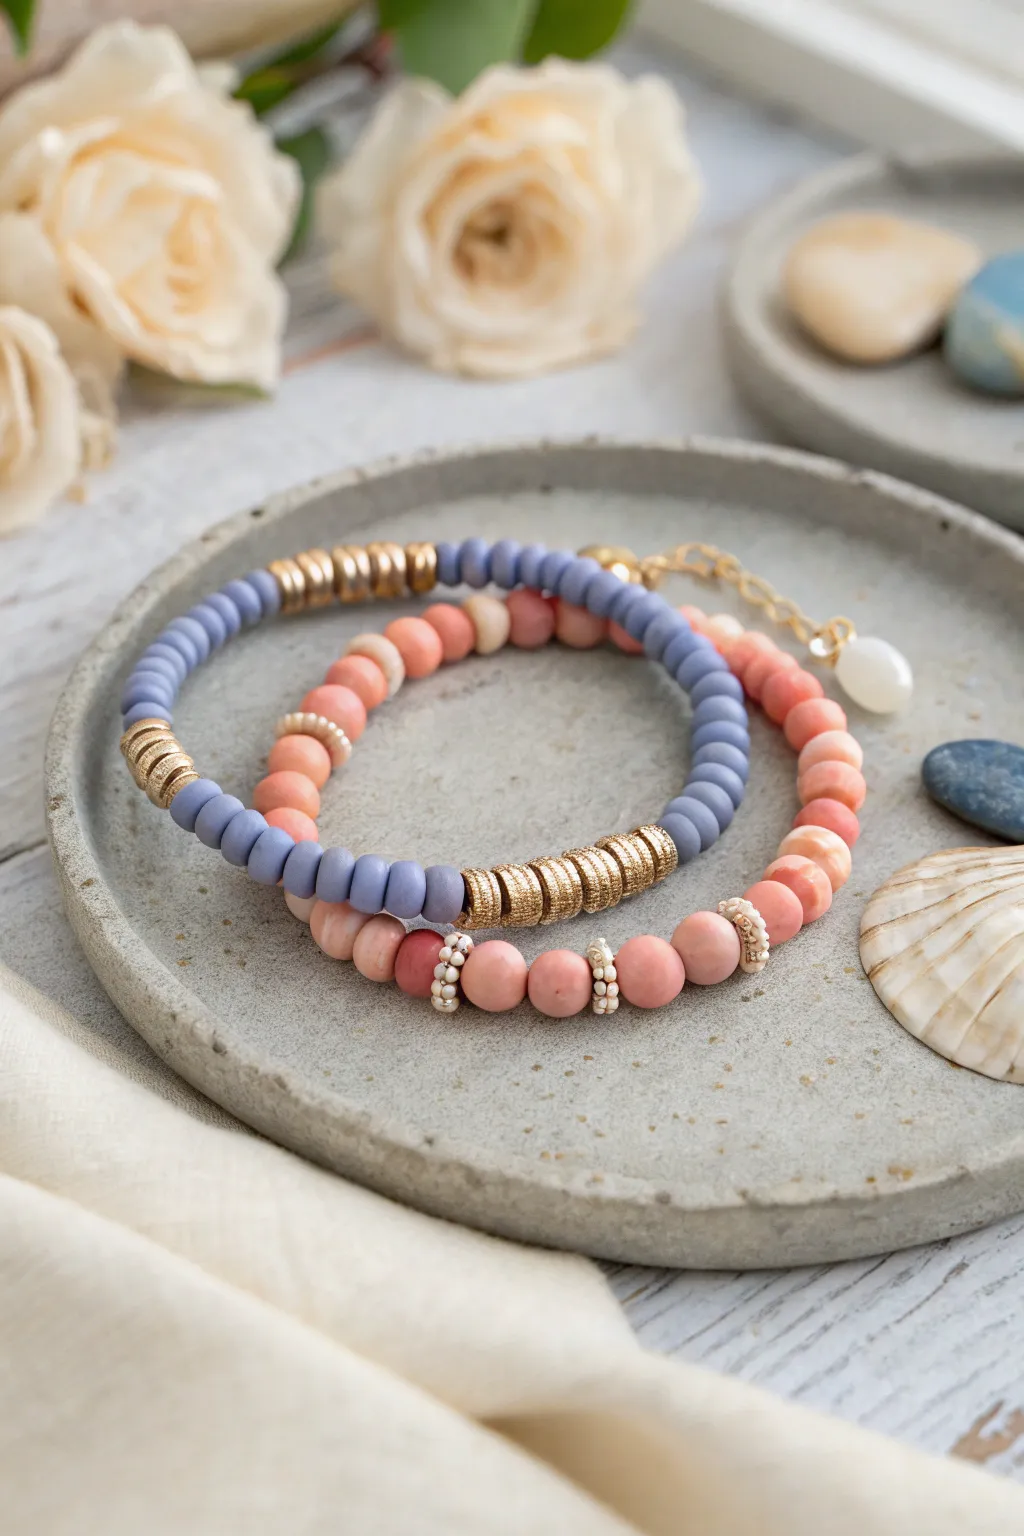
This elegant bracelet duo pairs soft lavender and warm coral clay beads with luxe gold accents, perfect for representing birth months or simply complementary aesthetics. The combination of matte textures and metallic shine creates a sophisticated friendship set that can be worn stacked or shared.
Detailed Instructions
Materials
- Matte lavender/periwinkle clay heishi beads (6mm)
- Matte coral/salmon clay or stone beads (6mm to 8mm)
- Gold plated disc spacer beads (heishi style)
- Gold tone daisy spacers or small bead caps
- Tiny white seed beads (size 11/0 or 15/0)
- Strong elastic cord (0.8mm)
- Super glue or jewelry cement
- Scissors
Step 1: Lavender & Gold Design
-
Measure and cut:
Begin by measuring your wrist and adding about 3 inches to that length. Cut a piece of elastic cord to this total length to ensure you have plenty of room for tying the knot later. -
Pre-stretch the cord:
Gently pull on the elastic cord several times. Pre-stretching is a crucial step that prevents the bracelet from sagging or loosening after the first few wears. -
Start the pattern:
Thread about 2-3 inches of the lavender clay beads onto the cord. Since these are thin heishi beads, you’ll need quite a few to create a substantial section. -
Add first gold accent:
Slide on a stack of 4 gold disc spacers. This creates a distinct metallic block rather than just a single flash of gold. -
Continue the main color:
Add another section of lavender beads. Aim for a length that covers about one-third of your total wrist circumference. -
Create the focal point:
Now, thread on a larger stack of gold disc spacers. I usually use about 10-12 discs here to creating a shining focal point that sits on top of the wrist. -
Finish the symmetry:
Complete the circle by adding more lavender beads and one more small stack of 4 gold spacers to mirror the first side, filling the rest of the cord until it fits comfortably around your wrist. -
Knot and secure:
Tie the ends together using a strong surgeon’s knot (right over left, left over right, loop through twice). Add a dab of jewelry glue to the knot, let it dry, and trim the excess cord.
Knot Hiding Trick
Use a crimp bead cover or simply slide the knot inside the hole of the largest bead or gold spacer stack to make the finish completely invisible.
Step 2: Coral & Pearl Accent Design
-
Prepare the second cord:
Cut and pre-stretch another length of elastic cord, following the same measurements as the first bracelet. -
Thread base beads:
String 5 coral beads onto the cord. Note that these beads in the image appear slightly rounder and more organic than the flat heishi beads, giving a nice textural contrast. -
Create a beaded spacer:
To mimic the intricate spacers shown, thread one gold daisy spacer, followed by three tiny white seed beads, and another gold daisy spacer. -
Repeat the pattern:
Add another set of 5 coral beads, followed by another beaded spacer assembly (gold daisy, 3 white seeds, gold daisy). -
Check spacing:
Continue this alternating pattern until you have reached the desired length. The rhythm of large matte beads broken up by delicate white and gold details is key to this look. -
Optional charm addition:
If you wish to duplicate the charm seen in the background, slide a jump ring with a small pearl or moonstone drop onto the cord before tying the final knot. -
Finalize the set:
Tie a secure surgeon’s knot, apply a small drop of glue for security, and trim the ends carefully closer to the knot, tucking it inside a bead hole if space permits.
Texture Play
Mix materials to elevate the look. Use gemstone round beads (like matte rhodochrosite) for the coral strand but polymer clay heishi for the purple strand.
Now you have a beautifully coordinated set of bracelets ready to gift or keep

TRACK YOUR CERAMIC JOURNEY
Capture glaze tests, firing details, and creative progress—all in one simple printable. Make your projects easier to repeat and improve.
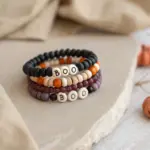
Morse Code Secret Message Set
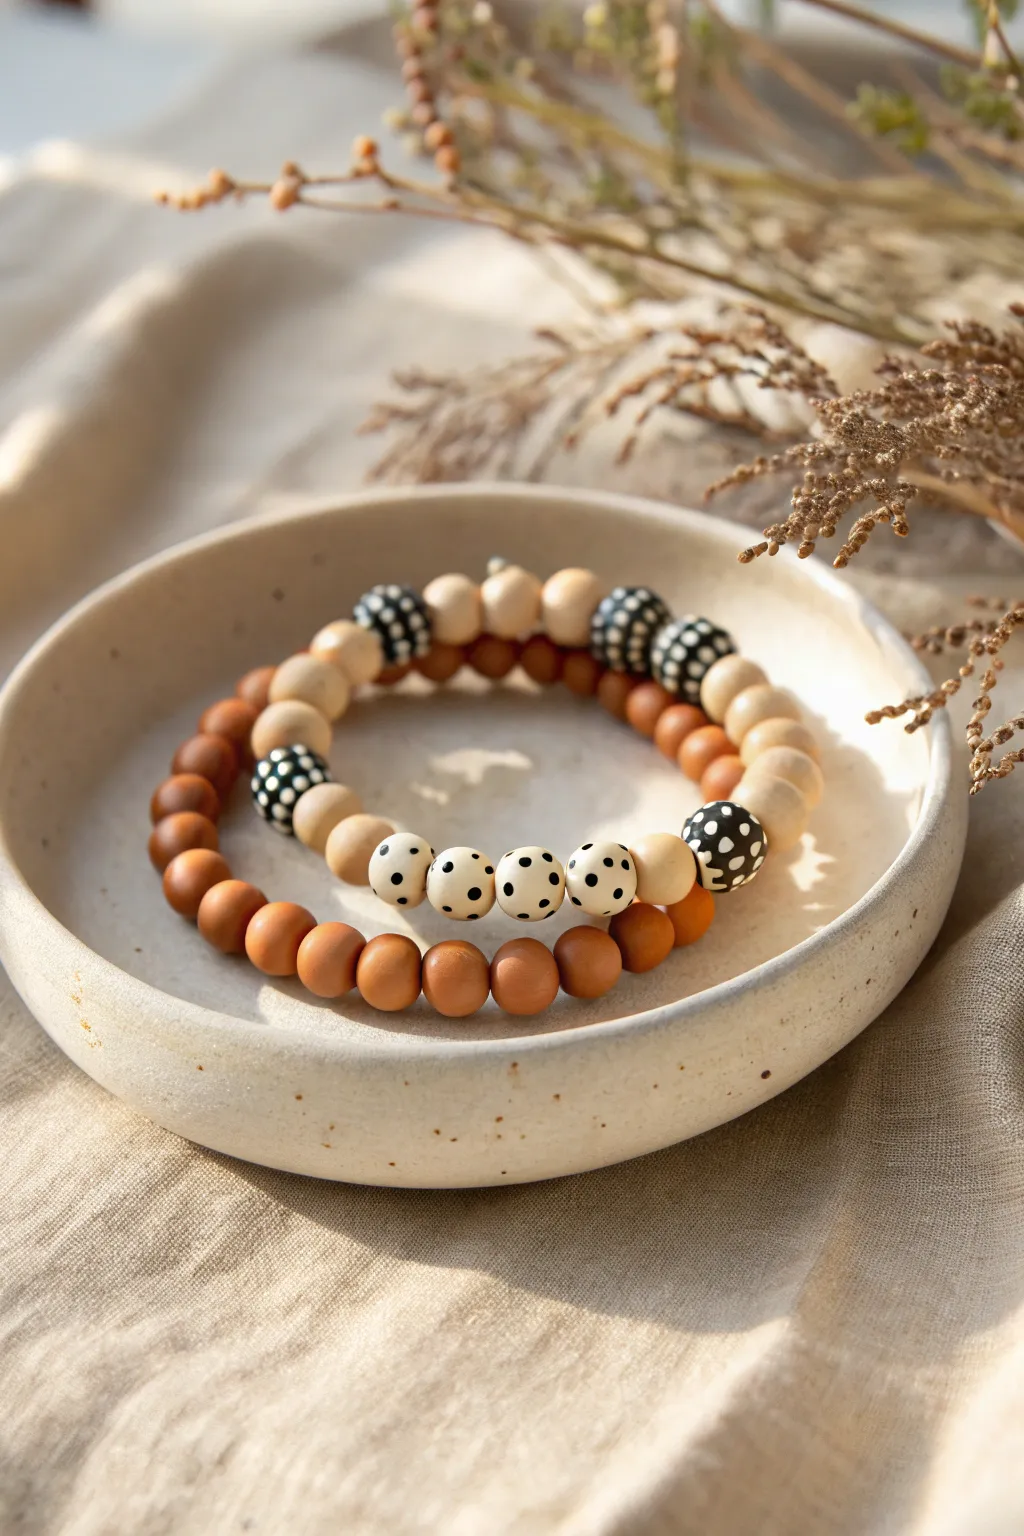
Create a sophisticated secret code between best friends with these tactile polymer clay bracelets. Combining earthy terracotta tones with striking black-and-white patterned accents, this set hides a meaningful message in plain sight using morse code or binary patterns.
How-To Guide
Materials
- Polymer clay (Terracotta or Burnt Sienna)
- Polymer clay (Cream or Beige)
- Polymer clay (Black)
- Polymer clay (White)
- Acrylic roller or pasta machine
- Round bead rolling tool (approx. 8mm – 10mm cavity) or hand-rolling skills
- Bead piercing pins or toothpicks
- Baking sheet and parchment paper
- Elastic stretch cord (0.7mm or 0.8mm)
- Jewelry glue (e.g., G-S Hypo Cement)
- Scissors
Step 1: Creating the Solid Color Beads
-
Condition the clay:
Begin by thoroughly conditioning your terracotta polymer clay until it is soft and pliable. Warm clay prevents cracking during the rolling process. Do the same for a smaller amount of cream clay. -
Portion the clay:
Roll your clay into a uniform log or use a clay cutter to slice equal-sized cubes. For these bracelets, you want beads that are roughly 8mm to 10mm in diameter. -
Roll spheres:
Take each portion and roll it between your palms using a circular motion. Apply even pressure to create a perfect sphere. Make approximately 25-30 terracotta beads and 10-15 cream beads. -
Pierce the beads:
Gently insert a bead pin or toothpick through the center of each sphere. Use a twisting motion rather than pushing straight through to avoid distorting the round shape.
Step 2: Crafting the Patterned Accents
-
Make the base beads:
Create several white spheres and several black spheres, sized slightly larger than your solid color beads to act as focal points. -
Create polka dots:
Roll extremely tiny snakes of contrasting clay (black for the white beads, white for the black beads). Slice off minuscule slivers and roll them into tiny balls. -
Apply the pattern:
Press the tiny contrasting dots gently onto the base beads. Roll the entire bead between your palms again to embed the dots seamlessly into the surface so they don’t stick out. -
Make the striped/checker beads:
For the more complex black beads, roll a thin sheet of white clay and slice it into strips. Lay these strips over a black bead, or combine small discs of black and white clay together and roll until smooth. -
Final shaping:
Once all patterned beads are rolled smooth, pierce them carefully. I find spinning the pin while holding the bead still works best for these delicate ones.
Use a Bead Rack
Suspend pierced beads on a dedicated baking rack or a makeshift foil accordion zigzag. This prevents flat spots from forming on the bottom of the beads during baking.
Step 3: Baking and Assembly
-
Bake the beads:
Arrange your beads on a parchment-lined baking sheet. Bake according to your clay package instructions (usually 275°F/135°C for 15-30 minutes). -
Cool down:
Allow the beads to cool completely in the oven with the door cracked open. This gradual cooling tempers the clay and makes it stronger. -
Plan the Morse Code:
Decide on your secret word. Use the cream/beige beads as ‘dots’ and the patterned black/white beads as ‘dashes’ (or vice versa), separated by the terracotta spacer beads. -
String the first bracelet:
Cut a 10-inch length of elastic cord. Pre-stretch it by pulling on it a few times to prevent it from sagging later. String your designed pattern for the first bracelet, filling the rest of the length with the solid terracotta beads. -
Tie the knot:
Tie a surgeon’s knot (right over left, left over right twice). Pull tight until the beads bunch closely together. -
Secure the finish:
Dab a tiny drop of jewelry glue on the knot. Let it dry for a moment, then trim the excess string, tucking the knot inside a neighboring bead hole if possible. -
Complete the set:
Repeat the stringing process for the second bracelet, perhaps inverting the color scheme or just using the cream and patterned beads as the focal point against the wood-tone clay.
Smudged clay colors?
If black clay smudges onto your white beads, wipe the unbaked bead gently with a Q-tip dipped in rubbing alcohol or baby oil to clean up the surface instantly.
Enjoy wearing your matching secret code bracelets and the connection they represent
Shell-and-Clay Beach Bestie Set
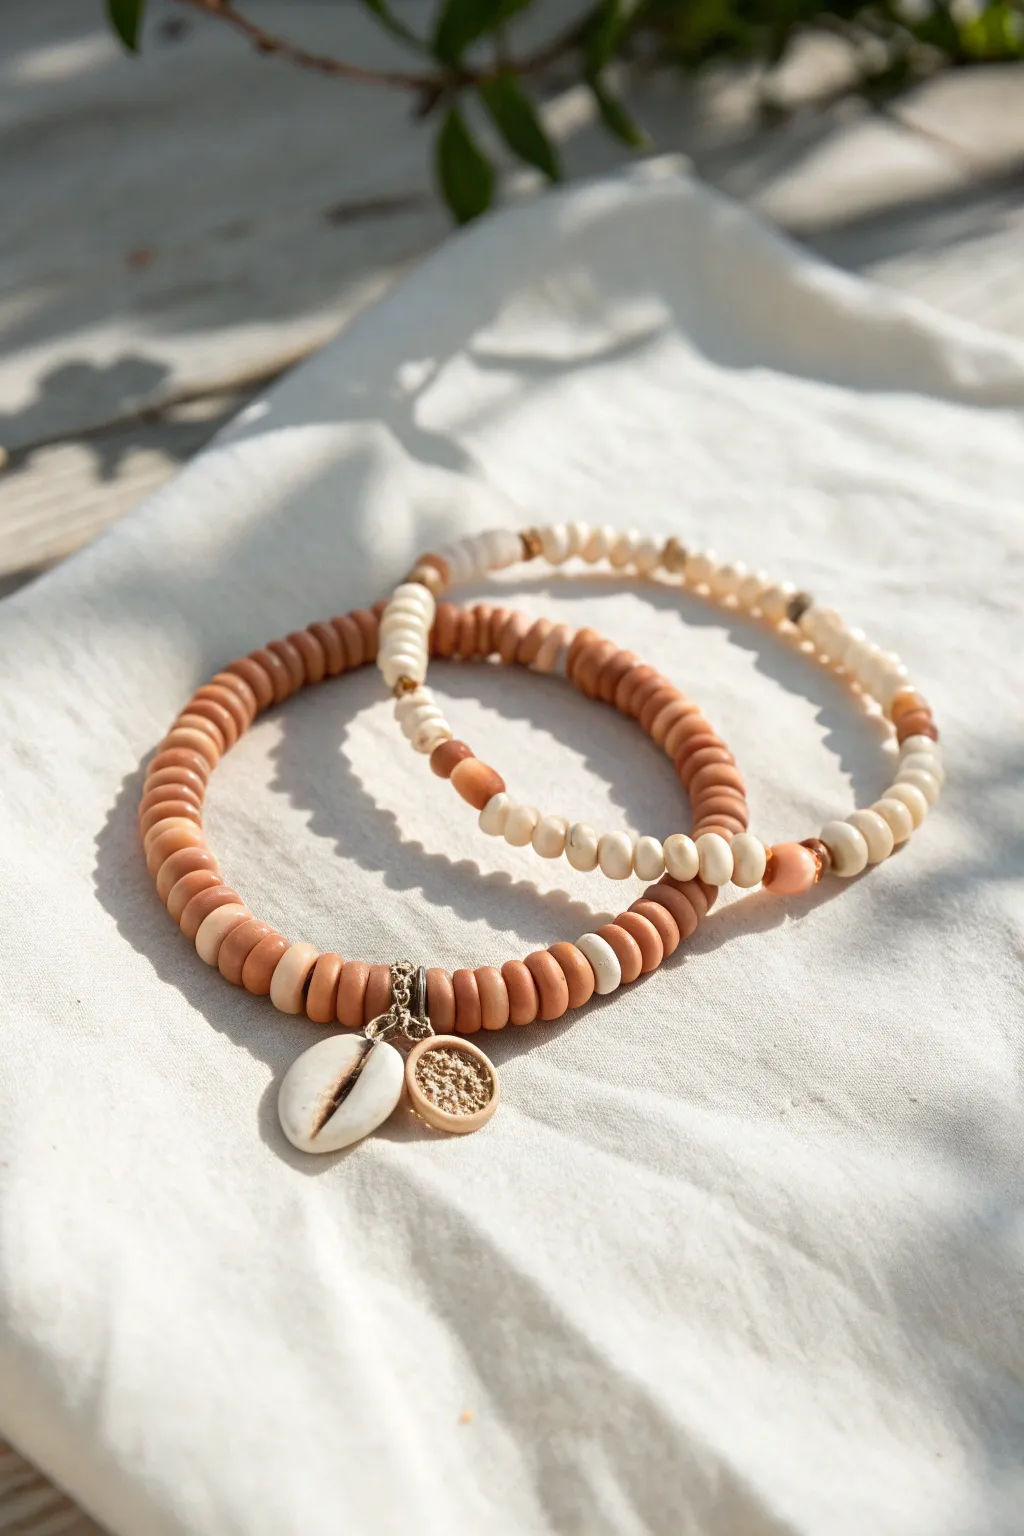
Capture the essence of sun-soaked days with this duo of organic, beach-inspired bracelets. Using earthy terracotta tones mixed with creamy whites and a genuine cowrie shell charm, this set feels effortlessly coastal and perfect for sharing.
Step-by-Step Guide
Materials
- Terracotta/rust polymer clay heishi beads (approx 6mm)
- Cream/off-white polymer clay heishi beads (approx 6mm)
- Gold spacer beads or small gold accents (optional)
- Small natural cowrie shell charm (drilled or with loop)
- Small round gold coin charm (textured)
- Elastic cord (0.8mm clear stretch cord)
- Jewelry glue (e.g., E6000 or GS Hypo Cement)
- Scissors
Step 1: Designing the Terracotta Charm Bracelet
-
Measure and Cut:
Begin by measuring your wrist and adding about 3 inches to that length. Cut a piece of elastic cord. Pre-stretch the elastic by pulling it gently a few times; this prevents the bracelet from stretching out later. -
secure one end:
Attach a piece of tape or a bead stopper to one end of the cord to keep your beads from sliding off while you design. -
String the Base Pattern:
Start threading the terracotta heishi beads onto the cord. String a solid block of about 15-20 terracotta beads. -
Add Cream Accents:
After your terracotta block, add a single cream bead, followed by one terracotta bead, and then another cream bead. This creates a subtle break in the color. -
Continue the Pattern:
Resume stringing terracotta beads. You can repeat the cream accent pattern on the opposite side of the bracelet or keep the rest solid terracotta for an asymmetrical look. -
Attach the Charms:
Find the center point of the bracelet design. Thread the loop of the cowrie shell charm and the gold coin charm onto the elastic cord so they sit side-by-side. -
Finish Stringing:
Continue adding terracotta beads until the bracelet reaches your desired length. Check the fit around your wrist to ensure it sits comfortably.
Knot Slipping?
If your elastic knot unravels, try roughening the cord ends slightly with sandpaper before tying. Always pull the elastic very tight when knotting to lock it in.
Step 2: Creating the Cream & Terracotta Mix Bracelet
-
Prepare the Second Cord:
Cut and pre-stretch another length of elastic cord, securing the end just like before. -
Create Alternating Sections:
For this bracelet, the focus is on a lighter palette. Start with a long section of cream heishi beads, approximately 2 inches long. -
Insert Terracotta Segments:
Add a small cluster of 3-5 terracotta beads. Follow this with a single gold spacer bead if you want a hint of shimmer, then back to cream beads. -
Mix Up the Pattern:
Unlike the first bracelet, make this pattern more random. Alternate between 1 inch of cream beads and single terracotta beads to create a speckled effect. -
Final sizing check:
Wrap the strand around your wrist. It should match the size of the first bracelet perfectly so they stack neatly.
Step 3: Finishing Touches
-
Tie the Surgeon’s Knot:
Take the ends of your first bracelet. Cross right over left, then left over right, looping it through a second time before pulling tight. This is a surgeon’s knot and is very secure. -
Secure with Glue:
Place a tiny dot of jewelry glue right onto the knot. I prefer to use a toothpick to apply the glue precisely so it doesn’t get all over the adjacent beads. -
Hide the Knot:
While the glue is still tacky, gently slide a bead over the knot to hide it inside. This gives a professional, seamless finish. -
Trim Excess:
Once the glue is fully dry (wait at least 15 minutes), use sharp scissors to trim the excess elastic cord close to the bead. -
Repeat and Wear:
Repeat the tying and gluing process for the second bracelet. Your matching set is now ready to wear or gift.
Anklet Upgrade
Make these beach-ready by adding 2 inches of length for an anklet version. Add a second larger shell charm for extra boho vibes.
Enjoy wearing your handmade slice of the seaside with your best friend
Glow-In-the-Dark Best Friend Duo
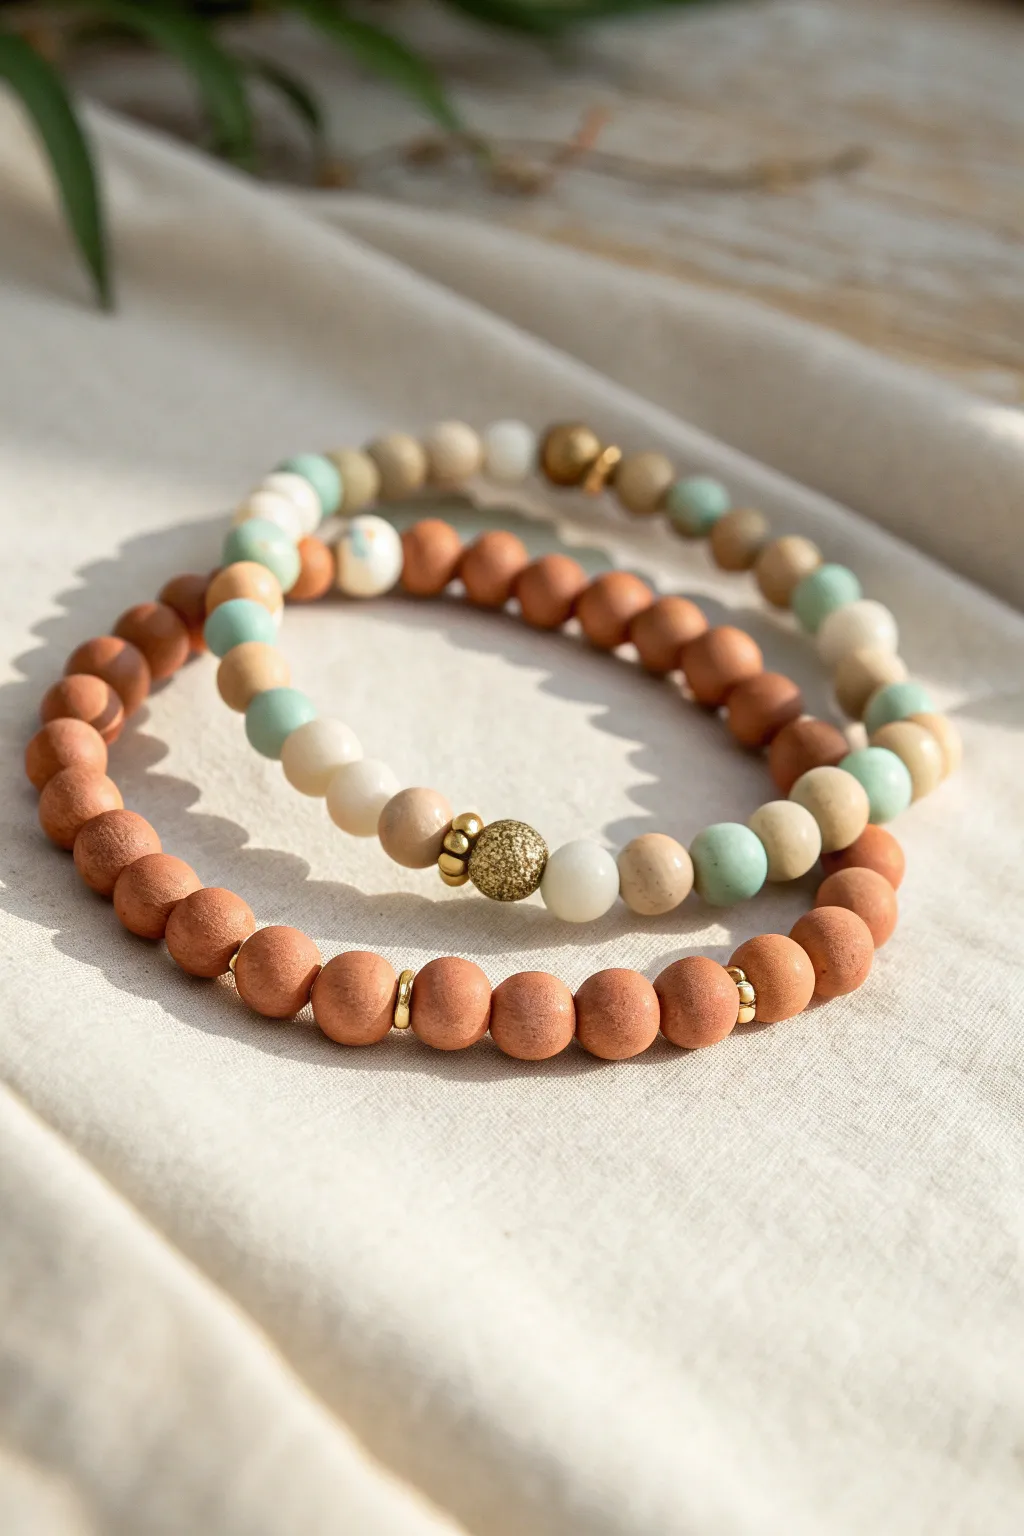
Embrace the beauty of contrast with this set of matching clay bead bracelets that blend warm terracotta tones with soft, airy pastels. The harmonious mix of textures, from matte clay to gold accents and a sparkling focal bead, makes this duo perfect for sharing with your best friend.
Detailed Instructions
Materials
- Terracotta-colored polymer clay round beads (approx. 8mm)
- Pastel mint green polymer clay round beads (approx. 8mm)
- Cream/off-white polymer clay round beads (approx. 8mm)
- Beige/taupe polymer clay round beads (approx. 8mm)
- Gold tone spacer beads (small flat discs or rondelles)
- Gold tone stardust or textured glitter ball bead (focal bead)
- Gold tone patterned or filigree accent bead (optional)
- Strong elastic beading cord (0.8mm or 1mm recommended)
- Scissors
- Jewelry glue or clear nail polish
- Beading needle (optional, for easier threading)
- Masking tape or bead stopper
Step 1: Setting the Foundation
-
Measure and cut:
Begin by measuring your wrist and your best friend’s wrist. Cut two lengths of elastic cord, adding about 3-4 inches of extra length to each for easier knotting later. -
Pre-stretch the cord:
Gently pull on each piece of elastic cord several times. Pre-stretching helps prevent the bracelets from sagging or loosening after you’ve worn them for a while. -
Secure the ends:
Place a piece of masking tape or a bead stopper on one end of each cord. This simple step saves you from the frustration of beads sliding right off while you work.
Pro Tip: Bead Sizing
If a bead hole is too small to hide the knot, gently ream it out with a bead reamer or a thick needle before stringing it next to where your knot will be.
Step 2: Designing the Solid Terracotta Bracelet
-
Start the pattern:
For the first bracelet (the darker one), thread on approximately 10 to 12 terracotta clay beads. -
Add gold definition:
Slide on a single gold spacer bead. This breaks up the solid color and adds a touch of shine. -
Continue the base:
Add three more terracotta beads, followed by another gold spacer. -
Insert the focal point:
String on three terracotta beads. Instead of a basic spacer, add a slightly larger or textured gold bead here if you have one, or stick to the simple gold spacer pattern for a minimalist look. -
Complete the circle:
Finish the strand by adding terracotta beads until you reach the desired wrist length, ensuring the pattern looks balanced.
Step 3: Designing the Mixed Pastel Bracelet
-
Create the color mix:
For the second bracelet, we want a random but cohesive look. Pour your mint, cream, beige, and remaining terracotta beads into a small dish to visualize the palette. -
Thread the focal section:
Start by threading a cream bead, then a gold spacer, and then the main attraction: the gold stardust or glitter ball bead. -
Frame the focal bead:
Immediately follow the glitter bead with another gold spacer and a cream bead to create a symmetrical center. -
Build the pastel pattern:
Working outward from the center, add beads in an alternating pattern. I usually go for: beige, mint, terracotta, cream. -
Incorporate texture:
As you string the beads, mix in an occasional gold spacer or a patterned bead (like the white one with flower details visible in the image) to add visual interest. -
Check the fit:
Wrap the strand around your wrist to check the size. Add or remove beads from the ends to adjust the fit without disturbing the central focal design.
Level Up: Scent Infusion
Use unfinished wood beads instead of clay for a few accents. Add a drop of essential oil to the wood for a wearable aromatherapy diffuser.
Step 4: Finishing and Securing
-
Prepare to knot:
Once both bracelets are beaded, remove the tape or stopper. Bring the two ends of the first bracelet together carefully. -
Tie the knot:
Tie a surgeon’s knot (right over left, left over right, and loop through an extra time) to secure the bracelet. Pull the elastic tight to close any gaps between beads. -
Seal the deal:
Apply a tiny dot of jewelry glue or clear nail polish directly onto the knot. This prevents it from slipping over time. -
Hide the knot:
Allow the glue to dry for a moment, then trim the excess cord ends close to the knot. Gently tug the beads so the knot slides inside the hole of a neighboring bead, hiding it from view. -
Repeat for the second:
Repeat the knotting and gluing process for the second bracelet.
Slip these on your wrists and enjoy your custom, coordinated accessory set
Puzzle Piece Color Blocking Set
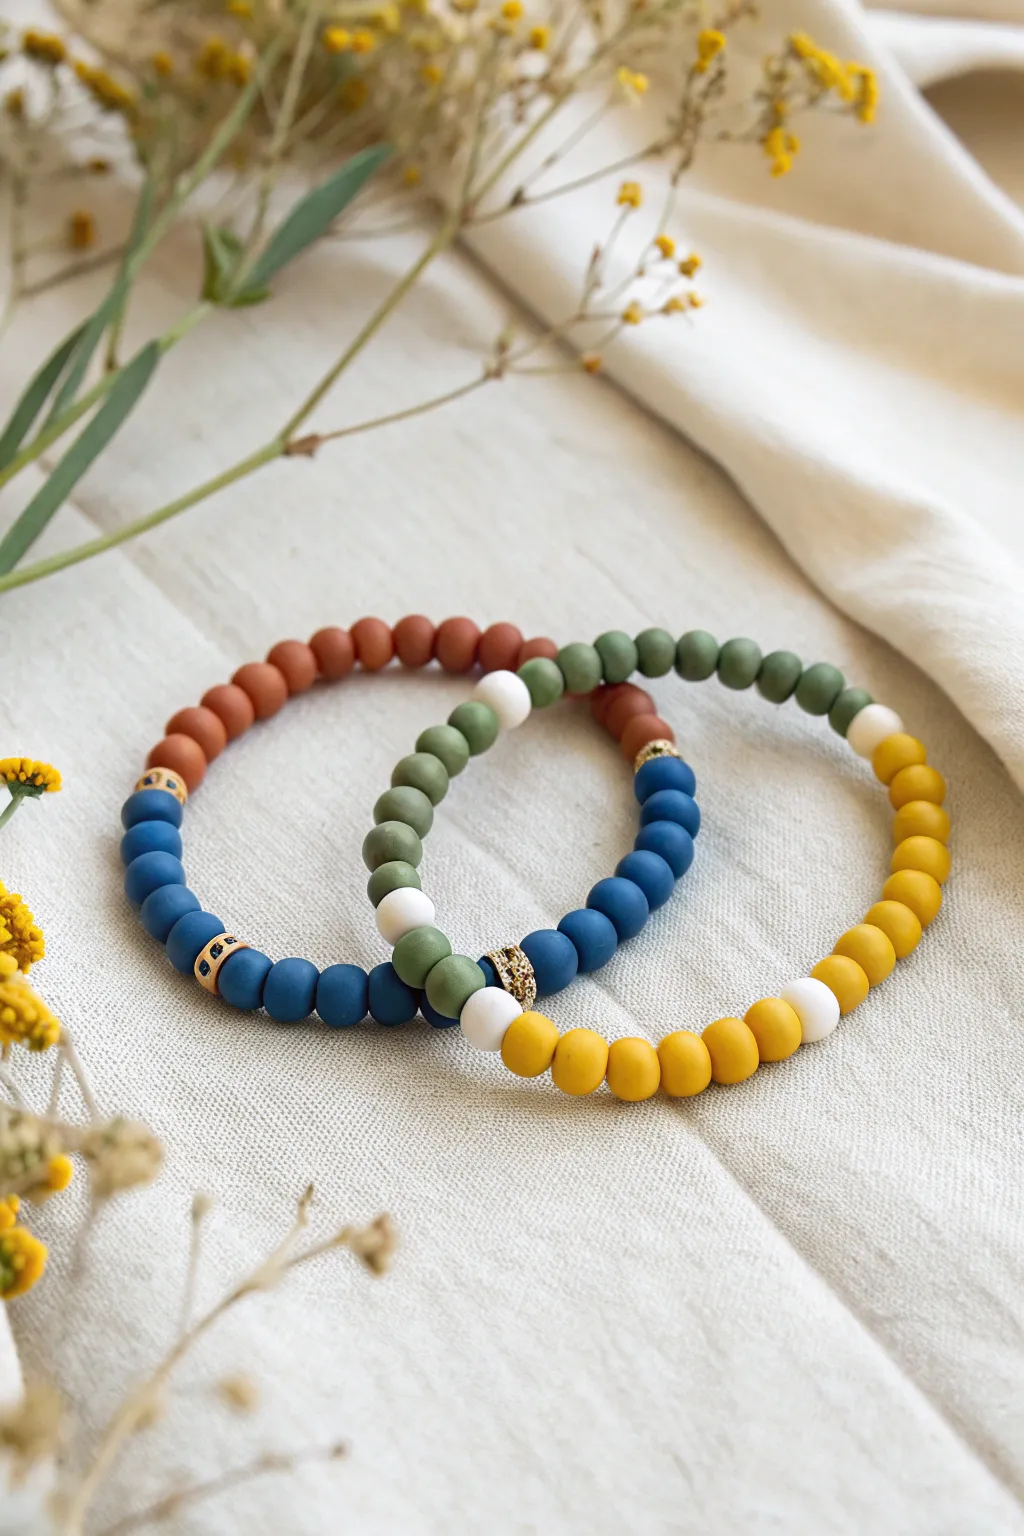
These complementary bracelets play with a split-color design that feels modern and unified, perfect for symbolizing two halves of a friendship. Using matte polymer clay beads in earthy tones creates a sophisticated look, while gold spacers add just enough shine to elevate the finish.
How-To Guide
Materials
- Matte polymer clay disc beads (6mm) in: terracotta, navy blue, sage green, and mustard yellow
- Small white round beads or disc beads
- Gold geometric spacer beads or gold spacers with blue enamel detail
- Strong elastic cord (0.8mm recommended)
- Scissors
- Superglue or jewelry glue
- Bead stopper or masking tape
Step 1: Planning the Design
-
Measure your wrist:
Cut a piece of elastic cord about 10-12 inches long for each bracelet to ensure you have plenty of room for tying knots. -
Secure the end:
Attach a bead stopper or simply tape one end of the cord to your work surface to prevent beads from sliding off while you design. -
Plan the color split:
Visualize the bracelet as two distinct halves. Decide which color combinations you want; the image shows a terracotta/navy split and a sage/mustard split.
Seamless Transitions
Use beads with slightly larger holes for the beads immediately next to the knot. You can gently tug the knot inside one of these to hide it completely.
Step 2: Creating the Terracotta & Navy Bracelet
-
Start with terracotta:
Thread approximately 3-3.5 inches of terracotta clay beads onto your first cord. This creates the first half of the color block. -
Add the first transition:
Slide on a gold spacer bead. The example uses a unique gold spacer with blue enamel dots, but any textured gold spacer works well here. -
Begin the navy section:
String on the navy blue clay beads. Continue adding them until this section matches the length of the terracotta section. -
Add the final transition:
Finish the strand with a second gold spacer bead before bringing the two ends together to check the fit.
Texture Play
Mix up the texture by using heishi beads made of different materials, like substituting the matte clay for rubberized beads or frosted glass.
Step 3: Creating the Sage & Mustard Bracelet
-
Start with sage green:
On your second cord, thread about 3 inches of sage green clay beads. -
Create the focal point:
To make the transition distinct, add one white round bead, followed by a gold geometric spacer (like a rondelle or textured drum bead), and then another white round bead. -
Add the mustard section:
String on the mustard yellow beads. Continue until this yellow section is equal in length to the green section. -
Complete the circle:
Before tying, add one final white bead, a gold spacer, and another white bead to the end so the pattern repeats seamlessly when closed.
Step 4: Finishing Touches
-
Pre-stretch the cord:
Gently pull on both ends of the elastic cord to pre-stretch it. This crucial step prevents the bracelet from sagging later. -
Tie the knot:
Tie a surgeon’s knot (right over left, left over right) and pull it tight. The knot should nestle discreetly next to or inside one of the larger hole beads if possible. -
Secure with glue:
Dab a tiny drop of jewelry glue onto the knot. I like to let this dry for a few minutes before trimming the excess to ensure it’s fully secure. -
Trim excess:
Carefully snip the extra elastic cord close to the knot, being careful not to cut the main thread.
Now you have a stylish set of bracelets ready to gift to your best friend or wear together for a chic stacked look