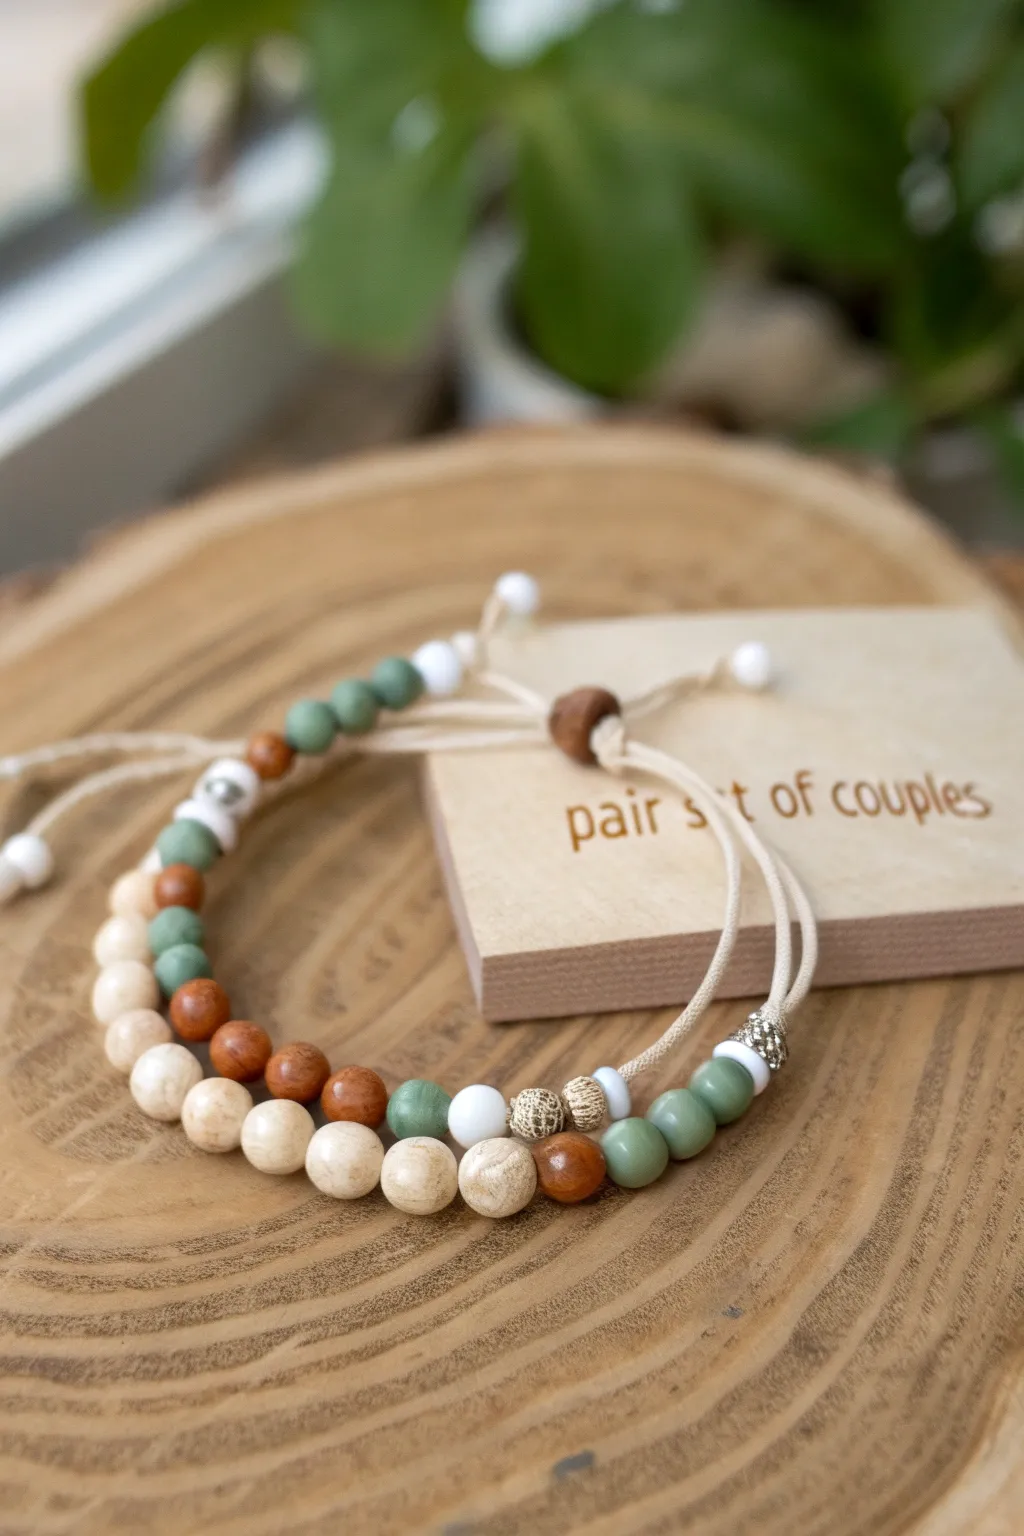
When I’m making clay bead bracelets for couples, I think of them as tiny, wearable little love notes that actually fit your everyday style. The fun part is choosing a matching or complementary set that feels like the two of you—connected, but still individual.
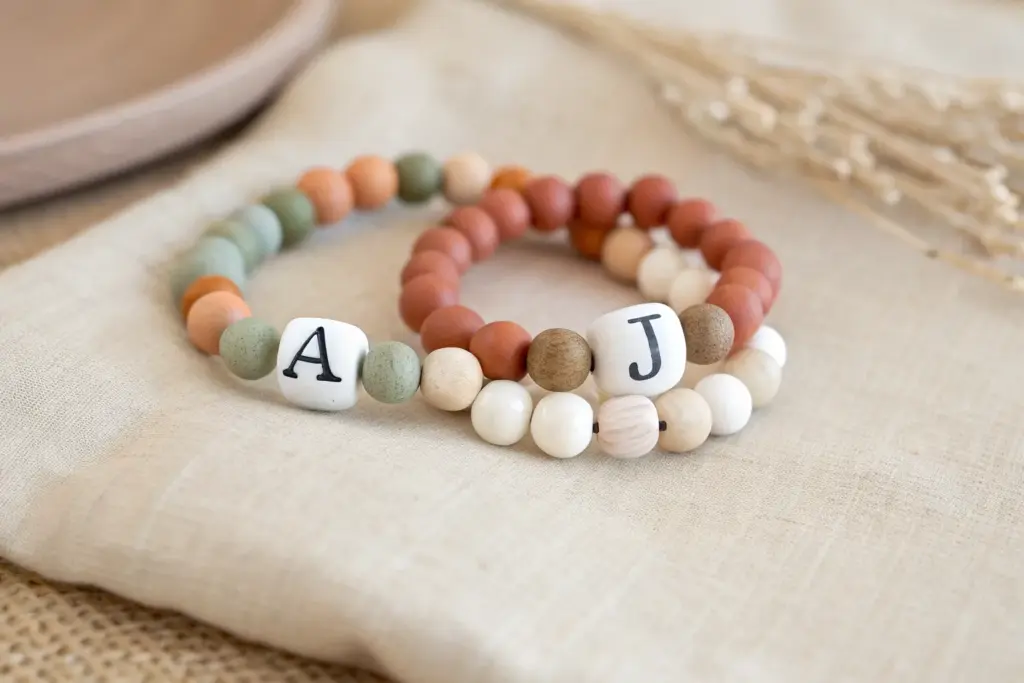
Classic Couple Initials With a Heart Spacer
Celebrate your connection with this lovely set of complementary clay bead bracelets featuring soft peaches, creamy whites, and warm terracotta tones. The delicate gold charms add a personalized touch, making them a perfect, understated accessory for couples or best friends.
Step-by-Step Tutorial
Materials
- Heishi clay disc beads (6mm) in Cream/White
- Heishi clay disc beads (6mm) in Peach/Light Coral
- Heishi clay disc beads (6mm) in Terracotta/Dusty Rose
- Gold textured spacer beads (round, approx 4-5mm)
- Small gold jump rings (4-6mm)
- Gold tone alloy charms (one with white enamel heart, one plain or initial)
- Elastic jewelers cord (0.8mm crystal string)
- Jewelry glue or clear nail polish
- Scissors
Step 1: Planning Your Design
-
Measure your wrist:
Cut a length of elastic cord about 10-12 inches long. This gives you plenty of extra room for tying knots later without the beads sliding off the ends. -
Pre-stretch the cord:
Give the elastic a few gentle tugs before you start beading. This simple trick prevents your bracelet from stretching out and becoming loose after only a few wears. -
Secure the end:
Place a piece of tape or a binder clip on one end of your string. This acts as a stopper so your beads don’t roll away while you work.
Sticky Situation?
If the knot won’t hide inside a flat heishi bead, add a round gold spacer or a larger bead specifically where you tie off, as they usually feature larger holes.
Step 2: Creating the Multi-Colored Bracelet
-
Start the pattern:
Begin stringing with a section of cream heishi beads. Aim for about 8-10 beads to create a solid white block. -
Add color accents:
Slide on a single peach or light coral bead, followed by one or two cream beads, and then another peach bead. Varying this slightly keeps the look organic. -
Insert gold spacers:
After your colored section, thread on one of the textured gold spacer beads. I like to sandwich these between the white sections to make the metal pop. -
Repeat the sequence:
Continue the pattern: a block of cream beads, a mixed section of peach and cream, and then a gold spacer. Repeat this until the strand is long enough to wrap comfortably around your wrist. -
Attach the charm:
Locate the center point or where you want your focal point to be. Slide a gold jump ring onto the cord between two gold spacers or beads. You’ll attach the heart charm to this ring later, or slide the charm directly onto the cord if the bail is large enough.
Step 3: Creating the Solid Color Bracelet
-
Start the second strand:
Prepare a second piece of elastic cord just like the first. This bracelet will be monochrome to complement the first one. -
String the beads:
Thread on the terracotta or dusty rose heishi beads continuously. You don’t need a complex pattern here; the beauty is in the solid, unified color. -
Check the fit:
Wrap it around the wrist periodically. Since it’s a solid color, you just need to ensure the total length matches the wearer’s wrist size. -
Add the charm:
Once you’ve reached the desired length, slide your second gold charm (perhaps an initial or simple disc) onto the cord.
Make It Personal
Swap the heart charm for letter beads to spell out a date, initials, or a short word inside the white sections for a truly custom hidden message.
Step 4: Finishing Touches
-
Tie the first knot:
Remove the tape or clip. Bring both ends of the elastic together and tie a simple overhand knot, pulling it tight but not so tight that the elastic buckles. -
Create a surgeon’s knot:
Loop the ends over each other again, but pass one end through the loop twice instead of once. Pull firmly to secure. -
Secure with glue:
Dab a tiny drop of jewelry glue or clear nail polish onto the knot. This prevents it from slipping over time. -
Hide the knot:
Once the glue is tacky or dry, trim the excess string close to the knot. If possible, gently tuck the knot inside the hole of a neighboring bead.
Now you have a matching set that carries a little piece of affection wherever you go


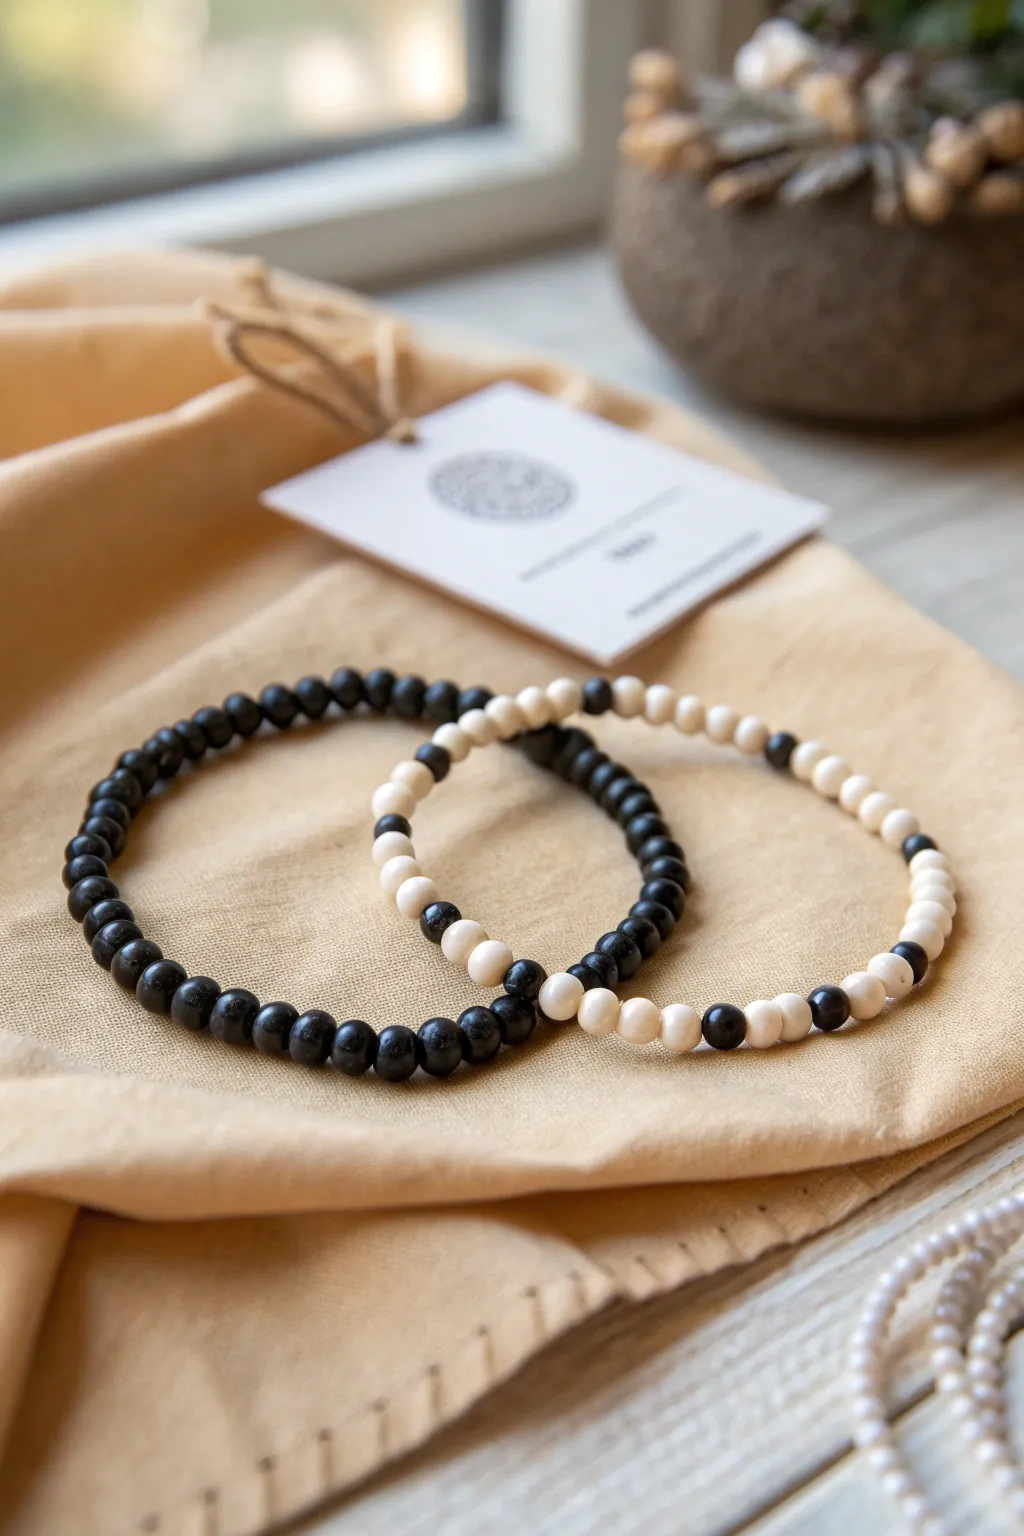
Black-and-White Yin Yang Sets
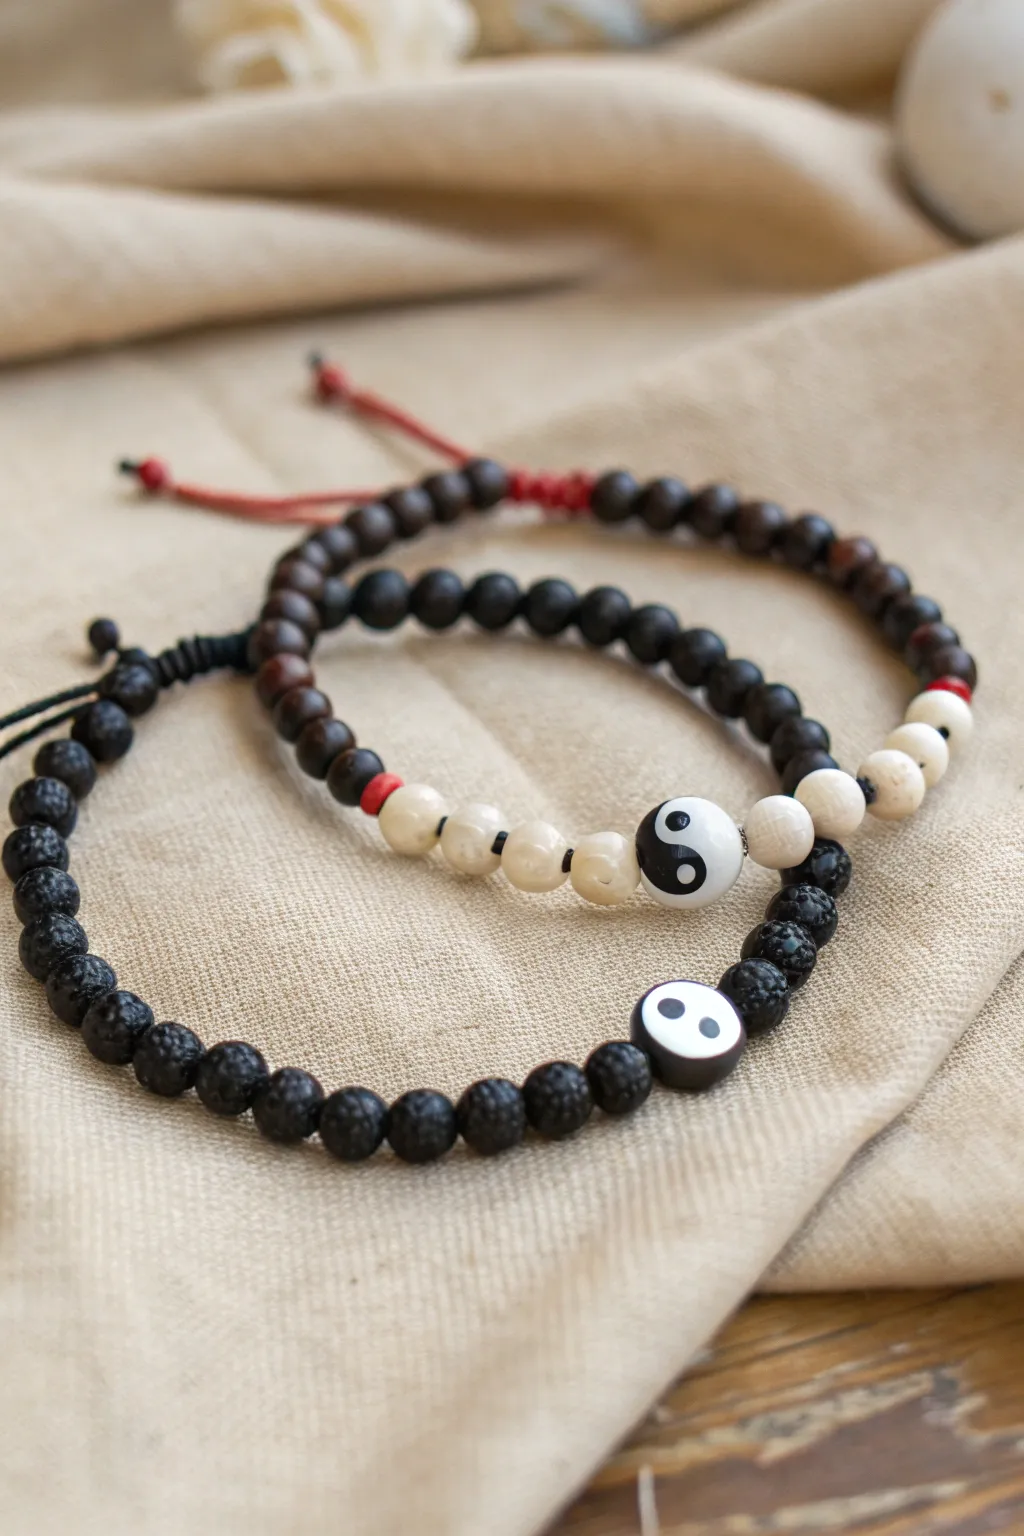
Balance your energy with these matching couple’s bracelets featuring classic Yin Yang focal beads. The design contrasts porous black lava stone with smooth wooden and bone-toned beads for a tactile and visual harmony.
Step-by-Step Tutorial
Materials
- Black lava stone beads (6mm or 8mm)
- Dark wood beads (dark brown/espresso)
- Creamy white bone or stone beads
- Yin Yang beads (polymer, acrylic, or ceramic)
- Black nylon cord (0.8mm or 1mm)
- Red nylon cord (0.8mm or 1mm)
- Scissors
- Lighter or thread burner
- Tape or clipboard
- Measuring tape
Step 1: Designing the Black Bracelet
-
Measure and Cut:
Cut a piece of black nylon cord to approximately 12-14 inches in length. This generous length gives you plenty of room for knots and adjustments. -
Secure the End:
Tie a simple overhand knot about 3 inches from one end. You can tape this end down to a table or clipboard to keep the cord taut while you bead. -
String the Lava Beads:
Thread your black lava stone beads onto the cord. For an average wrist, you’ll want about 3 inches of beads on this first side. -
Add the Centerpiece:
Slide on one black bead, then your central Yin Yang bead. Ensure the bead is oriented so the pattern faces outward correctly. -
Complete the Circle:
String the remaining lava beads on the other side of the focal bead to mirror the first side’s length. Check the fit around your wrist now before finishing.
Knot Slipping?
If the sliding knot is too loose, untie and redo the square knots with more tension. If it’s too tight to slide, gently wiggle the main cords to loosen the weave slightly.
Step 2: Designing the Wood & Bone Bracelet
-
Prepare the Red Cord:
Cut a 14-inch piece of red nylon cord. The red string is symbolic in many cultures for connection and destiny. -
Start the Pattern:
Tie your starting knot 3 inches from the end. Begin stringing with the dark brown wood beads. -
Transition to Light:
After about 2.5 inches of wood beads, add a small accent bead (like a tiny red cylinder or spacer) if desired, then switch to the cream-colored bone beads. -
Center the Yin Yang:
Thread about four or five cream beads, then the central Yin Yang bead, followed by four or five more cream beads to create a bright focal section. -
Finish the Strand:
Switch back to the dark wood beads to complete the symmetry of the strand.
Step 3: The Adjustable Closure
-
Form the Circle:
For the first bracelet, bring the two cord ends together so they overlap parallel to each other. Temporarily tape them down so the bracelet forms a circle. -
Tie the Sliding Knot:
Cut a separate 6-inch piece of matching cord. Tie a square knot around the two overlapped main adjustment cords. -
Create Macramé Knots:
Make 3-4 square knots (macramé style) using that short piece of cord over the main strands. Pull them tight but ensure the main cords can still slide through. -
Seal the Knot:
Trim the excess tails of the knotting cord very close to the knot. Carefully melt the very tips with a lighter to seal them; I like to tap the melted nylon with the side of the lighter to flatten it. -
Finish the Adjusted Ends:
Slide a small bead onto each of the two dangling tail ends of the main bracelet cord. Tie a knot at the very end to keep these stopper beads in place. -
Final Trim:
Trim any excess cord from the tails and lightly singe the ends to prevent fraying. -
Repeat fit the Second:
Repeat this entire closure process for the second bracelet, ensuring your knots are secure.
Scent Diffuser
Use the black bracelet as an essential oil diffuser! The porous lava stones absorb oil perfectly. Add a drop of lavender or sandalwood for calmness.
Wear these bracelets together to stay connected even when you are apart


Matching Birth Month Color Pairing
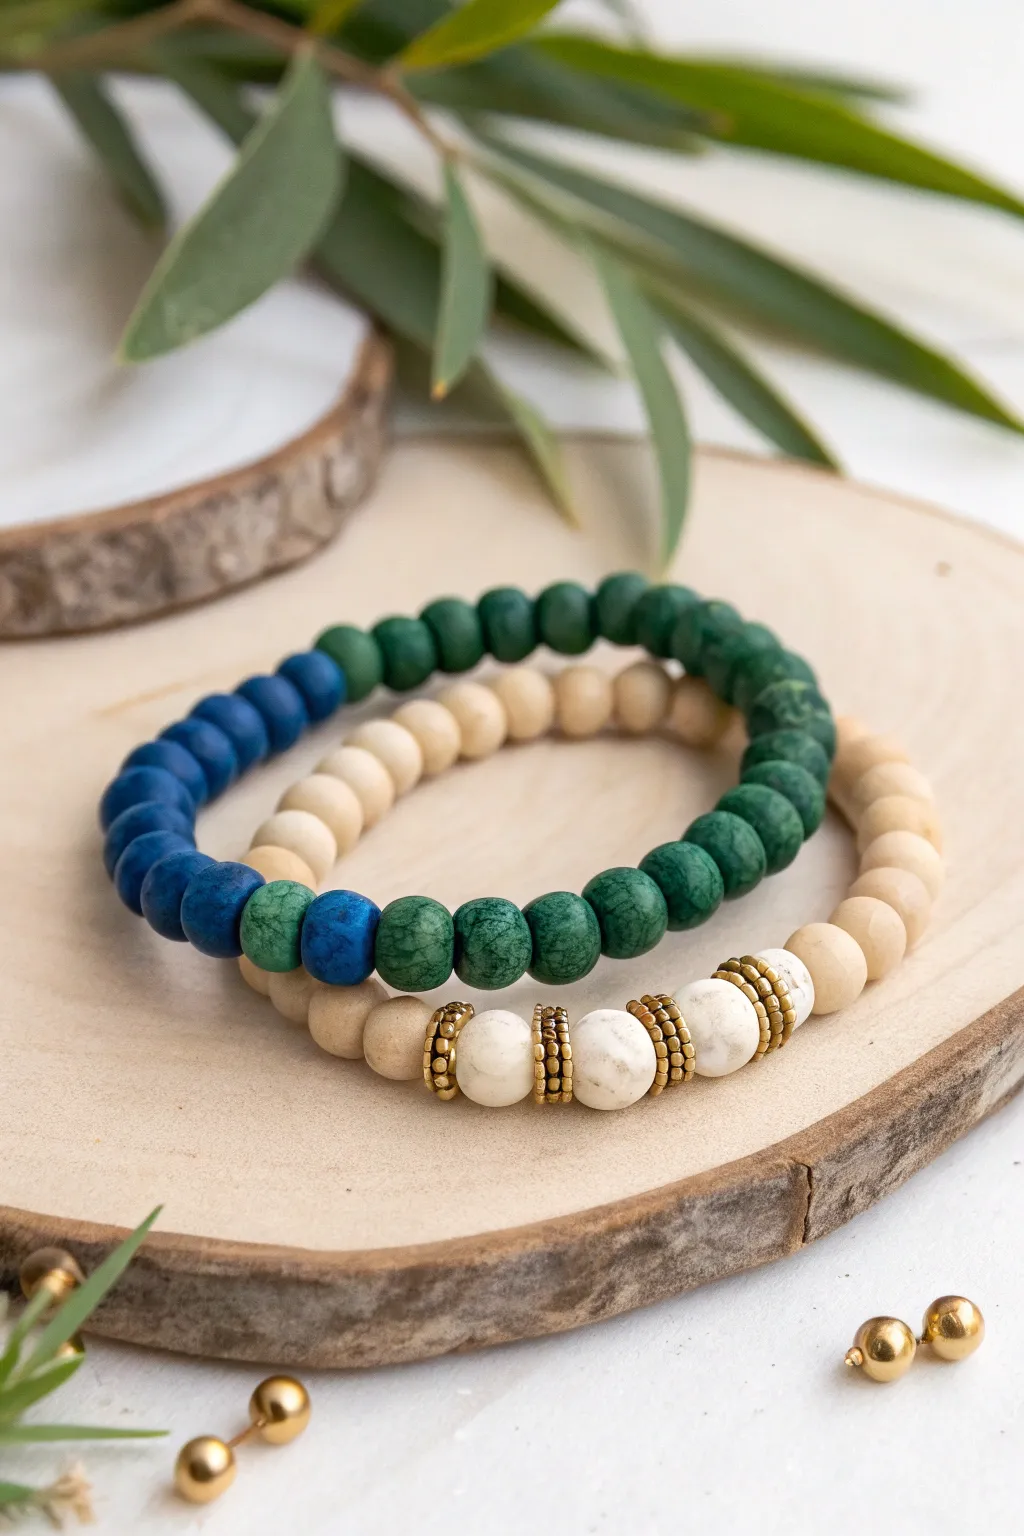
Celebrate your connection with these complementary birth month color bracelets, blending natural wood textures with vibrant hues for a grounded yet personalized look. The design features a mix of deep blues and greens alongside warm beige tones, accented by striking white focal beads and gold details.
Step-by-Step
Materials
- 8mm round dyed wooden beads in dark green
- 8mm round dyed wooden beads in deep blue
- 8mm round natural beige wooden beads
- 10mm round white howlite or marble beads
- Gold tone disc spacer beads with textured edges (heishi style or beaded edge)
- 0.8mm clear elastic cord
- Jewelry glue or clear nail polish
- Scissors
- Bead stopper or tape
- Measuring tape
Step 1: Preparation
-
Measure Your Wrist:
Wrap a measuring tape comfortably around your wrist to determine the size. Add about half an inch to this measurement to ensure the bracelet isn’t too tight once the beads are added. -
Calculate Bead Count:
Lay out your beads on a measuring board or alongside a ruler. For an average 7-inch wrist using 8mm beads, you will need approximately 22-24 beads total per bracelet. -
Prepare the Cord:
Cut a piece of elastic cord about 10-12 inches long. This extra length makes tying the finishing knots much easier. I always attach a bead stopper or a piece of tape to one end to prevent beads from sliding off while working.
Stretch Test Pro-Tip
Pre-stretch your elastic cord by pulling it firmly a few times before beading. This prevents the bracelet from sagging or loosening permanently after the first few wears.
Step 2: Creating the Blue-Green Gradient Bracelet
-
Start the Pattern:
Begin threading your beads with the deep blue wooden beads. Add approximately 8-10 blue beads to form the first section of color. -
Create the Transition:
To blend the colors, add one single green bead followed by one single blue bead. This subtle mix softens the line between the two main color blocks. -
Finish the Green Section:
String on the remaining green wooden beads until you reach your desired length. The bracelet should be roughly half blue and half green, representing two birth months merging together. -
Check the Fit:
Wrap the unfinished strand around your wrist to verify the size. Add or remove one or two beads if necessary to get that perfect comfortable fit. -
Tie the Knot:
Remove the bead stopper and bring the ends together. Tie a surgeon’s knot (loop the elastic through twice before pulling tight) and pull it firmly to secure the bracelet.
Level Up: Scent Diffuser
Use unfinished wooden beads for the beige sections. These are porous and can absorb essential oils, turning your matching jewelry into a wearable aromatherapy differ.
Step 3: Creating the Beige Focal Bracelet
-
Layout the Focal Section:
For the second bracelet, start by identifying the center. You will use three large 10mm white howlite beads as the focal point. -
Add Gold Accents:
String the center section in this order: Gold spacer, White bead, Gold spacer, Gold spacer, White bead, Gold spacer, Gold spacer, White bead, Gold spacer. -
Check Spacer Alignment:
Ensure the textured gold spacers act as caps hugging the white beads. Double spacers between the white beads add a rich, metallic detail that elevates the design. -
Fill with Natural Beads:
On either side of this focal centerpiece, string the 8mm natural beige wooden beads. Add an equal number to each side until the valid length is reached. -
Secure the Strand:
Just like the first bracelet, double-check the sizing against your wrist. Tie off with a strong surgeon’s knot.
Step 4: Finishing Touches
-
Secure the Knots:
Apply a tiny dab of jewelry glue or clear nail polish to the knots on both bracelets. Let this dry completely for a few minutes to ensure durability. -
Hide the Knots:
If the hole of a neighboring bead is large enough, gently tug the elastic so the knot slides inside the bead, hiding it from view for a professional finish. -
Trim Excess Cord:
Once the glue is fully cured, use your scissors to trim the excess elastic tail close to the knot, being careful not to nick the main cord.
Wear your matching set together to keep a reminder of your partner close at hand


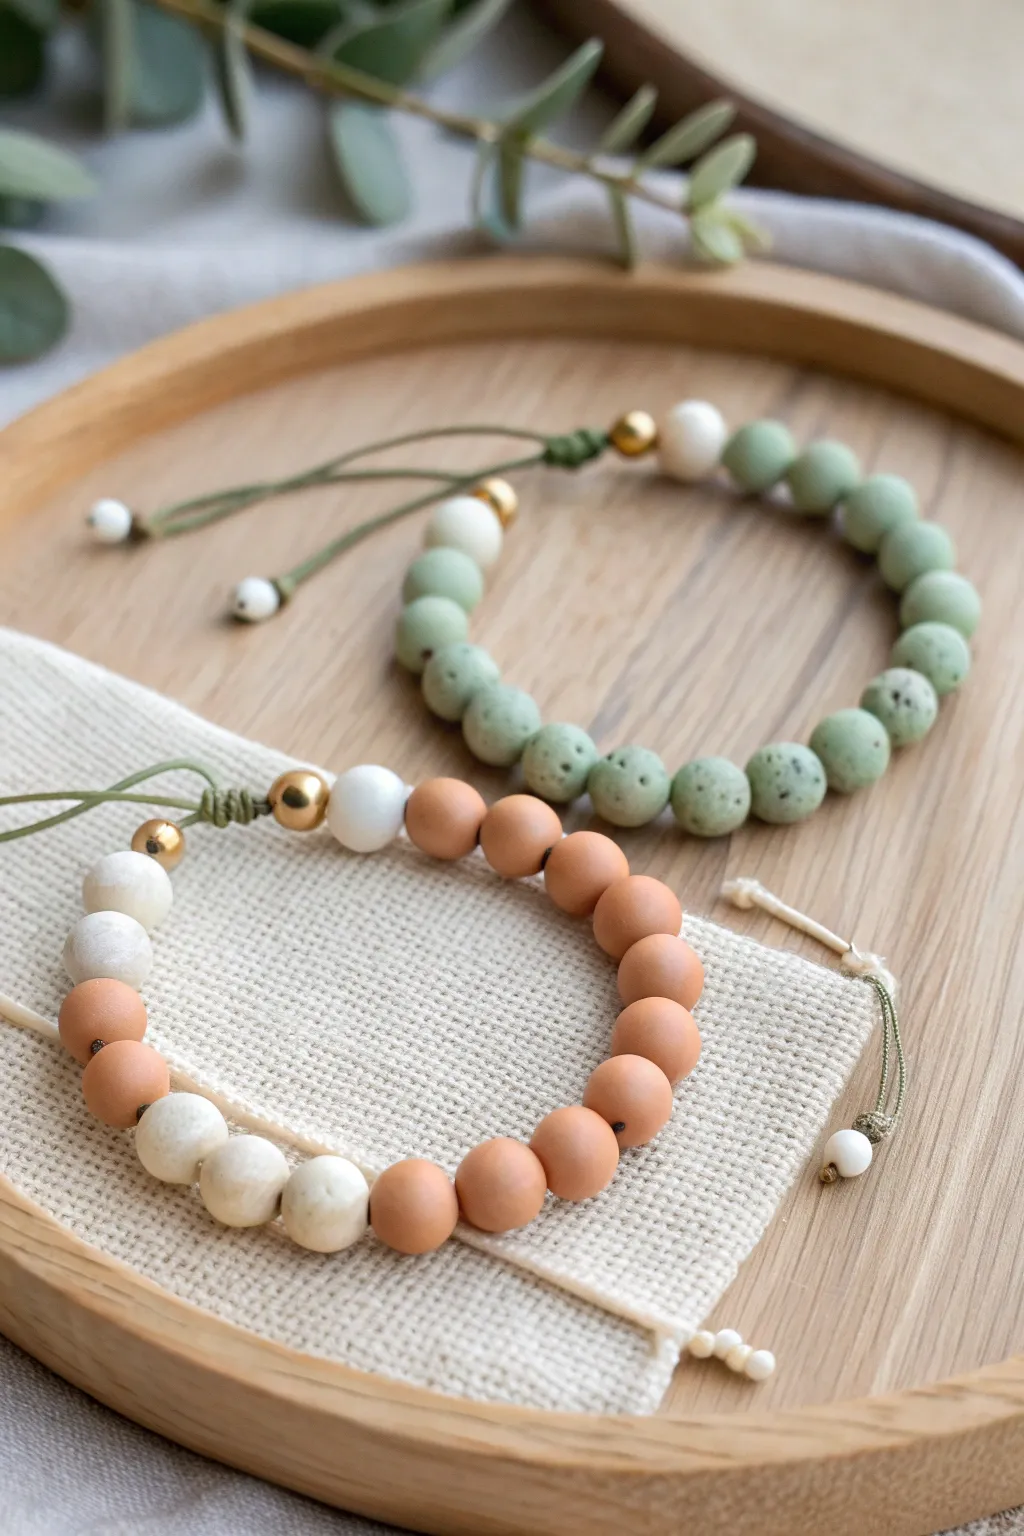
Two-Tone Half-and-Half Mirror Bracelets
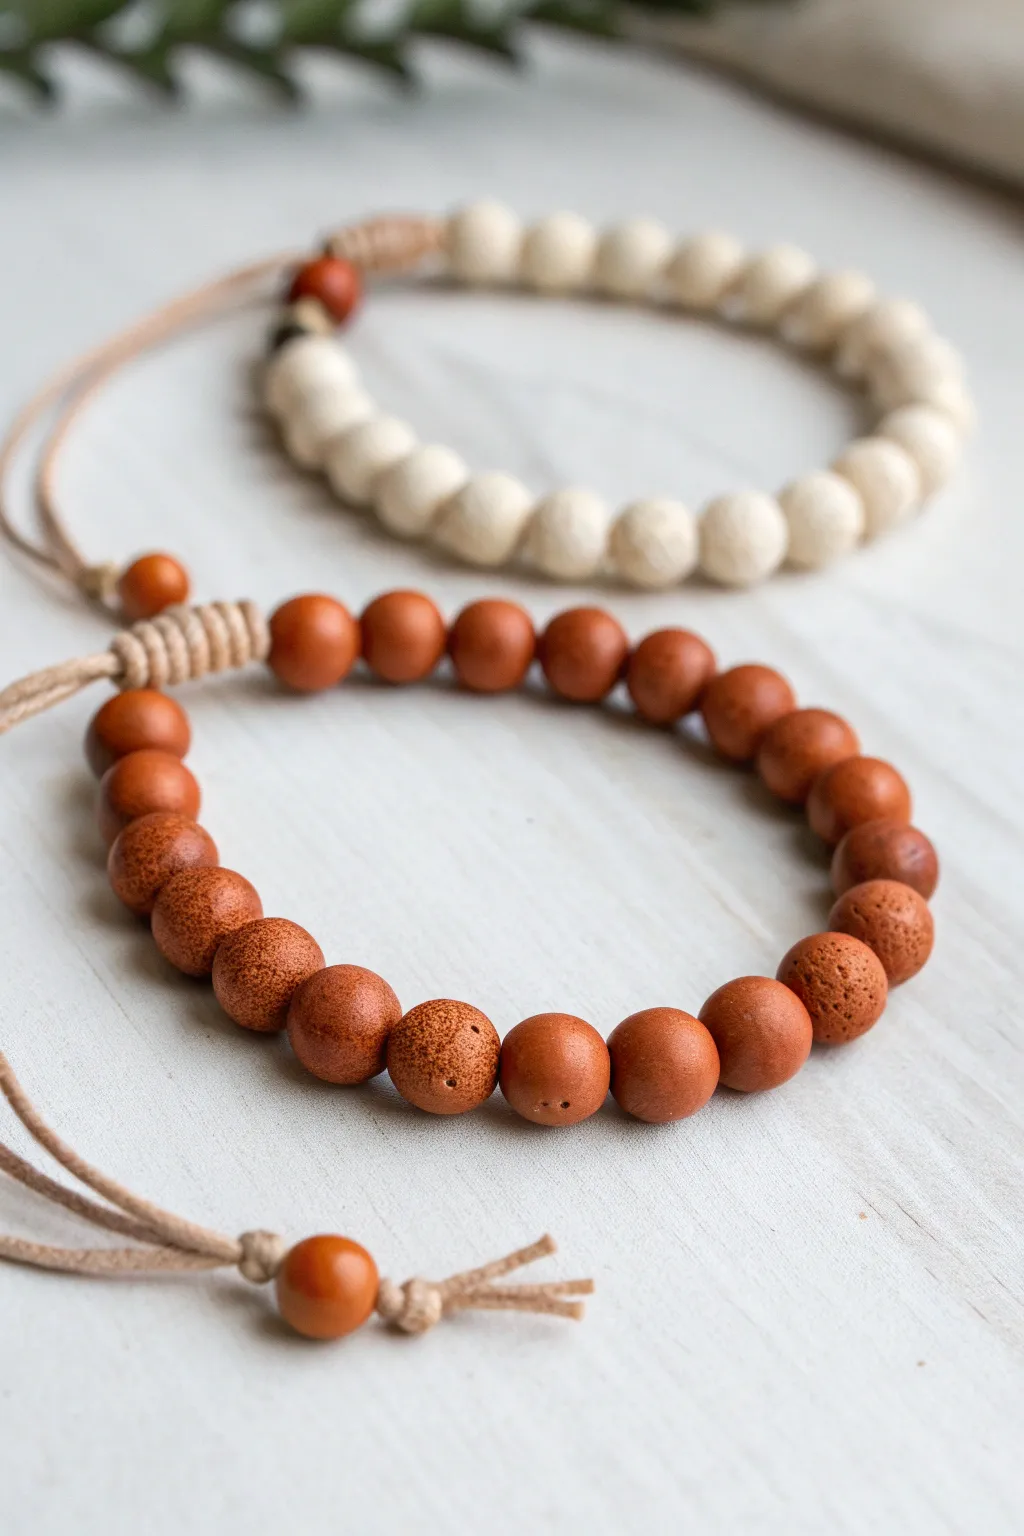
These complementary bracelets combine rugged terracotta tones with soft cream hues for a grounded, earthy aesthetic perfect for partners. The design features simple bead stringing elevated by a professional sliding knot closure, making them fully adjustable and comfortable for daily wear.
How-To Guide
Materials
- Terracotta polymer clay (or pre-made terracotta ceramic beads, approx 8-10mm)
- White or cream polymer clay (or pre-made white lava/ceramic beads, approx 8-10mm)
- Beige waxed cotton cord (1mm or 1.5mm thickness)
- Needle tool or toothpick (if making beads)
- Oven and baking sheet (if making beads)
- Scissors
- Ruler or measuring tape
- Hypo cement or clear craft glue
- Clip or tape (for securing cord while knotting)
Step 1: Crafting the Clay Beads (Optional)
-
Condition the clay:
If you are making your own beads rather than buying them, start by warming the terracotta and cream polymer clay in your hands until soft and pliable. -
Form the spheres:
Roll the clay into small, uniform spheres approximately 10mm in diameter. For the terracotta bracelet, you’ll need about 18-20 orange beads. For the cream bracelet, prepare the same amount in white. -
Texture the surface:
To mimic the speckled, porous look in the photo, gently roll the uncured beads over a piece of coarse sandpaper or tap them lightly with a stiff toothbrush. -
Create the holes:
Use a needle tool to pierce the center of each bead. I find twisting the tool as you push through prevents the bead from squashing out of shape. -
Bake and cool:
Bake the beads according to your clay package instructions (usually 275°F/135°C for 15-30 minutes). Let them cool completely before stringing.
Clean Beading Tip
If the waxed cord frays while threading, dip the tip in clear glue or nail polish and twist it into a sharp point. Let it dry for a built-in ‘needle’ that makes stringing easy.
Step 2: Stringing the Base
-
Cut the cord:
Cut a length of beige waxed cotton cord approximately 24 inches long for each bracelet. -
String the beads:
Thread your beads onto the center of the cord. The photo shows about 19 beads per bracelet, but adjust based on wrist size. -
Check the fit:
Wrap the beaded section around your wrist. The beads should cover most of the wrist but leave a gap of about 1-2 inches for the closure mechanism. -
Secure the ends:
Tie a simple overhand knot immediately after the last bead on both sides to keep the beads tight together in a row.
Step 3: The Sliding Macramé Closure
-
Overlap the cords:
Form a circle with your bracelet by overlapping the two tail ends of the cord. Temporarily tape or clip these overlapped cords down to your work surface. -
Cut a knotting cord:
Cut a fresh piece of beige cord, about 10-12 inches long. This will be used to make the sliding knot. -
Start the square knot:
Slide the new cord under the overlapped bracelet tails. Center it so you have equal lengths on left and right. -
Form the first loop:
Take the right knotting cord, cross it *over* the bracelet tails but *under* the left knotting cord, forming a ‘P’ shape. -
Complete the knot:
Take the left knotting cord, go *under* the bracelet tails and up through the loop of the ‘P’ shape. Pull both ends tight. -
Alternate and repeat:
Repeat the process, starting with the left side this time to create a full square knot. Continue alternating left and right for about 0.5 inches of knotting. -
Finish the closure:
Trim the excess lengths of the *knotting* cord (not the bracelet tails) close to the knot. Apply a tiny dot of glue to the cut ends to prevent fraying.
Mix It Up
Create a true ‘yin and yang’ set by swapping one bead! Put a single white bead in the center of the terracotta bracelet, and a single terracotta bead in the white bracelet.
Step 4: Finishing Touches
-
Add stopper beads:
Thread one single bead onto each of the hanging tail cords. -
Tie the ends:
Determine how long you want the pull cords to be, then tie a secure overhand knot after each stopper bead. -
Final trim:
Snip off any excess cord past the final knots and fray the very tips slightly with your thumbnail for a rustic finish.
Now you have a matching set of durable, earthy bracelets ready to gift or wear together

The Complete Guide to Pottery Troubleshooting
Uncover the most common ceramic mistakes—from cracking clay to failed glazes—and learn how to fix them fast.
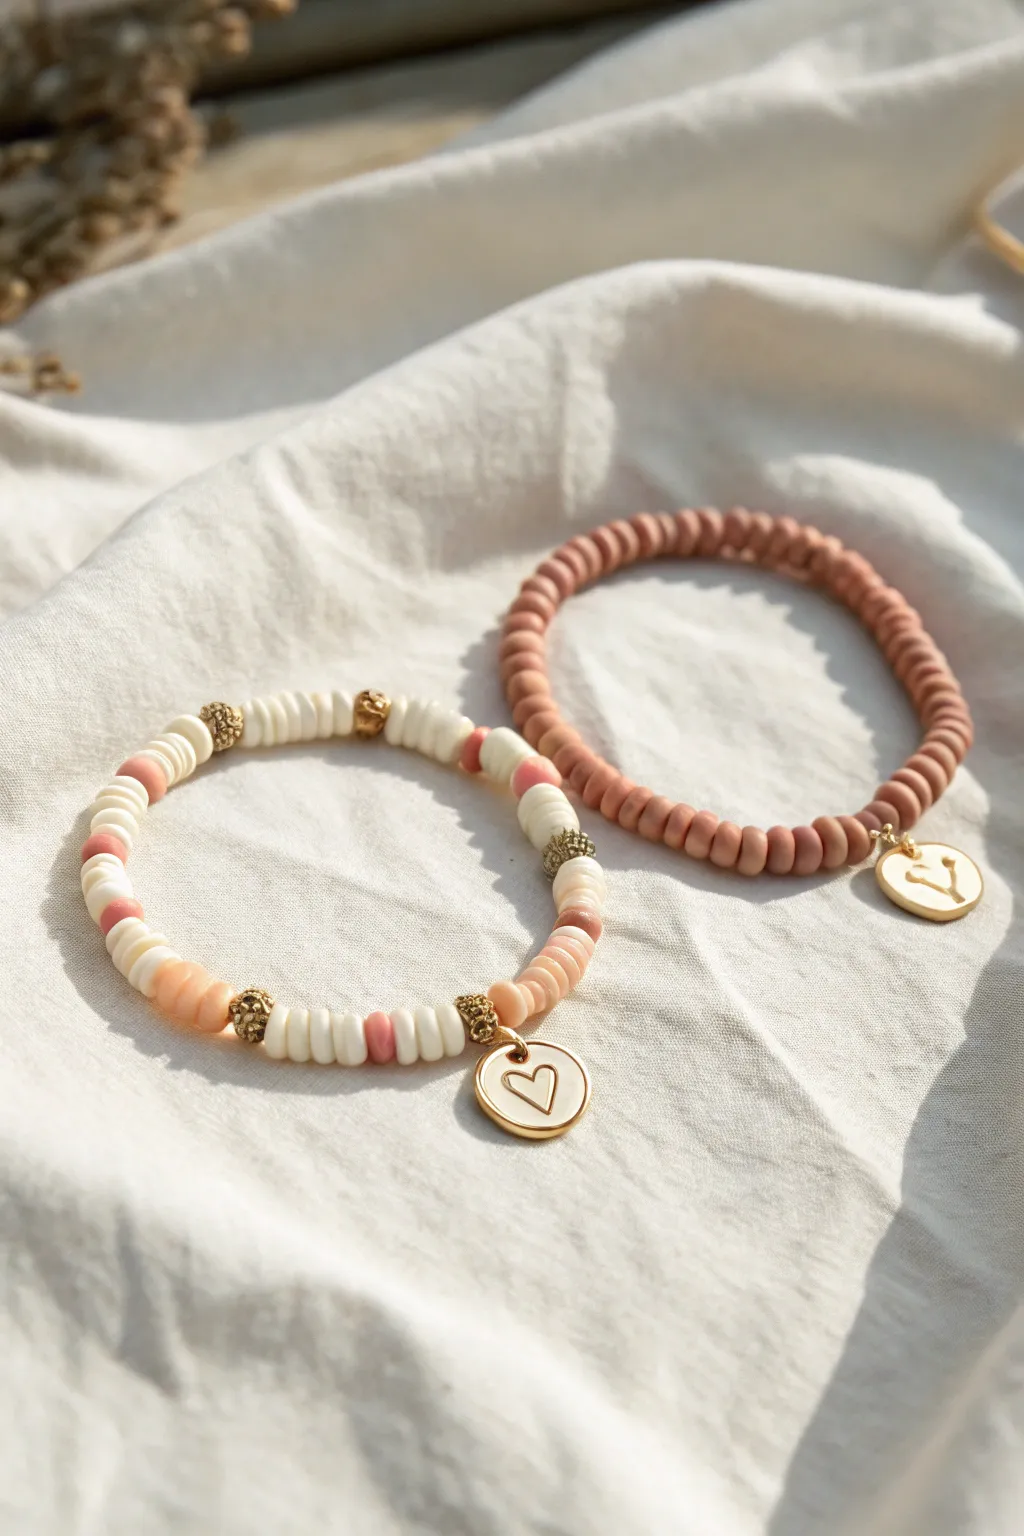
Neutral + Pastel His-and-Hers Look
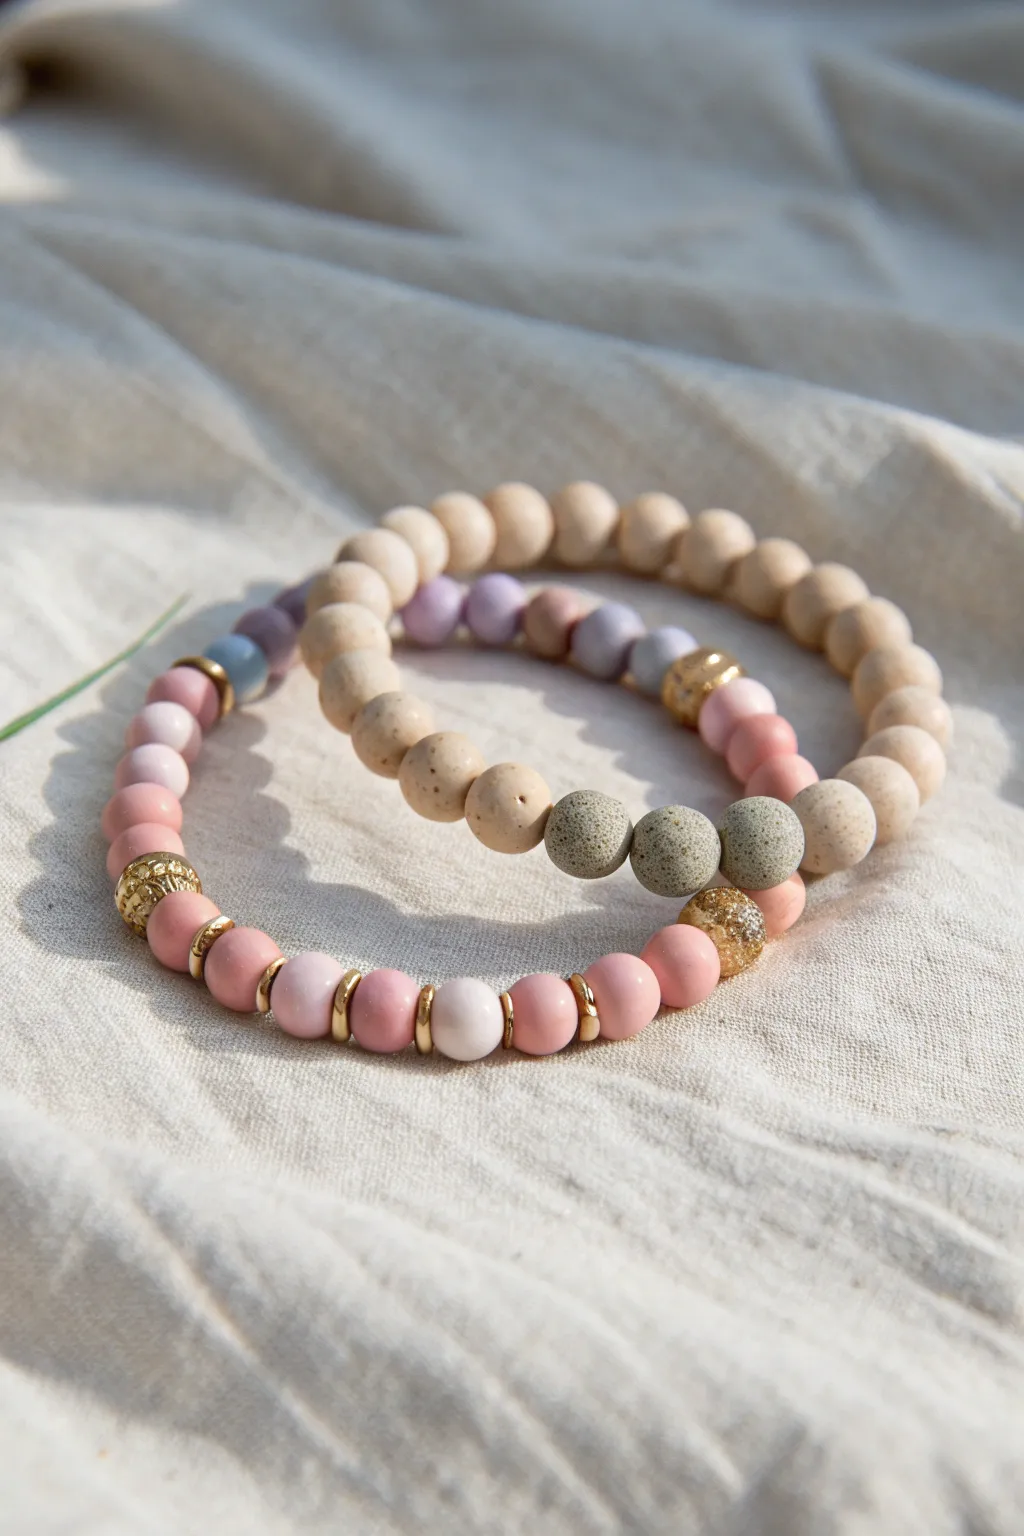
Achieve a harmonious balance of feminine and masculine elements with this paired bracelet set. Combining matte pink clay beads with natural wood textures and subtle gold accents creates a versatile look that symbolizes connection whether you’re together or apart.
Step-by-Step Tutorial
Materials
- Matte round polymer clay beads (8mm): Dusty rose, blush pink, and pale lilac
- Natural wood beads (8mm): Unfinished light blonde wood
- Lava stone beads (8mm): Porous grey texture
- Gold spacer beads: Heishi-style discs and small round beads
- Gold accent beads: Textured or stardust finish round beads (8mm)
- Strong elastic stretch cord (0.8mm or 1mm)
- Jewelry glue or clear nail polish
- Scissors
Step 1: The Pink ‘Hers’ Bracelet
-
Measure and prepare:
Cut a piece of elastic cord about 10-12 inches long. This generous length makes tying the final knot much easier. Pre-stretch the cord by tugging it gently a few times to prevent sagging later. -
Start the pattern:
Begin your strand with a textured gold ‘stardust’ bead. This will act as the focal point or the knot hider later on. -
Create the first color block:
Thread on three dusty rose clay beads. Between the third bead and the next, slide on a thin gold disc spacer. -
Transition to lighter tones:
Add a lighter blush pink bead, followed by another gold disc spacer. This breaks up the solid color and adds a hint of shine. -
Alternate the pattern:
Continue the pattern: three dark pink beads, spacer, one light pink bead, spacer. Repeat this sequence for about half the length of the bracelet. -
Incorporate the contrast:
Towards the back section of the bracelet, introduce 3-4 pale lilac or blue-grey clay beads. Mixing these cool tones with gold disc spacers adds depth to the warm pink palette. -
Check the fit:
Wrap the strand around your wrist. You want it snug but comfortable. Add or remove pink beads until the ends meet perfectly without gaps.
Step 2: The Wood ‘His’ Bracelet
-
Set the foundation:
Cut another 12-inch length of elastic cord and give it a good pre-stretch. The natural wood beads are lightweight, so standard cord works well. -
Group the focal beads:
Start by threading three grey lava stone beads. These porous stones add a rugged texture and contrast nicely with the smooth wood. -
Add metallic detail:
Flank this central trio of lava stones with two textured gold beads—one on each side. -
Build the wood body:
Fill the rest of the strand with the light blonde wood beads. I like to check the grain on each bead before threading it to ensure the textures align nicely. -
Subtle color integration:
To tie the two bracelets together, replace 3-4 random wood beads on the opposite side with the same pale lilac or blush beads used in the first bracelet. -
Incorporate gold spacers:
Place a gold disc spacer on either side of the small colored section to frame it neatly.
Knot Security
Don’t cut the elastic tails immediately after gluing! Let the glue cure fully for 24 hours before trimming to prevent the knot from snapping open.
Step 3: Finishing Touches
-
Secure the knots:
For each bracelet, tie a simple surgeon’s knot (right over left, left over right, and loop through an extra time). Pull it very tight. -
Apply adhesive:
Dab a tiny drop of jewelry glue or clear nail polish onto the knot. Let it dry for a minute to ensure it won’t slip. -
Hide the mechanics:
If possible, tuck the knot inside the hole of one of the larger gold or wood beads nearby. Trim the excess elastic close to the bead.
Scent Infusion
Add a drop of essential oil to the porous grey lava stones on the wood bracelet. They act as a natural diffuser, carrying a shared scent all day.
Enjoy wearing your complementary set or wrap them up as a thoughtful handcrafted gift.
Shared Last Initial Stackable Set
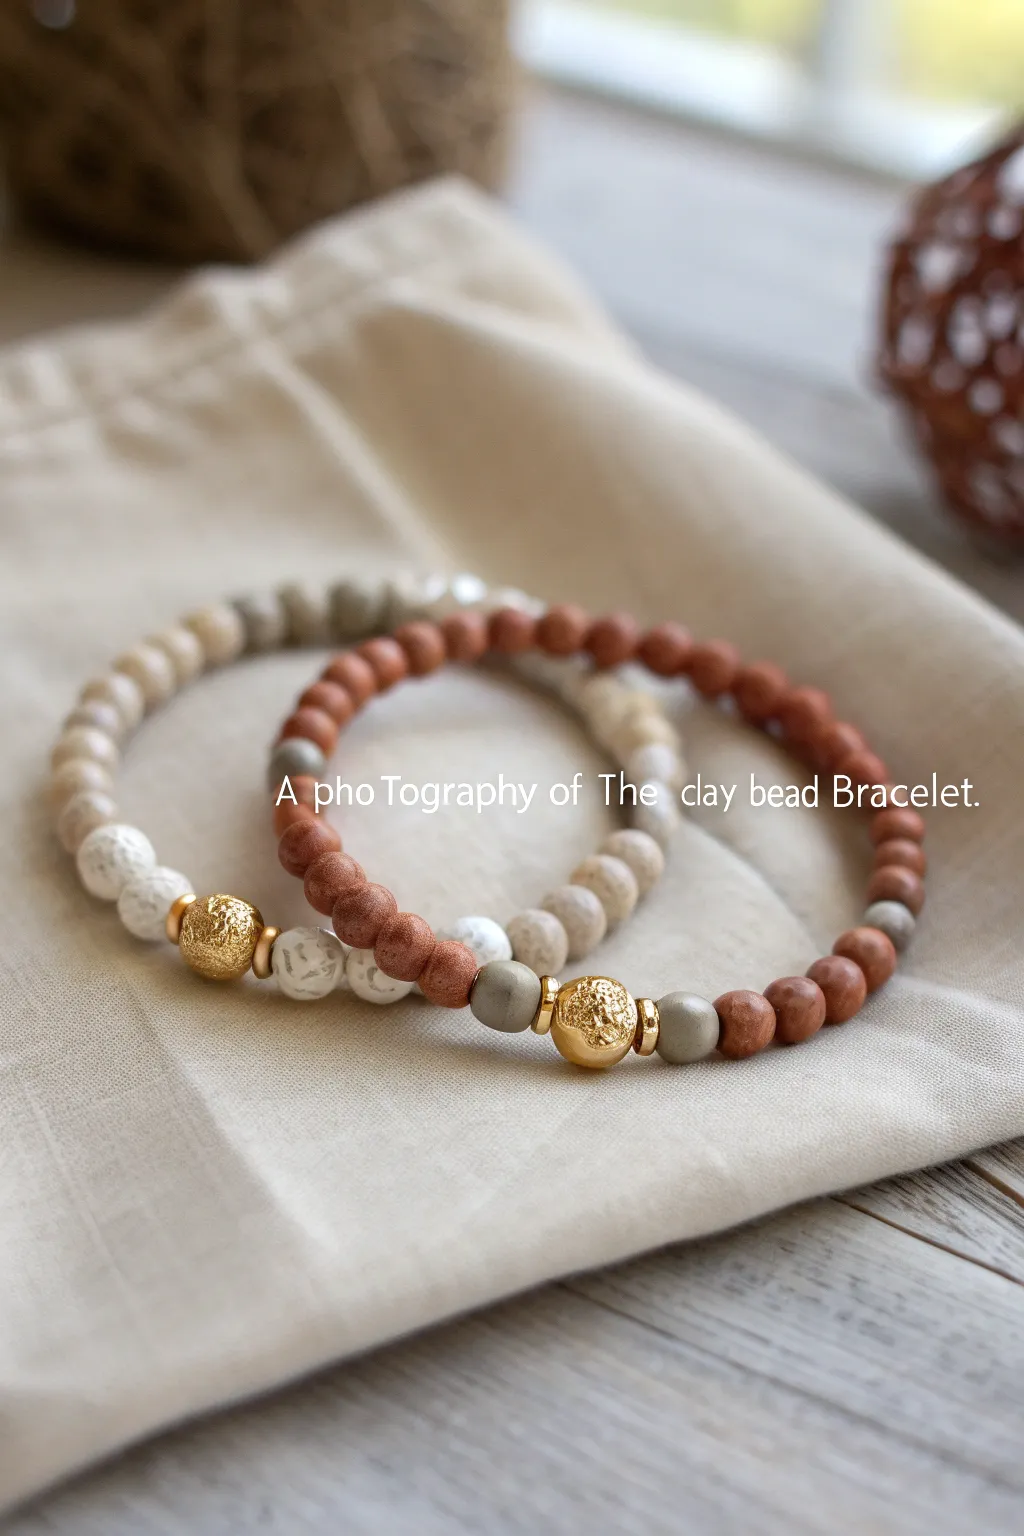
Create a unified yet distinct aesthetic with this matching bracelet set that balances warm terracotta tones with cool neutrals. The centerpiece of each strand is a textured gold bead, serving as a sophisticated focal point for a shared lasting connection.
Step-by-Step
Materials
- Reddish-brown clay or matte agate beads (6mm or 8mm)
- Beige/Taupe speckled clay or stone beads (6mm or 8mm)
- White or light grey lava stone beads (6mm or 8mm)
- Solid grey matte beads (accent color)
- 2 Large textured gold or gold-plated focal beads (10mm)
- 4 to 6 Gold spacer discs or heishi beads
- Strong elastic stretch cord (0.8mm or 1.0mm)
- Jewelry glue or clear nail polish
- Scissors
Step 1: Preparation
-
Measure Wrists:
Measure both wrists using a soft measuring tape. Add about 0.5 inches to each measurement to ensure a comfortable fit that isn’t too tight. -
Pre-stretch Cord:
Cut two lengths of elastic cord, roughly 10 inches each. Give each piece a firm tug several times; this pre-stretching prevents the bracelets from sagging later. -
Secure the End:
Place a piece of tape or a bead stopper on one end of your first cord to stop beads from sliding off while you design.
Hiding the Knot
If the knot won’t fit inside the gold bead’s hole, gently tug it inside one of the softer clay beads. You can carefully ream the clay hole slightly larger with a pin if needed.
Step 2: Designing Bracelet One (The Warm Tone)
-
Start the Pattern:
Begin by stringing the reddish-brown clay beads. I usually thread about half of the total required beads for the length first. -
Add the First Accent:
Slide on one solid grey matte bead. This provides a cool-toned transition before the gold centerpiece. -
Adding the Gold Focal:
Thread one gold spacer disc, then the large textured gold focal bead, followed by another gold spacer disc. -
Complete the Center:
Add the second solid grey matte bead to mirror the other side of the gold feature. -
Finish the Loop:
Continue adding the reddish-brown beads until you reach the desired length for the larger wrist size.
Loose Elastic?
If the bracelet feels loose immediately, you didn’t pre-stretch the cord enough. Undo the knot (or cut and re-string) and give the cord 4-5 vigorous pulls before re-tying.
Step 3: Designing Bracelet Two (The Neutral Tone)
-
Base Color Threading:
For the second bracelet, start stringing the beige or taupe speckled beads. These lighter beads offer a softer contrast. -
Texture Transition:
As you approach the center point, switch to the white lava stone beads. Add about 3-4 of these on either side of the center. -
Gold Center Assembly:
Just like the first bracelet, frame your second textured gold focal bead with gold spacer discs. -
Check Symmetry:
Ensure the white lava beads are flanking the gold center evenly on both sides before finishing the strand with the remaining beige beads.
Step 4: Knotting and Finishing
-
The Surgeon’s Knot:
Remove the tape or stop-bead. Cross the ends, loop one side under twice, and pull tight. This extra loop creates a secure surgeon’s knot. -
Apply Glue:
Dab a tiny drop of jewelry glue or clear nail polish directly onto the knot. This is crucial for longevity. -
Hide the Knot:
While the glue is still tacky but not wet, slide a bead over the knot to hide it inside. In this design, the larger gold bead is perfect for hiding knots. -
Trim Excess:
Once the glue is fully dry, trim the excess cord carefully with sharp scissors, getting as close to the bead hole as possible without cutting the knot. -
Final Test:
Give both bracelets a gentle stretch to ensure everything feels secure and the knots are holding firm.
Wear these complementary pieces together or apart as a stylish symbol of your bond


What Really Happens Inside the Kiln
Learn how time and temperature work together inside the kiln to transform clay into durable ceramic.
Coordinates of Your Special Place
Create a harmonious connection with this pair of nature-inspired bracelets featuring a soothing palette of cream, sage green, and warm brown beads. This adjustable design uses a simple sliding knot mechanism, making it a perfect, custom-fit gift for you and your partner.
Detailed Instructions
Materials
- Round beads (8mm or 10mm) in cream/beige (wood or stone)
- Round beads (8mm or 10mm) in sage green (matte finish preferred)
- Round beads (8mm or 10mm) in reddish-brown wood
- Small white accent beads (6mm)
- Textured spacer beads (silver filigree or woven style)
- Light beige nylon or waxed cotton cord (1mm thickness)
- Scissors
- Lighter or clear craft glue (for sealing ends)
- Ruler or measuring tape
Step 1: Preparing the Cord
-
Measure and cut:
Cut two lengths of cord, each roughly 12 to 14 inches long. This generous length allows plenty of room for knotting and adjusting later. -
Seal the ends:
If using nylon cord, carefully singe the very tips with a lighter to prevent fraying and make threading beads easier. For cotton cord, dab a tiny bit of glue on the tips and roll them between your fingers to create a needle-like point.
Use Textured Spacers
Mix metal or woven spacers between smooth beads. The contrast in texture elevates the design from simple craft to jewelry.
Step 2: First Bracelet (Cream Dominant)
-
Start the sequence:
Tie a loose overhand knot about 4 inches from one end of the cord to act as a temporary stopper. -
Thread the main section:
Begin threading your beads. For the lighter bracelet seen in the foreground, start with a sequence of about 5-6 cream-colored beads. -
Add color accents:
Slide on a single reddish-brown wood bead, followed by a sage green bead. -
Incorporate texture:
Add a small white bead, then a decorative textured spacer bead. These spacers add a lovely tactile break in the pattern. -
Complete the pattern:
Mirror the pattern or continue alternating colors. The design shown transitions from the cream section into a mix of brown, green, and white towards the other side. Aim for about 6-7 inches of beaded length total, depending on wrist size. -
Secure the beads:
Once satisfied with the length, undo your temporary starter knot. Center the beads on the cord.
Step 3: Second Bracelet (Mixed Dominant)
-
create the companion piece:
For the second bracelet, follow the same preparation steps but vary the bead pattern to complement rather than clone the first. -
Alternate the pattern:
Start with sage green beads this time, mixing in the reddish-brown wood beads more frequently. Use the cream beads as accents rather than the main color. -
Match the length:
Ensure the beaded section is roughly the same length as the first bracelet so they look balanced when worn together.
Beads Won’t Fit Cord?
Tape the cord end tightly or apply clear nail polish to stiffen it into a needle. Reaming the bead hole with a needle file also helps.
Step 4: Creating the Adjustable Closure
-
Form the circle:
Take one bracelet and bring the two cord ends together, crossing them over each other to form a circle with the beads at the bottom. -
Add a sliding bead:
Thread both crossed cord ends through a single large hole wooden bead. This bead needs a hole wide enough for two cords to pass through snugly. This acts as the sliding mechanism. -
Alternative sliding knot:
If you don’t have a large-hole bead, you can tie a “square knot” macrame closure over the two crossed cords using a separate 3-inch piece of scrap cord. -
Finish the tails:
At the very end of each cord tail, thread one small white bead. -
Knot the ends:
Tie a firm overhand knot right after each small white bead to keep it in place. Trim any excess cord beyond this knot. -
Final seal:
Secure these final knots with a tiny drop of glue or a quick singe with a lighter to ensure they never slip undone.
Enjoy wearing these matching pieces that carry a little piece of nature with you wherever you go
Hidden Morse Code Love Message
Create a pair of matching bracelets that carry a secret sentiment using the contrast of black and white clay beads. This couple’s set features a sleek, minimalist design where a Morse code message is hidden in plain sight against a solid background color.
How-To Guide
Materials
- Black polymer clay heishi beads (6mm or 4mm)
- White polymer clay heishi beads (6mm or 4mm)
- Strong elastic cord (0.8mm clear)
- Jewelry glue or clear nail polish
- Scissors
- Tape or bead stopper
- Ruler or measuring tape
Step 1: Planning Your Code
-
Decode your message:
Choose a short word or initials for each bracelet. Use a Morse code chart to translate your letters into dots and dashes. -
Assign bead colors:
Decide which color will represent the ‘dots’ and which will be the ‘dashes’. For the primarily black bracelet, use single white beads for dots and two or three white beads for dashes to create the code. -
Map the spacing:
Plan to use the main background color (black or white) as spacers between your code letters so the message is readable.
Use Spacer Beads
To make the Morse code easier to read, place small gold or silver spacer beads between the ‘dot’ and ‘dash’ sequences.
Step 2: Stringing the Black Bracelet
-
Prepare the cord:
Cut a piece of elastic cord about 10-12 inches long. This extra length makes tying the knot much easier later. -
Secure the end:
Place a piece of tape or a bead stopper on one end of the cord to prevent beads from sliding off while you work. -
Start the base:
Thread about 2 inches of solid black beads onto the cord. This establishes the dark, moody background of the bracelet. -
Insert the code:
Begin your Morse code section. String the white beads according to your pattern (e.g., one white bead for a dot), separating each code element with a single black bead. -
Finish the strand:
Once the coded section is complete, fill the rest of the bracelet with solid black beads until you reach the desired wrist length. -
Check the fit:
Wrap the strand around your wrist to ensure it sits comfortably without gaps. Add or remove black base beads if necessary.
Step 3: Stringing the White Bracelet
-
Reverse the heavy lifting:
Repeat the setup process with a new piece of cord, but this time, start with a base of solid white beads. -
Create the contrast:
For the code section on this bracelet, switch your logic. Use black beads to represent your dots and dashes against the white background. -
Complete the loop:
Finish stringing with white beads until this bracelet matches the size of the first one.
Glow in the Dark
Swap the white clay beads for glow-in-the-dark beads so the secret message actually illuminates when the lights go down.
Step 4: Securing the Knots
-
Pre-stretch the elastic:
Gently pull on both ends of the beaded cord. I always do this to remove slack, which prevents the bracelet from stretching out permanently after wearing it. -
Tie the surgeon’s knot:
Cross the ends, loop one side through twice, and pull tight. Repeat this knotting process to make it secure. -
Seal the deal:
Apply a tiny dab of jewelry glue or clear nail polish directly onto the knot. Let it dry for a few minutes. -
Hide and trim:
Slide a neighboring bead over the knot to hide it. Carefully trim the excess cord ends close to the bead, being careful not to cut the main knot.
Wear your matching set together to keep your secret messages close at hand

TRACK YOUR CERAMIC JOURNEY
Capture glaze tests, firing details, and creative progress—all in one simple printable. Make your projects easier to repeat and improve.
Puzzle Piece Center Beads That Match
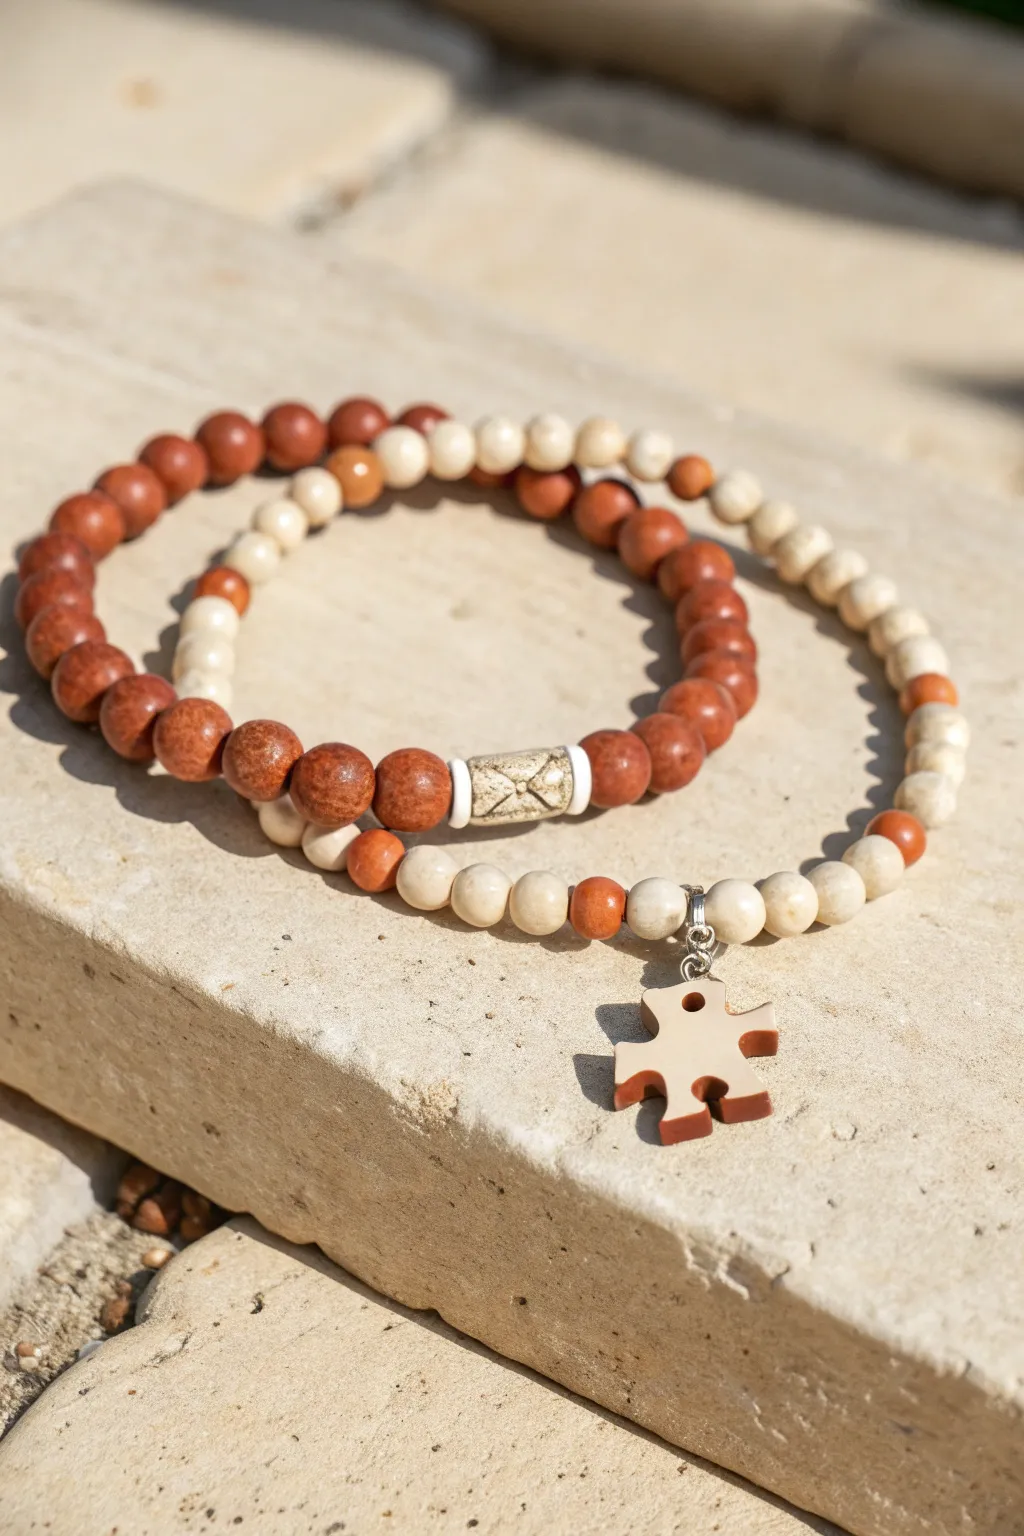
Celebrate your unique connection with these rustic, earth-toned couple’s bracelets featuring a charming puzzle piece charm. The warm terracotta and cream hues create a natural, grounding look that symbolizes how perfectly you fit together.
Step-by-Step Guide
Materials
- Reddish-brown earthy round beads (approx. 8mm, likely clay or jasper)
- Cream/off-white round beads (approx. 6-8mm, wood or bone)
- Elastic beading cord (0.8mm or 1mm)
- Puzzle piece pendant charm (cream enamel with copper/brown edges)
- Silver ornate tube spacer bead
- Silver jump ring (6-7mm)
- Jewelry adhesive (e.g., E6000 or GS Hypo Cement)
- Scissors
Step 1: Planning the Design
-
Define the lengths:
Measure both wrists to determine the necessary length for each bracelet. A standard size is about 7 inches for smaller wrists and 8 inches for larger wrists, but customizing ensures the best fit. -
Sort your beads:
Separate your reddish-brown beads and your cream-colored beads into piles. You will need a distinct mix for each bracelet to create the coordinating but not identical look seen in the photo.
Step 2: Creating the Puzzle Charm Bracelet
-
Prepare the cord:
Cut a piece of elastic cord about 10-12 inches long. Pre-stretch the elastic by pulling it firmly a few times; this prevents the bracelet from loosening up immediately after you finish it. -
Start the pattern:
Begin threading beads onto the cord. Looking at the bottom bracelet in the image, the pattern is primarily cream beads. Thread about 5 or 6 cream beads to start. -
Add color accents:
Insert a single reddish-brown bead, followed by one cream bead, then another reddish-brown bead to create a small pop of color. Resume with a long run of cream beads. -
Attach the jump ring:
Thread your silver jump ring onto the cord exactly where you want the charm to hang. It should nestle between two cream beads. -
Complete the circuit:
Continue adding cream beads until the strand is long enough for the wrist. Near the end, add one more section of alternating reddish-brown beads to balance the design. -
Secure the charm:
Open the jump ring slightly with pliers if it isn’t already attached to the puzzle piece, slide the puzzle charm on, and close it securely.
Secure That Knot
If the bead holes are too small to hide the knot, simply place the knot next to the silver tube bead or a metal spacer; metal beads often have larger holes than stone or clay ones.
Step 3: Creating the Tube Spacer Bracelet
-
Cord preparation:
Cut and pre-stretch a second length of elastic cord, similar to the first one. -
Thread the focal point:
Start by threading two thin white disc spacers (optional, as seen in the photo) and the ornate silver tube bead. This will ensure the focal point is centered while you work. -
Build the darker pattern:
For this partner bracelet, use the reddish-brown beads as your main color. Thread a long sequence of these darker beads on either side of the silver tube. -
Interject cream beads:
To tie the two designs together, interrupt the reddish-brown pattern by adding a small section of 3-4 cream beads on the opposite side of the bracelet. -
Check the symmetry:
Ensure the placement of the cream beads sits roughly opposite the silver tube bead so the design feels balanced when worn.
Personalize the Puzzle
Use a fine-point permanent marker or a tiny amount of acrylic paint to add initials or a significant date onto the back of the puzzle piece charm for a hidden message.
Step 4: Finishing Touches
-
Knotting the cord:
For both bracelets, bring the ends of the elastic together. Tie a surgeon’s knot (looping the cord through twice) and pull it very tight. -
Applying adhesive:
Dab a tiny drop of jewelry glue onto the knot. I find using a toothpick helps apply the glue precisely without making a mess on the surrounding beads. -
Hiding the knot:
While the glue is still slightly tacky but drying, gently tug the elastic so the knot slides inside the hole of the nearest bead. This hides the mechanics for a professional finish. -
Trim excess:
Once the glue is fully cured (check your glue’s instructions), trim the excess cord tails carefully with sharp scissors, getting as close to the bead as possible without cutting the knot.
Now you have a meaningful set of accessories ready to gift to your partner or best friend
Simple Monochrome With Shiny Spacers
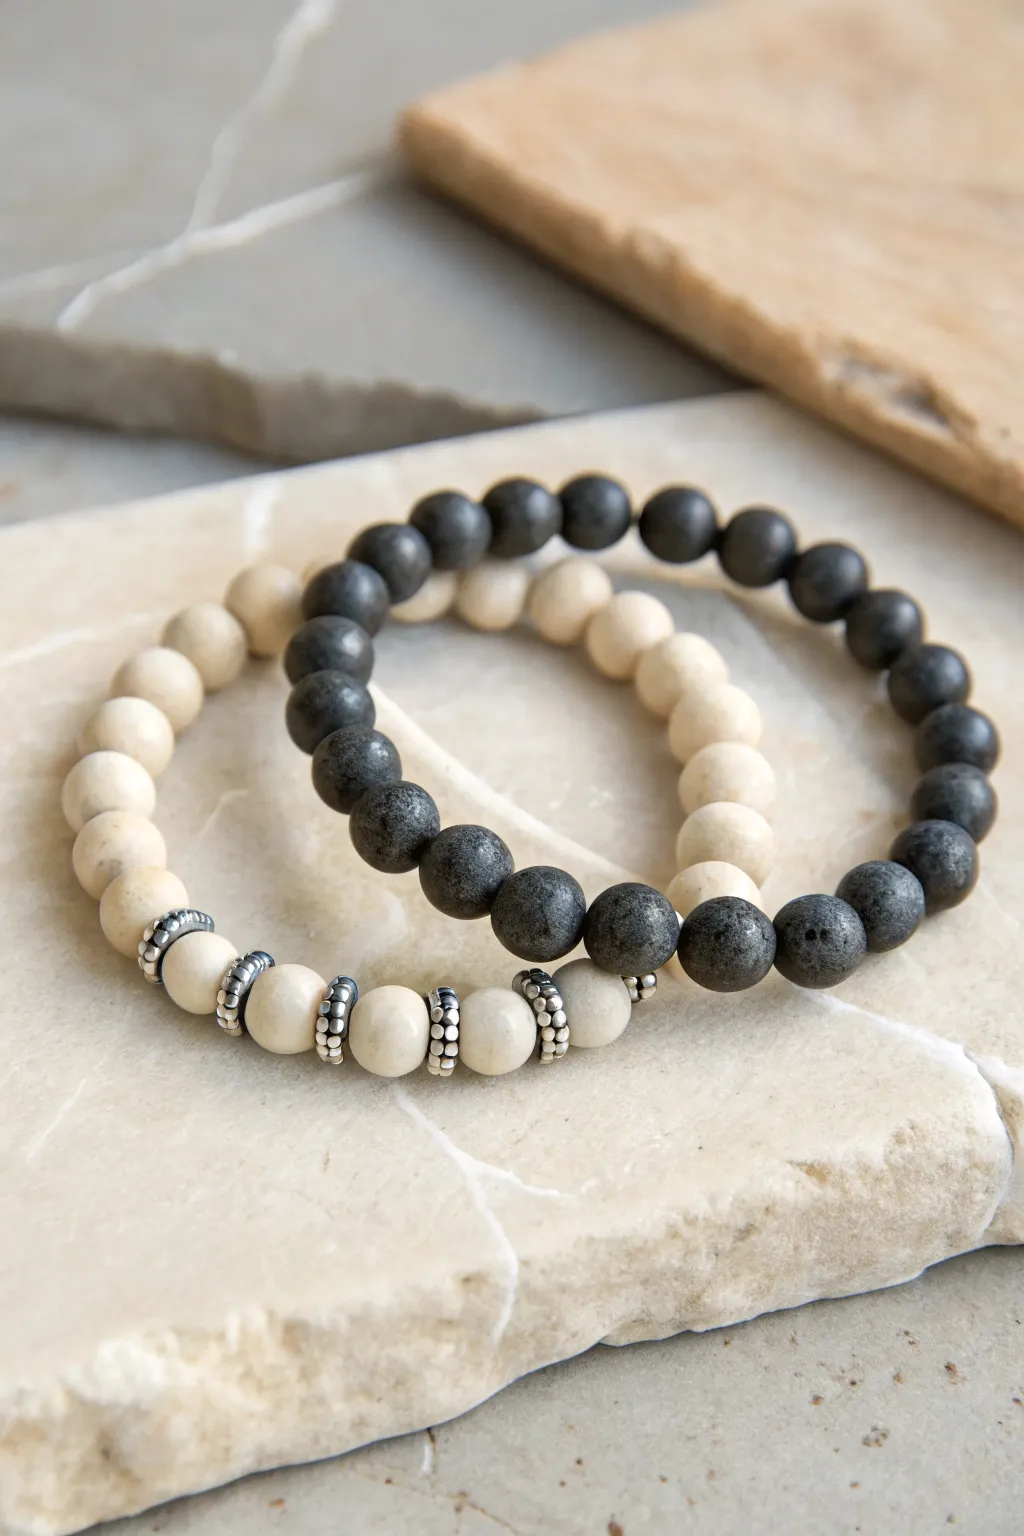
Achieve a sophisticated, understated look with this matching pair of bracelets featuring matte stone-textured clay beads. One bracelet showcases creamy white tones accented by metallic spacers, while its partner offers a bold contrast in dark charcoal, creating a harmonious and stylish connection.
How-To Guide
Materials
- Matte round clay or stone beads (8mm, cream/white color)
- Matte round clay or lava stone beads (8mm, dark grey/black color)
- Silver metallic spacer beads (rondelle or disc shape with beaded texture)
- Elastic jewelry cord (0.8mm or 1mm thickness)
- Jewelry glue or clear nail polish
- Scissors
Step 1: Planning and Preparation
-
Measure your wrist:
Wrap a flexible measuring tape or a strip of paper around your wrist to find the circumference. Add about half an inch to this measurement to ensure the bracelet fits comfortably without pinching. -
Cut the cord:
Cut a length of elastic cord about 10-12 inches long. Having this extra length makes it much easier to tie the final knot securely without fumbling. -
Pre-stretch the elastic:
Hold both ends of your cut cord and give it a few firm tugs. This pre-stretching step is crucial because it prevents the bracelet from stretching out and becoming loose after you wear it a few times. -
Secure the end:
Place a piece of tape or a binder clip on one end of the cord. This acts as a stopper so your beads normally don’t slide right off while you are working.
Step 2: Creating the White Bracelet
-
Start the pattern:
Begin by threading about 15 to 18 of the cream-colored matte beads onto the cord. This will form the back section of the bracelet. -
Add spacing accents:
Slide on your first silver metallic spacer bead. Follow this immediately with a cream bead, and then another silver spacer. -
Continue the focal section:
Repeat this pattern—cream bead, silver spacer—until you have about 5 or 6 silver spacers incorporated into the front section of the simple design. -
Finish the strand:
Add the remaining cream beads needed to reach your previously measured length. Wrap it around your wrist to check the fit before tying. -
Tie the knot:
Remove the tape or clip and tie a square knot (right over left, left over right). Pull the elastic tight to secure it. -
Apply adhesive:
Dab a tiny drop of jewelry glue directly onto the knot. I find using a toothpick helps place the glue precisely without getting it on the beads. -
Hide the knot:
While the glue is still tacky, gently pull the knot inside the hole of the nearest bead to conceal it. Trim the excess cord ends carefully.
Loose Knot Fix
If your elastic knot slips, try a ‘surgeon’s knot.’ It’s like a square knot, but loop the second crossover through twice before tightening for extra grip.
Step 3: Creating the Dark Bracelet
-
Prepare the second cord:
Repeat the cutting and pre-stretching process with a new piece of elastic cord for the partner bracelet. -
Thread the dark beads:
Thread the dark grey matte beads onto the cord. For this version, you can choose to keep it entirely monochrome as shown in the darker bracelet, or add spacers if you prefer symmetry. -
Check the sizing:
Wrist sizes often differ between partners, so hold this strand against the intended wrist or a ruler to verify the length is correct. -
Close the loop:
Tie a secure surgeon’s knot or square knot just as you did with the first bracelet. Create tension by pulling all four strands (the two ends and the loop loop). -
Finalize:
Apply your glue to the knot, pull it into a bead core to hide it, and trim the excess string close to the bead.
Aromatic Touch
Use porous lava stone beads for the black bracelet. You can add a drop of essential oil to them, turning the jewelry into a subtle portable diffuser.
Enjoy wearing your complementary set that stylishly balances light and dark elements
Sun and Moon Complementary Motif
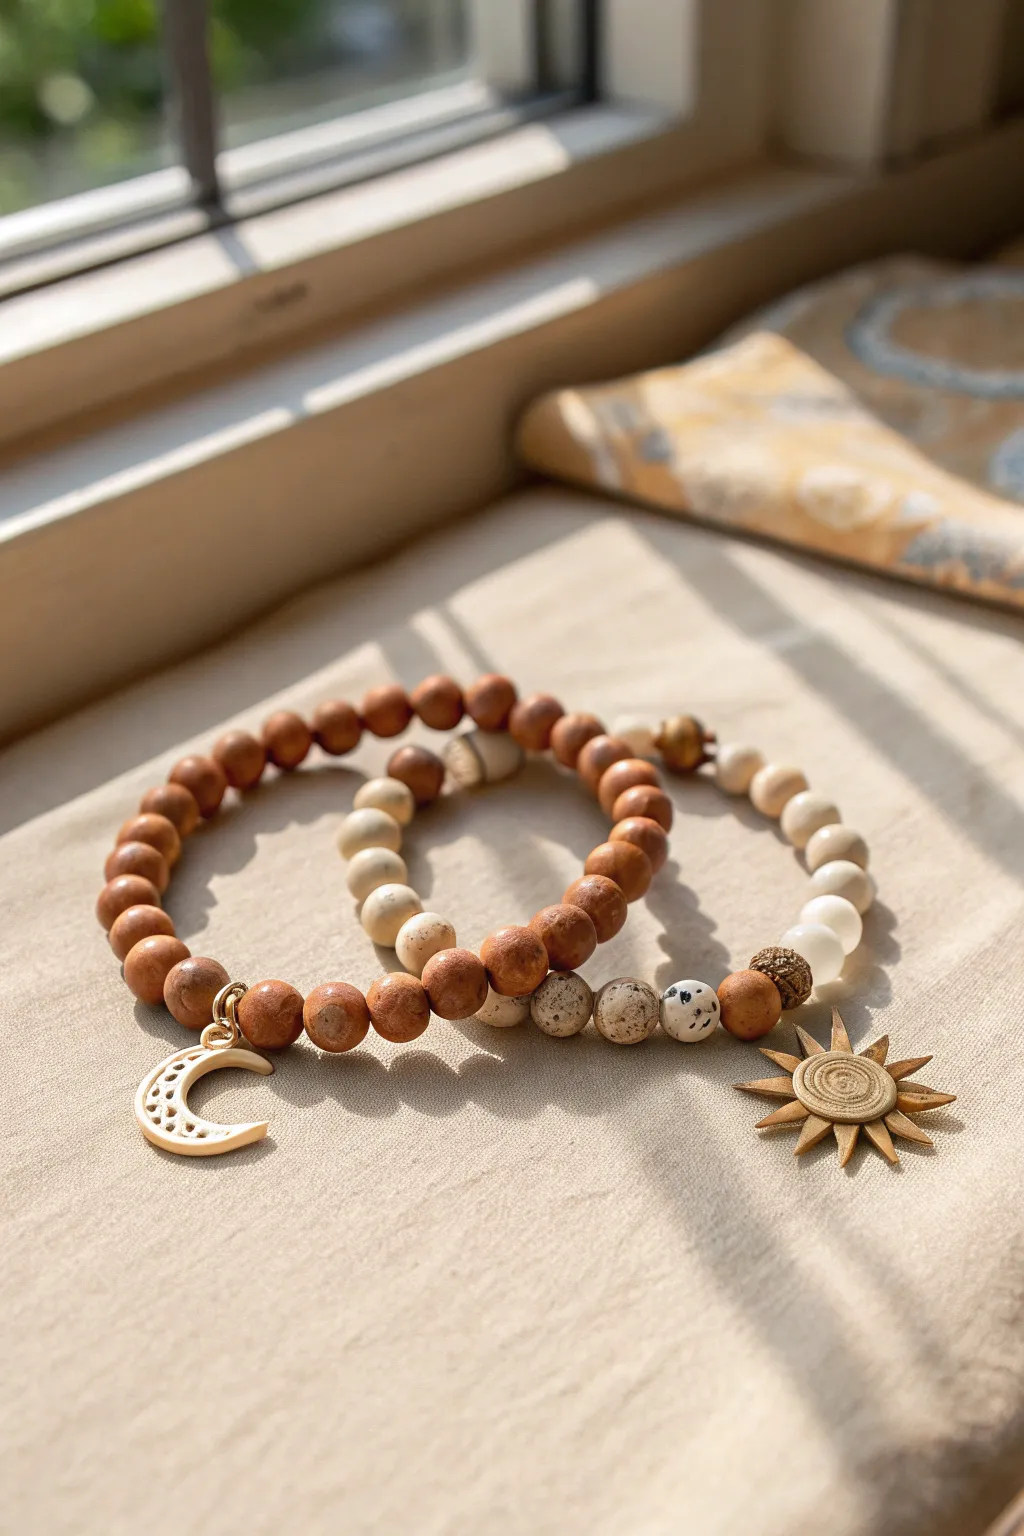
Celebrate your contrasting yet complementary personalities with this stunning sun and moon bracelet set. Using warm terracotta tones for the moon and creamy, speckled hues for the sun, these accessories capture the balance of day and night in a wearable art piece.
Step-by-Step Guide
Materials
- Red-brown terracotta or wooden round beads (8mm)
- Cream or off-white clay beads with brown speckles (8mm)
- Cream or white solid round beads (8mm)
- Gold-tone sun charm (solid metal or polymer clay)
- Cream or white crescent moon charm (carved or polymer clay)
- Gold jump rings (6mm)
- Strong elastic bead cord (0.8mm or 1mm)
- Jewelry adhesive or clear nail polish
- Scissors or jewelry snips
- Tape or bead stopper
- Chain nose pliers
Step 1: Planning and Prep
-
Measure wrists:
Before you begin, measure both wrists that will wear these bracelets. Add roughly half an inch to that measurement to ensure a comfortable fit that isn’t too tight. -
Cut the cord:
Cut two lengths of elastic cord, making them about 10-12 inches long. This extra length is crucial for tying secure knots later without fumbling. -
Secure the ends:
Place a piece of tape or a bead stopper on one end of each cord. This simple step saves you the heartbreak of watching your beads slide right off the other side while you work.
Step 2: Creating the Moon Bracelet
-
Attach the charm:
Start by attaching your crescent moon charm to a gold jump ring using your pliers. Slide this jump ring to the center of your first cord. -
Flanking beads:
On either side of the moon charm, string one of the cream or speckled beads. This creates a visual transition before the darker main color. -
String main color:
Fill the rest of the cord with the red-brown terracotta beads. If you are mixing materials, you might occasionally alternate a wooden bead to add texture. -
Check length:
Wrap the strand around your wrist (or a sizing cone) to check the fit. Add or remove red-brown beads until it sits perfectly.
Natural Texture Tip
Mix smooth polymer clay beads with porous lava rocks or wooden beads. The slight variation in surface texture makes the finished jewelry look more high-end and artisanal.
Step 3: Creating the Sun Bracelet
-
Prepare the sun charm:
Attach the sun charm to a jump ring. Slide this onto the center of your second elastic cord. -
Add texture accents:
Thread two or three of the speckled clay beads on the left side of the charm, and the darker terracotta beads on the right side. This asymmetry mimics the look in the photo. -
Create the gradient:
I like to create a soft fade effect here. Continue stringing the cream and white beads along the rest of the cord, perhaps mixing in one or two wooden spacer beads for continuity with the partner bracelet. -
Final sizing:
Just as before, check the length against the wrist intended for the sun bracelet. Adjust the number of cream beads as necessary.
Knot Slipping?
If your elastic knot keeps coming undone before the glue sets, try a “surgeon’s knot.” It’s like a square knot, but you loop the cord through twice on the first pass for extra grip.
Step 4: Finishing Touches
-
Pre-stretch the cord:
Gently pull on both ends of the elastic cord for each bracelet. This pre-stretching prevents the bracelet from becoming loose and saggy after the first few times you wear it. -
Tie the knot:
Cross the ends and tie a standard square knot (right over left, left over right). Pull it tight. -
Secure with glue:
Dab a tiny drop of jewelry adhesive or clear nail polish directly onto the knot. Let it dry for a minute to ensure it won’t slip. -
Hide the knot:
Trim the excess cord closer to the knot, but not flush. Gently tug the cord so the knot slides inside the hole of the nearest bead, hiding it from view.
Now you have a perfectly matched set of bracelets ready to gift or wear together as a symbol of your connection
Lock and Key Couple Bracelet Set
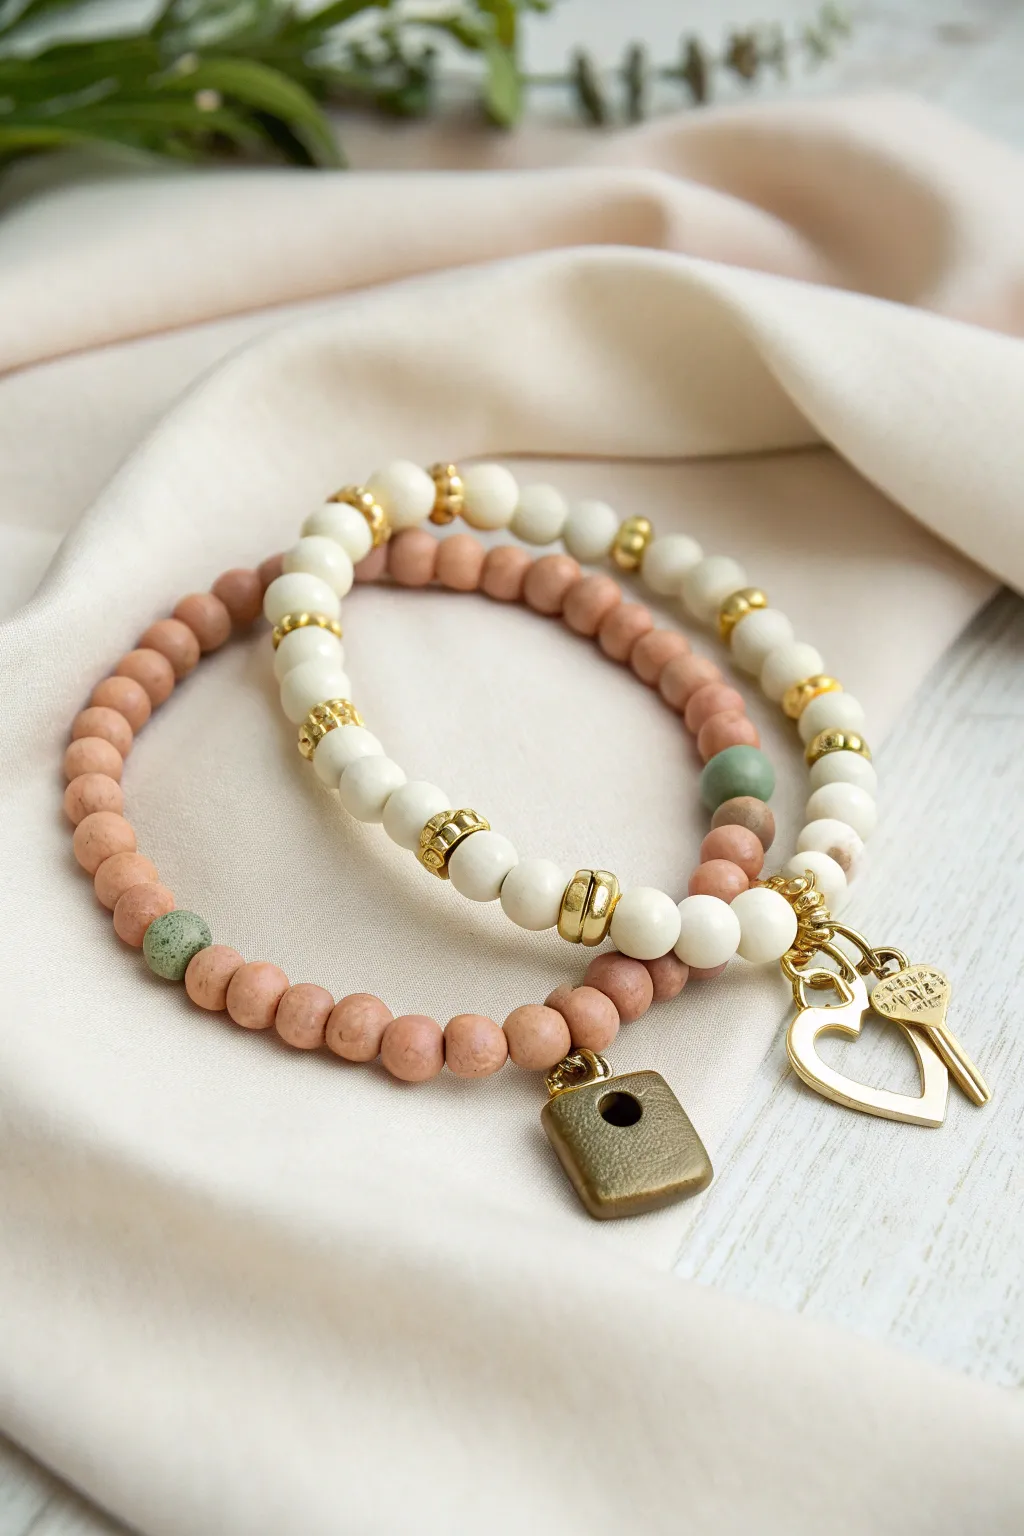
Celebrate your connection with this set of complementary bracelets featuring a classic lock and key motif. Mixing matte polymer clay textures with shining gold accents creates a sophisticated, earthy look that feels personal and handcrafted.
How-To Guide
Materials
- Matte terracotta/brown polymer clay round beads (approx. 6mm)
- Creamy white round beads (stone, wood, or polymer clay, approx. 8mm)
- Speckled sage green accent beads (2 total, matching size to respective strands)
- Gold-tone spacer beads (heishi or ring style)
- Textured gold-tone accent beads (rondelle style)
- Brass or gold-tone square lock charm
- Gold-tone open heart charm
- Gold-tone key charm
- Strong elastic bead cord (0.8mm recommended)
- Jewelry glue or clear nail polish
- Scissors
Step 1: Planning and Prep
-
Measure wrists:
Before cutting any cord, measure both wrists intended for the bracelets. Add about 0.5 inches to these measurements for a comfortable fit, then cut two lengths of elastic cord, leaving yourself an extra 3-4 inches on each end for tying knots. -
Plan the terracotta strand:
Lay out the beads for the darker bracelet on a bead board or cloth. This design uses a continuous string of matte brown beads with one single green accent bead placed roughly opposite where the charm will hang. -
Plan the cream strand:
Lay out the lighter bracelet pattern. This one is more complex: alternate groups of 3-4 cream beads with gold spacers. Plan to place the gold texture beads near the center focal point and include one green accent bead to match the partner bracelet.
Step 2: Assembling the ‘Lock’ Bracelet
-
Pre-stretch the cord:
Give your first piece of elastic a gentle tug to pre-stretch it; this prevents the bracelet from drooping later. -
String the beads:
Thread the matte terracotta beads onto the cord. About halfway through the strand, slide on the single sage green accent bead. -
Check the length:
Wrap the strand around your wrist to check the sizing. Add or remove brown beads until the ends meet comfortably without gaps. -
Add the lock charm:
Thread the jump ring of the square lock charm onto the cord so it sits between the last two beads. -
Tie the knot:
Tie a surgeon’s knot (right over left, left over right twice). Pull tight to secure. -
Secure and trim:
Dab a tiny dot of jewelry glue on the knot. Allow it to dry for a moment, then trim the excess cord close to the knot. If possible, hide the knot inside the hole of an adjacent bead.
Knot Ninja
Hide your knot inside the lock charm’s jump ring or bail if the bead holes are too small. This keeps the finish looking professional and seamless.
Step 3: Assembling the ‘Key’ Bracelet
-
Begin the pattern:
Start stringing the cream beads. Use the thin gold spacers between every bead or every other bead to create that rich, segmented look. -
Add texture accents:
Incorporate the larger, textured gold rondelle beads at random intervals or symmetrically on the sides for visual weight. -
Insert the green bead:
Just like the first bracelet, add the single green bead somewhere along the strand to visually link the set together. -
Attach the charms:
Slide both the heart charm and the key charm onto the cord. They should sit side-by-side or be separated by a single gold spacer ring. -
Final check:
Verify the length around the wrist again. The cream beads are often larger, so you might need fewer of them to reach the same circumference. -
Final knot:
Tie off this bracelet firmly with a surgeon’s knot, applying glue for security. I find counting to thirty helps ensure the glue is tacky before trimming.
Personalize It
Swap the single green accent bead for your partner’s birthstone color, or use alphabet beads to spell initials near the charm.
Creating these matching bracelets is a simple yet meaningful way to keep a reminder of your bond close at hand
Color-Blocked Pattern Swap Pair
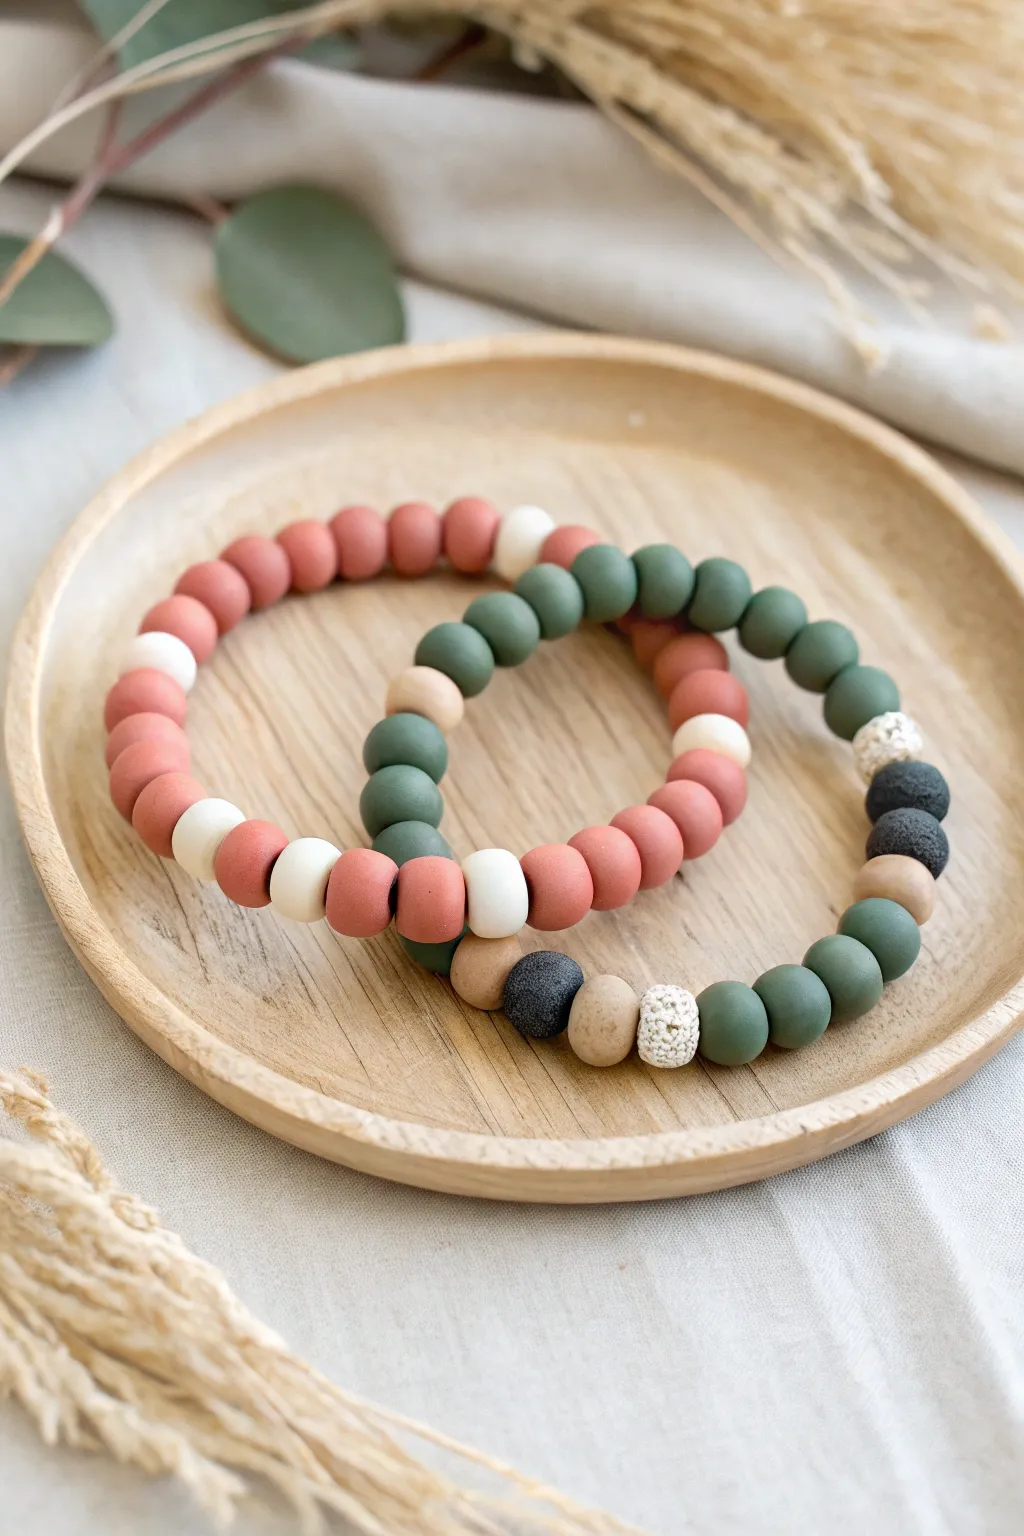
These complementary bracelets utilize a soothing palette of terra cotta, sage, and cream to create a unified but distinct set for couples. The matte finish of the beads adds a modern, organic touch that feels great to wear every day.
Step-by-Step Tutorial
Materials
- Matte polymer clay round beads (8-10mm) in Terra Cotta
- Matte polymer clay round beads (8-10mm) in Sage Green
- Matte polymer clay round beads (8-10mm) in Cream or Bone White
- Round wooden spacer beads (natural light wood tone)
- Black lava stone beads (8-10mm)
- Textured white lava or pumice stone beads (8-10mm)
- Strong elastic cord (0.8mm or 1mm transparent)
- Jewelry glue or clear nail polish
- Scissors
Step 1: Planning the “Terra Cotta” Bracelet
-
Measure your wrist:
Before stringing, wrap a piece of string around your wrist to find your comfortable size. Add about half an inch for a comfortable fit that isn’t too tight. -
Lay out the primary color:
Begin by laying out your Terra Cotta beads on a bead board or soft cloth. This will be the main color for the first bracelet, making up about 75% of the loop. -
Create the color blocks:
Group the Terra Cotta beads into sections of 6 to 10 beads. Separating them visually helps you decide where to place your accent colors. -
Insert the accents:
Between your larger Terra Cotta sections, place single Cream or Bone White beads. These act as high-contrast spacers that break up the solid color. -
Check the pattern:
Verify that your pattern alternates correctly—long sections of rusty pink interrupted by single pops of white—before you start stringing.
Step 2: Planning the “Sage Green” Bracelet
-
Establish the green base:
For the partner bracelet, lay out your Sage Green beads as the primary base. This mirrors the structure of the first bracelet but swaps the palette. -
Design the focal section:
Unlike the first bracelet, this one features a distinct focal point. Arrange a sequence of: one textured white bead, one patterned/textured gray or black bead, and wooden spacers. -
Refine the focal cluster:
I like to arrange the focal cluster asymmetrically: try a textured white bead, followed by a green bead, a wooden spacer, a black lava bead, another wooden spacer, and back to green. -
Add secondary accents:
Towards the opposite side of the focal cluster, insert a few Terra Cotta beads if you wish to tie the two bracelets together, though keeping it mostly green works perfectly too.
Sticky Situation
Issues threading lava beads? Their interiors can be rough. Re-cut your elastic at a sharp angle or use a tiny dab of superglue on the tip to create a stiff ‘needle’.
Step 3: Stringing and Finishing
-
Pre-stretch the cord:
Cut a length of elastic cord about 12 inches long. Give it a firm tug a few times to pre-stretch it; this prevents the bracelet from loosening up after the first wear. -
String the first bracelet:
Thread your Terra Cotta pattern onto the elastic. Keep tension consistent but don’t pull so tight that the cord warps. -
String the second bracelet:
Repeat the process for the Sage Green bracelet, taking care when threading the textured lava beads as their holes can sometimes be jagged. -
Test the size:
Bring the ends together and wrap the strand around your wrist one last time to ensure the fit is perfect before knotting. -
Tie the surgeon’s knot:
Cross the ends of the elastic, loop one end under twice, and pull tight. Then tie a standard overhand knot on top to secure it. -
Secure the knot:
Dab a tiny drop of jewelry glue or clear nail polish onto the knot. Let it dry completely for a few minutes. -
Hide the knot:
Once dry, trim the excess cord carefully. If possible, gently tug the elastic so the knot slides inside the hole of a neighboring bead for a seamless look.
Scent Infusion
Apply a drop of essential oil to the porous lava or wood beads. They act as natural diffusers, carrying your favorite scent with you throughout the day.
Wear your matching set together or gift one to your partner for a stylish connection.
Warm + Cool Opposites That Connect
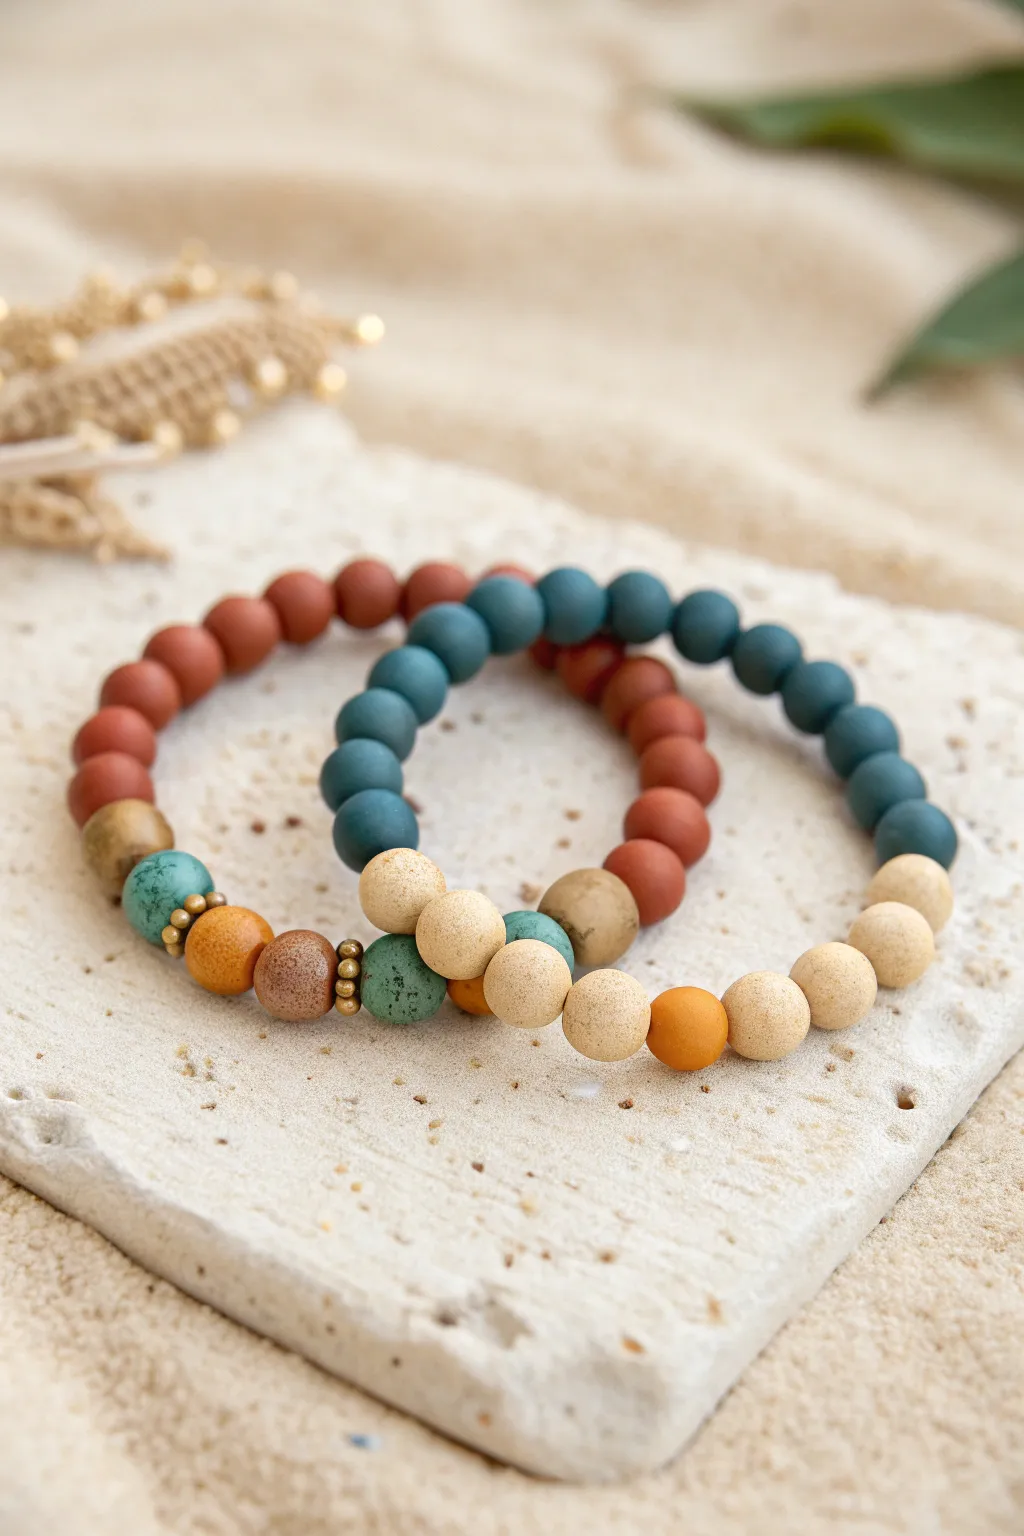
These complementary bracelets blend warm terracotta tones with cool matte teals and sandy neutrals, symbolizing distinct personalities that find harmony together. The soft, matte finish of the clay beads gives them a modern, organic feel perfect for everyday wear.
Detailed Instructions
Materials
- Matte polymer clay beads (8mm and 10mm round)
- Colors: Terracotta/Rust, Deep Teal/Petra, Mustard Yellow, Sandy Beige, Sage Green, Speckled Brown
- Small gold or brass spacer beads (smooth and textured)
- Strong elastic cord (0.8mm or 1.0mm recommended)
- Super glue or heavy-duty jewelry adhesive
- Scissors or bead snips
- Bead stopper or masking tape
Step 1: Planning the ‘Warm’ Design
-
Lay out the base:
Begin by laying out your beads on a bead board or a soft towel to prevent rolling. For the ‘Warm’ bracelet, start with approximately 18-20 terracotta beads to form the main band. -
Select focal beads:
Create the focal section at the center. From left to right, line up: one large textured brown bead, a sage green speckled bead, a mustard yellow bead, a speckled brown bead, and a speckled green bead. -
Add metallic accents:
Insert small brass spacer beads between the focal beads to break up the colors. Place a tiny gold bead on either side of the mustard yellow center bead and between the textured brown and sage beads. -
Check the sequence:
Review your pattern. The warm bracelet should feel dominated by the rust color but grounded by the earthy speckles in the center group.
Knot Slipping?
If your elastic knot feels insecure, try a ‘square knot’ followed by a ‘granny knot.’ Always pre-stretch your elastic cord before stringing to prevent it from sagging later.
Step 2: Planning the ‘Cool’ Design
-
Establish the cool base:
For the partner bracelet, lay out approximately 18-20 deep teal matte beads. This color acts as the visual anchor. -
Create the sandy transition:
At the ends of your teal strand, interrupt the pattern with a block of lighter beads. Place about 4-5 sandy beige beads on the right side of the focal point. -
Design the focal point:
Opposite the beige block, introduce a pop of warmth to mirror the first bracelet. Use one mustard yellow bead, flanked by sandy beige beads. -
Mirror the texture:
Optionally, include one larger, textured beige bead near the mustard accent to add tactile variety, similar to the brown bead in the first bracelet.
Step 3: Assembly & Finishing
-
Prepare the cord:
Cut a piece of elastic cord about 12 inches long. This extra length makes tying the final knot significantly easier. Pre-stretch the elastic by pulling it gently a few times. -
Secure the end:
Place a bead stopper or a piece of tape on one end of the cord so your beads don’t slide off while you work. -
String the beads:
Thread the beads onto the elastic following your laid-out design. I find it easiest to start with the focal section so it stays centered, filling in the base colors on either side. -
Test the fit:
Wrap the strung beads around your wrist (or a sizing cone) to check the fit. Add or remove base color beads from the back section as needed for a comfortable circumference. -
Tie the knot:
Remove the stopper and bring the ends together. Tie a surgeon’s knot (looping the cord through twice on the first pass) and pull tightly. Repeat with a standard square knot on top. -
Secure with glue:
Apply a tiny dot of jewelry adhesive directly onto the knot. Let it dry for a distinct moment before moving it. -
Hide the knot:
Once dry, trim the excess cord, leaving about 2mm. Gently tug the cord to pull the knot inside one of the larger hole beads (like the speckled ones) to hide it completely.
Mix It Up
Add a single lava stone bead to the focal section. You can add a drop of essential oil to it, turning your couple’s bracelets into wearable aromatherapy diffusers.
Now you have a perfectly matched set of bracelets grounded in harmonious earth tones to wear or gift.
Tradeable Center Bead You Can Swap
Create a matching set of bracelets featuring earthy clay beads and elegant gold accents, perfect for couples who want a shared connection. This design uses a smart sliding knot closure, making them fully adjustable and easy to take on and off.
Step-by-Step Guide
Materials
- Matte round clay beads (8mm or 10mm) in sage green speckled and terracotta
- Cream or off-white clay beads (same size as above)
- Gold tone metallic spacer beads (round or heishi)
- Waxed polyester or nylon cord (0.8mm or 1mm) in sage green
- Beading needle (optional, if cord is thick)
- Scissors
- Lighter or thread burner
- Tape or clipboard
Step 1: Preparation & Stringing
-
Measure and cut cord:
Cut a piece of your waxed cord to about 12-14 inches long. This generous length will give you plenty of room for knotting and adjusting later. -
Stiffen the cord end:
If you aren’t using a needle, briefly run a lighter flame near the tip of your cord and roll it between your fingers (carefully!) to create a stiff, needle-like point for easier threading. -
Plan your pattern:
Lay out your beads on a tray first. For the ‘his’ bracelet (green), use primarily sage speckled beads. For the ‘hers’ bracelet (terracotta), alternate blocks of terracotta and cream beads. -
Add the center swap bead:
The core concept here is a swappable element. Position a contrasting bead (like the white one on the green bracelet) near where the closure will be, flanked by gold spacers. -
Start stringing:
Thread your beads onto the cord. Start with your chosen pattern, ensuring you include the gold spacer beads specifically near the ends of the beaded section for that metallic pop seen in the photo. -
Check the length:
Wrap the beaded section around your wrist. The beads should cover most of the wrist but leave a gap of about 1-1.5 inches at the bottom for the closure mechanism.
Pro Tip: Bead Tightness
Add about 2mm of extra slack before tying your retaining knots. Too tight, and the bracelet will be stiff and angular; slightly loose allows it to circle the wrist comfortably.
Step 2: Knotting the Structure
-
Secure the bead ends:
Once your beads are centered, tie a simple overhand knot with the cord right up against the last bead on both sides. This keeps the beads from sliding around loosely. -
Prepare for closure:
Cross the two tail ends of your bracelet so they overlap parallel to each other. You can use a piece of tape to hold these parallel cords down on a table to make the next step easier.
Troubleshooting: Stuck Slider
If your sliding knot won’t budge, you likely melted the sealing ends onto the center cords. You’ll need to carefully cut the knot off (without cutting the main cords) and re-tie it.
Step 3: The Sliding Knot Closure
-
Cut the anchor cord:
Cut a separate small piece of cord, roughly 6-8 inches long. This will become the sliding knot itself. -
Start the square knots:
Slide this new cord under the two crossed tail ends. Tie a macramé square knot around both tail ends. I find it helpful to pull tight but not so tight that the inner cords can’t slide. -
Continue knotting:
Tie about 3-4 more square knots to create a sturdy barrel-like closure. Ensure they lay flat and neat. -
Finish the knot:
Trim the excess lengths of the knotting cord (not the bracelet tails!) close to the knot. carefully melt the cut ends with a lighter and press them flat against the knot to seal.
Step 4: Finishing Touches
-
Add end beads:
On each of the hanging tail ends, thread a small decorative bead (like the small white or gold ones shown). -
Knot the ends:
Tie a secure overhand knot at the very end of each tail to keep these accent beads in place. Make sure the tails are even in length. -
Final trim:
Snip off any remaining excess cord past your final knots and lightly singe the tips to prevent fraying. -
Test the slide:
Gently pull the tails to tighten the bracelet, and pull the bracelet sides to loosen it, breaking in the wax cord for smoother action.
Now you have a stylish set of bracelets that symbolizes your bond and complements any casual outfit perfectly