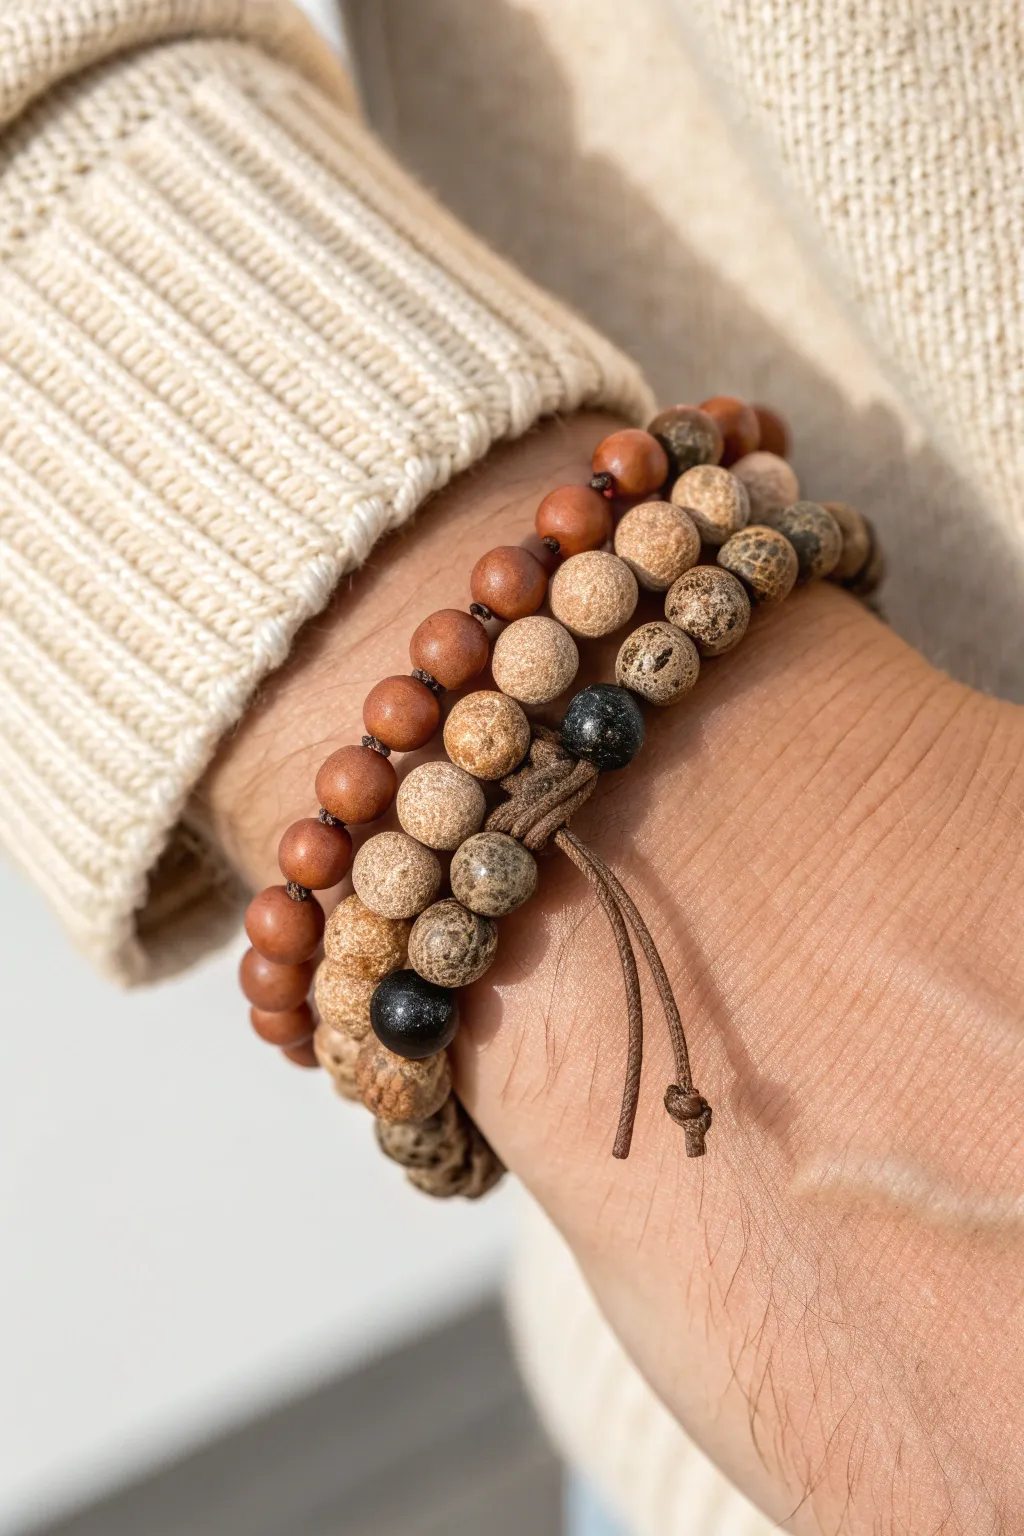
I love how clay bead bracelets can look laid-back and rugged without screaming for attention, especially when you stick to neutral colors and clean patterns. If you’re making one for yourself (or a guy in your life), these ideas keep the vibe simple, wearable, and effortlessly cool.
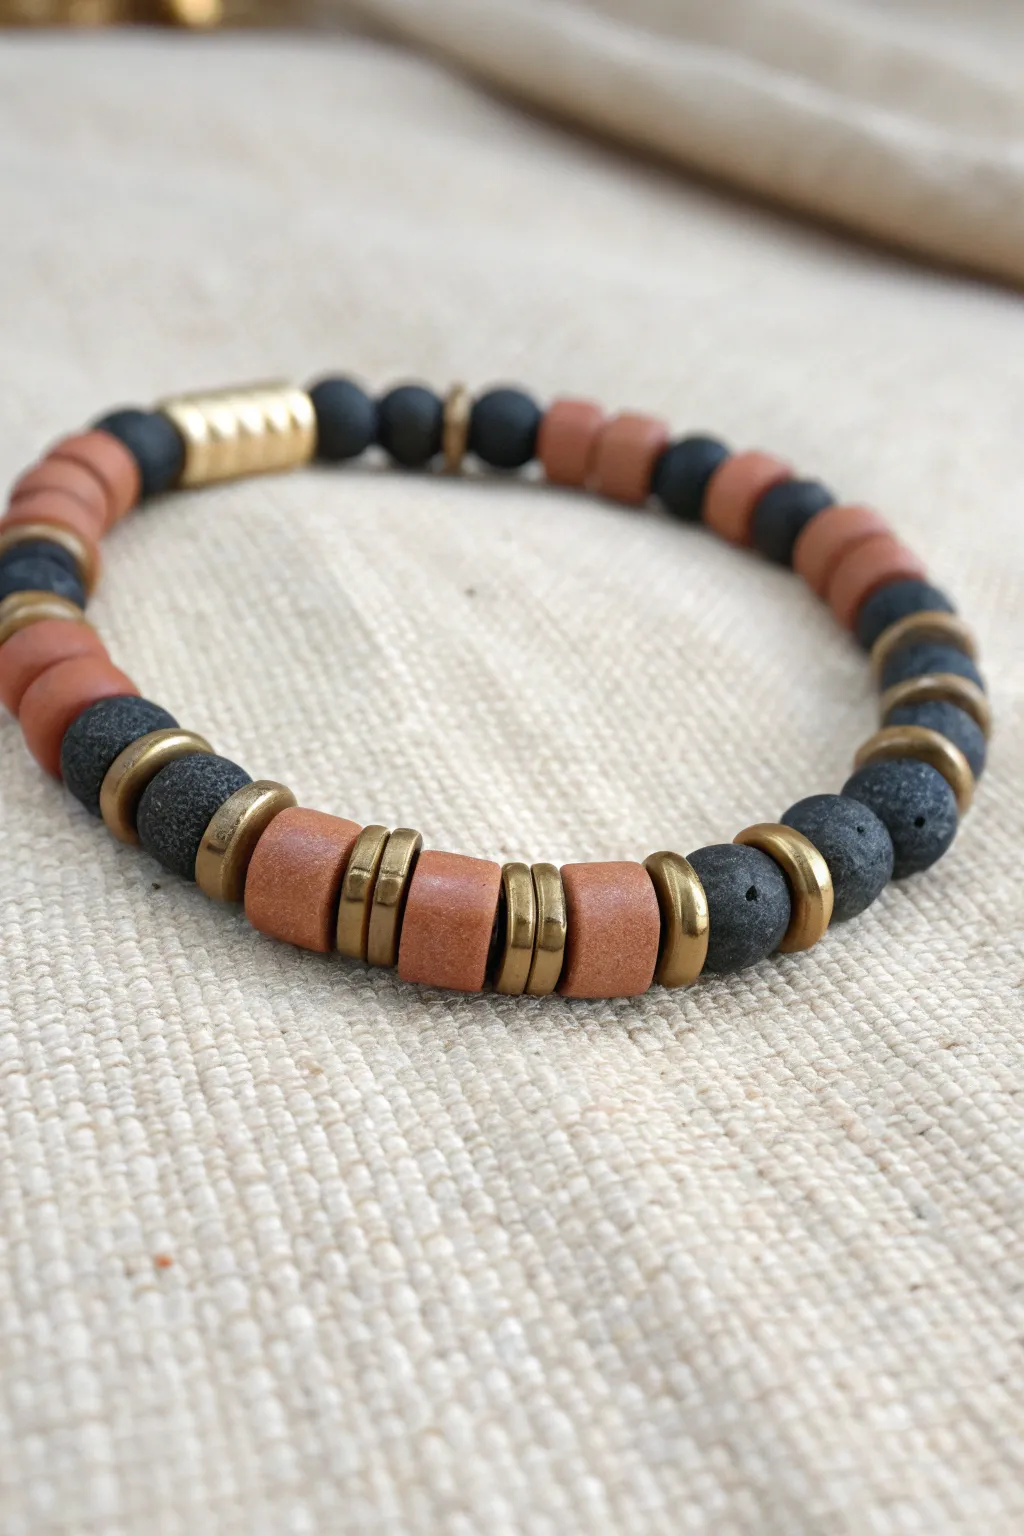
Matte Black Heishi With Metal Spacers
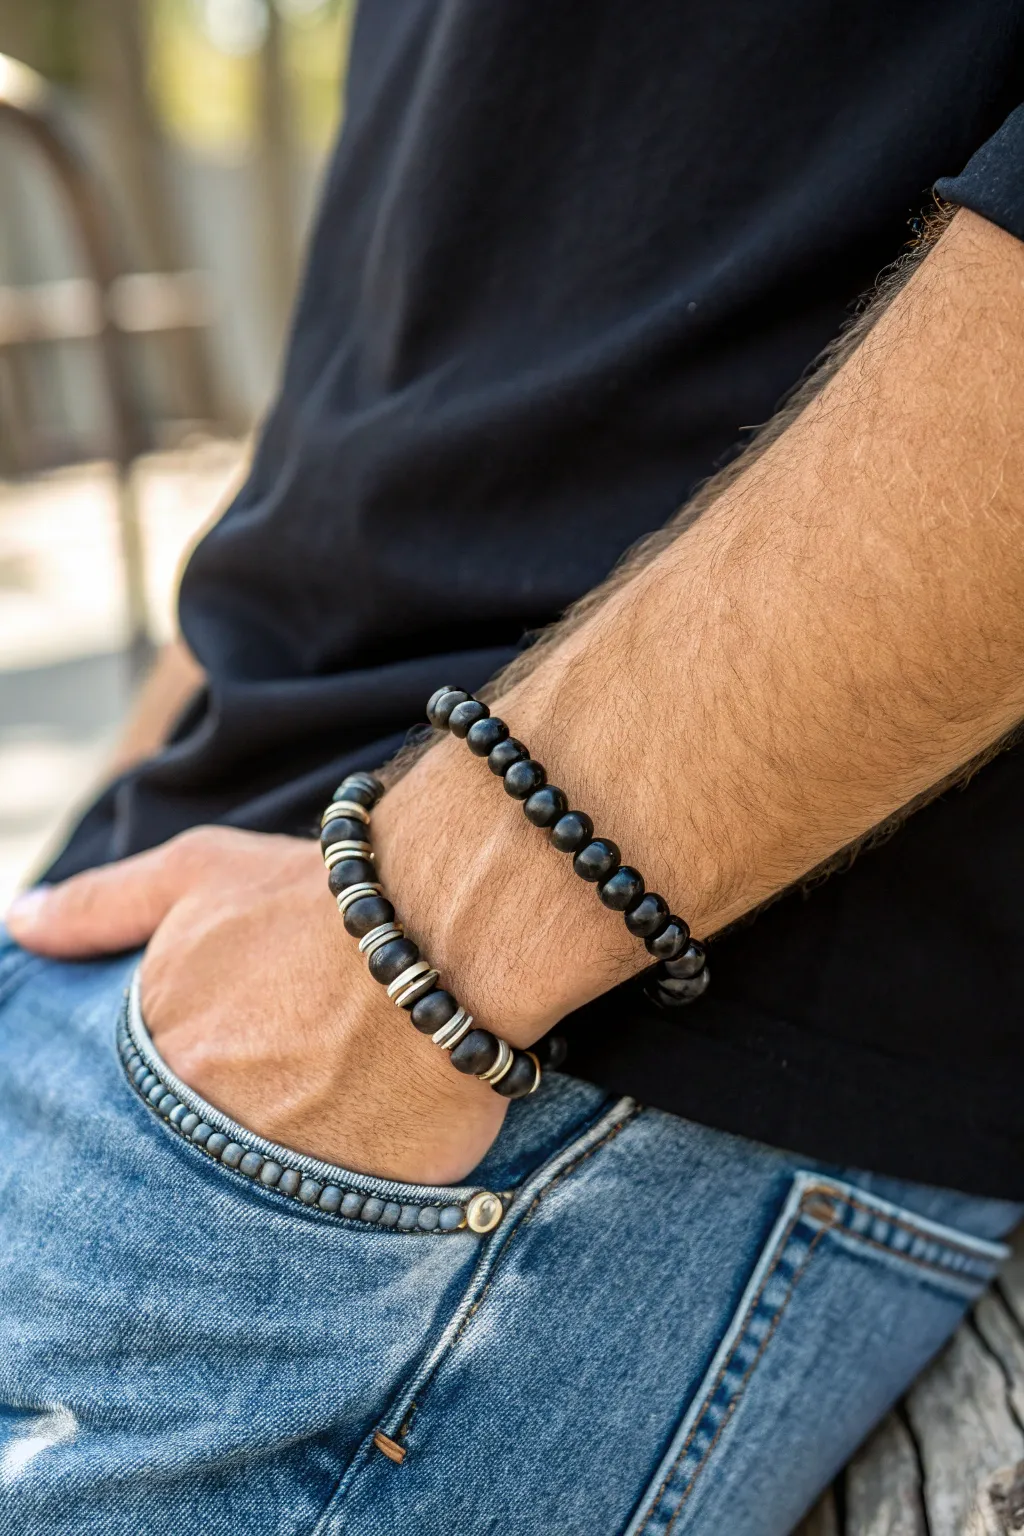
Achieve a rugged, sophisticated look with this dual-bracelet set featuring sleek matte black beads accented by striking silver spacers. This project combines industrial textures with a minimalist finish, perfect for adding a subtle masculine touch to any casual outfit.
Step-by-Step Guide
Materials
- 8mm matte black round beads (clay, onyx, or wood)
- 8mm polished black round beads
- Flat silver-tone washer spacer beads (approx. 6-8mm diameter)
- 0.8mm or 1mm clear elastic stretch cord
- Jewelry adhesive or clear nail polish
- Scissors
- Bead design board or small tray
- Tape or binder clip
Step 1: Preparation & Bead Selection
-
Measure your wrist:
Wrap a flexible measuring tape around your wrist bone to find your exact size. Add about 0.5 inches to this measurement to ensure the bracelet fits comfortably without pinching. -
Sort your beads:
Separate your matte black beads, polished black beads, and metal spacers into different piles. This visual organization helps you catch any defective beads before you start stinging. -
Prepare the cord:
Cut two lengths of elastic cord, each about 10-12 inches long. This generous length gives you plenty of room to tie secure knots later without struggling. -
Secure the end:
Attach a piece of tape or a binder clip to one end of your first cord. This creates a stopper so beads don’t slide off while you are working.
Step 2: Creating the Spacer Bracelet
-
Start the pattern:
Begin by threading one matte black bead onto the elastic cord. -
Add the metal accent:
Slide on one flat silver washer spacer directly after the black bead. The contrast between the matte finish and the shiny metal is key here. -
Repeat the sequence:
Continue adding one black bead followed by one silver spacer. Repeat this alternating pattern until the strand reaches your desired length. -
Check the fit:
Wrap the unfinished strand around your wrist to verify the size. Add or remove a bead-spacer pair if necessary, keeping in mind the knot will take up a tiny bit of space. -
Pre-stretch the cord:
Gently pull on both ends of the elastic cord a few times. I find this crucial step prevents the bracelet from stretching out permanently the first time you wear it. -
Tie the knot:
Remove the tape or clip and tie a surgeon’s knot (right over left, left over right twice). Pull the knot tight, ensuring there are no gaps between the beads. -
Secure and trim:
Dab a tiny drop of jewelry adhesive onto the knot. Let it dry completely, then trim the excess cord ends close to the knot. Hide the knot inside a bead if the hole is large enough.
Knot Slippage?
If your elastic knot feels loose, try a drop of clear nail polish instead of superglue. It dries slightly flexible, preventing the knot from becoming brittle and snapping.
Step 3: Creating the Solid Black Bracelet
-
Prepare the second cord:
Set up your second piece of elastic cord with a stopper at the end, just like before. -
String the beads:
Thread the polished black beads onto the cord one by one. This strand is simpler, relying on the uniform sheen of the beads for its impact. -
Verify length:
Compare the length of this strand against the first confirmed bracelet. They should be roughly the same size to stack comfortably. -
Stretch and knot:
Pre-stretch the elastic gently, then secure the ends with a strong surgeon’s knot. -
Glue and finish:
Apply a dot of glue to the knot for security. Once dry, snip off the extra cord tails.
Texture Twist
Mix it up by using lava stone beads instead of matte clay. The porous texture of lava beads works as a diffuser for essential oils like cedarwood.
Slide on your new stack to add an instant, stylish upgrade to your daily look


Charcoal to Gray Gradient Fade
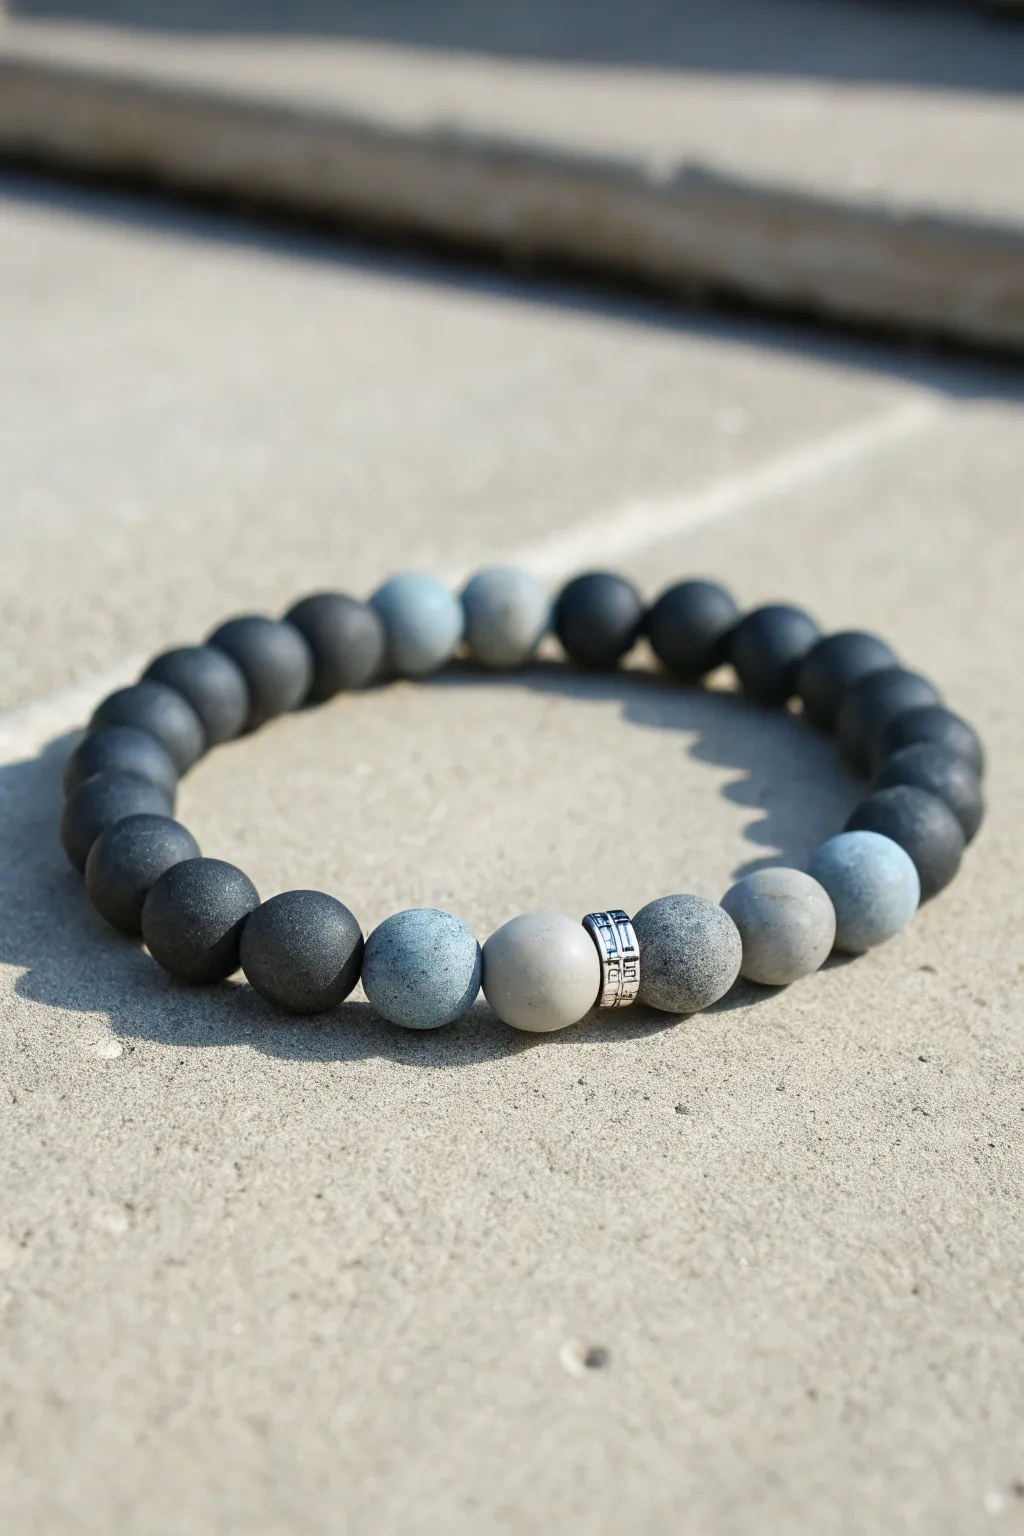
This masculine design masters the art of subtlety with a smooth gradient transition from deep charcoal to soft gray. The matte finish of the beads adds a modern, sophisticated texture that pairs easily with any casual outfit.
Detailed Instructions
Materials
- Matte black round beads (8mm or 10mm)
- Matte dark gray stone beads (8mm or 10mm)
- Matte light gray stone beads (8mm or 10mm)
- One silver spacer bead with etched details
- Strong elastic jewelry cord (0.8mm or 1mm)
- Super glue or jewelry cement
- Scissors
- Beading needle (optional but helpful)
- Bead design board or a towel
Step 1: Planning the Gradient
-
Measure your wrist:
Before sourcing beads, wrap a flexible measuring tape around your wrist to determine the circumference. Add about half an inch to this measurement for a comfortable fit. -
Lay out the design:
Find a flat surface or a bead design board to arrange your beads. This prevents them from rolling away while you plan your gradient pattern. -
Establish the focal point:
Place your silver etched spacer bead in the center of your workspace. This will act as the anchor for the lighter section of the gradient. -
Arrange the light section:
To the right of the silver spacer, place a textured medium-gray bead. To the left, place a smooth light-gray bead. -
Extend the fade:
Next to the light gray bead on the left, add a slightly darker gray bead with a blueish tint. Mirror this logic on the other side if you have matching beads, or create an asymmetrical fade like the photo. -
Fill in the darkness:
Complete the rest of the circle using the matte charcoal or black beads. Arrange them until the total length matches your wrist measurement plus the extra half-inch.
Knot Hiding Trick
If the knot won’t fit inside the bead hole, use a bead reamer or a small round file to carefully widen the hole of the bead adjacent to the knot.
Step 2: Stringing the Beads
-
Prepare the cord:
Cut a piece of elastic cord about 10-12 inches long. Having extra length makes tying the final knot much easier than struggling with short ends. -
Pre-stretch the elastic:
Give the cord a few firm tugs. I always do this to prevent the bracelet from loosening up and sagging after the first few times you wear it. -
Start threading:
Begin threading your beads onto the elastic. You can start from the black section to ensure the knot ends up hidden inside one of the darker beads later. -
Check the order:
As you transition from the dark beads to the gray and lighter beads, double-check that your silver spacer is positioned exactly where you planned it in the gradient. -
Review the sizing:
Once all beads are strung, bring the ends together carefully and wrap it around your wrist to verify the fit is correct before tying anything.
Add Natural Textures
Swap the plain gray beads for porous Lava Stone beads. You can then add a drop of essential oil to them for a functional aromatherapy bracelet.
Step 3: Securing the Bracelet
-
Tie the first knot:
Make a simple overhand knot and pull it tight to bring the beads together. Ensure there are no gaps between the beads, but don’t pull so tight that the bracelet puckers. -
Tie a surgeon’s knot:
For the second knot, loop the elastic through twice instead of once before pulling tight. This extra loop adds significant security. -
Apply adhesive:
Place a tiny drop of super glue or jewelry cement directly onto the knot. Be careful not to get glue on the beads themselves. -
Hide the knot:
While the glue is still tacky, gently pull the elastic so the knot slides inside the hole of the nearest large black bead. -
Let it cure:
Allow the glue to dry completely—usually about 15 minutes—before trimming the excess cord close to the bead hole.
Now you have a stylish, custom-fitted accessory that adds a rugged touch to your daily look


Navy and White Clean Colorblock
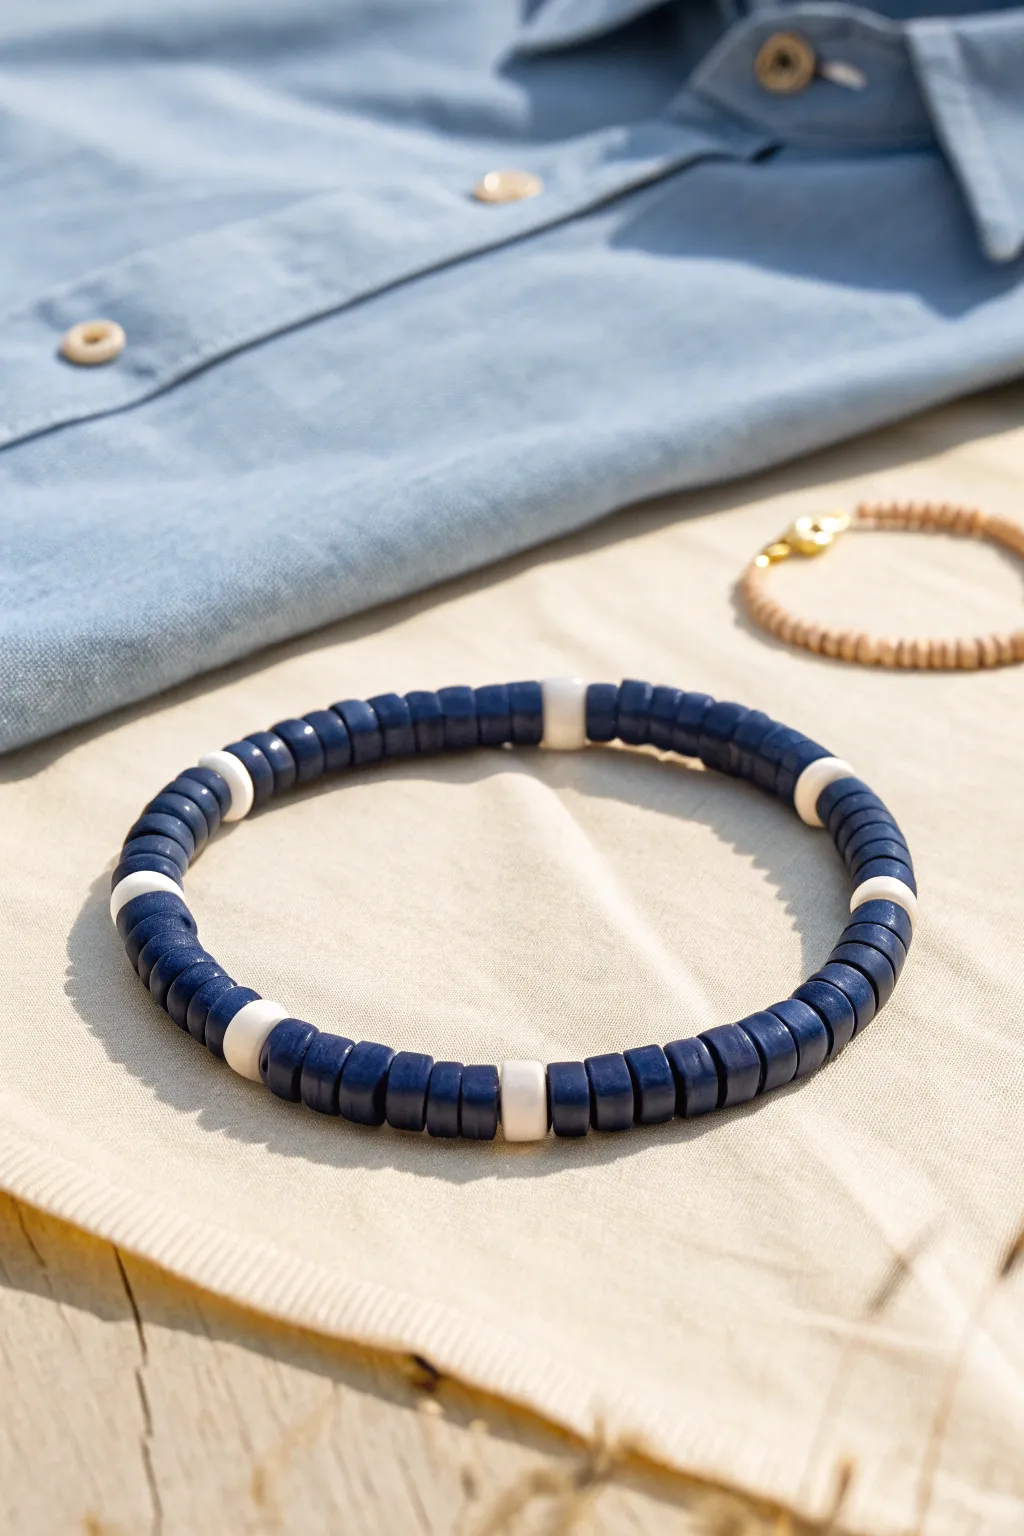
Embrace a timeless, masculine aesthetic with this clean-cut navy and white colorblock bracelet. The uniform disk beads create a sleek, low-profile look that pairs perfectly with denim or casual wear.
How-To Guide
Materials
- Navy blue polymer clay heishi beads (6mm)
- White or cream polymer clay heishi beads (6mm)
- Elastic beading cord (0.7mm or 0.8mm)
- Super glue or jewelry adhesive
- Scissors
- Measuring tape
- Beading needle (optional but helpful)
- Bead stopper or painter’s tape
Step 1: Preparation
-
Measure wrist:
Begin by measuring the wrist where the bracelet will sit. For a standard men’s fit, this is usually between 7.5 to 8.5 inches. Add about 2 inches of extra cord length for tying the knot later. -
Cut the cord:
Cut your elastic cord to the determined length. Pre-stretch the cord by gently pulling on both ends a few times; this prevents the bracelet from drooping or stretching out permanently after the first wear. -
Secure the end:
Attach a bead stopper or a piece of tape to one end of the cord to stop your beads from sliding off while you work.
Step 2: Pattern Design
-
Establish the ratio:
This specific design relies on a recurring 7-to-1 ratio. You will be threading seven navy blue beads followed by a single white bead. -
Check your bead thickness:
Heishi beads can vary slightly in thickness. If your navy beads are very thin, you might need 8 or 9 to get visually distinct blocks. I recommend doing a quick test string of one segment to see if you like the length of the blue section.
Pro Loop Tip
When tying your knot, tighten it slowly while wiggling the cord. This helps the elastic settle into itself and prevents it from snapping under friction heat.
Step 3: Stringing
-
Start the sequence:
Thread on your first set of seven navy blue beads. Ensure they sit flush against each other without gaps. -
Add the accent:
Slide on one single white bead. This high-contrast spacer is what gives the bracelet its crisp, nautical feel. -
Repeat the pattern:
Continue repeating the pattern—seven blue, one white—until you are close to your desired length. -
Monitor loop size:
Periodically wrap the strand around your wrist or a sizing tool to check the fit. Remember, it’s better to be slightly loose than too tight, as the beads take up inner circumference. -
Check the endpoints:
As you near the end, look at your pattern. Try to finish the strand so that when knotted, the pattern remains continuous (e.g., if you started with blue beads, end with a white bead so two white beads don’t touch).
Metal Remix
Swap the single white clay bead for a brushed silver spacer or a small geometric gold cube for a more industrial, upscale version of this design.
Step 4: Finishing
-
Prepare to knot:
Remove the tape or bead stopper carefully, holding both ends of the cord firmly. -
Tie the surgeon’s knot:
Cross the ends, loop one side through twice, and pull tight. Repeat this process to secure the knot firmly. The surgeon’s knot is much more reliable for elastic than a standard square knot. -
Apply adhesive:
Dab a tiny drop of super glue or jewelry cement directly onto the knot. I like to let this dry briefly while holding a little tension to keep the knot tight. -
Hide the knot:
Once the glue is tacky but not fully hardened, try to slide the knot inside the hole of one of the adjacent beads if the hole size permits. This gives a seamless professional finish. -
Trim excess:
Use sharp precision scissors to trim the excess cord ends as close to the bead/knot as possible without cutting the knot itself.
Slip on your new bracelet for an instant upgrade to your daily denim style


Olive, Sand, and Black Outdoors Mix
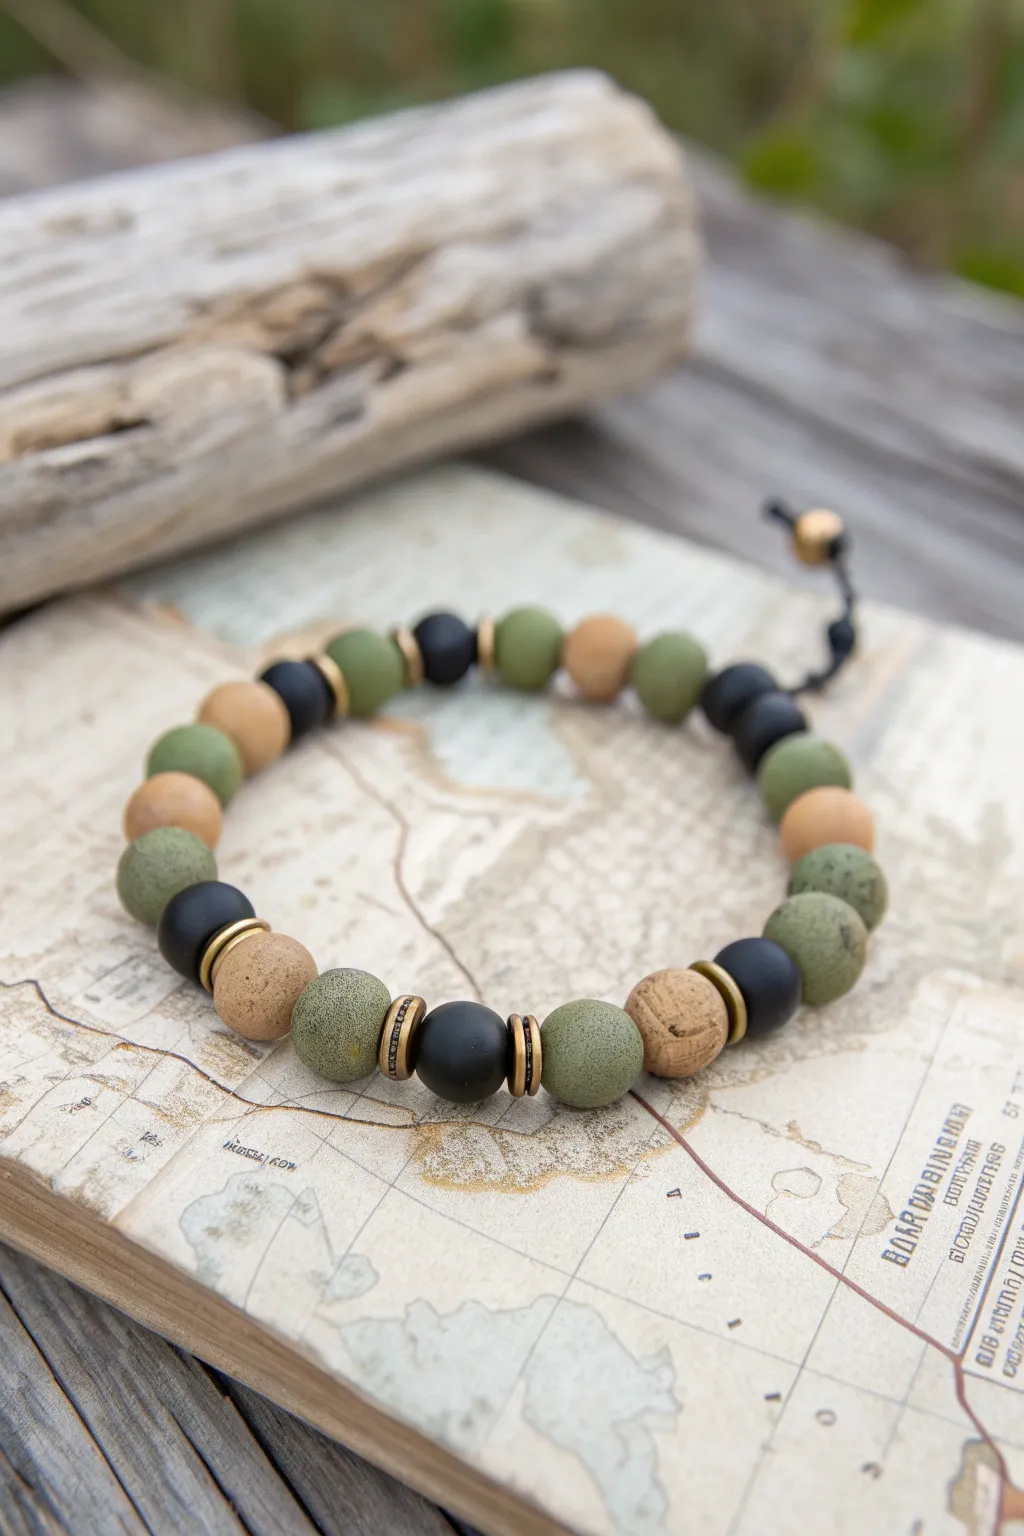
Evoke the spirit of the outdoors with this rugged bracelet featuring a mix of earthy textures and tones. The combination of matte olive, textured sand, and smooth black beads creates a versatile accessory perfect for everyday wear.
Detailed Instructions
Materials
- 10mm round beads: matte olive green (stone or polymer clay)
- 10mm round beads: textured tan/sand (cork or wood)
- 10mm round beads: matte black (onyx or agate)
- Antique bronze/brass spacer rings (approx 6mm)
- Antique bronze/brass ornate spacer beads (heishi style)
- Black nylon cord (0.8mm or 1mm thickness)
- Scissors
- Hypo cement or strong jeweller’s glue
- A bead stopper or binder clip
- Measuring tape
Step 1: Preparation
-
Measure the wrist:
Wrap your measuring tape comfortably around the wrist where the bracelet will sit. Add about half an inch to this measurement to account for the bulk of the 10mm beads, ensuring a fit that isn’t too tight. -
Cut the cord:
Cut a length of nylon cord approximately 12-14 inches long. This generous length gives you plenty of room to work on the knots without struggling. -
Secure the end:
Attach a bead stopper or simply use a binder clip about 3 inches from one end of the cord. This prevents your beads from sliding off while you design your pattern.
Knot Slipping?
If your surgeon’s knot feels loose, apply a dab of Hypo cement directly inside the knot before pulling it tight. Let it cure fully (24hrs) before wearing.
Step 2: Beading Composition
-
Establish the focal pattern:
Start with the central focal point. Thread on a pattern of: one thin brass spacer ring, one black bead, and another thin brass spacer ring. -
Add flanking texture:
On either side of that central black bead unit, slide on an olive green bead. Follow this with an ornate, thicker bronze spacer bead on both sides to serve as a visual break. -
Continue the sequence:
Next, add a textured sand/tan bead on each side. The goal is to build outwards symmetrically from that center black bead. -
Build the main body:
Continue the pattern by adding a plain brass spacer ring, then a black bead. This establishes a rhythm of metal accents breaking up the matte stone colors. -
Lengthen the strand:
Thread on an olive green bead, followed by a sand bead, then another olive bead. I find checking the length against my wrist periodically helps ensure the pattern stays balanced. -
Finish the main row:
Complete the beading by adding remaining black and olive beads until you reach the total length calculated earlier. Ensure the pattern ends symmetrically if possible, though a random earthy look works well too.
Step 3: Finishing the Ends
-
Check the fit:
Wrap the beaded strand around your wrist one last time to verify the size. Add or remove spacer beads near the ends for micro-adjustments. -
Tie the main knot:
Remove the bead stopper. Bring both ends of the cord together and tie a sturdy surgeon’s knot (right over left twice, then left over right twice) close to the beads. -
Create the adjustable closure:
Overlap the two cord tails. Using a separate short piece of cord (about 5 inches), tie 3-4 square macramé knots around the overlapped tails to create a sliding clasp. -
Secure the slider:
Trim the excess from your short macramé cord and carefully dab the cut ends with a tiny amount of glue, ensuring you don’t glue the slider to the main cords. -
Add end beads:
Thread a small brass or wood bead onto each remaining tail of the main cord. Tie a simple overhand knot at the very end to keep these stopper beads in place. -
Trim final excess:
Cut off any remaining tail cord beyond the end knots and apply a small dot of glue to the knots for extra security.
Design Pro-Tip
Vary the texture of your ‘sand’ beads. Mixing real cork beads with wooden ones adds subtle tactile variety that makes the bracelet feel more high-end.
Now you have a rugged, custom-fit accessory ready for your next adventure

The Complete Guide to Pottery Troubleshooting
Uncover the most common ceramic mistakes—from cracking clay to failed glazes—and learn how to fix them fast.
Black With One Bold Pop Bead
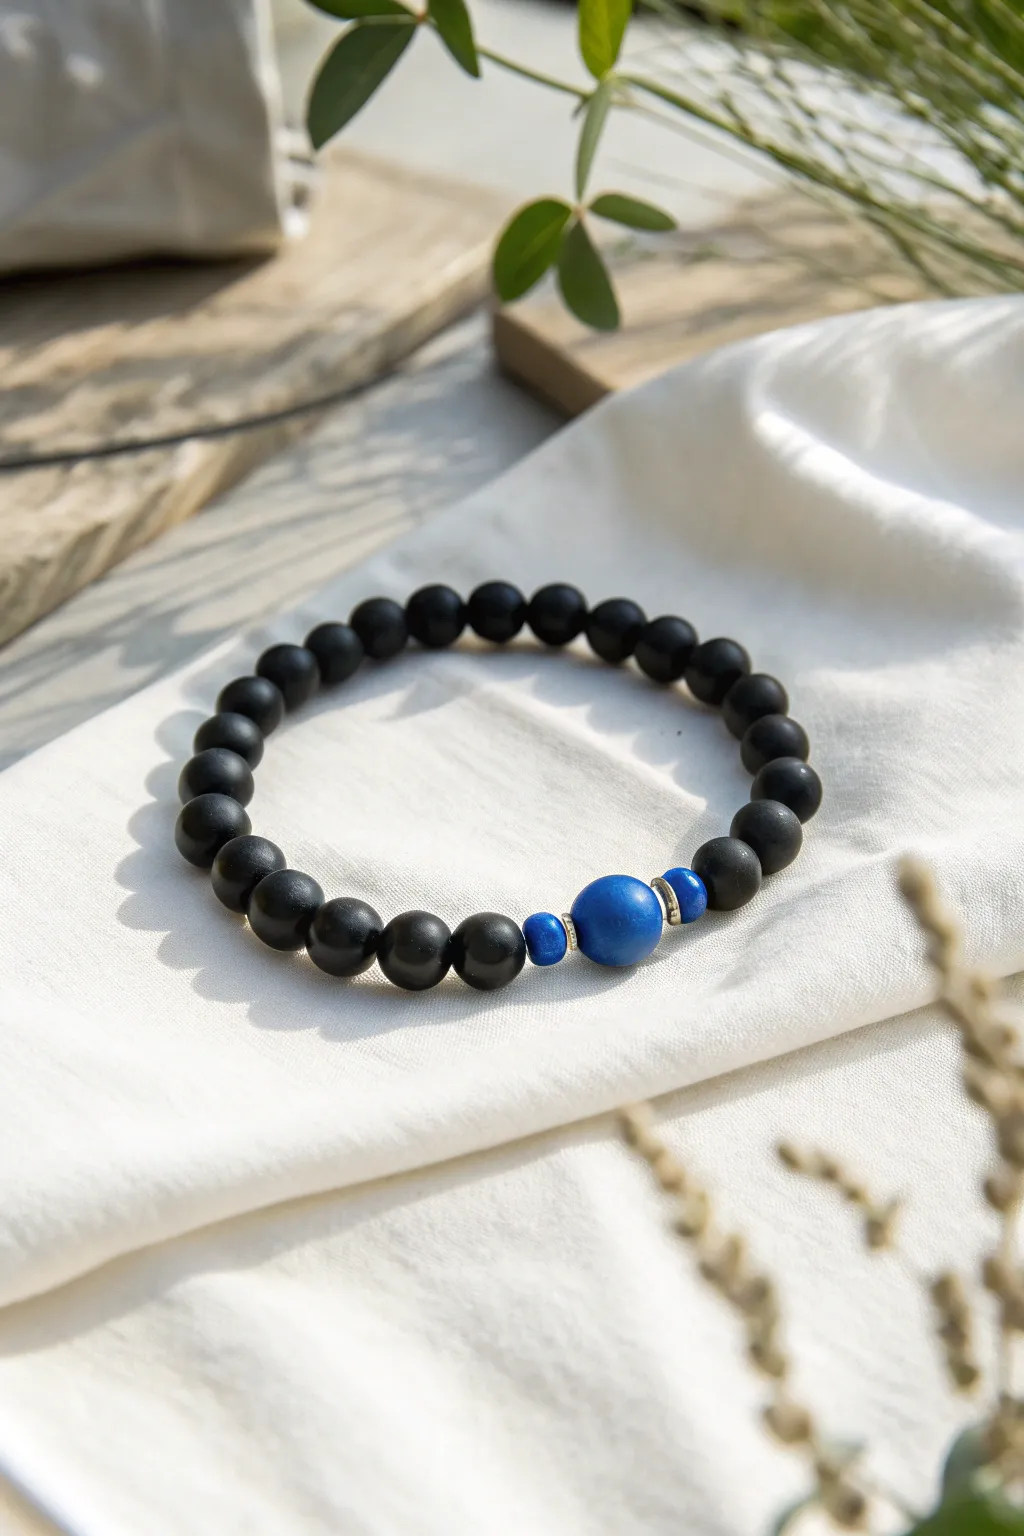
This design combines the understated cool of matte black beads with a singular, striking focal point. It features a bold cobalt blue centerpiece flanked by silver accents, creating a masculine and modern accessory perfect for everyday wear.
Step-by-Step Tutorial
Materials
- 20-22 matte black clay or onyx beads (8mm)
- 1 large bright blue focal bead (10mm – clay, ceramic, or painted wood)
- 2 smaller blue accent beads (6mm or disc spacers)
- 2 silver daisy spacer beads
- Strong elastic fused beading cord (0.8mm or 1mm)
- Scissors
Step 1: Planning and Prep
-
Measure your wrist:
Wrap a measuring tape loosely around your wrist to find your size. Add about half an inch to this measurement to ensure the bracelet fits comfortably without pinching. -
Cut the cord:
Cut a piece of elastic cord about 10-12 inches long. Having extra length makes the final knotting process much easier than struggling with short ends. -
Pre-stretch the elastic:
Hold the cord firmly at both ends and give it several good tugs. Pre-stretching prevents the finished bracelet from sagging or loosening up after you wear it a few times. -
Secure one end:
Attach a bead stopper or simply place a piece of tape on one end of the cord so your beads don’t slide right off while you work.
Knot Strength
When using thicker elastic cord (1mm), tie a secondary standard square knot on top of your surgeon’s knot for maximum hold.
Step 2: Creating the Pattern
-
Start the black base:
Begin threading the 8mm matte black beads onto the cord. Start with about 10 beads, which will form roughly half of the bracelet’s circumference. -
Add first transition:
Slide on one of the smaller blue accent beads. This acts as a visual step-up toward the main focal point. -
Place the silver spacer:
Thread on a silver daisy spacer. I like to orient the texture toward the center bead to frame it nicely. -
Add the focal bead:
Add the large 10mm blue bead. This is the centerpiece of the design, so ensure it sits snugly against the silver spacer. -
Complete the focal section:
Mirror your previous steps by adding the second silver spacer, followed immediately by the second small blue accent bead. -
Finish the black base:
Continue threading the remaining matte black beads until you reach your desired total length. Make sure the focal point stays roughly centered. -
Check the fit:
Wrap the unfinished strand around your wrist to check the size. Add or remove black beads from the ends as needed to get the perfect fit.
Step 3: Finishing Touches
-
Prepare to knot:
Remove the tape or bead stopper carefully. Bring the two ends of the cord together, ensuring there is no slack between the beads. -
Tie a surgeon’s knot:
Cross the ends like a standard knot, but loop the top strand through twice before pulling tight. This extra loop adds significant security. -
Tighten securely:
Pull the knot tight slowly and evenly. You want the beads to touch, but avoid pulling so hard that the elastic puckers or the bracelet effectively becomes rigid. -
Secure with adhesive:
Apply a tiny dot of jewelry glue or clear nail polish directly onto the knot. Let this dry completely before moving to the next step. -
Hide the knot:
Once dry, trim the excess cord ends close to the knot. Gently pull the cord to slide the knot inside the hole of the nearest large black bead to conceal it.
Texturize It
Swap the matte back beads for Lava Stone beads. You can add a drop of essential oil to the lava stones for a scent diffuser effect.
Slip on your new bracelet and enjoy the subtle pop of color it adds to your style
Minimal Stripe Pattern in Neutrals
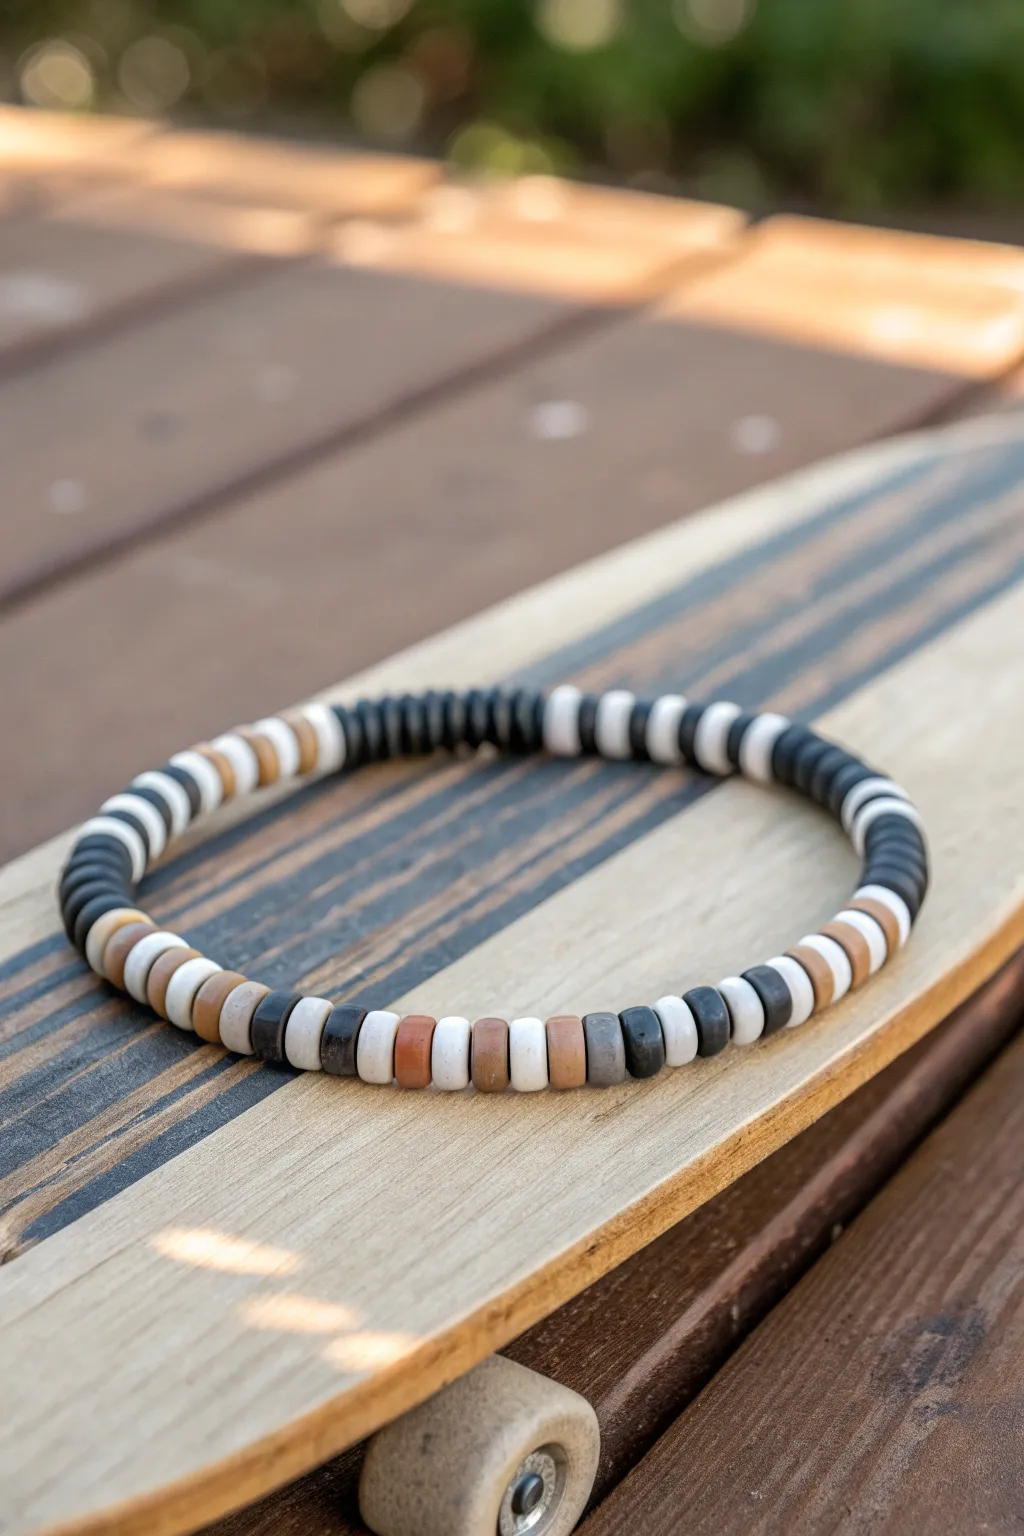
This bracelet captures the laid-back, rugged aesthetic of skate culture by combining matte blacks, stark whites, and earthy terracotta tones. The pattern alternates between solid blocks of color and striped sections, creating a dynamic rhythm that looks great stacked or worn solo.
How-To Guide
Materials
- 6mm Heishi (flat disc) polymer clay beads: Matte Black
- 6mm Heishi polymer clay beads: Matte White
- 6mm Heishi polymer clay beads: Terracotta/Rust Brown
- 6mm Heishi polymer clay beads: Warm Beige/Sand
- 6mm Heishi polymer clay beads: Dark Grey/Charcoal
- 0.8mm elastic stretch cord (durable quality)
- Beading needle (optional but helpful)
- Scissors or jewelry nippers
- Super glue or jewelry cement (e.g., G-S Hypo Cement)
- Bead design board or a piece of felt
- Tape or a bead stopper
Step 1: Planning and Prep
-
Measure your wrist:
Before cutting any cord, wrap a measuring tape around your wrist. For a comfortable fit on a man’s wrist, add about 0.5 to 0.75 inches to that measurement. This ensures the bracelet isn’t too tight. -
Prepare the elastic:
Cut a piece of elastic cord about 10-12 inches long. Having extra length makes tying the final knot much easier. -
Secure the end:
Attach a bead stopper or simply use a piece of tape on one end of your cord so your beads don’t slide right off while you work. -
Pre-stretch the cord:
Give the elastic a few gentle tugs. Pre-stretching prevents the bracelet from becoming loose and gap-y after the first few times you wear it.
Step 2: Creating the Pattern
-
Analyze the sequence:
Looking at the design, this isn’t a simple repeating pattern. It features a long ‘solid’ section of black beads balanced by a ‘striped’ section of mixed neutrals. We will build these two main zones. -
Begin the dark block:
Start by threading on your matte black beads. You want a solid block here. Thread approximately 15 to 20 black beads in a row to create the dark anchor of the design. -
Transition to stripes:
After the black block, switch to the lighter pattern. Start with 2 white beads, followed by 1 dark grey bead. -
Build the neutral mix:
Add 2 white beads, then 1 rust brown bead, followed by 1 beige bead. This irregularity is key to the organic look. -
Continue the sequence:
Thread 1 dark grey, 1 white, 1 rust brown, and 1 beige. Notice how we are mixing single beads now rather than doubles to change the visual rhythm. -
Add high contrast:
Place 2 white beads, 1 black bead, and 2 white beads. This stark contrast mimics the pinstripes often seen on skateboard grip tape. -
Create the second earthy section:
Thread 1 beige, 1 rust brown, 1 white, and 1 dark grey. This mirrors the earlier section but isn’t an exact copy. -
Finish the patterned zone:
Complete the striped area with a final sequence: 2 white beads, 1 rust brown, 1 beige, and 1 dark grey. Check the length against your wrist now; add more pattern beads or more black beads to the ends if needed.
Clean Lines Tip
Use a bead reamer or a thick needle to clear the holes of the clay beads before threading. Sometimes bits of clay stick inside, which can snag your elastic cord.
Step 3: Finishing the Bracelet
-
Double check the fit:
Wrap the unfinished strand around your wrist. The ends should touch comfortably without stretching the cord yet. -
Tie the surgeon’s knot:
Remove the tape/stopper. Cross the right end over the left, then loop it through twice (not just once like a shoelace). Pull tight. -
Secure the knot:
Repeat the process or tie a standard overhand knot on top to lock it in. I like to pull the elastic quite firmly here to ensure the knot is compact. -
Apply adhesive:
Dab a tiny drop of super glue or jewelry cement directly onto the knot. Be careful not to glue the adjacent beads together. -
Hide the knot:
While the glue is still slightly tacky but not wet, slide a bead directly over the knot to hide it. Often, beads with larger holes (like the black ones) work best for this. -
Trim the excess:
Once the glue is fully dry (wait at least 15 minutes), use your scissors to snip the excess cord as close to the bead as possible without cutting the knot.
Texture Twist
Swap out the rust-colored clay beads for real wooden spacer beads or copper washers. The mix of genuine wood grain against the matte polymer adds a premium feel.
Slide on your new bracelet and enjoy the custom fit and versatile style you created yourself


What Really Happens Inside the Kiln
Learn how time and temperature work together inside the kiln to transform clay into durable ceramic.
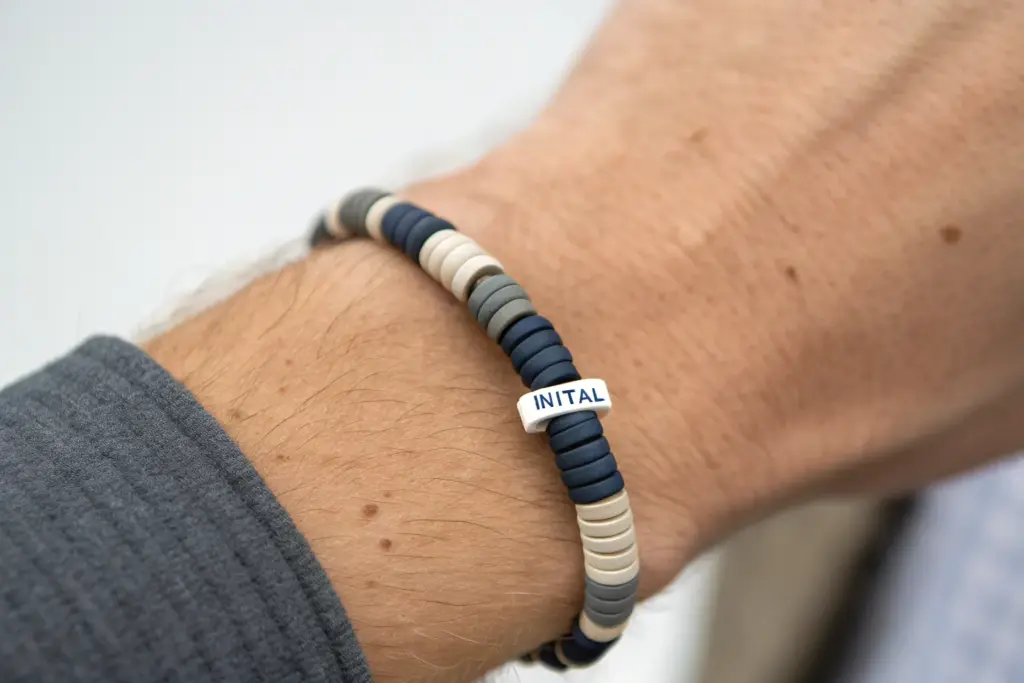
Initial Bead Center With Neutral Disks
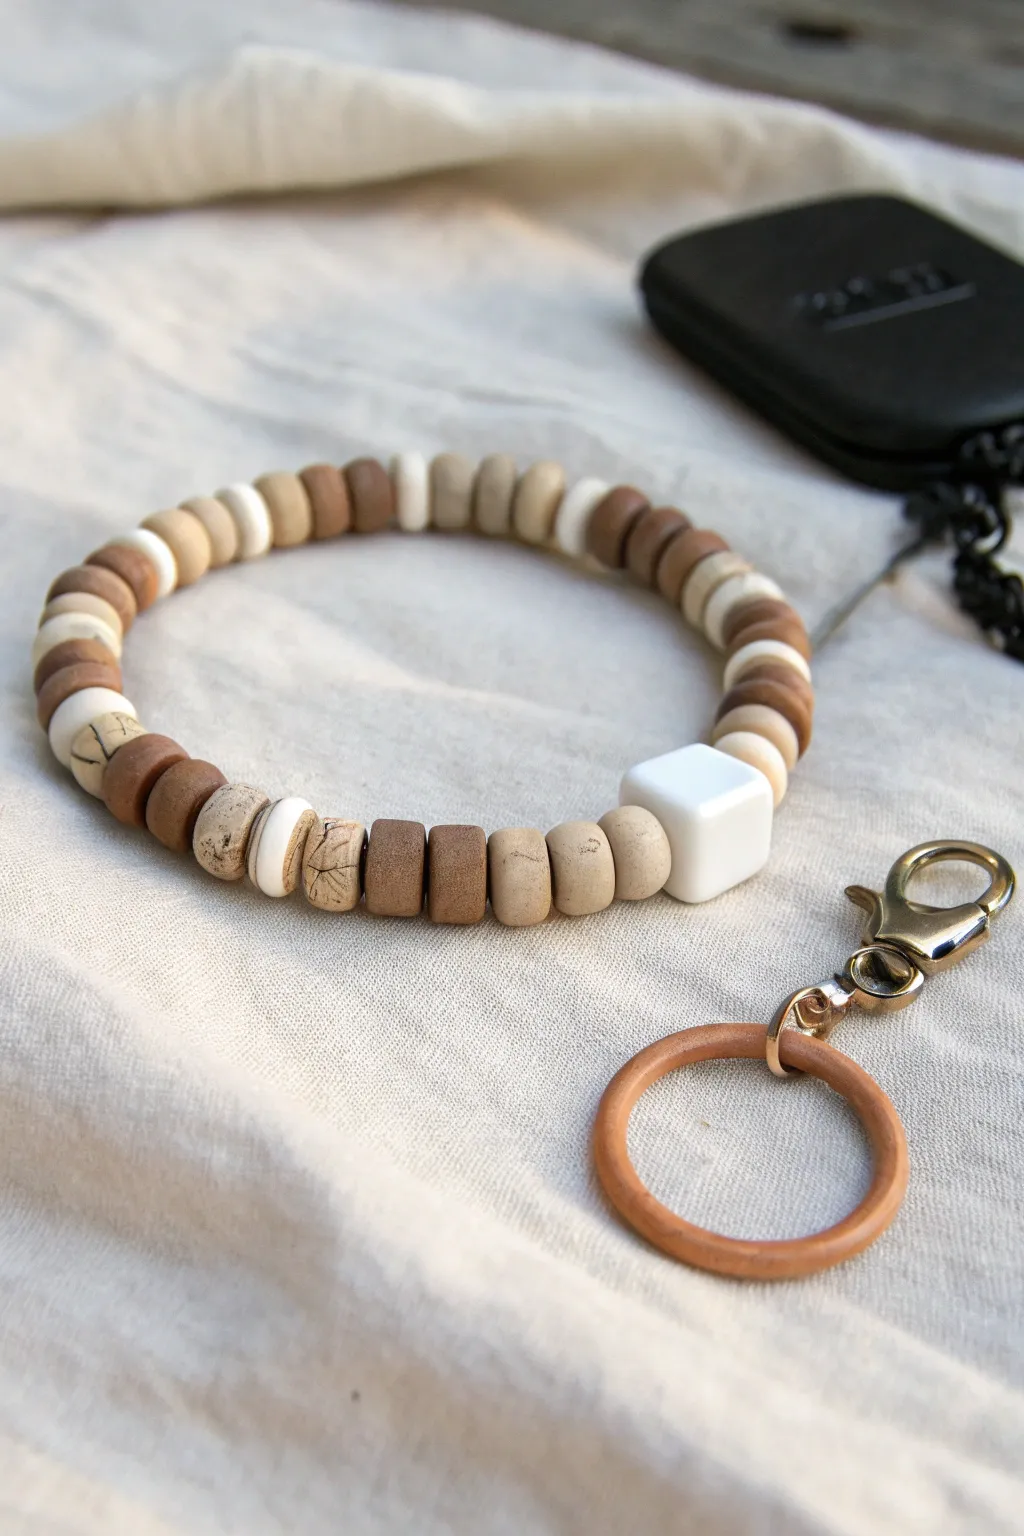
This masculine, earth-toned bracelet combines textured polymer clay disks with a standout geometric center bead for a rugged yet refined accessory. The addition of a practical clasp and wooden ring transforms it into a functional keychain wristlet or a stylish standalone piece.
Step-by-Step Tutorial
Materials
- Polymer clay Heishi beads (matte finish): mocha brown, dark taupe, cream, and speckled beige
- Large white acrylic or ceramic cube bead (approx. 10mm)
- Strong elastic cord (0.8mm or 1mm thickness)
- Gold-tone lobster clasp with swivel base
- Wooden O-ring (approx. 25mm diameter)
- Jump ring (gold-tone, sturdy gauge)
- Super glue or jewelry cement
- Scissors or wire cutters
- Flat-nose jewelry pliers
Step 1: Planning the Design
-
Measure your wrist:
Wrap a measuring tape loosely around your wrist to determine the desired length. For a wristlet keychain like this, add about an inch to your measurement so it slips on and off easily. -
Sort your palette:
Lay out your clay disk beads. Separate them by color: the darker browns, the speckled ‘stone’ look beads, the solid creams, and the occasional white accent disk. -
Establish the pattern:
This design relies on a random yet balanced mix. I like to group 3-5 beads of the same color together before switching shades to create ‘blocks’ of color, rather than a perfect 1-1-1 pattern.
Step 2: Stringing the Beads
-
Prepare the cord:
Cut a piece of elastic cord about 10-12 inches long. This generous length makes tying the final knot much less frustrating. -
Pre-stretch the elastic:
Give the cord a few firm tugs. This seemingly small step prevents the bracelet from sagging or stretching out permanently after the first wear. -
Secure the end:
Place a piece of tape on one end of the cord or attach a binder clip to stop beads from sliding off while you work. -
Start stringing:
Begin threading your clay disks onto the cord. Follow the ‘color block’ method, alternating between your mocha, taupe, and speckled sections. -
Add the center point:
Once you have strung approximately half of the bead length, slide on the large white cube bead. This acts as the focal point. -
Finish the bead strand:
Continue stringing the remaining clay disks until you reach your desired total length, mirroring the random pattern from the first half. -
Check the fit:
Wrap the unfinished strand around your wrist. The ends should meet comfortably without gaps, but it shouldn’t be tight.
Loose Knot Trouble?
If the elastic feels slippery and the knot won’t hold while gluing, try a ‘square knot’ first, then add the surgeon’s extra loop on top for grip.
Step 3: Attaching Hardware
-
Add the attachment point:
Before tying off, thread the cord directly through the small loop at the bottom of the lobster clasp swivel. -
Tie the surgeon’s knot:
Bring the two ends of the elastic together. Cross right over left and pull tight, then cross left over right and loop it through twice before pulling tight again. -
Secure the knot:
Apply a tiny drop of super glue or jewelry cement directly onto the knot. Let it dry for a minute to ensure it won’t slip. -
Hide the knot:
Trim the excess elastic ends close to the knot. Gently pull the elastic so the knot slides inside the hole of the nearest large cube bead or a group of disks to conceal it.
Level Up: Scent It
Use unfinished wood beads instead of clay for a section of the bracelet. Add a drop of essential oil to the wood for a wearable aromatherapy diffuser.
Step 4: Final Assembly
-
Prepare the jump ring:
Using your flat-nose pliers, carefully twist the jump ring open laterally (twist ends away from each other, don’t pull them apart). -
Connect the ring:
Slide the open jump ring through the wooden O-ring. -
Attach to clasp:
Hook the jump ring onto the jaw of the lobster clasp. -
Close the loop:
Use the pliers to twist the jump ring back into a closed circle, ensuring the ends meet perfectly flush so the wood ring stays secure.
Now you have a rugged, versatile accessory that keeps your keys close at hand with distinctive style
Double-Strand Look With a Sliding Knot
This masculine accessory combines the warm, matte finish of clay-toned beads with the rugged texture of Jasper-style stones in a layered design. The clever sliding knot closure connects the two strands seamlessly, creating a relaxed, adjustable fit perfect for everyday wear.
How-To Guide
Materials
- ~8mm Matte reddish-brown beads (terracotta or red jasper)
- ~8mm Textured beige/brown beads (picture jasper or wood jasper)
- ~8mm Black focal beads (lava stone or matte onyx)
- 1mm Dark brown waxed cotton or nylon cord
- Scissors
- Super glue or clear nail polish (optional)
- Beading needle (optional, for easier threading)
- Tape or clipboard
Step 1: Preparing the Base
-
Measure and Cut:
Cut two lengths of brown cord, each measuring about 24 inches (60 cm). This generous length allows plenty of room for knotting and the sliding closure. -
Setup:
Hold the two cords together and tie a temporary overhand knot roughly 6 inches from one end. Tape this knot down to your work surface or clip it to a clipboard to keep the tension steady. -
Select Your Pattern:
Plan your bead layout. Looking at the image, you’ll want one strand dominated by the matte reddish-brown beads and the other featuring the textured beige stones. Notice how the colors intersperse slightly for a cohesive look.
Step 2: Stringing the Beads
-
Start Strand One:
On the first cord, begin threading the reddish-brown beads. Create a small pattern interruption by adding one black focal bead near the center or just off-center. -
Measure the Length:
Continue adding beads until the beaded section covers about 6.5 to 7.5 inches, depending on the wrist size. It should wrap almost fully around the wrist but leave a gap for the closure. -
Secure Strand One:
Tie a loose, temporary overhand knot at the end of the beads on this first strand so they don’t slide off while you work on the second one. -
Start Strand Two:
On the second cord, thread your textured beige beads. I like to mix in one or two of the reddish beads from the first strand here to visually link the two layers. -
Add the Second Focal:
Slide a black focal bead onto this second strand as well. Try to position it so it sits near—but not exactly parallel to—the black bead on the first strand for an organic, asymmetrical feel. -
Finalize Beading:
Ensure the beaded length of the second strand matches the first strand exactly. Tie a temporary knot at the end of this strand.
Knot Security
When tying the final knots on the tail ends, burn the tips slightly with a lighter (if using synthetic cord) or use a drop of clear nail polish to lock them permanently.
Step 3: Creating the Closure
-
Align the Ends:
Remove the temporary anchor knots. Bring both beaded strands together. You should now have four cord tails (two on each side of the beads). -
Knot the Strands Together:
On the left side, take both cord tails and tie them together into a single sturdy overhand knot right against the last bead. Do the same on the right side. This essentially turns the two strands into one unit. -
Position for Sliding Knot:
Overlap the remaining cord tails from both sides. Form a circle with the bracelet so the left tails point right and the right tails point left, laying parallel to each other. -
Start the Macramé Knot:
Cut a separate 10-inch piece of cord. Place it under the bundle of overlapped tail cords. -
Tie the Square Knots:
Create a series of 3 to 4 square knots (macramé box knots) around the bundle of tail cords. Pull these tight enough to hold, but loose enough that the tail cords can still slide through. -
Trim the Knot:
Trim the excess ends of the 10-inch tying cord very close to the square knots. Carefully dab a tiny drop of super glue on these cut ends to prevents unraveling, ensuring you don’t glue the sliding cords underneath.
Add Metal Spacers
Elevate the rugged look by inserting small antique bronze or brass spacer beads on either side of the black focal beads. This adds a subtle metallic shine.
Step 4: Finishing Touches
-
Adjust Tails:
Slide the bracelet open to its maximum width to ensure the tails are long enough. Trim the four tail cords so they are even, leaving about 2 inches hanging. -
End Knots:
Tie a small overhand knot at the very end of each tail cord to prevent them from slipping back through the sliding closure. -
Texture Check:
Rub the cords slightly between your fingers to soften the wax if the knot feels too stiff.
Slide it on, pull the cords tight, and enjoy the custom fit of your new rugged stack.

TRACK YOUR CERAMIC JOURNEY
Capture glaze tests, firing details, and creative progress—all in one simple printable. Make your projects easier to repeat and improve.
Clay Disks Mixed With Wood Rounds
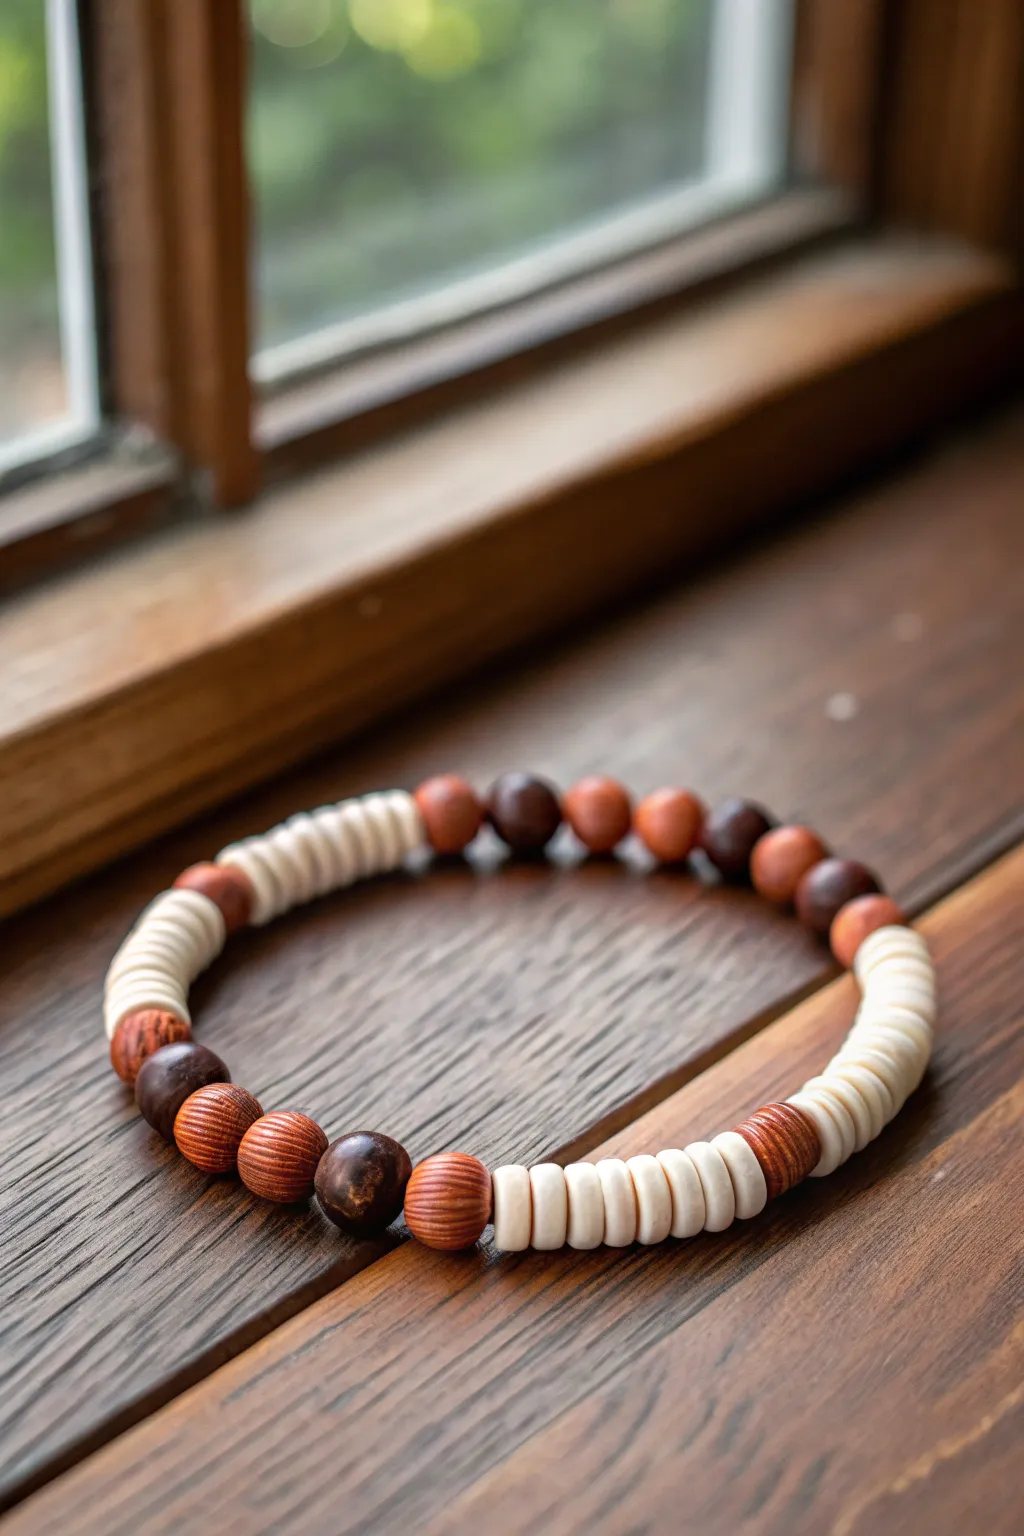
This masculine design balances rugged textures with smooth lines, combining creamy white clay heishi discs with rich, natural wood rounds. The result is a laid-back, versatile accessory that pairs just as well with a flannel shirt as it does with a summer tee.
Step-by-Step Guide
Materials
- White or cream polymer clay heishi beads (approx. 4-6mm)
- Medium brown wood round beads (8mm)
- Dark brown or espresso wood round beads (8mm)
- Reddish-brown wood round beads (8mm)
- Strong elastic bead cord (0.8mm or 1mm thickness)
- Scissors or jewelry snips
- G-S Hypo Cement or super glue
- Bead stopper or binder clip
- Measuring tape
Step 1: Preparation
-
Measure your wrist:
Wrap a measuring tape loosely around your wrist to find your size. Add about 0.5 inches to this measurement to ensure a comfortable fit that isn’t too tight. -
Cut the cord:
Cut a piece of elastic cord about 10-12 inches long. Having extra length makes the final knotting process much less frustrating. -
Secure the end:
Attach a bead stopper or a simple binder clip to one end of your cut cord. This essential step prevents your beads from sliding off while you design the pattern.
Knot Slipping?
If the elastic feels too slick to hold a knot, try sanding the very ends of the cord with an emery board before tying. This texture helps it grip.
Step 2: Creating the Pattern
-
Start with a focal section:
Begin by threading on the main wooden section seen at the bottom left. Slide on one reddish-brown wood bead, followed by a dark espresso bead. -
Build the wood gradient:
Next, add a lighter medium-brown wood bead, then a dark espresso bead. This creates an alternating stained wood effect. -
Add the first heishi segment:
Now, thread on approximately 8 to 10 of the cream clay heishi beads. These stacked discs act as a bright spacer that breaks up the heaviness of the wood. -
Create the second wood section:
After the white discs, add a single reddish-brown wood bead to frame the section. -
Mirror the heishi:
Slide on another large stack of the cream heishi beads. Use roughly 12 to 15 beads here for a slightly longer white section. -
Establish the opposite wood pattern:
Thread on a sequence of three wood beads: one reddish-brown, one dark espresso, then one reddish-brown again. -
Continue the pattern:
Add a third section of heishi beads—about 10 discs works well here to maintain visual balance. -
Finish the bead stringing:
Complete the loop with a distinctive final sequence: a dark espresso bead, three medium reddish beads, and finally one more dark bead. If you need more length, add heishi beads to the ends of the strand.
Step 3: Finishing Touches
-
Check the fit:
Carefully bring the two ends of the cord together, forming a circle around your wrist. It should sit comfortably without pinching your skin or dropping too far down your hand. -
Pre-stretch the elastic:
I always give the cord a gentle tug before knotting. This ‘pre-stretching’ helps prevent the bracelet from sagging or loosening permanently after the first few times you wear it. -
Tie the surgeon’s knot:
Remove the bead stopper. Cross the ends, loop one side under twice, and pull tight. Repeat with a second knot on top to secure it firmly. -
Reinforce:
Dab a tiny drop of G-S Hypo Cement or super glue directly onto the knot. Let it dry completely for a few minutes. -
Hide the knot:
Once dry, trim the excess cord tail close to the knot. Gently pull the elastic until the knot pops inside the hole of the nearest wood bead to hide it.
Material Mix-Up
Swap the rounds for lava stone beads. You can add a drop of essential oil to the lava stones to turn this bracelet into a subtle diffuser.
Now you have a stylish, custom-fitted accessory ready for daily wear
Tube Spacer Sections for a Cuff Feel
Achieve a sophisticated, masculine look with this beaded bracelet that blends the rugged texture of lava stone with smooth terracotta clay and gleaming brass spacers. The repeating pattern of tube beads and stacked metal rings creates a substantial, cuff-like feel without being bulky.
Detailed Instructions
Materials
- 6mm black lava stone round beads
- 6mm matte terracotta/clay heishi or tube beads (approx. 5-6mm height)
- Small antique brass spacer rings/discs (approx. 4-5mm)
- Large gold-plated or brass focal tube bead (ribbed or textured)
- Strong elastic cord (0.8mm or 1mm thickness)
- Jewelry adhesive or clear nail polish
- Scissors
- Tape or bead stopper
- Measuring tape
Step 1: Planning and Prep
-
Measure your wrist:
Before cutting any cord, wrap a measuring tape around your wrist to find the circumference. Add about 0.5 to 0.75 inches to this number so the bracelet fits comfortably without pinching. -
Prepare the cord:
Cut a piece of elastic cord about 10-12 inches long. This extra length gives you plenty of room to tie knots securely later. I like to prestretch the elastic slightly by pulling on both ends gently to prevent it from sagging after wear. -
Secure the end:
Attach a piece of tape or a bead stopper to one end of the cord to stop your beads from sliding off while you design your pattern. -
Identify your pattern components:
Observe the bead pattern in the reference image. The design relies on three distinct sections: a focal point, a heavy metallic ‘cuff’ section, and a lighter alternating back section.
Spacer Alignment
If your stacked metal rings twist awkwardly, string them onto a scrap piece of cord first to check for burrs or uneven edges that might cause bunching.
Step 2: The Main ‘Cuff’ Section
-
Start with the centerpiece:
Begin threading by adding your central group of three terracotta tube beads. Separate each of these three beads with two brass spacer rings stacked together. -
Wait, check the spacers:
Ensure you are using two thin brass rings between the clay tubes. The doubled-up rings add visual weight and make the beadwork look more like solid metal hardware. -
Frame the center:
On either side of this central terracotta group, slide on one single brass spacer ring, followed by one black lava bead. -
Add flanking metal:
After the black lava bead on each side, add another single brass spacer ring. -
Complete the cuff edges:
Finish this heavy section by sliding on one terracotta tube bead on each side, followed by a final minimal brass spacer. This creates the symmetrical ‘front’ of the bracelet.
Knot Hiding Pro-Tip
Always plan your pattern so the knot lands next to the bead with the largest hole (like the ribbed gold tube). It makes hiding the finish effortless.
Step 3: The Alternating Band
-
Transition to the band:
Now you are moving away from the complex front section. Add a black lava bead to both sides. -
Begin the alternating pattern:
Thread a terracotta bead, then a black lava bead. Repeat this simple 1-to-1 alternation for about three or four repetitions on each side. -
Check the length:
Pause here and wrap the strand around your wrist. You want to see how much gap is left to fill. This is where you adjust the size. -
Add the back focal bead:
Once you are near the ends, thread on your large, ribbed gold focal tube. This bead acts as a closure-hider and a decorative element for the underside of the wrist. -
Fill remaining space:
If there is still a gap, add small black or terracotta disc beads near the gold focal tube until the length is perfect.
Step 4: Closing the Bracelet
-
Remove stopper:
Carefully remove the tape or bead stopper from the beginning of your cord, ensuring you have a firm grip on both ends of the elastic. -
Tie the knot:
Tie a surgeon’s knot (right over left, left over right, looping through twice on the second pass). Pull the elastic tight to secure the knot close to the beads. -
Secure with glue:
Apply a tiny dot of jewelry adhesive or clear nail polish to the knot. Let it dry for a moment before proceeding. -
Hide the mechanism:
Trim the excess cord ends to about 2mm. Gently tug on the bracelet to pull the knot inside the large hollow gold tube bead, hiding it completely from view.
Now try experimenting with different stone textures to vary the look
Beachy Sea Tones in a Muted Palette
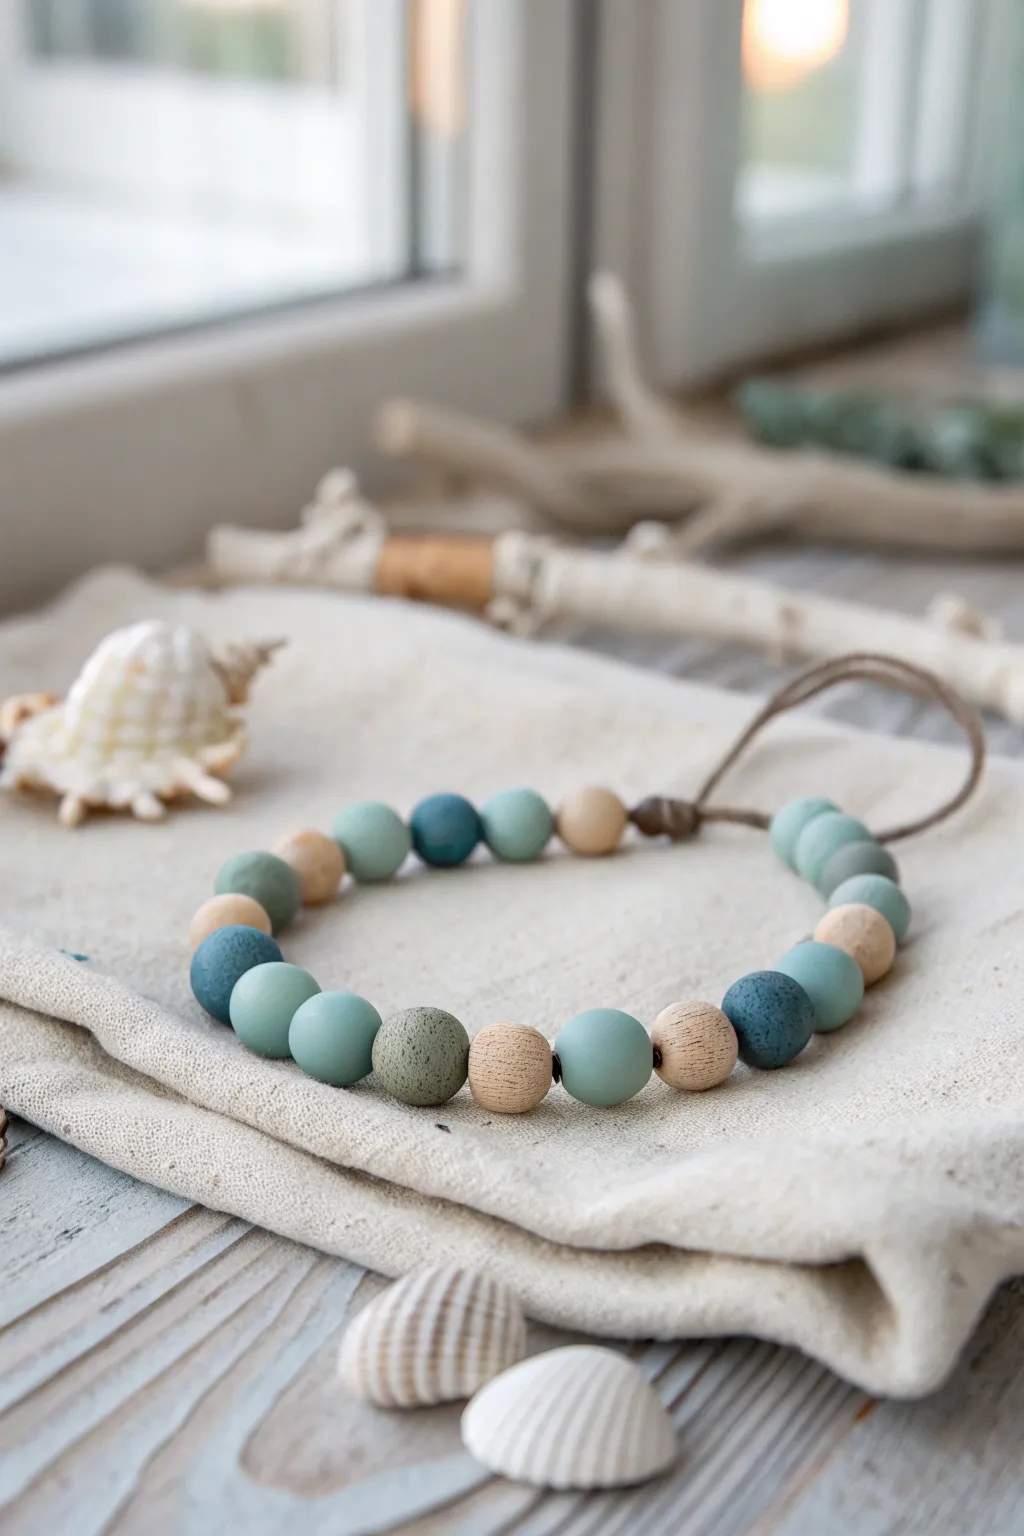
Capture the essence of a quiet, hazy day at the shore with this understated men’s bracelet. Combining matte polymer clay beads in soft sea-glass hues with natural wooden accents, this piece offers a rugged, earthy look that pairs perfectly with casual linen or denim.
Step-by-Step Guide
Materials
- Polymer clay (muted teal, seafoam green, slate blue, sand beige, and grey)
- Round wooden beads (approximately 10-12mm, unfinished or light stain)
- Texture sponge or sandpaper (fine grit)
- Beading awl or toothpick
- Waxed cotton cord or hemp twine (brown or grey)
- Oven for baking clay
- Scissors
Step 1: Prepping the Clay Beads
-
Mixing Custom Colors:
Begin by conditioning your polymer clay. To achieve the muted ‘sea tone’ palette seen here, avoid using straight-from-the-package brights. Mix a touch of grey or beige into your blues and greens to desaturate them, aiming for slate blue, seafoam, and sage colors. -
Forming the Base Shapes:
Roll the conditioned clay into spheres. Aim for a size that matches your wooden beads, roughly 10-12mm in diameter. Consistency is key for a uniform look, but slight variations add to the organic feel. -
Applying Texture:
To mimic the look of weathered stones, gently roll each unbaked clay ball over a texture sponge or heavily grit sandpaper. You don’t want deep gouges, just a matte, pitted surface. -
Creating the Holes:
Using your beading awl or a toothpick, pierce a hole through the center of each bead. Rotate the bead as you push through to prevent it from flattening out. -
Baking:
Arrange your beads on a baking sheet or tile. Bake them according to the manufacturer’s instructions for your specific brand of clay (usually 275°F/135°C for 15-30 minutes). Let them cool completely.
Step 2: Designing the Pattern
-
Laying Out the Design:
Lay your cooled clay beads and wooden beads on a table or bead board. The pattern in the image is random but balanced. Try alternating groups of two or three blue/green beads with a single wooden or beige bead. -
Checking the Length:
Arrange enough beads to wrap comfortably around the wrist. For a standard men’s size, you’ll want roughly 8 to 9 inches of total length, depending on fit preference. -
Mixing Textures:
Ensure the wooden beads are spaced out so they act as accents rather than dominating the strand. I find placing a light wooden bead next to a dark slate blue clay bead creates a nice visual pop.
Fixing Stiffness
If the bracelet feels too stiff after knotting, gently roll the knotted strand between your palms. This relaxes the cord fibers and allows the beads to settle into a more natural, fluid shape.
Step 3: Assembly and Knotting
-
Cutting the Cord:
Cut a length of your waxed cotton cord or hemp twine, approximately 20 inches long. This gives you plenty of slack for knotting. -
Creating the Loop:
Fold the cord in half. About an inch down from the fold, tie an overhand knot to create a loop. Ensure this loop is large enough for your finishing knot to pass through later, but not so loose that it falls off. -
Stringing the Beads:
Thread the ends of the cord through your beads following the pattern you laid out. If the cord is fraying, dab a tiny bit of glue on the tip or wrap it with tape to make a ‘needle’. -
Checking Fit:
Once all beads are strung, wrap the piece around your wrist to double-check the sizing. Add or remove a bead if necessary. -
Securing the End:
Push all beads snugly toward the loop knot. Tie a tight overhand knot flush against the last bead to secure the strand in place. -
Making the Closure Knot:
Leave a small gap of cord (about equal to the size of the loop you made in step 1), then tie a large, bulky knot. A figure-eight knot or a doubled overhand knot works well here. This knot will act as the ‘button’ to go through the loop. -
Trimming:
Trim the excess cord after the final knot, leaving a short tail (about half an inch) for a rustic look.
Add Weathering
For an even more rustic, aged look, lightly dilute brown acrylic paint with water and wash it over the baked clay beads. Wipe it off quickly so the dark color only stays in the textured crevices.
Now slip on your new accessory and enjoy the relaxed, beach-ready vibe it adds to your outfit
Speckled Stone-Look Clay Beads
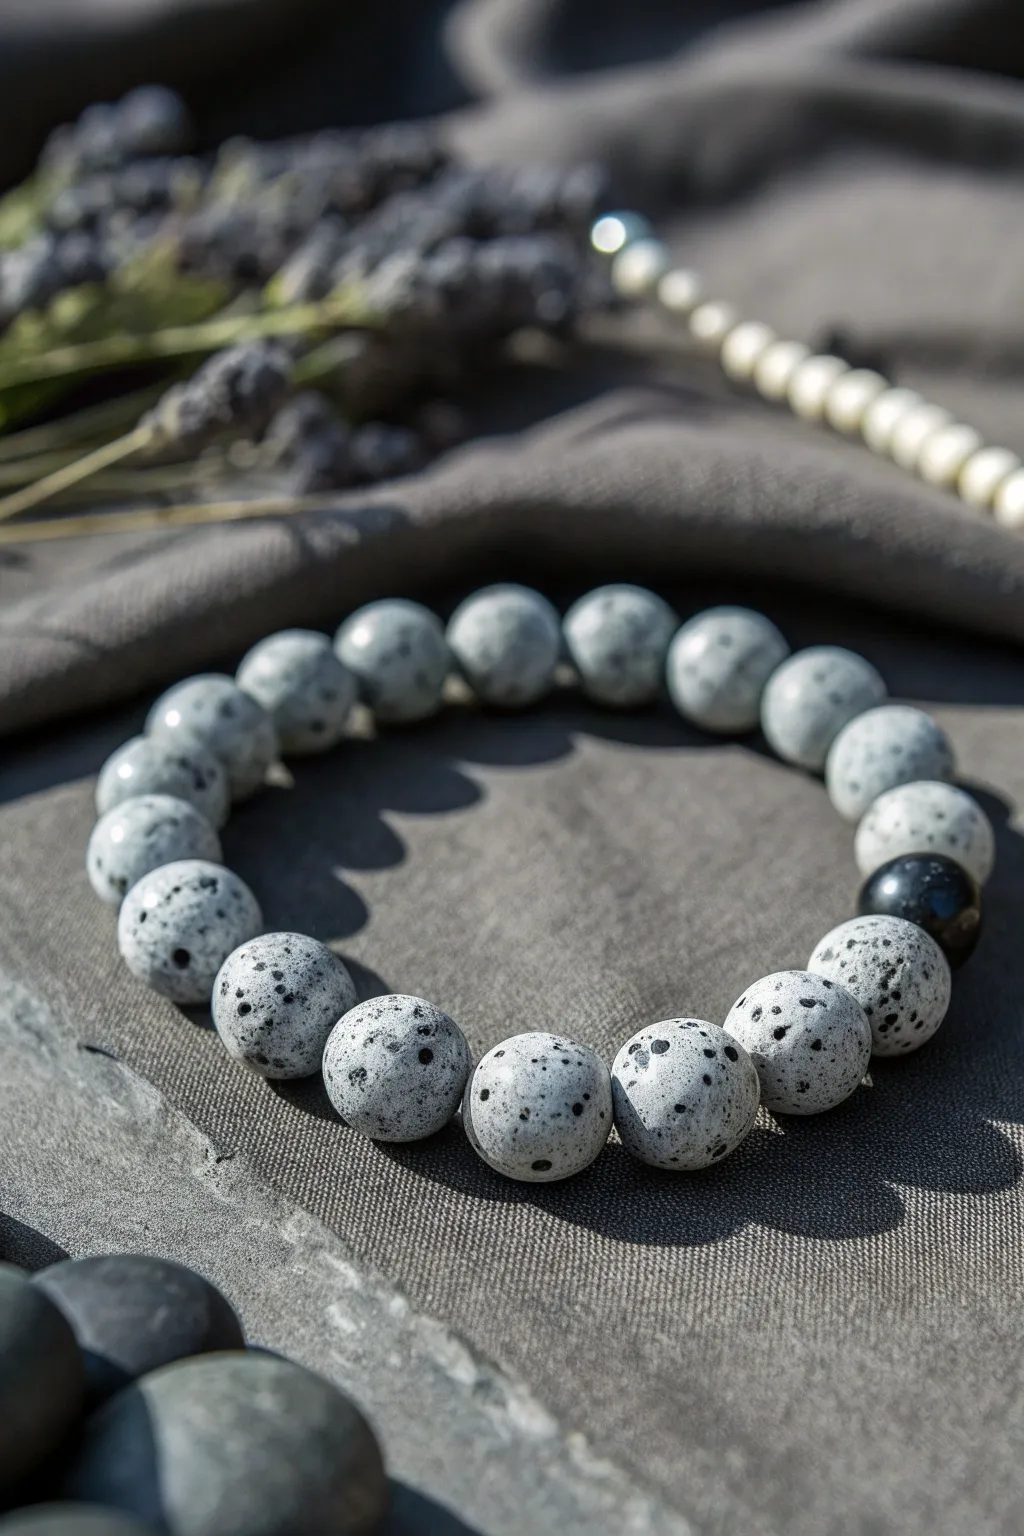
Achieve the rugged, sophisticated look of natural stone without the weight or cost using polymer clay. This project replicates the distinctive grey-white base and black speckles of Dalmatian Jasper, creating a minimalist accessory perfect for a masculine wrist stack.
Step-by-Step
Materials
- White polymer clay (approx. 2oz)
- Black polymer clay (very small amount)
- Translucent polymer clay (optional, for depth)
- Black acrylic paint
- Old toothbrush or stiff bristle brush
- Cardboard box or paper plate (for splatter guard)
- Bead rolling tool or clear acrylic block
- Needle tool or toothpick
- Elastic beading cord (0.8mm or 1mm)
- Superglue or jewelry knot cement
- Fine-grit sandpaper (400 and 800 grit)
- Matte or satin polymer clay varnish
- One solid black accent bead (stone or clay)
Step 1: Clay Preparation
-
Condition the base:
Start by thoroughly conditioning your white polymer clay until it is soft and pliable. If you want a slightly more realistic, stony depth, mix in a pea-sized amount of translucent clay and a tiny speck of black to turn the stark white into a very pale, cool grey-white. -
Create the ‘inclusion’ mix:
Take a tiny pinch of black polymer clay and chop it into microscopic bits with a craft blade. Mix these bits into your white clay base, but don’t over-blend; you want visible tiny specks inside the clay itself to mimic internal mineral deposits.
Step 2: Forming the Beads
-
Portion the clay:
Roll your clay mixture into a long, even log or ‘snake’ about 1/2 inch in diameter. Use a blade to slice the log into equal segments to ensure your beads are all the same size. -
Roll spheres:
Roll each segment between your palms to form a rough ball. For perfectly round beads, I find using a bead rolling tool or creating a circular motion with a flat acrylic block over the balls works best. -
Pierce the beads:
While the clay is still raw, gently twist a needle tool or toothpick through the center of each sphere to create the stringing hole. Pierce halfway from one side, then flip and pierce from the other to avoid distorting the shape. -
Check hole size:
Ideally, wiggle the tool slightly to widen the hole enough to accommodate your elastic cord later, as the hole may shrink slightly during baking.
Stone Texture Trick
Before baking, roll your raw beads over a piece of coarse sandpaper or a textured sponge. This imparts a subtle pitting that makes the faux stone look incredibly realistic.
Step 3: Creating the Speckles
-
Prepare the splatter station:
Place your raw beads on a sheet of paper inside a cardboard box. This will contain the mess from the next step. -
Mix paint consistency:
Dilute a small amount of black acrylic paint with a few drops of water. You want it fluid enough to flick, but not so watery that it drips. -
Apply the speckles:
Dip an old toothbrush into the thinned paint. Hold it over the beads and run your thumb across the bristles to flick tiny splatters of paint onto the clay surfaces. -
Rotate and repeat:
Let the first side dry for a minute, then gently roll the beads over to splatter the undersides. Aim for random distribution—some areas dense, some sparse. -
Add larger spots:
To mimic the larger mineral spots seen in the photo, use a fine-tip paintbrush or the end of a toothpick to manually dot a few larger, distinct black circles on random beads.
Paint Smearing?
If the black paint speckles smear when you try to varnish them, the paint wasn’t fully dry. Let the paint cure for at least an hour, or heat set it briefly with a hair dryer.
Step 4: Baking and Finishing
-
Bake the beads:
Arrange the beads on a baking sheet or tile. Bake according to your brand of polymer clay instructions (usually 275°F/135°C for 15-30 minutes). Let them cool completely. -
Sand for texture:
Once cool, lightly sand the beads under running water with 400 grit, then 800 grit sandpaper. This removes fingerprints and gives them a smooth, stone-like feel. Be careful not to sand off your painted speckles entirely; a light touch is key. -
Seal the surface:
Apply a very thin coat of matte or satin varnish to protect the paint. Avoid glossy finishes, as natural jasper usually has a duller luster.
Step 5: Assembly
-
Measure the cord:
Cut a piece of elastic cord about 10 inches long. Pre-stretch it by pulling on it firmly a few times; this prevents the bracelet from stretching out later. -
String the beads:
Thread your faux Dalmatian beads onto the cord. Incorporate one solid black accent bead (either purchased or made from black clay) to break up the pattern, just like in the example photo. -
Check fit:
Wrap the strand around your wrist to check the sizing. Add or remove beads as necessary for a comfortable fit. -
Tie the knot:
Tie a surgeon’s knot (right over left twice, then left over right twice). Pull the knot tight. -
Secure the knot:
Apply a tiny drop of superglue or knot cement to the knot. Let it dry for a few seconds before trimming the excess cord close to the knot. -
Hide the knot:
Ideally, slide the adjacent bead over the knot to hide it inside the hole for a professional finish.
Now you have a durable, custom-fit bracelet that carries the cool, earthy aesthetic of natural stone.
Black-and-Gray Marble Swirl Disks

This sophisticated men’s bracelet balances rugged textures with polished elements for a modern, versatile accessory. Featuring porous black lava stones alongside smooth gray and white focal beads, the design is elevated by sleek silver spacers creating a professional yet casual look.
Detailed Instructions
Materials
- 20-22 Black lava rock beads (8mm)
- 2 Matte gray stone beads (8mm, e.g., map stone or gray jasper)
- 1 White howlite or marble bead (8mm)
- 1 Black patterned barrel bead or decorative resin bead
- 1 Black round accent bead (8mm)
- 10-12 Silver metal spacer rings (flat or disc style, approx 6-8mm)
- Strong elastic stretch cord (0.8mm or 1mm transparent)
- Jewelry glue or clear nail polish
- Scissors
Step 1: Preparation
-
Measure and cut:
Begin by measuring your wrist circumference. Cut a length of elastic cord about 4 inches longer than your measurement to allow ample room for tying knots comfortably. -
Pre-stretch the cord:
Hold both ends of the elastic cord and give it several firm (but not breaking) tugs. This step is crucial because it removes the initial slack from the elastic, preventing your bracelet from sagging after the first wear. -
Plan your layout:
Lay your beads out on a bead board or a soft towel to visualize the design. The centerpiece of this bracelet is a symmetrical arrangement of gray, white, and silver elements, while the rest of the band consists of solid black lava stone.
Knot Slipping?
If your elastic knot feels slick and won’t hold, dust the ends lightly with cornstarch or baby powder before tying. The powder adds grip to smooth silicone surfaces.
Step 2: Creating the Focal Section
-
Start the center:
Thread the single white howlite bead onto the cord; this will act as the exact middle of your focal point. -
Add first spacers:
Slide one silver metal spacer ring on either side of the white center bead. -
Add gray contrast:
On both sides, next to the spacers, thread on one smooth matte gray stone bead. -
Second spacer layer:
Place another silver spacer ring on the outer side of each gray bead. -
Add asymmetry (left side):
Working on just one side now (let’s call it the left), add the decorative black patterned barrel bead. Follow it immediately with another silver spacer. -
Add asymmetry (right side):
On the opposite side (the right part of your layout), add a simple black round accent bead, followed by a silver spacer. I like doing this to create a bit of visual interest without making it fully uniform.
Pro Tip: Essential Oils
Lava rocks are naturally porous! Add a drop of cologne or essential oil to the black beads. They act as a diffuser, holding the scent for 1-2 days.
Step 3: Completing the Band
-
Transition to lava stone:
On both ends of your now-formed centerpiece, began adding black lava rock beads. Add one bead to the left, then one to the right, alternating back and forth. -
Check the fit:
Continue adding lava beads until the strand reaches the desired length for your wrist. Wrap it around your wrist occasionally to check the fit; it should be snug but not tight. -
Verify symmetry:
Ensure you have an equal number of black lava beads on each side of the centerpiece so the white bead sits exactly on top of your wrist when worn.
Step 4: Finishing
-
Tie the surgeon’s knot:
Bring the two ends of the cord together. Tie a standard overhand knot, but loop the elastic through twice instead of once before pulling tight. This is a surgeon’s knot. -
Tighten securely:
Pull the cords tight slowly and firmly. You want to eliminate gaps between the beads without making the bracelet buckle or curve unnaturally. -
Secure with glue:
While holding tension on the knot, apply a tiny drop of jewelry glue or clear nail polish directly onto the knot. Allow it to set for a few moments. -
Hide the knot:
Trim the excess cord tails close to the knot (leave about 1-2mm). Gently pull the elastic so the knot slides inside the hole of the nearest lava bead to hide it completely.
Wear your new stone bracelet stacked with a watch for a sharp, rugged accent to your daily style
Geometric Bead Mix With Clean Lines

This masculine accessory combines the raw textures of unfinished wood with the sharp geometry of black spacer beads for a look that is both sophisticated and grounded. It features a pleasing alternating pattern of earthy tones and bold shapes, perfect for everyday wear.
Step-by-Step
Materials
- Stretch cord (0.8mm or 1mm thickness)
- Black cubic wood or matte beads (6-8mm)
- Light beige round beads (8mm, possibly clay or unfinished wood)
- Dark brown/amber wood round beads (8mm)
- Off-white bone/clay round beads (8mm)
- Striped round beads (8mm, cream with dark pinstripes)
- Jewelry adhesive or clear nail polish
- Scissors
Step 1: Planning the Pattern
-
Establish the length:
Begin by cutting a length of stretch cord about 10-12 inches long. This gives you plenty of extra room for tying knots without struggling against tension. -
Pre-stretch the cord:
Give your cord a few firm tugs before you start threading. I find this helps preventing the bracelet from stretching out permanently after the first few times you wear it. -
Sort your palette:
Lay out your beads on a bead board or a towel. Group them by type: black cubes, light beige rounds, dark brown rounds, bone-colored rounds, and the striped accents. -
Design the sequence:
Draft the pattern flat before threading. The key to this look is irregular repetition. Start with a black cube, follow with three beige rounds, another black cube, then transition into the darker wood tones.
Step 2: Stringing the Beads
-
Start strong:
Place a bead stopper or a piece of tape on one end of the cord so beads don’t slide off while you work. -
First segment:
Thread a black cube bead followed by three textured light beige round beads. These light beads act as a spacer group between the geometric accents. -
Add the first accent:
Slide on another black cube, followed by three more light beige rounds to mirror the first section. -
Introduce dark tones:
Switch to the warm brown elements. Add a black cube, then string a mix of dark brown wood beads and bone-colored beads. -
The striped focal point:
Around the halfway point or ‘back’ of the bracelet design, introduce the striped spherical beads. Use one, followed by a black cube, and perhaps another striped bead later for balance. -
Complete the circle:
Continue the pattern until you reach the desired length (usually 7-8 inches for a men’s wrist). End with a bead that complements the starting bead to hide the knot effectively.
Knot Slipping?
If the knot won’t stay tight, try sanding the tips of the elastic cord lightly before tying to create friction, or use a tiny dab of glue while the knot is loose, then tighten.
Step 3: Finishing Touches
-
Check the fit:
Wrap the unfinished strand around your wrist to verify sizing. It should sit comfortably without pinching skin or hanging too loose. -
Tie the surgeon’s knot:
Bring ends together. Cross right over left, then left over right, looping the top cord through the loop twice before pulling tight. This double-loop makes the knot extra secure. -
Cin ch tight:
Pull all four strands (the two tails and the two loop sides) firmly to lock the knot in place. -
Secure with glue:
Apply a tiny dot of jewelry adhesive or clear nail polish directly onto the knot. Let this dry for a moment before trimming. -
Hide the knot:
Trim the excess cord close to the knot, then gently pull the bracelet to slide the knot inside the hole of the nearest large bead, preferably one of the 8mm round ones.
Mix Up Textures
Swap the round wood beads for lava stone to make this an essential oil diffuser bracelet. The porous surface holds scent for days.
Slip on your new geometric bracelet and enjoy the subtle blend of modern lines and natural textures
Imprinted Texture Beads for a Rugged Finish
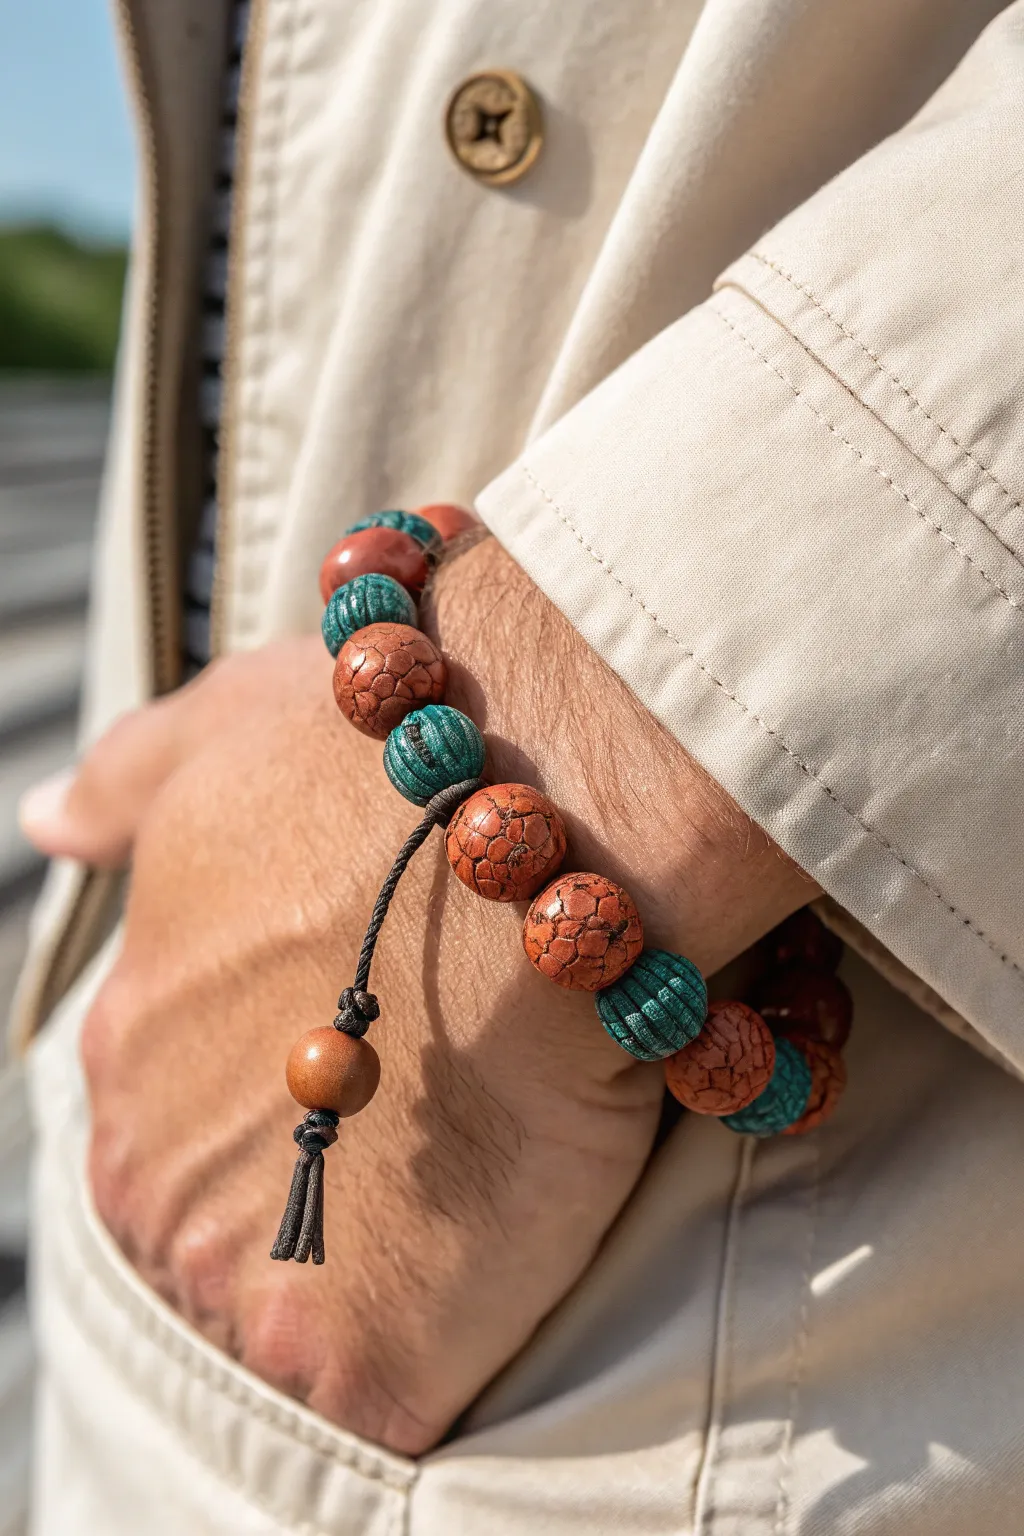
This masculine bracelet combines earthy terracotta tones with deep teal accents, featuring beads with distinct, tactile textures. The cracked-earth effect on the brown beads contrasts beautifully with the ribbed groove pattern on the teal ones, creating a rugged look perfect for everyday wear.
Step-by-Step Guide
Materials
- Polymer clay (terracotta/clay red)
- Polymer clay (teal or turquoise)
- Black acrylic paint
- Thick dark brown or black cord (1mm-1.5mm)
- Bead roller (optional)
- Texturing tool (crackle stamp or crumpled foil)
- Needle tool or toothpick
- Comb or serrated clay tool
- Paper towels
- Oven for baking
Step 1: Crafting the Terracotta Beads
-
Condition the Clay:
Start by taking your terracotta-colored polymer clay and kneading it in your hands until it becomes soft and pliable. This ensures the clay won’t crack unwantedly and holds the texture well. -
Form Basic Spheres:
Roll the clay into a log and slice it into equal segments. Roll each segment between your palms to create smooth, uniform spheres about 12-14mm in diameter. -
Create the Cracked Texture:
To achieve that signature rugged look, gently press a texturing tool into the surface of each terracotta bead. A piece of crumpled aluminum foil works okay, but for the specific defined scales shown, I prefer using a small hexagonal mesh or a specific ‘reptile skin’ texture stamp. -
Pierce the Holes:
While the beads are still raw, carefully pierce a hole through the center of each one using a needle tool. Ensure the hole is wide enough to accommodate your thick cord later—wiggle the tool a bit to widen it. -
Refine the Shape:
Handling the beads might have distorted them slightly. Gently roll them again very lightly to regain roundness without smoothing out your fresh texture.
Texture Pro Tip
If you don’t have a texture stamp, dry a small patch of clay, create cracks in it, make a mold of it, and use that raw mold to stamp your fresh beads.
Step 2: Crafting the Teal Grooved Beads
-
Prepare Teal Clay:
Clean your hands to avoid color transfer, then condition the teal polymer clay just as you did the red. -
Shape Teal Beads:
Create spheres that are slightly smaller or the same size as your terracotta ones. Aim for consistency in size for a professional finish. -
Add Grooved Texture:
Take a fine-toothed comb or a serrated clay tool. Gently roll the bead over the tool or press the tool into the bead repeatedly to create parallel vertical lines around the circumference, mimicking a carved wood effect. -
Pierce and Check:
Pierce holes in these beads as well, double-checking that the hole size matches the previous set.
Level Up: Scented Beads
Mix a drop of essential oil like cedarwood or sandalwood into the clay before baking (porous clay works best) or apply it to the finished beads for a subtle scent.
Step 3: Baking and Antiquing
-
Bake the Beads:
Arrange all your beads on a baking sheet lined with parchment paper. Bake according to the manufacturer’s instructions for your specific brand of clay (usually around 275°F/135°C for 15-30 minutes). -
Cool Down:
Let the beads cool completely before handling. They are fragile when hot. -
Apply Antiquing Paint:
To highlight the textures, brush a wash of diluted black acrylic paint over the beads. You want the paint to get deep into the cracks and grooves. -
Wipe Away Excess:
Immediately wipe the moist paint off the surface with a paper towel. The paint will stay trapped in the crevices, creating a shadowed, rugged depth. -
Seal (Optional):
If you want extra durability, apply a matte varnish. Avoid glossy finishes as they detract from the natural, earthy vibe.
Step 4: Assembly
-
Prepare the Cord:
Cut a length of thick brown cord, about 12 inches long. Tie a simple overhand knot roughly 3 inches from one end to act as a stopper. -
String the Pattern:
Thread your beads onto the cord. The pattern in the image alternates groups: one teal, one terracotta, then repeat, or one teal flanked by two terracotta. Find a rhythm that looks good to you. -
Create the Slider Knot:
Once all beads are on, bring the two cord ends together overlapping. Use a shorter piece of spare cord to tie a square knot or ‘macramé sliding knot’ over the two parallel strands. This makes the bracelet adjustable. -
Finish the Ends:
Add one small bead to each loose end of the pull cords and tie a secure knot at the very tip to prevent them from slipping through. Trim any excess cord.
Now you have a rugged, custom accessory that looks like it was carved from natural stone
Topographic Line Pattern Disks
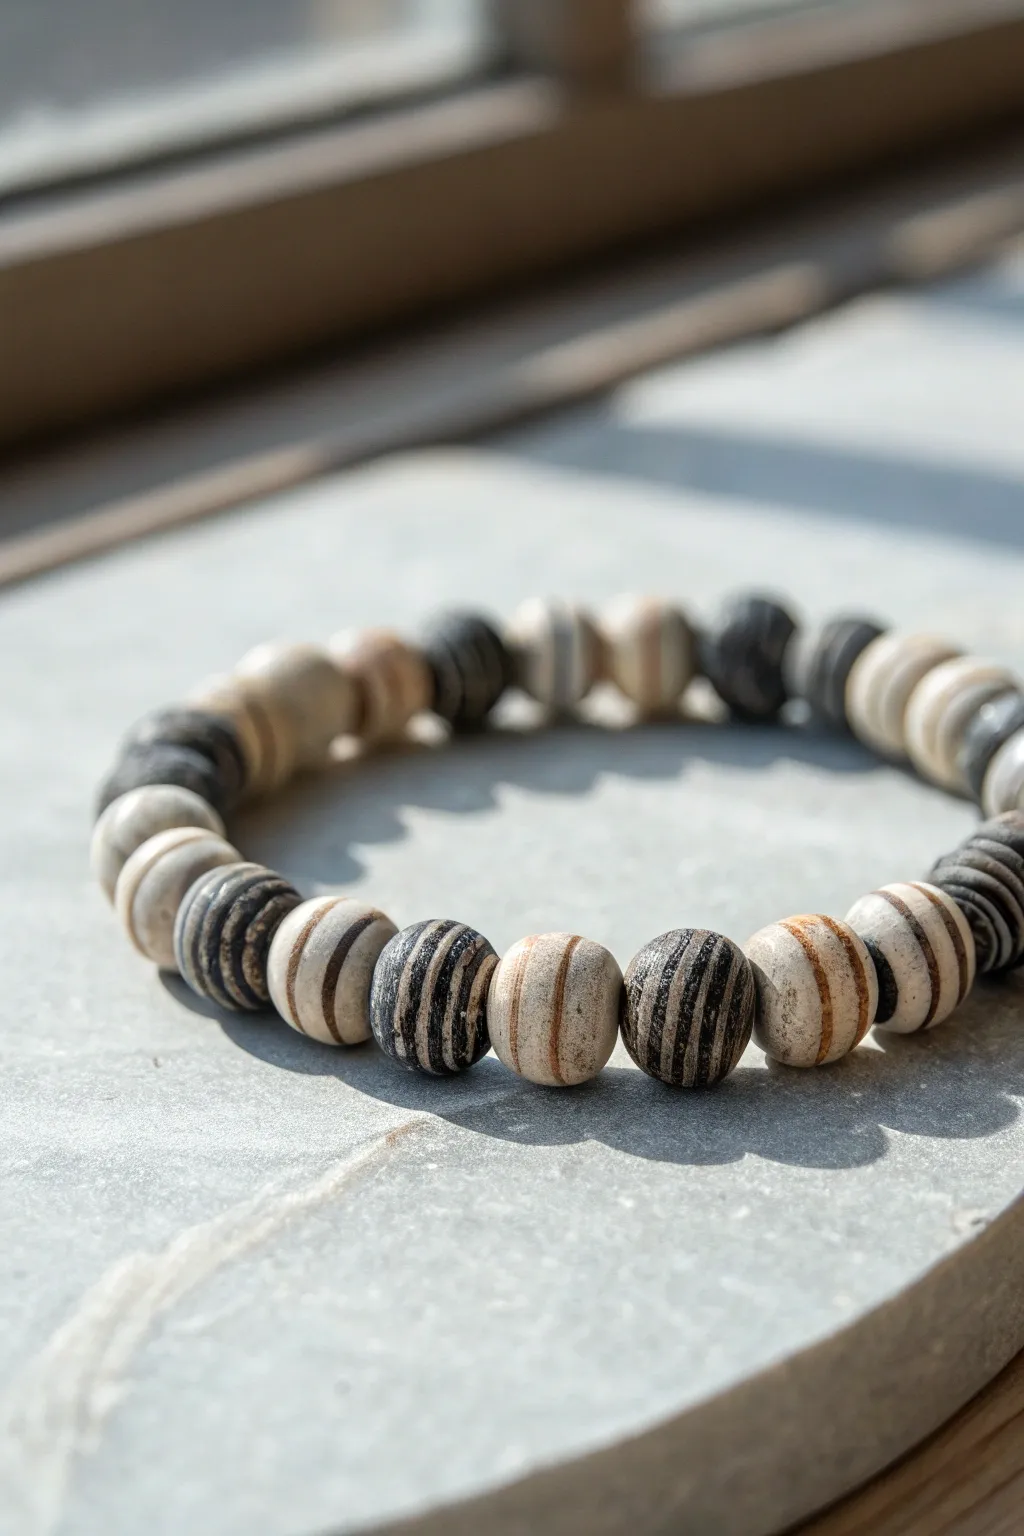
This rugged, earthy bracelet mimics the contour lines found on topographical maps, creating a sophisticated textured look perfect for everyday wear. By layering contrasting polymer clays, you can achieve organic strata that make each bead completely unique.
Step-by-Step Tutorial
Materials
- Polymer clay in beige/sand
- Polymer clay in black or dark charcoal
- Acrylic roller
- Tissue blade or sharp clay knife
- Bead piercing pin or needle tool
- Elastic cord (0.8mm or 1mm)
- Super glue or jewelry cement
- Wet/dry sandpaper (400 and 800 grit)
- Oven for baking
Step 1: Creating the Mokume Gane Stack
-
Condition the clay:
Start by thoroughly conditioning your beige and black polymer clay separately until they are soft and pliable. You want about equal amounts of each color, roughly a 2-ounce block of each for a full bracelet. -
Roll out sheets:
Using your acrylic roller or a pasta machine, roll the beige clay out to a medium thickness (setting 3 or 4). Do the same for the black clay. Aim for sheets that are approximately 2-3mm thick. -
Cut and stack:
Cut squares from your clay sheets, roughly 2 inches by 2 inches. Stack them in an alternating pattern: beige, black, beige, black. Continue until you have a stack about 1.5 inches high. -
Consolidate the block:
Gently compress the stack from the top and sides to remove trapped air. Roll over the top lightly with your acrylic roller to ensure the layers bond together firmly. -
Create the distortion:
Take the rounded handle of a paintbrush or a specialized rounded tool and press it deeply into the top of the stack. Make several indentations, pressing almost to the bottom but not quite through. -
Heal the block:
Push the sides of the block back together to interpret those holes. The goal is to distort the flat layers into wavy, topographic lines inside the block without leaving gaping holes.
Step 2: Forming the Beads
-
Slice the pattern:
Using your tissue blade, carefully slice thin layers off the top of your distorted block. As you slice, you will reveal the beautiful striped bullseye-like patterns. -
Prepare the core:
Roll some scrap clay (or leftover plain beige clay) into small balls, approximately 8-10mm in diameter. These will act as the base for your patterned slices. -
Cover the cores:
Wrap your patterned slices around the scrap clay balls. This veneers the bead with the design while saving your detailed stack for the surface. -
Roll into shape:
Roll the veneer-covered ball between your palms. Apply gentle pressure to smooth the seams where the projected slices meet. I find that cupping your hands slightly helps maintain a perfect round shape. -
Flatten the poles:
Gently press the spherical bead against your work surface, then flip and press again to create a rondelle or slightly flattened disk shape rather than a perfect sphere. -
Pierce the holes:
While the clay is still raw, use your bead piercing pin to create a hole through the center of the flattened sides. Twisting the pin as you push prevents the bead from squashing.
Muddy Patterns?
If your stripes look smeared, your clay might be too soft. Pop the stacked block in the fridge for 20 minutes before slicing to get crisp, clean lines.
Step 3: Finishing and Assembly
-
Bake the beads:
Arrange your beads on a baking sheet or tile. Bake according to your specific brand of polymer clay’s instructions (usually 275°F/135°C for 30-45 minutes). -
Cool and sand:
Allow the beads to cool completely. Once cool, wet sand them under running water, starting with 400 grit to remove fingerprints and moving to 800 grit for a smooth, matte stone-like finish. -
Buff (Optional):
Rub the beads briskly with a piece of denim or a soft cloth. This doesn’t make them glossy but gives them a subtle, professional sheen that highlights the topographic lines. -
String the beads:
Cut a length of elastic cord about 10 inches long. Pre-stretch the elastic by pulling it firmly a few times to prevent sagging later. Thread your finished beads onto the cord. -
Tie the knot:
Tie a secure surgeon’s knot (right over left, left over right twice). Pull the knot tight, apply a tiny drop of super glue or jewelry cement to the knot, and let it dry before trimming the excess cord.
Add Texture
Before baking, roll the finished raw beads lightly over a piece of coarse sandpaper or a concrete surface to give the ‘stone’ a realistic pitted texture.
Now you have a rugged, custom accessory that brings a bit of the outdoors to your wrist style.
Hidden Glow Accent in a Dark Stack
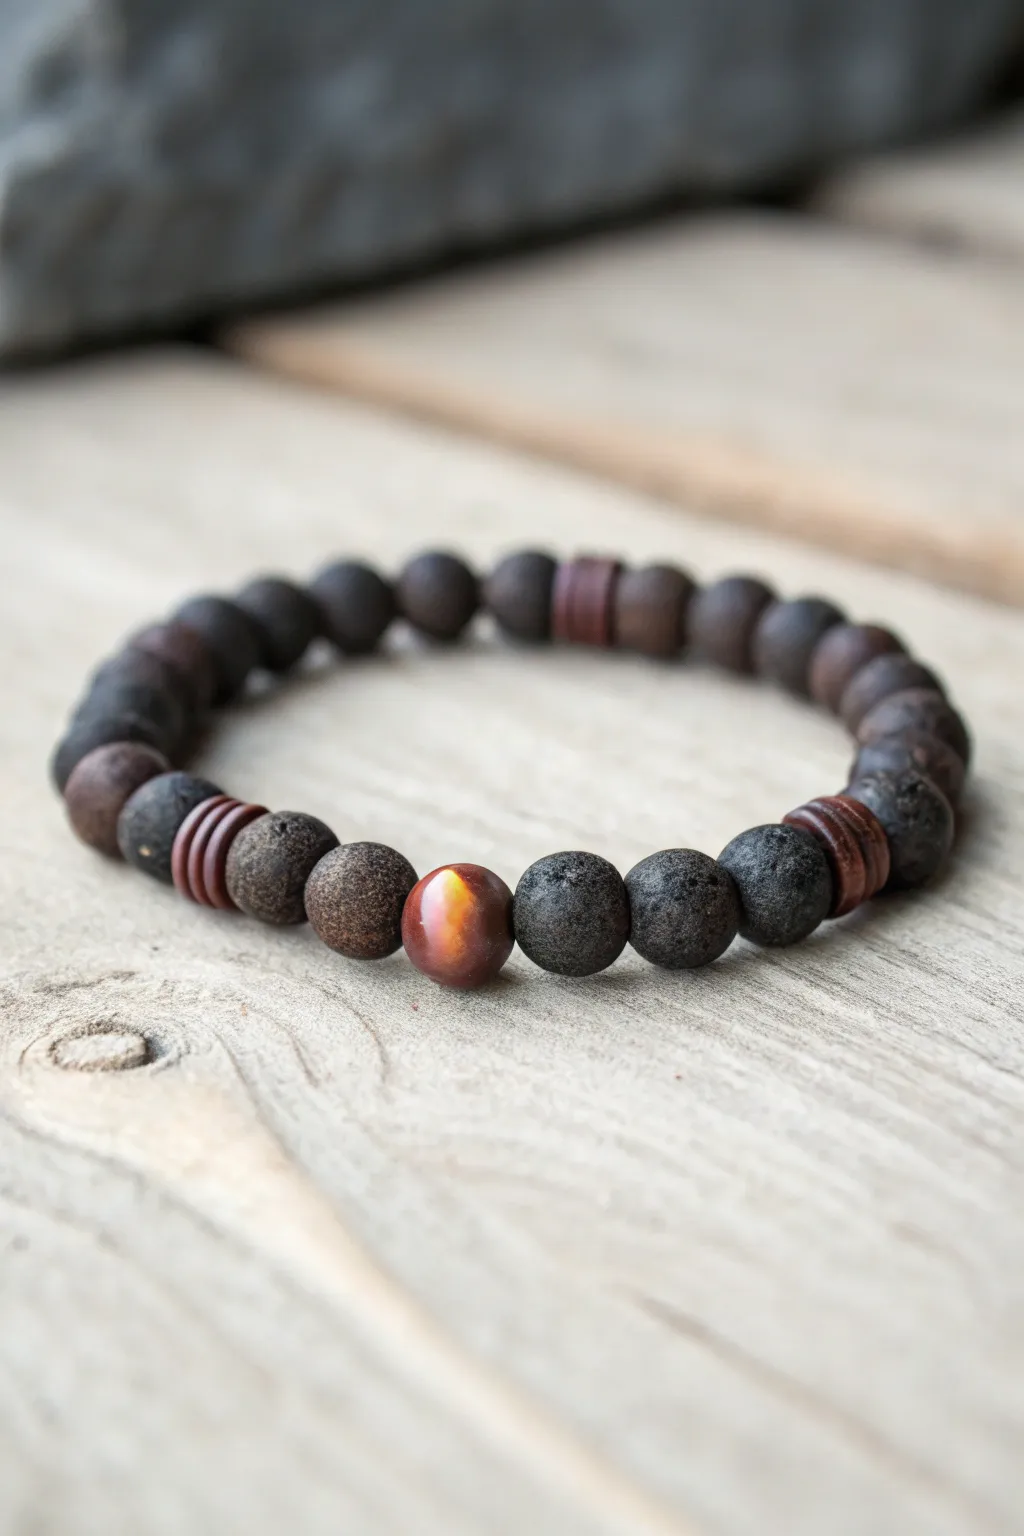
This masculine design balances rugged textures with a single point of warmth, featuring a glowing focal bead nestled among dark, porous stones. It’s a perfect everyday accessory that combines earthy lava rock aesthetics with a distinct, fiery centerpiece.
How-To Guide
Materials
- 10mm black lava rock beads (approximately 16-18 beads)
- Singular 10mm red tiger’s eye or amber resin bead (the ‘glow’ bead)
- Dark wood spacers or coconut shell heishi beads (4-6 pieces)
- 0.8mm durable clear elastic stretch cord
- Jewelry adhesive or G-S Hypo Cement
- Scissors
- Bead stopper or masking tape
- Ruler or measuring tape
Step 1: Planning and Sorting
-
Measure your wrist:
Wrap a measuring tape loosely around your wrist where you want the bracelet to sit. Add about 0.5 to 1 inch to this measurement depending on how loose you prefer the fit. -
Cut the cord:
Cut a piece of elastic cord about 10-12 inches long. Having extra length makes the final knotting process much less frustrating than struggling with short ends. -
Pre-stretch the elastic:
Hold the cord firmly at both ends and give it several gentle tugs. This pre-stretching prevents the bracelet from becoming loose and gaping shortly after you start wearing it. -
Secure the end:
Place a bead stopper or a piece of masking tape on one end of your cord so your beads don’t slide off while you are designing the pattern. -
Layout your design:
On a bead board or soft towel, arrange your beads to test the pattern. Place the glowing focal bead in the center, flanked by the dark lava stones.
Natural Diffuser Tip
Since lava rocks are porous, you can add 1-2 drops of essential oil (like cedarwood or sandalwood) to the black beads. They will hold the scent for a day or two.
Step 2: Stringing the Beads
-
Start with the back section:
Begin threading the standard black lava beads. Thread about half of the total number of common beads you plan to use. -
Add first spacers:
Unlike the image which shows multiple spacer sections, start simpler if you wish, or follow the photo by adding two thin coconut shell spacers after your first run of black beads. -
Position the focal bead:
Thread one or two more black lava beads, then slide on your glowing red tiger’s eye or amber bead. This creates the ’ember’ effect centrally in the design. -
Mirror the design:
Add the corresponding black lava beads to the other side of the focal bead to match what you just did. -
Insert second spacers:
Add your second set of coconut shell spacers. I like to double-check symmetry here to ensure the focal bead will sit exactly in the middle of the wrist. -
Finish the loop:
Thread the remaining black lava beads to complete the circle. Wrap it around your wrist to check the fit before tying.
Knot Slipping Out?
If the knot keeps popping out of the bead hole, the bead hole might be too small. Try hiding the knot inside one of the larger-hole spacers instead.
Step 3: Securing the Knot
-
Prepare the knot:
Remove the bead stopper carefully, holding both open ends of the elastic cord securely. -
Refine the tension:
Bring the ends together and remove any slack between the beads, but don’t pull so tight that the bracelet physically buckles or twists. -
Tie a surgeon’s knot:
To tie a surgeon’s knot, cross the strands like a normal overhand knot, but loop the end through twice instead of once before pulling tight. -
Tie a second knot:
Tie one more standard overhand knot on top of the surgeon’s knot to lock it in place. -
Apply adhesive:
Place a tiny drop of jewelry glue or cement directly onto the knot. Allow this to dry for at least 15 minutes before touching it. -
Hide the knot:
Once the glue is tacky but not fully hard, trim the excess cord ends to about 2mm. Gently tug the cord to slide the knot inside the hole of the nearest large lava bead.
Wear your new bracelet solo or stacked with a leather band for a textured, stylish look