If you’re making clay bead bracelets to sell, the secret sauce is a clear vibe: a tight color palette, a repeatable formula, and that “I need the whole stack” energy. Here are my favorite sellable designs that look current, photograph beautifully, and are easy to batch-produce in your studio.
Classic Rainbow Heishi Stack
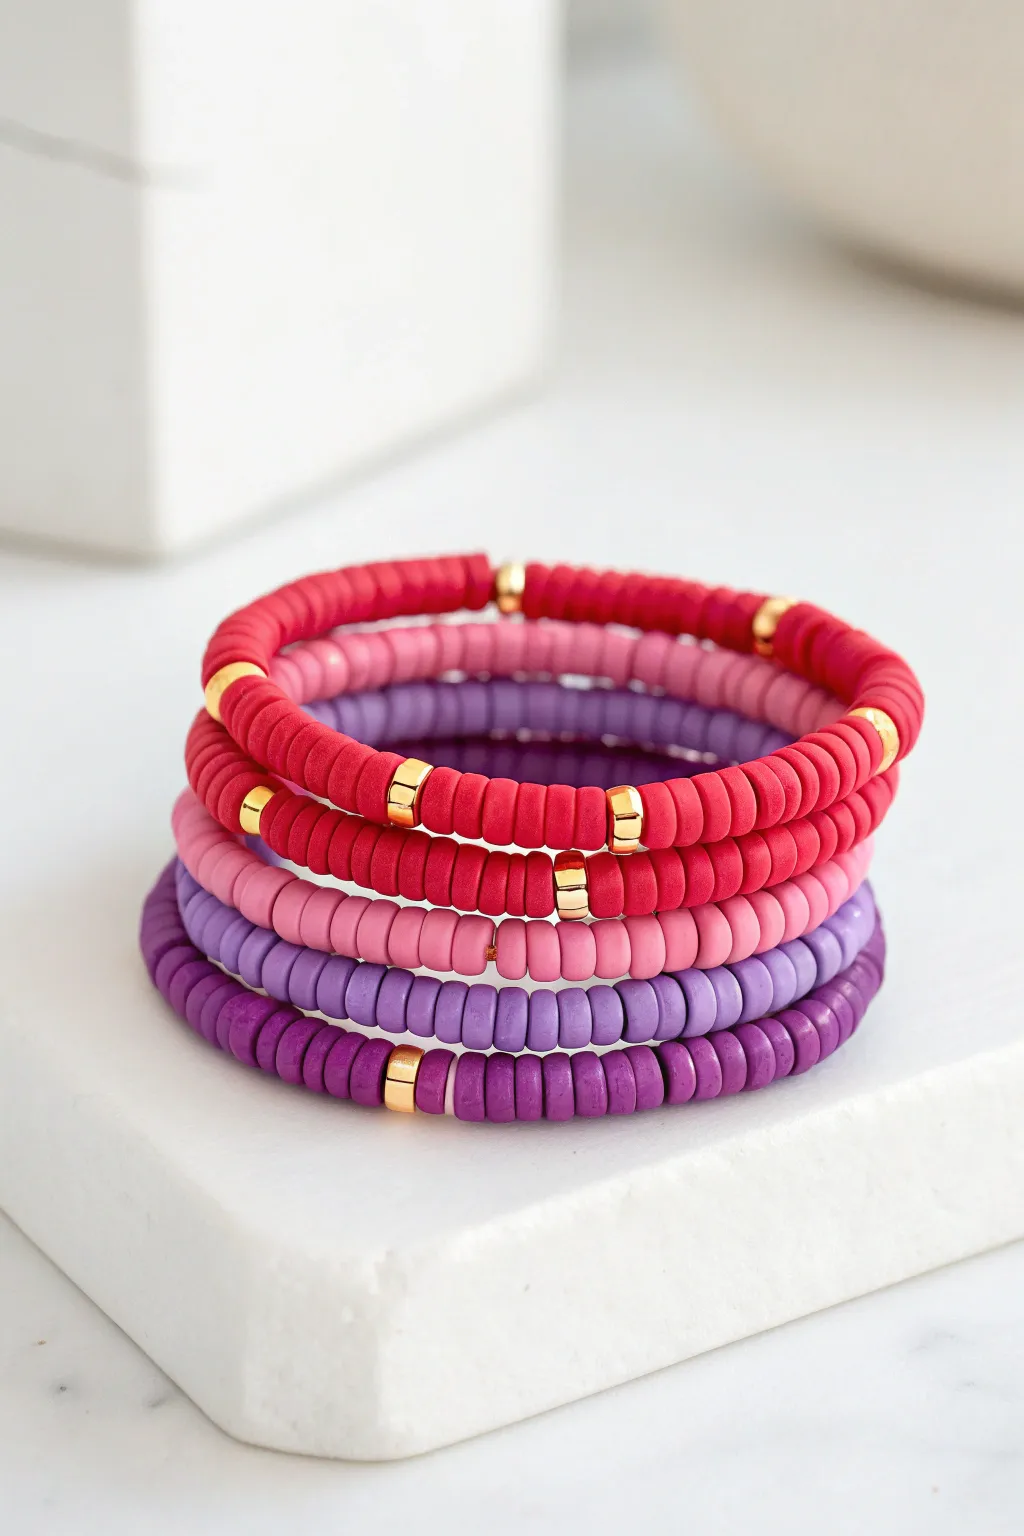
Embrace the warmth of a setting sun with this vibrant stack of five heishi bead bracelets in graduating shades of red, pink, and purple. Accented with sleek gold square spacers, these bracelets offer a polished look that mixes casual texture with a touch of elegance.
Step-by-Step
Materials
- 6mm Heishi polymer clay beads in Deep Red
- 6mm Heishi polymer clay beads in Hot Pink
- 6mm Heishi polymer clay beads in Light Pink
- 6mm Heishi polymer clay beads in Lavender
- 6mm Heishi polymer clay beads in Deep Purple
- Red gold plated square accent beads (approx. 3-4mm)
- Small gold round embellishment beads (optional)
- 0.8mm clear elastic stretch cord
- Jewelry adhesive (e.g., E6000 or G-S Hypo Cement)
- Scissors
Step 1: Preparation and Design
-
Measure your wrist:
Start by measuring your wrist with a flexible tape measure. Add about half an inch to this measurement to ensure the bracelets sit comfortably without pinching. -
Cut the cord:
Cut five strands of elastic cord, each about 10-12 inches long. Having extra length makes tying the final knots much easier than struggling with short ends. -
Pre-stretch the elastic:
Gently pull on each strand of elastic several times. This pre-stretching technique I like to use ensures the cord won’t sag immediately after you’ve finished your project.
Sticky Situation?
If the knot won’t slide into a bead hole, don’t force it. Instead, enlarge the hole of the bead next to the knot using a bead reamer or a thick needle.
Step 2: Creating the Red & Pink Bracelets
-
Start the deep red strand:
Secure one end of your first cord with a bead stopper or a piece of tape. Begin threading the Deep Red heishi beads. -
Add gold accents:
After approximately every 15-20 red beads, slide on a gold square spacer. Continue this pattern until you reach the desired length. -
Create the hot pink strand:
Repeat the previous step with the Hot Pink beads. For variety, try spacing the gold accents differently, perhaps every 10 beads, or keep it uniform for a symmetrical look. -
Thread the light pink solid strand:
For the middle bracelet, use only the Light Pink heishi beads. Creating a solid-color band without gold accents acts as a visual ‘breather’ in the stack.
Pro Tip: Batching
Use a bead spinner to thread the solid-colored sections quickly. It saves significant time compared to picking up heishi beads one by one!
Step 3: Creating the Purple Bracelets
-
Make the lavender strand:
Thread the Lavender beads onto the fourth cord. Similar to the light pink strand, keep this one solid color to emphasize the gradient transition. -
Assemble the deep purple strand:
For the final bottom bracelet, use the Deep Purple beads. Reintroduce the gold square spacers here, placing one every inch or so to tie the design back to the top red layers. -
Check the fit:
Wrap each unfinished strand around your wrist to verify the sizing. The ends should touch comfortably without gaps exposing the elastic.
Step 4: Finishing Touches
-
Tie the first knot:
Remove the tape or stopper. Bring the two ends of the elastic together and tie a standard overhand knot, pulling it tight to bring the beads together. -
Secure with a surgeon’s knot:
Follow up with a surgeon’s knot: loop the ends over each other twice before pulling tight. This provides extra security against slipping. -
Apply adhesive:
Place a tiny drop of jewelry adhesive directly onto the knot. Be careful not to get glue on the surrounding clay beads, as it can be hard to remove. -
Hide the knot:
While the glue is still slightly tacky, gently slide an adjacent heishi bead or gold spacer over the knot to conceal it inside the bead hole. -
Trim the excess:
Once the glue is fully dry (usually after 15-20 minutes), use sharp scissors to trim the excess elastic tail close to the bead. -
Repeat for all strands:
Perform the knotting and gluing process for the remaining four bracelets to complete your cohesive stack.
Wear your new gradient stack together for a bold statement or share individual bracelets with friends to spread the color.


Neutral Minimal Everyday Set
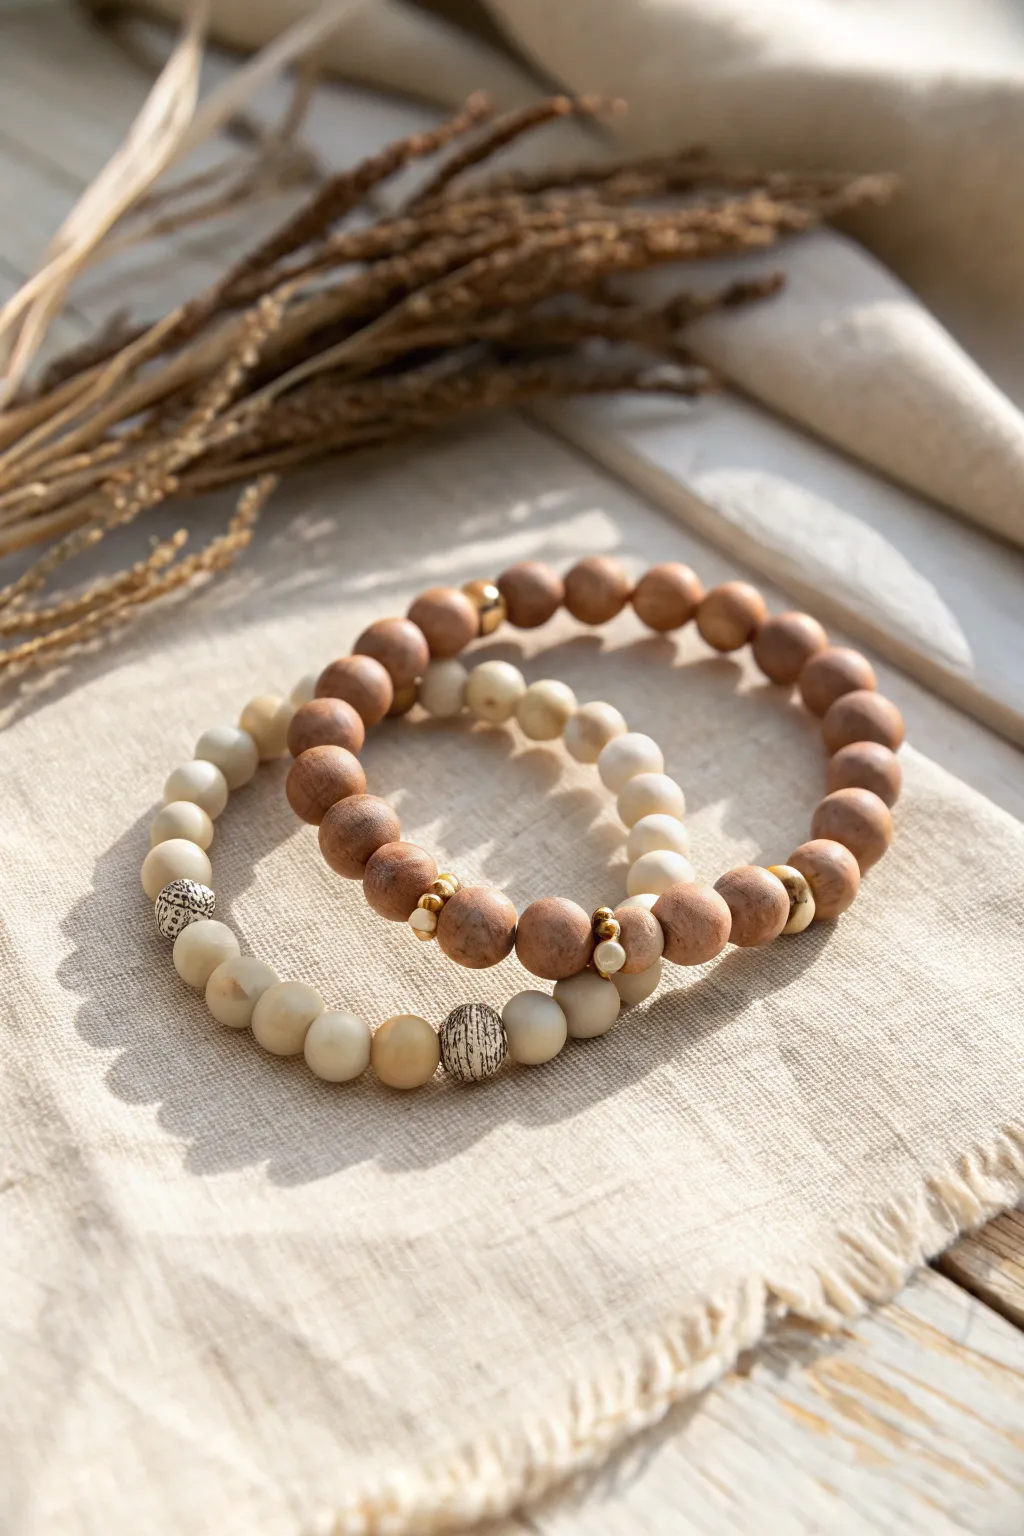
This serene matching set combines the warmth of natural wood with the cool smoothness of polished bone or clay. Perfect for everyday wear, these neutral-toned bracelets are easy to make and offer sophisticated, earthy elegance.
Step-by-Step Tutorial
Materials
- 8mm cream-colored bone or smooth clay beads (approx. 20)
- 8mm brown sandalwood or matte wood beads (approx. 20)
- 2 distinct patterned focal beads (carved bone or silver etched)
- Small gold spacer beads or tiny rondelles
- 0.8mm clear elastic stretch cord
- Jewelry adhesive or G-S Hypo Cement
- Scissors
Step 1: Planning and Measuring
-
Check fit:
Before cutting any cord, wrap a measuring tape around your wrist to find your size. Add about 0.5 inches for a comfortable fit that isn’t too tight. -
Prepare the cord:
Cut two pieces of elastic cord, each about 10-12 inches long. Having extra length makes tying the final knots much less frustrating. -
Pre-stretch:
Hold the ends of your cord segments and give them a few firm tugs. Pre-stretching the elastic prevents the bracelets from sagging or loosening shortly after you first wear them.
Sticky Situation
If the knot refuses to stay hidden inside a bead hole, use a bead reamer or a thick needle to gently widen the hole of the bead next to the knot.
Step 2: The Cream Bracelet
-
Start the sequence:
Begin threading your cream-colored beads onto the first cord. Stop when you have added about 5 or 6 beads. -
Add texture:
Slide on your first patterned focal bead. In the reference image, these have a unique black-and-white etched look that breaks up the solid color. -
Continue beading:
Add the remaining cream beads until you reach the desired length. I like to double-check the length against my wrist one last time before sealing it off. -
The Surgeon’s Knot:
Bring the two ends together. Tie a standard overhand knot, but loop the cord through a second time before pulling tight. -
Secure the ends:
Tie a second knot on top of the first for extra security. Pull the elastic firmly to ensure the knot sits snug between the beads.
Natural Scents
For a sensory upgrade, use porous unfinished lava beads or raw sandalwood. Add a drop of essential oil to these beads for long-lasting aromatherapy.
Step 3: The Wood Bracelet
-
Create the heavy base:
For the second bracelet, thread on approximately 10 of your darker brown wood beads. -
Insert gold accents:
To introduce a metallic touch, slide on a tiny gold spacer bead, followed by three wood beads, and another gold spacer. -
Symmetry check:
Finish the strand with the remaining wood beads, ensuring the gold spacers sit somewhat centrally or in a pattern you find pleasing. -
Knotting:
Repeat the Surgeon’s Knot method used for the first bracelet. Ensure the cord is pulled tight so no gaps show between the wooden beads.
Step 4: Finishing Touches
-
Apply adhesive:
Ideally, place a tiny dab of jewelry glue or G-S Hypo Cement specifically onto the knots. Be careful not to get glue on the beads themselves. -
Wait time:
Let the glue dry for at least 30 minutes before handling. Keep the bracelets flat while drying. -
Trim excess:
Once the glue is fully cured, use your scissors to snip the excess cord tails as close to the knot as possible. -
Hide the mechanism:
Gently tug the beads near the knot to slide the knot inside the hole of a neighboring bead, making the join invisible.
Pair your new bracelets with a linen outfit for a effortlessly coordinated look


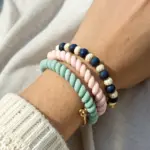
Pastel Candy Color Palette
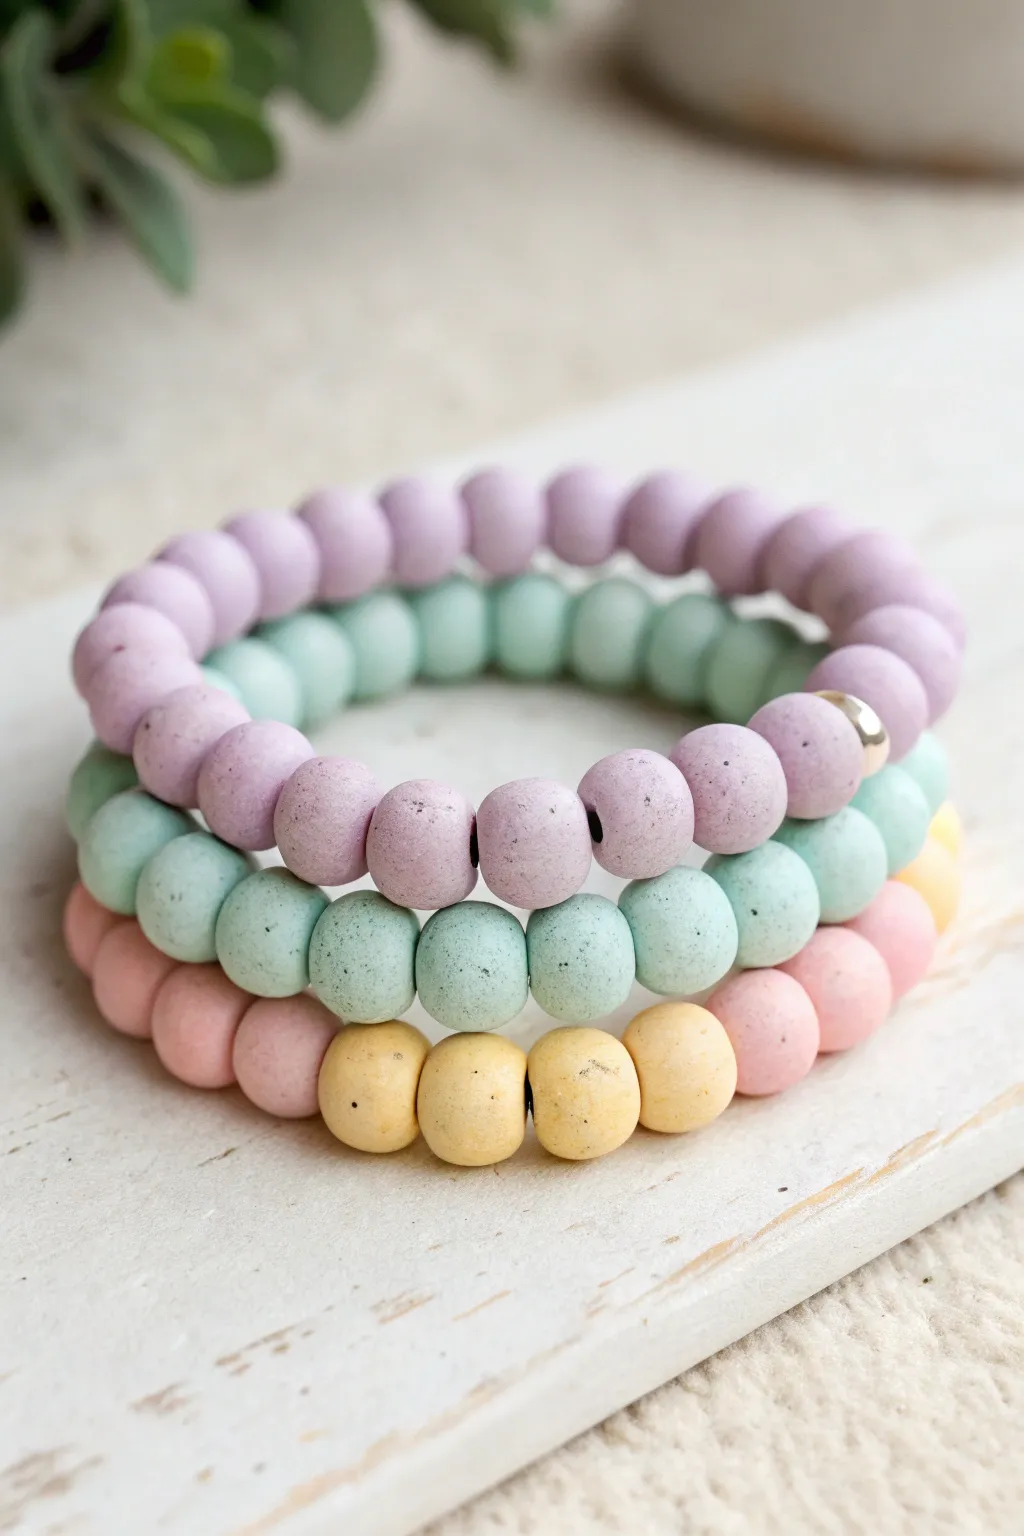
These charming bracelets evoke the soft, comforting hues of spring with their matte finish and speckled texture. By mixing solid strands with color-blocked designs, you can create a stackable set that feels like a sweet, sugary treat for your wrist.
Step-by-Step
Materials
- 10mm round matte acrylic or polymer clay beads (Lavender/Lilac)
- 10mm round matte acrylic or polymer clay beads (Mint Green)
- 10mm round matte acrylic or polymer clay beads (Pale Pink)
- 10mm round matte acrylic or polymer clay beads (Pale Yellow)
- Optional: 1 gold or silver spacer bead (round or disc)
- 0.8mm clear elastic stretch cord
- Jewelry adhesive (specifically for knots)
- Scissors or bead snips
- Bead stopper or tape
Step 1: Planning the Palette
-
Select your beads:
Gather your matte pastel beads. The key to this look is the specific finish—ensure they aren’t glossy. They should have a slightly porous, ceramic, or ‘terrazzo’ appearance with tiny speckles if possible to match the reference. -
Measure your wrist:
Wrap a piece of string around your wrist to find your size, then add about half an inch for a comfortable fit. For standard adult bracelets, this usually requires about 20-22 beads per bracelet depending on bead size.
Step 2: Bracelet 1: The Lavender Solid
-
Prepare the cord:
Cut a length of elastic cord about 10-12 inches long. This gives you plenty of extra room for tying knots later. -
Secure the end:
Place a bead stopper or a piece of tape on one end of the cord to prevent beads from sliding off as you work. -
String the beads:
Thread only the lavender beads onto the cord. Continue until you reach your desired length. -
Add a hidden accent:
If you wish to replicate the top bracelet perfectly, add a single metallic gold spacer bead at the very end of the strand to hide the knot later. -
Tie the knot:
Remove the bead stopper. Bring the two ends together and tie a surgeon’s knot (loop the right end over the left, traverse through the loop twice, then pull tight). Do this gently to pre-stretch the elastic slightly. -
Secure and trim:
Dab a tiny drop of jewelry adhesive onto the knot. Let it dry for a moment, then trim the excess cord close to the knot. Ideally, slip the knot inside the metallic spacer bead.
Sticky Situation
Does your knot keep slipping? Try ‘pre-stretching’ the elastic cord firmly before stringing beads. Use a surgeon’s knot (looping through twice) for extra grip.
Step 3: Bracelet 2: The Two-Tone Split
-
Start the second strand:
Cut another 12-inch piece of elastic and secure the end as before. -
Create the split pattern:
Thread roughly 10-11 mint green beads first. I find it helpful to lay them out on a board first to verify the halfway point. -
Finish the split:
Follow the green beads with an equal number of lavender beads to complete the circle. -
Knot and seal:
Repeat the surgeon’s knot technique, apply glue, and trim the ends. This bracelet relies on the cleaner block-color look rather than a random mix.
Pro Tip: Hiding Knots
Can’t hide the knot inside a bead? Use a bead reamer tool to gently widen the hole of the bead closest to your knot, allowing the knot to slide inside cleanly.
Step 4: Bracelet 3: The Tri-Color Block
-
Design the segments:
For the bottom bracelet, you will need three distinct color sections. Plan for approximately 7 beads of mint green, followed by 7 beads of pale pink, and finish with 7 beads of pale yellow. -
String the pattern:
Thread the beads in the order you laid them out: Green, Pink, then Yellow. This creates a soft ombre-like transition around the wrist. -
Check sizing:
Before tying, hold this bracelet up to the first two you made to ensure they are all exactly the same circumference for a unified stack appearance. -
Final assembly:
Tie the final surgeon’s knot, secure with adhesive, and trim the excess cord for your finished stack.
Wear your new pastel stack together or gift individual strands for a touch of soft color


Preppy Bright Color Block Stripes
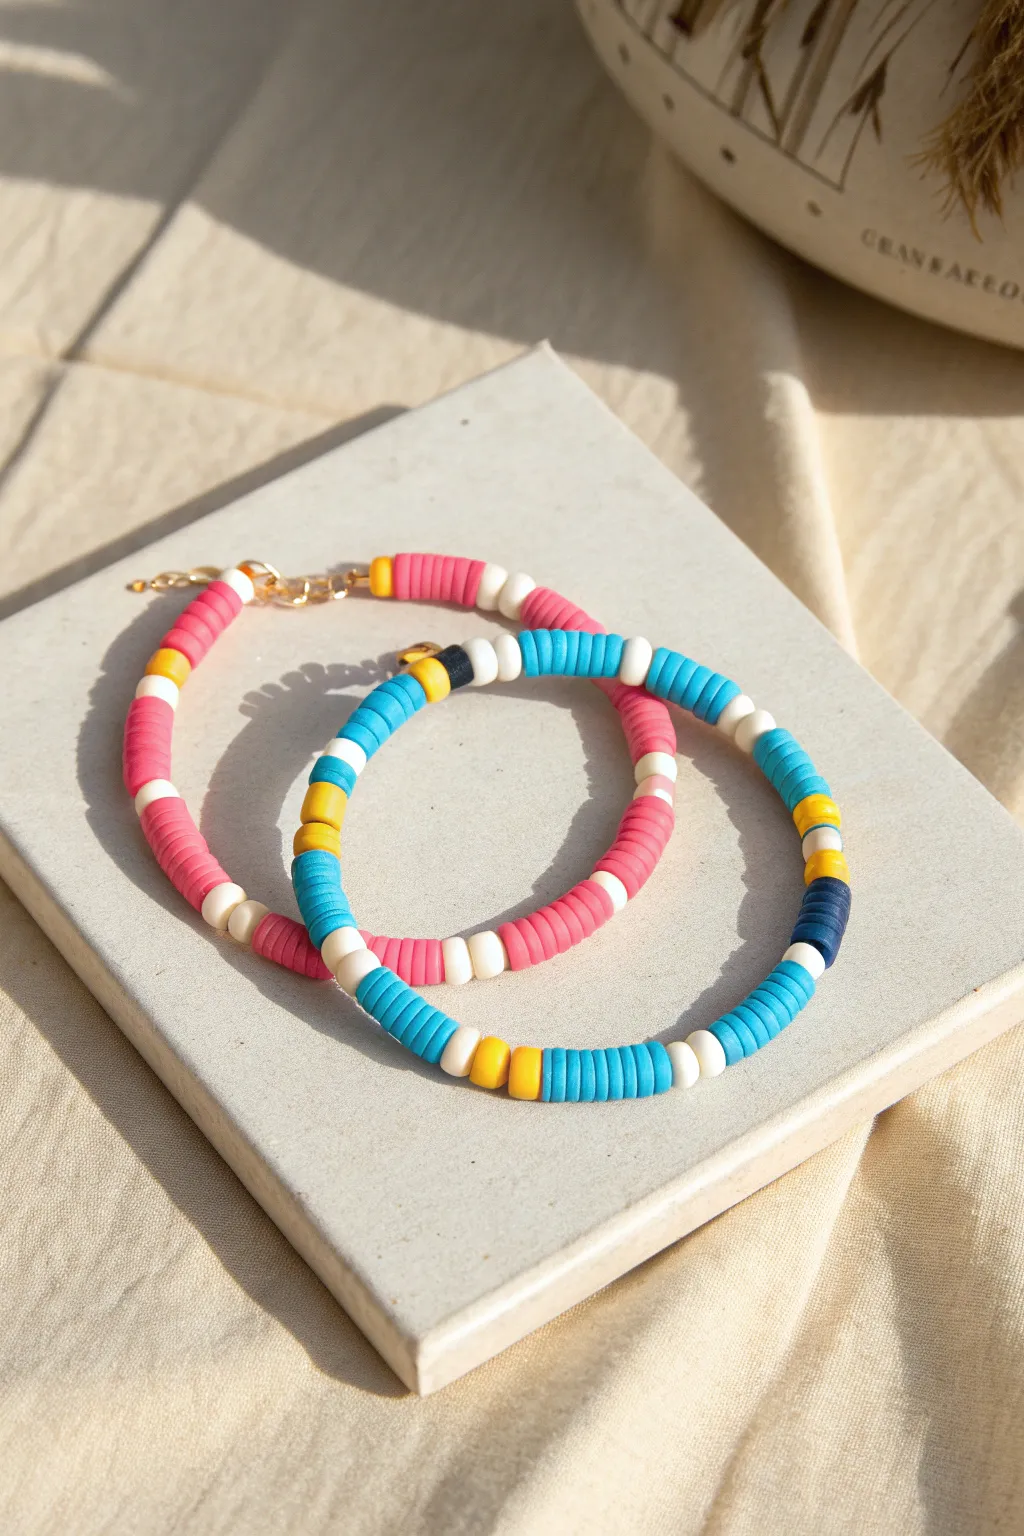
Brighten up any wrist stack with these cheerful, striped heishi bead bracelets featuring a preppy mix of hot pink, turquoise, and sunny yellow. These easy-to-make accessories rely on color blocking and high-contrast accents to create a trendy, boutique-worthy finish.
Step-by-Step Tutorial
Materials
- 6mm Polymer clay heishi beads (hot pink, turquoise blue, white, bright yellow, navy blue)
- 0.8mm clear elastic stretch cord
- Jewelry glue (GS Hypo Cement recommended)
- Scissors
- Crimp beads or clam shell bead tips (optional for closure)
- Gold tone jump rings and lobster clasp (optional for non-stretch version)
- Bead stopper or tape
- Ruler or measuring tape
Step 1: Planning the Design
-
Measure your wrist:
Start by wrapping a measuring tape around your wrist to find your size. Add about 0.5 inches to this measurement so the bracelet fits comfortably without pinching. -
Prepare the cord:
Cut a piece of elastic cord about 10-12 inches long. This extra length is crucial because it gives you plenty of room to tie a secure knot later without struggling. -
Secure the end:
Attach a bead stopper to one end of your cord, or simply tape it down to your table. I prefer using a piece of washi tape because it holds firm but peels off easily.
Knot Slipping?
If your elastic knot feels waxy or slips, wipe the cord ends with a little rubbing alcohol before tying to remove manufacturing sheen.
Step 2: Creating the Pink Color Block Pattern
-
Start the main block:
Begin threading your hot pink heishi beads. You want a solid block of color here, so add approximately 15 to 20 pink beads in a row. -
Add the first separator:
Slide on one single white bead. This acts as a crisp divider that makes the colors pop. -
Create the stripe accent:
Add a small section of contrast colors. Thread on 3 to 4 yellow beads followed by another single white bead. -
Repeat the pattern:
Return to your main color by adding another long block of 15-20 pink beads. Continue this pattern—long pink block, white spacer, short yellow stripe, white spacer—until you reach half your desired length. -
Incorporate the clasp area (method A):
If you are making the adjustable version shown in the back of the photo, you will stop beading about an inch short of your wrist size to accommodate the jump rings and lobster clasp hardware.
Step 3: Creating the Turquoise Color Block Pattern
-
Begin the blue pattern:
For the second bracelet, start with a block of turquoise beads, about 15 beads long. -
Insert spacers:
Add one white bead, followed by one yellow bead, then another white bead. The yellow here is just a tiny pop of color rather than a stripe. -
Add a navy accent:
Occasionally swap the yellow accent for a navy blue one to add depth. Thread a block of turquoise, a white bead, 3-4 navy beads, and a white bead. -
Check the fit:
Wrap the unfinished strand around your wrist to check the length. Add or remove a few main color beads to ensure the pattern looks balanced when the ends meet.
Pattern Harmony
For a cohesive stack, keep the white spacer beads consistent across all bracelets, even if the main block colors change.
Step 4: Finishing Touches
-
Pre-stretch the cord:
Before tying, gently pull on both ends of the elastic cord several times. This ‘pre-stretching’ prevents the bracelet from sagging or loosening after you wear it. -
Tie the knot:
Remove the bead stopper and tie a surgeon’s knot (cross right over left and loop under, then left over right and loop under twice). -
Secure with glue:
Place a tiny dab of jewelry glue directly onto the knot. Let it dry for a few minutes before trimming the excess cord close to the knot. -
Alternative clasp finish:
If using a clasp like the pink bracelet shown, thread the ends through crimp beads and attach to jump rings instead of just knotting. -
Hide the knot:
If the hole of your adjacent bead is large enough, gently tug the elastic until the knotted section slides inside a bead to hide it from view.
Stack these vibrant bracelets together or gift them individually for a splash of summer color year-round

The Complete Guide to Pottery Troubleshooting
Uncover the most common ceramic mistakes—from cracking clay to failed glazes—and learn how to fix them fast.
Gold Spacer “Elevated” Heishi Mix
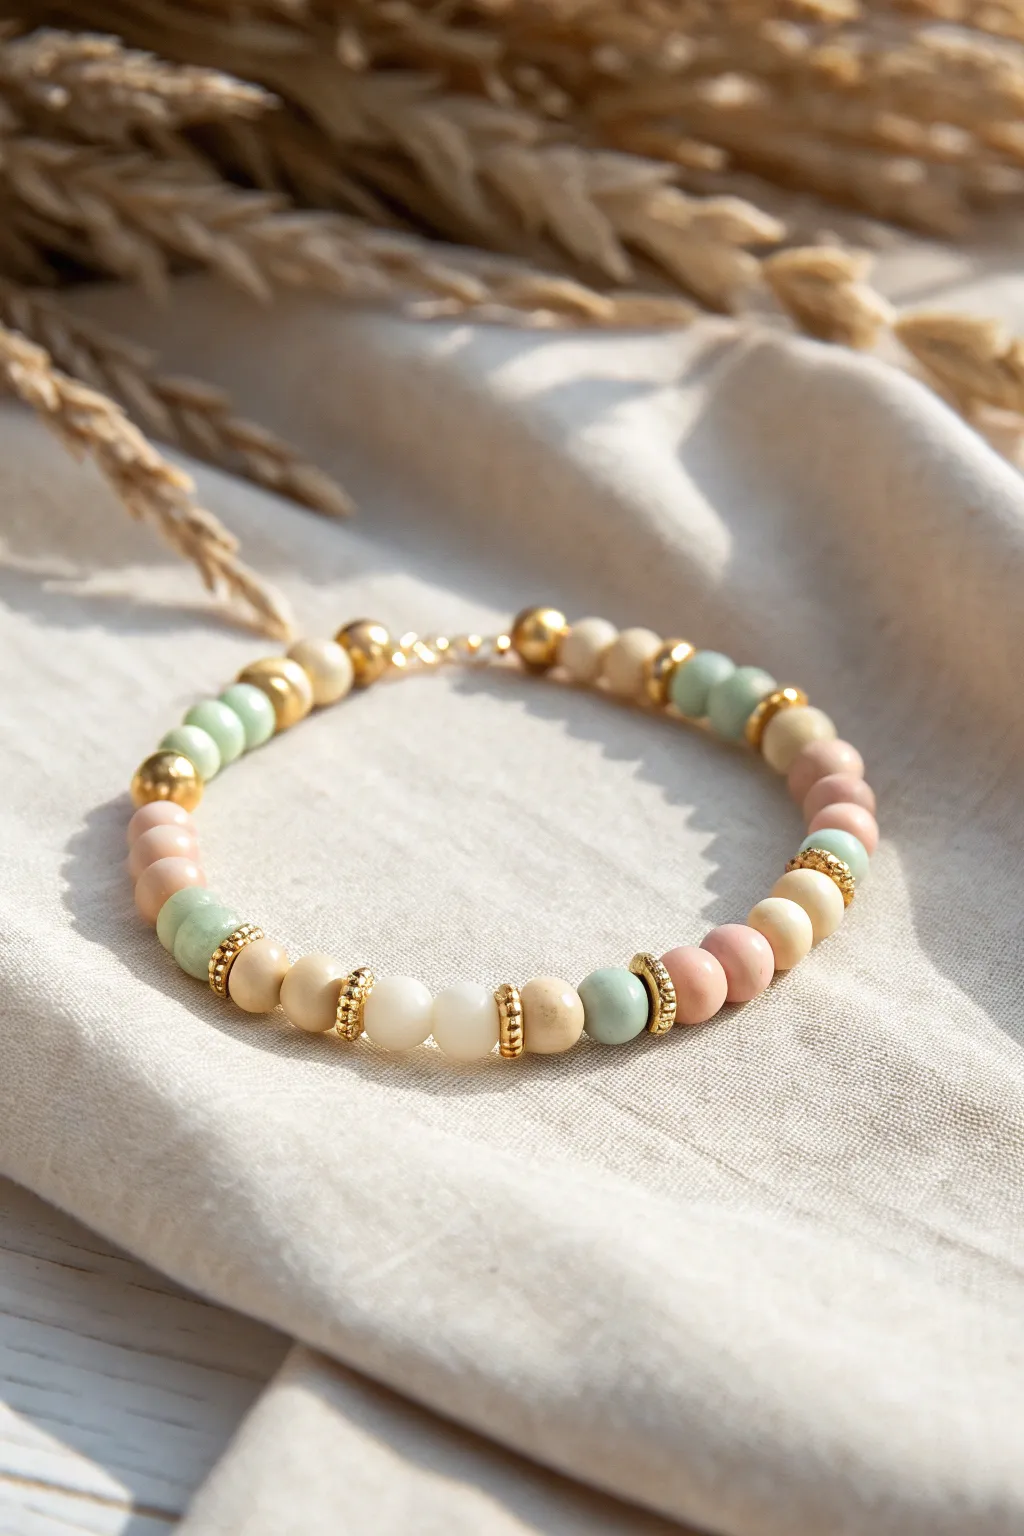
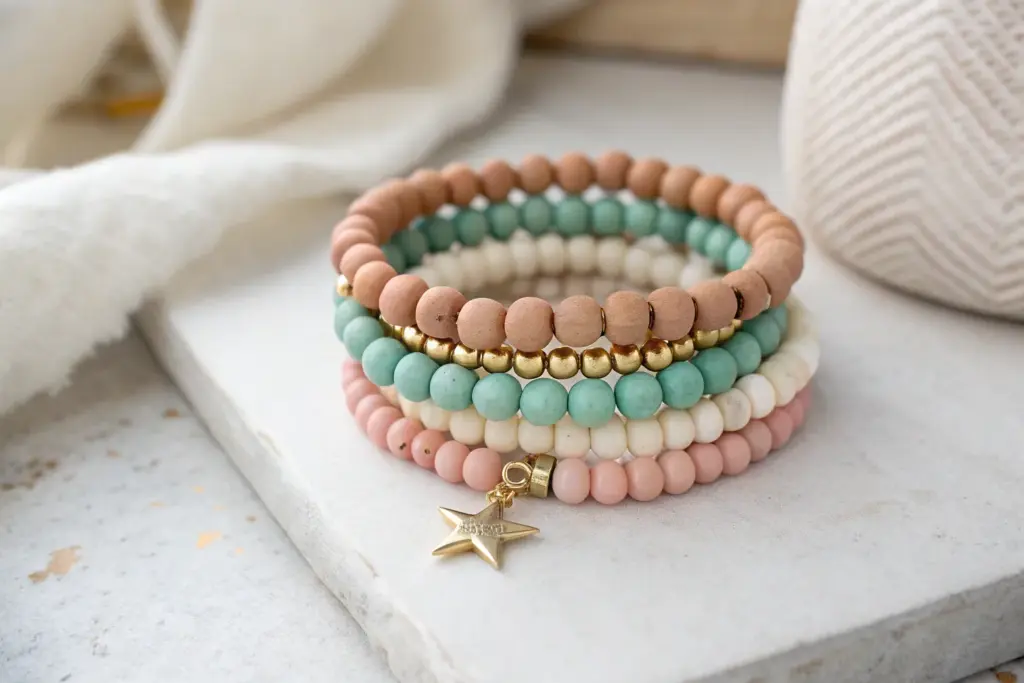
Elevate your bracelet collection with this sophisticated blend of matte pastel beads and gleaming gold accents. The combination of dusty rose, sage green, and creams creates a gentle, earthy palette that feels both luxurious and handcrafted.
Detailed Instructions
Materials
- Matte round gemstone beads approx. 6mm (Amazonite, Rhodonite, Riverstone)
- Gold-filled or gold-plated round beads (4mm and 6mm)
- Textured gold disc spacers or daisy spacers
- Strong elastic cord (0.7mm or 0.8mm)
- Jewelry glue (GS Hypo Cement)
- Scissors or bead snips
- Optional: Bead stopper or tape
Step 1: Preparation
-
Measure your wrist:
Wrap a flexible measuring tape around your wrist to find your size. Add about 1/2 inch to this measurement to ensure a comfortable fit that isn’t too tight. -
Pre-stretch the cord:
Cut a piece of elastic cord about 10-12 inches long. Before stringing, hold both ends and give it several firm tugs. This pre-stretching step prevents the bracelet from loosening up after you wear it a few times. -
Secure the end:
Place a bead stopper on one end of your cord, or simply use a piece of masking tape folded over the end to keep your beads from sliding off while you design.
Use Bead Boards
A flocked bead board is a lifesaver for this style. It lets you lay out the ‘random’ color pattern and rearrange spacers before you ever start stringing.
Step 2: Designing the Pattern
-
Establish the color palette:
Gather your sage green, dusty pink, and cream beads. The beauty of this design lies in its random yet balanced distribution of colors, rather than a strict repeating pattern. -
Cluster the gold rounds:
Create a focal point or ‘closure hider’ area using a small cluster of gold round beads. Start by threading two medium-sized gold round beads onto the cord. -
Begin the bead mix:
Thread a cream bead, followed by a sage green bead. I like to group similar tones occasionally, so follow that with another light green or cream bead. -
Add first texture spacer:
Slide on one of your textured gold disc spacers. These act as elegant dividers that break up the matte stone sections. -
Introduce the pink tones:
String three to four beads, mixing the dusty pinks with creams. Try a sequence like: Pink, Cream, Pink. -
Insert the next spacer:
Place another textured gold disc spacer. Notice how the gold pops against the matte finish of the beads. -
Continue the pattern:
Continue stringing sections of 3-5 colored beads separated by the textured gold spacers. Keep the color mix organic—don’t worry if two greens end up next to each other. -
Balance the design:
As you near the end of your required length, check the symmetry. You don’t need it to be perfect, but ensure the gold spacers generally mirror each other around the bracelet. -
Final bead check:
Wrap the unfinished strand around your wrist to check the size. Add or remove a bead or two if necessary to get that perfect fit. -
Close the loop:
Finish the stringing with beads that will blend well with the gold starter beads, perhaps ending with a solid cream stone.
Make a Stack
Create two companion bracelets to sell as a set: one made entirely of the gold spacers and rounds, and another using only the cream beads for a neutral look.
Step 3: Finishing Touches
-
Tie the knot:
Remove the tape or stopper. Bring the two ends of the elastic together and tie a standard surgeon’s knot (right over left, then left over right and loop through twice). -
Tighten securely:
Pull the knot tight. You should feel the elastic stretching slightly as the knot creates a secure ball. -
Apply adhesive:
Dab a tiny drop of jewelry glue onto the knot. Be careful not to get glue on the neighboring beads, as it can ruin their matte finish. -
Hide the knot:
While the glue is still tacky but not wet, gently pull the cord so the knot slides inside the hole of one of the larger gold beads or the neighboring stone bead. -
Trim the excess:
Once the glue is fully dry (wait at least 15 minutes), trim the excess elastic tails as close to the bead hole as possible without nicking the main knot.
Now you have a stunning, high-end looking bracelet ready to wear or package for your shop
Name And Word Bead Bestsellers
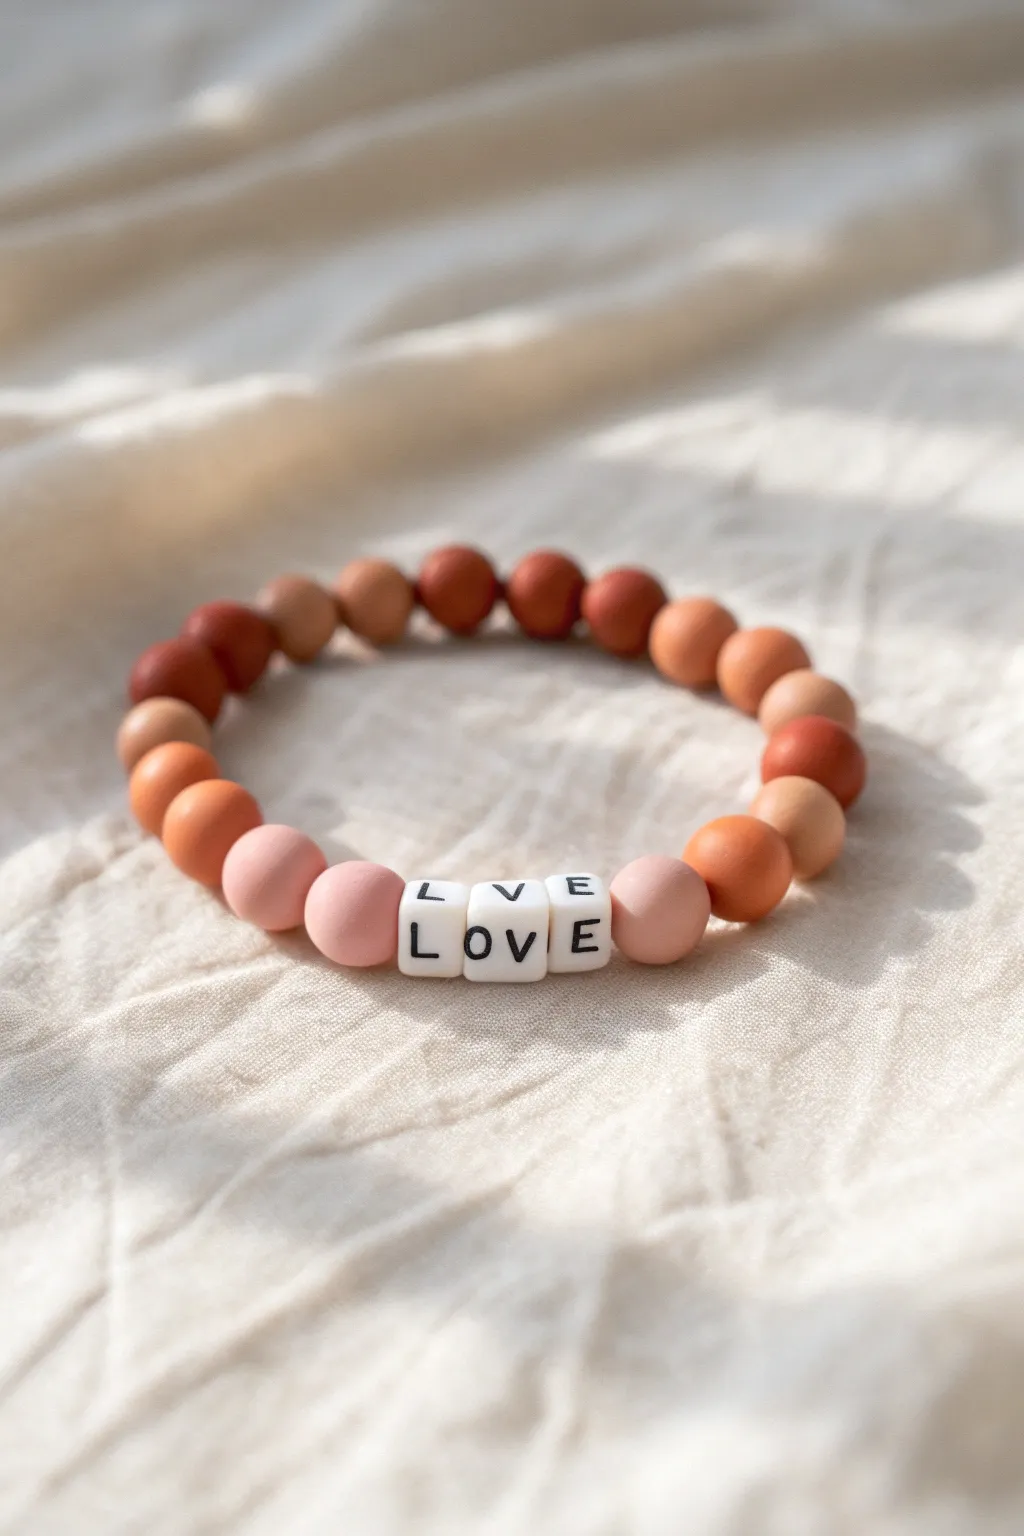
Warm, earthy tones meet minimalist sentiment in this best-selling bracelet design. By combining a gradient of terracotta, peach, and blush beads with classic letter blocks, you can create a piece that feels both trendy and timeless.
How-To Guide
Materials
- Polymer clay beads (round, 6mm-8mm) in: dark rust/terracotta
- Polymer clay beads in: warm peach or apricot
- Polymer clay beads in: soft blush pink
- White square letter beads (L, O, V, E)
- Stretch cord (0.8mm or 1mm)
- Scissors or jewelry snips
- Super glue or jewelry cement
- Bead stopper or binder clip
- Measuring tape
Step 1: Preparation
-
Measure your wrist:
Measure the wrist size you intend to make. For a standard adult bracelet, aim for about 7 inches in total length. -
Prepare the cord:
Cut a piece of stretch cord about 10-12 inches long. This generous length gives you plenty of room to tie knots without struggling. -
Pre-stretch the cord:
Hold both ends of the cord and give it a few firm (but not snapping) tugs. I find this helps prevent the bracelet from sagging after the first few wears. -
Secure the end:
Attach a bead stopper or a simple binder clip to one end of the cord so your beads don’t slide right off while you work.
Step 2: Beading the Gradient
-
Sort your gradient:
Lay out your clay beads on a flat surface. Organize them from darkest (rust/terracotta) to medium (peach) to lightest (blush pink) to visualize the color flow. -
Start with the darkest shade:
String about 5-6 of the dark rust/terracotta beads onto the cord. These will sit at the ‘back’ of the bracelet. -
Transition to medium:
Add 3-4 beads of the medium peach tone. This bridges the gap between the dark back and the lighter front section. -
Add the lightest shade:
String 2 blush pink beads. These light beads will frame the word immediately, drawing the eye to the center. -
Insert the word:
Thread on your white letter beads in order: L – O – V – E. Make sure they are all facing the same direction and right-side up. -
Mirror the ombré:
Reverse the pattern on the other side of the word. Start with 2 blush pink beads. -
Continue the mirror:
Add your 3-4 medium peach beads next. -
Finish with the dark shade:
Fill the rest of the cord with the dark rust/terracotta beads until you reach your desired total length (e.g., 7 inches). -
Check the fit:
Wrap the strand around your wrist to verify the size. Add or remove a few of the dark back beads if adjustment is needed.
Knot Slipping?
If your elastic knot keeps untying before the glue sets, try rubbing the knot area of the cord with a little beeswax or simple chalk to add friction and grip.
Step 3: Finishing Touches
-
Tie the first knot:
Remove the bead stopper and bring the two ends together. Tie a simple overhand knot and pull it tight to bring the beads together without gaps. -
Secure with a surgeon’s knot:
Tie a second knot, but this time loop the cord through twice before pulling tight. This is a surgeon’s knot and is much more secure. -
Apply adhesive:
Place a tiny dot of super glue or jewelry cement directly on the knot. Be careful not to glue the beads themselves. -
Let it cure:
Allow the glue to dry completely for a few minutes before touching it again. -
Hide the knot:
Ideally, slide the knot inside the hole of the nearest large clay bead to conceal it. -
Trim excess cord:
Use your scissors to snip off the remaining tails of the cord close to the bead/knot, ensuring no sharp ends stick out.
Color Harmony Tip
For a cohesive sellable line, stick to ‘families’ of color. Mixing warm tones (terracotta, peach) with cool tones (blue, grey) can look muddy unless deliberate.
Now you have a beautifully blended bracelet ready to wear or package for your next market


What Really Happens Inside the Kiln
Learn how time and temperature work together inside the kiln to transform clay into durable ceramic.
Single Statement Charm Centerpiece
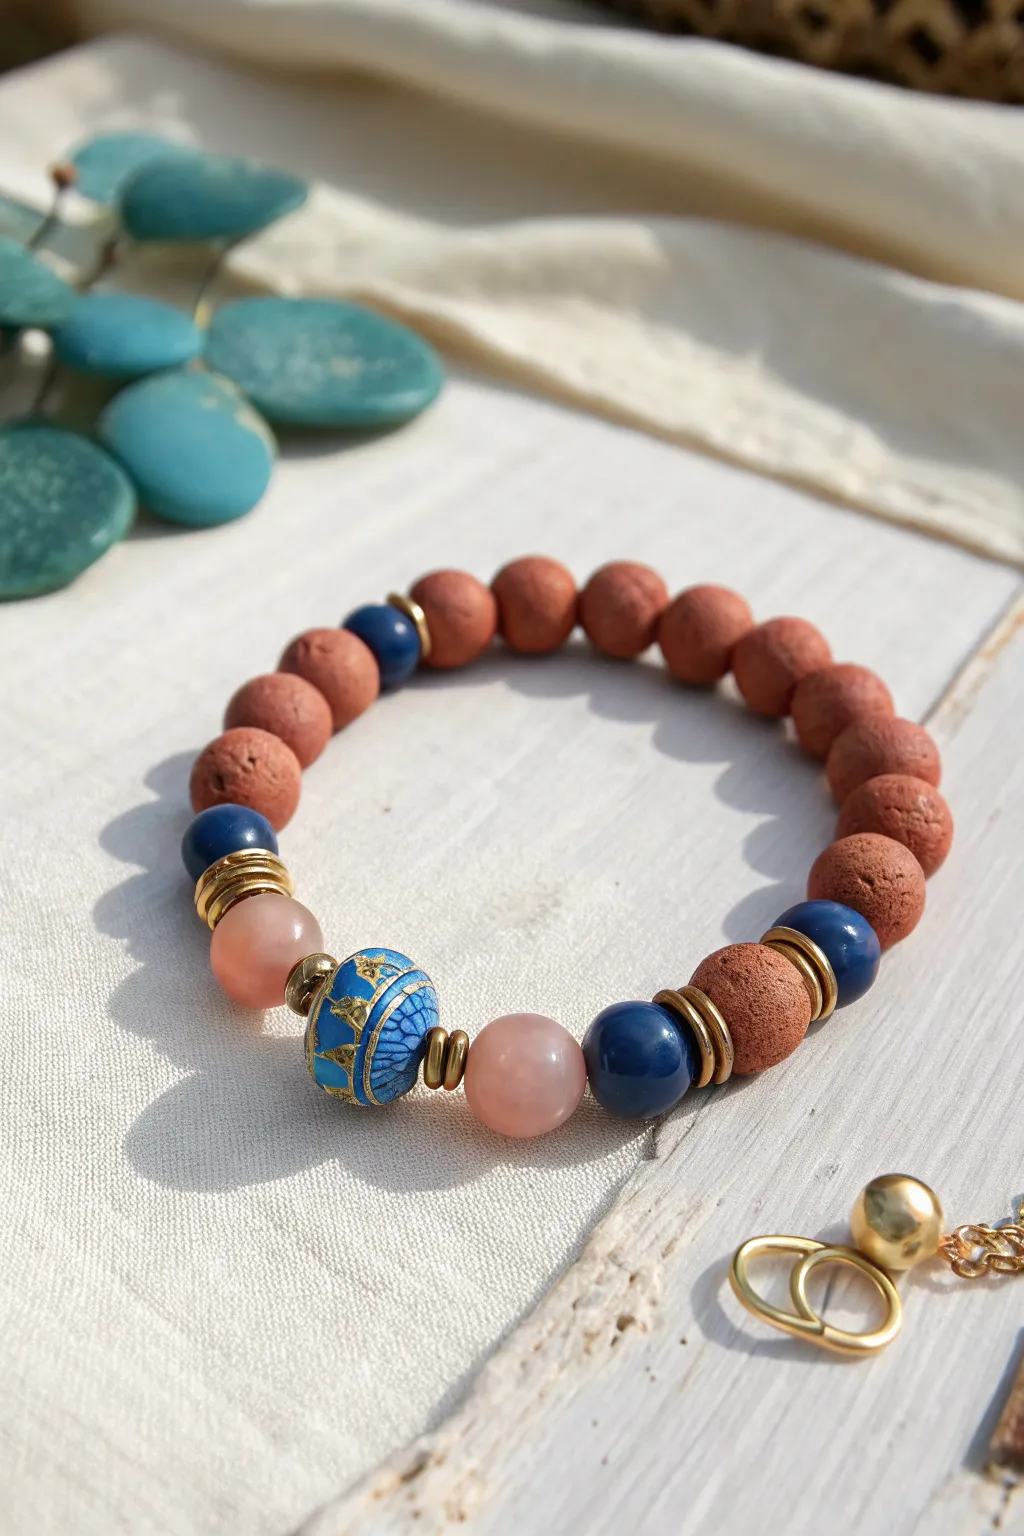
This elegant bracelet balances earthy terra cotta clay beads with touches of deep blue and gold for a sophisticated, travel-inspired accessory. The central cloissoné-style bead acts as a striking focal point, perfect for anchoring the design without overwhelming it.
Step-by-Step Guide
Materials
- Terra cotta or reddish-brown polymer clay round beads (approx. 8-10mm)
- Dark blue glossy round beads (lapis lazuli or blue agate, 8-10mm)
- 1 large focal bead (blue/gold cloisonné or painted ceramic, approx. 12-14mm)
- 2 pale pink translucent round beads (rose quartz or glass, 8-10mm)
- Gold tone heishi spacer beads or small flat metal washers
- Strong elastic bead cord (0.8mm or 1mm)
- Jewelry adhesive (e.g., G-S Hypo Cement)
- Scissors
Step 1: Preparation
-
Measure your wrist:
Wrap a piece of string around your wrist to find the circumference, then add about half an inch for a comfortable fit. Keep in mind that larger beads eat up more of the inner circumference. -
Pre-stretch the cord:
Cut a length of elastic cord about 10-12 inches long. Before stringing anything, give the elastic a few firm tugs to pre-stretch it; this prevents the finished bracelet from sagging later. -
Secure the end:
Place a bead stopper or simply a piece of strong tape on one end of your cord to prevent your beads from sliding off while you design.
Scent Infusion
Use unfinished terra cotta or lava stone beads for the brown sections. Place a drop of essential oil on them to turn your bracelet into a personal diffuser.
Step 2: Creating the Focal Section
-
String the pink accent:
Begin by sliding on one gold spacer, followed by one pale pink round bead so it sits next to the tape. -
Frame the centerpiece:
Add a second gold spacer, then thread your large blue and gold focal bead. This is the star of the show, so ensure the hole is clear and it sits flush against the spacer. -
Complete the center symmetry:
Slide on another gold spacer, followed by the second pink bead. Just like that, your centerpiece is framed. -
Add the blue transitions:
On both sides of this central group (you’ll have to work from one end now), add a gold spacer followed by a dark blue glossy bead. I like to double up the gold spacers here for a richer look, so add two spacers after the blue bead.
Level Up: Charm Dangle
Attach a small gold jump ring between two terra cotta beads and hang a tiny travel-themed charm, like a compass or airplane, for extra movement.
Step 3: Building the Band
-
Start the clay pattern:
Thread on a single terra cotta clay bead. These beads have a lovely matte texture that contrasts with the glossy blue. -
Insert a blue accent:
To keep the color flowing, add one gold spacer, one dark blue bead, and one more gold spacer. -
Fill the rest:
Continue stringing the remaining terra cotta beads until you reach your desired length. For a standard wrist, you will likely need about 12 to 14 of these clay beads to finish the loop. -
Check the symmetry:
Ensure that the pattern of blue accents looks balanced. In the image, there is an extra blue bead diametrically opposite the focal bead, breaking up the brown clay nicely. -
Test the size:
Carefully wrap the strand around your wrist. The ends should meet comfortably without gaps, but shouldn’t be tight enough to leave marks.
Step 4: Finishing
-
Prepare the knot:
Remove your tape or bead stopper carefully. Bring the two ends of the elastic together. -
Tie the knot:
Tie a surgeon’s knot—this is like a standard overhand knot but you loop the cord through a second time before pulling tight. Pull the elastic taut to secure the beads tightly. -
Secure with glue:
Apply a tiny dab of jewelry adhesive directly onto the knot. This is crucial for longevity. -
Hide the knot:
While the glue is still wet, gently pull the knot inside the hole of the nearest large bead (usually one of the terra cotta ones has a large enough hole) to hide it. -
Trim excess:
Allow the glue to dry for at least 15 minutes, then trim the excess cord ends carefully with sharp scissors, being careful not to nip the main knot.
Wear your new creation stacked with gold bangles or gift it to a friend with wanderlust.
Pearl Accent Boutique Stack
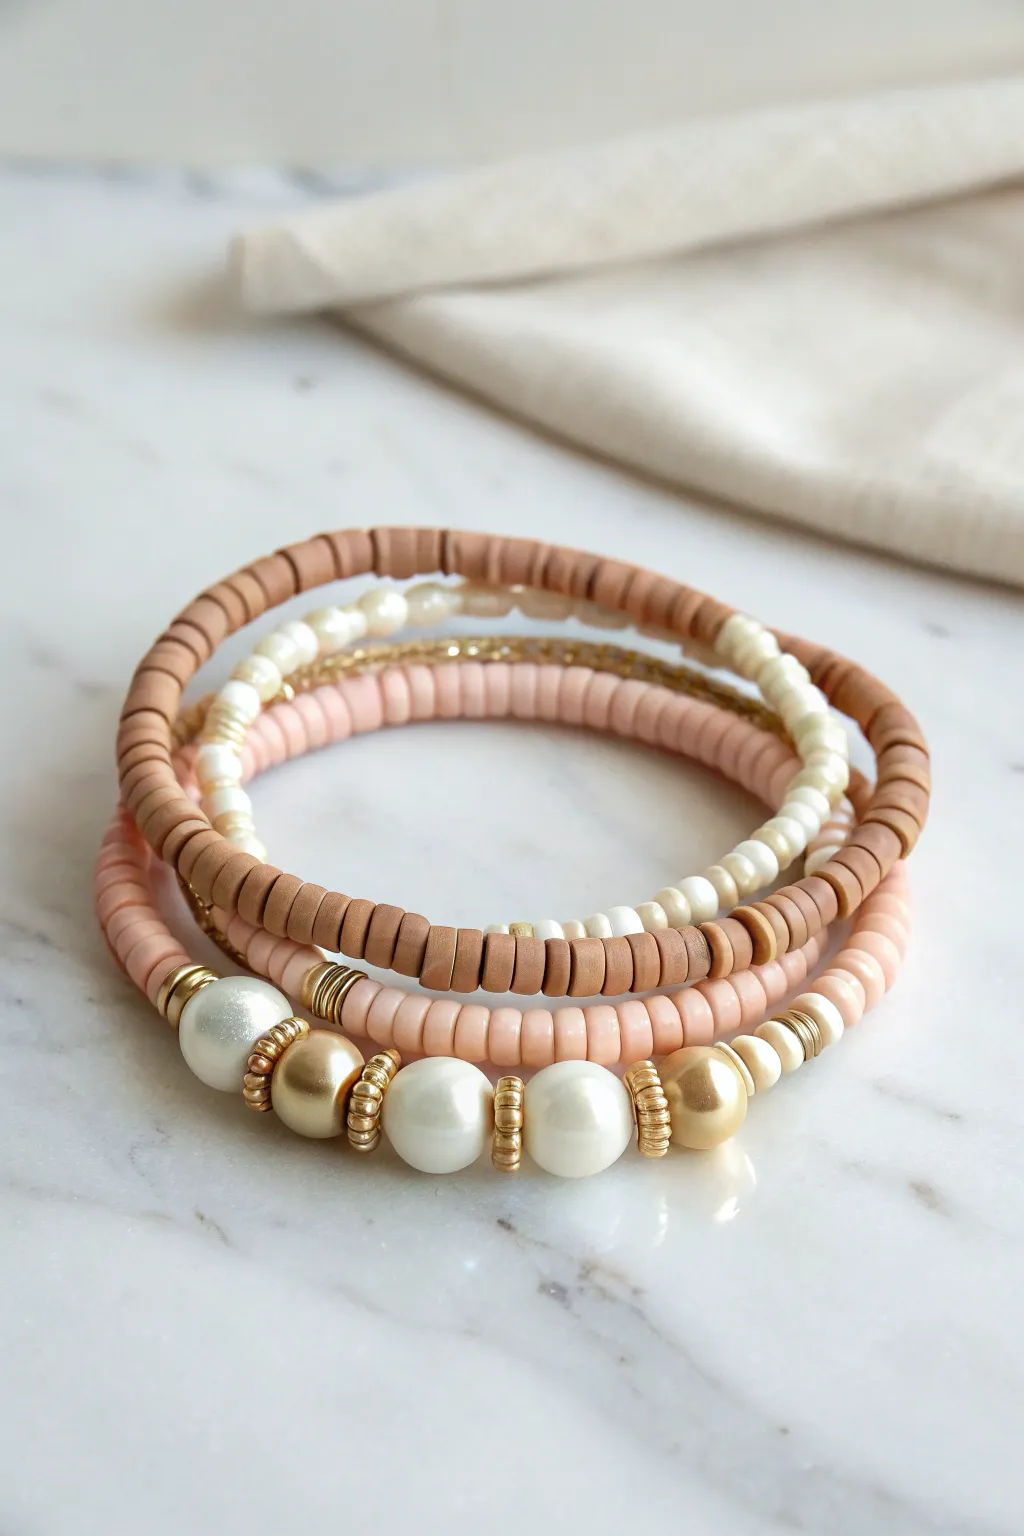
This elegant stack combines the matte texture of polymer clay heishi beads with the timeless shine of faux pearls and gold accents. The warm, neutral palette of mocha, cream, and blush pink makes this trio a versatile bestseller for any boutique collection.
How-To Guide
Materials
- 6mm polymer clay heishi beads (Mocha/Light Brown)
- 6mm polymer clay heishi beads (Blush Pink/Soft Peach)
- Small glass seed beads (Cream/Off-White)
- Large faux pearl beads (approx. 10-12mm, White and Gold)
- Gold spacer beads (heishi style and round beads)
- Gold rondelle spacer beads with rhinestone or textured edges
- Strong elastic bead cord (0.7mm or 0.8mm)
- Jewelry glue (e.g., E6000 or Hypo Cement)
- Scissors
- Bead stopper or painter’s tape
Step 1: Bracelet 1: The Mocha & Cream Mix
-
Measure the cord:
Cut a piece of elastic cord about 10-12 inches long. This gives you plenty of room to tie knots later without struggling. -
Secure the end:
Attach a bead stopper to one end of the cord, or simply tape it down to your table so your beads don’t slide off while working. -
Start the pattern:
Begin threading the mocha-colored polymer clay heishi beads. Add about 2 inches of these solid brown beads first. -
Create the color block:
Switch to your cream-colored seed beads interspersed with a few small white pearls or off-white clay beads. Continue this lighter section for about 1.5 inches. -
Add gold details:
Throughout the cream section, slip in a thin gold spacer bead every 4-5 beads to add a subtle metallic shimmer. -
Finish the strand:
Return to the mocha heishi beads and continue threading until the bracelet measures roughly 7 inches (or your desired wrist size). -
Tie it off:
Tie a strong surgeon’s knot (right over left, left over right), pull tight, dab with a tiny drop of glue, and trim the excess cord once dry.
Knot Slipping?
If your elastic knots feel loose, try pre-stretching the cord firmly before stringing. This prevents the bracelet from stretching out and helps the knot bite into itself tighter.
Step 2: Bracelet 2: The Plain Blush Band
-
Prep the second cord:
Cut another length of elastic cord and secure the end just like before. -
String the base:
This bracelet is simpler to provide balance. Thread 6mm blush pink heishi beads continuously onto the cord. -
Insert gold spacers:
Every inch or so, add a single thin gold heishi spacer. This breaks up the solid pink line without overwhelming it. -
Check the fit:
Wrap the strand around your wrist to ensure it matches the size of the first bracelet perfectly before knotting. -
Secure the knot:
Tie your surgeon’s knot, apply glue for security, and let it cure before trimming the tails.
Pro Tip: Hiding Knots
Use a bead adjacent to your knot that has a slightly larger hole (like the gold spacers). Pull the knotted section gently inside this bead while the glue is wet to make it invisible.
Step 3: Bracelet 3: The Pearl Focal Piece
-
Prepare the focal strand:
Cut your third piece of elastic. This bracelet features the heaviest beads, so ensure your cord is free of nicks. -
Build the back section:
Thread blush pink heishi beads to cover about 5 inches of the cord; this will form the back of the bracelet. -
Transition to the focal:
Add three thin gold spacer beads followed by a larger gold bead to mark the start of the focal section. -
Arrange the center:
Thread a large white pearl, a textured gold rondelle spacer, a large gold brushed bead, another spacer, a white pearl, spacer, gold bead, spacer, and a final white pearl. I prefer arranging this on a mat first to visualize the spacing. -
Close the pattern:
Finish the focal section with a few more thin gold spacers to mirror the other side. -
Final assembly:
Check the total length against the other two bracelets. If it’s too short, add a few more pink heishi beads to the back section. -
Knot and finish:
Perform the final tie-off with a surgeon’s knot and glue. Hide the knot inside one of the larger gold beads if possible for a professional finish.
Stack these three beauties together on a card to create a sophisticated, ready-to-sell accessory set

TRACK YOUR CERAMIC JOURNEY
Capture glaze tests, firing details, and creative progress—all in one simple printable. Make your projects easier to repeat and improve.
Ocean Blues And Sandy Neutrals
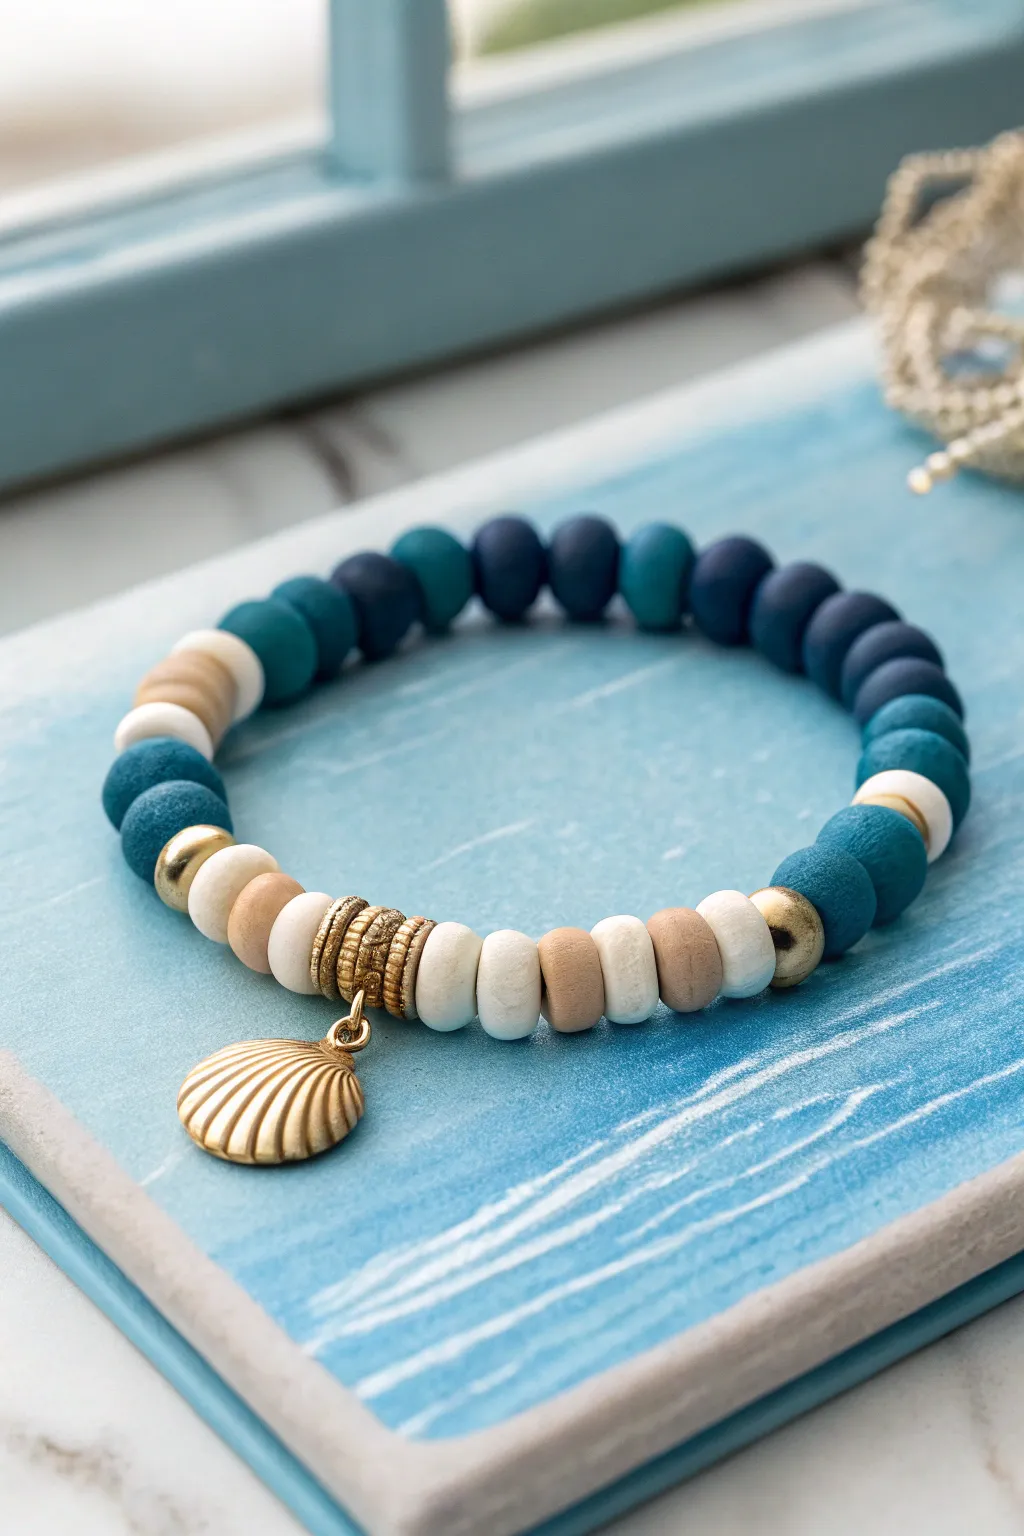
Bring the calming vibes of the coast to your wrist with this gorgeous combination of deep ocean blues, soft sandy neutrals, and gold accents. The focal point is a lovely gold scallop shell charm that dangles playfully, making this piece perfect for summer outfits or beach lovers.
Detailed Instructions
Materials
- Matte round beads (8mm or 10mm) in Navy Blue
- Matte round beads (8mm or 10mm) in Teal or Deep Turquoise
- Matte round wood or clay beads (flat disc or round) in Cream/White
- Matte round wood or clay beads in Tan/Light Brown
- Gold tone spacer beads (small round)
- Gold tone textured tube beads or large spacers (for the focal area)
- Gold scallop shell charm with jump ring
- Strong elastic cord (0.8mm or 1mm recommended)
- Jewelry glue or clear nail polish
- Scissors
- Bead stopper or tape
- Chain nose pliers (optional, for the jump ring)
Step 1: Planning the Pattern
-
Lay out the design:
Before stringing anything, lay your beads out on a bead board or a soft towel. This prevents them from rolling away and helps you visualize the color gradient. -
Create the focal section:
Start the center of your design with the charm holder section. Place two or three textured gold spacer beads in the middle; this is where your charm will hang later. -
Arrange the neutrals:
On either side of the gold center, create a pattern of sandy neutrals. Alternate between the cream/white beads and the tan beads. I like to use about 4-5 beads on each side here to establish the ‘sand’ look. -
Transition with gold:
Add a single small gold round spacer bead at the end of your neutral sections to act as a shiny divider before the colors change. -
Add the teal section:
Next, place your teal or turquoise beads. Use about 3-4 on each side, though you can adjust this number based on your wrist size. -
Finish with navy:
Complete the loop with the navy blue beads. These will make up the back of the bracelet, creating a seamless ombre effect from light sand to deep water.
Sticky Situation?
If you are struggling to pull the knot inside a bead, try widening the bead hole slightly with a bead reamer tool, or simply hide the knot inside one of the beads with a naturally larger hole.
Step 2: Stringing and Assembly
-
Prepare the cord:
Cut a piece of elastic cord about 10-12 inches long. This gives you plenty of slack for tying knots later. -
Secure the end:
Place a bead stopper or a piece of masking tape on one end of the cord so your beads don’t slide right off as you work. -
String the beads:
Transfer your laid-out pattern onto the elastic cord one bead at a time. It’s often easiest to start from one of the navy sections and work your way around so the knot ends up hidden in the back, but starting near the focal point works too. -
Check the fit:
Once all beads are strung, carefully wrap the strand around your wrist. It should be snug but comfortable, not cutting off circulation. -
Add the charm:
Locate the textured gold spacers you placed in the center. Use your pliers to open the jump ring on your gold scallop shell charm. -
Attach the charm:
Slide the open jump ring around the elastic cord between the gold spacers (or hook it onto the middle spacer if it has a loop). Close the jump ring securely with pliers.
Pro Tip: Texture Mix
Mix bead textures for a high-end look. Using velvety matte beads against the shiny gold spacers creates a sophisticated tactile contrast that elevates the design beyond a simple craft.
Step 3: Finishing Touches
-
Pre-stretch the cord:
Give the ends of the elastic a gentle tug. This pre-stretching prevents the bracelet from loosening up significantly the first time you wear it. -
Tie the knot:
Tie a surgeon’s knot (right over left, left over right, and loop through an extra time). Pull it tight. -
Secure with glue:
Dab a tiny drop of jewelry glue or clear nail polish onto the knot. This is crucial for longevity. -
Hide the knot:
Once the glue is tacky but not fully dry, trim the excess cord and gently pull the elastic so the knot slides inside one of the larger beads adjacent to it. -
Final cure:
Let the bracelet sit undisturbed for at least an hour (or whatever your glue manufacturer recommends) to ensure the bond is permanent before wearing.
Now you have a stunning seaside accessory ready to wear or sell
Sunset Ombre Fade
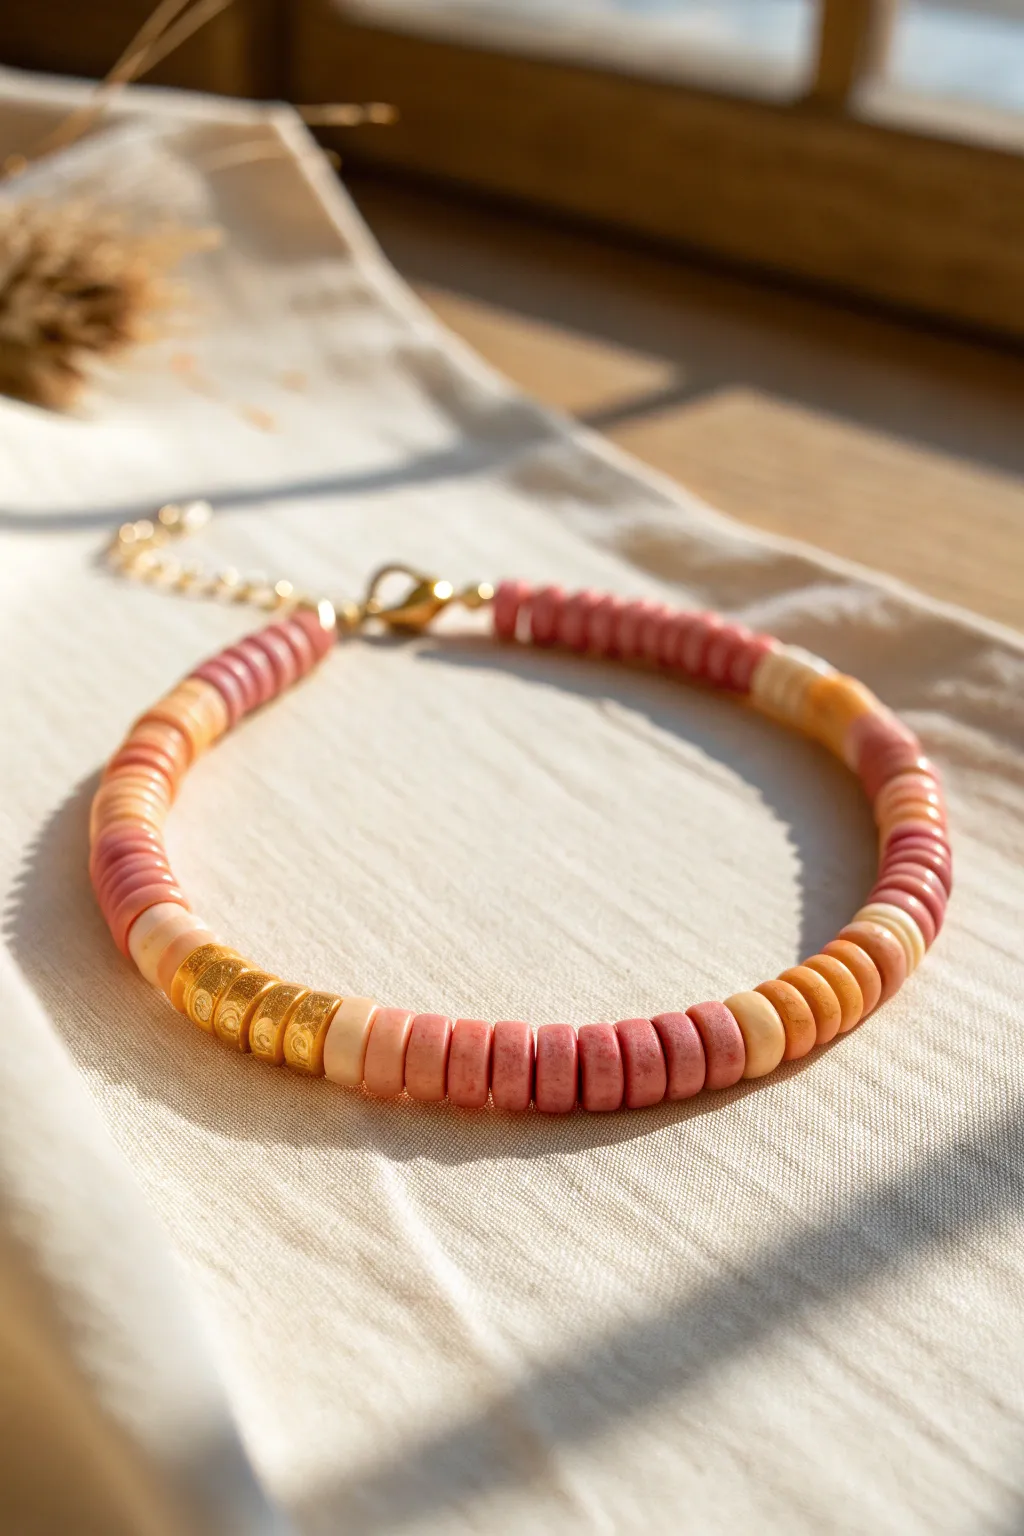
Capture the warmth of a setting sun with this stunning clay bead bracelet that transitions through shades of dusty rose, terracotta, and soft creams. The inclusion of textured gold spacer beads adds an elegant touch, making this piece perfect for stacking or wearing as a standalone statement.
How-To Guide
Materials
- Polymer clay Heishi disc beads in dusty rose/mauve
- Polymer clay Heishi disc beads in terracotta/rust orange
- Polymer clay Heishi disc beads in pale peach/cream
- 3-4 Gold-tone textured nugget spacer beads (approx. 4-6mm)
- Stretch cord (0.8mm or 1mm thickness)
- Gold-tone jump rings (4mm or 5mm)
- Lobster clasp closure
- Extension chain (optional)
- Jewelry finish line knots or crimp beads
- Flat nose pliers
- Scissors or jewelry cutters
- Beading needle (optional for faster threading)
Step 1: Planning the Pattern
-
Measure your wrist:
Wrap a piece of string around your wrist to find the desired length, adding about half an inch for a comfortable fit. -
Lay out the color palette:
Before threading, pour your beads onto a bead board or soft cloth. Group them by color: dusty rose, rust orange, and cream. -
Design the ombre transition:
Arrange the beads in a line on your workspace. Start with a solid block of the darkest dusty rose, then alternate beads to fade into the rust orange, finally transitioning into the cream. -
Plan the focal point:
Locate the cream section of your design. This is where you will place the gold nugget beads to act as a shiny centerpiece among the matte clay textures.
Uneven Spacing?
If the pattern looks lopsided when finished, count the number of discs in your solid color sections. They must be exactly equal on both sides for perfect symmetry.
Step 2: Stringing the Beads
-
Prepare the cord:
Cut a length of stretch cord about 10-12 inches long. This extra length makes tying the final knots much easier than working with a short piece. -
Secure the end:
Attach a piece of tape or a bead stopper to one end of the cord so your beads don’t slide off while you work. -
Start with the darker tones:
Begin threading your dusty rose beads. Thread about 1.5 to 2 inches of this solid color to form the back section of the bracelet. -
Create the first fade:
To transition, thread two dusty rose beads followed by one rust orange bead. Repeat this pattern three times. -
Intensify the orange:
Now switch to alternating one rose bead and one orange bead for about half an inch. -
Solidify the middle section:
Thread a solid section of the rust orange beads, covering approximately one inch of the cord. -
Transition to light:
Mirror your earlier fading technique: alternate one orange bead with one cream bead potential three to four times. -
Add the cream accents:
Thread a small section of just cream beads, roughly half an inch long. -
Insert the gold accents:
Slide on three or four textured gold nugget beads. I find that grouping them together creates a more intentional, high-end look than scattering them. -
Complete the symmetry:
Reverse your pattern to finish the other side: cream section, fade to orange, solid orange, fade to rose, and finish with solid rose beads until you reach your measured length.
Step 3: Finishing Touches
-
Pre-stretch the cord:
Gently pull on both ends of the bracelet to pre-stretch the elastic. This prevents the bracelet from loosening up after the first time you wear it. -
Prepare the hardware:
Open a jump ring using your pliers. Slide the jump ring onto one end of the cord. -
Tie the knot:
Tie a secure surgeon’s knot (right over left, left over right) to close the loop around the jump ring. Pull it very tight. -
Add security:
For extra durability, you can add a tiny dab of jewelry glue to the knot before trimming the excess cord. -
Hide the knot:
Tuck the knot inside the hole of the nearest large bead if possible. -
Attach the clasp:
On the jump ring you just attached, hook on your lobster clasp and close the ring securely with pliers. -
Finish the other side:
Repeat the knotting process on the other end of the bracelet, attaching a jump ring and an extension chain.
Smooth Transitions
To make the color fade smoother, increase the ‘mixing zone’ length. Use a pattern of 2:1, then 1:1, then 1:2 when switching between bead colors.
Enjoy the warm glow of your new handmade jewelry piece as it catches the afternoon light
Checkerboard Pattern Sections
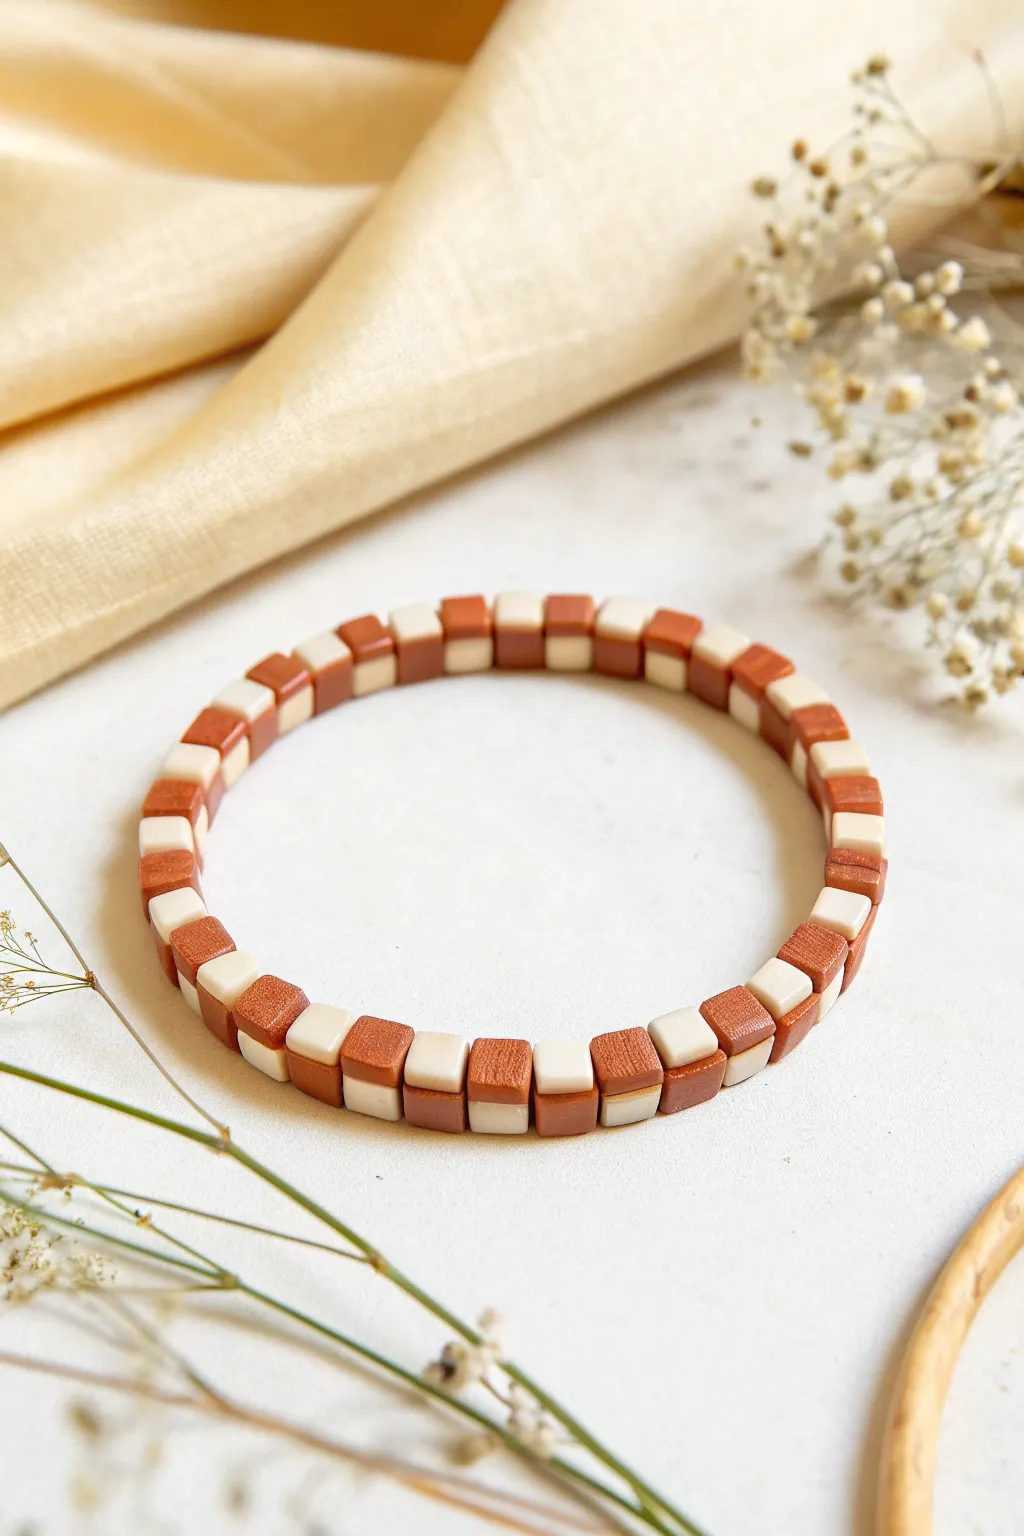
This elegant bracelet features a striking checkerboard pattern created by alternating square terracotta and cream-colored beads. The earthy tones combined with the geometric precision give it a sophisticated, modern bohemian look that pairs beautifully with neutral outfits.
Step-by-Step Tutorial
Materials
- Polymer clay (Terracotta or Rust color)
- Polymer clay (Cream or Bone White color)
- Acrylic rolling pin or pasta machine
- Tissue blade or very sharp craft knife
- Ruler
- Elastic cord (0.8mm or 1mm transparent)
- Super glue or jewelry cement
- Needle tool or bead piercing pins
- Baking tile or parchment paper
- Oven
Step 1: Creating the Canes
-
Condition the clay:
Begin by warming up your terracotta and cream polymer clay separately in your hands until they are soft and pliable. -
Roll into slabs:
Using your rolling pin or a pasta machine on a thick setting, roll both colors of clay out into flat, even slabs. Aim for a thickness of about 4-5mm for chunky, durable beads. -
Cut linear strips:
Use your tissue blade to cut long, straight strips from both slabs. Ensure each strip is approximately 5mm wide, matching the thickness of your slab to create a square cross-section. -
Stack the first layer:
Lay a terracotta strip next to a cream strip on your work surface. Press them gently together along the long side so they adhere without distorting the shape. -
Stack the second layer:
Place a cream strip on top of the bottom terracotta strip. Then, place a terracotta strip on top of the bottom cream strip. You are creating a 2×2 grid pattern. -
Consolidate the cane:
Gently press the four sides of your square log (cane) to ensure all four strips are fused together. Roll it slightly on the table or squeeze evenly to compact it into a solid square bar. -
Slice the beads:
Let the cane rest or pop it in the fridge for 10 minutes to firm up. Then, use your sharp blade to slice off individual square beads, roughly 4-5mm thick.
Wonky Squares?
If your beads squish while cutting, your clay is too warm. Chill the cane in the freezer for 5-10 minutes before slicing to get sharp, crisp edges.
Step 2: Piercing and Baking
-
Pierce the holes:
Take each sliced square bead and carefully use a needle tool to pierce a hole through the center. I find twisting the needle while pushing helps prevent the clay from squishing. -
Check alignment:
Ensure the hole runs perpendicular to the face of the bead so the checkerboard pattern faces outward when strung. -
Smooth the edges:
Lightly tap the cut sides of the beads with your finger to soften any sharp drag marks from the blade. -
Arrangement for baking:
Place all your beads on a ceramic tile or baking sheet lined with parchment paper, ensuring they aren’t touching. -
Bake the batch:
Bake the beads according to the manufacturer’s instructions on your specific package of clay (usually 275°F/135°C for 15-30 minutes). -
Cool down:
Allow the beads to cool completely within the oven or on top of it. Do not string them while they are still warm.
Step 3: Assembly
-
Measure the cord:
Cut a length of elastic cord about 10-12 inches long to give yourself plenty of room for tying knots. -
Pre-stretch the elastic:
Give the elastic cord several firm tugs. This pre-stretching prevents the bracelet from expanding and becoming loose shortly after you start wearing it. -
String the pattern:
Thread the cooled beads onto the elastic. Because each bead already contains the checkerboard pattern, you simply string them one after another. -
Check the fit:
Wrap the strand around your wrist to check the sizing. Add or remove beads until it sits comfortably without digging into your skin. -
Knot the ends:
Tie a surgeon’s knot (loop the ends twice before pulling tight) to secure the bracelet. Pull firmly to lock the knot in place. -
Secure and trim:
Add a tiny drop of super glue or jewelry cement to the knot for extra security. Once dry, trim the excess cord and tuck the knot inside a bead hole.
Make It Glossy
For a refined, ceramic look, coat the finished baked beads with a layer of UV resin or glossy polyurethane varnish to make the colors pop.
Slip on your new geometric bracelet and enjoy the stylish, handmade touch it adds to your daily wardrobe
Mixed Shape Bead Texture Combo

Embrace a natural, grounded aesthetic with this trio of beaded bracelets featuring a mix of matte wood and uniquely textured clay beads. The combination of warm terracotta, creamy white, and speckled slate creates a harmonious stack that feels both rustic and modern.
Step-by-Step Guide
Materials
- 0.8mm clear elastic stretch cord
- 6mm matte peach/terracotta round wood beads
- 6mm cream/off-white round wood or bone beads
- 6mm faceted grey/black speckled beads (stone or clay)
- Small gold accent charm (optional)
- Jewelry glue (such as G-S Hypo Cement)
- Scissors
Step 1: Planning & Prep
-
Measure your wrist:
Wrap a measuring tape loosely around your wrist to determine the circumference. Add about 0.5 inches to this measurement for a comfortable fit. -
Cut the cord:
Cut three lengths of elastic cord, each about 10-12 inches long. Having extra length makes tying the final knots much easier. -
Pre-stretch the elastic:
Hold each end of a cord segment and tug gently a few times. This helps prevent the bracelet from stretching out and sagging immediately after you wear it. -
Plan your patterns:
Lay out your three distinct designs on a bead board or a soft towel to prevent rolling. Design one is solid terracotta. Design two is solid cream. Design three is a patterned mix of grey, cream, and terracotta.
Knot Security Pro-Tip
For extra security, tie your knot while the elastic is under slight tension. This ‘locks’ the knot against the beads prevent gaps.
Step 2: Stringing the Solids
-
Start the terracotta band:
Take your first piece of pre-stretched elastic. Begin threading the matte peach/terracotta beads. -
Check the length:
Continue adding beads until the strand matches your target wrist length. Wrap it around your wrist to double-check the fit before tying. -
Secure the knot:
Tie a surgeon’s knot (right over left, left over right, looping the top strand through twice) to secure the loop. Pull it tight. -
Add glue and trim:
Dab a tiny drop of jewelry glue on the knot. Allow it to dry for a moment, then trim the excess cord ends, leaving about 2mm. -
Hide the knot:
Ideally, gently tug the knot inside the hole of the nearest bead to conceal it. -
Create the cream band:
Repeat the stringing process with the cream/off-white beads for the second bracelet, following the same measuring and knotting steps.
Step 3: Creating the Patterned Strand
-
Establish the pattern:
For the third mixed bracelet, create a repeating pattern. Based on the image, try a sequence like: 5 grey faceted beads, 1 gold charm connector (optional), followed by a section of cream beads, then a section of terracotta beads. -
Alternate textures:
The charm of this specific bracelet lies in the block color blocking. String about 2 inches of the grey speckled beads first. -
Transition colors:
Follow the grey section with about 2 inches of the cream beads. I usually like to check the transition points to ensure the colors don’t look muddy together. -
Finish with warmth:
Finish the strand with a section of the terracotta beads until you reach the desired length. -
Incorporate accents:
If using a gold accent or charm as seen in the image, slide it on between colour blocks to act as a separator. -
Final knotting:
Tie off this third bracelet with a tight surgeon’s knot, applying glue and hiding the knot just as you did with the previous two.
Level Up: Scent Diffuser
Use unfinished wood beads for one strand. You can add a drop of essential oil to these porous beads to turn your jewelry into a diffuser.
You have now created a chic, nature-inspired stack perfect for everyday wear
Mini Bead “Sprinkle” Confetti Look
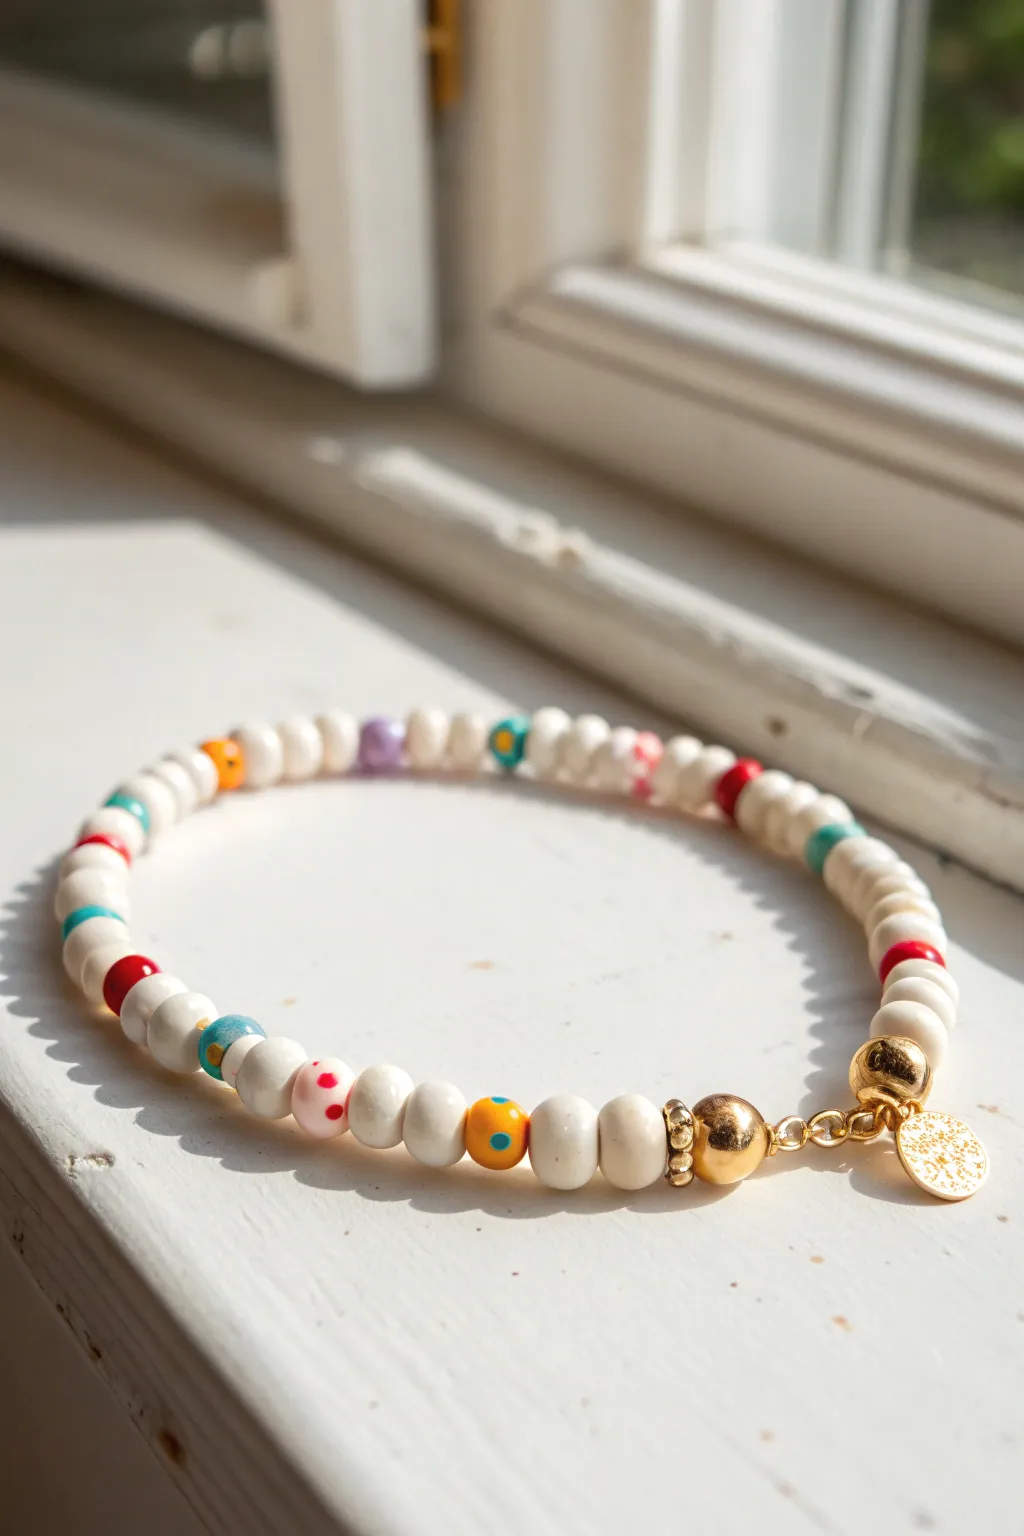
This charming bracelet mimics the delightful randomness of confetti sprinkles on a vanilla cupcake. By spacing out vibrant, colorful mini-beads between stretches of clean white clay, you create a playful yet minimalist accessory perfect for stacking.
How-To Guide
Materials
- 4mm or 5mm white polymer clay disc beads
- Assorted patterned or solid color accent beads (ceramic or painted wood, approx. 6mm)
- Small gold spacer beads (optional)
- Gold tone crimp covers or large knot-hiding beads
- Gold tone jump ring
- Gold tone patterned charm (coin style)
- Elastic beading cord (approx. 0.8mm)
- Super glue or jewelry adhesive
- Scissors
Step 1: Planning and Sorting
-
Select your palette:
Gather your featured accent beads. The image uses a mix of solid colors (red, light teal) and patterned beads (dots, flowers) to create that ‘confetti’ vibe. -
Measure your cord:
Cut a piece of elastic cord about 10-12 inches long. This generous length gives you plenty of room to tie knots without struggling. -
Pre-stretch the elastic:
Give your cord a few firm tugs before you start. This simple trick prevents the bracelet from loosening up immediately after you wear it. -
Secure the end:
Place a piece of tape or a bead stopper on one end of the cord so your carefully strung beads don’t slide off.
Knot Slipping?
If your elastic knot feels insecure, try a ‘surgeon’s knot.’ Loop the cord through twice on the first pass instead of once for extra grip before pulling tight.
Step 2: Stringing the Pattern
-
Start with a gold accent:
Begin by threading on the large gold bead which will eventually hide your knot. This acts as the visual anchor of the piece. -
The first white section:
Thread on approximately 4 to 6 white clay disc beads. These flat discs stack together to form a solid white tube shape. -
Add a sprinkle:
Slide on your first colorful accent bead. In the photo, a red solid bead is used near the start, providing a bold pop of color. -
Repeat the white base:
Add another section of white clay discs. Vary the count slightly if you want a more organic feel, or keep it strictly to 5 beads for symmetry. -
Add a patterned bead:
Choose a bead with a design, like the yellow bead with blue dots shown. This variation adds texture and whimsy to the strand. -
Continue the sequence:
Keep alternating between white sections and colorful ‘sprinkle’ beads. I try to ensure no two similar colors end up right next to each other. -
Check the fit:
Wrap the strand around your wrist occasionally. You want to stop threading when the ends meet comfortably without stretching the elastic yet. -
The final section:
End your stringing pattern with a small gold spacer or loop bead, ensuring it balances visually with the large gold bead you started with.
Step 3: Finishing Touches
-
Prepare the knot:
Remove your tape or bead stopper. Bring the two ends of the elastic together carefully. -
Tie the knot:
Tie a standard square knot (right over left, left over right). Pull the elastic tight to secure the tension. -
Secure with glue:
Dab a tiny drop of super glue or jewelry adhesive directly onto the knot. This is crucial for longevity. -
Hide the mechanism:
If your large gold bead has a large enough hole, gently tug the elastic so the knotted portion slides inside the bead, concealing it entirely. -
Trim the excess:
Once the glue is dry, trim the excess cord ends close to the bead, being careful not to nick the main structural cord. -
Attach the charm:
Using pliers, open a gold jump ring. Thread it through the loop of your gold coin charm and hook it onto the loop of your end bead. -
Close the ring:
Use the pliers to completely close the jump ring so the charm doesn’t slip off during wear.
Go Deluxe
Swap the plastic accent beads for real freshwater pearls or semi-precious gemstones like turquoise or amethyst for a high-end boutique version.
Now you have a sweet, sprinkle-inspired accessory ready to brighten up any outfit
Seasonal Halloween Color Stack
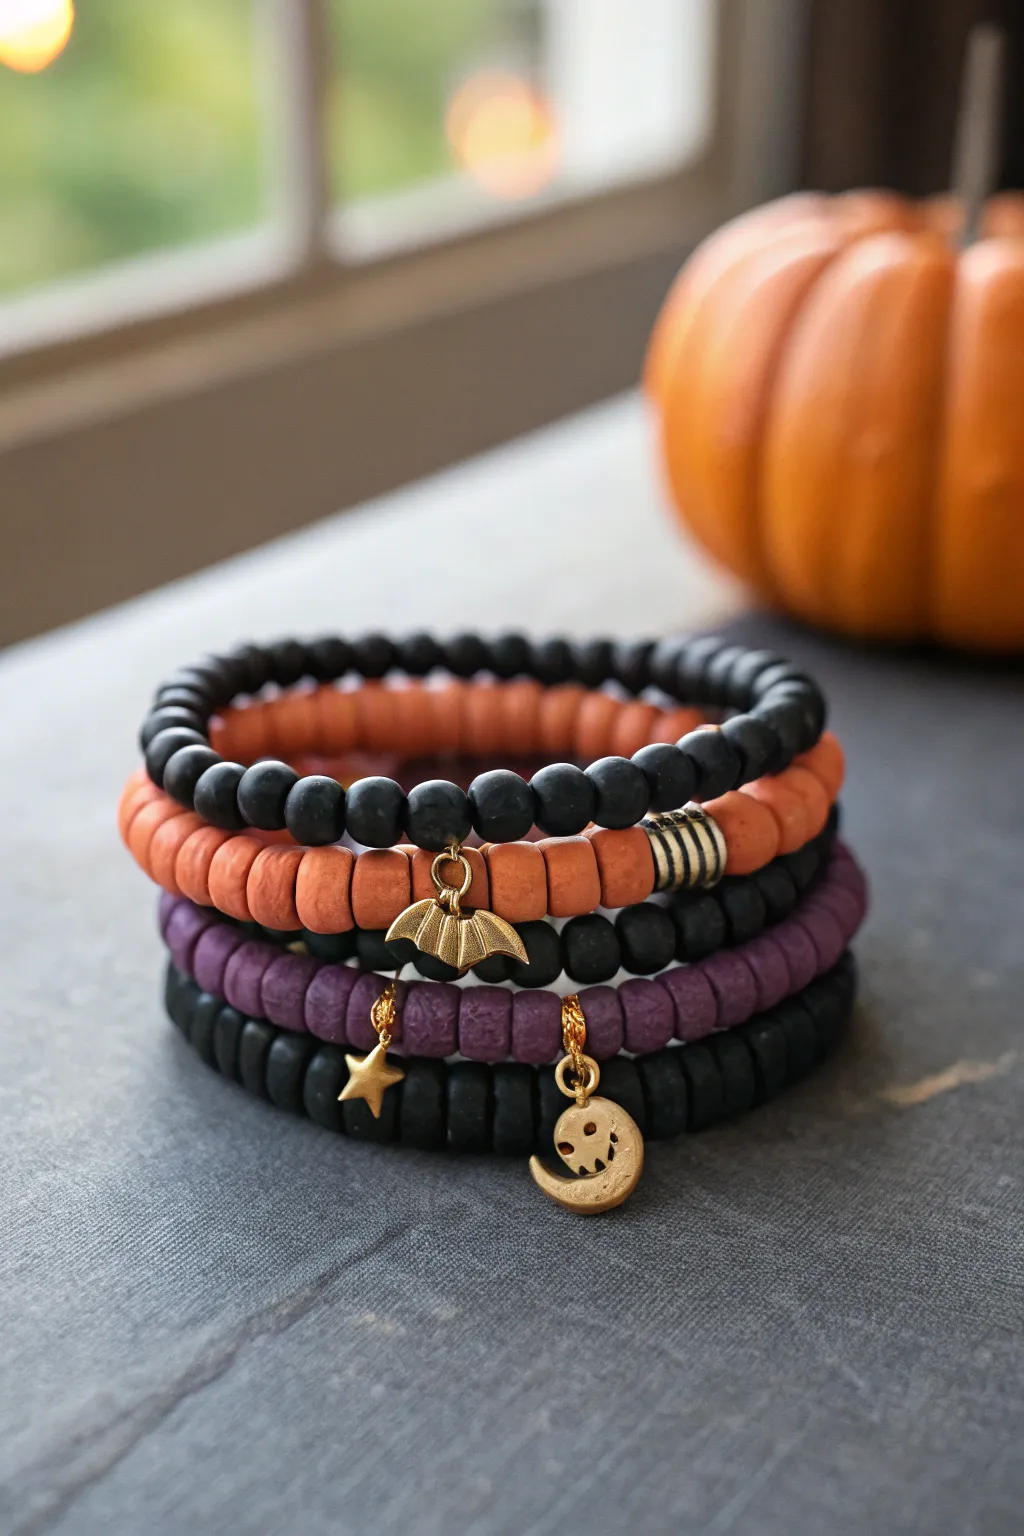
Capture the magic of Halloween night with this enchanting stack of beaded bracelets featuring rich blacks, pumpkin oranges, and deep purples. The mixture of textures and celestial charms makes this set a perfect seasonal bestseller.
Step-by-Step Guide
Materials
- Matte black round beads (6mm or 8mm)
- Orange polymer clay Heishi disc beads
- Deep purple polymer clay Heishi disc beads
- Gold bat charm
- Gold crescent moon face charm
- Gold star charm
- Gold jump rings (4-6mm)
- Gold decorative spacer beads or ribbed slider beads
- Strong elastic cord (0.8mm recommended)
- Super glue or jewelry cement
- Scissors
Step 1: Preparation & Sizing
-
Measure the wrist:
Before cutting any cord, determine the size you are making. A standard adult wrist is about 7 inches, but aiming for 7.5 inches allows for a comfortable stacked fit. -
Cut the elastic:
Cut four strands of elastic cord, each about 10-12 inches long. Having extra length makes tying the final knots much easier than struggling with short ends. -
Pre-stretch the cord:
Gently pull on each strand of elastic several times. This pre-stretching prevents the bracelets from sagging or stretching out permanently after the first wear.
Knot Security
Use a specialized jewelry glue like G-S Hypo Cement. Its precision tip fits between beads perfectly without making a mess on the matte finish.
Step 2: The Bead Strands
-
Start the matte black strand:
For the top bracelet (and the bottom one later), thread onto your elastic solely with the round matte black beads until you reach your target length. -
Secure the first strand:
Tie off this simple black strand using a surgeon’s knot (right over left, left over right, loop through twice). Add a dot of glue to the knot, let it dry, and trim the excess cord. -
Create the orange layer:
Thread the orange Heishi disc beads onto a new piece of cord. These are flatter, so you will need significantly more of them to reach the same length. -
Add the metallic accent:
Somewhere along the orange strand, insert a ribbed gold spacer bead or a cluster of small gold discs to break up the color and add a touch of elegance. -
Finish the orange bracelet:
Tie, glue, and trim the orange strand just as you did the first one. Set it aside with the black one. -
Create the purple layer:
Using the deep purple Heishi beads, create your third strand. These textured clay beads add a nice contrast to the smooth black rounds. -
Assemble the mixed texture strand:
For the final bracelet shown in the stack, create a pattern alternating between segments of black round beads and sections of the flat clay beads if you want extra variety, or simply make another solid black round strand as the base anchor.
Step 3: Adding the Charms
-
Open the jump rings:
Using two pairs of pliers (or your fingers if the wire is soft), gently twist the jump rings open laterally—never pull them apart outward. -
Attach the Bat:
Identify the center point of your orange bracelet. Hook the jump ring with the gold bat charm directly over the elastic cord between two beads. -
Close the ring:
Twist the jump ring back into a closed position, ensuring the ends meet perfectly so the charm doesn’t slip off. -
Attach the star:
On the purple bracelet, attach the small gold star charm using a jump ring. Let this dangle slightly off-center for a more organic look. -
Attach the crescent moon:
For the bottom black bracelet, attach the gold crescent moon face charm. I like to place this one opposite the bat so the charms stack nicely without tangling.
Glow Up
Swap a few of the orange clay discs for glow-in-the-dark beads. It adds a hidden surprise that only reveals itself when the lights go out.
Step 4: Final Touches
-
Hide the knots:
If hole sizes allow, gently tug the elastic knots inside a neighboring bead to hide them from view. -
Stack and check:
Place all four bracelets on a rolling display or your wrist to ensure the colors balance and the charms hang correctly.
Now you have a bewitching set of accessories ready for the spooky season
Winter Icy Neutrals And Metallics
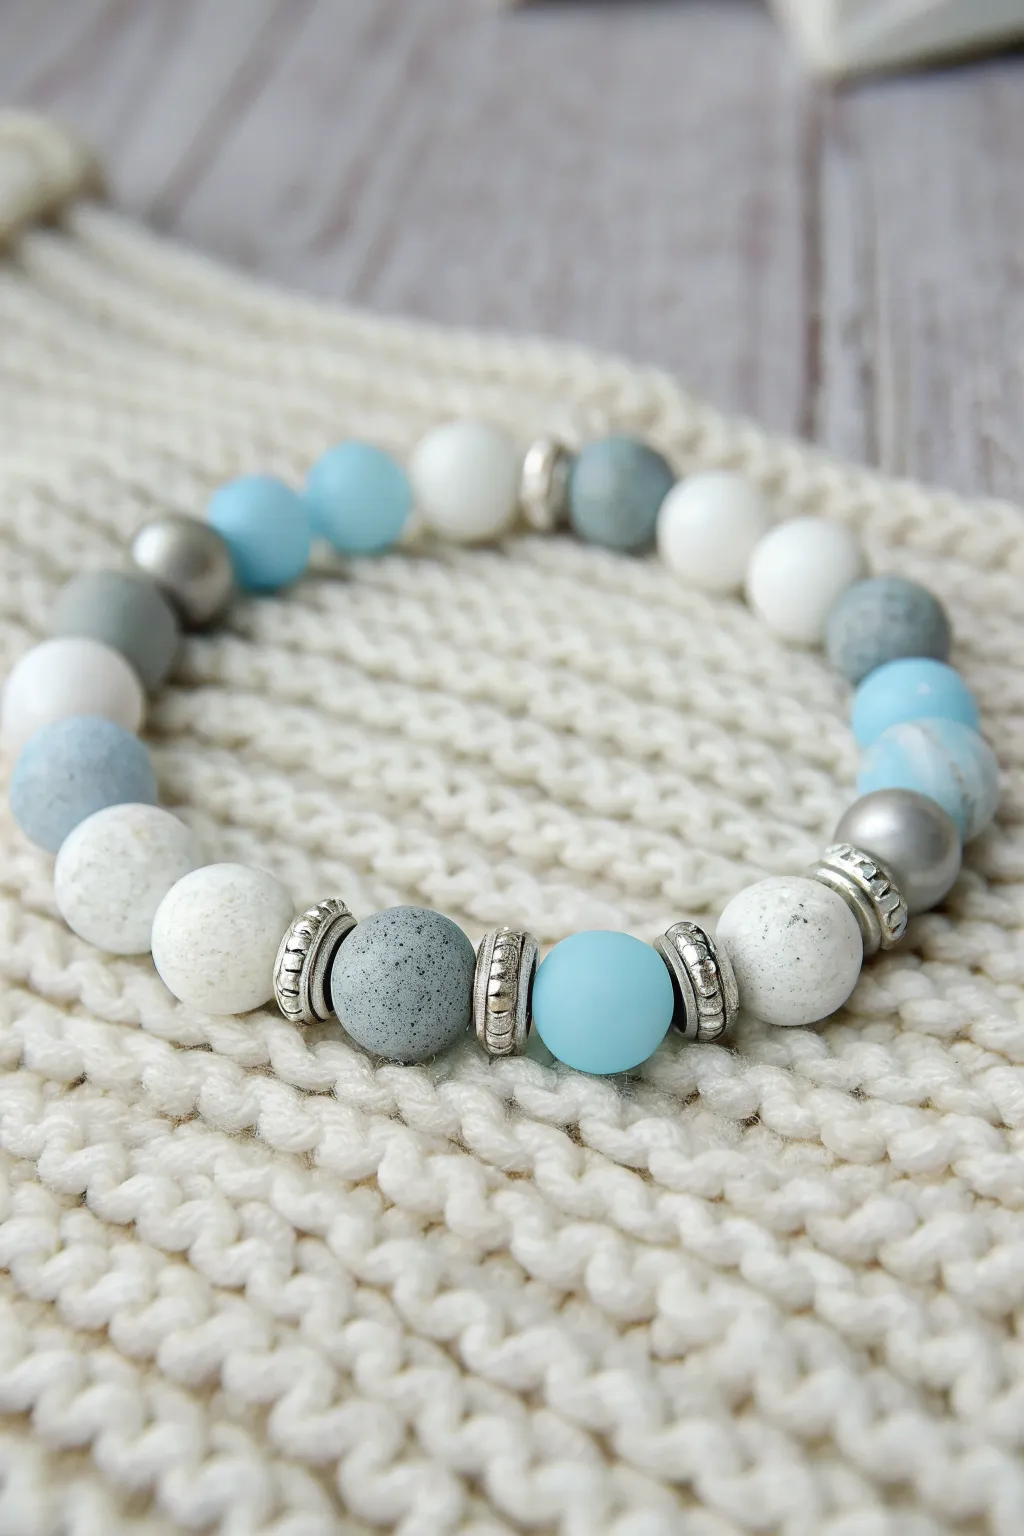
Capture the serene beauty of a winter landscape with this bracelet featuring icy blues, crisp whites, and cool grays. The mix of matte polymer clay textures and metallic accents creates a sophisticated accessory perfect for snowy days.
Step-by-Step Tutorial
Materials
- Matte polymer clay round beads (8mm or 10mm): Baby Blue
- Matte polymer clay round beads (8mm or 10mm): White
- Speckled polymer clay round beads (8mm or 10mm): Stone/Gray granite
- Speckled polymer clay round beads (8mm or 10mm): White flecked
- Metallic silver round beads (8mm or 10mm)
- Silver-tone varied spacer beads (heishi/disc and decorative rondelle)
- Clear elastic beading cord (0.7mm or 0.8mm)
- Jewelry glue or super glue
- Bead design board or shallow tray
- Scissors
Step 1: Planning and Preparation
-
Assess the Pattern:
Begin by examining the layout of your beads. This design relies on an asymmetrical yet balanced repeating pattern. Notice the ‘focal’ section with the silver spacers and the repeating blocks of color elsewhere. -
Measure the Wrist:
Determine the desired bracelet size. For a standard adult wrist, you will typically need about 7 inches of length. Cut a piece of elastic cord about 10-12 inches long to give yourself plenty of room for tying knots later. -
Pre-stretch the Cord:
Gently pull tightly on the elastic cord several times. This is a crucial step I always do to prevent the bracelet from sagging or stretching out permanently after the first wear.
Pro Tip: Bead Holes
If a clay bead hole is blocked or too small for the knot, gently twist a bead reamer or a thick sewing needle inside to clean it up before stringing.
Step 2: Designing the Layout
-
Lay Out the Focal Point:
On your bead board, place a speckled gray bead in the center. Flank it on either side with a detailed silver rondelle spacer. -
Add Contrast:
Next to those spacers, place a matte baby blue bead on the right and a speckled white bead on the left. This asymmetry adds visual interest. -
Expand the Pattern Right:
Continuing to the right of the baby blue bead, add another silver spacer, then a speckled white bead, followed by a metallic silver bead. -
Expand the Pattern Left:
Going back to the left side, after the speckled white bead, add a silver spacer, then a matte baby blue bead. -
Fill the Remaining Length:
Continue arranging the rest of your beads in a loose pattern, alternating between the matte gray, matte white, and remaining blue beads. Aim to create blocks of subtle color shifts rather than a rigid ABAB pattern. -
Check the Length:
Wrap your laid-out beads around your wrist or a sizing cone to ensure they will fit comfortably. Add or remove a bead or two if necessary.
Step 3: Stringing and Securing
-
Attach a Stopper:
Place a piece of tape or a bead stopper clip on one end of your cut elastic to prevent beads from sliding off while you work. -
Start Stringing:
Carefully thread the beads onto the elastic cord, following the pattern you laid out on the board. Double-check the order of the spacers to make sure they frame the focal beads correctly. -
Prepare the Knot:
Once all beads are strung, remove the tape or stopper. bring the two ends of the cord together to form a circle. -
Tie the Surgeon’s Knot:
Tie a standard overhand knot, but do not pull tight yet. Make a second loop through the knot (wrapped twice) and then pull both ends of the elastic firmly to secure it. This is a Surgeon’s knot. -
Secure with Glue:
Dab a tiny drop of jewelry glue directly onto the knot. Make sure not to get glue on the neighboring beads, as it can spoil the matte finish. -
Hide the Knot:
Before the glue fully hardens, gently tug the elastic so that the knot slides inside the hole of the nearest large bead (preferably one of the darker gray ones or a metallic bead with a larger hole). -
Did It Hide?:
If the knot doesn’t pull through easily, don’t force it excessively; simply let it rest as close to the bead hole as possible. -
Final Trim:
Allow the glue to dry completely according to the manufacturer’s instructions. Finally, use your sharp scissors to trim the excess cord ends as close to the bead/knot as possible.
Level Up: Charm Addition
Add a single silver snowflake charm on a jump ring next to the central focal bead for an extra wintry touch that dangles and catches the light.
Your wrist is now adorned with the cool elegance of a winter frost, ready to complement any cozy sweater
Birth Month Colorway “Drop” Sets
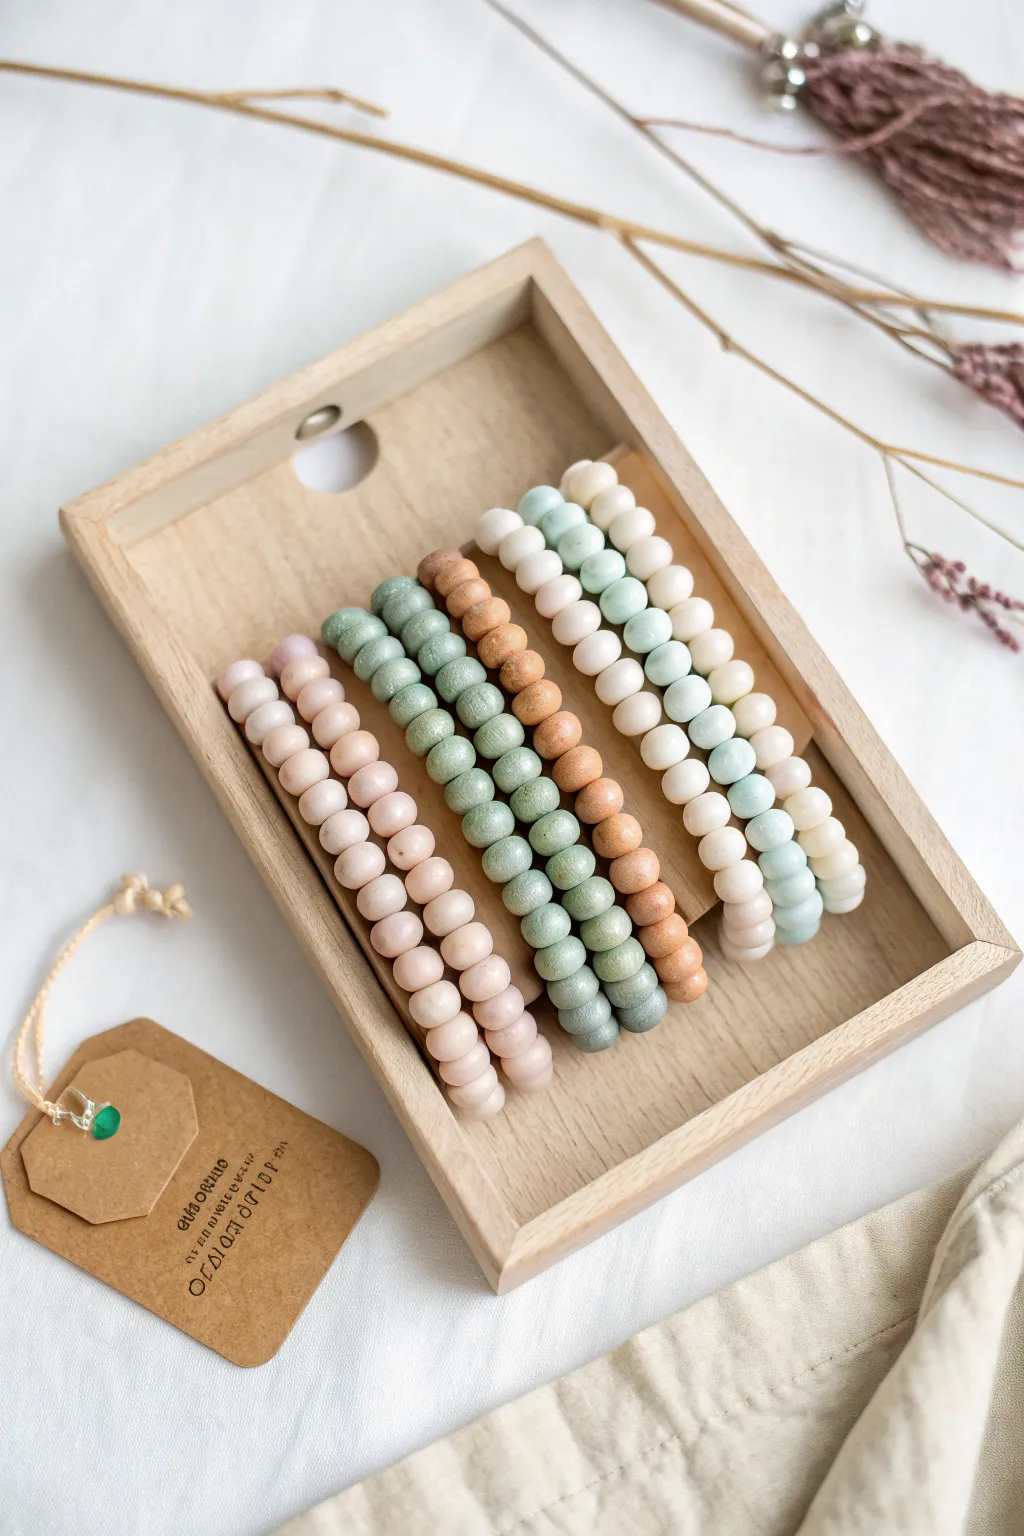
Create a sophisticated, boutique-ready bracelet collection using polymer clay heishi beads in a serene, earthy palette. This tutorial mimics the look of high-end ‘drop’ sets, combining muted pastels and warm woods for a cohesive stack that celebrates birth months or seasonal transitions.
How-To Guide
Materials
- Polymer clay heishi beads (6mm or 8mm) in: Pale Pink, Sage Green, Terracotta/Camel, Soft Teal, and Cream/White
- Strong elastic cord (0.7mm or 0.8mm clear stretch magic)
- Super glue or specialized jewelry glue (e.g., E6000 or G-S Hypo Cement)
- Scissors or jewelry snips
- Bead stopper or asking tape
- Bead design board (optional but helpful)
- A small wooden tray for presentation (optional)
Step 1: Planning Your Color Palette
-
Select your signature shades:
Begin by isolating the four distinct colorways shown: a dusty rose/pale pink, a muted sage green, a warm terracotta or camel brown, and a light creamy teal/white mix. The goal is a matte, slightly organic finish. -
Determine a pattern:
Observe that the bracelets are primarily monochromatic but textured. For two of the strands (the sage and the terracotta), use a single solid color. For the pink strand, mix two very close shades of pink for subtle depth. For the white/teal strand, alternate sections of cream and pale teal. -
Measure for fit:
Standard wrist size is usually around 7 inches. Cut four lengths of elastic cord to about 10-12 inches each to ensure you have plenty of room for tying knots comfortably. -
Secure the ends:
Attach a bead stopper or a piece of masking tape to one end of each elastic string so your beads don’t slide off while you work.
Step 2: Stringing the Strands
-
Create the pink strand:
String your pale pink heishi beads. If you have two slightly different dye lots of pink, mix them randomly to create that artisanal, hand-dyed appearance shown on the far left of the tray. -
Create the sage green strand:
Thread the sage green beads next. These appear slightly metallic or pearlescent in some lights, so if you can find a ‘frosted’ finish bead, that works perfectly here. -
Create the terracotta strand:
String the warm camel or terracotta beads. This provides a warm, grounding element to the otherwise pastel palette. -
Create the ombre accent strand:
For the fourth bracelet (shown on the far right), create a pattern. Thread about 1 inch of white/cream beads followed by 1 inch of pale teal beads. Repeat this pattern until the full length is reached. -
Check sizing:
Wrap each strung cord around your wrist or a sizing cone to ensure they are all uniform in length before tying.
Knot Slipping?
If using slippery elastic, coat the knot in clear nail polish or G-S Hypo Cement. Let it tack up before pulling it inside a bead to lock it in place permanently.
Step 3: Finishing the Set
-
Pre-stretch the elastic:
Before tying, give the elastic a few gentle tugs. This pre-stretching prevents the bracelet from sagging or loosening immediately after the first wear. -
Tie the surgeons knot:
Remove the tape/stopper. Cross the ends, loop one under twice, pull tight, and then tie a standard overhand knot on top. This creates a secure surgeon’s knot. -
Glue the knot:
Apply a tiny dot of jewelry glue to the knot. I like to let this dry for about 30 seconds before sliding a bead over it to hide the join. -
Hide the mechanism:
Gently pull the elastic so the knot slides inside the hole of the nearest bead. If the hole is too small, simply trim the tails very close to the knot after the glue is fully cured. -
Trim excess cord:
Once the glue is completely dry (check your glue instructions, usually 24 hours for full cure), trim any remaining tail ends close to the beads. -
Arrange for display:
To mimic the photo, place your finished stack in a small, shallow wooden tray or box to emphasize the natural materials and earthy color story.
Level It Up
Add a single gold or wooden spacer bead to the center of each bracelet to act as a focal point, or attach a small raw tag with birth month branding.
These calming colors look wonderful stacked together or worn individually for a subtle pop of color
Matching Best Friend Stack Pair
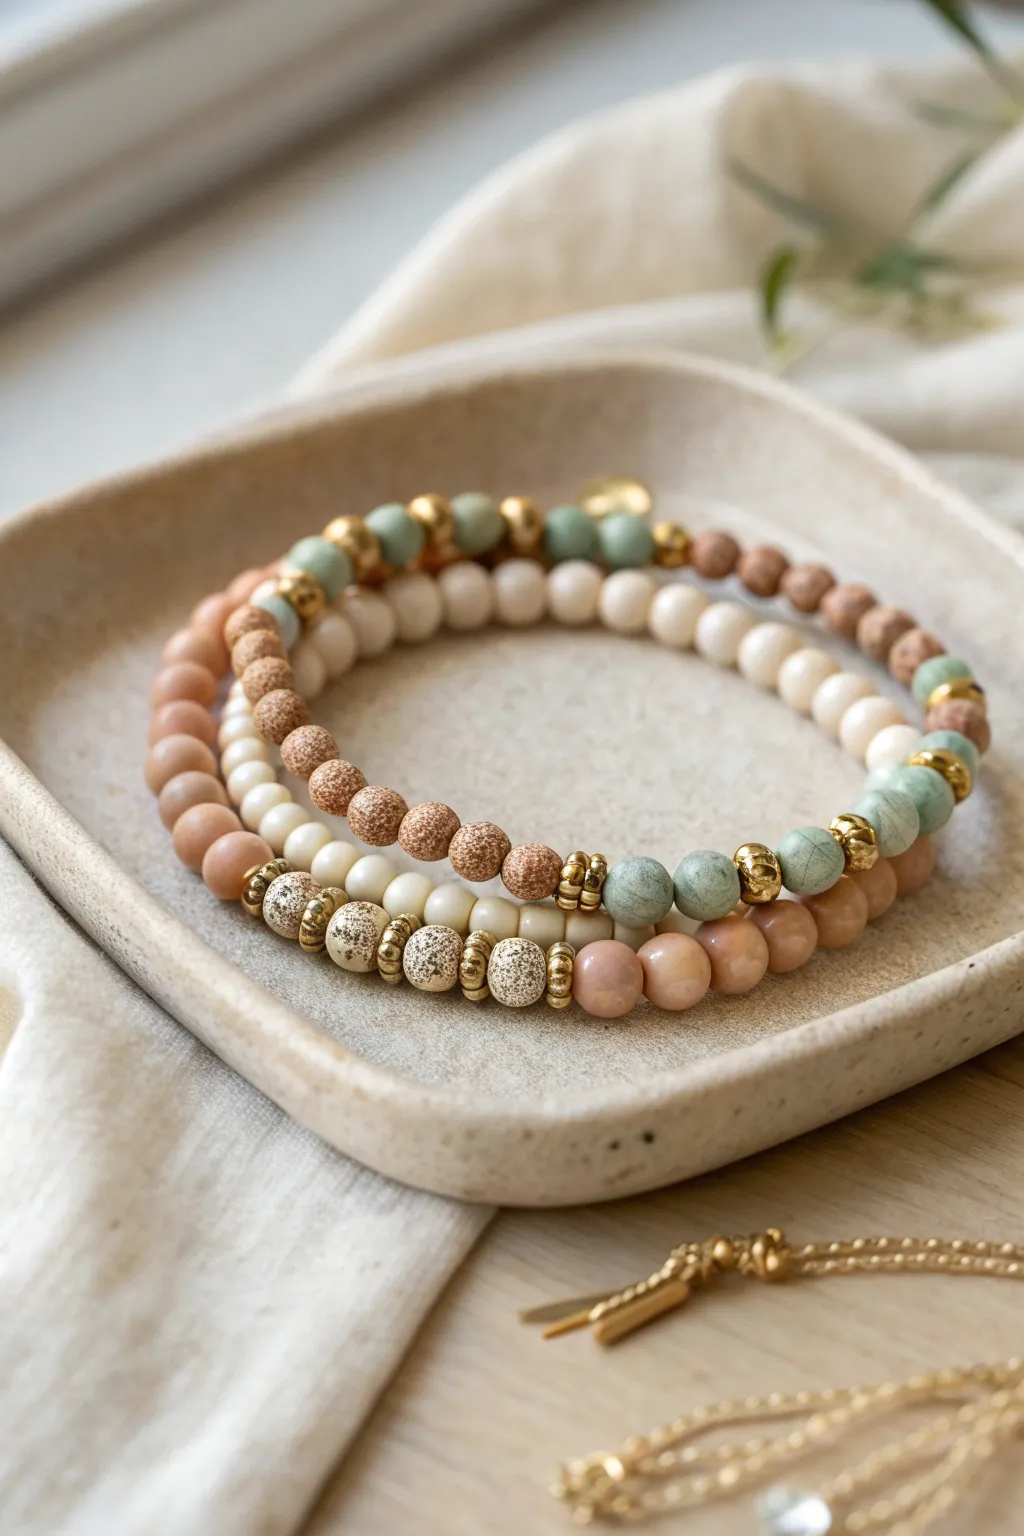
This harmonious trio of bracelets blends soft, earthy neutrals with touches of sage green and gold for a sophisticated bohemian look. Perfect for best friend sets, the design uses a mix of matte, speckled, and polished textures that feel organic yet refined.
Step-by-Step
Materials
- Elastic stretch cord (0.7mm or 0.8mm)
- 6mm matte peach/tan round gemstone beads (e.g., Sunstone or Peach Aventurine)
- 6mm matte sage green round beads (e.g., Amazonite or Dyed Jasper)
- 6mm creamy white round beads (bone or polished wood)
- 8mm textured/speckled beige ceramic or polymer clay beads
- 4mm gold plated spacer discs (heishi style)
- Create-your-own gold accent beads (small faceted or rondelle shapes)
- Jewelry glue (e.g., E6000 or G-S Hypo Cement)
- Scissors
Step 1: The Sage & Cream Spiral
-
Prepare your cord:
Cut a piece of elastic cord to about 12 inches. This gives you plenty of room to work without beads slipping off the ends while you string them. -
Pre-stretch the elastic:
Give the cord a few gentle tugs. I consider this a crucial step because it prevents the bracelet from loosening up permanently after the first few times you wear it. -
Begin the pattern:
Start by threading on about 10 to 12 of the creamy white round beads. This will form the base section that sits on the underside of the wrist. -
Add the first focal section:
Slide on one gold spacer disc, followed by three of the matte sage green beads, and then another gold spacer disc. -
continue the alternating pattern:
Add five cream beads, then repeat the sage-gold sequence: gold spacer, three sage beads, gold spacer. Continue until the bracelet reaches your desired length (usually about 6.5 to 7 inches for an average wrist). -
Secure the first bracelet:
Tie a surgeon’s knot (right over left-then-under twice, pull tight). Add a tiny dot of jewelry glue to the knot, let it tack up for a moment, and trim the excess cord.
Knot Slipping?
If your elastic is slippery, sand the ends lightly with an emery board before tying. This creates friction so the surgeon’s knot grips itself tighter without sliding undone.
Step 2: The Textured Earth Strand
-
Set up the second cord:
Cut and pre-stretch another 12-inch length of elastic cord just like before. -
Create the heavy texture segment:
This bracelet features a row of larger, speckled beads. Thread on five to six of the 8mm textured beige beads. Place a gold disc spacer between every single one of these beads to separate them. -
Transition to smoother beads:
On either side of this textured center block, add two gold rondelle or faceted accent beads. -
Finish the loop:
Fill the rest of the strand with the matte peach/tan gemstone beads until the size matches your first bracelet perfectly. -
Knot and glue:
Tie off this second bracelet firmly with a surgeon’s knot, apply your adhesive dabs, and trim the tails closely.
Level Up: Scent Diffuser
Use unfinished wood or lava stone for the porous beige beads. Add a drop of essential oil to these specific beads to turn the stack into a wearable aromatherapy diffuser.
Step 3: The Speckled Accent Band
-
Start the final strand:
Prepare your third piece of elastic cord. -
Build the texture pattern:
This design uses smaller textured beads. Thread three small, textured brown beads (like lava stone or brown ceramic), then one gold spacer, then another three textured beads. -
Incorporate color blocks:
Follow that textured section with a block of four sage green beads. Separate this block from the next with a single gold spacer. -
Complete the circle:
Continue alternating small groups of textured brown beads and sage green beads, using the cream white beads as filler if you need extra length to balance the design. -
Tie the final knot:
Perform your final surgeon’s knot. For a professional finish, try to pull the knot inside the hole of one of the larger beads before the glue fully sets.
Stack them all together on a display card or gift bag for a beautiful, handcrafted presentation
Adjustable Sliding Knot “One Size”
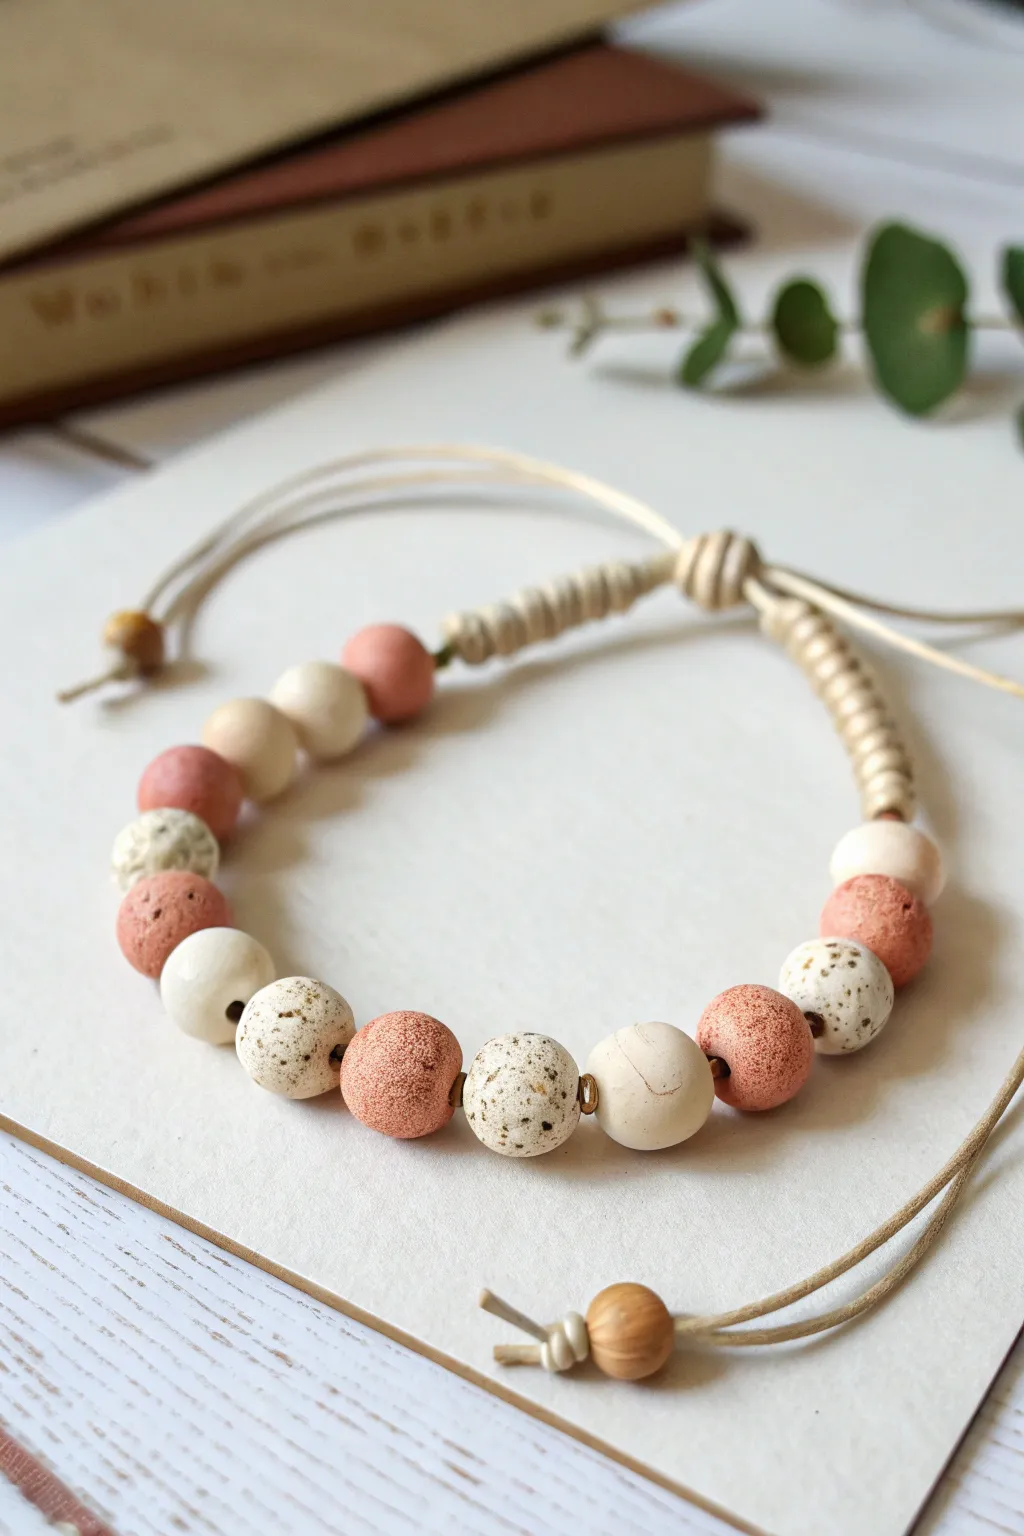
This earthy, adjustable bracelet features handmade polymer clay beads in soft terracottas and creams, strung on a durable leather cord. The sliding knot closure makes it a perfect ‘one size fits all’ piece to sell, offering both rustic charm and easy wearability.
How-To Guide
Materials
- Polymer clay (terracotta, white, beige, brown)
- Round leather cord or waxed cotton cord (1.5mm – 2mm, beige)
- Small brass or gold spacer beads
- Medium wooden beads (for cord ends)
- Clay roller or pasta machine
- Toothpick or bead piercing pin
- Sandpaper (fine grit)
- Oven for baking clay
- Old toothbrush (for the speckled effect)
- Acrylic paint (brown/black mix) for speckles
- Scissors
Step 1: Crafting the Clay Beads
-
Condition the clay:
Start by warming up your polymer clay in your hands until it is soft and malleable. You will need three primary colors: a terracotta red, a plain cream, and a slight off-white. -
Create the bead sizes:
Roll the clay into balls. Aim for a diameter of about 10-12mm. For this specific design, create roughly 5-6 terracotta beads, 4 cream beads, and 4 textured off-white beads. -
Texture the surface:
For the terracotta beads, gently roll them across a piece of sandpaper or use a stiff stippling brush to give them a stone-like, porous texture rather than a smooth finish. -
Pierce the holes:
Using your bead pin or a thick toothpick, carefully pierce a hole through the center of each bead. Ensure the hole is wide enough to accommodate two strands of your chosen cord—this is crucial for the sliding knot mechanism later. -
Add the speckled effect:
Dilute a small amount of brown/black acrylic paint with water. Dip an old toothbrush into the mix and run your thumb across the bristles to flick tiny specks onto the cream and white beads. -
Bake the beads:
Arrange the beads on a baking tray lined with parchment paper. Bake according to your polymer clay manufacturer’s instructions (usually 230°F – 275°F for 15-30 minutes). I like to cover them with a foil tent to prevent scorching. -
Cool and finish:
Allow the beads to cool completely. If any holes shrank during baking, gently re-drill them with a small hand drill or twisting tool to ensure the cord fits smoothly.
Loose Knots?
If the sliding knot slips too easily, the cord might be too smooth. Rough up the leather slightly with sandpaper or tie an extra turn in the coil for friction.
Step 2: Strung Assembly
-
Cut the main cord:
Cut a length of leather or waxed cotton cord approximately 14 inches long. This will be the central strand that holds the beads. -
Begin stringing:
Thread your beads onto the center of the cord. The pattern in the image alternates between solid cream, speckled white, terracotta, and cream again. -
Add spacer accents:
Place the small brass or gold spacer beads strategically. In the example, they sit between the central three beads, adding a subtle metallic highlight. -
Tie off the bead section:
Once your beads are centered, tie a simple overhand knot on either side of the bead group. This keeps the beads stationary and frames the design.
Step 3: The Sliding Macramé Knot
-
Form the circle:
Overlap the two ends of your main cord to form a circle. The tails should be pointing in opposite directions. -
Prepare the knotting cord:
Cut a second piece of cord, about 10 inches long. Place this underneath the overlapped section of the bracelet cords. -
Start the knot:
We will use a ‘coil knot’ or ‘wrapping knot’ style here. Take one end of the new cord and wrap it tightly around the overlapped bracelet cords, moving back toward the loop you started. -
Secure the wrap:
Wrap it neatly about 6-8 times. The coil should look like the one in the photo—tight and uniform. -
Thread back through:
Take the end of the wrapping cord you were just winding and tuck it through the loop created at the start of the wrap. Pull the other tail to tighten the loop, trapping the cord inside the coil. -
Trim the knot ends:
Cut the excess tails of the wrapping cord (NOT the bracelet cords!) extremely close to the coil. You can add a tiny dab of glue to the cut ends to prevent fraying. -
Add end stoppers:
Slide a small wooden bead onto each of the loose bracelet cord tails. Tie a firm overhand knot at the very end to secure the bead, then trim any excess cord.
Scent Infusion
Use unfinished wood or lava stone beads for the spacers. Customers can add a drop of essential oil to these porous beads for an aromatherapy twist.
This beautiful, adjustable design is now ready for your online shop or craft fair display
Carded Bundle Packaging For Sets
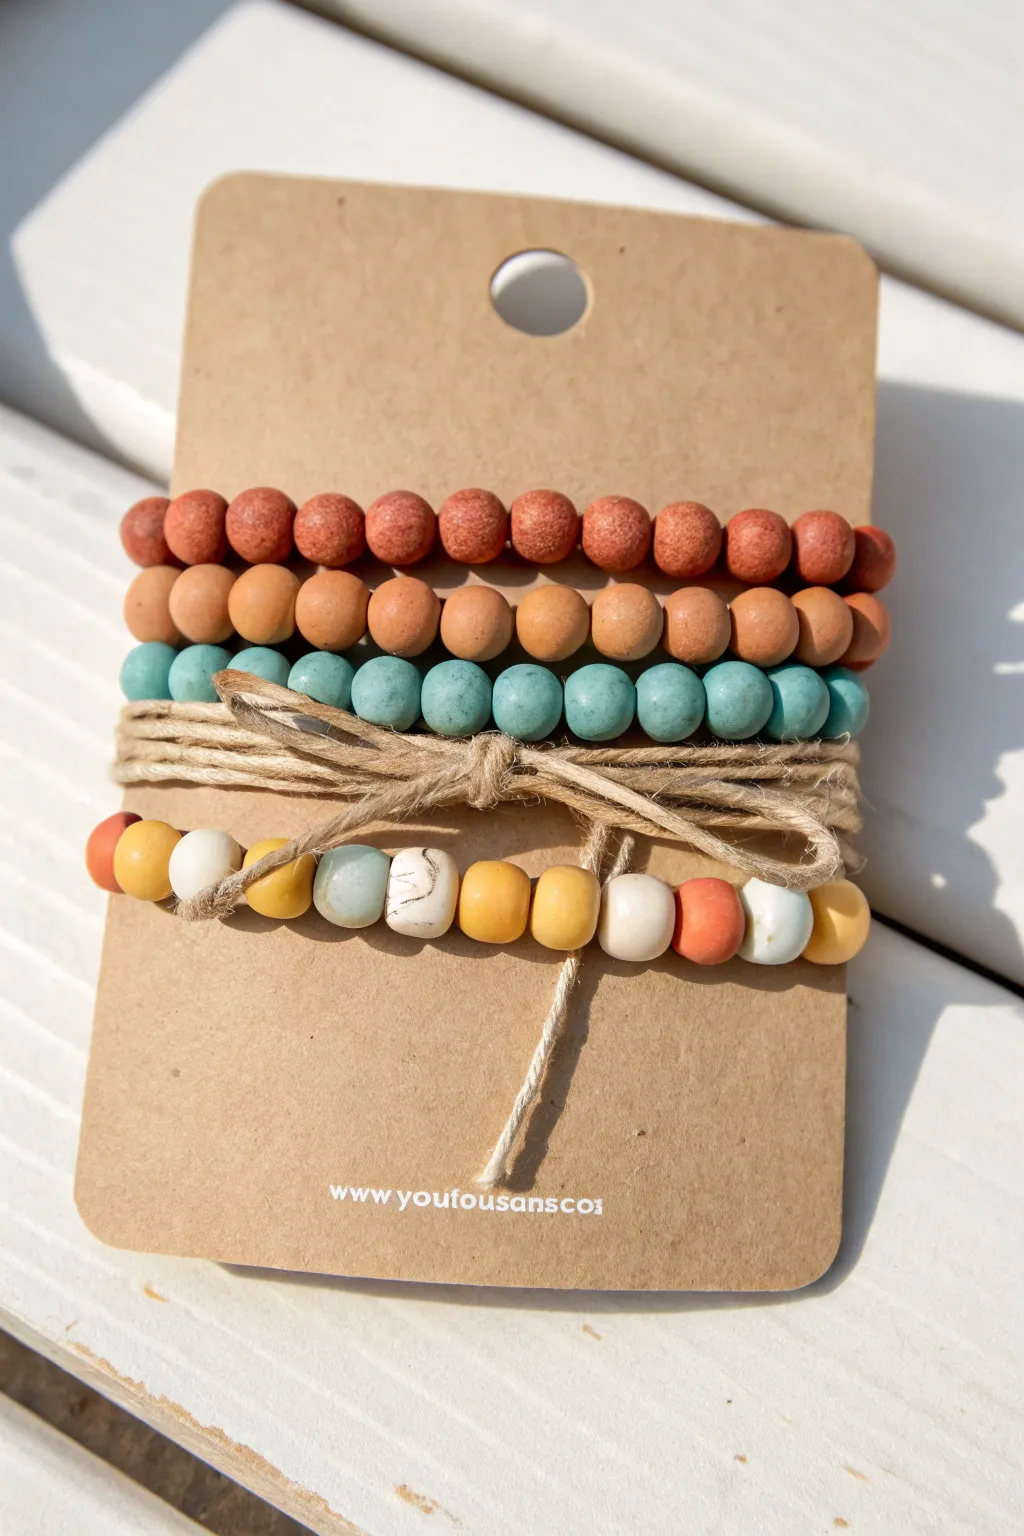
This rustic, earth-toned bracelet set combines simple clay textures with varied bead shapes for a perfectly cozy aesthetic. The bundle is tied together with natural twine and displayed on a kraft card, making it an instantly giftable or sellable package.
Detailed Instructions
Materials
- Polymer clay beads (10mm round): Terracotta/Rust color
- Polymer clay beads (10mm round): Matte tan/camel color
- Polymer clay beads (10mm round): Turquoise/Teal color
- Mixed accent beads (8-10mm): White, yellow, orange, marbled stone
- Elastic stretch cord (0.8mm or 1mm thickness)
- Natural jute twine
- Heavyweight kraft cardstock or pre-cut jewelry display cards
- Scissors
- Super glue or jewelry cement
- Hole punch (standard size)
- Ruler
Step 1: Creating the Solid Color Bracelets
-
Measure and Cut Cord:
Begin by cutting three lengths of elastic cord, each about 10-12 inches long. This extra length makes tying the final knots much easier. -
Pre-stretch the Elastic:
Give each piece of cord a firm tug a few times. Pre-stretching helps prevent the bracelets from sagging or loosening after the first wear. -
String the Rust Beads:
For the first bracelet, thread approximately 20-22 of the textured rust-colored clay beads onto the cord until it measures about 7 inches (or your desired wrist size). -
String the Tan Beads:
Repeat the process for the second bracelet using the matte tan clay beads. Ensure the bead count matches the first bracelet for uniformity. -
String the Teal Beads:
Create the third bracelet using the turquoise clay beads. I find that using consistent bead sizes across these top three stackers creates a cohesive look. -
Knot and Secure:
Tie off each bracelet using a surgeon’s knot (right over left, left over right). Pull the knot very tight. -
Glue and Trim:
Add a tiny drop of super glue or jewelry cement to the knot for security. Allow it to dry completely, then trim the excess cord ends close to the knot.
Step 2: Assembling the Mixed Accent Strand
-
Design the Pattern:
Lay out your mixed beads on your workspace before stringing. Aim for a random, organic pattern alternating between yellow, white, orange, and the marbled stone beads. -
String the Pattern:
Thread these mixed beads onto a new piece of elastic cord. This strand adds a pop of variety to the solid colors above it. -
Finish the Strand:
Tie a secure surgeon’s knot, glue it, let it dry, and trim the ends just like you did for the previous three bracelets.
Loose Knots?
If your elastic knots slip, try a ‘surgeon’s knot’: loop the thread through twice on the first pass instead of once before pulling tight.
Step 3: Packaging the Bundle
-
Prepare the Card:
Cut your kraft cardstock into a rectangle approximately 3 inches wide by 5 inches tall. Round the corners with scissors or a punch for a professional finish. -
Punch the Hanger Hole:
Punch a single hole centered near the top edge of the card. This is essential for hanging on display racks. -
Add Branding (Optional):
If you have a website or logo stamp, apply it near the bottom edge of the card now, leaving space in the middle for the bracelets. -
Arrange the Stack:
Slide the four bracelets onto the card in this order from top to bottom: Rust, Tan, Teal, Mixed. -
Secure with Twine:
Cut a length of natural jute twine. Wrap it horizontally around the card, positioning it directly between the teal bracelet and the mixed bottom bracelet. -
Tie the Bow:
Tie the twine into a simple shoelace bow on the front of the card. This physically separates the mixed strand to highlight it and visually ties the rustic theme together.
Pro Tip: Hidden Knots
Try to tuck your glued knot inside the hole of the nearest bead. This hides the mechanics and gives your jewelry a seamless finish.
Now you have a professionally packaged set ready for a craft fair or boutique display.