I love how clay bead friendship bracelets let you say “this is us” with nothing but color, a few heishi disc beads, and a stretchy cord. Here are my favorite design ideas for making easy, personalized stacks you can wear together, trade, and remake in a hundred different colorways.
Classic Rainbow Order Bracelet
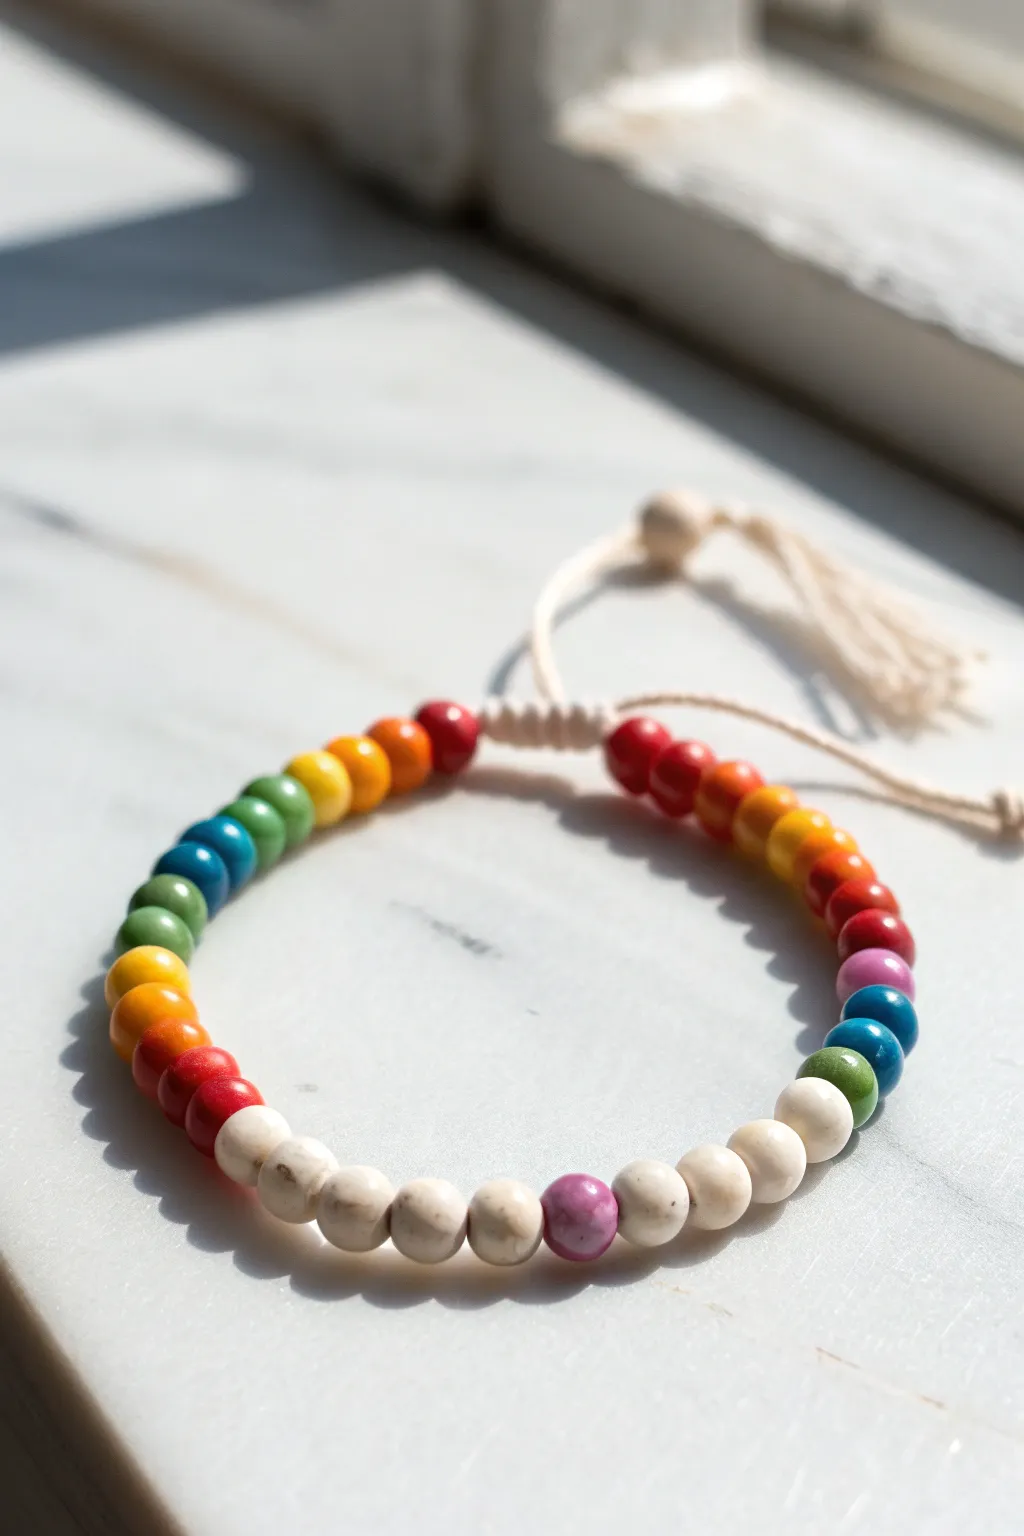
Create a cheerful, adjustable bracelet that combines a vibrant rainbow gradient with a calming section of neutrals. This design uses a smart sliding knot closure, making it easy to take on and off without clasps.
Step-by-Step Guide
Materials
- Round wood or finish-matte clay beads (8mm)
- Bead colors: Red, Orange, Yellow, Green, Blue, Purple, Cream/White
- Waxed cotton cord (1mm, beige or natural)
- Scissors
- Craft glue or clear nail polish
- Tape or clipboard
Step 1: Stringing the Pattern
-
Measure the cord:
Cut a piece of waxed cotton cord approximately 12-14 inches long to serve as your base strand. -
Prepare the ends:
Apply a tiny dab of glue or clear nail polish to the very tips of the cord and twist them. Let them dry for a minute to create stiff ‘needles’ for easier threading. -
Start the gradient:
Begin stringing your beads in rainbow order. I start with Red, then move through Orange, Yellow, Green, and Blue. -
The cool tones:
Continue the gradient into the darker cool tones, adding Indigo and Violet beads. -
Add the neutral block:
After your rainbow section is done, thread on 3 to 4 Cream or White beads to start the neutral bottom section. -
The center pop:
Add one single colorful bead (like the speckled purple one shown) to be the focal point of the white section. -
Close the neutral block:
Add 3 to 4 more Cream beads to finish the bottom segment. -
Reverse the rainbow:
To mirror the design, string the rainbow colors in reverse order (Violet back to Red). This ensures Red beads end up on both sides of the top closure. -
Check the fit:
Wrap the beaded section around your wrist. The beads should cover most of your wrist but leave a gap of about 1.5 inches for the closure.
Natural Diffuser
Since these beads look like unfinished wood, they make excellent essential oil diffusers! Add a drop of lavender or lemon oil to the wood beads, and the scent will carry with you all day.
Step 2: The Sliding Knot
-
Position the bracelet:
Form a circle with your bracelet, overlapping the two cord ends by about 3 inches. Tape these crossed cords down to a table or clipboard to keep them steady. -
Prepare the knotting cord:
Cut a separate piece of cord, roughly 8 inches long. -
Start the knot:
Slide the new cord under the crossed bracelet strands. Center it so you have equal lengths on left and right. -
Tie square knots:
Create a ‘macramé square knot’ around the main cords. Repeat this roughly 5-6 times to create a sturdy tubular slider. -
Secure the slider:
Trim the excess tails of the *knotting* cord (not the bracelet cord!) and seal the knot with a dab of glue so it doesn’t unravel. -
Finish the tails:
Tie a simple overhand knot at the very end of each bracelet pull-cord to prevent them from slipping through the slider. -
Create tassels:
Use a needle or your fingernails to carefully unravel the cord below the stopper knots, creating the soft, frayed tassel look shown in the photo.
Level Up: Mix Textures
For a more tactile design, alternate between smooth painted beads and raw wooden ones. The contrast in texture makes the bracelet feel more organic and high-end.
Now you have a beautifully balanced bracelet that adds a pop of color to any outfit!


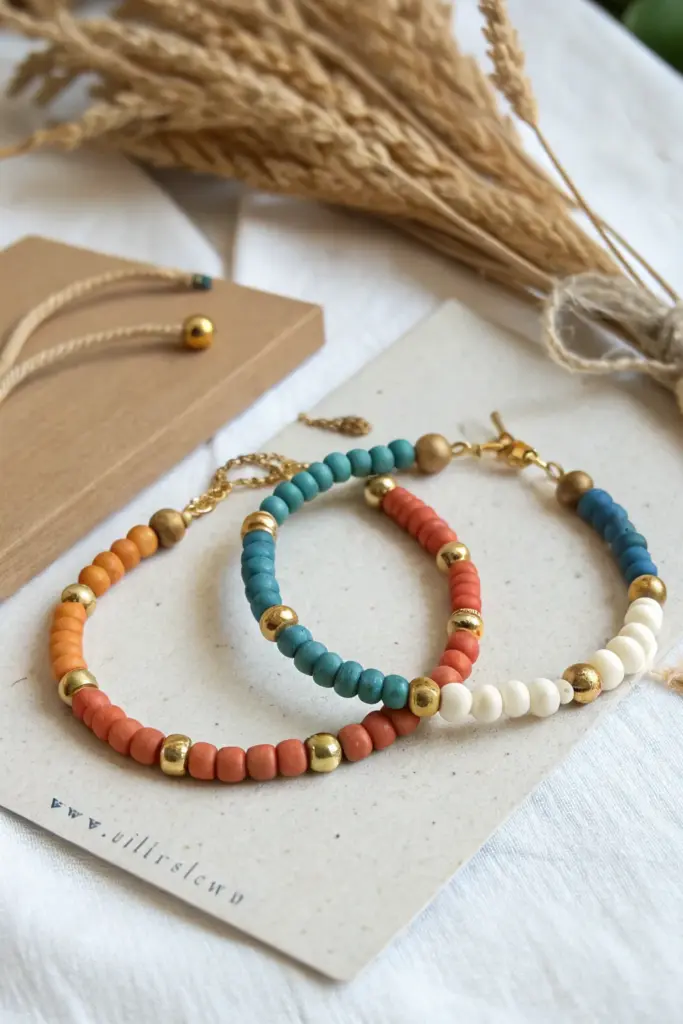
Half-and-Half Bestie Color Split
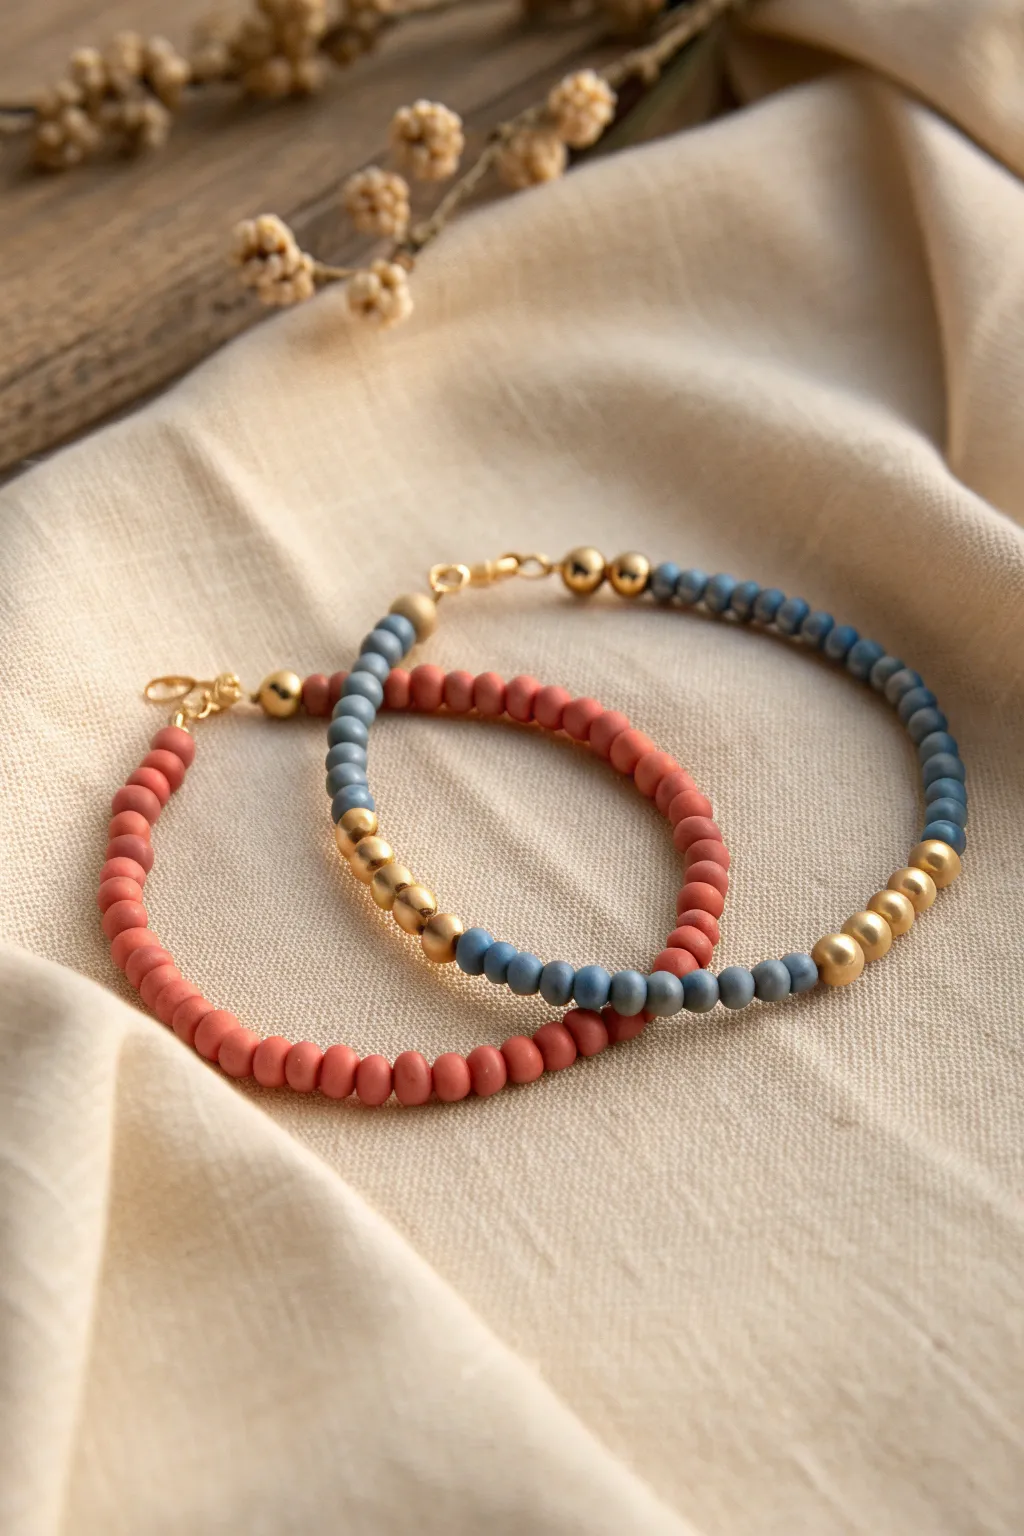
Embrace the elegance of earthy tones with these delicate half-and-half clay bead bracelets. The warm terracotta and cool slate blue beads create a stunning contrast, elevated by gleaming gold accents for a sophisticated, boutique-style finish.
Step-by-Step Tutorial
Materials
- Heishi clay beads in terracotta/rust
- Heishi clay beads in slate blue/grey
- Small round gold spacer beads (approx. 3-4mm)
- Small gold lobster clasp
- Gold jump rings
- Gold clam shell bead tips (or crimp beads)
- Flexible beading wire
- Jewelry pliers (round nose and flat nose)
- Wire cutters
- Strong jewelry glue (optional)
Step 1: Preparation
-
Measure your wrist:
Wrap a piece of string around your wrist to find the desired length. Add about half an inch to this measurement to account for the clasp and ease of movement. -
Cut the wire:
Using your wire cutters, snip a length of beading wire that is about 4-5 inches longer than your target bracelet length. This gives you plenty of room to work with the clasps. -
Plan your design:
Lay out your beads on a tray or fabric mat. For the ‘half-and-half’ look, visualize the bracelet as a circle: one half will be solid color A, and the other half will be color B, with a bridge of gold beads connecting them.
Step 2: Creating the Solid Sections
-
Secure the first end:
Thread one end of your wire through the small hole of a clam shell bead tip. Make a double knot in the wire nestled inside the shell. Add a tiny dab of glue, then gently close the shell over the knot using flat nose pliers. -
Start with the primary color:
String on your first color (e.g., the terracotta beads). Continue adding these until you have covered slightly less than half of your desired total length. -
Check for consistency:
Occasionally hold the wire up to ensure the beads sit flat against each other. Clay beads can sometimes vary in thickness, so I like to remove any that look too wonky or uneven.
Gold Bead Tip
Use higher-quality gold-filled or plated brass beads rather than plastic ones painted gold. The weight makes the bracelet drape better, and the finish lasts longer against skin oils.
Step 3: The Gold Transition
-
Add the first gold accent:
Once your first color section is done, thread on 3 to 5 round gold spacer beads. This creates a luxurious metallic transition point. -
Switch to the second color:
Begin stringing your second color beads (e.g., slate blue). String this section until it matches the length of your first color section. -
Balance the design:
At the very end of the second color section, add another set of 3 to 5 gold spacer beads. These will sit near the clasp, balancing the design visually.
Mix & Match Sets
Make a stacked set! Create a third bracelet that mixes the terracotta and blue beads in a random 1:1 pattern to tie the two solid-color bracelets together perfectly.
Step 4: Finishing Touches
-
Verify length:
Wrap the beaded wire around your wrist one last time to check the fit. Remember that the clasp hardware will add a tiny bit of length. -
Close the second end:
Thread the remaining wire end through another clam shell bead tip. Tie a secure double knot firmly against the last gold bead. -
Secure the knot:
Apply a tiny drop of jewelry glue to the knot to ensure it never slips. Trim the excess wire close to the knot. -
Seal the shell:
Use your flat nose pliers to gently close the clam shell tip over the knot, creating a professional-looking gold sphere at the end. -
Attach hardware:
Open a jump ring with your pliers (twist it sideways, don’t pull apart). Slide it through the loop of one clam shell tip and attach the gold lobster clasp. Close the ring securely. -
Final connection:
Attach a second jump ring to the clam shell tip on the other end of the bracelet. This will serve as the ring for the lobster clasp to hook onto.
Now you have a stunning, professional-looking bracelet set ready to wear or gift to your best friend


Preppy Pink, Purple, and White Blocks
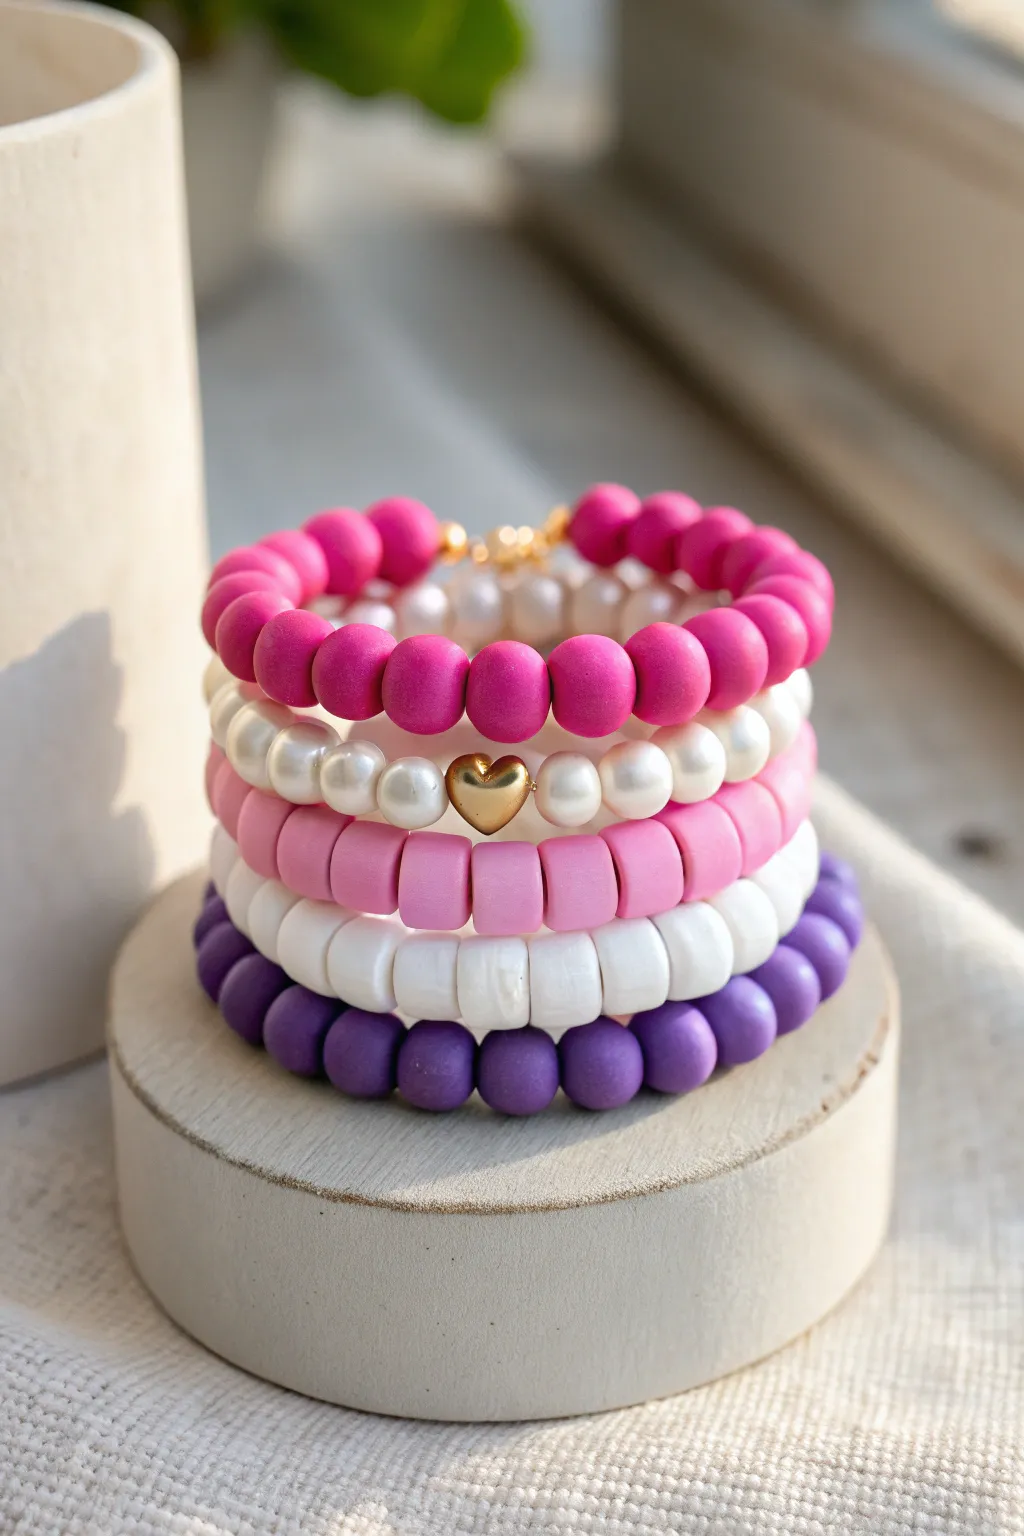
Capture a trendy, boutique look with this stacked set of five bracelets featuring a mix of round matte beads, heishi discs, pearlescent accents, and a charming gold heart centerpiece. The blend of textures—from smooth pearls to soft-touch matte beads—makes this preppy collection feel high-end and fun to wear.
Step-by-Step
Materials
- Bright pink 6-8mm round matte acrylic or clay beads
- Purple 6-8mm round matte acrylic or clay beads
- White 6-8mm glass pearl beads
- Light pink 6mm polymer clay heishi beads (disc beads)
- White 6mm polymer clay heishi beads (disc beads)
- Small gold heart charm or bead (center drilled)
- Gold finish crimp beads or knot covers (optional)
- Strong elastic cord (0.8mm recommended)
- Jewelry glue or clear nail polish
- Scissors
Step 1: Bracelet 1: The Matte Pink Classic
-
Measure and Cut:
Cut a piece of elastic cord about 10-12 inches long. This gives you plenty of room to tie knots later without struggling. -
Pre-stretch the Cord:
Before stringing, give your elastic a few firm tugs. This prevents the bracelet from stretching out permanently after the first wear. -
String the Pink Beads:
Thread on your 6-8mm bright pink matte round beads. String enough to fit comfortably around your wrist (usually about 6.5 to 7 inches for an average adult). -
Secure the Strand:
Tie a secure surgeon’s knot (right over left, left over right) and pull tight. Add a drop of jewelry glue to the knot before trimming the excess cord.
Knot Hiding Trick
If bead holes are too small to hide the knot, use a gold crimp cover over the knot. It looks like a purposeful gold accent bead!
Step 2: Bracelet 2: The Heart of the Stack
-
Start the Pearl Strand:
Cut another length of elastic. Begin threading on the white glass pearl beads until you have completed exactly half of your desired length. -
Add the Centerpiece:
Slide on your gold heart bead. Ensure the hole runs horizontally so the heart sits upright on your wrist. -
Finish the Strand:
Continue adding white pearl beads to match the number used on the first side, creating a symmetrical look. -
Close the Loop:
Tie off this bracelet with a strong knot, glue it, and trim the ends carefully.
Level Up: Lettering
Replace 3-4 heishi beads on the pink or white strands with gold letter beads to spell out initials or a short word like “XOXO”.
Step 3: Bracelet 3: Pink Heishi Discs
-
Prepare the Cord:
Cut a new piece of elastic cord, remembering to pre-stretch it. -
String the Pink Discs:
Thread on the light pink polymer clay heishi beads. These flat discs nest together tightly, so you will need many more of these than the round beads to reach the same length. -
Finalize:
Once the strand matches the length of your previous bracelets, tie your knot and secure with a dab of glue.
Step 4: Bracelet 4: White Heishi Discs
-
Repeat with White:
Using the same technique as the pink heishi bracelet, string the white polymer clay disc beads onto a prepared elastic cord. -
Check Consistency:
Hold it up against the pink heishi bracelet to ensure they are exactly the same length before tying. -
Tie and Trim:
Knot the elastic securely, glue the knot, wait for it to dry briefly, and snip the tails.
Step 5: Bracelet 5: The Matte Purple Anchor
-
String Purple Beads:
For the bottom layer of the stack, take your final piece of elastic and string the purple matte round beads. -
Final Secure Knot:
Complete the bracelet by tying your surgeon’s knot. I find pulling the elastic taut while the glue is wet helps the knot shrink slightly into the bead hole. -
Hide the Knots:
For all bracelets made with round beads, try to gently tug the knot inside the hole of the nearest bead for a seamless, professional finish.
Stack them all together on a display conn or your wrist to enjoy your new textured jewelry set


White and Gold Minimal Stack
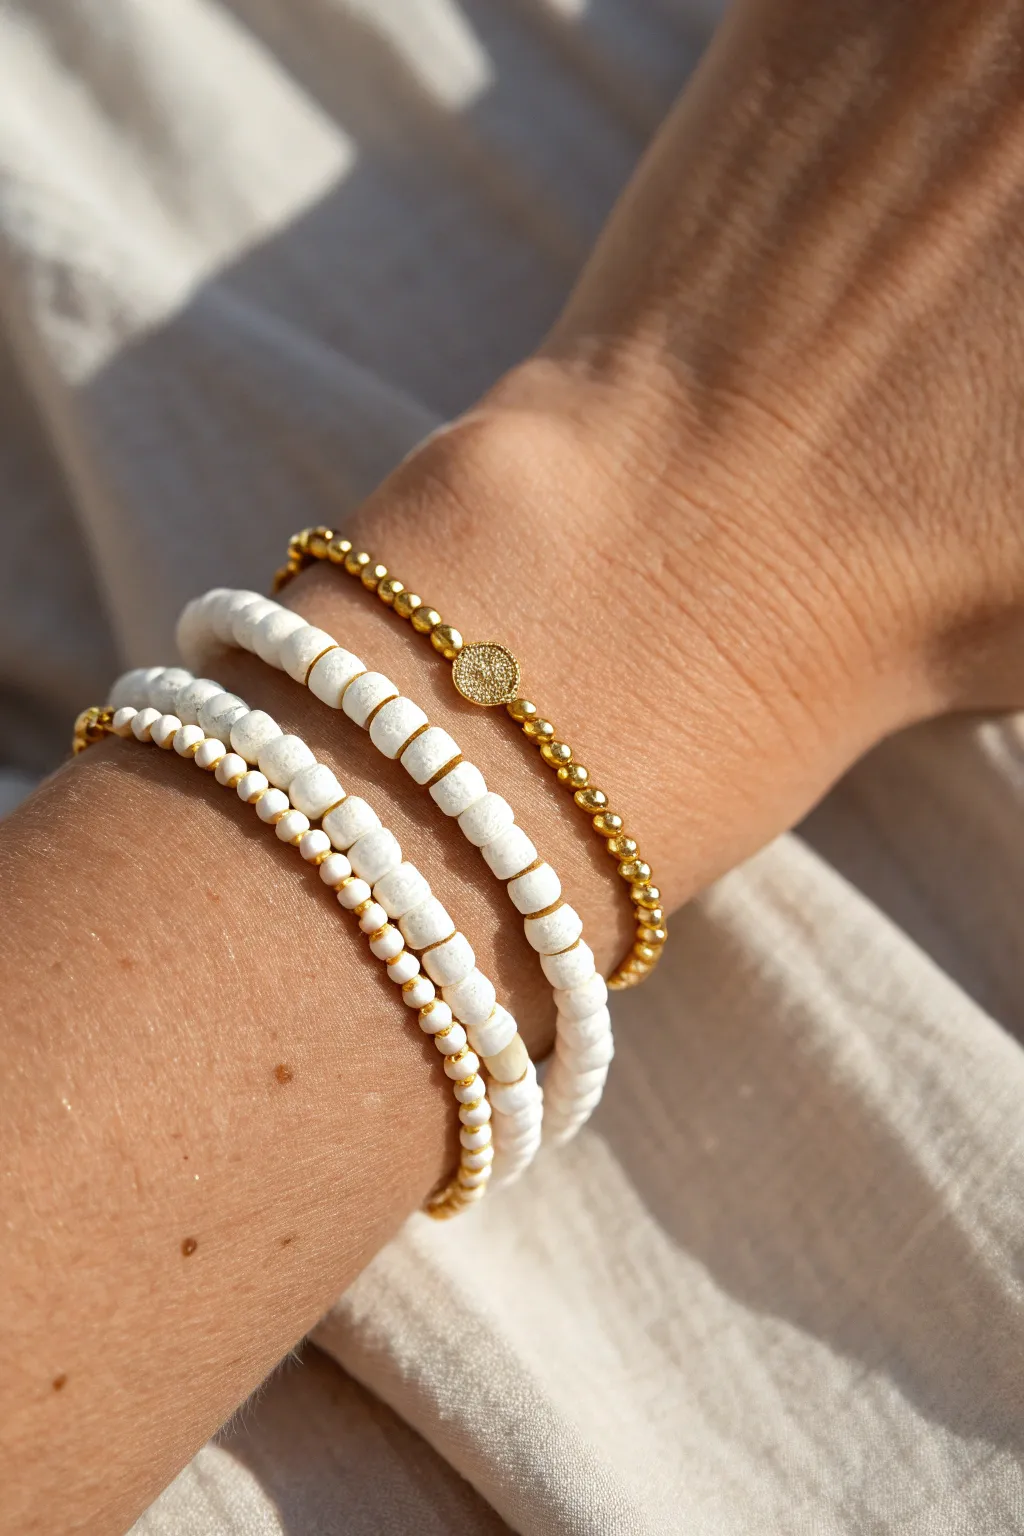
This elegant bracelet trio combines the organic texture of white clay heishi beads with the luxe shine of gold spacer beads for a look that feels effortlessly high-end. It’s the perfect minimal stack to start your summer jewelry collection, balancing matte neutrals with just the right amount of sparkle.
Step-by-Step Guide
Materials
- White 6mm polymer clay heishi beads
- White 4mm polymer clay heishi beads (optional size variation)
- Small 3mm spherical gold spacer beads (brass or gold-filled)
- Tiny 2mm gold seed beads or spacer beads
- Small textured flat gold disc charm or connector
- Strong elastic cord (0.5mm clear stretch cord recommended)
- Beading needle (optional but helpful)
- Scissors
Step 1: The Gold Disc Bracelet
-
Measure and Cut:
Begin by measuring your wrist and adding about 3 inches to determines your cord length. Cut a piece of your 0.5mm elastic cord. -
Start Beading:
Thread a beading needle if you have one, or just stiffen the end of the cord with a dab of superglue. Make a loose knot at the other end to stop beads from sliding off. -
Threading the Gold Beads:
String on your 3mm gold spherical spacer beads until you have covered approximately half the length needed for your wrist size. -
Adding the Feature Charm:
Slide on the small, textured gold disc charm. Ensure it sits flat against the existing beads. -
Finish the Strand:
Continue adding the 3mm gold beads on the other side of the charm until the bracelet fits comfortably around your wrist. -
Knotting:
Tie the ends together securely using a surgeon’s knot (right over left, left over right, looping the top strand twice). Pull tight to secure.
Pre-Stretching Tip
Before tying your final knots, give the elastic cord a gentle tug to pre-stretch it. This prevents the bracelet from sagging or loosening up after the first time you wear it.
Step 2: The Classic Heishi Strand
-
Prepare the Cord:
Cut another length of elastic cord, similar to the first bracelet. -
Stringing the Clay Beads:
This middle layer is all about simplicity. String your 6mm white polymer clay heishi beads onto the cord one by one. -
Checking Consistency:
Occasionally pause to check the strand against the gold bracelet to ensure the lengths match, though I usually like the clay one just slightly looser for better movement. -
Closing the Loop:
Once you have reached the desired length, tie off with a strong knot, pull tight, trim the excess cord, and tuck the knot inside one of the larger clay beads if possible.
Upgrade Your Whites
Swap standard polymer clay for natural white shell heishi beads or white turquoise discs. The natural irregularities add an expensive, boutique feel to the stack.
Step 3: The Mixed Texture Strand
-
Create the Pattern:
For the bottom bracelet adjacent to the hand, create a subtle pattern. String five to six white heishi beads. -
Insert Gold Accents:
After a small section of white clay beads, slide on a single, tiny 2mm gold spacer bead. This breaks up the white without overwhelming it. -
Repeat the Rhythm:
Continue this pattern—approximately six white beads followed by one gold spacer—around the entire length of the bracelet. -
Final Adjustments:
Before tying, wrap the strand around your wrist to verify the pattern ends cleanly; adjust the bead count slightly if you need the pattern to resolve perfectly. -
Secure the Knot:
Tie your final surgeon’s knot very tightly. A tiny dot of jewelry glue or clear nail polish on the knot adds extra security before trimming the ends closely.
Slip on all three bracelets together for an instantly chic, resort-ready wrist stack

The Complete Guide to Pottery Troubleshooting
Uncover the most common ceramic mistakes—from cracking clay to failed glazes—and learn how to fix them fast.
Soft Pastel Ombre Fade
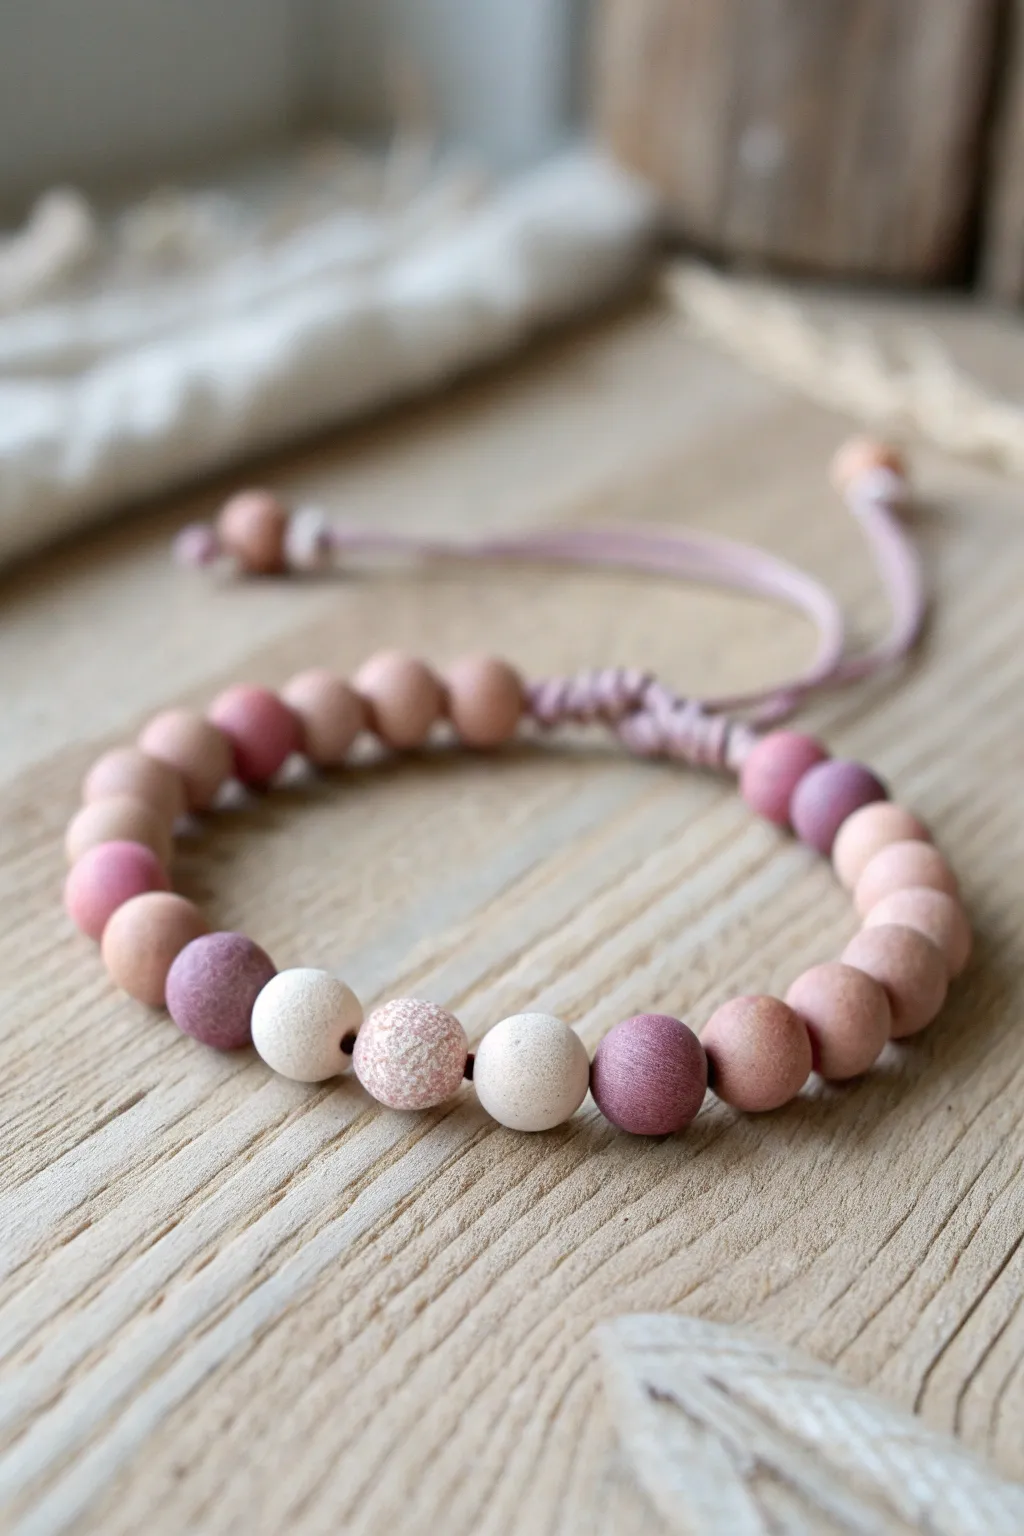
Capture the essence of soft flower petals with this matte-finish bracelet featuring gentle earthy pinks and cream tones. The simple sliding knot closure makes it adjustable and showcases the natural, unpolished texture of the clay beads beautifully.
How-To Guide
Materials
- Polymer clay (shades: dusty rose, mauve, terracotta, cream, white)
- Textured sandstone or speckled clay (optional for accent)
- Bead reamer or toothpick
- Waxed polyester cord (light pink, 1mm thickness)
- Scissors
- Ruler or measuring tape
- Baking sheet and parchment paper
- Oven (for baking clay)
Step 1: Crafting the Clay Beads
-
Condition the clay:
Begin by warming up your polymer clay blocks in your hands. Knead each color separately until soft and pliable to prevent cracking later. -
Mix custom shades:
To achieve that specific ombre look, create custom blends. Mix a bit of white into your terracotta for a dusty peach, and combine mauve with a touch of cream for a muted purple. Aim for about 5-6 distinct but harmonious shades. -
Create the speckled accent:
For the center focal bead, take a small ball of pink clay and roll it in sand or mix in faux-granite clay particles to get that rough, stone-like texture visible in the center. -
Form uniform spheres:
Pinch off equal amounts of clay for each bead. Roll them between your palms into spheres approximately 8-10mm in diameter. I like to use a small circle cutter on a flattened sheet first to ensure every bead has exactly the same volume of clay. -
Pierce the holes:
Using a toothpick or a bead piercing tool, carefully poke a hole through the center of each sphere. Gently rotate the bead as you pierce to keep the shape round. -
Refine the shape:
After piercing, the beads might be slightly squashed. Give them a gentle roll between your fingers again to restore their perfect roundness without closing the hole. -
Bake the beads:
Arrange your beads on a parchment-lined baking sheet. Bake according to your clay package instructions (usually 275°F/135°C for 15-30 minutes). Let them cool completely before handling.
Fingerprints on Clay?
If your beads show fingerprints before baking, lightly brush them with a drop of baby oil or cornstarch. This smooths ridges without altering the shape.
Step 2: Stringing and Assembly
-
Prepare the cord:
Cut a length of the light pink waxed cord, roughly 12 inches long. This gives you plenty of room for knotting. -
Design the layout:
Lay your cooled beads out on a flat surface. Place the speckled accent bead in the absolute center. Flank it with your lightest cream beads, then transition outwards into the darker mauves and terracotta pinks to create the gradient effect. -
String the beads:
Thread the beads onto the cord in your established order. If the cord end frays, briefly melt the tip with a lighter or add a dab of glue to stiffen it. -
Center and secure:
Push all beads to the middle of the cord length. Tie a simple overhand knot immediately before the first bead and immediately after the last bead to keep them tightly grouped together.
Step 3: The Sliding Knot Closure
-
Form the loop shape:
bring the two loose ends of the cord together so they overlap parallel to each other, forming a circle with the bracelet. -
Start the macramé knot:
Cut a separate piece of pink cord, about 6 inches long. Place this under the two overlapping bracelet strands. -
Tie a square knot:
Take the right end of the short cord, pass it over the bracelet strands and under the left cord. Take the left cord, go under the bracelet strands and up through the loop on the right. Pull tight. -
Continue the knotting:
Repeat the square knot process, alternating sides (left over, right under, etc.), until you have a knotted section about 1/2 inch long. This forms the slider. -
Finish the slider:
Trim the excess ends of the knotting cord (step carefully not to cut the main bracelet cords). Carefully melt the shortened ends to seal them against the knot. -
Add end beads:
Check the fit of the bracelet fully open. Thread one small bead onto each of the hanging tail ends of the main cord. -
Secure the ends:
Tie a firm knot at the very end of each tail cord to hold the stopper beads in place and trim any final excess length.
Pro Tip: Matte Finish
Do NOT glaze these beads. The soft, rustic look relies on the natural matte texture of the baked clay. Buff gently with denim cloth if you need subtle sheen.
Now you have a beautifully subtle accessory that pairs perfectly with cozy sweaters or summer dresses alike
Fruit Accent Bead Mix-In
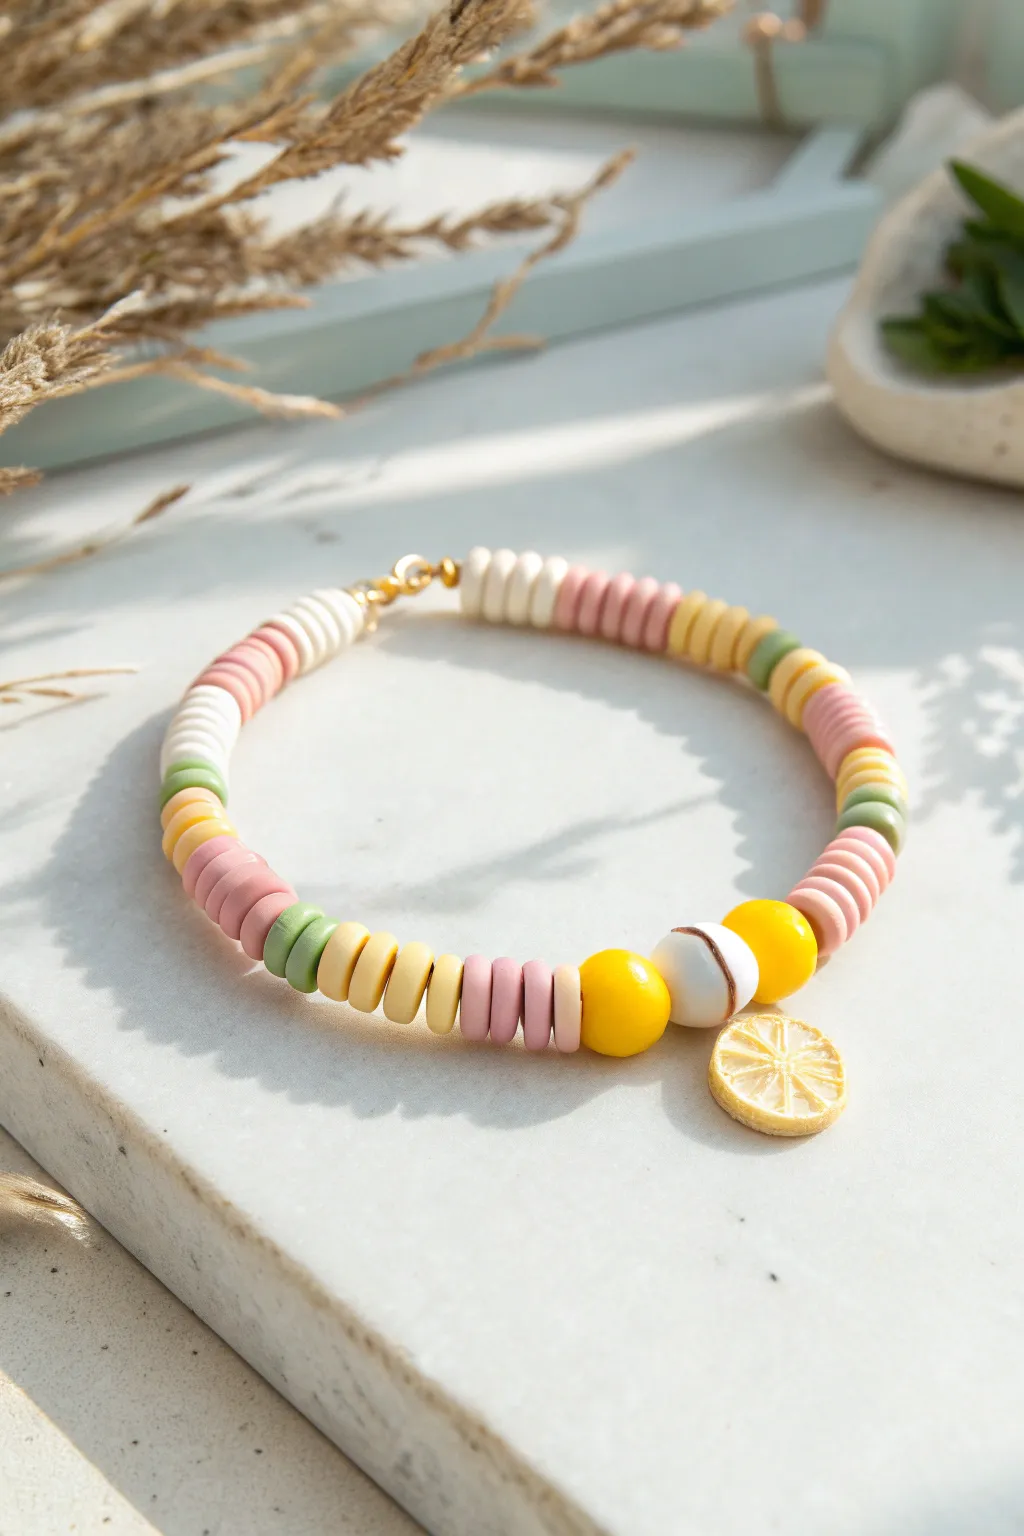
Brighten up your wrist stack with this cheerful design that captures the essence of summer citrus. By combining pastel heishi beads with a playful lemon slice charm and chunky round accents, you’ll create a fresh accessory perfect for sunny days.
Step-by-Step Tutorial
Materials
- Polymer clay heishi beads (pastel pink, sage green, pale yellow, cream/white)
- Gold-tone lobster clasp
- Gold-tone jump rings (4mm and 6mm)
- Beading wire or strong elastic cord (0.8mm)
- Crimp beads (if using wire) or jewelry glue (if using elastic)
- Two large yellow round beads (acrylic or clay, approx. 8-10mm)
- One white round bead with brown/neutral brush strokes (approx. 8-10mm)
- Lemon slice charm (resin or polymer clay)
- Chain nose pliers
- Scissors or wire cutters
Step 1: Planning and Preparation
-
Measure your fit:
Begin by wrapping a piece of string around your wrist to determine the ideal length, adding about half an inch for a comfortable fit. -
Prepare the charm:
Locate your lemon slice charm. If it doesn’t have a jump ring attached, carefully open a 6mm gold jump ring using your pliers and slide it through the charm’s loop, then close it securely. -
Plan the focal point:
Lay out your three large focal beads: the white patterned bead goes in the center, flanked by the two large yellow beads. -
Attach the charm:
Slide the lemon charm onto the wire so it rests directly underneath the central white bead. I find it easiest to thread the charm on first, or sandwich it between the center bead and a side bead depending on how you want it to hang.
Step 2: Creating the Bead Pattern
-
Start the wire:
Cut a length of wire or elastic cord about 10 inches long to give yourself plenty of room to tie knots or crimp later. -
Secure the first end:
If using wire and a clasp, attach the lobster clasp to one end using a crimp bead and jump ring now. If using elastic, you can simply tape one end to a table to prevent beads from sliding off. -
Analyze the color blocks:
Look closely at the pattern: it uses blocks of solid color rather than a random mix. You’ll need groups of roughly 5-8 heishi beads per color section. -
Begin heishi threading:
Start threading from the clasp side towards the center. A good sequence to mimic the photo is: White block -> Pink block -> Yellow block -> Green block -> Pink block. -
Refine the sections:
Vary the lengths slightly for an organic look. For example, make the pink section slightly longer (about 8 beads) and the green section shorter (about 3-4 beads). -
Introduce the focal section:
Once you have reached the halfway point of your desired length, slide on the first large yellow round bead. -
Add the center bead:
Slide on the white patterned bead. Ensure your lemon charm hangs from the cord right here, nesting between the beads. -
Complete the center:
Slide on the second large yellow round bead to frame the centerpiece symmetrically.
Smooth Moves
Use a bead stopper or simply a piece of masking tape on the end of your string while working to prevent an accidental spill of your carefully arranged pattern.
Step 3: Finishing the Design
-
Mirror the pattern:
Continue lighter threading on the other side of the focal point. To keep it balanced but not identical, reverse your color order: Pink block -> Green block -> Yellow block -> Pink block -> White block. -
Check the length:
Wrap the unfinished strand around your wrist to check the sizing. Add or remove a few white heishi beads at the very end to adjust the tightness without disrupting the main pattern. -
Prepare to close:
Thread on a crimp bead followed by a jump ring (for the receiving end of the clasp). -
Secure the wire:
Loop the wire back through the crimp bead and pull tight, using your pliers to flatten the crimp bead securely fast. -
Finish for elastic:
If using elastic, tie a strong surgeon’s knot (right over left, left over right), pull it very tight, and dab a tiny drop of super glue on the knot before trimming. -
Trim excess:
Snip off any extra wire or cord close to the bead, tucking the tail into the adjacent beads if possible for a clean finish.
Level It Up
Add tiny gold spacer beads between the color blocks to add a hint of metallic shine and separate the pastel sections more distinctly.
Wear your new fruity creation solo or stack it with other pastel bracelets for a complete summer vibe


What Really Happens Inside the Kiln
Learn how time and temperature work together inside the kiln to transform clay into durable ceramic.
Beachy Shell and Sand Palette
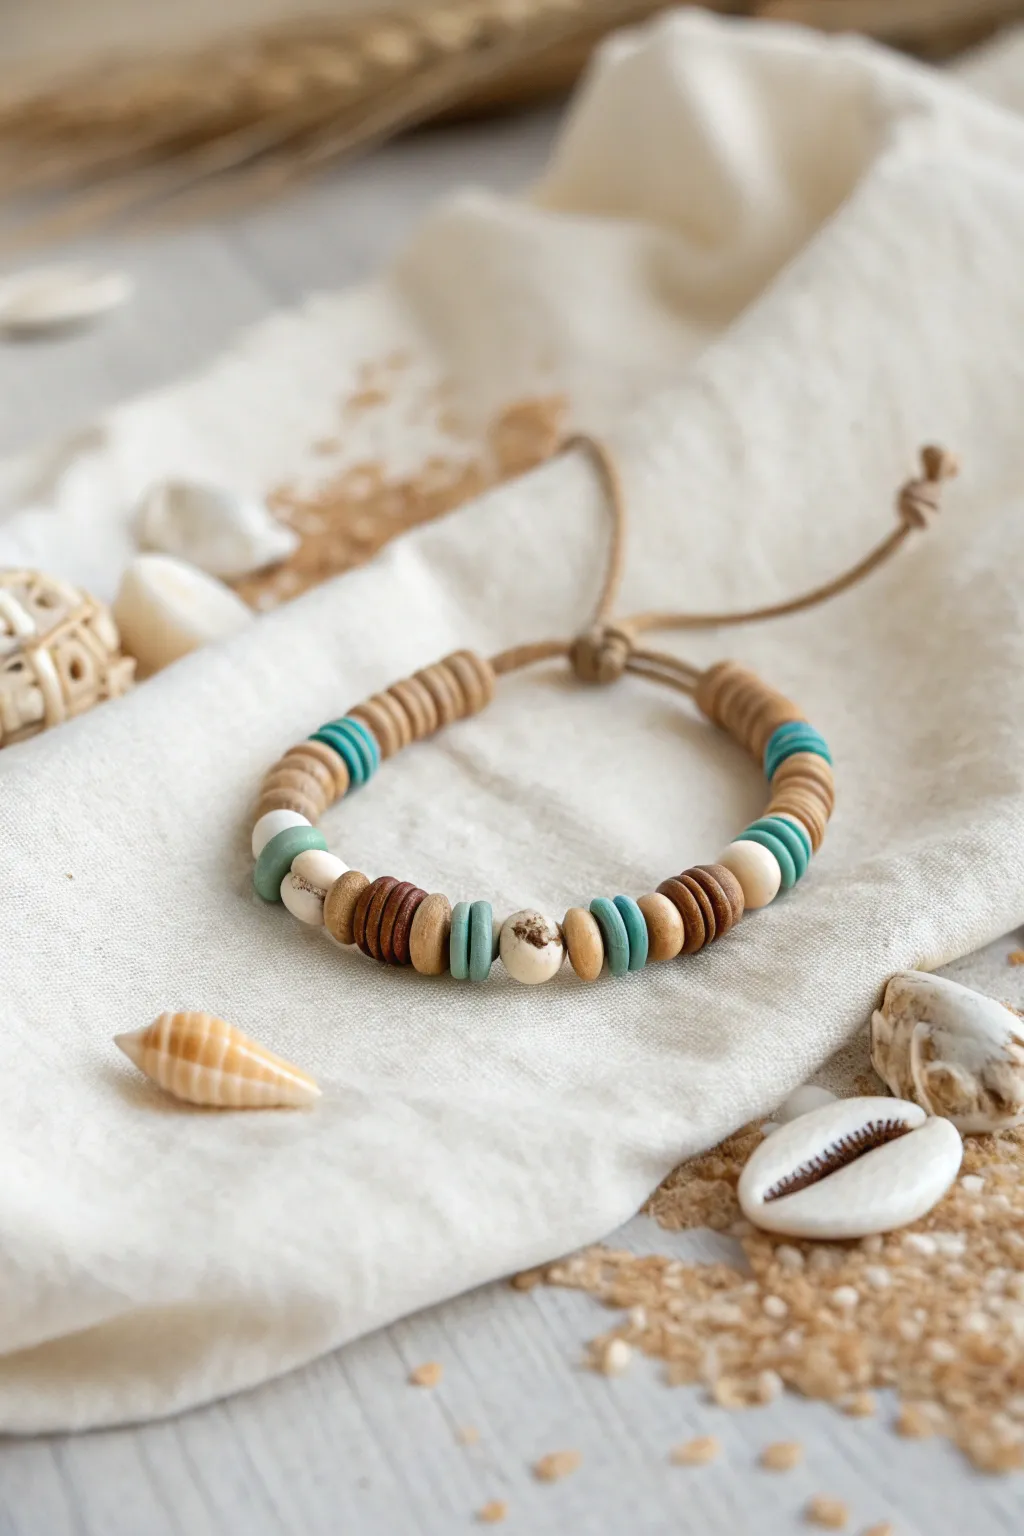
Capture the essence of a serene beach day with this earthy, textured bracelet that combines the warmth of sand and driftwood with bursts of ocean teal. This adjustable sliding-knot design uses natural wood and clay heishi beads for a laid-back, surfer-chic accessory perfect for stacking.
Step-by-Step Guide
Materials
- Waxed cotton or hemp cord (1mm thickness, light brown/tan)
- Wood heishi beads (light brown/natural, approx. 6mm)
- Wood heishi beads (dark brown, approx. 6mm)
- Clay heishi beads (turquoise/teal, 6mm)
- Round wood beads (whitewashed or light natural, approx. 8mm)
- Large-hole bead or focal bead (optional, speckled cream)
- Scissors
- Tape or clipboard
- Ruler
Step 1: Setting the Foundation
-
Measure and Cut:
Cut a piece of your waxed cord about 24 inches long. This generous length ensures you have plenty of room for knotting the adjustable closure later. -
Secure the Cord:
Tape one end of the cord down to a table or secure it under the clip of a clipboard. Leave about 6 inches of tail at the top before the tape creates your working area. -
Tie a Stopper Knot:
Make a simple overhand knot about 5-6 inches from the end of the cord. This will hold your beads in place while you string them.
Sticky Slider?
If your sliding knot is too tight to move easily, wiggle the cord back and forth aggressively to loosen the fibers. Waxed cord softens with body heat and movement.
Step 2: Designing the Pattern
-
Start the Sequence:
Begin stringing with a stack of about 4-5 light natural wood heishi beads. This establishes the sandy base tone of the bracelet. -
Add a Pop of Color:
Slide on two turquoise clay heishi beads. The contrast between the matte clay and the wood texture is key to this look. -
Introduce Texture:
Add a stack of 3-4 more light wood heishi beads followed by one round whitewashed wooden bead. This change in shape adds nice dimension. -
Create the Central Accent:
Now, thread on a darker pattern: 3 dark brown wood disks, followed by 2 turquoise clay disks. -
The Centerpiece:
Place your focal bead (the speckled cream round bead) right in the center. I like to frame this bead with a single turquoise disk on either side to make it pop. -
Mirror the Pattern:
Now reverse your steps to create a symmetrical look. Add 3 dark brown wood disks, then one round whitewashed bead. -
Finish the Sequence:
Add 2 turquoise clay disks, and finish with a stack of 4-5 light wood heishi beads to match the beginning.
Ocean Treasures
Swap the central speckled bead for a small cowrie shell with the back cut off. It lays flat against the wrist and amplifies the beachy vibe significantly.
Step 3: Creating the Adjustable Closure
-
Secure the Beads:
Once you are happy with the length (aim for about 6-7 inches of beading for an average wrist), tie a second overhand knot snugly against the last bead to lock everything in place. -
Form a Circle:
Bring the two cord ends together, overlapping them so they lay parallel to each other. You want them running in opposite directions. -
Prepare the Sliding Knot:
Cut a separate scrap piece of cord, about 10 inches long. Place this under the two overlapping main cords. -
Tie the Macramé Square Knots:
Using the scrap cord, tie a series of 3-4 square knots (also known as cobra knots) around the two main cords. Ensure these are tight enough to hold but loose enough to slide. -
Trim the Sliding Knot:
Cut the excess tails of the scrap cord (the knotting cord) very close to the knots. You can add a tiny dab of glue or carefully singe the ends if using synthetic cord to prevent fraying. -
Finish the Tails:
Slide the bracelet open to its maximum width. Tie a small overhand knot at the very end of each main cord tail to prevent them from pulling through the slider. -
Final Trim:
Trim any excess cord past these final stopper knots for a clean finish.
Slip on your new bracelet and enjoy the relaxed coastal style it brings to your outfit
Heart-to-Heart Coordinated Bracelets
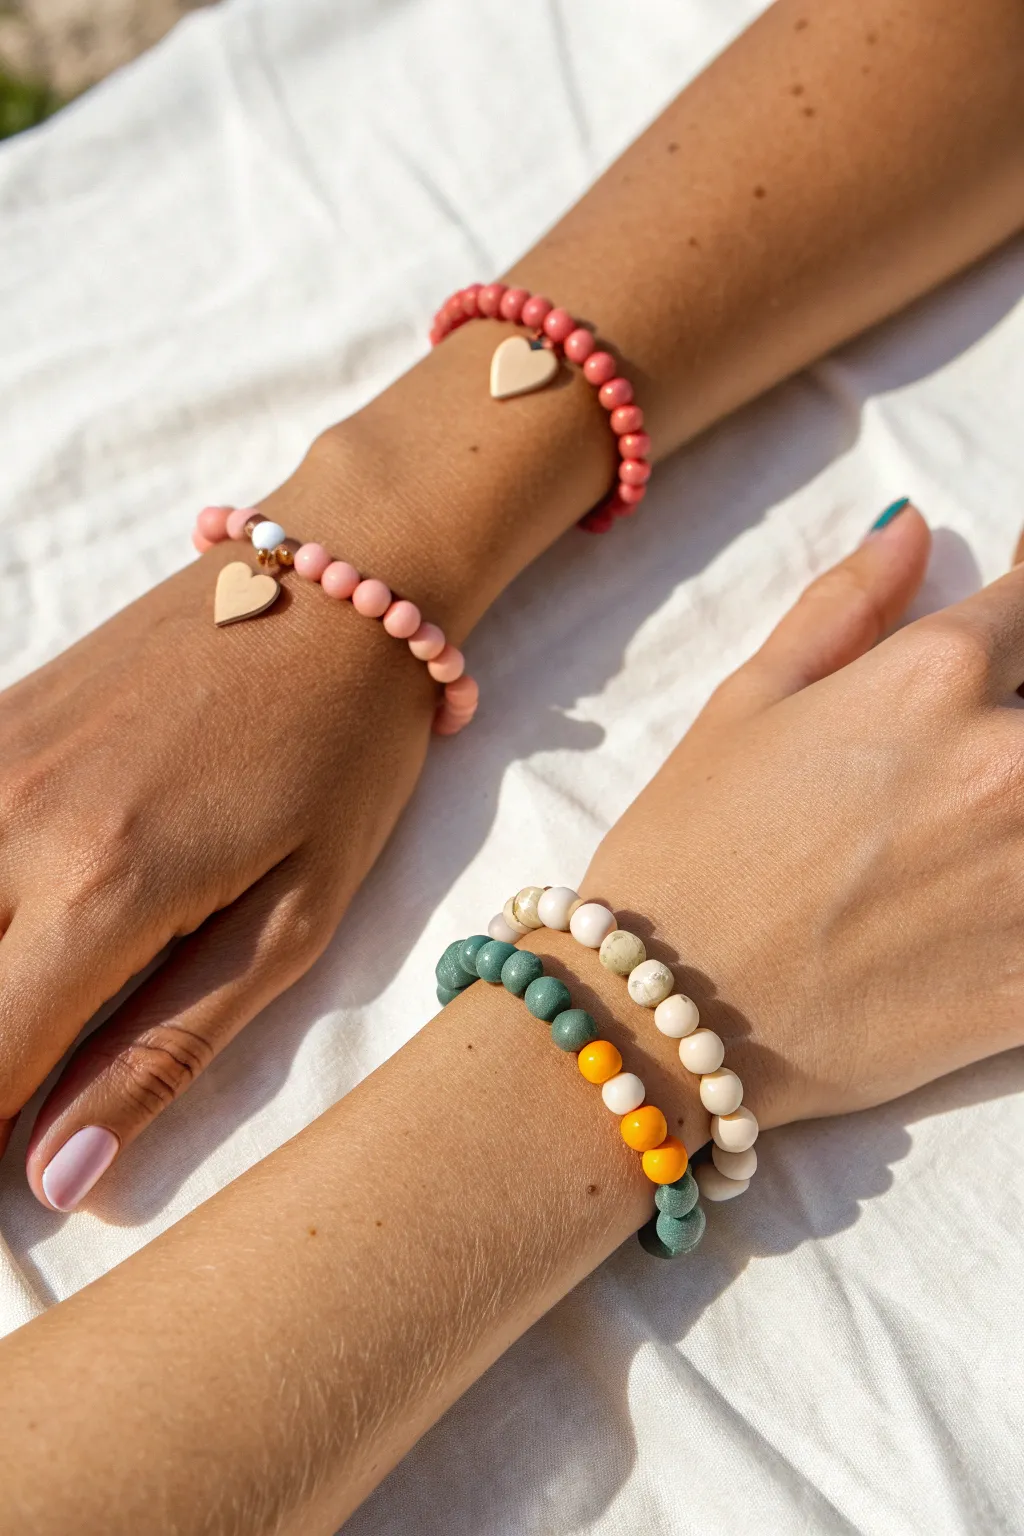
Celebrate connection with this set of four coordinated friendship bracelets that blend warm clay textures with elegant metallic accents. The design features a pair of romantic pink bracelets adorned with heart charms and a complementary earthy set mixing sage greens, mustards, and cream tones.
Step-by-Step Guide
Materials
- Polymer clay heishi beads (coral pink, light blush pink, sage green, mustard yellow, cream/off-white)
- Small round gold spacer beads
- Gold heart pendants (small)
- Elastic stretch cord (0.8mm recommended)
- Super glue or jewelry cement
- Scissors
Step 1: Planning Your Palette
-
Sort your colors:
Begin by separating your clay beads into two distinct color families: a romantic palette (coral, light blush) and an earthy palette (sage, mustard, cream). -
Measure the wrist:
Wrap a piece of string around your wrist to determine the circumference, then add about 3 inches of extra length to your elastic cord before cutting to make trying knots easier later. -
Pre-stretch the cord:
Gently pull on your cut lengths of elastic cord several times; this crucial step prevents the finished bracelet from stretching out and becoming loose after the first few wears.
Knot Security
Work over a tray or velvet mat so loose beads don’t roll away. If your knot is too bulky to hide, try widening a bead hole with a needle tool.
Step 2: Creating the Pink Heart Duo
-
Start the coral bracelet:
Thread about 3 inches of the darker coral pink beads onto your first piece of elastic, creating a solid block of color. -
Add the first charm:
Slide on a small gold heart pendant so it rests in the center. The hole in the pendant should face sideways so the heart lies flat against the wrist. -
Finish the coral band:
Continue threading coral beads until the strand reaches your desired wrist length, ensuring the heart stays centered. -
Begin the blush bracelet:
For the second pink bracelet, use the lighter blush beads. Thread about 10 beads, then add a small gold spacer bead. -
Create the focal point:
Thread a single darker coral bead, followed by the gold heart charm, another coral bead, and another gold spacer to frame the charm beautifully. -
Complete the blush pattern:
Finish the strand using only the light blush beads, keeping the design simple to let the central charm cluster stand out.
Step 3: Crafting the Earthy Stack
-
Design the cream strand:
For the third bracelet, create a soothing pattern using mostly cream or off-white clay beads. -
Add texture accents:
Intersperse occasional speckled or beige beads every inch or so to give the cream bracelet a more organic, natural stone look. -
Start the color-block bracelet:
On your final string, begin with a long section of sage green beads, covering about half the bracelet’s length. -
Insert the pop of color:
Transition into a small section of mustard yellow beads—use about 3 to 5 beads here—separated by a single cream bead on either side for contrast. -
Finish with green:
Complete the circle by returning to the sage green beads until the ends meet.
Stacking Style
Mix metal finishes! Swap the gold spacers and hearts for silver or rose gold to match the wearer’s personal jewelry preference.
Step 4: Securing the Knots
-
Tie the first knot:
Take the two ends of your first bracelet and tie a simple overhand knot, pulling it tight against the beads without causing them to buckle. -
Secure with a surgeon’s knot:
Tie a second knot, but this time loop the string through twice before pulling tight (this is a surgeon’s knot) for extra security. -
Apply adhesive:
I always place a tiny dab of jewelry cement or super glue directly onto the knot and let it dry for a minute to ensure it never slips. -
Hide the knot:
Trim the excess string close to the knot, then gently tug the bracelet so the knot slides inside the hole of a neighboring bead to conceal it. -
Repeat for all bands:
Follow this same tying and gluing process for the remaining three bracelets.
Enjoy wearing your new stacks or gift a matching set to your best friend for a stylish coordinated look

TRACK YOUR CERAMIC JOURNEY
Capture glaze tests, firing details, and creative progress—all in one simple printable. Make your projects easier to repeat and improve.
Daisy Accent Friendship Bracelet
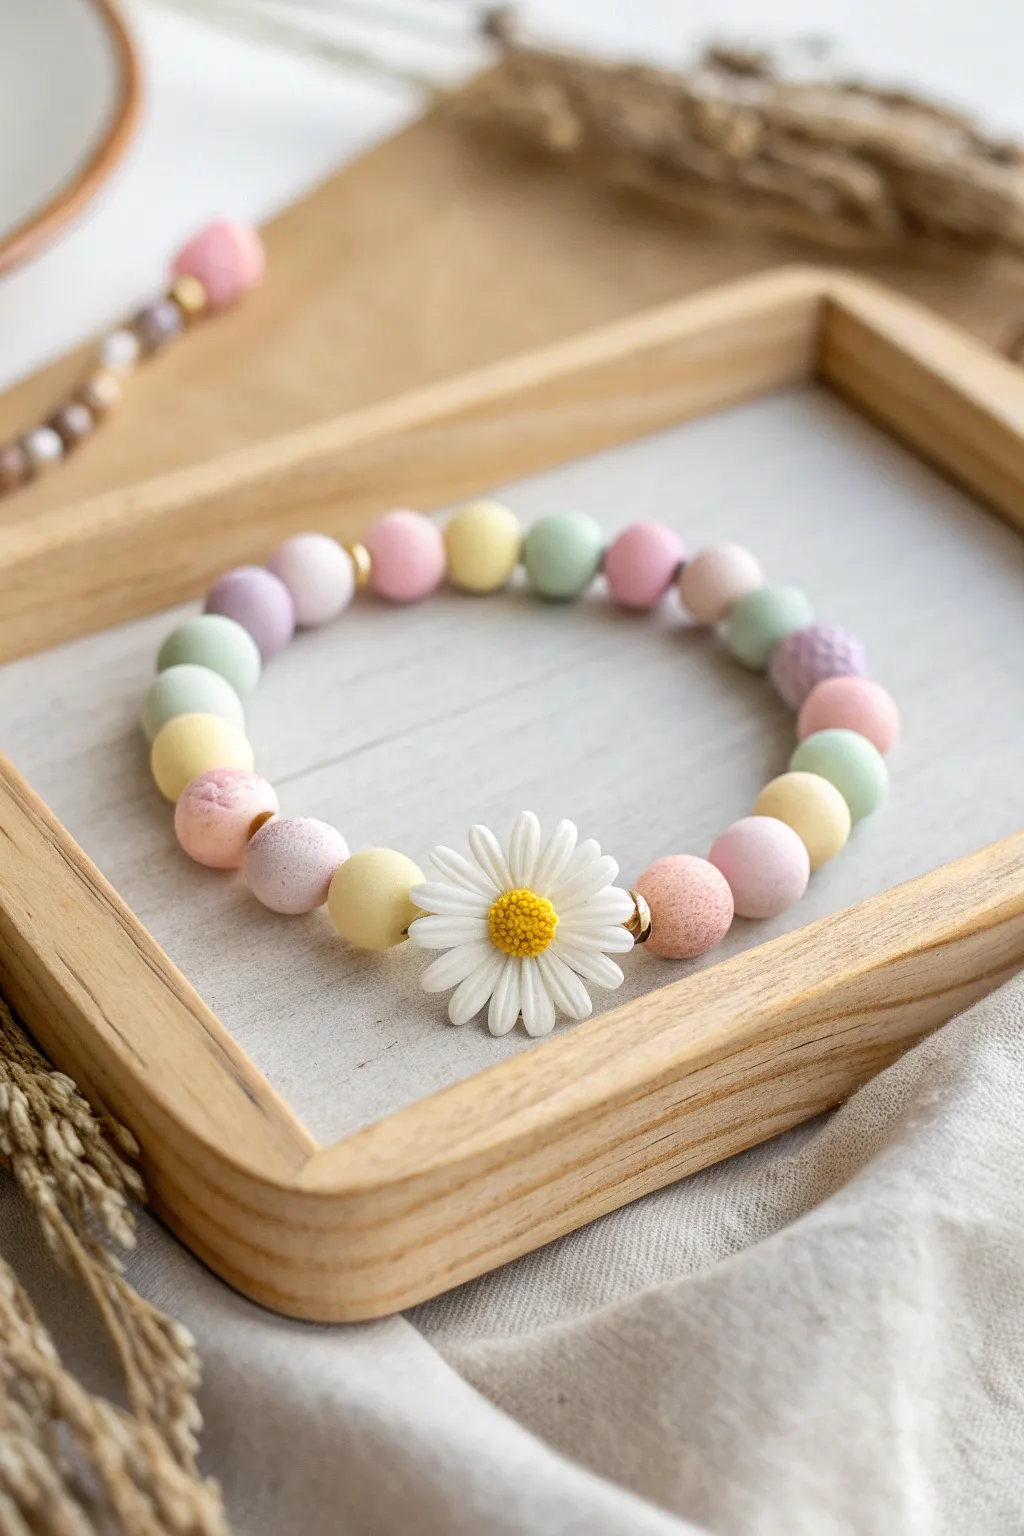
Embrace the soft beauty of spring with this delightful pastel bracelet featuring a prominent daisy focal point. The matte texture of the clay beads combined with a single, detailed flower creates a sophisticated yet playful accessory perfect for stacking or wearing solo.
Step-by-Step Tutorial
Materials
- Matte polymer clay round beads (approx. 8mm or 10mm) in pastel colors: pink, pale yellow, mint green, lavender
- Large white daisy flower bead or charm (polymer clay or resin, center-drilled horizontally)
- Small gold spacer beads (optional)
- Strong elastic stretch cord (0.7mm or 0.8mm)
- Beading needle (collapsible eye)
- Jewelry glue (e.g., E6000 or specialized knot glue)
- Scissors
Step 1: Preparation and Design
-
Measure your wrist:
Before cutting any cord, wrap a measuring tape comfortably around your wrist. Add about 0.5 inches to this measurement for a comfortable fit, or slightly more if you prefer a looser dangle. -
Cut the cord:
Cut a length of elastic cord about 10-12 inches long. Having this extra length makes tying the final knot much easier and prevents beads from slipping off while you work. -
Pre-stretch the elastic:
Hold the cord ends and give them a few firm tugs. This pre-stretching step is crucial because it ensures your bracelet won’t sag or lose its shape after the first time you wear it. -
Plan your pattern:
Lay out your beads on a bead board or a soft towel to prevent rolling. Start with the daisy charm in the center and arrange the pastel clay beads outward on either side to visualize the color balance. -
Check the sequence:
Aim for a random but balanced mix of pastels—alternating pinks, mints, yellows, and lavenders—to match the soft aesthetic shown in the photo.
Knot Security Tip
When pulling your knot tight, stretch the bracelet cord slightly away from the knot simultaneously. This helps lock the elastic fibers together for a grip that won’t slip.
Step 2: Stringing the Beads
-
Secure the end:
Place a piece of tape or a bead stopper on one end of your elastic cord to act as an anchor while you string. -
Start with the focal point:
Thread the large daisy bead onto the cord first. Slide it down to the center (or let it rest against your stopper if you prefer stringing from one end). -
Add gold accents:
Thread a small gold spacer bead on either immediately next to the daisy or spaced out between a few pastel beads to add a touch of warmth and luxury. -
String the first half:
Begin threading your pastel clay beads onto one side of the daisy. Continue until you have covered about half of your total wrist circumference minus the width of the daisy. -
String the second half:
Repeat the process on the other side of the daisy. I like to mirror the color pattern near the flower for symmetry, then let it go random towards the back. -
Verify the size:
Carefully lift the cord and wrap it around your wrist to check the fit. Be sure the beads meet comfortably without gaps, but aren’t so tight they pinch.
Step 3: Finishing Touches
-
Prepare the knot:
Remove the tape or stopper. Bring the two ends of the elastic cord together, ensuring there is no slack between the beads. -
Tie the first loop:
Cross the ends and make a simple overhand knot. Pull it tight, but be gentle enough not to snap the cord. -
Secure with a surgeon’s knot:
Make another loop, but this time pass the tail end through the loop twice instead of once. Pull this knot firmly down on top of the first one. -
Apply adhesive:
Apply a tiny dot of jewelry glue directly onto the knot. This seals the elastic and prevents it from unraveling over time. -
Hide the knot:
While the glue is still slightly tacky but not wet, slide the nearest large-hole bead over the knot to conceal it inside. -
Trim the excess:
Once the glue is fully dry (check your glue’s instructions), trim the excess cord ends close to the bead hole using sharp scissors.
Hiding the Knot
If your bead holes are too small to hide the knot, finish the bracelet next to the large daisy bead. Its hole is usually larger and can easily swallow the knot.
Now you have a charming accessory that blends the tactile feel of clay with a fresh floral vibe
Notebook and Pencil Color Theme
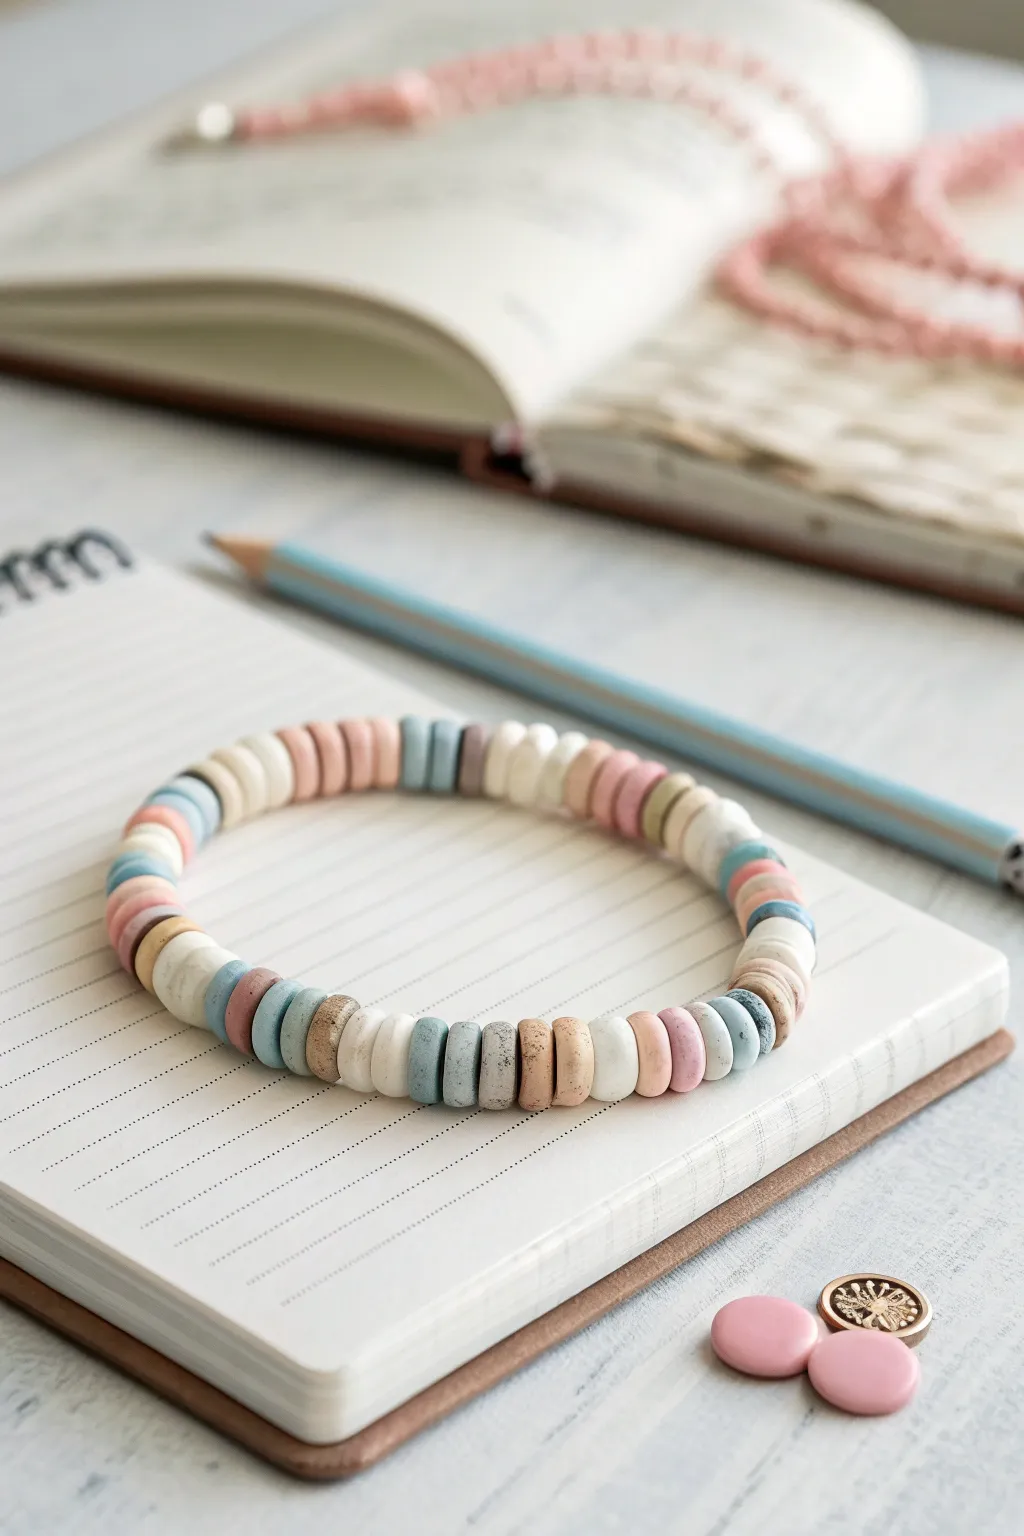
Capture the nostalgic vibe of back-to-school days with this understated clay bead bracelet. Featuring a soft palette of muted teals, dusty pinks, and stone-effect textures, this accessory perfectly matches a notebook-and-pencil aesthetic.
Step-by-Step
Materials
- Polymer clay heishi beads (flat disc beads) in: muted teal, blush pink, cream/white, beige/tan, and grey granite effect
- Elastic stretch cord (0.8mm or 1mm)
- Super glue or jewelry cement ideas
- Scissors
- Tape or a bead stopper
- Ruler or measuring tape
Step 1: Preparation
-
Measure your wrist:
Wrap a measuring tape loosely around your wrist to find your size. Add about 0.5 inches to this measurement to ensure the bracelet fits comfortably without being too tight. -
Cut the cord:
Cut a piece of elastic cord that is about 12 inches long. Having this extra length makes tying the final knot much easier than fighting with short ends. -
Secure the end:
Attach a piece of tape to one end of the cord or use a bead stopper clip. This prevents your beads from sliding off while you work, which is a lifesaver.
Knot Slipping?
If your elastic knot keeps undoing itself before you can glue it, try rubbing the cord ends with a little beeswax or chalk to give them grip.
Step 2: Designing the Pattern
-
Sort your colors:
Lay out your bead strands on a flat surface. Identify the key colors: the muted teal, the blush pink, the cream, and the textured granite/stone beads. -
Establish the rhythm:
Look closely at the bracelet’s random yet balanced pattern. It isn’t a strict A-B-A-B repeat. Instead, it uses small blocks of color. -
Create color blocks:
Group beads into sets of 2, 3, or sometimes just 1. For example, grab three cream beads, then two teal, then one pink. Varying these quantities gives that organic, handmade look.
Add a Focal Point
Add a single gold spacer bead or a small brass charm between two cream sections to elevate the design from casual to chic.
Step 3: Stringing the Beads
-
Start stringing:
Begin threading the beads onto the cord. Start with a small block of neutral colors like beige or tan to anchor the design visually. -
Add the accents:
Introduce your colors. Thread two blush pink beads followed by a single granite-effect bead for texture. -
Integrate the blue:
Add a small section of the muted teal beads. I find that placing the teal next to the cream beads makes the blue pop gently without being overpowering. -
Check the length:
Periodically wrap the strung cord around your wrist to check the fit. The beads take up space, so actual fit is better than just measuring against a ruler. -
Fill the length:
Continue adding blocks of color—mixing up the order of pink, teal, cream, beige, and granite—until you reach your desired length.
Step 4: Finishing Touches
-
Pre-stretch the cord:
Before tying, gently pull on both ends of the elastic cord. This pre-stretching helps prevent the bracelet from sagging or loosening up after you wear it a few times. -
The surgeon’s knot:
Remove the tape or stopper. Cross the ends, loop one under twice, and pull tight. Make another loop and pull tight again to form a secure surgeon’s knot. -
Secure with glue:
Apply a tiny dab of jewelry cement or super glue directly onto the knot. Wait a moment for it to tack up before letting go completely. -
Hide the knot:
Once the glue is dry, trim the excess cord ends close to the knot. Gently slide an adjacent bead over the knot to hide it inside the bead hole.
Enjoy styling your new bracelet stack with your favorite daily planner or journal
Glow-in-the-Dark Night Swap Set
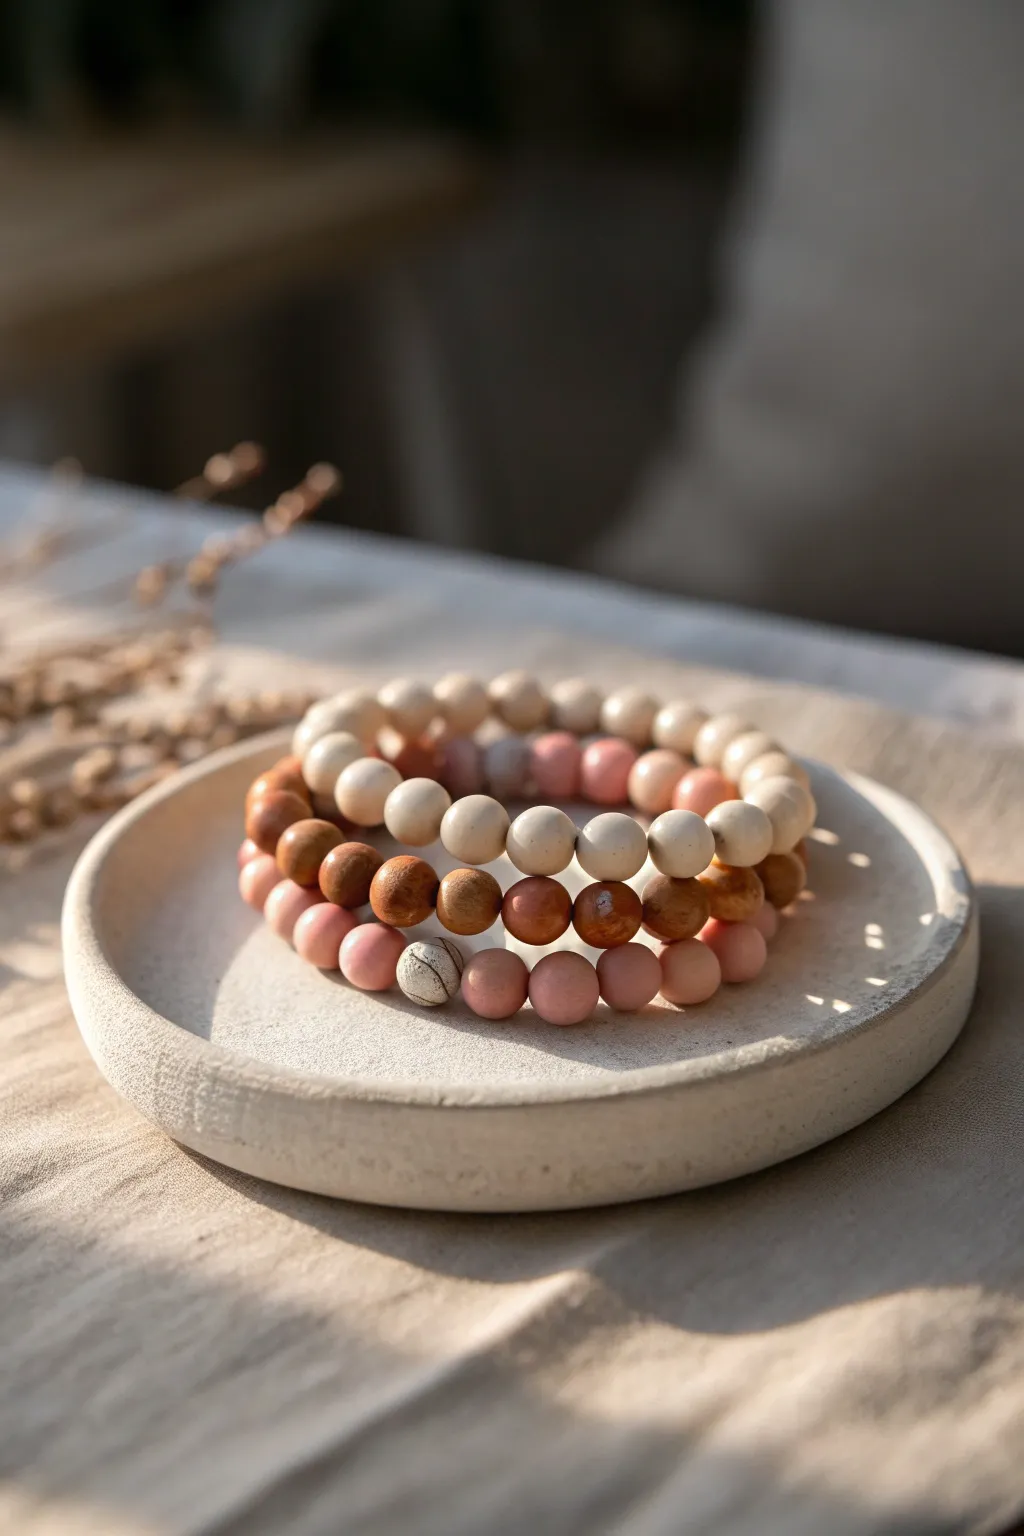
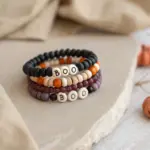
This stacked set combines earthy wood tones, soft matte pinks, and creamy neutrals for a sophisticated take on the classic friendship bracelet. Perfectly presented on a handmade dish, these three strands work beautifully together or as stylish separates.
Detailed Instructions
Materials
- 10mm round wooden beads (medium brown)
- 8mm matte polymer clay beads (cream)
- 8mm matte polymer clay beads (dusty rose/pink)
- One specialty focal bead (textured/mottled white)
- Strong elastic cord (0.8mm or 1mm)
- Super glue or jewelry adhesive
- Scissors
- Beading needle (optional but helpful)
- Clear nail polish (to seal knots)
Step 1: Planning the Palette
-
Assess your beads:
Before cutting any string, lay out your beads on a soft cloth or bead mat. You’ll be making three distinct strands that coordinate: one primarily cream, one mixed brown wood tone, and one dusty pink. -
Measure the wrist:
Wrap a piece of string around your wrist to find the comfortable length, adding about half an inch for ease. Use this measurement to determine how many beads you will need per bracelet.
Step 2: Strand One: The Cream Neutral
-
Prepare the elastic:
Cut a piece of elastic cord about 10-12 inches long. Pre-stretching the elastic slightly helps prevent the finished bracelet from stretching out later. -
Begin beading:
String the 8mm cream matte polymer clay beads onto the elastic. Keep threading until you reach your measured length. -
Check the fit:
Wrap the strand around your wrist to ensure it isn’t too tight. Add or remove a bead if necessary to get perfect comfort. -
Tie the knot:
Tie a surgeon’s knot (right over left, left over right, looping the second tie through twice). Pull the elastic tight so the knot is secure. -
Secure and hide:
Add a tiny drop of super glue to the knot. Once dry, trim the excess ends and gently tug the knot inside one of the adjacent beads to hide it.
Sticky Situation?
If a knot refuses to stay hidden inside a bead hole, use a bead reamer or a small round file to gently widen the hole of the bead adjacent to the knot.
Step 3: Strand Two: The Earthy Wood
-
Mix your textures:
For the second bracelet, you will be mixing the medium brown wooden beads with a few of the cream beads for contrast. -
Create a pattern:
Thread a alternating pattern, perhaps doing five wood beads followed by one cream bead, or simply focusing on the wood texture for a solid look. The example uses mostly wood with subtle variation in the grain. -
Stringing the wood:
Thread the wooden beads onto a new length of prepared elastic. Wooden beads sometimes have rougher holes, so check each one to ensure it won’t fray your cord. -
Finish the second strand:
Repeat the knotting and gluing process used for the first bracelet. I verify the knot is fully dry before trimming the cord.
Scent Infusion
Since one strand uses unfinished wooden beads, apply a drop of essential oil like lavender or cedarwood to the wood. They act as a natural diffuser.
Step 4: Strand Three: The Pink Accent
-
Highlight the focal point:
This strand features the dusty rose beads and that unique mottled white focal bead. Locate the center of your strand first. -
Start from the middle:
Threading the specialty mottled white bead first ensures it sits exactly where you want it if you build the design outwards, but for simple threading, just ensure you place it where it will be visible. -
Add the pink beads:
Fill the rest of the strand with the 8mm dusty rose matte beads. The soft color bridges the gap between the dark wood and the light cream strands. -
Final assembly:
Knot, glue, and trim this final bracelet. Let all three sit for at least 15 minutes to let the glue cure completely.
Stack these beauties together or gift one to a friend for a modern, coordinated look
Memory Color Code Friendship Bracelets

These sophisticated friendship bracelets trade bright neons for earthy, matte clay tones separated by elegant gold spacers. The pattern encourages you to encode a special memory using color blocks, like the blue of the ocean meeting the warm sand.
Step-by-Step Guide
Materials
- Matte round polymer clay beads (6mm or 8mm) in teal, terracotta/rust, light orange, and cream
- Gold tone metallic spacer beads (round or saucer shape)
- Gold tone crimp beads
- Gold tone jump rings (4mm or 5mm)
- Gold tone lobster clasp with extender chain and tag
- Flexible beading wire (e.g., Beadalon, 0.38mm or 0.45mm)
- Wire cutters
- Crimping pliers
- Flat nose pliers
Step 1: Planning the Pattern
-
Measure your wrist:
Wrap a measuring tape loosely around your wrist to determine the desired length. Add about half an inch to account for the beads’ bulk. -
Select your palette:
Choose 3-4 clay bead colors that represent a specific memory or location. For the top bracelet shown, we’re using teal, rust, and light orange. -
Layout the design:
Lay your beads out on a bead board or towel. The key to this look is creating blocks of solid color—try 8-10 beads of one color—separated by single gold spacers.
Spacer Tip
Use gold spacers with larger holes if possible; they help hide the wire knot or crimp bead better at the ends of the bracelet for a cleaner finish.
Step 2: Stringing the Beads
-
Cut the wire:
Cut a piece of beading wire about 10 inches long. This gives you plenty of extra room to work with the clasps. -
Secure the first end:
Thread a crimp bead onto one end of the wire, followed by a jump ring or the loop of your clasp. -
Create the loop:
Pass the tail of the wire back through the crimp bead to create a small loop securing the hardware. -
Crimp it down:
Use your crimping pliers to flatten the crimp bead securely. I always give a gentle tug to make sure it holds tight. -
Start the first block:
Thread the tail of the wire into the first few beads as you string them. Begin with your first color block (e.g., 5 rust beads for the start). -
Add gold accents:
Slide on a gold spacer bead. This acts as the visual divider between your color memories. -
Build the pattern:
Continue stringing: a block of teal beads, a gold spacer, a block of light orange beads, and so on. Adjust the number of beads in each block to vary the rhythm if desired. -
Check the length:
Periodically wrap the strand around your wrist. Stop adding beads when you are about half an inch short of your final desired length to make room for the clasp.
Dual-Tone Symmetry
Make a matching pair by reversing the color order on the second bracelet, or swap just the center color block for a complementary look like the white section shown.
Step 3: Finishing Touches
-
Add final crimp:
Thread a crimp bead onto the open end of the wire. -
Attach the clasp component:
Thread the wire through the loop of your extender chain or the other half of your clasp. -
Loop back:
Pass the wire back down through the crimp bead and through the last 2-3 clay beads you strung. -
Tighten and crimp:
Pull the wire taut so there are no gaps between beads, but not so tight that the bracelet becomes stiff. Flatten the crimp bead with pliers. -
Trim excess wire:
Use your flush cutters to trim the remaining wire tail as close to the beads as possible so it doesn’t poke the skin. -
Adjust hardware:
Use flat nose pliers to gently open any jump rings if you need to attach a decorative tag or adjust the clasp orientation.
Now you have a stylish, wearable memory to gift to a friend or keep for yourself