
Making a clay bird feeder is one of my favorite ways to blend pottery time with a little backyard joy. Here are some doable, good-looking ideas you can shape in air-dry clay or kiln-fired clay—depending on your setup and how weatherproof you want to go.
Classic Shallow Dish Feeder
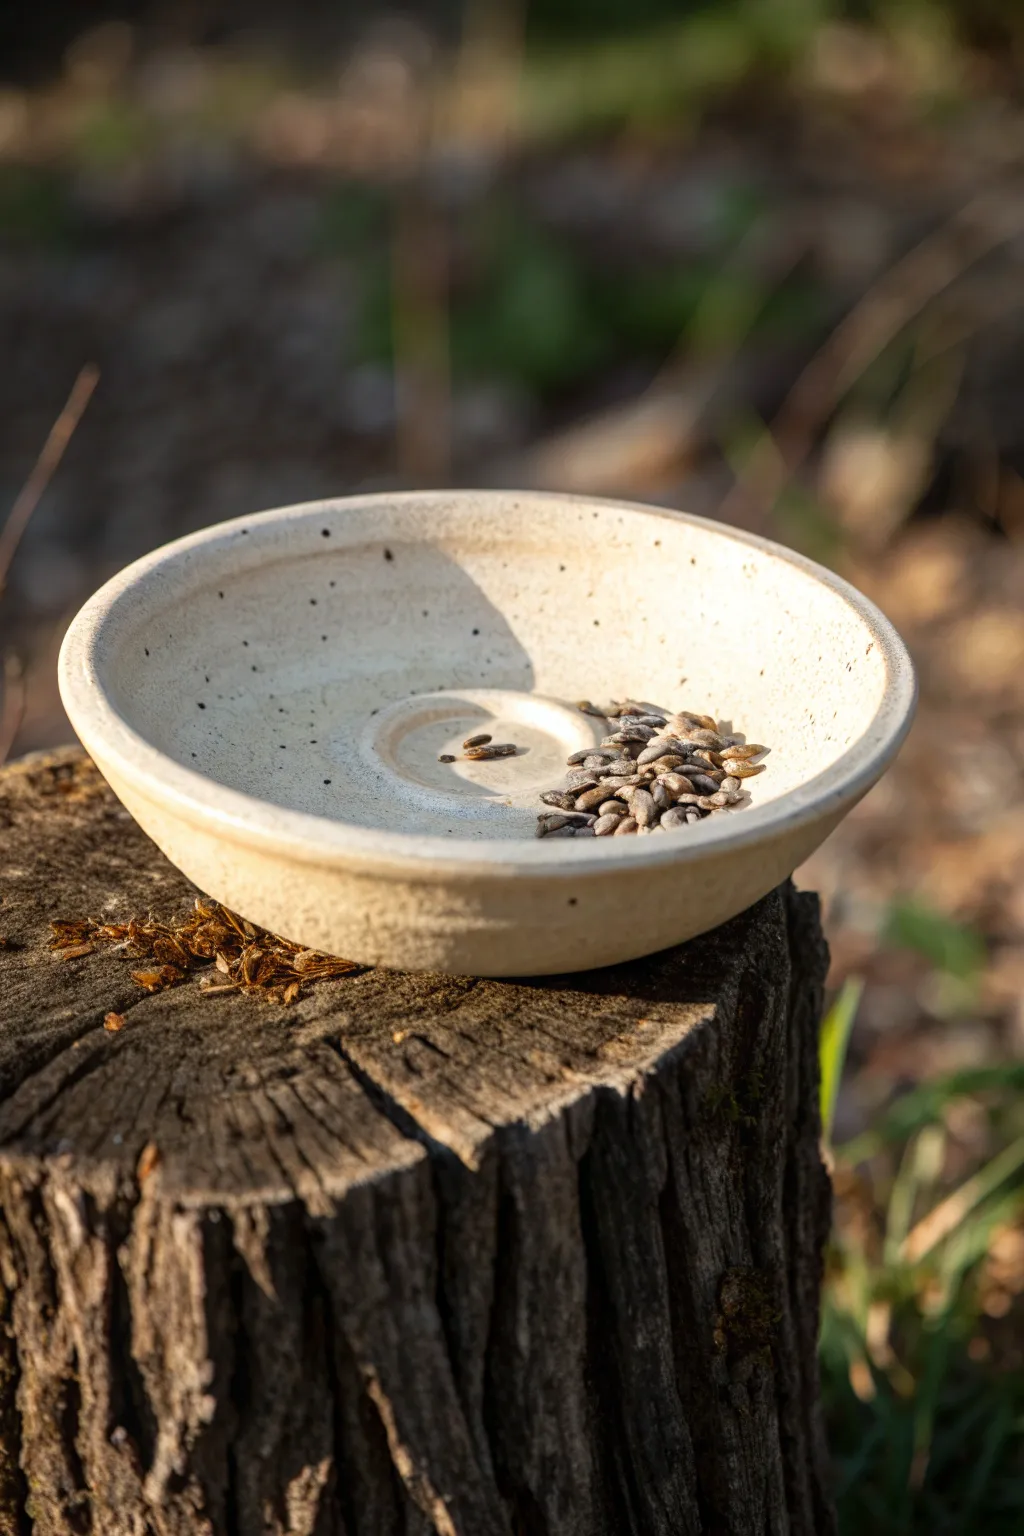
This elegant, yet sturdy shallow dish feeder features a minimalist design with a clever recessed center well for holding seeds securely. The creamy, speckled glaze finish gives it a natural, organic look that blends seamlessly into any garden setting.
Detailed Instructions
Materials
- Stoneware clay body (speckled or buff)
- Pottery wheel (or can be hand-built)
- Small sponge
- Wire cutter
- Wooden rib tool
- Needle tool
- Trimming tools
- Cream/White matte glaze (food safe recommended)
- Kiln
Step 1: Throwing the Form
-
Center the clay:
Start with about 2-3 pounds of stoneware clay. Wedge it thoroughly to remove air bubbles, then slam it onto the wheel head and center it methodically using steady pressure. -
Open wide and shallow:
Open the centered mound, but keep it low. Instead of pulling up high walls, you want to spread the clay outward to form a wide, flat disc shape, leaving about a 1/2 inch thickness for the floor. -
Define the center well:
Before compressing the floor entirely, use your fingers to press a small, circular depression in the very center about 2 inches in diameter. This unique feature, visible in the reference, helps pool smaller seeds. -
Raise the rim:
Pull up the outer edge of the clay disc to create a vertical rim about 1.5 inches high. Keep the wall thickness consistent with the floor. -
Shape the profile:
Using a wooden rib on the outside and a sponge on the inside, gently curve the walls outward to create an open bowl shape. The transition from the floor to the wall should be smooth and gradual. -
Compress the rim:
Use a damp chamois or your sponge to compress and round off the top lip of the rim. This prevents chipping later and gives it that refined look. -
Wire off:
Slide your wire tool underneath the bat to release the pot, but leave it on the bat to firm up until it reaches leather-hard consistency.
Step 2: Trimming and Refining
-
Center for trimming:
Once leather hard, flip the dish upside down onto the wheel head. Secure it with small clay lugs or a Giffin Grip. -
Trim the foot ring:
Carve away excess clay from the bottom to create a defined foot ring. This elevates the feeder slightly and gives the form visual lift. -
Refine the surface:
Use a metal kidney rib to smooth out any throwing lines on the exterior if you want a cleaner look, though leaving slight texture adds character. -
Bisque fire:
Let the piece dry slowly and completely. Once bone dry, load it into the kiln for a bisque firing (usually to Cone 04 or 06).
Warping Woes?
Shallow, wide forms love to warp. Dry very slowly, flipping it occasionally or using weighted bags on the rim to keep it flat.
Step 3: Glazing and Finishing
-
Prep for glazing:
Wipe the bisque-fired piece with a damp sponge to remove dust. Wax the foot ring to prevent glaze from adhering to the bottom. -
Apply the base glaze:
Pour a creamy white or oatmeal matte glaze into the interior. Swirl it to coat the entire inside, including that central well, and pour out the excess. -
Coat the exterior:
Dip the exterior of the bowl into the same glaze bucket. I prefer holding it by the foot ring for a quick dunk to ensure an even coat. -
Add speckling (optional):
If your clay body isn’t naturally speckled, you can flick a toothbrush dipped in iron oxide wash gently over the surface to mimic the spots seen in the image. -
Check the rim:
Make sure the glaze doesn’t pool too thickly on the rim, which could run during firing. Smooth any drips with your finger. -
Final wipe:
Double-check the foot ring is perfectly clean of glaze. Any residue will fuse the pot to your kiln shelf. -
Glaze fire:
Fire the piece to the maturity temperature of your clay and glaze (often Cone 5 or 6 for stoneware).
Hang It Up
Before firing, punch three evenly spaced holes in the rim. Add twine or chain post-firing to turn this into a hanging feeder.
Once cooled, fill the center well with seeds and watch your feathered friends enjoy their durable new dining table


Hanging Teardrop Seed Pod
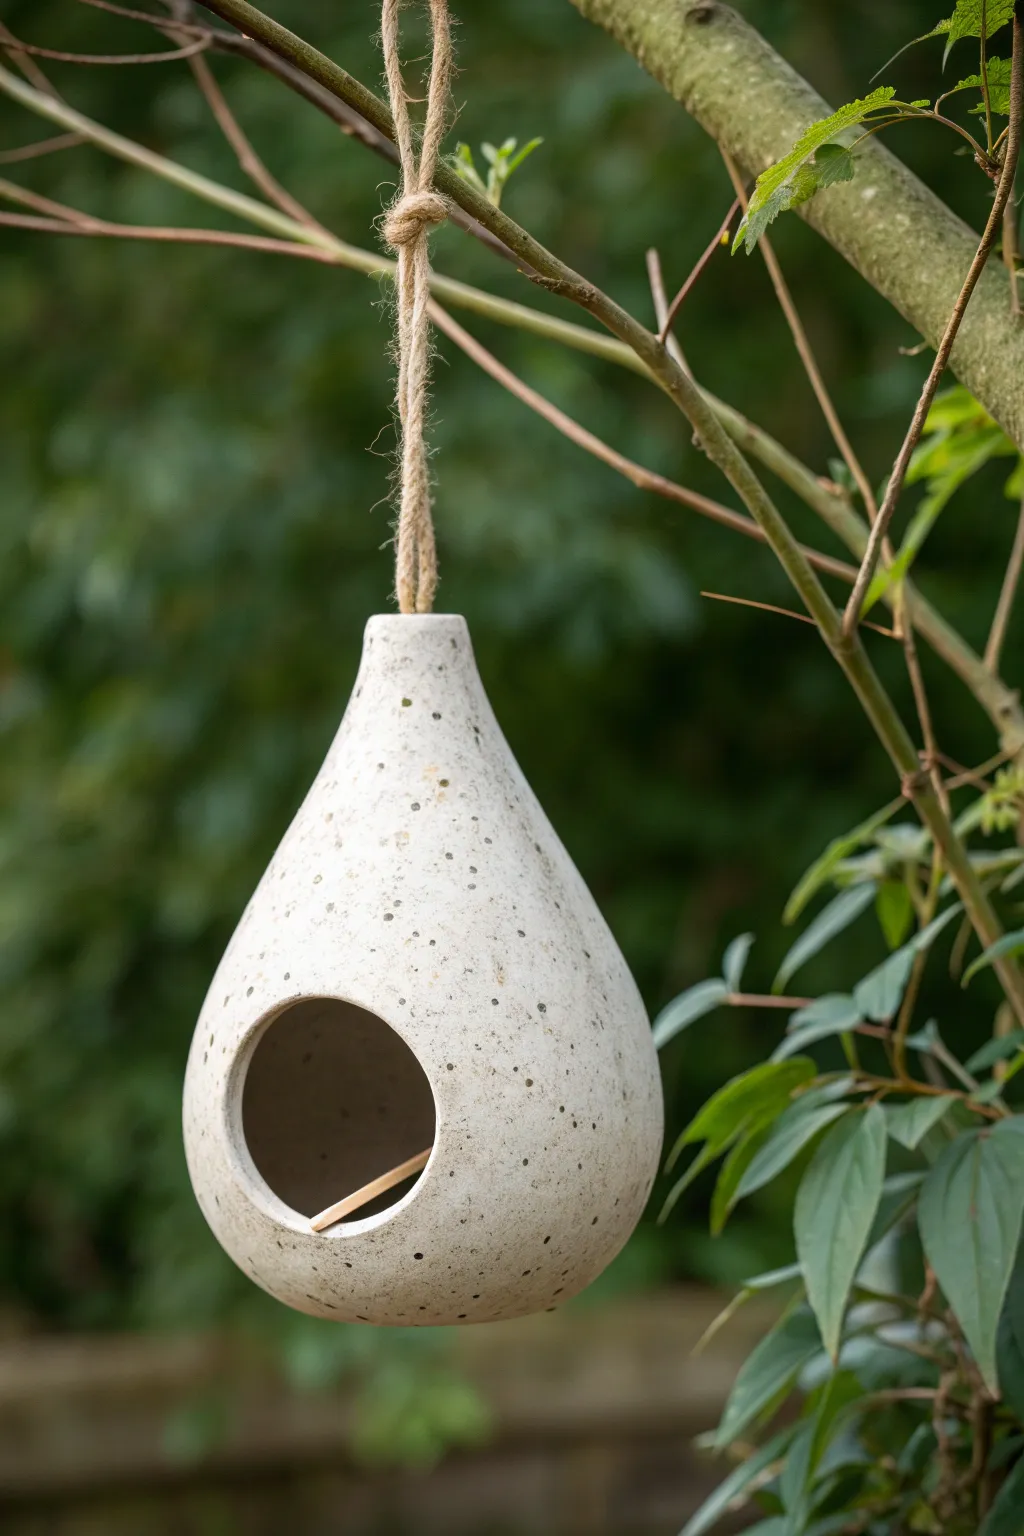
This elegant, minimalist bird feeder mimics the organic shape of a seed pod, blending seamlessly into garden foilage. With its speckled white glaze and rustic twine hanger, it offers a sturdy and stylish shelter for your backyard visitors.
Step-by-Step Guide
Materials
- White stoneware clay (preferably speckled or groggy)
- Pottery wheel (optional, can be hand-built)
- Wooden modeling tools
- Metal kidney rib
- Sponge
- Needle tool
- Clay hole cutter (circular)
- White or transparent speckled glaze and paintbrush
- Thick jute twine
- Kiln access
Step 1: Forming the Shape
-
Prepare the Clay:
Start by wedging a 2-pound ball of white stoneware clay thoroughly to remove air bubbles. This ensures the walls of your feeder won’t crack during firing. -
Establish the Base:
If throwing on a wheel, center your clay and open it up, leaving a floor about a half-inch thick. If hand-building, create a sturdy pinch pot as your base. -
Pull the Walls:
Begin pulling the walls upward. Unlike a bowl, you want to belly the form out in the middle and then gently collar it inwards as you reach the top to create that teardrop silhouette. -
Refine the Curve:
Use a metal kidney rib on the outside while supporting the inside with your hand or a sponge. Smooth the clay to create a continuous, uninterrupted curve from the base to the neck. -
Close the Neck:
Continue collaring the neck until it narrows significantly, leaving an opening at the very top just wide enough for your rope (about 1/2 inch).
Clean Cuts
When cutting the main hole, support the clay wall from the inside with a rib or sponge. This prevents the pressure of the knife from deforming the sphere’s perfect curve.
Step 2: Carving and Detailing
-
Leather Hard Stage:
Allow the piece to dry slowly until it reaches a leather-hard state. It should be firm enough to handle without warping but still cool to the touch. -
Trim the Base:
Flip the pod over and trim away excess weight from the bottom. I find a rounded bottom looks best, so trim until the curve mimics the rest of the shape. -
Cut the Entrance:
Choose the smoothest side of your pod. Using a circular hole cutter or a steady hand with a needle tool, cut a 2-3 inch circular opening near the widest part of the ‘belly’. -
Smooth the Edges:
Take a damp sponge or your finger and carefully round off the sharp edges of the circular cutout. Sharp clay edges can be dangerous for birds’ feet. -
Add Drainage:
Use a small drill bit or needle tool to poke 2-3 tiny drainage holes in the very bottom of the feeder so rainwater doesn’t pool inside. -
Refine the Hanger Hole:
Double-check the top neck opening. Ensure it is clean and large enough for your jute twine to pass through after the clay shrinks in the kiln.
Perch Perfect
Before firing, drill a tiny hole just below the main opening. After firing, you can insert a small wooden dowel or twig to create a standing perch for feeding birds.
Step 3: Glazing and Assembly
-
Bisque Fire:
Fire the piece in the kiln to cone 04 (or your clay’s specific bisque temperature) to prepare it for glazing. -
Apply Glaze:
Brush or dip the feeder in a white, speckled glaze. A matte or satin finish looks particularly nice here. Wipe the foot (bottom) clean so it doesn’t stick to the kiln shelf. -
Glaze Fire:
Fire the piece again to the maturation temperature of your glaze and clay body (often Cone 5 or 6 for stoneware). -
Knot the Rope:
Cut a long length of thick jute twine. Fold it in half to create a loop, tie a knot at the top loop end, and feed the loose ends down through the neck of the feeder. -
Secure the Interior:
Reach through the main opening and tie a large, bulky double knot with the twine ends inside the pod. This knot anchors the feeder when it hangs.
Now you have a durable, nature-inspired vessel ready to be filled with seeds and hung in your favorite tree


Two-Plate Rain-Shelter Feeder
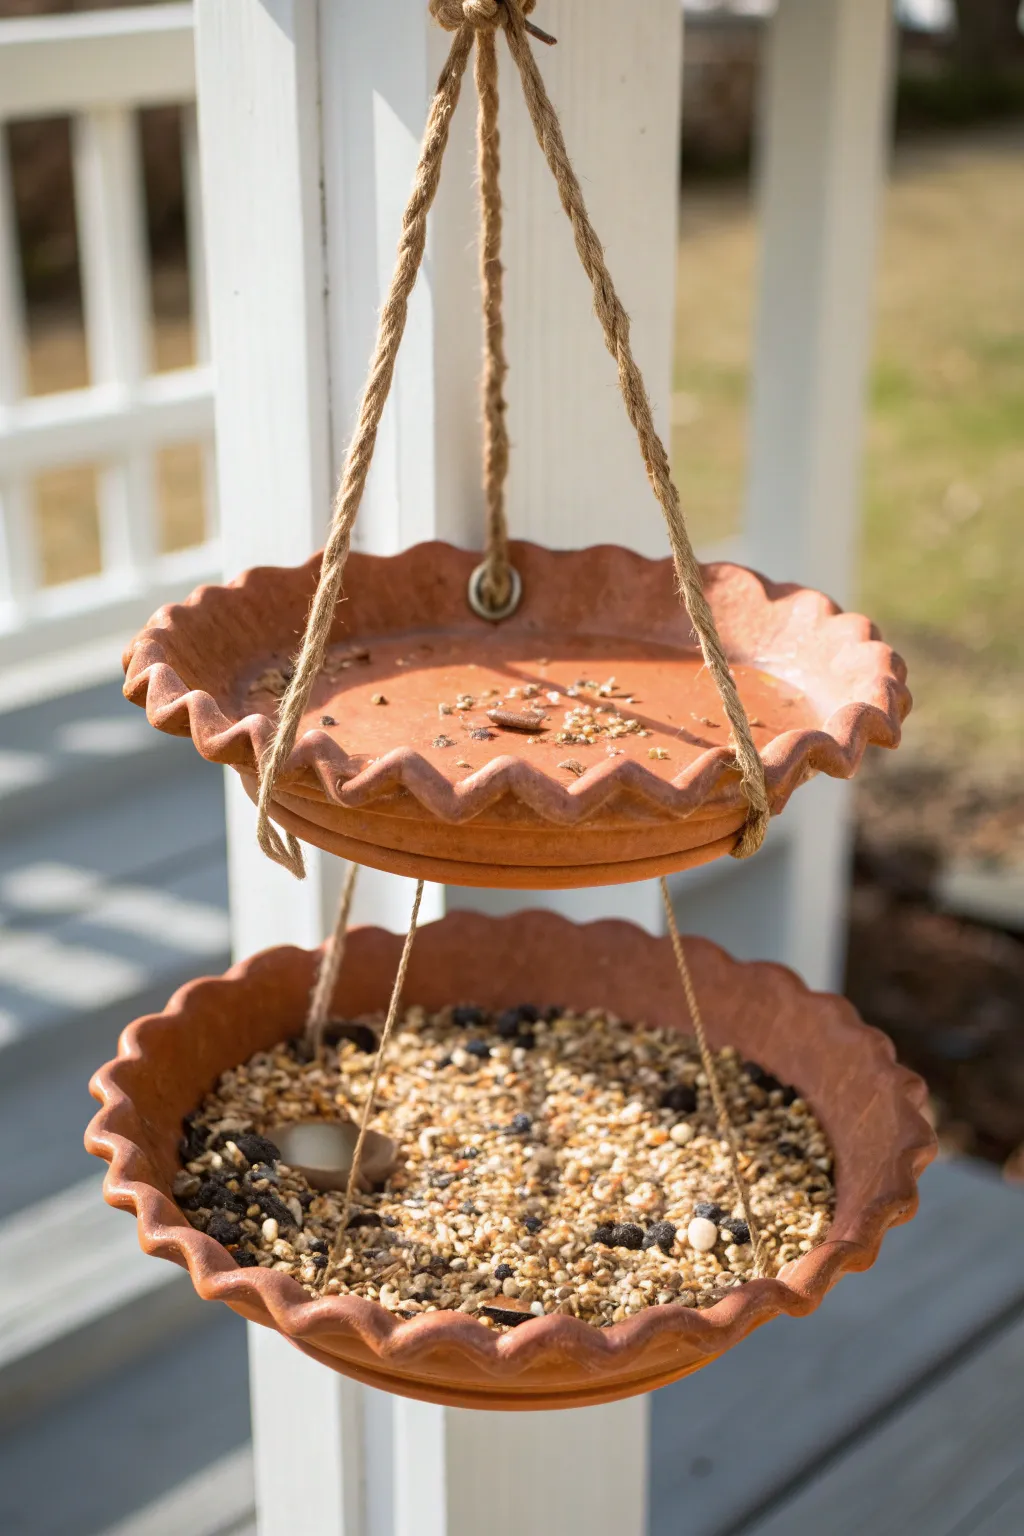
Transform simple garden saucers into a charming, two-tiered bird feeder that protects seeds from the elements. The scalloped edges give it a rustic pie-crust look while the double-decker design keeps snacks dry for your feathered friends.
Step-by-Step Tutorial
Materials
- Two terracotta clay saucers (one slightly larger than the other, approx. 6-inch and 8-inch)
- Thick jute twine or sisal rope
- Power drill with a masonry bit (sized to match your twine thickness)
- Pencil or marker
- Measuring tape
- Kneading clay (optional, if making your own saucers)
- Large metal washer or keyring (for hanging loop)
- All-weather clear sealant spray
Step 1: Preparing the Clay Saucers
-
Select your vessels:
Choose two terracotta planter saucers. For the best rain protection, ensure the top saucer is slightly larger than the bottom one, or at least equal in size. -
Mark the center hole:
Turn both saucers upside down. Find the exact center of each saucer and mark it clearly with a pencil or marker. -
Mark the hanging holes (bottom saucer):
On the smaller saucer (the feeder base), mark three points along the outer rim. Visualize an equilateral triangle to space them evenly apart. -
Mark the threading holes (top saucer):
On the larger saucer (the roof), align it over the bottom one and mark three corresponding holes on the rim so the ropes will hang straight down. -
Drill the holes:
Using a masonry bit, carefully drill through all marked points. Go slowly to avoid cracking the terracotta. I find placing a scrap piece of wood underneath helps support the clay as the drill exits. -
Clean and seal:
Wipe away all terracotta dust. Spray both saucers with a clear all-weather sealant to prevent them from absorbing too much moisture, which can cause cracking in freezing weather.
Cracked Clay?
If the terracotta cracks while drilling, try placing a piece of masking tape over the drill spot first. This helps grip the bit and reduces vibration stress on the clay.
Step 2: Rigging the Hanging System
-
Cut the rope:
Cut three equal lengths of jute twine, about 30 to 36 inches long each. Better to have them too long than too short. -
Anchor the bottom tier:
Thread one end of a twine piece through a rim hole on the bottom saucer. Tie a thick double knot underneath to secure it. Repeat for the other two holes. -
Position the roof:
Thread the loose ends of the twine up through the corresponding rim holes of the top saucer (the roof). -
Set the height:
Determine how much space you want between the two tiers—about 5 to 6 inches is usually good for small birds. Tie knots in the twine right underneath the top saucer’s rim holes to hold the roof in place at this height. -
Create the central support:
For extra stability, cut a shorter piece of twine. Thread it through the center hole of the bottom saucer and knot it underneath. Run it up through the center hole of the top saucer. -
Gather and tie:
Bring the three main ropes and the central support rope together at the top. -
Secure the top loop:
Feed all strands through a large metal washer or keyring. Tie them securely together in a large overhand knot, trimming any excess fray. -
Final adjustment:
Hold the feeder up by the ring to check the balance. Adjust the knots slightly if one side dips lower than the others. -
Fill and hang:
Pour birdseed into the bottom saucer and hang your new creation from a sturdy branch or hook.
Add color
Before sealing, paint patterns on the saucers using outdoor acrylic paints. Avoid painting the inside where food sits to keep it safe for the birds.
Enjoy watching your local birds flock to their stylish new dining spot


Roofed Cylinder Seed Feeder
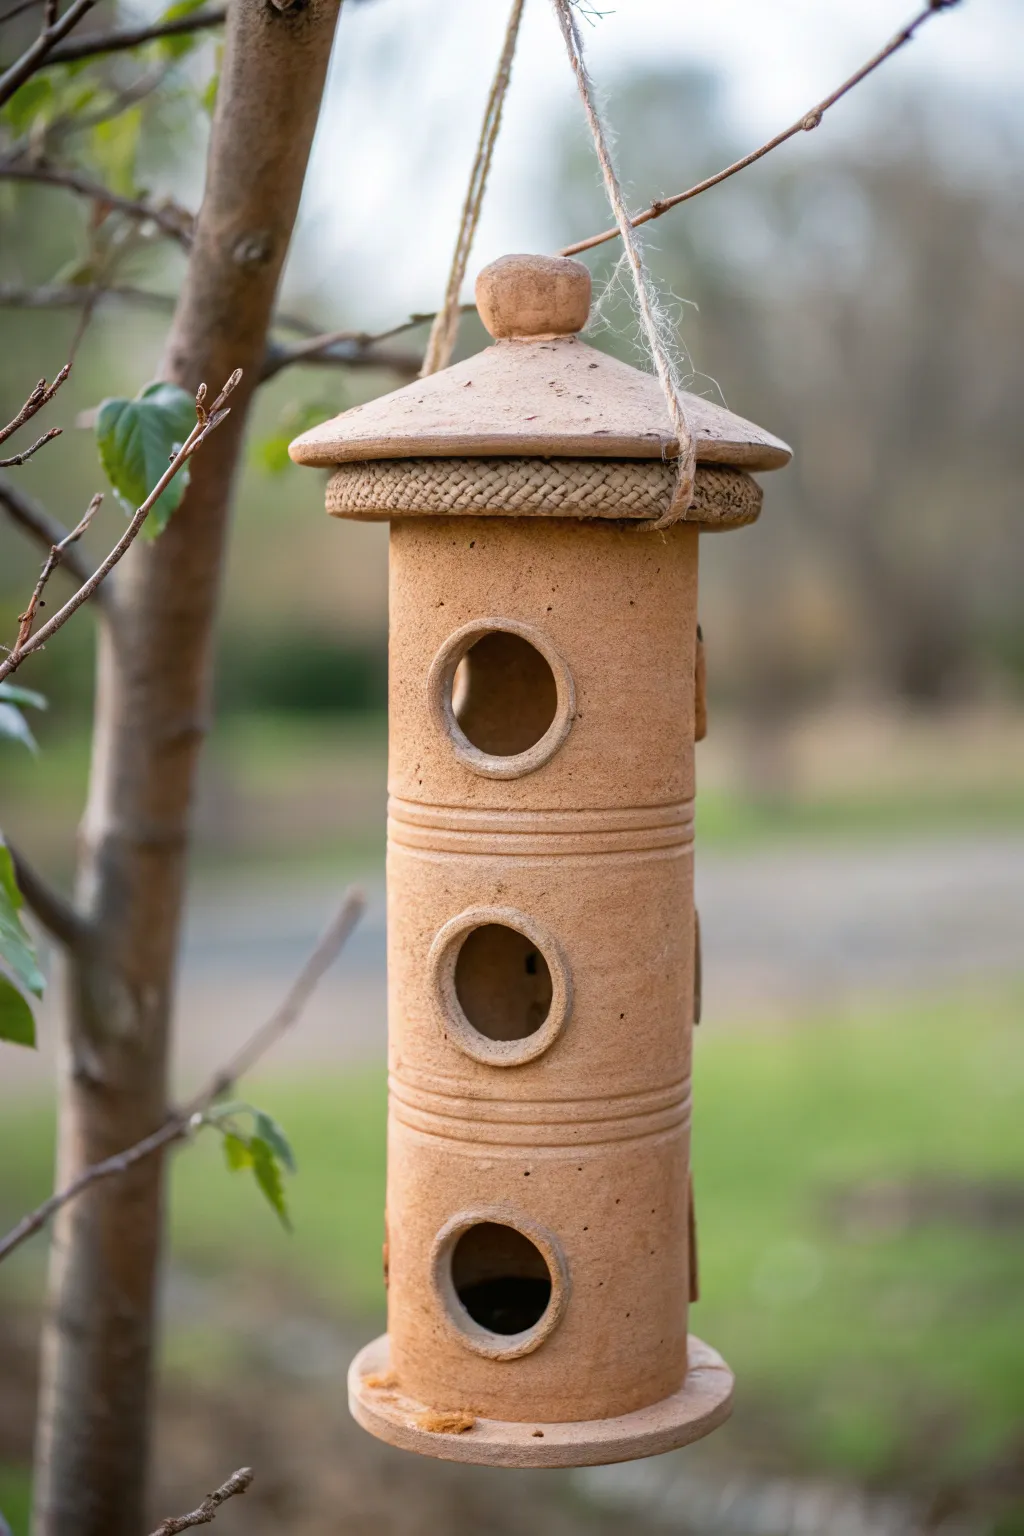
This rustic, multi-story bird feeder is built from natural clay and features a segmented cylindrical design that mimics a modern bird condominium. With its protective conical roof and multiple feeding ports, it blends seamlessly into garden environments while providing a sturdy dining spot for your feathered neighbors.
Step-by-Step Guide
Materials
- Earthenware or Terracotta clay (mid-fire)
- Rolling pin
- PVC pipe or sturdy cardboard tube (approx. 3-inch diameter) for form
- Paper or newspaper (to wrap the form)
- Fettling knife or clay cutter
- Circle cutters (approx. 1.5-inch diameter)
- Slip and scoring tool
- Wooden modeling tools
- Heavy-duty twine or natural jute rope
- Sponge and water
- Canvas or cloth work surface
Step 1: Forming the Main Cylinder
-
Prepare the workspace:
Begin by covering your working surface with canvas to prevent sticking. Take your cylindrical form (PVC pipe or tube) and wrap it in a single layer of newspaper; this ensures the clay won’t bond to the plastic later. -
Roll the slab:
Roll out a substantial slab of clay to an even thickness of about 1/4 inch. It needs to be long enough to wrap fully around your tube with a slight overlap, and tall enough for three feeding levels (roughly 10-12 inches). -
Wrap and seal:
Carefully lift the slab and wrap it around your newspaper-covered form. Where the edges meet, cut through both layers of clay simultaneously with a knife to create a perfect butt joint. -
Join the seam:
Score the cut edges aggressively and apply slip. Press the edges together firmly and smooth the seam inside and out until it is invisible. -
Add the base:
Roll a smaller slab and cut a circle slightly larger than the cylinder’s diameter. Attach this to the bottom of the cylinder using the scour-and-slip method to create the floor of the feeder.
Pro Tip: Clean Lines
For perfectly straight decorative grooves around the cylinder, rest your modeling tool on a stack of books at the correct height and rotate the clay tube against it.
Step 2: Detailing and Ports
-
Mark the segments:
While the clay is still on the form (or very leather hard if you removed it), lightly mark three horizontal sections. Use a modeling tool to press shallow double-grooves around the circumference to visually separate the ‘floors’ of the feeder. -
Cut the ports:
Use your circle cutter to punch out one hole in the center of each of the three sections. Remove the cut clay carefully. -
Refine the edges:
Smooth the cut edges of the circular holes with a damp sponge or your finger. I find that burnishing these edges now prevents sharp spots that could hurt bird feet later. -
Remove the form:
If you haven’t already, gently slide the PVC pipe out. The newspaper might stay inside; peel it out carefully or leave it to burn off in the kiln if the shape feels fragile.
Troubleshooting: Slumping Clay
If your cylinder starts to sag when you remove the inner form, the clay is too wet. Put the form back in and let it stiffen to a ‘leather hard’ state before proceeding.
Step 3: Creating the Roof
-
Shape the cone:
Roll a new slab and cut a large circle (wider than your cylinder). Cut a pie-slice wedge out of the circle, dampen the cut edges with slip, and pull them together to form a shallow cone shape. -
Add the knob:
Form a small ball of clay and attach it securely to the very peak of the roof. This adds a decorative touch and strength to the hanging point. -
Create the hanging holes:
Drill or punch two small holes through the roof—one on each side of the central knob—large enough for your twine to pass through later. -
The decorative rim:
Roll a coil of clay and twist it gently to look like a rope. Attach this decorative coil around the outer bottom rim of the roof using slip, pressing firmly to bond.
Step 4: Assembly and Firing
-
Dry fit check:
Place the roof gently on the cylinder to ensure the diameter is correct. The roof should overhang slightly, but doesn’t need to be permanently attached as a removable lid makes filling seeds easier. -
Drying:
Dry both pieces slowly away from drafts to prevent warping. The cylinder needs to stay perfectly round. -
Firing:
Bisque fire the pieces to the appropriate cone for your specific clay body (usually Cone 04-06 for earthenware). You can leave it unglazed for a natural terracotta look. -
Final assembly:
Thread your thick jute rope through the holes in the roof. Tie a large knot on the underside of the roof to hold the weight, leaving a long loop on top for hanging.
Hang your new earthenware creation from a sturdy branch and watch the local birds explore their new dining tower

The Complete Guide to Pottery Troubleshooting
Uncover the most common ceramic mistakes—from cracking clay to failed glazes—and learn how to fix them fast.
Hanging Bowl With Built-In Loop
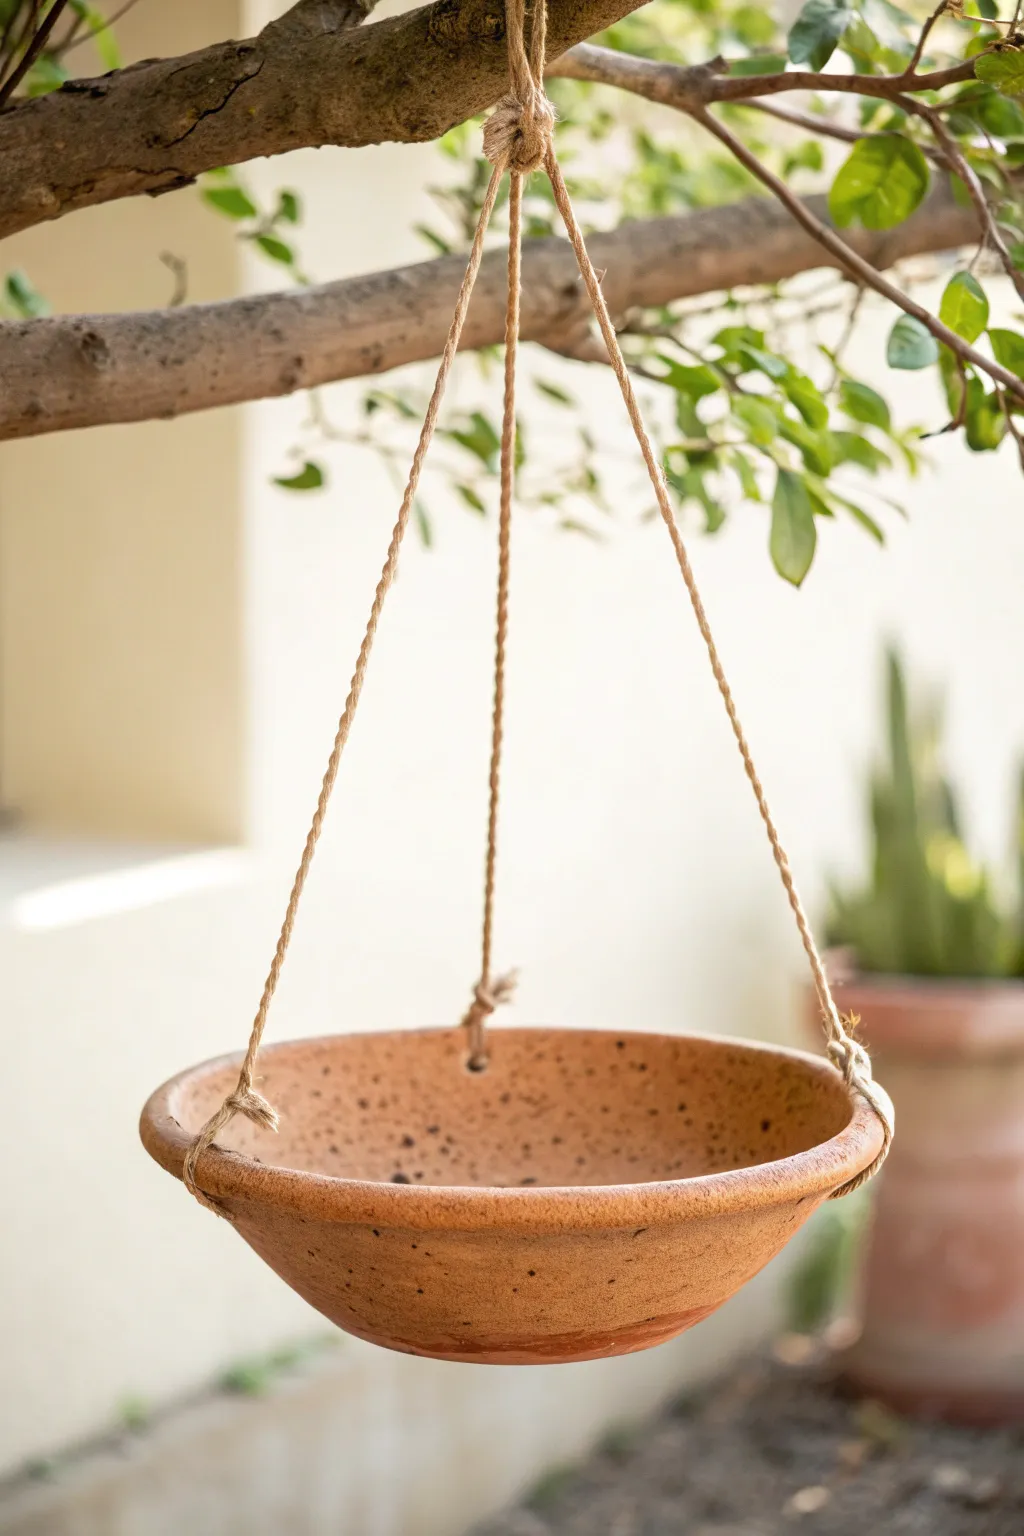
This rustic, nature-inspired bird feeder combines the organic warmth of speckled stoneware with simple macramé techniques. Its shallow profile makes it perfect for local songbirds, while the natural clay tones blend seamlessly with garden surroundings.
How-To Guide
Materials
- Speckled stoneware clay (approx. 2-3 lbs)
- Rolling pin
- Canvas work surface or wooden board
- Large mixing bowl (to use as a mold)
- Small circular cookie cutter or straw (for hole punching)
- Sponge
- Water dish
- Natural jute twine or 3-ply hemp cord
- Pottery needle tool or knife
- Sandpaper (fine grit)
- Kiln (or access to a firing service)
Step 1: Forming the Bowl
-
Prepare your clay:
Begin by wedging your speckled stoneware clay thoroughly to remove any air bubbles, which prevents cracking during firing. -
Roll out a slab:
On your canvas surface, flatten the clay ball slightly with your hand, then use the rolling pin to create a smooth, even slab about 1/4 to 3/8 inch thick. -
Cut the circle:
Place your large mixing bowl face down onto the slab. Using your needle tool, trace around the rim to cut out a perfect circle. -
Create the curve:
Carefully lift your clay circle and drape it inside your mixing bowl (which acts as a hump mold). I like to dust the bowl with cornstarch first so the clay doesn’t stick. -
Smooth the shape:
Gently press the clay into the bowl’s curve, smoothing it with a damp sponge to erase any fingerprints or canvas textures. -
Define the rim:
Even out the rim of the bowl with your wet fingers or a chamois cloth, ensuring it is rounded and comfortable for birds to perch on.
Step 2: Adding Suspension Points
-
Mark the holes:
While the clay is leather-hard (firm but still cool to the touch), use a ruler to mark three equidistant points around the rim. -
Punch the holes:
Use a small circular cutter or a sturdy straw to punch clean holes about half an inch below the rim at your marked spots. -
Refine the edges:
Smooth around the newly cut holes with a damp finger to ensure the rough edges won’t fray your twine later. -
Dry thoroughly:
Allow the piece to dry completely. This usually takes several days; cover it loosely with plastic for the first day to ensure even drying. -
Bisc firing:
Fire the piece in a kiln to bisque temperature (usually cone 04 or 06) to harden it permanently. -
Glaze (Optional):
If you prefer a glazed finish, apply a matte clear glaze now and fire again. Leaving it unglazed creates that raw, earthy look seen in the photo.
Tip: Smooth Edges
Before firing, run a damp chamois leather strip over the rim. This compresses the clay particles, making the edge extra durable against chipping.
Step 3: Rigging the Suspension
-
Cut the twine:
Cut three equal lengths of jute twine, each about 4 to 5 feet long, depending on how low you want the feeder to hang. -
Thread the bowl:
Feed one end of a twine piece through one of the holes in the rim, pulling it through until ends meet. -
Secure the knots:
Tie a secure overhand knot or double knot at the rim hole for each of the three suspension points. -
Gather the strands:
Bring all three ropes together at the top, ensuring the bowl hangs level. Adjust the lengths if it tilts. -
Create the top loop:
Tie all three strands together into a large, sturdy knot at the top, leaving a loop for hanging on a tree branch. -
Final trim:
Trim any excess twine from your knots for a tidy appearance.
Level Up: Texture
Press actual leaves or wildflower stems into the wet clay slab before molding it to leave fossil-like impressions on the interior surface.
Now you have a charming, minimalist feeder ready to welcome wildlife into your garden space
Planter-Saucer Pedestal Feeder
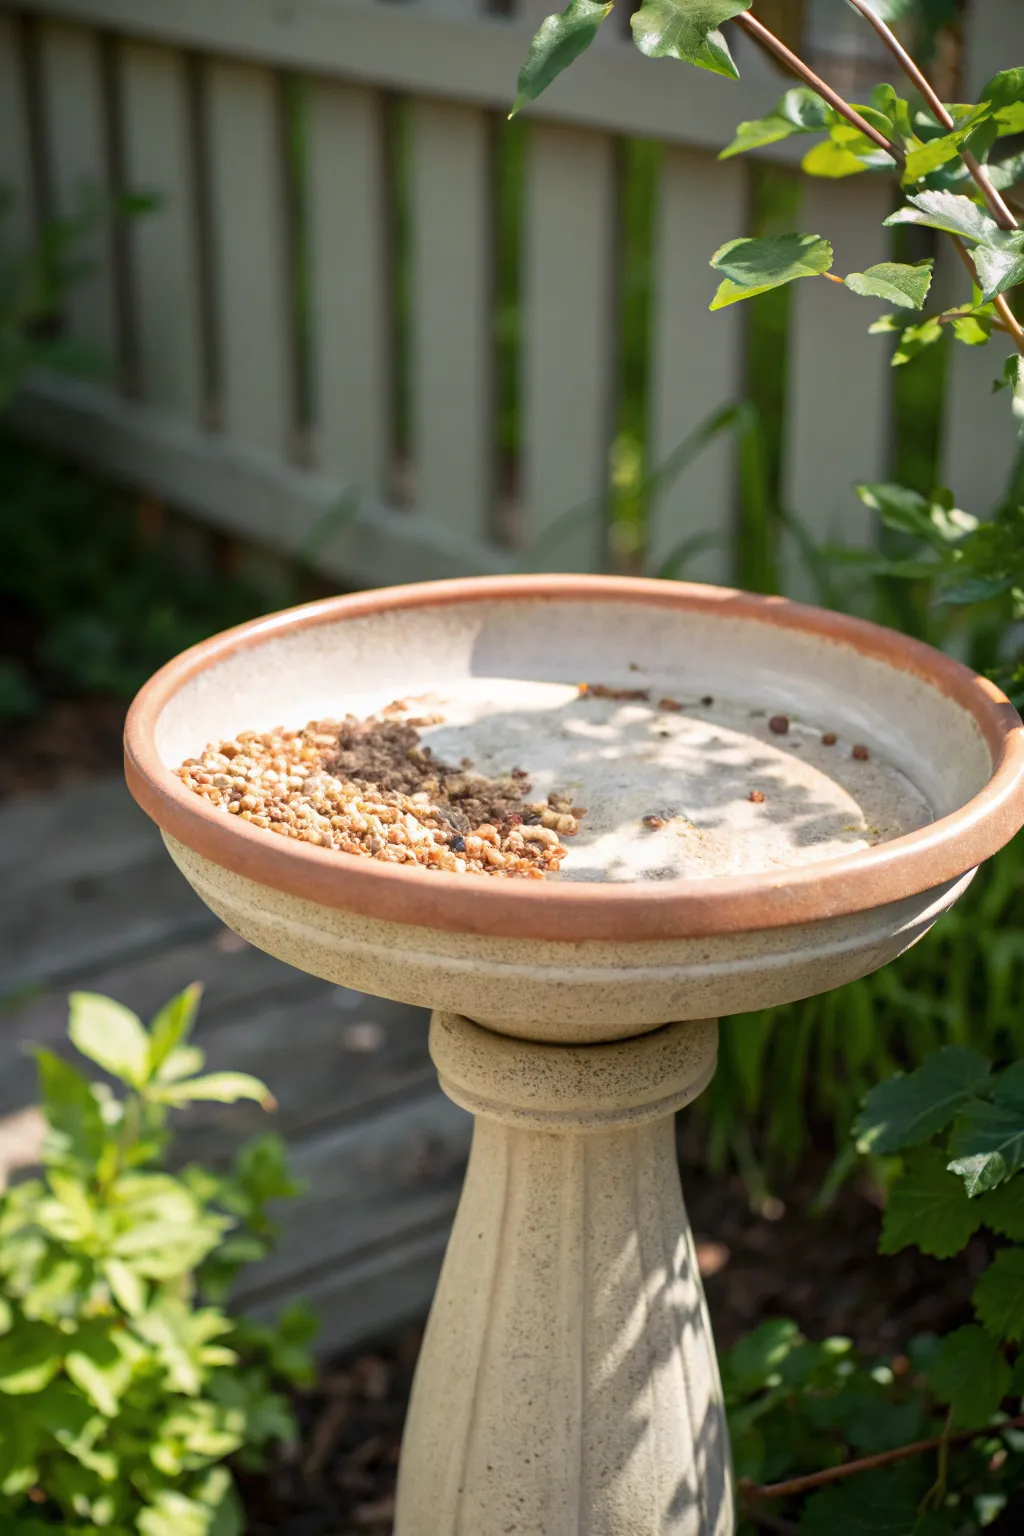
Transform humble garden basics into a beautiful, sun-warmed feeding station with this elegant pedestal project. By combining a terracotta saucer with a matching base, you create a classic, timeless look that fits seamlessly among your backyard blooms.
Step-by-Step Tutorial
Materials
- Large glazed terracotta saucer (approx. 12-14 inches)
- Matching pedestal base or inverted tall planter
- Outdoor-grade construction adhesive (e.g., E6000 or Liquid Nails)
- Sandpaper (80 or 100 grit)
- Clean cloth or rag
- Rubbing alcohol
- Level
- Wild bird seed mix
- Waterproofing spray or sealant (optional but recommended for terracotta)
Step 1: Preparation & Selection
-
Choose your ceramics:
For the most cohesive look, source a saucer and a pedestal that have similar textures and coloring. In the example, a beige, speckled clay finish with a subtle rust-colored rim creates a warm, natural aesthetic. -
Check the fit:
Before committing to glue, place the saucer on top of your chosen pedestal. Ensure the base of the saucer is wide enough to sit stably on the pedestal’s top surface without wobbling. -
Clean the surfaces:
Use a damp cloth to wipe down both the top of the pedestal and the bottom center of the saucer to remove any garden center dust or price tag residue. -
Rough it up:
Take your sandpaper and gently scuff the area on the bottom of the saucer where it will meet the pedestal, as well as the top rim of the pedestal itself. This creates a better ‘tooth’ for the glue to grab onto. -
Final wipe down:
Wipe the sanded areas with a cloth dampened with rubbing alcohol. This removes the fine dust created by sanding and ensures a perfectly clean bond.
Wobble Worries
If your pedestal ground isn’t perfectly flat, wedge a small, flat slate shims or rubber washers under the pedestal base to level it before filling the top with birdseed.
Step 2: Assembly
-
Apply the adhesive:
Squeeze a generous, continuous bead of outdoor construction adhesive on the top rim of your pedestal. I find it helpful to stay about a half-inch from the very edge to prevent glue from squishing out visibly. -
Position the saucer:
Carefully lower the saucer onto the pedestal. Take a moment to eye-ball it from above to ensure it is perfectly centered. -
Level check:
Place a small level across the rim of the saucer to ensure it sits flat. This is crucial so rainwater won’t pool on one side and seed won’t slide off unevenly. -
Weigh it down:
Place a heavy object, like a brick wrapped in a towel or a bag of sand, gently into the saucer to apply downward pressure while the adhesive sets. -
Allow to cure:
Let the glue cure completely according to the manufacturer’s instructions. This usually takes at least 24 hours. Do not move the feeder during this time.
Mosaic Magic
Before sealing, create a mosaic pattern on the inside of the saucer using bits of broken china or sea glass and grout for a colorful, custom hidden surprise as the birds eat.
Step 3: Finishing Touches
-
Seal the surface (optional):
If your saucer is unglazed terracotta, spray the interior with a non-toxic, matte outdoor sealant. This prevents water from soaking into the clay and damaging it during freeze-thaw cycles. -
Let the sealant dry:
Allow the sealant to air out for another 24 hours so any fumes dissipate completely before introducing food. -
Prepare the location:
Find a flat, stable surface in your garden—a deck railing, a flat stone, or a patio table—where the pedestal can stand without tipping. -
Add drainage (if needed):
If your area gets heavy rain, you might want to carefully drill two small holes in the bottom of the saucer using a masonry bit, though a shallow saucer will often just evaporate quickly in the sun. -
Fill with seed:
Pour a mix of seeds onto the saucer. The wide, open design allows for separating different types of treats, like mealworms on one side and sunflower seeds on the other, just like in the photo.
Your garden now has a sturdy, classic focal point that the local wildlife will surely appreciate


What Really Happens Inside the Kiln
Learn how time and temperature work together inside the kiln to transform clay into durable ceramic.
Speckled Stoneware Tray Feeder
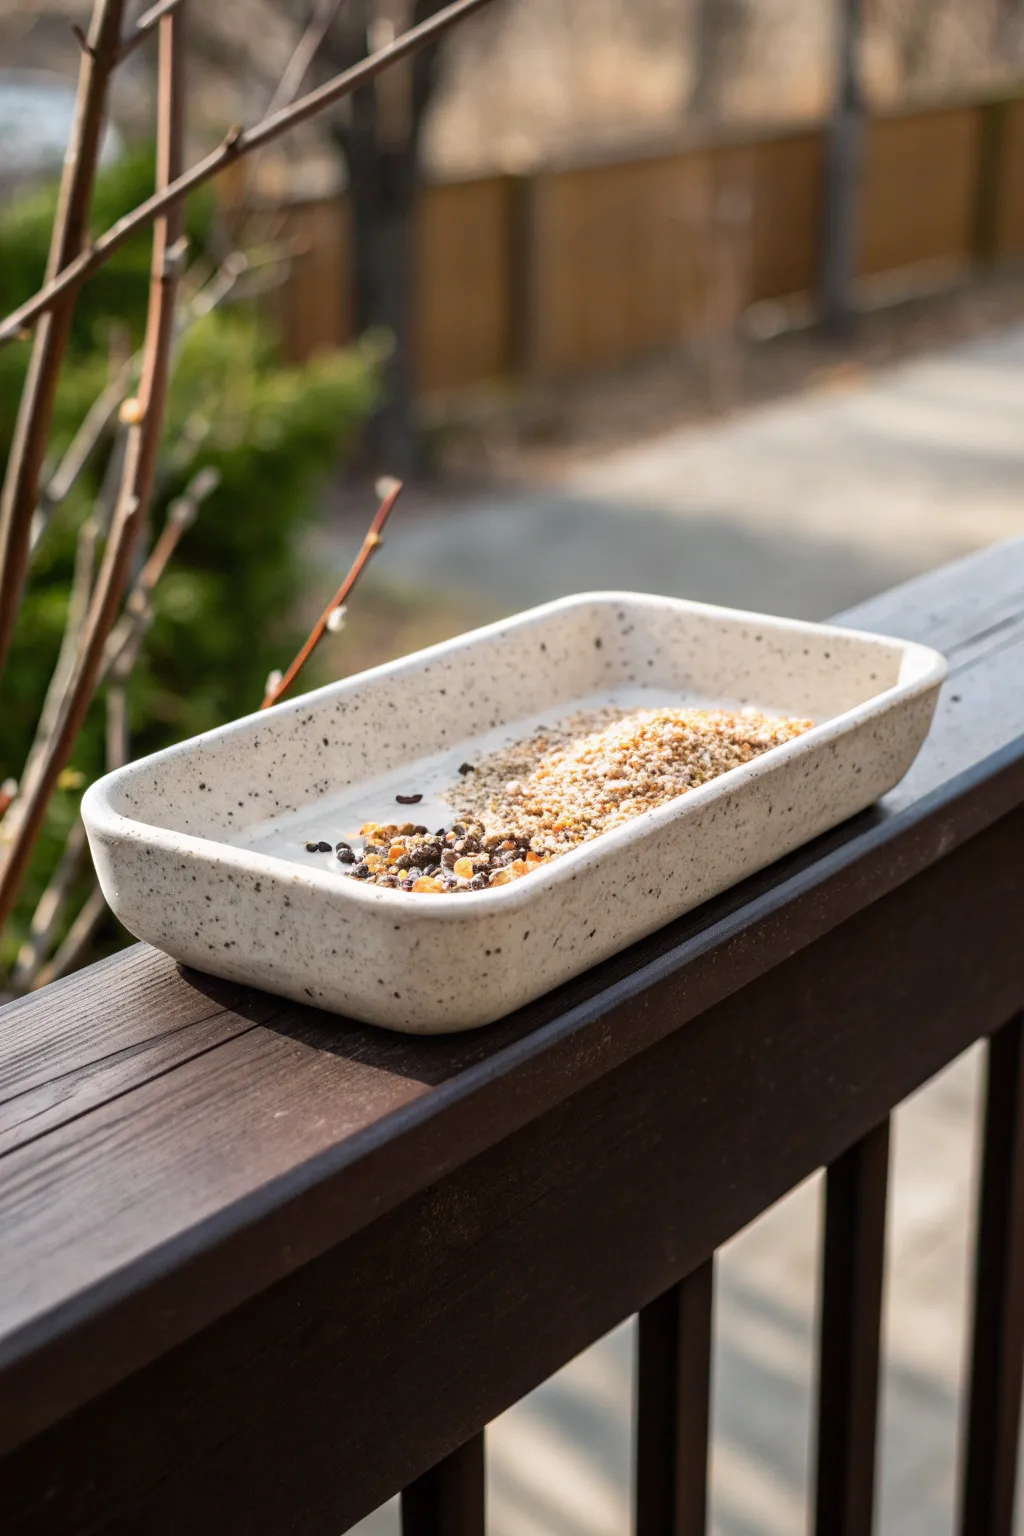
Embrace the natural beauty of raw clay with this minimalist tray feeder, featuring a stunning speckled finish that complements any garden setting. Its shallow rectangular form is perfect for smaller birds, and the sturdy stoneware construction ensures it endures the elements with grace.
Detailed Instructions
Materials
- Speckled stoneware clay body (e.g., cone 6)
- Rolling pin
- Two long wooden guide strips (approx. 1/4 inch thick)
- Rectangular slump mold or a sturdy shoebox wrapped in plastic
- Fettling knife or needle tool
- Rib tool (wooden or rubber)
- Sponge
- Clear matte glaze (food safe/lead-free)
- Canvas board or cloth for rolling
- Score and slip tool
Step 1: Forming the Base
-
Prepare your workspace:
Lay down your canvas cloth to prevent sticking. Place your two wooden guide strips parallel to each other, slightly wider than the width of material you plan to roll out. -
Roll the slab:
Take a generous chunk of speckled clay and knead it briefly to remove large air bubbles. Place it between the guide strips and roll it flat with your rolling pin until the pin rests on the wood guides, ensuring an even thickness. -
Compress the clay:
Run a rubber rib tool firmly over the surface of the slab in multiple directions. This compression step is crucial for preventing warping later during the firing process. -
Measure and cut:
Using a ruler or a paper template, cut a large rectangle for the base. For the sides, cut four long strips: two matching the length of your base and two matching the width.
Step 2: Constructing the Tray
-
Score the edges:
Take your needle tool or a serrated kidney and roughen up the outer edges of the base slab where the walls will attach. Do the same to the bottom edge of your four wall strips. -
Apply slip:
Dab a generous amount of clay slip (liquid clay) onto the scored areas. This acts as the glue that bonds your pieces together. -
Attach the walls:
Place the wall strips onto the base, pressing them down firmly. I find it helpful to wiggle them slightly to really lock the clay particles together. -
Reinforce the seams:
Roll a very thin coil of clay. Place this coil into the interior corner where the floor meets the wall. Smooth this coil down into the seam using a wooden modeling tool to create a rounded, seamless transition. -
Smooth the exterior:
On the outside, use your rib tool or finger to pull clay from the wall down onto the base to hide the seam completely.
Warping Walls?
If your straight walls start bowing inward while drying, place a ruler or straight edge diagonally across the top rim to hold them apart until they stiffen.
Step 3: Refining and Finishing
-
Drying setup:
To ensure the rectangular shape holds perfectly, you can gently place a structured form (like a wrapped block of wood) inside, or simply prop up the outside walls with small weights until the clay is leather-hard. -
Round the rim:
Once the clay has stiffened up a bit, take a slightly damp sponge and run it along the top rim. This softens any sharp edges that might be uncomfortable for bird feet. -
Smoothing the surface:
Give the entire piece a final sponging to bring out the texture of the speckles and remove any remaining tool marks or fingerprints. -
Bisque fire:
Allow the feeder to dry slowly under plastic for several days before letting it air dry completely. Fire it in a kiln to a bisque temperature (usually Cone 04 or 06). -
Glazing:
Apply a clear matte glaze to the interior and exterior. The clear glaze will seal the clay while allowing the natural speckles of the stoneware to remain the star of the show. -
Final firing:
Fire the piece again to the maturity temperature of your specific clay and glaze (typically Cone 5 or 6 for stoneware). This vitrifies the clay, making it weather-resistant.
Drainage Tip
Before drying, use a small straw to poke 2-3 holes in the bottom corners of the tray. This prevents rainwater from pooling and spoiling the birdseed.
Once cooled, fill your durable new heavy-duty tray with seed and watch the local wildlife enjoy your handiwork.
Flower-Shaped Rim Dish Feeder
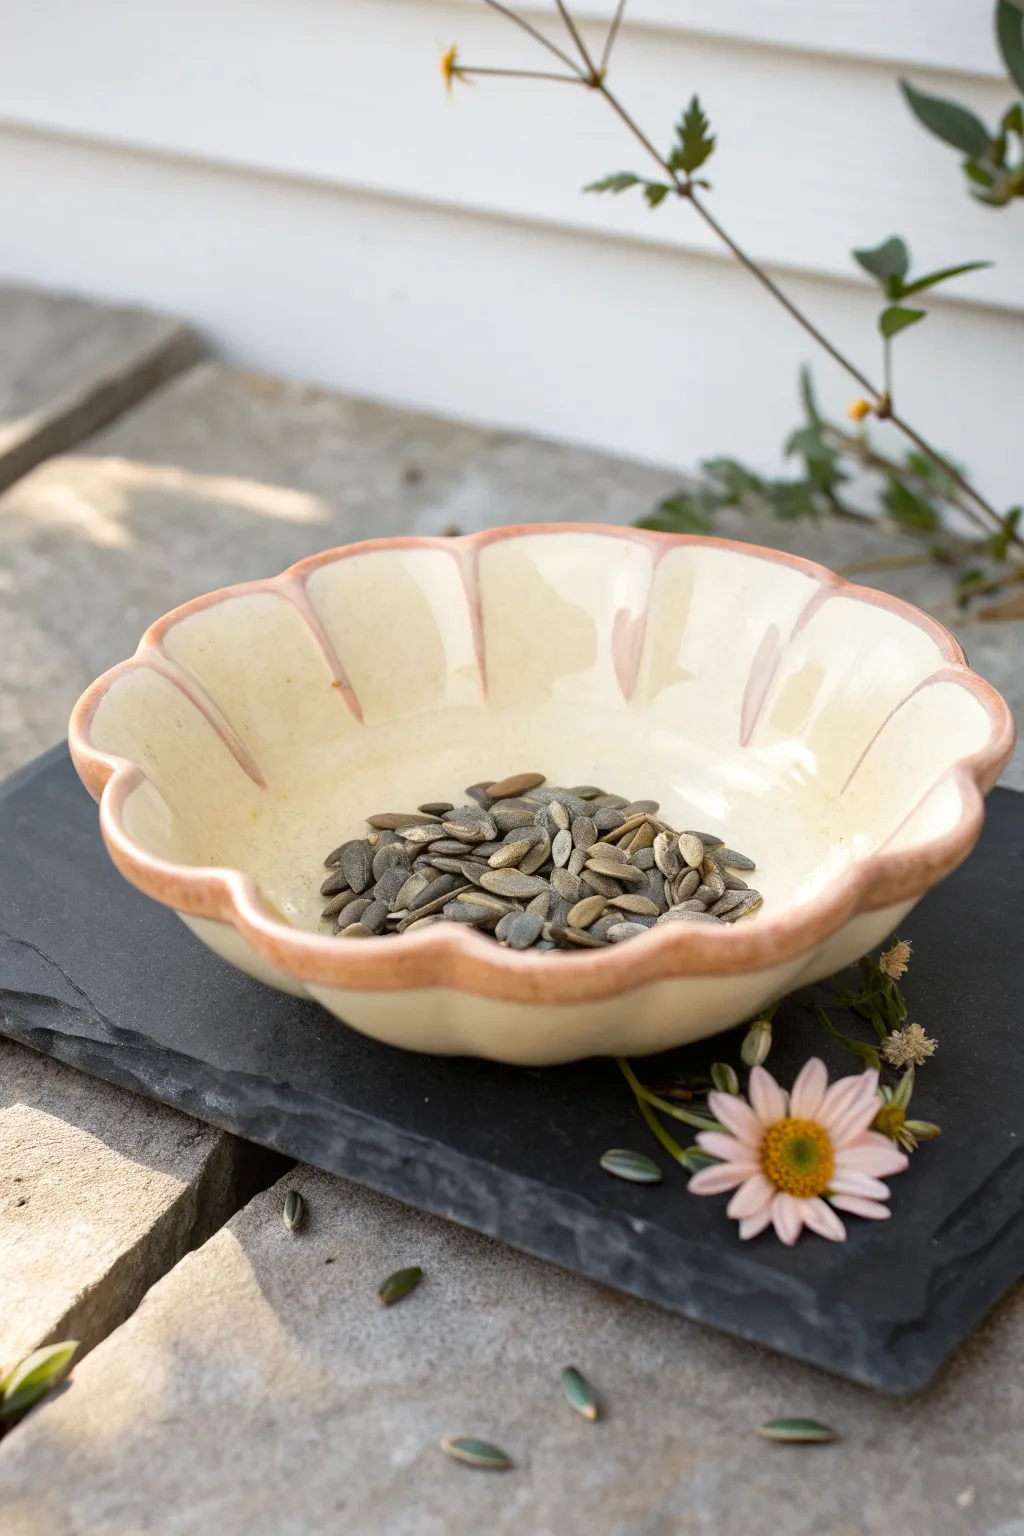
This charming, low-profile bird feeder mimics the gentle curves of a blooming flower, inviting songbirds to perch right on its scalloped edge. With a soft cream glaze and a touch of terracotta warmth along the rim, it brings an organic, handmade beauty to your garden setup.
Step-by-Step Tutorial
Materials
- Low-fire white earthenware clay
- Rolling pin
- Guide strips or dowels (approx. 1/4 inch thick)
- Small bowl or hump mold (for shaping)
- Needle tool or clay knife
- Rib tool (smooth wood or rubber)
- Sponge
- Clear or cream low-fire glaze
- Terracotta or pink underglaze (optional for rim)
- Paintbrush (soft round)
- Kiln access
Step 1: Forming the Base
-
Prepare your clay:
Begin by wedging a softball-sized amount of white earthenware clay to remove air bubbles and ensure a uniform consistency. -
Roll the slab:
Set up your guide strips on a canvas work surface. Roll the clay out into a smooth slab, using the guides to maintain an even 1/4 inch thickness. -
Cut the circle:
Place a round template (a paper plate works well) or a bowel inverted onto the clay. Trace around it with your needle tool to cut out a perfect circle. -
Smooth the surface:
Before shaping, use a slightly damp rib tool to compress the clay slab on both sides, removing any canvas texture and preventing future cracking.
Warped Rim?
If your rim warps while drying, weigh it down gently with a small bag of rice placed in the center during the leather-hard stage to keep the base flat.
Step 2: Shaping the Flower
-
Mold the shape:
Gently drape your clay circle over a hump mold or press it into a shaping bowl to establish the concave feeder shape. Press gently from the center outward. -
Create the petals:
Visualize the rim as a clock face. Using your thumb and forefinger, gently pinch the rim at regular intervals to create indentations that form the petal separations. Aim for roughly 8 to 10 distinct sections. -
Define the scallops:
Between each pinched indentation, use your finger to gently push the clay rim outward, rounding each ‘petal’ so it curves gracefully. I like to smooth the very edge with a damp sponge here to soften the look. -
Enhance the grooves:
Take a modeling tool or the handle of a paintbrush and press lightly from the rim indentation down toward the center of the bowl. This creates subtle fluting lines inside the bowl, mimicking real flower anatomy. -
Dry slowly:
Cover the piece loosely with plastic and allow it to dry to a leather-hard state. Once firm enough to hold its shape, remove it from the mold and let it dry completely to bone dry.
Hanging Option
Before the clay dries, use a straw to punch three equidistant holes near the rim. After firing, thread twine through to hang it from a branch.
Step 3: Glazing and Finishing
-
Bisque fire:
Load the bone-dry piece into the kiln and fire to cone 04 (or your clay’s specific bisque temperature). -
Clean the bisque:
Wipe the fired piece with a damp sponge to remove any kiln dust, which helps the glaze adhere properly. -
Apply base glaze:
Brush two to three even coats of a cream or clear gloss glaze over the entire interior of the bowl. Let each coat dry to the touch before adding the next. -
Accent the rim:
Dip a small brush into a watered-down terracotta or soft pink underglaze. Carefully run the brush along the very top edge of the scalloped rim, allowing the color to bleed slightly down the grooves for a natural effect. -
Wipe the foot:
Use a sponge to wipe any glaze off the bottom foot of the bowl so it doesn’t fuse to the kiln shelf. -
Glaze fire:
Fire the piece a second time to the glaze’s recommended temperature (usually cone 05 or 06).
Now you have a durable, blossom-inspired feeder ready to be filled with seeds for your garden friends