Whenever I’m craving a quick, satisfying project, I reach for clay and make a little bowl—because it’s practical, pretty, and totally beginner-friendly. Here are my favorite clay bowl ideas you can personalize with color, texture, and shape to fit your space and your style.
Classic Pinch-Pot Trinket Dish
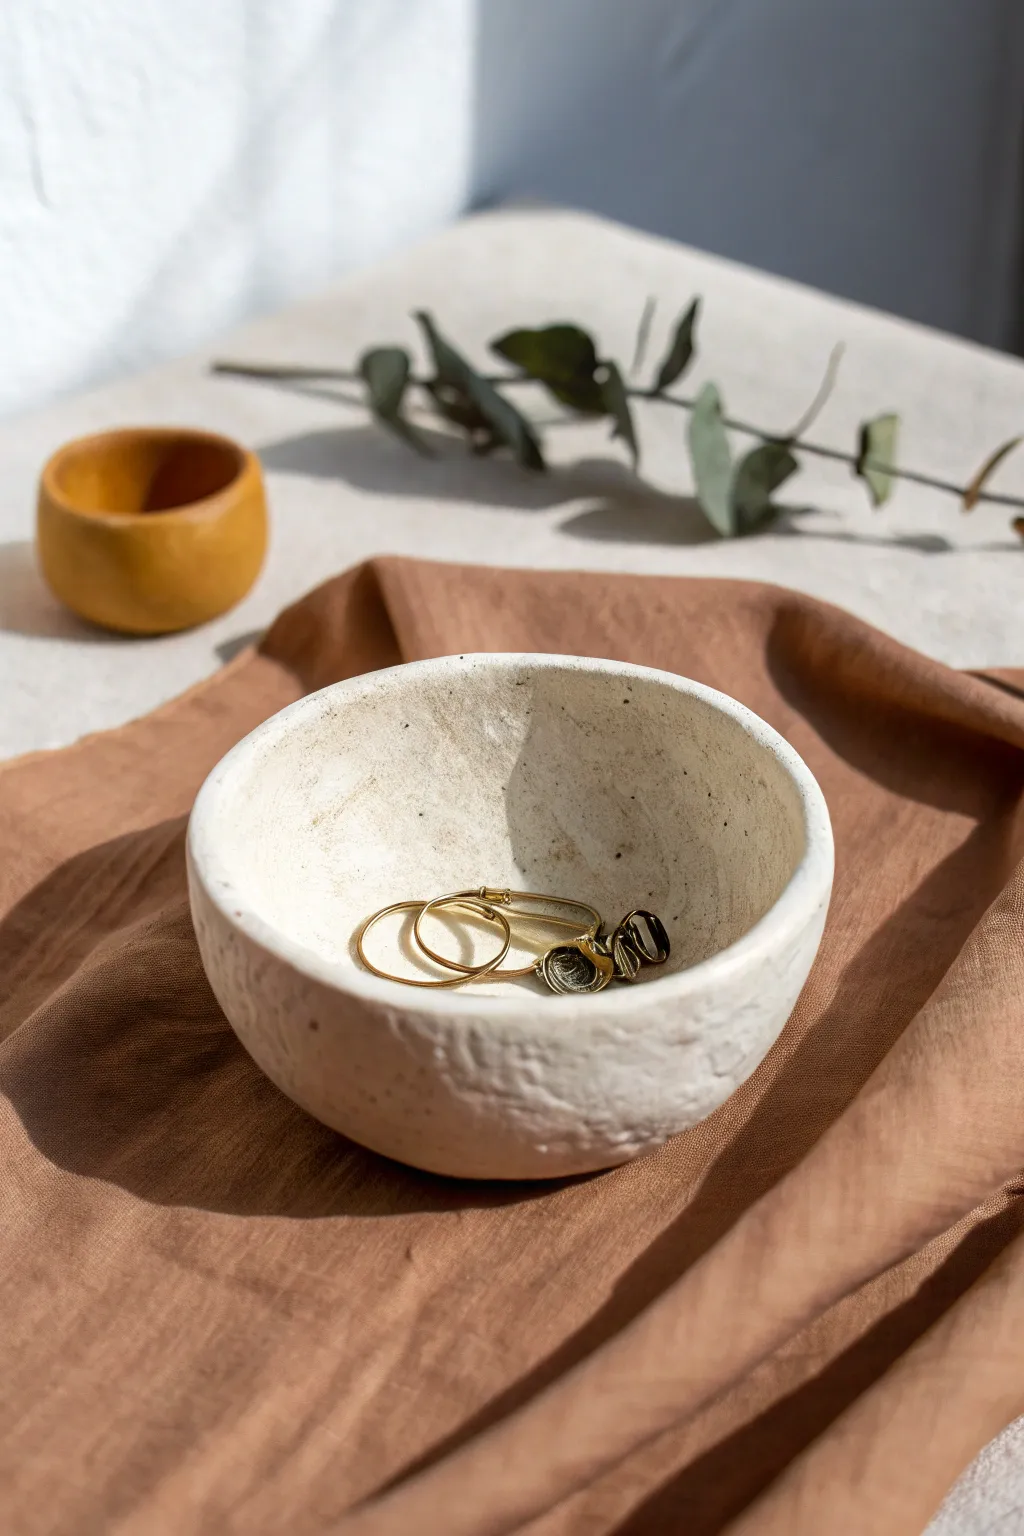
Embrace the beauty of imperfection with this elegantly simple clay dish, perfect for corralling rings and small treasures. The organic shape and textured, stone-like finish give it a sophisticated, earthy feel that fits beautifully in any modern home.
Step-by-Step Guide
Materials
- White or off-white air-dry clay (approx. 1/2 lb)
- Small bowl of water
- Rolling pin (optional)
- Sanding sponge or fine-grit sandpaper
- Acrylic paint (warm white/cream)
- Baking soda (for texture)
- Matte varnish or sealant
- Soft paintbrush
- Clean cloth or sponge
Step 1: Shaping the Form
-
Condition the clay:
Begin by taking a chunk of air-dry clay roughly the size of a tennis ball. Knead it in your hands for a minute or two to warm it up and ensure it is pliable and free of air bubbles. -
Form a sphere:
Roll the conditioned clay between your palms or on a flat surface until you have a smooth, round ball. -
Start the pinch pot:
Hold the clay ball in one hand. With your other thumb, press gently into the center of the sphere, creating a depression. Don’t push all the way through to the bottom; leave about a half-inch base. -
Pinch the walls:
Using your thumb on the inside and your fingers on the outside, gently pinch the clay, rotating the ball as you go. Work from the bottom up to thin out the walls evenly. -
Widen the opening:
Continue pinching and turning until you have a bowl shape. Aim for walls that are roughly 1/4 inch thick. Don’t worry about perfect symmetry; the organic shape is part of the charm. -
Smooth the rim:
Dip your finger in a little water and run it along the rim to smooth out any major cracks. You can gently tap the rim against your work surface to flatten it slightly if desired. -
Create texture:
Instead of smoothing the exterior perfectly, use a slightly damp sponge to dab the outside. This creates a subtle, porous texture similar to natural stone.
Stone Effect Secret
For a speckled stone look, mix a tiny drop of brown or grey paint into your baking soda mixture, but don’t blend completely. Streaks create natural variance.
Step 2: Drying and Refining
-
Let it dry:
Place your bowl on a clean, dry surface. Let it air dry completely, which typically takes 24-48 hours depending on humidity. Rotate it occasionally to ensure even drying. -
Check for dryness:
The clay should look chalky and feel room temperature (not cold) to the touch when it is fully dry. -
Light sanding:
Once dry, use a fine-grit sanding sponge to gently go over the rim and interior. I like to focus on any sharp edges while leaving the exterior texture mostly intact. -
Wipe clean:
Use a dry cloth or a soft brush to remove all sanding dust from the bowl before moving on to finishing.
Cracks happen!
If small cracks appear while drying, don’t panic. Mix a small slurry of clay and water (slip) to patch them, then sand smooth once dry.
Step 3: Creating the Stone Finish
-
Mix textured paint:
Squeeze some warm white or cream acrylic paint onto a palette. Mix in a small teaspoon of baking soda. This transforms the paint into a thick, textured paste. -
Apply first coat:
Using a soft brush, apply the baking soda paint mixture to the entire bowl. Dab the brush rather than stroking it to enhance the stone-like effect. -
Dry and repeat:
Let the first coat dry for about 20 minutes. Apply a second coat if you want a richer texture or more opaque color coverage. -
Distress (optional):
If the finish looks too uniform, you can very lightly sand high spots once the paint is dry to reveal tiny bits of the raw clay underneath, adding depth. -
Seal the piece:
Apply a coat of ultra-matte varnish to protect your work. Since this is a trinket dish, sealing ensures jewelry won’t scratch the paint and makes it easy to wipe clean.
Now your handcrafted bowl is ready to display your favorite jewelry pieces with elegant minimalism


Simple Molded Bowl Using a Household Form
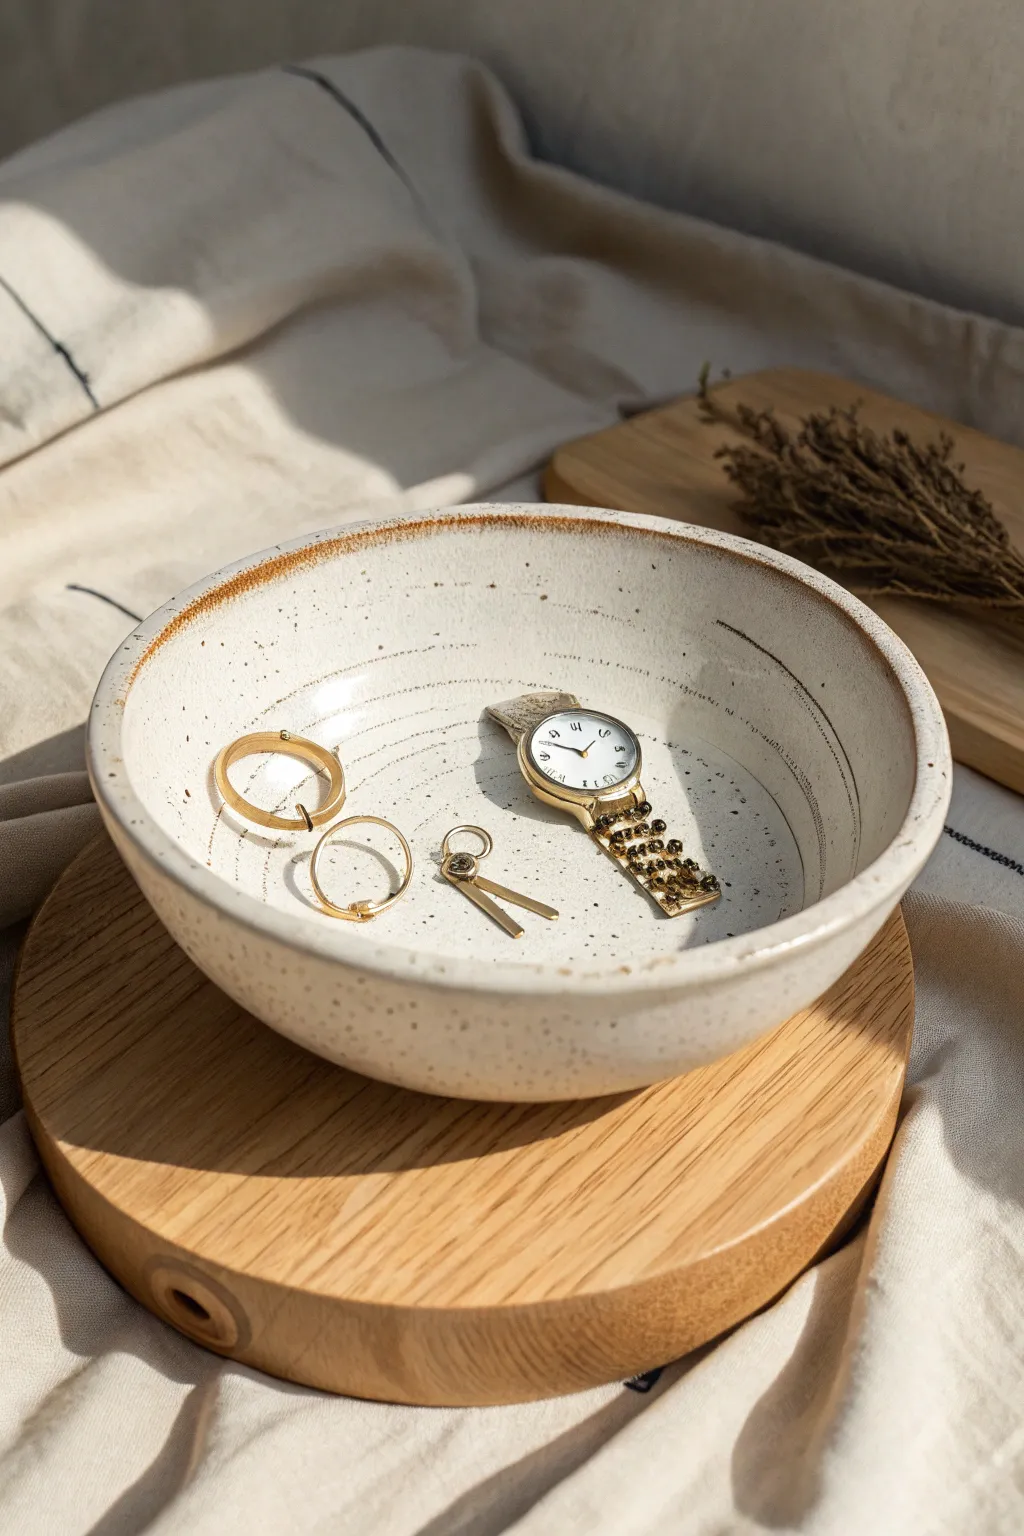
Create a sophisticated catch-all dish with a natural, rustic charm using just a simple household bowl as your mold. The finished piece features a lovely speckled finish and a raw, unglazed rim that adds a warm, tactile quality to your vanity or bedside table.
How-To Guide
Materials
- Speckled stoneware clay (white or buff)
- Existing bowl (for mold)
- Cotton fabric or tea towel (textured weave works well)
- Rolling pin
- Two wooden slats (approx. 1/4 inch thick)
- Potter’s needle or fettling knife
- Rib tool (flexible metal or rubber)
- Sponge
- Clear or transparent white glaze
- Kiln (or access to firing services)
Step 1: Preparation and Rolling
-
Select your mold:
Choose a shallow, wide bowl from your kitchen to use as a slump mold. A soup plate or pasta bowl shape works perfectly for this jewelry dish design. -
Prepare the slab:
Wedge your speckled clay thoroughly to remove air bubbles. Place it on a canvas board or sturdy work surface between your two wooden thickness slats. -
Roll out the clay:
Using the rolling pin, roll the clay out until the pin rests on the guide slats, ensuring an even quarter-inch thickness across the entire slab. -
Smooth the surface:
Take your flexible rib tool and gently compress the clay surface in long, smooth strokes. This aligns the clay particles and removes any canvas texture if you prefer a smoother look.
Sticky Situation?
If the clay is sticking to the mold despite the cloth, dust your fabric with a little cornstarch before draping the clay. It acts as a release agent and burns off in the kiln.
Step 2: Forming the Bowl
-
Line the mold:
Drape your cotton cloth or tea towel inside the kitchen bowl you’re using as a mold. Ensure the cloth is smooth, though slight wrinkles can add organic character. -
Transfer the clay:
Carefully lift your clay slab and gently lower it into the cloth-lined bowl. Let gravity do most of the work. -
Settle the clay:
Starting from the center and working outward in a spiral, gently press the clay against the mold with a soft sponge to mimic the curve. Don’t press too hard or you might thin the clay unevenly. -
Trim the excess:
Hold your needle tool perpendicular to the rim of the mold. Cut away the excess clay around the top edge to define the bowl’s circular shape. -
Refine the rim:
Run a damp sponge or your finger along the cut edge to round it off. I always spend extra time here to ensure there are no sharp edges that might be uncomfortable to touch later. -
Initial drying:
Leave the clay in the mold until it reaches a leather-hard state. It should be firm enough to hold its shape but still cool to the touch.
Step 3: Finishing and Firing
-
Remove and refine:
Lift the clay out of the mold using the edges of the cloth. Peel the cloth away gently. Use a barely damp sponge to smooth any rough marks from the cloth texture on the outside. -
Create the signature lines:
If you want to replicate the subtle interior lines seen in the image, gently hold a tool against the interior while spinning the bowl on a banding wheel, or carefully carve faint concentric circles freehand. -
Bisque fire:
Allow the bowl to bone dry completely, which usually takes several days. Fire it to a bisque temperature (usually Cone 06 or 04 depending on your clay body). -
Wax the rim:
Apply a line of wax resist along the very top edge of the rim. This will keep the raw, toasted clay exposed, creating that beautiful contrast border. -
Glaze application:
Dip the bowl into a transparent or semi-transparent white glaze. The transparency is crucial as it allows the natural speckles of the clay body to show through. -
Wipe the foot:
Clean off any glaze from the bottom of the bowl with a sponge to prevent it sticking to the kiln shelf. -
Glaze fire:
Fire the piece for a second time to the maturation temperature of your specific clay and glaze (often Cone 5 or 6 for stoneware).
Rim Aesthetic Pro-Tip
Wipe a sponge dipped in iron oxide along the raw rim before the final firing. It deepens the brown, toasted color and makes the unglazed edge pop against the white glaze.
Once cooled, your handmade dish is ready to hold your favorite daily essentials with effortless style


Soft-Sided Slab Bowl With Rounded Corners
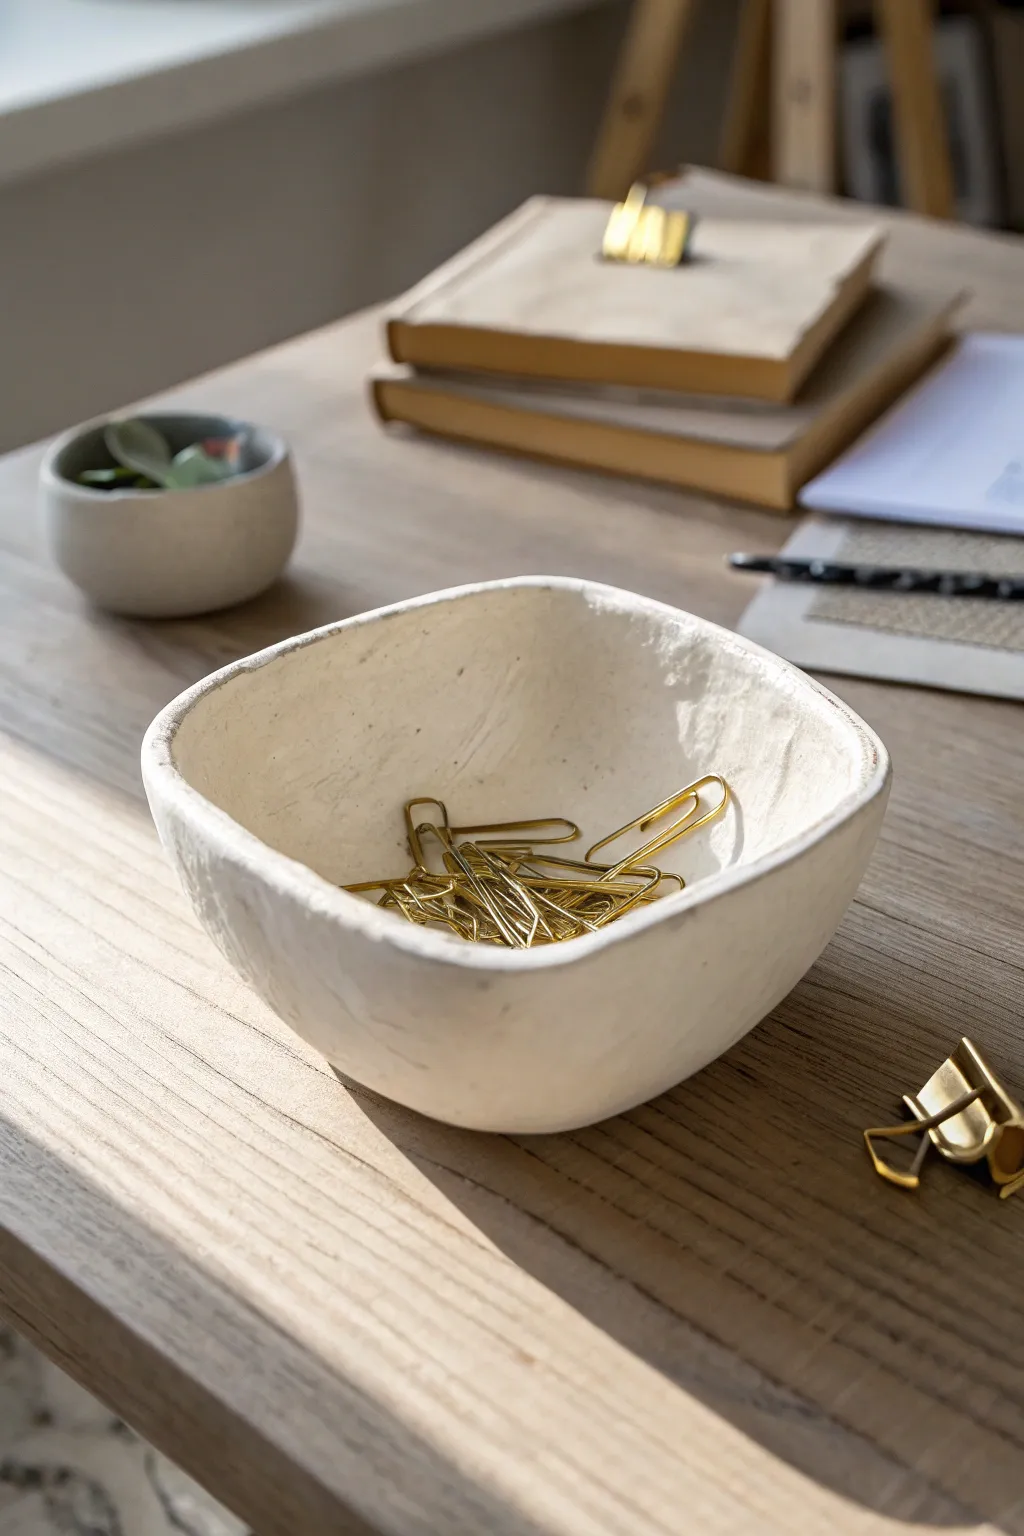
Embrace the beauty of imperfection with this lovely, organic catch-all bowl. Featuring gently curved corners and a tactile, matte finish, it’s the perfect size for desk accessories or jewelry.
Step-by-Step Tutorial
Materials
- Air-dry clay (white or cream)
- Rolling pin
- Canvas mat or parchment paper
- Sharp craft knife or clay needle tool
- A small bowl (approx 4-5 inches wide) to use as a slump mold
- Sponge
- Cup of water
- Fine-grit sandpaper
- White or antique white acrylic paint (matte)
- Matte varnish or sealant
- Paintbrushes (flat)
Step 1: Preparing the Slab
-
Condition the clay:
Start by taking a handful of air-dry clay and kneading it in your hands until it feels soft, warm, and pliable. This prevents cracks later on. -
Roll it out:
Place your clay on a canvas mat or parchment paper. Use your rolling pin to roll it into a flat sheet, aiming for an even thickness of about 1/4 inch. -
Smooth the surface:
Before cutting, take a slightly damp sponge and gently wipe the surface of the slab to remove any canvas texture or rolling pin marks.
Smooth Moves
Keep a small dish of water nearby. If the clay starts cracking while you shape it, dip your finger in water and smooth the crack immediately to bond it back together.
Step 2: Shaping the Bowl
-
Cut a rough square:
Using your knife or needle tool, cut out a square shape from your slab. For the size shown, a 6×6 inch square is a good starting point. -
Round the corners:
Instead of leaving sharp 90-degree angles, use your tool to gently trim of the tips of the four corners, creating a rounded edge. -
The slump mold method:
Take your small bowl (the mold) and cover the inside with cling wrap or a light dusting of cornstarch to prevent sticking. Carefully lift your clay slab and gently press it *inside* the bowl. -
Forming the curve:
Gently press the center of the clay down to match the bowl’s bottom. Allow the sides to naturally curve up the walls of the mold. -
Refining the shape:
The clay might ripple slightly at the corners because you are forcing a flat square into a curve. Use your damp sponge or fingers to smooth these ripples, compressing the clay to thicken the walls slightly. -
Smoothing the rim:
Run your wet finger along the top rim of the clay to round it off. We want a soft, organic edge, not a sharp cut.
Natural Speckle
Mix dried coffee grounds or cracked pepper into your clay before rolling it out. When painted over lightly, this creates a stunning faux-stoneware speckle effect.
Step 3: Drying and Finishing
-
Let it firm up:
Let the clay sit in the mold for about 24 hours until it is leather-hard and holds its shape on its own. -
Remove and dry:
Carefully pop the clay out of the mold. Flip it upside down on a drying rack to let the bottom dry completely. This usually takes another 24-48 hours depending on humidity. -
Sand imperfections:
Once bone dry, use fine-grit sandpaper to smooth out any rough patches on the rim or the outside. Wipe away the dust with a barely damp cloth. -
First coat of paint:
Apply a layer of matte white or antique white acrylic paint. Since the clay is porous, I find the first coat soaks in quickly, acting almost like a primer. -
Adding texture:
For the second coat, dab the paint on rather than stroking it. This creates that lovely, subtle stippled texture seen in the photo. -
Seal the piece:
Finish with a coat of matte varnish to protect the surface from scratches and make it easier to dust later.
Fill your new bowl with paperclips or small trinkets and enjoy the handmade warmth it brings to your workspace


Marbled Polymer Clay Jewelry Bowl
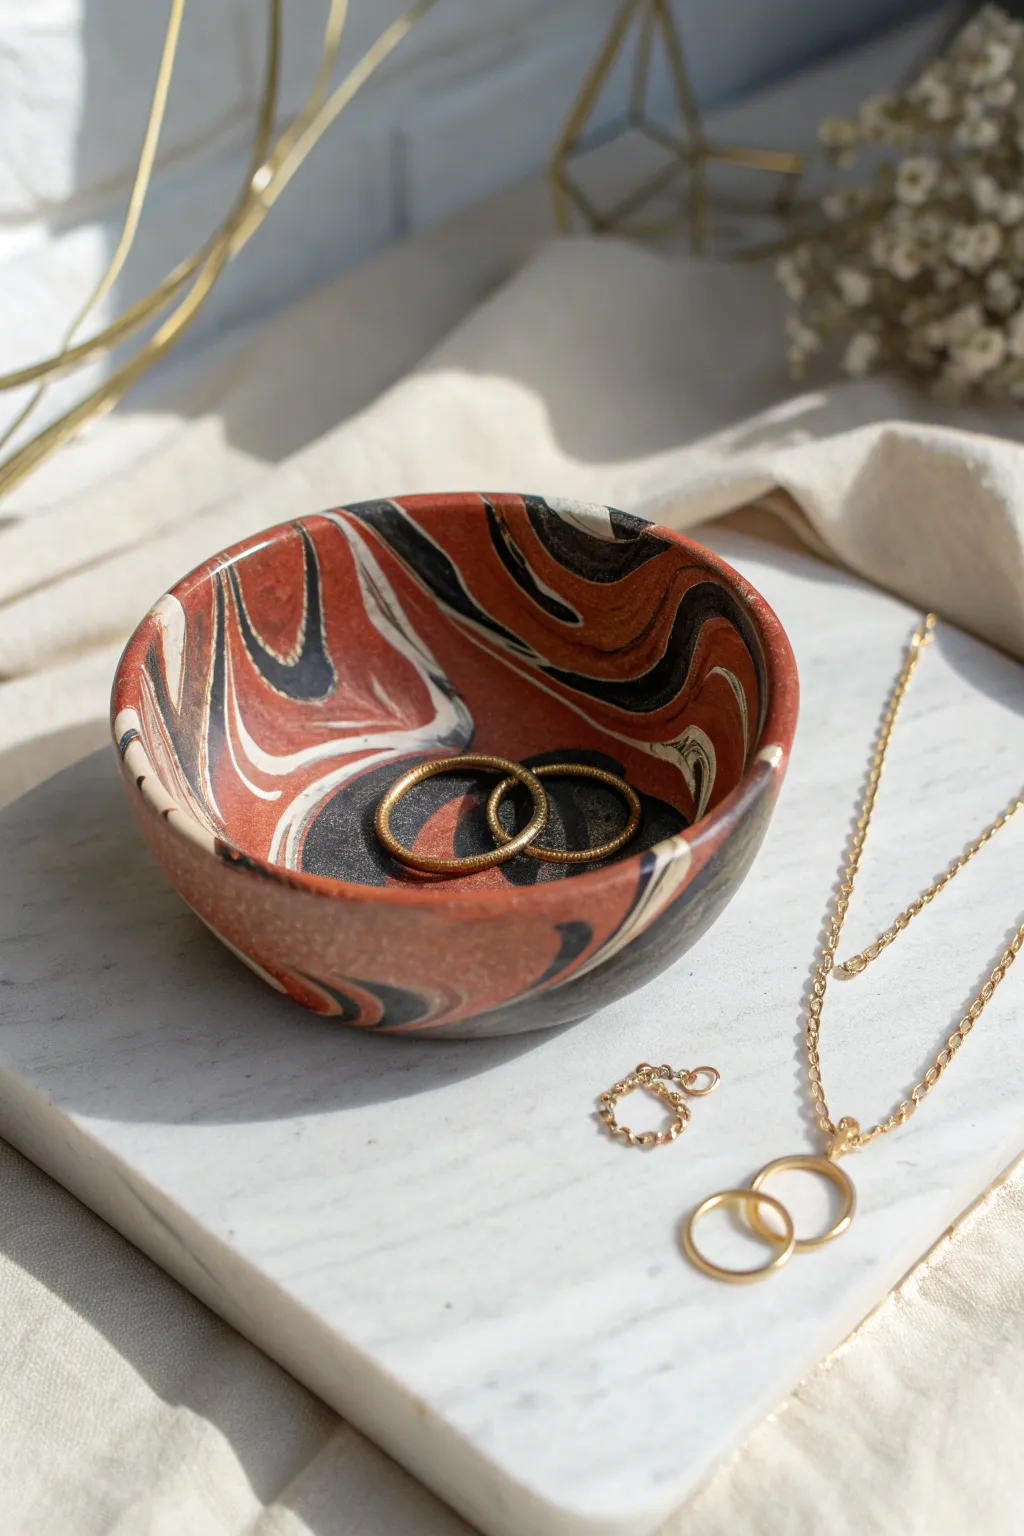
Capture the organic elegance of natural stone with this striking polymer clay dish, featuring bold swirls of terracotta, deep black, and creamy white. It’s the perfect size for keeping rings and dainty necklaces safe while adding an artistic touch to your nightstand.
How-To Guide
Materials
- Polymer clay (terracotta/rust color)
- Polymer clay (black)
- Polymer clay (white or translucent white)
- Acrylic rolling pin or clay machine
- Circle cutter or a round bowl for a template (approx. 4-5 inches)
- Oven-safe glass or ceramic bowl (to use as a mold)
- Sharp craft knife
- Fine-grit sandpaper (400 to 1000 grit)
- Matte or satin polymer clay varnish (optional)
Step 1: Preparing the Clay
-
Condition the clay:
Start by kneading each color of polymer clay separately until they are soft, pliable, and warm to the touch. This conditioning step prevents cracking later. -
Create your color tubes:
Roll each color into a long, snake-like cylinder. Since the bowl in the image is predominantly terracotta, make that cylinder the thickest (about 1 inch wide), followed by a medium black cylinder, and a thinner white cylinder. -
Twist the colors together:
Gather your three snakes and twist them together into one large rope. Fold this rope in half and twist it again. Repeat this twisting and folding process 3–4 times, but stop before the colors blend completely into a muddy gray. -
Form a ball:
Roll your twisted rope into a smooth, tight ball. This helps to solidly fuse the different colored clays together.
Muddy Colors?
Stop twisting sooner than you think! If colors look gray or muddy, you’ve over-mixed. Keep lines distinct for high contrast.
Step 2: Creating the Marble Pattern
-
Roll out the slab:
Using your acrylic roller or pasta machine, flatten the ball into a sheet approximately 1/4 inch thick. Roll in different directions to stretch the pattern organically. -
Check the swirl:
Examine your slab. If you want more intricate marbling like the reference photo, simply fold the sheet over and roll it out one more time. -
Cut the shape:
Place your circle cutter or round bowl template onto the most attractive part of the clay sheet. Use a sharp craft knife to trace around it, cutting out a clean circle. -
Smooth the edges:
Gently run your finger along the cut edge of the circle to soften any sharp corners or drag marks left by the knife.
Pro Tip: Gold Rim
Paint the very edge of the rim with liquid gold leaf after baking. It adds a luxury touch that highlights the terracotta tones perfectly.
Step 3: Shaping and Baking
-
Shape the bowl:
Place your clay circle inside or over your oven-safe bowl mold. Gently press it down to conform to the shape, ensuring no air bubbles are trapped underneath. -
Bake the project:
Place the mold with the clay into a preheated oven according to your clay manufacturer’s instructions (usually 230°F – 275°F) for about 15-30 minutes. -
Allow to cool:
Remove from the oven and let the clay cool completely inside the mold. Removing it while hot can warp the shape. -
Sand for smoothness:
Once cool, pop the clay out of the mold. Wet a piece of fine-grit sandpaper and gently sand the rim and inside surface to remove any fingerprints or texture. -
Finish and seal:
Wipe away any sanding dust with a damp cloth. For a sheen like the photo, apply a thin layer of satin varnish or leave it raw for a true matte stone look.
Place your new marbled dish on a dresser or vanity to instantly elevate your daily jewelry storage

The Complete Guide to Pottery Troubleshooting
Uncover the most common ceramic mistakes—from cracking clay to failed glazes—and learn how to fix them fast.
Speckled Terrazzo-Style Clay Bowl
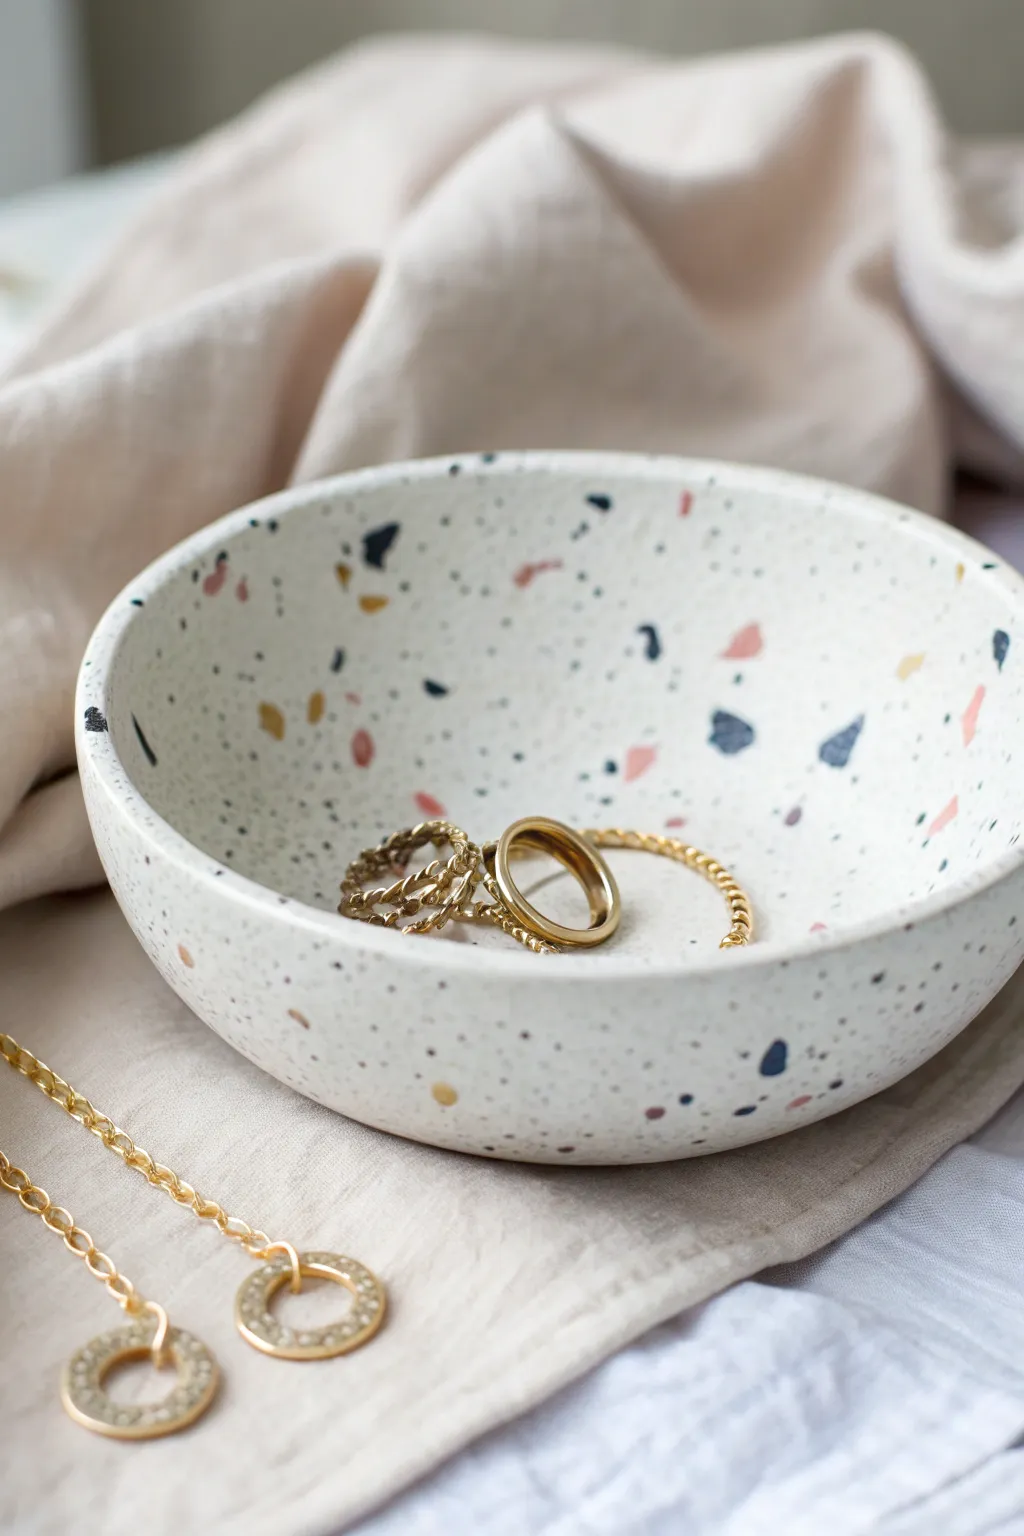
Bring the trendy look of Italian terrazzo into your home with this chic, speckled jewelry dish. The combination of a creamy white base with scattering of colorful clay chips creates a high-end ceramic look without the need for a kiln.
Detailed Instructions
Materials
- Polymer clay (white or translucent white for base)
- Polymer clay scraps (navy, gold/ochre, coral/terracotta, light pink)
- Acrylic rolling pin
- Rolling mat or parchment paper
- Medium-sized oven-proof bowl (to use as a mold)
- Craft knife or clay blade
- Fine-grit sandpaper (400 to 1000 grit)
- Gloss or matte polyurethane varnish (optional)
- Soft paintbrush
Step 1: Preparing the ‘Chips’
-
Condition the colored clay:
Begin by taking small amounts of your colored polymer clay scraps—navy, ochre, coral, and pink. Knead each color individually until it is soft and pliable. -
Roll out thin sheets:
Roll each color out into a very thin sheet. You want these to be almost paper-thin, as they will need to embed into the base clay later. -
Create the terrazzo chips:
Use your craft knife to chop these thin sheets into random, jagged little pieces. Aim for variety; make some tiny specks and some slightly larger, angular shards. -
Separate and set aside:
Keep the piles of colored chips separate for now so you can control the distribution later.
Stone Texture Trick
Mix a tiny pinch of black pepper or black sand into your white base clay before rolling. This creates minuscule, realistic black specks that mimic real stone.
Step 2: Forming the Base
-
Condition the white clay:
Take a large block of white polymer clay (about 2oz or 56g) and knead it thoroughly until warm and soft. This prevents cracking later. -
Roll the base sheet:
Using your acrylic roller, flatten the white clay into a consistent sheet, roughly 1/4 inch thick. It needs to be thick enough to be sturdy but thin enough to look elegant. -
Sprinkle the chips:
Gently scatter your colored clay chips over the white sheet. I like to start with the larger pieces and fill in the gaps with the tiny specks. -
Embed the chips:
Once you are happy with the arrangement, take your roller and gently roll over the clay again. -
Smooth the surface:
Continue rolling until the colorful chips are completely flush with the white base. The surface should feel smooth to the touch. -
Repeat on the back (optional):
If you want the pattern on both sides, carefully flip the sheet over and repeat the sprinkling and rolling process on the reverse side.
Step 3: Shaping and Baking
-
Cut the circle:
Find a circular cutter or a bowl with a rim slightly larger than your desired dish size. Press it into the clay sheet to cut a clean, perfect circle. -
Prepare the mold:
Take your oven-proof bowl and turn it upside down on your work surface. If the clay is sticky, you can lightly dust the outside of the bowl with cornstarch. -
Drape the clay:
Center your clay circle over the upturned bowl. Gently press it down so it hugs the curve of the bowl, shaping it into a dish form. -
Refine the shape:
Check the edges to ensure they are even and not rippled, smoothing them lightly with your finger if necessary. -
Bake:
Place the bowl (with the clay still on it) onto a baking sheet. Bake according to your brand of polymer clay instructions—usually around 275°F (130°C) for 15-30 minutes. -
Cool down:
Once baked, turn off the oven and let the clay cool completely inside. Removing it while hot can cause warping.
Clay Sticking to Roller?
If your clay gets too warm and sticky, place it in the fridge for 10 minutes. Alternatively, place a sheet of parchment paper between the clay and the roller.
Step 4: Finishing Touches
-
Remove from mold:
Once fully cool, carefully pop the clay bowl off the mold. It should release easily. -
Sand the edges:
Use fine-grit sandpaper to gently smooth the rim of the bowl. You can also lightly sand the surface if you want a more matte, organic stone texture. -
Seal (optional):
For a glossy ceramic look like the example, apply a thin coat of polyurethane varnish. Let it dry completely before using.
Now you have a stunning, modern catch-all dish perfect for holding your rings and favorite jewelry pieces
Stamped Pattern Bowl With Raised Texture
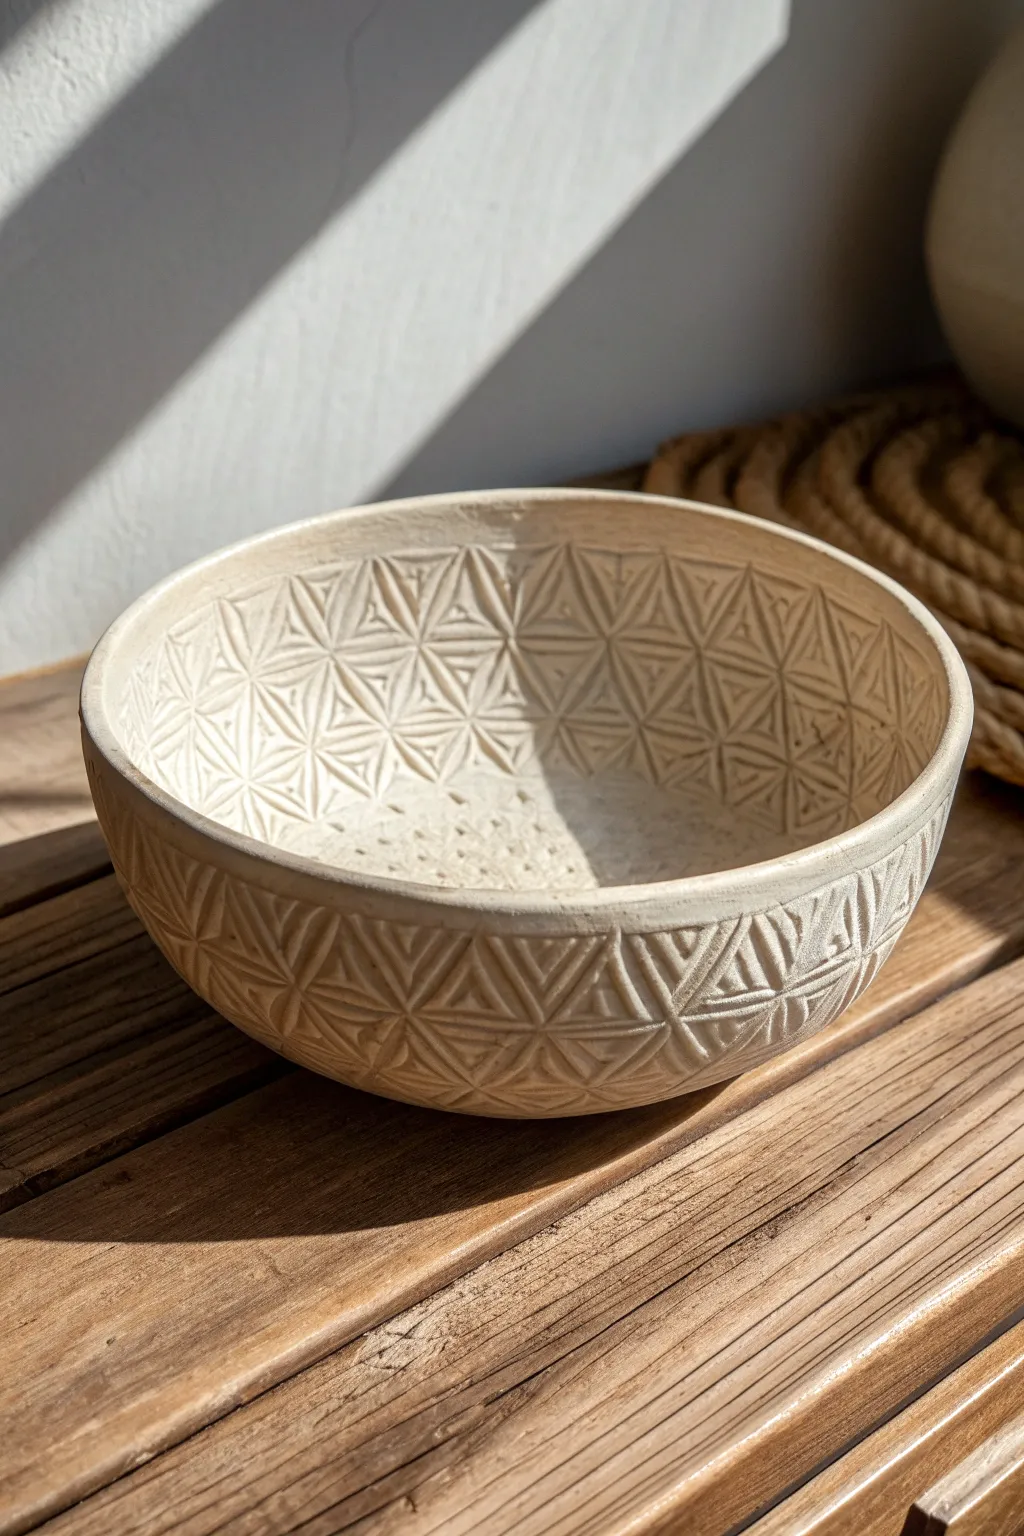
This elegant project proves that complex patterns can be achieved through simple repetition. You’ll create a medium-sized vessel featuring a mesmerizing geometric relief texture that wraps seamlessly inside and out, perfect for adding tactile beauty to any surface.
Step-by-Step Guide
Materials
- White stoneware or porcelain clay
- Rolling pin with guide sticks (1/4 inch thickness)
- Round slump mold (plaster or bisque)
- Geometric triangular stamp (or 3D printed tool)
- Small round texture tool or stylus
- Rib tool (flexible rubber or metal)
- Sponge
- Needle tool
- Potter’s knife
- Banding wheel (optional)
Step 1: Preparing the Slab
-
Wedge the clay:
Start by wedging your white stoneware clay thoroughly to remove air bubbles and ensure a consistent texture, which is crucial for clean stamping. -
Roll out the slab:
Using guide sticks and a rolling pin, roll the clay out to an even slab about 1/4 inch thick. Compress the slab on both sides with a damp sponge or rib to align the clay particles. -
Cut the circle:
Determine the size of your bowl and cut a large circle from the slab using a needle tool. Ensure the circle is large enough to drape over your mold with some excess.
Sticky Stamps?
If your stamp pulls up clay, dust the clay surface lightly with cornstarch or dip the stamp tool quickly into vegetable oil before pressing.
Step 2: Applying the Texture
-
Plan your pattern center:
Before molding, decide where the pattern starts. For the exterior, we will stamp the flat slab first. Identify the very center of your clay circle. -
Stamp the central motif:
Press your geometric triangular stamp firmly into the center. Ensure even pressure so all lines of the triangle register clearly. -
Radiate outward:
Align the edge of your next stamp directly against the line of the previous one. Work in concentric circles moving outward from the center, creating a tessellated honeycomb-like grid. -
Maintain consistency:
Continue stamping until you reach the outer edge of the circle. I find it helpful to stand up while doing this to apply downward pressure evenly without distorting the slab.
Two-Tone Glazing
After bisque firing, apply a dark oxide wash and wipe it back with a sponge. The dark color will remain in the stamped crevices, making the pattern pop.
Step 3: Forming the Bowl
-
Prepare the mold:
Dust your slump mold lightly with cornstarch or cover it with a thin plastic sheet to prevent sticking. -
Drape the slab:
Carefully lift your stamped slab and drape it *pattern-side down* into the slump mold. This ensures the pattern you just made becomes the exterior texture. -
Secure the shape:
Gently press the slab into the curve of the mold. Don’t press too hard or you will flatten the exterior texture against the mold wall; just ensure it takes the shape. -
Trim the rim:
Use a potter’s knife or needle tool to trim the excess clay flush with the mold’s edge for a clean, uniform rim.
Step 4: Interior Detailing and Finishing
-
Smooth the interior:
With the bowl still in the mold, use a soft rubber rib to smooth the interior surface, removing any canvas marks or fingerprints. -
Stamp the interior walls:
Now, carefuly stamp the interior walls. Start from the rim and work downward. Support the outside of the bowl (through the mold) as you press to avoid warping. -
Create the basin texture:
Instead of continuing the geometric pattern to the very bottom, switch to a round stylus tool. Press random stipples into the basin floor to create the contrasting bubbly texture seen in the photo. -
Refine the rim:
Run a damp chamois or sponge over the rim to soften the sharp cut edge. A rounded rim is more durable and pleasant to touch. -
Slow drying:
Let the bowl stiffen to leather-hard inside the mold before removing it. Once removed, cover loosely with plastic to ensure the thick and thin areas dry at the same rate. -
Fire:
Bisque fire the piece, then glaze if desired, though this piece looks stunning left as raw, unglazed clay or with a simple matte wash to highlight the relief.
Once fired, the interplay of light and shadow across the ridges will make this bowl a standout piece in your collection


What Really Happens Inside the Kiln
Learn how time and temperature work together inside the kiln to transform clay into durable ceramic.
Lace-Texture Bowl With Delicate Impressions
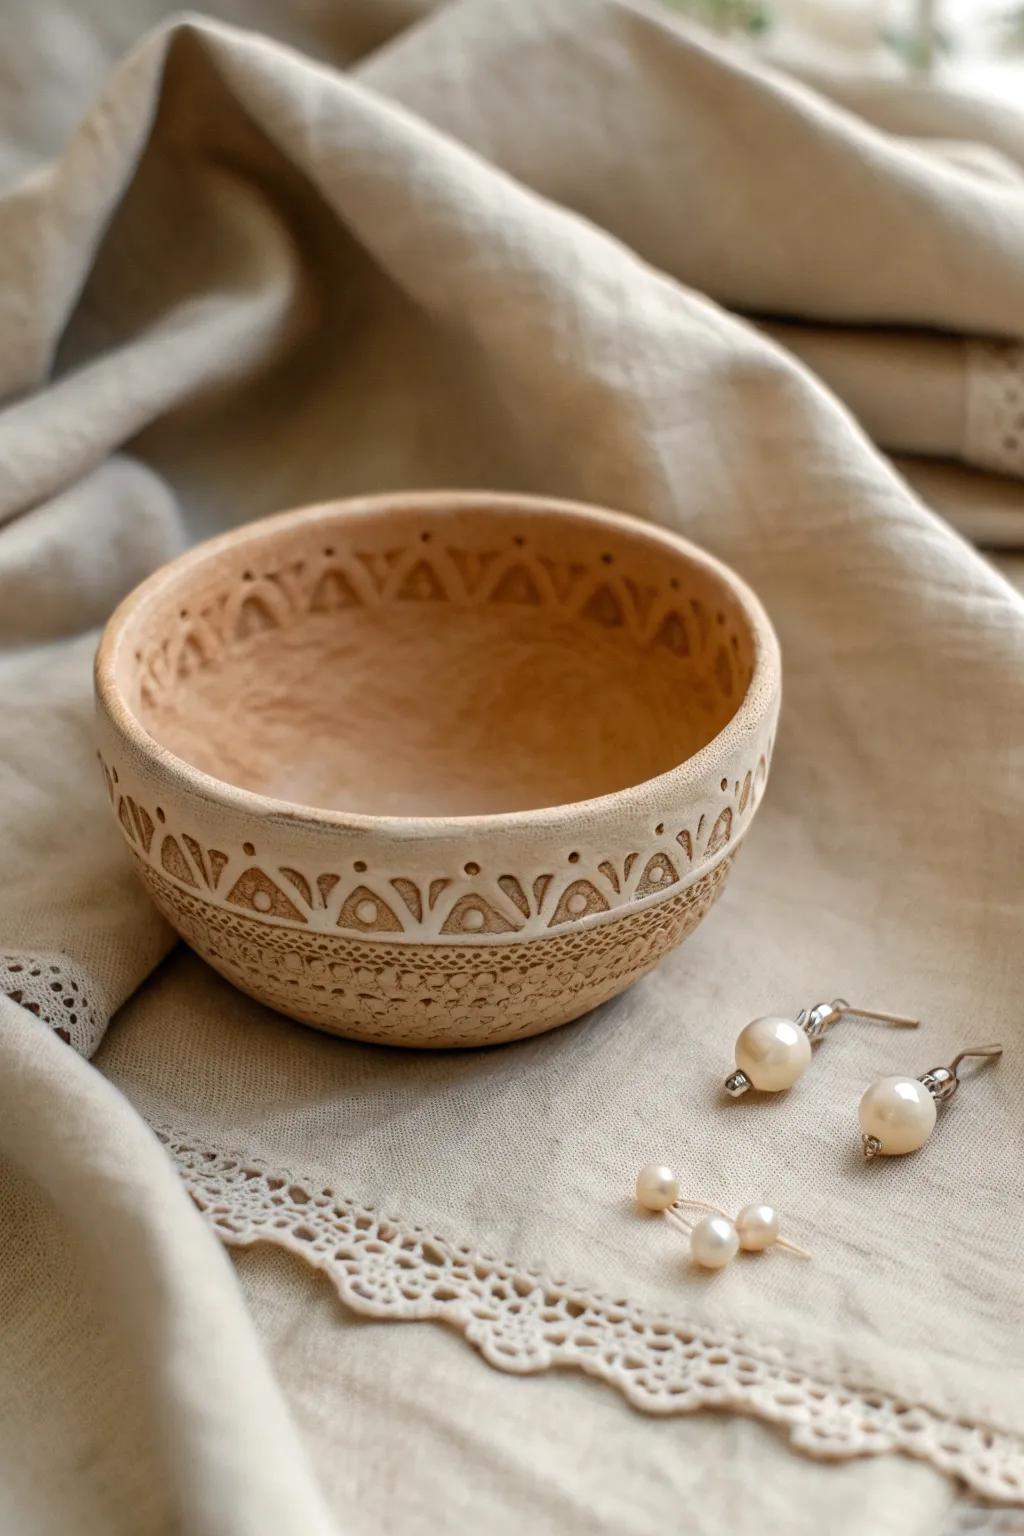
This rustic yet elegant earthenware bowl features a dual-texture effect, combining intricate lace impressions with a carved geometric band. It uses the contrast between raw clay and white slip inlay to create a vintage heirloom aesthetic perfect for holding jewelry.
Step-by-Step
Materials
- Earthenware or stoneware clay (grooless or fine grog)
- White slip or white underglaze
- Cotton lace or a lace doily with a defined pattern
- Rolling pin
- Canvas mat or slab roller
- Bowl mold or a simple cereal bowl for shaping
- Needle tool
- Loop tool or carving gouge
- Sponge
- Soft brush
- Flexible rib (metal or rubber)
- Clear matte glaze (optional)
Step 1: Forming the Base
-
Roll the slab:
Begin by rolling out a slab of clay to an even thickness, approximately 1/4 inch. Smooth it out with a flexible rib to remove any canvas texture on the side that will become the interior. -
Apply the lace texture:
Place your lace fabric onto the clay slab where you intend to cut the bottom portion of the bowl. Roll over it firmly with the rolling pin once to imprint the pattern deeply, then carefully peel the lace away. -
Cut the circle:
Select a circle template or bowl large enough to accommodate your design. Using a needle tool, cut a clean circle from the textured slab. -
Shape the bowl:
Drape your cut clay circle over an inverted bowl mold (or inside a bowl lined with plastic wrap) to create the curve. Gently press it to the form, being careful not to smudge the lace texture on the exterior. -
Refine the rim:
While the clay is supported by the mold, trim the rim to be even. Use a damp sponge to round off the lip so it is smooth to the touch. -
Stiffen the form:
Allow the clay to dry to a ‘leather hard’ state. This is crucial; the clay must be firm enough to hold its shape without the mold but soft enough to carve.
Step 2: Carving and Decorating
-
Mark the design band:
Using a needle tool, lightly score two horizontal lines around the upper exterior of the bowl to define the band where the geometric pattern will go. Leave the lace texture below this band untouched. -
Apply white slip:
Paint a generous layer of white slip or underglaze into this marked band area. I like to let this dry briefly until the sheen disappears before moving to the next step. -
Carve the triangles:
Using a small loop tool or carving tool, carve out the negative space around the white triangles. You are essentially scratching away the background clay to leave raised white shapes, or carving through the white slip to reveal the clay body, depending on your preferred sgraffito style. -
Add detail dots:
Use the tip of a dull pencil or a ball stylus to press small circles into the centers of the white triangles and in the spaces between them, adding rythmic detail. -
Create the interior pattern:
Don’t forget the inside rim. Carve a matching or complementary geometric band just inside the lip of the bowl using the same sgraffito technique. -
Clean up lines:
Once the carving is bone dry, lightly brush away any clay crumbs with a soft, dry brush. Be gentle to avoid damaging the delicate white slip edges.
Slip Styling
If your white slip is chipping off while carving, the clay underneath is likely too dry. Apply slip when the clay is leather-hard, not bone dry.
Step 3: Finishing
-
Bisque fire:
Fire the piece in a kiln to bisque temperature (usually cone 04) to permanently set the shape and decoration. -
Apply a wash (optional):
To highlight the lace texture on the bottom, you can apply a thinned wash of oxide (like red iron oxide) or a dark stain, wipe it back with a sponge, leaving the color only in the deep lace recesses. -
Glaze interior:
If you want the bowl to be food safe or hold liquid, pour a clear glaze inside. For a decorative jewelry holder like the one pictured, leaving the exterior matte and unglazed preserves the tactile quality of the carving. -
Final firing:
Fire the bowl a final time according to your clay and glaze specifications.
Antique Finish
Rub a tiny amount of brown wax or shoe polish over the unglazed textured areas after the final firing to give it an aged, excavated look.
Place your finished bowl on a bedside table to catch earrings or rings and enjoy the hand-carved details every day
Botanical Leaf-Imprint Bowl
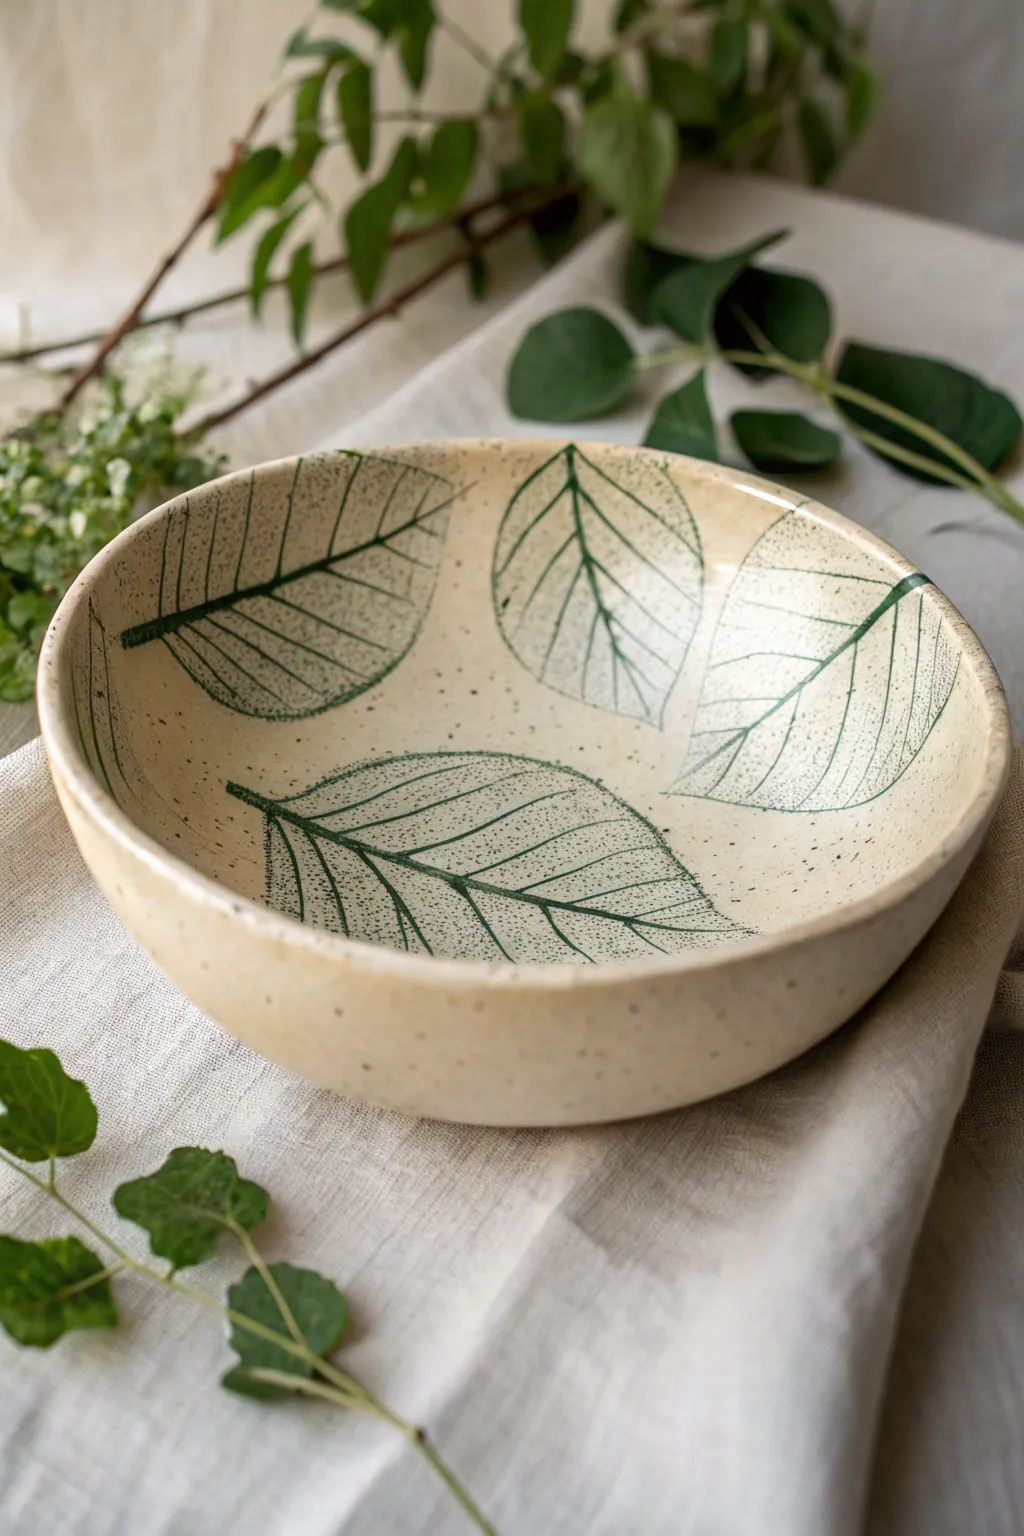
Capture the delicate veins of nature with this organic ceramic bowl project, featuring a speckled cream finish and distinct green leaf motifs. It is perfect for holding fresh fruit or simply sitting as a centerpiece that brings the outdoors in.
Step-by-Step Guide
Materials
- Speckled stoneware clay (mid-fire)
- Rolling pin
- Guide strips or slab roller
- Bisque mold or plaster slump mold (bowl shape)
- Fresh leaves with prominent veins (beech or similar)
- Green underglaze (deep forest green)
- Small sponge or brush
- Rib tool (wooden or silicone)
- Pin tool or fettling knife
- Clear matte or satin glaze
- Sponge for cleanup
- Kiln
Step 1: Slab Preparation
-
Roll the Slab:
Begin by wedging your speckled stoneware clay to remove air bubbles. Roll it out into a smooth, even slab about 1/4 inch thick, using guide strips to ensure consistency across the surface. -
Smooth the Canvas:
Use a soft rib tool to compress the clay slab on both sides. This aligns the clay particles which prevents warping later, and creates a pristine canvas for your leaf impressions. -
Cut the Circle:
Place your slump mold upside down on the slab to gauge the size, or use a paper template. Cut a large circle of clay that is slightly larger than your mold to allow for the bowl’s depth.
Leaves Sticking?
If leaves tear when peeling, they may be too thin. Use sturdier leaves or lightly dust the leaf back with cornstarch before rolling to ensure an easy release.
Step 2: Creating the Leaf Impressions
-
Select and Prep Leaves:
Choose fresh leaves that are sturdy but not too dry—beech leaves or similar ovate shapes work beautifully. Ensure they are clean and dry. -
Arrange the Composition:
Lay the leaves vein-side down onto your flat clay circle. I like to arrange them in a radial pattern, pointing inward, ensuring they don’t overlap too much. -
Roll It In:
Gently roll over the leaves with your rolling pin. Apply firm, even pressure to press the veins deep into the clay without destroying the leaf structure. You want a distinct texture. -
Underglaze Transfer:
Before removing the leaves, paint a coat of deep green underglaze directly onto the back of the embedded leaves. Alternatively, you can carefully peel, paint the clay impression, and wipe back, but coating the leaf back and pressing again creates a crisp print. -
Reveal the Patterns:
Carefully peel away each leaf using a pin tool to lift the stem. You should see a green-tinted impression of the veins left behind in the clay.
Darker Definition
To make veins pop, wash black iron oxide into the fired grooves, wipe back with a damp sponge, then apply your clear glaze layer. This adds dramatic contrast.
Step 3: Forming the Bowl
-
Transfer to Mold:
Lift your clay circle gently and drape it over your slump mold (or inside a bisque mold). Use a sponge to gently press the clay to conform to the curve. -
Refine the Rim:
Once the clay is in the mold, trim any excess clay from the rim with a fettling knife for a clean edge. Smooth the rim with a damp sponge or chamois leather. -
Slow Drying:
Cover the bowl loosely with plastic and let it dry slowly to the leather-hard stage. This helps prevent the rim from warping as it shrinks. -
Bisque Fire:
Once the piece is bone dry, load it into the kiln for a bisque firing (typically Cone 04). This hardens the clay and prepares it for the final glaze.
Step 4: Glazing and Finishing
-
Wax Resist (Optional):
If you want the green leaf lines to remain very crisp and raw, apply a wax resist carefully over the leaf designs. However, for the look in the photo, glazing over is fine. -
Apply Clear Glaze:
Dip or brush a clear satin or matte glaze over the entire interior and exterior of the bowl. A matte finish accentuates the rustic, earthy vibe of the speckles. -
Wipe the Foot:
Use a wet sponge to wipe away any glaze from the bottom foot ring of the bowl so it doesn’t stick to the kiln shelf. -
Glaze Fire:
Fire the bowl to the maturity temperature of your clay body (likely Cone 5 or 6 for mid-fire stoneware). -
Final Sanding:
After the kiln cools, check the bottom for any rough spots. A quick rub with sandpaper or a grinding stone ensures the base is smooth enough for your table.
Enjoy using your custom botanical bowl for salads or simply displaying it to admire the intricate details of the leaves

TRACK YOUR CERAMIC JOURNEY
Capture glaze tests, firing details, and creative progress—all in one simple printable. Make your projects easier to repeat and improve.
Tropical Leaf Painted Bowl With Gold Rim
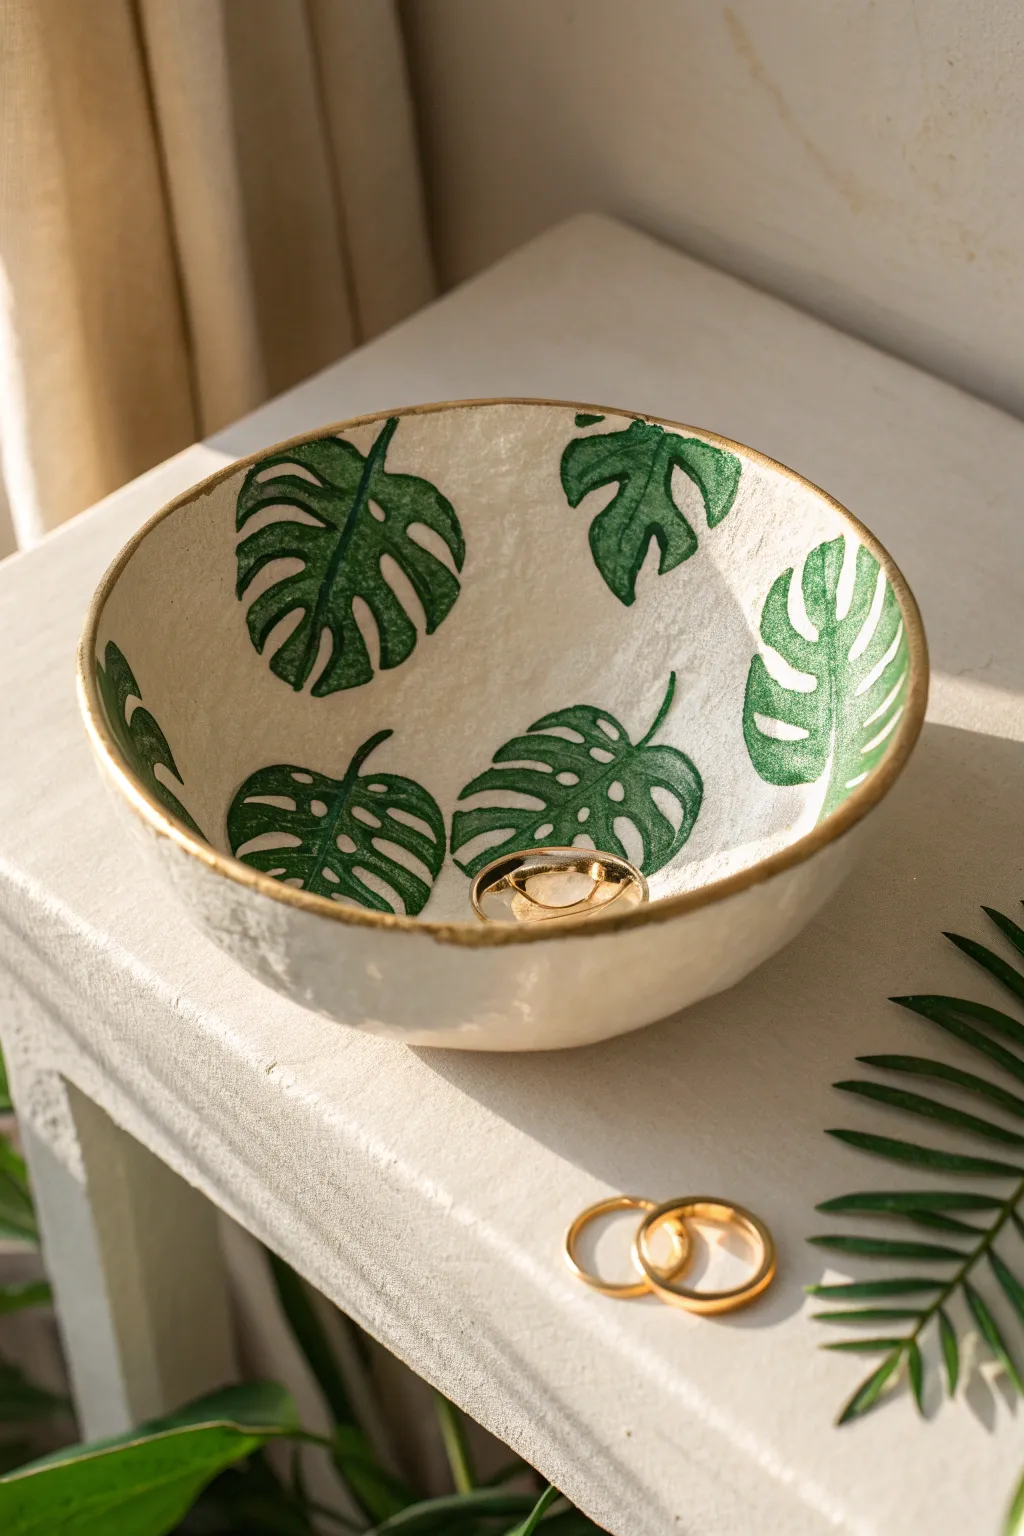
Bring a touch of the rainforest into your home with this elegant, handmade clay bowl featuring vibrant monstera leaves and a luxurious gold rim. Its organic shape and botanical motif make it the perfect vessel for holding your favorite rings or simply brightening up a bedside table.
Step-by-Step
Materials
- Air-dry clay (white)
- Small rolling pin
- Bowl to use as a mold
- Sandpaper (fine grit)
- Acrylic paint (Deep Green, Forest Green, Emerald)
- Small fine-tip paintbrush (size 0 or 1)
- Medium flat paintbrush
- Gold leaf paint or liquid gilding
- Gloss varnish or sealant
- Pencil
- Palette
- Water cup
Step 1: Sculpting the Form
-
Prepare the clay:
Start by taking a generous handful of white air-dry clay. Knead it in your hands for a minute to warm it up and make it pliable, removing any air bubbles. -
Roll out the slab:
Using your rolling pin, roll the clay out on a smooth surface until it is about 1/4 inch thick. Aim for an even thickness throughout to prevent cracking during the drying process. -
Cut the circle:
Place a bowl upside down on your rolled clay to act as a stencil. Use a knife or clay tool to cut around the rim, creating a perfect clay circle. -
Shape the bowl:
Gently lift your clay circle and drape it inside your mold bowl. Press it lightly against the sides so it takes the shape. I find that smoothing the edges with a wet finger right now saves a lot of sanding later. -
Dry completely:
Leave the clay inside the mold for at least 24 hours, or until it is bone dry and turns a chalky white color. Once dry, carefully pop it out of the mold. -
Sand the surface:
Using fine-grit sandpaper, gently sand the rim and the interior surface to remove any bumps or rough textures, creating a smooth canvas for your painting.
Step 2: Painting the Design
-
Draft the leaves:
Lightly sketch the outline of monstera leaves inside the bowl using a pencil. Scatter them randomly, having some ‘grow’ up from the bottom and others peeking in from the sides. -
Mix your greens:
On your palette, squeeze out your green acrylics. Use a mix of deep and forest greens to create a rich, natural shade that isn’t too bright. -
Outline the leaves:
Dip your fine-tip brush into the green paint and carefully trace over your pencil outlines. Creating crisp edges here is key to the final look. -
Fill in the color:
Fill in the bodies of the leaves. Don’t worry about making the coverage perfectly opaque; a slightly streaky texture can actually mimic the veins of real leaves. -
Add vein details:
Once the base layer is dry, mix a slightly darker green shade. Use your finest brush to paint the central vein down the middle of each leaf for added dimension. -
Add texture marks:
For a stylized look like the example, you can add tiny, faint horizontal strokes within the leaves to suggest texture rather than painting realistic veins. -
Dry the paint:
Allow the green paint to dry completely before moving on to the metallic accents. This usually takes about 20 minutes depending on paint thickness.
Smooth Operator
Use a tiny amount of water on your fingertip to smooth out the clay edges while it’s still wet. This reduces sanding time significantly later on.
Step 3: Gilding and Sealing
-
Apply the gold rim:
Dip a small brush into your liquid gold gilding or gold leaf paint. Carefully run the brush along the very top edge of the bowl’s rim. -
Refine the gold edge:
Let the gold paint naturally wobble slightly onto the inner and outer lip of the bowl. This irregularity gives it that charming, organic handmade aesthetic. -
Seal the piece:
Once all paint is fully cured, apply a coat of gloss varnish over the entire inside and outside of the bowl. -
Final cure:
Let the varnish cure according to the bottle instructions (usually 24 hours) to ensure the surface is hard and water-resistant for your jewelry.
Glazed Finish
For a ceramic-like look without a kiln, use a high-gloss resin or ‘Triple Thick’ glaze as your final coat. It makes the colors pop and adds durability.
Now you have a stunning, nature-inspired dish ready to hold your treasures or gift to a friend
Minimal Geometric Stripe Bowl
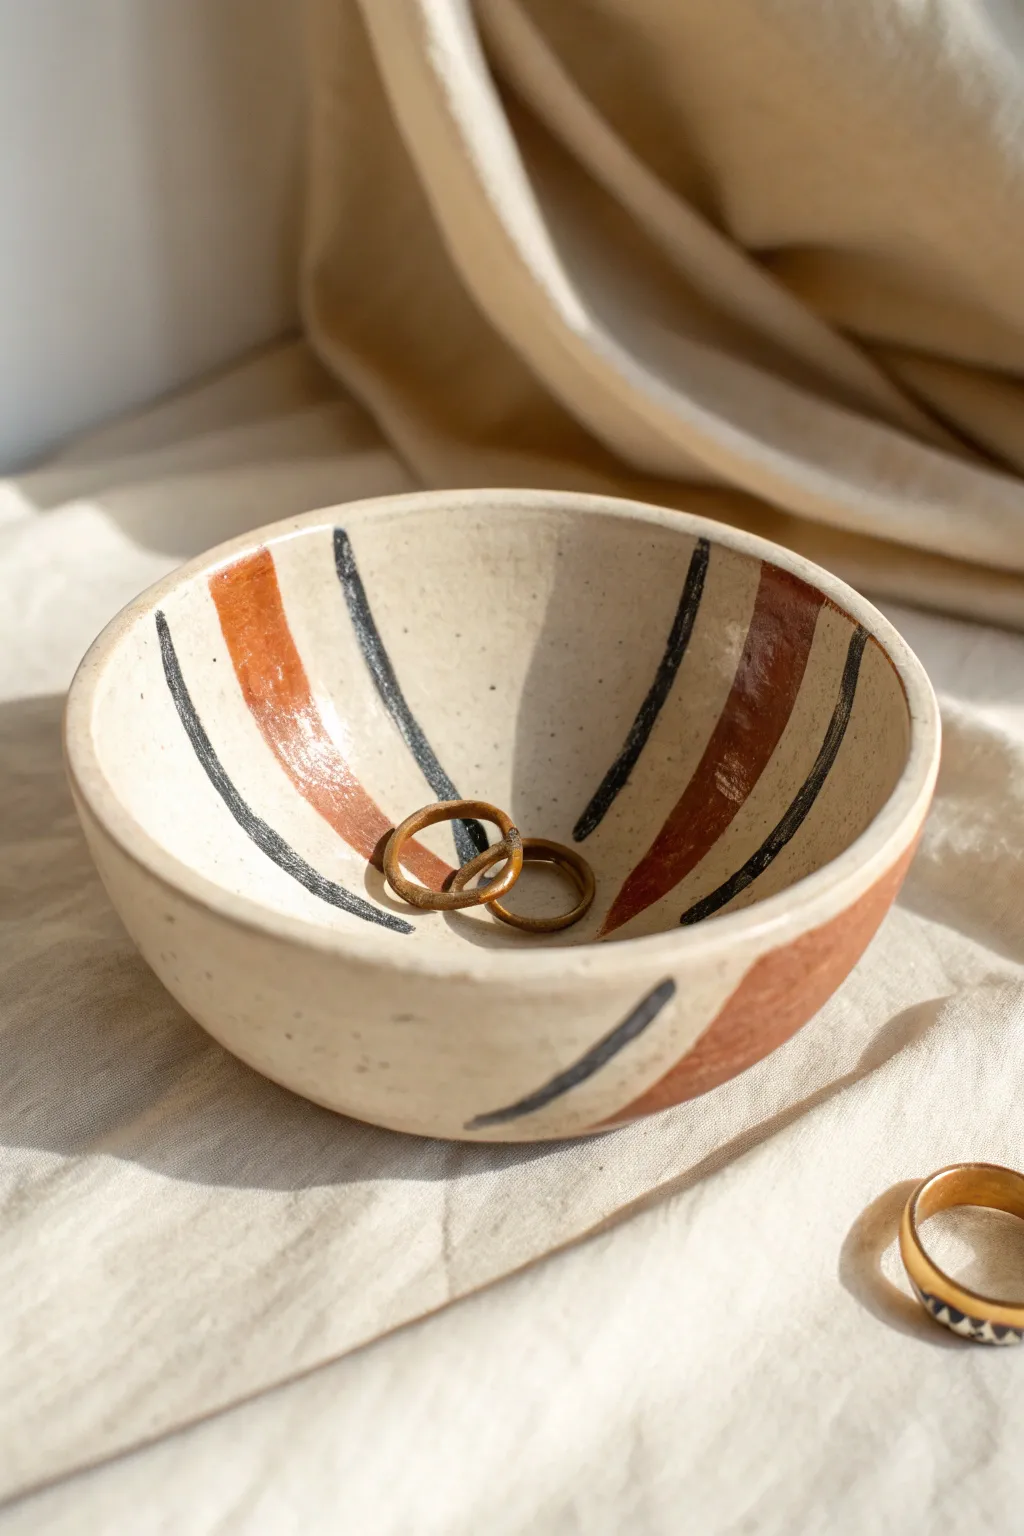
This charming little dish combines rustic, speckled clay with bold, modern geometric lines for a timeless look. Perfect for holding rings or small treasures, the alternating terracotta and black stripes create a striking contrast against the creamy ceramic base.
How-To Guide
Materials
- Speckled cream stoneware clay (cone 5/6)
- Potter’s wheel (optional) or canvas work surface
- Underglazes (terracotta/rust orange and black)
- Clear transparent glaze (glossy or satin)
- Small fine-point liner brush
- Medium round brush
- Rib tool (metal or rubber)
- Sponge
- Wire cutter
- Kiln access
Step 1: Forming the Base
-
Prepare the Clay:
Begin by wedging a small ball of speckled stoneware clay, about the size of a tennis ball, to remove air bubbles and ensure consistency. -
Shape the Form:
You can either throw this on the wheel or pinch it by hand. For hand-building, press your thumb into the center of the ball and gently pinch the walls upward while rotating. -
Refine the Curve:
Aim for a gentle, upward-curving shape. The bowl shouldn’t be too flat; keep the walls vertical enough to hold small items securely. -
Smooth the Surface:
Use a damp sponge or a rubber rib to smooth out any fingerprints or throwing lines. The interior needs to be a clean canvas for your stripes later. -
Rim Maintenance:
Pay attention to the rim. It should be slightly rounded rather than sharp, so run a piece of chamois or your finger over it to soften the edge. -
Leather Hard Stage:
Set the bowl aside to dry until it reaches the leather-hard stage. It should be firm enough to handle without deforming but still cool to the touch.
Fixing Smudges
If you smudge underglaze while painting, wait for it to dry completely, then gently scrape the mistake off with a needle tool or stiff brush before repriming.
Step 2: Painting the Design
-
Plan the Pattern:
Visualize where your stripes will go. This design uses converging lines that start wider at the rim and meet towards the center bottom. -
Apply Rust Stripes:
Dip your medium round brush into the terracotta or rust-colored underglaze. Paint bold, varying-width stripes from the rim down into the bowl. -
Layer the Color:
Let the first coat dry briefly, then apply a second layer of the rust color to ensure opacity. I find three thin layers often work better than one thick, gloppy one. -
Add Thin Black Lines:
Using your fine-point liner brush and black underglaze, paint thinner lines in the negative spaces between the rust stripes. -
Create Movement:
Don’t worry about perfect straightness. Allow the lines to follow the natural curve of the bowl, giving the piece organic movement. -
Exterior Detail:
Extend the design to the outside of the bowl. Wrap the stripes over the rim and down the exterior walls for a cohesive look. -
Bisque Fire:
Once the underglaze is completely dry, let the bowl bone dry fully before loading it into the kiln for a bisque firing (usually Cone 04).
Step 3: Glazing and Finishing
-
Clean the Bisque:
Wipe the fired bisque ware with a clean, damp sponge to remove any kiln dust that could prevent the glaze from adhering properly. -
Apply Clear Glaze:
Dip the entire bowl into a clear transparent glaze. Ensure you pour the glaze inside, swirl it to coat, and pour it out, or submerge the whole piece using tongs. -
Wipe the Foot:
Clean the bottom of the bowl (the foot ring) with a sponge to ensure no glaze touches the kiln shelf during firing. -
Final Fire:
Fire the piece again to the maturity temperature of your clay body (likely Cone 5 or 6). This will seal the clay and make the colors pop.
Wax Resist Method
For super crisp lines, paint liquid wax resist where you want the raw clay to show, let it dry, then paint your underglazes freely over the entire surface.
Place your favorite rings inside and admire how the warm stripes complement your gold jewelry
Black Doodle Illustration Bowl
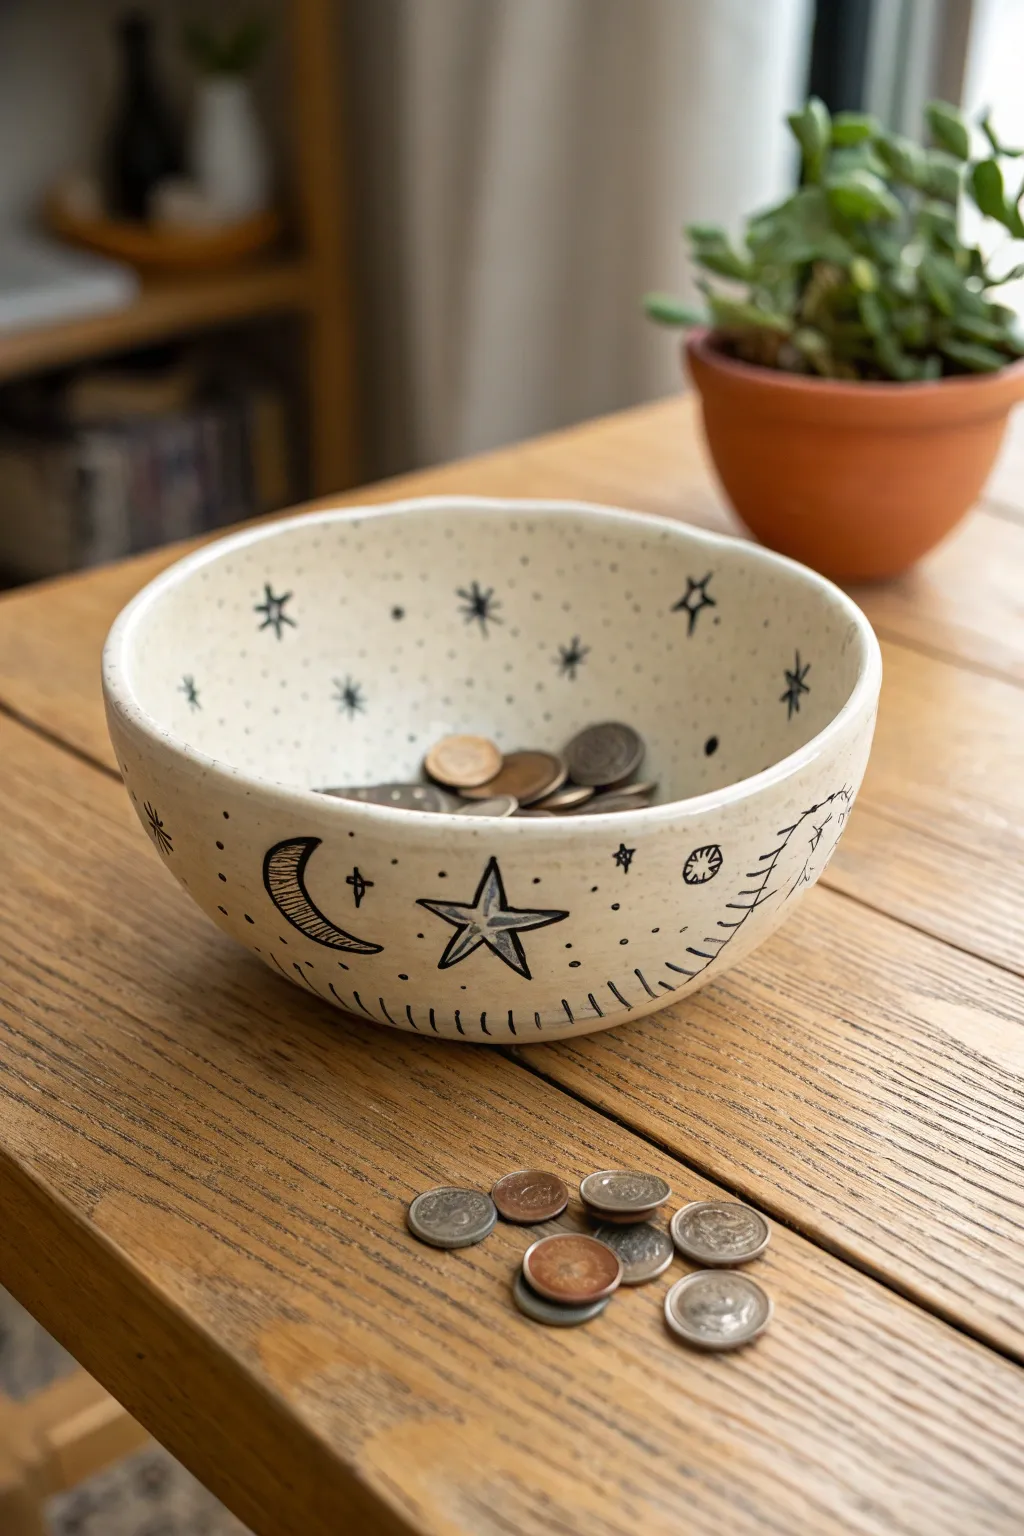
Embrace the imperfect charm of hand-building with this whimsical, celestial-themed bowl. Featuring simple black line art against a speckled cream background, this project combines rustic pottery techniques with playful doodles for a truly unique catch-all dish.
Step-by-Step Tutorial
Materials
- Speckled buff stoneware clay (or white clay with speckles added)
- Pottery wheel (optional) or rolling pin and slump mold
- Pottery sponge
- Rib tool
- Loop trimming tool
- Underglaze pencil (black) or fine-tip underglaze applicator bottle
- Clear dipping glaze or brush-on clear glaze
- Kiln
- Clean water and spray bottle
Step 1: Forming the Bowl
-
Prepare the Clay:
Start with a speckled buff stoneware clay body. If you are throwing on the wheel, wedge a ball of clay roughly the size of a large grapefruit to ensure there are no air bubbles. -
Shape the Base:
Center your clay on the wheel and open it up to create a wide, gently curving floor. If hand-building, roll out a slab to about 1/4 inch thickness and drape it over a slump mold to create a similar hemispherical shape. -
Refine the Walls:
Pull up the walls to form a deep, generous bowl shape. Keep the rim slightly thick and rounded for that sturdy, handcrafted feel shown in the photo. -
Smooth the Surface:
Use a rib tool to smooth the interior and exterior curves, removing any throwing lines or canvas texture. The surface needs to be relatively smooth for your illustrations later. -
Dry to Leather Hard:
Allow the bowl to dry slowly until it reaches a leather-hard state. It should be firm enough to handle without deforming but still cool to the touch. -
Trim the Foot:
Invert the bowl and trim a neat foot ring using a loop tool. This elevates the form and gives it a professional finish.
Step 2: Illustrating & Glazing
-
Plan Your Spacing:
Before drawing, visualize where your main elements will go. The design features a large star and a crescent moon as focal points, with smaller elements filling the gaps. -
Draw the Crescent Moon:
Using a black underglaze pencil or a very fine applicator tip, draw a crescent moon on the exterior side. Shade the inside with horizontal hatching lines to add texture. -
Add the Central Star:
Draw a large, five-pointed open star near the moon. Inside the main star, draw a smaller star shape and shade the space between the two outlines to create contrast. -
Create the Ladder Motif:
On the opposite side or further around the curve, sketch a curved ladder-like structure or a stylized sun ray pattern that follows the contour of the bowl. -
Fill with Stars:
Scatter different styles of small stars around the exterior and interior rim. Use simple crossed lines and asterisks to vary the look. -
Add Finishing Details:
Fill the empty negative spaces with small dots, tiny circles, and additional hatch marks along the bottom curve of the bowl to ground the design. -
Bisque Fire:
Once fully bone dry, load the bowl into the kiln for a bisque firing (usually Cone 04). This sets the clay and the underglaze drawing permanently. -
Cleanup:
Wipe the bisque-fired bowl with a damp sponge to remove any dust that might interfere with the glaze application. -
Apply Clear Glaze:
Dip the entire bowl into a clear, glossy glaze. Alternatively, brush on three even coats of clear glaze, allowing each coat to dry between applications. -
Wipe the Foot:
Carefully wipe all glaze off the foot ring with a damp sponge so the bowl doesn’t fuse to the kiln shelf. -
Final Firing:
Fire the bowl again to your clay body’s maturity temperature (typically Cone 5 or 6 for stoneware). The clear glaze will melt, making the speckles pop and sealing your drawings
Smudged Pencil Lines?
If your underglaze pencil smudges while handling, lightly scrape the mistake away with an X-Acto knife or needle tool instead of wiping, which can smear pigment into the clay pores.
Level Up: Galaxy Effect
For a deeper cosmic look, sponge a very watered-down wash of deep blue or purple underglaze over random sections before adding the clear glaze.
Now you have a charming, food-safe vessel perfect for holding loose change or serving your morning oatmeal
Citrus Slice Painted Bowl (Lemon or Orange Look)
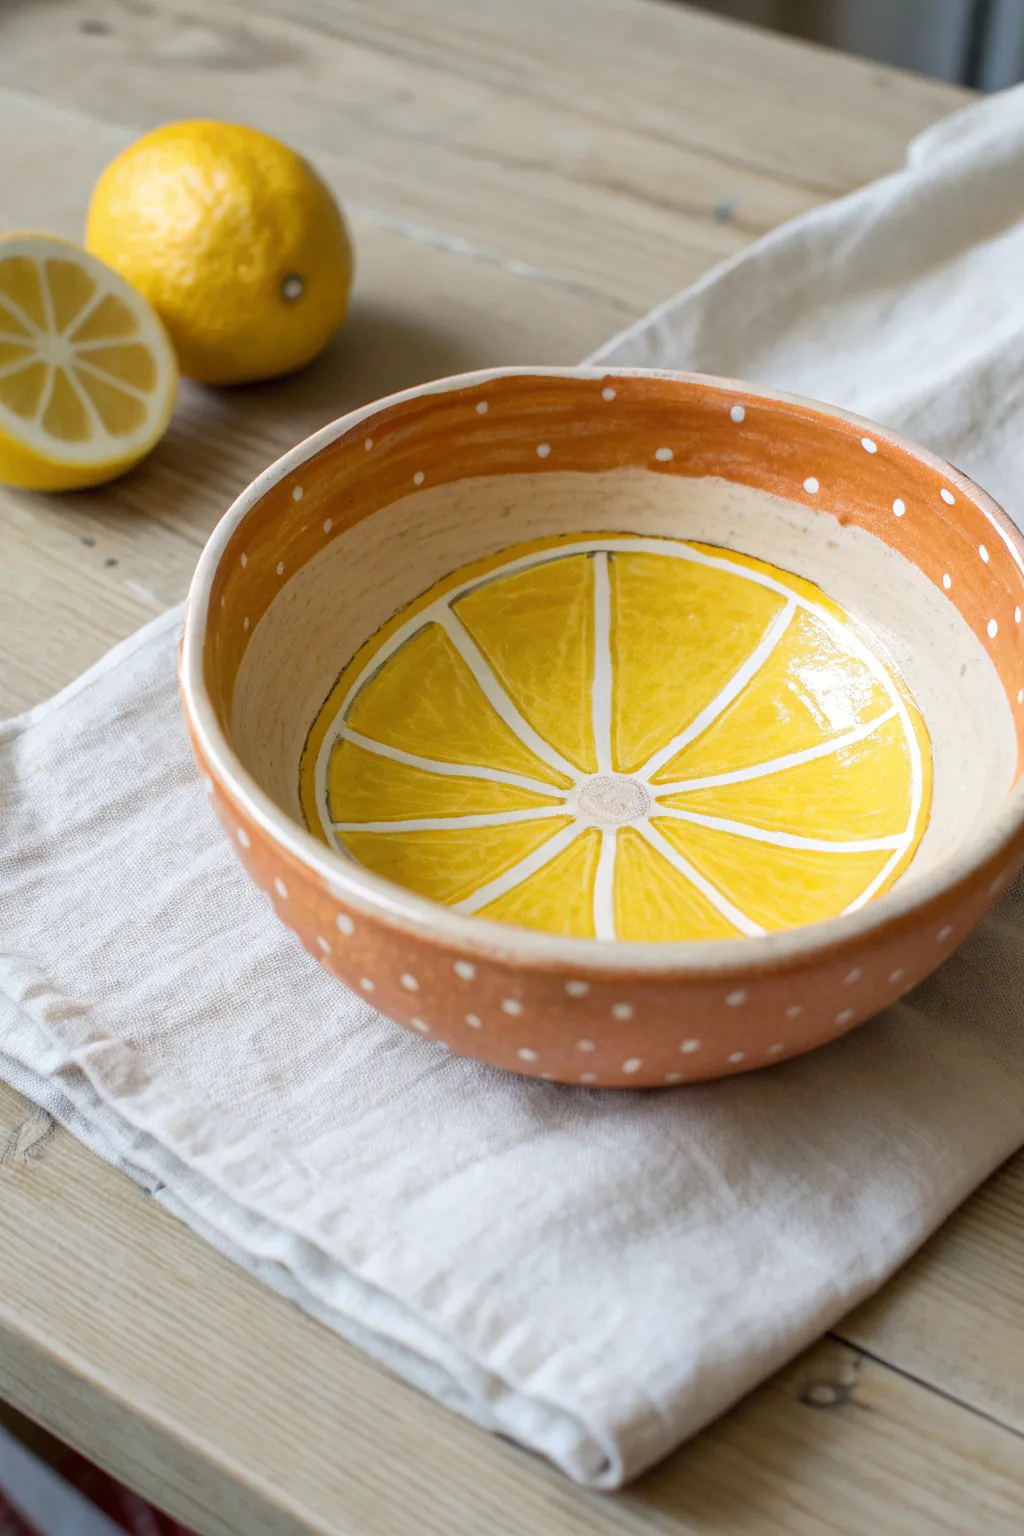
Bring a splash of sunshine to your kitchen with this delightful citrus-inspired bowl. Featuring a bright yellow lemon slice interior and a charming polka-dot exterior, this project combines functional pottery with playful, summery design.
Step-by-Step
Materials
- Earthenware or stoneware clay body (suitable for throwing or hand-building)
- Pottery wheel (or slab roller/rolling pin for hand-building)
- Rib tool
- Sponge
- Underglazes: Bright Yellow, Terracotta/Burnt Orange, White
- Clear transparent glaze
- Small fine-liner brush
- Medium round brush
- Wax resist (optional)
- Pencil (for light sketching)
Step 1: Forming the Bowl
-
Prepare the Clay:
Begin by wedging your clay thoroughly to remove any air bubbles. Typically, 1 to 1.5 pounds of clay is sufficient for a medium-sized bowl like this. -
Throw the Shape:
Center the clay on your wheel and open it up. Keep the base relatively flat and wide to act as the ‘canvas’ for your lemon slice later. -
Shape the Walls:
Pull the walls up and curve them gently outward. Aim for a nice, open curve rather than a steep vertical wall, as this allows the design inside to be easily seen. -
Refine the Rim:
Compress the rim with a sponge or a piece of chamois. I like to leave the rim slightly rounded to match the organic feel of the fruit theme. -
Dry to Leather Hard:
Allow the bowl to dry until it is leather hard—firm enough to handle without warping, but still cool to the touch. Trim the foot ring at this stage if necessary.
Step 2: Painting the Fruit Interior
-
Sketch the Segments:
Lightly sketch a circle in the center of the bowl’s interior with a pencil. Mark a small center point, then draw radiating lines outward to create wedge shapes, resembling pizza slices. -
Apply White Base Lines:
Using your fine-liner brush and white underglaze, paint over your pencil lines. These will be the pith (the white fibrous part) separating the lemon segments. Paint a small white circle in the very center. -
Block in the Yellow:
With a medium round brush, fill in the wedge shapes with bright yellow underglaze. Be careful not to paint over your white dividing lines. -
Layer for Opacity:
Yellow underglaze can be translucent. Apply 2-3 coats to ensure a solid, vibrant color, letting each coat dry just until the sheen disappears before adding the next. -
Add Pith Details:
Once the yellow is dry, re-trace the white dividing lines if they got messy. Add a thicker white border around the entire outer circumference of the yellow circle to finish the slice look.
Fixing Smears
If yellow smears onto the white lines, wait for it to dry completely. Gently scratch away the mistake with a needle tool or stiff brush before reapplying white.
Step 3: Decorating the Exterior
-
Paint the Upper Band:
Apply a band of Terracotta or Burnt Orange underglaze to the inside rim of the bowl, extending down just a little way to meet the natural clay color. -
Cover the Outside:
Paint the entire exterior of the bowl with the same orange underglaze. You may need two coats for even coverage. -
Create the Polka Dots:
Dip the handle end of a paintbrush into white underglaze. Use this as a stamp to create uniform white dots all over the orange painted areas. -
Dot Placement:
Stagger the dots for a playful pattern. Don’t forget to add a row of dots along the inner orange rim band as well.
Vibrant Yellows
Yellow underglaze burns out easily. Apply a thin layer of white underglaze under the yellow areas first to make the color significantly brighter and more opaque.
Step 4: Firing and Glazing
-
Bisque Fire:
Once the bowl is bone dry, load it into the kiln for a bisque firing (usually Cone 04 or 06). This hardens the clay and sets the underglaze design. -
Apply Clear Glaze:
After the bisque firing, dip the entire bowl into a clear transparent glaze. This will make the colors pop and ensure the bowl is food safe. -
Wipe the Foot:
Use a damp sponge to meticulously wipe any glaze off the foot ring (the bottom where it touches the shelf) to prevent it from sticking to the kiln shelf. -
Final Fire:
Fire the bowl again to the maturity temperature of your clay and clear glaze (typically Cone 5 or 6 for stoneware).
Once cooled from the kiln, your cheerful bowl is ready to hold fresh fruit or serve up a summer salad
Watermelon-Inspired Bowl With Rind Detail
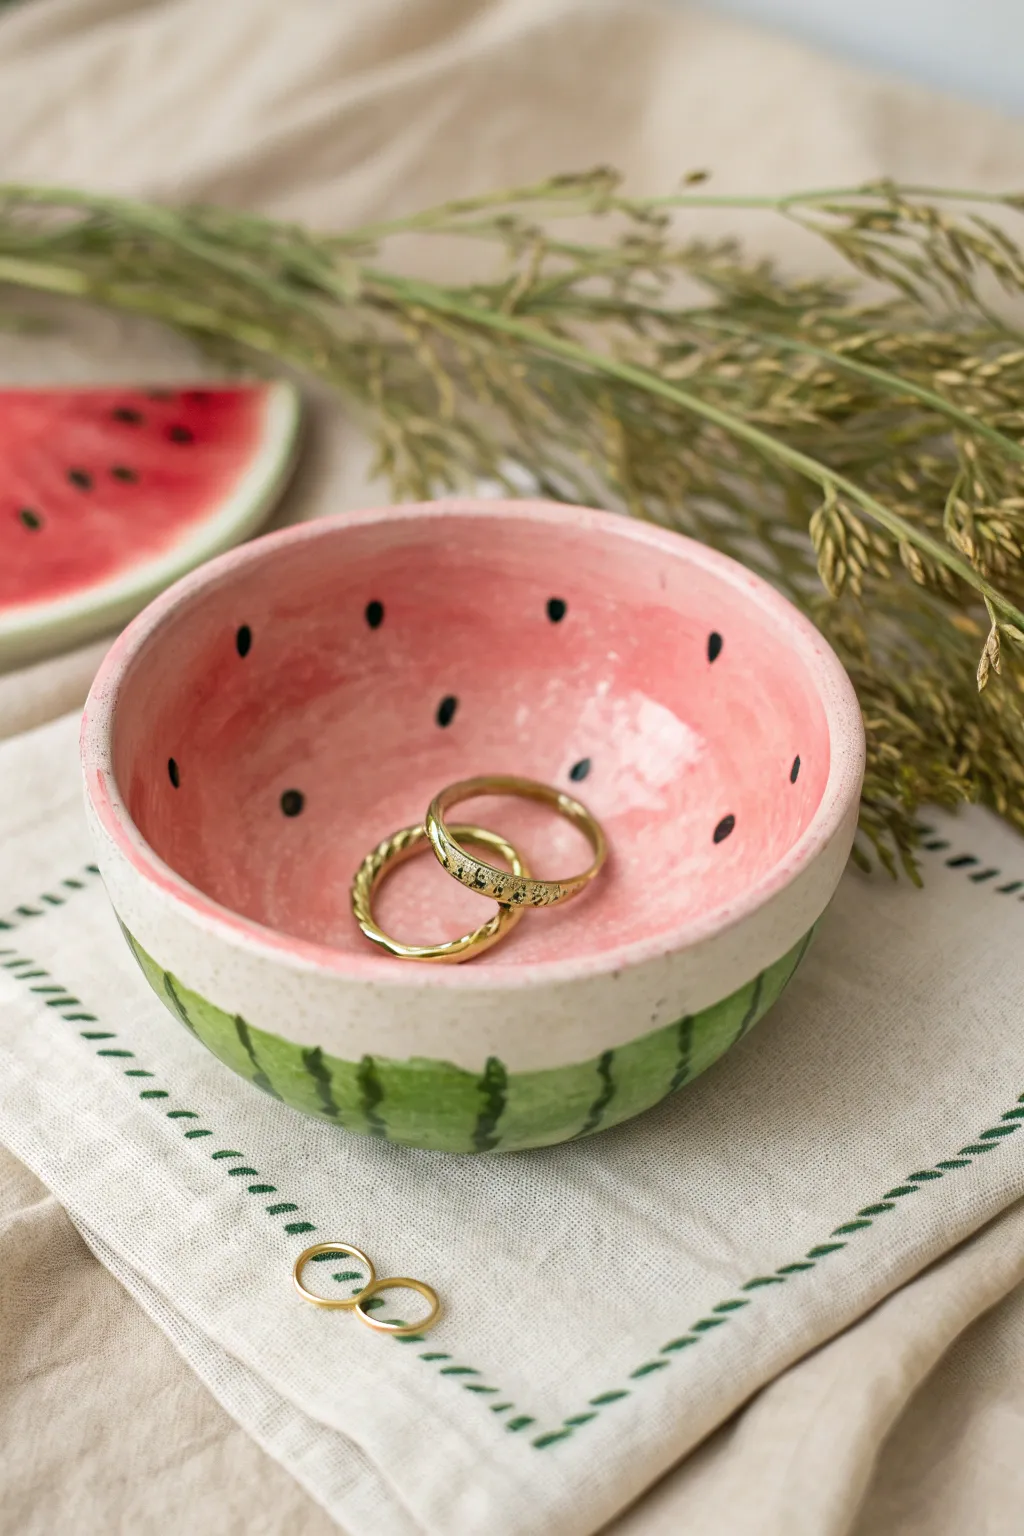
Brighten up your vanity with this charming little catch-all dish that mimics the juicy cross-section of a summer watermelon. Made from air-dry clay and painted with delicate washes of color, it captures the playful spirit of the fruit right down to the speckled rind.
How-To Guide
Materials
- White air-dry clay
- Rolling pin
- Small bowl (for a mold) or just your hands
- Sandpaper (fine grit)
- Acrylic paints: Warm Pink, White, Sap Green, Dark Green, Black
- Clear acrylic sealant (glossy)
- Small round paintbrushes
- Palette or small dish for mixing
- Water cup
- Sponge
Step 1: Shaping the Clay
-
Condition the clay:
Start with a ball of air-dry clay roughly the size of a tangerine. Knead it in your hands until it is warm, pliable, and free of any cracks. -
Form the pinch pot:
Press your thumb into the center of the ball, leaving about a half-inch of thickness at the bottom. Gently pinch and turn the clay between your thumb and fingers to raise the walls. -
Refine the shape:
Aim for a hemispherical shape. The rim doesn’t need to be perfectly sharp; a slightly rounded, organic edge mimics a real fruit rind nicely. Keep the walls about 1/4 inch thick for durability. -
Smooth the surface:
Dip your finger in a tiny bit of water and run it over the clay to smooth out fingerprints or significant bumps. Set the bowl aside to dry completely, which usually takes 24 to 48 hours depending on humidity. -
Sand for perfection:
Once bone dry, take your fine-grit sandpaper and gently buff the entire surface. Pay special attention to the rim to ensure it feels smooth to the touch. Wipe away all dust with a slightly damp sponge.
Step 2: Painting the Fruit
-
Mix the flesh color:
Create a watery wash by mixing a small amount of warm pink acrylic paint with a drop of water. This helps the paint soak into the clay for a more natural, stained look rather than a thick plastic coat. -
Paint the interior:
Apply the pink wash to the entire inside of the bowl. Brush it right up to the rim, but stop just as you crest over the top edge. -
Create the white rind:
Using white acrylic paint, paint a band around the exterior top edge, about 1/2 inch wide. I like to bring this white paint slightly over the rim to meet the pink interior, ensuring no raw clay is showing. -
Paint the base green:
Paint the remaining bottom portion of the exterior with a light Sap Green. Blend the top edge of this green section slightly into the white band so there isn’t a harsh line, creating a soft transition. -
Add dark stripes:
Mix a darker green shade. Using a thin brush, paint vertical, wiggly stripes over the light green base. Let these stripes fade out as they reach the white rind section, mimicking the pattern of a real watermelon. -
Paint the seeds:
Using a very fine-tipped brush and black paint, dot small tear-drop shapes onto the pink interior. Scatter them randomly, clustering a few near the center but keeping them distinct.
Juicy Texture
Mix a tiny bit of gloss medium directly into your pink paint before applying. It gives the ‘fruit flesh’ a subtle, permanent sheen distinct from the dry rind.
Step 3: Sealing and Fnishing
-
Allow paint to cure:
Let all the paint layers dry completely. If the paint feels cool to the touch, it still holds moisture, so give it another hour. -
Apply the first coat of varnish:
Brush a thin layer of glossy clear acrylic sealant over the entire bowl, inside and out. This will make the colors pop and give it that ‘wet fruit’ shine. -
Add a second coat:
Once the first coat is tacky or dry, apply a second coat for extra durability and shine. This protects the clay from minor moisture and scratches. -
Final dry:
Let the sealant cure fully according to the bottle instructions—usually overnight—before placing any jewelry inside.
Cracked Clay?
If small cracks appear while drying, mix a slurry of clay dust and white glue (or water) to fill them. Smooth over with a finger and sand once dry.
Now you have a sweet slice of summer perfect for holding your favorite rings and trinkets
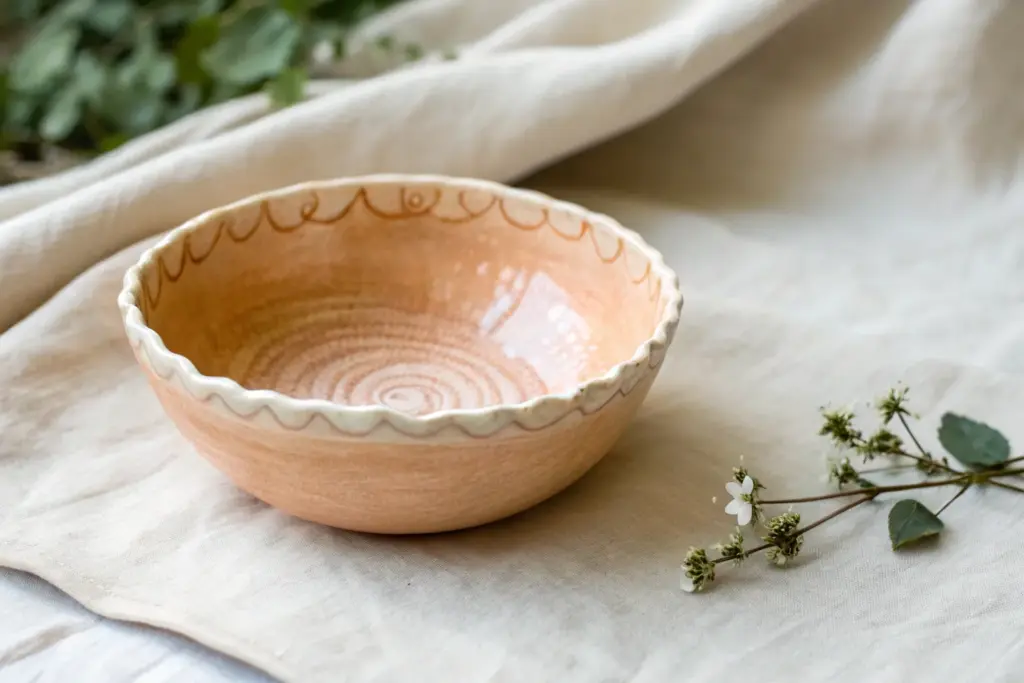
Scalloped Edge “Flower” Bowl

This delicate catch-all dish features a charming flower-like silhouette with gentle scalloped edges and a subtle speckled finish. The touch of gold along the rim adds an elegant, organic feel that transforms a simple pinch pot into a keepsake piece.
Step-by-Step
Materials
- White polymer clay or air-dry clay (approx. 2-3 oz)
- Speckle inclusions: black pepper, dried coffee grounds, or black embossing powder
- Rolling pin or smooth glass jar
- Circle cutter or a small bowl to trace (approx. 4-inch diameter)
- Small craft knife or needle tool
- Small rounded modeling tool or the back of a measuring spoon
- Fine-grit sandpaper (400-600 grit)
- Gold liquid gilding or metallic gold acrylic paint
- Small detail paintbrush
- Gloss varnish or glaze (optional, for sealing)
Step 1: Preparing the Clay
-
Condition the Clay:
Begin by kneading your white clay until it is soft, pliable, and free of cracks. Warm clay is much easier to work with and will reduce the chance of splitting later. -
Add Texture:
To achieve that organic, speckled stoneware look without a kiln, knead a very small pinch of black pepper or dried coffee grounds into the white clay. Fold the clay over itself repeatedly until the specks are evenly distributed. -
Roll It Out:
Place the clay on a smooth surface or silicone mat. Roll it out to a uniform thickness of about 1/4 inch. Try to keep it consistent so the bowl dries or bakes evenly.
Step 2: Shaping the Flower
-
Cut the Base Circle:
Use a circle cutter or trace around a small bowl (about 4 inches wide) on top of your rolled clay. Cut out the circle using your craft knife and remove the excess clay. -
Form the Scallops:
Using your thumb or the back of a rounded measuring spoon, gently press into the edge of the circle at regular intervals to create indentations. This pushes the clay outward between presses to form the ‘petals’. -
Refine the Petals:
Go around the edge again, using your fingers to pinch and round off each petal shape. I like to smooth the dip between each scallop to ensure there are no sharp cuts, aiming for a soft, fluid flow. -
Create the Bowl Depth:
Place your clay flower into a slightly larger curved bowl or a cupped object (like an egg carton section) to give it a concave shape. Press the center down gently so it takes the form of the mold. -
Smooth Imperfections:
Dip your finger in a tiny bit of water (for air-dry clay) or baby oil (for polymer) and gently run it over the surface to erase fingerprints or tiny cracks.
Natural Speckles
Use coarse-ground black pepper for larger, rustic specks, or used dried coffee grounds for finer, earthy brown specks that look like real stoneware.
Step 3: Drying and Finishing
-
Cure or Dry:
If using polymer clay, bake according to the package instructions (usually 275°F for 15-30 minutes). If using air-dry clay, let it sit undisturbed in a cool, dry place for 24-48 hours until completely hard. -
Sand the Edges:
Once fully cured and cooled, take your fine-grit sandpaper and very lightly sand the rim of the scallops. This isn’t to change the shape, but to ensure the rim is perfectly smooth for the gold application. -
Clean the Surface:
Wipe the bowl down with a slightly damp cloth to remove any sanding dust. The surface needs to be dust-free for the paint to adhere properly.
Texture Twist
Before cutting the circle, gently press a piece of lace or a textured linen fabric into the wet clay to give the inside of the bowl a subtle woven pattern.
Step 4: The Gold Rim
-
Prepare the Gold:
Shake your liquid gilding or metallic paint well. You want the pigment to be rich and opaque. -
Load the Brush:
Dip a fine detail brush into the gold. Wipe off a little excess so the paint doesn’t drip down the sides of the bowl. -
Paint the Edge:
Carefully trace the very top edge of the scalloped rim. Hold the brush perpendicular to the rim to coat slightly over the inside and outside lip, creating that rustic, hand-dipped look. -
Let it Set:
Allow the gold rim to dry completely. Liquid gilding usually dries fast, but give it an hour to be safe. -
Seal (Optional):
Brush a coat of gloss varnish over the entire inside of the bowl if you want a ceramic-like shine. Avoid brushing over liquid gilding as some varnishes can tarnish it; seal the white parts first.
Place your favorite rings inside and enjoy the simple elegance of your handmade creation
Pierced Rim Bowl Laced With Twine or Raffia
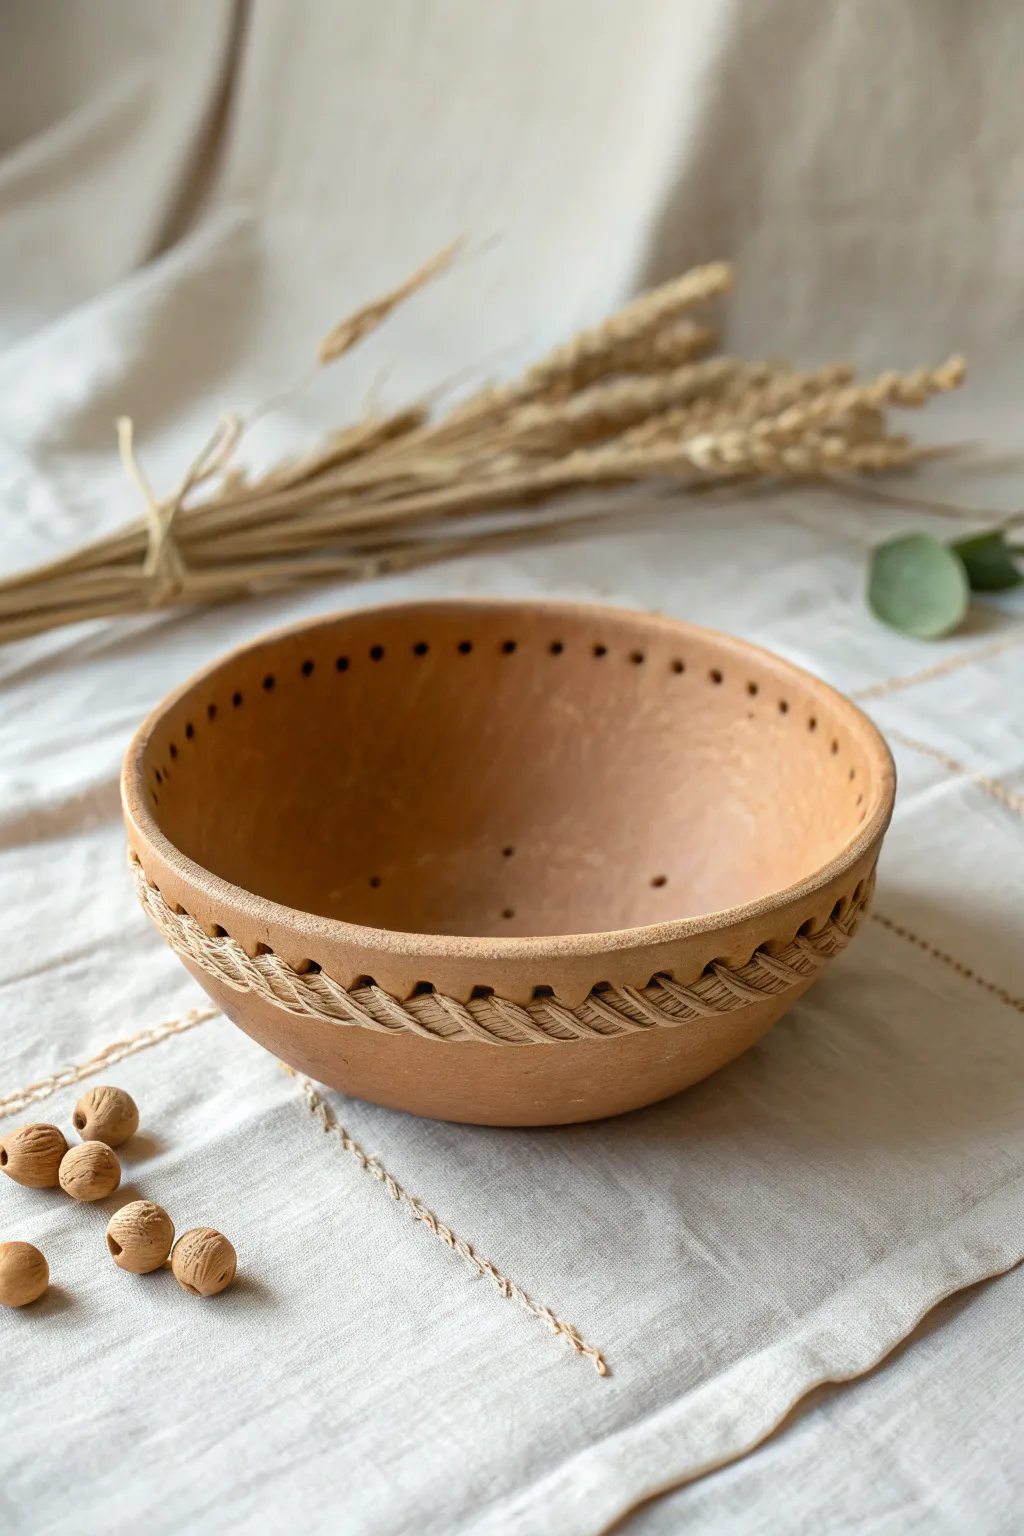
This project combines the rustic warmth of natural clay with the textural interest of fiber art. By piercing the rim of a simple coil or pinch pot, you create a canvas for weaving twine or raffia, resulting in a charming, earthy vessel perfect for holding dry goods.
How-To Guide
Materials
- Terracotta air-dry clay or low-fire earthenware clay
- Potter’s needle tool or a small drill bit
- Rolling pin
- Sponge
- Bowl mold (optional) or just your hands
- Natural jute twine or raffia
- Large tapestry needle
- Sandpaper (fine grit)
- Clear matte sealant (optional)
Step 1: Forming the Bowl
-
Prepare the clay:
Start by wedging your terracotta clay to remove air bubbles. This ensures a smooth consistency and prevents cracking later. -
Create the base:
Roll a ball of clay about the size of a grapefruit. You can either pinch this into a bowl shape using your thumbs or roll it flat into a slab. -
Draping method (Method A):
For a uniform shape like the one in the photo, roll the clay into a slab regarding 1/4 inch thick. Drape it over an overturned bowl covered in plastic wrap to act as a mold. -
Pinch method (Method B):
If you prefer a hand-built look, pinch the clay ball from the center outwards, maintaining an even wall thickness as you rotate the clay in your hands. -
Smooth the surface:
Use a slightly damp sponge to smooth out any fingerprints or cracks. Pay special attention to the rim; it needs to be slightly rounded, not sharp.
Step 2: Piercing and Refining
-
Mark the holes:
While the clay is leather-hard (firm but still cool to the touch), lightly mark a line about 1/2 to 3/4 inch down from the rim. Mark dots along this line spaced about 1/2 inch apart. -
Pinch the holes:
Using a needle tool or a small drinking straw, carefully punch holes through the marked dots. If you want drainage holes at the bottom like the photo, add a few there as well. -
Clean the edges:
As the tool exits the clay, it might create a burr. Smooth these rough bits gently with your finger or a sponge immediately. -
Dry completely:
Allow the bowl to dry slowly away from direct heat or drafts. This usually takes 24-48 hours depending on humidity. -
Sanding:
Once bone dry, take fine-grit sandpaper and gently smooth the rim and any rough spots. Wipe away the dust with a barely damp cloth.
Hole Sizing Tip
Make your holes slightly larger than you think you need. Clay shrinks when drying (and firing), and tight holes make threading the thick twine very frustrating later on.
Step 3: Weaving the Accent
-
Seal the piece:
If using air-dry clay, apply a matte sealant now to protect against moisture. If kiln-firing, fire the piece before proceeding to weaving. -
Prepare the twine:
Cut a long length of jute twine or heavy raffia. Thread it onto a large tapestry needle. -
Start the stitch:
Insert the needle from the inside of the bowl through a hole. Leave a 2-inch tail on the inside to secure later. -
Create the diagonal:
Bring the twine over the rim to the outside, moving diagonally. Re-enter the *same* hole from the outside to create a loop, or move to the next hole depending on your desired pattern. -
Weave the rim pattern:
For the specific look in the photo, use a ‘whip stitch’ variation: go out through a hole, over the rim, and back in through the *next* hole. Keep the tension consistent but not so tight that it snaps the clay. -
Double back (optional):
To get that thick, braided look, you may want to retrace your steps in the opposite direction, crossing over the previous stitches. -
Finish the ends:
Once the rim is fully circled, tie off the twine on the inside or tuck the ends under existing stitches with a dab of glue to hide them.
Cracked Rims?
If the clay cracks while punching holes, it’s too dry. Mist it lightly with water, cover with plastic for an hour to rehydrate, and try again when it’s softer.
Fill your new bowl with dried acorns or wooden beads to complete the natural aesthetic