
A clay box is one of those projects that feels both practical and totally artistic at the same time. If you’ve got a basic lidded form, these clay box design ideas will help you turn it into something you’ll actually want to display and use.
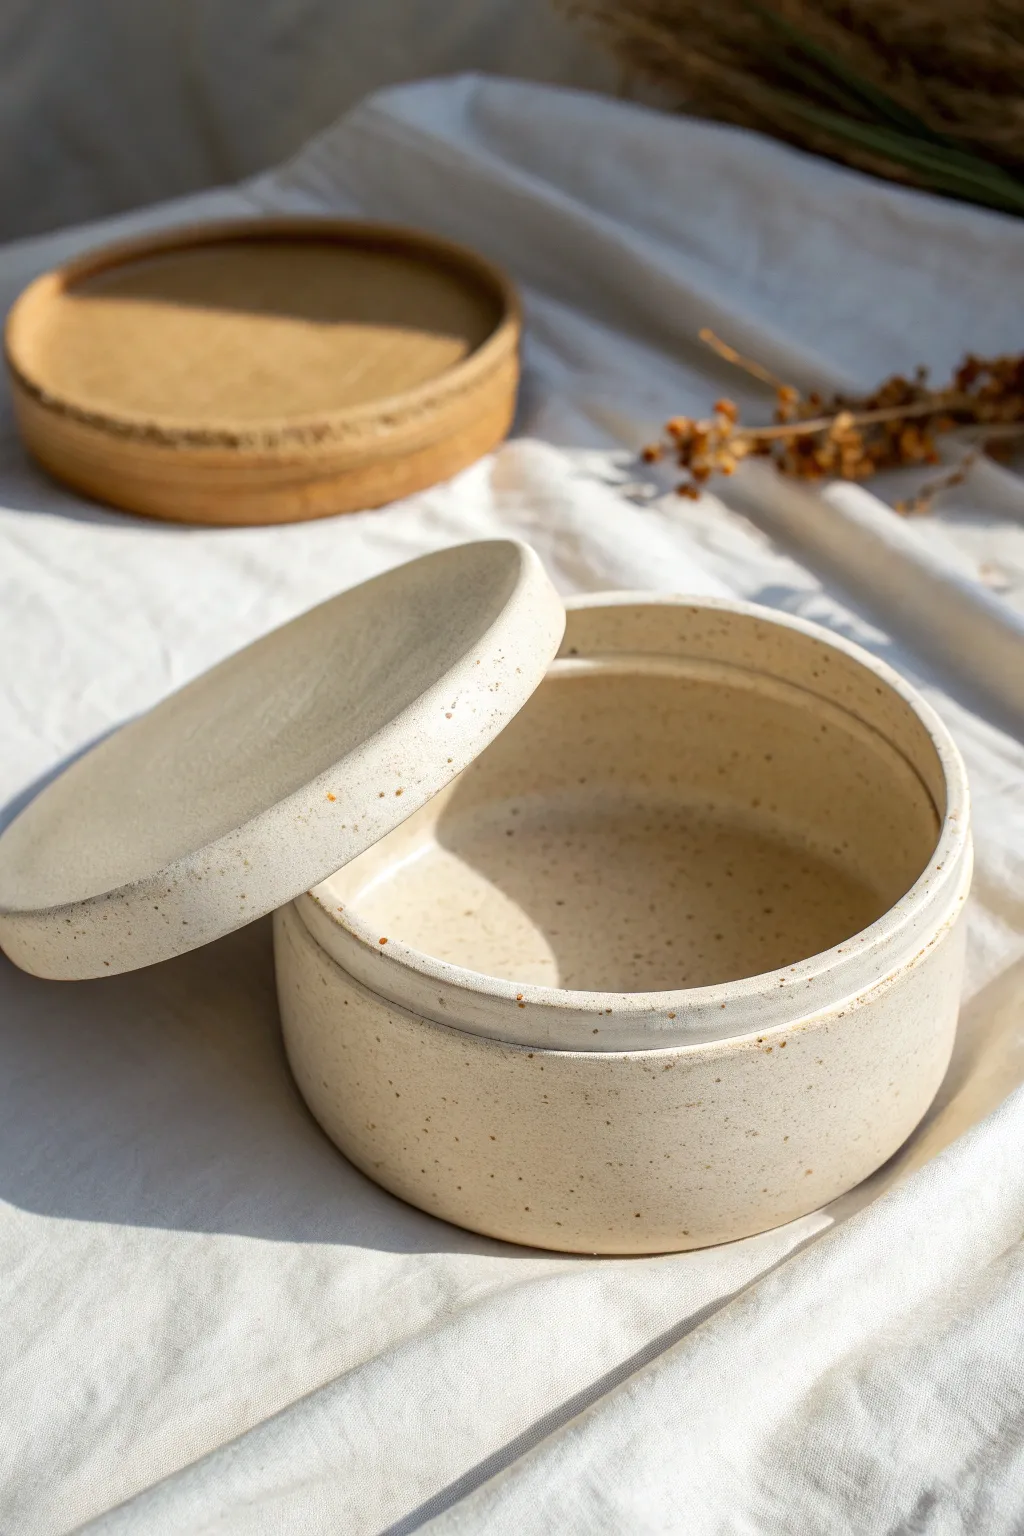
Classic Slab-Built Square With a Flush Lid
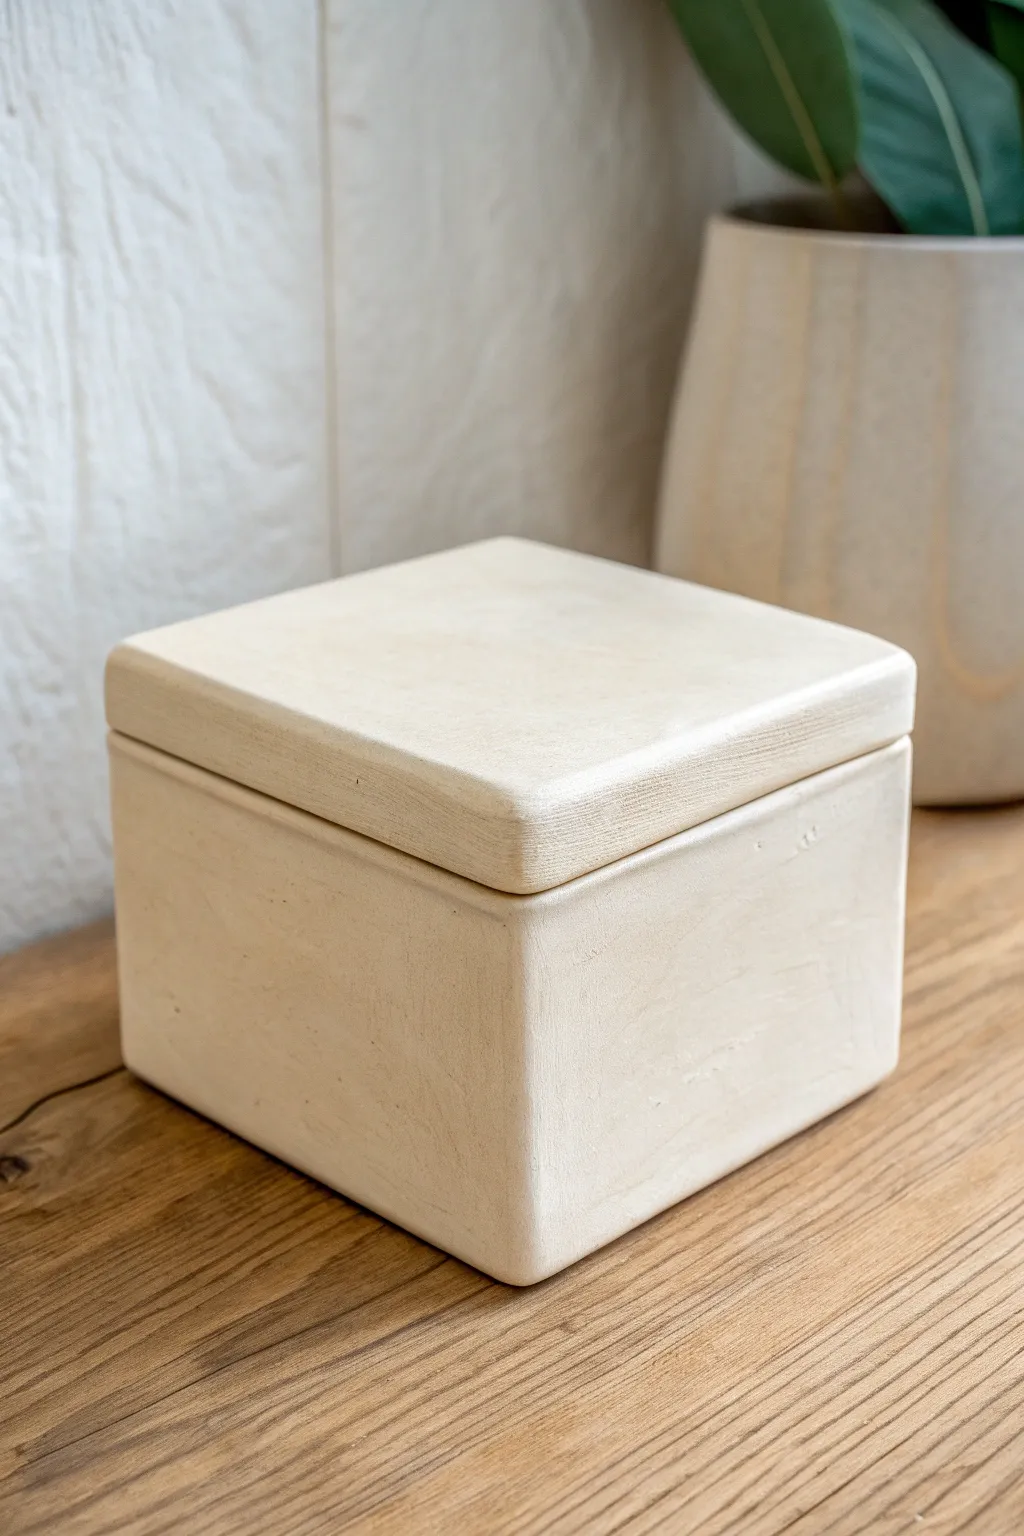
This project explores the timeless elegance of unadorned stoneware, focusing on clean lines and a precise flush-fitting lid. The end result is a sleek, cream-colored vessel perfect for holding small treasures or serving as a minimalist decor accent.
How-To Guide
Materials
- Light-colored stoneware clay body (grog-free for smoother finish)
- Rolling pin
- Slab strips or guide sticks (approx. 1/4 inch thick)
- Fettling knife or X-Acto blade
- Ruler
- Scoring tool or serrated kidney
- Slip (clay slurry)
- Wooden paddle
- Soft rubber rib
- Chamois or small sponge
Step 1: Slab Preparation
-
Roll the clay:
Begin by rolling out a uniform slab of clay using your rolling pin and guide sticks. Aim for sturdy walls about 1/4 inch thick to ensure the box keeps its shape without warping. -
Smooth the surface:
Before cutting, run a soft rubber rib firmly over both sides of the slab. This compresses the clay particles—minimizing future cracking—and creates that canvas-smooth texture we want for the final finish. -
Wait for stiffness:
Let the slab sit until it reaches a soft leather-hard stage. It should be firm enough to hold its shape when lifted but still pliable enough to join easily. -
Measure and cut:
Using a ruler, measure and cut five identical squares for the base box (bottom + 4 sides). For the lid, cut a slightly larger square that will overhang the walls just a hair, plus four narrow strips for the inner flange.
Clean Bevels
If you struggle with freehand bevel cuts, lay your knife flat against the edge of a table for support, or invest in a 45-degree angle cutting tool.
Step 2: Constructing the Base
-
Bevel the edges:
For the sharpest, cleanest corners, cut 45-degree bevels on the vertical edges of your side walls and the matching edges of the base plate. -
Score securely:
Rough up all joining surfaces with your scoring tool. Don’t be shy here; deep scratches ensure a strong mechanical bond. -
Apply slip:
Generously dab slip onto the scored areas. It should look like thick yogurt. -
Assemble the walls:
Press the walls onto the base and against each other. Give them a firm wiggle to lock the clay particles together and squeeze out excess slip. -
Reinforce the interior:
Roll very thin coils of soft clay and press them into the interior seams. Smooth these out completely with a modeling tool or your fingertip. -
Paddle into shape:
Gently tap the exterior walls with a wooden paddle. This squares up the form and helps eliminate any warping that happened during handling.
Add a Subtle Tint
Mix a tiny amount of mason stain (like sand or light ochre) directly into your white clay body before building to create a warm, natural stone color without glazing.
Step 3: Creating the Lid
-
Attach the lid face:
Take your top slab piece and verify it fits squarely over the box base. It visually matches the thickness of the box floor. -
Build the flange:
On the underside of the lid slab, score and slip the area inset about 1/4 inch from the edge. Attach your narrow clay strips here to create a flange that will sit *inside* the box walls. -
Test the fit:
Once the flange is attached but still workable, gently place the lid onto the box. I usually do this with a piece of plastic wrap or newspaper in between to prevent sticking, ensuring the flange fits snugly without binding. -
Level the lid:
With the lid in place, paddle the top gently to ensure it sits perfectly flush with the wall tops.
Step 4: Refining and Finishing
-
Clean the edges:
Once the box is leather-hard, use a fettling knife or rasp to shave down any uneven overhangs on the lid so it is perfectly flush with the exterior walls. -
Soften the corners:
The box in the example has a soft touch; use a damp sponge or your thumb to slightly round over the sharp 90-degree corners and edges. You don’t want them razor-sharp. -
Burnish the surface:
For that matte, stone-like quality, rub the entire exterior with the back of a spoon or a soft cloth when the clay is bone dry. This aligns the surface particles. -
Final wipe:
Go over the piece with a barely damp chamois to remove any dust or crumbs before firing. -
Firing:
Bisque fire the piece, then fire to temperature. To match the image, skip the glaze entirely if using a beautiful white stoneware, or apply a very thin matte transparent glaze.
Enjoy the calm satisfaction of seeing your perfectly fitted lid slide into place


Round Trinket Box With a Gallery Rim

This elegant little lidded vessel features a gallery rim design that keeps the lid securely in place, coupled with a warm, speckled cream glaze. The unglazed clay accents on the rim and knob add a lovely rustic contrast to the smooth ceramic body.
Step-by-Step
Materials
- Stoneware clay (speckled or plain buff)
- Pottery wheel
- Throwing tools (sponge, needle tool, ribs, wire cutter)
- Trimming tools
- Calipers
- Satin finish cream or white glaze
- Wax resist
- Kiln
Step 1: Throwing the Body
-
Center and Open:
Start with about 1-1.5 lbs of clay centered on the wheel. Open the clay to a flat interior floor, leaving about a 3/8-inch thickness at the bottom for trimming later. -
Pull the Walls:
Pull the walls up into a low cylinder shape. Curve the belly out slightly for a rounded, organic profile, but keep the rim slightly thicker than usual to support the gallery. -
Form the Gallery:
To create the seat for the lid, support the outside of the rim with your left hand. Use your right thumb or a wooden modeling tool to press the inner half of the rim downward, creating a small shelf or ‘gallery’ inside the lip. -
Refine and Measure:
Clean up the gallery with a square-edged tool to ensure a 90-degree angle. Use calipers to measure the exact inner diameter of the gallery shelf while the clay is still wet.
Shrinkage Check
Clay shrinks as it dries. When measuring the lid, make it a tiny fraction larger than your caliper measurement so you can trim it to a perfect fit later.
Step 2: Creating the Lid
-
Throw the Lid:
Using a smaller ball of clay (about 0.5-0.75 lbs), throw a low, upside-down bowl shape. This will be your lid. -
Match the Measurements:
Carefully measure the outer rim of this new piece using your set calipers. You want the lid’s rim to fit perfectly into the gallery shelf of the pot. -
Dry to Leather Hard:
Cut both pieces from the wheel bat and allow them to dry slowly under plastic until they reach a leather-hard state.
Variations
Try using a dark brown clay body with a translucent white glaze. The dark clay will ‘break’ through the glaze on the edges for a dramatic contrast.
Step 3: Trimming and Assembly
-
Trim the Pot:
Center the main body upside down on the wheel. Trim away excess weight from the bottom and refine the curve of the walls. -
Trim the Lid:
Center the lid upside down (showing the top surface). Trim it into a smooth, gentle dome shape. Finish the surface with a flexible rib to remove trimming marks. -
Add the Knob:
Roll a small ball of clay and attach it to the center of the lid using slip and scoring. Shape it into a flat button style knob while the lid spins slowly on the wheel. -
Detail the Rim:
Use a small loop tool or needle tool to scratch a textured band around the outer edge of the lid and the knob, creating the ribbed detail seen in the reference.
Step 4: Glazing and Finishing
-
Bisque Fire:
Once bone dry, fire both pieces in a bisque kiln (usually Cone 04) to prepare them for glazing. -
Wax Resist Application:
This is crucial for the design: Apply wax resist carefully to the textured rim of the lid and the edge of the knob. This prevents glaze from adhering, exposing the raw clay. -
Glaze the Interior:
Pour your satin cream glaze inside the pot, swirl to coat, and pour out the excess. Wipe any drips from the gallery rim immediately. -
Dip the Exterior:
Holding the pot by the foot, dip the exterior into the glaze. Do the same for the lid, ensuring an even coat. I find holding the lid by the knob (if un-waxed) or using tongs works best. -
Clean and Fire:
Use a damp sponge to wipe any glaze off the waxed areas to ensure a crisp line. Sponge the foot of the pot clean. Glaze fire to the maturity temperature of your clay (likely Cone 5 or 6).
Once cooled, your custom gallery box is ready to hold jewelry or precious keepsakes on your vanity


Heart-Shaped Box With Soft Curves
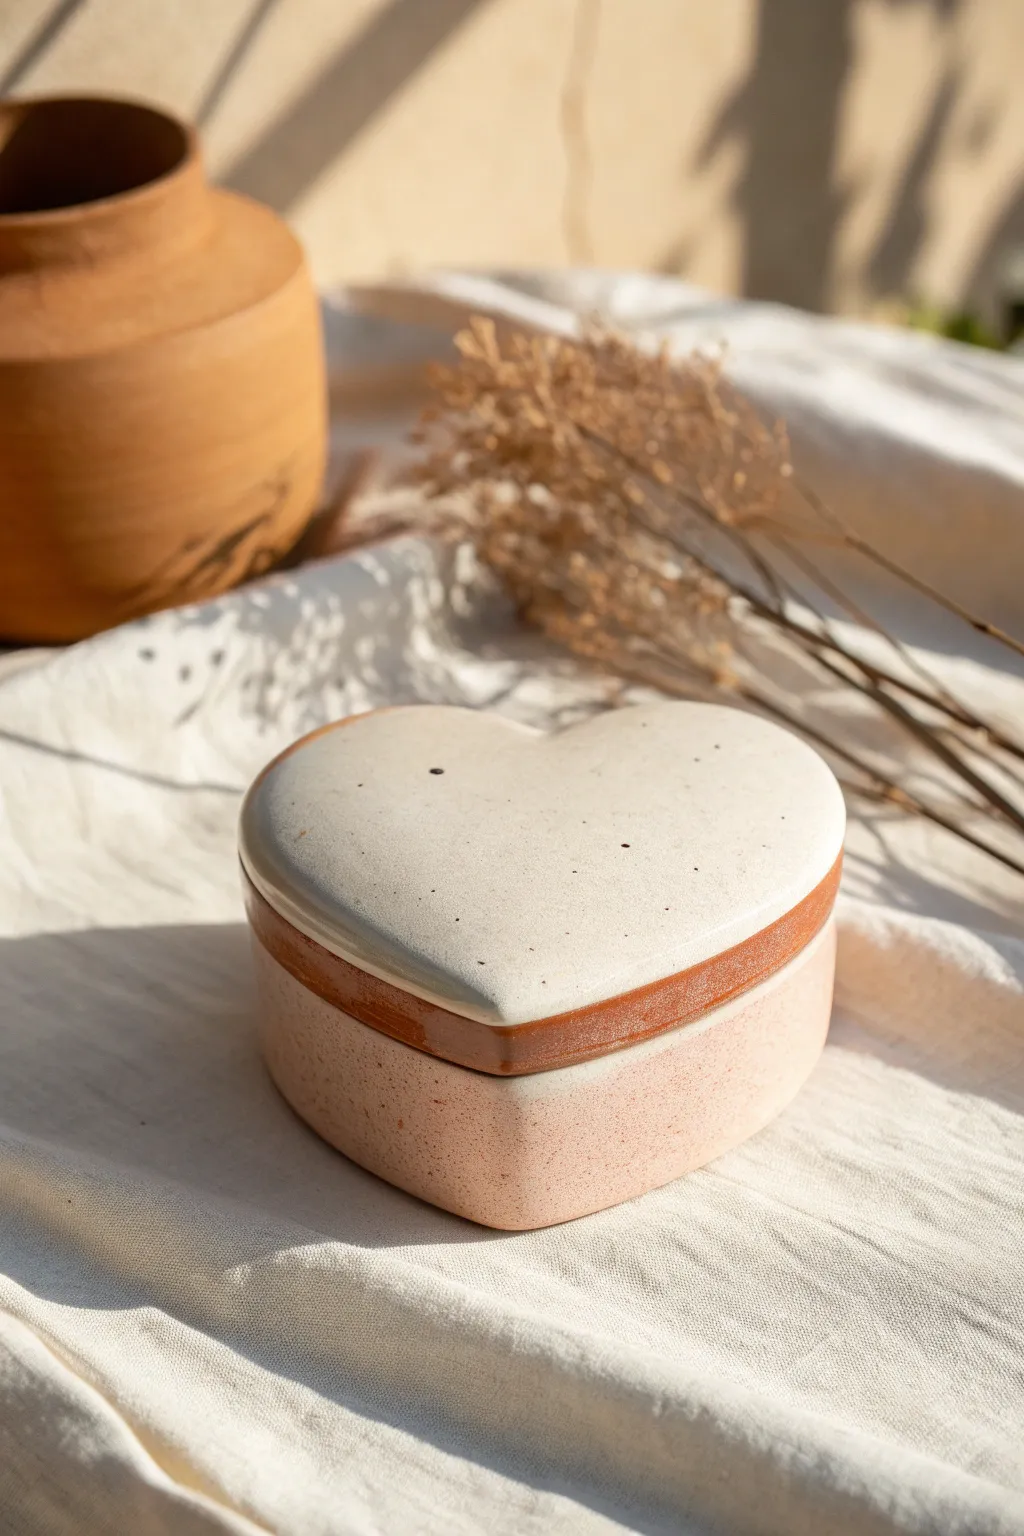
This charming heart-shaped trinket box combines smooth functionality with a lovely organic aesthetic. The design features a gentle two-tone finish, pairing a creamy, speckled white lid with a soft blush base, brought together by a warm terracotta-colored rim.
How-To Guide
Materials
- White or light-colored stoneware clay (speckled clay works best)
- Heart-shaped cookie cutter (large) or paper template
- Rolling pin and guide sticks (approx. 1/4 inch thickness)
- Slab mat or canvas cloth
- Needle tool
- Scoring tool or serrated rib
- Slip (clay mixed with water)
- Modeling tool or wooden rib
- Sponge
- Glossy white glaze (speckled preferred)
- Glossy terracotta or rust-colored glaze
- Matte pink or blush glaze
- Paintbrushes for glazing
- Kiln for firing
Step 1: Forming the Base and Lid
-
Roll the Slabs:
Begin by wedging your clay to remove air bubbles, then roll it out on your canvas or slab mat. Use guide sticks to ensure an even thickness of about 1/4 inch across the entire slab. -
Cut the Hearts:
Using your large heart cutter or a paper template with a needle tool, cut out two identical heart shapes. One will become the floor of the box, and the other will be the lid. -
Cut the Walls:
From the remaining slab, cut a long rectangular strip for the box walls. The width of this strip determines the height of your box—about 1.5 to 2 inches is usually ideal for a keepsake box. -
Bevel the Edges:
For a cleaner join, cut a 45-degree bevel on the short ends of your wall strip where they will meet. This creates increased surface area for a bond that is less likely to crack. -
Score and Slip:
Thoroughly score the outer edge of one heart base and the bottom edge of your clay strip. Apply a generous amount of slip to the scored areas. -
Attach the Walls:
Carefully stand the wall strip up along the perimeter of the heart base. Press it firmly into place. When the ends meet at the point or cleft of the heart, join the beveled edges securely. -
Reinforce Seams:
Roll a very thin coil of clay and press it into the interior seam where the wall meets the floor. Use a modeling tool to smooth this coil completely until it disappears, ensuring a watertight seal.
Warped Lid Woes
If the lid rocks after firing, use a piece of wet sanding paper or a diamond sanding pad on a flat surface. Rub the box rim in a figure-8 motion to level it.
Step 2: Fitement and Refining
-
Create the Lid Flange:
To keep the lid from sliding off, you’ll need a flange. Roll a smaller, thinner strip of clay and attach it to the *underside* of the lid piece, slightly inset from the edge so it fits inside the box walls. -
Smooth the Surfaces:
Use a damp sponge or a soft rib to smooth out the exterior walls and the top of the lid. Pay special attention to rounding the sharp edges to match the soft curves seen in the photo. -
Check the Fit:
Gently place the lid onto the box to ensure the flange fits comfortably. If it’s too tight, shave a little clay off the flange; if it’s too loose, you can gently widen the flange. -
Dry Slowly:
Loosely cover the box with plastic to let it dry slowly to the leather-hard stage. This prevents warping, which is crucial for a fitted lid. Once bone dry, bisquefire the piece according to your clay body’s instructions.
Defined Lines
Use automotive pinstriping tape or wax resist to get a perfectly crisp line between the white lid top and the terracotta colored rim.
Step 3: Glazing and Finishing
-
Wax the Foot:
Apply wax resist to the bottom of the box and the underside rim of the lid where it will touch the box to prevent the pieces from fusing together in the kiln. -
Glaze the Top:
Dip or brush the top of the lid in a glossy white glaze. If your clay isn’t naturally speckled, choose a glaze with added speckles for that organic look. -
Glaze the Rim:
Carefully apply a band of terracotta or rust-colored glaze along the vertical edge of the lid and the very top rim of the box base. This creates the contrasting band shown in the image. -
Glaze the Base:
Apply the matte blush or pink glaze to the exterior walls of the box base. I find that two coats usually give the best opacity while maintaining the matte texture. -
Interior Glazing:
For the inside of the box, you can use either the white glossy glaze or the terracotta color, depending on your preference. Pour the glaze in, swirl it around to coat, and pour the excess out. -
Clean Up:
Use a damp sponge to wipe away any stray glaze droplets on the waxed areas or seams. Ensuring the contact points are completely clean is vital. -
Final Firing:
Fire the piece in the kiln to the maturing temperature of your glazes (typically Cone 5 or 6 for stoneware). Once cool, the two-tone effect will be permanently set.
Now you have a beautiful, handmade vessel perfect for holding jewelry or small treasures.


Tiny Jewelry Box With a Knob Handle

This charming, petite ceramic box features a rich, glossy teal glaze with natural speckling that evokes a rustic yet refined aesthetic. With its snug-fitting lid and delicate knob handle, it is an ideal vessel for safeguarding your most precious rings or earrings.
Step-by-Step Tutorial
Materials
- Speckled stoneware clay (white or buff)
- Pottery wheel (or rolling pin for hand-building)
- Needle tool
- Rib tool (wooden and metal)
- Wire cutter
- Sponge
- Trimming tools
- Teal/Turquoise glossy glaze suitable for stoneware
- Small brush for wax resist
- Kiln
Step 1: Throwing the Body
-
Prepare the Clay:
Begin by wedging about 1 lb of speckled stoneware clay to remove air bubbles and ensure consistency. -
Center on the Wheel:
Secure the clay to the wheel head and center it using steady pressure and water for lubrication. -
Open the Form:
Press your thumbs into the center to open the clay, leaving a floor thickness of about 1/4 inch. -
Pull the Walls:
Gently pull the clay upward to create a cylindrical shape. Aim for a wall height of roughly 2-3 inches, keeping the walls straight and vertical. -
Refine the Rim:
Use a chamois or a damp sponge to compress and smooth the rim. This step is crucial for lid fit later on. -
Create a Gallery:
Using a wooden tool or your thumb, press gently into the inside of the rim to create a small ledge or ‘gallery’ where the lid will sit. It should be about 1/8 inch deep.
Step 2: Creating the Lid
-
Measure the Opening:
Before throwing the lid, use calipers to measure the diameter of the gallery you just created on the pot body. -
Throw the Lid:
Center a smaller ball of clay (about 0.5 lb). Flatten it into a thick disc that matches your caliper measurements. -
Shape the Lid Profile:
Trim the edges of the disc so it tapers slightly to fit into the gallery. Create a slight dome shape on the top surface. -
Form the Knob:
While the clay is still attached to the hump, pinch a small amount of clay in the very center upward to form a knob. Shape it into a rounded mushroom profile.
Gallery Pro-Tip
Make your gallery ledge slightly angled downward towards the center. This helps gravity keep the lid centered and prevents it from sliding off easily.
Step 3: Trimming and Assembly
-
Dry to Leather Hard:
Allow both the pot and lid to dry until they are leather hard—firm enough to handle without deforming but still cool to the touch. -
Trim the Pot Bottom:
Place the pot upside down on the wheel. Use trimming tools to clean up the foot ring and remove excess weight from the bottom corners. -
Trim the Lid:
Place the lid upside down (resting on the knob, supported by a chuck or clay coils) and trim the underside to remove excess bulk and ensure a clean fit. -
Test the Fit:
Carefully place the lid onto the pot. It should sit flush in the gallery without wobbling. Sand lightly if needed for a perfect join. -
Bisque Fire:
Once bone dry, load the pieces into the kiln for a bisque firing (usually Cone 04 or 06).
Level Up Your Knob
Instead of a plain round knob, try sculpting a tiny animal, geometric crystal shape, or a looped handle for a unique custom touch.
Step 4: Glazing
-
Clean the Bisqueware:
Wipe the fired pieces with a damp sponge to remove any dust that might prevent glaze adhesion. -
Wax Resist:
Apply wax resist to the bottom foot of the pot and the contact points where the lid touches the gallery. I find this prevents the lid from sticking during firing. -
Apply Glaze:
Dip the pot and lid into a glossy teal glaze. Ensure an even coat. If the glaze is too thick, it may obscure the clay’s natural speckles. -
Clean Edges:
Sponge away any glaze that may have dripped onto the waxed areas or the gallery ledge. -
Final Fire:
Fire the kiln to the maturity temperature of your clay and glaze (typically Cone 5 or 6). Allow to cool completely before opening.
Once cooled, your jewelry box is ready to hold small treasures on a vanity or bedside table

The Complete Guide to Pottery Troubleshooting
Uncover the most common ceramic mistakes—from cracking clay to failed glazes—and learn how to fix them fast.
Footed Box With Ball or Coil Feet
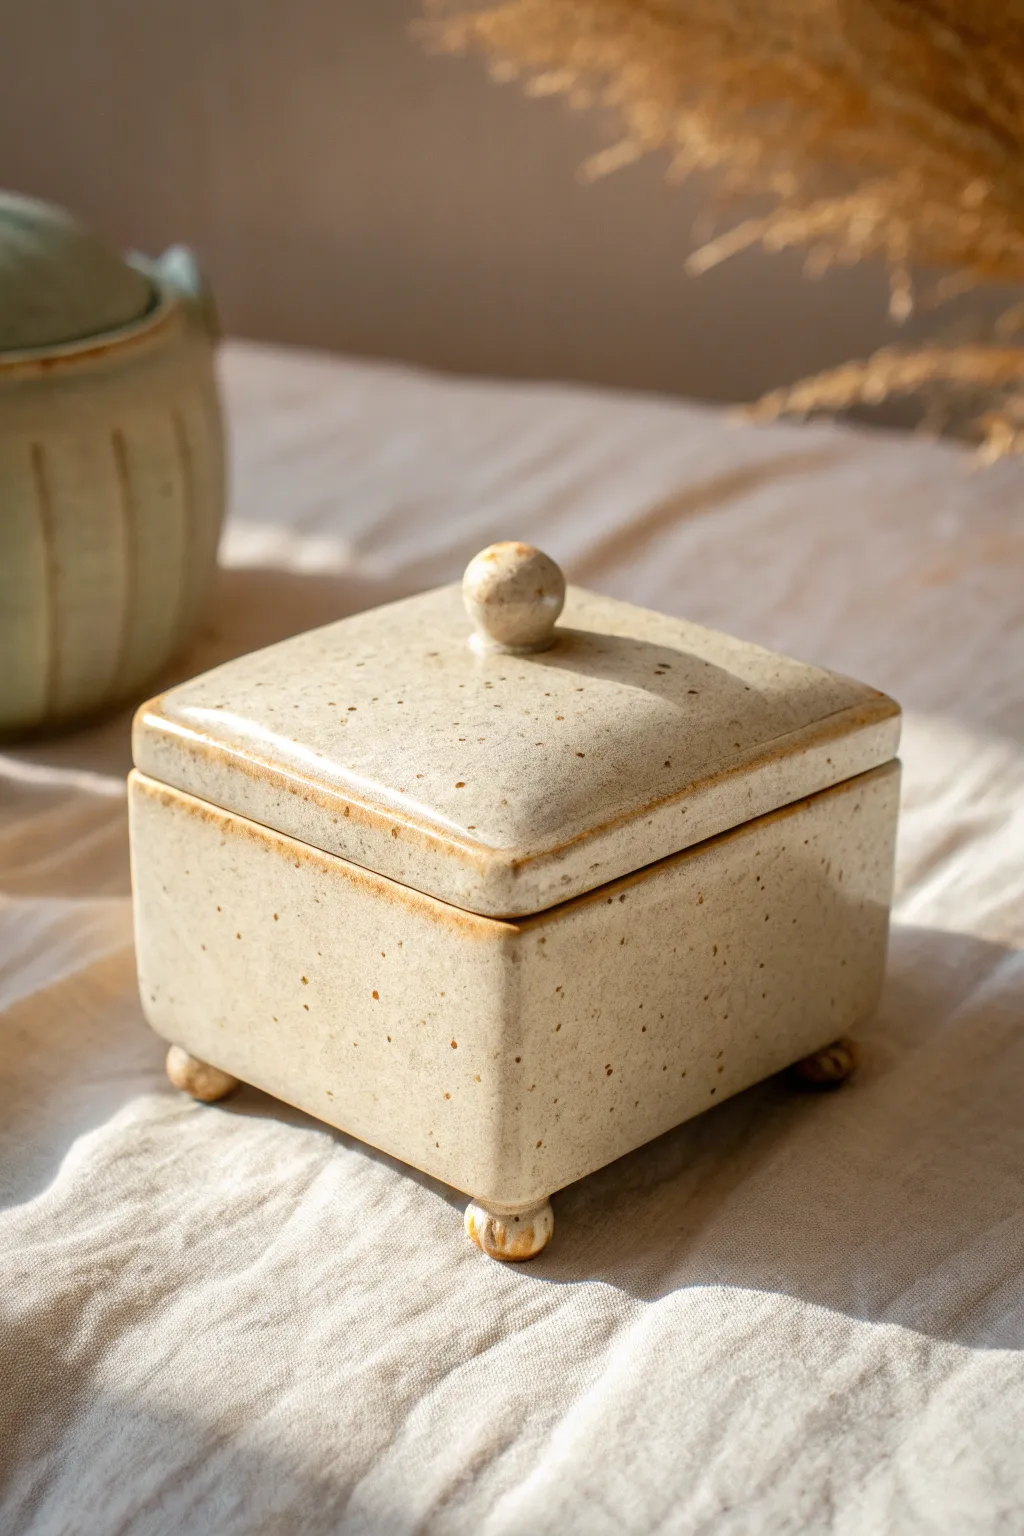
This charming footed box features a warm, speckled cream glaze highlighted by toasted edges and sturdy ball feet. Its simple square form and rugged texture make it a perfect beginner-friendly slab project for holding trinkets or jewelry.
Detailed Instructions
Materials
- Stoneware clay (speckled or buff)
- Rolling pin
- Guide strips or slats (approx. 1/4 inch thick)
- Needle tool
- Fettling knife
- Ruler
- Scoring tool (serrated rib or fork)
- Slip (clay mixed with water)
- Sponge
- Cream/Oatmeal speckled glaze
- Iron oxide wash (optional for edges)
Step 1: Preparing the Slabs
-
Roll the clay:
Begin by wedging your clay to remove air bubbles, then roll it out into a large, even slab. Use guide strips on either side of your rolling pin to ensure a consistent thickness of about 1/4 inch. -
Smooth the surface:
Before cutting, take a rubber rib or a slightly damp sponge and compress the clay slab on both sides. This removes canvas textures and aligns the clay particles which helps prevent warping later. -
Measure and cut components:
Using a ruler and needle tool, cut out your pieces: one 4×4 inch square for the base, one 4.25×4.25 inch square for the lid, and four rectangular walls that are 4 inches long and 2.5 inches high. -
Leather hard stage:
Let the cut pieces sit on a ware board until they reach a soft leather-hard state. They should be firm enough to hold their shape without slumping but still soft enough to join easily.
Warped Lid Troubles?
Dry the lid on the box! Place a piece of paper towel between the lid and box body during the drying phase. This ensures they shrink together and stay perfectly fitted.
Step 2: Assembling the Box Body
-
Miter the edges:
For a clean corner joint, I like to cut the vertical edges of the wall pieces at a 45-degree angle. You can also use a simple butt joint if you prefer, just adjust your measurements slightly. -
Score and slip:
Rough up the contact points on the base slab and the bottom/sides of your wall pieces using a scoring tool. Apply a generous amount of slip to these scored areas. -
Attach the walls:
Press the first wall firmly onto the base. Attach the second wall adjacent to it, joining the corners. Continue until all four walls are attached to the base and each other. -
Reinforce the seams:
Roll a very thin coil of clay and press it into the interior corners of the box. Smooth this coil out with a modeling tool or your finger to ensure a strong, leak-proof bond. -
Refine the exterior:
Use a paddle or flat board to gently tap the outside walls. This squares up the form and ensures the sides are straight and distinctive.
Clean Corner Pro-Tip
After joining your walls, run a lightly damp chamois strip along the rim. This compresses the clay lip better than a sponge and creates a buttery smooth, professional finish.
Step 3: Adding Feet and Lid
-
Create the feet:
Roll four equal-sized balls of clay, roughly the size of a large marble or small grape. These will become the feet that elevate the box. -
Attach the feet:
Flip the box upside down. Score and slip the four corners of the base and the clay balls. Press the balls firmly onto the corners, gently flattening the bottom of each ball so the box sits stable. -
Form the lid flange:
To keep the lid from sliding off, you need a flange. Roll a small square of clay slightly smaller than the box opening and attach it to the underside of your lid slab, or simply add small clay tabs on the underside corners. -
Curve the lid:
While the lid is still workable, gently press the center from the underside or let it slump slightly over a curved mold to give it that subtle domed shape seen in the image. -
Add the knob:
Roll another small ball of clay for the handle. Score and slip the center of the lid top and attach the ball securely.
Step 4: Finishing and Glazing
-
Soften the edges:
Once the box is fully leather hard, use a damp sponge to round over any sharp edges or corners. This gives the piece the soft, worn look shown in the photo. -
Bisque fire:
Allow the piece to dry completely, slowly, to avoid warping. Fire it in the kiln to cone 04 (or your clay’s specific bisque temperature). -
Apply accent wash:
Before dipping in the main glaze, brush a little iron oxide wash or a dark stain onto the rim, the feet, and the edges. Sponge it back so it only remains in the texture and on the very edges. -
Glaze application:
Dip or brush your speckled cream glaze over the entire piece. If you used the oxide wash, the glaze will interact with it to create those toasted, brown borders. -
Final wipe:
Wipe the very bottoms of the feet clean using a wax resist or a damp sponge so they don’t stick to the kiln shelf. -
Glaze fire:
Fire the box to the maturation temperature of your clay and glaze (likely Cone 5 or 6 for stoneware).
Once cooled, your box is ready to bring a touch of earthy elegance to your dresser or desk
Texture-Stamped Sides for an Easy Pattern
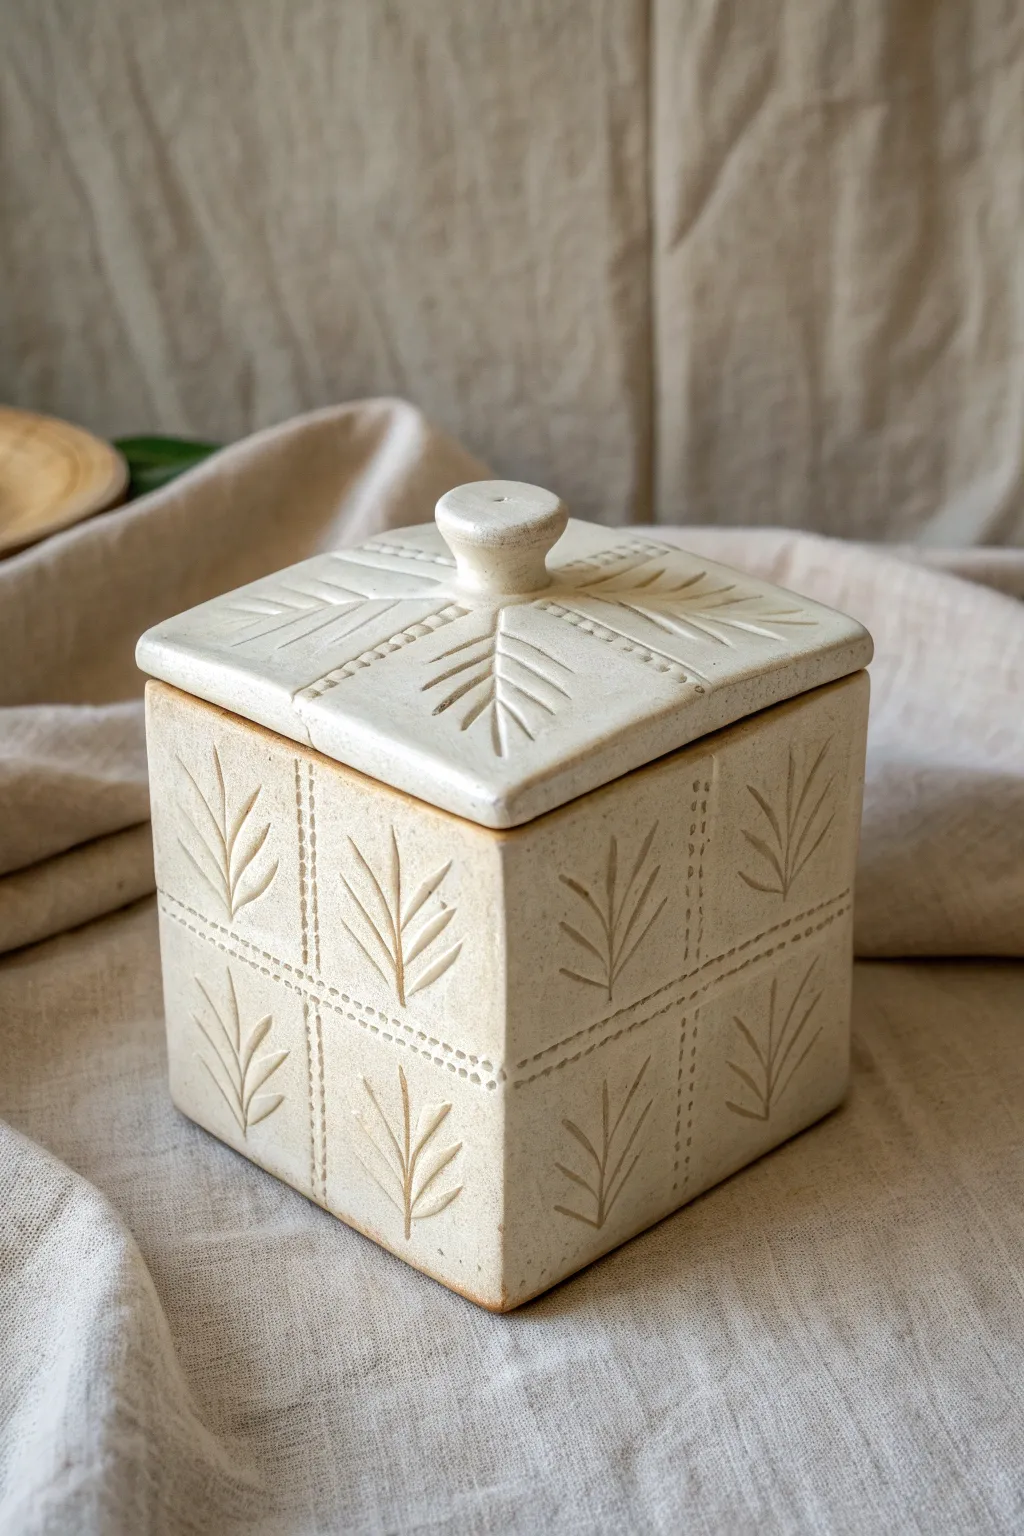
This charming lidded box combines crisp geometric structure with organic botanical patterns for a timeless look. The creamy glaze finish highlights the carved details, making it a perfect functional piece for storing trinkets or tea.
How-To Guide
Materials
- Light-colored stoneware clay or white earthenware (rolled to 1/4 inch slab)
- Square template or ruler
- Fettling knife or needle tool
- Carving tool or sgraffito loop tool
- Small round piping tip or needle tool (for dotted lines)
- Leaf/Fern stamp or carving tool for freehanding
- Scoring and slipping tools (serrated rib and slip/vinegar)
- Wooden paddle
- Cream or antique white glaze (semi-matte recommended)
- Kiln for firing
Step 1: Creating the Box Structure
-
Roll and measure:
Begin by rolling out your clay slab to an even 1/4 inch thickness. Use a large square template or ruler to measure out five squares for the box (one base and four sides) and one slightly larger square for the lid. -
Cut the components:
Using a fettling knife, cut out your squares cleanly. For the box shown, the side panels appear to be roughly 4×4 inches. Let these slabs firm up to a ‘leather hard’ state so they can stand upright without slumping. -
Bevel the edges:
For crisp corners, miter (bevel) the edges of your side walls and the base at a 45-degree angle. This joined edge will be stronger and cleaner than a simple butt joint. -
Score and slip:
Aggressively score the beveled edges of the base and the side walls. Apply slip or magic water to the scored areas. -
Assemble the walls:
Attach the four walls to the base and to each other. Press the joints firmly together. You can reinforce the interior seams with a thin coil of clay, smoothing it out completely with a wooden modeling tool. -
Refine the shape:
Use a wooden paddle to gently tap the outside walls. This helps sharpen the box’s square shape and ensures the walls are perfectly straight.
Step 2: Carving the Design
-
Mapping the grid:
Before carving, lightly trace your grid lines onto the box sides and lid. Divide each face into four equal quadrants with a cross shape. -
Creating dotted lines:
To create the stitched-look dividers, press a small, blunt tool (like the end of a paintbrush or a specialized texture wheel) into the clay along your traced grid lines. Keep the spacing consistent for a tidy appearance. -
Adding the botanical motif:
In the center of each quadrant, you will create a fern frond. You can use a pre-made stamp for this, but I like to hand-carve these v-shapes using a small loop tool for a more artisanal feel. -
Carving details:
If carving freehand, make one central vertical stem line, then carve angled strokes outward to create the leaves. Repeat this pattern in all four quadrants on every side of the box.
Clean Corner Tip
When assembling the box, use a straight edge or a carpenter’s square while the clay is leather hard to ensure your 90-degree angles are perfectly true before drying.
Step 3: Lid Construction and Finishing
-
Prepare the lid:
Take your separate lid slab and repeat the grid and botanical texture pattern on the top surface. Ensure the pattern aligns somewhat with the box sides for continuity. -
Form the knob:
Roll a small ball of clay and flatten the top slightly to create a knob. Score and slip the center of the lid and the bottom of the knob, then attach it securely. -
Add a flange:
To keep the lid from sliding off, flip the lid over and attach a small square flange (a ridge of clay) about 1/4 inch inside the perimeter, verifying it fits snugly inside the box opening. -
Drying:
Place the lid on the box to dry slowly under loose plastic. Drying them together helps prevent the box from warping out of square. -
Bisque fire:
Once bone dry, bisque fire the piece to the appropriate cone for your clay body (usually Cone 04). -
Glazing:
Apply a cream or antique white glaze. A glaze that breaks over texture is ideal here, as it will pool slightly in the carved ferns and stitch marks, darkening them to reveal the design. -
Final wipe back:
If your glaze is too thick, gently wipe the raised surfaces with a damp sponge before firing to enhance the contrast between the texture and the smooth clay. -
Glaze fire:
Fire the piece a final time according to your glaze instructions to complete the project.
Antique Effect
Apply an iron oxide wash into the textures and wipe it away before glazing. This darkens the grooves significantly, making the pattern pop beautifully.
Once fired, fill your new handmade box with treasures or display it proudly on a shelf


What Really Happens Inside the Kiln
Learn how time and temperature work together inside the kiln to transform clay into durable ceramic.
Carved Linework With Simple Sgraffito Style
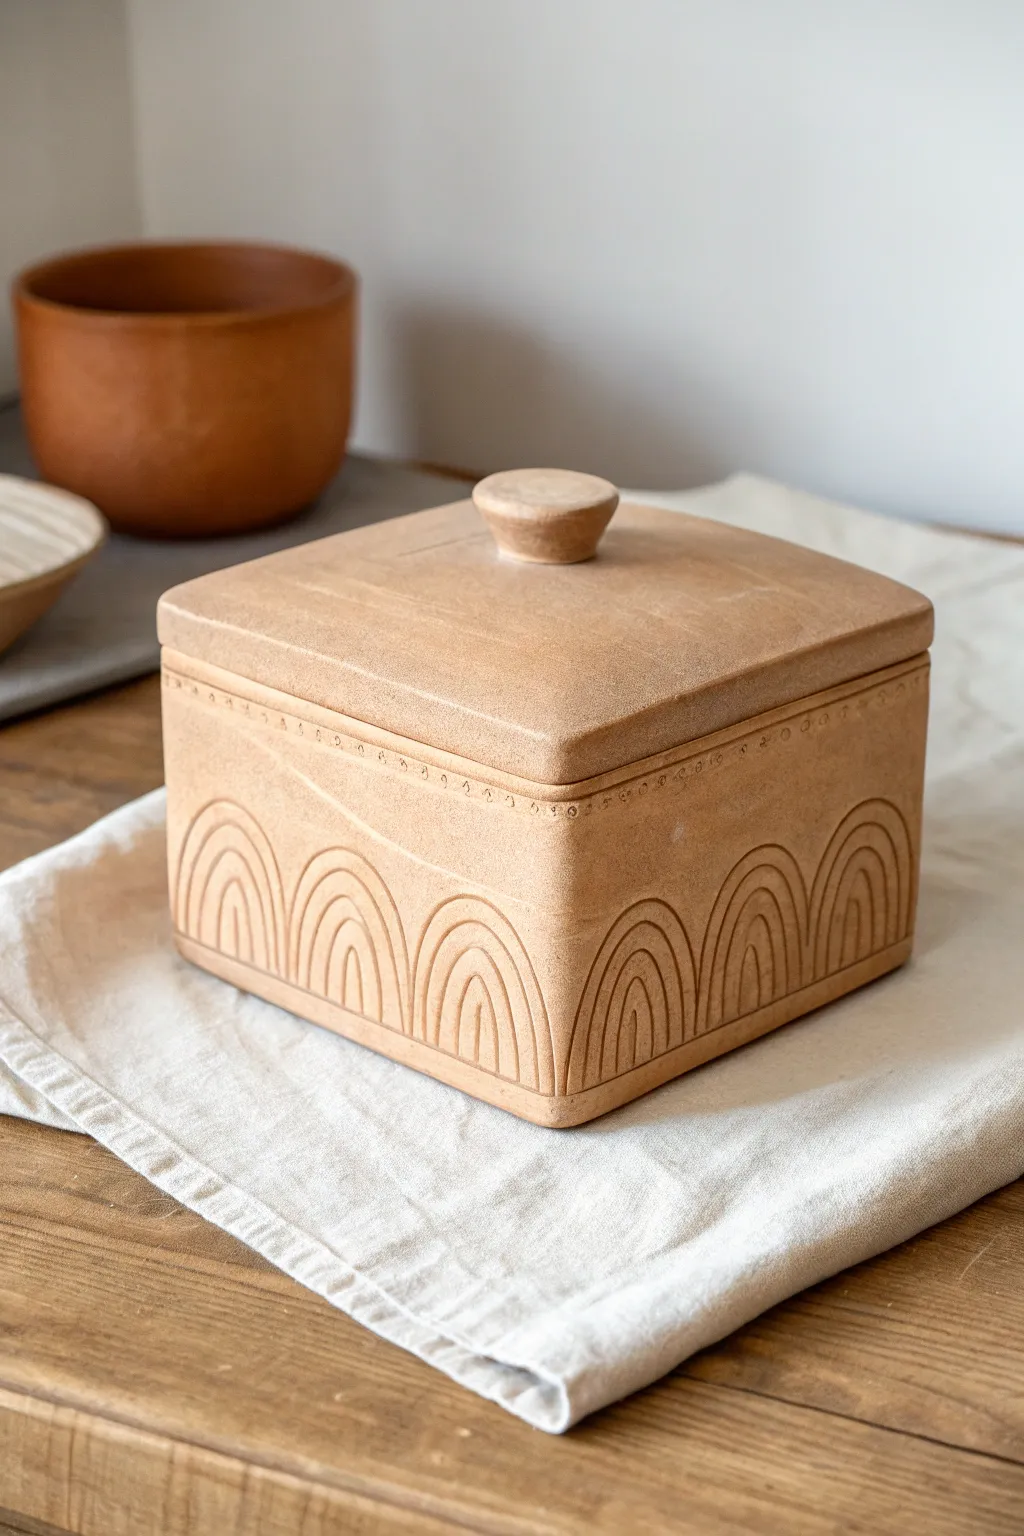
This charming lidded box combines structural slab building with delicate surface decoration reminiscent of art deco architecture. The raw, unglazed terracotta finish highlights the warmth of the clay and the precision of the carved linework.
Step-by-Step Guide
Materials
- Terracotta or stoneware clay body (fine grog)
- Rolling pin
- Two wooden thickness strips (approx. 1/4 inch or 6mm)
- canvas work surface
- Needle tool
- Fettling knife
- Ruler
- Square template (paper or cardboard, approx. 5×5 inches)
- Score and slip tool (or serrated rib)
- Slip (clay slurry)
- Loop tool (small radius)
- Wooden modeling tool
- Small sponge
Step 1: Slab Construction
-
Roll out the slabs:
Begin by wedging your clay thoroughly to remove air bubbles. Place your clay on the canvas between your two thickness strips. Roll the clay out into a large, consistent sheet. The strips will ensure your walls are perfectly even, which is crucial for a box shape. -
Cut the components:
Using your square paper template as a guide, cut out two squares for the top and bottom. Then, calculate the dimensions for your four side walls. They should be the same length as the base minus the thickness of two walls if you are overlapping them, or cut them with mitered 45-degree angles for a cleaner corner. -
Dry to leather hard:
This is the most critical patience step. Let your slab pieces sit until they become leather-hard—firm enough to hold their shape without bending, but soft enough to score and join. I usually check them after about an hour or two depending on humidity. -
Score and slip the base:
Take your bottom square and score the perimeter edges where the walls will sit. Apply a generous amount of slip to these roughed-up areas. -
Assemble the walls:
Score and slip the edges of your wall pieces. Press the first wall firmly onto the base. Add the adjacent wall, ensuring the corner seam is tight. Continue until all four walls are attached to the base and to each other. -
Reinforce the seams:
Roll a very thin coil of damp clay. Press this coil into the interior corners of the box to reinforce the joints. Smooth it out with a wooden modeling tool so it blends seamlessly into the walls. -
Construct the lid:
Take the second square slab you cut earlier. Flip it over and attach a smaller recessed square of clay (or small tabs) to the underside. This ‘flange’ will sit inside the box opening to keep the lid from sliding off. -
Form the knob:
Shape a small ball of clay into a tapered disk or knob shape. Score the center of the lid and the bottom of the knob, applying slip before pressing them firmly together. Clean up any excess slip with a brush.
Warped Walls?
If walls bow inward while building, stuff the box interior gently with crumpled newspaper or foam to support the shape while it dries to leather hard.
Step 2: Carving the Design
-
Smooth the surfaces:
Before carving, use a slightly damp sponge or a flexible rib to burnish and smooth the exterior walls. Any canvas texture left from rolling should be removed now to create a clean ‘canvas’ for your drawing. -
Mark the rim guide:
Using your needle tool and a ruler, lightly scratch a horizontal line about half an inch below the top rim of the box. This will be the border for your dot pattern. -
Add the dots:
Use a small, blunt tool—like the end of a paintbrush or a specialized dotting tool—to impress a row of small circles along the guide line you just drew. Try to keep the spacing consistent. -
Sketch the arches:
Lightly sketch the repeating arch motif along the bottom edge of the box using a needle tool. Don’t press deep yet; just lay out the spacing to ensure the arches fit evenly across the width of each side. -
Carve the main lines:
Using a small loop tool or a sharp sgraffito tool, carve over your sketched arch lines. Remove long strips of clay to create defined grooves. The depth should be consistent but not too deep that it weakens the wall. -
Add interior details:
Inside each main arch, carve two or three smaller, concentric arches. Finish the center of each motif with a small vertical line. -
Clean up the burrs:
Carving often leaves little crumbs or ‘burrs’ of clay. Wait until the piece is bone dry before brushing these away with a soft brush; trying to remove them while wet often smears the lines. -
Final drying and firing:
Allow the box to dry slowly under loose plastic for a day, then uncovered until bone dry to prevent warping. Fire gently to bisque temperature. For the look in the photo, leave the exterior unglazed or apply a clear matte glaze to the interior only.
Make it Shine
For a sleek finish, burnish the uncarved areas with the back of a spoon when leather hard. This compresses the clay and gives a soft, natural sheen after firing.
Enjoy the tactile satisfaction of storing your trinkets in a vessel built by your own hands
Raised Dot Border for a Beaded Look
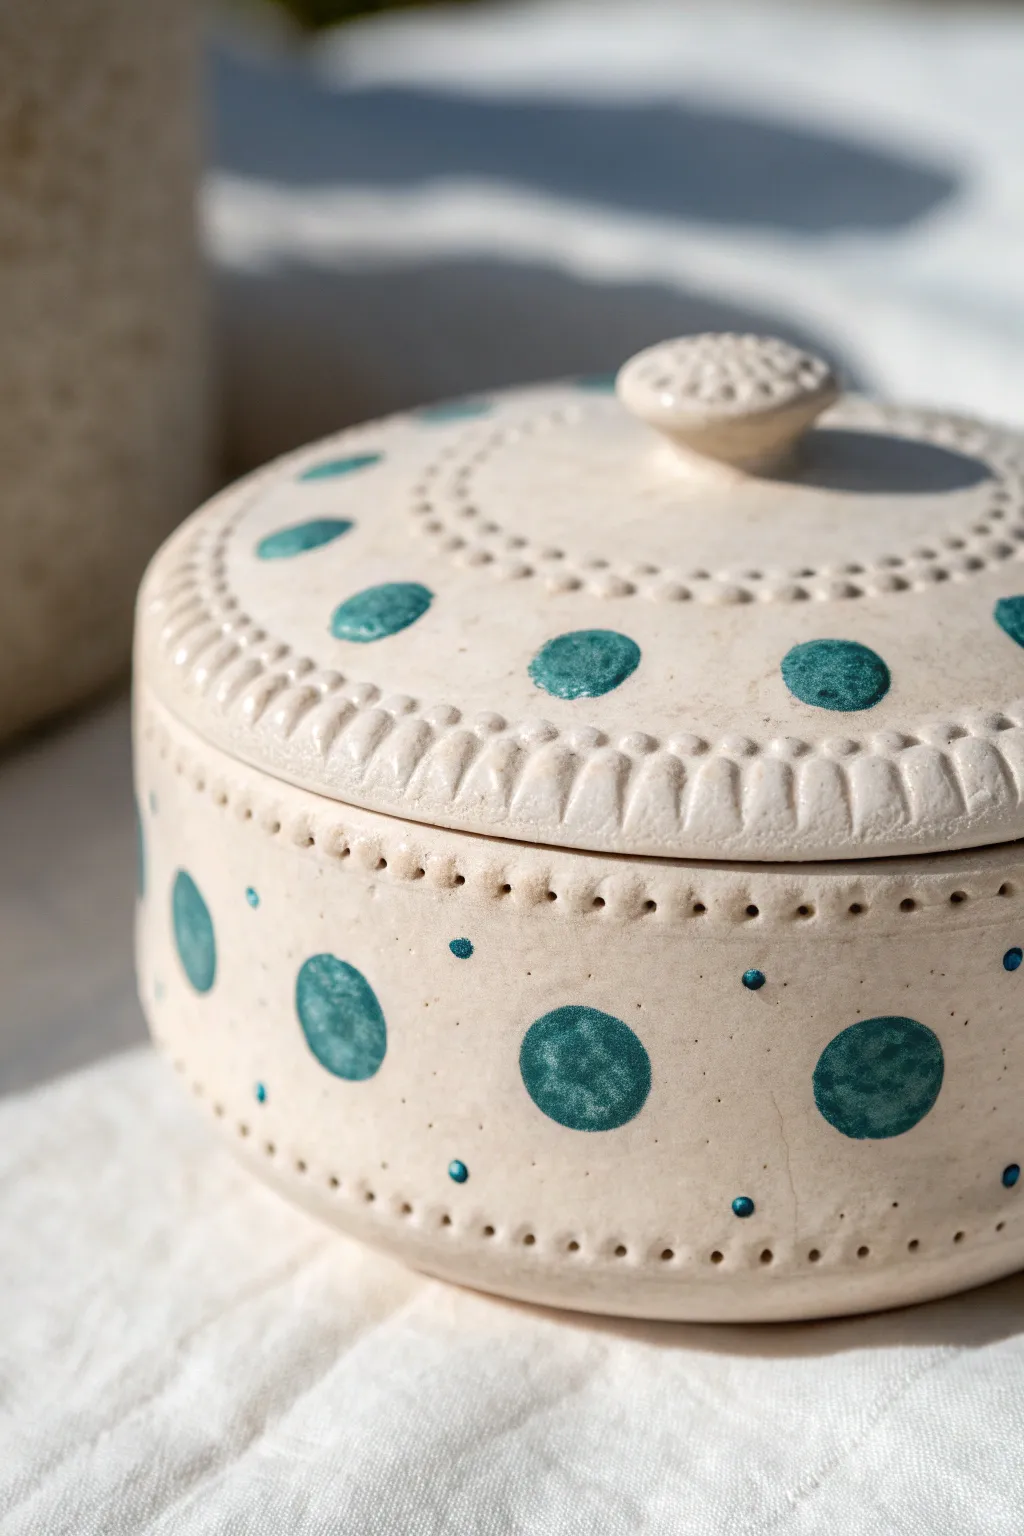
This charming lidded box combines earthy, natural clay tones with vibrant pops of teal for a design that feels both ancient and modern. The standout feature is the incredibly tactile, bead-like texture running along the rim and base, achieved through careful tool work rather than adding separate clay bits.
Step-by-Step
Materials
- Light-colored stoneware clay or white earthenware (smooth body)
- Pottery wheel (or rolling pin and slab templates for hand-building)
- Needle tool
- Small loop tool or carving tool
- Wooden modeling tool with a rounded point
- Sponge
- Teal underglaze
- Small round paintbrush
- Clear matte or satin glaze
- Kiln
Step 1: Forming the Box and Lid
-
Throw or Build the Base:
Begin by creating a cylindrical vessel. If throwing, form a cylinder with straight walls and a flat bottom. If hand-building, roll a slab, cut a rectangle and a circle, and join them to form a cylinder. Keep the walls thick enough (about 1/4 inch) to allow for carving later. -
Create a Gallery:
Ensure the rim of your cylinder is wide and flat. You can create an interior ledge (gallery) now, or rely on a flanged lid later. Smooth the rim with a chamois or sponge. -
Form the Lid:
Throw or build a flat or slightly domed lid that perfectly fits your cylinder. Add a small knob to the center. I like to keep the knob simple and rounded to match the polka dot theme. -
Leather Hard Stage:
Allow both the box and the lid to dry slowly until they reach the leather-hard stage. This is crucial—the clay must be firm enough to carve without warping, but soft enough to take an impression. -
Trim the Pieces:
Place the pieces back on the wheel (or use a banding wheel) to trim away excess weight from the bottom and refine the curve of the lid.
Uneven Spacing?
If your carved notches look uneven, don’t restart. Use a modeling tool to widen the narrower gaps slightly. The eye forgives small variations in handmade patterns.
Step 2: Creating the Beaded Texture
-
Mark the Guidelines:
Lightly scribe two parallel lines around the outer edge of the lid and the top/bottom rims of the box using a needle tool. This defines the ‘track’ where your beaded texture will go. -
Carve the Notches:
Using a small carving tool allow you to cut vertical notches between your guidelines. Remove small wedges of clay at regular intervals. The remaining clay between the cuts will become your ‘beads’. -
Round the Beads:
Take a damp sponge or a wooden modeling tool and gently round off the sharp edges of the raised clay sections you just created. This transforms them from square blocks into soft, rounded bead shapes. -
Add Punctures:
For the tiny dot texture seen on the box body, use a small, blunt tool (like the back of a drill bit or a specialized texture tool) to impress a row of small holes just below the rim and just above the base. -
Texture the Lid Center:
Repeat a smaller version of the beaded carving or simple dot impressions in a ring around the central knob for added detail.
Clean Lines
When painting the polka dots, steady your painting hand against the table or the pot itself. Use a “loading” stroke—press, swirl slightly, and lift—for rounder dots.
Step 3: Decoration and Glazing
-
Bisque Fire:
Once the piece is bone dry, fire it to bisque temperature (usually Cone 04 or 06) to prepare it for glazing. -
Clean the Surface:
Wipe the bisque-ware down with a damp sponge to remove any dust that might interfere with glaze adhesion. -
Paint Large Polka Dots:
Using a small round brush, apply teal underglaze to create large, evenly spaced polka dots around the middle of the box and on the lid. Two to three coats will ensure solid, opaque color. -
Add Tiny Accent Dots:
Use the very tip of your brush or a slip-trailing bottle to add tiny teal dots scattered between the larger ones. This varies the scale and adds whimsy. -
Apply Clear Glaze:
Once the underglaze is dry, dip or brush a clear matte or satin glaze over the entire piece. A glossy glaze works too, but a matte finish emphasizes the rustic stone-like quality. -
Final Firing:
Load the kiln carefully, ensuring the lid is not placed on the box unless the contact points are completely wax-resisted. Fire to the maturity temperature of your clay and glaze.
Now you have a delightful storage vessel that feels like a treasured artifact unearthed from the past

TRACK YOUR CERAMIC JOURNEY
Capture glaze tests, firing details, and creative progress—all in one simple printable. Make your projects easier to repeat and improve.
Lid Medallion in Low Relief
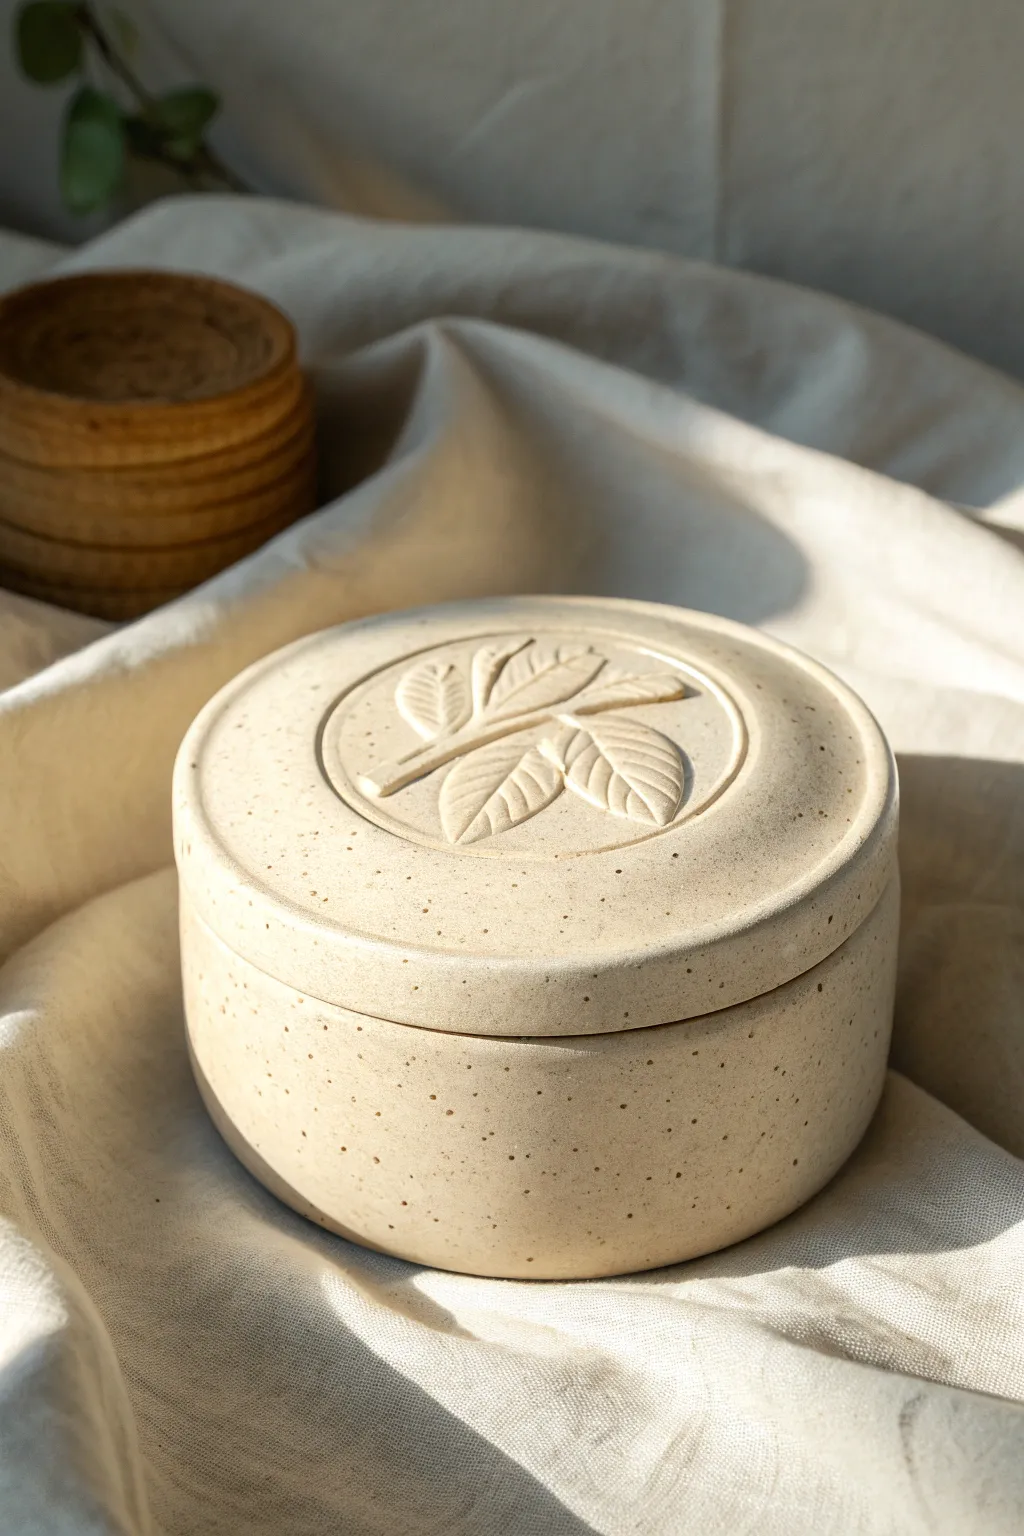
This elegant cylindrical box relies on the beauty of speckled stoneware clay and a subtle, nature-inspired embellishment. The centerpiece is a delicately carved leaf medallion on the lid, created using low-relief techniques to maintain a clean, minimalist profile.
Step-by-Step Tutorial
Materials
- Speckled buff stoneware clay
- Rolling pin
- Canvas work surface
- Circle cutter or template (approx. 4-inch diameter)
- Fettling knife
- Needle tool
- Wooden modeling tool (flat edge)
- Small loop tool or carving tool
- Scoring tool (serrated rib)
- Slip (clay mixed with water)
- Sponge
- Clear matte glaze
Step 1: Forming the Base & Lid
-
Prepare the slabs:
Begin by wedging your speckled clay to remove air bubbles. Roll it out into an even slab about 1/4 inch thick. Compress the slab on both sides with a rib to prevent warping later. -
Cut the components:
You will need two circles of identical size for the base and the lid top. Use your circle cutter or a paper template and needle tool to cut these out. Then, cut a long rectangular strip for the wall of the box. Measure the circumference of your base circle to determine the length needed. -
Attach wall to base:
Score the outer edge of your base circle and one long edge of your rectangular strip. Apply slip generously to both scored areas. -
Secure the join:
Wrap the strip around the base circle, pressing firming to create a tight seal. Score and slip the vertical seam where the wall ends meet, blending the clay together on both the inside and outside so the seam disappears. -
Create the lid flange:
To make the lid fit securely, you need an inner flange. Roll a narrower strip of clay and attach it to the underside of your lid circle, inset slightly from the edge so it will slot inside the box walls. Test the fit gently; it should be snug but not tight. -
Refine the form:
Once the basic structure is assembled, use a damp sponge to smooth all edges. Pay special attention to the rim of the box and the edge of the lid to ensure they are rounded and pleasant to touch.
Sticky Lid Syndrome?
If your lid gets stuck during drying, place a piece of newspaper or thin plastic between the lid and box base. This creates a barrier while allowing them to dry together to maintain shape.
Step 2: Carving the Medallion
-
Define the medallion area:
On the top of the lid, lightly trace a smaller circle in the center using a compass or a smaller circular object. This will be the border of your relief design. -
Carve the recess:
Using a small loop tool, carefully carve away a thin layer of clay inside this traced circle. You want to lower the background slightly, leaving a raised rim around the medallion. -
Sketch the botanical motif:
Wait until the clay is leather-hard—this is crucial for clean carving. Lightly scratch your leaf design into the recessed circle with a needle tool. Keep the design simple: a central stem with paired leaves works beautifully. -
Excavate the background:
I prefer to use a fine loop tool here to carve away the negative space around the leaves. You aren’t removing the leaves themselves; you are removing the clay *around* them to make them appear raised. -
Shape the leaves:
Use a wooden modeling tool to gently round the edges of your raised leaves, giving them a soft, organic curvature rather than sharp, square edges. -
Add veins:
With a sharp needle tool or knife, incise fine lines for the central vein and side veins on each leaf. Press gently to create distinct but delicate marks. -
Final smoothing:
Use a soft brush or your finger to smooth away any burrs or clay crumbs created during carving. The surface should look polished before firing.
Step 3: Firing and Glazing
-
Bisque fire:
Allow the piece to dry completely slowly to avoid cracking. Fire it to cone 04 (or your clay body’s bisque temperature). -
Apply clear glaze:
Dip or brush a clear matte glaze over the entire piece. The clear glaze is essential as it protects the surface while allowing the natural speckles of the clay to show through. -
Glaze wiping:
Ensure the bottom of the box and the contact points where the lid meets the box are free of glaze. Use a sponge to wipe these areas clean to prevent the lid fusing to the base. -
Final firing:
Fire the piece to the maturity temperature of your stoneware clay (typically cone 5 or 6). This high fire will bring out the rich, toasted color of the speckles.
Make It Pop
Apply a dark underglaze or wash into the carved crevices of the leaves, then sponge it off the high points before clear glazing. This accentuates the depth of your relief carving.
Once cooled, your box is ready to hold small treasures while displaying a quiet, earthy elegance.
Geometric Color Blocking on Lid and Base

Embrace the warmth of terracotta and sage tones with this handcrafted ceramic-style box. The design features bold, angular triangles on the body and a radiating sunburst-meets-mosaic pattern on the lid, all set against a speckled cream background.
Step-by-Step Guide
Materials
- Round paper mache or smooth wooden craft box with lid (approx. 4-5 inches diameter)
- Acrylic paints: Cream/Off-white, Terracotta/Rust Orange, Sage Green
- Stiff synthetic flat brushes (small and medium)
- Very fine detail brush
- Pencil and eraser
- Ruler or flexible measuring tape
- Matte finish spray sealant or varnish
- Fine grit sandpaper (for base prep)
- Small wooden bead or knob (if your box doesn’t have a handle)
- Strong craft glue (e.g., E6000)
Step 1: Base Preparation
-
Sand the Box:
Begin by lightly sanding your paper mache or wooden box to remove any rough textures or manufacturing seams. Wipe away the dust with a barely damp cloth. -
Attach the Handle:
If your box lid is flat, glue a small wooden bead or knob to the exact center. Let the glue cure completely according to the manufacturer’s instructions before painting. -
Apply the Base Coat:
Paint the entire box—inside and out—with your cream or off-white acrylic paint. You want a solid, opaque finish, so plan on applying 2-3 coats. -
Create the Speckled Effect:
To mimic the look of stoneware clay visible in the photo, mix a tiny drop of brown paint with water. Load an old toothbrush, run your thumb over the bristles, and flick tiny specks of paint onto the dried cream base. Keep it subtle.
Step 2: Drafting the Design
-
Mark the Lid Center:
Using the knob as your anchor, lightly pencil a circle around the base of the knob to create the central ring border. -
Draw Radiating Lines:
Lightly sketch lines radiating from that center circle to the edge of the lid, dividing it into equal pie slices. Aim for 8 or 10 sections depending on the size of your lid. -
Sketch Lid Geometry:
In alternating sections, sketch a diamond or trapezoid shape near the outer edge (these will be green). In the gaps between them, sketch thin, radiating spokes (these will be rust). -
Map the Main Body:
Move to the side of the box. Measure the circumference and divide it into equal segments. Mark these intervals lightly with a pencil. -
Draw Triangles:
Connect your marks to form large triangles. Alternate their orientation: one pointing up, the next pointing down. This creates the alternating zigzag pattern seen on the base.
Uneven Lines?
If you struggle with freehand painting, use low-tack washi tape or painter’s tape to mask off the triangles before painting for crisp, sharp edges.
Step 3: Painting the Motifs
-
Mix Your Palette:
Prepare your Sage Green and Terracotta/Rust paints on a palette. Add a tiny drop of water to improve the flow, making it easier to get sharp edges. -
Paint the Green Lid Segments:
Using a small flat brush, fill in the geometric shapes near the edge of the lid with Sage Green. Use the flat edge of the brush to keep the lines straight. -
Paint the Rust Details:
Switch to the Terracotta paint. Carefully fill in the central circle around the knob and the radiating spokes between the green shapes. -
Start the Body Pattern:
On the side of the box, identify which triangles should be green. I find it helpful to mark them with a tiny dot of paint first so I don’t lose track of the pattern. -
Fill the Green Triangles:
Paint the green triangles on the body. Do not worry about perfect opacity on the first pass; a second coat will look smoother. -
Fill the Rust Triangles:
Once the green is dry to the touch, fill in the adjacent alternating triangles with the Terracotta paint.
Ceramic Texture Hack
Mix a teaspoon of baking soda into your acrylic paint before applying. This creates a grainy, stoneware-like texture that feels like real pottery.
Step 4: Finishing Touches
-
Clean Up Edges:
Inspect your geometric shapes. If any paint bled or lines look wobbly, use your cream base color and a detail brush to ‘cut back’ into the shapes and straighten the edges. -
Texturize (Optional):
For a more rustic, hand-painted look, you can dry-brush a tiny bit of a lighter shade over the green and rust areas to give them dimension. -
Erase Guide Lines:
Once the paint is 100% dry, gently erase any visible pencil marks. Be careful not to rub off the paint. -
Seal the Project:
Take the box to a well-ventilated area and apply a matte spray varnish. This protects the paint and unifies the sheen, making it look more like fired ceramic.
Now you have a geometric storage container that adds a touch of artisan charm to your shelf
Scalloped Rim for a Soft, Vintage Edge
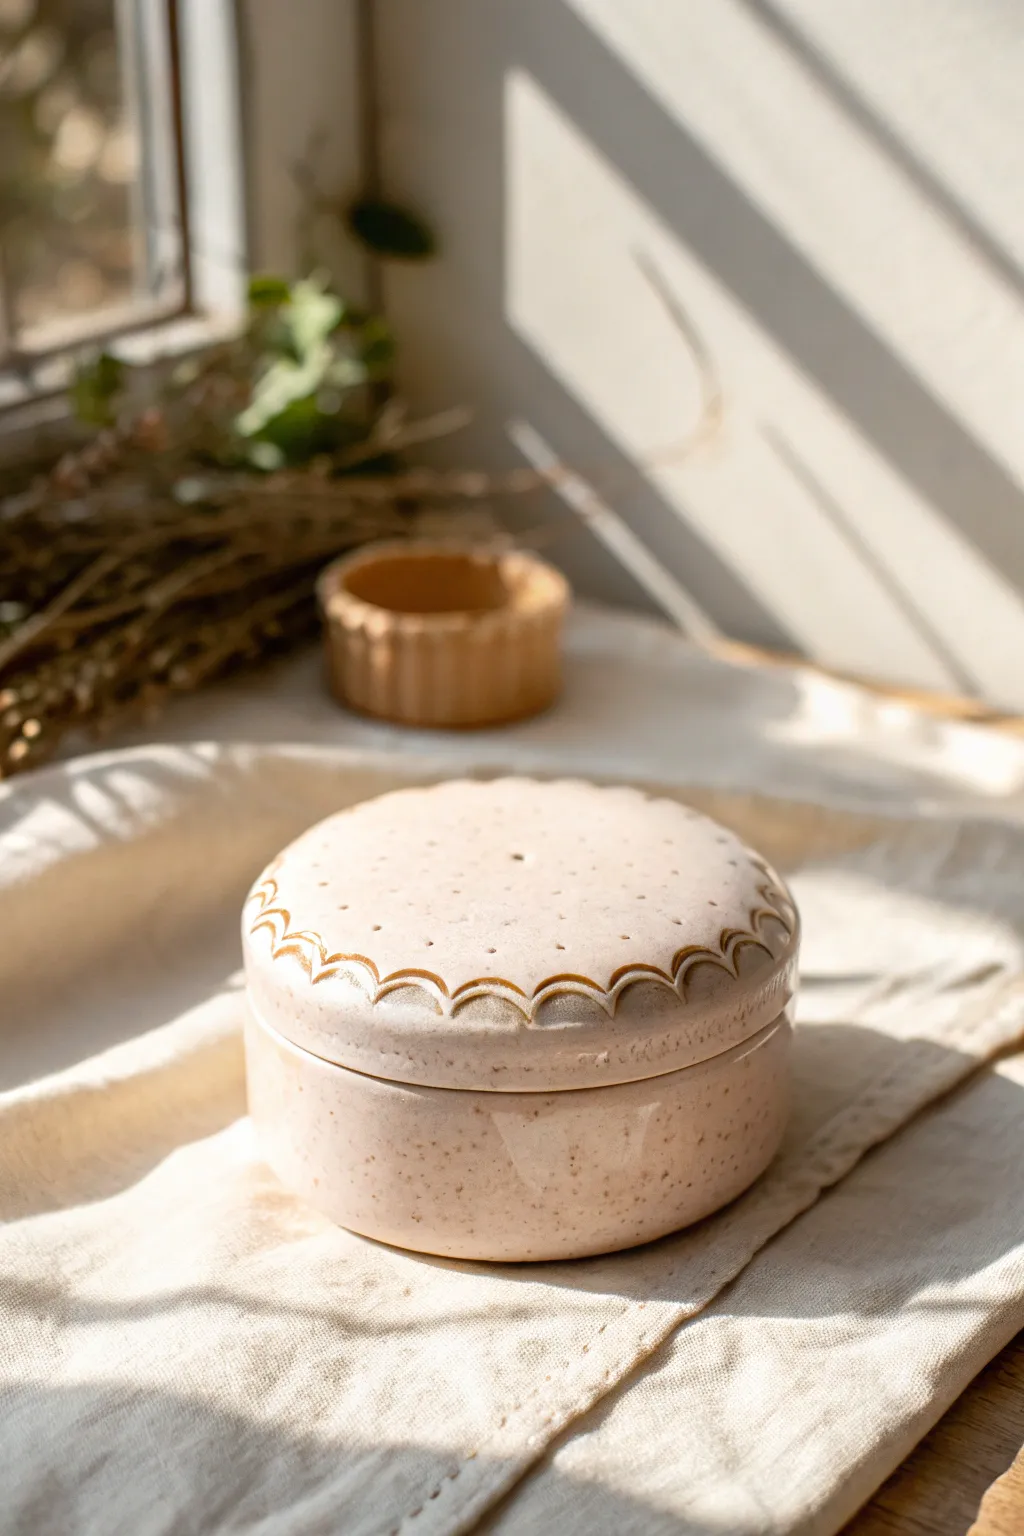
This charming lidded box combines simplicity with a touch of detail, featuring a hand-carved scalloped pattern and delicate pin-prick texture. The speckled clay body shines through a translucent glaze, creating a soft, vintage aesthetic perfect for holding jewelry or keepsakes.
Detailed Instructions
Materials
- Speckled stoneware clay (white or buff)
- Pottery wheel
- Throwing tools (rib, sponge, wire cutter)
- Calipers
- Trimming tools (loop tool)
- Needle tool or small etching tool
- Carving tool (small loop or specialized fluting tool)
- Small paintbrush & water
- Translucent white or clear glaze
- Kiln
Step 1: Throwing the Body & Lid
-
Throw the base:
Begin by centering about 1-1.5 lbs of speckled clay on your wheel. Create a cylinder that is slightly wider than it is tall, aiming for straight walls and a flat, distinct bottom inside. -
Create the gallery:
Using a wooden tool or your fingers, split the rim of the cylinder slightly or compress it downwards to create a strong, flat edge where the lid will sit. Measure the outer diameter with calipers before cutting it off the bat. -
Throw the lid:
Center a slightly smaller amount of clay (roughly less than 1 lb). Throw a shallow bowl shape upside down, ensuring the rim matches the measurement you took from the base. -
Measure for fit:
Use your calipers to constantly check the lid’s width against the base’s measurement. It’s better to leave the lid slightly wider, as you can trim it down later. -
Dry to leather hard:
Allow both pieces to dry slowly until they reach a leather-hard state. They should be firm enough to handle without deforming but soft enough to carve easily.
Master the Scallop
Practice your carving on a scrap slab first. V-shaped gouges create deeper shadows than U-shaped ones, making the pattern pop more under glaze.
Step 2: Trimming & Fitting
-
Trim the base:
Invert the base onto the wheel head, secure it with clay lugs, and trim away excess weight from the bottom and sides to refine the silhouette. -
Trim the lid’s seat:
Place the lid upside down (dome relative to the wheel head) and trim the underside. Carve a flange or ledge that will slot perfectly inside the gallery of your base. -
Refine the lid curve:
Flip the lid over (you may need a chuck or a foam bat) to trim the top surface into a gentle, smooth dome shape. -
Final fit check:
Place the lid onto the base. If it’s too tight, carefully trim or sand the flange slightly. The fit should be snug but not sticky.
Lid Rocking?
If the lid rattles or rocks after trimming, apply a small amount of grinding paste (valve grinding compound) between the specific contact points and twist back and forth.
Step 3: Carving the Scallops
-
Mark the spacing:
Lightly mark even intervals around the circumference of the lid’s rim using a needle tool. I find measuring tape helps keep the spacing symmetrical. -
Outline the scallops:
Draw faint semicircles connecting your interval marks along the edge of the lid to serve as carving guides. -
Carve the relief:
Using a small loop tool, carve away the negative space just outside your drawn scallops. Angle the cut slightly inward to create a shadowed, 3D effect. -
Add detail lines:
Use a sharp needle tool or etching tool to scribe a double line following the curve of each scallop, enhancing the definition. -
Texture the surface:
Randomly prick the top surface of the lid with a needle tool to create tiny decorative holes that complement the clay’s natural speckles. -
Smooth the edges:
Gently run a damp sponge or finger over the carved areas to soften any sharp burrs without erasing the crispness of the design.
Step 4: Glazing & Firing
-
Bisque fire:
Once the piece is bone dry, fire it in the kiln to cone 04 (or your clay’s specific bisque temperature). -
Apply wax resist:
Paint wax resist on the gallery of the base and the flange of the lid where the two clay bodies touch to prevent them from fusing during the glaze firing. -
Glaze application:
Dip or brush a translucent white or clear glaze over the entire piece. The translucent quality is key to letting the speckles and carving show through. -
Wipe back detail:
If the glaze pools too thickly in the carved lines, gently wipe a little away with a damp sponge to ensuring the scallop definition remains sharp. -
Final firing:
Fire the piece to maturity (typically cone 5 or 6 for stoneware). Be careful not to over-fire if your glaze is very runny.
Now you have a beautifully textured ceramic box ready to store your most precious items
Ribbon or Bow Lid Topper
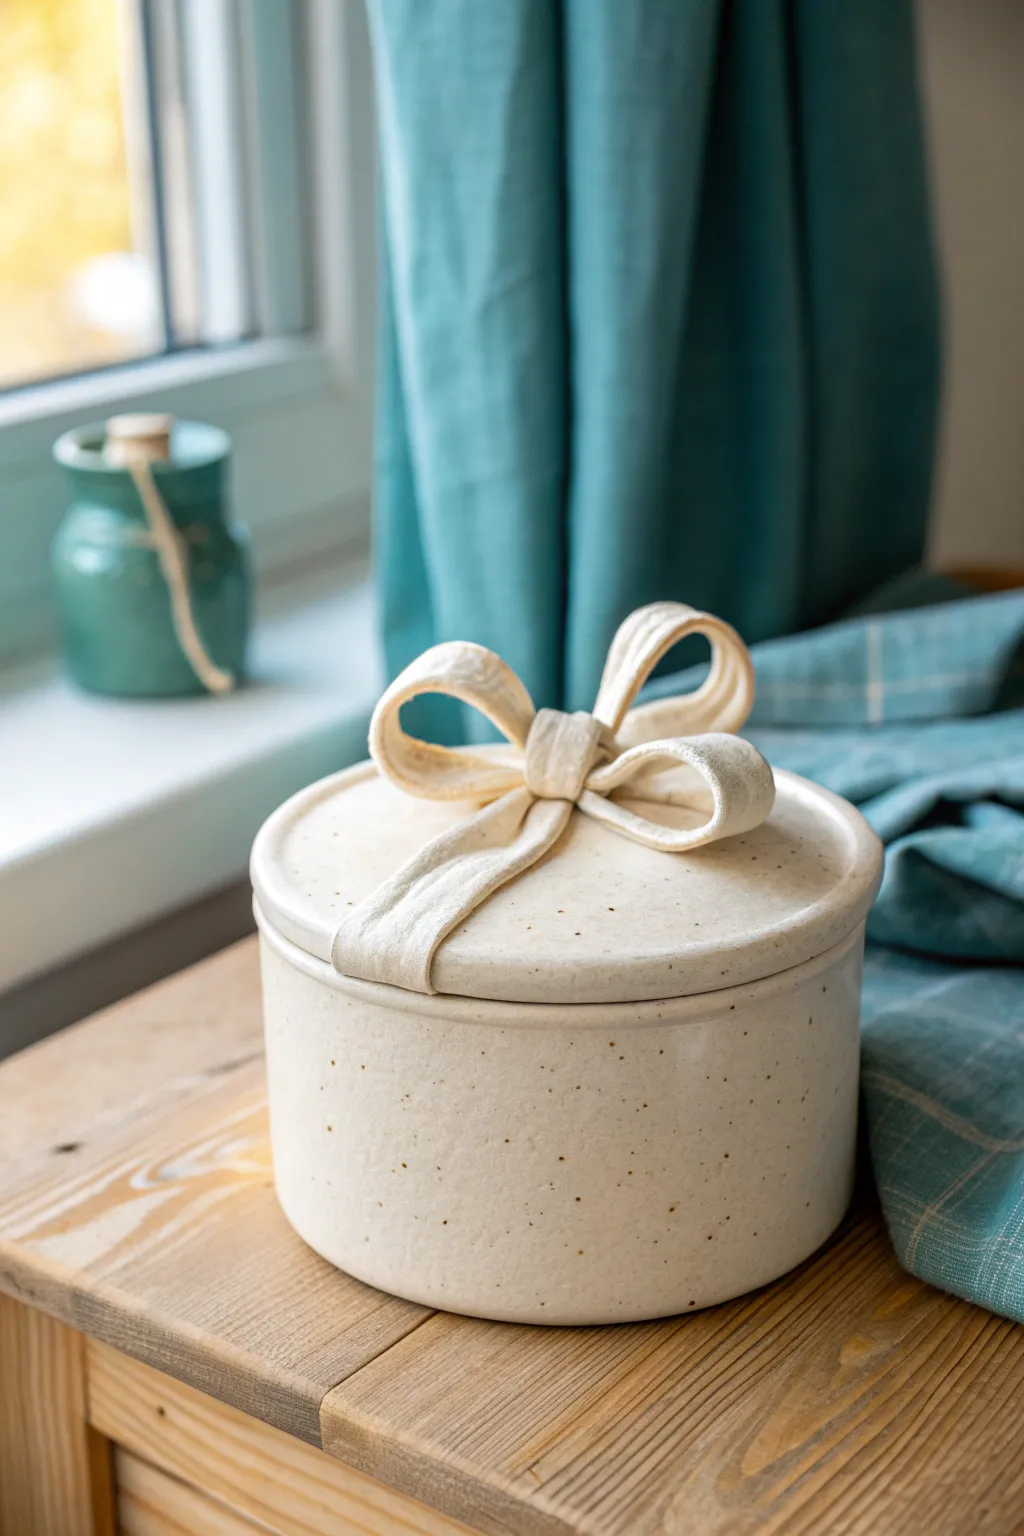
This charming lidded jar mimics the look of a wrapped present with a permanently tied bow sculpted directly onto the lid. The speckles in the clay give it a rustic, vanilla-bean appearance that feels cozy and timeless.
Step-by-Step Guide
Materials
- Speckled cream stoneware clay (e.g., Laguna Speckled Buff)
- Pattern template (circle for base and lid, rectangle for walls)
- Rolling pin
- Guide sticks or slab roller (approx. 1/4 inch thickness)
- Needle tool or fettling knife
- Score and slip tool (serrated rib)
- Slip (liquid clay)
- Wooden modeling tool
- Soft sponge
- Clear matte glaze
Step 1: Forming the Cylinder Body
-
Roll the Slabs:
Begin by rolling out your speckled clay into an even slab using guide sticks to ensure a consistent 1/4 inch thickness. Smooth both sides with a rib to compress the clay particles. -
Cut the Components:
Using your templates, cut out two identical circles (one for the base, one for the lid) and a long rectangle for the cylinder walls. -
Form the Wall:
Score and slip the short ends of your rectangle. Curl the slab into a cylinder, overlapping the scored ends slightly, and press them firmly together to create a seam. -
Refine the Seam:
Use a wooden tool to blend the seam vertically, both inside and out, until it disappears, then support the wall while gently reshaping it into a perfect circle. -
Attach the Base:
Score and slip the bottom edge of your cylinder and the outer rim of your base circle. Place the cylinder on top and press down firmly to secure the join. -
Clean the Join:
Roll a very thin coil of clay and press it into the interior seam for extra strength, smoothing it out completely with your finger or a tool.
Supporting the Loops
While working, tuck small balls of crumpled paper or plastic wrap inside the bow loops. This supports the clay’s weight against gravity until it stiffens up.
Step 2: Creating the Lid and Bow
-
Prepare the Lid:
Take your second clay circle and create a small flange on the underside. You can do this by attaching a slightly smaller ring of clay underneath so the lid sits snugly inside the jar rim. -
Cut the Ribbon Strips:
Roll out a fresh, slightly thinner slab for the bow. Cut four strips: two for the ‘flat’ ribbon across the lid, and two longer ones for the loops. -
Attach the Base Ribbon:
Score a cross shape onto the top of your lid. Lay the two flat strips perpendicular to each other, pressing them down so they look like ribbon wrapping the box. Trim any overhang flush with the lid edge. -
Form the Loops:
Take the longer strips and fold them into loop shapes. I like to pinch the ends together to create that fabric-like gather before attaching them. -
Attach the Bow:
Score the center of the cross heavily. Place your loops meeting in the center. Roll a small ‘knot’ piece of clay to cover the center join and press it down securely. -
Sculpt the Details:
Use a modeling tool to gently carve shallow grooves into the ribbon loops, mimicking the tension and fold of real fabric. -
Smooth and Refine:
Use a damp sponge to smooth all sharp edges on the box rim and the bow loops. Ensure the bow is securely attached but still looks lofty and delicate.
Step 3: Firing and Glazing
-
Slow Drying:
Cover the piece loosely with plastic to dry very slowly. The differing thickness of the bow and lid can cause warping if dried too fast. -
Bisque Fire:
Once bone dry, bisque fire the piece to the appropriate cone (usually Cone 04) for your specific clay body. -
Glazing:
Dip or brush a clear matte glaze over the entire piece. This highlights the natural speckles without obscuring the delicate modeling of the bow. -
Final Firing:
Glaze fire to maturity (likely Cone 5 or 6). Ensure the lid is fired separately or with a generous amount of wax resist on the contact points.
Preventing Lid Lock
If firing the lid ON the jar, use a generous layer of alumina hydrate or wax resist on the rim to prevent them from fusing together permanently.
Now you have a perfect keepsake container that looks like a gift that never needs unwrapping
Flower Bloom Lid With Petal Layers

This elegant trinket box captures the heavy, organic feel of stoneware with a delicate, blooming centerpiece. The soft peach-pink glaze melts beautifully over the layered clay petals, creating a functional yet artistic home for your smallest treasures.
Detailed Instructions
Materials
- White low-fire earthenware clay or air-dry clay (for a non-fired version)
- Circle cutters (various sizes)
- Rolling pin
- Pottery sponge
- Scoring tool or needle tool
- Slip (clay mixed with water)
- Small paintbrush
- Peach/Pink ceramic glaze (e.g., Mayco or Amaco)
- Clear gloss glaze
- Gold luster or gold acrylic paint (for center accents)
- Canvas working mat
Step 1: Forming the Base Box
-
Roll the Slabs:
Begin by rolling out your white clay on a canvas mat to an even thickness of about 1/4 inch. You will need enough for the base, the walls, and the lid. -
Cut the Base Circles:
Use your main circle cutter (about 4 inches diameter) to cut two identical circles. One will be the floor of the box, and the other will become the lid. -
Create the Wall Strip:
Cut a long rectangular strip of clay, approximately 1.5 inches tall and long enough to wrap around the circumference of your base circle with a slight overlap. -
Attach the Walls:
Score the outer edge of the base circle and one long edge of your rectangular strip. Apply slip to the scored areas. Wrap the strip around the base, pressing firmly to join them. -
Smooth the Seams:
Blend the vertical seam where the wall overlaps and the horizontal seam connecting the wall to the base. Use a damp sponge to smooth everything out until it looks like a single, seamless cup. -
Add the Lid Flange:
Flip the lid circle over. Roll a thin coil of clay and attach it to the underside of the lid, slightly inset from the edge. This flange keeps the lid from sliding off the base.
Step 2: Sculpting the Flower
-
Prepare the Petals:
Roll a thin slab of clay (thinner than your box walls) and cut out roughly 12-15 teardrop shapes in graduating sizes—large, medium, and small. -
Shape the Outer Petals:
Take the largest petals and gently pinch the pointed ends. Using your thumb, press the center of each petal to cup it slightly, giving it a natural, curved look. -
Attach the First Layer:
Score and slip the center of the lid. Arrange the largest petals in a circle, pressing the pointed ends into the center point. I like to lift the tips slightly so they don’t lie completely flat. -
Build the Inner Layers:
Repeat the shaping process with the medium petals, placing them in a second ring inside the first, offsetting them so they sit in the gaps of the previous layer. -
Create the Center Bud:
Place the smallest petals in the very center, tighter together to form a bud. Use a needle tool to create a textured, pollen-like center in the very middle of the flower. -
Refine and Dry:
Check the profile of the flower; gently urge petals upward if they have slumped. Let the piece dry slowly under plastic for a day, then uncover until bone dry.
Glaze Running?
If using ceramic glazes, keep the bottom 1/4 inch of the box unglazed or use a wax resist. This prevents the glaze from melting onto your kiln shelf.
Step 3: Glazing and Finishing
-
Bisque Fire (or Dry):
If using ceramic clay, bisque fire to cone 04. If using air-dry clay, ensure the piece is fully cured and hard. -
Apply Base Color:
Dilute your peach/pink glaze slightly with water. Brush a wash of this color onto the bottom half of the box base, fading it out as you go up to create a soft ombre effect. -
Glaze the Petals:
carefully paint the petals with the full-strength peach glaze. Focus the color on the tips and edges, letting the glaze pool slightly in the cupped centers of the petals for depth. -
Clear Coat:
Once the color layer is dry, dip or brush the entire piece with a clear gloss glaze. This seals the white clay and makes the pink pop. -
Final Fire:
Glaze fire the piece according to your clay’s instructions (usually cone 05/06). If using air-dry clay, use a high-gloss varnish instead. -
Gold Accent:
For that luxe finish seen in the photo, apply a touch of gold luster (requires a third firing) or gold leaf paint to the textured center of the flower.
Petal Lifter
To keep petals lifted while drying, tuck small bits of crumpled paper towel or foam under the outer edges. Remove them once the clay stiffens.
Once the final clear coat catches the light, you’ll have a stunning, blooming vessel ready to hold your jewelry.
Fruit Slice Lid for a Cute Pop of Color
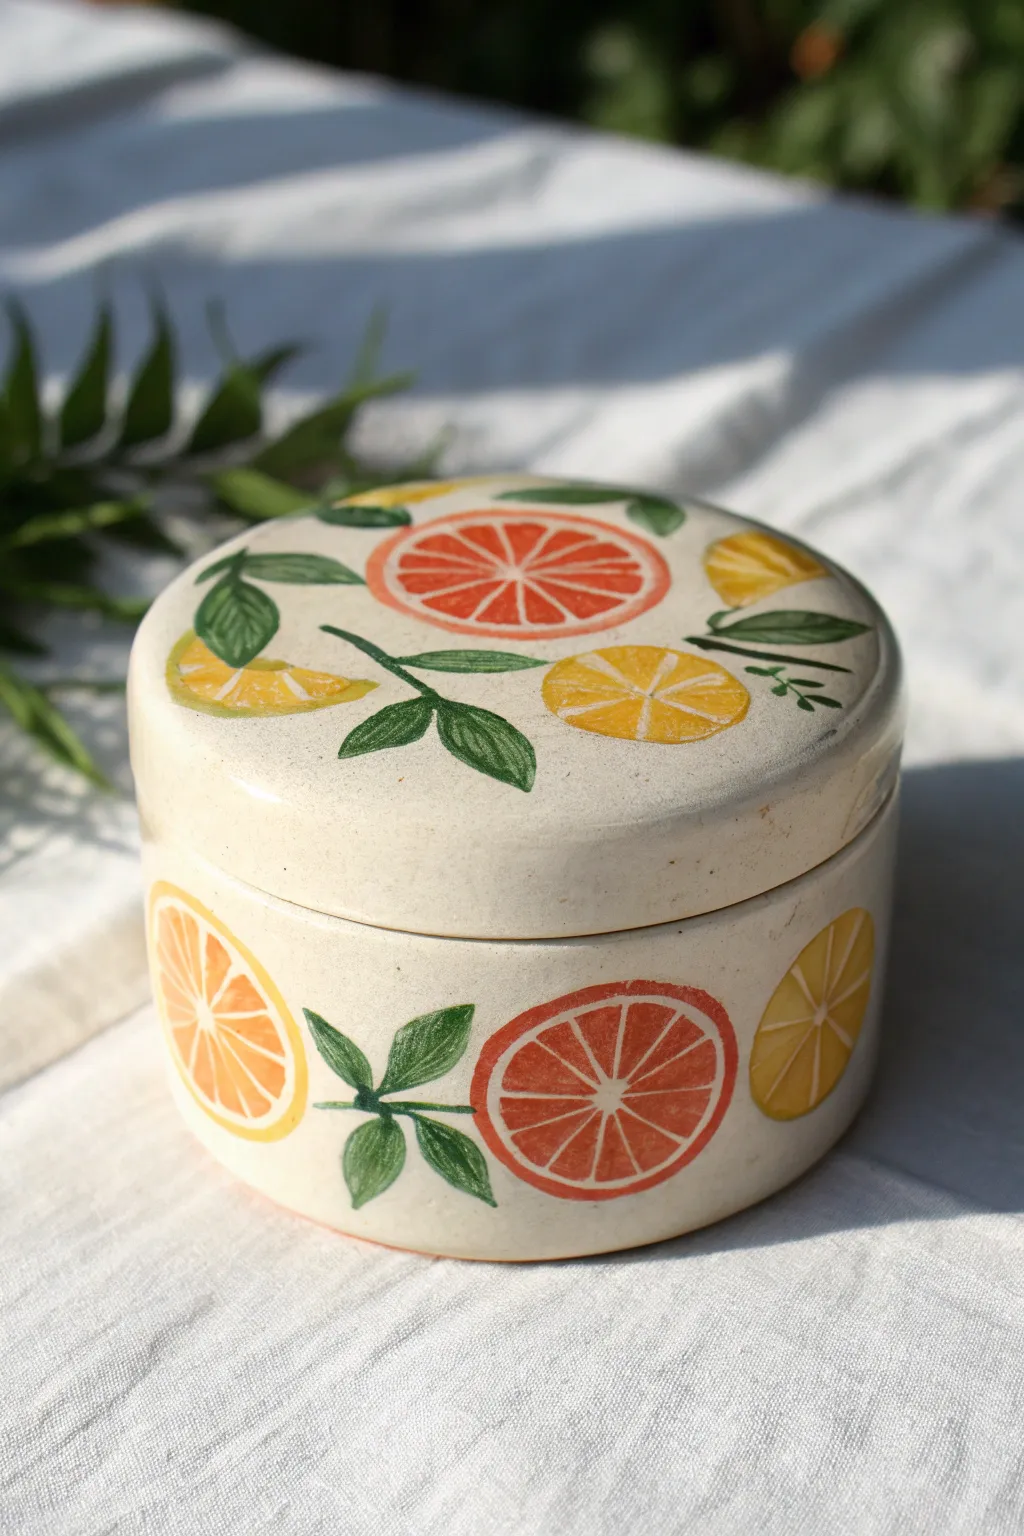
Brighten up your vanity or kitchen counter with this delightfully fresh lidded box inspired by summer markets. This wheel-thrown or hand-built vessel features vibrant grapefruit and lemon slices hand-painted in underglaze for a permanent, glossy pop of color.
How-To Guide
Materials
- White stoneware or porcelain clay
- Pottery wheel (or rolling pin and slab templates)
- Needle tool
- Trimming tools
- Sponge
- Assorted underglazes (Bright Orange, Yellow, Dark Green, Light Green, White)
- Fine detail brushes
- Clear transparent glaze
- Kiln
Step 1: Forming the Box
-
Prepare the Clay:
Begin by thoroughly wedging about 1.5 to 2 pounds of white stoneware clay to remove air bubbles. This ensures a smooth canvas for your bright citrus designs later. -
Throw the Body:
Center approximately 1 pound of clay on the wheel. Open the clay wide to create a flat bottom, then pull up short, vertical walls to form a cylinder about 3 inches high. Keep the rim slightly thick to support the lid. -
Measure the Gallery:
Using calipers, measure the inside diameter of your vessel’s rim. Write this measurement down precisely, as your lid must fit into this space. -
Throw the Lid:
Center the remaining clay. Throw a flat disc slightly wider than your vessel. Create a descending flange on the underside that matches your caliper measurement so it will sit snugly inside the box rim. -
Dry to Leather Hard:
Allow both pieces to dry slowly to a leather-hard state. This is crucial for trimming; the clay should be firm enough to handle without deforming but soft enough to carve. -
Trim the Pieces:
Place the box body upside down on the wheel and trim the bottom for a clean foot. Repeat with the lid, refining the curve of the top so it is smooth and slightly domed.
Step 2: Painting the Design
-
Sketch the Layout:
Lightly wipe the surface with a damp sponge to remove dust. Using a dull pencil, faintly sketch circles for your fruit slices and lines for stems directly onto the raw clay. Don’t worry about mistakes; the graphite will burn off in the kiln. -
Base Coat the Fruit:
Using a small round brush, fill in the large fruit circles with a solid layer of white underglaze first if your clay isn’t perfectly white. This makes the colors pop. Then, apply your base colors: bright orange for grapefruit and sunny yellow for lemons. -
Add Rind Details:
Once the base circles are dry to the touch, mix a slightly lighter shade of your fruit color. Paint a thin ring around the outer edge to define the rind/skin. -
Paint the Segments:
Load a fine liner brush with a slightly darker or more reddish-orange (for the grapefruit). Carefully paint the triangular wedge shapes inside the circle, leaving thin lines of the base color showing between them to represent the pith. -
Create the Greenery:
Paint the stems connecting the fruits using dark green underglaze. I prefer to use a single, confident stroke for the stems to keep them looking organic. -
Detail the Leaves:
Paint leaf shapes attached to the stems. Fill them with a medium green, then use a darker green and a very fine brush to add the central vein and tiny textural vein lines. -
Refine Edges:
Check your design for any blurry edges. You can use a clean, damp brush or a scratch tool to gently clean up the perimeters of the fruit slices for a crisp look.
Smudged Lines?
If underglaze smears while painting, wait for it to dry completely. Gently scratch the mistake away with an X-Acto knife or needle tool rather than wiping it.
Step 3: Firing
-
Bisque Fire:
Load your thoroughly dried detailed box and lid into the kiln for a bisque firing (typically Cone 04). This sets the shape and makes the underglaze permanent. -
Apply Clear Glaze:
Once cool, wipe the bisque ware with a damp sponge. Dip the entire piece (or brush generously) with a clear, transparent glaze. This will amplify the colors and make the surface food-safe. -
Clean the Foot:
Use a sponge to wipe all glaze off the very bottom of the box and the contact points of the lid flange. This prevents the lid from fusing to the box during firing. -
Glaze Fire:
Fire the piece again to the maturation temperature of your specific clay and glaze (often Cone 5 or 6). Allow the kiln to cool completely before opening.
Vibrant Whites
Paint 2-3 thin layers of white underglaze under the yellow lemons. Yellow is often translucent, and the white base ensures it doesn’t look muddy on the clay.
Lift the lid to reveal your treasures, enjoying the fresh burst of citrus art every time you use it
Drippy Frosting Dessert Lid With Sprinkles
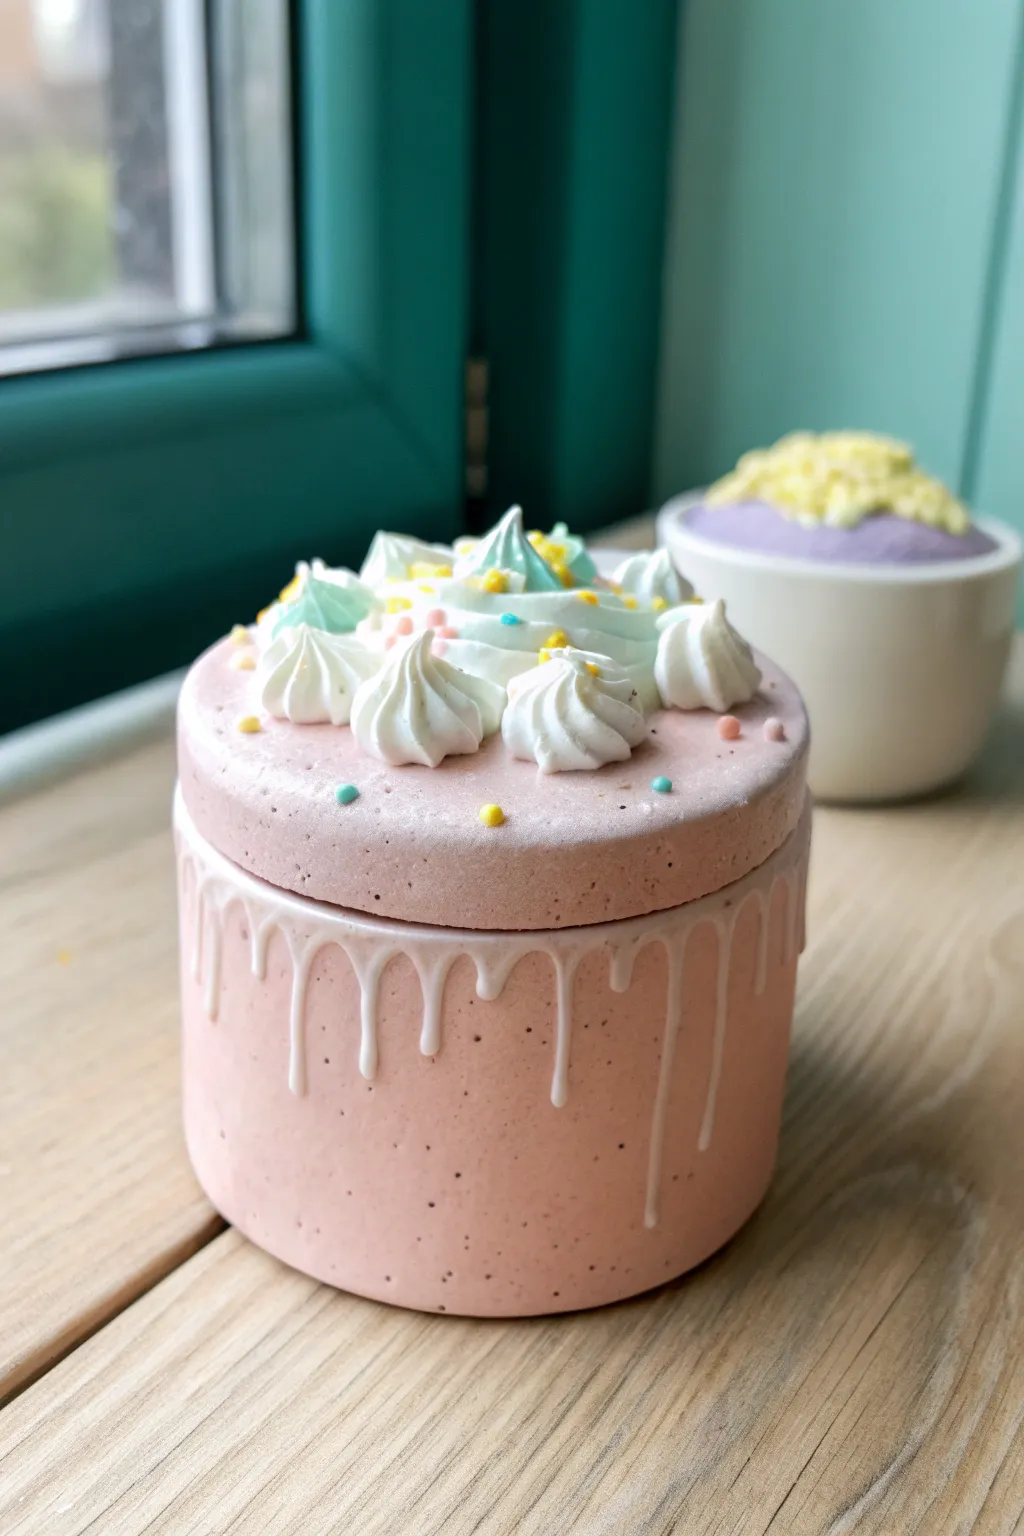
Transform a simple round container into a confectionery masterpiece that looks good enough to eat but is designed for safer keeping. This project combines smooth clay finishing techniques with realistic piping methods to create a charming storage pot topped with faux frosting and colorful sprinkles.
Detailed Instructions
Materials
- Polymer clay (Soft pink for the base)
- White liquid polymer clay (or translucent liquid sculpey mixed with white clay softener)
- White variety polymer clay (stiffer, for piping)
- Round clay cutters (sized for base and lid)
- Small star piping tip and piping bag
- Aluminum foil (for armature)
- Acrylic roller
- Needle tool
- Pastel polymer clay scraps (for sprinkles: yellow, teal, pink)
- Gloss glaze (optional)
- Oven and baking sheet
Step 1: Forming the Base Box
-
Prepare the Clay:
Condition your soft pink polymer clay thoroughly until it is pliable and warm. Roll it out into a smooth, even sheet about 1/4 inch thick to ensure sturdy walls for your box. -
Create the Base Disk:
Using your circle cutter, punch out two identical circles. Set one aside for the lid later. Place the other on your baking surface; this will be the floor of your box. -
Build the Walls:
Cut a long rectangular strip of the rolled pink clay. Measure the circumference of your base circle to get the length right. Wrap this strip around the edge of the base circle, blending the seam on the inside and outside with a modeling tool so it becomes one solid cup shape. -
Pre-Bake the Base:
Start by baking just this bottom container according to the clay manufacturer’s instructions (usually around 275°F/130°C for 15-20 minutes). This hardens the structure so you can decorate it without squishing it.
Step 2: Creating the Drip Effect
-
Prepare Liquid Clay:
While the base cools, prepare your white liquid clay. If you don’t have pre-made liquid clay, mix white solid clay with clay softener until it reaches a consistency similar to heavy cream or thick honey. -
Apply the Drips:
Turn your cooled pink box upside down or hold it sideways. Carefully squeeze the liquid white clay along the top rim (which feels odd, but gravity helps the drips look natural). Let the liquid run down the sides in varied lengths. Use a needle tool to guide stubborn drips. -
Set the Decoration:
Once the drips look perfect, bake the base again for about 10 minutes to set the liquid clay so it doesn’t smudge during the next steps.
Smoother Piped Clay
If your ‘frosting’ clay is too hard to pipe, add drops of clay softener or baby oil. It should flow like toothpaste—stiff enough to hold peaks, but soft enough to squeeze.
Step 3: Constructing the Whipped Lid
-
Fit the Lid:
Take the second pink circle you cut earlier. Ensure it sits flat on top of your baked box. If you want a lip to keep it secure, create a smaller circle of clay and attach it to the underside of the lid. -
Texture the Clay Cream:
Soften your white piping clay. You need it to be very soft—I usually mix it with a generous amount of liquid clay or baby oil until it has the consistency of sticky frosting or toothpaste. -
Load the Piping Bag:
Fit a piping bag with a small star tip. Fill the bag with your softened white clay mixture. Twist the top tight to remove air pockets. -
Pipe the Swirls:
Pipe individual dollops of ‘whipped cream’ onto the center of the pink lid. Try creating a small mound in the middle and surrounding it with distinct stars, or pipe one large rosette. Keep the edges of the lid clear so it can be handled easily. -
Make the Sprinkles:
Roll tiny snakes of yellow, teal, and pink clay. Cut them into tiny, rice-sized bits. Alternatively, bake these thin snakes first and crumble them for a crunchier look. -
Garnish the Lid:
While the white piping clay is still raw and sticky, gently drop your sprinkles over the whipped cream peaks. Use tweezers to place specific colors if you want a balanced arrangement. -
Final Cure:
Place the decorated lid on the baking sheet. Bake it for the full recommended duration (usually 30 minutes per 1/4 inch of thickness) to ensure the thick piped sections cure completely. -
Cool and Finish:
Let everything cool completely inside the oven to prevent thermal shock cracks. The result is a durable, matte finish that looks remarkably like fondant or sugar paste.
Fixing Burnt Tips
Piped clay peaks can scorch easily. If your oven has hot spots, cover the delicate frosting with a tent of aluminum foil for the first half of the baking time.
Now you have a sweet little hiding spot for trinkets that looks charming on any shelf
Book-Style Box With a Faux Spine Edge
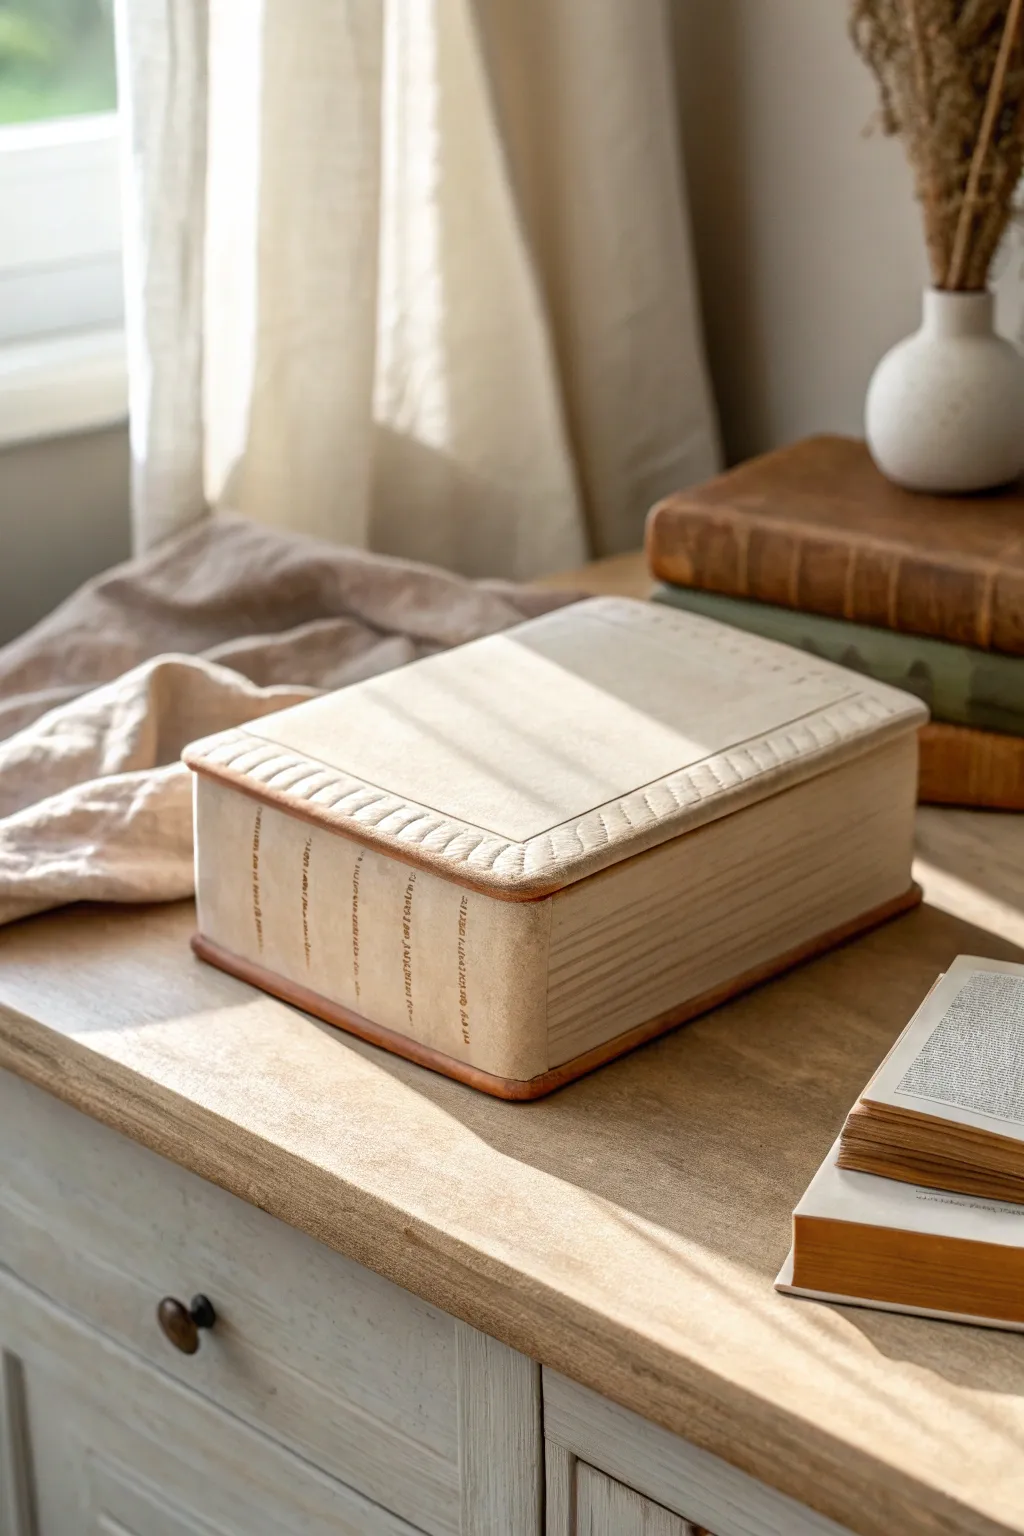
Transform simple clay into a secret hiding spot that blends perfectly with your library shelf. This project creates a sturdy, box-style vessel mimicking the texture and charm of an old leather-bound volume, complete with realistic page edges and a classic raised-spine design.
How-To Guide
Materials
- Air-dry clay or polymer clay (white or cream)
- Ruler and rolling pin
- Craft knife or scalpel
- Clay sculpting tools (needle tool, modeling tool)
- Slip (if using air-dry clay) or liquid polymer clay
- Fine-grit sandpaper
- Acrylic paints (cream, beige, antique brown)
- Matte varnish or sealant
- Old comb or fine-tooth texture tool
Step 1: Constructing the Base
-
Roll the slabs:
Begin by conditioning your clay and rolling it out into a uniform thickness of about 1/4 inch. You will need separate slabs for the top, bottom, and four sides. -
Measure and cut:
Using a ruler, cut two identical large rectangles for the book ‘covers’ (lid and base). Cut two long, narrow strips for the spine and the opposite page edge, and two shorter strips for the top and bottom page edges. -
Assemble the box body:
Assemble the bottom rectangle and the four wall strips to create an open box. If using air-dry clay, score the edges and apply slip before joining; for polymer, blend the seams securely on the inside. -
Create the lid:
The top rectangle will serve as the lid. To keep it from sliding off, add a small inner rim or flange on the underside, set about 1/8 inch in from the edge. -
Refine the shape:
Smooth all external seams until the box looks like a solid block. Use your thumb or a flat tool to gently round the strip that represents the book’s spine, giving it that characteristic convex curve.
Fixing Warp
If the lid warps while drying, lightly mist the concave side with water and weigh it down with a heavy board until it flattens back out.
Step 2: Adding Texture and Detail
-
Detailing the spine:
Roll very thin coils of clay and attach them horizontally across the spine at regular intervals to mimic raised binding cords. Blend the edges of these coils into the spine so they look like bumps under leather. -
Texturing the pages:
On the three sides representing the paper pages, use a needle tool, an old comb, or a fine-tooth texture tool to drag horizontal lines along the length of the clay. Varied pressure here creates a realistic sheaf-of-papers look. -
Designing the cover border:
On the top lid, use a modeling tool to press a decorative border about half an inch from the edge. I like creating a simple pressed rope pattern by pushing the tool in at an angle repeatedly. -
Adding overhang:
Ensure the top and bottom ‘covers’ extend slightly past the ‘page’ block, just like a hardback book. If your box walls are flush, add thin strips of clay to the rim of the lid and base to create this overhang. -
Final smoothing:
Check the entire piece for unwanted fingerprints. Use a slightly damp sponge (or baby oil for polymer) to smooth the flat surface of the cover, keeping the paper textures crisp. -
Drying or baking:
If using air-dry clay, let the box dry slowly under plastic for 24-48 hours to prevent warping. If using polymer, bake according to the manufacturer’s instructions.
Gilded Edges
For a luxe antique look, use metallic gold wax rub or gold leaf paint on the texturized ‘page’ edges instead of the cream color.
Step 3: Finishing and Painting
-
Sanding:
Once fully cured or dry, use fine-grit sandpaper to smooth any sharp edges on the corners or the box rim, but be careful not to sand away the page texture. -
Base coat:
Apply a solid base coat of cream or pale beige acrylic paint to the entire piece. This mimics the look of raw parchment or vellum. -
Washing the details:
Mix a watery wash of antique brown paint. Brush it over the spine bands and the impressed cover border, then immediately wipe the surface with a paper towel. The dark paint will remain in the recesses, highlighting the details. -
Highlighting pages:
Use a dry-brush technique with a slightly lighter cream color across the ‘page’ ridges to make the individual lines pop. -
Sealing the work:
Finish with a matte varnish to protect the paint while maintaining a realistic, non-glossy paper and leather appearance.
Now you have a clever storage piece that hides your treasures right in plain sight on the bookshelf
Hidden Compartment Box With a False Bottom
This minimalist ceramic box features a warm, speckled cream glaze and a fitted lid that rests perfectly on a recessed gallery. While it appears simple on the outside, the design allows for the clever addition of a false bottom insert to create a secret compartment underneath entirely hidden from view.
Step-by-Step Guide
Materials
- Speckled Stoneware Clay (e.g., Lagunitas or similar buff clay with grog)
- Pottery Wheel
- Throwing Ribs (wooden and metal)
- Wire Clay Cutter
- Trimming Tools
- Calipers
- Needle Tool
- Sponge
- Heat Gun or Torch (optional)
- Matte White or Clear Glaze (depending on clay body)
Step 1: Throwing the Main Vessel
-
Center the Clay:
Start with about 1.5 to 2 lbs of speckled stoneware clay. Wedge it thoroughly to remove air bubbles, then slam it onto the wheel head and center it into a low, wide puck shape. -
Open the Form:
Open the clay to create the floor. Because we want a hidden compartment, leave the floor significantly thicker than usual—aim for at least 3/4 of an inch to 1 inch thick. Compress the bottom well with a rib. -
Pull the Walls:
Pull the walls up to create a cylinder. Keep the walls strictly vertical and straight-sided to match the minimalist aesthetic in the photo. Use a wooden rib on the outside to scrape away slip and define that sharp, clean profile. -
Form the Gallery:
At the rim, use the side of your finger or a tool to split the rim slightly, pushing the inner half down to create a ‘gallery’ or shelf. This is where the lid will sit. Ensure this shelf is flat and sharp. -
Measure the Gallery:
Use calipers to measure the exact diameter of the gallery shelf you just made. Lock the calipers in place; you will need this precise measurement for the lid.
Shrinkage Warning
Clay shrinks! If you make the lid fit perfectly when wet, it might not fit after firing. Always leave a tiny bit of wiggle room (about 1-2mm) between the lid and gallery.
Step 2: Throwing the Lid
-
Throw the Lid off the Hump:
Using a new ball of clay (or throwing off the hump), center a small amount of clay. Flatten it into a disk shape. -
Shape the Flange:
Create a downward-facing flange that will fit inside the pot’s rim. Use your calipers to check the width constantly. The lid needs to be just a hair smaller than the gallery measurement to account for glaze thickness later. -
Refine the Top:
Trim the top surface of the lid smooth with a rib while it’s spinning. Cut the lid free from the hump with your wire tool.
Step 3: Trimming and False Bottom
-
Leather Hard Stage:
Allow both pieces to dry to a leather-hard state. They should be firm enough to handle without warping but soft enough to carve. -
Flip and Trim the Jar:
Center the main jar upside down on the wheel. Secure it with clay lugs. Trim the exterior bottom to be perfectly flat with a slight bevel at the edge. -
Carve the Secret Recess:
Since we left a thick floor initially, you can now trim a deep recess into the *bottom* of the pot from the outside. Carve away the center of the foot, going up into the thick floor, creating a hollow space underneath that isn’t visible from the inside. -
Create the False Bottom Disc:
Roll out a slab of clay creating a thin disc that fits perfectly into the bottom recess you just carved. This disc will act as the cap for your secret compartment. -
Trim the Lid:
Place the jar right-side up and fit the lid into the gallery. You can trim the top of the lid now to ensure the curve matches the photo—a gentle, almost flat dome.
Clean Gallery Tip
Use the corner of an old credit card or a specific gallery trimming tool to get a super sharp 90-degree angle on the shelf. This ensures the lid sits flat without wobbling.
Step 4: Finishing and Firing
-
Bisque Fire:
Once bone dry, fire all pieces (jar, lid, and false bottom disc) to bisque temperature (usually Cone 04 or 06 depending on your clay). -
Wax Resist:
Apply wax resist to the gallery shelf on the jar and the contact point on the lid flange. This prevents the lid from fusing to the jar during firing. -
Glazing:
I prefer to dip the piece for an even coat. Use a matte white or satin clear glaze. The speckles in the clay body will burn through the glaze, creating the texture seen in the image. -
Glaze Firing:
Fire the piece to maturity (Cone 5, 6, or 10 depending on clay). Ensure the lid is fired separately or heavily wadded if fired in place. -
Assembly:
Once cool, the false bottom disc can be attached with a strong epoxy or left loose if you want the compartment to be accessible.
Enjoy using your beautiful new ceramic box to store your treasures securely